
1. The Blueprint, setting up the foundation
Before we can build our house, we need to secure the land, set up a way to pay for materials, and open our toolbox. In the cloud, these concepts translate to Projects, and Billing
What is a Google Cloud Project?
Think of Google Cloud as a massive digital warehouse filled with powerful tools and services. A Project is your own private, secured corner of that warehouse. It's a container that holds all your resources (like servers, databases, and code), tracks all your costs, and manages who is allowed to enter and use the tools within it. Every action we take today will happen inside this project boundary.
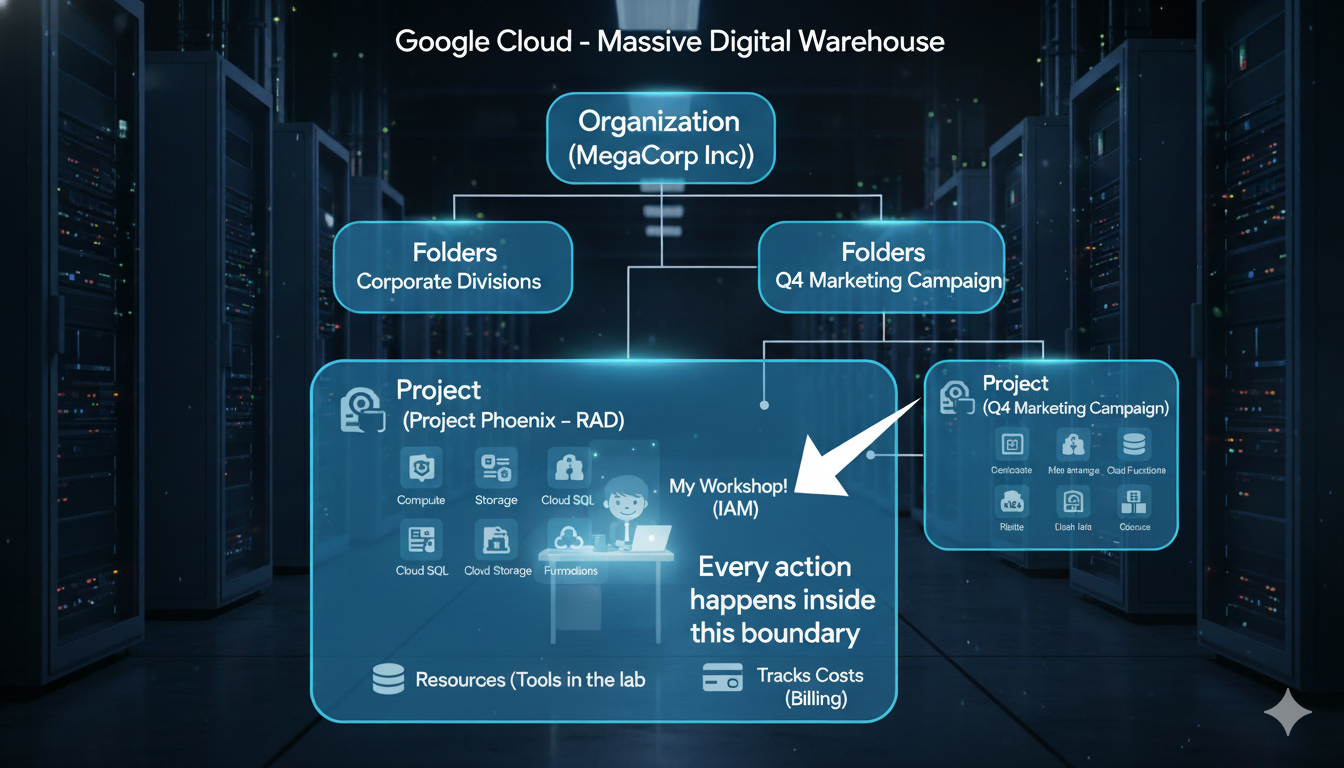
While a Project is our focus today, it's helpful to understand where it fits in the larger structure used by companies. Google Cloud organizes everything in a clear, top-down hierarchy.
Organization (The entire Corporation, e.g., "MegaCorp Inc.")
└── Folders (The Corporate Divisions, e.g., "Research & Development")
    ├── Project (A specific team's lab, e.g., "Project Phoenix - R&D")
    │   └── Resources (The tools in the lab, e.g., a specific server)
    └── Project (Another team's workshop, e.g., "Q4 Marketing Campaign")
        └── Resources (The tools for that campaign, e.g., a storage bucket)
Here are the levels of that hierarchy, from top to bottom:
- The Organization Node:
- This is the Corporate Headquarters of the entire company (e.g.,
yourcompany.com). It sits at the very top and is where company-wide security and billing policies are set. For the Google Cloud Free Trial, you typically operate without an Organization node, which is perfectly fine for learning.
- This is the Corporate Headquarters of the entire company (e.g.,
- Folders:
- These are the Divisions or Departments within the corporation (e.g., Engineering, Finance). They are an optional layer used to group projects and apply policies to entire teams at once. We will not be using Folders in this workshop.
- Projects (Our Focus):
- This is a specific Team's Workshop or Lab. This is where the actual work happens, and it is the most critical level for our workshop. All resources you create must live inside a project. A project is also the level where you enable APIs (services) and link a billing account.
- Resources:
- These are the individual Tools and Machines inside the workshop. The Cloud Run application we will deploy is a resource. A virtual machine, a database, or a storage bucket are all examples of resources.
Hands-on: Create & Configure Project
- Claim your credit
goo.gle/devfest-boston-ai/. And accept the Google Cloud Platform Terms of Service. Once applied, you'll see the message showing the credit has applied.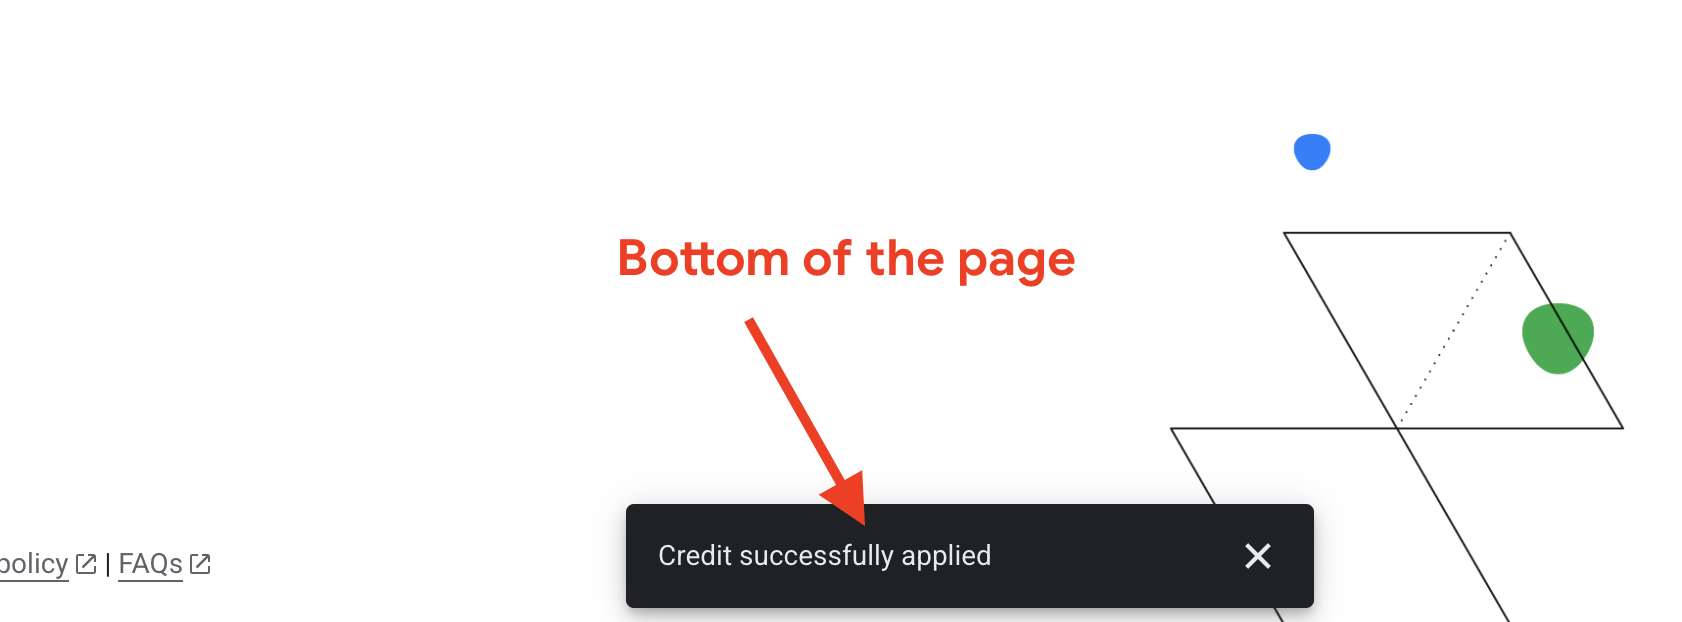
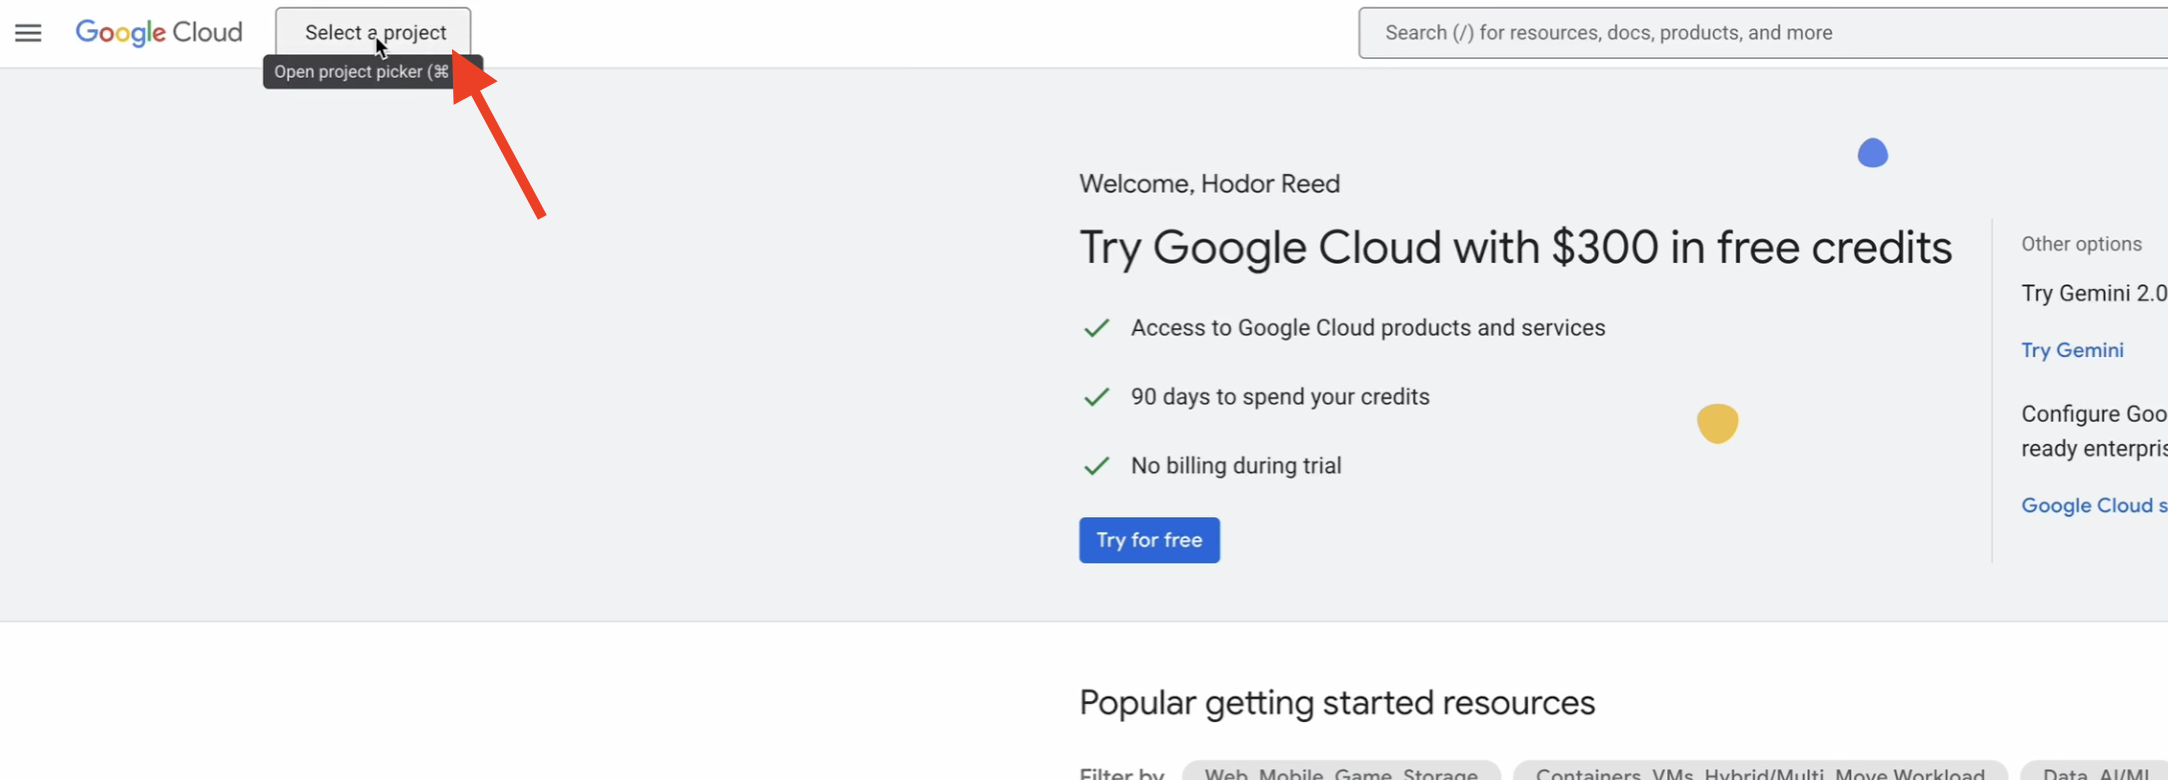
- Navigate to the .
- In the top navigation bar, click Select a project, then New Project.
- Give your project a unique name (e.g.,
idea-to-launch-yourname) and click Create. Select "No Organization".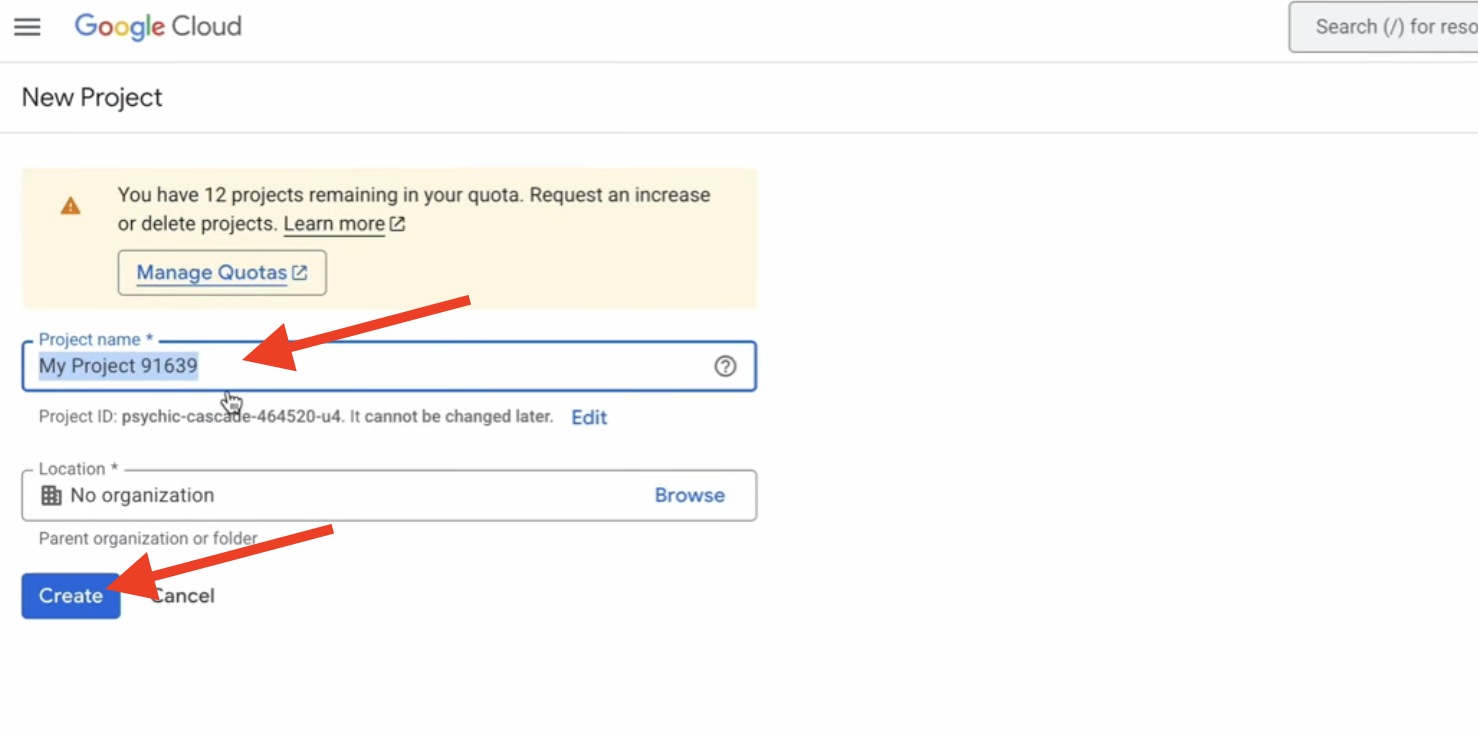
- Ensure your new project is selected from the dropdown menu at the top of the page.
Why is Billing So Important?
A Billing Account is the financial backbone of your project; it's the "credit card on file" that pays for the resources you use. For this workshop, you are using the Google Cloud Free Trial, which provides you with free credits. This is a safe, sandboxed environment. You will not be automatically charged after your credits are used or the trial period ends unless you manually upgrade your account. Understanding billing is the first step to controlling costs. Best practices like setting budgets and alerts allow you to receive email notifications if your spending approaches a certain limit, preventing any surprises.
Hands-on: Link Your Billing Account
- Go to .
- Click Link a billing account.
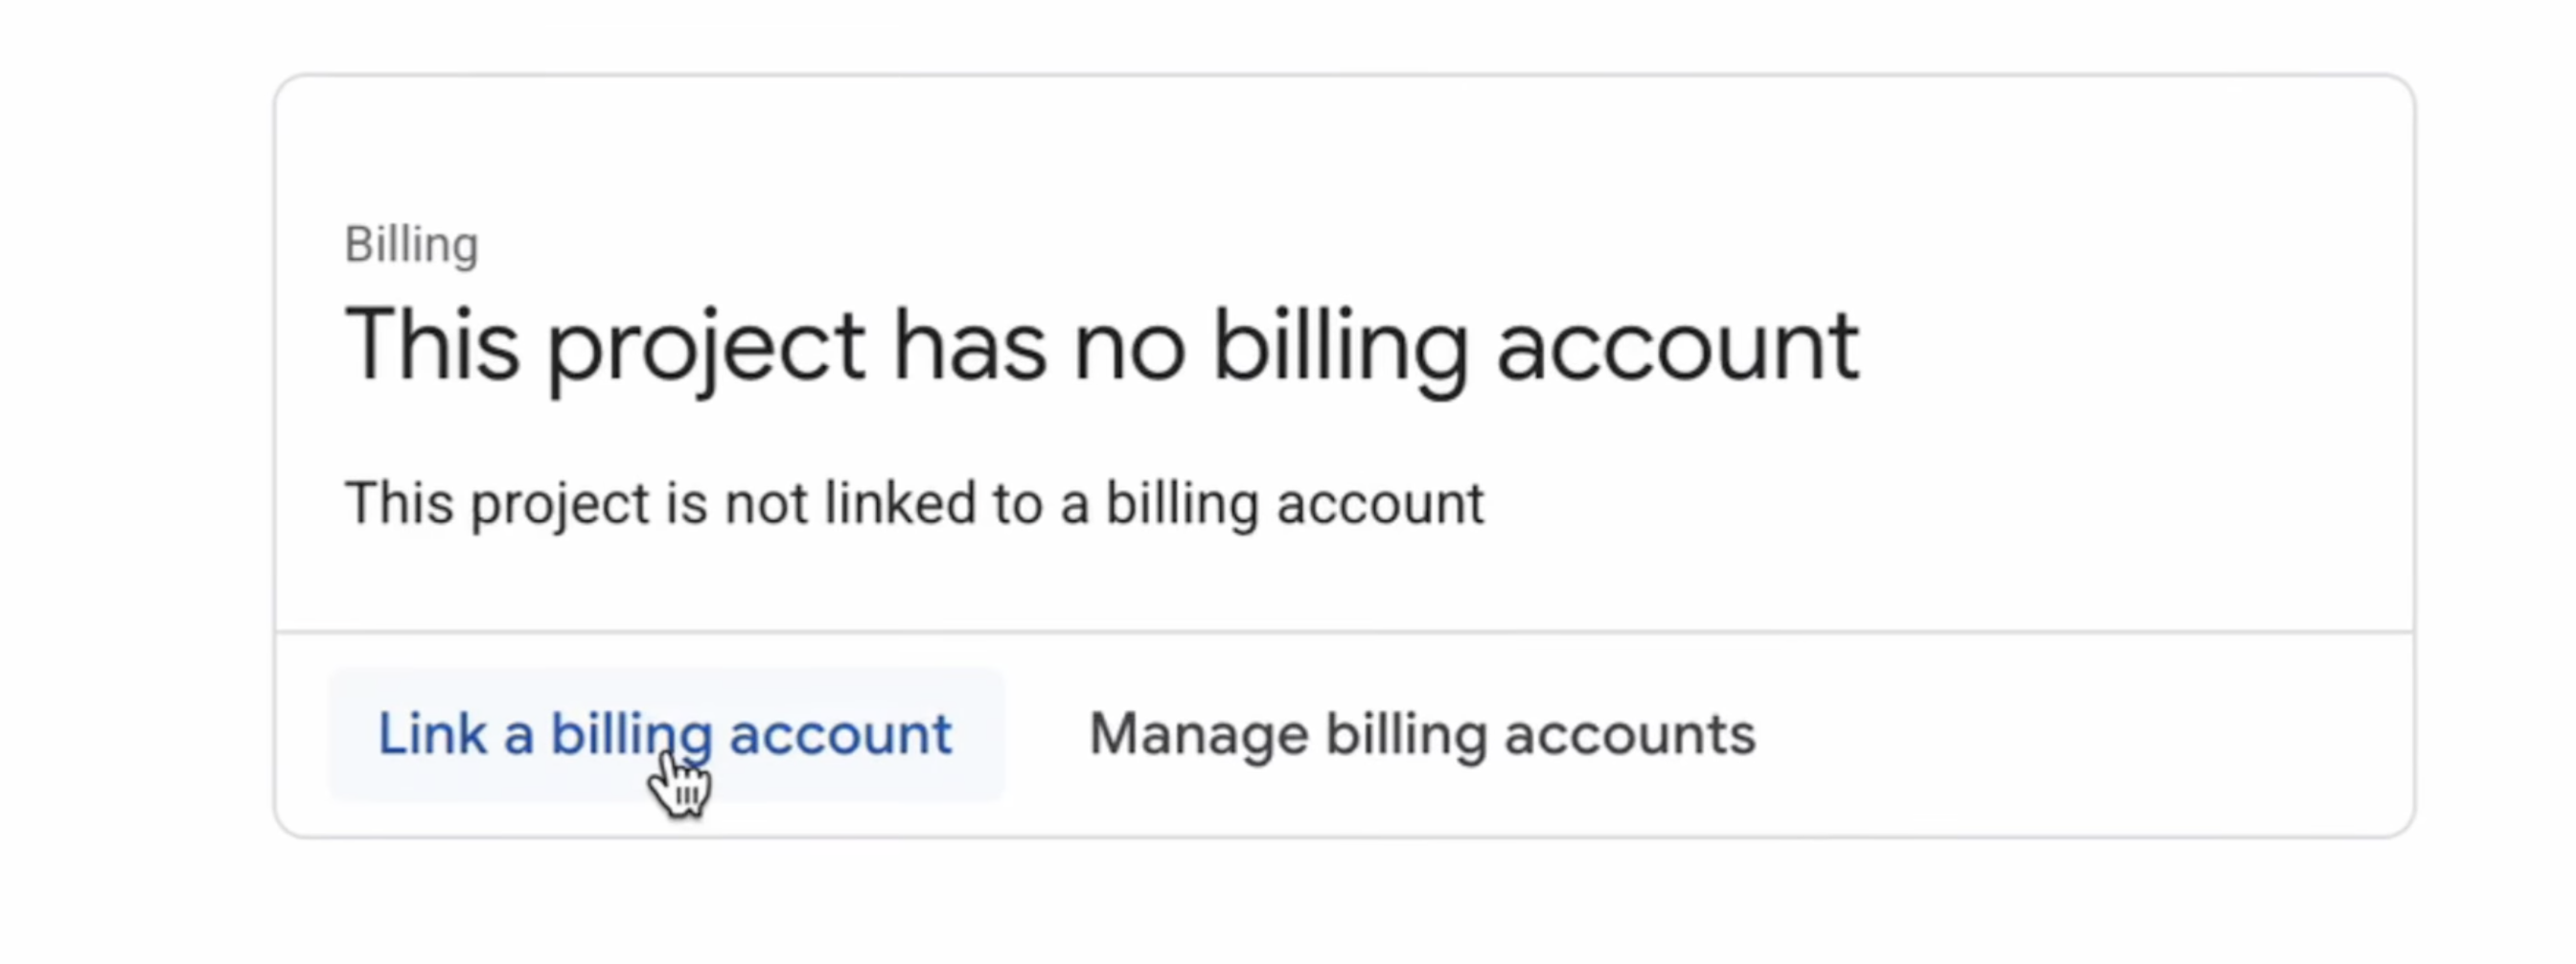
- Select Google Cloud Platform Trial Billing Account from the dropdown, and click Set account. (If you don't see the dropdown menu, wait one minute for the credit to be applied and reload the page.)
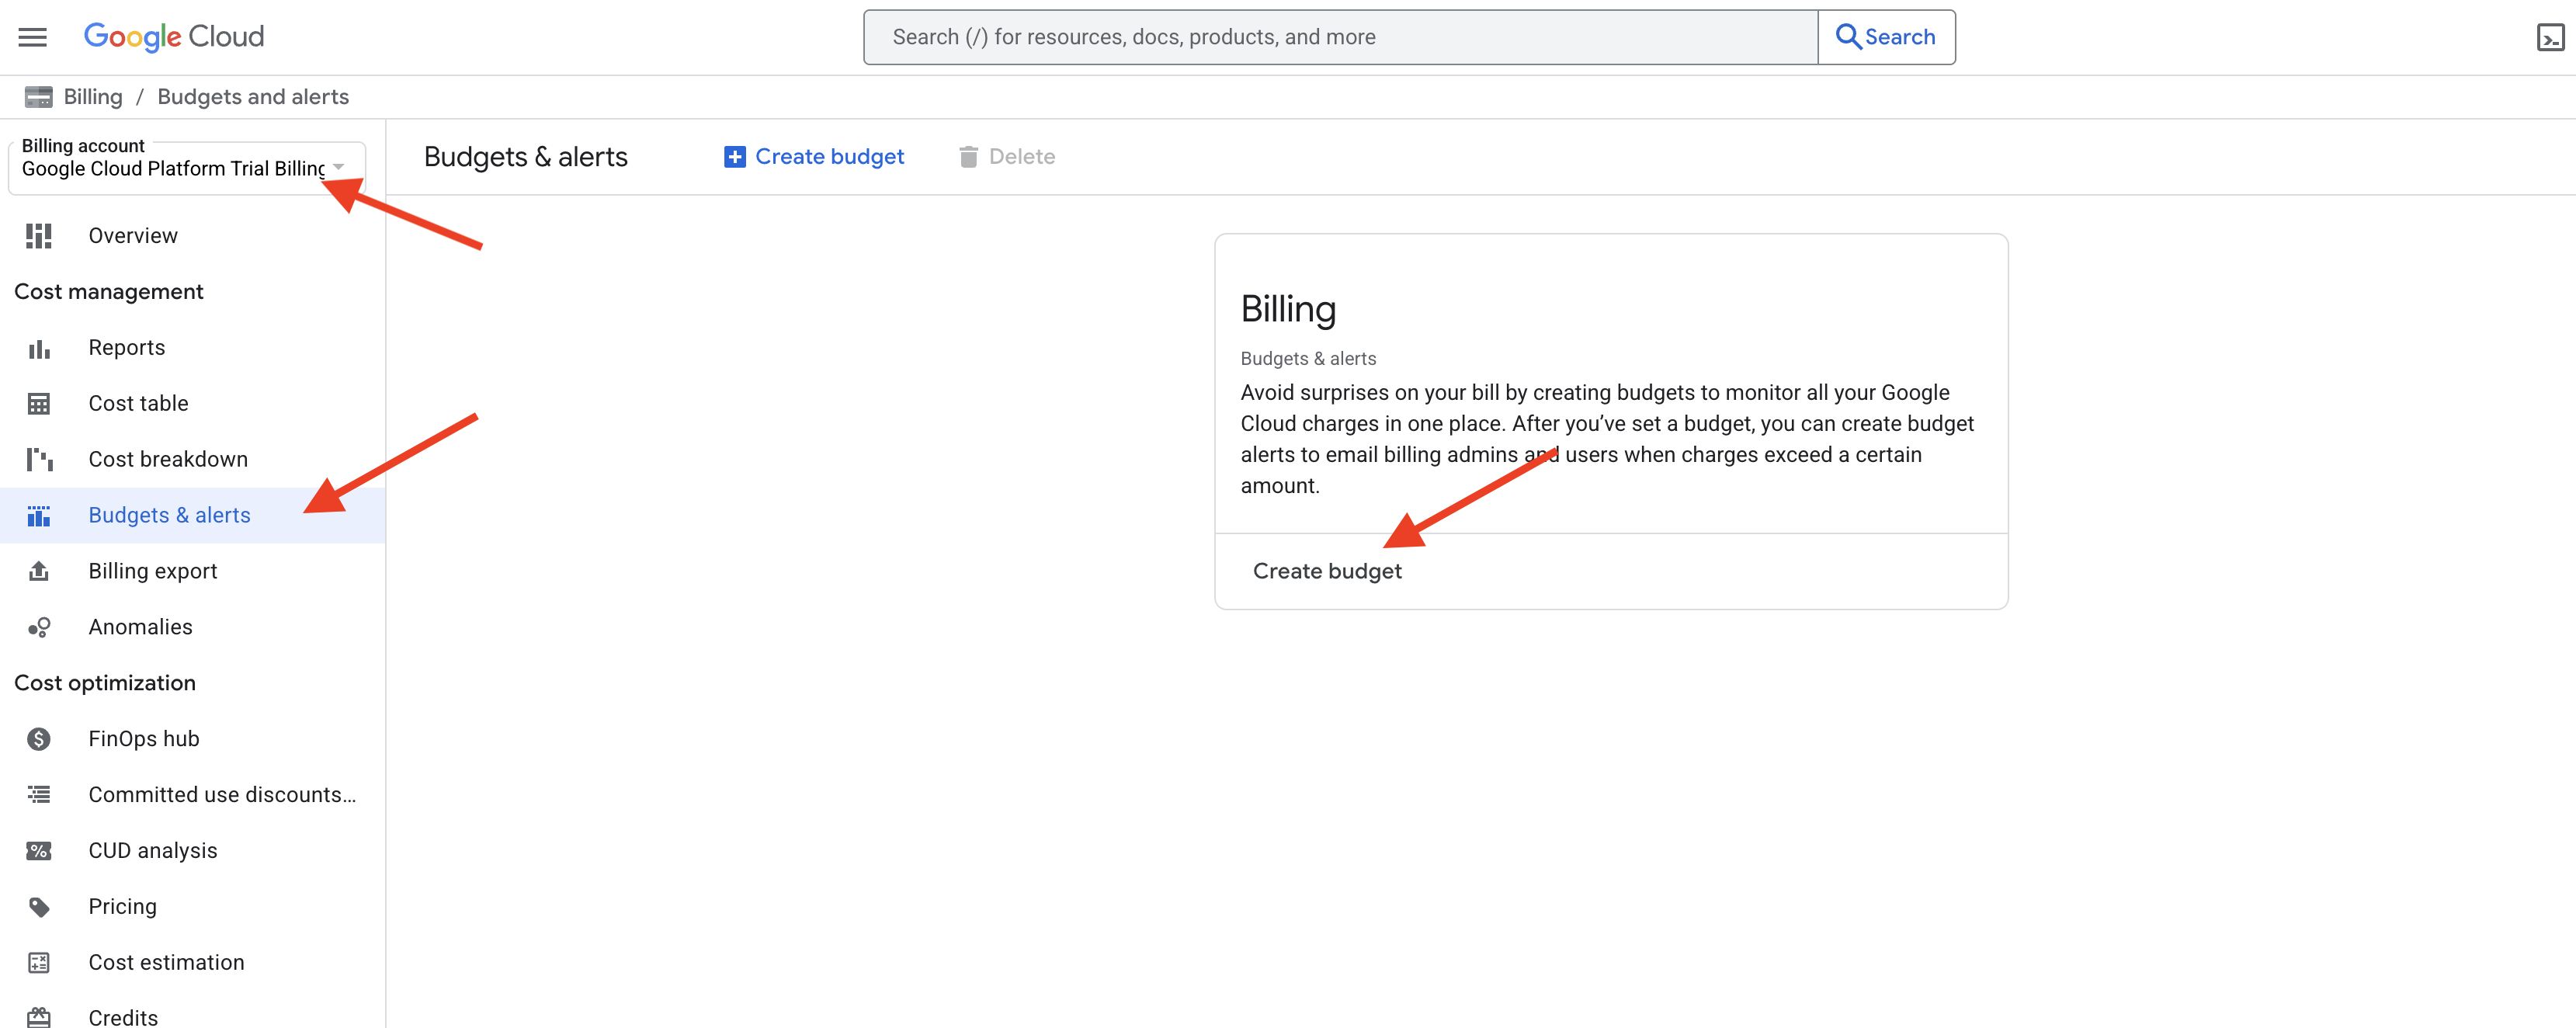
Hands-on: Set a Budget Alert (Best Practice)
Now that your billing is active, let's perform a critical best practice for cost control: setting a budget. This does not stop your services when the amount is reached; instead, it sends you email alerts so you are always aware of your spending.
- In the left-hand menu of the Billing page, click Budgets & alerts.
- At the top of the page, click + CREATE BUDGET.
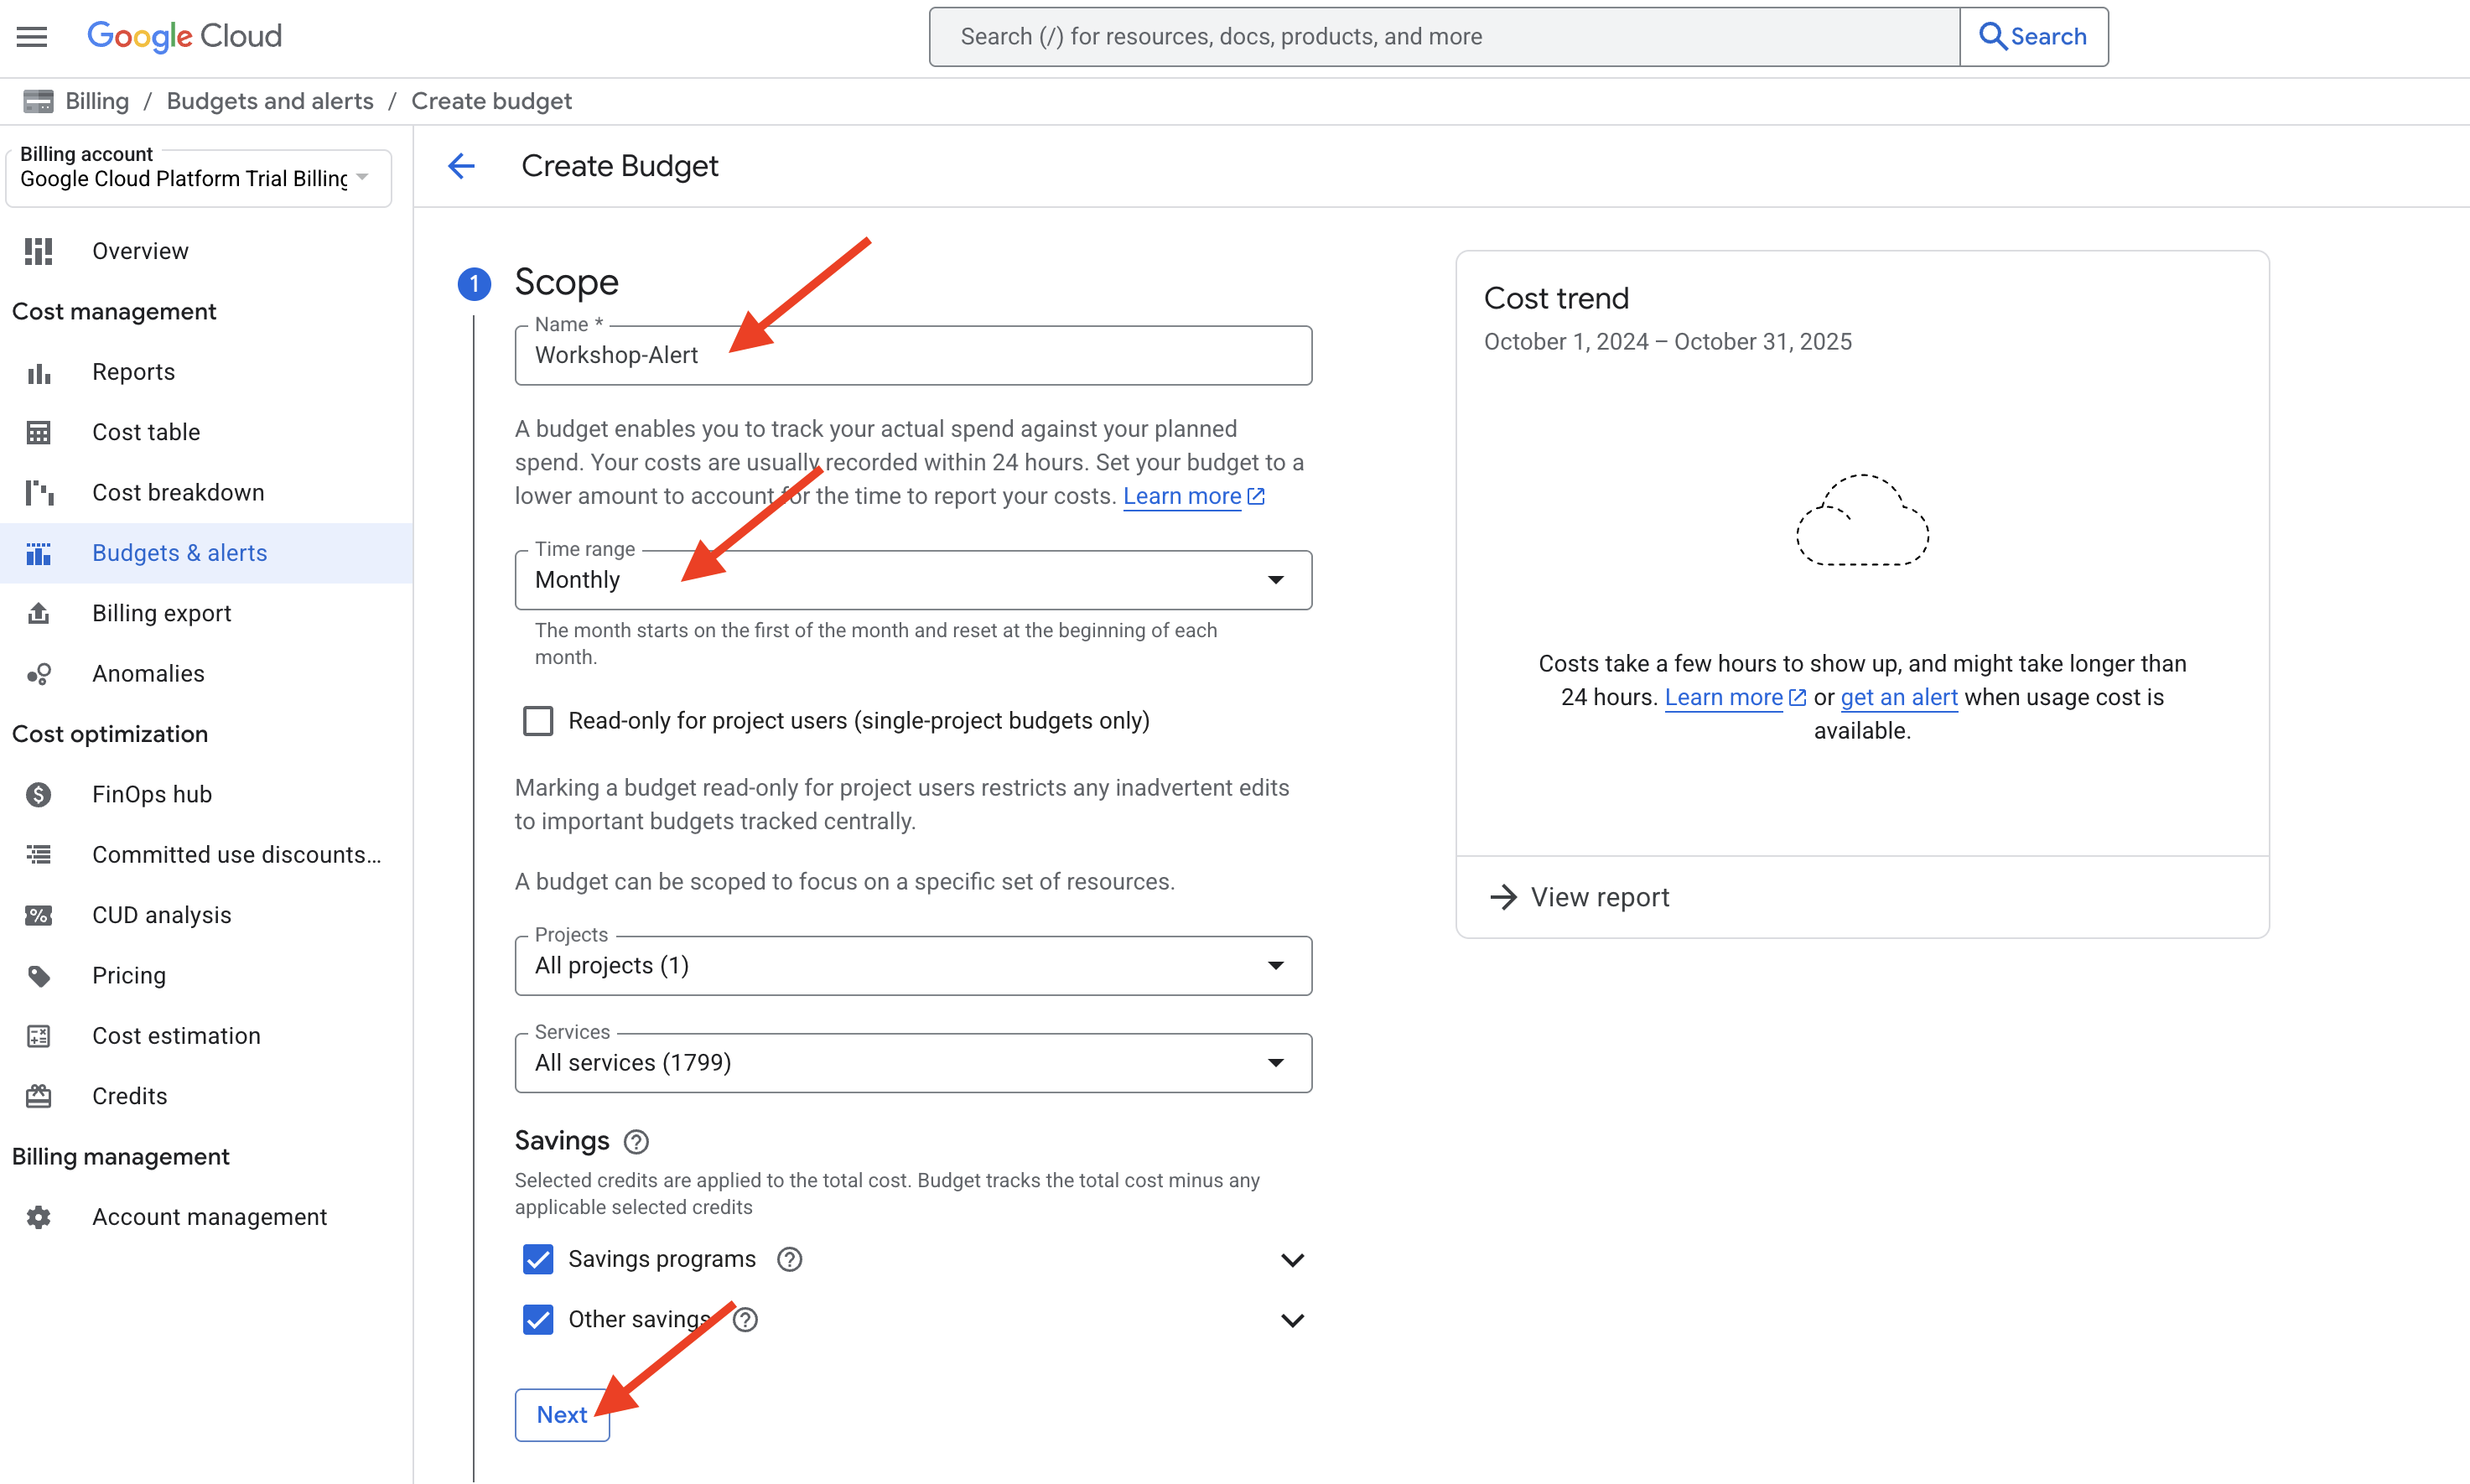
- Name your budget: Give it a simple name like
Workshop-Alert. - Scope: Leave the default settings, which should have your current project selected. Click Next.
- Amount: In the "Budget amount" section, for "Amount type" select Specified amount. Enter a low amount, for example,
10. This means our budget is $10. Click Next.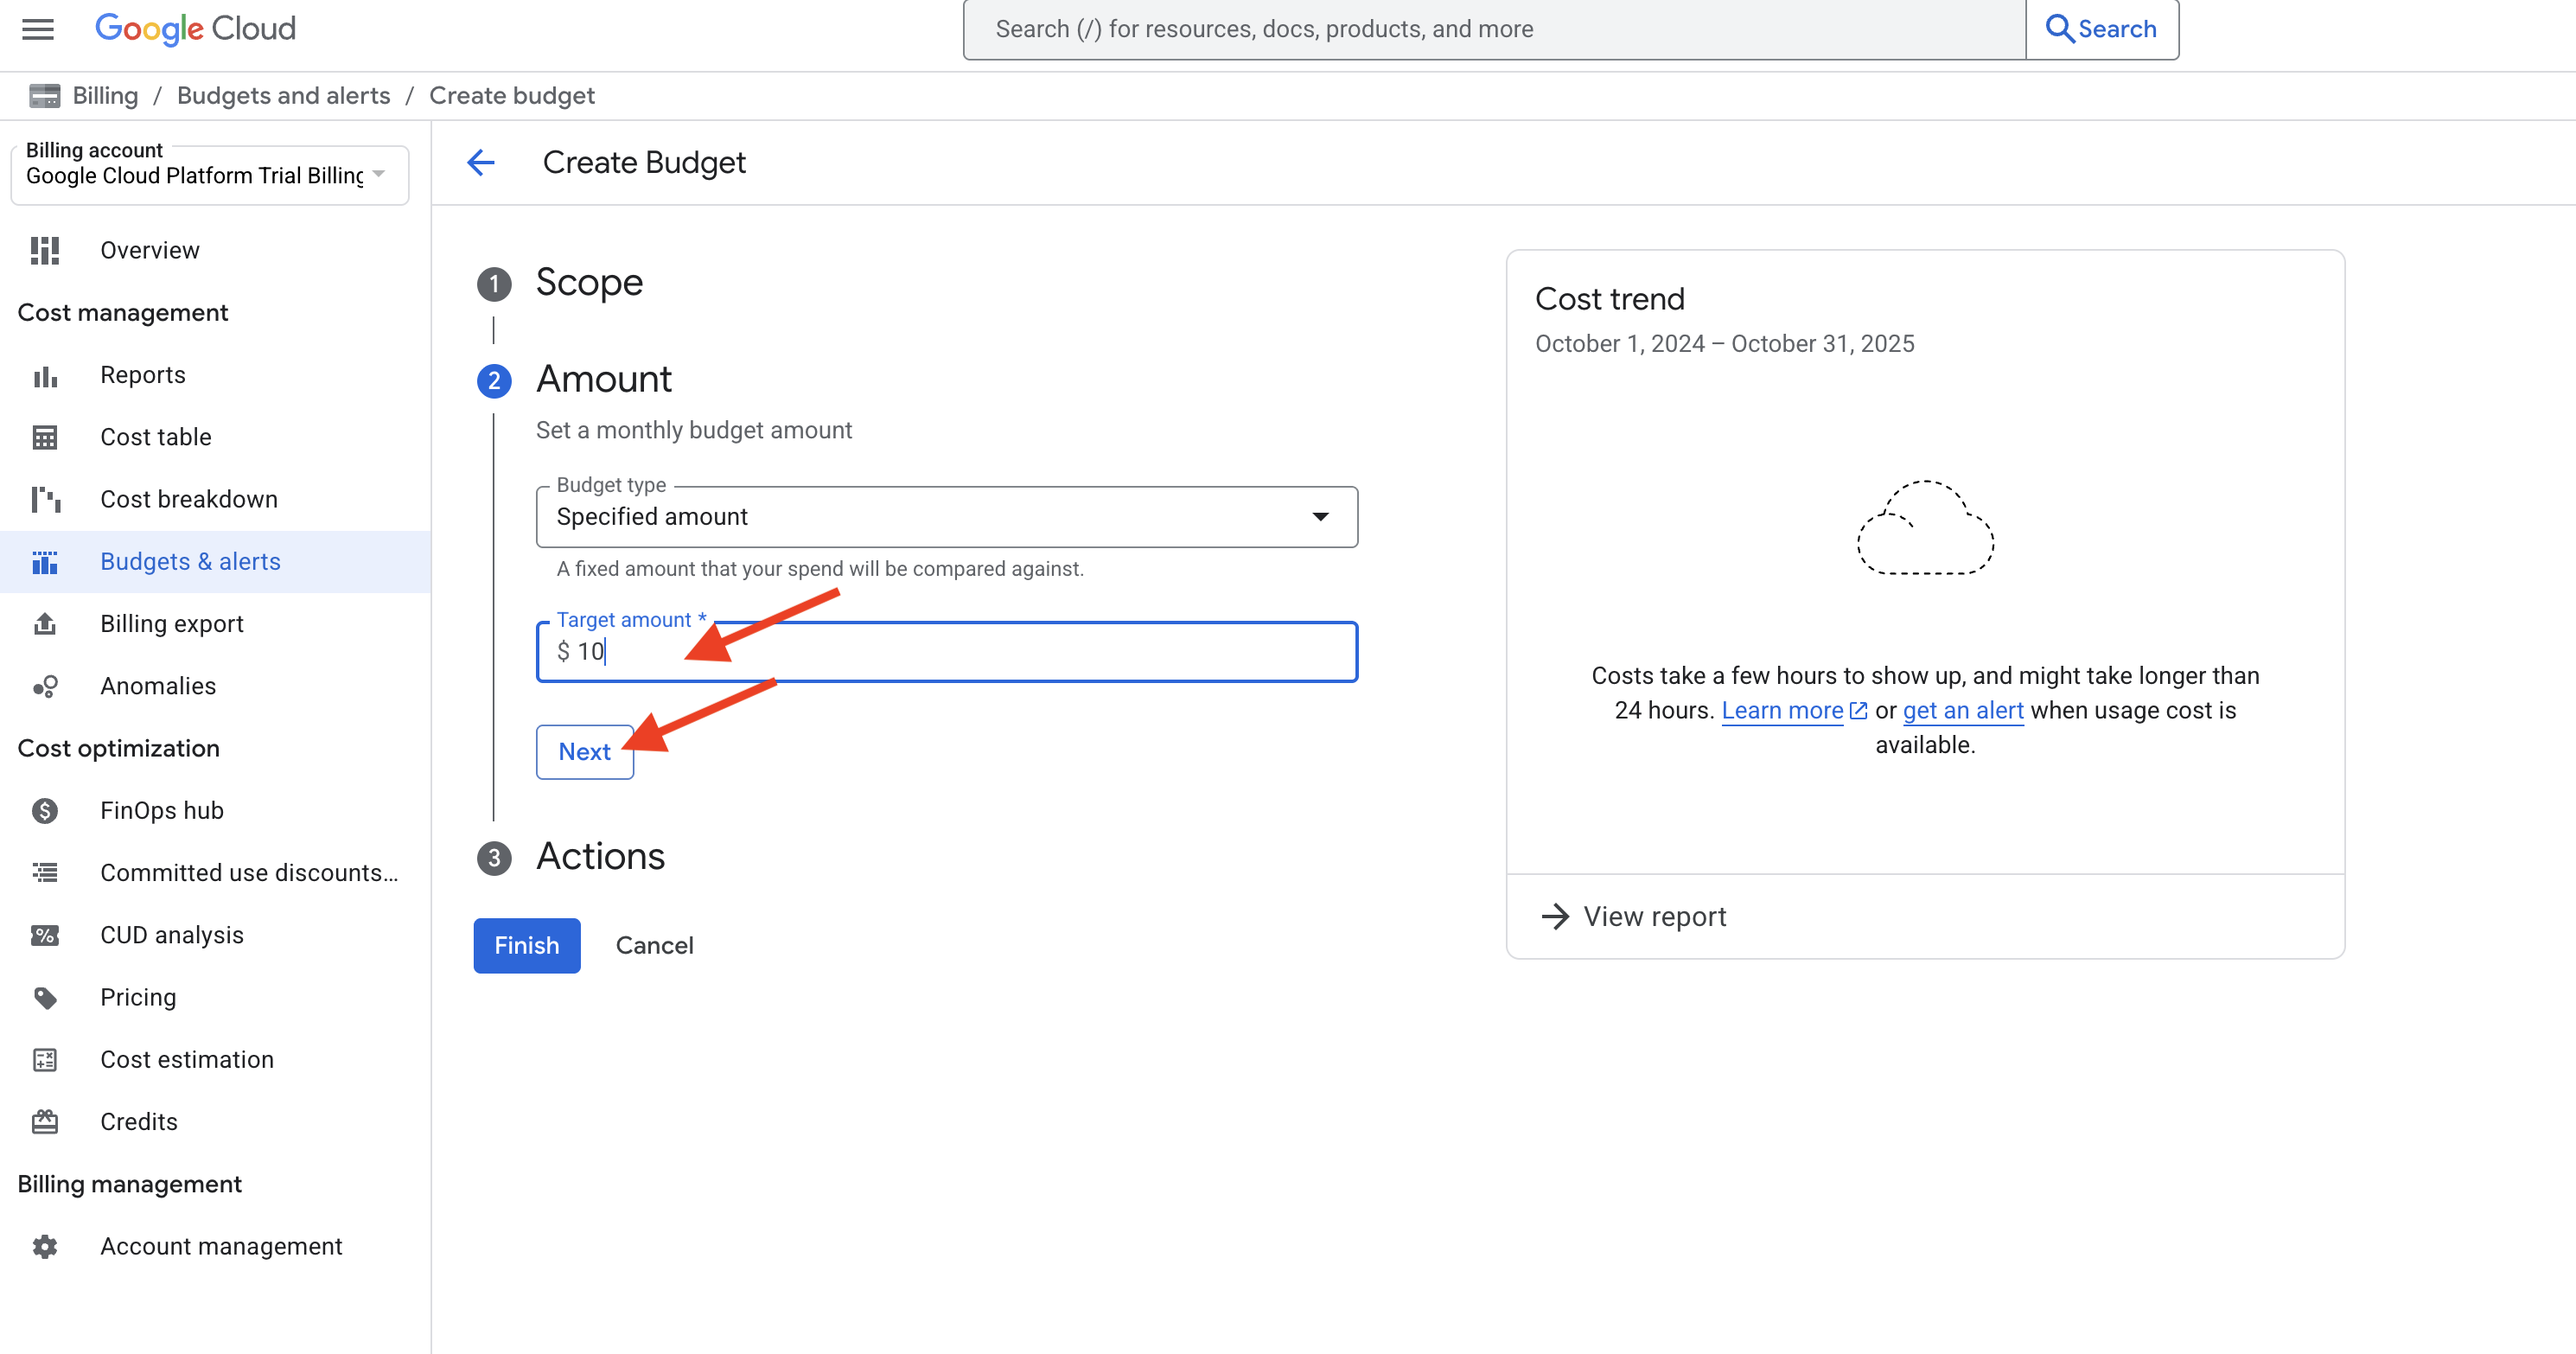
- Actions: This is where you set the alerts. By default, it will set alerts for when your spending crosses 50%, 90%, and 100% of your budget amount ($5, $9, and $10).
- Under "Email notifications", ensure that Email alerts to billing administrators and users is checked. This will send the notifications to the email address associated with your account.
- Click Finish.
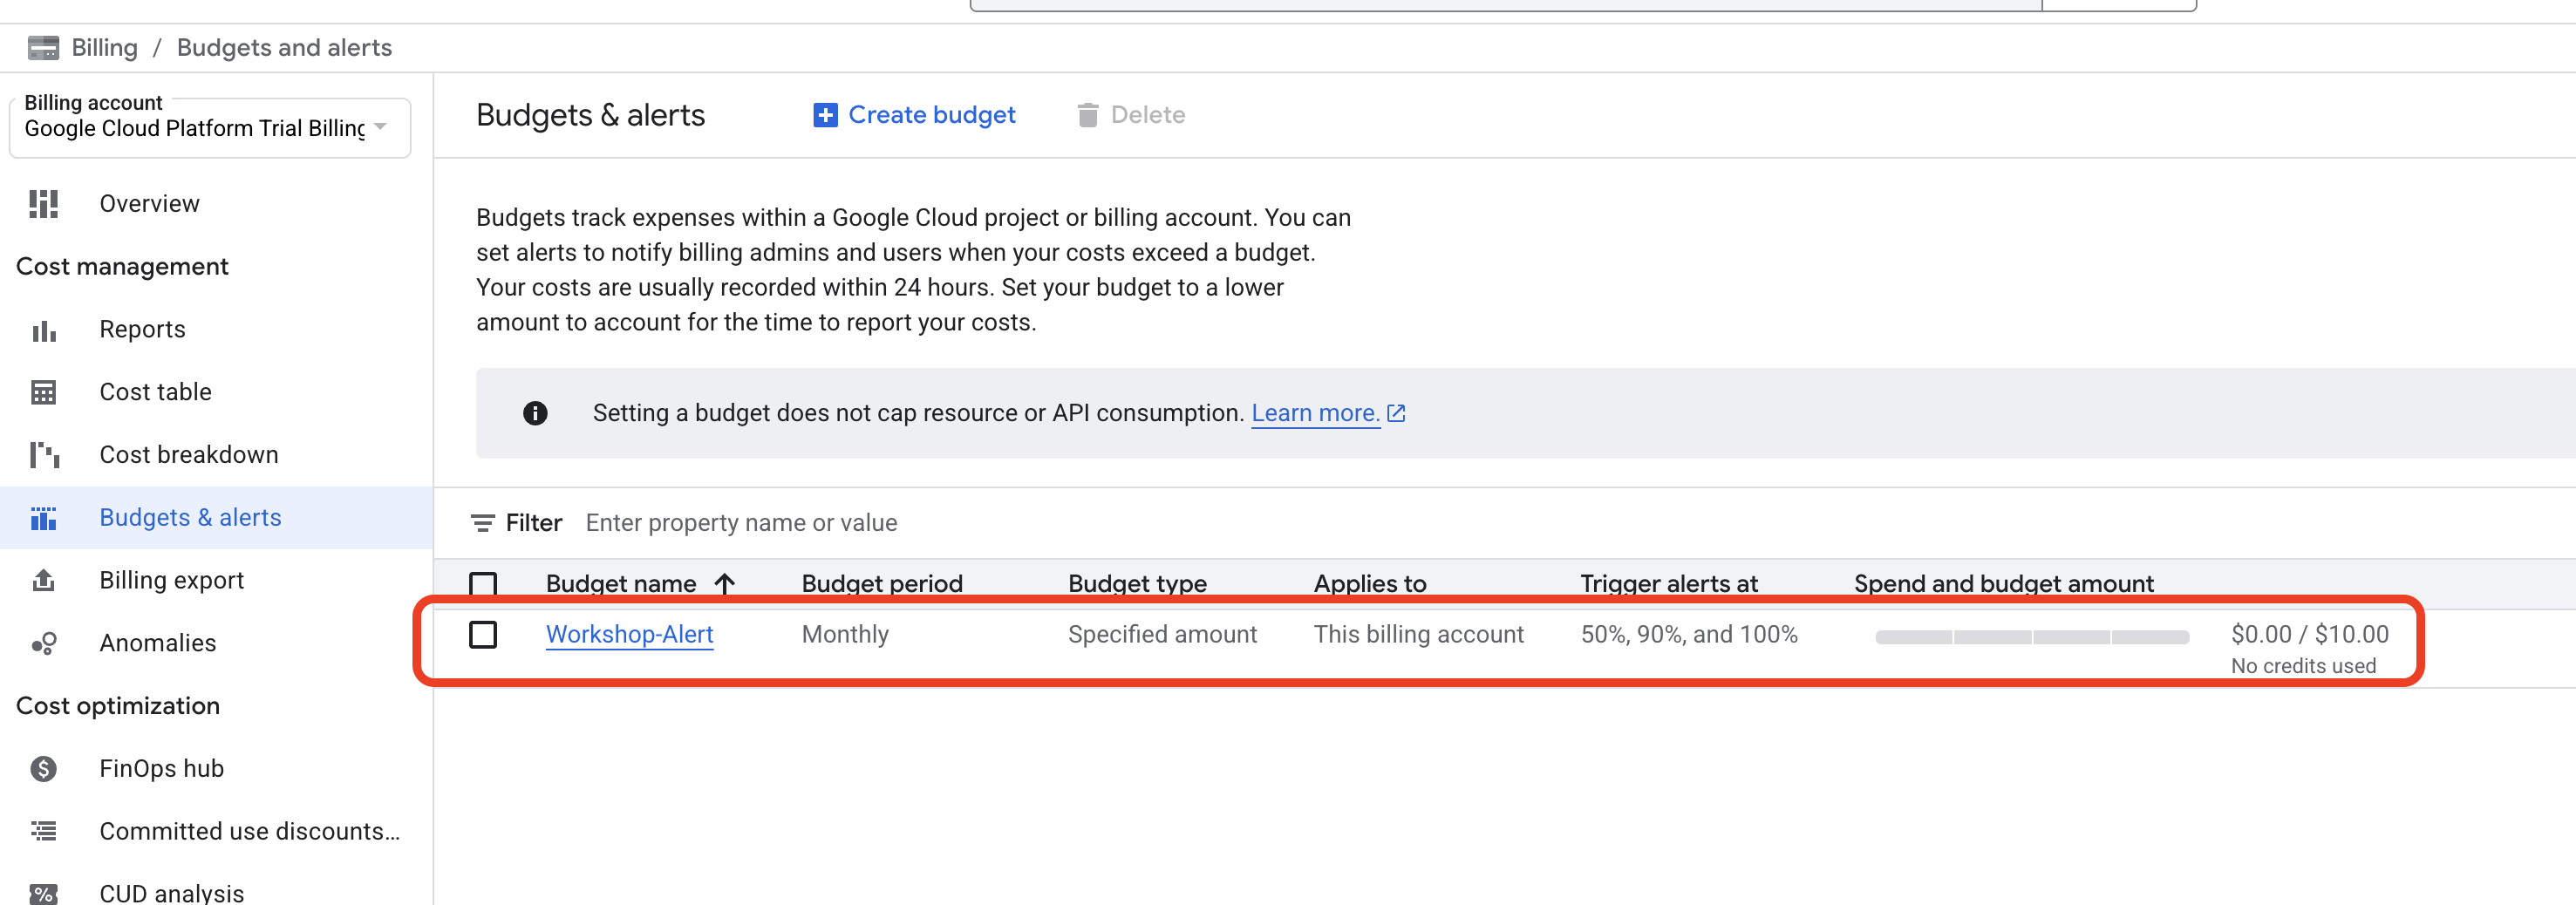
You have now set up a proactive cost management tool. In a real-world project, this is one of the most important first steps to ensure there are no financial surprises.
What are Services and Why Do We Enable Them?
Now that you have your command center set up in your private lab, let's talk about the heavy-duty equipment available to you. Google Cloud offers over 200 distinct products, from databases to AI models. Each of these is called a Service. Think of Cloud Run as the "Automated Shipping & Logistics Service" and Gemini as the "AI Invention & Prototyping Service". To use any of these powerful services, you must first enable its corresponding API (Application Programming Interface) for your project.
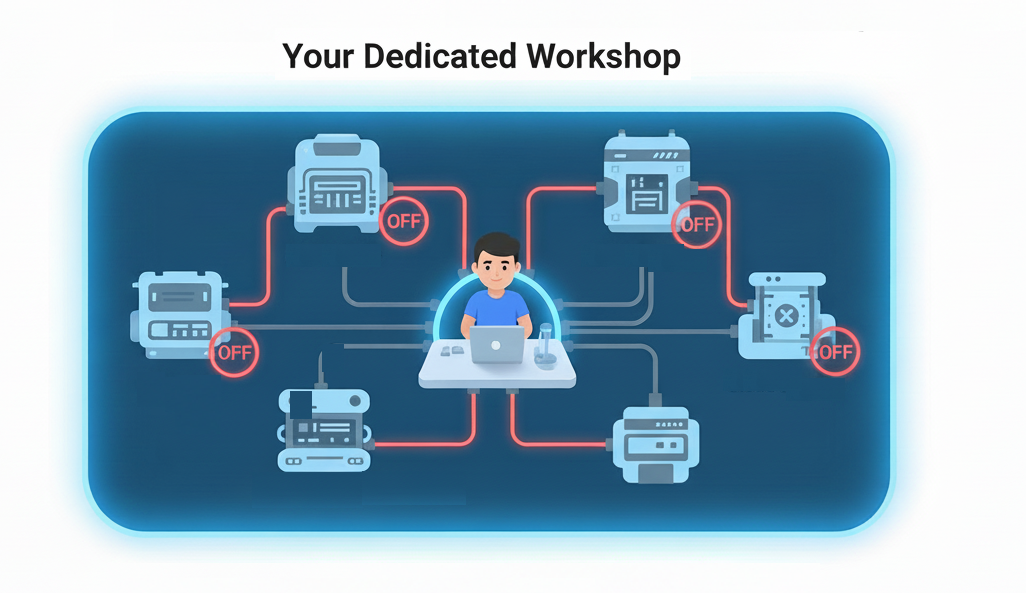
Let's continue with our warehouse and lab analogy. Imagine your Google Cloud Project is your dedicated workshop inside the massive warehouse. The workshop is outfitted with various advanced workstations: a station for AI analysis, a station for global deployment, a station for data storage, and so on. For safety and efficiency, the main power conduit to each of these specialized workstations is turned off by default.
Enabling an API is the act of walking over to a specific workstation in your lab—like the "AI Prototyping Station"—and flipping its main power switch to the "ON" position.
But why is everything off by default? This is a deliberate design choice for several important reasons:
- Security: It enforces the Principle of Least Privilege at the project level. If you aren't using a service, its connections to your project are inactive, reducing the potential "attack surface."
- Governance and Cost Control: It requires a deliberate, auditable action to start using a potentially costly service. This prevents accidental usage and helps organizations control which tools their teams are using.
- Simplicity: It keeps your project environment clean. Your permissions and dashboards aren't cluttered with options for services you have no intention of using.
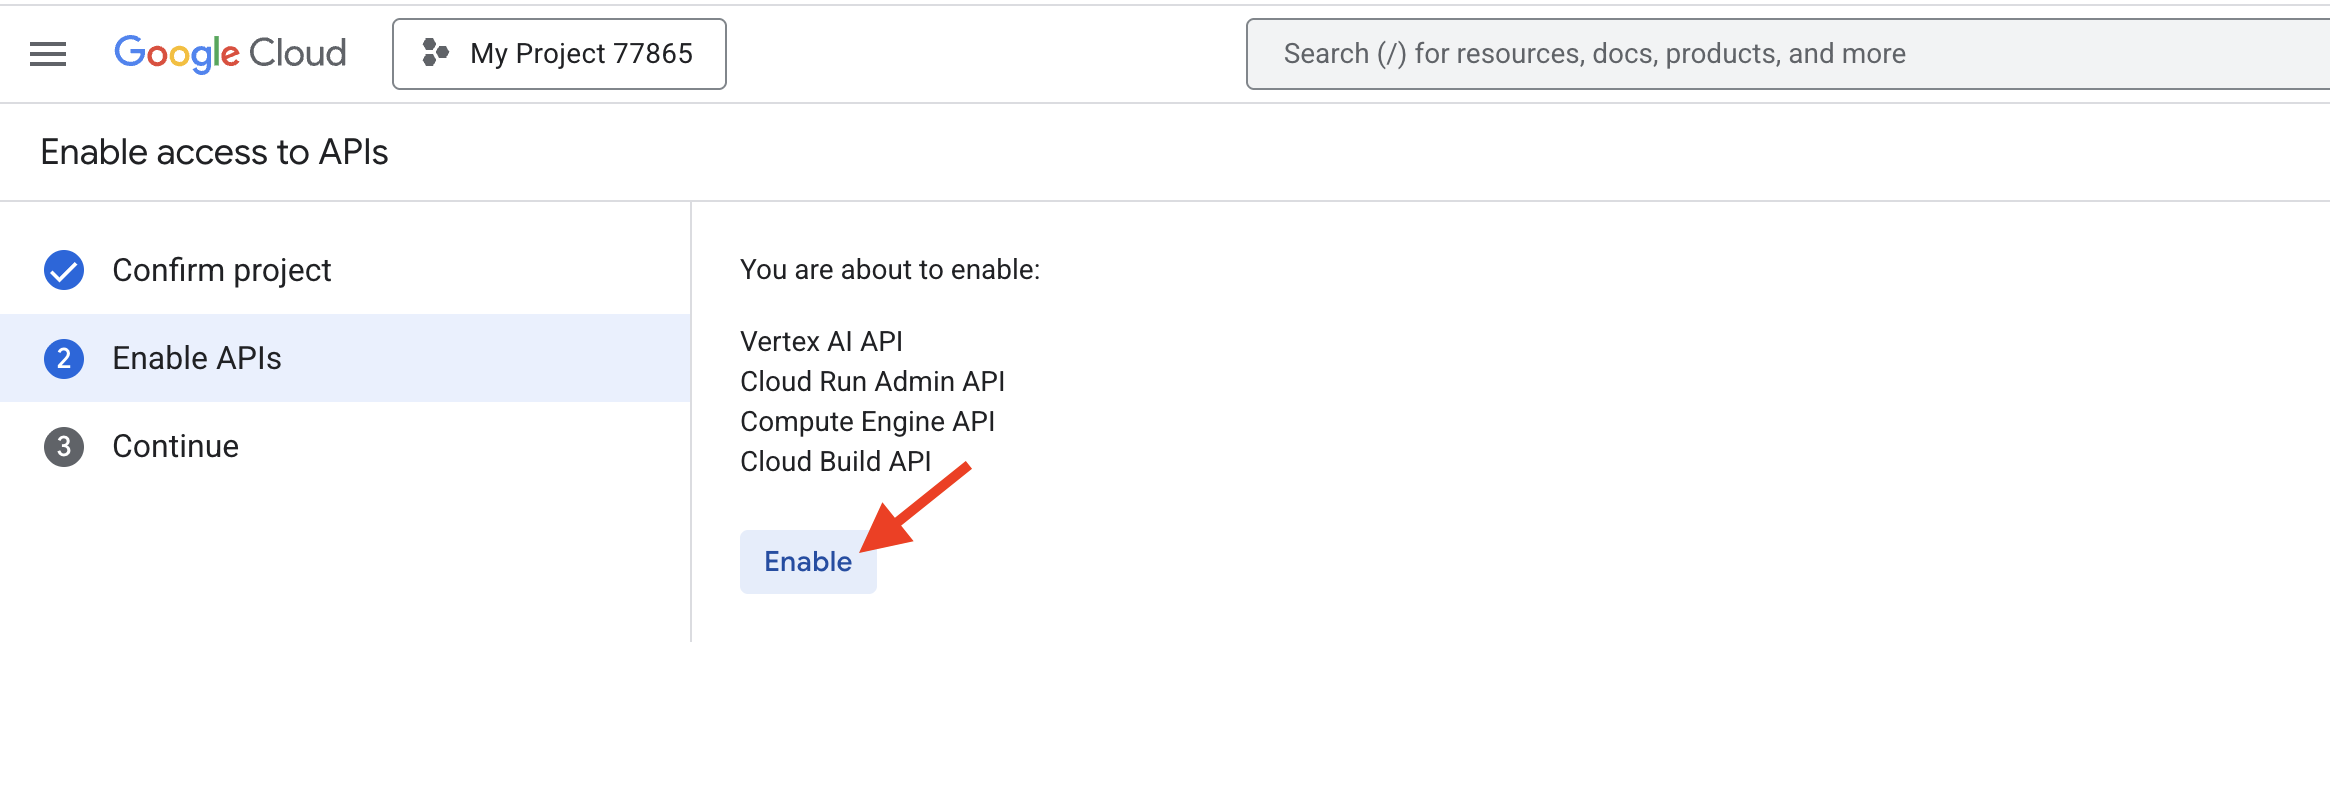
Hands-on: Initialize Your Environment
2. Securing Your Application: Who (or What) Can Control Your App?
Conceptual Introduction
Our applications are live on the internet, which is a fantastic achievement. But this brings up a critical question: how was any of this actually allowed to happen? When you deployed your code, a series of secure, permission-based "handshakes" occurred behind the scenes. Understanding these is the key to cloud security.
This is all managed by Identity and Access Management (IAM).
- The Core Formula of IAM IAM operates on a simple but powerful principle: Who can do What on Which Resource.
- The Two Types of "Who" (Principals) In our workshop so far, we've seen two fundamental types of identities:
- Users: This is you! An identity tied to a human, like your personal Gmail account.
- Service Accounts: These are special, non-human identities for your applications and services. Think of them as an ID badge for your code. When one Google Cloud service (like Cloud Build) needs to interact with another (like Artifact Registry to save a container), it uses its Service Account to prove it has permission.
When you deployed any application, both types of identities were used:
- Your User account had permission to start the deployment.
- A Service Account for the Cloud Build service had permission to build your code and save the resulting container.
Managing Access
Let's use the IAM console to investigate the permissions that made our deployment possible and then grant specific access to another user.
- The Investigation: Go to the IAM Console
- Find Your Identity (The User)
- In the list of Principals, find your own email address. Notice that its Role is "Owner". The Owner role grants full, unrestricted permission to do anything in the project. This is why you were authorized to enable APIs and run the
gcloud run deploycommand.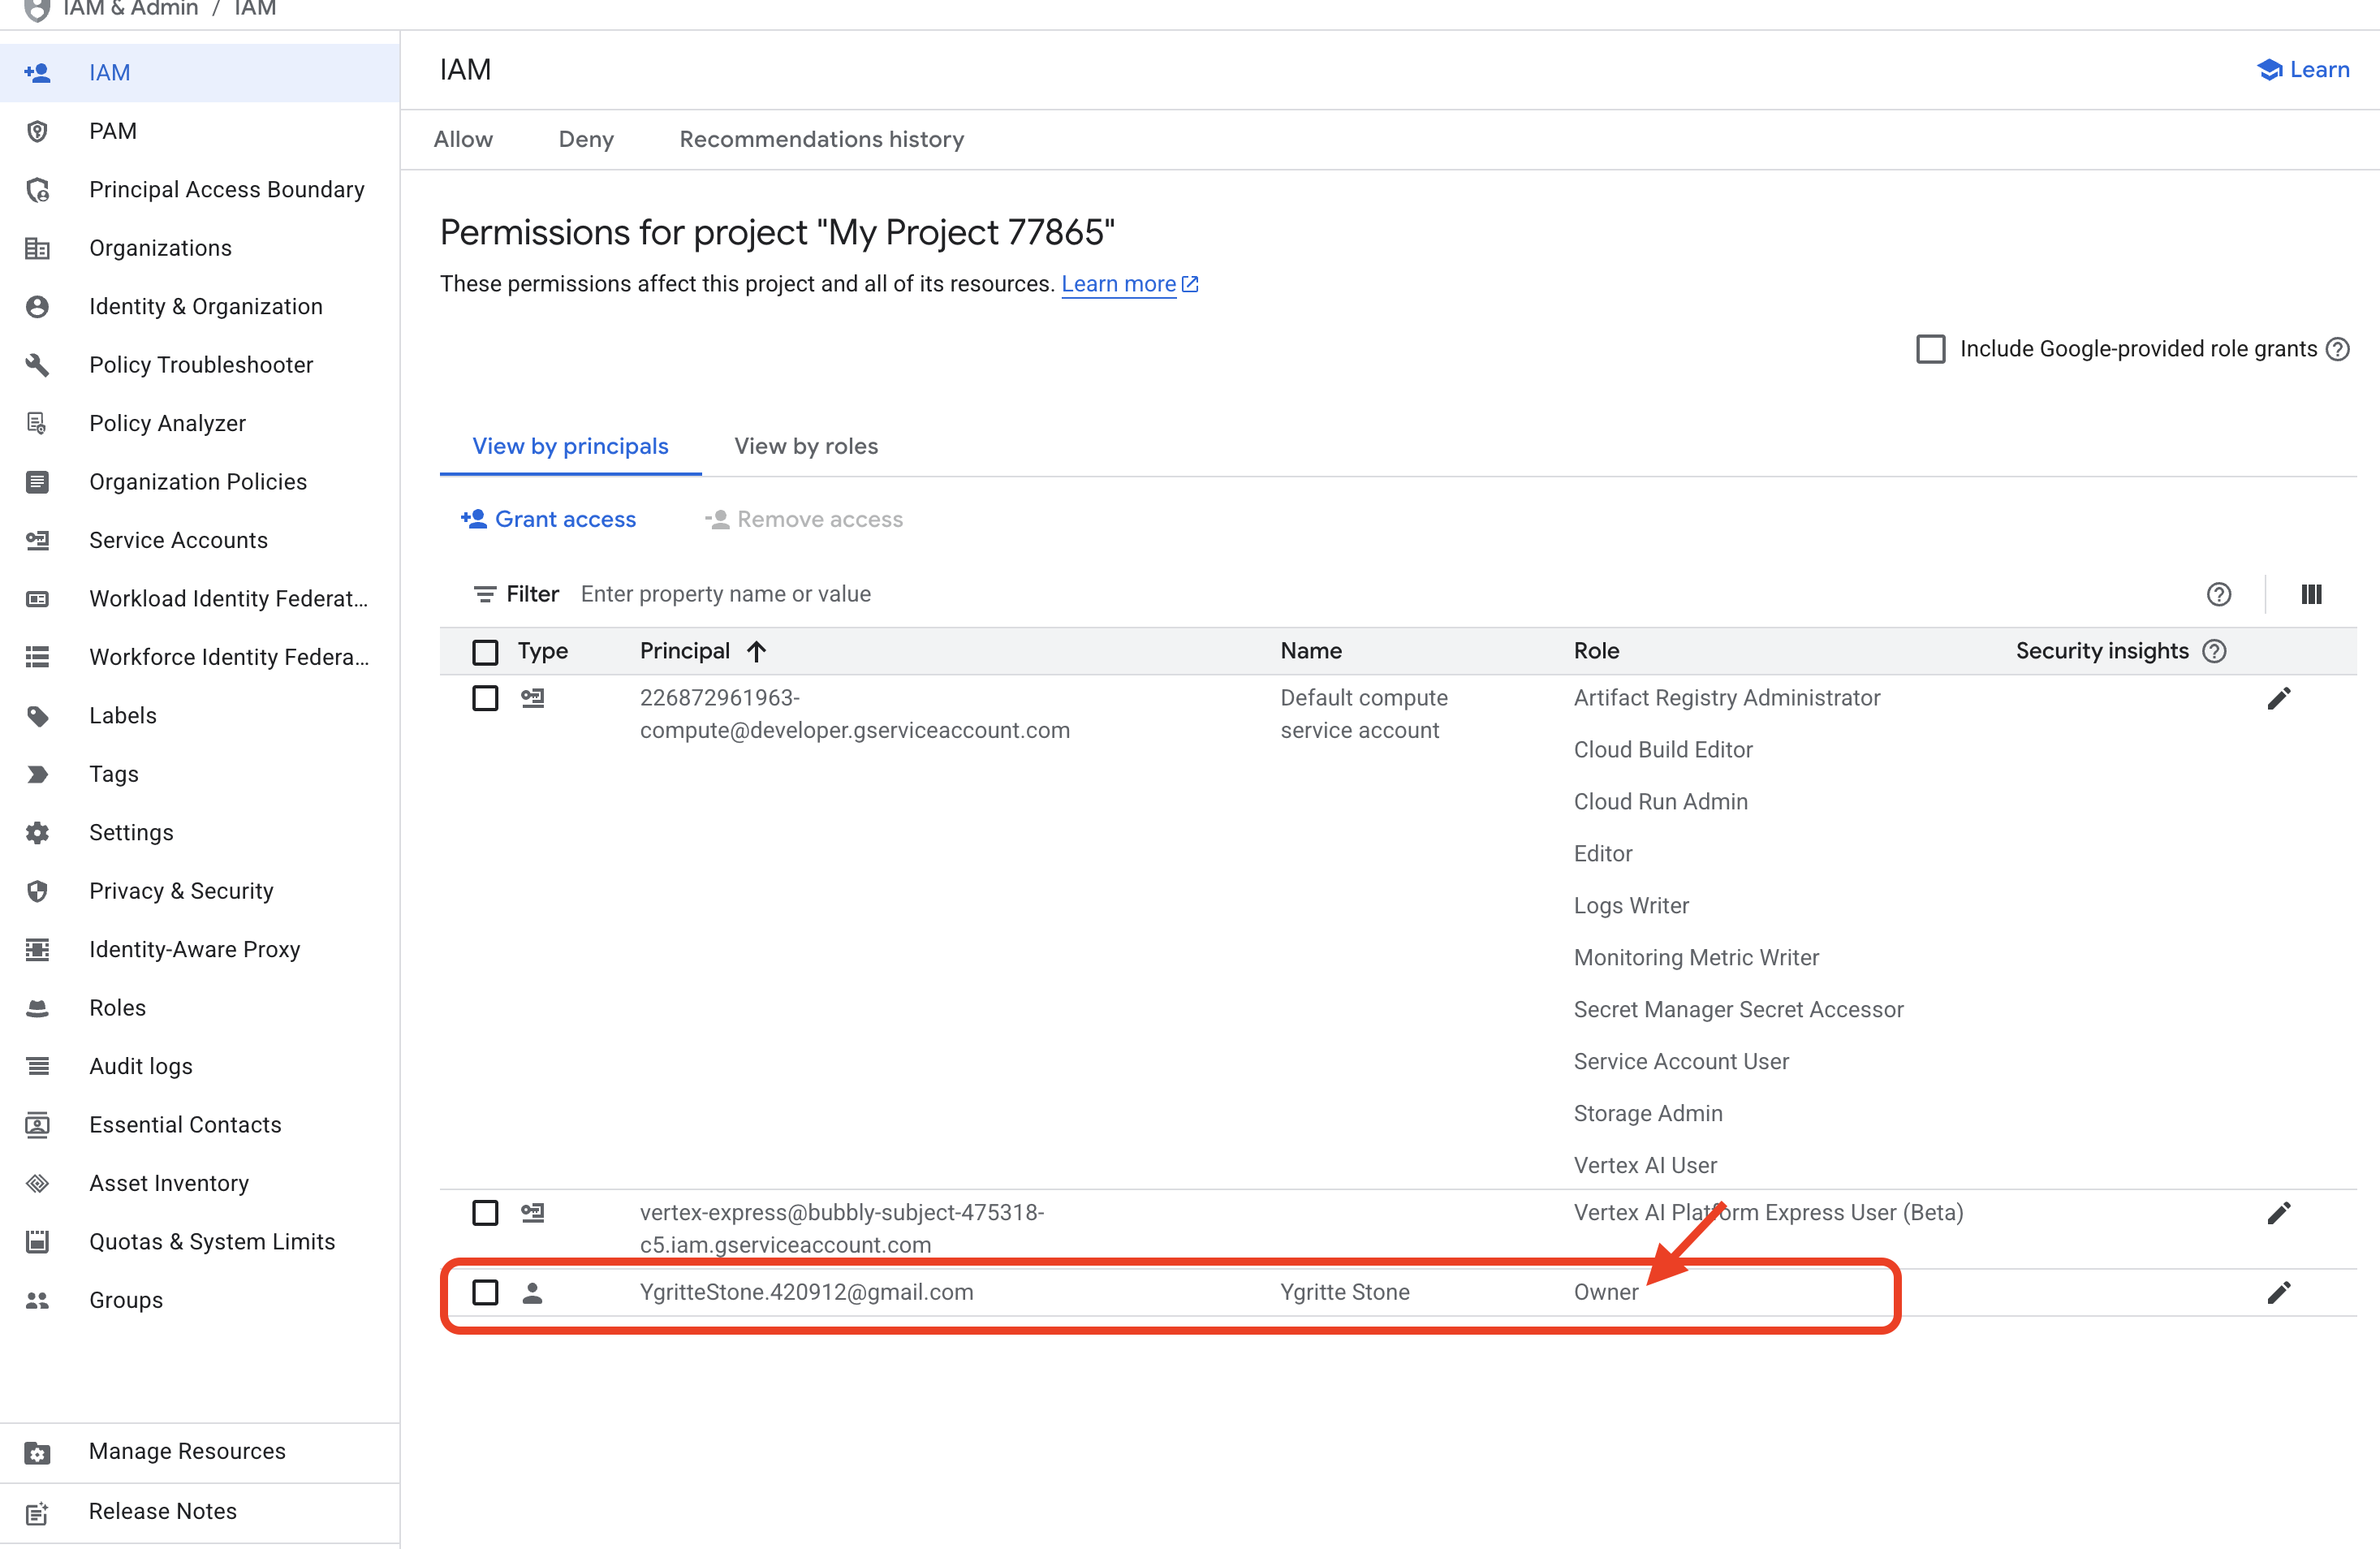
- In the list of Principals, find your own email address. Notice that its Role is "Owner". The Owner role grants full, unrestricted permission to do anything in the project. This is why you were authorized to enable APIs and run the
- Find the Service's Identity (The Service Account)
- Now, look for a Principal with a name like
[PROJECT_NUMBER]-compute@developer.gserviceaccount.com. This is the default Service Account used by the Cloud Build service. - Look at its Role. It will have a role like "Cloud Build Service Agent". This role contains the specific permissions needed to perform its job, such as pulling source code and writing container images to a registry. This is the identity that did the heavy lifting for your deployment.
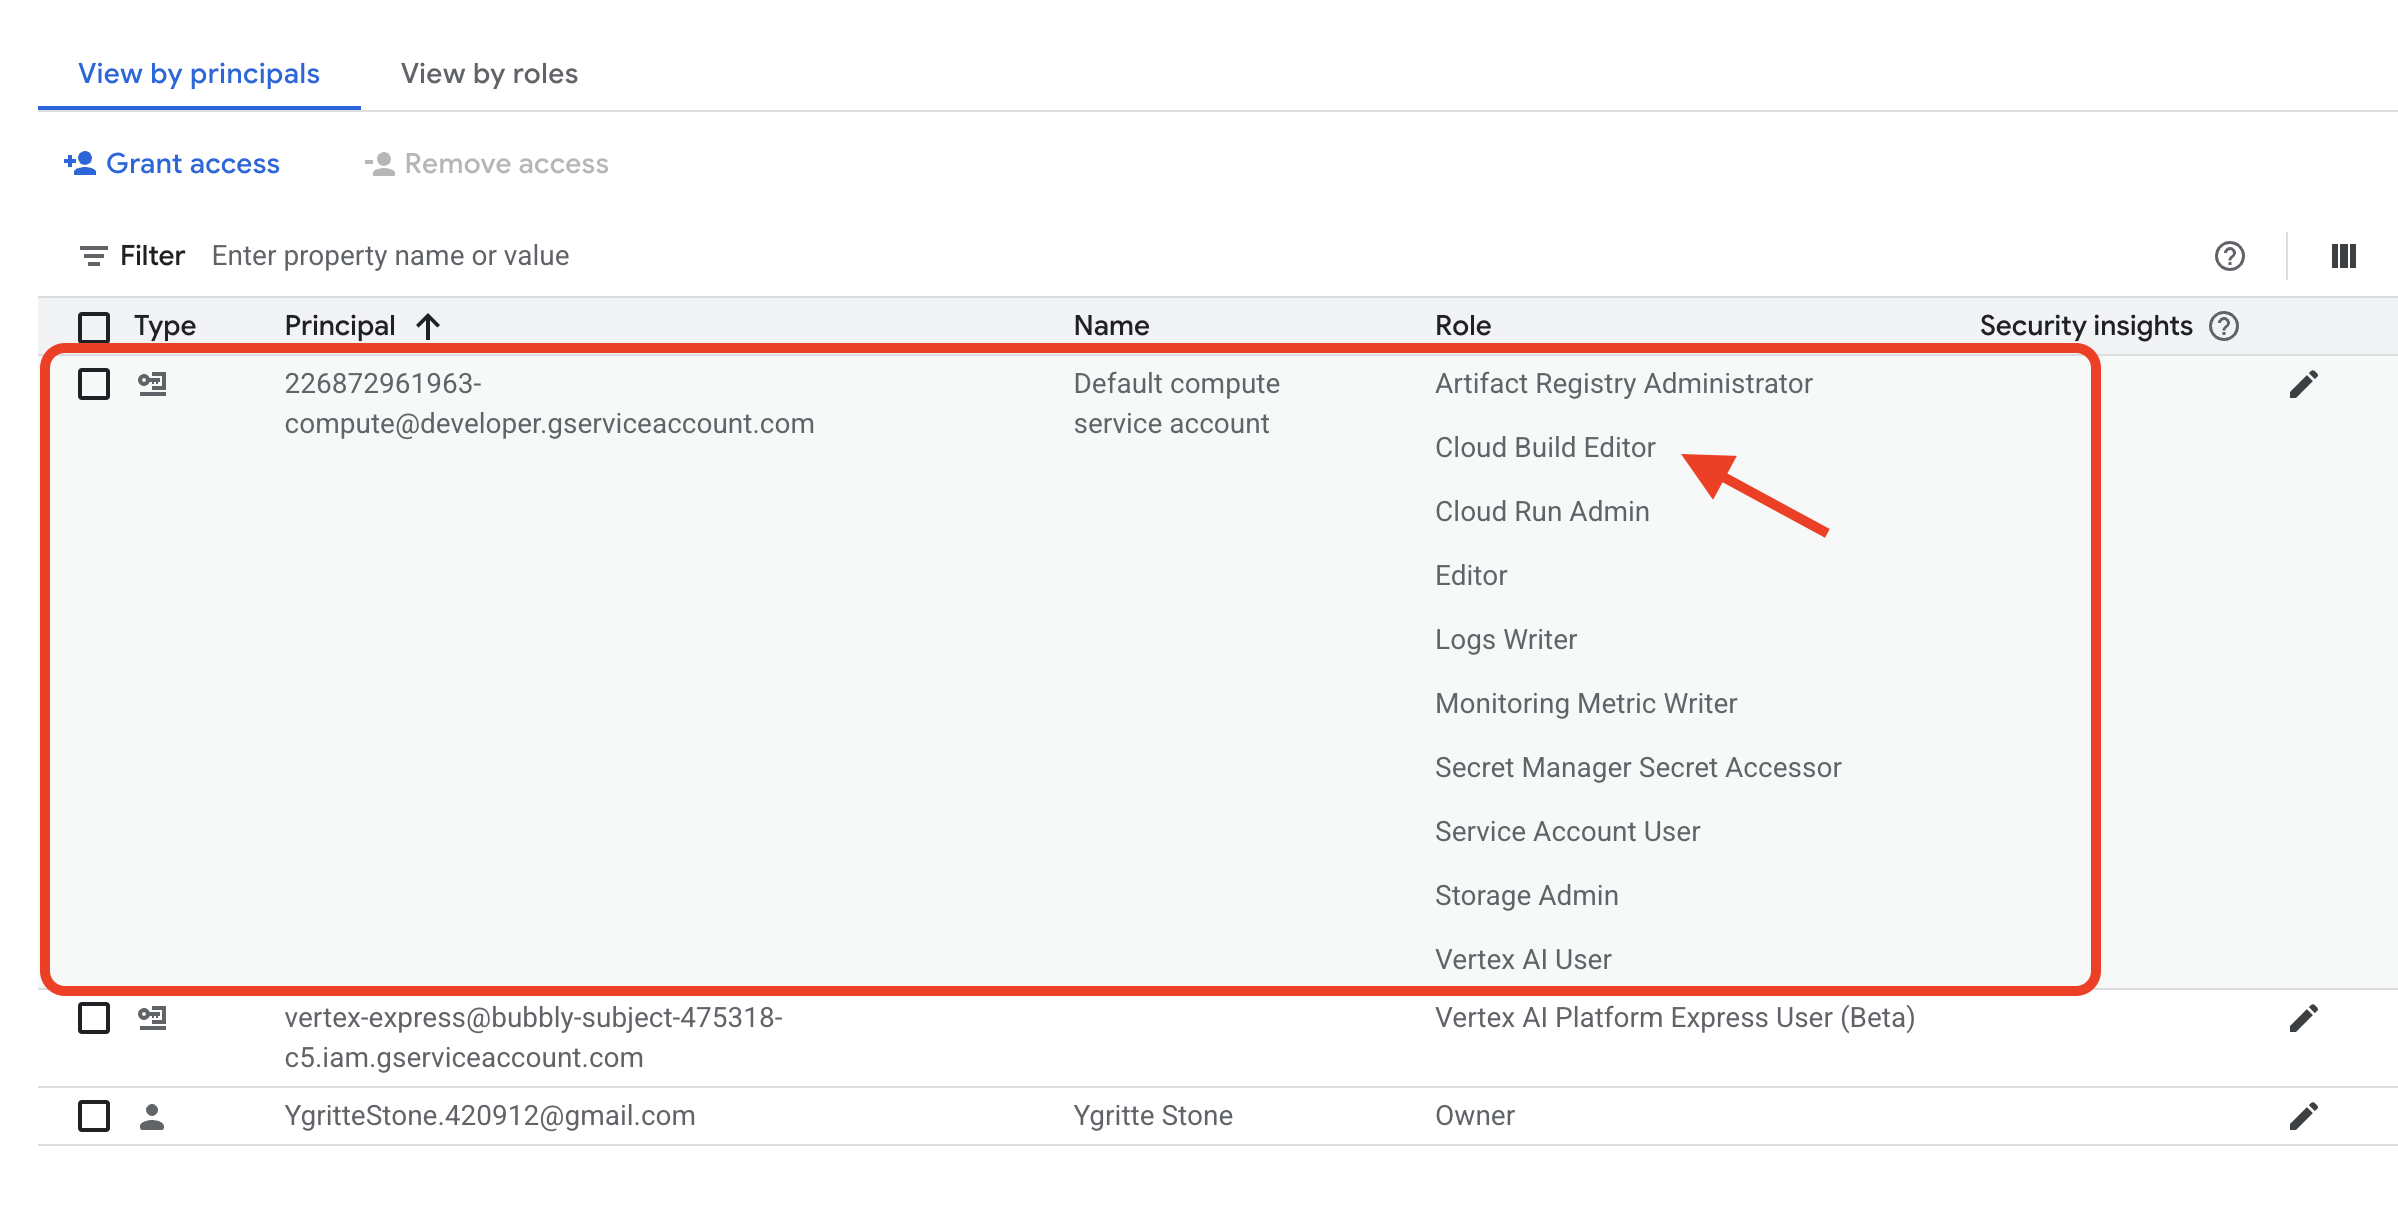
- Now, look for a Principal with a name like
- Managing Access (The Practical Task)
- Now, let's perform a relevant security task. Imagine a new colleague needs to be able to monitor the performance and check the logs for the two applications we just deployed (
fact-app-manualandfact-app-cli), but for security reasons, they should not be able to deploy a new version or delete them. - At the top of the IAM page, click + Grant Access.
- In the New principals field, enter a fictional email address, like
dev-intern@example.com. - In the Select a role dropdown, use the filter to find and select the role "Cloud Run Viewer". This role is a perfect example of the Principle of Least Privilege. It grants read-only access specifically to Cloud Run services and nothing more. (Or try use the Help me choose roles)
- Click Save.

- Now, let's perform a relevant security task. Imagine a new colleague needs to be able to monitor the performance and check the logs for the two applications we just deployed (
- Review the Result
- You have now successfully added a new user and given them a granular, least-privilege role that is directly relevant to the resources you created in this workshop. They can see your two fact-apps, but they cannot change them. You have seen how both user accounts and service accounts work together to create a secure and auditable cloud environment.
Now, let's practice granting permission not to a person, but to another application or service. Imagine an external automated tool, represented by the service account vertex-express@..., needs to be able to use the AI services within our project. We need to grant it the correct role.
- Navigate to the Service Accounts Page:
- Still in the IAM page, go to Service Accounts.
- Locate the Target Service Account:
- In the list of service accounts, find the one named
vertex-express@ecstatic-acumen-{PROJECT_NUMBER}-c9.iam.gserviceaccount.com. (You'll need to replace{PROJECT_NUMBER}with your actual project number). This is the identity we want to grant permissions to.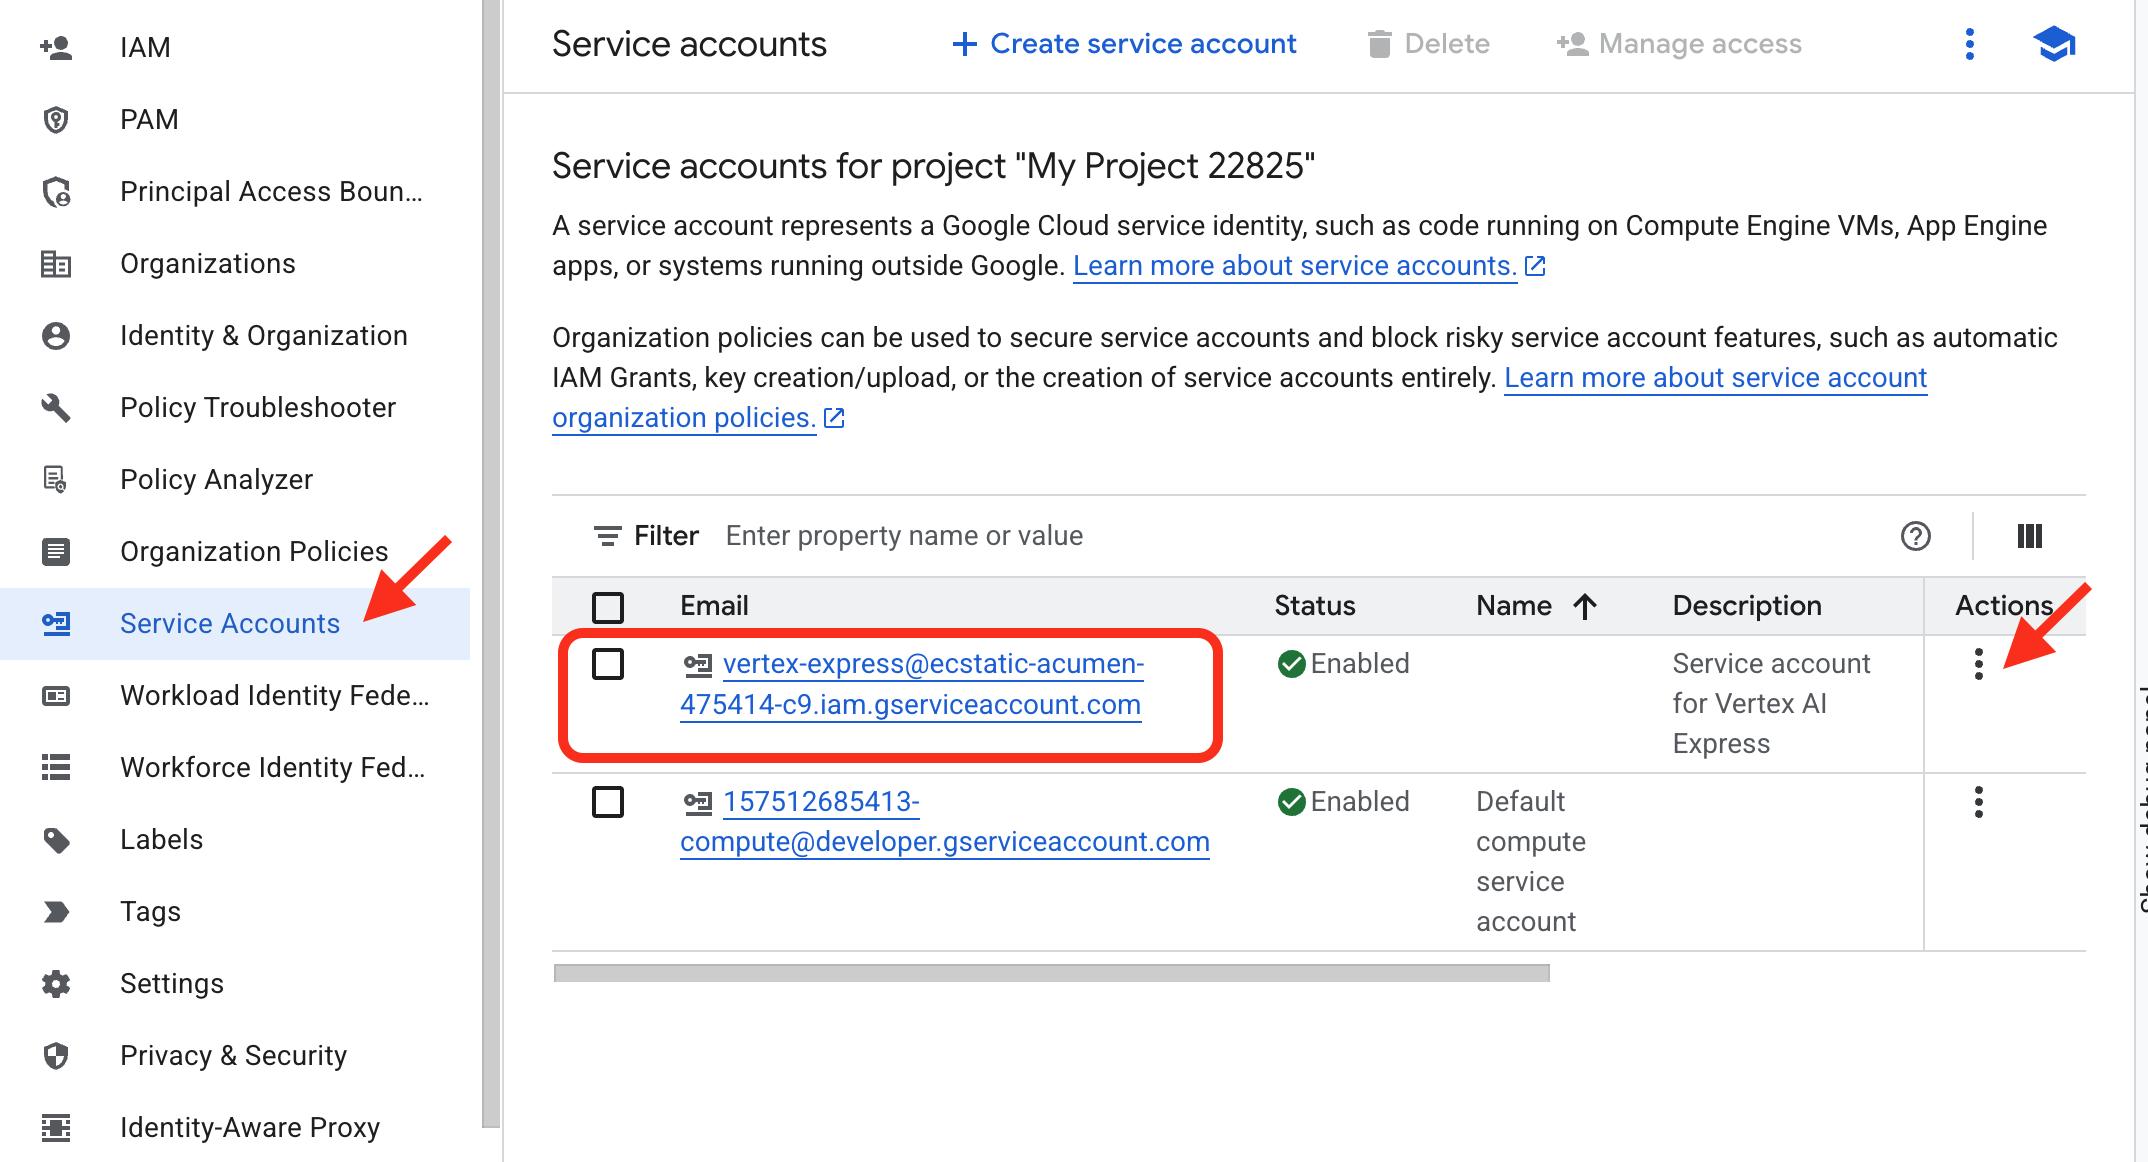
- In the list of service accounts, find the one named
- Manage Permissions for the Service Account:
- In Action column on the right, click the triple dot, where you will see a drop down menu.
- To manage what this service account can do, click the MANAGE PERMISSIONS.
- Grant the "Vertex AI User" Role:
- In the Assign roles dropdown, use the filter to find and select the role "Vertex AI User".
- Click Save.
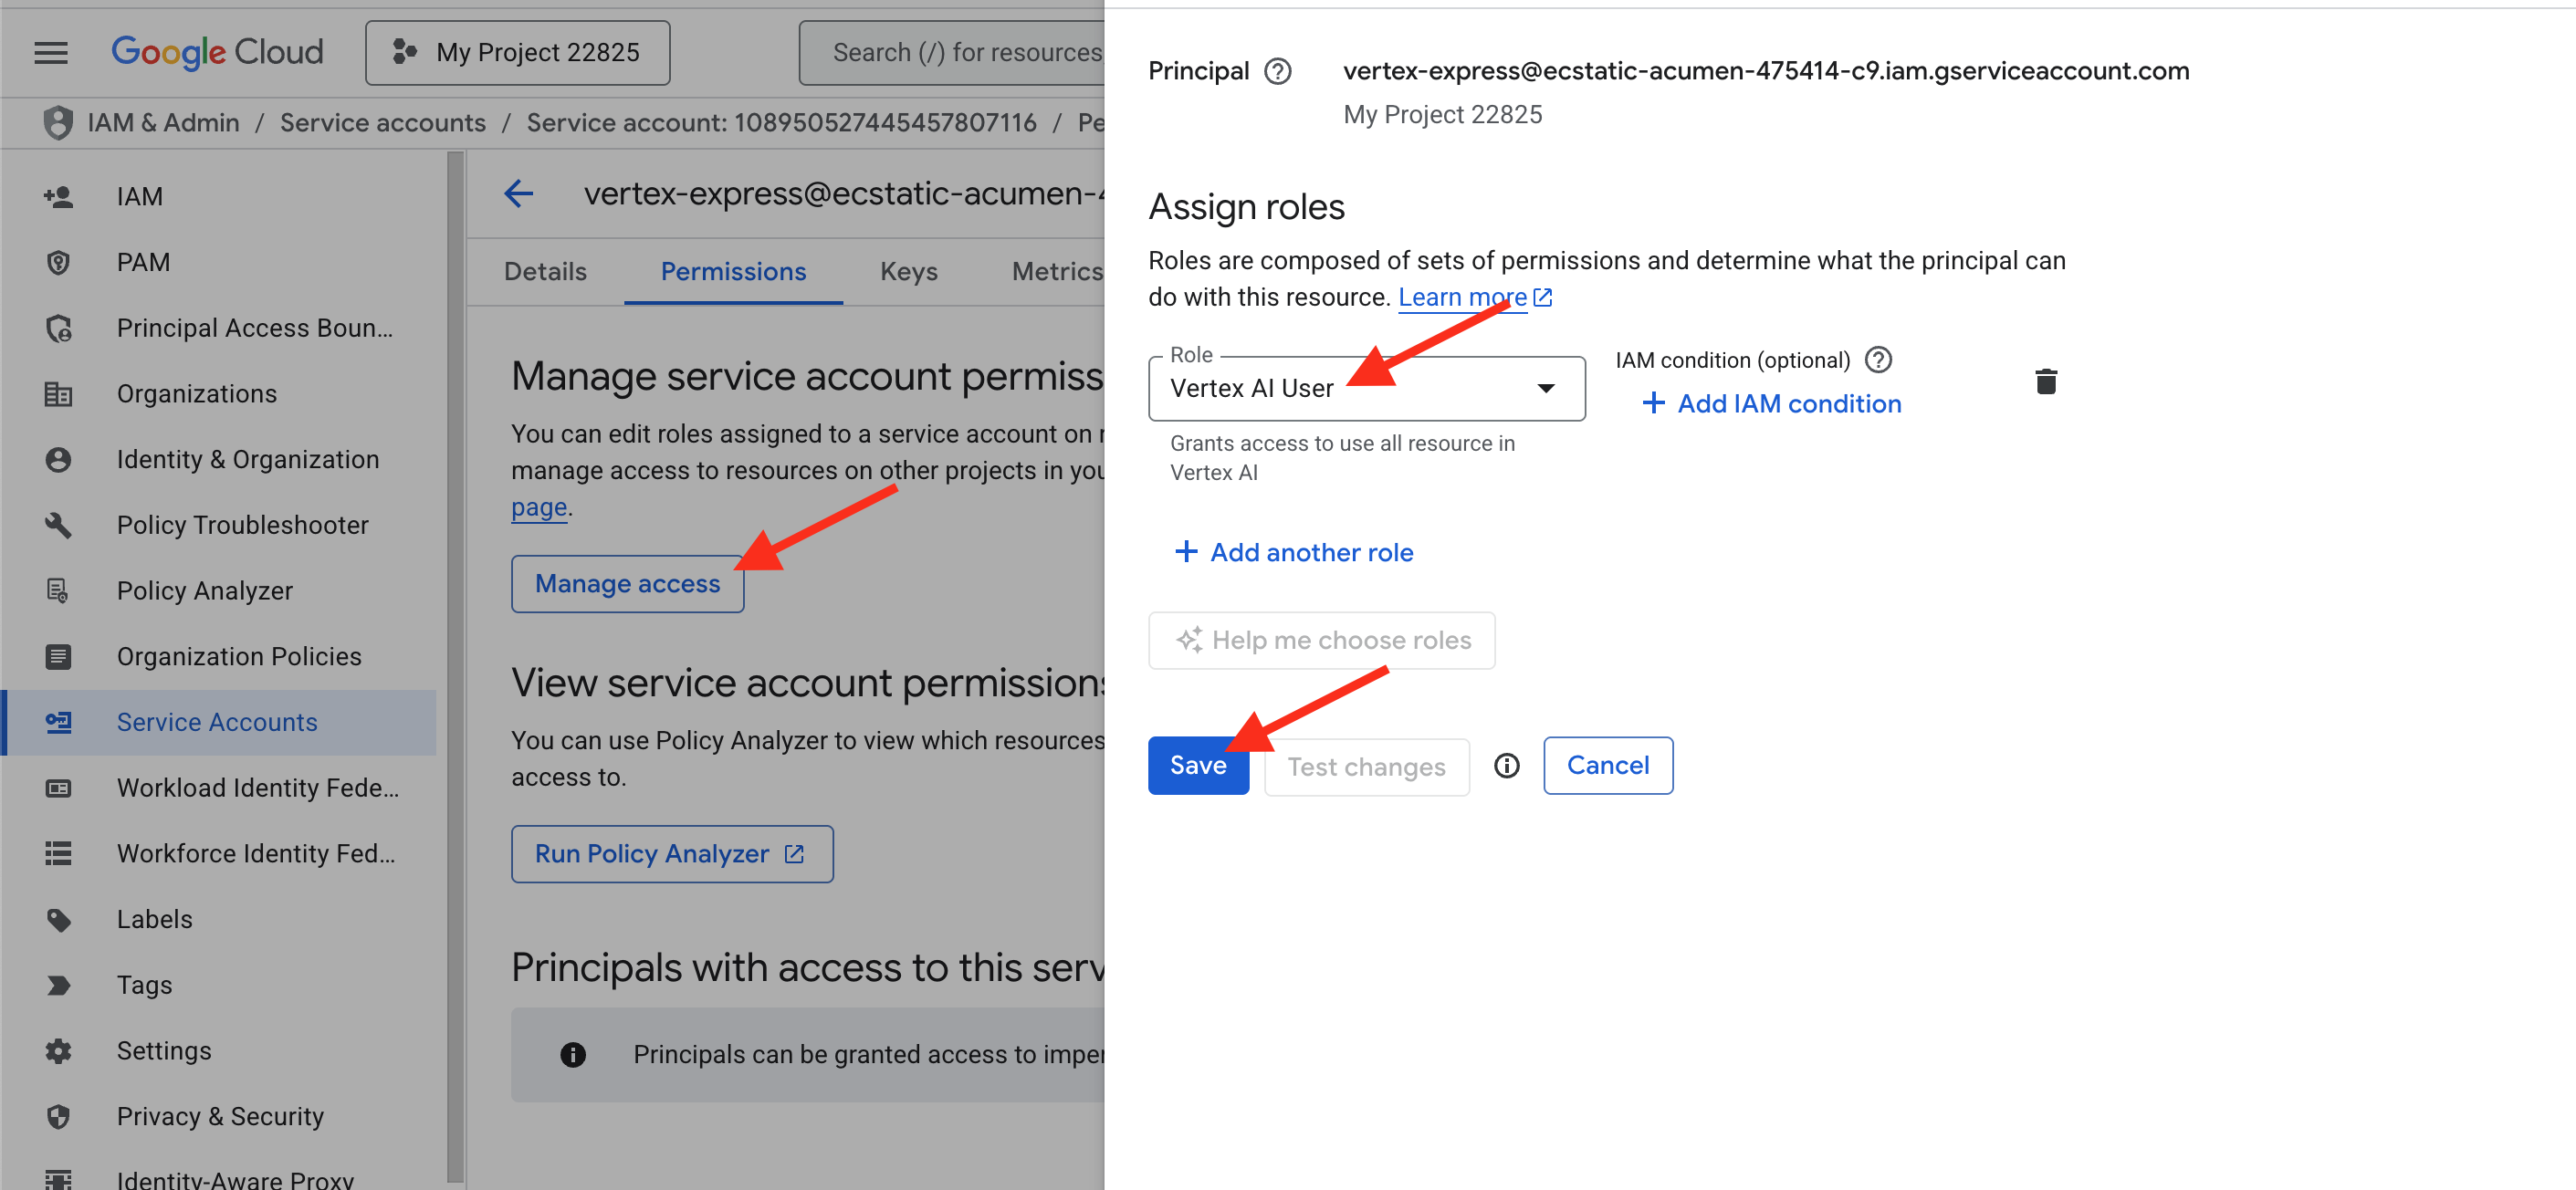
You have now successfully navigated from the service account's specific page to the correct project-level permissions page and authorized it to use the AI capabilities within your project.
3. Building Code with an AI Assistant
Conceptual Introduction
Every application starts with code. Traditionally, this is the most time-consuming part. Today, we'll work with an AI partner, Gemini, to accelerate this process. But before we write our first command, it's important to understand the landscape of AI tools Google Cloud offers.
Google's AI offerings can be thought of in three main categories, from simplest to most powerful:
You can interact with the "Creative Engine" (Gemini) through two primary interfaces, each designed for a different purpose.
- Google AI Studio (
aistudio.google.com)- What it is: A free, web-based tool for rapid prototyping and experimentation with Gemini. It's the quickest way to start writing prompts and seeing what the models can do.
- How it works: You can start using it with just your Google account. To use it in an application, you generate an API key. To use it for this workshop, you would need to enable the "Generative Language API" service in your project.
- Analogy: AI Studio is the public library or open workshop. It's easy to walk in and start experimenting with the tools for free.
- Vertex AI
- What it is: This is Google Cloud's end-to-end platform for managing the entire machine learning lifecycle. It's the full professional workbench where you can use foundation models like Gemini, but also build, train, and deploy your own custom machine learning models from scratch. It's built for enterprise-grade security, scalability, and governance. It also offers enterprise-grade version of the same tools, fully integrated within your Google Cloud project.
- How it works: It uses the same powerful models but inherits all the security, access control (IAM), and data governance features of your project. This is the service we enabled in Part 1 by turning on the
aiplatform.googleapis.comAPI. - Analogy: Vertex AI is your private, secure, corporate R&D lab. Everything you do is logged, secured, and connected to your other project resources.
Hands-on: Generating Application Code in Vertex AI Studio
Let's see what happens when we build our app using the visual tools inside Vertex AI.
- Navigate to Vertex AI Studio:
- Generate the Website:
- In the prompt box, enter the exact same request we will use later:
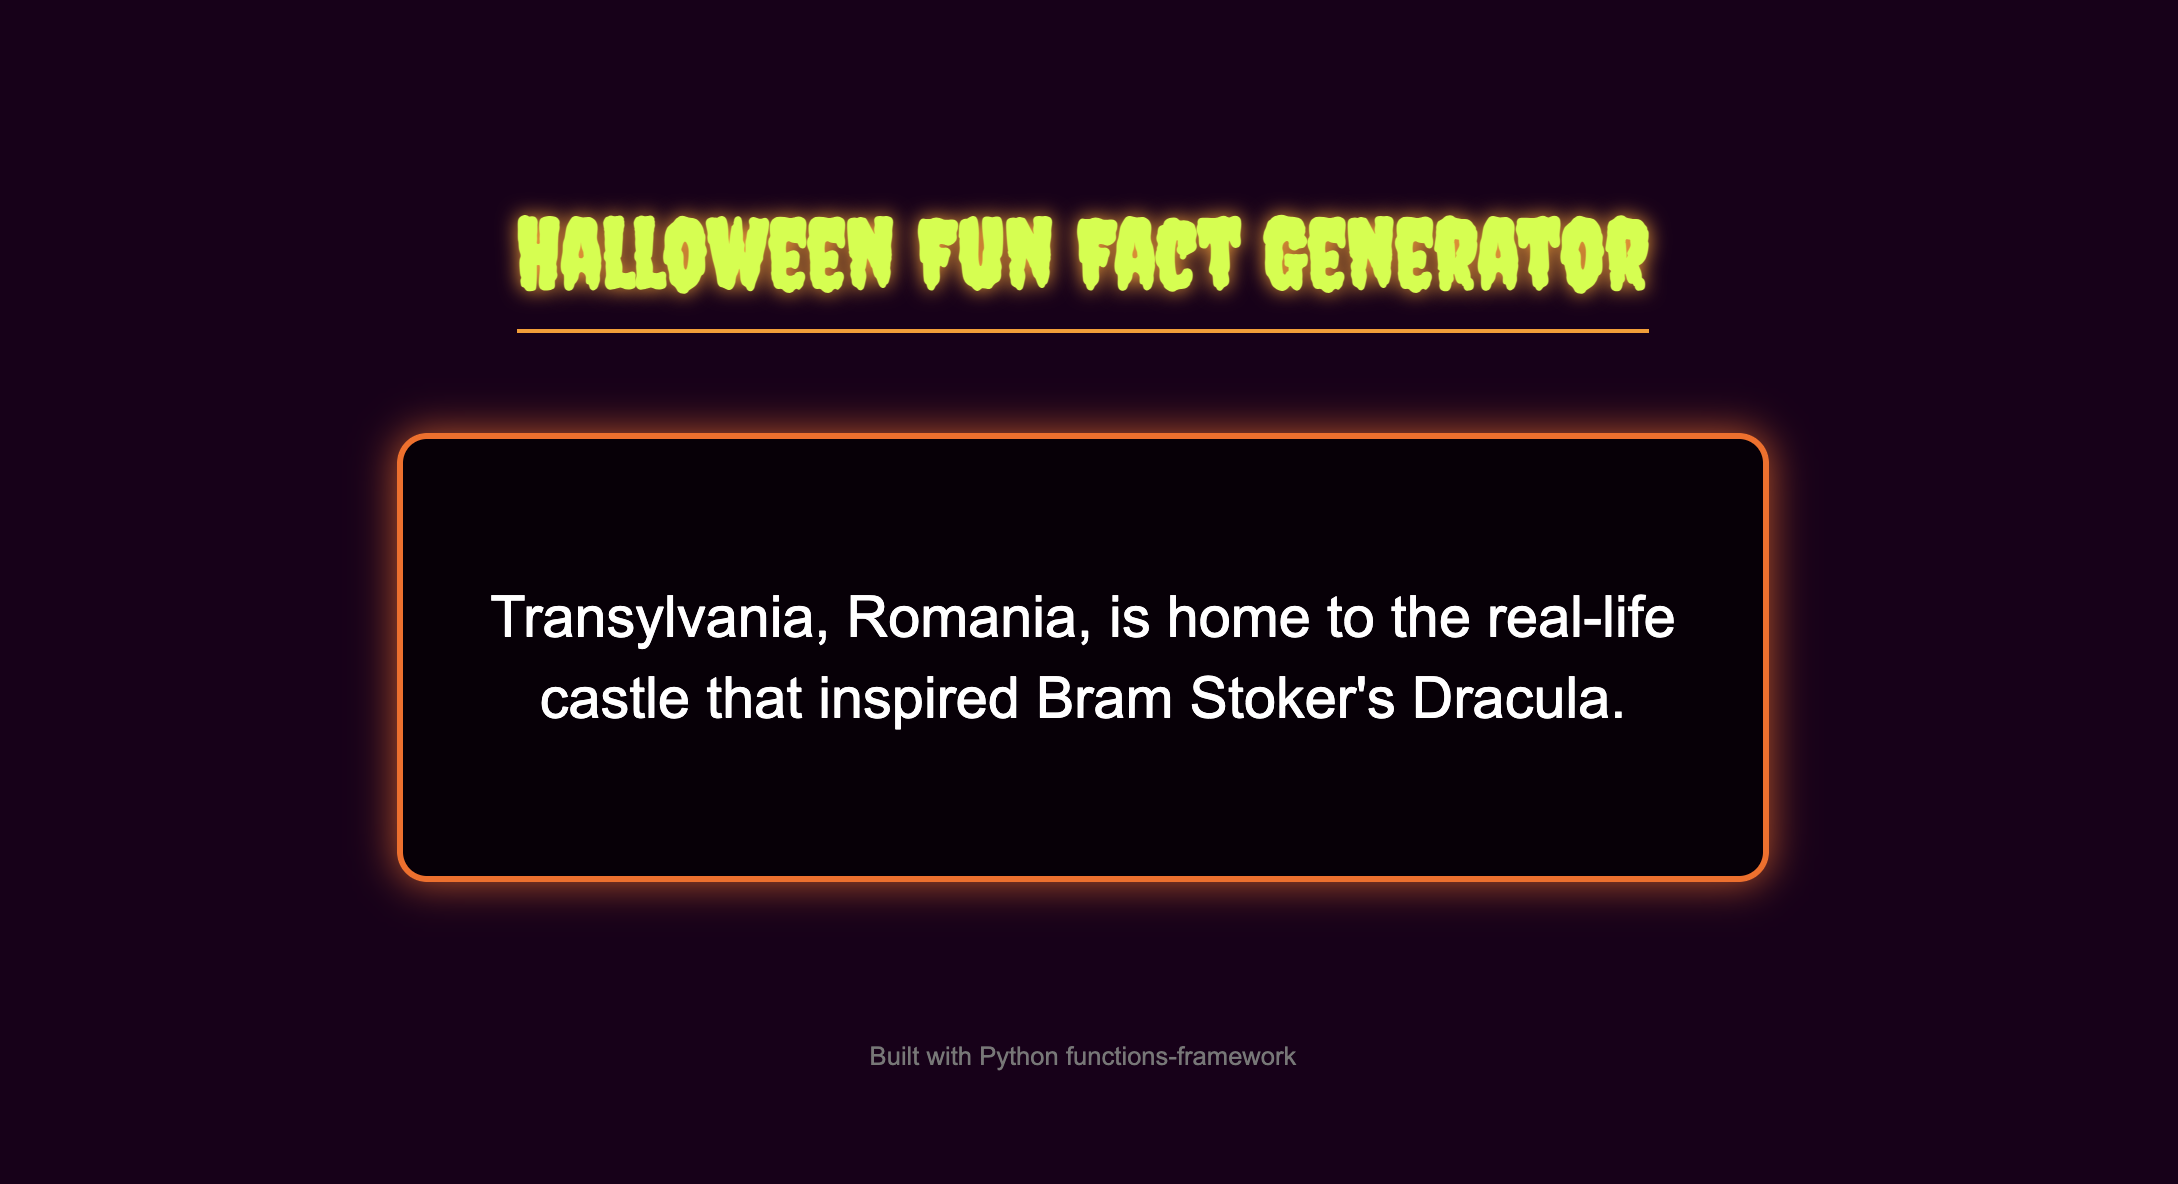
Create the code for a simple web application that shows Halloween fun facts. The application should be built using the Python functions_framework for Cloud Run. The entry point function must be named 'hello_http'. When a user visits the main page, the server should randomly display one fact from a list. The page should have a separate 'index.html' file for the structure and a 'style.css' file to give it a spooky theme
- Press Enter. The model will generate the code, likely in three distinct blocks: one for Python (
main.py), one for HTML (index.html), and one for CSS (style.css).
Keep this browser tab open! You will need to copy the code from these three blocks in the next section. Notice how the AI has correctly separated the files. This is good practice, but as we'll see, it requires several manual steps to deploy.
4. Deploying to the World with Cloud Run
Conceptual Introduction
Our code has been generated, but it's just text in a browser. To serve customers, it needs to run on a server. Cloud Run is a "serverless" platform, meaning we provide the code, and Google handles everything else: the servers, the scaling, and the security. Its most powerful feature is scaling to zero—if no one is visiting your app, you pay nothing for idle time.
- What is "Serverless"? Traditionally, deploying an app meant renting a server (a virtual machine), installing an operating system, configuring networking and security, and constantly maintaining it. Serverless is a modern cloud approach where you, the developer, focus only on your code. You hand your code to a service like Cloud Run, and it handles everything else: the servers, the scaling, the security, and the networking.
- How Cloud Run Works: The Magic of Scaling When you deploy to Cloud Run, it packages your code into a container (a standardized, portable package of your application and all its dependencies). When a user visits your app's URL, Cloud Run instantly starts your container to handle the request. If a thousand users visit at once, it automatically starts a thousand copies. The most powerful feature is scaling to zero. When no one is visiting your app, Cloud Run scales the number of running containers all the way down to zero. This means you pay absolutely nothing for idle time, making it incredibly cost-effective.
For our first deployment, we will use the Cloud Run console's inline editor, manually copying our code into place.
Hands-on: Deploying Your Application
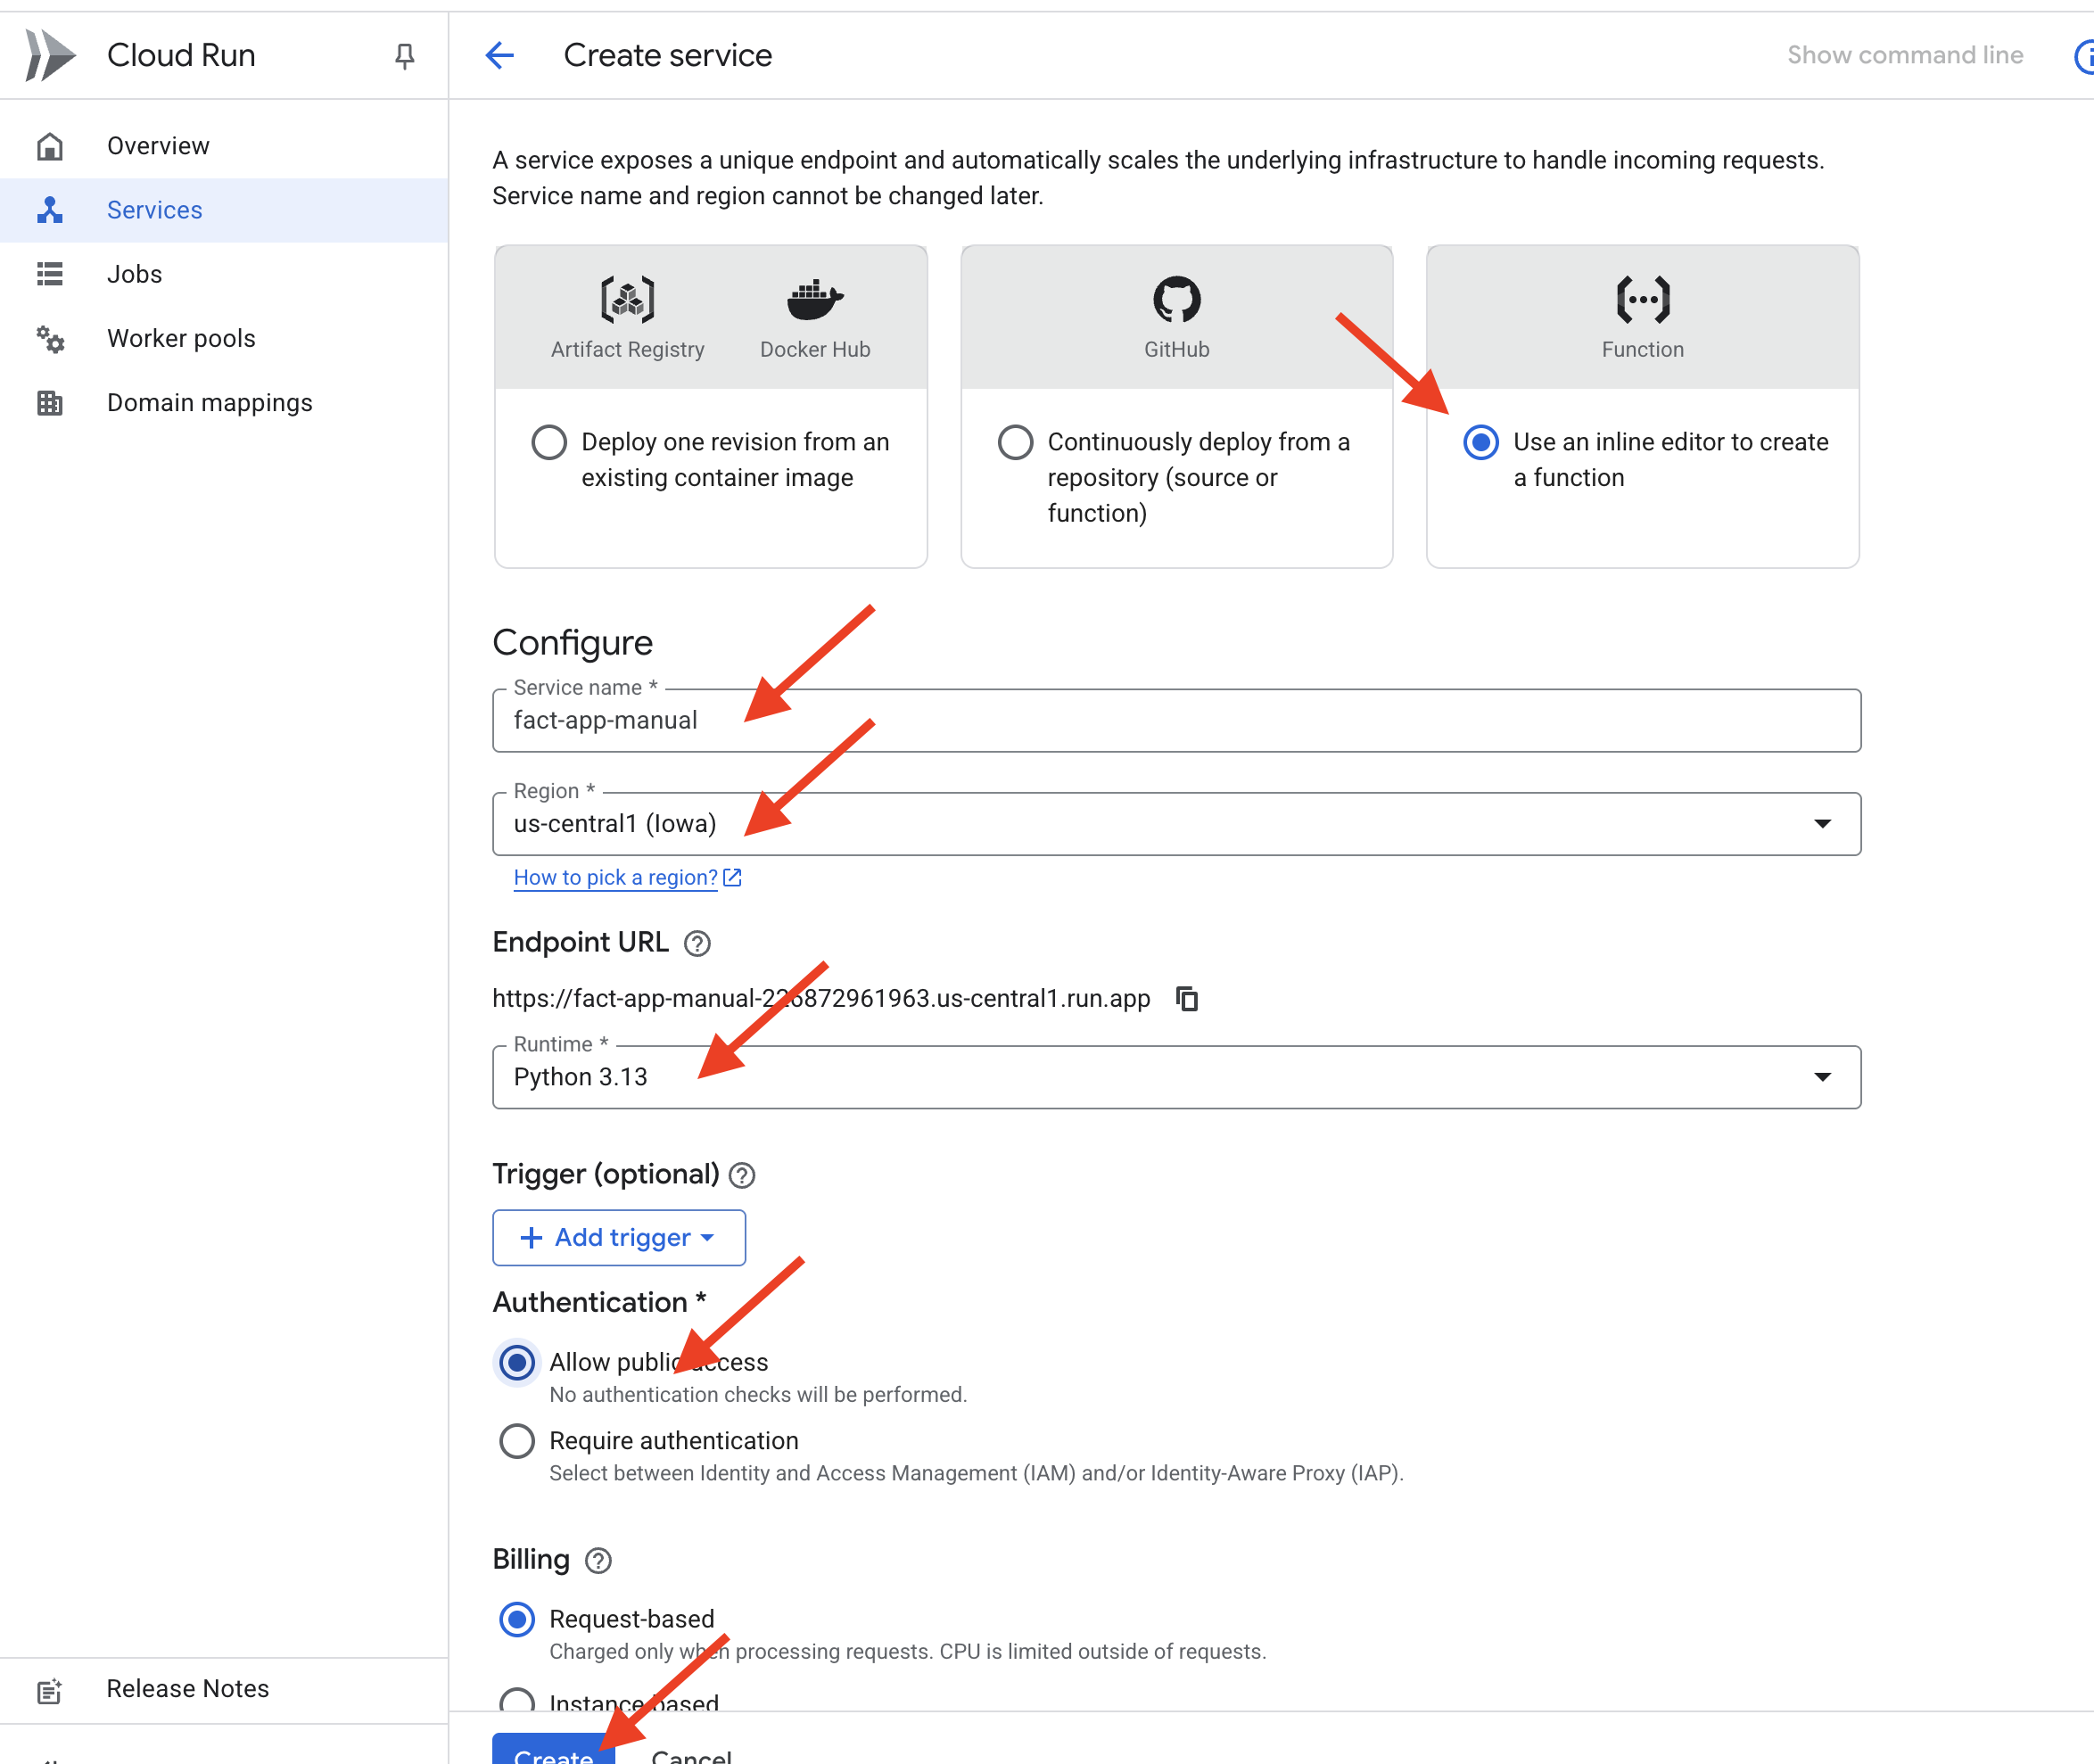
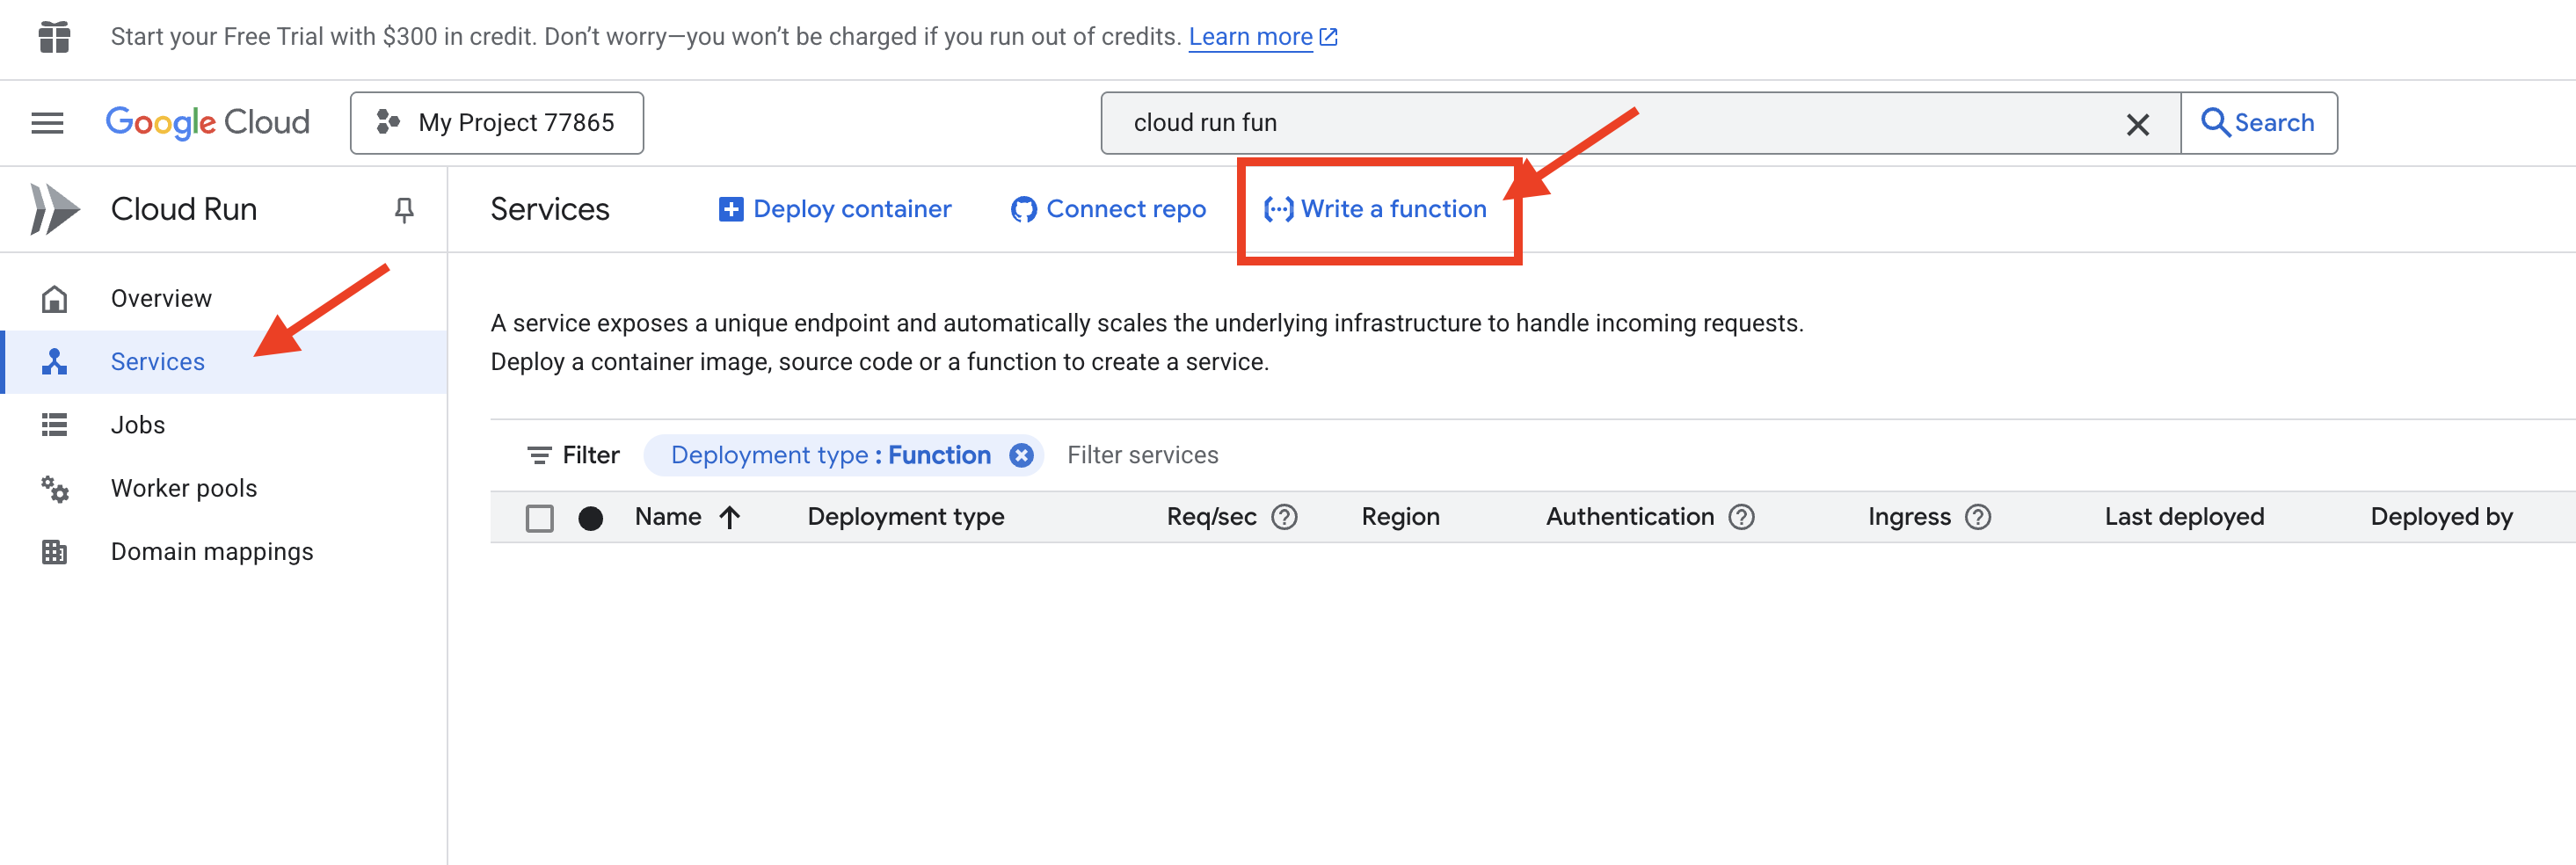
- Start the Cloud Run Creation Wizard:
- Configure the Service:
- Choose Use an inline editor to create a function.
- Give your service a name:
fact-app-manual. - Select a Runtime
Python 3.13. - Select a Region
us-central1. - Select Allow public access.
- Leave all other settings as their defaults.
- Click the CREATE button at the bottom.
- Enter Your Code:
- You will see an editor with a default
main.pyandrequirements.txtfile. - main.py: Go to your Vertex AI Studio tab. Copy the entire Python code block. Come back to the Cloud Run editor and replace the default
main.pycontent with the code you just copied. - requirements.txt:* Click on the
requirements.txtfile in the editor. The Python code needs thefunctions-framework. Replace the file content with:functions-framework - index.html: In the editor's file explorer, click ‘+' to add the new file. Name the file
index.html. Go to your Vertex AI Studio tab, copy the HTML code block, and paste it into this newindex.htmlfile. - style.css: click ‘+' to add the new file. Name it
style.css. Go to your Vertex AI Studio tab, copy the CSS code block, and paste it into this newstyle.cssfile.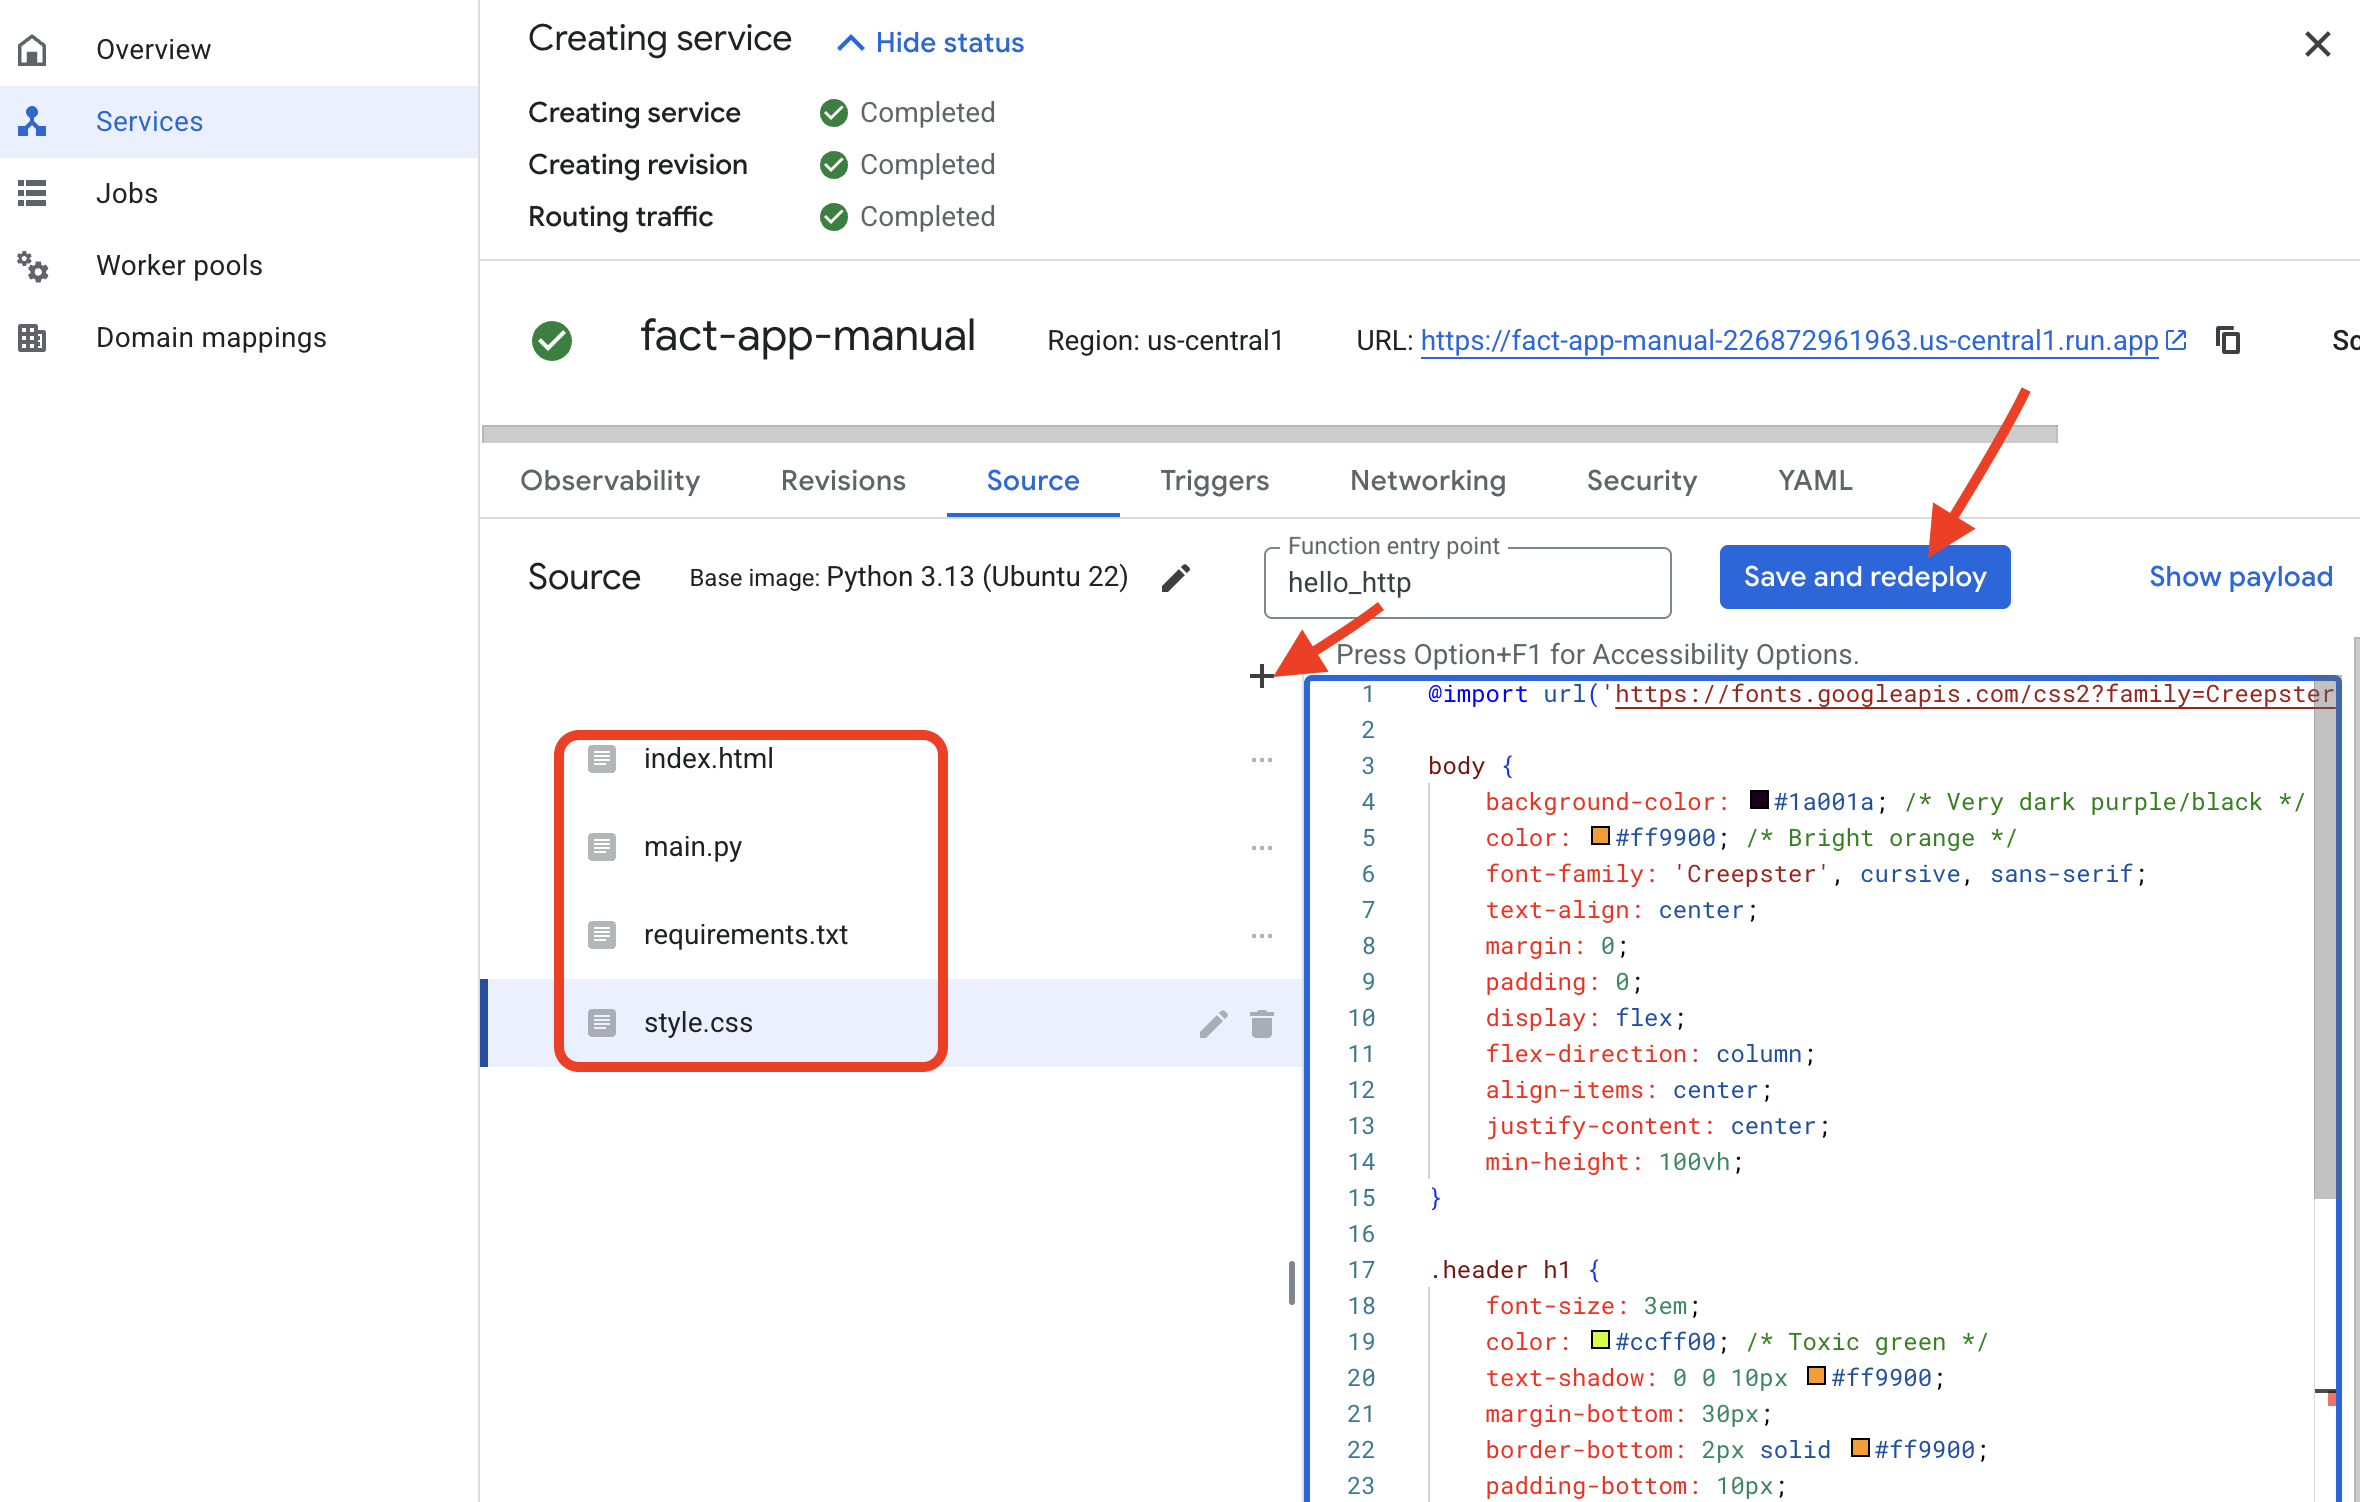
- You will see an editor with a default
- Deploy the Service:
- With your three files correctly in place, click the SAVE and DEPLOY button .
- Access Your Live Application:
- The deployment will take a few minutes. When it's finished, the service details page will appear with a public URL at the top.
- Click this URL. Your application is now live! It works, but that was a lot of manual copy-pasting.
5. Optimizing the Developer's Workflow
The console is great for learning, but it's slow for iterative development. Now, we will see the developer's preferred workflow, using the Cloud Shell and Gemini CLI to turn that entire multi-step process into a streamlined conversation. 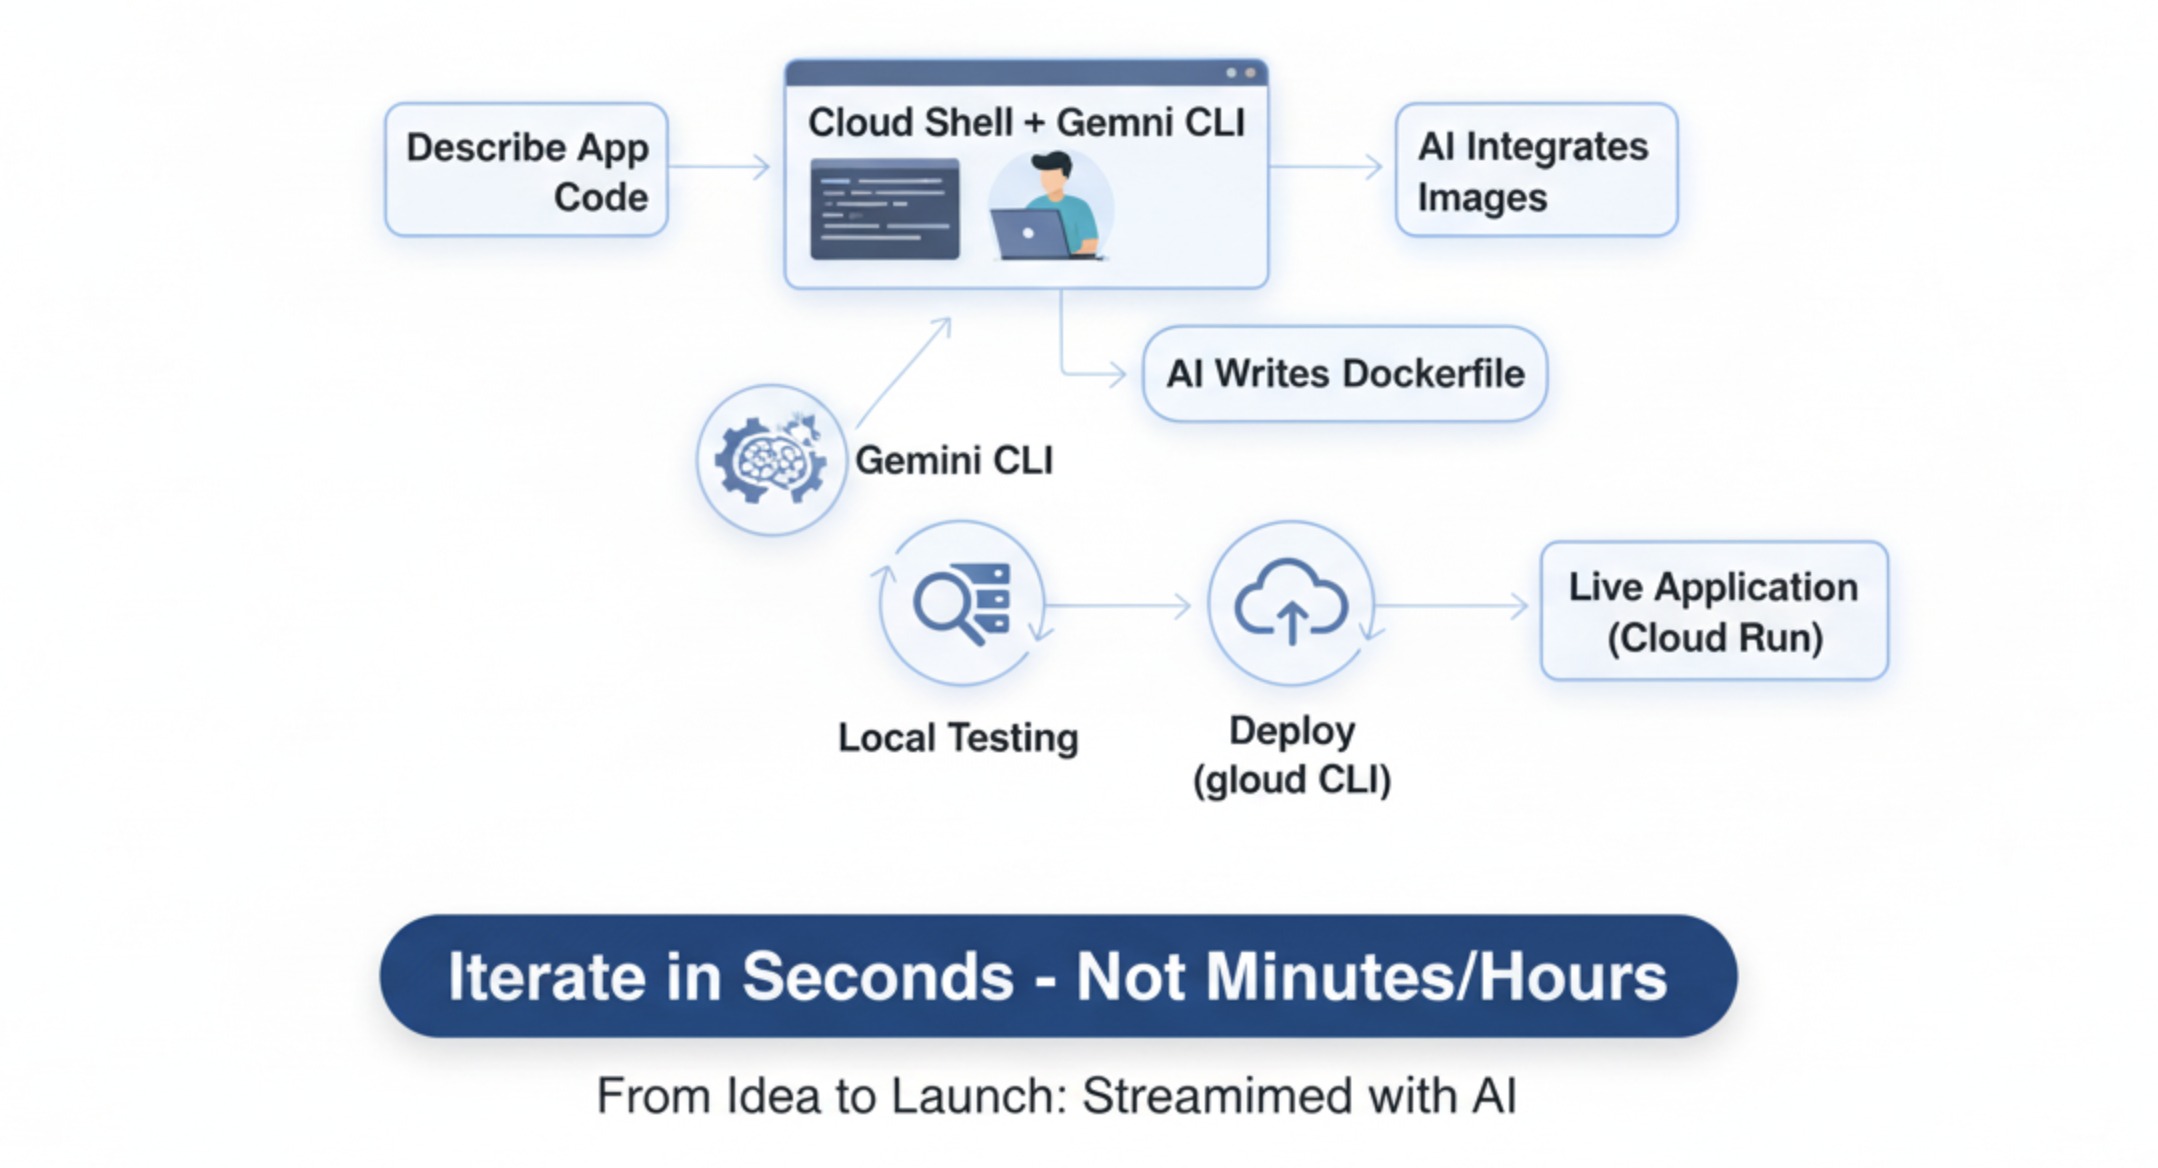
What is Cloud Shell and the Gemini CLI?
Cloud Shell is a full Linux computer in your browser, pre-loaded with developer tools like the gcloud CLI (your remote control for Google Cloud).
The Gemini CLI is an interactive, AI-powered coding assistant that lives in your terminal.
What are Gemini Extensions?
Think of the Gemini CLI as a powerful smartphone. By itself, it's very capable. Extensions are like apps you install from an app store. They give the Gemini CLI new, specialized abilities that it doesn't have by default. The nanobanana extension, for example, is an "app" that connects the Gemini CLI to Google's powerful image generation models, allowing us to generate images directly from the command line.
Hands-on: The Streamlined Workflow
- Generate an API key
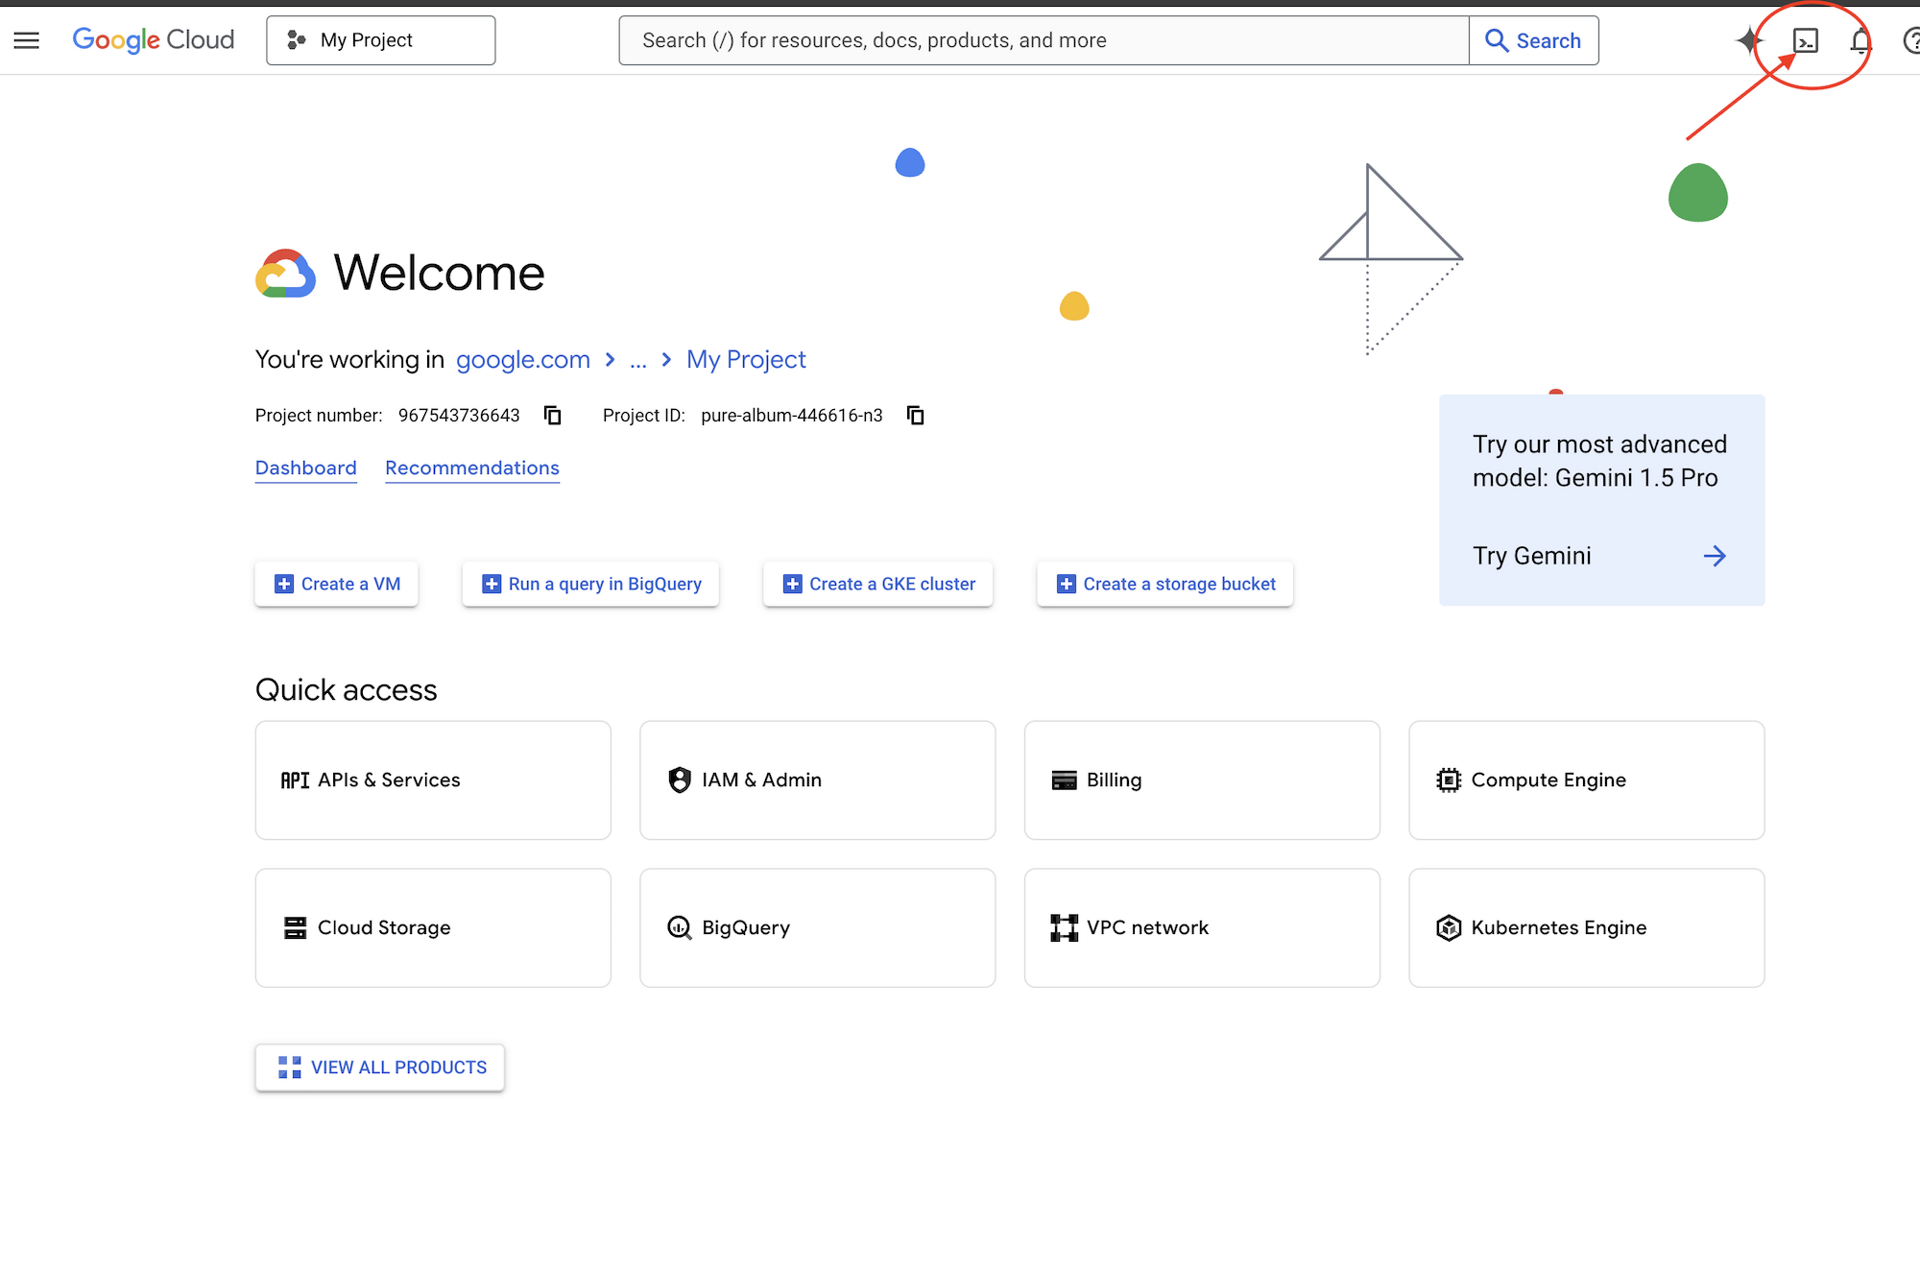
- Activate and Configure Cloud Shell:
- At the top of the Google Cloud console, click the Activate Cloud Shell icon (
>_).
- Run the following commands in the terminal to set up your environment, make sure to replace it with your own Project ID
# Set your Project ID export PROJECT_ID="[your-project-id-goes-here]"Yto the continue installing.)gcloud config set project $PROJECT_ID # REPLACE with your API Key. export NANOBANANA_GOOGLE_API_KEY="[your-api-key-goes-here]"# Configure the CLI to use your project with Vertex AI export GOOGLE_CLOUD_PROJECT=$PROJECT_ID export GOOGLE_CLOUD_LOCATION=us-central1 export GOOGLE_GENAI_USE_VERTEXAI=true # Install the image generation extension gemini extensions install https://github.com/gemini-cli-extensions/nanobanana
- At the top of the Google Cloud console, click the Activate Cloud Shell icon (
- We'll use the Gemini CLI, a powerful command-line interface that acts as an AI coding assistant. It allows us to describe the code we want in plain English, and it will generate the structure for us, significantly speeding up development.
- Start an Interactive AI Session:
- Let's create a new directory for our project and start the Gemini CLI in its interactive mode. Run the following command in the termina.
mkdir ~/2025-website
cd ~/2025-website
cat <<EOF > .env
  GOOGLE_CLOUD_PROJECT=$PROJECT_ID
  GOOGLE_CLOUD_LOCATION=$GOOGLE_CLOUD_LOCATION
  GOOGLE_GENAI_USE_VERTEXAI=true
  NANOBANANA_GOOGLE_API_KEY=$NANOBANANA_GOOGLE_API_KEY
EOF
clear
gemini --yolo
- Let's create a new directory for our project and start the Gemini CLI in its interactive mode. Run the following command in the termina.
- Generate and Iterate on Your App:
- You are now in a chat session with your AI assistant. Paste the following prompt to generate the entire website with one command:
Write a simple web app that shows Halloween fun facts using the Python Flask. When a user visits the main page, it should show one random fact. Include a button that fetches and displays a new fact when clicked. Create a simple, clean index.html, a separate style.css with a spooky theme, and a requirements.txt file. After creating the files, attempt to start the web app locally on port 8080. - Test Locally: The AI will create the files and start a web server. (Sometimes the loading would not stop, if you see it is attempting to start the server, feel free to move to the next step. )
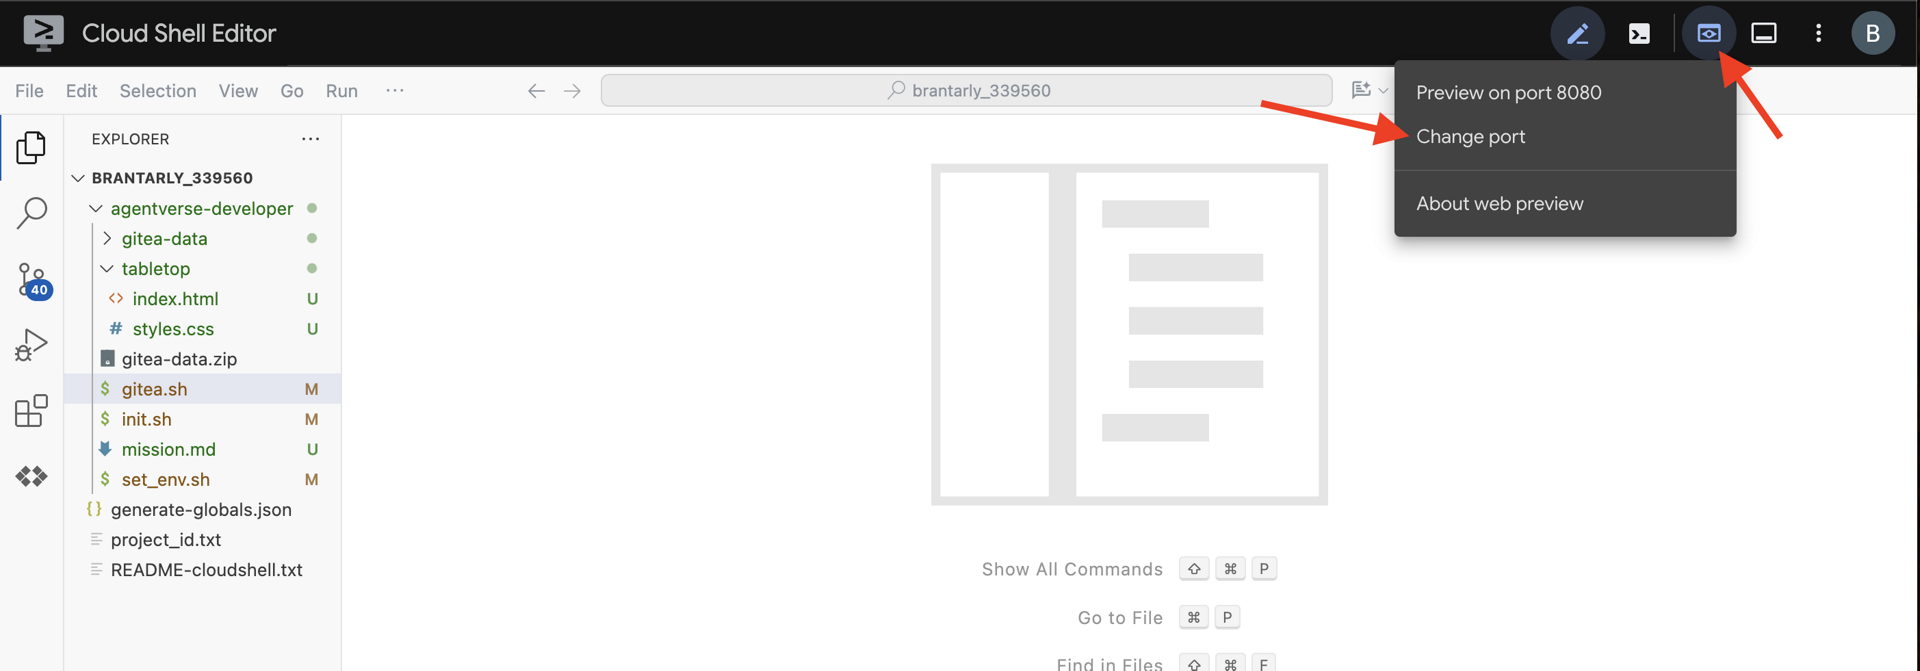
- Click the Web preview icon in the Cloud Shell toolbar, select Preview on port 8080, and your site will appear in a new tab.
- In the Gemini CLI, press
Escto cancel the request and or prompt Gemini CLI toStop the web server.
- You are now in a chat session with your AI assistant. Paste the following prompt to generate the entire website with one command:
- Update the Website with AI-Generated Images:
- Now, let's use our extension. A command starting with
/is a "slash command" directed at a tool, not a prompt for the AI./generate 3 images of spooky halloween fun - The extension will create three images. Now, let's ask the AI to modify the website to use them.
Update the website so it will display and rotate between the 3 newly generated images each time the button is clicked. And do NOT start the server.
- Now, let's use our extension. A command starting with
- Prepare for Deployment:
- Cloud Run deploys code using containers. A
Dockerfileis a recipe for building a container. Let's ask the AI to create one for us.Create a Dockerfile suitable for deploying this Python Flask app to Cloud Run.
- Cloud Run deploys code using containers. A
- Deploy with a Single Command:
- Exit the Gemini CLI by pressing
CtrlCtwice. Or type/quitin prompt - Now, use the
gcloudCLI to deploy the entire application from your current directory.gcloud run deploy fact-app-cli \ --source . \ --region us-central1 \ --allow-unauthenticated
- Exit the Gemini CLI by pressing
- See the Difference:
- After a few minutes, you'll get a new URL for your fully featured, AI-generated website. Visit the Cloud Run console, and you'll see both services:
fact-app-manualandfact-app-cli. You have just experienced the speed and power of the command-line developer workflow.
- After a few minutes, you'll get a new URL for your fully featured, AI-generated website. Visit the Cloud Run console, and you'll see both services:
Congratulations
You have successfully completed the entire development lifecycle on Google Cloud. You started with an empty project and have now:
- Configured a secure project with billing.
- Used an AI assistant to write a complete application.
- Deployed that application to a scalable, serverless platform.
- Learned how to manage its security with IAM.
You now have the foundational skills to build even more complex and capable applications on Google Cloud.