
1. परिचय
जैसे-जैसे एआई एजेंट ज़्यादा ज़िम्मेदारियाँ लेते हैं, वैसे-वैसे एक ही एजेंट से सभी काम कराना मुश्किल होता जाता है. साथ ही, उसे बनाए रखना, ज़रूरत के हिसाब से बढ़ाना, और बेहतर बनाना भी मुश्किल होता जाता है. अलग-अलग सुविधाओं के लिए, अक्सर अलग-अलग डिप्लॉयमेंट रणनीतियों, अपडेट साइकल या यहां तक कि अलग-अलग टीमों की ज़रूरत होती है.
- A2A (Agent2Agent) प्रोटोकॉल, बातचीत से जुड़ी समस्या को हल करता है. यह प्रोटोकॉल, एजेंटों के लिए यह तय करता है कि वे एक-दूसरे की क्षमताओं के बारे में कैसे जानें और अलग-अलग फ़्रेमवर्क और संगठनों के साथ मिलकर कैसे काम करें.
- Gemini Enterprise Agent Platform Runtime, डिप्लॉयमेंट से जुड़ी समस्या को हल करता है. यह पूरी तरह से मैनेज किया गया सर्वरलेस प्लैटफ़ॉर्म है. यह आपके एजेंट को होस्ट करता है. इसमें A2A के लिए सहायता, ऑटो-स्केलिंग, सुरक्षित एंडपॉइंट, परसिस्टेंट सेशन, और इंफ़्रास्ट्रक्चर मैनेजमेंट की सुविधा पहले से मौजूद होती है.
इन दोनों की मदद से, खास एजेंट बनाए जा सकते हैं. साथ ही, इन्हें A2A सेवाओं के तौर पर डिप्लॉय किया जा सकता है, ताकि इन्हें खोजा जा सके. इसके अलावा, इन्हें मल्टी-एजेंट सिस्टम में कंपोज़ किया जा सकता है.
आपको क्या बनाने को मिलेगा
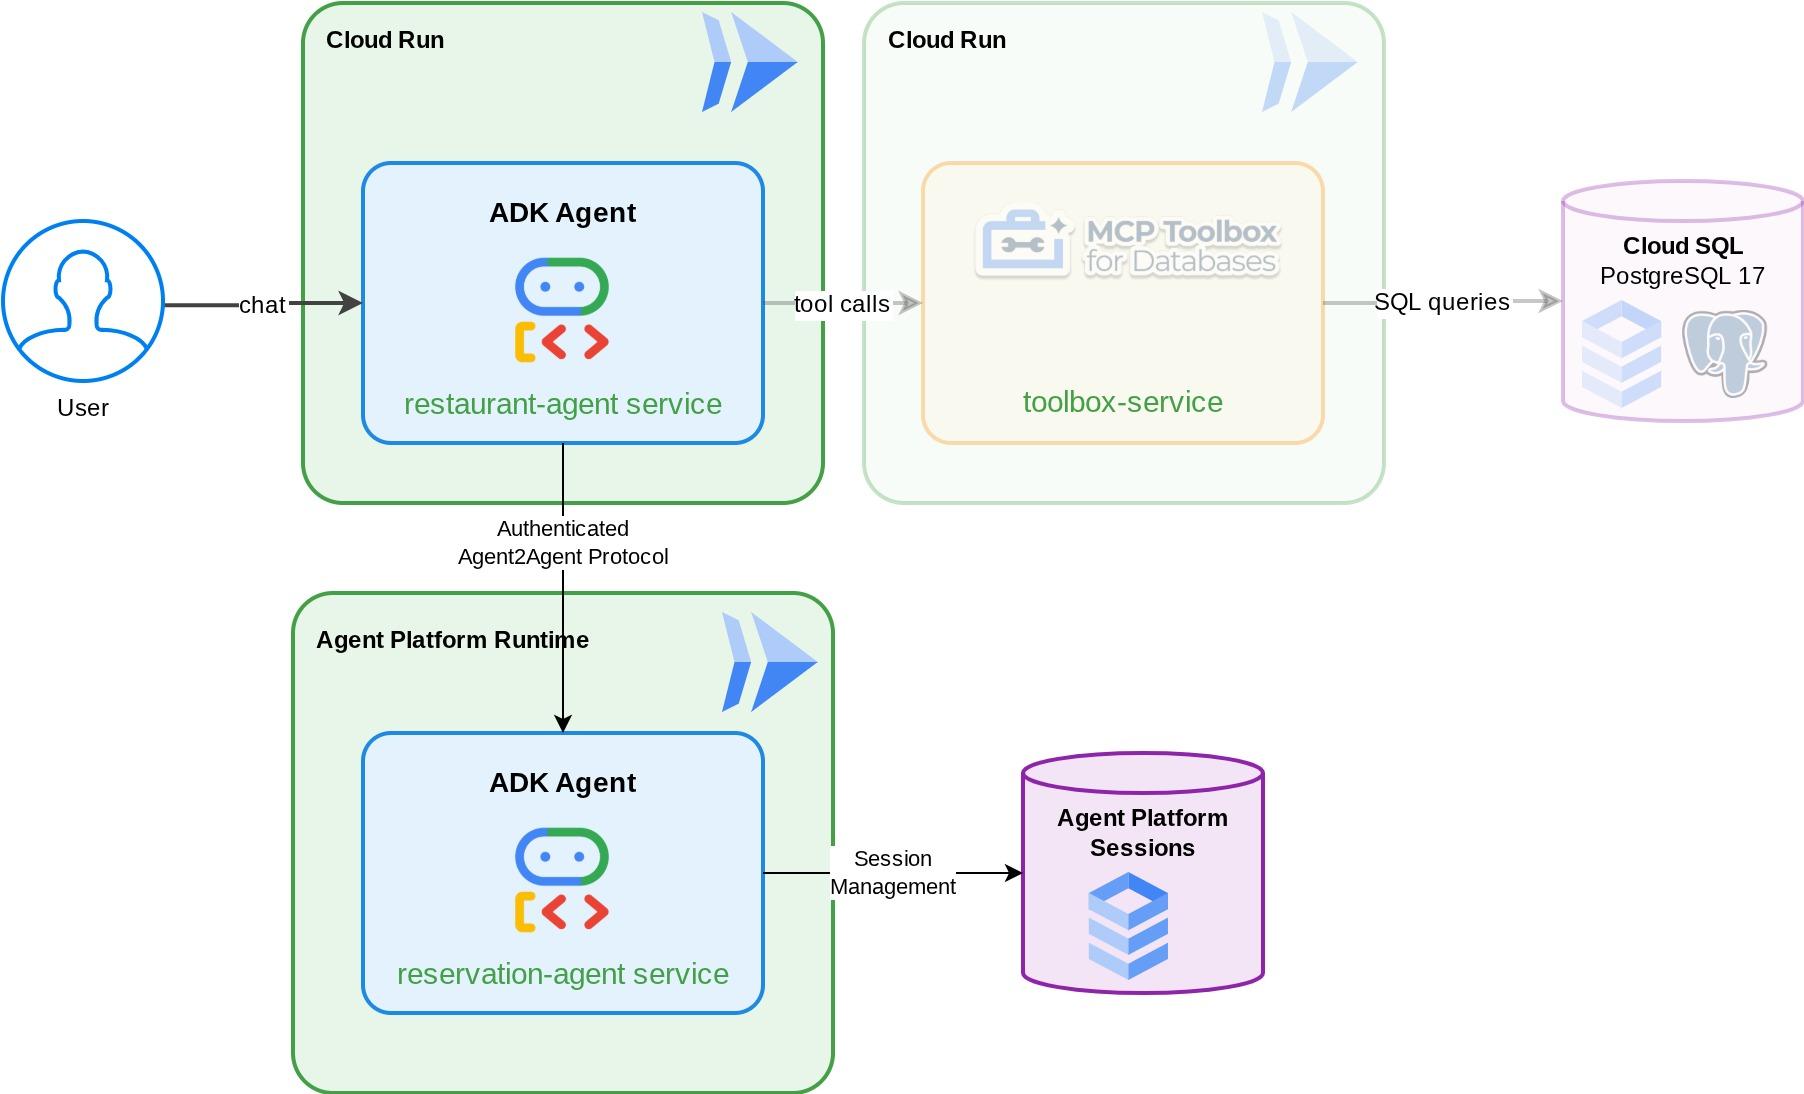
एक बुकिंग एजेंट, जो ADK सेशन की स्थिति का इस्तेमाल करके, रेस्टोरेंट में टेबल बुक करने (बनाना, जांच करना, और रद्द करना) की सुविधा मैनेज करता है. इसे Gemini Enterprise एजेंट प्लैटफ़ॉर्म के सेशन मैनेज करते हैं. इस एजेंट को Gemini Enterprise एजेंट प्लैटफ़ॉर्म के रनटाइम पर डिप्लॉय किया जाता है. यहाँ यह A2A प्रोटोकॉल के एजेंट कार्ड के ज़रिए खोजा जा सकता है. इसके बाद, फ़ूडी फ़ाइंड्स रेस्टोरेंट के कंसीयर्ज एजेंट को अपग्रेड किया जाता है. यह ज़रूरी शर्तें पूरी करने वाले कोडलैब से मिलता है. अगर आपने कोडलैब नहीं देखा है, तो चिंता न करें. हमने आपके लिए एक स्टार्टर रिपॉज़िटरी तैयार की है. इसे रिमोट A2A सब-एजेंट के तौर पर बुकिंग एजेंट का इस्तेमाल करने के लिए अपग्रेड किया जाता है. इसका नतीजा यह होता है कि एक मल्टी-एजेंट सिस्टम तैयार हो जाता है. इसमें ऑर्केस्ट्रेटर, मेन्यू से जुड़ी क्वेरी को एमसीपी टूलबॉक्स पर और बुकिंग के अनुरोधों को रिमोट A2A एजेंट पर भेजता है.
आपको क्या सीखने को मिलेगा
- ऐसा ADK एजेंट बनाना जो मैनेज की गई सेशन सेवा का इस्तेमाल करके, बुकिंग के डेटा को मैनेज करता हो
- एजेंट कार्ड और स्किल के साथ, ADK एजेंट को A2A सर्वर के तौर पर उपलब्ध कराना
- A2A एजेंट को Gemini Enterprise Agent Runtime में डिप्लॉय करना
RemoteA2aAgentका इस्तेमाल करके, किसी दूसरे ADK एजेंट से रिमोट A2A एजेंट का इस्तेमाल करना और पुष्टि किए गए अनुरोध को मैनेज करना- मल्टी-एजेंट सिस्टम को धीरे-धीरे टेस्ट करें: लोकल A2A, डिप्लॉय किया गया A2A, कुछ हद तक इंटिग्रेशन, पूरी तरह से डिप्लॉयमेंट
ज़रूरी शर्तें
- (सुझाया गया) आपने ये कोडलैब पूरे किए हों :
- ADK और CloudSQL की मदद से, परसिस्टेंट एआई एजेंट बनाना -> ADK सेशन और स्थिति के बारे में ज़्यादा जानकारी
- एडीके, MCP Toolbox, और Cloud SQL के साथ एजेंटिक आरएजी -> इस कोडलैब से अपने एजेंट को बनाना जारी रखा जा सकता है. इसमें दिया गया स्टार्टर कोड एक जैसा है
- चालू बिलिंग खाते वाला Google Cloud खाता
- Python और एडीके के कॉन्सेप्ट की बुनियादी जानकारी
2. एनवायरमेंट सेटअप करना - पिछले कोडलैब से आगे
इस कोडलैब में दी गई जानकारी, ज़रूरी शर्तें पूरी करने वाले इस कोडलैब: एडीके, MCP Toolbox, और Cloud SQL के साथ एजेंटिक आरएजी से ली गई है . पिछले कोडलैब से अपना काम जारी रखा जा सकता है
हम पिछली कोडलैब की वर्किंग डायरेक्ट्री ( वर्किंग डायरेक्ट्री build-agent-adk-toolbox-cloudsql होनी चाहिए) में बनाना शुरू कर सकते हैं. भ्रम से बचने के लिए, डायरेक्ट्री का नाम बदलकर वही नाम रख देते हैं जिसका इस्तेमाल हम नए सिरे से शुरू करते समय करते हैं
mv ~/build-agent-adk-toolbox-cloudsql ~/adk-a2a-agent-runtime-starter
cloudshell workspace ~/adk-a2a-agent-runtime-starter && cd ~/adk-a2a-agent-runtime-starter
source .env
पुष्टि करें कि पिछले कोडलैब की मुख्य फ़ाइलें मौजूद हैं:
echo "--- Restaurant Agent ---"
cat restaurant_agent/agent.py | head -5
echo ""
echo "--- Toolbox Config ---"
cat tools.yaml | head -5
आपको restaurant_agent/agent.py फ़ाइल के साथ LlmAgent इंपोर्ट और tools.yaml के साथ टूलबॉक्स कॉन्फ़िगरेशन दिखेगा.
इसके बाद, हम अपने Python एनवायरमेंट को फिर से शुरू करेंगे
rm -rf .venv
uv sync
यह भी पुष्टि करें कि डेटाबेस सीड किया गया हो और इस्तेमाल के लिए तैयार हो:
uv run python scripts/verify_seed.py
अगर आपने पिछले कोडलैब में टेस्टिंग से जुड़ी हर जानकारी को फ़ॉलो किया है, तो आपको इस तरह का आउटपुट दिख सकता है
Menu Items: 16/15
Embeddings: 16/15

✗ Database not ready
कोई बात नहीं! डेटाबेस की जांच में, डेटा इंटेक की जांच के दौरान डाला गया अतिरिक्त डेटा शामिल नहीं किया जाता. अगर आपके पास 15 या इससे ज़्यादा डेटा है, तो कोई समस्या नहीं है!
ज़रूरी एपीआई चालू करना
इसके बाद, हमें यह पक्का करना होगा कि Gemini Enterprise एजेंट प्लैटफ़ॉर्म के साथ इंटरैक्ट करने के लिए, ज़रूरी एपीआई चालू हो
gcloud services enable \
  cloudresourcemanager.googleapis.com
अगले सेक्शन पर जाने के लिए, आपके पास ज़रूरी फ़ाइलें और इन्फ़्रास्ट्रक्चर पहले से ही होना चाहिए: A2A Protocol and Gemini Enterprise Agent Runtime !
3. एनवायरमेंट सेटअप करना - स्टार्टर रेपो के साथ नई शुरुआत करना
इस चरण में, Cloud Shell एनवायरमेंट तैयार किया जाता है. साथ ही, आपके Google Cloud प्रोजेक्ट को कॉन्फ़िगर किया जाता है और स्टार्टर रिपॉज़िटरी को क्लोन किया जाता है.
Cloud Shell खोलें
अपने ब्राउज़र में Cloud Shell खोलें. Cloud Shell, पहले से कॉन्फ़िगर किया गया एनवायरमेंट उपलब्ध कराता है. इसमें आपको इस कोडलैब के लिए ज़रूरी सभी टूल मिलते हैं. जब आपसे
इसके बाद, टर्मिनल खोलने के लिए "व्यू" -> "टर्मिनल" पर क्लिक करें.आपका इंटरफ़ेस कुछ ऐसा दिखना चाहिए
यह हमारा मुख्य इंटरफ़ेस होगा, जिसमें आईडीई सबसे ऊपर और टर्मिनल सबसे नीचे होगा
अपनी वर्किंग डायरेक्ट्री सेट अप करना
स्टार्टर रिपॉज़िटरी को क्लोन करें. इस कोडलैब में लिखा गया सारा कोड यहां सेव होता है:
rm -rf ~/adk-a2a-agent-runtime-starter
git clone https://github.com/alphinside/adk-a2a-agent-runtime-starter.git
cloudshell workspace ~/adk-a2a-agent-runtime-starter && cd ~/adk-a2a-agent-runtime-starter
दिए गए टेंप्लेट से .env फ़ाइल बनाएं:
cp .env.example .env
अपने टर्मिनल में प्रोजेक्ट को आसानी से सेट अप करने के लिए, इस प्रोजेक्ट सेटअप स्क्रिप्ट को अपनी वर्किंग डायरेक्ट्री में डाउनलोड करें:
curl -sL https://raw.githubusercontent.com/alphinside/cloud-trial-project-setup/main/setup_verify_trial_project.sh -o setup_verify_trial_project.sh
स्क्रिप्ट चलाएं. यह आपके मुफ़्त में आज़माने वाले बिलिंग खाते की पुष्टि करता है, एक नया प्रोजेक्ट बनाता है या किसी मौजूदा प्रोजेक्ट की पुष्टि करता है, आपके प्रोजेक्ट आईडी को मौजूदा डायरेक्ट्री में मौजूद .env फ़ाइल में सेव करता है, और gcloud में चालू प्रोजेक्ट सेट करता है.
bash setup_verify_trial_project.sh && source .env
स्क्रिप्ट में ये काम किए जाएंगे:
- पुष्टि करें कि आपके पास मुफ़्त में आज़माने की सुविधा वाला चालू बिलिंग खाता हो
.envमें कोई मौजूदा प्रोजेक्ट है या नहीं, यह देखें- कोई नया प्रोजेक्ट बनाएं या मौजूदा प्रोजेक्ट का फिर से इस्तेमाल करें
- मुफ़्त में आज़माने की सुविधा वाले बिलिंग खाते को अपने प्रोजेक्ट से लिंक करना
- प्रोजेक्ट आईडी को
.envमें सेव करें - प्रोजेक्ट को चालू
gcloudप्रोजेक्ट के तौर पर सेट करें
पुष्टि करें कि प्रोजेक्ट सही तरीके से सेट किया गया है. इसके लिए, Cloud Shell टर्मिनल प्रॉम्प्ट में अपनी वर्किंग डायरेक्ट्री के बगल में मौजूद पीले रंग का टेक्स्ट देखें. इसमें आपका प्रोजेक्ट आईडी दिखना चाहिए.

ज़रूरी एपीआई चालू करना
इसके बाद, हमें यह पक्का करना होगा कि Gemini Enterprise एजेंट प्लैटफ़ॉर्म के साथ इंटरैक्ट करने के लिए, ज़रूरी एपीआई चालू हो
gcloud services enable \
  aiplatform.googleapis.com \
  cloudresourcemanager.googleapis.com
स्टार्टर इन्फ़्रास्ट्रक्चर सेटअप
सबसे पहले, हमें uv का इस्तेमाल करके Python की डिपेंडेंसी इंस्टॉल करनी होंगी. यह Rust में लिखा गया एक तेज़ Python पैकेज और प्रोजेक्ट मैनेजर है ( uv के दस्तावेज़ ). इस कोडलैब में, इसका इस्तेमाल Python प्रोजेक्ट को तेज़ी से और आसानी से मैनेज करने के लिए किया जाता है
uv sync
इसके बाद, सेटअप स्क्रिप्ट को पूरी तरह से चलाएं. यह Cloud SQL इंस्टेंस बनाती है, डेटा डालती है, और टूलबॉक्स सेवा को डिप्लॉय करती है. यह सेवा, हमारे रेस्टोरेंट एजेंट की शुरुआती स्थिति के तौर पर काम करेगी
bash scripts/full_setup.sh > logs/full_setup.log 2>&1 &
4. कॉन्सेप्ट: Agent2Agent (A2A) प्रोटोकॉल और Gemini Enterprise एजेंट रनटाइम
ऐप्लिकेशन बनाने से पहले, आइए इस कोडलैब में बताई गई दो मुख्य टेक्नोलॉजी के बारे में जानते हैं. इनकी मदद से, हम अपने एजेंटिक ऐप्लिकेशन को स्केल कर सकते हैं.
Agent2Agent (A2A) प्रोटोकॉल
Agent2Agent (A2A) प्रोटोकॉल एक ओपन स्टैंडर्ड है. इसे एआई एजेंट के बीच आसानी से बातचीत और साथ मिलकर काम करने के लिए डिज़ाइन किया गया है. एमसीपी (मॉडल कॉन्टेक्स्ट प्रोटोकॉल) , एजेंटों को टूल और डेटा से कनेक्ट करता है. वहीं, A2A, एजेंटों को अन्य एजेंटों से कनेक्ट करता है. इससे एजेंट, एक-दूसरे की क्षमताओं के बारे में जान पाते हैं, टास्क सौंप पाते हैं, और फ़्रेमवर्क और संगठनों के साथ मिलकर काम कर पाते हैं.
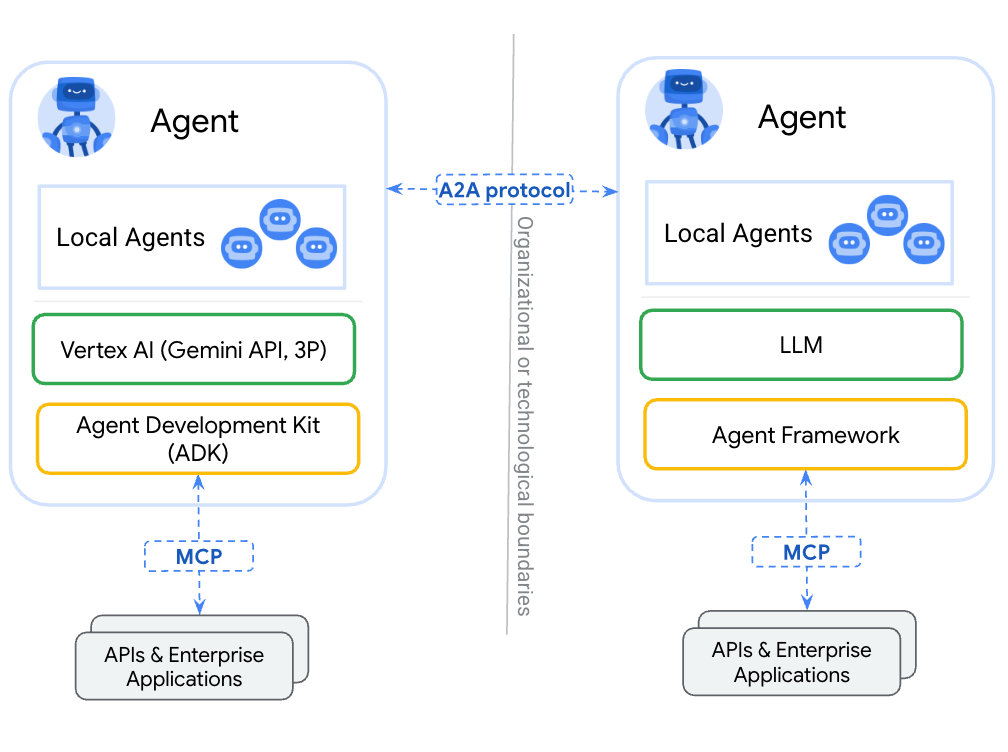
किसी एजेंट को एमसीपी के ज़रिए टूल के तौर पर रैप करने और उसे A2A के ज़रिए उपलब्ध कराने के बीच मुख्य अंतर यह है कि टूल स्टेटलेस होते हैं और एक ही फ़ंक्शन करते हैं. वहीं, A2A एजेंट तर्क दे सकते हैं, स्थिति बनाए रख सकते हैं, और बातचीत के कई चरणों को हैंडल कर सकते हैं. जैसे, बातचीत या स्पष्टीकरण. A2A के ज़रिए उपलब्ध कराया गया एजेंट, फ़ंक्शन कॉल तक सीमित होने के बजाय अपनी पूरी क्षमताओं को बनाए रखता है.
A2A में तीन मुख्य सिद्धांत बताए गए हैं:
- एजेंट कार्ड — यह एक JSON दस्तावेज़ होता है. इसमें एजेंट के काम, उसकी क्षमताओं, और उसके एंडपॉइंट के बारे में जानकारी होती है. अन्य एजेंट, सुविधाओं के बारे में जानने के लिए इस कार्ड को फ़ेच करते हैं.
- मैसेज — किसी उपयोगकर्ता या एजेंट का अनुरोध, जिसे A2A एंडपॉइंट पर भेजा जाता है. इससे कोई टास्क ट्रिगर होता है.
- टास्क — काम की एक यूनिट, जिसका लाइफ़साइकल होता है (सबमिट किया गया → काम जारी है → पूरा हुआ/फ़ेल हुआ). इसमें नतीजे दिखाने वाले आर्टफ़ैक्ट शामिल होते हैं.

ज़्यादा जानकारी के लिए, A2A क्या है? लेख पढ़ें
Gemini Enterprise Agent Platform Runtime
Agent Runtime, Google Cloud पर पूरी तरह से मैनेज की जाने वाली सेवा है. इसका इस्तेमाल, प्रोडक्शन में एआई एजेंट को डिप्लॉय करने, स्केल करने, और मैनेज करने के लिए किया जाता है. इसमें एंटरप्राइज़ की सुरक्षा से जुड़ी सुविधाएं शामिल होती हैं. जैसे, वीपीसी सर्विस कंट्रोल, सीएमईके. यह सेवा, इन्फ़्रास्ट्रक्चर को मैनेज करती है, ताकि आप एजेंट लॉजिक पर फ़ोकस कर सकें.

Agent Runtime में ये सुविधाएं मिलती हैं:
- मैनेज किया गया डिप्लॉयमेंट — ADK, LangGraph या किसी भी Python फ़्रेमवर्क की मदद से बनाए गए एजेंट को, एसडीके के एक कॉल से डिप्लॉय करें
- A2A होस्टिंग — एजेंटों को A2A के मुताबिक एंडपॉइंट के तौर पर डिप्लॉय करें. इसमें एजेंट कार्ड अपने-आप उपलब्ध कराने और पुष्टि किए गए ऐक्सेस की सुविधा मिलती है
- परसिस्टेंट सेशन —
VertexAiSessionServiceयह कुकी, सभी अनुरोधों के लिए बातचीत के इतिहास और स्थिति को सेव करती है - ऑटो-स्केलिंग — यह सुविधा, ट्रैफ़िक को मैनेज करने के लिए शून्य से स्केल करती है. इसके लिए, इंफ़्रास्ट्रक्चर को मैनेज करने की ज़रूरत नहीं होती
- निगरानी की क्षमता — Google Cloud के निगरानी स्टैक की मदद से, ट्रेसिंग, लॉगिंग, और मॉनिटरिंग की सुविधा पहले से मौजूद होती है
- और भी कई सुविधाओं के बारे में जानने के लिए, यह दस्तावेज़ देखें
इस कोडलैब में, बुकिंग एजेंट को एजेंट रनटाइम में डिप्लॉय करने का तरीका बताया गया है. डिप्लॉयमेंट की प्रोसेस, आपके एजेंट कोड को क्रम से लगाती है और उसे अपलोड करती है. Agent Runtime, सर्वरलेस एंडपॉइंट उपलब्ध कराता है. यह A2A प्रोटोकॉल के साथ काम करता है. अन्य एजेंट (या क्लाइंट) स्टैंडर्ड एचटीटीपी कॉल के ज़रिए इससे इंटरैक्ट करते हैं. इनकी पुष्टि Google Cloud क्रेडेंशियल से की जाती है.
5. बुकिंग एजेंट बनाना
इस चरण में, एक नया ADK एजेंट बनाया जाता है. यह एजेंट, सेशन की स्थिति का इस्तेमाल करके रेस्टोरेंट में बुकिंग मैनेज करता है. यह एजेंट तीन कार्रवाइयां कर सकता है: फ़ोन नंबर को लुकअप कुंजी के तौर पर इस्तेमाल करके, बुकिंग बनाना, बुकिंग की जांच करना, और बुकिंग रद्द करना. बुकिंग से जुड़ा सारा डेटा, ADK के सेशन की स्थिति में सेव होता है
एजेंट को तैयार करना
सही मॉडल और प्रोजेक्ट कॉन्फ़िगरेशन के साथ एजेंट डायरेक्ट्री स्ट्रक्चर जनरेट करने के लिए, adk create का इस्तेमाल करें:
source .env
uv run adk create reservation_agent \
    --model gemini-3.5-flash \
    --project ${GOOGLE_CLOUD_PROJECT} \
    --region ${GOOGLE_CLOUD_LOCATION}
इससे reservation_agent/ डायरेक्ट्री बनती है. इसमें एजेंट प्लैटफ़ॉर्म पर Gemini मॉडल के लिए, __init__.py, agent.py, और .env पहले से कॉन्फ़िगर किए गए होते हैं.
adk-a2a-agent-runtime-starter/
├── reservation_agent/
│   ├── __init__.py
│   ├── agent.py
│   └── .env
├── logs
├── scripts
└── ...
अब एजेंट कोड को अपडेट करते हैं
एजेंट का कोड लिखना
जनरेट की गई एजेंट फ़ाइल खोलें:
cloudshell edit reservation_agent/agent.py
इसके बाद, कॉन्टेंट को इससे बदलें:
# reservation_agent/agent.py
import os
from functools import cached_property
from typing import Any

from google.adk.agents import LlmAgent
from google.adk.models.google_llm import Gemini
from google.adk.tools import ToolContext
from google.genai import Client, types

# App-scoped state prefix ensures reservations persist across all sessions.
# See https://adk.dev/sessions/state/ for state scope details.
STATE_PREFIX = "app:reservation:"


class GeminiGlobal(Gemini):
    """Gemini with location pinned to 'global'.

    A2aAgent.set_up() on Agent Platform Runtime SDK overwrites GOOGLE_CLOUD_LOCATION with the Agent Platform Runtime
    region (e.g. us-central1), but the Gemini 3-family endpoint requires 'global'.
    """

    @cached_property
    def api_client(self) -> Client:
        project = os.getenv("GOOGLE_CLOUD_PROJECT")
        return Client(
            project=project,
            location="global",
            http_options=types.HttpOptions(
                headers=self._tracking_headers(),
                retry_options=self.retry_options,
            ),
        )


def create_reservation(
    phone_number: str,
    name: str,
    party_size: int,
    date: str,
    time: str,
    tool_context: ToolContext,
) -> dict:
    """Create a new restaurant reservation.

    Args:
        phone_number: Customer's phone number, used as the reservation ID.
        name: Name for the reservation.
        party_size: Number of guests.
        date: Reservation date (e.g., '2025-07-15' or 'this Friday').
        time: Reservation time (e.g., '7:00 PM').

    Returns:
        Confirmation of the reservation.
    """
    reservation = {
        "name": name,
        "party_size": party_size,
        "date": date,
        "time": time,
        "status": "confirmed",
    }
    tool_context.state[f"{STATE_PREFIX}{phone_number}"] = reservation
    return {
        "status": "confirmed",
        "message": f"Reservation created for {name}, party of {party_size} on {date} at {time}. Phone: {phone_number}.",
    }


def check_reservation(phone_number: str, tool_context: ToolContext) -> dict:
    """Look up an existing reservation by phone number.

    Args:
        phone_number: The phone number used when the reservation was created.
        tool_context: ADK tool context for state access.

    Returns:
        The reservation details, or a message if not found.
    """
    reservation = tool_context.state.get(f"{STATE_PREFIX}{phone_number}")
    if reservation:
        return {"found": True, "reservation": reservation}
    return {"found": False, "message": f"No reservation found for {phone_number}."}


def cancel_reservation(phone_number: str, tool_context: ToolContext) -> dict:
    """Cancel an existing reservation by phone number.

    Args:
        phone_number: The phone number used when the reservation was created.
        tool_context: ADK tool context for state access.

    Returns:
        Confirmation of cancellation, or a message if not found.
    """
    key = f"{STATE_PREFIX}{phone_number}"
    reservation = tool_context.state.get(key)
    if not reservation:
        return {
            "success": False,
            "message": f"No reservation found for {phone_number}.",
        }
    if reservation.get("status") == "cancelled":
        return {
            "success": False,
            "message": f"Reservation for {phone_number} is already cancelled.",
        }
    reservation["status"] = "cancelled"
    tool_context.state[key] = reservation
    return {
        "success": True,
        "message": f"Reservation for {reservation['name']} ({phone_number}) has been cancelled.",
    }


root_agent = LlmAgent(
    name="reservation_agent",
    model=GeminiGlobal(model="gemini-3.5-flash"),
    instruction="""You are a friendly reservation assistant for "Foodie Finds" restaurant.
You help diners create, check, and cancel table reservations.

When a diner wants to make a reservation, collect these details:
- Name for the reservation
- Phone number (used as the reservation ID)
- Party size (number of guests)
- Date
- Time

Always confirm the details before creating the reservation.
When checking or cancelling, ask for the phone number if not provided.
Be concise and professional.""",
    tools=[create_reservation, check_reservation, cancel_reservation],
)
6. A2A सर्वर कॉन्फ़िगरेशन तैयार करना
A2A एजेंट कार्ड तय करना
एजेंट कार्ड में, आपके एजेंट की क्षमताओं के बारे में स्ट्रक्चर्ड ब्यौरा होता है. अन्य एजेंट और क्लाइंट इसका इस्तेमाल यह जानने के लिए करते हैं कि आपका एजेंट क्या काम करता है. कार्ड का कॉन्फ़िगरेशन बनाएं:
cloudshell edit reservation_agent/a2a_config.py
नीचे दिए गए कोड को reservation_agent/a2a_config.py में कॉपी करें:
# reservation_agent/a2a_config.py
from a2a.types import AgentSkill
from vertexai.preview.reasoning_engines.templates.a2a import create_agent_card

reservation_skill = AgentSkill(
    id="manage_reservations",
    name="Restaurant Reservations",
    description="Create, check, and cancel table reservations at Foodie Finds restaurant",
    tags=["reservations", "restaurant", "booking"],
    examples=[
        "Book a table for 4 on Friday at 7pm",
        "Check reservation for 555-0101",
        "Cancel my reservation, phone number 555-0101",
    ],
    input_modes=["text/plain"],
    output_modes=["text/plain"],
)

agent_card = create_agent_card(
    agent_name="Reservation Agent",
    description="Handles restaurant table reservations — create, check, and cancel bookings for Foodie Finds restaurant.",
    skills=[reservation_skill],
)
A2A एक्ज़ीक्यूटर बनाना
एक्ज़ीक्यूटर, A2A प्रोटोकॉल और ADK एजेंट के बीच ब्रिज का काम करता है. इसे A2A अनुरोध मिलते हैं. यह उन्हें ADK एजेंट के ज़रिए प्रोसेस करता है और A2A टास्क के तौर पर नतीजे दिखाता है:
cloudshell edit reservation_agent/executor.py
नीचे दिए गए कोड को reservation_agent/executor.py में कॉपी करें:
# reservation_agent/executor.py
import os
from typing import NoReturn

import vertexai
from a2a.server.agent_execution import AgentExecutor, RequestContext
from a2a.server.events import EventQueue
from a2a.server.tasks import TaskUpdater
from a2a.types import TaskState, TextPart, UnsupportedOperationError
from a2a.utils import new_agent_text_message
from a2a.utils.errors import ServerError
from google.adk.artifacts import InMemoryArtifactService
from google.adk.memory.in_memory_memory_service import InMemoryMemoryService
from google.adk.runners import Runner
from google.adk.sessions import InMemorySessionService, VertexAiSessionService
from google.genai import types

from reservation_agent.agent import root_agent as reservation_agent


class ReservationAgentExecutor(AgentExecutor):
    """Bridge between the A2A protocol and the ADK reservation agent.

    Uses InMemorySessionService for local testing, VertexAiSessionService
    when deployed to Agent Runtime (detected via GOOGLE_CLOUD_AGENT_ENGINE_ID).
    """

    def __init__(self) -> None:
        self.agent = None
        self.runner = None

    def _init_agent(self) -> None:
        if self.agent is not None:
            return

        self.agent = reservation_agent
        engine_id = os.environ.get("GOOGLE_CLOUD_AGENT_ENGINE_ID")

        if engine_id:
            project = os.environ.get("GOOGLE_CLOUD_PROJECT")
            location = os.environ.get("GOOGLE_CLOUD_LOCATION", "us-central1")
            vertexai.init(project=project, location=location)
            session_service = VertexAiSessionService(
                project=project, location=location, agent_engine_id=engine_id,
            )
            app_name = engine_id
        else:
            session_service = InMemorySessionService()
            app_name = self.agent.name

        self.runner = Runner(
            app_name=app_name,
            agent=self.agent,
            artifact_service=InMemoryArtifactService(),
            session_service=session_service,
            memory_service=InMemoryMemoryService(),
        )

    async def execute(self, context: RequestContext, event_queue: EventQueue) -> None:
        if self.agent is None:
            self._init_agent()

        query = context.get_user_input()
        updater = TaskUpdater(event_queue, context.task_id, context.context_id)
        user_id = context.message.metadata.get("user_id", "a2a-user") if context.message.metadata else "a2a-user"

        if not context.current_task:
            await updater.submit()
        await updater.start_work()

        try:
            session = await self._get_or_create_session(context.context_id, user_id)
            content = types.Content(role="user", parts=[types.Part(text=query)])

            async for event in self.runner.run_async(
                session_id=session.id, user_id=user_id, new_message=content,
            ):
                if event.is_final_response():
                    parts = event.content.parts
                    answer = " ".join(p.text for p in parts if p.text) or "No response."
                    await updater.add_artifact([TextPart(text=answer)], name="answer")
                    await updater.complete()
                    break
        except Exception as e:
            await updater.update_status(
                TaskState.failed, message=new_agent_text_message(f"Error: {e!s}"),
            )
            raise

    async def _get_or_create_session(self, context_id: str, user_id: str):
        app_name = self.runner.app_name
        if context_id:
            session = await self.runner.session_service.get_session(
                app_name=app_name, session_id=context_id, user_id=user_id,
            )
            if session:
                return session
        session = await self.runner.session_service.create_session(
            app_name=app_name, user_id=user_id, session_id=context_id,
        )
        return session

    async def cancel(self, context: RequestContext, event_queue: EventQueue) -> NoReturn:
        raise ServerError(error=UnsupportedOperationError())
एक्ज़ीक्यूटर, अपने एनवायरमेंट का अपने-आप पता लगाता है: जब GOOGLE_CLOUD_AGENT_ENGINE_ID सेट होता है, तो एजेंट रनटाइम इसे डिप्लॉयमेंट के समय इंजेक्ट करता है. इसके बाद, यह लगातार सेशन के लिए VertexAiSessionService का इस्तेमाल करता है. स्थानीय तौर पर, यह InMemorySessionService पर वापस आ जाता है.
आपकी reservation_agent डायरेक्ट्री में अब यह कॉन्टेंट होना चाहिए:
reservation_agent/
├── __init__.py
├── agent.py
├── a2a_config.py
├── executor.py
└── .env
7. Agent Platform SDK का इस्तेमाल करके A2A एजेंट तैयार करना और उसे स्थानीय तौर पर टेस्ट करना
इस चरण में, बुकिंग एजेंट को A2A के मुताबिक काम करने वाले एजेंट के तौर पर रैप किया जाता है. इसके लिए, Agent Platform SDK ( एसडीके का नाम अब भी vertex शब्द का इस्तेमाल कर रहा है, ताकि यह पुराने वर्शन के साथ काम कर सके ) की A2aAgent क्लास का इस्तेमाल किया जाता है. इसके बाद, A2A प्रोटोकॉल के पूरे फ़्लो की स्थानीय तौर पर जाँच की जाती है. जैसे, एजेंट कार्ड वापस पाना, मैसेज भेजना, और टास्क वापस पाना. यह वही A2aAgent ऑब्जेक्ट है जिसे अगले चरण में, एजेंट रनटाइम में डिप्लॉय किया जाता है.
डिपेंडेंसी जोड़ना
Agent Platform SDK को Agent Runtime और ADK के साथ इंस्टॉल करें. साथ ही, A2A SDK भी इंस्टॉल करें:
uv add "google-cloud-aiplatform[agent_engines,adk]==1.149.0" "a2a-sdk==0.3.26"
A2A कॉम्पोनेंट के बारे में जानकारी
A2A के लिए ADK एजेंट को रैप करने के लिए, तीन कॉम्पोनेंट की ज़रूरत होती है:
- एजेंट कार्ड — यह एक "बिजनेस कार्ड" होता है. इसमें एजेंट की क्षमताओं, कौशल, और एंडपॉइंट यूआरएल के बारे में जानकारी होती है. अन्य एजेंट इसका इस्तेमाल यह जानने के लिए करते हैं कि आपका एजेंट क्या काम करता है.
- Agent Executor — यह A2A प्रोटोकॉल और आपके ADK एजेंट के लॉजिक के बीच का ब्रिज होता है. इसे A2A अनुरोध मिलते हैं. यह उन्हें ADK एजेंट के ज़रिए प्रोसेस करता है और A2A टास्क के तौर पर नतीजे दिखाता है.
- A2aAgent — यह Agent Platform SDK क्लास है. यह कार्ड और एक्ज़ीक्यूटर को एक डिप्लॉयबल यूनिट में जोड़ती है.
टेस्ट स्क्रिप्ट बनाना
स्थानीय तौर पर जांच करने के लिए, यह स्क्रिप्ट बनाएं
cloudshell edit scripts/test_a2a_agent_local.py
नीचे दिए गए कोड को scripts/test_a2a_agent_local.py में कॉपी करें:
# scripts/test_a2a_agent_local.py
import asyncio
import json
import os
from pprint import pprint

from dotenv import load_dotenv
from starlette.requests import Request
from vertexai.preview.reasoning_engines import A2aAgent

from reservation_agent.a2a_config import agent_card
from reservation_agent.executor import ReservationAgentExecutor

load_dotenv()


# --- Helper functions for building mock requests ---

def receive_wrapper(data: dict):
    async def receive():
        byte_data = json.dumps(data).encode("utf-8")
        return {"type": "http.request", "body": byte_data, "more_body": False}
    return receive

def build_post_request(data: dict = None, path_params: dict = None) -> Request:
    scope = {"type": "http", "http_version": "1.1", "headers": [(b"content-type", b"application/json")], "app": None}
    if path_params:
        scope["path_params"] = path_params
    return Request(scope, receive_wrapper(data))

def build_get_request(path_params: dict) -> Request:
    scope = {"type": "http", "http_version": "1.1", "query_string": b"", "app": None}
    if path_params:
        scope["path_params"] = path_params
    async def receive():
        return {"type": "http.disconnect"}
    return Request(scope, receive)


# --- Helper: poll for task completion ---

async def wait_for_task(a2a_agent, task_id, max_retries=30):
    """Poll on_get_task until the task reaches a terminal state."""
    for _ in range(max_retries):
        request = build_get_request({"id": task_id})
        result = await a2a_agent.on_get_task(request=request, context=None)
        state = result.get("status", {}).get("state", "")
        if state in ["completed", "failed"]:
            return result
        await asyncio.sleep(1)
    return result


def print_task_answer(result):
    """Extract and print the answer from task artifacts."""
    print(f"Status: {result.get('status', {}).get('state')}")
    for artifact in result.get("artifacts", []):
        if artifact.get("parts") and "text" in artifact["parts"][0]:
            print(f"Answer: {artifact['parts'][0]['text']}")


# --- Local test ---

async def main():
    # Create and set up the A2A agent locally

    a2a_agent = A2aAgent(agent_card=agent_card, agent_executor_builder=ReservationAgentExecutor)
    a2a_agent.set_up()

    # 1. Get agent card
    print("=" * 50)
    print("1. Retrieving agent card...")
    print("=" * 50)
    request = build_get_request(None)
    card_response = await a2a_agent.handle_authenticated_agent_card(request=request, context=None)
    print(f"Agent: {card_response.get('name')}")
    print(f"Skills: {[s.get('name') for s in card_response.get('skills', [])]}")

    # 2. Create a reservation
    print("\n" + "=" * 50)
    print("2. Creating a reservation...")
    print("=" * 50)
    message_data = {
        "message": {
            "messageId": f"msg-{os.urandom(4).hex()}",
            "content": [{"text": "Book a table for 2 on Saturday at 6pm. Name: Bob, Phone: 555-0202"}],
            "role": "ROLE_USER",
        },
    }
    request = build_post_request(message_data)
    response = await a2a_agent.on_message_send(request=request, context=None)
    task_id = response["task"]["id"]
    context_id = response["task"].get("contextId")
    print(f"Task ID: {task_id}")

    # 3. Wait for result
    print("\n" + "=" * 50)
    print("3. Waiting for task result...")
    print("=" * 50)
    result = await wait_for_task(a2a_agent, task_id)
    print_task_answer(result)

    # 4. Check the reservation (same context for session continuity)
    print("\n" + "=" * 50)
    print("4. Checking the reservation...")
    print("=" * 50)
    check_data = {
        "message": {
            "messageId": f"msg-{os.urandom(4).hex()}",
            "content": [{"text": "Check the reservation for 555-0202"}],
            "role": "ROLE_USER",
            "contextId": context_id,
        },
    }
    request = build_post_request(check_data)
    check_response = await a2a_agent.on_message_send(request=request, context=None)
    check_result = await wait_for_task(a2a_agent, check_response["task"]["id"])
    print_task_answer(check_result)

    # 5. Cancel the reservation
    print("\n" + "=" * 50)
    print("5. Cancelling the reservation...")
    print("=" * 50)
    cancel_data = {
        "message": {
            "messageId": f"msg-{os.urandom(4).hex()}",
            "content": [{"text": "Cancel the reservation for 555-0202"}],
            "role": "ROLE_USER",
            "contextId": context_id,
        },
    }
    request = build_post_request(cancel_data)
    cancel_response = await a2a_agent.on_message_send(request=request, context=None)
    cancel_result = await wait_for_task(a2a_agent, cancel_response["task"]["id"])
    print_task_answer(cancel_result)

    print("\n" + "=" * 50)
    print("All tests passed!")
    print("=" * 50)


if __name__ == "__main__":
    asyncio.run(main())
टेस्ट स्क्रिप्ट, पिछले चरण में बनाए गए एजेंट कार्ड और एक्ज़ीक्यूटर को इंपोर्ट करती है. इसमें कोई डुप्लीकेट नहीं होता. यह एक लोकल A2aAgent बनाएगा. साथ ही, मॉक एचटीटीपी अनुरोधों के ज़रिए A2A प्रोटोकॉल कॉल का सिम्युलेट करेगा और बुकिंग से जुड़ी तीनों कार्रवाइयों की पुष्टि करेगा.
स्थानीय तौर पर कोई GOOGLE_CLOUD_AGENT_ENGINE_ID सेट न होने की वजह से, एक्ज़ीक्यूटर InMemorySessionService का इस्तेमाल करता है. एजेंट रनटाइम में डिप्लॉय किए जाने पर, यही एक्ज़ीक्यूटर लगातार सेशन के लिए VertexAiSessionService पर अपने-आप स्विच हो जाता है.
टेस्ट चलाना
PYTHONPATH=. uv run python scripts/test_a2a_agent_local.py
आउटपुट में पांच चरणों के बारे में बताया गया है:
- एजेंट कार्ड — इससे एजेंट की क्षमताओं और कौशल के बारे में जानकारी मिलती है
- बुकिंग करें — इससे टेबल बुक हो जाती है और पुष्टि के साथ एक टास्क दिखता है
- टास्क का नतीजा पाएं — इससे जवाब के साथ पूरा हो चुका टास्क वापस मिलता है
- बुकिंग की जानकारी देखें — यह विकल्प, फ़ोन नंबर के हिसाब से बुकिंग की जानकारी ढूंढता है
- बुकिंग रद्द करें — बुकिंग रद्द करता है और इसकी पुष्टि करता है
आउटपुट का उदाहरण, जैसा कि यहां दिखाया गया है
==================================================
1. Retrieving agent card...
==================================================
Agent: Reservation Agent
Skills: ['Restaurant Reservations']

==================================================
2. Creating a reservation...
==================================================
Task ID: f7f7004d-cfea-49c2-b57d-5bca9959e193

==================================================
3. Waiting for task result...
==================================================
Status: TASK_STATE_COMPLETED
Answer: Your reservation for Bob, party of 2, on Saturday at 6:00 PM has been confirmed. The phone number associated is 555-0202.

==================================================
4. Checking the reservation...
==================================================
Status: TASK_STATE_COMPLETED
Answer: I found a reservation for Bob, party of 2, on Saturday at 6:00 PM. The reservation status is confirmed.

==================================================
5. Cancelling the reservation...
==================================================
Status: TASK_STATE_COMPLETED
Answer: Your reservation for Bob (555-0202) has been cancelled.

==================================================
All tests passed!
==================================================
इस चरण में, आपने इन बातों की पुष्टि कर ली है: A2A एजेंट कार्ड में सही स्किल के बारे में बताया गया है, बुकिंग से जुड़ी तीनों कार्रवाइयां A2A प्रोटोकॉल के मैसेज/टास्क फ़्लो के ज़रिए काम करती हैं, और एक ही संदर्भ में किए गए सभी मैसेज में स्थिति बनी रहती है.
8. बुकिंग एजेंट को एजेंट रनटाइम में डिप्लॉय करना
इस चरण में, बुकिंग एजेंट को Gemini Enterprise Agent Platform Runtime पर डिप्लॉय किया जाता है. यह पूरी तरह से मैनेज किया जाने वाला, सर्वरलेस प्लैटफ़ॉर्म है. यह आपके एजेंट को होस्ट करता है और इसे सुरक्षित A2A एंडपॉइंट के तौर पर दिखाता है. डिप्लॉयमेंट के बाद, अनुमति पा चुका कोई भी क्लाइंट, स्टैंडर्ड A2A एचटीटीपी एंडपॉइंट के ज़रिए एजेंट को ढूंढ सकता है और उससे इंटरैक्ट कर सकता है.
स्टेजिंग बकेट बनाना
एजेंट रनटाइम की स्टेजिंग के लिए, Cloud Storage बकेट बनाएं. एजेंट रनटाइम, इस बकेट का इस्तेमाल डिप्लॉयमेंट के दौरान आपके एजेंट के कोड और डिपेंडेंसी को अपलोड करने के लिए करता है:
STAGING_BUCKET="${GOOGLE_CLOUD_PROJECT}-adk-a2a-agent-runtime"
gsutil mb -l $REGION -p $GOOGLE_CLOUD_PROJECT gs://$STAGING_BUCKET 2>/dev/null || echo "Bucket already exists"
echo "STAGING_BUCKET=$STAGING_BUCKET" >> .env
source .env
डिप्लॉयमेंट स्क्रिप्ट बनाना
इसके बाद, हमें डिप्लॉयमेंट स्क्रिप्ट तैयार करनी होगी
cloudshell edit scripts/deploy_a2a_agent_runtime.py
नीचे दिए गए कोड को scripts/deploy_a2a_agent_runtime.py में कॉपी करें:
# scripts/deploy_a2a_agent_runtime.py
import os
from pathlib import Path

import vertexai
from dotenv import load_dotenv
from google.genai import types
from vertexai.preview.reasoning_engines import A2aAgent

from reservation_agent.a2a_config import agent_card
from reservation_agent.executor import ReservationAgentExecutor

load_dotenv()

PROJECT_ID = os.environ["GOOGLE_CLOUD_PROJECT"]
REGION = os.environ["REGION"]
STAGING_BUCKET = os.environ.get("STAGING_BUCKET", f"{PROJECT_ID}-adk-a2a-agent-runtime")
BUCKET_URI = f"gs://{STAGING_BUCKET}"

a2a_agent = A2aAgent(
    agent_card=agent_card,
    agent_executor_builder=ReservationAgentExecutor,
)


def main():
    vertexai.init(project=PROJECT_ID, location=REGION, staging_bucket=BUCKET_URI)
    client = vertexai.Client(
        project=PROJECT_ID,
        location=REGION,
        http_options=types.HttpOptions(api_version="v1beta1"),
    )

    print("Deploying Reservation Agent to Agent Runtime...")
    print("This may take 3-5 minutes.")

    remote_agent = client.agent_engines.create(
        agent=a2a_agent,
        config={
            "display_name": agent_card.name,
            "description": agent_card.description,
            "requirements": [
                "google-cloud-aiplatform[agent_engines,adk]==1.149.0",
                "a2a-sdk==0.3.26",
                "google-adk==1.29.0",
                "cloudpickle",
                "pydantic"
            ],
            "extra_packages": [
                "./reservation_agent",
            ],
            "http_options": {
                "api_version": "v1beta1",
            },
            "staging_bucket": BUCKET_URI,
        },
    )

    resource_name = remote_agent.api_resource.name
    print(f"\nDeployment complete!")
    print(f"Resource name: {resource_name}")

    env_path = Path(".env")
    lines = env_path.read_text().splitlines() if env_path.exists() else []
    lines = [l for l in lines if not l.startswith("RESERVATION_AGENT_RESOURCE_NAME=")]
    lines.append(f"RESERVATION_AGENT_RESOURCE_NAME={resource_name}")
    env_path.write_text("\n".join(lines) + "\n")
    print("Written RESERVATION_AGENT_RESOURCE_NAME to .env")


if __name__ == "__main__":
    main()
डिप्लॉय स्क्रिप्ट, स्थानीय टेस्टिंग में इस्तेमाल किए गए agent_card और ReservationAgentExecutor को इंपोर्ट करती है. इससे कोड डुप्लीकेट नहीं होता. एजेंट रनटाइम, डिप्लॉयमेंट के लिए A2aAgent ऑब्जेक्ट और उसकी डिपेंडेंसी को क्रम से लगाता है. डिप्लॉयमेंट स्क्रिप्ट के आखिर में, यह RESERVATION_AGENT_RESOURCE_NAME वैल्यू को .env फ़ाइल में लिखता है
एजेंट रनटाइम में डिप्लॉय करें
डिप्लॉयमेंट स्क्रिप्ट चलाएं:
PYTHONPATH=. uv run python scripts/deploy_a2a_agent_runtime.py
डिप्लॉय करने में तीन से पांच मिनट लगते हैं. स्क्रिप्ट, एजेंट रनटाइम पर सर्वरलेस एंडपॉइंट उपलब्ध कराती है. यह एंडपॉइंट, बुकिंग एजेंट को होस्ट करता है. डिप्लॉयमेंट पूरा होने के बाद, आपको नीचे दिए गए उदाहरण जैसा आउटपुट दिखेगा
Deploying Reservation Agent to Agent Runtime...
This may take 3-5 minutes.

Deployment complete!
Resource name: projects/your-project-number/locations/us-central1/reasoningEngines/your-agent-deployment-unique-id
Written RESERVATION_AGENT_RESOURCE_NAME to .env
क्लाउड कंसोल में डिप्लॉय किए गए एजेंट को देखा जा सकता है. कंसोल के खोज बार में Agent Platform खोजें
इसके बाद, बाईं ओर मौजूद टैब में, Agents पर कर्सर घुमाएं और Deployments को चुनें
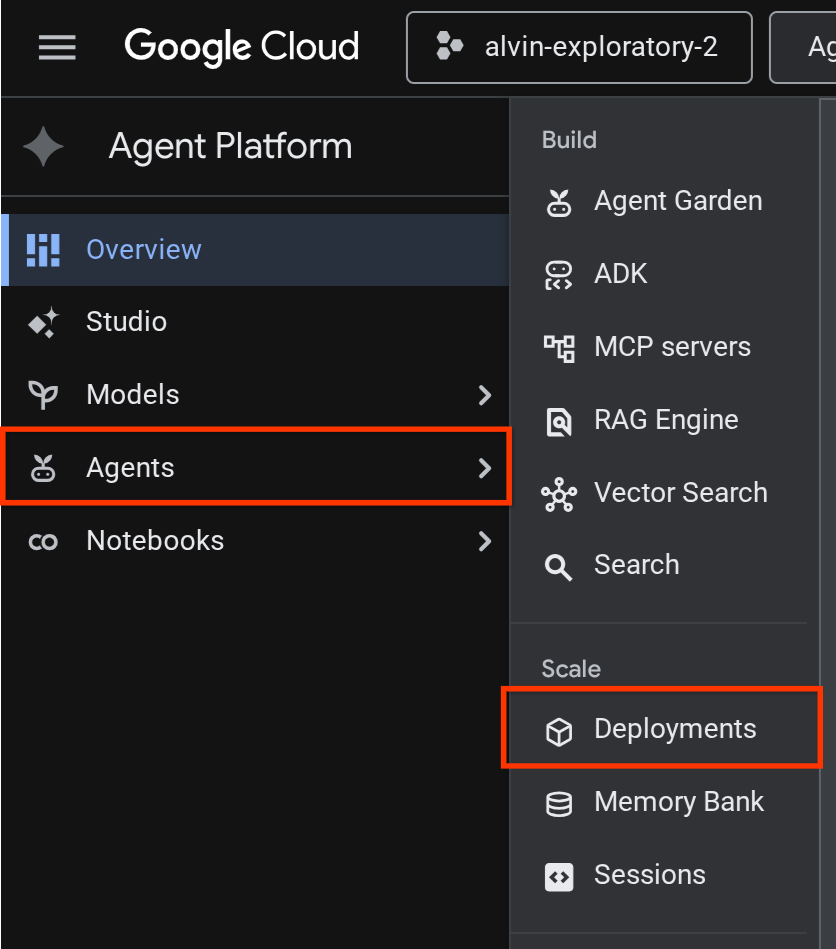
आपको डिप्लॉयमेंट लिस्ट में Reservation Agent दिखेगा. यह नीचे दिखाया गया है

डिप्लॉय किए गए एजेंट की जांच करना
अब हम डिप्लॉय किए गए एजेंट की जांच करने के लिए तैयार हैं. इसके लिए, डिप्लॉय किए गए एजेंट के लिए एक टेस्ट स्क्रिप्ट बनाएं:
cloudshell edit scripts/test_a2a_agent_runtime.py
नीचे दिए गए कोड को scripts/test_a2a_agent_runtime.py में कॉपी करें:
# scripts/test_a2a_agent_runtime.py
import asyncio
import os
import time

import vertexai
from a2a.types import TaskState
from dotenv import load_dotenv
from google.genai import types

load_dotenv()

PROJECT_ID = os.environ["GOOGLE_CLOUD_PROJECT"]
REGION = os.environ["REGION"]
RESOURCE_NAME = os.environ["RESERVATION_AGENT_RESOURCE_NAME"]


async def main():
    vertexai.init(project=PROJECT_ID, location=REGION)
    client = vertexai.Client(
        project=PROJECT_ID, location=REGION,
        http_options=types.HttpOptions(api_version="v1beta1"),
    )

    agent = client.agent_engines.get(name=RESOURCE_NAME)

    # 1. Get agent card
    print("=" * 50)
    print("1. Retrieving agent card...")
    print("=" * 50)
    card = await agent.handle_authenticated_agent_card()
    print(f"Agent: {card.name}")
    print(f"URL: {card.url}")
    print(f"Skills: {[s.name for s in card.skills]}")

    # 2. Send a reservation request
    print("\n" + "=" * 50)
    print("2. Sending reservation request...")
    print("=" * 50)
    message_data = {
        "messageId": "msg-remote-001",
        "role": "user",
        "parts": [{"kind": "text", "text": "Book a table for 3 on Sunday at noon. Name: Carol, Phone: 555-0303"}],
    }
    response = await agent.on_message_send(**message_data)

    task_object = None
    for chunk in response:
        if isinstance(chunk, tuple) and len(chunk) > 0 and hasattr(chunk[0], "id"):
            task_object = chunk[0]
            break

    task_id = task_object.id
    print(f"Task ID: {task_id}")
    print(f"Status: {task_object.status.state}")

    # 3. Poll for result
    print("\n" + "=" * 50)
    print("3. Waiting for result...")
    print("=" * 50)
    result = None
    for _ in range(30):
        try:
            result = await agent.on_get_task(id=task_id)
            if result.status.state in [TaskState.completed, TaskState.failed]:
                break
        except Exception:
            pass
        time.sleep(1)

    print(f"Final status: {result.status.state}")
    if result.artifacts:
        for artifact in result.artifacts:
            if artifact.parts and hasattr(artifact.parts[0], "root") and hasattr(artifact.parts[0].root, "text"):
                print(f"Answer: {artifact.parts[0].root.text}")

    print("\n" + "=" * 50)
    print("Remote agent test passed!")
    print("=" * 50)


if __name__ == "__main__":
    asyncio.run(main())
इसके बाद, टेस्ट चलाते हैं
source .env
uv run python scripts/test_a2a_agent_runtime.py
आउटपुट में, "रेस्टोरेंट की बुकिंग" सुविधा वाला एजेंट कार्ड दिखाया गया है. इसके बाद, बुकिंग की पुष्टि के साथ टास्क पूरा किया गया है.
==================================================
1. Retrieving agent card...
==================================================
Agent: Reservation Agent
URL: https://us-central1-aiplatform.googleapis.com/v1beta1/projects/your-project-id/locations/us-central1/reasoningEngines/your-agent-unique-id/a2a
Skills: ['Restaurant Reservations']

==================================================
2. Sending reservation request...
==================================================
Task ID: b34585d0-5f03-4cb0-85a3-40710a0d224d
Status: TaskState.completed

==================================================
3. Waiting for result...
==================================================
Final status: TaskState.completed
Answer: Your reservation for Carol, party of 3 on Sunday at noon with phone number 555-0303 is confirmed.

==================================================
Remote agent test passed!
==================================================
बुकिंग एजेंट अब एजेंट रनटाइम पर मैनेज किए गए A2A एंडपॉइंट के तौर पर काम कर रहा है.
9. A2A Reservation Agent को Root Restaurant Agent के साथ इंटिग्रेट करना
इस चरण में, रेस्टोरेंट एजेंट को अपग्रेड किया जाता है, ताकि वह डिप्लॉय किए गए बुकिंग एजेंट को रिमोट A2A सब-एजेंट के तौर पर इस्तेमाल कर सके. ऑर्केस्ट्रेटर, स्थानीय तौर पर काम करता है. वहीं, बुकिंग एजेंट, एजेंट रनटाइम पर काम करता है. यह एक ऐसा इंटिग्रेशन है जो पूरी तरह से डिप्लॉय होने से पहले, A2A कनेक्शन की पुष्टि करता है.
A2A एजेंट कार्ड के यूआरएल से जुड़ी समस्या हल करना
RemoteA2aAgent को, डिप्लॉय किए गए बुकिंग एजेंट के कार्ड यूआरएल की ज़रूरत होती है, ताकि वह उसकी क्षमताओं के बारे में जान सके. ऐसी स्क्रिप्ट बनाएं जो एजेंट रनटाइम से इस यूआरएल को फ़ेच करे और उसे रेस्टोरेंट एजेंट के .env में लिखे:
cloudshell edit scripts/resolve_agent_card_url.py
नीचे दिए गए कोड को scripts/resolve_agent_card_url.py में कॉपी करें:
# scripts/resolve_agent_card_url.py
import asyncio
import os
from pathlib import Path

import vertexai
from dotenv import load_dotenv
from google.genai import types

load_dotenv()

PROJECT_ID = os.environ["GOOGLE_CLOUD_PROJECT"]
REGION = os.environ["REGION"]
RESOURCE_NAME = os.environ["RESERVATION_AGENT_RESOURCE_NAME"]


async def main():
    vertexai.init(project=PROJECT_ID, location=REGION)
    client = vertexai.Client(
        project=PROJECT_ID, location=REGION,
        http_options=types.HttpOptions(api_version="v1beta1"),
    )

    agent = client.agent_engines.get(name=RESOURCE_NAME)
    card = await agent.handle_authenticated_agent_card()
    card_url = f"{card.url}/v1/card"

    print(f"Agent: {card.name}")
    print(f"Card URL: {card_url}")

    # Write to restaurant_agent/.env
    # Write to both restaurant_agent/.env (for adk web) and root .env (for Cloud Run deploy)
    for env_path in [Path("restaurant_agent/.env"), Path(".env")]:
        lines = env_path.read_text().splitlines() if env_path.exists() else []
        lines = [l for l in lines if not l.startswith("RESERVATION_AGENT_CARD_URL=")]
        lines.append(f"RESERVATION_AGENT_CARD_URL={card_url}")
        env_path.write_text("\n".join(lines) + "\n")
        print(f"Written RESERVATION_AGENT_CARD_URL to {env_path}")


if __name__ == "__main__":
    asyncio.run(main())
एजेंट कार्ड के यूआरएल से .env फ़ाइल भरने के लिए स्क्रिप्ट चलाएं
uv run python scripts/resolve_agent_card_url.py
source .env
रेस्टोरेंट एजेंट को अपडेट करना
रेस्टोरेंट एजेंट की फ़ाइल खोलें:
cloudshell edit restaurant_agent/agent.py
इसके बाद, कॉन्टेंट को अपडेट किए गए वर्शन से बदलें. इसमें रिमोट बुकिंग एजेंट को सब-एजेंट के तौर पर शामिल किया गया है:
# restaurant_agent/agent.py
import os

import httpx
from google.adk.agents import LlmAgent
from google.adk.agents.remote_a2a_agent import RemoteA2aAgent
from google.auth import default
from google.auth.transport.requests import Request as AuthRequest
from toolbox_adk import ToolboxToolset

TOOLBOX_URL = os.environ.get("TOOLBOX_URL", "http://127.0.0.1:5000")
RESERVATION_AGENT_CARD_URL = os.environ.get("RESERVATION_AGENT_CARD_URL", "")

toolbox = ToolboxToolset(TOOLBOX_URL)


class GoogleCloudAuth(httpx.Auth):
    """Auto-refreshing Google Cloud authentication for httpx.

    Refreshes the access token before each request if expired,
    so long-running agents never hit 401 errors.
    """

    def __init__(self):
        self.credentials, _ = default(
            scopes=["https://www.googleapis.com/auth/cloud-platform"]
        )

    def auth_flow(self, request):
        # Refresh the token if it is expired or missing
        if not self.credentials.valid:
            self.credentials.refresh(AuthRequest())

        request.headers["Authorization"] = f"Bearer {self.credentials.token}"
        yield request


reservation_remote_agent = RemoteA2aAgent(
    name="reservation_agent",
    description="Handles restaurant table reservations — create, check, and cancel bookings. Delegate to this agent when the user wants to book a table, check a reservation, or cancel a reservation.",
    agent_card=RESERVATION_AGENT_CARD_URL,
    httpx_client=httpx.AsyncClient(auth=GoogleCloudAuth(), timeout=60),
)

root_agent = LlmAgent(
    name="restaurant_agent",
    model="gemini-3.5-flash",
    instruction="""You are a friendly and knowledgeable concierge at "Foodie Finds," a restaurant. Your job:
- Help diners browse the menu by category or cuisine type.
- Provide full details about specific dishes, including ingredients, price, and dietary information.
- Recommend dishes based on natural language descriptions of what the diner is craving.
- Add new menu items when asked.
- For reservation requests (booking, checking, or cancelling tables), delegate to the reservation_agent.

When a diner asks about a specific dish by name or cuisine, use the get-item-details tool.
When a diner asks for a specific category or cuisine type, use the search-menu tool.
When a diner describes what kind of food they want — by flavor, texture, dietary needs, or cravings — use the search-menu-by-description tool for semantic search.

When in doubt between search-menu and search-menu-by-description, prefer search-menu-by-description — it searches dish descriptions and finds more relevant matches.
If a dish is not available (available is false), let the diner know and suggest similar alternatives from the search results.
Be conversational, knowledgeable, and concise.""",
    tools=[toolbox],
    sub_agents=[reservation_remote_agent],
)
पिछले वर्शन के मुकाबले, इसमें ये मुख्य बदलाव हुए हैं:
GoogleCloudAuth— यह एक कस्टमhttpx.Authहैंडलर है, जो हर अनुरोध से पहले Google Cloud के ऐक्सेस टोकन को रीफ़्रेश करता है. एजेंट रनटाइम के लिए, पुष्टि की गई A2A कॉल की ज़रूरत होती है. साथ ही, टोकन की समयसीमा कुछ समय बाद खत्म हो जाती है.RemoteA2aAgent,.envसेRESERVATION_AGENT_CARD_URLको पढ़ता है. इसे रिज़ॉल्व स्क्रिप्ट ने लिखा है. साथ ही, यह पुष्टि किए गएhttpx_clientका इस्तेमाल करता है- सब-एजेंट के तौर पर रजिस्टर किया गया है — ADK का ऑर्केस्ट्रेटर, बुकिंग के अनुरोधों को अपने-आप इस एजेंट को असाइन कर देता है
- बुकिंग का ऐक्सेस देने के बारे में बताने के लिए अपडेट किया गया निर्देश
इंटिग्रेट किए गए एजेंट को स्थानीय तौर पर टेस्ट करना
स्टार्टर एजेंट को MCP टूलबॉक्स के साथ इंटिग्रेट करने की ज़रूरत होती है. ज़रूरी फ़ाइल, पिछले कोडलैब या स्टार्टर रेपो से पहले ही उपलब्ध कराई जानी चाहिए. हमें सिर्फ़ यह पक्का करना है कि टूलबॉक्स प्रोसेस ठीक से काम करे.
अगर आपके .env में मौजूद TOOLBOX_URL पहले से ही किसी Cloud Run सेवा (पिछले कोडलैब या शायद स्टार्टर रेपो के full_setup.sh से) की ओर इशारा करता है, तो इस चरण को छोड़ा जा सकता है. एजेंट, डिप्लॉय किए गए Toolbox से कनेक्ट हो जाएगा.
अगर आपको स्थानीय टूलबॉक्स की ज़रूरत है, तो नया इंस्टेंस शुरू करने से पहले देखें कि कोई टूलबॉक्स पहले से चल रहा है या नहीं:
if curl -s http://127.0.0.1:5000/api/toolsets > /dev/null 2>&1; then
  echo "Toolbox already running on port 5000"
else
  set -a; source .env; set +a
  ./toolbox --config=tools.yaml > logs/toolbox.log 2>&1 &
  echo "Toolbox started"
fi
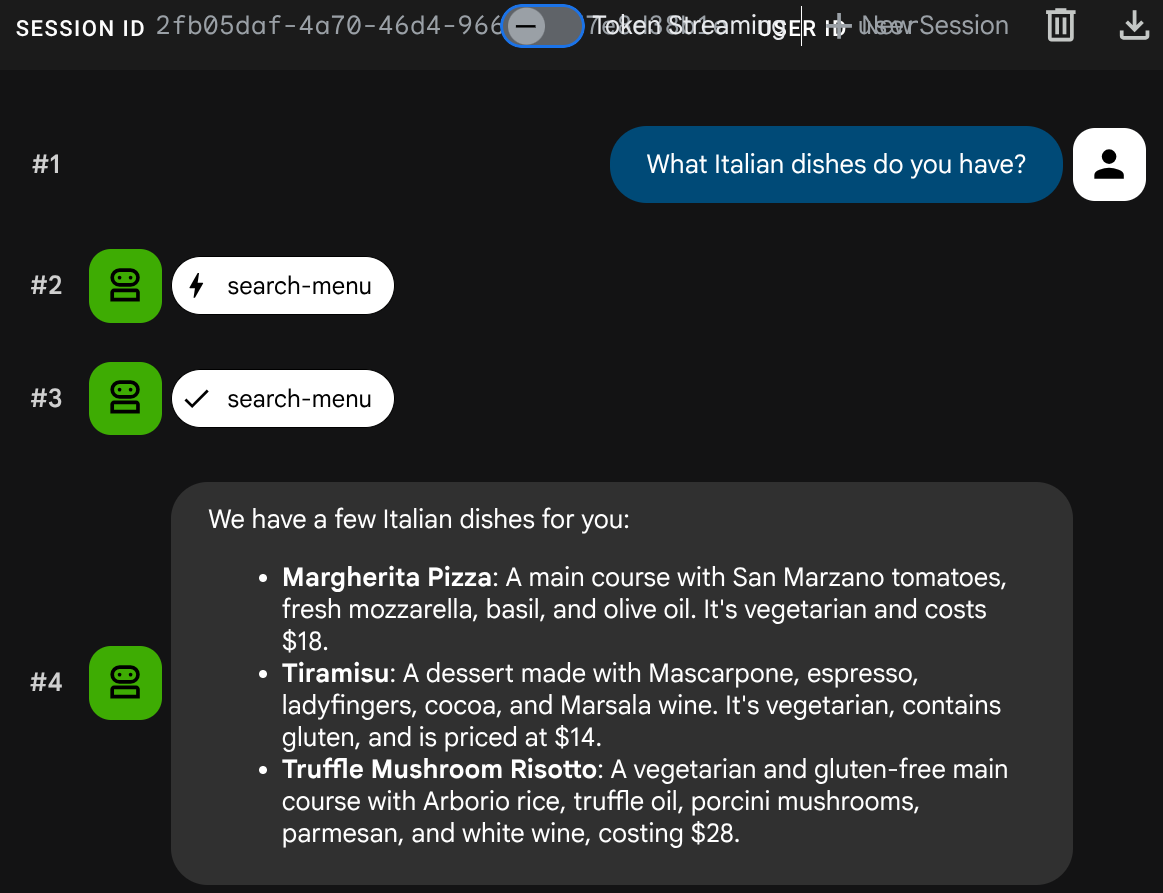
इसके बाद, हम ADK वेब डेवलपर यूज़र इंटरफ़ेस (यूआई) के ज़रिए, रेस्टोरेंट के एजेंट से इंटरैक्ट करने की कोशिश कर सकते हैं
uv run adk web --allow_origins "regex:https://.*\.cloudshell\.dev" --port 8080
Cloud Shell Web Preview का इस्तेमाल करके ADK का वेब यूज़र इंटरफ़ेस (यूआई) खोलें. इसके लिए, Web Preview बटन पर क्लिक करें और पोर्ट को 8080 पर बदलें. इसके बाद, restaurant_agent चुनें
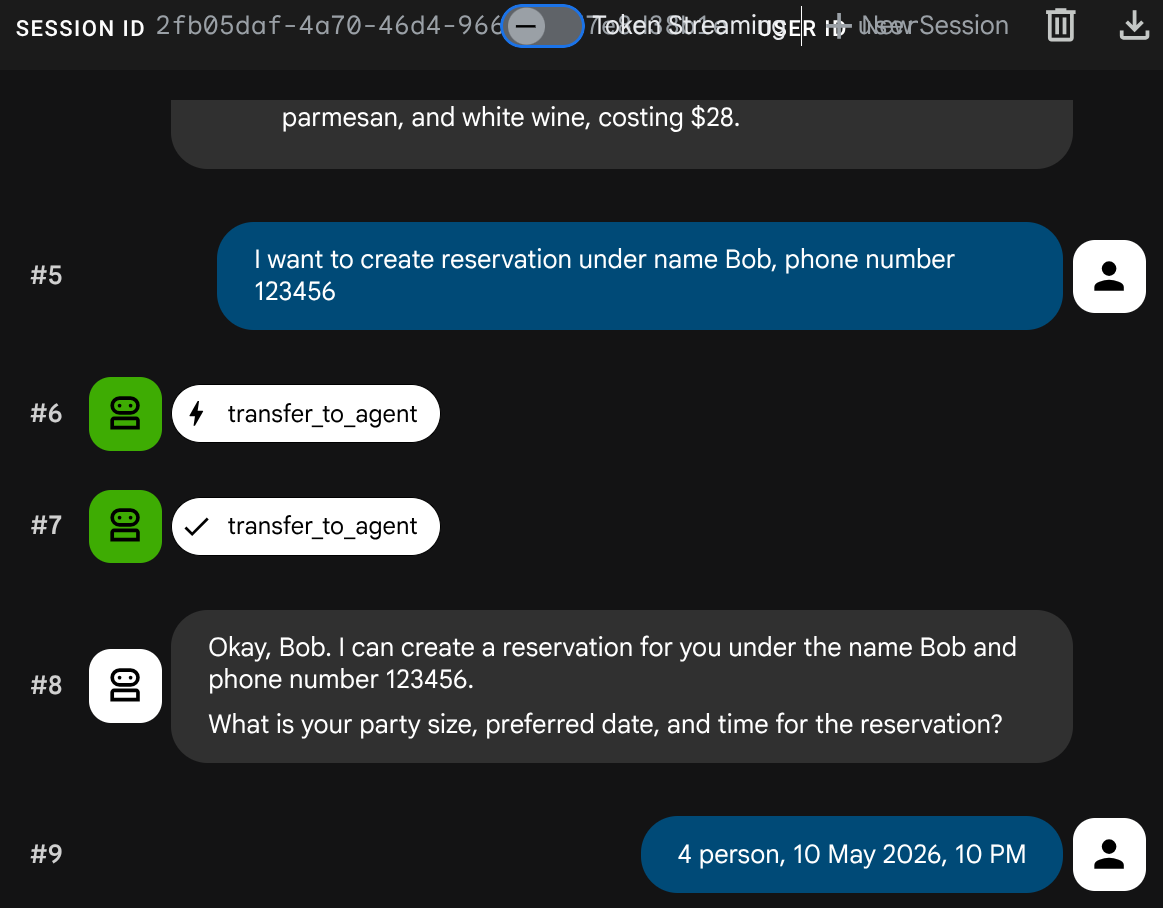
अलग-अलग तरह की बातचीत की जांच करना:
मेन्यू क्वेरी
What Italian dishes do you have?
बुकिंग का अनुरोध
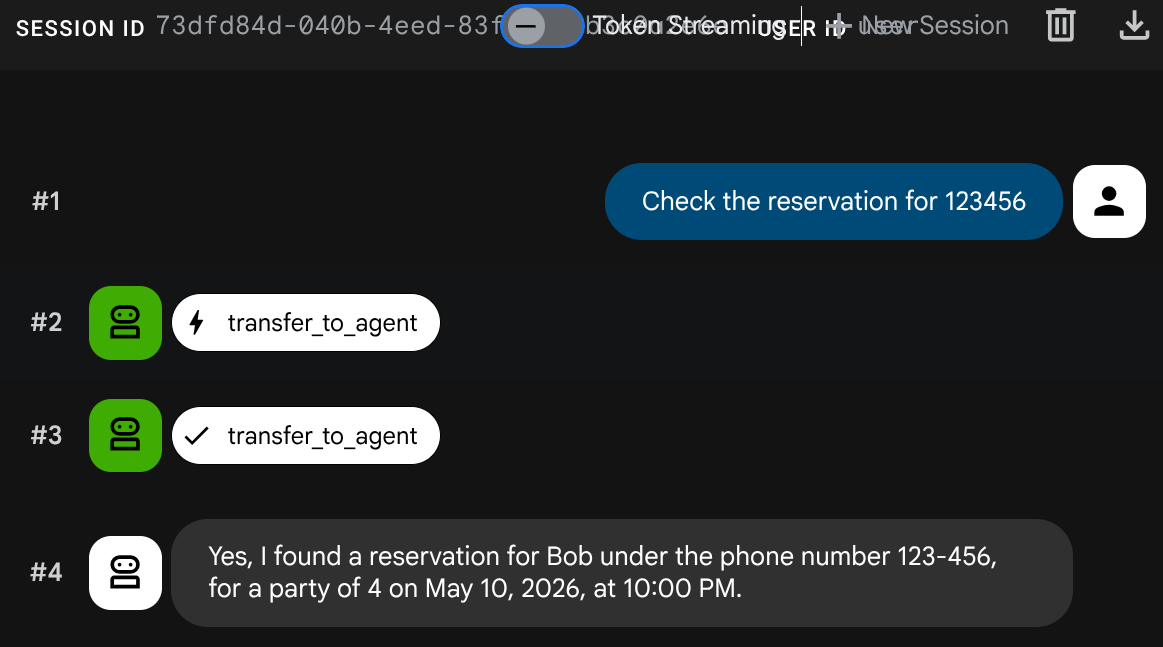
I want to create reservation under name Bob, phone number 123456
बुकिंग की जानकारी देखना
नया सेशन बनाएं ( नई बातचीत शुरू करें ):
Check the reservation for 123456
adk web प्रोसेस को रोकने के लिए, Ctrl+C को दो बार दबाएं. अब हम एजेंट को पूरी तरह से डिप्लॉय करके सिस्टम को पूरा करते हैं
10. अपडेट किए गए रेस्टोरेंट एजेंट को Cloud Run पर डिप्लॉय करना
इस चरण में, रेस्टोरेंट एजेंट को A2A इंटिग्रेशन के साथ Cloud Run पर फिर से डिप्लॉय किया जाता है. इससे, पूरी तरह से डिप्लॉय किया गया मल्टी-एजेंट सिस्टम तैयार हो जाता है.
एजेंट रनटाइम को ऐक्सेस करने की अनुमतियां देना
Cloud Run सेवा खाते को, एजेंट रनटाइम को कॉल करने की अनुमति चाहिए. डिफ़ॉल्ट Compute Engine सेवा खाते को roles/aiplatform.user की भूमिका असाइन करें:
PROJECT_NUMBER=$(gcloud projects describe $GOOGLE_CLOUD_PROJECT --format='value(projectNumber)')
gcloud projects add-iam-policy-binding $GOOGLE_CLOUD_PROJECT \
  --member="serviceAccount:${PROJECT_NUMBER}-compute@developer.gserviceaccount.com" \
  --role="roles/aiplatform.user"
Cloud Run पर डिप्लॉय करें
इस सेटअप में, हम यह मानकर चलते हैं कि रेस्टोरेंट एजेंट सेवा, पिछले कोडलैब से पहले से मौजूद है. अगर आपने नया कोडलैब शुरू किया है, तो scripts/full_setup.sh चलाकर इसे सेट अप किया जा सकता है. यह अपडेट किए गए कोड (नया RemoteA2aAgent इंटिग्रेशन) के साथ फिर से डिप्लॉय होता है. साथ ही, रिज़र्वेशन एजेंट कार्ड के यूआरएल को नए एनवायरमेंट वैरिएबल के तौर पर जोड़ता है. मौजूदा एनवायरमेंट वैरिएबल (TOOLBOX_URL, GOOGLE_CLOUD_PROJECT वगैरह) को सुरक्षित रखा जाता है:
gcloud run deploy restaurant-agent \
  --source . \
  --region=$REGION \
  --allow-unauthenticated \
  --update-env-vars="RESERVATION_AGENT_CARD_URL=$RESERVATION_AGENT_CARD_URL" \
  --min-instances=0 \
  --max-instances=1 \
  --memory=1Gi \
  --port=8080
पूरी तरह से डिप्लॉय किए गए सिस्टम की जांच करना
डिप्लॉय की गई सेवा का यूआरएल पाएं:
AGENT_URL=$(gcloud run services describe restaurant-agent --region=$REGION --format='value(status.url)')
echo "Agent URL: $AGENT_URL"
अपने ब्राउज़र में यूआरएल खोलें. ADK का वेब यूज़र इंटरफ़ेस (यूआई) लोड होता है. यह वही इंटरफ़ेस है जिसका इस्तेमाल आपने लोकल तौर पर किया था. अब यह Cloud Run पर चल रहा है.
एजेंट से खुलकर बातचीत करें
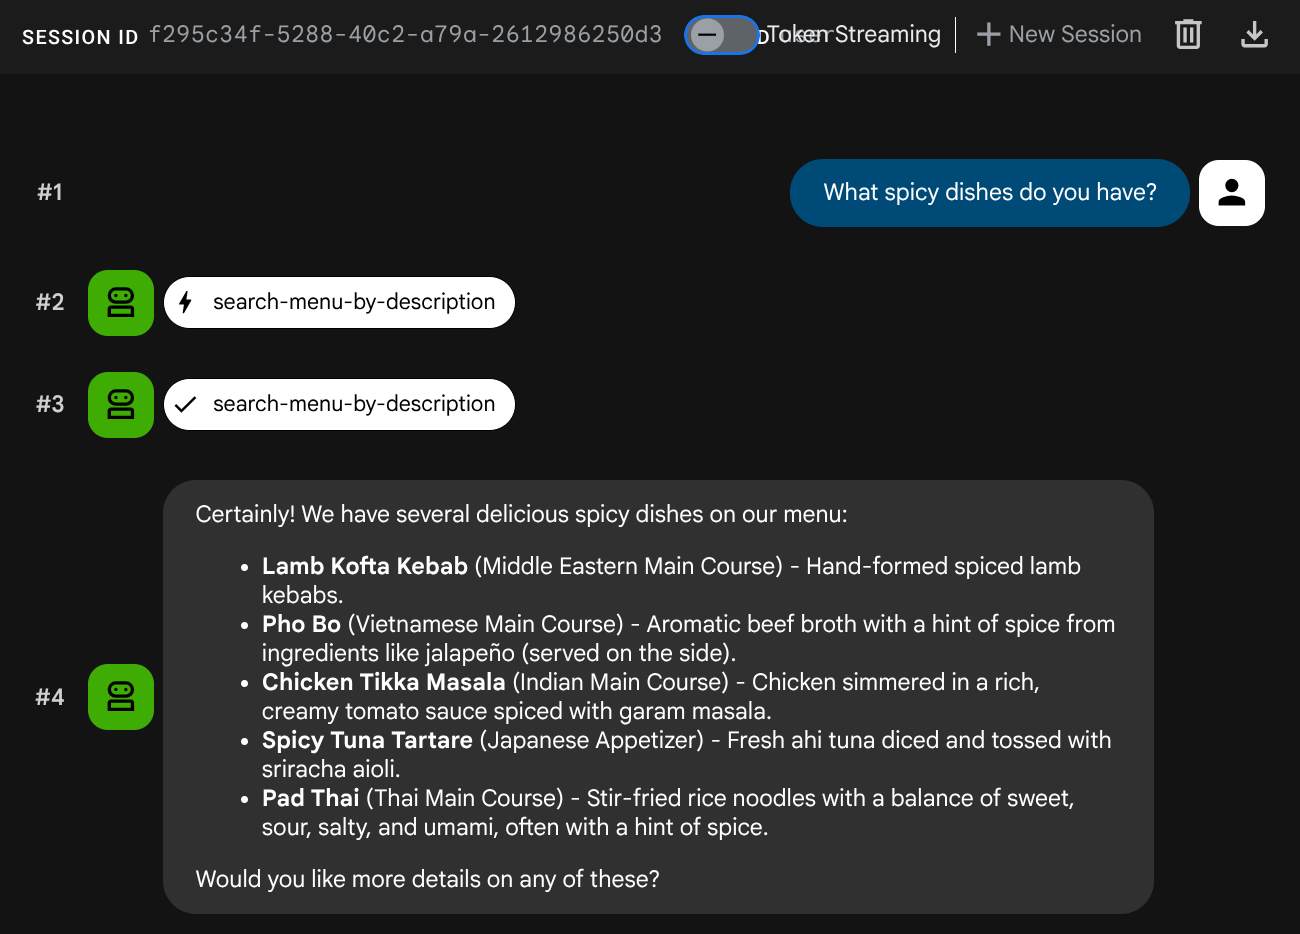
मेन्यू क्वेरी
What spicy dishes do you have?
बुकिंग का अनुरोध
Book a table for 4 on Friday at 7pm. Name: Eve, Phone: 555-0505
बुकिंग की जानकारी देखना
नया सेशन बनाएं ( नई बातचीत शुरू करें ):
Check reservation for 555-0505
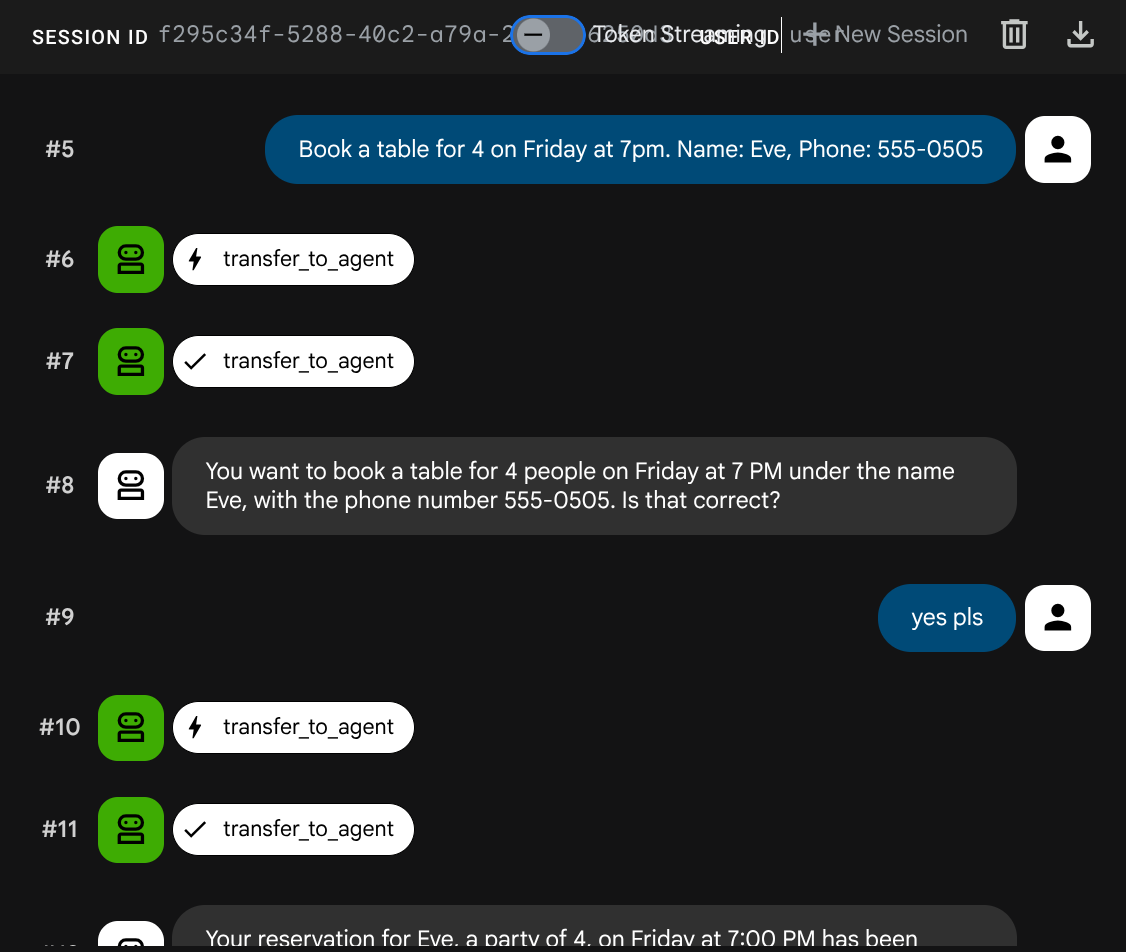
मल्टी-एजेंट सिस्टम पूरी तरह से डिप्लॉय हो गया है. Cloud Run पर मौजूद रेस्टोरेंट एजेंट, दो बैकएंड सेवाओं के बीच तालमेल बिठाता है: मेन्यू से जुड़ी कार्रवाइयों के लिए एमसीपी टूलबॉक्स और Agent Runtime पर मौजूद A2A बुकिंग एजेंट.
11. बधाई हो!
आपने Google Cloud पर A2A प्रोटोकॉल का इस्तेमाल करके, मल्टी-एजेंट सिस्टम बनाया और उसे डिप्लॉय किया हो.
आपने क्या सीखा
- ADK एजेंट बनाया गया है, जो डेटाबेस के बिना बुकिंग के डेटा को मैनेज करने के लिए सेशन की स्थिति (
ToolContext) का इस्तेमाल करता है - आपने Agent Platform SDK का इस्तेमाल करके, A2A एजेंट को एजेंट रनटाइम में डिप्लॉय किया हो
RemoteA2aAgentको सब-एजेंट के तौर पर इस्तेमाल करके, किसी दूसरे ADK एजेंट से रिमोट A2A एजेंट का इस्तेमाल किया गया हो- सिस्टम की जांच चरण दर चरण की गई: लोकल A2A → डिप्लॉय किया गया A2A → आंशिक इंटिग्रेशन → पूरी तरह से डिप्लॉय किया गया
खाली करने के लिए जगह
अपने Google Cloud खाते पर शुल्क लगने से बचने के लिए, इस कोडलैब में बनाए गए संसाधनों को मिटाएं.
पहला विकल्प: प्रोजेक्ट मिटाएं (सुझाया गया)
gcloud projects delete $GOOGLE_CLOUD_PROJECT
दूसरा विकल्प: एक-एक करके संसाधन मिटाना
# Delete the Agent Runtime deployment
uv run python -c "
import vertexai
from google.genai import types
vertexai.init(project='$GOOGLE_CLOUD_PROJECT', location='$REGION')
client = vertexai.Client(
    project='$GOOGLE_CLOUD_PROJECT', location='$REGION',
    http_options=types.HttpOptions(api_version='v1beta1'),
)
agent = client.agent_engines.get(name='$RESERVATION_AGENT_RESOURCE_NAME')
agent.delete(force=True)
print('Agent Runtime deployment deleted.')
"

# Delete Cloud Run services
gcloud run services delete restaurant-agent --region=$REGION --quiet
gcloud run services delete toolbox-service --region=$REGION --quiet

# Delete Cloud SQL instance
gcloud sql instances delete $DB_INSTANCE --quiet

# Delete GCS staging bucket
gsutil rm -r gs://$STAGING_BUCKET