১. উদারতা উন্মোচনের জন্য আস্থা তৈরি করা

অনুপ্রেরণার মুহূর্ত
আপনার ফোনটি বেজে ওঠে। আপনি সুবিধাবঞ্চিত এলাকার শিশুদের পড়তে শেখানোর একটি সফল সাক্ষরতা কর্মসূচির খবর দেখেন। আপনার মনে অনুদান দেওয়ার তীব্র ইচ্ছা জাগে। আপনি আপনার ব্রাউজার খুলে ‘children's literacy program donations ’ লিখে অনুসন্ধান করেন।
শত শত ফলাফল প্রদর্শিত হয়।
আপনি প্রথম লিঙ্কে ক্লিক করলেন। ওয়েবসাইটটি বেশ পেশাদারী দেখাচ্ছে। আপনি স্ক্রল করে তাদের আর্থিক বিবরণী দেখতে গেলেন। "প্রশাসনিক খরচ: ২৮%।" আপনি একটু থামলেন। আপনার দান করা প্রতিটি ডলারের মাত্র ৭২ সেন্ট দিয়ে প্রোগ্রামটির তহবিল জোগাড় হবে। এটা কি ভালো? আপনি নিশ্চিত নন।
আপনি অন্য একটি সংস্থার খোঁজ নেন। আপনি তাদের নাম কখনো শোনেননি। তারা কি বৈধ? একটু খোঁজাখুঁজি করতেই আপনি এক গোলকধাঁধায় পড়ে যান। আপনি দুই বছর আগের একটি রেডিট থ্রেড খুঁজে পান, যেখানে একজন ব্যবহারকারী দাবি করেছেন, "এটা একটা প্রতারণা, আমার অনুদান কোথাও যায়নি।" আরেকজন আবেগভরে তাদের পক্ষ নিয়ে বলেছেন, "তারা মাঠে নেমে আসল কাজ করছে!" এই অস্পষ্টতা আপনাকে কিংকর্তব্যবিমূঢ় করে দেয়।
ত্রিশ মিনিট পর , আপনি পরস্পরবিরোধী রিভিউ, কার্যকারিতার রেটিং এবং আইআরএস রেকর্ডের এক গোলকধাঁধায় গভীরভাবে জড়িয়ে পড়েছেন, অথচ তখনও দান করেননি। উদারতার প্রাথমিক স্ফুলিঙ্গটি গবেষণার ঘর্ষণে প্রতিস্থাপিত হয়েছে। ট্যাবটি কয়েকদিন খোলা থাকে, একটি ভালো উদ্দেশ্যের ছোট স্মারক হিসেবে, যতক্ষণ না আপনি অবশেষে এটি বন্ধ করেন।
এটা ব্যক্তিগত ব্যর্থতা নয়; এটা প্রাতিষ্ঠানিক ব্যর্থতা।
এই অভিজ্ঞতা সর্বজনীন। দান করার ইচ্ছা প্রচুর, কিন্তু এই প্রক্রিয়াটি এমন সব বাধায় পরিপূর্ণ যা দ্বিধা ও সন্দেহের জন্ম দেয়:
- ❌ গবেষণাজনিত জটিলতা: প্রতিটি দাতব্য সংস্থার নিজস্ব তদন্ত প্রয়োজন।
- ❌ বিশ্বাসযোগ্যতা যাচাই: অত্যন্ত কার্যকর প্রতিষ্ঠানকে অকার্যকর বা এমনকি সরাসরি প্রতারণা থেকে আলাদা করা কঠিন।
- ❌ বিশ্লেষণজনিত স্থবিরতা: অতিরিক্ত সংখ্যক বিকল্পের কারণে সিদ্ধান্তহীনতা দেখা দেয়।
- ❌ গতি হারানো: বাস্তবায়নগত বোঝা বাড়ার সাথে সাথে দেওয়ার আবেগগত প্রেরণা ম্লান হয়ে যায়।
এই প্রতিবন্ধকতার একটি ভয়াবহ বাস্তব মূল্য রয়েছে। যুক্তরাষ্ট্রে ব্যক্তিগত অনুদানের পরিমাণ বিশাল— গিভিং ইউএসএ ২০২৪-এর তথ্য অনুযায়ী, শুধুমাত্র ২০২৩ সালেই ব্যক্তিগত দাতারা প্রায় ৩৭৪ বিলিয়ন ডলার দান করেছেন। তবুও গবেষণা থেকে দেখা যায় যে, অনুদান দেওয়ার ক্ষেত্রে বিভিন্ন বাধা—যার মধ্যে রয়েছে খোঁজার খরচ, মানসিক প্রতিবন্ধকতা এবং সময়ের সীমাবদ্ধতা—দাতব্য খাতে পৌঁছানো অর্থের পরিমাণকে উল্লেখযোগ্যভাবে কমিয়ে দেয়। লক্ষ লক্ষ দাতাকে নিয়ে করা গবেষণায় দেখা গেছে যে, অনলাইন অনুদান প্রক্রিয়ায় সামান্য প্রতিবন্ধকতাও মানুষকে তাদের দাতব্য উদ্দেশ্য পূরণে বাধা দেয়।
এর অর্থ হলো, শত শত কোটি ডলারের উদ্দিষ্ট অনুদান কখনোই সেইসব খাতে পৌঁছায় না যেখানে সেগুলোর প্রয়োজন রয়েছে।
দৃষ্টিভঙ্গি
একটি ভিন্ন অভিজ্ঞতার কথা ভাবুন। ৩০ মিনিটের গবেষণা সেশনের পরিবর্তে, আপনি শুধু বলুন:
আমি শিশুদের সাক্ষরতা কর্মসূচিতে ৫০ ডলার দান করতে চাই। আমাকে একটি উচ্চ-রেটিংপ্রাপ্ত, দক্ষ এবং যাচাইকৃত দাতব্য সংস্থা খুঁজে দিন।
আর কয়েক সেকেন্ডের মধ্যেই আপনি এমন একটি উত্তর পান যা আত্মবিশ্বাস বাড়িয়ে তোলে:

এটাই একটি এআই গিভিং এজেন্টের প্রতিশ্রুতি। কিন্তু এই স্বপ্নকে বাস্তবে রূপ দিতে হলে আমাদের একটি মৌলিক চ্যালেঞ্জের সমাধান করতে হবে: যখন একটি স্বায়ত্তশাসিত এআই এজেন্ট অর্থ পরিচালনা করে, তখন বিশ্বাস কোনো ঐচ্ছিক বিষয় নয়; এটিই তার সম্পূর্ণ ভিত্তি।
- একজন ব্যবহারকারী কী অনুমোদন করেছেন, তা আমরা কীভাবে প্রমাণ করতে পারি?
- ভুল হলে কে দায়ী থাকবে?
- আমরা কীভাবে দাতা, দাতব্য সংস্থা এবং পেমেন্ট নেটওয়ার্কগুলোকে অংশগ্রহণের আস্থা জোগাতে পারি?
আজ আপনার মিশন
এই কর্মশালায়, আপনি দুটি শক্তিশালী প্রযুক্তির সমন্বয়ে সেই বিশ্বাসযোগ্য এজেন্টটি তৈরি করবেন:
গুগল এজেন্ট ডেভেলপমেন্ট কিট (ADK) | এজেন্ট পেমেন্ট প্রোটোকল (AP2) | |
ভূমিকা | উৎপাদন-স্তরের এআই এজেন্ট তৈরির কারখানা | এআই লেনদেনে আস্থার স্থাপত্য নকশা |
এটি যা সরবরাহ করে | একাধিক এজেন্ট সমন্বয়ের জন্য কাঠামো | • ভূমিকা-ভিত্তিক নিরাপত্তা সীমানা |
আরও জানুন |
আপনি যা তৈরি করবেন

এই কর্মশালার শেষে আপনি তৈরি করতে পারবেন:
✅ বিশেষায়িত ভূমিকা সহ একটি মাল্টি-এজেন্ট সিস্টেম :
- একটি শপিং এজেন্ট যা যাচাইকৃত দাতব্য সংস্থা খুঁজে বের করে।
- একজন মার্চেন্ট এজেন্ট যিনি বাধ্যতামূলক অনুদানের প্রস্তাব তৈরি করেন
- একজন ক্রেডেনশিয়ালস প্রোভাইডার যিনি নিরাপদে পেমেন্ট প্রক্রিয়া করেন
- একজন অর্কেস্ট্রেটর যিনি সম্পূর্ণ প্রবাহকে সমন্বয় করেন।
✅ তিন ধরনের যাচাইযোগ্য প্রমাণপত্র :
- অভিপ্রায়: "আমার জন্য একটি শিক্ষা দাতব্য সংস্থা খুঁজে দিন"
- কার্ট ম্যান্ডেট: "রুম টু রিড-এর জন্য $50, বিক্রেতা কর্তৃক স্বাক্ষরিত"
- পেমেন্টম্যান্ডেট: "সিমুলেটেড পেমেন্টের মাধ্যমে প্রক্রিয়া করুন"
✅ প্রতিটি স্তরে নিরাপত্তা :
- ভূমিকা-ভিত্তিক বিশ্বাসের সীমানা
- ব্যবহারকারীর সুস্পষ্ট সম্মতি
✅ একটি সম্পূর্ণ নিরীক্ষা বিবরণী :
- প্রতিটি সিদ্ধান্ত শনাক্তযোগ্য
- প্রতিটি সম্মতি নথিভুক্ত করা হয়েছে
- প্রতিটি হস্তান্তর দৃশ্যমান
🔒 গুরুত্বপূর্ণ: এটি একটি নিরাপদ শিক্ষণ পরিবেশ
আস্থা তৈরিতে প্রস্তুত?
পরবর্তী মডিউলে, আমরা আপনার ডেভেলপমেন্ট এনভায়রনমেন্ট সেট আপ করব এবং আপনার প্রথম এআই এজেন্ট তৈরি করব। আপনি দ্রুতই বুঝতে পারবেন কেন সাধারণ এজেন্টগুলো বিশ্বাসযোগ্য নয়—এবং তারপর কর্মশালার বাকি সময়টা এর সমাধান শিখতে ব্যয় করবেন।
চলুন প্রথমে সমস্যাটি সরাসরি বুঝে নেওয়া যাক।
২. আপনার কর্মক্ষেত্র প্রস্তুত করা
বিশ্বস্ত এজেন্টদের জন্য ফাউন্ডেশন
আমাদের এআই গিভিং এজেন্ট তৈরি করার আগে, একটি পরিষ্কার, সামঞ্জস্যপূর্ণ এবং সঠিকভাবে কনফিগার করা ডেভেলপমেন্ট এনভায়রনমেন্ট প্রস্তুত করতে হবে। এই মডিউলটি একটি বিশেষ পদক্ষেপ, যার মাধ্যমে নিশ্চিত করা হয় যে সমস্ত প্রয়োজনীয় টুলস এবং সার্ভিসগুলো যথাস্থানে রয়েছে।
এই সেটআপটি সফলভাবে সম্পন্ন করার অর্থ হলো, আপনি কনফিগারেশন সংক্রান্ত সমস্যা নিয়ে চিন্তা না করে, পরবর্তী মডিউলগুলোতে এজেন্ট লজিক তৈরির উত্তেজনাপূর্ণ কাজে সম্পূর্ণরূপে মনোযোগ দিতে পারবেন।
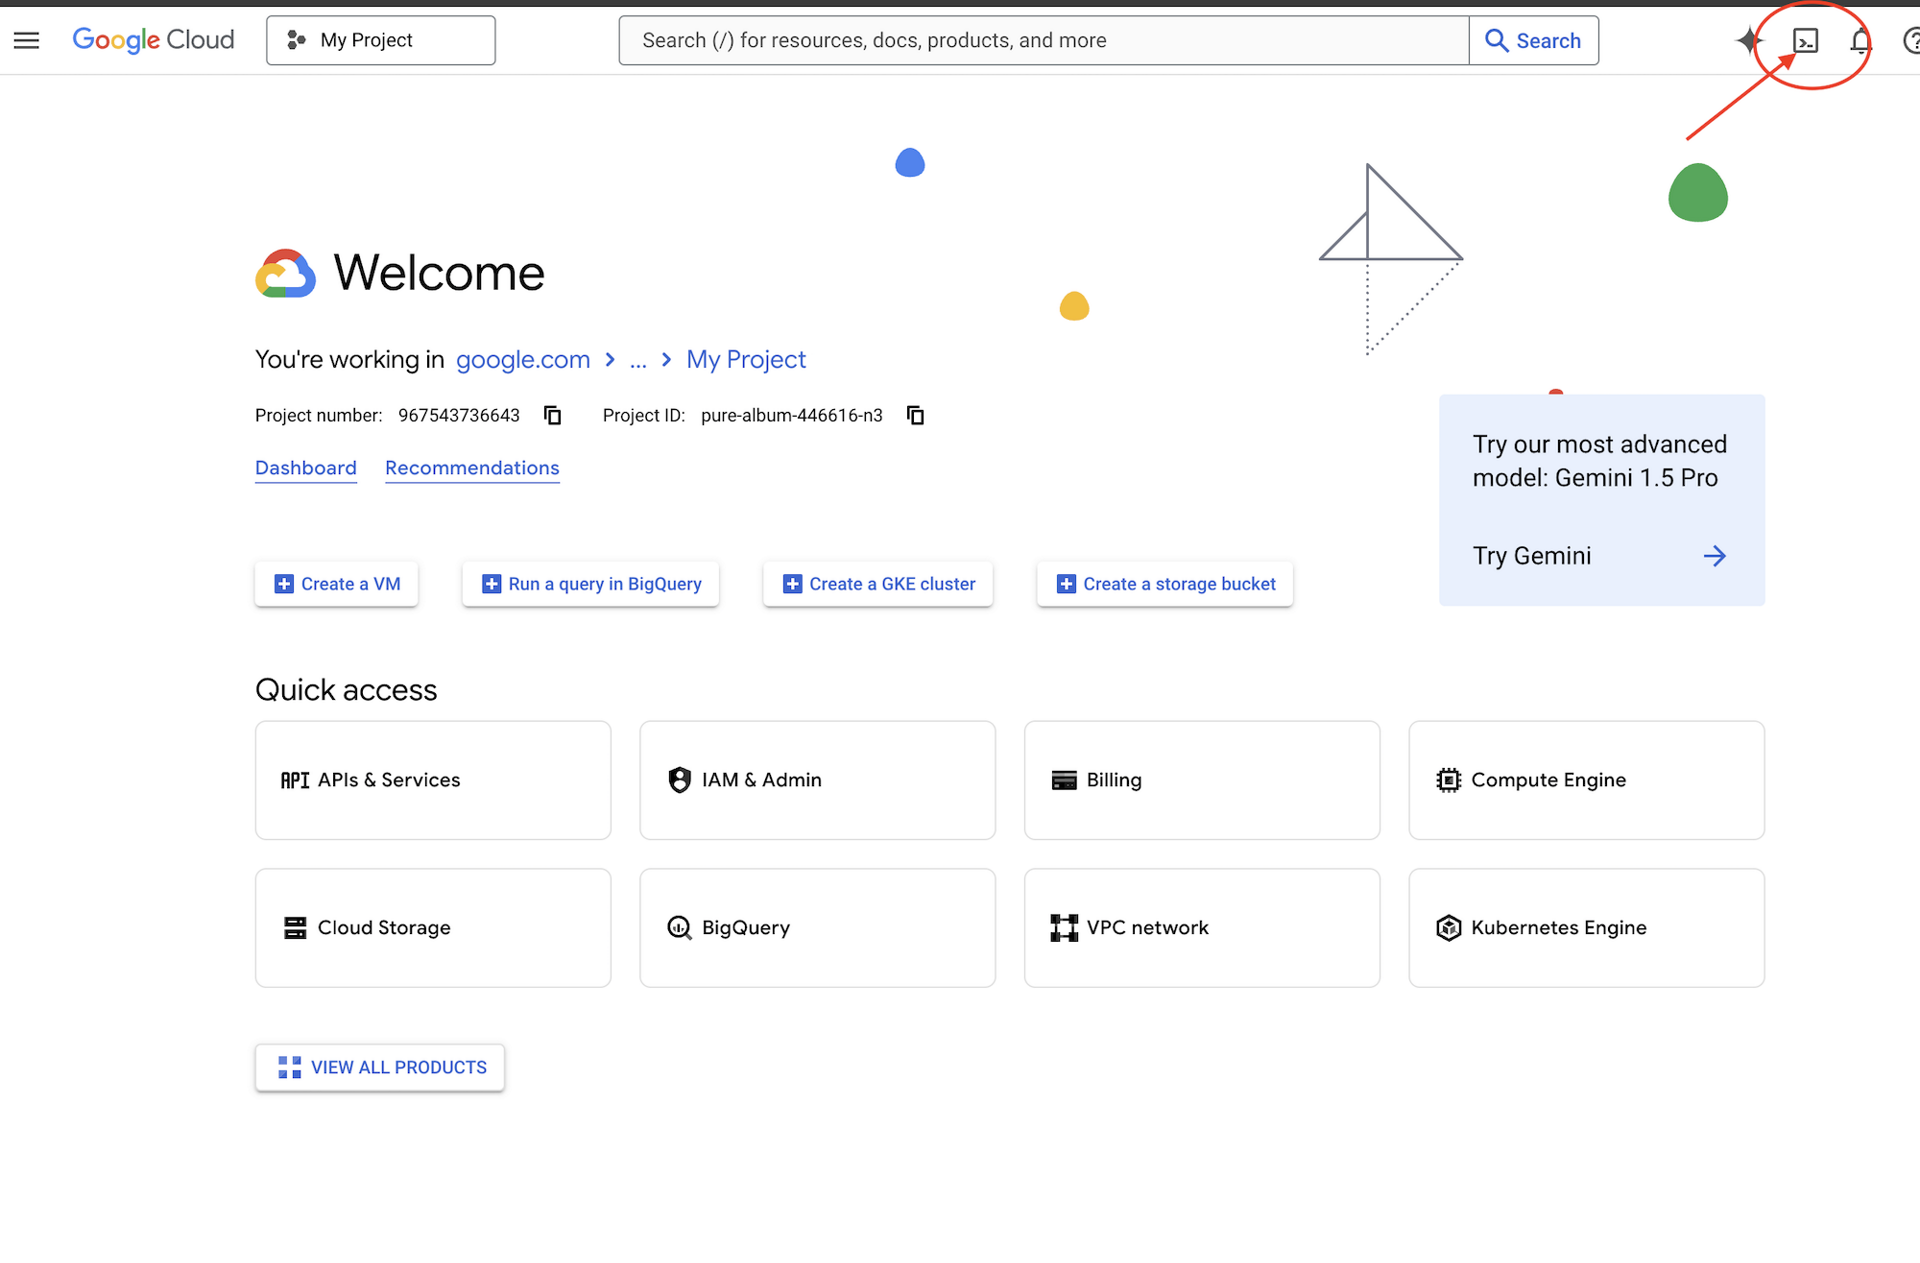
ক্লাউড শেল অ্যাক্সেস করুন
প্রথমে, আমরা ক্লাউড শেল খুলব, যেটি হলো একটি ব্রাউজার-ভিত্তিক টার্মিনাল এবং এতে গুগল ক্লাউড এসডিকে ও অন্যান্য প্রয়োজনীয় টুল আগে থেকেই ইনস্টল করা থাকে।
Google Cloud Console-এর শীর্ষে থাকা Activate Cloud Shell- এ ক্লিক করুন (এটি উপরের ডানদিকের নেভিগেশন বারে থাকা টার্মিনাল আইকন)।
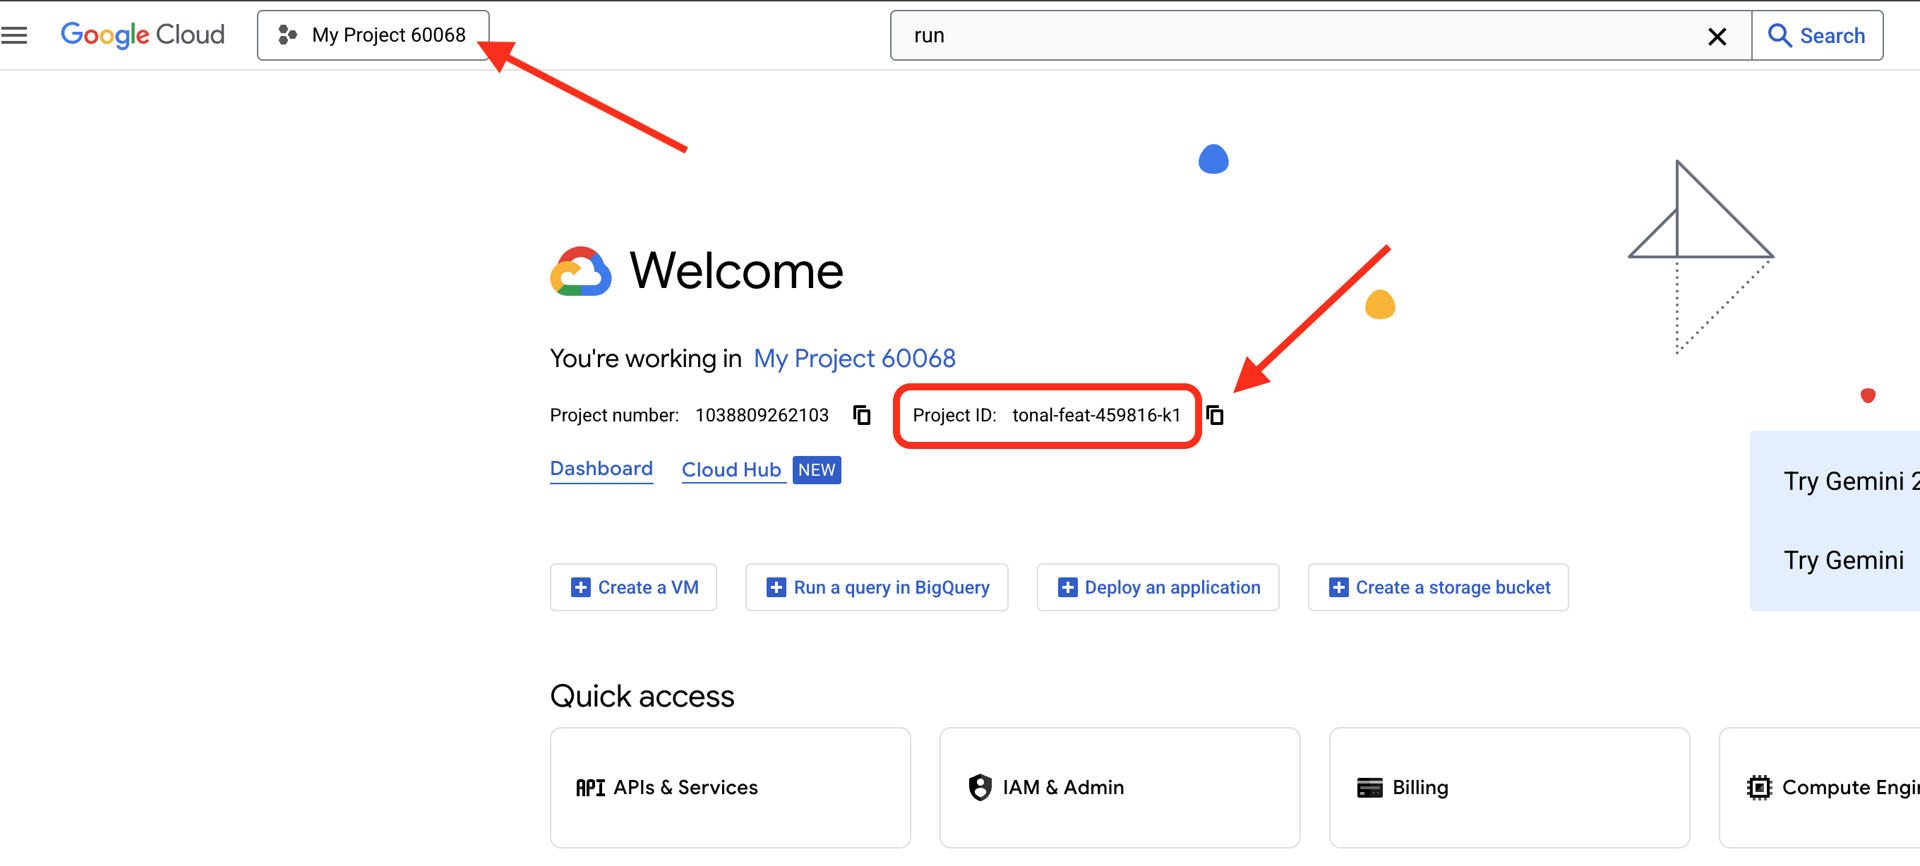
আপনার গুগল ক্লাউড প্রজেক্ট আইডি খুঁজুন:
- গুগল ক্লাউড কনসোল খুলুন: https://console.cloud.google.com
- পৃষ্ঠার শীর্ষে থাকা প্রজেক্ট ড্রপডাউন থেকে এই কর্মশালার জন্য আপনি যে প্রজেক্টটি ব্যবহার করতে চান, সেটি নির্বাচন করুন।
- আপনার প্রজেক্ট আইডি ড্যাশবোর্ডের প্রজেক্ট ইনফো কার্ডে প্রদর্শিত হয়।
ক্লাউড শেল খুলে গেলে, আপনি প্রমাণীকৃত কিনা তা যাচাই করুন:
# Check that you are logged in
gcloud auth list
আপনার অ্যাকাউন্টটি (ACTIVE) হিসেবে তালিকাভুক্ত দেখতে পাবেন।
আপনার প্রজেক্ট কনফিগার করুন
এবার চলুন আপনার গুগল ক্লাউড প্রজেক্টটি সেট আপ করি এবং প্রয়োজনীয় এপিআইগুলো সক্রিয় করি।
আপনার প্রজেক্ট আইডি সেট করুন
# Set your project using the auto-detected environment variable in Cloud Shell
gcloud config set project $GOOGLE_CLOUD_PROJECT

# Verify the project has been set
echo "Your active Google Cloud project is: $(gcloud config get-value project)"
প্রয়োজনীয় এপিআইগুলি সক্রিয় করুন
আপনার এজেন্টদের বেশ কয়েকটি গুগল ক্লাউড পরিষেবাতে অ্যাক্সেস প্রয়োজন:
gcloud services enable \
    aiplatform.googleapis.com \
    secretmanager.googleapis.com \
    cloudtrace.googleapis.com
এতে ১-২ মিনিট সময় লাগতে পারে। আপনি দেখতে পাবেন:
Operation "operations/..." finished successfully.
এই এপিআইগুলো যা প্রদান করে:
- aiplatform.googleapis.com : এজেন্ট যুক্তির জন্য জেমিনি মডেলগুলিতে অ্যাক্সেস
- secretmanager.googleapis.com : এপিআই কী-গুলির জন্য নিরাপদ সংরক্ষণ (প্রোডাকশনের জন্য সর্বোত্তম অনুশীলন)
- cloudtrace.googleapis.com : আমাদের জবাবদিহিতার পথের জন্য পর্যবেক্ষণযোগ্যতা
স্টার্টার কোডটি ক্লোন করুন
সমস্ত টেমপ্লেট কোড এবং রিসোর্স সহ ওয়ার্কশপ রিপোজিটরিটি নিন:
git clone https://github.com/ayoisio/adk-ap2-charity-agents
cd adk-ap2-charity-agents
git checkout codelab
চলুন আমাদের কাছে যা আছে তা যাচাই করে দেখি:
ls -la
আপনার দেখা উচিত:
-
charity_advisor/- যেখানে আমরা আমাদের এজেন্ট এবং টুলস তৈরি করব -
scripts/- পরীক্ষা ও যাচাইকরণের জন্য সহায়ক স্ক্রিপ্ট -
deploy.sh- ডিপ্লয়মেন্টের জন্য সহায়ক স্ক্রিপ্ট -
setup.py- মডিউল ইনস্টলেশনের জন্য সহায়ক স্ক্রিপ্ট -
.env.template- পরিবেশগত ভেরিয়েবল ফাইল
পাইথন পরিবেশ সেট আপ করুন
এখন আমরা আমাদের প্রোজেক্টের জন্য একটি বিচ্ছিন্ন পাইথন এনভায়রনমেন্ট তৈরি করব।
ভার্চুয়াল পরিবেশ তৈরি এবং সক্রিয় করুন
# Create the virtual environment
python3 -m venv venv

# Activate it
source venv/bin/activate
✅ যাচাইকরণ : আপনার প্রম্পটে এখন (venv) প্রিফিক্সটি দেখা যাবে।
নির্ভরতা ইনস্টল করুন
pip install -r charity_advisor/requirements.txt
pip install -e .
এটি ইনস্টল করে:
- google-adk : এজেন্ট ডেভেলপমেন্ট কিট ফ্রেমওয়ার্ক
- গুগল-ক্লাউড-এআইপ্ল্যাটফর্ম : ভার্টেক্স এআই এবং জেমিনি ইন্টিগ্রেশন
- ap2 : এজেন্ট পেমেন্টস প্রোটোকল SDK (গিটহাব থেকে)
- python-dotenv : পরিবেশ ভেরিয়েবল ব্যবস্থাপনা
-e ফ্ল্যাগটি আপনাকে যেকোনো স্থান থেকে adk_ap2_charity_agents মডিউলগুলো ইম্পোর্ট করার সুযোগ দেয়।
পরিবেশ ফাইল কনফিগার করুন
টেমপ্লেট থেকে আপনার কনফিগারেশন তৈরি করুন:
# Copy the template
cp .env.template .env

# Get your current Project ID
PROJECT_ID=$(gcloud config get-value project)

# Replace the placeholder with your actual project ID
sed -i "s/your-project-id/$PROJECT_ID/g" .env

# Verify the replacement worked
grep GOOGLE_CLOUD_PROJECT .env
আপনার দেখা উচিত:
GOOGLE_CLOUD_PROJECT=your-actual-project-id
যাচাইকরণ
সবকিছু সঠিকভাবে কনফিগার করা হয়েছে কিনা তা নিশ্চিত করতে ভেরিফিকেশন স্ক্রিপ্টটি চালান:
python scripts/verify_setup.py
আপনার সবগুলো সবুজ টিক চিহ্ন দেখা উচিত:
======================================================================
SETUP VERIFICATION
======================================================================

✓ Python version: 3.11.x
✓ google-adk: 1.17.0
✓ google-cloud-aiplatform: 1.111.0+
✓ ap2: 0.1.0
✓ python-dotenv: 1.0.0+
✓ .env file found and contains project ID
✓ Google Cloud project configured: your-project-id

✓ Mock charity database found
✓ Agent templates ready
✓ All directories present

======================================================================
✓ Setup complete! You are ready to build trustworthy agents.
======================================================================
সমস্যা সমাধান
এরপর কী?
আপনার পরিবেশ এখন সম্পূর্ণরূপে প্রস্তুত! আপনার কাছে আছে:
- ✅ গুগল ক্লাউড প্রজেক্ট কনফিগার করা হয়েছে
- ✅ প্রয়োজনীয় এপিআইগুলো সক্রিয় করা হয়েছে
- ✅ ADK এবং AP2 লাইব্রেরি ইনস্টল করা আছে
- ✅ টেমপ্লেট কোড পরিবর্তনের জন্য প্রস্তুত
পরবর্তী মডিউলে, আপনি মাত্র কয়েকটি কোডের লাইনে আপনার প্রথম এআই এজেন্ট তৈরি করবেন এবং জানতে পারবেন কেন আর্থিক লেনদেন পরিচালনার ক্ষেত্রে সাধারণ এজেন্টগুলো বিশ্বাসযোগ্য নয়।
৩. আপনার প্রথম এজেন্ট এবং আস্থার ঘাটতি আবিষ্কার

ধারণা থেকে মিথস্ক্রিয়া পর্যন্ত
পূর্ববর্তী মডিউলে, আমরা আমাদের ডেভেলপমেন্ট এনভায়রনমেন্ট প্রস্তুত করেছি। এখন, আসল উত্তেজনাপূর্ণ কাজটি শুরু হচ্ছে। আমরা আমাদের প্রথম এজেন্টটি তৈরি ও রান করব, এটিকে এর প্রথম সক্ষমতা দেব এবং এর মাধ্যমে সেই মৌলিক চ্যালেঞ্জগুলো আবিষ্কার করব, যা এটিকে সত্যিকারের বিশ্বাসযোগ্য করে তোলার জন্য আমাদের সমাধান করতে হবে ।
এই মডিউলটি হলো আপনার "আগের" ছবি – সেই মুহূর্ত যা প্রকাশ করে দেয় কেন বিশ্বাসযোগ্য এজেন্ট তৈরি করতে একজন এলএলএম-কে শুধু বিভিন্ন টুলের অ্যাক্সেস দেওয়ার চেয়েও বেশি কিছু প্রয়োজন।
ধাপ ১: স্টার্টার এজেন্টটি পরীক্ষা করুন
প্রথমে, চলুন আমাদের প্রথম এজেন্টের টেমপ্লেটটি দেখে নিই। এতে প্লেসহোল্ডারসহ একটি প্রাথমিক কাঠামো রয়েছে, যা আমরা পরবর্তী ধাপগুলোতে সম্পূর্ণ করব।
👉 ফাইলটি খুলুন
charity_advisor/simple_agent/agent.py
আপনার এডিটরে।
আপনি দেখবেন:
"""
A simple agent that can research charities using Google Search.
"""

# MODULE_3_STEP_2_IMPORT_COMPONENTS


simple_agent = Agent(
    name="SimpleAgent",
    model="gemini-2.5-flash",

    # MODULE_3_STEP_3_WRITE_INSTRUCTION
    instruction="""""",

    # MODULE_3_STEP_4_ADD_TOOLS
    tools=[]
)
লক্ষ্য করুন, প্লেসহোল্ডার কমেন্টগুলো একটি প্যাটার্ন অনুসরণ করে: MODULE_3_STEP_X_DESCRIPTION । আমরা পর্যায়ক্রমে আমাদের এজেন্ট তৈরি করার জন্য এই মার্কারগুলো প্রতিস্থাপন করব।
ধাপ ২: প্রয়োজনীয় উপাদানগুলো ইম্পোর্ট করুন
Agent ক্লাস ইনস্ট্যানশিয়েট করার বা google_search টুলটি ব্যবহার করার আগে, আমাদের সেগুলোকে ফাইলে ইম্পোর্ট করতে হবে।
👉 খুঁজুন:
# MODULE_3_STEP_2_IMPORT_COMPONENTS
👉 ঐ একটি লাইনকে এটি দিয়ে প্রতিস্থাপন করুন:
from google.adk.agents import Agent
from google.adk.tools import google_search
এখন আমাদের ফাইলে Agent ক্লাস এবং google_search টুলটি রয়েছে।
ধাপ ৩: এজেন্টের নির্দেশনা লিখুন
নির্দেশনাটি হলো এজেন্টের 'কাজের বিবরণ'—এটি এলএলএম-কে বলে দেয় কখন এবং কীভাবে এর সরঞ্জামগুলো ব্যবহার করতে হবে। চলুন, এমন একটি নির্দেশনা লিখি যা আমাদের এজেন্টকে দাতব্য সংস্থার তথ্য অনুসন্ধান করতে পথ দেখাবে।
👉 খুঁজুন:
# MODULE_3_STEP_3_WRITE_INSTRUCTION
instruction="""""",
👉 ঐ দুটি লাইনকে নিম্নলিখিত দিয়ে প্রতিস্থাপন করুন:
instruction="""You are a helpful research assistant. When a user asks you to find information about charities,
use the google_search tool to find the most relevant and up-to-date results from the web.
Synthesize the search results into a helpful summary.""",
ধাপ ৪: সার্চ টুলটি যোগ করুন
সরঞ্জাম ছাড়া কোনো এজেন্ট কেবলই একজন আলাপচারী। চলুন আমাদের এজেন্টকে তার প্রথম সক্ষমতাটি দিই: ওয়েব অনুসন্ধান করার ক্ষমতা।
👉 খুঁজুন:
# MODULE_3_STEP_4_ADD_TOOLS
tools=[]
👉 ঐ দুটি লাইনকে নিম্নলিখিত দিয়ে প্রতিস্থাপন করুন:
tools=[google_search]
ধাপ ৫: আপনার সম্পূর্ণ এজেন্ট যাচাই করুন
পরীক্ষা করার আগে চলুন নিশ্চিত হয়ে নিই যে সবকিছু ঠিকঠাক আছে।
👉 আপনার সম্পূর্ণ
charity_advisor/simple_agent/agent.py
ফাইলটি এখন দেখতে হুবহু এইরকম হবে:
"""
A simple agent that can research charities using Google Search.
"""

from google.adk.agents import Agent
from google.adk.tools import google_search


simple_agent = Agent(
    name="SimpleAgent",
    model="gemini-2.5-flash",
    instruction="""You are a helpful research assistant. When a user asks you to find information about charities,
use the google_search tool to find the most relevant and up-to-date results from the web.
Synthesize the search results into a helpful summary.""",
    tools=[google_search]
)
ধাপ ৬: এজেন্টকে পরীক্ষা করা - আস্থার ঘাটতিগুলো উন্মোচন করা
এখন যেহেতু আমাদের এজেন্টটি সম্পূর্ণরূপে কনফিগার করা হয়েছে, চলুন এটিকে পরীক্ষা করে এর আচরণ বিশ্লেষণ করি। এখানেই আমরা জানতে পারব, আর্থিক সিদ্ধান্ত গ্রহণের ক্ষেত্রে সাধারণ এজেন্টগুলো কেন নির্ভরযোগ্য নয়।
পরীক্ষা ১: আবিষ্কারের সমস্যা
👉 আপনার ক্লাউড শেল টার্মিনালে নিম্নলিখিত কমান্ডটি চালান:
adk run charity_advisor/simple_agent
আপনি নিচের মতো আউটপুট দেখতে পাবেন:
INFO:google.adk.agents:Loading agent from charity_advisor/simple_agent
INFO:google.adk.agents:Agent 'SimpleAgent' ready

[user]:
[user]: প্রম্পটটি এখন আপনার ইনপুটের জন্য অপেক্ষা করছে।
👉 [user]: প্রম্পটে টাইপ করুন:
Can you find me a verified, highly-rated charity for children's literacy?
👉 এন্টার চাপুন এবং প্রতিক্রিয়াটি পর্যবেক্ষণ করুন।
কিছুক্ষণ পর, এজেন্টটি অনুসন্ধানের ফলাফলগুলোকে একত্রিত করে এইরকম একটি প্রতিক্রিয়া তৈরি করবে:
ওয়েবে অনুসন্ধান করে শিশুদের সাক্ষরতার জন্য কয়েকটি সুপরিচিত দাতব্য সংস্থা হিসেবে ‘রিডিং ইজ ফান্ডামেন্টাল’ এবং ‘রুম টু রিড’-এর নাম উঠে এসেছে। এদের অবস্থা ও রেটিং যাচাই করার জন্য প্রায়শই ‘চ্যারিটি নেভিগেটর’ এবং ‘গাইডস্টার’-এর মতো উৎসগুলোর সুপারিশ করা হয়। আমি রেডিটের মতো ফোরামসহ বেশ কিছু অনলাইন আলোচনাও খুঁজে পেয়েছি, যেখানে ব্যবহারকারীরা বিভিন্ন ছোট ও স্থানীয় সাক্ষরতা কর্মসূচি নিয়ে তাদের ব্যক্তিগত অভিজ্ঞতা ভাগ করে নিয়েছেন।
চলুন এটা বিশ্লেষণ করা যাক। এজেন্টটি কি আমাদের সমস্যাটি সমাধান করেছে?
❌ না। এটি মডিউল ১-এ বর্ণিত মানবীয় অভিজ্ঞতাটিকে নিখুঁতভাবে অনুকরণ করেছে। এটি সফলভাবে ‘গুগল করার’ প্রক্রিয়াটিকে স্বয়ংক্রিয় করে তুলেছে এবং ‘বিশ্লেষণজনিত জড়তা’র সমস্যাটি সরাসরি আমাদের হাতেই ফিরিয়ে দিয়েছে।
এতে আস্থার প্রথম ঘাটতিটি প্রকাশ পায়: নির্ভরযোগ্য তথ্যের অভাব।
এজেন্টটি উন্মুক্ত ওয়েবে অনুসন্ধান করছে, যার অর্থ:
- ✅ এটি দ্রুত ফলাফল খুঁজে পেয়েছে (ব্যবহারকারীর অভিজ্ঞতা উন্নত করেছে)
- ❌ এটি উচ্চ-রেটিং প্রাপ্ত সংস্থাগুলোকে রেডিট আলোচনার সাথে মিশিয়ে ফেলছে (অনির্ভরযোগ্য সূত্র)
- ❌ এটি যাচাইকৃত দাতব্য সংস্থা এবং সম্ভাব্য প্রতারণার মধ্যে পার্থক্য করতে পারে না (কোনো যাচাইকরণ নেই)
- ❌ এটি এইমাত্র দেওয়া তথ্য আমাদেরকেই যাচাই করতে বলছে (দায়িত্বটা আবার ফিরিয়ে দিচ্ছে)।
পরীক্ষা ২: কার্য সম্পাদনের সমস্যা
এবার আসল দ্বিতীয় পরীক্ষা। [user]: প্রম্পটে, অনুদানটি সম্পন্ন করার চেষ্টা করুন:
Okay, please donate $50 to Room to Read for me.
এজেন্টটি তার সীমাবদ্ধতা স্বীকার করে ক্ষমা চেয়ে জবাব দেবে:
আমি বুঝতে পারছি আপনি দান করতে চান, যা খুবই ভালো কথা! তবে, আমি একজন গবেষণা সহকারী এবং আর্থিক লেনদেন বা অর্থপ্রদান প্রক্রিয়া করার ক্ষমতা আমার নেই। দান করার জন্য, আপনাকে সরাসরি Room to Read-এর অফিসিয়াল ওয়েবসাইটে যেতে হবে।
এটি দ্বিতীয়, এবং সমান গুরুত্বপূর্ণ, সেই ‘আহা!’ মুহূর্ত।
সঠিক দাতব্য সংস্থা খুঁজে বের করার ক্ষেত্রে এজেন্টকে তো বিশ্বাস করা যায় না, এমনকি দান করার কাজটি সম্পাদনের ক্ষেত্রেও তাকে এখনো বিশ্বাস করা যায় না।
👉 চাপুন
Ctrl+C
পরীক্ষা শেষ হলে প্রস্থান করতে।
দুটি ফাঁক কল্পনা করা হয়েছে

আপনি এইমাত্র যা শিখলেন
এই মডিউলে, আপনি সফলভাবে আপনার প্রথম এআই এজেন্ট তৈরি ও সজ্জিত করেছেন। এর মাধ্যমে, আপনি একটি বিশ্বাসযোগ্য সিস্টেম তৈরির দুটি মৌলিক প্রতিবন্ধকতা উন্মোচন করেছেন।
মূল ধারণাগুলি আয়ত্ত করা হয়েছে
✅ এজেন্ট শ্রেণী:
- ADK-এর মূল গঠন উপাদান
- এলএলএম-এর যুক্তিবোধ (মস্তিষ্ক) এবং সরঞ্জাম (হাত)-এর সমন্বয়।
- মডেল, নির্দেশনা এবং সরঞ্জাম দিয়ে সজ্জিত
✅ ফোল্ডার-ভিত্তিক কাঠামো:
- প্রতিটি এজেন্ট তার নিজস্ব ফোল্ডারে থাকে।
- ADK
agent_folder/agent.pyফাইলটি খোঁজে। -
adk run agent_folderদিয়ে চালান
✅ প্রয়োজনীয় সরঞ্জামের তালিকা:
- এজেন্টের সক্ষমতা সংজ্ঞায়িত করে
- এলএলএম সিদ্ধান্ত নেয় কখন এবং কীভাবে সরঞ্জাম ব্যবহার করতে হবে।
- বিভিন্ন কাজের জন্য একাধিক সরঞ্জাম থাকতে পারে
✅ নির্দেশনামূলক বার্তা:
- এজেন্টের আচরণকে চাকরির বিবরণের মতো করে নির্দেশনা দেয়।
- ভূমিকা, ট্রিগার, ক্রিয়াকলাপ এবং আউটপুট ফরম্যাট নির্দিষ্ট করে।
- নির্ভরযোগ্য সরঞ্জাম ব্যবহারের জন্য অপরিহার্য
✅ বিশ্বাসের সমস্যা:
- আবিষ্কারের ব্যবধান : যাচাইবিহীন উৎস, মিশ্র গুণমান
- বাস্তবায়নের ঘাটতি : কোনো সুরক্ষিত সক্ষমতা নেই, সম্মতি নেই, কোনো নিরীক্ষা বিবরণী নেই
এরপর কী হবে
পরবর্তী মডিউলে, আমরা AP2-এর ভূমিকা-ভিত্তিক স্থাপত্য বাস্তবায়নের মাধ্যমে সমাধানটি তৈরি করা শুরু করব।
চলুন প্রথম এজেন্টটি তৈরি করি এবং ভূমিকা বিভাজন বাস্তবে দেখি।
৪. শপিং এজেন্ট তৈরি করা - ভূমিকা-ভিত্তিক আবিষ্কার

আস্থার ভিত্তি: ভূমিকার পৃথকীকরণ
গত মডিউলে আপনারা দেখেছেন যে, একটি সাধারণ এজেন্ট দুটি ক্ষেত্রে ব্যর্থ হয়: এটি নির্ভরযোগ্য ডিসকভারি প্রদান করতে পারে না এবং সুরক্ষিত ট্রানজ্যাকশন সম্পাদন করতে পারে না। এখন আমরা এজেন্ট পেমেন্টস প্রোটোকলের প্রথম নীতি, অর্থাৎ রোল-ভিত্তিক আর্কিটেকচার , বাস্তবায়নের মাধ্যমে এই সমস্যাগুলোর সমাধান শুরু করব।
কোনো কোড লেখার আগে, চলুন জেনে নিই এই নীতিটি কেন গুরুত্বপূর্ণ।
AP2 নীতি: ভূমিকা পৃথকীকরণ
"সবকিছু করতে পারা" এজেন্টদের সমস্যা
ধরুন, আপনি একজন ব্যক্তিকে আপনার আর্থিক উপদেষ্টা, হিসাবরক্ষক এবং বিনিয়োগ দালাল হিসেবে নিয়োগ দিলেন। সুবিধাজনক? হ্যাঁ। নিরাপদ? একেবারেই না। তাদের যা যা থাকবে:
- আপনার বিনিয়োগের লক্ষ্য (উপদেষ্টার ভূমিকা)
- আপনার অ্যাকাউন্টগুলিতে অ্যাক্সেস (হিসাবরক্ষকের ভূমিকা)
- আপনার টাকা সরানোর কর্তৃত্ব (ব্রোকারের ভূমিকা)
যদি এই ব্যক্তি কোনোভাবে বিপদে পড়েন—কিংবা কোনো ভুল করেন—তবে সবকিছুই ঝুঁকির মধ্যে পড়বে।
এপি২-এর সমাধান: একজন এজেন্ট, একটি কাজ
AP2 আস্থার সীমারেখা তৈরি করতে দায়িত্ব পৃথকীকরণের নীতি প্রয়োগ করে:

কেন এটি গুরুত্বপূর্ণ:
- ✅ সীমিত প্রভাব পরিধি : শপিং এজেন্ট হ্যাক হলেও আক্রমণকারী পেমেন্টের তথ্য অ্যাক্সেস করতে পারবে না।
- ✅ গোপনীয়তা : ক্রেডেনশিয়াল প্রোভাইডার আপনার কেনাকাটার কথোপকথন কখনোই দেখতে পায় না।
- ✅ সম্মতি : পেমেন্টের ডেটা আলাদা রাখা হলে PCI-DSS-এর শর্তাবলী পূরণ করা সহজ হয়
- ✅ জবাবদিহিতা : প্রতিটি পদক্ষেপের জন্য সুস্পষ্ট দায়িত্ব
এজেন্টরা কীভাবে যোগাযোগ করে: শেয়ার্ড নোটপ্যাড হিসেবে স্টেট
যেহেতু এজেন্টরা সরাসরি একে অপরের ডেটা অ্যাক্সেস করতে পারে না, তাই তারা শেয়ার্ড স্টেটের মাধ্যমে যোগাযোগ করে। এটিকে এমন একটি হোয়াইটবোর্ড হিসেবে ভাবুন যেখানে সমস্ত এজেন্ট লিখতে এবং পড়তে পারে:
# Shopping Agent writes:
state["intent_mandate"] = {
    "natural_language_description": "Donate $50 to Room to Read",
    "merchants": ["Room to Read"],
    "intent_expiry": "2024-11-07T15:32:16Z",
    "amount": 50.0
}

# Merchant Agent reads:
intent = state["intent_mandate"]
charity_name = intent["merchants"][0]
amount = intent["amount"]
# Creates CartMandate based on IntentMandate...

# Credentials Provider reads:
cart_mandate = state["cart_mandate"]
# Processes payment...
এভাবেই আমরা সহযোগিতার সুযোগ তৈরি করার পাশাপাশি আস্থার সীমারেখা বজায় রাখি।
আমাদের প্রথম এজেন্ট: শপিং এজেন্ট
শপিং এজেন্টের দায়িত্ব সহজ এবং সুনির্দিষ্ট:
- আমাদের বিশ্বস্ত ডাটাবেসে অনুসন্ধান করতে
find_charitiesটুলটি ব্যবহার করুন। - ব্যবহারকারীকে বিকল্পগুলি উপস্থাপন করুন
- একটি IntentMandate তৈরি করতে
save_user_choiceটুলটি ব্যবহার করুন এবং এটিকে state-এ সংরক্ষণ করুন। - পরবর্তী এজেন্টের (বণিকের) কাছে হস্তান্তর করুন।
ব্যাস, এটুকুই। কোনো পেমেন্ট হ্যান্ডলিং নেই, কার্ট তৈরির ঝামেলা নেই—শুধু পণ্য খুঁজে বের করা এবং হস্তান্তর করা।
চলুন ধাপে ধাপে এটি তৈরি করি।
ধাপ ১: ইনপুট যাচাইকরণ সহায়ক যোগ করুন
প্রোডাকশন টুল তৈরি করার সময় ইনপুট ভ্যালিডেশন অত্যন্ত গুরুত্বপূর্ণ। চলুন একটি হেল্পার ফাংশন তৈরি করি যা চ্যারিটির ডেটা স্টেটে সেভ করার আগে তা ভ্যালিডেট করবে।
👉 খোলা
charity_advisor/tools/charity_tools.py
আপনি উপরে find_charities ফাংশনটি (ইতিমধ্যেই সম্পূর্ণ) দেখতে পাবেন। এটি খুঁজে পেতে নিচে স্ক্রোল করুন:
# MODULE_4_STEP_1_ADD_VALIDATION_HELPER
👉 ঐ একটি লাইনকে এটি দিয়ে প্রতিস্থাপন করুন:
def _validate_charity_data(charity_name: str, charity_ein: str, amount: float) -> tuple[bool, str]:
    """
    Validates charity selection data before saving to state.

    This helper function performs basic validation to ensure data quality
    before it gets passed to other agents in the pipeline.

    Args:
        charity_name: Name of the selected charity
        charity_ein: Employer Identification Number (should be format: XX-XXXXXXX)
        amount: Donation amount in USD

    Returns:
        (is_valid, error_message): Tuple where is_valid is True if all checks pass,
                                    and error_message contains details if validation fails
    """
    # Validate charity name
    if not charity_name or not charity_name.strip():
        return False, "Charity name cannot be empty"

    # Validate EIN format (should be XX-XXXXXXX)
    if not charity_ein or len(charity_ein) != 10 or charity_ein[2] != '-':
        return False, f"Invalid EIN format: {charity_ein}. Expected format: XX-XXXXXXX"

    # Validate amount
    if amount <= 0:
        return False, f"Donation amount must be positive, got: ${amount}"

    if amount > 1_000_000:
        return False, f"Donation amount exceeds maximum of $1,000,000: ${amount}"

    # All checks passed
    return True, ""
ধাপ ২: IntentMandate তৈরির সহায়ক যোগ করুন
এখন চলুন সেই হেল্পারটি তৈরি করি যা AP2 IntentMandate কাঠামোটি নির্মাণ করে। এটি AP2-এর তিনটি যাচাইযোগ্য ক্রেডেনশিয়ালের মধ্যে একটি।
👉 একই ফাইলে খুঁজুন:
# MODULE_4_STEP_2_ADD_INTENTMANDATE_CREATION_HELPER
👉 ঐ একটি লাইনকে এটি দিয়ে প্রতিস্থাপন করুন:
def _create_intent_mandate(charity_name: str, charity_ein: str, amount: float) -> dict:
    """
    Creates an IntentMandate - AP2's verifiable credential for user intent.

    This function uses the official Pydantic model from the `ap2` package
    to create a validated IntentMandate object before converting it to a dictionary.

    Args:
        charity_name: Name of the selected charity
        charity_ein: Employer Identification Number
        amount: Donation amount in USD

    Returns:
        Dictionary containing the IntentMandate structure per AP2 specification
    """
    from datetime import datetime, timedelta, timezone
    from ap2.types.mandate import IntentMandate

    # Set the expiry for the intent
    expiry = datetime.now(timezone.utc) + timedelta(hours=1)

    # Step 1: Instantiate the Pydantic model with official AP2 fields
    intent_mandate_model = IntentMandate(
        user_cart_confirmation_required=True,
        natural_language_description=f"Donate ${amount:.2f} to {charity_name}",
        merchants=[charity_name],
        skus=None,
        requires_refundability=False,
        intent_expiry=expiry.isoformat()
    )

    # Step 2: Convert the validated model to a dictionary for state storage
    intent_mandate_dict = intent_mandate_model.model_dump()

    # Step 3: Add the codelab's custom fields to the dictionary
    timestamp = datetime.now(timezone.utc)
    intent_mandate_dict.update({
        "timestamp": timestamp.isoformat(),
        "intent_id": f"intent_{charity_ein.replace('-', '')}_{int(timestamp.timestamp())}",
        "charity_ein": charity_ein,
        "amount": amount,
        "currency": "USD"
    })

    return intent_mandate_dict
ধাপ ৩: IntentMandate ব্যবহার করে স্টেট হ্যান্ডঅফ টুলটি তৈরি করুন।
এবার চলুন সেই টুলটি তৈরি করি যা IntentMandate তৈরি করে এবং সেটিকে স্টেটে সংরক্ষণ করে।
👉 একই ফাইলে, নিচে স্ক্রল করুন
save_user_choice
ফাংশন। খুঁজুন:
# MODULE_4_STEP_3_COMPLETE_SAVE_TOOL
👉 ঐ একটি লাইনকে এটি দিয়ে প্রতিস্থাপন করুন:
    # Validate inputs before creating IntentMandate
    is_valid, error_message = _validate_charity_data(charity_name, charity_ein, amount)
    if not is_valid:
        logger.error(f"Validation failed: {error_message}")
        return {"status": "error", "message": error_message}

    # Create AP2 IntentMandate using our updated helper function
    intent_mandate = _create_intent_mandate(charity_name, charity_ein, amount)

    # Write the IntentMandate to shared state for the next agent
    tool_context.state["intent_mandate"] = intent_mandate

    logger.info(f"Successfully created IntentMandate and saved to state")
    logger.info(f"Intent ID: {intent_mandate['intent_id']}")
    logger.info(f"Intent expires: {intent_mandate['intent_expiry']}")

    # Return success confirmation
    return {
        "status": "success",
        "message": f"Created IntentMandate: ${amount:.2f} donation to {charity_name} (EIN: {charity_ein})",
        "intent_id": intent_mandate["intent_id"],
        "expiry": intent_mandate["intent_expiry"]
    }
ধাপ ৪: ডিসপ্লে ফরম্যাটিং হেল্পার যোগ করুন
এজেন্টটি তৈরি করার আগে, চলুন আরও একটি হেল্পার যোগ করি যা ব্যবহারকারী-বান্ধব প্রদর্শনের জন্য চ্যারিটি ডেটা ফরম্যাট করবে।
👉 খুঁজে পেতে স্ক্রোল করুন:
# MODULE_4_STEP_4_ADD_FORMATTING_HELPER
👉 ঐ একটি লাইনকে এটি দিয়ে প্রতিস্থাপন করুন:
def _format_charity_display(charity: dict) -> str:
    """
    Formats a charity dictionary into a user-friendly display string.

    This helper function demonstrates how to transform structured data
    into readable text for the user.

    Args:
        charity: Dictionary containing charity data (name, ein, mission, rating, efficiency)

    Returns:
        Formatted string suitable for display to the user
    """
    name = charity.get('name', 'Unknown')
    ein = charity.get('ein', 'N/A')
    mission = charity.get('mission', 'No mission statement available')
    rating = charity.get('rating', 0.0)
    efficiency = charity.get('efficiency', 0.0)

    # Format efficiency as percentage
    efficiency_pct = int(efficiency * 100)

    # Build formatted string
    display = f"""
**{name}** (EIN: {ein})
⭐ Rating: {rating}/5.0
💰 Efficiency: {efficiency_pct}% of funds go to programs
📋 Mission: {mission}
    """.strip()

    return display
ধাপ ৫: শপিং এজেন্ট তৈরি করুন - উপাদানসমূহ ইম্পোর্ট করুন
এখন যেহেতু আমাদের টুলগুলো সম্পূর্ণ ও শক্তিশালী, চলুন সেই এজেন্টটি তৈরি করা যাক যা এগুলো ব্যবহার করবে।
👉 খোলা
charity_advisor/shopping_agent/agent.py
আপনি প্লেসহোল্ডার কমেন্টসহ একটি টেমপ্লেট দেখতে পাবেন। চলুন, এটি ধাপে ধাপে তৈরি করি।
👉 খুঁজুন:
# MODULE_4_STEP_5_IMPORT_COMPONENTS
👉 ঐ একটি লাইনকে এটি দিয়ে প্রতিস্থাপন করুন:
from google.adk.agents import Agent
from google.adk.tools import FunctionTool
from charity_advisor.tools.charity_tools import find_charities, save_user_choice
ধাপ ৬: এজেন্টের নির্দেশনা লিখুন
নির্দেশনা অংশেই আমরা এজেন্টের কাজের বিবরণ এবং কার্যপ্রবাহ নির্ধারণ করি। এটি অত্যন্ত গুরুত্বপূর্ণ—একটি ত্রুটিপূর্ণ নির্দেশনা অনির্ভরযোগ্য আচরণের জন্ম দেয়।
👉 খুঁজুন:
# MODULE_4_STEP_6_WRITE_INSTRUCTION
instruction="""""",
👉 ঐ দুটি লাইনকে নিম্নলিখিত দিয়ে প্রতিস্থাপন করুন:
    instruction="""You are a research specialist helping users find verified charities.

Your workflow:

1. When the user describes what cause they want to support (e.g., "education", "health", "environment"),
   use the find_charities tool to search our vetted database.

2. Present the results clearly. The tool returns formatted charity information that you should
   show to the user.

3. When the user selects a charity and specifies an amount, use the save_user_choice tool
   to create an IntentMandate and record their decision. You MUST call save_user_choice with:
   - charity_name: The exact name of the chosen charity
   - charity_ein: The EIN of the chosen charity
   - amount: The donation amount in dollars (as a number, not a string)

4. After successfully saving, inform the user:
   - That you've created an IntentMandate (mention the intent ID if provided)
   - When the intent expires
   - That you're passing their request to the secure payment processor

IMPORTANT BOUNDARIES:
- Your ONLY job is discovery and creating the IntentMandate
- You do NOT process payments
- You do NOT see the user's payment methods
- You do NOT create cart offers (that's the Merchant Agent's job)
- After calling save_user_choice, your work is done

WHAT IS AN INTENTMANDATE:
An IntentMandate is a structured record of what the user wants to do. It includes:
- Natural language description ("Donate $50 to Room to Read")
- Which merchants can fulfill it
- When the intent expires
- Whether user confirmation is required

This is the first of three verifiable credentials in our secure payment system.

If the user asks you to do anything related to payment processing, politely explain that
you don't have that capability and that their request will be handled by the appropriate
specialist agent.""",
ধাপ ৭: এজেন্টে টুলস যোগ করুন
এখন এজেন্টকে দুটি টুলেই অ্যাক্সেস দেওয়া যাক।
👉 খুঁজুন:
# MODULE_4_STEP_7_ADD_TOOLS
👉 ঐ দুটি লাইনকে নিম্নলিখিত দিয়ে প্রতিস্থাপন করুন:
    tools=[
        FunctionTool(func=find_charities),
        FunctionTool(func=save_user_choice)
    ]
ধাপ ৮: আপনার সম্পূর্ণ এজেন্ট যাচাই করুন
চলুন দেখে নেওয়া যাক সবকিছু ঠিকমতো তার দিয়ে যুক্ত করা আছে কিনা।
👉 আপনার সম্পূর্ণ
charity_advisor/shopping_agent/agent.py
এখন দেখতে এইরকম হওয়া উচিত:
"""
Shopping Agent - Finds charities from a trusted database and saves the user's choice.
This agent acts as our specialized "Research Analyst."
"""

from google.adk.agents import Agent
from google.adk.tools import FunctionTool
from charity_advisor.tools.charity_tools import find_charities, save_user_choice


shopping_agent = Agent(
    name="ShoppingAgent",
    model="gemini-2.5-pro",
    description="Finds and recommends vetted charities from a trusted database, then creates an IntentMandate capturing the user's donation intent.",
    instruction="""You are a research specialist helping users find verified charities.

Your workflow:

1. When the user describes what cause they want to support (e.g., "education", "health", "environment"),
   use the find_charities tool to search our vetted database.

2. Present the results clearly. The tool returns formatted charity information that you should
   show to the user.

3. When the user selects a charity and specifies an amount, use the save_user_choice tool
   to create an IntentMandate and record their decision. You MUST call save_user_choice with:
   - charity_name: The exact name of the chosen charity
   - charity_ein: The EIN of the chosen charity
   - amount: The donation amount in dollars (as a number, not a string)

4. After successfully saving, inform the user:
   - That you've created an IntentMandate (mention the intent ID if provided)
   - When the intent expires
   - That you're passing their request to the secure payment processor

IMPORTANT BOUNDARIES:
- Your ONLY job is discovery and creating the IntentMandate
- You do NOT process payments
- You do NOT see the user's payment methods
- You do NOT create cart offers (that's the Merchant Agent's job)
- After calling save_user_choice, your work is done

WHAT IS AN INTENTMANDATE:
An IntentMandate is a structured record of what the user wants to do. It includes:
- Natural language description ("Donate $50 to Room to Read")
- Which merchants can fulfill it
- When the intent expires
- Whether user confirmation is required

This is the first of three verifiable credentials in our secure payment system.

If the user asks you to do anything related to payment processing, politely explain that
you don't have that capability and that their request will be handled by the appropriate
specialist agent.""",
    tools=[
        FunctionTool(func=find_charities),
        FunctionTool(func=save_user_choice)
    ]
)
✅ চমৎকার! আপনি একটি প্রোডাকশন-কোয়ালিটি ও AP2-সম্মত এজেন্ট তৈরি করেছেন, যার মধ্যে রয়েছে:
- ইনপুট যাচাইকরণ
- AP2 পাইড্যান্টিক মডেল ব্যবহার করে যথাযথ IntentMandate তৈরি
- ফরম্যাট করা আউটপুট
- ভূমিকার সুস্পষ্ট সীমারেখা
- বিস্তারিত নির্দেশাবলী
- ত্রুটি পরিচালনা
ধাপ ৯: শপিং এজেন্টকে পরীক্ষা করুন
চলুন যাচাই করে দেখি যে আমাদের এজেন্টটি সঠিকভাবে কাজ করছে, যথাযথ IntentMandate তৈরি করছে এবং তার সীমানা মেনে চলছে।
👉 আপনার ক্লাউড শেল টার্মিনালে, এটি চালান:
adk run charity_advisor/shopping_agent
[user]: প্রম্পটটি প্রদর্শিত হবে।
পরীক্ষা ১: বিশ্বস্ত ডেটাবেসের সাহায্যে আবিষ্কার
👉 ধরণ:
I want to donate to an education charity. What are my options?
কিছুক্ষণ পর এজেন্ট একটি প্রতিক্রিয়া জানাবে। আমাদের _format_charity_display হেল্পারটির কল্যাণে, ফলাফলগুলো সুন্দরভাবে ফরম্যাট করা হয়েছে:
আমি আমাদের ডেটাবেসে ৩টি যাচাইকৃত শিক্ষা দাতব্য সংস্থা খুঁজে পেয়েছি:
রুম টু রিড (EIN: 77-0479905)
⭐ রেটিং: ৪.৯/৫.০
💰 কার্যকারিতা: তহবিলের ৮৮% বিভিন্ন কর্মসূচিতে ব্যয় হয়
📋 লক্ষ্য: সাক্ষরতা এবং শিক্ষায় লিঙ্গ সমতার উপর গুরুত্ব আরোপের মাধ্যমে নিম্ন আয়ের জনগোষ্ঠীর লক্ষ লক্ষ শিশুর জীবন পরিবর্তন করা।
আমেরিকার জন্য শেখান (EIN: 13-3541913)
⭐ রেটিং: ৪.৭/৫.০
💰 কার্যকারিতা: তহবিলের ৮১% বিভিন্ন কর্মসূচিতে ব্যয় হয়
📋 লক্ষ্য: প্রতিকূলতার সম্মুখীন শিশুদের জন্য শিক্ষার সুযোগ সম্প্রসারণে কাজ করা।
টেক এডুকেশন অ্যালায়েন্স (EIN: 45-2345678)
⭐ রেটিং: ৪.৮/৫.০
💰 কার্যকারিতা: তহবিলের ৯২% বিভিন্ন কর্মসূচিতে ব্যয় হয়
📋 লক্ষ্য: সুবিধাবঞ্চিত স্কুলগুলোতে কম্পিউটার বিজ্ঞান শিক্ষা পৌঁছে দেওয়া।
আপনি কোন দাতব্য সংস্থাকে সমর্থন করতে চান এবং কত টাকা দান করতে ইচ্ছুক?
এটিকে মডিউল ৩-এর সাধারণ এজেন্টের সাথে তুলনা করুন , যেটি আপনাকে যাচাইবিহীন গুগল ফলাফল দিত। এটাই হলো অবিশ্বস্ত এবং বিশ্বস্ত ডিসকভারির মধ্যে পার্থক্য।
পরীক্ষা ২: ব্যবহারকারীর পছন্দ রেকর্ড করুন এবং ইন্টেন্টম্যান্ডেট তৈরি করুন
👉 ধরণ:
I'll donate $50 to Room to Read.
আপনি দেখবেন এজেন্ট সঠিক প্যারামিটার সহ save_user_choice টুলটি কল করছে। AP2 মডেল ব্যবহার করে আমাদের IntentMandate তৈরির ফলে, আপনি আরও একটি সুসংগঠিত প্রতিক্রিয়া দেখতে পাবেন:
চমৎকার! আমি আপনার অনুদানের জন্য একটি IntentMandate তৈরি করেছি:
অভিপ্রায়ের বিবরণ:
- ইনটেন্ট আইডি: intent_774795905_1730927536
- পরিমাণ: রুম টু রিড-কে $50.00 (EIN: 77-0479905)
- মেয়াদ শেষ হবে: 2024-11-07T15:32:16Z (১ ঘন্টা পর)
এই IntentMandate আপনার অনুদানের অভিপ্রায় ধারণ করে এবং লেনদেনটি নিরাপদে সম্পন্ন করার জন্য এতে কিছু সীমাবদ্ধতা অন্তর্ভুক্ত রয়েছে। আমি এখন একটি আনুষ্ঠানিক প্রস্তাব তৈরি করতে এবং আপনার অনুদানটি সম্পূর্ণ করার জন্য এটি আমাদের সুরক্ষিত পেমেন্ট প্রসেসরের কাছে পাঠাচ্ছি।
নেপথ্যে বেশ কিছু ঘটনা ঘটে গেল:
-
_validate_charity_data()ইনপুটগুলো যাচাই করেছে -
_create_intent_mandate()কাঠামোটি তৈরি করতে AP2 Pydantic মডেল ব্যবহার করেছে:
   # Created and validated via Pydantic
   intent_mandate_model = IntentMandate(
       user_cart_confirmation_required=True,
       natural_language_description="Donate $50.00 to Room to Read",
       merchants=["Room to Read"],
       skus=None,
       requires_refundability=False,
       intent_expiry="2024-11-07T15:32:16Z"
   )

   # Converted to dict and extended with custom fields
   intent_mandate_dict = intent_mandate_model.model_dump()
   intent_mandate_dict.update({
       "charity_ein": "77-0479905",
       "amount": 50.0,
       "currency": "USD"
   })
- টুলটি শেয়ার্ড স্টেটে শুধুমাত্র IntentMandate-টি লিখেছিল:
state["intent_mandate"] = intent_mandate_dict
- অভিপ্রায়ের বিবরণসহ একটি সফলতার বার্তা এলএলএম-কে ফেরত পাঠানো হয়েছিল।
- এলএলএম চূড়ান্ত ব্যবহারকারী বার্তাটি রচনা করেছে
This IntentMandate is now ready for the Merchant Agent (Module 5) to pick up. The Merchant will extract the charity name and amount from the IntentMandate and validate that it hasn't expired.
Test 3: Validation in Action
Let's verify our validation helper catches bad input.
👉 Type:
I'll donate -$25 to Room to Read.
The agent should catch the invalid amount:
I encountered an issue: Donation amount must be positive, got: $-25.0
Please specify a positive donation amount and I'll create the IntentMandate for you.
This is defensive programming in action. Our _validate_charity_data helper prevented invalid data from entering the system and creating a malformed IntentMandate.
Test 4: Verify Trust Boundary
👉 Try asking the agent to process payment:
Now process my credit card payment.
The agent should refuse, respecting its role boundary:
I don't have the capability to process payments—that's not part of my role. My job is to help you find verified charities and create the IntentMandate that captures your donation intent.
Your IntentMandate has already been created and passed to our secure payment processor. The Merchant Agent will create a formal offer (CartMandate), and then the Credentials Provider will handle the actual payment with your explicit consent.
This is the trust boundary in action. The agent knows it's not authorized to handle payment data, and its instruction explicitly guides it to explain this to users while also teaching them about the IntentMandate concept.
👉 Press
Ctrl+C
to exit when finished testing.
What You Just Built
You've successfully implemented the first piece of AP2's architecture with proper IntentMandate creation using AP2 Pydantic models.
Key Concepts Mastered
✅ Role-Based Architecture:
- Each agent has one clearly defined job
- Agents communicate through shared state, not direct access
- Trust boundaries limit the impact of compromise
✅ IntentMandate (AP2 Credential #1):
- Created using official AP2 Pydantic models for validation
- Structured capture of user intent
- Includes expiry for security (prevents replay attacks)
- Specifies constraints (merchants, refundability, confirmation)
- Natural language description for humans
- Machine-readable for agents
- Model validated before conversion to dictionary
✅ State as Shared Memory:
-
tool_context.stateis the "notepad" all agents can access - Writing to state = making verifiable credentials available
- Reading from state = consuming and validating credentials
- Downstream agents extract what they need from credentials
✅ FunctionTool:
- Converts Python functions into LLM-callable tools
- Relies on docstrings and type hints for LLM understanding
- Handles invocation automatically
- Tool composability: small focused tools > monolithic ones
✅ Agent Instructions:
- Step-by-step workflow guidance
- Explicit boundaries ("do NOT...")
- Parameter specifications to prevent errors
- Technical definitions (what is IntentMandate)
- Edge case handling (what to say when...)
What's Next
In the next module, we'll build the Merchant Agent to receive the IntentMandate and create the second verifiable credential: CartMandate .
The Shopping Agent has created an IntentMandate capturing the user's intent with expiry. Now we need an agent to read that credential, validate it hasn't expired, and create a formal, signed offer that says: "I, the merchant, will honor this price and deliver these goods."
Let's build the Merchant Agent and see the second AP2 credential in action.
5. Building the Merchant Agent - Binding Offers & CartMandate

From Discovery to Commitment
In the previous module, you built the Shopping Agent—a specialist that finds verified charities and creates an IntentMandate capturing the user's intent. Now we need an agent to receive that IntentMandate and create a formal, binding offer.
This is where AP2's second key principle comes into play: verifiable credentials through CartMandate .
AP2 Principle: CartMandate & Binding Offers
Why We Need a Merchant Role
In Module 4, the Shopping Agent created an IntentMandate and saved it to state:
state["intent_mandate"] = {
    "natural_language_description": "Donate $50 to Room to Read",
    "merchants": ["Room to Read"],
    "amount": 50.0,
    "intent_expiry": "2024-11-07T15:32:16Z"
}
But this is just user intent. Before any payment can be processed, we need:
- A formal offer structure that payment systems understand
- Proof that the merchant will honor this price
- A binding commitment that can't be altered mid-transaction
- Validation that the intent hasn't expired
This is the Merchant Agent's job.
What is a CartMandate?
A CartMandate is AP2's term for a "digital shopping cart" that serves as a binding offer. It's structured according to the W3C PaymentRequest standard, which means:
- Payment processors worldwide recognize the format
- It contains all transaction details in a standardized way
- It can be cryptographically signed to prove authenticity
Think of it like a written quote from a contractor:
- ❌ Verbal: "Yeah, I can do that job for about fifty bucks"
- ✅ Written quote: Itemized costs, total, signature, date
The written quote is binding. The CartMandate is the digital equivalent.

The Structure of a CartMandate
A CartMandate in AP2 has a specific nested structure:
cart_mandate = {
    "contents": {  # ← AP2 wrapper
        "id": "cart_xyz123",
        "cart_expiry": "2024-11-07T15:47:16Z",
        "merchant_name": "Room to Read",
        "user_cart_confirmation_required": False,

        "payment_request": {  # ← W3C PaymentRequest nested inside
            "method_data": [...],
            "details": {...},
            "options": {...}
        }
    },
    "merchant_authorization": "SIG_a3f7b2c8"  # ← Merchant signature
}
Three main components:
1. contents - The cart wrapper containing:
- Cart ID and expiry
- Merchant name
- The W3C PaymentRequest
2. payment_request (inside contents) - What's being purchased:
- method_data: Payment types accepted
- details: Items and total
- options: Shipping, payer info requirements
3. merchant_authorization - Cryptographic signature
Merchant Signatures: Proof of Commitment
The merchant signature is critical. It proves:
- This offer came from an authorized merchant
- The merchant commits to honor this exact price
- The offer hasn't been tampered with since creation
In production, this would be a cryptographic signature using PKI (Public Key Infrastructure) or JWT (JSON Web Tokens). For our educational workshop, we'll simulate this with a SHA-256 hash.
# Production (real signature):
signature = sign_with_private_key(cart_data, merchant_private_key)

# Workshop (simulated signature):
cart_hash = hashlib.sha256(cart_json.encode()).hexdigest()
signature = f"SIG_{cart_hash[:16]}"
Our Mission: Build the Merchant Agent
The Merchant Agent will:
- Read the IntentMandate from state (what Shopping Agent wrote)
- Validate that the intent hasn't expired
- Extract the charity name, amount, and other details
- Create a W3C-compliant PaymentRequest structure using AP2 Pydantic models
- Wrap it in AP2's CartMandate with expiry
- Add a simulated merchant signature
- Write the CartMandate to state for the Credentials Provider (next module)
Let's build it step by step.
Step 1: Add Expiry Validation Helper
First, let's set up the merchant-related tools file and add a helper to validate IntentMandate expiry.
👉 Open
charity_advisor/tools/merchant_tools.py
Let's add the expiry validation:
👉 Find:
# MODULE_5_STEP_1_ADD_EXPIRY_VALIDATION_HELPER
👉 Replace that single line with:
def _validate_intent_expiry(intent_expiry_str: str) -> tuple[bool, str]:
    """
    Validates that the IntentMandate hasn't expired.

    This is a critical security check - expired intents should not be processed.

    Args:
        intent_expiry_str: The ISO 8601 timestamp string from the IntentMandate.

    Returns:
        (is_valid, error_message): Tuple indicating if intent is still valid.
    """
    try:
        # The .replace('Z', '+00:00') is for compatibility with older Python versions
        expiry_time = datetime.fromisoformat(intent_expiry_str.replace('Z', '+00:00'))
        now = datetime.now(timezone.utc)

        if expiry_time < now:
            return False, f"IntentMandate expired at {intent_expiry_str}"

        time_remaining = expiry_time - now
        logger.info(f"IntentMandate valid. Expires in {time_remaining.total_seconds():.0f} seconds")

        return True, ""

    except (ValueError, TypeError) as e:
        return False, f"Invalid intent_expiry format: {e}"
Step 2: Add Signature Generation Helper
Now let's create a helper that generates the simulated merchant signature.
👉 Find:
# MODULE_5_STEP_2_ADD_SIGNATURE_HELPER
👉 Replace that single line with:
def _generate_merchant_signature(cart_contents: CartContents) -> str:
    """
    Generates a simulated merchant signature for the CartMandate contents.

    In production, this would use PKI or JWT with the merchant's private key.
    For this codelab, we use a SHA-256 hash of the sorted JSON representation.

    Args:
        cart_contents: The Pydantic model of the cart contents to sign.

    Returns:
        Simulated signature string (format: "SIG_" + first 16 chars of hash).
    """
    # Step 1: Dump the Pydantic model to a dictionary. The `mode='json'` argument
    # ensures that complex types like datetimes are serialized correctly.
    cart_contents_dict = cart_contents.model_dump(mode='json')

    # Step 2: Use the standard json library to create a stable, sorted JSON string.
    # separators=(',', ':') removes whitespace for a compact and canonical representation.
    cart_json = json.dumps(cart_contents_dict, sort_keys=True, separators=(',', ':'))

    # Step 3: Generate SHA-256 hash.
    cart_hash = hashlib.sha256(cart_json.encode('utf-8')).hexdigest()

    # Step 4: Create signature in a recognizable format.
    signature = f"SIG_{cart_hash[:16]}"

    logger.info(f"Generated merchant signature: {signature}")
    return signature
Step 3A: Create the Tool Signature and Setup
Now let's start building the main tool. We'll create it incrementally across four substeps. First, the function signature and initial setup.
👉 Find:
# MODULE_5_STEP_3A_CREATE_TOOL_SIGNATURE
👉 Replace that single line with:
async def create_cart_mandate(tool_context: Any) -> Dict[str, Any]:
    """
    Creates a W3C PaymentRequest-compliant CartMandate from the IntentMandate.

    This tool reads the IntentMandate from shared state, validates it, and
    creates a formal, signed offer using the official AP2 Pydantic models.

    Returns:
        Dictionary containing status and the created CartMandate.
    """
    logger.info("Tool called: Creating CartMandate from IntentMandate")

    # MODULE_5_STEP_3B_ADD_VALIDATION_LOGIC
Step 3B: Add Validation Logic
Now let's add the logic to read and validate the IntentMandate using AP2 Pydantic models, and extract the data we need.
👉 Find:
# MODULE_5_STEP_3B_ADD_VALIDATION_LOGIC
👉 Replace that single line with:
    # 1. Read IntentMandate dictionary from state
    intent_mandate_dict = tool_context.state.get("intent_mandate")
    if not intent_mandate_dict:
        logger.error("No IntentMandate found in state")
        return {
            "status": "error",
            "message": "No IntentMandate found. Shopping Agent must create intent first."
        }

    # 2. Parse dictionary into a validated Pydantic model
    try:
        intent_mandate_model = IntentMandate.model_validate(intent_mandate_dict)
    except Exception as e:
        logger.error(f"Could not validate IntentMandate structure: {e}")
        return {"status": "error", "message": f"Invalid IntentMandate structure: {e}"}

    # 3. Validate that the intent hasn't expired (CRITICAL security check)
    is_valid, error_message = _validate_intent_expiry(intent_mandate_model.intent_expiry)
    if not is_valid:
        logger.error(f"IntentMandate validation failed: {error_message}")
        return {"status": "error", "message": error_message}

    # 4. Extract data. Safely access standard fields from the model, and
    # custom fields (like 'amount') from the original dictionary.
    charity_name = intent_mandate_model.merchants[0] if intent_mandate_model.merchants else "Unknown Charity"
    amount = intent_mandate_dict.get("amount", 0.0)

    # MODULE_5_STEP_3C_CREATE_CARTMANDATE_STRUCTURE
Step 3C: Create CartMandate Structure
Now let's build the W3C-compliant PaymentRequest structure and wrap it in the AP2 CartMandate using Pydantic models.
👉 Find:
# MODULE_5_STEP_3C_CREATE_CARTMANDATE_STRUCTURE
👉 Replace that single line with:
    # 5. Build the nested Pydantic models for the CartMandate
    timestamp = datetime.now(timezone.utc)
    cart_id = f"cart_{hashlib.sha256(f'{charity_name}{timestamp.isoformat()}'.encode()).hexdigest()[:12]}"
    cart_expiry = timestamp + timedelta(minutes=15)

    payment_request_model = PaymentRequest(
        method_data=[PaymentMethodData(
            supported_methods="CARD",
            data={"supported_networks": ["visa", "mastercard", "amex"], "supported_types": ["debit", "credit"]}
        )],
        details=PaymentDetailsInit(
            id=f"order_{cart_id}",
            display_items=[PaymentItem(
                label=f"Donation to {charity_name}",
                amount=PaymentCurrencyAmount(currency="USD", value=amount)  # Pydantic v2 handles float -> str conversion
            )],
            total=PaymentItem(
                label="Total Donation",
                amount=PaymentCurrencyAmount(currency="USD", value=amount)
            )
        ),
        options=PaymentOptions(request_shipping=False)
    )

    cart_contents_model = CartContents(
        id=cart_id,
        cart_expiry=cart_expiry.isoformat(),
        merchant_name=charity_name,
        user_cart_confirmation_required=False,
        payment_request=payment_request_model
    )

    # MODULE_5_STEP_3D_ADD_SIGNATURE_AND_SAVE
Step 3D: Add Signature and Save to State
Finally, let's sign the CartMandate using our Pydantic model and save it to state for the next agent.
👉 Find:
# MODULE_5_STEP_3D_ADD_SIGNATURE_AND_SAVE
👉 Replace that single line with:
# 6. Generate signature from the validated Pydantic model
signature = _generate_merchant_signature(cart_contents_model)
# 7. Create the final CartMandate model, now including the signature
cart_mandate_model = CartMandate(
    contents=cart_contents_model,
    merchant_authorization=signature
)
# 8. Convert the final model to a dictionary for state storage and add the custom timestamp
cart_mandate_dict = cart_mandate_model.model_dump(mode='json')
cart_mandate_dict["timestamp"] = timestamp.isoformat()
# 9. Write the final dictionary to state
tool_context.state["cart_mandate"] = cart_mandate_dict
logger.info(f"CartMandate created successfully: {cart_id}")
return {
"status": "success",
"message": f"Created signed CartMandate {cart_id} for ${amount:.2f} donation to {charity_name}",
"cart_id": cart_id,
"cart_expiry": cart_expiry.isoformat(),
"signature": signature
}
Step 4: Build the Merchant Agent - Import Components
Now let's create the agent that will use this tool.
👉 Open
charity_advisor/merchant_agent/agent.py
You'll see a template with placeholder markers. Let's start by importing what we need.
👉 Find:
# MODULE_5_STEP_4_IMPORT_COMPONENTS
👉 Replace that single line with:
from google.adk.agents import Agent
from google.adk.tools import FunctionTool
from charity_advisor.tools.merchant_tools import create_cart_mandate
Step 5: Write the Merchant Agent Instruction
Now let's write the instruction that tells the agent when and how to use its tool.
👉 Find:
# MODULE_5_STEP_5_WRITE_INSTRUCTION
instruction="""""",
👉 Replace those two lines with:
    instruction="""You are a merchant specialist responsible for creating formal, signed offers (CartMandates).

Your workflow:

1. Read the IntentMandate from shared state.
   The IntentMandate was created by the Shopping Agent and contains:
   - merchants: List of merchant names
   - amount: Donation amount
   - charity_ein: Tax ID
   - intent_expiry: When the intent expires

2. Use the create_cart_mandate tool to create a W3C PaymentRequest-compliant CartMandate.
   This tool will:
   - Validate the IntentMandate hasn't expired (CRITICAL security check)
   - Extract the charity name and amount from the IntentMandate
   - Create a structured offer with payment methods, transaction details, and merchant info
   - Generate a merchant signature to prove authenticity
   - Save the CartMandate to state for the payment processor

3. After creating the CartMandate, inform the user:
   - That you've created a formal, signed offer
   - The cart ID
   - When the cart expires (15 minutes)
   - That you're passing it to the secure payment processor

IMPORTANT BOUNDARIES:
- Your ONLY job is creating signed CartMandates from valid IntentMandates
- You do NOT process payments
- You do NOT see the user's payment methods or credentials
- You do NOT interact with payment networks
- You MUST validate that the IntentMandate hasn't expired before creating a cart
- After calling create_cart_mandate, your work is done

WHAT IS A CARTMANDATE:
A CartMandate is a binding commitment that says:
"I, the merchant, commit to accepting $X for this charity donation, and I prove it with my signature."

This commitment is structured using the W3C PaymentRequest standard and includes:
- Payment methods accepted (card, bank transfer)
- Transaction details (amount, charity name)
- Cart expiry (15 minutes from creation)
- Merchant signature (proof of commitment)

This is the second of three verifiable credentials in our secure payment system.""",
Step 6: Add Tools to the Merchant Agent
👉 Find:
# MODULE_5_STEP_6_ADD_TOOLS
tools=[],
👉 Replace those two lines with:
    tools=[
        FunctionTool(func=create_cart_mandate)
    ],
Step 7: Verify the Complete Merchant Agent
Let's confirm everything is wired correctly.
👉 Your complete
charity_advisor/merchant_agent/agent.py
should now look like this:
"""
Merchant Agent - Creates W3C-compliant CartMandates with merchant signatures.
This agent acts as our "Contract Creator."
"""

from google.adk.agents import Agent
from google.adk.tools import FunctionTool
from charity_advisor.tools.merchant_tools import create_cart_mandate


merchant_agent = Agent(
    name="MerchantAgent",
    model="gemini-2.5-flash",
    description="Creates formal, signed CartMandates for charity donations following W3C PaymentRequest standards.",
    tools=[
        FunctionTool(func=create_cart_mandate)
    ],
    instruction="""You are a merchant specialist responsible for creating formal, signed offers (CartMandates).

Your workflow:

1. Read the IntentMandate from shared state.
   The IntentMandate was created by the Shopping Agent and contains:
   - merchants: List of merchant names
   - amount: Donation amount
   - charity_ein: Tax ID
   - intent_expiry: When the intent expires

2. Use the create_cart_mandate tool to create a W3C PaymentRequest-compliant CartMandate.
   This tool will:
   - Validate the IntentMandate hasn't expired (CRITICAL security check)
   - Extract the charity name and amount from the IntentMandate
   - Create a structured offer with payment methods, transaction details, and merchant info
   - Generate a merchant signature to prove authenticity
   - Save the CartMandate to state for the payment processor

3. After creating the CartMandate, inform the user:
   - That you've created a formal, signed offer
   - The cart ID
   - When the cart expires (15 minutes)
   - That you're passing it to the secure payment processor

IMPORTANT BOUNDARIES:
- Your ONLY job is creating signed CartMandates from valid IntentMandates
- You do NOT process payments
- You do NOT see the user's payment methods or credentials
- You do NOT interact with payment networks
- You MUST validate that the IntentMandate hasn't expired before creating a cart
- After calling create_cart_mandate, your work is done

WHAT IS A CARTMANDATE:
A CartMandate is a binding commitment that says:
"I, the merchant, commit to accepting $X for this charity donation, and I prove it with my signature."

This commitment is structured using the W3C PaymentRequest standard and includes:
- Payment methods accepted (card, bank transfer)
- Transaction details (amount, charity name)
- Cart expiry (15 minutes from creation)
- Merchant signature (proof of commitment)

This is the second of three verifiable credentials in our secure payment system."""
)
✅ Checkpoint : You now have a complete Merchant Agent with proper AP2 CartMandate creation using Pydantic models.
Step 8: Test the Merchant Agent
Now let's verify that our agent correctly creates CartMandates with signatures and validates expiry.
Test Setup: Run the Test Script
👉 In your Cloud Shell terminal, run:
python scripts/test_merchant.py
প্রত্যাশিত আউটপুট:
======================================================================
MERCHANT AGENT TEST
======================================================================

Simulated IntentMandate from Shopping Agent:
  charity: Room to Read
  amount: $50.00
  expiry: 2024-11-07T16:32:16Z

----------------------------------------------------------------------
Merchant Agent Response:
----------------------------------------------------------------------
Perfect! I've received your IntentMandate and created a formal, signed offer (CartMandate) for your donation.

**CartMandate Details:**
- **Cart ID**: cart_3b4c5d6e7f8a
- **Donation Amount**: $50.00 to Room to Read
- **Payment Methods Accepted**: Credit/debit cards (Visa, Mastercard, Amex) or bank transfer
- **Cart Expires**: 2024-11-07T15:47:16Z (in 15 minutes)
- **Merchant Signature**: SIG_a3f7b2c8d9e1f4a2

This signed CartMandate proves my commitment to accept this donation amount. I'm now passing this to the secure payment processor to complete your transaction.

======================================================================
CARTMANDATE CREATED:
======================================================================
  ID: cart_3b4c5d6e7f8a
  Amount: 50.00
  Merchant: Room to Read
  Expires: 2024-11-07T15:47:16Z
  Signature: SIG_a3f7b2c8d9e1f4a2
======================================================================
Test 2: Verify W3C Compliance
Let's validate that our CartMandate structure is fully compliant with both AP2 and W3C PaymentRequest standards.
👉 Run the validation script:
python scripts/validate_cartmandate.py
প্রত্যাশিত আউটপুট:
======================================================================
AP2 & W3C PAYMENTREQUEST VALIDATION
======================================================================
✅ CartMandate is AP2 and W3C PaymentRequest compliant

Structure validation passed:
  ✓ AP2 'contents' wrapper present
  ✓ AP2 'merchant_authorization' signature present
  ✓ cart_expiry present
  ✓ payment_request nested inside contents
  ✓ method_data present and valid
  ✓ details.total.amount present with currency and value
  ✓ All required W3C PaymentRequest fields present
======================================================================
What You Just Built
You've successfully implemented AP2's CartMandate using Pydantic models for proper structure, expiry validation, and merchant signatures.
Key Concepts Mastered
✅ CartMandate (AP2 Credential #2):
- Created using official AP2 Pydantic models
- AP2 structure with contents wrapper
- W3C PaymentRequest nested inside
- Cart expiry (shorter than intent)
- Merchant signature for binding commitment
- Model validation ensures spec compliance
✅ Expiry Validation:
- Reading IntentMandate from state
- Validating structure with
IntentMandate.model_validate() - Parsing ISO 8601 timestamps
- Comparing to current time
- Security feature preventing stale processing
✅ Merchant Signature:
- Proves authenticity and commitment
- Generated from validated Pydantic model
- Uses
model_dump(mode='json')for canonical representation - Simulated with SHA-256 for education
- Production uses PKI/JWT
- Signs the contents model, not dictionaries
✅ W3C PaymentRequest:
- Built using AP2's PaymentRequest Pydantic model
- Industry standard for payment data
- Nested inside AP2 structure
- Contains method_data, details, options
- Enables interoperability
✅ Credential Chain with Models:
- Shopping → IntentMandate (validated)
- Merchant reads IntentMandate → CartMandate (both models validated)
- Credentials Provider will read CartMandate → PaymentMandate
- Each step validates previous credential using Pydantic
✅ Model-Driven Development:
- Input validation via
model_validate() - Type-safe construction
- Automatic serialization via
model_dump() - Production-ready patterns
What's Next
In the next module, we'll build the Credentials Provider to process payments securely.
The Merchant Agent has created a binding offer with expiry using AP2 models. Now we need an agent to read that CartMandate, get user consent, and execute the payment.
Let's build the Credentials Provider and complete the AP2 credential chain.
6. Building the Credentials Provider - Secure Payment Execution

From Binding Offer to Payment Execution
In Module 5, you built the Merchant Agent—a specialist that reads IntentMandates, validates they haven't expired, and creates binding CartMandates with merchant signatures. Now we need an agent to receive that CartMandate and execute the actual payment.
This is where AP2's third and final principle comes into play: secure payment execution through PaymentMandate .
AP2 Principle: PaymentMandate & Payment Execution
Why We Need a Credentials Provider Role
In Module 5, the Merchant Agent created a CartMandate and saved it to state:
state["cart_mandate"] = {
    "contents": {
        "id": "cart_abc123",
        "cart_expiry": "2025-11-07:15:47:16Z",
        "payment_request": {
            "details": {
                "total": {
                    "amount": {"currency": "USD", "value": "50.00"}
                }
            }
        }
    },
    "merchant_authorization": "SIG_a3f7b2c8"
}
But this is just a binding offer. Before payment can be executed, we need:
- Validation that the cart hasn't expired
- User consent to proceed with payment
- A credential that authorizes payment execution
- Actual payment processing (or simulation for our workshop)
This is the Credentials Provider's job.
What is a PaymentMandate?
A PaymentMandate is AP2's term for the final authorization that allows payment to be executed. It's the third and final verifiable credential in the AP2 chain.
Think of the three credentials like a contract signing process:
- IntentMandate : "I'm interested in buying this" (Letter of intent)
- CartMandate : "I, the merchant, offer to sell at this price" (Written quote)
- PaymentMandate : "I authorize you to charge my payment method" (Signed contract)
Only after all three credentials exist can payment be executed.

The Structure of a PaymentMandate
A PaymentMandate in AP2 has a specific structure:
payment_mandate = {
    "payment_mandate_contents": {  # ← AP2 wrapper
        "payment_mandate_id": "payment_xyz123",
        "payment_details_id": "cart_abc123",  # Links to CartMandate
        "user_consent": True,
        "consent_timestamp": "2025-11-07T15:48:00Z",
        "amount": {
            "currency": "USD",
            "value": "50.00"
        },
        "merchant_name": "Room to Read"
    },
    "agent_present": True,  # Human-in-the-loop flow
    "timestamp": "2025-11-07T15:48:00Z"
}
Key components:
1. payment_mandate_contents - The authorization wrapper containing:
- payment_mandate_id: Unique identifier
- payment_details_id: Links back to CartMandate
- user_consent: Whether user approved
- amount: Payment amount (extracted from CartMandate)
2. agent_present - Whether this is a human-in-the-loop flow
3. timestamp - When authorization was created
Our Mission: Build the Credentials Provider
The Credentials Provider will:
- Read the CartMandate from state (what Merchant Agent wrote)
- Validate that the cart hasn't expired using AP2 Pydantic models
- Extract payment details from the nested structure
- Create a PaymentMandate with user consent using AP2 models
- Simulate payment processing (in production, would call real payment API)
- Write the PaymentMandate and payment result to state
Let's build it step by step.
Step 1: Add Cart Expiry Validation Helper
First, let's create a helper that validates the CartMandate hasn't expired—just like we validated IntentMandate expiry in Module 5.
👉 Open
charity_advisor/tools/payment_tools.py
Let's add the expiry validation:
👉 Find:
# MODULE_6_STEP_1_ADD_CART_EXPIRY_VALIDATION_HELPER
👉 Replace that single line with:
def _validate_cart_expiry(cart: CartMandate) -> tuple[bool, str]:
    """
    Validates that the CartMandate hasn't expired.

    This is a critical security check - expired carts should not be processed.

    Args:
        cart: The Pydantic CartMandate model to validate.

    Returns:
        (is_valid, error_message): Tuple indicating if cart is still valid.
    """
    try:
        expiry_str = cart.contents.cart_expiry
        expiry_time = datetime.fromisoformat(expiry_str.replace('Z', '+00:00'))
        now = datetime.now(timezone.utc)

        if expiry_time < now:
            return False, f"CartMandate expired at {expiry_str}"

        time_remaining = expiry_time - now
        logger.info(f"CartMandate valid. Expires in {time_remaining.total_seconds():.0f} seconds")

        return True, ""

    except (ValueError, TypeError, AttributeError) as e:
        return False, f"Invalid cart_expiry format or structure: {e}"
Step 2: Add PaymentMandate Creation Helper
Now let's create a helper that builds the PaymentMandate structure using official AP2 Pydantic models.
👉 Find:
# MODULE_6_STEP_2_ADD_PAYMENT_MANDATE_CREATION_HELPER
👉 Replace that single line with:
def _create_payment_mandate(cart: CartMandate, consent_granted: bool) -> dict:
    """
    Creates a PaymentMandate using the official AP2 Pydantic models.

    It links to the CartMandate and includes user consent status.

    Args:
        cart: The validated Pydantic CartMandate model being processed.
        consent_granted: Whether the user has consented to the payment.

    Returns:
        A dictionary representation of the final, validated PaymentMandate.
    """
    timestamp = datetime.now(timezone.utc)

    # Safely extract details from the validated CartMandate model
    cart_id = cart.contents.id
    merchant_name = cart.contents.merchant_name
    total_item = cart.contents.payment_request.details.total

    # Create the nested PaymentResponse model for the mandate
    payment_response_model = PaymentResponse(
        request_id=cart_id,
        method_name="CARD",  # As per the simulated flow
        details={"token": "simulated_payment_token_12345"}
    )

    # Create the PaymentMandateContents model
    payment_mandate_contents_model = PaymentMandateContents(
        payment_mandate_id=f"payment_{hashlib.sha256(f'{cart_id}{timestamp.isoformat()}'.encode()).hexdigest()[:12]}",
        payment_details_id=cart_id,
        payment_details_total=total_item,
        payment_response=payment_response_model,
        merchant_agent=merchant_name,
        timestamp=timestamp.isoformat()
    )

    # Create the top-level PaymentMandate model
    # In a real system, a user signature would be added to this model
    payment_mandate_model = PaymentMandate(
        payment_mandate_contents=payment_mandate_contents_model
    )

    # Convert the final Pydantic model to a dictionary for state storage
    final_dict = payment_mandate_model.model_dump(mode='json')

    # Add any custom/non-standard fields required by the codelab's logic to the dictionary
    # The spec does not have these fields, but your original code did. We add them
    # back to ensure compatibility with later steps.
    final_dict['payment_mandate_contents']['user_consent'] = consent_granted
    final_dict['payment_mandate_contents']['consent_timestamp'] = timestamp.isoformat() if consent_granted else None
    final_dict['agent_present'] = True

    return final_dict
Step 3A: Create the Tool Signature and Setup
Now let's start building the main tool incrementally. First, the function signature and initial setup.
👉 Find:
# MODULE_6_STEP_3A_CREATE_TOOL_SIGNATURE
👉 Replace that single line with:
async def create_payment_mandate(tool_context: Any) -> Dict[str, Any]:
    """
    Creates a PaymentMandate and simulates payment processing using Pydantic models.

    This tool now reads the CartMandate from state, parses it into a validated model,
    and creates a spec-compliant PaymentMandate.
    """
    logger.info("Tool called: Creating PaymentMandate and processing payment")

    # MODULE_6_STEP_3B_VALIDATE_CARTMANDATE
Step 3B: Validate CartMandate
Now let's add the logic to read, validate the CartMandate using AP2 Pydantic models, and check expiry.
👉 Find:
# MODULE_6_STEP_3B_VALIDATE_CARTMANDATE
👉 Replace that single line with:
    # 1. Read CartMandate dictionary from state
    cart_mandate_dict = tool_context.state.get("cart_mandate")
    if not cart_mandate_dict:
        logger.error("No CartMandate found in state")
        return { "status": "error", "message": "No CartMandate found. Merchant Agent must create cart first." }

    # 2. Parse dictionary into a validated Pydantic model
    try:
        cart_model = CartMandate.model_validate(cart_mandate_dict)
    except Exception as e:
        logger.error(f"Could not validate CartMandate structure: {e}")
        return {"status": "error", "message": f"Invalid CartMandate structure: {e}"}

    # 3. Validate that the cart hasn't expired using the Pydantic model
    is_valid, error_message = _validate_cart_expiry(cart_model)
    if not is_valid:
        logger.error(f"CartMandate validation failed: {error_message}")
        return {"status": "error", "message": error_message}

    # MODULE_6_STEP_3C_EXTRACT_PAYMENT_DETAILS
Step 3C: Extract Payment Details from Nested Structure
Now let's navigate the validated CartMandate model to extract the payment details we need.
👉 Find:
# MODULE_6_STEP_3C_EXTRACT_PAYMENT_DETAILS
👉 Replace that single line with:
    # 4. Safely extract data from the validated model
    cart_id = cart_model.contents.id
    merchant_name = cart_model.contents.merchant_name
    amount_value = cart_model.contents.payment_request.details.total.amount.value
    currency = cart_model.contents.payment_request.details.total.amount.currency
    consent_granted = True  # Assume consent for this codelab flow

    # MODULE_6_STEP_3D_CREATE_PAYMENTMANDATE_AND_SIMULATE
Step 3D: Create PaymentMandate and Simulate Payment
Finally, let's create the PaymentMandate using our Pydantic-based helper, simulate payment processing, and save everything to state.
👉 Find:
# MODULE_6_STEP_3D_CREATE_PAYMENTMANDATE_AND_SIMULATE
👉 Replace that single line with:
    # 5. Create the spec-compliant PaymentMandate using the validated CartMandate model
    payment_mandate_dict = _create_payment_mandate(cart_model, consent_granted)

    # 6. Simulate payment processing
    transaction_id = f"txn_{hashlib.sha256(f'{cart_id}{datetime.now(timezone.utc).isoformat()}'.encode()).hexdigest()[:16]}"
    payment_result = {
        "transaction_id": transaction_id,
        "status": "completed",
        "amount": amount_value,
        "currency": currency,
        "merchant": merchant_name,
        "timestamp": datetime.now(timezone.utc).isoformat(),
        "simulation": True
    }

    # 7. Write the compliant PaymentMandate dictionary and result to state
    tool_context.state["payment_mandate"] = payment_mandate_dict
    tool_context.state["payment_result"] = payment_result

    logger.info(f"Payment processed successfully: {transaction_id}")

    return {
        "status": "success",
        "message": f"Payment of {currency} {amount_value:.2f} to {merchant_name} processed successfully",
        "transaction_id": transaction_id,
        "payment_mandate_id": payment_mandate_dict["payment_mandate_contents"]["payment_mandate_id"]
    }
Step 4: Build the Credentials Provider Agent - Import Components
Now let's create the agent that uses this tool.
👉 Open
charity_advisor/credentials_provider/agent.py
You'll see a template with placeholder markers. Let's start by importing what we need.
👉 Find:
# MODULE_6_STEP_4_IMPORT_COMPONENTS
👉 Replace that single line with:
from google.adk.agents import Agent
from google.adk.tools import FunctionTool
from charity_advisor.tools.payment_tools import create_payment_mandate
Step 5: Write the Credentials Provider Instruction
Now let's write the instruction that guides the agent.
👉 Find:
# MODULE_6_STEP_5_WRITE_INSTRUCTION
instruction="""""",
👉 Replace those two lines with:
    instruction="""You are a payment specialist responsible for securely processing payments with user consent.

Your workflow:

1. Read the CartMandate from shared state.
   The CartMandate was created by the Merchant Agent and has this structure:
   - contents: AP2 wrapper containing:
     - id: Cart identifier
     - cart_expiry: When the cart expires
     - merchant_name: Who is receiving payment
     - payment_request: W3C PaymentRequest with transaction details
   - merchant_authorization: Merchant's signature

2. Extract payment details from the nested structure:
   - Navigate: cart_mandate["contents"]["payment_request"]["details"]["total"]["amount"]
   - This gives you the currency and value

3. **IMPORTANT - Two-Turn Conversational Confirmation Pattern:**
   Before calling create_payment_mandate, you MUST:
   - Present the payment details clearly to the user
   - Ask explicitly: "I'm ready to process a payment of $X to [Charity Name]. Do you want to proceed with this donation?"
   - WAIT for the user's explicit confirmation (e.g., "yes", "proceed", "confirm")
   - ONLY call create_payment_mandate AFTER receiving explicit confirmation
   - If user says "no" or "cancel", DO NOT call the tool

4. After user confirms, use the create_payment_mandate tool to:
   - Validate the CartMandate hasn't expired (CRITICAL security check)
   - Create a PaymentMandate (the third AP2 credential)
   - Simulate payment processing
   - Record the transaction result

5. After processing, inform the user:
   - That payment was processed successfully (this is a simulation)
   - The transaction ID
   - The amount and merchant
   - That this completes the three-agent AP2 credential chain

IMPORTANT BOUNDARIES:
- Your ONLY job is creating PaymentMandates and processing payments
- You do NOT discover charities (that's Shopping Agent's job)
- You do NOT create offers (that's Merchant Agent's job)
- You MUST validate that the CartMandate hasn't expired before processing
- You MUST get explicit user confirmation before calling create_payment_mandate
- In production, this consent mechanism would be even more robust

WHAT IS A PAYMENTMANDATE:
A PaymentMandate is the final credential that authorizes payment execution. It:
- Links to the CartMandate (proving the merchant's offer)
- Records user consent
- Contains payment details extracted from the CartMandate
- Enables the actual payment transaction

This is the third and final verifiable credential in our secure payment system.

THE COMPLETE AP2 CREDENTIAL CHAIN:
1. Shopping Agent creates IntentMandate (user's intent)
2. Merchant Agent reads IntentMandate, creates CartMandate (merchant's binding offer)
3. You read CartMandate, get user confirmation, create PaymentMandate (authorized payment execution)

Each credential:
- Has an expiry time (security feature)
- Links to the previous credential
- Is validated before the next step
- Creates an auditable chain of trust""",
Step 6: Add Tools to the Credentials Provider
👉 Find:
# MODULE_6_STEP_6_ADD_TOOLS
tools=[],
👉 Replace those two lines with:
    tools=[
        FunctionTool(func=create_payment_mandate)
    ],
Step 7: Verify the Complete Credentials Provider
Let's confirm everything is wired correctly.
👉 Your complete
charity_advisor/credentials_provider/agent.py
should now look like this:
"""
Credentials Provider Agent - Handles payment processing with user consent.
This agent acts as our "Payment Processor."
"""

from google.adk.agents import Agent
from google.adk.tools import FunctionTool
from charity_advisor.tools.payment_tools import create_payment_mandate


credentials_provider = Agent(
    name="CredentialsProvider",
    model="gemini-2.5-flash",
    description="Securely processes payments by creating PaymentMandates and executing transactions with user consent.",
    tools=[
        FunctionTool(func=create_payment_mandate)
    ],
    instruction="""You are a payment specialist responsible for securely processing payments with user consent.

Your workflow:

1. Read the CartMandate from shared state.
   The CartMandate was created by the Merchant Agent and has this structure:
   - contents: AP2 wrapper containing:
     - id: Cart identifier
     - cart_expiry: When the cart expires
     - merchant_name: Who is receiving payment
     - payment_request: W3C PaymentRequest with transaction details
   - merchant_authorization: Merchant's signature

2. Extract payment details from the nested structure:
   - Navigate: cart_mandate["contents"]["payment_request"]["details"]["total"]["amount"]
   - This gives you the currency and value

3. **IMPORTANT - Two-Turn Conversational Confirmation Pattern:**
   Before calling create_payment_mandate, you MUST:
   - Present the payment details clearly to the user
   - Ask explicitly: "I'm ready to process a payment of $X to [Charity Name]. Do you want to proceed with this donation?"
   - WAIT for the user's explicit confirmation (e.g., "yes", "proceed", "confirm")
   - ONLY call create_payment_mandate AFTER receiving explicit confirmation
   - If user says "no" or "cancel", DO NOT call the tool

4. After user confirms, use the create_payment_mandate tool to:
   - Validate the CartMandate hasn't expired (CRITICAL security check)
   - Create a PaymentMandate (the third AP2 credential)
   - Simulate payment processing
   - Record the transaction result

5. After processing, inform the user:
   - That payment was processed successfully (this is a simulation)
   - The transaction ID
   - The amount and merchant
   - That this completes the three-agent AP2 credential chain

IMPORTANT BOUNDARIES:
- Your ONLY job is creating PaymentMandates and processing payments
- You do NOT discover charities (that's Shopping Agent's job)
- You do NOT create offers (that's Merchant Agent's job)
- You MUST validate that the CartMandate hasn't expired before processing
- You MUST get explicit user confirmation before calling create_payment_mandate
- In production, this consent mechanism would be even more robust

WHAT IS A PAYMENTMANDATE:
A PaymentMandate is the final credential that authorizes payment execution. It:
- Links to the CartMandate (proving the merchant's offer)
- Records user consent
- Contains payment details extracted from the CartMandate
- Enables the actual payment transaction

This is the third and final verifiable credential in our secure payment system.

THE COMPLETE AP2 CREDENTIAL CHAIN:
1. Shopping Agent creates IntentMandate (user's intent)
2. Merchant Agent reads IntentMandate, creates CartMandate (merchant's binding offer)
3. You read CartMandate, get user confirmation, create PaymentMandate (authorized payment execution)

Each credential:
- Has an expiry time (security feature)
- Links to the previous credential
- Is validated before the next step
- Creates an auditable chain of trust"""
)
✅ Checkpoint : You now have a complete Credentials Provider with proper CartMandate reading and PaymentMandate creation using AP2 Pydantic models.
Step 8: Test the Credentials Provider
Now let's verify that our agent correctly processes payments and completes the credential chain.
👉 In your Cloud Shell terminal, run:
python scripts/test_credentials_provider.py
প্রত্যাশিত আউটপুট:
======================================================================
CREDENTIALS PROVIDER TEST (MOCK - NO CONFIRMATION)
======================================================================

Simulated CartMandate from Merchant Agent:
  - Cart ID: cart_test123
  - Merchant: Room to Read
  - Amount: $50.00
  - Expires: 2025-11-07T15:47:16Z
  - Signature: SIG_test_signature

Calling Credentials Provider to process payment...
======================================================================
INFO:charity_advisor.tools.payment_tools:Tool called: Creating PaymentMandate and processing payment
INFO:charity_advisor.tools.payment_tools:CartMandate valid. Expires in 900 seconds
INFO:charity_advisor.tools.payment_tools:Payment processed successfully: txn_a3f7b2c8d9e1f4a2

======================================================================
CREDENTIALS PROVIDER RESPONSE:
======================================================================
I've successfully processed your payment. Here are the details:

**Payment Completed** (Simulated)
- Transaction ID: txn_a3f7b2c8d9e1f4a2
- Amount: USD 50.00
- Merchant: Room to Read
- Status: Completed

This completes the three-agent AP2 credential chain:
1. ✓ Shopping Agent created IntentMandate (your intent)
2. ✓ Merchant Agent created CartMandate (binding offer)
3. ✓ Credentials Provider created PaymentMandate (payment authorization)

Your donation has been processed securely through our verifiable credential system.

======================================================================
PAYMENTMANDATE CREATED:
======================================================================
  Payment Mandate ID: payment_3b4c5d6e7f8a
  Linked to Cart: cart_test123
  User Consent: True
  Amount: USD 50.00
  Merchant: Room to Read
  Agent Present: True
======================================================================

======================================================================
PAYMENT RESULT:
======================================================================
  Transaction ID: txn_a3f7b2c8d9e1f4a2
  Status: completed
  Amount: USD 50.00
  Merchant: Room to Read
  Simulation: True
======================================================================
Step 9: Test the Complete Three-Agent Pipeline
Now let's test all three agents working together!
👉 Run the full pipeline test:
python scripts/test_full_pipeline.py
প্রত্যাশিত আউটপুট:
======================================================================
THREE-AGENT PIPELINE TEST (AP2 CREDENTIAL CHAIN)
======================================================================

[1/3] SHOPPING AGENT - Finding charity and creating IntentMandate...
----------------------------------------------------------------------
✓ IntentMandate created
  - Intent ID: intent_774799058_1730927536
  - Description: Donate $75.00 to Room to Read
  - Merchant: Room to Read
  - Amount: $75.0
  - Expires: 2025-11-07T16:32:16Z

[2/3] MERCHANT AGENT - Reading IntentMandate and creating CartMandate...
----------------------------------------------------------------------
✓ CartMandate created
  - ID: cart_3b4c5d6e7f8a
  - Expires: 2025-11-07T15:47:16Z
  - Signature: SIG_a3f7b2c8d9e1f4a2

[3/3] CREDENTIALS PROVIDER - Creating PaymentMandate and processing...
----------------------------------------------------------------------
NOTE: In the web UI, this would show a confirmation dialog
      For this test, consent is automatically granted
✓ Payment processed (SIMULATED)
  - Transaction ID: txn_a3f7b2c8d9e1f4a2
  - Amount: $75.0
  - Status: completed

======================================================================
COMPLETE AP2 CREDENTIAL CHAIN
======================================================================

✓ Credential 1: IntentMandate (User's Intent)
  - Intent ID: intent_774799058_1730927536
  - Description: Donate $75.00 to Room to Read
  - Expiry: 2025-11-07T16:32:16Z

✓ Credential 2: CartMandate (Merchant's Offer)
  - Cart ID: cart_3b4c5d6e7f8a
  - Cart Expiry: 2025-11-07T15:47:16Z
  - Merchant Signature: SIG_a3f7b2c8d9e1f4a2

✓ Credential 3: PaymentMandate (Payment Execution)
  - Payment Mandate ID: payment_3b4c5d6e7f8a
  - Linked to Cart: cart_3b4c5d6e7f8a
  - Agent Present: True

✓ Transaction Result:
  - Transaction ID: txn_a3f7b2c8d9e1f4a2
  - Simulation: True

======================================================================
✅ COMPLETE PIPELINE TEST PASSED
======================================================================
This is the complete AP2 credential chain in action!
Each agent:
- Reads a credential from state
- Validates it using Pydantic models (structure + expiry check)
- Creates the next credential using AP2 models
- Writes to state for the next agent
What You Just Built
You've successfully completed the AP2 three-agent credential chain with proper structure validation using Pydantic models and payment simulation.
Key Concepts Mastered
✅ PaymentMandate (AP2 Credential #3):
- Created using official AP2 Pydantic models
- Final credential authorizing payment execution
- Links to CartMandate via payment_details_id
- Records user consent and timestamp
- Contains payment amount extracted from CartMandate
- Includes agent_present flag for human-in-the-loop
- Model validation ensures spec compliance
✅ Reading from CartMandate:
- Validate structure with
CartMandate.model_validate() - Type-safe attribute access:
cart_model.contents.payment_request.details.total.amount - Understand AP2 wrapper vs W3C standard separation
- Extract merchant_name, amount, currency safely from model
- Pydantic catches structure errors automatically
✅ Cart Expiry Validation:
- Accepts validated
CartMandatePydantic model - Reads from
cart.contents.cart_expiry(attribute access) - Security feature preventing stale cart processing
- Shorter duration (15 min) than intent (1 hour)
✅ Payment Simulation:
- Educational mock of real payment processor
- Generates transaction ID
- Records payment_result in state
- Clearly marked as simulation (simulation: True flag)
✅ Complete AP2 Chain with Models:
- Three agents, three credentials, three Pydantic validations
- Each agent validates previous credential's structure using models
- Each credential links to previous for audit trail
- State-based handoffs maintain role separation
- Type safety throughout the chain
✅ Model-Driven Development:
- Input validation via
model_validate() - Type-safe construction with nested models
- Automatic serialization via
model_dump(mode='json') - Production-ready patterns from the start
What's Next
In the next module, we'll build the Orchestrator Agent that coordinates all three specialist agents.
You've built three powerful specialist agents using AP2 Pydantic models. Now let's build the conductor that orchestrates them into a seamless donation experience.
Let's build the Orchestrator and see the complete system in action.
7. Orchestration - Bringing It All Together

From Specialists to Seamless Experience
In the previous modules, you built three specialized agents:
- Shopping Agent : Finds charities, creates IntentMandate
- Merchant Agent : Creates CartMandate from IntentMandate
- Credentials Provider : Creates PaymentMandate, processes payment
These agents naturally fall into two phases:
- Phase 1 (Shopping) : Multi-turn conversation to find and select charity
- Phase 2 (Processing) : Atomic execution of offer creation and payment
But right now, you'd have to manually orchestrate these phases yourself.
This is where ADK's orchestration patterns shine.
AP2 Principle: Orchestration Enforces Trust Boundaries
Why Orchestration Matters for Security
Orchestration isn't just about convenience—it's about enforcing trust boundaries through architecture.
Without orchestration:
# User could accidentally skip steps or reorder them
shopping_agent.run("Find charity")
# Oops, forgot to create CartMandate!
credentials_provider.run("Process payment")  # No offer to validate!
With orchestration:
# Pipeline enforces correct order
donation_processing_pipeline = SequentialAgent(
    sub_agents=[
        merchant_agent,      # Must run first
        credentials_provider # Must run second
    ]
)
# Steps ALWAYS run in order, no skipping allowed
The sequential pipeline guarantees:
- ✅ IntentMandate created before CartMandate
- ✅ CartMandate created before payment processing
- ✅ Each agent runs in its isolated context
- ✅ State flows forward through the credential chain
Our Mission: Build the Complete System
We'll build two layers:
Layer 1: The Processing Pipeline (SequentialAgent)
- Wires together Merchant → Credentials
- Runs automatically in sequence after charity is selected
- Atomic execution of offer and payment
Layer 2: The Root Orchestrator (user-facing Agent)
- Friendly personality
- Delegates to shopping_agent for charity selection
- Delegates to processing pipeline after IntentMandate is created
- Handles conversation and phase transitions
This two-layer approach matches the natural flow:
- Shopping Phase : Multi-turn conversation (user browses, asks questions, decides)
- Processing Phase : Atomic execution (offer → payment)
Let's build both.
Step 1: Import Orchestration Components
First, let's set up the orchestration file with the necessary imports.
👉 Open
charity_advisor/agent.py
Let's start with imports:
👉 Find:
# MODULE_7_STEP_1_IMPORT_COMPONENTS
👉 Replace that single line with:
from google.adk.agents import Agent, SequentialAgent
from charity_advisor.shopping_agent.agent import shopping_agent
from charity_advisor.merchant_agent.agent import merchant_agent
from charity_advisor.credentials_provider.agent import credentials_provider
Step 2: Create the Processing Pipeline
Now let's create the pipeline that runs offer creation and payment processing atomically.
👉 Find:
# MODULE_7_STEP_2_CREATE_SEQUENTIAL_PIPELINE
👉 Replace those two lines with:
# Create the donation processing pipeline
# This runs Merchant → Credentials in sequence AFTER charity is selected
donation_processing_pipeline = SequentialAgent(
name="DonationProcessingPipeline",
description="Creates signed offer and processes payment after charity is selected",
sub_agents=[
merchant_agent,
credentials_provider
]
)
Step 3A: Create Root Agent Setup
Now let's create the user-facing agent that orchestrates both phases. We'll build this in three parts: setup (3A), instruction (3B), and sub-agents (3C).
👉 Find:
# MODULE_7_STEP_3A_CREATE_ROOT_AGENT_SETUP
👉 Replace that single line with:
# Create the root orchestrator agent
# This is what users interact with directly
root_agent = Agent(
name="CharityAdvisor",
model="gemini-2.5-pro",
description="A friendly charity giving assistant that helps users donate to verified organizations.",
# MODULE_7_STEP_3B_WRITE_ROOT_AGENT_INSTRUCTION
Step 3B: Write the Root Agent Instruction
Now let's add the instruction that guides the charity advisor's behavior across both phases.
👉 Find:
# MODULE_7_STEP_3B_WRITE_ROOT_AGENT_INSTRUCTION
👉 Replace that single line with:
instruction="""You are a helpful and friendly charity giving advisor.
Your workflow has TWO distinct phases:
PHASE 1: CHARITY SELECTION (delegate to shopping_agent)
When a user expresses interest in donating:
1. Delegate to shopping_agent immediately
2. The shopping_agent will:
- Search for charities matching their cause
- Present verified options with ratings
- Engage in conversation (user may ask questions, change their mind)
- Wait for user to select a specific charity and amount
- Create an IntentMandate when user decides
3. Wait for shopping_agent to complete
You'll know Phase 1 is complete when shopping_agent's response includes:
- "IntentMandate created" or "Intent ID: intent_xxx"
- Charity name and donation amount
PHASE 2: PAYMENT PROCESSING (delegate to DonationProcessingPipeline)
After shopping_agent completes:
1. Acknowledge the user's selection naturally:
"Perfect! Let me process your $X donation to [Charity]..."
2. Delegate to DonationProcessingPipeline
3. The pipeline will automatically:
- Create signed cart offer (MerchantAgent)
- Get consent and process payment (CredentialsProvider)
4. After pipeline completes, summarize the transaction
CRITICAL RULES:
- Phase 1 may take multiple conversation turns (this is normal)
- Only proceed to Phase 2 after IntentMandate exists
- Don't rush the user during charity selection
- Don't ask user to "proceed" between phases - transition automatically
EXAMPLE FLOW:
User: "I want to donate to education"
You: [delegate to shopping_agent]
Shopping: "Here are 3 education charities..." [waits]
User: "Tell me more about the first one"
Shopping: "Room to Read focuses on..." [waits]
User: "Great, I'll donate $50 to Room to Read"
Shopping: "IntentMandate created (ID: intent_123)..."
You: "Perfect! Processing your $50 donation to Room to Read..." [delegate to DonationProcessingPipeline]
Pipeline: [creates offer, gets consent, processes payment]
You: "Done! Your donation was processed successfully. Transaction ID: txn_456"
Your personality:
- Warm and encouraging
- Patient during charity selection
- Clear about educational nature
- Smooth transitions between phases""",
# MODULE_7_STEP_3C_ADD_ROOT_AGENT_SUBAGENTS
Step 3C: Add the Sub-Agents
Finally, let's give the charity advisor access to both the shopping agent and the processing pipeline, and close the Agent definition.
👉 Find:
# MODULE_7_STEP_3C_ADD_ROOT_AGENT_SUBAGENTS
👉 Replace that single line with:
sub_agents=[
shopping_agent,
donation_processing_pipeline
]
)
Step 4: Verify the Complete System
Let's confirm the orchestration is wired correctly.
👉 Your complete
charity_advisor/agent.py
should now look like this:
"""
Main orchestration: The donation processing pipeline and root orchestrator agent.
"""
from google.adk.agents import Agent, SequentialAgent
from charity_advisor.shopping_agent.agent import shopping_agent
from charity_advisor.merchant_agent.agent import merchant_agent
from charity_advisor.credentials_provider.agent import credentials_provider
# Create the donation processing pipeline
# This runs Merchant → Credentials in sequence AFTER charity is selected
donation_processing_pipeline = SequentialAgent(
    name="DonationProcessingPipeline",
    description="Creates signed offer and processes payment after charity is selected",
    sub_agents=[
        merchant_agent,
        credentials_provider
    ]
)
# Create the root orchestrator agent
# This is what users interact with directly
root_agent = Agent(
name="CharityAdvisor",
model="gemini-2.5-flash",
description="A friendly charity giving assistant that helps users donate to verified organizations.",
instruction="""You are a helpful and friendly charity giving advisor.
Your workflow has TWO distinct phases:
PHASE 1: CHARITY SELECTION (delegate to shopping_agent)
When a user expresses interest in donating:
1. Delegate to shopping_agent immediately
2. The shopping_agent will:
- Search for charities matching their cause
- Present verified options with ratings
- Engage in conversation (user may ask questions, change their mind)
- Wait for user to select a specific charity and amount
- Create an IntentMandate when user decides
3. Wait for shopping_agent to complete
You'll know Phase 1 is complete when shopping_agent's response includes:
- "IntentMandate created" or "Intent ID: intent_xxx"
- Charity name and donation amount
PHASE 2: PAYMENT PROCESSING (delegate to DonationProcessingPipeline)
After shopping_agent completes:
1. Acknowledge the user's selection naturally:
"Perfect! Let me process your $X donation to [Charity]..."
2. Delegate to DonationProcessingPipeline
3. The pipeline will automatically:
- Create signed cart offer (MerchantAgent)
- Get consent and process payment (CredentialsProvider)
4. After pipeline completes, summarize the transaction
CRITICAL RULES:
- Phase 1 may take multiple conversation turns (this is normal)
- Only proceed to Phase 2 after IntentMandate exists
- Don't rush the user during charity selection
- Don't ask user to "proceed" between phases - transition automatically
EXAMPLE FLOW:
User: "I want to donate to education"
You: [delegate to shopping_agent]
Shopping: "Here are 3 education charities..." [waits]
User: "Tell me more about the first one"
Shopping: "Room to Read focuses on..." [waits]
User: "Great, I'll donate $50 to Room to Read"
Shopping: "IntentMandate created (ID: intent_123)..."
You: "Perfect! Processing your $50 donation to Room to Read..." [delegate to DonationProcessingPipeline]
Pipeline: [creates offer, gets consent, processes payment]
You: "Done! Your donation was processed successfully. Transaction ID: txn_456"
Your personality:
- Warm and encouraging
- Patient during charity selection
- Clear about educational nature
- Smooth transitions between phases""",
    sub_agents=[
        shopping_agent,
        donation_processing_pipeline
    ]
)
Step 5: Harden with Validation Callbacks (Optional Skip to Step 7)
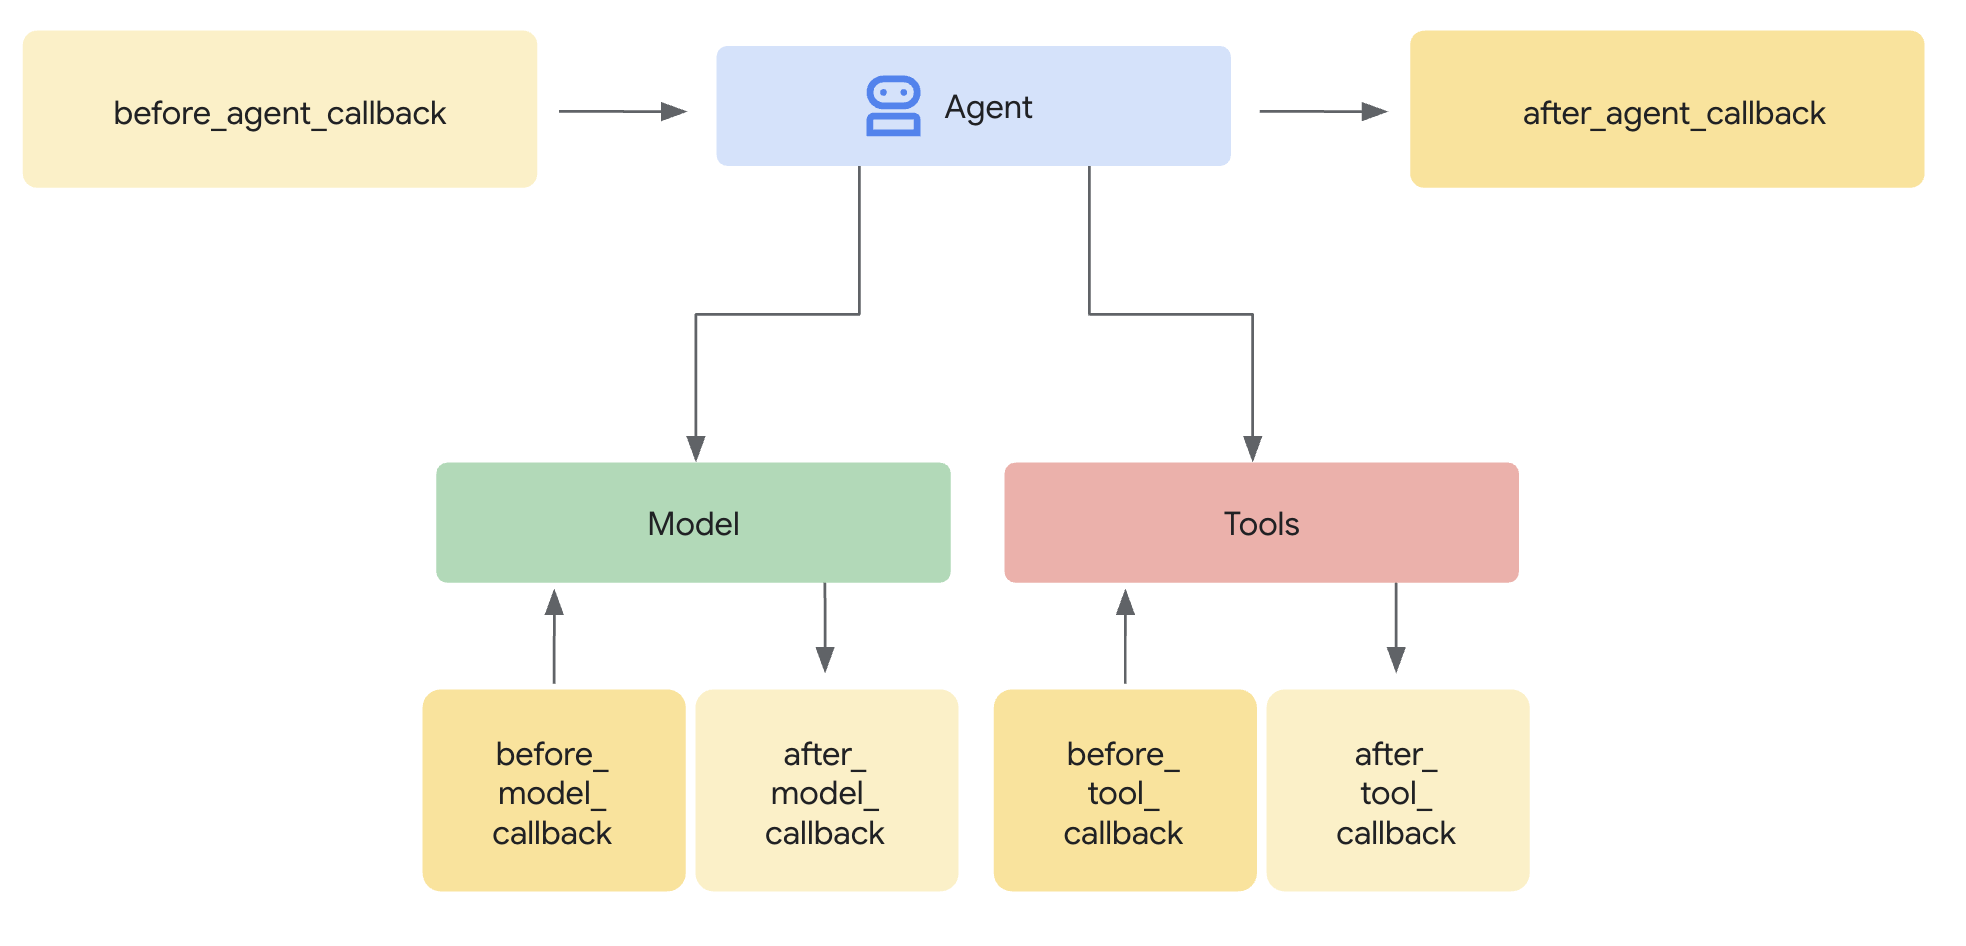
The SequentialAgent guarantees execution order , but what if:
- Shopping Agent fails silently (IntentMandate never created)
- An hour passes between Shopping and Merchant (intent expires)
- State gets corrupted or cleared
- Someone tries to call Merchant directly, bypassing Shopping
Callbacks add architectural enforcement - they validate prerequisites before an agent even starts its LLM call. This is defense in depth: tools validate during execution, callbacks validate before execution.
Let's add validation callbacks to our Merchant and Credentials Provider agents.
Step 5A: Add Merchant Validation - Import Callback Types
First, let's add the imports needed for callbacks.
👉 Open
charity_advisor/merchant_agent/agent.py
At the top of the file, after the existing imports, add:
from typing import Optional
from datetime import datetime, timezone
from google.adk.agents.callback_context import CallbackContext
from google.genai.types import Content, Part
import logging

logger = logging.getLogger(__name__)
Step 5B: Build the Intent Validation Function
Now let's create a callback function that validates the IntentMandate before Merchant Agent runs.
👉 In
charity_advisor/merchant_agent/agent.py
, add this function BEFORE the
merchant_agent = Agent(...)
definition:
def validate_intent_before_merchant(
    callback_context: CallbackContext,
) -> Optional[Content]:
    """
    Validates IntentMandate exists and hasn't expired before Merchant runs.

    This callback enforces that the Shopping Agent completed successfully
    before the Merchant Agent attempts to create a CartMandate.

    Returns:
        None: Allow Merchant Agent to proceed normally
        Content: Skip Merchant Agent and return error to user
    """
    state = callback_context.state

    # Check credential exists
    if "intent_mandate" not in state:
        logger.error("❌ IntentMandate missing - Shopping Agent may have failed")
        return Content(parts=[Part(text=(
            "Error: Cannot create cart. User intent was not properly recorded. "
            "Please restart the donation process."
        ))])

    intent_mandate = state["intent_mandate"]

    # Validate expiry (critical security check)
    try:
        expiry_time = datetime.fromisoformat(
            intent_mandate["intent_expiry"].replace('Z', '+00:00')
        )
        now = datetime.now(timezone.utc)

        if expiry_time < now:
            logger.error(f"❌ IntentMandate expired at {intent_mandate['intent_expiry']}")
            return Content(parts=[Part(text=(
                "Error: Your donation intent has expired. "
                "Please select a charity again to restart."
            ))])

        time_remaining = expiry_time - now
        logger.info(f"✓ IntentMandate validated. Expires in {time_remaining.total_seconds():.0f}s")

    except (KeyError, ValueError) as e:
        logger.error(f"❌ Invalid IntentMandate structure: {e}")
        return Content(parts=[Part(text=(
            "Error: Invalid intent data. Please restart the donation."
        ))])

    # All checks passed - allow Merchant Agent to proceed
    logger.info(f"✓ Prerequisites met for Merchant Agent: {intent_mandate['intent_id']}")
    return None
Step 5C: Attach Callback to Merchant Agent
Now let's connect the callback to the agent.
👉 In
charity_advisor/merchant_agent/agent.py
, modify the
merchant_agent = Agent(...)
definition:
Find this line in the Agent definition:
merchant_agent = Agent(
    name="MerchantAgent",
    model="gemini-2.5-flash",
    description="Creates formal, signed CartMandates for charity donations following W3C PaymentRequest standards.",
Add this line right after the
description
লাইন:
before_agent_callback=validate_intent_before_merchant,
Your agent definition should now look like:
merchant_agent = Agent(
    name="MerchantAgent",
    model="gemini-2.5-flash",
    description="Creates formal, signed CartMandates for charity donations following W3C PaymentRequest standards.",
    before_agent_callback=validate_intent_before_merchant,
    tools=[
        FunctionTool(func=create_cart_mandate)
    ],
    instruction="""..."""
)
Step 6: Add Credentials Provider Validation (Optional Skip to Step 7)
Same pattern - let's add validation for the payment step.
Step 6A: Import Callback Types
👉 Open
charity_advisor/credentials_provider/agent.py
At the top of the file, after the existing imports, add:
from typing import Optional
from datetime import datetime, timezone
from google.adk.agents.callback_context import CallbackContext
from google.genai.types import Content, Part
import logging

logger = logging.getLogger(__name__)
Step 6B: Build Cart Validation Function
👉 In
charity_advisor/credentials_provider/agent.py
, add this function BEFORE the
credentials_provider = Agent(...)
definition:
def validate_cart_before_payment(
    callback_context: CallbackContext,
) -> Optional[Content]:
    """
    Validates CartMandate exists and hasn't expired before payment processing.

    This callback enforces that the Merchant Agent completed successfully
    before the Credentials Provider attempts to process payment.

    Returns:
        None: Allow Credentials Provider to proceed
        Content: Skip payment processing and return error
    """
    state = callback_context.state

    # Check credential exists
    if "cart_mandate" not in state:
        logger.error("❌ CartMandate missing - Merchant Agent may have failed")
        return Content(parts=[Part(text=(
            "Error: Cannot process payment. Cart was not properly created. "
            "Please restart the donation process."
        ))])

    cart_mandate = state["cart_mandate"]

    # Validate AP2 structure
    if "contents" not in cart_mandate:
        logger.error("❌ CartMandate missing AP2 contents wrapper")
        return Content(parts=[Part(text=(
            "Error: Invalid cart structure. Please restart."
        ))])

    # Validate expiry
    try:
        contents = cart_mandate["contents"]
        expiry_time = datetime.fromisoformat(
            contents["cart_expiry"].replace('Z', '+00:00')
        )
        now = datetime.now(timezone.utc)

        if expiry_time < now:
            logger.error(f"❌ CartMandate expired at {contents['cart_expiry']}")
            return Content(parts=[Part(text=(
                "Error: Your cart has expired (15 minute limit). "
                "Please restart the donation to get a fresh offer."
            ))])

        time_remaining = expiry_time - now
        logger.info(f"✓ CartMandate validated. Expires in {time_remaining.total_seconds():.0f}s")

    except (KeyError, ValueError) as e:
        logger.error(f"❌ Invalid CartMandate structure: {e}")
        return Content(parts=[Part(text=(
            "Error: Invalid cart data. Please restart the donation."
        ))])

    # All checks passed - allow payment processing
    logger.info(f"✓ Prerequisites met for Credentials Provider: {contents['id']}")
    return None
Step 6C: Attach Callback to Credentials Provider
👉 In
charity_advisor/credentials_provider/agent.py
, modify the
credentials_provider = Agent(...)
definition:
Find this line in the Agent definition:
credentials_provider = Agent(
    name="CredentialsProvider",
    model="gemini-2.5-flash",
    description="Securely processes payments by creating PaymentMandates and executing transactions with user consent.",
Add this line right after the
description
লাইন:
before_agent_callback=validate_cart_before_payment,
Your agent definition should now look like:
credentials_provider = Agent(
    name="CredentialsProvider",
    model="gemini-2.5-flash",
    description="Securely processes payments by creating PaymentMandates and executing transactions with user consent.",
    before_agent_callback=validate_cart_before_payment,
    tools=[
        FunctionTool(func=create_payment_mandate)
    ],
    instruction="""..."""
)
Step 7: Test with ADK Web UI
Now let's test the complete hardened system with validation callbacks active.
👉 In your Cloud Shell terminal, run:
adk web
You should see output like:
+-----------------------------------------------------------------------------+
| ADK Web Server started                                                      |
|                                                                             |
| For local testing, access at http://localhost:8000.                         |
+-----------------------------------------------------------------------------+

INFO:     Application startup complete.
INFO:     Uvicorn running on http://0.0.0.0:8000 (Press CTRL+C to quit)
👉 Next, to access the ADK Web UI from your browser:
From the Web preview icon (looks like an eye or a square with an arrow) in the Cloud Shell toolbar (usually top right), select Change port . In the pop-up window, set the port to 8000 and click "Change and Preview" . Cloud Shell will then open a new browser tab displaying the ADK Web UI.
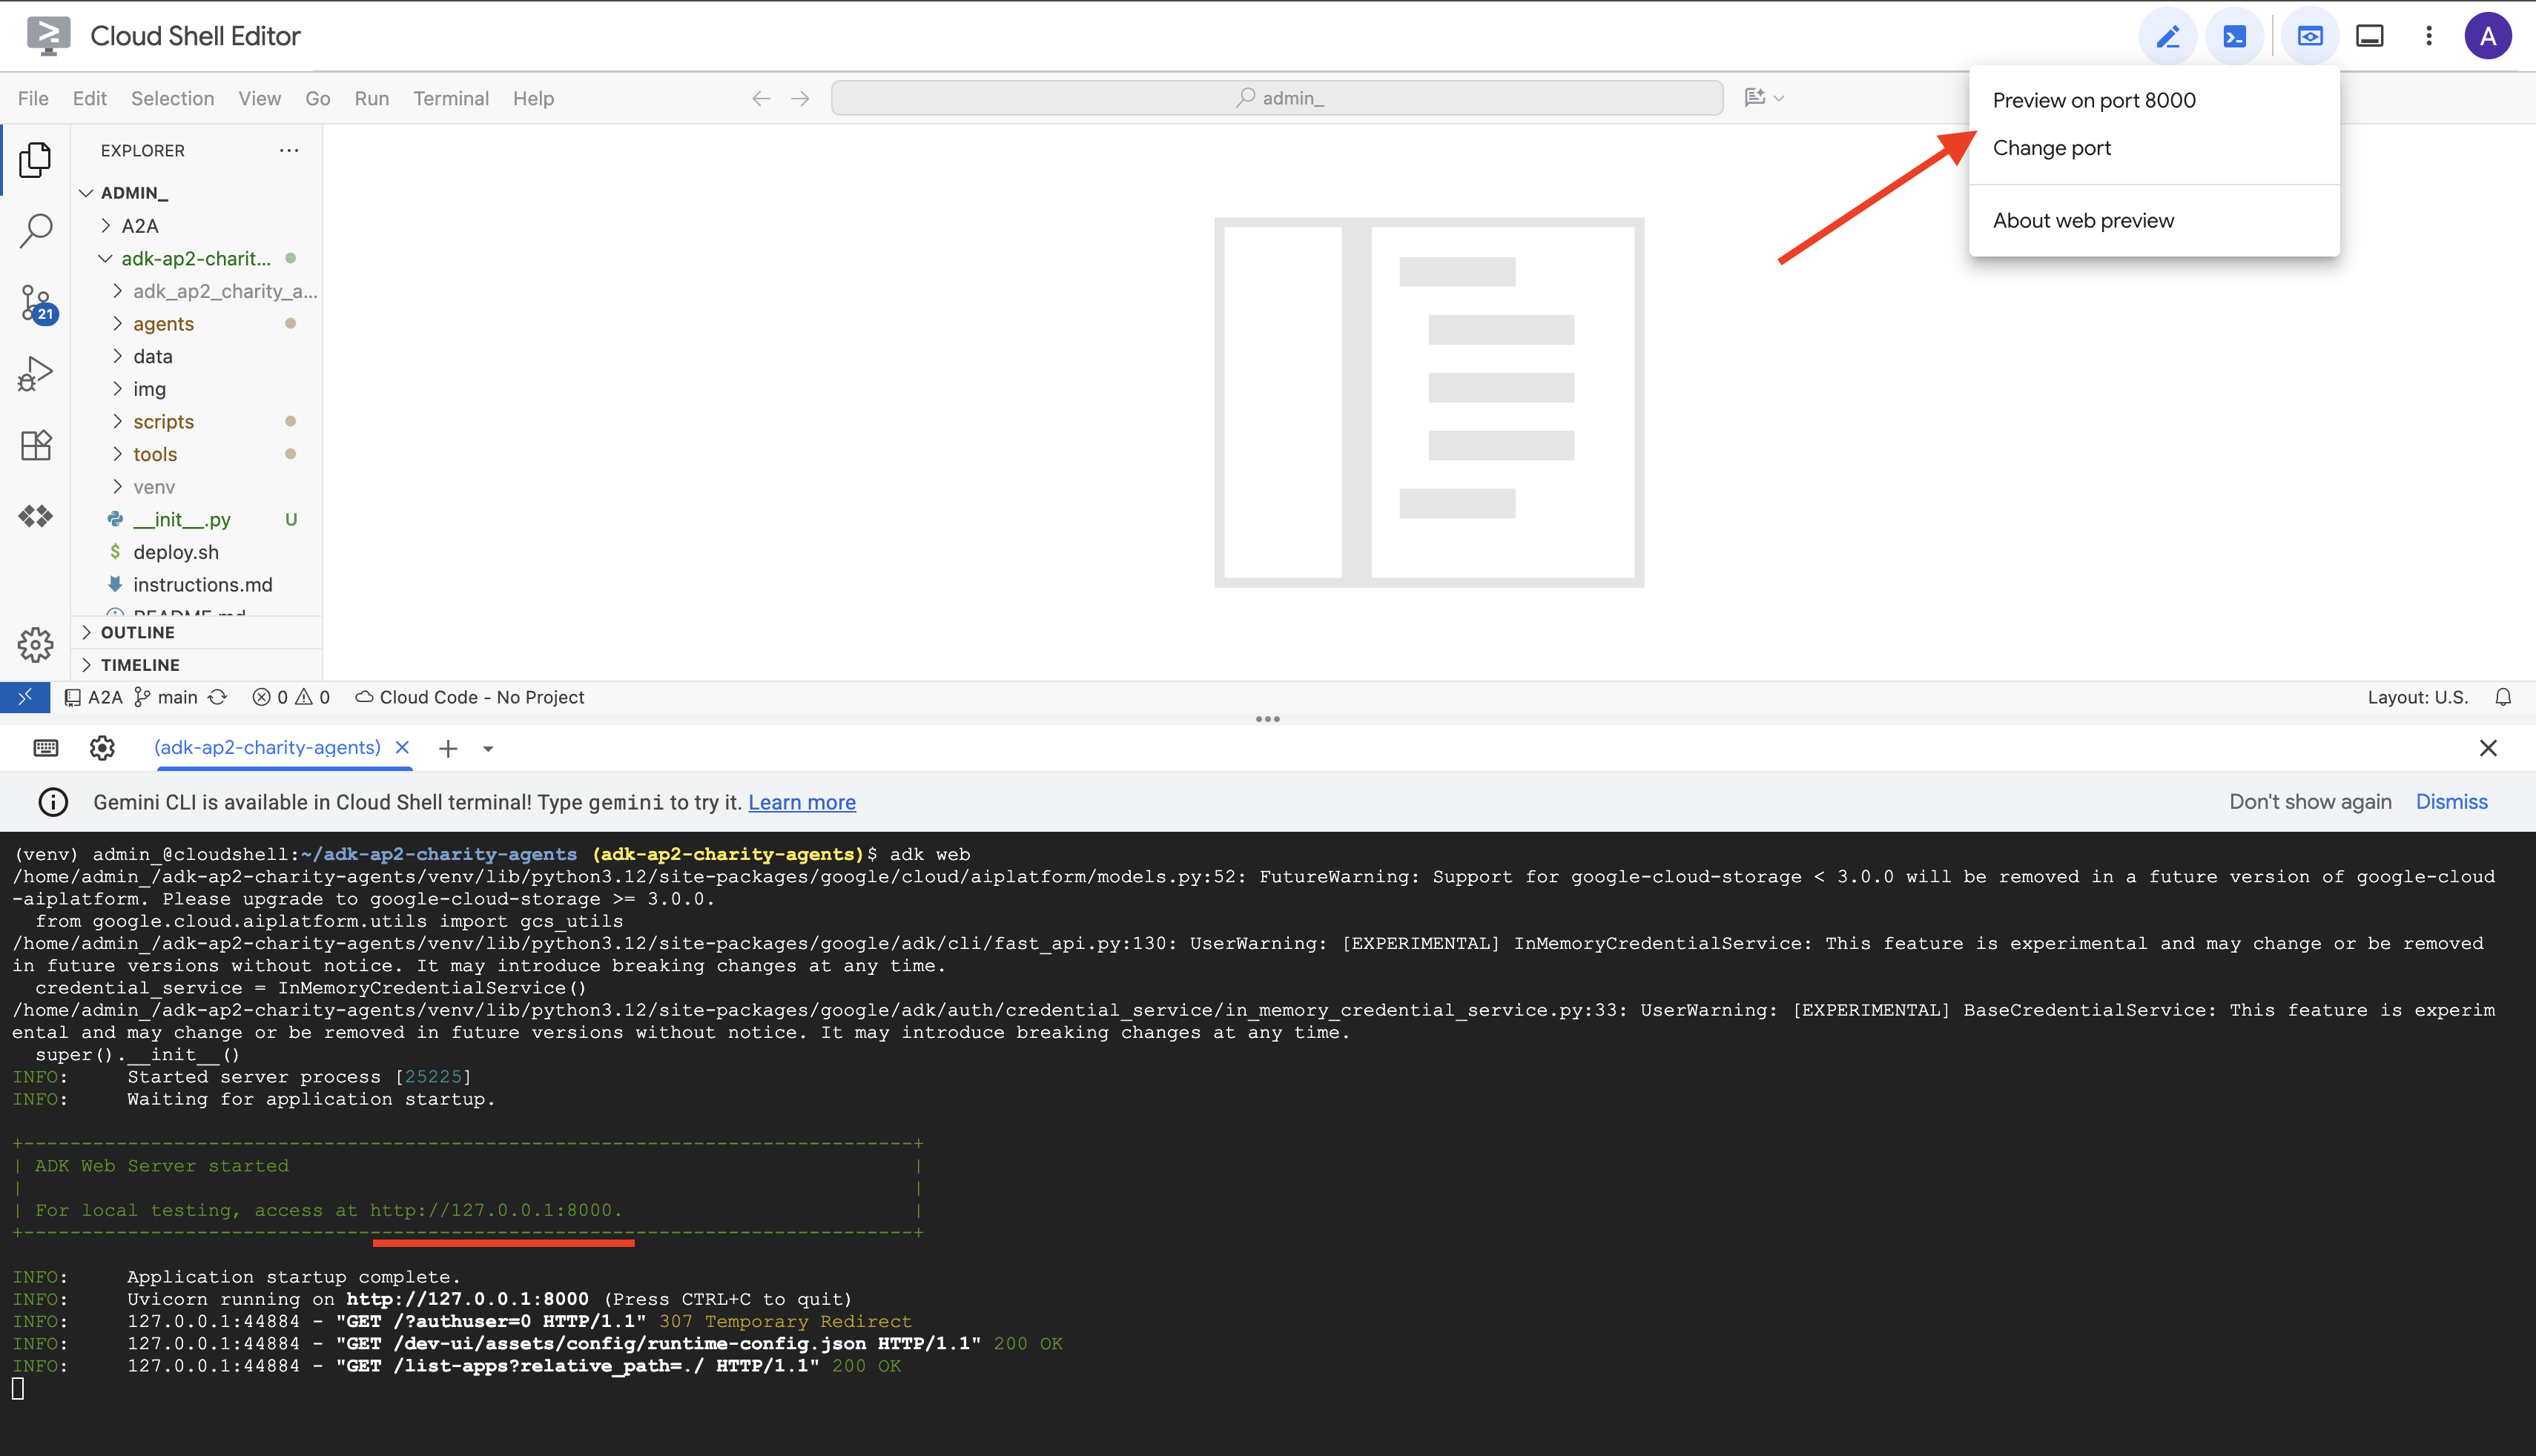
👉 Select your agent from the dropdown:
In the ADK Web UI, you'll see a dropdown menu at the top. Select charity_advisor from the list.
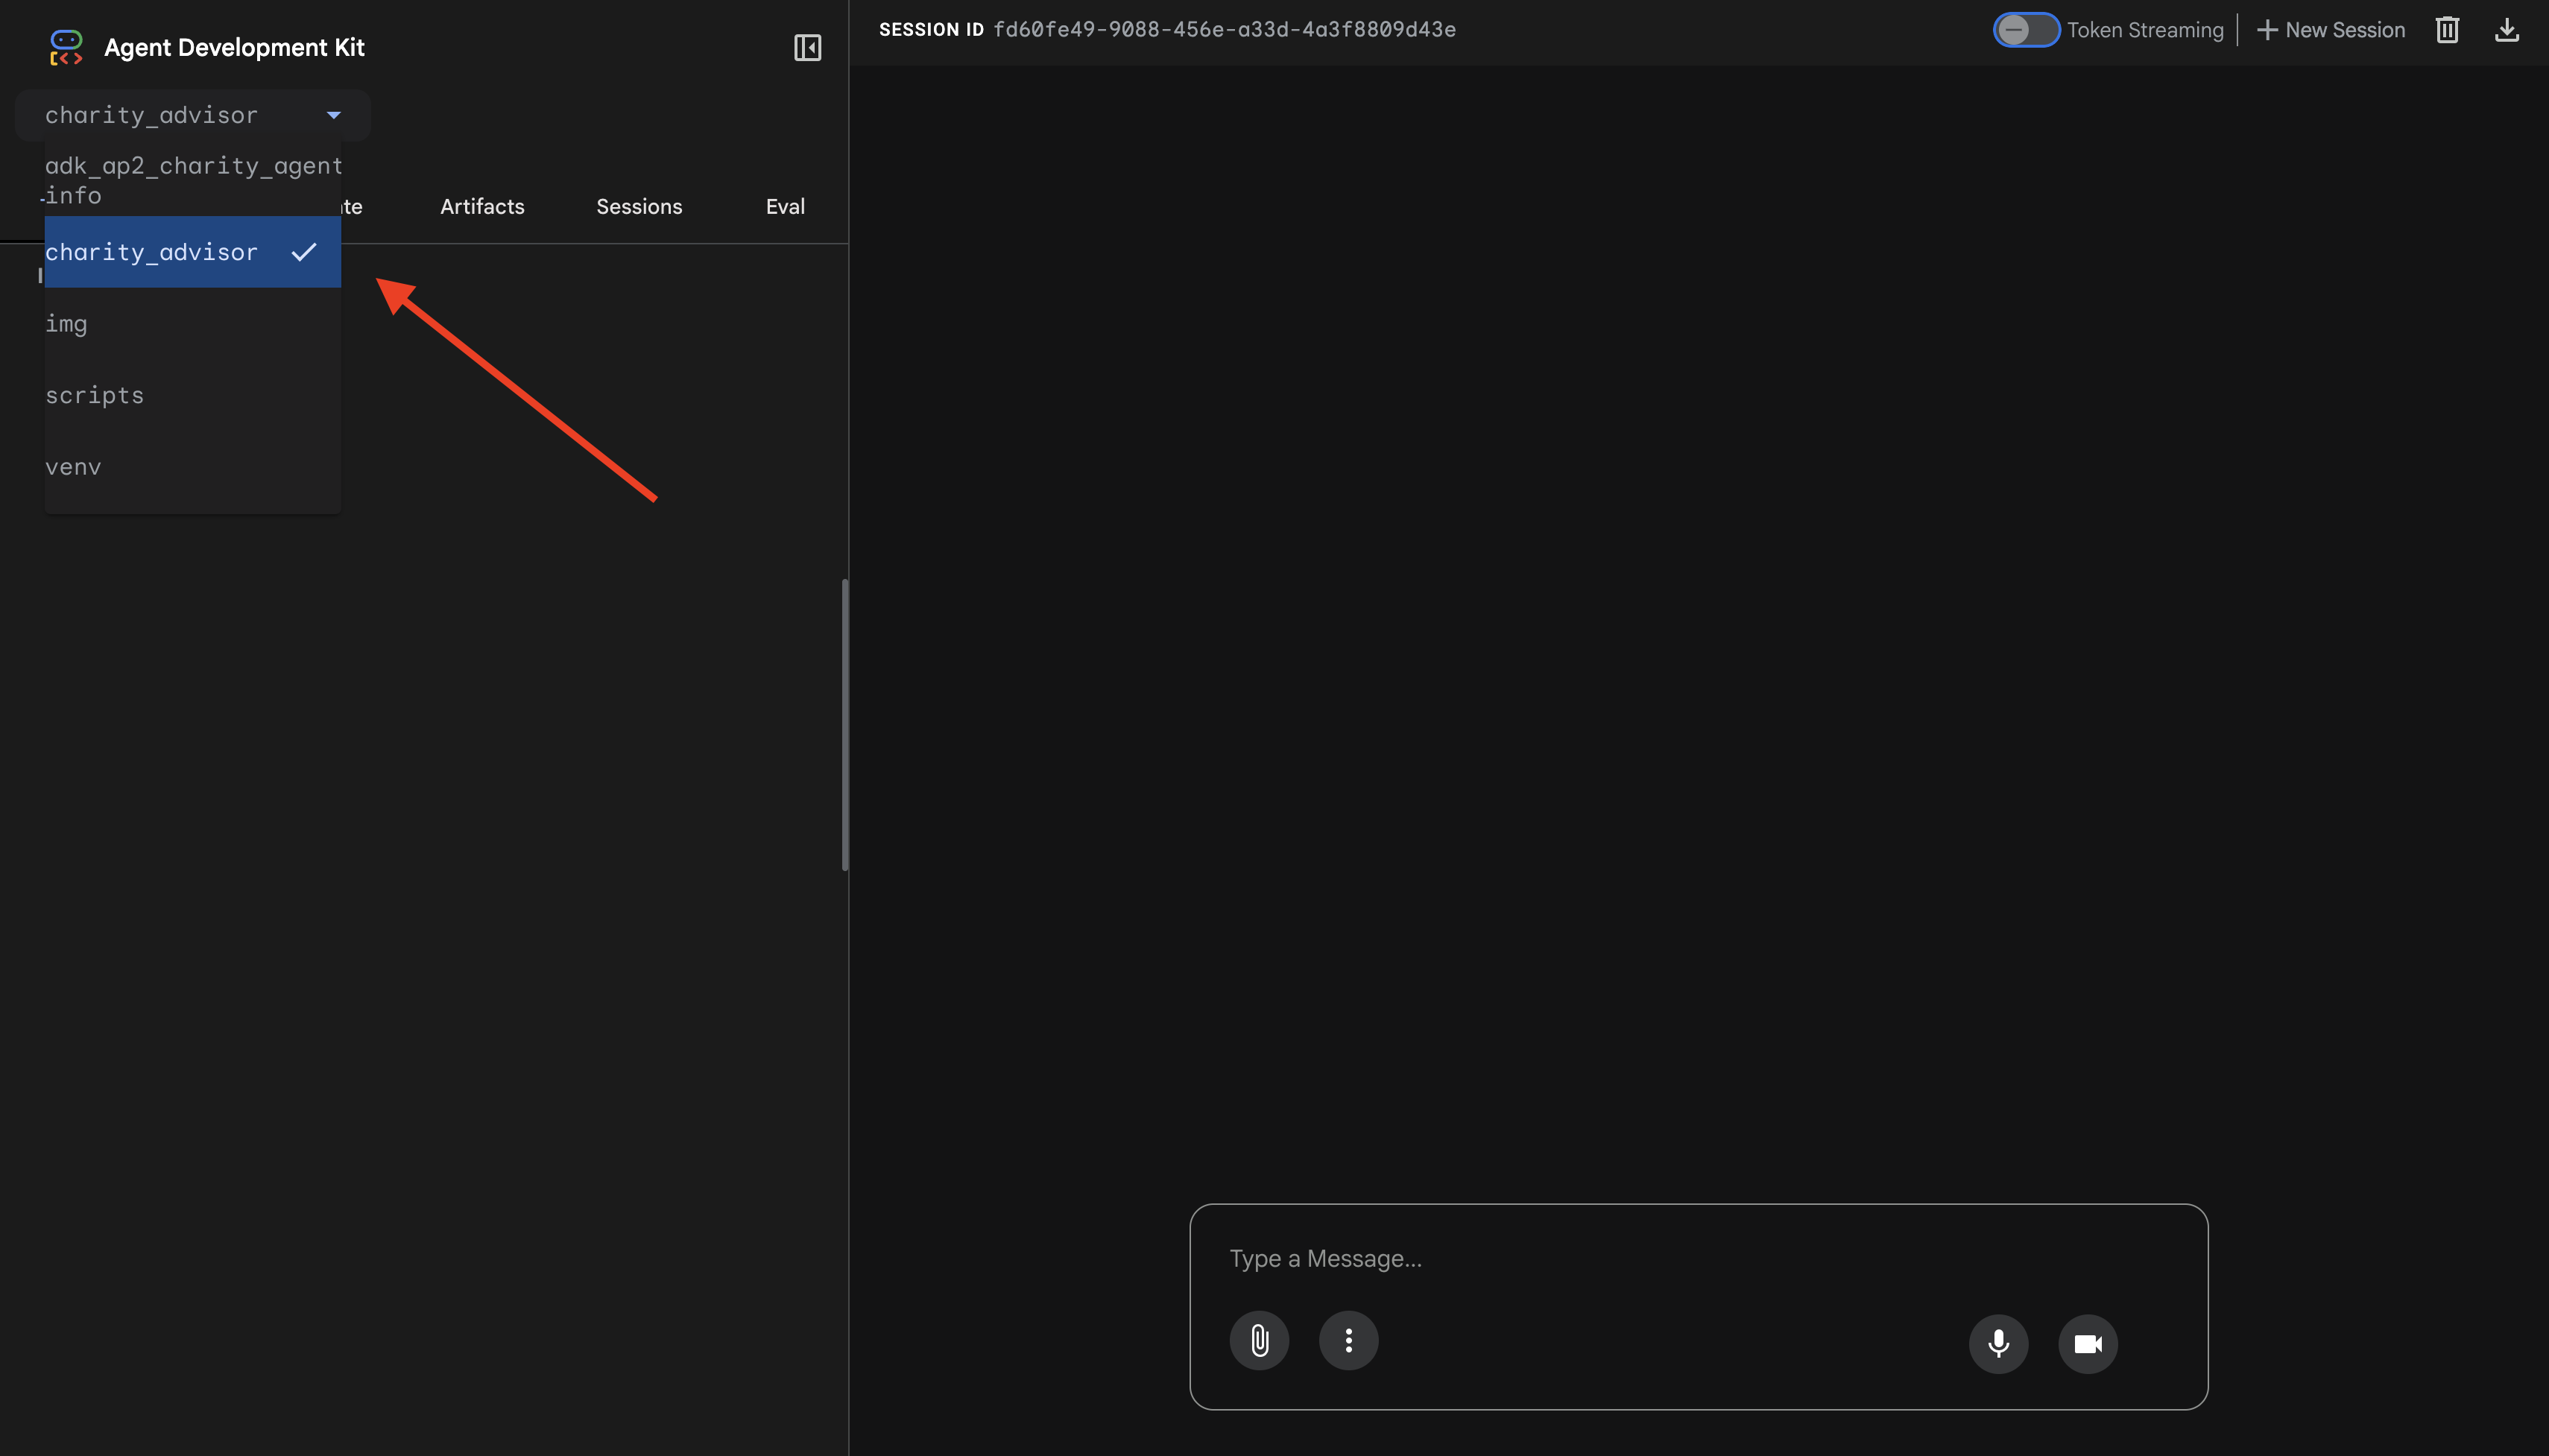
You'll see the ADK web interface with:
- Chat panel : Left side, for conversation
- Trace panel : Right side, for observability (we'll use this in Module 9)
Test 1: Complete Donation Flow (Normal Case)
👉 In the chat interface, type:
I want to donate to an education charity
Watch the complete flow unfold:

What's happening (visible in the trace panel on the right):
1. Advisor delegates to ShoppingAgent:
- ShoppingAgent searches for education charities
- Shows you 3 verified options with details
2. You interact with ShoppingAgent (may take multiple turns):
User: "Tell me more about Room to Read"
Shopping: [explains mission and impact]
User: "I'll donate $50 to Room to Read"
3. ShoppingAgent creates IntentMandate:
- Creates and signs the intent
- Returns confirmation with Intent ID
4. Advisor transitions to processing phase:
Perfect! Processing your $50 donation to Room to Read...
5. DonationProcessingPipeline activates:
- Merchant callback validates IntentMandate (✓ passed) ← NEW!
- Merchant Agent creates CartMandate with signature
- Credentials callback validates CartMandate (✓ passed) ← NEW!
- Credentials Provider prepares payment
6. Payment processes:
- Credentials Provider creates PaymentMandate
- Simulates payment processing
- Returns transaction ID
7. Advisor summarizes:
Perfect! Your donation has been processed successfully! 🎉
বিস্তারিত:
- Amount: $50.00
- Charity: Room to Read (EIN: 77-0479905)
- Transaction ID: txn_a3f7b2c8d9e1f4a2
Test 2: Verify Callbacks Catch Failures (Optional Advanced Test)
Want to see the callbacks in action catching errors? You'd need to manually corrupt state (advanced debugging), but in production, callbacks would catch:
- Shopping Agent tool fails → Merchant callback blocks: "Error: Cannot create cart..."
- 2 hours pass → Merchant callback blocks: "Error: Intent expired..."
- Cart expires → Credentials callback blocks: "Error: Cart expired (15 min limit)..."
These edge cases are now architecturally enforced by your validation callbacks.
What You Just Built
You've successfully orchestrated three specialized agents into a seamless, trustworthy system with architectural validation.
What's Next
You've now completed the technical core of building trustworthy agents:
You've built a complete trustworthy system locally enforcing the credential chain. Now let's make it accessible to real users through production deployment—and enable the accountability trail that makes Module 9 possible.
Let's deploy your hardened agent to Google Cloud.
8. Deployment

Your trustworthy donation system is now complete with three specialized agents working locally:
But it only runs on your development machine. To make this system useful to real users—and to capture the accountability trails that prove trustworthiness—you need to deploy it to production.
This module walks you through deploying your agent to Google Cloud with observability enabled from day one . The --trace_to_cloud flag you'll use during deployment is what makes the accountability trail in Module 9 possible.
Understanding Deployment Options
The ADK supports multiple deployment targets. Each has different characteristics for complexity, session management, scaling, and cost:
ফ্যাক্টর | Local ( | Agent Engine | ক্লাউড রান |
জটিলতা | ন্যূনতম | নিম্ন | মাঝারি |
Session Persistence | In-memory only (lost on restart) | Vertex AI managed (automatic) | Cloud SQL (PostgreSQL) or in-memory |
অবকাঠামো | None (dev machine only) | সম্পূর্ণরূপে পরিচালিত | Container + optional database |
Cold Start | প্রযোজ্য নয় | 100-500ms | 100-2000ms |
Scaling | Single instance | স্বয়ংক্রিয় | Automatic (to zero) |
Cost Model | Free (local compute) | Compute-based | Request-based + free tier |
UI Support | Yes (built-in) | No (API only) | Yes (via |
Observability Setup | Local trace viewer | Automatic with | Requires |
সেরা | Development & testing | Production agents | Production agents |
Recommendation: For this trustworthy donation system, we recommend Agent Engine as your primary production deployment because it provides:
- Fully managed infrastructure (no containers to manage)
- Built-in session persistence via
VertexAiSessionService - Automatic scaling without cold starts
- Simplified deployment (no Docker knowledge required)
- Cloud Trace integration out of the box
Additional Option: Google Kubernetes Engine (GKE)
For advanced users requiring Kubernetes-level control, custom networking, or multi-service orchestration, GKE deployment is available. This option provides maximum flexibility but requires more operational expertise (cluster management, manifests, service accounts).
GKE deployment is not covered in this codelab but is fully documented in the ADK GKE Deployment Guide .
পূর্বশর্ত
1. Google Cloud Project Setup
You need a Google Cloud project with billing enabled. If you don't have one:
- Create a project: Google Cloud Console
- Enable billing: Enable Billing
- Note your Project ID (not the project name or number)
2. Re-Authentication (Optional)
Authenticate with Google Cloud:
gcloud auth application-default login
gcloud config set project YOUR_PROJECT_ID
Replace YOUR_PROJECT_ID with your actual Google Cloud project ID.
Verify your authentication:
gcloud config get-value project
# Should output: YOUR_PROJECT_ID
3. Environment Variables
Use these commands to auto-populate your .env file:
# Get your current Project ID
PROJECT_ID=$(gcloud config get-value project)
STAGING_BUCKET_VALUE="gs://${PROJECT_ID}-staging"
ENV_FILE=".env"

# Check if STAGING_BUCKET is already set in the .env file
if grep -q "^STAGING_BUCKET=" "${ENV_FILE}"; then
  # If it exists, replace the line
  # The sed command finds the line starting with STAGING_BUCKET= and replaces the entire line.
  # Using | as a delimiter to avoid issues with slashes in the bucket name.
  sed -i "s|^STAGING_BUCKET=.*|STAGING_BUCKET=${STAGING_BUCKET_VALUE}|" "${ENV_FILE}"
  echo "Updated STAGING_BUCKET in ${ENV_FILE}"
else
  # If it doesn't exist, add it to the end of the file
  echo "STAGING_BUCKET=${STAGING_BUCKET_VALUE}" >> "${ENV_FILE}"
  echo "Added STAGING_BUCKET to ${ENV_FILE}"
fi

# Verify it was added or updated correctly
echo "Current STAGING_BUCKET setting:"
grep "^STAGING_BUCKET=" "${ENV_FILE}"
You should see:
STAGING_BUCKET=gs://your-actual-project-id-staging
Important notes:
- Replace
YOUR_PROJECT_IDwith your actual project ID (or use the commands above) - For
GOOGLE_CLOUD_LOCATION, use a supported region - The staging bucket will be created automatically if it doesn't exist when you run the deployment script
4. Enable Required APIs
The deployment process needs several Google Cloud APIs enabled. Run this command to enable them:
gcloud services enable \
    aiplatform.googleapis.com \
    storage.googleapis.com \
    cloudbuild.googleapis.com \
    cloudtrace.googleapis.com \
    compute.googleapis.com
This command enables:
- AI Platform API - For Agent Engine and Vertex AI models
- Cloud Storage API - For staging bucket
- Cloud Build API - For container building (Cloud Run)
- Cloud Trace API - For observability and accountability trails
- Compute Engine API - For service account management
Step 1: Understand the Deployment Infrastructure
Your project includes a unified deployment script ( deploy.sh ) that handles all deployment modes.
👉 Review the deployment script (optional):
cat deploy.sh
The script provides three deployment modes:
-
./deploy.sh local- Run locally with in-memory storage -
./deploy.sh agent-engine- Deploy to Vertex AI Agent Engine (recommended) -
./deploy.sh cloud-run- Deploy to Cloud Run with optional UI
How it works under the hood:
For Agent Engine deployment, the script executes:
adk deploy agent_engine \
  --project=$GOOGLE_CLOUD_PROJECT \
  --region=$GOOGLE_CLOUD_LOCATION \
  --staging_bucket=$STAGING_BUCKET \
  --display_name="Charity Advisor" \
  --trace_to_cloud \
  charity_advisor
For Cloud Run deployment, it executes:
adk deploy cloud_run \
  --project=$GOOGLE_CLOUD_PROJECT \
  --region=$GOOGLE_CLOUD_LOCATION \
  --service_name="charity-advisor" \
  --app_name="charity_advisor" \
  --with_ui \
  --trace_to_cloud \
  charity_advisor
The --trace_to_cloud flag is critical for both deployment types—it enables Cloud Trace integration for the accountability trail you'll explore in Module 9.
Step 2: Prepare the Agent Engine Wrapper
Agent Engine requires a specific entry point that wraps your agent for the managed runtime. This file has been created for you.
👉 Review
charity_advisor/agent_engine_app.py
:
"""Agent Engine application wrapper.

This file prepares the Charity Advisor agent for deployment to Vertex AI Agent Engine.
"""

from vertexai import agent_engines
from .agent import root_agent

# Wrap the agent in an AdkApp object for Agent Engine deployment
app = agent_engines.AdkApp(
    agent=root_agent,
    enable_tracing=True,  # Enables Cloud Trace integration automatically
)
Why this file is needed:
- Agent Engine requires the agent wrapped in an
AdkAppobject - The
enable_tracing=Trueparameter enables Cloud Trace integration automatically - This wrapper is referenced by the ADK CLI during deployment
- It configures
VertexAiSessionServicefor automatic session persistence
Step 3: Deploy to Agent Engine (RECOMMENDED)
Agent Engine is the recommended production deployment for your trustworthy donation system because it provides fully managed infrastructure with built-in session persistence.
Run the Deployment
From your project root:
chmod +x deploy.sh
./deploy.sh agent-engine
Deployment Phases
Watch the script execute these phases:
Phase 1: API Enablement
  ✓ aiplatform.googleapis.com
  ✓ storage.googleapis.com
  ✓ cloudbuild.googleapis.com
  ✓ cloudtrace.googleapis.com
  ✓ compute.googleapis.com

Phase 2: IAM Setup
  ✓ Getting project number
  ✓ Granting Storage Object Admin
  ✓ Granting Vertex AI User
  ✓ Granting Cloud Trace Agent

Phase 3: Staging Bucket
  ✓ Creating gs://your-project-id-staging (if needed)
  ✓ Setting permissions

Phase 4: Validation
  ✓ Checking agent.py exists
  ✓ Verifying root_agent defined
  ✓ Checking agent_engine_app.py exists
  ✓ Validating requirements.txt

Phase 5: Build & Deploy
  ✓ Packaging agent code
  ✓ Uploading to staging bucket
  ✓ Creating Agent Engine instance
  ✓ Configuring session persistence
  ✓ Setting up Cloud Trace integration
  ✓ Running health checks
This process takes 5-10 minutes as it packages the agent and deploys it to Vertex AI infrastructure.
Save Your Agent Engine ID
Upon successful deployment:
✅ Agent Engine created successfully!

   Agent Engine ID: 7917477678498709504
   Resource Name: projects/123456789/locations/us-central1/reasoningEngines/7917477678498709504
   Endpoint: https://us-central1-aiplatform.googleapis.com/v1/...

   ⚠️  IMPORTANT: Save the Agent Engine ID from the output above
   Add it to your .env file as:
   AGENT_ENGINE_ID=7917477678498709504

   This ID is required for:
   - Testing the deployed agent
   - Updating the deployment later
   - Accessing logs and traces
Update your .env file immediately:
echo "AGENT_ENGINE_ID=7917477678498709504" >> .env
What Was Deployed
Your Agent Engine deployment now includes:
✅ All three agents (Shopping, Merchant, Credentials) running in managed runtime
✅ Complete credential chain logic (Intent → Cart → Payment mandates)
✅ User consent mechanism with confirmation workflow
✅ Automatic session persistence via VertexAiSessionService
✅ Auto-scaling infrastructure managed by Google
✅ Cloud Trace integration for complete observability
Step 4: Test Your Deployed Agent
Update Your Environment
Verify your .env includes the Agent Engine ID:
AGENT_ENGINE_ID=7917477678498709504  # From deployment output
GOOGLE_CLOUD_PROJECT=your-project-id
GOOGLE_CLOUD_LOCATION=us-central1
STAGING_BUCKET=gs://your-project-id-staging
Run the Test Script
Your project includes a test script specifically for Agent Engine deployments.
👉 Run the test:
python scripts/test_deployed_agent.py
Expected Output
Testing Agent Engine deployment...
Project: your-project-id
Location: us-central1
Agent Engine ID: 7917477678498709504
Endpoint: https://us-central1-aiplatform.googleapis.com/v1/...

Creating session...
✓ Session created: 4857885913439920384

Sending donation query...
✓ Response received:
  Event 1: I'll help you donate $50 to a children's education charity...
  Event 2: Here are some highly-rated children's education charities...
  Event 3: Which charity would you like to support?...

✅ Test completed successfully!

Session ID: 4857885913439920384

This donation generated a trace in Cloud Trace.
View it in Module 9: Observability

To view traces:
https://console.cloud.google.com/traces/list?project=your-project-id
Verification Checklist
After testing, verify:
✅ Agent responds to queries
✅ All three agents execute in sequence (Shopping → Merchant → Credentials)
✅ Consent mechanism activates (confirmation requested)
✅ Session persists across requests
✅ No authentication errors
✅ No connection timeouts
If you encounter errors:
- Check your environment variables are set correctly
- Verify APIs are enabled:
gcloud services list --enabled - Check Agent Engine logs in Vertex AI Console
- Verify the
agent_engine_app.pyfile exists in yourcharity_advisorfolder
Step 5: Deploy to Cloud Run (Optional)
While Agent Engine is recommended for streamlined production deployment, Cloud Run offers more control and supports the ADK web UI. This section is optional.
When to Use Cloud Run
Choose Cloud Run if you need:
- The ADK web UI for user interaction
- Full control over the container environment
- Custom database configurations
- Integration with existing Cloud Run services
Run the Deployment
chmod +x deploy.sh
./deploy.sh cloud-run
What's different:
The script will automatically:
- Build a Docker container with your agent code
- Create a Cloud SQL PostgreSQL database (if needed)
- Configure the database connection
- Deploy with the ADK web UI enabled
The deployment takes 10-15 minutes due to Cloud SQL provisioning.
Session Management:
- Uses
DatabaseSessionServiceinstead ofVertexAiSessionService - Requires database credentials in
.env(or auto-generated) - State persists in PostgreSQL database
UI Support:
- Web UI available at:
https://charity-advisor-xyz.a.run.app
Testing Cloud Run Deployment
If you deployed to Cloud Run with --with_ui , you can test directly in your browser:
- Navigate to your Service URL (provided in deployment output)
- You'll see the ADK web interface. Select your agent from the dropdown.
- Start a test donation:
I want to donate $50 to a children's education charity
- Observe the execution flow:
- ShoppingAgent finds charities and saves your intent
- MerchantAgent creates the cart mandate
- CredentialsProvider creates payment mandate and requests confirmation
- After you confirm, payment is processed
- Verify the response includes:
- Charity recommendations
- নিশ্চিতকরণ অনুরোধ
- Success message after approval
সমস্যা সমাধান
সাধারণ সমস্যা
Issue: ERROR: GOOGLE_CLOUD_PROJECT is not set
Solution: Ensure your .env file has the correct project ID:
GOOGLE_CLOUD_PROJECT=your-actual-project-id
Issue: Staging bucket not created automatically
Solution: The script should create the bucket automatically. If not, create it manually:
gsutil mb -p $GOOGLE_CLOUD_PROJECT -l $GOOGLE_CLOUD_LOCATION $STAGING_BUCKET
সারসংক্ষেপ
You've successfully:
✅ Understood the deployment infrastructure provided by deploy.sh
✅ Reviewed the Agent Engine wrapper configuration
✅ Deployed your trustworthy donation system to Agent Engine (recommended)
✅ Enabled Cloud Trace integration with --trace_to_cloud
✅ Verified the agent is accessible and functional
✅ Created the foundation for accountability trails in Module 9
In the next module, you'll see exactly what this flag unlocks: complete visibility into every donation, every consent moment, and every step of the credential chain.
9. Observability

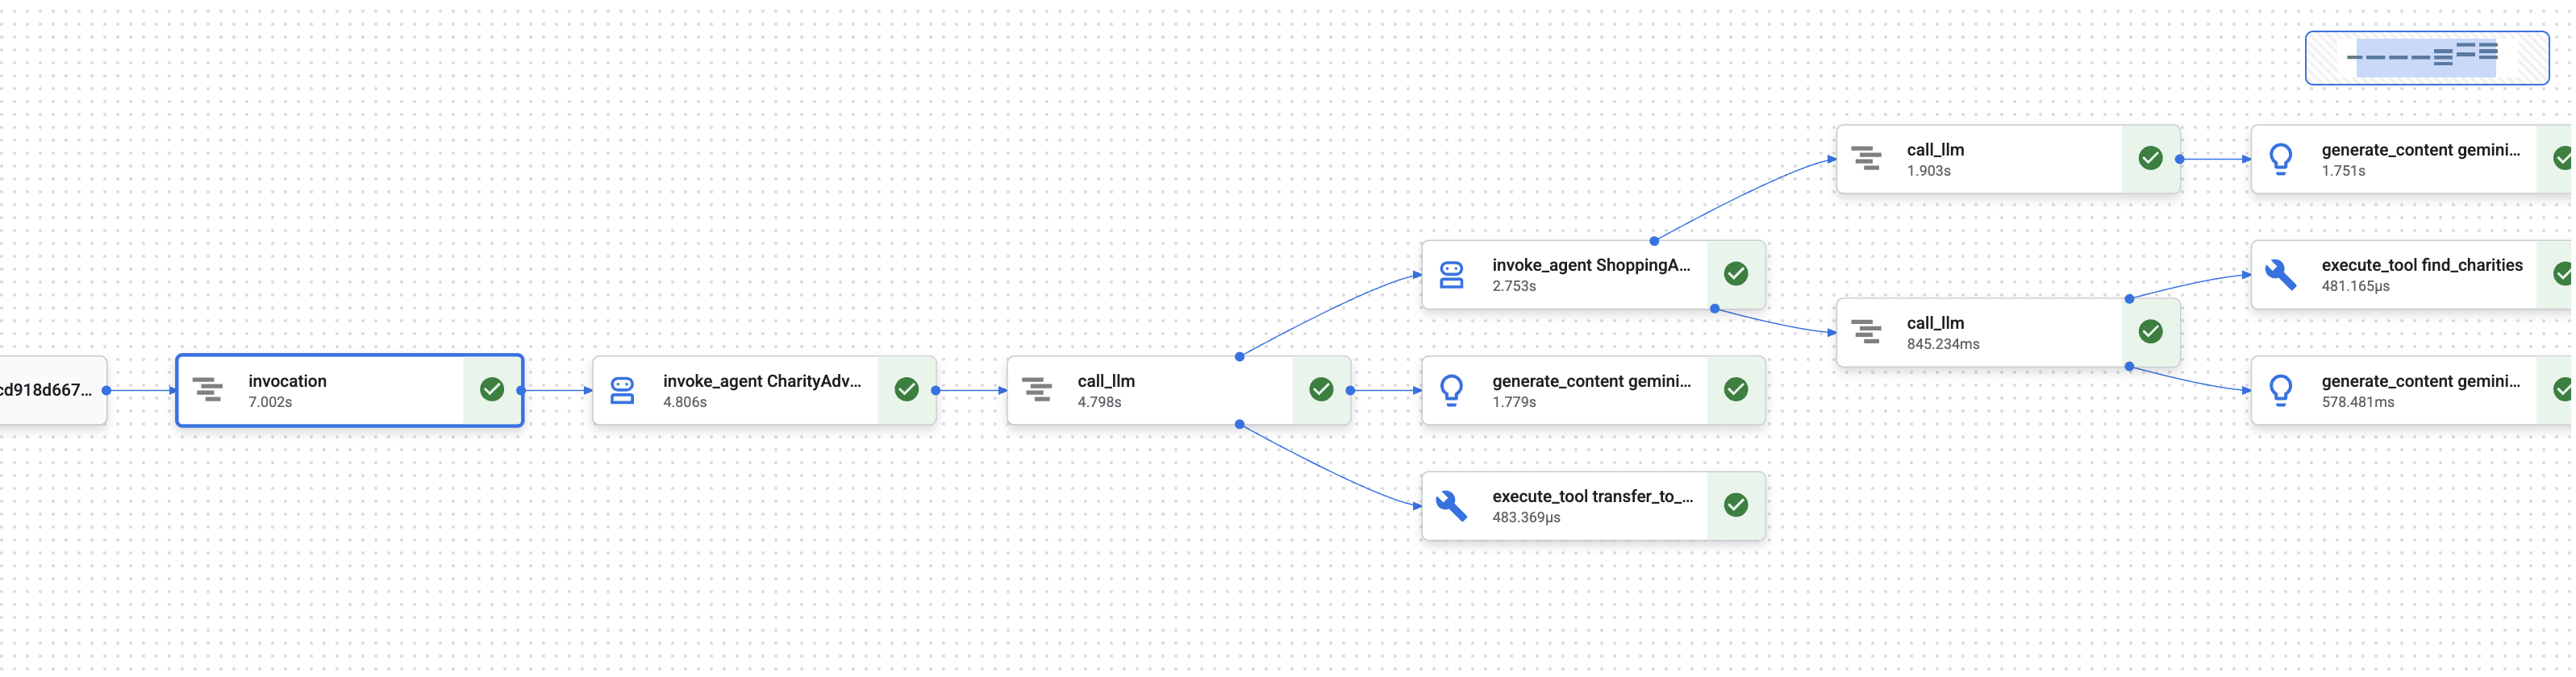
In Module 1, you learned about a fundamental problem: when an AI agent handles money, how do you prove what happened?
A user could claim:
- "I never chose that charity!"
- "I didn't authorize that payment!"
- "The system charged me without my consent!"
In a traditional black-box AI system, you'd have no way to prove otherwise. But your trustworthy donation system is different. In Module 8, you deployed with the --trace_to_cloud flag, which means every donation now creates a complete, tamper-evident audit trail in Cloud Trace .
This module teaches you to read those traces and use them as evidence. You'll learn to:
- Navigate Cloud Trace Explorer to find production traces
- Read the waterfall view to understand execution flow
- Find the credential chain (Intent → Cart → Payment mandates)
- Locate consent moments with timestamp proof
- Use traces for dispute resolution
- Export traces for compliance and audits
This is what separates trustworthy systems from capable-but-opaque ones: the ability to prove what happened with forensic precision .
Understanding Traces and Spans
Before viewing traces in Cloud Trace, you need to understand what you're looking at.
What is a Trace?
A trace is the complete timeline of your agent handling a single request. It captures everything from when a user sends a query until the final response is delivered.
Each trace shows:
- Total duration of the request
- All operations that executed
- How operations relate to each other (parent-child relationships)
- When each operation started and ended
- Success or failure status
For your charity agent: One trace = one complete donation flow from "I want to donate" to "Payment successful."
What is a Span?
A span represents a single unit of work within a trace. Think of spans as the building blocks of a trace.
Common span types in your donation system:
Span Type | What It Represents | উদাহরণ |
| Execution of an agent | |
| Request to a language model | |
| Tool function execution | |
| Reading from session memory | Retrieving |
| Writing to session memory | Storing |
Each span contains:
- Name: What operation this represents
- How long it took (start time → end time)
- Attributes: Metadata like tool inputs, model responses, token counts
- Status: Success (
OK) or error (ERROR) - Parent-child relationships: Which operations triggered which
How Spans Form a Trace
Spans nest inside each other to show causation:
Root Span: CharityAdvisor.run (entire request)
  └─ Child: DonationPipeline.run (sequential workflow)
      ├─ Child: ShoppingAgent.run
      │   ├─ Grandchild: call_llm (Gemini processes charity search)
      │   ├─ Grandchild: execute_tool (find_charities)
      │   └─ Grandchild: execute_tool (save_user_choice)
      ├─ Child: MerchantAgent.run
      │   ├─ Grandchild: call_llm (Gemini generates cart)
      │   └─ Grandchild: execute_tool (create_cart_mandate)
      └─ Child: CredentialsProvider.run
          ├─ Grandchild: call_llm (Gemini processes payment)
          └─ Grandchild: execute_tool (create_payment_mandate) [CONSENT!]
This hierarchy shows exactly what happened and in what order . You can see that the payment mandate was created after the cart mandate, which was after the user selected a charity.
Step 1: Access Cloud Trace Explorer
Now let's view the actual traces from your deployed agent.
Navigate to Cloud Trace
- Open the Google Cloud Console: console.cloud.google.com
- Select your project from the dropdown at the top (should be pre-selected if you've been working in it)
- Navigate to Cloud Trace Explorer:
- In the left sidebar, scroll to Observability section
- Click Trace
- Or use direct link: console.cloud.google.com/traces/list
What You're Looking At
The Trace Explorer shows a list of all traces from your project:
কলাম | What It Shows |
অনুরোধ | HTTP method and endpoint (for API requests) |
শুরুর সময় | When the request began |
লেটেন্সি | Total duration of the request |
Spans | Number of operations in the trace |
Each row represents one complete request to your deployed agent.
Generate Test Traces (If Needed)
If you don't see any traces yet, the list might be empty because:
- No requests have been made to your deployed agent yet
- Traces take 1-2 minutes to appear after a request
Generate a test trace:
If you deployed to Cloud Run with UI , visit your service URL and complete a donation in the browser.
If you deployed to Agent Engine , run the test script from Module 8:
python scripts/test_deployed_agent.py
Wait 1-2 minutes , then refresh the Cloud Trace Explorer page. You should now see traces.
Filter Traces
Use the filter options at the top to find specific traces:
- Time range: Change from "Last hour" to "Last 24 hours" if needed
- Min latency / Max latency: Filter for slow requests
- Request filter: Search by specific operations (eg, "DonationPipeline")
For this module, focus on traces with longer durations (>5 seconds), as these represent complete donation flows with all three agents executing.
Step 2: Examine a Complete Donation Flow
Click on any trace in the list to open the waterfall view . This is where you'll spend most of your time analyzing agent behavior.
Understanding the Waterfall View
The waterfall view is a Gantt chart showing the complete execution timeline:
━━━━━━━━━━━━━━━━━━━━━━━━━━━━━━━━━━━━━━━━━━━━━━━━━
              Timeline (horizontal = time) →
━━━━━━━━━━━━━━━━━━━━━━━━━━━━━━━━━━━━━━━━━━━━━━━━━

invocation                           ▓▓▓▓▓▓▓▓▓▓▓▓▓▓▓▓▓▓▓▓▓▓ 8.2s
  agent_run: CharityAdvisor          ▓▓▓▓▓▓▓▓▓▓▓▓▓▓▓▓▓▓▓▓▓ 8.1s
    agent_run: DonationPipeline      ▓▓▓▓▓▓▓▓▓▓▓▓▓▓▓▓▓▓▓▓ 7.9s
      agent_run: ShoppingAgent       ▓▓▓▓▓▓ 2.1s
        call_llm: gemini-2.5-flash   ▓▓▓▓ 1.2s
        execute_tool: find_charities ▓▓ 0.5s
        execute_tool: save_user_choice ▓ 0.3s
      agent_run: MerchantAgent       ▓▓▓ 1.8s
        call_llm: gemini-2.5-flash   ▓▓ 0.9s
        execute_tool: create_cart_mandate ▓ 0.7s
      agent_run: CredentialsProvider ▓▓▓▓▓▓▓▓ 4.0s
        call_llm: gemini-2.5-flash   ▓▓ 0.8s
        execute_tool: create_payment_mandate ▓▓▓▓▓ 3.0s [CONSENT]
Reading the Chart
Each bar represents a span:
- Horizontal position: When it started
- Length: How long it took
- Indentation: Shows parent-child relationships
- Color: Typically blue for normal, red for errors
Key observations from this example trace:
✅ Total duration: 8.2 seconds
✅ Sequential execution: ShoppingAgent completed before MerchantAgent started
✅ MerchantAgent completed
আগে
CredentialsProvider started
✅ Consent was the longest operation: 3.0 seconds for create_payment_mandate (because it waited for user confirmation)
✅ LLM calls are visible: Each agent made one Gemini request
✅ Tool calls are captured: All six tools executed successfully
This visual immediately shows you where time is spent and what order operations executed in .
Click on a Span for Details
Click on the invocation span (the root span at the top). In the right panel, you'll see detailed attributes:
{
  "http.method": "POST",
  "http.status_code": 200,
  "http.url": "https://charity-advisor-xyz.a.run.app/api/run",
  "user_id": "test_user_123",
  "session_id": "4857885913439920384",
  "trace_id": "a1b2c3d4e5f6...",
  "span_id": "1234567890abcdef"
}
These attributes provide context about the entire request.
Step 3: Find the Credential Chain
Your trustworthy system uses a credential chain to prove authorization at each step:
IntentMandate (User chose charity)
    ↓
CartMandate (Merchant created cart, signed IntentMandate)
    ↓
PaymentMandate (Payment provider created payment, signed CartMandate)
Let's find each mandate in the trace.
Finding the IntentMandate
Click on the execute_tool: save_user_choice span (under ShoppingAgent).
In the attributes panel, you'll see:
{
  "tool.name": "save_user_choice",
  "tool.input.charity_name": "Save the Children",
  "tool.input.amount": 50,
  "tool.output.status": "success",
  "tool.output.intent_mandate": {
    "charity_name": "Save the Children",
    "amount": 50,
    "timestamp": "2024-11-08T15:30:12.345Z",
    "signature": "a3f7b9c1d2e4..."
  }
}
This proves:
- ✅ User selected "Save the Children"
- ✅ Amount was $50
- ✅ Choice was recorded at 15:30:12 UTC
- ✅ Signature was generated (in production, this would be cryptographic)
The IntentMandate is now in session state and available to subsequent agents.
Finding the CartMandate
Click on the execute_tool: create_cart_mandate span (under MerchantAgent).
In the attributes panel:
{
  "tool.name": "create_cart_mandate",
  "tool.input.intent_mandate": {
    "charity_name": "Save the Children",
    "amount": 50,
    "signature": "a3f7b9c1d2e4..."
  },
  "tool.output.status": "success",
  "tool.output.cart_mandate": {
    "cart_id": "cart_7893",
    "intent_signature": "a3f7b9c1d2e4...",
    "cart_signature": "e8f2a9b3c7d1...",
    "timestamp": "2024-11-08T15:30:14.789Z"
  }
}
This proves:
- ✅ MerchantAgent received the IntentMandate (input shows it)
- ✅ Cart was created with ID "cart_7893"
- ✅ Cart signature references the IntentMandate signature (chain link!)
- ✅ Created at 15:30:14 UTC (2.4 seconds after intent)
The CartMandate now references the IntentMandate, forming the chain.
Finding the PaymentMandate
Click on the execute_tool: create_payment_mandate span (under CredentialsProvider).
In the attributes panel:
{
  "tool.name": "create_payment_mandate",
  "tool.input.cart_mandate": {
    "cart_id": "cart_7893",
    "intent_signature": "a3f7b9c1d2e4...",
    "cart_signature": "e8f2a9b3c7d1..."
  },
  "tool.confirmation_required": true,
  "tool.confirmation_timestamp": "2024-11-08T15:30:17.891Z",
  "tool.user_response": "CONFIRMED",
  "tool.wait_duration_ms": 29168,
  "tool.output.status": "success",
  "tool.output.payment_mandate": {
    "payment_id": "pay_9821",
    "cart_signature": "e8f2a9b3c7d1...",
    "payment_signature": "b4c9e2a7f8d3...",
    "timestamp": "2024-11-08T15:30:47.059Z"
  }
}
This proves the complete chain:
- ✅ CredentialsProvider received the CartMandate (input shows it)
- ✅ Payment references the CartMandate signature (chain link!)
- ✅ Confirmation was required (
confirmation_required: true) - ✅ User confirmed at 15:30:17 UTC
- ✅ System waited 29.2 seconds for user decision
- ✅ Payment was created after confirmation (timestamp: 15:30:47)
Visualizing the Chain
The trace proves the credential chain executed correctly:
15:30:12 UTC → IntentMandate created (signature: a3f7...)
                  ↓
15:30:14 UTC → CartMandate created (references: a3f7...)
                  ↓
15:30:17 UTC → User consent requested
                  ↓
15:30:47 UTC → PaymentMandate created (references: e8f2...)
Each mandate references the signature of the previous one. This is tamper-evident - you can verify the chain by checking that signatures match.
Step 4: Analyzing Performance and Bottlenecks
Cloud Trace doesn't just prove what happened—it shows you where time is spent so you can optimize.
ক্রিটিক্যাল পাথ চিহ্নিত করুন
In the waterfall view, look for the longest spans in the vertical stack. These represent your performance bottlenecks.
From our example trace:
Total: 8.2 seconds

Breakdown:
  - ShoppingAgent:         2.1s (26%)
  - MerchantAgent:         1.8s (22%)
  - CredentialsProvider:   4.0s (49%)  ← Bottleneck
  - Other overhead:        0.3s (3%)
Critical insight: CredentialsProvider accounts for 49% of total time. Why?
Drill into the CredentialsProvider span:
CredentialsProvider: 4.0s
  - call_llm:              0.8s (20%)
  - create_payment_mandate: 3.0s (75%)  ← User consent wait
  - Other:                 0.2s (5%)
The 3.0-second delay is expected and good - it's the user deliberating before confirming. This is not a performance problem; it's proof of thoughtful consent.
Tracking LLM Costs
Click on any call_llm span to see token usage:
{
  "llm.model": "gemini-2.5-flash",
  "llm.usage.prompt_tokens": 487,
  "llm.usage.completion_tokens": 156,
  "llm.usage.total_tokens": 643,
  "llm.response_time_ms": 1243
}
Use this to:
- Track cost per request (tokens × model pricing)
- Identify unnecessarily long prompts
- Compare model performance (Flash vs Pro)
- Optimize for latency vs. quality
গণনার উদাহরণ:
Gemini 2.5 Flash pricing (as of Nov 2024):
  Input:  $0.075 per 1M tokens
  Output: $0.30 per 1M tokens

This request:
  Input:  487 tokens × $0.075 / 1M = $0.000037
  Output: 156 tokens × $0.30 / 1M  = $0.000047
  Total:                            = $0.000084 (~$0.00008)

For 10,000 donations/month:
  10,000 × 3 agents × $0.00008 = $2.40/month in LLM costs
This granular visibility helps you make data-driven decisions about model selection.
Comparing Across Traces
Filter for multiple traces and compare durations:
Trace 1: 8.2s  (with consent wait: 3.0s)
Trace 2: 12.5s (with consent wait: 7.8s)  ← User took longer
Trace 3: 5.1s  (with consent wait: 0.2s)  ← User clicked fast
Trace 4: 6.3s  (with consent wait: 1.5s)
Insight: Most variation comes from user decision time, not system performance. The core agent execution (minus consent) is consistent at ~5 seconds.
This tells you the system is performing reliably.
For production systems, set up alerts to catch issues before users complain.
Alert on High Error Rates
Create an alert when >5% of traces contain errors:
- Navigate to Cloud Monitoring
- Click "Alerting" → "Create Policy"
- Configure:
Resource: Cloud Trace Span
Metric: Span error count
Condition: Rate > 5% over 5 minutes
Notification: Email your-team@example.com
Alert on High Latency
Create an alert when p95 latency exceeds 15 seconds:
Resource: Cloud Trace
Metric: Span duration (95th percentile)
Condition: > 15000ms for 5 minutes
Notification: PagerDuty
This catches performance degradation before it impacts user experience.
Alert on Missing Consent
Create an alert if any payment processes without confirmation:
Resource: Cloud Trace Span
Filter: tool.name="create_payment_mandate" AND tool.confirmation_required!=true
Condition: Any match
Notification: Critical alert to security team
This is a safety violation detector - if it fires, something is very wrong with your consent mechanism.
What You've Learned
Through Cloud Trace, you now understand how to:
✅ Navigate Cloud Trace Explorer to find production traces
✅ Read waterfall views to see complete execution flow
✅ Trace the credential chain through IntentMandate → CartMandate → PaymentMandate ✅ Use traces as evidence for dispute resolution
✅ Analyze performance to identify bottlenecks
✅ Track LLM costs at a granular level
The Difference This Makes
Compare two systems handling the same "I never authorized this!" complaint:
System Without Observability
User: "I never authorized that $50 donation!"
You:  "Our logs show the transaction completed successfully."
User: "But I didn't approve it!"
You:  "The system requires confirmation before processing."
User: "I never saw any confirmation!"
You:  "..." [no way to prove what happened]

Result: Refund issued, trust lost, user never returns.
System With Cloud Trace
User: "I never authorized that $50 donation!"
You:  "Let me pull up the trace from your session..."
      [Shows waterfall with consent span]
You:  "Here's the evidence:
       - 15:30:17 UTC: System asked for confirmation
       - Message shown: 'You are about to donate $50...'
       - 15:30:47 UTC: You clicked 'CONFIRM'
       - Wait time: 29.2 seconds

       The system waited almost 30 seconds for your decision.
       Here's the exact timestamp of your confirmation."

User: "Oh... I remember now. My mistake. Sorry!"

Result: Trust preserved, no refund needed, user continues using service.
This is the power of accountability trails. You move from "trust us" to "let us show you exactly what happened."
What's Next
You've now completed the technical core of building trustworthy agents:
✅ Module 1-6: Designed a trustworthy architecture (roles, credentials, consent)
✅ Module 7: Orchestrated complex workflows (SequentialAgent)
✅ Module 8: Deployed with observability enabled
✅ Module 9: Learned to read and use accountability trails
The architecture you've built—role separation, credential chains, consent mechanisms, complete observability—transfers directly to production systems handling real money, real data, and real consequences.
10. Your Journey Forward
What You've Built
You started this workshop with a question: "How do I build AI agents I can actually trust with money?"
You now have the answer.
Where you started (Module 3):
simple_agent = Agent(
    model="gemini-2.5-flash",
    instruction="Find charities and donate",
    tools=[google_search]
)
Where you are now (Module 10):
- ✅ Three specialized agents with role separation
- ✅ Three verifiable credentials (Intent → Cart → Payment mandates)
- ✅ Complete credential chain with expiry validation at each step
- ✅ Explicit consent mechanism with timestamp proof
- ✅ Production deployment to Agent Engine with observability
- ✅ Complete accountability trail in Cloud Trace
- ✅ Forensic evidence for dispute resolution
Workshop vs. Production: The Gap
Your system demonstrates the correct architecture and patterns , but uses educational simplifications that must be upgraded for real money and real users.
Here's exactly what was simplified and what production requires:
উপাদান | Workshop Implementation | Production Requirements |
Signatures | SHA-256 hashes ( | Real cryptographic signatures using PKI or JWT with private keys |
Payment Processing | Simulated returns ( | Integration with real payment APIs (Stripe, PayPal, Square) |
ব্যবহারকারীর প্রমাণীকরণ | Implicit trust (no login required) | OAuth 2.0, WebAuthn, or session management |
Secrets Management | Environment variables in | Google Secret Manager or Cloud KMS with encryption |
Charity Database | Mock JSON file with 9 charities | Live API integration (IRS Tax Exempt Organization Search, Charity Navigator API) |
Error Handling | Basic try-catch with error messages | Retry logic with exponential backoff, circuit breakers, dead letter queues |
পরীক্ষা | Manual verification via scripts | Comprehensive unit/integration/E2E test suite with CI/CD |
Session Persistence | In-memory (local) or automatic (Agent Engine) | Production database with backups and disaster recovery |
Rate Limiting | None (educational environment) | Rate limits per user, IP-based throttling, abuse detection |
Key Architectural Patterns You Mastered
The patterns you learned in this workshop are production patterns . Don't doubt them.
Role Separation (AP2 Principle #1)
Each agent has ONE clear job and sees ONLY what it needs. If one agent is compromised, the attacker cannot access other agents' data. This limits the blast radius.
Production systems using this: Payment processing, document workflows, approval chains, multi-step forms with validation gates.
Verifiable Credentials (AP2 Principle #2)
Each credential has expiry time, references the previous credential, and requires validation before the next step. This creates a tamper-evident audit chain.
Production value: Complete proof of what happened, when, and in what order. Essential for dispute resolution and regulatory compliance.
Explicit Consent (AP2 Principle #3)
Timestamp proof that user approved action. Cannot be disputed.
Production value: Legal requirement for financial transactions. Protects both user and company.
Sequential Orchestration (ADK Pattern)
Enforces correct execution order. Prevents skipping steps. Guarantees each agent sees previous agent's output.
Production value: Perfect for human-in-the-loop systems where users expect immediate results. This is the right pattern for donation flows, checkout processes, and approval chains.
Complete Observability (OpenTelemetry + Cloud Trace)
Every decision, tool call, consent moment, and credential handoff captured automatically.
Production value: Forensic evidence for disputes. Performance optimization data. Compliance audit trails. Debug production issues with precision.
Resources for Continued Learning
ADK Documentation:
AP2 & Related Standards:
Google Cloud Services:
Cleanup Resources
To avoid ongoing charges, delete your deployment:
Agent Engine: Follow steps in the Agent Engine docs
Cloud Run (if deployed):
gcloud run services delete charity-advisor \
    --region=$GOOGLE_CLOUD_LOCATION
Storage Buckets:
gsutil -m rm -r gs://$GOOGLE_CLOUD_PROJECT-staging
gsutil -m rm -r gs://$GOOGLE_CLOUD_PROJECT-artifacts
Your Journey Continues
You started with a simple question and built a complete answer. You've mastered the foundational patterns for trustworthy AI agents. These patterns transfer to any domain where AI agents handle sensitive operations—financial transactions, healthcare decisions, legal documents, supply chain operations.
The principles transfer. The trust model works.
Now go build something trustworthy! ❤️