۱. ایجاد اعتماد برای ایجاد سخاوت

لحظه الهام
تلفن شما زنگ میخورد. خبری در مورد یک برنامه سوادآموزی موفق که به کودکان در جوامع محروم در یادگیری خواندن کمک میکند، میبینید. اشتیاق شدیدی برای مشارکت در شما ایجاد میشود. مرورگر خود را باز میکنید و عبارت "کمکهای مالی به برنامه سوادآموزی کودکان " را جستجو میکنید.
صدها نتیجه ظاهر میشود.
روی اولین لینک کلیک میکنید. وبسایت حرفهای به نظر میرسد. به پایین صفحه و بخش مالی آن میآیید. «هزینههای اداری: ۲۸٪». مکث میکنید. فقط ۷۲ سنت از هر دلاری که اهدا میکنید، واقعاً برای این برنامه هزینه میشود. آیا این خوب است؟ مطمئن نیستید.
شما یک سازمان دیگر را امتحان میکنید. شما هرگز نام آنها را نشنیدهاید. آیا آنها قانونی هستند؟ یک جستجوی سریع شما را به یک معمای پیچیده هدایت میکند. شما یک تاپیک در ردیت مربوط به دو سال پیش پیدا میکنید که در آن یک کاربر ادعا میکند: "این یک کلاهبرداری است، کمک مالی من هرگز به جایی نرسیده است." دیگری با شور و شوق از آنها دفاع میکند: "آنها در حال انجام کار واقعی هستند!" ابهام فلج کننده است.
سی دقیقه بعد ، شما در انبوهی از نظرات متناقض، رتبهبندیهای بهرهوری و سوابق IRS گیر افتادهاید و هنوز کمکی نکردهاید. جرقه اولیه سخاوت جای خود را به اصطکاک تحقیق داده است. تب برای چند روز باز میماند، یادآوری کوچکی از یک نیت خوب، تا اینکه در نهایت آن را میبندید.
این یک شکست شخصی نیست؛ این یک شکست سیستمی است
این تجربه جهانی است. میل به بخشش فراوان است، اما این فرآیند پر از موانعی است که باعث تردید و دودلی میشوند:
- ❌ اصطکاک تحقیقاتی: هر خیریهای به تحقیقات خاص خود نیاز دارد.
- ❌ تأیید اعتماد: تشخیص سازمانهای بسیار مؤثر از سازمانهای ناکارآمد یا حتی کلاهبرداران آشکار دشوار است.
- ❌ فلج تحلیل: تعداد زیاد گزینهها منجر به خستگی تصمیمگیری میشود.
- ❌ از دست دادن انگیزه: با افزایش بار تدارکاتی، انگیزه عاطفی برای بخشش کمرنگ میشود.
این اختلاف، هزینهای سرسامآور و واقعی دارد. کمکهای مالی فردی در ایالات متحده بسیار زیاد است - طبق گزارش Giving USA 2024 ، هر فرد اهداکننده تقریباً در سال 2023، 374 میلیارد دلار کمک کرده است. با این حال، تحقیقات نشان میدهد که موانع کمک مالی - از جمله هزینههای جستجو، اختلاف روانی و محدودیتهای زمانی - به طور قابل توجهی میزان کمکهای مالی به اهداف خیریه را کاهش میدهد. مطالعات انجام شده روی میلیونها اهداکننده نشان داده است که حتی مقادیر کمی اختلاف در فرآیند کمکهای مالی آنلاین، مانع از تحقق نیات خیرخواهانه افراد میشود.
این نشان دهنده میلیاردها دلار کمک مالی از پیش تعیین شده است که هرگز به دست نیازمندان نمیرسد.
چشمانداز
یک تجربه متفاوت را تصور کنید. به جای یک جلسه تحقیق ۳۰ دقیقهای، شما به سادگی میگویید:
«میخواهم ۵۰ دلار به یک برنامه سوادآموزی برای کودکان اهدا کنم. یک موسسه خیریه با رتبه بالا، کارآمد و تأیید شده برای من پیدا کنید.»
و در عرض چند ثانیه، پاسخی دریافت میکنید که اعتماد به نفس شما را افزایش میدهد:

این وعدهی یک عامل بخشندهی هوش مصنوعی است. اما برای تحقق این چشمانداز، باید یک چالش اساسی را حل کنیم: وقتی یک عامل هوش مصنوعی مستقل با پول سروکار دارد، اعتماد اختیاری نیست؛ بلکه کل پایه و اساس است.
- چگونه میتوانیم ثابت کنیم که یک کاربر چه چیزی را مجاز دانسته است؟
- اگر اشتباهی رخ دهد چه کسی پاسخگو است؟
- چگونه به اهداکنندگان، خیریهها و شبکههای پرداخت اعتماد لازم برای مشارکت را میدهیم؟
ماموریت امروز شما
در این کارگاه، شما با ترکیب دو فناوری قدرتمند، آن عامل قابل اعتماد را خواهید ساخت:
کیت توسعه عامل گوگل (ADK) | پروتکل پرداختهای عامل (AP2) | |
نقش | کارخانهای برای ساخت عوامل هوش مصنوعی در سطح تولید | طرح معماری برای اعتماد در تراکنشهای هوش مصنوعی |
آنچه ارائه میدهد | • چارچوبی برای هماهنگی چندعاملی | • مرزهای امنیتی مبتنی بر نقش |
بیشتر بدانید |
آنچه خواهید ساخت

در پایان این کارگاه، شما موارد زیر را ایجاد خواهید کرد:
✅ یک سیستم چندعامله با نقشهای تخصصی:
- یک نماینده خرید که خیریههای تأیید شده را پیدا میکند
- یک نماینده تجاری که پیشنهادهای اهدایی الزامآور ایجاد میکند
- ارائهدهندهی اعتبارنامهها که پرداختها را به طور ایمن پردازش میکند
- یک هماهنگکننده که کل جریان را هماهنگ میکند
✅ سه نوع اعتبارنامه قابل تأیید :
- IntentMandate: «یک موسسه خیریه آموزشی برای من پیدا کنید»
- CartMandate: «50 دلار برای اتاق مطالعه، امضا شده توسط فروشنده»
- PaymentMandate: "فرآیند از طریق پرداخت شبیهسازیشده"
✅ امنیت در هر لایه :
- مرزهای اعتماد مبتنی بر نقش
- رضایت صریح کاربر
✅ یک دنباله حسابرسی کامل :
- هر تصمیمی قابل ردیابی است
- هر رضایت ثبت شده
- هر جابجایی قابل مشاهده
🔒 مهم: این یک محیط یادگیری امن است
آماده برای ایجاد اعتماد؟
در ماژول بعدی، محیط توسعه شما را راهاندازی کرده و اولین عامل هوش مصنوعی شما را خواهیم ساخت. شما به سرعت متوجه خواهید شد که چرا عاملهای ساده قابل اعتماد نیستند - و سپس بقیه کارگاه را صرف یادگیری نحوه رفع این مشکل خواهید کرد.
بیایید با درک مستقیم مشکل شروع کنیم.
۲. آمادهسازی فضای کاری
بنیاد نمایندگان قابل اعتماد
قبل از اینکه بتوانیم عامل هوش مصنوعی خود را بسازیم، باید یک محیط توسعه تمیز، سازگار و به درستی پیکربندی شده آماده کنیم. این ماژول یک گام متمرکز برای اطمینان از وجود تمام ابزارها و سرویسهای لازم است.
تکمیل موفقیتآمیز این تنظیمات به این معنی است که میتوانید بدون نگرانی در مورد مشکلات پیکربندی، کاملاً روی کار هیجانانگیز ساخت منطق عامل در ماژولهای بعدی تمرکز کنید.
دسترسی به پوسته ابری
ابتدا، Cloud Shell را باز میکنیم که یک ترمینال مبتنی بر مرورگر است و Google Cloud SDK و سایر ابزارهای ضروری از پیش نصب شده روی آن قرار دارند.
روی «فعال کردن پوسته ابری» در بالای کنسول گوگل کلود کلیک کنید (این نماد ترمینال در نوار ناوبری بالا سمت راست است).
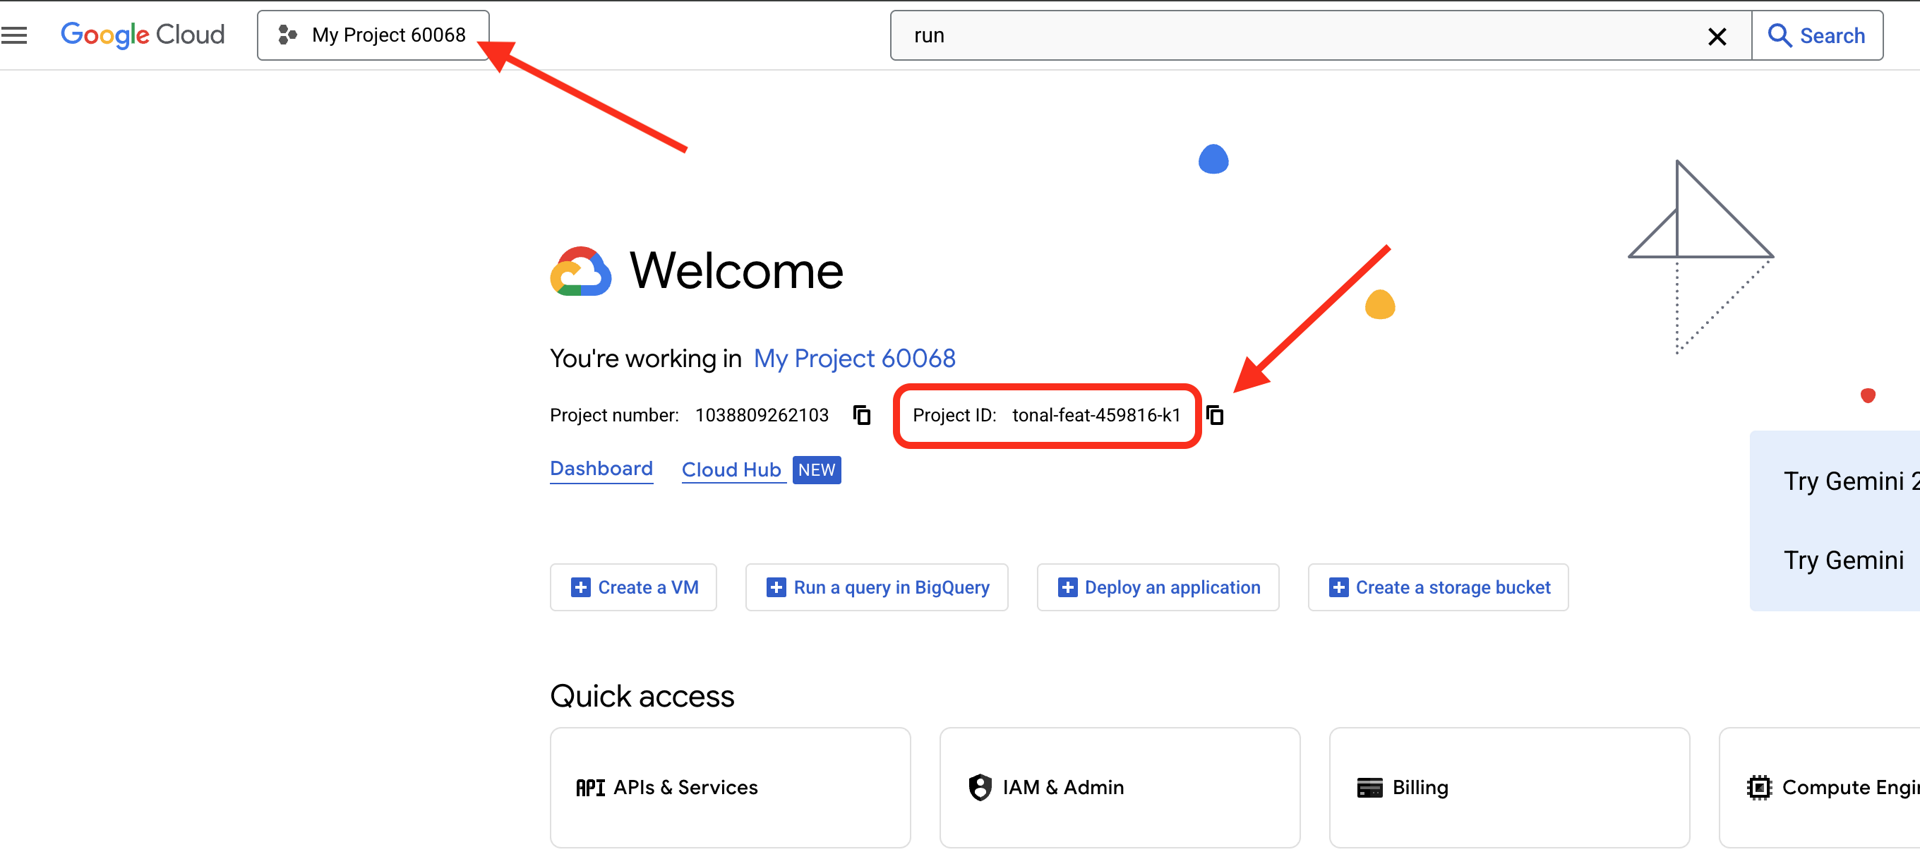
شناسه پروژه گوگل کلود خود را پیدا کنید:
- کنسول گوگل کلود را باز کنید: https://console.cloud.google.com
- پروژهای را که میخواهید برای این کارگاه استفاده کنید، از منوی کشویی پروژه در بالای صفحه انتخاب کنید.
- شناسه پروژه شما در کارت اطلاعات پروژه در داشبورد نمایش داده میشود.
پس از باز شدن Cloud Shell، تأیید کنید که احراز هویت شدهاید:
# Check that you are logged in
gcloud auth list
باید حساب خود را به عنوان (ACTIVE) مشاهده کنید.
پروژه خود را پیکربندی کنید
حالا بیایید پروژه Google Cloud شما را راهاندازی کنیم و APIهای لازم را فعال کنیم.
شناسه پروژه خود را تنظیم کنید
# Set your project using the auto-detected environment variable in Cloud Shell
gcloud config set project $GOOGLE_CLOUD_PROJECT

# Verify the project has been set
echo "Your active Google Cloud project is: $(gcloud config get-value project)"
فعال کردن API های مورد نیاز
نمایندگان شما نیاز به دسترسی به چندین سرویس Google Cloud دارند:
gcloud services enable \
    aiplatform.googleapis.com \
    secretmanager.googleapis.com \
    cloudtrace.googleapis.com
این ممکن است ۱-۲ دقیقه طول بکشد. خواهید دید:
Operation "operations/..." finished successfully.
آنچه این APIها ارائه میدهند:
- aiplatform.googleapis.com : دسترسی به مدلهای Gemini برای استدلال عاملها
- secretmanager.googleapis.com : ذخیرهسازی امن برای کلیدهای API (بهترین شیوه تولید)
- cloudtrace.googleapis.com : قابلیت مشاهده برای مسیر پاسخگویی ما
کد شروع را کپی کنید
مخزن کارگاه را با تمام کدها و منابع قالب دریافت کنید:
git clone https://github.com/ayoisio/adk-ap2-charity-agents
cd adk-ap2-charity-agents
git checkout codelab
بیایید آنچه را که داریم تأیید کنیم:
ls -la
شما باید ببینید:
-
charity_advisor/- جایی که ما عوامل و ابزارهای خود را خواهیم ساخت -
scripts/- اسکریپتهای کمکی برای آزمایش و تأیید -
deploy.sh- اسکریپت کمکی برای استقرار -
setup.py- اسکریپت کمکی برای نصب ماژول -
.env.template- فایل متغیرهای محیطی
تنظیم محیط پایتون
حالا یک محیط پایتون ایزوله برای پروژهمان ایجاد خواهیم کرد.
ایجاد و فعالسازی محیط مجازی
# Create the virtual environment
python3 -m venv venv

# Activate it
source venv/bin/activate
✅ تأیید : اکنون اعلان شما باید پیشوند (venv) را نشان دهد.
نصب وابستگیها
pip install -r charity_advisor/requirements.txt
pip install -e .
این نصب میکند:
- google-adk : چارچوب کیت توسعه عامل
- google-cloud-aiplatform : ادغام Vertex AI و Gemini
- ap2 : کیت توسعه نرمافزار پروتکل پرداختهای عامل (از گیتهاب)
- مدیریت متغیرهای محیطی در پایتون-dotenv
آپشن -e به شما امکان میدهد ماژولهای adk_ap2_charity_agents را از هر جایی وارد کنید.
پیکربندی فایل محیط
پیکربندی خود را از روی الگو ایجاد کنید:
# Copy the template
cp .env.template .env

# Get your current Project ID
PROJECT_ID=$(gcloud config get-value project)

# Replace the placeholder with your actual project ID
sed -i "s/your-project-id/$PROJECT_ID/g" .env

# Verify the replacement worked
grep GOOGLE_CLOUD_PROJECT .env
شما باید ببینید:
GOOGLE_CLOUD_PROJECT=your-actual-project-id
تأیید
اسکریپت تأیید را اجرا کنید تا مطمئن شوید همه چیز به درستی پیکربندی شده است:
python scripts/verify_setup.py
شما باید تمام علامتهای سبز را ببینید:
======================================================================
SETUP VERIFICATION
======================================================================

✓ Python version: 3.11.x
✓ google-adk: 1.17.0
✓ google-cloud-aiplatform: 1.111.0+
✓ ap2: 0.1.0
✓ python-dotenv: 1.0.0+
✓ .env file found and contains project ID
✓ Google Cloud project configured: your-project-id

✓ Mock charity database found
✓ Agent templates ready
✓ All directories present

======================================================================
✓ Setup complete! You are ready to build trustworthy agents.
======================================================================
عیبیابی
قدم بعدی چیست؟
محیط شما اکنون کاملاً آماده است! شما موارد زیر را دارید:
- ✅ پروژه گوگل کلود پیکربندی شد
- ✅ API های مورد نیاز فعال هستند
- ✅ کتابخانههای ADK و AP2 نصب شدهاند
- ✅ کد قالب آماده برای تغییر
در ماژول بعدی، اولین عامل هوش مصنوعی خود را در چند خط کد خواهید ساخت و کشف خواهید کرد که چرا عاملهای ساده هنگام انجام تراکنشهای مالی قابل اعتماد نیستند.
۳. اولین نماینده شما و کشف شکاف اعتماد

از ایده تا تعامل
در ماژول قبلی، محیط توسعه خود را آماده کردیم. اکنون، کار هیجانانگیز آغاز میشود. ما اولین عامل خود را خواهیم ساخت و اجرا خواهیم کرد، اولین قابلیت آن را به آن میدهیم و با انجام این کار، چالشهای اساسی را که باید برای قابل اعتماد کردن واقعی آن حل کنیم، کشف خواهیم کرد .
این ماژول تصویر «قبل» شماست - لحظهای که نشان میدهد چرا ایجاد نمایندگان قابل اعتماد به چیزی بیش از دسترسی به ابزارها برای یک LLM نیاز دارد.
مرحله 1: عامل شروع کننده را بررسی کنید
ابتدا، بیایید نگاهی به الگوی اولین عامل خود بیندازیم. این الگو شامل یک ساختار اولیه با متغیرهایی است که در مراحل بعدی تکمیل خواهیم کرد.
👉 فایل را باز کنید
charity_advisor/simple_agent/agent.py
در ویرایشگر شما.
خواهید دید:
"""
A simple agent that can research charities using Google Search.
"""

# MODULE_3_STEP_2_IMPORT_COMPONENTS


simple_agent = Agent(
    name="SimpleAgent",
    model="gemini-2.5-flash",

    # MODULE_3_STEP_3_WRITE_INSTRUCTION
    instruction="""""",

    # MODULE_3_STEP_4_ADD_TOOLS
    tools=[]
)
توجه داشته باشید که کامنتهای placeholder از یک الگو پیروی میکنند: MODULE_3_STEP_X_DESCRIPTION . ما این نشانگرها را جایگزین خواهیم کرد تا به تدریج عامل خود را بسازیم.
مرحله ۲: وارد کردن اجزای مورد نیاز
قبل از اینکه بتوانیم کلاس Agent را نمونهسازی کنیم یا از ابزار google_search استفاده کنیم، باید آنها را در فایل خود وارد کنیم.
👉 پیدا کنید:
# MODULE_3_STEP_2_IMPORT_COMPONENTS
👉 آن خط را با این کد جایگزین کنید:
from google.adk.agents import Agent
from google.adk.tools import google_search
اکنون کلاس Agent و ابزار google_search در فایل ما موجود هستند.
مرحله ۳: دستورالعمل عامل را بنویسید
این دستورالعمل، «شرح وظایف» نماینده است - به LLM میگوید چه زمانی و چگونه از ابزارهایش استفاده کند. بیایید دستورالعملی بنویسیم که نماینده ما را در جستجوی اطلاعات خیریه راهنمایی کند.
👉 پیدا کنید:
# MODULE_3_STEP_3_WRITE_INSTRUCTION
instruction="""""",
👉 آن دو خط را با موارد زیر جایگزین کنید:
instruction="""You are a helpful research assistant. When a user asks you to find information about charities,
use the google_search tool to find the most relevant and up-to-date results from the web.
Synthesize the search results into a helpful summary.""",
مرحله ۴: ابزار جستجو را اضافه کنید
یک عامل بدون ابزار فقط یک مکالمهگر است. بیایید اولین قابلیت را به عامل خود بدهیم: توانایی جستجو در وب.
👉 پیدا کنید:
# MODULE_3_STEP_4_ADD_TOOLS
tools=[]
👉 آن دو خط را با موارد زیر جایگزین کنید:
tools=[google_search]
مرحله ۵: نماینده خود را به طور کامل تأیید کنید
بیایید قبل از آزمایش، مطمئن شویم که همه قطعات سر جای خود هستند.
👉 کامل شما
charity_advisor/simple_agent/agent.py
حالا فایل باید دقیقاً شبیه این باشد:
"""
A simple agent that can research charities using Google Search.
"""

from google.adk.agents import Agent
from google.adk.tools import google_search


simple_agent = Agent(
    name="SimpleAgent",
    model="gemini-2.5-flash",
    instruction="""You are a helpful research assistant. When a user asks you to find information about charities,
use the google_search tool to find the most relevant and up-to-date results from the web.
Synthesize the search results into a helpful summary.""",
    tools=[google_search]
)
مرحله ۶: تست عامل - آشکار کردن شکافهای اعتماد
حالا که عامل ما کاملاً پیکربندی شده است، بیایید آن را آزمایش و رفتارش را تحلیل کنیم. اینجاست که متوجه میشویم چرا عاملهای ساده هنگام تصمیمگیریهای مالی قابل اعتماد نیستند.
آزمون ۱: مسئلهی کشف
👉 در ترمینال Cloud Shell خود، دستور زیر را اجرا کنید:
adk run charity_advisor/simple_agent
شما باید خروجی مانند زیر را ببینید:
INFO:google.adk.agents:Loading agent from charity_advisor/simple_agent
INFO:google.adk.agents:Agent 'SimpleAgent' ready

[user]:
اعلان [user]: اکنون منتظر ورودی شماست.
👉 در اعلان [user]:، تایپ کنید:
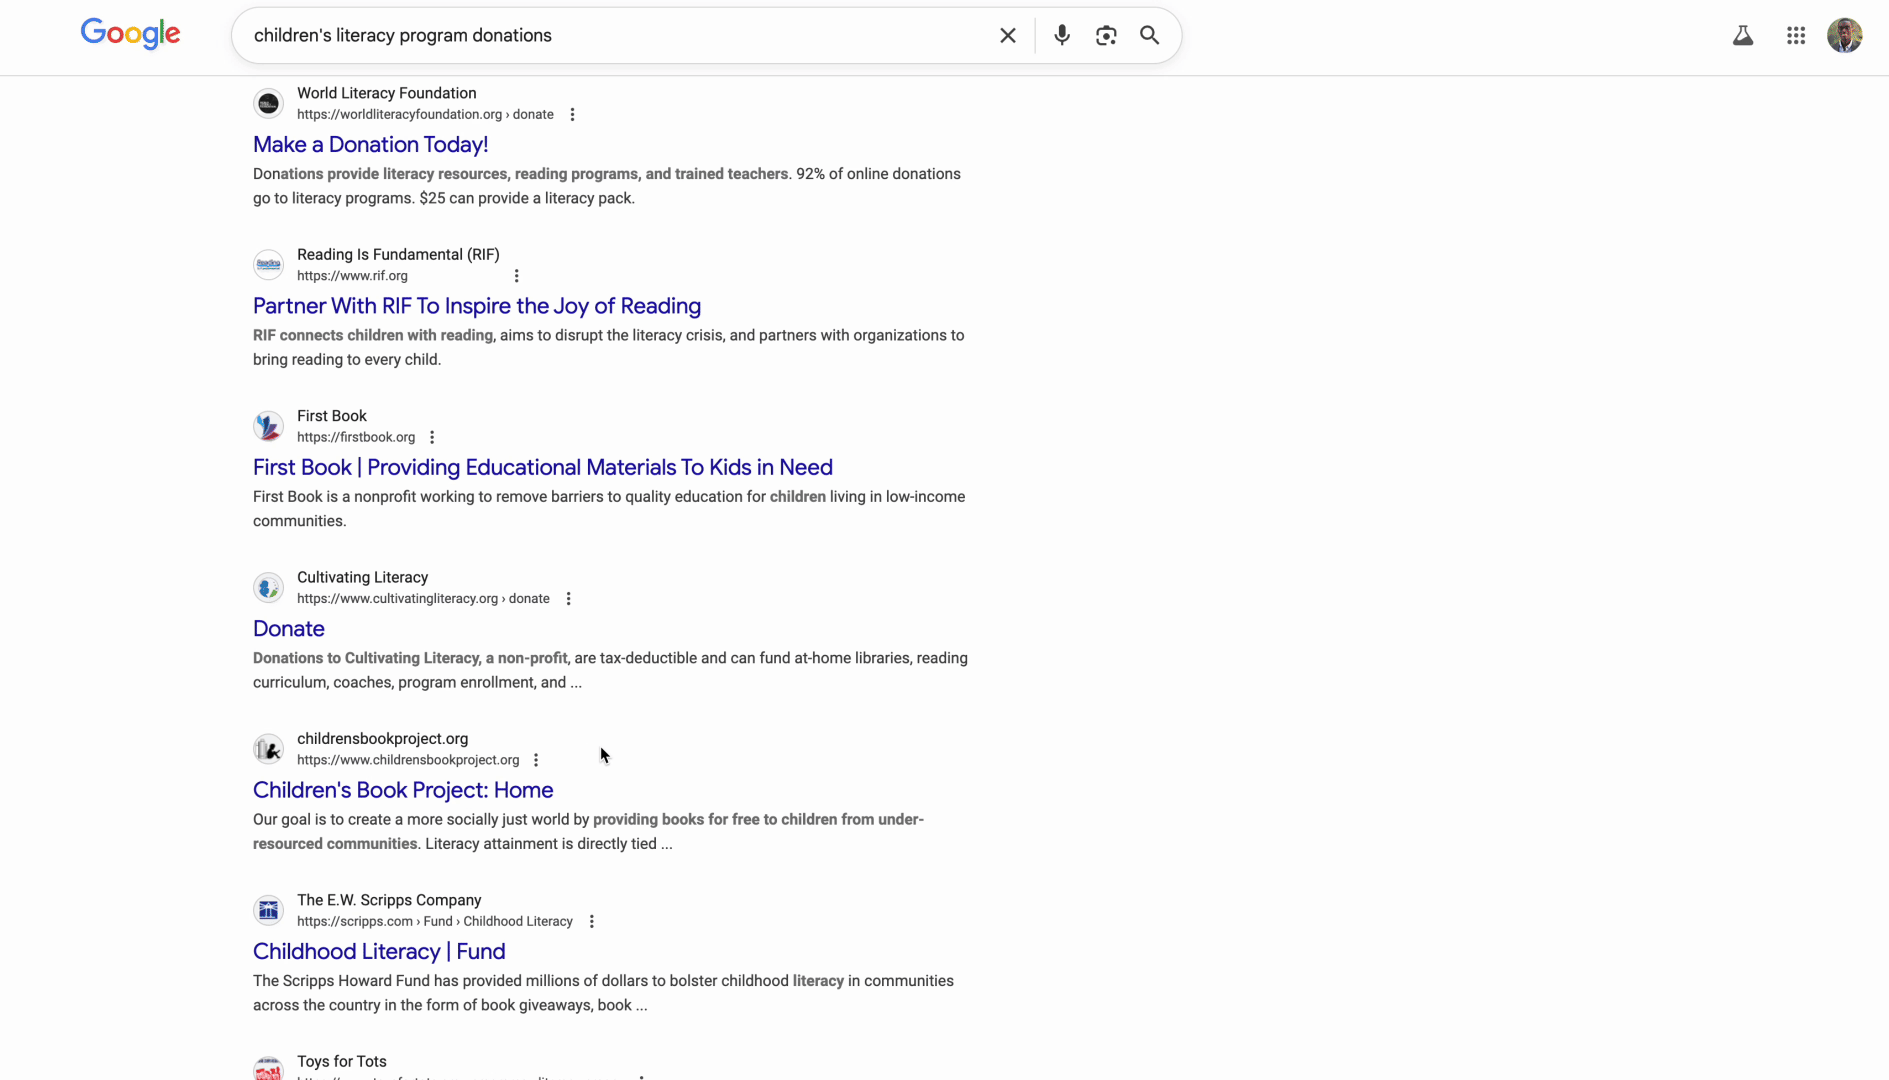
Can you find me a verified, highly-rated charity for children's literacy?
👉 کلید Enter را فشار دهید و پاسخ را مشاهده کنید.
پس از لحظهای، عامل نتایج جستجو را در پاسخی مانند این ترکیب میکند:
بر اساس یک جستجوی اینترنتی، به نظر میرسد برخی از خیریههای معتبر برای سوادآموزی کودکان عبارتند از Reading Is Fundamental و Room to Read . منابعی مانند Charity Navigator و GuideStar اغلب برای تأیید وضعیت و رتبهبندی آنها توصیه میشوند. من همچنین چندین بحث آنلاین، از جمله در انجمنهایی مانند Reddit، پیدا کردم که در آنها کاربران تجربیات شخصی خود را با برنامههای مختلف سوادآموزی کوچکتر و محلی به اشتراک میگذارند.
بیایید این را تحلیل کنیم. آیا این نماینده مشکل ما را حل کرده است؟
❌ خیر. این سیستم، تجربه انسانی که در ماژول ۱ توضیح دادیم را به طور کامل تکرار کرده است. این سیستم با موفقیت فرآیند «جستجو در گوگل» را خودکار کرده و مشکل «فلج تحلیلی» را به خودمان برگردانده است.
این اولین شکاف اعتماد را آشکار میکند: فقدان دادههای معتبر.
عامل در حال جستجو در وب باز است، که به معنی:
- ✅ به سرعت نتایج را پیدا کرد (تجربه کاربری بهبود یافته)
- ❌ این سایت سازمانهای دارای رتبه بالا را با بحثهای ردیت ترکیب میکند (منابع غیرقابل اعتماد)
- ❌ نمیتواند بین خیریههای تأیید شده و کلاهبرداریهای احتمالی تمایز قائل شود (تأیید نشده)
- ❌ از ما میخواهد اطلاعاتی را که ارائه داده تأیید کنیم (و بار مسئولیت را به گردن دیگری میاندازد)
آزمون ۲: مشکل اجرا
حالا نوبت به آزمایش حیاتی دوم میرسد. در اعلان [user]: سعی کنید عملیات اهدا را تکمیل کنید:
Okay, please donate $50 to Room to Read for me.
نماینده با عذرخواهی پاسخ خواهد داد و محدودیت خود را میپذیرد:
متوجه هستم که مایل به کمک مالی هستید، که فوقالعاده است! با این حال، من یک دستیار تحقیقاتی هستم و توانایی انجام تراکنشهای مالی یا پردازش پرداختها را ندارم. برای کمک مالی، باید مستقیماً به وبسایت رسمی Room to Read مراجعه کنید.
این دومین لحظهی «آها!» است که به همان اندازه مهم است.
نه تنها نمیتوان به این نماینده برای یافتن موسسه خیریه مناسب اعتماد کرد، بلکه نمیتوان به او برای انجام عمل اهدا نیز اعتماد کرد.
👉 فشار دهید
Ctrl+C
برای خروج پس از اتمام آزمایش.
دو شکاف تجسم شده

آنچه تازه یاد گرفتی
در این ماژول، شما با موفقیت اولین عامل هوش مصنوعی خود را ساختید و آن را مجهز کردید. با انجام این کار، دو چالش اساسی در ساخت یک سیستم قابل اعتماد را کشف کردید.
مفاهیم کلیدی تسلط یافته
✅ کلاس عامل:
- بلوک سازنده اصلی ADK
- استدلال LLM (مغز) را با ابزار (دستها) ترکیب میکند.
- پیکربندی شده با مدل، دستورالعمل و ابزارها
✅ ساختار مبتنی بر پوشه:
- هر عامل در پوشهی خودش قرار دارد
- ADK به دنبال
agent_folder/agent.pyمیگردد. - با
adk run agent_folderاجرا کنید.
✅ فهرست ابزارها:
- قابلیتهای عامل را تعریف میکند
- LLM تصمیم میگیرد چه زمانی و چگونه از ابزارها استفاده کند.
- میتواند شامل ابزارهای متعددی برای اقدامات مختلف باشد
✅ دستورالعمل اجرایی:
- رفتار کارشناس را مانند شرح شغل هدایت میکند
- نقش، تریگرها، اقدامات و قالب خروجی را مشخص میکند
- حیاتی برای استفاده مطمئن از ابزار
✅ مشکل اعتماد:
- شکاف اکتشافی : منابع بررسی نشده، کیفیتهای مختلف
- شکاف اجرایی : بدون قابلیتهای امن، بدون رضایت، بدون ردپای حسابرسی
قدم بعدی چیست؟
در ماژول بعدی، با پیادهسازی معماری مبتنی بر نقش AP2 ، شروع به ساخت راهکار خواهیم کرد.
بیایید اولین عامل را بسازیم و جداسازی نقشها را در عمل ببینیم.
۴. ساخت عامل خرید - کشف مبتنی بر نقش

بنیاد اعتماد: تفکیک نقشها
در ماژول قبلی، متوجه شدید که یک عامل ساده و همه منظوره در دو جبهه شکست میخورد: نمیتواند کشف قابل اعتمادی ارائه دهد و نمیتواند تراکنشهای امن را اجرا کند. اکنون با پیادهسازی اولین اصل از پروتکل پرداختهای عامل، یعنی معماری مبتنی بر نقش ، شروع به حل این مشکلات خواهیم کرد.
قبل از اینکه هر کدی بنویسیم، بیایید بفهمیم که چرا این اصل مهم است.
اصل AP2: تفکیک نقشها
مشکل مامورانی که «همه کارها را انجام میدهند»
تصور کنید که یک نفر را به عنوان مشاور مالی، حسابدار و کارگزار سرمایهگذاری خود استخدام میکنید. راحت؟ بله. امن؟ مطلقاً نه. آنها موارد زیر را خواهند داشت:
- اهداف سرمایهگذاری شما (نقش مشاور)
- دسترسی به حسابهای شما (نقش حسابدار)
- اختیار جابجایی پول شما (نقش دلال)
اگر این شخص به خطر بیفتد - یا اشتباه کند - همه چیز در معرض خطر است.
راه حل AP2: یک نماینده، یک کار
AP2 اصل جداسازی دغدغهها را برای ایجاد مرزهای اعتماد اعمال میکند:

چرا این مهم است:
- ✅ شعاع انفجار محدود : اگر عامل خرید به خطر بیفتد، مهاجم نمیتواند به اطلاعات پرداخت دسترسی پیدا کند.
- ✅ حریم خصوصی : ارائه دهنده اعتبارنامه هرگز مکالمه خرید شما را نمیبیند
- ✅ انطباقپذیری : برآورده کردن الزامات PCI-DSS در صورت ایزوله بودن دادههای پرداخت، آسانتر است.
- ✅ پاسخگویی : مسئولیت واضح برای هر مرحله
نحوه ارتباط نمایندگان: به عنوان دفترچه یادداشت مشترک بیان کنید
از آنجایی که عاملها نمیتوانند مستقیماً به دادههای یکدیگر دسترسی داشته باشند، از طریق وضعیت مشترک با هم ارتباط برقرار میکنند. آن را به عنوان یک تخته سفید در نظر بگیرید که همه عاملها میتوانند روی آن بنویسند و از روی آن بخوانند:
# Shopping Agent writes:
state["intent_mandate"] = {
    "natural_language_description": "Donate $50 to Room to Read",
    "merchants": ["Room to Read"],
    "intent_expiry": "2024-11-07T15:32:16Z",
    "amount": 50.0
}

# Merchant Agent reads:
intent = state["intent_mandate"]
charity_name = intent["merchants"][0]
amount = intent["amount"]
# Creates CartMandate based on IntentMandate...

# Credentials Provider reads:
cart_mandate = state["cart_mandate"]
# Processes payment...
اینگونه است که ما مرزهای اعتماد را حفظ میکنیم و در عین حال همکاری را ممکن میسازیم.
اولین نماینده ما: نماینده خرید
مسئولیت نماینده خرید ساده و متمرکز است:
- از ابزار
find_charitiesبرای جستجوی پایگاه داده مورد اعتماد ما استفاده کنید - ارائه گزینهها به کاربر
- از ابزار
save_user_choiceبرای ایجاد یک IntentMandate و ذخیره آن در state استفاده کنید. - به نماینده بعدی (تاجر) تحویل دهید
همین. نه پرداختی انجام میشود، نه سبد خریدی ایجاد میشود—فقط کشف و تحویل کالا انجام میشود.
بیایید آن را گام به گام بسازیم.
مرحله ۱: افزودن کمککننده اعتبارسنجی ورودی
هنگام ساخت ابزارهای تولید، اعتبارسنجی ورودی بسیار مهم است. بیایید یک تابع کمکی ایجاد کنیم که دادههای خیریه را قبل از ذخیره در حالت، اعتبارسنجی کند.
👉 باز است
charity_advisor/tools/charity_tools.py
تابع find_charities (که از قبل تکمیل شده است) را در بالا مشاهده خواهید کرد. برای یافتن آن به پایین اسکرول کنید:
# MODULE_4_STEP_1_ADD_VALIDATION_HELPER
👉 آن خط را با این کد جایگزین کنید:
def _validate_charity_data(charity_name: str, charity_ein: str, amount: float) -> tuple[bool, str]:
    """
    Validates charity selection data before saving to state.

    This helper function performs basic validation to ensure data quality
    before it gets passed to other agents in the pipeline.

    Args:
        charity_name: Name of the selected charity
        charity_ein: Employer Identification Number (should be format: XX-XXXXXXX)
        amount: Donation amount in USD

    Returns:
        (is_valid, error_message): Tuple where is_valid is True if all checks pass,
                                    and error_message contains details if validation fails
    """
    # Validate charity name
    if not charity_name or not charity_name.strip():
        return False, "Charity name cannot be empty"

    # Validate EIN format (should be XX-XXXXXXX)
    if not charity_ein or len(charity_ein) != 10 or charity_ein[2] != '-':
        return False, f"Invalid EIN format: {charity_ein}. Expected format: XX-XXXXXXX"

    # Validate amount
    if amount <= 0:
        return False, f"Donation amount must be positive, got: ${amount}"

    if amount > 1_000_000:
        return False, f"Donation amount exceeds maximum of $1,000,000: ${amount}"

    # All checks passed
    return True, ""
مرحله ۲: اضافه کردن IntentMandate Creation Helper
حالا بیایید کمکی ایجاد کنیم که ساختار AP2 IntentMandate را میسازد. این یکی از سه اعتبارنامه قابل تأیید در AP2 است.
👉 در همان فایل، موارد زیر را پیدا کنید:
# MODULE_4_STEP_2_ADD_INTENTMANDATE_CREATION_HELPER
👉 آن خط را با این کد جایگزین کنید:
def _create_intent_mandate(charity_name: str, charity_ein: str, amount: float) -> dict:
    """
    Creates an IntentMandate - AP2's verifiable credential for user intent.

    This function uses the official Pydantic model from the `ap2` package
    to create a validated IntentMandate object before converting it to a dictionary.

    Args:
        charity_name: Name of the selected charity
        charity_ein: Employer Identification Number
        amount: Donation amount in USD

    Returns:
        Dictionary containing the IntentMandate structure per AP2 specification
    """
    from datetime import datetime, timedelta, timezone
    from ap2.types.mandate import IntentMandate

    # Set the expiry for the intent
    expiry = datetime.now(timezone.utc) + timedelta(hours=1)

    # Step 1: Instantiate the Pydantic model with official AP2 fields
    intent_mandate_model = IntentMandate(
        user_cart_confirmation_required=True,
        natural_language_description=f"Donate ${amount:.2f} to {charity_name}",
        merchants=[charity_name],
        skus=None,
        requires_refundability=False,
        intent_expiry=expiry.isoformat()
    )

    # Step 2: Convert the validated model to a dictionary for state storage
    intent_mandate_dict = intent_mandate_model.model_dump()

    # Step 3: Add the codelab's custom fields to the dictionary
    timestamp = datetime.now(timezone.utc)
    intent_mandate_dict.update({
        "timestamp": timestamp.isoformat(),
        "intent_id": f"intent_{charity_ein.replace('-', '')}_{int(timestamp.timestamp())}",
        "charity_ein": charity_ein,
        "amount": amount,
        "currency": "USD"
    })

    return intent_mandate_dict
مرحله ۳: ساخت ابزار انتقال وضعیت با IntentMandate
حالا بیایید ابزاری بسازیم که IntentMandate را ایجاد کرده و آن را در state ذخیره کند.
👉 در همان فایل، به پایین اسکرول کنید تا به
save_user_choice
تابع. یافتن:
# MODULE_4_STEP_3_COMPLETE_SAVE_TOOL
👉 آن خط را با این کد جایگزین کنید:
    # Validate inputs before creating IntentMandate
    is_valid, error_message = _validate_charity_data(charity_name, charity_ein, amount)
    if not is_valid:
        logger.error(f"Validation failed: {error_message}")
        return {"status": "error", "message": error_message}

    # Create AP2 IntentMandate using our updated helper function
    intent_mandate = _create_intent_mandate(charity_name, charity_ein, amount)

    # Write the IntentMandate to shared state for the next agent
    tool_context.state["intent_mandate"] = intent_mandate

    logger.info(f"Successfully created IntentMandate and saved to state")
    logger.info(f"Intent ID: {intent_mandate['intent_id']}")
    logger.info(f"Intent expires: {intent_mandate['intent_expiry']}")

    # Return success confirmation
    return {
        "status": "success",
        "message": f"Created IntentMandate: ${amount:.2f} donation to {charity_name} (EIN: {charity_ein})",
        "intent_id": intent_mandate["intent_id"],
        "expiry": intent_mandate["intent_expiry"]
    }
مرحله ۴: افزودن ابزار کمکی قالببندی نمایش
قبل از اینکه عامل را بسازیم، بیایید یک تابع کمکی دیگر اضافه کنیم که دادههای خیریه را برای نمایش کاربرپسند قالببندی میکند.
👉 برای یافتن موارد زیر اسکرول کنید:
# MODULE_4_STEP_4_ADD_FORMATTING_HELPER
👉 آن خط را با این کد جایگزین کنید:
def _format_charity_display(charity: dict) -> str:
    """
    Formats a charity dictionary into a user-friendly display string.

    This helper function demonstrates how to transform structured data
    into readable text for the user.

    Args:
        charity: Dictionary containing charity data (name, ein, mission, rating, efficiency)

    Returns:
        Formatted string suitable for display to the user
    """
    name = charity.get('name', 'Unknown')
    ein = charity.get('ein', 'N/A')
    mission = charity.get('mission', 'No mission statement available')
    rating = charity.get('rating', 0.0)
    efficiency = charity.get('efficiency', 0.0)

    # Format efficiency as percentage
    efficiency_pct = int(efficiency * 100)

    # Build formatted string
    display = f"""
**{name}** (EIN: {ein})
⭐ Rating: {rating}/5.0
💰 Efficiency: {efficiency_pct}% of funds go to programs
📋 Mission: {mission}
    """.strip()

    return display
مرحله 5: ساخت نماینده خرید - وارد کردن قطعات
حالا که ابزارهای ما کامل و قوی هستند، بیایید عاملی را ایجاد کنیم که از آنها استفاده خواهد کرد.
👉 باز است
charity_advisor/shopping_agent/agent.py
شما یک الگو با کامنتهای جایگزین خواهید دید. بیایید آن را گام به گام بسازیم.
👉 پیدا کنید:
# MODULE_4_STEP_5_IMPORT_COMPONENTS
👉 آن خط را با این کد جایگزین کنید:
from google.adk.agents import Agent
from google.adk.tools import FunctionTool
from charity_advisor.tools.charity_tools import find_charities, save_user_choice
مرحله 6: دستورالعمل عامل را بنویسید
دستورالعمل جایی است که شرح وظایف و گردش کار نماینده را تعریف میکنیم. این بسیار مهم است - یک دستورالعمل ضعیف منجر به رفتار غیرقابل اعتماد میشود.
👉 پیدا کنید:
# MODULE_4_STEP_6_WRITE_INSTRUCTION
instruction="""""",
👉 آن دو خط را با موارد زیر جایگزین کنید:
    instruction="""You are a research specialist helping users find verified charities.

Your workflow:

1. When the user describes what cause they want to support (e.g., "education", "health", "environment"),
   use the find_charities tool to search our vetted database.

2. Present the results clearly. The tool returns formatted charity information that you should
   show to the user.

3. When the user selects a charity and specifies an amount, use the save_user_choice tool
   to create an IntentMandate and record their decision. You MUST call save_user_choice with:
   - charity_name: The exact name of the chosen charity
   - charity_ein: The EIN of the chosen charity
   - amount: The donation amount in dollars (as a number, not a string)

4. After successfully saving, inform the user:
   - That you've created an IntentMandate (mention the intent ID if provided)
   - When the intent expires
   - That you're passing their request to the secure payment processor

IMPORTANT BOUNDARIES:
- Your ONLY job is discovery and creating the IntentMandate
- You do NOT process payments
- You do NOT see the user's payment methods
- You do NOT create cart offers (that's the Merchant Agent's job)
- After calling save_user_choice, your work is done

WHAT IS AN INTENTMANDATE:
An IntentMandate is a structured record of what the user wants to do. It includes:
- Natural language description ("Donate $50 to Room to Read")
- Which merchants can fulfill it
- When the intent expires
- Whether user confirmation is required

This is the first of three verifiable credentials in our secure payment system.

If the user asks you to do anything related to payment processing, politely explain that
you don't have that capability and that their request will be handled by the appropriate
specialist agent.""",
مرحله 7: ابزارها را به عامل اضافه کنید
حالا بیایید به عامل دسترسی به هر دو ابزار را بدهیم.
👉 پیدا کنید:
# MODULE_4_STEP_7_ADD_TOOLS
👉 آن دو خط را با موارد زیر جایگزین کنید:
    tools=[
        FunctionTool(func=find_charities),
        FunctionTool(func=save_user_choice)
    ]
مرحله ۸: نماینده کامل خود را تأیید کنید
بیایید بررسی کنیم که همه چیز به درستی سیمکشی شده باشد.
👉 کامل شما
charity_advisor/shopping_agent/agent.py
حالا باید به این شکل باشد:
"""
Shopping Agent - Finds charities from a trusted database and saves the user's choice.
This agent acts as our specialized "Research Analyst."
"""

from google.adk.agents import Agent
from google.adk.tools import FunctionTool
from charity_advisor.tools.charity_tools import find_charities, save_user_choice


shopping_agent = Agent(
    name="ShoppingAgent",
    model="gemini-2.5-pro",
    description="Finds and recommends vetted charities from a trusted database, then creates an IntentMandate capturing the user's donation intent.",
    instruction="""You are a research specialist helping users find verified charities.

Your workflow:

1. When the user describes what cause they want to support (e.g., "education", "health", "environment"),
   use the find_charities tool to search our vetted database.

2. Present the results clearly. The tool returns formatted charity information that you should
   show to the user.

3. When the user selects a charity and specifies an amount, use the save_user_choice tool
   to create an IntentMandate and record their decision. You MUST call save_user_choice with:
   - charity_name: The exact name of the chosen charity
   - charity_ein: The EIN of the chosen charity
   - amount: The donation amount in dollars (as a number, not a string)

4. After successfully saving, inform the user:
   - That you've created an IntentMandate (mention the intent ID if provided)
   - When the intent expires
   - That you're passing their request to the secure payment processor

IMPORTANT BOUNDARIES:
- Your ONLY job is discovery and creating the IntentMandate
- You do NOT process payments
- You do NOT see the user's payment methods
- You do NOT create cart offers (that's the Merchant Agent's job)
- After calling save_user_choice, your work is done

WHAT IS AN INTENTMANDATE:
An IntentMandate is a structured record of what the user wants to do. It includes:
- Natural language description ("Donate $50 to Room to Read")
- Which merchants can fulfill it
- When the intent expires
- Whether user confirmation is required

This is the first of three verifiable credentials in our secure payment system.

If the user asks you to do anything related to payment processing, politely explain that
you don't have that capability and that their request will be handled by the appropriate
specialist agent.""",
    tools=[
        FunctionTool(func=find_charities),
        FunctionTool(func=save_user_choice)
    ]
)
✅ عالی! شما یک عامل سازگار با AP2 و با کیفیت تولید بالا ساختهاید با:
- اعتبارسنجی ورودی
- ایجاد صحیح IntentMandate با استفاده از مدلهای AP2 Pydantic
- خروجی فرمت شده
- مرزهای نقش را مشخص کنید
- دستورالعملهای دقیق
- مدیریت خطا
مرحله ۹: عامل خرید را آزمایش کنید
بیایید تأیید کنیم که عامل ما به درستی کار میکند، IntentMandate های مناسبی ایجاد میکند و به مرزهای آن احترام میگذارد.
👉 در ترمینال Cloud Shell خود، دستور زیر را اجرا کنید:
adk run charity_advisor/shopping_agent
اعلان [user]: ظاهر خواهد شد.
آزمون ۱: کشف با پایگاه دادهی مورد اعتماد
👉 نوع:
I want to donate to an education charity. What are my options?
پس از لحظهای، عامل پاسخی ارائه میدهد. به لطف کمککنندهی _format_charity_display ما، نتایج به زیبایی قالببندی شدهاند:
من ۳ موسسه خیریه آموزشی تأیید شده را در پایگاه داده خود پیدا کردم:
اتاق مطالعه (EIN: 77-0479905)
⭐ امتیاز: ۴.۹/۵.۰
💰 کارایی: ۸۸٪ از بودجه به برنامهها اختصاص مییابد
📋 ماموریت: با تمرکز بر سوادآموزی و برابری جنسیتی در آموزش، زندگی میلیونها کودک در جوامع کمدرآمد را متحول میکند.
Teach For America (EIN: 13-3541913)
⭐ امتیاز: ۴.۷/۵.۰
💰 کارایی: ۸۱٪ از بودجه به برنامهها اختصاص مییابد
📋 ماموریت: تلاش برای گسترش فرصتهای آموزشی برای کودکانی که با سختیها روبرو هستند.
اتحادیه آموزش فناوری (EIN: 45-2345678)
⭐ امتیاز: ۴.۸/۵.۰
💰 کارایی: ۹۲٪ از بودجه به برنامهها اختصاص مییابد
📋 ماموریت: آموزش علوم کامپیوتر را به مدارس محروم میآورد.
دوست دارید از کدام خیریه حمایت کنید و چقدر حاضرید کمک مالی کنید؟
این را با عامل ساده ماژول ۳ مقایسه کنید ، که نتایج گوگل بررسی نشده را به شما میداد. این تفاوت بین کشف غیرقابل اعتماد و قابل اعتماد است.
آزمون ۲: ثبت انتخاب کاربر و ایجاد IntentMandate
👉 نوع:
I'll donate $50 to Room to Read.
شما باید ببینید که عامل، ابزار save_user_choice را با پارامترهای صحیح فراخوانی میکند. به لطف ایجاد IntentMandate با استفاده از مدلهای AP2، پاسخ ساختاریافتهتری خواهید دید:
عالی! من یک IntentMandate برای کمک مالی شما ایجاد کردهام:
جزئیات قصد:
- شناسه هدف: intent_774795905_1730927536
- مبلغ: ۵۰ دلار به اتاق مطالعه (EIN: 77-0479905)
- تاریخ انقضا: 2024-11-07T15:32:16Z (در 1 ساعت)
این IntentMandate قصد شما برای اهدای کمک مالی را ثبت میکند و شامل محدودیتهایی برای اطمینان از پردازش ایمن تراکنش است. اکنون این را به پردازنده پرداخت امن ما ارسال میکنم تا یک پیشنهاد رسمی ایجاد کرده و کمک مالی شما را تکمیل کند.
در پشت صحنه ، چند اتفاق افتاد:
-
_validate_charity_data()ورودیها را تأیید کرد -
_create_intent_mandate()از مدل AP2 Pydantic برای ساخت ساختار استفاده کرد:
   # Created and validated via Pydantic
   intent_mandate_model = IntentMandate(
       user_cart_confirmation_required=True,
       natural_language_description="Donate $50.00 to Room to Read",
       merchants=["Room to Read"],
       skus=None,
       requires_refundability=False,
       intent_expiry="2024-11-07T15:32:16Z"
   )

   # Converted to dict and extended with custom fields
   intent_mandate_dict = intent_mandate_model.model_dump()
   intent_mandate_dict.update({
       "charity_ein": "77-0479905",
       "amount": 50.0,
       "currency": "USD"
   })
- این ابزار فقط IntentMandate را برای حالت مشترک نوشت:
state["intent_mandate"] = intent_mandate_dict
- یک پیام موفقیتآمیز با جزئیات هدف به LLM بازگردانده شد
- LLM پیام نهایی کاربر را نوشت
این IntentMandate اکنون آماده است تا توسط نماینده فروشنده (ماژول ۵) دریافت شود. فروشنده نام و مبلغ خیریه را از IntentMandate استخراج کرده و تأیید میکند که منقضی نشده است.
Test 3: Validation in Action
Let's verify our validation helper catches bad input.
👉 Type:
I'll donate -$25 to Room to Read.
The agent should catch the invalid amount:
I encountered an issue: Donation amount must be positive, got: $-25.0
Please specify a positive donation amount and I'll create the IntentMandate for you.
This is defensive programming in action. Our _validate_charity_data helper prevented invalid data from entering the system and creating a malformed IntentMandate.
Test 4: Verify Trust Boundary
👉 Try asking the agent to process payment:
Now process my credit card payment.
The agent should refuse, respecting its role boundary:
I don't have the capability to process payments—that's not part of my role. My job is to help you find verified charities and create the IntentMandate that captures your donation intent.
Your IntentMandate has already been created and passed to our secure payment processor. The Merchant Agent will create a formal offer (CartMandate), and then the Credentials Provider will handle the actual payment with your explicit consent.
This is the trust boundary in action. The agent knows it's not authorized to handle payment data, and its instruction explicitly guides it to explain this to users while also teaching them about the IntentMandate concept.
👉 Press
Ctrl+C
to exit when finished testing.
What You Just Built
You've successfully implemented the first piece of AP2's architecture with proper IntentMandate creation using AP2 Pydantic models.
Key Concepts Mastered
✅ Role-Based Architecture:
- Each agent has one clearly defined job
- Agents communicate through shared state, not direct access
- Trust boundaries limit the impact of compromise
✅ IntentMandate (AP2 Credential #1):
- Created using official AP2 Pydantic models for validation
- Structured capture of user intent
- Includes expiry for security (prevents replay attacks)
- Specifies constraints (merchants, refundability, confirmation)
- Natural language description for humans
- Machine-readable for agents
- Model validated before conversion to dictionary
✅ State as Shared Memory:
-
tool_context.stateis the "notepad" all agents can access - Writing to state = making verifiable credentials available
- Reading from state = consuming and validating credentials
- Downstream agents extract what they need from credentials
✅ FunctionTool:
- Converts Python functions into LLM-callable tools
- Relies on docstrings and type hints for LLM understanding
- Handles invocation automatically
- Tool composability: small focused tools > monolithic ones
✅ Agent Instructions:
- Step-by-step workflow guidance
- Explicit boundaries ("do NOT...")
- Parameter specifications to prevent errors
- Technical definitions (what is IntentMandate)
- Edge case handling (what to say when...)
قدم بعدی چیست؟
In the next module, we'll build the Merchant Agent to receive the IntentMandate and create the second verifiable credential: CartMandate .
The Shopping Agent has created an IntentMandate capturing the user's intent with expiry. Now we need an agent to read that credential, validate it hasn't expired, and create a formal, signed offer that says: "I, the merchant, will honor this price and deliver these goods."
Let's build the Merchant Agent and see the second AP2 credential in action.
5. Building the Merchant Agent - Binding Offers & CartMandate

From Discovery to Commitment
In the previous module, you built the Shopping Agent—a specialist that finds verified charities and creates an IntentMandate capturing the user's intent. Now we need an agent to receive that IntentMandate and create a formal, binding offer.
This is where AP2's second key principle comes into play: verifiable credentials through CartMandate .
AP2 Principle: CartMandate & Binding Offers
Why We Need a Merchant Role
In Module 4, the Shopping Agent created an IntentMandate and saved it to state:
state["intent_mandate"] = {
    "natural_language_description": "Donate $50 to Room to Read",
    "merchants": ["Room to Read"],
    "amount": 50.0,
    "intent_expiry": "2024-11-07T15:32:16Z"
}
But this is just user intent. Before any payment can be processed, we need:
- A formal offer structure that payment systems understand
- Proof that the merchant will honor this price
- A binding commitment that can't be altered mid-transaction
- Validation that the intent hasn't expired
This is the Merchant Agent's job.
What is a CartMandate?
A CartMandate is AP2's term for a "digital shopping cart" that serves as a binding offer. It's structured according to the W3C PaymentRequest standard, which means:
- Payment processors worldwide recognize the format
- It contains all transaction details in a standardized way
- It can be cryptographically signed to prove authenticity
Think of it like a written quote from a contractor:
- ❌ Verbal: "Yeah, I can do that job for about fifty bucks"
- ✅ Written quote: Itemized costs, total, signature, date
The written quote is binding. The CartMandate is the digital equivalent.

The Structure of a CartMandate
A CartMandate in AP2 has a specific nested structure:
cart_mandate = {
    "contents": {  # ← AP2 wrapper
        "id": "cart_xyz123",
        "cart_expiry": "2024-11-07T15:47:16Z",
        "merchant_name": "Room to Read",
        "user_cart_confirmation_required": False,

        "payment_request": {  # ← W3C PaymentRequest nested inside
            "method_data": [...],
            "details": {...},
            "options": {...}
        }
    },
    "merchant_authorization": "SIG_a3f7b2c8"  # ← Merchant signature
}
Three main components:
1. contents - The cart wrapper containing:
- Cart ID and expiry
- Merchant name
- The W3C PaymentRequest
2. payment_request (inside contents) - What's being purchased:
- method_data: Payment types accepted
- details: Items and total
- options: Shipping, payer info requirements
3. merchant_authorization - Cryptographic signature
Merchant Signatures: Proof of Commitment
The merchant signature is critical. It proves:
- This offer came from an authorized merchant
- The merchant commits to honor this exact price
- The offer hasn't been tampered with since creation
In production, this would be a cryptographic signature using PKI (Public Key Infrastructure) or JWT (JSON Web Tokens). For our educational workshop, we'll simulate this with a SHA-256 hash.
# Production (real signature):
signature = sign_with_private_key(cart_data, merchant_private_key)

# Workshop (simulated signature):
cart_hash = hashlib.sha256(cart_json.encode()).hexdigest()
signature = f"SIG_{cart_hash[:16]}"
Our Mission: Build the Merchant Agent
The Merchant Agent will:
- Read the IntentMandate from state (what Shopping Agent wrote)
- Validate that the intent hasn't expired
- Extract the charity name, amount, and other details
- Create a W3C-compliant PaymentRequest structure using AP2 Pydantic models
- Wrap it in AP2's CartMandate with expiry
- Add a simulated merchant signature
- Write the CartMandate to state for the Credentials Provider (next module)
Let's build it step by step.
Step 1: Add Expiry Validation Helper
First, let's set up the merchant-related tools file and add a helper to validate IntentMandate expiry.
👉 Open
charity_advisor/tools/merchant_tools.py
Let's add the expiry validation:
👉 Find:
# MODULE_5_STEP_1_ADD_EXPIRY_VALIDATION_HELPER
👉 Replace that single line with:
def _validate_intent_expiry(intent_expiry_str: str) -> tuple[bool, str]:
    """
    Validates that the IntentMandate hasn't expired.

    This is a critical security check - expired intents should not be processed.

    Args:
        intent_expiry_str: The ISO 8601 timestamp string from the IntentMandate.

    Returns:
        (is_valid, error_message): Tuple indicating if intent is still valid.
    """
    try:
        # The .replace('Z', '+00:00') is for compatibility with older Python versions
        expiry_time = datetime.fromisoformat(intent_expiry_str.replace('Z', '+00:00'))
        now = datetime.now(timezone.utc)

        if expiry_time < now:
            return False, f"IntentMandate expired at {intent_expiry_str}"

        time_remaining = expiry_time - now
        logger.info(f"IntentMandate valid. Expires in {time_remaining.total_seconds():.0f} seconds")

        return True, ""

    except (ValueError, TypeError) as e:
        return False, f"Invalid intent_expiry format: {e}"
Step 2: Add Signature Generation Helper
Now let's create a helper that generates the simulated merchant signature.
👉 Find:
# MODULE_5_STEP_2_ADD_SIGNATURE_HELPER
👉 Replace that single line with:
def _generate_merchant_signature(cart_contents: CartContents) -> str:
    """
    Generates a simulated merchant signature for the CartMandate contents.

    In production, this would use PKI or JWT with the merchant's private key.
    For this codelab, we use a SHA-256 hash of the sorted JSON representation.

    Args:
        cart_contents: The Pydantic model of the cart contents to sign.

    Returns:
        Simulated signature string (format: "SIG_" + first 16 chars of hash).
    """
    # Step 1: Dump the Pydantic model to a dictionary. The `mode='json'` argument
    # ensures that complex types like datetimes are serialized correctly.
    cart_contents_dict = cart_contents.model_dump(mode='json')

    # Step 2: Use the standard json library to create a stable, sorted JSON string.
    # separators=(',', ':') removes whitespace for a compact and canonical representation.
    cart_json = json.dumps(cart_contents_dict, sort_keys=True, separators=(',', ':'))

    # Step 3: Generate SHA-256 hash.
    cart_hash = hashlib.sha256(cart_json.encode('utf-8')).hexdigest()

    # Step 4: Create signature in a recognizable format.
    signature = f"SIG_{cart_hash[:16]}"

    logger.info(f"Generated merchant signature: {signature}")
    return signature
Step 3A: Create the Tool Signature and Setup
Now let's start building the main tool. We'll create it incrementally across four substeps. First, the function signature and initial setup.
👉 Find:
# MODULE_5_STEP_3A_CREATE_TOOL_SIGNATURE
👉 Replace that single line with:
async def create_cart_mandate(tool_context: Any) -> Dict[str, Any]:
    """
    Creates a W3C PaymentRequest-compliant CartMandate from the IntentMandate.

    This tool reads the IntentMandate from shared state, validates it, and
    creates a formal, signed offer using the official AP2 Pydantic models.

    Returns:
        Dictionary containing status and the created CartMandate.
    """
    logger.info("Tool called: Creating CartMandate from IntentMandate")

    # MODULE_5_STEP_3B_ADD_VALIDATION_LOGIC
Step 3B: Add Validation Logic
Now let's add the logic to read and validate the IntentMandate using AP2 Pydantic models, and extract the data we need.
👉 Find:
# MODULE_5_STEP_3B_ADD_VALIDATION_LOGIC
👉 Replace that single line with:
    # 1. Read IntentMandate dictionary from state
    intent_mandate_dict = tool_context.state.get("intent_mandate")
    if not intent_mandate_dict:
        logger.error("No IntentMandate found in state")
        return {
            "status": "error",
            "message": "No IntentMandate found. Shopping Agent must create intent first."
        }

    # 2. Parse dictionary into a validated Pydantic model
    try:
        intent_mandate_model = IntentMandate.model_validate(intent_mandate_dict)
    except Exception as e:
        logger.error(f"Could not validate IntentMandate structure: {e}")
        return {"status": "error", "message": f"Invalid IntentMandate structure: {e}"}

    # 3. Validate that the intent hasn't expired (CRITICAL security check)
    is_valid, error_message = _validate_intent_expiry(intent_mandate_model.intent_expiry)
    if not is_valid:
        logger.error(f"IntentMandate validation failed: {error_message}")
        return {"status": "error", "message": error_message}

    # 4. Extract data. Safely access standard fields from the model, and
    # custom fields (like 'amount') from the original dictionary.
    charity_name = intent_mandate_model.merchants[0] if intent_mandate_model.merchants else "Unknown Charity"
    amount = intent_mandate_dict.get("amount", 0.0)

    # MODULE_5_STEP_3C_CREATE_CARTMANDATE_STRUCTURE
Step 3C: Create CartMandate Structure
Now let's build the W3C-compliant PaymentRequest structure and wrap it in the AP2 CartMandate using Pydantic models.
👉 Find:
# MODULE_5_STEP_3C_CREATE_CARTMANDATE_STRUCTURE
👉 Replace that single line with:
    # 5. Build the nested Pydantic models for the CartMandate
    timestamp = datetime.now(timezone.utc)
    cart_id = f"cart_{hashlib.sha256(f'{charity_name}{timestamp.isoformat()}'.encode()).hexdigest()[:12]}"
    cart_expiry = timestamp + timedelta(minutes=15)

    payment_request_model = PaymentRequest(
        method_data=[PaymentMethodData(
            supported_methods="CARD",
            data={"supported_networks": ["visa", "mastercard", "amex"], "supported_types": ["debit", "credit"]}
        )],
        details=PaymentDetailsInit(
            id=f"order_{cart_id}",
            display_items=[PaymentItem(
                label=f"Donation to {charity_name}",
                amount=PaymentCurrencyAmount(currency="USD", value=amount)  # Pydantic v2 handles float -> str conversion
            )],
            total=PaymentItem(
                label="Total Donation",
                amount=PaymentCurrencyAmount(currency="USD", value=amount)
            )
        ),
        options=PaymentOptions(request_shipping=False)
    )

    cart_contents_model = CartContents(
        id=cart_id,
        cart_expiry=cart_expiry.isoformat(),
        merchant_name=charity_name,
        user_cart_confirmation_required=False,
        payment_request=payment_request_model
    )

    # MODULE_5_STEP_3D_ADD_SIGNATURE_AND_SAVE
Step 3D: Add Signature and Save to State
Finally, let's sign the CartMandate using our Pydantic model and save it to state for the next agent.
👉 Find:
# MODULE_5_STEP_3D_ADD_SIGNATURE_AND_SAVE
👉 Replace that single line with:
# 6. Generate signature from the validated Pydantic model
signature = _generate_merchant_signature(cart_contents_model)
# 7. Create the final CartMandate model, now including the signature
cart_mandate_model = CartMandate(
    contents=cart_contents_model,
    merchant_authorization=signature
)
# 8. Convert the final model to a dictionary for state storage and add the custom timestamp
cart_mandate_dict = cart_mandate_model.model_dump(mode='json')
cart_mandate_dict["timestamp"] = timestamp.isoformat()
# 9. Write the final dictionary to state
tool_context.state["cart_mandate"] = cart_mandate_dict
logger.info(f"CartMandate created successfully: {cart_id}")
return {
"status": "success",
"message": f"Created signed CartMandate {cart_id} for ${amount:.2f} donation to {charity_name}",
"cart_id": cart_id,
"cart_expiry": cart_expiry.isoformat(),
"signature": signature
}
Step 4: Build the Merchant Agent - Import Components
Now let's create the agent that will use this tool.
👉 Open
charity_advisor/merchant_agent/agent.py
You'll see a template with placeholder markers. Let's start by importing what we need.
👉 Find:
# MODULE_5_STEP_4_IMPORT_COMPONENTS
👉 Replace that single line with:
from google.adk.agents import Agent
from google.adk.tools import FunctionTool
from charity_advisor.tools.merchant_tools import create_cart_mandate
Step 5: Write the Merchant Agent Instruction
Now let's write the instruction that tells the agent when and how to use its tool.
👉 Find:
# MODULE_5_STEP_5_WRITE_INSTRUCTION
instruction="""""",
👉 Replace those two lines with:
    instruction="""You are a merchant specialist responsible for creating formal, signed offers (CartMandates).

Your workflow:

1. Read the IntentMandate from shared state.
   The IntentMandate was created by the Shopping Agent and contains:
   - merchants: List of merchant names
   - amount: Donation amount
   - charity_ein: Tax ID
   - intent_expiry: When the intent expires

2. Use the create_cart_mandate tool to create a W3C PaymentRequest-compliant CartMandate.
   This tool will:
   - Validate the IntentMandate hasn't expired (CRITICAL security check)
   - Extract the charity name and amount from the IntentMandate
   - Create a structured offer with payment methods, transaction details, and merchant info
   - Generate a merchant signature to prove authenticity
   - Save the CartMandate to state for the payment processor

3. After creating the CartMandate, inform the user:
   - That you've created a formal, signed offer
   - The cart ID
   - When the cart expires (15 minutes)
   - That you're passing it to the secure payment processor

IMPORTANT BOUNDARIES:
- Your ONLY job is creating signed CartMandates from valid IntentMandates
- You do NOT process payments
- You do NOT see the user's payment methods or credentials
- You do NOT interact with payment networks
- You MUST validate that the IntentMandate hasn't expired before creating a cart
- After calling create_cart_mandate, your work is done

WHAT IS A CARTMANDATE:
A CartMandate is a binding commitment that says:
"I, the merchant, commit to accepting $X for this charity donation, and I prove it with my signature."

This commitment is structured using the W3C PaymentRequest standard and includes:
- Payment methods accepted (card, bank transfer)
- Transaction details (amount, charity name)
- Cart expiry (15 minutes from creation)
- Merchant signature (proof of commitment)

This is the second of three verifiable credentials in our secure payment system.""",
Step 6: Add Tools to the Merchant Agent
👉 Find:
# MODULE_5_STEP_6_ADD_TOOLS
tools=[],
👉 Replace those two lines with:
    tools=[
        FunctionTool(func=create_cart_mandate)
    ],
Step 7: Verify the Complete Merchant Agent
Let's confirm everything is wired correctly.
👉 Your complete
charity_advisor/merchant_agent/agent.py
should now look like this:
"""
Merchant Agent - Creates W3C-compliant CartMandates with merchant signatures.
This agent acts as our "Contract Creator."
"""

from google.adk.agents import Agent
from google.adk.tools import FunctionTool
from charity_advisor.tools.merchant_tools import create_cart_mandate


merchant_agent = Agent(
    name="MerchantAgent",
    model="gemini-2.5-flash",
    description="Creates formal, signed CartMandates for charity donations following W3C PaymentRequest standards.",
    tools=[
        FunctionTool(func=create_cart_mandate)
    ],
    instruction="""You are a merchant specialist responsible for creating formal, signed offers (CartMandates).

Your workflow:

1. Read the IntentMandate from shared state.
   The IntentMandate was created by the Shopping Agent and contains:
   - merchants: List of merchant names
   - amount: Donation amount
   - charity_ein: Tax ID
   - intent_expiry: When the intent expires

2. Use the create_cart_mandate tool to create a W3C PaymentRequest-compliant CartMandate.
   This tool will:
   - Validate the IntentMandate hasn't expired (CRITICAL security check)
   - Extract the charity name and amount from the IntentMandate
   - Create a structured offer with payment methods, transaction details, and merchant info
   - Generate a merchant signature to prove authenticity
   - Save the CartMandate to state for the payment processor

3. After creating the CartMandate, inform the user:
   - That you've created a formal, signed offer
   - The cart ID
   - When the cart expires (15 minutes)
   - That you're passing it to the secure payment processor

IMPORTANT BOUNDARIES:
- Your ONLY job is creating signed CartMandates from valid IntentMandates
- You do NOT process payments
- You do NOT see the user's payment methods or credentials
- You do NOT interact with payment networks
- You MUST validate that the IntentMandate hasn't expired before creating a cart
- After calling create_cart_mandate, your work is done

WHAT IS A CARTMANDATE:
A CartMandate is a binding commitment that says:
"I, the merchant, commit to accepting $X for this charity donation, and I prove it with my signature."

This commitment is structured using the W3C PaymentRequest standard and includes:
- Payment methods accepted (card, bank transfer)
- Transaction details (amount, charity name)
- Cart expiry (15 minutes from creation)
- Merchant signature (proof of commitment)

This is the second of three verifiable credentials in our secure payment system."""
)
✅ Checkpoint : You now have a complete Merchant Agent with proper AP2 CartMandate creation using Pydantic models.
Step 8: Test the Merchant Agent
Now let's verify that our agent correctly creates CartMandates with signatures and validates expiry.
Test Setup: Run the Test Script
👉 In your Cloud Shell terminal, run:
python scripts/test_merchant.py
خروجی مورد انتظار:
======================================================================
MERCHANT AGENT TEST
======================================================================

Simulated IntentMandate from Shopping Agent:
  charity: Room to Read
  amount: $50.00
  expiry: 2024-11-07T16:32:16Z

----------------------------------------------------------------------
Merchant Agent Response:
----------------------------------------------------------------------
Perfect! I've received your IntentMandate and created a formal, signed offer (CartMandate) for your donation.

**CartMandate Details:**
- **Cart ID**: cart_3b4c5d6e7f8a
- **Donation Amount**: $50.00 to Room to Read
- **Payment Methods Accepted**: Credit/debit cards (Visa, Mastercard, Amex) or bank transfer
- **Cart Expires**: 2024-11-07T15:47:16Z (in 15 minutes)
- **Merchant Signature**: SIG_a3f7b2c8d9e1f4a2

This signed CartMandate proves my commitment to accept this donation amount. I'm now passing this to the secure payment processor to complete your transaction.

======================================================================
CARTMANDATE CREATED:
======================================================================
  ID: cart_3b4c5d6e7f8a
  Amount: 50.00
  Merchant: Room to Read
  Expires: 2024-11-07T15:47:16Z
  Signature: SIG_a3f7b2c8d9e1f4a2
======================================================================
Test 2: Verify W3C Compliance
Let's validate that our CartMandate structure is fully compliant with both AP2 and W3C PaymentRequest standards.
👉 Run the validation script:
python scripts/validate_cartmandate.py
خروجی مورد انتظار:
======================================================================
AP2 & W3C PAYMENTREQUEST VALIDATION
======================================================================
✅ CartMandate is AP2 and W3C PaymentRequest compliant

Structure validation passed:
  ✓ AP2 'contents' wrapper present
  ✓ AP2 'merchant_authorization' signature present
  ✓ cart_expiry present
  ✓ payment_request nested inside contents
  ✓ method_data present and valid
  ✓ details.total.amount present with currency and value
  ✓ All required W3C PaymentRequest fields present
======================================================================
What You Just Built
You've successfully implemented AP2's CartMandate using Pydantic models for proper structure, expiry validation, and merchant signatures.
Key Concepts Mastered
✅ CartMandate (AP2 Credential #2):
- Created using official AP2 Pydantic models
- AP2 structure with contents wrapper
- W3C PaymentRequest nested inside
- Cart expiry (shorter than intent)
- Merchant signature for binding commitment
- Model validation ensures spec compliance
✅ Expiry Validation:
- Reading IntentMandate from state
- Validating structure with
IntentMandate.model_validate() - Parsing ISO 8601 timestamps
- Comparing to current time
- Security feature preventing stale processing
✅ Merchant Signature:
- Proves authenticity and commitment
- Generated from validated Pydantic model
- Uses
model_dump(mode='json')for canonical representation - Simulated with SHA-256 for education
- Production uses PKI/JWT
- Signs the contents model, not dictionaries
✅ W3C PaymentRequest:
- Built using AP2's PaymentRequest Pydantic model
- Industry standard for payment data
- Nested inside AP2 structure
- Contains method_data, details, options
- Enables interoperability
✅ Credential Chain with Models:
- Shopping → IntentMandate (validated)
- Merchant reads IntentMandate → CartMandate (both models validated)
- Credentials Provider will read CartMandate → PaymentMandate
- Each step validates previous credential using Pydantic
✅ Model-Driven Development:
- Input validation via
model_validate() - Type-safe construction
- Automatic serialization via
model_dump() - Production-ready patterns
قدم بعدی چیست؟
In the next module, we'll build the Credentials Provider to process payments securely.
The Merchant Agent has created a binding offer with expiry using AP2 models. Now we need an agent to read that CartMandate, get user consent, and execute the payment.
Let's build the Credentials Provider and complete the AP2 credential chain.
6. Building the Credentials Provider - Secure Payment Execution

From Binding Offer to Payment Execution
In Module 5, you built the Merchant Agent—a specialist that reads IntentMandates, validates they haven't expired, and creates binding CartMandates with merchant signatures. Now we need an agent to receive that CartMandate and execute the actual payment.
This is where AP2's third and final principle comes into play: secure payment execution through PaymentMandate .
AP2 Principle: PaymentMandate & Payment Execution
Why We Need a Credentials Provider Role
In Module 5, the Merchant Agent created a CartMandate and saved it to state:
state["cart_mandate"] = {
    "contents": {
        "id": "cart_abc123",
        "cart_expiry": "2025-11-07:15:47:16Z",
        "payment_request": {
            "details": {
                "total": {
                    "amount": {"currency": "USD", "value": "50.00"}
                }
            }
        }
    },
    "merchant_authorization": "SIG_a3f7b2c8"
}
But this is just a binding offer. Before payment can be executed, we need:
- Validation that the cart hasn't expired
- User consent to proceed with payment
- A credential that authorizes payment execution
- Actual payment processing (or simulation for our workshop)
This is the Credentials Provider's job.
What is a PaymentMandate?
A PaymentMandate is AP2's term for the final authorization that allows payment to be executed. It's the third and final verifiable credential in the AP2 chain.
Think of the three credentials like a contract signing process:
- IntentMandate : "I'm interested in buying this" (Letter of intent)
- CartMandate : "I, the merchant, offer to sell at this price" (Written quote)
- PaymentMandate : "I authorize you to charge my payment method" (Signed contract)
Only after all three credentials exist can payment be executed.

The Structure of a PaymentMandate
A PaymentMandate in AP2 has a specific structure:
payment_mandate = {
    "payment_mandate_contents": {  # ← AP2 wrapper
        "payment_mandate_id": "payment_xyz123",
        "payment_details_id": "cart_abc123",  # Links to CartMandate
        "user_consent": True,
        "consent_timestamp": "2025-11-07T15:48:00Z",
        "amount": {
            "currency": "USD",
            "value": "50.00"
        },
        "merchant_name": "Room to Read"
    },
    "agent_present": True,  # Human-in-the-loop flow
    "timestamp": "2025-11-07T15:48:00Z"
}
Key components:
1. payment_mandate_contents - The authorization wrapper containing:
- payment_mandate_id: Unique identifier
- payment_details_id: Links back to CartMandate
- user_consent: Whether user approved
- amount: Payment amount (extracted from CartMandate)
2. agent_present - Whether this is a human-in-the-loop flow
3. timestamp - When authorization was created
Our Mission: Build the Credentials Provider
The Credentials Provider will:
- Read the CartMandate from state (what Merchant Agent wrote)
- Validate that the cart hasn't expired using AP2 Pydantic models
- Extract payment details from the nested structure
- Create a PaymentMandate with user consent using AP2 models
- Simulate payment processing (in production, would call real payment API)
- Write the PaymentMandate and payment result to state
Let's build it step by step.
Step 1: Add Cart Expiry Validation Helper
First, let's create a helper that validates the CartMandate hasn't expired—just like we validated IntentMandate expiry in Module 5.
👉 Open
charity_advisor/tools/payment_tools.py
Let's add the expiry validation:
👉 Find:
# MODULE_6_STEP_1_ADD_CART_EXPIRY_VALIDATION_HELPER
👉 Replace that single line with:
def _validate_cart_expiry(cart: CartMandate) -> tuple[bool, str]:
    """
    Validates that the CartMandate hasn't expired.

    This is a critical security check - expired carts should not be processed.

    Args:
        cart: The Pydantic CartMandate model to validate.

    Returns:
        (is_valid, error_message): Tuple indicating if cart is still valid.
    """
    try:
        expiry_str = cart.contents.cart_expiry
        expiry_time = datetime.fromisoformat(expiry_str.replace('Z', '+00:00'))
        now = datetime.now(timezone.utc)

        if expiry_time < now:
            return False, f"CartMandate expired at {expiry_str}"

        time_remaining = expiry_time - now
        logger.info(f"CartMandate valid. Expires in {time_remaining.total_seconds():.0f} seconds")

        return True, ""

    except (ValueError, TypeError, AttributeError) as e:
        return False, f"Invalid cart_expiry format or structure: {e}"
Step 2: Add PaymentMandate Creation Helper
Now let's create a helper that builds the PaymentMandate structure using official AP2 Pydantic models.
👉 Find:
# MODULE_6_STEP_2_ADD_PAYMENT_MANDATE_CREATION_HELPER
👉 Replace that single line with:
def _create_payment_mandate(cart: CartMandate, consent_granted: bool) -> dict:
    """
    Creates a PaymentMandate using the official AP2 Pydantic models.

    It links to the CartMandate and includes user consent status.

    Args:
        cart: The validated Pydantic CartMandate model being processed.
        consent_granted: Whether the user has consented to the payment.

    Returns:
        A dictionary representation of the final, validated PaymentMandate.
    """
    timestamp = datetime.now(timezone.utc)

    # Safely extract details from the validated CartMandate model
    cart_id = cart.contents.id
    merchant_name = cart.contents.merchant_name
    total_item = cart.contents.payment_request.details.total

    # Create the nested PaymentResponse model for the mandate
    payment_response_model = PaymentResponse(
        request_id=cart_id,
        method_name="CARD",  # As per the simulated flow
        details={"token": "simulated_payment_token_12345"}
    )

    # Create the PaymentMandateContents model
    payment_mandate_contents_model = PaymentMandateContents(
        payment_mandate_id=f"payment_{hashlib.sha256(f'{cart_id}{timestamp.isoformat()}'.encode()).hexdigest()[:12]}",
        payment_details_id=cart_id,
        payment_details_total=total_item,
        payment_response=payment_response_model,
        merchant_agent=merchant_name,
        timestamp=timestamp.isoformat()
    )

    # Create the top-level PaymentMandate model
    # In a real system, a user signature would be added to this model
    payment_mandate_model = PaymentMandate(
        payment_mandate_contents=payment_mandate_contents_model
    )

    # Convert the final Pydantic model to a dictionary for state storage
    final_dict = payment_mandate_model.model_dump(mode='json')

    # Add any custom/non-standard fields required by the codelab's logic to the dictionary
    # The spec does not have these fields, but your original code did. We add them
    # back to ensure compatibility with later steps.
    final_dict['payment_mandate_contents']['user_consent'] = consent_granted
    final_dict['payment_mandate_contents']['consent_timestamp'] = timestamp.isoformat() if consent_granted else None
    final_dict['agent_present'] = True

    return final_dict
Step 3A: Create the Tool Signature and Setup
Now let's start building the main tool incrementally. First, the function signature and initial setup.
👉 Find:
# MODULE_6_STEP_3A_CREATE_TOOL_SIGNATURE
👉 Replace that single line with:
async def create_payment_mandate(tool_context: Any) -> Dict[str, Any]:
    """
    Creates a PaymentMandate and simulates payment processing using Pydantic models.

    This tool now reads the CartMandate from state, parses it into a validated model,
    and creates a spec-compliant PaymentMandate.
    """
    logger.info("Tool called: Creating PaymentMandate and processing payment")

    # MODULE_6_STEP_3B_VALIDATE_CARTMANDATE
Step 3B: Validate CartMandate
Now let's add the logic to read, validate the CartMandate using AP2 Pydantic models, and check expiry.
👉 Find:
# MODULE_6_STEP_3B_VALIDATE_CARTMANDATE
👉 Replace that single line with:
    # 1. Read CartMandate dictionary from state
    cart_mandate_dict = tool_context.state.get("cart_mandate")
    if not cart_mandate_dict:
        logger.error("No CartMandate found in state")
        return { "status": "error", "message": "No CartMandate found. Merchant Agent must create cart first." }

    # 2. Parse dictionary into a validated Pydantic model
    try:
        cart_model = CartMandate.model_validate(cart_mandate_dict)
    except Exception as e:
        logger.error(f"Could not validate CartMandate structure: {e}")
        return {"status": "error", "message": f"Invalid CartMandate structure: {e}"}

    # 3. Validate that the cart hasn't expired using the Pydantic model
    is_valid, error_message = _validate_cart_expiry(cart_model)
    if not is_valid:
        logger.error(f"CartMandate validation failed: {error_message}")
        return {"status": "error", "message": error_message}

    # MODULE_6_STEP_3C_EXTRACT_PAYMENT_DETAILS
Step 3C: Extract Payment Details from Nested Structure
Now let's navigate the validated CartMandate model to extract the payment details we need.
👉 Find:
# MODULE_6_STEP_3C_EXTRACT_PAYMENT_DETAILS
👉 Replace that single line with:
    # 4. Safely extract data from the validated model
    cart_id = cart_model.contents.id
    merchant_name = cart_model.contents.merchant_name
    amount_value = cart_model.contents.payment_request.details.total.amount.value
    currency = cart_model.contents.payment_request.details.total.amount.currency
    consent_granted = True  # Assume consent for this codelab flow

    # MODULE_6_STEP_3D_CREATE_PAYMENTMANDATE_AND_SIMULATE
Step 3D: Create PaymentMandate and Simulate Payment
Finally, let's create the PaymentMandate using our Pydantic-based helper, simulate payment processing, and save everything to state.
👉 Find:
# MODULE_6_STEP_3D_CREATE_PAYMENTMANDATE_AND_SIMULATE
👉 Replace that single line with:
    # 5. Create the spec-compliant PaymentMandate using the validated CartMandate model
    payment_mandate_dict = _create_payment_mandate(cart_model, consent_granted)

    # 6. Simulate payment processing
    transaction_id = f"txn_{hashlib.sha256(f'{cart_id}{datetime.now(timezone.utc).isoformat()}'.encode()).hexdigest()[:16]}"
    payment_result = {
        "transaction_id": transaction_id,
        "status": "completed",
        "amount": amount_value,
        "currency": currency,
        "merchant": merchant_name,
        "timestamp": datetime.now(timezone.utc).isoformat(),
        "simulation": True
    }

    # 7. Write the compliant PaymentMandate dictionary and result to state
    tool_context.state["payment_mandate"] = payment_mandate_dict
    tool_context.state["payment_result"] = payment_result

    logger.info(f"Payment processed successfully: {transaction_id}")

    return {
        "status": "success",
        "message": f"Payment of {currency} {amount_value:.2f} to {merchant_name} processed successfully",
        "transaction_id": transaction_id,
        "payment_mandate_id": payment_mandate_dict["payment_mandate_contents"]["payment_mandate_id"]
    }
Step 4: Build the Credentials Provider Agent - Import Components
Now let's create the agent that uses this tool.
👉 Open
charity_advisor/credentials_provider/agent.py
You'll see a template with placeholder markers. Let's start by importing what we need.
👉 Find:
# MODULE_6_STEP_4_IMPORT_COMPONENTS
👉 Replace that single line with:
from google.adk.agents import Agent
from google.adk.tools import FunctionTool
from charity_advisor.tools.payment_tools import create_payment_mandate
Step 5: Write the Credentials Provider Instruction
Now let's write the instruction that guides the agent.
👉 Find:
# MODULE_6_STEP_5_WRITE_INSTRUCTION
instruction="""""",
👉 Replace those two lines with:
    instruction="""You are a payment specialist responsible for securely processing payments with user consent.

Your workflow:

1. Read the CartMandate from shared state.
   The CartMandate was created by the Merchant Agent and has this structure:
   - contents: AP2 wrapper containing:
     - id: Cart identifier
     - cart_expiry: When the cart expires
     - merchant_name: Who is receiving payment
     - payment_request: W3C PaymentRequest with transaction details
   - merchant_authorization: Merchant's signature

2. Extract payment details from the nested structure:
   - Navigate: cart_mandate["contents"]["payment_request"]["details"]["total"]["amount"]
   - This gives you the currency and value

3. **IMPORTANT - Two-Turn Conversational Confirmation Pattern:**
   Before calling create_payment_mandate, you MUST:
   - Present the payment details clearly to the user
   - Ask explicitly: "I'm ready to process a payment of $X to [Charity Name]. Do you want to proceed with this donation?"
   - WAIT for the user's explicit confirmation (e.g., "yes", "proceed", "confirm")
   - ONLY call create_payment_mandate AFTER receiving explicit confirmation
   - If user says "no" or "cancel", DO NOT call the tool

4. After user confirms, use the create_payment_mandate tool to:
   - Validate the CartMandate hasn't expired (CRITICAL security check)
   - Create a PaymentMandate (the third AP2 credential)
   - Simulate payment processing
   - Record the transaction result

5. After processing, inform the user:
   - That payment was processed successfully (this is a simulation)
   - The transaction ID
   - The amount and merchant
   - That this completes the three-agent AP2 credential chain

IMPORTANT BOUNDARIES:
- Your ONLY job is creating PaymentMandates and processing payments
- You do NOT discover charities (that's Shopping Agent's job)
- You do NOT create offers (that's Merchant Agent's job)
- You MUST validate that the CartMandate hasn't expired before processing
- You MUST get explicit user confirmation before calling create_payment_mandate
- In production, this consent mechanism would be even more robust

WHAT IS A PAYMENTMANDATE:
A PaymentMandate is the final credential that authorizes payment execution. It:
- Links to the CartMandate (proving the merchant's offer)
- Records user consent
- Contains payment details extracted from the CartMandate
- Enables the actual payment transaction

This is the third and final verifiable credential in our secure payment system.

THE COMPLETE AP2 CREDENTIAL CHAIN:
1. Shopping Agent creates IntentMandate (user's intent)
2. Merchant Agent reads IntentMandate, creates CartMandate (merchant's binding offer)
3. You read CartMandate, get user confirmation, create PaymentMandate (authorized payment execution)

Each credential:
- Has an expiry time (security feature)
- Links to the previous credential
- Is validated before the next step
- Creates an auditable chain of trust""",
Step 6: Add Tools to the Credentials Provider
👉 Find:
# MODULE_6_STEP_6_ADD_TOOLS
tools=[],
👉 Replace those two lines with:
    tools=[
        FunctionTool(func=create_payment_mandate)
    ],
Step 7: Verify the Complete Credentials Provider
Let's confirm everything is wired correctly.
👉 Your complete
charity_advisor/credentials_provider/agent.py
should now look like this:
"""
Credentials Provider Agent - Handles payment processing with user consent.
This agent acts as our "Payment Processor."
"""

from google.adk.agents import Agent
from google.adk.tools import FunctionTool
from charity_advisor.tools.payment_tools import create_payment_mandate


credentials_provider = Agent(
    name="CredentialsProvider",
    model="gemini-2.5-flash",
    description="Securely processes payments by creating PaymentMandates and executing transactions with user consent.",
    tools=[
        FunctionTool(func=create_payment_mandate)
    ],
    instruction="""You are a payment specialist responsible for securely processing payments with user consent.

Your workflow:

1. Read the CartMandate from shared state.
   The CartMandate was created by the Merchant Agent and has this structure:
   - contents: AP2 wrapper containing:
     - id: Cart identifier
     - cart_expiry: When the cart expires
     - merchant_name: Who is receiving payment
     - payment_request: W3C PaymentRequest with transaction details
   - merchant_authorization: Merchant's signature

2. Extract payment details from the nested structure:
   - Navigate: cart_mandate["contents"]["payment_request"]["details"]["total"]["amount"]
   - This gives you the currency and value

3. **IMPORTANT - Two-Turn Conversational Confirmation Pattern:**
   Before calling create_payment_mandate, you MUST:
   - Present the payment details clearly to the user
   - Ask explicitly: "I'm ready to process a payment of $X to [Charity Name]. Do you want to proceed with this donation?"
   - WAIT for the user's explicit confirmation (e.g., "yes", "proceed", "confirm")
   - ONLY call create_payment_mandate AFTER receiving explicit confirmation
   - If user says "no" or "cancel", DO NOT call the tool

4. After user confirms, use the create_payment_mandate tool to:
   - Validate the CartMandate hasn't expired (CRITICAL security check)
   - Create a PaymentMandate (the third AP2 credential)
   - Simulate payment processing
   - Record the transaction result

5. After processing, inform the user:
   - That payment was processed successfully (this is a simulation)
   - The transaction ID
   - The amount and merchant
   - That this completes the three-agent AP2 credential chain

IMPORTANT BOUNDARIES:
- Your ONLY job is creating PaymentMandates and processing payments
- You do NOT discover charities (that's Shopping Agent's job)
- You do NOT create offers (that's Merchant Agent's job)
- You MUST validate that the CartMandate hasn't expired before processing
- You MUST get explicit user confirmation before calling create_payment_mandate
- In production, this consent mechanism would be even more robust

WHAT IS A PAYMENTMANDATE:
A PaymentMandate is the final credential that authorizes payment execution. It:
- Links to the CartMandate (proving the merchant's offer)
- Records user consent
- Contains payment details extracted from the CartMandate
- Enables the actual payment transaction

This is the third and final verifiable credential in our secure payment system.

THE COMPLETE AP2 CREDENTIAL CHAIN:
1. Shopping Agent creates IntentMandate (user's intent)
2. Merchant Agent reads IntentMandate, creates CartMandate (merchant's binding offer)
3. You read CartMandate, get user confirmation, create PaymentMandate (authorized payment execution)

Each credential:
- Has an expiry time (security feature)
- Links to the previous credential
- Is validated before the next step
- Creates an auditable chain of trust"""
)
✅ Checkpoint : You now have a complete Credentials Provider with proper CartMandate reading and PaymentMandate creation using AP2 Pydantic models.
Step 8: Test the Credentials Provider
Now let's verify that our agent correctly processes payments and completes the credential chain.
👉 In your Cloud Shell terminal, run:
python scripts/test_credentials_provider.py
خروجی مورد انتظار:
======================================================================
CREDENTIALS PROVIDER TEST (MOCK - NO CONFIRMATION)
======================================================================

Simulated CartMandate from Merchant Agent:
  - Cart ID: cart_test123
  - Merchant: Room to Read
  - Amount: $50.00
  - Expires: 2025-11-07T15:47:16Z
  - Signature: SIG_test_signature

Calling Credentials Provider to process payment...
======================================================================
INFO:charity_advisor.tools.payment_tools:Tool called: Creating PaymentMandate and processing payment
INFO:charity_advisor.tools.payment_tools:CartMandate valid. Expires in 900 seconds
INFO:charity_advisor.tools.payment_tools:Payment processed successfully: txn_a3f7b2c8d9e1f4a2

======================================================================
CREDENTIALS PROVIDER RESPONSE:
======================================================================
I've successfully processed your payment. Here are the details:

**Payment Completed** (Simulated)
- Transaction ID: txn_a3f7b2c8d9e1f4a2
- Amount: USD 50.00
- Merchant: Room to Read
- Status: Completed

This completes the three-agent AP2 credential chain:
1. ✓ Shopping Agent created IntentMandate (your intent)
2. ✓ Merchant Agent created CartMandate (binding offer)
3. ✓ Credentials Provider created PaymentMandate (payment authorization)

Your donation has been processed securely through our verifiable credential system.

======================================================================
PAYMENTMANDATE CREATED:
======================================================================
  Payment Mandate ID: payment_3b4c5d6e7f8a
  Linked to Cart: cart_test123
  User Consent: True
  Amount: USD 50.00
  Merchant: Room to Read
  Agent Present: True
======================================================================

======================================================================
PAYMENT RESULT:
======================================================================
  Transaction ID: txn_a3f7b2c8d9e1f4a2
  Status: completed
  Amount: USD 50.00
  Merchant: Room to Read
  Simulation: True
======================================================================
Step 9: Test the Complete Three-Agent Pipeline
Now let's test all three agents working together!
👉 Run the full pipeline test:
python scripts/test_full_pipeline.py
خروجی مورد انتظار:
======================================================================
THREE-AGENT PIPELINE TEST (AP2 CREDENTIAL CHAIN)
======================================================================

[1/3] SHOPPING AGENT - Finding charity and creating IntentMandate...
----------------------------------------------------------------------
✓ IntentMandate created
  - Intent ID: intent_774799058_1730927536
  - Description: Donate $75.00 to Room to Read
  - Merchant: Room to Read
  - Amount: $75.0
  - Expires: 2025-11-07T16:32:16Z

[2/3] MERCHANT AGENT - Reading IntentMandate and creating CartMandate...
----------------------------------------------------------------------
✓ CartMandate created
  - ID: cart_3b4c5d6e7f8a
  - Expires: 2025-11-07T15:47:16Z
  - Signature: SIG_a3f7b2c8d9e1f4a2

[3/3] CREDENTIALS PROVIDER - Creating PaymentMandate and processing...
----------------------------------------------------------------------
NOTE: In the web UI, this would show a confirmation dialog
      For this test, consent is automatically granted
✓ Payment processed (SIMULATED)
  - Transaction ID: txn_a3f7b2c8d9e1f4a2
  - Amount: $75.0
  - Status: completed

======================================================================
COMPLETE AP2 CREDENTIAL CHAIN
======================================================================

✓ Credential 1: IntentMandate (User's Intent)
  - Intent ID: intent_774799058_1730927536
  - Description: Donate $75.00 to Room to Read
  - Expiry: 2025-11-07T16:32:16Z

✓ Credential 2: CartMandate (Merchant's Offer)
  - Cart ID: cart_3b4c5d6e7f8a
  - Cart Expiry: 2025-11-07T15:47:16Z
  - Merchant Signature: SIG_a3f7b2c8d9e1f4a2

✓ Credential 3: PaymentMandate (Payment Execution)
  - Payment Mandate ID: payment_3b4c5d6e7f8a
  - Linked to Cart: cart_3b4c5d6e7f8a
  - Agent Present: True

✓ Transaction Result:
  - Transaction ID: txn_a3f7b2c8d9e1f4a2
  - Simulation: True

======================================================================
✅ COMPLETE PIPELINE TEST PASSED
======================================================================
This is the complete AP2 credential chain in action!
Each agent:
- Reads a credential from state
- Validates it using Pydantic models (structure + expiry check)
- Creates the next credential using AP2 models
- Writes to state for the next agent
What You Just Built
You've successfully completed the AP2 three-agent credential chain with proper structure validation using Pydantic models and payment simulation.
Key Concepts Mastered
✅ PaymentMandate (AP2 Credential #3):
- Created using official AP2 Pydantic models
- Final credential authorizing payment execution
- Links to CartMandate via payment_details_id
- Records user consent and timestamp
- Contains payment amount extracted from CartMandate
- Includes agent_present flag for human-in-the-loop
- Model validation ensures spec compliance
✅ Reading from CartMandate:
- Validate structure with
CartMandate.model_validate() - Type-safe attribute access:
cart_model.contents.payment_request.details.total.amount - Understand AP2 wrapper vs W3C standard separation
- Extract merchant_name, amount, currency safely from model
- Pydantic catches structure errors automatically
✅ Cart Expiry Validation:
- Accepts validated
CartMandatePydantic model - Reads from
cart.contents.cart_expiry(attribute access) - Security feature preventing stale cart processing
- Shorter duration (15 min) than intent (1 hour)
✅ Payment Simulation:
- Educational mock of real payment processor
- Generates transaction ID
- Records payment_result in state
- Clearly marked as simulation (simulation: True flag)
✅ Complete AP2 Chain with Models:
- Three agents, three credentials, three Pydantic validations
- Each agent validates previous credential's structure using models
- Each credential links to previous for audit trail
- State-based handoffs maintain role separation
- Type safety throughout the chain
✅ Model-Driven Development:
- Input validation via
model_validate() - Type-safe construction with nested models
- Automatic serialization via
model_dump(mode='json') - Production-ready patterns from the start
قدم بعدی چیست؟
In the next module, we'll build the Orchestrator Agent that coordinates all three specialist agents.
You've built three powerful specialist agents using AP2 Pydantic models. Now let's build the conductor that orchestrates them into a seamless donation experience.
Let's build the Orchestrator and see the complete system in action.
7. Orchestration - Bringing It All Together

From Specialists to Seamless Experience
In the previous modules, you built three specialized agents:
- Shopping Agent : Finds charities, creates IntentMandate
- Merchant Agent : Creates CartMandate from IntentMandate
- Credentials Provider : Creates PaymentMandate, processes payment
These agents naturally fall into two phases:
- Phase 1 (Shopping) : Multi-turn conversation to find and select charity
- Phase 2 (Processing) : Atomic execution of offer creation and payment
But right now, you'd have to manually orchestrate these phases yourself.
This is where ADK's orchestration patterns shine.
AP2 Principle: Orchestration Enforces Trust Boundaries
Why Orchestration Matters for Security
Orchestration isn't just about convenience—it's about enforcing trust boundaries through architecture.
Without orchestration:
# User could accidentally skip steps or reorder them
shopping_agent.run("Find charity")
# Oops, forgot to create CartMandate!
credentials_provider.run("Process payment")  # No offer to validate!
With orchestration:
# Pipeline enforces correct order
donation_processing_pipeline = SequentialAgent(
    sub_agents=[
        merchant_agent,      # Must run first
        credentials_provider # Must run second
    ]
)
# Steps ALWAYS run in order, no skipping allowed
The sequential pipeline guarantees:
- ✅ IntentMandate created before CartMandate
- ✅ CartMandate created before payment processing
- ✅ Each agent runs in its isolated context
- ✅ State flows forward through the credential chain
Our Mission: Build the Complete System
We'll build two layers:
Layer 1: The Processing Pipeline (SequentialAgent)
- Wires together Merchant → Credentials
- Runs automatically in sequence after charity is selected
- Atomic execution of offer and payment
Layer 2: The Root Orchestrator (user-facing Agent)
- Friendly personality
- Delegates to shopping_agent for charity selection
- Delegates to processing pipeline after IntentMandate is created
- Handles conversation and phase transitions
This two-layer approach matches the natural flow:
- Shopping Phase : Multi-turn conversation (user browses, asks questions, decides)
- Processing Phase : Atomic execution (offer → payment)
Let's build both.
Step 1: Import Orchestration Components
First, let's set up the orchestration file with the necessary imports.
👉 Open
charity_advisor/agent.py
Let's start with imports:
👉 Find:
# MODULE_7_STEP_1_IMPORT_COMPONENTS
👉 Replace that single line with:
from google.adk.agents import Agent, SequentialAgent
from charity_advisor.shopping_agent.agent import shopping_agent
from charity_advisor.merchant_agent.agent import merchant_agent
from charity_advisor.credentials_provider.agent import credentials_provider
Step 2: Create the Processing Pipeline
Now let's create the pipeline that runs offer creation and payment processing atomically.
👉 Find:
# MODULE_7_STEP_2_CREATE_SEQUENTIAL_PIPELINE
👉 Replace those two lines with:
# Create the donation processing pipeline
# This runs Merchant → Credentials in sequence AFTER charity is selected
donation_processing_pipeline = SequentialAgent(
name="DonationProcessingPipeline",
description="Creates signed offer and processes payment after charity is selected",
sub_agents=[
merchant_agent,
credentials_provider
]
)
Step 3A: Create Root Agent Setup
Now let's create the user-facing agent that orchestrates both phases. We'll build this in three parts: setup (3A), instruction (3B), and sub-agents (3C).
👉 Find:
# MODULE_7_STEP_3A_CREATE_ROOT_AGENT_SETUP
👉 Replace that single line with:
# Create the root orchestrator agent
# This is what users interact with directly
root_agent = Agent(
name="CharityAdvisor",
model="gemini-2.5-pro",
description="A friendly charity giving assistant that helps users donate to verified organizations.",
# MODULE_7_STEP_3B_WRITE_ROOT_AGENT_INSTRUCTION
Step 3B: Write the Root Agent Instruction
Now let's add the instruction that guides the charity advisor's behavior across both phases.
👉 Find:
# MODULE_7_STEP_3B_WRITE_ROOT_AGENT_INSTRUCTION
👉 Replace that single line with:
instruction="""You are a helpful and friendly charity giving advisor.
Your workflow has TWO distinct phases:
PHASE 1: CHARITY SELECTION (delegate to shopping_agent)
When a user expresses interest in donating:
1. Delegate to shopping_agent immediately
2. The shopping_agent will:
- Search for charities matching their cause
- Present verified options with ratings
- Engage in conversation (user may ask questions, change their mind)
- Wait for user to select a specific charity and amount
- Create an IntentMandate when user decides
3. Wait for shopping_agent to complete
You'll know Phase 1 is complete when shopping_agent's response includes:
- "IntentMandate created" or "Intent ID: intent_xxx"
- Charity name and donation amount
PHASE 2: PAYMENT PROCESSING (delegate to DonationProcessingPipeline)
After shopping_agent completes:
1. Acknowledge the user's selection naturally:
"Perfect! Let me process your $X donation to [Charity]..."
2. Delegate to DonationProcessingPipeline
3. The pipeline will automatically:
- Create signed cart offer (MerchantAgent)
- Get consent and process payment (CredentialsProvider)
4. After pipeline completes, summarize the transaction
CRITICAL RULES:
- Phase 1 may take multiple conversation turns (this is normal)
- Only proceed to Phase 2 after IntentMandate exists
- Don't rush the user during charity selection
- Don't ask user to "proceed" between phases - transition automatically
EXAMPLE FLOW:
User: "I want to donate to education"
You: [delegate to shopping_agent]
Shopping: "Here are 3 education charities..." [waits]
User: "Tell me more about the first one"
Shopping: "Room to Read focuses on..." [waits]
User: "Great, I'll donate $50 to Room to Read"
Shopping: "IntentMandate created (ID: intent_123)..."
You: "Perfect! Processing your $50 donation to Room to Read..." [delegate to DonationProcessingPipeline]
Pipeline: [creates offer, gets consent, processes payment]
You: "Done! Your donation was processed successfully. Transaction ID: txn_456"
Your personality:
- Warm and encouraging
- Patient during charity selection
- Clear about educational nature
- Smooth transitions between phases""",
# MODULE_7_STEP_3C_ADD_ROOT_AGENT_SUBAGENTS
Step 3C: Add the Sub-Agents
Finally, let's give the charity advisor access to both the shopping agent and the processing pipeline, and close the Agent definition.
👉 Find:
# MODULE_7_STEP_3C_ADD_ROOT_AGENT_SUBAGENTS
👉 Replace that single line with:
sub_agents=[
shopping_agent,
donation_processing_pipeline
]
)
Step 4: Verify the Complete System
Let's confirm the orchestration is wired correctly.
👉 Your complete
charity_advisor/agent.py
should now look like this:
"""
Main orchestration: The donation processing pipeline and root orchestrator agent.
"""
from google.adk.agents import Agent, SequentialAgent
from charity_advisor.shopping_agent.agent import shopping_agent
from charity_advisor.merchant_agent.agent import merchant_agent
from charity_advisor.credentials_provider.agent import credentials_provider
# Create the donation processing pipeline
# This runs Merchant → Credentials in sequence AFTER charity is selected
donation_processing_pipeline = SequentialAgent(
    name="DonationProcessingPipeline",
    description="Creates signed offer and processes payment after charity is selected",
    sub_agents=[
        merchant_agent,
        credentials_provider
    ]
)
# Create the root orchestrator agent
# This is what users interact with directly
root_agent = Agent(
name="CharityAdvisor",
model="gemini-2.5-flash",
description="A friendly charity giving assistant that helps users donate to verified organizations.",
instruction="""You are a helpful and friendly charity giving advisor.
Your workflow has TWO distinct phases:
PHASE 1: CHARITY SELECTION (delegate to shopping_agent)
When a user expresses interest in donating:
1. Delegate to shopping_agent immediately
2. The shopping_agent will:
- Search for charities matching their cause
- Present verified options with ratings
- Engage in conversation (user may ask questions, change their mind)
- Wait for user to select a specific charity and amount
- Create an IntentMandate when user decides
3. Wait for shopping_agent to complete
You'll know Phase 1 is complete when shopping_agent's response includes:
- "IntentMandate created" or "Intent ID: intent_xxx"
- Charity name and donation amount
PHASE 2: PAYMENT PROCESSING (delegate to DonationProcessingPipeline)
After shopping_agent completes:
1. Acknowledge the user's selection naturally:
"Perfect! Let me process your $X donation to [Charity]..."
2. Delegate to DonationProcessingPipeline
3. The pipeline will automatically:
- Create signed cart offer (MerchantAgent)
- Get consent and process payment (CredentialsProvider)
4. After pipeline completes, summarize the transaction
CRITICAL RULES:
- Phase 1 may take multiple conversation turns (this is normal)
- Only proceed to Phase 2 after IntentMandate exists
- Don't rush the user during charity selection
- Don't ask user to "proceed" between phases - transition automatically
EXAMPLE FLOW:
User: "I want to donate to education"
You: [delegate to shopping_agent]
Shopping: "Here are 3 education charities..." [waits]
User: "Tell me more about the first one"
Shopping: "Room to Read focuses on..." [waits]
User: "Great, I'll donate $50 to Room to Read"
Shopping: "IntentMandate created (ID: intent_123)..."
You: "Perfect! Processing your $50 donation to Room to Read..." [delegate to DonationProcessingPipeline]
Pipeline: [creates offer, gets consent, processes payment]
You: "Done! Your donation was processed successfully. Transaction ID: txn_456"
Your personality:
- Warm and encouraging
- Patient during charity selection
- Clear about educational nature
- Smooth transitions between phases""",
    sub_agents=[
        shopping_agent,
        donation_processing_pipeline
    ]
)
Step 5: Harden with Validation Callbacks (Optional Skip to Step 7)
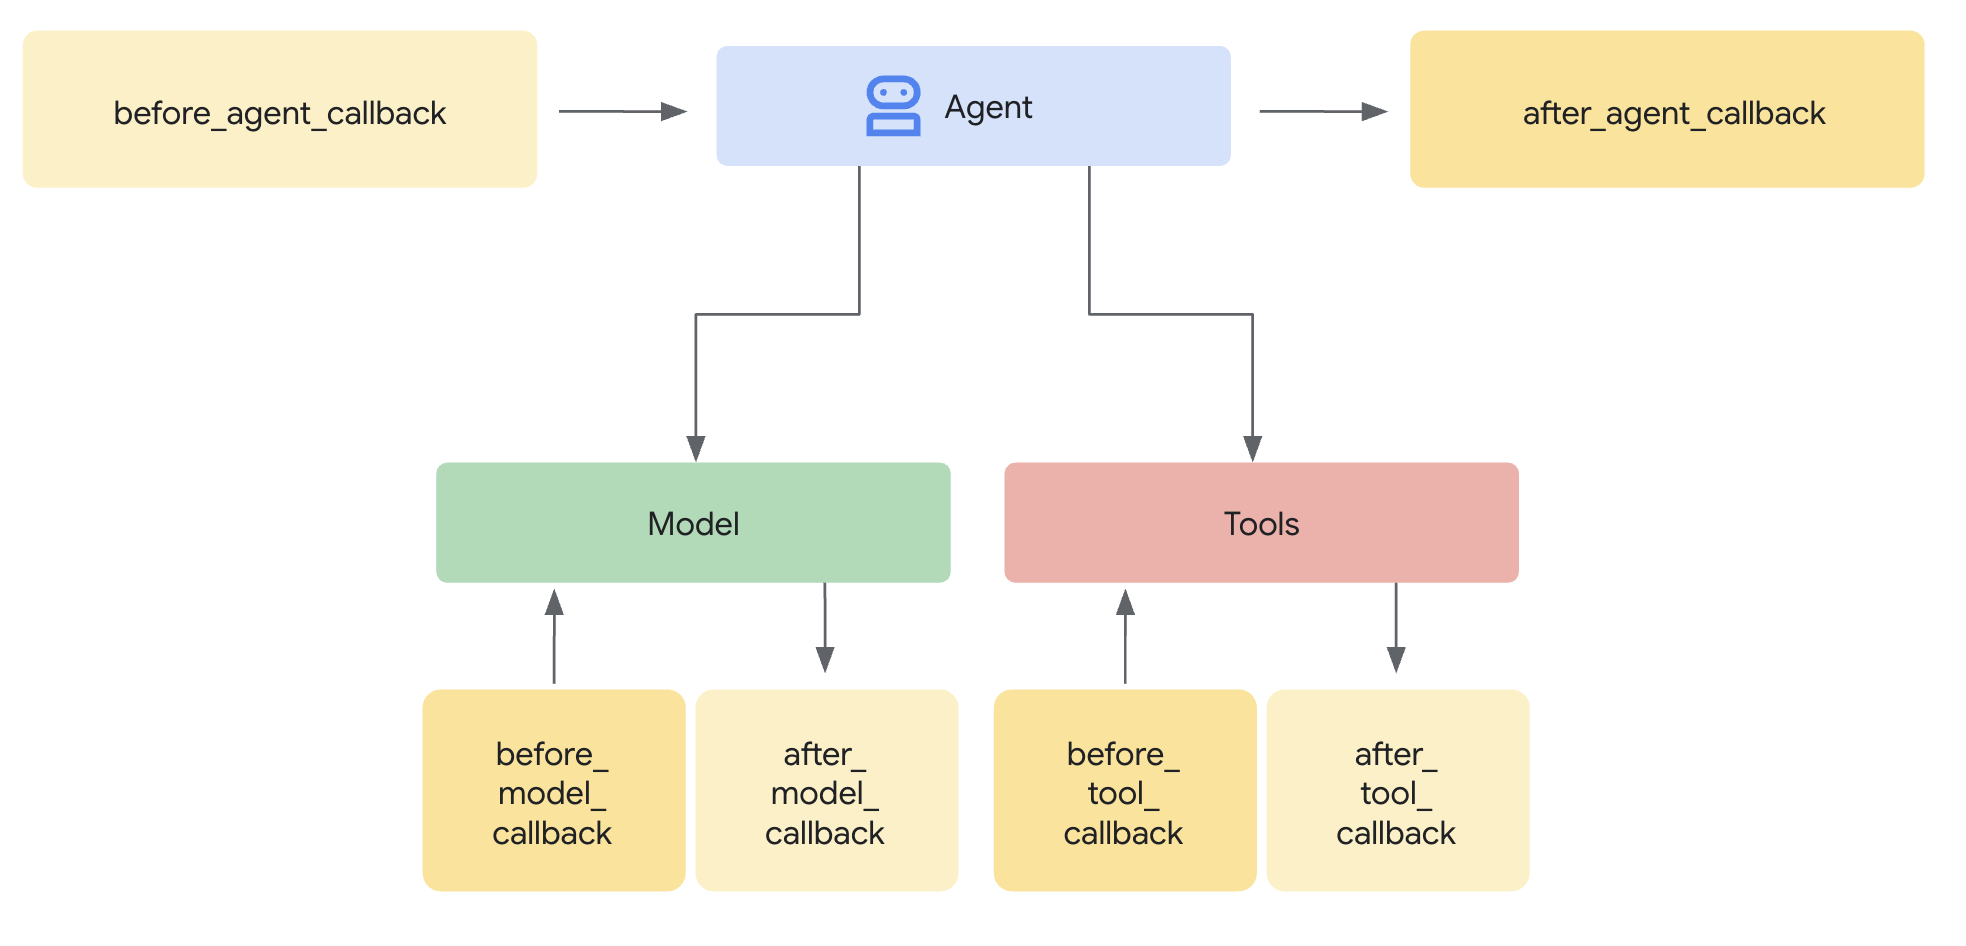
The SequentialAgent guarantees execution order , but what if:
- Shopping Agent fails silently (IntentMandate never created)
- An hour passes between Shopping and Merchant (intent expires)
- State gets corrupted or cleared
- Someone tries to call Merchant directly, bypassing Shopping
Callbacks add architectural enforcement - they validate prerequisites before an agent even starts its LLM call. This is defense in depth: tools validate during execution, callbacks validate before execution.
Let's add validation callbacks to our Merchant and Credentials Provider agents.
Step 5A: Add Merchant Validation - Import Callback Types
First, let's add the imports needed for callbacks.
👉 Open
charity_advisor/merchant_agent/agent.py
At the top of the file, after the existing imports, add:
from typing import Optional
from datetime import datetime, timezone
from google.adk.agents.callback_context import CallbackContext
from google.genai.types import Content, Part
import logging

logger = logging.getLogger(__name__)
Step 5B: Build the Intent Validation Function
Now let's create a callback function that validates the IntentMandate before Merchant Agent runs.
👉 In
charity_advisor/merchant_agent/agent.py
, add this function BEFORE the
merchant_agent = Agent(...)
تعریف:
def validate_intent_before_merchant(
    callback_context: CallbackContext,
) -> Optional[Content]:
    """
    Validates IntentMandate exists and hasn't expired before Merchant runs.

    This callback enforces that the Shopping Agent completed successfully
    before the Merchant Agent attempts to create a CartMandate.

    Returns:
        None: Allow Merchant Agent to proceed normally
        Content: Skip Merchant Agent and return error to user
    """
    state = callback_context.state

    # Check credential exists
    if "intent_mandate" not in state:
        logger.error("❌ IntentMandate missing - Shopping Agent may have failed")
        return Content(parts=[Part(text=(
            "Error: Cannot create cart. User intent was not properly recorded. "
            "Please restart the donation process."
        ))])

    intent_mandate = state["intent_mandate"]

    # Validate expiry (critical security check)
    try:
        expiry_time = datetime.fromisoformat(
            intent_mandate["intent_expiry"].replace('Z', '+00:00')
        )
        now = datetime.now(timezone.utc)

        if expiry_time < now:
            logger.error(f"❌ IntentMandate expired at {intent_mandate['intent_expiry']}")
            return Content(parts=[Part(text=(
                "Error: Your donation intent has expired. "
                "Please select a charity again to restart."
            ))])

        time_remaining = expiry_time - now
        logger.info(f"✓ IntentMandate validated. Expires in {time_remaining.total_seconds():.0f}s")

    except (KeyError, ValueError) as e:
        logger.error(f"❌ Invalid IntentMandate structure: {e}")
        return Content(parts=[Part(text=(
            "Error: Invalid intent data. Please restart the donation."
        ))])

    # All checks passed - allow Merchant Agent to proceed
    logger.info(f"✓ Prerequisites met for Merchant Agent: {intent_mandate['intent_id']}")
    return None
Step 5C: Attach Callback to Merchant Agent
Now let's connect the callback to the agent.
👉 In
charity_advisor/merchant_agent/agent.py
, modify the
merchant_agent = Agent(...)
تعریف:
Find this line in the Agent definition:
merchant_agent = Agent(
    name="MerchantAgent",
    model="gemini-2.5-flash",
    description="Creates formal, signed CartMandates for charity donations following W3C PaymentRequest standards.",
Add this line right after the
description
خط:
before_agent_callback=validate_intent_before_merchant,
Your agent definition should now look like:
merchant_agent = Agent(
    name="MerchantAgent",
    model="gemini-2.5-flash",
    description="Creates formal, signed CartMandates for charity donations following W3C PaymentRequest standards.",
    before_agent_callback=validate_intent_before_merchant,
    tools=[
        FunctionTool(func=create_cart_mandate)
    ],
    instruction="""..."""
)
Step 6: Add Credentials Provider Validation (Optional Skip to Step 7)
Same pattern - let's add validation for the payment step.
Step 6A: Import Callback Types
👉 Open
charity_advisor/credentials_provider/agent.py
At the top of the file, after the existing imports, add:
from typing import Optional
from datetime import datetime, timezone
from google.adk.agents.callback_context import CallbackContext
from google.genai.types import Content, Part
import logging

logger = logging.getLogger(__name__)
Step 6B: Build Cart Validation Function
👉 In
charity_advisor/credentials_provider/agent.py
, add this function BEFORE the
credentials_provider = Agent(...)
تعریف:
def validate_cart_before_payment(
    callback_context: CallbackContext,
) -> Optional[Content]:
    """
    Validates CartMandate exists and hasn't expired before payment processing.

    This callback enforces that the Merchant Agent completed successfully
    before the Credentials Provider attempts to process payment.

    Returns:
        None: Allow Credentials Provider to proceed
        Content: Skip payment processing and return error
    """
    state = callback_context.state

    # Check credential exists
    if "cart_mandate" not in state:
        logger.error("❌ CartMandate missing - Merchant Agent may have failed")
        return Content(parts=[Part(text=(
            "Error: Cannot process payment. Cart was not properly created. "
            "Please restart the donation process."
        ))])

    cart_mandate = state["cart_mandate"]

    # Validate AP2 structure
    if "contents" not in cart_mandate:
        logger.error("❌ CartMandate missing AP2 contents wrapper")
        return Content(parts=[Part(text=(
            "Error: Invalid cart structure. Please restart."
        ))])

    # Validate expiry
    try:
        contents = cart_mandate["contents"]
        expiry_time = datetime.fromisoformat(
            contents["cart_expiry"].replace('Z', '+00:00')
        )
        now = datetime.now(timezone.utc)

        if expiry_time < now:
            logger.error(f"❌ CartMandate expired at {contents['cart_expiry']}")
            return Content(parts=[Part(text=(
                "Error: Your cart has expired (15 minute limit). "
                "Please restart the donation to get a fresh offer."
            ))])

        time_remaining = expiry_time - now
        logger.info(f"✓ CartMandate validated. Expires in {time_remaining.total_seconds():.0f}s")

    except (KeyError, ValueError) as e:
        logger.error(f"❌ Invalid CartMandate structure: {e}")
        return Content(parts=[Part(text=(
            "Error: Invalid cart data. Please restart the donation."
        ))])

    # All checks passed - allow payment processing
    logger.info(f"✓ Prerequisites met for Credentials Provider: {contents['id']}")
    return None
Step 6C: Attach Callback to Credentials Provider
👉 In
charity_advisor/credentials_provider/agent.py
, modify the
credentials_provider = Agent(...)
تعریف:
Find this line in the Agent definition:
credentials_provider = Agent(
    name="CredentialsProvider",
    model="gemini-2.5-flash",
    description="Securely processes payments by creating PaymentMandates and executing transactions with user consent.",
Add this line right after the
description
خط:
before_agent_callback=validate_cart_before_payment,
Your agent definition should now look like:
credentials_provider = Agent(
    name="CredentialsProvider",
    model="gemini-2.5-flash",
    description="Securely processes payments by creating PaymentMandates and executing transactions with user consent.",
    before_agent_callback=validate_cart_before_payment,
    tools=[
        FunctionTool(func=create_payment_mandate)
    ],
    instruction="""..."""
)
Step 7: Test with ADK Web UI
Now let's test the complete hardened system with validation callbacks active.
👉 In your Cloud Shell terminal, run:
adk web
You should see output like:
+-----------------------------------------------------------------------------+
| ADK Web Server started                                                      |
|                                                                             |
| For local testing, access at http://localhost:8000.                         |
+-----------------------------------------------------------------------------+

INFO:     Application startup complete.
INFO:     Uvicorn running on http://0.0.0.0:8000 (Press CTRL+C to quit)
👉 Next, to access the ADK Web UI from your browser:
From the Web preview icon (looks like an eye or a square with an arrow) in the Cloud Shell toolbar (usually top right), select Change port . In the pop-up window, set the port to 8000 and click "Change and Preview" . Cloud Shell will then open a new browser tab displaying the ADK Web UI.
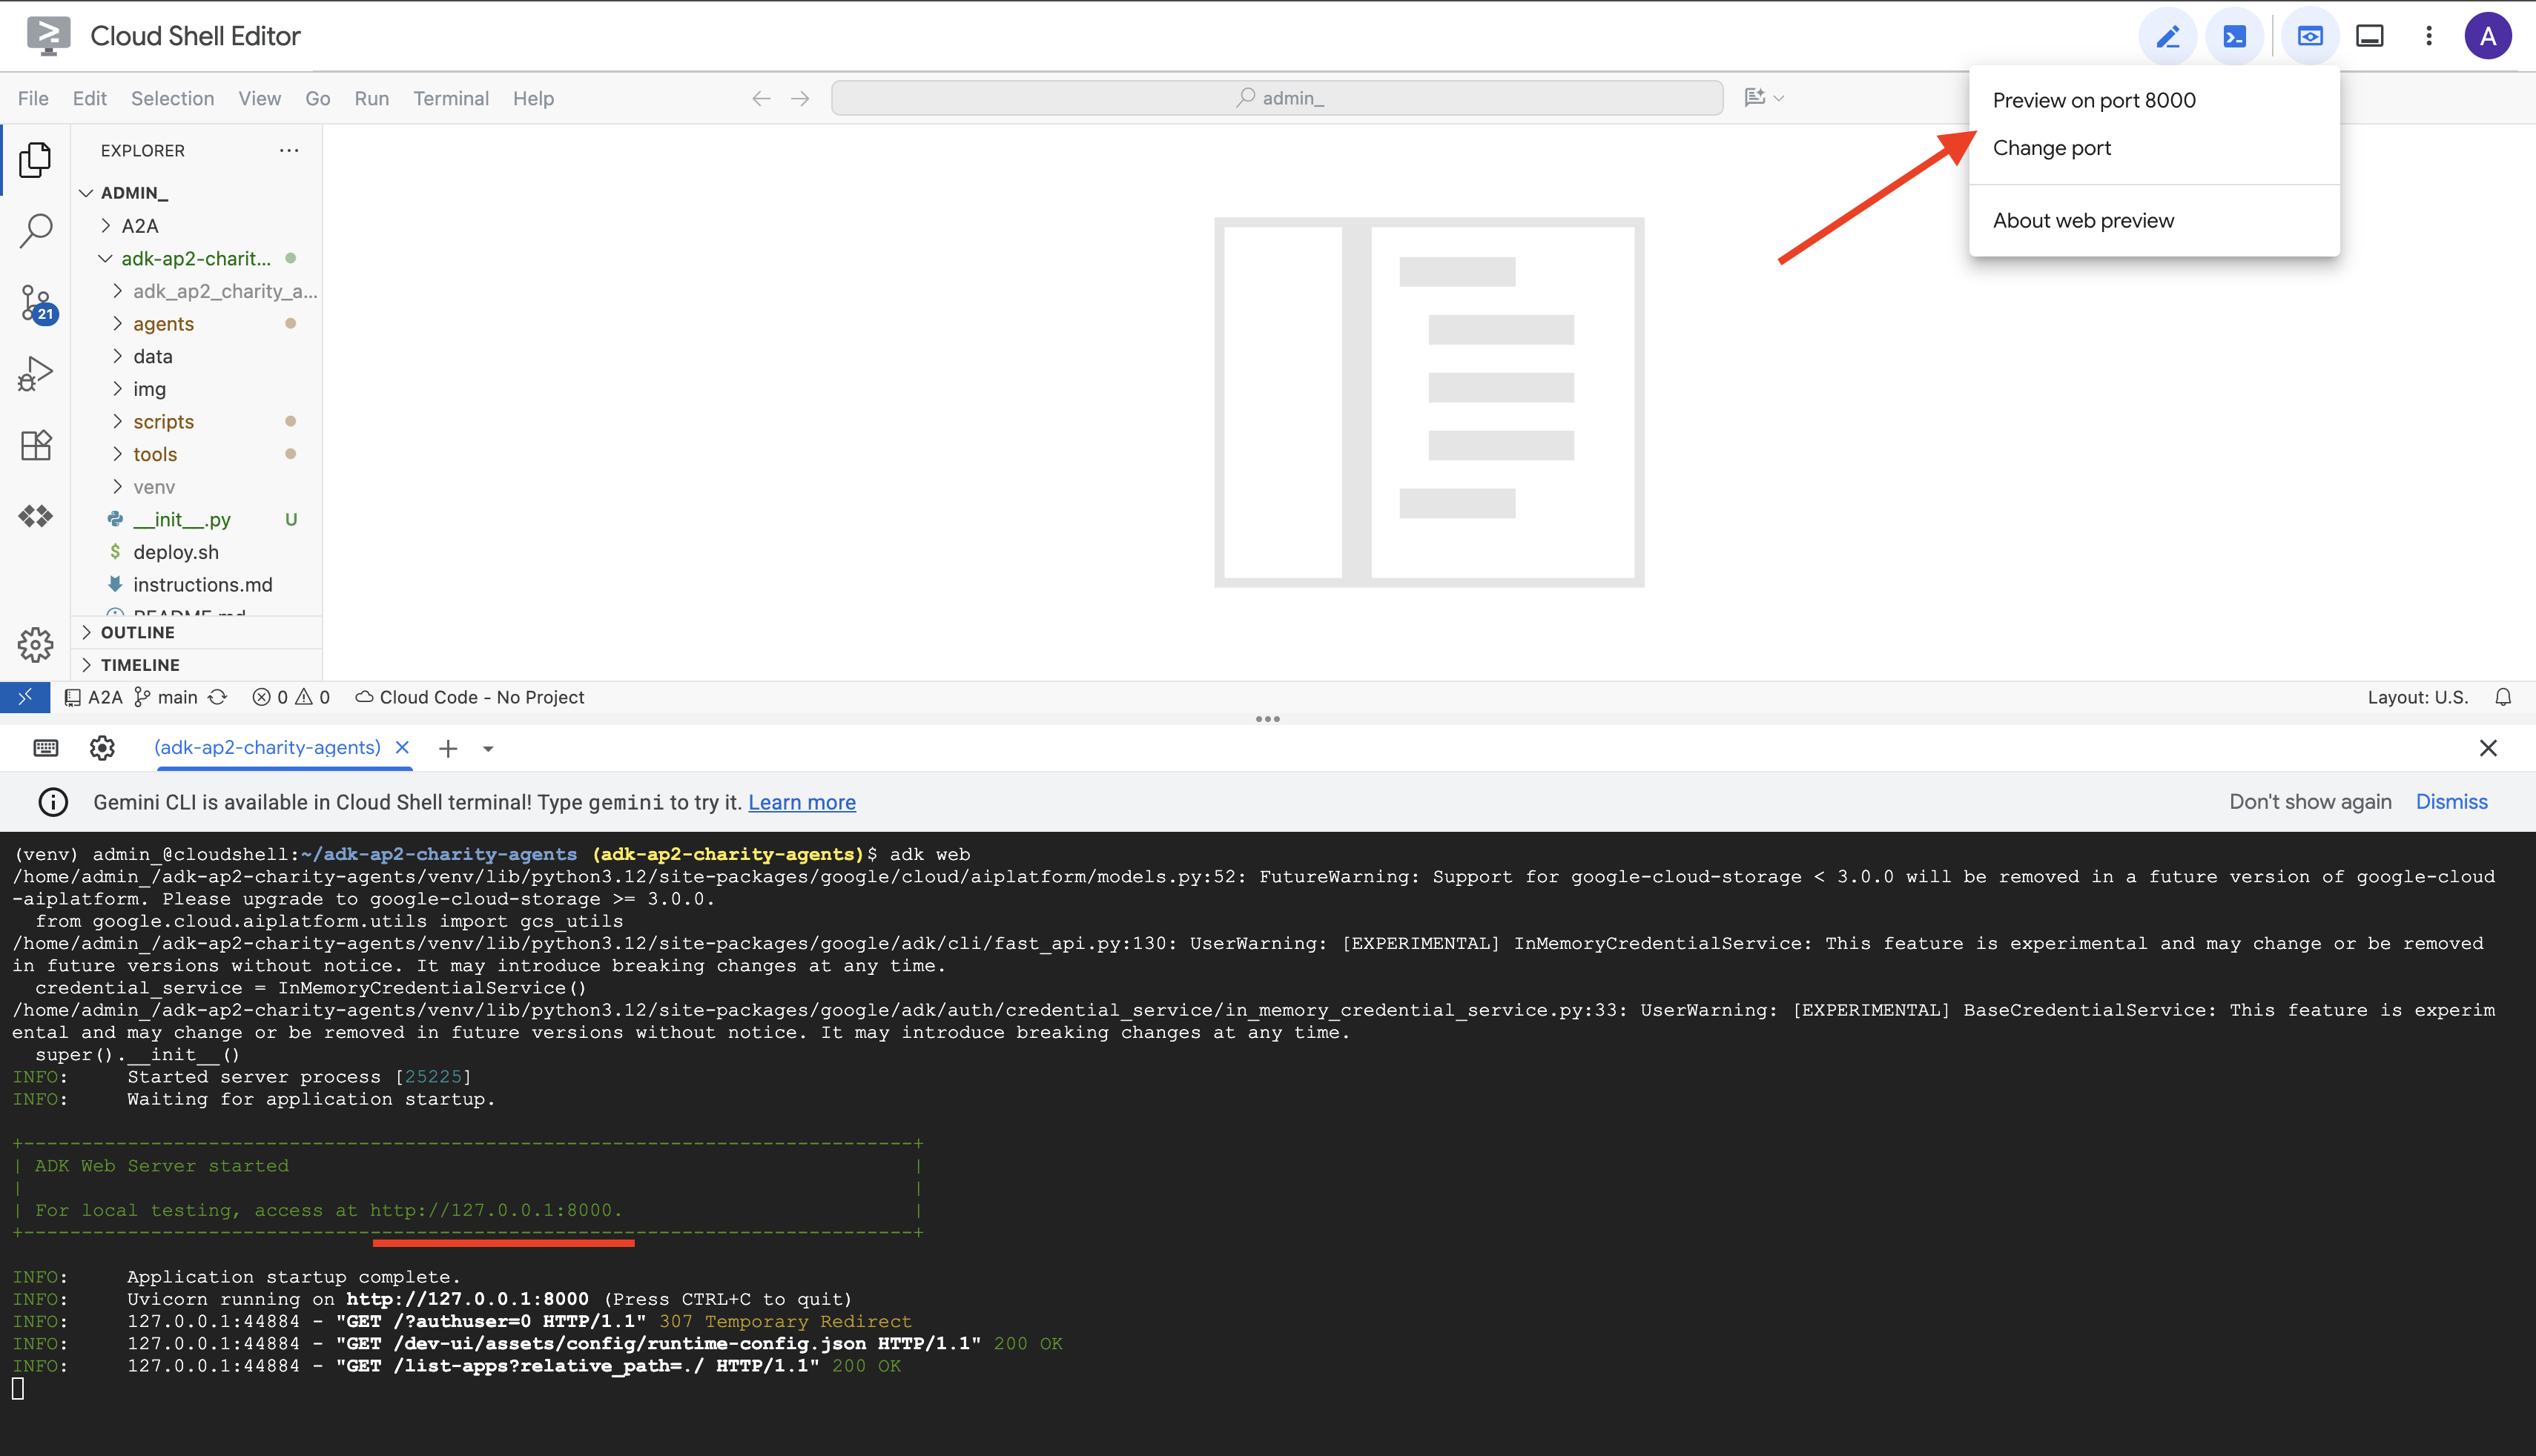
👉 Select your agent from the dropdown:
In the ADK Web UI, you'll see a dropdown menu at the top. Select charity_advisor from the list.
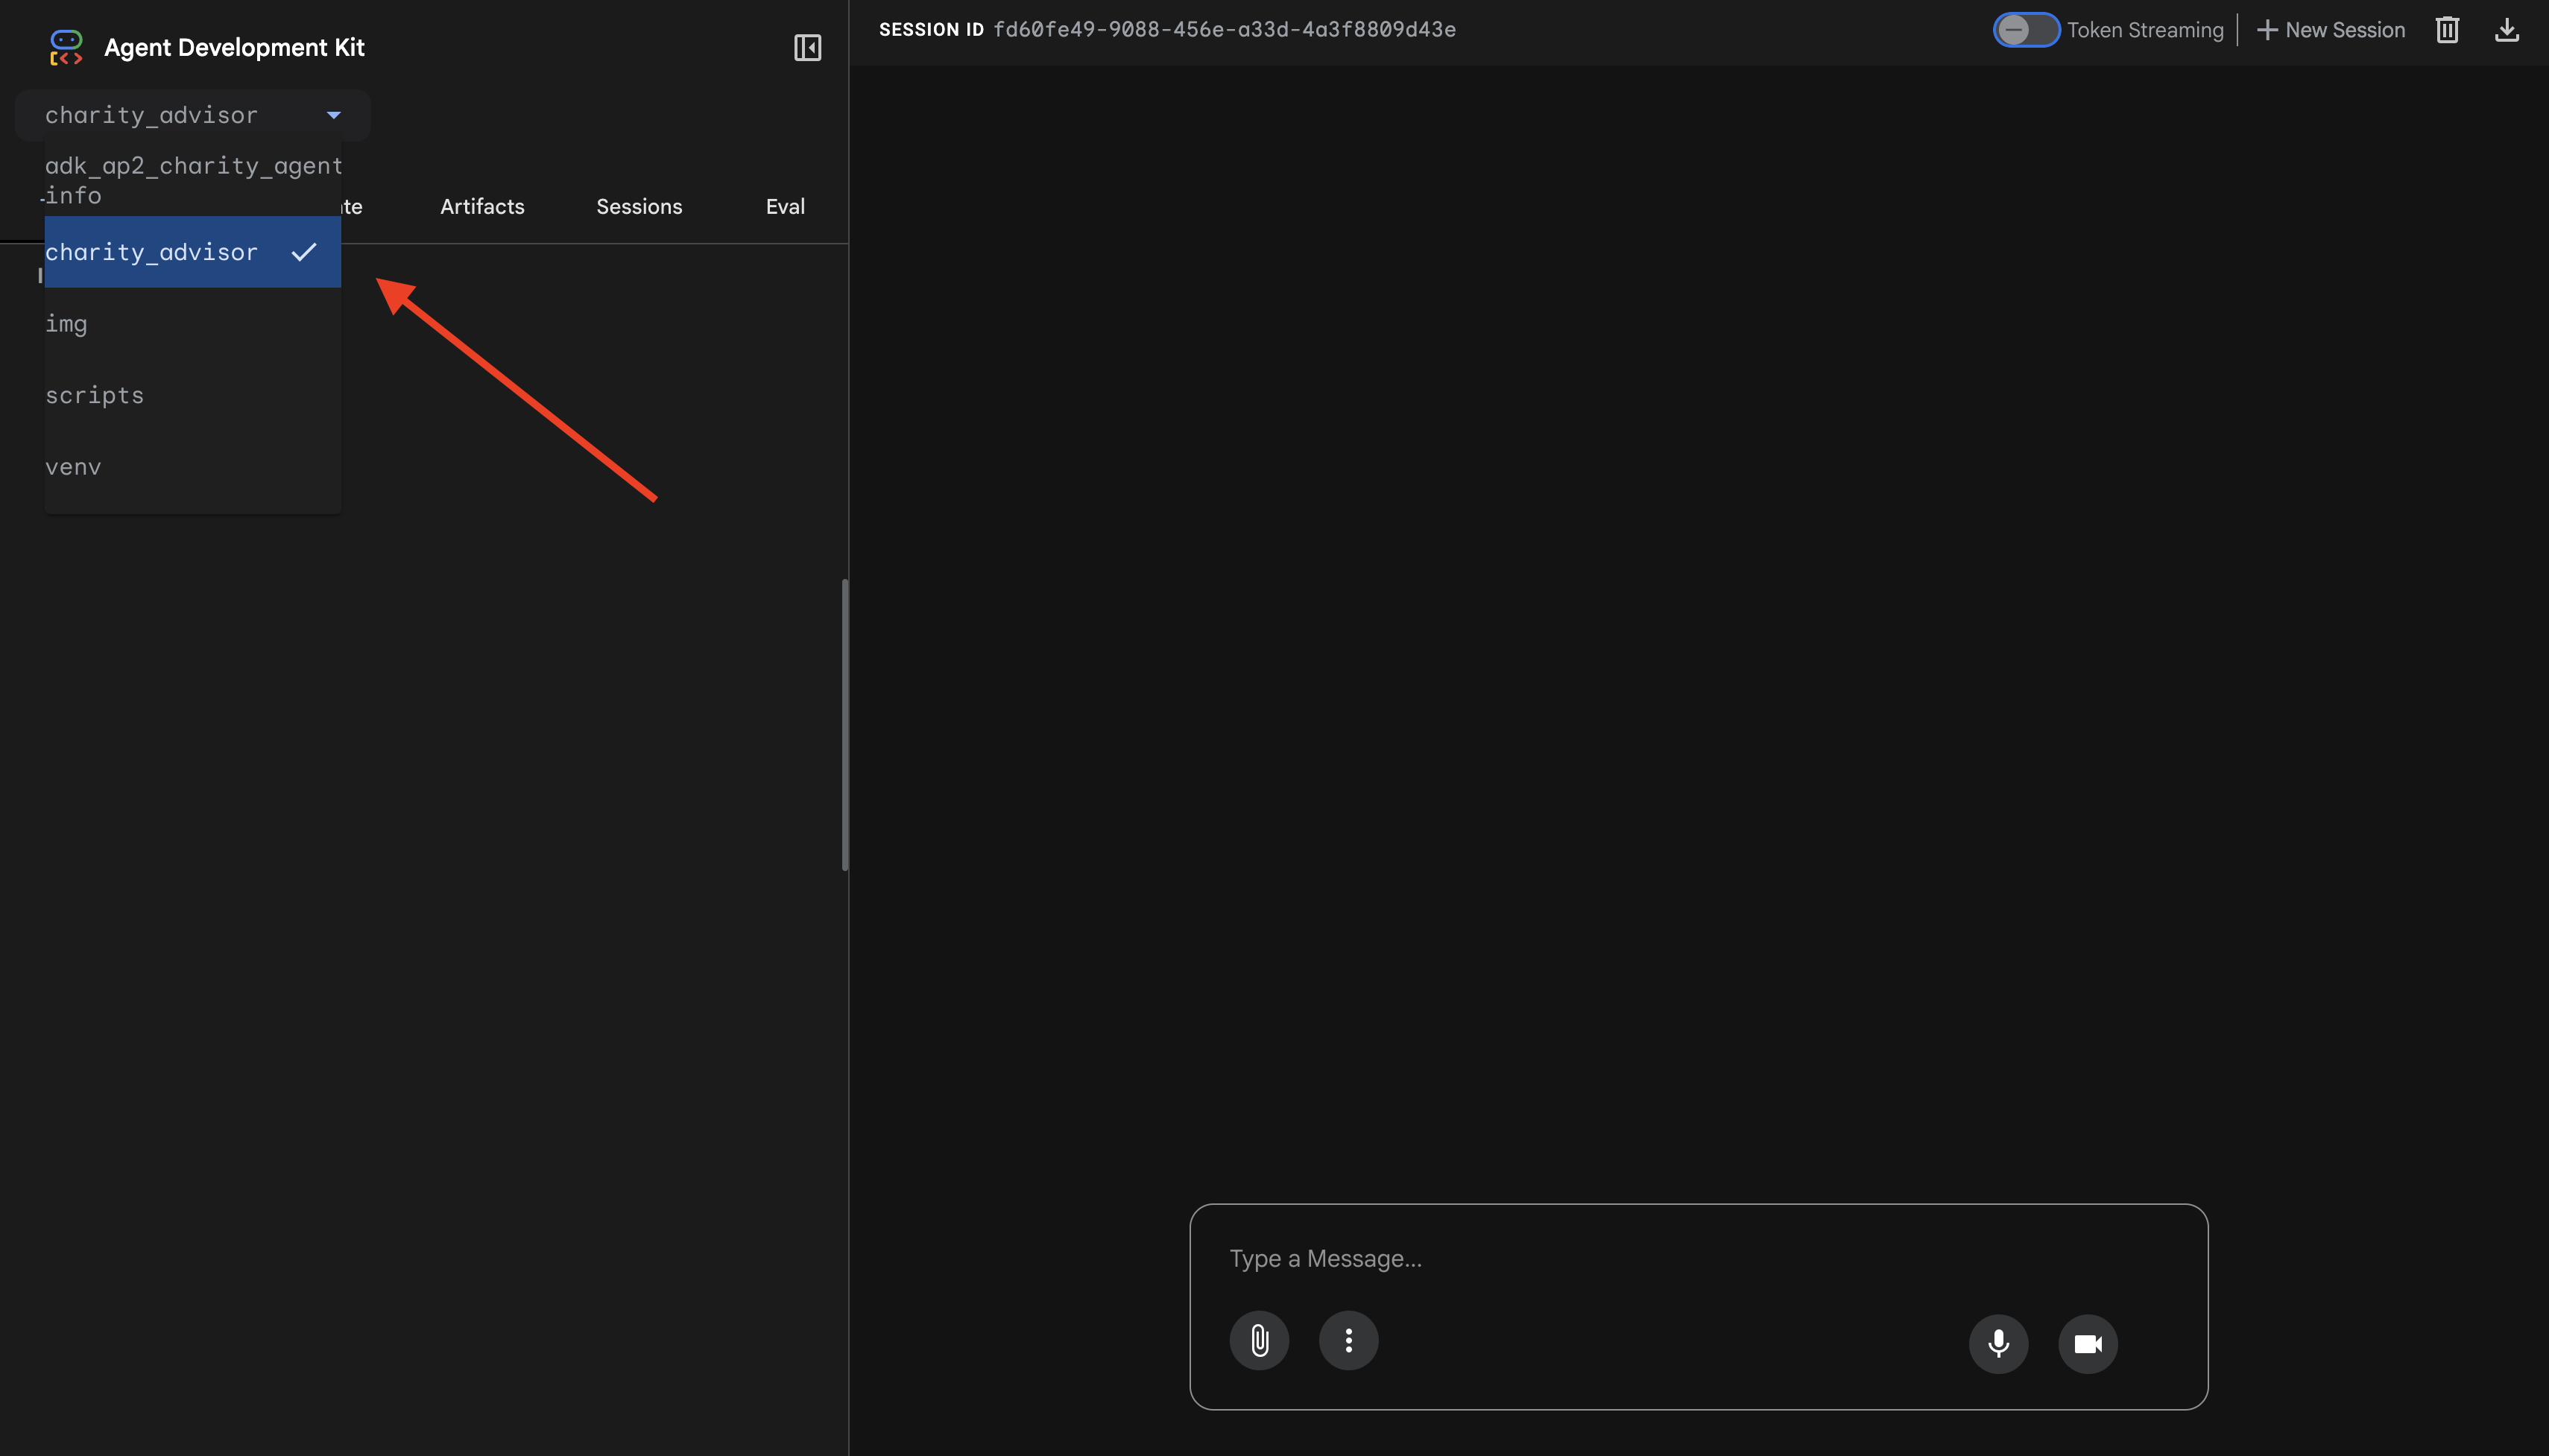
You'll see the ADK web interface with:
- Chat panel : Left side, for conversation
- Trace panel : Right side, for observability (we'll use this in Module 9)
Test 1: Complete Donation Flow (Normal Case)
👉 In the chat interface, type:
I want to donate to an education charity
Watch the complete flow unfold:

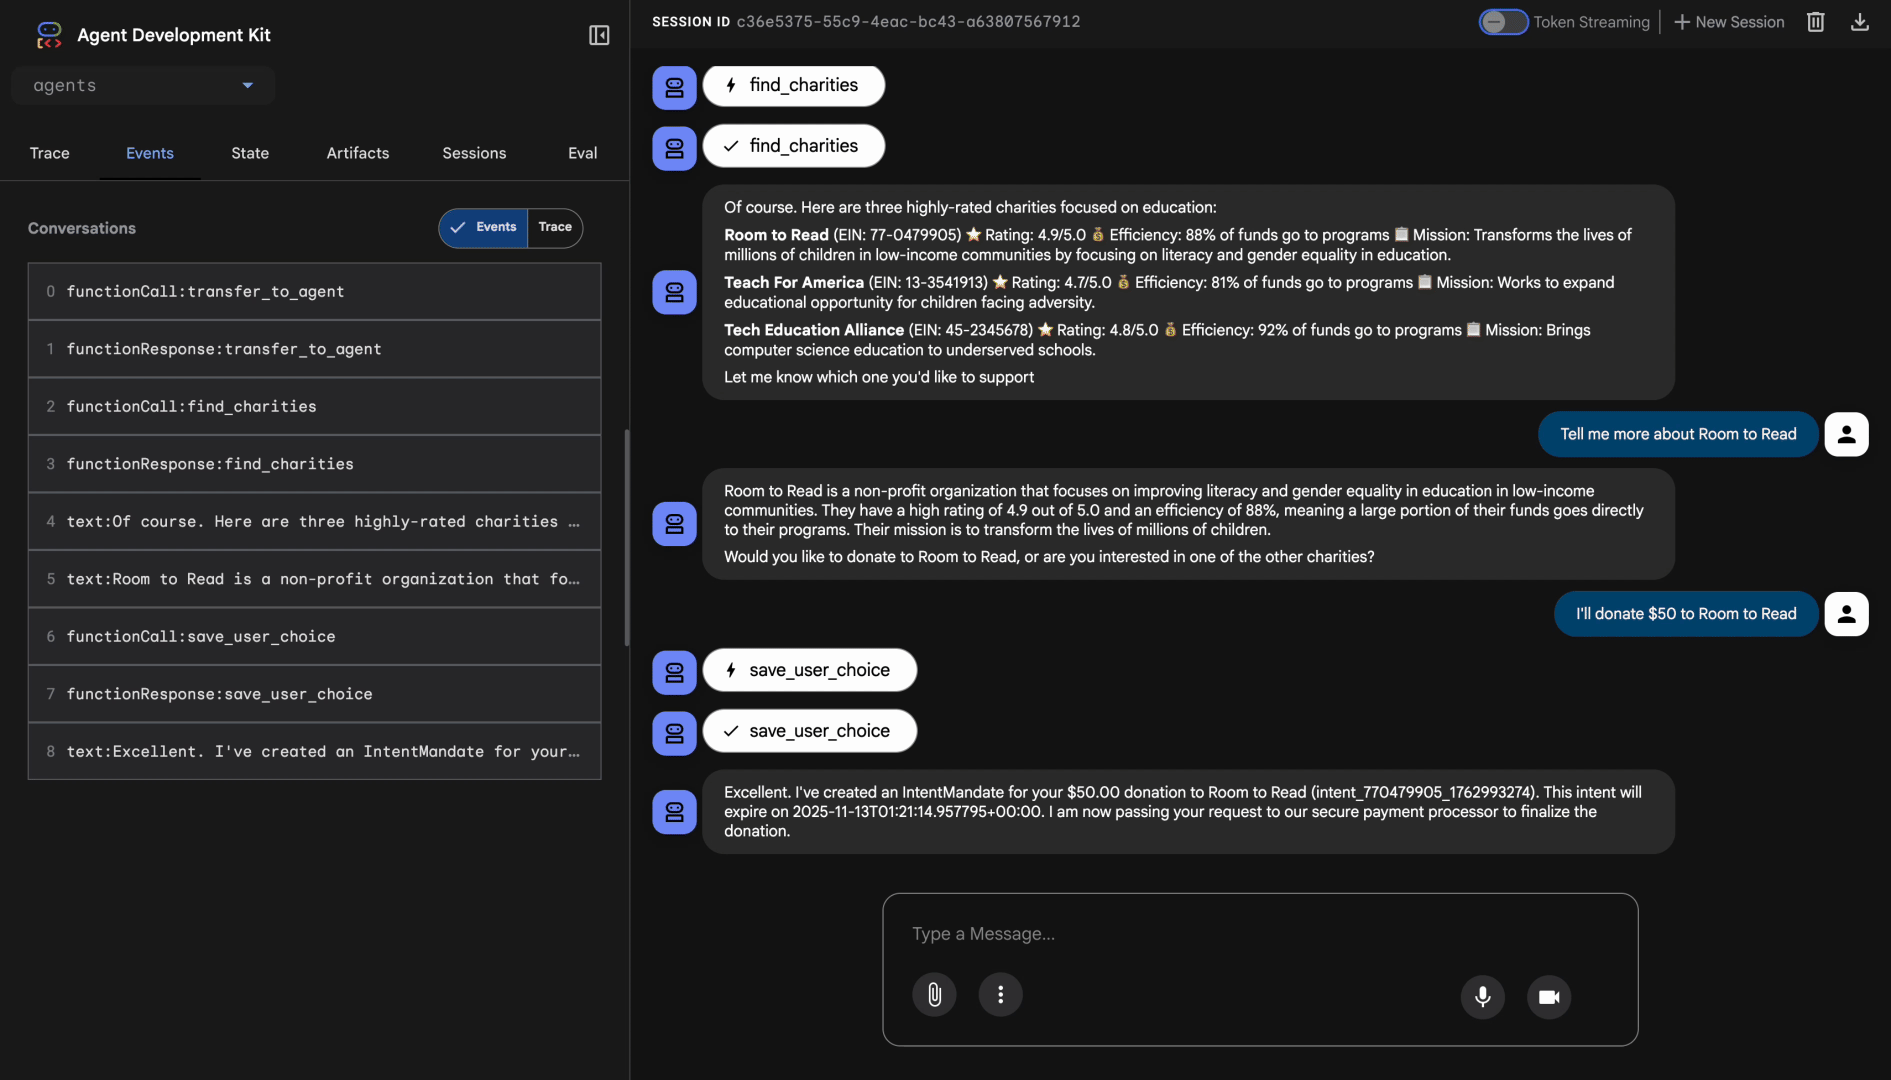
What's happening (visible in the trace panel on the right):
1. Advisor delegates to ShoppingAgent:
- ShoppingAgent searches for education charities
- Shows you 3 verified options with details
2. You interact with ShoppingAgent (may take multiple turns):
User: "Tell me more about Room to Read"
Shopping: [explains mission and impact]
User: "I'll donate $50 to Room to Read"
3. ShoppingAgent creates IntentMandate:
- Creates and signs the intent
- Returns confirmation with Intent ID
4. Advisor transitions to processing phase:
Perfect! Processing your $50 donation to Room to Read...
5. DonationProcessingPipeline activates:
- Merchant callback validates IntentMandate (✓ passed) ← NEW!
- Merchant Agent creates CartMandate with signature
- Credentials callback validates CartMandate (✓ passed) ← NEW!
- Credentials Provider prepares payment
6. Payment processes:
- Credentials Provider creates PaymentMandate
- Simulates payment processing
- Returns transaction ID
7. Advisor summarizes:
Perfect! Your donation has been processed successfully! 🎉
جزئیات:
- Amount: $50.00
- Charity: Room to Read (EIN: 77-0479905)
- Transaction ID: txn_a3f7b2c8d9e1f4a2
Test 2: Verify Callbacks Catch Failures (Optional Advanced Test)
Want to see the callbacks in action catching errors? You'd need to manually corrupt state (advanced debugging), but in production, callbacks would catch:
- Shopping Agent tool fails → Merchant callback blocks: "Error: Cannot create cart..."
- 2 hours pass → Merchant callback blocks: "Error: Intent expired..."
- Cart expires → Credentials callback blocks: "Error: Cart expired (15 min limit)..."
These edge cases are now architecturally enforced by your validation callbacks.
What You Just Built
You've successfully orchestrated three specialized agents into a seamless, trustworthy system with architectural validation.
قدم بعدی چیست؟
You've now completed the technical core of building trustworthy agents:
You've built a complete trustworthy system locally enforcing the credential chain. Now let's make it accessible to real users through production deployment—and enable the accountability trail that makes Module 9 possible.
Let's deploy your hardened agent to Google Cloud.
8. Deployment
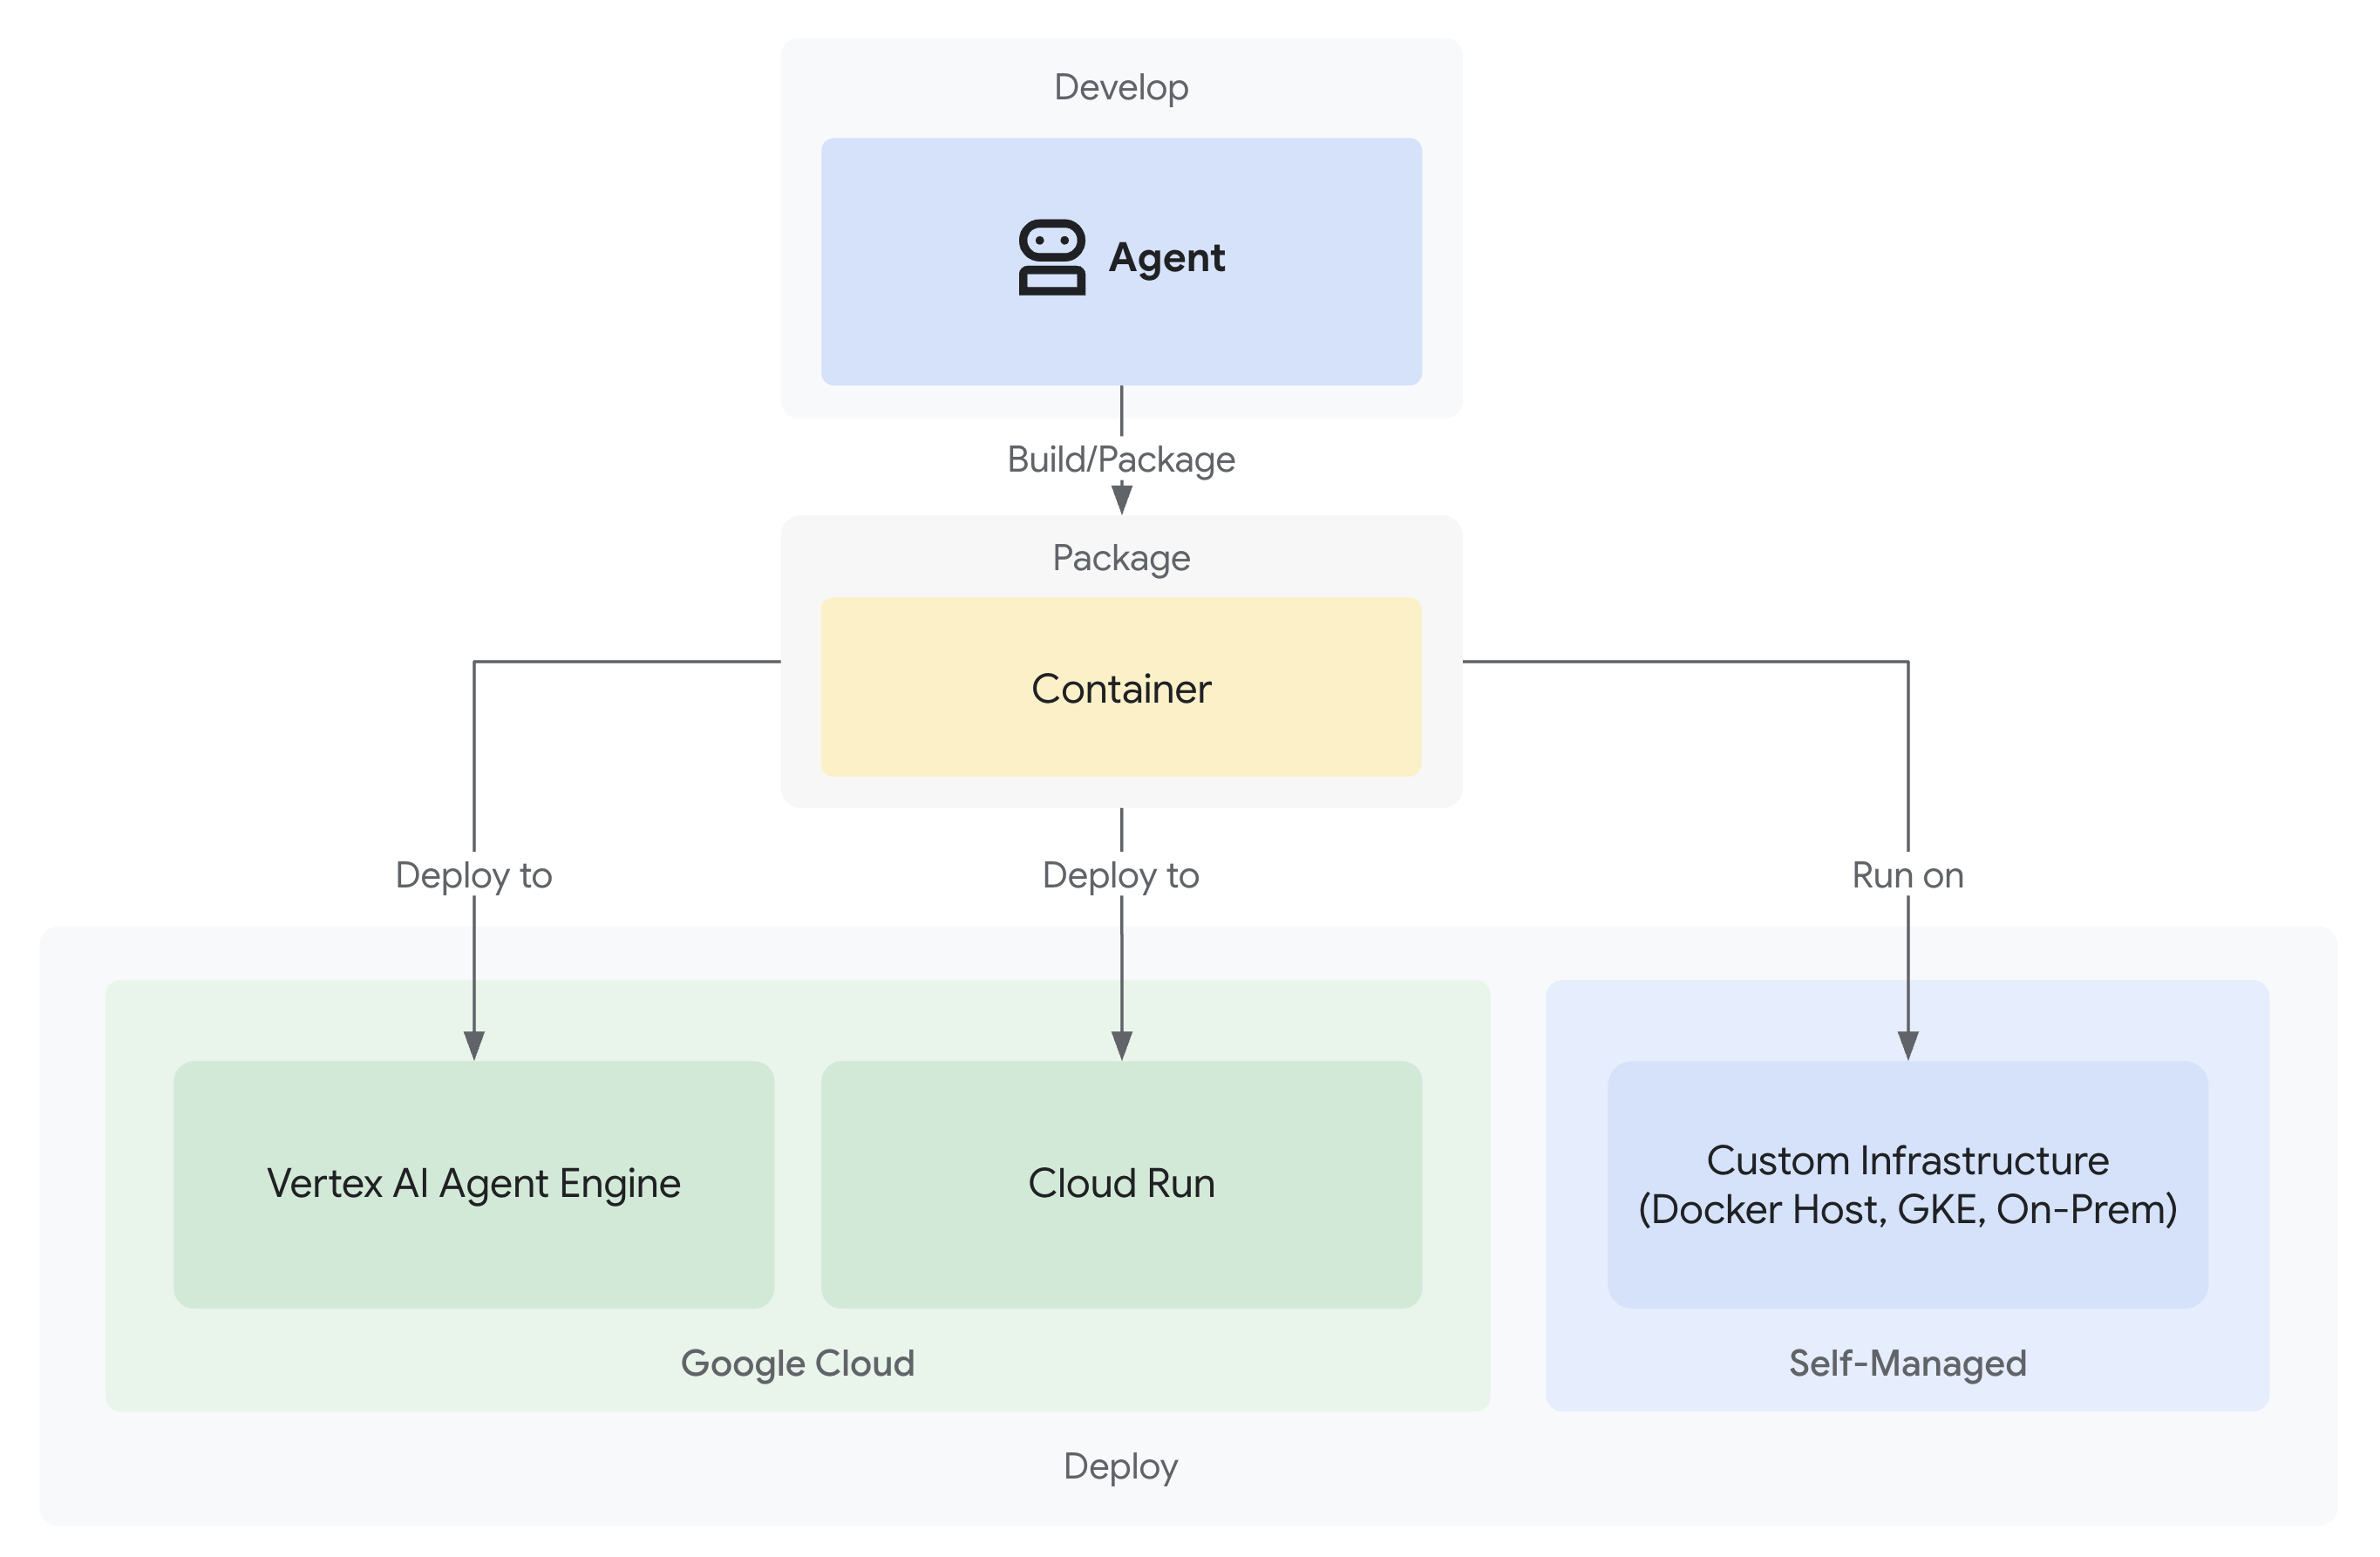
Your trustworthy donation system is now complete with three specialized agents working locally:
But it only runs on your development machine. To make this system useful to real users—and to capture the accountability trails that prove trustworthiness—you need to deploy it to production.
This module walks you through deploying your agent to Google Cloud with observability enabled from day one . The --trace_to_cloud flag you'll use during deployment is what makes the accountability trail in Module 9 possible.
Understanding Deployment Options
The ADK supports multiple deployment targets. Each has different characteristics for complexity, session management, scaling, and cost:
عامل | Local ( | Agent Engine | اجرای ابری |
پیچیدگی | مینیمال | کم | متوسط |
Session Persistence | In-memory only (lost on restart) | Vertex AI managed (automatic) | Cloud SQL (PostgreSQL) or in-memory |
زیرساخت | None (dev machine only) | کاملاً مدیریت شده | Container + optional database |
Cold Start | ناموجود | 100-500ms | 100-2000ms |
Scaling | Single instance | خودکار | Automatic (to zero) |
Cost Model | Free (local compute) | Compute-based | Request-based + free tier |
UI Support | Yes (built-in) | No (API only) | Yes (via |
Observability Setup | Local trace viewer | Automatic with | Requires |
بهترین برای | Development & testing | Production agents | Production agents |
Recommendation: For this trustworthy donation system, we recommend Agent Engine as your primary production deployment because it provides:
- Fully managed infrastructure (no containers to manage)
- Built-in session persistence via
VertexAiSessionService - Automatic scaling without cold starts
- Simplified deployment (no Docker knowledge required)
- Cloud Trace integration out of the box
Additional Option: Google Kubernetes Engine (GKE)
For advanced users requiring Kubernetes-level control, custom networking, or multi-service orchestration, GKE deployment is available. This option provides maximum flexibility but requires more operational expertise (cluster management, manifests, service accounts).
GKE deployment is not covered in this codelab but is fully documented in the ADK GKE Deployment Guide .
پیشنیازها
1. Google Cloud Project Setup
You need a Google Cloud project with billing enabled. If you don't have one:
- Create a project: Google Cloud Console
- Enable billing: Enable Billing
- Note your Project ID (not the project name or number)
2. Re-Authentication (Optional)
Authenticate with Google Cloud:
gcloud auth application-default login
gcloud config set project YOUR_PROJECT_ID
Replace YOUR_PROJECT_ID with your actual Google Cloud project ID.
Verify your authentication:
gcloud config get-value project
# Should output: YOUR_PROJECT_ID
3. Environment Variables
Use these commands to auto-populate your .env file:
# Get your current Project ID
PROJECT_ID=$(gcloud config get-value project)
STAGING_BUCKET_VALUE="gs://${PROJECT_ID}-staging"
ENV_FILE=".env"

# Check if STAGING_BUCKET is already set in the .env file
if grep -q "^STAGING_BUCKET=" "${ENV_FILE}"; then
  # If it exists, replace the line
  # The sed command finds the line starting with STAGING_BUCKET= and replaces the entire line.
  # Using | as a delimiter to avoid issues with slashes in the bucket name.
  sed -i "s|^STAGING_BUCKET=.*|STAGING_BUCKET=${STAGING_BUCKET_VALUE}|" "${ENV_FILE}"
  echo "Updated STAGING_BUCKET in ${ENV_FILE}"
else
  # If it doesn't exist, add it to the end of the file
  echo "STAGING_BUCKET=${STAGING_BUCKET_VALUE}" >> "${ENV_FILE}"
  echo "Added STAGING_BUCKET to ${ENV_FILE}"
fi

# Verify it was added or updated correctly
echo "Current STAGING_BUCKET setting:"
grep "^STAGING_BUCKET=" "${ENV_FILE}"
You should see:
STAGING_BUCKET=gs://your-actual-project-id-staging
نکات مهم:
- Replace
YOUR_PROJECT_IDwith your actual project ID (or use the commands above) - For
GOOGLE_CLOUD_LOCATION, use a supported region - The staging bucket will be created automatically if it doesn't exist when you run the deployment script
4. Enable Required APIs
The deployment process needs several Google Cloud APIs enabled. Run this command to enable them:
gcloud services enable \
    aiplatform.googleapis.com \
    storage.googleapis.com \
    cloudbuild.googleapis.com \
    cloudtrace.googleapis.com \
    compute.googleapis.com
This command enables:
- AI Platform API - For Agent Engine and Vertex AI models
- Cloud Storage API - For staging bucket
- Cloud Build API - For container building (Cloud Run)
- Cloud Trace API - For observability and accountability trails
- Compute Engine API - For service account management
Step 1: Understand the Deployment Infrastructure
Your project includes a unified deployment script ( deploy.sh ) that handles all deployment modes.
👉 Review the deployment script (optional):
cat deploy.sh
The script provides three deployment modes:
-
./deploy.sh local- Run locally with in-memory storage -
./deploy.sh agent-engine- Deploy to Vertex AI Agent Engine (recommended) -
./deploy.sh cloud-run- Deploy to Cloud Run with optional UI
How it works under the hood:
For Agent Engine deployment, the script executes:
adk deploy agent_engine \
  --project=$GOOGLE_CLOUD_PROJECT \
  --region=$GOOGLE_CLOUD_LOCATION \
  --staging_bucket=$STAGING_BUCKET \
  --display_name="Charity Advisor" \
  --trace_to_cloud \
  charity_advisor
For Cloud Run deployment, it executes:
adk deploy cloud_run \
  --project=$GOOGLE_CLOUD_PROJECT \
  --region=$GOOGLE_CLOUD_LOCATION \
  --service_name="charity-advisor" \
  --app_name="charity_advisor" \
  --with_ui \
  --trace_to_cloud \
  charity_advisor
The --trace_to_cloud flag is critical for both deployment types—it enables Cloud Trace integration for the accountability trail you'll explore in Module 9.
Step 2: Prepare the Agent Engine Wrapper
Agent Engine requires a specific entry point that wraps your agent for the managed runtime. This file has been created for you.
👉 Review
charity_advisor/agent_engine_app.py
:
"""Agent Engine application wrapper.

This file prepares the Charity Advisor agent for deployment to Vertex AI Agent Engine.
"""

from vertexai import agent_engines
from .agent import root_agent

# Wrap the agent in an AdkApp object for Agent Engine deployment
app = agent_engines.AdkApp(
    agent=root_agent,
    enable_tracing=True,  # Enables Cloud Trace integration automatically
)
Why this file is needed:
- Agent Engine requires the agent wrapped in an
AdkAppobject - The
enable_tracing=Trueparameter enables Cloud Trace integration automatically - This wrapper is referenced by the ADK CLI during deployment
- It configures
VertexAiSessionServicefor automatic session persistence
Step 3: Deploy to Agent Engine (RECOMMENDED)
Agent Engine is the recommended production deployment for your trustworthy donation system because it provides fully managed infrastructure with built-in session persistence.
Run the Deployment
From your project root:
chmod +x deploy.sh
./deploy.sh agent-engine
Deployment Phases
Watch the script execute these phases:
Phase 1: API Enablement
  ✓ aiplatform.googleapis.com
  ✓ storage.googleapis.com
  ✓ cloudbuild.googleapis.com
  ✓ cloudtrace.googleapis.com
  ✓ compute.googleapis.com

Phase 2: IAM Setup
  ✓ Getting project number
  ✓ Granting Storage Object Admin
  ✓ Granting Vertex AI User
  ✓ Granting Cloud Trace Agent

Phase 3: Staging Bucket
  ✓ Creating gs://your-project-id-staging (if needed)
  ✓ Setting permissions

Phase 4: Validation
  ✓ Checking agent.py exists
  ✓ Verifying root_agent defined
  ✓ Checking agent_engine_app.py exists
  ✓ Validating requirements.txt

Phase 5: Build & Deploy
  ✓ Packaging agent code
  ✓ Uploading to staging bucket
  ✓ Creating Agent Engine instance
  ✓ Configuring session persistence
  ✓ Setting up Cloud Trace integration
  ✓ Running health checks
This process takes 5-10 minutes as it packages the agent and deploys it to Vertex AI infrastructure.
Save Your Agent Engine ID
Upon successful deployment:
✅ Agent Engine created successfully!

   Agent Engine ID: 7917477678498709504
   Resource Name: projects/123456789/locations/us-central1/reasoningEngines/7917477678498709504
   Endpoint: https://us-central1-aiplatform.googleapis.com/v1/...

   ⚠️  IMPORTANT: Save the Agent Engine ID from the output above
   Add it to your .env file as:
   AGENT_ENGINE_ID=7917477678498709504

   This ID is required for:
   - Testing the deployed agent
   - Updating the deployment later
   - Accessing logs and traces
Update your .env file immediately:
echo "AGENT_ENGINE_ID=7917477678498709504" >> .env
What Was Deployed
Your Agent Engine deployment now includes:
✅ All three agents (Shopping, Merchant, Credentials) running in managed runtime
✅ Complete credential chain logic (Intent → Cart → Payment mandates)
✅ User consent mechanism with confirmation workflow
✅ Automatic session persistence via VertexAiSessionService
✅ Auto-scaling infrastructure managed by Google
✅ Cloud Trace integration for complete observability
Step 4: Test Your Deployed Agent
Update Your Environment
Verify your .env includes the Agent Engine ID:
AGENT_ENGINE_ID=7917477678498709504  # From deployment output
GOOGLE_CLOUD_PROJECT=your-project-id
GOOGLE_CLOUD_LOCATION=us-central1
STAGING_BUCKET=gs://your-project-id-staging
Run the Test Script
Your project includes a test script specifically for Agent Engine deployments.
👉 Run the test:
python scripts/test_deployed_agent.py
Expected Output
Testing Agent Engine deployment...
Project: your-project-id
Location: us-central1
Agent Engine ID: 7917477678498709504
Endpoint: https://us-central1-aiplatform.googleapis.com/v1/...

Creating session...
✓ Session created: 4857885913439920384

Sending donation query...
✓ Response received:
  Event 1: I'll help you donate $50 to a children's education charity...
  Event 2: Here are some highly-rated children's education charities...
  Event 3: Which charity would you like to support?...

✅ Test completed successfully!

Session ID: 4857885913439920384

This donation generated a trace in Cloud Trace.
View it in Module 9: Observability

To view traces:
https://console.cloud.google.com/traces/list?project=your-project-id
Verification Checklist
After testing, verify:
✅ Agent responds to queries
✅ All three agents execute in sequence (Shopping → Merchant → Credentials)
✅ Consent mechanism activates (confirmation requested)
✅ Session persists across requests
✅ No authentication errors
✅ No connection timeouts
If you encounter errors:
- Check your environment variables are set correctly
- Verify APIs are enabled:
gcloud services list --enabled - Check Agent Engine logs in Vertex AI Console
- Verify the
agent_engine_app.pyfile exists in yourcharity_advisorfolder
Step 5: Deploy to Cloud Run (Optional)
While Agent Engine is recommended for streamlined production deployment, Cloud Run offers more control and supports the ADK web UI. This section is optional.
When to Use Cloud Run
Choose Cloud Run if you need:
- The ADK web UI for user interaction
- Full control over the container environment
- Custom database configurations
- Integration with existing Cloud Run services
Run the Deployment
chmod +x deploy.sh
./deploy.sh cloud-run
What's different:
The script will automatically:
- Build a Docker container with your agent code
- Create a Cloud SQL PostgreSQL database (if needed)
- Configure the database connection
- Deploy with the ADK web UI enabled
The deployment takes 10-15 minutes due to Cloud SQL provisioning.
Session Management:
- Uses
DatabaseSessionServiceinstead ofVertexAiSessionService - Requires database credentials in
.env(or auto-generated) - State persists in PostgreSQL database
UI Support:
- Web UI available at:
https://charity-advisor-xyz.a.run.app
Testing Cloud Run Deployment
If you deployed to Cloud Run with --with_ui , you can test directly in your browser:
- Navigate to your Service URL (provided in deployment output)
- You'll see the ADK web interface. Select your agent from the dropdown.
- Start a test donation:
I want to donate $50 to a children's education charity
- Observe the execution flow:
- ShoppingAgent finds charities and saves your intent
- MerchantAgent creates the cart mandate
- CredentialsProvider creates payment mandate and requests confirmation
- After you confirm, payment is processed
- Verify the response includes:
- Charity recommendations
- Confirmation request
- Success message after approval
عیبیابی
مشکلات رایج
Issue: ERROR: GOOGLE_CLOUD_PROJECT is not set
Solution: Ensure your .env file has the correct project ID:
GOOGLE_CLOUD_PROJECT=your-actual-project-id
Issue: Staging bucket not created automatically
Solution: The script should create the bucket automatically. If not, create it manually:
gsutil mb -p $GOOGLE_CLOUD_PROJECT -l $GOOGLE_CLOUD_LOCATION $STAGING_BUCKET
خلاصه
You've successfully:
✅ Understood the deployment infrastructure provided by deploy.sh
✅ Reviewed the Agent Engine wrapper configuration
✅ Deployed your trustworthy donation system to Agent Engine (recommended)
✅ Enabled Cloud Trace integration with --trace_to_cloud
✅ Verified the agent is accessible and functional
✅ Created the foundation for accountability trails in Module 9
In the next module, you'll see exactly what this flag unlocks: complete visibility into every donation, every consent moment, and every step of the credential chain.
9. Observability
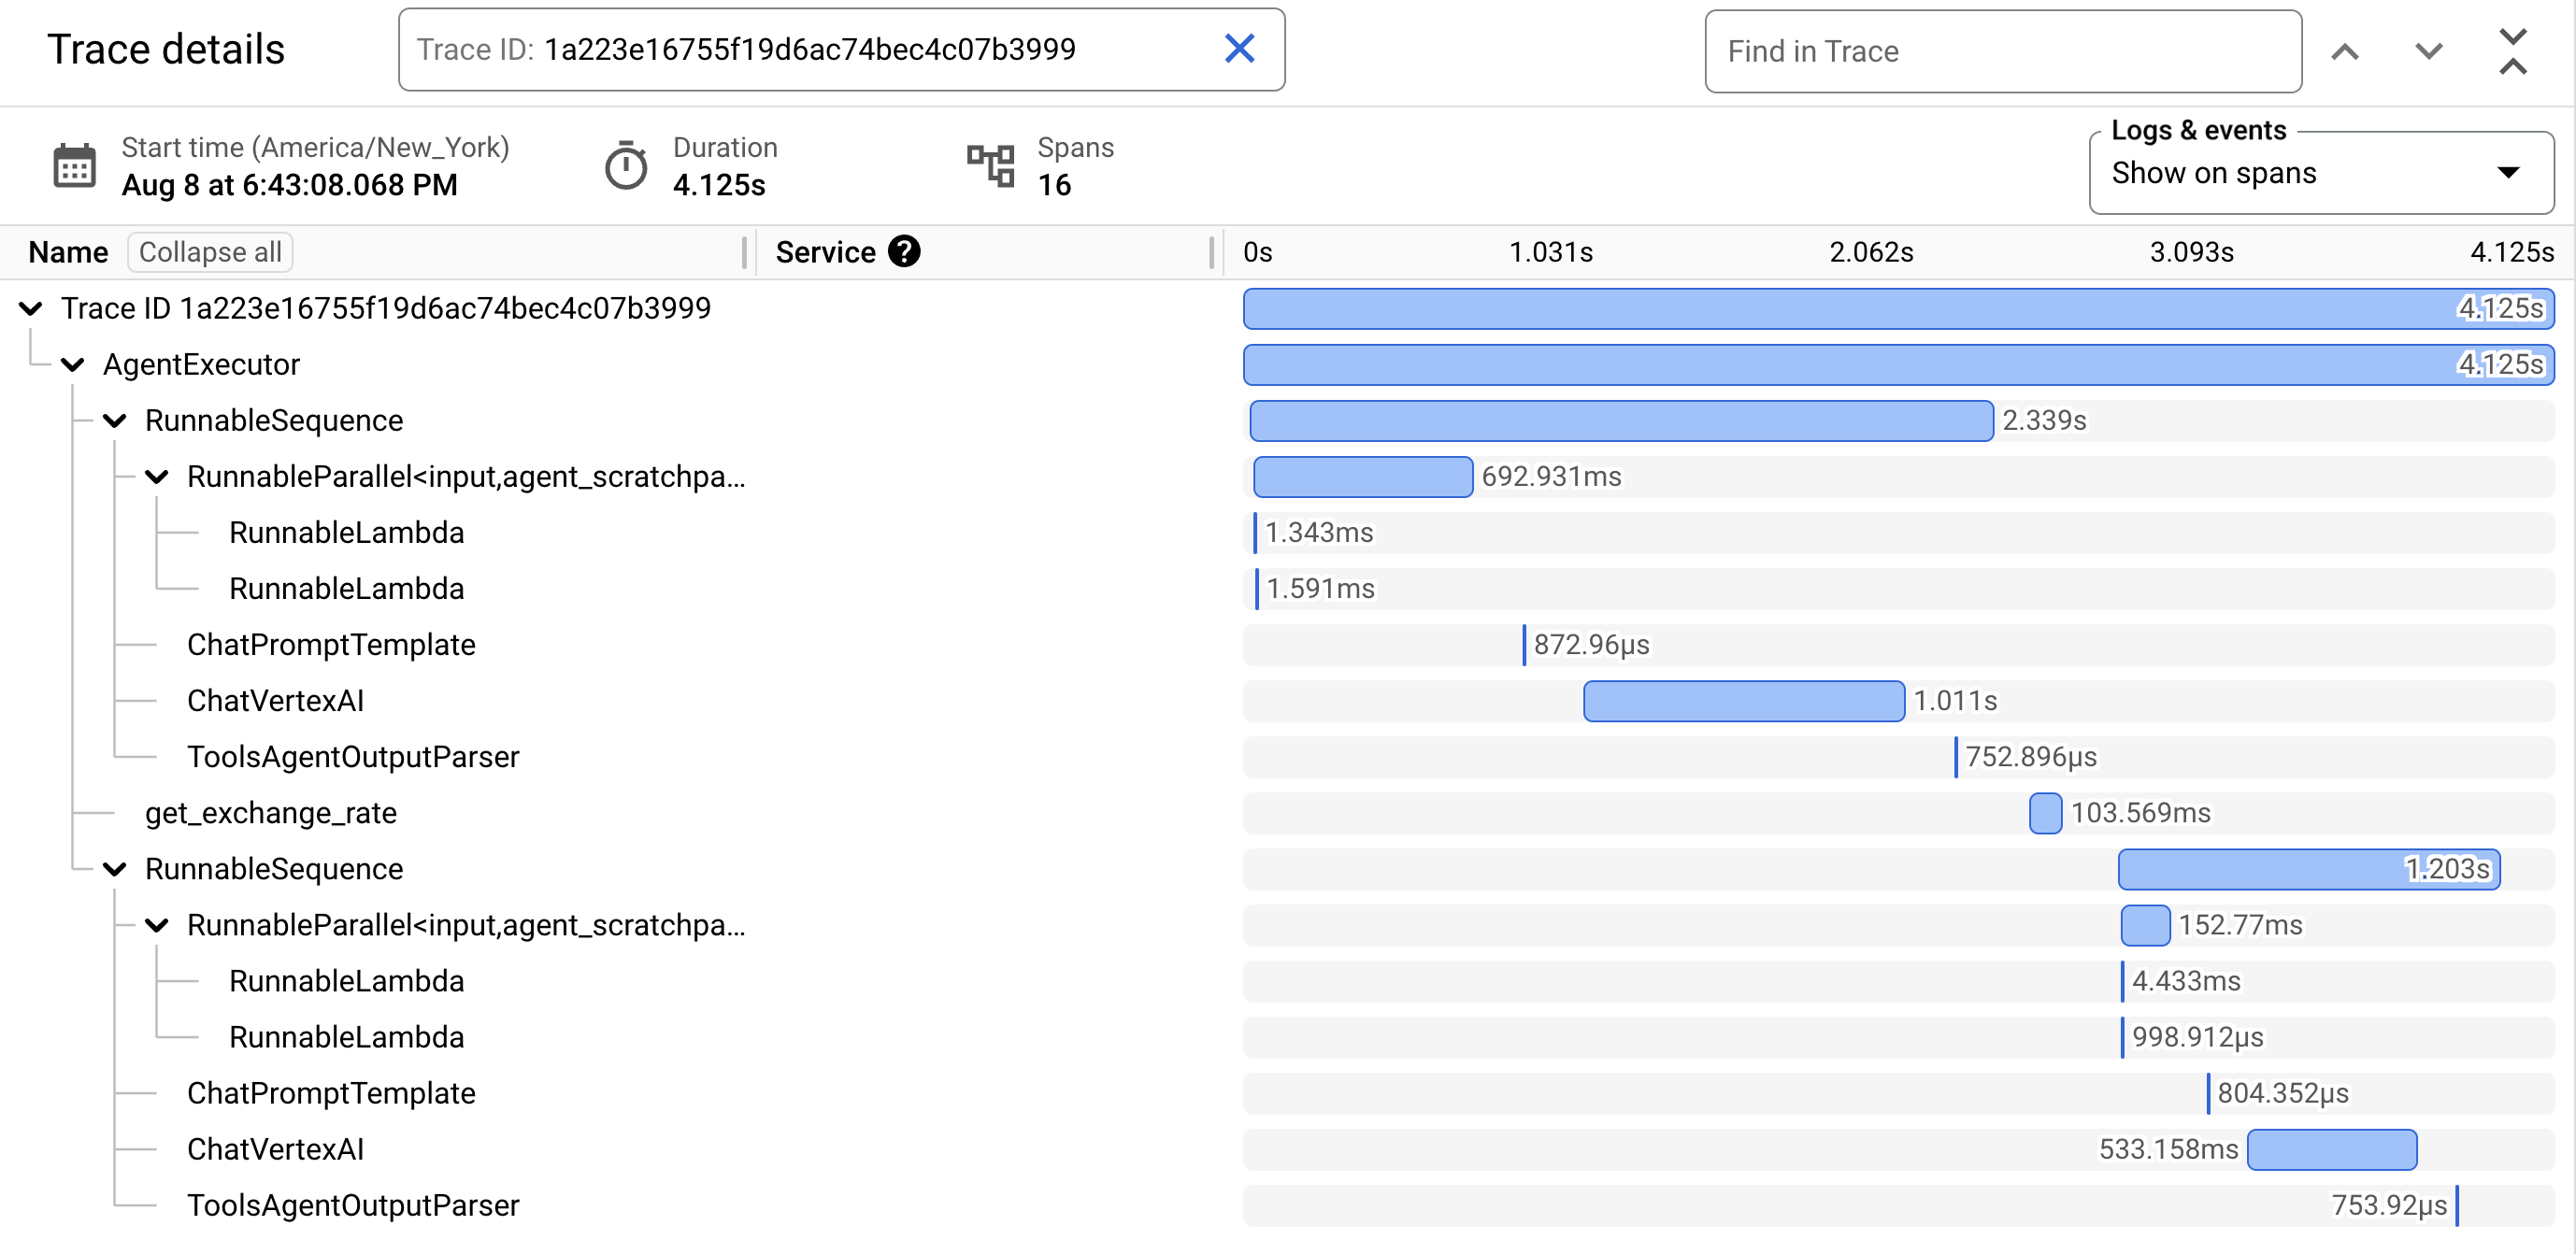
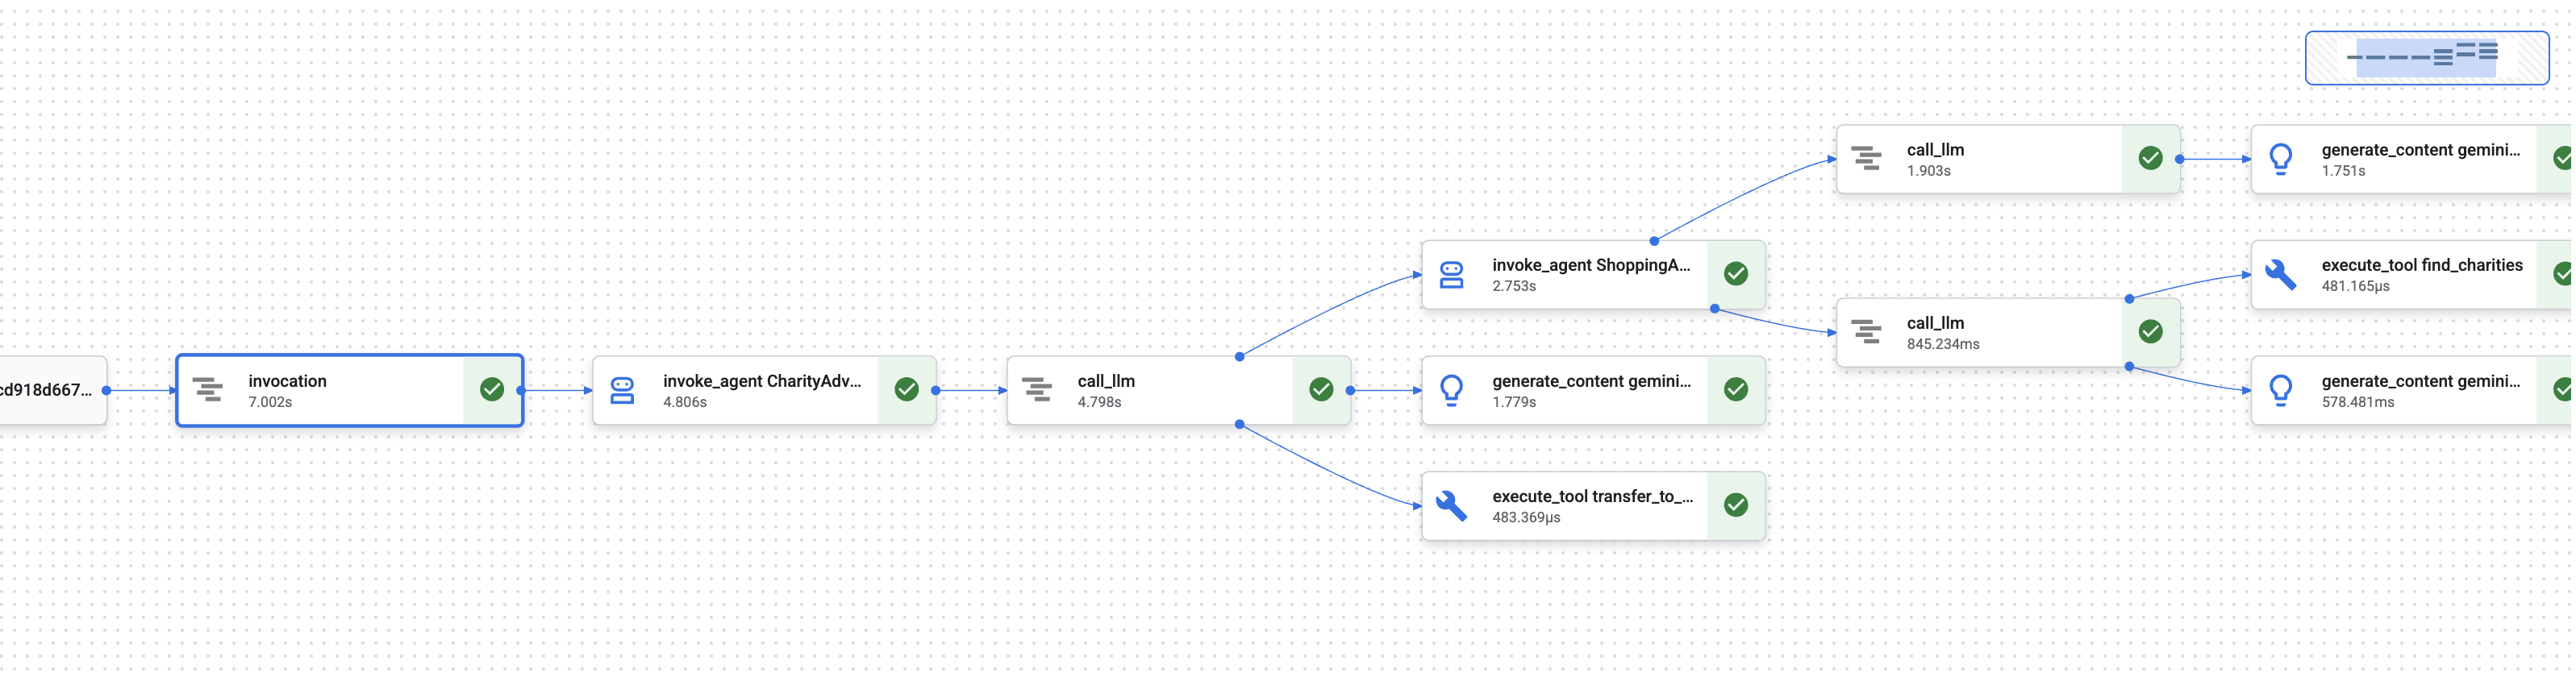
In Module 1, you learned about a fundamental problem: when an AI agent handles money, how do you prove what happened?
A user could claim:
- "I never chose that charity!"
- "I didn't authorize that payment!"
- "The system charged me without my consent!"
In a traditional black-box AI system, you'd have no way to prove otherwise. But your trustworthy donation system is different. In Module 8, you deployed with the --trace_to_cloud flag, which means every donation now creates a complete, tamper-evident audit trail in Cloud Trace .
This module teaches you to read those traces and use them as evidence. You'll learn to:
- Navigate Cloud Trace Explorer to find production traces
- Read the waterfall view to understand execution flow
- Find the credential chain (Intent → Cart → Payment mandates)
- Locate consent moments with timestamp proof
- Use traces for dispute resolution
- Export traces for compliance and audits
This is what separates trustworthy systems from capable-but-opaque ones: the ability to prove what happened with forensic precision .
Understanding Traces and Spans
Before viewing traces in Cloud Trace, you need to understand what you're looking at.
What is a Trace?
A trace is the complete timeline of your agent handling a single request. It captures everything from when a user sends a query until the final response is delivered.
Each trace shows:
- Total duration of the request
- All operations that executed
- How operations relate to each other (parent-child relationships)
- When each operation started and ended
- Success or failure status
For your charity agent: One trace = one complete donation flow from "I want to donate" to "Payment successful."
What is a Span?
A span represents a single unit of work within a trace. Think of spans as the building blocks of a trace.
Common span types in your donation system:
Span Type | What It Represents | مثال |
| Execution of an agent | |
| Request to a language model | |
| Tool function execution | |
| Reading from session memory | Retrieving |
| Writing to session memory | Storing |
Each span contains:
- Name: What operation this represents
- How long it took (start time → end time)
- Attributes: Metadata like tool inputs, model responses, token counts
- Status: Success (
OK) or error (ERROR) - Parent-child relationships: Which operations triggered which
How Spans Form a Trace
Spans nest inside each other to show causation:
Root Span: CharityAdvisor.run (entire request)
  └─ Child: DonationPipeline.run (sequential workflow)
      ├─ Child: ShoppingAgent.run
      │   ├─ Grandchild: call_llm (Gemini processes charity search)
      │   ├─ Grandchild: execute_tool (find_charities)
      │   └─ Grandchild: execute_tool (save_user_choice)
      ├─ Child: MerchantAgent.run
      │   ├─ Grandchild: call_llm (Gemini generates cart)
      │   └─ Grandchild: execute_tool (create_cart_mandate)
      └─ Child: CredentialsProvider.run
          ├─ Grandchild: call_llm (Gemini processes payment)
          └─ Grandchild: execute_tool (create_payment_mandate) [CONSENT!]
This hierarchy shows exactly what happened and in what order . You can see that the payment mandate was created after the cart mandate, which was after the user selected a charity.
Step 1: Access Cloud Trace Explorer
Now let's view the actual traces from your deployed agent.
Navigate to Cloud Trace
- Open the Google Cloud Console: console.cloud.google.com
- Select your project from the dropdown at the top (should be pre-selected if you've been working in it)
- Navigate to Cloud Trace Explorer:
- In the left sidebar, scroll to Observability section
- Click Trace
- Or use direct link: console.cloud.google.com/traces/list
What You're Looking At
The Trace Explorer shows a list of all traces from your project:
ستون | What It Shows |
درخواست | HTTP method and endpoint (for API requests) |
زمان شروع | When the request began |
تأخیر | Total duration of the request |
Spans | Number of operations in the trace |
Each row represents one complete request to your deployed agent.
Generate Test Traces (If Needed)
If you don't see any traces yet, the list might be empty because:
- No requests have been made to your deployed agent yet
- Traces take 1-2 minutes to appear after a request
Generate a test trace:
If you deployed to Cloud Run with UI , visit your service URL and complete a donation in the browser.
If you deployed to Agent Engine , run the test script from Module 8:
python scripts/test_deployed_agent.py
Wait 1-2 minutes , then refresh the Cloud Trace Explorer page. You should now see traces.
Filter Traces
Use the filter options at the top to find specific traces:
- Time range: Change from "Last hour" to "Last 24 hours" if needed
- Min latency / Max latency: Filter for slow requests
- Request filter: Search by specific operations (eg, "DonationPipeline")
For this module, focus on traces with longer durations (>5 seconds), as these represent complete donation flows with all three agents executing.
Step 2: Examine a Complete Donation Flow
Click on any trace in the list to open the waterfall view . This is where you'll spend most of your time analyzing agent behavior.
Understanding the Waterfall View
The waterfall view is a Gantt chart showing the complete execution timeline:
━━━━━━━━━━━━━━━━━━━━━━━━━━━━━━━━━━━━━━━━━━━━━━━━━
              Timeline (horizontal = time) →
━━━━━━━━━━━━━━━━━━━━━━━━━━━━━━━━━━━━━━━━━━━━━━━━━

invocation                           ▓▓▓▓▓▓▓▓▓▓▓▓▓▓▓▓▓▓▓▓▓▓ 8.2s
  agent_run: CharityAdvisor          ▓▓▓▓▓▓▓▓▓▓▓▓▓▓▓▓▓▓▓▓▓ 8.1s
    agent_run: DonationPipeline      ▓▓▓▓▓▓▓▓▓▓▓▓▓▓▓▓▓▓▓▓ 7.9s
      agent_run: ShoppingAgent       ▓▓▓▓▓▓ 2.1s
        call_llm: gemini-2.5-flash   ▓▓▓▓ 1.2s
        execute_tool: find_charities ▓▓ 0.5s
        execute_tool: save_user_choice ▓ 0.3s
      agent_run: MerchantAgent       ▓▓▓ 1.8s
        call_llm: gemini-2.5-flash   ▓▓ 0.9s
        execute_tool: create_cart_mandate ▓ 0.7s
      agent_run: CredentialsProvider ▓▓▓▓▓▓▓▓ 4.0s
        call_llm: gemini-2.5-flash   ▓▓ 0.8s
        execute_tool: create_payment_mandate ▓▓▓▓▓ 3.0s [CONSENT]
Reading the Chart
Each bar represents a span:
- Horizontal position: When it started
- Length: How long it took
- Indentation: Shows parent-child relationships
- Color: Typically blue for normal, red for errors
Key observations from this example trace:
✅ Total duration: 8.2 seconds
✅ Sequential execution: ShoppingAgent completed before MerchantAgent started
✅ MerchantAgent completed
قبل از
CredentialsProvider started
✅ Consent was the longest operation: 3.0 seconds for create_payment_mandate (because it waited for user confirmation)
✅ LLM calls are visible: Each agent made one Gemini request
✅ Tool calls are captured: All six tools executed successfully
This visual immediately shows you where time is spent and what order operations executed in .
Click on a Span for Details
Click on the invocation span (the root span at the top). In the right panel, you'll see detailed attributes:
{
  "http.method": "POST",
  "http.status_code": 200,
  "http.url": "https://charity-advisor-xyz.a.run.app/api/run",
  "user_id": "test_user_123",
  "session_id": "4857885913439920384",
  "trace_id": "a1b2c3d4e5f6...",
  "span_id": "1234567890abcdef"
}
These attributes provide context about the entire request.
Step 3: Find the Credential Chain
Your trustworthy system uses a credential chain to prove authorization at each step:
IntentMandate (User chose charity)
    ↓
CartMandate (Merchant created cart, signed IntentMandate)
    ↓
PaymentMandate (Payment provider created payment, signed CartMandate)
Let's find each mandate in the trace.
Finding the IntentMandate
Click on the execute_tool: save_user_choice span (under ShoppingAgent).
In the attributes panel, you'll see:
{
  "tool.name": "save_user_choice",
  "tool.input.charity_name": "Save the Children",
  "tool.input.amount": 50,
  "tool.output.status": "success",
  "tool.output.intent_mandate": {
    "charity_name": "Save the Children",
    "amount": 50,
    "timestamp": "2024-11-08T15:30:12.345Z",
    "signature": "a3f7b9c1d2e4..."
  }
}
This proves:
- ✅ User selected "Save the Children"
- ✅ Amount was $50
- ✅ Choice was recorded at 15:30:12 UTC
- ✅ Signature was generated (in production, this would be cryptographic)
The IntentMandate is now in session state and available to subsequent agents.
Finding the CartMandate
Click on the execute_tool: create_cart_mandate span (under MerchantAgent).
In the attributes panel:
{
  "tool.name": "create_cart_mandate",
  "tool.input.intent_mandate": {
    "charity_name": "Save the Children",
    "amount": 50,
    "signature": "a3f7b9c1d2e4..."
  },
  "tool.output.status": "success",
  "tool.output.cart_mandate": {
    "cart_id": "cart_7893",
    "intent_signature": "a3f7b9c1d2e4...",
    "cart_signature": "e8f2a9b3c7d1...",
    "timestamp": "2024-11-08T15:30:14.789Z"
  }
}
This proves:
- ✅ MerchantAgent received the IntentMandate (input shows it)
- ✅ Cart was created with ID "cart_7893"
- ✅ Cart signature references the IntentMandate signature (chain link!)
- ✅ Created at 15:30:14 UTC (2.4 seconds after intent)
The CartMandate now references the IntentMandate, forming the chain.
Finding the PaymentMandate
Click on the execute_tool: create_payment_mandate span (under CredentialsProvider).
In the attributes panel:
{
  "tool.name": "create_payment_mandate",
  "tool.input.cart_mandate": {
    "cart_id": "cart_7893",
    "intent_signature": "a3f7b9c1d2e4...",
    "cart_signature": "e8f2a9b3c7d1..."
  },
  "tool.confirmation_required": true,
  "tool.confirmation_timestamp": "2024-11-08T15:30:17.891Z",
  "tool.user_response": "CONFIRMED",
  "tool.wait_duration_ms": 29168,
  "tool.output.status": "success",
  "tool.output.payment_mandate": {
    "payment_id": "pay_9821",
    "cart_signature": "e8f2a9b3c7d1...",
    "payment_signature": "b4c9e2a7f8d3...",
    "timestamp": "2024-11-08T15:30:47.059Z"
  }
}
This proves the complete chain:
- ✅ CredentialsProvider received the CartMandate (input shows it)
- ✅ Payment references the CartMandate signature (chain link!)
- ✅ Confirmation was required (
confirmation_required: true) - ✅ User confirmed at 15:30:17 UTC
- ✅ System waited 29.2 seconds for user decision
- ✅ Payment was created after confirmation (timestamp: 15:30:47)
Visualizing the Chain
The trace proves the credential chain executed correctly:
15:30:12 UTC → IntentMandate created (signature: a3f7...)
                  ↓
15:30:14 UTC → CartMandate created (references: a3f7...)
                  ↓
15:30:17 UTC → User consent requested
                  ↓
15:30:47 UTC → PaymentMandate created (references: e8f2...)
Each mandate references the signature of the previous one. This is tamper-evident - you can verify the chain by checking that signatures match.
Step 4: Analyzing Performance and Bottlenecks
Cloud Trace doesn't just prove what happened—it shows you where time is spent so you can optimize.
Identify the Critical Path
In the waterfall view, look for the longest spans in the vertical stack. These represent your performance bottlenecks.
From our example trace:
Total: 8.2 seconds

Breakdown:
  - ShoppingAgent:         2.1s (26%)
  - MerchantAgent:         1.8s (22%)
  - CredentialsProvider:   4.0s (49%)  ← Bottleneck
  - Other overhead:        0.3s (3%)
Critical insight: CredentialsProvider accounts for 49% of total time. Why?
Drill into the CredentialsProvider span:
CredentialsProvider: 4.0s
  - call_llm:              0.8s (20%)
  - create_payment_mandate: 3.0s (75%)  ← User consent wait
  - Other:                 0.2s (5%)
The 3.0-second delay is expected and good - it's the user deliberating before confirming. This is not a performance problem; it's proof of thoughtful consent.
Tracking LLM Costs
Click on any call_llm span to see token usage:
{
  "llm.model": "gemini-2.5-flash",
  "llm.usage.prompt_tokens": 487,
  "llm.usage.completion_tokens": 156,
  "llm.usage.total_tokens": 643,
  "llm.response_time_ms": 1243
}
Use this to:
- Track cost per request (tokens × model pricing)
- Identify unnecessarily long prompts
- Compare model performance (Flash vs Pro)
- Optimize for latency vs. quality
Example calculation:
Gemini 2.5 Flash pricing (as of Nov 2024):
  Input:  $0.075 per 1M tokens
  Output: $0.30 per 1M tokens

This request:
  Input:  487 tokens × $0.075 / 1M = $0.000037
  Output: 156 tokens × $0.30 / 1M  = $0.000047
  Total:                            = $0.000084 (~$0.00008)

For 10,000 donations/month:
  10,000 × 3 agents × $0.00008 = $2.40/month in LLM costs
This granular visibility helps you make data-driven decisions about model selection.
Comparing Across Traces
Filter for multiple traces and compare durations:
Trace 1: 8.2s  (with consent wait: 3.0s)
Trace 2: 12.5s (with consent wait: 7.8s)  ← User took longer
Trace 3: 5.1s  (with consent wait: 0.2s)  ← User clicked fast
Trace 4: 6.3s  (with consent wait: 1.5s)
Insight: Most variation comes from user decision time, not system performance. The core agent execution (minus consent) is consistent at ~5 seconds.
This tells you the system is performing reliably.
For production systems, set up alerts to catch issues before users complain.
Alert on High Error Rates
Create an alert when >5% of traces contain errors:
- Navigate to Cloud Monitoring
- Click "Alerting" → "Create Policy"
- Configure:
Resource: Cloud Trace Span
Metric: Span error count
Condition: Rate > 5% over 5 minutes
Notification: Email your-team@example.com
Alert on High Latency
Create an alert when p95 latency exceeds 15 seconds:
Resource: Cloud Trace
Metric: Span duration (95th percentile)
Condition: > 15000ms for 5 minutes
Notification: PagerDuty
This catches performance degradation before it impacts user experience.
Alert on Missing Consent
Create an alert if any payment processes without confirmation:
Resource: Cloud Trace Span
Filter: tool.name="create_payment_mandate" AND tool.confirmation_required!=true
Condition: Any match
Notification: Critical alert to security team
This is a safety violation detector - if it fires, something is very wrong with your consent mechanism.
What You've Learned
Through Cloud Trace, you now understand how to:
✅ Navigate Cloud Trace Explorer to find production traces
✅ Read waterfall views to see complete execution flow
✅ Trace the credential chain through IntentMandate → CartMandate → PaymentMandate ✅ Use traces as evidence for dispute resolution
✅ Analyze performance to identify bottlenecks
✅ Track LLM costs at a granular level
The Difference This Makes
Compare two systems handling the same "I never authorized this!" complaint:
System Without Observability
User: "I never authorized that $50 donation!"
You:  "Our logs show the transaction completed successfully."
User: "But I didn't approve it!"
You:  "The system requires confirmation before processing."
User: "I never saw any confirmation!"
You:  "..." [no way to prove what happened]

Result: Refund issued, trust lost, user never returns.
System With Cloud Trace
User: "I never authorized that $50 donation!"
You:  "Let me pull up the trace from your session..."
      [Shows waterfall with consent span]
You:  "Here's the evidence:
       - 15:30:17 UTC: System asked for confirmation
       - Message shown: 'You are about to donate $50...'
       - 15:30:47 UTC: You clicked 'CONFIRM'
       - Wait time: 29.2 seconds

       The system waited almost 30 seconds for your decision.
       Here's the exact timestamp of your confirmation."

User: "Oh... I remember now. My mistake. Sorry!"

Result: Trust preserved, no refund needed, user continues using service.
This is the power of accountability trails. You move from "trust us" to "let us show you exactly what happened."
قدم بعدی چیست؟
You've now completed the technical core of building trustworthy agents:
✅ Module 1-6: Designed a trustworthy architecture (roles, credentials, consent)
✅ Module 7: Orchestrated complex workflows (SequentialAgent)
✅ Module 8: Deployed with observability enabled
✅ Module 9: Learned to read and use accountability trails
The architecture you've built—role separation, credential chains, consent mechanisms, complete observability—transfers directly to production systems handling real money, real data, and real consequences.
10. Your Journey Forward
What You've Built
You started this workshop with a question: "How do I build AI agents I can actually trust with money?"
You now have the answer.
Where you started (Module 3):
simple_agent = Agent(
    model="gemini-2.5-flash",
    instruction="Find charities and donate",
    tools=[google_search]
)
Where you are now (Module 10):
- ✅ Three specialized agents with role separation
- ✅ Three verifiable credentials (Intent → Cart → Payment mandates)
- ✅ Complete credential chain with expiry validation at each step
- ✅ Explicit consent mechanism with timestamp proof
- ✅ Production deployment to Agent Engine with observability
- ✅ Complete accountability trail in Cloud Trace
- ✅ Forensic evidence for dispute resolution
Workshop vs. Production: The Gap
Your system demonstrates the correct architecture and patterns , but uses educational simplifications that must be upgraded for real money and real users.
Here's exactly what was simplified and what production requires:
کامپوننت | Workshop Implementation | Production Requirements |
امضاها | SHA-256 hashes ( | Real cryptographic signatures using PKI or JWT with private keys |
پردازش پرداخت | Simulated returns ( | Integration with real payment APIs (Stripe, PayPal, Square) |
User Authentication | Implicit trust (no login required) | OAuth 2.0, WebAuthn, or session management |
Secrets Management | Environment variables in | Google Secret Manager or Cloud KMS with encryption |
Charity Database | Mock JSON file with 9 charities | Live API integration (IRS Tax Exempt Organization Search, Charity Navigator API) |
Error Handling | Basic try-catch with error messages | Retry logic with exponential backoff, circuit breakers, dead letter queues |
آزمایش | Manual verification via scripts | Comprehensive unit/integration/E2E test suite with CI/CD |
Session Persistence | In-memory (local) or automatic (Agent Engine) | Production database with backups and disaster recovery |
Rate Limiting | None (educational environment) | Rate limits per user, IP-based throttling, abuse detection |
Key Architectural Patterns You Mastered
The patterns you learned in this workshop are production patterns . Don't doubt them.
Role Separation (AP2 Principle #1)
Each agent has ONE clear job and sees ONLY what it needs. If one agent is compromised, the attacker cannot access other agents' data. This limits the blast radius.
Production systems using this: Payment processing, document workflows, approval chains, multi-step forms with validation gates.
Verifiable Credentials (AP2 Principle #2)
Each credential has expiry time, references the previous credential, and requires validation before the next step. This creates a tamper-evident audit chain.
Production value: Complete proof of what happened, when, and in what order. Essential for dispute resolution and regulatory compliance.
Explicit Consent (AP2 Principle #3)
Timestamp proof that user approved action. Cannot be disputed.
Production value: Legal requirement for financial transactions. Protects both user and company.
Sequential Orchestration (ADK Pattern)
Enforces correct execution order. Prevents skipping steps. Guarantees each agent sees previous agent's output.
Production value: Perfect for human-in-the-loop systems where users expect immediate results. This is the right pattern for donation flows, checkout processes, and approval chains.
Complete Observability (OpenTelemetry + Cloud Trace)
Every decision, tool call, consent moment, and credential handoff captured automatically.
Production value: Forensic evidence for disputes. Performance optimization data. Compliance audit trails. Debug production issues with precision.
Resources for Continued Learning
ADK Documentation:
AP2 & Related Standards:
Google Cloud Services:
Cleanup Resources
To avoid ongoing charges, delete your deployment:
Agent Engine: Follow steps in the Agent Engine docs
Cloud Run (if deployed):
gcloud run services delete charity-advisor \
    --region=$GOOGLE_CLOUD_LOCATION
Storage Buckets:
gsutil -m rm -r gs://$GOOGLE_CLOUD_PROJECT-staging
gsutil -m rm -r gs://$GOOGLE_CLOUD_PROJECT-artifacts
Your Journey Continues
You started with a simple question and built a complete answer. You've mastered the foundational patterns for trustworthy AI agents. These patterns transfer to any domain where AI agents handle sensitive operations—financial transactions, healthcare decisions, legal documents, supply chain operations.
The principles transfer. The trust model works.
Now go build something trustworthy! ❤️