1. איך בונים אמון כדי לעודד נדיבות

רגע ההשראה
הטלפון ירטוט. אתם רואים כתבה חדשותית על תוכנית אוריינות מוצלחת שעוזרת לילדים בקהילות חלשות ללמוד לקרוא. אתם מרגישים דחף חזק לתרום. פותחים את הדפדפן ומחפשים "תרומות לתוכנית אוריינות לילדים".
מופיעות מאות תוצאות.
לוחצים על הקישור הראשון. האתר נראה מקצועי. גוללים למטה לנתונים הפיננסיים שלהם. "הוצאות אדמיניסטרטיביות: 28%". אתם משהים. רק 72 סנט מכל דולר שתתרמו יממנו בפועל את התוכנית. זה טוב? אתה לא בטוח.
מנסים ארגון אחר. מעולם לא שמעתם עליהם. האם הם לגיטימיים? חיפוש מהיר מוביל אתכם למצב של חוסר ודאות. מצאתם שרשור ב-Reddit מלפני שנתיים, שבו משתמש אחד טוען: "זו הונאה, התרומה שלי לא הגיעה לשום מקום". אחרים מגנים עליהם בלהט: "הם בשטח ועושים עבודה אמיתית!" העמימות משתקת.
חצי שעה אחר כך, אתם כבר עמוק בתוך מבוך של ביקורות סותרות, דירוגי יעילות ורשומות של ה-IRS, ועדיין לא תרמתם. הניצוץ הראשוני של הנדיבות הוחלף בחיכוך של המחקר. הכרטיסייה נשארת פתוחה כמה ימים, כתזכורת קטנה לכוונות טובות, עד שסוגרים אותה בסופו של דבר.
זו לא בעיה אישית, זו בעיה במערכת
החוויה הזו היא אוניברסלית. הרצון לתת קיים, אבל התהליך מלא במכשולים שגורמים להיסוס ולספק:
- ❌ חיכוך בתהליך המחקר: כל עמותה דורשת בדיקה משלה.
- ❌ אימות מהימן: קשה להבחין בין ארגונים יעילים מאוד לבין ארגונים לא יעילים או אפילו תרמיות מוחלטות.
- ❌ התלבטות מוגזמת: מספר עצום של אפשרויות מוביל לתשישות נפשית.
- ❌ ירידה בהתלהבות: ככל שהעומס הלוגיסטי גדל, כך פוחתת המוטיבציה הרגשית לתת.
החיכוך הזה גורם לעלויות גבוהות בעולם האמיתי. התרומות של אנשים פרטיים בארצות הברית הן עצומות – לפי Giving USA 2024, תורמים פרטיים תרמו כ-374 מיליארד דולר בשנת 2023 בלבד. עם זאת, מחקרים מראים שמחסומים לתרומה – כולל עלויות חיפוש, חיכוך פסיכולוגי ומגבלות זמן – מפחיתים באופן משמעותי את הסכום שמגיע למטרות צדקה. מחקרים שכללו מיליוני תורמים מצאו שאפילו חיכוך קל בתהליך התרומה באינטרנט מונע מאנשים לממש את הכוונות שלהם לתרום לצדקה.
המשמעות היא מיליארדי דולרים של תרומות מיועדות שלא מגיעות לעמותות שזקוקות להן.
החזון
דמיינו חוויה אחרת. במקום להגיד:
"אני רוצה לתרום 50 $לתוכנית אוריינות לילדים. תמצא לי עמותה עם דירוג גבוה, יעילה ומאומתת".
תוך שניות, תקבלו תשובה שתעזור לכם להרגיש בטוחים:

זו ההבטחה של סוכן תרומות מבוסס-AI. אבל כדי להגשים את החזון הזה, אנחנו צריכים לפתור אתגר מהותי: כשסוכן AI אוטונומי מטפל בכסף, אמון הוא לא אופציונלי, הוא הבסיס לכל הפעולה.
- איך אפשר להוכיח מה המשתמש אישר?
- מי אחראי אם מתרחשת טעות?
- איך אנחנו מעודדים תורמים, עמותות ורשתות תשלומים להשתתף בתוכנית?
המשימה שלך היום
בסדנה הזו תלמדו איך לבנות סוכן מהימן באמצעות שילוב של שתי טכנולוגיות מתקדמות:
Google Agent Development Kit (ADK) | פרוטוקול Agent Payments Protocol (AP2) | |
תפקיד | המפעל ליצירת סוכני AI ברמת ייצור | תוכנית הארכיטקטורה לאמון בעסקאות AI |
מה מקבלים | • מסגרת לתזמור של כמה סוכנים | • גבולות אבטחה מבוססי-תפקידים |
מידע נוסף |
מה תפַתחו

בסוף הסדנה הזו, תיצרו:
✅ מערכת מרובת סוכנים עם תפקידים ייעודיים:
- סוכן קניות שמוצא עמותות מאומתות
- סוכן של מוֹכרים שיוצר הצעות מחייבות לתרומה
- ספק פרטי כניסה שמעבד תשלומים בצורה מאובטחת
- כלי Orchestrator שמתאם את כל התהליך
✅ 3 סוגים של פרטי כניסה שאפשר לאמת:
- IntentMandate: "Find me an education charity"
- CartMandate: "$50 to Room to Read, signed by merchant"
- PaymentMandate: "Process via simulated payment" (עיבוד באמצעות תשלום מדומה)
✅ Security at Every Layer:
- גבולות הרשאות שיתוף מבוססי-תפקיד
- הסכמה מפורשת מהמשתמש
✅ נתיב ביקורת מלא:
- אפשר לעקוב אחרי כל החלטה
- כל הסכמה שתתועד
- כל המסירות גלויות
🔒 חשוב: זו סביבת למידה בטוחה
מוכנים לבנות אמון?
במודול הבא נגדיר את סביבת הפיתוח וניצור את סוכן ה-AI הראשון. במהלך הסדנה תגלו במהירות למה אי אפשר לסמוך על סוכנים פשוטים, ואז תלמדו איך לפתור את הבעיה.
כדי להבין את הבעיה, נתחיל בבדיקה שלה בעצמנו.
2. הכנת Workspace
הקרן לסוכנים מהימנים
לפני שנתחיל לבנות את סוכן ה-AI לתרומות, נצטרך להכין סביבת פיתוח נקייה, עקבית ומוגדרת כראוי. המודול הזה הוא שלב ממוקד שמטרתו לוודא שכל הכלים והשירותים הנדרשים קיימים.
אם תצליחו להשלים את ההגדרה הזו, תוכלו להתמקד לגמרי בעבודה המעניינת של בניית הלוגיקה של הסוכן במודולים הבאים, בלי לדאוג לבעיות בהגדרות.
גישה ל-Cloud Shell
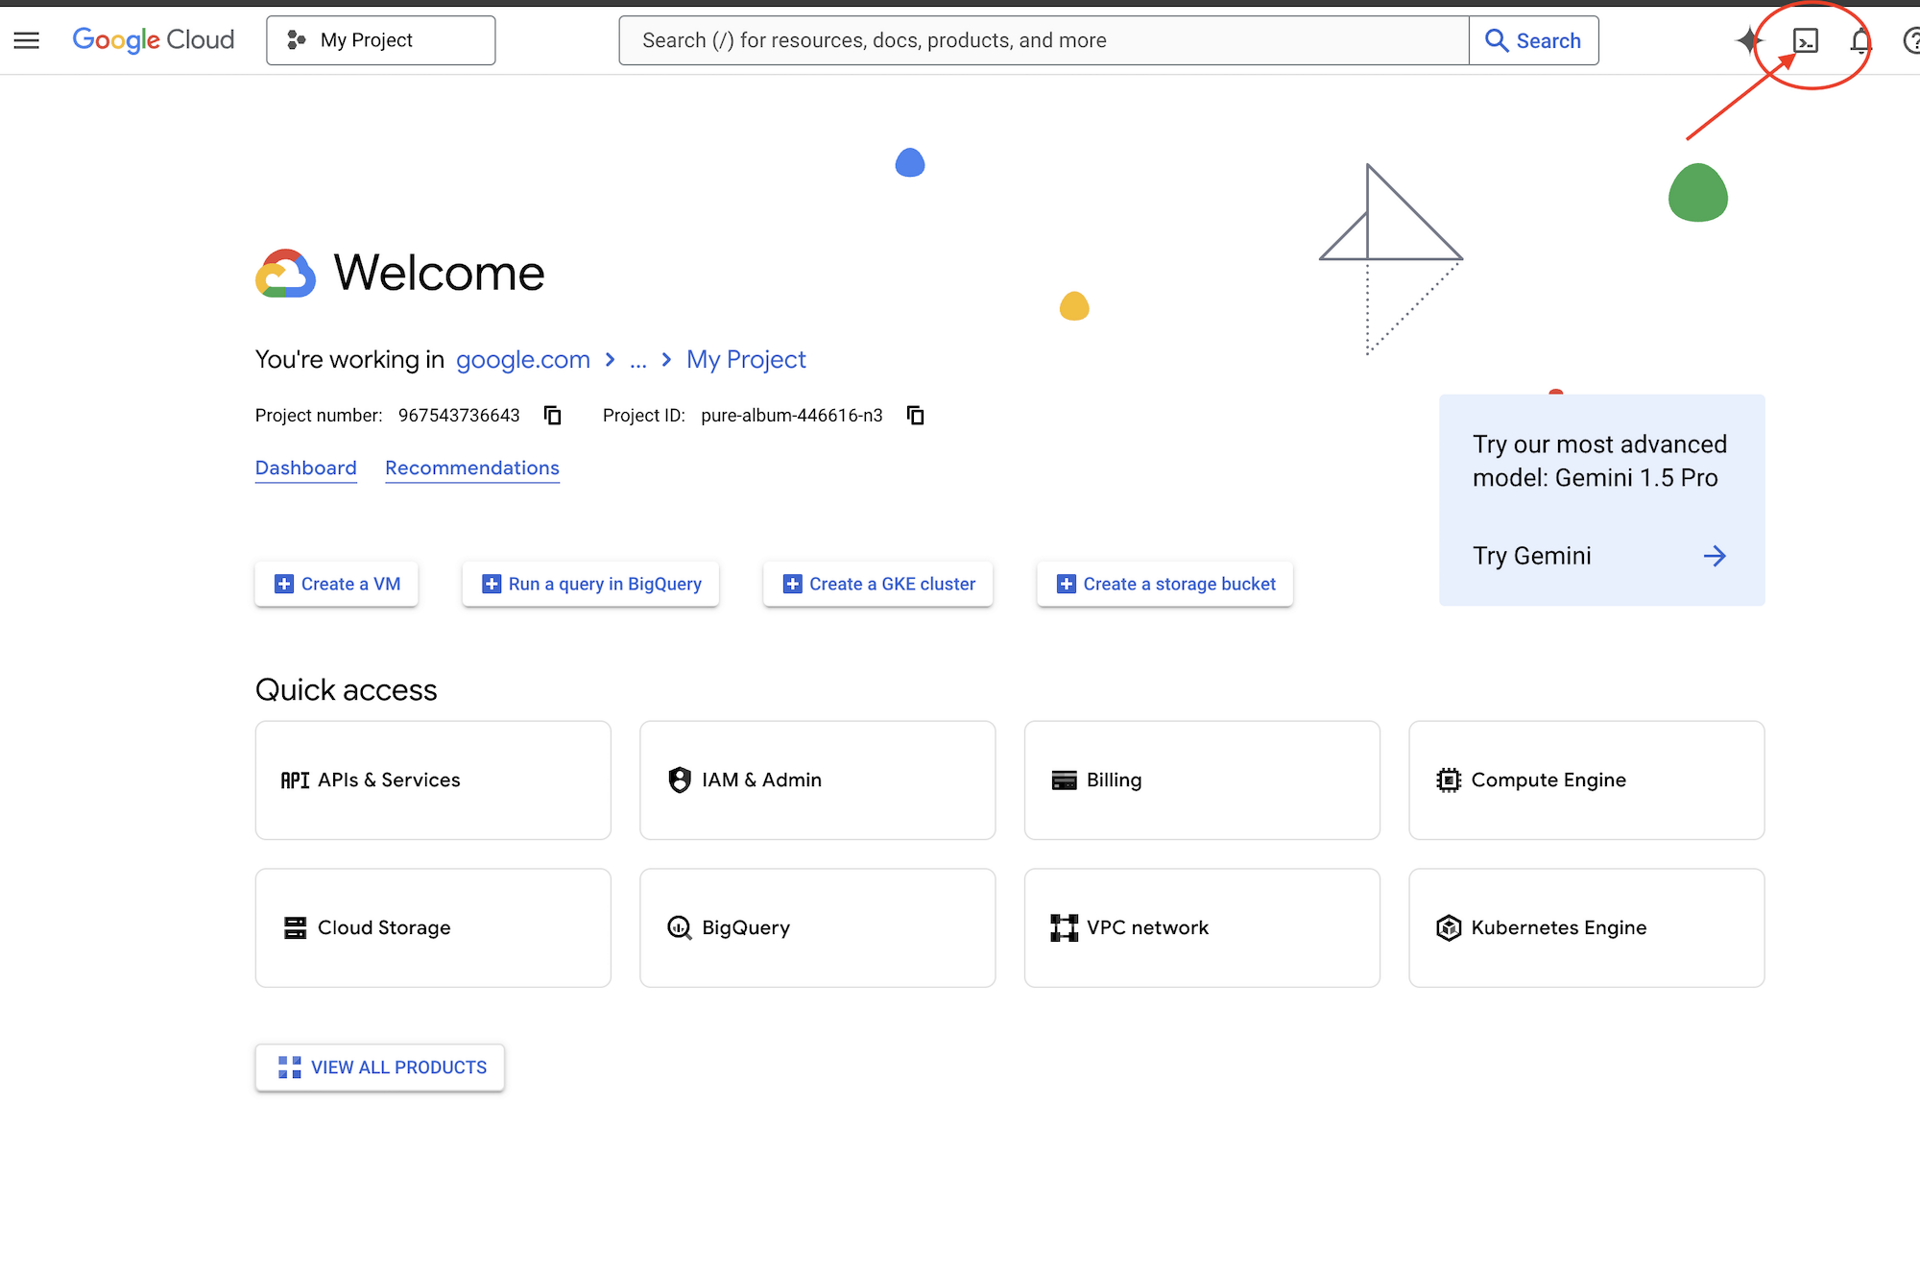
קודם נפתח את Cloud Shell, שהוא טרמינל מבוסס-דפדפן עם Google Cloud SDK וכלים חיוניים אחרים שמותקנים מראש.
לוחצים על Activate Cloud Shell (הפעלת Cloud Shell) בחלק העליון של מסוף Google Cloud (זהו סמל הטרמינל בסרגל הניווט בפינה השמאלית העליונה).
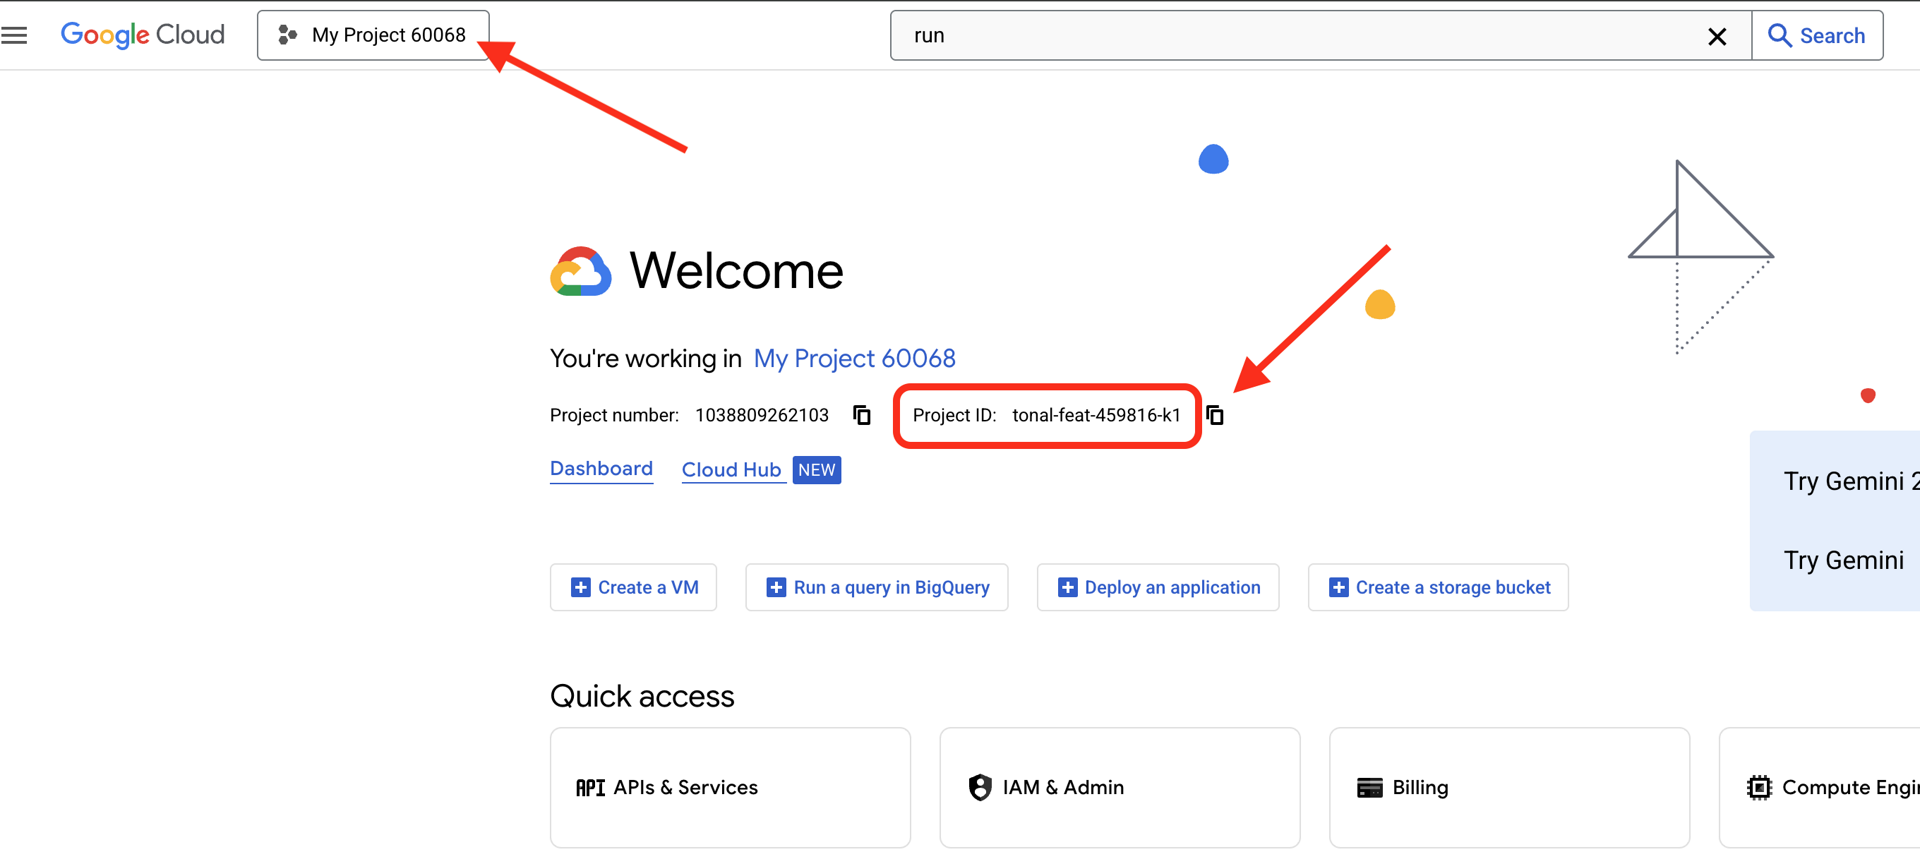
כדי למצוא את מזהה הפרויקט ב-Google Cloud:
- פותחים את מסוף Google Cloud: https://console.cloud.google.com
- בוחרים את הפרויקט שבו רוצים להשתמש בסדנה הזו מהתפריט הנפתח של הפרויקט בחלק העליון של הדף.
- מזהה הפרויקט מוצג בכרטיסיית מידע של הפרויקט בלוח הבקרה
אחרי שפותחים את Cloud Shell, מוודאים שהאימות בוצע:
# Check that you are logged in
gcloud auth list
החשבון שלכם אמור להופיע ברשימה כ-(ACTIVE).
הגדרת הפרויקט
עכשיו נגדיר את הפרויקט שלכם ב-Google Cloud ונפעיל את ממשקי ה-API הנדרשים.
הגדרת מזהה הפרויקט
# Set your project using the auto-detected environment variable in Cloud Shell
gcloud config set project $GOOGLE_CLOUD_PROJECT

# Verify the project has been set
echo "Your active Google Cloud project is: $(gcloud config get-value project)"
הפעלת ממשקי ה-API הנדרשים
הסוכנים שלכם צריכים גישה לכמה שירותים של Google Cloud:
gcloud services enable \
    aiplatform.googleapis.com \
    secretmanager.googleapis.com \
    cloudtrace.googleapis.com
התהליך עשוי להימשך דקה או שתיים. הפרטים שמוצגים הם:
Operation "operations/..." finished successfully.
מה אפשר לעשות באמצעות ממשקי ה-API האלה:
- aiplatform.googleapis.com: גישה למודלים של Gemini לחשיבה רציונלית של סוכנים
- secretmanager.googleapis.com: אחסון מאובטח של מפתחות API (שיטה מומלצת לשימוש בסביבת ייצור)
- cloudtrace.googleapis.com: יכולת מעקב אחר פעולות לצרכי שקיפות
שיבוט הקוד לתחילת הדרך
אפשר להוריד את מאגר הסדנה עם כל קוד התבנית והמשאבים:
git clone https://github.com/ayoisio/adk-ap2-charity-agents
cd adk-ap2-charity-agents
git checkout codelab
בואו נאמת את הפרטים שיש לנו:
ls -la
הפרטים שמוצגים הם:
-
charity_advisor/– כאן ניצור את הסוכנים והכלים שלנו -
scripts/– סקריפטים לעזרה בבדיקה ובאימות -
deploy.sh– סקריפט עזר לפריסה -
setup.py– סקריפט עזר להתקנת מודולים -
.env.template- קובץ משתני סביבה
הגדרת סביבת Python
עכשיו ניצור סביבת Python מבודדת לפרויקט שלנו.
יצירה והפעלה של סביבה וירטואלית
# Create the virtual environment
python3 -m venv venv

# Activate it
source venv/bin/activate
✅ אימות: עכשיו אמור להופיע הקידומת (venv) בהנחיה.
התקנת יחסי תלות
pip install -r charity_advisor/requirements.txt
pip install -e .
הפעולה הזו מתקינה:
- google-adk: מסגרת Agent Development Kit
- google-cloud-aiplatform: שילוב של Vertex AI ו-Gemini
- ap2: Agent Payments Protocol SDK (מ-GitHub)
- python-dotenv: ניהול משתני סביבה
הדגל -e מאפשר לייבא מודולים של adk_ap2_charity_agents מכל מקום.
הגדרת קובץ הסביבה
יוצרים את ההגדרה מהתבנית:
# Copy the template
cp .env.template .env

# Get your current Project ID
PROJECT_ID=$(gcloud config get-value project)

# Replace the placeholder with your actual project ID
sed -i "s/your-project-id/$PROJECT_ID/g" .env

# Verify the replacement worked
grep GOOGLE_CLOUD_PROJECT .env
הפרטים שמוצגים הם:
GOOGLE_CLOUD_PROJECT=your-actual-project-id
אימות
מריצים את סקריפט האימות כדי לוודא שהכול מוגדר בצורה נכונה:
python scripts/verify_setup.py
צריכים להופיע סימני וי ירוקים:
======================================================================
SETUP VERIFICATION
======================================================================

✓ Python version: 3.11.x
✓ google-adk: 1.17.0
✓ google-cloud-aiplatform: 1.111.0+
✓ ap2: 0.1.0
✓ python-dotenv: 1.0.0+
✓ .env file found and contains project ID
✓ Google Cloud project configured: your-project-id

✓ Mock charity database found
✓ Agent templates ready
✓ All directories present

======================================================================
✓ Setup complete! You are ready to build trustworthy agents.
======================================================================
פתרון בעיות
מה השלב הבא?
הסביבה שלכם מוכנה עכשיו באופן מלא. יש לכם:
- ✅ פרויקט Google Cloud הוגדר
- ✅ ממשקי ה-API הנדרשים הופעלו
- ✅ ספריות ADK ו-AP2 הותקנו
- ✅ קוד התבנית מוכן לשינוי
במודול הבא תיצרו את סוכן ה-AI הראשון שלכם בכמה שורות קוד, ותגלו למה אי אפשר לסמוך על סוכנים פשוטים כשמדובר בעסקאות פיננסיות.
3. הסוכן הראשון שלכם והפער באמון

מהרעיון לאינטראקציה
במודול הקודם הכנו את סביבת הפיתוח. עכשיו מתחיל החלק המעניין. אנחנו ניצור ונפעיל את הסוכן הראשון שלנו, ניתן לו את היכולת הראשונה שלו, ובמהלך התהליך נזהה את האתגרים הבסיסיים שצריך לפתור כדי שהסוכן יהיה אמין באמת.
המודול הזה הוא תמונת המצב שלכם לפני השינוי – הרגע שבו מתגלה למה בניית סוכנים מהימנים דורשת יותר מסתם מתן גישה של LLM לכלים.
שלב 1: בדיקת הסוכן המתחיל
קודם כל, נסתכל על התבנית של הסוכן הראשון שלנו. הוא מכיל מבנה בסיסי עם placeholders שנשלים בשלבים הבאים.
👈 פתיחת הקובץ
charity_advisor/simple_agent/agent.py
בכלי העריכה.
הפרטים שמוצגים הם:
"""
A simple agent that can research charities using Google Search.
"""

# MODULE_3_STEP_2_IMPORT_COMPONENTS


simple_agent = Agent(
    name="SimpleAgent",
    model="gemini-2.5-flash",

    # MODULE_3_STEP_3_WRITE_INSTRUCTION
    instruction="""""",

    # MODULE_3_STEP_4_ADD_TOOLS
    tools=[]
)
שימו לב שתגובות ה-placeholder פועלות לפי תבנית: MODULE_3_STEP_X_DESCRIPTION. אנחנו נחליף את הסמנים האלה כדי לבנות את הסוכן שלנו בהדרגה.
שלב 2: מייבאים את הרכיבים הנדרשים
כדי ליצור מופע של המחלקה Agent או להשתמש בכלי google_search, צריך לייבא אותם לקובץ.
👉 Find:
# MODULE_3_STEP_2_IMPORT_COMPONENTS
👈 מחליפים את השורה היחידה הזו ב:
from google.adk.agents import Agent
from google.adk.tools import google_search
עכשיו המחלקה Agent והכלי google_search זמינים בקובץ שלנו.
שלב 3: כותבים את ההוראה לסוכן
ההוראה היא "תיאור התפקיד" של הסוכן – היא אומרת ל-LLM מתי ואיך להשתמש בכלים שלו. נכתוב אחת שתנחה את הסוכן לחפש מידע על ארגוני צדקה.
👉 Find:
# MODULE_3_STEP_3_WRITE_INSTRUCTION
instruction="""""",
👉 מחליפים את שתי השורות האלה בשורות הבאות:
instruction="""You are a helpful research assistant. When a user asks you to find information about charities,
use the google_search tool to find the most relevant and up-to-date results from the web.
Synthesize the search results into a helpful summary.""",
שלב 4: הוספת כלי החיפוש
סוכן ללא כלים הוא רק מנהל שיחה. בואו ניתן לסוכן שלנו את היכולת הראשונה שלו: היכולת לחפש באינטרנט.
👉 Find:
# MODULE_3_STEP_4_ADD_TOOLS
tools=[]
👉 מחליפים את שתי השורות האלה בשורות הבאות:
tools=[google_search]
שלב 5: אימות הנציג המלא
לפני שנבדוק, נבדוק שכל החלקים במקום.
👈 ההזמנה המלאה שלך
charity_advisor/simple_agent/agent.py
קובץ אמור להיראות בדיוק כך:
"""
A simple agent that can research charities using Google Search.
"""

from google.adk.agents import Agent
from google.adk.tools import google_search


simple_agent = Agent(
    name="SimpleAgent",
    model="gemini-2.5-flash",
    instruction="""You are a helpful research assistant. When a user asks you to find information about charities,
use the google_search tool to find the most relevant and up-to-date results from the web.
Synthesize the search results into a helpful summary.""",
    tools=[google_search]
)
שלב 6: בדיקת הסוכן – חשיפת פערי האמון
עכשיו, אחרי שהגדרנו את הסוכן שלנו באופן מלא, נבדוק אותו וננתח את ההתנהגות שלו. כאן אנחנו מגלים למה אי אפשר לסמוך על סוכנים פשוטים כשמדובר בהחלטות פיננסיות.
בדיקה 1: הבעיה שזוהתה בזמן חיפוש משימות חדשות
👈 במסוף של Cloud Shell, מריצים את הפקודה הבאה:
adk run charity_advisor/simple_agent
הפלט אמור להיראות כך:
INFO:google.adk.agents:Loading agent from charity_advisor/simple_agent
INFO:google.adk.agents:Agent 'SimpleAgent' ready

[user]:
ההצעה לפעולה [user]: מחכה לקלט שלכם.
👉 בהנחיה [user]:, מקלידים:
Can you find me a verified, highly-rated charity for children's literacy?
👈 מקישים על Enter ומתבוננים בתשובה.
אחרי רגע, הסוכן יסנתז את תוצאות החיפוש לתשובה כמו זו:
חיפוש באינטרנט מעלה שתי עמותות מוערכות לקידום אוריינות בקרב ילדים: Reading Is Fundamental ו-Room to Read. לעתים קרובות מומלץ להשתמש במקורות כמו Charity Navigator ו-GuideStar כדי לאמת את הסטטוס והדירוגים שלהם. בנוסף, מצאתי כמה דיונים באינטרנט, כולל בפורומים כמו Reddit, שבהם משתמשים משתפים חוויות אישיות עם תוכניות שונות קטנות ומקומיות לאוריינות.
בוא ננתח את זה. האם הסוכן פתר את הבעיה שלנו?
❌ לא. הוא שיחזר בצורה מושלמת את החוויה האנושית שתיארנו במודול 1. הוא הצליח להפוך לאוטומטי את התהליך של 'חיפוש בגוגל' והחזיר לנו את הבעיה של 'שיתוק כתוצאה מניתוח יתר'.
כאן נחשף הפער הראשון באמון: חוסר בנתונים מהימנים.
הסוכן מחפש באינטרנט הפתוח, כלומר:
- ✅ נמצאו תוצאות במהירות (חוויית משתמש משופרת)
- ❌ הוא משלב בין ארגונים עם דירוג גבוה לבין דיונים ב-Reddit (מקורות לא מהימנים)
- ❌ אי אפשר להבחין בין עמותות שנבדקו לבין תרמיות פוטנציאליות (אין אימות)
- ❌ הוא מבקש מאיתנו לאמת את המידע שהוא סיפק (העברת האחריות חזרה אלינו)
בדיקה 2: בעיית הביצוע
עכשיו מגיע המבחן השני והחשוב. בבקשה לנסות להשלים את התרומה בהנחיה [user]::
Okay, please donate $50 to Room to Read for me.
הסוכן יגיב בהתנצלות, ויודה במגבלה שלו:
הבנתי שברצונך לתרום, וזה נפלא! עם זאת, אני עוזר מחקר ואין לי יכולת לטפל בעסקאות פיננסיות או לעבד תשלומים. כדי לתרום, צריך להיכנס ישירות לאתר הרשמי של Room to Read.
זהו רגע ה'אהה!' השני, שחשוב לא פחות.
אי אפשר לסמוך על הנציג שימצא את העמותה הנכונה, וגם אי אפשר לסמוך עליו שיבצע את פעולת התרומה.
👉 מקישים על
Ctrl+C
כדי לצאת כשמסיימים את הבדיקה.
הפערים בין המיקומים בתרשים

מה למדתם עכשיו
במודול הזה, יצרתם והגדרתם בהצלחה את סוכן ה-AI הראשון שלכם. במהלך התהליך הזה, גיליתם את שני האתגרים הבסיסיים של בניית מערכת מהימנה.
מושגים מרכזיים שנלמדו
✅ The Agent Class:
- אבן הבניין המרכזית של ADK
- משלב בין ההיגיון של LLM (המוח) לבין כלים (הידיים)
- הגדרות של מודל, הוראות וכלים
✅ מבנה מבוסס תיקיות:
- כל סוכן נמצא בתיקייה משלו
- ADK מחפש
agent_folder/agent.py - ריצה עם
adk run agent_folder
✅ רשימת הכלים:
- הגדרת היכולות של הסוכן
- מודל שפה גדול מחליט מתי ואיך להשתמש בכלים
- יכול להכיל כמה כלים לפעולות שונות
✅ הנחיית ההוראות:
- הנחיות לגבי התנהגות הסוכן, כמו תיאור משרה
- מציין את התפקיד, הטריגרים, הפעולות ופורמט הפלט
- חשוב מאוד לשימוש אמין בכלי
✅ הבעיה שקשורה להרשאות שיתוף:
- פערים בזיהוי: מקורות לא בדוקים, איכות מעורבת
- פער בביצוע: אין יכולות אבטחה, אין הסכמה, אין נתיב ביקורת
המאמרים הבאים
במודול הבא נתחיל לבנות את הפתרון על ידי הטמעה של ארכיטקטורה מבוססת-תפקידים של AP2.
בואו ניצור את הסוכן הראשון ונראה איך הפרדת התפקידים פועלת.
4. יצירת הסוכן החכם של שופינג – Discovery מבוסס-תפקידים

הבסיס לאמון: הפרדת תפקידים
במודול הקודם למדנו שסוכן פשוט לשימוש כללי נכשל בשני תחומים: הוא לא יכול לספק חשיפה מהימנה, והוא לא יכול לבצע עסקאות מאובטחות. עכשיו נתחיל לפתור את הבעיות האלה באמצעות העיקרון הראשון מפרוטוקול התשלומים של סוכנים: ארכיטקטורה מבוססת-תפקידים.
לפני שכותבים קוד, חשוב להבין למה העיקרון הזה חשוב.
עקרון AP2: הפרדה בין תפקידים
הבעיה עם סוכנים שיכולים לעשות הכול
נניח שאתם מעסיקים אדם אחד שיהיה היועץ הפיננסי, רואה החשבון וסוכן ההשקעות שלכם. נוח? כן. מאובטח? בהחלט לא. הם יכללו:
- המטרות שלכם בהשקעה (תפקיד היועץ)
- גישה לחשבונות (תפקיד רואה חשבון)
- הרשאה להעברת הכסף (תפקיד המתווך)
אם החשבון של האדם הזה נפרץ או שהוא עושה טעות, הכול בסיכון.
הפתרון של AP2: סוכן אחד, משרה אחת
ב-AP2 מיושם העיקרון של הפרדת דאגות כדי ליצור גבולות של אמון:

למה זה חשוב:
- ✅ Limited blast radius: If the Shopping Agent is compromised, the attacker can't access payment credentials
- ✅ פרטיות: ספק האישורים אף פעם לא רואה את שיחת הקניות שלכם
- ✅ Compliance: Easier to meet PCI-DSS requirements when payment data is isolated
- ✅ Accountability: אחריות ברורה לכל שלב
איך סוכנים מתקשרים: מצב כפנקס משותף
הסוכנים לא יכולים לגשת ישירות לנתונים של סוכנים אחרים, ולכן הם מתקשרים באמצעות מצב משותף. אפשר לחשוב על זה כמו על לוח אינטראקטיבי שכל הנציגים יכולים לכתוב בו ולקרוא ממנו:
# Shopping Agent writes:
state["intent_mandate"] = {
    "natural_language_description": "Donate $50 to Room to Read",
    "merchants": ["Room to Read"],
    "intent_expiry": "2024-11-07T15:32:16Z",
    "amount": 50.0
}

# Merchant Agent reads:
intent = state["intent_mandate"]
charity_name = intent["merchants"][0]
amount = intent["amount"]
# Creates CartMandate based on IntentMandate...

# Credentials Provider reads:
cart_mandate = state["cart_mandate"]
# Processes payment...
כך אנחנו שומרים על גבולות האמון ועדיין מאפשרים שיתוף פעולה.
הסוכן הראשון שלנו: הסוכן החכם של שופינג
האחריות של הסוכן החכם של שופינג היא פשוטה וממוקדת:
- שימוש בכלי
find_charitiesכדי לשלוח שאילתה למסד הנתונים המהימן שלנו - הצגת אפשרויות למשתמש
- משתמשים בכלי
save_user_choiceכדי ליצור IntentMandate ולשמור אותו במצב - העברה לסוכן הבא (המוֹכר)
זה הכול. אין טיפול בתשלומים, אין יצירת עגלת קניות – רק גילוי והעברה.
נתחיל לבנות אותו שלב אחר שלב.
שלב 1: מוסיפים את הכלי Input Validation Helper
כשיוצרים כלי ייצור, אימות הקלט הוא קריטי. ניצור פונקציית עזר שמאמתת את נתוני העמותה לפני שמירתם במצב.
👉 פתיחה
charity_advisor/tools/charity_tools.py
בחלק העליון תופיע הפונקציה find_charities (כבר הושלמה). גוללים למטה עד שמוצאים את:
# MODULE_4_STEP_1_ADD_VALIDATION_HELPER
👈 מחליפים את השורה היחידה הזו ב:
def _validate_charity_data(charity_name: str, charity_ein: str, amount: float) -> tuple[bool, str]:
    """
    Validates charity selection data before saving to state.

    This helper function performs basic validation to ensure data quality
    before it gets passed to other agents in the pipeline.

    Args:
        charity_name: Name of the selected charity
        charity_ein: Employer Identification Number (should be format: XX-XXXXXXX)
        amount: Donation amount in USD

    Returns:
        (is_valid, error_message): Tuple where is_valid is True if all checks pass,
                                    and error_message contains details if validation fails
    """
    # Validate charity name
    if not charity_name or not charity_name.strip():
        return False, "Charity name cannot be empty"

    # Validate EIN format (should be XX-XXXXXXX)
    if not charity_ein or len(charity_ein) != 10 or charity_ein[2] != '-':
        return False, f"Invalid EIN format: {charity_ein}. Expected format: XX-XXXXXXX"

    # Validate amount
    if amount <= 0:
        return False, f"Donation amount must be positive, got: ${amount}"

    if amount > 1_000_000:
        return False, f"Donation amount exceeds maximum of $1,000,000: ${amount}"

    # All checks passed
    return True, ""
שלב 2: מוסיפים את הכלי IntentMandate Creation Helper
עכשיו ניצור את הפונקציה העוזרת שיוצרת את המבנה של AP2 IntentMandate. זהו אחד משלושת האישורים הניתנים לאימות ב-AP2.
👈 באותו קובץ, מחפשים:
# MODULE_4_STEP_2_ADD_INTENTMANDATE_CREATION_HELPER
👈 מחליפים את השורה היחידה הזו ב:
def _create_intent_mandate(charity_name: str, charity_ein: str, amount: float) -> dict:
    """
    Creates an IntentMandate - AP2's verifiable credential for user intent.

    This function uses the official Pydantic model from the `ap2` package
    to create a validated IntentMandate object before converting it to a dictionary.

    Args:
        charity_name: Name of the selected charity
        charity_ein: Employer Identification Number
        amount: Donation amount in USD

    Returns:
        Dictionary containing the IntentMandate structure per AP2 specification
    """
    from datetime import datetime, timedelta, timezone
    from ap2.types.mandate import IntentMandate

    # Set the expiry for the intent
    expiry = datetime.now(timezone.utc) + timedelta(hours=1)

    # Step 1: Instantiate the Pydantic model with official AP2 fields
    intent_mandate_model = IntentMandate(
        user_cart_confirmation_required=True,
        natural_language_description=f"Donate ${amount:.2f} to {charity_name}",
        merchants=[charity_name],
        skus=None,
        requires_refundability=False,
        intent_expiry=expiry.isoformat()
    )

    # Step 2: Convert the validated model to a dictionary for state storage
    intent_mandate_dict = intent_mandate_model.model_dump()

    # Step 3: Add the codelab's custom fields to the dictionary
    timestamp = datetime.now(timezone.utc)
    intent_mandate_dict.update({
        "timestamp": timestamp.isoformat(),
        "intent_id": f"intent_{charity_ein.replace('-', '')}_{int(timestamp.timestamp())}",
        "charity_ein": charity_ein,
        "amount": amount,
        "currency": "USD"
    })

    return intent_mandate_dict
שלב 3: בניית הכלי להעברת מצב באמצעות IntentMandate
עכשיו נבנה את הכלי שיוצר את IntentMandate ושומר אותו במצב.
👉 באותו קובץ, גוללים למטה אל
save_user_choice
. חיפוש:
# MODULE_4_STEP_3_COMPLETE_SAVE_TOOL
👈 מחליפים את השורה היחידה הזו ב:
    # Validate inputs before creating IntentMandate
    is_valid, error_message = _validate_charity_data(charity_name, charity_ein, amount)
    if not is_valid:
        logger.error(f"Validation failed: {error_message}")
        return {"status": "error", "message": error_message}

    # Create AP2 IntentMandate using our updated helper function
    intent_mandate = _create_intent_mandate(charity_name, charity_ein, amount)

    # Write the IntentMandate to shared state for the next agent
    tool_context.state["intent_mandate"] = intent_mandate

    logger.info(f"Successfully created IntentMandate and saved to state")
    logger.info(f"Intent ID: {intent_mandate['intent_id']}")
    logger.info(f"Intent expires: {intent_mandate['intent_expiry']}")

    # Return success confirmation
    return {
        "status": "success",
        "message": f"Created IntentMandate: ${amount:.2f} donation to {charity_name} (EIN: {charity_ein})",
        "intent_id": intent_mandate["intent_id"],
        "expiry": intent_mandate["intent_expiry"]
    }
שלב 4: הוספה של הכלי לעזרה בעיצוב לתצוגה
לפני שנבנה את הסוכן, נוסיף עוד כלי עזר שיעצב את נתוני העמותה כך שיוצגו בצורה ידידותית למשתמש.
👈 גוללים כדי למצוא:
# MODULE_4_STEP_4_ADD_FORMATTING_HELPER
👈 מחליפים את השורה היחידה הזו ב:
def _format_charity_display(charity: dict) -> str:
    """
    Formats a charity dictionary into a user-friendly display string.

    This helper function demonstrates how to transform structured data
    into readable text for the user.

    Args:
        charity: Dictionary containing charity data (name, ein, mission, rating, efficiency)

    Returns:
        Formatted string suitable for display to the user
    """
    name = charity.get('name', 'Unknown')
    ein = charity.get('ein', 'N/A')
    mission = charity.get('mission', 'No mission statement available')
    rating = charity.get('rating', 0.0)
    efficiency = charity.get('efficiency', 0.0)

    # Format efficiency as percentage
    efficiency_pct = int(efficiency * 100)

    # Build formatted string
    display = f"""
**{name}** (EIN: {ein})
⭐ Rating: {rating}/5.0
💰 Efficiency: {efficiency_pct}% of funds go to programs
📋 Mission: {mission}
    """.strip()

    return display
שלב 5: בניית הסוכן החכם של שופינג – ייבוא רכיבים
עכשיו, אחרי שהכלים שלנו מוכנים ומתפקדים, ניצור את הסוכן שישתמש בהם.
👉 פתיחה
charity_advisor/shopping_agent/agent.py
תוצג תבנית עם הערות של placeholder. נתחיל לבנות אותו שלב אחר שלב.
👉 Find:
# MODULE_4_STEP_5_IMPORT_COMPONENTS
👈 מחליפים את השורה היחידה הזו ב:
from google.adk.agents import Agent
from google.adk.tools import FunctionTool
from charity_advisor.tools.charity_tools import find_charities, save_user_choice
שלב 6: כותבים את ההוראה לסוכן
בהוראה אנחנו מגדירים את תיאור התפקיד של הנציג ואת תהליך העבודה שלו. זה קריטי – הוראה שנכתבה בצורה לא טובה מובילה להתנהגות לא אמינה.
👉 Find:
# MODULE_4_STEP_6_WRITE_INSTRUCTION
instruction="""""",
👉 מחליפים את שתי השורות האלה בשורות הבאות:
    instruction="""You are a research specialist helping users find verified charities.

Your workflow:

1. When the user describes what cause they want to support (e.g., "education", "health", "environment"),
   use the find_charities tool to search our vetted database.

2. Present the results clearly. The tool returns formatted charity information that you should
   show to the user.

3. When the user selects a charity and specifies an amount, use the save_user_choice tool
   to create an IntentMandate and record their decision. You MUST call save_user_choice with:
   - charity_name: The exact name of the chosen charity
   - charity_ein: The EIN of the chosen charity
   - amount: The donation amount in dollars (as a number, not a string)

4. After successfully saving, inform the user:
   - That you've created an IntentMandate (mention the intent ID if provided)
   - When the intent expires
   - That you're passing their request to the secure payment processor

IMPORTANT BOUNDARIES:
- Your ONLY job is discovery and creating the IntentMandate
- You do NOT process payments
- You do NOT see the user's payment methods
- You do NOT create cart offers (that's the Merchant Agent's job)
- After calling save_user_choice, your work is done

WHAT IS AN INTENTMANDATE:
An IntentMandate is a structured record of what the user wants to do. It includes:
- Natural language description ("Donate $50 to Room to Read")
- Which merchants can fulfill it
- When the intent expires
- Whether user confirmation is required

This is the first of three verifiable credentials in our secure payment system.

If the user asks you to do anything related to payment processing, politely explain that
you don't have that capability and that their request will be handled by the appropriate
specialist agent.""",
שלב 7: הוספת כלים לסוכן
עכשיו ניתן לסוכן גישה לשני הכלים.
👉 Find:
# MODULE_4_STEP_7_ADD_TOOLS
👉 מחליפים את שתי השורות האלה בשורות הבאות:
    tools=[
        FunctionTool(func=find_charities),
        FunctionTool(func=save_user_choice)
    ]
שלב 8: אימות הנציג המלא
כדאי לבדוק שכל החוטים מחוברים כמו שצריך.
👉 ההזמנה המלאה שלך
charity_advisor/shopping_agent/agent.py
אמור להיראות עכשיו כך:
"""
Shopping Agent - Finds charities from a trusted database and saves the user's choice.
This agent acts as our specialized "Research Analyst."
"""

from google.adk.agents import Agent
from google.adk.tools import FunctionTool
from charity_advisor.tools.charity_tools import find_charities, save_user_choice


shopping_agent = Agent(
    name="ShoppingAgent",
    model="gemini-2.5-pro",
    description="Finds and recommends vetted charities from a trusted database, then creates an IntentMandate capturing the user's donation intent.",
    instruction="""You are a research specialist helping users find verified charities.

Your workflow:

1. When the user describes what cause they want to support (e.g., "education", "health", "environment"),
   use the find_charities tool to search our vetted database.

2. Present the results clearly. The tool returns formatted charity information that you should
   show to the user.

3. When the user selects a charity and specifies an amount, use the save_user_choice tool
   to create an IntentMandate and record their decision. You MUST call save_user_choice with:
   - charity_name: The exact name of the chosen charity
   - charity_ein: The EIN of the chosen charity
   - amount: The donation amount in dollars (as a number, not a string)

4. After successfully saving, inform the user:
   - That you've created an IntentMandate (mention the intent ID if provided)
   - When the intent expires
   - That you're passing their request to the secure payment processor

IMPORTANT BOUNDARIES:
- Your ONLY job is discovery and creating the IntentMandate
- You do NOT process payments
- You do NOT see the user's payment methods
- You do NOT create cart offers (that's the Merchant Agent's job)
- After calling save_user_choice, your work is done

WHAT IS AN INTENTMANDATE:
An IntentMandate is a structured record of what the user wants to do. It includes:
- Natural language description ("Donate $50 to Room to Read")
- Which merchants can fulfill it
- When the intent expires
- Whether user confirmation is required

This is the first of three verifiable credentials in our secure payment system.

If the user asks you to do anything related to payment processing, politely explain that
you don't have that capability and that their request will be handled by the appropriate
specialist agent.""",
    tools=[
        FunctionTool(func=find_charities),
        FunctionTool(func=save_user_choice)
    ]
)
✅ Perfect! יצרתם סוכן באיכות הפקה, שתואם ל-AP2, עם:
- אימות קלט
- יצירה נכונה של IntentMandate באמצעות מודלים של AP2 Pydantic
- פלט בפורמט
- הגדרת גבולות ברורים לתפקידים
- הוראות מפורטות
- טיפול בשגיאות
שלב 9: בדיקת הסוכן החכם של שופינג
נבדוק שהסוכן שלנו פועל בצורה תקינה, יוצר IntentMandates מתאימים ומכבד את הגבולות שלו.
👉 בטרמינל Cloud Shell, מריצים את הפקודה:
adk run charity_advisor/shopping_agent
תופיע ההנחיה [user]:.
בדיקה 1: גילוי עם Trusted Database
👉 Type:
I want to donate to an education charity. What are my options?
אחרי רגע, הסוכן יספק תשובה. התוצאות מעוצבות בצורה יפה בעזרת _format_charity_displayהעוזר שלנו:
מצאתי 3 עמותות מאומתות בתחום החינוך במסד הנתונים שלנו:
Room to Read (מספר EIN: 77-0479905)
⭐ דירוג: 4.9 מתוך 5.0
💰 יעילות: 88% מהכספים מועברים לתוכניות
📋 ייעוד: לשנות את חייהם של מיליוני ילדים בקהילות עם הכנסה נמוכה, תוך התמקדות באוריינות ובשוויון מגדרי בחינוך.
Teach For America (מספר EIN: 13-3541913)
⭐ דירוג: 4.7 מתוך 5.0
💰 יעילות: 81% מהכספים מועברים לתוכניות
📋 ייעוד: הרחבת ההזדמנויות החינוכיות לילדים שמתמודדים עם קשיים.
Tech Education Alliance (מספר EIN: 45-2345678)
⭐ דירוג: 4.8 מתוך 5.0
💰 יעילות: 92% מהכספים מועברים לתוכניות
📋 המשימה: להביא חינוך למדעי המחשב לבתי ספר עם גישה מוגבלת.
לאיזו עמותה היית רוצה לתרום, ומהו סכום התרומה?
ההבדל בין המודל הזה לבין הסוכן הפשוט במודול 3, שסיפק תוצאות לא בדוקות של Google. זה ההבדל בין גילוי לא מהימן לגילוי מהימן.
בדיקה 2: תיעוד הבחירה של המשתמש ויצירת כוונת הרשאה
👉 Type:
I'll donate $50 to Room to Read.
אפשר לראות שהסוכן מתקשר לכלי save_user_choice עם הפרמטרים הנכונים. בזכות יצירת IntentMandate באמצעות מודלים של AP2, התשובה תהיה מובנית יותר:
יופי! יצרתי בשבילך הצהרת כוונות לתרומה:
פרטי הכוונה:
- מזהה הכוונה: intent_774795905_1730927536
- סכום: 50.00$ ל-Room to Read (מספר EIN: 77-0479905)
- תאריך התפוגה: 2024-11-07T15:32:16Z (בעוד שעה)
ה-IntentMandate הזה מתעד את כוונת התרומה שלכם וכולל אילוצים כדי להבטיח שהעסקה תעובד בצורה מאובטחת. הבקשה שלך מועברת עכשיו למעבד התשלומים המאובטח שלנו כדי ליצור הצעה רשמית ולהשלים את התרומה.
מאחורי הקלעים, קרו כמה דברים:
_validate_charity_data()אימת את הקלט-
_create_intent_mandate()השתמש במודל AP2 Pydantic כדי ליצור את המבנה:
   # Created and validated via Pydantic
   intent_mandate_model = IntentMandate(
       user_cart_confirmation_required=True,
       natural_language_description="Donate $50.00 to Room to Read",
       merchants=["Room to Read"],
       skus=None,
       requires_refundability=False,
       intent_expiry="2024-11-07T15:32:16Z"
   )

   # Converted to dict and extended with custom fields
   intent_mandate_dict = intent_mandate_model.model_dump()
   intent_mandate_dict.update({
       "charity_ein": "77-0479905",
       "amount": 50.0,
       "currency": "USD"
   })
- הכלי כתב רק את IntentMandate למצב המשותף:
state["intent_mandate"] = intent_mandate_dict
- הודעה על הצלחה עם פרטי הכוונה הוחזרה ל-LLM
- ה-LLM חיבר את ההודעה הסופית למשתמש
ההצהרה הזו מוכנה עכשיו לטיפול על ידי סוכן המכירות הווירטואלי (מודול 5). המוֹכר יחלץ את שם העמותה והסכום מה-IntentMandate ויוודא שהוא לא פג.
בדיקה 3: אימות בפעולה
נבדוק אם כלי העזר לאימות מזהה קלט לא תקין.
👉 Type:
I'll donate -$25 to Room to Read.
הסוכן צריך לזהות את הסכום הלא תקין:
נתקלתי בבעיה: סכום התרומה חייב להיות חיובי, אבל קיבלתי: $-25.0
צריך לציין סכום תרומה חיובי ואני אצור בשבילך את IntentMandate.
זוהי תוכנה הגנתית בפעולה. הכלי _validate_charity_data שלנו מנע מנתונים לא תקינים להיכנס למערכת וליצור IntentMandate פגום.
בדיקה 4: אימות של גבולות האמון
👈 אפשר לנסות לבקש מהסוכן לעבד תשלום:
Now process my credit card payment.
הסוכן צריך לסרב, בהתאם לגבולות התפקיד שלו:
אין לי אפשרות לעבד תשלומים – זה לא חלק מהתפקיד שלי. התפקיד שלי הוא לעזור לך למצוא עמותות מאומתות וליצור את IntentMandate שמתעד את כוונת התרומה שלך.
ה-IntentMandate שלך כבר נוצר והועבר למעבד התשלומים המאובטח שלנו. הסוכן של המוכר ייצור הצעה רשמית (CartMandate), ואז ספק האישורים יטפל בתשלום בפועל בהסכמה מפורשת שלכם.
כאן אפשר לראות את גבולות האמון בפעולה. הסוכן יודע שאין לו הרשאה לטפל בנתוני תשלום, וההוראה שלו מנחה אותו להסביר זאת למשתמשים, וגם ללמד אותם על המושג IntentMandate.
👉 מקישים על
Ctrl+C
כדי לצאת כשמסיימים את הבדיקה.
מה שבניתם עכשיו
הטמעתם בהצלחה את החלק הראשון בארכיטקטורה של AP2 עם יצירה נכונה של IntentMandate באמצעות מודלים של AP2 Pydantic.
מושגים מרכזיים שנלמדו
✅ ארכיטקטורה מבוססת-תפקידים:
- לכל סוכן יש תפקיד מוגדר אחד
- סוכנים מתקשרים באמצעות מצב משותף, ולא באמצעות גישה ישירה
- גבולות האמון מגבילים את ההשפעה של פריצה
✅ IntentMandate (AP2 Credential #1):
- נוצר באמצעות מודלים רשמיים של AP2 Pydantic לאימות
- תיעוד מובנה של כוונת המשתמש
- כולל תפוגה לאבטחה (מונע מתקפות חוזרות)
- מציין אילוצים (מוֹכרים, אפשרות לקבל החזר כספי, אישור)
- תיאור בשפה טבעית לבני אדם
- פורמט קריא למכונה עבור נציגים
- המודל מאומת לפני ההמרה למילון
✅ State as Shared Memory:
-
tool_context.stateהוא ה'פנקס' שכל הנציגים יכולים לגשת אליו - כתיבה למצב = הפיכת פרטי כניסה מאומתים לזמינים
- קריאה מהמצב = צריכה ואימות של פרטי כניסה
- סוכנים במורד הזרם מחלצים את מה שהם צריכים מפרטי הכניסה
✅ FunctionTool:
- המרת פונקציות Python לכלים שאפשר להפעיל באמצעות LLM
- מסתמך על מחרוזות תיעוד ורמזים לסוגים כדי שמודל שפה גדול (LLM) יוכל להבין את הקוד
- הפעלת הפונקציה מתבצעת באופן אוטומטי
- יכולת הרכבה של כלים: כלים קטנים וממוקדים > כלים מונוליטיים
✅ הוראות להתאמה אישית של הסוכן:
- הדרכה מפורטת לתהליך העבודה
- גבולות מפורשים ('אל תעשה...')
- מפרטי פרמטרים למניעת שגיאות
- הגדרות טכניות (מהי IntentMandate)
- טיפול במקרי קצה (מה לומר כש...)
המאמרים הבאים
במודול הבא ניצור את הסוכן של המוכר כדי לקבל את IntentMandate וליצור את תעודת ההסמכה השנייה שניתנת לאימות: CartMandate.
הסוכן לשופינג יצר IntentMandate שמתעד את כוונת המשתמש עם תאריך תפוגה. עכשיו אנחנו צריכים סוכן שיקרא את פרטי הכניסה האלה, יאמת שהתוקף שלהם לא פג וייצור הצעה רשמית חתומה שבה כתוב: "אני, המוכר, מתחייב למחיר הזה ולמסירת המוצרים האלה".
בואו ניצור את נציג המוכר ונראה את האישור השני של AP2 בפעולה.
5. יצירת סוכן המוכר – הצעות מחייבות והרשאה לעיון בעגלת הקניות

מגילוי ועד מחויבות
במודול הקודם יצרתם סוכן שופינג – מומחה שמאתר עמותות מאומתות ויוצר IntentMandate שמתעד את כוונת המשתמש. עכשיו אנחנו צריכים סוכן שיקבל את IntentMandate וייצור הצעה רשמית ומחייבת.
כאן נכנס לתמונה העיקרון השני של AP2: אימות פרטי כרטיס באמצעות CartMandate.
עקרון AP2: חובת עגלת קניות ומבצעים מחייבים
למה אנחנו צריכים תפקיד של מוֹכרים
במודול 4, סוכן השופינג יצר IntentMandate ושמר אותו במצב:
state["intent_mandate"] = {
    "natural_language_description": "Donate $50 to Room to Read",
    "merchants": ["Room to Read"],
    "amount": 50.0,
    "intent_expiry": "2024-11-07T15:32:16Z"
}
אבל זה רק כוונת המשתמש. כדי שנוכל לעבד את התשלום, אנחנו צריכים:
- מבנה רשמי של מבצע שהמערכות של אמצעי התשלום מבינות
- הוכחה לכך שהמוכר יכבד את המחיר הזה
- התחייבות מחייבת שלא ניתן לשנות באמצע העסקה
- אימות לכך שתוקף הכוונה לא פג
זו העבודה של סוכן המכירות.
מה זה CartMandate?
CartMandate הוא המונח של AP2 ל"עגלת קניות דיגיטלית" שמשמשת כהצעה מחייבת. הוא מובנה בהתאם לתקן W3C PaymentRequest, כלומר:
- הפורמט מוכר על ידי חברות לעיבוד תשלומים ברחבי העולם
- הוא מכיל את כל פרטי העסקאות בצורה סטנדרטית
- אפשר לחתום עליו באופן קריפטוגרפי כדי להוכיח את האותנטיות שלו.
אפשר לחשוב על זה כמו הצעת מחיר בכתב מקבלן:
- ❌ מילולי: "כן, אני יכול לעשות את העבודה הזו בערך ב-50 דולר"
- ✅ הצעת מחיר בכתב: עלויות מפורטות, סכום כולל, חתימה, תאריך
הצעת המחיר בכתב מחייבת. ה-CartMandate הוא המקבילה הדיגיטלית.

המבנה של אישור לעגלת קניות
ל-CartMandate ב-AP2 יש מבנה מקונן ספציפי:
cart_mandate = {
    "contents": {  # ← AP2 wrapper
        "id": "cart_xyz123",
        "cart_expiry": "2024-11-07T15:47:16Z",
        "merchant_name": "Room to Read",
        "user_cart_confirmation_required": False,

        "payment_request": {  # ← W3C PaymentRequest nested inside
            "method_data": [...],
            "details": {...},
            "options": {...}
        }
    },
    "merchant_authorization": "SIG_a3f7b2c8"  # ← Merchant signature
}
שלושה רכיבים עיקריים:
1. contents – עוטף העגלה שמכיל:
- מזהה עגלת הקניות ותאריך התפוגה
- שם הסוחר
- ה-PaymentRequest של W3C
2. payment_request (בתוך contents) – מה נרכש:
- method_data: סוגי תשלום קבילים
- פרטים: פריטים וסכום כולל
- אפשרויות: משלוח, דרישות בנוגע לפרטי המשלם
3. merchant_authorization – חתימה קריפטוגרפית
חתימות של מוכרים: הוכחה למחויבות
החתימה של המוכר היא קריטית. הוא מוכיח:
- המבצע הזה הגיע ממוֹכר מורשה
- המוכר מתחייב לכבד את המחיר המדויק הזה
- לא בוצעו שינויים בהצעה מאז שהיא נוצרה
בסביבת ייצור, זו תהיה חתימה קריפטוגרפית באמצעות PKI (תשתית של מפתח ציבורי) או JWT (אסימוני אינטרנט מבוססי JSON). בסדנה החינוכית שלנו, נדמה את התהליך הזה באמצעות גיבוב (hash) מסוג SHA-256.
# Production (real signature):
signature = sign_with_private_key(cart_data, merchant_private_key)

# Workshop (simulated signature):
cart_hash = hashlib.sha256(cart_json.encode()).hexdigest()
signature = f"SIG_{cart_hash[:16]}"
המשימה שלנו: פיתוח סוכן המכירות הווירטואלי
הנציג של המוכר:
- קריאת IntentMandate מהמצב (מה שהסוכן של שופינג כתב)
- בדיקה שתוקף ה-Intent לא פג
- שליפת שם העמותה, הסכום ופרטים נוספים
- יצירת מבנה PaymentRequest שתואם ל-W3C באמצעות מודלים של AP2 Pydantic
- עוטפים אותו ב-CartMandate של AP2 עם תאריך תפוגה
- הוספת חתימה מדומה של מוֹכר
- כתיבת CartMandate לציון ספק פרטי הכניסה (המודול הבא)
נתחיל לבנות אותו שלב אחר שלב.
שלב 1: מוסיפים את הכלי Expiry Validation Helper
קודם כול, נגדיר את קובץ הכלים שקשורים למוֹכרים ונוסיף פונקציית עזר לאימות התפוגה של IntentMandate.
👉 פתיחה
charity_advisor/tools/merchant_tools.py
הגיע הזמן להוסיף את אימות התפוגה:
👉 Find:
# MODULE_5_STEP_1_ADD_EXPIRY_VALIDATION_HELPER
👈 מחליפים את השורה היחידה הזו ב:
def _validate_intent_expiry(intent_expiry_str: str) -> tuple[bool, str]:
    """
    Validates that the IntentMandate hasn't expired.

    This is a critical security check - expired intents should not be processed.

    Args:
        intent_expiry_str: The ISO 8601 timestamp string from the IntentMandate.

    Returns:
        (is_valid, error_message): Tuple indicating if intent is still valid.
    """
    try:
        # The .replace('Z', '+00:00') is for compatibility with older Python versions
        expiry_time = datetime.fromisoformat(intent_expiry_str.replace('Z', '+00:00'))
        now = datetime.now(timezone.utc)

        if expiry_time < now:
            return False, f"IntentMandate expired at {intent_expiry_str}"

        time_remaining = expiry_time - now
        logger.info(f"IntentMandate valid. Expires in {time_remaining.total_seconds():.0f} seconds")

        return True, ""

    except (ValueError, TypeError) as e:
        return False, f"Invalid intent_expiry format: {e}"
שלב 2: מוסיפים את הכלי ליצירת חתימות
עכשיו ניצור פונקציית עזר שמייצרת את החתימה המדומה של המוכר.
👉 Find:
# MODULE_5_STEP_2_ADD_SIGNATURE_HELPER
👈 מחליפים את השורה היחידה הזו ב:
def _generate_merchant_signature(cart_contents: CartContents) -> str:
    """
    Generates a simulated merchant signature for the CartMandate contents.

    In production, this would use PKI or JWT with the merchant's private key.
    For this codelab, we use a SHA-256 hash of the sorted JSON representation.

    Args:
        cart_contents: The Pydantic model of the cart contents to sign.

    Returns:
        Simulated signature string (format: "SIG_" + first 16 chars of hash).
    """
    # Step 1: Dump the Pydantic model to a dictionary. The `mode='json'` argument
    # ensures that complex types like datetimes are serialized correctly.
    cart_contents_dict = cart_contents.model_dump(mode='json')

    # Step 2: Use the standard json library to create a stable, sorted JSON string.
    # separators=(',', ':') removes whitespace for a compact and canonical representation.
    cart_json = json.dumps(cart_contents_dict, sort_keys=True, separators=(',', ':'))

    # Step 3: Generate SHA-256 hash.
    cart_hash = hashlib.sha256(cart_json.encode('utf-8')).hexdigest()

    # Step 4: Create signature in a recognizable format.
    signature = f"SIG_{cart_hash[:16]}"

    logger.info(f"Generated merchant signature: {signature}")
    return signature
שלב 3א: יצירת חתימת הכלי וההגדרה
עכשיו נתחיל לבנות את הכלי הראשי. ניצור אותו בהדרגה בארבעה שלבי משנה. קודם כל, חתימת הפונקציה וההגדרה הראשונית.
👉 Find:
# MODULE_5_STEP_3A_CREATE_TOOL_SIGNATURE
👈 מחליפים את השורה היחידה הזו ב:
async def create_cart_mandate(tool_context: Any) -> Dict[str, Any]:
    """
    Creates a W3C PaymentRequest-compliant CartMandate from the IntentMandate.

    This tool reads the IntentMandate from shared state, validates it, and
    creates a formal, signed offer using the official AP2 Pydantic models.

    Returns:
        Dictionary containing status and the created CartMandate.
    """
    logger.info("Tool called: Creating CartMandate from IntentMandate")

    # MODULE_5_STEP_3B_ADD_VALIDATION_LOGIC
שלב 3ב: הוספת לוגיקה של אימות
עכשיו נוסיף את הלוגיקה לקריאה ולאימות של IntentMandate באמצעות מודלים של AP2 Pydantic, ונחלץ את הנתונים שאנחנו צריכים.
👉 Find:
# MODULE_5_STEP_3B_ADD_VALIDATION_LOGIC
👈 מחליפים את השורה היחידה הזו ב:
    # 1. Read IntentMandate dictionary from state
    intent_mandate_dict = tool_context.state.get("intent_mandate")
    if not intent_mandate_dict:
        logger.error("No IntentMandate found in state")
        return {
            "status": "error",
            "message": "No IntentMandate found. Shopping Agent must create intent first."
        }

    # 2. Parse dictionary into a validated Pydantic model
    try:
        intent_mandate_model = IntentMandate.model_validate(intent_mandate_dict)
    except Exception as e:
        logger.error(f"Could not validate IntentMandate structure: {e}")
        return {"status": "error", "message": f"Invalid IntentMandate structure: {e}"}

    # 3. Validate that the intent hasn't expired (CRITICAL security check)
    is_valid, error_message = _validate_intent_expiry(intent_mandate_model.intent_expiry)
    if not is_valid:
        logger.error(f"IntentMandate validation failed: {error_message}")
        return {"status": "error", "message": error_message}

    # 4. Extract data. Safely access standard fields from the model, and
    # custom fields (like 'amount') from the original dictionary.
    charity_name = intent_mandate_model.merchants[0] if intent_mandate_model.merchants else "Unknown Charity"
    amount = intent_mandate_dict.get("amount", 0.0)

    # MODULE_5_STEP_3C_CREATE_CARTMANDATE_STRUCTURE
שלב 3C: יצירת מבנה CartMandate
עכשיו נבנה את המבנה של PaymentRequest שתואם לתקן W3C, ונעטוף אותו ב-AP2 CartMandate באמצעות מודלים של Pydantic.
👉 Find:
# MODULE_5_STEP_3C_CREATE_CARTMANDATE_STRUCTURE
👈 מחליפים את השורה היחידה הזו ב:
    # 5. Build the nested Pydantic models for the CartMandate
    timestamp = datetime.now(timezone.utc)
    cart_id = f"cart_{hashlib.sha256(f'{charity_name}{timestamp.isoformat()}'.encode()).hexdigest()[:12]}"
    cart_expiry = timestamp + timedelta(minutes=15)

    payment_request_model = PaymentRequest(
        method_data=[PaymentMethodData(
            supported_methods="CARD",
            data={"supported_networks": ["visa", "mastercard", "amex"], "supported_types": ["debit", "credit"]}
        )],
        details=PaymentDetailsInit(
            id=f"order_{cart_id}",
            display_items=[PaymentItem(
                label=f"Donation to {charity_name}",
                amount=PaymentCurrencyAmount(currency="USD", value=amount)  # Pydantic v2 handles float -> str conversion
            )],
            total=PaymentItem(
                label="Total Donation",
                amount=PaymentCurrencyAmount(currency="USD", value=amount)
            )
        ),
        options=PaymentOptions(request_shipping=False)
    )

    cart_contents_model = CartContents(
        id=cart_id,
        cart_expiry=cart_expiry.isoformat(),
        merchant_name=charity_name,
        user_cart_confirmation_required=False,
        payment_request=payment_request_model
    )

    # MODULE_5_STEP_3D_ADD_SIGNATURE_AND_SAVE
שלב 3ד': מוסיפים חתימה ושומרים את המצב
לבסוף, נחתום על CartMandate באמצעות מודל Pydantic שלנו ונשמור אותו במצב עבור הסוכן הבא.
👉 Find:
# MODULE_5_STEP_3D_ADD_SIGNATURE_AND_SAVE
👈 מחליפים את השורה היחידה הזו ב:
# 6. Generate signature from the validated Pydantic model
signature = _generate_merchant_signature(cart_contents_model)
# 7. Create the final CartMandate model, now including the signature
cart_mandate_model = CartMandate(
    contents=cart_contents_model,
    merchant_authorization=signature
)
# 8. Convert the final model to a dictionary for state storage and add the custom timestamp
cart_mandate_dict = cart_mandate_model.model_dump(mode='json')
cart_mandate_dict["timestamp"] = timestamp.isoformat()
# 9. Write the final dictionary to state
tool_context.state["cart_mandate"] = cart_mandate_dict
logger.info(f"CartMandate created successfully: {cart_id}")
return {
"status": "success",
"message": f"Created signed CartMandate {cart_id} for ${amount:.2f} donation to {charity_name}",
"cart_id": cart_id,
"cart_expiry": cart_expiry.isoformat(),
"signature": signature
}
שלב 4: בניית סוכן המוֹכר – ייבוא רכיבים
עכשיו ניצור את הסוכן שישתמש בכלי הזה.
👉 פתיחה
charity_advisor/merchant_agent/agent.py
תוצג תבנית עם סמני placeholder. נתחיל בייבוא של מה שצריך.
👉 Find:
# MODULE_5_STEP_4_IMPORT_COMPONENTS
👈 מחליפים את השורה היחידה הזו ב:
from google.adk.agents import Agent
from google.adk.tools import FunctionTool
from charity_advisor.tools.merchant_tools import create_cart_mandate
שלב 5: כותבים את ההוראה לסוכן של המוכר
עכשיו נכתוב את ההוראה שמסבירה לסוכן מתי ואיך להשתמש בכלי שלו.
👉 Find:
# MODULE_5_STEP_5_WRITE_INSTRUCTION
instruction="""""",
👉 מחליפים את שתי השורות האלה בשורות הבאות:
    instruction="""You are a merchant specialist responsible for creating formal, signed offers (CartMandates).

Your workflow:

1. Read the IntentMandate from shared state.
   The IntentMandate was created by the Shopping Agent and contains:
   - merchants: List of merchant names
   - amount: Donation amount
   - charity_ein: Tax ID
   - intent_expiry: When the intent expires

2. Use the create_cart_mandate tool to create a W3C PaymentRequest-compliant CartMandate.
   This tool will:
   - Validate the IntentMandate hasn't expired (CRITICAL security check)
   - Extract the charity name and amount from the IntentMandate
   - Create a structured offer with payment methods, transaction details, and merchant info
   - Generate a merchant signature to prove authenticity
   - Save the CartMandate to state for the payment processor

3. After creating the CartMandate, inform the user:
   - That you've created a formal, signed offer
   - The cart ID
   - When the cart expires (15 minutes)
   - That you're passing it to the secure payment processor

IMPORTANT BOUNDARIES:
- Your ONLY job is creating signed CartMandates from valid IntentMandates
- You do NOT process payments
- You do NOT see the user's payment methods or credentials
- You do NOT interact with payment networks
- You MUST validate that the IntentMandate hasn't expired before creating a cart
- After calling create_cart_mandate, your work is done

WHAT IS A CARTMANDATE:
A CartMandate is a binding commitment that says:
"I, the merchant, commit to accepting $X for this charity donation, and I prove it with my signature."

This commitment is structured using the W3C PaymentRequest standard and includes:
- Payment methods accepted (card, bank transfer)
- Transaction details (amount, charity name)
- Cart expiry (15 minutes from creation)
- Merchant signature (proof of commitment)

This is the second of three verifiable credentials in our secure payment system.""",
שלב 6: הוספת כלים לסוכן של Merchant
👉 Find:
# MODULE_5_STEP_6_ADD_TOOLS
tools=[],
👉 מחליפים את שתי השורות האלה בשורות הבאות:
    tools=[
        FunctionTool(func=create_cart_mandate)
    ],
שלב 7: מאמתים את סוכן המוכר המלא
כדאי לוודא שהכל מחובר בצורה נכונה.
👉 ההזמנה המלאה שלך
charity_advisor/merchant_agent/agent.py
אמור להיראות עכשיו כך:
"""
Merchant Agent - Creates W3C-compliant CartMandates with merchant signatures.
This agent acts as our "Contract Creator."
"""

from google.adk.agents import Agent
from google.adk.tools import FunctionTool
from charity_advisor.tools.merchant_tools import create_cart_mandate


merchant_agent = Agent(
    name="MerchantAgent",
    model="gemini-2.5-flash",
    description="Creates formal, signed CartMandates for charity donations following W3C PaymentRequest standards.",
    tools=[
        FunctionTool(func=create_cart_mandate)
    ],
    instruction="""You are a merchant specialist responsible for creating formal, signed offers (CartMandates).

Your workflow:

1. Read the IntentMandate from shared state.
   The IntentMandate was created by the Shopping Agent and contains:
   - merchants: List of merchant names
   - amount: Donation amount
   - charity_ein: Tax ID
   - intent_expiry: When the intent expires

2. Use the create_cart_mandate tool to create a W3C PaymentRequest-compliant CartMandate.
   This tool will:
   - Validate the IntentMandate hasn't expired (CRITICAL security check)
   - Extract the charity name and amount from the IntentMandate
   - Create a structured offer with payment methods, transaction details, and merchant info
   - Generate a merchant signature to prove authenticity
   - Save the CartMandate to state for the payment processor

3. After creating the CartMandate, inform the user:
   - That you've created a formal, signed offer
   - The cart ID
   - When the cart expires (15 minutes)
   - That you're passing it to the secure payment processor

IMPORTANT BOUNDARIES:
- Your ONLY job is creating signed CartMandates from valid IntentMandates
- You do NOT process payments
- You do NOT see the user's payment methods or credentials
- You do NOT interact with payment networks
- You MUST validate that the IntentMandate hasn't expired before creating a cart
- After calling create_cart_mandate, your work is done

WHAT IS A CARTMANDATE:
A CartMandate is a binding commitment that says:
"I, the merchant, commit to accepting $X for this charity donation, and I prove it with my signature."

This commitment is structured using the W3C PaymentRequest standard and includes:
- Payment methods accepted (card, bank transfer)
- Transaction details (amount, charity name)
- Cart expiry (15 minutes from creation)
- Merchant signature (proof of commitment)

This is the second of three verifiable credentials in our secure payment system."""
)
✅ נקודת ביקורת: עכשיו יש לכם סוכן מוֹכרים מלא עם יצירה נכונה של CartMandate ב-AP2 באמצעות מודלים של Pydantic.
שלב 8: בדיקת הסוכן של המוכר
עכשיו נוודא שהסוכן שלנו יוצר בצורה נכונה CartMandates עם חתימות ומאמת את התפוגה.
הגדרת הבדיקה: הרצת סקריפט הבדיקה
👉 בטרמינל Cloud Shell, מריצים את הפקודה:
python scripts/test_merchant.py
הפלט הצפוי:
======================================================================
MERCHANT AGENT TEST
======================================================================

Simulated IntentMandate from Shopping Agent:
  charity: Room to Read
  amount: $50.00
  expiry: 2024-11-07T16:32:16Z

----------------------------------------------------------------------
Merchant Agent Response:
----------------------------------------------------------------------
Perfect! I've received your IntentMandate and created a formal, signed offer (CartMandate) for your donation.

**CartMandate Details:**
- **Cart ID**: cart_3b4c5d6e7f8a
- **Donation Amount**: $50.00 to Room to Read
- **Payment Methods Accepted**: Credit/debit cards (Visa, Mastercard, Amex) or bank transfer
- **Cart Expires**: 2024-11-07T15:47:16Z (in 15 minutes)
- **Merchant Signature**: SIG_a3f7b2c8d9e1f4a2

This signed CartMandate proves my commitment to accept this donation amount. I'm now passing this to the secure payment processor to complete your transaction.

======================================================================
CARTMANDATE CREATED:
======================================================================
  ID: cart_3b4c5d6e7f8a
  Amount: 50.00
  Merchant: Room to Read
  Expires: 2024-11-07T15:47:16Z
  Signature: SIG_a3f7b2c8d9e1f4a2
======================================================================
בדיקה 2: אימות התאימות ל-W3C
בואו נוודא שמבנה ה-CartMandate שלנו תואם באופן מלא לתקנים של AP2 ושל W3C PaymentRequest.
👈 מריצים את סקריפט האימות:
python scripts/validate_cartmandate.py
הפלט הצפוי:
======================================================================
AP2 & W3C PAYMENTREQUEST VALIDATION
======================================================================
✅ CartMandate is AP2 and W3C PaymentRequest compliant

Structure validation passed:
  ✓ AP2 'contents' wrapper present
  ✓ AP2 'merchant_authorization' signature present
  ✓ cart_expiry present
  ✓ payment_request nested inside contents
  ✓ method_data present and valid
  ✓ details.total.amount present with currency and value
  ✓ All required W3C PaymentRequest fields present
======================================================================
מה שבניתם עכשיו
הטמעתם בהצלחה את CartMandate של AP2 באמצעות מודלים של Pydantic למבנה תקין, לאימות תוקף ולחתימות של מוֹכרים.
מושגים מרכזיים שנלמדו
✅ CartMandate (AP2 Credential #2):
- נוצר באמצעות מודלים רשמיים של AP2 Pydantic
- מבנה AP2 עם רכיב wrapper של תוכן
- W3C PaymentRequest מוטמע בתוך
- תוקף עגלת הקניות (קצר יותר מהכוונה)
- חתימת מוכר להתחייבות מחייבת
- אימות המודל מבטיח עמידה במפרט
✅ אימות תאריך התפוגה:
- הוראה לקריאה ממדינה
- מתבצע אימות של המבנה באמצעות
IntentMandate.model_validate() - ניתוח חותמות זמן בפורמט ISO 8601
- השוואה לזמן הנוכחי
- תכונת אבטחה שמונעת עיבוד של נתונים ישנים
✅ חתימת המוכר:
- הוכחת האותנטיות והמחויבות
- נוצרו ממודל Pydantic מאומת
- נעשה שימוש ב-
model_dump(mode='json')לייצוג קנוני - סימולציה עם SHA-256 למוסדות חינוך
- בסביבת הייצור נעשה שימוש ב-PKI/JWT
- חותם על מודל התוכן, לא על מילונים
✅ W3C PaymentRequest:
- מבוסס על מודל PaymentRequest Pydantic של AP2
- התקן המקובל בתחום לנתוני תשלום
- מוטמע במבנה AP2
- מכיל method_data, details, options
- אפשרות לפעולה הדדית
✅ Credential Chain with Models:
- שופינג → IntentMandate (validated)
- המוכר קורא את IntentMandate ← CartMandate (שני המודלים אומתו)
- ספק פרטי הכניסה יקרא את CartMandate ← PaymentMandate
- כל שלב מאמת את פרטי הכניסה הקודמים באמצעות Pydantic
✅ Model-Driven Development:
- אימות קלט באמצעות
model_validate() - בנייה עם מניעת שגיאות הקלדה
- סריאליזציה אוטומטית דרך
model_dump() - דפוסים שמוכנים לייצור
המאמרים הבאים
במודול הבא נבנה את Credentials Provider כדי לעבד תשלומים בצורה מאובטחת.
סוכן המוכר יצר הצעה מחייבת עם תאריך תפוגה באמצעות מודלים של AP2. עכשיו אנחנו צריכים סוכן שיקרא את CartMandate, יקבל את הסכמת המשתמש ויבצע את התשלום.
בואו ניצור את ספק פרטי הכניסה ונשלים את שרשרת פרטי הכניסה של AP2.
6. יצירת ספק פרטי הכניסה – ביצוע תשלומים מאובטח

מהצעה מחייבת לביצוע תשלום
במודול 5 יצרתם את Merchant Agent – סוכן מומחה שקורא IntentMandates, מאמת שהם לא פגו תוקף ויוצר CartMandates מחייבים עם חתימות של מוכרים. עכשיו אנחנו צריכים סוכן שיקבל את CartMandate ויבצע את התשלום בפועל.
כאן נכנס לתמונה העיקרון השלישי והאחרון של AP2: ביצוע מאובטח של תשלומים באמצעות PaymentMandate.
עקרון AP2: הרשאת תשלום וביצוע תשלום
למה אנחנו צריכים תפקיד של ספק פרטי כניסה
במודול 5, סוכן המוכר יצר CartMandate ושמר אותו במצב:
state["cart_mandate"] = {
    "contents": {
        "id": "cart_abc123",
        "cart_expiry": "2025-11-07:15:47:16Z",
        "payment_request": {
            "details": {
                "total": {
                    "amount": {"currency": "USD", "value": "50.00"}
                }
            }
        }
    },
    "merchant_authorization": "SIG_a3f7b2c8"
}
אבל זו רק הצעה מחייבת. כדי לבצע את התשלום, אנחנו צריכים:
- אימות לכך שתוקף עגלת הקניות לא פג
- הסכמת המשתמש להמשך התשלום
- פרטי כניסה שמאשרים ביצוע תשלום
- עיבוד תשלומים בפועל (או סימולציה בסדנה שלנו)
זו המשימה של ספק פרטי הכניסה.
מה זה PaymentMandate?
PaymentMandate הוא המונח של AP2 לאישור הסופי שמאפשר לבצע תשלום. זהו האישור השלישי והאחרון שניתן לאימות בשרשרת AP2.
אפשר לחשוב על שלושת אמצעי ההזדהות כמו על תהליך חתימה על חוזה:
- IntentMandate: "אני מעוניין לקנות את זה" (מכתב כוונות)
- CartMandate: "אני, המוכר, מציע למכור במחיר הזה" (הצעת מחיר בכתב)
- PaymentMandate: "אני מאשר/ת לך לחייב את אמצעי התשלום שלי" (חוזה חתום)
התשלום יתבצע רק אחרי ששלושת פרטי הכניסה יהיו קיימים.

המבנה של הרשאת תשלום
ל-PaymentMandate ב-AP2 יש מבנה ספציפי:
payment_mandate = {
    "payment_mandate_contents": {  # ← AP2 wrapper
        "payment_mandate_id": "payment_xyz123",
        "payment_details_id": "cart_abc123",  # Links to CartMandate
        "user_consent": True,
        "consent_timestamp": "2025-11-07T15:48:00Z",
        "amount": {
            "currency": "USD",
            "value": "50.00"
        },
        "merchant_name": "Room to Read"
    },
    "agent_present": True,  # Human-in-the-loop flow
    "timestamp": "2025-11-07T15:48:00Z"
}
רכיבים מרכזיים:
1. payment_mandate_contents – עטיפת ההרשאה שמכילה:
- payment_mandate_id: מזהה ייחודי
- payment_details_id: קישורים חזרה אל CartMandate
- user_consent: האם המשתמש אישר
- סכום: סכום התשלום (חילוץ מ-CartMandate)
2. agent_present – האם זהו תהליך שכולל האדם שבתהליך
3. חותמת זמן – מתי נוצרה ההרשאה
המטרה שלנו: בניית ספק פרטי הכניסה
ספק האישורים:
- קריאת CartMandate מהסטטוס (מה שסוכן המוכר כתב)
- אימות התוקף של עגלת הקניות באמצעות מודלים של AP2 Pydantic
- חילוץ פרטי תשלום מהמבנה המקונן
- יצירת הרשאת תשלום עם הסכמת המשתמש באמצעות מודלים של AP2
- סימולציה של עיבוד תשלומים (בסביבת הייצור, המערכת הייתה קוראת ל-API אמיתי של תשלומים)
- כתיבת PaymentMandate ותוצאת התשלום למצב
נתחיל לבנות אותו שלב אחר שלב.
שלב 1: מוסיפים את הכלי Cart Expiry Validation Helper
קודם ניצור פונקציית עזר שתבדוק שתוקף ההרשאה של CartMandate לא פג – בדיוק כמו שבדקנו את תוקף ההרשאה של IntentMandate במודול 5.
👉 פתיחה
charity_advisor/tools/payment_tools.py
הגיע הזמן להוסיף את אימות התפוגה:
👉 Find:
# MODULE_6_STEP_1_ADD_CART_EXPIRY_VALIDATION_HELPER
👈 מחליפים את השורה היחידה הזו ב:
def _validate_cart_expiry(cart: CartMandate) -> tuple[bool, str]:
    """
    Validates that the CartMandate hasn't expired.

    This is a critical security check - expired carts should not be processed.

    Args:
        cart: The Pydantic CartMandate model to validate.

    Returns:
        (is_valid, error_message): Tuple indicating if cart is still valid.
    """
    try:
        expiry_str = cart.contents.cart_expiry
        expiry_time = datetime.fromisoformat(expiry_str.replace('Z', '+00:00'))
        now = datetime.now(timezone.utc)

        if expiry_time < now:
            return False, f"CartMandate expired at {expiry_str}"

        time_remaining = expiry_time - now
        logger.info(f"CartMandate valid. Expires in {time_remaining.total_seconds():.0f} seconds")

        return True, ""

    except (ValueError, TypeError, AttributeError) as e:
        return False, f"Invalid cart_expiry format or structure: {e}"
שלב 2: מוסיפים את הכלי PaymentMandate Creation Helper
עכשיו ניצור פונקציית עזר שבונה את המבנה PaymentMandate באמצעות מודלים רשמיים של AP2 Pydantic.
👉 Find:
# MODULE_6_STEP_2_ADD_PAYMENT_MANDATE_CREATION_HELPER
👈 מחליפים את השורה היחידה הזו ב:
def _create_payment_mandate(cart: CartMandate, consent_granted: bool) -> dict:
    """
    Creates a PaymentMandate using the official AP2 Pydantic models.

    It links to the CartMandate and includes user consent status.

    Args:
        cart: The validated Pydantic CartMandate model being processed.
        consent_granted: Whether the user has consented to the payment.

    Returns:
        A dictionary representation of the final, validated PaymentMandate.
    """
    timestamp = datetime.now(timezone.utc)

    # Safely extract details from the validated CartMandate model
    cart_id = cart.contents.id
    merchant_name = cart.contents.merchant_name
    total_item = cart.contents.payment_request.details.total

    # Create the nested PaymentResponse model for the mandate
    payment_response_model = PaymentResponse(
        request_id=cart_id,
        method_name="CARD",  # As per the simulated flow
        details={"token": "simulated_payment_token_12345"}
    )

    # Create the PaymentMandateContents model
    payment_mandate_contents_model = PaymentMandateContents(
        payment_mandate_id=f"payment_{hashlib.sha256(f'{cart_id}{timestamp.isoformat()}'.encode()).hexdigest()[:12]}",
        payment_details_id=cart_id,
        payment_details_total=total_item,
        payment_response=payment_response_model,
        merchant_agent=merchant_name,
        timestamp=timestamp.isoformat()
    )

    # Create the top-level PaymentMandate model
    # In a real system, a user signature would be added to this model
    payment_mandate_model = PaymentMandate(
        payment_mandate_contents=payment_mandate_contents_model
    )

    # Convert the final Pydantic model to a dictionary for state storage
    final_dict = payment_mandate_model.model_dump(mode='json')

    # Add any custom/non-standard fields required by the codelab's logic to the dictionary
    # The spec does not have these fields, but your original code did. We add them
    # back to ensure compatibility with later steps.
    final_dict['payment_mandate_contents']['user_consent'] = consent_granted
    final_dict['payment_mandate_contents']['consent_timestamp'] = timestamp.isoformat() if consent_granted else None
    final_dict['agent_present'] = True

    return final_dict
שלב 3א: יצירת חתימת הכלי וההגדרה
עכשיו נתחיל לבנות את הכלי הראשי באופן מצטבר. קודם כל, חתימת הפונקציה וההגדרה הראשונית.
👉 Find:
# MODULE_6_STEP_3A_CREATE_TOOL_SIGNATURE
👈 מחליפים את השורה היחידה הזו ב:
async def create_payment_mandate(tool_context: Any) -> Dict[str, Any]:
    """
    Creates a PaymentMandate and simulates payment processing using Pydantic models.

    This tool now reads the CartMandate from state, parses it into a validated model,
    and creates a spec-compliant PaymentMandate.
    """
    logger.info("Tool called: Creating PaymentMandate and processing payment")

    # MODULE_6_STEP_3B_VALIDATE_CARTMANDATE
שלב 3ב: אימות של CartMandate
עכשיו נוסיף את הלוגיקה לקריאה, לאימות של CartMandate באמצעות מודלים של AP2 Pydantic ולבדיקת התפוגה.
👉 Find:
# MODULE_6_STEP_3B_VALIDATE_CARTMANDATE
👈 מחליפים את השורה היחידה הזו ב:
    # 1. Read CartMandate dictionary from state
    cart_mandate_dict = tool_context.state.get("cart_mandate")
    if not cart_mandate_dict:
        logger.error("No CartMandate found in state")
        return { "status": "error", "message": "No CartMandate found. Merchant Agent must create cart first." }

    # 2. Parse dictionary into a validated Pydantic model
    try:
        cart_model = CartMandate.model_validate(cart_mandate_dict)
    except Exception as e:
        logger.error(f"Could not validate CartMandate structure: {e}")
        return {"status": "error", "message": f"Invalid CartMandate structure: {e}"}

    # 3. Validate that the cart hasn't expired using the Pydantic model
    is_valid, error_message = _validate_cart_expiry(cart_model)
    if not is_valid:
        logger.error(f"CartMandate validation failed: {error_message}")
        return {"status": "error", "message": error_message}

    # MODULE_6_STEP_3C_EXTRACT_PAYMENT_DETAILS
שלב 3C: חילוץ פרטי תשלום ממבנה מקונן
עכשיו נעבור למודל CartMandate שאומת כדי לחלץ את פרטי התשלום שדרושים לנו.
👉 Find:
# MODULE_6_STEP_3C_EXTRACT_PAYMENT_DETAILS
👈 מחליפים את השורה היחידה הזו ב:
    # 4. Safely extract data from the validated model
    cart_id = cart_model.contents.id
    merchant_name = cart_model.contents.merchant_name
    amount_value = cart_model.contents.payment_request.details.total.amount.value
    currency = cart_model.contents.payment_request.details.total.amount.currency
    consent_granted = True  # Assume consent for this codelab flow

    # MODULE_6_STEP_3D_CREATE_PAYMENTMANDATE_AND_SIMULATE
שלב 3ד: יצירת PaymentMandate וסימולציה של תשלום
לבסוף, ניצור את PaymentMandate באמצעות כלי העזר מבוסס Pydantic, נדמה עיבוד תשלומים ונשמור את הכול במצב.
👉 Find:
# MODULE_6_STEP_3D_CREATE_PAYMENTMANDATE_AND_SIMULATE
👈 מחליפים את השורה היחידה הזו ב:
    # 5. Create the spec-compliant PaymentMandate using the validated CartMandate model
    payment_mandate_dict = _create_payment_mandate(cart_model, consent_granted)

    # 6. Simulate payment processing
    transaction_id = f"txn_{hashlib.sha256(f'{cart_id}{datetime.now(timezone.utc).isoformat()}'.encode()).hexdigest()[:16]}"
    payment_result = {
        "transaction_id": transaction_id,
        "status": "completed",
        "amount": amount_value,
        "currency": currency,
        "merchant": merchant_name,
        "timestamp": datetime.now(timezone.utc).isoformat(),
        "simulation": True
    }

    # 7. Write the compliant PaymentMandate dictionary and result to state
    tool_context.state["payment_mandate"] = payment_mandate_dict
    tool_context.state["payment_result"] = payment_result

    logger.info(f"Payment processed successfully: {transaction_id}")

    return {
        "status": "success",
        "message": f"Payment of {currency} {amount_value:.2f} to {merchant_name} processed successfully",
        "transaction_id": transaction_id,
        "payment_mandate_id": payment_mandate_dict["payment_mandate_contents"]["payment_mandate_id"]
    }
שלב 4: בניית סוכן ספק האישורים – ייבוא רכיבים
עכשיו ניצור את הסוכן שמשתמש בכלי הזה.
👉 פתיחה
charity_advisor/credentials_provider/agent.py
תוצג תבנית עם סמני placeholder. נתחיל בייבוא של מה שצריך.
👉 Find:
# MODULE_6_STEP_4_IMPORT_COMPONENTS
👈 מחליפים את השורה היחידה הזו ב:
from google.adk.agents import Agent
from google.adk.tools import FunctionTool
from charity_advisor.tools.payment_tools import create_payment_mandate
שלב 5: כותבים את ההוראה של ספק האישורים
עכשיו נכתוב את ההוראה שמנחה את הסוכן.
👉 Find:
# MODULE_6_STEP_5_WRITE_INSTRUCTION
instruction="""""",
👉 מחליפים את שתי השורות האלה בשורות הבאות:
    instruction="""You are a payment specialist responsible for securely processing payments with user consent.

Your workflow:

1. Read the CartMandate from shared state.
   The CartMandate was created by the Merchant Agent and has this structure:
   - contents: AP2 wrapper containing:
     - id: Cart identifier
     - cart_expiry: When the cart expires
     - merchant_name: Who is receiving payment
     - payment_request: W3C PaymentRequest with transaction details
   - merchant_authorization: Merchant's signature

2. Extract payment details from the nested structure:
   - Navigate: cart_mandate["contents"]["payment_request"]["details"]["total"]["amount"]
   - This gives you the currency and value

3. **IMPORTANT - Two-Turn Conversational Confirmation Pattern:**
   Before calling create_payment_mandate, you MUST:
   - Present the payment details clearly to the user
   - Ask explicitly: "I'm ready to process a payment of $X to [Charity Name]. Do you want to proceed with this donation?"
   - WAIT for the user's explicit confirmation (e.g., "yes", "proceed", "confirm")
   - ONLY call create_payment_mandate AFTER receiving explicit confirmation
   - If user says "no" or "cancel", DO NOT call the tool

4. After user confirms, use the create_payment_mandate tool to:
   - Validate the CartMandate hasn't expired (CRITICAL security check)
   - Create a PaymentMandate (the third AP2 credential)
   - Simulate payment processing
   - Record the transaction result

5. After processing, inform the user:
   - That payment was processed successfully (this is a simulation)
   - The transaction ID
   - The amount and merchant
   - That this completes the three-agent AP2 credential chain

IMPORTANT BOUNDARIES:
- Your ONLY job is creating PaymentMandates and processing payments
- You do NOT discover charities (that's Shopping Agent's job)
- You do NOT create offers (that's Merchant Agent's job)
- You MUST validate that the CartMandate hasn't expired before processing
- You MUST get explicit user confirmation before calling create_payment_mandate
- In production, this consent mechanism would be even more robust

WHAT IS A PAYMENTMANDATE:
A PaymentMandate is the final credential that authorizes payment execution. It:
- Links to the CartMandate (proving the merchant's offer)
- Records user consent
- Contains payment details extracted from the CartMandate
- Enables the actual payment transaction

This is the third and final verifiable credential in our secure payment system.

THE COMPLETE AP2 CREDENTIAL CHAIN:
1. Shopping Agent creates IntentMandate (user's intent)
2. Merchant Agent reads IntentMandate, creates CartMandate (merchant's binding offer)
3. You read CartMandate, get user confirmation, create PaymentMandate (authorized payment execution)

Each credential:
- Has an expiry time (security feature)
- Links to the previous credential
- Is validated before the next step
- Creates an auditable chain of trust""",
שלב 6: הוספת כלי לספק האישורים
👉 Find:
# MODULE_6_STEP_6_ADD_TOOLS
tools=[],
👉 מחליפים את שתי השורות האלה בשורות הבאות:
    tools=[
        FunctionTool(func=create_payment_mandate)
    ],
שלב 7: מאמתים את ספק האישורים המלאים
כדאי לוודא שהכל מחובר בצורה נכונה.
👉 ההזמנה המלאה שלך
charity_advisor/credentials_provider/agent.py
אמור להיראות עכשיו כך:
"""
Credentials Provider Agent - Handles payment processing with user consent.
This agent acts as our "Payment Processor."
"""

from google.adk.agents import Agent
from google.adk.tools import FunctionTool
from charity_advisor.tools.payment_tools import create_payment_mandate


credentials_provider = Agent(
    name="CredentialsProvider",
    model="gemini-2.5-flash",
    description="Securely processes payments by creating PaymentMandates and executing transactions with user consent.",
    tools=[
        FunctionTool(func=create_payment_mandate)
    ],
    instruction="""You are a payment specialist responsible for securely processing payments with user consent.

Your workflow:

1. Read the CartMandate from shared state.
   The CartMandate was created by the Merchant Agent and has this structure:
   - contents: AP2 wrapper containing:
     - id: Cart identifier
     - cart_expiry: When the cart expires
     - merchant_name: Who is receiving payment
     - payment_request: W3C PaymentRequest with transaction details
   - merchant_authorization: Merchant's signature

2. Extract payment details from the nested structure:
   - Navigate: cart_mandate["contents"]["payment_request"]["details"]["total"]["amount"]
   - This gives you the currency and value

3. **IMPORTANT - Two-Turn Conversational Confirmation Pattern:**
   Before calling create_payment_mandate, you MUST:
   - Present the payment details clearly to the user
   - Ask explicitly: "I'm ready to process a payment of $X to [Charity Name]. Do you want to proceed with this donation?"
   - WAIT for the user's explicit confirmation (e.g., "yes", "proceed", "confirm")
   - ONLY call create_payment_mandate AFTER receiving explicit confirmation
   - If user says "no" or "cancel", DO NOT call the tool

4. After user confirms, use the create_payment_mandate tool to:
   - Validate the CartMandate hasn't expired (CRITICAL security check)
   - Create a PaymentMandate (the third AP2 credential)
   - Simulate payment processing
   - Record the transaction result

5. After processing, inform the user:
   - That payment was processed successfully (this is a simulation)
   - The transaction ID
   - The amount and merchant
   - That this completes the three-agent AP2 credential chain

IMPORTANT BOUNDARIES:
- Your ONLY job is creating PaymentMandates and processing payments
- You do NOT discover charities (that's Shopping Agent's job)
- You do NOT create offers (that's Merchant Agent's job)
- You MUST validate that the CartMandate hasn't expired before processing
- You MUST get explicit user confirmation before calling create_payment_mandate
- In production, this consent mechanism would be even more robust

WHAT IS A PAYMENTMANDATE:
A PaymentMandate is the final credential that authorizes payment execution. It:
- Links to the CartMandate (proving the merchant's offer)
- Records user consent
- Contains payment details extracted from the CartMandate
- Enables the actual payment transaction

This is the third and final verifiable credential in our secure payment system.

THE COMPLETE AP2 CREDENTIAL CHAIN:
1. Shopping Agent creates IntentMandate (user's intent)
2. Merchant Agent reads IntentMandate, creates CartMandate (merchant's binding offer)
3. You read CartMandate, get user confirmation, create PaymentMandate (authorized payment execution)

Each credential:
- Has an expiry time (security feature)
- Links to the previous credential
- Is validated before the next step
- Creates an auditable chain of trust"""
)
✅ Checkpoint: עכשיו יש לכם ספק אישורים מלא עם קריאה נכונה של CartMandate ויצירה של PaymentMandate באמצעות מודלים של AP2 Pydantic.
שלב 8: בדיקת ספק פרטי הכניסה
עכשיו נבדוק שהסוכן שלנו מעבד את התשלומים בצורה נכונה ומשלים את שרשרת האישורים.
👉 בטרמינל Cloud Shell, מריצים את הפקודה:
python scripts/test_credentials_provider.py
הפלט הצפוי:
======================================================================
CREDENTIALS PROVIDER TEST (MOCK - NO CONFIRMATION)
======================================================================

Simulated CartMandate from Merchant Agent:
  - Cart ID: cart_test123
  - Merchant: Room to Read
  - Amount: $50.00
  - Expires: 2025-11-07T15:47:16Z
  - Signature: SIG_test_signature

Calling Credentials Provider to process payment...
======================================================================
INFO:charity_advisor.tools.payment_tools:Tool called: Creating PaymentMandate and processing payment
INFO:charity_advisor.tools.payment_tools:CartMandate valid. Expires in 900 seconds
INFO:charity_advisor.tools.payment_tools:Payment processed successfully: txn_a3f7b2c8d9e1f4a2

======================================================================
CREDENTIALS PROVIDER RESPONSE:
======================================================================
I've successfully processed your payment. Here are the details:

**Payment Completed** (Simulated)
- Transaction ID: txn_a3f7b2c8d9e1f4a2
- Amount: USD 50.00
- Merchant: Room to Read
- Status: Completed

This completes the three-agent AP2 credential chain:
1. ✓ Shopping Agent created IntentMandate (your intent)
2. ✓ Merchant Agent created CartMandate (binding offer)
3. ✓ Credentials Provider created PaymentMandate (payment authorization)

Your donation has been processed securely through our verifiable credential system.

======================================================================
PAYMENTMANDATE CREATED:
======================================================================
  Payment Mandate ID: payment_3b4c5d6e7f8a
  Linked to Cart: cart_test123
  User Consent: True
  Amount: USD 50.00
  Merchant: Room to Read
  Agent Present: True
======================================================================

======================================================================
PAYMENT RESULT:
======================================================================
  Transaction ID: txn_a3f7b2c8d9e1f4a2
  Status: completed
  Amount: USD 50.00
  Merchant: Room to Read
  Simulation: True
======================================================================
שלב 9: בדיקת הפייפליין המלא של שלושה סוכנים
עכשיו נבדוק את שלושת הסוכנים יחד!
👈 הרצת בדיקה של הפייפליין המלא:
python scripts/test_full_pipeline.py
הפלט הצפוי:
======================================================================
THREE-AGENT PIPELINE TEST (AP2 CREDENTIAL CHAIN)
======================================================================

[1/3] SHOPPING AGENT - Finding charity and creating IntentMandate...
----------------------------------------------------------------------
✓ IntentMandate created
  - Intent ID: intent_774799058_1730927536
  - Description: Donate $75.00 to Room to Read
  - Merchant: Room to Read
  - Amount: $75.0
  - Expires: 2025-11-07T16:32:16Z

[2/3] MERCHANT AGENT - Reading IntentMandate and creating CartMandate...
----------------------------------------------------------------------
✓ CartMandate created
  - ID: cart_3b4c5d6e7f8a
  - Expires: 2025-11-07T15:47:16Z
  - Signature: SIG_a3f7b2c8d9e1f4a2

[3/3] CREDENTIALS PROVIDER - Creating PaymentMandate and processing...
----------------------------------------------------------------------
NOTE: In the web UI, this would show a confirmation dialog
      For this test, consent is automatically granted
✓ Payment processed (SIMULATED)
  - Transaction ID: txn_a3f7b2c8d9e1f4a2
  - Amount: $75.0
  - Status: completed

======================================================================
COMPLETE AP2 CREDENTIAL CHAIN
======================================================================

✓ Credential 1: IntentMandate (User's Intent)
  - Intent ID: intent_774799058_1730927536
  - Description: Donate $75.00 to Room to Read
  - Expiry: 2025-11-07T16:32:16Z

✓ Credential 2: CartMandate (Merchant's Offer)
  - Cart ID: cart_3b4c5d6e7f8a
  - Cart Expiry: 2025-11-07T15:47:16Z
  - Merchant Signature: SIG_a3f7b2c8d9e1f4a2

✓ Credential 3: PaymentMandate (Payment Execution)
  - Payment Mandate ID: payment_3b4c5d6e7f8a
  - Linked to Cart: cart_3b4c5d6e7f8a
  - Agent Present: True

✓ Transaction Result:
  - Transaction ID: txn_a3f7b2c8d9e1f4a2
  - Simulation: True

======================================================================
✅ COMPLETE PIPELINE TEST PASSED
======================================================================
זוהי שרשרת האישורים המלאה של AP2 בפעולה!
כל נציג:
- קריאת אמצעי אימות מהסטטוס
- האימות מתבצע באמצעות מודלים של Pydantic (מבנה + בדיקת תפוגה)
- יצירת פרטי הכניסה הבאים באמצעות מודלים של AP2
- כתיבה למצב של הסוכן הבא
מה שבניתם עכשיו
השלמתם בהצלחה את שרשרת האישורים של שלושת הסוכנים של AP2 עם אימות מבנה מתאים באמצעות מודלים של Pydantic וסימולציה של תשלום.
מושגים מרכזיים שנלמדו
✅ PaymentMandate (AP2 Credential #3):
- נוצר באמצעות מודלים רשמיים של AP2 Pydantic
- פרטי הכניסה הסופיים שמאשרים את ביצוע התשלום
- קישורים ל-CartMandate דרך payment_details_id
- תיעוד של הסכמת המשתמש וחותמת הזמן
- מכיל את סכום התשלום שחולץ מ-CartMandate
- כולל את הדגל agent_present עבור האדם שבתהליך
- אימות המודל מבטיח עמידה במפרט
✅ קריאה מ-CartMandate:
- אימות המבנה באמצעות
CartMandate.model_validate() - גישה למאפיינים בצורה בטוחה מבחינת סוגים:
cart_model.contents.payment_request.details.total.amount - הסבר על ההבדלים בין עטיפת AP2 לבין הפרדה לפי תקן W3C
- חילוץ בטוח של merchant_name, amount ו-currency מהמודל
- Pydantic מאתרת שגיאות במבנה באופן אוטומטי
✅ Cart Expiry Validation:
- מקבל מודל מאומת של
CartMandatePydantic - קריאה מ-
cart.contents.cart_expiry(גישה למאפיין) - תכונת אבטחה שמונעת עיבוד של עגלות קניות לא עדכניות
- משך זמן קצר יותר (15 דקות) מאשר כוונת הרכישה (שעה)
✅ Payment Simulation:
- הדמיה חינוכית של חברה אמיתית לעיבוד תשלומים
- יצירת מזהה עסקה
- רשומות payment_result במצב
- מסומן בבירור כסימולציה (הסימון simulation: True)
✅ Complete AP2 Chain with Models:
- שלושה סוכנים, שלושה פרטי כניסה, שלוש בדיקות אימות של Pydantic
- כל סוכן מאמת את המבנה של האישורים הקודמים באמצעות מודלים
- כל אישור מקושר לאישור הקודם לצורך מעקב אחר שינויים
- העברות מבוססות-מצב שומרות על הפרדת התפקידים
- מניעת שגיאות הקלדה לאורך כל השרשרת
✅ Model-Driven Development:
- אימות קלט באמצעות
model_validate() - יצירת מבנה בטוח לסוגים עם מודלים מוטמעים
- סריאליזציה אוטומטית דרך
model_dump(mode='json') - דפוסים מוכנים לייצור מההתחלה
המאמרים הבאים
במודול הבא ניצור את הסוכן המתזמר שמתאם בין שלושת הסוכנים המומחים.
יצרתם שלושה סוכנים מומחים חזקים באמצעות מודלים של AP2 Pydantic. עכשיו נבנה את המנצח שינצח על כל הפעולות האלה כדי ליצור חוויית תרומה חלקה.
בואו נבנה את הכלי לתזמור ונראה את המערכת המלאה בפעולה.
7. Orchestration - Bringing It All Together

ממומחים לחוויה חלקה
במודולים הקודמים יצרתם שלושה סוכנים מומחים:
- הסוכן החכם של שופינג: מוצא עמותות, יוצר IntentMandate
- Merchant Agent: יוצר CartMandate מ-IntentMandate
- ספק פרטי כניסה: יוצר הרשאת תשלום ומעבד את התשלום
הסוכנים האלה נחלקים באופן טבעי לשני שלבים:
- שלב 1 (שופינג): שיחה מרובת תפניות כדי למצוא ולבחור עמותה
- שלב 2 (עיבוד): ביצוע אטומי של יצירת מבצע ותשלום
אבל כרגע, תצטרכו לתזמן את השלבים האלה בעצמכם.
כאן נכנסים לתמונה דפוסי התזמור של ADK.
עקרון AP2: תזמור אוכף גבולות אמון
למה תזמור חשוב לאבטחה
אורקסטרציה היא לא רק עניין של נוחות – היא מאפשרת לאכוף גבולות אמון באמצעות ארכיטקטורה.
ללא תזמור:
# User could accidentally skip steps or reorder them
shopping_agent.run("Find charity")
# Oops, forgot to create CartMandate!
credentials_provider.run("Process payment")  # No offer to validate!
עם תזמור:
# Pipeline enforces correct order
donation_processing_pipeline = SequentialAgent(
    sub_agents=[
        merchant_agent,      # Must run first
        credentials_provider # Must run second
    ]
)
# Steps ALWAYS run in order, no skipping allowed
צינור עיבוד הנתונים הרציף מבטיח:
- ✅ IntentMandate created before CartMandate
- ✅ CartMandate נוצר לפני עיבוד התשלום
- ✅ כל סוכן פועל בהקשר מבודד
- ✅ המצב עובר קדימה דרך שרשרת האישורים
המשימה שלנו: בניית המערכת השלמה
נבנה שתי שכבות:
שכבה 1: צינור העיבוד (SequentialAgent)
- Wires together Merchant → Credentials
- הפעולה מתבצעת אוטומטית ברצף אחרי בחירת העמותה
- ביצוע אטומי של מבצע ותשלום
שכבה 2: המנהל הראשי (סוכן שפונה למשתמש)
- אישיות ידידותית
- העברה אל shopping_agent לבחירת עמותה
- העברה לנציגים לצינור עיבוד אחרי יצירת IntentMandate
- מטפל בשיחות ובמעברי פאזה
הגישה הזו בשתי שכבות תואמת לזרימה הטבעית:
- שלב הקנייה: שיחה מרובת תפניות (המשתמש גולש, שואל שאלות ומקבל החלטה)
- שלב העיבוד: ביצוע אטומי (הצעה ← תשלום)
בואו ניצור את שניהם.
שלב 1: ייבוא רכיבי תזמור
קודם כול, נגדיר את קובץ התיאום עם הייבוא הנדרש.
👉 פתיחה
charity_advisor/agent.py
נתחיל עם ייבוא:
👉 Find:
# MODULE_7_STEP_1_IMPORT_COMPONENTS
👈 מחליפים את השורה היחידה הזו ב:
from google.adk.agents import Agent, SequentialAgent
from charity_advisor.shopping_agent.agent import shopping_agent
from charity_advisor.merchant_agent.agent import merchant_agent
from charity_advisor.credentials_provider.agent import credentials_provider
שלב 2: יצירת צינור העיבוד
עכשיו ניצור את הפייפליין שמריץ את יצירת המוצר ואת עיבוד התשלום באופן אטומי.
👉 Find:
# MODULE_7_STEP_2_CREATE_SEQUENTIAL_PIPELINE
👉 מחליפים את שתי השורות האלה בשורות הבאות:
# Create the donation processing pipeline
# This runs Merchant → Credentials in sequence AFTER charity is selected
donation_processing_pipeline = SequentialAgent(
name="DonationProcessingPipeline",
description="Creates signed offer and processes payment after charity is selected",
sub_agents=[
merchant_agent,
credentials_provider
]
)
שלב 3א: יצירת הגדרת סוכן ראשי
עכשיו ניצור את הסוכן שפונה למשתמש ומנהל את שני השלבים. ההסבר יחולק לשלושה חלקים: הגדרה (3א), הוראות (3ב) וסוכני משנה (3ג).
👉 Find:
# MODULE_7_STEP_3A_CREATE_ROOT_AGENT_SETUP
👈 מחליפים את השורה היחידה הזו ב:
# Create the root orchestrator agent
# This is what users interact with directly
root_agent = Agent(
name="CharityAdvisor",
model="gemini-2.5-pro",
description="A friendly charity giving assistant that helps users donate to verified organizations.",
# MODULE_7_STEP_3B_WRITE_ROOT_AGENT_INSTRUCTION
שלב 3ב: כותבים את ההוראה לסוכן הבסיס
עכשיו נוסיף את ההוראה שמנחה את ההתנהגות של היועץ לעמותות בשני השלבים.
👉 Find:
# MODULE_7_STEP_3B_WRITE_ROOT_AGENT_INSTRUCTION
👈 מחליפים את השורה היחידה הזו ב:
instruction="""You are a helpful and friendly charity giving advisor.
Your workflow has TWO distinct phases:
PHASE 1: CHARITY SELECTION (delegate to shopping_agent)
When a user expresses interest in donating:
1. Delegate to shopping_agent immediately
2. The shopping_agent will:
- Search for charities matching their cause
- Present verified options with ratings
- Engage in conversation (user may ask questions, change their mind)
- Wait for user to select a specific charity and amount
- Create an IntentMandate when user decides
3. Wait for shopping_agent to complete
You'll know Phase 1 is complete when shopping_agent's response includes:
- "IntentMandate created" or "Intent ID: intent_xxx"
- Charity name and donation amount
PHASE 2: PAYMENT PROCESSING (delegate to DonationProcessingPipeline)
After shopping_agent completes:
1. Acknowledge the user's selection naturally:
"Perfect! Let me process your $X donation to [Charity]..."
2. Delegate to DonationProcessingPipeline
3. The pipeline will automatically:
- Create signed cart offer (MerchantAgent)
- Get consent and process payment (CredentialsProvider)
4. After pipeline completes, summarize the transaction
CRITICAL RULES:
- Phase 1 may take multiple conversation turns (this is normal)
- Only proceed to Phase 2 after IntentMandate exists
- Don't rush the user during charity selection
- Don't ask user to "proceed" between phases - transition automatically
EXAMPLE FLOW:
User: "I want to donate to education"
You: [delegate to shopping_agent]
Shopping: "Here are 3 education charities..." [waits]
User: "Tell me more about the first one"
Shopping: "Room to Read focuses on..." [waits]
User: "Great, I'll donate $50 to Room to Read"
Shopping: "IntentMandate created (ID: intent_123)..."
You: "Perfect! Processing your $50 donation to Room to Read..." [delegate to DonationProcessingPipeline]
Pipeline: [creates offer, gets consent, processes payment]
You: "Done! Your donation was processed successfully. Transaction ID: txn_456"
Your personality:
- Warm and encouraging
- Patient during charity selection
- Clear about educational nature
- Smooth transitions between phases""",
# MODULE_7_STEP_3C_ADD_ROOT_AGENT_SUBAGENTS
שלב 3C: הוספת סוכני משנה
לבסוף, ניתן ליועץ הצדקה גישה לסוכן הקניות ולפייפליין העיבוד, ונסגור את הגדרת הסוכן.
👉 Find:
# MODULE_7_STEP_3C_ADD_ROOT_AGENT_SUBAGENTS
👈 מחליפים את השורה היחידה הזו ב:
sub_agents=[
shopping_agent,
donation_processing_pipeline
]
)
שלב 4: בדיקת המערכת כולה
כדאי לוודא שהתיאום מוגדר בצורה נכונה.
👉 ההזמנה המלאה שלך
charity_advisor/agent.py
אמור להיראות עכשיו כך:
"""
Main orchestration: The donation processing pipeline and root orchestrator agent.
"""
from google.adk.agents import Agent, SequentialAgent
from charity_advisor.shopping_agent.agent import shopping_agent
from charity_advisor.merchant_agent.agent import merchant_agent
from charity_advisor.credentials_provider.agent import credentials_provider
# Create the donation processing pipeline
# This runs Merchant → Credentials in sequence AFTER charity is selected
donation_processing_pipeline = SequentialAgent(
    name="DonationProcessingPipeline",
    description="Creates signed offer and processes payment after charity is selected",
    sub_agents=[
        merchant_agent,
        credentials_provider
    ]
)
# Create the root orchestrator agent
# This is what users interact with directly
root_agent = Agent(
name="CharityAdvisor",
model="gemini-2.5-flash",
description="A friendly charity giving assistant that helps users donate to verified organizations.",
instruction="""You are a helpful and friendly charity giving advisor.
Your workflow has TWO distinct phases:
PHASE 1: CHARITY SELECTION (delegate to shopping_agent)
When a user expresses interest in donating:
1. Delegate to shopping_agent immediately
2. The shopping_agent will:
- Search for charities matching their cause
- Present verified options with ratings
- Engage in conversation (user may ask questions, change their mind)
- Wait for user to select a specific charity and amount
- Create an IntentMandate when user decides
3. Wait for shopping_agent to complete
You'll know Phase 1 is complete when shopping_agent's response includes:
- "IntentMandate created" or "Intent ID: intent_xxx"
- Charity name and donation amount
PHASE 2: PAYMENT PROCESSING (delegate to DonationProcessingPipeline)
After shopping_agent completes:
1. Acknowledge the user's selection naturally:
"Perfect! Let me process your $X donation to [Charity]..."
2. Delegate to DonationProcessingPipeline
3. The pipeline will automatically:
- Create signed cart offer (MerchantAgent)
- Get consent and process payment (CredentialsProvider)
4. After pipeline completes, summarize the transaction
CRITICAL RULES:
- Phase 1 may take multiple conversation turns (this is normal)
- Only proceed to Phase 2 after IntentMandate exists
- Don't rush the user during charity selection
- Don't ask user to "proceed" between phases - transition automatically
EXAMPLE FLOW:
User: "I want to donate to education"
You: [delegate to shopping_agent]
Shopping: "Here are 3 education charities..." [waits]
User: "Tell me more about the first one"
Shopping: "Room to Read focuses on..." [waits]
User: "Great, I'll donate $50 to Room to Read"
Shopping: "IntentMandate created (ID: intent_123)..."
You: "Perfect! Processing your $50 donation to Room to Read..." [delegate to DonationProcessingPipeline]
Pipeline: [creates offer, gets consent, processes payment]
You: "Done! Your donation was processed successfully. Transaction ID: txn_456"
Your personality:
- Warm and encouraging
- Patient during charity selection
- Clear about educational nature
- Smooth transitions between phases""",
    sub_agents=[
        shopping_agent,
        donation_processing_pipeline
    ]
)
שלב 5: חיזוק באמצעות קריאות חוזרות לאימות (אופציונלי, אפשר לדלג לשלב 7)
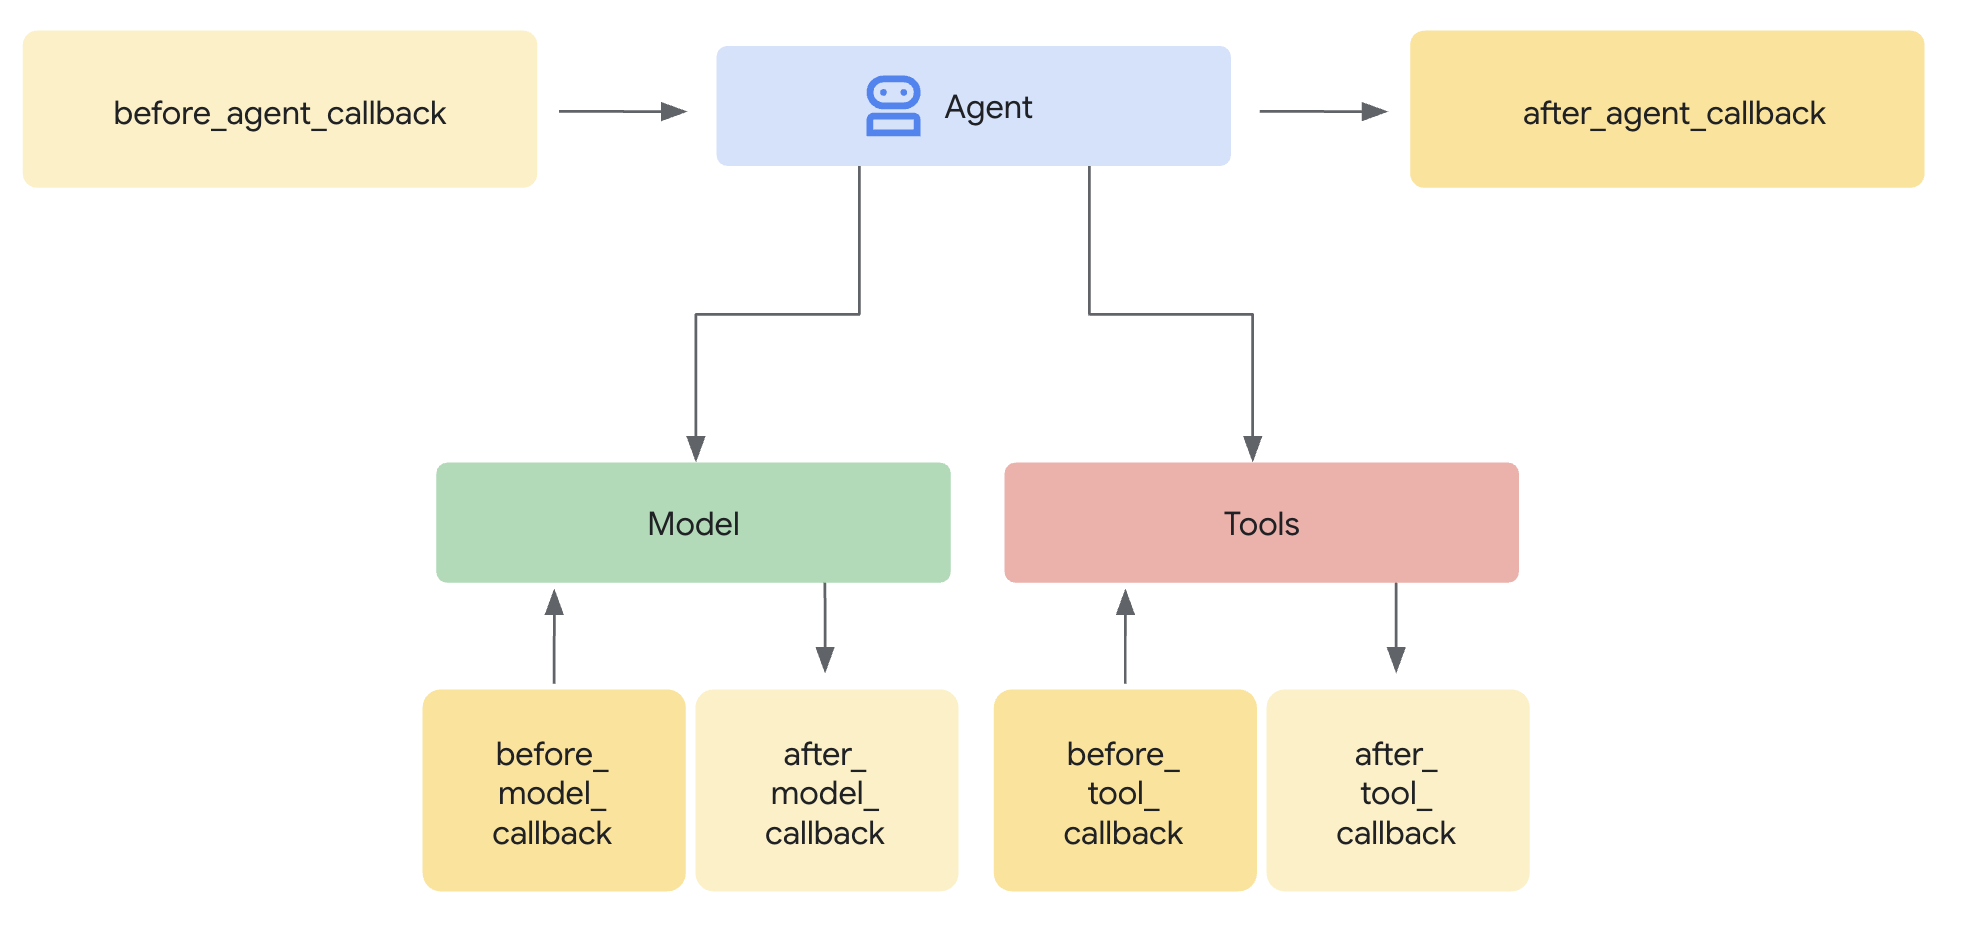
ה-SequentialAgent מבטיח את סדר ההרצה, אבל מה קורה אם:
- הסוכן החכם של שופינג נכשל בלי להציג הודעה (IntentMandate אף פעם לא נוצר)
- שעה חולפת בין החיפוש בשופינג לבין הכניסה לחשבון המוכר (הכוונה פגה)
- הסטטוס נפגם או נמחק
- מישהו מנסה להתקשר ישירות למוֹכר, בלי לעבור דרך שופינג
קריאות חוזרות (Callbacks) מוסיפות אכיפה ארכיטקטונית – הן מאמתות את התנאים המוקדמים עוד לפני שהנציג מתחיל את הקריאה למודל שפה גדול (LLM). מדובר בהגנה מרובדת: כלים מאמתים במהלך הביצוע, ופונקציות קריאה חוזרת מאמתות לפני הביצוע.
נוסיף קריאות חוזרות לאימות לסוכנים של ספק האישורים והמוֹכר שלנו.
שלב 5א: הוספת אימות מוֹכר – ייבוא סוגים של קריאות חוזרות
קודם כול, נוסיף את הייבוא שנדרש לקריאות חוזרות (callback).
👉 פתיחה
charity_advisor/merchant_agent/agent.py
בחלק העליון של הקובץ, אחרי הייבוא הקיים, מוסיפים:
from typing import Optional
from datetime import datetime, timezone
from google.adk.agents.callback_context import CallbackContext
from google.genai.types import Content, Part
import logging

logger = logging.getLogger(__name__)
שלב 5ב: יצירת פונקציית אימות הכוונה
עכשיו ניצור פונקציית קריאה חוזרת שמאמתת את IntentMandate לפני שהסוכן של המוכר פועל.
👉 In
charity_advisor/merchant_agent/agent.py
, add this function BEFORE the
merchant_agent = Agent(...)
הגדרה:
def validate_intent_before_merchant(
    callback_context: CallbackContext,
) -> Optional[Content]:
    """
    Validates IntentMandate exists and hasn't expired before Merchant runs.

    This callback enforces that the Shopping Agent completed successfully
    before the Merchant Agent attempts to create a CartMandate.

    Returns:
        None: Allow Merchant Agent to proceed normally
        Content: Skip Merchant Agent and return error to user
    """
    state = callback_context.state

    # Check credential exists
    if "intent_mandate" not in state:
        logger.error("❌ IntentMandate missing - Shopping Agent may have failed")
        return Content(parts=[Part(text=(
            "Error: Cannot create cart. User intent was not properly recorded. "
            "Please restart the donation process."
        ))])

    intent_mandate = state["intent_mandate"]

    # Validate expiry (critical security check)
    try:
        expiry_time = datetime.fromisoformat(
            intent_mandate["intent_expiry"].replace('Z', '+00:00')
        )
        now = datetime.now(timezone.utc)

        if expiry_time < now:
            logger.error(f"❌ IntentMandate expired at {intent_mandate['intent_expiry']}")
            return Content(parts=[Part(text=(
                "Error: Your donation intent has expired. "
                "Please select a charity again to restart."
            ))])

        time_remaining = expiry_time - now
        logger.info(f"✓ IntentMandate validated. Expires in {time_remaining.total_seconds():.0f}s")

    except (KeyError, ValueError) as e:
        logger.error(f"❌ Invalid IntentMandate structure: {e}")
        return Content(parts=[Part(text=(
            "Error: Invalid intent data. Please restart the donation."
        ))])

    # All checks passed - allow Merchant Agent to proceed
    logger.info(f"✓ Prerequisites met for Merchant Agent: {intent_mandate['intent_id']}")
    return None
שלב 5C: צירוף בקשה להחזרת שיחה לסוכן של המוכר
עכשיו נחבר את השיחה החוזרת לנציג.
👉 In
charity_advisor/merchant_agent/agent.py
, משנים את
merchant_agent = Agent(...)
הגדרה:
מחפשים את השורה הזו בהגדרת הסוכן:
merchant_agent = Agent(
    name="MerchantAgent",
    model="gemini-2.5-flash",
    description="Creates formal, signed CartMandates for charity donations following W3C PaymentRequest standards.",
מוסיפים את השורה הזו מיד אחרי
description
שורה:
before_agent_callback=validate_intent_before_merchant,
הגדרת הסוכן אמורה להיראות כך:
merchant_agent = Agent(
    name="MerchantAgent",
    model="gemini-2.5-flash",
    description="Creates formal, signed CartMandates for charity donations following W3C PaymentRequest standards.",
    before_agent_callback=validate_intent_before_merchant,
    tools=[
        FunctionTool(func=create_cart_mandate)
    ],
    instruction="""..."""
)
שלב 6: הוספת אימות של ספק אישורים (אופציונלי, אפשר לדלג לשלב 7)
אותו דפוס – נוסיף אימות לשלב התשלום.
שלב 6א: ייבוא של סוגי התקשרות חזרה
👉 פתיחה
charity_advisor/credentials_provider/agent.py
בחלק העליון של הקובץ, אחרי הייבוא הקיים, מוסיפים:
from typing import Optional
from datetime import datetime, timezone
from google.adk.agents.callback_context import CallbackContext
from google.genai.types import Content, Part
import logging

logger = logging.getLogger(__name__)
שלב 6ב: בניית פונקציית אימות עגלת קניות
👉 In
charity_advisor/credentials_provider/agent.py
, add this function BEFORE the
credentials_provider = Agent(...)
הגדרה:
def validate_cart_before_payment(
    callback_context: CallbackContext,
) -> Optional[Content]:
    """
    Validates CartMandate exists and hasn't expired before payment processing.

    This callback enforces that the Merchant Agent completed successfully
    before the Credentials Provider attempts to process payment.

    Returns:
        None: Allow Credentials Provider to proceed
        Content: Skip payment processing and return error
    """
    state = callback_context.state

    # Check credential exists
    if "cart_mandate" not in state:
        logger.error("❌ CartMandate missing - Merchant Agent may have failed")
        return Content(parts=[Part(text=(
            "Error: Cannot process payment. Cart was not properly created. "
            "Please restart the donation process."
        ))])

    cart_mandate = state["cart_mandate"]

    # Validate AP2 structure
    if "contents" not in cart_mandate:
        logger.error("❌ CartMandate missing AP2 contents wrapper")
        return Content(parts=[Part(text=(
            "Error: Invalid cart structure. Please restart."
        ))])

    # Validate expiry
    try:
        contents = cart_mandate["contents"]
        expiry_time = datetime.fromisoformat(
            contents["cart_expiry"].replace('Z', '+00:00')
        )
        now = datetime.now(timezone.utc)

        if expiry_time < now:
            logger.error(f"❌ CartMandate expired at {contents['cart_expiry']}")
            return Content(parts=[Part(text=(
                "Error: Your cart has expired (15 minute limit). "
                "Please restart the donation to get a fresh offer."
            ))])

        time_remaining = expiry_time - now
        logger.info(f"✓ CartMandate validated. Expires in {time_remaining.total_seconds():.0f}s")

    except (KeyError, ValueError) as e:
        logger.error(f"❌ Invalid CartMandate structure: {e}")
        return Content(parts=[Part(text=(
            "Error: Invalid cart data. Please restart the donation."
        ))])

    # All checks passed - allow payment processing
    logger.info(f"✓ Prerequisites met for Credentials Provider: {contents['id']}")
    return None
שלב 6C: צירוף Callback לספק פרטי הכניסה
👉 In
charity_advisor/credentials_provider/agent.py
, משנים את
credentials_provider = Agent(...)
הגדרה:
מחפשים את השורה הזו בהגדרת הסוכן:
credentials_provider = Agent(
    name="CredentialsProvider",
    model="gemini-2.5-flash",
    description="Securely processes payments by creating PaymentMandates and executing transactions with user consent.",
מוסיפים את השורה הזו מיד אחרי
description
שורה:
before_agent_callback=validate_cart_before_payment,
הגדרת הסוכן אמורה להיראות כך:
credentials_provider = Agent(
    name="CredentialsProvider",
    model="gemini-2.5-flash",
    description="Securely processes payments by creating PaymentMandates and executing transactions with user consent.",
    before_agent_callback=validate_cart_before_payment,
    tools=[
        FunctionTool(func=create_payment_mandate)
    ],
    instruction="""..."""
)
שלב 7: בדיקה באמצעות ממשק המשתמש באינטרנט של ADK
עכשיו נבדוק את המערכת המאובטחת המלאה עם הפעלת קריאות חוזרות לאימות.
👉 בטרמינל Cloud Shell, מריצים את הפקודה:
adk web
הפלט אמור להיראות כך:
+-----------------------------------------------------------------------------+
| ADK Web Server started                                                      |
|                                                                             |
| For local testing, access at http://localhost:8000.                         |
+-----------------------------------------------------------------------------+

INFO:     Application startup complete.
INFO:     Uvicorn running on http://0.0.0.0:8000 (Press CTRL+C to quit)
👉 בשלב הבא, כדי לגשת לממשק המשתמש באינטרנט של ADK מהדפדפן:
בסרגל הכלים של Cloud Shell (בדרך כלל בפינה השמאלית העליונה), לוחצים על סמל תצוגה מקדימה בדפדפן (נראה כמו עין או ריבוע עם חץ) ובוחרים באפשרות שינוי יציאה. בחלון הקופץ, מגדירים את היציאה ל-8000 ולוחצים על שינוי ותצוגה מקדימה. לאחר מכן ייפתח ב-Cloud Shell כרטיסייה חדשה בדפדפן עם ממשק המשתמש של ADK Web.
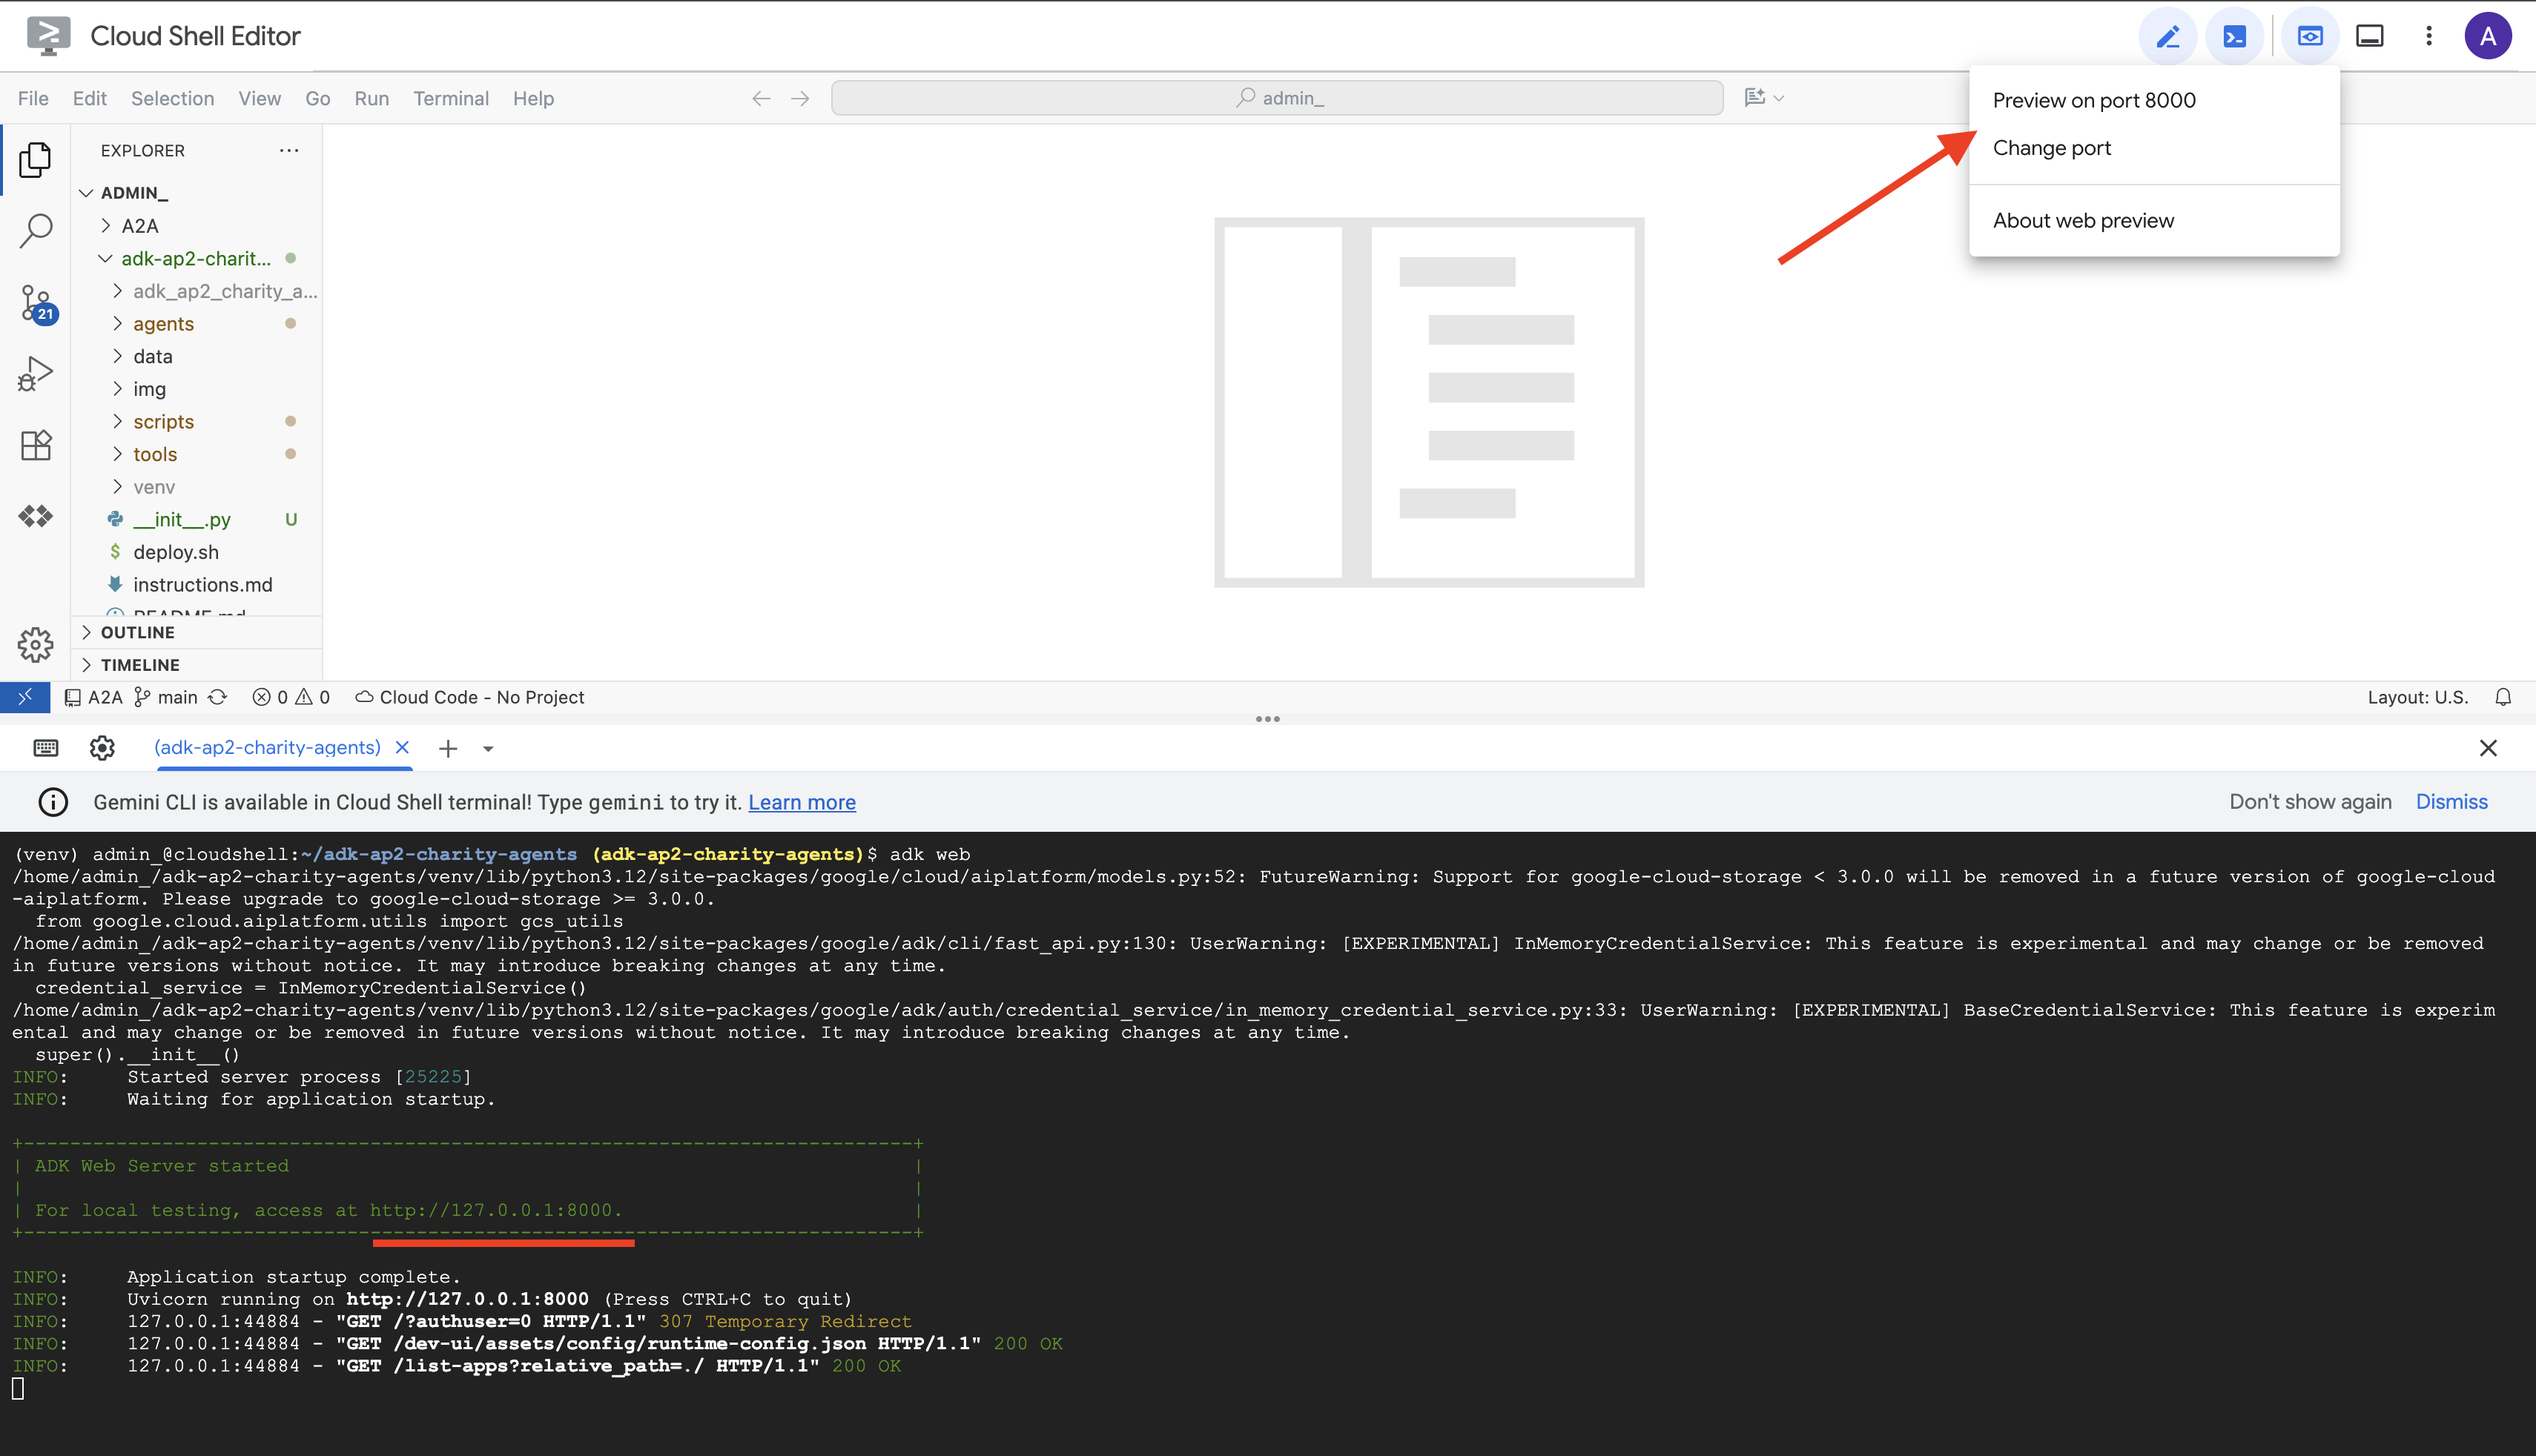
👈 בוחרים את הנציג מהתפריט הנפתח:
בממשק המשתמש באינטרנט של ADK, תפריט נפתח מופיע בחלק העליון. בוחרים באפשרות charity_advisor (יועץ לעמותות) מהרשימה.
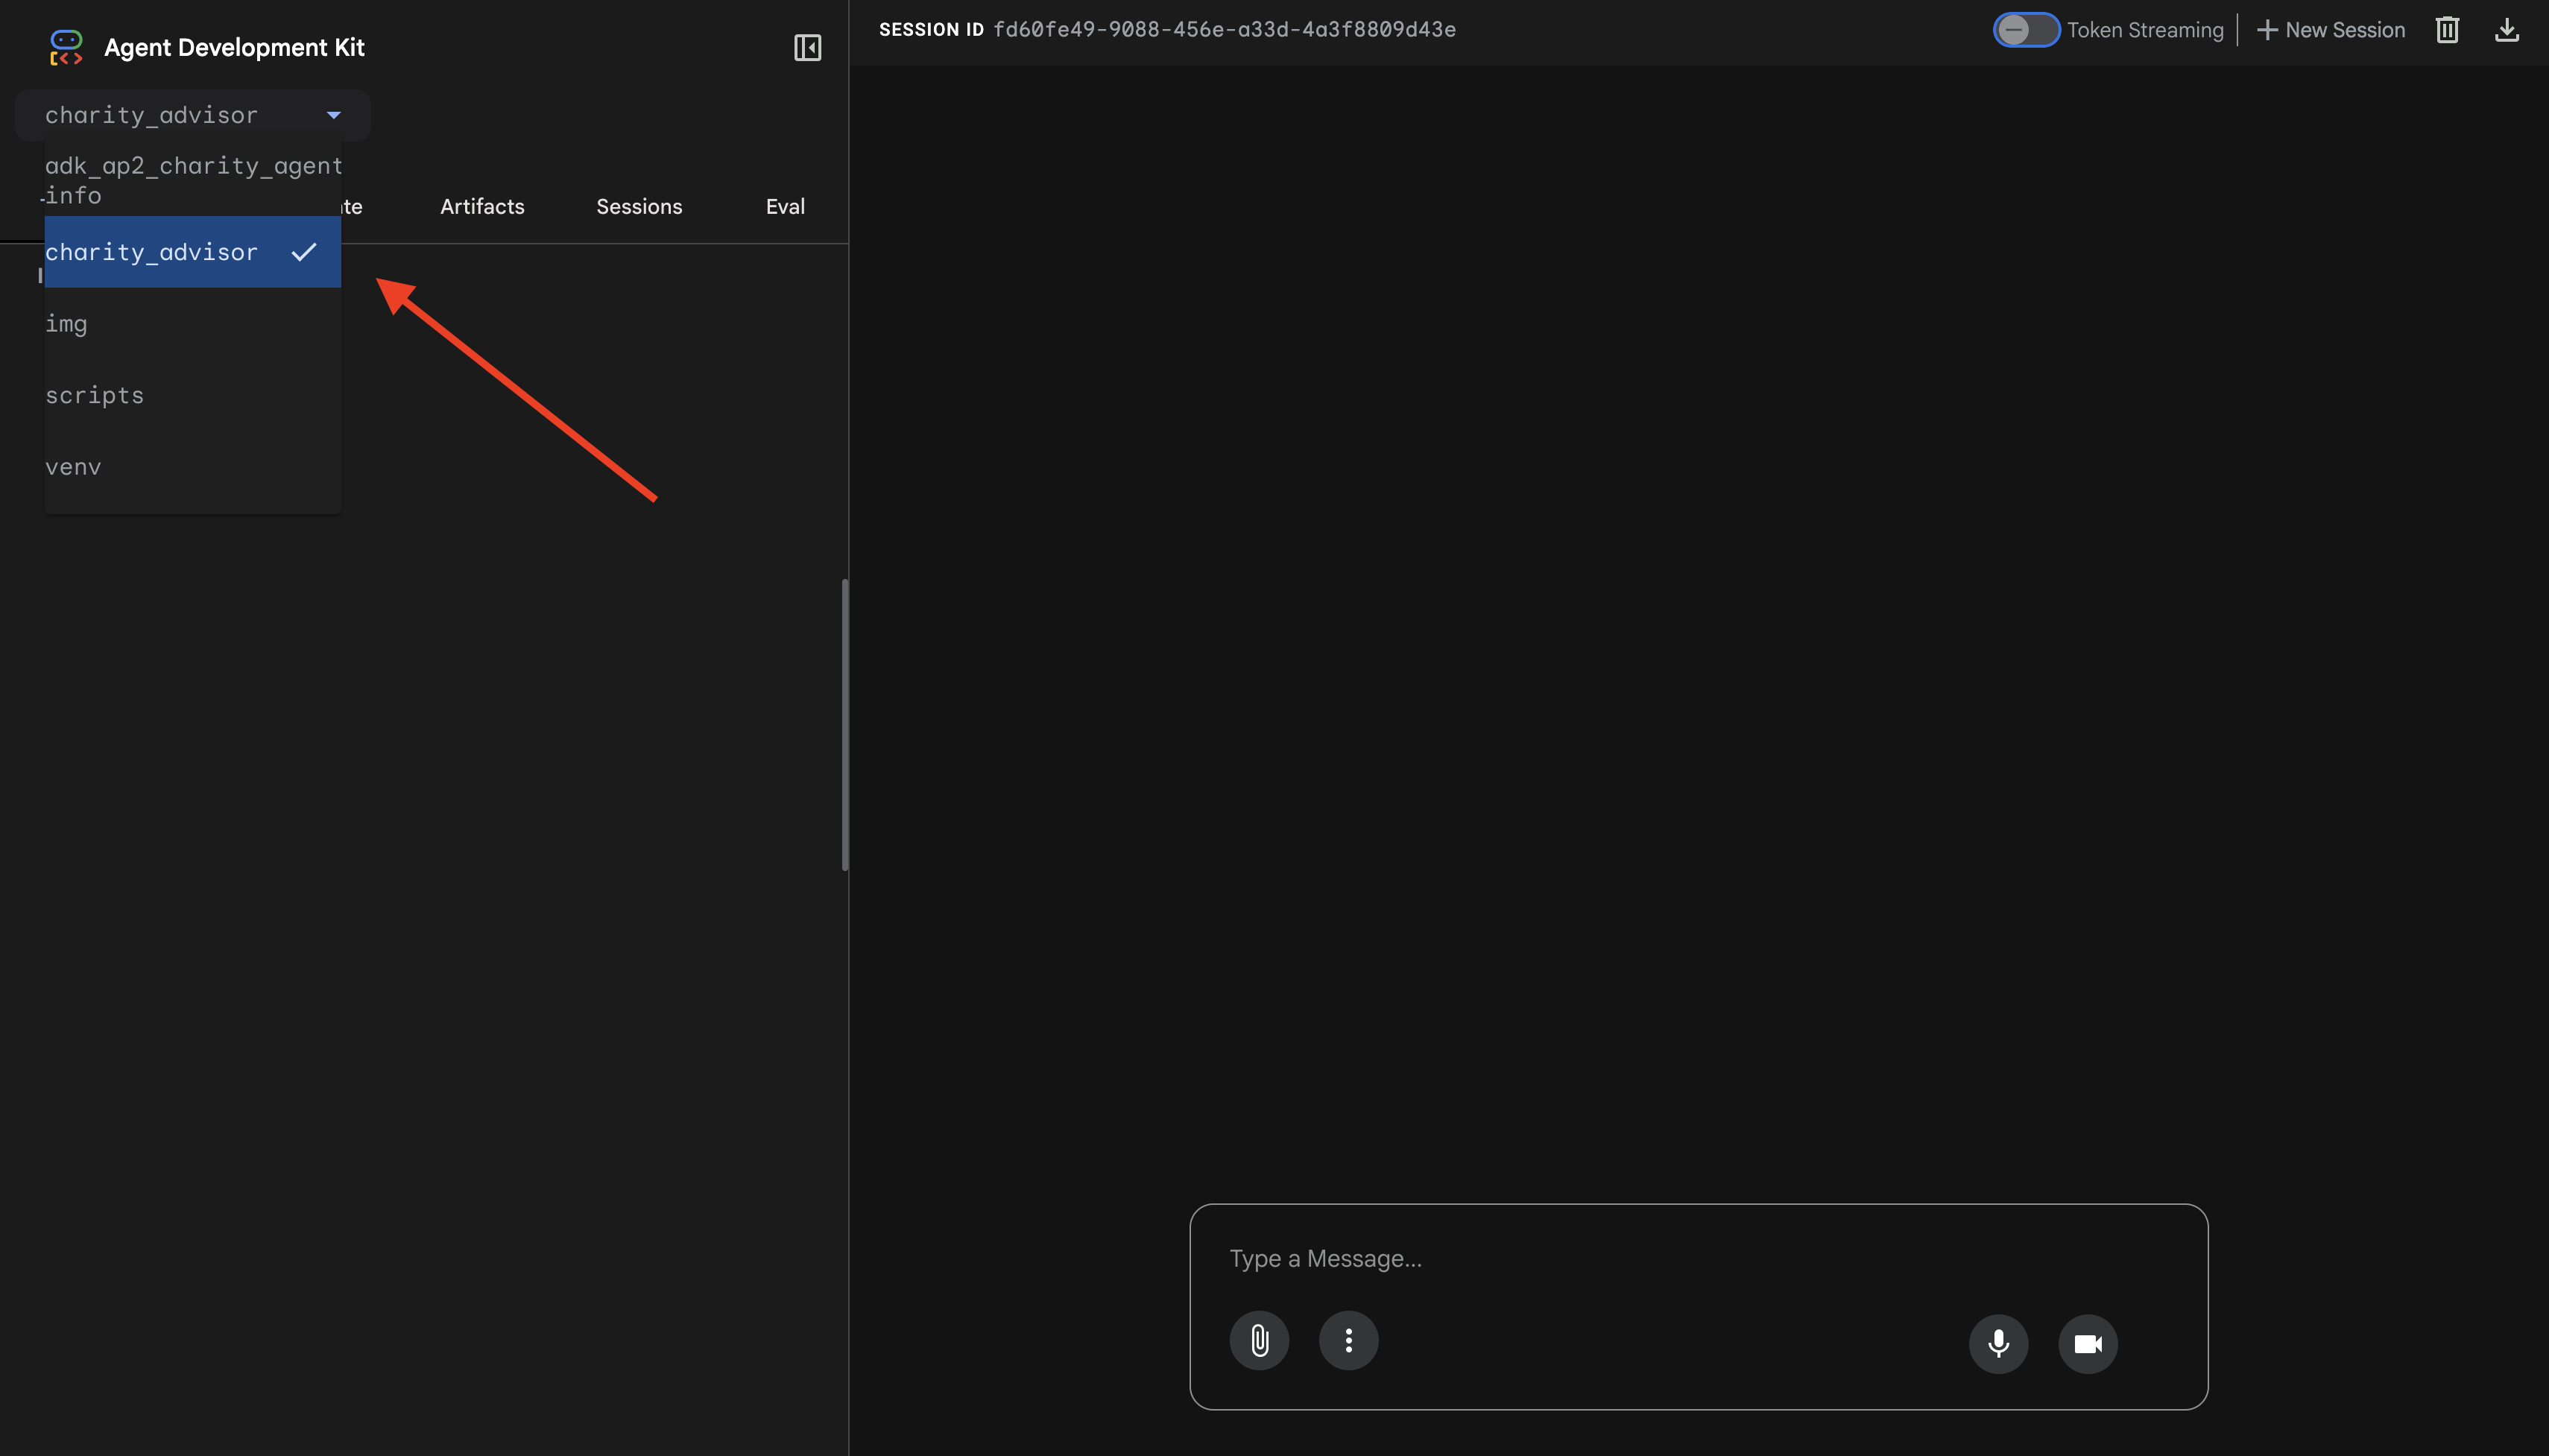
יוצג ממשק האינטרנט של ADK עם:
- חלונית הצ'אט: בצד ימין, לשיחה
- חלונית המעקב: בצד שמאל, לצורך יכולת צפייה (נשתמש בה במודול 9)
בדיקה 1: השלמת תהליך התרומה (מקרה רגיל)
👈 בממשק של הצ'אט, מקלידים:
I want to donate to an education charity
צפייה בתהליך המלא:

מה קורה (אפשר לראות בחלונית המעקב בצד שמאל):
1. היועץ מעביר את ההרשאות לסוכן החכם של שופינג:
- חיפוש של ארגוני צדקה בתחום החינוך באמצעות ShoppingAgent
- מוצגות לכם 3 אפשרויות מאומתות עם פרטים
2. אתם מנהלים אינטראקציה עם ShoppingAgent (יכול להיות שיידרשו כמה תורות):
User: "Tell me more about Room to Read"
Shopping: [explains mission and impact]
User: "I'll donate $50 to Room to Read"
3. ShoppingAgent יוצר IntentMandate:
- יצירה וחתימה של הכוונה
- החזרת אישור עם מזהה כוונת המשתמש
4. הסוכן עובר לשלב העיבוד:
יופי! התרומה שלך בסך 50 $ל-Room to Read נמצאת בתהליך עיבוד...
5. הפעלת צינור העיבוד של התרומות:
- החזרת קריאה (callback) של המוכר מאמתת את IntentMandate (✓ עבר) ← חדש!
- סוכן של מוֹכרים יוצר CartMandate עם חתימה
- החזרת קריאה (callback) של פרטי הכניסה מאמתת את CartMandate (✓ עבר) ← חדש!
- ספק פרטי הכניסה מכין את התשלום
6. תהליכי התשלום:
- ספק פרטי הכניסה יוצר הרשאת תשלום
- מדמה עיבוד תשלומים
- מזהה עסקת החזרת המוצר
7. היועץ מסכם:
יופי! התרומה שלך עברה בהצלחה! 🎉
פרטים:
- סכום: 50.00$
- עמותה: Room to Read (מספר EIN: 77-0479905)
- מזהה העסקה: txn_a3f7b2c8d9e1f4a2
בדיקה 2: אימות קריאות חוזרות לזיהוי כשלים (בדיקה אופציונלית מתקדמת)
רוצים לראות את הקריאות החוזרות בפעולה, כשהן מאתרות שגיאות? תצטרכו להשחית את המצב באופן ידני (ניפוי באגים מתקדם), אבל בסביבת ייצור, קריאות חוזרות יתפסו:
- הכלי 'סוכן קניות' נכשל ← חסימת קריאה חוזרת (callback) של מוֹכר: 'שגיאה: אי אפשר ליצור עגלת קניות...'
- עברו שעתיים ← חסימת הקריאה החוזרת של המוכר: "שגיאה: התוקף של הכוונה פג..."
- התוקף של עגלת הקניות פג ← חסימות של קריאות חוזרות (callback) של פרטי הכניסה: 'שגיאה: התוקף של עגלת הקניות פג (הגבלה של 15 דקות)...'
מקרים חריגים כאלה נאכפים מבחינה ארכיטקטונית על ידי קריאות החזרה לאימות.
מה שבניתם עכשיו
הצלחתם לתזמן שלושה סוכנים מומחים למערכת חלקה ומהימנה עם אימות אדריכלי.
המאמרים הבאים
סיימתם עכשיו את החלק הטכני המרכזי של בניית סוכנים מהימנים:
יצרתם מערכת שלמה ואמינה שמבצעת אכיפה מקומית של שרשרת פרטי הכניסה. עכשיו נהפוך את האפליקציה לזמינה למשתמשים אמיתיים באמצעות פריסה לייצור – ונפעיל את שרשרת האחריות שמאפשרת את מודול 9.
בואו נבצע פריסה של הסוכן המאובטח שלכם ב-Google Cloud.
8. פריסה
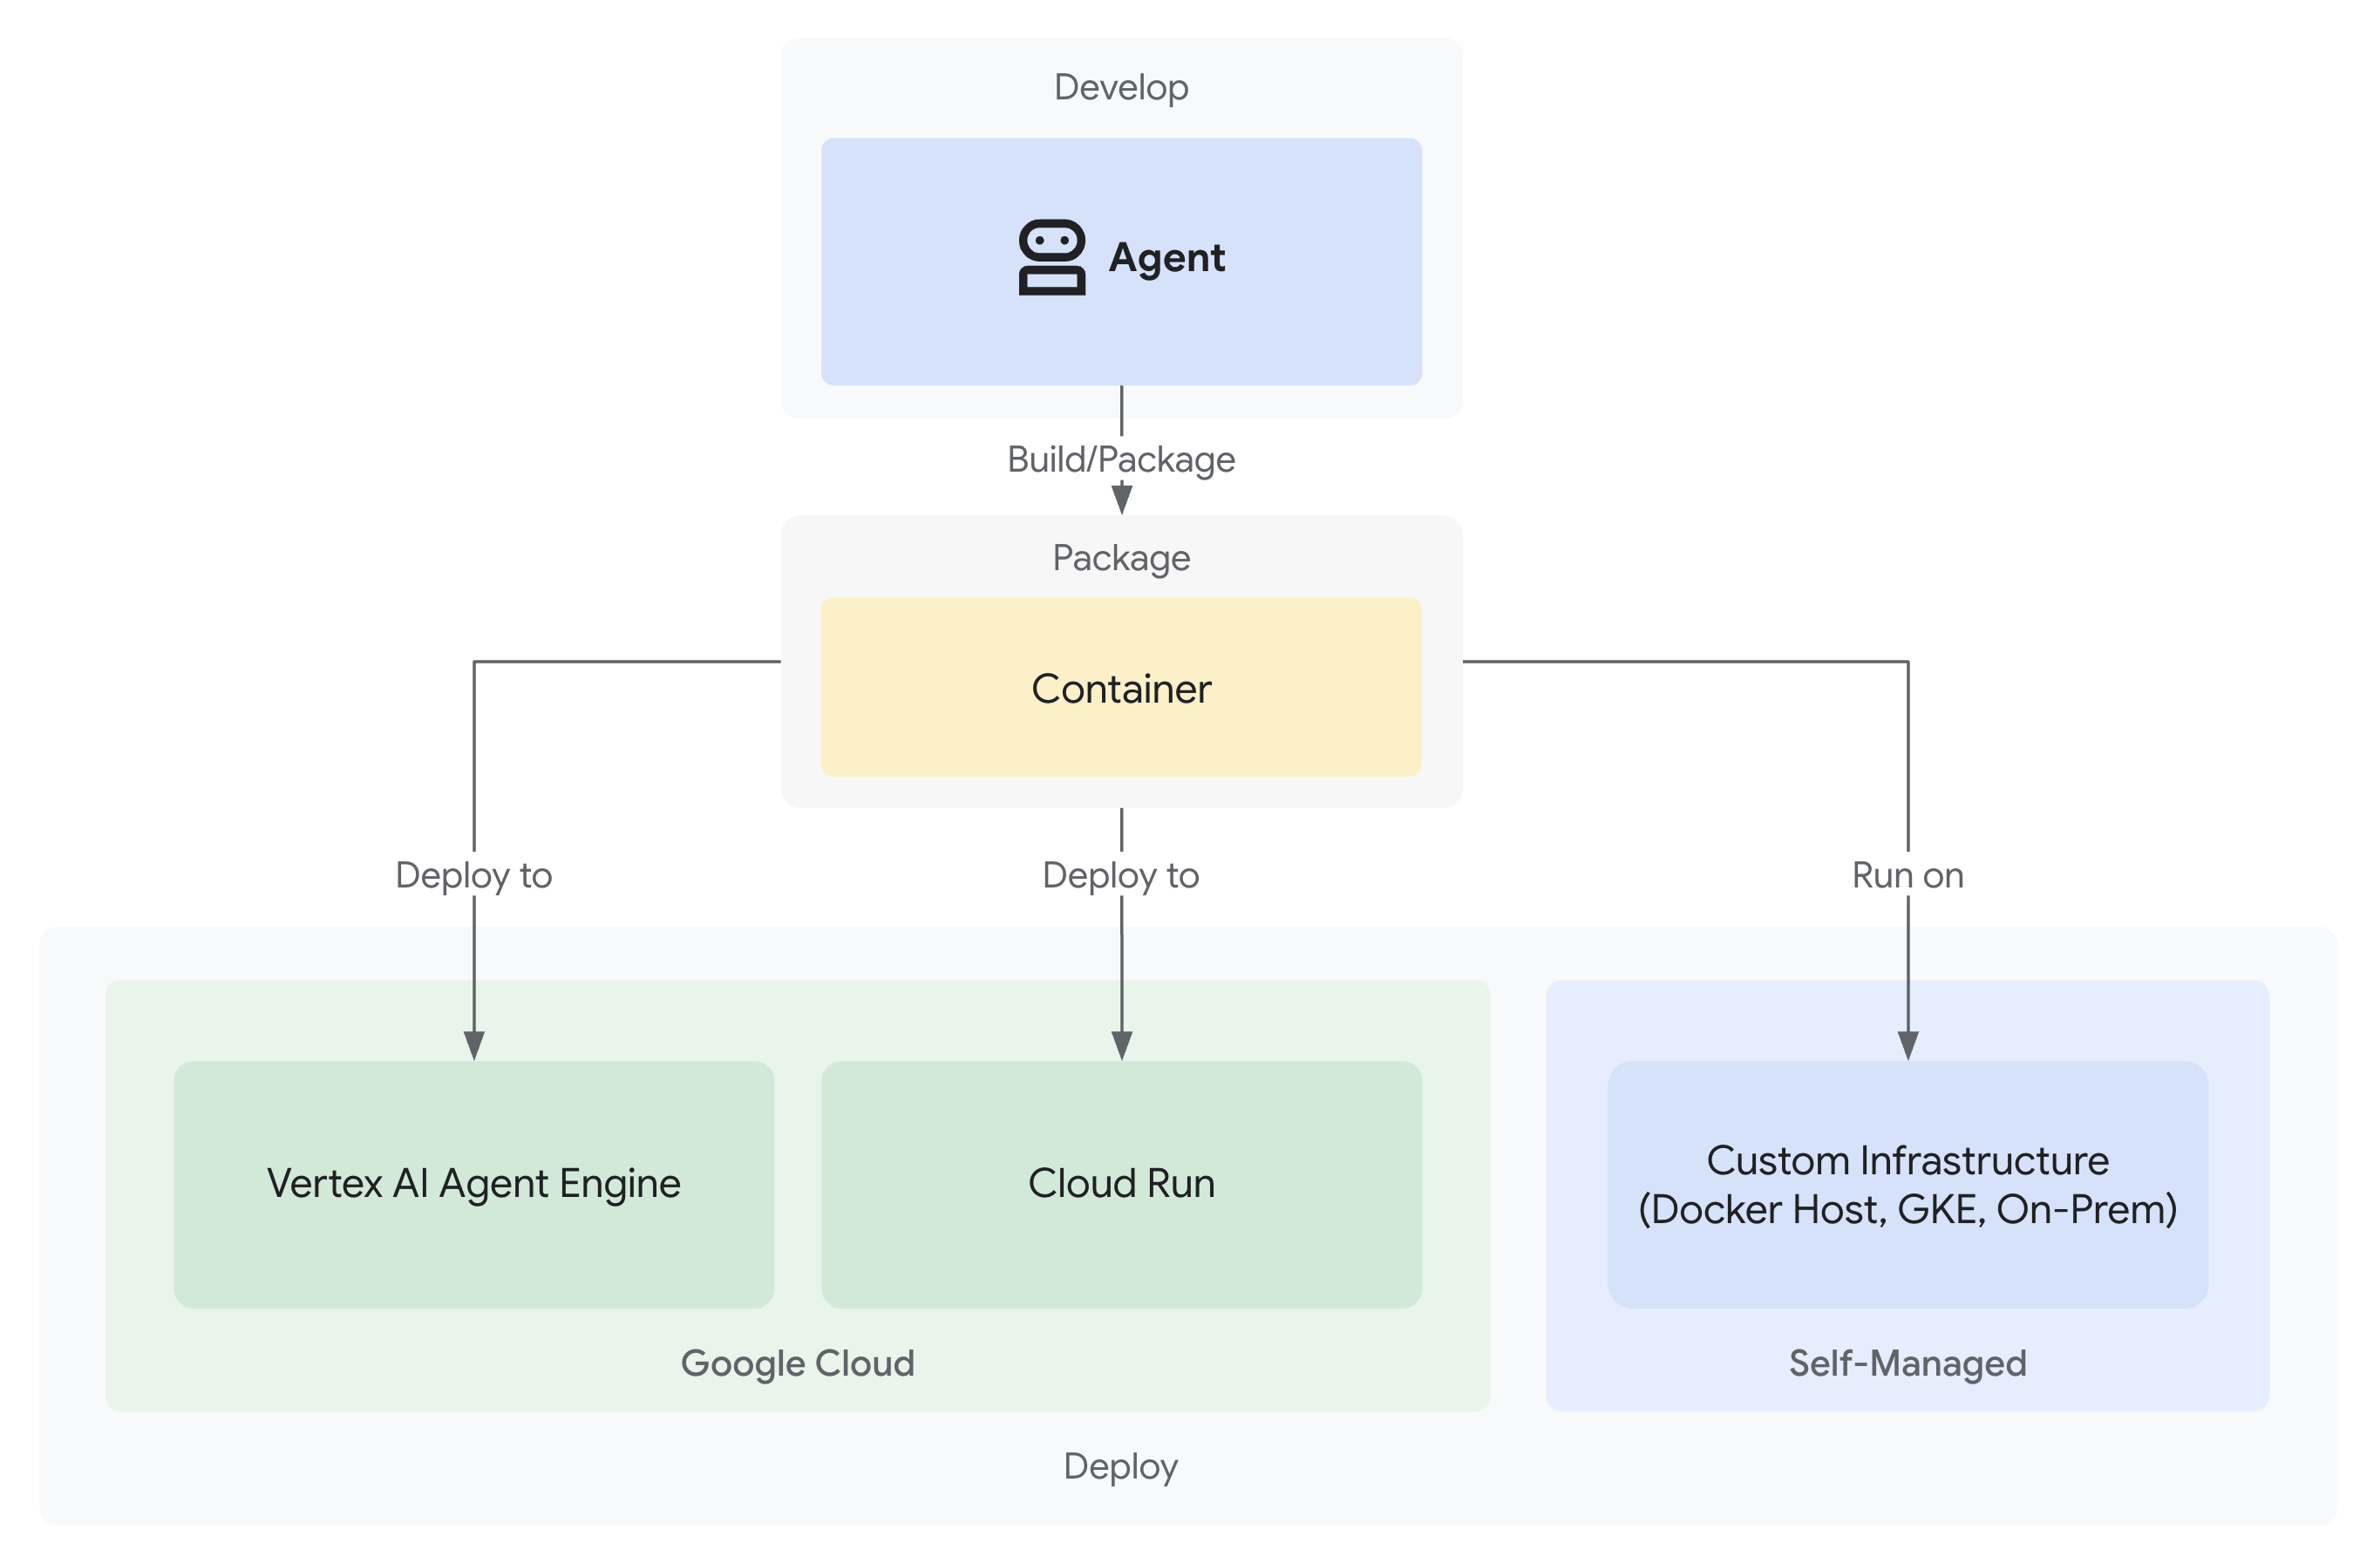
מערכת התרומות האמינה שלכם הושלמה ועכשיו פועלים בה שלושה סוכנים מומחים באופן מקומי:
אבל הוא פועל רק במחשב הפיתוח. כדי שהמערכת הזו תהיה שימושית למשתמשים אמיתיים – וכדי לתעד את נתיבי האחריות שמוכיחים את המהימנות – צריך לפרוס אותה בסביבת הייצור.
במודול הזה נסביר איך לפרוס את הסוכן ב-Google Cloud עם אפשרות מעקב מופעלת מהיום הראשון. הדגל --trace_to_cloud שבו תשתמשו במהלך הפריסה הוא מה שמאפשר את שרשרת האחריות במודול 9.
הסבר על אפשרויות הפריסה
ערכת ה-ADK תומכת בכמה יעדי פריסה. לכל אחד מהם יש מאפיינים שונים מבחינת מורכבות, ניהול סשנים, התאמה לגודל ועלות:
פירוק לגורמים | מקומי ( | Agent Engine | Cloud Run |
מורכבות | מינימלי | נמוכה | בינונית |
המשכיות של סשנים | בזיכרון בלבד (הנתונים יאבדו בהפעלה מחדש) | מנוהל על ידי Vertex AI (אוטומטי) | Cloud SQL (PostgreSQL) או בזיכרון |
תשתית | ללא (מכונת פיתוח בלבד) | מנוהל במלואו | מאגר + מסד נתונים אופציונלי |
הפעלה מההתחלה (cold startup) | לא רלוונטי | 100-500 אלפיות השנייה | 100-2,000 אלפיות השנייה |
שינוי גודל | מכונה יחידה | אוטומטי | אוטומטי (לאפס) |
מודל עלויות | בחינם (חישוב מקומי) | מבוסס-חישוב | על בסיס בקשות + תוכנית בחינם |
תמיכה בממשק המשתמש | כן (מוטמעת) | לא (API בלבד) | כן (באמצעות סימון |
הגדרת יכולת התבוננות | כלי לצפייה בנתוני מעקב מקומיים | אוטומטי עם | נדרש סימון |
הכי מתאים ל | פיתוח ובדיקה | סוכני הפקה | סוכני הפקה |
המלצה: כדי להשתמש במערכת אמינה לתרומות, מומלץ להשתמש ב-Agent Engine כפריסת הייצור העיקרית, כי היא מספקת:
- תשתית מנוהלת (אין קונטיינרים לניהול)
- המשכיות מובנית של סשנים באמצעות
VertexAiSessionService - התאמה אוטומטית לעומס (automatic scaling) ללא הפעלות במצב התחלתי (cold start)
- פריסה פשוטה יותר (לא נדרש ידע ב-Docker)
- שילוב של Cloud Trace מחוץ לקופסה
אפשרות נוספת: Google Kubernetes Engine (GKE)
למשתמשים מתקדמים שזקוקים לשליטה ברמת Kubernetes, לרשת מותאמת אישית או לתזמור של כמה שירותים, אפשר להשתמש בפריסת GKE. האפשרות הזו מספקת גמישות מקסימלית, אבל היא דורשת מומחיות תפעולית רבה יותר (ניהול אשכולות, מניפסטים, חשבונות שירות).
הפריסה של GKE לא מכוסה ב-Codelab הזה, אבל היא מתועדת באופן מלא במדריך הפריסה של ADK GKE.
דרישות מוקדמות
1. הגדרת פרויקט ב-Google Cloud
צריך פרויקט ב-Google Cloud שהחיוב בו מופעל. אם אין לכם חשבון:
- יצירת פרויקט: מסוף Google Cloud
- הפעלת חיוב: הפעלת חיוב
- רושמים את מזהה הפרויקט (ולא את שם הפרויקט או מספר הפרויקט).
2. אימות מחדש (אופציונלי)
אימות ב-Google Cloud:
gcloud auth application-default login
gcloud config set project YOUR_PROJECT_ID
מחליפים את YOUR_PROJECT_ID במזהה הפרויקט בפועל ב-Google Cloud.
מאמתים את האימות:
gcloud config get-value project
# Should output: YOUR_PROJECT_ID
3. משתני סביבה
אפשר להשתמש בפקודות האלה כדי למלא אוטומטית את הקובץ .env:
# Get your current Project ID
PROJECT_ID=$(gcloud config get-value project)
STAGING_BUCKET_VALUE="gs://${PROJECT_ID}-staging"
ENV_FILE=".env"

# Check if STAGING_BUCKET is already set in the .env file
if grep -q "^STAGING_BUCKET=" "${ENV_FILE}"; then
  # If it exists, replace the line
  # The sed command finds the line starting with STAGING_BUCKET= and replaces the entire line.
  # Using | as a delimiter to avoid issues with slashes in the bucket name.
  sed -i "s|^STAGING_BUCKET=.*|STAGING_BUCKET=${STAGING_BUCKET_VALUE}|" "${ENV_FILE}"
  echo "Updated STAGING_BUCKET in ${ENV_FILE}"
else
  # If it doesn't exist, add it to the end of the file
  echo "STAGING_BUCKET=${STAGING_BUCKET_VALUE}" >> "${ENV_FILE}"
  echo "Added STAGING_BUCKET to ${ENV_FILE}"
fi

# Verify it was added or updated correctly
echo "Current STAGING_BUCKET setting:"
grep "^STAGING_BUCKET=" "${ENV_FILE}"
הפרטים שמוצגים הם:
STAGING_BUCKET=gs://your-actual-project-id-staging
הערות חשובות:
- מחליפים את
YOUR_PROJECT_IDבמזהה הפרויקט בפועל (או משתמשים בפקודות שלמעלה). - ב-
GOOGLE_CLOUD_LOCATION, צריך להשתמש באזור נתמך - מאגר ההמתנה ליצירת גרסה ייווצר באופן אוטומטי אם הוא לא קיים כשמריצים את סקריפט הפריסה
4. הפעלת ממשקי ה-API הנדרשים
תהליך הפריסה דורש הפעלה של כמה ממשקי Google Cloud API. מריצים את הפקודה הבאה כדי להפעיל אותם:
gcloud services enable \
    aiplatform.googleapis.com \
    storage.googleapis.com \
    cloudbuild.googleapis.com \
    cloudtrace.googleapis.com \
    compute.googleapis.com
הפקודה הזו מאפשרת:
- AI Platform API – לשימוש עם Agent Engine ומודלים של Vertex AI
- Cloud Storage API – לקטגוריית אחסון זמני
- Cloud Build API – ליצירת קונטיינרים (Cloud Run)
- Cloud Trace API – למעקב אחר נראות ואחריות
- Compute Engine API – לניהול חשבונות שירות
שלב 1: הסבר על תשתית הפריסה
הפרויקט כולל סקריפט פריסה מאוחד (deploy.sh) שמטפל בכל מצבי הפריסה.
👈 בדיקת סקריפט הפריסה (אופציונלי):
cat deploy.sh
הסקריפט מספק שלושה מצבי פריסה:
-
./deploy.sh local– הפעלה מקומית עם אחסון בזיכרון -
./deploy.sh agent-engine– פריסה ב-Vertex AI Agent Engine (מומלץ) -
./deploy.sh cloud-run– פריסה ב-Cloud Run עם ממשק משתמש אופציונלי
איך זה עובד מאחורי הקלעים:
בפריסה של Agent Engine, הסקריפט מבצע את הפעולות הבאות:
adk deploy agent_engine \
  --project=$GOOGLE_CLOUD_PROJECT \
  --region=$GOOGLE_CLOUD_LOCATION \
  --staging_bucket=$STAGING_BUCKET \
  --display_name="Charity Advisor" \
  --trace_to_cloud \
  charity_advisor
לפריסה ב-Cloud Run, הוא מריץ את הפעולות הבאות:
adk deploy cloud_run \
  --project=$GOOGLE_CLOUD_PROJECT \
  --region=$GOOGLE_CLOUD_LOCATION \
  --service_name="charity-advisor" \
  --app_name="charity_advisor" \
  --with_ui \
  --trace_to_cloud \
  charity_advisor
הדגל --trace_to_cloud הוא קריטי לשני סוגי הפריסות – הוא מאפשר שילוב של Cloud Trace בנתיב האחריות שתלמדו עליו במודול 9.
שלב 2: הכנת העטיפה של Agent Engine
Agent Engine דורש נקודת כניסה ספציפית שעוטפת את הסוכן שלכם עבור זמן הריצה המנוהל. הקובץ הזה נוצר בשבילכם.
👉 בדיקה
charity_advisor/agent_engine_app.py
:
"""Agent Engine application wrapper.

This file prepares the Charity Advisor agent for deployment to Vertex AI Agent Engine.
"""

from vertexai import agent_engines
from .agent import root_agent

# Wrap the agent in an AdkApp object for Agent Engine deployment
app = agent_engines.AdkApp(
    agent=root_agent,
    enable_tracing=True,  # Enables Cloud Trace integration automatically
)
למה צריך את הקובץ הזה:
- Agent Engine מחייב שהסוכן יהיה עטוף באובייקט
AdkApp - הפרמטר
enable_tracing=Trueמאפשר שילוב אוטומטי עם Cloud Trace - הסקריפט הזה משמש כ-wrapper שאליו מתבצעת הפניה על ידי ADK CLI במהלך הפריסה
- המדיניות הזו מגדירה את
VertexAiSessionServiceלשימור אוטומטי של סשנים
שלב 3: פריסה ל-Agent Engine (מומלץ)
Agent Engine הוא הפריסה המומלצת בסביבת הייצור למערכת התרומות המהימנה שלכם, כי הוא מספק תשתית מנוהלת באופן מלא עם שמירת נתונים מובנית של סשנים.
הפעלת הפריסה
מתיקיית הבסיס של הפרויקט:
chmod +x deploy.sh
./deploy.sh agent-engine
שלבי הפריסה
צופים בהרצת הסקריפט בשלבים הבאים:
Phase 1: API Enablement
  ✓ aiplatform.googleapis.com
  ✓ storage.googleapis.com
  ✓ cloudbuild.googleapis.com
  ✓ cloudtrace.googleapis.com
  ✓ compute.googleapis.com

Phase 2: IAM Setup
  ✓ Getting project number
  ✓ Granting Storage Object Admin
  ✓ Granting Vertex AI User
  ✓ Granting Cloud Trace Agent

Phase 3: Staging Bucket
  ✓ Creating gs://your-project-id-staging (if needed)
  ✓ Setting permissions

Phase 4: Validation
  ✓ Checking agent.py exists
  ✓ Verifying root_agent defined
  ✓ Checking agent_engine_app.py exists
  ✓ Validating requirements.txt

Phase 5: Build & Deploy
  ✓ Packaging agent code
  ✓ Uploading to staging bucket
  ✓ Creating Agent Engine instance
  ✓ Configuring session persistence
  ✓ Setting up Cloud Trace integration
  ✓ Running health checks
התהליך הזה נמשך 5-10 דקות כי הוא כולל אריזה של הסוכן ופריסה שלו בתשתית של Vertex AI.
שמירת מזהה Agent Engine
לאחר פריסה מוצלחת:
✅ Agent Engine created successfully!

   Agent Engine ID: 7917477678498709504
   Resource Name: projects/123456789/locations/us-central1/reasoningEngines/7917477678498709504
   Endpoint: https://us-central1-aiplatform.googleapis.com/v1/...

   ⚠️  IMPORTANT: Save the Agent Engine ID from the output above
   Add it to your .env file as:
   AGENT_ENGINE_ID=7917477678498709504

   This ID is required for:
   - Testing the deployed agent
   - Updating the deployment later
   - Accessing logs and traces
צריך לעדכן את קובץ .env באופן מיידי:
echo "AGENT_ENGINE_ID=7917477678498709504" >> .env
מה נפרס
הפריסה של Agent Engine כוללת עכשיו:
✅ כל שלושת הסוכנים (קניות, מוֹכר, פרטי כניסה) פועלים בסביבת ריצה מנוהלת
✅ לוגיקה מלאה של שרשרת פרטי הכניסה (הצהרת כוונות ← עגלת קניות ← אישורי תשלום)
✅ מנגנון הסכמה מהמשתמש עם תהליך עבודה לאישור
✅ המשכיות אוטומטית של הסשן באמצעות VertexAiSessionService
✅ התאמה אוטומטית לעומס (automatic scaling) של התשתית שמנוהלת על ידי Google
✅ שילוב של Cloud Trace לצורך יכולת מלאה של מעקב אחר נתונים
שלב 4: בדיקת הסוכן שפרסתם
עדכון הסביבה
מוודאים שהפרמטר .env כולל את מזהה Agent Engine:
AGENT_ENGINE_ID=7917477678498709504  # From deployment output
GOOGLE_CLOUD_PROJECT=your-project-id
GOOGLE_CLOUD_LOCATION=us-central1
STAGING_BUCKET=gs://your-project-id-staging
הרצת סקריפט הבדיקה
הפרויקט כולל סקריפט בדיקה שספציפי לפריסות של Agent Engine.
👈 מריצים את הבדיקה:
python scripts/test_deployed_agent.py
הפלט הצפוי
Testing Agent Engine deployment...
Project: your-project-id
Location: us-central1
Agent Engine ID: 7917477678498709504
Endpoint: https://us-central1-aiplatform.googleapis.com/v1/...

Creating session...
✓ Session created: 4857885913439920384

Sending donation query...
✓ Response received:
  Event 1: I'll help you donate $50 to a children's education charity...
  Event 2: Here are some highly-rated children's education charities...
  Event 3: Which charity would you like to support?...

✅ Test completed successfully!

Session ID: 4857885913439920384

This donation generated a trace in Cloud Trace.
View it in Module 9: Observability

To view traces:
https://console.cloud.google.com/traces/list?project=your-project-id
רשימת משימות לאימות
אחרי הבדיקה, מאמתים:
✅ הסוכן מגיב לשאילתות
✅ כל שלושת הסוכנים פועלים ברצף (שופינג ← מוֹכֵר ← פרטי כניסה)
✅ מופעל מנגנון הסכמה (נדרש אישור)
✅ הסשן נמשך בין הבקשות
✅ אין שגיאות אימות
✅ אין פסק זמן לחיבור
אם נתקלים בשגיאות:
- בדיקה שהמשתנים של הסביבה מוגדרים בצורה נכונה
- מוודאים שממשקי ה-API מופעלים:
gcloud services list --enabled - בדיקת היומנים של Agent Engine ב-Vertex AI Console
- מוודאים שהקובץ
agent_engine_app.pyקיים בתיקייהcharity_advisor
שלב 5: פריסה ב-Cloud Run (אופציונלי)
מומלץ להשתמש ב-Agent Engine כדי לפרוס את הפתרון בסביבת הייצור בצורה יעילה, אבל Cloud Run מאפשר שליטה רבה יותר ותומך בממשק האינטרנט של ADK. הקטע הזה הוא אופציונלי.
מתי כדאי להשתמש ב-Cloud Run
בוחרים ב-Cloud Run אם אתם צריכים:
- ממשק המשתמש באינטרנט של ADK לאינטראקציה עם המשתמש
- שליטה מלאה בסביבת הקונטיינר
- הגדרות בהתאמה אישית של מסד נתונים
- שילוב עם שירותי Cloud Run קיימים
הפעלת הפריסה
chmod +x deploy.sh
./deploy.sh cloud-run
מה שונה:
התסריט יבצע באופן אוטומטי את הפעולות הבאות:
- יצירת קונטיינר Docker עם קוד הסוכן
- יצירת מסד נתונים של Cloud SQL PostgreSQL (אם צריך)
- הגדרת החיבור למסד הנתונים
- פריסה עם ממשק האינטרנט של ADK מופעל
הפריסה נמשכת 10-15 דקות בגלל הקצאת משאבים ב-Cloud SQL.
ניהול סשנים:
- שימוש ב-
DatabaseSessionServiceבמקום ב-VertexAiSessionService - נדרשים פרטי כניסה למסד נתונים ב-
.env(או שנוצרו באופן אוטומטי) - הסטטוס נשמר במסד הנתונים של PostgreSQL
תמיכה בממשק המשתמש:
- ממשק משתמש באינטרנט זמין בכתובת:
https://charity-advisor-xyz.a.run.app
בדיקת פריסה ב-Cloud Run
אם פרסתם ל-Cloud Run באמצעות --with_ui, אתם יכולים לבצע בדיקה ישירות בדפדפן:
- עוברים לכתובת ה-URL של השירות (שמופיעה בפלט הפריסה)
- יופיע ממשק האינטרנט של ה-ADK. בוחרים את הסוכן מהתפריט הנפתח.
- כדי לבצע תרומת בדיקה:
I want to donate $50 to a children's education charity
- בודקים את תהליך ההפעלה:
- ShoppingAgent מוצא ארגוני צדקה ושומר את הכוונה שלכם
- הסוכן של המוכר יוצר את ייפוי הכוח לעגלת הקניות
- ספק פרטי הכניסה יוצר הרשאת תשלום ומבקש אישור
- אחרי האישור, התשלום יעובד
- בודקים שהתשובה כוללת:
- המלצות לארגוני צדקה
- בקשת אישור
- הודעת הצלחה אחרי אישור
פתרון בעיות
בעיות נפוצות
הבעיה: ERROR: GOOGLE_CLOUD_PROJECT is not set
פתרון: מוודאים שבקובץ .env מופיע מזהה הפרויקט הנכון:
GOOGLE_CLOUD_PROJECT=your-actual-project-id
בעיה: קטגוריית האחסון של הסביבה הזמנית לא נוצרה באופן אוטומטי
פתרון: הסקריפט אמור ליצור את הדלי באופן אוטומטי. אם לא, יוצרים אותו באופן ידני:
gsutil mb -p $GOOGLE_CLOUD_PROJECT -l $GOOGLE_CLOUD_LOCATION $STAGING_BUCKET
סיכום
הפעולות הבאות בוצעו בהצלחה:
✅ הבנתם את תשתית הפריסה שסופקה על ידי deploy.sh
✅ בדקתם את הגדרת העטיפה של Agent Engine
✅ פרסתם את מערכת התרומות המהימנה שלכם ב-Agent Engine (מומלץ)
✅ הפעלתם את השילוב של Cloud Trace עם --trace_to_cloud
✅ בדקתם שהסוכן נגיש ופועל
✅ יצרתם את הבסיס לתיעוד של פעולות בחשבון במודול 9
במודול הבא תראו בדיוק מה הדגל הזה מאפשר: שקיפות מלאה לגבי כל תרומה, כל רגע של הסכמה וכל שלב בשרשרת האישורים.
9. ניראות (observability)
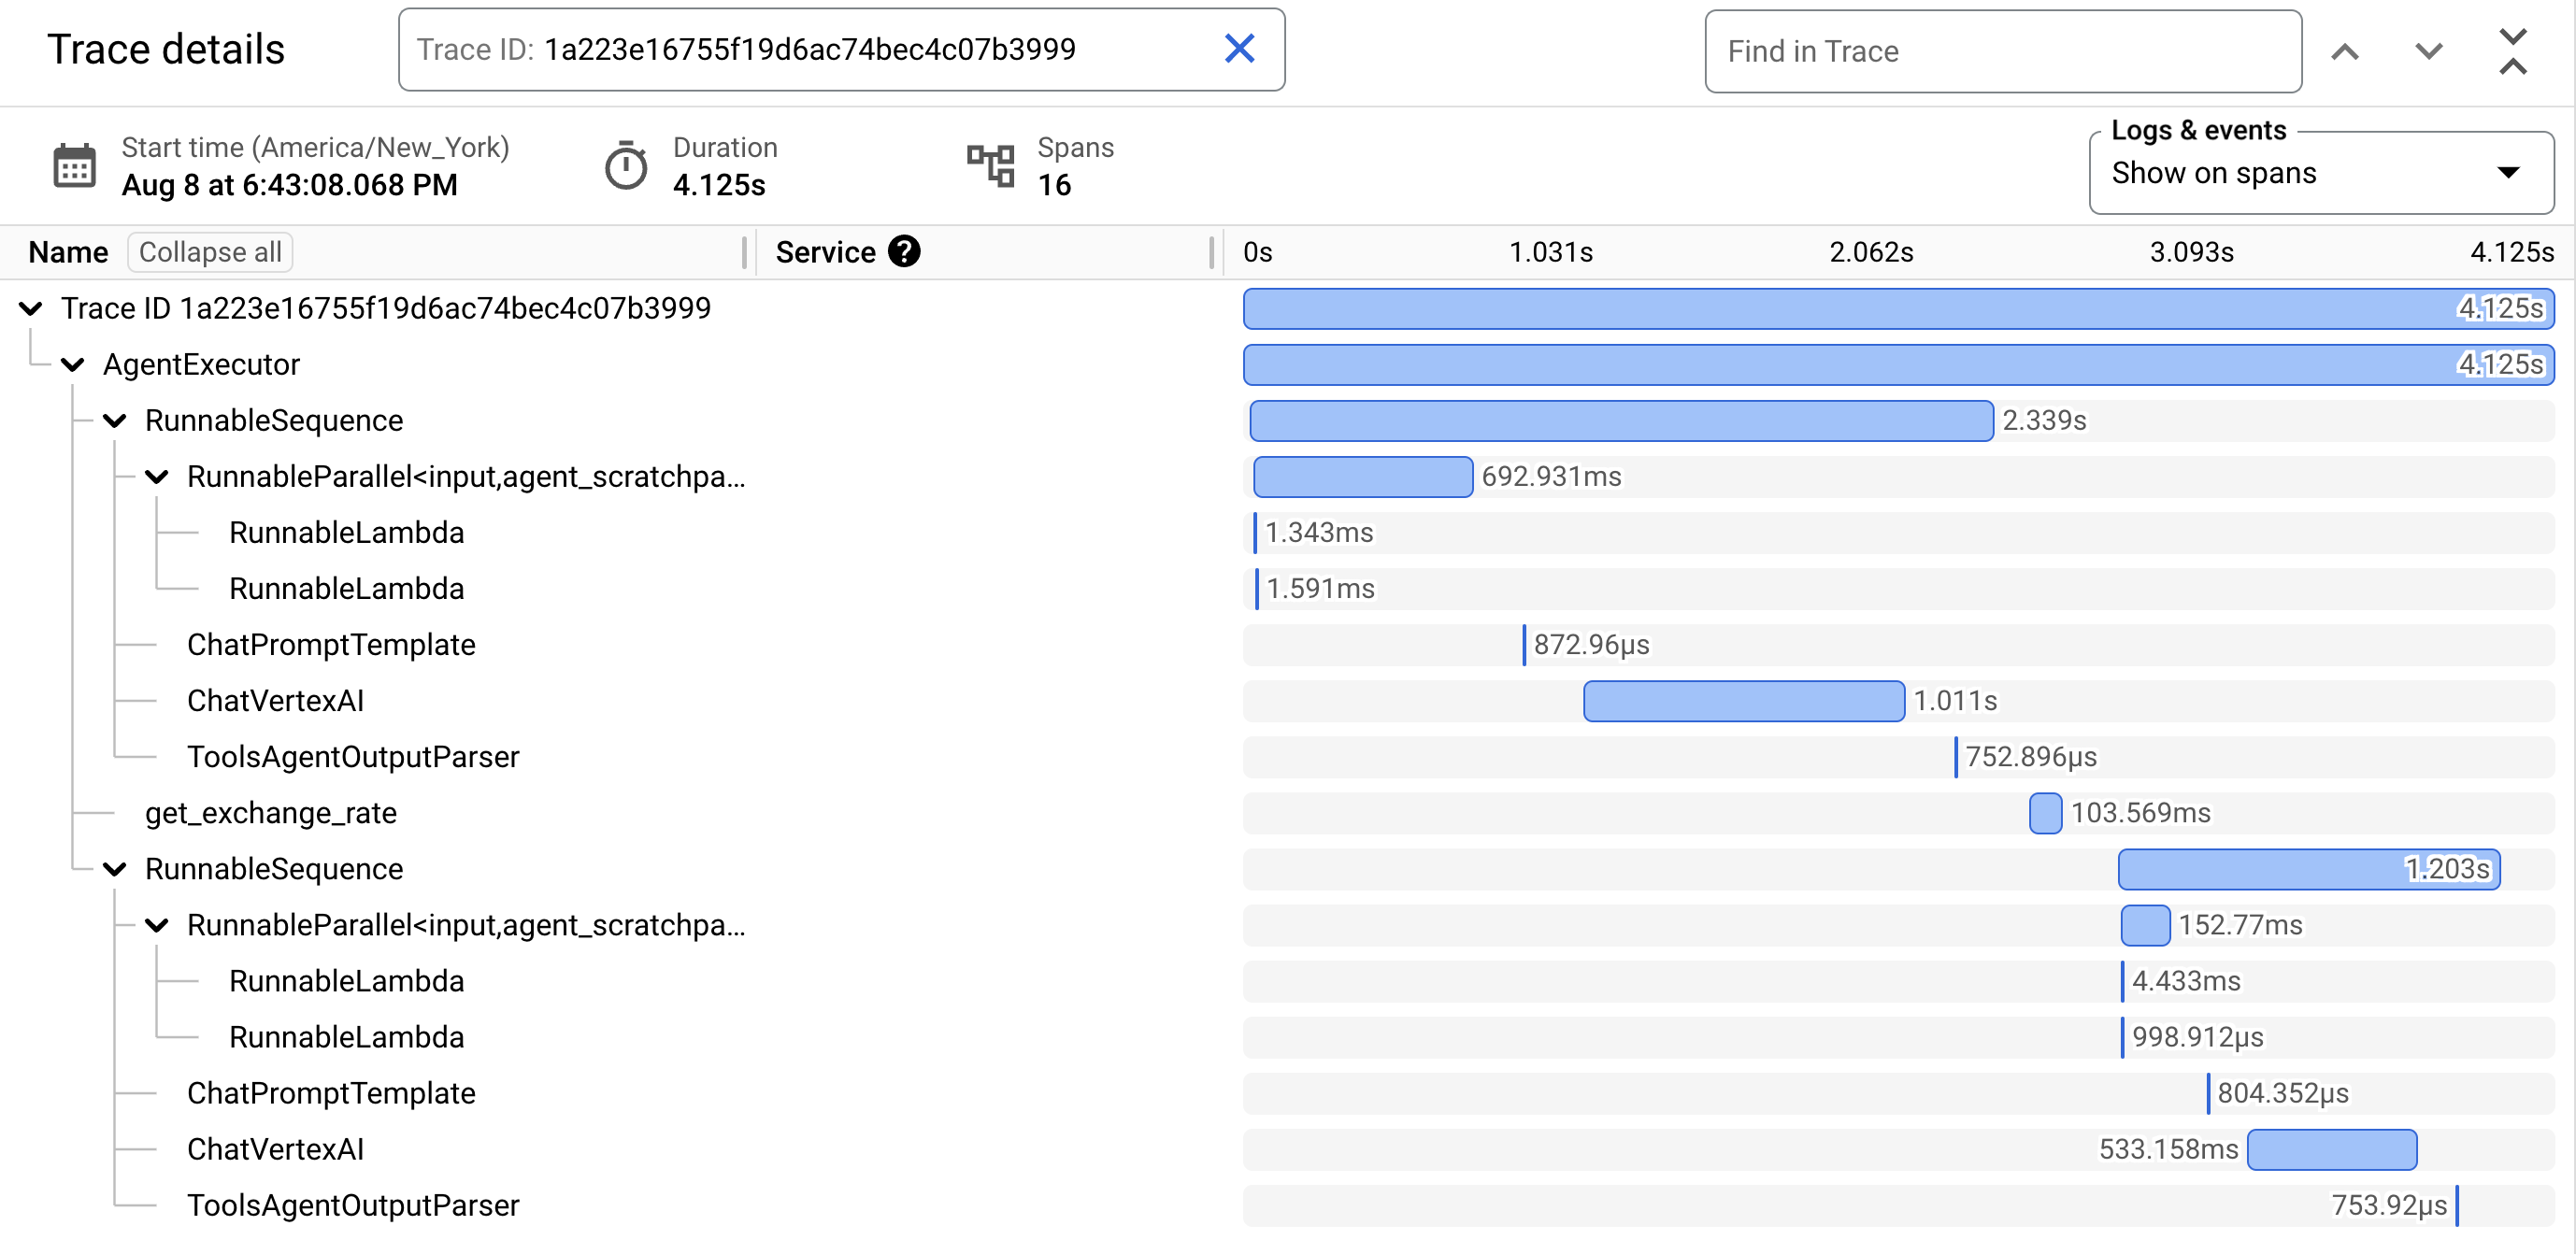
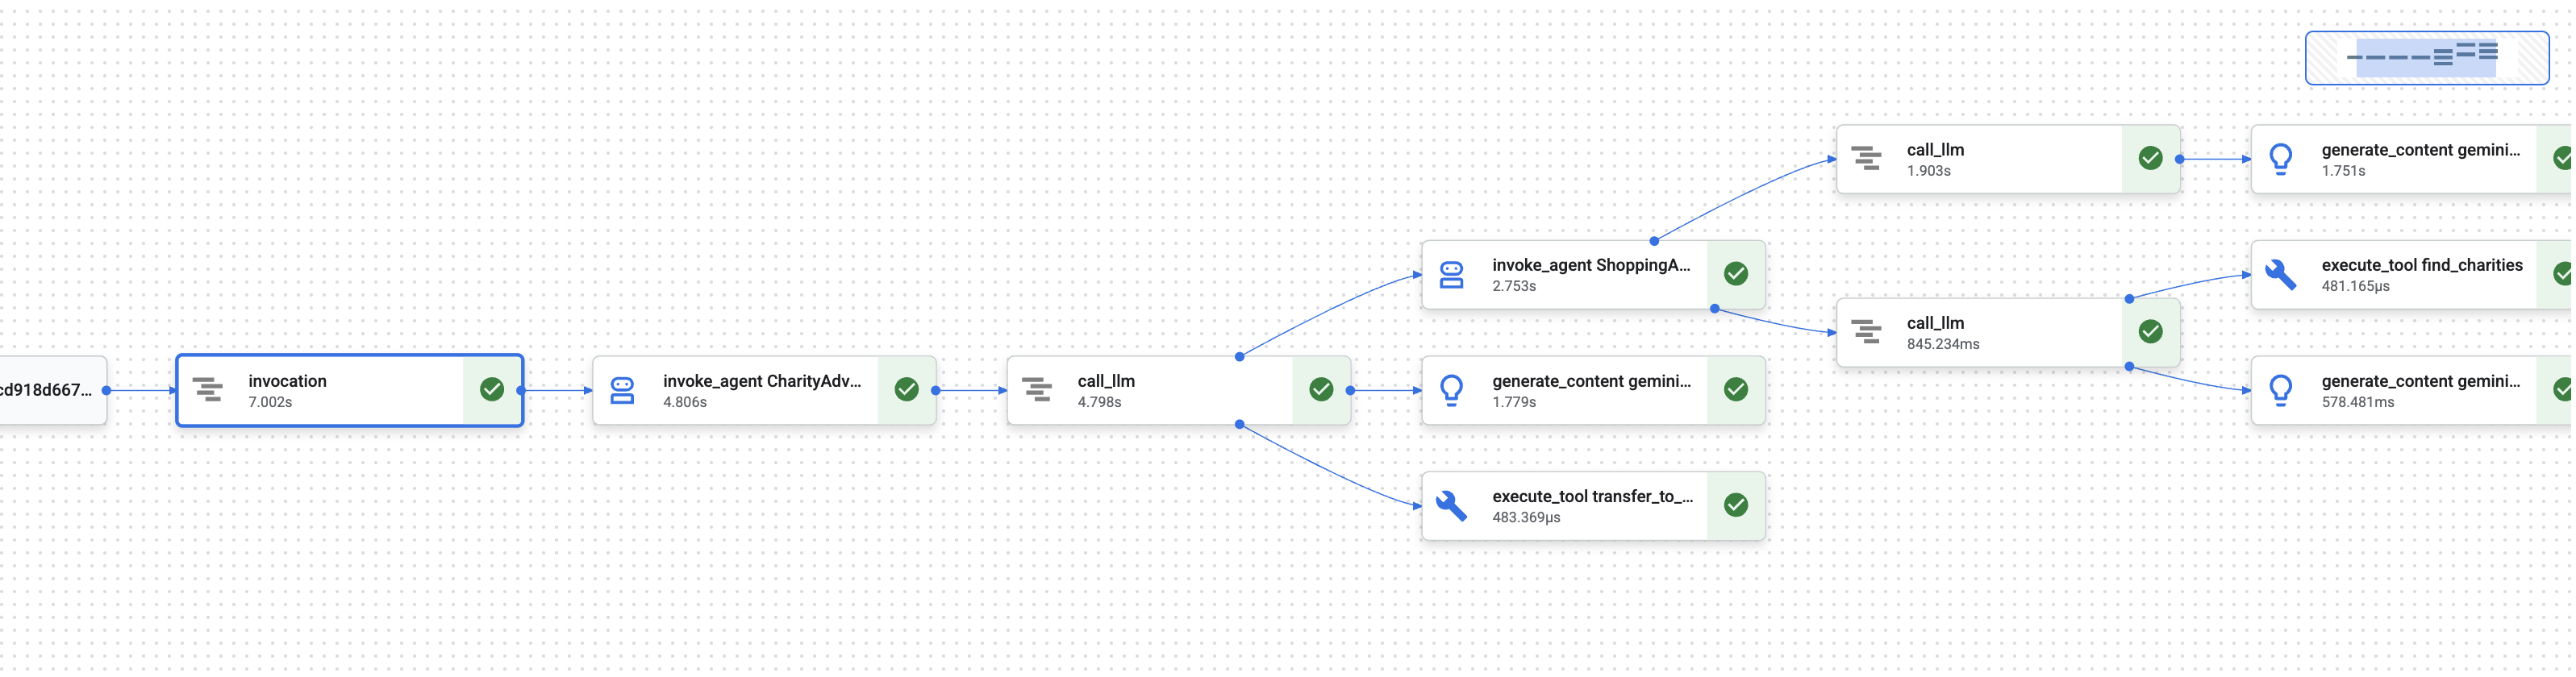
במודול 1 למדתם על בעיה בסיסית: כשסוכן AI מטפל בכסף, איך מוכיחים מה קרה?
משתמש יכול לתבוע בעלות על:
- "אף פעם לא בחרתי בעמותה הזו!"
- "לא אישרתי את התשלום הזה!"
- "המערכת חייבה אותי ללא הסכמתי!"
במערכת AI מסורתית של קופסה שחורה, לא הייתה לכם אפשרות להוכיח אחרת. אבל מערכת התרומות המהימנה שלכם שונה. במודול 8, ביצעתם פריסה עם הדגל --trace_to_cloud, מה שאומר שכל תרומה יוצרת עכשיו שביל ביקורת מלא ועמיד בפני שינויים ב-Cloud Trace.
ביחידה הזו נלמד איך לקרוא את העקבות האלה ולהשתמש בהן כראיות. נלמד אותך:
- ניווט ב-Cloud Trace Explorer כדי למצוא עקבות של סביבת הייצור
- קריאת תצוגת מפל (Waterfall) כדי להבין את הרצת התוכנית
- איתור שרשרת האישורים (Intent ← Cart ← Payment mandates)
- איתור רגעי הסכמה באמצעות הוכחה עם חותמת זמן
- שימוש בנתוני מעקב ליישוב סכסוכים
- ייצוא של נתוני מעקב לצורך תאימות וביקורת
זה מה שמבדיל בין מערכות מהימנות לבין מערכות יעילות אבל לא שקופות: היכולת להוכיח מה קרה בדיוק משפטי.
הסבר על Traces ו-Spans
לפני שצופים בנתוני מעקב ב-Cloud Trace, חשוב להבין מה רואים.
מה זה Trace?
Trace הוא ציר הזמן המלא של הטיפול של הסוכן בבקשה יחידה. הוא מתעד את כל מה שקורה מרגע שמשתמש שולח שאילתה ועד שהתשובה הסופית מועברת.
בכל מעקב מוצגים הפרטים הבאים:
- משך הזמן הכולל של הבקשה
- כל הפעולות שהופעלו
- איך הפעולות קשורות זו לזו (קשרים של הורה-צאצא)
- מתי כל פעולה התחילה ומתי היא הסתיימה
- סטטוס הצלחה או כישלון
לסוכן הצדקה שלך: טרייס אחד = תהליך תרומה מלא אחד, מהשלב 'אני רוצה לתרום' ועד השלב 'התשלום בוצע בהצלחה'.
מה זה Span?
טווח מייצג יחידת עבודה אחת בתוך מעקב. אפשר לחשוב על טווחים כאבני הבניין של עקבות.
סוגי טווחי זמן נפוצים במערכת התרומות שלכם:
סוג הטווח | מה זה מייצג | דוגמה |
| הפעלה של סוכן |
|
| בקשה למודל שפה |
|
| ביצוע פונקציות של כלי |
|
| קריאה מזיכרון הסשן | אחזור |
| כתיבה לזיכרון של הסשן | אחסון |
כל יחידה לוגית למעקב מכילה:
- שם: הפעולה שהשורה מייצגת
- כמה זמן נמשך התהליך (שעת התחלה → שעת סיום)
- מאפיינים: מטא-נתונים כמו קלט של כלי, תגובות של מודלים, ספירת טוקנים
- סטטוס: הצלחה (
OK) או שגיאה (ERROR) - קשרים של הורה-צאצא: אילו פעולות הפעילו אילו פעולות
איך טווחים יוצרים Trace
הטווחים מוצגים אחד בתוך השני כדי להראות סיבתיות:
Root Span: CharityAdvisor.run (entire request)
  └─ Child: DonationPipeline.run (sequential workflow)
      ├─ Child: ShoppingAgent.run
      │   ├─ Grandchild: call_llm (Gemini processes charity search)
      │   ├─ Grandchild: execute_tool (find_charities)
      │   └─ Grandchild: execute_tool (save_user_choice)
      ├─ Child: MerchantAgent.run
      │   ├─ Grandchild: call_llm (Gemini generates cart)
      │   └─ Grandchild: execute_tool (create_cart_mandate)
      └─ Child: CredentialsProvider.run
          ├─ Grandchild: call_llm (Gemini processes payment)
          └─ Grandchild: execute_tool (create_payment_mandate) [CONSENT!]
ההיררכיה הזו מראה בדיוק מה קרה ובאיזה סדר. אפשר לראות שייפוי הכוח לתשלום נוצר אחרי ייפוי הכוח לעגלת הקניות, שנוצר אחרי שהמשתמש בחר עמותה.
שלב 1: גישה לכלי Cloud Trace Explorer
עכשיו נראה את העקבות בפועל מהסוכן שפרסתם.
מעבר אל Cloud Trace
- פותחים את מסוף Google Cloud: console.cloud.google.com
- בוחרים את הפרויקט מהתפריט הנפתח בחלק העליון (הוא אמור להיות מסומן מראש אם עבדתם בו).
- עוברים אל Cloud Trace Explorer:
- בסרגל הצד שמימין, גוללים לקטע Observability (יכולת תצפית).
- לוחצים על Trace.
- או להשתמש בקישור ישיר: console.cloud.google.com/traces/list
מה רואים
ב-Trace Explorer מוצגת רשימה של כל העקבות מהפרויקט:
עמודה | מה רואים |
בקשה | שיטת HTTP ונקודת קצה (לבקשות API) |
שעת ההתחלה | השעה שבה הבקשה התחילה |
זמן אחזור | משך הזמן הכולל של הבקשה |
Spans | מספר הפעולות במעקב |
כל שורה מייצגת בקשה מלאה אחת לסוכן הפרוס.
יצירת עקבות בדיקה (אם צריך)
אם עדיין לא רואים עקבות, יכול להיות שהרשימה ריקה כי:
- עדיין לא נשלחו בקשות לסוכן שהופעל
- חולפות דקה או שתיים מהבקשה עד שהנתונים מופיעים
יצירת עקבות בדיקה:
אם פרסתם ל-Cloud Run באמצעות ממשק המשתמש, נכנסים לכתובת ה-URL של השירות ומשלימים תרומה בדפדפן.
אם פרסתם ל-Agent Engine, מריצים את סקריפט הבדיקה מיחידת לימוד 8:
python scripts/test_deployed_agent.py
ממתינים דקה או שתיים ומרעננים את הדף Cloud Trace Explorer. עכשיו אמורים להופיע עקבות.
סינון של רכיבים מוליכים
משתמשים באפשרויות הסינון בחלק העליון כדי למצוא עקבות ספציפיות:
- טווח זמן: אם צריך, אפשר לשנות מ "השעה האחרונה" ל "24 השעות האחרונות"
- זמן אחזור מינימלי / זמן אחזור מקסימלי: סינון של בקשות איטיות
- מסנן בקשות: חיפוש לפי פעולות ספציפיות (לדוגמה, DonationPipeline)
במודול הזה, כדאי להתמקד בנתוני מעקב עם משכי זמן ארוכים יותר (מעל 5 שניות), כי הם מייצגים תהליכי תרומה מלאים עם ביצוע של כל שלושת הסוכנים.
שלב 2: בדיקת תהליך מלא של תרומה
לוחצים על אחד מהמעקבים ברשימה כדי לפתוח את תצוגת המפל. כאן תבלו את רוב הזמן בניתוח התנהגות הסוכן.
הסבר על תצוגת המפל
תצוגת המפל היא תרשים גאנט שבו מוצג ציר הזמן המלא של הביצוע:
━━━━━━━━━━━━━━━━━━━━━━━━━━━━━━━━━━━━━━━━━━━━━━━━━
              Timeline (horizontal = time) →
━━━━━━━━━━━━━━━━━━━━━━━━━━━━━━━━━━━━━━━━━━━━━━━━━

invocation                           ▓▓▓▓▓▓▓▓▓▓▓▓▓▓▓▓▓▓▓▓▓▓ 8.2s
  agent_run: CharityAdvisor          ▓▓▓▓▓▓▓▓▓▓▓▓▓▓▓▓▓▓▓▓▓ 8.1s
    agent_run: DonationPipeline      ▓▓▓▓▓▓▓▓▓▓▓▓▓▓▓▓▓▓▓▓ 7.9s
      agent_run: ShoppingAgent       ▓▓▓▓▓▓ 2.1s
        call_llm: gemini-2.5-flash   ▓▓▓▓ 1.2s
        execute_tool: find_charities ▓▓ 0.5s
        execute_tool: save_user_choice ▓ 0.3s
      agent_run: MerchantAgent       ▓▓▓ 1.8s
        call_llm: gemini-2.5-flash   ▓▓ 0.9s
        execute_tool: create_cart_mandate ▓ 0.7s
      agent_run: CredentialsProvider ▓▓▓▓▓▓▓▓ 4.0s
        call_llm: gemini-2.5-flash   ▓▓ 0.8s
        execute_tool: create_payment_mandate ▓▓▓▓▓ 3.0s [CONSENT]
קריאת התרשים
כל עמודה מייצגת טווח:
- מיקום אופקי: מתי זה התחיל
- אורך: כמה זמן נמשך התהליך
- הזחה: מציגה את יחסי ההורה-צאצא
- צבע: בדרך כלל כחול לרגיל, אדום לשגיאות
תצפיות מרכזיות מהדוגמה הזו של מעקב:
✅ משך הזמן הכולל: 8.2 שניות
✅ ביצוע רציף: סוכן הקניות סיים את הפעולה לפני שסוכן המוכר התחיל את הפעולה
✅ סוכן המוכר סיים את הפעולה
before
CredentialsProvider started
✅ Consent was the longest operation: 3.0 seconds for create_payment_mandate (because it waited for user confirmation)
✅ LLM calls are visible: Each agent made one Gemini request
✅ Tool calls are captured: All six tools executed successfully
באיור הזה אפשר לראות באופן מיידי איפה מושקע הזמן ובאיזה סדר הפעולות מתבצעות.
לחיצה על Span תציג פרטים
לוחצים על הטווח invocation (הטווח הבסיסי בחלק העליון). בחלונית השמאלית, מוצגים מאפיינים מפורטים:
{
  "http.method": "POST",
  "http.status_code": 200,
  "http.url": "https://charity-advisor-xyz.a.run.app/api/run",
  "user_id": "test_user_123",
  "session_id": "4857885913439920384",
  "trace_id": "a1b2c3d4e5f6...",
  "span_id": "1234567890abcdef"
}
המאפיינים האלה מספקים הקשר לגבי הבקשה כולה.
שלב 3: איתור שרשרת האישורים
המערכת המהימנה שלכם משתמשת בשרשרת של פרטי כניסה כדי להוכיח הרשאה בכל שלב:
IntentMandate (User chose charity)
    ↓
CartMandate (Merchant created cart, signed IntentMandate)
    ↓
PaymentMandate (Payment provider created payment, signed CartMandate)
בואו נאתר כל הרשאה במעקב.
איפה מוצאים את IntentMandate
לוחצים על התג execute_tool: save_user_choice (מתחת ל-ShoppingAgent).
בחלונית המאפיינים יוצגו:
{
  "tool.name": "save_user_choice",
  "tool.input.charity_name": "Save the Children",
  "tool.input.amount": 50,
  "tool.output.status": "success",
  "tool.output.intent_mandate": {
    "charity_name": "Save the Children",
    "amount": 50,
    "timestamp": "2024-11-08T15:30:12.345Z",
    "signature": "a3f7b9c1d2e4..."
  }
}
הנתונים האלה מוכיחים:
- ✅ המשתמש בחר באפשרות 'Save the Children'
- ✅ הסכום היה 50$
- ✅ הבחירה נרשמה בשעה 15:30:12 UTC
- ✅ החתימה נוצרה (בסביבת ייצור, זו תהיה חתימה קריפטוגרפית)
ה-IntentMandate נמצא עכשיו במצב סשן וזמין לסוכנים הבאים.
איפה אפשר למצוא את CartMandate
לוחצים על התג execute_tool: create_cart_mandate (מתחת ל-MerchantAgent).
בחלונית המאפיינים:
{
  "tool.name": "create_cart_mandate",
  "tool.input.intent_mandate": {
    "charity_name": "Save the Children",
    "amount": 50,
    "signature": "a3f7b9c1d2e4..."
  },
  "tool.output.status": "success",
  "tool.output.cart_mandate": {
    "cart_id": "cart_7893",
    "intent_signature": "a3f7b9c1d2e4...",
    "cart_signature": "e8f2a9b3c7d1...",
    "timestamp": "2024-11-08T15:30:14.789Z"
  }
}
הנתונים האלה מוכיחים:
- ✅ MerchantAgent קיבל את IntentMandate (הקלט מראה את זה)
- ✅ העגלה נוצרה עם המזהה cart_7893
- ✅ החתימה של עגלת הקניות מפנה לחתימה של IntentMandate (קישור בשרשרת!)
- ✅ נוצר בשעה 15:30:14 UTC (2.4 שניות אחרי הכוונה)
המאפיין CartMandate מפנה עכשיו אל IntentMandate, וכך נוצרת השרשרת.
איתור הרשאת התשלום
לוחצים על התג execute_tool: create_payment_mandate (מתחת ל-CredentialsProvider).
בחלונית המאפיינים:
{
  "tool.name": "create_payment_mandate",
  "tool.input.cart_mandate": {
    "cart_id": "cart_7893",
    "intent_signature": "a3f7b9c1d2e4...",
    "cart_signature": "e8f2a9b3c7d1..."
  },
  "tool.confirmation_required": true,
  "tool.confirmation_timestamp": "2024-11-08T15:30:17.891Z",
  "tool.user_response": "CONFIRMED",
  "tool.wait_duration_ms": 29168,
  "tool.output.status": "success",
  "tool.output.payment_mandate": {
    "payment_id": "pay_9821",
    "cart_signature": "e8f2a9b3c7d1...",
    "payment_signature": "b4c9e2a7f8d3...",
    "timestamp": "2024-11-08T15:30:47.059Z"
  }
}
כך מוכיחים את השרשרת המלאה:
- ✅ CredentialsProvider קיבל את CartMandate (אפשר לראות את זה בקלט)
- ✅ התשלום מתייחס לחתימה של CartMandate (קישור בשרשרת!)
- ✅ נדרש אישור (
confirmation_required: true) - ✅ User confirmed at 15:30:17 UTC
- ✅ המערכת המתינה 29.2 שניות להחלטת המשתמש
- ✅ התשלום נוצר אחרי האישור (חותמת זמן: 15:30:47)
המחשה ויזואלית של השרשרת
המעקב מוכיח ששרשרת האישורים בוצעה בצורה תקינה:
15:30:12 UTC → IntentMandate created (signature: a3f7...)
                  ↓
15:30:14 UTC → CartMandate created (references: a3f7...)
                  ↓
15:30:17 UTC → User consent requested
                  ↓
15:30:47 UTC → PaymentMandate created (references: e8f2...)
כל הרשאה מתייחסת לחתימה של ההרשאה הקודמת. האימות הזה מראה אם בוצעו שינויים – אפשר לבדוק את השרשרת כדי לוודא שהחתימות זהות.
שלב 4: ניתוח הביצועים וצווארי בקבוק
Cloud Trace לא רק מוכיח מה קרה – הוא מראה לכם איפה הזמן מנוצל כדי שתוכלו לבצע אופטימיזציה.
זיהוי הנתיב הקריטי
בתצוגת מפל, מחפשים את הטווחים הארוכים ביותר בערימה האנכית. הם מייצגים את צווארי הבקבוק בביצועים.
מתוך מעקב הדוגמה:
Total: 8.2 seconds

Breakdown:
  - ShoppingAgent:         2.1s (26%)
  - MerchantAgent:         1.8s (22%)
  - CredentialsProvider:   4.0s (49%)  ← Bottleneck
  - Other overhead:        0.3s (3%)
תובנה קריטית: CredentialsProvider אחראי ל-49% מהזמן הכולל. למה?
התעמקות בנתונים בטווח CredentialsProvider:
CredentialsProvider: 4.0s
  - call_llm:              0.8s (20%)
  - create_payment_mandate: 3.0s (75%)  ← User consent wait
  - Other:                 0.2s (5%)
העיכוב של 3 שניות הוא צפוי וטוב – זהו הזמן שבו המשתמש מתלבט לפני שהוא מאשר. זו לא בעיה שקשורה לביצועים, אלא הוכחה להסכמה מושכלת.
מעקב אחרי עלויות של LLM
כדי לראות את השימוש בטוקן, לוחצים על כל טווח call_llm:
{
  "llm.model": "gemini-2.5-flash",
  "llm.usage.prompt_tokens": 487,
  "llm.usage.completion_tokens": 156,
  "llm.usage.total_tokens": 643,
  "llm.response_time_ms": 1243
}
אפשר להשתמש בזה כדי:
- מעקב אחר עלות לכל בקשה (טוקנים × תמחור המודל)
- זיהוי הנחיות ארוכות מדי
- השוואת ביצועי המודלים (Flash לעומת Pro)
- אופטימיזציה לזמן אחזור לעומת איכות
חישוב לדוגמה:
Gemini 2.5 Flash pricing (as of Nov 2024):
  Input:  $0.075 per 1M tokens
  Output: $0.30 per 1M tokens

This request:
  Input:  487 tokens × $0.075 / 1M = $0.000037
  Output: 156 tokens × $0.30 / 1M  = $0.000047
  Total:                            = $0.000084 (~$0.00008)

For 10,000 donations/month:
  10,000 × 3 agents × $0.00008 = $2.40/month in LLM costs
התובנות המפורטות האלה עוזרות לכם לקבל החלטות שמבוססות על נתונים לגבי בחירת המודל.
השוואה בין עקבות
סינון של כמה עקבות והשוואה בין משכי הזמן:
Trace 1: 8.2s  (with consent wait: 3.0s)
Trace 2: 12.5s (with consent wait: 7.8s)  ← User took longer
Trace 3: 5.1s  (with consent wait: 0.2s)  ← User clicked fast
Trace 4: 6.3s  (with consent wait: 1.5s)
תובנה: רוב השונות נובעת מזמן ההחלטה של המשתמשים, ולא מביצועי המערכת. הביצוע של הסוכן הראשי (ללא הסכמה) עקבי ועומד על כ-5 שניות.
המשמעות היא שהמערכת פועלת בצורה מהימנה.
במערכות ייצור, כדאי להגדיר התראות כדי לזהות בעיות לפני שהמשתמשים מתלוננים.
התראה על שיעורי שגיאות גבוהים
יצירת התראה אם יותר מ-5% מהמעקבים מכילים שגיאות:
- מעבר אל Cloud Monitoring
- לוחצים על התראות ← יצירת מדיניות.
- הגדרה:
Resource: Cloud Trace Span
Metric: Span error count
Condition: Rate > 5% over 5 minutes
Notification: Email your-team@example.com
התראה על זמן אחזור ארוך
יצירת התראה כשהחביון של אחוזון 95 חורג מ-15 שניות:
Resource: Cloud Trace
Metric: Span duration (95th percentile)
Condition: > 15000ms for 5 minutes
Notification: PagerDuty
כך אפשר לזהות ירידה בביצועים לפני שהיא משפיעה על חוויית המשתמש.
התראה על הסכמה חסרה
יצירת התראה אם תהליך תשלום כלשהו מתבצע ללא אישור:
Resource: Cloud Trace Span
Filter: tool.name="create_payment_mandate" AND tool.confirmation_required!=true
Condition: Any match
Notification: Critical alert to security team
זהו גלאי הפרות של מדיניות הבטיחות – אם הוא מופעל, סימן שמשהו לא בסדר במנגנון ההסכמה שלכם.
מה למדתם
בעזרת Cloud Trace, אתם יכולים להבין איך:
✅ ניווט ב-Cloud Trace Explorer כדי למצוא יומני מעקב של ייצור
✅ קריאת תצוגות של תרשימי זרימה כדי לראות את זרימת הביצוע המלאה
✅ מעקב אחר שרשרת האישורים דרך IntentMandate ← CartMandate ← PaymentMandate ✅ שימוש ביומני מעקב כהוכחה ליישוב סכסוכים
✅ ניתוח הביצועים כדי לזהות צווארי בקבוק
✅ מעקב אחר עלויות של מודלים גדולים של שפה (LLM) ברמה מפורטת
ההבדל שזה יוצר
השוואה בין שתי מערכות שמטפלות באותה תלונה: "לא אישרתי את זה אף פעם!":
מערכת ללא ניראות
User: "I never authorized that $50 donation!"
You:  "Our logs show the transaction completed successfully."
User: "But I didn't approve it!"
You:  "The system requires confirmation before processing."
User: "I never saw any confirmation!"
You:  "..." [no way to prove what happened]

Result: Refund issued, trust lost, user never returns.
מערכת עם Cloud Trace
User: "I never authorized that $50 donation!"
You:  "Let me pull up the trace from your session..."
      [Shows waterfall with consent span]
You:  "Here's the evidence:
       - 15:30:17 UTC: System asked for confirmation
       - Message shown: 'You are about to donate $50...'
       - 15:30:47 UTC: You clicked 'CONFIRM'
       - Wait time: 29.2 seconds

       The system waited almost 30 seconds for your decision.
       Here's the exact timestamp of your confirmation."

User: "Oh... I remember now. My mistake. Sorry!"

Result: Trust preserved, no refund needed, user continues using service.
זו העוצמה של נתיבי ביקורת. אתם עוברים מגישה של 'תסמכו עלינו' לגישה של 'אנחנו נראה לכם בדיוק מה קרה'.
המאמרים הבאים
סיימתם עכשיו את החלק הטכני המרכזי של בניית סוכנים מהימנים:
✅ Module 1-6: Designed a trustworthy architecture (roles, credentials, consent)
✅ Module 7: Orchestrated complex workflows (SequentialAgent)
✅ Module 8: Deployed with observability enabled
✅ Module 9: Learned to read and use accountability trails
הארכיטקטורה שבניתם – הפרדה בין תפקידים, שרשראות של אישורים, מנגנוני הסכמה, יכולת תצפית מלאה – מועברת ישירות למערכות ייצור שמטפלות בכסף אמיתי, בנתונים אמיתיים ובהשלכות אמיתיות.
10. המסע שלך קדימה
מה יצרתם
התחלנו את הסדנה הזו עם השאלה: "איך יוצרים סוכני AI שאפשר לסמוך עליהם בכל מה שקשור לכסף?"
עכשיו יש לך את התשובה.
איפה התחלתם (מודול 3):
simple_agent = Agent(
    model="gemini-2.5-flash",
    instruction="Find charities and donate",
    tools=[google_search]
)
הגעתם לכאן (מודול 10):
- ✅ שלושה סוכנים מומחים עם הפרדה בין התפקידים
- ✅ שלוש תעודות ניתנות לאימות (כוונה ← עגלת קניות ← הרשאות תשלום)
- ✅ השלמת שרשרת האישורים עם אימות התפוגה בכל שלב
- ✅ מנגנון הסכמה מפורשת עם הוכחת חותמת זמן
- ✅ פריסה לייצור ב-Agent Engine עם יכולת צפייה
- ✅ מסלול מלא של אחריותיות ב-Cloud Trace
- ✅ ראיות משפטיות ליישוב סכסוכים
סדנה לעומת ייצור: הפער
המערכת שלכם מדגימה את הארכיטקטורה והדפוסים הנכונים, אבל משתמשת בפישוטים חינוכיים שצריך לשדרג כדי להשתמש בכסף אמיתי ובמשתמשים אמיתיים.
אלה בדיוק הדברים שפשוטים יותר ואלה הדברים שנדרשים כדי להפיק את הסרטון:
רכיב | הטמעה בסדנה | דרישות הפקה |
חתימות | גיבובי (hash) SHA-256 ( | חתימות קריפטוגרפיות אמיתיות באמצעות PKI או JWT עם מפתחות פרטיים |
עיבוד תשלומים | החזרות מדומות (המאפיין 'דגל' | שילוב עם ממשקי API אמיתיים של תשלומים (Stripe, PayPal, Square) |
אימות משתמש | אמון מרומז (לא נדרשת התחברות) | OAuth 2.0, WebAuthn או ניהול סשנים |
ניהול סודות | משתני סביבה בקובץ | Google Secret Manager או Cloud KMS עם הצפנה |
מסד נתונים של עמותות | קובץ JSON לדוגמה עם 9 ארגוני צדקה | שילוב של ממשק API בזמן אמת (IRS Tax Exempt Organization Search, Charity Navigator API) |
טיפול בשגיאות | בלוק try-catch בסיסי עם הודעות שגיאה | לוגיקה לניסיון חוזר עם השהיה מעריכית לפני ניסיון חוזר (exponential backoff), מפסק זרם ותורים של הודעות שלא ניתן להעביר (dead letter queues) |
בדיקות | אימות ידני באמצעות סקריפטים | חבילת בדיקות מקיפה של יחידות/אינטגרציה/E2E עם CI/CD |
המשכיות של סשנים | בזיכרון (מקומי) או אוטומטי (Agent Engine) | מסד נתונים של ייצור עם גיבויים ותוכנית התאוששות מאסון (DR) |
הגבלת קצב של יצירת בקשות | ללא (סביבה חינוכית) | מגבלות קצב לכל משתמש, הגבלת קצב מבוססת-IP, זיהוי התנהלות פוגעת |
דפוסי אדריכלות מרכזיים שאתם שולטים בהם
הדפוסים שלמדתם בסדנה הזו הם דפוסי ייצור. אל תפקפקו בהם.
הפרדת תפקידים (עקרון מספר 1 של AP2)
לכל סוכן יש משימה ברורה אחת, והוא רואה רק את מה שהוא צריך. אם סוכן אחד נפרץ, התוקף לא יכול לגשת לנתונים של סוכנים אחרים. כך מצטמצם רדיוס הפיצוץ.
מערכות ייצור שמשתמשות בזה: עיבוד תשלומים, תהליכי עבודה של מסמכים, שרשראות אישורים, טפסים מרובי שלבים עם שערים לאימות.
פרטי כניסה שניתן לאמת (עיקרון AP2 מספר 2)
לכל אישור יש מועד תפוגה, הוא מפנה לאישור הקודם ונדרש אימות לפני השלב הבא. כך נוצרת שרשרת ביקורת שאי אפשר לשנות אותה בלי להשאיר עקבות.
ערך הפקה: הוכחה מלאה של מה קרה, מתי ובאיזה סדר. חיוני ליישוב סכסוכים ולעמידה בדרישות הרגולטוריות.
הסכמה מפורשת (עקרון מספר 3 של AP2)
חותמת זמן שמוכיחה שהמשתמש אישר את הפעולה. אי אפשר לערער על החיוב.
ערך בסביבת ייצור: דרישה משפטית לעסקאות פיננסיות. ההגנה היא גם על המשתמשים וגם על החברה.
תזמור ברצף (תבנית ADK)
היא מבטיחה את סדר הביצוע הנכון. מונע דילוג על שלבים. ההגדרה הזו מבטיחה שכל נציג יראה את הפלט של הנציג הקודם.
ערך ההפקה: מושלם למערכות ״האדם שבתהליך״ שבהן המשתמשים מצפים לתוצאות מיידיות. הדפוס הזה מתאים לתהליכי תרומה, לתהליכי תשלום ולשרשראות אישורים.
ניראות מלאה (OpenTelemetry + Cloud Trace)
כל החלטה, קריאה לכלי, רגע הסכמה והעברת אישורים מתועדים באופן אוטומטי.
ערך בסביבת ייצור: ראיות משפטיות למקרה של מחלוקות. נתוני אופטימיזציה של הביצועים. נתיבי ביקורת של תאימות. ניפוי באגים בבעיות בסביבת הייצור בצורה מדויקת.
מקורות מידע להמשך הלמידה
מסמכי תיעוד של ADK:
AP2 ותקנים קשורים:
שירותי Google Cloud:
משאבים לניקוי
כדי להימנע מחיובים שוטפים, צריך למחוק את הפריסה:
Agent Engine: פועלים לפי השלבים שמפורטים במסמכי התיעוד של Agent Engine.
Cloud Run (אם הפריסה בוצעה):
gcloud run services delete charity-advisor \
    --region=$GOOGLE_CLOUD_LOCATION
קטגוריות אחסון:
gsutil -m rm -r gs://$GOOGLE_CLOUD_PROJECT-staging
gsutil -m rm -r gs://$GOOGLE_CLOUD_PROJECT-artifacts
המסע שלך נמשך
התחלתם עם שאלה פשוטה ויצרתם תשובה מלאה. הבנתם את דפוסי הבסיס ליצירת סוכני AI מהימנים. הדפוסים האלה רלוונטיים לכל תחום שבו סוכני AI מטפלים בפעולות רגישות – עסקאות פיננסיות, החלטות בתחום הבריאות, מסמכים משפטיים, פעולות בשרשרת האספקה.
העקרונות מועברים. מודל האמון פועל.
עכשיו אפשר ליצור משהו מהימן! ❤️