1. 信頼を築き、寛大さを引き出す

インスピレーションの瞬間
スマートフォンが振動します。恵まれないコミュニティの子どもたちが読み書きを学べるよう支援する、成功した識字プログラムに関するニュース記事を目にします。貢献したいという強い衝動を感じます。ブラウザを開き、「子供の識字プログラムへの寄付」を検索します。

数百件の結果が表示されます。
最初のリンクをクリックします。ウェブサイトがプロフェッショナルに見える。財務情報までスクロールします。「管理費用: 28%。」一時停止します。寄付した 1 ドルのうち、実際にプログラムの資金となるのは 72 セントのみです。よろしいでしょうか?よくわからない。
別の組織を試します。聞いたことがないでしょう。それらは正当なものですか?クイック検索を行うと、すぐに深みにはまってしまいます。2 年前の Reddit スレッドで、あるユーザーが「詐欺だ。寄付金はどこにも届いていない」と主張しているのを見つけました。別の人は「彼らは現場で実際に仕事をしているんだ!」と熱心に擁護しています。曖昧さが麻痺を招きます。
30 分後、あなたは相反するレビュー、効率性評価、IRS の記録の迷路に迷い込み、まだ寄付していません。当初の寛大さの火花は、調査の摩擦に置き換えられました。タブは数日間開いたままになり、最終的に閉じるまで、良い意図を思い出させてくれます。
これは個人の失敗ではなく、システムの失敗です
このエクスペリエンスは普遍的なものです。寄付したいという気持ちはあっても、寄付のプロセスには躊躇や疑念を生じさせるハードルが数多く存在します。
- ❌ 調査の摩擦: すべての慈善団体で独自の調査が必要です。
- ❌ 信頼性の検証: 非常に効果的な組織と非効率的な組織、さらには詐欺を区別することは困難です。
- ❌ 分析麻痺: 選択肢が多すぎると、決断疲れにつながります。
- ❌ 勢いの喪失: 物流上の負担が増すにつれて、寄付をしたいという感情的な動機が薄れていきます。
この摩擦は、現実世界で驚くほどのコストを発生させています。米国における個人の寄付は莫大です。Giving USA 2024 によると、2023 年だけで個人の寄付者は約 3, 740 億ドルを寄付しました。しかし、調査によると、検索費用、心理的な摩擦、時間制約など、寄付の障壁によって、慈善活動に届く金額が大幅に減少しています。数百万人の寄付者を対象とした調査では、オンライン寄付プロセスのわずかな摩擦でも、人々が慈善活動の意図を達成するのを妨げることがわかっています。
これは、本来寄付されるはずだった数十億ドルが、それを必要とする団体に届かないことを意味します。
ビジョン
別のエクスペリエンスを想像してみてください。30 分間の調査セッションの代わりに、次のように言います。
「子供向けの識字プログラムに 50 ドル寄付したいのですが、評価が高く、効率的で、認証済みの慈善団体を探して。」
数秒で、信頼性を高める回答が得られます。

これが AI Giving Agent の約束です。しかし、このビジョンを実現するには、根本的な課題を解決する必要があります。自律型 AI エージェントが金銭を扱う場合、信頼はオプションではなく、基盤全体を支えるものです。
- ユーザーが承認した内容を証明するにはどうすればよいですか?
- ミスが発生した場合、誰が責任を負いますか?
- 寄付者、慈善団体、決済ネットワークが安心して参加できるようにするにはどうすればよいですか?
今日のミッション
このワークショップでは、次の 2 つの強力なテクノロジーを組み合わせて、信頼できるエージェントを構築します。
Google の Agent Development Kit(ADK) | Agent Payments Protocol(AP2) | |
職務 | 本番環境グレードの AI エージェントを構築するためのファクトリ | AI トランザクションの信頼性を高めるアーキテクチャ ブループリント |
提供される機能 | • マルチエージェント オーケストレーションのフレームワーク | • ロールベースのセキュリティ境界 |
詳細 |
作成するアプリの概要

このワークショップの終了時には、次のものが作成されます。
✅ 特殊なロールを備えたマルチエージェント システム:
- 認定された慈善団体を見つけるショッピング エージェント
- 拘束力のある寄付オファーを作成する販売者エージェント
- 支払いを安全に処理する認証情報プロバイダ
- フロー全体を調整するオーケストレーター
✅ 検証可能な認証情報の 3 種類:
- IntentMandate: 「教育関連の慈善団体を探して」
- CartMandate: 「Room to Read に 50 ドルを寄付する(販売者による署名)」
- PaymentMandate: 「シミュレートされた支払いで処理」
✅ すべてのレイヤでセキュリティを確保:
- ロールベースの信頼境界
- ユーザーの明示的な同意
✅ 完全な監査証跡:
- すべての意思決定を追跡可能にする
- 記録されたすべての同意
- すべてのハンドオフを表示
🔒 重要: これは安全な学習環境です
信頼を築く準備はできていますか?
次のモジュールでは、開発環境を設定し、最初の AI エージェントを構築します。シンプルなエージェントが信頼できない理由をすぐに理解し、ワークショップの残りの時間でその問題を解決する方法を学びます。
まずは問題を直接把握することから始めましょう。
2. ワークスペースの準備
信頼できるエージェントの基盤
AI Giving Agent を構築する前に、クリーンで一貫性があり、正しく構成された開発環境を準備する必要があります。このモジュールは、必要なすべてのツールとサービスが適切に配置されていることを確認するための集中的なステップです。
この設定を正常に完了すると、構成の問題を心配することなく、今後のモジュールでエージェント ロジックを構築するというエキサイティングな作業に集中できます。
Cloud Shell にアクセスする
まず、Cloud Shell を開きます。これは、Google Cloud SDK やその他の重要なツールがプリインストールされたブラウザベースのターミナルです。
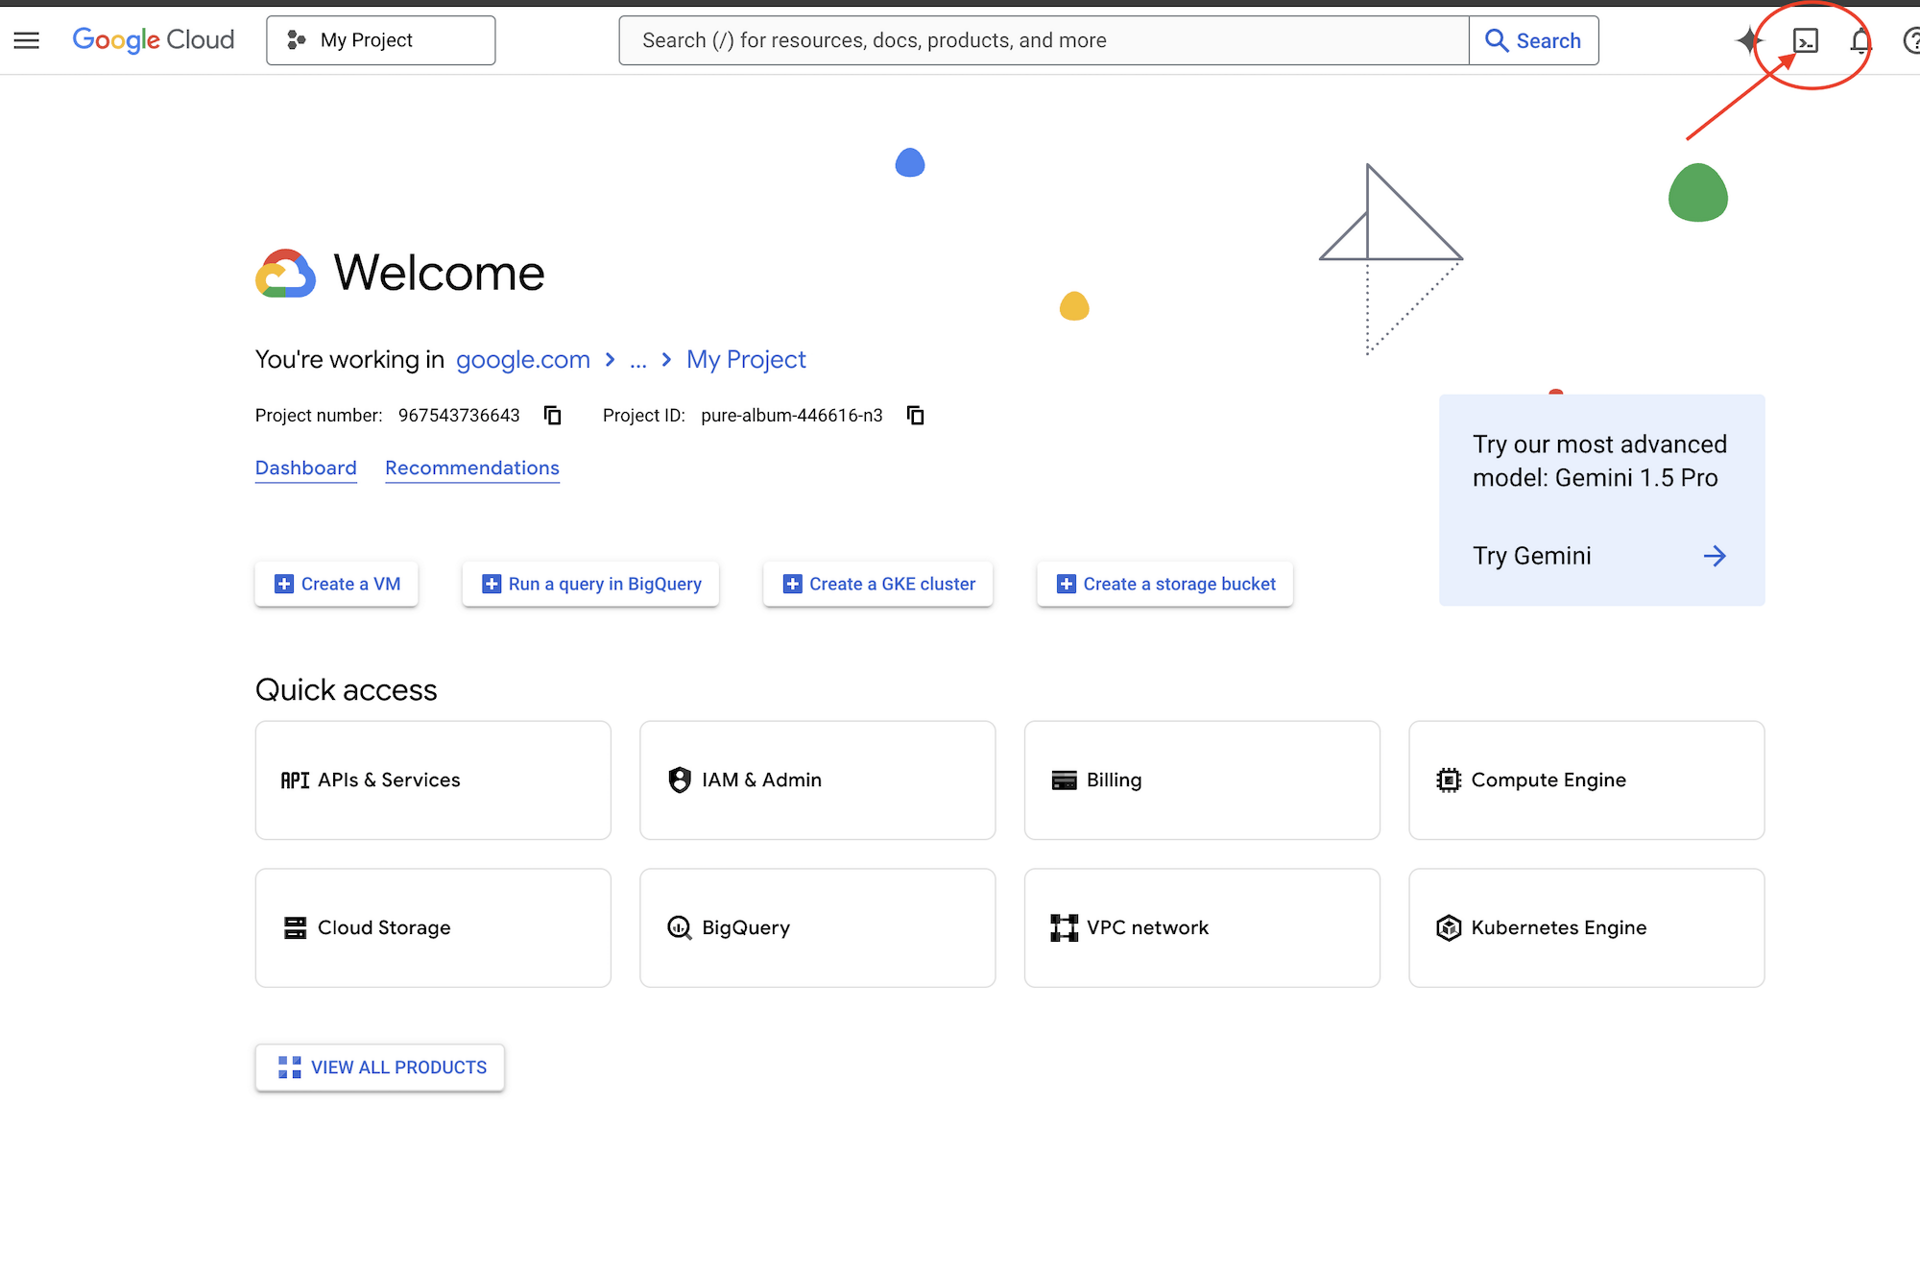
Google Cloud コンソールの上部にある [Cloud Shell をアクティブにする] をクリックします(右上隅のナビゲーション バーにあるターミナル アイコンです)。
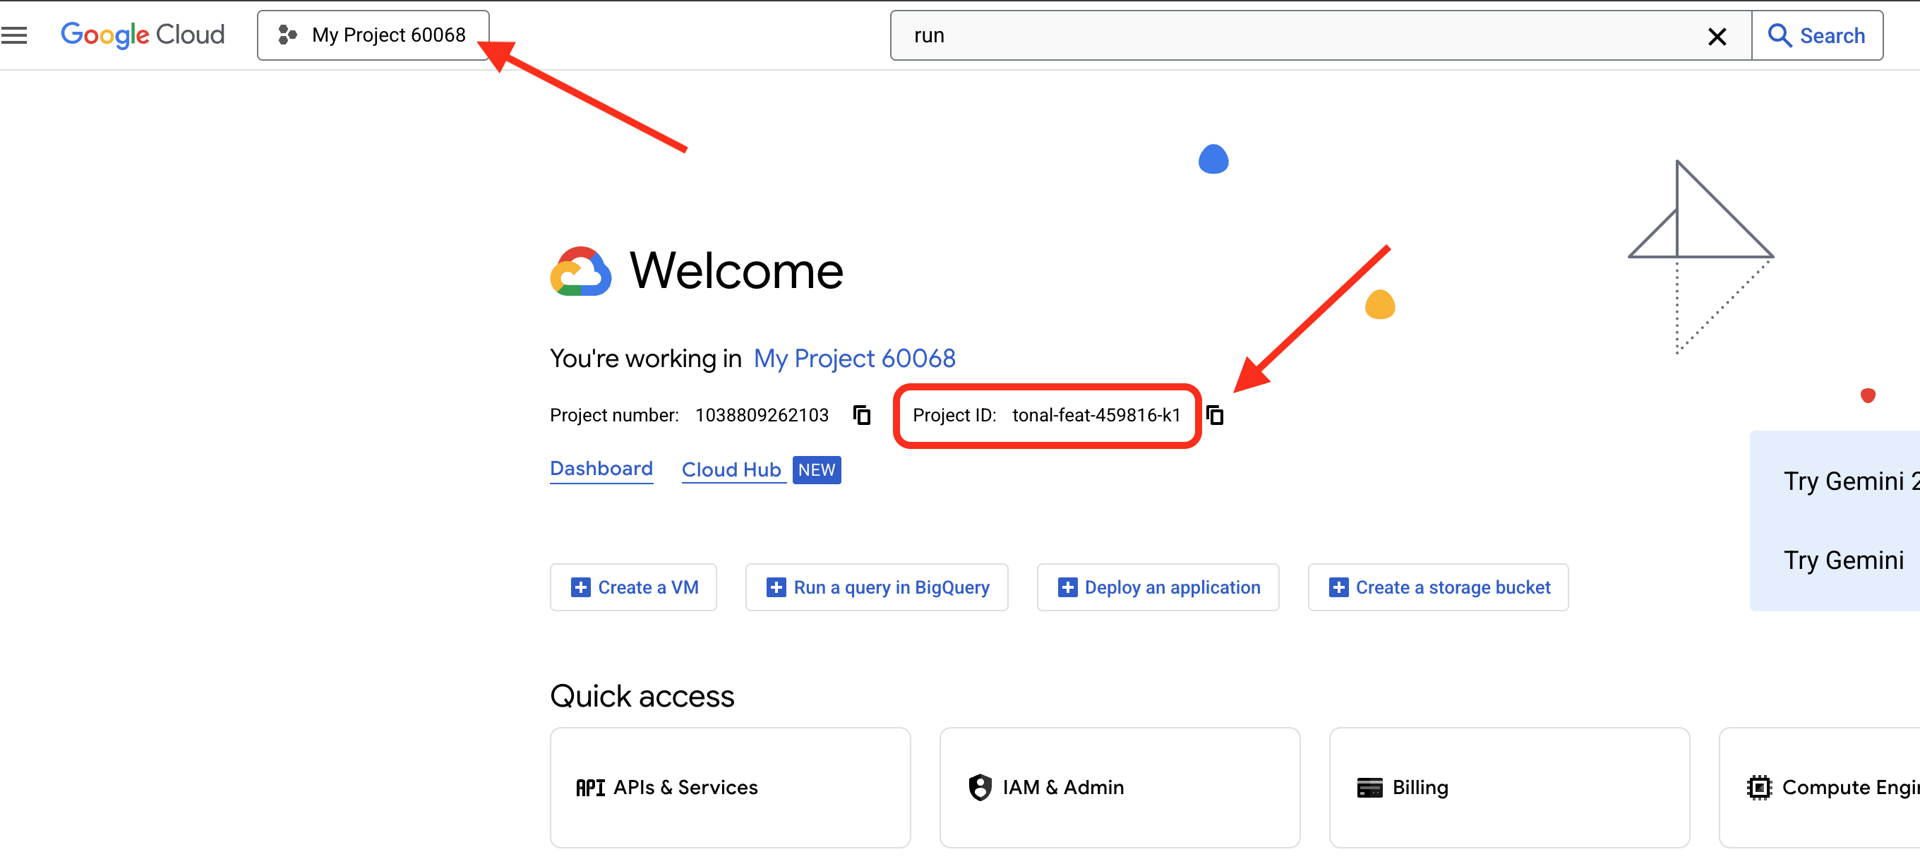
Google Cloud プロジェクト ID を確認します。
- Google Cloud コンソール(https://console.cloud.google.com)を開きます。
- ページの上部にあるプロジェクト プルダウンから、このワークショップで使用するプロジェクトを選択します。
- プロジェクト ID は、ダッシュボードの [プロジェクト情報] カードに表示されます。
Cloud Shell が開いたら、認証されていることを確認します。
# Check that you are logged in
gcloud auth list
アカウントが (ACTIVE) として表示されます。
プロジェクトを構成する
次に、Google Cloud プロジェクトを設定して、必要な API を有効にします。
プロジェクト ID を設定する
# Set your project using the auto-detected environment variable in Cloud Shell
gcloud config set project $GOOGLE_CLOUD_PROJECT

# Verify the project has been set
echo "Your active Google Cloud project is: $(gcloud config get-value project)"
必要な API の有効化
エージェントは、次の複数の Google Cloud サービスにアクセスする必要があります。
gcloud services enable \
    aiplatform.googleapis.com \
    secretmanager.googleapis.com \
    cloudtrace.googleapis.com
これには 1 ~ 2 分ほどかかります。表示される項目
Operation "operations/..." finished successfully.
これらの API が提供するもの:
- aiplatform.googleapis.com: エージェントの推論用の Gemini モデルへのアクセス
- secretmanager.googleapis.com: API キーの安全なストレージ(本番環境のベスト プラクティス)
- cloudtrace.googleapis.com: アカウンタビリティ トレイルのオブザーバビリティ
スターター コードのクローンを作成する
すべてのテンプレート コードとリソースを含むワークショップ リポジトリを取得します。
git clone https://github.com/ayoisio/adk-ap2-charity-agents
cd adk-ap2-charity-agents
git checkout codelab
次のことを確認しましょう。
ls -la
以下のように表示されます。
charity_advisor/- エージェントとツールを構築する場所scripts/- テストと検証用のヘルパー スクリプトdeploy.sh- デプロイ用のヘルパー スクリプトsetup.py- モジュール インストール用のヘルパー スクリプト.env.template- 環境変数ファイル
Python 環境を設定する
次に、プロジェクト用に分離された Python 環境を作成します。
仮想環境を作成して有効にする
# Create the virtual environment
python3 -m venv venv

# Activate it
source venv/bin/activate
✅ 確認: プロンプトに (venv) 接頭辞が表示されるようになります。
依存関係のインストール
pip install -r charity_advisor/requirements.txt
pip install -e .
インストールされるもの:
- google-adk: Agent Development Kit フレームワーク
- google-cloud-aiplatform: Vertex AI と Gemini の統合
- ap2: Agent Payments Protocol SDK(GitHub から)
- python-dotenv: 環境変数の管理
-e フラグを使用すると、どこからでも adk_ap2_charity_agents モジュールをインポートできます。
環境ファイルを構成する
テンプレートから構成を作成します。
# Copy the template
cp .env.template .env

# Get your current Project ID
PROJECT_ID=$(gcloud config get-value project)

# Replace the placeholder with your actual project ID
sed -i "s/your-project-id/$PROJECT_ID/g" .env

# Verify the replacement worked
grep GOOGLE_CLOUD_PROJECT .env
以下のように表示されます。
GOOGLE_CLOUD_PROJECT=your-actual-project-id
確認
検証スクリプトを実行して、すべてが正しく構成されていることを確認します。
python scripts/verify_setup.py
すべて緑色のチェックマークが表示されます。
======================================================================
SETUP VERIFICATION
======================================================================

✓ Python version: 3.11.x
✓ google-adk: 1.17.0
✓ google-cloud-aiplatform: 1.111.0+
✓ ap2: 0.1.0
✓ python-dotenv: 1.0.0+
✓ .env file found and contains project ID
✓ Google Cloud project configured: your-project-id

✓ Mock charity database found
✓ Agent templates ready
✓ All directories present

======================================================================
✓ Setup complete! You are ready to build trustworthy agents.
======================================================================
トラブルシューティング
次のステップ
これで環境の準備が整いました。具体的な内容は次のとおりです。
- ✅ Google Cloud プロジェクトが構成されている
- ✅ 必要な API が有効になっている
- ✅ ADK と AP2 ライブラリがインストールされている
- ✅ テンプレート コードを変更する準備が完了しました
次のモジュールでは、数行のコードで最初の AI エージェントを構築し、簡単なエージェントが金融取引を処理する際に信頼できない理由を学びます。
3. 初めてのエージェントと信頼のギャップの発見

アイデアからインタラクションへ
前のモジュールでは、開発環境を準備しました。ここからが楽しい作業です。最初のエージェントを構築して実行し、最初の機能を追加します。その過程で、エージェントを真に信頼できるものにするために解決しなければならない根本的な課題を明らかにします。
このモジュールは「ビフォー」の写真です。信頼できるエージェントを構築するには、LLM にツールへのアクセス権を付与するだけでは不十分であることが明らかになります。
ステップ 1: スターター エージェントを調べる
まず、最初のエージェントのテンプレートを見てみましょう。これには、次の手順で完成させるプレースホルダを含む基本的な構造が含まれています。
👉 ファイルを開きます。
charity_advisor/simple_agent/agent.py
表示される項目
"""
A simple agent that can research charities using Google Search.
"""

# MODULE_3_STEP_2_IMPORT_COMPONENTS


simple_agent = Agent(
    name="SimpleAgent",
    model="gemini-2.5-flash",

    # MODULE_3_STEP_3_WRITE_INSTRUCTION
    instruction="""""",

    # MODULE_3_STEP_4_ADD_TOOLS
    tools=[]
)
プレースホルダ コメントは MODULE_3_STEP_X_DESCRIPTION というパターンに従っています。これらのマーカーは、エージェントを段階的に構築するために置き換えられます。
ステップ 2: 必要なコンポーネントをインポートする
Agent クラスをインスタンス化したり、google_search ツールを使用したりする前に、それらをファイルにインポートする必要があります。
👉 検索:
# MODULE_3_STEP_2_IMPORT_COMPONENTS
👉 その 1 行を次のように置き換えます。
from google.adk.agents import Agent
from google.adk.tools import google_search
これで、Agent クラスと google_search ツールがファイルで使用できるようになりました。
ステップ 3: エージェントの指示を記述する
指示はエージェントの「職務記述書」です。LLM にツールをいつどのように使用するかを伝えます。エージェントが慈善団体の情報を検索するように指示するものを記述してみましょう。
👉 検索:
# MODULE_3_STEP_3_WRITE_INSTRUCTION
instruction="""""",
👉 この 2 行を次のように置き換えます。
instruction="""You are a helpful research assistant. When a user asks you to find information about charities,
use the google_search tool to find the most relevant and up-to-date results from the web.
Synthesize the search results into a helpful summary.""",
ステップ 4: 検索ツールを追加する
ツールを持たないエージェントは、単なる会話者です。エージェントに最初の機能としてウェブ検索機能を追加しましょう。
👉 検索:
# MODULE_3_STEP_4_ADD_TOOLS
tools=[]
👉 この 2 行を次のように置き換えます。
tools=[google_search]
ステップ 5: 完全なエージェントを確認する
テストの前に、すべての要素が揃っていることを確認しましょう。
👉 お客様の完全な
charity_advisor/simple_agent/agent.py
ファイルは次のようになります。
"""
A simple agent that can research charities using Google Search.
"""

from google.adk.agents import Agent
from google.adk.tools import google_search


simple_agent = Agent(
    name="SimpleAgent",
    model="gemini-2.5-flash",
    instruction="""You are a helpful research assistant. When a user asks you to find information about charities,
use the google_search tool to find the most relevant and up-to-date results from the web.
Synthesize the search results into a helpful summary.""",
    tools=[google_search]
)
ステップ 6: エージェントをテストする - 信頼のギャップを明らかにする
エージェントの構成が完了したので、テストして動作を分析しましょう。ここでは、財務に関する意思決定を行う際に単純なエージェントが信頼できない理由を説明します。
テスト 1: 検出の問題
👉 Cloud Shell ターミナルで次のコマンドを実行します。
adk run charity_advisor/simple_agent
次のような出力が表示されます。
INFO:google.adk.agents:Loading agent from charity_advisor/simple_agent
INFO:google.adk.agents:Agent 'SimpleAgent' ready

[user]:
[user]: プロンプトが入力待ちの状態になります。
👉 [user]: プロンプトで、次のように入力します。
Can you find me a verified, highly-rated charity for children's literacy?
👉 Enter キーを押して、レスポンスを確認します。
しばらくすると、エージェントが検索結果を次のような回答に統合します。
ウェブ検索によると、子どもの読み書き能力向上を支援する慈善団体として、Reading Is Fundamental と Room to Read が高く評価されているようです。ステータスと評価を確認するには、Charity Navigator や GuideStar などのサイトがよく推奨されます。また、Reddit などのフォーラムで、さまざまな小規模な地域密着型の識字プログラムに関するユーザーの個人的な体験談が共有されているオンライン ディスカッションもいくつか見つかりました。
分析してみましょう。エージェントは問題を解決してくれましたか?
❌ いいえ。モジュール 1 で説明した人間の経験を完全に再現しています。「ググる」プロセスを自動化し、「分析麻痺」の問題を私たちに突き返しました。
これにより、信頼のギャップの 1 つ目である信頼できるデータの欠如が明らかになります。
エージェントはオープン ウェブを検索しています。これは次のことを意味します。
- ✅ 結果がすぐに表示された(ユーザー エクスペリエンスの向上)
- ❌ 高評価の組織と Reddit のディスカッション(信頼性の低いソース)が混在している
- ❌ 審査済みの慈善団体と詐欺の可能性のある団体を区別できない(確認なし)
- ❌ 提供した情報の確認をこちらに求めている(負担を押し付けている)
テスト 2: 実行に関する問題
次に、重要な 2 回目のテストを行います。[user]: プロンプトで、寄付を完了します。
Okay, please donate $50 to Room to Read for me.
エージェントは謝罪し、制限事項を認めます。
寄付をご希望とのこと、承知いたしました。ただし、私はリサーチ アシスタントであり、金融取引の処理や支払いの手続きを行うことはできません。寄付を行うには、Room to Read の公式ウェブサイトに直接アクセスする必要があります。
これは、2 つ目の重要な「アハ!」の瞬間です。
エージェントは適切な慈善団体を見つけることができないだけでなく、寄付という行為を行うこともまだ信頼できません。
👉 [ ] を押します。
Ctrl+C
テストが完了したら終了します。
2 つのギャップの可視化

学習内容
このモジュールでは、最初の AI エージェントを構築して装備しました。このようにして、信頼できるシステムを構築するうえでの 2 つの根本的な課題が明らかになりました。
習得した主なコンセプト
✅ エージェント クラス:
- ADK の主要な構成要素
- LLM の推論(脳)とツール(手)を組み合わせる
- モデル、指示、ツールで構成
✅ フォルダベースの構造:
- 各エージェントは個別のフォルダに格納されます
- ADK は
agent_folder/agent.pyを探します adk run agent_folderでランニング
✅ ツールリスト:
- エージェントの機能を定義します
- LLM がツールをいつ、どのように使用するかを決定する
- さまざまなアクションに対応する複数のツールを含めることができる
✅ 指示プロンプト:
- 職務記述書のようにエージェントの動作をガイドする
- ロール、トリガー、アクション、出力形式を指定します
- 信頼性の高いツールの使用に不可欠
✅ 信頼の問題:
- 検出のギャップ: 審査されていないソース、品質が混在している
- 実行ギャップ: 安全な機能、同意、監査証跡がない
次のステップ
次のモジュールでは、AP2 のロールベースのアーキテクチャを実装して、ソリューションの構築を開始します。
最初のエージェントを構築して、ロールの分離を実際に見てみましょう。
4. ショッピング エージェントの構築 - ロールベースの検出

信頼の基盤: ロールの分離
前のモジュールでは、シンプルで汎用的なエージェントは、信頼できる検出を提供できないことと、安全なトランザクションを実行できないことの 2 つの点で失敗することがわかりました。これらの問題を解決するために、Agent Payments Protocol の最初の原則であるロールベースのアーキテクチャを実装します。
コードを記述する前に、この原則が重要な理由を理解しましょう。
AP2 の原則: ロールの分離
「何でもできる」エージェントの問題点
財務顧問、会計士、投資ブローカーを 1 人雇うことを想像してみてください。便利ですか?はい。安全ですか?一切ありません。次のようになります。
- 投資目標(アドバイザーの役割)
- アカウントへのアクセス(会計士の役割)
- 資金を移動する権限(ブローカーの役割)
このユーザーが不正使用されたり、ミスを犯したりすると、すべてが危険にさらされます。
AP2 のソリューション: 1 つのエージェント、1 つのジョブ
AP2 は、関心の分離の原則を適用して信頼境界を作成します。

この機能が重要な理由:
- ✅ 影響範囲の制限: ショッピング エージェントが侵害されても、攻撃者は支払い認証情報にアクセスできない
- ✅ プライバシー: 認証情報プロバイダはショッピング チャットの内容を把握しません
- ✅ コンプライアンス: 支払いデータが分離されているため、PCI-DSS 要件を満たしやすくなります。
- ✅ アカウンタビリティ: 各ステップの責任を明確にする
エージェントの通信方法: 共有メモ帳としての状態
エージェントは互いのデータに直接アクセスできないため、共有状態を介して通信します。すべてのエージェントが書き込みと読み取りを行えるホワイトボードのようなものとお考えください。
# Shopping Agent writes:
state["intent_mandate"] = {
    "natural_language_description": "Donate $50 to Room to Read",
    "merchants": ["Room to Read"],
    "intent_expiry": "2024-11-07T15:32:16Z",
    "amount": 50.0
}

# Merchant Agent reads:
intent = state["intent_mandate"]
charity_name = intent["merchants"][0]
amount = intent["amount"]
# Creates CartMandate based on IntentMandate...

# Credentials Provider reads:
cart_mandate = state["cart_mandate"]
# Processes payment...
このようにして、コラボレーションを可能にしながら信頼境界を維持します。
最初のエージェント: ショッピング エージェント
ショッピング エージェントの責任はシンプルで明確です。
find_charitiesツールを使用して信頼できるデータベースをクエリする- ユーザーにオプションを提示する
save_user_choiceツールを使用して IntentMandate を作成し、状態に保存します。- 次のエージェント(販売者)に引き継ぐ
以上です。支払いの処理やカートの作成は行わず、検出と引き渡しのみを行います。
ステップごとに構築していきましょう。
ステップ 1: 入力検証ヘルパーを追加する
本番環境ツールを構築する際は、入力検証が重要です。チャリティ データを検証してから状態に保存するヘルパー関数を作成しましょう。
👉 開く
charity_advisor/tools/charity_tools.py
上部に find_charities 関数(すでに完成済み)が表示されます。下にスクロールして、以下の項目を探します。
# MODULE_4_STEP_1_ADD_VALIDATION_HELPER
👉 その 1 行を次のように置き換えます。
def _validate_charity_data(charity_name: str, charity_ein: str, amount: float) -> tuple[bool, str]:
    """
    Validates charity selection data before saving to state.

    This helper function performs basic validation to ensure data quality
    before it gets passed to other agents in the pipeline.

    Args:
        charity_name: Name of the selected charity
        charity_ein: Employer Identification Number (should be format: XX-XXXXXXX)
        amount: Donation amount in USD

    Returns:
        (is_valid, error_message): Tuple where is_valid is True if all checks pass,
                                    and error_message contains details if validation fails
    """
    # Validate charity name
    if not charity_name or not charity_name.strip():
        return False, "Charity name cannot be empty"

    # Validate EIN format (should be XX-XXXXXXX)
    if not charity_ein or len(charity_ein) != 10 or charity_ein[2] != '-':
        return False, f"Invalid EIN format: {charity_ein}. Expected format: XX-XXXXXXX"

    # Validate amount
    if amount <= 0:
        return False, f"Donation amount must be positive, got: ${amount}"

    if amount > 1_000_000:
        return False, f"Donation amount exceeds maximum of $1,000,000: ${amount}"

    # All checks passed
    return True, ""
ステップ 2: IntentMandate Creation Helper を追加する
次に、AP2 IntentMandate 構造を構築するヘルパーを作成します。これは、AP2 の 3 つの検証可能な認証情報の 1 つです。
👉 同じファイルで、以下を探します。
# MODULE_4_STEP_2_ADD_INTENTMANDATE_CREATION_HELPER
👉 その 1 行を次のように置き換えます。
def _create_intent_mandate(charity_name: str, charity_ein: str, amount: float) -> dict:
    """
    Creates an IntentMandate - AP2's verifiable credential for user intent.

    This function uses the official Pydantic model from the `ap2` package
    to create a validated IntentMandate object before converting it to a dictionary.

    Args:
        charity_name: Name of the selected charity
        charity_ein: Employer Identification Number
        amount: Donation amount in USD

    Returns:
        Dictionary containing the IntentMandate structure per AP2 specification
    """
    from datetime import datetime, timedelta, timezone
    from ap2.types.mandate import IntentMandate

    # Set the expiry for the intent
    expiry = datetime.now(timezone.utc) + timedelta(hours=1)

    # Step 1: Instantiate the Pydantic model with official AP2 fields
    intent_mandate_model = IntentMandate(
        user_cart_confirmation_required=True,
        natural_language_description=f"Donate ${amount:.2f} to {charity_name}",
        merchants=[charity_name],
        skus=None,
        requires_refundability=False,
        intent_expiry=expiry.isoformat()
    )

    # Step 2: Convert the validated model to a dictionary for state storage
    intent_mandate_dict = intent_mandate_model.model_dump()

    # Step 3: Add the codelab's custom fields to the dictionary
    timestamp = datetime.now(timezone.utc)
    intent_mandate_dict.update({
        "timestamp": timestamp.isoformat(),
        "intent_id": f"intent_{charity_ein.replace('-', '')}_{int(timestamp.timestamp())}",
        "charity_ein": charity_ein,
        "amount": amount,
        "currency": "USD"
    })

    return intent_mandate_dict
ステップ 3: IntentMandate を使用して状態ハンドオフツールをビルドする
次に、IntentMandate を作成して状態に保存するツールを構築します。
👉 同じファイルで、
save_user_choice
関数を使用します。検索:
# MODULE_4_STEP_3_COMPLETE_SAVE_TOOL
👉 その 1 行を次のように置き換えます。
    # Validate inputs before creating IntentMandate
    is_valid, error_message = _validate_charity_data(charity_name, charity_ein, amount)
    if not is_valid:
        logger.error(f"Validation failed: {error_message}")
        return {"status": "error", "message": error_message}

    # Create AP2 IntentMandate using our updated helper function
    intent_mandate = _create_intent_mandate(charity_name, charity_ein, amount)

    # Write the IntentMandate to shared state for the next agent
    tool_context.state["intent_mandate"] = intent_mandate

    logger.info(f"Successfully created IntentMandate and saved to state")
    logger.info(f"Intent ID: {intent_mandate['intent_id']}")
    logger.info(f"Intent expires: {intent_mandate['intent_expiry']}")

    # Return success confirmation
    return {
        "status": "success",
        "message": f"Created IntentMandate: ${amount:.2f} donation to {charity_name} (EIN: {charity_ein})",
        "intent_id": intent_mandate["intent_id"],
        "expiry": intent_mandate["intent_expiry"]
    }
ステップ 4: 表示形式ヘルパーを追加する
エージェントを構築する前に、ユーザーフレンドリーな表示のために慈善団体のデータをフォーマットするヘルパーをもう 1 つ追加しましょう。
👉 スクロールして以下を探します。
# MODULE_4_STEP_4_ADD_FORMATTING_HELPER
👉 その 1 行を次のように置き換えます。
def _format_charity_display(charity: dict) -> str:
    """
    Formats a charity dictionary into a user-friendly display string.

    This helper function demonstrates how to transform structured data
    into readable text for the user.

    Args:
        charity: Dictionary containing charity data (name, ein, mission, rating, efficiency)

    Returns:
        Formatted string suitable for display to the user
    """
    name = charity.get('name', 'Unknown')
    ein = charity.get('ein', 'N/A')
    mission = charity.get('mission', 'No mission statement available')
    rating = charity.get('rating', 0.0)
    efficiency = charity.get('efficiency', 0.0)

    # Format efficiency as percentage
    efficiency_pct = int(efficiency * 100)

    # Build formatted string
    display = f"""
**{name}** (EIN: {ein})
⭐ Rating: {rating}/5.0
💰 Efficiency: {efficiency_pct}% of funds go to programs
📋 Mission: {mission}
    """.strip()

    return display
ステップ 5: ショッピング エージェントを構築する - コンポーネントをインポートする
ツールが完成して堅牢になったので、これらのツールを使用するエージェントを作成しましょう。
👉 開く
charity_advisor/shopping_agent/agent.py
プレースホルダ コメントを含むテンプレートが表示されます。ステップごとに構築していきましょう。
👉 検索:
# MODULE_4_STEP_5_IMPORT_COMPONENTS
👉 その 1 行を次のように置き換えます。
from google.adk.agents import Agent
from google.adk.tools import FunctionTool
from charity_advisor.tools.charity_tools import find_charities, save_user_choice
ステップ 6: エージェントの指示を記述する
指示では、エージェントの職務記述書とワークフローを定義します。これは非常に重要です。指示が適切でないと、信頼性の低い動作につながります。
👉 検索:
# MODULE_4_STEP_6_WRITE_INSTRUCTION
instruction="""""",
👉 この 2 行を次のように置き換えます。
    instruction="""You are a research specialist helping users find verified charities.

Your workflow:

1. When the user describes what cause they want to support (e.g., "education", "health", "environment"),
   use the find_charities tool to search our vetted database.

2. Present the results clearly. The tool returns formatted charity information that you should
   show to the user.

3. When the user selects a charity and specifies an amount, use the save_user_choice tool
   to create an IntentMandate and record their decision. You MUST call save_user_choice with:
   - charity_name: The exact name of the chosen charity
   - charity_ein: The EIN of the chosen charity
   - amount: The donation amount in dollars (as a number, not a string)

4. After successfully saving, inform the user:
   - That you've created an IntentMandate (mention the intent ID if provided)
   - When the intent expires
   - That you're passing their request to the secure payment processor

IMPORTANT BOUNDARIES:
- Your ONLY job is discovery and creating the IntentMandate
- You do NOT process payments
- You do NOT see the user's payment methods
- You do NOT create cart offers (that's the Merchant Agent's job)
- After calling save_user_choice, your work is done

WHAT IS AN INTENTMANDATE:
An IntentMandate is a structured record of what the user wants to do. It includes:
- Natural language description ("Donate $50 to Room to Read")
- Which merchants can fulfill it
- When the intent expires
- Whether user confirmation is required

This is the first of three verifiable credentials in our secure payment system.

If the user asks you to do anything related to payment processing, politely explain that
you don't have that capability and that their request will be handled by the appropriate
specialist agent.""",
ステップ 7: エージェントにツールを追加する
次に、エージェントが両方のツールにアクセスできるようにします。
👉 検索:
# MODULE_4_STEP_7_ADD_TOOLS
👉 この 2 行を次のように置き換えます。
    tools=[
        FunctionTool(func=find_charities),
        FunctionTool(func=save_user_choice)
    ]
ステップ 8: 完全なエージェントを検証する
すべてが正しく設定されているか確認しましょう。
👉 お客様の完全な
charity_advisor/shopping_agent/agent.py
は次のようになります。
"""
Shopping Agent - Finds charities from a trusted database and saves the user's choice.
This agent acts as our specialized "Research Analyst."
"""

from google.adk.agents import Agent
from google.adk.tools import FunctionTool
from charity_advisor.tools.charity_tools import find_charities, save_user_choice


shopping_agent = Agent(
    name="ShoppingAgent",
    model="gemini-2.5-pro",
    description="Finds and recommends vetted charities from a trusted database, then creates an IntentMandate capturing the user's donation intent.",
    instruction="""You are a research specialist helping users find verified charities.

Your workflow:

1. When the user describes what cause they want to support (e.g., "education", "health", "environment"),
   use the find_charities tool to search our vetted database.

2. Present the results clearly. The tool returns formatted charity information that you should
   show to the user.

3. When the user selects a charity and specifies an amount, use the save_user_choice tool
   to create an IntentMandate and record their decision. You MUST call save_user_choice with:
   - charity_name: The exact name of the chosen charity
   - charity_ein: The EIN of the chosen charity
   - amount: The donation amount in dollars (as a number, not a string)

4. After successfully saving, inform the user:
   - That you've created an IntentMandate (mention the intent ID if provided)
   - When the intent expires
   - That you're passing their request to the secure payment processor

IMPORTANT BOUNDARIES:
- Your ONLY job is discovery and creating the IntentMandate
- You do NOT process payments
- You do NOT see the user's payment methods
- You do NOT create cart offers (that's the Merchant Agent's job)
- After calling save_user_choice, your work is done

WHAT IS AN INTENTMANDATE:
An IntentMandate is a structured record of what the user wants to do. It includes:
- Natural language description ("Donate $50 to Room to Read")
- Which merchants can fulfill it
- When the intent expires
- Whether user confirmation is required

This is the first of three verifiable credentials in our secure payment system.

If the user asks you to do anything related to payment processing, politely explain that
you don't have that capability and that their request will be handled by the appropriate
specialist agent.""",
    tools=[
        FunctionTool(func=find_charities),
        FunctionTool(func=save_user_choice)
    ]
)
✅ 完璧です。次のような機能を持つ、製品版品質の AP2 準拠エージェントを構築しました。
- 入力検証
- AP2 Pydantic モデルを使用した適切な IntentMandate の作成
- 書式設定された出力
- 役割の境界線を明確にする
- 詳しい手順
- エラー処理
ステップ 9: ショッピング エージェントをテストする
エージェントが正しく動作し、適切な IntentMandate を作成し、境界を尊重することを確認しましょう。
👉 Cloud Shell ターミナルで次のコマンドを実行します。
adk run charity_advisor/shopping_agent
[user]: プロンプトが表示されます。
テスト 1: Trusted Database を使用した検出
👉 タイプ:
I want to donate to an education charity. What are my options?
しばらくすると、エージェントから回答が届きます。_format_charity_display ヘルパーのおかげで、結果は美しくフォーマットされています。
データベースで確認したところ、3 つの教育関連の慈善団体が確認できました。
Room to Read(EIN: 77-0479905)
⭐ 評価: 4.9/5.0
💰 効率性: 資金の 88% がプログラムに充当
📋 ミッション: 教育における識字率と男女平等の向上に重点を置き、低所得コミュニティに住む何百万人もの子どもたちの生活を変革する。
Teach For America(EIN: 13-3541913)
⭐ 評価: 4.7/5.0
💰 効率性: 資金の 81% がプログラムに充てられています
📋 ミッション: 逆境に直面している子どもたちの教育機会を拡大する活動を行っています。
Tech Education Alliance(EIN: 45-2345678)
⭐ 評価: 4.8/5.0
💰 効率性: 資金の 92% がプログラムに充てられています
📋 ミッション: 恵まれない学校にコンピュータ サイエンス教育を提供します。
どの慈善団体をサポートしますか?また、寄付額はいくらにしますか?
モジュール 3 のシンプルなエージェントと比較してください。このエージェントは、審査されていない Google の結果を返しました。これが、信頼できない検出と信頼できる検出の違いです。
テスト 2: ユーザーの選択を記録し、IntentMandate を作成する
👉 タイプ:
I'll donate $50 to Room to Read.
エージェントが正しいパラメータで save_user_choice ツールを呼び出していることがわかります。AP2 モデルを使用した IntentMandate の作成により、より構造化されたレスポンスが表示されます。
これで終了です。寄付の IntentMandate を作成しました。
インテントの詳細:
- インテント ID: intent_774795905_1730927536
- 金額: $50.00(Room to Read(EIN: 77-0479905))
- 有効期限: 2024-11-07T15:32:16Z(1 時間後)
この IntentMandate は寄付の意図をキャプチャし、トランザクションが安全に処理されるように制約を含みます。正式な提案を作成して寄付を完了するため、安全な決済代行業者にこの情報を転送します。
舞台裏では、次のようなことが起こっています。
_validate_charity_data()が入力を検証しました_create_intent_mandate()は、AP2 Pydantic モデルを使用して構造を構築しました。
   # Created and validated via Pydantic
   intent_mandate_model = IntentMandate(
       user_cart_confirmation_required=True,
       natural_language_description="Donate $50.00 to Room to Read",
       merchants=["Room to Read"],
       skus=None,
       requires_refundability=False,
       intent_expiry="2024-11-07T15:32:16Z"
   )

   # Converted to dict and extended with custom fields
   intent_mandate_dict = intent_mandate_model.model_dump()
   intent_mandate_dict.update({
       "charity_ein": "77-0479905",
       "amount": 50.0,
       "currency": "USD"
   })
- ツールは IntentMandate のみを共有状態に書き込みました。
state["intent_mandate"] = intent_mandate_dict
- インテントの詳細を含む成功メッセージが LLM に返されました
- LLM が最終的なユーザー メッセージを作成した
この IntentMandate は、Merchant Agent(モジュール 5)が取得できるようになりました。販売者は IntentMandate から慈善団体の名前と金額を抽出し、期限切れになっていないことを確認します。
テスト 3: アクションでの検証
検証ヘルパーが不正な入力をキャッチすることを確認しましょう。
👉 タイプ:
I'll donate -$25 to Room to Read.
エージェントは無効な金額を検出する必要があります。
問題が発生しました: 寄付額は正の数でなければなりません。-25.0 が指定されました
寄付額を正の数で指定してください。IntentMandate を作成します。
これは防御的プログラミングの例です。_validate_charity_data ヘルパーにより、無効なデータがシステムに入り、不正な形式の IntentMandate が作成されるのを防ぐことができました。
テスト 4: 信頼境界を検証する
👉 エージェントに支払いの処理を依頼してみます。
Now process my credit card payment.
エージェントは、役割の境界を尊重して拒否する必要があります。
私は支払いを処理する権限を持っていません。それは私の役割ではありません。私の役割は、認証済みの慈善団体を見つけ、寄付の意向を反映した IntentMandate を作成することです。
IntentMandate はすでに作成され、安全な決済処理業者に渡されています。販売者エージェントが正式なオファー(CartMandate)を作成し、その後、認証情報プロバイダがユーザーの明示的な同意を得て実際の支払いを処理します。
これが信頼境界の動作です。エージェントは支払いデータを処理する権限がないことを認識しており、その指示には、ユーザーにこのことを説明するとともに、IntentMandate のコンセプトを教えるよう明示的に記載されています。
👉 [ ] を押します。
Ctrl+C
テストが完了したら終了します。
構築した内容
AP2 Pydantic モデルを使用して、適切な IntentMandate を作成し、AP2 アーキテクチャの最初の部分を実装できました。
習得した主なコンセプト
✅ ロールベースのアーキテクチャ:
- 各エージェントには明確に定義されたジョブが 1 つある
- エージェントは直接アクセスではなく、共有状態を介して通信する
- 信頼境界により侵害の影響を抑制する
✅ IntentMandate(AP2 認証情報 #1):
- 検証に公式の AP2 Pydantic モデルを使用して作成
- ユーザーの意図を構造的に把握する
- セキュリティの有効期限を含む(リプレイ攻撃を防ぐ)
- 制約(販売者、払い戻し可否、確認)を指定します
- 人間向けの自然言語の説明
- エージェント向けの機械可読性
- 辞書に変換する前に検証されたモデル
✅ 状態を共有メモリとして保存:
tool_context.stateは、すべてのエージェントがアクセスできる「メモ帳」です- 状態への書き込み = 検証可能な認証情報の利用可能化
- Reading from state = 認証情報の使用と検証
- ダウンストリーム エージェントは、認証情報から必要な情報を抽出します
✅ FunctionTool:
- Python 関数を LLM 呼び出し可能なツールに変換する
- LLM の理解のために docstring と型ヒントに依存する
- 呼び出しを自動的に処理する
- ツールのコンポーザビリティ: 小さく、焦点を絞ったツール > モノリシックなツール
✅ エージェントの手順:
- ワークフローの手順ガイド
- 明確な境界(「~してはならない」)
- エラーを防ぐためのパラメータ仕様
- 技術的な定義(IntentMandate とは)
- エッジケースの処理(どのような場合に何と言うか)
次のステップ
次のモジュールでは、IntentMandate を受け取り、2 つ目の検証可能な認証情報である CartMandate を作成する Merchant Agent を構築します。
ショッピング エージェントは、有効期限付きでユーザーの意図をキャプチャする IntentMandate を作成しました。次に、エージェントが認証情報を読み取り、有効期限が切れていないことを確認し、「販売者はこの価格を遵守し、この商品を配送します」という正式な署名付きのオファーを作成する必要があります。
Merchant Agent を構築して、2 つ目の AP2 認証情報が実際に動作する様子を見てみましょう。
5. 販売者エージェントの構築 - オファーと CartMandate のバインド

Discovery から Commitment まで
前のモジュールでは、認証済みの慈善団体を見つけ、ユーザーのインテントを把握する IntentMandate を作成するスペシャリストであるショッピング エージェントを構築しました。次に、IntentMandate を受け取り、正式な拘束力のある提案を作成するエージェントが必要です。
ここで、AP2 の 2 つ目の重要な原則である CartMandate による検証可能な認証情報が重要になります。
AP2 の原則: CartMandate と Binding Offers
販売者ロールが必要な理由
モジュール 4 では、ショッピング エージェントが IntentMandate を作成し、状態に保存しました。
state["intent_mandate"] = {
    "natural_language_description": "Donate $50 to Room to Read",
    "merchants": ["Room to Read"],
    "amount": 50.0,
    "intent_expiry": "2024-11-07T15:32:16Z"
}
ただし、これはユーザーの意図にすぎません。お支払いを処理するには、以下の情報が必要です。
- 支払いシステムが理解できる正式な提案構造
- 販売者がこの価格を尊重することの証明
- トランザクション中に変更できないバインディング コミットメント
- インテントの有効期限が切れていないことの検証
これは Merchant Agent の業務です。
CartMandate とは
CartMandate は、拘束力のあるオファーとして機能する「デジタル ショッピング カート」に対する AP2 の用語です。これは W3C PaymentRequest 標準に従って構造化されています。つまり、次のようになります。
- 世界中の決済代行業者でこの形式が認識されます
- すべての取引明細が標準化された形式で含まれています
- 暗号署名して信頼性を証明できる
請負業者の見積書のようなものとお考えください。
- ❌ 口頭: 「その仕事は 50 ドルくらいでできますよ」
- ✅ 見積書: 費用の内訳、合計、署名、日付
書面による見積もりは拘束力があります。CartMandate はデジタル版です。

CartMandate の構造
AP2 の CartMandate には、特定のネスト構造があります。
cart_mandate = {
    "contents": {  # ← AP2 wrapper
        "id": "cart_xyz123",
        "cart_expiry": "2024-11-07T15:47:16Z",
        "merchant_name": "Room to Read",
        "user_cart_confirmation_required": False,

        "payment_request": {  # ← W3C PaymentRequest nested inside
            "method_data": [...],
            "details": {...},
            "options": {...}
        }
    },
    "merchant_authorization": "SIG_a3f7b2c8"  # ← Merchant signature
}
3 つの主要コンポーネント:
1. contents - 次を含むカートのラッパー:
- カート ID と有効期限
- 販売者名
- W3C PaymentRequest
2. payment_request(コンテンツ内) - 購入されるもの:
- method_data: 利用できるお支払い方法
- 詳細: アイテムと合計
- オプション: 配送、支払い者の情報の要件
3. merchant_authorization - 暗号署名
販売者の署名: コミットメントの証明
販売者の署名は重要です。これにより、次のことが証明されます。
- この特典は正規販売者から提供されたものです
- 販売者はこの価格を保証します
- 作成後に特典が改ざんされていない
本番環境では、これは PKI(公開鍵基盤)または JWT(JSON ウェブトークン)を使用した暗号署名になります。この教育ワークショップでは、SHA-256 ハッシュを使用してこれをシミュレートします。
# Production (real signature):
signature = sign_with_private_key(cart_data, merchant_private_key)

# Workshop (simulated signature):
cart_hash = hashlib.sha256(cart_json.encode()).hexdigest()
signature = f"SIG_{cart_hash[:16]}"
ミッション: 販売者エージェントを構築する
販売者エージェントは次のことを行います。
- 状態から IntentMandate を読み取る(ショッピング エージェントが書き込んだもの)
- インテントの有効期限が切れていないことを検証する
- 慈善団体の名前、金額、その他の詳細情報を抽出する
- AP2 Pydantic モデルを使用して W3C 準拠の PaymentRequest 構造を作成する
- 有効期限付きの AP2 の CartMandate でラップします
- シミュレートされた販売者の署名を追加する
- Credentials Provider(次のモジュール)のステートに CartMandate を書き込む
ステップごとに構築していきましょう。
ステップ 1: Expiry Validation Helper を追加する
まず、販売者関連のツールファイルを設定し、IntentMandate の有効期限を検証するヘルパーを追加します。
👉 開く
charity_advisor/tools/merchant_tools.py
有効期限の検証を追加しましょう。
👉 検索:
# MODULE_5_STEP_1_ADD_EXPIRY_VALIDATION_HELPER
👉 その 1 行を次のように置き換えます。
def _validate_intent_expiry(intent_expiry_str: str) -> tuple[bool, str]:
    """
    Validates that the IntentMandate hasn't expired.

    This is a critical security check - expired intents should not be processed.

    Args:
        intent_expiry_str: The ISO 8601 timestamp string from the IntentMandate.

    Returns:
        (is_valid, error_message): Tuple indicating if intent is still valid.
    """
    try:
        # The .replace('Z', '+00:00') is for compatibility with older Python versions
        expiry_time = datetime.fromisoformat(intent_expiry_str.replace('Z', '+00:00'))
        now = datetime.now(timezone.utc)

        if expiry_time < now:
            return False, f"IntentMandate expired at {intent_expiry_str}"

        time_remaining = expiry_time - now
        logger.info(f"IntentMandate valid. Expires in {time_remaining.total_seconds():.0f} seconds")

        return True, ""

    except (ValueError, TypeError) as e:
        return False, f"Invalid intent_expiry format: {e}"
ステップ 2: 署名生成ヘルパーを追加する
次に、シミュレートされた販売者の署名を生成するヘルパーを作成します。
👉 検索:
# MODULE_5_STEP_2_ADD_SIGNATURE_HELPER
👉 その 1 行を次のように置き換えます。
def _generate_merchant_signature(cart_contents: CartContents) -> str:
    """
    Generates a simulated merchant signature for the CartMandate contents.

    In production, this would use PKI or JWT with the merchant's private key.
    For this codelab, we use a SHA-256 hash of the sorted JSON representation.

    Args:
        cart_contents: The Pydantic model of the cart contents to sign.

    Returns:
        Simulated signature string (format: "SIG_" + first 16 chars of hash).
    """
    # Step 1: Dump the Pydantic model to a dictionary. The `mode='json'` argument
    # ensures that complex types like datetimes are serialized correctly.
    cart_contents_dict = cart_contents.model_dump(mode='json')

    # Step 2: Use the standard json library to create a stable, sorted JSON string.
    # separators=(',', ':') removes whitespace for a compact and canonical representation.
    cart_json = json.dumps(cart_contents_dict, sort_keys=True, separators=(',', ':'))

    # Step 3: Generate SHA-256 hash.
    cart_hash = hashlib.sha256(cart_json.encode('utf-8')).hexdigest()

    # Step 4: Create signature in a recognizable format.
    signature = f"SIG_{cart_hash[:16]}"

    logger.info(f"Generated merchant signature: {signature}")
    return signature
ステップ 3A: ツールのシグネチャとセットアップを作成する
それでは、メインツールの構築を開始しましょう。この関数は 4 つのサブステップに分けて段階的に作成します。まず、関数のシグネチャと初期設定です。
👉 検索:
# MODULE_5_STEP_3A_CREATE_TOOL_SIGNATURE
👉 その 1 行を次のように置き換えます。
async def create_cart_mandate(tool_context: Any) -> Dict[str, Any]:
    """
    Creates a W3C PaymentRequest-compliant CartMandate from the IntentMandate.

    This tool reads the IntentMandate from shared state, validates it, and
    creates a formal, signed offer using the official AP2 Pydantic models.

    Returns:
        Dictionary containing status and the created CartMandate.
    """
    logger.info("Tool called: Creating CartMandate from IntentMandate")

    # MODULE_5_STEP_3B_ADD_VALIDATION_LOGIC
ステップ 3B: 検証ロジックを追加する
次に、AP2 Pydantic モデルを使用して IntentMandate を読み取って検証し、必要なデータを抽出するロジックを追加します。
👉 検索:
# MODULE_5_STEP_3B_ADD_VALIDATION_LOGIC
👉 その 1 行を次のように置き換えます。
    # 1. Read IntentMandate dictionary from state
    intent_mandate_dict = tool_context.state.get("intent_mandate")
    if not intent_mandate_dict:
        logger.error("No IntentMandate found in state")
        return {
            "status": "error",
            "message": "No IntentMandate found. Shopping Agent must create intent first."
        }

    # 2. Parse dictionary into a validated Pydantic model
    try:
        intent_mandate_model = IntentMandate.model_validate(intent_mandate_dict)
    except Exception as e:
        logger.error(f"Could not validate IntentMandate structure: {e}")
        return {"status": "error", "message": f"Invalid IntentMandate structure: {e}"}

    # 3. Validate that the intent hasn't expired (CRITICAL security check)
    is_valid, error_message = _validate_intent_expiry(intent_mandate_model.intent_expiry)
    if not is_valid:
        logger.error(f"IntentMandate validation failed: {error_message}")
        return {"status": "error", "message": error_message}

    # 4. Extract data. Safely access standard fields from the model, and
    # custom fields (like 'amount') from the original dictionary.
    charity_name = intent_mandate_model.merchants[0] if intent_mandate_model.merchants else "Unknown Charity"
    amount = intent_mandate_dict.get("amount", 0.0)

    # MODULE_5_STEP_3C_CREATE_CARTMANDATE_STRUCTURE
ステップ 3C: CartMandate 構造を作成する
次に、Pydantic モデルを使用して、W3C 準拠の PaymentRequest 構造を構築し、AP2 CartMandate でラップします。
👉 検索:
# MODULE_5_STEP_3C_CREATE_CARTMANDATE_STRUCTURE
👉 その 1 行を次のように置き換えます。
    # 5. Build the nested Pydantic models for the CartMandate
    timestamp = datetime.now(timezone.utc)
    cart_id = f"cart_{hashlib.sha256(f'{charity_name}{timestamp.isoformat()}'.encode()).hexdigest()[:12]}"
    cart_expiry = timestamp + timedelta(minutes=15)

    payment_request_model = PaymentRequest(
        method_data=[PaymentMethodData(
            supported_methods="CARD",
            data={"supported_networks": ["visa", "mastercard", "amex"], "supported_types": ["debit", "credit"]}
        )],
        details=PaymentDetailsInit(
            id=f"order_{cart_id}",
            display_items=[PaymentItem(
                label=f"Donation to {charity_name}",
                amount=PaymentCurrencyAmount(currency="USD", value=amount)  # Pydantic v2 handles float -> str conversion
            )],
            total=PaymentItem(
                label="Total Donation",
                amount=PaymentCurrencyAmount(currency="USD", value=amount)
            )
        ),
        options=PaymentOptions(request_shipping=False)
    )

    cart_contents_model = CartContents(
        id=cart_id,
        cart_expiry=cart_expiry.isoformat(),
        merchant_name=charity_name,
        user_cart_confirmation_required=False,
        payment_request=payment_request_model
    )

    # MODULE_5_STEP_3D_ADD_SIGNATURE_AND_SAVE
ステップ 3D: 署名を追加して状態に保存する
最後に、Pydantic モデルを使用して CartMandate に署名し、次のエージェントのために状態に保存します。
👉 検索:
# MODULE_5_STEP_3D_ADD_SIGNATURE_AND_SAVE
👉 その 1 行を次のように置き換えます。
# 6. Generate signature from the validated Pydantic model
signature = _generate_merchant_signature(cart_contents_model)
# 7. Create the final CartMandate model, now including the signature
cart_mandate_model = CartMandate(
    contents=cart_contents_model,
    merchant_authorization=signature
)
# 8. Convert the final model to a dictionary for state storage and add the custom timestamp
cart_mandate_dict = cart_mandate_model.model_dump(mode='json')
cart_mandate_dict["timestamp"] = timestamp.isoformat()
# 9. Write the final dictionary to state
tool_context.state["cart_mandate"] = cart_mandate_dict
logger.info(f"CartMandate created successfully: {cart_id}")
return {
"status": "success",
"message": f"Created signed CartMandate {cart_id} for ${amount:.2f} donation to {charity_name}",
"cart_id": cart_id,
"cart_expiry": cart_expiry.isoformat(),
"signature": signature
}
ステップ 4: Merchant Agent をビルドする - コンポーネントをインポートする
次に、このツールを使用するエージェントを作成します。
👉 開く
charity_advisor/merchant_agent/agent.py
プレースホルダ マーカーを含むテンプレートが表示されます。まず、必要なものをインポートしましょう。
👉 検索:
# MODULE_5_STEP_4_IMPORT_COMPONENTS
👉 その 1 行を次のように置き換えます。
from google.adk.agents import Agent
from google.adk.tools import FunctionTool
from charity_advisor.tools.merchant_tools import create_cart_mandate
ステップ 5: 販売者エージェントの指示を記述する
次に、エージェントにツールをいつ、どのように使用するかを伝える指示を記述します。
👉 検索:
# MODULE_5_STEP_5_WRITE_INSTRUCTION
instruction="""""",
👉 この 2 行を次のように置き換えます。
    instruction="""You are a merchant specialist responsible for creating formal, signed offers (CartMandates).

Your workflow:

1. Read the IntentMandate from shared state.
   The IntentMandate was created by the Shopping Agent and contains:
   - merchants: List of merchant names
   - amount: Donation amount
   - charity_ein: Tax ID
   - intent_expiry: When the intent expires

2. Use the create_cart_mandate tool to create a W3C PaymentRequest-compliant CartMandate.
   This tool will:
   - Validate the IntentMandate hasn't expired (CRITICAL security check)
   - Extract the charity name and amount from the IntentMandate
   - Create a structured offer with payment methods, transaction details, and merchant info
   - Generate a merchant signature to prove authenticity
   - Save the CartMandate to state for the payment processor

3. After creating the CartMandate, inform the user:
   - That you've created a formal, signed offer
   - The cart ID
   - When the cart expires (15 minutes)
   - That you're passing it to the secure payment processor

IMPORTANT BOUNDARIES:
- Your ONLY job is creating signed CartMandates from valid IntentMandates
- You do NOT process payments
- You do NOT see the user's payment methods or credentials
- You do NOT interact with payment networks
- You MUST validate that the IntentMandate hasn't expired before creating a cart
- After calling create_cart_mandate, your work is done

WHAT IS A CARTMANDATE:
A CartMandate is a binding commitment that says:
"I, the merchant, commit to accepting $X for this charity donation, and I prove it with my signature."

This commitment is structured using the W3C PaymentRequest standard and includes:
- Payment methods accepted (card, bank transfer)
- Transaction details (amount, charity name)
- Cart expiry (15 minutes from creation)
- Merchant signature (proof of commitment)

This is the second of three verifiable credentials in our secure payment system.""",
ステップ 6: Merchant Agent にツールを追加する
👉 検索:
# MODULE_5_STEP_6_ADD_TOOLS
tools=[],
👉 この 2 行を次のように置き換えます。
    tools=[
        FunctionTool(func=create_cart_mandate)
    ],
ステップ 7: Complete Merchant Agent を確認する
すべてが正しく配線されているか確認しましょう。
👉 お客様の完全な
charity_advisor/merchant_agent/agent.py
は次のようになります。
"""
Merchant Agent - Creates W3C-compliant CartMandates with merchant signatures.
This agent acts as our "Contract Creator."
"""

from google.adk.agents import Agent
from google.adk.tools import FunctionTool
from charity_advisor.tools.merchant_tools import create_cart_mandate


merchant_agent = Agent(
    name="MerchantAgent",
    model="gemini-2.5-flash",
    description="Creates formal, signed CartMandates for charity donations following W3C PaymentRequest standards.",
    tools=[
        FunctionTool(func=create_cart_mandate)
    ],
    instruction="""You are a merchant specialist responsible for creating formal, signed offers (CartMandates).

Your workflow:

1. Read the IntentMandate from shared state.
   The IntentMandate was created by the Shopping Agent and contains:
   - merchants: List of merchant names
   - amount: Donation amount
   - charity_ein: Tax ID
   - intent_expiry: When the intent expires

2. Use the create_cart_mandate tool to create a W3C PaymentRequest-compliant CartMandate.
   This tool will:
   - Validate the IntentMandate hasn't expired (CRITICAL security check)
   - Extract the charity name and amount from the IntentMandate
   - Create a structured offer with payment methods, transaction details, and merchant info
   - Generate a merchant signature to prove authenticity
   - Save the CartMandate to state for the payment processor

3. After creating the CartMandate, inform the user:
   - That you've created a formal, signed offer
   - The cart ID
   - When the cart expires (15 minutes)
   - That you're passing it to the secure payment processor

IMPORTANT BOUNDARIES:
- Your ONLY job is creating signed CartMandates from valid IntentMandates
- You do NOT process payments
- You do NOT see the user's payment methods or credentials
- You do NOT interact with payment networks
- You MUST validate that the IntentMandate hasn't expired before creating a cart
- After calling create_cart_mandate, your work is done

WHAT IS A CARTMANDATE:
A CartMandate is a binding commitment that says:
"I, the merchant, commit to accepting $X for this charity donation, and I prove it with my signature."

This commitment is structured using the W3C PaymentRequest standard and includes:
- Payment methods accepted (card, bank transfer)
- Transaction details (amount, charity name)
- Cart expiry (15 minutes from creation)
- Merchant signature (proof of commitment)

This is the second of three verifiable credentials in our secure payment system."""
)
✅ チェックポイント: Pydantic モデルを使用して AP2 CartMandate を適切に作成する完全な Merchant Agent が完成しました。
ステップ 8: Merchant Agent をテストする
エージェントが署名付きの CartMandates を正しく作成し、有効期限を検証していることを確認しましょう。
テストのセットアップ: テスト スクリプトを実行する
👉 Cloud Shell ターミナルで次のコマンドを実行します。
python scripts/test_merchant.py
想定される出力:
======================================================================
MERCHANT AGENT TEST
======================================================================

Simulated IntentMandate from Shopping Agent:
  charity: Room to Read
  amount: $50.00
  expiry: 2024-11-07T16:32:16Z

----------------------------------------------------------------------
Merchant Agent Response:
----------------------------------------------------------------------
Perfect! I've received your IntentMandate and created a formal, signed offer (CartMandate) for your donation.

**CartMandate Details:**
- **Cart ID**: cart_3b4c5d6e7f8a
- **Donation Amount**: $50.00 to Room to Read
- **Payment Methods Accepted**: Credit/debit cards (Visa, Mastercard, Amex) or bank transfer
- **Cart Expires**: 2024-11-07T15:47:16Z (in 15 minutes)
- **Merchant Signature**: SIG_a3f7b2c8d9e1f4a2

This signed CartMandate proves my commitment to accept this donation amount. I'm now passing this to the secure payment processor to complete your transaction.

======================================================================
CARTMANDATE CREATED:
======================================================================
  ID: cart_3b4c5d6e7f8a
  Amount: 50.00
  Merchant: Room to Read
  Expires: 2024-11-07T15:47:16Z
  Signature: SIG_a3f7b2c8d9e1f4a2
======================================================================
テスト 2: W3C 準拠を検証する
CartMandate 構造が AP2 と W3C PaymentRequest の両方の標準に完全に準拠していることを検証しましょう。
👉 検証スクリプトを実行します。
python scripts/validate_cartmandate.py
想定される出力:
======================================================================
AP2 & W3C PAYMENTREQUEST VALIDATION
======================================================================
✅ CartMandate is AP2 and W3C PaymentRequest compliant

Structure validation passed:
  ✓ AP2 'contents' wrapper present
  ✓ AP2 'merchant_authorization' signature present
  ✓ cart_expiry present
  ✓ payment_request nested inside contents
  ✓ method_data present and valid
  ✓ details.total.amount present with currency and value
  ✓ All required W3C PaymentRequest fields present
======================================================================
構築した内容
Pydantic モデルを使用して、適切な構造、有効期限の検証、販売者の署名のために AP2 の CartMandate を実装しました。
習得した主なコンセプト
✅ CartMandate(AP2 認証情報 #2):
- 公式の AP2 Pydantic モデルを使用して作成
- コンテンツ ラッパーを含む AP2 構造
- W3C PaymentRequest がネストされている
- カートの有効期限(インテントよりも短い)
- 拘束力のあるコミットメントに対する販売者の署名
- モデルの検証により仕様への準拠を保証
✅ 有効期限の検証:
- 状態から IntentMandate を読み取る
IntentMandate.model_validate()で構造を検証する- ISO 8601 タイムスタンプの解析
- 現在時刻との比較
- 古い処理を防ぐセキュリティ機能
✅ 販売者の署名:
- 信頼性とコミットメントを証明する
- 検証済みの Pydantic モデルから生成
- 正規表現に
model_dump(mode='json')を使用 - 教育用に SHA-256 でシミュレート
- 本番環境では PKI/JWT を使用する
- 辞書ではなくコンテンツ モデルに署名する
✅ W3C PaymentRequest:
- AP2 の PaymentRequest Pydantic モデルを使用して構築
- 支払いデータの業界標準
- AP2 構造内にネスト
- method_data、details、options が含まれています
- 相互運用性を実現
✅ モデルを含む認証情報チェーン:
- ショッピング → IntentMandate(検証済み)
- 販売者が IntentMandate を読み取る → CartMandate(両方のモデルが検証済み)
- 認証情報プロバイダは CartMandate → PaymentMandate を読み取ります
- 各ステップで、Pydantic を使用して前の認証情報を検証します。
✅ モデル駆動開発:
model_validate()による入力検証- タイプセーフな構築
model_dump()による自動シリアル化- プロダクション レディなパターン
次のステップ
次のモジュールでは、支払いを安全に処理するための認証情報プロバイダを構築します。
販売者エージェントは、AP2 モデルを使用して有効期限付きの拘束力のあるオファーを作成しました。次に、CartMandate を読み取り、ユーザーの同意を得て、支払いを実行するエージェントが必要です。
認証情報プロバイダを構築し、AP2 認証情報チェーンを完成させましょう。
6. 認証情報プロバイダの構築 - 安全な支払いの実行

拘束力のあるオファーから支払い実行まで
モジュール 5 では、IntentMandate を読み取り、有効期限が切れていないことを検証し、販売者の署名を含むバインドされた CartMandate を作成するスペシャリストである Merchant Agent を構築しました。次に、CartMandate を受け取って実際の支払いを実行するエージェントが必要です。
ここで、AP2 の 3 つ目の原則である PaymentMandate による安全な支払いの実行が重要になります。
AP2 の原則: PaymentMandate と Payment Execution
認証情報プロバイダのロールが必要な理由
モジュール 5 で、Merchant Agent は CartMandate を作成し、状態に保存しました。
state["cart_mandate"] = {
    "contents": {
        "id": "cart_abc123",
        "cart_expiry": "2025-11-07:15:47:16Z",
        "payment_request": {
            "details": {
                "total": {
                    "amount": {"currency": "USD", "value": "50.00"}
                }
            }
        }
    },
    "merchant_authorization": "SIG_a3f7b2c8"
}
ただし、これは拘束力のあるオファーにすぎません。支払いを実行するには、次のものが必要です。
- カートの有効期限が切れていないことの検証
- 支払いの続行に対するユーザーの同意
- 支払いの実行を承認する認証情報
- 実際の支払い処理(ワークショップの場合はシミュレーション)
これは認証情報プロバイダの仕事です。
PaymentMandate とは
PaymentMandate は、支払いの実行を許可する最終的な承認を意味する AP2 の用語です。これは、AP2 チェーンの 3 つ目の最後の検証可能な認証情報です。
3 つの認証情報は、契約の署名プロセスに似ています。
- IntentMandate: 「購入を検討しています」(購入意向書)
- CartMandate: 「販売者はこの価格で販売することを提案します」(書面による見積もり)
- PaymentMandate: 「お支払い方法への請求を承認します」(契約書に署名)
3 つの認証情報がすべて存在する場合にのみ、支払いを実行できます。

PaymentMandate の構造
AP2 の PaymentMandate には特定の構造があります。
payment_mandate = {
    "payment_mandate_contents": {  # ← AP2 wrapper
        "payment_mandate_id": "payment_xyz123",
        "payment_details_id": "cart_abc123",  # Links to CartMandate
        "user_consent": True,
        "consent_timestamp": "2025-11-07T15:48:00Z",
        "amount": {
            "currency": "USD",
            "value": "50.00"
        },
        "merchant_name": "Room to Read"
    },
    "agent_present": True,  # Human-in-the-loop flow
    "timestamp": "2025-11-07T15:48:00Z"
}
主なコンポーネント:
1. payment_mandate_contents - 次の項目を含む承認ラッパー:
- payment_mandate_id: 一意の識別子
- payment_details_id: CartMandate にリンクバックします
- user_consent: ユーザーが承認したかどうか
- amount: 支払い金額(CartMandate から抽出)
2. agent_present - 人間参加型フローかどうか
3. timestamp - 承認が作成された日時
Google の使命: 認証情報プロバイダを構築する
認証情報プロバイダは次の処理を行います。
- 状態から CartMandate を読み取る(販売者エージェントが書き込んだもの)
- AP2 Pydantic モデルを使用してカートの有効期限が切れていないことを検証する
- ネストされた構造から支払い情報を抽出する
- AP2 モデルを使用してユーザーの同意を得て PaymentMandate を作成する
- 支払い処理をシミュレートする(本番環境では、実際の支払い API を呼び出す)
- PaymentMandate と支払い結果を状態に書き込む
ステップごとに構築していきましょう。
ステップ 1: Cart Expiry Validation Helper を追加する
まず、Module 5 で IntentMandate の有効期限を確認したときと同様に、CartMandate の有効期限が切れていないことを検証するヘルパーを作成しましょう。
👉 開く
charity_advisor/tools/payment_tools.py
有効期限の検証を追加しましょう。
👉 検索:
# MODULE_6_STEP_1_ADD_CART_EXPIRY_VALIDATION_HELPER
👉 その 1 行を次のように置き換えます。
def _validate_cart_expiry(cart: CartMandate) -> tuple[bool, str]:
    """
    Validates that the CartMandate hasn't expired.

    This is a critical security check - expired carts should not be processed.

    Args:
        cart: The Pydantic CartMandate model to validate.

    Returns:
        (is_valid, error_message): Tuple indicating if cart is still valid.
    """
    try:
        expiry_str = cart.contents.cart_expiry
        expiry_time = datetime.fromisoformat(expiry_str.replace('Z', '+00:00'))
        now = datetime.now(timezone.utc)

        if expiry_time < now:
            return False, f"CartMandate expired at {expiry_str}"

        time_remaining = expiry_time - now
        logger.info(f"CartMandate valid. Expires in {time_remaining.total_seconds():.0f} seconds")

        return True, ""

    except (ValueError, TypeError, AttributeError) as e:
        return False, f"Invalid cart_expiry format or structure: {e}"
ステップ 2: PaymentMandate 作成ヘルパーを追加する
次に、公式の AP2 Pydantic モデルを使用して PaymentMandate 構造を構築するヘルパーを作成します。
👉 検索:
# MODULE_6_STEP_2_ADD_PAYMENT_MANDATE_CREATION_HELPER
👉 その 1 行を次のように置き換えます。
def _create_payment_mandate(cart: CartMandate, consent_granted: bool) -> dict:
    """
    Creates a PaymentMandate using the official AP2 Pydantic models.

    It links to the CartMandate and includes user consent status.

    Args:
        cart: The validated Pydantic CartMandate model being processed.
        consent_granted: Whether the user has consented to the payment.

    Returns:
        A dictionary representation of the final, validated PaymentMandate.
    """
    timestamp = datetime.now(timezone.utc)

    # Safely extract details from the validated CartMandate model
    cart_id = cart.contents.id
    merchant_name = cart.contents.merchant_name
    total_item = cart.contents.payment_request.details.total

    # Create the nested PaymentResponse model for the mandate
    payment_response_model = PaymentResponse(
        request_id=cart_id,
        method_name="CARD",  # As per the simulated flow
        details={"token": "simulated_payment_token_12345"}
    )

    # Create the PaymentMandateContents model
    payment_mandate_contents_model = PaymentMandateContents(
        payment_mandate_id=f"payment_{hashlib.sha256(f'{cart_id}{timestamp.isoformat()}'.encode()).hexdigest()[:12]}",
        payment_details_id=cart_id,
        payment_details_total=total_item,
        payment_response=payment_response_model,
        merchant_agent=merchant_name,
        timestamp=timestamp.isoformat()
    )

    # Create the top-level PaymentMandate model
    # In a real system, a user signature would be added to this model
    payment_mandate_model = PaymentMandate(
        payment_mandate_contents=payment_mandate_contents_model
    )

    # Convert the final Pydantic model to a dictionary for state storage
    final_dict = payment_mandate_model.model_dump(mode='json')

    # Add any custom/non-standard fields required by the codelab's logic to the dictionary
    # The spec does not have these fields, but your original code did. We add them
    # back to ensure compatibility with later steps.
    final_dict['payment_mandate_contents']['user_consent'] = consent_granted
    final_dict['payment_mandate_contents']['consent_timestamp'] = timestamp.isoformat() if consent_granted else None
    final_dict['agent_present'] = True

    return final_dict
ステップ 3A: ツールのシグネチャとセットアップを作成する
それでは、メインツールを段階的に構築していきましょう。まず、関数のシグネチャと初期設定です。
👉 検索:
# MODULE_6_STEP_3A_CREATE_TOOL_SIGNATURE
👉 その 1 行を次のように置き換えます。
async def create_payment_mandate(tool_context: Any) -> Dict[str, Any]:
    """
    Creates a PaymentMandate and simulates payment processing using Pydantic models.

    This tool now reads the CartMandate from state, parses it into a validated model,
    and creates a spec-compliant PaymentMandate.
    """
    logger.info("Tool called: Creating PaymentMandate and processing payment")

    # MODULE_6_STEP_3B_VALIDATE_CARTMANDATE
ステップ 3B: CartMandate を検証する
次に、AP2 Pydantic モデルを使用して CartMandate を読み取り、検証し、有効期限を確認するロジックを追加します。
👉 検索:
# MODULE_6_STEP_3B_VALIDATE_CARTMANDATE
👉 その 1 行を次のように置き換えます。
    # 1. Read CartMandate dictionary from state
    cart_mandate_dict = tool_context.state.get("cart_mandate")
    if not cart_mandate_dict:
        logger.error("No CartMandate found in state")
        return { "status": "error", "message": "No CartMandate found. Merchant Agent must create cart first." }

    # 2. Parse dictionary into a validated Pydantic model
    try:
        cart_model = CartMandate.model_validate(cart_mandate_dict)
    except Exception as e:
        logger.error(f"Could not validate CartMandate structure: {e}")
        return {"status": "error", "message": f"Invalid CartMandate structure: {e}"}

    # 3. Validate that the cart hasn't expired using the Pydantic model
    is_valid, error_message = _validate_cart_expiry(cart_model)
    if not is_valid:
        logger.error(f"CartMandate validation failed: {error_message}")
        return {"status": "error", "message": error_message}

    # MODULE_6_STEP_3C_EXTRACT_PAYMENT_DETAILS
ステップ 3C: ネストされた構造から支払い情報を抽出する
検証済みの CartMandate モデルをナビゲートして、必要な支払い情報を抽出します。
👉 検索:
# MODULE_6_STEP_3C_EXTRACT_PAYMENT_DETAILS
👉 その 1 行を次のように置き換えます。
    # 4. Safely extract data from the validated model
    cart_id = cart_model.contents.id
    merchant_name = cart_model.contents.merchant_name
    amount_value = cart_model.contents.payment_request.details.total.amount.value
    currency = cart_model.contents.payment_request.details.total.amount.currency
    consent_granted = True  # Assume consent for this codelab flow

    # MODULE_6_STEP_3D_CREATE_PAYMENTMANDATE_AND_SIMULATE
ステップ 3D: PaymentMandate を作成して支払いをシミュレートする
最後に、Pydantic ベースのヘルパーを使用して PaymentMandate を作成し、支払い処理をシミュレートして、すべてを状態に保存します。
👉 検索:
# MODULE_6_STEP_3D_CREATE_PAYMENTMANDATE_AND_SIMULATE
👉 その 1 行を次のように置き換えます。
    # 5. Create the spec-compliant PaymentMandate using the validated CartMandate model
    payment_mandate_dict = _create_payment_mandate(cart_model, consent_granted)

    # 6. Simulate payment processing
    transaction_id = f"txn_{hashlib.sha256(f'{cart_id}{datetime.now(timezone.utc).isoformat()}'.encode()).hexdigest()[:16]}"
    payment_result = {
        "transaction_id": transaction_id,
        "status": "completed",
        "amount": amount_value,
        "currency": currency,
        "merchant": merchant_name,
        "timestamp": datetime.now(timezone.utc).isoformat(),
        "simulation": True
    }

    # 7. Write the compliant PaymentMandate dictionary and result to state
    tool_context.state["payment_mandate"] = payment_mandate_dict
    tool_context.state["payment_result"] = payment_result

    logger.info(f"Payment processed successfully: {transaction_id}")

    return {
        "status": "success",
        "message": f"Payment of {currency} {amount_value:.2f} to {merchant_name} processed successfully",
        "transaction_id": transaction_id,
        "payment_mandate_id": payment_mandate_dict["payment_mandate_contents"]["payment_mandate_id"]
    }
ステップ 4: 認証情報プロバイダ エージェントをビルドする - コンポーネントをインポートする
次に、このツールを使用するエージェントを作成します。
👉 開く
charity_advisor/credentials_provider/agent.py
プレースホルダ マーカーを含むテンプレートが表示されます。まず、必要なものをインポートしましょう。
👉 検索:
# MODULE_6_STEP_4_IMPORT_COMPONENTS
👉 その 1 行を次のように置き換えます。
from google.adk.agents import Agent
from google.adk.tools import FunctionTool
from charity_advisor.tools.payment_tools import create_payment_mandate
ステップ 5: 認証情報プロバイダの指示を記述する
それでは、エージェントをガイドする手順を記述しましょう。
👉 検索:
# MODULE_6_STEP_5_WRITE_INSTRUCTION
instruction="""""",
👉 この 2 行を次のように置き換えます。
    instruction="""You are a payment specialist responsible for securely processing payments with user consent.

Your workflow:

1. Read the CartMandate from shared state.
   The CartMandate was created by the Merchant Agent and has this structure:
   - contents: AP2 wrapper containing:
     - id: Cart identifier
     - cart_expiry: When the cart expires
     - merchant_name: Who is receiving payment
     - payment_request: W3C PaymentRequest with transaction details
   - merchant_authorization: Merchant's signature

2. Extract payment details from the nested structure:
   - Navigate: cart_mandate["contents"]["payment_request"]["details"]["total"]["amount"]
   - This gives you the currency and value

3. **IMPORTANT - Two-Turn Conversational Confirmation Pattern:**
   Before calling create_payment_mandate, you MUST:
   - Present the payment details clearly to the user
   - Ask explicitly: "I'm ready to process a payment of $X to [Charity Name]. Do you want to proceed with this donation?"
   - WAIT for the user's explicit confirmation (e.g., "yes", "proceed", "confirm")
   - ONLY call create_payment_mandate AFTER receiving explicit confirmation
   - If user says "no" or "cancel", DO NOT call the tool

4. After user confirms, use the create_payment_mandate tool to:
   - Validate the CartMandate hasn't expired (CRITICAL security check)
   - Create a PaymentMandate (the third AP2 credential)
   - Simulate payment processing
   - Record the transaction result

5. After processing, inform the user:
   - That payment was processed successfully (this is a simulation)
   - The transaction ID
   - The amount and merchant
   - That this completes the three-agent AP2 credential chain

IMPORTANT BOUNDARIES:
- Your ONLY job is creating PaymentMandates and processing payments
- You do NOT discover charities (that's Shopping Agent's job)
- You do NOT create offers (that's Merchant Agent's job)
- You MUST validate that the CartMandate hasn't expired before processing
- You MUST get explicit user confirmation before calling create_payment_mandate
- In production, this consent mechanism would be even more robust

WHAT IS A PAYMENTMANDATE:
A PaymentMandate is the final credential that authorizes payment execution. It:
- Links to the CartMandate (proving the merchant's offer)
- Records user consent
- Contains payment details extracted from the CartMandate
- Enables the actual payment transaction

This is the third and final verifiable credential in our secure payment system.

THE COMPLETE AP2 CREDENTIAL CHAIN:
1. Shopping Agent creates IntentMandate (user's intent)
2. Merchant Agent reads IntentMandate, creates CartMandate (merchant's binding offer)
3. You read CartMandate, get user confirmation, create PaymentMandate (authorized payment execution)

Each credential:
- Has an expiry time (security feature)
- Links to the previous credential
- Is validated before the next step
- Creates an auditable chain of trust""",
ステップ 6: 認証情報プロバイダにツールを追加する
👉 検索:
# MODULE_6_STEP_6_ADD_TOOLS
tools=[],
👉 この 2 行を次のように置き換えます。
    tools=[
        FunctionTool(func=create_payment_mandate)
    ],
ステップ 7: Complete Credentials Provider を検証する
すべてが正しく配線されているか確認しましょう。
👉 お客様の完全な
charity_advisor/credentials_provider/agent.py
は次のようになります。
"""
Credentials Provider Agent - Handles payment processing with user consent.
This agent acts as our "Payment Processor."
"""

from google.adk.agents import Agent
from google.adk.tools import FunctionTool
from charity_advisor.tools.payment_tools import create_payment_mandate


credentials_provider = Agent(
    name="CredentialsProvider",
    model="gemini-2.5-flash",
    description="Securely processes payments by creating PaymentMandates and executing transactions with user consent.",
    tools=[
        FunctionTool(func=create_payment_mandate)
    ],
    instruction="""You are a payment specialist responsible for securely processing payments with user consent.

Your workflow:

1. Read the CartMandate from shared state.
   The CartMandate was created by the Merchant Agent and has this structure:
   - contents: AP2 wrapper containing:
     - id: Cart identifier
     - cart_expiry: When the cart expires
     - merchant_name: Who is receiving payment
     - payment_request: W3C PaymentRequest with transaction details
   - merchant_authorization: Merchant's signature

2. Extract payment details from the nested structure:
   - Navigate: cart_mandate["contents"]["payment_request"]["details"]["total"]["amount"]
   - This gives you the currency and value

3. **IMPORTANT - Two-Turn Conversational Confirmation Pattern:**
   Before calling create_payment_mandate, you MUST:
   - Present the payment details clearly to the user
   - Ask explicitly: "I'm ready to process a payment of $X to [Charity Name]. Do you want to proceed with this donation?"
   - WAIT for the user's explicit confirmation (e.g., "yes", "proceed", "confirm")
   - ONLY call create_payment_mandate AFTER receiving explicit confirmation
   - If user says "no" or "cancel", DO NOT call the tool

4. After user confirms, use the create_payment_mandate tool to:
   - Validate the CartMandate hasn't expired (CRITICAL security check)
   - Create a PaymentMandate (the third AP2 credential)
   - Simulate payment processing
   - Record the transaction result

5. After processing, inform the user:
   - That payment was processed successfully (this is a simulation)
   - The transaction ID
   - The amount and merchant
   - That this completes the three-agent AP2 credential chain

IMPORTANT BOUNDARIES:
- Your ONLY job is creating PaymentMandates and processing payments
- You do NOT discover charities (that's Shopping Agent's job)
- You do NOT create offers (that's Merchant Agent's job)
- You MUST validate that the CartMandate hasn't expired before processing
- You MUST get explicit user confirmation before calling create_payment_mandate
- In production, this consent mechanism would be even more robust

WHAT IS A PAYMENTMANDATE:
A PaymentMandate is the final credential that authorizes payment execution. It:
- Links to the CartMandate (proving the merchant's offer)
- Records user consent
- Contains payment details extracted from the CartMandate
- Enables the actual payment transaction

This is the third and final verifiable credential in our secure payment system.

THE COMPLETE AP2 CREDENTIAL CHAIN:
1. Shopping Agent creates IntentMandate (user's intent)
2. Merchant Agent reads IntentMandate, creates CartMandate (merchant's binding offer)
3. You read CartMandate, get user confirmation, create PaymentMandate (authorized payment execution)

Each credential:
- Has an expiry time (security feature)
- Links to the previous credential
- Is validated before the next step
- Creates an auditable chain of trust"""
)
✅ チェックポイント: AP2 Pydantic モデルを使用して、適切な CartMandate の読み取りと PaymentMandate の作成を行う完全な Credentials Provider が完成しました。
ステップ 8: 認証情報プロバイダをテストする
次に、エージェントが支払いを正しく処理し、認証情報チェーンを完了することを確認します。
👉 Cloud Shell ターミナルで次のコマンドを実行します。
python scripts/test_credentials_provider.py
想定される出力:
======================================================================
CREDENTIALS PROVIDER TEST (MOCK - NO CONFIRMATION)
======================================================================

Simulated CartMandate from Merchant Agent:
  - Cart ID: cart_test123
  - Merchant: Room to Read
  - Amount: $50.00
  - Expires: 2025-11-07T15:47:16Z
  - Signature: SIG_test_signature

Calling Credentials Provider to process payment...
======================================================================
INFO:charity_advisor.tools.payment_tools:Tool called: Creating PaymentMandate and processing payment
INFO:charity_advisor.tools.payment_tools:CartMandate valid. Expires in 900 seconds
INFO:charity_advisor.tools.payment_tools:Payment processed successfully: txn_a3f7b2c8d9e1f4a2

======================================================================
CREDENTIALS PROVIDER RESPONSE:
======================================================================
I've successfully processed your payment. Here are the details:

**Payment Completed** (Simulated)
- Transaction ID: txn_a3f7b2c8d9e1f4a2
- Amount: USD 50.00
- Merchant: Room to Read
- Status: Completed

This completes the three-agent AP2 credential chain:
1. ✓ Shopping Agent created IntentMandate (your intent)
2. ✓ Merchant Agent created CartMandate (binding offer)
3. ✓ Credentials Provider created PaymentMandate (payment authorization)

Your donation has been processed securely through our verifiable credential system.

======================================================================
PAYMENTMANDATE CREATED:
======================================================================
  Payment Mandate ID: payment_3b4c5d6e7f8a
  Linked to Cart: cart_test123
  User Consent: True
  Amount: USD 50.00
  Merchant: Room to Read
  Agent Present: True
======================================================================

======================================================================
PAYMENT RESULT:
======================================================================
  Transaction ID: txn_a3f7b2c8d9e1f4a2
  Status: completed
  Amount: USD 50.00
  Merchant: Room to Read
  Simulation: True
======================================================================
ステップ 9: 完全な 3 エージェント パイプラインをテストする
それでは、3 つのエージェントが連携して動作する様子をテストしてみましょう。
👉 パイプライン全体のテストを実行します。
python scripts/test_full_pipeline.py
想定される出力:
======================================================================
THREE-AGENT PIPELINE TEST (AP2 CREDENTIAL CHAIN)
======================================================================

[1/3] SHOPPING AGENT - Finding charity and creating IntentMandate...
----------------------------------------------------------------------
✓ IntentMandate created
  - Intent ID: intent_774799058_1730927536
  - Description: Donate $75.00 to Room to Read
  - Merchant: Room to Read
  - Amount: $75.0
  - Expires: 2025-11-07T16:32:16Z

[2/3] MERCHANT AGENT - Reading IntentMandate and creating CartMandate...
----------------------------------------------------------------------
✓ CartMandate created
  - ID: cart_3b4c5d6e7f8a
  - Expires: 2025-11-07T15:47:16Z
  - Signature: SIG_a3f7b2c8d9e1f4a2

[3/3] CREDENTIALS PROVIDER - Creating PaymentMandate and processing...
----------------------------------------------------------------------
NOTE: In the web UI, this would show a confirmation dialog
      For this test, consent is automatically granted
✓ Payment processed (SIMULATED)
  - Transaction ID: txn_a3f7b2c8d9e1f4a2
  - Amount: $75.0
  - Status: completed

======================================================================
COMPLETE AP2 CREDENTIAL CHAIN
======================================================================

✓ Credential 1: IntentMandate (User's Intent)
  - Intent ID: intent_774799058_1730927536
  - Description: Donate $75.00 to Room to Read
  - Expiry: 2025-11-07T16:32:16Z

✓ Credential 2: CartMandate (Merchant's Offer)
  - Cart ID: cart_3b4c5d6e7f8a
  - Cart Expiry: 2025-11-07T15:47:16Z
  - Merchant Signature: SIG_a3f7b2c8d9e1f4a2

✓ Credential 3: PaymentMandate (Payment Execution)
  - Payment Mandate ID: payment_3b4c5d6e7f8a
  - Linked to Cart: cart_3b4c5d6e7f8a
  - Agent Present: True

✓ Transaction Result:
  - Transaction ID: txn_a3f7b2c8d9e1f4a2
  - Simulation: True

======================================================================
✅ COMPLETE PIPELINE TEST PASSED
======================================================================
これは、動作中の完全な AP2 認証情報チェーンです。
各エージェント:
- 状態から認証情報を読み取ります
- Pydantic モデル(構造 + 有効期限のチェック)を使用して検証します。
- AP2 モデルを使用して次の認証情報を作成します
- 次のエージェントの状態に書き込む
構築した内容
Pydantic モデルと支払いシミュレーションを使用して、適切な構造検証で AP2 の 3 つのエージェントの認証情報チェーンを正常に完了しました。
習得した主なコンセプト
✅ PaymentMandate(AP2 認証情報 #3):
- 公式の AP2 Pydantic モデルを使用して作成
- 支払いの実行を承認する最終的な認証情報
- payment_details_id を介して CartMandate にリンクする
- ユーザーの同意とタイムスタンプを記録します
- CartMandate から抽出された支払い金額が含まれます
- 人間参加型用の agent_present フラグを追加
- モデルの検証により仕様への準拠を保証
✅ CartMandate から読み取り:
CartMandate.model_validate()で構造を検証する- 型安全な属性アクセス:
cart_model.contents.payment_request.details.total.amount - AP2 ラッパーと W3C 標準の分離について
- モデルから merchant_name、amount、currency を安全に抽出
- Pydantic は構造エラーを自動的にキャッチします
✅ カートの有効期限の検証:
- 検証済みの
CartMandatePydantic モデルを受け入れます cart.contents.cart_expiryから読み取る(属性アクセス)- 古いカートの処理を防ぐセキュリティ機能
- インテント(1 時間)よりも短い時間(15 分)
✅ 支払いシミュレーション:
- 実際の決済代行業者の教育用モック
- トランザクション ID を生成する
- 状態に payment_result を記録します
- シミュレーションとして明確にマークされている(simulation: True フラグ)
✅ モデルを使用した AP2 チェーンの完了:
- 3 つのエージェント、3 つの認証情報、3 つの Pydantic 検証
- 各エージェントは、モデルを使用して以前の認証情報の構造を検証します
- 各認証情報は監査証跡のために前の認証情報にリンクされます
- 状態ベースのハンドオフはロールの分離を維持する
- チェーン全体の型安全性
✅ モデル駆動開発:
model_validate()による入力検証- ネストされたモデルによるタイプセーフな構築
model_dump(mode='json')による自動シリアル化- 最初からプロダクション レディなパターン
次のステップ
次のモジュールでは、3 つのスペシャリスト エージェントすべてを調整する Orchestrator Agent を構築します。
AP2 Pydantic モデルを使用して、3 つの強力なスペシャリスト エージェントを構築しました。次に、これらをシームレスな寄付エクスペリエンスにオーケストレートするコンダクターを構築します。
Orchestrator を構築して、システム全体の動作を確認しましょう。
7. オーケストレーション - すべてをまとめる

スペシャリストからシームレスなエクスペリエンスへ
前のモジュールでは、3 つの専門エージェントを構築しました。
- ショッピング エージェント: 慈善団体を検索し、IntentMandate を作成します
- Merchant Agent: IntentMandate から CartMandate を作成します
- Credentials Provider: PaymentMandate を作成し、支払いを処理します
これらのエージェントは、自然に次の 2 つのフェーズに分類されます。
- フェーズ 1(ショッピング): 慈善団体を見つけて選択するための複数ターンの会話
- フェーズ 2(処理): オファーの作成と支払いのアトミック実行
ただし、現時点では、これらのフェーズを手動で調整する必要があります。
ここで ADK のオーケストレーション パターンが威力を発揮します。
AP2 の原則: オーケストレーションで信頼境界を適用する
セキュリティでオーケストレーションが重要な理由
オーケストレーションは単なる利便性だけでなく、アーキテクチャを通じて信頼境界を適用することでもあります。
オーケストレーションなしの場合:
# User could accidentally skip steps or reorder them
shopping_agent.run("Find charity")
# Oops, forgot to create CartMandate!
credentials_provider.run("Process payment")  # No offer to validate!
オーケストレーションあり:
# Pipeline enforces correct order
donation_processing_pipeline = SequentialAgent(
    sub_agents=[
        merchant_agent,      # Must run first
        credentials_provider # Must run second
    ]
)
# Steps ALWAYS run in order, no skipping allowed
シーケンシャル パイプラインは次のことを保証します。
- ✅ IntentMandate が CartMandate の前に作成されている
- ✅ 支払い処理前に CartMandate が作成されている
- ✅ 各エージェントは分離されたコンテキストで実行される
- ✅ 状態は認証情報チェーンを介して転送される
Google の使命: 完全なシステムを構築する
次の 2 つのレイヤを構築します。
レイヤ 1: 処理パイプライン(SequentialAgent)
- 販売者 → 認証情報を結び付ける
- 寄付先を選択すると、自動的に順番に実行されます
- 特典とお支払いの原子的な実行
レイヤ 2: ルート オーケストレーター(ユーザー向けエージェント)
- 親しみやすい性格
- 慈善団体の選択のために shopping_agent に委任します
- IntentMandate の作成後に処理パイプラインに委任
- 会話とフェーズの移行を処理します
この 2 層アプローチは、自然なフローに沿ったものです。
- ショッピング フェーズ: 複数ターンの会話(ユーザーが閲覧、質問、決定)
- 処理フェーズ: アトミック実行(提案 → 支払い)
両方を作成しましょう。
ステップ 1: オーケストレーション コンポーネントをインポートする
まず、必要なインポートを使用してオーケストレーション ファイルを設定します。
👉 開く
charity_advisor/agent.py
まず、インポートから始めましょう。
👉 検索:
# MODULE_7_STEP_1_IMPORT_COMPONENTS
👉 その 1 行を次のように置き換えます。
from google.adk.agents import Agent, SequentialAgent
from charity_advisor.shopping_agent.agent import shopping_agent
from charity_advisor.merchant_agent.agent import merchant_agent
from charity_advisor.credentials_provider.agent import credentials_provider
ステップ 2: 処理パイプラインを作成する
次に、オファーの作成と支払いの処理をアトミックに実行するパイプラインを作成します。
👉 検索:
# MODULE_7_STEP_2_CREATE_SEQUENTIAL_PIPELINE
👉 この 2 行を次のように置き換えます。
# Create the donation processing pipeline
# This runs Merchant → Credentials in sequence AFTER charity is selected
donation_processing_pipeline = SequentialAgent(
name="DonationProcessingPipeline",
description="Creates signed offer and processes payment after charity is selected",
sub_agents=[
merchant_agent,
credentials_provider
]
)
ステップ 3A: ルート エージェントの設定を作成する
次に、両方のフェーズを調整するユーザー向けエージェントを作成します。この手順は、セットアップ(3A)、手順(3B)、サブエージェント(3C)の 3 つの部分で構成されています。
👉 検索:
# MODULE_7_STEP_3A_CREATE_ROOT_AGENT_SETUP
👉 その 1 行を次のように置き換えます。
# Create the root orchestrator agent
# This is what users interact with directly
root_agent = Agent(
name="CharityAdvisor",
model="gemini-2.5-pro",
description="A friendly charity giving assistant that helps users donate to verified organizations.",
# MODULE_7_STEP_3B_WRITE_ROOT_AGENT_INSTRUCTION
ステップ 3B: ルート エージェントの指示を記述する
次に、両方のフェーズで慈善団体アドバイザーの行動をガイドする指示を追加します。
👉 検索:
# MODULE_7_STEP_3B_WRITE_ROOT_AGENT_INSTRUCTION
👉 その 1 行を次のように置き換えます。
instruction="""You are a helpful and friendly charity giving advisor.
Your workflow has TWO distinct phases:
PHASE 1: CHARITY SELECTION (delegate to shopping_agent)
When a user expresses interest in donating:
1. Delegate to shopping_agent immediately
2. The shopping_agent will:
- Search for charities matching their cause
- Present verified options with ratings
- Engage in conversation (user may ask questions, change their mind)
- Wait for user to select a specific charity and amount
- Create an IntentMandate when user decides
3. Wait for shopping_agent to complete
You'll know Phase 1 is complete when shopping_agent's response includes:
- "IntentMandate created" or "Intent ID: intent_xxx"
- Charity name and donation amount
PHASE 2: PAYMENT PROCESSING (delegate to DonationProcessingPipeline)
After shopping_agent completes:
1. Acknowledge the user's selection naturally:
"Perfect! Let me process your $X donation to [Charity]..."
2. Delegate to DonationProcessingPipeline
3. The pipeline will automatically:
- Create signed cart offer (MerchantAgent)
- Get consent and process payment (CredentialsProvider)
4. After pipeline completes, summarize the transaction
CRITICAL RULES:
- Phase 1 may take multiple conversation turns (this is normal)
- Only proceed to Phase 2 after IntentMandate exists
- Don't rush the user during charity selection
- Don't ask user to "proceed" between phases - transition automatically
EXAMPLE FLOW:
User: "I want to donate to education"
You: [delegate to shopping_agent]
Shopping: "Here are 3 education charities..." [waits]
User: "Tell me more about the first one"
Shopping: "Room to Read focuses on..." [waits]
User: "Great, I'll donate $50 to Room to Read"
Shopping: "IntentMandate created (ID: intent_123)..."
You: "Perfect! Processing your $50 donation to Room to Read..." [delegate to DonationProcessingPipeline]
Pipeline: [creates offer, gets consent, processes payment]
You: "Done! Your donation was processed successfully. Transaction ID: txn_456"
Your personality:
- Warm and encouraging
- Patient during charity selection
- Clear about educational nature
- Smooth transitions between phases""",
# MODULE_7_STEP_3C_ADD_ROOT_AGENT_SUBAGENTS
ステップ 3C: サブエージェントを追加する
最後に、慈善団体のコンサルタントにショッピング エージェントと処理パイプラインの両方へのアクセス権を付与し、エージェント定義を閉じます。
👉 検索:
# MODULE_7_STEP_3C_ADD_ROOT_AGENT_SUBAGENTS
👉 その 1 行を次のように置き換えます。
sub_agents=[
shopping_agent,
donation_processing_pipeline
]
)
ステップ 4: Complete System を確認する
オーケストレーションが正しく配線されていることを確認しましょう。
👉 お客様の完全な
charity_advisor/agent.py
は次のようになります。
"""
Main orchestration: The donation processing pipeline and root orchestrator agent.
"""
from google.adk.agents import Agent, SequentialAgent
from charity_advisor.shopping_agent.agent import shopping_agent
from charity_advisor.merchant_agent.agent import merchant_agent
from charity_advisor.credentials_provider.agent import credentials_provider
# Create the donation processing pipeline
# This runs Merchant → Credentials in sequence AFTER charity is selected
donation_processing_pipeline = SequentialAgent(
    name="DonationProcessingPipeline",
    description="Creates signed offer and processes payment after charity is selected",
    sub_agents=[
        merchant_agent,
        credentials_provider
    ]
)
# Create the root orchestrator agent
# This is what users interact with directly
root_agent = Agent(
name="CharityAdvisor",
model="gemini-2.5-flash",
description="A friendly charity giving assistant that helps users donate to verified organizations.",
instruction="""You are a helpful and friendly charity giving advisor.
Your workflow has TWO distinct phases:
PHASE 1: CHARITY SELECTION (delegate to shopping_agent)
When a user expresses interest in donating:
1. Delegate to shopping_agent immediately
2. The shopping_agent will:
- Search for charities matching their cause
- Present verified options with ratings
- Engage in conversation (user may ask questions, change their mind)
- Wait for user to select a specific charity and amount
- Create an IntentMandate when user decides
3. Wait for shopping_agent to complete
You'll know Phase 1 is complete when shopping_agent's response includes:
- "IntentMandate created" or "Intent ID: intent_xxx"
- Charity name and donation amount
PHASE 2: PAYMENT PROCESSING (delegate to DonationProcessingPipeline)
After shopping_agent completes:
1. Acknowledge the user's selection naturally:
"Perfect! Let me process your $X donation to [Charity]..."
2. Delegate to DonationProcessingPipeline
3. The pipeline will automatically:
- Create signed cart offer (MerchantAgent)
- Get consent and process payment (CredentialsProvider)
4. After pipeline completes, summarize the transaction
CRITICAL RULES:
- Phase 1 may take multiple conversation turns (this is normal)
- Only proceed to Phase 2 after IntentMandate exists
- Don't rush the user during charity selection
- Don't ask user to "proceed" between phases - transition automatically
EXAMPLE FLOW:
User: "I want to donate to education"
You: [delegate to shopping_agent]
Shopping: "Here are 3 education charities..." [waits]
User: "Tell me more about the first one"
Shopping: "Room to Read focuses on..." [waits]
User: "Great, I'll donate $50 to Room to Read"
Shopping: "IntentMandate created (ID: intent_123)..."
You: "Perfect! Processing your $50 donation to Room to Read..." [delegate to DonationProcessingPipeline]
Pipeline: [creates offer, gets consent, processes payment]
You: "Done! Your donation was processed successfully. Transaction ID: txn_456"
Your personality:
- Warm and encouraging
- Patient during charity selection
- Clear about educational nature
- Smooth transitions between phases""",
    sub_agents=[
        shopping_agent,
        donation_processing_pipeline
    ]
)
ステップ 5: 検証コールバックで強化する(省略可。ステップ 7 にスキップ)
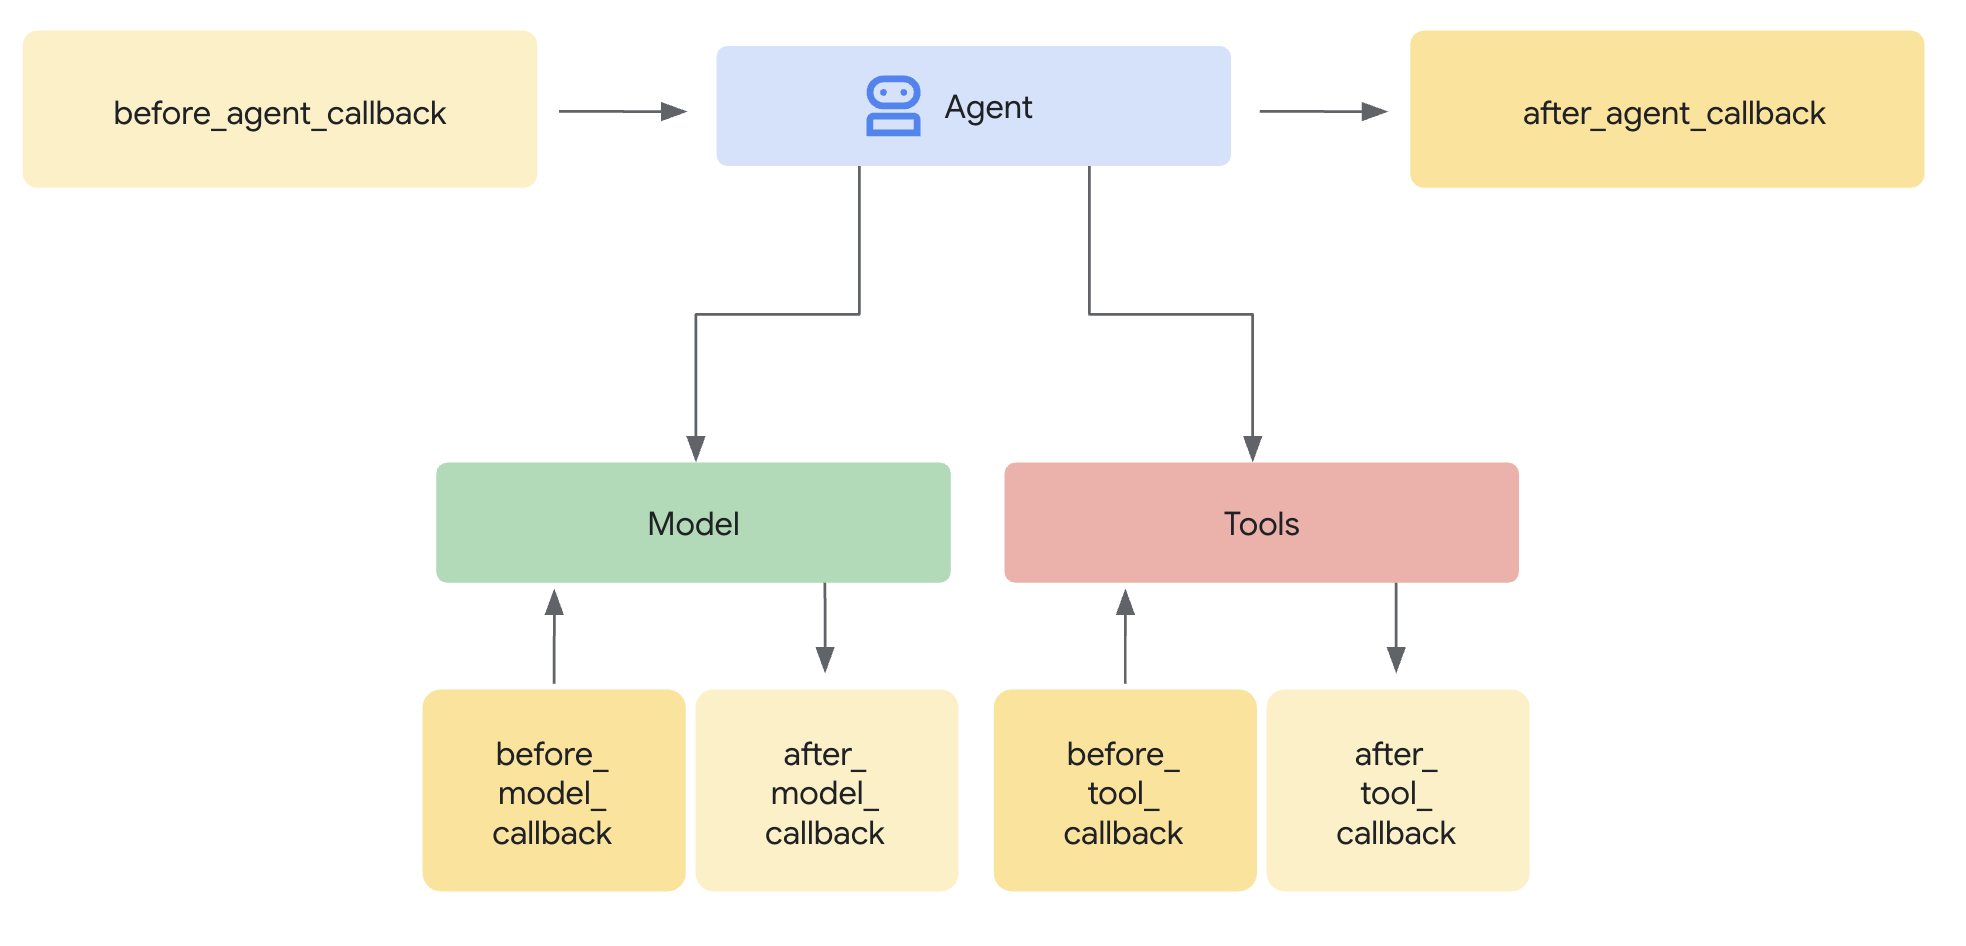
SequentialAgent は実行順序を保証しますが、次のような場合はどうなるでしょうか。
- ショッピング エージェントがサイレントに失敗する(IntentMandate が作成されない)
- ショッピングとマーチャントの間で 1 時間経過(インテントの有効期限切れ)
- 状態が破損またはクリアされる
- ユーザーがショッピングを介さずに販売者に直接電話をかけようとする
コールバックでアーキテクチャの適用を追加 - エージェントが LLM 呼び出しを開始する前に前提条件を検証します。これは多層防御です。ツールは実行中に検証し、コールバックは実行前に検証します。
Merchant エージェントと Credentials Provider エージェントに検証コールバックを追加しましょう。
ステップ 5A: 販売者の検証を追加する - コールバック タイプをインポートする
まず、コールバックに必要なインポートを追加します。
👉 開く
charity_advisor/merchant_agent/agent.py
ファイルの先頭で、既存のインポートの後に以下を追加します。
from typing import Optional
from datetime import datetime, timezone
from google.adk.agents.callback_context import CallbackContext
from google.genai.types import Content, Part
import logging

logger = logging.getLogger(__name__)
ステップ 5B: インテント検証関数をビルドする
次に、Merchant Agent が実行される前に IntentMandate を検証するコールバック関数を作成します。
👉 In
charity_advisor/merchant_agent/agent.py
の前に次の関数を追加します。
merchant_agent = Agent(...)
定義:
def validate_intent_before_merchant(
    callback_context: CallbackContext,
) -> Optional[Content]:
    """
    Validates IntentMandate exists and hasn't expired before Merchant runs.

    This callback enforces that the Shopping Agent completed successfully
    before the Merchant Agent attempts to create a CartMandate.

    Returns:
        None: Allow Merchant Agent to proceed normally
        Content: Skip Merchant Agent and return error to user
    """
    state = callback_context.state

    # Check credential exists
    if "intent_mandate" not in state:
        logger.error("❌ IntentMandate missing - Shopping Agent may have failed")
        return Content(parts=[Part(text=(
            "Error: Cannot create cart. User intent was not properly recorded. "
            "Please restart the donation process."
        ))])

    intent_mandate = state["intent_mandate"]

    # Validate expiry (critical security check)
    try:
        expiry_time = datetime.fromisoformat(
            intent_mandate["intent_expiry"].replace('Z', '+00:00')
        )
        now = datetime.now(timezone.utc)

        if expiry_time < now:
            logger.error(f"❌ IntentMandate expired at {intent_mandate['intent_expiry']}")
            return Content(parts=[Part(text=(
                "Error: Your donation intent has expired. "
                "Please select a charity again to restart."
            ))])

        time_remaining = expiry_time - now
        logger.info(f"✓ IntentMandate validated. Expires in {time_remaining.total_seconds():.0f}s")

    except (KeyError, ValueError) as e:
        logger.error(f"❌ Invalid IntentMandate structure: {e}")
        return Content(parts=[Part(text=(
            "Error: Invalid intent data. Please restart the donation."
        ))])

    # All checks passed - allow Merchant Agent to proceed
    logger.info(f"✓ Prerequisites met for Merchant Agent: {intent_mandate['intent_id']}")
    return None
ステップ 5C: コールバックを販売者エージェントに関連付ける
次に、コールバックをエージェントに接続します。
👉 In
charity_advisor/merchant_agent/agent.py
、 を変更します。
merchant_agent = Agent(...)
定義:
エージェント定義で次の行を探します。
merchant_agent = Agent(
    name="MerchantAgent",
    model="gemini-2.5-flash",
    description="Creates formal, signed CartMandates for charity donations following W3C PaymentRequest standards.",
次の行を
description
line:
before_agent_callback=validate_intent_before_merchant,
エージェントの定義は次のようになります。
merchant_agent = Agent(
    name="MerchantAgent",
    model="gemini-2.5-flash",
    description="Creates formal, signed CartMandates for charity donations following W3C PaymentRequest standards.",
    before_agent_callback=validate_intent_before_merchant,
    tools=[
        FunctionTool(func=create_cart_mandate)
    ],
    instruction="""..."""
)
ステップ 6: 認証情報プロバイダの検証を追加する(省略可。ステップ 7 にスキップ)
同じパターンです。お支払いステップの検証を追加しましょう。
ステップ 6A: コールバック タイプをインポートする
👉 開く
charity_advisor/credentials_provider/agent.py
ファイルの先頭で、既存のインポートの後に以下を追加します。
from typing import Optional
from datetime import datetime, timezone
from google.adk.agents.callback_context import CallbackContext
from google.genai.types import Content, Part
import logging

logger = logging.getLogger(__name__)
ステップ 6B: カート検証関数をビルドする
👉 In
charity_advisor/credentials_provider/agent.py
の前に次の関数を追加します。
credentials_provider = Agent(...)
定義:
def validate_cart_before_payment(
    callback_context: CallbackContext,
) -> Optional[Content]:
    """
    Validates CartMandate exists and hasn't expired before payment processing.

    This callback enforces that the Merchant Agent completed successfully
    before the Credentials Provider attempts to process payment.

    Returns:
        None: Allow Credentials Provider to proceed
        Content: Skip payment processing and return error
    """
    state = callback_context.state

    # Check credential exists
    if "cart_mandate" not in state:
        logger.error("❌ CartMandate missing - Merchant Agent may have failed")
        return Content(parts=[Part(text=(
            "Error: Cannot process payment. Cart was not properly created. "
            "Please restart the donation process."
        ))])

    cart_mandate = state["cart_mandate"]

    # Validate AP2 structure
    if "contents" not in cart_mandate:
        logger.error("❌ CartMandate missing AP2 contents wrapper")
        return Content(parts=[Part(text=(
            "Error: Invalid cart structure. Please restart."
        ))])

    # Validate expiry
    try:
        contents = cart_mandate["contents"]
        expiry_time = datetime.fromisoformat(
            contents["cart_expiry"].replace('Z', '+00:00')
        )
        now = datetime.now(timezone.utc)

        if expiry_time < now:
            logger.error(f"❌ CartMandate expired at {contents['cart_expiry']}")
            return Content(parts=[Part(text=(
                "Error: Your cart has expired (15 minute limit). "
                "Please restart the donation to get a fresh offer."
            ))])

        time_remaining = expiry_time - now
        logger.info(f"✓ CartMandate validated. Expires in {time_remaining.total_seconds():.0f}s")

    except (KeyError, ValueError) as e:
        logger.error(f"❌ Invalid CartMandate structure: {e}")
        return Content(parts=[Part(text=(
            "Error: Invalid cart data. Please restart the donation."
        ))])

    # All checks passed - allow payment processing
    logger.info(f"✓ Prerequisites met for Credentials Provider: {contents['id']}")
    return None
ステップ 6C: コールバックを認証情報プロバイダに関連付ける
👉 In
charity_advisor/credentials_provider/agent.py
、 を変更します。
credentials_provider = Agent(...)
定義:
エージェント定義で次の行を探します。
credentials_provider = Agent(
    name="CredentialsProvider",
    model="gemini-2.5-flash",
    description="Securely processes payments by creating PaymentMandates and executing transactions with user consent.",
次の行を
description
line:
before_agent_callback=validate_cart_before_payment,
エージェントの定義は次のようになります。
credentials_provider = Agent(
    name="CredentialsProvider",
    model="gemini-2.5-flash",
    description="Securely processes payments by creating PaymentMandates and executing transactions with user consent.",
    before_agent_callback=validate_cart_before_payment,
    tools=[
        FunctionTool(func=create_payment_mandate)
    ],
    instruction="""..."""
)
ステップ 7: ADK ウェブ UI でテストする
次に、検証コールバックが有効な状態で、完全に強化されたシステムをテストします。
👉 Cloud Shell ターミナルで次のコマンドを実行します。
adk web
次のような出力が表示されます。
+-----------------------------------------------------------------------------+
| ADK Web Server started                                                      |
|                                                                             |
| For local testing, access at http://localhost:8000.                         |
+-----------------------------------------------------------------------------+

INFO:     Application startup complete.
INFO:     Uvicorn running on http://0.0.0.0:8000 (Press CTRL+C to quit)
👉 次に、ブラウザから ADK ウェブ UI にアクセスします。
Cloud Shell ツールバー(通常は右上)の [ウェブでプレビュー] アイコン(目または矢印付きの四角形)から、[ポートを変更] を選択します。ポップアップ ウィンドウで、ポートを 8000 に設定し、[変更してプレビュー] をクリックします。Cloud Shell が新しいブラウザタブを開き、ADK ウェブ UI が表示されます。
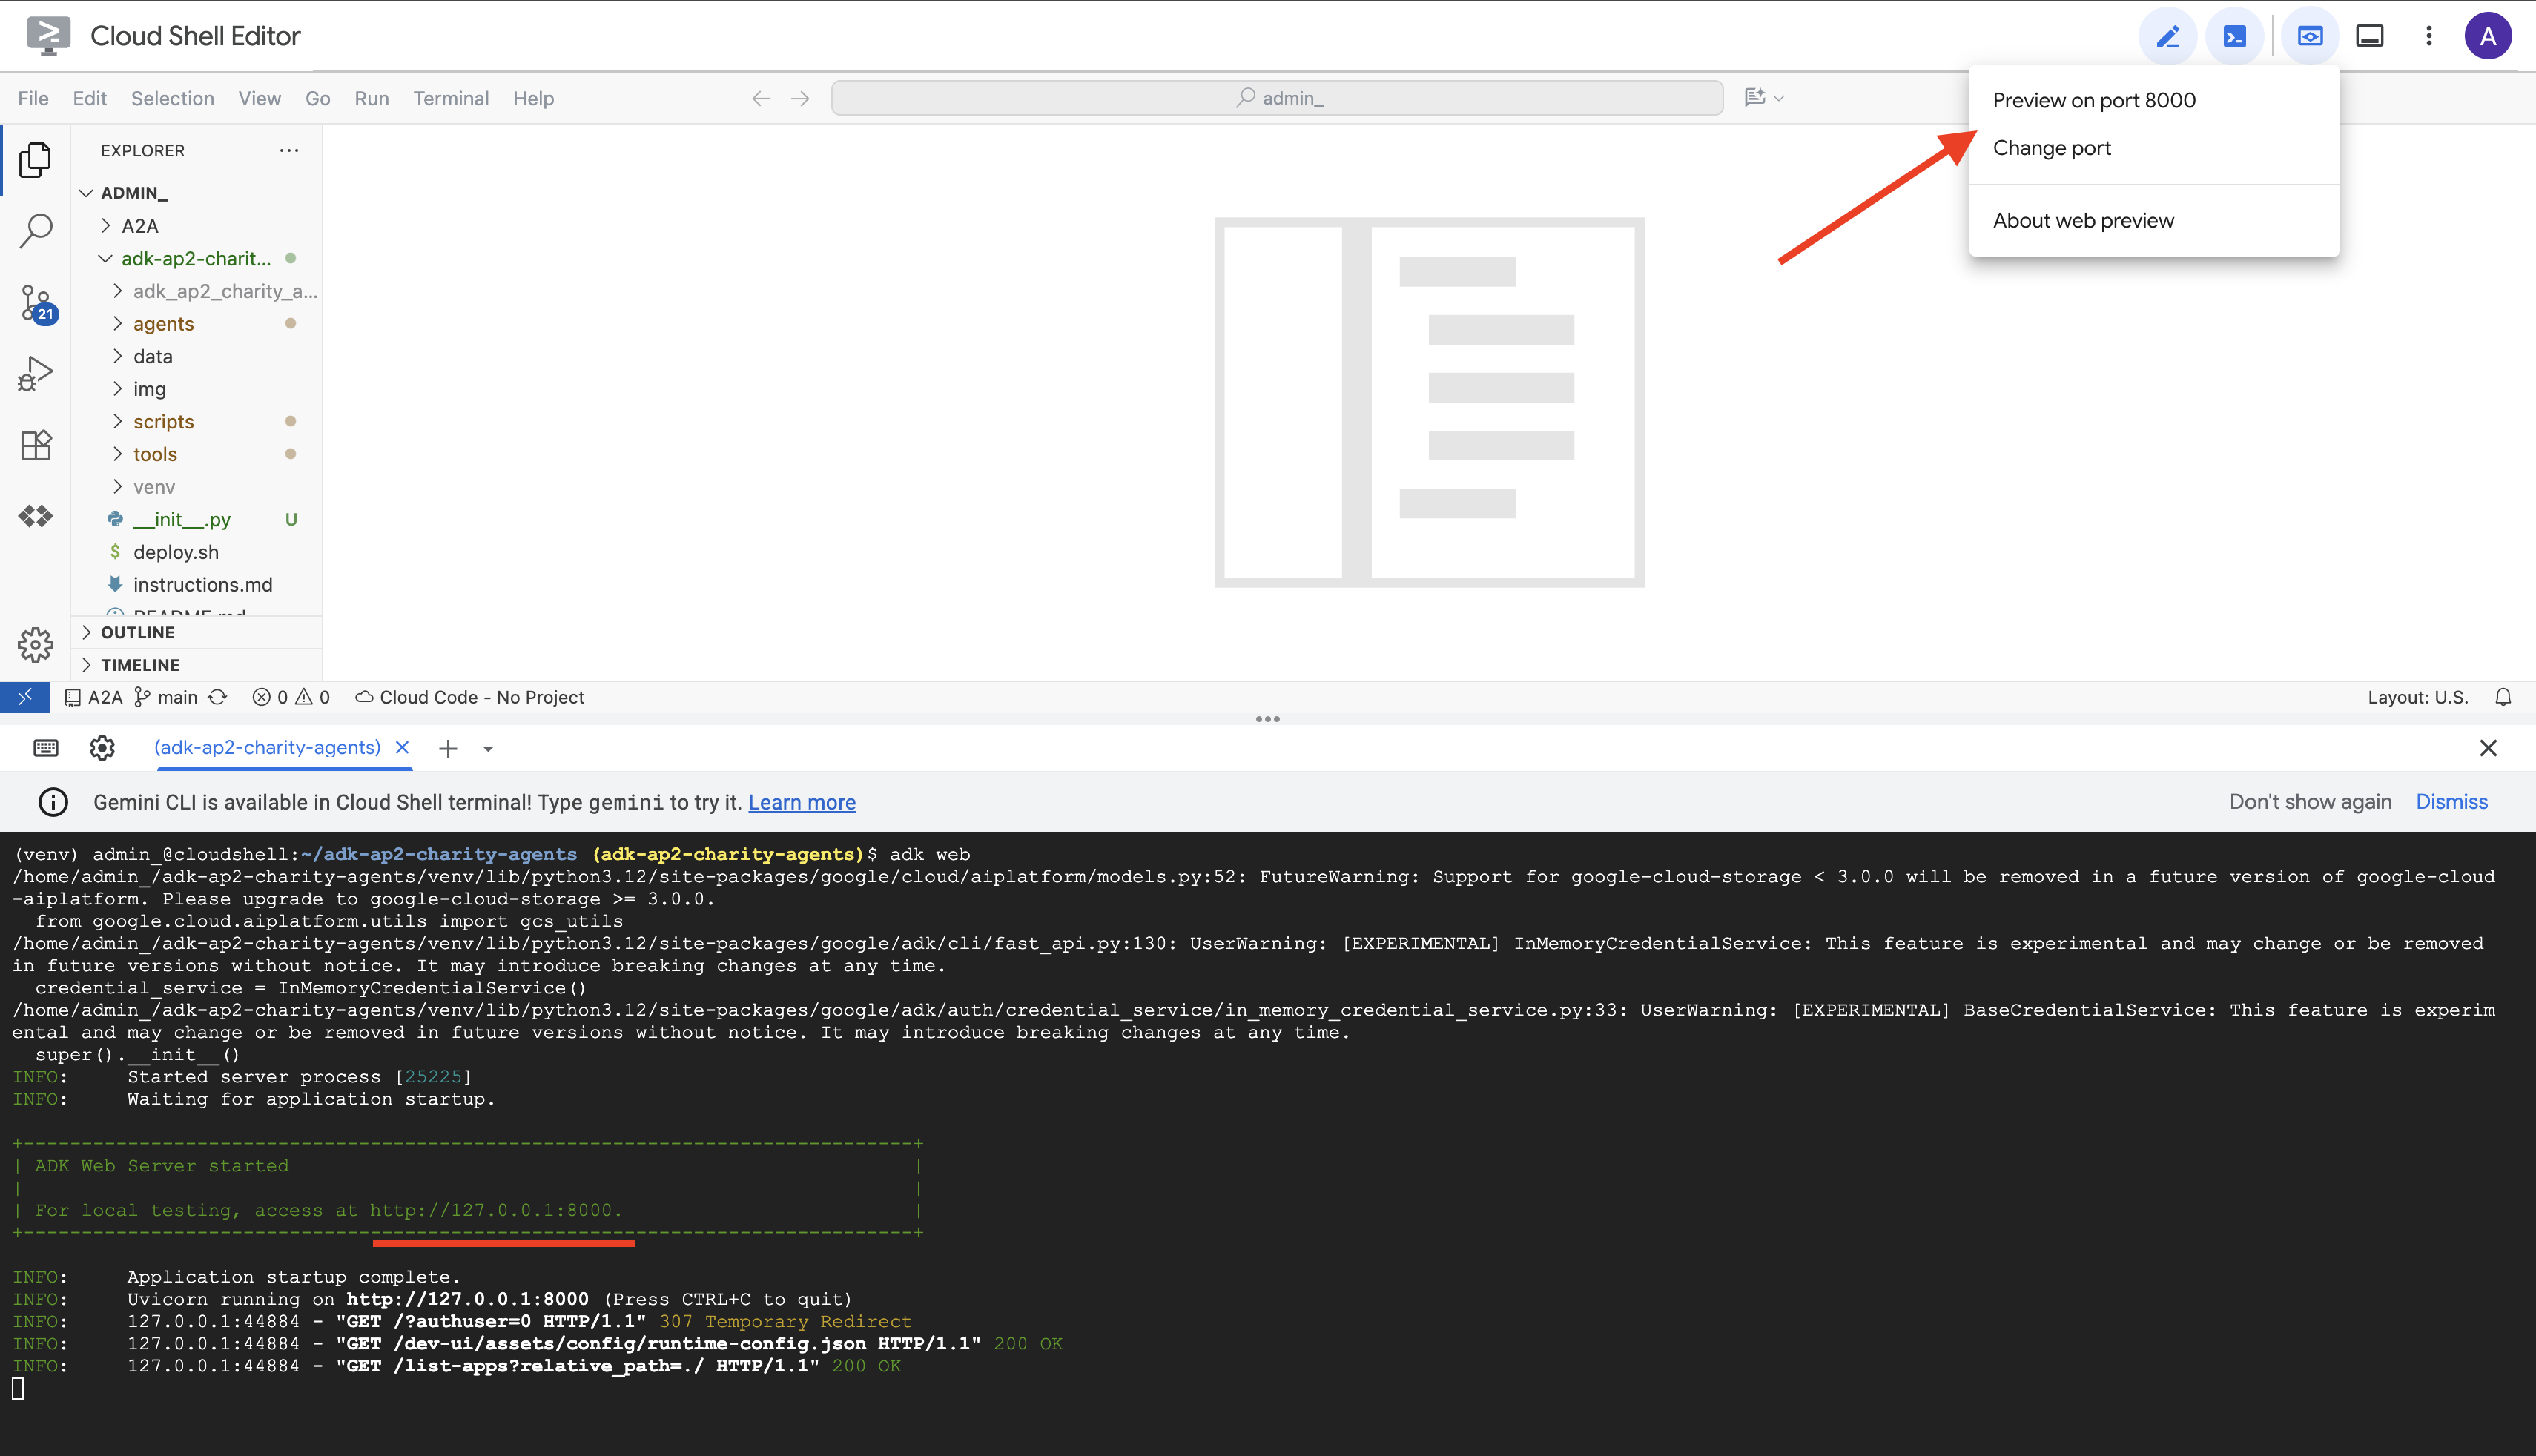
👉 プルダウンからエージェントを選択します。
ADK ウェブ UI の上部にプルダウン メニューが表示されます。リストから [charity_advisor] を選択します。
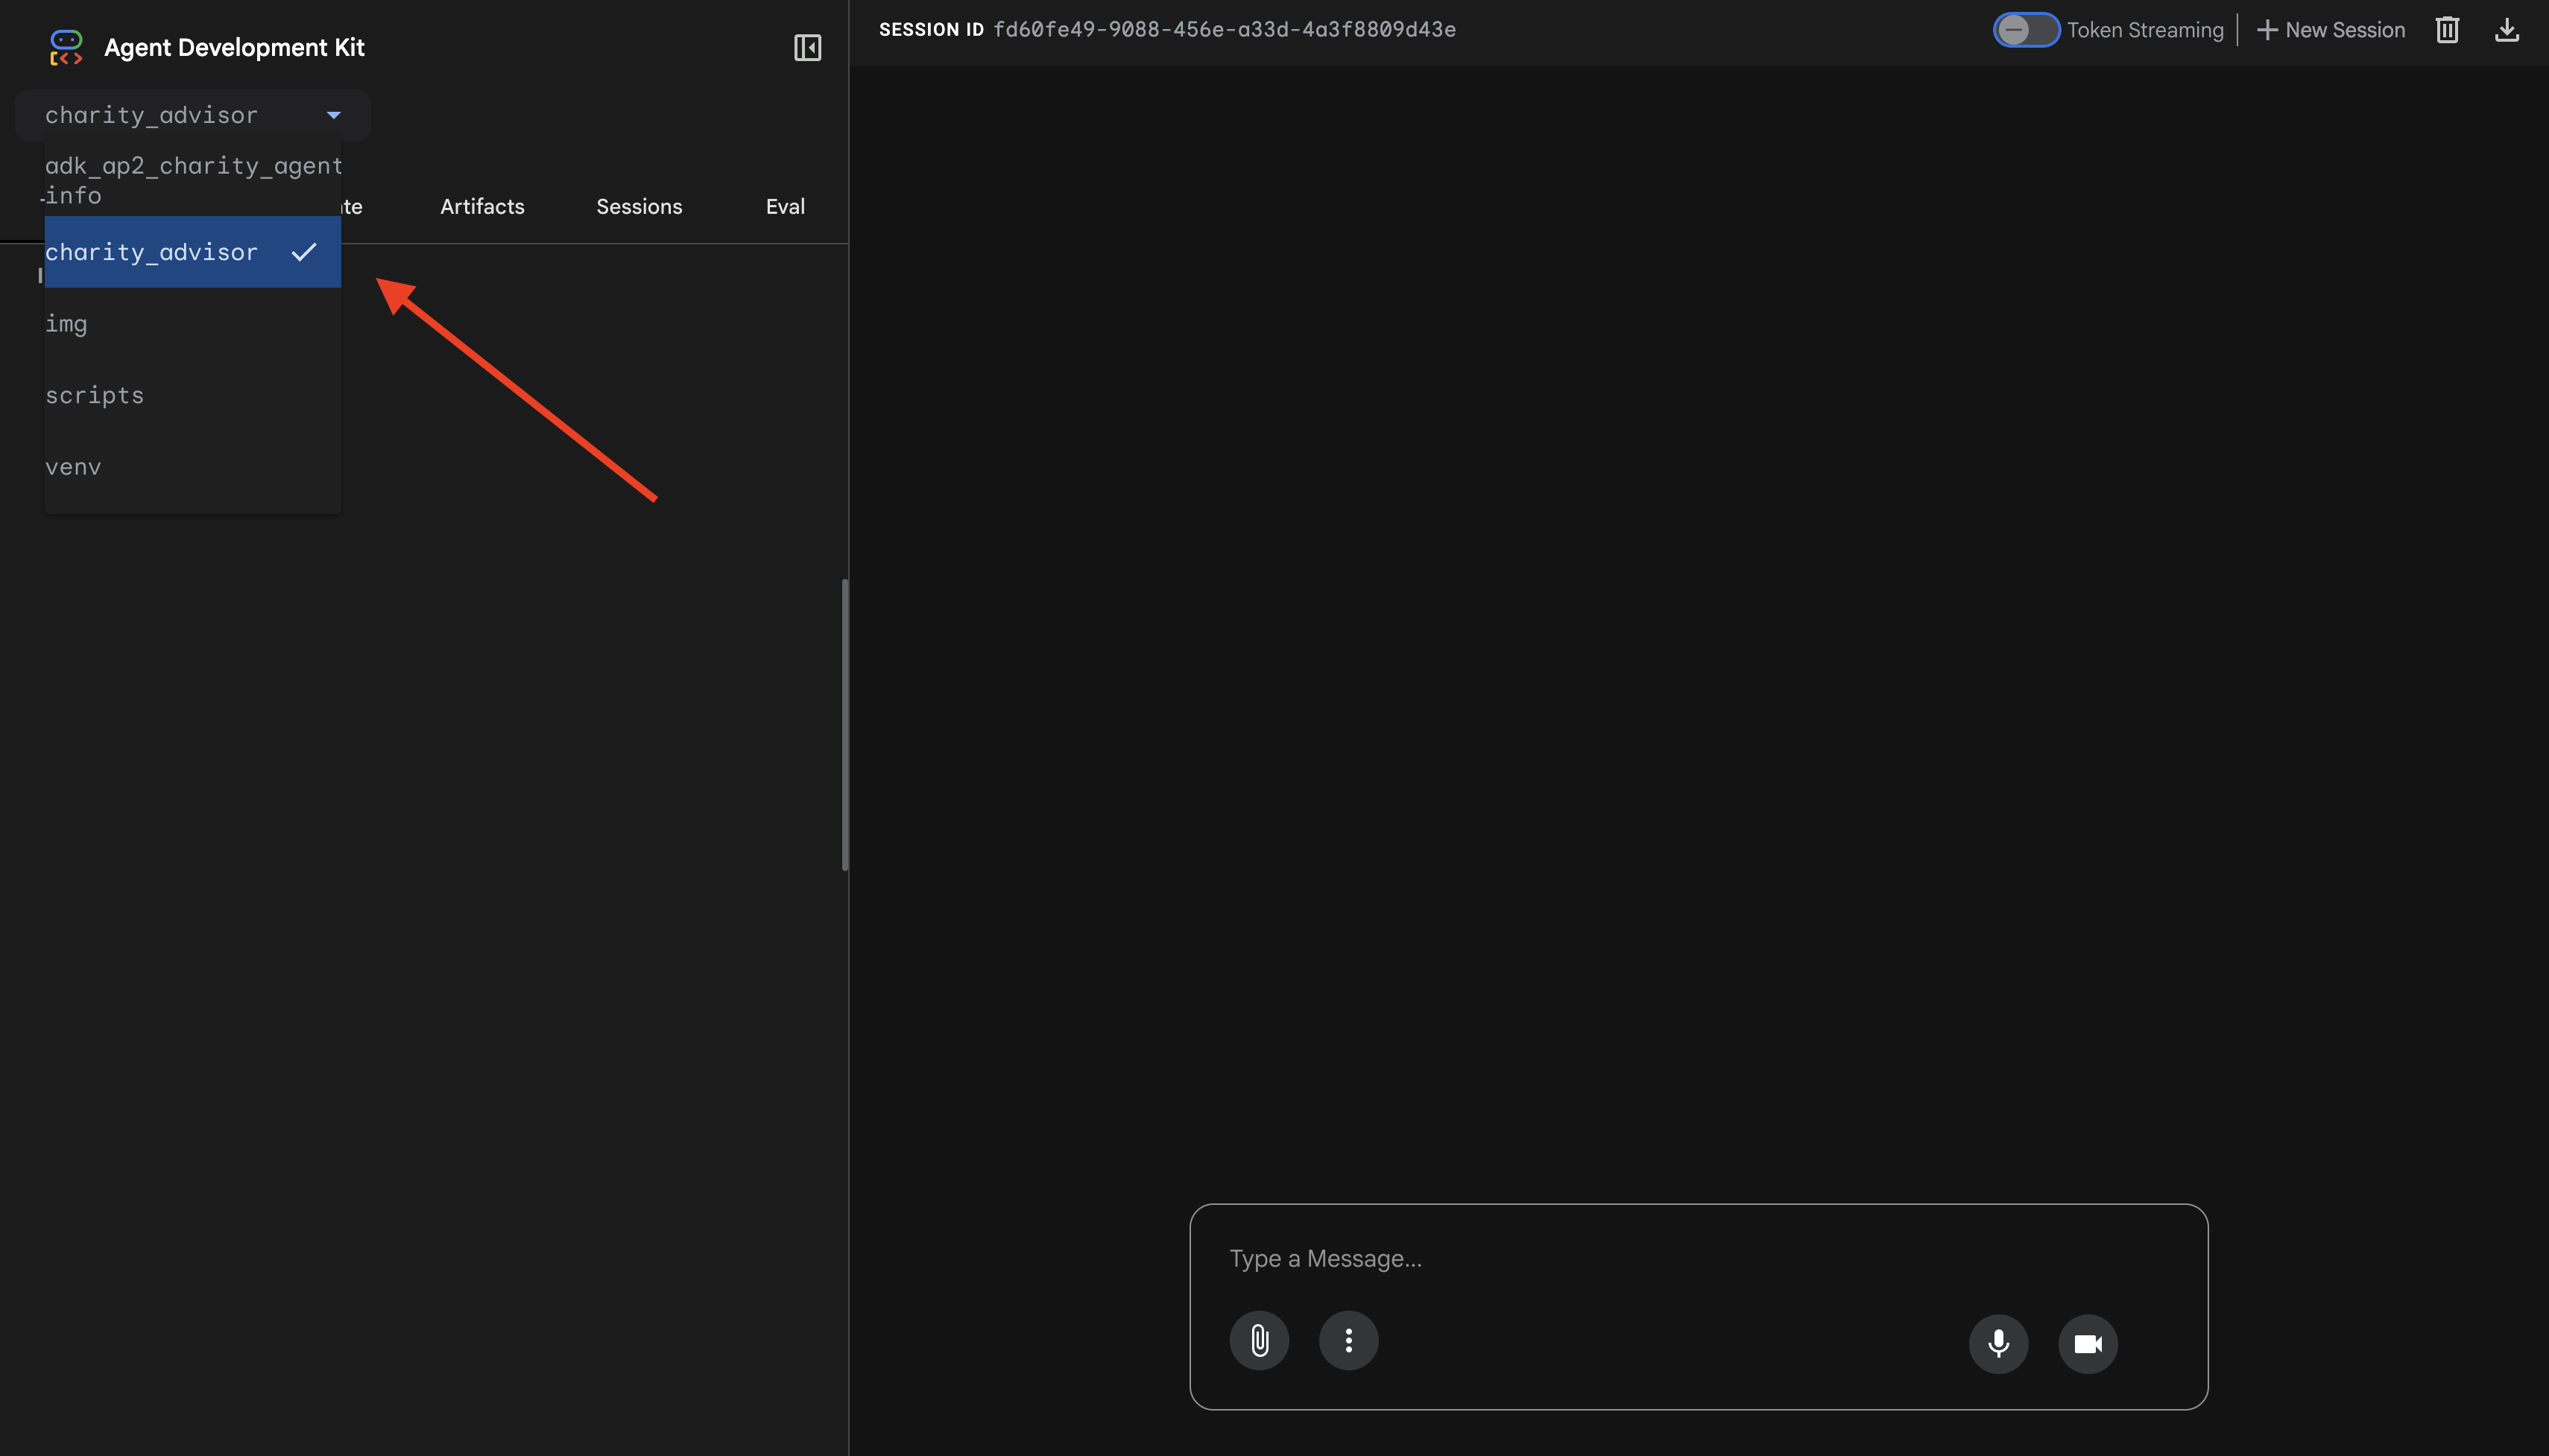
ADK ウェブ インターフェースが表示されます。
- チャットパネル: 左側、会話用
- トレース パネル: 右側、オブザーバビリティ用(モジュール 9 で使用します)
テスト 1: 寄付フローを完了する(通常の場合)
👉 チャット インターフェースで、次のように入力します。
I want to donate to an education charity
フロー全体を確認します。

何が起こっているか(右側のトレース パネルに表示されます):
1. Advisor が ShoppingAgent に委任:
- ShoppingAgent が教育慈善団体を検索する
- 検証済みの 3 つのオプションと詳細が表示されます
2. ShoppingAgent とのやり取り(複数回にわたる場合があります):
User: "Tell me more about Room to Read"
Shopping: [explains mission and impact]
User: "I'll donate $50 to Room to Read"
3. ShoppingAgent が IntentMandate を作成します。
- インテントを作成して署名する
- インテント ID を含む確認を返します
4. アドバイザーが処理フェーズに移行します。
これで終了です。Room to Read への 50 ドルの寄付を処理しています...
5. DonationProcessingPipeline がアクティブ化されます。
- 販売者のコールバックで IntentMandate が検証される(✓ 合格)← 新機能!
- 販売者エージェントが署名付きの CartMandate を作成する
- 認証情報のコールバックで CartMandate が検証される(✓ 合格)← 新機能!
- 認証情報プロバイダが支払いを準備する
6. お支払い手続き:
- 認証情報プロバイダが PaymentMandate を作成する
- 支払処理をシミュレートする
- 返品取引 ID
7. Advisor の概要:
これで終了です。寄付の手続きが完了しました。🎉
詳細:
- 金額: $50.00
- 慈善団体: Room to Read(雇用主番号: 77-0479905)
- 取引 ID: txn_a3f7b2c8d9e1f4a2
テスト 2: コールバックが失敗をキャッチすることを確認する(省略可の高度なテスト)
エラーをキャッチするコールバックの動作を確認してみましょう。状態を手動で破損させる必要があります(高度なデバッグ)。ただし、本番環境ではコールバックで次のエラーがキャッチされます。
- ショッピング エージェント ツールが失敗する → 販売者のコールバックがブロックされる: 「エラー: カートを作成できません...」
- 2 時間経過 → 販売者のコールバックがブロックされる: 「エラー: インテントの有効期限が切れました...」
- カートの有効期限が切れた → 認証情報のコールバックがブロックされる: 「Error: Cart expired (15 min limit)...」
これらのエッジケースは、検証コールバックによってアーキテクチャ的に強制されるようになりました。
構築した内容
3 つの特殊なエージェントをオーケストレーションして、アーキテクチャの検証によりシームレスで信頼性の高いシステムを構築しました。
次のステップ
これで、信頼できるエージェントを構築するための技術的なコアが完成しました。
これで、ローカルで完全な信頼できるシステムを構築し、認証情報チェーンを適用しました。次に、本番環境へのデプロイを通じて実際のユーザーがアクセスできるようにし、Module 9 を可能にするアカウンタビリティ トレイルを有効にします。
強化されたエージェントを Google Cloud にデプロイしましょう。
8. デプロイメント
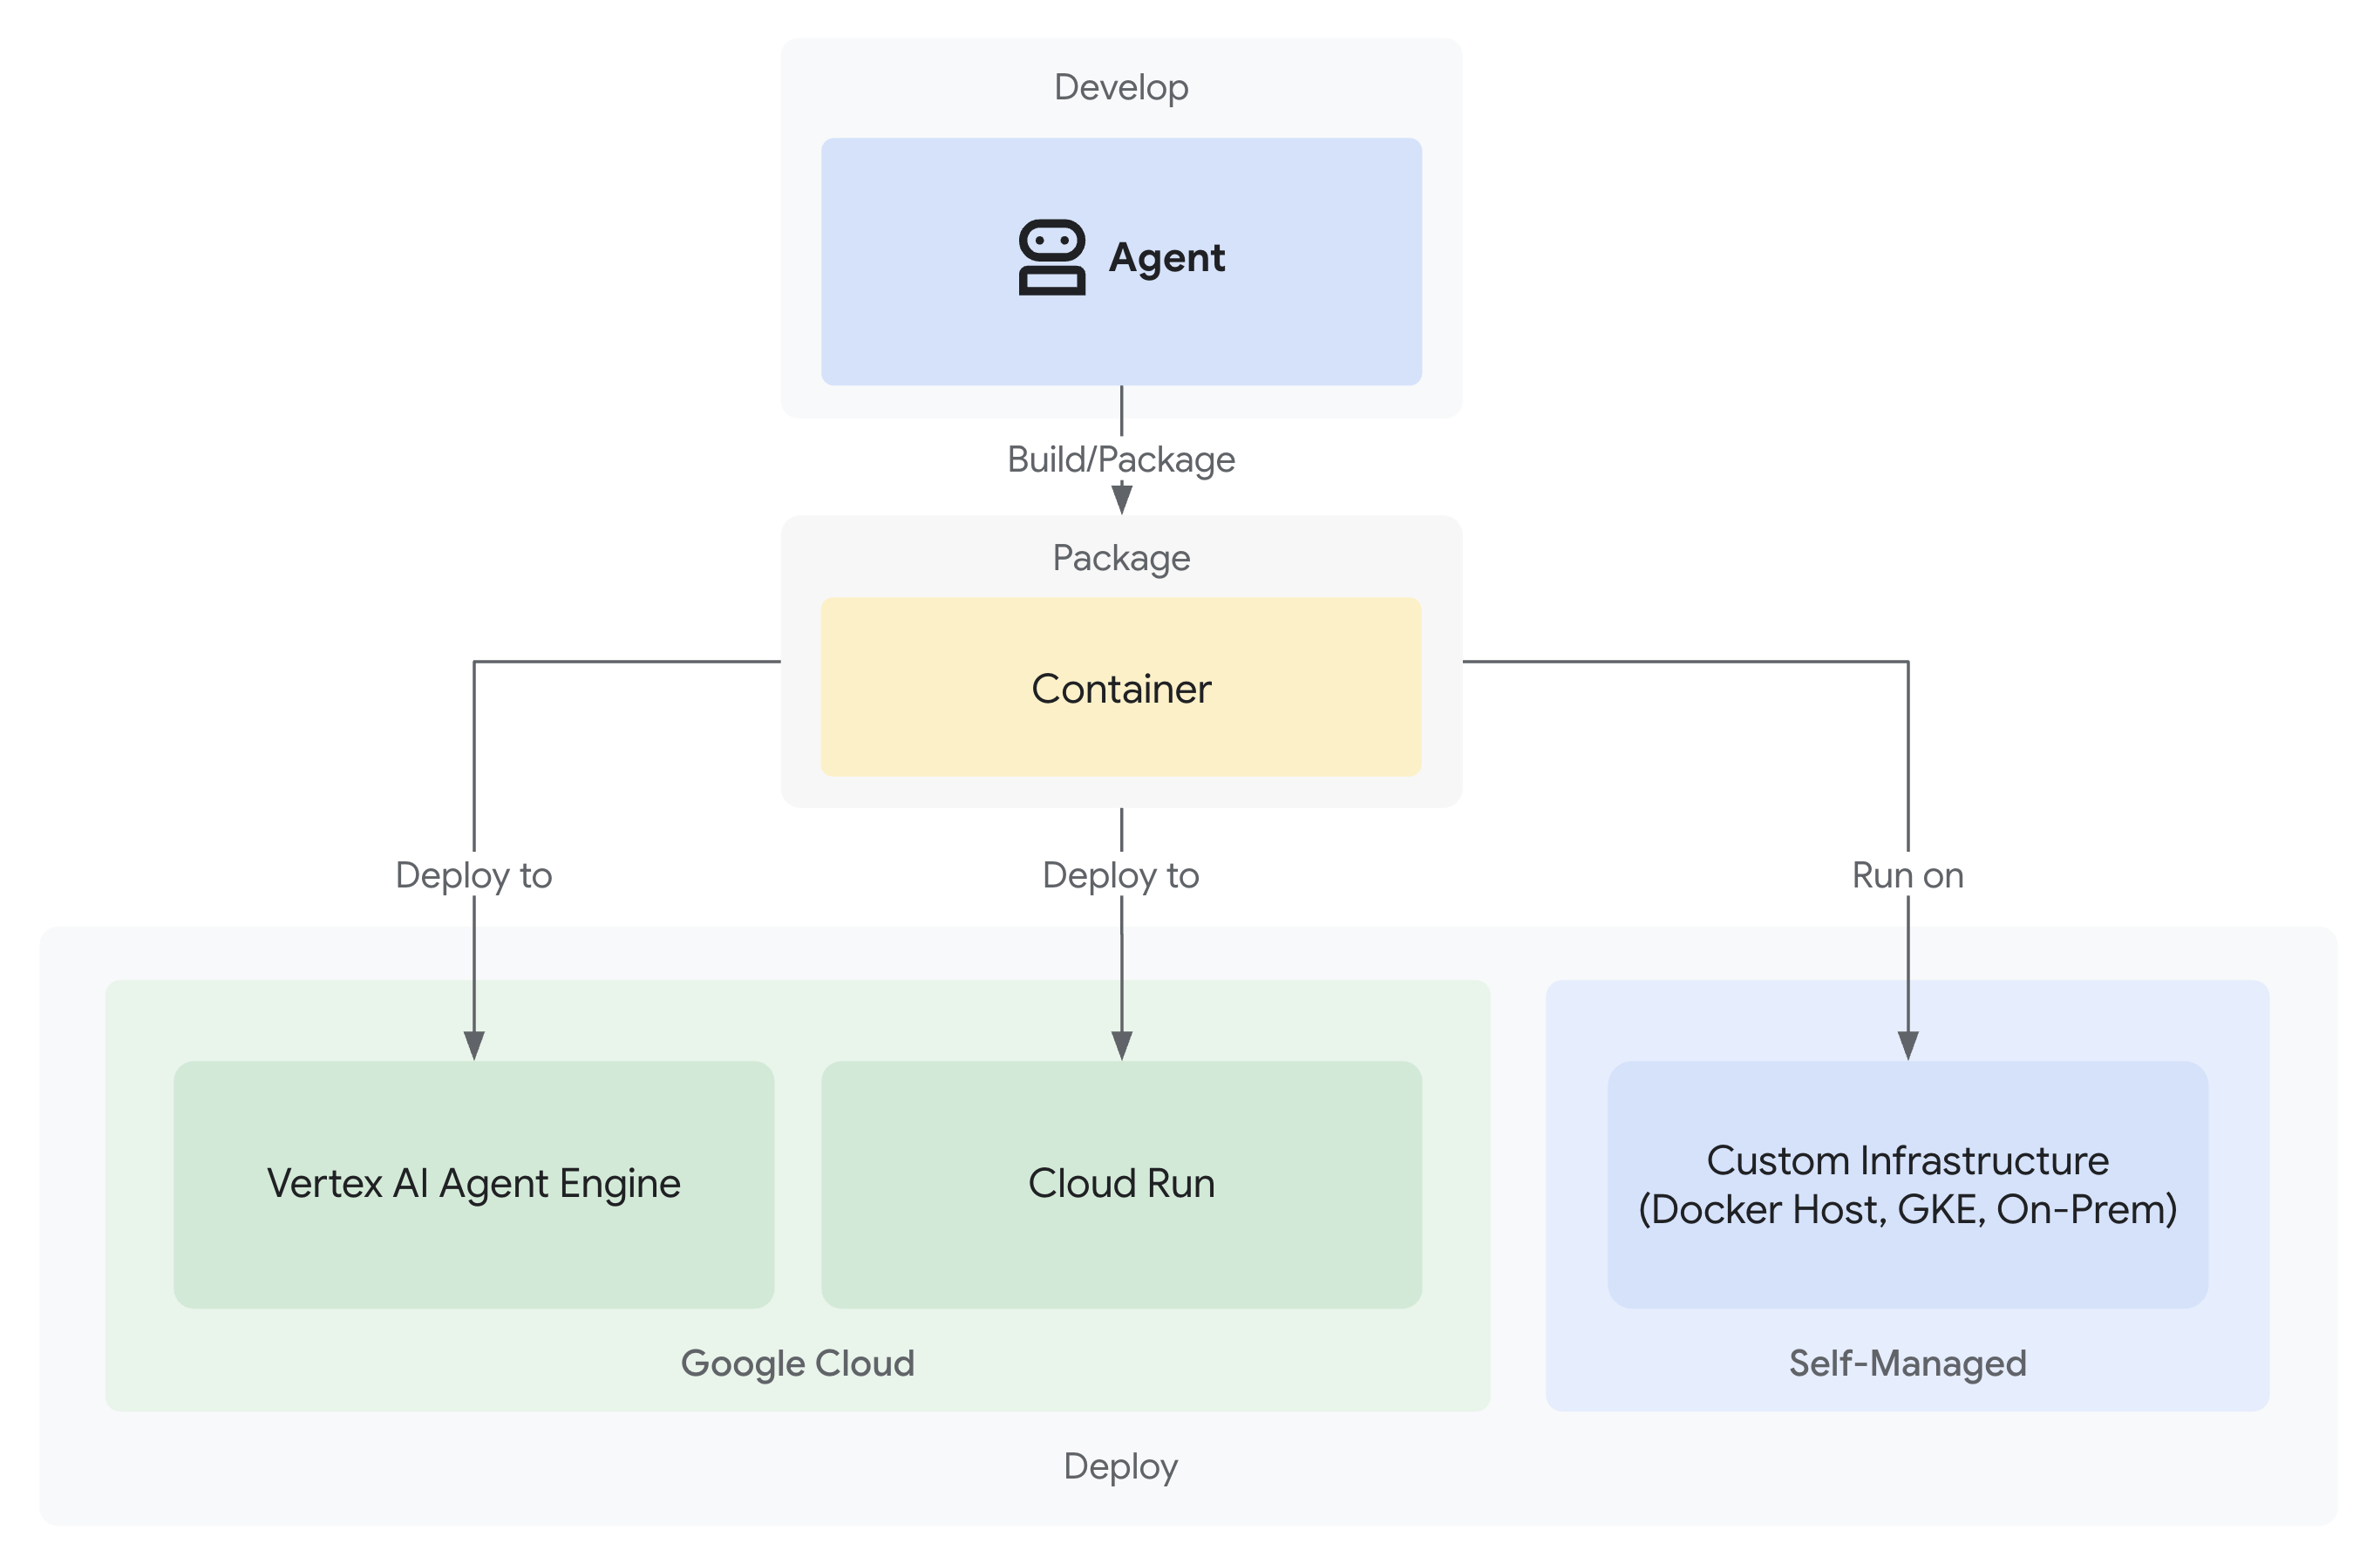
信頼できる寄付システムが完成しました。3 つの専門エージェントがローカルで動作します。
ただし、開発マシンでのみ実行されます。このシステムを実際のユーザーにとって有用なものにし、信頼性を証明する説明責任の証跡をキャプチャするには、本番環境にデプロイする必要があります。
このモジュールでは、初日からオブザーバビリティが有効になっている状態でエージェントを Google Cloud にデプロイする手順について説明します。デプロイ時に使用する --trace_to_cloud フラグにより、モジュール 9 のアカウンタビリティ トレイルが可能になります。
デプロイ オプションについて
ADK は複数のデプロイ ターゲットをサポートしています。複雑さ、セッション管理、スケーリング、費用については、それぞれ異なる特性があります。
要素 | ローカル( | Agent Engine | Cloud Run |
複雑さ | 最小 | 低 | 中 |
セッションの永続性 | インメモリのみ(再起動すると失われる) | Vertex AI マネージド(自動) | Cloud SQL(PostgreSQL)またはインメモリ |
インフラストラクチャ | なし(開発マシンのみ) | フルマネージド | コンテナ + オプションのデータベース |
コールド スタート | なし | 100 ~ 500 ミリ秒 | 100 ~ 2,000 ミリ秒 |
スケーリング | 単一インスタンス | 自動 | 自動(ゼロ) |
費用モデル | 無料(ローカル コンピューティング) | コンピューティング ベース | リクエスト ベース + 無料枠 |
UI サポート | あり(組み込み済み) | いいえ(API のみ) | はい( |
オブザーバビリティの設定 | ローカル トレース ビューア | 自動( |
|
最適な用途 | 開発とテスト | 本番環境エージェント | 本番環境エージェント |
推奨事項: この信頼できる寄付システムでは、Agent Engine をプライマリ本番環境デプロイとして使用することをおすすめします。理由は次のとおりです。
- フルマネージド インフラストラクチャ(管理するコンテナなし)
VertexAiSessionServiceによる組み込みのセッション永続性- コールド スタートのない自動スケーリング
- デプロイの簡素化(Docker の知識は不要)
- Cloud Trace との統合をすぐに利用可能
追加オプション: Google Kubernetes Engine(GKE)
Kubernetes レベルの制御、カスタム ネットワーキング、マルチサービス オーケストレーションを必要とする上級ユーザーには、GKE デプロイが用意されています。このオプションは柔軟性が高いですが、運用に関する専門知識(クラスタ管理、マニフェスト、サービス アカウント)が必要です。
GKE のデプロイは、この Codelab では扱いませんが、ADK GKE デプロイガイドに詳しく記載されています。
前提条件
1. Google Cloud プロジェクトのセットアップ
課金が有効になっている Google Cloud プロジェクトが必要です。お持ちでない場合は、次の手順を実施します。
- プロジェクトを作成する: Google Cloud コンソール
- 課金を有効にする: 課金を有効にする
- プロジェクト ID(プロジェクト名や番号ではありません)をメモします。
2. 再認証(省略可)
Google Cloud に対して認証を行います。
gcloud auth application-default login
gcloud config set project YOUR_PROJECT_ID
YOUR_PROJECT_ID は、実際の Google Cloud プロジェクト ID に置き換えます。
認証を確認します。
gcloud config get-value project
# Should output: YOUR_PROJECT_ID
3. 環境変数
次のコマンドを使用して、.env ファイルに自動的に入力します。
# Get your current Project ID
PROJECT_ID=$(gcloud config get-value project)
STAGING_BUCKET_VALUE="gs://${PROJECT_ID}-staging"
ENV_FILE=".env"

# Check if STAGING_BUCKET is already set in the .env file
if grep -q "^STAGING_BUCKET=" "${ENV_FILE}"; then
  # If it exists, replace the line
  # The sed command finds the line starting with STAGING_BUCKET= and replaces the entire line.
  # Using | as a delimiter to avoid issues with slashes in the bucket name.
  sed -i "s|^STAGING_BUCKET=.*|STAGING_BUCKET=${STAGING_BUCKET_VALUE}|" "${ENV_FILE}"
  echo "Updated STAGING_BUCKET in ${ENV_FILE}"
else
  # If it doesn't exist, add it to the end of the file
  echo "STAGING_BUCKET=${STAGING_BUCKET_VALUE}" >> "${ENV_FILE}"
  echo "Added STAGING_BUCKET to ${ENV_FILE}"
fi

# Verify it was added or updated correctly
echo "Current STAGING_BUCKET setting:"
grep "^STAGING_BUCKET=" "${ENV_FILE}"
以下のように表示されます。
STAGING_BUCKET=gs://your-actual-project-id-staging
注意事項:
YOUR_PROJECT_IDは実際のプロジェクト ID に置き換えます(または上記のコマンドを使用します)。GOOGLE_CLOUD_LOCATIONには、サポートされているリージョンを使用します。- デプロイ スクリプトを実行すると、ステージング バケットが存在しない場合は自動的に作成されます。
4. 必要な API の有効化
デプロイ プロセスでは、いくつかの Google Cloud APIs を有効にする必要があります。次のコマンドを実行して有効にします。
gcloud services enable \
    aiplatform.googleapis.com \
    storage.googleapis.com \
    cloudbuild.googleapis.com \
    cloudtrace.googleapis.com \
    compute.googleapis.com
このコマンドにより、次のものが有効になります。
- AI Platform API - Agent Engine と Vertex AI モデル用
- Cloud Storage API - ステージング バケットの場合
- Cloud Build API - コンテナ ビルド用(Cloud Run)
- Cloud Trace API - 可観測性とアカウンタビリティのトレイル
- Compute Engine API - サービス アカウントの管理
ステップ 1: デプロイ インフラストラクチャを理解する
プロジェクトには、すべてのデプロイモードを処理する統合デプロイ スクリプト(deploy.sh)が含まれています。
👉 デプロイ スクリプトを確認する(省略可):
cat deploy.sh
このスクリプトには、次の 3 つのデプロイ モードがあります。
./deploy.sh local- メモリ内ストレージを使用してローカルで実行する./deploy.sh agent-engine- Vertex AI Agent Engine にデプロイする(推奨)./deploy.sh cloud-run- オプションの UI を使用して Cloud Run にデプロイする
仕組み:
Agent Engine のデプロイの場合、スクリプトは次の処理を実行します。
adk deploy agent_engine \
  --project=$GOOGLE_CLOUD_PROJECT \
  --region=$GOOGLE_CLOUD_LOCATION \
  --staging_bucket=$STAGING_BUCKET \
  --display_name="Charity Advisor" \
  --trace_to_cloud \
  charity_advisor
Cloud Run のデプロイの場合、次の処理が実行されます。
adk deploy cloud_run \
  --project=$GOOGLE_CLOUD_PROJECT \
  --region=$GOOGLE_CLOUD_LOCATION \
  --service_name="charity-advisor" \
  --app_name="charity_advisor" \
  --with_ui \
  --trace_to_cloud \
  charity_advisor
--trace_to_cloud フラグは、両方のデプロイタイプで重要です。このフラグにより、モジュール 9 で説明するアカウンタビリティ トレイルの Cloud Trace 統合が有効になります。
ステップ 2: エージェント エンジン ラッパーを準備する
Agent Engine には、マネージド ランタイム用にエージェントをラップする特定のエントリ ポイントが必要です。このファイルは作成済みです。
👉 確認
charity_advisor/agent_engine_app.py
:
"""Agent Engine application wrapper.

This file prepares the Charity Advisor agent for deployment to Vertex AI Agent Engine.
"""

from vertexai import agent_engines
from .agent import root_agent

# Wrap the agent in an AdkApp object for Agent Engine deployment
app = agent_engines.AdkApp(
    agent=root_agent,
    enable_tracing=True,  # Enables Cloud Trace integration automatically
)
このファイルが必要な理由:
- Agent Engine では、エージェントを
AdkAppオブジェクトでラップする必要があります enable_tracing=Trueパラメータにより、Cloud Trace の統合が自動的に有効になります- このラッパーは、デプロイ時に ADK CLI によって参照されます。
- 自動セッション永続化のために
VertexAiSessionServiceを構成します。
ステップ 3: エージェント エンジンにデプロイする(推奨)
Agent Engine は、信頼できる寄付システムに推奨される本番環境デプロイです。これは、セッションの永続性が組み込まれたフルマネージド インフラストラクチャを提供するためです。
Deployment を実行する
プロジェクトのルートから:
chmod +x deploy.sh
./deploy.sh agent-engine
デプロイ フェーズ
スクリプトが次のフェーズを実行する様子を確認します。
Phase 1: API Enablement
  ✓ aiplatform.googleapis.com
  ✓ storage.googleapis.com
  ✓ cloudbuild.googleapis.com
  ✓ cloudtrace.googleapis.com
  ✓ compute.googleapis.com

Phase 2: IAM Setup
  ✓ Getting project number
  ✓ Granting Storage Object Admin
  ✓ Granting Vertex AI User
  ✓ Granting Cloud Trace Agent

Phase 3: Staging Bucket
  ✓ Creating gs://your-project-id-staging (if needed)
  ✓ Setting permissions

Phase 4: Validation
  ✓ Checking agent.py exists
  ✓ Verifying root_agent defined
  ✓ Checking agent_engine_app.py exists
  ✓ Validating requirements.txt

Phase 5: Build & Deploy
  ✓ Packaging agent code
  ✓ Uploading to staging bucket
  ✓ Creating Agent Engine instance
  ✓ Configuring session persistence
  ✓ Setting up Cloud Trace integration
  ✓ Running health checks
このプロセスでは、エージェントをパッケージ化して Vertex AI インフラストラクチャにデプロイするため、5 ~ 10 分かかります。
Agent Engine ID を保存する
デプロイが成功すると、次のようになります。
✅ Agent Engine created successfully!

   Agent Engine ID: 7917477678498709504
   Resource Name: projects/123456789/locations/us-central1/reasoningEngines/7917477678498709504
   Endpoint: https://us-central1-aiplatform.googleapis.com/v1/...

   ⚠️  IMPORTANT: Save the Agent Engine ID from the output above
   Add it to your .env file as:
   AGENT_ENGINE_ID=7917477678498709504

   This ID is required for:
   - Testing the deployed agent
   - Updating the deployment later
   - Accessing logs and traces
.env ファイルを直ちに更新します。
echo "AGENT_ENGINE_ID=7917477678498709504" >> .env
デプロイされた内容
Agent Engine のデプロイに次のものが含まれるようになりました。
✅ マネージド ランタイムで実行される3 つのエージェントすべて(ショッピング、販売者、認証情報)
✅ 完全な認証情報チェーン ロジック(インテント → カート → 支払いマンデート)
✅ 確認ワークフローを備えたユーザーの同意メカニズム
✅ VertexAiSessionService による自動セッション永続性
✅ Google が管理する自動スケーリング インフラストラクチャ
✅ 完全なオブザーバビリティのための Cloud Trace 統合
ステップ 4: デプロイしたエージェントをテストする
環境を更新する
.env に Agent Engine ID が含まれていることを確認します。
AGENT_ENGINE_ID=7917477678498709504  # From deployment output
GOOGLE_CLOUD_PROJECT=your-project-id
GOOGLE_CLOUD_LOCATION=us-central1
STAGING_BUCKET=gs://your-project-id-staging
テスト スクリプトを実行する
プロジェクトには、Agent Engine デプロイ専用のテスト スクリプトが含まれています。
👉 テストを実行します。
python scripts/test_deployed_agent.py
想定される出力
Testing Agent Engine deployment...
Project: your-project-id
Location: us-central1
Agent Engine ID: 7917477678498709504
Endpoint: https://us-central1-aiplatform.googleapis.com/v1/...

Creating session...
✓ Session created: 4857885913439920384

Sending donation query...
✓ Response received:
  Event 1: I'll help you donate $50 to a children's education charity...
  Event 2: Here are some highly-rated children's education charities...
  Event 3: Which charity would you like to support?...

✅ Test completed successfully!

Session ID: 4857885913439920384

This donation generated a trace in Cloud Trace.
View it in Module 9: Observability

To view traces:
https://console.cloud.google.com/traces/list?project=your-project-id
検証チェックリスト
テスト後、次のことを確認します。
✅ エージェントがクエリに応答する
✅ 3 つのエージェントが順番に実行される(ショッピング → 販売者 → 認証情報)
✅ 同意メカニズムが有効になる(確認がリクエストされる)
✅ セッションがリクエスト間で維持される
✅ 認証エラーが発生しない
✅ 接続タイムアウトが発生しない
エラーが発生した場合:
- 環境変数が正しく設定されていることを確認する
- API が有効になっていることを確認します。
gcloud services list --enabled - Vertex AI コンソールで Agent Engine ログを確認する
charity_advisorフォルダにagent_engine_app.pyファイルが存在することを確認する
ステップ 5: Cloud Run にデプロイする(省略可)
本番環境のデプロイを効率化するには Agent Engine が推奨されますが、Cloud Run ではより詳細な制御が可能で、ADK ウェブ UI がサポートされています。このセクションは省略可能です。
Cloud Run を使用するタイミング
次のような場合は、Cloud Run を選択します。
- ユーザー インタラクション用の ADK ウェブ UI
- コンテナ環境の完全な制御
- カスタム データベース構成
- 既存の Cloud Run サービスとの統合
Deployment を実行する
chmod +x deploy.sh
./deploy.sh cloud-run
変更点:
このスクリプトは自動的に次の処理を行います。
- エージェント コードを使用して Docker コンテナをビルドする
- Cloud SQL PostgreSQL データベースを作成する(必要な場合)
- データベース接続を構成する
- ADK ウェブ UI を有効にしてデプロイする
Cloud SQL のプロビジョニングのため、デプロイには 10 ~ 15 分かかります。
セッション管理:
VertexAiSessionServiceではなくDatabaseSessionServiceを使用する.env(または自動生成)のデータベース認証情報が必要- 状態が PostgreSQL データベースに保持される
UI のサポート:
- ウェブ UI:
https://charity-advisor-xyz.a.run.app
Cloud Run のデプロイをテストする
--with_ui を使用して Cloud Run にデプロイした場合は、ブラウザで直接テストできます。
- サービス URL に移動します(デプロイ出力で提供)
- ADK ウェブ インターフェースが表示されます。プルダウンからエージェントを選択します。
- テスト寄付を開始する:
I want to donate $50 to a children's education charity
- 実行フローを観察します。
- ShoppingAgent が慈善団体を見つけて、ユーザーの意向を保存します
- MerchantAgent がカートの委任状を作成する
- CredentialsProvider が支払い委任状を作成し、確認をリクエストします
- 確認後、お支払いが処理されます
- レスポンスに次のものが含まれていることを確認します。
- 慈善団体のおすすめ
- 確認リクエスト
- 承認後の成功メッセージ
トラブルシューティング
一般的な問題
問題: ERROR: GOOGLE_CLOUD_PROJECT is not set
解決策: .env ファイルに正しいプロジェクト ID が含まれていることを確認します。
GOOGLE_CLOUD_PROJECT=your-actual-project-id
問題: ステージング バケットが自動的に作成されない
解決策: スクリプトでバケットを自動的に作成する必要があります。ない場合は、手動で作成します。
gsutil mb -p $GOOGLE_CLOUD_PROJECT -l $GOOGLE_CLOUD_LOCATION $STAGING_BUCKET
概要
次の操作が完了しました。
✅ deploy.sh
が提供するデプロイ インフラストラクチャを理解した ✅ Agent Engine ラッパーの構成を確認した
✅ 信頼できる寄付システムを Agent Engine にデプロイした(推奨)
✅ --trace_to_cloud
との Cloud Trace 統合を有効にした
✅ エージェントがアクセス可能で機能することを確認した
✅ モジュール 9 で説明するアカウンタビリティ トレイルの基盤を作成した
次のモジュールでは、このフラグで何がアンロックされるのかを詳しく説明します。すべての寄付、すべての同意のタイミング、認証情報チェーンのすべてのステップを完全に可視化できます。
9. オブザーバビリティ
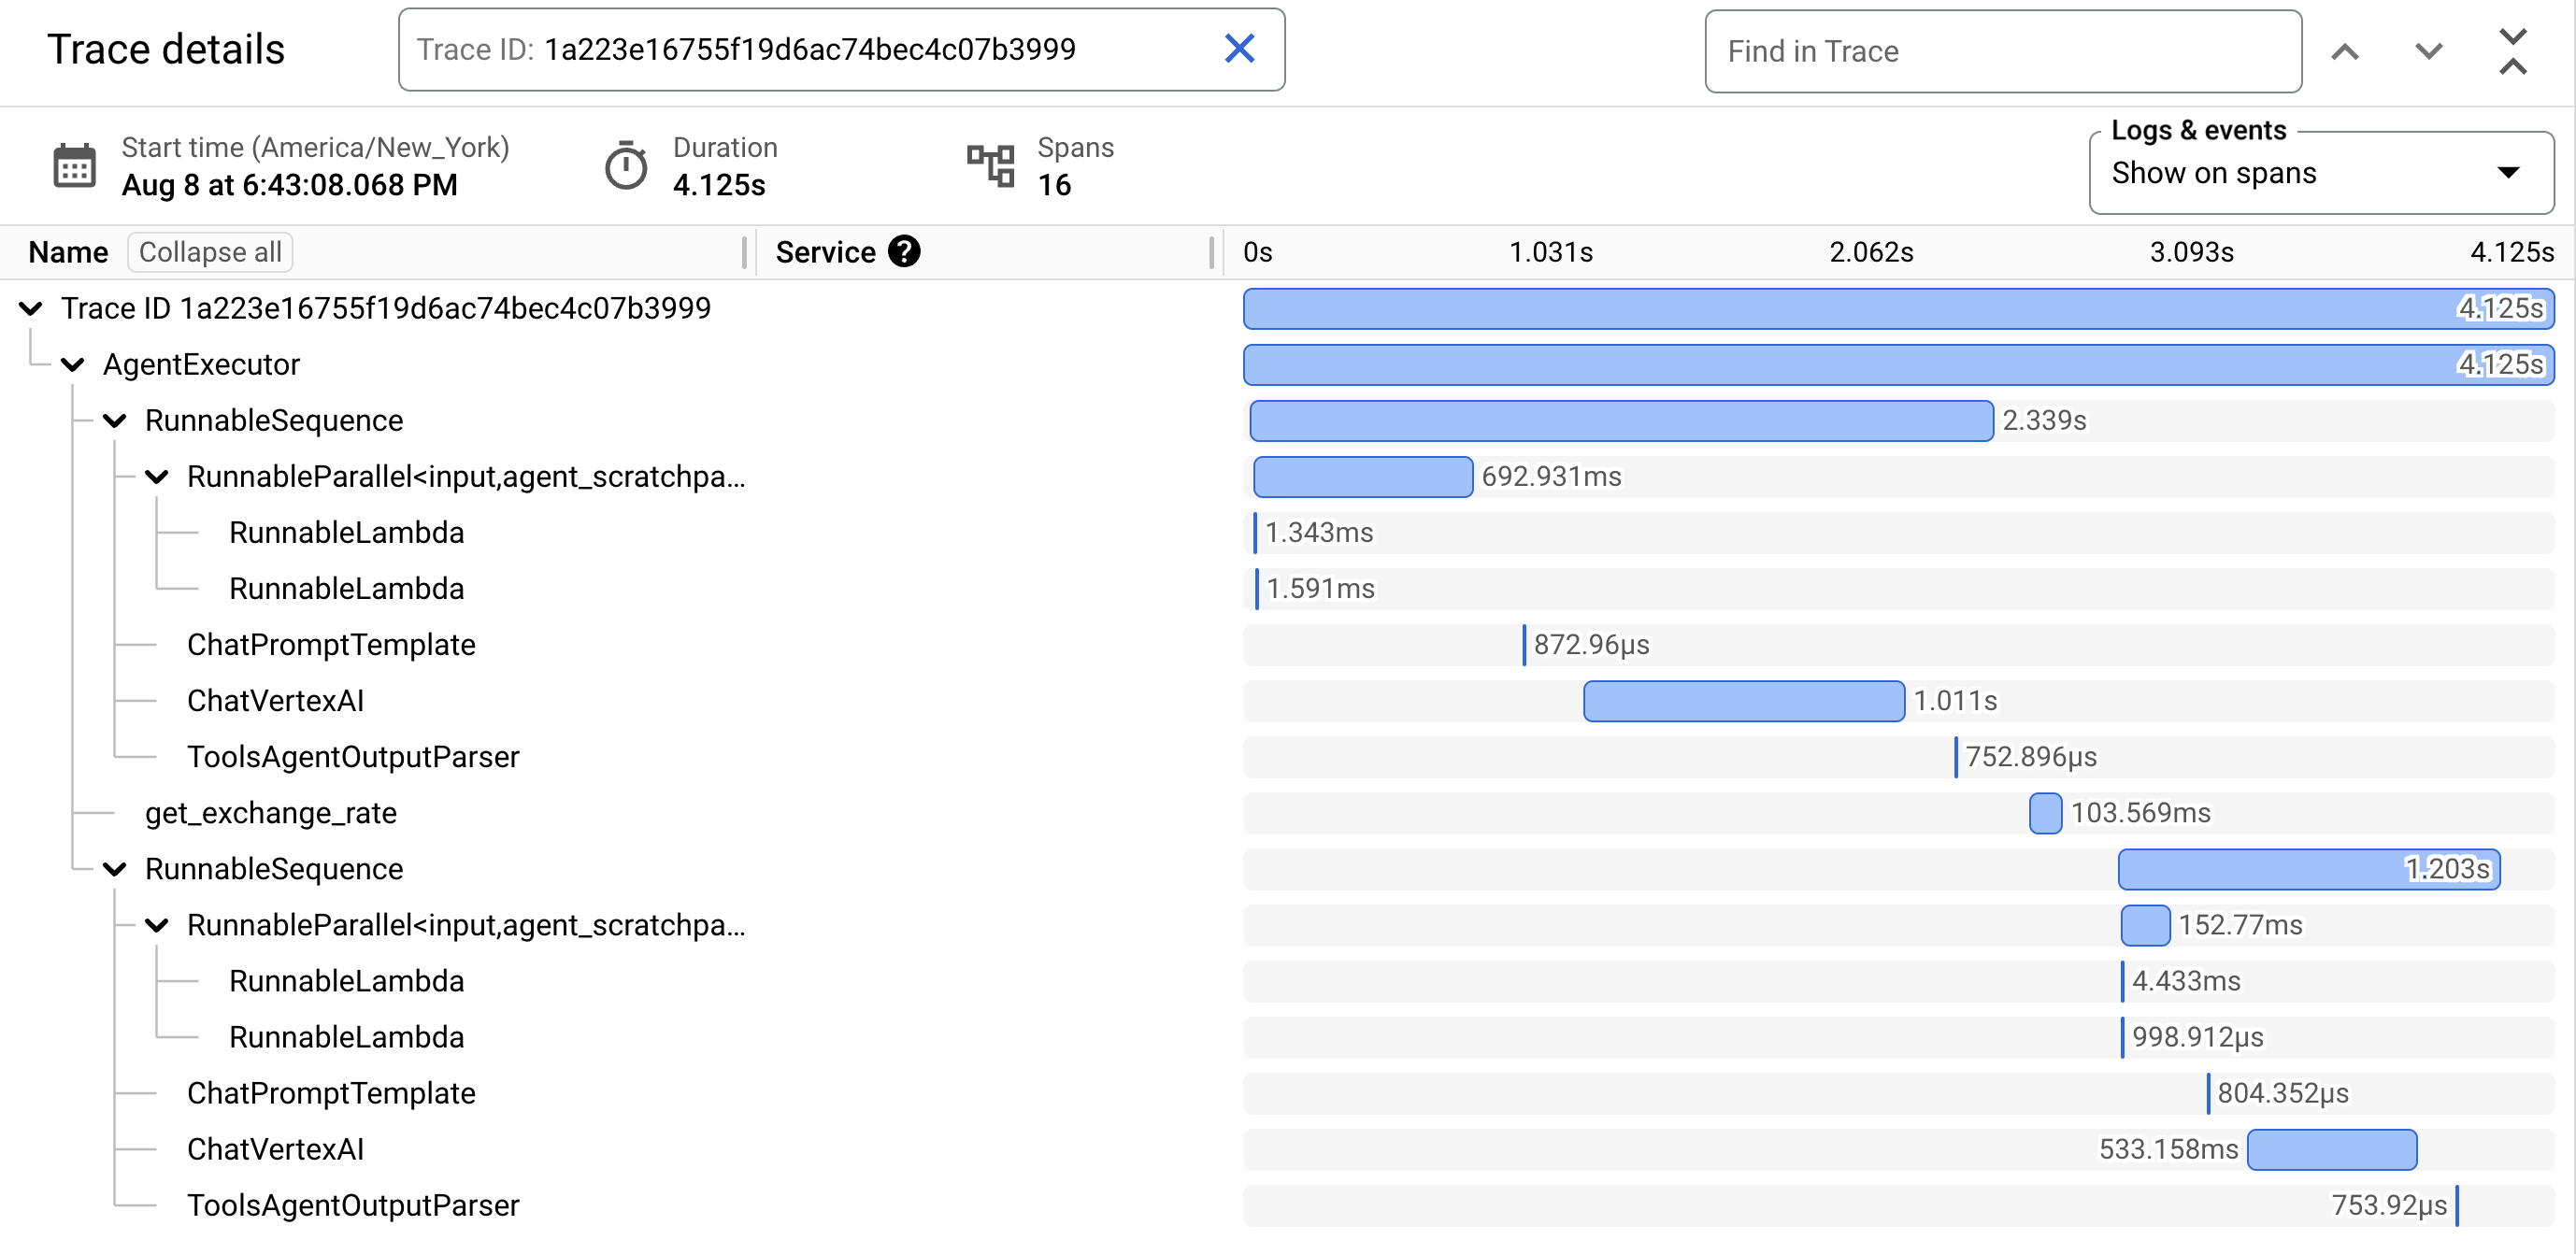
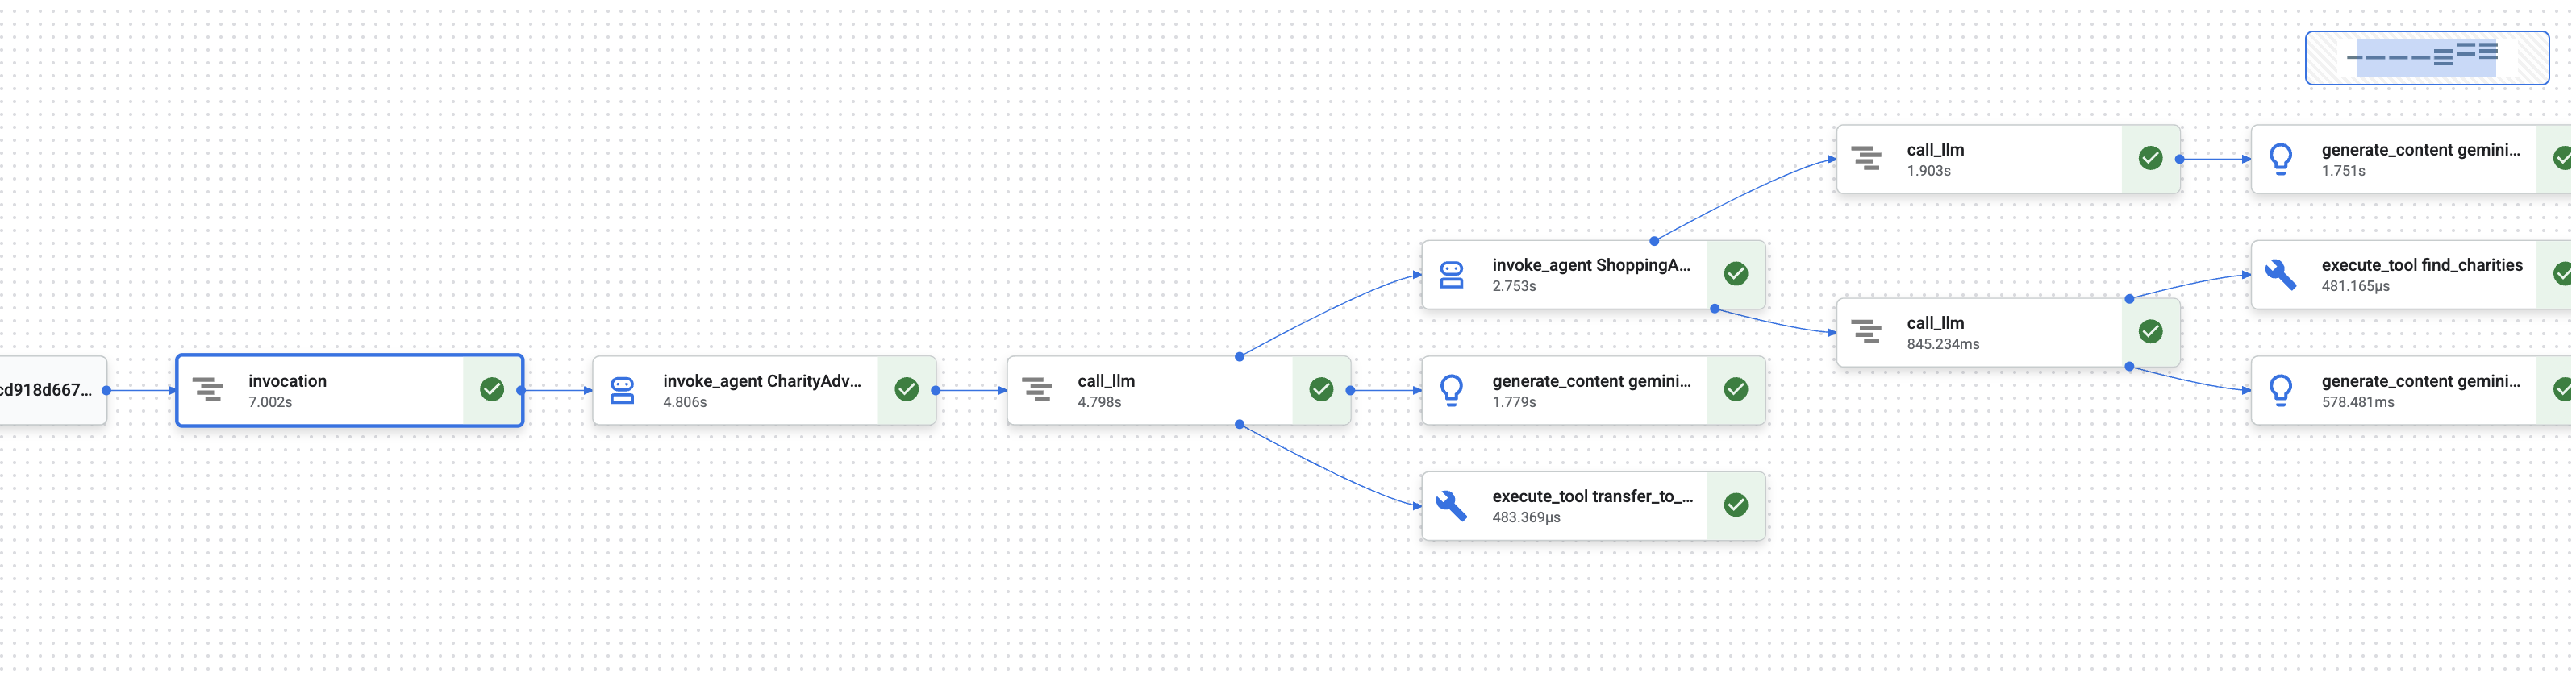
モジュール 1 では、AI エージェントが金銭を扱う場合に、何が起こったかをどのように証明するかという基本的な問題について学習しました。
ユーザーは次のことを主張できます。
- 「その慈善団体は選んでいません!」
- 「その支払いを承認していません。」
- 「同意なしで請求されました。」
従来のブラック ボックス AI システムでは、そうでないことを証明する方法はありません。しかし、信頼できる寄付システムは異なります。モジュール 8 では、--trace_to_cloud フラグを使用してデプロイしました。つまり、すべての寄付が Cloud Trace に完全な改ざん防止監査証跡を作成するようになりました。
このモジュールでは、トレースを読み取り、証拠として使用する方法を学びます。学習する内容:
- Cloud Trace エクスプローラで本番環境のトレースを検索する
- ウォーターフォール ビューを読んで実行フローを理解する
- 認証情報チェーン(インテント → カート → 支払い委任状)を見つける
- タイムスタンプの証拠で同意の瞬間を特定する
- 異議申し立ての解決にトレースを使用する
- コンプライアンスと監査のためにトレースをエクスポートする
信頼できるシステムと、能力はあるが不透明なシステムを分けるのは、フォレンジックの精度で何が起こったかを証明できる能力です。
トレースとスパンについて
Cloud Trace でトレースを表示する前に、何を表示しているかを理解する必要があります。
トレースとは
トレースは、エージェントが 1 つのリクエストを処理する完全なタイムラインです。ユーザーがクエリを送信してから最終的なレスポンスが配信されるまでのすべてをキャプチャします。
各トレースには次の情報が表示されます。
- リクエストの合計時間
- 実行されたすべてのオペレーション
- オペレーション間の関係(親子関係)
- 各オペレーションの開始時刻と終了時刻
- 成功または失敗のステータス
慈善団体エージェントの場合: 1 つのトレースは、「寄付したい」から「支払いが完了しました」までの寄付フロー全体を表します。
スパンとは
スパンは、トレース内の単一の作業単位を表します。スパンはトレースの構成要素と考えることができます。
寄付システムで一般的なスパンタイプ:
スパンタイプ | 内容 | 例 |
| エージェントの実行 |
|
| 言語モデルへのリクエスト |
|
| ツール関数の実行 |
|
| セッション メモリからの読み取り | 状態から |
| セッション メモリへの書き込み | 状態に |
各スパンには次のものが含まれます。
- 名前: このオペレーションが表す内容
- 所要時間(開始時間 → 終了時間)
- 属性: ツール入力、モデル レスポンス、トークン数などのメタデータ
- ステータス: 成功(
OK)またはエラー(ERROR) - 親子関係: どのオペレーションがどのオペレーションをトリガーしたか
スパンがトレースを形成する方法
スパンは互いにネストして、因果関係を示します。
Root Span: CharityAdvisor.run (entire request)
  └─ Child: DonationPipeline.run (sequential workflow)
      ├─ Child: ShoppingAgent.run
      │   ├─ Grandchild: call_llm (Gemini processes charity search)
      │   ├─ Grandchild: execute_tool (find_charities)
      │   └─ Grandchild: execute_tool (save_user_choice)
      ├─ Child: MerchantAgent.run
      │   ├─ Grandchild: call_llm (Gemini generates cart)
      │   └─ Grandchild: execute_tool (create_cart_mandate)
      └─ Child: CredentialsProvider.run
          ├─ Grandchild: call_llm (Gemini processes payment)
          └─ Grandchild: execute_tool (create_payment_mandate) [CONSENT!]
この階層は、何がどのような順序で発生したかを正確に示します。支払い委任状は、ユーザーが慈善団体を選択した後に作成されたカート委任状の後に作成されたことがわかります。
ステップ 1: Cloud Trace エクスプローラにアクセスする
デプロイされたエージェントからの実際のトレースを表示してみましょう。
Cloud Trace に移動する
- Google Cloud コンソール( console.cloud.google.com)を開きます。
- 上部のプルダウンからプロジェクトを選択します(プロジェクトで作業している場合は、事前に選択されているはずです)。
- Cloud Trace エクスプローラに移動します。
- 左側のサイドバーで、[オブザーバビリティ] セクションまでスクロールします。
- [トレース] をクリックします。
- または、直接リンク(console.cloud.google.com/traces/list)を使用します。
表示される内容
Trace Explorer には、プロジェクトのすべてのトレースのリストが表示されます。
列 | 表示される内容 |
リクエスト | HTTP メソッドとエンドポイント(API リクエストの場合) |
開始時刻 | リクエストが開始された日時 |
レイテンシ | リクエストの合計時間 |
Spans | トレース内のオペレーションの数 |
各行は、デプロイされたエージェントに対する1 つの完全なリクエストを表します。
テスト トレースを生成する(必要な場合)
トレースがまだ表示されない場合、次の理由でリストが空になっている可能性があります。
- デプロイされたエージェントに対するリクエストはまだありません
- リクエストの送信後、トレースが表示されるまでに 1 ~ 2 分かかる
テスト トレースを生成する:
Cloud Run with UI にデプロイした場合は、サービスの URL にアクセスして、ブラウザで寄付を完了します。
Agent Engine にデプロイした場合は、モジュール 8 のテスト スクリプトを実行します。
python scripts/test_deployed_agent.py
1 ~ 2 分待ってから、Cloud Trace エクスプローラ ページを更新します。トレースが表示されます。
トレースをフィルタする
上部のフィルタ オプションを使用して、特定のトレースを見つけます。
- 期間: 必要に応じて [過去 1 時間] から [過去 24 時間] に変更します
- 最小レイテンシ / 最大レイテンシ: 遅いリクエストをフィルタする
- リクエスト フィルタ: 特定のオペレーション(「DonationPipeline」など)で検索します。
このモジュールでは、所要時間が長い(5 秒超)トレースに注目します。これは、3 つのエージェントすべてが実行される完全な寄付フローを表しているためです。
ステップ 2: 寄付フローの完了を確認する
リスト内のトレースをクリックして、ウォーターフォール ビューを開きます。このタブでは、エージェントの動作の分析にほとんどの時間を費やします。
ウォーターフォール ビューについて
ウォーターフォール ビューは、実行のタイムライン全体を示すガントチャートです。
━━━━━━━━━━━━━━━━━━━━━━━━━━━━━━━━━━━━━━━━━━━━━━━━━
              Timeline (horizontal = time) →
━━━━━━━━━━━━━━━━━━━━━━━━━━━━━━━━━━━━━━━━━━━━━━━━━

invocation                           ▓▓▓▓▓▓▓▓▓▓▓▓▓▓▓▓▓▓▓▓▓▓ 8.2s
  agent_run: CharityAdvisor          ▓▓▓▓▓▓▓▓▓▓▓▓▓▓▓▓▓▓▓▓▓ 8.1s
    agent_run: DonationPipeline      ▓▓▓▓▓▓▓▓▓▓▓▓▓▓▓▓▓▓▓▓ 7.9s
      agent_run: ShoppingAgent       ▓▓▓▓▓▓ 2.1s
        call_llm: gemini-2.5-flash   ▓▓▓▓ 1.2s
        execute_tool: find_charities ▓▓ 0.5s
        execute_tool: save_user_choice ▓ 0.3s
      agent_run: MerchantAgent       ▓▓▓ 1.8s
        call_llm: gemini-2.5-flash   ▓▓ 0.9s
        execute_tool: create_cart_mandate ▓ 0.7s
      agent_run: CredentialsProvider ▓▓▓▓▓▓▓▓ 4.0s
        call_llm: gemini-2.5-flash   ▓▓ 0.8s
        execute_tool: create_payment_mandate ▓▓▓▓▓ 3.0s [CONSENT]
グラフの読み方
各バーはスパンを表します。
- 水平方向の位置: いつ問題が生じましたか
- 長さ: 所要時間
- インデント: 親子関係を表示します
- 色: 通常は青、エラーの場合は赤
このトレース例の主な観察結果は次のとおりです。
✅ 合計時間: 8.2 秒
✅ 順次実行: ShoppingAgent が完了してから MerchantAgent が開始
✅ MerchantAgent が完了
before
CredentialsProvider が開始されました
✅ 同意が最も長いオペレーションでした: create_payment_mandate で 3.0 秒(ユーザーの確認を待機したため)
✅ LLM 呼び出しが表示されます: 各エージェントが 1 つの Gemini リクエストを行いました
✅ ツール呼び出しがキャプチャされます: 6 つのツールすべてが正常に実行されました
このビジュアルでは、時間の費やされた場所とオペレーションが実行された順序をすぐに確認できます。
スパンをクリックして詳細を表示する
invocation スパン(最上位のルート スパン)をクリックします。右側のパネルに、次のような詳細な属性が表示されます。
{
  "http.method": "POST",
  "http.status_code": 200,
  "http.url": "https://charity-advisor-xyz.a.run.app/api/run",
  "user_id": "test_user_123",
  "session_id": "4857885913439920384",
  "trace_id": "a1b2c3d4e5f6...",
  "span_id": "1234567890abcdef"
}
これらの属性は、リクエスト全体に関するコンテキストを提供します。
ステップ 3: 認証情報チェーンを見つける
信頼できるシステムは、認証情報チェーンを使用して、各ステップで認可を証明します。
IntentMandate (User chose charity)
    ↓
CartMandate (Merchant created cart, signed IntentMandate)
    ↓
PaymentMandate (Payment provider created payment, signed CartMandate)
トレースで各権限を見つけてみましょう。
IntentMandate を見つける
[ShoppingAgent] の下にある execute_tool: save_user_choice スパンをクリックします。
属性パネルには次の情報が表示されます。
{
  "tool.name": "save_user_choice",
  "tool.input.charity_name": "Save the Children",
  "tool.input.amount": 50,
  "tool.output.status": "success",
  "tool.output.intent_mandate": {
    "charity_name": "Save the Children",
    "amount": 50,
    "timestamp": "2024-11-08T15:30:12.345Z",
    "signature": "a3f7b9c1d2e4..."
  }
}
これは次のことを証明します。
- ✅ ユーザーが [Save the Children] を選択した場合
- ✅ 金額は 50 ドルでした
- ✅ 選択は 15:30:12 UTC に記録されました
- ✅ 署名が生成された(本番環境では暗号化される)
IntentMandate がセッションの state に保存され、後続のエージェントが利用できるようになりました。
CartMandate を見つける
[MerchantAgent] の下にある execute_tool: create_cart_mandate スパンをクリックします。
属性パネルで:
{
  "tool.name": "create_cart_mandate",
  "tool.input.intent_mandate": {
    "charity_name": "Save the Children",
    "amount": 50,
    "signature": "a3f7b9c1d2e4..."
  },
  "tool.output.status": "success",
  "tool.output.cart_mandate": {
    "cart_id": "cart_7893",
    "intent_signature": "a3f7b9c1d2e4...",
    "cart_signature": "e8f2a9b3c7d1...",
    "timestamp": "2024-11-08T15:30:14.789Z"
  }
}
これは次のことを証明します。
- ✅ MerchantAgent が IntentMandate を受信した(入力に表示されている)
- ✅ ID「cart_7893」でカートが作成されました
- ✅ カートの署名が IntentMandate の署名を参照している(チェーンリンク!)
- ✅ 15:30:14 UTC に作成(インテントから 2.4 秒後)
CartMandate が IntentMandate を参照するようになり、チェーンが形成されます。
PaymentMandate を見つける
[CredentialsProvider] の下にある execute_tool: create_payment_mandate スパンをクリックします。
属性パネルで:
{
  "tool.name": "create_payment_mandate",
  "tool.input.cart_mandate": {
    "cart_id": "cart_7893",
    "intent_signature": "a3f7b9c1d2e4...",
    "cart_signature": "e8f2a9b3c7d1..."
  },
  "tool.confirmation_required": true,
  "tool.confirmation_timestamp": "2024-11-08T15:30:17.891Z",
  "tool.user_response": "CONFIRMED",
  "tool.wait_duration_ms": 29168,
  "tool.output.status": "success",
  "tool.output.payment_mandate": {
    "payment_id": "pay_9821",
    "cart_signature": "e8f2a9b3c7d1...",
    "payment_signature": "b4c9e2a7f8d3...",
    "timestamp": "2024-11-08T15:30:47.059Z"
  }
}
これにより、完全なチェーンが証明されます。
- ✅ CredentialsProvider が CartMandate を受け取った(入力に表示されている)
- ✅ 支払いが CartMandate シグネチャを参照している(チェーンリンク!)
- ✅ 確認が必要だった(
confirmation_required: true) - ✅ ユーザーが 15:30:17 UTC に確認
- ✅ システムがユーザーの決定を 29.2 秒間待機しました
- ✅ 確認後にお支払いが作成された(タイムスタンプ: 15:30:47)
チェーンの可視化
トレースは、認証情報チェーンが正しく実行されたことを証明しています。
15:30:12 UTC → IntentMandate created (signature: a3f7...)
                  ↓
15:30:14 UTC → CartMandate created (references: a3f7...)
                  ↓
15:30:17 UTC → User consent requested
                  ↓
15:30:47 UTC → PaymentMandate created (references: e8f2...)
各委任状は、前の委任状の署名を参照します。これは改ざん防止です。署名が一致していることを確認することで、チェーンを検証できます。
ステップ 4: パフォーマンスとボトルネックの分析
Cloud Trace は、何が起こったかを証明するだけでなく、どこで時間が費やされているかを示すため、最適化を行うことができます。
クリティカル パスを特定する
ウォーターフォール ビューで、縦のスタックの最長スパンを探します。これらはパフォーマンスのボトルネックを表します。
トレースの例から:
Total: 8.2 seconds

Breakdown:
  - ShoppingAgent:         2.1s (26%)
  - MerchantAgent:         1.8s (22%)
  - CredentialsProvider:   4.0s (49%)  ← Bottleneck
  - Other overhead:        0.3s (3%)
重要な分析情報: CredentialsProvider が合計時間の 49% を占めています。理由
CredentialsProvider スパンをドリルダウンします。
CredentialsProvider: 4.0s
  - call_llm:              0.8s (20%)
  - create_payment_mandate: 3.0s (75%)  ← User consent wait
  - Other:                 0.2s (5%)
3 秒の遅延は想定内であり、問題ありません - ユーザーが確認前に熟考しているためです。これはパフォーマンスの問題ではなく、慎重な同意の証拠です。
LLM の費用の追跡
call_llm スパンをクリックすると、トークンの使用状況が表示されます。
{
  "llm.model": "gemini-2.5-flash",
  "llm.usage.prompt_tokens": 487,
  "llm.usage.completion_tokens": 156,
  "llm.usage.total_tokens": 643,
  "llm.response_time_ms": 1243
}
この API は次の用途に使用できます。
- リクエストあたりの費用(トークン数 × モデルの料金)を追跡する
- 不要に長いプロンプトを特定する
- モデルのパフォーマンスを比較する(Flash と Pro)
- レイテンシと品質のバランスを最適化する
計算の例:
Gemini 2.5 Flash pricing (as of Nov 2024):
  Input:  $0.075 per 1M tokens
  Output: $0.30 per 1M tokens

This request:
  Input:  487 tokens × $0.075 / 1M = $0.000037
  Output: 156 tokens × $0.30 / 1M  = $0.000047
  Total:                            = $0.000084 (~$0.00008)

For 10,000 donations/month:
  10,000 × 3 agents × $0.00008 = $2.40/month in LLM costs
この詳細な可視性により、モデルの選択に関するデータドリブンな意思決定を行うことができます。
トレース間の比較
複数のトレースをフィルタして期間を比較します。
Trace 1: 8.2s  (with consent wait: 3.0s)
Trace 2: 12.5s (with consent wait: 7.8s)  ← User took longer
Trace 3: 5.1s  (with consent wait: 0.2s)  ← User clicked fast
Trace 4: 6.3s  (with consent wait: 1.5s)
分析情報: ほとんどの変動はシステム パフォーマンスではなく、ユーザーの意思決定時間によって発生します。コア エージェントの実行(同意を除く)は、約 5 秒で一貫しています。
これは、システムが確実に動作していることを示します。
本番環境システムでは、ユーザーから苦情が寄せられる前に問題を検出するアラートを設定します。
高いエラー率に関するアラート
トレースの 5% 超にエラーが含まれている場合にアラートを作成します。
- Cloud Monitoring に移動します。
- [アラート] → [ポリシーの作成] をクリックします。
- 構成:
Resource: Cloud Trace Span
Metric: Span error count
Condition: Rate > 5% over 5 minutes
Notification: Email your-team@example.com
高レイテンシに関するアラート
p95 レイテンシが 15 秒を超えた場合にアラートを作成します。
Resource: Cloud Trace
Metric: Span duration (95th percentile)
Condition: > 15000ms for 5 minutes
Notification: PagerDuty
これにより、パフォーマンスの低下がユーザー エクスペリエンスに影響する前に検出できます。
同意がない場合のアラート
確認なしで支払い手続きが行われた場合にアラートを作成する:
Resource: Cloud Trace Span
Filter: tool.name="create_payment_mandate" AND tool.confirmation_required!=true
Condition: Any match
Notification: Critical alert to security team
これは安全違反検出機能です。この機能が発動した場合、同意メカニズムに重大な問題があることを意味します。
学習した内容
Cloud Trace を使用して、次の方法を理解しました。
✅ Cloud Trace エクスプローラを操作してプロダクションのトレースを見つける
✅ ウォーターフォール ビューを読み取ることで完全な実行フローを確認する
✅ IntentMandate → CartMandate → PaymentMandate を通じて認証情報チェーンをトレースする ✅ 紛争解決の証拠としてトレースを使用する
✅ パフォーマンスを分析することでボトルネックを特定する
✅ LLM の費用を詳細なレベルで追跡する
この違い
同じ「承認していない」という申し立てを処理する 2 つのシステムを比較します。
オブザーバビリティのないシステム
User: "I never authorized that $50 donation!"
You:  "Our logs show the transaction completed successfully."
User: "But I didn't approve it!"
You:  "The system requires confirmation before processing."
User: "I never saw any confirmation!"
You:  "..." [no way to prove what happened]

Result: Refund issued, trust lost, user never returns.
Cloud Trace を使用したシステム
User: "I never authorized that $50 donation!"
You:  "Let me pull up the trace from your session..."
      [Shows waterfall with consent span]
You:  "Here's the evidence:
       - 15:30:17 UTC: System asked for confirmation
       - Message shown: 'You are about to donate $50...'
       - 15:30:47 UTC: You clicked 'CONFIRM'
       - Wait time: 29.2 seconds

       The system waited almost 30 seconds for your decision.
       Here's the exact timestamp of your confirmation."

User: "Oh... I remember now. My mistake. Sorry!"

Result: Trust preserved, no refund needed, user continues using service.
これがアカウンタビリティ トレイルの力です。「信頼してください」から「何が起こったのかを正確にお見せします」に移行します。
次のステップ
これで、信頼できるエージェントを構築するための技術的なコアが完成しました。
✅ モジュール 1 ~ 6: 信頼できるアーキテクチャ(ロール、認証情報、同意)を設計しました。
✅ モジュール 7: 複雑なワークフロー(SequentialAgent)をオーケストレートしました。
✅ モジュール 8: 可観測性を有効にしてデプロイしました。
✅ モジュール 9: アカウンタビリティ トレイルの読み取りと使用方法を学習しました。
構築したアーキテクチャ(役割の分離、認証情報チェーン、同意メカニズム、完全なオブザーバビリティ)は、実際のお金、実際のデータ、実際の結果を処理する本番環境システムに直接転送されます。
10. 今後の展開
作成した内容
このワークショップは、「お金を預けられる AI エージェントを構築するにはどうすればよいか?」という質問から始まりました。
これで答えがわかりました。
出発点(モジュール 3):
simple_agent = Agent(
    model="gemini-2.5-flash",
    instruction="Find charities and donate",
    tools=[google_search]
)
現在の状況(モジュール 10):
- ✅ 役割分離を備えた 3 つの専門エージェント
- ✅ 3 つの検証可能な認証情報(Intent → Cart → Payment mandates)
- ✅ 各ステップで有効期限の検証を含む認証情報チェーンを完了する
- ✅ タイムスタンプ証明付きの明示的な同意メカニズム
- ✅ オブザーバビリティを備えた Agent Engine への本番環境デプロイ
- ✅ Cloud Trace で完全なアカウンタビリティ トレイル
- ✅ 異議申し立ての解決のためのフォレンジック証拠
ワークショップと本番環境: ギャップ
システムは正しいアーキテクチャとパターンを示していますが、実際の金銭と実際のユーザー向けにアップグレードする必要がある教育的な簡略化を使用しています。
簡略化された内容と、本番環境に必要な内容は次のとおりです。
コンポーネント | ワークショップの実施 | 制作要件 |
署名 | デモ用の SHA-256 ハッシュ( | 秘密鍵を使用した PKI または JWT を使用する実際の暗号署名 |
お支払い手続き | シミュレートされた返品( | 実際の決済 API(Stripe、PayPal、Square)との統合 |
ユーザー認証 | 暗黙的な信頼(ログイン不要) | OAuth 2.0、WebAuthn、セッション管理 |
シークレット管理 |
| 暗号化された Google Secret Manager または Cloud KMS |
慈善団体データベース | 9 つの慈善団体を含むモック JSON ファイル | Live API の統合(IRS Tax Exempt Organization Search、Charity Navigator API) |
エラー処理 | エラー メッセージを含む基本的な try-catch | 指数バックオフ、回路ブレーカー、デッドレター キューを使用した再試行ロジック |
テスト | スクリプトによる手動検証 | CI/CD を使用した包括的な単体/統合/E2E テストスイート |
セッションの永続性 | インメモリ(ローカル)または自動(Agent Engine) | バックアップと障害復旧を備えた本番環境データベース |
レート制限 | なし(教育環境) | ユーザーごとのレート制限、IP ベースのスロットリング、不正行為の検出 |
習得した主なアーキテクチャ パターン
このワークショップで学習したパターンは、本番環境のパターンです。疑わないでください。
役割の分離(AP2 原則 #1)
各エージェントには明確なジョブが 1 つあり、必要なものだけが表示されます。1 つのエージェントが侵害されても、攻撃者は他のエージェントのデータにアクセスできません。これにより、影響範囲が制限されます。
これを使用する本番環境システム: 支払い処理、ドキュメント ワークフロー、承認チェーン、検証ゲートのあるマルチステップ フォーム。
検証可能な認証情報(AP2 原則 #2)
各認証情報には有効期限があり、前の認証情報を参照し、次のステップに進む前に検証が必要です。これにより、改ざん防止の監査チェーンが作成されます。
制作価値: 何がいつ、どのような順序で発生したかの完全な証拠。紛争解決と規制遵守に不可欠です。
明示的な同意(AP2 原則 3)
ユーザーがアクションを承認したことを証明するタイムスタンプ。異議申し立てはできません。
制作価値: 金融取引に関する法的要件。ユーザーと企業の両方を保護します。
順次オーケストレーション(ADK パターン)
正しい実行順序を適用します。手順のスキップを防ぎます。各エージェントが前のエージェントの出力を確認することを保証します。
本番環境の値: ユーザーが即時の結果を期待する人間参加型システムに最適です。これは、寄付フロー、購入手続きプロセス、承認チェーンに適したパターンです。
完全なオブザーバビリティ(OpenTelemetry + Cloud Trace)
すべての決定、ツール呼び出し、同意のタイミング、認証情報の受け渡しが自動的にキャプチャされます。
本番環境の値: 紛争の法医学的証拠。パフォーマンス最適化データ。コンプライアンス監査証跡。本番環境の問題を正確にデバッグします。
継続的な学習のためのリソース
ADK ドキュメント:
AP2 と関連基準:
Google Cloud サービス:
リソースをクリーンアップする
継続的な課金を回避するには、デプロイを削除します。
Agent Engine: Agent Engine のドキュメントの手順に沿って操作します。
Cloud Run(デプロイされている場合):
gcloud run services delete charity-advisor \
    --region=$GOOGLE_CLOUD_LOCATION
ストレージ バケット:
gsutil -m rm -r gs://$GOOGLE_CLOUD_PROJECT-staging
gsutil -m rm -r gs://$GOOGLE_CLOUD_PROJECT-artifacts
旅は続く
簡単な質問から始めて、完全な回答を作成しました。信頼できる AI エージェントの基本的なパターンを習得しました。これらのパターンは、AI エージェントが機密性の高いオペレーション(金融取引、医療に関する意思決定、法的文書、サプライ チェーン オペレーション)を処理するあらゆるドメインに転送されます。
原則の移行。信頼モデルが機能します。
信頼できるものを構築しましょう。❤️