1. 신뢰를 구축하여 관대함 이끌어내기

영감을 받는 순간
휴대전화가 진동합니다. 소외된 지역사회의 아동이 읽기 능력을 배우도록 돕는 성공적인 문해력 프로그램에 관한 뉴스 기사를 보게 됩니다. 기여하고 싶은 강력한 충동을 느낍니다. 브라우저를 열고 '아동 문해력 프로그램 기부'를 검색합니다.
수백 개의 결과가 표시됩니다.
첫 번째 링크를 클릭합니다. 웹사이트가 전문적으로 보입니다. 재무 정보까지 아래로 스크롤합니다. '관리 비용: 28%' 일시중지합니다. 기부금 1달러 중 72센트만 실제로 프로그램에 사용됩니다. 괜찮은가요? 확실하지 않습니다.
다른 조직을 시도합니다. 들어본 적이 없을 겁니다. 합법적인가요? 간단한 검색으로도 깊은 곳까지 파고들 수 있습니다. 2년 전 Reddit 스레드에서 한 사용자가 '사기입니다. 내 기부금이 어디에도 전달되지 않았어요'라고 주장합니다. '현장에서 실제 작업을 하고 있습니다!'라며 열정적으로 옹호하는 사람도 있습니다. 모호함은 마비됩니다.
30분 후, 상충되는 리뷰, 효율성 등급, IRS 기록의 미로에 빠져 아직 기부하지 않았습니다. 처음의 관대함은 조사라는 마찰로 대체되었습니다. 탭은 결국 닫을 때까지 며칠 동안 열려 있으며, 이는 좋은 의도를 상기시켜 주는 작은 알림입니다.
개인적인 실패가 아닌 시스템의 실패입니다.
이 환경은 범용입니다. 기부하고 싶은 마음은 많지만 절차에 망설임과 의심을 유발하는 장애물이 많습니다.
- ❌ 조사 마찰: 모든 자선단체에는 자체 조사가 필요합니다.
- ❌ 신뢰성 검증: 매우 효과적인 조직과 비효율적인 조직, 심지어 완전한 사기를 구별하기 어렵습니다.
- ❌ 분석 마비: 너무 많은 선택지로 인해 의사결정 피로가 발생합니다.
- ❌ 모멘텀 손실: 물류 부담이 커지면서 기부하려는 감정적 동기가 사라집니다.
이러한 마찰은 실제 세계에서 엄청난 비용을 초래합니다. 미국의 개인 기부 규모는 매우 큽니다. Giving USA 2024에 따르면 2023년에만 개인 기부자가 약 3, 740억 달러를 기부했습니다. 하지만 연구에 따르면 검색 비용, 심리적 마찰, 시간 제약 등 기부의 장벽으로 인해 자선 단체에 전달되는 금액이 크게 줄어듭니다. 수백만 명의 기부자를 대상으로 한 연구에 따르면 온라인 기부 과정에서 약간의 불편함만 있어도 사람들이 자선 의도를 실현하지 못하는 것으로 나타났습니다.
이는 수십억 달러에 달하는 기부금이 필요한 곳에 전달되지 않는다는 것을 의미합니다.
비전
다른 경험을 상상해 보세요. 30분간의 연구 세션 대신 다음과 같이 말하면 됩니다.
"어린이 문해력 프로그램에 50달러를 기부하고 싶어. 평점이 높고 효율적이며 검증된 자선단체를 찾아 줘."
몇 초 만에 신뢰를 주는 대답을 얻을 수 있습니다.

이것이 AI Giving Agent가 약속하는 바입니다. 하지만 이러한 비전을 실현하려면 근본적인 과제를 해결해야 합니다. 자율 AI 에이전트가 돈을 처리할 때는 신뢰가 선택사항이 아니라 전체 기반이 됩니다.
- 사용자가 승인한 내용을 어떻게 증명할 수 있나요?
- 실수가 발생하면 누가 책임을 지나요?
- 기부자, 자선단체, 결제 네트워크가 안심하고 참여할 수 있도록 어떻게 지원하나요?
오늘의 미션
이 워크숍에서는 두 가지 강력한 기술을 결합하여 신뢰할 수 있는 에이전트를 빌드합니다.
Google 에이전트 개발 키트 (ADK) | 상담사 결제 프로토콜 (AP2) | |
직책 | 프로덕션 등급 AI 에이전트를 빌드하기 위한 팩토리 | AI 거래의 신뢰를 위한 아키텍처 청사진 |
제공되는 기능 | • 멀티 에이전트 오케스트레이션 프레임워크 | • 역할 기반 보안 경계 |
자세히 알아보기 |
빌드할 항목

이 워크숍을 마치면 다음을 만들게 됩니다.
✅ 전문적인 역할이 있는 멀티 에이전트 시스템:
- 인증된 자선단체를 찾는 쇼핑 에이전트
- 바인딩 기부 혜택을 만드는 판매자 에이전트
- 안전하게 결제를 처리하는 사용자 인증 정보 제공자
- 전체 흐름을 조정하는 오케스트레이터
✅ 세 가지 유형의 검증 가능한 사용자 인증 정보:
- IntentMandate: '교육 자선단체 찾아 줘'
- CartMandate: 'Room to Read에 $50 기부, 판매자 서명'
- PaymentMandate: '시뮬레이션된 결제를 통해 처리'
✅ 모든 계층에서의 보안:
- 역할 기반 신뢰 경계
- 명시적 사용자 동의
✅ 완전한 감사 추적:
- 모든 결정을 추적할 수 있음
- 기록된 모든 동의
- 모든 핸드오프가 표시됨
🔒 중요: 안전한 학습 환경
신뢰를 구축할 준비가 되셨나요?
다음 모듈에서는 개발 환경을 설정하고 첫 번째 AI 에이전트를 빌드합니다. 간단한 에이전트가 신뢰할 수 없는 이유를 빠르게 파악한 다음 워크숍의 나머지 시간 동안 이 문제를 해결하는 방법을 배우게 됩니다.
문제를 직접 이해하는 것부터 시작해 보겠습니다.
2. 작업공간 준비
신뢰할 수 있는 에이전트를 위한 기반
AI Giving Agent를 빌드하기 전에 깨끗하고 일관되며 올바르게 구성된 개발 환경을 준비해야 합니다. 이 모듈은 필요한 모든 도구와 서비스가 마련되어 있는지 확인하는 데 중점을 둡니다.
이 설정을 완료하면 구성 문제에 대해 걱정하지 않고 향후 모듈에서 에이전트 로직을 빌드하는 흥미로운 작업에만 집중할 수 있습니다.
Cloud Shell 액세스
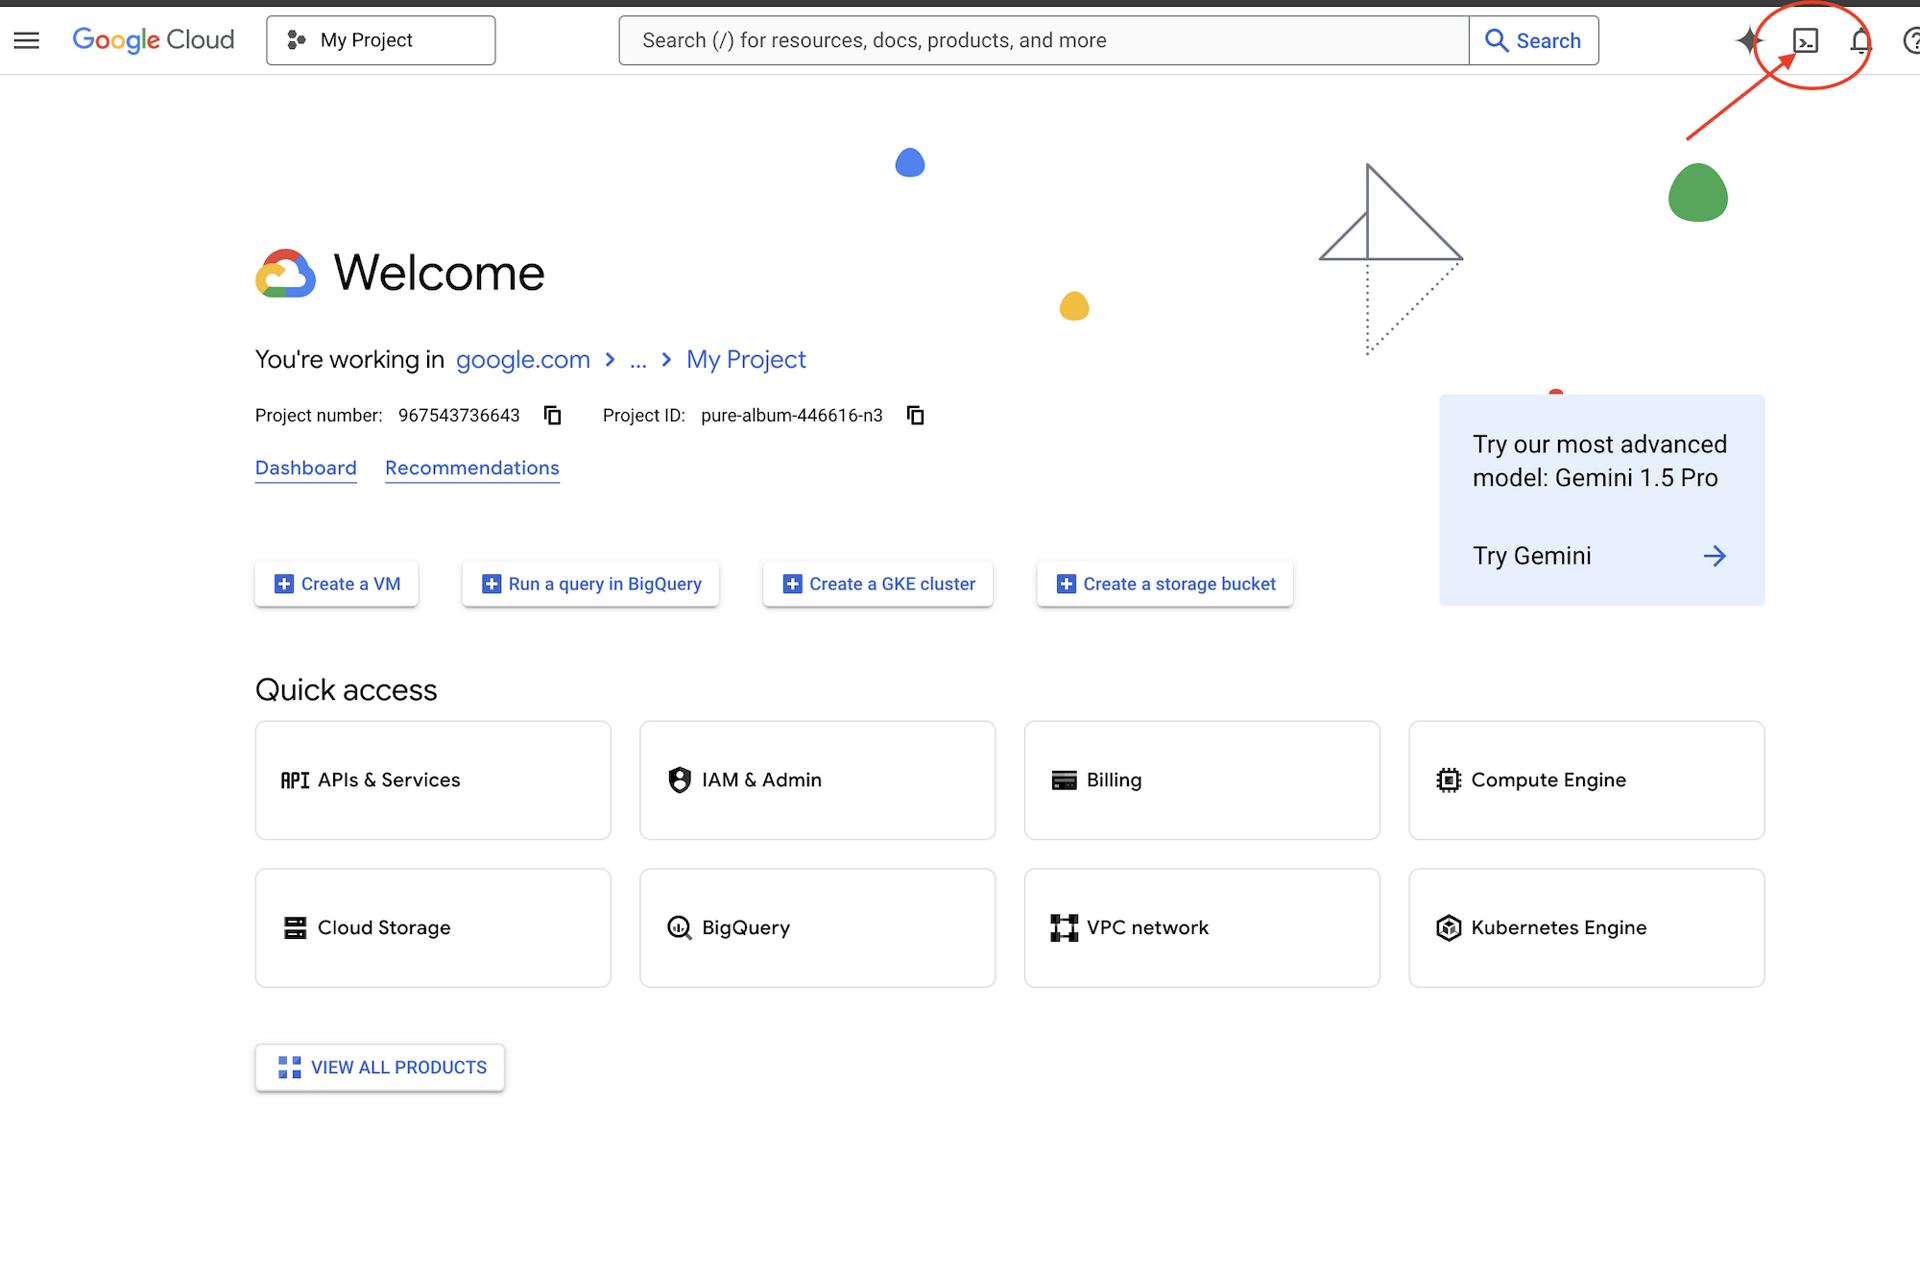
먼저 Google Cloud SDK 및 기타 필수 도구가 사전 설치된 브라우저 기반 터미널인 Cloud Shell을 엽니다.
Google Cloud 콘솔 상단에서 Cloud Shell 활성화를 클릭합니다 (오른쪽 상단 탐색 메뉴의 터미널 아이콘).
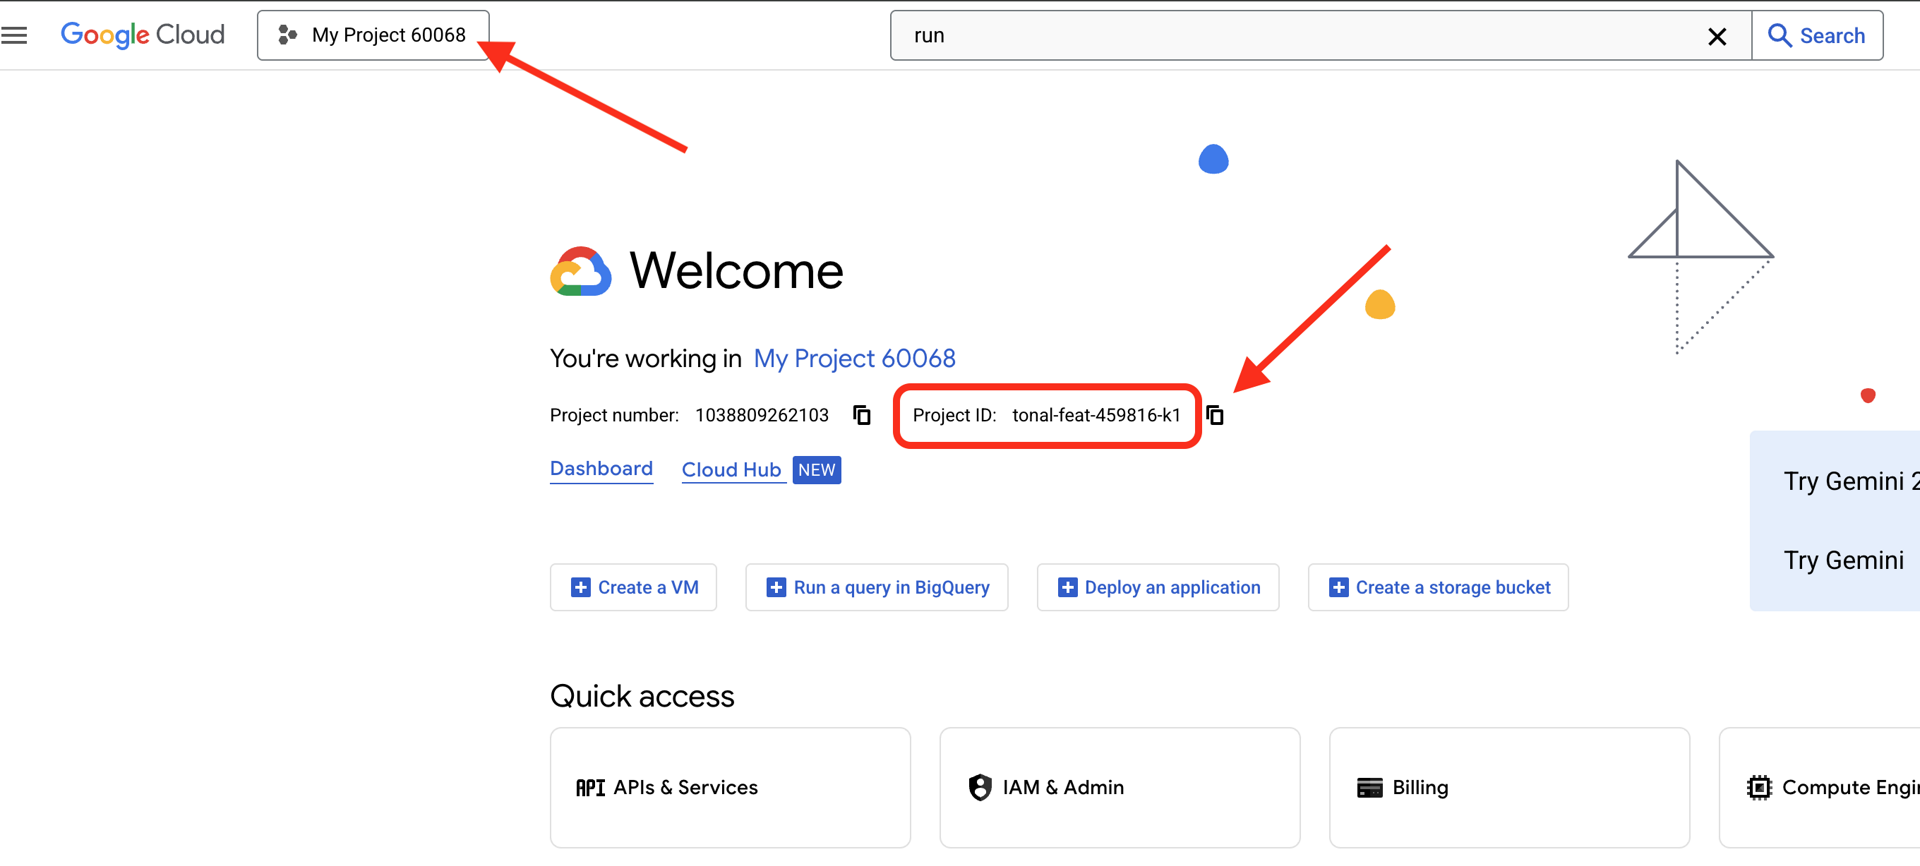
Google Cloud 프로젝트 ID를 찾습니다.
- Google Cloud 콘솔(https://console.cloud.google.com)을 엽니다.
- 페이지 상단의 프로젝트 드롭다운에서 이 워크숍에 사용할 프로젝트를 선택합니다.
- 프로젝트 ID는 대시보드의 프로젝트 정보 카드에 표시됩니다.
Cloud Shell이 열리면 인증되었는지 확인합니다.
# Check that you are logged in
gcloud auth list
계정이 (ACTIVE)로 표시됩니다.
프로젝트 구성
이제 Google Cloud 프로젝트를 설정하고 필요한 API를 사용 설정해 보겠습니다.
프로젝트 ID 설정
# Set your project using the auto-detected environment variable in Cloud Shell
gcloud config set project $GOOGLE_CLOUD_PROJECT

# Verify the project has been set
echo "Your active Google Cloud project is: $(gcloud config get-value project)"
필수 API 사용 설정
상담사는 다음과 같은 여러 Google Cloud 서비스에 액세스해야 합니다.
gcloud services enable \
    aiplatform.googleapis.com \
    secretmanager.googleapis.com \
    cloudtrace.googleapis.com
1~2분 정도 걸릴 수 있습니다. 다음 내용이 표시됩니다.
Operation "operations/..." finished successfully.
이러한 API가 제공하는 기능:
- aiplatform.googleapis.com: 에이전트 추론을 위한 Gemini 모델 액세스
- secretmanager.googleapis.com: API 키의 보안 스토리지 (프로덕션 권장사항)
- cloudtrace.googleapis.com: 책임 추적을 위한 관측 가능성
시작 코드 클론
모든 템플릿 코드와 리소스가 포함된 워크숍 저장소를 가져옵니다.
git clone https://github.com/ayoisio/adk-ap2-charity-agents
cd adk-ap2-charity-agents
git checkout codelab
다음과 같이 확인해 보겠습니다.
ls -la
다음과 같이 표시됩니다.
charity_advisor/- 에이전트와 도구를 빌드할 위치scripts/- 테스트 및 확인을 위한 도우미 스크립트deploy.sh- 배포 도우미 스크립트setup.py- 모듈 설치를 위한 도우미 스크립트.env.template- 환경 변수 파일
Python 환경 설정
이제 프로젝트를 위한 격리된 Python 환경을 만듭니다.
가상 환경 만들기 및 활성화
# Create the virtual environment
python3 -m venv venv

# Activate it
source venv/bin/activate
✅ 인증: 프롬프트에 (venv) 접두사가 표시됩니다.
종속 항목 설치
pip install -r charity_advisor/requirements.txt
pip install -e .
다음이 설치됩니다.
- google-adk: 에이전트 개발 키트 프레임워크
- google-cloud-aiplatform: Vertex AI 및 Gemini 통합
- ap2: 에이전트 결제 프로토콜 SDK (GitHub에서 가져옴)
- python-dotenv: 환경 변수 관리
-e 플래그를 사용하면 어디서나 adk_ap2_charity_agents 모듈을 가져올 수 있습니다.
환경 파일 구성
템플릿에서 구성을 만듭니다.
# Copy the template
cp .env.template .env

# Get your current Project ID
PROJECT_ID=$(gcloud config get-value project)

# Replace the placeholder with your actual project ID
sed -i "s/your-project-id/$PROJECT_ID/g" .env

# Verify the replacement worked
grep GOOGLE_CLOUD_PROJECT .env
다음과 같이 표시됩니다.
GOOGLE_CLOUD_PROJECT=your-actual-project-id
인증
확인 스크립트를 실행하여 모든 항목이 올바르게 구성되었는지 확인합니다.
python scripts/verify_setup.py
모든 녹색 체크표시가 표시됩니다.
======================================================================
SETUP VERIFICATION
======================================================================

✓ Python version: 3.11.x
✓ google-adk: 1.17.0
✓ google-cloud-aiplatform: 1.111.0+
✓ ap2: 0.1.0
✓ python-dotenv: 1.0.0+
✓ .env file found and contains project ID
✓ Google Cloud project configured: your-project-id

✓ Mock charity database found
✓ Agent templates ready
✓ All directories present

======================================================================
✓ Setup complete! You are ready to build trustworthy agents.
======================================================================
문제 해결
다음 단계
이제 환경이 완전히 준비되었습니다. 이 과정에서 다음과 같은 작업을 수행하셨습니다.
- ✅ Google Cloud 프로젝트 구성됨
- ✅ 필수 API 사용 설정됨
- ✅ ADK 및 AP2 라이브러리 설치됨
- ✅ 템플릿 코드를 수정할 준비가 됨
다음 모듈에서는 몇 줄의 코드로 첫 번째 AI 에이전트를 빌드하고 금융 거래를 처리할 때 간단한 에이전트가 신뢰할 수 없는 이유를 알아봅니다.
3. 첫 번째 에이전트 및 신뢰 격차 발견

아이디어에서 상호작용까지
이전 모듈에서는 개발 환경을 준비했습니다. 이제 흥미로운 작업이 시작됩니다. 첫 번째 에이전트를 빌드하고 실행하여 첫 번째 기능을 부여합니다. 이 과정에서 에이전트가 진정으로 신뢰할 수 있게 되려면 해결해야 하는 근본적인 문제를 발견합니다.
이 모듈은 '이전' 사진과 같습니다. 신뢰할 수 있는 에이전트를 빌드하려면 LLM에 도구 액세스 권한을 부여하는 것 이상이 필요하다는 것을 보여줍니다.
1단계: 스타터 에이전트 검토
먼저 첫 번째 에이전트의 템플릿을 살펴보겠습니다. 여기에는 다음 단계에서 완료할 자리표시자가 있는 기본 구조가 포함되어 있습니다.
👉 파일 열기
charity_advisor/simple_agent/agent.py
편집기에서
다음 내용이 표시됩니다.
"""
A simple agent that can research charities using Google Search.
"""

# MODULE_3_STEP_2_IMPORT_COMPONENTS


simple_agent = Agent(
    name="SimpleAgent",
    model="gemini-2.5-flash",

    # MODULE_3_STEP_3_WRITE_INSTRUCTION
    instruction="""""",

    # MODULE_3_STEP_4_ADD_TOOLS
    tools=[]
)
자리표시자 주석이 MODULE_3_STEP_X_DESCRIPTION 패턴을 따릅니다. 점진적으로 에이전트를 빌드하기 위해 이러한 마커를 대체할 것입니다.
2단계: 필수 구성요소 가져오기
Agent 클래스를 인스턴스화하거나 google_search 도구를 사용하려면 파일로 가져와야 합니다.
👉 찾기:
# MODULE_3_STEP_2_IMPORT_COMPONENTS
👉 단일 줄을 다음으로 바꿉니다.
from google.adk.agents import Agent
from google.adk.tools import google_search
이제 Agent 클래스와 google_search 도구를 파일에서 사용할 수 있습니다.
3단계: 에이전트 요청 사항 작성
요청 사항은 에이전트의 '직무 설명'입니다. LLM에게 도구를 언제 어떻게 사용해야 하는지 알려줍니다. 에이전트가 자선 단체 정보를 검색하도록 안내하는 프롬프트를 작성해 보겠습니다.
👉 찾기:
# MODULE_3_STEP_3_WRITE_INSTRUCTION
instruction="""""",
👉 이 두 줄을 다음으로 바꿉니다.
instruction="""You are a helpful research assistant. When a user asks you to find information about charities,
use the google_search tool to find the most relevant and up-to-date results from the web.
Synthesize the search results into a helpful summary.""",
4단계: 검색 도구 추가
도구가 없는 에이전트는 대화형 에이전트일 뿐입니다. 에이전트에게 첫 번째 기능인 웹 검색 기능을 부여해 보겠습니다.
👉 찾기:
# MODULE_3_STEP_4_ADD_TOOLS
tools=[]
👉 이 두 줄을 다음으로 바꿉니다.
tools=[google_search]
5단계: 완전한 에이전트 확인
테스트하기 전에 모든 요소가 준비되었는지 확인해 보겠습니다.
👉 전체
charity_advisor/simple_agent/agent.py
파일은 다음과 같이 표시됩니다.
"""
A simple agent that can research charities using Google Search.
"""

from google.adk.agents import Agent
from google.adk.tools import google_search


simple_agent = Agent(
    name="SimpleAgent",
    model="gemini-2.5-flash",
    instruction="""You are a helpful research assistant. When a user asks you to find information about charities,
use the google_search tool to find the most relevant and up-to-date results from the web.
Synthesize the search results into a helpful summary.""",
    tools=[google_search]
)
6단계: 에이전트 테스트 - 신뢰 격차 노출
이제 에이전트가 완전히 구성되었으므로 이를 테스트하고 동작을 분석해 보겠습니다. 여기에서 간단한 에이전트가 재무 결정을 처리할 때 신뢰할 수 없는 이유를 알 수 있습니다.
테스트 1: 검색 문제
👉 Cloud Shell 터미널에서 다음 명령어를 실행합니다.
adk run charity_advisor/simple_agent
다음과 같은 출력이 표시됩니다.
INFO:google.adk.agents:Loading agent from charity_advisor/simple_agent
INFO:google.adk.agents:Agent 'SimpleAgent' ready

[user]:
이제 [user]: 프롬프트에서 사용자의 입력을 기다립니다.
👉 [user]: 프롬프트에서 다음을 입력합니다.
Can you find me a verified, highly-rated charity for children's literacy?
👉 Enter 키를 누르고 대답을 확인합니다.
잠시 후 에이전트가 검색 결과를 다음과 같은 대답으로 종합합니다.
웹 검색에 따르면 아동 문해력과 관련해 평판이 좋은 자선단체는 Reading Is Fundamental과 Room to Read인 것으로 보입니다. 상태와 등급을 확인하려면 Charity Navigator 및 GuideStar와 같은 소스를 사용하는 것이 좋습니다. 또한 Reddit과 같은 포럼에서 사용자들이 다양한 소규모 지역 문해력 프로그램에 대한 개인적인 경험을 공유하는 등 여러 온라인 토론도 발견했습니다.
분석해 보겠습니다. 상담사가 문제를 해결해 주었나요?
❌ 아니요. 1단원에서 설명한 인간의 경험을 완벽하게 복제했습니다. 'Google 검색' 프로세스를 성공적으로 자동화하고 '분석 마비' 문제를 다시 사용자에게 넘겨주었습니다.
여기서 첫 번째 신뢰 격차인 신뢰할 수 있는 데이터의 부족이 드러납니다.
에이전트가 공개 웹을 검색하고 있습니다. 즉,
- ✅ 결과를 빠르게 찾음 (사용자 환경 개선)
- ❌ 평점이 높은 조직과 Reddit 토론 (신뢰할 수 없는 소스)이 혼합되어 있습니다.
- ❌ 검증된 자선단체와 잠재적 사기를 구분할 수 없습니다 (인증 없음).
- ❌ 방금 제공한 정보를 Google에서 확인하도록 요청합니다 (책임 전가).
테스트 2: 실행 문제
이제 중요한 두 번째 테스트를 진행합니다. [user]: 프롬프트에서 기부를 완료해 보세요.
Okay, please donate $50 to Room to Read for me.
에이전트는 다음과 같이 사과하며 한계를 인정합니다.
기부하고 싶다고 문의하신 내용을 확인했습니다. 하지만 저는 연구 어시스턴트이므로 금융 거래를 처리하거나 결제를 처리할 수 없습니다. 기부하려면 Room to Read 공식 웹사이트를 직접 방문해야 합니다.
이것이 두 번째로 중요한 '아하!' 순간입니다.
에이전트가 적절한 자선단체를 찾을 수 없을 뿐만 아니라 기부 행위를 수행할 수 있다고 신뢰할 수도 없습니다.
👉 단축키
Ctrl+C
를 눌러 테스트를 완료한 후 종료합니다.
두 가지 격차 시각화

지금까지 학습한 내용
이 모듈에서는 첫 번째 AI 에이전트를 빌드하고 장착했습니다. 이렇게 하면 신뢰할 수 있는 시스템을 구축하는 데 있어 두 가지 근본적인 문제를 발견할 수 있습니다.
학습한 핵심 개념
✅ 상담사 클래스:
- ADK의 핵심 구성요소
- LLM 추론 (뇌)과 도구 (손)를 결합합니다.
- 모델, 안내, 도구로 구성됨
✅ 폴더 기반 구조:
- 각 에이전트는 자체 폴더에 있습니다.
- ADK는
agent_folder/agent.py를 찾습니다. adk run agent_folder로 러닝
✅ 도구 목록:
- 에이전트 기능을 정의합니다.
- LLM이 도구를 사용할 시기와 방법을 결정함
- 여러 작업에 사용할 수 있는 여러 도구를 포함할 수 있음
✅ 요청 사항 프롬프트:
- 직무 설명서처럼 에이전트 동작을 안내합니다.
- 역할, 트리거, 작업, 출력 형식을 지정합니다.
- 안정적인 도구 사용에 중요
✅ 신뢰 문제:
- 검색 격차: 검증되지 않은 소스, 품질이 혼합됨
- 실행 격차: 보안 기능 없음, 동의 없음, 감사 추적 없음
다음 단계
다음 모듈에서는 AP2의 역할 기반 아키텍처를 구현하여 솔루션을 빌드합니다.
첫 번째 에이전트를 빌드하고 역할 분리가 실제로 어떻게 작동하는지 살펴보겠습니다.
4. 쇼핑 에이전트 빌드 - 역할 기반 검색

신뢰 기반: 역할 분리
이전 모듈에서는 단순한 범용 에이전트가 신뢰할 수 있는 검색을 제공할 수 없고 안전한 거래를 실행할 수 없다는 두 가지 측면에서 실패한다는 것을 확인했습니다. 이제 에이전트 결제 프로토콜의 첫 번째 원칙인 역할 기반 아키텍처를 구현하여 이러한 문제를 해결해 보겠습니다.
코드를 작성하기 전에 이 원칙이 중요한 이유를 알아보겠습니다.
AP2 원칙: 역할 분리
'모든 작업' 에이전트의 문제점
재무 상담사, 회계사, 투자 중개인 역할을 한 사람에게 맡긴다고 가정해 보겠습니다. 편리한가요? 예. 안전한가요? 절대 아니에요. 다음과 같은 정보가 포함됩니다.
- 투자 목표 (자문 역할)
- 계정 액세스 (회계사 역할)
- 자금을 이동할 권한 (브로커 역할)
이 사용자의 계정이 도용되거나 실수를 하면 모든 것이 위험해집니다.
AP2의 솔루션: 에이전트 하나, 작업 하나
AP2는 관심사 분리 원칙을 적용하여 신뢰 경계를 만듭니다.

중요한 이유:
- ✅ 제한된 피해 범위: 쇼핑 에이전트가 손상되더라도 공격자는 결제 사용자 인증 정보에 액세스할 수 없습니다.
- ✅ 개인 정보 보호: 사용자 인증 정보 제공업체는 쇼핑 대화를 볼 수 없습니다.
- ✅ 규정 준수: 결제 데이터가 격리되면 PCI-DSS 요구사항을 더 쉽게 충족할 수 있습니다.
- ✅ 책임: 각 단계에 대한 명확한 책임
에이전트의 커뮤니케이션 방식: 공유 메모장으로서의 상태
에이전트는 서로의 데이터에 직접 액세스할 수 없으므로 공유 상태를 통해 통신합니다. 모든 상담사가 쓰고 읽을 수 있는 화이트보드라고 생각하면 됩니다.
# Shopping Agent writes:
state["intent_mandate"] = {
    "natural_language_description": "Donate $50 to Room to Read",
    "merchants": ["Room to Read"],
    "intent_expiry": "2024-11-07T15:32:16Z",
    "amount": 50.0
}

# Merchant Agent reads:
intent = state["intent_mandate"]
charity_name = intent["merchants"][0]
amount = intent["amount"]
# Creates CartMandate based on IntentMandate...

# Credentials Provider reads:
cart_mandate = state["cart_mandate"]
# Processes payment...
이러한 방식으로 Google은 공동작업을 지원하면서 신뢰 경계를 유지합니다.
첫 번째 에이전트: 쇼핑 에이전트
쇼핑 에이전트의 책임은 간단하고 명확합니다.
find_charities도구를 사용하여 신뢰할 수 있는 데이터베이스 쿼리- 사용자에게 옵션 표시
save_user_choice도구를 사용하여 IntentMandate를 만들고 상태에 저장합니다.- 다음 상담사 (판매자)에게 인계
이상입니다. 결제 처리도, 장바구니 생성도 없습니다. 탐색과 핸드오프만 있습니다.
단계별로 빌드해 보겠습니다.
1단계: 입력 유효성 검사 도우미 추가
프로덕션 도구를 빌드할 때는 입력 유효성 검사가 중요합니다. 자선단체 데이터를 상태에 저장하기 전에 유효성을 검사하는 도우미 함수를 만들어 보겠습니다.
👉 열기
charity_advisor/tools/charity_tools.py
상단에 find_charities 함수 (이미 완료됨)가 표시됩니다. 아래로 스크롤하여 다음을 찾습니다.
# MODULE_4_STEP_1_ADD_VALIDATION_HELPER
👉 단일 줄을 다음으로 바꿉니다.
def _validate_charity_data(charity_name: str, charity_ein: str, amount: float) -> tuple[bool, str]:
    """
    Validates charity selection data before saving to state.

    This helper function performs basic validation to ensure data quality
    before it gets passed to other agents in the pipeline.

    Args:
        charity_name: Name of the selected charity
        charity_ein: Employer Identification Number (should be format: XX-XXXXXXX)
        amount: Donation amount in USD

    Returns:
        (is_valid, error_message): Tuple where is_valid is True if all checks pass,
                                    and error_message contains details if validation fails
    """
    # Validate charity name
    if not charity_name or not charity_name.strip():
        return False, "Charity name cannot be empty"

    # Validate EIN format (should be XX-XXXXXXX)
    if not charity_ein or len(charity_ein) != 10 or charity_ein[2] != '-':
        return False, f"Invalid EIN format: {charity_ein}. Expected format: XX-XXXXXXX"

    # Validate amount
    if amount <= 0:
        return False, f"Donation amount must be positive, got: ${amount}"

    if amount > 1_000_000:
        return False, f"Donation amount exceeds maximum of $1,000,000: ${amount}"

    # All checks passed
    return True, ""
2단계: IntentMandate 생성 도우미 추가
이제 AP2 IntentMandate 구조를 빌드하는 도우미를 만들어 보겠습니다. AP2의 세 가지 확인 가능한 인증 정보 중 하나입니다.
👉 동일한 파일에서 다음을 찾습니다.
# MODULE_4_STEP_2_ADD_INTENTMANDATE_CREATION_HELPER
👉 단일 줄을 다음으로 바꿉니다.
def _create_intent_mandate(charity_name: str, charity_ein: str, amount: float) -> dict:
    """
    Creates an IntentMandate - AP2's verifiable credential for user intent.

    This function uses the official Pydantic model from the `ap2` package
    to create a validated IntentMandate object before converting it to a dictionary.

    Args:
        charity_name: Name of the selected charity
        charity_ein: Employer Identification Number
        amount: Donation amount in USD

    Returns:
        Dictionary containing the IntentMandate structure per AP2 specification
    """
    from datetime import datetime, timedelta, timezone
    from ap2.types.mandate import IntentMandate

    # Set the expiry for the intent
    expiry = datetime.now(timezone.utc) + timedelta(hours=1)

    # Step 1: Instantiate the Pydantic model with official AP2 fields
    intent_mandate_model = IntentMandate(
        user_cart_confirmation_required=True,
        natural_language_description=f"Donate ${amount:.2f} to {charity_name}",
        merchants=[charity_name],
        skus=None,
        requires_refundability=False,
        intent_expiry=expiry.isoformat()
    )

    # Step 2: Convert the validated model to a dictionary for state storage
    intent_mandate_dict = intent_mandate_model.model_dump()

    # Step 3: Add the codelab's custom fields to the dictionary
    timestamp = datetime.now(timezone.utc)
    intent_mandate_dict.update({
        "timestamp": timestamp.isoformat(),
        "intent_id": f"intent_{charity_ein.replace('-', '')}_{int(timestamp.timestamp())}",
        "charity_ein": charity_ein,
        "amount": amount,
        "currency": "USD"
    })

    return intent_mandate_dict
3단계: IntentMandate로 상태 핸드오프 도구 빌드
이제 IntentMandate를 만들고 상태에 저장하는 도구를 빌드해 보겠습니다.
👉 같은 파일에서
save_user_choice
함수를 사용합니다. 찾기:
# MODULE_4_STEP_3_COMPLETE_SAVE_TOOL
👉 단일 줄을 다음으로 바꿉니다.
    # Validate inputs before creating IntentMandate
    is_valid, error_message = _validate_charity_data(charity_name, charity_ein, amount)
    if not is_valid:
        logger.error(f"Validation failed: {error_message}")
        return {"status": "error", "message": error_message}

    # Create AP2 IntentMandate using our updated helper function
    intent_mandate = _create_intent_mandate(charity_name, charity_ein, amount)

    # Write the IntentMandate to shared state for the next agent
    tool_context.state["intent_mandate"] = intent_mandate

    logger.info(f"Successfully created IntentMandate and saved to state")
    logger.info(f"Intent ID: {intent_mandate['intent_id']}")
    logger.info(f"Intent expires: {intent_mandate['intent_expiry']}")

    # Return success confirmation
    return {
        "status": "success",
        "message": f"Created IntentMandate: ${amount:.2f} donation to {charity_name} (EIN: {charity_ein})",
        "intent_id": intent_mandate["intent_id"],
        "expiry": intent_mandate["intent_expiry"]
    }
4단계: 표시 형식 도우미 추가
에이전트를 빌드하기 전에 사용자 친화적인 표시를 위해 자선단체 데이터를 포맷하는 도우미를 하나 더 추가해 보겠습니다.
👉 스크롤하여 다음을 찾습니다.
# MODULE_4_STEP_4_ADD_FORMATTING_HELPER
👉 단일 줄을 다음으로 바꿉니다.
def _format_charity_display(charity: dict) -> str:
    """
    Formats a charity dictionary into a user-friendly display string.

    This helper function demonstrates how to transform structured data
    into readable text for the user.

    Args:
        charity: Dictionary containing charity data (name, ein, mission, rating, efficiency)

    Returns:
        Formatted string suitable for display to the user
    """
    name = charity.get('name', 'Unknown')
    ein = charity.get('ein', 'N/A')
    mission = charity.get('mission', 'No mission statement available')
    rating = charity.get('rating', 0.0)
    efficiency = charity.get('efficiency', 0.0)

    # Format efficiency as percentage
    efficiency_pct = int(efficiency * 100)

    # Build formatted string
    display = f"""
**{name}** (EIN: {ein})
⭐ Rating: {rating}/5.0
💰 Efficiency: {efficiency_pct}% of funds go to programs
📋 Mission: {mission}
    """.strip()

    return display
5단계: 쇼핑 에이전트 빌드 - 구성요소 가져오기
이제 도구가 완성되고 강력해졌으므로 이를 사용할 에이전트를 만들어 보겠습니다.
👉 열기
charity_advisor/shopping_agent/agent.py
자리표시자 댓글이 포함된 템플릿이 표시됩니다. 단계별로 빌드해 보겠습니다.
👉 찾기:
# MODULE_4_STEP_5_IMPORT_COMPONENTS
👉 단일 줄을 다음으로 바꿉니다.
from google.adk.agents import Agent
from google.adk.tools import FunctionTool
from charity_advisor.tools.charity_tools import find_charities, save_user_choice
6단계: 에이전트 요청 사항 작성
요청 사항은 에이전트의 직무 설명과 워크플로를 정의하는 곳입니다. 이는 매우 중요합니다. 잘못 작성된 명령어는 신뢰할 수 없는 동작으로 이어집니다.
👉 찾기:
# MODULE_4_STEP_6_WRITE_INSTRUCTION
instruction="""""",
👉 이 두 줄을 다음으로 바꿉니다.
    instruction="""You are a research specialist helping users find verified charities.

Your workflow:

1. When the user describes what cause they want to support (e.g., "education", "health", "environment"),
   use the find_charities tool to search our vetted database.

2. Present the results clearly. The tool returns formatted charity information that you should
   show to the user.

3. When the user selects a charity and specifies an amount, use the save_user_choice tool
   to create an IntentMandate and record their decision. You MUST call save_user_choice with:
   - charity_name: The exact name of the chosen charity
   - charity_ein: The EIN of the chosen charity
   - amount: The donation amount in dollars (as a number, not a string)

4. After successfully saving, inform the user:
   - That you've created an IntentMandate (mention the intent ID if provided)
   - When the intent expires
   - That you're passing their request to the secure payment processor

IMPORTANT BOUNDARIES:
- Your ONLY job is discovery and creating the IntentMandate
- You do NOT process payments
- You do NOT see the user's payment methods
- You do NOT create cart offers (that's the Merchant Agent's job)
- After calling save_user_choice, your work is done

WHAT IS AN INTENTMANDATE:
An IntentMandate is a structured record of what the user wants to do. It includes:
- Natural language description ("Donate $50 to Room to Read")
- Which merchants can fulfill it
- When the intent expires
- Whether user confirmation is required

This is the first of three verifiable credentials in our secure payment system.

If the user asks you to do anything related to payment processing, politely explain that
you don't have that capability and that their request will be handled by the appropriate
specialist agent.""",
7단계: 에이전트에 도구 추가
이제 에이전트가 두 도구에 모두 액세스할 수 있도록 하겠습니다.
👉 찾기:
# MODULE_4_STEP_7_ADD_TOOLS
👉 이 두 줄을 다음으로 바꿉니다.
    tools=[
        FunctionTool(func=find_charities),
        FunctionTool(func=save_user_choice)
    ]
8단계: 완전한 에이전트 확인
모든 항목이 올바르게 연결되어 있는지 확인해 보겠습니다.
👉 전체
charity_advisor/shopping_agent/agent.py
이제 다음과 같이 표시됩니다.
"""
Shopping Agent - Finds charities from a trusted database and saves the user's choice.
This agent acts as our specialized "Research Analyst."
"""

from google.adk.agents import Agent
from google.adk.tools import FunctionTool
from charity_advisor.tools.charity_tools import find_charities, save_user_choice


shopping_agent = Agent(
    name="ShoppingAgent",
    model="gemini-2.5-pro",
    description="Finds and recommends vetted charities from a trusted database, then creates an IntentMandate capturing the user's donation intent.",
    instruction="""You are a research specialist helping users find verified charities.

Your workflow:

1. When the user describes what cause they want to support (e.g., "education", "health", "environment"),
   use the find_charities tool to search our vetted database.

2. Present the results clearly. The tool returns formatted charity information that you should
   show to the user.

3. When the user selects a charity and specifies an amount, use the save_user_choice tool
   to create an IntentMandate and record their decision. You MUST call save_user_choice with:
   - charity_name: The exact name of the chosen charity
   - charity_ein: The EIN of the chosen charity
   - amount: The donation amount in dollars (as a number, not a string)

4. After successfully saving, inform the user:
   - That you've created an IntentMandate (mention the intent ID if provided)
   - When the intent expires
   - That you're passing their request to the secure payment processor

IMPORTANT BOUNDARIES:
- Your ONLY job is discovery and creating the IntentMandate
- You do NOT process payments
- You do NOT see the user's payment methods
- You do NOT create cart offers (that's the Merchant Agent's job)
- After calling save_user_choice, your work is done

WHAT IS AN INTENTMANDATE:
An IntentMandate is a structured record of what the user wants to do. It includes:
- Natural language description ("Donate $50 to Room to Read")
- Which merchants can fulfill it
- When the intent expires
- Whether user confirmation is required

This is the first of three verifiable credentials in our secure payment system.

If the user asks you to do anything related to payment processing, politely explain that
you don't have that capability and that their request will be handled by the appropriate
specialist agent.""",
    tools=[
        FunctionTool(func=find_charities),
        FunctionTool(func=save_user_choice)
    ]
)
✅ 잘하셨습니다. 다음과 같은 방법으로 프로덕션 품질의 AP2 규격 에이전트를 빌드했습니다.
- 입력 검증
- AP2 Pydantic 모델을 사용한 적절한 IntentMandate 생성
- 형식이 지정된 출력
- 명확한 역할 경계
- 자세한 안내
- 오류 처리
9단계: 쇼핑 에이전트 테스트
에이전트가 올바르게 작동하고, 적절한 IntentMandates를 생성하고, 경계를 준수하는지 확인해 보겠습니다.
👉 Cloud Shell 터미널에서 다음을 실행합니다.
adk run charity_advisor/shopping_agent
[user]: 프롬프트가 표시됩니다.
테스트 1: 신뢰할 수 있는 데이터베이스를 사용한 검색
👉 유형:
I want to donate to an education charity. What are my options?
잠시 후 에이전트가 대답을 제공합니다. _format_charity_display 도우미 덕분에 결과가 아름답게 형식화됩니다.
데이터베이스에서 인증된 교육 자선단체 3곳을 찾았습니다.
Room to Read (EIN: 77-0479905)
⭐ 평가: 4.9/5.0
💰 효율성: 기금의 88% 가 프로그램에 사용됨
📋 사명: 교육의 문해력과 성 평등에 중점을 두어 저소득층 지역의 수백만 명의 아동의 삶을 변화시킵니다.
Teach For America (EIN: 13-3541913)
⭐ 평가: 4.7/5.0
💰 효율성: 기금의 81% 가 프로그램에 사용됨
📋 사명: 역경에 처한 아동의 교육 기회를 확대하기 위해 노력합니다.
Tech Education Alliance (EIN: 45-2345678)
⭐ 평가: 4.8/5.0
💰 효율성: 기금의 92% 가 프로그램에 사용됨
📋 사명: 소외된 학교에 컴퓨터 과학 교육을 제공합니다.
어떤 자선단체를 지원하고 싶으신가요? 얼마를 기부하고 싶으신가요?
검증되지 않은 Google 결과를 제공한 3단원의 간단한 에이전트와 비교해 보세요. 신뢰할 수 없는 검색과 신뢰할 수 있는 검색의 차이점은 바로 이것입니다.
테스트 2: 사용자 선택 기록 및 IntentMandate 생성
👉 유형:
I'll donate $50 to Room to Read.
에이전트가 올바른 매개변수로 save_user_choice 도구를 호출하는 것을 확인할 수 있습니다. AP2 모델을 사용하여 의도 명령어를 생성한 덕분에 더 구조화된 대답이 표시됩니다.
좋습니다. 기부를 위한 IntentMandate를 생성했습니다.
인텐트 세부정보:
- 인텐트 ID: intent_774795905_1730927536
- 금액: $50.00(Room to Read(EIN: 77-0479905))
- 만료: 2024-11-07T15:32:16Z (1시간 후)
이 IntentMandate는 기부 의도를 포착하고 거래가 안전하게 처리되도록 제약 조건을 포함합니다. 이제 공식 제안을 만들고 기부를 완료하기 위해 보안 결제 대행업체에 이 정보를 전달합니다.
백그라운드에서 다음과 같은 일이 일어났습니다.
_validate_charity_data()가 입력을 확인했습니다._create_intent_mandate()는 AP2 Pydantic 모델을 사용하여 구조를 빌드했습니다.
   # Created and validated via Pydantic
   intent_mandate_model = IntentMandate(
       user_cart_confirmation_required=True,
       natural_language_description="Donate $50.00 to Room to Read",
       merchants=["Room to Read"],
       skus=None,
       requires_refundability=False,
       intent_expiry="2024-11-07T15:32:16Z"
   )

   # Converted to dict and extended with custom fields
   intent_mandate_dict = intent_mandate_model.model_dump()
   intent_mandate_dict.update({
       "charity_ein": "77-0479905",
       "amount": 50.0,
       "currency": "USD"
   })
- 이 도구는 IntentMandate만 공유 상태에 썼습니다.
state["intent_mandate"] = intent_mandate_dict
- 의도 세부정보가 포함된 성공 메시지가 LLM에 반환되었습니다.
- LLM이 최종 사용자 메시지를 작성했습니다.
이제 판매자 에이전트 (모듈 5)가 이 IntentMandate를 선택할 수 있습니다. 판매자는 IntentMandate에서 자선단체 이름과 금액을 추출하고 만료되지 않았는지 확인합니다.
테스트 3: 실제 검증
유효성 검사 도우미가 잘못된 입력을 포착하는지 확인해 보겠습니다.
👉 유형:
I'll donate -$25 to Room to Read.
상담사는 무효한 금액을 포착해야 합니다.
문제가 발생했습니다. 기부 금액은 양수여야 하는데 -25.0이 입력되었습니다.
기부 금액을 양수로 지정해 주세요. 그러면 IntentMandate를 만들어 드리겠습니다.
이것이 바로 방어적 프로그래밍입니다. _validate_charity_data 도우미는 잘못된 데이터가 시스템에 입력되어 잘못된 형식의 IntentMandate가 생성되는 것을 방지했습니다.
테스트 4: 신뢰 경계 확인
👉 에이전트에게 결제 처리를 요청해 보세요.
Now process my credit card payment.
상담사는 역할 경계를 존중하여 거부해야 합니다.
저는 결제를 처리할 수 없습니다. 제 역할에 포함되지 않습니다. 저의 역할은 인증된 자선단체를 찾고 기부 의도를 포착하는 IntentMandate를 만드는 것입니다.
IntentMandate가 이미 생성되어 Google의 보안 결제 처리기에 전달되었습니다. 판매자 에이전트가 공식 제안 (CartMandate)을 생성하면 사용자 동의를 얻어 실제 결제를 처리합니다.
이것이 바로 트러스트 경계가 작동하는 방식입니다. 에이전트는 결제 데이터를 처리할 권한이 없음을 알고 있으며, 안내에서는 사용자에게 이를 설명하는 동시에 IntentMandate 개념을 가르치도록 명시적으로 안내합니다.
👉 단축키
Ctrl+C
를 눌러 테스트를 완료한 후 종료합니다.
방금 빌드한 항목
AP2 Pydantic 모델을 사용하여 적절한 IntentMandate 생성으로 AP2 아키텍처의 첫 번째 부분을 성공적으로 구현했습니다.
학습한 핵심 개념
✅ 역할 기반 아키텍처:
- 각 에이전트에는 명확하게 정의된 작업이 하나 있습니다.
- 에이전트는 직접 액세스가 아닌 공유 상태를 통해 통신합니다.
- 신뢰 경계는 보안 침해의 영향을 제한합니다.
✅ IntentMandate (AP2 사용자 인증 정보 #1):
- 검증을 위해 공식 AP2 Pydantic 모델을 사용하여 생성됨
- 사용자 의도의 구조화된 캡처
- 보안 만료 포함 (재전송 공격 방지)
- 제약 조건 (판매자, 환불 가능 여부, 확인)을 지정합니다.
- 사람을 위한 자연어 설명
- 에이전트가 읽을 수 있는 형식
- 사전으로 변환하기 전에 모델이 검증됨
✅ 공유 메모리로 상태 지정:
tool_context.state은(는) 모든 상담사가 액세스할 수 있는 '메모장'입니다.- 상태에 쓰기 = 확인 가능한 사용자 인증 정보를 사용할 수 있도록 함
- 상태에서 읽기 = 사용자 인증 정보 사용 및 검증
- 다운스트림 에이전트가 사용자 인증 정보에서 필요한 항목을 추출합니다.
✅ FunctionTool:
- Python 함수를 LLM 호출 가능 도구로 변환
- LLM 이해를 위해 docstring 및 유형 힌트 사용
- 자동으로 호출 처리
- 도구 컴포저빌리티: 작고 집중된 도구 > 모놀리식 도구
✅ 상담사 안내:
- 단계별 워크플로 안내
- 명시적 경계 ('...하지 마세요')
- 오류를 방지하기 위한 매개변수 사양
- 기술 정의 (IntentMandate란 무엇인가요?)
- 특이 사례 처리 (다음과 같은 경우 어떻게 말해야 하는지)
다음 단계
다음 모듈에서는 인텐트 위임장을 수신하고 두 번째 확인 가능한 사용자 인증 정보인 CartMandate를 생성하는 Merchant Agent를 빌드합니다.
쇼핑 에이전트가 만료일이 있는 사용자의 의도를 포착하는 IntentMandate를 생성했습니다. 이제 에이전트가 사용자 인증 정보를 읽고, 만료되지 않았는지 확인하고, '판매자인 저는 이 가격을 준수하고 이 상품을 배송할 것입니다'라고 명시된 공식 서명된 제안을 만들어야 합니다.
판매자 에이전트를 빌드하고 두 번째 AP2 사용자 인증 정보가 작동하는지 확인해 보겠습니다.
5. 판매자 에이전트 빌드 - 제품 및 CartMandate 바인딩

탐색에서 약속까지
이전 모듈에서는 인증된 자선단체를 찾아 사용자의 의도를 포착하는 IntentMandate를 만드는 전문가인 쇼핑 에이전트를 빌드했습니다. 이제 IntentMandate를 수신하고 공식적이고 구속력 있는 제안을 생성하는 에이전트가 필요합니다.
이때 AP2의 두 번째 핵심 원칙인 CartMandate를 통한 검증 가능한 사용자 인증 정보가 중요한 역할을 합니다.
AP2 원칙: CartMandate 및 바인딩 혜택
판매자 역할이 필요한 이유
모듈 4에서 쇼핑 에이전트는 IntentMandate를 만들어 상태에 저장했습니다.
state["intent_mandate"] = {
    "natural_language_description": "Donate $50 to Room to Read",
    "merchants": ["Room to Read"],
    "amount": 50.0,
    "intent_expiry": "2024-11-07T15:32:16Z"
}
하지만 이는 사용자 의도일 뿐입니다. 지급을 처리하려면 다음 정보가 필요합니다.
- 결제 시스템이 이해하는 공식 혜택 구조
- 판매자가 이 가격을 준수한다는 증빙 자료
- 거래 중에 변경할 수 없는 구속력 있는 약정
- 인텐트가 만료되지 않았는지 확인
판매자 상담사의 업무입니다.
CartMandate란 무엇인가요?
CartMandate는 구속력 있는 제안 역할을 하는 '디지털 장바구니'에 대한 AP2의 용어입니다. W3C PaymentRequest 표준에 따라 구조화되어 있습니다. 즉,
- 전 세계 결제 대행업체에서 이 형식을 인식합니다.
- 표준화된 방식으로 모든 거래 세부정보를 포함합니다.
- 신뢰성을 증명하기 위해 암호화 방식으로 서명할 수 있습니다.
이를 시공업체의 서면 견적과 비슷하다고 생각하면 됩니다.
- ❌ 구두: '네, 그 작업을 50달러 정도에 해 드릴 수 있습니다.'
- ✅ 서면 견적: 항목별 비용, 합계, 서명, 날짜
서면 견적은 구속력이 있습니다. CartMandate는 디지털에 상응하는 항목입니다.

CartMandate의 구조
AP2의 CartMandate에는 다음과 같은 특정 중첩 구조가 있습니다.
cart_mandate = {
    "contents": {  # ← AP2 wrapper
        "id": "cart_xyz123",
        "cart_expiry": "2024-11-07T15:47:16Z",
        "merchant_name": "Room to Read",
        "user_cart_confirmation_required": False,

        "payment_request": {  # ← W3C PaymentRequest nested inside
            "method_data": [...],
            "details": {...},
            "options": {...}
        }
    },
    "merchant_authorization": "SIG_a3f7b2c8"  # ← Merchant signature
}
세 가지 주요 구성요소:
1. contents - 다음을 포함하는 장바구니 래퍼
- 장바구니 ID 및 만료
- 판매자 이름
- W3C PaymentRequest
2. payment_request (콘텐츠 내부) - 구매되는 항목:
- method_data: 허용되는 결제 유형
- 세부정보: 상품 및 합계
- 옵션: 배송, 결제자 정보 요구사항
3. merchant_authorization - 암호화 서명
판매자 서명: 약정 증빙
판매자 서명은 매우 중요합니다. 다음과 같은 사항을 증명합니다.
- 이 혜택은 공인 판매자로부터 제공되었습니다.
- 판매자가 이 정확한 가격을 준수하기로 약속합니다.
- 생성된 이후로 혜택이 조작되지 않았습니다.
프로덕션에서는 PKI (공개 키 인프라) 또는 JWT (JSON 웹 토큰)를 사용하는 암호화 서명이 됩니다. 교육 워크숍에서는 SHA-256 해시를 사용하여 이를 시뮬레이션합니다.
# Production (real signature):
signature = sign_with_private_key(cart_data, merchant_private_key)

# Workshop (simulated signature):
cart_hash = hashlib.sha256(cart_json.encode()).hexdigest()
signature = f"SIG_{cart_hash[:16]}"
Google의 사명: 판매자 에이전트 빌드
판매자 상담사는 다음을 수행합니다.
- 상태에서 IntentMandate 읽기 (쇼핑 에이전트가 작성한 내용)
- 인텐트가 만료되지 않았는지 확인
- 자선단체 이름, 금액, 기타 세부정보 추출
- AP2 Pydantic 모델을 사용하여 W3C 호환 PaymentRequest 구조 만들기
- 만료일이 있는 AP2의 CartMandate로 래핑합니다.
- 시뮬레이션된 판매자 서명 추가
- 다음 모듈의 사용자 인증 정보 제공업체에 상태를 지정하는 CartMandate 작성
단계별로 빌드해 보겠습니다.
1단계: 만료 유효성 검사 도우미 추가
먼저 판매자 관련 도구 파일을 설정하고 IntentMandate 만료를 검증하는 도우미를 추가합니다.
👉 열기
charity_advisor/tools/merchant_tools.py
만료 유효성 검사를 추가해 보겠습니다.
👉 찾기:
# MODULE_5_STEP_1_ADD_EXPIRY_VALIDATION_HELPER
👉 단일 줄을 다음으로 바꿉니다.
def _validate_intent_expiry(intent_expiry_str: str) -> tuple[bool, str]:
    """
    Validates that the IntentMandate hasn't expired.

    This is a critical security check - expired intents should not be processed.

    Args:
        intent_expiry_str: The ISO 8601 timestamp string from the IntentMandate.

    Returns:
        (is_valid, error_message): Tuple indicating if intent is still valid.
    """
    try:
        # The .replace('Z', '+00:00') is for compatibility with older Python versions
        expiry_time = datetime.fromisoformat(intent_expiry_str.replace('Z', '+00:00'))
        now = datetime.now(timezone.utc)

        if expiry_time < now:
            return False, f"IntentMandate expired at {intent_expiry_str}"

        time_remaining = expiry_time - now
        logger.info(f"IntentMandate valid. Expires in {time_remaining.total_seconds():.0f} seconds")

        return True, ""

    except (ValueError, TypeError) as e:
        return False, f"Invalid intent_expiry format: {e}"
2단계: 서명 생성 도우미 추가
이제 시뮬레이션된 판매자 서명을 생성하는 도우미를 만들어 보겠습니다.
👉 찾기:
# MODULE_5_STEP_2_ADD_SIGNATURE_HELPER
👉 단일 줄을 다음으로 바꿉니다.
def _generate_merchant_signature(cart_contents: CartContents) -> str:
    """
    Generates a simulated merchant signature for the CartMandate contents.

    In production, this would use PKI or JWT with the merchant's private key.
    For this codelab, we use a SHA-256 hash of the sorted JSON representation.

    Args:
        cart_contents: The Pydantic model of the cart contents to sign.

    Returns:
        Simulated signature string (format: "SIG_" + first 16 chars of hash).
    """
    # Step 1: Dump the Pydantic model to a dictionary. The `mode='json'` argument
    # ensures that complex types like datetimes are serialized correctly.
    cart_contents_dict = cart_contents.model_dump(mode='json')

    # Step 2: Use the standard json library to create a stable, sorted JSON string.
    # separators=(',', ':') removes whitespace for a compact and canonical representation.
    cart_json = json.dumps(cart_contents_dict, sort_keys=True, separators=(',', ':'))

    # Step 3: Generate SHA-256 hash.
    cart_hash = hashlib.sha256(cart_json.encode('utf-8')).hexdigest()

    # Step 4: Create signature in a recognizable format.
    signature = f"SIG_{cart_hash[:16]}"

    logger.info(f"Generated merchant signature: {signature}")
    return signature
3A단계: 도구 서명 및 설정 만들기
이제 기본 도구를 빌드해 보겠습니다. 4개의 하위 단계에 걸쳐 점진적으로 만들어 보겠습니다. 먼저 함수 서명과 초기 설정입니다.
👉 찾기:
# MODULE_5_STEP_3A_CREATE_TOOL_SIGNATURE
👉 단일 줄을 다음으로 바꿉니다.
async def create_cart_mandate(tool_context: Any) -> Dict[str, Any]:
    """
    Creates a W3C PaymentRequest-compliant CartMandate from the IntentMandate.

    This tool reads the IntentMandate from shared state, validates it, and
    creates a formal, signed offer using the official AP2 Pydantic models.

    Returns:
        Dictionary containing status and the created CartMandate.
    """
    logger.info("Tool called: Creating CartMandate from IntentMandate")

    # MODULE_5_STEP_3B_ADD_VALIDATION_LOGIC
3B단계: 유효성 검사 로직 추가
이제 AP2 Pydantic 모델을 사용하여 IntentMandate를 읽고 검증하는 로직을 추가하고 필요한 데이터를 추출해 보겠습니다.
👉 찾기:
# MODULE_5_STEP_3B_ADD_VALIDATION_LOGIC
👉 단일 줄을 다음으로 바꿉니다.
    # 1. Read IntentMandate dictionary from state
    intent_mandate_dict = tool_context.state.get("intent_mandate")
    if not intent_mandate_dict:
        logger.error("No IntentMandate found in state")
        return {
            "status": "error",
            "message": "No IntentMandate found. Shopping Agent must create intent first."
        }

    # 2. Parse dictionary into a validated Pydantic model
    try:
        intent_mandate_model = IntentMandate.model_validate(intent_mandate_dict)
    except Exception as e:
        logger.error(f"Could not validate IntentMandate structure: {e}")
        return {"status": "error", "message": f"Invalid IntentMandate structure: {e}"}

    # 3. Validate that the intent hasn't expired (CRITICAL security check)
    is_valid, error_message = _validate_intent_expiry(intent_mandate_model.intent_expiry)
    if not is_valid:
        logger.error(f"IntentMandate validation failed: {error_message}")
        return {"status": "error", "message": error_message}

    # 4. Extract data. Safely access standard fields from the model, and
    # custom fields (like 'amount') from the original dictionary.
    charity_name = intent_mandate_model.merchants[0] if intent_mandate_model.merchants else "Unknown Charity"
    amount = intent_mandate_dict.get("amount", 0.0)

    # MODULE_5_STEP_3C_CREATE_CARTMANDATE_STRUCTURE
3C단계: CartMandate 구조 만들기
이제 Pydantic 모델을 사용하여 W3C 호환 PaymentRequest 구조를 빌드하고 AP2 CartMandate로 래핑하겠습니다.
👉 찾기:
# MODULE_5_STEP_3C_CREATE_CARTMANDATE_STRUCTURE
👉 단일 줄을 다음으로 바꿉니다.
    # 5. Build the nested Pydantic models for the CartMandate
    timestamp = datetime.now(timezone.utc)
    cart_id = f"cart_{hashlib.sha256(f'{charity_name}{timestamp.isoformat()}'.encode()).hexdigest()[:12]}"
    cart_expiry = timestamp + timedelta(minutes=15)

    payment_request_model = PaymentRequest(
        method_data=[PaymentMethodData(
            supported_methods="CARD",
            data={"supported_networks": ["visa", "mastercard", "amex"], "supported_types": ["debit", "credit"]}
        )],
        details=PaymentDetailsInit(
            id=f"order_{cart_id}",
            display_items=[PaymentItem(
                label=f"Donation to {charity_name}",
                amount=PaymentCurrencyAmount(currency="USD", value=amount)  # Pydantic v2 handles float -> str conversion
            )],
            total=PaymentItem(
                label="Total Donation",
                amount=PaymentCurrencyAmount(currency="USD", value=amount)
            )
        ),
        options=PaymentOptions(request_shipping=False)
    )

    cart_contents_model = CartContents(
        id=cart_id,
        cart_expiry=cart_expiry.isoformat(),
        merchant_name=charity_name,
        user_cart_confirmation_required=False,
        payment_request=payment_request_model
    )

    # MODULE_5_STEP_3D_ADD_SIGNATURE_AND_SAVE
3D단계: 서명 추가 및 상태에 저장
마지막으로 Pydantic 모델을 사용하여 CartMandate에 서명하고 다음 에이전트를 위해 상태에 저장합니다.
👉 찾기:
# MODULE_5_STEP_3D_ADD_SIGNATURE_AND_SAVE
👉 단일 줄을 다음으로 바꿉니다.
# 6. Generate signature from the validated Pydantic model
signature = _generate_merchant_signature(cart_contents_model)
# 7. Create the final CartMandate model, now including the signature
cart_mandate_model = CartMandate(
    contents=cart_contents_model,
    merchant_authorization=signature
)
# 8. Convert the final model to a dictionary for state storage and add the custom timestamp
cart_mandate_dict = cart_mandate_model.model_dump(mode='json')
cart_mandate_dict["timestamp"] = timestamp.isoformat()
# 9. Write the final dictionary to state
tool_context.state["cart_mandate"] = cart_mandate_dict
logger.info(f"CartMandate created successfully: {cart_id}")
return {
"status": "success",
"message": f"Created signed CartMandate {cart_id} for ${amount:.2f} donation to {charity_name}",
"cart_id": cart_id,
"cart_expiry": cart_expiry.isoformat(),
"signature": signature
}
4단계: 판매자 에이전트 빌드 - 구성요소 가져오기
이제 이 도구를 사용할 에이전트를 만들어 보겠습니다.
👉 열기
charity_advisor/merchant_agent/agent.py
자리표시자 마커가 있는 템플릿이 표시됩니다. 필요한 항목을 가져오는 것부터 시작해 보겠습니다.
👉 찾기:
# MODULE_5_STEP_4_IMPORT_COMPONENTS
👉 단일 줄을 다음으로 바꿉니다.
from google.adk.agents import Agent
from google.adk.tools import FunctionTool
from charity_advisor.tools.merchant_tools import create_cart_mandate
5단계: 판매자 에이전트 요청 사항 작성
이제 에이전트에게 언제 어떻게 도구를 사용해야 하는지 알려주는 요청 사항을 작성해 보겠습니다.
👉 찾기:
# MODULE_5_STEP_5_WRITE_INSTRUCTION
instruction="""""",
👉 이 두 줄을 다음으로 바꿉니다.
    instruction="""You are a merchant specialist responsible for creating formal, signed offers (CartMandates).

Your workflow:

1. Read the IntentMandate from shared state.
   The IntentMandate was created by the Shopping Agent and contains:
   - merchants: List of merchant names
   - amount: Donation amount
   - charity_ein: Tax ID
   - intent_expiry: When the intent expires

2. Use the create_cart_mandate tool to create a W3C PaymentRequest-compliant CartMandate.
   This tool will:
   - Validate the IntentMandate hasn't expired (CRITICAL security check)
   - Extract the charity name and amount from the IntentMandate
   - Create a structured offer with payment methods, transaction details, and merchant info
   - Generate a merchant signature to prove authenticity
   - Save the CartMandate to state for the payment processor

3. After creating the CartMandate, inform the user:
   - That you've created a formal, signed offer
   - The cart ID
   - When the cart expires (15 minutes)
   - That you're passing it to the secure payment processor

IMPORTANT BOUNDARIES:
- Your ONLY job is creating signed CartMandates from valid IntentMandates
- You do NOT process payments
- You do NOT see the user's payment methods or credentials
- You do NOT interact with payment networks
- You MUST validate that the IntentMandate hasn't expired before creating a cart
- After calling create_cart_mandate, your work is done

WHAT IS A CARTMANDATE:
A CartMandate is a binding commitment that says:
"I, the merchant, commit to accepting $X for this charity donation, and I prove it with my signature."

This commitment is structured using the W3C PaymentRequest standard and includes:
- Payment methods accepted (card, bank transfer)
- Transaction details (amount, charity name)
- Cart expiry (15 minutes from creation)
- Merchant signature (proof of commitment)

This is the second of three verifiable credentials in our secure payment system.""",
6단계: 판매자 에이전트에 도구 추가
👉 찾기:
# MODULE_5_STEP_6_ADD_TOOLS
tools=[],
👉 이 두 줄을 다음으로 바꿉니다.
    tools=[
        FunctionTool(func=create_cart_mandate)
    ],
7단계: 완전한 판매자 에이전트 확인
모든 것이 올바르게 연결되어 있는지 확인해 보겠습니다.
👉 전체
charity_advisor/merchant_agent/agent.py
이제 다음과 같이 표시됩니다.
"""
Merchant Agent - Creates W3C-compliant CartMandates with merchant signatures.
This agent acts as our "Contract Creator."
"""

from google.adk.agents import Agent
from google.adk.tools import FunctionTool
from charity_advisor.tools.merchant_tools import create_cart_mandate


merchant_agent = Agent(
    name="MerchantAgent",
    model="gemini-2.5-flash",
    description="Creates formal, signed CartMandates for charity donations following W3C PaymentRequest standards.",
    tools=[
        FunctionTool(func=create_cart_mandate)
    ],
    instruction="""You are a merchant specialist responsible for creating formal, signed offers (CartMandates).

Your workflow:

1. Read the IntentMandate from shared state.
   The IntentMandate was created by the Shopping Agent and contains:
   - merchants: List of merchant names
   - amount: Donation amount
   - charity_ein: Tax ID
   - intent_expiry: When the intent expires

2. Use the create_cart_mandate tool to create a W3C PaymentRequest-compliant CartMandate.
   This tool will:
   - Validate the IntentMandate hasn't expired (CRITICAL security check)
   - Extract the charity name and amount from the IntentMandate
   - Create a structured offer with payment methods, transaction details, and merchant info
   - Generate a merchant signature to prove authenticity
   - Save the CartMandate to state for the payment processor

3. After creating the CartMandate, inform the user:
   - That you've created a formal, signed offer
   - The cart ID
   - When the cart expires (15 minutes)
   - That you're passing it to the secure payment processor

IMPORTANT BOUNDARIES:
- Your ONLY job is creating signed CartMandates from valid IntentMandates
- You do NOT process payments
- You do NOT see the user's payment methods or credentials
- You do NOT interact with payment networks
- You MUST validate that the IntentMandate hasn't expired before creating a cart
- After calling create_cart_mandate, your work is done

WHAT IS A CARTMANDATE:
A CartMandate is a binding commitment that says:
"I, the merchant, commit to accepting $X for this charity donation, and I prove it with my signature."

This commitment is structured using the W3C PaymentRequest standard and includes:
- Payment methods accepted (card, bank transfer)
- Transaction details (amount, charity name)
- Cart expiry (15 minutes from creation)
- Merchant signature (proof of commitment)

This is the second of three verifiable credentials in our secure payment system."""
)
✅ 체크포인트: 이제 Pydantic 모델을 사용하여 적절한 AP2 CartMandate를 생성하는 완전한 판매자 에이전트가 있습니다.
8단계: 판매자 에이전트 테스트
이제 에이전트가 서명으로 CartMandates를 올바르게 생성하고 만료를 검증하는지 확인해 보겠습니다.
테스트 설정: 테스트 스크립트 실행
👉 Cloud Shell 터미널에서 다음을 실행합니다.
python scripts/test_merchant.py
예상 출력:
======================================================================
MERCHANT AGENT TEST
======================================================================

Simulated IntentMandate from Shopping Agent:
  charity: Room to Read
  amount: $50.00
  expiry: 2024-11-07T16:32:16Z

----------------------------------------------------------------------
Merchant Agent Response:
----------------------------------------------------------------------
Perfect! I've received your IntentMandate and created a formal, signed offer (CartMandate) for your donation.

**CartMandate Details:**
- **Cart ID**: cart_3b4c5d6e7f8a
- **Donation Amount**: $50.00 to Room to Read
- **Payment Methods Accepted**: Credit/debit cards (Visa, Mastercard, Amex) or bank transfer
- **Cart Expires**: 2024-11-07T15:47:16Z (in 15 minutes)
- **Merchant Signature**: SIG_a3f7b2c8d9e1f4a2

This signed CartMandate proves my commitment to accept this donation amount. I'm now passing this to the secure payment processor to complete your transaction.

======================================================================
CARTMANDATE CREATED:
======================================================================
  ID: cart_3b4c5d6e7f8a
  Amount: 50.00
  Merchant: Room to Read
  Expires: 2024-11-07T15:47:16Z
  Signature: SIG_a3f7b2c8d9e1f4a2
======================================================================
테스트 2: W3C 규정 준수 확인
CartMandate 구조가 AP2 및 W3C PaymentRequest 표준을 모두 완전히 준수하는지 확인해 보겠습니다.
👉 검증 스크립트를 실행합니다.
python scripts/validate_cartmandate.py
예상 출력:
======================================================================
AP2 & W3C PAYMENTREQUEST VALIDATION
======================================================================
✅ CartMandate is AP2 and W3C PaymentRequest compliant

Structure validation passed:
  ✓ AP2 'contents' wrapper present
  ✓ AP2 'merchant_authorization' signature present
  ✓ cart_expiry present
  ✓ payment_request nested inside contents
  ✓ method_data present and valid
  ✓ details.total.amount present with currency and value
  ✓ All required W3C PaymentRequest fields present
======================================================================
방금 빌드한 항목
올바른 구조, 만료 유효성 검사, 판매자 서명을 위해 Pydantic 모델을 사용하여 AP2의 CartMandate를 성공적으로 구현했습니다.
학습한 핵심 개념
✅ CartMandate (AP2 사용자 인증 정보 #2):
- 공식 AP2 Pydantic 모델을 사용하여 생성됨
- 콘텐츠 래퍼가 있는 AP2 구조
- 내부에 중첩된 W3C PaymentRequest
- 장바구니 만료 (의도보다 짧음)
- 바인딩 약정에 대한 판매자 서명
- 모델 검증을 통해 사양 준수 보장
✅ 만료일 검증:
- 상태에서 IntentMandate 읽기
IntentMandate.model_validate()로 구조 유효성 검사- ISO 8601 타임스탬프 파싱
- 현재 시간과 비교
- 오래된 처리를 방지하는 보안 기능
✅ 판매자 서명:
- 진정성과 헌신을 증명
- 검증된 Pydantic 모델에서 생성됨
- 표준 표현에
model_dump(mode='json')사용 - 교육용 SHA-256으로 시뮬레이션
- 프로덕션에서 PKI/JWT 사용
- 사전이 아닌 콘텐츠 모델에 서명합니다.
✅ W3C PaymentRequest:
- AP2의 PaymentRequest Pydantic 모델을 사용하여 빌드됨
- 결제 데이터의 업계 표준
- AP2 구조 내에 중첩됨
- method_data, details, options를 포함합니다.
- 상호 운용성 지원
✅ 모델이 포함된 사용자 인증 정보 체인:
- 쇼핑 → IntentMandate (검증됨)
- 판매자 읽기 IntentMandate → CartMandate (두 모델 모두 검증됨)
- 사용자 인증 정보 제공 프로그램이 CartMandate → PaymentMandate를 읽습니다.
- 각 단계에서는 Pydantic을 사용하여 이전 사용자 인증 정보를 검증합니다.
✅ 모델 기반 개발:
model_validate()를 통한 입력 유효성 검사- 형식이 안전한 생성
model_dump()을 통한 자동 직렬화- 프로덕션에 즉시 사용 가능한 패턴
다음 단계
다음 모듈에서는 결제를 안전하게 처리할 수 있는 사용자 인증 정보 제공자를 빌드합니다.
판매자 에이전트가 AP2 모델을 사용하여 만료일이 있는 바인딩된 제안을 만들었습니다. 이제 에이전트가 CartMandate를 읽고, 사용자 동의를 얻고, 결제를 실행해야 합니다.
사용자 인증 정보 제공자를 빌드하고 AP2 사용자 인증 정보 체인을 완료합니다.
6. 사용자 인증 정보 제공업체 빌드 - 보안 결제 실행

구속력 있는 제안에서 결제 실행까지
모듈 5에서는 IntentMandates를 읽고, 만료되지 않았는지 확인하고, 판매자 서명으로 바인딩된 CartMandates를 생성하는 전문가인 Merchant Agent를 빌드했습니다. 이제 장바구니 위임을 수신하고 실제 결제를 실행할 에이전트가 필요합니다.
여기서 AP2의 세 번째이자 마지막 원칙인 PaymentMandate를 통한 안전한 결제 실행이 적용됩니다.
AP2 원칙: 결제 위임 및 결제 실행
사용자 인증 정보 제공자 역할이 필요한 이유
모듈 5에서 판매자 에이전트는 CartMandate를 만들어 상태에 저장했습니다.
state["cart_mandate"] = {
    "contents": {
        "id": "cart_abc123",
        "cart_expiry": "2025-11-07:15:47:16Z",
        "payment_request": {
            "details": {
                "total": {
                    "amount": {"currency": "USD", "value": "50.00"}
                }
            }
        }
    },
    "merchant_authorization": "SIG_a3f7b2c8"
}
하지만 이는 구속력 있는 제안일 뿐입니다. 지급을 실행하려면 다음 정보가 필요합니다.
- 장바구니가 만료되지 않았는지 확인
- 결제를 진행하기 위한 사용자 동의
- 결제 실행을 승인하는 사용자 인증 정보
- 실제 결제 처리 (또는 워크숍을 위한 시뮬레이션)
이는 사용자 인증 정보 제공업체의 작업입니다.
PaymentMandate란 무엇인가요?
PaymentMandate는 결제가 실행되도록 허용하는 최종 승인에 대한 AP2의 용어입니다. AP2 체인의 세 번째이자 마지막으로 검증 가능한 사용자 인증 정보입니다.
세 가지 사용자 인증 정보를 계약 서명 절차와 같이 생각해 보세요.
- IntentMandate: '이 제품을 구매하고 싶습니다' (의향서)
- CartMandate: '본인은 판매자로서 이 가격에 판매할 것을 제안합니다' (서면 인용)
- PaymentMandate: '결제 수단에 청구하는 것을 승인합니다' (서명된 계약)
세 가지 사용자 인증 정보가 모두 있어야 결제를 실행할 수 있습니다.

PaymentMandate의 구조
AP2의 PaymentMandate는 다음과 같은 특정 구조를 갖습니다.
payment_mandate = {
    "payment_mandate_contents": {  # ← AP2 wrapper
        "payment_mandate_id": "payment_xyz123",
        "payment_details_id": "cart_abc123",  # Links to CartMandate
        "user_consent": True,
        "consent_timestamp": "2025-11-07T15:48:00Z",
        "amount": {
            "currency": "USD",
            "value": "50.00"
        },
        "merchant_name": "Room to Read"
    },
    "agent_present": True,  # Human-in-the-loop flow
    "timestamp": "2025-11-07T15:48:00Z"
}
주요 구성요소:
1. payment_mandate_contents - 다음을 포함하는 승인 래퍼입니다.
- payment_mandate_id: 고유 식별자
- payment_details_id: CartMandate로 다시 연결됩니다.
- user_consent: 사용자가 승인했는지 여부
- amount: 결제 금액 (CartMandate에서 추출됨)
2. agent_present - 인간 참여형 흐름인지 여부
3. timestamp - 승인이 생성된 시간
사명: 사용자 인증 정보 제공업체 빌드
사용자 인증 정보 제공자는 다음을 수행합니다.
- 상태에서 CartMandate 읽기 (판매자 에이전트가 작성한 내용)
- AP2 Pydantic 모델을 사용하여 장바구니가 만료되지 않았는지 확인
- 중첩된 구조에서 결제 세부정보 추출
- AP2 모델을 사용하여 사용자 동의로 PaymentMandate 만들기
- 결제 처리 시뮬레이션 (프로덕션에서는 실제 결제 API를 호출함)
- PaymentMandate 및 결제 결과를 상태에 쓰기
단계별로 빌드해 보겠습니다.
1단계: 장바구니 만료 유효성 검사 도우미 추가
먼저 5단원에서 IntentMandate 만료를 검증한 것처럼 CartMandate가 만료되지 않았는지 검증하는 도우미를 만들어 보겠습니다.
👉 열기
charity_advisor/tools/payment_tools.py
만료 유효성 검사를 추가해 보겠습니다.
👉 찾기:
# MODULE_6_STEP_1_ADD_CART_EXPIRY_VALIDATION_HELPER
👉 단일 줄을 다음으로 바꿉니다.
def _validate_cart_expiry(cart: CartMandate) -> tuple[bool, str]:
    """
    Validates that the CartMandate hasn't expired.

    This is a critical security check - expired carts should not be processed.

    Args:
        cart: The Pydantic CartMandate model to validate.

    Returns:
        (is_valid, error_message): Tuple indicating if cart is still valid.
    """
    try:
        expiry_str = cart.contents.cart_expiry
        expiry_time = datetime.fromisoformat(expiry_str.replace('Z', '+00:00'))
        now = datetime.now(timezone.utc)

        if expiry_time < now:
            return False, f"CartMandate expired at {expiry_str}"

        time_remaining = expiry_time - now
        logger.info(f"CartMandate valid. Expires in {time_remaining.total_seconds():.0f} seconds")

        return True, ""

    except (ValueError, TypeError, AttributeError) as e:
        return False, f"Invalid cart_expiry format or structure: {e}"
2단계: PaymentMandate Creation Helper 추가
이제 공식 AP2 Pydantic 모델을 사용하여 PaymentMandate 구조를 빌드하는 도우미를 만들어 보겠습니다.
👉 찾기:
# MODULE_6_STEP_2_ADD_PAYMENT_MANDATE_CREATION_HELPER
👉 단일 줄을 다음으로 바꿉니다.
def _create_payment_mandate(cart: CartMandate, consent_granted: bool) -> dict:
    """
    Creates a PaymentMandate using the official AP2 Pydantic models.

    It links to the CartMandate and includes user consent status.

    Args:
        cart: The validated Pydantic CartMandate model being processed.
        consent_granted: Whether the user has consented to the payment.

    Returns:
        A dictionary representation of the final, validated PaymentMandate.
    """
    timestamp = datetime.now(timezone.utc)

    # Safely extract details from the validated CartMandate model
    cart_id = cart.contents.id
    merchant_name = cart.contents.merchant_name
    total_item = cart.contents.payment_request.details.total

    # Create the nested PaymentResponse model for the mandate
    payment_response_model = PaymentResponse(
        request_id=cart_id,
        method_name="CARD",  # As per the simulated flow
        details={"token": "simulated_payment_token_12345"}
    )

    # Create the PaymentMandateContents model
    payment_mandate_contents_model = PaymentMandateContents(
        payment_mandate_id=f"payment_{hashlib.sha256(f'{cart_id}{timestamp.isoformat()}'.encode()).hexdigest()[:12]}",
        payment_details_id=cart_id,
        payment_details_total=total_item,
        payment_response=payment_response_model,
        merchant_agent=merchant_name,
        timestamp=timestamp.isoformat()
    )

    # Create the top-level PaymentMandate model
    # In a real system, a user signature would be added to this model
    payment_mandate_model = PaymentMandate(
        payment_mandate_contents=payment_mandate_contents_model
    )

    # Convert the final Pydantic model to a dictionary for state storage
    final_dict = payment_mandate_model.model_dump(mode='json')

    # Add any custom/non-standard fields required by the codelab's logic to the dictionary
    # The spec does not have these fields, but your original code did. We add them
    # back to ensure compatibility with later steps.
    final_dict['payment_mandate_contents']['user_consent'] = consent_granted
    final_dict['payment_mandate_contents']['consent_timestamp'] = timestamp.isoformat() if consent_granted else None
    final_dict['agent_present'] = True

    return final_dict
3A단계: 도구 서명 및 설정 만들기
이제 기본 도구를 점진적으로 빌드해 보겠습니다. 먼저 함수 서명과 초기 설정입니다.
👉 찾기:
# MODULE_6_STEP_3A_CREATE_TOOL_SIGNATURE
👉 단일 줄을 다음으로 바꿉니다.
async def create_payment_mandate(tool_context: Any) -> Dict[str, Any]:
    """
    Creates a PaymentMandate and simulates payment processing using Pydantic models.

    This tool now reads the CartMandate from state, parses it into a validated model,
    and creates a spec-compliant PaymentMandate.
    """
    logger.info("Tool called: Creating PaymentMandate and processing payment")

    # MODULE_6_STEP_3B_VALIDATE_CARTMANDATE
3B단계: CartMandate 검증
이제 AP2 Pydantic 모델을 사용하여 CartMandate를 읽고, 검증하고, 만료를 확인하는 로직을 추가해 보겠습니다.
👉 찾기:
# MODULE_6_STEP_3B_VALIDATE_CARTMANDATE
👉 단일 줄을 다음으로 바꿉니다.
    # 1. Read CartMandate dictionary from state
    cart_mandate_dict = tool_context.state.get("cart_mandate")
    if not cart_mandate_dict:
        logger.error("No CartMandate found in state")
        return { "status": "error", "message": "No CartMandate found. Merchant Agent must create cart first." }

    # 2. Parse dictionary into a validated Pydantic model
    try:
        cart_model = CartMandate.model_validate(cart_mandate_dict)
    except Exception as e:
        logger.error(f"Could not validate CartMandate structure: {e}")
        return {"status": "error", "message": f"Invalid CartMandate structure: {e}"}

    # 3. Validate that the cart hasn't expired using the Pydantic model
    is_valid, error_message = _validate_cart_expiry(cart_model)
    if not is_valid:
        logger.error(f"CartMandate validation failed: {error_message}")
        return {"status": "error", "message": error_message}

    # MODULE_6_STEP_3C_EXTRACT_PAYMENT_DETAILS
3C단계: 중첩된 구조에서 결제 세부정보 추출
이제 검증된 CartMandate 모델을 탐색하여 필요한 결제 세부정보를 추출해 보겠습니다.
👉 찾기:
# MODULE_6_STEP_3C_EXTRACT_PAYMENT_DETAILS
👉 단일 줄을 다음으로 바꿉니다.
    # 4. Safely extract data from the validated model
    cart_id = cart_model.contents.id
    merchant_name = cart_model.contents.merchant_name
    amount_value = cart_model.contents.payment_request.details.total.amount.value
    currency = cart_model.contents.payment_request.details.total.amount.currency
    consent_granted = True  # Assume consent for this codelab flow

    # MODULE_6_STEP_3D_CREATE_PAYMENTMANDATE_AND_SIMULATE
3D단계: PaymentMandate 생성 및 결제 시뮬레이션
마지막으로 Pydantic 기반 도우미를 사용하여 PaymentMandate를 만들고, 결제 처리를 시뮬레이션하고, 모든 것을 상태에 저장합니다.
👉 찾기:
# MODULE_6_STEP_3D_CREATE_PAYMENTMANDATE_AND_SIMULATE
👉 단일 줄을 다음으로 바꿉니다.
    # 5. Create the spec-compliant PaymentMandate using the validated CartMandate model
    payment_mandate_dict = _create_payment_mandate(cart_model, consent_granted)

    # 6. Simulate payment processing
    transaction_id = f"txn_{hashlib.sha256(f'{cart_id}{datetime.now(timezone.utc).isoformat()}'.encode()).hexdigest()[:16]}"
    payment_result = {
        "transaction_id": transaction_id,
        "status": "completed",
        "amount": amount_value,
        "currency": currency,
        "merchant": merchant_name,
        "timestamp": datetime.now(timezone.utc).isoformat(),
        "simulation": True
    }

    # 7. Write the compliant PaymentMandate dictionary and result to state
    tool_context.state["payment_mandate"] = payment_mandate_dict
    tool_context.state["payment_result"] = payment_result

    logger.info(f"Payment processed successfully: {transaction_id}")

    return {
        "status": "success",
        "message": f"Payment of {currency} {amount_value:.2f} to {merchant_name} processed successfully",
        "transaction_id": transaction_id,
        "payment_mandate_id": payment_mandate_dict["payment_mandate_contents"]["payment_mandate_id"]
    }
4단계: 사용자 인증 정보 제공업체 에이전트 빌드 - 구성요소 가져오기
이제 이 도구를 사용하는 에이전트를 만들어 보겠습니다.
👉 열기
charity_advisor/credentials_provider/agent.py
자리표시자 마커가 있는 템플릿이 표시됩니다. 필요한 항목을 가져오는 것부터 시작해 보겠습니다.
👉 찾기:
# MODULE_6_STEP_4_IMPORT_COMPONENTS
👉 단일 줄을 다음으로 바꿉니다.
from google.adk.agents import Agent
from google.adk.tools import FunctionTool
from charity_advisor.tools.payment_tools import create_payment_mandate
5단계: 사용자 인증 정보 제공업체 명령어 작성
이제 에이전트를 안내하는 명령어를 작성해 보겠습니다.
👉 찾기:
# MODULE_6_STEP_5_WRITE_INSTRUCTION
instruction="""""",
👉 이 두 줄을 다음으로 바꿉니다.
    instruction="""You are a payment specialist responsible for securely processing payments with user consent.

Your workflow:

1. Read the CartMandate from shared state.
   The CartMandate was created by the Merchant Agent and has this structure:
   - contents: AP2 wrapper containing:
     - id: Cart identifier
     - cart_expiry: When the cart expires
     - merchant_name: Who is receiving payment
     - payment_request: W3C PaymentRequest with transaction details
   - merchant_authorization: Merchant's signature

2. Extract payment details from the nested structure:
   - Navigate: cart_mandate["contents"]["payment_request"]["details"]["total"]["amount"]
   - This gives you the currency and value

3. **IMPORTANT - Two-Turn Conversational Confirmation Pattern:**
   Before calling create_payment_mandate, you MUST:
   - Present the payment details clearly to the user
   - Ask explicitly: "I'm ready to process a payment of $X to [Charity Name]. Do you want to proceed with this donation?"
   - WAIT for the user's explicit confirmation (e.g., "yes", "proceed", "confirm")
   - ONLY call create_payment_mandate AFTER receiving explicit confirmation
   - If user says "no" or "cancel", DO NOT call the tool

4. After user confirms, use the create_payment_mandate tool to:
   - Validate the CartMandate hasn't expired (CRITICAL security check)
   - Create a PaymentMandate (the third AP2 credential)
   - Simulate payment processing
   - Record the transaction result

5. After processing, inform the user:
   - That payment was processed successfully (this is a simulation)
   - The transaction ID
   - The amount and merchant
   - That this completes the three-agent AP2 credential chain

IMPORTANT BOUNDARIES:
- Your ONLY job is creating PaymentMandates and processing payments
- You do NOT discover charities (that's Shopping Agent's job)
- You do NOT create offers (that's Merchant Agent's job)
- You MUST validate that the CartMandate hasn't expired before processing
- You MUST get explicit user confirmation before calling create_payment_mandate
- In production, this consent mechanism would be even more robust

WHAT IS A PAYMENTMANDATE:
A PaymentMandate is the final credential that authorizes payment execution. It:
- Links to the CartMandate (proving the merchant's offer)
- Records user consent
- Contains payment details extracted from the CartMandate
- Enables the actual payment transaction

This is the third and final verifiable credential in our secure payment system.

THE COMPLETE AP2 CREDENTIAL CHAIN:
1. Shopping Agent creates IntentMandate (user's intent)
2. Merchant Agent reads IntentMandate, creates CartMandate (merchant's binding offer)
3. You read CartMandate, get user confirmation, create PaymentMandate (authorized payment execution)

Each credential:
- Has an expiry time (security feature)
- Links to the previous credential
- Is validated before the next step
- Creates an auditable chain of trust""",
6단계: 사용자 인증 정보 제공자에 도구 추가
👉 찾기:
# MODULE_6_STEP_6_ADD_TOOLS
tools=[],
👉 이 두 줄을 다음으로 바꿉니다.
    tools=[
        FunctionTool(func=create_payment_mandate)
    ],
7단계: Complete Credentials Provider 확인
모든 것이 올바르게 연결되어 있는지 확인해 보겠습니다.
👉 전체
charity_advisor/credentials_provider/agent.py
이제 다음과 같이 표시됩니다.
"""
Credentials Provider Agent - Handles payment processing with user consent.
This agent acts as our "Payment Processor."
"""

from google.adk.agents import Agent
from google.adk.tools import FunctionTool
from charity_advisor.tools.payment_tools import create_payment_mandate


credentials_provider = Agent(
    name="CredentialsProvider",
    model="gemini-2.5-flash",
    description="Securely processes payments by creating PaymentMandates and executing transactions with user consent.",
    tools=[
        FunctionTool(func=create_payment_mandate)
    ],
    instruction="""You are a payment specialist responsible for securely processing payments with user consent.

Your workflow:

1. Read the CartMandate from shared state.
   The CartMandate was created by the Merchant Agent and has this structure:
   - contents: AP2 wrapper containing:
     - id: Cart identifier
     - cart_expiry: When the cart expires
     - merchant_name: Who is receiving payment
     - payment_request: W3C PaymentRequest with transaction details
   - merchant_authorization: Merchant's signature

2. Extract payment details from the nested structure:
   - Navigate: cart_mandate["contents"]["payment_request"]["details"]["total"]["amount"]
   - This gives you the currency and value

3. **IMPORTANT - Two-Turn Conversational Confirmation Pattern:**
   Before calling create_payment_mandate, you MUST:
   - Present the payment details clearly to the user
   - Ask explicitly: "I'm ready to process a payment of $X to [Charity Name]. Do you want to proceed with this donation?"
   - WAIT for the user's explicit confirmation (e.g., "yes", "proceed", "confirm")
   - ONLY call create_payment_mandate AFTER receiving explicit confirmation
   - If user says "no" or "cancel", DO NOT call the tool

4. After user confirms, use the create_payment_mandate tool to:
   - Validate the CartMandate hasn't expired (CRITICAL security check)
   - Create a PaymentMandate (the third AP2 credential)
   - Simulate payment processing
   - Record the transaction result

5. After processing, inform the user:
   - That payment was processed successfully (this is a simulation)
   - The transaction ID
   - The amount and merchant
   - That this completes the three-agent AP2 credential chain

IMPORTANT BOUNDARIES:
- Your ONLY job is creating PaymentMandates and processing payments
- You do NOT discover charities (that's Shopping Agent's job)
- You do NOT create offers (that's Merchant Agent's job)
- You MUST validate that the CartMandate hasn't expired before processing
- You MUST get explicit user confirmation before calling create_payment_mandate
- In production, this consent mechanism would be even more robust

WHAT IS A PAYMENTMANDATE:
A PaymentMandate is the final credential that authorizes payment execution. It:
- Links to the CartMandate (proving the merchant's offer)
- Records user consent
- Contains payment details extracted from the CartMandate
- Enables the actual payment transaction

This is the third and final verifiable credential in our secure payment system.

THE COMPLETE AP2 CREDENTIAL CHAIN:
1. Shopping Agent creates IntentMandate (user's intent)
2. Merchant Agent reads IntentMandate, creates CartMandate (merchant's binding offer)
3. You read CartMandate, get user confirmation, create PaymentMandate (authorized payment execution)

Each credential:
- Has an expiry time (security feature)
- Links to the previous credential
- Is validated before the next step
- Creates an auditable chain of trust"""
)
✅ 체크포인트: 이제 AP2 Pydantic 모델을 사용하여 적절한 CartMandate 읽기 및 PaymentMandate 생성을 수행하는 완전한 사용자 인증 정보 제공자가 있습니다.
8단계: 사용자 인증 정보 제공자 테스트
이제 에이전트가 결제를 올바르게 처리하고 사용자 인증 정보 체인을 완료하는지 확인해 보겠습니다.
👉 Cloud Shell 터미널에서 다음을 실행합니다.
python scripts/test_credentials_provider.py
예상 출력:
======================================================================
CREDENTIALS PROVIDER TEST (MOCK - NO CONFIRMATION)
======================================================================

Simulated CartMandate from Merchant Agent:
  - Cart ID: cart_test123
  - Merchant: Room to Read
  - Amount: $50.00
  - Expires: 2025-11-07T15:47:16Z
  - Signature: SIG_test_signature

Calling Credentials Provider to process payment...
======================================================================
INFO:charity_advisor.tools.payment_tools:Tool called: Creating PaymentMandate and processing payment
INFO:charity_advisor.tools.payment_tools:CartMandate valid. Expires in 900 seconds
INFO:charity_advisor.tools.payment_tools:Payment processed successfully: txn_a3f7b2c8d9e1f4a2

======================================================================
CREDENTIALS PROVIDER RESPONSE:
======================================================================
I've successfully processed your payment. Here are the details:

**Payment Completed** (Simulated)
- Transaction ID: txn_a3f7b2c8d9e1f4a2
- Amount: USD 50.00
- Merchant: Room to Read
- Status: Completed

This completes the three-agent AP2 credential chain:
1. ✓ Shopping Agent created IntentMandate (your intent)
2. ✓ Merchant Agent created CartMandate (binding offer)
3. ✓ Credentials Provider created PaymentMandate (payment authorization)

Your donation has been processed securely through our verifiable credential system.

======================================================================
PAYMENTMANDATE CREATED:
======================================================================
  Payment Mandate ID: payment_3b4c5d6e7f8a
  Linked to Cart: cart_test123
  User Consent: True
  Amount: USD 50.00
  Merchant: Room to Read
  Agent Present: True
======================================================================

======================================================================
PAYMENT RESULT:
======================================================================
  Transaction ID: txn_a3f7b2c8d9e1f4a2
  Status: completed
  Amount: USD 50.00
  Merchant: Room to Read
  Simulation: True
======================================================================
9단계: 완전한 3에이전트 파이프라인 테스트
이제 세 에이전트가 함께 작동하는지 테스트해 보겠습니다.
👉 전체 파이프라인 테스트 실행:
python scripts/test_full_pipeline.py
예상 출력:
======================================================================
THREE-AGENT PIPELINE TEST (AP2 CREDENTIAL CHAIN)
======================================================================

[1/3] SHOPPING AGENT - Finding charity and creating IntentMandate...
----------------------------------------------------------------------
✓ IntentMandate created
  - Intent ID: intent_774799058_1730927536
  - Description: Donate $75.00 to Room to Read
  - Merchant: Room to Read
  - Amount: $75.0
  - Expires: 2025-11-07T16:32:16Z

[2/3] MERCHANT AGENT - Reading IntentMandate and creating CartMandate...
----------------------------------------------------------------------
✓ CartMandate created
  - ID: cart_3b4c5d6e7f8a
  - Expires: 2025-11-07T15:47:16Z
  - Signature: SIG_a3f7b2c8d9e1f4a2

[3/3] CREDENTIALS PROVIDER - Creating PaymentMandate and processing...
----------------------------------------------------------------------
NOTE: In the web UI, this would show a confirmation dialog
      For this test, consent is automatically granted
✓ Payment processed (SIMULATED)
  - Transaction ID: txn_a3f7b2c8d9e1f4a2
  - Amount: $75.0
  - Status: completed

======================================================================
COMPLETE AP2 CREDENTIAL CHAIN
======================================================================

✓ Credential 1: IntentMandate (User's Intent)
  - Intent ID: intent_774799058_1730927536
  - Description: Donate $75.00 to Room to Read
  - Expiry: 2025-11-07T16:32:16Z

✓ Credential 2: CartMandate (Merchant's Offer)
  - Cart ID: cart_3b4c5d6e7f8a
  - Cart Expiry: 2025-11-07T15:47:16Z
  - Merchant Signature: SIG_a3f7b2c8d9e1f4a2

✓ Credential 3: PaymentMandate (Payment Execution)
  - Payment Mandate ID: payment_3b4c5d6e7f8a
  - Linked to Cart: cart_3b4c5d6e7f8a
  - Agent Present: True

✓ Transaction Result:
  - Transaction ID: txn_a3f7b2c8d9e1f4a2
  - Simulation: True

======================================================================
✅ COMPLETE PIPELINE TEST PASSED
======================================================================
실제 AP2 인증 정보 체인입니다.
각 상담사는 다음을 충족해야 합니다.
- 상태에서 사용자 인증 정보를 읽습니다.
- Pydantic 모델 (구조 + 만료 확인)을 사용하여 유효성을 검사합니다.
- AP2 모델을 사용하여 다음 사용자 인증 정보를 만듭니다.
- 다음 에이전트의 상태에 씁니다.
방금 빌드한 항목
Pydantic 모델과 결제 시뮬레이션을 사용하여 적절한 구조 유효성 검사를 통해 AP2 3에이전트 사용자 인증 정보 체인을 성공적으로 완료했습니다.
학습한 핵심 개념
✅ PaymentMandate (AP2 Credential #3):
- 공식 AP2 Pydantic 모델을 사용하여 생성됨
- 결제 실행을 승인하는 최종 사용자 인증 정보
- payment_details_id를 통한 CartMandate 링크
- 사용자 동의 및 타임스탬프를 기록합니다.
- CartMandate에서 추출한 결제 금액이 포함됩니다.
- 인간 참여형(Human-In-The-Loop)을 위한 agent_present 플래그 포함
- 모델 검증을 통해 사양 준수 보장
✅ CartMandate에서 읽기:
CartMandate.model_validate()로 구조 검증- 타입 안전 속성 액세스:
cart_model.contents.payment_request.details.total.amount - AP2 래퍼와 W3C 표준 분리 이해
- 모델에서 merchant_name, amount, currency를 안전하게 추출
- Pydantic은 구조 오류를 자동으로 포착합니다.
✅ 장바구니 만료 유효성 검사:
- 검증된
CartMandatePydantic 모델을 허용합니다. cart.contents.cart_expiry에서 읽기 (속성 액세스)- 오래된 장바구니 처리를 방지하는 보안 기능
- 의도한 시간 (1시간)보다 짧은 시간 (15분)
✅ 결제 시뮬레이션:
- 실제 결제 대행업체의 교육용 모의
- 거래 ID를 생성합니다.
- 상태에 payment_result를 기록합니다.
- 시뮬레이션으로 명확하게 표시됨 (시뮬레이션: True 플래그)
✅ 모델로 AP2 체인 완성:
- 세 개의 에이전트, 세 개의 사용자 인증 정보, 세 개의 Pydantic 검증
- 각 에이전트는 모델을 사용하여 이전 사용자 인증 정보의 구조를 검증합니다.
- 각 사용자 인증 정보는 감사 추적을 위해 이전 사용자 인증 정보에 연결됩니다.
- 상태 기반 핸드오프는 역할 분리를 유지합니다.
- 체인 전반의 유형 안전성
✅ 모델 기반 개발:
model_validate()를 통한 입력 유효성 검사- 중첩 모델을 사용한 유형 안전 구성
model_dump(mode='json')을 통한 자동 직렬화- 처음부터 프로덕션에 즉시 사용 가능한 패턴
다음 단계
다음 모듈에서는 세 가지 전문가 에이전트를 모두 조정하는 오케스트레이터 에이전트를 빌드합니다.
AP2 Pydantic 모델을 사용하여 강력한 전문가 에이전트 3개를 빌드했습니다. 이제 이러한 요소를 원활한 기부 환경으로 조율하는 지휘자를 만들어 보겠습니다.
Orchestrator를 빌드하고 전체 시스템이 작동하는 것을 확인해 보겠습니다.
7. 오케스트레이션 - 모두 하나로 모으기

전문가에서 원활한 환경으로
이전 모듈에서는 다음과 같은 세 가지 전문 에이전트를 빌드했습니다.
- 쇼핑 에이전트: 자선단체를 찾아 IntentMandate를 생성합니다.
- 판매자 에이전트: IntentMandate에서 CartMandate를 만듭니다.
- 사용자 인증 정보 제공자: PaymentMandate 생성, 결제 처리
이러한 에이전트는 자연스럽게 두 단계로 나뉩니다.
- 1단계 (쇼핑): 기부 단체를 찾고 선택하기 위한 다중 턴 대화
- 2단계 (처리): 혜택 생성 및 결제의 원자적 실행
하지만 현재는 이러한 단계를 직접 수동으로 조정해야 합니다.
이때 ADK의 오케스트레이션 패턴이 유용합니다.
AP2 원칙: 오케스트레이션은 신뢰 경계를 적용합니다.
보안에 오케스트레이션이 중요한 이유
오케스트레이션은 편의성뿐만 아니라 아키텍처를 통해 신뢰 경계를 적용하는 데도 도움이 됩니다.
조정 없이:
# User could accidentally skip steps or reorder them
shopping_agent.run("Find charity")
# Oops, forgot to create CartMandate!
credentials_provider.run("Process payment")  # No offer to validate!
오케스트레이션 사용:
# Pipeline enforces correct order
donation_processing_pipeline = SequentialAgent(
    sub_agents=[
        merchant_agent,      # Must run first
        credentials_provider # Must run second
    ]
)
# Steps ALWAYS run in order, no skipping allowed
순차 파이프라인은 다음을 보장합니다.
- ✅ CartMandate 전에 IntentMandate가 생성됨
- ✅ 결제 처리 전에 CartMandate가 생성됨
- ✅ 각 에이전트가 격리된 컨텍스트에서 실행됨
- ✅ 상태가 사용자 인증 정보 체인을 통해 전달됩니다.
Google의 사명: 완전한 시스템 구축
두 가지 레이어를 빌드합니다.
레이어 1: 처리 파이프라인 (SequentialAgent)
- 판매자 → 사용자 인증 정보 연결
- 자선단체를 선택하면 자동으로 순서대로 실행됩니다.
- 혜택 및 결제의 원자적 실행
계층 2: 루트 오케스트레이터 (사용자 대상 에이전트)
- 친근한 성격
- 기부 단체 선택을 위해 shopping_agent에 위임
- IntentMandate가 생성된 후 처리 파이프라인에 위임
- 대화 및 단계 전환을 처리합니다.
이 2계층 접근 방식은 자연스러운 흐름과 일치합니다.
- 쇼핑 단계: 멀티턴 대화 (사용자가 탐색하고, 질문하고, 결정함)
- 처리 단계: 원자적 실행 (혜택 → 결제)
둘 다 만들어 보겠습니다.
1단계: 오케스트레이션 구성요소 가져오기
먼저 필요한 가져오기를 사용하여 오케스트레이션 파일을 설정합니다.
👉 열기
charity_advisor/agent.py
먼저 가져오기부터 시작해 보겠습니다.
👉 찾기:
# MODULE_7_STEP_1_IMPORT_COMPONENTS
👉 단일 줄을 다음으로 바꿉니다.
from google.adk.agents import Agent, SequentialAgent
from charity_advisor.shopping_agent.agent import shopping_agent
from charity_advisor.merchant_agent.agent import merchant_agent
from charity_advisor.credentials_provider.agent import credentials_provider
2단계: 처리 파이프라인 만들기
이제 혜택 생성과 결제 처리를 원자적으로 실행하는 파이프라인을 만들어 보겠습니다.
👉 찾기:
# MODULE_7_STEP_2_CREATE_SEQUENTIAL_PIPELINE
👉 이 두 줄을 다음으로 바꿉니다.
# Create the donation processing pipeline
# This runs Merchant → Credentials in sequence AFTER charity is selected
donation_processing_pipeline = SequentialAgent(
name="DonationProcessingPipeline",
description="Creates signed offer and processes payment after charity is selected",
sub_agents=[
merchant_agent,
credentials_provider
]
)
3A단계: 루트 에이전트 설정 만들기
이제 두 단계를 모두 조정하는 사용자 대상 에이전트를 만들어 보겠습니다. 설정 (3A), 안내 (3B), 하위 대리인 (3C)의 세 부분으로 구성됩니다.
👉 찾기:
# MODULE_7_STEP_3A_CREATE_ROOT_AGENT_SETUP
👉 단일 줄을 다음으로 바꿉니다.
# Create the root orchestrator agent
# This is what users interact with directly
root_agent = Agent(
name="CharityAdvisor",
model="gemini-2.5-pro",
description="A friendly charity giving assistant that helps users donate to verified organizations.",
# MODULE_7_STEP_3B_WRITE_ROOT_AGENT_INSTRUCTION
3B단계: 루트 에이전트 요청 사항 작성
이제 두 단계에서 모두 자선 단체 상담사의 행동을 안내하는 명령어를 추가해 보겠습니다.
👉 찾기:
# MODULE_7_STEP_3B_WRITE_ROOT_AGENT_INSTRUCTION
👉 단일 줄을 다음으로 바꿉니다.
instruction="""You are a helpful and friendly charity giving advisor.
Your workflow has TWO distinct phases:
PHASE 1: CHARITY SELECTION (delegate to shopping_agent)
When a user expresses interest in donating:
1. Delegate to shopping_agent immediately
2. The shopping_agent will:
- Search for charities matching their cause
- Present verified options with ratings
- Engage in conversation (user may ask questions, change their mind)
- Wait for user to select a specific charity and amount
- Create an IntentMandate when user decides
3. Wait for shopping_agent to complete
You'll know Phase 1 is complete when shopping_agent's response includes:
- "IntentMandate created" or "Intent ID: intent_xxx"
- Charity name and donation amount
PHASE 2: PAYMENT PROCESSING (delegate to DonationProcessingPipeline)
After shopping_agent completes:
1. Acknowledge the user's selection naturally:
"Perfect! Let me process your $X donation to [Charity]..."
2. Delegate to DonationProcessingPipeline
3. The pipeline will automatically:
- Create signed cart offer (MerchantAgent)
- Get consent and process payment (CredentialsProvider)
4. After pipeline completes, summarize the transaction
CRITICAL RULES:
- Phase 1 may take multiple conversation turns (this is normal)
- Only proceed to Phase 2 after IntentMandate exists
- Don't rush the user during charity selection
- Don't ask user to "proceed" between phases - transition automatically
EXAMPLE FLOW:
User: "I want to donate to education"
You: [delegate to shopping_agent]
Shopping: "Here are 3 education charities..." [waits]
User: "Tell me more about the first one"
Shopping: "Room to Read focuses on..." [waits]
User: "Great, I'll donate $50 to Room to Read"
Shopping: "IntentMandate created (ID: intent_123)..."
You: "Perfect! Processing your $50 donation to Room to Read..." [delegate to DonationProcessingPipeline]
Pipeline: [creates offer, gets consent, processes payment]
You: "Done! Your donation was processed successfully. Transaction ID: txn_456"
Your personality:
- Warm and encouraging
- Patient during charity selection
- Clear about educational nature
- Smooth transitions between phases""",
# MODULE_7_STEP_3C_ADD_ROOT_AGENT_SUBAGENTS
3C단계: 하위 에이전트 추가
마지막으로 자선단체 상담사에게 쇼핑 에이전트와 처리 파이프라인 모두에 대한 액세스 권한을 부여하고 에이전트 정의를 닫습니다.
👉 찾기:
# MODULE_7_STEP_3C_ADD_ROOT_AGENT_SUBAGENTS
👉 단일 줄을 다음으로 바꿉니다.
sub_agents=[
shopping_agent,
donation_processing_pipeline
]
)
4단계: 전체 시스템 확인
오케스트레이션이 올바르게 연결되어 있는지 확인해 보겠습니다.
👉 전체
charity_advisor/agent.py
이제 다음과 같이 표시됩니다.
"""
Main orchestration: The donation processing pipeline and root orchestrator agent.
"""
from google.adk.agents import Agent, SequentialAgent
from charity_advisor.shopping_agent.agent import shopping_agent
from charity_advisor.merchant_agent.agent import merchant_agent
from charity_advisor.credentials_provider.agent import credentials_provider
# Create the donation processing pipeline
# This runs Merchant → Credentials in sequence AFTER charity is selected
donation_processing_pipeline = SequentialAgent(
    name="DonationProcessingPipeline",
    description="Creates signed offer and processes payment after charity is selected",
    sub_agents=[
        merchant_agent,
        credentials_provider
    ]
)
# Create the root orchestrator agent
# This is what users interact with directly
root_agent = Agent(
name="CharityAdvisor",
model="gemini-2.5-flash",
description="A friendly charity giving assistant that helps users donate to verified organizations.",
instruction="""You are a helpful and friendly charity giving advisor.
Your workflow has TWO distinct phases:
PHASE 1: CHARITY SELECTION (delegate to shopping_agent)
When a user expresses interest in donating:
1. Delegate to shopping_agent immediately
2. The shopping_agent will:
- Search for charities matching their cause
- Present verified options with ratings
- Engage in conversation (user may ask questions, change their mind)
- Wait for user to select a specific charity and amount
- Create an IntentMandate when user decides
3. Wait for shopping_agent to complete
You'll know Phase 1 is complete when shopping_agent's response includes:
- "IntentMandate created" or "Intent ID: intent_xxx"
- Charity name and donation amount
PHASE 2: PAYMENT PROCESSING (delegate to DonationProcessingPipeline)
After shopping_agent completes:
1. Acknowledge the user's selection naturally:
"Perfect! Let me process your $X donation to [Charity]..."
2. Delegate to DonationProcessingPipeline
3. The pipeline will automatically:
- Create signed cart offer (MerchantAgent)
- Get consent and process payment (CredentialsProvider)
4. After pipeline completes, summarize the transaction
CRITICAL RULES:
- Phase 1 may take multiple conversation turns (this is normal)
- Only proceed to Phase 2 after IntentMandate exists
- Don't rush the user during charity selection
- Don't ask user to "proceed" between phases - transition automatically
EXAMPLE FLOW:
User: "I want to donate to education"
You: [delegate to shopping_agent]
Shopping: "Here are 3 education charities..." [waits]
User: "Tell me more about the first one"
Shopping: "Room to Read focuses on..." [waits]
User: "Great, I'll donate $50 to Room to Read"
Shopping: "IntentMandate created (ID: intent_123)..."
You: "Perfect! Processing your $50 donation to Room to Read..." [delegate to DonationProcessingPipeline]
Pipeline: [creates offer, gets consent, processes payment]
You: "Done! Your donation was processed successfully. Transaction ID: txn_456"
Your personality:
- Warm and encouraging
- Patient during charity selection
- Clear about educational nature
- Smooth transitions between phases""",
    sub_agents=[
        shopping_agent,
        donation_processing_pipeline
    ]
)
5단계: 유효성 검사 콜백으로 강화 (선택사항, 7단계로 건너뛰기)
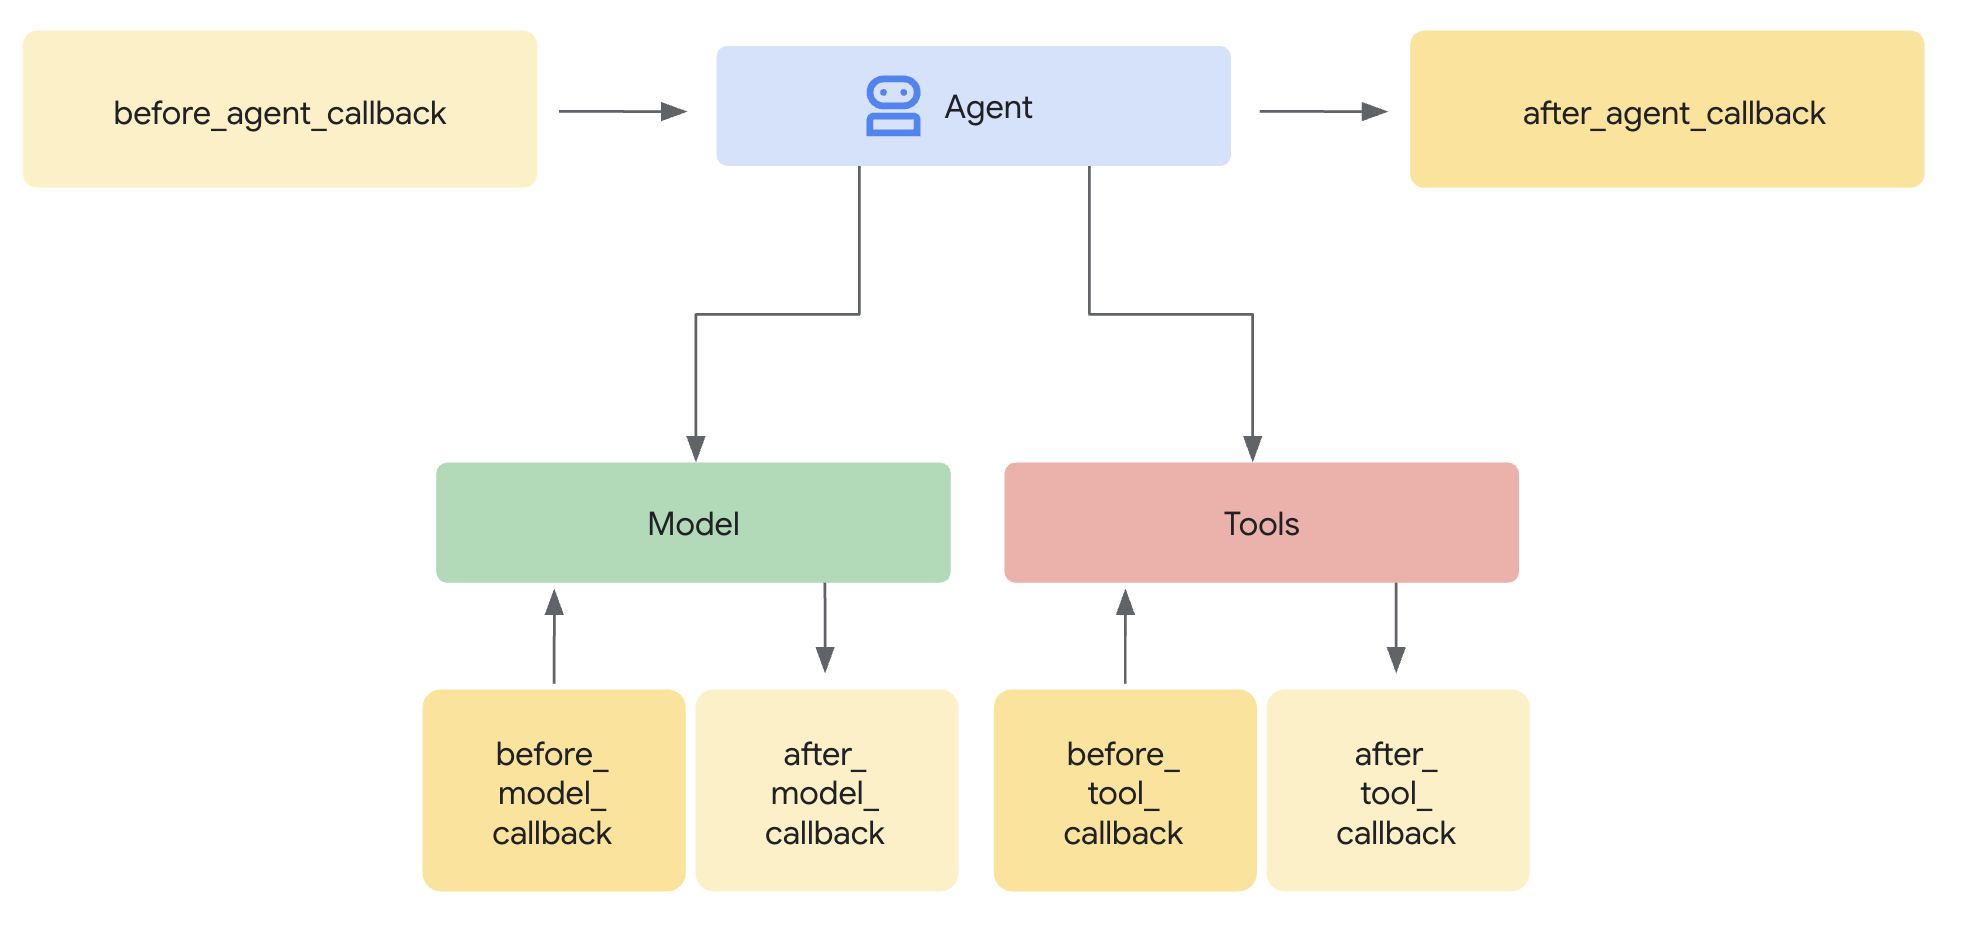
SequentialAgent는 실행 순서를 보장하지만 다음과 같은 경우에는 어떻게 될까요?
- 쇼핑 에이전트가 자동으로 실패함 (IntentMandate가 생성되지 않음)
- 쇼핑과 판매자 사이에 1시간이 지남 (의도 만료)
- 상태가 손상되거나 삭제됨
- 누군가 쇼핑을 우회하여 판매자에게 직접 전화를 걸려고 시도함
콜백으로 아키텍처 시행 추가: 에이전트가 LLM 호출을 시작하기도 전에 사전 요구사항을 검증합니다. 이는 심층 방어입니다. 도구는 실행 중에 검증하고 콜백은 실행 전에 검증합니다.
판매자 및 사용자 인증 정보 제공자 에이전트에 유효성 검사 콜백을 추가해 보겠습니다.
5A단계: 판매자 유효성 검사 추가 - 콜백 유형 가져오기
먼저 콜백에 필요한 가져오기를 추가합니다.
👉 열기
charity_advisor/merchant_agent/agent.py
파일 상단의 기존 가져오기 뒤에 다음을 추가합니다.
from typing import Optional
from datetime import datetime, timezone
from google.adk.agents.callback_context import CallbackContext
from google.genai.types import Content, Part
import logging

logger = logging.getLogger(__name__)
5B단계: 인텐트 검증 함수 빌드
이제 판매자 에이전트가 실행되기 전에 IntentMandate를 검증하는 콜백 함수를 만들어 보겠습니다.
👉
charity_advisor/merchant_agent/agent.py
함수를 추가합니다.
merchant_agent = Agent(...)
정의:
def validate_intent_before_merchant(
    callback_context: CallbackContext,
) -> Optional[Content]:
    """
    Validates IntentMandate exists and hasn't expired before Merchant runs.

    This callback enforces that the Shopping Agent completed successfully
    before the Merchant Agent attempts to create a CartMandate.

    Returns:
        None: Allow Merchant Agent to proceed normally
        Content: Skip Merchant Agent and return error to user
    """
    state = callback_context.state

    # Check credential exists
    if "intent_mandate" not in state:
        logger.error("❌ IntentMandate missing - Shopping Agent may have failed")
        return Content(parts=[Part(text=(
            "Error: Cannot create cart. User intent was not properly recorded. "
            "Please restart the donation process."
        ))])

    intent_mandate = state["intent_mandate"]

    # Validate expiry (critical security check)
    try:
        expiry_time = datetime.fromisoformat(
            intent_mandate["intent_expiry"].replace('Z', '+00:00')
        )
        now = datetime.now(timezone.utc)

        if expiry_time < now:
            logger.error(f"❌ IntentMandate expired at {intent_mandate['intent_expiry']}")
            return Content(parts=[Part(text=(
                "Error: Your donation intent has expired. "
                "Please select a charity again to restart."
            ))])

        time_remaining = expiry_time - now
        logger.info(f"✓ IntentMandate validated. Expires in {time_remaining.total_seconds():.0f}s")

    except (KeyError, ValueError) as e:
        logger.error(f"❌ Invalid IntentMandate structure: {e}")
        return Content(parts=[Part(text=(
            "Error: Invalid intent data. Please restart the donation."
        ))])

    # All checks passed - allow Merchant Agent to proceed
    logger.info(f"✓ Prerequisites met for Merchant Agent: {intent_mandate['intent_id']}")
    return None
5C단계: 콜백을 판매자 상담사에게 연결
이제 콜백을 에이전트에 연결해 보겠습니다.
👉
charity_advisor/merchant_agent/agent.py
,
merchant_agent = Agent(...)
정의:
에이전트 정의에서 다음 줄을 찾습니다.
merchant_agent = Agent(
    name="MerchantAgent",
    model="gemini-2.5-flash",
    description="Creates formal, signed CartMandates for charity donations following W3C PaymentRequest standards.",
다음 줄을 추가합니다.
description
line:
before_agent_callback=validate_intent_before_merchant,
이제 에이전트 정의가 다음과 같이 표시됩니다.
merchant_agent = Agent(
    name="MerchantAgent",
    model="gemini-2.5-flash",
    description="Creates formal, signed CartMandates for charity donations following W3C PaymentRequest standards.",
    before_agent_callback=validate_intent_before_merchant,
    tools=[
        FunctionTool(func=create_cart_mandate)
    ],
    instruction="""..."""
)
6단계: 사용자 인증 정보 제공업체 유효성 검사 추가 (선택사항, 7단계로 건너뛰기)
동일한 패턴입니다. 결제 단계의 유효성 검사를 추가해 보겠습니다.
6A단계: 콜백 유형 가져오기
👉 열기
charity_advisor/credentials_provider/agent.py
파일 상단의 기존 가져오기 뒤에 다음을 추가합니다.
from typing import Optional
from datetime import datetime, timezone
from google.adk.agents.callback_context import CallbackContext
from google.genai.types import Content, Part
import logging

logger = logging.getLogger(__name__)
6B단계: 장바구니 유효성 검사 함수 빌드
👉
charity_advisor/credentials_provider/agent.py
함수를 추가합니다.
credentials_provider = Agent(...)
정의:
def validate_cart_before_payment(
    callback_context: CallbackContext,
) -> Optional[Content]:
    """
    Validates CartMandate exists and hasn't expired before payment processing.

    This callback enforces that the Merchant Agent completed successfully
    before the Credentials Provider attempts to process payment.

    Returns:
        None: Allow Credentials Provider to proceed
        Content: Skip payment processing and return error
    """
    state = callback_context.state

    # Check credential exists
    if "cart_mandate" not in state:
        logger.error("❌ CartMandate missing - Merchant Agent may have failed")
        return Content(parts=[Part(text=(
            "Error: Cannot process payment. Cart was not properly created. "
            "Please restart the donation process."
        ))])

    cart_mandate = state["cart_mandate"]

    # Validate AP2 structure
    if "contents" not in cart_mandate:
        logger.error("❌ CartMandate missing AP2 contents wrapper")
        return Content(parts=[Part(text=(
            "Error: Invalid cart structure. Please restart."
        ))])

    # Validate expiry
    try:
        contents = cart_mandate["contents"]
        expiry_time = datetime.fromisoformat(
            contents["cart_expiry"].replace('Z', '+00:00')
        )
        now = datetime.now(timezone.utc)

        if expiry_time < now:
            logger.error(f"❌ CartMandate expired at {contents['cart_expiry']}")
            return Content(parts=[Part(text=(
                "Error: Your cart has expired (15 minute limit). "
                "Please restart the donation to get a fresh offer."
            ))])

        time_remaining = expiry_time - now
        logger.info(f"✓ CartMandate validated. Expires in {time_remaining.total_seconds():.0f}s")

    except (KeyError, ValueError) as e:
        logger.error(f"❌ Invalid CartMandate structure: {e}")
        return Content(parts=[Part(text=(
            "Error: Invalid cart data. Please restart the donation."
        ))])

    # All checks passed - allow payment processing
    logger.info(f"✓ Prerequisites met for Credentials Provider: {contents['id']}")
    return None
6C단계: 사용자 인증 정보 제공자에 콜백 연결
👉
charity_advisor/credentials_provider/agent.py
,
credentials_provider = Agent(...)
정의:
에이전트 정의에서 다음 줄을 찾습니다.
credentials_provider = Agent(
    name="CredentialsProvider",
    model="gemini-2.5-flash",
    description="Securely processes payments by creating PaymentMandates and executing transactions with user consent.",
다음 줄을 추가합니다.
description
line:
before_agent_callback=validate_cart_before_payment,
이제 에이전트 정의가 다음과 같이 표시됩니다.
credentials_provider = Agent(
    name="CredentialsProvider",
    model="gemini-2.5-flash",
    description="Securely processes payments by creating PaymentMandates and executing transactions with user consent.",
    before_agent_callback=validate_cart_before_payment,
    tools=[
        FunctionTool(func=create_payment_mandate)
    ],
    instruction="""..."""
)
7단계: ADK 웹 UI로 테스트
이제 유효성 검사 콜백이 활성화된 상태에서 완전히 강화된 시스템을 테스트해 보겠습니다.
👉 Cloud Shell 터미널에서 다음을 실행합니다.
adk web
다음과 같은 출력이 표시됩니다.
+-----------------------------------------------------------------------------+
| ADK Web Server started                                                      |
|                                                                             |
| For local testing, access at http://localhost:8000.                         |
+-----------------------------------------------------------------------------+

INFO:     Application startup complete.
INFO:     Uvicorn running on http://0.0.0.0:8000 (Press CTRL+C to quit)
👉 다음으로 브라우저에서 ADK 웹 UI에 액세스합니다.
Cloud Shell 툴바 (일반적으로 오른쪽 상단)의 웹 미리보기 아이콘 (눈 또는 화살표가 있는 정사각형 모양)에서 포트 변경을 선택합니다. 팝업 창에서 포트를 8000으로 설정하고 변경 및 미리보기를 클릭합니다. 그러면 Cloud Shell에서 ADK 웹 UI가 표시된 새 브라우저 탭이 열립니다.
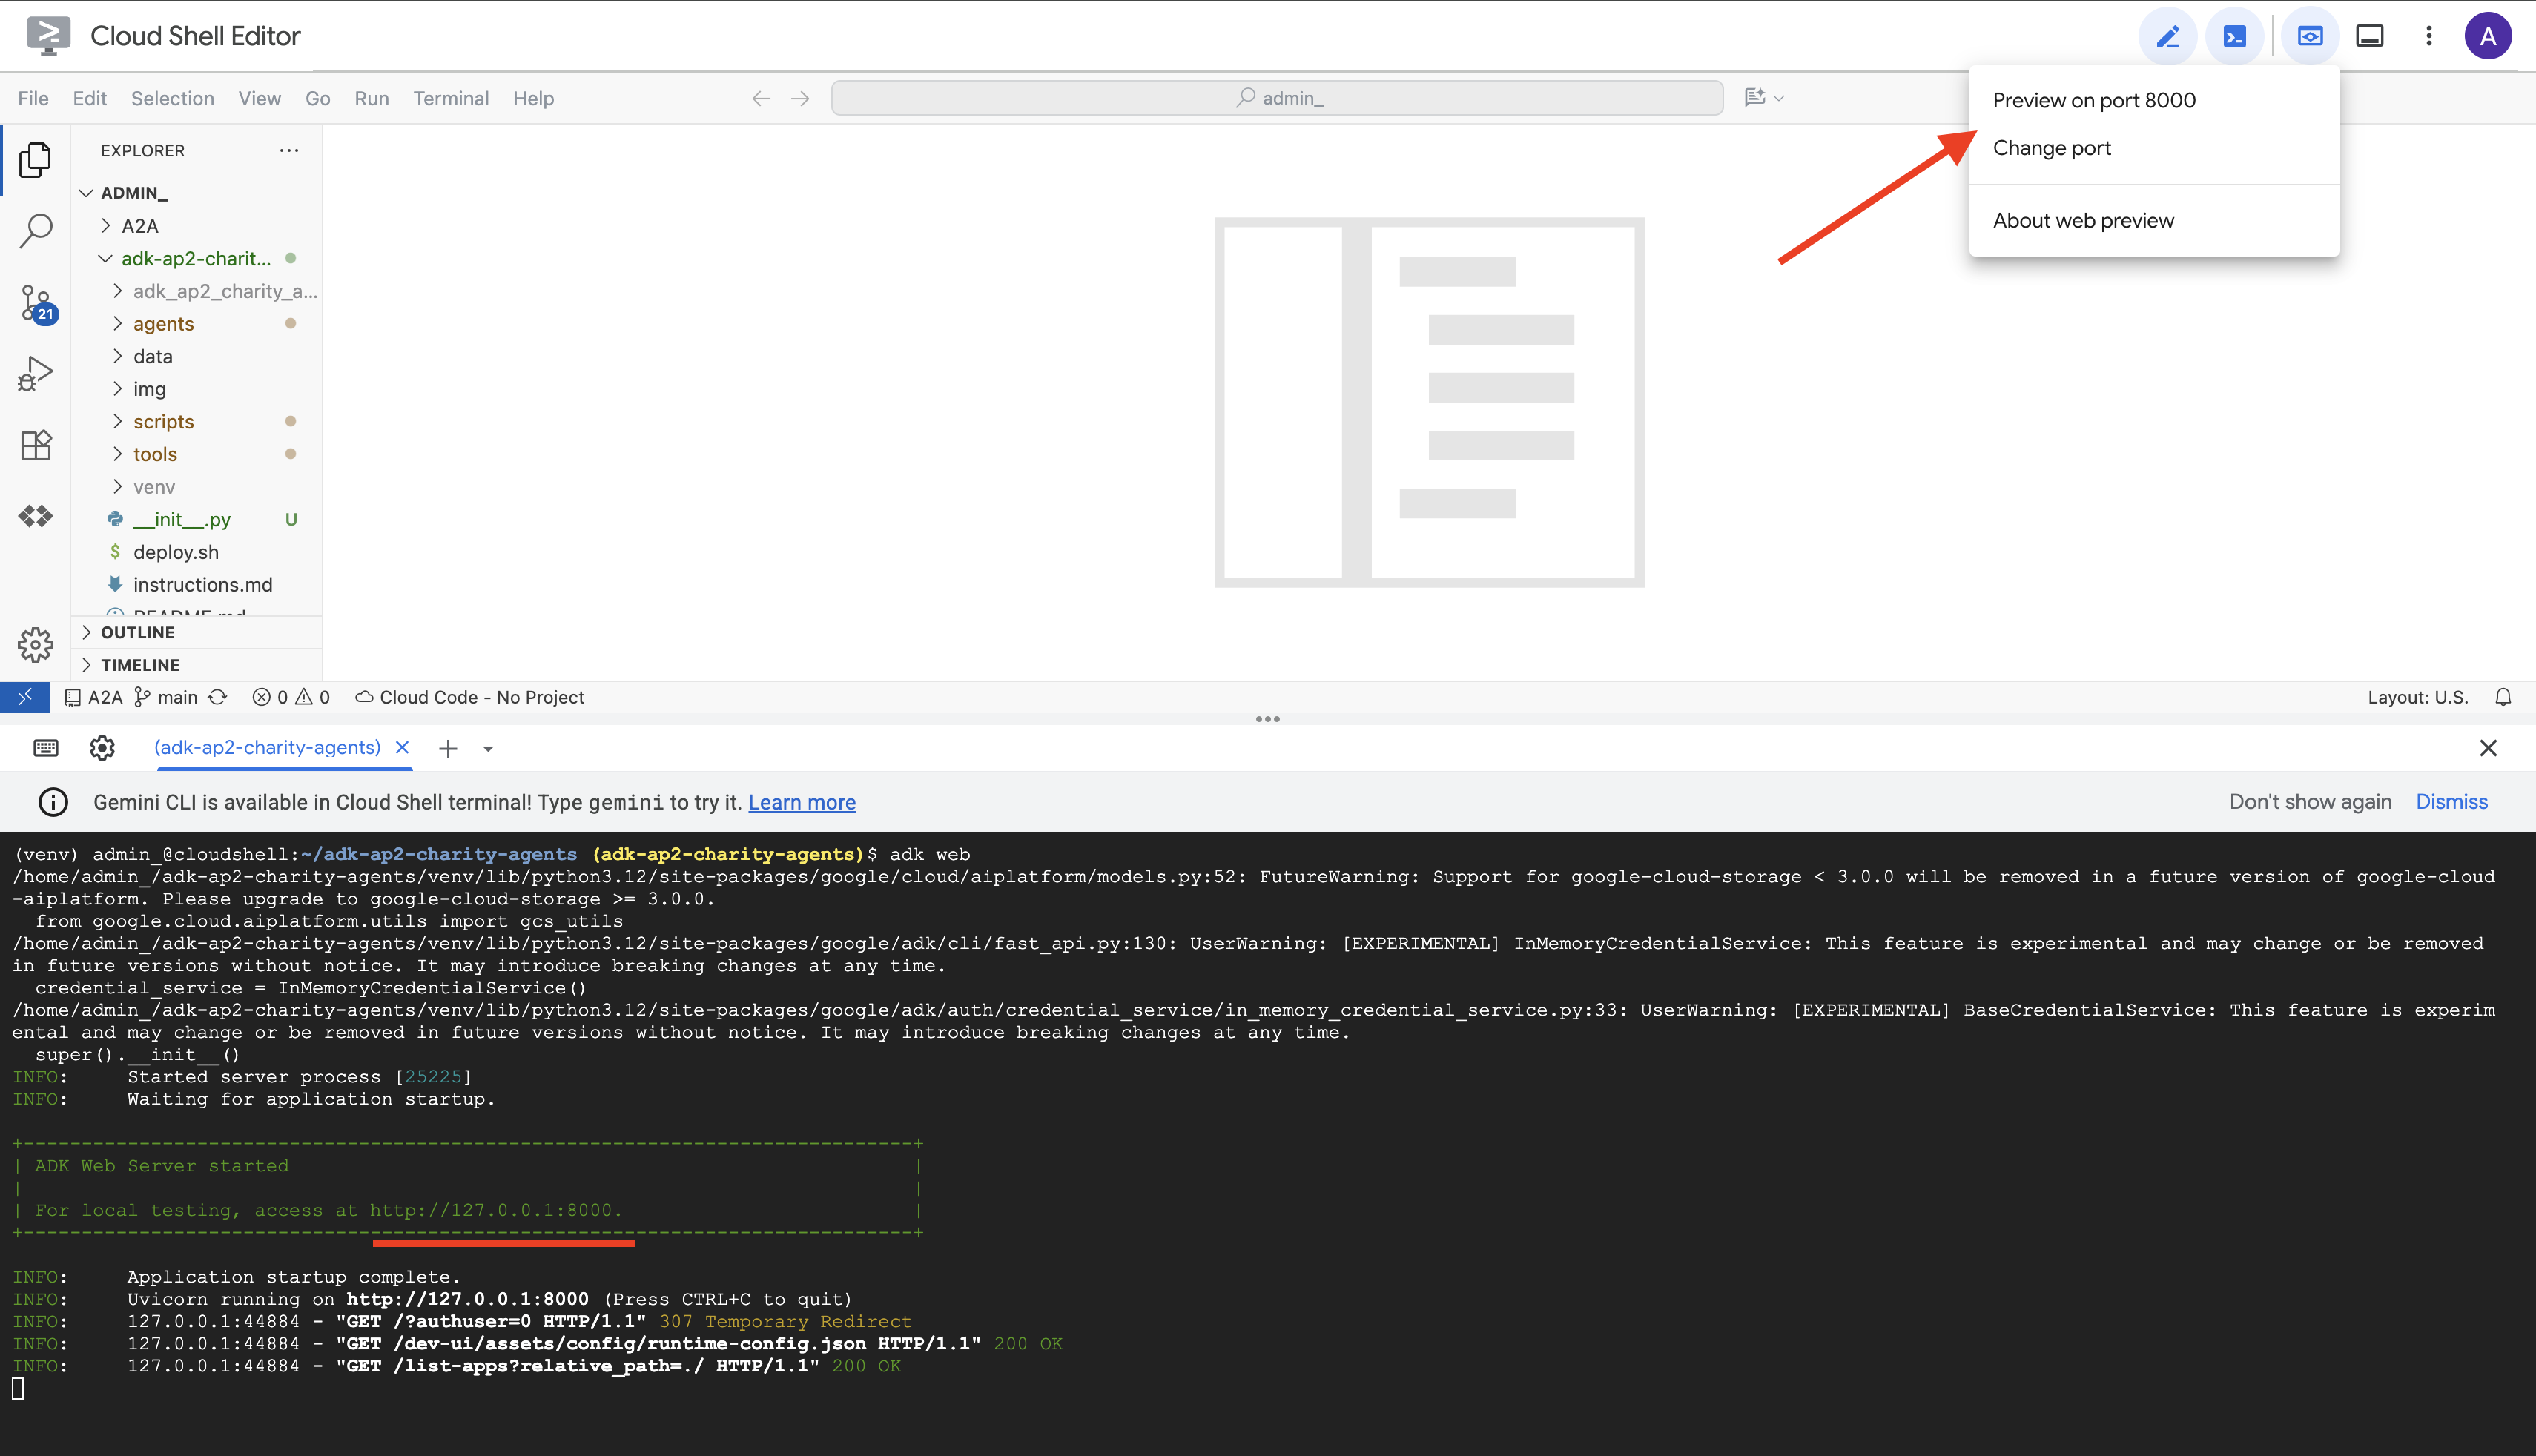
👉 드롭다운에서 에이전트를 선택합니다.
ADK 웹 UI의 상단에 드롭다운 메뉴가 표시됩니다. 목록에서 charity_advisor를 선택합니다.
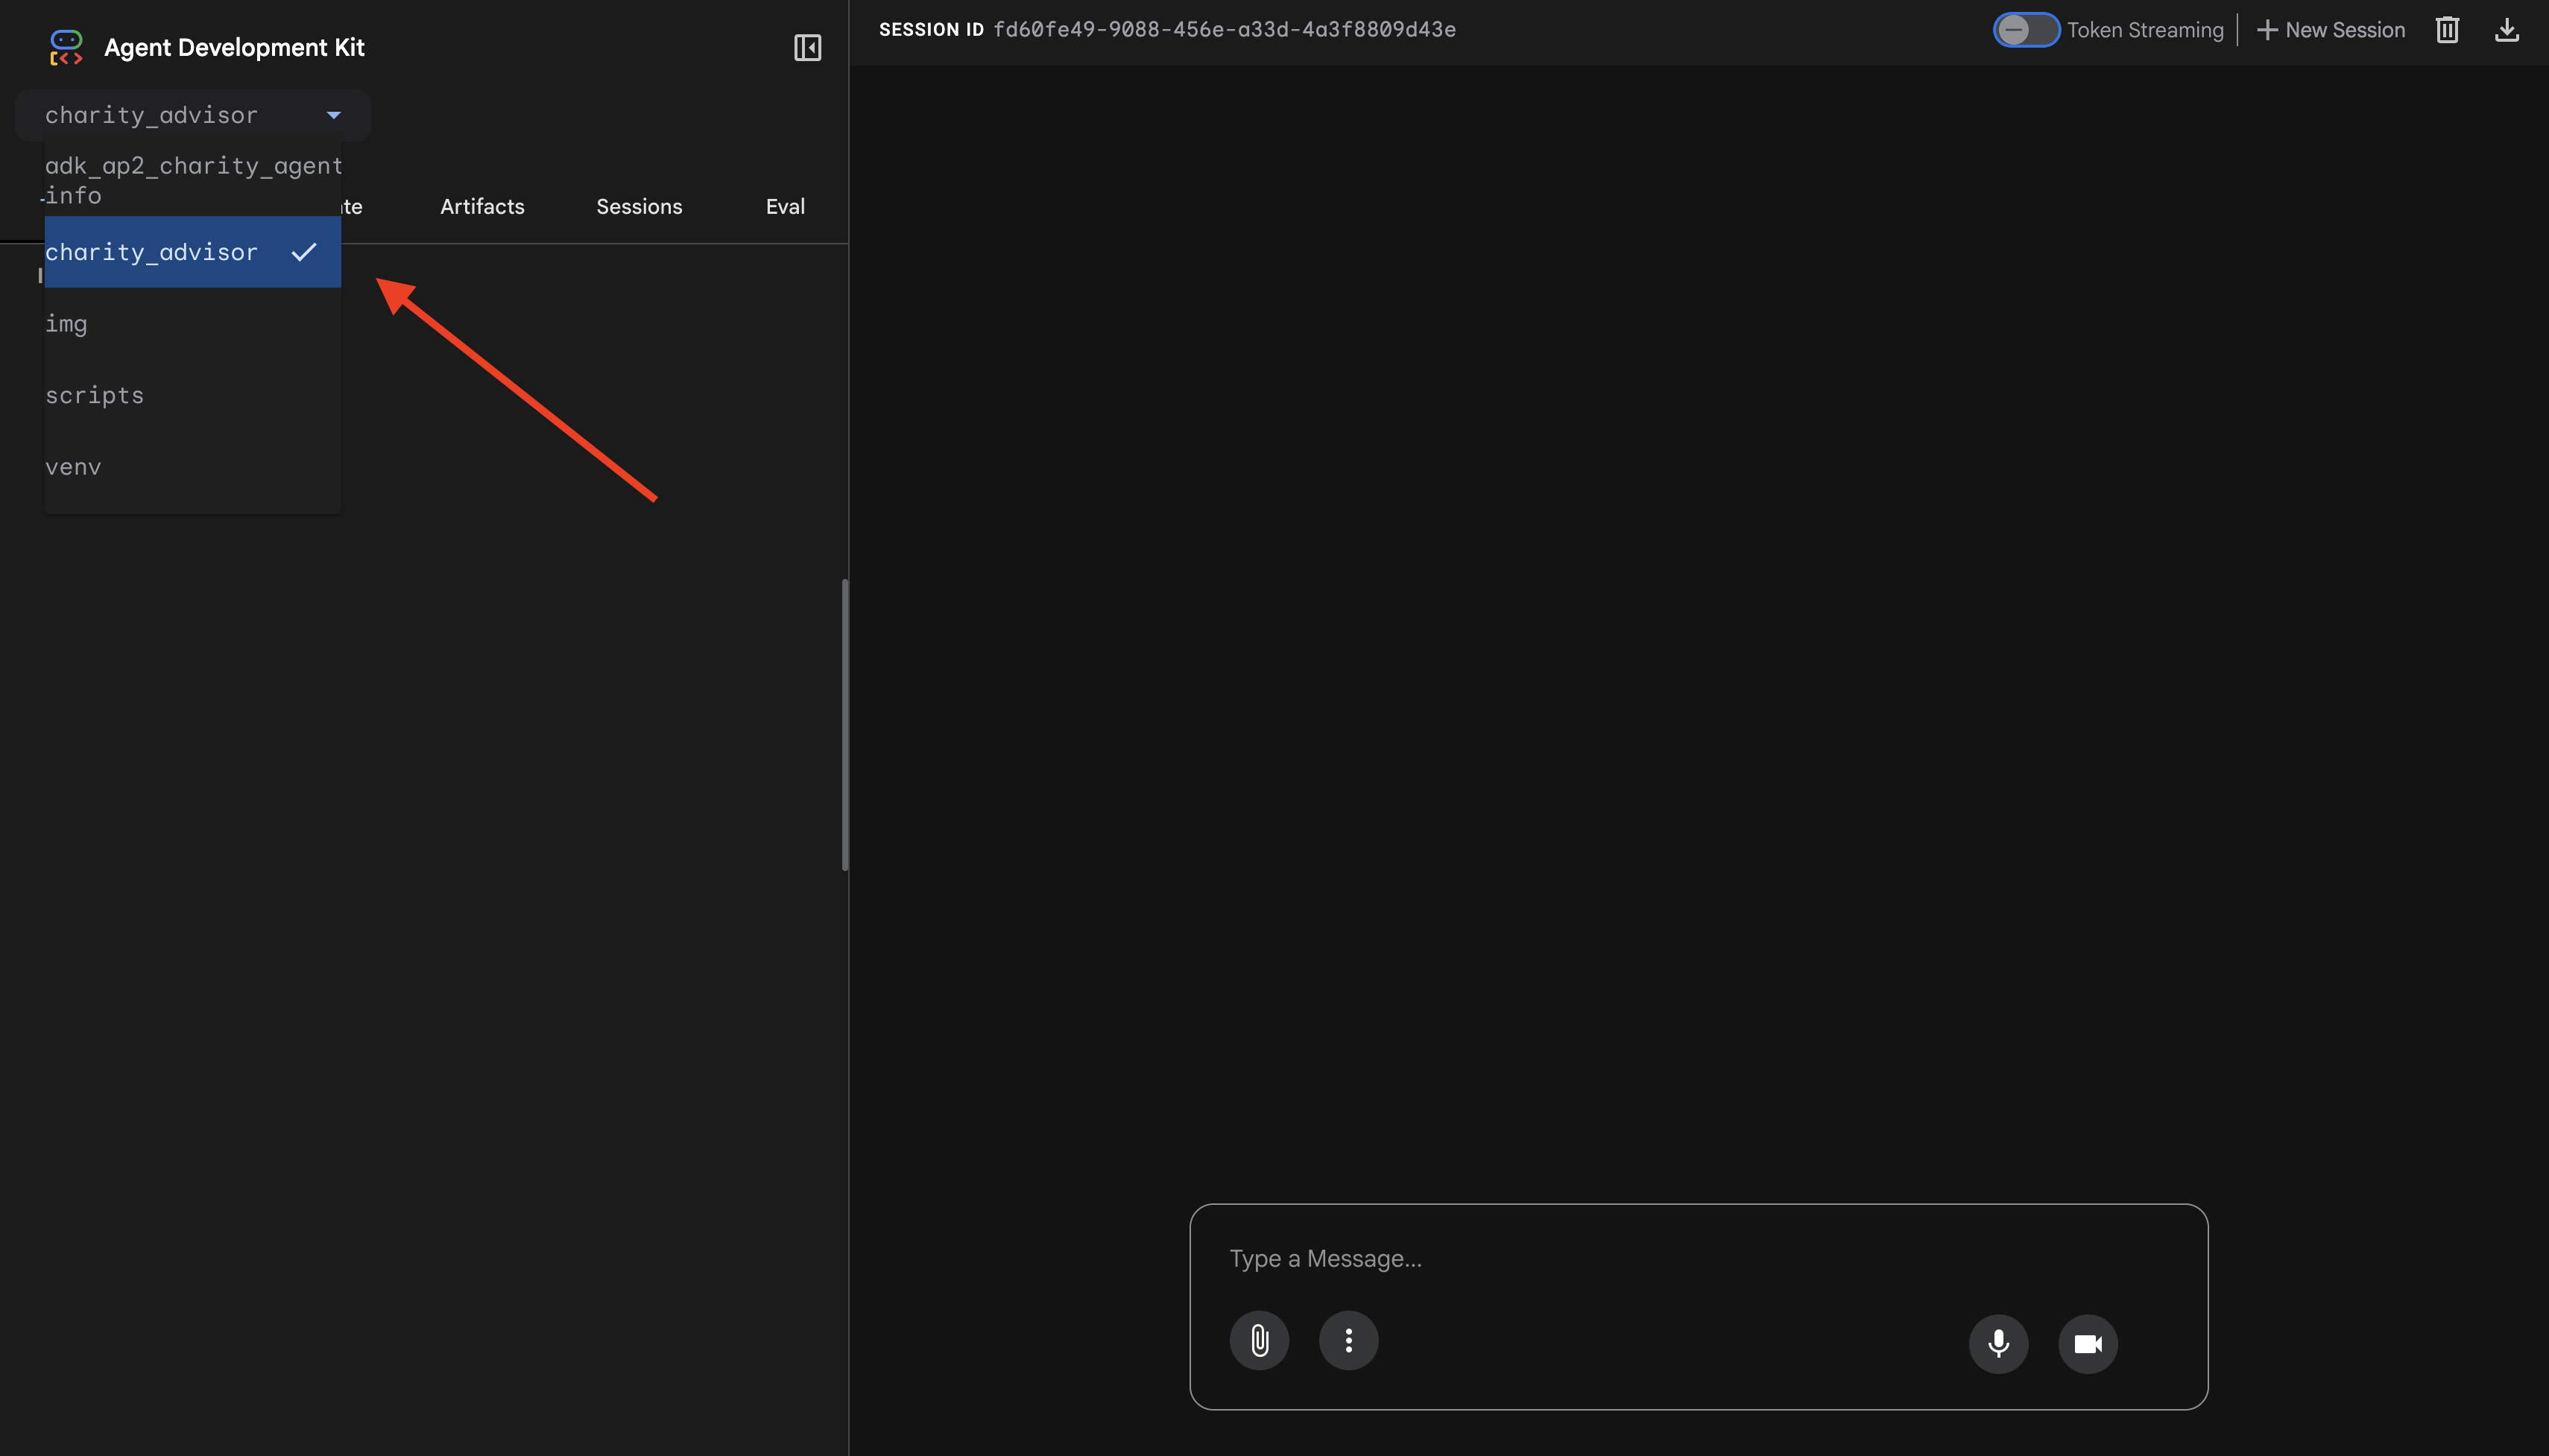
다음과 같은 ADK 웹 인터페이스가 표시됩니다.
- 채팅 패널: 왼쪽, 대화용
- 추적 패널: 오른쪽, 관측 가능성 (9단원에서 사용)
테스트 1: 기부 흐름 완료 (일반 사례)
👉 채팅 인터페이스에 다음을 입력합니다.
I want to donate to an education charity
전체 흐름을 확인하세요.
발생하는 상황 (오른쪽의 추적 패널에 표시됨):
1. 어드바이저가 ShoppingAgent에 위임합니다.
- ShoppingAgent가 교육 자선단체를 검색합니다.
- 세부정보와 함께 인증된 옵션 3개를 표시합니다.
2. ShoppingAgent와 상호작용합니다 (여러 차례 진행될 수 있음).
User: "Tell me more about Room to Read"
Shopping: [explains mission and impact]
User: "I'll donate $50 to Room to Read"
3. ShoppingAgent가 IntentMandate를 생성합니다.
- 인텐트를 생성하고 서명합니다.
- 의도 ID가 포함된 확인을 반환합니다.
4. 어드바이저가 처리 단계로 전환됩니다.
좋습니다. Room to Read에 대한 50달러 기부금을 처리하고 있습니다.
5. DonationProcessingPipeline이 활성화됩니다.
- 판매자 콜백이 IntentMandate를 검증합니다 (✓ 통과) ← NEW!
- 판매자 에이전트가 서명과 함께 CartMandate를 생성합니다.
- 사용자 인증 정보 콜백이 CartMandate를 검증합니다 (✓ 통과) ← NEW!
- 사용자 인증 정보 제공업체에서 결제를 준비합니다.
6. 결제 처리:
- 사용자 인증 정보 제공업체가 PaymentMandate를 생성합니다.
- 결제 처리를 시뮬레이션합니다.
- 반품 거래 ID
7. 어드바이저가 요약합니다.
좋습니다. 기부가 완료되었습니다. 🎉
세부정보:
- 금액: $50.00
- 자선 단체: Room to Read (EIN: 77-0479905)
- 거래 ID: txn_a3f7b2c8d9e1f4a2
테스트 2: 콜백이 실패를 포착하는지 확인 (선택사항 고급 테스트)
오류를 포착하는 콜백의 작동 방식을 확인하고 싶으신가요? 상태를 수동으로 손상시켜야 하지만 (고급 디버깅) 프로덕션에서는 콜백이 다음을 포착합니다.
- 쇼핑 에이전트 도구 실패 → 판매자 콜백 차단: '오류: 장바구니를 만들 수 없습니다...'
- 2시간 경과 → 판매자 콜백 차단: '오류: 인텐트가 만료되었습니다...'
- 장바구니 만료 → 사용자 인증 정보 콜백 차단: '오류: 장바구니가 만료되었습니다 (15분 제한)...'
이제 이러한 특이 사례는 검증 콜백에 의해 아키텍처로 적용됩니다.
방금 빌드한 항목
3개의 전문 에이전트를 아키텍처 검증을 통해 원활하고 신뢰할 수 있는 시스템으로 오케스트레이션했습니다.
다음 단계
이제 신뢰할 수 있는 에이전트 빌드의 기술적 핵심을 완료했습니다.
이제 인증서 체인을 적용하는 완전한 신뢰할 수 있는 시스템을 로컬로 빌드했습니다. 이제 프로덕션 배포를 통해 실제 사용자가 액세스할 수 있도록 하고 모듈 9를 가능하게 하는 책임 추적을 사용 설정해 보겠습니다.
강화된 에이전트를 Google Cloud에 배포해 보겠습니다.
8. 배포
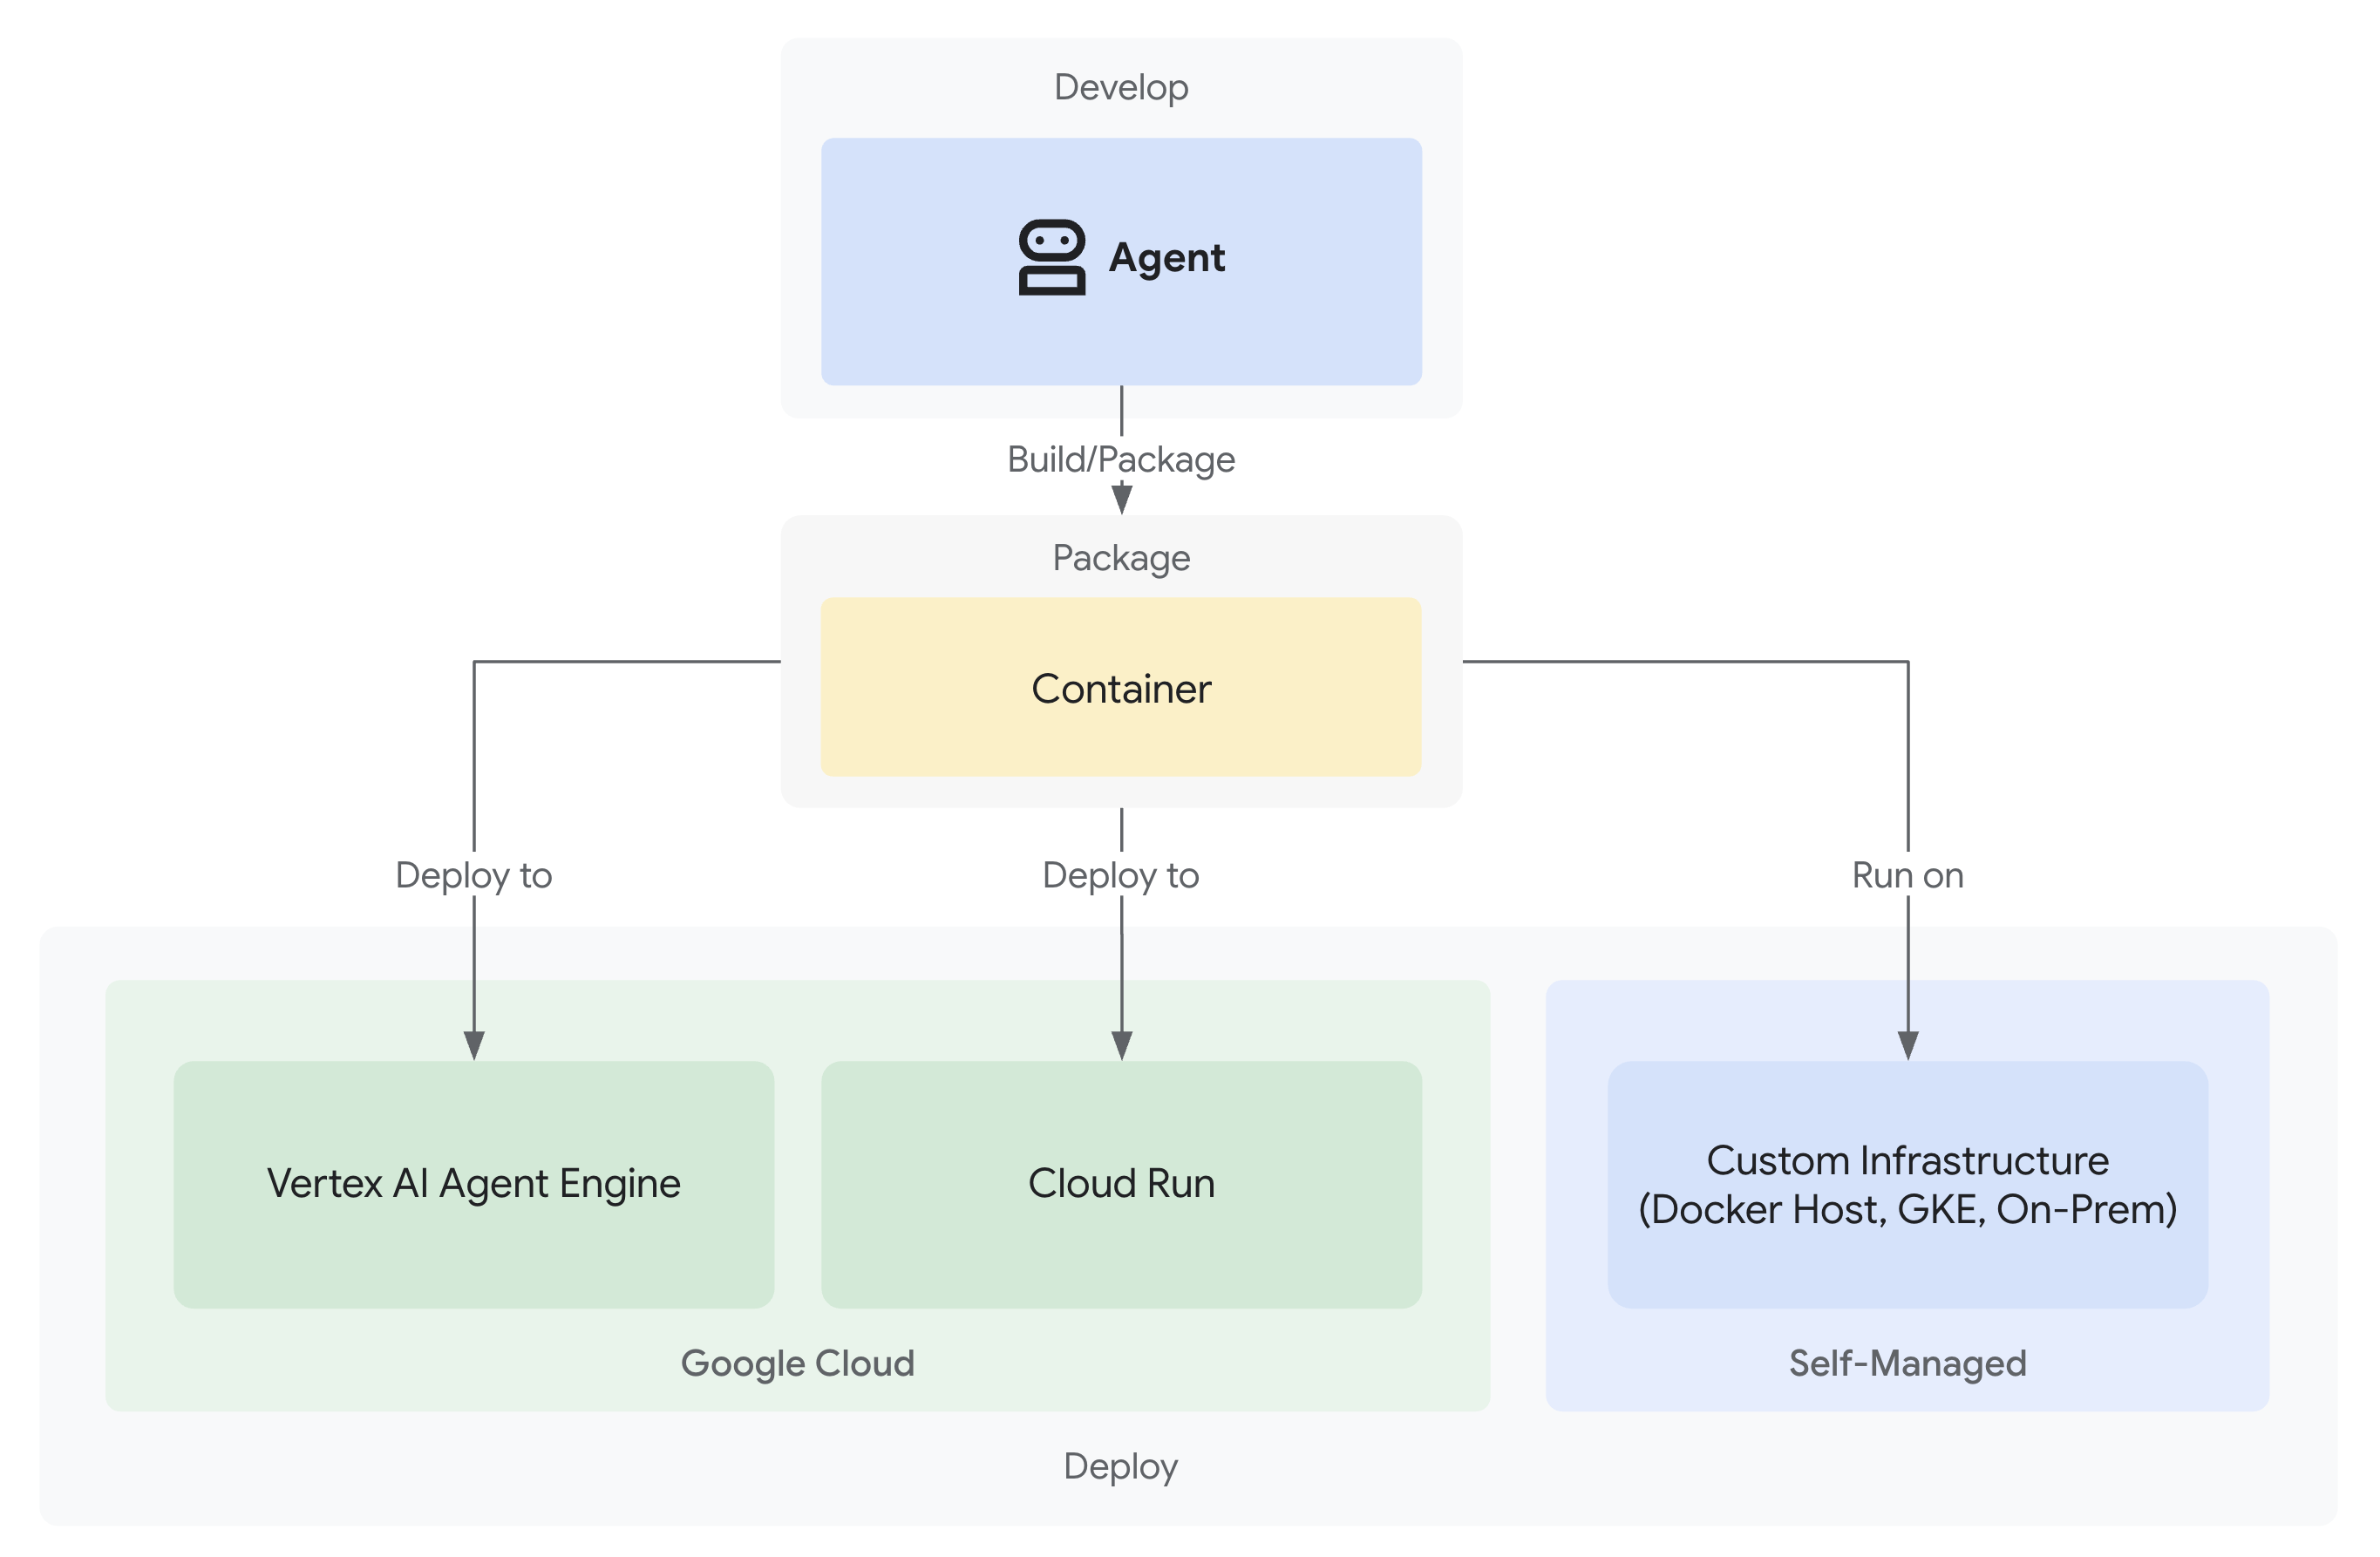
이제 신뢰할 수 있는 기부 시스템이 로컬에서 작동하는 세 가지 전문 에이전트로 완성되었습니다.
하지만 개발 머신에서만 실행됩니다. 이 시스템이 실제 사용자에게 유용하고 신뢰성을 증명하는 책임 추적을 포착하려면 프로덕션에 배포해야 합니다.
이 모듈에서는 처음부터 관찰 가능성을 사용 설정하여 Google Cloud에 에이전트를 배포하는 방법을 안내합니다. 배포 중에 사용할 --trace_to_cloud 플래그를 통해 모듈 9에서 책임 추적이 가능합니다.
배포 옵션 이해하기
ADK는 여러 배포 대상을 지원합니다. 각각 복잡성, 세션 관리, 확장, 비용에 대한 특성이 다릅니다.
인수 분해 | 지역( | 에이전트 엔진 | Cloud Run |
복잡성 | 최소 | 낮음 | 보통 |
세션 지속성 | 인메모리 전용 (다시 시작하면 손실됨) | Vertex AI 관리형 (자동) | Cloud SQL (PostgreSQL) 또는 인메모리 |
인프라 | 없음 (개발자 머신만 해당) | 완전 관리형 | 컨테이너 + 선택적 데이터베이스 |
콜드 스타트 | 해당 사항 없음 | 100~500ms | 100~2,000ms |
확장 | 단일 인스턴스 | 자동 | 자동 (0) |
비용 모델 | 무료 (로컬 컴퓨팅) | 컴퓨팅 기반 | 요청 기반 + 무료 등급 |
UI 지원 | 예 (내장) | 아니요 (API만 해당) | 예 ( |
관측 가능성 설정 | 로컬 trace 뷰어 |
|
|
용도 | 개발 및 테스트 | 프로덕션 에이전트 | 프로덕션 에이전트 |
권장사항: 이 신뢰할 수 있는 기부 시스템에는 다음과 같은 이점이 있는 Agent Engine을 기본 프로덕션 배포로 사용하는 것이 좋습니다.
- 완전 관리형 인프라 (관리할 컨테이너 없음)
VertexAiSessionService를 통한 내장 세션 지속성- 콜드 스타트 없는 자동 확장
- 간소화된 배포 (Docker 지식 필요 없음)
- 기본 제공 Cloud Trace 통합
추가 옵션: Google Kubernetes Engine (GKE)
Kubernetes 수준 제어, 맞춤 네트워킹 또는 다중 서비스 오케스트레이션이 필요한 고급 사용자의 경우 GKE 배포를 사용할 수 있습니다. 이 옵션은 최대한의 유연성을 제공하지만 운영 전문 지식 (클러스터 관리, 매니페스트, 서비스 계정)이 더 많이 필요합니다.
GKE 배포는 이 Codelab에서 다루지 않지만 ADK GKE 배포 가이드에 자세히 설명되어 있습니다.
기본 요건
1. Google Cloud 프로젝트 설정
결제가 사용 설정된 Google Cloud 프로젝트가 필요합니다. 계정이 없는 경우 다음 단계를 따르세요.
- 프로젝트 만들기: Google Cloud 콘솔
- 결제 사용 설정: 결제 사용 설정
- 프로젝트 ID (프로젝트 이름 또는 번호 아님)를 기록합니다.
2. 재인증 (선택사항)
Google Cloud로 인증합니다.
gcloud auth application-default login
gcloud config set project YOUR_PROJECT_ID
YOUR_PROJECT_ID를 실제 Google Cloud 프로젝트 ID로 바꿉니다.
인증을 확인합니다.
gcloud config get-value project
# Should output: YOUR_PROJECT_ID
3. 환경 변수
다음 명령어를 사용하여 .env 파일을 자동 완성합니다.
# Get your current Project ID
PROJECT_ID=$(gcloud config get-value project)
STAGING_BUCKET_VALUE="gs://${PROJECT_ID}-staging"
ENV_FILE=".env"

# Check if STAGING_BUCKET is already set in the .env file
if grep -q "^STAGING_BUCKET=" "${ENV_FILE}"; then
  # If it exists, replace the line
  # The sed command finds the line starting with STAGING_BUCKET= and replaces the entire line.
  # Using | as a delimiter to avoid issues with slashes in the bucket name.
  sed -i "s|^STAGING_BUCKET=.*|STAGING_BUCKET=${STAGING_BUCKET_VALUE}|" "${ENV_FILE}"
  echo "Updated STAGING_BUCKET in ${ENV_FILE}"
else
  # If it doesn't exist, add it to the end of the file
  echo "STAGING_BUCKET=${STAGING_BUCKET_VALUE}" >> "${ENV_FILE}"
  echo "Added STAGING_BUCKET to ${ENV_FILE}"
fi

# Verify it was added or updated correctly
echo "Current STAGING_BUCKET setting:"
grep "^STAGING_BUCKET=" "${ENV_FILE}"
다음과 같이 표시됩니다.
STAGING_BUCKET=gs://your-actual-project-id-staging
중요사항:
YOUR_PROJECT_ID를 실제 프로젝트 ID로 바꿉니다 (또는 위의 명령어를 사용).GOOGLE_CLOUD_LOCATION의 경우 지원되는 리전을 사용합니다.- 배포 스크립트를 실행하면 스테이징 버킷이 없는 경우 자동으로 생성됩니다.
4. 필수 API 사용 설정
배포 프로세스에는 여러 Google Cloud API가 사용 설정되어 있어야 합니다. 다음 명령어를 실행하여 사용 설정합니다.
gcloud services enable \
    aiplatform.googleapis.com \
    storage.googleapis.com \
    cloudbuild.googleapis.com \
    cloudtrace.googleapis.com \
    compute.googleapis.com
이 명령어는 다음을 사용 설정합니다.
- AI Platform API - Agent Engine 및 Vertex AI 모델용
- Cloud Storage API - 스테이징 버킷
- Cloud Build API - 컨테이너 빌드 (Cloud Run)
- Cloud Trace API - 관측 가능성 및 책임 추적
- Compute Engine API - 서비스 계정 관리
1단계: 배포 인프라 이해하기
프로젝트에 모든 배포 모드를 처리하는 통합 배포 스크립트 (deploy.sh)가 포함되어 있습니다.
👉 배포 스크립트 검토 (선택사항):
cat deploy.sh
스크립트는 세 가지 배포 모드를 제공합니다.
./deploy.sh local- 인메모리 스토리지를 사용하여 로컬에서 실행./deploy.sh agent-engine- Vertex AI Agent Engine에 배포 (권장)./deploy.sh cloud-run- 선택적 UI를 사용하여 Cloud Run에 배포
내부 작동 방식:
Agent Engine 배포의 경우 스크립트는 다음을 실행합니다.
adk deploy agent_engine \
  --project=$GOOGLE_CLOUD_PROJECT \
  --region=$GOOGLE_CLOUD_LOCATION \
  --staging_bucket=$STAGING_BUCKET \
  --display_name="Charity Advisor" \
  --trace_to_cloud \
  charity_advisor
Cloud Run 배포의 경우 다음을 실행합니다.
adk deploy cloud_run \
  --project=$GOOGLE_CLOUD_PROJECT \
  --region=$GOOGLE_CLOUD_LOCATION \
  --service_name="charity-advisor" \
  --app_name="charity_advisor" \
  --with_ui \
  --trace_to_cloud \
  charity_advisor
--trace_to_cloud 플래그는 두 배포 유형 모두에 중요합니다. 이 플래그를 사용하면 모듈 9에서 살펴볼 책임 추적을 위한 Cloud Trace 통합이 사용 설정됩니다.
2단계: 에이전트 엔진 래퍼 준비
Agent Engine에는 관리형 런타임용 에이전트를 래핑하는 특정 진입점이 필요합니다. 이 파일은 자동으로 생성되었습니다.
👉 검토
charity_advisor/agent_engine_app.py
:
"""Agent Engine application wrapper.

This file prepares the Charity Advisor agent for deployment to Vertex AI Agent Engine.
"""

from vertexai import agent_engines
from .agent import root_agent

# Wrap the agent in an AdkApp object for Agent Engine deployment
app = agent_engines.AdkApp(
    agent=root_agent,
    enable_tracing=True,  # Enables Cloud Trace integration automatically
)
이 파일이 필요한 이유:
- Agent Engine에는
AdkApp객체로 래핑된 에이전트가 필요합니다. enable_tracing=True매개변수는 Cloud Trace 통합을 자동으로 사용 설정합니다.- 이 래퍼는 배포 중에 ADK CLI에서 참조합니다.
- 자동 세션 지속성을 위해
VertexAiSessionService를 구성합니다.
3단계: Agent Engine에 배포 (권장)
Agent Engine은 신뢰할 수 있는 기부 시스템을 위한 권장되는 프로덕션 배포입니다. 완전 관리형 인프라와 내장된 세션 지속성을 제공하기 때문입니다.
배포 실행
프로젝트 루트에서 다음을 실행합니다.
chmod +x deploy.sh
./deploy.sh agent-engine
배포 단계
스크립트가 다음 단계를 실행하는 것을 확인합니다.
Phase 1: API Enablement
  ✓ aiplatform.googleapis.com
  ✓ storage.googleapis.com
  ✓ cloudbuild.googleapis.com
  ✓ cloudtrace.googleapis.com
  ✓ compute.googleapis.com

Phase 2: IAM Setup
  ✓ Getting project number
  ✓ Granting Storage Object Admin
  ✓ Granting Vertex AI User
  ✓ Granting Cloud Trace Agent

Phase 3: Staging Bucket
  ✓ Creating gs://your-project-id-staging (if needed)
  ✓ Setting permissions

Phase 4: Validation
  ✓ Checking agent.py exists
  ✓ Verifying root_agent defined
  ✓ Checking agent_engine_app.py exists
  ✓ Validating requirements.txt

Phase 5: Build & Deploy
  ✓ Packaging agent code
  ✓ Uploading to staging bucket
  ✓ Creating Agent Engine instance
  ✓ Configuring session persistence
  ✓ Setting up Cloud Trace integration
  ✓ Running health checks
이 프로세스는 에이전트를 패키징하고 Vertex AI 인프라에 배포하므로 5~10분이 걸립니다.
에이전트 엔진 ID 저장
배포가 완료되면 다음을 수행합니다.
✅ Agent Engine created successfully!

   Agent Engine ID: 7917477678498709504
   Resource Name: projects/123456789/locations/us-central1/reasoningEngines/7917477678498709504
   Endpoint: https://us-central1-aiplatform.googleapis.com/v1/...

   ⚠️  IMPORTANT: Save the Agent Engine ID from the output above
   Add it to your .env file as:
   AGENT_ENGINE_ID=7917477678498709504

   This ID is required for:
   - Testing the deployed agent
   - Updating the deployment later
   - Accessing logs and traces
.env 파일을 즉시 업데이트합니다.
echo "AGENT_ENGINE_ID=7917477678498709504" >> .env
배포된 항목
이제 Agent Engine 배포에 다음이 포함됩니다.
✅ 관리형 런타임에서 실행되는 세 가지 에이전트 (쇼핑, 판매자, 사용자 인증 정보)
✅ 완전한 사용자 인증 정보 체인 로직 (의도 → 장바구니 → 결제 명령)
✅ 확인 워크플로가 포함된 사용자 동의 메커니즘
✅ VertexAiSessionService를 통한 자동 세션 지속성
✅ Google에서 관리하는 자동 확장 인프라
✅ 완전한 관찰 가능성을 위한 Cloud Trace 통합
4단계: 배포된 에이전트 테스트
환경 업데이트
.env에 에이전트 엔진 ID가 포함되어 있는지 확인합니다.
AGENT_ENGINE_ID=7917477678498709504  # From deployment output
GOOGLE_CLOUD_PROJECT=your-project-id
GOOGLE_CLOUD_LOCATION=us-central1
STAGING_BUCKET=gs://your-project-id-staging
테스트 스크립트 실행
프로젝트에 Agent Engine 배포를 위한 테스트 스크립트가 포함되어 있습니다.
👉 테스트 실행:
python scripts/test_deployed_agent.py
정상 출력
Testing Agent Engine deployment...
Project: your-project-id
Location: us-central1
Agent Engine ID: 7917477678498709504
Endpoint: https://us-central1-aiplatform.googleapis.com/v1/...

Creating session...
✓ Session created: 4857885913439920384

Sending donation query...
✓ Response received:
  Event 1: I'll help you donate $50 to a children's education charity...
  Event 2: Here are some highly-rated children's education charities...
  Event 3: Which charity would you like to support?...

✅ Test completed successfully!

Session ID: 4857885913439920384

This donation generated a trace in Cloud Trace.
View it in Module 9: Observability

To view traces:
https://console.cloud.google.com/traces/list?project=your-project-id
인증 체크리스트
테스트 후 다음을 확인합니다.
✅ 에이전트가 질문에 응답함
✅ 세 에이전트가 순서대로 실행됨 (쇼핑 → 판매자 → 사용자 인증 정보)
✅ 동의 메커니즘이 활성화됨 (확인 요청됨)
✅ 요청 전반에 걸쳐 세션이 유지됨
✅ 인증 오류 없음
✅ 연결 시간 제한 없음
오류가 발생한 경우:
- 환경 변수가 올바르게 설정되었는지 확인
- API가 사용 설정되었는지 확인:
gcloud services list --enabled - Vertex AI 콘솔에서 Agent Engine 로그 확인
agent_engine_app.py파일이charity_advisor폴더에 있는지 확인합니다.
5단계: Cloud Run에 배포 (선택사항)
Agent Engine은 간소화된 프로덕션 배포에 권장되지만 Cloud Run은 더 많은 제어 기능을 제공하고 ADK 웹 UI를 지원합니다. 이 섹션은 선택사항입니다.
Cloud Run을 사용해야 하는 경우
다음과 같은 경우 Cloud Run을 선택하세요.
- 사용자 상호작용을 위한 ADK 웹 UI
- 컨테이너 환경에 대한 완전한 제어
- 맞춤 데이터베이스 구성
- 기존 Cloud Run 서비스와의 통합
배포 실행
chmod +x deploy.sh
./deploy.sh cloud-run
변경사항:
스크립트는 다음을 자동으로 실행합니다.
- 에이전트 코드로 Docker 컨테이너 빌드
- 필요한 경우 Cloud SQL PostgreSQL 데이터베이스 만들기
- 데이터베이스 연결 구성
- ADK 웹 UI를 사용 설정하여 배포
Cloud SQL 프로비저닝으로 인해 배포에 10~15분이 걸립니다.
세션 관리:
VertexAiSessionService대신DatabaseSessionService사용.env에 데이터베이스 사용자 인증 정보가 필요합니다 (또는 자동 생성).- 상태가 PostgreSQL 데이터베이스에 유지됨
UI 지원:
- 웹 UI는
https://charity-advisor-xyz.a.run.app에서 확인할 수 있습니다.
Cloud Run 배포 테스트
--with_ui를 사용하여 Cloud Run에 배포한 경우 브라우저에서 직접 테스트할 수 있습니다.
- 서비스 URL로 이동 (배포 출력에 제공됨)
- ADK 웹 인터페이스가 표시됩니다. 드롭다운에서 에이전트를 선택합니다.
- 테스트 후원 시작:
I want to donate $50 to a children's education charity
- 실행 흐름을 관찰합니다.
- ShoppingAgent가 자선단체를 찾아 사용자의 의도를 저장합니다.
- MerchantAgent가 장바구니 위임장을 생성합니다.
- CredentialsProvider가 결제 위임장을 생성하고 확인을 요청합니다.
- 확인하면 결제가 처리됩니다.
- 응답에 다음이 포함되어 있는지 확인합니다.
- 자선단체 추천
- 확인 요청
- 승인 후 성공 메시지
문제 해결
일반적인 문제
문제: ERROR: GOOGLE_CLOUD_PROJECT is not set
해결 방법: .env 파일에 올바른 프로젝트 ID가 있는지 확인합니다.
GOOGLE_CLOUD_PROJECT=your-actual-project-id
문제: 스테이징 버킷이 자동으로 생성되지 않음
해결 방법: 스크립트가 버킷을 자동으로 만들어야 합니다. 그렇지 않은 경우 수동으로 만듭니다.
gsutil mb -p $GOOGLE_CLOUD_PROJECT -l $GOOGLE_CLOUD_LOCATION $STAGING_BUCKET
요약
다음 작업을 완료했습니다.
✅ deploy.sh
에서 제공하는 배포 인프라를 이해했습니다. ✅ 에이전트 엔진 래퍼 구성을 검토했습니다.
✅ 신뢰할 수 있는 기부 시스템을 에이전트 엔진에 배포했습니다 (권장).
✅ --trace_to_cloud와 Cloud Trace 통합을 사용 설정했습니다.
✅ 에이전트가 액세스 가능하고 작동하는지 확인했습니다.
✅ 9단원에서 책임 추적을 위한 기반을 만들었습니다.
다음 모듈에서는 이 플래그로 무엇을 잠금 해제할 수 있는지 정확히 알아봅니다. 모든 기부, 모든 동의 순간, 모든 사용자 인증 정보 체인의 단계를 완전히 파악할 수 있습니다.
9. 관측 가능성
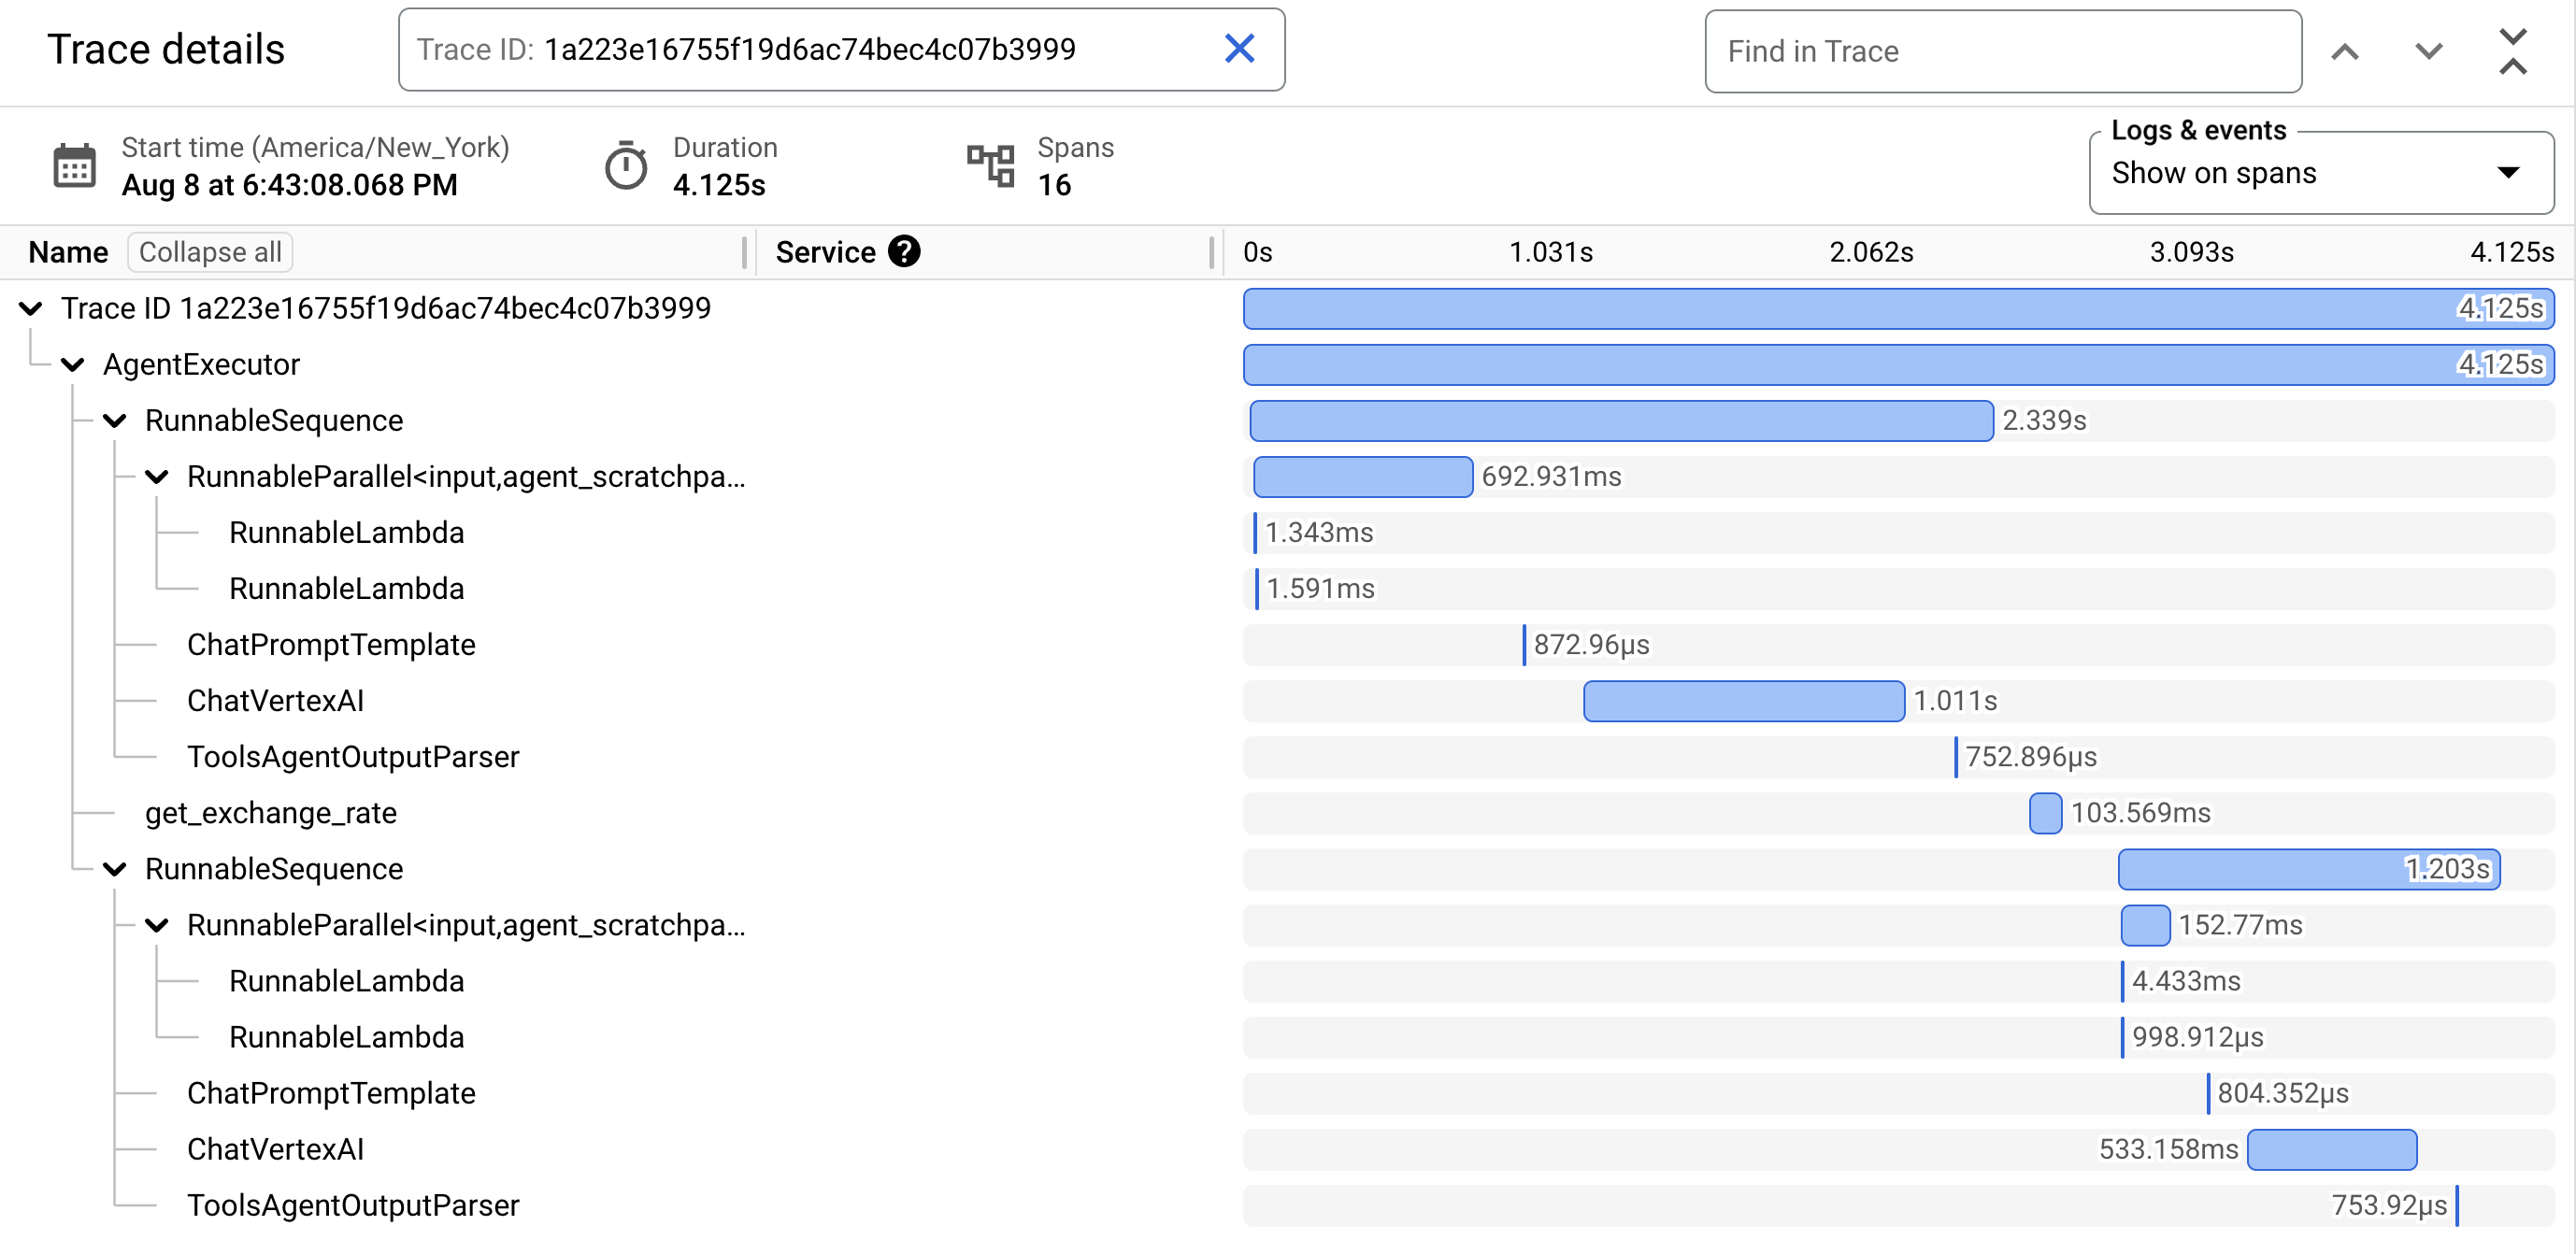
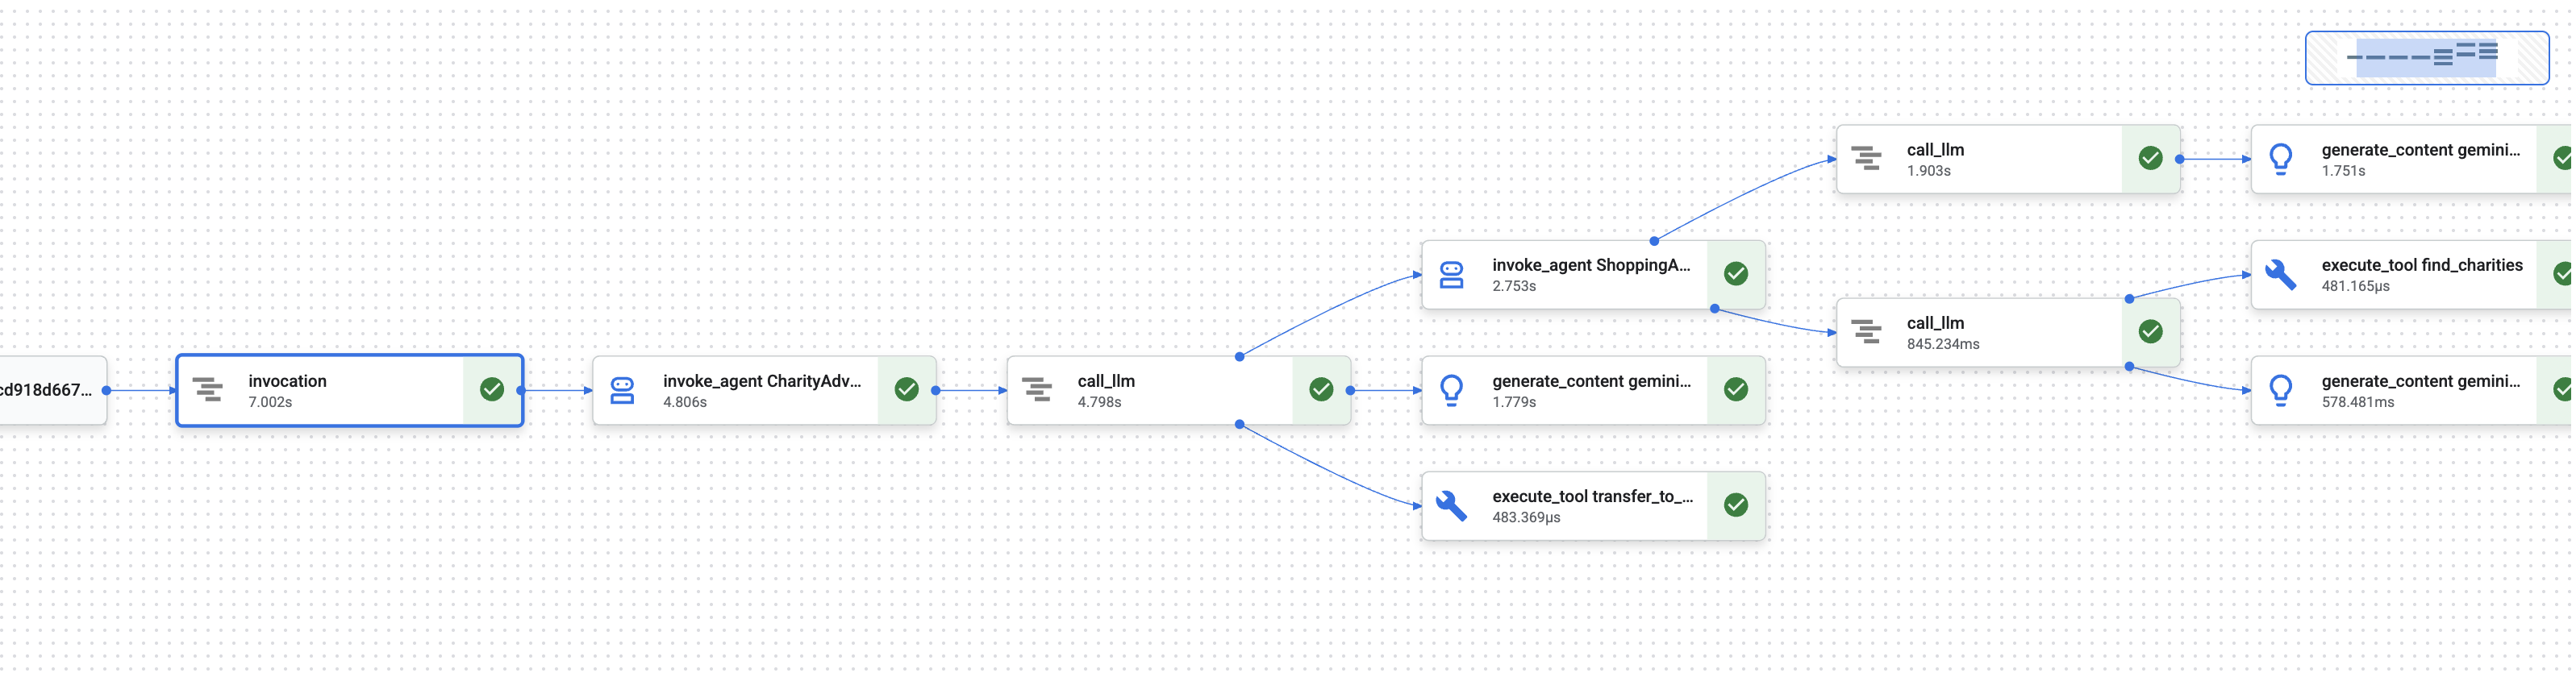
모듈 1에서는 AI 에이전트가 돈을 처리할 때 무슨 일이 일어났는지 어떻게 증명할 수 있는지라는 기본적인 문제에 대해 알아봤습니다.
사용자는 다음을 주장할 수 있습니다.
- '이 자선단체를 선택한 적이 없어요!'
- '이 결제를 승인하지 않았습니다.'
- '동의 없이 요금이 청구되었습니다.'
기존의 블랙박스 AI 시스템에서는 이를 증명할 방법이 없습니다. 하지만 신뢰할 수 있는 기부 시스템은 다릅니다. 모듈 8에서는 --trace_to_cloud 플래그를 사용하여 배포했으므로 이제 모든 기부로 Cloud Trace에 완전하고 조작 방지 감사 추적이 생성됩니다.
이 모듈에서는 이러한 트레이스를 읽고 증거로 사용하는 방법을 알아봅니다. 학습할 내용:
- Cloud Trace 탐색기로 이동하여 프로덕션 트레이스 찾기
- 폭포식 뷰를 읽어 실행 흐름 이해하기
- 사용자 인증 정보 체인 찾기 (인텐트 → 장바구니 → 결제 위임)
- 타임스탬프 증거로 동의 시점 찾기
- 이의 제기 해결을 위해 트레이스 사용
- 규정 준수 및 감사를 위해 트레이스 내보내기
신뢰할 수 있는 시스템과 유능하지만 불투명한 시스템을 구분하는 것은 법의학적 정확성으로 발생한 일을 증명하는 능력입니다.
트레이스 및 스팬 이해
Cloud Trace에서 트레이스를 보기 전에 무엇을 보고 있는지 이해해야 합니다.
추적이란 무엇인가요?
trace는 에이전트가 단일 요청을 처리하는 전체 타임라인입니다. 사용자가 질문을 보낸 시점부터 최종 응답이 전송될 때까지의 모든 것을 캡처합니다.
각 추적에는 다음이 표시됩니다.
- 요청의 총 기간
- 실행된 모든 작업
- 작업 간 관계 (상위-하위 관계)
- 각 작업이 시작되고 종료된 시간
- 성공 또는 실패 상태
자선단체 상담사: 추적 1개 = '기부하고 싶습니다'부터 '결제 완료'까지의 전체 기부 흐름 1개
스팬이란 무엇인가요?
스팬은 트레이스 내의 단일 작업 단위를 나타냅니다. 스팬은 트레이스의 구성요소라고 생각하면 됩니다.
기부 시스템의 일반적인 스팬 유형:
스팬 유형 | 의미 | 예 |
| 에이전트 실행 |
|
| 언어 모델에 대한 요청 |
|
| 도구 함수 실행 |
|
| 세션 메모리에서 읽기 | 상태에서 |
| 세션 메모리에 쓰기 | 상태에 |
각 범위에는 다음이 포함됩니다.
- 이름: 이 작업이 나타내는 것
- 소요 시간 (시작 시간 → 종료 시간)
- 속성: 도구 입력, 모델 응답, 토큰 수와 같은 메타데이터
- 상태: 성공 (
OK) 또는 오류 (ERROR) - 상위-하위 관계: 어떤 작업이 어떤 작업을 트리거했는지
스팬이 트레이스를 형성하는 방식
스팬은 인과관계를 보여주기 위해 서로 중첩됩니다.
Root Span: CharityAdvisor.run (entire request)
  └─ Child: DonationPipeline.run (sequential workflow)
      ├─ Child: ShoppingAgent.run
      │   ├─ Grandchild: call_llm (Gemini processes charity search)
      │   ├─ Grandchild: execute_tool (find_charities)
      │   └─ Grandchild: execute_tool (save_user_choice)
      ├─ Child: MerchantAgent.run
      │   ├─ Grandchild: call_llm (Gemini generates cart)
      │   └─ Grandchild: execute_tool (create_cart_mandate)
      └─ Child: CredentialsProvider.run
          ├─ Grandchild: call_llm (Gemini processes payment)
          └─ Grandchild: execute_tool (create_payment_mandate) [CONSENT!]
이 계층 구조는 정확히 어떤 일이 어떤 순서로 발생했는지 보여줍니다. 결제 위임은 장바구니 위임 후에 생성되었으며, 장바구니 위임은 사용자가 자선단체를 선택한 후에 생성되었습니다.
1단계: Cloud Trace 탐색기 액세스
이제 배포된 에이전트의 실제 트레이스를 확인해 보겠습니다.
Cloud Trace로 이동
- Google Cloud 콘솔 열기: console.cloud.google.com
- 상단의 드롭다운에서 프로젝트를 선택합니다 (작업 중인 경우 사전 선택됨).
- Cloud Trace 탐색기로 이동합니다.
- 왼쪽 사이드바에서 모니터링 가능성 섹션으로 스크롤합니다.
- Trace를 클릭합니다.
- 또는 직접 링크 console.cloud.google.com/traces/list를 사용합니다.
표시되는 내용
Trace Explorer에는 프로젝트의 모든 트레이스 목록이 표시됩니다.
열 | 표시되는 내용 |
요청 | HTTP 메서드 및 엔드포인트 (API 요청용) |
시작 시간 | 요청이 시작된 시간 |
지연 시간 | 요청의 총 기간 |
스팬 | 트레이스의 작업 수 |
각 행은 배포된 에이전트에 대한 하나의 완전한 요청을 나타냅니다.
테스트 트레이스 생성 (필요한 경우)
아직 트레이스가 표시되지 않는 경우 다음 이유로 목록이 비어 있을 수 있습니다.
- 배포된 에이전트에 대한 요청이 아직 없습니다.
- 요청 후 트레이스가 표시되는 데 1~2분 정도 걸립니다.
테스트 트레이스 생성:
UI를 사용하여 Cloud Run에 배포한 경우 서비스 URL을 방문하여 브라우저에서 기부를 완료합니다.
Agent Engine에 배포한 경우 모듈 8에서 테스트 스크립트를 실행합니다.
python scripts/test_deployed_agent.py
1~2분 정도 기다린 후 Cloud Trace 탐색기 페이지를 새로고침합니다. 이제 트레이스가 표시됩니다.
트레이스 필터링
상단의 필터 옵션을 사용하여 특정 트레이스를 찾습니다.
- 기간: 필요한 경우 '지난 1시간'에서 '지난 24시간'으로 변경합니다.
- 최소 지연 시간 / 최대 지연 시간: 느린 요청 필터링
- 요청 필터: 특정 작업 (예: 'DonationPipeline')으로 검색
이 모듈에서는 기간이 긴 (>5초) 트레이스에 집중하세요. 이러한 트레이스는 세 에이전트가 모두 실행되는 완전한 기부 흐름을 나타내기 때문입니다.
2단계: 전체 기부 흐름 살펴보기
목록에서 트레이스를 클릭하여 폭포 보기를 엽니다. 여기에서 에이전트 동작을 분석하는 데 대부분의 시간을 할애하게 됩니다.
폭포식 구조 보기 이해하기
폭포식 뷰는 전체 실행 타임라인을 보여주는 Gantt 차트입니다.
━━━━━━━━━━━━━━━━━━━━━━━━━━━━━━━━━━━━━━━━━━━━━━━━━
              Timeline (horizontal = time) →
━━━━━━━━━━━━━━━━━━━━━━━━━━━━━━━━━━━━━━━━━━━━━━━━━

invocation                           ▓▓▓▓▓▓▓▓▓▓▓▓▓▓▓▓▓▓▓▓▓▓ 8.2s
  agent_run: CharityAdvisor          ▓▓▓▓▓▓▓▓▓▓▓▓▓▓▓▓▓▓▓▓▓ 8.1s
    agent_run: DonationPipeline      ▓▓▓▓▓▓▓▓▓▓▓▓▓▓▓▓▓▓▓▓ 7.9s
      agent_run: ShoppingAgent       ▓▓▓▓▓▓ 2.1s
        call_llm: gemini-2.5-flash   ▓▓▓▓ 1.2s
        execute_tool: find_charities ▓▓ 0.5s
        execute_tool: save_user_choice ▓ 0.3s
      agent_run: MerchantAgent       ▓▓▓ 1.8s
        call_llm: gemini-2.5-flash   ▓▓ 0.9s
        execute_tool: create_cart_mandate ▓ 0.7s
      agent_run: CredentialsProvider ▓▓▓▓▓▓▓▓ 4.0s
        call_llm: gemini-2.5-flash   ▓▓ 0.8s
        execute_tool: create_payment_mandate ▓▓▓▓▓ 3.0s [CONSENT]
차트 읽기
각 막대는 스팬을 나타냅니다.
- 수평 위치: 시작 시간
- 길이: 소요 시간
- 들여쓰기: 상위-하위 관계를 표시합니다.
- 색상: 일반적으로 정상은 파란색, 오류는 빨간색
이 예 추적의 주요 관찰 결과:
✅ 총 시간: 8.2초
✅ 순차적 실행: ShoppingAgent가 완료된 후에 MerchantAgent가 시작됨
✅ MerchantAgent 완료됨
before
CredentialsProvider 시작됨
✅ 동의가 가장 긴 작업이었습니다. create_payment_mandate의 경우 3.0초 (사용자 확인을 기다렸기 때문)
✅ LLM 호출이 표시됨: 각 에이전트가 Gemini 요청을 한 번 실행함
✅ 도구 호출이 포착됨: 6개 도구가 모두 성공적으로 실행됨
이 시각적 요소는 시간이 어디에 사용되었는지와 작업이 실행된 순서를 즉시 보여줍니다.
스팬을 클릭하여 세부정보 확인
invocation 스팬 (상단의 루트 스팬)을 클릭합니다. 오른쪽 패널에 다음과 같은 세부 속성이 표시됩니다.
{
  "http.method": "POST",
  "http.status_code": 200,
  "http.url": "https://charity-advisor-xyz.a.run.app/api/run",
  "user_id": "test_user_123",
  "session_id": "4857885913439920384",
  "trace_id": "a1b2c3d4e5f6...",
  "span_id": "1234567890abcdef"
}
이러한 속성은 전체 요청에 관한 컨텍스트를 제공합니다.
3단계: 사용자 인증 정보 체인 찾기
신뢰할 수 있는 시스템은 사용자 인증 정보 체인을 사용하여 각 단계에서 승인을 증명합니다.
IntentMandate (User chose charity)
    ↓
CartMandate (Merchant created cart, signed IntentMandate)
    ↓
PaymentMandate (Payment provider created payment, signed CartMandate)
트레이스에서 각 명령어를 찾아보겠습니다.
IntentMandate 찾기
execute_tool: save_user_choice 스팬 (ShoppingAgent 아래)을 클릭합니다.
속성 패널에는 다음 정보가 표시됩니다.
{
  "tool.name": "save_user_choice",
  "tool.input.charity_name": "Save the Children",
  "tool.input.amount": 50,
  "tool.output.status": "success",
  "tool.output.intent_mandate": {
    "charity_name": "Save the Children",
    "amount": 50,
    "timestamp": "2024-11-08T15:30:12.345Z",
    "signature": "a3f7b9c1d2e4..."
  }
}
이를 통해 다음을 알 수 있습니다.
- ✅ 사용자가 '세이브더칠드런'을 선택함
- ✅ 금액이 50달러였습니다.
- ✅ 선택사항이 15시 30분 12초(UTC)에 기록됨
- ✅ 서명이 생성되었습니다 (프로덕션에서는 암호화됨).
이제 IntentMandate가 세션 상태에 있으며 후속 에이전트가 사용할 수 있습니다.
CartMandate 찾기
execute_tool: create_cart_mandate 범위 (MerchantAgent 아래)를 클릭합니다.
속성 패널에서 다음 단계를 따르세요.
{
  "tool.name": "create_cart_mandate",
  "tool.input.intent_mandate": {
    "charity_name": "Save the Children",
    "amount": 50,
    "signature": "a3f7b9c1d2e4..."
  },
  "tool.output.status": "success",
  "tool.output.cart_mandate": {
    "cart_id": "cart_7893",
    "intent_signature": "a3f7b9c1d2e4...",
    "cart_signature": "e8f2a9b3c7d1...",
    "timestamp": "2024-11-08T15:30:14.789Z"
  }
}
이를 통해 다음을 알 수 있습니다.
- ✅ MerchantAgent가 IntentMandate를 수신함 (입력에 표시됨)
- ✅ ID가 'cart_7893'인 장바구니가 생성되었습니다.
- ✅ 장바구니 서명이 IntentMandate 서명을 참조합니다 (체인 링크).
- ✅ 15:30:14 UTC에 생성됨 (의도 후 2.4초)
이제 CartMandate가 IntentMandate를 참조하여 체인을 형성합니다.
PaymentMandate 찾기
execute_tool: create_payment_mandate 범위 (CredentialsProvider 아래)를 클릭합니다.
속성 패널에서 다음 단계를 따르세요.
{
  "tool.name": "create_payment_mandate",
  "tool.input.cart_mandate": {
    "cart_id": "cart_7893",
    "intent_signature": "a3f7b9c1d2e4...",
    "cart_signature": "e8f2a9b3c7d1..."
  },
  "tool.confirmation_required": true,
  "tool.confirmation_timestamp": "2024-11-08T15:30:17.891Z",
  "tool.user_response": "CONFIRMED",
  "tool.wait_duration_ms": 29168,
  "tool.output.status": "success",
  "tool.output.payment_mandate": {
    "payment_id": "pay_9821",
    "cart_signature": "e8f2a9b3c7d1...",
    "payment_signature": "b4c9e2a7f8d3...",
    "timestamp": "2024-11-08T15:30:47.059Z"
  }
}
이를 통해 전체 체인이 증명됩니다.
- ✅ CredentialsProvider가 CartMandate를 수신했습니다 (입력에 표시됨).
- ✅ 결제에서 CartMandate 서명을 참조합니다 (체인 링크).
- ✅ 확인이 필요함 (
confirmation_required: true) - ✅ 사용자가 15:30:17(UTC)에 확인
- ✅ 시스템이 사용자 결정을 위해 29.2초 동안 기다림
- ✅ 확인 후 결제가 생성됨 (타임스탬프: 15:30:47)
체인 시각화
트레이스를 통해 사용자 인증 정보 체인이 올바르게 실행되었음을 확인할 수 있습니다.
15:30:12 UTC → IntentMandate created (signature: a3f7...)
                  ↓
15:30:14 UTC → CartMandate created (references: a3f7...)
                  ↓
15:30:17 UTC → User consent requested
                  ↓
15:30:47 UTC → PaymentMandate created (references: e8f2...)
각 위임은 이전 위임의 서명을 참조합니다. 이는 변조 방지입니다. 서명이 일치하는지 확인하여 체인을 확인할 수 있습니다.
4단계: 성능 및 병목 현상 분석
Cloud Trace는 발생한 상황을 증명할 뿐만 아니라 시간이 소요되는 위치를 보여주므로 최적화할 수 있습니다.
주 공정 식별
폭포형 뷰에서 세로 스택의 가장 긴 스팬을 찾습니다. 이는 성능 병목 현상을 나타냅니다.
예시 트레이스에서 다음을 확인할 수 있습니다.
Total: 8.2 seconds

Breakdown:
  - ShoppingAgent:         2.1s (26%)
  - MerchantAgent:         1.8s (22%)
  - CredentialsProvider:   4.0s (49%)  ← Bottleneck
  - Other overhead:        0.3s (3%)
중요한 통계: CredentialsProvider가 전체 시간의 49% 를 차지합니다. 왜냐하면
CredentialsProvider 스팬을 드릴합니다.
CredentialsProvider: 4.0s
  - call_llm:              0.8s (20%)
  - create_payment_mandate: 3.0s (75%)  ← User consent wait
  - Other:                 0.2s (5%)
3초 지연은 예상되는 것이며 좋은 것입니다.사용자가 확인하기 전에 신중하게 생각하는 것입니다. 이는 성능 문제가 아니라 신중한 동의의 증거입니다.
LLM 비용 추적
call_llm 범위를 클릭하여 토큰 사용량을 확인합니다.
{
  "llm.model": "gemini-2.5-flash",
  "llm.usage.prompt_tokens": 487,
  "llm.usage.completion_tokens": 156,
  "llm.usage.total_tokens": 643,
  "llm.response_time_ms": 1243
}
다음과 같은 용도로 사용하세요.
- 요청당 비용 추적 (토큰 × 모델 가격)
- 불필요하게 긴 프롬프트 식별
- 모델 성능 비교 (Flash vs Pro)
- 지연 시간과 품질 간 최적화
계산 예:
Gemini 2.5 Flash pricing (as of Nov 2024):
  Input:  $0.075 per 1M tokens
  Output: $0.30 per 1M tokens

This request:
  Input:  487 tokens × $0.075 / 1M = $0.000037
  Output: 156 tokens × $0.30 / 1M  = $0.000047
  Total:                            = $0.000084 (~$0.00008)

For 10,000 donations/month:
  10,000 × 3 agents × $0.00008 = $2.40/month in LLM costs
이 세부적인 가시성을 통해 모델 선택에 관한 데이터 기반 결정을 내릴 수 있습니다.
트레이스 간 비교
여러 트레이스를 필터링하고 기간을 비교합니다.
Trace 1: 8.2s  (with consent wait: 3.0s)
Trace 2: 12.5s (with consent wait: 7.8s)  ← User took longer
Trace 3: 5.1s  (with consent wait: 0.2s)  ← User clicked fast
Trace 4: 6.3s  (with consent wait: 1.5s)
통계: 대부분의 변동은 시스템 성능이 아닌 사용자 결정 시간에서 발생합니다. 핵심 에이전트 실행 (동의 제외)은 약 5초로 일관됩니다.
이는 시스템이 안정적으로 작동하고 있음을 나타냅니다.
프로덕션 시스템의 경우 사용자가 불만을 제기하기 전에 문제를 파악할 수 있도록 알림을 설정합니다.
높은 오류율에 대한 알림
트레이스의 5% 이상에 오류가 포함된 경우 알림을 만듭니다.
- Cloud Monitoring으로 이동합니다.
- 알림 → 정책 만들기를 클릭합니다.
- 구성:
Resource: Cloud Trace Span
Metric: Span error count
Condition: Rate > 5% over 5 minutes
Notification: Email your-team@example.com
높은 지연 시간에 대한 알림
p95 지연 시간이 15초를 초과하면 알림을 만듭니다.
Resource: Cloud Trace
Metric: Span duration (95th percentile)
Condition: > 15000ms for 5 minutes
Notification: PagerDuty
이렇게 하면 사용자 경험에 영향을 미치기 전에 성능 저하를 포착할 수 있습니다.
동의 누락에 대한 알림
확인 없이 결제가 처리되는 경우 알림을 생성합니다.
Resource: Cloud Trace Span
Filter: tool.name="create_payment_mandate" AND tool.confirmation_required!=true
Condition: Any match
Notification: Critical alert to security team
이는 안전 위반 감지기입니다. 이 감지기가 작동하면 동의 메커니즘에 매우 심각한 문제가 있는 것입니다.
학습한 내용
이제 Cloud Trace를 통해 다음 작업을 수행하는 방법을 알게 되었습니다.
✅ Cloud Trace 탐색기 탐색을 통해 프로덕션 추적 찾기
✅ 폭포식 보기 읽기를 통해 전체 실행 흐름 확인하기
✅ IntentMandate → CartMandate → PaymentMandate를 통해 사용자 인증 정보 체인 추적하기 ✅ 분쟁 해결을 위한 증거로 추적 사용하기
✅ 성능 분석을 통해 병목 현상 식별하기
✅ 세부적인 수준에서 LLM 비용 추적하기
이로 인한 차이점
동일한 '이 결제를 승인한 적이 없습니다' 불만사항을 처리하는 두 시스템을 비교해 보세요.
모니터링 가능성이 없는 시스템
User: "I never authorized that $50 donation!"
You:  "Our logs show the transaction completed successfully."
User: "But I didn't approve it!"
You:  "The system requires confirmation before processing."
User: "I never saw any confirmation!"
You:  "..." [no way to prove what happened]

Result: Refund issued, trust lost, user never returns.
Cloud Trace가 있는 시스템
User: "I never authorized that $50 donation!"
You:  "Let me pull up the trace from your session..."
      [Shows waterfall with consent span]
You:  "Here's the evidence:
       - 15:30:17 UTC: System asked for confirmation
       - Message shown: 'You are about to donate $50...'
       - 15:30:47 UTC: You clicked 'CONFIRM'
       - Wait time: 29.2 seconds

       The system waited almost 30 seconds for your decision.
       Here's the exact timestamp of your confirmation."

User: "Oh... I remember now. My mistake. Sorry!"

Result: Trust preserved, no refund needed, user continues using service.
이것이 바로 책임 추적의 힘입니다. '저희를 믿으세요'에서 '정확히 무슨 일이 일어났는지 보여드리겠습니다'로 전환됩니다.
다음 단계
이제 신뢰할 수 있는 에이전트 빌드의 기술적 핵심을 완료했습니다.
✅ 모듈 1~6: 신뢰할 수 있는 아키텍처 (역할, 사용자 인증 정보, 동의) 설계
✅ 모듈 7: 복잡한 워크플로 오케스트레이션 (SequentialAgent)
✅ 모듈 8: 모니터링 가능성이 사용 설정된 상태로 배포
✅ 모듈 9: 책임 추적을 읽고 사용하는 방법 학습
빌드한 아키텍처(역할 분리, 사용자 인증 정보 체인, 동의 메커니즘, 완전한 관측 가능성)는 실제 돈, 실제 데이터, 실제 결과를 처리하는 프로덕션 시스템으로 직접 이전됩니다.
10. 앞으로 나아가는 여정
빌드한 항목
이 워크숍은 '실제로 돈을 맡길 수 있는 AI 에이전트를 어떻게 빌드하나요?'라는 질문으로 시작했습니다.
이제 답을 알게 되었습니다.
시작한 위치 (모듈 3):
simple_agent = Agent(
    model="gemini-2.5-flash",
    instruction="Find charities and donate",
    tools=[google_search]
)
현재 위치 (모듈 10):
- ✅ 역할 분리가 적용된 3개의 전문 에이전트
- ✅ 검증 가능한 사용자 인증 정보 3개 (의도 → 장바구니 → 결제 위임)
- ✅ 각 단계에서 만료 확인을 통해 인증 정보 체인 완료
- ✅ 타임스탬프 증거가 포함된 명시적 동의 메커니즘
- ✅ 관측 가능성을 갖춘 Agent Engine에 프로덕션 배포
- ✅ Cloud Trace에서 완전한 책임 추적
- ✅ 분쟁 해결을 위한 포렌식 증거
워크숍과 프로덕션의 차이
시스템이 올바른 아키텍처와 패턴을 보여주지만 실제 돈과 실제 사용자를 위해 업그레이드해야 하는 교육용 단순화를 사용합니다.
간소화된 항목과 프로덕션에 필요한 항목은 다음과 같습니다.
구성요소 | 워크숍 구현 | 제작 요구사항 |
서명 | 데모용 SHA-256 해시 ( | 비공개 키가 있는 PKI 또는 JWT를 사용하는 실제 암호화 서명 |
결제 처리 | 시뮬레이션된 반품 ( | 실제 결제 API (Stripe, PayPal, Square)와의 통합 |
사용자 인증 | 암시적 트러스트 (로그인 필요 없음) | OAuth 2.0, WebAuthn 또는 세션 관리 |
보안 비밀 관리 |
| 암호화된 Google Secret Manager 또는 Cloud KMS |
Charity Database(자선 단체 데이터베이스) | 9개의 자선단체가 포함된 모의 JSON 파일 | 라이브 API 통합 (IRS 면세 조직 검색, Charity Navigator API) |
오류 처리 | 오류 메시지가 포함된 기본 try-catch | 지수 백오프, 회로 차단기, 데드 레터 큐를 사용한 재시도 로직 |
테스트 | 스크립트를 통한 수동 확인 | CI/CD를 사용하는 포괄적인 단위/통합/E2E 테스트 모음 |
세션 지속성 | 인메모리 (로컬) 또는 자동 (Agent Engine) | 백업 및 재해 복구가 있는 프로덕션 데이터베이스 |
비율 제한 | 없음 (교육 환경) | 사용자별 비율 제한, IP 기반 스로틀링, 악용 감지 |
숙달한 주요 아키텍처 패턴
이 워크숍에서 배운 패턴은 프로덕션 패턴입니다. 의심하지 마세요.
역할 분리 (AP2 원칙 #1)
각 에이전트는 하나의 명확한 작업을 수행하며 필요한 것만 확인합니다. 한 에이전트가 보안 침해되더라도 공격자는 다른 에이전트의 데이터에 액세스할 수 없습니다. 이렇게 하면 영향 범위가 제한됩니다.
이 기능을 사용하는 프로덕션 시스템: 결제 처리, 문서 워크플로, 승인 체인, 유효성 검사 게이트가 있는 다단계 양식
검증 가능한 사용자 인증 정보 (AP2 원칙 2)
각 사용자 인증 정보에는 만료 시간이 있고 이전 사용자 인증 정보를 참조하며 다음 단계를 진행하기 전에 검증이 필요합니다. 이렇게 하면 조작 방지 감사 체인이 생성됩니다.
제작 가치: 언제, 어떤 순서로 어떤 일이 일어났는지에 대한 완전한 증거입니다. 분쟁 해결 및 규정 준수에 필수적입니다.
명시적 동의 (AP2 원칙 #3)
사용자가 작업을 승인했음을 증명하는 타임스탬프입니다. 이의 제기할 수 없습니다.
제작 가치: 금융 거래에 대한 법적 요구사항입니다. 사용자와 회사를 모두 보호합니다.
순차적 조정 (ADK 패턴)
올바른 실행 순서를 적용합니다. 단계를 건너뛰는 것을 방지합니다. 각 에이전트가 이전 에이전트의 출력을 볼 수 있도록 보장합니다.
프로덕션 가치: 사용자가 즉각적인 결과를 기대하는 human-in-the-loop 시스템에 적합합니다. 기부 흐름, 결제 프로세스, 승인 체인에 적합한 패턴입니다.
완전한 모니터링 가능성 (OpenTelemetry + Cloud Trace)
모든 결정, 도구 호출, 동의 순간, 사용자 인증 정보 전달이 자동으로 캡처됩니다.
제작 가치: 분쟁에 대한 법의학적 증거 성능 최적화 데이터입니다. 규정 준수 감사 추적 정확하게 프로덕션 문제를 디버그하세요.
지속적인 학습을 위한 리소스
ADK 문서:
AP2 및 관련 표준:
Google Cloud 서비스:
리소스 정리
지속적으로 요금이 청구되지 않도록 하려면 배포를 삭제하세요.
Agent Engine: Agent Engine 문서의 단계를 따릅니다.
Cloud Run (배포된 경우):
gcloud run services delete charity-advisor \
    --region=$GOOGLE_CLOUD_LOCATION
스토리지 버킷:
gsutil -m rm -r gs://$GOOGLE_CLOUD_PROJECT-staging
gsutil -m rm -r gs://$GOOGLE_CLOUD_PROJECT-artifacts
여정은 계속됩니다
간단한 질문으로 시작하여 완전한 답변을 구성했습니다. 신뢰할 수 있는 AI 에이전트를 위한 기본 패턴을 익혔습니다. 이러한 패턴은 AI 에이전트가 민감한 작업(금융 거래, 의료 결정, 법적 문서, 공급망 운영)을 처리하는 모든 도메인으로 이전됩니다.
원칙이 이전됩니다. 신뢰 모델이 작동합니다.
이제 신뢰할 수 있는 앱을 만들어 보세요. ❤️