1. 建立信任,激发慷慨

灵感时刻
手机会振动。您看到一则新闻报道,内容是某项成功的识字计划帮助弱势社区的儿童学会了阅读。您会强烈渴望做出贡献。您打开浏览器,搜索“儿童识字计划捐款”。
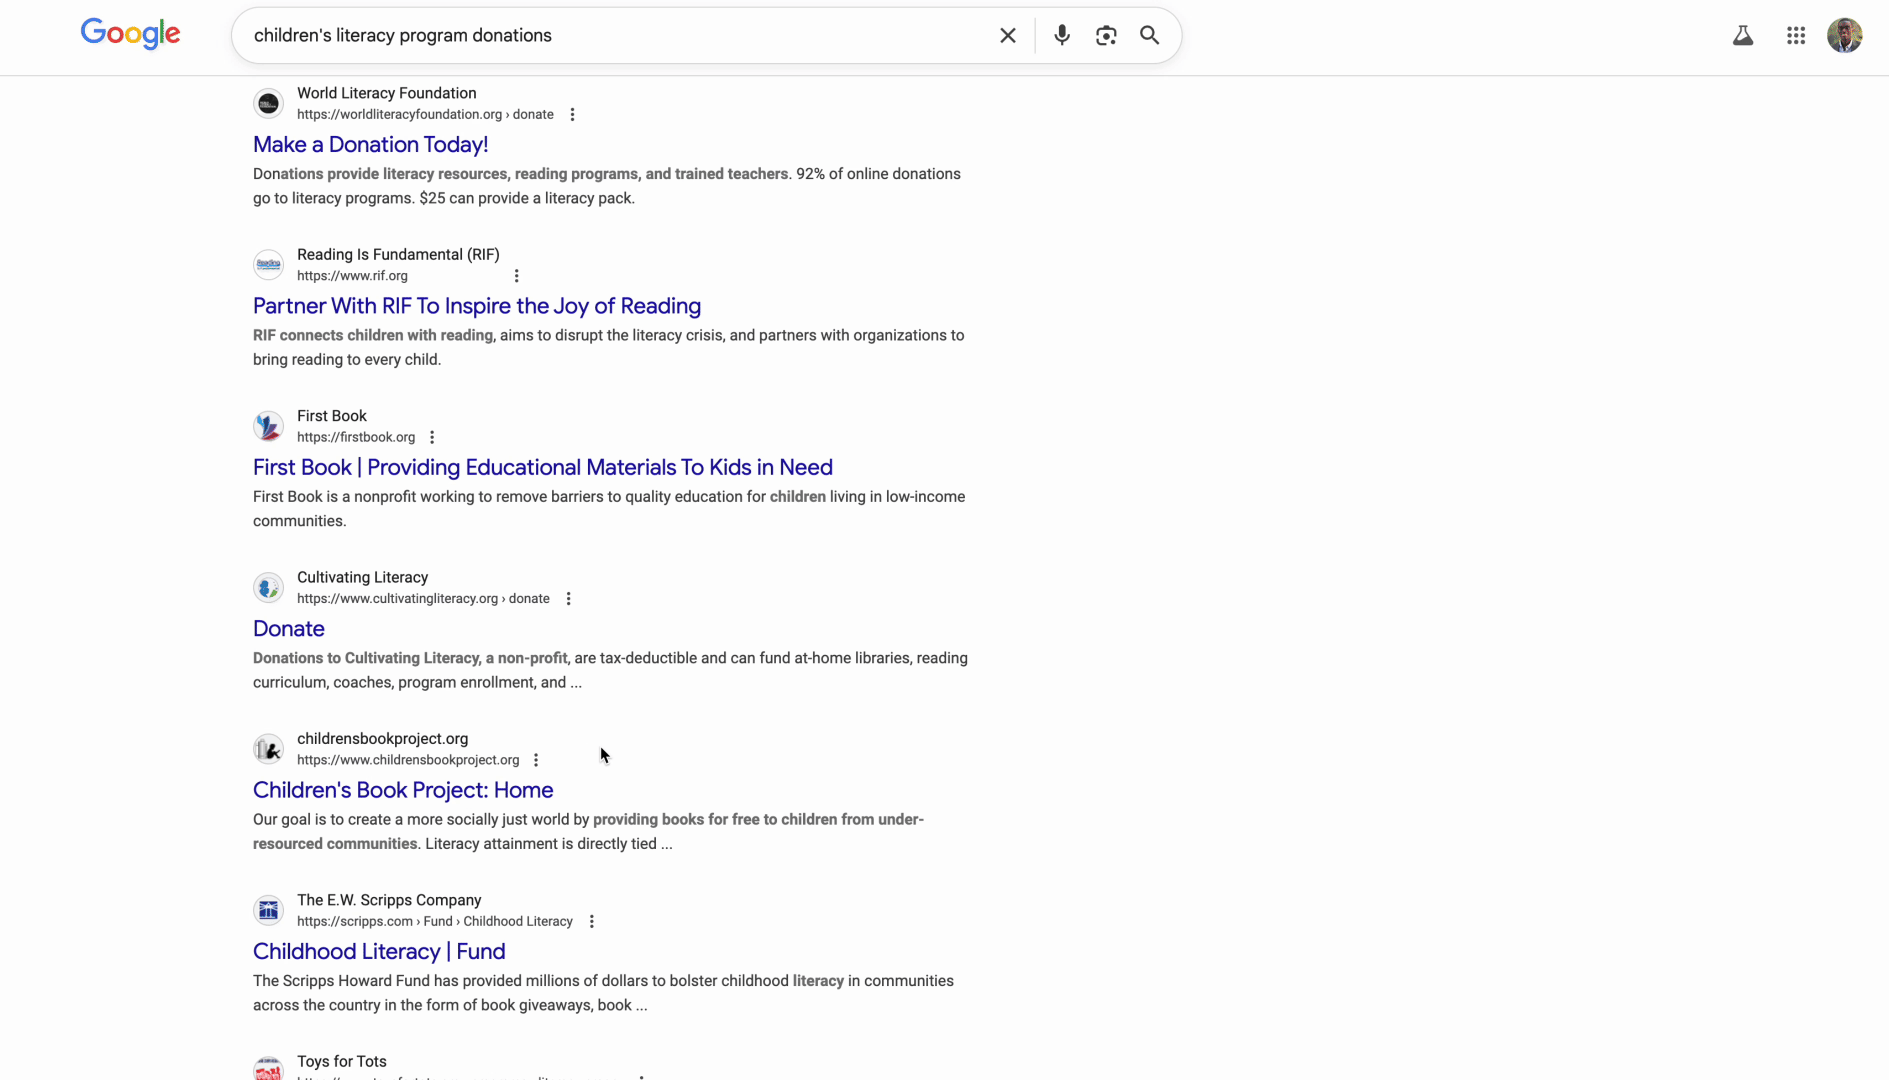
显示数百条结果。
您点击第一个链接。网站看起来很专业。您向下滚动到其财务信息。“管理费用:28%。”您暂停了。您捐赠的每一美元中,只有 72 美分会实际用于资助该计划。这样好吗?您不确定。
您尝试其他组织。您从未听说过这些公司。它们是否合法?一次快速搜索可能会让您陷入无尽的探索之中。您找到了一篇两年前的 Reddit 帖子,其中一位用户声称:“这是个骗局,我的捐款根本没到任何地方。”另一位则热情地为他们辩护:“他们正在实地开展实际工作!”这种模棱两可的状态令人无所适从。
30 分钟后,您深陷于相互矛盾的评价、效率评级和 IRS 记录中,但仍未捐款。最初的慷慨热情已被研究的摩擦所取代。该标签页会保持打开状态几天,作为对美好意愿的小小提醒,直到您最终将其关闭。
这不是个人失败,而是系统失败
此体验是通用的。人们有强烈的捐赠意愿,但捐赠流程中存在许多障碍,导致人们犹豫不决、疑虑重重:
- ❌ 研究摩擦:每个慈善机构都需要单独进行调查。
- ❌ 信任验证:很难区分高效组织与低效组织,甚至很难区分高效组织与彻头彻尾的诈骗组织。
- ❌ 选择困难症:过多的选择会导致决策疲劳。
- ❌ 动力减弱:随着后勤负担的增加,捐赠的情感动力会逐渐减弱。
这种摩擦会带来惊人的实际成本。美国个人捐款金额巨大。根据 Giving USA 2024 的数据,仅 2023 年,个人捐款就达到约 3, 740 亿美元。然而,研究表明,捐款障碍(包括搜索成本、心理摩擦和时间限制)会大幅减少慈善事业获得的捐款金额。涉及数百万捐赠者的研究发现,即使在线捐赠流程中存在少量摩擦,也会阻止人们实现慈善意图。
这意味着,本应捐给有需要的公益组织的数十亿美元捐款从未到达这些组织手中。
愿景
想象一下不同的体验。您只需说出“将研究会话时间缩短为 15 分钟”,
“我想向儿童识字计划捐款 50 美元。帮我找一家评价高、效率高且经过验证的公益组织。”
几秒钟后,您会收到一条增强信心的回答:

这就是 AI 捐赠代理的承诺。但要实现这一愿景,我们必须解决一个根本性挑战:当自主 AI 智能体处理资金时,信任不是可选项,而是整个基础。
- 如何证明用户授权了哪些内容?
- 如果出现错误,谁应负责?
- 我们如何让捐赠者、慈善机构和支付网络放心地参与其中?
您今天的任务
在本研讨会中,您将结合使用两项强大的技术来构建可信赖的代理:
Google 智能体开发套件 (ADK) | Agent Payments Protocol (AP2) | |
角色 | 用于构建生产级 AI 智能体的工厂 | AI 交易信任的架构蓝图 |
提供的内容 | • 多智能体编排框架 | • 基于角色的安全边界 |
了解详情 |
您将构建的内容

完成本研讨会后,您将能够创建:
✅ 具有专用角色的多智能体系统:
- 可查找经过验证的公益组织的购物助理
- 创建具有约束力的捐款优惠的商家代理
- 安全处理付款的凭据提供程序
- 用于协调整个流程的编排器
✅ 三种可验证凭据:
- IntentMandate:“帮我找一家教育慈善机构”
- CartMandate:“$50 to Room to Read, signed by merchant”(“$50 to Room to Read, signed by merchant”)
- PaymentMandate:“通过模拟付款进行处理”
✅ 层层安全防护:
- 基于角色的信任边界
- 明确的用户同意
✅ 完整的审核跟踪记录:
- 每个决策都可追溯
- 记录的每项同意声明
- 每次切换都可见
🔒 重要提示:这是一个安全学习环境
准备好建立信任了吗?
在下一个模块中,我们将设置开发环境并构建您的第一个 AI 智能体。您很快就会发现为什么简单智能体不可信,然后在本研讨会的剩余时间里学习如何解决这个问题。
我们先来亲身了解一下问题。
2. 准备工作区
可信赖的智能体基础
在构建 AI 捐赠代理之前,我们需要准备一个干净、一致且配置正确的开发环境。本模块是一个重点步骤,旨在确保所有必要的工具和服务都已就绪。
成功完成此设置意味着,您可以完全专注于后续模块中令人兴奋的智能体逻辑构建工作,而无需担心配置问题。
访问 Cloud Shell
首先,我们将打开 Cloud Shell,这是一个基于浏览器的终端,其中预安装了 Google Cloud SDK 和其他必备工具。
点击 Google Cloud 控制台顶部的激活 Cloud Shell(这是右上角导航栏中的终端图标)。
查找您的 Google Cloud 项目 ID:
- 打开 Google Cloud 控制台:https://console.cloud.google.com
- 从页面顶部的项目下拉菜单中选择要用于本次研讨会的项目。
- 项目 ID 会显示在信息中心内的“项目信息”卡片中
Cloud Shell 打开后,验证您是否已通过身份验证:
# Check that you are logged in
gcloud auth list
您应该会看到自己的账号显示为 (ACTIVE)。
配置项目
现在,我们来设置您的 Google Cloud 项目并启用必要的 API。
设置项目 ID
# Set your project using the auto-detected environment variable in Cloud Shell
gcloud config set project $GOOGLE_CLOUD_PROJECT

# Verify the project has been set
echo "Your active Google Cloud project is: $(gcloud config get-value project)"
启用必需的 API
您的代理需要访问多项 Google Cloud 服务:
gcloud services enable \
    aiplatform.googleapis.com \
    secretmanager.googleapis.com \
    cloudtrace.googleapis.com
此过程可能需要 1-2 分钟。您会看到:
Operation "operations/..." finished successfully.
这些 API 提供以下功能:
- aiplatform.googleapis.com:用于智能体推理的 Gemini 模型访问权限
- secretmanager.googleapis.com:用于安全存储 API 密钥(生产环境最佳实践)
- cloudtrace.googleapis.com:用于监控我们的责任链
克隆起始代码
获取包含所有模板代码和资源的工作坊代码库:
git clone https://github.com/ayoisio/adk-ap2-charity-agents
cd adk-ap2-charity-agents
git checkout codelab
我们来验证一下目前的情况:
ls -la
您应该会看到:
charity_advisor/- 我们将在其中构建智能体和工具scripts/- 用于测试和验证的辅助脚本deploy.sh- 部署帮助程序脚本setup.py- 用于模块安装的辅助脚本.env.template- 环境变量文件
设置 Python 环境
现在,我们将为项目创建一个独立的 Python 环境。
创建并激活虚拟环境
# Create the virtual environment
python3 -m venv venv

# Activate it
source venv/bin/activate
✅ 验证:您的提示现在应显示 (venv) 前缀。
安装依赖项
pip install -r charity_advisor/requirements.txt
pip install -e .
此命令会安装:
- google-adk:智能体开发套件框架
- google-cloud-aiplatform:Vertex AI 和 Gemini 集成
- ap2:代理付款协议 SDK(来自 GitHub)
- python-dotenv:环境变量管理
借助 -e 标志,您可以从任何位置导入 adk_ap2_charity_agents 模块。
配置环境文件
根据模板创建配置:
# Copy the template
cp .env.template .env

# Get your current Project ID
PROJECT_ID=$(gcloud config get-value project)

# Replace the placeholder with your actual project ID
sed -i "s/your-project-id/$PROJECT_ID/g" .env

# Verify the replacement worked
grep GOOGLE_CLOUD_PROJECT .env
您应该会看到:
GOOGLE_CLOUD_PROJECT=your-actual-project-id
验证
运行验证脚本,确保一切配置正确无误:
python scripts/verify_setup.py
您应该会看到所有绿色对勾标记:
======================================================================
SETUP VERIFICATION
======================================================================

✓ Python version: 3.11.x
✓ google-adk: 1.17.0
✓ google-cloud-aiplatform: 1.111.0+
✓ ap2: 0.1.0
✓ python-dotenv: 1.0.0+
✓ .env file found and contains project ID
✓ Google Cloud project configured: your-project-id

✓ Mock charity database found
✓ Agent templates ready
✓ All directories present

======================================================================
✓ Setup complete! You are ready to build trustworthy agents.
======================================================================
问题排查
后续步骤
您的环境现已完全准备就绪!您已完成以下操作:
- ✅ Google Cloud 项目已配置
- ✅ 已启用必需的 API
- ✅ ADK 和 AP2 库已安装
- ✅ 模板代码已准备就绪,可以修改
在下一个模块中,您将通过几行代码构建自己的第一个 AI 智能体,并了解为什么在处理金融交易时,简单的智能体不可信。
3. 您的第一个代理和发现信任差距

从构思到互动
在上一模块中,我们准备了开发环境。现在,激动人心的工作开始了。我们将构建并运行第一个智能体,为其赋予第一项能力,并在此过程中发现我们必须解决的基本挑战,才能使其真正值得信赖。
本模块是您的“前”图,它揭示了为什么构建可信赖的智能体需要的不仅仅是让 LLM 访问工具。
第 1 步:检查初始代理
首先,我们来看看第一个代理的模板。它包含一个带有占位符的基本结构,我们将在后续步骤中完成这些占位符。
👉 打开文件
charity_advisor/simple_agent/agent.py
在编辑器中。
您会看到:
"""
A simple agent that can research charities using Google Search.
"""

# MODULE_3_STEP_2_IMPORT_COMPONENTS


simple_agent = Agent(
    name="SimpleAgent",
    model="gemini-2.5-flash",

    # MODULE_3_STEP_3_WRITE_INSTRUCTION
    instruction="""""",

    # MODULE_3_STEP_4_ADD_TOOLS
    tools=[]
)
请注意,占位注释遵循以下模式:MODULE_3_STEP_X_DESCRIPTION。我们将替换这些标记,以便逐步构建代理。
第 2 步:导入必需的组件
在实例化 Agent 类或使用 google_search 工具之前,我们需要将它们导入到我们的文件中。
👉 查找:
# MODULE_3_STEP_2_IMPORT_COMPONENTS
👉 将该单行替换为:
from google.adk.agents import Agent
from google.adk.tools import google_search
现在,Agent 类和 google_search 工具已在我们的文件中提供。
第 3 步:编写智能体指令
指令是代理的“职位说明”,它会告诉 LLM 何时以及如何使用其工具。我们来编写一个引导代理搜索慈善机构信息的提示。
👉 查找:
# MODULE_3_STEP_3_WRITE_INSTRUCTION
instruction="""""",
👉 将这两行代码替换为:
instruction="""You are a helpful research assistant. When a user asks you to find information about charities,
use the google_search tool to find the most relevant and up-to-date results from the web.
Synthesize the search results into a helpful summary.""",
第 4 步:添加搜索工具
没有工具的智能体只是一个对话者。我们先为代理添加第一个功能:网络搜索功能。
👉 查找:
# MODULE_3_STEP_4_ADD_TOOLS
tools=[]
👉 将这两行代码替换为:
tools=[google_search]
第 5 步:验证完整智能体
在测试之前,我们先确认所有组件都已就位。
👉 您的完整
charity_advisor/simple_agent/agent.py
文件现在应如下所示:
"""
A simple agent that can research charities using Google Search.
"""

from google.adk.agents import Agent
from google.adk.tools import google_search


simple_agent = Agent(
    name="SimpleAgent",
    model="gemini-2.5-flash",
    instruction="""You are a helpful research assistant. When a user asks you to find information about charities,
use the google_search tool to find the most relevant and up-to-date results from the web.
Synthesize the search results into a helpful summary.""",
    tools=[google_search]
)
第 6 步:测试代理 - 揭示信任差距
现在,我们的代理已完全配置完毕,接下来让我们测试一下并分析其行为。在此处,我们将了解为什么简单智能体在处理财务决策时不可信。
测试 1:发现问题
👉 在 Cloud Shell 终端中,运行以下命令:
adk run charity_advisor/simple_agent
您应该会看到类似如下所示的输出:
INFO:google.adk.agents:Loading agent from charity_advisor/simple_agent
INFO:google.adk.agents:Agent 'SimpleAgent' ready

[user]:
[user]: 提示现在正在等待您的输入。
👉 在 [user]: 提示符处,输入:
Can you find me a verified, highly-rated charity for children's literacy?
👉 按 Enter 键,然后观察回答。
过一会儿,智能体就会将搜索结果整合为如下回答:
根据网络搜索结果,一些备受好评的儿童识字慈善机构包括 Reading Is Fundamental 和 Room to Read。建议您通过 Charity Navigator 和 GuideStar 等来源验证其状态和评级。我还发现了一些在线讨论,包括在 Reddit 等论坛上,用户分享了他们参与各种小型本地识字计划的个人经历。
我们来分析一下。客服人员是否已解决我们的问题?
❌ 否。它完美地复制了我们在模块 1 中描述的人类体验。它成功地将“Google 一下”的过程自动化,并将“分析瘫痪”问题重新抛给了我们。
这暴露了第一个信任缺口:缺乏权威数据。
智能体正在搜索开放网络,这意味着:
- ✅ 能够快速找到结果(提升用户体验)
- ❌ 它将高评价组织与 Reddit 讨论(不可靠的来源)混为一谈
- ❌ 无法区分经过审核的慈善机构和潜在的诈骗行为(没有验证)
- ❌ 它要求我们验证它刚刚提供的信息(将负担转回)
测试 2:执行问题
现在,我们来执行至关重要的第二次测试。在 [user]: 提示符处,尝试完成捐款:
Okay, please donate $50 to Room to Read for me.
智能体将回复道歉消息,承认其局限性:
我们了解到,您想捐款,这太棒了!不过,我是一名研究助理,无法处理金融交易或付款。如需捐款,您需要直接访问 Room to Read 的官方网站。
这是第二个同样重要的“灵光一现”时刻。
该智能体不仅无法可靠地找到合适的公益组织,还无法可靠地执行捐款操作。
👉 按
Ctrl+C
,以便在完成测试后退出。
以图表形式直观呈现的两个差距

您刚刚学到的内容
在本模块中,您已成功构建并装备了您的第一个 AI 智能体。这样一来,您就发现了构建可信赖系统的两大根本性挑战。
掌握的关键概念
✅ 代理类:
- ADK 的核心构建块
- 将 LLM 推理(大脑)与工具(双手)相结合
- 已配置模型、指令和工具
✅ 基于文件夹的结构:
- 每个代理都位于自己的文件夹中
- ADK 会查找
agent_folder/agent.py adk run agent_folder跑步
✅ 工具列表:
- 定义智能体功能
- LLM 决定何时以及如何使用工具
- 可以包含多个用于不同操作的工具
✅ 指令提示:
- 像职位说明一样引导智能体行为
- 指定角色、触发器、操作和输出格式
- 对于可靠地使用工具至关重要
✅ 信任问题:
- 发现差距:未经审核的来源,质量参差不齐
- 执行差距:没有安全功能、没有意见征求、没有审核轨迹
后续步骤
在下一个模块中,我们将通过实现 AP2 的基于角色的架构来开始构建解决方案。
我们来构建第一个代理,看看角色分离的实际效果。
4. 构建购物智能体 - 基于角色的发现

信任的基础:角色分离
在最后一个模块中,您发现一个简单的通用代理在两个方面都失败了:它无法提供可信的发现,也无法执行安全的交易。现在,我们将开始解决这些问题,首先要实现代理付款协议中的第一个原则:基于角色的架构。
在编写任何代码之前,我们先来了解一下为什么这个原则很重要。
AP2 原则:角色分离
“万能”代理存在的问题
假设您聘请了一位财务顾问、会计师和投资经纪人。方便吗?可以。安全吗?绝对不用。他们会:
- 您的投资目标(顾问角色)
- 对您账号的访问权限(会计师角色)
- 转移资金的权限(经纪人角色)
如果此人遭到入侵或犯了错误,那么一切都将面临风险。
AP2 的解决方案:一个代理,一个作业
AP2 应用了关注点分离原则来创建信任边界:

重要意义:
- ✅ 有限的影响范围:如果购物助理遭到入侵,攻击者无法访问付款凭据
- ✅ 隐私权:凭据提供程序绝不会看到您的购物对话
- ✅ 合规性:隔离支付数据后,更容易满足 PCI-DSS 要求
- ✅ 问责制:明确每个步骤的责任
代理如何通信:将状态作为共享记事本
由于代理无法直接访问彼此的数据,因此它们通过共享状态进行通信。您可以将其视为所有客服人员都可以写入和读取的白板:
# Shopping Agent writes:
state["intent_mandate"] = {
    "natural_language_description": "Donate $50 to Room to Read",
    "merchants": ["Room to Read"],
    "intent_expiry": "2024-11-07T15:32:16Z",
    "amount": 50.0
}

# Merchant Agent reads:
intent = state["intent_mandate"]
charity_name = intent["merchants"][0]
amount = intent["amount"]
# Creates CartMandate based on IntentMandate...

# Credentials Provider reads:
cart_mandate = state["cart_mandate"]
# Processes payment...
这样,我们既能保持信任边界,又能实现协作。
我们的首个智能体:购物智能体
购物助理的职责简单而明确:
- 使用
find_charities工具查询我们的可信数据库 - 向用户显示选项
- 使用
save_user_choice工具创建 IntentMandate 并将其保存到状态 - 转交给下一位客服人员(商家)
大功告成。无需处理付款事宜,无需创建购物车,只需发现和移交。
我们来逐步构建它。
第 1 步:添加输入验证帮助程序
在构建生产工具时,输入验证至关重要。我们来创建一个辅助函数,用于在将公益组织数据保存到状态之前对其进行验证。
👉 打开
charity_advisor/tools/charity_tools.py
您会在顶部看到 find_charities 函数(已完成)。向下滚动以查找以下内容:
# MODULE_4_STEP_1_ADD_VALIDATION_HELPER
👉 将该单行替换为:
def _validate_charity_data(charity_name: str, charity_ein: str, amount: float) -> tuple[bool, str]:
    """
    Validates charity selection data before saving to state.

    This helper function performs basic validation to ensure data quality
    before it gets passed to other agents in the pipeline.

    Args:
        charity_name: Name of the selected charity
        charity_ein: Employer Identification Number (should be format: XX-XXXXXXX)
        amount: Donation amount in USD

    Returns:
        (is_valid, error_message): Tuple where is_valid is True if all checks pass,
                                    and error_message contains details if validation fails
    """
    # Validate charity name
    if not charity_name or not charity_name.strip():
        return False, "Charity name cannot be empty"

    # Validate EIN format (should be XX-XXXXXXX)
    if not charity_ein or len(charity_ein) != 10 or charity_ein[2] != '-':
        return False, f"Invalid EIN format: {charity_ein}. Expected format: XX-XXXXXXX"

    # Validate amount
    if amount <= 0:
        return False, f"Donation amount must be positive, got: ${amount}"

    if amount > 1_000_000:
        return False, f"Donation amount exceeds maximum of $1,000,000: ${amount}"

    # All checks passed
    return True, ""
第 2 步:添加 IntentMandate 创建帮助程序
现在,我们来创建用于构建 AP2 IntentMandate 结构的辅助程序。这是 AP2 中的三种可验证凭据之一。
👉 在同一文件中,找到:
# MODULE_4_STEP_2_ADD_INTENTMANDATE_CREATION_HELPER
👉 将该单行替换为:
def _create_intent_mandate(charity_name: str, charity_ein: str, amount: float) -> dict:
    """
    Creates an IntentMandate - AP2's verifiable credential for user intent.

    This function uses the official Pydantic model from the `ap2` package
    to create a validated IntentMandate object before converting it to a dictionary.

    Args:
        charity_name: Name of the selected charity
        charity_ein: Employer Identification Number
        amount: Donation amount in USD

    Returns:
        Dictionary containing the IntentMandate structure per AP2 specification
    """
    from datetime import datetime, timedelta, timezone
    from ap2.types.mandate import IntentMandate

    # Set the expiry for the intent
    expiry = datetime.now(timezone.utc) + timedelta(hours=1)

    # Step 1: Instantiate the Pydantic model with official AP2 fields
    intent_mandate_model = IntentMandate(
        user_cart_confirmation_required=True,
        natural_language_description=f"Donate ${amount:.2f} to {charity_name}",
        merchants=[charity_name],
        skus=None,
        requires_refundability=False,
        intent_expiry=expiry.isoformat()
    )

    # Step 2: Convert the validated model to a dictionary for state storage
    intent_mandate_dict = intent_mandate_model.model_dump()

    # Step 3: Add the codelab's custom fields to the dictionary
    timestamp = datetime.now(timezone.utc)
    intent_mandate_dict.update({
        "timestamp": timestamp.isoformat(),
        "intent_id": f"intent_{charity_ein.replace('-', '')}_{int(timestamp.timestamp())}",
        "charity_ein": charity_ein,
        "amount": amount,
        "currency": "USD"
    })

    return intent_mandate_dict
第 3 步:使用 IntentMandate 构建状态切换工具
现在,我们来构建用于创建 IntentMandate 并将其保存到状态的工具。
👉 在同一文件中,向下滚动到
save_user_choice
函数。查找:
# MODULE_4_STEP_3_COMPLETE_SAVE_TOOL
👉 将该单行替换为:
    # Validate inputs before creating IntentMandate
    is_valid, error_message = _validate_charity_data(charity_name, charity_ein, amount)
    if not is_valid:
        logger.error(f"Validation failed: {error_message}")
        return {"status": "error", "message": error_message}

    # Create AP2 IntentMandate using our updated helper function
    intent_mandate = _create_intent_mandate(charity_name, charity_ein, amount)

    # Write the IntentMandate to shared state for the next agent
    tool_context.state["intent_mandate"] = intent_mandate

    logger.info(f"Successfully created IntentMandate and saved to state")
    logger.info(f"Intent ID: {intent_mandate['intent_id']}")
    logger.info(f"Intent expires: {intent_mandate['intent_expiry']}")

    # Return success confirmation
    return {
        "status": "success",
        "message": f"Created IntentMandate: ${amount:.2f} donation to {charity_name} (EIN: {charity_ein})",
        "intent_id": intent_mandate["intent_id"],
        "expiry": intent_mandate["intent_expiry"]
    }
第 4 步:添加显示格式设置帮助程序
在构建代理之前,我们再添加一个有助于设置慈善机构数据格式的辅助函数,以便以用户友好的方式显示数据。
👉 滚动以查找:
# MODULE_4_STEP_4_ADD_FORMATTING_HELPER
👉 将该单行替换为:
def _format_charity_display(charity: dict) -> str:
    """
    Formats a charity dictionary into a user-friendly display string.

    This helper function demonstrates how to transform structured data
    into readable text for the user.

    Args:
        charity: Dictionary containing charity data (name, ein, mission, rating, efficiency)

    Returns:
        Formatted string suitable for display to the user
    """
    name = charity.get('name', 'Unknown')
    ein = charity.get('ein', 'N/A')
    mission = charity.get('mission', 'No mission statement available')
    rating = charity.get('rating', 0.0)
    efficiency = charity.get('efficiency', 0.0)

    # Format efficiency as percentage
    efficiency_pct = int(efficiency * 100)

    # Build formatted string
    display = f"""
**{name}** (EIN: {ein})
⭐ Rating: {rating}/5.0
💰 Efficiency: {efficiency_pct}% of funds go to programs
📋 Mission: {mission}
    """.strip()

    return display
第 5 步:构建购物代理 - 导入组件
现在,我们的工具已经完善且功能强大,接下来我们来创建将使用这些工具的代理。
👉 打开
charity_advisor/shopping_agent/agent.py
您会看到一个包含占位评论的模板。我们来逐步构建它。
👉 查找:
# MODULE_4_STEP_5_IMPORT_COMPONENTS
👉 将该单行替换为:
from google.adk.agents import Agent
from google.adk.tools import FunctionTool
from charity_advisor.tools.charity_tools import find_charities, save_user_choice
第 6 步:编写智能体指令
指令用于定义代理的职位描述和工作流程。这一点至关重要,因为指令写得不好会导致行为不可靠。
👉 查找:
# MODULE_4_STEP_6_WRITE_INSTRUCTION
instruction="""""",
👉 将这两行代码替换为:
    instruction="""You are a research specialist helping users find verified charities.

Your workflow:

1. When the user describes what cause they want to support (e.g., "education", "health", "environment"),
   use the find_charities tool to search our vetted database.

2. Present the results clearly. The tool returns formatted charity information that you should
   show to the user.

3. When the user selects a charity and specifies an amount, use the save_user_choice tool
   to create an IntentMandate and record their decision. You MUST call save_user_choice with:
   - charity_name: The exact name of the chosen charity
   - charity_ein: The EIN of the chosen charity
   - amount: The donation amount in dollars (as a number, not a string)

4. After successfully saving, inform the user:
   - That you've created an IntentMandate (mention the intent ID if provided)
   - When the intent expires
   - That you're passing their request to the secure payment processor

IMPORTANT BOUNDARIES:
- Your ONLY job is discovery and creating the IntentMandate
- You do NOT process payments
- You do NOT see the user's payment methods
- You do NOT create cart offers (that's the Merchant Agent's job)
- After calling save_user_choice, your work is done

WHAT IS AN INTENTMANDATE:
An IntentMandate is a structured record of what the user wants to do. It includes:
- Natural language description ("Donate $50 to Room to Read")
- Which merchants can fulfill it
- When the intent expires
- Whether user confirmation is required

This is the first of three verifiable credentials in our secure payment system.

If the user asks you to do anything related to payment processing, politely explain that
you don't have that capability and that their request will be handled by the appropriate
specialist agent.""",
第 7 步:向智能体添加工具
现在,我们为智能体授予对这两个工具的访问权限。
👉 查找:
# MODULE_4_STEP_7_ADD_TOOLS
👉 将这两行代码替换为:
    tools=[
        FunctionTool(func=find_charities),
        FunctionTool(func=save_user_choice)
    ]
第 8 步:验证完整智能体
我们来检查一下所有线路是否都已正确连接。
👉 您的完整
charity_advisor/shopping_agent/agent.py
现在应如下所示:
"""
Shopping Agent - Finds charities from a trusted database and saves the user's choice.
This agent acts as our specialized "Research Analyst."
"""

from google.adk.agents import Agent
from google.adk.tools import FunctionTool
from charity_advisor.tools.charity_tools import find_charities, save_user_choice


shopping_agent = Agent(
    name="ShoppingAgent",
    model="gemini-2.5-pro",
    description="Finds and recommends vetted charities from a trusted database, then creates an IntentMandate capturing the user's donation intent.",
    instruction="""You are a research specialist helping users find verified charities.

Your workflow:

1. When the user describes what cause they want to support (e.g., "education", "health", "environment"),
   use the find_charities tool to search our vetted database.

2. Present the results clearly. The tool returns formatted charity information that you should
   show to the user.

3. When the user selects a charity and specifies an amount, use the save_user_choice tool
   to create an IntentMandate and record their decision. You MUST call save_user_choice with:
   - charity_name: The exact name of the chosen charity
   - charity_ein: The EIN of the chosen charity
   - amount: The donation amount in dollars (as a number, not a string)

4. After successfully saving, inform the user:
   - That you've created an IntentMandate (mention the intent ID if provided)
   - When the intent expires
   - That you're passing their request to the secure payment processor

IMPORTANT BOUNDARIES:
- Your ONLY job is discovery and creating the IntentMandate
- You do NOT process payments
- You do NOT see the user's payment methods
- You do NOT create cart offers (that's the Merchant Agent's job)
- After calling save_user_choice, your work is done

WHAT IS AN INTENTMANDATE:
An IntentMandate is a structured record of what the user wants to do. It includes:
- Natural language description ("Donate $50 to Room to Read")
- Which merchants can fulfill it
- When the intent expires
- Whether user confirmation is required

This is the first of three verifiable credentials in our secure payment system.

If the user asks you to do anything related to payment processing, politely explain that
you don't have that capability and that their request will be handled by the appropriate
specialist agent.""",
    tools=[
        FunctionTool(func=find_charities),
        FunctionTool(func=save_user_choice)
    ]
)
✅ 太棒了!您已构建了一个符合 AP2 标准的生产质量智能体,该智能体具有以下特点:
- 输入验证
- 使用 AP2 Pydantic 模型正确创建 IntentMandate
- 格式化输出
- 明确角色界限
- 详细说明
- 错误处理
第 9 步:测试购物助理
我们来验证一下代理是否正常运行、是否创建了适当的 IntentMandate,以及是否遵守了其边界。
👉 在 Cloud Shell 终端中,运行以下命令:
adk run charity_advisor/shopping_agent
系统会显示 [user]: 提示符。
测试 1:使用可信数据库进行发现
👉 Type:
I want to donate to an education charity. What are my options?
稍等片刻,智能体就会给出回答。借助 _format_charity_display 辅助函数,结果的格式非常美观:
我们在数据库中找到了 3 家经过验证的教育慈善机构:
Room to Read(EIN:77-0479905)
⭐ 评分:4.9/5.0
💰 效率:88% 的资金用于公益项目
📋 使命:专注于教育领域的识字能力和性别平等,帮助低收入社区数百万儿童改变生活。
Teach For America (EIN: 13-3541913)
⭐ 评分:4.7/5.0
💰 效率:81% 的资金用于计划
📋 使命:致力于为面临困境的儿童扩大教育机会。
技术教育联盟(EIN:45-2345678)
⭐ 评分:4.8/5.0
💰 效率:92% 的资金用于计划
📋 使命:为服务欠缺的学校提供计算机科学教育。
您想支持哪个慈善机构,以及想捐多少钱?
与第 3 模块的简单代理进行比较,后者会提供未经审核的 Google 搜索结果。这就是不受信任的发现与受信任的发现之间的区别。
测试 2:记录用户选择并创建 IntentMandate
👉 Type:
I'll donate $50 to Room to Read.
您应该会看到代理使用正确的参数调用 save_user_choice 工具。借助我们使用 AP2 模型创建的 IntentMandate,您将看到更结构化的回答:
太好了!我已为您的捐款创建了 IntentMandate:
意图详细信息:
- 意图 ID:intent_774795905_1730927536
- 金额:50.00 美元,捐赠给 Room to Read(EIN:77-0479905)
- 过期时间:2024-11-07T15:32:16Z(1 小时后)
此 IntentMandate 可捕获您的捐款意图,并包含一些限制条件,以确保交易得到安全处理。我现在将此信息传递给我们的安全支付处理方,以便创建正式的捐款优惠并完成您的捐款。
幕后,刚刚发生了以下几件事:
_validate_charity_data()验证了输入_create_intent_mandate()使用 AP2 Pydantic 模型构建结构:
   # Created and validated via Pydantic
   intent_mandate_model = IntentMandate(
       user_cart_confirmation_required=True,
       natural_language_description="Donate $50.00 to Room to Read",
       merchants=["Room to Read"],
       skus=None,
       requires_refundability=False,
       intent_expiry="2024-11-07T15:32:16Z"
   )

   # Converted to dict and extended with custom fields
   intent_mandate_dict = intent_mandate_model.model_dump()
   intent_mandate_dict.update({
       "charity_ein": "77-0479905",
       "amount": 50.0,
       "currency": "USD"
   })
- 该工具仅将 IntentMandate 写入共享状态:
state["intent_mandate"] = intent_mandate_dict
- 向 LLM 返回了包含意图详细信息的成功消息
- LLM 撰写了最终用户消息
此 IntentMandate 现在已准备就绪,可供商家代理 (Module 5) 提取。商家将从 IntentMandate 中提取慈善机构名称和金额,并验证其是否已过期。
测试 3:验证在行动
让我们验证一下验证帮助程序是否会捕获错误输入。
👉 Type:
I'll donate -$25 to Room to Read.
代理应捕获无效金额:
我遇到了一个问题:捐款金额必须为正数,但实际金额为 -25.0 美元
请指定一个正数捐款金额,我会为您创建 IntentMandate。
这是防御性编程的实际应用。我们的 _validate_charity_data 帮助程序阻止了无效数据进入系统并创建格式有误的 IntentMandate。
测试 4:验证信任边界
👉 尝试让代理处理付款:
Now process my credit card payment.
智能体应拒绝,同时尊重其角色界限:
我无法处理付款,这不在我的职责范围内。我的职责是帮助您找到经过验证的公益组织,并创建可记录您的捐款意向的 IntentMandate。
您的 IntentMandate 已创建并传递给我们的安全付款处理方。商家代理会创建正式的优惠 (CartMandate),然后凭据提供方会在您明确同意的情况下处理实际付款。
这就是信任边界的实际应用。代理知道自己无权处理付款数据,因此其指令明确引导代理向用户说明这一点,同时向用户介绍 IntentMandate 概念。
👉 按
Ctrl+C
,以便在完成测试后退出。
您刚刚构建的内容
您已成功使用 AP2 Pydantic 模型创建了适当的 IntentMandate,从而实现了 AP2 架构的第一部分。
掌握的关键概念
✅ 基于角色的架构:
- 每个代理都有一个明确定义的工作
- 智能体通过共享状态进行通信,而不是直接访问
- 信任边界可限制泄露的影响
✅ IntentMandate(AP2 凭据 #1):
- 使用官方 AP2 Pydantic 模型进行验证
- 以结构化方式捕获用户意图
- 包含安全过期时间(可防范重放攻击)
- 指定限制条件(商家、退款、确认)
- 面向人类的自然语言说明
- 代理可读的机器可读格式
- 在转换为字典之前验证模型
✅ 以共享内存形式呈现的状态:
tool_context.state是所有客服人员都可以访问的“记事本”- 写入状态 = 使可验证凭据可用
- 从状态读取 = 使用和验证凭据
- 下游代理从凭据中提取所需信息
✅ FunctionTool:
- 将 Python 函数转换为可由 LLM 调用的工具
- 依赖文档字符串和类型提示来帮助 LLM 理解
- 自动处理调用
- 工具可组合性:小而专注的工具 > 庞大的工具
✅ 客服人员说明:
- 分步工作流程指南
- 明确的边界(“请勿...”)
- 参数规范,可防止出错
- 技术定义(什么是 IntentMandate)
- 边缘情况处理(在以下情况下该说什么...)
后续步骤
在下一模块中,我们将构建商家代理来接收 IntentMandate 并创建第二个可验证凭据:CartMandate。
购物代理已创建 IntentMandate,其中包含用户的意图和到期时间。现在,我们需要一个代理来读取该凭据,验证其是否已过期,并创建一份正式的签名优惠,其中写明:“我(商家)将兑现此价格并交付这些商品。”
我们来构建商家代理,看看第二个 AP2 凭据的实际效果。
5. 构建商家代理 - 绑定优惠和 CartMandate

从发现到承诺
在上一模块中,您构建了购物代理,该代理可以查找经过验证的公益组织并创建捕获用户意图的 IntentMandate。现在,我们需要一个代理来接收该 IntentMandate 并创建正式的约束性要约。
这时,AP2 的第二个关键原则就派上了用场:通过 CartMandate 实现可验证的凭据。
AP2 原则:购物车强制性优惠和绑定优惠
为什么需要商家角色
在模块 4 中,购物代理创建了一个 IntentMandate 并将其保存到状态:
state["intent_mandate"] = {
    "natural_language_description": "Donate $50 to Room to Read",
    "merchants": ["Room to Read"],
    "amount": 50.0,
    "intent_expiry": "2024-11-07T15:32:16Z"
}
但这只是用户意图。在处理任何付款之前,我们需要:
- 支付系统可识别的正式优惠结构
- 证明商家会遵守此价格
- 具有约束力的承诺,在交易过程中无法更改
- 验证 intent 是否已过期
这是 Merchant Agent 的工作。
什么是 CartMandate?
CartMandate 是 AP2 中“数字购物车”的术语,可作为具有约束力的要约。它根据 W3C PaymentRequest 标准构建,这意味着:
- 全球各地的支付处理方都认可此格式
- 它以标准化方式包含所有交易详情
- 可以进行加密签名以证明真实性
您可以将其视为承包商提供的书面报价:
- ❌ 口头:“没问题,我能以 50 美元左右的价格完成这项工作”
- ✅ 书面报价:费用明细、总费用、签名、日期
书面报价具有约束力。CartMandate 是数字等效项。

CartMandate 的结构
AP2 中的 CartMandate 具有特定的嵌套结构:
cart_mandate = {
    "contents": {  # ← AP2 wrapper
        "id": "cart_xyz123",
        "cart_expiry": "2024-11-07T15:47:16Z",
        "merchant_name": "Room to Read",
        "user_cart_confirmation_required": False,

        "payment_request": {  # ← W3C PaymentRequest nested inside
            "method_data": [...],
            "details": {...},
            "options": {...}
        }
    },
    "merchant_authorization": "SIG_a3f7b2c8"  # ← Merchant signature
}
三个主要组成部分:
1. contents - 包含以下内容的购物车封装容器:
- 购物车 ID 和到期时间
- 商家名称
- W3C PaymentRequest
2. payment_request(内容内部)- 购买的内容:
- method_data:接受的付款类型
- 详细信息:商品和总计
- 选项:配送、付款人信息要求
3. merchant_authorization - 加密签名
商家签名:承诺证明
商家签名至关重要。这证明:
- 此优惠来自授权商家
- 商家承诺按此确切价格提供商品
- 自创建以来,优惠未被篡改
在生产环境中,这会是使用 PKI(公钥基础架构)或 JWT(JSON Web 令牌)的加密签名。在我们的教育研讨会中,我们将使用 SHA-256 哈希来模拟此过程。
# Production (real signature):
signature = sign_with_private_key(cart_data, merchant_private_key)

# Workshop (simulated signature):
cart_hash = hashlib.sha256(cart_json.encode()).hexdigest()
signature = f"SIG_{cart_hash[:16]}"
我们的使命:构建商家代理
商家客服人员将:
- 从状态(购物智能体写入的内容)读取 IntentMandate
- 验证 intent 是否未过期
- 提取公益组织名称、金额和其他详细信息
- 使用 AP2 Pydantic 模型创建符合 W3C 标准的 PaymentRequest 结构
- 使用带有有效期的 AP2 的 CartMandate 封装它
- 添加模拟商家签名
- 将 CartMandate 写入凭据提供程序的状态(下一个模块)
我们来逐步构建它。
第 1 步:添加 Expiry Validation Helper
首先,我们来设置商家相关工具文件,并添加一个用于验证 IntentMandate 过期的辅助函数。
👉 打开
charity_advisor/tools/merchant_tools.py
接下来,我们添加过期验证:
👉 查找:
# MODULE_5_STEP_1_ADD_EXPIRY_VALIDATION_HELPER
👉 将该单行替换为:
def _validate_intent_expiry(intent_expiry_str: str) -> tuple[bool, str]:
    """
    Validates that the IntentMandate hasn't expired.

    This is a critical security check - expired intents should not be processed.

    Args:
        intent_expiry_str: The ISO 8601 timestamp string from the IntentMandate.

    Returns:
        (is_valid, error_message): Tuple indicating if intent is still valid.
    """
    try:
        # The .replace('Z', '+00:00') is for compatibility with older Python versions
        expiry_time = datetime.fromisoformat(intent_expiry_str.replace('Z', '+00:00'))
        now = datetime.now(timezone.utc)

        if expiry_time < now:
            return False, f"IntentMandate expired at {intent_expiry_str}"

        time_remaining = expiry_time - now
        logger.info(f"IntentMandate valid. Expires in {time_remaining.total_seconds():.0f} seconds")

        return True, ""

    except (ValueError, TypeError) as e:
        return False, f"Invalid intent_expiry format: {e}"
第 2 步:添加签名生成帮助程序
现在,我们来创建一个用于生成模拟商家签名的辅助函数。
👉 查找:
# MODULE_5_STEP_2_ADD_SIGNATURE_HELPER
👉 将该单行替换为:
def _generate_merchant_signature(cart_contents: CartContents) -> str:
    """
    Generates a simulated merchant signature for the CartMandate contents.

    In production, this would use PKI or JWT with the merchant's private key.
    For this codelab, we use a SHA-256 hash of the sorted JSON representation.

    Args:
        cart_contents: The Pydantic model of the cart contents to sign.

    Returns:
        Simulated signature string (format: "SIG_" + first 16 chars of hash).
    """
    # Step 1: Dump the Pydantic model to a dictionary. The `mode='json'` argument
    # ensures that complex types like datetimes are serialized correctly.
    cart_contents_dict = cart_contents.model_dump(mode='json')

    # Step 2: Use the standard json library to create a stable, sorted JSON string.
    # separators=(',', ':') removes whitespace for a compact and canonical representation.
    cart_json = json.dumps(cart_contents_dict, sort_keys=True, separators=(',', ':'))

    # Step 3: Generate SHA-256 hash.
    cart_hash = hashlib.sha256(cart_json.encode('utf-8')).hexdigest()

    # Step 4: Create signature in a recognizable format.
    signature = f"SIG_{cart_hash[:16]}"

    logger.info(f"Generated merchant signature: {signature}")
    return signature
第 3A 步:创建工具签名和设置
现在,我们开始构建主要工具。我们将分四个子步骤逐步创建该应用。首先,是函数签名和初始设置。
👉 查找:
# MODULE_5_STEP_3A_CREATE_TOOL_SIGNATURE
👉 将该单行替换为:
async def create_cart_mandate(tool_context: Any) -> Dict[str, Any]:
    """
    Creates a W3C PaymentRequest-compliant CartMandate from the IntentMandate.

    This tool reads the IntentMandate from shared state, validates it, and
    creates a formal, signed offer using the official AP2 Pydantic models.

    Returns:
        Dictionary containing status and the created CartMandate.
    """
    logger.info("Tool called: Creating CartMandate from IntentMandate")

    # MODULE_5_STEP_3B_ADD_VALIDATION_LOGIC
第 3B 步:添加验证逻辑
现在,我们来添加使用 AP2 Pydantic 模型读取和验证 IntentMandate 的逻辑,并提取所需的数据。
👉 查找:
# MODULE_5_STEP_3B_ADD_VALIDATION_LOGIC
👉 将该单行替换为:
    # 1. Read IntentMandate dictionary from state
    intent_mandate_dict = tool_context.state.get("intent_mandate")
    if not intent_mandate_dict:
        logger.error("No IntentMandate found in state")
        return {
            "status": "error",
            "message": "No IntentMandate found. Shopping Agent must create intent first."
        }

    # 2. Parse dictionary into a validated Pydantic model
    try:
        intent_mandate_model = IntentMandate.model_validate(intent_mandate_dict)
    except Exception as e:
        logger.error(f"Could not validate IntentMandate structure: {e}")
        return {"status": "error", "message": f"Invalid IntentMandate structure: {e}"}

    # 3. Validate that the intent hasn't expired (CRITICAL security check)
    is_valid, error_message = _validate_intent_expiry(intent_mandate_model.intent_expiry)
    if not is_valid:
        logger.error(f"IntentMandate validation failed: {error_message}")
        return {"status": "error", "message": error_message}

    # 4. Extract data. Safely access standard fields from the model, and
    # custom fields (like 'amount') from the original dictionary.
    charity_name = intent_mandate_model.merchants[0] if intent_mandate_model.merchants else "Unknown Charity"
    amount = intent_mandate_dict.get("amount", 0.0)

    # MODULE_5_STEP_3C_CREATE_CARTMANDATE_STRUCTURE
第 3C 步:创建 CartMandate 结构
现在,我们来构建符合 W3C 标准的 PaymentRequest 结构,并使用 Pydantic 模型将其封装在 AP2 CartMandate 中。
👉 查找:
# MODULE_5_STEP_3C_CREATE_CARTMANDATE_STRUCTURE
👉 将该单行替换为:
    # 5. Build the nested Pydantic models for the CartMandate
    timestamp = datetime.now(timezone.utc)
    cart_id = f"cart_{hashlib.sha256(f'{charity_name}{timestamp.isoformat()}'.encode()).hexdigest()[:12]}"
    cart_expiry = timestamp + timedelta(minutes=15)

    payment_request_model = PaymentRequest(
        method_data=[PaymentMethodData(
            supported_methods="CARD",
            data={"supported_networks": ["visa", "mastercard", "amex"], "supported_types": ["debit", "credit"]}
        )],
        details=PaymentDetailsInit(
            id=f"order_{cart_id}",
            display_items=[PaymentItem(
                label=f"Donation to {charity_name}",
                amount=PaymentCurrencyAmount(currency="USD", value=amount)  # Pydantic v2 handles float -> str conversion
            )],
            total=PaymentItem(
                label="Total Donation",
                amount=PaymentCurrencyAmount(currency="USD", value=amount)
            )
        ),
        options=PaymentOptions(request_shipping=False)
    )

    cart_contents_model = CartContents(
        id=cart_id,
        cart_expiry=cart_expiry.isoformat(),
        merchant_name=charity_name,
        user_cart_confirmation_required=False,
        payment_request=payment_request_model
    )

    # MODULE_5_STEP_3D_ADD_SIGNATURE_AND_SAVE
步骤 3D:添加签名并保存到状态
最后,我们使用 Pydantic 模型对 CartMandate 进行签名,并将其保存到状态中以供下一个代理使用。
👉 查找:
# MODULE_5_STEP_3D_ADD_SIGNATURE_AND_SAVE
👉 将该单行替换为:
# 6. Generate signature from the validated Pydantic model
signature = _generate_merchant_signature(cart_contents_model)
# 7. Create the final CartMandate model, now including the signature
cart_mandate_model = CartMandate(
    contents=cart_contents_model,
    merchant_authorization=signature
)
# 8. Convert the final model to a dictionary for state storage and add the custom timestamp
cart_mandate_dict = cart_mandate_model.model_dump(mode='json')
cart_mandate_dict["timestamp"] = timestamp.isoformat()
# 9. Write the final dictionary to state
tool_context.state["cart_mandate"] = cart_mandate_dict
logger.info(f"CartMandate created successfully: {cart_id}")
return {
"status": "success",
"message": f"Created signed CartMandate {cart_id} for ${amount:.2f} donation to {charity_name}",
"cart_id": cart_id,
"cart_expiry": cart_expiry.isoformat(),
"signature": signature
}
第 4 步:构建商家代理 - 导入组件
现在,我们来创建将使用此工具的代理。
👉 打开
charity_advisor/merchant_agent/agent.py
您会看到一个带有占位标记的模板。我们先导入所需的内容。
👉 查找:
# MODULE_5_STEP_4_IMPORT_COMPONENTS
👉 将该单行替换为:
from google.adk.agents import Agent
from google.adk.tools import FunctionTool
from charity_advisor.tools.merchant_tools import create_cart_mandate
第 5 步:编写商家代理指令
现在,我们来编写指令,告诉智能体何时以及如何使用其工具。
👉 查找:
# MODULE_5_STEP_5_WRITE_INSTRUCTION
instruction="""""",
👉 将这两行代码替换为:
    instruction="""You are a merchant specialist responsible for creating formal, signed offers (CartMandates).

Your workflow:

1. Read the IntentMandate from shared state.
   The IntentMandate was created by the Shopping Agent and contains:
   - merchants: List of merchant names
   - amount: Donation amount
   - charity_ein: Tax ID
   - intent_expiry: When the intent expires

2. Use the create_cart_mandate tool to create a W3C PaymentRequest-compliant CartMandate.
   This tool will:
   - Validate the IntentMandate hasn't expired (CRITICAL security check)
   - Extract the charity name and amount from the IntentMandate
   - Create a structured offer with payment methods, transaction details, and merchant info
   - Generate a merchant signature to prove authenticity
   - Save the CartMandate to state for the payment processor

3. After creating the CartMandate, inform the user:
   - That you've created a formal, signed offer
   - The cart ID
   - When the cart expires (15 minutes)
   - That you're passing it to the secure payment processor

IMPORTANT BOUNDARIES:
- Your ONLY job is creating signed CartMandates from valid IntentMandates
- You do NOT process payments
- You do NOT see the user's payment methods or credentials
- You do NOT interact with payment networks
- You MUST validate that the IntentMandate hasn't expired before creating a cart
- After calling create_cart_mandate, your work is done

WHAT IS A CARTMANDATE:
A CartMandate is a binding commitment that says:
"I, the merchant, commit to accepting $X for this charity donation, and I prove it with my signature."

This commitment is structured using the W3C PaymentRequest standard and includes:
- Payment methods accepted (card, bank transfer)
- Transaction details (amount, charity name)
- Cart expiry (15 minutes from creation)
- Merchant signature (proof of commitment)

This is the second of three verifiable credentials in our secure payment system.""",
第 6 步:向 Merchant Agent 添加工具
👉 查找:
# MODULE_5_STEP_6_ADD_TOOLS
tools=[],
👉 将这两行代码替换为:
    tools=[
        FunctionTool(func=create_cart_mandate)
    ],
第 7 步:验证 Complete Merchant Agent
我们来确认所有线路是否都已正确连接。
👉 您的完整
charity_advisor/merchant_agent/agent.py
现在应如下所示:
"""
Merchant Agent - Creates W3C-compliant CartMandates with merchant signatures.
This agent acts as our "Contract Creator."
"""

from google.adk.agents import Agent
from google.adk.tools import FunctionTool
from charity_advisor.tools.merchant_tools import create_cart_mandate


merchant_agent = Agent(
    name="MerchantAgent",
    model="gemini-2.5-flash",
    description="Creates formal, signed CartMandates for charity donations following W3C PaymentRequest standards.",
    tools=[
        FunctionTool(func=create_cart_mandate)
    ],
    instruction="""You are a merchant specialist responsible for creating formal, signed offers (CartMandates).

Your workflow:

1. Read the IntentMandate from shared state.
   The IntentMandate was created by the Shopping Agent and contains:
   - merchants: List of merchant names
   - amount: Donation amount
   - charity_ein: Tax ID
   - intent_expiry: When the intent expires

2. Use the create_cart_mandate tool to create a W3C PaymentRequest-compliant CartMandate.
   This tool will:
   - Validate the IntentMandate hasn't expired (CRITICAL security check)
   - Extract the charity name and amount from the IntentMandate
   - Create a structured offer with payment methods, transaction details, and merchant info
   - Generate a merchant signature to prove authenticity
   - Save the CartMandate to state for the payment processor

3. After creating the CartMandate, inform the user:
   - That you've created a formal, signed offer
   - The cart ID
   - When the cart expires (15 minutes)
   - That you're passing it to the secure payment processor

IMPORTANT BOUNDARIES:
- Your ONLY job is creating signed CartMandates from valid IntentMandates
- You do NOT process payments
- You do NOT see the user's payment methods or credentials
- You do NOT interact with payment networks
- You MUST validate that the IntentMandate hasn't expired before creating a cart
- After calling create_cart_mandate, your work is done

WHAT IS A CARTMANDATE:
A CartMandate is a binding commitment that says:
"I, the merchant, commit to accepting $X for this charity donation, and I prove it with my signature."

This commitment is structured using the W3C PaymentRequest standard and includes:
- Payment methods accepted (card, bank transfer)
- Transaction details (amount, charity name)
- Cart expiry (15 minutes from creation)
- Merchant signature (proof of commitment)

This is the second of three verifiable credentials in our secure payment system."""
)
✅ 检查点:您现在拥有一个完整的商家代理,该代理使用 Pydantic 模型正确创建了 AP2 CartMandate。
第 8 步:测试商家代理
现在,我们来验证代理是否正确创建了带有签名并验证了有效期的 CartMandates。
测试设置:运行测试脚本
👉 在 Cloud Shell 终端中,运行以下命令:
python scripts/test_merchant.py
预期输出:
======================================================================
MERCHANT AGENT TEST
======================================================================

Simulated IntentMandate from Shopping Agent:
  charity: Room to Read
  amount: $50.00
  expiry: 2024-11-07T16:32:16Z

----------------------------------------------------------------------
Merchant Agent Response:
----------------------------------------------------------------------
Perfect! I've received your IntentMandate and created a formal, signed offer (CartMandate) for your donation.

**CartMandate Details:**
- **Cart ID**: cart_3b4c5d6e7f8a
- **Donation Amount**: $50.00 to Room to Read
- **Payment Methods Accepted**: Credit/debit cards (Visa, Mastercard, Amex) or bank transfer
- **Cart Expires**: 2024-11-07T15:47:16Z (in 15 minutes)
- **Merchant Signature**: SIG_a3f7b2c8d9e1f4a2

This signed CartMandate proves my commitment to accept this donation amount. I'm now passing this to the secure payment processor to complete your transaction.

======================================================================
CARTMANDATE CREATED:
======================================================================
  ID: cart_3b4c5d6e7f8a
  Amount: 50.00
  Merchant: Room to Read
  Expires: 2024-11-07T15:47:16Z
  Signature: SIG_a3f7b2c8d9e1f4a2
======================================================================
测试 2:验证 W3C 合规性
让我们验证一下 CartMandate 结构是否完全符合 AP2 和 W3C PaymentRequest 标准。
👉 运行验证脚本:
python scripts/validate_cartmandate.py
预期输出:
======================================================================
AP2 & W3C PAYMENTREQUEST VALIDATION
======================================================================
✅ CartMandate is AP2 and W3C PaymentRequest compliant

Structure validation passed:
  ✓ AP2 'contents' wrapper present
  ✓ AP2 'merchant_authorization' signature present
  ✓ cart_expiry present
  ✓ payment_request nested inside contents
  ✓ method_data present and valid
  ✓ details.total.amount present with currency and value
  ✓ All required W3C PaymentRequest fields present
======================================================================
您刚刚构建的内容
您已成功使用 Pydantic 模型实现了 AP2 的 CartMandate,以确保结构正确、失效日期有效且商家签名有效。
掌握的关键概念
✅ CartMandate(AP2 凭据 2):
- 使用官方 AP2 Pydantic 模型创建
- 包含内容封装容器的 AP2 结构
- 嵌套在内部的 W3C PaymentRequest
- 购物车过期时间(短于意向)
- 商家签名(用于具有约束力的承诺)
- 模型验证可确保符合规范
✅ 到期验证:
- 从状态读取 IntentMandate
- 使用
IntentMandate.model_validate()验证结构 - 解析 ISO 8601 时间戳
- 与当前时间进行比较
- 防止过时处理的安全功能
✅ 商家签名:
- 证明真实性和承诺
- 根据经过验证的 Pydantic 模型生成
- 使用
model_dump(mode='json')作为规范表示形式 - 使用 SHA-256 进行模拟(用于教育)
- 生产环境使用 PKI/JWT
- 对内容模型(而非字典)进行签名
✅ W3C PaymentRequest:
- 使用 AP2 的 PaymentRequest Pydantic 模型构建
- 支付数据的行业标准
- 嵌套在 AP2 结构中
- 包含 method_data、details、options
- 实现互操作性
✅ 包含模型的凭据链:
- 购物 → IntentMandate(已验证)
- 商家读取 IntentMandate → CartMandate(两个模型均已验证)
- 凭据提供程序将读取 CartMandate → PaymentMandate
- 每个步骤都会使用 Pydantic 验证之前的凭据
✅ 模型驱动的开发:
- 通过
model_validate()进行输入验证 - 类型安全构建
- 通过
model_dump()实现自动序列化 - 可用于生产用途的模式
后续步骤
在下一个模块中,我们将构建 Credentials Provider 以安全地处理付款。
商家代理已使用 AP2 模型创建了具有失效期的约束性优惠。现在,我们需要一个代理来读取该 CartMandate、征得用户同意并执行付款。
让我们构建凭据提供程序并完成 AP2 凭据链。
6. 构建凭据提供程序 - 安全付款执行

从绑定报价到付款执行
在模块 5 中,您构建了商家代理,该代理是一种专门用于读取 IntentMandate、验证其是否已过期,以及创建带有商家签名的绑定 CartMandate 的代理。现在,我们需要一个代理来接收该 CartMandate 并执行实际付款。
这时,AP2 的第三条也是最后一条原则就派上用场了:通过 PaymentMandate 实现安全的付款执行。
AP2 原理:付款授权和付款执行
为什么需要凭据提供方角色
在模块 5 中,商家代理创建了一个 CartMandate 并将其保存到状态:
state["cart_mandate"] = {
    "contents": {
        "id": "cart_abc123",
        "cart_expiry": "2025-11-07:15:47:16Z",
        "payment_request": {
            "details": {
                "total": {
                    "amount": {"currency": "USD", "value": "50.00"}
                }
            }
        }
    },
    "merchant_authorization": "SIG_a3f7b2c8"
}
但这只是具有约束力的提议。在执行付款之前,我们需要:
- 验证购物车是否未过期
- 用户同意继续付款
- 授权执行付款的凭据
- 实际付款处理(或我们研讨会的模拟付款处理)
这是凭据提供程序的任务。
什么是 PaymentMandate?
PaymentMandate是 AP2 中允许执行付款的最终授权。它是 AP2 链中的第三个也是最后一个可验证凭据。
您可以将这三种凭据视为合同签署流程:
- IntentMandate:“我有意购买此商品”(意向书)
- CartMandate:“我(商家)愿意以这个价格出售”(书面报价)
- PaymentMandate:“我授权您从我的支付方式中扣款”(已签署的合同)
只有在所有这三项凭据都存在的情况下,才能执行付款。

PaymentMandate 的结构
AP2 中的 PaymentMandate 具有特定结构:
payment_mandate = {
    "payment_mandate_contents": {  # ← AP2 wrapper
        "payment_mandate_id": "payment_xyz123",
        "payment_details_id": "cart_abc123",  # Links to CartMandate
        "user_consent": True,
        "consent_timestamp": "2025-11-07T15:48:00Z",
        "amount": {
            "currency": "USD",
            "value": "50.00"
        },
        "merchant_name": "Room to Read"
    },
    "agent_present": True,  # Human-in-the-loop flow
    "timestamp": "2025-11-07T15:48:00Z"
}
主要组件:
1. payment_mandate_contents - 包含以下内容的授权封装容器:
- payment_mandate_id:唯一标识符
- payment_details_id:链接回 CartMandate
- user_consent:用户是否已批准
- 金额:付款金额(从 CartMandate 中提取)
2. agent_present - 是否为人机协同流程
3. 时间戳 - 授权的创建时间
我们的使命:构建凭据提供程序
凭据提供程序将:
- 从状态(商家代理写入的内容)中读取 CartMandate
- 使用 AP2 Pydantic 模型验证购物车是否已过期
- 从嵌套结构中提取付款详情
- 使用 AP2 模型创建包含用户同意情况的 PaymentMandate
- 模拟付款处理(在生产环境中,会调用实际的付款 API)
- 将 PaymentMandate 和付款结果写入状态
我们来逐步构建它。
第 1 步:添加购物车过期验证帮助程序
首先,我们创建一个用于验证 CartMandate 是否已过期的辅助函数,就像我们在模块 5 中验证 IntentMandate 是否已过期一样。
👉 打开
charity_advisor/tools/payment_tools.py
接下来,我们添加过期验证:
👉 查找:
# MODULE_6_STEP_1_ADD_CART_EXPIRY_VALIDATION_HELPER
👉 将该单行替换为:
def _validate_cart_expiry(cart: CartMandate) -> tuple[bool, str]:
    """
    Validates that the CartMandate hasn't expired.

    This is a critical security check - expired carts should not be processed.

    Args:
        cart: The Pydantic CartMandate model to validate.

    Returns:
        (is_valid, error_message): Tuple indicating if cart is still valid.
    """
    try:
        expiry_str = cart.contents.cart_expiry
        expiry_time = datetime.fromisoformat(expiry_str.replace('Z', '+00:00'))
        now = datetime.now(timezone.utc)

        if expiry_time < now:
            return False, f"CartMandate expired at {expiry_str}"

        time_remaining = expiry_time - now
        logger.info(f"CartMandate valid. Expires in {time_remaining.total_seconds():.0f} seconds")

        return True, ""

    except (ValueError, TypeError, AttributeError) as e:
        return False, f"Invalid cart_expiry format or structure: {e}"
第 2 步:添加 PaymentMandate Creation Helper
现在,我们来创建一个辅助函数,用于使用官方 AP2 Pydantic 模型构建 PaymentMandate 结构。
👉 查找:
# MODULE_6_STEP_2_ADD_PAYMENT_MANDATE_CREATION_HELPER
👉 将该单行替换为:
def _create_payment_mandate(cart: CartMandate, consent_granted: bool) -> dict:
    """
    Creates a PaymentMandate using the official AP2 Pydantic models.

    It links to the CartMandate and includes user consent status.

    Args:
        cart: The validated Pydantic CartMandate model being processed.
        consent_granted: Whether the user has consented to the payment.

    Returns:
        A dictionary representation of the final, validated PaymentMandate.
    """
    timestamp = datetime.now(timezone.utc)

    # Safely extract details from the validated CartMandate model
    cart_id = cart.contents.id
    merchant_name = cart.contents.merchant_name
    total_item = cart.contents.payment_request.details.total

    # Create the nested PaymentResponse model for the mandate
    payment_response_model = PaymentResponse(
        request_id=cart_id,
        method_name="CARD",  # As per the simulated flow
        details={"token": "simulated_payment_token_12345"}
    )

    # Create the PaymentMandateContents model
    payment_mandate_contents_model = PaymentMandateContents(
        payment_mandate_id=f"payment_{hashlib.sha256(f'{cart_id}{timestamp.isoformat()}'.encode()).hexdigest()[:12]}",
        payment_details_id=cart_id,
        payment_details_total=total_item,
        payment_response=payment_response_model,
        merchant_agent=merchant_name,
        timestamp=timestamp.isoformat()
    )

    # Create the top-level PaymentMandate model
    # In a real system, a user signature would be added to this model
    payment_mandate_model = PaymentMandate(
        payment_mandate_contents=payment_mandate_contents_model
    )

    # Convert the final Pydantic model to a dictionary for state storage
    final_dict = payment_mandate_model.model_dump(mode='json')

    # Add any custom/non-standard fields required by the codelab's logic to the dictionary
    # The spec does not have these fields, but your original code did. We add them
    # back to ensure compatibility with later steps.
    final_dict['payment_mandate_contents']['user_consent'] = consent_granted
    final_dict['payment_mandate_contents']['consent_timestamp'] = timestamp.isoformat() if consent_granted else None
    final_dict['agent_present'] = True

    return final_dict
第 3A 步:创建工具签名和设置
现在,我们开始逐步构建主要工具。首先,是函数签名和初始设置。
👉 查找:
# MODULE_6_STEP_3A_CREATE_TOOL_SIGNATURE
👉 将该单行替换为:
async def create_payment_mandate(tool_context: Any) -> Dict[str, Any]:
    """
    Creates a PaymentMandate and simulates payment processing using Pydantic models.

    This tool now reads the CartMandate from state, parses it into a validated model,
    and creates a spec-compliant PaymentMandate.
    """
    logger.info("Tool called: Creating PaymentMandate and processing payment")

    # MODULE_6_STEP_3B_VALIDATE_CARTMANDATE
第 3B 步:验证 CartMandate
现在,我们来添加逻辑,以使用 AP2 Pydantic 模型读取和验证 CartMandate,并检查到期情况。
👉 查找:
# MODULE_6_STEP_3B_VALIDATE_CARTMANDATE
👉 将该单行替换为:
    # 1. Read CartMandate dictionary from state
    cart_mandate_dict = tool_context.state.get("cart_mandate")
    if not cart_mandate_dict:
        logger.error("No CartMandate found in state")
        return { "status": "error", "message": "No CartMandate found. Merchant Agent must create cart first." }

    # 2. Parse dictionary into a validated Pydantic model
    try:
        cart_model = CartMandate.model_validate(cart_mandate_dict)
    except Exception as e:
        logger.error(f"Could not validate CartMandate structure: {e}")
        return {"status": "error", "message": f"Invalid CartMandate structure: {e}"}

    # 3. Validate that the cart hasn't expired using the Pydantic model
    is_valid, error_message = _validate_cart_expiry(cart_model)
    if not is_valid:
        logger.error(f"CartMandate validation failed: {error_message}")
        return {"status": "error", "message": error_message}

    # MODULE_6_STEP_3C_EXTRACT_PAYMENT_DETAILS
第 3C 步:从嵌套结构中提取付款详细信息
现在,我们来浏览经过验证的 CartMandate 模型,以提取所需的付款详细信息。
👉 查找:
# MODULE_6_STEP_3C_EXTRACT_PAYMENT_DETAILS
👉 将该单行替换为:
    # 4. Safely extract data from the validated model
    cart_id = cart_model.contents.id
    merchant_name = cart_model.contents.merchant_name
    amount_value = cart_model.contents.payment_request.details.total.amount.value
    currency = cart_model.contents.payment_request.details.total.amount.currency
    consent_granted = True  # Assume consent for this codelab flow

    # MODULE_6_STEP_3D_CREATE_PAYMENTMANDATE_AND_SIMULATE
第 3D 步:创建 PaymentMandate 并模拟付款
最后,我们使用基于 Pydantic 的辅助程序创建 PaymentMandate,模拟付款处理,并将所有内容保存到状态。
👉 查找:
# MODULE_6_STEP_3D_CREATE_PAYMENTMANDATE_AND_SIMULATE
👉 将该单行替换为:
    # 5. Create the spec-compliant PaymentMandate using the validated CartMandate model
    payment_mandate_dict = _create_payment_mandate(cart_model, consent_granted)

    # 6. Simulate payment processing
    transaction_id = f"txn_{hashlib.sha256(f'{cart_id}{datetime.now(timezone.utc).isoformat()}'.encode()).hexdigest()[:16]}"
    payment_result = {
        "transaction_id": transaction_id,
        "status": "completed",
        "amount": amount_value,
        "currency": currency,
        "merchant": merchant_name,
        "timestamp": datetime.now(timezone.utc).isoformat(),
        "simulation": True
    }

    # 7. Write the compliant PaymentMandate dictionary and result to state
    tool_context.state["payment_mandate"] = payment_mandate_dict
    tool_context.state["payment_result"] = payment_result

    logger.info(f"Payment processed successfully: {transaction_id}")

    return {
        "status": "success",
        "message": f"Payment of {currency} {amount_value:.2f} to {merchant_name} processed successfully",
        "transaction_id": transaction_id,
        "payment_mandate_id": payment_mandate_dict["payment_mandate_contents"]["payment_mandate_id"]
    }
第 4 步:构建凭据提供程序代理 - 导入组件
现在,我们来创建使用此工具的代理。
👉 打开
charity_advisor/credentials_provider/agent.py
您会看到一个带有占位标记的模板。我们先导入所需的内容。
👉 查找:
# MODULE_6_STEP_4_IMPORT_COMPONENTS
👉 将该单行替换为:
from google.adk.agents import Agent
from google.adk.tools import FunctionTool
from charity_advisor.tools.payment_tools import create_payment_mandate
第 5 步:编写凭据提供程序指令
现在,我们来编写指导智能体的指令。
👉 查找:
# MODULE_6_STEP_5_WRITE_INSTRUCTION
instruction="""""",
👉 将这两行代码替换为:
    instruction="""You are a payment specialist responsible for securely processing payments with user consent.

Your workflow:

1. Read the CartMandate from shared state.
   The CartMandate was created by the Merchant Agent and has this structure:
   - contents: AP2 wrapper containing:
     - id: Cart identifier
     - cart_expiry: When the cart expires
     - merchant_name: Who is receiving payment
     - payment_request: W3C PaymentRequest with transaction details
   - merchant_authorization: Merchant's signature

2. Extract payment details from the nested structure:
   - Navigate: cart_mandate["contents"]["payment_request"]["details"]["total"]["amount"]
   - This gives you the currency and value

3. **IMPORTANT - Two-Turn Conversational Confirmation Pattern:**
   Before calling create_payment_mandate, you MUST:
   - Present the payment details clearly to the user
   - Ask explicitly: "I'm ready to process a payment of $X to [Charity Name]. Do you want to proceed with this donation?"
   - WAIT for the user's explicit confirmation (e.g., "yes", "proceed", "confirm")
   - ONLY call create_payment_mandate AFTER receiving explicit confirmation
   - If user says "no" or "cancel", DO NOT call the tool

4. After user confirms, use the create_payment_mandate tool to:
   - Validate the CartMandate hasn't expired (CRITICAL security check)
   - Create a PaymentMandate (the third AP2 credential)
   - Simulate payment processing
   - Record the transaction result

5. After processing, inform the user:
   - That payment was processed successfully (this is a simulation)
   - The transaction ID
   - The amount and merchant
   - That this completes the three-agent AP2 credential chain

IMPORTANT BOUNDARIES:
- Your ONLY job is creating PaymentMandates and processing payments
- You do NOT discover charities (that's Shopping Agent's job)
- You do NOT create offers (that's Merchant Agent's job)
- You MUST validate that the CartMandate hasn't expired before processing
- You MUST get explicit user confirmation before calling create_payment_mandate
- In production, this consent mechanism would be even more robust

WHAT IS A PAYMENTMANDATE:
A PaymentMandate is the final credential that authorizes payment execution. It:
- Links to the CartMandate (proving the merchant's offer)
- Records user consent
- Contains payment details extracted from the CartMandate
- Enables the actual payment transaction

This is the third and final verifiable credential in our secure payment system.

THE COMPLETE AP2 CREDENTIAL CHAIN:
1. Shopping Agent creates IntentMandate (user's intent)
2. Merchant Agent reads IntentMandate, creates CartMandate (merchant's binding offer)
3. You read CartMandate, get user confirmation, create PaymentMandate (authorized payment execution)

Each credential:
- Has an expiry time (security feature)
- Links to the previous credential
- Is validated before the next step
- Creates an auditable chain of trust""",
第 6 步:向凭据提供程序添加工具
👉 查找:
# MODULE_6_STEP_6_ADD_TOOLS
tools=[],
👉 将这两行代码替换为:
    tools=[
        FunctionTool(func=create_payment_mandate)
    ],
第 7 步:验证完整的凭据提供程序
我们来确认所有线路是否都已正确连接。
👉 您的完整
charity_advisor/credentials_provider/agent.py
现在应如下所示:
"""
Credentials Provider Agent - Handles payment processing with user consent.
This agent acts as our "Payment Processor."
"""

from google.adk.agents import Agent
from google.adk.tools import FunctionTool
from charity_advisor.tools.payment_tools import create_payment_mandate


credentials_provider = Agent(
    name="CredentialsProvider",
    model="gemini-2.5-flash",
    description="Securely processes payments by creating PaymentMandates and executing transactions with user consent.",
    tools=[
        FunctionTool(func=create_payment_mandate)
    ],
    instruction="""You are a payment specialist responsible for securely processing payments with user consent.

Your workflow:

1. Read the CartMandate from shared state.
   The CartMandate was created by the Merchant Agent and has this structure:
   - contents: AP2 wrapper containing:
     - id: Cart identifier
     - cart_expiry: When the cart expires
     - merchant_name: Who is receiving payment
     - payment_request: W3C PaymentRequest with transaction details
   - merchant_authorization: Merchant's signature

2. Extract payment details from the nested structure:
   - Navigate: cart_mandate["contents"]["payment_request"]["details"]["total"]["amount"]
   - This gives you the currency and value

3. **IMPORTANT - Two-Turn Conversational Confirmation Pattern:**
   Before calling create_payment_mandate, you MUST:
   - Present the payment details clearly to the user
   - Ask explicitly: "I'm ready to process a payment of $X to [Charity Name]. Do you want to proceed with this donation?"
   - WAIT for the user's explicit confirmation (e.g., "yes", "proceed", "confirm")
   - ONLY call create_payment_mandate AFTER receiving explicit confirmation
   - If user says "no" or "cancel", DO NOT call the tool

4. After user confirms, use the create_payment_mandate tool to:
   - Validate the CartMandate hasn't expired (CRITICAL security check)
   - Create a PaymentMandate (the third AP2 credential)
   - Simulate payment processing
   - Record the transaction result

5. After processing, inform the user:
   - That payment was processed successfully (this is a simulation)
   - The transaction ID
   - The amount and merchant
   - That this completes the three-agent AP2 credential chain

IMPORTANT BOUNDARIES:
- Your ONLY job is creating PaymentMandates and processing payments
- You do NOT discover charities (that's Shopping Agent's job)
- You do NOT create offers (that's Merchant Agent's job)
- You MUST validate that the CartMandate hasn't expired before processing
- You MUST get explicit user confirmation before calling create_payment_mandate
- In production, this consent mechanism would be even more robust

WHAT IS A PAYMENTMANDATE:
A PaymentMandate is the final credential that authorizes payment execution. It:
- Links to the CartMandate (proving the merchant's offer)
- Records user consent
- Contains payment details extracted from the CartMandate
- Enables the actual payment transaction

This is the third and final verifiable credential in our secure payment system.

THE COMPLETE AP2 CREDENTIAL CHAIN:
1. Shopping Agent creates IntentMandate (user's intent)
2. Merchant Agent reads IntentMandate, creates CartMandate (merchant's binding offer)
3. You read CartMandate, get user confirmation, create PaymentMandate (authorized payment execution)

Each credential:
- Has an expiry time (security feature)
- Links to the previous credential
- Is validated before the next step
- Creates an auditable chain of trust"""
)
✅ 检查点:您现在拥有一个完整的凭据提供程序,该程序使用 AP2 Pydantic 模型正确读取 CartMandate 并创建 PaymentMandate。
第 8 步:测试凭据提供程序
现在,我们来验证代理是否正确处理付款并完成凭据链。
👉 在 Cloud Shell 终端中,运行以下命令:
python scripts/test_credentials_provider.py
预期输出:
======================================================================
CREDENTIALS PROVIDER TEST (MOCK - NO CONFIRMATION)
======================================================================

Simulated CartMandate from Merchant Agent:
  - Cart ID: cart_test123
  - Merchant: Room to Read
  - Amount: $50.00
  - Expires: 2025-11-07T15:47:16Z
  - Signature: SIG_test_signature

Calling Credentials Provider to process payment...
======================================================================
INFO:charity_advisor.tools.payment_tools:Tool called: Creating PaymentMandate and processing payment
INFO:charity_advisor.tools.payment_tools:CartMandate valid. Expires in 900 seconds
INFO:charity_advisor.tools.payment_tools:Payment processed successfully: txn_a3f7b2c8d9e1f4a2

======================================================================
CREDENTIALS PROVIDER RESPONSE:
======================================================================
I've successfully processed your payment. Here are the details:

**Payment Completed** (Simulated)
- Transaction ID: txn_a3f7b2c8d9e1f4a2
- Amount: USD 50.00
- Merchant: Room to Read
- Status: Completed

This completes the three-agent AP2 credential chain:
1. ✓ Shopping Agent created IntentMandate (your intent)
2. ✓ Merchant Agent created CartMandate (binding offer)
3. ✓ Credentials Provider created PaymentMandate (payment authorization)

Your donation has been processed securely through our verifiable credential system.

======================================================================
PAYMENTMANDATE CREATED:
======================================================================
  Payment Mandate ID: payment_3b4c5d6e7f8a
  Linked to Cart: cart_test123
  User Consent: True
  Amount: USD 50.00
  Merchant: Room to Read
  Agent Present: True
======================================================================

======================================================================
PAYMENT RESULT:
======================================================================
  Transaction ID: txn_a3f7b2c8d9e1f4a2
  Status: completed
  Amount: USD 50.00
  Merchant: Room to Read
  Simulation: True
======================================================================
第 9 步:测试完整的三代理流水线
现在,让我们测试一下这三个智能体协同工作的情况!
👉 运行完整的流水线测试:
python scripts/test_full_pipeline.py
预期输出:
======================================================================
THREE-AGENT PIPELINE TEST (AP2 CREDENTIAL CHAIN)
======================================================================

[1/3] SHOPPING AGENT - Finding charity and creating IntentMandate...
----------------------------------------------------------------------
✓ IntentMandate created
  - Intent ID: intent_774799058_1730927536
  - Description: Donate $75.00 to Room to Read
  - Merchant: Room to Read
  - Amount: $75.0
  - Expires: 2025-11-07T16:32:16Z

[2/3] MERCHANT AGENT - Reading IntentMandate and creating CartMandate...
----------------------------------------------------------------------
✓ CartMandate created
  - ID: cart_3b4c5d6e7f8a
  - Expires: 2025-11-07T15:47:16Z
  - Signature: SIG_a3f7b2c8d9e1f4a2

[3/3] CREDENTIALS PROVIDER - Creating PaymentMandate and processing...
----------------------------------------------------------------------
NOTE: In the web UI, this would show a confirmation dialog
      For this test, consent is automatically granted
✓ Payment processed (SIMULATED)
  - Transaction ID: txn_a3f7b2c8d9e1f4a2
  - Amount: $75.0
  - Status: completed

======================================================================
COMPLETE AP2 CREDENTIAL CHAIN
======================================================================

✓ Credential 1: IntentMandate (User's Intent)
  - Intent ID: intent_774799058_1730927536
  - Description: Donate $75.00 to Room to Read
  - Expiry: 2025-11-07T16:32:16Z

✓ Credential 2: CartMandate (Merchant's Offer)
  - Cart ID: cart_3b4c5d6e7f8a
  - Cart Expiry: 2025-11-07T15:47:16Z
  - Merchant Signature: SIG_a3f7b2c8d9e1f4a2

✓ Credential 3: PaymentMandate (Payment Execution)
  - Payment Mandate ID: payment_3b4c5d6e7f8a
  - Linked to Cart: cart_3b4c5d6e7f8a
  - Agent Present: True

✓ Transaction Result:
  - Transaction ID: txn_a3f7b2c8d9e1f4a2
  - Simulation: True

======================================================================
✅ COMPLETE PIPELINE TEST PASSED
======================================================================
这是完整的 AP2 凭据链的实际应用!
每个代理:
- 从状态读取凭据
- 使用 Pydantic 模型(结构 + 过期检查)对其进行验证
- 使用 AP2 模型创建下一个凭据
- 写入下一个代理的状态
您刚刚构建的内容
您已成功完成 AP2 三代理凭据链,并使用 Pydantic 模型和付款模拟进行了适当的结构验证。
掌握的关键概念
✅ PaymentMandate(AP2 凭据 #3):
- 使用官方 AP2 Pydantic 模型创建
- 授权执行付款的最终凭据
- 通过 payment_details_id 链接到 CartMandate
- 记录用户同意情况和时间戳
- 包含从 CartMandate 中提取的付款金额
- 包含人机协同的 agent_present 标志
- 模型验证可确保规范合规性
✅ 从 CartMandate 读取:
- 使用
CartMandate.model_validate()验证结构 - 类型安全的属性访问:
cart_model.contents.payment_request.details.total.amount - 了解 AP2 封装容器与 W3C 标准分离
- 从模型中安全地提取 merchant_name、金额和币种
- Pydantic 会自动捕获结构错误
✅ 购物车过期验证:
- 接受经过验证的
CartMandatePydantic 模型 - 从
cart.contents.cart_expiry(属性访问)读取 - 可防止处理过时购物车的安全功能
- 时长(15 分钟)短于意向时长(1 小时)
✅ 付款模拟:
- 真实支付处理方的教育模拟
- 生成交易 ID
- 记录处于状态的 payment_result
- 明确标记为模拟(模拟:True 标志)
✅ 使用模型完成 AP2 链:
- 三个代理、三个凭据、三个 Pydantic 验证
- 每个代理使用模型验证先前凭据的结构
- 每项凭据都会链接到之前的凭据,以形成审核轨迹
- 基于状态的切换可保持角色分离
- 整个链条中的类型安全
✅ 模型驱动的开发:
- 通过
model_validate()进行输入验证 - 使用嵌套模型进行类型安全构建
- 通过
model_dump(mode='json')实现自动序列化 - 从一开始就提供可用于生产用途的模式
后续步骤
在下一模块中,我们将构建一个编排器代理,用于协调所有三个专业代理。
您已使用 AP2 Pydantic 模型构建了三个强大的专业智能体。现在,我们来构建指挥器,将它们编排成流畅的捐款体验。
让我们构建 Orchestrator,看看完整的系统是如何运行的。
7. 编排 - 整合所有内容

从专家到顺畅体验
在之前的模块中,您构建了三个专业智能体:
- 购物智能体:查找公益组织,创建 IntentMandate
- 商家代理:根据 IntentMandate 创建 CartMandate
- 凭据提供方:创建 PaymentMandate,处理付款
这些代理自然分为两个阶段:
- 第 1 阶段(购物):通过多轮对话查找和选择公益组织
- 第 2 阶段(处理):以原子方式执行优惠创建和付款
但目前,您必须自行手动编排这些阶段。
这正是 ADK 的编排模式大放异彩的地方。
AP2 原则:编排可强制执行信任边界
为什么编排对安全至关重要
编排不仅是为了方便,更是为了通过架构来强制执行信任边界。
不进行编排:
# User could accidentally skip steps or reorder them
shopping_agent.run("Find charity")
# Oops, forgot to create CartMandate!
credentials_provider.run("Process payment")  # No offer to validate!
使用编排:
# Pipeline enforces correct order
donation_processing_pipeline = SequentialAgent(
    sub_agents=[
        merchant_agent,      # Must run first
        credentials_provider # Must run second
    ]
)
# Steps ALWAYS run in order, no skipping allowed
顺序流水线保证:
- ✅ IntentMandate 创建时间早于 CartMandate
- ✅ 在处理付款之前创建了 CartMandate
- ✅ 每个代理都在其隔离的上下文中运行
- ✅ 状态通过凭据链向前流动
我们的使命:构建完整的系统
我们将构建两个层:
第 1 层:处理流水线 (SequentialAgent)
- 将商家信息与凭据关联起来 → 凭据
- 选择公益组织后自动按顺序运行
- 优惠和付款的原子执行
第 2 层:根编排器(面向用户的代理)
- 性格友善
- 委托给 shopping_agent 进行慈善机构选择
- 在创建 IntentMandate 后委托给处理流水线
- 处理对话和阶段过渡
这种双层方法符合自然流程:
- 购物阶段:多轮对话(用户浏览、提问、做出决定)
- 处理阶段:原子执行(提供优惠 → 付款)
我们来构建这两个版本。
第 1 步:导入编排组件
首先,我们来设置包含必要导入内容的编排文件。
👉 打开
charity_advisor/agent.py
我们先从导入开始:
👉 查找:
# MODULE_7_STEP_1_IMPORT_COMPONENTS
👉 将该单行替换为:
from google.adk.agents import Agent, SequentialAgent
from charity_advisor.shopping_agent.agent import shopping_agent
from charity_advisor.merchant_agent.agent import merchant_agent
from charity_advisor.credentials_provider.agent import credentials_provider
第 2 步:创建处理流水线
现在,我们来创建以原子方式运行优惠创建和付款处理的流水线。
👉 查找:
# MODULE_7_STEP_2_CREATE_SEQUENTIAL_PIPELINE
👉 将这两行代码替换为:
# Create the donation processing pipeline
# This runs Merchant → Credentials in sequence AFTER charity is selected
donation_processing_pipeline = SequentialAgent(
name="DonationProcessingPipeline",
description="Creates signed offer and processes payment after charity is selected",
sub_agents=[
merchant_agent,
credentials_provider
]
)
第 3A 步:创建根代理设置
现在,我们来创建面向用户的代理,该代理可协调这两个阶段。我们将分三个部分构建此功能:设置 (3A)、指令 (3B) 和子代理 (3C)。
👉 查找:
# MODULE_7_STEP_3A_CREATE_ROOT_AGENT_SETUP
👉 将该单行替换为:
# Create the root orchestrator agent
# This is what users interact with directly
root_agent = Agent(
name="CharityAdvisor",
model="gemini-2.5-pro",
description="A friendly charity giving assistant that helps users donate to verified organizations.",
# MODULE_7_STEP_3B_WRITE_ROOT_AGENT_INSTRUCTION
第 3B 步:编写根代理指令
现在,我们来添加在两个阶段指导公益顾问行为的指令。
👉 查找:
# MODULE_7_STEP_3B_WRITE_ROOT_AGENT_INSTRUCTION
👉 将该单行替换为:
instruction="""You are a helpful and friendly charity giving advisor.
Your workflow has TWO distinct phases:
PHASE 1: CHARITY SELECTION (delegate to shopping_agent)
When a user expresses interest in donating:
1. Delegate to shopping_agent immediately
2. The shopping_agent will:
- Search for charities matching their cause
- Present verified options with ratings
- Engage in conversation (user may ask questions, change their mind)
- Wait for user to select a specific charity and amount
- Create an IntentMandate when user decides
3. Wait for shopping_agent to complete
You'll know Phase 1 is complete when shopping_agent's response includes:
- "IntentMandate created" or "Intent ID: intent_xxx"
- Charity name and donation amount
PHASE 2: PAYMENT PROCESSING (delegate to DonationProcessingPipeline)
After shopping_agent completes:
1. Acknowledge the user's selection naturally:
"Perfect! Let me process your $X donation to [Charity]..."
2. Delegate to DonationProcessingPipeline
3. The pipeline will automatically:
- Create signed cart offer (MerchantAgent)
- Get consent and process payment (CredentialsProvider)
4. After pipeline completes, summarize the transaction
CRITICAL RULES:
- Phase 1 may take multiple conversation turns (this is normal)
- Only proceed to Phase 2 after IntentMandate exists
- Don't rush the user during charity selection
- Don't ask user to "proceed" between phases - transition automatically
EXAMPLE FLOW:
User: "I want to donate to education"
You: [delegate to shopping_agent]
Shopping: "Here are 3 education charities..." [waits]
User: "Tell me more about the first one"
Shopping: "Room to Read focuses on..." [waits]
User: "Great, I'll donate $50 to Room to Read"
Shopping: "IntentMandate created (ID: intent_123)..."
You: "Perfect! Processing your $50 donation to Room to Read..." [delegate to DonationProcessingPipeline]
Pipeline: [creates offer, gets consent, processes payment]
You: "Done! Your donation was processed successfully. Transaction ID: txn_456"
Your personality:
- Warm and encouraging
- Patient during charity selection
- Clear about educational nature
- Smooth transitions between phases""",
# MODULE_7_STEP_3C_ADD_ROOT_AGENT_SUBAGENTS
第 3C 步:添加子代理
最后,我们为慈善顾问授予对购物代理和处理流水线的访问权限,并关闭代理定义。
👉 查找:
# MODULE_7_STEP_3C_ADD_ROOT_AGENT_SUBAGENTS
👉 将该单行替换为:
sub_agents=[
shopping_agent,
donation_processing_pipeline
]
)
第 4 步:验证完整系统
我们来确认编排是否已正确连接。
👉 您的完整
charity_advisor/agent.py
现在应如下所示:
"""
Main orchestration: The donation processing pipeline and root orchestrator agent.
"""
from google.adk.agents import Agent, SequentialAgent
from charity_advisor.shopping_agent.agent import shopping_agent
from charity_advisor.merchant_agent.agent import merchant_agent
from charity_advisor.credentials_provider.agent import credentials_provider
# Create the donation processing pipeline
# This runs Merchant → Credentials in sequence AFTER charity is selected
donation_processing_pipeline = SequentialAgent(
    name="DonationProcessingPipeline",
    description="Creates signed offer and processes payment after charity is selected",
    sub_agents=[
        merchant_agent,
        credentials_provider
    ]
)
# Create the root orchestrator agent
# This is what users interact with directly
root_agent = Agent(
name="CharityAdvisor",
model="gemini-2.5-flash",
description="A friendly charity giving assistant that helps users donate to verified organizations.",
instruction="""You are a helpful and friendly charity giving advisor.
Your workflow has TWO distinct phases:
PHASE 1: CHARITY SELECTION (delegate to shopping_agent)
When a user expresses interest in donating:
1. Delegate to shopping_agent immediately
2. The shopping_agent will:
- Search for charities matching their cause
- Present verified options with ratings
- Engage in conversation (user may ask questions, change their mind)
- Wait for user to select a specific charity and amount
- Create an IntentMandate when user decides
3. Wait for shopping_agent to complete
You'll know Phase 1 is complete when shopping_agent's response includes:
- "IntentMandate created" or "Intent ID: intent_xxx"
- Charity name and donation amount
PHASE 2: PAYMENT PROCESSING (delegate to DonationProcessingPipeline)
After shopping_agent completes:
1. Acknowledge the user's selection naturally:
"Perfect! Let me process your $X donation to [Charity]..."
2. Delegate to DonationProcessingPipeline
3. The pipeline will automatically:
- Create signed cart offer (MerchantAgent)
- Get consent and process payment (CredentialsProvider)
4. After pipeline completes, summarize the transaction
CRITICAL RULES:
- Phase 1 may take multiple conversation turns (this is normal)
- Only proceed to Phase 2 after IntentMandate exists
- Don't rush the user during charity selection
- Don't ask user to "proceed" between phases - transition automatically
EXAMPLE FLOW:
User: "I want to donate to education"
You: [delegate to shopping_agent]
Shopping: "Here are 3 education charities..." [waits]
User: "Tell me more about the first one"
Shopping: "Room to Read focuses on..." [waits]
User: "Great, I'll donate $50 to Room to Read"
Shopping: "IntentMandate created (ID: intent_123)..."
You: "Perfect! Processing your $50 donation to Room to Read..." [delegate to DonationProcessingPipeline]
Pipeline: [creates offer, gets consent, processes payment]
You: "Done! Your donation was processed successfully. Transaction ID: txn_456"
Your personality:
- Warm and encouraging
- Patient during charity selection
- Clear about educational nature
- Smooth transitions between phases""",
    sub_agents=[
        shopping_agent,
        donation_processing_pipeline
    ]
)
第 5 步:通过验证回调进行强化(可选;跳至第 7 步)
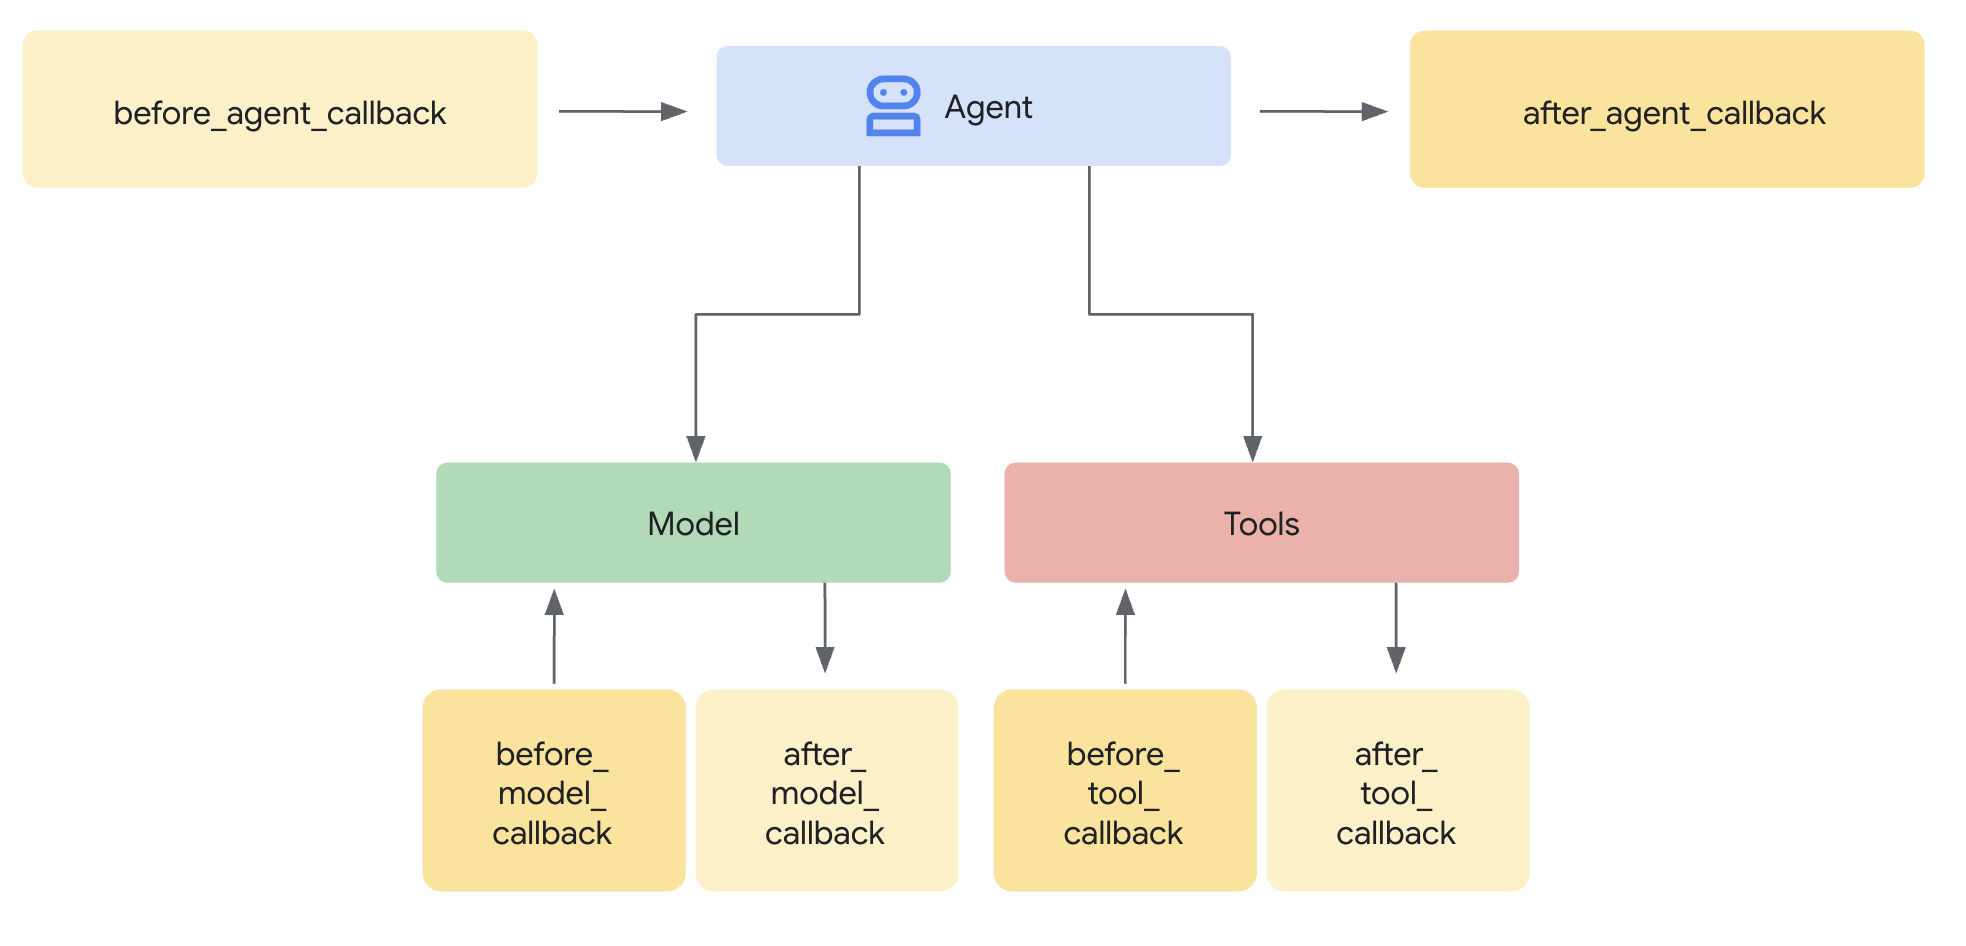
SequentialAgent 可保证执行顺序,但如果出现以下情况,该怎么办:
- 购物智能体静默失败(从未创建 IntentMandate)
- 从购物到商家(意向过期)之间经过 1 小时
- 状态损坏或被清除
- 有人尝试直接致电商家,绕过 Google 购物
回调 添加架构强制执行 - 它们在代理甚至开始 LLM 调用之前验证前提条件。这是纵深防御:工具在执行期间进行验证,回调在执行之前进行验证。
我们来为 Merchant 和 Credentials Provider 代理添加验证回调。
第 5A 步:添加商家验证 - 导入回调类型
首先,我们来添加回调所需的导入。
👉 打开
charity_advisor/merchant_agent/agent.py
在文件顶部,在现有导入之后添加:
from typing import Optional
from datetime import datetime, timezone
from google.adk.agents.callback_context import CallbackContext
from google.genai.types import Content, Part
import logging

logger = logging.getLogger(__name__)
第 5B 步:构建 intent 验证函数
现在,我们来创建一个回调函数,用于在商家代理运行之前验证 IntentMandate。
👉 在 中
charity_advisor/merchant_agent/agent.py
,请在
merchant_agent = Agent(...)
定义:
def validate_intent_before_merchant(
    callback_context: CallbackContext,
) -> Optional[Content]:
    """
    Validates IntentMandate exists and hasn't expired before Merchant runs.

    This callback enforces that the Shopping Agent completed successfully
    before the Merchant Agent attempts to create a CartMandate.

    Returns:
        None: Allow Merchant Agent to proceed normally
        Content: Skip Merchant Agent and return error to user
    """
    state = callback_context.state

    # Check credential exists
    if "intent_mandate" not in state:
        logger.error("❌ IntentMandate missing - Shopping Agent may have failed")
        return Content(parts=[Part(text=(
            "Error: Cannot create cart. User intent was not properly recorded. "
            "Please restart the donation process."
        ))])

    intent_mandate = state["intent_mandate"]

    # Validate expiry (critical security check)
    try:
        expiry_time = datetime.fromisoformat(
            intent_mandate["intent_expiry"].replace('Z', '+00:00')
        )
        now = datetime.now(timezone.utc)

        if expiry_time < now:
            logger.error(f"❌ IntentMandate expired at {intent_mandate['intent_expiry']}")
            return Content(parts=[Part(text=(
                "Error: Your donation intent has expired. "
                "Please select a charity again to restart."
            ))])

        time_remaining = expiry_time - now
        logger.info(f"✓ IntentMandate validated. Expires in {time_remaining.total_seconds():.0f}s")

    except (KeyError, ValueError) as e:
        logger.error(f"❌ Invalid IntentMandate structure: {e}")
        return Content(parts=[Part(text=(
            "Error: Invalid intent data. Please restart the donation."
        ))])

    # All checks passed - allow Merchant Agent to proceed
    logger.info(f"✓ Prerequisites met for Merchant Agent: {intent_mandate['intent_id']}")
    return None
第 5C 步:将回调附加到商家代理
现在,我们将回调连接到代理。
👉 在 中
charity_advisor/merchant_agent/agent.py
,修改
merchant_agent = Agent(...)
定义:
在代理定义中找到以下行:
merchant_agent = Agent(
    name="MerchantAgent",
    model="gemini-2.5-flash",
    description="Creates formal, signed CartMandates for charity donations following W3C PaymentRequest standards.",
在 之后添加以下这行代码
description
line:
before_agent_callback=validate_intent_before_merchant,
您的代理定义现在应如下所示:
merchant_agent = Agent(
    name="MerchantAgent",
    model="gemini-2.5-flash",
    description="Creates formal, signed CartMandates for charity donations following W3C PaymentRequest standards.",
    before_agent_callback=validate_intent_before_merchant,
    tools=[
        FunctionTool(func=create_cart_mandate)
    ],
    instruction="""..."""
)
第 6 步:添加凭据提供方验证(可选;可跳至第 7 步)
同样的方式 - 我们为付款步骤添加验证。
第 6A 步:导入回调类型
👉 打开
charity_advisor/credentials_provider/agent.py
在文件顶部,在现有导入之后添加:
from typing import Optional
from datetime import datetime, timezone
from google.adk.agents.callback_context import CallbackContext
from google.genai.types import Content, Part
import logging

logger = logging.getLogger(__name__)
第 6B 步:构建购物车验证函数
👉 在 中
charity_advisor/credentials_provider/agent.py
,请在
credentials_provider = Agent(...)
定义:
def validate_cart_before_payment(
    callback_context: CallbackContext,
) -> Optional[Content]:
    """
    Validates CartMandate exists and hasn't expired before payment processing.

    This callback enforces that the Merchant Agent completed successfully
    before the Credentials Provider attempts to process payment.

    Returns:
        None: Allow Credentials Provider to proceed
        Content: Skip payment processing and return error
    """
    state = callback_context.state

    # Check credential exists
    if "cart_mandate" not in state:
        logger.error("❌ CartMandate missing - Merchant Agent may have failed")
        return Content(parts=[Part(text=(
            "Error: Cannot process payment. Cart was not properly created. "
            "Please restart the donation process."
        ))])

    cart_mandate = state["cart_mandate"]

    # Validate AP2 structure
    if "contents" not in cart_mandate:
        logger.error("❌ CartMandate missing AP2 contents wrapper")
        return Content(parts=[Part(text=(
            "Error: Invalid cart structure. Please restart."
        ))])

    # Validate expiry
    try:
        contents = cart_mandate["contents"]
        expiry_time = datetime.fromisoformat(
            contents["cart_expiry"].replace('Z', '+00:00')
        )
        now = datetime.now(timezone.utc)

        if expiry_time < now:
            logger.error(f"❌ CartMandate expired at {contents['cart_expiry']}")
            return Content(parts=[Part(text=(
                "Error: Your cart has expired (15 minute limit). "
                "Please restart the donation to get a fresh offer."
            ))])

        time_remaining = expiry_time - now
        logger.info(f"✓ CartMandate validated. Expires in {time_remaining.total_seconds():.0f}s")

    except (KeyError, ValueError) as e:
        logger.error(f"❌ Invalid CartMandate structure: {e}")
        return Content(parts=[Part(text=(
            "Error: Invalid cart data. Please restart the donation."
        ))])

    # All checks passed - allow payment processing
    logger.info(f"✓ Prerequisites met for Credentials Provider: {contents['id']}")
    return None
第 6C 步:将回调附加到凭据提供程序
👉 在 中
charity_advisor/credentials_provider/agent.py
,修改
credentials_provider = Agent(...)
定义:
在代理定义中找到以下行:
credentials_provider = Agent(
    name="CredentialsProvider",
    model="gemini-2.5-flash",
    description="Securely processes payments by creating PaymentMandates and executing transactions with user consent.",
在 之后添加以下这行代码
description
line:
before_agent_callback=validate_cart_before_payment,
您的代理定义现在应如下所示:
credentials_provider = Agent(
    name="CredentialsProvider",
    model="gemini-2.5-flash",
    description="Securely processes payments by creating PaymentMandates and executing transactions with user consent.",
    before_agent_callback=validate_cart_before_payment,
    tools=[
        FunctionTool(func=create_payment_mandate)
    ],
    instruction="""..."""
)
第 7 步:使用 ADK Web 界面进行测试
现在,我们来测试完整的强化系统,并启用验证回调。
👉 在 Cloud Shell 终端中,运行以下命令:
adk web
您应该会看到类似如下所示的输出:
+-----------------------------------------------------------------------------+
| ADK Web Server started                                                      |
|                                                                             |
| For local testing, access at http://localhost:8000.                         |
+-----------------------------------------------------------------------------+

INFO:     Application startup complete.
INFO:     Uvicorn running on http://0.0.0.0:8000 (Press CTRL+C to quit)
👉 接下来,如需从浏览器访问 ADK Web 界面,请执行以下操作:
在 Cloud Shell 工具栏(通常位于右上角)中,点击网页预览图标(看起来像眼睛或带有箭头的正方形),然后选择更改端口。在弹出式窗口中,将端口设置为 8000,然后点击更改并预览。然后,Cloud Shell 会打开一个新的浏览器标签页,其中显示 ADK Web 界面。
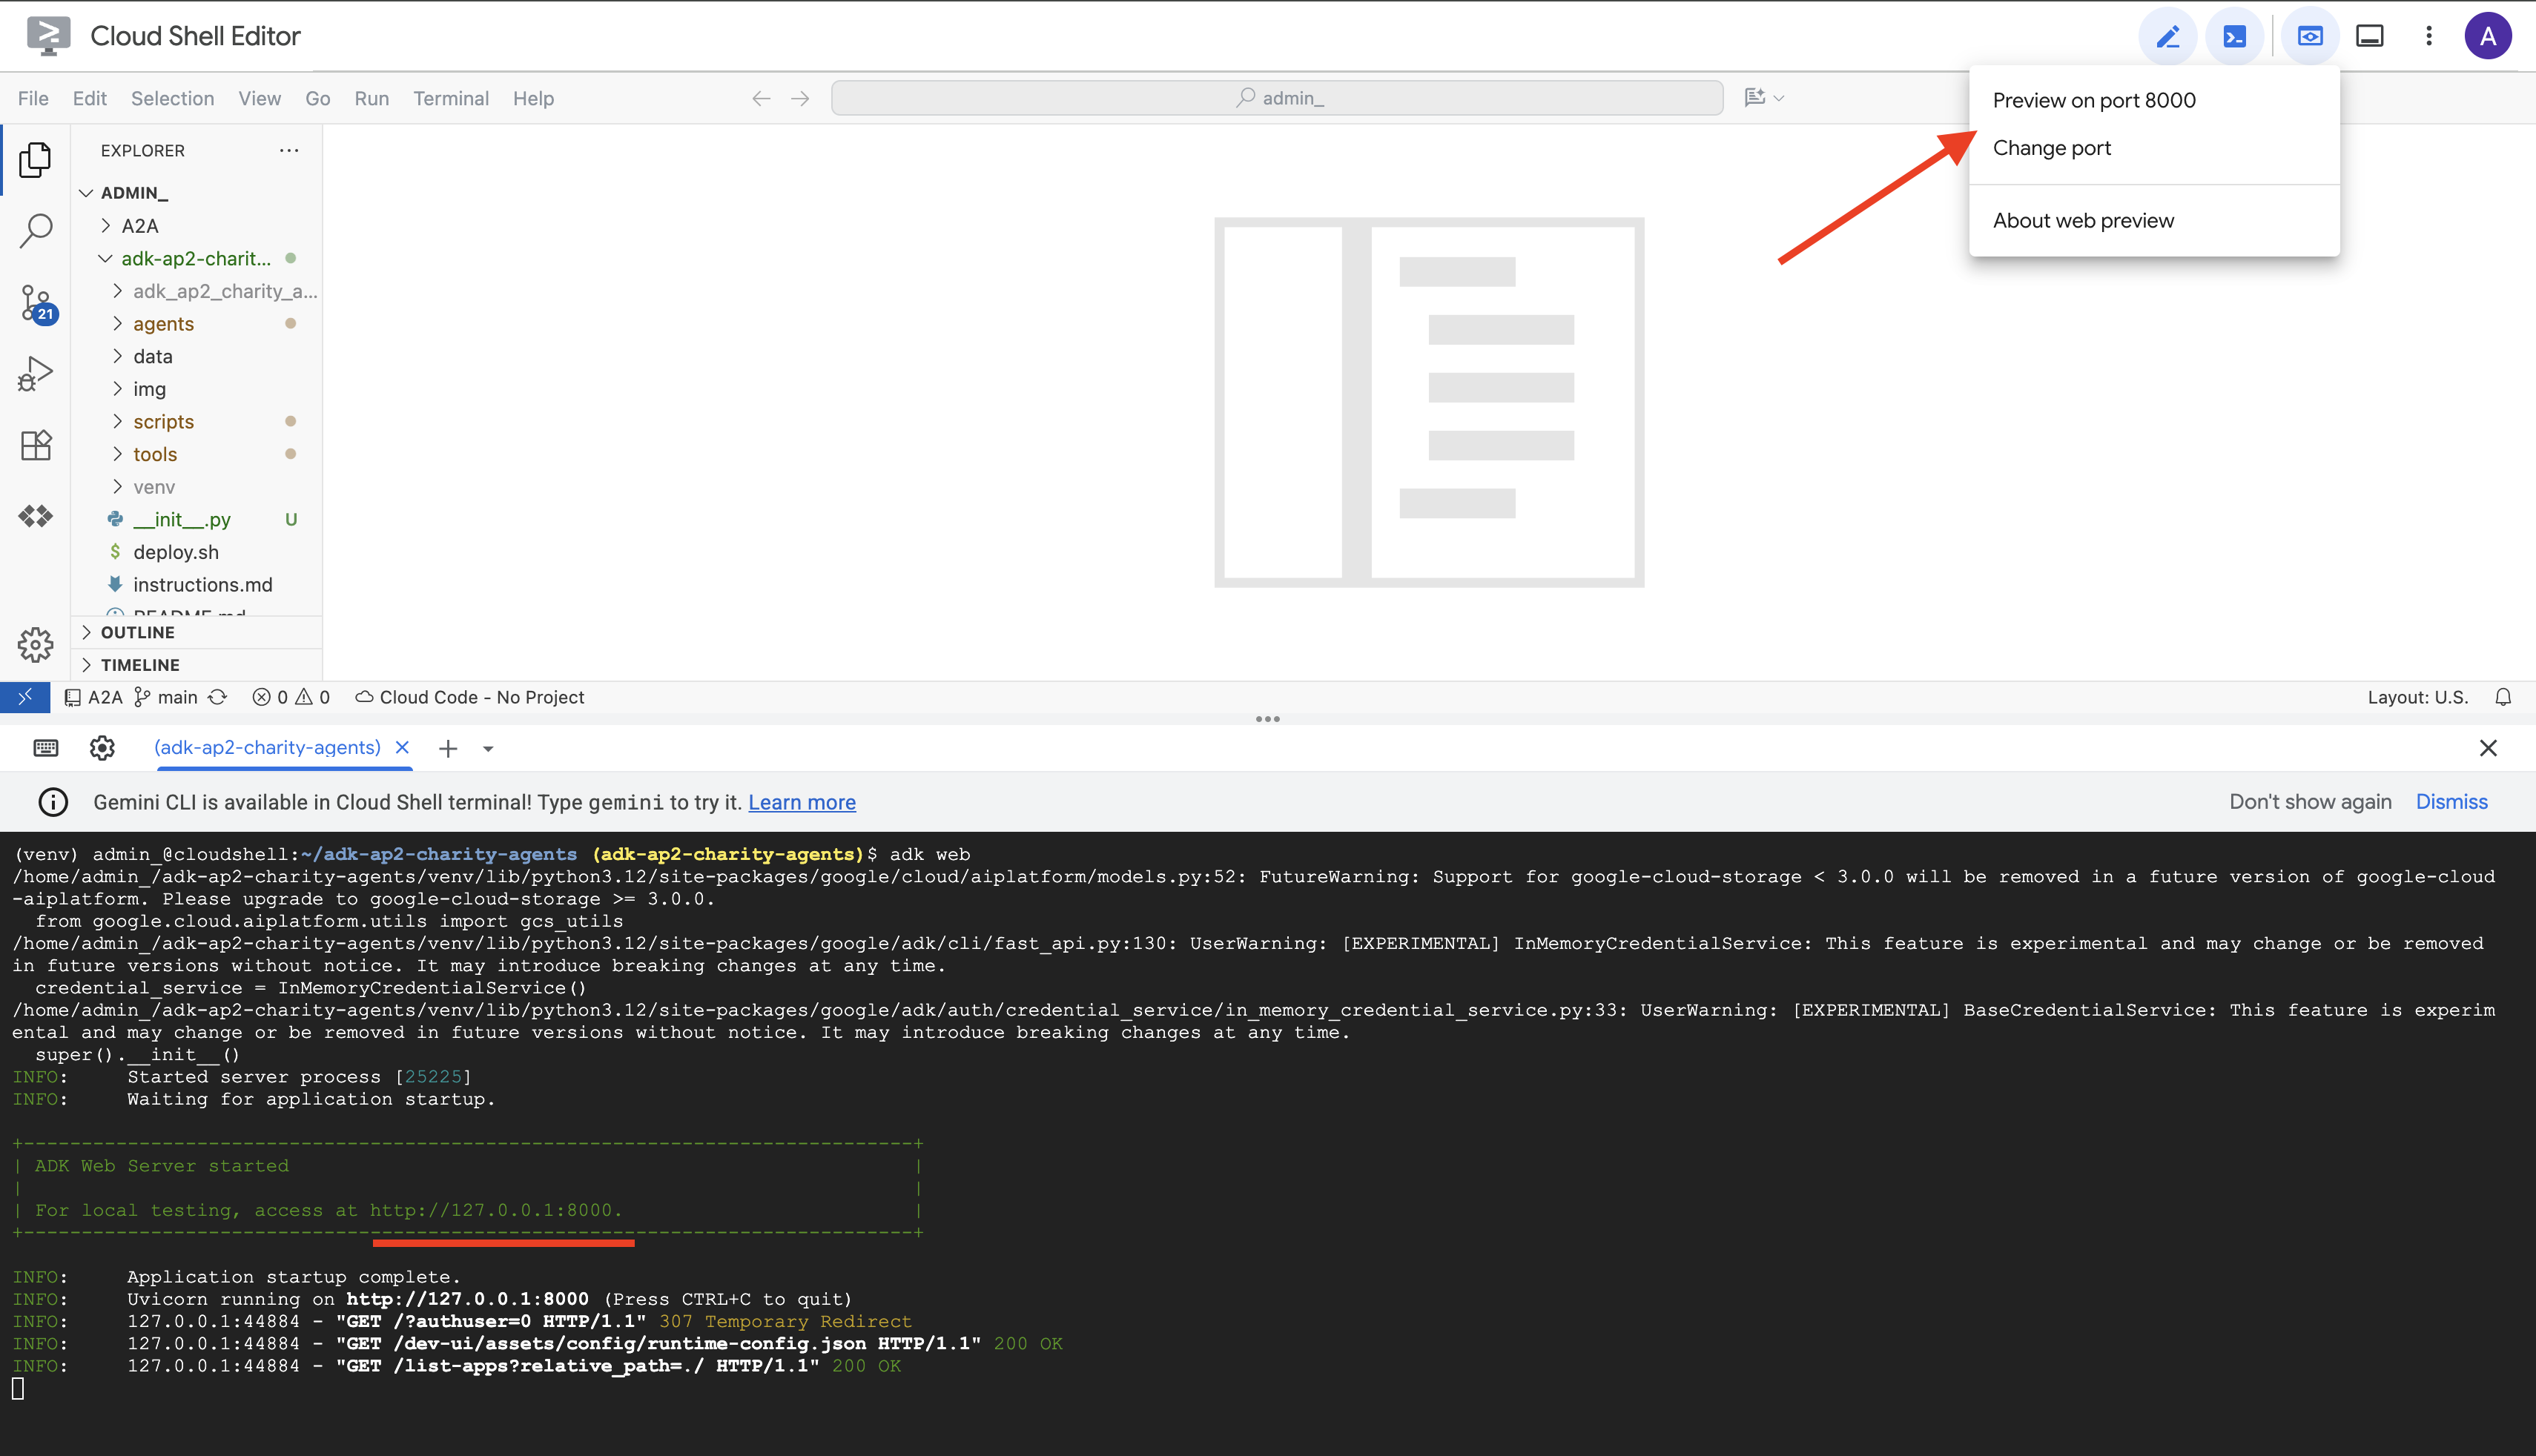
👉 从下拉菜单中选择您的智能体:
在 ADK Web 界面中,您会在顶部看到一个下拉菜单。从列表中选择 charity_advisor。
您将看到 ADK 网页界面,其中包含:
- 聊天面板:位于左侧,用于对话
- 轨迹面板:右侧,用于可观测性(我们将在模块 9 中使用此面板)
测试 1:完成捐款流程(正常情况)
👉 在聊天界面中,输入:
I want to donate to an education charity
观看完整流程:

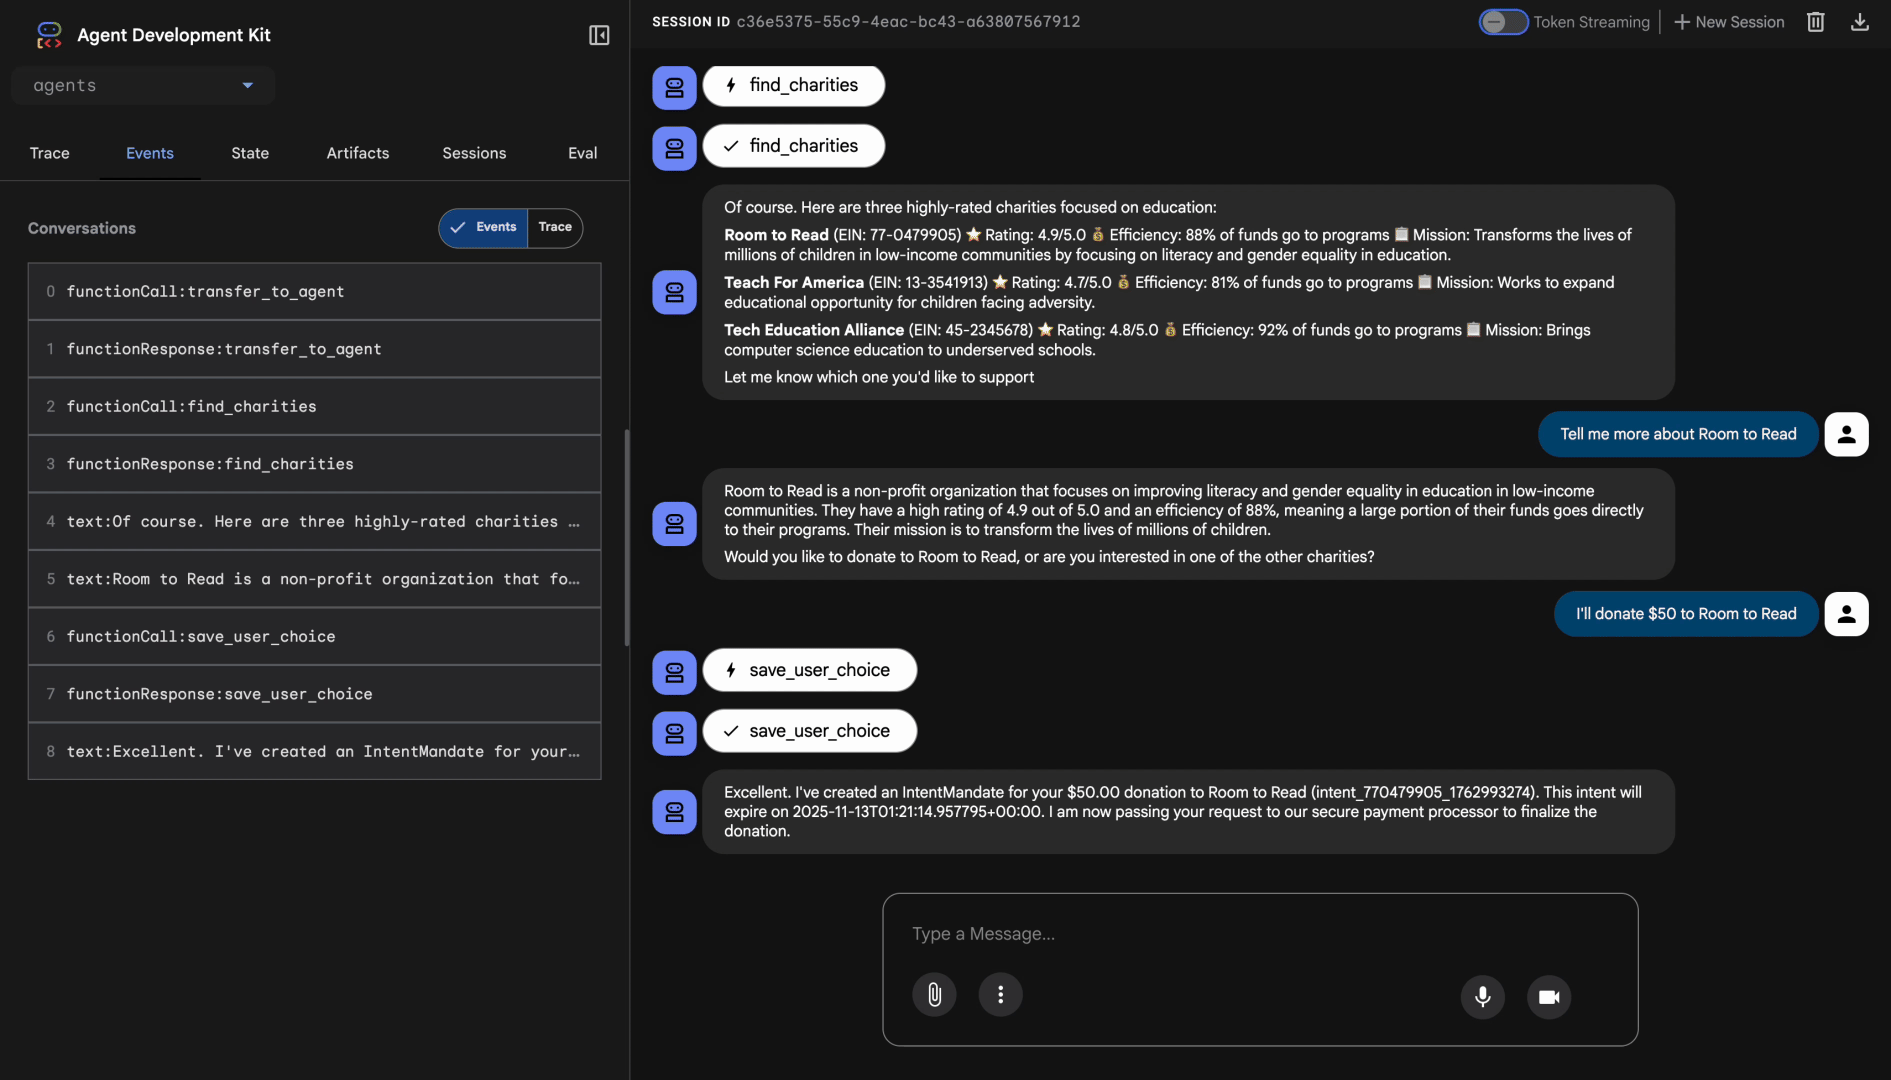
发生的情况(在右侧的轨迹面板中可见):
1. 顾问将任务委托给 ShoppingAgent:
- ShoppingAgent 搜索教育慈善机构
- 向您显示 3 个已验证的选项,并提供详细信息
2. 您与 ShoppingAgent 互动(可能需要多次对话):
User: "Tell me more about Room to Read"
Shopping: [explains mission and impact]
User: "I'll donate $50 to Room to Read"
3. ShoppingAgent 创建 IntentMandate:
- 创建并签署 intent
- 返回包含 intent ID 的确认信息
4. 进入处理阶段:
太好了!正在处理您向 Room to Read 捐赠的 50 美元...
5. DonationProcessingPipeline 激活:
- 商家回调验证 IntentMandate(✓ 通过)← 新增!
- 商家代理使用签名创建 CartMandate
- 凭据回调验证 CartMandate(✓ 通过)← 新增!
- 凭据提供方准备付款
6. 付款流程:
- 凭据提供方创建 PaymentMandate
- 模拟付款处理
- 退货交易 ID
7. 智能助理总结:
太好了!您的捐款已成功处理!🎉
详细信息:
- 金额:50.00 美元
- 慈善机构:Room to Read(EIN:77-0479905)
- 交易 ID:txn_a3f7b2c8d9e1f4a2
测试 2:验证回调是否会捕获失败(可选的高级测试)
想了解回调如何实际捕获错误?您需要手动损坏状态(高级调试),但在生产环境中,回调会捕获以下情况:
- 购物代理工具失败 → 商家回调被阻止:“错误:无法创建购物车...”
- 2 小时后 → 商家回调阻塞:“错误:Intent 已过期...”
- 购物车过期 → 凭据回调阻塞:“错误:购物车已过期(15 分钟限制)...”
现在,您的验证回调会在架构上强制执行这些边缘情况。
您刚刚构建的内容
您已成功将三个专业代理编排为一个无缝、可信赖的系统,并进行了架构验证。
后续步骤
您现已完成构建可信赖的代理的技术核心:
您已在本地构建了一个完整的可信系统,用于强制执行凭据链。现在,让我们通过正式版部署向实际用户提供此功能,并启用使模块 9 成为可能的可追溯性。
接下来,我们将强化后的代理部署到 Google Cloud。
8. 部署
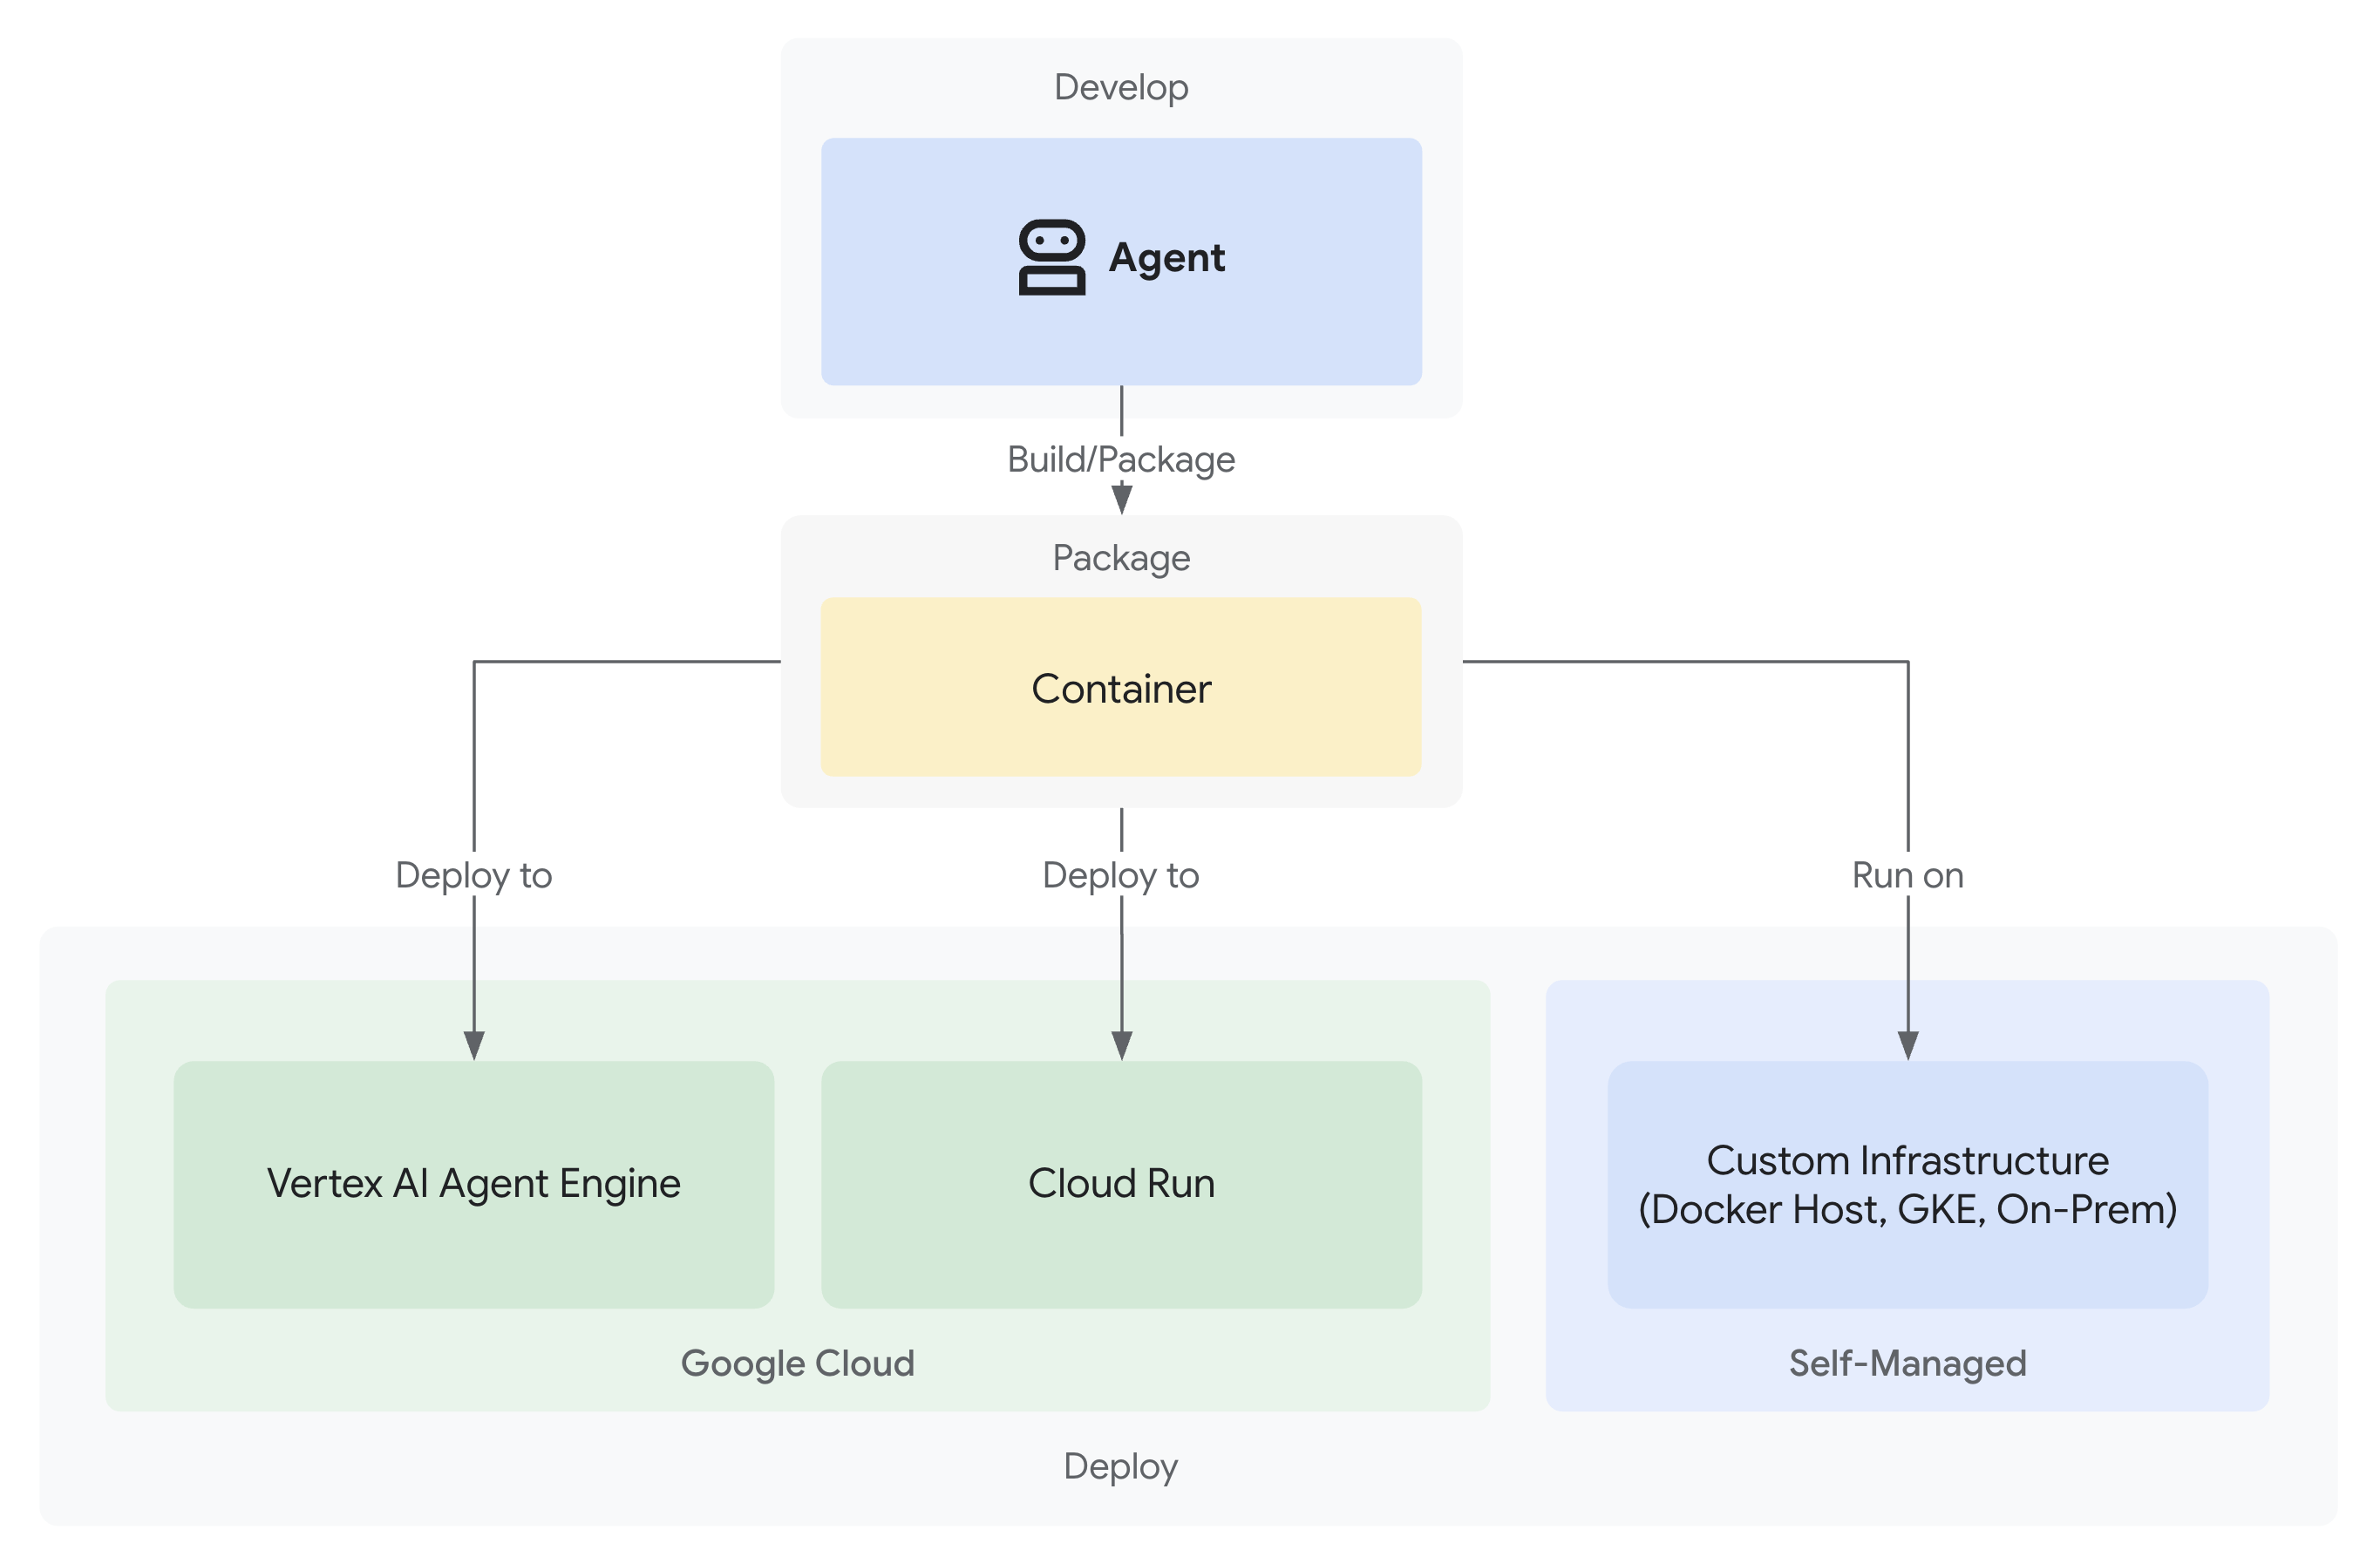
您的可信捐款系统现已完成,其中包含 3 个在本地运行的专用代理:
但它仅在开发机器上运行。为了让真实用户能够使用此系统,并捕获可证明可信度的责任链,您需要将其部署到生产环境中。
本模块将引导您在 Google Cloud 上部署代理,从第一天起就启用可观测性。您在部署期间使用的 --trace_to_cloud 标志可实现模块 9 中的责任链。
了解部署选项
ADK 支持多个部署目标。每种模式在复杂性、会话管理、扩缩和费用方面都有不同的特征:
因素 | 本地( | Agent Engine | Cloud Run |
复杂性 | 最小 | 低 | 中 |
会话持久性 | 仅在内存中(重启后丢失) | Vertex AI 托管式(自动) | Cloud SQL (PostgreSQL) 或内存中 |
基础架构 | 无(仅限开发机器) | 全代管式 | 容器 + 可选数据库 |
冷启动 | 不适用 | 100-500 毫秒 | 100-2000 毫秒 |
扩缩 | 单一实例 | 自动 | 自动(至零) |
费用模型 | 免费(本地计算) | 基于计算 | 基于请求 + 免费层级 |
界面支持 | 是(内置) | 否(仅限 API) | 是(通过 |
可观测性设置 | 本地跟踪记录查看器 | 自动(使用 | 需要 |
最适合 | 开发和测试 | 生产代理 | 生产代理 |
建议:对于此可信赖的捐款系统,我们建议将 Agent Engine 作为主要生产部署,因为它提供:
- 全托管式基础架构(无需管理容器)
- 通过
VertexAiSessionService实现的内置会话持久性 - 自动扩缩,无冷启动
- 简化部署(无需具备 Docker 知识)
- 开箱即用的 Cloud Trace 集成
其他选项:Google Kubernetes Engine (GKE)
对于需要 Kubernetes 级控制、自定义网络或多服务编排的高级用户,可以使用 GKE 部署。此选项可提供极大的灵活性,但需要更丰富的运维专业知识(集群管理、清单、服务账号)。
本 Codelab 不会介绍 GKE 部署,但 ADK GKE 部署指南中对此进行了全面介绍。
前提条件
1. Google Cloud 项目设置
您需要一个启用了结算功能的 Google Cloud 项目。如果您没有,请执行以下操作:
- 创建项目:Google Cloud 控制台
- 启用结算功能:启用结算功能
- 记下您的项目 ID(不是项目名称或编号)
2. 重新进行身份验证(可选)
向 Google Cloud 进行身份验证:
gcloud auth application-default login
gcloud config set project YOUR_PROJECT_ID
将 YOUR_PROJECT_ID 替换为您的实际 Google Cloud 项目 ID。
验证您的身份验证:
gcloud config get-value project
# Should output: YOUR_PROJECT_ID
3. 环境变量
使用以下命令自动填充 .env 文件:
# Get your current Project ID
PROJECT_ID=$(gcloud config get-value project)
STAGING_BUCKET_VALUE="gs://${PROJECT_ID}-staging"
ENV_FILE=".env"

# Check if STAGING_BUCKET is already set in the .env file
if grep -q "^STAGING_BUCKET=" "${ENV_FILE}"; then
  # If it exists, replace the line
  # The sed command finds the line starting with STAGING_BUCKET= and replaces the entire line.
  # Using | as a delimiter to avoid issues with slashes in the bucket name.
  sed -i "s|^STAGING_BUCKET=.*|STAGING_BUCKET=${STAGING_BUCKET_VALUE}|" "${ENV_FILE}"
  echo "Updated STAGING_BUCKET in ${ENV_FILE}"
else
  # If it doesn't exist, add it to the end of the file
  echo "STAGING_BUCKET=${STAGING_BUCKET_VALUE}" >> "${ENV_FILE}"
  echo "Added STAGING_BUCKET to ${ENV_FILE}"
fi

# Verify it was added or updated correctly
echo "Current STAGING_BUCKET setting:"
grep "^STAGING_BUCKET=" "${ENV_FILE}"
您应该会看到:
STAGING_BUCKET=gs://your-actual-project-id-staging
重要说明:
- 将
YOUR_PROJECT_ID替换为您的实际项目 ID(或使用上述命令) - 对于
GOOGLE_CLOUD_LOCATION,请使用受支持的区域 - 运行部署脚本时,如果暂存存储分区不存在,系统会自动创建该存储分区
4. 启用必需的 API
部署过程需要启用多个 Google Cloud API。运行以下命令以启用这些功能:
gcloud services enable \
    aiplatform.googleapis.com \
    storage.googleapis.com \
    cloudbuild.googleapis.com \
    cloudtrace.googleapis.com \
    compute.googleapis.com
此命令会启用:
- AI Platform API - 适用于 Agent Engine 和 Vertex AI 模型
- Cloud Storage API - 针对临时存储分区
- Cloud Build API - 用于构建容器 (Cloud Run)
- Cloud Trace API - 用于提供可观测性和责任链
- Compute Engine API - 用于服务账号管理
第 1 步:了解部署基础架构
您的项目包含一个统一的部署脚本 (deploy.sh),用于处理所有部署模式。
👉 查看部署脚本(可选):
cat deploy.sh
该脚本提供三种部署模式:
./deploy.sh local- 在本地运行,使用内存中存储./deploy.sh agent-engine- 部署到 Vertex AI Agent Engine(推荐)./deploy.sh cloud-run- 部署到 Cloud Run(可选界面)
后台运作方式:
对于 Agent Engine 部署,脚本会执行以下操作:
adk deploy agent_engine \
  --project=$GOOGLE_CLOUD_PROJECT \
  --region=$GOOGLE_CLOUD_LOCATION \
  --staging_bucket=$STAGING_BUCKET \
  --display_name="Charity Advisor" \
  --trace_to_cloud \
  charity_advisor
对于 Cloud Run 部署,它会执行以下操作:
adk deploy cloud_run \
  --project=$GOOGLE_CLOUD_PROJECT \
  --region=$GOOGLE_CLOUD_LOCATION \
  --service_name="charity-advisor" \
  --app_name="charity_advisor" \
  --with_ui \
  --trace_to_cloud \
  charity_advisor
--trace_to_cloud 标志对于这两种部署类型都至关重要,它可实现 Cloud Trace 集成,以便您在模块 9 中探索责任链。
第 2 步:准备 Agent Engine 封装容器
Agent Engine 需要一个特定的入口点,用于封装代理以供受管理的运行时使用。系统已为您创建此文件。
👉 查看
charity_advisor/agent_engine_app.py
:
"""Agent Engine application wrapper.

This file prepares the Charity Advisor agent for deployment to Vertex AI Agent Engine.
"""

from vertexai import agent_engines
from .agent import root_agent

# Wrap the agent in an AdkApp object for Agent Engine deployment
app = agent_engines.AdkApp(
    agent=root_agent,
    enable_tracing=True,  # Enables Cloud Trace integration automatically
)
为什么需要此文件:
- Agent Engine 要求将代理封装在
AdkApp对象中 enable_tracing=True参数可自动启用 Cloud Trace 集成- 此封装容器在部署期间由 ADK CLI 引用
- 它配置了
VertexAiSessionService以实现自动会话持久性
第 3 步:部署到 Agent Engine(推荐)
Agent Engine 是值得信赖的捐款系统的推荐生产部署,因为它提供全托管式基础设施,并内置了会话持久性。
运行部署
从项目根目录:
chmod +x deploy.sh
./deploy.sh agent-engine
部署阶段
观看脚本执行以下阶段:
Phase 1: API Enablement
  ✓ aiplatform.googleapis.com
  ✓ storage.googleapis.com
  ✓ cloudbuild.googleapis.com
  ✓ cloudtrace.googleapis.com
  ✓ compute.googleapis.com

Phase 2: IAM Setup
  ✓ Getting project number
  ✓ Granting Storage Object Admin
  ✓ Granting Vertex AI User
  ✓ Granting Cloud Trace Agent

Phase 3: Staging Bucket
  ✓ Creating gs://your-project-id-staging (if needed)
  ✓ Setting permissions

Phase 4: Validation
  ✓ Checking agent.py exists
  ✓ Verifying root_agent defined
  ✓ Checking agent_engine_app.py exists
  ✓ Validating requirements.txt

Phase 5: Build & Deploy
  ✓ Packaging agent code
  ✓ Uploading to staging bucket
  ✓ Creating Agent Engine instance
  ✓ Configuring session persistence
  ✓ Setting up Cloud Trace integration
  ✓ Running health checks
此过程需要 5-10 分钟,因为系统会将代理打包并将其部署到 Vertex AI 基础架构。
保存您的 Agent Engine ID
成功部署后:
✅ Agent Engine created successfully!

   Agent Engine ID: 7917477678498709504
   Resource Name: projects/123456789/locations/us-central1/reasoningEngines/7917477678498709504
   Endpoint: https://us-central1-aiplatform.googleapis.com/v1/...

   ⚠️  IMPORTANT: Save the Agent Engine ID from the output above
   Add it to your .env file as:
   AGENT_ENGINE_ID=7917477678498709504

   This ID is required for:
   - Testing the deployed agent
   - Updating the deployment later
   - Accessing logs and traces
立即更新 .env 文件:
echo "AGENT_ENGINE_ID=7917477678498709504" >> .env
部署的内容
您的 Agent Engine 部署现在包含:
✅ 在受管理的运行时
中运行的所有三个代理(购物、商家、凭据)✅ 完整的凭据链逻辑(意图 → 购物车 → 付款授权)
✅ 具有确认工作流的用户意见征求机制
✅ 通过 VertexAiSessionService 实现自动会话持久性
✅ 由 Google 管理的自动扩缩基础设施
✅ 集成 Cloud Trace 以实现完全可观测性
第 4 步:测试已部署的代理
更新环境
验证您的 .env 是否包含 Agent Engine ID:
AGENT_ENGINE_ID=7917477678498709504  # From deployment output
GOOGLE_CLOUD_PROJECT=your-project-id
GOOGLE_CLOUD_LOCATION=us-central1
STAGING_BUCKET=gs://your-project-id-staging
运行测试脚本
您的项目包含专门用于 Agent Engine 部署的测试脚本。
👉 运行测试:
python scripts/test_deployed_agent.py
预期输出
Testing Agent Engine deployment...
Project: your-project-id
Location: us-central1
Agent Engine ID: 7917477678498709504
Endpoint: https://us-central1-aiplatform.googleapis.com/v1/...

Creating session...
✓ Session created: 4857885913439920384

Sending donation query...
✓ Response received:
  Event 1: I'll help you donate $50 to a children's education charity...
  Event 2: Here are some highly-rated children's education charities...
  Event 3: Which charity would you like to support?...

✅ Test completed successfully!

Session ID: 4857885913439920384

This donation generated a trace in Cloud Trace.
View it in Module 9: Observability

To view traces:
https://console.cloud.google.com/traces/list?project=your-project-id
验证核对清单
测试完成后,请验证:
✅ 智能体响应查询
✅ 所有三个智能体按顺序执行(购物 → 商家 → 凭据)
✅ 意见征求机制已激活(请求确认)
✅ 会话在请求之间保持不变
✅ 无身份验证错误
✅ 无连接超时
如果您遇到错误:
- 检查环境变量是否已正确设置
- 验证 API 是否已启用:
gcloud services list --enabled - 在 Vertex AI 控制台中查看 Agent Engine 日志
- 验证
agent_engine_app.py文件是否存在于charity_advisor文件夹中
第 5 步:部署到 Cloud Run(可选)
虽然建议使用 Agent Engine 来简化生产部署,但 Cloud Run 可提供更多控制权,并支持 ADK Web 界面。此部分为可选。
何时使用 Cloud Run
如果您需要以下功能,请选择 Cloud Run:
- 用于用户互动的 ADK Web 界面
- 完全控制容器环境
- 自定义数据库配置
- 与现有 Cloud Run 服务集成
运行部署
chmod +x deploy.sh
./deploy.sh cloud-run
不同之处:
该脚本将自动执行以下操作:
- 使用代理代码构建 Docker 容器
- 创建 Cloud SQL PostgreSQL 数据库(如果需要)
- 配置数据库连接
- 在启用了 ADK 网页界面的情况下进行部署
由于 Cloud SQL 预配,部署需要 10-15 分钟。
会话管理:
- 使用
DatabaseSessionService而不是VertexAiSessionService - 需要
.env中的数据库凭据(或自动生成的凭据) - 状态会保留在 PostgreSQL 数据库中
界面支持:
- 网页界面可在以下网址访问:
https://charity-advisor-xyz.a.run.app
测试 Cloud Run 部署
如果您使用 --with_ui 部署到 Cloud Run,可以直接在浏览器中进行测试:
- 前往您的服务网址(在部署输出中提供)
- 您将看到 ADK 网页界面。从下拉菜单中选择您的代理。
- 开始测试捐款:
I want to donate $50 to a children's education charity
- 观察执行流程:
- ShoppingAgent 会查找慈善机构并保存您的意向
- MerchantAgent 创建购物车授权书
- CredentialsProvider 创建付款授权并请求确认
- 确认后,系统会处理付款
- 验证响应是否包含以下内容:
- 慈善机构推荐
- 确认请求
- 获得批准后的成功消息
问题排查
常见问题
问题: ERROR: GOOGLE_CLOUD_PROJECT is not set
解决方案:确保您的 .env 文件包含正确的项目 ID:
GOOGLE_CLOUD_PROJECT=your-actual-project-id
问题:暂存存储分区未自动创建
解决方案:脚本应自动创建存储分区。如果不存在,请手动创建:
gsutil mb -p $GOOGLE_CLOUD_PROJECT -l $GOOGLE_CLOUD_LOCATION $STAGING_BUCKET
摘要
您已成功完成以下操作:
✅ 了解了 deploy.sh
提供的部署基础设施 ✅ 查看了 Agent Engine 封装容器配置
✅ 将可信的捐款系统部署到 Agent Engine(推荐)
✅ 启用了与 --trace_to_cloud 的 Cloud Trace 集成
✅ 验证了代理是否可访问且正常运行
✅ 在模块 9 中为责任链奠定了基础
在下一个模块中,您将确切了解此标志解锁的功能:全面了解每笔捐款、每次用户意见征求时刻以及凭据链的每个步骤。
9. 可观测性
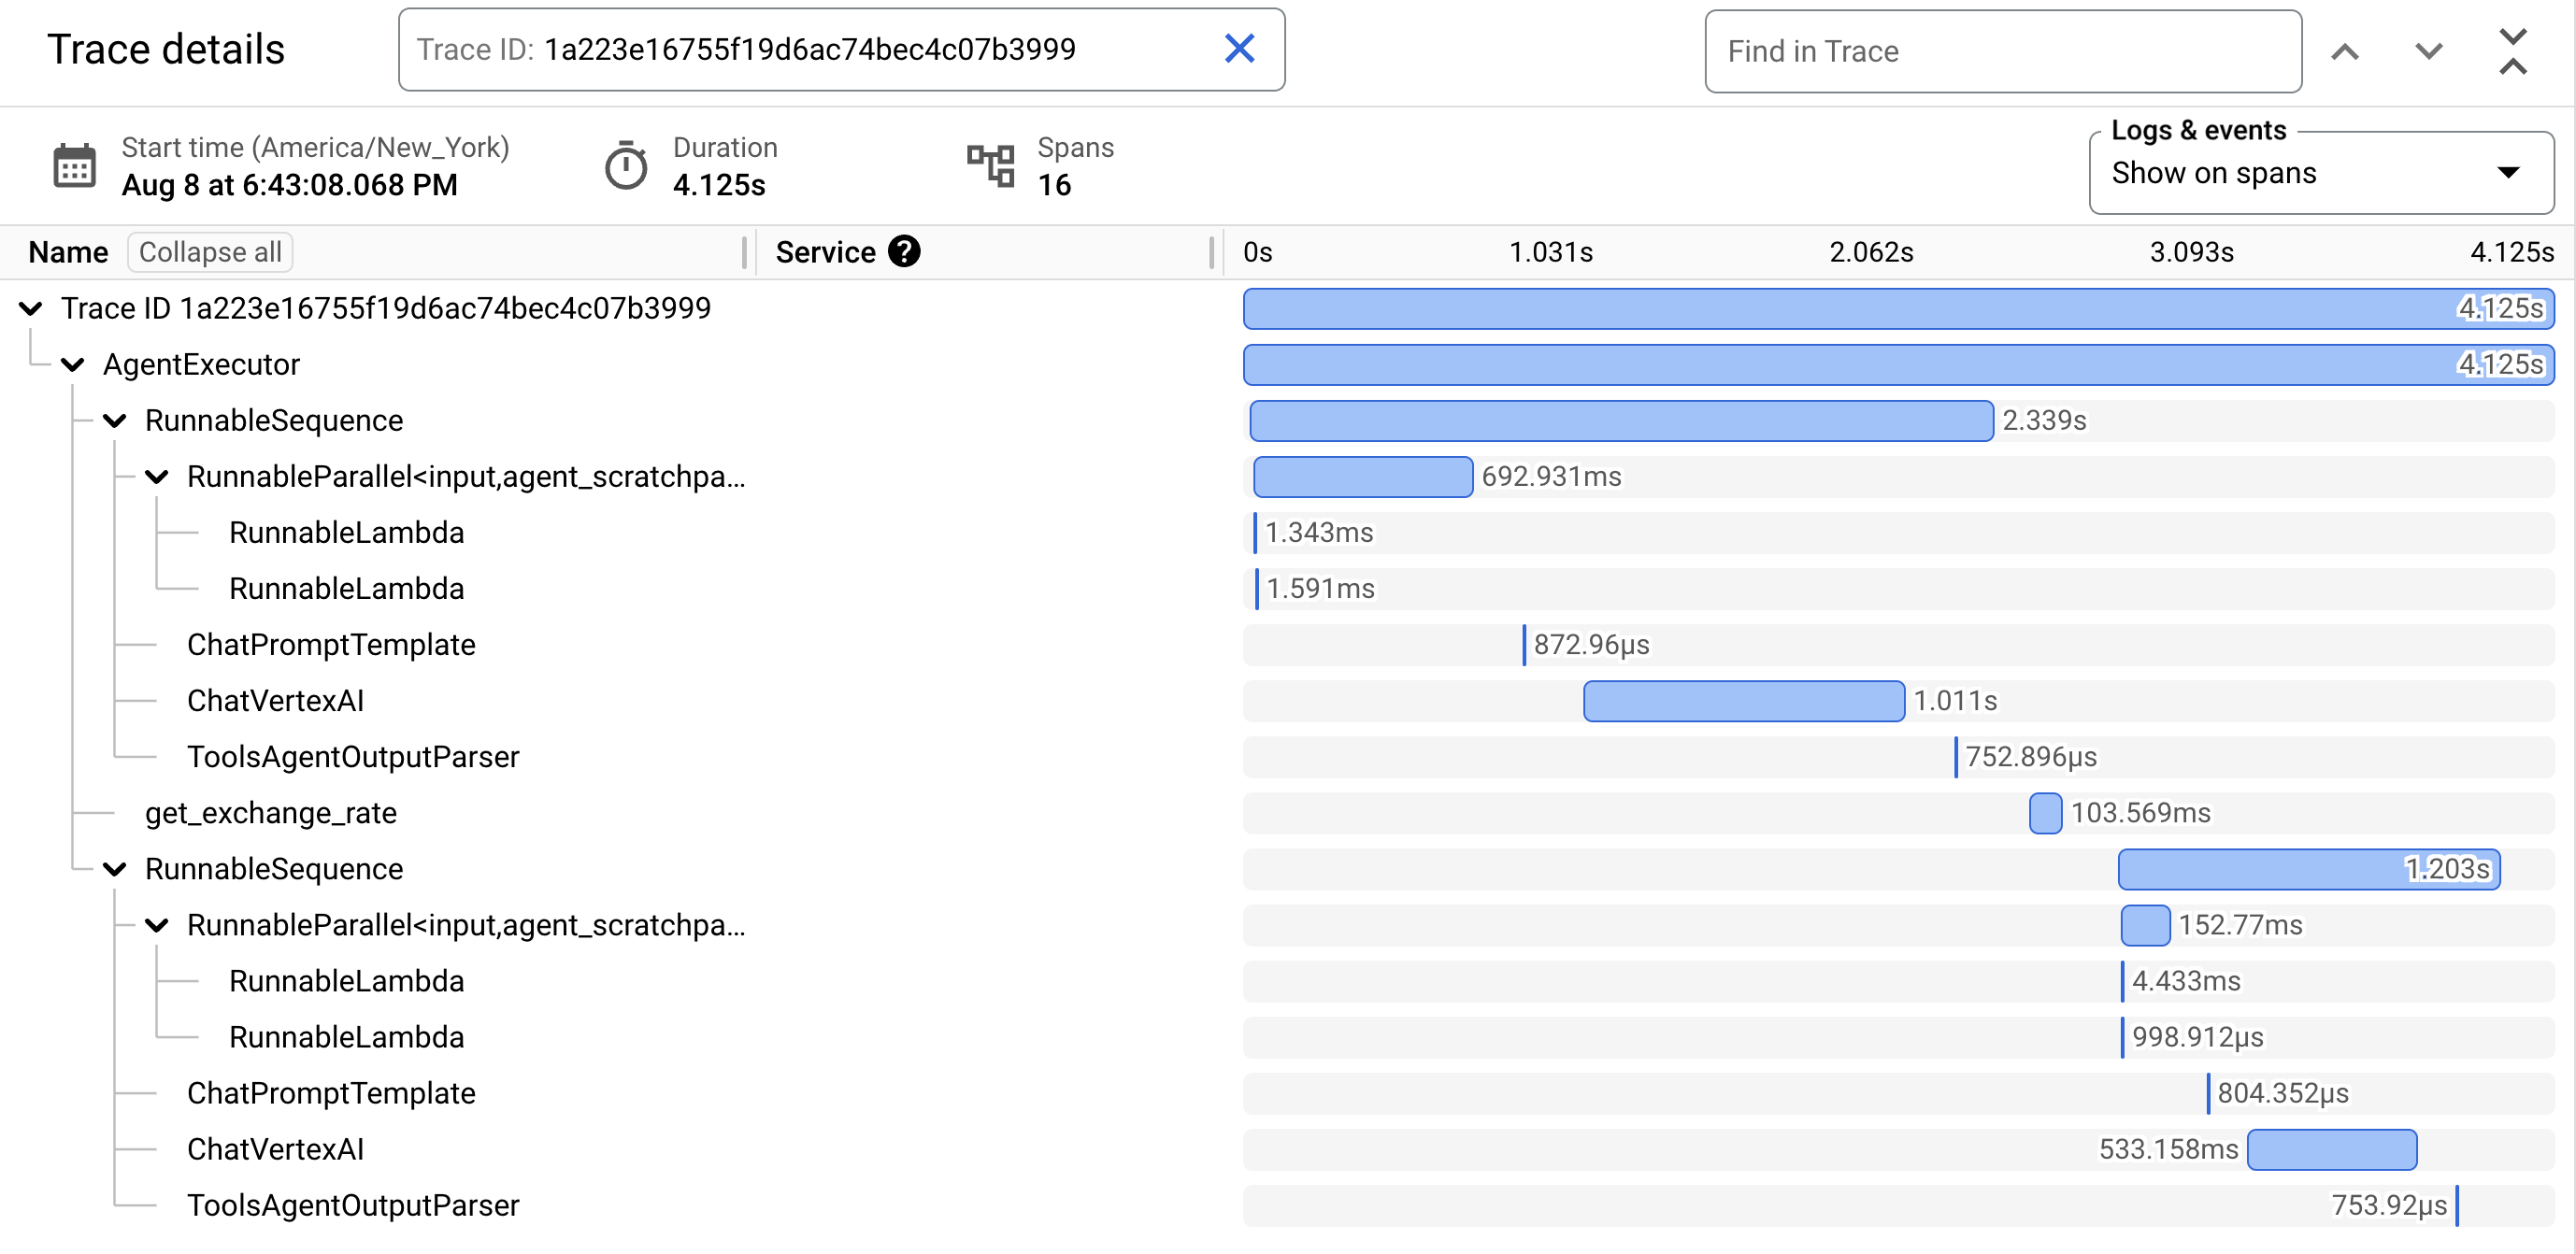
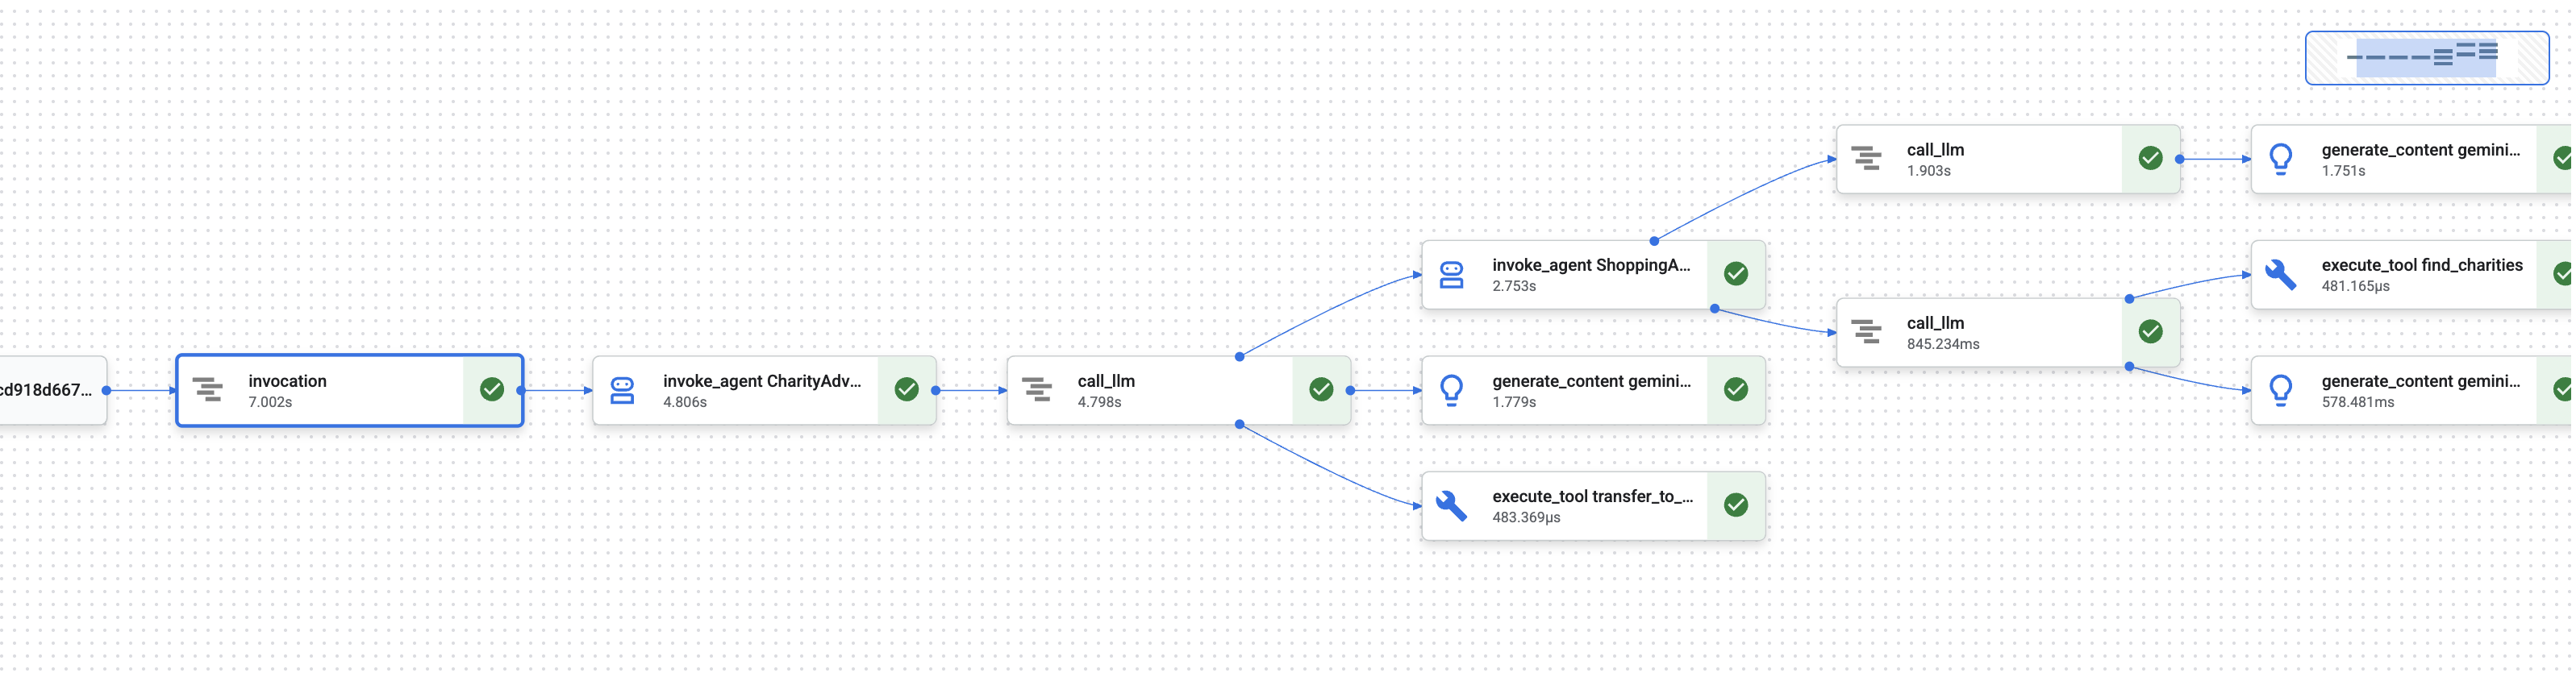
在第 1 模块中,您了解了一个基本问题:当 AI 智能体处理资金时,如何证明发生了什么?
用户可以声明:
- “我从未选择过该慈善机构!”
- “我没有授权这笔付款!”
- “系统未经我的同意就扣款了!”
在传统的黑盒 AI 系统中,您无法证明情况并非如此。但我们值得信赖的捐款系统却有所不同。在模块 8 中,您使用 --trace_to_cloud 标志进行了部署,这意味着现在每次捐款都会在 Cloud Trace 中创建一个完整的、防篡改的审核轨迹。
本模块将教您如何读取这些轨迹并将其用作证据。您将学会:
- 导航到 Cloud Trace 探索器以查找生产跟踪记录
- 阅读瀑布视图,了解执行流程
- 查找凭据链(意图 → 购物车 → 付款授权)
- 通过时间戳证明查找意见征求时刻
- 使用轨迹数据解决争议
- 导出跟踪记录以用于合规性和审核
这正是可信赖的系统与功能强大但不够透明的系统之间的区别:能够以法医级的精确度证明发生了什么。
了解跟踪记录和 span
在 Cloud Trace 中查看跟踪记录之前,您需要了解自己看到的内容。
什么是轨迹?
轨迹是指智能体处理单个请求的完整时间轴。它会捕获从用户发送查询到最终回答交付的整个过程。
每条轨迹都会显示:
- 请求的总时长
- 已执行的所有操作
- 操作之间的关系(父子关系)
- 每项操作的开始时间和结束时间
- 成功或失败状态
对于公益代理:一次轨迹 = 从“我想捐款”到“付款成功”的完整捐款流程。
什么是 span?
span 表示轨迹中的单个工作单元。可以将 span 视为轨迹的组成要素。
捐款系统中的常见跨度类型:
Span 类型 | 代表的含义 | 示例 |
| 智能体的执行 |
|
| 向语言模型发出的请求 |
|
| 工具函数执行 |
|
| 从会话内存读取数据 | 从状态中检索 |
| 写入会话内存 | 在状态中存储 |
每个 span 包含:
- 名称:表示的操作
- 所用时间(开始时间 → 结束时间)
- 属性:元数据,例如工具输入、模型回答、令牌数量
- 状态:成功 (
OK) 或错误 (ERROR) - 父子关系:哪些操作触发了哪些操作
span 如何构成跟踪记录
Span 相互嵌套以显示因果关系:
Root Span: CharityAdvisor.run (entire request)
  └─ Child: DonationPipeline.run (sequential workflow)
      ├─ Child: ShoppingAgent.run
      │   ├─ Grandchild: call_llm (Gemini processes charity search)
      │   ├─ Grandchild: execute_tool (find_charities)
      │   └─ Grandchild: execute_tool (save_user_choice)
      ├─ Child: MerchantAgent.run
      │   ├─ Grandchild: call_llm (Gemini generates cart)
      │   └─ Grandchild: execute_tool (create_cart_mandate)
      └─ Child: CredentialsProvider.run
          ├─ Grandchild: call_llm (Gemini processes payment)
          └─ Grandchild: execute_tool (create_payment_mandate) [CONSENT!]
此层次结构会显示确切发生了什么以及发生顺序。您可以看到,付款授权是在购物车授权之后创建的,而购物车授权是在用户选择慈善机构之后创建的。
第 1 步:访问 Cloud Trace 探索器
现在,我们来查看已部署代理的实际轨迹。
前往 Cloud Trace
- 打开 Google Cloud 控制台: console.cloud.google.com
- 从顶部的下拉菜单中选择您的项目(如果您一直在该项目中工作,则应已预先选择)
- 前往 Cloud Trace 探索器:
- 在左侧边栏中,滚动到可观测性部分
- 点击 Trace
- 或者使用直接链接:console.cloud.google.com/traces/list
您看到的内容
Trace Explorer 会显示项目中的所有轨迹的列表:
列 | 显示内容 |
请求 | HTTP 方法和端点(适用于 API 请求) |
开始时间 | 请求的开始时间 |
延迟时间 | 请求的总时长 |
跨度 | 轨迹中的操作数 |
每行代表向已部署的代理发出的一个完整请求。
生成测试轨迹(如果需要)
如果您尚未看到任何轨迹,则列表可能为空,原因如下:
- 尚未向已部署的代理提出任何请求
- 跟踪记录会在请求发出后 1-2 分钟内显示
生成测试轨迹:
如果您部署到 Cloud Run(使用界面),请访问您的服务网址,然后在浏览器中完成捐款。
如果您已部署到 Agent Engine,请运行第 8 模块中的测试脚本:
python scripts/test_deployed_agent.py
等待 1-2 分钟,然后刷新 Cloud Trace 探索器页面。现在,您应该会看到轨迹。
过滤轨迹
使用顶部的过滤选项查找特定轨迹:
- 时间范围:如果需要,请从“过去 1 小时”更改为“过去 24 小时”
- 最短延迟时间 / 最长延迟时间:过滤出延迟时间较长的请求
- 请求过滤条件:按特定操作(例如“DonationPipeline”)进行搜索
对于此模块,请重点关注时长较长(超过 5 秒)的轨迹,因为这些轨迹表示所有三个代理都已执行的完整捐款流程。
第 2 步:检查完整的捐款流程
点击列表中的任何轨迹,即可打开瀑布视图。您将在此处花费大部分时间来分析代理的行为。
了解瀑布流视图
瀑布视图是一个甘特图,显示了完整的执行时间轴:
━━━━━━━━━━━━━━━━━━━━━━━━━━━━━━━━━━━━━━━━━━━━━━━━━
              Timeline (horizontal = time) →
━━━━━━━━━━━━━━━━━━━━━━━━━━━━━━━━━━━━━━━━━━━━━━━━━

invocation                           ▓▓▓▓▓▓▓▓▓▓▓▓▓▓▓▓▓▓▓▓▓▓ 8.2s
  agent_run: CharityAdvisor          ▓▓▓▓▓▓▓▓▓▓▓▓▓▓▓▓▓▓▓▓▓ 8.1s
    agent_run: DonationPipeline      ▓▓▓▓▓▓▓▓▓▓▓▓▓▓▓▓▓▓▓▓ 7.9s
      agent_run: ShoppingAgent       ▓▓▓▓▓▓ 2.1s
        call_llm: gemini-2.5-flash   ▓▓▓▓ 1.2s
        execute_tool: find_charities ▓▓ 0.5s
        execute_tool: save_user_choice ▓ 0.3s
      agent_run: MerchantAgent       ▓▓▓ 1.8s
        call_llm: gemini-2.5-flash   ▓▓ 0.9s
        execute_tool: create_cart_mandate ▓ 0.7s
      agent_run: CredentialsProvider ▓▓▓▓▓▓▓▓ 4.0s
        call_llm: gemini-2.5-flash   ▓▓ 0.8s
        execute_tool: create_payment_mandate ▓▓▓▓▓ 3.0s [CONSENT]
解读图表
每个条形代表一个时间段:
- 水平位置:开始时间
- 时长:通话持续时间
- 缩进:显示父子关系
- 颜色:正常情况下为蓝色,出现错误时为红色
此示例轨迹的关键观测结果:
✅ 总时长:8.2 秒
✅ 顺序执行:ShoppingAgent 在 MerchantAgent 开始之前完成
✅ MerchantAgent 完成
之前
CredentialsProvider 已启动
✅ 同意是耗时最长的操作:create_payment_mandate 耗时 3.0 秒(因为它在等待用户确认)
✅ LLM 调用可见:每个代理都发出了一次 Gemini 请求
✅ 工具调用已捕获:所有六个工具都已成功执行
此可视化图表可立即显示时间花费在何处以及操作的执行顺序。
点击跨度可查看详细信息
点击 invocation span(顶部的根 span)。在右侧面板中,您会看到详细的属性:
{
  "http.method": "POST",
  "http.status_code": 200,
  "http.url": "https://charity-advisor-xyz.a.run.app/api/run",
  "user_id": "test_user_123",
  "session_id": "4857885913439920384",
  "trace_id": "a1b2c3d4e5f6...",
  "span_id": "1234567890abcdef"
}
这些属性提供有关整个请求的上下文信息。
第 3 步:找到凭据链
可信系统使用凭据链在每个步骤中证明授权:
IntentMandate (User chose charity)
    ↓
CartMandate (Merchant created cart, signed IntentMandate)
    ↓
PaymentMandate (Payment provider created payment, signed CartMandate)
我们来在轨迹中查找每个强制执行的命令。
查找 IntentMandate
点击 execute_tool: save_user_choice span(位于 ShoppingAgent 下)。
在“属性”面板中,您会看到:
{
  "tool.name": "save_user_choice",
  "tool.input.charity_name": "Save the Children",
  "tool.input.amount": 50,
  "tool.output.status": "success",
  "tool.output.intent_mandate": {
    "charity_name": "Save the Children",
    "amount": 50,
    "timestamp": "2024-11-08T15:30:12.345Z",
    "signature": "a3f7b9c1d2e4..."
  }
}
这证明:
- ✅ 用户选择了“救助儿童会”
- ✅ 金额为 50 美元
- ✅ 系统已于世界协调时间 (UTC) 15:30:12 记录您的选择
- ✅ 已生成签名(在生产环境中,此签名将是加密签名)
IntentMandate 现在处于会话状态,可供后续代理使用。
查找 CartMandate
点击 execute_tool: create_cart_mandate span(位于 MerchantAgent 下)。
在属性面板中:
{
  "tool.name": "create_cart_mandate",
  "tool.input.intent_mandate": {
    "charity_name": "Save the Children",
    "amount": 50,
    "signature": "a3f7b9c1d2e4..."
  },
  "tool.output.status": "success",
  "tool.output.cart_mandate": {
    "cart_id": "cart_7893",
    "intent_signature": "a3f7b9c1d2e4...",
    "cart_signature": "e8f2a9b3c7d1...",
    "timestamp": "2024-11-08T15:30:14.789Z"
  }
}
这证明:
- ✅ MerchantAgent 收到了 IntentMandate(输入显示了这一点)
- ✅ 已创建 ID 为“cart_7893”的购物车
- ✅ 购物车签名引用了 IntentMandate 签名(链式链接!)
- ✅ 创建时间:15:30:14 UTC(意图发出后 2.4 秒)
CartMandate 现在引用了 IntentMandate,从而形成链。
查找 PaymentMandate
点击 execute_tool: create_payment_mandate span(位于 CredentialsProvider 下)。
在属性面板中:
{
  "tool.name": "create_payment_mandate",
  "tool.input.cart_mandate": {
    "cart_id": "cart_7893",
    "intent_signature": "a3f7b9c1d2e4...",
    "cart_signature": "e8f2a9b3c7d1..."
  },
  "tool.confirmation_required": true,
  "tool.confirmation_timestamp": "2024-11-08T15:30:17.891Z",
  "tool.user_response": "CONFIRMED",
  "tool.wait_duration_ms": 29168,
  "tool.output.status": "success",
  "tool.output.payment_mandate": {
    "payment_id": "pay_9821",
    "cart_signature": "e8f2a9b3c7d1...",
    "payment_signature": "b4c9e2a7f8d3...",
    "timestamp": "2024-11-08T15:30:47.059Z"
  }
}
这证明了完整的链式反应:
- ✅ CredentialsProvider 收到了 CartMandate(输入显示了这一点)
- ✅ 付款引用了 CartMandate 签名(链式链接!)
- ✅ 需要确认 (
confirmation_required: true) - ✅ 用户已于 15:30:17 UTC 确认
- ✅ 系统等待用户做出决定的时间为 29.2 秒
- ✅ 付款是在确认后创建的(时间戳:15:30:47)
直观呈现链
此轨迹证明了凭据链已正确执行:
15:30:12 UTC → IntentMandate created (signature: a3f7...)
                  ↓
15:30:14 UTC → CartMandate created (references: a3f7...)
                  ↓
15:30:17 UTC → User consent requested
                  ↓
15:30:47 UTC → PaymentMandate created (references: e8f2...)
每项授权都会引用前一项授权的签名。这是防篡改的 - 您可以通过检查签名是否匹配来验证链。
第 4 步:分析性能和瓶颈
Cloud Trace 不仅能证明发生了什么,还能显示时间花费在何处,以便您进行优化。
确定关键路径
在瀑布视图中,查找垂直堆栈中的最长跨度。这些表示您的效果瓶颈。
从我们的示例轨迹中:
Total: 8.2 seconds

Breakdown:
  - ShoppingAgent:         2.1s (26%)
  - MerchantAgent:         1.8s (22%)
  - CredentialsProvider:   4.0s (49%)  ← Bottleneck
  - Other overhead:        0.3s (3%)
关键见解:CredentialsProvider 占总时间的 49%。为什么?
深入了解 CredentialsProvider span:
CredentialsProvider: 4.0s
  - call_llm:              0.8s (20%)
  - create_payment_mandate: 3.0s (75%)  ← User consent wait
  - Other:                 0.2s (5%)
3.0 秒的延迟是预期中的正常情况 - 这是用户在确认之前进行考虑的时间。这并非性能问题,而是深思熟虑的同意证明。
跟踪 LLM 费用
点击任意 call_llm 范围即可查看令牌使用情况:
{
  "llm.model": "gemini-2.5-flash",
  "llm.usage.prompt_tokens": 487,
  "llm.usage.completion_tokens": 156,
  "llm.usage.total_tokens": 643,
  "llm.response_time_ms": 1243
}
用途:
- 跟踪每次请求的费用(token 数 × 模型价格)
- 识别不必要的长提示
- 比较模型性能(Flash 与 Pro)
- 针对延迟时间与画质进行优化
计算示例:
Gemini 2.5 Flash pricing (as of Nov 2024):
  Input:  $0.075 per 1M tokens
  Output: $0.30 per 1M tokens

This request:
  Input:  487 tokens × $0.075 / 1M = $0.000037
  Output: 156 tokens × $0.30 / 1M  = $0.000047
  Total:                            = $0.000084 (~$0.00008)

For 10,000 donations/month:
  10,000 × 3 agents × $0.00008 = $2.40/month in LLM costs
这种精细的可见性有助于您根据数据做出模型选择决策。
跨轨迹比较
针对多个轨迹进行过滤并比较时长:
Trace 1: 8.2s  (with consent wait: 3.0s)
Trace 2: 12.5s (with consent wait: 7.8s)  ← User took longer
Trace 3: 5.1s  (with consent wait: 0.2s)  ← User clicked fast
Trace 4: 6.3s  (with consent wait: 1.5s)
数据洞见:大多数差异来自用户决策时间,而不是系统性能。核心代理执行(不包括意见征求)的时间约为 5 秒。
这表示系统运行可靠。
对于生产系统,请设置提醒,以便在用户投诉之前发现问题。
针对高错误率触发提醒
当超过 5% 的轨迹包含错误时创建提醒:
- 前往 Cloud Monitoring
- 依次点击提醒 → 创建政策
- 配置:
Resource: Cloud Trace Span
Metric: Span error count
Condition: Rate > 5% over 5 minutes
Notification: Email your-team@example.com
高延迟提醒
在第 95 百分位的延迟时间超过 15 秒时创建提醒:
Resource: Cloud Trace
Metric: Span duration (95th percentile)
Condition: > 15000ms for 5 minutes
Notification: PagerDuty
这样可以在性能下降影响用户体验之前及时发现。
缺少意见征求模式提醒
如果任何付款未经确认就处理,则创建提醒:
Resource: Cloud Trace Span
Filter: tool.name="create_payment_mandate" AND tool.confirmation_required!=true
Condition: Any match
Notification: Critical alert to security team
这是一个安全违规检测器 - 如果它触发,说明您的意见征求机制存在严重问题。
您学到的内容
通过 Cloud Trace,您现在可以了解如何:
✅ 浏览 Cloud Trace 探索器,查找生产环境跟踪记录
✅ 阅读瀑布流视图,查看完整的执行流程
✅ 通过 IntentMandate → CartMandate → PaymentMandate 跟踪凭据链 ✅ 使用跟踪记录作为证据来解决争议
✅ 分析性能以找出瓶颈
✅ 以精细的粒度跟踪 LLM 费用
这会带来哪些不同
比较两个处理相同“我从未授权过这笔交易!”投诉的系统:
没有可观测性的系统
User: "I never authorized that $50 donation!"
You:  "Our logs show the transaction completed successfully."
User: "But I didn't approve it!"
You:  "The system requires confirmation before processing."
User: "I never saw any confirmation!"
You:  "..." [no way to prove what happened]

Result: Refund issued, trust lost, user never returns.
使用 Cloud Trace 的系统
User: "I never authorized that $50 donation!"
You:  "Let me pull up the trace from your session..."
      [Shows waterfall with consent span]
You:  "Here's the evidence:
       - 15:30:17 UTC: System asked for confirmation
       - Message shown: 'You are about to donate $50...'
       - 15:30:47 UTC: You clicked 'CONFIRM'
       - Wait time: 29.2 seconds

       The system waited almost 30 seconds for your decision.
       Here's the exact timestamp of your confirmation."

User: "Oh... I remember now. My mistake. Sorry!"

Result: Trust preserved, no refund needed, user continues using service.
这就是责任链的强大之处。从“相信我们”转变为“让我们向您展示到底发生了什么”。
后续步骤
您现已完成构建可信赖的代理的技术核心:
✅ 第 1-6 单元:设计了可信赖的架构(角色、凭据、意见征求)
✅ 第 7 单元:编排了复杂的工作流 (SequentialAgent)
✅ 第 8 单元:部署时启用了可观测性
✅ 第 9 单元:学会了读取和使用责任轨迹
您构建的架构(角色分离、凭据链、意见征求机制、完整的可观测性)可直接转移到处理真金白银、真实数据和真实后果的生产系统。
10. 您的后续流程
您已构建的内容
本次研讨会开始时,您提出了一个问题:“如何构建真正值得信赖的 AI 代理来处理金钱事务?”
您现在已经知道答案了。
您的起点(模块 3):
simple_agent = Agent(
    model="gemini-2.5-flash",
    instruction="Find charities and donate",
    tools=[google_search]
)
您目前所处的模块(模块 10):
- ✅ 三个具有角色分离功能的专业智能体
- ✅ 三个可验证的凭据(意向 → 购物车 → 付款授权)
- ✅ 在每个步骤中完成凭据链并进行到期验证
- ✅ 具有时间戳证明的明确意见征求机制
- ✅ 部署到生产环境并实现可观测性
- ✅ 在 Cloud Trace 中提供完整的责任链
- ✅ 用于解决争议的取证证据
工作坊与生产环境:差距
您的系统展示了正确的架构和模式,但使用了必须升级的教育简化功能,才能用于真钱交易和真实用户。
以下是简化内容和生产环境要求:
组件 | 研讨会实施 | 投产要求 |
签名 | 用于演示的 SHA-256 哈希 ( | 使用 PKI 或 JWT 和私钥的真实加密签名 |
付款处理 | 模拟退回( | 与实际付款 API(Stripe、PayPal、Square)集成 |
用户身份验证 | 隐式信任(无需登录) | OAuth 2.0、WebAuthn 或会话管理 |
密文管理 |
| Google Secret Manager 或 Cloud KMS(含加密功能) |
公益组织数据库 | 包含 9 个公益组织的模拟 JSON 文件 | 实时 API 集成(美国国税局免税组织搜索、Charity Navigator API) |
错误处理 | 带有错误消息的基本 try-catch | 具有指数退避算法、断路器、死信队列的重试逻辑 |
测试 | 通过脚本进行手动验证 | 包含 CI/CD 的全面单元/集成/E2E 测试套件 |
会话持久性 | 内存中(本地)或自动(代理引擎) | 具有备份和灾难恢复功能的生产数据库 |
速率限制 | 无(教育环境) | 每位用户的速率限制、基于 IP 的限制、滥用行为检测 |
您掌握的关键架构模式
您在本研讨会中学习的模式是生产模式。不要怀疑他们。
角色分离(AP2 原则 #1)
每个代理都有一个明确的任务,并且只查看所需的内容。如果某个代理被盗用,攻击者无法访问其他代理的数据。这样可以限制危害的影响范围。
使用此功能的生产系统:付款处理、文档工作流、审批链、具有验证门的多个步骤的表单。
可验证的凭据(AP2 原则 2)
每个凭据都有到期时间,引用了上一个凭据,并且需要在执行下一步之前进行验证。这样便可创建防篡改的审核链。
制作价值:完整证明发生了什么、何时发生以及按什么顺序发生。对于解决争议和遵守监管合规至关重要。
明确同意(AP2 原则 3)
用户批准操作的时间戳证明。无法提出异议。
生产价值:金融交易的法律要求。同时保护用户和公司。
顺序编排(ADK 模式)
强制执行正确的执行顺序。防止跳过步骤。保证每个代理都能看到上一个代理的输出。
生产价值:非常适合用户希望立即获得结果的人机协同系统。这是捐款流程、结账流程和审批链的正确模式。
全面的可观测性 (OpenTelemetry + Cloud Trace)
自动捕获每个决策、工具调用、意见征求时刻和凭据移交。
证据价值:用于解决争议的取证证据。性能优化数据。合规性审核跟踪记录。精准调试生产环境中的问题。
可供持续学习的资源
ADK 文档:
AP2 及相关标准:
Google Cloud 服务:
清理资源
为避免持续产生费用,请删除部署:
Agent Engine:按照 Agent Engine 文档中的步骤操作
Cloud Run(如果已部署):
gcloud run services delete charity-advisor \
    --region=$GOOGLE_CLOUD_LOCATION
存储分区:
gsutil -m rm -r gs://$GOOGLE_CLOUD_PROJECT-staging
gsutil -m rm -r gs://$GOOGLE_CLOUD_PROJECT-artifacts
您的旅程仍在继续
您从一个简单的问题开始,逐步构建出完整的答案。您已掌握可信赖的 AI 智能体的基础模式。这些模式可应用于 AI 代理处理敏感操作的任何领域,例如金融交易、医疗保健决策、法律文件、供应链运营。
原则转移。信任模型有效。
现在,去构建值得信赖的应用吧!❤️