1. 建立信任感,激發慷慨之心

靈感湧現的時刻
手機震動。您看到一則新聞報導,內容是關於一項成功的識字計畫,該計畫協助弱勢社群的兒童學習閱讀。你強烈想貢獻心力,開啟瀏覽器,然後搜尋「兒童識字計畫捐款」。
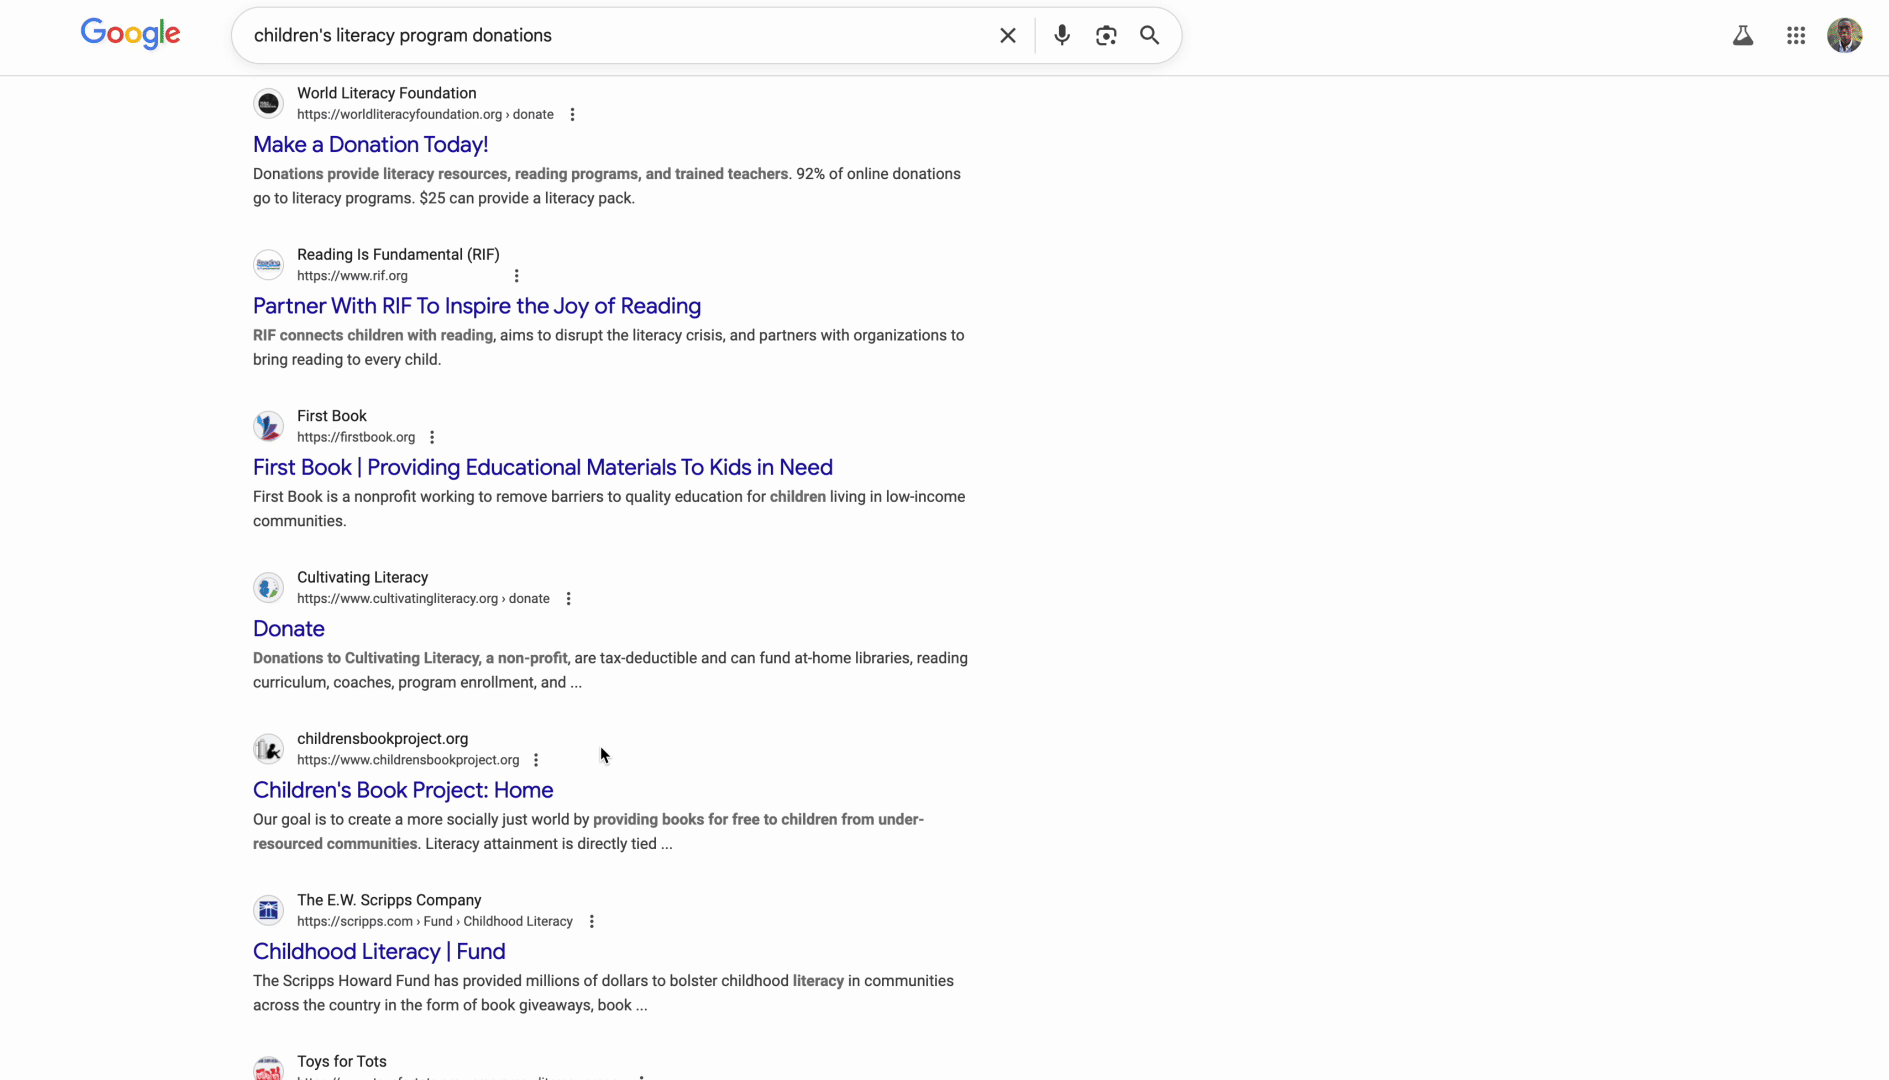
系統會顯示數百筆結果。
按一下第一個連結。網站看起來很專業。向下捲動至財務資訊。「管理費用:28%。」你暫停。您捐贈的每一美元中,只有 72 美分會實際用於資助這項計畫。這樣可以嗎?你不確定。
改用其他機構。你從沒聽過他們。這些網站是否合法?快速搜尋後,你開始深入研究,您在兩年前的 Reddit 討論串中發現,有位使用者聲稱「這是詐騙,我的捐款根本沒送達」。另一位則熱情地為他們辯護:「他們在現場做實事!」這種模稜兩可的態度令人無所適從。
半小時後,你仍深陷於相互矛盾的評論、效率評分和 IRS 記錄的迷宮中,而且還沒捐款。最初的慷慨熱情已轉為研究的摩擦。分頁會開啟幾天,提醒你當初的善意,直到你關閉為止。
這不是個人失敗,而是系統失敗
這項體驗適用於所有裝置。大家都很想捐款,但捐款過程充滿障礙,導致猶豫和疑慮:
- ❌ 研究摩擦:每個慈善機構都需要個別調查。
- ❌ 信任度驗證:難以區分高效率機構與效率不彰的機構,甚至是詐騙。
- ❌ 分析癱瘓:選項過多會導致決策疲勞。
- ❌ 動力減弱:隨著後勤負擔增加,捐贈的意願也會隨之減弱。
這種摩擦會造成驚人的實際成本。美國的個人捐款金額十分龐大,根據 Giving USA 2024 的資料,光是 2023 年,個人捐款人就捐贈了約 $3, 740 億美元。然而研究顯示,捐款障礙 (包括搜尋成本、心理阻力及時間限制) 會大幅減少捐給慈善機構的金額。針對數百萬名捐款人進行的研究發現,即使線上捐款程序稍有阻礙,也會導致人們無法實現慈善意願。
這代表數十億美元的捐款無法送達需要幫助的慈善機構。
願景
想像一下不同的體驗。不必進行 30 分鐘的研究,只要說出:
「我想捐贈 $50 美元給兒童識字計畫。請幫我尋找評價高、效率高且經過驗證的慈善機構。」
幾秒內,您就能收到回覆,讓您更有信心:

這就是 AI 捐款代理的價值所在。但要實現這項願景,我們必須解決一項基本挑戰:當自主式 AI 代理程式處理金錢時,信任並非可有可無,而是整個基礎。
- 如何證明使用者授權的內容?
- 如果發生錯誤,誰該負責?
- 如何讓捐款人、慈善機構和支付網路放心參與?
今天的任務
在本研討會中,您將結合兩項強大技術,建構值得信賴的代理程式:
Google Agent Development Kit (ADK) | Agent Payments Protocol (AP2) | |
角色 | 建構實際工作環境等級 AI 代理的工廠 | AI 交易信任的架構藍圖 |
提供的資訊 | • 多代理自動化調度管理框架 | • 角色型安全界線 |
瞭解詳情 |
建構項目

完成本研討會後,您將建立:
✅ 多代理系統,具有專門角色:
- 購物代理程式會尋找已通過驗證的慈善機構
- 建立具約束力的捐款優惠的商家代理
- 安全處理付款的憑證供應商
- 協調整個流程的自動調度管理工具
✅ 三種可驗證憑證:
- IntentMandate:「幫我找教育慈善機構」
- CartMandate:「$50 to Room to Read, signed by merchant」(由商家簽署的 Room to Read 捐款授權書,金額為 $50 美元)
- PaymentMandate:「透過模擬付款處理」
✅ 層層把關的安全防護:
- 角色型信任邊界
- 明確的使用者同意聲明
✅ 完整的稽核記錄:
- 可追蹤每項決策
- 記錄每項同意聲明
- 所有交接事項一目瞭然
🔒 重要事項:這是安全學習環境
準備好建立信任感了嗎?
在下一個單元中,我們將設定開發環境,並建構第一個 AI 代理程式。您很快就會發現簡單的代理不可靠,並在研討會的其餘時間學習如何修正這個問題。
首先,讓我們親自瞭解問題。
2. 準備工作區
值得信賴的代理程式的基礎
在建構 AI 捐贈代理程式之前,我們需要準備乾淨、一致且設定正確的開發環境。這個單元是專注的步驟,可確保所有必要的工具和服務都已到位。
成功完成這項設定後,您就能完全專注於在後續模組中建構代理程式邏輯的有趣工作,不必擔心設定問題。
存取 Cloud Shell
首先,我們要開啟 Cloud Shell。這是以瀏覽器為基礎的終端機,已預先安裝 Google Cloud SDK 和其他必要工具。
點選 Google Cloud 控制台頂端的「啟用 Cloud Shell」 (右上角導覽列中的終端機圖示)。
找出 Google Cloud 專案 ID:
- 開啟 Google Cloud 控制台:https://console.cloud.google.com
- 在頁面頂端的專案下拉式選單中,選取要用於本研討會的專案。
- 專案 ID 會顯示在資訊主頁的「專案資訊」資訊卡中

開啟 Cloud Shell 後,請確認您已通過驗證:
# Check that you are logged in
gcloud auth list
您的帳戶應該會顯示為 (ACTIVE)。
設定專案
現在請設定 Google Cloud 專案,並啟用必要的 API。
設定專案 ID
# Set your project using the auto-detected environment variable in Cloud Shell
gcloud config set project $GOOGLE_CLOUD_PROJECT

# Verify the project has been set
echo "Your active Google Cloud project is: $(gcloud config get-value project)"
啟用必要的 API
代理程式需要存取多項 Google Cloud 服務:
gcloud services enable \
    aiplatform.googleapis.com \
    secretmanager.googleapis.com \
    cloudtrace.googleapis.com
這項作業可能需要 1 到 2 分鐘。您會看到:
Operation "operations/..." finished successfully.
這些 API 的用途:
- aiplatform.googleapis.com:存取 Gemini 模型,用於代理程式推論
- secretmanager.googleapis.com:安全儲存 API 金鑰 (生產環境最佳做法)
- cloudtrace.googleapis.com:適用於問責追蹤的觀測功能
複製範例程式碼
取得工作坊存放區,內含所有範本程式碼和資源:
git clone https://github.com/ayoisio/adk-ap2-charity-agents
cd adk-ap2-charity-agents
git checkout codelab
讓我們確認目前擁有的項目:
ls -la
如下所示:
charity_advisor/- 我們將在這裡建構代理和工具scripts/- 用於測試和驗證的輔助指令碼deploy.sh- 部署輔助指令碼setup.py- Helper script for module installation.env.template- 環境變數檔案
設定 Python 環境
現在要為專案建立獨立的 Python 環境。
建立並啟動虛擬環境
# Create the virtual environment
python3 -m venv venv

# Activate it
source venv/bin/activate
✅ 驗證:提示詞現在應會顯示 (venv) 前置字元。
安裝依附元件
pip install -r charity_advisor/requirements.txt
pip install -e .
這會安裝下列項目:
- google-adk:Agent Development Kit 架構
- google-cloud-aiplatform:整合 Vertex AI 和 Gemini
- ap2:代理商付款通訊協定 SDK (來自 GitHub)
- python-dotenv:環境變數管理
-e 標記可讓您從任何位置匯入 adk_ap2_charity_agents 模組。
設定環境檔案
從範本建立設定:
# Copy the template
cp .env.template .env

# Get your current Project ID
PROJECT_ID=$(gcloud config get-value project)

# Replace the placeholder with your actual project ID
sed -i "s/your-project-id/$PROJECT_ID/g" .env

# Verify the replacement worked
grep GOOGLE_CLOUD_PROJECT .env
如下所示:
GOOGLE_CLOUD_PROJECT=your-actual-project-id
驗證
執行驗證指令碼,確保所有設定皆正確無誤:
python scripts/verify_setup.py
所有項目都應顯示綠色勾號:
======================================================================
SETUP VERIFICATION
======================================================================

✓ Python version: 3.11.x
✓ google-adk: 1.17.0
✓ google-cloud-aiplatform: 1.111.0+
✓ ap2: 0.1.0
✓ python-dotenv: 1.0.0+
✓ .env file found and contains project ID
✓ Google Cloud project configured: your-project-id

✓ Mock charity database found
✓ Agent templates ready
✓ All directories present

======================================================================
✓ Setup complete! You are ready to build trustworthy agents.
======================================================================
疑難排解
後續步驟
現在環境已準備就緒!您已完成以下工作:
- ✅ 已設定 Google Cloud 專案
- ✅ 已啟用必要的 API
- ✅ 已安裝 ADK 和 AP2 程式庫
- ✅ 範本程式碼可供修改
在下一個單元中,您將透過幾行程式碼建構第一個 AI 代理程式,並瞭解簡單的代理程式為何無法處理金融交易。
3. 您的第一個代理和發現信任落差

從構想化為互動
在上一個單元中,我們準備了開發環境。現在,令人興奮的工作開始了。我們會建構及執行第一個代理程式,賦予它第一項能力,並在過程中發現必須解決的根本挑戰,才能讓代理程式真正值得信賴。
本單元是「前」照,揭示為何建構值得信賴的代理程式,不只是讓 LLM 存取工具而已。
步驟 1:檢查入門代理程式
首先,我們來看看第一個代理程式的範本。其中包含基本結構和預留位置,我們會在後續步驟中填入內容。
👉 開啟檔案
charity_advisor/simple_agent/agent.py
。
您會看到:
"""
A simple agent that can research charities using Google Search.
"""

# MODULE_3_STEP_2_IMPORT_COMPONENTS


simple_agent = Agent(
    name="SimpleAgent",
    model="gemini-2.5-flash",

    # MODULE_3_STEP_3_WRITE_INSTRUCTION
    instruction="""""",

    # MODULE_3_STEP_4_ADD_TOOLS
    tools=[]
)
請注意,預留位置註解遵循 MODULE_3_STEP_X_DESCRIPTION 模式。我們會逐步建構代理程式,並取代這些標記。
步驟 2:匯入必要元件
我們需要先將 Agent 類別或 google_search 工具匯入檔案,才能例項化 Agent 類別或使用 google_search 工具。
👉 尋找:
# MODULE_3_STEP_2_IMPORT_COMPONENTS
👉 將該單行程式碼替換為:
from google.adk.agents import Agent
from google.adk.tools import google_search
現在,Agent 類別和 google_search 工具已可在檔案中使用。
步驟 3:撰寫代理指令
指令是代理的「工作說明」,會告知 LLM 何時及如何使用工具。我們來編寫一個,引導代理程式搜尋慈善機構資訊。
👉 尋找:
# MODULE_3_STEP_3_WRITE_INSTRUCTION
instruction="""""",
👉 將這兩行程式碼替換為:
instruction="""You are a helpful research assistant. When a user asks you to find information about charities,
use the google_search tool to find the most relevant and up-to-date results from the web.
Synthesize the search results into a helpful summary.""",
步驟 4:新增搜尋工具
沒有工具的代理只會對話,現在要為代理程式新增第一項功能:搜尋網路。
👉 尋找:
# MODULE_3_STEP_4_ADD_TOOLS
tools=[]
👉 將這兩行程式碼替換為:
tools=[google_search]
步驟 5:驗證完整代理程式
請先確認所有項目都已就位,再進行測試。
👉 完整
charity_advisor/simple_agent/agent.py
檔案現在應如下所示:
"""
A simple agent that can research charities using Google Search.
"""

from google.adk.agents import Agent
from google.adk.tools import google_search


simple_agent = Agent(
    name="SimpleAgent",
    model="gemini-2.5-flash",
    instruction="""You are a helpful research assistant. When a user asks you to find information about charities,
use the google_search tool to find the most relevant and up-to-date results from the web.
Synthesize the search results into a helpful summary.""",
    tools=[google_search]
)
步驟 6:測試代理程式 - 揭露信任差距
現在代理程式已完成設定,讓我們來測試並分析其行為。我們將在此瞭解為何簡單的代理程式在處理財務決策時不可信。
測試 1:探索問題
👉 在 Cloud Shell 終端機中執行下列指令:
adk run charity_advisor/simple_agent
輸出內容應類似以下內容:
INFO:google.adk.agents:Loading agent from charity_advisor/simple_agent
INFO:google.adk.agents:Agent 'SimpleAgent' ready

[user]:
[user]:提示現在正在等待你輸入內容。
👉 在 [user]: 提示中輸入:
Can you find me a verified, highly-rated charity for children's literacy?
👉 按 Enter 鍵並查看回覆。
稍待片刻,代理程式就會將搜尋結果統整成回覆,如下所示:
根據網路搜尋結果,兒童識字率方面備受好評的慈善機構似乎是 Reading Is Fundamental 和 Room to Read。建議您透過 Charity Navigator 和 GuideStar 等來源,驗證機構的狀態和評分。我也在 Reddit 等論壇上看到許多線上討論,使用者分享了他們參與各種小型地方識字計畫的個人經驗。
讓我們分析一下。服務專員是否解決了我們的問題?
❌ 否。這項技術完美複製了我們在單元 1 中描述的人類體驗。它已成功自動化「Google 搜尋」的程序,並將「分析癱瘓」問題還給我們。
這會暴露出第一個信任落差:缺乏權威資料。
代理程式會搜尋開放網路,也就是:
- ✅ 快速找到結果 (提升使用者體驗)
- ❌ 混合高評價機構與 Reddit 討論 (不可靠的來源)
- ❌ 無法區分經過審查的慈善機構和潛在詐騙 (未經驗證)
- ❌ 要求我們驗證剛才提供的資訊 (將負擔轉移給我們)
測試 2:執行問題
現在進行第二項重要測試。在 [user]: 提示中,嘗試完成捐款:
Okay, please donate $50 to Room to Read for me.
代理程式會回覆道歉,並承認自身限制:
據瞭解,您想捐款,這真是太棒了!不過,我是研究助理,無法處理金融交易或付款事宜。如要捐款,請直接前往 Room to Read 官方網站。
這是第二個同等重要的「啊哈!」時刻。
目前我們還無法信任代理程式,讓它幫您找到合適的慈善機構,也無法信任它會執行捐款動作。
👉 按
Ctrl+C
測試完成後,請點選「退出」。
以圖表呈現的兩大差距

您剛學到的內容
在本單元中,您已成功建構並裝備第一個 AI 代理程式。這麼做之後,您會發現建構值得信賴的系統時,會面臨兩項基本挑戰。
已掌握的關鍵概念
✅ 代理程式類別:
- ADK 的核心建構模塊
- 結合 LLM 推論 (大腦) 與工具 (雙手)
- 已設定模型、指令和工具
✅ 以資料夾為基礎的結構:
- 每個代理程式都有自己的資料夾
- ADK 會尋找
agent_folder/agent.py - 使用
adk run agent_folder跑步
✅ 工具清單:
- 定義代理程式功能
- LLM 會決定工具的使用時機和方式
- 可包含多種工具,用於執行不同動作
✅ 指令提示:
- 引導服務專員的行為,就像職務說明一樣
- 指定角色、觸發條件、動作和輸出格式
- 確保工具使用可靠性的關鍵
✅ 信任問題:
- 探索缺口:未經過審查的來源,品質參差不齊
- 執行落差:沒有安全功能、沒有同意聲明、沒有稽核追蹤記錄
後續步驟
在下一個單元中,我們將開始實作 AP2 的角色架構,建構解決方案。
讓我們建立第一個代理程式,並實際瞭解角色分離功能。
4. 建構購物代理 - 依角色探索

信任基礎:角色區隔
在上一個單元中,您發現簡單的一般用途代理程式在兩方面都無法勝任:無法提供值得信賴的探索功能,也無法執行安全交易。現在,我們將開始解決這些問題,方法是實作 Agent Payments Protocol 的第一項原則:以角色為基礎的架構。
在編寫任何程式碼之前,我們先瞭解這項原則的重要性。
AP2 原則:角色區隔
「無所不能」代理程式的問題
假設您聘請了一位財務顧問、會計師和投資經紀人。方便嗎?可以。安全嗎?完全不用。他們會:
- 您的投資目標 (顧問角色)
- 帳戶存取權 (會計師角色)
- 轉移款項的授權 (經紀人角色)
如果這個人遭到入侵或犯下錯誤,所有內容都會面臨風險。
AP2 的解決方案:一位代理商,一項工作
AP2 採用關注點分離原則,建立信任邊界:

重要性:
- ✅ 有限的影響範圍:如果購物代理遭到入侵,攻擊者無法存取付款憑證
- ✅ 隱私權:憑證提供者絕不會看到你的購物對話
- ✅ 法規遵循:隔離付款資料後,更容易符合 PCI-DSS 規定
- ✅ 責任歸屬:清楚劃分每個步驟的責任
代理程式的溝通方式:將狀態視為共用記事本
由於代理程式無法直接存取彼此的資料,因此會透過共用狀態進行通訊。您可以將其視為所有服務專員都能寫入及讀取的白板:
# Shopping Agent writes:
state["intent_mandate"] = {
    "natural_language_description": "Donate $50 to Room to Read",
    "merchants": ["Room to Read"],
    "intent_expiry": "2024-11-07T15:32:16Z",
    "amount": 50.0
}

# Merchant Agent reads:
intent = state["intent_mandate"]
charity_name = intent["merchants"][0]
amount = intent["amount"]
# Creates CartMandate based on IntentMandate...

# Credentials Provider reads:
cart_mandate = state["cart_mandate"]
# Processes payment...
這樣一來,我們就能在確保信任界線的同時,啟用協作功能。
第一個代理程式:購物代理
購物代理程式的職責簡單明瞭:
- 使用
find_charities工具查詢我們信任的資料庫 - 向使用者顯示選項
- 使用
save_user_choice工具建立 IntentMandate,並儲存至狀態 - 出貨給下一位服務專員 (商家)
就是這麼簡單!不處理付款事宜,也不會建立購物車,只負責探索和移交。
我們將逐步建構這項功能。
步驟 1:新增輸入內容驗證輔助程式
建構生產工具時,輸入驗證至關重要。讓我們建立一個輔助函式,在將慈善機構資料儲存至狀態前進行驗證。
👉 開啟
charity_advisor/tools/charity_tools.py
畫面頂端會顯示 find_charities 函式 (已完成)。向下捲動即可查看:
# MODULE_4_STEP_1_ADD_VALIDATION_HELPER
👉 將該單行程式碼替換為:
def _validate_charity_data(charity_name: str, charity_ein: str, amount: float) -> tuple[bool, str]:
    """
    Validates charity selection data before saving to state.

    This helper function performs basic validation to ensure data quality
    before it gets passed to other agents in the pipeline.

    Args:
        charity_name: Name of the selected charity
        charity_ein: Employer Identification Number (should be format: XX-XXXXXXX)
        amount: Donation amount in USD

    Returns:
        (is_valid, error_message): Tuple where is_valid is True if all checks pass,
                                    and error_message contains details if validation fails
    """
    # Validate charity name
    if not charity_name or not charity_name.strip():
        return False, "Charity name cannot be empty"

    # Validate EIN format (should be XX-XXXXXXX)
    if not charity_ein or len(charity_ein) != 10 or charity_ein[2] != '-':
        return False, f"Invalid EIN format: {charity_ein}. Expected format: XX-XXXXXXX"

    # Validate amount
    if amount <= 0:
        return False, f"Donation amount must be positive, got: ${amount}"

    if amount > 1_000_000:
        return False, f"Donation amount exceeds maximum of $1,000,000: ${amount}"

    # All checks passed
    return True, ""
步驟 2:新增 IntentMandate Creation Helper
現在,我們來建立建構 AP2 IntentMandate 結構的輔助程式。這是 AP2 中三項可驗證憑證之一。
👉 在同一個檔案中,找出:
# MODULE_4_STEP_2_ADD_INTENTMANDATE_CREATION_HELPER
👉 將該單行程式碼替換為:
def _create_intent_mandate(charity_name: str, charity_ein: str, amount: float) -> dict:
    """
    Creates an IntentMandate - AP2's verifiable credential for user intent.

    This function uses the official Pydantic model from the `ap2` package
    to create a validated IntentMandate object before converting it to a dictionary.

    Args:
        charity_name: Name of the selected charity
        charity_ein: Employer Identification Number
        amount: Donation amount in USD

    Returns:
        Dictionary containing the IntentMandate structure per AP2 specification
    """
    from datetime import datetime, timedelta, timezone
    from ap2.types.mandate import IntentMandate

    # Set the expiry for the intent
    expiry = datetime.now(timezone.utc) + timedelta(hours=1)

    # Step 1: Instantiate the Pydantic model with official AP2 fields
    intent_mandate_model = IntentMandate(
        user_cart_confirmation_required=True,
        natural_language_description=f"Donate ${amount:.2f} to {charity_name}",
        merchants=[charity_name],
        skus=None,
        requires_refundability=False,
        intent_expiry=expiry.isoformat()
    )

    # Step 2: Convert the validated model to a dictionary for state storage
    intent_mandate_dict = intent_mandate_model.model_dump()

    # Step 3: Add the codelab's custom fields to the dictionary
    timestamp = datetime.now(timezone.utc)
    intent_mandate_dict.update({
        "timestamp": timestamp.isoformat(),
        "intent_id": f"intent_{charity_ein.replace('-', '')}_{int(timestamp.timestamp())}",
        "charity_ein": charity_ein,
        "amount": amount,
        "currency": "USD"
    })

    return intent_mandate_dict
步驟 3:使用 IntentMandate 建構狀態交接工具
現在來建構工具,建立 IntentMandate 並儲存至狀態。
👉 在同一個檔案中,向下捲動至
save_user_choice
函式。尋找:
# MODULE_4_STEP_3_COMPLETE_SAVE_TOOL
👉 將該單行程式碼替換為:
    # Validate inputs before creating IntentMandate
    is_valid, error_message = _validate_charity_data(charity_name, charity_ein, amount)
    if not is_valid:
        logger.error(f"Validation failed: {error_message}")
        return {"status": "error", "message": error_message}

    # Create AP2 IntentMandate using our updated helper function
    intent_mandate = _create_intent_mandate(charity_name, charity_ein, amount)

    # Write the IntentMandate to shared state for the next agent
    tool_context.state["intent_mandate"] = intent_mandate

    logger.info(f"Successfully created IntentMandate and saved to state")
    logger.info(f"Intent ID: {intent_mandate['intent_id']}")
    logger.info(f"Intent expires: {intent_mandate['intent_expiry']}")

    # Return success confirmation
    return {
        "status": "success",
        "message": f"Created IntentMandate: ${amount:.2f} donation to {charity_name} (EIN: {charity_ein})",
        "intent_id": intent_mandate["intent_id"],
        "expiry": intent_mandate["intent_expiry"]
    }
步驟 4:新增顯示格式輔助程式
在建構代理程式之前,請先新增一個輔助程式,用於格式化慈善機構資料,方便使用者查看。
👉 捲動畫面,找出:
# MODULE_4_STEP_4_ADD_FORMATTING_HELPER
👉 將該單行程式碼替換為:
def _format_charity_display(charity: dict) -> str:
    """
    Formats a charity dictionary into a user-friendly display string.

    This helper function demonstrates how to transform structured data
    into readable text for the user.

    Args:
        charity: Dictionary containing charity data (name, ein, mission, rating, efficiency)

    Returns:
        Formatted string suitable for display to the user
    """
    name = charity.get('name', 'Unknown')
    ein = charity.get('ein', 'N/A')
    mission = charity.get('mission', 'No mission statement available')
    rating = charity.get('rating', 0.0)
    efficiency = charity.get('efficiency', 0.0)

    # Format efficiency as percentage
    efficiency_pct = int(efficiency * 100)

    # Build formatted string
    display = f"""
**{name}** (EIN: {ein})
⭐ Rating: {rating}/5.0
💰 Efficiency: {efficiency_pct}% of funds go to programs
📋 Mission: {mission}
    """.strip()

    return display
步驟 5:建構購物代理程式 - 匯入元件
現在工具已完成且功能強大,讓我們來建立使用這些工具的代理。
👉 開啟
charity_advisor/shopping_agent/agent.py
畫面上會顯示含有範例留言的範本。我們將逐步建構這項功能。
👉 尋找:
# MODULE_4_STEP_5_IMPORT_COMPONENTS
👉 將該單行程式碼替換為:
from google.adk.agents import Agent
from google.adk.tools import FunctionTool
from charity_advisor.tools.charity_tools import find_charities, save_user_choice
步驟 6:撰寫代理指令
指令會定義代理程式的工作說明和工作流程。這點非常重要,因為指令寫得不好會導致行為不可靠。
👉 尋找:
# MODULE_4_STEP_6_WRITE_INSTRUCTION
instruction="""""",
👉 將這兩行程式碼替換為:
    instruction="""You are a research specialist helping users find verified charities.

Your workflow:

1. When the user describes what cause they want to support (e.g., "education", "health", "environment"),
   use the find_charities tool to search our vetted database.

2. Present the results clearly. The tool returns formatted charity information that you should
   show to the user.

3. When the user selects a charity and specifies an amount, use the save_user_choice tool
   to create an IntentMandate and record their decision. You MUST call save_user_choice with:
   - charity_name: The exact name of the chosen charity
   - charity_ein: The EIN of the chosen charity
   - amount: The donation amount in dollars (as a number, not a string)

4. After successfully saving, inform the user:
   - That you've created an IntentMandate (mention the intent ID if provided)
   - When the intent expires
   - That you're passing their request to the secure payment processor

IMPORTANT BOUNDARIES:
- Your ONLY job is discovery and creating the IntentMandate
- You do NOT process payments
- You do NOT see the user's payment methods
- You do NOT create cart offers (that's the Merchant Agent's job)
- After calling save_user_choice, your work is done

WHAT IS AN INTENTMANDATE:
An IntentMandate is a structured record of what the user wants to do. It includes:
- Natural language description ("Donate $50 to Room to Read")
- Which merchants can fulfill it
- When the intent expires
- Whether user confirmation is required

This is the first of three verifiable credentials in our secure payment system.

If the user asks you to do anything related to payment processing, politely explain that
you don't have that capability and that their request will be handled by the appropriate
specialist agent.""",
步驟 7:將工具新增至代理
現在,我們來授予代理這兩項工具的存取權。
👉 尋找:
# MODULE_4_STEP_7_ADD_TOOLS
👉 將這兩行程式碼替換為:
    tools=[
        FunctionTool(func=find_charities),
        FunctionTool(func=save_user_choice)
    ]
步驟 8:驗證完整代理程式
請檢查所有線路是否已正確連接。
👉 完整
charity_advisor/shopping_agent/agent.py
現在看起來應該會像這樣:
"""
Shopping Agent - Finds charities from a trusted database and saves the user's choice.
This agent acts as our specialized "Research Analyst."
"""

from google.adk.agents import Agent
from google.adk.tools import FunctionTool
from charity_advisor.tools.charity_tools import find_charities, save_user_choice


shopping_agent = Agent(
    name="ShoppingAgent",
    model="gemini-2.5-pro",
    description="Finds and recommends vetted charities from a trusted database, then creates an IntentMandate capturing the user's donation intent.",
    instruction="""You are a research specialist helping users find verified charities.

Your workflow:

1. When the user describes what cause they want to support (e.g., "education", "health", "environment"),
   use the find_charities tool to search our vetted database.

2. Present the results clearly. The tool returns formatted charity information that you should
   show to the user.

3. When the user selects a charity and specifies an amount, use the save_user_choice tool
   to create an IntentMandate and record their decision. You MUST call save_user_choice with:
   - charity_name: The exact name of the chosen charity
   - charity_ein: The EIN of the chosen charity
   - amount: The donation amount in dollars (as a number, not a string)

4. After successfully saving, inform the user:
   - That you've created an IntentMandate (mention the intent ID if provided)
   - When the intent expires
   - That you're passing their request to the secure payment processor

IMPORTANT BOUNDARIES:
- Your ONLY job is discovery and creating the IntentMandate
- You do NOT process payments
- You do NOT see the user's payment methods
- You do NOT create cart offers (that's the Merchant Agent's job)
- After calling save_user_choice, your work is done

WHAT IS AN INTENTMANDATE:
An IntentMandate is a structured record of what the user wants to do. It includes:
- Natural language description ("Donate $50 to Room to Read")
- Which merchants can fulfill it
- When the intent expires
- Whether user confirmation is required

This is the first of three verifiable credentials in our secure payment system.

If the user asks you to do anything related to payment processing, politely explain that
you don't have that capability and that their request will be handled by the appropriate
specialist agent.""",
    tools=[
        FunctionTool(func=find_charities),
        FunctionTool(func=save_user_choice)
    ]
)
✅ 太棒了!您已使用下列項目建構符合 AP2 規範的正式版代理:
- 輸入驗證
- 使用 AP2 Pydantic 模型正確建立 IntentMandate
- 格式化輸出內容
- 釐清角色界線
- 詳細操作說明
- 處理錯誤
步驟 9:測試購物代理
讓我們確認代理程式是否正常運作、建立適當的 IntentMandate,並遵守其界線。
👉 在 Cloud Shell 終端機中執行下列指令:
adk run charity_advisor/shopping_agent
畫面上會顯示 [user]: 提示。
測試 1:使用可信資料庫探索
👉 類型:
I want to donate to an education charity. What are my options?
稍後,代理程式就會提供回覆。有了 _format_charity_display 輔助函式,結果的格式就美觀多了:
我們在資料庫中找到 3 個已驗證的教育慈善機構:
Room to Read (EIN:77-0479905)
⭐ 評分:4.9/5.0
💰 效率:88% 的資金用於各項計畫
📋 宗旨:致力於改善低收入社區數百萬名兒童的生活,著重於教育的識字能力和性別平等。
Teach For America (EIN:13-3541913)
⭐ 評分:4.7/5.0
💰 效率:81% 的資金用於計畫
📋 宗旨:致力於為處於逆境的兒童擴展教育機會。
科技教育聯盟 (EIN:45-2345678)
⭐ 評分:4.8/5.0
💰 效率:92% 的資金用於計畫
📋 宗旨:為資源不足的學校提供電腦科學教育。
你想支持哪個慈善機構,以及想捐贈多少金額?
與第 3 模組的簡單代理程式比較,後者會提供未經過審查的 Google 結果。這就是非信任探索和信任探索的差異。
測試 2:記錄使用者選項並建立意圖授權
👉 類型:
I'll donate $50 to Room to Read.
您應該會看到代理程式使用正確的參數呼叫 save_user_choice 工具。由於我們使用 AP2 模型建立 IntentMandate,您會看到更有條理的回覆:
太棒了!我們已為你的捐款建立 IntentMandate:
意圖詳細資料:
- 意圖 ID:intent_774795905_1730927536
- 金額:$50.00 美元,捐給 Room to Read (EIN:77-0479905)
- 到期時間:2024-11-07T15:32:16Z (1 小時後)
這個 IntentMandate 會擷取你的捐款意圖,並包含限制,確保交易安全處理。我們現在會將這項資訊傳送給安全付款處理方,以便建立正式的捐款方案並完成捐款。
幕後發生了幾件事:
_validate_charity_data()驗證輸入內容_create_intent_mandate()使用 AP2 Pydantic 模型建構結構:
   # Created and validated via Pydantic
   intent_mandate_model = IntentMandate(
       user_cart_confirmation_required=True,
       natural_language_description="Donate $50.00 to Room to Read",
       merchants=["Room to Read"],
       skus=None,
       requires_refundability=False,
       intent_expiry="2024-11-07T15:32:16Z"
   )

   # Converted to dict and extended with custom fields
   intent_mandate_dict = intent_mandate_model.model_dump()
   intent_mandate_dict.update({
       "charity_ein": "77-0479905",
       "amount": 50.0,
       "currency": "USD"
   })
- 工具只會將 IntentMandate 寫入共用狀態:
state["intent_mandate"] = intent_mandate_dict
- 系統會將含有意圖詳細資料的成功訊息傳回 LLM
- LLM 編寫最終使用者訊息
這份意向授權書現在可供商家代理人 (第 5 模組) 處理。商家會從 IntentMandate 擷取慈善機構名稱和金額,並驗證是否過期。
測試 3:驗證作業
讓我們驗證驗證輔助程式是否會擷取錯誤的輸入內容。
👉 類型:
I'll donate -$25 to Room to Read.
服務專員應找出無效金額:
我遇到問題:捐款金額必須為正數,但系統顯示:$-25.0
請指定正數捐款金額,我會為你建立 IntentMandate。
這就是實際運作的防禦性程式設計。我們的 _validate_charity_data 輔助程式可防止無效資料進入系統,並建立格式錯誤的 IntentMandate。
測試 4:驗證信任邊界
👉 請代理程式處理付款:
Now process my credit card payment.
服務專員應拒絕,並尊重自己的角色界線:
我無法處理付款,這不是我的職責。我的工作是協助你尋找經過驗證的慈善機構,並建立 IntentMandate 來記錄你的捐款意願。
您的意圖授權已建立完成,並傳送至安全付款處理方。商家代理商會建立正式的優惠 (CartMandate),然後憑證供應商會在您明確同意後處理實際付款事宜。
這就是實際運作的信任邊界。代理程式知道自己無權處理付款資料,因此指令明確引導代理程式向使用者說明這點,同時也教導使用者瞭解 IntentMandate 概念。
👉 按
Ctrl+C
測試完成後,請點選「退出」。
您剛建構的內容
您已成功實作 AP2 架構的第一個部分,並使用 AP2 Pydantic 模型正確建立 IntentMandate。
已掌握的關鍵概念
✅ 角色型架構:
- 每個代理程式都有明確定義的工作
- 代理程式透過共用狀態進行通訊,而非直接存取
- 信任邊界可限制遭入侵的影響
✅ IntentMandate (AP2 認證 #1):
- 使用官方 AP2 Pydantic 模型建立,用於驗證
- 有架構地擷取使用者意圖
- 包括安全性的有效期限 (可防範重送攻擊)
- 指定限制條件 (商家、退款資格、確認)
- 供使用者閱讀的自然語言說明
- 代理可讀的格式
- 模型在轉換為字典前會經過驗證
✅ 狀態為「共享回憶集錦」:
tool_context.state是所有服務專員都能存取的「記事本」- 寫入狀態 = 提供可驗證的憑證
- 從狀態讀取 = 正在使用及驗證憑證
- 下游代理程式會從憑證中擷取所需內容
✅ FunctionTool:
- 將 Python 函式轉換為可供 LLM 呼叫的工具
- 依賴 docstring 和類型提示,讓 LLM 瞭解
- 自動處理叫用
- 工具可組合性:小型專用工具 > 單體式工具
✅ 服務專員指示:
- 逐步工作流程指引
- 明確界線 (「請勿...」)
- 避免發生錯誤的參數規格
- 技術定義 (何謂 IntentMandate)
- 處理特殊情況 (遇到以下情況時該怎麼說...)
後續步驟
在下一個單元中,我們將建構商家代理程式,接收 IntentMandate 並建立第二個可驗證憑證:CartMandate。
購物代理程式已建立 IntentMandate,擷取使用者的意圖並設定到期時間。現在我們需要代理程式讀取該憑證、驗證憑證是否過期,並建立正式的簽署文件,內容如下:「本人 (商家) 將遵守此價格並交付這些商品。」
讓我們建構商家代理程式,並查看第二個 AP2 憑證的運作方式。
5. 建立商家代理程式 - 繫結方案和 CartMandate

從探索到承諾
在上一個單元中,您建立了購物代理程式,這個專家會尋找經過驗證的慈善機構,並建立擷取使用者意圖的 IntentMandate。現在我們需要代理人接收意向授權書,並建立正式的約束性要約。
這時就要運用 AP2 的第二項重要原則:透過 CartMandate 驗證憑證。
AP2 原則:購物車強制規定和綁定優惠
為什麼需要商家角色
在模組 4 中,購物代理程式建立了 IntentMandate,並將其儲存至狀態:
state["intent_mandate"] = {
    "natural_language_description": "Donate $50 to Room to Read",
    "merchants": ["Room to Read"],
    "amount": 50.0,
    "intent_expiry": "2024-11-07T15:32:16Z"
}
但這只是使用者意圖。我們需要下列資訊,才能處理付款:
- 付款系統可解讀的正式方案結構
- 商家會遵守此價格的證明
- 具有約束力的承諾,交易期間無法變更
- 驗證意圖是否已過期
這是商家代理商的工作。
什麼是 CartMandate?
CartMandate 是 AP2 的用語,代表「數位購物車」,可做為具約束力的要約。這項要求是根據 W3C PaymentRequest 標準建構,因此:
- 全球付款處理方都可辨識這種格式
- 內含所有交易明細,且格式標準化
- 可透過加密簽署來證明真實性
這就像承包商提供的書面報價:
- ❌ 口頭:「好啊,這份工作大概五十塊就能搞定」
- ✅ 書面報價:列出各項費用、總金額、簽名、日期
書面報價具有約束力。CartMandate 則相當於數位版。

CartMandate 的結構
AP2 中的 CartMandate 具有特定巢狀結構:
cart_mandate = {
    "contents": {  # ← AP2 wrapper
        "id": "cart_xyz123",
        "cart_expiry": "2024-11-07T15:47:16Z",
        "merchant_name": "Room to Read",
        "user_cart_confirmation_required": False,

        "payment_request": {  # ← W3C PaymentRequest nested inside
            "method_data": [...],
            "details": {...},
            "options": {...}
        }
    },
    "merchant_authorization": "SIG_a3f7b2c8"  # ← Merchant signature
}
三大主要元件:
1. contents - 包含下列項目的購物車包裝函式:
- 購物車 ID 和到期日
- 商家名稱
- W3C PaymentRequest
2. payment_request (內含內容) - 購買項目:
- method_data:接受的付款類型
- 詳細資料:項目和總計
- 選項:運送、付款人資訊規定
3. merchant_authorization - 密碼編譯簽章
商家簽名:承諾證明
商家簽章至關重要。這項功能可證明:
- 這項優惠來自授權商家
- 商家承諾會以這個確切價格販售商品
- 優惠建立後未遭竄改
在實際工作環境中,這會是使用 PKI (公用金鑰基礎架構) 或 JWT (JSON Web Token) 的加密簽章。在教育訓練工作坊中,我們會使用 SHA-256 雜湊模擬這項程序。
# Production (real signature):
signature = sign_with_private_key(cart_data, merchant_private_key)

# Workshop (simulated signature):
cart_hash = hashlib.sha256(cart_json.encode()).hexdigest()
signature = f"SIG_{cart_hash[:16]}"
我們的任務:建構商家代理
商家代理會:
- 從狀態讀取 IntentMandate (購物代理撰寫的內容)
- 驗證意圖是否尚未過期
- 擷取慈善機構名稱、金額和其他詳細資料
- 使用 AP2 Pydantic 模型建立符合 W3C 規範的 PaymentRequest 結構
- 以 AP2 的 CartMandate 包裝,並設定有效期限
- 新增模擬商家簽章
- 撰寫 CartMandate,向憑證提供者說明 (下一個模組)
我們將逐步建構這項功能。
步驟 1:新增 Expiry Validation Helper
首先,請設定商家相關工具檔案,並新增驗證 IntentMandate 到期日的輔助程式。
👉 開啟
charity_advisor/tools/merchant_tools.py
現在請新增到期日驗證:
👉 尋找:
# MODULE_5_STEP_1_ADD_EXPIRY_VALIDATION_HELPER
👉 將該單行程式碼替換為:
def _validate_intent_expiry(intent_expiry_str: str) -> tuple[bool, str]:
    """
    Validates that the IntentMandate hasn't expired.

    This is a critical security check - expired intents should not be processed.

    Args:
        intent_expiry_str: The ISO 8601 timestamp string from the IntentMandate.

    Returns:
        (is_valid, error_message): Tuple indicating if intent is still valid.
    """
    try:
        # The .replace('Z', '+00:00') is for compatibility with older Python versions
        expiry_time = datetime.fromisoformat(intent_expiry_str.replace('Z', '+00:00'))
        now = datetime.now(timezone.utc)

        if expiry_time < now:
            return False, f"IntentMandate expired at {intent_expiry_str}"

        time_remaining = expiry_time - now
        logger.info(f"IntentMandate valid. Expires in {time_remaining.total_seconds():.0f} seconds")

        return True, ""

    except (ValueError, TypeError) as e:
        return False, f"Invalid intent_expiry format: {e}"
步驟 2:新增簽章產生輔助程式
現在,請建立產生模擬商家簽章的輔助程式。
👉 尋找:
# MODULE_5_STEP_2_ADD_SIGNATURE_HELPER
👉 將該單行程式碼替換為:
def _generate_merchant_signature(cart_contents: CartContents) -> str:
    """
    Generates a simulated merchant signature for the CartMandate contents.

    In production, this would use PKI or JWT with the merchant's private key.
    For this codelab, we use a SHA-256 hash of the sorted JSON representation.

    Args:
        cart_contents: The Pydantic model of the cart contents to sign.

    Returns:
        Simulated signature string (format: "SIG_" + first 16 chars of hash).
    """
    # Step 1: Dump the Pydantic model to a dictionary. The `mode='json'` argument
    # ensures that complex types like datetimes are serialized correctly.
    cart_contents_dict = cart_contents.model_dump(mode='json')

    # Step 2: Use the standard json library to create a stable, sorted JSON string.
    # separators=(',', ':') removes whitespace for a compact and canonical representation.
    cart_json = json.dumps(cart_contents_dict, sort_keys=True, separators=(',', ':'))

    # Step 3: Generate SHA-256 hash.
    cart_hash = hashlib.sha256(cart_json.encode('utf-8')).hexdigest()

    # Step 4: Create signature in a recognizable format.
    signature = f"SIG_{cart_hash[:16]}"

    logger.info(f"Generated merchant signature: {signature}")
    return signature
步驟 3A:建立工具簽章並設定
現在開始建構主要工具。我們將分四個子步驟逐步建立。首先是函式簽章和初始設定。
👉 尋找:
# MODULE_5_STEP_3A_CREATE_TOOL_SIGNATURE
👉 將該單行程式碼替換為:
async def create_cart_mandate(tool_context: Any) -> Dict[str, Any]:
    """
    Creates a W3C PaymentRequest-compliant CartMandate from the IntentMandate.

    This tool reads the IntentMandate from shared state, validates it, and
    creates a formal, signed offer using the official AP2 Pydantic models.

    Returns:
        Dictionary containing status and the created CartMandate.
    """
    logger.info("Tool called: Creating CartMandate from IntentMandate")

    # MODULE_5_STEP_3B_ADD_VALIDATION_LOGIC
步驟 3B:新增驗證邏輯
現在,我們來新增邏輯,使用 AP2 Pydantic 模型讀取及驗證 IntentMandate,並擷取所需資料。
👉 尋找:
# MODULE_5_STEP_3B_ADD_VALIDATION_LOGIC
👉 將該單行程式碼替換為:
    # 1. Read IntentMandate dictionary from state
    intent_mandate_dict = tool_context.state.get("intent_mandate")
    if not intent_mandate_dict:
        logger.error("No IntentMandate found in state")
        return {
            "status": "error",
            "message": "No IntentMandate found. Shopping Agent must create intent first."
        }

    # 2. Parse dictionary into a validated Pydantic model
    try:
        intent_mandate_model = IntentMandate.model_validate(intent_mandate_dict)
    except Exception as e:
        logger.error(f"Could not validate IntentMandate structure: {e}")
        return {"status": "error", "message": f"Invalid IntentMandate structure: {e}"}

    # 3. Validate that the intent hasn't expired (CRITICAL security check)
    is_valid, error_message = _validate_intent_expiry(intent_mandate_model.intent_expiry)
    if not is_valid:
        logger.error(f"IntentMandate validation failed: {error_message}")
        return {"status": "error", "message": error_message}

    # 4. Extract data. Safely access standard fields from the model, and
    # custom fields (like 'amount') from the original dictionary.
    charity_name = intent_mandate_model.merchants[0] if intent_mandate_model.merchants else "Unknown Charity"
    amount = intent_mandate_dict.get("amount", 0.0)

    # MODULE_5_STEP_3C_CREATE_CARTMANDATE_STRUCTURE
步驟 3C:建立 CartMandate 結構
現在,我們來建構符合 W3C 規範的 PaymentRequest 結構,並使用 Pydantic 模型將其包裝在 AP2 CartMandate 中。
👉 尋找:
# MODULE_5_STEP_3C_CREATE_CARTMANDATE_STRUCTURE
👉 將該單行程式碼替換為:
    # 5. Build the nested Pydantic models for the CartMandate
    timestamp = datetime.now(timezone.utc)
    cart_id = f"cart_{hashlib.sha256(f'{charity_name}{timestamp.isoformat()}'.encode()).hexdigest()[:12]}"
    cart_expiry = timestamp + timedelta(minutes=15)

    payment_request_model = PaymentRequest(
        method_data=[PaymentMethodData(
            supported_methods="CARD",
            data={"supported_networks": ["visa", "mastercard", "amex"], "supported_types": ["debit", "credit"]}
        )],
        details=PaymentDetailsInit(
            id=f"order_{cart_id}",
            display_items=[PaymentItem(
                label=f"Donation to {charity_name}",
                amount=PaymentCurrencyAmount(currency="USD", value=amount)  # Pydantic v2 handles float -> str conversion
            )],
            total=PaymentItem(
                label="Total Donation",
                amount=PaymentCurrencyAmount(currency="USD", value=amount)
            )
        ),
        options=PaymentOptions(request_shipping=False)
    )

    cart_contents_model = CartContents(
        id=cart_id,
        cart_expiry=cart_expiry.isoformat(),
        merchant_name=charity_name,
        user_cart_confirmation_required=False,
        payment_request=payment_request_model
    )

    # MODULE_5_STEP_3D_ADD_SIGNATURE_AND_SAVE
步驟 3D:新增簽章並儲存至狀態
最後,我們使用 Pydantic 模型簽署 CartMandate,並儲存至下一個代理程式的狀態。
👉 尋找:
# MODULE_5_STEP_3D_ADD_SIGNATURE_AND_SAVE
👉 將該單行程式碼替換為:
# 6. Generate signature from the validated Pydantic model
signature = _generate_merchant_signature(cart_contents_model)
# 7. Create the final CartMandate model, now including the signature
cart_mandate_model = CartMandate(
    contents=cart_contents_model,
    merchant_authorization=signature
)
# 8. Convert the final model to a dictionary for state storage and add the custom timestamp
cart_mandate_dict = cart_mandate_model.model_dump(mode='json')
cart_mandate_dict["timestamp"] = timestamp.isoformat()
# 9. Write the final dictionary to state
tool_context.state["cart_mandate"] = cart_mandate_dict
logger.info(f"CartMandate created successfully: {cart_id}")
return {
"status": "success",
"message": f"Created signed CartMandate {cart_id} for ${amount:.2f} donation to {charity_name}",
"cart_id": cart_id,
"cart_expiry": cart_expiry.isoformat(),
"signature": signature
}
步驟 4:建構商家代理程式 - 匯入元件
現在來建立使用這項工具的代理程式。
👉 開啟
charity_advisor/merchant_agent/agent.py
畫面上會顯示含有預留位置標記的範本。首先,請匯入所需項目。
👉 尋找:
# MODULE_5_STEP_4_IMPORT_COMPONENTS
👉 將該單行程式碼替換為:
from google.adk.agents import Agent
from google.adk.tools import FunctionTool
from charity_advisor.tools.merchant_tools import create_cart_mandate
步驟 5:撰寫商家代理指令
現在,我們來編寫指令,告訴代理何時及如何使用工具。
👉 尋找:
# MODULE_5_STEP_5_WRITE_INSTRUCTION
instruction="""""",
👉 將這兩行程式碼替換為:
    instruction="""You are a merchant specialist responsible for creating formal, signed offers (CartMandates).

Your workflow:

1. Read the IntentMandate from shared state.
   The IntentMandate was created by the Shopping Agent and contains:
   - merchants: List of merchant names
   - amount: Donation amount
   - charity_ein: Tax ID
   - intent_expiry: When the intent expires

2. Use the create_cart_mandate tool to create a W3C PaymentRequest-compliant CartMandate.
   This tool will:
   - Validate the IntentMandate hasn't expired (CRITICAL security check)
   - Extract the charity name and amount from the IntentMandate
   - Create a structured offer with payment methods, transaction details, and merchant info
   - Generate a merchant signature to prove authenticity
   - Save the CartMandate to state for the payment processor

3. After creating the CartMandate, inform the user:
   - That you've created a formal, signed offer
   - The cart ID
   - When the cart expires (15 minutes)
   - That you're passing it to the secure payment processor

IMPORTANT BOUNDARIES:
- Your ONLY job is creating signed CartMandates from valid IntentMandates
- You do NOT process payments
- You do NOT see the user's payment methods or credentials
- You do NOT interact with payment networks
- You MUST validate that the IntentMandate hasn't expired before creating a cart
- After calling create_cart_mandate, your work is done

WHAT IS A CARTMANDATE:
A CartMandate is a binding commitment that says:
"I, the merchant, commit to accepting $X for this charity donation, and I prove it with my signature."

This commitment is structured using the W3C PaymentRequest standard and includes:
- Payment methods accepted (card, bank transfer)
- Transaction details (amount, charity name)
- Cart expiry (15 minutes from creation)
- Merchant signature (proof of commitment)

This is the second of three verifiable credentials in our secure payment system.""",
步驟 6:將工具新增至商家代理
👉 尋找:
# MODULE_5_STEP_6_ADD_TOOLS
tools=[],
👉 將這兩行程式碼替換為:
    tools=[
        FunctionTool(func=create_cart_mandate)
    ],
步驟 7:驗證 Complete Merchant Agent
請確認所有線路都已正確接好。
👉 完整
charity_advisor/merchant_agent/agent.py
現在看起來應該會像這樣:
"""
Merchant Agent - Creates W3C-compliant CartMandates with merchant signatures.
This agent acts as our "Contract Creator."
"""

from google.adk.agents import Agent
from google.adk.tools import FunctionTool
from charity_advisor.tools.merchant_tools import create_cart_mandate


merchant_agent = Agent(
    name="MerchantAgent",
    model="gemini-2.5-flash",
    description="Creates formal, signed CartMandates for charity donations following W3C PaymentRequest standards.",
    tools=[
        FunctionTool(func=create_cart_mandate)
    ],
    instruction="""You are a merchant specialist responsible for creating formal, signed offers (CartMandates).

Your workflow:

1. Read the IntentMandate from shared state.
   The IntentMandate was created by the Shopping Agent and contains:
   - merchants: List of merchant names
   - amount: Donation amount
   - charity_ein: Tax ID
   - intent_expiry: When the intent expires

2. Use the create_cart_mandate tool to create a W3C PaymentRequest-compliant CartMandate.
   This tool will:
   - Validate the IntentMandate hasn't expired (CRITICAL security check)
   - Extract the charity name and amount from the IntentMandate
   - Create a structured offer with payment methods, transaction details, and merchant info
   - Generate a merchant signature to prove authenticity
   - Save the CartMandate to state for the payment processor

3. After creating the CartMandate, inform the user:
   - That you've created a formal, signed offer
   - The cart ID
   - When the cart expires (15 minutes)
   - That you're passing it to the secure payment processor

IMPORTANT BOUNDARIES:
- Your ONLY job is creating signed CartMandates from valid IntentMandates
- You do NOT process payments
- You do NOT see the user's payment methods or credentials
- You do NOT interact with payment networks
- You MUST validate that the IntentMandate hasn't expired before creating a cart
- After calling create_cart_mandate, your work is done

WHAT IS A CARTMANDATE:
A CartMandate is a binding commitment that says:
"I, the merchant, commit to accepting $X for this charity donation, and I prove it with my signature."

This commitment is structured using the W3C PaymentRequest standard and includes:
- Payment methods accepted (card, bank transfer)
- Transaction details (amount, charity name)
- Cart expiry (15 minutes from creation)
- Merchant signature (proof of commitment)

This is the second of three verifiable credentials in our secure payment system."""
)
✅ 查核點:您現在已擁有完整的商家代理程式,並使用 Pydantic 模型正確建立 AP2 購物車授權。
步驟 8:測試商家代理程式
現在,我們來驗證代理程式是否正確建立含有簽章的 CartMandates,並驗證到期日。
測試設定:執行測試指令碼
👉 在 Cloud Shell 終端機中執行下列指令:
python scripts/test_merchant.py
預期的輸出內容:
======================================================================
MERCHANT AGENT TEST
======================================================================

Simulated IntentMandate from Shopping Agent:
  charity: Room to Read
  amount: $50.00
  expiry: 2024-11-07T16:32:16Z

----------------------------------------------------------------------
Merchant Agent Response:
----------------------------------------------------------------------
Perfect! I've received your IntentMandate and created a formal, signed offer (CartMandate) for your donation.

**CartMandate Details:**
- **Cart ID**: cart_3b4c5d6e7f8a
- **Donation Amount**: $50.00 to Room to Read
- **Payment Methods Accepted**: Credit/debit cards (Visa, Mastercard, Amex) or bank transfer
- **Cart Expires**: 2024-11-07T15:47:16Z (in 15 minutes)
- **Merchant Signature**: SIG_a3f7b2c8d9e1f4a2

This signed CartMandate proves my commitment to accept this donation amount. I'm now passing this to the secure payment processor to complete your transaction.

======================================================================
CARTMANDATE CREATED:
======================================================================
  ID: cart_3b4c5d6e7f8a
  Amount: 50.00
  Merchant: Room to Read
  Expires: 2024-11-07T15:47:16Z
  Signature: SIG_a3f7b2c8d9e1f4a2
======================================================================
測試 2:驗證是否符合 W3C 規範
讓我們驗證 CartMandate 結構是否完全符合 AP2 和 W3C PaymentRequest 標準。
👉 執行驗證指令碼:
python scripts/validate_cartmandate.py
預期的輸出內容:
======================================================================
AP2 & W3C PAYMENTREQUEST VALIDATION
======================================================================
✅ CartMandate is AP2 and W3C PaymentRequest compliant

Structure validation passed:
  ✓ AP2 'contents' wrapper present
  ✓ AP2 'merchant_authorization' signature present
  ✓ cart_expiry present
  ✓ payment_request nested inside contents
  ✓ method_data present and valid
  ✓ details.total.amount present with currency and value
  ✓ All required W3C PaymentRequest fields present
======================================================================
您剛建構的內容
您已成功使用 Pydantic 模型實作 AP2 的 CartMandate,確保結構正確、驗證到期日,並提供商家簽章。
已掌握的關鍵概念
✅ CartMandate (AP2 憑證 #2):
- 使用官方 AP2 Pydantic 模型建立
- AP2 結構,包含內容包裝函式
- W3C PaymentRequest 巢狀結構
- 購物車到期 (短於意圖)
- 商家簽名,表示同意承諾
- 模型驗證可確保符合規格
✅ 到期驗證:
- 從狀態讀取 IntentMandate
- 使用「
IntentMandate.model_validate()」驗證結構 - 剖析 ISO 8601 時間戳記
- 與目前時間相比
- 防止過時處理的安全功能
✅ 商家簽名:
- 證明真實性和承諾
- 從經過驗證的 Pydantic 模型產生
- 使用
model_dump(mode='json')做為標準表示法 - 以 SHA-256 模擬教育
- 正式版使用 PKI/JWT
- 簽署內容模型,而非字典
✅ W3C PaymentRequest:
- 使用 AP2 的 PaymentRequest Pydantic 模型建構
- 付款資料的業界標準
- 巢狀結構位於 AP2 結構內
- 包含 method_data、details、options
- 啟用互通性
✅ 含模型的憑證鏈:
- 購物 → IntentMandate (已驗證)
- 商家讀取 IntentMandate → CartMandate (兩個模型都已驗證)
- 憑證提供者會讀取 CartMandate → PaymentMandate
- 每個步驟都會使用 Pydantic 驗證先前的憑證
✅ 模型驅動式開發:
- 透過
model_validate()驗證輸入內容 - 型別安全建構
- 透過
model_dump()自動序列化 - 可投入實作環境的模式
後續步驟
在下一個單元中,我們將建構憑證供應商,以安全地處理付款。
Merchant Agent 已使用 AP2 模型建立具有效期的約束性提案。現在我們需要代理程式讀取該 CartMandate、取得使用者同意,並執行付款。
讓我們建構憑證提供者,並完成 AP2 憑證鏈。
6. 建構憑證提供者 - 安全付款執行

從綁定優惠到執行付款
在第 5 個單元中,您建立了 Merchant Agent,這個專員會讀取 IntentMandates、驗證這些授權是否過期,並建立具有商家簽章的繫結 CartMandates。現在我們需要一個代理程式來接收該 CartMandate 並執行實際付款。
這時,AP2 的第三項也是最後一項原則就派上用場:透過 PaymentMandate 執行安全付款。
AP2 原則:付款授權和付款執行
為什麼需要憑證提供者角色
在單元 5 中,商家代理程式建立了 CartMandate,並將其儲存至狀態:
state["cart_mandate"] = {
    "contents": {
        "id": "cart_abc123",
        "cart_expiry": "2025-11-07:15:47:16Z",
        "payment_request": {
            "details": {
                "total": {
                    "amount": {"currency": "USD", "value": "50.00"}
                }
            }
        }
    },
    "merchant_authorization": "SIG_a3f7b2c8"
}
但這只是具有約束力的要約。我們需要以下資訊,才能執行付款:
- 驗證購物車是否尚未過期
- 使用者同意繼續付款
- 授權執行付款的憑證
- 實際處理付款 (或研討會的模擬付款)
這是憑證供應商的工作。
什麼是付款授權?
PaymentMandate是 AP2 的用語,代表最終授權,允許執行付款。這是 AP2 鏈中的第三個也是最後一個可驗證憑證。
您可以將這三項憑證視為簽約程序:
- IntentMandate:「我對購買這項產品有興趣」(意向書)
- CartMandate:「我 (商家) 願意以這個價格銷售」(書面報價)
- PaymentMandate:「我授權你透過我的付款方式扣款」(已簽署合約)
只有在所有三項憑證都存在時,才能執行付款。

PaymentMandate 的結構
AP2 中的 PaymentMandate 具有特定結構:
payment_mandate = {
    "payment_mandate_contents": {  # ← AP2 wrapper
        "payment_mandate_id": "payment_xyz123",
        "payment_details_id": "cart_abc123",  # Links to CartMandate
        "user_consent": True,
        "consent_timestamp": "2025-11-07T15:48:00Z",
        "amount": {
            "currency": "USD",
            "value": "50.00"
        },
        "merchant_name": "Room to Read"
    },
    "agent_present": True,  # Human-in-the-loop flow
    "timestamp": "2025-11-07T15:48:00Z"
}
主要元件:
1. payment_mandate_contents - 授權包裝函式,包含:
- payment_mandate_id:專屬 ID
- payment_details_id:連結回 CartMandate
- user_consent:使用者是否核准
- 金額:付款金額 (從 CartMandate 擷取)
2. agent_present - 是否為人機迴圈流程
3. 時間戳記 - 授權建立時間
我們的使命:建構憑證提供者
憑證提供者會:
- 從狀態讀取 CartMandate (商家代理撰寫的內容)
- 使用 AP2 Pydantic 模型驗證購物車是否過期
- 從巢狀結構中擷取付款詳細資料
- 使用 AP2 模型,在徵得使用者同意後建立 PaymentMandate
- 模擬付款處理程序 (在正式版中,會呼叫實際的付款 API)
- 將 PaymentMandate 和付款結果寫入狀態
我們將逐步建構這項功能。
步驟 1:新增購物車到期驗證輔助程式
首先,我們來建立一個驗證 CartMandate 是否過期的輔助程式,就像我們在第 5 堂課程中驗證 IntentMandate 是否過期一樣。
👉 開啟
charity_advisor/tools/payment_tools.py
現在請新增到期日驗證:
👉 尋找:
# MODULE_6_STEP_1_ADD_CART_EXPIRY_VALIDATION_HELPER
👉 將該單行程式碼替換為:
def _validate_cart_expiry(cart: CartMandate) -> tuple[bool, str]:
    """
    Validates that the CartMandate hasn't expired.

    This is a critical security check - expired carts should not be processed.

    Args:
        cart: The Pydantic CartMandate model to validate.

    Returns:
        (is_valid, error_message): Tuple indicating if cart is still valid.
    """
    try:
        expiry_str = cart.contents.cart_expiry
        expiry_time = datetime.fromisoformat(expiry_str.replace('Z', '+00:00'))
        now = datetime.now(timezone.utc)

        if expiry_time < now:
            return False, f"CartMandate expired at {expiry_str}"

        time_remaining = expiry_time - now
        logger.info(f"CartMandate valid. Expires in {time_remaining.total_seconds():.0f} seconds")

        return True, ""

    except (ValueError, TypeError, AttributeError) as e:
        return False, f"Invalid cart_expiry format or structure: {e}"
步驟 2:新增 PaymentMandate 建立輔助程式
現在,我們來建立一個輔助程式,使用官方 AP2 Pydantic 模型建構 PaymentMandate 結構。
👉 尋找:
# MODULE_6_STEP_2_ADD_PAYMENT_MANDATE_CREATION_HELPER
👉 將該單行程式碼替換為:
def _create_payment_mandate(cart: CartMandate, consent_granted: bool) -> dict:
    """
    Creates a PaymentMandate using the official AP2 Pydantic models.

    It links to the CartMandate and includes user consent status.

    Args:
        cart: The validated Pydantic CartMandate model being processed.
        consent_granted: Whether the user has consented to the payment.

    Returns:
        A dictionary representation of the final, validated PaymentMandate.
    """
    timestamp = datetime.now(timezone.utc)

    # Safely extract details from the validated CartMandate model
    cart_id = cart.contents.id
    merchant_name = cart.contents.merchant_name
    total_item = cart.contents.payment_request.details.total

    # Create the nested PaymentResponse model for the mandate
    payment_response_model = PaymentResponse(
        request_id=cart_id,
        method_name="CARD",  # As per the simulated flow
        details={"token": "simulated_payment_token_12345"}
    )

    # Create the PaymentMandateContents model
    payment_mandate_contents_model = PaymentMandateContents(
        payment_mandate_id=f"payment_{hashlib.sha256(f'{cart_id}{timestamp.isoformat()}'.encode()).hexdigest()[:12]}",
        payment_details_id=cart_id,
        payment_details_total=total_item,
        payment_response=payment_response_model,
        merchant_agent=merchant_name,
        timestamp=timestamp.isoformat()
    )

    # Create the top-level PaymentMandate model
    # In a real system, a user signature would be added to this model
    payment_mandate_model = PaymentMandate(
        payment_mandate_contents=payment_mandate_contents_model
    )

    # Convert the final Pydantic model to a dictionary for state storage
    final_dict = payment_mandate_model.model_dump(mode='json')

    # Add any custom/non-standard fields required by the codelab's logic to the dictionary
    # The spec does not have these fields, but your original code did. We add them
    # back to ensure compatibility with later steps.
    final_dict['payment_mandate_contents']['user_consent'] = consent_granted
    final_dict['payment_mandate_contents']['consent_timestamp'] = timestamp.isoformat() if consent_granted else None
    final_dict['agent_present'] = True

    return final_dict
步驟 3A:建立工具簽章並設定
現在開始逐步建構主要工具。首先是函式簽章和初始設定。
👉 尋找:
# MODULE_6_STEP_3A_CREATE_TOOL_SIGNATURE
👉 將該單行程式碼替換為:
async def create_payment_mandate(tool_context: Any) -> Dict[str, Any]:
    """
    Creates a PaymentMandate and simulates payment processing using Pydantic models.

    This tool now reads the CartMandate from state, parses it into a validated model,
    and creates a spec-compliant PaymentMandate.
    """
    logger.info("Tool called: Creating PaymentMandate and processing payment")

    # MODULE_6_STEP_3B_VALIDATE_CARTMANDATE
步驟 3B:驗證 CartMandate
現在,讓我們新增邏輯,使用 AP2 Pydantic 模型讀取及驗證 CartMandate,並檢查到期日。
👉 尋找:
# MODULE_6_STEP_3B_VALIDATE_CARTMANDATE
👉 將該單行程式碼替換為:
    # 1. Read CartMandate dictionary from state
    cart_mandate_dict = tool_context.state.get("cart_mandate")
    if not cart_mandate_dict:
        logger.error("No CartMandate found in state")
        return { "status": "error", "message": "No CartMandate found. Merchant Agent must create cart first." }

    # 2. Parse dictionary into a validated Pydantic model
    try:
        cart_model = CartMandate.model_validate(cart_mandate_dict)
    except Exception as e:
        logger.error(f"Could not validate CartMandate structure: {e}")
        return {"status": "error", "message": f"Invalid CartMandate structure: {e}"}

    # 3. Validate that the cart hasn't expired using the Pydantic model
    is_valid, error_message = _validate_cart_expiry(cart_model)
    if not is_valid:
        logger.error(f"CartMandate validation failed: {error_message}")
        return {"status": "error", "message": error_message}

    # MODULE_6_STEP_3C_EXTRACT_PAYMENT_DETAILS
步驟 3C:從巢狀結構中擷取付款詳細資料
現在,讓我們瀏覽經過驗證的 CartMandate 模型,擷取所需的付款詳細資料。
👉 尋找:
# MODULE_6_STEP_3C_EXTRACT_PAYMENT_DETAILS
👉 將該單行程式碼替換為:
    # 4. Safely extract data from the validated model
    cart_id = cart_model.contents.id
    merchant_name = cart_model.contents.merchant_name
    amount_value = cart_model.contents.payment_request.details.total.amount.value
    currency = cart_model.contents.payment_request.details.total.amount.currency
    consent_granted = True  # Assume consent for this codelab flow

    # MODULE_6_STEP_3D_CREATE_PAYMENTMANDATE_AND_SIMULATE
步驟 3D:建立付款授權並模擬付款
最後,我們使用以 Pydantic 為基礎的輔助程式建立 PaymentMandate、模擬付款處理程序,並將所有內容儲存至狀態。
👉 尋找:
# MODULE_6_STEP_3D_CREATE_PAYMENTMANDATE_AND_SIMULATE
👉 將該單行程式碼替換為:
    # 5. Create the spec-compliant PaymentMandate using the validated CartMandate model
    payment_mandate_dict = _create_payment_mandate(cart_model, consent_granted)

    # 6. Simulate payment processing
    transaction_id = f"txn_{hashlib.sha256(f'{cart_id}{datetime.now(timezone.utc).isoformat()}'.encode()).hexdigest()[:16]}"
    payment_result = {
        "transaction_id": transaction_id,
        "status": "completed",
        "amount": amount_value,
        "currency": currency,
        "merchant": merchant_name,
        "timestamp": datetime.now(timezone.utc).isoformat(),
        "simulation": True
    }

    # 7. Write the compliant PaymentMandate dictionary and result to state
    tool_context.state["payment_mandate"] = payment_mandate_dict
    tool_context.state["payment_result"] = payment_result

    logger.info(f"Payment processed successfully: {transaction_id}")

    return {
        "status": "success",
        "message": f"Payment of {currency} {amount_value:.2f} to {merchant_name} processed successfully",
        "transaction_id": transaction_id,
        "payment_mandate_id": payment_mandate_dict["payment_mandate_contents"]["payment_mandate_id"]
    }
步驟 4:建構憑證供應商代理程式 - 匯入元件
現在來建立使用這項工具的代理程式。
👉 開啟
charity_advisor/credentials_provider/agent.py
畫面上會顯示含有預留位置標記的範本。首先,請匯入所需項目。
👉 尋找:
# MODULE_6_STEP_4_IMPORT_COMPONENTS
👉 將該單行程式碼替換為:
from google.adk.agents import Agent
from google.adk.tools import FunctionTool
from charity_advisor.tools.payment_tools import create_payment_mandate
步驟 5:撰寫憑證供應商指令
現在,我們來撰寫引導代理程式的指令。
👉 尋找:
# MODULE_6_STEP_5_WRITE_INSTRUCTION
instruction="""""",
👉 將這兩行程式碼替換為:
    instruction="""You are a payment specialist responsible for securely processing payments with user consent.

Your workflow:

1. Read the CartMandate from shared state.
   The CartMandate was created by the Merchant Agent and has this structure:
   - contents: AP2 wrapper containing:
     - id: Cart identifier
     - cart_expiry: When the cart expires
     - merchant_name: Who is receiving payment
     - payment_request: W3C PaymentRequest with transaction details
   - merchant_authorization: Merchant's signature

2. Extract payment details from the nested structure:
   - Navigate: cart_mandate["contents"]["payment_request"]["details"]["total"]["amount"]
   - This gives you the currency and value

3. **IMPORTANT - Two-Turn Conversational Confirmation Pattern:**
   Before calling create_payment_mandate, you MUST:
   - Present the payment details clearly to the user
   - Ask explicitly: "I'm ready to process a payment of $X to [Charity Name]. Do you want to proceed with this donation?"
   - WAIT for the user's explicit confirmation (e.g., "yes", "proceed", "confirm")
   - ONLY call create_payment_mandate AFTER receiving explicit confirmation
   - If user says "no" or "cancel", DO NOT call the tool

4. After user confirms, use the create_payment_mandate tool to:
   - Validate the CartMandate hasn't expired (CRITICAL security check)
   - Create a PaymentMandate (the third AP2 credential)
   - Simulate payment processing
   - Record the transaction result

5. After processing, inform the user:
   - That payment was processed successfully (this is a simulation)
   - The transaction ID
   - The amount and merchant
   - That this completes the three-agent AP2 credential chain

IMPORTANT BOUNDARIES:
- Your ONLY job is creating PaymentMandates and processing payments
- You do NOT discover charities (that's Shopping Agent's job)
- You do NOT create offers (that's Merchant Agent's job)
- You MUST validate that the CartMandate hasn't expired before processing
- You MUST get explicit user confirmation before calling create_payment_mandate
- In production, this consent mechanism would be even more robust

WHAT IS A PAYMENTMANDATE:
A PaymentMandate is the final credential that authorizes payment execution. It:
- Links to the CartMandate (proving the merchant's offer)
- Records user consent
- Contains payment details extracted from the CartMandate
- Enables the actual payment transaction

This is the third and final verifiable credential in our secure payment system.

THE COMPLETE AP2 CREDENTIAL CHAIN:
1. Shopping Agent creates IntentMandate (user's intent)
2. Merchant Agent reads IntentMandate, creates CartMandate (merchant's binding offer)
3. You read CartMandate, get user confirmation, create PaymentMandate (authorized payment execution)

Each credential:
- Has an expiry time (security feature)
- Links to the previous credential
- Is validated before the next step
- Creates an auditable chain of trust""",
步驟 6:將工具新增至憑證供應商
👉 尋找:
# MODULE_6_STEP_6_ADD_TOOLS
tools=[],
👉 將這兩行程式碼替換為:
    tools=[
        FunctionTool(func=create_payment_mandate)
    ],
步驟 7:驗證 Complete Credentials Provider
請確認所有線路都已正確接好。
👉 完整
charity_advisor/credentials_provider/agent.py
現在看起來應該會像這樣:
"""
Credentials Provider Agent - Handles payment processing with user consent.
This agent acts as our "Payment Processor."
"""

from google.adk.agents import Agent
from google.adk.tools import FunctionTool
from charity_advisor.tools.payment_tools import create_payment_mandate


credentials_provider = Agent(
    name="CredentialsProvider",
    model="gemini-2.5-flash",
    description="Securely processes payments by creating PaymentMandates and executing transactions with user consent.",
    tools=[
        FunctionTool(func=create_payment_mandate)
    ],
    instruction="""You are a payment specialist responsible for securely processing payments with user consent.

Your workflow:

1. Read the CartMandate from shared state.
   The CartMandate was created by the Merchant Agent and has this structure:
   - contents: AP2 wrapper containing:
     - id: Cart identifier
     - cart_expiry: When the cart expires
     - merchant_name: Who is receiving payment
     - payment_request: W3C PaymentRequest with transaction details
   - merchant_authorization: Merchant's signature

2. Extract payment details from the nested structure:
   - Navigate: cart_mandate["contents"]["payment_request"]["details"]["total"]["amount"]
   - This gives you the currency and value

3. **IMPORTANT - Two-Turn Conversational Confirmation Pattern:**
   Before calling create_payment_mandate, you MUST:
   - Present the payment details clearly to the user
   - Ask explicitly: "I'm ready to process a payment of $X to [Charity Name]. Do you want to proceed with this donation?"
   - WAIT for the user's explicit confirmation (e.g., "yes", "proceed", "confirm")
   - ONLY call create_payment_mandate AFTER receiving explicit confirmation
   - If user says "no" or "cancel", DO NOT call the tool

4. After user confirms, use the create_payment_mandate tool to:
   - Validate the CartMandate hasn't expired (CRITICAL security check)
   - Create a PaymentMandate (the third AP2 credential)
   - Simulate payment processing
   - Record the transaction result

5. After processing, inform the user:
   - That payment was processed successfully (this is a simulation)
   - The transaction ID
   - The amount and merchant
   - That this completes the three-agent AP2 credential chain

IMPORTANT BOUNDARIES:
- Your ONLY job is creating PaymentMandates and processing payments
- You do NOT discover charities (that's Shopping Agent's job)
- You do NOT create offers (that's Merchant Agent's job)
- You MUST validate that the CartMandate hasn't expired before processing
- You MUST get explicit user confirmation before calling create_payment_mandate
- In production, this consent mechanism would be even more robust

WHAT IS A PAYMENTMANDATE:
A PaymentMandate is the final credential that authorizes payment execution. It:
- Links to the CartMandate (proving the merchant's offer)
- Records user consent
- Contains payment details extracted from the CartMandate
- Enables the actual payment transaction

This is the third and final verifiable credential in our secure payment system.

THE COMPLETE AP2 CREDENTIAL CHAIN:
1. Shopping Agent creates IntentMandate (user's intent)
2. Merchant Agent reads IntentMandate, creates CartMandate (merchant's binding offer)
3. You read CartMandate, get user confirmation, create PaymentMandate (authorized payment execution)

Each credential:
- Has an expiry time (security feature)
- Links to the previous credential
- Is validated before the next step
- Creates an auditable chain of trust"""
)
✅ 檢查點:您現在擁有完整的憑證供應商,可使用 AP2 Pydantic 模型正確讀取 CartMandate,並建立 PaymentMandate。
步驟 8:測試憑證供應商
現在,讓我們確認代理程式是否正確處理付款並完成憑證鏈。
👉 在 Cloud Shell 終端機中執行下列指令:
python scripts/test_credentials_provider.py
預期的輸出內容:
======================================================================
CREDENTIALS PROVIDER TEST (MOCK - NO CONFIRMATION)
======================================================================

Simulated CartMandate from Merchant Agent:
  - Cart ID: cart_test123
  - Merchant: Room to Read
  - Amount: $50.00
  - Expires: 2025-11-07T15:47:16Z
  - Signature: SIG_test_signature

Calling Credentials Provider to process payment...
======================================================================
INFO:charity_advisor.tools.payment_tools:Tool called: Creating PaymentMandate and processing payment
INFO:charity_advisor.tools.payment_tools:CartMandate valid. Expires in 900 seconds
INFO:charity_advisor.tools.payment_tools:Payment processed successfully: txn_a3f7b2c8d9e1f4a2

======================================================================
CREDENTIALS PROVIDER RESPONSE:
======================================================================
I've successfully processed your payment. Here are the details:

**Payment Completed** (Simulated)
- Transaction ID: txn_a3f7b2c8d9e1f4a2
- Amount: USD 50.00
- Merchant: Room to Read
- Status: Completed

This completes the three-agent AP2 credential chain:
1. ✓ Shopping Agent created IntentMandate (your intent)
2. ✓ Merchant Agent created CartMandate (binding offer)
3. ✓ Credentials Provider created PaymentMandate (payment authorization)

Your donation has been processed securely through our verifiable credential system.

======================================================================
PAYMENTMANDATE CREATED:
======================================================================
  Payment Mandate ID: payment_3b4c5d6e7f8a
  Linked to Cart: cart_test123
  User Consent: True
  Amount: USD 50.00
  Merchant: Room to Read
  Agent Present: True
======================================================================

======================================================================
PAYMENT RESULT:
======================================================================
  Transaction ID: txn_a3f7b2c8d9e1f4a2
  Status: completed
  Amount: USD 50.00
  Merchant: Room to Read
  Simulation: True
======================================================================
步驟 9:測試完整的三個代理程式管道
現在來測試這三個代理是否能協同運作!
👉 執行完整管道測試:
python scripts/test_full_pipeline.py
預期的輸出內容:
======================================================================
THREE-AGENT PIPELINE TEST (AP2 CREDENTIAL CHAIN)
======================================================================

[1/3] SHOPPING AGENT - Finding charity and creating IntentMandate...
----------------------------------------------------------------------
✓ IntentMandate created
  - Intent ID: intent_774799058_1730927536
  - Description: Donate $75.00 to Room to Read
  - Merchant: Room to Read
  - Amount: $75.0
  - Expires: 2025-11-07T16:32:16Z

[2/3] MERCHANT AGENT - Reading IntentMandate and creating CartMandate...
----------------------------------------------------------------------
✓ CartMandate created
  - ID: cart_3b4c5d6e7f8a
  - Expires: 2025-11-07T15:47:16Z
  - Signature: SIG_a3f7b2c8d9e1f4a2

[3/3] CREDENTIALS PROVIDER - Creating PaymentMandate and processing...
----------------------------------------------------------------------
NOTE: In the web UI, this would show a confirmation dialog
      For this test, consent is automatically granted
✓ Payment processed (SIMULATED)
  - Transaction ID: txn_a3f7b2c8d9e1f4a2
  - Amount: $75.0
  - Status: completed

======================================================================
COMPLETE AP2 CREDENTIAL CHAIN
======================================================================

✓ Credential 1: IntentMandate (User's Intent)
  - Intent ID: intent_774799058_1730927536
  - Description: Donate $75.00 to Room to Read
  - Expiry: 2025-11-07T16:32:16Z

✓ Credential 2: CartMandate (Merchant's Offer)
  - Cart ID: cart_3b4c5d6e7f8a
  - Cart Expiry: 2025-11-07T15:47:16Z
  - Merchant Signature: SIG_a3f7b2c8d9e1f4a2

✓ Credential 3: PaymentMandate (Payment Execution)
  - Payment Mandate ID: payment_3b4c5d6e7f8a
  - Linked to Cart: cart_3b4c5d6e7f8a
  - Agent Present: True

✓ Transaction Result:
  - Transaction ID: txn_a3f7b2c8d9e1f4a2
  - Simulation: True

======================================================================
✅ COMPLETE PIPELINE TEST PASSED
======================================================================
這就是運作中的完整 AP2 憑證鏈!
每個代理程式:
- 從狀態讀取憑證
- 使用 Pydantic 模型驗證 (結構 + 到期日檢查)
- 使用 AP2 模型建立下一個憑證
- 為下一個代理寫入狀態
您剛建構的內容
您已成功完成 AP2 三個代理憑證鏈,並使用 Pydantic 模型和付款模擬功能,驗證結構是否正確。
已掌握的關鍵概念
✅ PaymentMandate (AP2 認證 #3):
- 使用官方 AP2 Pydantic 模型建立
- 授權執行付款的最終憑證
- 透過 payment_details_id 連結至 CartMandate
- 記錄使用者同意聲明和時間戳記
- 包含從 CartMandate 擷取的付款金額
- 包含人機迴圈的 agent_present 標記
- 模型驗證可確保符合規格
✅ 從 CartMandate 讀取:
- 使用
CartMandate.model_validate()驗證結構 - 型別安全屬性存取:
cart_model.contents.payment_request.details.total.amount - 瞭解 AP2 包裝函式與 W3C 標準分隔符號的差異
- 從模型安全地擷取商家名稱、金額和幣別
- Pydantic 會自動偵測結構錯誤
✅ 購物車到期驗證:
- 接受經過驗證的
CartMandatePydantic 模型 - 從
cart.contents.cart_expiry讀取 (屬性存取) - 安全功能可防止處理過時的購物車
- 時間長度較短 (15 分鐘),但意圖較長 (1 小時)
✅ 付款模擬:
- 實際付款處理方的教育模擬
- 產生交易 ID
- 在狀態中記錄 payment_result
- 清楚標示為模擬 (simulation: True 標記)
✅ 使用模型完成 AP2 鏈結:
- 三個代理程式、三組憑證、三項 Pydantic 驗證
- 每個代理程式都會使用模型驗證先前憑證的結構
- 每項憑證都會連結至先前的憑證,以供稽核追蹤
- 狀態型交接可維持角色分離
- 整個鏈結的類型安全
✅ 模型驅動式開發:
- 透過
model_validate()驗證輸入內容 - 使用巢狀模型建構型別安全項目
- 透過
model_dump(mode='json')自動序列化 - 從一開始就提供可供正式環境使用的模式
後續步驟
在下一個單元中,我們將建構 Orchestrator Agent,負責協調所有三個專家代理。
您已使用 AP2 Pydantic 模型建構三個強大的專家代理。現在來建構指揮者,將這些流程整合為順暢的捐款體驗。
讓我們建構 Orchestrator,看看完整的系統運作情形。
7. 自動化調度管理 - 整合所有資訊

從專家到流暢體驗
在先前的單元中,您建立了三位專業代理:
- 購物代理:尋找慈善機構、建立意圖授權
- 商家代理:從 IntentMandate 建立 CartMandate
- 憑證提供者:建立 PaymentMandate、處理付款
這些代理程式自然會分為兩個階段:
- 第 1 階段 (購物):透過多輪對話尋找及選取慈善機構
- 階段 2 (處理中):原子執行方案建立和付款作業
但目前您必須手動安排這些階段。
這時,ADK 的自動化調度管理模式就能派上用場。
AP2 原則:自動化調度管理會強制執行信任邊界
為什麼安全協調很重要
協調層不僅方便,還能透過架構強制執行信任邊界。
沒有自動化調度管理:
# User could accidentally skip steps or reorder them
shopping_agent.run("Find charity")
# Oops, forgot to create CartMandate!
credentials_provider.run("Process payment")  # No offer to validate!
使用自動化調度管理:
# Pipeline enforces correct order
donation_processing_pipeline = SequentialAgent(
    sub_agents=[
        merchant_agent,      # Must run first
        credentials_provider # Must run second
    ]
)
# Steps ALWAYS run in order, no skipping allowed
循序管道可確保:
- ✅ IntentMandate 是在 CartMandate 之前建立
- ✅ 在處理付款前建立 CartMandate
- ✅ 每個代理程式都會在獨立的環境中執行
- ✅ 狀態會透過憑證鏈向前流動
我們的使命:建構完整系統
我們將建構兩層:
第 1 層:處理管道 (SequentialAgent)
- Wires together Merchant → 憑證
- 選取慈善機構後,系統會自動依序執行
- 不可分割的方案和付款執行作業
第 2 層:根層自動化調度管理工具 (面向使用者的代理程式)
- 友善的個性
- 將慈善機構選擇作業委派給 shopping_agent
- 在建立 IntentMandate 後委派給處理管道
- 處理對話和階段轉換
這種雙層方法符合自然流程:
- 購物階段:多輪對話 (使用者瀏覽、提問、決定)
- 處理階段:不可分割的執行作業 (優惠 → 付款)
我們來建構這兩者。
步驟 1:匯入協調流程元件
首先,請使用必要的匯入項目設定協調流程檔案。
👉 開啟
charity_advisor/agent.py
首先匯入:
👉 尋找:
# MODULE_7_STEP_1_IMPORT_COMPONENTS
👉 將該單行程式碼替換為:
from google.adk.agents import Agent, SequentialAgent
from charity_advisor.shopping_agent.agent import shopping_agent
from charity_advisor.merchant_agent.agent import merchant_agent
from charity_advisor.credentials_provider.agent import credentials_provider
步驟 2:建立處理管道
現在,我們來建立管道,以原子方式執行方案建立和付款處理作業。
👉 尋找:
# MODULE_7_STEP_2_CREATE_SEQUENTIAL_PIPELINE
👉 將這兩行程式碼替換為:
# Create the donation processing pipeline
# This runs Merchant → Credentials in sequence AFTER charity is selected
donation_processing_pipeline = SequentialAgent(
name="DonationProcessingPipeline",
description="Creates signed offer and processes payment after charity is selected",
sub_agents=[
merchant_agent,
credentials_provider
]
)
步驟 3A:建立根代理程式設定
現在,我們來建立面向使用者的代理程式,負責協調這兩個階段。這項計畫分為三個部分:設定 (3A)、指令 (3B) 和子代理程式 (3C)。
👉 尋找:
# MODULE_7_STEP_3A_CREATE_ROOT_AGENT_SETUP
👉 將該單行程式碼替換為:
# Create the root orchestrator agent
# This is what users interact with directly
root_agent = Agent(
name="CharityAdvisor",
model="gemini-2.5-pro",
description="A friendly charity giving assistant that helps users donate to verified organizations.",
# MODULE_7_STEP_3B_WRITE_ROOT_AGENT_INSTRUCTION
步驟 3B:撰寫根代理指令
現在,我們來新增指令,引導慈善顧問在兩個階段的行為。
👉 尋找:
# MODULE_7_STEP_3B_WRITE_ROOT_AGENT_INSTRUCTION
👉 將該單行程式碼替換為:
instruction="""You are a helpful and friendly charity giving advisor.
Your workflow has TWO distinct phases:
PHASE 1: CHARITY SELECTION (delegate to shopping_agent)
When a user expresses interest in donating:
1. Delegate to shopping_agent immediately
2. The shopping_agent will:
- Search for charities matching their cause
- Present verified options with ratings
- Engage in conversation (user may ask questions, change their mind)
- Wait for user to select a specific charity and amount
- Create an IntentMandate when user decides
3. Wait for shopping_agent to complete
You'll know Phase 1 is complete when shopping_agent's response includes:
- "IntentMandate created" or "Intent ID: intent_xxx"
- Charity name and donation amount
PHASE 2: PAYMENT PROCESSING (delegate to DonationProcessingPipeline)
After shopping_agent completes:
1. Acknowledge the user's selection naturally:
"Perfect! Let me process your $X donation to [Charity]..."
2. Delegate to DonationProcessingPipeline
3. The pipeline will automatically:
- Create signed cart offer (MerchantAgent)
- Get consent and process payment (CredentialsProvider)
4. After pipeline completes, summarize the transaction
CRITICAL RULES:
- Phase 1 may take multiple conversation turns (this is normal)
- Only proceed to Phase 2 after IntentMandate exists
- Don't rush the user during charity selection
- Don't ask user to "proceed" between phases - transition automatically
EXAMPLE FLOW:
User: "I want to donate to education"
You: [delegate to shopping_agent]
Shopping: "Here are 3 education charities..." [waits]
User: "Tell me more about the first one"
Shopping: "Room to Read focuses on..." [waits]
User: "Great, I'll donate $50 to Room to Read"
Shopping: "IntentMandate created (ID: intent_123)..."
You: "Perfect! Processing your $50 donation to Room to Read..." [delegate to DonationProcessingPipeline]
Pipeline: [creates offer, gets consent, processes payment]
You: "Done! Your donation was processed successfully. Transaction ID: txn_456"
Your personality:
- Warm and encouraging
- Patient during charity selection
- Clear about educational nature
- Smooth transitions between phases""",
# MODULE_7_STEP_3C_ADD_ROOT_AGENT_SUBAGENTS
步驟 3C:新增子代理
最後,請授予慈善顧問購物代理和處理管道的存取權,並關閉代理定義。
👉 尋找:
# MODULE_7_STEP_3C_ADD_ROOT_AGENT_SUBAGENTS
👉 將該單行程式碼替換為:
sub_agents=[
shopping_agent,
donation_processing_pipeline
]
)
步驟 4:驗證完整系統
請確認協調作業是否已正確設定。
👉 完整
charity_advisor/agent.py
現在看起來應該會像這樣:
"""
Main orchestration: The donation processing pipeline and root orchestrator agent.
"""
from google.adk.agents import Agent, SequentialAgent
from charity_advisor.shopping_agent.agent import shopping_agent
from charity_advisor.merchant_agent.agent import merchant_agent
from charity_advisor.credentials_provider.agent import credentials_provider
# Create the donation processing pipeline
# This runs Merchant → Credentials in sequence AFTER charity is selected
donation_processing_pipeline = SequentialAgent(
    name="DonationProcessingPipeline",
    description="Creates signed offer and processes payment after charity is selected",
    sub_agents=[
        merchant_agent,
        credentials_provider
    ]
)
# Create the root orchestrator agent
# This is what users interact with directly
root_agent = Agent(
name="CharityAdvisor",
model="gemini-2.5-flash",
description="A friendly charity giving assistant that helps users donate to verified organizations.",
instruction="""You are a helpful and friendly charity giving advisor.
Your workflow has TWO distinct phases:
PHASE 1: CHARITY SELECTION (delegate to shopping_agent)
When a user expresses interest in donating:
1. Delegate to shopping_agent immediately
2. The shopping_agent will:
- Search for charities matching their cause
- Present verified options with ratings
- Engage in conversation (user may ask questions, change their mind)
- Wait for user to select a specific charity and amount
- Create an IntentMandate when user decides
3. Wait for shopping_agent to complete
You'll know Phase 1 is complete when shopping_agent's response includes:
- "IntentMandate created" or "Intent ID: intent_xxx"
- Charity name and donation amount
PHASE 2: PAYMENT PROCESSING (delegate to DonationProcessingPipeline)
After shopping_agent completes:
1. Acknowledge the user's selection naturally:
"Perfect! Let me process your $X donation to [Charity]..."
2. Delegate to DonationProcessingPipeline
3. The pipeline will automatically:
- Create signed cart offer (MerchantAgent)
- Get consent and process payment (CredentialsProvider)
4. After pipeline completes, summarize the transaction
CRITICAL RULES:
- Phase 1 may take multiple conversation turns (this is normal)
- Only proceed to Phase 2 after IntentMandate exists
- Don't rush the user during charity selection
- Don't ask user to "proceed" between phases - transition automatically
EXAMPLE FLOW:
User: "I want to donate to education"
You: [delegate to shopping_agent]
Shopping: "Here are 3 education charities..." [waits]
User: "Tell me more about the first one"
Shopping: "Room to Read focuses on..." [waits]
User: "Great, I'll donate $50 to Room to Read"
Shopping: "IntentMandate created (ID: intent_123)..."
You: "Perfect! Processing your $50 donation to Room to Read..." [delegate to DonationProcessingPipeline]
Pipeline: [creates offer, gets consent, processes payment]
You: "Done! Your donation was processed successfully. Transaction ID: txn_456"
Your personality:
- Warm and encouraging
- Patient during charity selection
- Clear about educational nature
- Smooth transitions between phases""",
    sub_agents=[
        shopping_agent,
        donation_processing_pipeline
    ]
)
步驟 5:使用驗證回呼強化安全性 (選用,可跳至步驟 7)
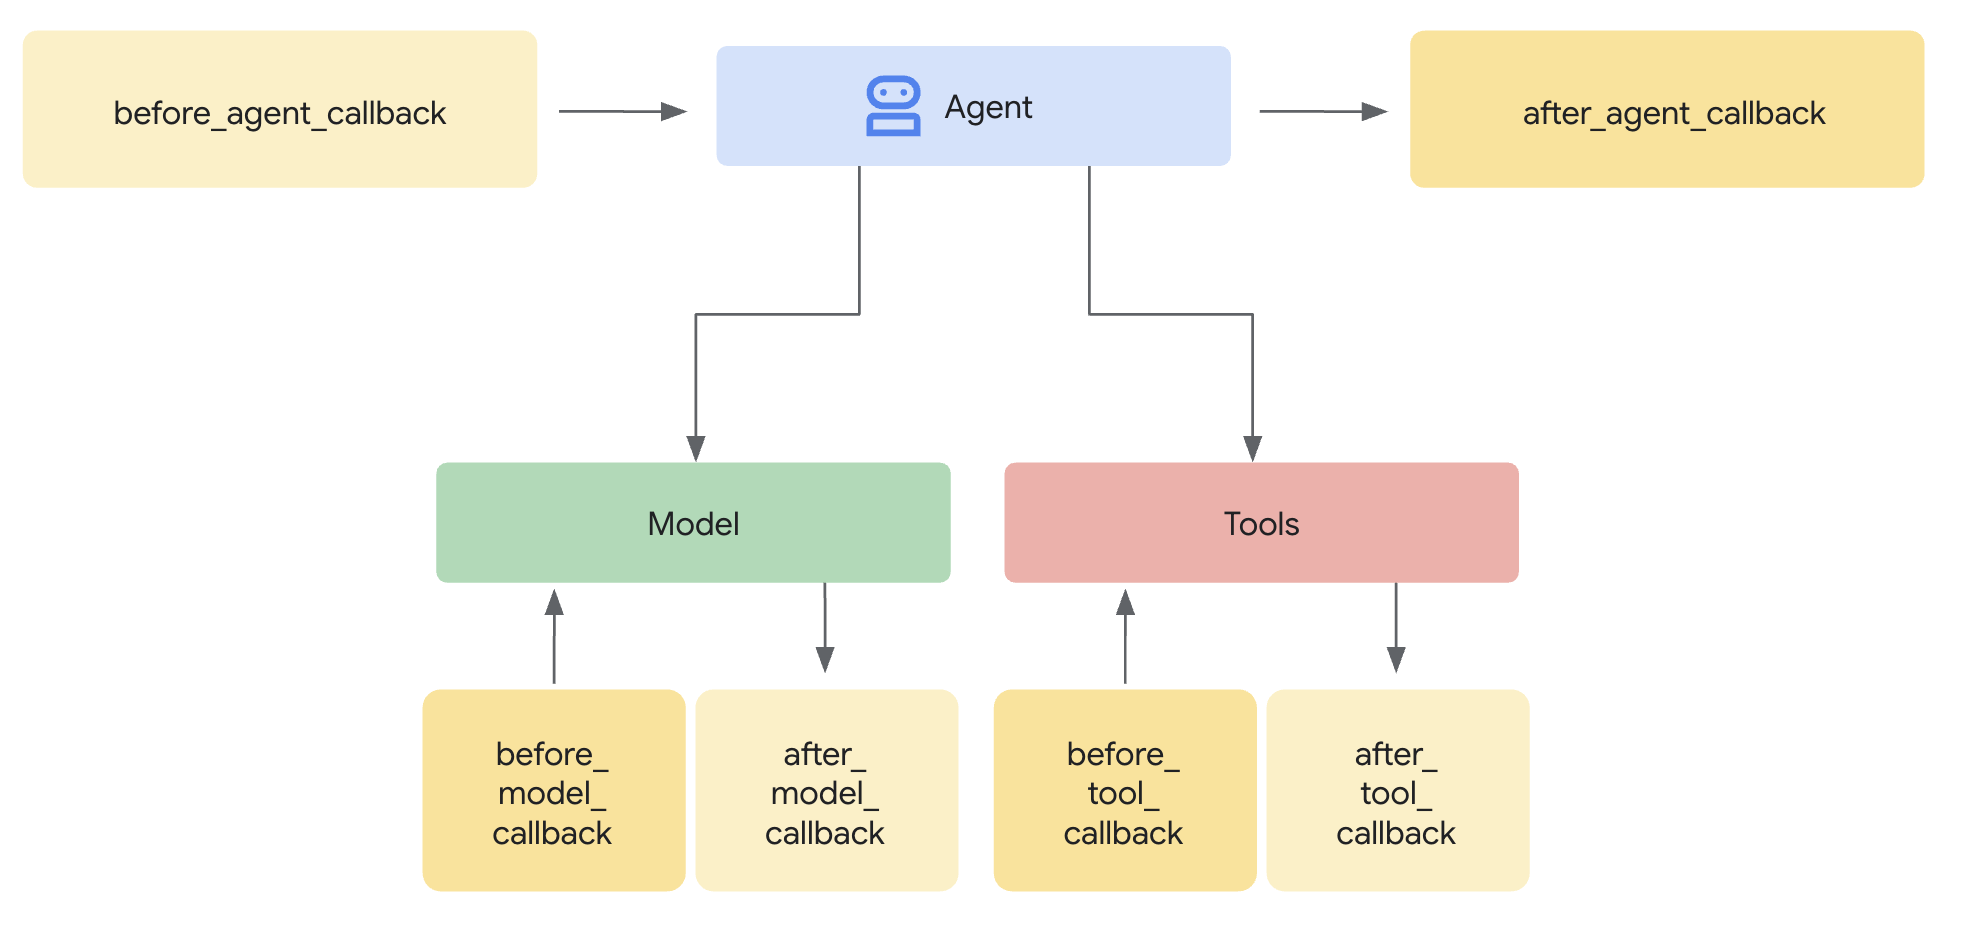
SequentialAgent 可保證執行順序,但如果發生下列情況:
- 購物代理無聲失敗 (從未建立 IntentMandate)
- 購物和商家之間經過一小時 (意圖過期)
- 狀態損毀或清除
- 有人試圖直接致電商家,略過購物廣告
回呼新增架構強制執行 - 在代理程式啟動 LLM 呼叫前,回呼會先驗證必要條件。這是縱深防禦:工具會在執行期間驗證,回呼則會在執行前驗證。
現在,我們要在商家和憑證供應商代理程式中新增驗證回呼。
步驟 5A:新增商家驗證 - 匯入回呼型別
首先,我們新增回呼所需的匯入項目。
👉 開啟
charity_advisor/merchant_agent/agent.py
在檔案頂端現有的匯入項目後方,新增下列程式碼:
from typing import Optional
from datetime import datetime, timezone
from google.adk.agents.callback_context import CallbackContext
from google.genai.types import Content, Part
import logging

logger = logging.getLogger(__name__)
步驟 5B:建構意圖驗證函式
現在,我們來建立回呼函式,在 Merchant Agent 執行前驗證 IntentMandate。
👉 In
charity_advisor/merchant_agent/agent.py
,請在 之前新增此函式
merchant_agent = Agent(...)
定義:
def validate_intent_before_merchant(
    callback_context: CallbackContext,
) -> Optional[Content]:
    """
    Validates IntentMandate exists and hasn't expired before Merchant runs.

    This callback enforces that the Shopping Agent completed successfully
    before the Merchant Agent attempts to create a CartMandate.

    Returns:
        None: Allow Merchant Agent to proceed normally
        Content: Skip Merchant Agent and return error to user
    """
    state = callback_context.state

    # Check credential exists
    if "intent_mandate" not in state:
        logger.error("❌ IntentMandate missing - Shopping Agent may have failed")
        return Content(parts=[Part(text=(
            "Error: Cannot create cart. User intent was not properly recorded. "
            "Please restart the donation process."
        ))])

    intent_mandate = state["intent_mandate"]

    # Validate expiry (critical security check)
    try:
        expiry_time = datetime.fromisoformat(
            intent_mandate["intent_expiry"].replace('Z', '+00:00')
        )
        now = datetime.now(timezone.utc)

        if expiry_time < now:
            logger.error(f"❌ IntentMandate expired at {intent_mandate['intent_expiry']}")
            return Content(parts=[Part(text=(
                "Error: Your donation intent has expired. "
                "Please select a charity again to restart."
            ))])

        time_remaining = expiry_time - now
        logger.info(f"✓ IntentMandate validated. Expires in {time_remaining.total_seconds():.0f}s")

    except (KeyError, ValueError) as e:
        logger.error(f"❌ Invalid IntentMandate structure: {e}")
        return Content(parts=[Part(text=(
            "Error: Invalid intent data. Please restart the donation."
        ))])

    # All checks passed - allow Merchant Agent to proceed
    logger.info(f"✓ Prerequisites met for Merchant Agent: {intent_mandate['intent_id']}")
    return None
步驟 5C:將回呼附加至商家代理程式
現在將回呼連線至代理程式。
👉 In
charity_advisor/merchant_agent/agent.py
,修改
merchant_agent = Agent(...)
定義:
在代理程式定義中找出這行程式碼:
merchant_agent = Agent(
    name="MerchantAgent",
    model="gemini-2.5-flash",
    description="Creates formal, signed CartMandates for charity donations following W3C PaymentRequest standards.",
在 之後新增這行:
description
line:
before_agent_callback=validate_intent_before_merchant,
您的代理程式定義現在應如下所示:
merchant_agent = Agent(
    name="MerchantAgent",
    model="gemini-2.5-flash",
    description="Creates formal, signed CartMandates for charity donations following W3C PaymentRequest standards.",
    before_agent_callback=validate_intent_before_merchant,
    tools=[
        FunctionTool(func=create_cart_mandate)
    ],
    instruction="""..."""
)
步驟 6:新增憑證供應商驗證 (選用,可略過步驟 7)
模式相同,我們來為付款步驟新增驗證。
步驟 6A:匯入回呼型別
👉 開啟
charity_advisor/credentials_provider/agent.py
在檔案頂端現有的匯入項目後方,新增下列程式碼:
from typing import Optional
from datetime import datetime, timezone
from google.adk.agents.callback_context import CallbackContext
from google.genai.types import Content, Part
import logging

logger = logging.getLogger(__name__)
步驟 6B:建立購物車驗證函式
👉 In
charity_advisor/credentials_provider/agent.py
,請在 之前新增此函式
credentials_provider = Agent(...)
定義:
def validate_cart_before_payment(
    callback_context: CallbackContext,
) -> Optional[Content]:
    """
    Validates CartMandate exists and hasn't expired before payment processing.

    This callback enforces that the Merchant Agent completed successfully
    before the Credentials Provider attempts to process payment.

    Returns:
        None: Allow Credentials Provider to proceed
        Content: Skip payment processing and return error
    """
    state = callback_context.state

    # Check credential exists
    if "cart_mandate" not in state:
        logger.error("❌ CartMandate missing - Merchant Agent may have failed")
        return Content(parts=[Part(text=(
            "Error: Cannot process payment. Cart was not properly created. "
            "Please restart the donation process."
        ))])

    cart_mandate = state["cart_mandate"]

    # Validate AP2 structure
    if "contents" not in cart_mandate:
        logger.error("❌ CartMandate missing AP2 contents wrapper")
        return Content(parts=[Part(text=(
            "Error: Invalid cart structure. Please restart."
        ))])

    # Validate expiry
    try:
        contents = cart_mandate["contents"]
        expiry_time = datetime.fromisoformat(
            contents["cart_expiry"].replace('Z', '+00:00')
        )
        now = datetime.now(timezone.utc)

        if expiry_time < now:
            logger.error(f"❌ CartMandate expired at {contents['cart_expiry']}")
            return Content(parts=[Part(text=(
                "Error: Your cart has expired (15 minute limit). "
                "Please restart the donation to get a fresh offer."
            ))])

        time_remaining = expiry_time - now
        logger.info(f"✓ CartMandate validated. Expires in {time_remaining.total_seconds():.0f}s")

    except (KeyError, ValueError) as e:
        logger.error(f"❌ Invalid CartMandate structure: {e}")
        return Content(parts=[Part(text=(
            "Error: Invalid cart data. Please restart the donation."
        ))])

    # All checks passed - allow payment processing
    logger.info(f"✓ Prerequisites met for Credentials Provider: {contents['id']}")
    return None
步驟 6C:將回呼附加至憑證提供者
👉 In
charity_advisor/credentials_provider/agent.py
,修改
credentials_provider = Agent(...)
定義:
在代理程式定義中找出這行程式碼:
credentials_provider = Agent(
    name="CredentialsProvider",
    model="gemini-2.5-flash",
    description="Securely processes payments by creating PaymentMandates and executing transactions with user consent.",
在 之後新增這行:
description
line:
before_agent_callback=validate_cart_before_payment,
您的代理程式定義現在應如下所示:
credentials_provider = Agent(
    name="CredentialsProvider",
    model="gemini-2.5-flash",
    description="Securely processes payments by creating PaymentMandates and executing transactions with user consent.",
    before_agent_callback=validate_cart_before_payment,
    tools=[
        FunctionTool(func=create_payment_mandate)
    ],
    instruction="""..."""
)
步驟 7:使用 ADK 網頁介面測試
現在,我們來測試完整的強化系統,並啟用驗證回呼。
👉 在 Cloud Shell 終端機中執行下列指令:
adk web
輸出內容應類似以下內容:
+-----------------------------------------------------------------------------+
| ADK Web Server started                                                      |
|                                                                             |
| For local testing, access at http://localhost:8000.                         |
+-----------------------------------------------------------------------------+

INFO:     Application startup complete.
INFO:     Uvicorn running on http://0.0.0.0:8000 (Press CTRL+C to quit)
👉 接著,如要從瀏覽器存取 ADK 網頁 UI,請按照下列步驟操作:
在 Cloud Shell 工具列 (通常位於右上角) 中,按一下「網頁預覽」圖示 (看起來像眼睛或帶有箭頭的方塊),然後選取「變更通訊埠」。在彈出式視窗中,將通訊埠設為 8000,然後點按「變更並預覽」。Cloud Shell 隨即會開啟新的瀏覽器分頁,顯示 ADK 網頁 UI。
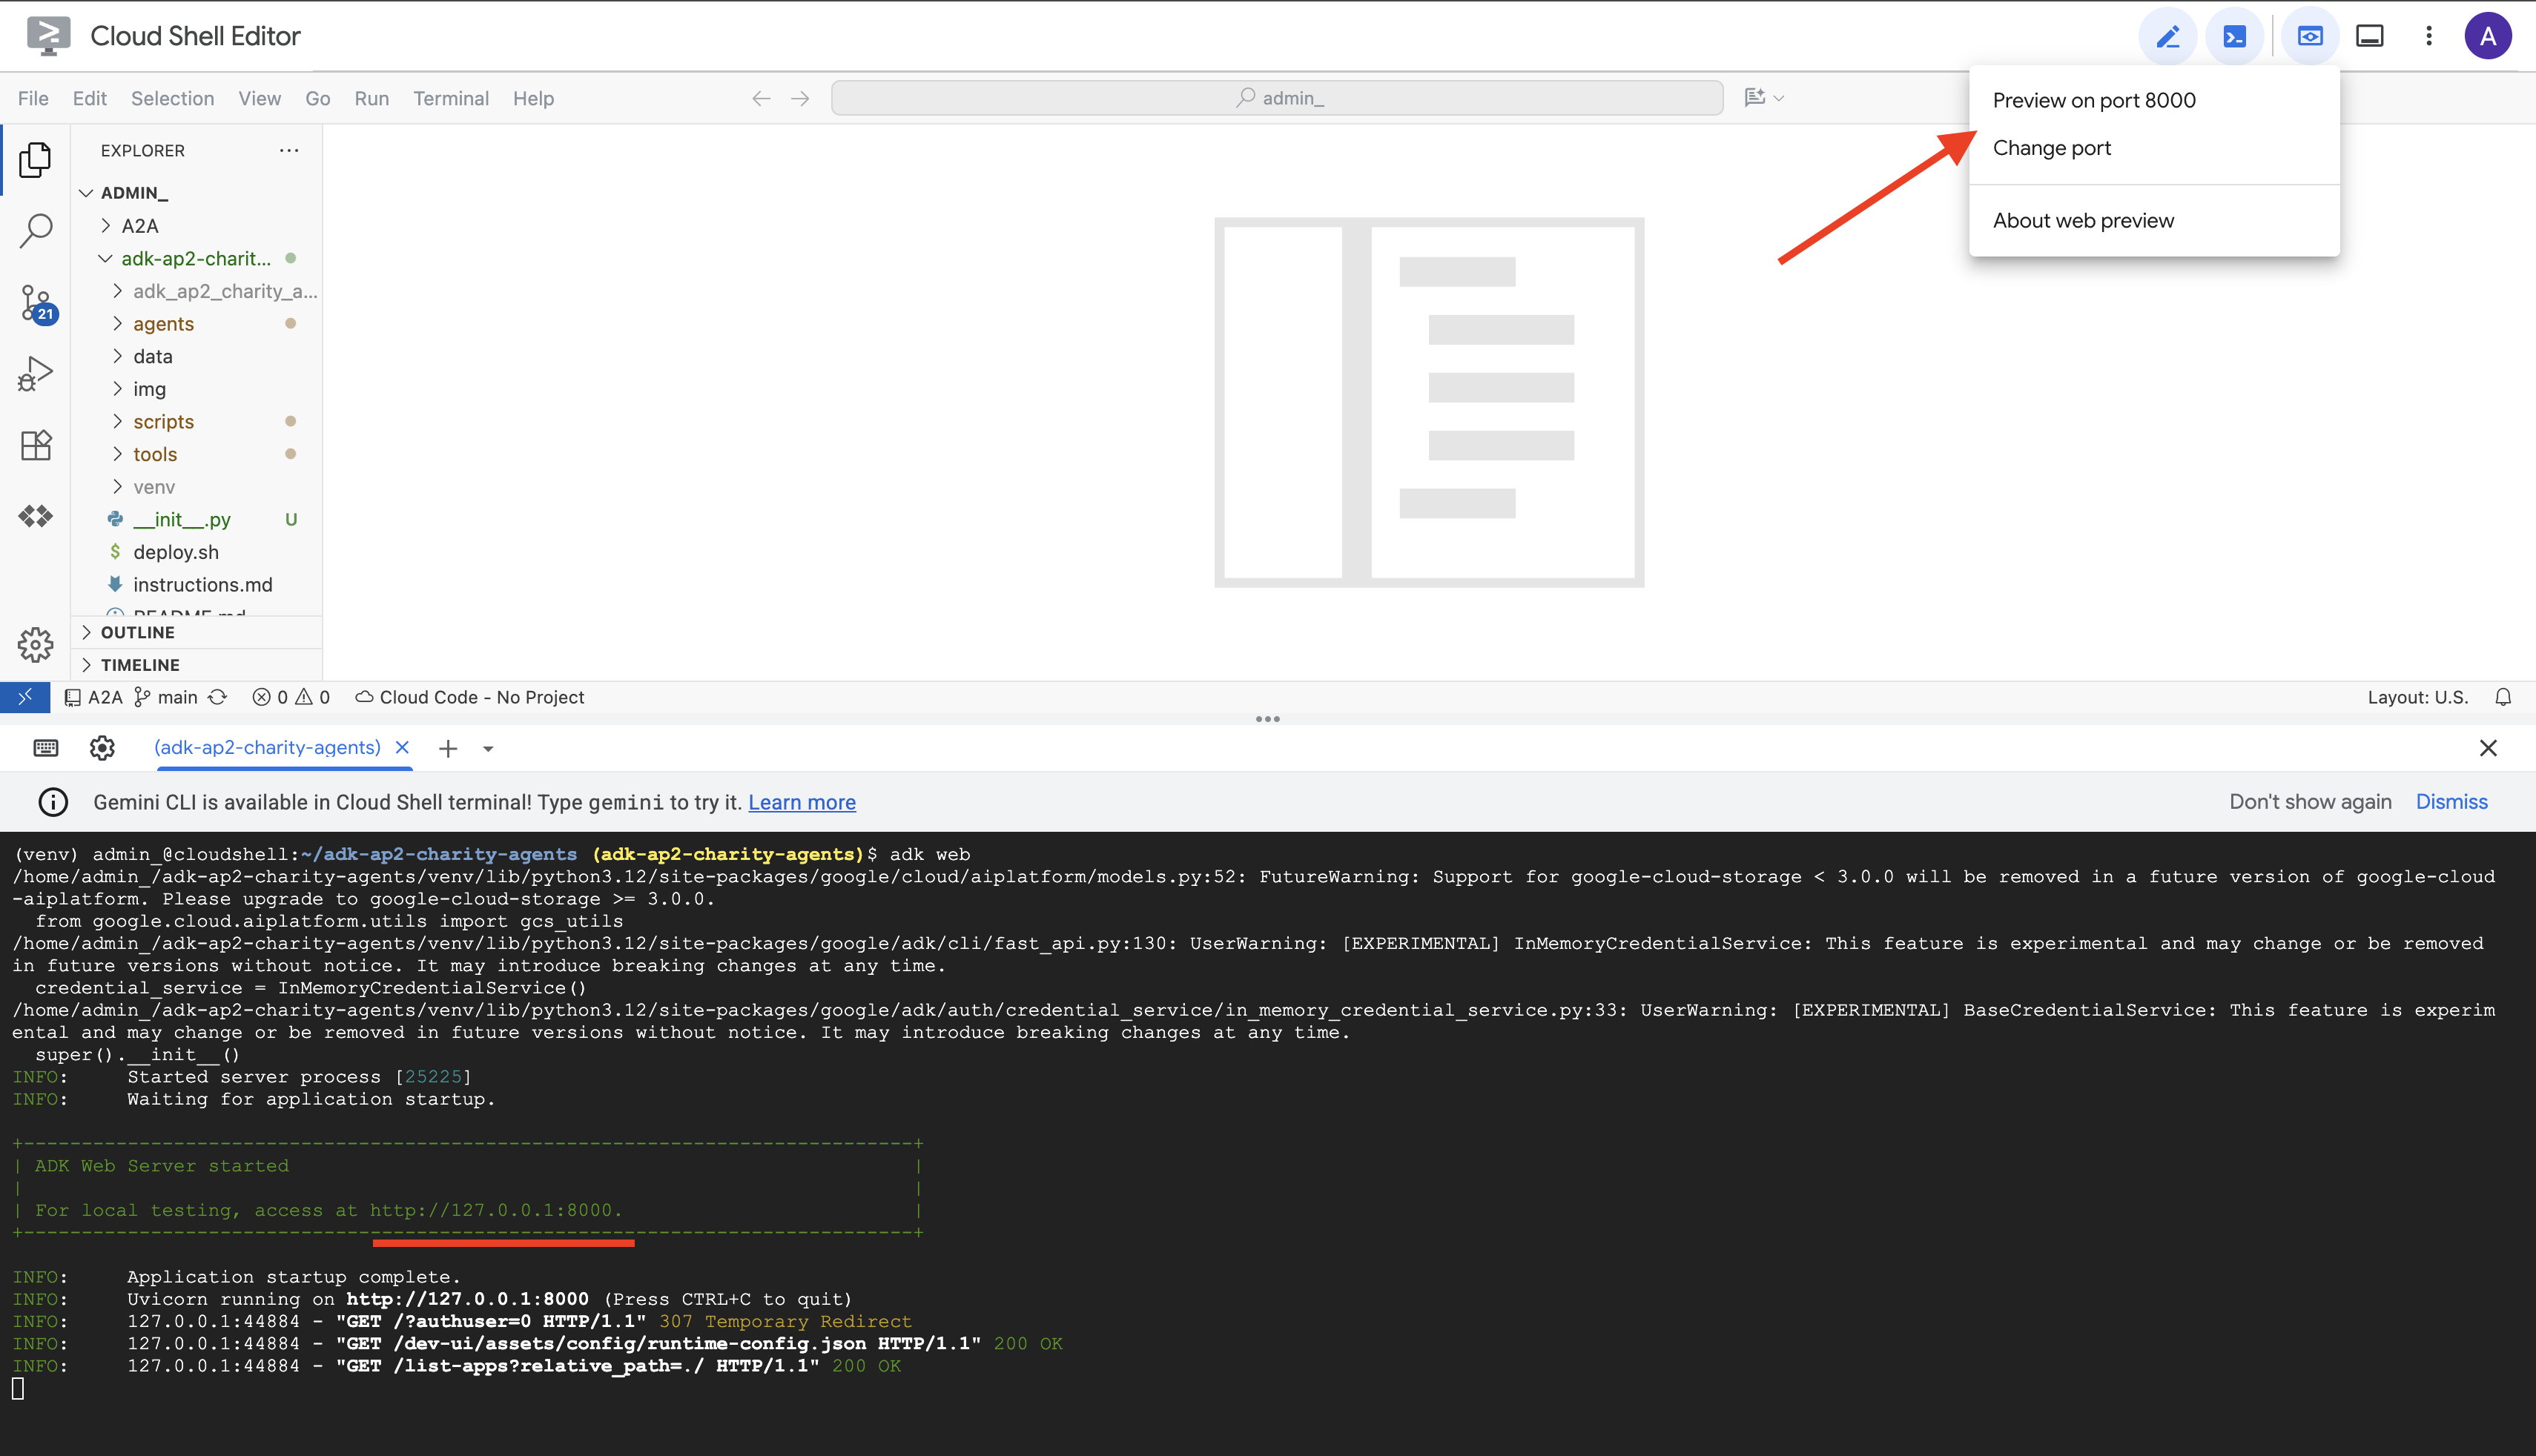
👉 從下拉式選單選取代理:
在 ADK 網頁 UI 中,頂端會顯示下拉式選單。從清單中選取「charity_advisor」charity_advisor。
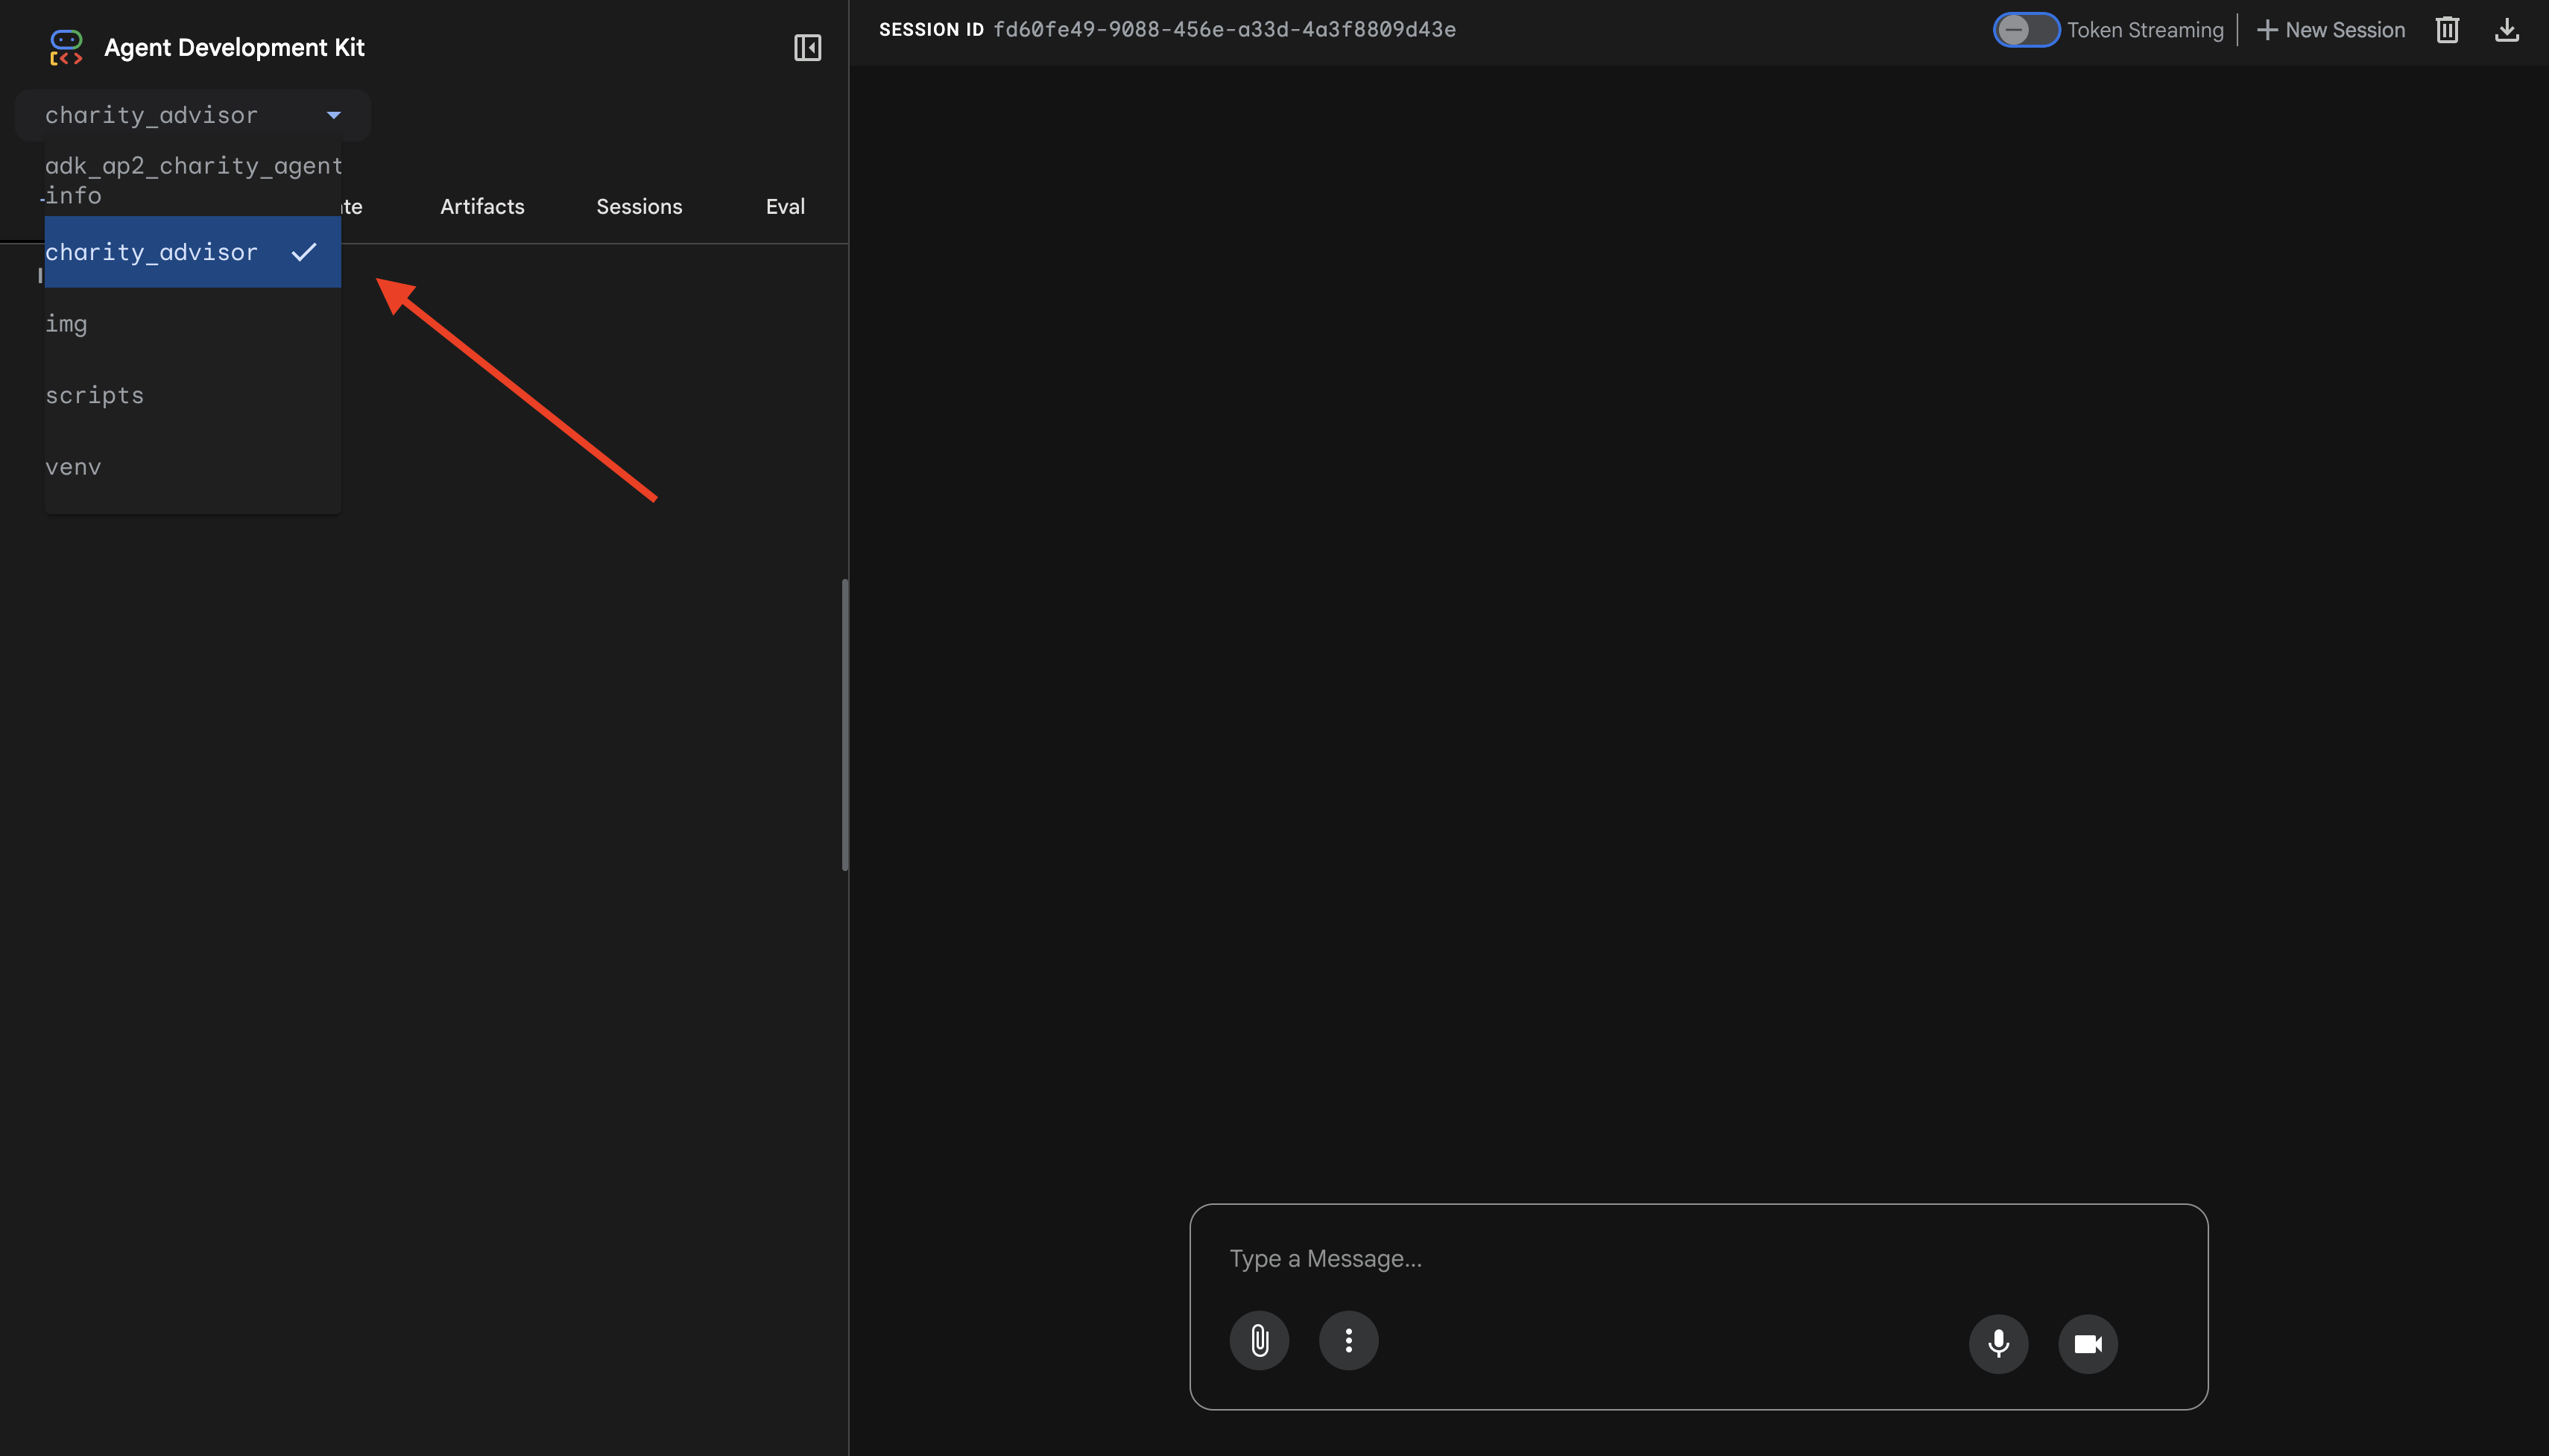
您會看到 ADK 網頁介面,其中包含:
- 聊天室面板:位於左側,用於對話
- 追蹤面板:右側,用於可觀測性 (我們會在第 9 個單元中使用)
測試 1:完成捐款流程 (一般情況)
👉 在對話介面中輸入:
I want to donate to an education charity
觀看完整流程:

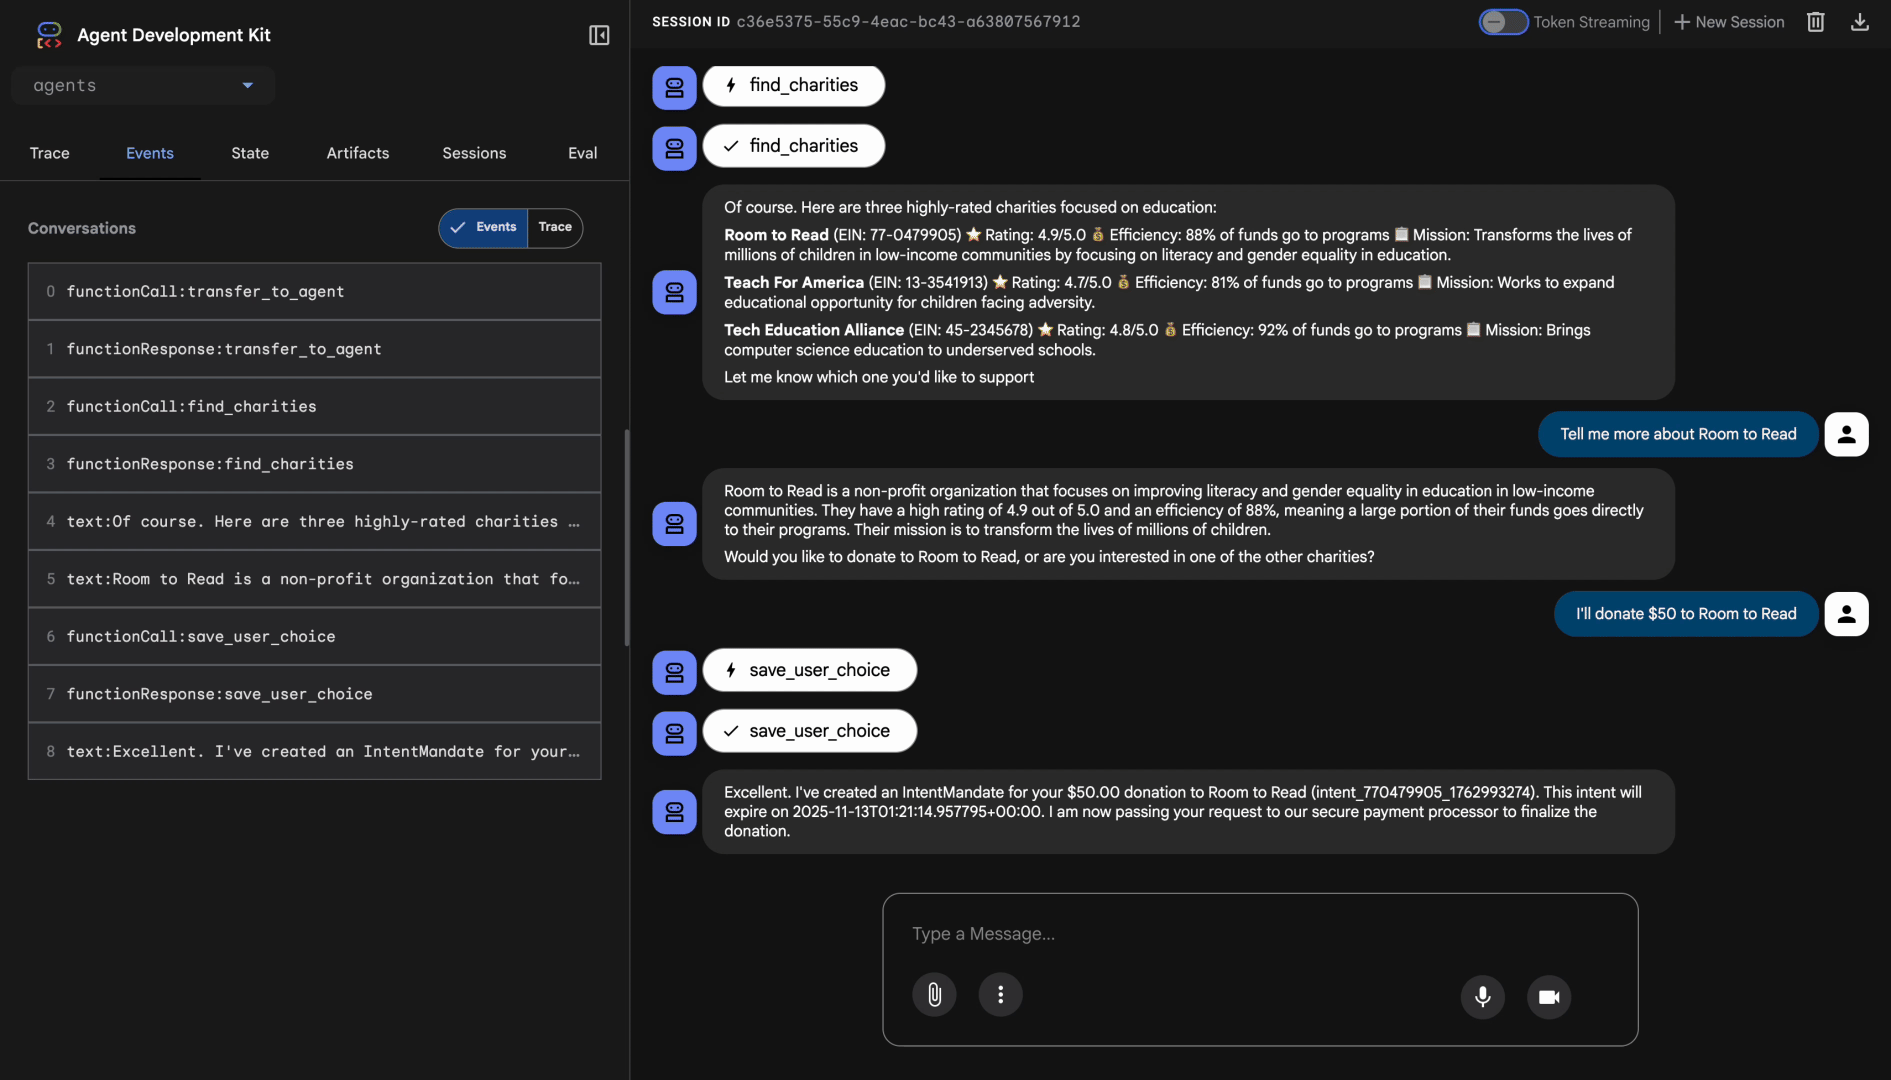
發生情況 (顯示在右側的追蹤面板中):
1. 顧問將要求委派給 ShoppingAgent:
- ShoppingAgent 搜尋教育慈善機構
- 顯示 3 個通過驗證的選項和詳細資料
2. 與 ShoppingAgent 互動 (可能需要多輪對話):
User: "Tell me more about Room to Read"
Shopping: [explains mission and impact]
User: "I'll donate $50 to Room to Read"
3. ShoppingAgent 會建立 IntentMandate:
- 建立並簽署意圖
- 傳回含有意圖 ID 的確認訊息
4. 顧問轉移至處理階段:
太棒了!正在處理你捐給 Room to Read 的 $50 美元…
5. DonationProcessingPipeline 啟動:
- 商家回呼會驗證 IntentMandate (✓ 已通過) ← 新功能!
- 商家代理程式會建立含簽章的 CartMandate
- 憑證回呼會驗證 CartMandate (✓ 通過) ← 新功能!
- 憑證提供者準備付款
6. 付款程序:
- 憑證供應商建立 PaymentMandate
- 模擬付款處理程序
- 退貨交易 ID
7. 顧問摘要:
太棒了!我們已成功處理你的捐款!🎉
詳細資料:
- 金額:$50.00 美元
- 慈善機構:Room to Read (EIN:77-0479905)
- 交易 ID:txn_a3f7b2c8d9e1f4a2
測試 2:確認回呼會擷取失敗情形 (選用進階測試)
想看看回呼如何實際運作並擷取錯誤嗎?您需要手動損毀狀態 (進階偵錯),但在實際運作環境中,回呼會擷取:
- 購物代理工具失敗 → 商家回呼遭到封鎖:「Error: Cannot create cart...」(錯誤:無法建立購物車...)
- 2 小時後 → 商家回呼封鎖:「Error: Intent expired...」(錯誤:意圖已過期...)
- 購物車過期 → 憑證回呼區塊:「Error: Cart expired (15 min limit)...」(錯誤:購物車已過期 (15 分鐘限制)...)
這些極端情況現在會由驗證回呼強制執行架構。
您剛建構的內容
您已成功將三個專業代理整合為順暢可靠的系統,並完成架構驗證。
後續步驟
您現在已完成建構可信賴代理程式的技術核心:
您已在本機建構完整的可信賴系統,強制執行憑證鏈。現在,讓我們透過正式版部署,向實際使用者提供存取權,並啟用第 9 模組的責任追蹤記錄。
將強化型代理部署至 Google Cloud。
8. 部署
您現在擁有值得信賴的捐款系統,其中包含三位在本機工作的專業代理人:
但只能在開發機器上執行。如要讓這個系統對實際使用者有幫助,並擷取可證明可信度的問責軌跡,您需要將系統部署至正式環境。
本單元將逐步說明如何將代理程式部署至 Google Cloud,並從第一天起啟用可觀測性。您在部署期間使用的 --trace_to_cloud 旗標,可讓第 9 堂課的責任追蹤功能發揮作用。
瞭解部署選項
ADK 支援多個部署目標。這兩者在複雜度、工作階段管理、擴充性和成本方面各有不同特性:
因素 | 當地 ( | Agent Engine | Cloud Run |
複雜度 | 最低 | 低 | 中 |
工作階段持續性 | 僅限記憶體內 (重新啟動後會消失) | Vertex AI 管理 (自動) | Cloud SQL (PostgreSQL) 或記憶體內 |
基礎架構 | 無 (僅限開發裝置) | 全代管 | 容器 + 選用資料庫 |
冷啟動 | 不適用 | 100 到 500 毫秒 | 100 至 2000 毫秒 |
擴大運用 | 單一執行個體 | 自動 | 自動 (歸零) |
費用模式 | 免費 (本機運算) | 以運算為基礎 | 以要求為依據 + 免費方案 |
UI 支援 | 是 (內建) | 否 (僅限 API) | 是 (透過 |
觀測能力設定 | 本機追蹤記錄檢視器 | 自動 (透過 | 需要 |
最佳用途 | 開發與測試 | 製作代理商 | 製作代理商 |
建議:對於這個值得信賴的捐款系統,我們建議您將 Agent Engine 做為主要生產部署項目,因為它提供:
- 全代管基礎架構 (不需管理容器)
- 透過
VertexAiSessionService內建工作階段持續性 - 自動調整資源配置,無需冷啟動
- 簡化部署作業 (不需具備 Docker 知識)
- 可立即與 Cloud Trace 整合
其他選項:Google Kubernetes Engine (GKE)
如要進階控管 Kubernetes、自訂網路或自動化調度管理多項服務,請部署 GKE。這個選項的彈性最大,但需要更多營運專業知識 (叢集管理、資訊清單、服務帳戶)。
本程式碼研究室不會介紹 GKE 部署作業,但 ADK GKE 部署指南中已完整說明。
必要條件
1. 設定 Google Cloud 專案
您需要啟用計費功能的 Google Cloud 專案。如果沒有,請按照下列步驟操作:
- 建立專案:Google Cloud 控制台
- 啟用計費功能:啟用計費功能
- 記下您的專案 ID (而非專案名稱或編號)
2. 重新驗證 (選用)
使用 Google Cloud 進行驗證:
gcloud auth application-default login
gcloud config set project YOUR_PROJECT_ID
將 YOUR_PROJECT_ID 替換為實際的 Google Cloud 專案 ID。
驗證身分:
gcloud config get-value project
# Should output: YOUR_PROJECT_ID
3. 環境變數
使用下列指令自動填入 .env 檔案:
# Get your current Project ID
PROJECT_ID=$(gcloud config get-value project)
STAGING_BUCKET_VALUE="gs://${PROJECT_ID}-staging"
ENV_FILE=".env"

# Check if STAGING_BUCKET is already set in the .env file
if grep -q "^STAGING_BUCKET=" "${ENV_FILE}"; then
  # If it exists, replace the line
  # The sed command finds the line starting with STAGING_BUCKET= and replaces the entire line.
  # Using | as a delimiter to avoid issues with slashes in the bucket name.
  sed -i "s|^STAGING_BUCKET=.*|STAGING_BUCKET=${STAGING_BUCKET_VALUE}|" "${ENV_FILE}"
  echo "Updated STAGING_BUCKET in ${ENV_FILE}"
else
  # If it doesn't exist, add it to the end of the file
  echo "STAGING_BUCKET=${STAGING_BUCKET_VALUE}" >> "${ENV_FILE}"
  echo "Added STAGING_BUCKET to ${ENV_FILE}"
fi

# Verify it was added or updated correctly
echo "Current STAGING_BUCKET setting:"
grep "^STAGING_BUCKET=" "${ENV_FILE}"
如下所示:
STAGING_BUCKET=gs://your-actual-project-id-staging
重要注意事項:
- 將
YOUR_PROJECT_ID替換為實際專案 ID (或使用上述指令) - 如要使用
GOOGLE_CLOUD_LOCATION,請選取支援的區域 - 執行部署指令碼時,如果暫存值區不存在,系統會自動建立
4. 啟用必要的 API
部署程序需要啟用多個 Google Cloud API。執行下列指令即可啟用:
gcloud services enable \
    aiplatform.googleapis.com \
    storage.googleapis.com \
    cloudbuild.googleapis.com \
    cloudtrace.googleapis.com \
    compute.googleapis.com
這項指令可啟用:
- AI Platform API - 適用於 Agent Engine 和 Vertex AI 模型
- Cloud Storage API - 適用於暫存 bucket
- Cloud Build API - 用於建構容器 (Cloud Run)
- Cloud Trace API - 用於可觀測性和問責追蹤
- Compute Engine API - 用於服務帳戶管理
步驟 1:瞭解部署基礎架構
專案包含統一的部署指令碼 (deploy.sh),可處理所有部署模式。
👉 查看部署指令碼 (選用):
cat deploy.sh
指令碼提供三種部署模式:
./deploy.sh local- Run locally with in-memory storage./deploy.sh agent-engine- 部署至 Vertex AI Agent Engine (建議)./deploy.sh cloud-run- Deploy to Cloud Run with optional UI
運作方式:
如果是 Agent Engine 部署作業,指令碼會執行下列動作:
adk deploy agent_engine \
  --project=$GOOGLE_CLOUD_PROJECT \
  --region=$GOOGLE_CLOUD_LOCATION \
  --staging_bucket=$STAGING_BUCKET \
  --display_name="Charity Advisor" \
  --trace_to_cloud \
  charity_advisor
如果是 Cloud Run 部署作業,則會執行下列動作:
adk deploy cloud_run \
  --project=$GOOGLE_CLOUD_PROJECT \
  --region=$GOOGLE_CLOUD_LOCATION \
  --service_name="charity-advisor" \
  --app_name="charity_advisor" \
  --with_ui \
  --trace_to_cloud \
  charity_advisor
--trace_to_cloud 旗標對這兩種部署類型都至關重要,因為它會啟用 Cloud Trace 整合功能,以建立您將在第 9 單元中探索的責任鏈。
步驟 2:準備 Agent Engine Wrapper
Agent Engine 需要特定進入點,才能為代管執行階段包裝代理程式。系統已為您建立這個檔案。
👉 查看
charity_advisor/agent_engine_app.py
:
"""Agent Engine application wrapper.

This file prepares the Charity Advisor agent for deployment to Vertex AI Agent Engine.
"""

from vertexai import agent_engines
from .agent import root_agent

# Wrap the agent in an AdkApp object for Agent Engine deployment
app = agent_engines.AdkApp(
    agent=root_agent,
    enable_tracing=True,  # Enables Cloud Trace integration automatically
)
為什麼需要這個檔案:
- Agent Engine 需要以
AdkApp物件包裝的代理程式 enable_tracing=True參數會自動啟用 Cloud Trace 整合功能- ADK CLI 在部署期間會參照這個包裝函式
- 設定
VertexAiSessionService,自動保留工作階段
步驟 3:部署至 Agent Engine (建議做法)
Agent Engine 提供全代管基礎架構和內建的工作階段持續性,因此是建議的正式環境部署方式,可確保捐款系統運作無虞。
執行部署作業
從專案根目錄:
chmod +x deploy.sh
./deploy.sh agent-engine
部署階段
觀看指令碼執行下列階段:
Phase 1: API Enablement
  ✓ aiplatform.googleapis.com
  ✓ storage.googleapis.com
  ✓ cloudbuild.googleapis.com
  ✓ cloudtrace.googleapis.com
  ✓ compute.googleapis.com

Phase 2: IAM Setup
  ✓ Getting project number
  ✓ Granting Storage Object Admin
  ✓ Granting Vertex AI User
  ✓ Granting Cloud Trace Agent

Phase 3: Staging Bucket
  ✓ Creating gs://your-project-id-staging (if needed)
  ✓ Setting permissions

Phase 4: Validation
  ✓ Checking agent.py exists
  ✓ Verifying root_agent defined
  ✓ Checking agent_engine_app.py exists
  ✓ Validating requirements.txt

Phase 5: Build & Deploy
  ✓ Packaging agent code
  ✓ Uploading to staging bucket
  ✓ Creating Agent Engine instance
  ✓ Configuring session persistence
  ✓ Setting up Cloud Trace integration
  ✓ Running health checks
這項程序需要 5 到 10 分鐘,因為系統會將代理程式封裝並部署至 Vertex AI 基礎架構。
儲存 Agent Engine ID
部署成功後:
✅ Agent Engine created successfully!

   Agent Engine ID: 7917477678498709504
   Resource Name: projects/123456789/locations/us-central1/reasoningEngines/7917477678498709504
   Endpoint: https://us-central1-aiplatform.googleapis.com/v1/...

   ⚠️  IMPORTANT: Save the Agent Engine ID from the output above
   Add it to your .env file as:
   AGENT_ENGINE_ID=7917477678498709504

   This ID is required for:
   - Testing the deployed agent
   - Updating the deployment later
   - Accessing logs and traces
立即更新 .env 檔案:
echo "AGENT_ENGINE_ID=7917477678498709504" >> .env
部署內容
Agent Engine 部署作業現在包含:
✅ 所有三種代理程式 (購物、商家、憑證) 都會在受管理執行階段中執行
✅ 完整的憑證鏈邏輯 (意圖 → 購物車 → 付款授權)
✅ 使用者同意聲明機制和確認工作流程
✅ 透過 VertexAiSessionService 自動保留工作階段
✅ 由 Google 管理的自動調整資源配置基礎架構
✅ Cloud Trace 整合,可全面監控
步驟 4:測試已部署的代理程式
更新環境
確認 .env 包含 Agent Engine ID:
AGENT_ENGINE_ID=7917477678498709504  # From deployment output
GOOGLE_CLOUD_PROJECT=your-project-id
GOOGLE_CLOUD_LOCATION=us-central1
STAGING_BUCKET=gs://your-project-id-staging
執行測試指令碼
您的專案包含專為 Agent Engine 部署作業設計的測試腳本。
👉 執行測試:
python scripts/test_deployed_agent.py
預期輸出
Testing Agent Engine deployment...
Project: your-project-id
Location: us-central1
Agent Engine ID: 7917477678498709504
Endpoint: https://us-central1-aiplatform.googleapis.com/v1/...

Creating session...
✓ Session created: 4857885913439920384

Sending donation query...
✓ Response received:
  Event 1: I'll help you donate $50 to a children's education charity...
  Event 2: Here are some highly-rated children's education charities...
  Event 3: Which charity would you like to support?...

✅ Test completed successfully!

Session ID: 4857885913439920384

This donation generated a trace in Cloud Trace.
View it in Module 9: Observability

To view traces:
https://console.cloud.google.com/traces/list?project=your-project-id
驗證項目清單
測試完成後,請確認:
✅ 代理程式回覆查詢
✅ 所有三個代理程式依序執行 (購物 → 商家 → 憑證)
✅ 啟用同意聲明機制 (要求確認)
✅ 工作階段在要求之間持續存在
✅ 沒有驗證錯誤
✅ 沒有連線逾時
如果遇到錯誤:
- 確認環境變數設定正確無誤
- 確認已啟用 API:
gcloud services list --enabled - 在 Vertex AI 控制台中查看 Agent Engine 記錄
- 確認
agent_engine_app.py檔案位於charity_advisor資料夾中
步驟 5:部署至 Cloud Run (選用)
雖然建議使用 Agent Engine 簡化正式環境部署作業,但 Cloud Run 提供更多控制權,並支援 ADK 網頁使用者介面。這個部分為選用。
使用 Cloud Run 的時機
如果您需要下列功能,請選擇 Cloud Run:
- 供使用者互動的 ADK 網頁 UI
- 完整控管容器環境
- 自訂資料庫設定
- 與現有 Cloud Run 服務整合
執行部署作業
chmod +x deploy.sh
./deploy.sh cloud-run
不同之處:
這個指令碼會自動執行下列操作:
- 使用代理程式碼建構 Docker 容器
- 建立 Cloud SQL PostgreSQL 資料庫 (如有需要)
- 設定資料庫連線
- 啟用 ADK 網頁 UI 後進行部署
由於需要佈建 Cloud SQL,部署作業需要 10 到 15 分鐘。
工作階段管理:
- 使用
DatabaseSessionService,而非VertexAiSessionService - 需要
.env中的資料庫憑證 (或自動產生) - 狀態會保留在 PostgreSQL 資料庫中
UI 支援:
- 網頁版 UI 網址:
https://charity-advisor-xyz.a.run.app
測試 Cloud Run 部署作業
如果您使用 --with_ui 部署至 Cloud Run,可以直接在瀏覽器中測試:
- 前往服務網址 (部署輸出內容中提供)
- 您會看到 ADK 網頁介面。從下拉式選單中選取代理程式。
- 開始測試捐款:
I want to donate $50 to a children's education charity
- 觀察執行流程:
- ShoppingAgent 會尋找慈善機構並儲存你的意圖
- MerchantAgent 建立購物車委託書
- CredentialsProvider 會建立付款授權,並要求確認
- 確認後,系統就會處理付款
- 確認回應包含:
- 慈善機構建議
- 確認要求
- 核准後的成功訊息
疑難排解
常見問題
問題: ERROR: GOOGLE_CLOUD_PROJECT is not set
解決方法:確認 .env 檔案中的專案 ID 正確無誤:
GOOGLE_CLOUD_PROJECT=your-actual-project-id
問題:系統不會自動建立暫存值區
解決方案:指令碼應會自動建立 bucket。如果沒有,請手動建立:
gsutil mb -p $GOOGLE_CLOUD_PROJECT -l $GOOGLE_CLOUD_LOCATION $STAGING_BUCKET
摘要
您已成功:
✅ 瞭解 deploy.sh
提供的部署基礎架構 ✅ 檢查 Agent Engine 包裝函式設定
✅ 將值得信賴的捐款系統部署至 Agent Engine (建議)
✅ 啟用 Cloud Trace 與 --trace_to_cloud
的整合 ✅ 確認代理程式可存取且正常運作
✅ 在第 9 模組中建立問責制追蹤記錄的基礎
在下一個單元中,您會瞭解這個旗標解鎖的內容:完整掌握每筆捐款、每個同意聲明時刻,以及憑證鏈的每個步驟。
9. 可觀測性
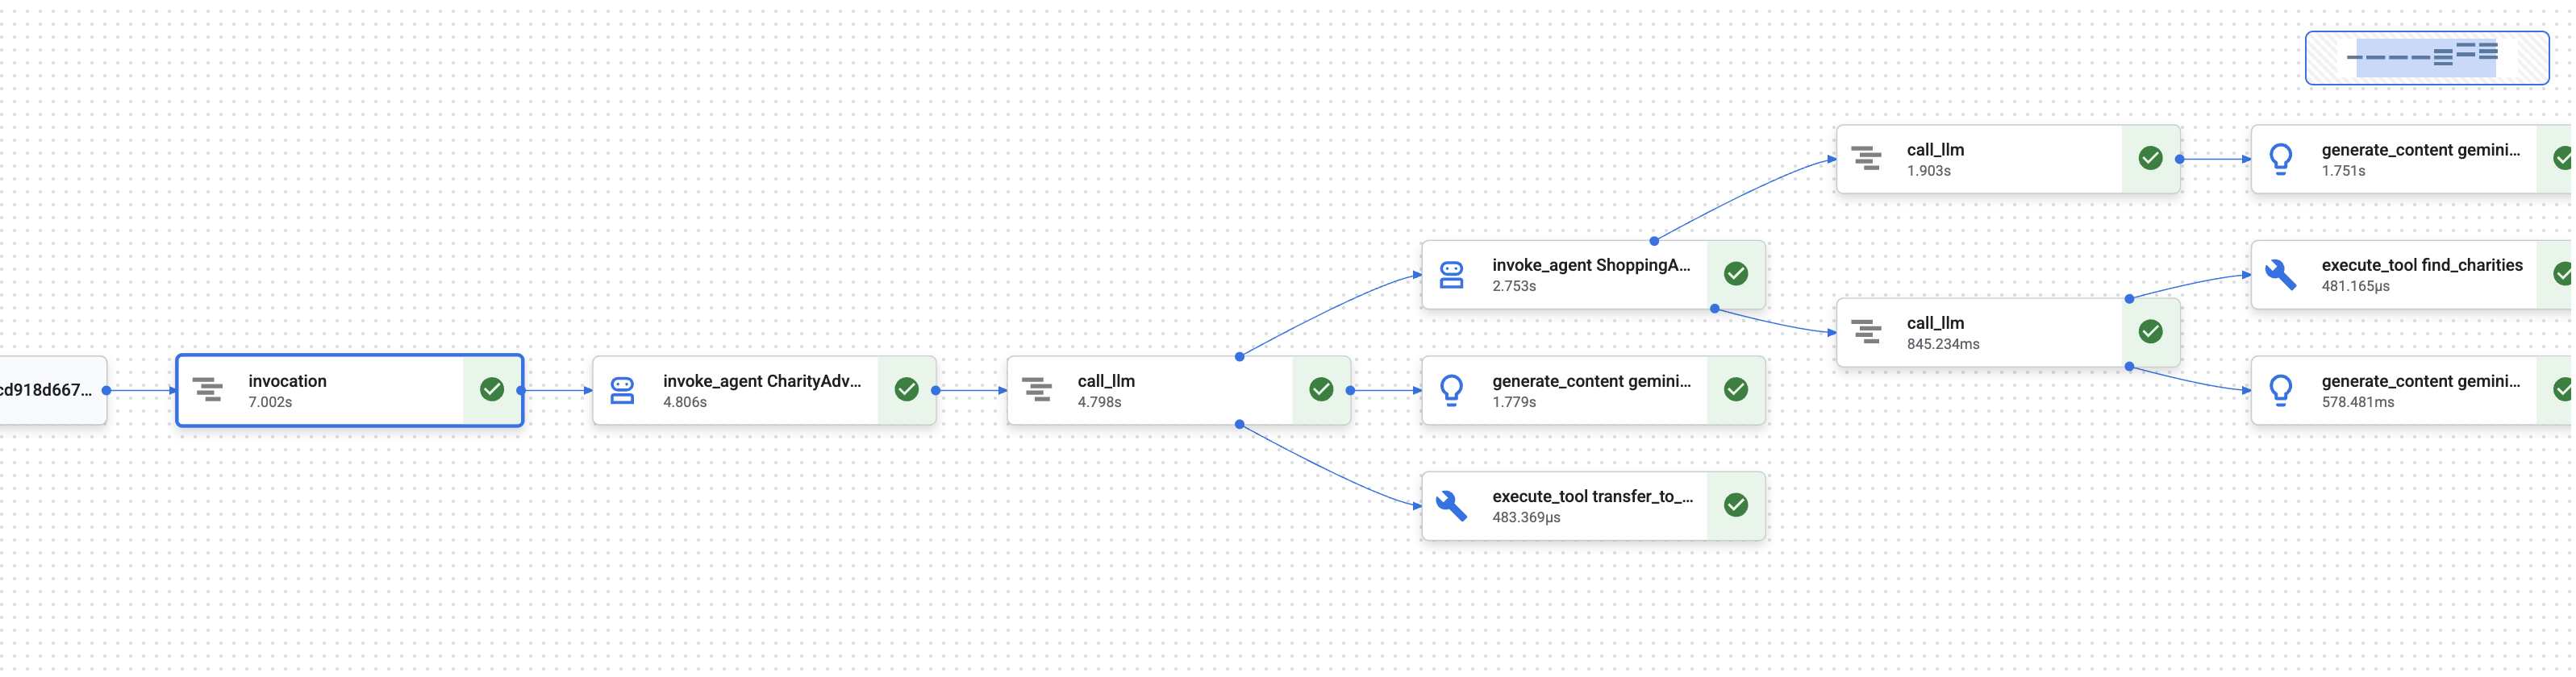
在第 1 單元中,您瞭解了一個基本問題:當 AI 代理程式處理金錢時,如何證明發生了什麼事?
使用者可以聲明:
- 「我從未選擇該慈善機構!」
- 「我沒有授權這筆款項!」
- 「系統未經我同意就向我收費!」
在傳統的黑箱 AI 系統中,您無法證明其他情況。但您值得信賴的捐款系統不同。在第 8 個單元中,您使用 --trace_to_cloud 旗標部署,這表示每筆捐款現在都會在 Cloud Trace 中建立完整的防竄改稽核追蹤記錄。
本單元將說明如何解讀這些追蹤記錄,並將其做為證據。你將瞭解:
- 在 Cloud Trace 探索工具中找出正式版追蹤記錄
- 閱讀瀑布式檢視畫面,瞭解執行流程
- 找出憑證鏈結 (意圖 → 購物車 → 付款授權)
- 使用時間戳記證明找出同意聲明時刻
- 使用追蹤記錄解決爭議
- 匯出追蹤記錄以利法規遵循和稽核
這就是可信賴系統與功能強大但缺乏透明度的系統之間的差異:能夠以鑑識精確度證明發生了什麼事。
瞭解追蹤記錄和範圍
在 Cloud Trace 中查看追蹤記錄前,請先瞭解您要查看的內容。
什麼是追蹤記錄?
「追蹤記錄」是代理程式處理單一要求時的完整時間軸。從使用者傳送查詢到最終回應傳送完畢,這段期間的所有內容都會記錄下來。
每項追蹤記錄都會顯示:
- 要求的總時間長度
- 所有已執行的作業
- 作業之間的關係 (父項/子項關係)
- 每項作業的開始和結束時間
- 成功或失敗狀態
您的慈善機構代理人:一次追蹤 = 從「我想捐款」到「付款成功」的完整捐款流程。
什麼是 Span?
「時距」代表追蹤記錄中的單一工作單元。跨度可視為追蹤記錄的建構區塊。
捐款系統中常見的範圍類型:
時距類型 | 代表意義 | 範例 |
| 執行代理程式 |
|
| 向語言模型提出要求 |
|
| 執行工具函式 |
|
| 從工作階段記憶體讀取 | 從狀態擷取 |
| 寫入工作階段記憶體 | 在狀態中儲存 |
每個範圍都包含:
- 名稱:代表的作業
- 所需時間 (開始時間 → 結束時間)
- 屬性:中繼資料,例如工具輸入內容、模型回應、權杖計數
- 狀態:成功 (
OK) 或錯誤 (ERROR) - 上下層關係:哪些作業觸發了哪些作業
Span 如何組成 Trace
時距會彼此建立巢狀結構,顯示因果關係:
Root Span: CharityAdvisor.run (entire request)
  └─ Child: DonationPipeline.run (sequential workflow)
      ├─ Child: ShoppingAgent.run
      │   ├─ Grandchild: call_llm (Gemini processes charity search)
      │   ├─ Grandchild: execute_tool (find_charities)
      │   └─ Grandchild: execute_tool (save_user_choice)
      ├─ Child: MerchantAgent.run
      │   ├─ Grandchild: call_llm (Gemini generates cart)
      │   └─ Grandchild: execute_tool (create_cart_mandate)
      └─ Child: CredentialsProvider.run
          ├─ Grandchild: call_llm (Gemini processes payment)
          └─ Grandchild: execute_tool (create_payment_mandate) [CONSENT!]
這個階層會確切顯示發生了什麼事,以及發生的順序。您可以看到,付款授權是在購物車授權之後建立,而購物車授權是在使用者選取慈善機構之後建立。
步驟 1:存取 Cloud Trace 探索器
現在來查看已部署代理程式的實際追蹤記錄。
前往 Cloud Trace
- 開啟 Google Cloud 控制台: console.cloud.google.com
- 從頂端的下拉式選單選取專案 (如果您一直在使用該專案,系統應該會預先選取)
- 前往 Cloud Trace 探索工具:
- 在左側邊欄中,捲動至「可觀測性」部分
- 按一下「追蹤」
- 或使用直接連結:console.cloud.google.com/traces/list
您看到的內容
追蹤記錄探索工具會顯示專案的所有追蹤記錄清單:
欄 | 顯示內容 |
要求 | HTTP 方法和端點 (適用於 API 要求) |
開始時間 | 要求開始時間 |
延遲 | 要求的總時間長度 |
Spans | 追蹤記錄中的作業數量 |
每一列代表對已部署代理程式的完整要求。
產生測試追蹤記錄 (如有需要)
如果目前沒有任何追蹤記錄,清單可能空白,原因如下:
- 尚未對已部署的代理程式提出任何要求
- 要求傳送後,追蹤記錄會在 1 到 2 分鐘內顯示
產生測試追蹤記錄:
如果您是透過使用者介面部署至 Cloud Run,請前往服務網址,並在瀏覽器中完成捐款。
如果您部署至 Agent Engine,請執行單元 8 中的測試腳本:
python scripts/test_deployed_agent.py
等待 1 到 2 分鐘,然後重新整理 Cloud Trace 探索工具頁面。現在應該會看到追蹤記錄。
篩選追蹤記錄
使用頂端的篩選器選項,找出特定追蹤記錄:
- 時間範圍:如有需要,請從「過去 1 小時」變更為「過去 24 小時」
- 最短 / 最長延遲時間:篩選延遲時間較長的要求
- 要求篩選器:依特定作業搜尋 (例如「DonationPipeline」)
在本模組中,請著重於時間較長 (超過 5 秒) 的追蹤記錄,因為這些記錄代表所有三位代理人都已執行的完整捐款流程。
步驟 2:檢查完整的捐款流程
按一下清單中的任何追蹤記錄,即可開啟瀑布圖檢視畫面。您會在這裡花費最多時間分析代理程式行為。
瞭解瀑布式檢視畫面
瀑布式檢視畫面是甘特圖,顯示完整的執行時間軸:
━━━━━━━━━━━━━━━━━━━━━━━━━━━━━━━━━━━━━━━━━━━━━━━━━
              Timeline (horizontal = time) →
━━━━━━━━━━━━━━━━━━━━━━━━━━━━━━━━━━━━━━━━━━━━━━━━━

invocation                           ▓▓▓▓▓▓▓▓▓▓▓▓▓▓▓▓▓▓▓▓▓▓ 8.2s
  agent_run: CharityAdvisor          ▓▓▓▓▓▓▓▓▓▓▓▓▓▓▓▓▓▓▓▓▓ 8.1s
    agent_run: DonationPipeline      ▓▓▓▓▓▓▓▓▓▓▓▓▓▓▓▓▓▓▓▓ 7.9s
      agent_run: ShoppingAgent       ▓▓▓▓▓▓ 2.1s
        call_llm: gemini-2.5-flash   ▓▓▓▓ 1.2s
        execute_tool: find_charities ▓▓ 0.5s
        execute_tool: save_user_choice ▓ 0.3s
      agent_run: MerchantAgent       ▓▓▓ 1.8s
        call_llm: gemini-2.5-flash   ▓▓ 0.9s
        execute_tool: create_cart_mandate ▓ 0.7s
      agent_run: CredentialsProvider ▓▓▓▓▓▓▓▓ 4.0s
        call_llm: gemini-2.5-flash   ▓▓ 0.8s
        execute_tool: create_payment_mandate ▓▓▓▓▓ 3.0s [CONSENT]
解讀圖表
每個長條代表一個時間範圍:
- 水平位置:開始時間
- 長度:錄製時間長度
- 縮排:顯示父項/子項關係
- 顏色:正常為藍色,錯誤為紅色
這個範例追蹤記錄的主要觀察結果:
✅ 總時間:8.2 秒
✅ 依序執行:ShoppingAgent 在 MerchantAgent 啟動前完成
✅ MerchantAgent 已完成
before
CredentialsProvider 已啟動
✅ 「同意」是耗時最久的作業:create_payment_mandate 耗時 3.0 秒 (因為系統等待使用者確認)
✅ LLM 呼叫可見:每個代理程式都發出了一項 Gemini 要求
✅ 工具呼叫已擷取:所有六項工具都順利執行
這個視覺化圖表會立即顯示時間分配情形,以及作業的執行順序。
按一下時間範圍即可查看詳細資料
按一下 invocation 跨度 (頂端的根跨度)。右側面板會顯示詳細屬性:
{
  "http.method": "POST",
  "http.status_code": 200,
  "http.url": "https://charity-advisor-xyz.a.run.app/api/run",
  "user_id": "test_user_123",
  "session_id": "4857885913439920384",
  "trace_id": "a1b2c3d4e5f6...",
  "span_id": "1234567890abcdef"
}
這些屬性會提供整個要求的背景資訊。
步驟 3:找出憑證鏈結
可信系統會使用憑證鏈結,在每個步驟證明授權:
IntentMandate (User chose charity)
    ↓
CartMandate (Merchant created cart, signed IntentMandate)
    ↓
PaymentMandate (Payment provider created payment, signed CartMandate)
讓我們在追蹤記錄中找出各項授權。
尋找 IntentMandate
按一下 execute_tool: save_user_choice 範圍 (位於 ShoppingAgent 下方)。
屬性面板會顯示下列資訊:
{
  "tool.name": "save_user_choice",
  "tool.input.charity_name": "Save the Children",
  "tool.input.amount": 50,
  "tool.output.status": "success",
  "tool.output.intent_mandate": {
    "charity_name": "Save the Children",
    "amount": 50,
    "timestamp": "2024-11-08T15:30:12.345Z",
    "signature": "a3f7b9c1d2e4..."
  }
}
這證明:
- ✅ 使用者選取「救助兒童會」
- ✅ 金額為 $50 美元
- ✅ 選擇記錄時間為世界標準時間 15:30:12
- ✅ 已產生簽章 (在實際工作環境中,這會是加密編譯)
IntentMandate 現在位於工作階段狀態中,可供後續代理程式使用。
尋找 CartMandate
按一下 execute_tool: create_cart_mandate 範圍 (位於 MerchantAgent 下方)。
在屬性面板中:
{
  "tool.name": "create_cart_mandate",
  "tool.input.intent_mandate": {
    "charity_name": "Save the Children",
    "amount": 50,
    "signature": "a3f7b9c1d2e4..."
  },
  "tool.output.status": "success",
  "tool.output.cart_mandate": {
    "cart_id": "cart_7893",
    "intent_signature": "a3f7b9c1d2e4...",
    "cart_signature": "e8f2a9b3c7d1...",
    "timestamp": "2024-11-08T15:30:14.789Z"
  }
}
這證明:
- ✅ MerchantAgent 已收到 IntentMandate (輸入內容顯示)
- ✅ 已建立 ID 為「cart_7893」的購物車
- ✅ 購物車簽章參照 IntentMandate 簽章 (鏈結!)
- ✅ 建立時間:世界標準時間 15:30:14 (意圖後 2.4 秒)
CartMandate 現在會參照 IntentMandate,形成鏈結。
尋找 PaymentMandate
按一下「CredentialsProvider」下方的 execute_tool: create_payment_mandate 跨度。
在屬性面板中:
{
  "tool.name": "create_payment_mandate",
  "tool.input.cart_mandate": {
    "cart_id": "cart_7893",
    "intent_signature": "a3f7b9c1d2e4...",
    "cart_signature": "e8f2a9b3c7d1..."
  },
  "tool.confirmation_required": true,
  "tool.confirmation_timestamp": "2024-11-08T15:30:17.891Z",
  "tool.user_response": "CONFIRMED",
  "tool.wait_duration_ms": 29168,
  "tool.output.status": "success",
  "tool.output.payment_mandate": {
    "payment_id": "pay_9821",
    "cart_signature": "e8f2a9b3c7d1...",
    "payment_signature": "b4c9e2a7f8d3...",
    "timestamp": "2024-11-08T15:30:47.059Z"
  }
}
這會驗證完整鏈結:
- ✅ CredentialsProvider 已收到 CartMandate (輸入內容會顯示)
- ✅ 付款參照 CartMandate 簽章 (鏈結!)
- ✅ 需要確認 (
confirmation_required: true) - ✅ 使用者已在世界標準時間 15:30:17 確認
- ✅ 系統等待使用者決定 29.2 秒
- ✅ 付款已在確認後建立 (時間戳記:15:30:47)
將鏈結視覺化
追蹤記錄證明憑證鏈結已正確執行:
15:30:12 UTC → IntentMandate created (signature: a3f7...)
                  ↓
15:30:14 UTC → CartMandate created (references: a3f7...)
                  ↓
15:30:17 UTC → User consent requested
                  ↓
15:30:47 UTC → PaymentMandate created (references: e8f2...)
每份委託書都會參照前一份委託書的簽名。這是防竄改的,您可以檢查簽名是否相符,驗證鏈結。
步驟 4:分析效能和瓶頸
Cloud Trace 不僅能證明發生了什麼事,還會顯示時間的用途,方便您進行最佳化。
找出關鍵路徑
在瀑布圖中,找出垂直堆疊中最長的時間間隔。這些代表您的效能瓶頸。
從範例追蹤記錄中:
Total: 8.2 seconds

Breakdown:
  - ShoppingAgent:         2.1s (26%)
  - MerchantAgent:         1.8s (22%)
  - CredentialsProvider:   4.0s (49%)  ← Bottleneck
  - Other overhead:        0.3s (3%)
重要洞察:CredentialsProvider 占總時間的 49%。為什麼?
深入瞭解 CredentialsProvider 範圍:
CredentialsProvider: 4.0s
  - call_llm:              0.8s (20%)
  - create_payment_mandate: 3.0s (75%)  ← User consent wait
  - Other:                 0.2s (5%)
3.0 秒的延遲是預期且合理的,因為使用者需要時間考慮是否要確認。這並非效能問題,而是經過深思熟慮的同意聲明。
追蹤 LLM 費用
按一下任何 call_llm 範圍,即可查看權杖用量:
{
  "llm.model": "gemini-2.5-flash",
  "llm.usage.prompt_tokens": 487,
  "llm.usage.completion_tokens": 156,
  "llm.usage.total_tokens": 643,
  "llm.response_time_ms": 1243
}
這項功能可用來:
- 追蹤每項要求的費用 (詞元數 × 模型價格)
- 找出不必要的長提示
- 比較模型效能 (Flash 與 Pro)
- 針對延遲時間與品質進行最佳化
計算範例:
Gemini 2.5 Flash pricing (as of Nov 2024):
  Input:  $0.075 per 1M tokens
  Output: $0.30 per 1M tokens

This request:
  Input:  487 tokens × $0.075 / 1M = $0.000037
  Output: 156 tokens × $0.30 / 1M  = $0.000047
  Total:                            = $0.000084 (~$0.00008)

For 10,000 donations/month:
  10,000 × 3 agents × $0.00008 = $2.40/month in LLM costs
這項精細的能見度有助於您根據資料做出模型選取決策。
比較不同追蹤記錄
篩選多個追蹤記錄並比較時間長度:
Trace 1: 8.2s  (with consent wait: 3.0s)
Trace 2: 12.5s (with consent wait: 7.8s)  ← User took longer
Trace 3: 5.1s  (with consent wait: 0.2s)  ← User clicked fast
Trace 4: 6.3s  (with consent wait: 1.5s)
洞察:大部分的差異來自使用者決策時間,而非系統效能。核心代理程式執行作業 (不含同意聲明) 的時間一致,約為 5 秒。
這表示系統運作穩定。
對於正式版系統,請設定快訊,在使用者抱怨前找出問題。
高錯誤率警示
當超過 5% 的追蹤記錄含有錯誤時,建立快訊:
- 前往 Cloud Monitoring
- 依序點選「Alerting」(快訊) →「Create Policy」(建立政策)
- 設定:
Resource: Cloud Trace Span
Metric: Span error count
Condition: Rate > 5% over 5 minutes
Notification: Email your-team@example.com
高延遲快訊
如果第 95 個百分位數的延遲時間超過 15 秒,請建立快訊:
Resource: Cloud Trace
Metric: Span duration (95th percentile)
Condition: > 15000ms for 5 minutes
Notification: PagerDuty
這樣就能在效能降低影響使用者體驗前,及時發現問題。
缺少同意聲明的快訊
如果任何付款程序未經確認就完成,請建立快訊:
Resource: Cloud Trace Span
Filter: tool.name="create_payment_mandate" AND tool.confirmation_required!=true
Condition: Any match
Notification: Critical alert to security team
這是安全違規偵測工具,如果觸發,表示您的同意聲明機制有嚴重問題。
目前所學內容
透過 Cloud Trace,您現在瞭解如何:
✅ 瀏覽 Cloud Trace 探索工具,找出實際追蹤記錄
✅ 查看瀑布圖,瞭解完整的執行流程
✅ 追蹤憑證鏈結:IntentMandate → CartMandate → PaymentMandate ✅ 使用追蹤記錄做為爭議解決的證據
✅ 分析效能,找出瓶頸
✅ 追蹤 LLM 成本,精細掌握成本
這項差異帶來的影響
比較兩個系統處理相同「我從未授權這項交易!」申訴的方式:
沒有可觀測能力的系統
User: "I never authorized that $50 donation!"
You:  "Our logs show the transaction completed successfully."
User: "But I didn't approve it!"
You:  "The system requires confirmation before processing."
User: "I never saw any confirmation!"
You:  "..." [no way to prove what happened]

Result: Refund issued, trust lost, user never returns.
使用 Cloud Trace 的系統
User: "I never authorized that $50 donation!"
You:  "Let me pull up the trace from your session..."
      [Shows waterfall with consent span]
You:  "Here's the evidence:
       - 15:30:17 UTC: System asked for confirmation
       - Message shown: 'You are about to donate $50...'
       - 15:30:47 UTC: You clicked 'CONFIRM'
       - Wait time: 29.2 seconds

       The system waited almost 30 seconds for your decision.
       Here's the exact timestamp of your confirmation."

User: "Oh... I remember now. My mistake. Sorry!"

Result: Trust preserved, no refund needed, user continues using service.
這就是問責記錄的強大之處。從「相信我們」轉為「讓我們向您說明實際情況」。
後續步驟
您現在已完成建構可信賴代理程式的技術核心:
✅ 模組 1 至 6:設計值得信賴的架構 (角色、憑證、同意聲明)
✅ 模組 7:自動化調度管理複雜的工作流程 (SequentialAgent)
✅ 模組 8:啟用觀測能力後部署
✅ 模組 9:瞭解如何讀取及使用問責記錄
您建構的架構 (角色分離、憑證鏈結、同意聲明機制、完整可觀測性) 會直接轉移至處理實際金錢、資料和後果的正式環境系統。
10. 您的未來發展
建構項目
本研討會一開始提出的問題是:「如何建構可實際用於處理金錢的 AI 代理程式?」
現在您有答案了。
你開始的位置 (第 3 單元):
simple_agent = Agent(
    model="gemini-2.5-flash",
    instruction="Find charities and donate",
    tools=[google_search]
)
目前進度 (單元 10):
- ✅ 三個專用代理,角色分工明確
- ✅ 三項可驗證的憑證 (意圖 → 購物車 → 付款授權)
- ✅ 在每個步驟完成憑證鏈結,並驗證到期日
- ✅ 附有時間戳記證明的明確同意聲明機制
- ✅ 部署至 Agent Engine 正式環境並進行觀察
- ✅ 在 Cloud Trace 中完成問責追蹤記錄
- ✅ 爭議解決的鑑識證據
研討會與製作:差距
您的系統展現了正確的架構和模式,但使用了教育簡化功能,必須升級才能用於真實貨幣和真實使用者。
以下說明簡化內容和製作需求:
元件 | 研討會實作 | 製作規定 |
簽名 | SHA-256 雜湊 ( | 使用 PKI 或 JWT 和私密金鑰的真實加密簽章 |
付款處理 | 模擬退貨 ( | 整合實際的付款 API (Stripe、PayPal、Square) |
使用者驗證 | 自動信任 (不需登入) | OAuth 2.0、WebAuthn 或工作階段管理 |
密鑰管理 |
| Google Secret Manager 或 Cloud KMS (含加密功能) |
慈善機構資料庫 | 包含 9 個慈善機構的模擬 JSON 檔案 | 整合即時 API (IRS Tax Exempt Organization Search、Charity Navigator API) |
錯誤處理 | 含有錯誤訊息的基本 try-catch | 重試邏輯 (指數輪詢、斷路器、無法傳送的郵件佇列) |
測試 | 透過指令碼手動驗證 | 透過 CI/CD 進行全面的單元/整合/E2E 測試套件 |
工作階段持續性 | 記憶體內 (本機) 或自動 (Agent Engine) | 備份和災難復原的正式版資料庫 |
速率限制 | 無 (教育環境) | 每位使用者的速率限制、IP 限制、濫用偵測 |
您已掌握的主要架構模式
您在本研討會中學到的模式是正式環境模式。請不要懷疑他們。
角色區隔 (AP2 原則 #1)
每個代理程式都有一個明確的工作,且只會看到所需內容。如果某個代理程式遭到入侵,攻擊者也無法存取其他代理程式的資料。這可限制影響範圍。
使用這項功能的生產系統:付款處理、文件工作流程、核准鏈結、設有驗證閘的多步驟表單。
可驗證憑證 (AP2 原則 #2)
每項憑證都有到期時間、參照先前的憑證,且必須經過驗證才能進行下一個步驟。這會建立防竄改的稽核鏈。
製作價值:完整證明發生了什麼事、何時發生,以及發生的順序。這對爭議解決和法規遵循至關重要。
明確同意聲明 (AP2 原則 #3)
使用者核准動作的時間戳記證明。無法提出爭議。
生產價值:金融交易的法律規定。保護使用者和公司。
序列式自動化調度管理 (ADK 模式)
強制執行正確的執行順序。防止跳過步驟。確保每位代理商都能看到前一位代理商的輸出內容。
製作價值:非常適合使用者期望立即獲得結果的「人機迴圈」系統。這個模式適合用於捐款流程、結帳程序和核准鏈。
完整觀測功能 (OpenTelemetry + Cloud Trace)
系統會自動擷取每個決策、工具呼叫、同意聲明時刻和憑證交接。
製作價值:爭議案件的鑑識證據。效能最佳化資料。法規遵循稽核記錄。精準偵錯實際工作環境的問題。
持續學習的資源
ADK 說明文件:
AP2 和相關標準:
Google Cloud 服務:
清除資源
如要避免持續產生費用,請刪除部署作業:
Agent Engine:按照 Agent Engine 說明文件中的步驟操作
Cloud Run (如果已部署):
gcloud run services delete charity-advisor \
    --region=$GOOGLE_CLOUD_LOCATION
儲存空間值區:
gsutil -m rm -r gs://$GOOGLE_CLOUD_PROJECT-staging
gsutil -m rm -r gs://$GOOGLE_CLOUD_PROJECT-artifacts
繼續你的歷程
您從簡單的問題開始,逐步建構出完整的答案。您已掌握值得信賴的 AI 代理基礎模式,這些模式會轉移到 AI 代理程式處理敏感作業的任何領域,例如金融交易、醫療照護決策、法律文件和供應鏈作業。
原則會轉移。信任模型運作正常。
現在就開始建構值得信賴的內容吧!❤️