
1. はじめに
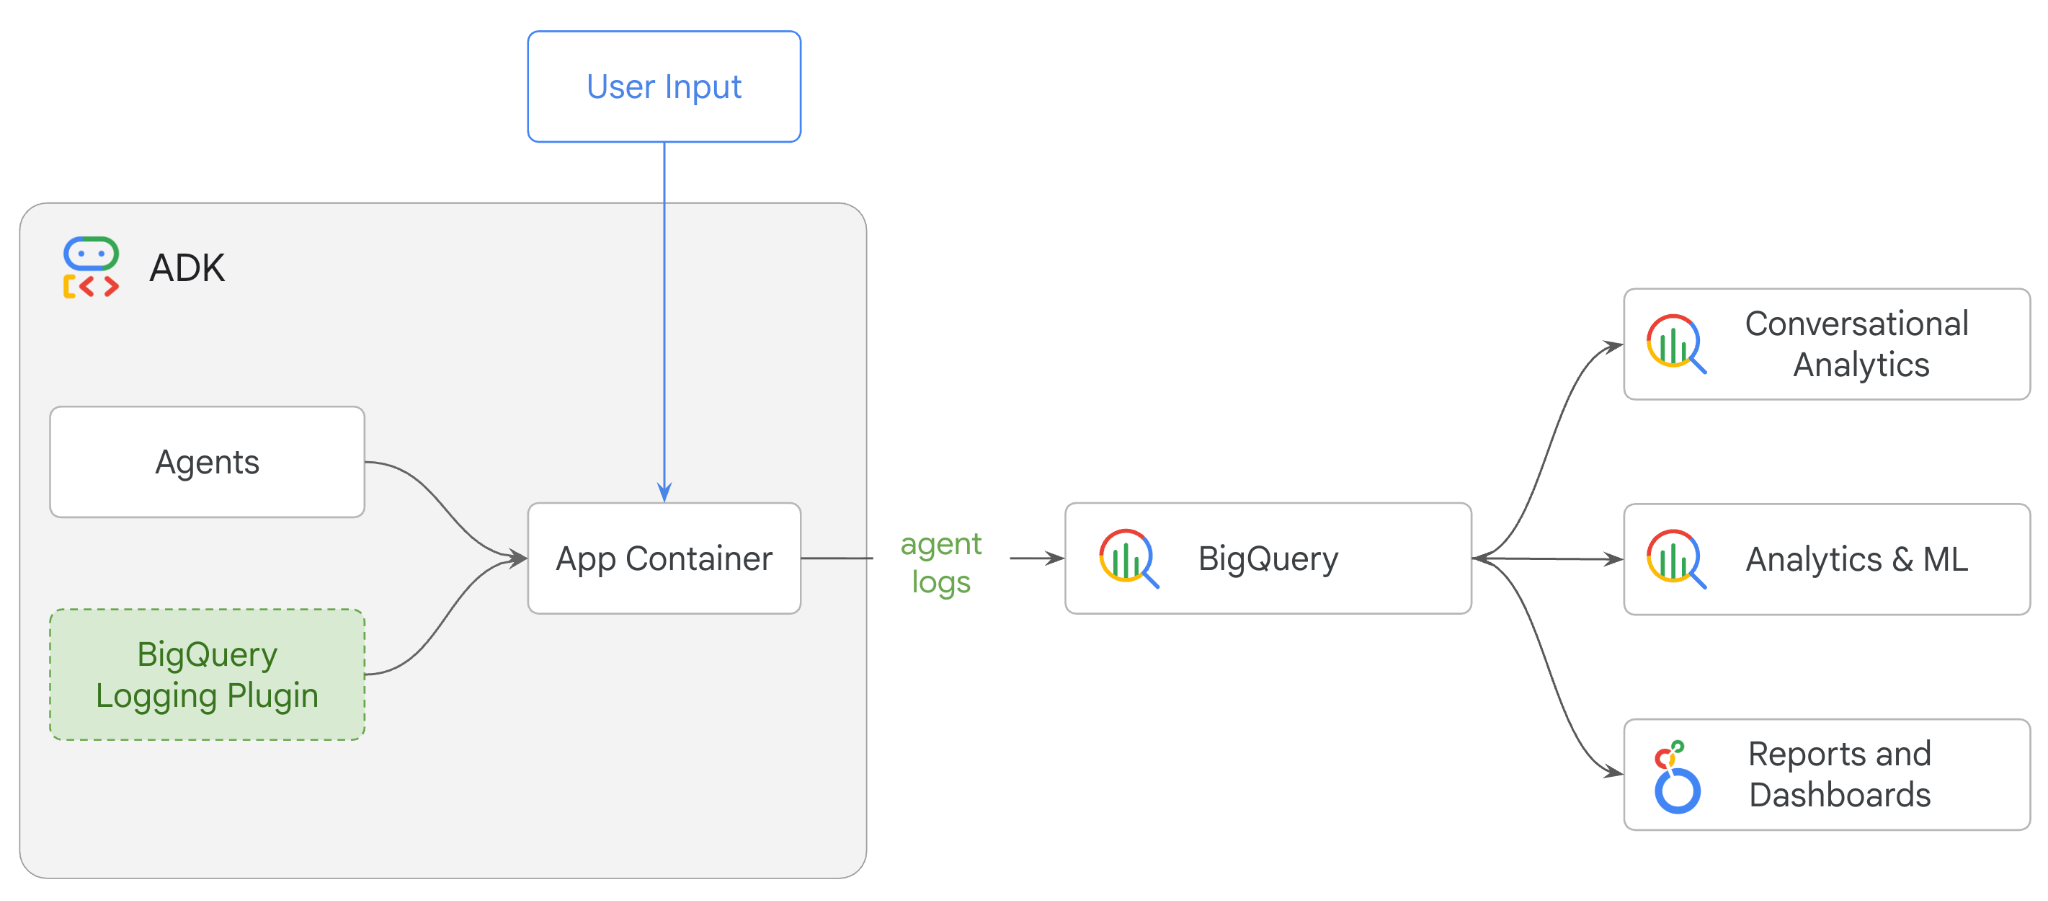
この Codelab では、Agent Development Kit(ADK)を使用してマルチエージェント システムを構築し、BigQuery Agent Analytics プラグインを使用してエージェントのオブザーバビリティを有効にします。エージェントに一連の質問を行い、BigQuery を使用して会話トレースとエージェント ツールの使用状況を分析します。
演習内容
- ADK を使用してマルチエージェントの小売アシスタントを構築する
- BigQuery Agent Analytics プラグイン を初期化して、このエージェントの実行に関するトレースデータを BigQuery にキャプチャして保存する
- BigQuery でエージェント ログデータを分析する
必要なもの
- ウェブブラウザ(Chrome など)
- 課金を有効にした Google Cloud プロジェクト、または
- Gmail アカウント。次のセクションでは、この Codelab で使用できる 5 ドルの無料クレジットを利用して、新しいプロジェクトを設定する方法について説明します。
この Codelab は、初心者を含むあらゆるレベルのデベロッパーを対象としています。Google Cloud Shell のコマンドライン インターフェースと ADK 開発用の Python コードを使用します。Python の専門家である必要はありませんが、コードの読み取り方法を理解していると、コンセプトを理解するのに役立ちます。
2. 始める前に
Google Cloud プロジェクトの作成
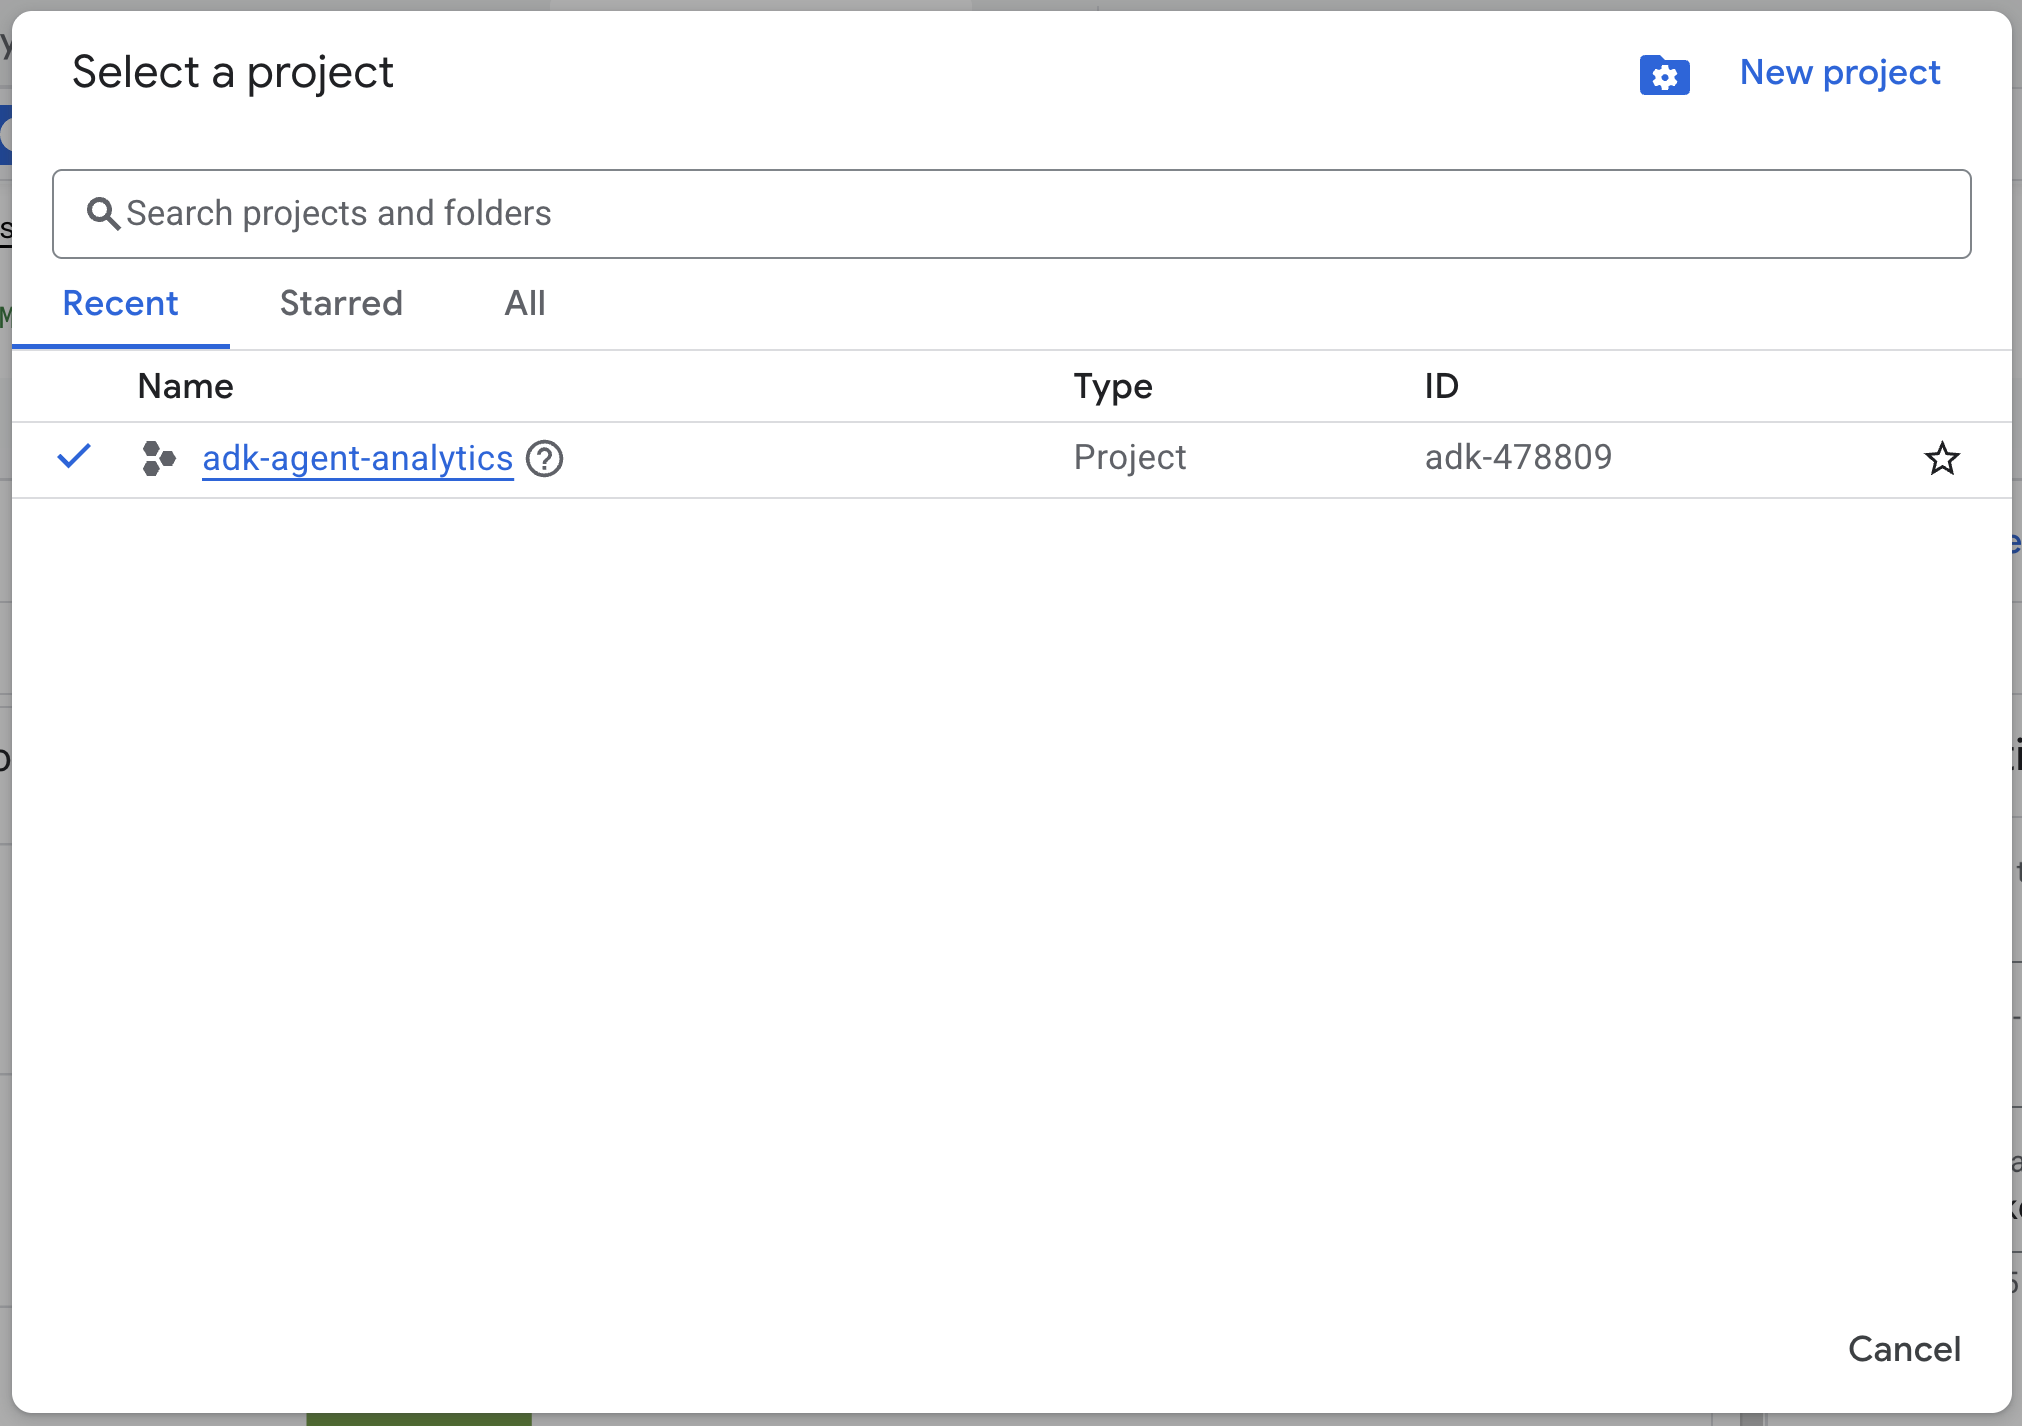
- Google Cloud コンソールのプロジェクト選択ページで、Google Cloud プロジェクトを選択または作成します。
- Cloud プロジェクトに対して課金が有効になっていることを確認します。詳しくは、プロジェクトで課金が有効になっているかどうかを確認する方法をご覧ください。
Cloud Shell の起動
Cloud Shell は、必要なツールがプリロードされた Google Cloud 上で動作するコマンドライン環境です。
- Google Cloud コンソールの上部にある「Cloud Shell をアクティブにする 」アイコンをクリックします。

- Cloud Shell に接続したら、次のコマンドを実行して Cloud Shell で認証を確認します。
gcloud auth list
- 次のコマンドを実行して、プロジェクトが gcloud で使用するように構成されていることを確認します。
gcloud config get project
- プロジェクトが想定どおりに構成されていない場合は、次のコマンドを使用してプロジェクトを設定します。
export PROJECT_ID=<YOUR_PROJECT_ID>
gcloud config set project $PROJECT_ID
API を有効にする
- 次のコマンドを実行して、必要な API とサービスをすべて有効にします。
gcloud services enable bigquery.googleapis.com \
cloudresourcemanager.googleapis.com \
aiplatform.googleapis.com
- コマンドが正常に実行されると、次のようなメッセージが表示されます。
Operation "operations/..." finished successfully.
3. 取り付けとセットアップ
Cloud Shell に戻り、ホーム ディレクトリにいることを確認します。
Cloud Shell で次のコマンドを実行して、BigQuery に adk_logs という名前の新しいデータセットを作成します。
bq mk --dataset --location=US adk_logs
次に、仮想 Python 環境を作成し、必要なパッケージをインストールします。
- Cloud Shell で新しいターミナルタブを開き、次のコマンドを実行して
adk-agent-observabilityという名前のフォルダを作成して移動します。
mkdir adk-agent-observability
cd adk-agent-observability
- 仮想 Python 環境を作成します。
python -m venv .venv
- 仮想環境をアクティブにします。
source .venv/bin/activate
- ADK をインストールする
pip install --upgrade google-adk
4. ADK アプリケーションを作成する
次に、小売アシスタント エージェントを作成しましょう。このエージェントは、...
- adk create ユーティリティ コマンド を実行して、必要なフォルダとファイルを含む新しいエージェント アプリケーションをスキャフォールディングします。
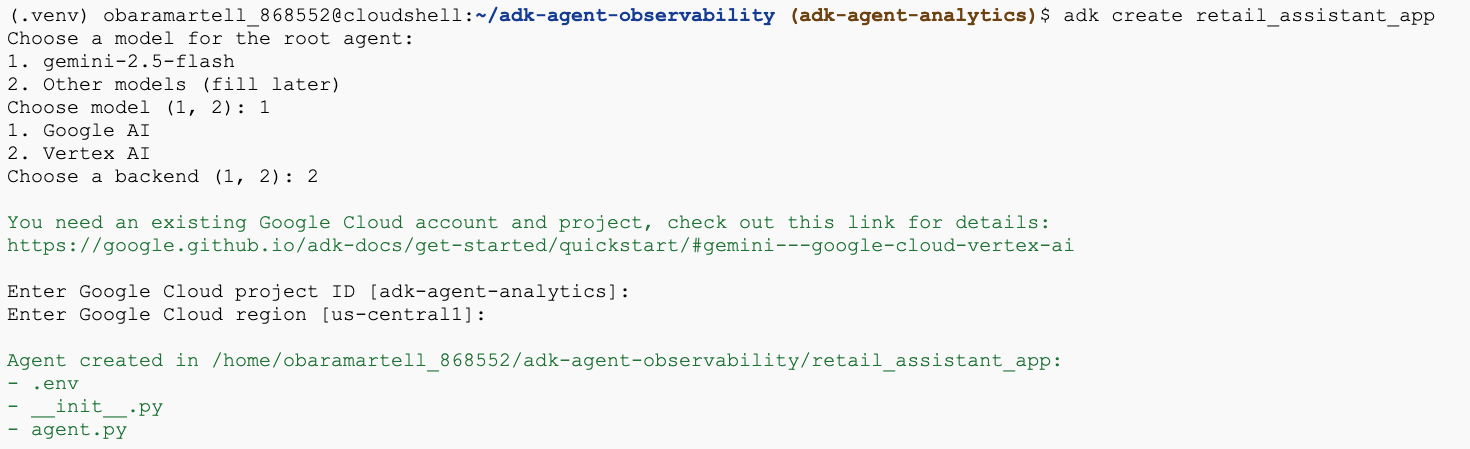
adk create retail_assistant_app
プロンプトに従って操作します。
- モデルに gemini-2.5-flash を選択します。
- バックエンドに Vertex AI を選択します。
- デフォルト の Google Cloud プロジェクト ID とリージョンを確認します。
インタラクションの例を次に示します。
- Cloud Shell で [エディタを開く] ボタンをクリックして Cloud Shell エディタを開き、新しく作成されたフォルダとファイルを表示します。

生成されたファイルに注意してください。
retail_assistant_app/
├── .venv/
└── retail_assistant_app/
    ├── __init__.py
    ├── agent.py
    └── .env
- init.py: フォルダを Python モジュールとしてマークします。
- agent.py: 初期エージェント定義が含まれています。
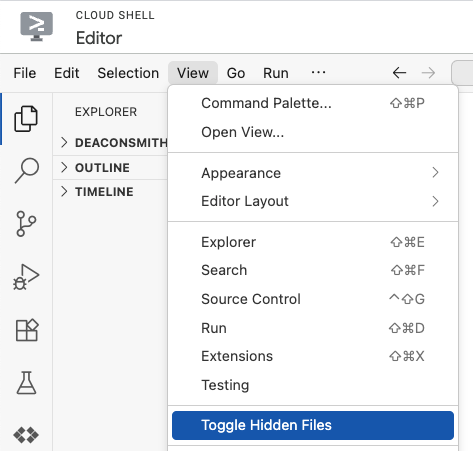
- .env: このファイルを表示するには、[表示] > [非表示ファイルの切り替え] をクリックする必要がある場合があります。
- .env ファイルにはプロジェクトの環境変数が含まれています。プロンプトで正しく設定されなかった変数を更新します。
GOOGLE_GENAI_USE_VERTEXAI=1
GOOGLE_CLOUD_PROJECT=<YOUR_GOOGLE_PROJECT_ID>
GOOGLE_CLOUD_LOCATION=<YOUR_GOOGLE_CLOUD_REGION>
5. エージェントを定義する
次に、階層型マルチエージェント システムを定義します。
- リアルタイム トレンド エージェント: Google 検索を使用して現在のファッショントレンドを検索します。
- 在庫データ エージェント: BigQuery Toolset を使用して、一般公開データセット thelook_ecommerce で利用可能な商品をクエリします。
- 小売アシスタント(ルート)エージェント: トレンド エージェントにアドバイスを求め、在庫エージェントに一致する商品を求めることで、ワークフローを調整します。
retail_assistant_app/agent.py の内容全体を次のコードに置き換えます。
import os
import uuid
import asyncio
import google.auth
import dotenv
from google.genai import types
from google.adk.agents import Agent
from google.adk.apps import App
from google.adk.runners import InMemoryRunner
from google.adk.tools import AgentTool, google_search
from google.adk.tools.bigquery import BigQueryCredentialsConfig, BigQueryToolset
from google.adk.plugins.bigquery_agent_analytics_plugin import BigQueryAgentAnalyticsPlugin

dotenv.load_dotenv()

# --- Configuration ---

PROJECT_ID = os.getenv('GOOGLE_CLOUD_PROJECT', 'project_not_set')
DATASET_ID = "adk_logs"
TABLE_ID = "retail_assistant_agent_logs"
APP_NAME = "retail_assistant_agent"
USER_ID = "test_user"

# --- Toolsets ---

credentials, _ = google.auth.default()
credentials_config = BigQueryCredentialsConfig(credentials=credentials)
bigquery_toolset = BigQueryToolset(
 credentials_config=credentials_config
)

# --- Agents ---

# 1. Trend Spotter
real_time_agent = Agent(
   name="real_time_agent",
   model="gemini-2.5-flash",
    description="Researches external factors like weather, local events, and current fashion trends.",
   instruction="""
       You are a real-time research agent.
       Use Google Search to find real-time information relevant to the user's request,
       such as the current weather in their location or trending styles.
   """,
   tools=[google_search]
)

# 2. Inventory Manager
inventory_data_agent = Agent(
   name="inventory_data_agent",
   model="gemini-2.5-flash",
   description="Oversees product inventory in the BigQuery `thelook_ecommerce` dataset to find available items and prices.",
   instruction=f"""
   You manage the inventory. You have access to the `bigquery-public-data.thelook_ecommerce` dataset via the BigQuery toolset.
   Run all BigQuery queries the project id of: '{PROJECT_ID}'

   Your workflow:
   1. Look at the products table.
   2. Find items that match the requirements, factor in the results from the trend_setter agent if there are any.
   3. Return with a user friendly response, including the list of specific products and prices.
   """,
   tools=[bigquery_toolset]
)

# 3. Root Orchestrator
root_agent = Agent(
   name="retail_assistant",
   model="gemini-2.5-flash",
   description="The primary orchestrator, responsible for handling user input, delegating to sub-agents, and synthesizing the final product recommendation.",
   instruction="""
   You are a Retail Assistant.
   You can ask the 'real_time_agent' agent for any realtime information needed, or style advice, include any information provided by the user.
   You should ask the 'inventory_data_agent' agent to find a maximum of 3 available items matching that style.
   Combine the results into a recommendation.
   """,
   tools=[AgentTool(agent=real_time_agent)],
   sub_agents=[inventory_data_agent]
)
6. BigQuery Agent Analytics プラグインでログを生成する
次に、BigQuery Agent Analytics プラグイン を構成して実行データをキャプチャします。
これを行うには、App クラスのインスタンスを作成します。このクラスはエージェントのランタイム コンテナとして機能します。会話ループを管理し、ユーザーの状態を処理し、接続されているプラグイン(エージェント分析ロガーなど)を調整します。
次のコード:
- ロギング プラグインを初期化します。 必要な接続詳細情報を使用して
BigQueryAgentAnalyticsPluginを作成します。 - プラグインを統合します。 初期化された BigQuery プラグインを
Appコンストラクタに渡して、エージェントの実行イベントが自動的にキャプチャされてログに記録されるようにします。 - エージェントの実行を実行してログに記録します。
runner.run_asyncを介して会話フローを実行します。プラグインは、リソースを閉じる前に、イベントのシーケンス全体を収集して BigQuery に送信します。
次のコードをコピーして、 agent.py ファイルのエージェント定義の下に貼り付けます。
async def main(prompt: str):
    """Runs a conversation with the BigQuery agent using the ADK Runner."""
    bq_logger_plugin = BigQueryAgentAnalyticsPlugin(
        project_id=PROJECT_ID, dataset_id=DATASET_ID, table_id=TABLE_ID
    )
    app = App(name=APP_NAME, root_agent=root_agent, plugins=[bq_logger_plugin])
    runner = InMemoryRunner(app=app)

    try:
        session_id = f"{USER_ID}_{uuid.uuid4().hex[:8]}"

        my_session = await runner.session_service.create_session(
            app_name=APP_NAME, user_id=USER_ID, session_id=session_id
        )

        async for event in runner.run_async(
            user_id=USER_ID,
            new_message=types.Content(
                role="user", parts=[types.Part.from_text(text=prompt)]
            ),
            session_id=my_session.id,
        ):
            if event.content.parts and event.content.parts[0].text:
                print(f"** {event.author}: {event.content.parts[0].text}")

    except Exception as e:
        print(f"Error in main: {e}")
    finally:
        print("Closing BQ Plugin...")
        await bq_logger_plugin.close()
        print("BQ Plugin closed.")

async def run_all_prompts():
    """Runs all prompts in a single event loop."""
    prompts = [
        "what outfits do you have available that are suitable for the weather in london this week?",
        "You are such a cool agent! I need a gift idea for my friend who likes yoga.",
        "I'd like to complain - the products sold here are not very good quality!"
    ]
    for prompt in prompts:
        await main(prompt)

if __name__ == "__main__":
    asyncio.run(run_all_prompts())
インストルメンテーションが完了したので、エージェントの動作を確認しましょう。スクリプトを実行して、会話ワークフローをトリガーします。
python retail_assistant_app/agent.py
小売アシスタントがワークフローを調整していることを確認します。
- リアルタイム トレンド エージェント(real_time_agent) にロンドンの天気を特定し、適切なファッショントレンドを検索するように依頼します。
- 次に、在庫データ エージェント(inventory_data_agent) に委任して、これらのトレンドに一致する特定の商品について
thelook_ecommerceBigQuery データセットをクエリします。 - 最後に、ルート オーケストレーター が結果を合成して最終的な推奨事項を作成します。
その間、プラグインはエージェントの実行トレースを BigQuery にストリーミングします。
7. エージェント ログを分析する
ツールの使用状況
エージェントが舞台裏で何を行っていたかを確認できるようになりました。データは BigQuery にストリーミングされ、分析の準備ができています。
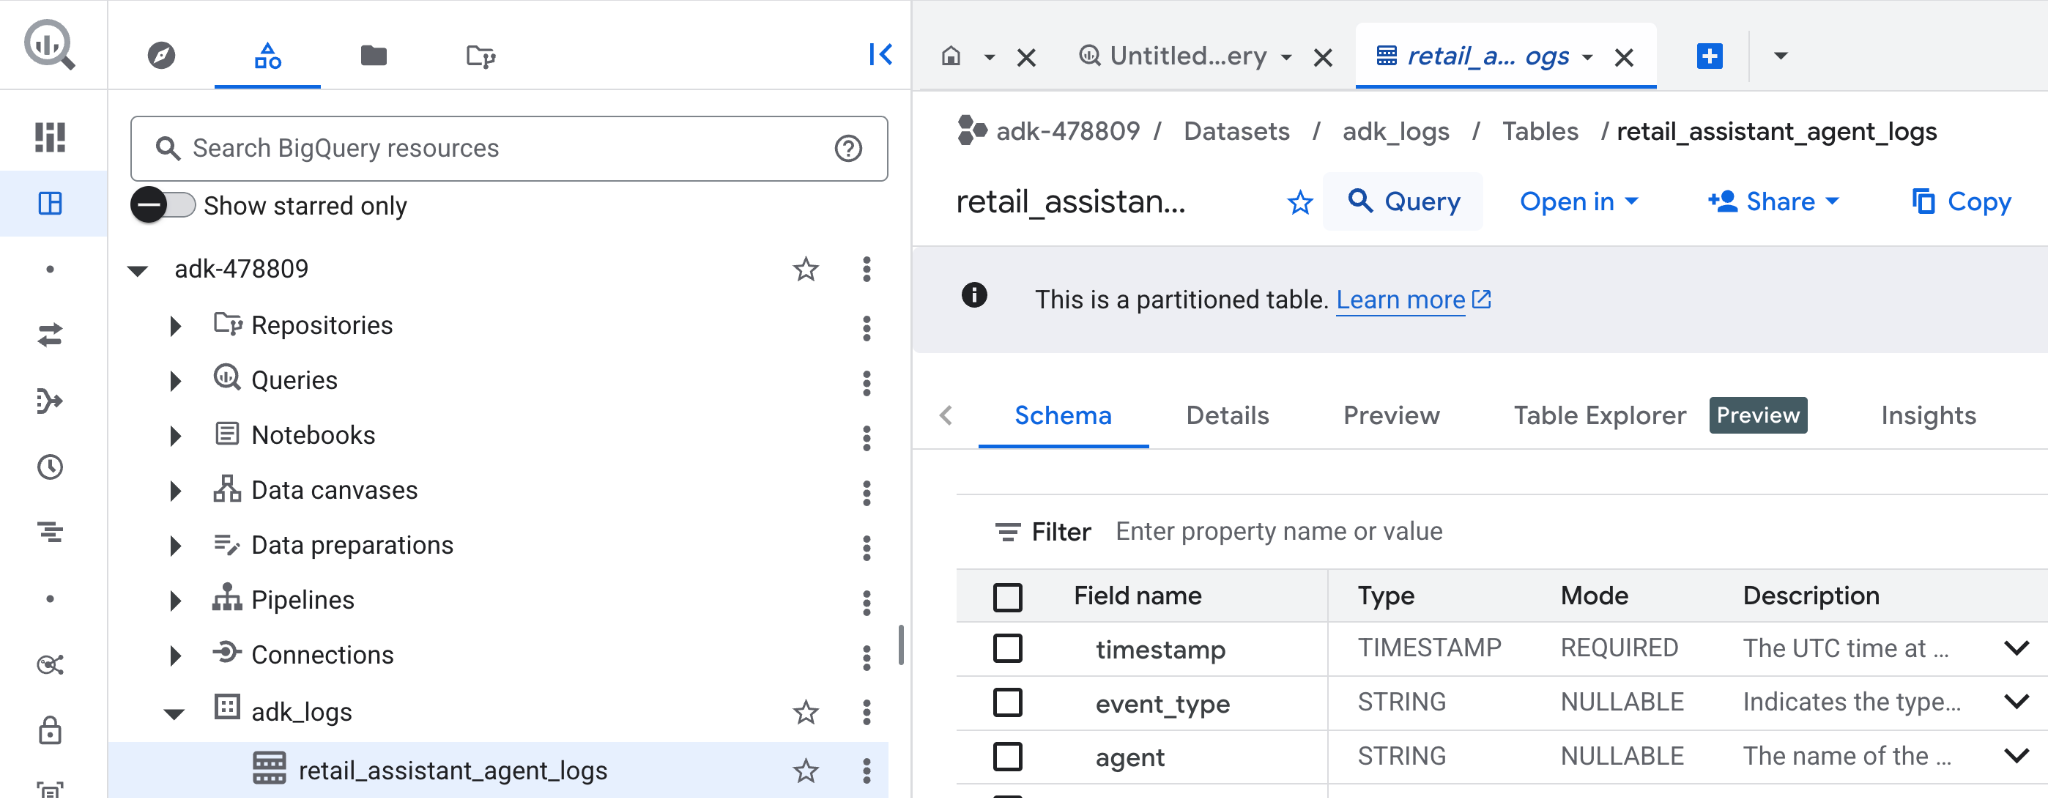
- Google Cloud コンソールで「BigQuery 」を検索します。
- [エクスプローラ] ペインで プロジェクトを探します。
adk_logsデータセットを開きます。retail_assitant_agent_logsテーブルを開き、[クエリ] をクリックします。
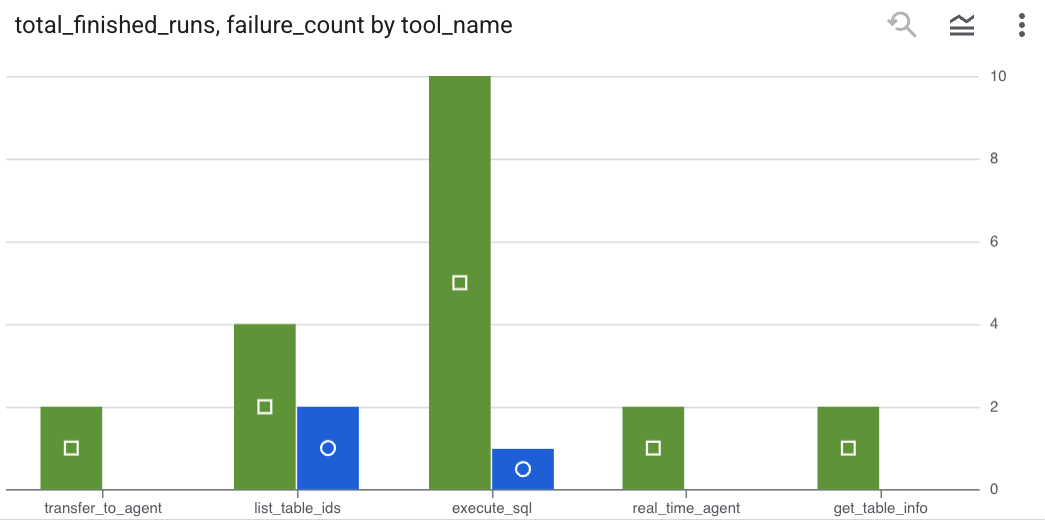
エージェントが行ったツール呼び出しを確認し、ツールエラーをキャプチャするには、BigQuery エディタで次のクエリを実行します。
SELECT
  -- Extract the tool name directly from the JSON key "tool"
  JSON_VALUE(content, '$.tool') AS tool_name,
  -- Count every time a tool finished (successfully or with an error)
  COUNT(*) AS total_finished_runs,
  -- Count as a failure if  event_type is ERROR, result object contains a status of 'ERROR', or error_details exist
  COUNTIF(
    event_type = 'TOOL_ERROR' OR
    JSON_VALUE(content, '$.result.status') = 'ERROR' OR
    JSON_VALUE(content, '$.result.error_details') IS NOT NULL
  ) AS failure_count
FROM
  `adk_logs.retail_assistant_agent_logs`
WHERE
  event_type IN ('TOOL_COMPLETED', 'TOOL_ERROR')
GROUP BY
  1;
[ビジュアリゼーション] をクリックして、結果をグラフとして表示します(結果は異なる場合があります)。
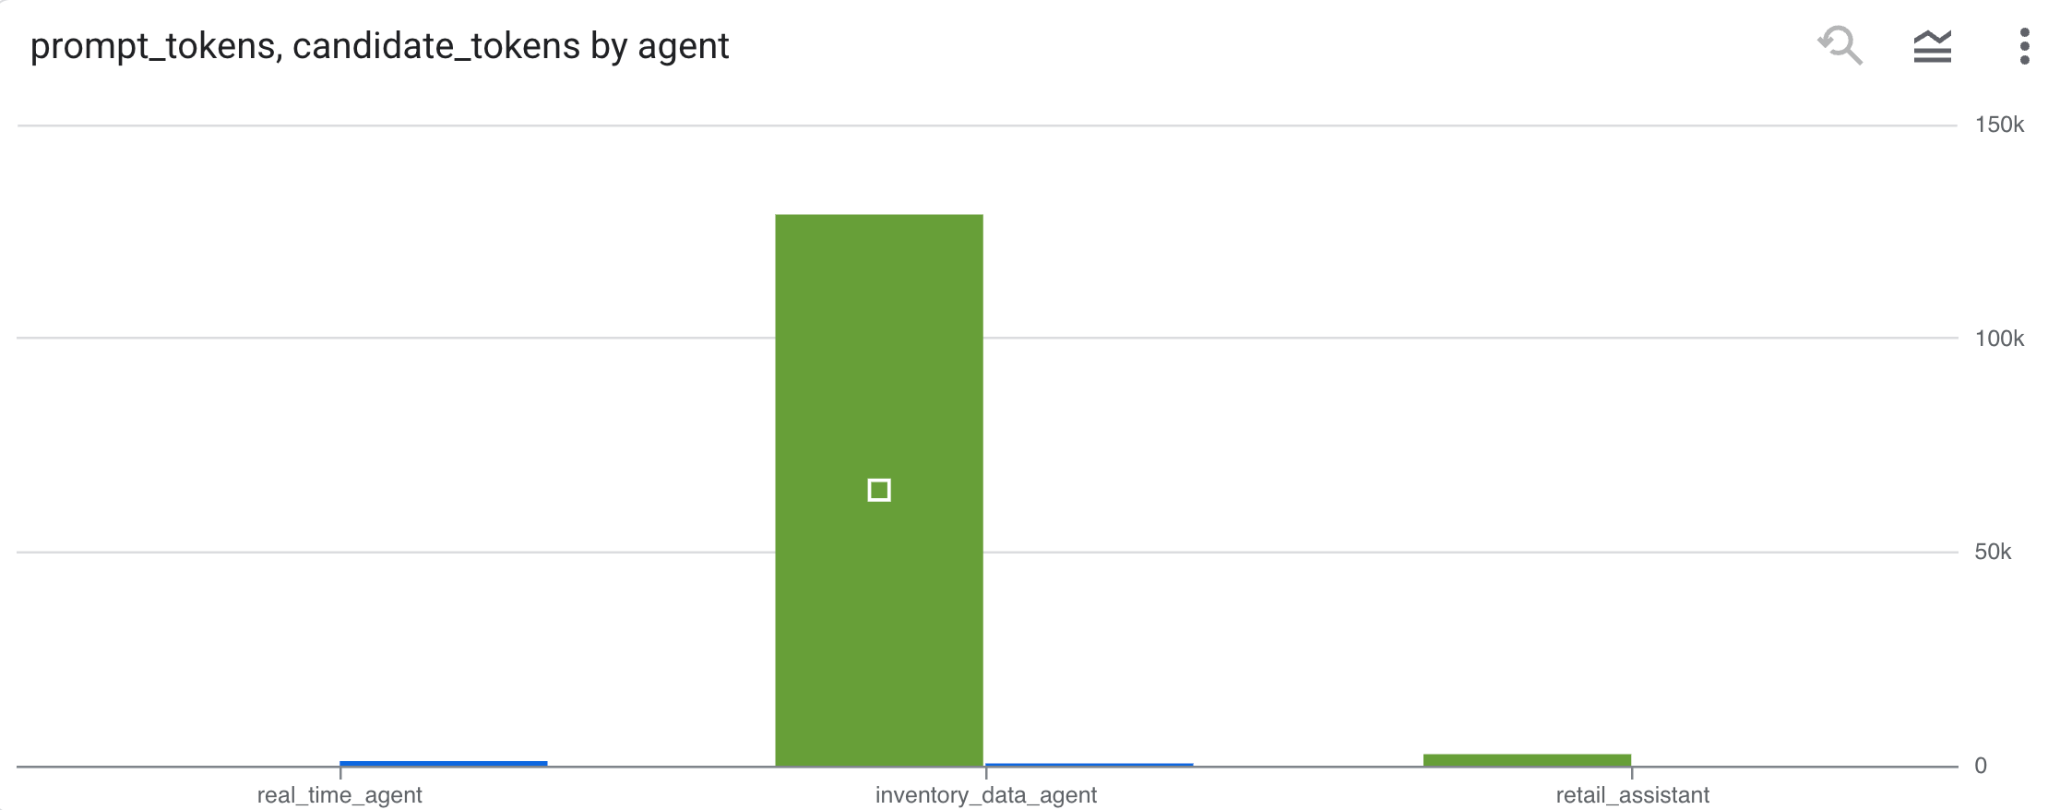
トークン使用量
エージェントの費用を推測するには、個別のエージェントが消費したプロンプト トークンと候補トークンを集計します。
SELECT
 t.agent,
 SUM(LAX_INT64(t.content.usage.prompt)) AS prompt_tokens,
 SUM(LAX_INT64(t.content.usage.completion)) AS completion_tokens
FROM
 `adk_logs.retail_assistant_agent_logs` AS t
WHERE
 t.event_type = 'LLM_RESPONSE'
 -- Filter for records that actually contain usage metadata
 AND t.content.usage IS NOT NULL
GROUP BY 1;
[ビジュアリゼーション] をクリックして、結果をグラフとして表示します(結果は異なる場合があります)。
8. [ボーナス] ユーザーの感情を分析する
次に、エージェントに提供されたユーザー入力の感情を分析しましょう。
- Cloud Shell で、Cloud リソース接続を作成して、BigQuery が Vertex AI サービスとやり取りできるようにします。
bq mk --connection --location=us \
    --connection_type=CLOUD_RESOURCE test_connection
次のようなレスポンスが表示されます。
Connection 517325854360.us.test_connection successfully created
- クラウド リソース接続を作成します。
export SERVICE_ACCOUNT_EMAIL=$(bq show --format=prettyjson --connection us.test_connection | grep "serviceAccountId" | cut -d '"' -f 4)
- 次のコマンドを実行して、サービス アカウントが正常に作成されたことを確認します。
echo $SERVICE_ACCOUNT_EMAIL
サービス アカウントが表示されます。

- Vertex AI とのやり取りに必要なプロジェクト レベルの権限をリソース接続サービス アカウントに付与します。
gcloud projects add-iam-policy-binding $(gcloud config get-value project) \
    --member="serviceAccount:$SERVICE_ACCOUNT_EMAIL" \
    --role='roles/bigquery.connectionUser' && \
gcloud projects add-iam-policy-binding $(gcloud config get-value project) \
    --member="serviceAccount:$SERVICE_ACCOUNT_EMAIL" \
    --role='roles/aiplatform.user'
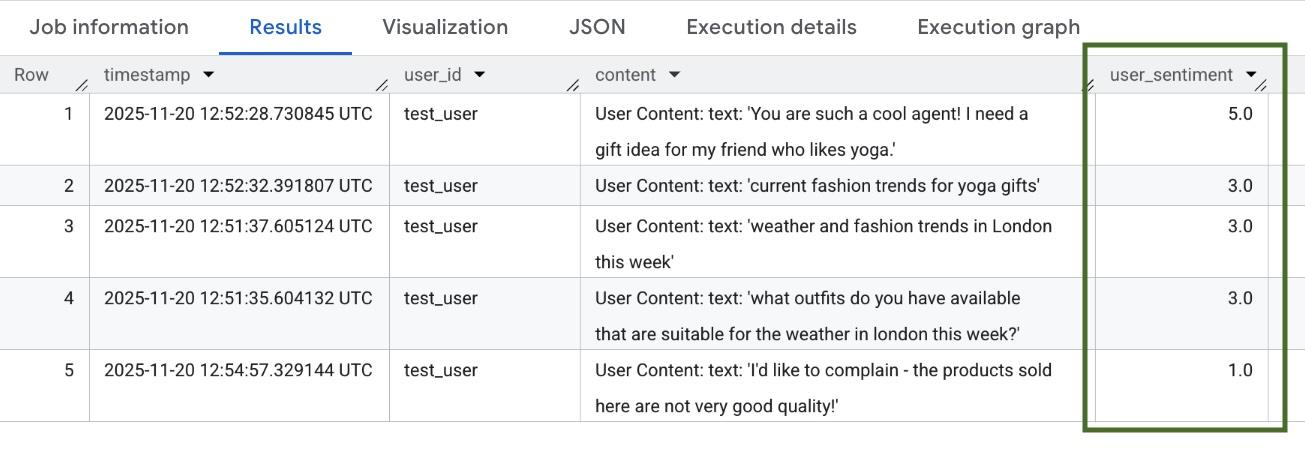
権限が反映されるまで数分待ちます。次に BigQuery に戻り、 AI.SCORE 関数を含む次のクエリを実行して、ユーザーの感情を分析します。
SELECT
 timestamp,
 user_id,
 content,
 AI.SCORE((
   'What is the sentiment of the user in this text:', JSON_VALUE(content.text_summary),
   'Use a scale from 1 to 5.'),
 connection_id => 'us.test_connection') AS user_sentiment
FROM
 `adk_logs.retail_assistant_agent_logs`
WHERE
  event_type = 'USER_MESSAGE_RECEIVED'
ORDER BY
 user_sentiment DESC;
AI.SCORE 関数は、ユーザー入力ごとに 1 ~ 5 の感情値を割り当てます。次のような結果が表示されます。
9. クリーンアップ
Google Cloud アカウントへの継続的な課金を回避するには、このワークショップで作成したリソースを削除します。
スクリプトで作成したロギング データセットを削除します。
bq rm -r -f -d $PROJECT_ID:adk_logs
クラウド リソース接続を削除します。
bq rm --connection --project_id=$PROJECT_ID --location=us test_connection
bigquery-adk-codelab ディレクトリとその内容を削除するには:
cd ..
rm -rf adk-agent-observability
10. 完了
おめでとうございます!Agent Development Kit(ADK)を使用してマルチエージェント システムを構築し、BigQuery Agent Analytics プラグインを統合してエージェントの動作を追跡および監査しました。