
1. 소개
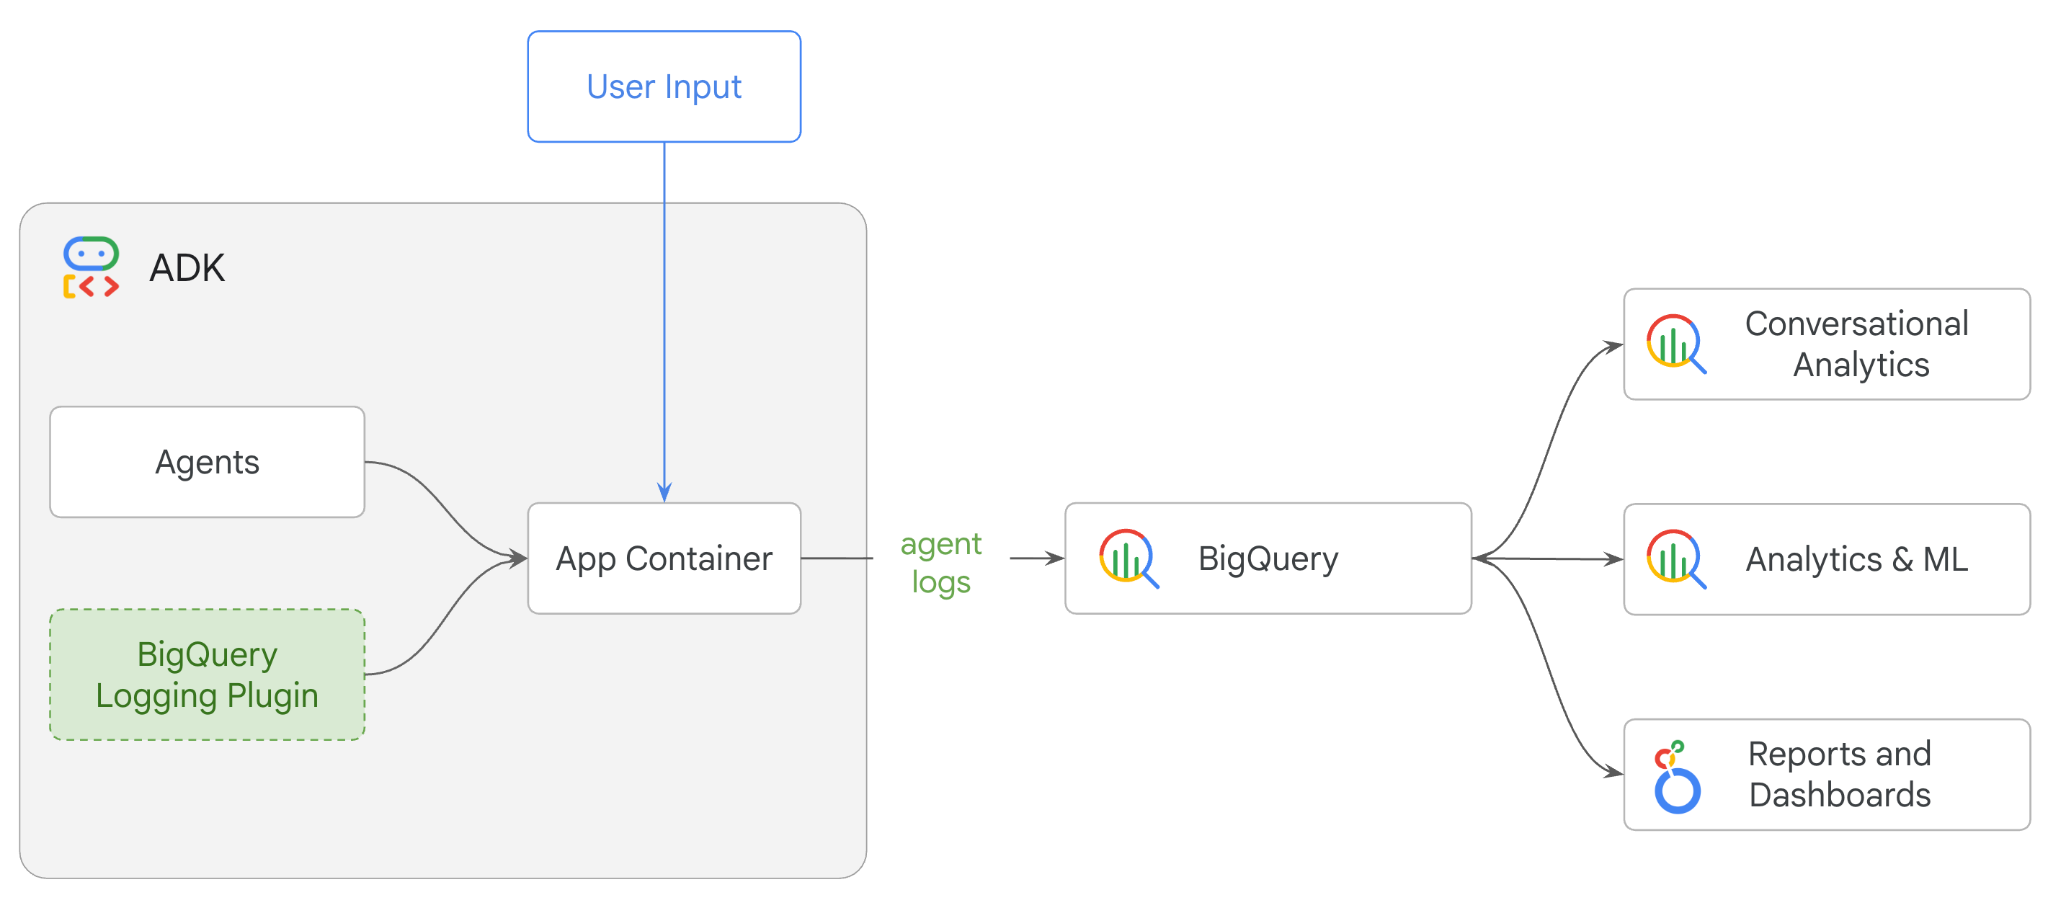
이 Codelab에서는 에이전트 개발 키트 (ADK)를 사용하여 멀티 에이전트 시스템을 빌드하고 BigQuery 에이전트 분석 플러그인을 사용하여 에이전트 모니터링 가능성을 사용 설정합니다.에이전트에게 일련의 질문을 한 다음 BigQuery를 사용하여 대화 트레이스와 에이전트 도구 사용량을 분석합니다.
실습할 내용
- ADK 를 사용하여 멀티 에이전트 소매업 어시스턴트 빌드
- 이 에이전트 실행에 관한 트레이스 데이터를 BigQuery에 캡처하고 저장하도록 BigQuery 에이전트 분석 플러그인 초기화
- BigQuery에서 에이전트 로그 데이터 분석
필요한 항목
- 웹브라우저(예: Chrome)
- 결제가 사용 설정된 Google Cloud 프로젝트 또는
- Gmail 계정 다음 섹션에서는 이 Codelab에 사용할 수 있는 무료 $5 크레딧을 사용하고 새 프로젝트를 설정하는 방법을 보여줍니다.
이 Codelab은 초보자를 포함한 모든 수준의 개발자를 대상으로 합니다. Google Cloud Shell의 명령줄 인터페이스와 ADK 개발용 Python 코드를 사용합니다. Python 전문가일 필요는 없지만 코드를 읽는 방법을 기본적인 이해하고 있으면 개념을 이해하는 데 도움이 됩니다.
2. 시작하기 전에
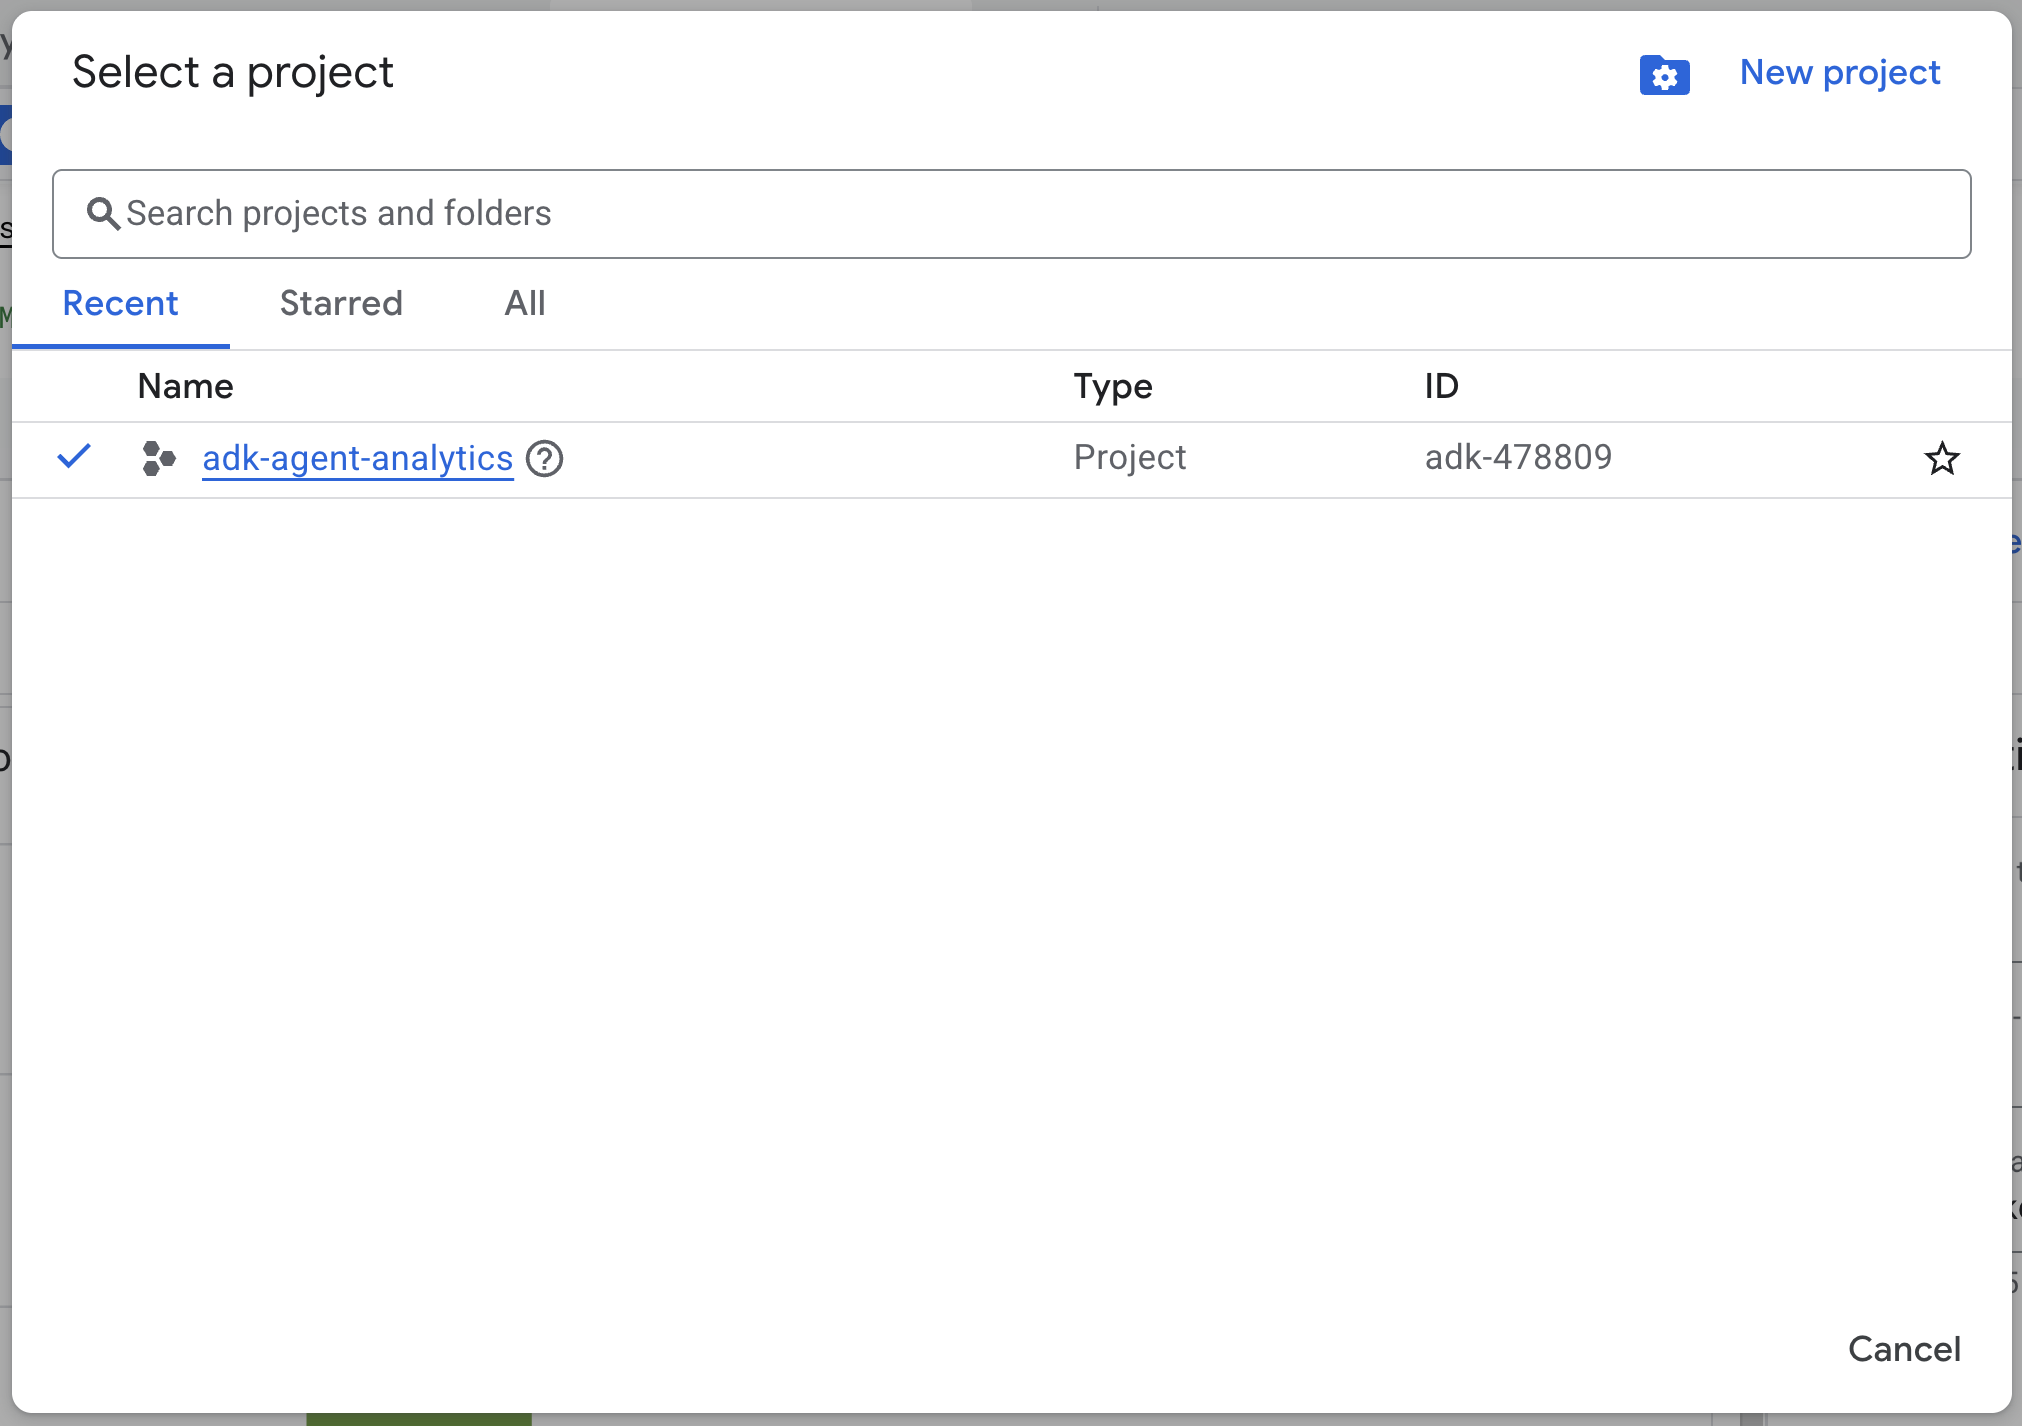
Google Cloud 프로젝트 만들기
- Google Cloud 콘솔의 프로젝트 선택기 페이지에서 Google Cloud 프로젝트를 선택하거나 만듭니다.
- Cloud 프로젝트에 결제가 사용 설정되어 있는지 확인합니다. 프로젝트에 결제가 사용 설정되어 있는지 확인하는 방법을 알아보세요.
Cloud Shell 시작
Cloud Shell 은 Google Cloud에서 실행되며 필요한 도구가 사전 로드된 명령줄 환경입니다.
- Google Cloud 콘솔 상단에서 Cloud Shell 활성화 를 클릭합니다.

- Cloud Shell에 연결되면 이 명령어를 실행하여 Cloud Shell에서 인증을 확인합니다.
gcloud auth list
- 다음 명령어를 실행하여 프로젝트가 gcloud와 함께 사용하도록 구성되어 있는지 확인합니다.
gcloud config get project
- 프로젝트가 예상대로 구성되지 않은 경우 다음 명령어를 사용하여 프로젝트를 설정합니다.
export PROJECT_ID=<YOUR_PROJECT_ID>
gcloud config set project $PROJECT_ID
API 사용 설정
- 이 명령어를 실행하여 필요한 모든 API와 서비스를 사용 설정합니다.
gcloud services enable bigquery.googleapis.com \
cloudresourcemanager.googleapis.com \
aiplatform.googleapis.com
- 명령어가 실행되면 아래와 비슷한 메시지가 표시됩니다.
Operation "operations/..." finished successfully.
3. 설치 및 설정
Cloud Shell로 돌아가서 홈 디렉터리에 있는지 확인합니다.
Cloud Shell에서 다음 명령어를 실행하여 BigQuery에 adk_logs라는 새 데이터 세트를 만듭니다.
bq mk --dataset --location=US adk_logs
이제 가상 Python 환경을 만들고 필요한 패키지를 설치해 보겠습니다.
- Cloud Shell에서 새 터미널 탭을 열고 이 명령어를 실행하여
adk-agent-observability라는 폴더를 만들고 폴더로 이동합니다.
mkdir adk-agent-observability
cd adk-agent-observability
- 가상 Python 환경을 만듭니다.
python -m venv .venv
- 가상 환경을 활성화합니다.
source .venv/bin/activate
- ADK 설치
pip install --upgrade google-adk
4. ADK 애플리케이션 만들기
이제 소매업 어시스턴트 에이전트를 만들어 보겠습니다. 이 에이전트는 다음과 같이 설계됩니다.
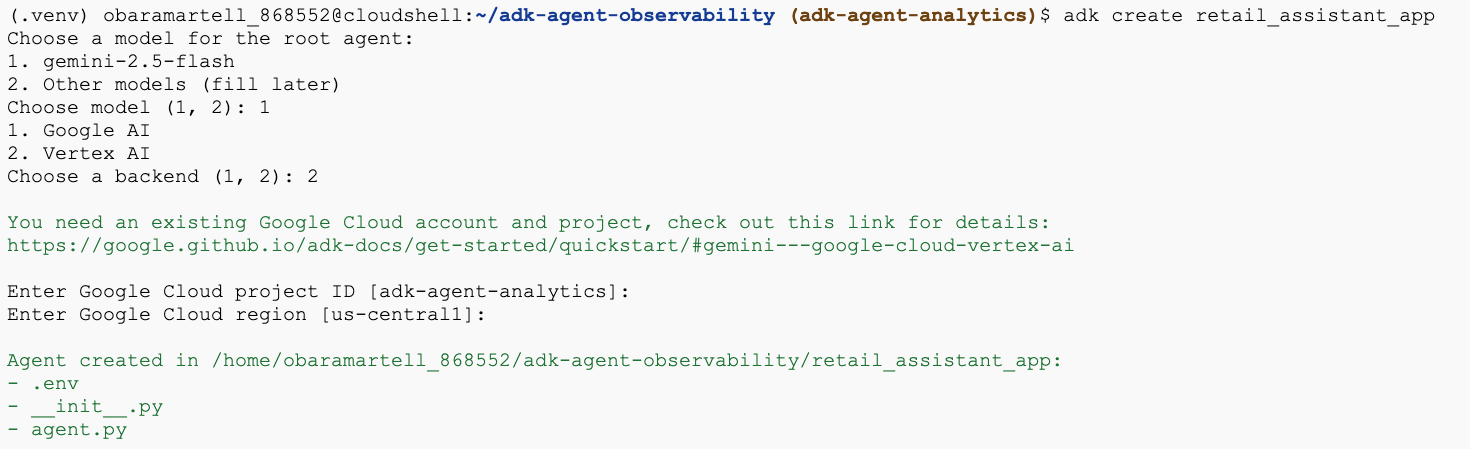
- adk create utility command 를 실행하여 필요한 폴더와 파일이 포함된 새 에이전트 애플리케이션을 스캐폴딩합니다.
adk create retail_assistant_app
프롬프트의 안내를 따릅니다.
- 모델로 gemini-2.5-flash 를 선택합니다.
- 백엔드로 Vertex AI 를 선택합니다.
- 기본 Google Cloud 프로젝트 ID와 리전을 확인합니다.
샘플 상호작용은 아래와 같습니다.
- Cloud Shell에서 편집기 열기 버튼을 클릭 하여 Cloud Shell 편집기를 열고 새로 만든 폴더와 파일을 확인합니다.

생성된 파일을 확인합니다.
retail_assistant_app/
├── .venv/
└── retail_assistant_app/
    ├── __init__.py
    ├── agent.py
    └── .env
- init.py: 폴더를 Python 모듈로 표시합니다.
- agent.py: 초기 에이전트 정의를 포함합니다.
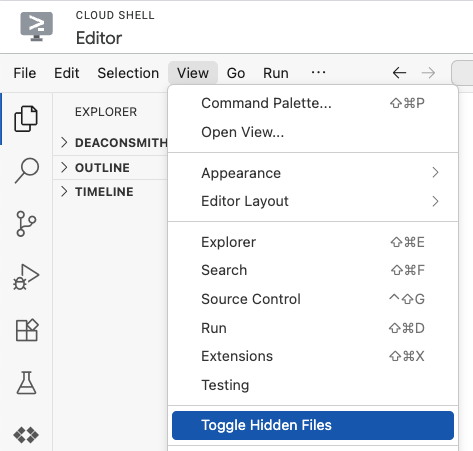
- .env: 이 파일을 보려면 보기 > 숨은 파일 전환을 클릭해야 할 수 있습니다.
- .env 파일에는 프로젝트의 환경 변수가 포함되어 있습니다. 프롬프트에서 올바르게 설정되지 않은 변수를 업데이트합니다.
GOOGLE_GENAI_USE_VERTEXAI=1
GOOGLE_CLOUD_PROJECT=<YOUR_GOOGLE_PROJECT_ID>
GOOGLE_CLOUD_LOCATION=<YOUR_GOOGLE_CLOUD_REGION>
5. 에이전트 정의
이제 계층적 멀티 에이전트 시스템을 정의해 보겠습니다.
- 실시간 트렌드 에이전트: Google 검색을 사용하여 현재 패션 트렌드를 찾습니다.
- 인벤토리 데이터 에이전트: BigQuery 도구 모음을 사용하여 공개 thelook_ecommerce 데이터 세트에서 사용 가능한 제품을 쿼리합니다.
- 소매업 어시스턴트 (루트) 에이전트: 트렌드 에이전트에게 조언을 구하고 인벤토리 에이전트에게 일치하는 제품을 요청하여 워크플로를 조정합니다.
retail_assistant_app/agent.py의 전체 콘텐츠를 다음 코드로 바꿉니다.
import os
import uuid
import asyncio
import google.auth
import dotenv
from google.genai import types
from google.adk.agents import Agent
from google.adk.apps import App
from google.adk.runners import InMemoryRunner
from google.adk.tools import AgentTool, google_search
from google.adk.tools.bigquery import BigQueryCredentialsConfig, BigQueryToolset
from google.adk.plugins.bigquery_agent_analytics_plugin import BigQueryAgentAnalyticsPlugin

dotenv.load_dotenv()

# --- Configuration ---

PROJECT_ID = os.getenv('GOOGLE_CLOUD_PROJECT', 'project_not_set')
DATASET_ID = "adk_logs"
TABLE_ID = "retail_assistant_agent_logs"
APP_NAME = "retail_assistant_agent"
USER_ID = "test_user"

# --- Toolsets ---

credentials, _ = google.auth.default()
credentials_config = BigQueryCredentialsConfig(credentials=credentials)
bigquery_toolset = BigQueryToolset(
 credentials_config=credentials_config
)

# --- Agents ---

# 1. Trend Spotter
real_time_agent = Agent(
   name="real_time_agent",
   model="gemini-2.5-flash",
    description="Researches external factors like weather, local events, and current fashion trends.",
   instruction="""
       You are a real-time research agent.
       Use Google Search to find real-time information relevant to the user's request,
       such as the current weather in their location or trending styles.
   """,
   tools=[google_search]
)

# 2. Inventory Manager
inventory_data_agent = Agent(
   name="inventory_data_agent",
   model="gemini-2.5-flash",
   description="Oversees product inventory in the BigQuery `thelook_ecommerce` dataset to find available items and prices.",
   instruction=f"""
   You manage the inventory. You have access to the `bigquery-public-data.thelook_ecommerce` dataset via the BigQuery toolset.
   Run all BigQuery queries the project id of: '{PROJECT_ID}'

   Your workflow:
   1. Look at the products table.
   2. Find items that match the requirements, factor in the results from the trend_setter agent if there are any.
   3. Return with a user friendly response, including the list of specific products and prices.
   """,
   tools=[bigquery_toolset]
)

# 3. Root Orchestrator
root_agent = Agent(
   name="retail_assistant",
   model="gemini-2.5-flash",
   description="The primary orchestrator, responsible for handling user input, delegating to sub-agents, and synthesizing the final product recommendation.",
   instruction="""
   You are a Retail Assistant.
   You can ask the 'real_time_agent' agent for any realtime information needed, or style advice, include any information provided by the user.
   You should ask the 'inventory_data_agent' agent to find a maximum of 3 available items matching that style.
   Combine the results into a recommendation.
   """,
   tools=[AgentTool(agent=real_time_agent)],
   sub_agents=[inventory_data_agent]
)
6. BigQuery 에이전트 분석 플러그인으로 로그 생성
이제 실행 데이터를 캡처하도록 BigQuery 에이전트 분석 플러그인 을 구성해 보겠습니다.
이렇게 하려면 App 클래스의 인스턴스를 만듭니다. 이 클래스는 에이전트의 런타임 컨테이너 역할을 합니다. 대화 루프를 관리하고, 사용자 상태를 처리하며, 연결된 플러그인 (예: 에이전트 분석 로거)을 조정합니다.
아래 코드는 다음과 같습니다.
- 로깅 플러그인 초기화: 필요한 연결 세부정보로
BigQueryAgentAnalyticsPlugin을 만듭니다. - 플러그인 통합: 초기화된 BigQuery 플러그인을
App생성자에 전달하여 에이전트 실행 이벤트가 자동으로 캡처되고 로깅되도록 합니다. - 에이전트 실행 및 로깅: 플러그인이 리소스를 닫기 전에 전체 이벤트 시퀀스를 동시에 수집하여 BigQuery로 전송하면서
runner.run_async를 통해 대화 흐름을 실행합니다.
이 코드를 복사하여 agent.py 파일의 에이전트 정의 아래에 붙여넣습니다.
async def main(prompt: str):
    """Runs a conversation with the BigQuery agent using the ADK Runner."""
    bq_logger_plugin = BigQueryAgentAnalyticsPlugin(
        project_id=PROJECT_ID, dataset_id=DATASET_ID, table_id=TABLE_ID
    )
    app = App(name=APP_NAME, root_agent=root_agent, plugins=[bq_logger_plugin])
    runner = InMemoryRunner(app=app)

    try:
        session_id = f"{USER_ID}_{uuid.uuid4().hex[:8]}"

        my_session = await runner.session_service.create_session(
            app_name=APP_NAME, user_id=USER_ID, session_id=session_id
        )

        async for event in runner.run_async(
            user_id=USER_ID,
            new_message=types.Content(
                role="user", parts=[types.Part.from_text(text=prompt)]
            ),
            session_id=my_session.id,
        ):
            if event.content.parts and event.content.parts[0].text:
                print(f"** {event.author}: {event.content.parts[0].text}")

    except Exception as e:
        print(f"Error in main: {e}")
    finally:
        print("Closing BQ Plugin...")
        await bq_logger_plugin.close()
        print("BQ Plugin closed.")

async def run_all_prompts():
    """Runs all prompts in a single event loop."""
    prompts = [
        "what outfits do you have available that are suitable for the weather in london this week?",
        "You are such a cool agent! I need a gift idea for my friend who likes yoga.",
        "I'd like to complain - the products sold here are not very good quality!"
    ]
    for prompt in prompts:
        await main(prompt)

if __name__ == "__main__":
    asyncio.run(run_all_prompts())
계측이 완료되었으므로 이제 에이전트가 작동하는 것을 확인할 수 있습니다. 스크립트를 실행하여 대화 워크플로를 트리거합니다.
python retail_assistant_app/agent.py
소매업 어시스턴트가 워크플로를 조정하는 것을 볼 수 있습니다.
- 실시간 트렌드 에이전트 (real_time_agent) 에게 런던의 날씨를 파악하고 적합한 패션 트렌드를 검색하도록 요청합니다.
- 그런 다음 인벤토리 데이터 에이전트 (inventory_data_agent) 에게 위임하여 이러한 트렌드와 일치하는 특정 제품에 대해
thelook_ecommerceBigQuery 데이터 세트를 쿼리합니다. - 마지막으로 루트 오케스트레이터 가 결과를 종합하여 최종 추천을 생성합니다.
그동안 플러그인은 에이전트의 실행 트레이스를 BigQuery로 스트리밍합니다.
7. 에이전트 로그 분석
도구 사용량
이제 에이전트가 백그라운드에서 무엇을 하고 있는지 확인할 수 있습니다. 데이터가 BigQuery로 스트리밍되었으며 분석할 준비가 되었습니다.
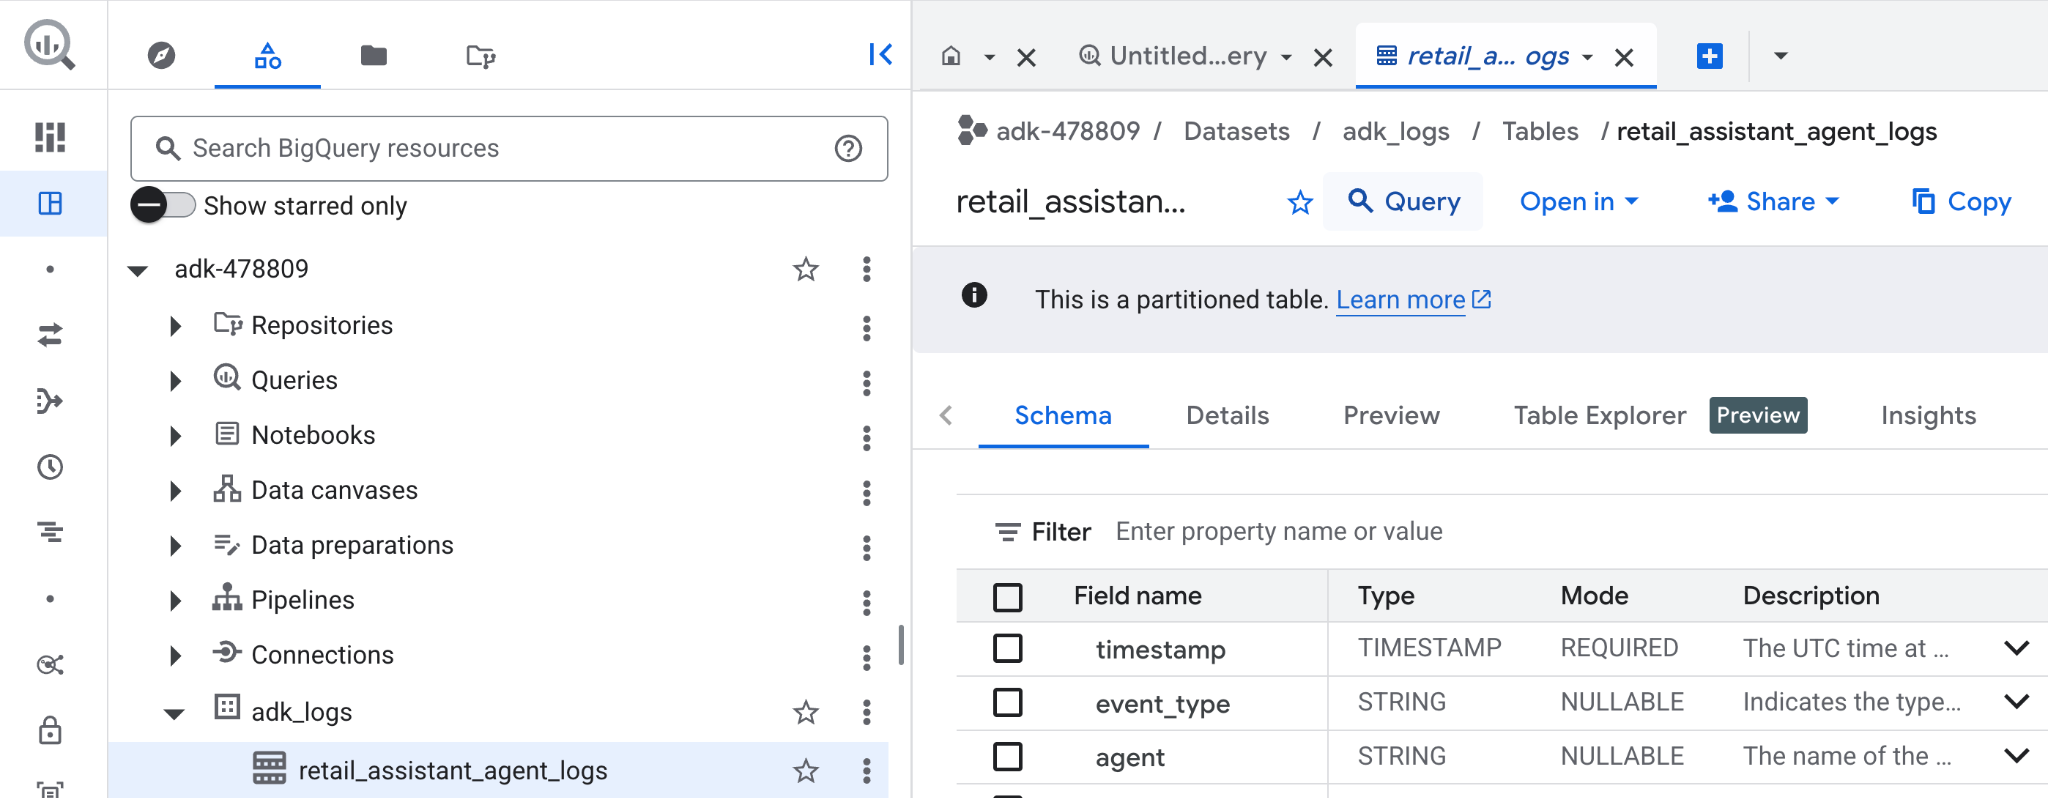
- Google Cloud 콘솔에서 BigQuery 를 검색합니다.
- 탐색기 창에서 프로젝트를 찾습니다.
adk_logs데이터 세트를 펼칩니다.retail_assitant_agent_logs테이블을 열고 쿼리 를 클릭합니다.
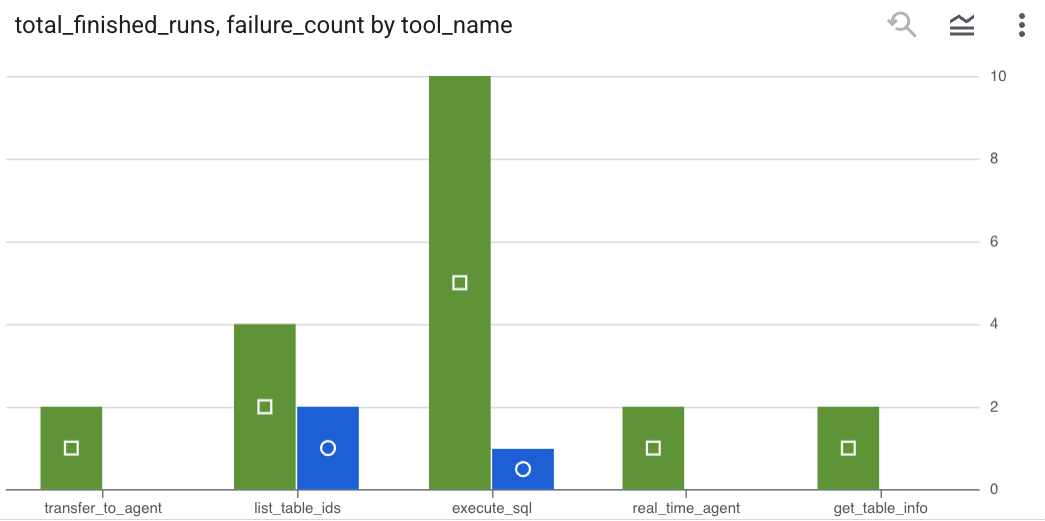
에이전트가 호출한 도구를 확인하고 도구 오류를 캡처하려면 BigQuery 편집기에서 다음 쿼리를 실행합니다.
SELECT
  -- Extract the tool name directly from the JSON key "tool"
  JSON_VALUE(content, '$.tool') AS tool_name,
  -- Count every time a tool finished (successfully or with an error)
  COUNT(*) AS total_finished_runs,
  -- Count as a failure if  event_type is ERROR, result object contains a status of 'ERROR', or error_details exist
  COUNTIF(
    event_type = 'TOOL_ERROR' OR
    JSON_VALUE(content, '$.result.status') = 'ERROR' OR
    JSON_VALUE(content, '$.result.error_details') IS NOT NULL
  ) AS failure_count
FROM
  `adk_logs.retail_assistant_agent_logs`
WHERE
  event_type IN ('TOOL_COMPLETED', 'TOOL_ERROR')
GROUP BY
  1;
시각화를 클릭하여 결과를 차트로 확인합니다 (결과는 다를 수 있음).
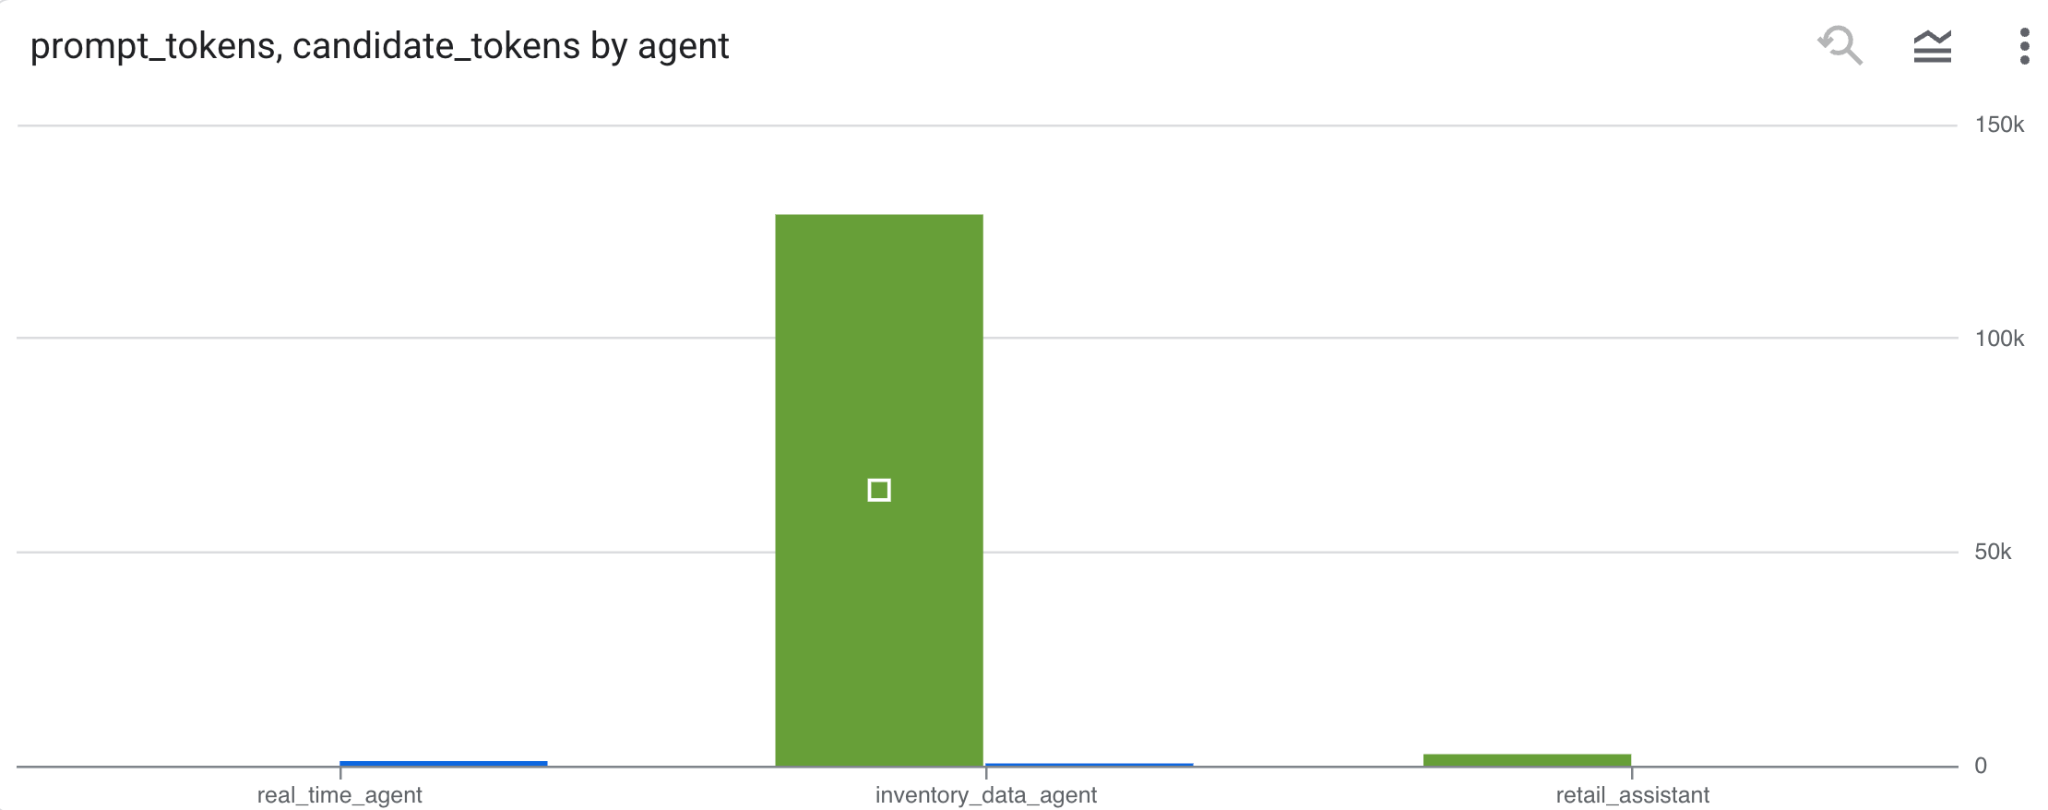
토큰 사용량
에이전트의 비용을 추론하려면 각 고유 에이전트에서 사용하는 프롬프트 토큰과 후보 토큰을 집계하면 됩니다.
SELECT
 t.agent,
 SUM(LAX_INT64(t.content.usage.prompt)) AS prompt_tokens,
 SUM(LAX_INT64(t.content.usage.completion)) AS completion_tokens
FROM
 `adk_logs.retail_assistant_agent_logs` AS t
WHERE
 t.event_type = 'LLM_RESPONSE'
 -- Filter for records that actually contain usage metadata
 AND t.content.usage IS NOT NULL
GROUP BY 1;
시각화를 클릭하여 결과를 차트로 확인합니다 (결과는 다를 수 있음).
8. [보너스] 사용자 감정 분석
이제 에이전트에 제공된 사용자 입력의 감정을 분석해 보겠습니다.
- Cloud Shell에서 클라우드 리소스 연결을 만들어 BigQuery가 Vertex AI 서비스와 상호작용하도록 합니다.
bq mk --connection --location=us \
    --connection_type=CLOUD_RESOURCE test_connection
다음과 같은 응답이 표시됩니다.
Connection 517325854360.us.test_connection successfully created
- 클라우드 리소스 연결을 만듭니다.
export SERVICE_ACCOUNT_EMAIL=$(bq show --format=prettyjson --connection us.test_connection | grep "serviceAccountId" | cut -d '"' -f 4)
- 이 명령어를 실행하여 서비스 계정이 생성되었는지 확인합니다.
echo $SERVICE_ACCOUNT_EMAIL
서비스 계정이 표시됩니다.

- Vertex AI와 상호작용하는 데 필요한 프로젝트 수준 권한을 리소스 연결 서비스 계정에 부여합니다.
gcloud projects add-iam-policy-binding $(gcloud config get-value project) \
    --member="serviceAccount:$SERVICE_ACCOUNT_EMAIL" \
    --role='roles/bigquery.connectionUser' && \
gcloud projects add-iam-policy-binding $(gcloud config get-value project) \
    --member="serviceAccount:$SERVICE_ACCOUNT_EMAIL" \
    --role='roles/aiplatform.user'
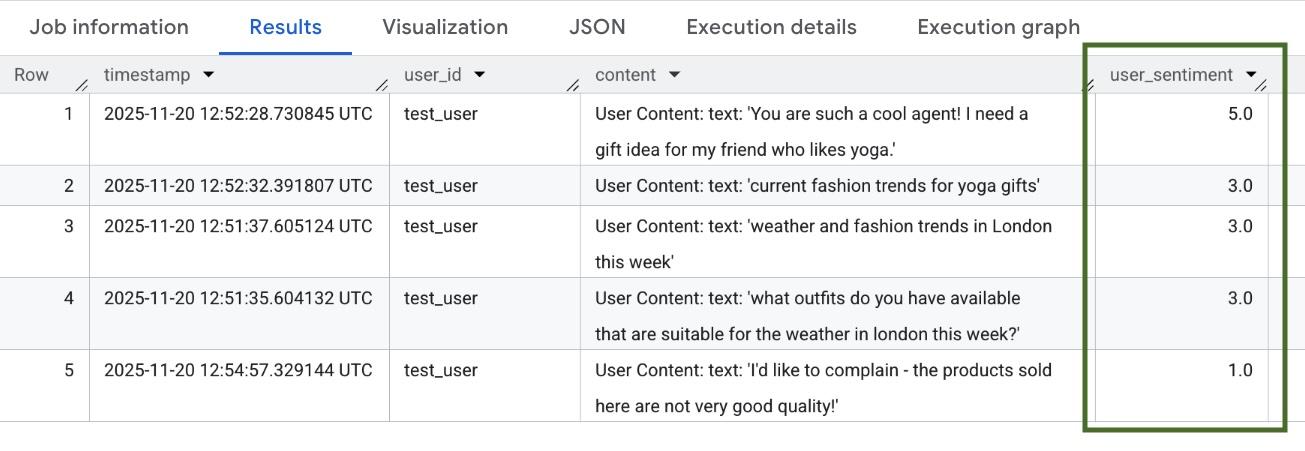
권한이 전파될 때까지 몇 분 정도 기다립니다. 그런 다음 BigQuery로 돌아가서 AI.SCORE 함수가 포함된 다음 쿼리를 실행하여 사용자 감정을 분석합니다.
SELECT
 timestamp,
 user_id,
 content,
 AI.SCORE((
   'What is the sentiment of the user in this text:', JSON_VALUE(content.text_summary),
   'Use a scale from 1 to 5.'),
 connection_id => 'us.test_connection') AS user_sentiment
FROM
 `adk_logs.retail_assistant_agent_logs`
WHERE
  event_type = 'USER_MESSAGE_RECEIVED'
ORDER BY
 user_sentiment DESC;
AI.SCORE 함수는 각 사용자 입력에 대해 1~5 사이의 감정 값을 할당합니다. 다음과 비슷한 결과가 표시됩니다.
9. 삭제
Google Cloud 계정에 비용이 청구되지 않도록 하려면 이 워크숍 중에 만든 리소스를 삭제합니다.
스크립트로 만든 로깅 데이터 세트를 삭제합니다.
bq rm -r -f -d $PROJECT_ID:adk_logs
클라우드 리소스 연결을 삭제합니다.
bq rm --connection --project_id=$PROJECT_ID --location=us test_connection
bigquery-adk-codelab 디렉터리와 콘텐츠를 삭제하려면 다음을 실행합니다.
cd ..
rm -rf adk-agent-observability
10. 축하합니다
축하합니다. 에이전트 개발 키트 (ADK)로 멀티 에이전트 시스템을 빌드하고 BigQuery 에이전트 분석 플러그인을 통합하여 에이전트의 동작을 추적하고 감사했습니다.