
1. บทนำ
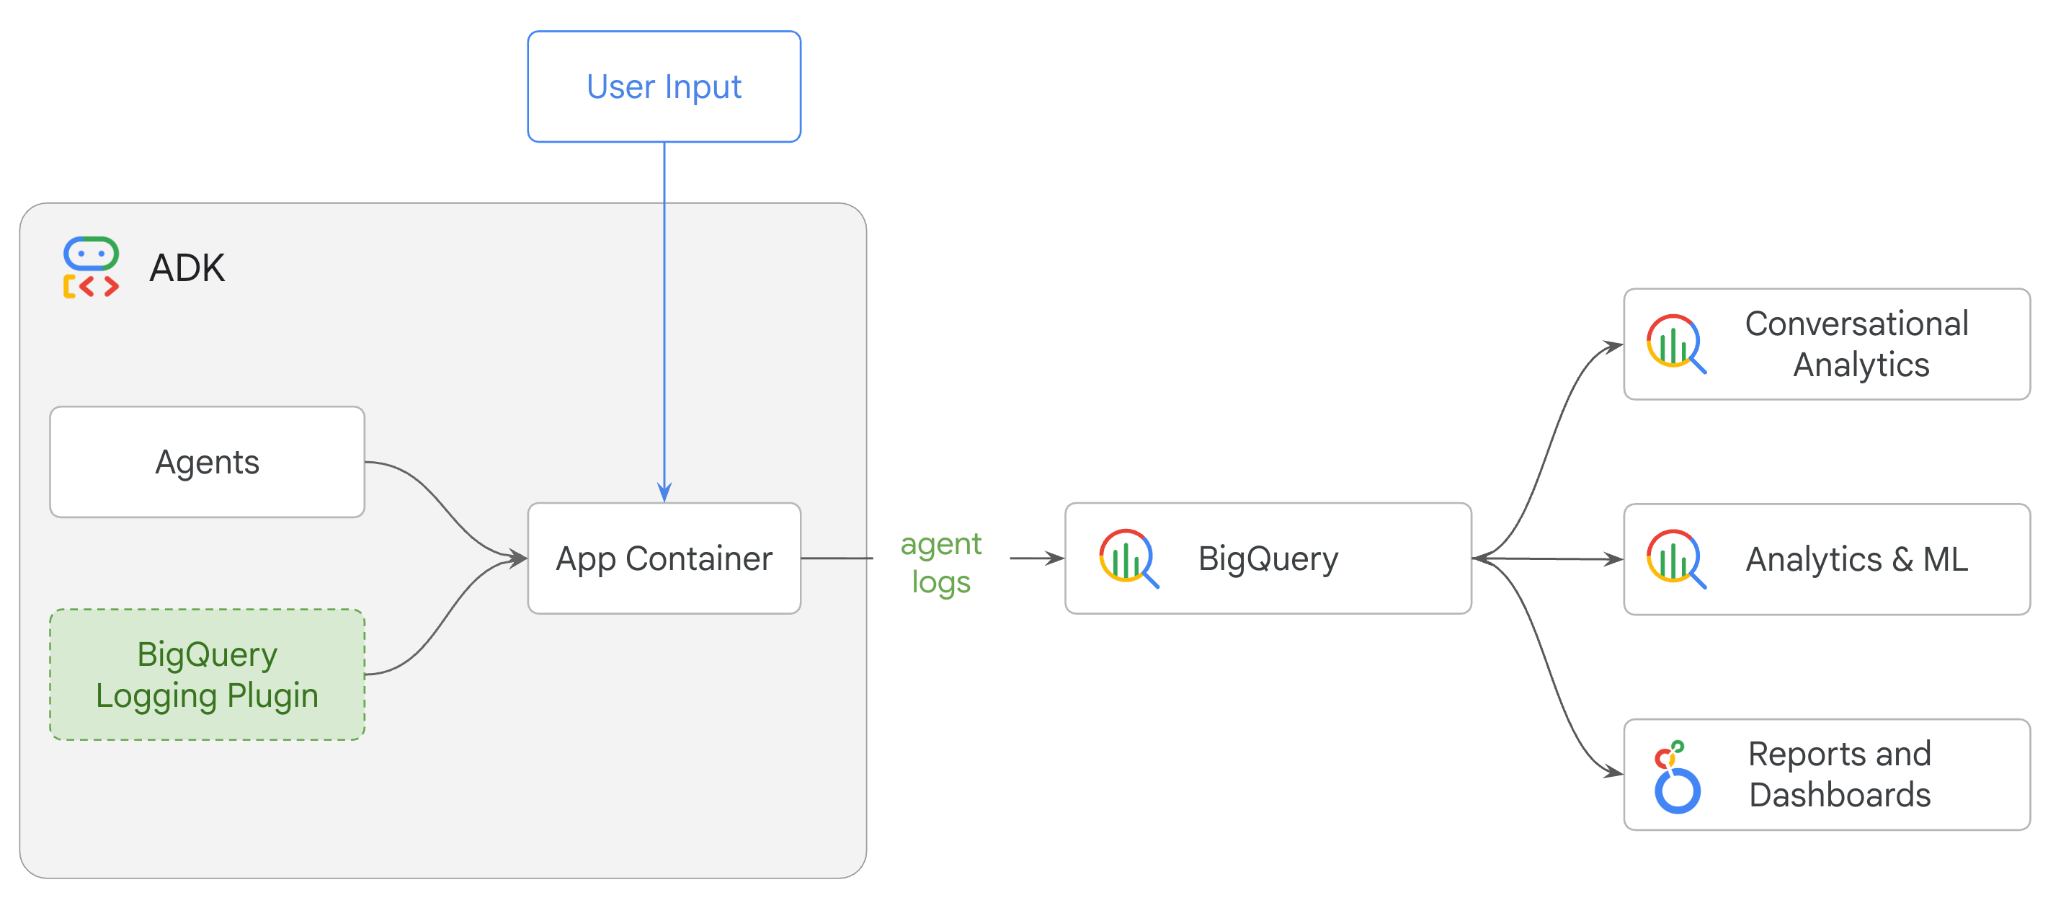
ใน Codelab นี้ คุณจะสร้างระบบแบบหลาย Agent โดยใช้ Agent Development Kit (ADK) และเปิดใช้ความสามารถในการสังเกต Agent โดยใช้ปลั๊กอิน BigQuery Agent Analytics คุณจะถามคำถามชุดหนึ่งกับ Agent จากนั้นใช้ BigQuery เพื่อวิเคราะห์ร่องรอยการสนทนาและการใช้เครื่องมือของ Agent
สิ่งที่คุณต้องทำ
- สร้างผู้ช่วยด้านการค้าปลีกแบบหลาย Agent โดยใช้ ADK
- เริ่มต้นปลั๊กอิน BigQuery Agent Analytics เพื่อบันทึกและจัดเก็บข้อมูลการติดตามเกี่ยวกับการดำเนินการของเอเจนต์นี้ไปยัง BigQuery
- วิเคราะห์ข้อมูลบันทึกของตัวแทนใน BigQuery
สิ่งที่คุณต้องมี
- เว็บเบราว์เซอร์ เช่น Chrome
- โปรเจ็กต์ Google Cloud ที่เปิดใช้การเรียกเก็บเงิน หรือ
- บัญชี Gmail ส่วนถัดไปจะแสดงวิธีแลกรับเครดิต $5 ฟรีสำหรับ Codelab นี้และตั้งค่าโปรเจ็กต์ใหม่
Codelab นี้มีไว้สำหรับนักพัฒนาซอฟต์แวร์ทุกระดับ รวมถึงผู้เริ่มต้น คุณจะใช้อินเทอร์เฟซบรรทัดคำสั่งใน Google Cloud Shell และโค้ด Python สำหรับการพัฒนา ADK คุณไม่จำเป็นต้องเป็นผู้เชี่ยวชาญด้าน Python แต่ความเข้าใจพื้นฐานเกี่ยวกับวิธีอ่านโค้ดจะช่วยให้คุณเข้าใจแนวคิดต่างๆ ได้
2. ก่อนเริ่มต้น
สร้างโปรเจ็กต์ Google Cloud
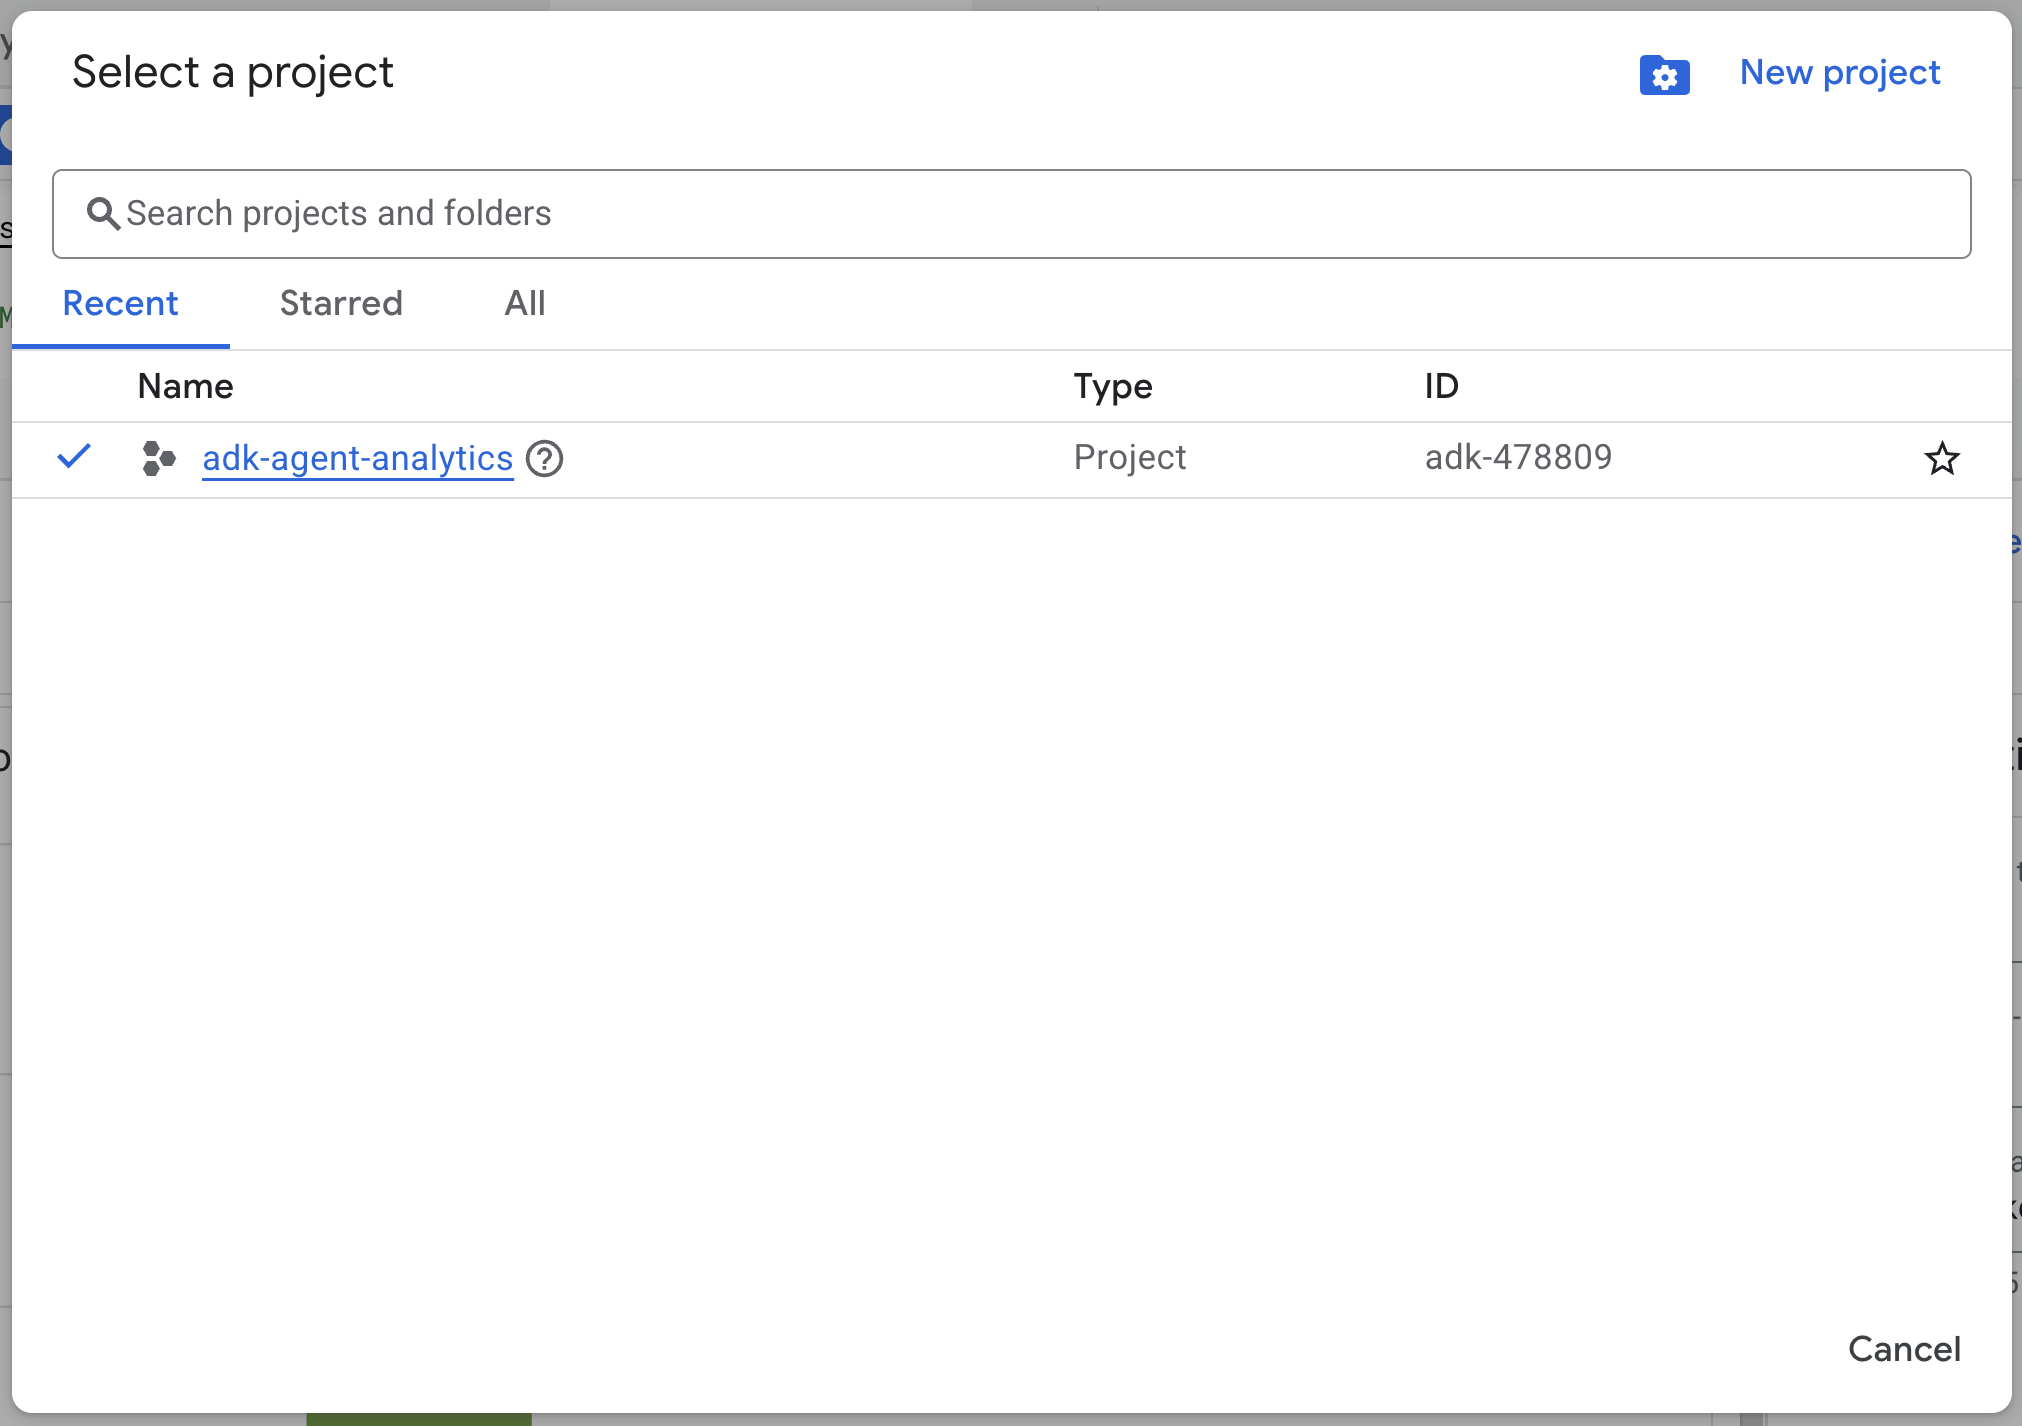
- ในคอนโซล Google Cloud ในหน้าตัวเลือกโปรเจ็กต์ ให้เลือกหรือสร้างโปรเจ็กต์ Google Cloud
- ตรวจสอบว่าได้เปิดใช้การเรียกเก็บเงินสำหรับโปรเจ็กต์ที่อยู่ในระบบคลาวด์แล้ว ดูวิธีตรวจสอบว่าได้เปิดใช้การเรียกเก็บเงินในโปรเจ็กต์แล้วหรือไม่
เริ่มต้น Cloud Shell
Cloud Shell คือสภาพแวดล้อมบรรทัดคำสั่งที่ทำงานใน Google Cloud ซึ่งโหลดเครื่องมือที่จำเป็นไว้ล่วงหน้า
- คลิกเปิดใช้งาน Cloud Shell ที่ด้านบนของคอนโซล Google Cloud

- เมื่อเชื่อมต่อกับ Cloud Shell แล้ว ให้เรียกใช้คำสั่งต่อไปนี้เพื่อยืนยันการตรวจสอบสิทธิ์ใน Cloud Shell
gcloud auth list
- เรียกใช้คำสั่งต่อไปนี้เพื่อยืนยันว่าได้กำหนดค่าโปรเจ็กต์ให้ใช้กับ gcloud แล้ว
gcloud config get project
- หากไม่ได้กำหนดค่าโปรเจ็กต์ตามที่คาดไว้ ให้ใช้คำสั่งต่อไปนี้เพื่อตั้งค่าโปรเจ็กต์
export PROJECT_ID=<YOUR_PROJECT_ID>
gcloud config set project $PROJECT_ID
เปิดใช้ API
- เรียกใช้คำสั่งนี้เพื่อเปิดใช้ API และบริการที่จำเป็นทั้งหมด
gcloud services enable bigquery.googleapis.com \
cloudresourcemanager.googleapis.com \
aiplatform.googleapis.com
- เมื่อเรียกใช้คำสั่งสำเร็จ คุณควรเห็นข้อความที่คล้ายกับข้อความที่แสดงด้านล่าง
การดำเนินการ "operations/..." เสร็จสมบูรณ์แล้ว
3. การติดตั้งและการตั้งค่า
กลับไปที่ Cloud Shell และตรวจสอบว่าคุณอยู่ในไดเรกทอรีหลัก
เรียกใช้คำสั่งต่อไปนี้ใน Cloud Shell เพื่อสร้างชุดข้อมูลใหม่ชื่อ adk_logs ใน BigQuery
bq mk --dataset --location=US adk_logs
ตอนนี้มาสร้างสภาพแวดล้อมเสมือนของ Python และติดตั้งแพ็กเกจที่จำเป็นกัน
- เปิดแท็บเทอร์มินัลใหม่ใน Cloud Shell แล้วเรียกใช้คำสั่งนี้เพื่อสร้างและไปยังโฟลเดอร์ชื่อ
adk-agent-observability
mkdir adk-agent-observability
cd adk-agent-observability
- สร้างสภาพแวดล้อมเสมือนของ Python
python -m venv .venv
- เปิดใช้งานสภาพแวดล้อมเสมือน
source .venv/bin/activate
- ติดตั้ง ADK:
pip install --upgrade google-adk
4. สร้างแอปพลิเคชัน ADK
ตอนนี้เรามาสร้าง Agent ผู้ช่วยด้านการค้าปลีกกัน เอเจนต์นี้จะได้รับการออกแบบมาเพื่อ ...
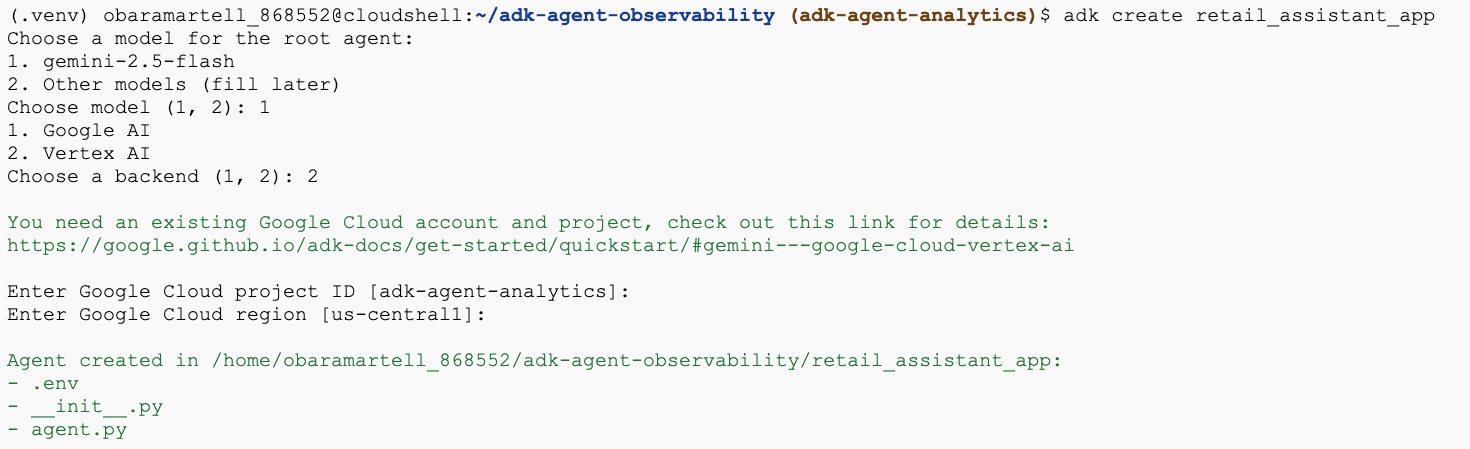
- เรียกใช้คำสั่งยูทิลิตี adk create เพื่อสร้างโครงร่างแอปพลิเคชันตัวแทนใหม่ที่มีโฟลเดอร์และไฟล์ที่จำเป็น
adk create retail_assistant_app
ทำตามข้อความแจ้ง
- เลือก gemini-2.5-flash สำหรับโมเดล
- เลือก Vertex AI สำหรับแบ็กเอนด์
- ยืนยันรหัสโปรเจ็กต์ Google Cloud และภูมิภาคเริ่มต้น
ตัวอย่างการโต้ตอบแสดงอยู่ด้านล่าง
- คลิกปุ่มเปิดตัวแก้ไขใน Cloud Shell เพื่อเปิด Cloud Shell Editor และดูโฟลเดอร์และไฟล์ที่สร้างขึ้นใหม่

โปรดทราบว่าไฟล์ที่สร้างขึ้นมีดังนี้
retail_assistant_app/
├── .venv/
└── retail_assistant_app/
    ├── __init__.py
    ├── agent.py
    └── .env
- init.py: ทำเครื่องหมายโฟลเดอร์เป็นโมดูล Python
- agent.py: มีคำจำกัดความเริ่มต้นของ Agent
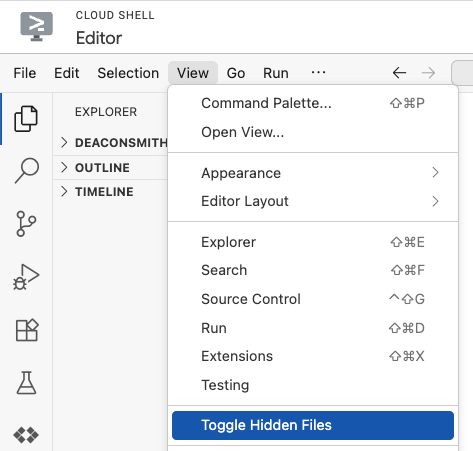
- .env: คุณอาจต้องคลิกดู > สลับไฟล์ที่ซ่อนเพื่อดูไฟล์นี้
- ไฟล์ .env มีตัวแปรสภาพแวดล้อมสำหรับโปรเจ็กต์ของคุณ ให้อัปเดตตัวแปรที่ตั้งค่าไม่ถูกต้องจากพรอมต์
GOOGLE_GENAI_USE_VERTEXAI=1
GOOGLE_CLOUD_PROJECT=<YOUR_GOOGLE_PROJECT_ID>
GOOGLE_CLOUD_LOCATION=<YOUR_GOOGLE_CLOUD_REGION>
5. กำหนด Agent
ตอนนี้เรามากำหนดระบบหลายเอเจนต์แบบลำดับชั้นกัน
- เอเจนต์เทรนด์แบบเรียลไทม์: ใช้ Google Search เพื่อค้นหาเทรนด์แฟชั่นปัจจุบัน
- ตัวแทนข้อมูลสินค้าคงคลัง: ใช้ชุดเครื่องมือ BigQuery เพื่อค้นหาชุดข้อมูล thelook_ecommerce สาธารณะสำหรับผลิตภัณฑ์ที่พร้อมจำหน่าย
- เอเจนต์ผู้ช่วยด้านการค้าปลีก (Root): จัดการเวิร์กโฟลว์โดยขอคำแนะนำจากเอเจนต์เทรนด์และขอผลิตภัณฑ์ที่ตรงกันจากเอเจนต์สินค้าคงคลัง
แทนที่เนื้อหาทั้งหมดของ retail_assistant_app/agent.py ด้วยโค้ดต่อไปนี้
import os
import uuid
import asyncio
import google.auth
import dotenv
from google.genai import types
from google.adk.agents import Agent
from google.adk.apps import App
from google.adk.runners import InMemoryRunner
from google.adk.tools import AgentTool, google_search
from google.adk.tools.bigquery import BigQueryCredentialsConfig, BigQueryToolset
from google.adk.plugins.bigquery_agent_analytics_plugin import BigQueryAgentAnalyticsPlugin

dotenv.load_dotenv()

# --- Configuration ---

PROJECT_ID = os.getenv('GOOGLE_CLOUD_PROJECT', 'project_not_set')
DATASET_ID = "adk_logs"
TABLE_ID = "retail_assistant_agent_logs"
APP_NAME = "retail_assistant_agent"
USER_ID = "test_user"

# --- Toolsets ---

credentials, _ = google.auth.default()
credentials_config = BigQueryCredentialsConfig(credentials=credentials)
bigquery_toolset = BigQueryToolset(
 credentials_config=credentials_config
)

# --- Agents ---

# 1. Trend Spotter
real_time_agent = Agent(
   name="real_time_agent",
   model="gemini-2.5-flash",
    description="Researches external factors like weather, local events, and current fashion trends.",
   instruction="""
       You are a real-time research agent.
       Use Google Search to find real-time information relevant to the user's request,
       such as the current weather in their location or trending styles.
   """,
   tools=[google_search]
)

# 2. Inventory Manager
inventory_data_agent = Agent(
   name="inventory_data_agent",
   model="gemini-2.5-flash",
   description="Oversees product inventory in the BigQuery `thelook_ecommerce` dataset to find available items and prices.",
   instruction=f"""
   You manage the inventory. You have access to the `bigquery-public-data.thelook_ecommerce` dataset via the BigQuery toolset.
   Run all BigQuery queries the project id of: '{PROJECT_ID}'

   Your workflow:
   1. Look at the products table.
   2. Find items that match the requirements, factor in the results from the trend_setter agent if there are any.
   3. Return with a user friendly response, including the list of specific products and prices.
   """,
   tools=[bigquery_toolset]
)

# 3. Root Orchestrator
root_agent = Agent(
   name="retail_assistant",
   model="gemini-2.5-flash",
   description="The primary orchestrator, responsible for handling user input, delegating to sub-agents, and synthesizing the final product recommendation.",
   instruction="""
   You are a Retail Assistant.
   You can ask the 'real_time_agent' agent for any realtime information needed, or style advice, include any information provided by the user.
   You should ask the 'inventory_data_agent' agent to find a maximum of 3 available items matching that style.
   Combine the results into a recommendation.
   """,
   tools=[AgentTool(agent=real_time_agent)],
   sub_agents=[inventory_data_agent]
)
6. สร้างบันทึกด้วยปลั๊กอิน BigQuery Agent Analytics
ตอนนี้มากำหนดค่าปลั๊กอิน BigQuery Agent Analytics เพื่อบันทึกข้อมูลการดำเนินการกัน
โดยคุณจะสร้างอินสแตนซ์ของคลาส App คลาสนี้ทำหน้าที่เป็นคอนเทนเนอร์รันไทม์สำหรับเอเจนต์ของคุณ โดยจะจัดการลูปการสนทนา จัดการสถานะผู้ใช้ และจัดระเบียบปลั๊กอินที่แนบมา (เช่น เครื่องบันทึกการวิเคราะห์เอเจนต์ของเรา)
โค้ดด้านล่าง
- เริ่มต้นปลั๊กอินการบันทึก: สร้าง
BigQueryAgentAnalyticsPluginพร้อมรายละเอียดการเชื่อมต่อที่จำเป็น - ผสานรวมปลั๊กอิน: ส่งปลั๊กอิน BigQuery ที่เริ่มต้นแล้วไปยังตัวสร้าง
Appเพื่อให้มั่นใจว่าระบบจะบันทึกและบันทึกเหตุการณ์การดำเนินการของ Agent โดยอัตโนมัติ - เรียกใช้และบันทึกการดำเนินการของ Agent: เรียกใช้โฟลว์การสนทนาผ่าน
runner.run_asyncโดยปลั๊กอินจะรวบรวมและส่งลําดับเหตุการณ์ทั้งหมดไปยัง BigQuery พร้อมกันก่อนที่จะปิดทรัพยากร
คัดลอกและวางโค้ดนี้ไว้ใต้คำจำกัดความของเอเจนต์ในไฟล์ agent.py
async def main(prompt: str):
    """Runs a conversation with the BigQuery agent using the ADK Runner."""
    bq_logger_plugin = BigQueryAgentAnalyticsPlugin(
        project_id=PROJECT_ID, dataset_id=DATASET_ID, table_id=TABLE_ID
    )
    app = App(name=APP_NAME, root_agent=root_agent, plugins=[bq_logger_plugin])
    runner = InMemoryRunner(app=app)

    try:
        session_id = f"{USER_ID}_{uuid.uuid4().hex[:8]}"

        my_session = await runner.session_service.create_session(
            app_name=APP_NAME, user_id=USER_ID, session_id=session_id
        )

        async for event in runner.run_async(
            user_id=USER_ID,
            new_message=types.Content(
                role="user", parts=[types.Part.from_text(text=prompt)]
            ),
            session_id=my_session.id,
        ):
            if event.content.parts and event.content.parts[0].text:
                print(f"** {event.author}: {event.content.parts[0].text}")

    except Exception as e:
        print(f"Error in main: {e}")
    finally:
        print("Closing BQ Plugin...")
        await bq_logger_plugin.close()
        print("BQ Plugin closed.")

async def run_all_prompts():
    """Runs all prompts in a single event loop."""
    prompts = [
        "what outfits do you have available that are suitable for the weather in london this week?",
        "You are such a cool agent! I need a gift idea for my friend who likes yoga.",
        "I'd like to complain - the products sold here are not very good quality!"
    ]
    for prompt in prompts:
        await main(prompt)

if __name__ == "__main__":
    asyncio.run(run_all_prompts())
เมื่อติดตั้งเครื่องมือแล้ว ก็ถึงเวลาดู Agent ทำงาน เรียกใช้สคริปต์เพื่อทริกเกอร์เวิร์กโฟลว์การสนทนา
python retail_assistant_app/agent.py
คุณควรเห็นผู้ช่วยร้านค้าจัดระเบียบเวิร์กโฟลว์ดังนี้
- โดยจะขอให้เอเจนต์เทรนด์แบบเรียลไทม์ (real_time_agent) ระบุสภาพอากาศในลอนดอนและค้นหาเทรนด์แฟชั่นที่เหมาะสม
- จากนั้นจะมอบสิทธิ์ให้ตัวแทนข้อมูลสินค้าคงคลัง (inventory_data_agent) เพื่อค้นหา
thelook_ecommerceชุดข้อมูล BigQuery สำหรับผลิตภัณฑ์ที่เฉพาะเจาะจงซึ่งตรงกับเทรนด์เหล่านั้น - สุดท้าย Root Orchestrator จะสังเคราะห์ผลลัพธ์เป็นคำแนะนำสุดท้าย
ในขณะเดียวกัน ปลั๊กอินจะสตรีมการติดตามการดำเนินการของเอเจนต์ไปยัง BigQuery
7. วิเคราะห์บันทึกของ Agent
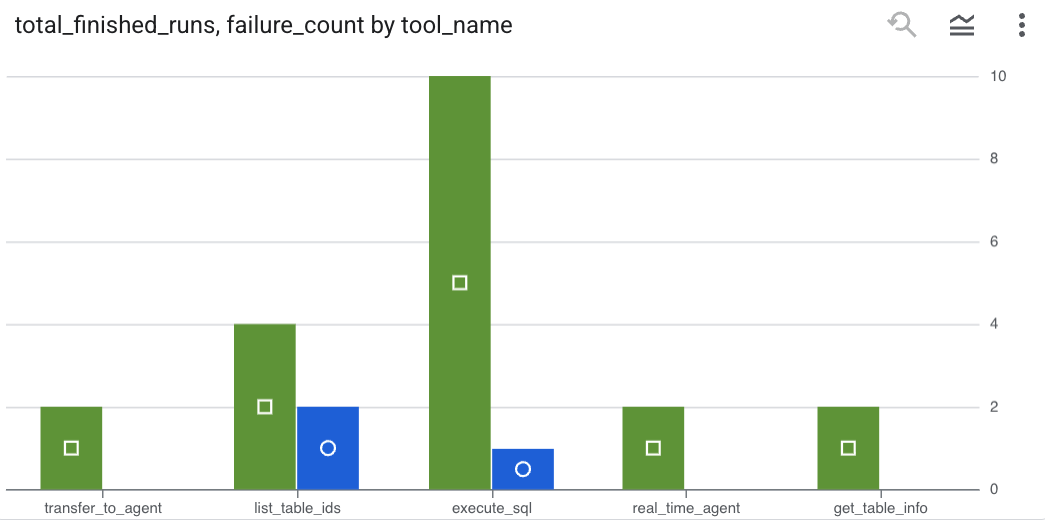
การใช้เครื่องมือ
ตอนนี้เราสามารถดูสิ่งที่เอเจนต์ทำเบื้องหลังได้แล้ว ระบบได้สตรีมข้อมูลไปยัง BigQuery แล้ว และพร้อมสำหรับการวิเคราะห์
- ในคอนโซล Google Cloud ให้ค้นหา BigQuery
- ในบานหน้าต่าง Explorer ให้ค้นหาโปรเจ็กต์
- ขยายชุดข้อมูล
adk_logs - เปิด
retail_assitant_agent_logsตาราง แล้วคลิกคําค้นหา

หากต้องการดูการเรียกใช้เครื่องมือที่ Agent ของคุณทำ และบันทึกข้อผิดพลาดของเครื่องมือ ให้เรียกใช้การค้นหาต่อไปนี้ใน BigQuery Editor
SELECT
  -- Extract the tool name directly from the JSON key "tool"
  JSON_VALUE(content, '$.tool') AS tool_name,
  -- Count every time a tool finished (successfully or with an error)
  COUNT(*) AS total_finished_runs,
  -- Count as a failure if  event_type is ERROR, result object contains a status of 'ERROR', or error_details exist
  COUNTIF(
    event_type = 'TOOL_ERROR' OR
    JSON_VALUE(content, '$.result.status') = 'ERROR' OR
    JSON_VALUE(content, '$.result.error_details') IS NOT NULL
  ) AS failure_count
FROM
  `adk_logs.retail_assistant_agent_logs`
WHERE
  event_type IN ('TOOL_COMPLETED', 'TOOL_ERROR')
GROUP BY
  1;
คลิกการแสดงภาพเพื่อดูผลลัพธ์ในรูปแบบแผนภูมิ (ผลลัพธ์ของคุณอาจแตกต่างกัน)
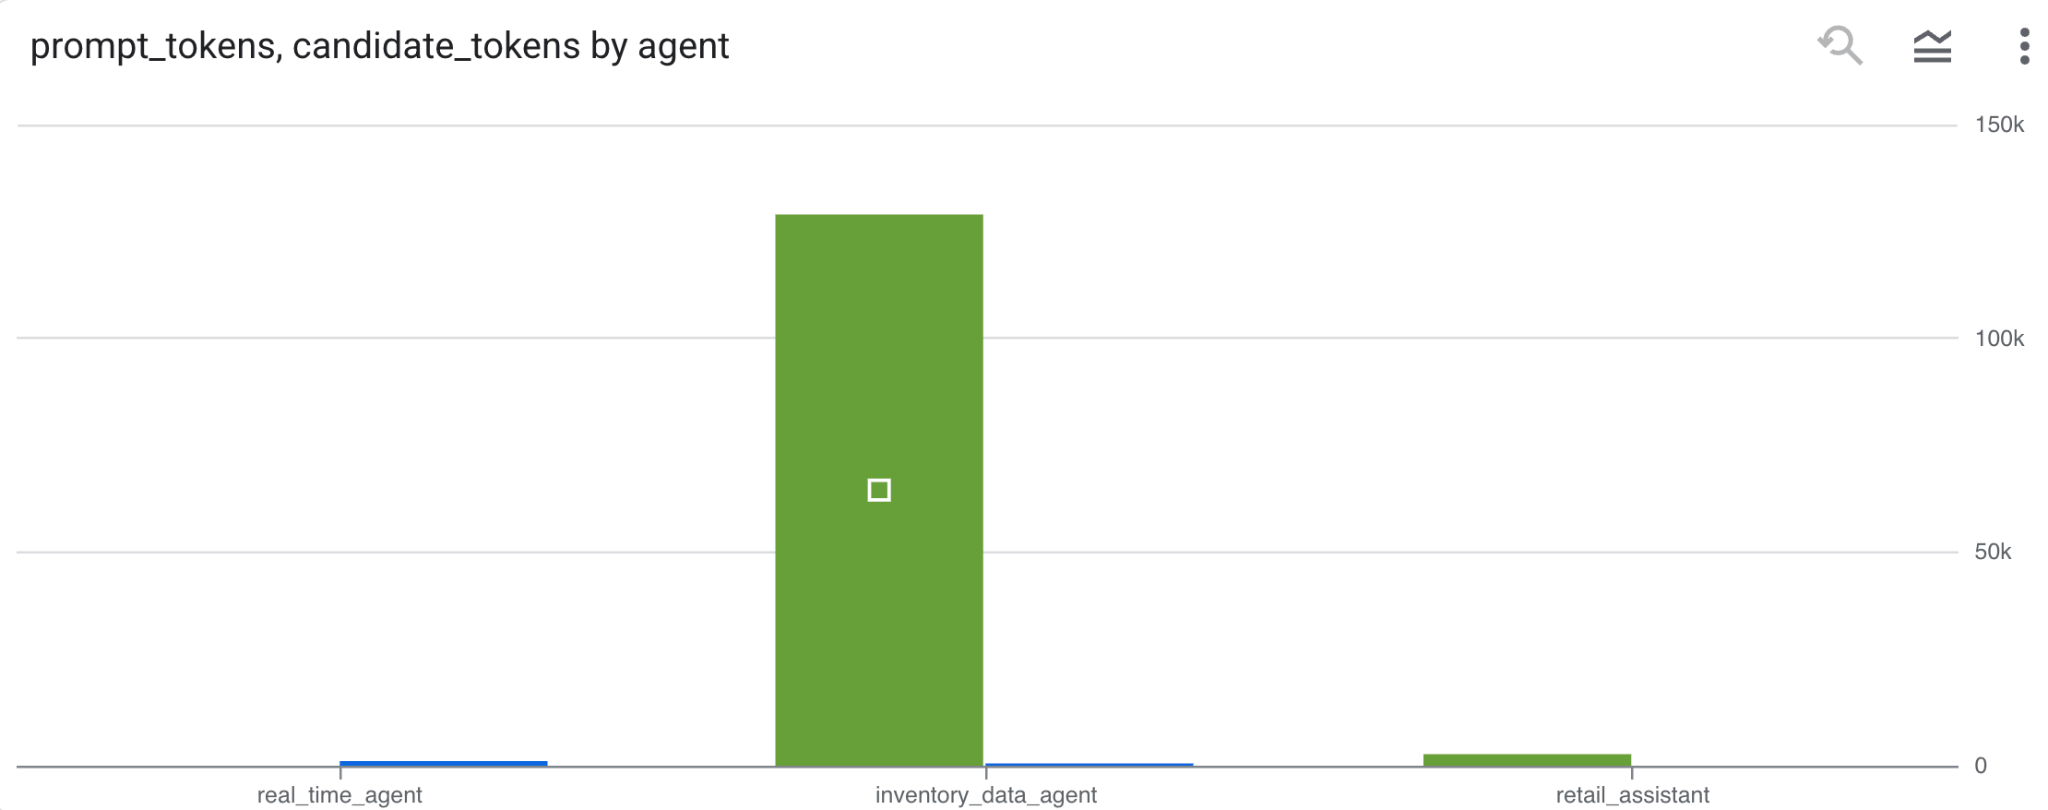
การใช้งานโทเค็น
หากต้องการอนุมานค่าใช้จ่ายของเอเจนต์ คุณสามารถรวบรวมโทเค็นพรอมต์และโทเค็นตัวเลือกที่เอเจนต์แต่ละรายใช้ได้โดยทำดังนี้
SELECT
 t.agent,
 SUM(LAX_INT64(t.content.usage.prompt)) AS prompt_tokens,
 SUM(LAX_INT64(t.content.usage.completion)) AS completion_tokens
FROM
 `adk_logs.retail_assistant_agent_logs` AS t
WHERE
 t.event_type = 'LLM_RESPONSE'
 -- Filter for records that actually contain usage metadata
 AND t.content.usage IS NOT NULL
GROUP BY 1;
คลิกการแสดงภาพเพื่อดูผลลัพธ์ในรูปแบบแผนภูมิ (ผลลัพธ์ของคุณอาจแตกต่างกัน)
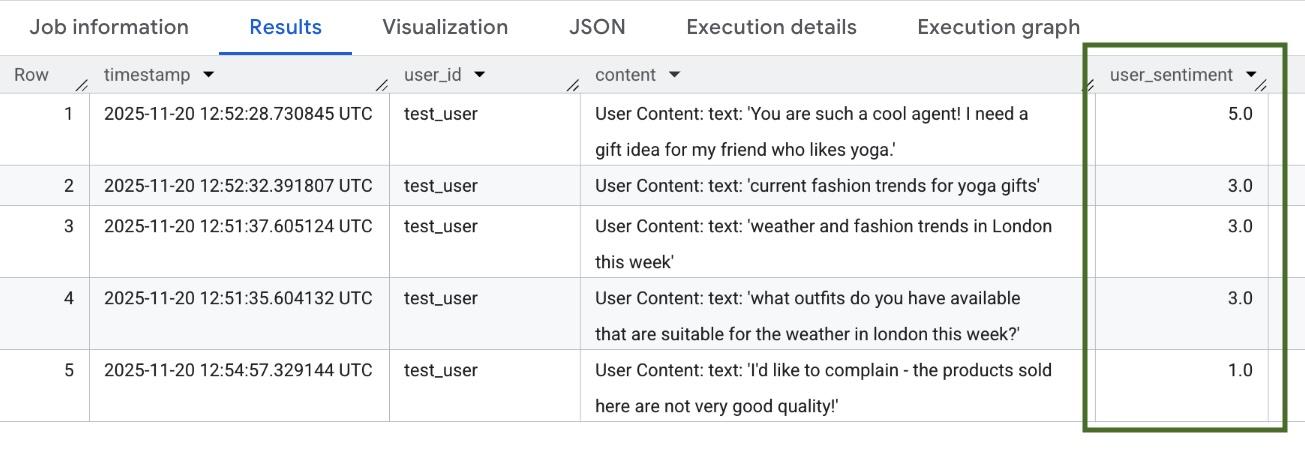
8. [โบนัส] วิเคราะห์ความรู้สึกของผู้ใช้
ตอนนี้เรามาวิเคราะห์ความรู้สึกของอินพุตของผู้ใช้ที่ระบุไว้ในเอเจนต์กัน
- ใน Cloud Shell ให้สร้างการเชื่อมต่อทรัพยากรระบบคลาวด์เพื่อให้ BigQuery โต้ตอบกับบริการ Vertex AI ได้โดยทำดังนี้
bq mk --connection --location=us \
    --connection_type=CLOUD_RESOURCE test_connection
คุณควรเห็นคำตอบดังนี้
สร้างการเชื่อมต่อ 517325854360.us.test_connection เรียบร้อยแล้ว
- สร้างการเชื่อมต่อทรัพยากรระบบคลาวด์
export SERVICE_ACCOUNT_EMAIL=$(bq show --format=prettyjson --connection us.test_connection | grep "serviceAccountId" | cut -d '"' -f 4)
- เรียกใช้คำสั่งนี้เพื่อตรวจสอบว่าสร้างบัญชีบริการสำเร็จแล้ว
echo $SERVICE_ACCOUNT_EMAIL
คุณควรเห็นบัญชีบริการแสดงอยู่

- ให้สิทธิ์ระดับโปรเจ็กต์ที่จำเป็นต่อการโต้ตอบกับ Vertex AI แก่บัญชีบริการการเชื่อมต่อทรัพยากร
gcloud projects add-iam-policy-binding $(gcloud config get-value project) \
    --member="serviceAccount:$SERVICE_ACCOUNT_EMAIL" \
    --role='roles/bigquery.connectionUser' && \
gcloud projects add-iam-policy-binding $(gcloud config get-value project) \
    --member="serviceAccount:$SERVICE_ACCOUNT_EMAIL" \
    --role='roles/aiplatform.user'
รอสักครู่เพื่อให้สิทธิ์มีผล จากนั้นกลับไปที่ BigQuery แล้วเรียกใช้การค้นหาต่อไปนี้ซึ่งมีฟังก์ชัน AI.SCORE เพื่อวิเคราะห์ความรู้สึกของผู้ใช้
SELECT
 timestamp,
 user_id,
 content,
 AI.SCORE((
   'What is the sentiment of the user in this text:', JSON_VALUE(content.text_summary),
   'Use a scale from 1 to 5.'),
 connection_id => 'us.test_connection') AS user_sentiment
FROM
 `adk_logs.retail_assistant_agent_logs`
WHERE
  event_type = 'USER_MESSAGE_RECEIVED'
ORDER BY
 user_sentiment DESC;
ฟังก์ชัน AI.SCORE จะกําหนดค่าความรู้สึกระหว่าง 1 ถึง 5 สําหรับข้อมูลจากผู้ใช้แต่ละราย คุณควรเห็นผลลัพธ์ที่คล้ายกับผลลัพธ์ต่อไปนี้
9. ล้างข้อมูล
โปรดลบทรัพยากรที่สร้างขึ้นในเวิร์กช็อปนี้เพื่อหลีกเลี่ยงการเรียกเก็บเงินอย่างต่อเนื่องในบัญชี Google Cloud
ลบชุดข้อมูลการบันทึกที่สคริปต์สร้างขึ้น
bq rm -r -f -d $PROJECT_ID:adk_logs
ลบการเชื่อมต่อทรัพยากรระบบคลาวด์
bq rm --connection --project_id=$PROJECT_ID --location=us test_connection
วิธีนำไดเรกทอรี bigquery-adk-codelab และเนื้อหาในไดเรกทอรีออก
cd ..
rm -rf adk-agent-observability
10. ขอแสดงความยินดี
ยินดีด้วย คุณได้สร้างระบบหลาย Agent ด้วย Agent Development Kit (ADK) และผสานรวมปลั๊กอิน BigQuery Agent Analytics เพื่อติดตามและตรวจสอบลักษณะการทำงานของ Agent เรียบร้อยแล้ว