
1. 簡介
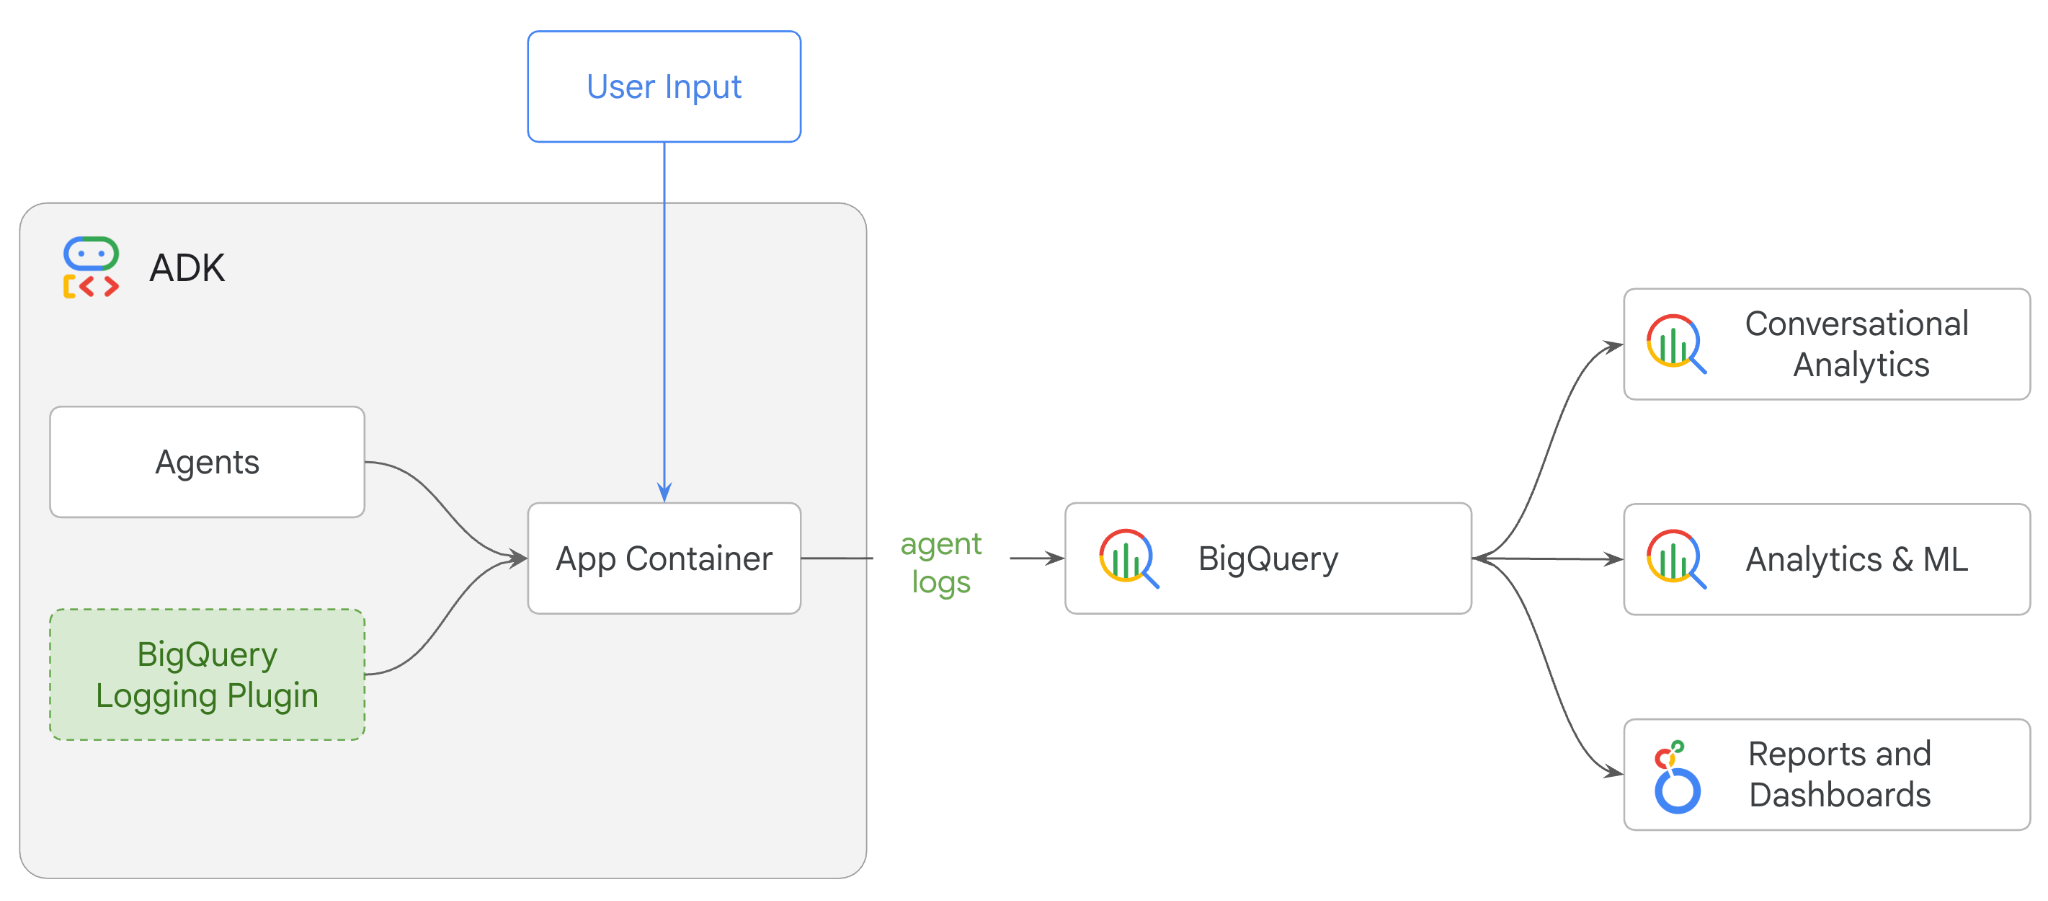
在本程式碼研究室中,您將使用 Agent Development Kit (ADK) 建構多代理系統,並透過 BigQuery Agent Analytics 外掛程式啟用代理觀測能力。您將向代理提出一連串問題,然後使用 BigQuery 分析對話追蹤記錄和代理工具使用情況。
執行步驟
- 使用 ADK 建構多代理零售助理
- 初始化 BigQuery Agent Analytics 外掛程式,擷取並儲存這個代理程式執行作業的追蹤資料到 BigQuery
- 在 BigQuery 中分析代理程式記錄檔資料
軟硬體需求
- 網路瀏覽器,例如 Chrome
- 已啟用計費功能的 Google Cloud 專案,或
- Gmail 帳戶。下一節將說明如何兌換這個程式碼研究室的 $5 美元免費抵免額,並設定新專案
本程式碼研究室適合各種程度的開發人員 (包括初學者)。您將使用 Google Cloud Shell 中的指令列介面和 Python 程式碼進行 ADK 開發。您不需要是 Python 專家,但瞭解如何解讀程式碼有助於理解概念。
2. 事前準備
建立 Google Cloud 專案
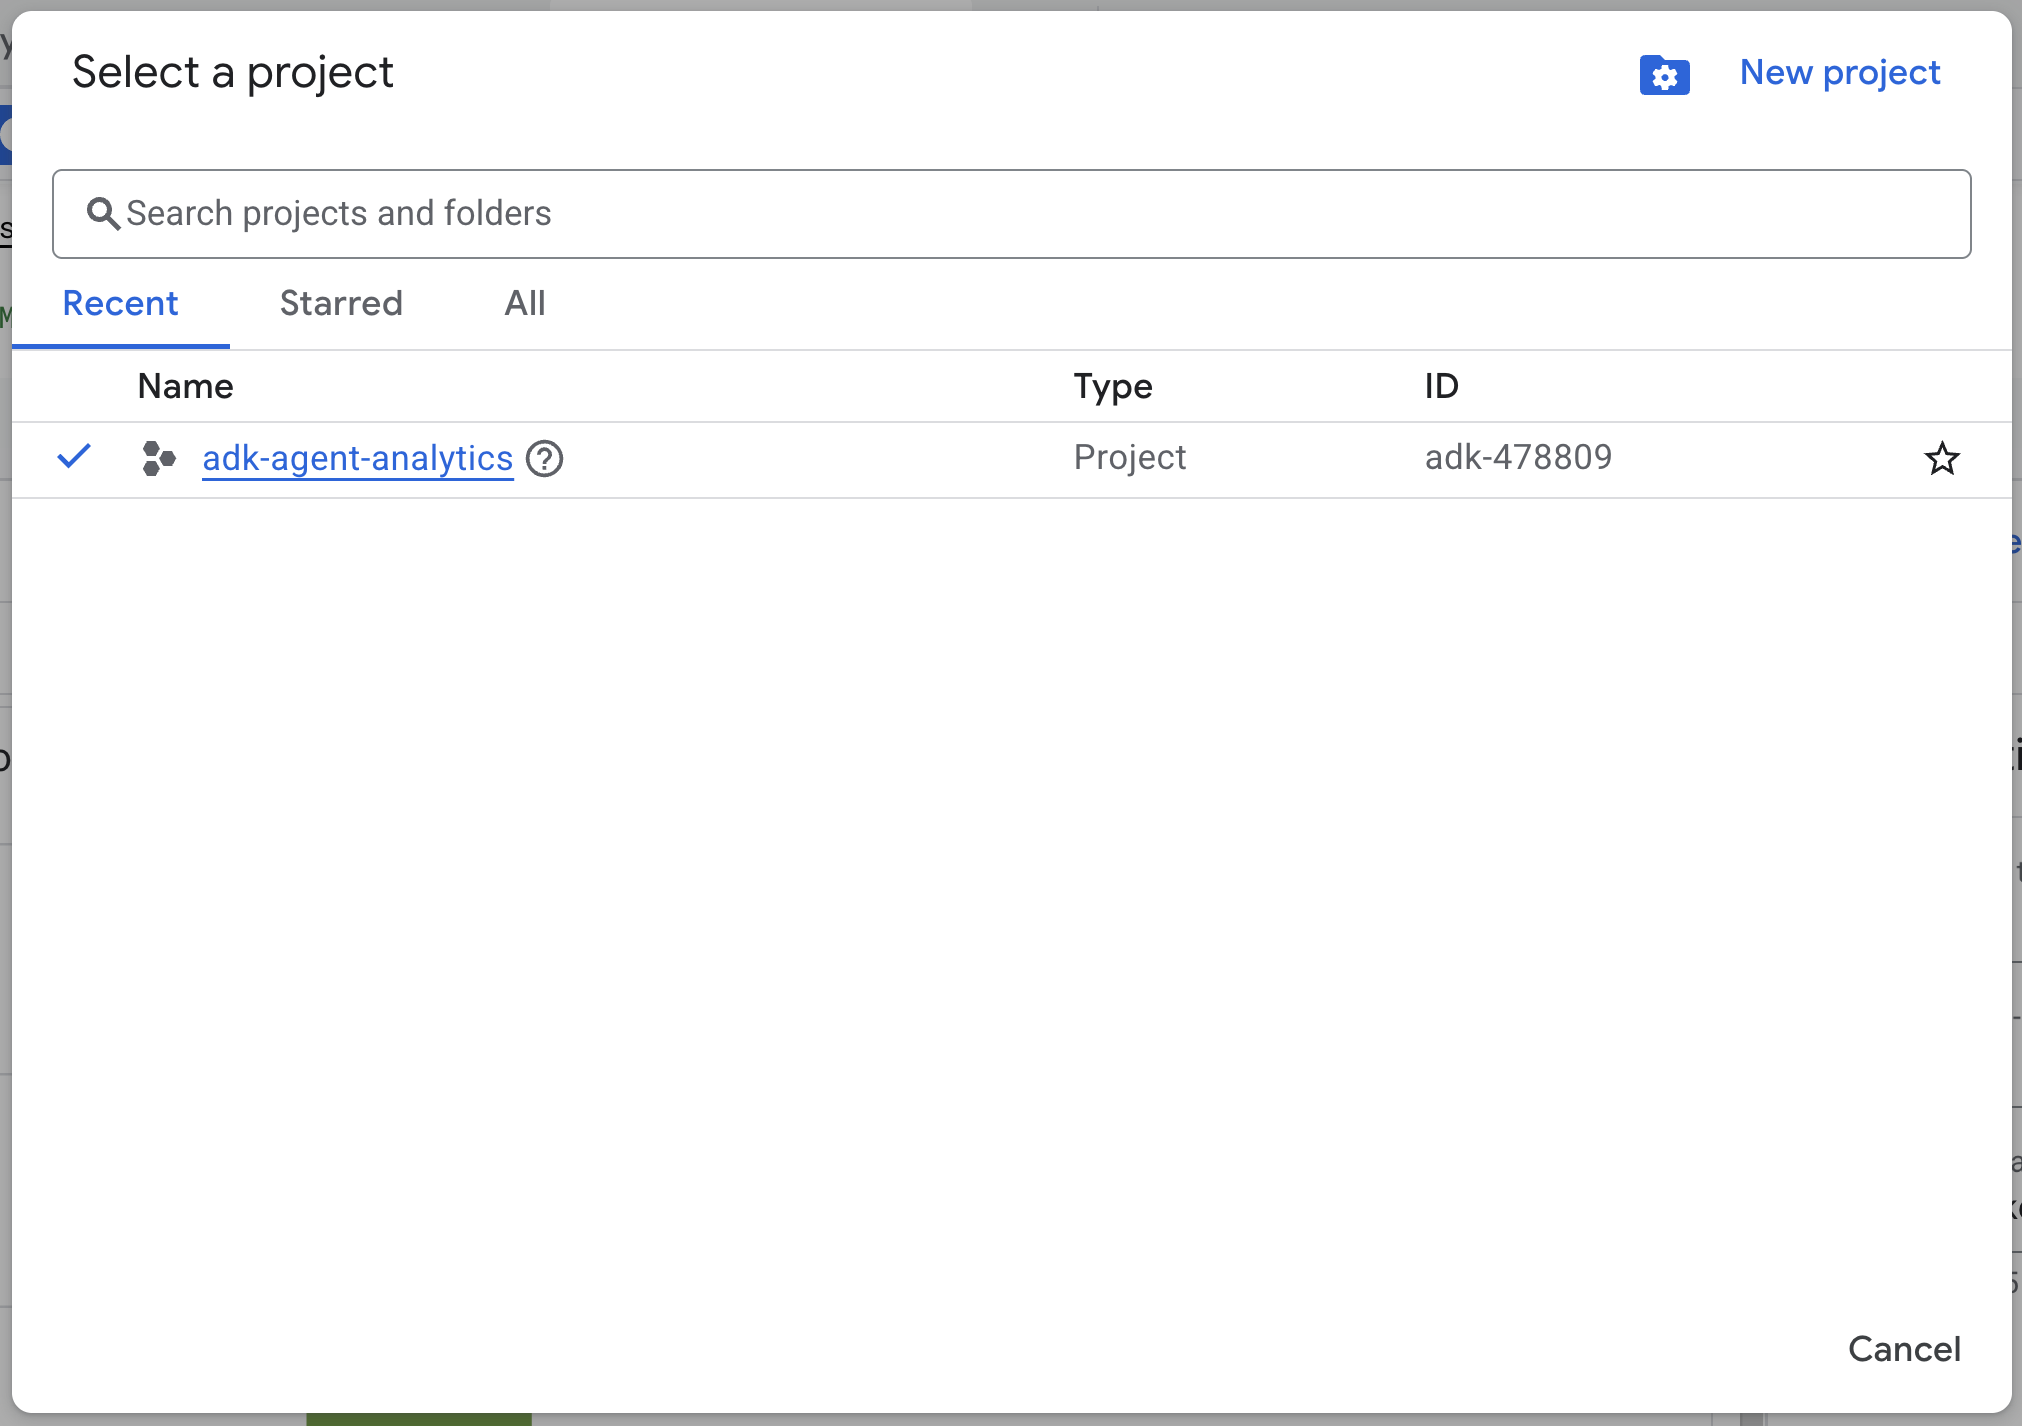
- 在 Google Cloud 控制台的專案選取器頁面中,選取或建立 Google Cloud 專案。
- 確認 Cloud 專案已啟用計費功能。瞭解如何檢查專案是否已啟用計費功能。
啟動 Cloud Shell
Cloud Shell 是在 Google Cloud 中運作的指令列環境,已預先載入必要工具。
- 點選 Google Cloud 控制台頂端的「啟用 Cloud Shell」:

- 連線至 Cloud Shell 後,請執行下列指令,在 Cloud Shell 中驗證您的身分:
gcloud auth list
- 執行下列指令,確認專案已設定為搭配 gcloud 使用:
gcloud config get project
- 如果專案未如預期設定,請使用下列指令設定專案:
export PROJECT_ID=<YOUR_PROJECT_ID>
gcloud config set project $PROJECT_ID
啟用 API
- 執行下列指令,啟用所有必要 API 和服務:
gcloud services enable bigquery.googleapis.com \
cloudresourcemanager.googleapis.com \
aiplatform.googleapis.com
- 成功執行指令後,您應該會看到類似下方的訊息:
Operation "operations/..." finished successfully.
3. 安裝與設定
返回 Cloud Shell,確認您位於主目錄。
在 Cloud Shell 中執行下列指令,在 BigQuery 中建立名為 adk_logs 的新資料集:
bq mk --dataset --location=US adk_logs
現在,讓我們建立 Python 虛擬環境,並安裝必要套件。
- 在 Cloud Shell 中開啟新的終端機分頁,然後執行下列指令,建立並前往名為
adk-agent-observability的資料夾:
mkdir adk-agent-observability
cd adk-agent-observability
- 建立 Python 虛擬環境:
python -m venv .venv
- 啟動虛擬環境:
source .venv/bin/activate
- 安裝 ADK:
pip install --upgrade google-adk
4. 建立 ADK 應用程式
現在,我們來建立零售助理代理程式。這個代理程式的設計目標是 ...
- 執行 ADK 建立公用程式指令,使用必要的資料夾和檔案,架構新的代理程式應用程式:
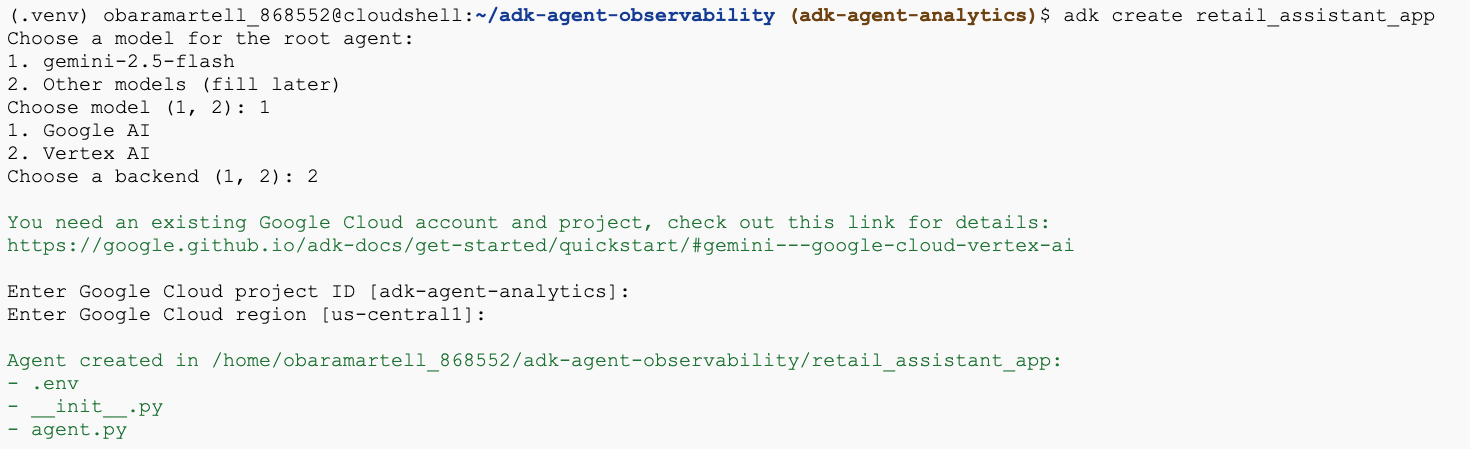
adk create retail_assistant_app
按照提示操作:
- 選擇「gemini-2.5-flash」做為模型。
- 選擇 Vertex AI 做為後端。
- 確認預設 Google Cloud 專案 ID 和區域。
以下是互動範例:
- 按一下 Cloud Shell 中的「開啟編輯器」按鈕,開啟 Cloud Shell 編輯器並查看新建立的資料夾和檔案:

請注意產生的檔案:
retail_assistant_app/
├── .venv/
└── retail_assistant_app/
    ├── __init__.py
    ├── agent.py
    └── .env
- init.py:將資料夾標示為 Python 模組。
- agent.py:包含初始代理程式定義。
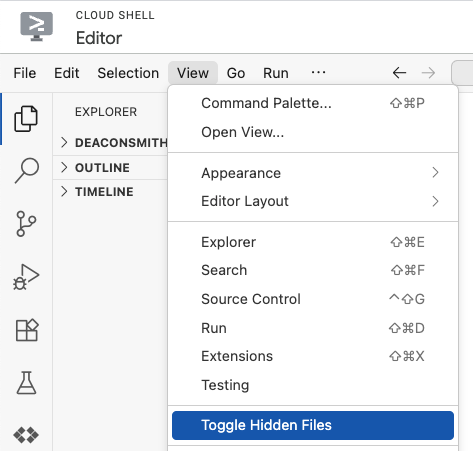
- .env:您可能需要依序點選「View」>「Toggle Hidden Files」來查看這個檔案
- .env 檔案包含專案的環境變數,請更新提示中未正確設定的變數:
GOOGLE_GENAI_USE_VERTEXAI=1
GOOGLE_CLOUD_PROJECT=<YOUR_GOOGLE_PROJECT_ID>
GOOGLE_CLOUD_LOCATION=<YOUR_GOOGLE_CLOUD_REGION>
5. 定義代理程式
現在來定義階層式多代理系統。
- 即時趨勢代理:使用 Google 搜尋尋找當前時尚趨勢。
- 庫存資料代理程式:使用 BigQuery 工具組查詢公開的 thelook_ecommerce 資料集,找出可用的產品。
- 零售助理 (根) 代理:向趨勢代理尋求建議,並向庫存代理索取相符產品,藉此自動調度管理工作流程。
將 retail_assistant_app/agent.py 的所有內容替換為下列程式碼。
import os
import uuid
import asyncio
import google.auth
import dotenv
from google.genai import types
from google.adk.agents import Agent
from google.adk.apps import App
from google.adk.runners import InMemoryRunner
from google.adk.tools import AgentTool, google_search
from google.adk.tools.bigquery import BigQueryCredentialsConfig, BigQueryToolset
from google.adk.plugins.bigquery_agent_analytics_plugin import BigQueryAgentAnalyticsPlugin

dotenv.load_dotenv()

# --- Configuration ---

PROJECT_ID = os.getenv('GOOGLE_CLOUD_PROJECT', 'project_not_set')
DATASET_ID = "adk_logs"
TABLE_ID = "retail_assistant_agent_logs"
APP_NAME = "retail_assistant_agent"
USER_ID = "test_user"

# --- Toolsets ---

credentials, _ = google.auth.default()
credentials_config = BigQueryCredentialsConfig(credentials=credentials)
bigquery_toolset = BigQueryToolset(
 credentials_config=credentials_config
)

# --- Agents ---

# 1. Trend Spotter
real_time_agent = Agent(
   name="real_time_agent",
   model="gemini-2.5-flash",
    description="Researches external factors like weather, local events, and current fashion trends.",
   instruction="""
       You are a real-time research agent.
       Use Google Search to find real-time information relevant to the user's request,
       such as the current weather in their location or trending styles.
   """,
   tools=[google_search]
)

# 2. Inventory Manager
inventory_data_agent = Agent(
   name="inventory_data_agent",
   model="gemini-2.5-flash",
   description="Oversees product inventory in the BigQuery `thelook_ecommerce` dataset to find available items and prices.",
   instruction=f"""
   You manage the inventory. You have access to the `bigquery-public-data.thelook_ecommerce` dataset via the BigQuery toolset.
   Run all BigQuery queries the project id of: '{PROJECT_ID}'

   Your workflow:
   1. Look at the products table.
   2. Find items that match the requirements, factor in the results from the trend_setter agent if there are any.
   3. Return with a user friendly response, including the list of specific products and prices.
   """,
   tools=[bigquery_toolset]
)

# 3. Root Orchestrator
root_agent = Agent(
   name="retail_assistant",
   model="gemini-2.5-flash",
   description="The primary orchestrator, responsible for handling user input, delegating to sub-agents, and synthesizing the final product recommendation.",
   instruction="""
   You are a Retail Assistant.
   You can ask the 'real_time_agent' agent for any realtime information needed, or style advice, include any information provided by the user.
   You should ask the 'inventory_data_agent' agent to find a maximum of 3 available items matching that style.
   Combine the results into a recommendation.
   """,
   tools=[AgentTool(agent=real_time_agent)],
   sub_agents=[inventory_data_agent]
)
6. 使用 BigQuery Agent Analytics 外掛程式產生記錄
現在,請設定 BigQuery Agent Analytics 外掛程式,擷取執行資料。
為此,您將建立 App 類別的執行個體。這個類別是代理程式的執行階段容器,可管理對話迴圈、處理使用者狀態,以及協調任何附加的外掛程式 (例如代理程式分析記錄器)。
以下程式碼:
- 初始化記錄外掛程式:使用必要的連線詳細資料建立
BigQueryAgentAnalyticsPlugin。 - 整合外掛程式:將初始化的 BigQuery 外掛程式傳遞至
App建構函式,確保系統會自動擷取並記錄代理程式執行事件。 - 執行及記錄代理程式執行作業:透過
runner.run_async執行對話流程,外掛程式會同時收集並將整個事件序列傳送至 BigQuery,然後關閉資源。
複製這段程式碼,並貼到 agent.py 檔案的代理定義下方:
async def main(prompt: str):
    """Runs a conversation with the BigQuery agent using the ADK Runner."""
    bq_logger_plugin = BigQueryAgentAnalyticsPlugin(
        project_id=PROJECT_ID, dataset_id=DATASET_ID, table_id=TABLE_ID
    )
    app = App(name=APP_NAME, root_agent=root_agent, plugins=[bq_logger_plugin])
    runner = InMemoryRunner(app=app)

    try:
        session_id = f"{USER_ID}_{uuid.uuid4().hex[:8]}"

        my_session = await runner.session_service.create_session(
            app_name=APP_NAME, user_id=USER_ID, session_id=session_id
        )

        async for event in runner.run_async(
            user_id=USER_ID,
            new_message=types.Content(
                role="user", parts=[types.Part.from_text(text=prompt)]
            ),
            session_id=my_session.id,
        ):
            if event.content.parts and event.content.parts[0].text:
                print(f"** {event.author}: {event.content.parts[0].text}")

    except Exception as e:
        print(f"Error in main: {e}")
    finally:
        print("Closing BQ Plugin...")
        await bq_logger_plugin.close()
        print("BQ Plugin closed.")

async def run_all_prompts():
    """Runs all prompts in a single event loop."""
    prompts = [
        "what outfits do you have available that are suitable for the weather in london this week?",
        "You are such a cool agent! I need a gift idea for my friend who likes yoga.",
        "I'd like to complain - the products sold here are not very good quality!"
    ]
    for prompt in prompts:
        await main(prompt)

if __name__ == "__main__":
    asyncio.run(run_all_prompts())
完成檢測後,現在可以看看代理程式的實際運作情形。執行指令碼,觸發對話工作流程。
python retail_assistant_app/agent.py
您應該會看到零售助理協調工作流程:
- 這項要求會請即時趨勢代理程式 (real_time_agent) 找出倫敦的天氣,並搜尋合適的時尚趨勢。
- 接著,系統會將查詢工作委派給目錄資料代理 (inventory_data_agent),在
thelook_ecommerceBigQuery 資料集中查詢符合這些趨勢的特定產品。 - 最後,根層級自動化調度管理工具會將結果綜合歸納,得出最終建議。
同時,外掛程式會將代理程式的執行追蹤記錄串流至 BigQuery。
7. 分析代理程式記錄檔
工具使用情形
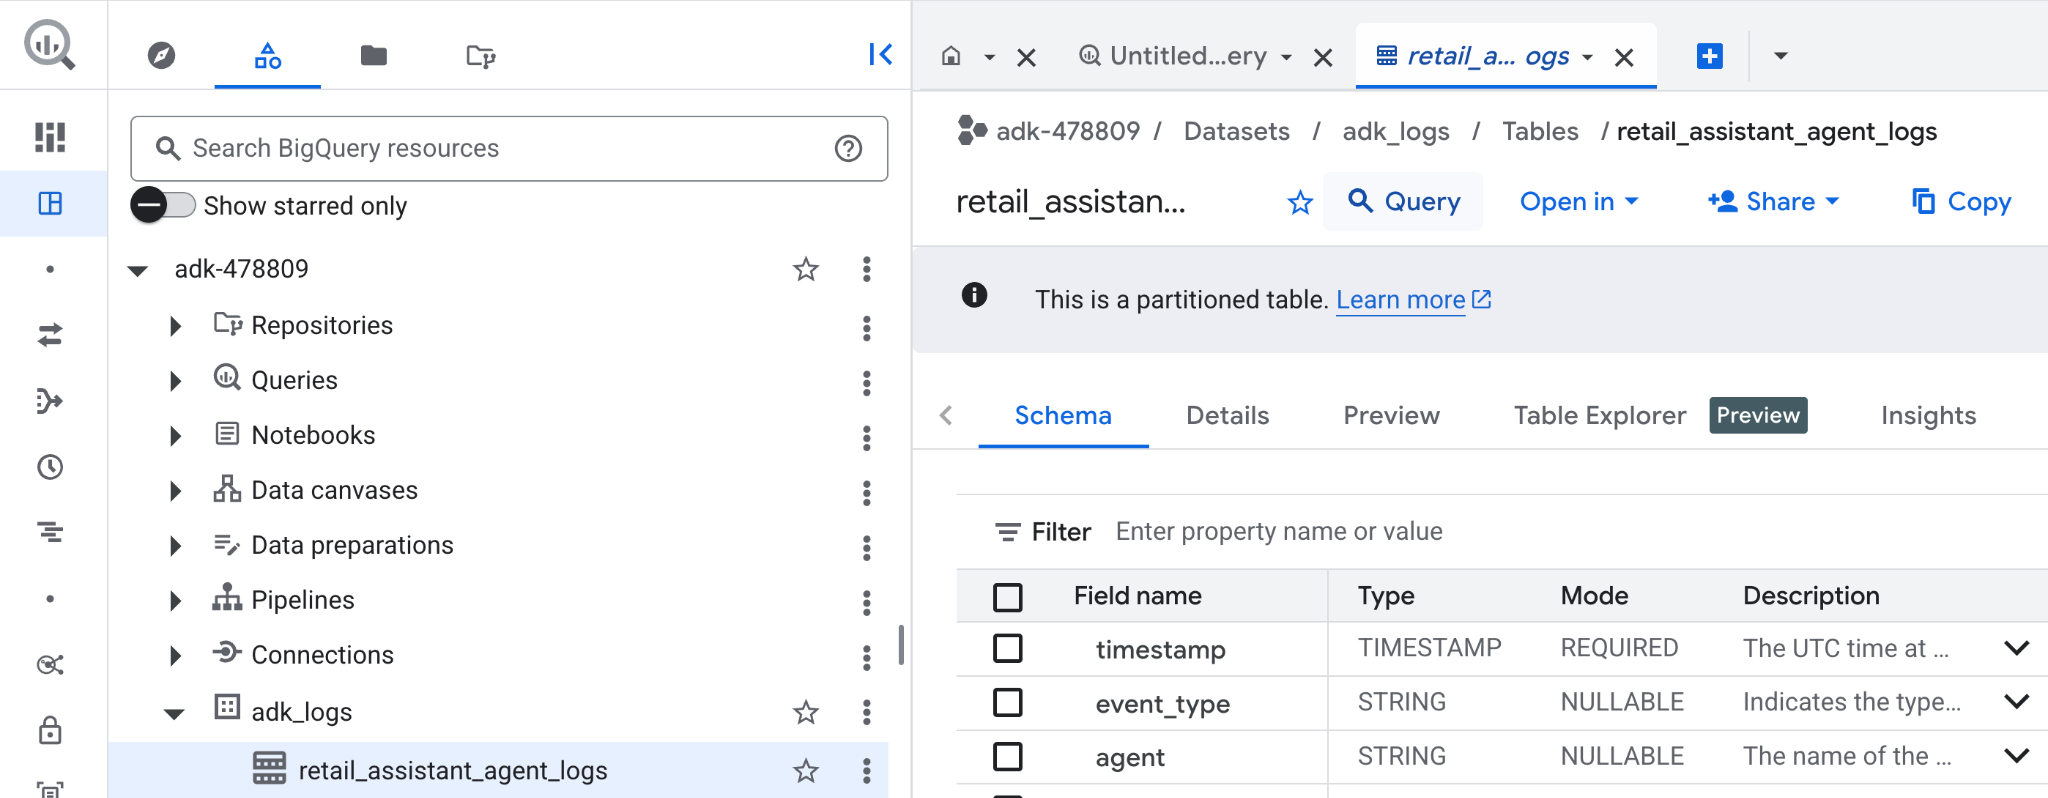
現在我們可以看到代理程式在幕後做了什麼!資料已串流至 BigQuery,可供分析:
- 在 Google Cloud 控制台中搜尋「BigQuery」BigQuery。
- 在「Explorer」窗格中,找出您的專案。
- 展開
adk_logs資料集。 - 開啟
retail_assitant_agent_logs表格,然後按一下「查詢」。
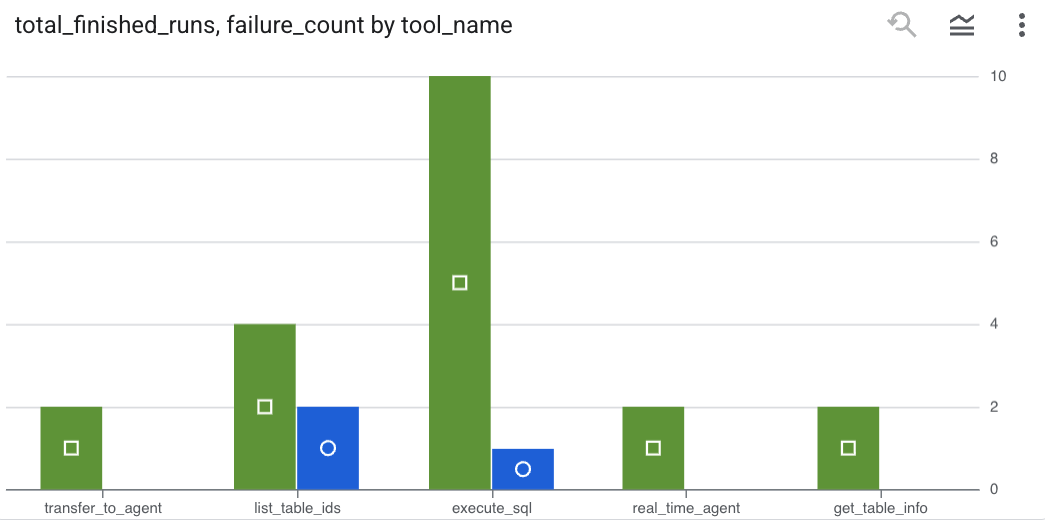
如要查看代理程式發出的工具呼叫,並擷取任何工具錯誤,請在 BigQuery 編輯器中執行下列查詢:
SELECT
  -- Extract the tool name directly from the JSON key "tool"
  JSON_VALUE(content, '$.tool') AS tool_name,
  -- Count every time a tool finished (successfully or with an error)
  COUNT(*) AS total_finished_runs,
  -- Count as a failure if  event_type is ERROR, result object contains a status of 'ERROR', or error_details exist
  COUNTIF(
    event_type = 'TOOL_ERROR' OR
    JSON_VALUE(content, '$.result.status') = 'ERROR' OR
    JSON_VALUE(content, '$.result.error_details') IS NOT NULL
  ) AS failure_count
FROM
  `adk_logs.retail_assistant_agent_logs`
WHERE
  event_type IN ('TOOL_COMPLETED', 'TOOL_ERROR')
GROUP BY
  1;
按一下「圖表」,以圖表形式查看結果 (您的結果可能不同):
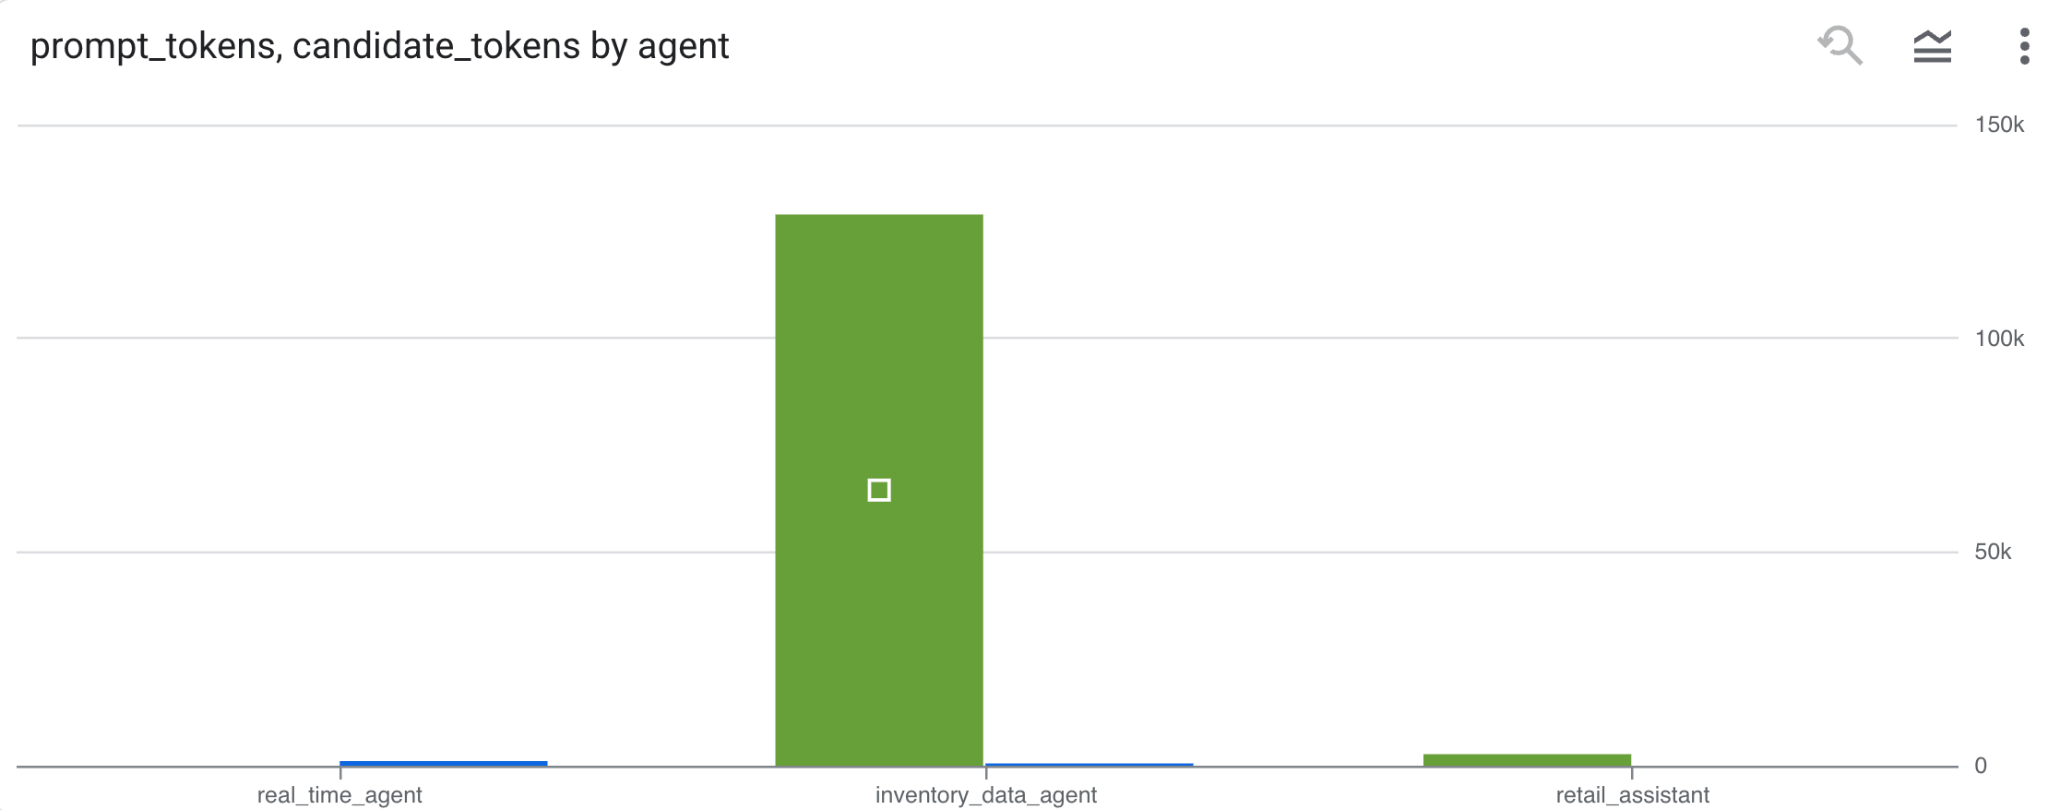
詞元用量
如要推斷代理程式的費用,您可以彙整每個不同代理程式消耗的提示權杖和候選權杖:
SELECT
 t.agent,
 SUM(LAX_INT64(t.content.usage.prompt)) AS prompt_tokens,
 SUM(LAX_INT64(t.content.usage.completion)) AS completion_tokens
FROM
 `adk_logs.retail_assistant_agent_logs` AS t
WHERE
 t.event_type = 'LLM_RESPONSE'
 -- Filter for records that actually contain usage metadata
 AND t.content.usage IS NOT NULL
GROUP BY 1;
按一下「圖表」,以圖表形式查看結果 (您的結果可能不同):
8. [加分題] 分析使用者情緒
現在來分析使用者提供給代理程式的輸入內容情緒。
- 在 Cloud Shell 中建立雲端資源連結,讓 BigQuery 與 Vertex AI 服務互動:
bq mk --connection --location=us \
    --connection_type=CLOUD_RESOURCE test_connection
畫面應會顯示類似以下的回覆:
已成功建立連線 517325854360.us.test_connection
- 建立 Cloud 資源連結:
export SERVICE_ACCOUNT_EMAIL=$(bq show --format=prettyjson --connection us.test_connection | grep "serviceAccountId" | cut -d '"' -f 4)
- 執行下列指令,驗證服務帳戶是否已成功建立:
echo $SERVICE_ACCOUNT_EMAIL
畫面上應會顯示您的服務帳戶:

- 授予資源連線服務帳戶與 Vertex AI 互動所需的專案層級權限:
gcloud projects add-iam-policy-binding $(gcloud config get-value project) \
    --member="serviceAccount:$SERVICE_ACCOUNT_EMAIL" \
    --role='roles/bigquery.connectionUser' && \
gcloud projects add-iam-policy-binding $(gcloud config get-value project) \
    --member="serviceAccount:$SERVICE_ACCOUNT_EMAIL" \
    --role='roles/aiplatform.user'
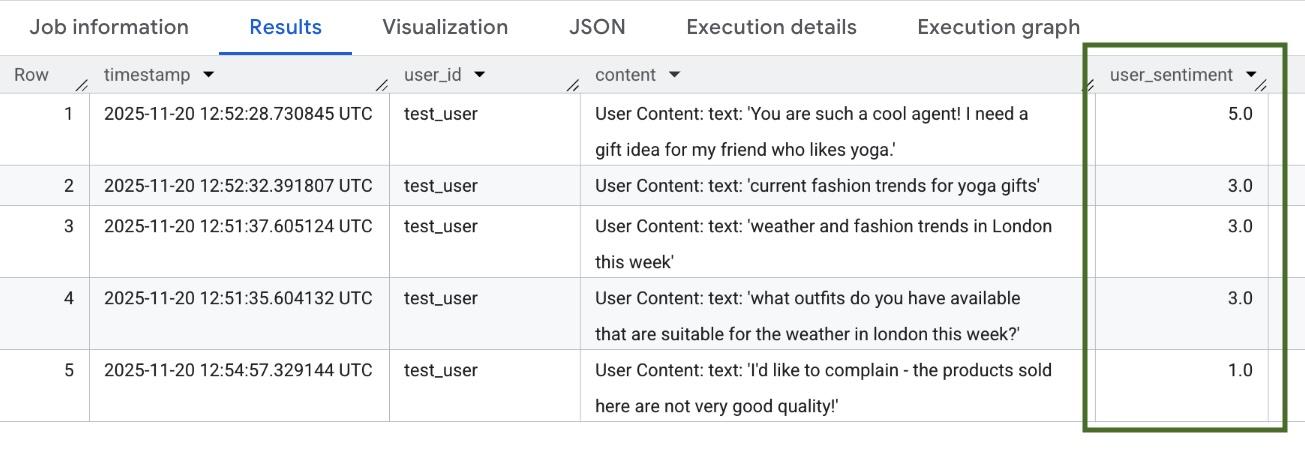
請稍候幾分鐘,讓權限生效。然後返回 BigQuery,執行下列包含 AI.SCORE 函式的查詢,分析使用者情緒:
SELECT
 timestamp,
 user_id,
 content,
 AI.SCORE((
   'What is the sentiment of the user in this text:', JSON_VALUE(content.text_summary),
   'Use a scale from 1 to 5.'),
 connection_id => 'us.test_connection') AS user_sentiment
FROM
 `adk_logs.retail_assistant_agent_logs`
WHERE
  event_type = 'USER_MESSAGE_RECEIVED'
ORDER BY
 user_sentiment DESC;
AI.SCORE 函式會為每項使用者輸入內容指派 1 到 5 之間的情緒值。您應該會看到類似下方的結果:
9. 清除
如要避免系統持續向您的 Google Cloud 帳戶收取費用,請刪除在本研討會中建立的資源。
刪除指令碼建立的記錄資料集:
bq rm -r -f -d $PROJECT_ID:adk_logs
刪除 Cloud 資源連結:
bq rm --connection --project_id=$PROJECT_ID --location=us test_connection
如要移除 bigquery-adk-codelab 目錄和當中內容,請執行下列指令:
cd ..
rm -rf adk-agent-observability
10. 恭喜
恭喜!您已使用 Agent Development Kit (ADK) 建構多代理系統,並順利整合 BigQuery Agent Analytics 外掛程式,追蹤及稽核代理的行為。