
১. দ্য লেট নাইট কোড রিভিউ
এখন রাত ২টা।
আপনি ঘণ্টার পর ঘণ্টা ধরে ডিবাগিং করছেন। ফাংশনটি ঠিকই দেখাচ্ছে, কিন্তু কোথাও একটা ভুল আছে। আপনি নিশ্চয়ই সেই অনুভূতিটা জানেন — যখন কোনো কোড কাজ করার কথা কিন্তু করে না, এবং আপনি আর কারণটা খুঁজে পান না, কারণ আপনি অনেকক্ষণ ধরে সেটার দিকে তাকিয়ে আছেন।
def dfs_search_v1(graph, start, target):
    """Find if target is reachable from start."""
    visited = set()
    stack = start  # Looks innocent enough...

    while stack:
        current = stack.pop()

        if current == target:
            return True

        if current not in visited:
            visited.add(current)

            for neighbor in graph[current]:
                if neighbor not in visited:
                    stack.append(neighbor)

    return False
এআই ডেভেলপারের যাত্রা
আপনি যদি এটি পড়ে থাকেন, তাহলে সম্ভবত আপনি কোডিং-এ এআই-এর আনা পরিবর্তনটি অনুভব করেছেন। Gemini Code Assist , Claude Code , এবং Cursor-এর মতো টুলগুলো আমাদের কোড লেখার পদ্ধতি বদলে দিয়েছে। বয়লারপ্লেট তৈরি করা, বাস্তবায়নের পরামর্শ দেওয়া এবং ডেভেলপমেন্টের গতি বাড়ানোর জন্য এগুলো অসাধারণ।
কিন্তু আপনি এখানে এসেছেন কারণ আপনি আরও গভীরে যেতে চান। আপনি শুধু এই এআই সিস্টেমগুলো ব্যবহার করতে চান না, বরং এগুলো কীভাবে তৈরি করতে হয় তা বুঝতে চান। আপনি এমন কিছু তৈরি করতে চান যা:
- এর আচরণ অনুমানযোগ্য ও শনাক্তযোগ্য।
- আত্মবিশ্বাসের সাথে প্রোডাকশনে স্থাপন করা যেতে পারে
- নির্ভরযোগ্য ও ধারাবাহিক ফলাফল প্রদান করে।
- এটি আপনাকে স্পষ্টভাবে দেখায় যে এটি কীভাবে সিদ্ধান্ত নেয়।
ভোক্তা থেকে স্রষ্টা
আজ আপনি এআই টুল ব্যবহার করা থেকে সেগুলো তৈরি করার দিকে এক ধাপ এগিয়ে যাবেন। আপনি এমন একটি মাল্টি-এজেন্ট সিস্টেম নির্মাণ করবেন যা:
- কোডের গঠনকে নির্ণয়মূলকভাবে বিশ্লেষণ করে
- আচরণ যাচাই করার জন্য প্রকৃত পরীক্ষা চালানো হয় ।
- আসল লিন্টারের সাথে স্টাইলের সামঞ্জস্য যাচাই করে।
- প্রাপ্ত তথ্যগুলোকে সংশ্লেষণ করে কার্যকরী প্রতিক্রিয়া প্রদান করে।
- সম্পূর্ণ পর্যবেক্ষণযোগ্যতা সহ গুগল ক্লাউডে স্থাপন করা হয়
২. আপনার প্রথম এজেন্ট স্থাপন
ডেভেলপারের প্রশ্ন
আমি এলএলএম বুঝি, এপিআইগুলোও ব্যবহার করেছি, কিন্তু একটি পাইথন স্ক্রিপ্ট থেকে কীভাবে একটি স্কেলেবল প্রোডাকশন এআই এজেন্ট তৈরি করব?
চলুন, প্রথমে আপনার পরিবেশটি সঠিকভাবে সেট আপ করে এবং তারপর প্রোডাকশন প্যাটার্নে যাওয়ার আগে প্রাথমিক বিষয়গুলো বোঝার জন্য একটি সাধারণ এজেন্ট তৈরি করে এর উত্তর দেওয়া যাক।
প্রথমে অপরিহার্য সেটআপ
কোনো এজেন্ট তৈরি করার আগে, চলুন নিশ্চিত করে নিই যে আপনার গুগল ক্লাউড পরিবেশ প্রস্তুত আছে।
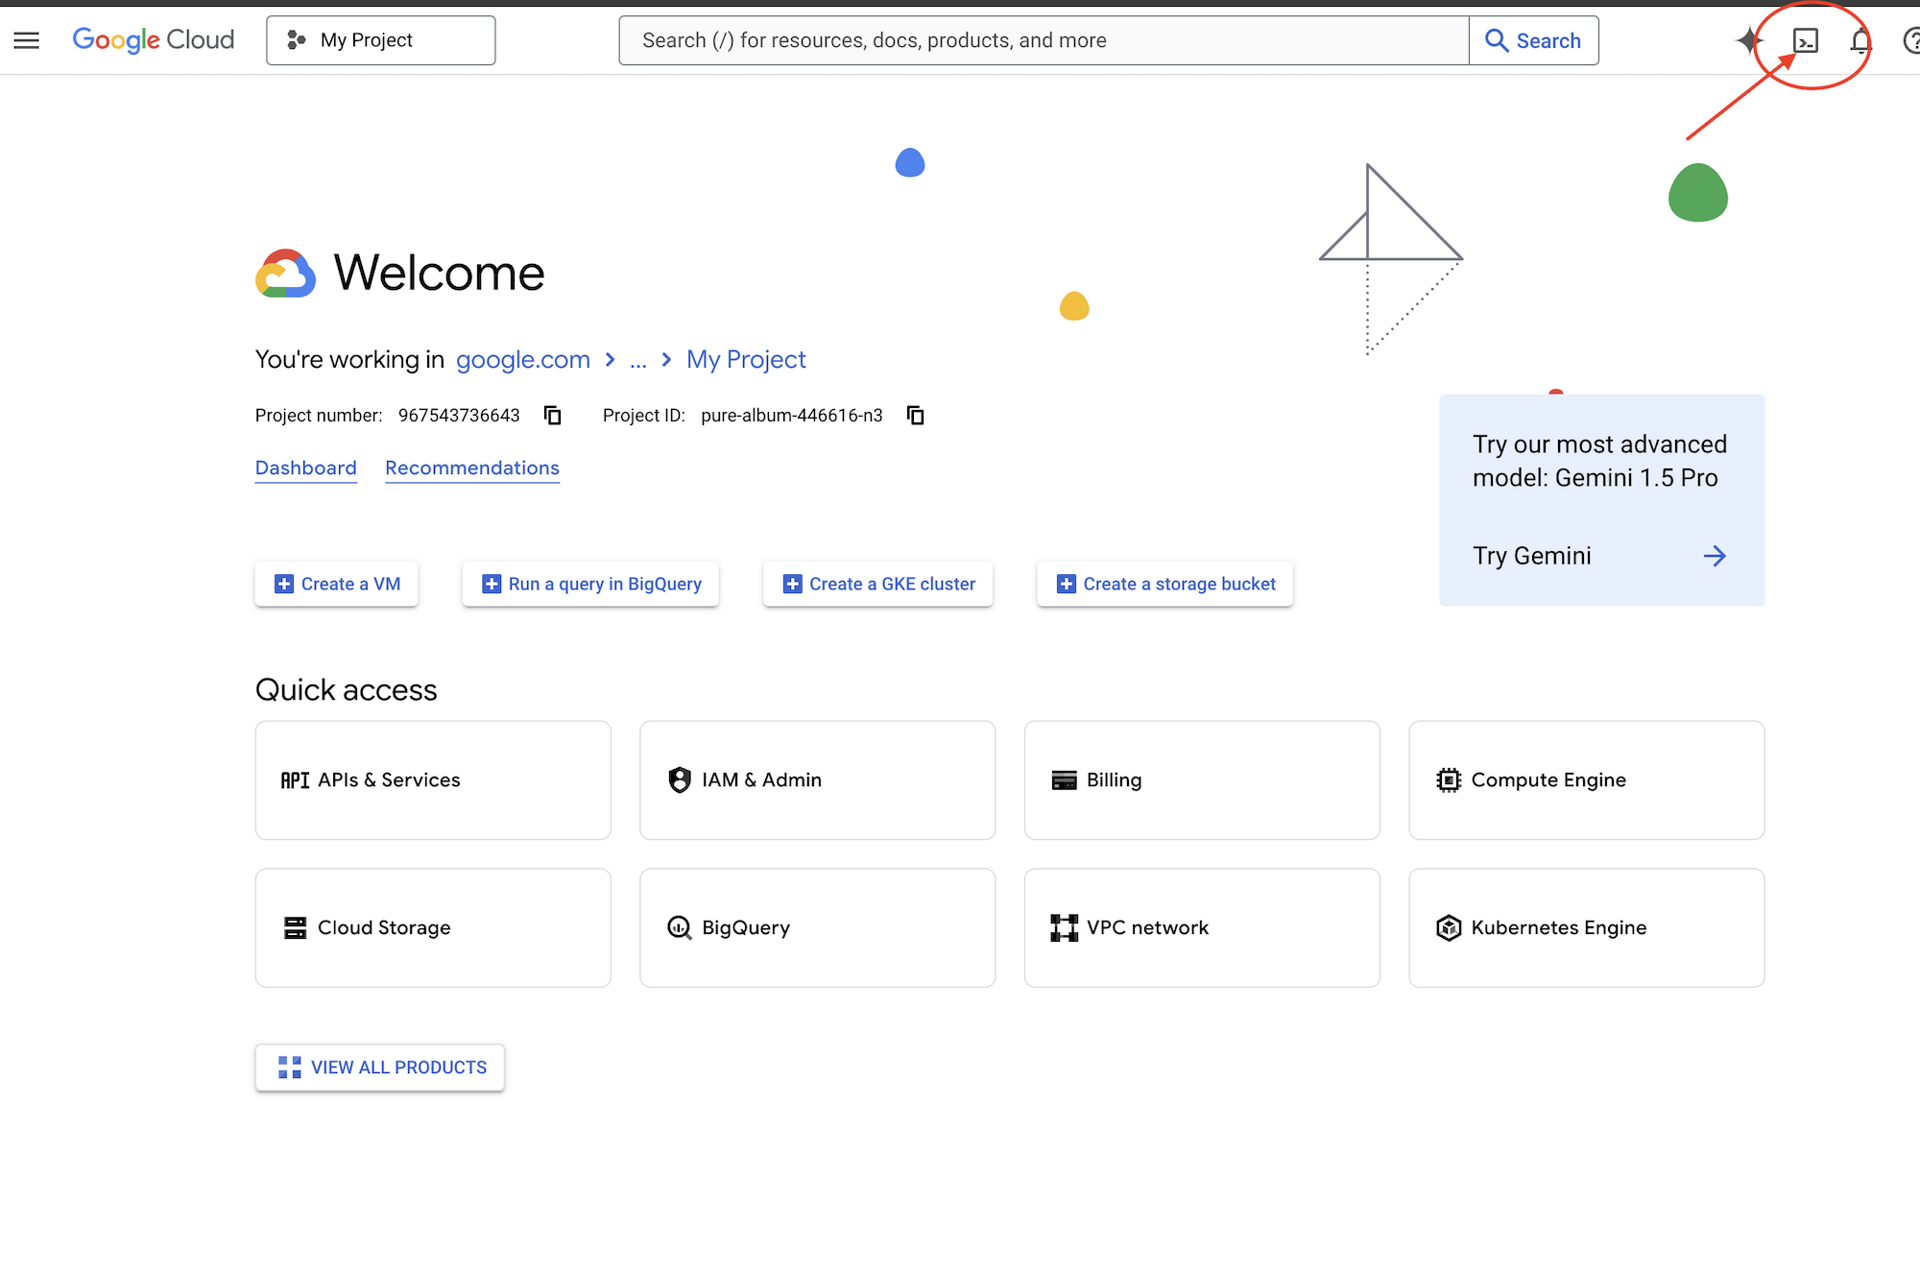
Google Cloud কনসোলের শীর্ষে থাকা Activate Cloud Shell-এ ক্লিক করুন (এটি Cloud Shell পেনের শীর্ষে থাকা টার্মিনাল আকৃতির আইকন),
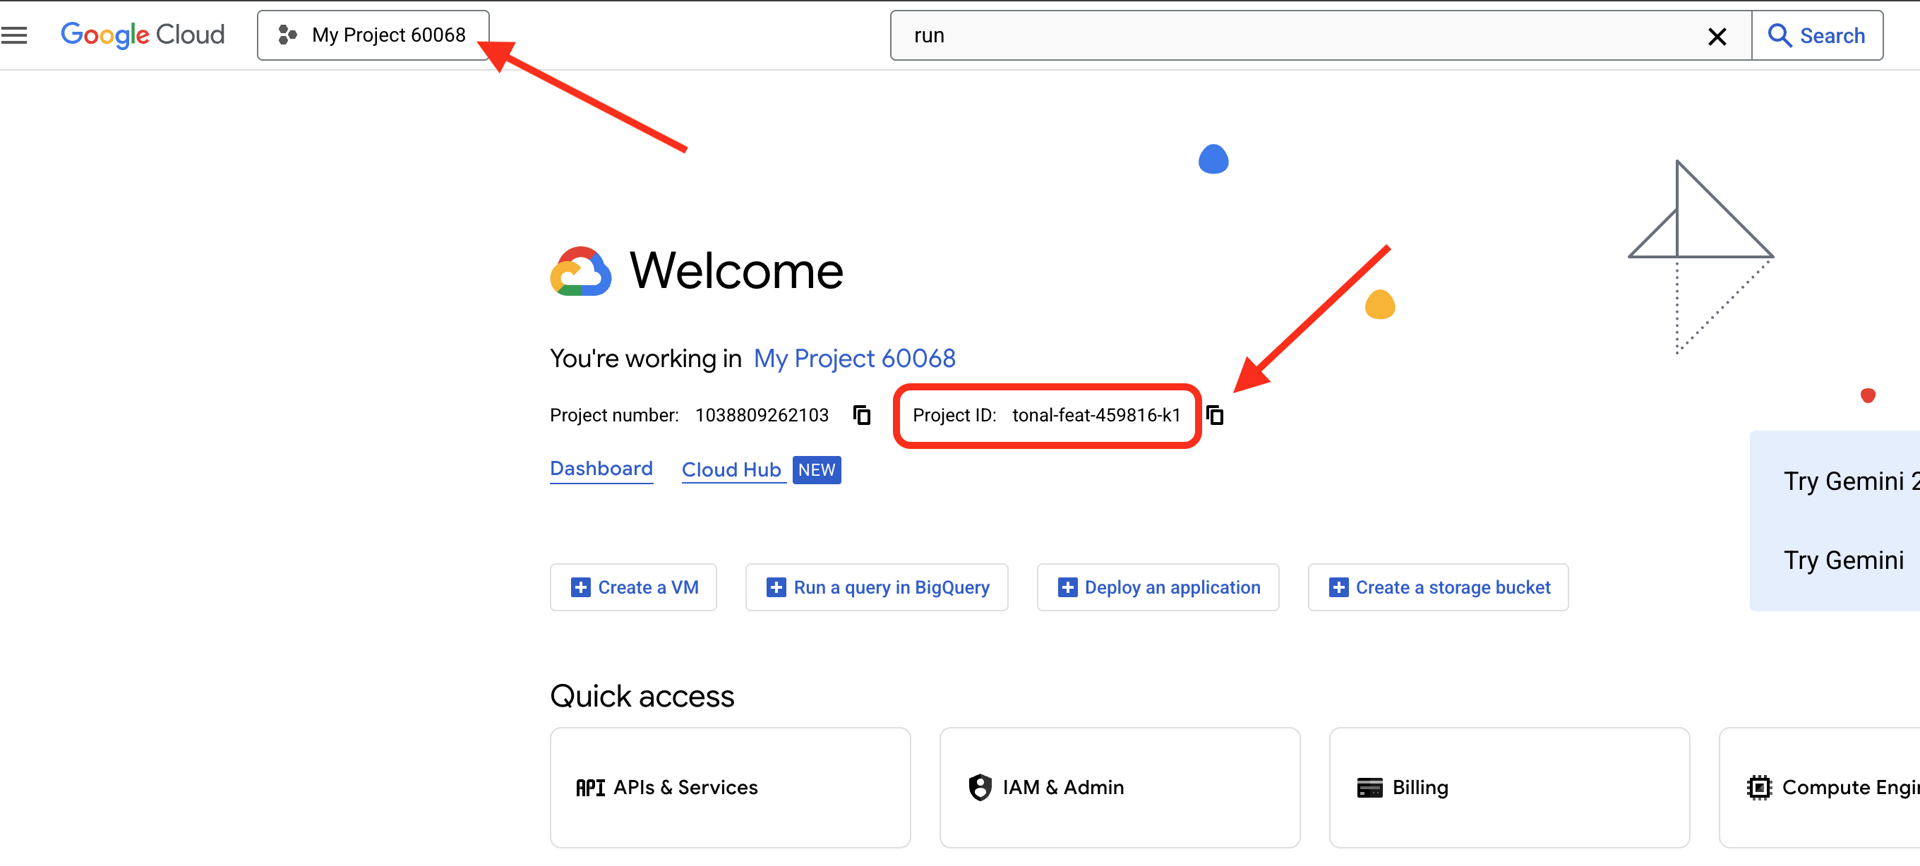
আপনার গুগল ক্লাউড প্রজেক্ট আইডি খুঁজুন:
- গুগল ক্লাউড কনসোল খুলুন: https://console.cloud.google.com
- পৃষ্ঠার শীর্ষে থাকা প্রজেক্ট ড্রপডাউন থেকে এই কর্মশালার জন্য আপনি যে প্রজেক্টটি ব্যবহার করতে চান, সেটি নির্বাচন করুন।
- আপনার প্রজেক্ট আইডি ড্যাশবোর্ডের প্রজেক্ট ইনফো কার্ডে প্রদর্শিত হয়।
ধাপ ১: আপনার প্রজেক্ট আইডি সেট করুন
ক্লাউড শেলে gcloud কমান্ড-লাইন টুলটি আগে থেকেই কনফিগার করা থাকে। আপনার সক্রিয় প্রজেক্ট সেট করতে নিম্নলিখিত কমান্ডটি চালান। এটি $GOOGLE_CLOUD_PROJECT এনভায়রনমেন্ট ভেরিয়েবল ব্যবহার করে, যা আপনার ক্লাউড শেল সেশনে স্বয়ংক্রিয়ভাবে সেট হয়ে যায়।
gcloud config set project $GOOGLE_CLOUD_PROJECT
ধাপ ২: আপনার সেটআপ যাচাই করুন
এরপর, আপনার প্রজেক্টটি সঠিকভাবে সেট করা হয়েছে এবং আপনি প্রমাণীকৃত কিনা তা নিশ্চিত করতে নিম্নলিখিত কমান্ডগুলো চালান।
# Confirm project is set
echo "Current project: $(gcloud config get-value project)"

# Check authentication status
gcloud auth list
আপনি আপনার প্রজেক্ট আইডি প্রিন্ট করা অবস্থায় দেখতে পাবেন এবং আপনার ইউজার অ্যাকাউন্টের পাশে (ACTIVE) লেখা দেখতে পাবেন।
যদি আপনার অ্যাকাউন্টটি সক্রিয় হিসেবে তালিকাভুক্ত না থাকে, অথবা যদি আপনি কোনো প্রমাণীকরণ ত্রুটি পান, তাহলে লগ ইন করতে নিম্নলিখিত কমান্ডটি চালান:
gcloud auth application-default login
ধাপ ৩: অপরিহার্য এপিআইগুলো সক্রিয় করুন
বেসিক এজেন্টের জন্য আমাদের অন্তত এই এপিআইগুলো প্রয়োজন:
gcloud services enable \
    aiplatform.googleapis.com \
    compute.googleapis.com
এতে এক বা দুই মিনিট সময় লাগতে পারে। আপনি দেখতে পাবেন:
Operation "operations/..." finished successfully.
ধাপ ৪: ADK ইনস্টল করুন
# Install the ADK CLI
pip install google-adk --upgrade

# Verify installation
adk --version
আপনি 1.15.0 বা তার চেয়ে উচ্চতর একটি সংস্করণ নম্বর দেখতে পাবেন।
এখন আপনার বেসিক এজেন্ট তৈরি করুন
পরিবেশ প্রস্তুত হয়ে গেলে, চলুন সেই সাধারণ এজেন্টটি তৈরি করা যাক।
ধাপ ৫: ADK Create ব্যবহার করুন
adk create my_first_agent
ইন্টারেক্টিভ নির্দেশাবলী অনুসরণ করুন:
Choose a model for the root agent:
1. gemini-2.5-flash
2. Other models (fill later)
Choose model (1, 2): 1

1. Google AI
2. Vertex AI
Choose a backend (1, 2): 2

Enter Google Cloud project ID [auto-detected-from-gcloud]:
Enter Google Cloud region [us-central1]:
ধাপ ৬: যা তৈরি করা হয়েছিল তা পরীক্ষা করুন
cd my_first_agent
ls -la
আপনি তিনটি ফাইল পাবেন:
.env          # Configuration (auto-populated with your project)
__init__.py   # Package marker
agent.py      # Your agent definition
ধাপ ৭: দ্রুত কনফিগারেশন যাচাই
# Verify the .env was created correctly
cat .env

# Should show something like:
# GOOGLE_CLOUD_PROJECT=your-project-id
# GOOGLE_CLOUD_LOCATION=us-central1
# GOOGLE_GENAI_USE_VERTEXAI=1
প্রজেক্ট আইডি অনুপস্থিত বা ভুল হলে, .env ফাইলটি সম্পাদনা করুন:
nano .env # or use your preferred editor
ধাপ ৮: এজেন্ট কোডটি দেখুন
cat agent.py
from google.adk.agents.llm_agent import Agent

root_agent = Agent(
    model='gemini-2.5-flash',
    name='root_agent',
    description='A helpful assistant for user questions.',
    instruction='Answer user questions to the best of your knowledge',
)
সরল, পরিচ্ছন্ন, বাহুল্যবর্জিত। এটাই আপনার এজেন্টদের জন্য 'হ্যালো ওয়ার্ল্ড'।
আপনার বেসিক এজেন্ট পরীক্ষা করুন
ধাপ ৯: আপনার এজেন্ট চালান
cd ..
adk run my_first_agent
আপনি এইরকম কিছু দেখতে পাবেন:
Log setup complete: /tmp/agents_log/agent.20250930_162430.log
To access latest log: tail -F /tmp/agents_log/agent.latest.log
[user]:
ধাপ ১০: কিছু কোয়েরি চেষ্টা করে দেখুন
যে টার্মিনালে adk run চলছে, সেখানে আপনি একটি প্রম্পট দেখতে পাবেন। আপনার কোয়েরিগুলো টাইপ করুন:
[user]: Hey, what can you do?
[root_agent]: I can help answer questions, generate text, explain concepts, assist with problem-solving, and provide information on a wide range of topics. What would you like to know or discuss?

[user]: What's the current weather in Mountain View?
[root_agent]: I'm sorry, but I cannot provide real-time weather information as I don't have access to current data or weather services. To get the current weather in Mountain View, I recommend checking a weather website or app like weather.com or using a search engine.
সীমাবদ্ধতাটি লক্ষ্য করুন - এটি বর্তমান ডেটা অ্যাক্সেস করতে পারে না। চলুন আরও এগিয়ে যাই:
[user]: Review this Python code: def add(a, b): return a + b
[root_agent]: This is a simple Python function that adds two numbers. Here's my review:

**Strengths:**
- Clean and concise implementation
- Follows Python conventions for simple operations
- Clear function name that describes its purpose

**Suggestions for improvement:**
- Add a docstring to document the function
- Consider adding type hints for better code clarity
- You might want to handle edge cases

Here's an enhanced version:
def add(a: float, b: float) -> float:
    """Add two numbers and return their sum."""
    return a + b
এজেন্ট কোড নিয়ে আলোচনা করতে পারে, কিন্তু এটি কি পারে:
- আসলে গঠন বোঝার জন্য AST পার্স করবেন?
- এটি কাজ করছে কিনা তা যাচাই করতে পরীক্ষা চালান?
- শৈলীর সামঞ্জস্য পরীক্ষা করুন?
- আপনার আগের রিভিউগুলোর কথা মনে আছে?
না। এখানেই আমাদের স্থাপত্যের প্রয়োজন।
🏃🚪 প্রস্থান করুন
Ctrl+C
অন্বেষণ শেষ হলে
৩. আপনার উৎপাদন কর্মক্ষেত্র প্রস্তুত করা
সমাধান: একটি উৎপাদন-উপযোগী আর্কিটেকচার
ঐ সাধারণ এজেন্টটি সূচনা বিন্দুটি দেখিয়েছিল, কিন্তু একটি উৎপাদন ব্যবস্থার জন্য একটি সুদৃঢ় কাঠামো প্রয়োজন। আমরা এখন একটি সম্পূর্ণ প্রকল্প স্থাপন করব যা উৎপাদনের নীতিগুলোকে মূর্ত করে তুলবে।
ভিত্তি স্থাপন
আপনি ইতিমধ্যেই আপনার গুগল ক্লাউড প্রজেক্টটি বেসিক এজেন্টের জন্য কনফিগার করেছেন। এখন চলুন একটি বাস্তব সিস্টেমের জন্য প্রয়োজনীয় সমস্ত টুল, প্যাটার্ন এবং অবকাঠামো দিয়ে সম্পূর্ণ প্রোডাকশন ওয়ার্কস্পেসটি প্রস্তুত করি।
ধাপ ১: কাঠামোগত প্রকল্পটি সংগ্রহ করুন
প্রথমে, Ctrl+C চেপে চলমান যেকোনো adk run বন্ধ করুন এবং পরিষ্কার-পরিচ্ছন্ন করুন:
# Clean up the basic agent
cd ~  # Make sure you're not inside my_first_agent
rm -rf my_first_agent

# Get the production scaffold
git clone https://github.com/ayoisio/adk-code-review-assistant.git
cd adk-code-review-assistant
git checkout codelab
ধাপ ২: ভার্চুয়াল পরিবেশ তৈরি এবং সক্রিয় করুন
# Create the virtual environment
python -m venv .venv

# Activate it
# On macOS/Linux:
source .venv/bin/activate
# On Windows:
# .venv\Scripts\activate
যাচাইকরণ : আপনার প্রম্পটের শুরুতে এখন (.venv) দেখা যাবে।
ধাপ ৩: নির্ভরতাগুলো ইনস্টল করুন
pip install -r code_review_assistant/requirements.txt

# Install the package in editable mode (enables imports)
pip install -e .
এটি ইনস্টল করে:
-
google-adk- ADK ফ্রেমওয়ার্ক -
pycodestyle- PEP 8 চেকিংয়ের জন্য -
vertexai- ক্লাউড ডেপ্লয়মেন্টের জন্য - অন্যান্য উৎপাদন নির্ভরতা
-e ফ্ল্যাগটি আপনাকে যেকোনো জায়গা থেকে code_review_assistant মডিউল ইম্পোর্ট করার সুযোগ দেয়।
ধাপ ৪: আপনার পরিবেশ কনফিগার করুন
# Copy the example environment file
cp .env.example .env

# Edit .env and replace the placeholders:
# - GOOGLE_CLOUD_PROJECT=your-project-id → your actual project ID
# - Keep other defaults as-is
যাচাইকরণ : আপনার কনফিগারেশন পরীক্ষা করুন:
cat .env
দেখানো উচিত:
GOOGLE_CLOUD_PROJECT=your-actual-project-id
GOOGLE_CLOUD_LOCATION=us-central1
GOOGLE_GENAI_USE_VERTEXAI=TRUE
ধাপ ৫: প্রমাণীকরণ নিশ্চিত করুন
যেহেতু আপনি আগেই gcloud auth চালিয়েছেন, চলুন যাচাই করে নেওয়া যাক:
# Check current authentication
gcloud auth list

# Should show your account with (ACTIVE)
# If not, run:
gcloud auth application-default login
ধাপ ৬: অতিরিক্ত প্রোডাকশন এপিআই সক্রিয় করুন
আমরা ইতিমধ্যেই বেসিক এপিআইগুলো চালু করেছি। এখন প্রোডাকশন এপিআইগুলো যোগ করুন:
gcloud services enable \
    sqladmin.googleapis.com \
    run.googleapis.com \
    cloudbuild.googleapis.com \
    artifactregistry.googleapis.com \
    storage.googleapis.com \
    cloudtrace.googleapis.com
এর ফলে:
- SQL অ্যাডমিন : ক্লাউড রান ব্যবহার করলে ক্লাউড SQL-এর জন্য
- ক্লাউড রান : সার্ভারবিহীন ডেপ্লয়মেন্টের জন্য
- ক্লাউড বিল্ড : স্বয়ংক্রিয় ডেপ্লয়মেন্টের জন্য
- আর্টিফ্যাক্ট রেজিস্ট্রি : কন্টেইনার ইমেজের জন্য
- ক্লাউড স্টোরেজ : আর্টিফ্যাক্ট এবং স্টেজিংয়ের জন্য
- ক্লাউড ট্রেস : পর্যবেক্ষণযোগ্যতার জন্য
ধাপ ৭: আর্টিফ্যাক্ট রেজিস্ট্রি রিপোজিটরি তৈরি করুন
আমাদের ডেপ্লয়মেন্ট এমন কন্টেইনার ইমেজ তৈরি করবে যেগুলোর জন্য একটি আশ্রয় প্রয়োজন:
gcloud artifacts repositories create code-review-assistant-repo \
    --repository-format=docker \
    --location=us-central1 \
    --description="Docker repository for Code Review Assistant"
আপনার দেখা উচিত:
Created repository [code-review-assistant-repo].
যদি এটি আগে থেকেই বিদ্যমান থাকে (সম্ভবত পূর্ববর্তী কোনো প্রচেষ্টা থেকে), তাতে কোনো সমস্যা নেই - আপনি একটি ত্রুটির বার্তা দেখতে পাবেন যা আপনি উপেক্ষা করতে পারেন।
ধাপ ৮: IAM অনুমতি প্রদান করুন
# Get your project number
PROJECT_NUMBER=$(gcloud projects describe $GOOGLE_CLOUD_PROJECT \
    --format="value(projectNumber)")

# Define the service account
SERVICE_ACCOUNT="${PROJECT_NUMBER}@cloudbuild.gserviceaccount.com"

# Grant necessary roles
gcloud projects add-iam-policy-binding $GOOGLE_CLOUD_PROJECT \
    --member="serviceAccount:${SERVICE_ACCOUNT}" \
    --role="roles/run.admin"

gcloud projects add-iam-policy-binding $GOOGLE_CLOUD_PROJECT \
    --member="serviceAccount:${SERVICE_ACCOUNT}" \
    --role="roles/iam.serviceAccountUser"

gcloud projects add-iam-policy-binding $GOOGLE_CLOUD_PROJECT \
    --member="serviceAccount:${SERVICE_ACCOUNT}" \
    --role="roles/cloudsql.admin"

gcloud projects add-iam-policy-binding $GOOGLE_CLOUD_PROJECT \
    --member="serviceAccount:${SERVICE_ACCOUNT}" \
    --role="roles/storage.admin"
প্রতিটি কমান্ডের আউটপুট হবে:
Updated IAM policy for project [your-project-id].
আপনি যা অর্জন করেছেন
আপনার প্রোডাকশন ওয়ার্কস্পেস এখন সম্পূর্ণরূপে প্রস্তুত:
✅ গুগল ক্লাউড প্রজেক্ট কনফিগার এবং প্রমাণীকৃত
✅ সীমাবদ্ধতা বোঝার জন্য বেসিক এজেন্ট পরীক্ষা করা হয়েছে
✅ কৌশলগত প্লেসহোল্ডার সহ প্রজেক্ট কোড প্রস্তুত
✅ ভার্চুয়াল পরিবেশে নির্ভরশীলতাগুলো বিচ্ছিন্ন
✅ সকল প্রয়োজনীয় এপিআই সক্রিয় করা হয়েছে
✅ কন্টেইনার রেজিস্ট্রি ডেপ্লয়মেন্টের জন্য প্রস্তুত
✅ IAM অনুমতিগুলি সঠিকভাবে কনফিগার করা হয়েছে
✅ এনভায়রনমেন্ট ভেরিয়েবলগুলো সঠিকভাবে সেট করা হয়েছে
এখন আপনি ডিটারমিনিস্টিক টুলস, স্টেট ম্যানেজমেন্ট এবং যথাযথ আর্কিটেকচার ব্যবহার করে একটি সত্যিকারের এআই সিস্টেম তৈরি করতে প্রস্তুত।
৪. আপনার প্রথম এজেন্ট তৈরি করা
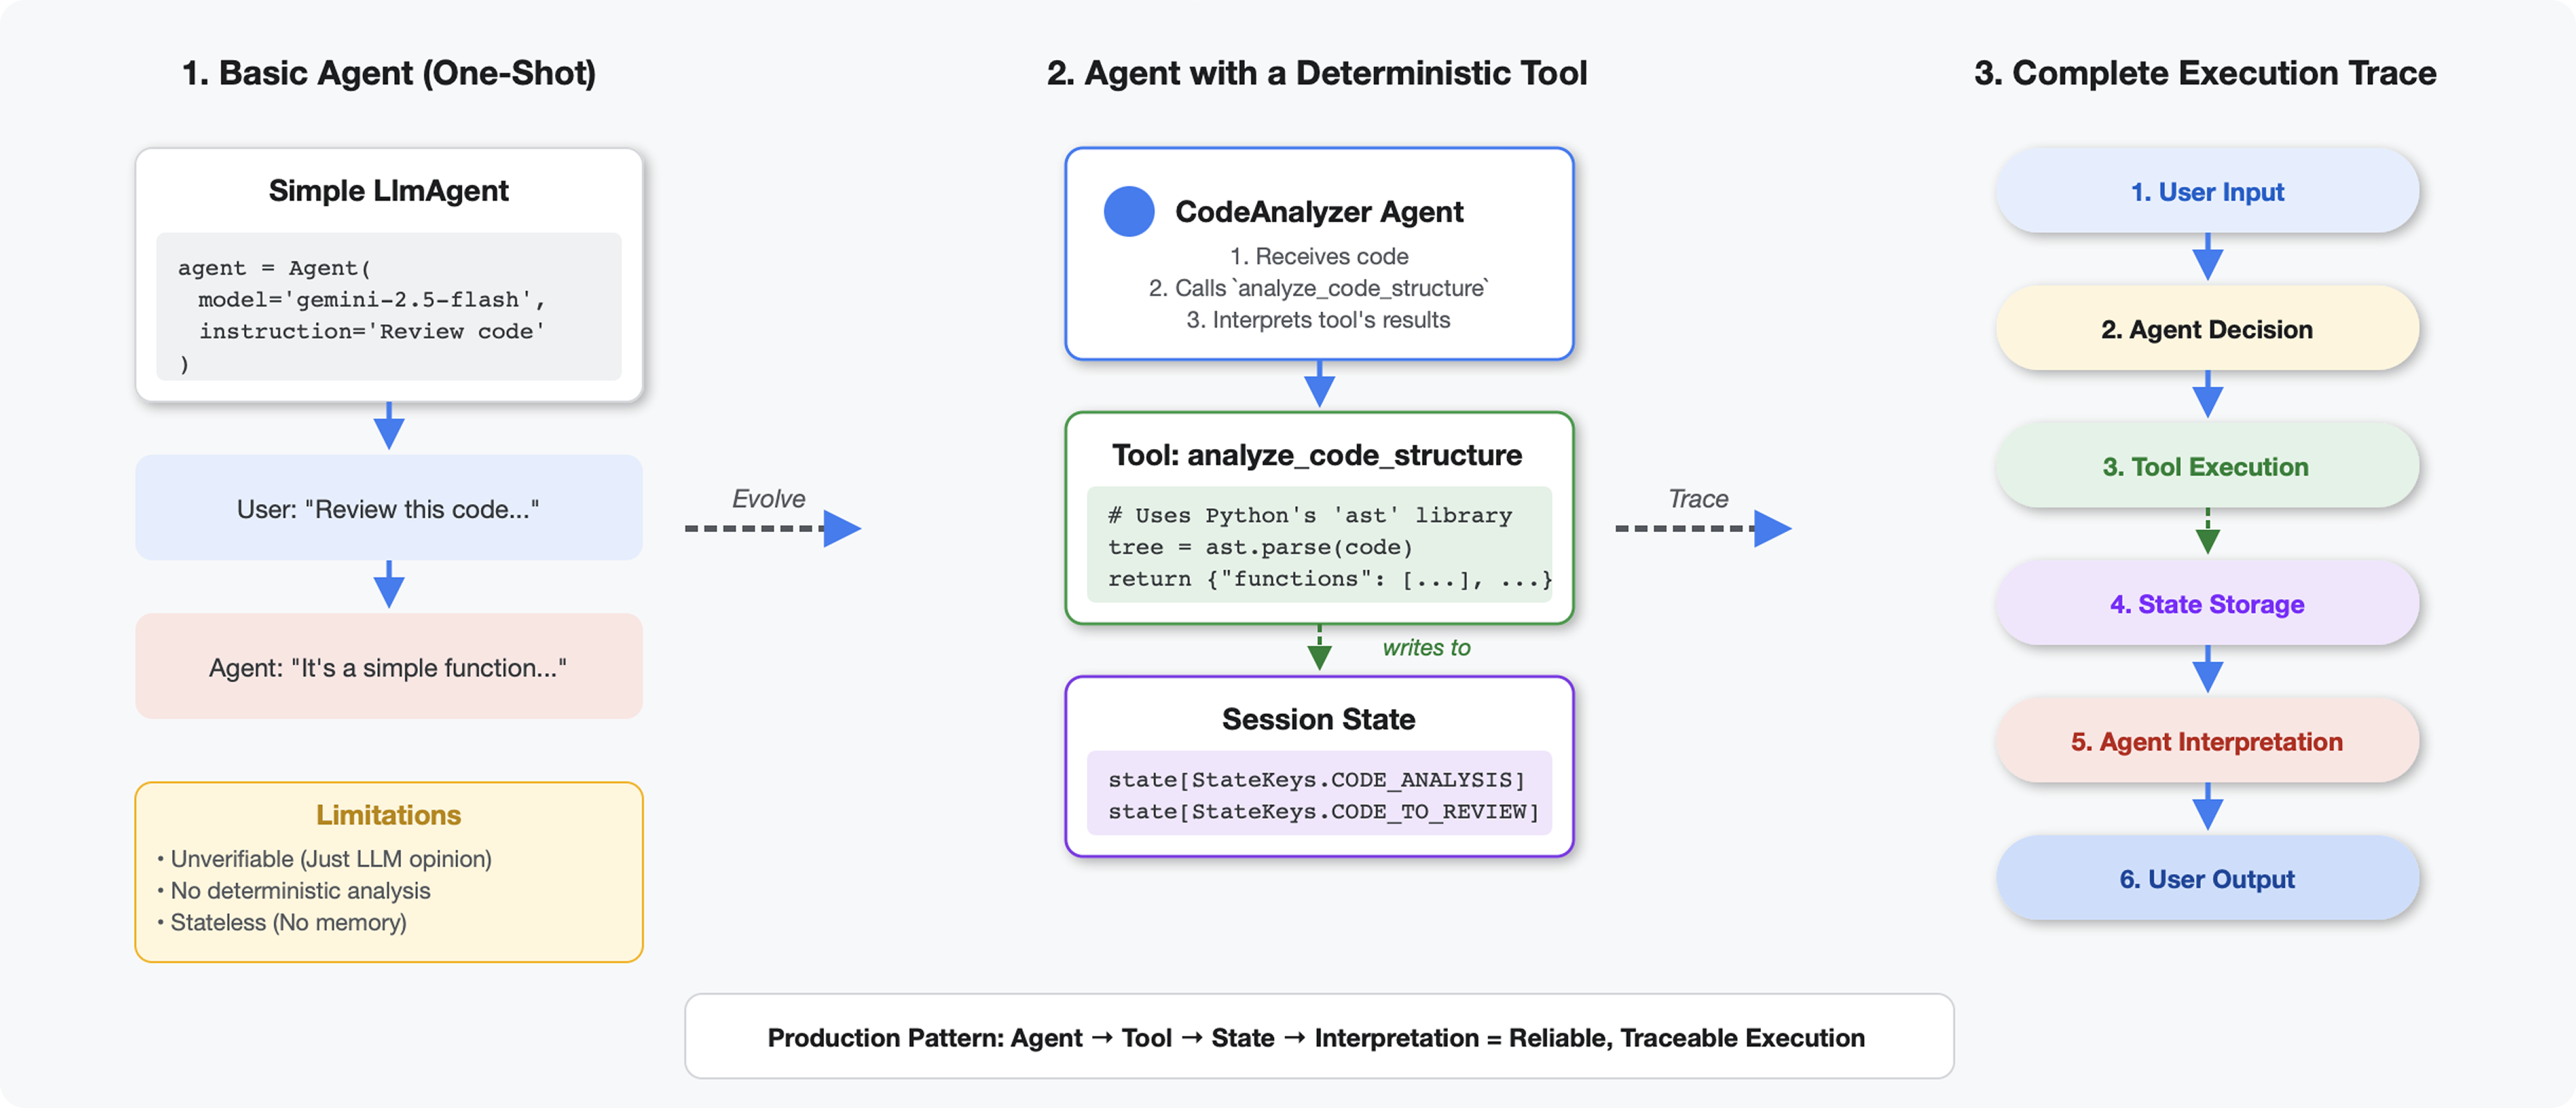
টুলস এবং এলএলএম-এর মধ্যে পার্থক্য কী?
যখন আপনি কোনো এলএলএম-কে জিজ্ঞাসা করেন "এই কোডে কয়টি ফাংশন আছে?", তখন এটি প্যাটার্ন ম্যাচিং এবং অনুমানের উপর নির্ভর করে। যখন আপনি এমন কোনো টুল ব্যবহার করেন যা পাইথনের ast.parse() কল করে, তখন এটি প্রকৃত সিনট্যাক্স ট্রি পার্স করে — কোনো অনুমান নয়, প্রতিবার একই ফলাফল।
এই অংশে এমন একটি টুল তৈরি করা হয়েছে যা সুনির্দিষ্টভাবে কোডের কাঠামো বিশ্লেষণ করে, এবং তারপর সেটিকে এমন একটি এজেন্টের সাথে সংযুক্ত করে যা জানে কখন সেটিকে আহ্বান করতে হবে।
ধাপ ১: স্ক্যাফোল্ডটি বোঝা
চলুন, আপনি যে কাঠামোটি পূরণ করবেন তা পরীক্ষা করা যাক।
👉 খোলা
code_review_assistant/tools.py
আপনি analyze_code_structure ফাংশনটি দেখতে পাবেন, যেখানে কোড যোগ করার জন্য প্লেসহোল্ডার কমেন্ট দেওয়া আছে। ফাংশনটির প্রাথমিক কাঠামো আগে থেকেই তৈরি করা আছে - আপনি এটিকে ধাপে ধাপে উন্নত করবেন।
ধাপ ২: স্টেট স্টোরেজ যোগ করুন
স্টেট স্টোরেজ পাইপলাইনে থাকা অন্যান্য এজেন্টদেরকে বিশ্লেষণটি পুনরায় না চালিয়েই আপনার টুলের ফলাফল অ্যাক্সেস করার সুযোগ দেয়।
👉 খুঁজুন:
# MODULE_4_STEP_2_ADD_STATE_STORAGE
👉 ঐ একটি লাইনকে এটি দিয়ে প্রতিস্থাপন করুন:
        # Store code and analysis for other agents to access
        tool_context.state[StateKeys.CODE_TO_REVIEW] = code
        tool_context.state[StateKeys.CODE_ANALYSIS] = analysis
        tool_context.state[StateKeys.CODE_LINE_COUNT] = len(code.splitlines())
ধাপ ৩: থ্রেড পুলের সাহায্যে অ্যাসিঙ্ক পার্সিং যুক্ত করুন
আমাদের টুলটিকে অন্য অপারেশনগুলোকে ব্লক না করে AST পার্স করতে হবে। চলুন, থ্রেড পুল ব্যবহার করে অ্যাসিঙ্ক এক্সিকিউশন যুক্ত করি।
👉 খুঁজুন:
# MODULE_4_STEP_3_ADD_ASYNC
👉 ঐ একটি লাইনকে এটি দিয়ে প্রতিস্থাপন করুন:
        # Parse in thread pool to avoid blocking the event loop
        loop = asyncio.get_event_loop()
        with ThreadPoolExecutor() as executor:
            tree = await loop.run_in_executor(executor, ast.parse, code)
ধাপ ৪: বিস্তারিত তথ্য সংগ্রহ করুন
এখন চলুন ক্লাস, ইম্পোর্ট এবং বিস্তারিত মেট্রিক্স বের করে নিই — একটি সম্পূর্ণ কোড পর্যালোচনার জন্য আমাদের যা যা প্রয়োজন, তার সবকিছুই।
👉 খুঁজুন:
# MODULE_4_STEP_4_EXTRACT_DETAILS
👉 ঐ একটি লাইনকে এটি দিয়ে প্রতিস্থাপন করুন:
# Extract comprehensive structural information
analysis = await loop.run_in_executor(
executor, _extract_code_structure, tree, code
)
👉 যাচাই করুন: ফাংশনটি
analyze_code_structure
ভিতরে
tools.py
এর একটি কেন্দ্রীয় অংশ আছে যা দেখতে এইরকম:
# Parse in thread pool to avoid blocking the event loop
loop = asyncio.get_event_loop()
with ThreadPoolExecutor() as executor:
    tree = await loop.run_in_executor(executor, ast.parse, code)
        # Extract comprehensive structural information
        analysis = await loop.run_in_executor(
            executor, _extract_code_structure, tree, code
        )
# Store code and analysis for other agents to access
tool_context.state[StateKeys.CODE_TO_REVIEW] = code
tool_context.state[StateKeys.CODE_ANALYSIS] = analysis
tool_context.state[StateKeys.CODE_LINE_COUNT] = len(code.splitlines())
👉 এখন একদম নিচে স্ক্রোল করুন
tools.py
এবং খুঁজুন:
# MODULE_4_STEP_4_HELPER_FUNCTION
👉 ঐ একটি লাইনকে সম্পূর্ণ হেল্পার ফাংশনটি দিয়ে প্রতিস্থাপন করুন:
def _extract_code_structure(tree: ast.AST, code: str) -> Dict[str, Any]:
    """
    Helper function to extract structural information from AST.
    Runs in thread pool for CPU-bound work.
    """
    functions = []
    classes = []
    imports = []
    docstrings = []

    for node in ast.walk(tree):
        if isinstance(node, ast.FunctionDef):
            func_info = {
                'name': node.name,
                'args': [arg.arg for arg in node.args.args],
                'lineno': node.lineno,
                'has_docstring': ast.get_docstring(node) is not None,
                'is_async': isinstance(node, ast.AsyncFunctionDef),
                'decorators': [d.id for d in node.decorator_list
                               if isinstance(d, ast.Name)]
            }
            functions.append(func_info)

            if func_info['has_docstring']:
                docstrings.append(f"{node.name}: {ast.get_docstring(node)[:50]}...")

        elif isinstance(node, ast.ClassDef):
            methods = []
            for item in node.body:
                if isinstance(item, ast.FunctionDef):
                    methods.append(item.name)

            class_info = {
                'name': node.name,
                'lineno': node.lineno,
                'methods': methods,
                'has_docstring': ast.get_docstring(node) is not None,
                'base_classes': [base.id for base in node.bases
                                 if isinstance(base, ast.Name)]
            }
            classes.append(class_info)

        elif isinstance(node, ast.Import):
            for alias in node.names:
                imports.append({
                    'module': alias.name,
                    'alias': alias.asname,
                    'type': 'import'
                })
        elif isinstance(node, ast.ImportFrom):
            imports.append({
                'module': node.module or '',
                'names': [alias.name for alias in node.names],
                'type': 'from_import',
                'level': node.level
            })

    return {
        'functions': functions,
        'classes': classes,
        'imports': imports,
        'docstrings': docstrings,
        'metrics': {
            'line_count': len(code.splitlines()),
            'function_count': len(functions),
            'class_count': len(classes),
            'import_count': len(imports),
            'has_main': any(f['name'] == 'main' for f in functions),
            'has_if_main': '__main__' in code,
            'avg_function_length': _calculate_avg_function_length(tree)
        }
    }


def _calculate_avg_function_length(tree: ast.AST) -> float:
    """Calculate average function length in lines."""
    function_lengths = []

    for node in ast.walk(tree):
        if isinstance(node, ast.FunctionDef):
            if hasattr(node, 'end_lineno') and hasattr(node, 'lineno'):
                length = node.end_lineno - node.lineno + 1
                function_lengths.append(length)

    if function_lengths:
        return sum(function_lengths) / len(function_lengths)
    return 0.0
ধাপ ৫: একজন এজেন্টের সাথে সংযোগ করুন
এখন আমরা টুলটিকে এমন একটি এজেন্টের সাথে সংযুক্ত করি, যেটি জানে কখন এটি ব্যবহার করতে হবে এবং এর ফলাফল কীভাবে ব্যাখ্যা করতে হবে।
👉 খোলা
code_review_assistant/sub_agents/review_pipeline/code_analyzer.py
👉 খুঁজুন:
# MODULE_4_STEP_5_CREATE_AGENT
👉 ওই একটি লাইনকে সম্পূর্ণ প্রোডাকশন এজেন্ট দিয়ে প্রতিস্থাপন করুন:
code_analyzer_agent = Agent(
    name="CodeAnalyzer",
    model=config.worker_model,
    description="Analyzes Python code structure and identifies components",
    instruction="""You are a code analysis specialist responsible for understanding code structure.

Your task:
1. Take the code submitted by the user (it will be provided in the user message)
2. Use the analyze_code_structure tool to parse and analyze it
3. Pass the EXACT code to your tool - do not modify, fix, or "improve" it
4. Identify all functions, classes, imports, and structural patterns
5. Note any syntax errors or structural issues
6. Store the analysis in state for other agents to use

CRITICAL:
- Pass the code EXACTLY as provided to the analyze_code_structure tool
- Do not fix syntax errors, even if obvious
- Do not add missing imports or fix indentation
- The goal is to analyze what IS there, not what SHOULD be there

When calling the tool, pass the code as a string to the 'code' parameter.
If the analysis fails due to syntax errors, clearly report the error location and type.

Provide a clear summary including:
- Number of functions and classes found
- Key structural observations
- Any syntax errors or issues detected
- Overall code organization assessment""",
    tools=[FunctionTool(func=analyze_code_structure)],
    output_key="structure_analysis_summary"
)
আপনার কোড অ্যানালাইজার পরীক্ষা করুন
এখন যাচাই করুন আপনার অ্যানালাইজারটি সঠিকভাবে কাজ করছে কিনা।
👉 টেস্ট স্ক্রিপ্টটি চালান:
python tests/test_code_analyzer.py
টেস্ট স্ক্রিপ্টটি python-dotenv ব্যবহার করে আপনার .env ফাইল থেকে স্বয়ংক্রিয়ভাবে কনফিগারেশন লোড করে, তাই ম্যানুয়ালি কোনো এনভায়রনমেন্ট ভেরিয়েবল সেটআপ করার প্রয়োজন নেই।
প্রত্যাশিত আউটপুট:
INFO:code_review_assistant.config:Code Review Assistant Configuration Loaded:
INFO:code_review_assistant.config:  - GCP Project: your-project-id
INFO:code_review_assistant.config:  - Artifact Bucket: gs://your-project-artifacts
INFO:code_review_assistant.config:  - Models: worker=gemini-2.5-flash, critic=gemini-2.5-pro
Testing code analyzer...
INFO:code_review_assistant.tools:Tool: Analysis complete - 2 functions, 1 classes

=== Analyzer Response ===
The analysis of the provided code shows the following:

* **Functions Found:** 2
    * `add(a, b)`: A global function at line 2.
    * `multiply(self, x, y)`: A method within the `Calculator` class.

* **Classes Found:** 1
    * `Calculator`: A class defined at line 5. Contains one method, `multiply`.

* **Imports:** 0

* **Structural Patterns:** The code defines one global function and one class
  with a single method. Both are simple, each with a single return statement.

* **Syntax Errors/Issues:** No syntax errors detected.

* **Overall Code Organization:** The code is well-organized for its small size,
  clearly defining a function and a class with a method.
এইমাত্র যা ঘটল:
- টেস্ট স্ক্রিপ্টটি আপনার
.envকনফিগারেশন স্বয়ংক্রিয়ভাবে লোড করেছে। - আপনার
analyze_code_structure()টুলটি পাইথনের AST ব্যবহার করে কোডটি পার্স করেছে। -
_extract_code_structure()হেল্পারটি ফাংশন, ক্লাস এবং মেট্রিক্স নিষ্কাশন করেছে। -
StateKeysকনস্ট্যান্ট ব্যবহার করে ফলাফলগুলো সেশন স্টেটে সংরক্ষণ করা হয়েছিল। - কোড অ্যানালাইজার এজেন্ট ফলাফলগুলো ব্যাখ্যা করে একটি সারসংক্ষেপ প্রদান করেছে।
সমস্যা সমাধান:
- "'code_review_assistant' নামের কোনো মডিউল নেই" : প্রজেক্ট রুট থেকে
pip install -e .চালান। - "গুরুত্বপূর্ণ ইনপুট আর্গুমেন্ট অনুপস্থিত" : যাচাই করুন আপনার
.envফাইলেGOOGLE_CLOUD_PROJECT,GOOGLE_CLOUD_LOCATION, এবংGOOGLE_GENAI_USE_VERTEXAI=trueআছে কিনা।
আপনি যা তৈরি করেছেন
এখন আপনার কাছে একটি প্রোডাকশন-রেডি কোড অ্যানালাইজার আছে যা:
✅ প্রকৃত পাইথন AST পার্স করে - এটি ডিটারমিনিস্টিক, প্যাটার্ন ম্যাচিং নয়।
✅ ফলাফল স্টেটে সংরক্ষণ করে - অন্যান্য এজেন্টরা বিশ্লেষণটি অ্যাক্সেস করতে পারে
✅ অ্যাসিঙ্ক্রোনাসভাবে চলে - অন্যান্য টুলকে ব্লক করে না
✅ বিস্তারিত তথ্য সংগ্রহ করে - ফাংশন, ক্লাস, ইম্পোর্ট, মেট্রিক্স
✅ ত্রুটিগুলি সুন্দরভাবে সামাল দেয় - লাইন নম্বর সহ সিনট্যাক্স ত্রুটি রিপোর্ট করে
✅ একজন এজেন্টের সাথে সংযোগ স্থাপন করে - এলএলএম জানে কখন এবং কীভাবে এটি ব্যবহার করতে হয়।
মূল ধারণাগুলি আয়ত্ত করা হয়েছে
সরঞ্জাম বনাম এজেন্ট:
- টুলগুলো সুনির্দিষ্ট কাজ করে (AST পার্সিং)।
- এজেন্টরা কখন সরঞ্জাম ব্যবহার করবে তা নির্ধারণ করে এবং ফলাফল ব্যাখ্যা করে।
ফেরত মান বনাম অবস্থা:
- প্রত্যাবর্তন: এলএলএম যা তাৎক্ষণিকভাবে দেখে
- অবস্থা: যা অন্যান্য এজেন্টদের জন্য টিকে থাকে
অবস্থা কী ধ্রুবক:
- মাল্টি-এজেন্ট সিস্টেমে টাইপো প্রতিরোধ করুন
- এজেন্টদের মধ্যে চুক্তি হিসেবে কাজ করে
- এজেন্টরা যখন ডেটা শেয়ার করে তখন এটি গুরুত্বপূর্ণ।
অ্যাসিঙ্ক + থ্রেড পুল:
-
async defটুলগুলিকে এক্সিকিউশন থামাতে সাহায্য করে। - থ্রেড পুলগুলো ব্যাকগ্রাউন্ডে সিপিইউ-নির্ভর কাজগুলো চালায়।
- একসাথে তারা ইভেন্ট লুপকে প্রতিক্রিয়াশীল রাখে
সহায়ক ফাংশনসমূহ:
- সিঙ্ক হেল্পারগুলোকে অ্যাসিঙ্ক টুল থেকে আলাদা করুন
- কোডকে পরীক্ষাযোগ্য ও পুনঃব্যবহারযোগ্য করে তোলে
এজেন্টের নির্দেশাবলী:
- বিস্তারিত নির্দেশাবলী এলএলএম-এর সাধারণ ভুলগুলো প্রতিরোধ করে।
- কী করা যাবে না সে সম্পর্কে সুস্পষ্টভাবে বলুন (কোড ঠিক করবেন না)
- সামঞ্জস্যের জন্য সুস্পষ্ট কর্মপ্রবাহের ধাপসমূহ
এরপর কী হবে
মডিউল ৫-এ, আপনাকে যোগ করতে হবে:
- স্টাইল চেকার যা স্টেট থেকে কোড পড়ে
- টেস্ট রানার যা প্রকৃতপক্ষে টেস্টগুলো সম্পাদন করে
- ফিডব্যাক সিন্থেসাইজার যা সমস্ত বিশ্লেষণকে একত্রিত করে
আপনি দেখতে পাবেন কীভাবে একটি সিকোয়েনশিয়াল পাইপলাইনের মধ্য দিয়ে স্টেট প্রবাহিত হয়, এবং একাধিক এজেন্ট যখন একই ডেটা পড়ে ও লেখে তখন কনস্ট্যান্ট প্যাটার্নটি কেন গুরুত্বপূর্ণ।
৫. একটি পাইপলাইন তৈরি করা: একাধিক এজেন্টের সম্মিলিত প্রচেষ্টা
ভূমিকা
মডিউল ৪-এ, আপনি একটি একক এজেন্ট তৈরি করেছেন যা কোডের কাঠামো বিশ্লেষণ করে। কিন্তু একটি পূর্ণাঙ্গ কোড পর্যালোচনার জন্য শুধু পার্সিং-ই যথেষ্ট নয় — এর জন্য স্টাইল চেকিং, টেস্ট এক্সিকিউশন এবং বুদ্ধিদীপ্ত ফিডব্যাক সংশ্লেষণ প্রয়োজন।
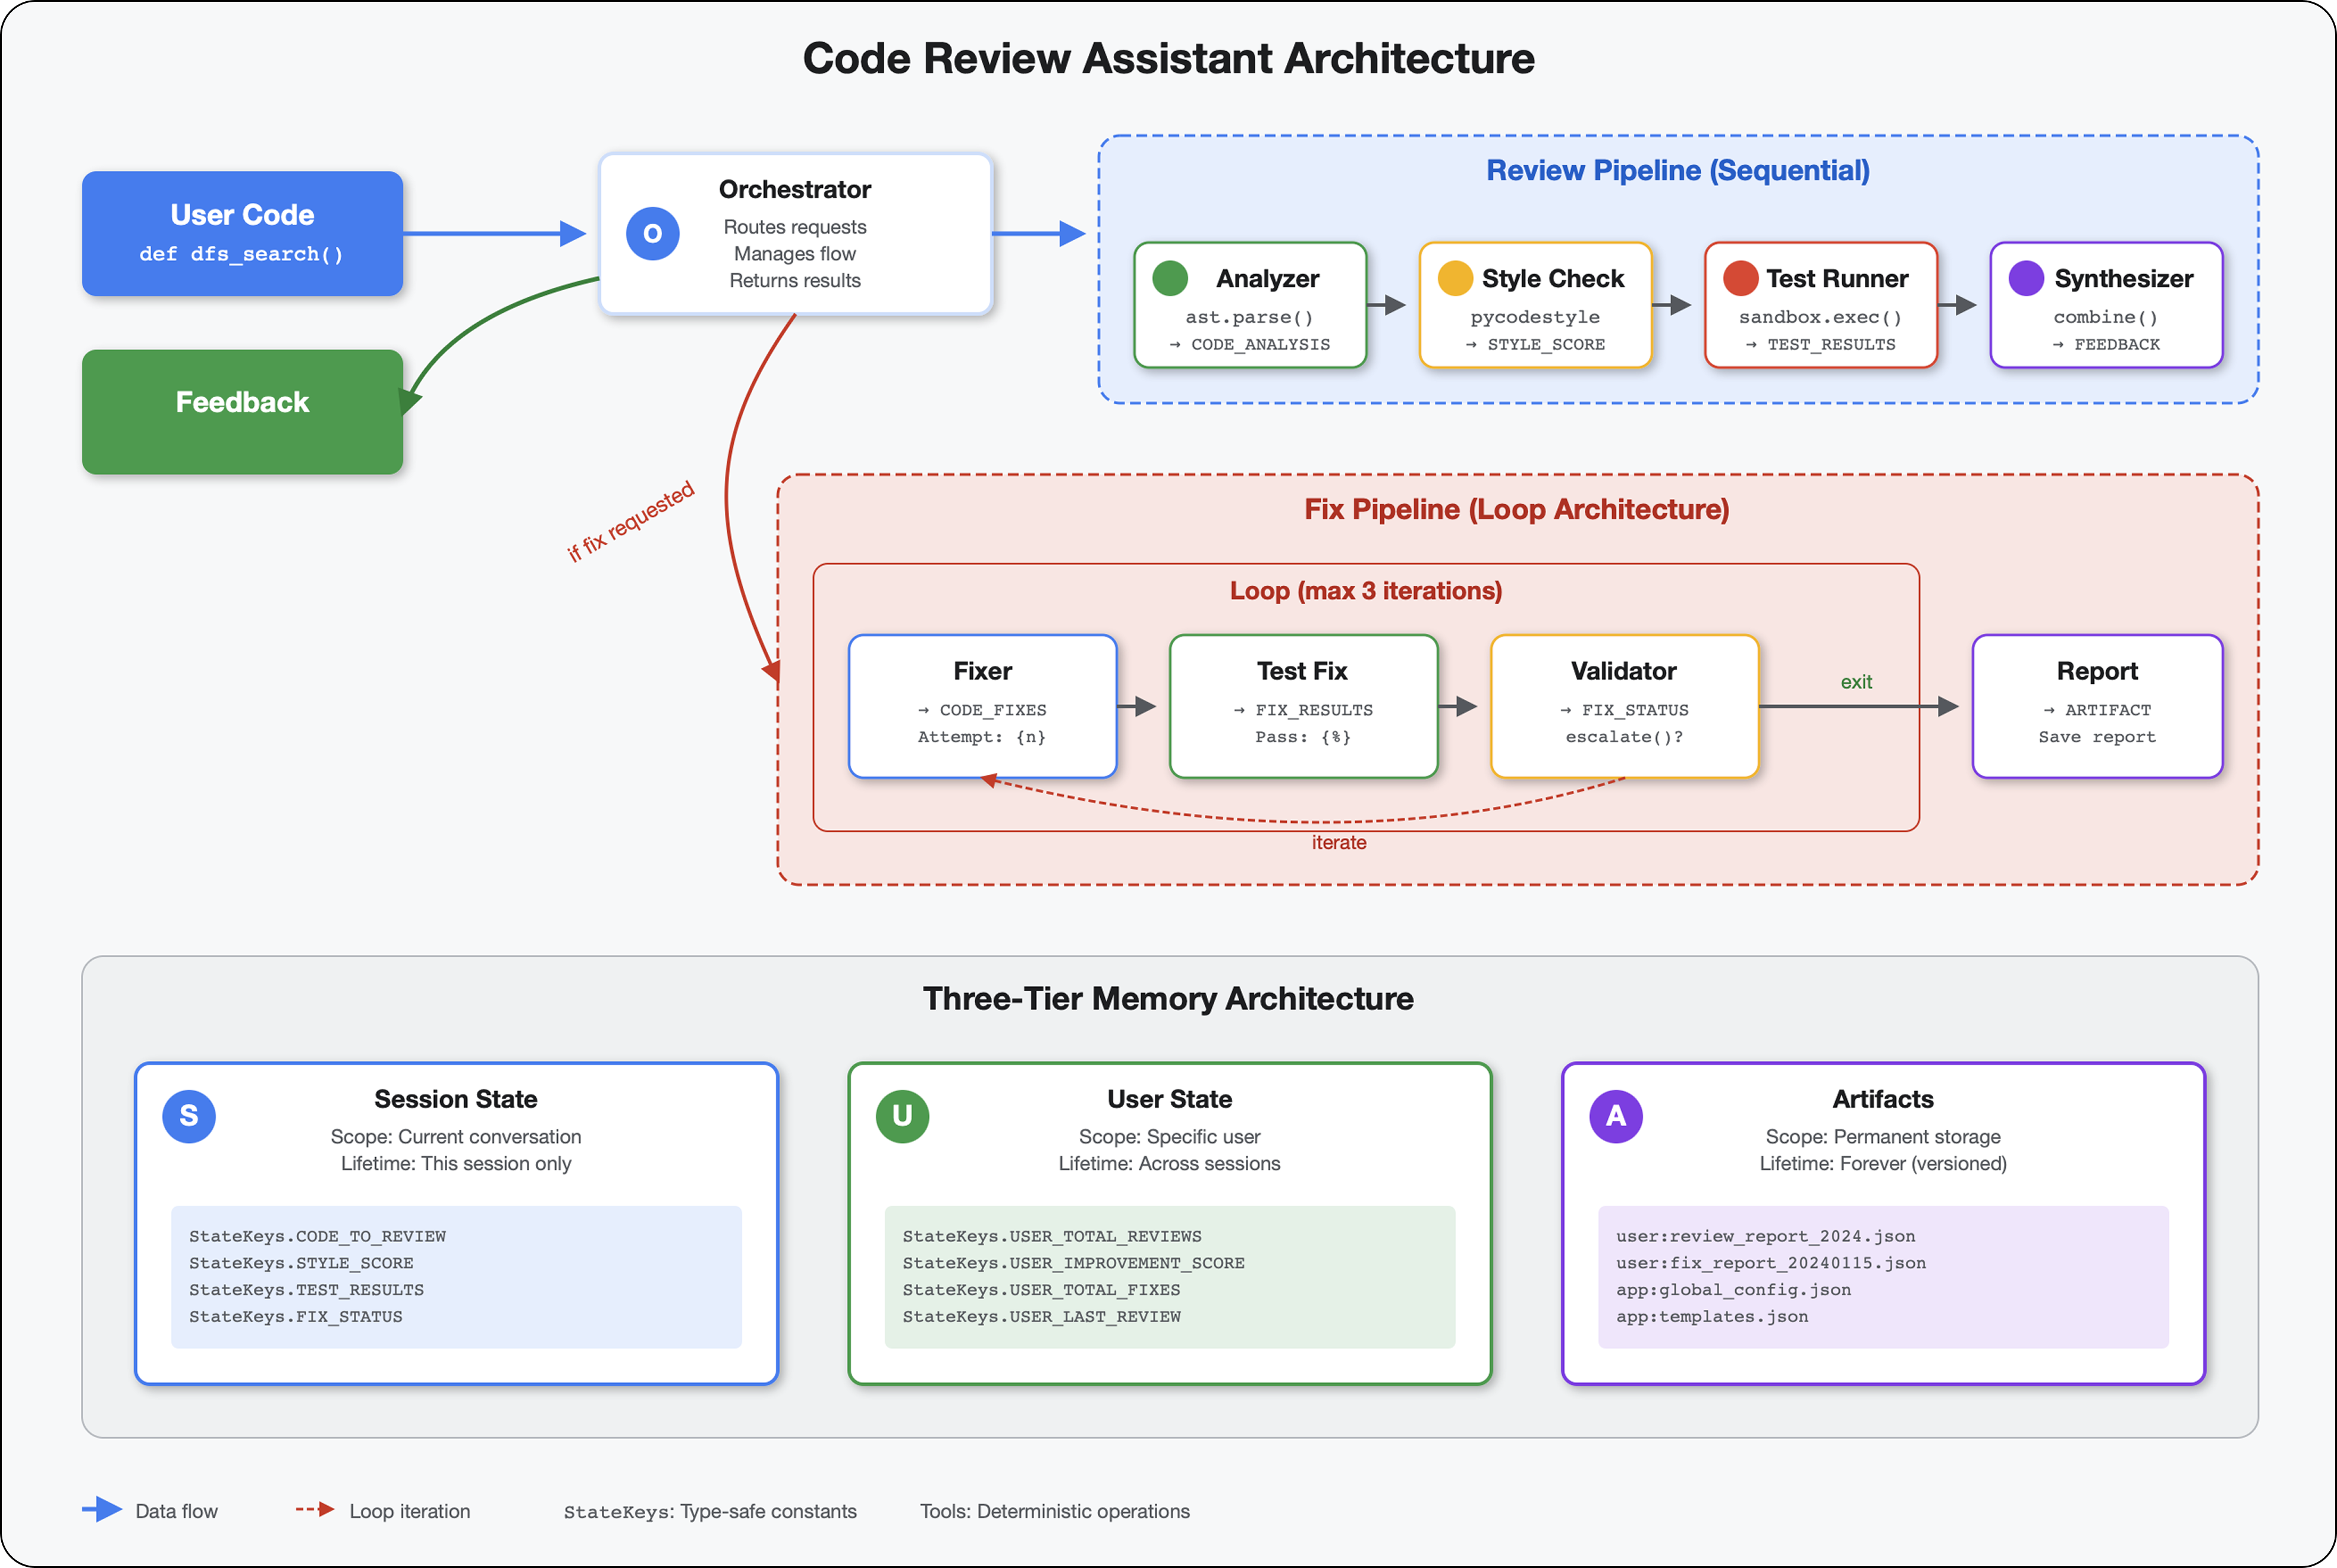
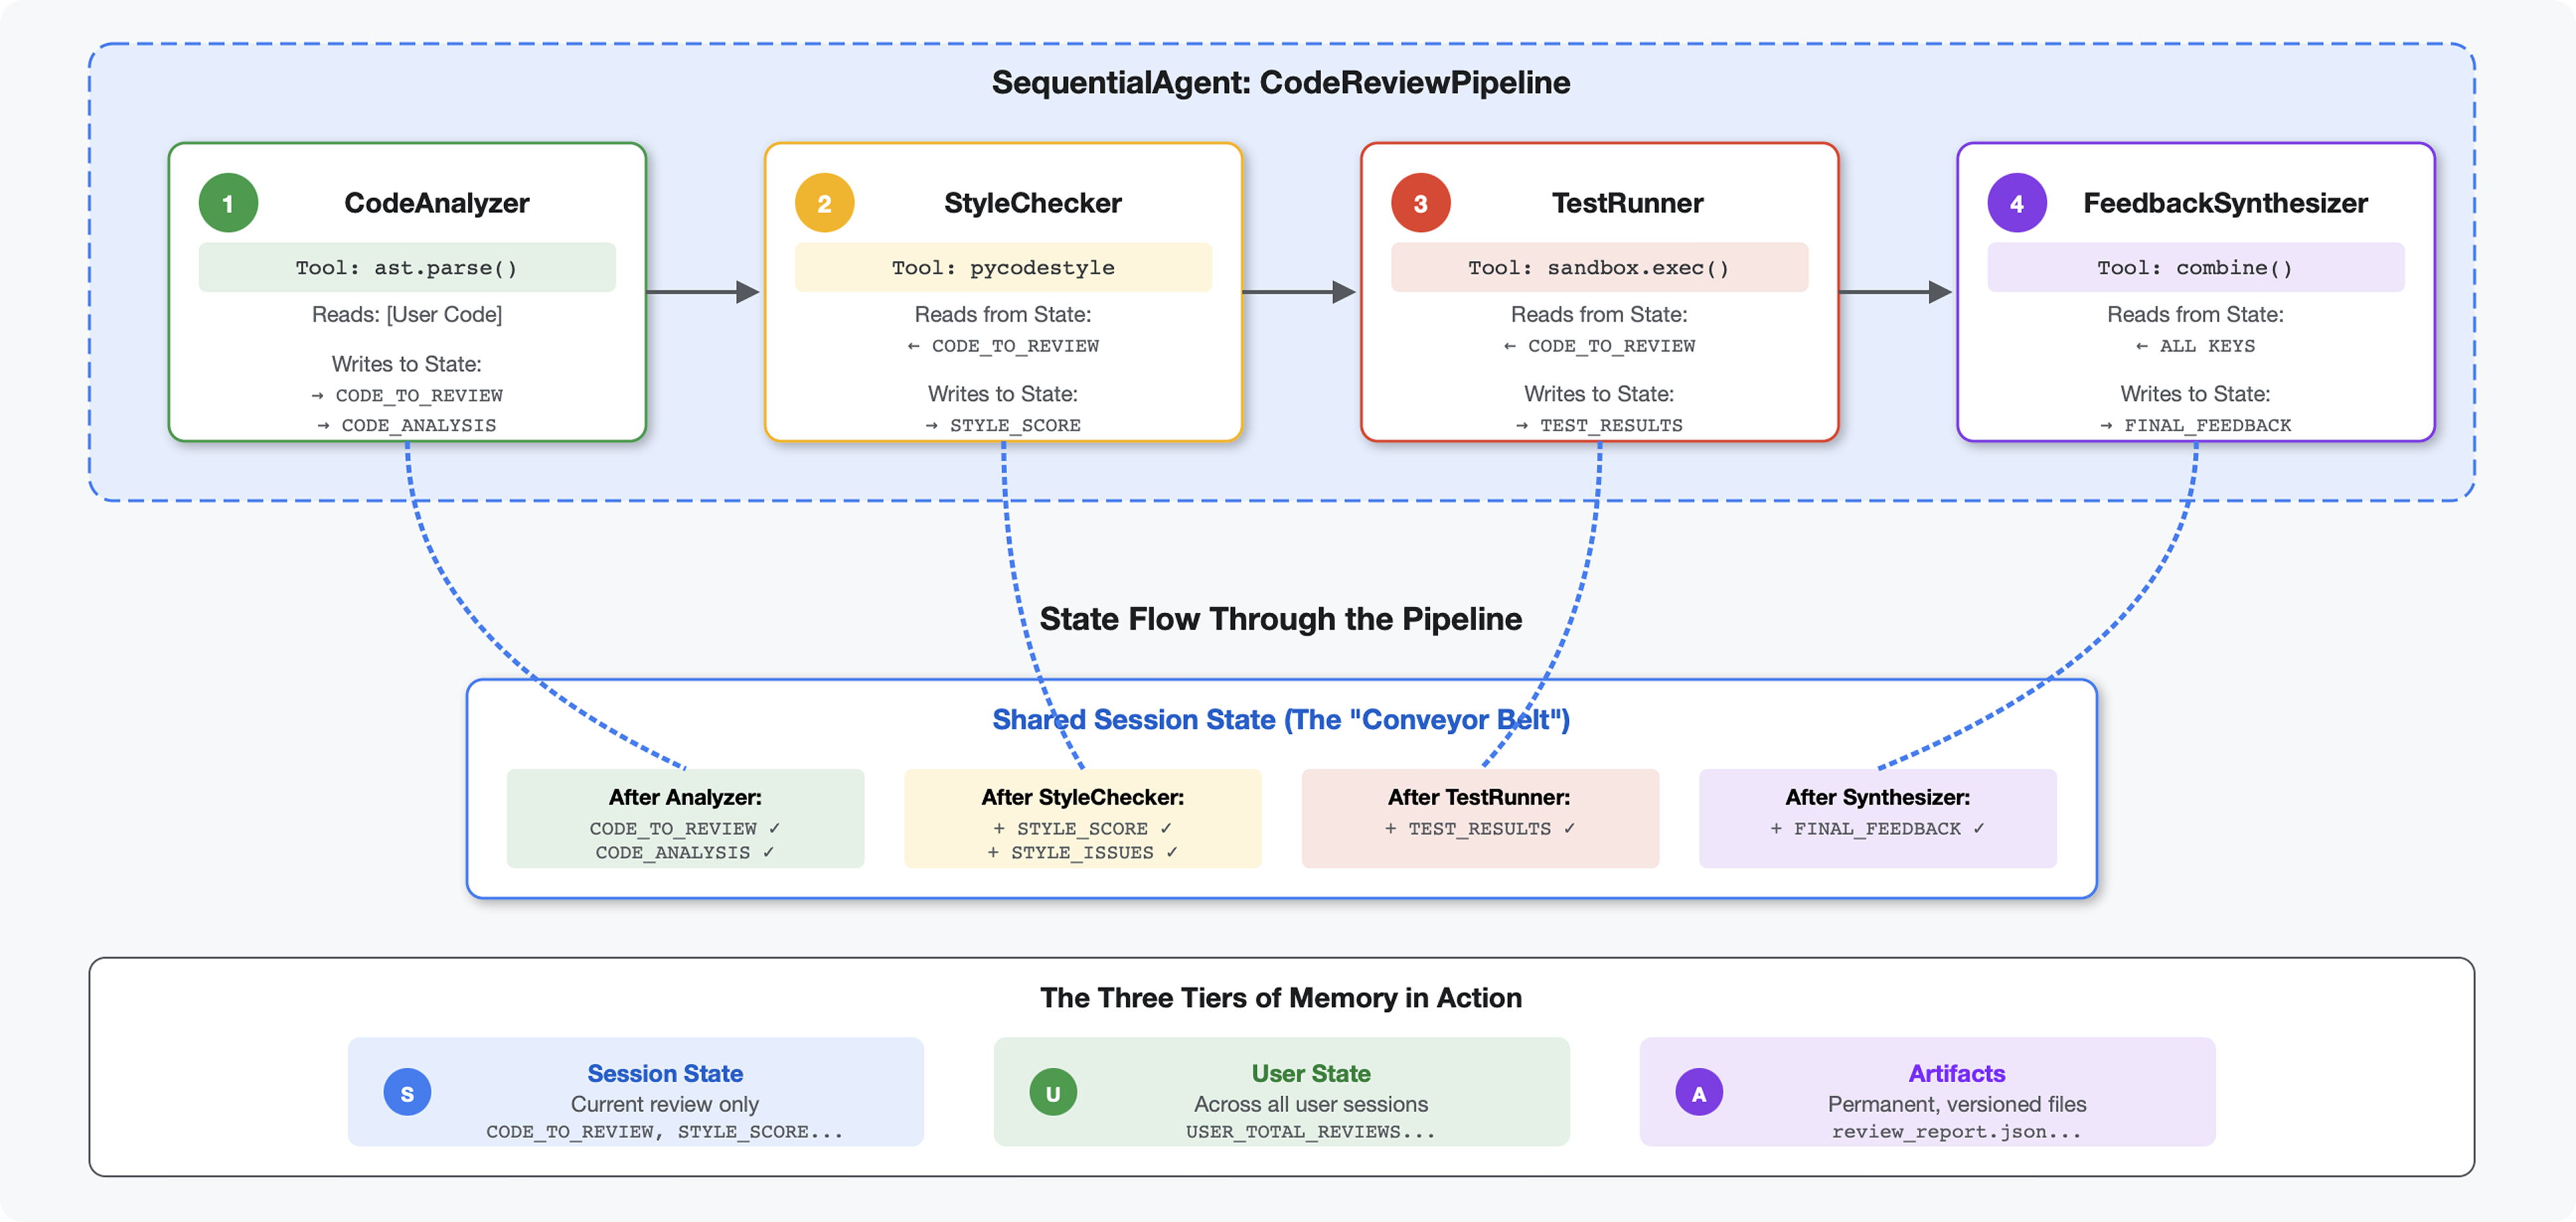
এই মডিউলটি ৪টি এজেন্টের একটি পাইপলাইন তৈরি করে, যারা পর্যায়ক্রমে একসাথে কাজ করে এবং প্রত্যেকে বিশেষায়িত বিশ্লেষণ প্রদান করে:
- কোড অ্যানালাইজার (মডিউল ৪ থেকে) - কাঠামো পার্স করে
- স্টাইল চেকার - স্টাইলের ত্রুটি শনাক্ত করে
- টেস্ট রানার - টেস্টগুলো সম্পাদন ও যাচাই করে।
- ফিডব্যাক সিন্থেসাইজার - সবকিছুকে একত্রিত করে কার্যকরী ফিডব্যাকে পরিণত করে
মূল ধারণা: যোগাযোগের মাধ্যম হিসেবে স্টেট। প্রতিটি এজেন্ট পূর্ববর্তী এজেন্টরা স্টেটে যা লিখেছে তা পড়ে, নিজের বিশ্লেষণ যোগ করে এবং সেই সমৃদ্ধ স্টেটটি পরবর্তী এজেন্টের কাছে পাঠিয়ে দেয়। যখন একাধিক এজেন্ট ডেটা আদান-প্রদান করে, তখন মডিউল ৪-এর কনস্ট্যান্ট প্যাটার্নটি অত্যন্ত গুরুত্বপূর্ণ হয়ে ওঠে।
আপনি যা তৈরি করবেন তার একটি পূর্বরূপ: অগোছালো কোড জমা দিন → ৪টি এজেন্টের মাধ্যমে স্টেটের প্রবাহ পর্যবেক্ষণ করুন → অতীতের প্যাটার্নের উপর ভিত্তি করে ব্যক্তিগতকৃত ফিডব্যাকসহ একটি বিশদ রিপোর্ট গ্রহণ করুন।
ধাপ ১: স্টাইল চেকার টুল + এজেন্ট যোগ করুন
স্টাইল চেকারটি পাইকোডস্টাইল (pycodestyle) ব্যবহার করে পিইপি ৮ (PEP 8) লঙ্ঘন শনাক্ত করে – এটি একটি ডিটারমিনিস্টিক লিন্টার, এলএলএম-ভিত্তিক ইন্টারপ্রিটেশন নয়।
স্টাইল চেকিং টুল যোগ করুন
👉 খোলা
code_review_assistant/tools.py
👉 খুঁজুন:
# MODULE_5_STEP_1_STYLE_CHECKER_TOOL
👉 ঐ একটি লাইনকে এটি দিয়ে প্রতিস্থাপন করুন:
async def check_code_style(code: str, tool_context: ToolContext) -> Dict[str, Any]:
    """
    Checks code style compliance using pycodestyle (PEP 8).

    Args:
        code: Python source code to check (or will retrieve from state)
        tool_context: ADK tool context

    Returns:
        Dictionary containing style score and issues
    """
    logger.info("Tool: Checking code style...")

    try:
        # Retrieve code from state if not provided
        if not code:
            code = tool_context.state.get(StateKeys.CODE_TO_REVIEW, '')
            if not code:
                return {
                    "status": "error",
                    "message": "No code provided or found in state"
                }

        # Run style check in thread pool
        loop = asyncio.get_event_loop()
        with ThreadPoolExecutor() as executor:
            result = await loop.run_in_executor(
                executor, _perform_style_check, code
            )

        # Store results in state
        tool_context.state[StateKeys.STYLE_SCORE] = result['score']
        tool_context.state[StateKeys.STYLE_ISSUES] = result['issues']
        tool_context.state[StateKeys.STYLE_ISSUE_COUNT] = result['issue_count']

        logger.info(f"Tool: Style check complete - Score: {result['score']}/100, "
                    f"Issues: {result['issue_count']}")

        return result

    except Exception as e:
        error_msg = f"Style check failed: {str(e)}"
        logger.error(f"Tool: {error_msg}", exc_info=True)

        # Set default values on error
        tool_context.state[StateKeys.STYLE_SCORE] = 0
        tool_context.state[StateKeys.STYLE_ISSUES] = []

        return {
            "status": "error",
            "message": error_msg,
            "score": 0
        }
👉 এবার ফাইলটির একদম শেষে যান এবং খুঁজুন:
# MODULE_5_STEP_1_STYLE_HELPERS
👉 ঐ একটি লাইনকে হেল্পার ফাংশনগুলো দিয়ে প্রতিস্থাপন করুন:
def _perform_style_check(code: str) -> Dict[str, Any]:
    """Helper to perform style check in thread pool."""
    import io
    import sys

    with tempfile.NamedTemporaryFile(mode='w', suffix='.py', delete=False) as tmp:
        tmp.write(code)
        tmp_path = tmp.name

    try:
        # Capture stdout to get pycodestyle output
        old_stdout = sys.stdout
        sys.stdout = captured_output = io.StringIO()

        style_guide = pycodestyle.StyleGuide(
            quiet=False,  # We want output
            max_line_length=100,
            ignore=['E501', 'W503']
        )

        result = style_guide.check_files([tmp_path])

        # Restore stdout
        sys.stdout = old_stdout

        # Parse captured output
        output = captured_output.getvalue()
        issues = []

        for line in output.strip().split('\n'):
            if line and ':' in line:
                parts = line.split(':', 4)
                if len(parts) >= 4:
                    try:
                        issues.append({
                            'line': int(parts[1]),
                            'column': int(parts[2]),
                            'code': parts[3].split()[0] if len(parts) > 3 else 'E000',
                            'message': parts[3].strip() if len(parts) > 3 else 'Unknown error'
                        })
                    except (ValueError, IndexError):
                        pass

        # Add naming convention checks
        try:
            tree = ast.parse(code)
            naming_issues = _check_naming_conventions(tree)
            issues.extend(naming_issues)
        except SyntaxError:
            pass  # Syntax errors will be caught elsewhere

        # Calculate weighted score
        score = _calculate_style_score(issues)

        return {
            "status": "success",
            "score": score,
            "issue_count": len(issues),
            "issues": issues[:10],  # First 10 issues
            "summary": f"Style score: {score}/100 with {len(issues)} violations"
        }

    finally:
        if os.path.exists(tmp_path):
            os.unlink(tmp_path)


def _check_naming_conventions(tree: ast.AST) -> List[Dict[str, Any]]:
    """Check PEP 8 naming conventions."""
    naming_issues = []

    for node in ast.walk(tree):
        if isinstance(node, ast.FunctionDef):
            # Skip private/protected methods and __main__
            if not node.name.startswith('_') and node.name != node.name.lower():
                naming_issues.append({
                    'line': node.lineno,
                    'column': node.col_offset,
                    'code': 'N802',
                    'message': f"N802 function name '{node.name}' should be lowercase"
                })
        elif isinstance(node, ast.ClassDef):
            # Check if class name follows CapWords convention
            if not node.name[0].isupper() or '_' in node.name:
                naming_issues.append({
                    'line': node.lineno,
                    'column': node.col_offset,
                    'code': 'N801',
                    'message': f"N801 class name '{node.name}' should use CapWords convention"
                })

    return naming_issues


def _calculate_style_score(issues: List[Dict[str, Any]]) -> int:
    """Calculate weighted style score based on violation severity."""
    if not issues:
        return 100

    # Define weights by error type
    weights = {
        'E1': 10,  # Indentation errors
        'E2': 3,  # Whitespace errors
        'E3': 5,  # Blank line errors
        'E4': 8,  # Import errors
        'E5': 5,  # Line length
        'E7': 7,  # Statement errors
        'E9': 10,  # Syntax errors
        'W2': 2,  # Whitespace warnings
        'W3': 2,  # Blank line warnings
        'W5': 3,  # Line break warnings
        'N8': 7,  # Naming conventions
    }

    total_deduction = 0
    for issue in issues:
        code_prefix = issue['code'][:2] if len(issue['code']) >= 2 else 'E2'
        weight = weights.get(code_prefix, 3)
        total_deduction += weight

    # Cap at 100 points deduction
    return max(0, 100 - min(total_deduction, 100))
স্টাইল চেকার এজেন্ট যোগ করুন
👉 খোলা
code_review_assistant/sub_agents/review_pipeline/style_checker.py
👉 খুঁজুন:
# MODULE_5_STEP_1_INSTRUCTION_PROVIDER
👉 ঐ একটি লাইনকে এটি দিয়ে প্রতিস্থাপন করুন:
async def style_checker_instruction_provider(context: ReadonlyContext) -> str:
    """Dynamic instruction provider that injects state variables."""
    template = """You are a code style expert focused on PEP 8 compliance.

Your task:
1. Use the check_code_style tool to validate PEP 8 compliance
2. The tool will retrieve the ORIGINAL code from state automatically
3. Report violations exactly as found
4. Present the results clearly and confidently

CRITICAL:
- The tool checks the code EXACTLY as provided by the user
- Do not suggest the code was modified or fixed
- Report actual violations found in the original code
- If there are style issues, they should be reported honestly

Call the check_code_style tool with an empty string for the code parameter,
as the tool will retrieve the code from state automatically.

When presenting results based on what the tool returns:
- State the exact score from the tool results
- If score >= 90: "Excellent style compliance!"
- If score 70-89: "Good style with minor improvements needed"
- If score 50-69: "Style needs attention"
- If score < 50: "Significant style improvements needed"

List the specific violations found (the tool will provide these):
- Show line numbers, error codes, and messages
- Focus on the top 10 most important issues

Previous analysis: {structure_analysis_summary}

Format your response as:
## Style Analysis Results
- Style Score: [exact score]/100
- Total Issues: [count]
- Assessment: [your assessment based on score]

## Top Style Issues
[List issues with line numbers and descriptions]

## Recommendations
[Specific fixes for the most critical issues]"""

    return await instructions_utils.inject_session_state(template, context)
👉 খুঁজুন:
# MODULE_5_STEP_1_STYLE_CHECKER_AGENT
👉 ঐ একটি লাইনকে এটি দিয়ে প্রতিস্থাপন করুন:
style_checker_agent = Agent(
    name="StyleChecker",
    model=config.worker_model,
    description="Checks Python code style against PEP 8 guidelines",
    instruction=style_checker_instruction_provider,
    tools=[FunctionTool(func=check_code_style)],
    output_key="style_check_summary"
)
ধাপ ২: টেস্ট রানার এজেন্ট যোগ করুন
টেস্ট রানার বিশদ পরীক্ষা তৈরি করে এবং অন্তর্নির্মিত কোড এক্সিকিউটর ব্যবহার করে সেগুলো সম্পাদন করে।
👉 খোলা
code_review_assistant/sub_agents/review_pipeline/test_runner.py
👉 খুঁজুন:
# MODULE_5_STEP_2_INSTRUCTION_PROVIDER
👉 ঐ একটি লাইনকে এটি দিয়ে প্রতিস্থাপন করুন:
async def test_runner_instruction_provider(context: ReadonlyContext) -> str:
    """Dynamic instruction provider that injects the code_to_review directly."""
    template = """You are a testing specialist who creates and runs tests for Python code.

THE CODE TO TEST IS:
{code_to_review}

YOUR TASK:
1. Understand what the function appears to do based on its name and structure
2. Generate comprehensive tests (15-20 test cases)
3. Execute the tests using your code executor
4. Analyze results to identify bugs vs expected behavior
5. Output a detailed JSON analysis

TESTING METHODOLOGY:
- Test with the most natural interpretation first
- When something fails, determine if it's a bug or unusual design
- Test edge cases, boundaries, and error scenarios
- Document any surprising behavior

Execute your tests and output ONLY valid JSON with this structure:
- "test_summary": object with "total_tests_run", "tests_passed", "tests_failed", "tests_with_errors", "critical_issues_found"
- "critical_issues": array of objects, each with "type", "description", "example_input", "expected_behavior", "actual_behavior", "severity"
- "test_categories": object with "basic_functionality", "edge_cases", "error_handling" (each containing "passed", "failed", "errors" counts)
- "function_behavior": object with "apparent_purpose", "actual_interface", "unexpected_requirements"
- "verdict": object with "status" (WORKING/BUGGY/BROKEN), "confidence" (high/medium/low), "recommendation"

Do NOT output the test code itself, only the JSON analysis."""

    return await instructions_utils.inject_session_state(template, context)
👉 খুঁজুন:
# MODULE_5_STEP_2_TEST_RUNNER_AGENT
👉 ঐ একটি লাইনকে এটি দিয়ে প্রতিস্থাপন করুন:
test_runner_agent = Agent(
    name="TestRunner",
    model=config.critic_model,
    description="Generates and runs tests for Python code using safe code execution",
    instruction=test_runner_instruction_provider,
    code_executor=BuiltInCodeExecutor(),
    output_key="test_execution_summary"
)
ধাপ ৩: বিভিন্ন সেশনের মধ্যে শেখার জন্য স্মৃতি বোঝা
ফিডব্যাক সিন্থেসাইজার তৈরি করার আগে, আপনাকে স্টেট এবং মেমরির মধ্যে পার্থক্য বুঝতে হবে - দুটি ভিন্ন উদ্দেশ্যে ব্যবহৃত দুটি ভিন্ন স্টোরেজ ব্যবস্থা।
অবস্থা বনাম স্মৃতি: মূল পার্থক্য
কোড রিভিউ থেকে একটি বাস্তব উদাহরণ দিয়ে বিষয়টি স্পষ্ট করা যাক:
রাজ্য (শুধুমাত্র চলতি অধিবেশনের জন্য):
# Data from THIS review session
tool_context.state[StateKeys.STYLE_ISSUES] = [
    {"line": 5, "code": "E231", "message": "missing whitespace"},
    {"line": 12, "code": "E701", "message": "multiple statements"}
]
- পরিধি: শুধুমাত্র এই কথোপকথন
- উদ্দেশ্য: বর্তমান পাইপলাইনে এজেন্টদের মধ্যে ডেটা আদান-প্রদান করা।
- বাস করে:
Sessionঅবজেক্ট - আজীবন: সেশন শেষ হলে বাতিল হয়ে যায়
স্মৃতি (পূর্ববর্তী সকল সেশন):
# Learned from 50 previous reviews
"User frequently forgets docstrings on helper functions"
"User tends to write long functions (avg 45 lines)"
"User improved error handling after feedback in session #23"
- পরিধি: এই ব্যবহারকারীর অতীতের সমস্ত সেশন
- উদ্দেশ্য: প্যাটার্ন শনাক্ত করা, ব্যক্তিগতকৃত প্রতিক্রিয়া প্রদান করা
- বাস করেন:
MemoryService - আজীবন: সেশন জুড়ে স্থায়ী, অনুসন্ধানযোগ্য
কেন ফিডব্যাকে উভয়েরই প্রয়োজন:
কল্পনা করুন সিন্থেসাইজারটি ফিডব্যাক তৈরি করছে:
শুধুমাত্র রাজ্য ব্যবহার করে (বর্তমান পর্যালোচনা):
"Function `calculate_total` has no docstring."
সাধারণ, যান্ত্রিক প্রতিক্রিয়া।
অবস্থা ও স্মৃতি ব্যবহার করে (বর্তমান ও অতীতের ধরণ):
"Function `calculate_total` has no docstring. This is the 4th review
where helper functions lacked documentation. Consider adding docstrings
as you write functions, not afterwards - you mentioned in our last
session that you find it easier that way."
ব্যক্তিগতকৃত, প্রাসঙ্গিক, সময়ের সাথে সাথে রেফারেন্সের উন্নতি।
প্রোডাকশন ডেপ্লয়মেন্টের জন্য আপনার কাছে কয়েকটি বিকল্প রয়েছে :
বিকল্প ১: VertexAiMemoryBankService (উন্নত)
- এর কাজ: এলএলএম-এর সহায়তায় কথোপকথন থেকে অর্থপূর্ণ তথ্য আহরণ করা।
- অনুসন্ধান: শব্দার্থিক অনুসন্ধান (শুধু কীওয়ার্ড নয়, অর্থও বোঝে)
- স্মৃতি ব্যবস্থাপনা: সময়ের সাথে সাথে স্বয়ংক্রিয়ভাবে স্মৃতি সংহত ও হালনাগাদ করে।
- প্রয়োজনীয়: গুগল ক্লাউড প্রজেক্ট + এজেন্ট ইঞ্জিন সেটআপ
- যখন ব্যবহার করবেন: আপনি যখন পরিশীলিত, পরিবর্তনশীল ও ব্যক্তিগত স্মৃতি চান
- উদাহরণ: "ব্যবহারকারী ফাংশনাল প্রোগ্রামিং পছন্দ করেন" (কোড স্টাইল সম্পর্কিত ১০টি কথোপকথন থেকে সংগৃহীত)
বিকল্প ২: ইনমেমোরিমেমোরিসার্ভিস + পারসিস্টেন্ট সেশন চালু রাখুন
- এর কাজ: কীওয়ার্ড অনুসন্ধানের জন্য সম্পূর্ণ কথোপকথনের ইতিহাস সংরক্ষণ করা।
- অনুসন্ধান: পূর্ববর্তী সেশন জুড়ে মৌলিক কীওয়ার্ড মিলকরণ
- মেমরি ব্যবস্থাপনা: কী সংরক্ষিত হবে তা আপনি নিয়ন্ত্রণ করেন (
add_session_to_memoryএর মাধ্যমে)। - প্রয়োজন: শুধুমাত্র একটি স্থায়ী
SessionService(যেমনVertexAiSessionServiceবাDatabaseSessionService) - যখন ব্যবহার করবেন: এলএলএম প্রসেসিং ছাড়াই অতীতের কথোপকথনগুলোর মধ্যে সহজ অনুসন্ধানের প্রয়োজন হলে।
- উদাহরণ: "docstring" অনুসন্ধান করলে সেই শব্দটি উল্লেখ করা সমস্ত সেশন ফেরত আসবে।
স্মৃতি কীভাবে পূর্ণ হয়
প্রতিটি কোড পর্যালোচনা সম্পন্ন হওয়ার পর:
# At the end of a session (typically in your application code)
await memory_service.add_session_to_memory(session)
যা ঘটে:
- InMemoryMemoryService: কীওয়ার্ড অনুসন্ধানের জন্য সম্পূর্ণ সেশন ইভেন্টগুলো সংরক্ষণ করে।
- VertexAiMemoryBankService: LLM মূল তথ্য নিষ্কাশন করে এবং বিদ্যমান মেমোরির সাথে একীভূত করে।
পরবর্তী সেশনগুলিতে তখন কোয়েরি করা যাবে:
# In a tool, search for relevant past feedback
results = tool_context.search_memory("feedback about docstrings")
ধাপ ৪: ফিডব্যাক সিন্থেসাইজার টুল এবং এজেন্ট যোগ করুন
ফিডব্যাক সিন্থেসাইজার হলো পাইপলাইনের সবচেয়ে অত্যাধুনিক এজেন্ট। এটি তিনটি টুলকে সমন্বয় করে, ডায়নামিক নির্দেশাবলী ব্যবহার করে এবং স্টেট, মেমরি ও আর্টিফ্যাক্টসকে একত্রিত করে।
তিনটি সিন্থেসাইজার টুল যোগ করুন
👉 খোলা
code_review_assistant/tools.py
👉 খুঁজুন:
# MODULE_5_STEP_4_SEARCH_PAST_FEEDBACK
👉 টুল ১ - মেমরি সার্চ (প্রোডাকশন ভার্সন) দিয়ে প্রতিস্থাপন করুন:
async def search_past_feedback(developer_id: str, tool_context: ToolContext) -> Dict[str, Any]:
    """
    Search for past feedback in memory service.

    Args:
        developer_id: ID of the developer (defaults to "default_user")
        tool_context: ADK tool context with potential memory service access

    Returns:
        Dictionary containing feedback search results
    """
    logger.info(f"Tool: Searching for past feedback for developer {developer_id}...")

    try:
        # Default developer ID if not provided
        if not developer_id:
            developer_id = tool_context.state.get(StateKeys.USER_ID, 'default_user')

        # Check if memory service is available
        if hasattr(tool_context, 'search_memory'):
            try:
                # Perform structured searches
                queries = [
                    f"developer:{developer_id} code review feedback",
                    f"developer:{developer_id} common issues",
                    f"developer:{developer_id} improvements"
                ]

                all_feedback = []
                patterns = {
                    'common_issues': [],
                    'improvements': [],
                    'strengths': []
                }

                for query in queries:
                    search_result = await tool_context.search_memory(query)

                    if search_result and hasattr(search_result, 'memories'):
                        for memory in search_result.memories[:5]:
                            memory_text = memory.text if hasattr(memory, 'text') else str(memory)
                            all_feedback.append(memory_text)

                            # Extract patterns
                            if 'style' in memory_text.lower():
                                patterns['common_issues'].append('style compliance')
                            if 'improved' in memory_text.lower():
                                patterns['improvements'].append('showing improvement')
                            if 'excellent' in memory_text.lower():
                                patterns['strengths'].append('consistent quality')

                # Store in state
                tool_context.state[StateKeys.PAST_FEEDBACK] = all_feedback
                tool_context.state[StateKeys.FEEDBACK_PATTERNS] = patterns

                logger.info(f"Tool: Found {len(all_feedback)} past feedback items")

                return {
                    "status": "success",
                    "feedback_found": True,
                    "count": len(all_feedback),
                    "summary": " | ".join(all_feedback[:3]) if all_feedback else "No feedback",
                    "patterns": patterns
                }

            except Exception as e:
                logger.warning(f"Tool: Memory search error: {e}")

        # Fallback: Check state for cached feedback
        cached_feedback = tool_context.state.get(StateKeys.USER_PAST_FEEDBACK_CACHE, [])
        if cached_feedback:
            tool_context.state[StateKeys.PAST_FEEDBACK] = cached_feedback
            return {
                "status": "success",
                "feedback_found": True,
                "count": len(cached_feedback),
                "summary": "Using cached feedback",
                "patterns": {}
            }

        # No feedback found
        tool_context.state[StateKeys.PAST_FEEDBACK] = []
        logger.info("Tool: No past feedback found")

        return {
            "status": "success",
            "feedback_found": False,
            "message": "No past feedback available - this appears to be a first submission",
            "patterns": {}
        }

    except Exception as e:
        error_msg = f"Feedback search error: {str(e)}"
        logger.error(f"Tool: {error_msg}", exc_info=True)

        tool_context.state[StateKeys.PAST_FEEDBACK] = []

        return {
            "status": "error",
            "message": error_msg,
            "feedback_found": False
        }
👉 খুঁজুন:
# MODULE_5_STEP_4_UPDATE_GRADING_PROGRESS
👉 টুল ২ - গ্রেডিং ট্র্যাকার (প্রোডাকশন ভার্সন) দিয়ে প্রতিস্থাপন করুন:
async def update_grading_progress(tool_context: ToolContext) -> Dict[str, Any]:
    """
    Updates grading progress counters and metrics in state.
    """
    logger.info("Tool: Updating grading progress...")

    try:
        current_time = datetime.now().isoformat()

        # Build all state changes
        state_updates = {}

        # Temporary (invocation-level) state
        state_updates[StateKeys.TEMP_PROCESSING_TIMESTAMP] = current_time

        # Session-level state
        attempts = tool_context.state.get(StateKeys.GRADING_ATTEMPTS, 0) + 1
        state_updates[StateKeys.GRADING_ATTEMPTS] = attempts
        state_updates[StateKeys.LAST_GRADING_TIME] = current_time

        # User-level persistent state
        lifetime_submissions = tool_context.state.get(StateKeys.USER_TOTAL_SUBMISSIONS, 0) + 1
        state_updates[StateKeys.USER_TOTAL_SUBMISSIONS] = lifetime_submissions
        state_updates[StateKeys.USER_LAST_SUBMISSION_TIME] = current_time

        # Calculate improvement metrics
        current_style_score = tool_context.state.get(StateKeys.STYLE_SCORE, 0)
        last_style_score = tool_context.state.get(StateKeys.USER_LAST_STYLE_SCORE, 0)
        score_improvement = current_style_score - last_style_score

        state_updates[StateKeys.USER_LAST_STYLE_SCORE] = current_style_score
        state_updates[StateKeys.SCORE_IMPROVEMENT] = score_improvement

        # Track test results if available
        test_results = tool_context.state.get(StateKeys.TEST_EXECUTION_SUMMARY, {})

        # Parse if it's a string
        if isinstance(test_results, str):
            try:
                test_results = json.loads(test_results)
            except:
                test_results = {}

        if test_results and test_results.get('test_summary', {}).get('total_tests_run', 0) > 0:
            summary = test_results['test_summary']
            total = summary.get('total_tests_run', 0)
            passed = summary.get('tests_passed', 0)
            if total > 0:
                pass_rate = (passed / total) * 100
                state_updates[StateKeys.USER_LAST_TEST_PASS_RATE] = pass_rate

        # Apply all updates atomically
        for key, value in state_updates.items():
            tool_context.state[key] = value

        logger.info(f"Tool: Progress updated - Attempt #{attempts}, "
                    f"Lifetime: {lifetime_submissions}")

        return {
            "status": "success",
            "session_attempts": attempts,
            "lifetime_submissions": lifetime_submissions,
            "timestamp": current_time,
            "improvement": {
                "style_score_change": score_improvement,
                "direction": "improved" if score_improvement > 0 else "declined"
            },
            "summary": f"Attempt #{attempts} recorded, {lifetime_submissions} total submissions"
        }

    except Exception as e:
        error_msg = f"Progress update error: {str(e)}"
        logger.error(f"Tool: {error_msg}", exc_info=True)

        return {
            "status": "error",
            "message": error_msg
        }
👉 খুঁজুন:
# MODULE_5_STEP_4_SAVE_GRADING_REPORT
👉 টুল ৩ - আর্টিফ্যাক্ট সেভার (প্রোডাকশন ভার্সন) দিয়ে প্রতিস্থাপন করুন:
async def save_grading_report(feedback_text: str, tool_context: ToolContext) -> Dict[str, Any]:
    """
    Saves a detailed grading report as an artifact.

    Args:
        feedback_text: The feedback text to include in the report
        tool_context: ADK tool context for state management

    Returns:
        Dictionary containing save status and details
    """
    logger.info("Tool: Saving grading report...")

    try:
        # Gather all relevant data from state
        code = tool_context.state.get(StateKeys.CODE_TO_REVIEW, '')
        analysis = tool_context.state.get(StateKeys.CODE_ANALYSIS, {})
        style_score = tool_context.state.get(StateKeys.STYLE_SCORE, 0)
        style_issues = tool_context.state.get(StateKeys.STYLE_ISSUES, [])

        # Get test results
        test_results = tool_context.state.get(StateKeys.TEST_EXECUTION_SUMMARY, {})

        # Parse if it's a string
        if isinstance(test_results, str):
            try:
                test_results = json.loads(test_results)
            except:
                test_results = {}

        timestamp = datetime.now().isoformat()

        # Create comprehensive report dictionary
        report = {
            'timestamp': timestamp,
            'grading_attempt': tool_context.state.get(StateKeys.GRADING_ATTEMPTS, 1),
            'code': {
                'content': code,
                'line_count': len(code.splitlines()),
                'hash': hashlib.md5(code.encode()).hexdigest()
            },
            'analysis': analysis,
            'style': {
                'score': style_score,
                'issues': style_issues[:5]  # First 5 issues
            },
            'tests': test_results,
            'feedback': feedback_text,
            'improvements': {
                'score_change': tool_context.state.get(StateKeys.SCORE_IMPROVEMENT, 0),
                'from_last_score': tool_context.state.get(StateKeys.USER_LAST_STYLE_SCORE, 0)
            }
        }

        # Convert report to JSON string
        report_json = json.dumps(report, indent=2)
        report_part = types.Part.from_text(text=report_json)

        # Try to save as artifact if the service is available
        if hasattr(tool_context, 'save_artifact'):
            try:
                # Generate filename with timestamp (replace colons for filesystem compatibility)
                filename = f"grading_report_{timestamp.replace(':', '-')}.json"

                # Save the main report
                version = await tool_context.save_artifact(filename, report_part)

                # Also save a "latest" version for easy access
                await tool_context.save_artifact("latest_grading_report.json", report_part)

                logger.info(f"Tool: Report saved as {filename} (version {version})")

                # Store report in state as well for redundancy
                tool_context.state[StateKeys.USER_LAST_GRADING_REPORT] = report

                return {
                    "status": "success",
                    "artifact_saved": True,
                    "filename": filename,
                    "version": str(version),
                    "size": len(report_json),
                    "summary": f"Report saved as {filename}"
                }

            except Exception as artifact_error:
                logger.warning(f"Artifact service error: {artifact_error}, falling back to state storage")
                # Continue to fallback below

        # Fallback: Store in state if artifact service is not available or failed
        tool_context.state[StateKeys.USER_LAST_GRADING_REPORT] = report
        logger.info("Tool: Report saved to state (artifact service not available)")

        return {
            "status": "success",
            "artifact_saved": False,
            "message": "Report saved to state only",
            "size": len(report_json),
            "summary": "Report saved to session state"
        }

    except Exception as e:
        error_msg = f"Report save error: {str(e)}"
        logger.error(f"Tool: {error_msg}", exc_info=True)

        # Still try to save minimal data to state
        try:
            tool_context.state[StateKeys.USER_LAST_GRADING_REPORT] = {
                'error': error_msg,
                'feedback': feedback_text,
                'timestamp': datetime.now().isoformat()
            }
        except:
            pass

        return {
            "status": "error",
            "message": error_msg,
            "artifact_saved": False,
            "summary": f"Failed to save report: {error_msg}"
        }
সিন্থেসাইজার এজেন্ট তৈরি করুন
👉 খোলা
code_review_assistant/sub_agents/review_pipeline/feedback_synthesizer.py
👉 খুঁজুন:
# MODULE_5_STEP_4_INSTRUCTION_PROVIDER
👉 উৎপাদন নির্দেশনা প্রদানকারী দিয়ে প্রতিস্থাপন করুন:
async def feedback_instruction_provider(context: ReadonlyContext) -> str:
    """Dynamic instruction provider that injects state variables."""
    template = """You are an expert code reviewer and mentor providing constructive, educational feedback.

CONTEXT FROM PREVIOUS AGENTS:
- Structure analysis summary: {structure_analysis_summary}
- Style check summary: {style_check_summary}
- Test execution summary: {test_execution_summary}

YOUR TASK requires these steps IN ORDER:
1. Call search_past_feedback tool with developer_id="default_user"
2. Call update_grading_progress tool with no parameters
3. Carefully analyze the test results to understand what really happened
4. Generate comprehensive feedback following the structure below
5. Call save_grading_report tool with the feedback_text parameter
6. Return the feedback as your final output

CRITICAL - Understanding Test Results:
The test_execution_summary contains structured JSON. Parse it carefully:
- tests_passed = Code worked correctly
- tests_failed = Code produced wrong output
- tests_with_errors = Code crashed
- critical_issues = Fundamental problems with the code

If critical_issues array contains items, these are serious bugs that need fixing.
Do NOT count discovering bugs as test successes.

FEEDBACK STRUCTURE TO FOLLOW:

## 📊 Summary
Provide an honest assessment. Be encouraging but truthful about problems found.

## ✅ Strengths
List 2-3 things done well, referencing specific code elements.

## 📈 Code Quality Analysis

### Structure & Organization
Comment on code organization, readability, and documentation.

### Style Compliance
Report the actual style score and any specific issues.

### Test Results
Report the actual test results accurately:
- If critical_issues exist, report them as bugs to fix
- Be clear: "X tests passed, Y critical issues were found"
- List each critical issue
- Don't hide or minimize problems

## 💡 Recommendations for Improvement
Based on the analysis, provide specific actionable fixes.
If critical issues exist, fixing them is top priority.

## 🎯 Next Steps
Prioritized action list based on severity of issues.

## 💬 Encouragement
End with encouragement while being honest about what needs fixing.

Remember: Complete ALL steps including calling save_grading_report."""

    return await instructions_utils.inject_session_state(template, context)
👉 খুঁজুন:
# MODULE_5_STEP_4_SYNTHESIZER_AGENT
👉 এর পরিবর্তে ব্যবহার করুন:
feedback_synthesizer_agent = Agent(
    name="FeedbackSynthesizer",
    model=config.critic_model,
    description="Synthesizes all analysis into constructive, personalized feedback",
    instruction=feedback_instruction_provider,
    tools=[
        FunctionTool(func=search_past_feedback),
        FunctionTool(func=update_grading_progress),
        FunctionTool(func=save_grading_report)
    ],
    output_key="final_feedback"
)
ধাপ ৫: পাইপলাইনে তার সংযোগ করুন
এখন চারটি এজেন্টকেই একটি অনুক্রমিক পাইপলাইনে সংযুক্ত করুন এবং রুট এজেন্টটি তৈরি করুন।
👉 খোলা
code_review_assistant/agent.py
👉 ফাইলের শুরুতে (বিদ্যমান ইম্পোর্টগুলোর পরে) প্রয়োজনীয় ইম্পোর্টগুলো যোগ করুন:
from google.adk.agents import Agent, SequentialAgent
from code_review_assistant.sub_agents.review_pipeline.code_analyzer import code_analyzer_agent
from code_review_assistant.sub_agents.review_pipeline.style_checker import style_checker_agent
from code_review_assistant.sub_agents.review_pipeline.test_runner import test_runner_agent
from code_review_assistant.sub_agents.review_pipeline.feedback_synthesizer import feedback_synthesizer_agent
আপনার ফাইলটি এখন দেখতে এইরকম হবে:
"""
Main agent orchestration for the Code Review Assistant.
"""

from google.adk.agents import Agent, SequentialAgent
from .config import config
from code_review_assistant.sub_agents.review_pipeline.code_analyzer import code_analyzer_agent
from code_review_assistant.sub_agents.review_pipeline.style_checker import style_checker_agent
from code_review_assistant.sub_agents.review_pipeline.test_runner import test_runner_agent
from code_review_assistant.sub_agents.review_pipeline.feedback_synthesizer import feedback_synthesizer_agent

# MODULE_5_STEP_5_CREATE_PIPELINE

# MODULE_6_STEP_5_CREATE_FIX_LOOP

# MODULE_6_STEP_5_UPDATE_ROOT_AGENT
👉 খুঁজুন:
# MODULE_5_STEP_5_CREATE_PIPELINE
👉 ঐ একটি লাইনকে এটি দিয়ে প্রতিস্থাপন করুন:
# Create sequential pipeline
code_review_pipeline = SequentialAgent(
    name="CodeReviewPipeline",
    description="Complete code review pipeline with analysis, testing, and feedback",
    sub_agents=[
        code_analyzer_agent,
        style_checker_agent,
        test_runner_agent,
        feedback_synthesizer_agent
    ]
)

# Root agent - coordinates the review pipeline
root_agent = Agent(
    name="CodeReviewAssistant",
    model=config.worker_model,
    description="An intelligent code review assistant that analyzes Python code and provides educational feedback",
    instruction="""You are a specialized Python code review assistant focused on helping developers improve their code quality.

When a user provides Python code for review:
1. Immediately delegate to CodeReviewPipeline and pass the code EXACTLY as it was provided by the user.
2. The pipeline will handle all analysis and feedback
3. Return ONLY the final feedback from the pipeline - do not add any commentary

When a user asks what you can do or asks general questions:
- Explain your capabilities for code review
- Do NOT trigger the pipeline for non-code messages

The pipeline handles everything for code review - just pass through its final output.""",
    sub_agents=[code_review_pipeline],
    output_key="assistant_response"
)
ধাপ ৬: সম্পূর্ণ পাইপলাইন পরীক্ষা করুন
এবার চারজন এজেন্টকে একসাথে কাজ করতে দেখার পালা।
👉 সিস্টেমটি চালু করুন:
adk web code_review_assistant
adk web কমান্ডটি চালানোর পর, আপনার টার্মিনালে এই ধরনের একটি আউটপুট দেখতে পাবেন যা নির্দেশ করবে যে ADK ওয়েব সার্ভারটি চালু হয়েছে:
+-----------------------------------------------------------------------------+
| ADK Web Server started                                                      |
|                                                                             |
| For local testing, access at http://localhost:8000.                         |
+-----------------------------------------------------------------------------+

INFO:     Application startup complete.
INFO:     Uvicorn running on http://0.0.0.0:8000 (Press CTRL+C to quit)
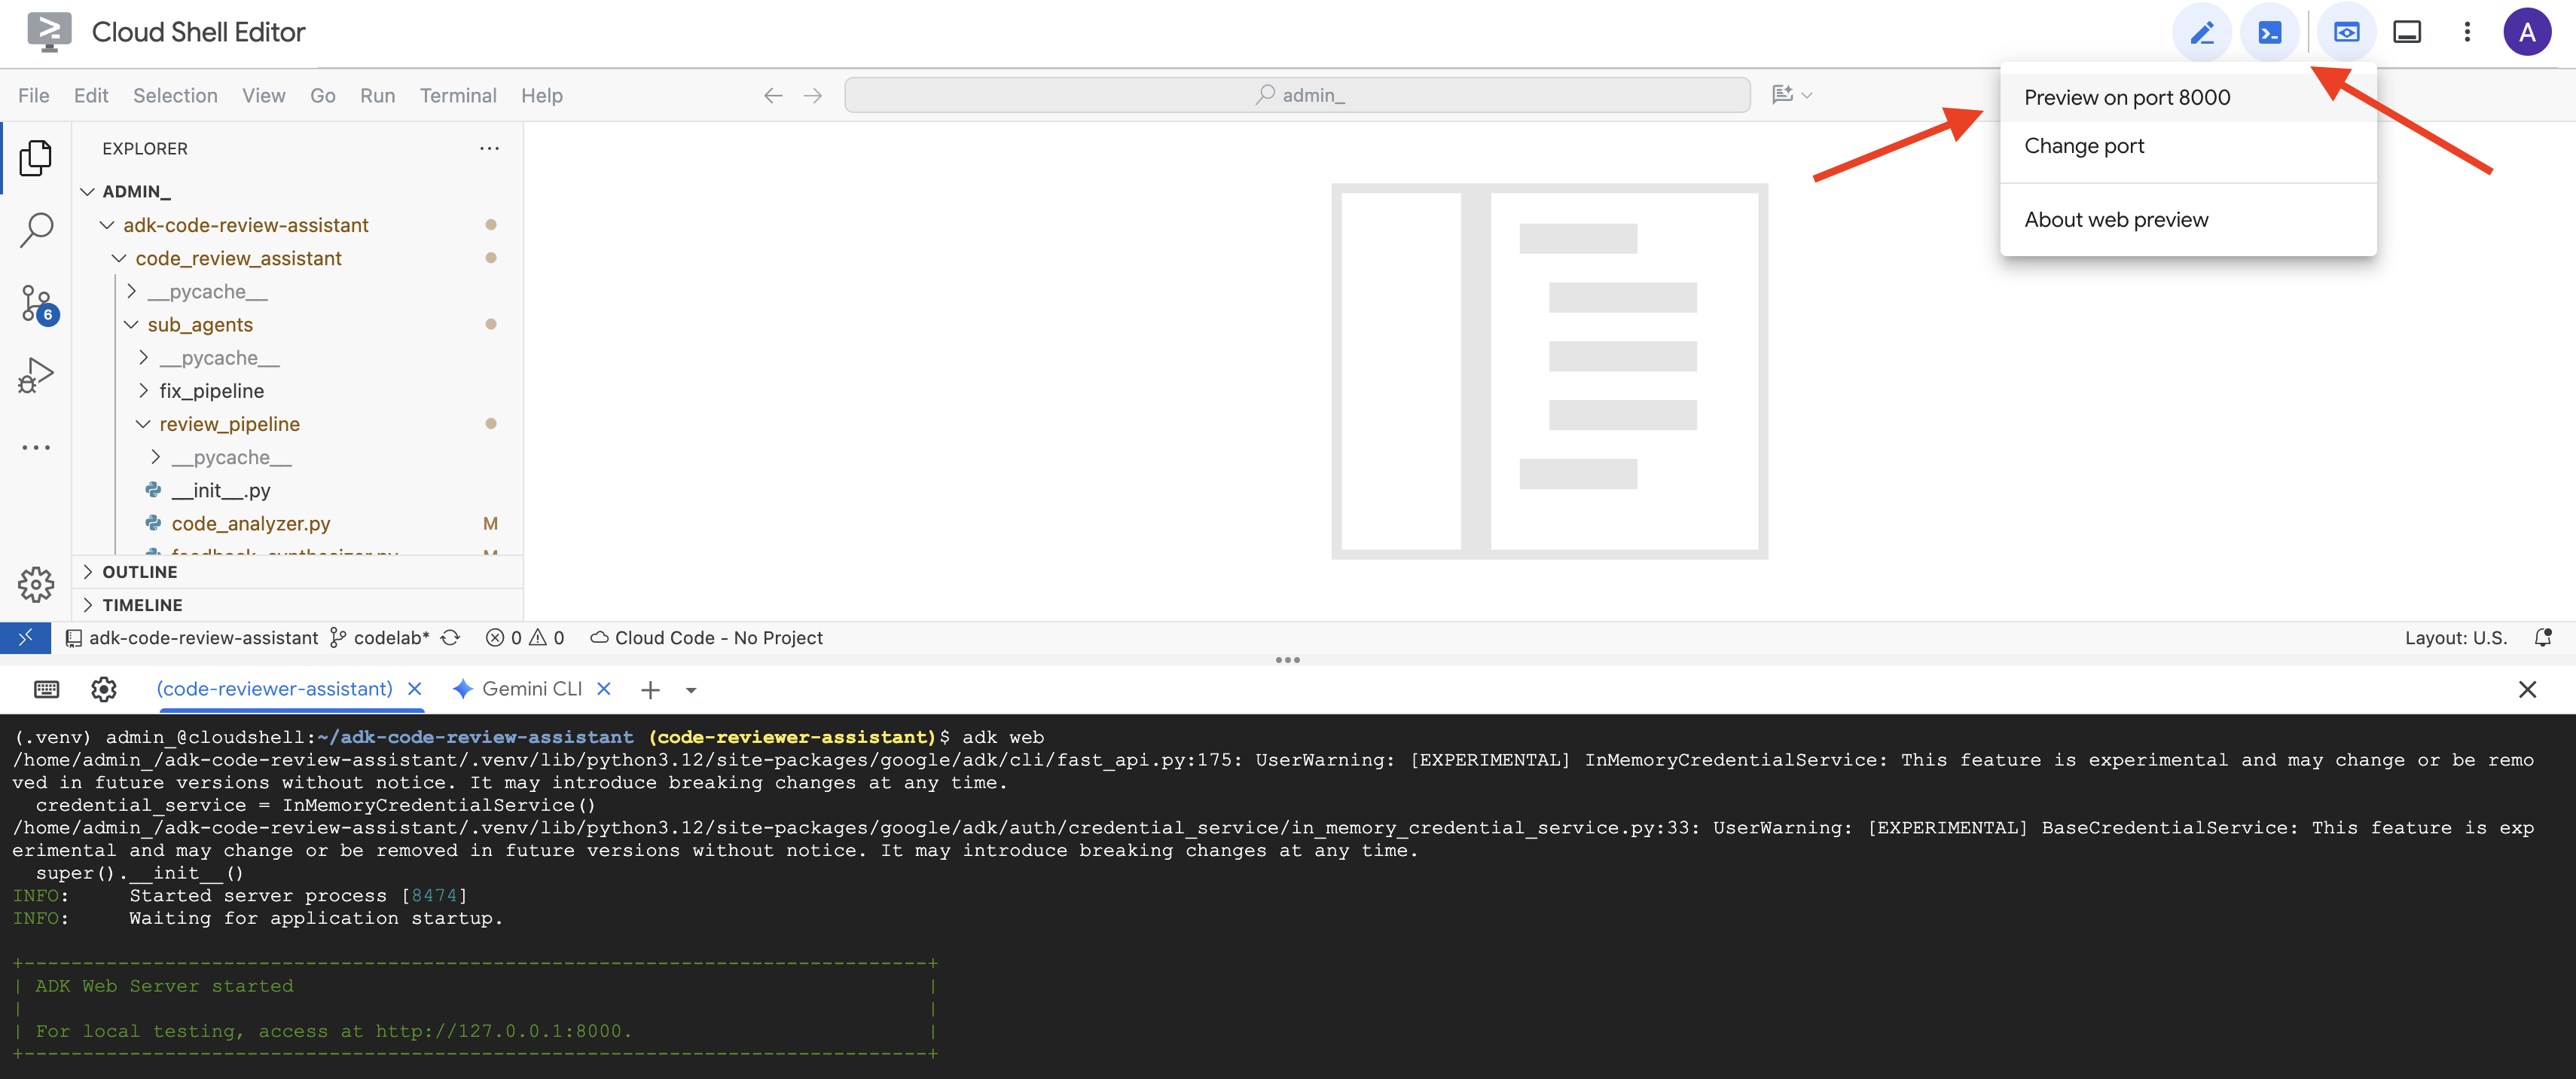
👉 এরপর, আপনার ব্রাউজার থেকে ADK Dev UI অ্যাক্সেস করতে:
ক্লাউড শেল টুলবারে (সাধারণত উপরের ডানদিকে) থাকা ওয়েব প্রিভিউ আইকন (যা প্রায়শই একটি চোখ বা তীর চিহ্নসহ একটি বর্গক্ষেত্রের মতো দেখতে হয়) থেকে ‘Change port’ নির্বাচন করুন। পপ-আপ উইন্ডোতে, পোর্টটি 8000-এ সেট করুন এবং ‘Change and Preview’-এ ক্লিক করুন। এরপর ক্লাউড শেল একটি নতুন ব্রাউজার ট্যাব বা উইন্ডো খুলবে যেখানে ADK Dev UI প্রদর্শিত হবে।
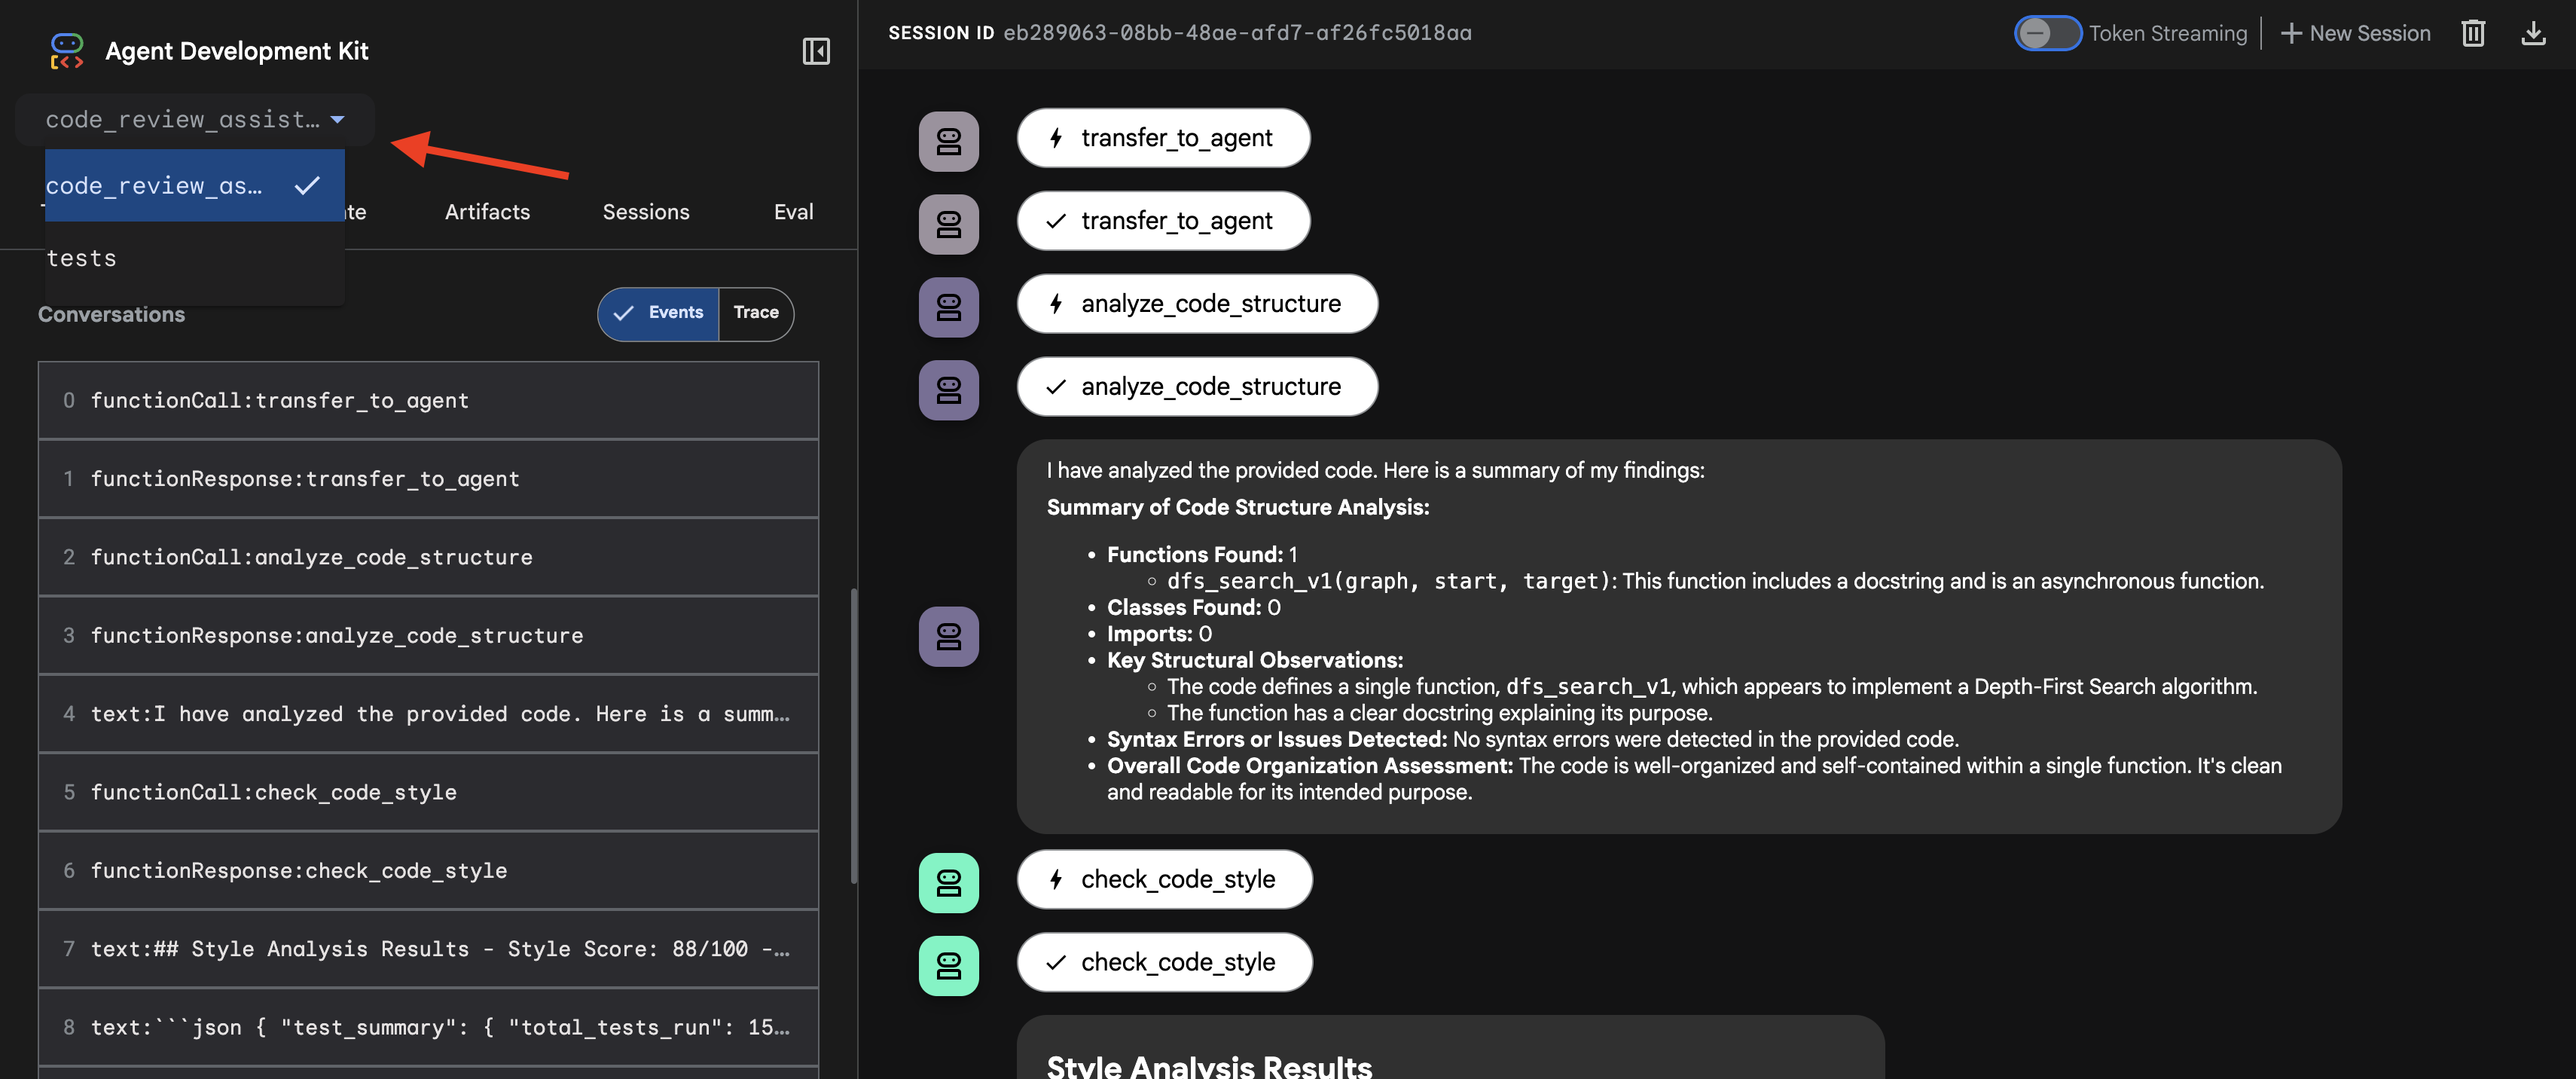
👉 এজেন্টটি এখন চালু আছে। আপনার ব্রাউজারে থাকা ADK Dev UI-ই হলো এজেন্টের সাথে আপনার সরাসরি সংযোগ।
- আপনার টার্গেট নির্বাচন করুন: UI-এর উপরের ড্রপডাউন মেনু থেকে
code_review_assistantএজেন্টটি বেছে নিন।
👉 পরীক্ষার নির্দেশিকা:
Please analyze the following:
def dfs_search_v1(graph, start, target):
    """Find if target is reachable from start."""
    visited = set()
    stack = start

    while stack:
        current = stack.pop()

        if current == target:
            return True

        if current not in visited:
            visited.add(current)

            for neighbor in graph[current]:
                if neighbor not in visited:
                    stack.append(neighbor)

    return False
👉 কোড রিভিউ পাইপলাইনটি বাস্তবে দেখুন:
যখন আপনি ত্রুটিপূর্ণ dfs_search_v1 ফাংশনটি সাবমিট করেন, তখন আপনি শুধু একটি উত্তরই পান না। আপনি আপনার মাল্টি-এজেন্ট পাইপলাইনকে কাজ করতে দেখেন। আপনি যে স্ট্রিমিং আউটপুটটি দেখেন, তা হলো পর্যায়ক্রমে কার্যকর হওয়া চারটি বিশেষায়িত এজেন্টের ফলাফল, যেখানে প্রতিটি এজেন্ট তার পূর্ববর্তীটির উপর ভিত্তি করে কাজ করে।
চূড়ান্ত ও বিশদ পর্যালোচনায় প্রতিটি এজেন্ট কী অবদান রাখে, তার একটি বিশদ বিবরণ এখানে দেওয়া হলো, যা কাঁচা ডেটাকে কার্যকর তথ্যে রূপান্তরিত করে।
১. কোড অ্যানালাইজারের কাঠামোগত প্রতিবেদন
প্রথমে, CodeAnalyzer এজেন্ট মূল কোডটি গ্রহণ করে। এটি কোডটি কী কাজ করে তা অনুমান করে না; বরং এটি analyze_code_structure টুলটি ব্যবহার করে একটি সুনির্দিষ্ট অ্যাবস্ট্রাক্ট সিনট্যাক্স ট্রি (AST) পার্সিং সম্পন্ন করে।
এর আউটপুট হলো কোডের গঠন সম্পর্কে বিশুদ্ধ, বাস্তব তথ্য:
The analysis of the provided code reveals the following:

Summary:
- Functions Found: 1
- Classes Found: 0

Key Structural Observations:
- A single function, dfs_search_v1, is defined.
- It includes a docstring: "Find if target is reachable from start."
- No syntax errors were detected.

Overall Code Organization Assessment:
- The code snippet is a well-defined, self-contained function.
⭐ গুরুত্ব: এই প্রাথমিক পদক্ষেপটি অন্যান্য এজেন্টদের জন্য একটি পরিষ্কার ও নির্ভরযোগ্য ভিত্তি প্রদান করে। এটি নিশ্চিত করে যে কোডটি বৈধ পাইথন এবং পর্যালোচনার জন্য প্রয়োজনীয় সুনির্দিষ্ট উপাদানগুলো শনাক্ত করে।
২. স্টাইল চেকারের পিইপি ৮ অডিট
এরপর, StyleChecker এজেন্ট দায়িত্ব গ্রহণ করে। এটি শেয়ার্ড স্টেট থেকে কোড পড়ে এবং check_code_style টুলটি ব্যবহার করে, যা pycodestyle লিন্টারকে কাজে লাগায়।
এর ফলাফল হলো একটি পরিমাপযোগ্য গুণগত মান স্কোর এবং সুনির্দিষ্ট লঙ্ঘনসমূহ:
Style Analysis Results
- Style Score: 88/100
- Total Issues: 6
- Assessment: Good style with minor improvements needed

Top Style Issues
- Line 5, W293: blank line contains whitespace
- Line 19, W292: no newline at end of file
⭐ বিশেষত্ব: এই এজেন্ট প্রতিষ্ঠিত কমিউনিটি স্ট্যান্ডার্ড (PEP 8) অনুসারে বস্তুনিষ্ঠ ও অপরিবর্তনীয় মতামত প্রদান করে। এর ওয়েটেড স্কোরিং সিস্টেম ব্যবহারকারীকে সমস্যাগুলোর তীব্রতা সম্পর্কে তাৎক্ষণিকভাবে জানিয়ে দেয়।
৩. টেস্ট রানারের গুরুতর বাগ আবিষ্কার
এই পর্যায়ে সিস্টেমটি উপরিভাগের বিশ্লেষণকে ছাড়িয়ে যায়। TestRunner এজেন্ট কোডের আচরণ যাচাই করার জন্য একটি ব্যাপক পরীক্ষা-নিরীক্ষার সেট তৈরি ও সম্পাদন করে।
এর আউটপুট হলো একটি কাঠামোগত JSON অবজেক্ট, যাতে একটি মারাত্মক রায় রয়েছে:
{
  "critical_issues": [
    {
      "type": "Critical Bug",
      "description": "The function's initialization `stack = start` is incorrect... When a common input like a string... is provided... the function crashes with an AttributeError.",
      "severity": "Critical"
    }
  ],
  "verdict": {
    "status": "BROKEN",
    "confidence": "high",
    "recommendation": "The function is fundamentally broken... the stack initialization line `stack = start` must be changed to `stack = [start]`."
  }
}
⭐ গুরুত্ব: এটিই সবচেয়ে গুরুত্বপূর্ণ পর্যবেক্ষণ। এজেন্টটি শুধু অনুমান করেনি; এটি কোডটি চালিয়ে প্রমাণ করেছে যে এতে ত্রুটি ছিল। এটি একটি সূক্ষ্ম কিন্তু গুরুতর রানটাইম বাগ উন্মোচন করেছে যা একজন সাধারণ পর্যালোচক সহজেই এড়িয়ে যেতে পারতেন এবং এর সঠিক কারণ ও প্রয়োজনীয় সমাধান চিহ্নিত করেছে।
৪. ফিডব্যাক সিন্থেসাইজারের চূড়ান্ত প্রতিবেদন
অবশেষে, FeedbackSynthesizer এজেন্টটি পরিচালকের ভূমিকা পালন করে। এটি পূর্ববর্তী তিনটি এজেন্টের কাছ থেকে কাঠামোগত ডেটা নিয়ে একটি একক, ব্যবহার-বান্ধব প্রতিবেদন তৈরি করে, যা একই সাথে বিশ্লেষণাত্মক এবং উৎসাহব্যঞ্জক।
এর ফল হলো এই চূড়ান্ত, পরিমার্জিত পর্যালোচনাটি যা আপনি দেখছেন:
📊 Summary
Great effort on implementing the Depth-First Search algorithm! ... However, a critical bug in the initialization of the stack prevents the function from working correctly...

✅ Strengths
- Good Algorithm Structure
- Correct Use of `visited` Set

📈 Code Quality Analysis
...
### Style Compliance
The style analysis returned a good score of 88/100.
...
### Test Results
The automated testing revealed a critical issue... The line `stack = start` directly assigns the input... which results in an `AttributeError`.

💡 Recommendations for Improvement
**Fix the Critical Stack Initialization Bug:**
- Incorrect Code: `stack = start`
- Correct Code: `stack = [start]`

💬 Encouragement
You are very close to a perfect implementation! The core logic of your DFS algorithm is sound, which is the hardest part.
⭐ Value: This agent transforms technical data into a helpful, educational experience. It prioritizes the most important issue (the bug), explains it clearly, provides the exact solution, and does so in an encouraging tone. It successfully integrates the findings from all previous stages into a cohesive and valuable whole.
This multi-stage process demonstrates the power of an agentic pipeline. Instead of a single, monolithic response, you get a layered analysis where each agent performs a specialized, verifiable task. This leads to a review that is not only insightful but also deterministic, reliable, and deeply educational.
👉💻 Once you're done testing, return to your Cloud Shell Editor terminal and press Ctrl+C to stop the ADK Dev UI.
What You've Built
You now have a complete code review pipeline that:
✅ Parses code structure - deterministic AST analysis with helper functions
✅ Checks style - weighted scoring with naming conventions
✅ Runs tests - comprehensive test generation with structured JSON output
✅ Synthesizes feedback - integrates state + memory + artifacts
✅ Tracks progress - multi-tier state across invocations/sessions/users
✅ Learns over time - memory service for cross-session patterns
✅ Provides artifacts - downloadable JSON reports with complete audit trail
Key Concepts Mastered
Sequential Pipelines:
- Four agents executing in strict order
- Each enriches state for the next
- Dependencies determine execution sequence
Production Patterns:
- Helper function separation (sync in thread pools)
- Graceful degradation (fallback strategies)
- Multi-tier state management (temp/session/user)
- Dynamic instruction providers (context-aware)
- Dual storage (artifacts + state redundancy)
State as Communication:
- Constants prevent typos across agents
-
output_keywrites agent summaries to state - Later agents read via StateKeys
- State flows linearly through pipeline
Memory vs State:
- State: current session data
- Memory: patterns across sessions
- Different purposes, different lifetimes
Tool Orchestration:
- Single-tool agents (analyzer, style_checker)
- Built-in executors (test_runner)
- Multi-tool coordination (synthesizer)
Model Selection Strategy:
- Worker model: mechanical tasks (parsing, linting, routing)
- Critic model: reasoning tasks (testing, synthesis)
- Cost optimization through appropriate selection
What's Next
In Module 6, you'll build the fix pipeline :
- LoopAgent architecture for iterative fixing
- Exit conditions via escalation
- State accumulation across iterations
- Validation and retry logic
- Integration with review pipeline to offer fixes
You'll see how the same state patterns scale to complex iterative workflows where agents attempt multiple times until success, and how to coordinate multiple pipelines in a single application.
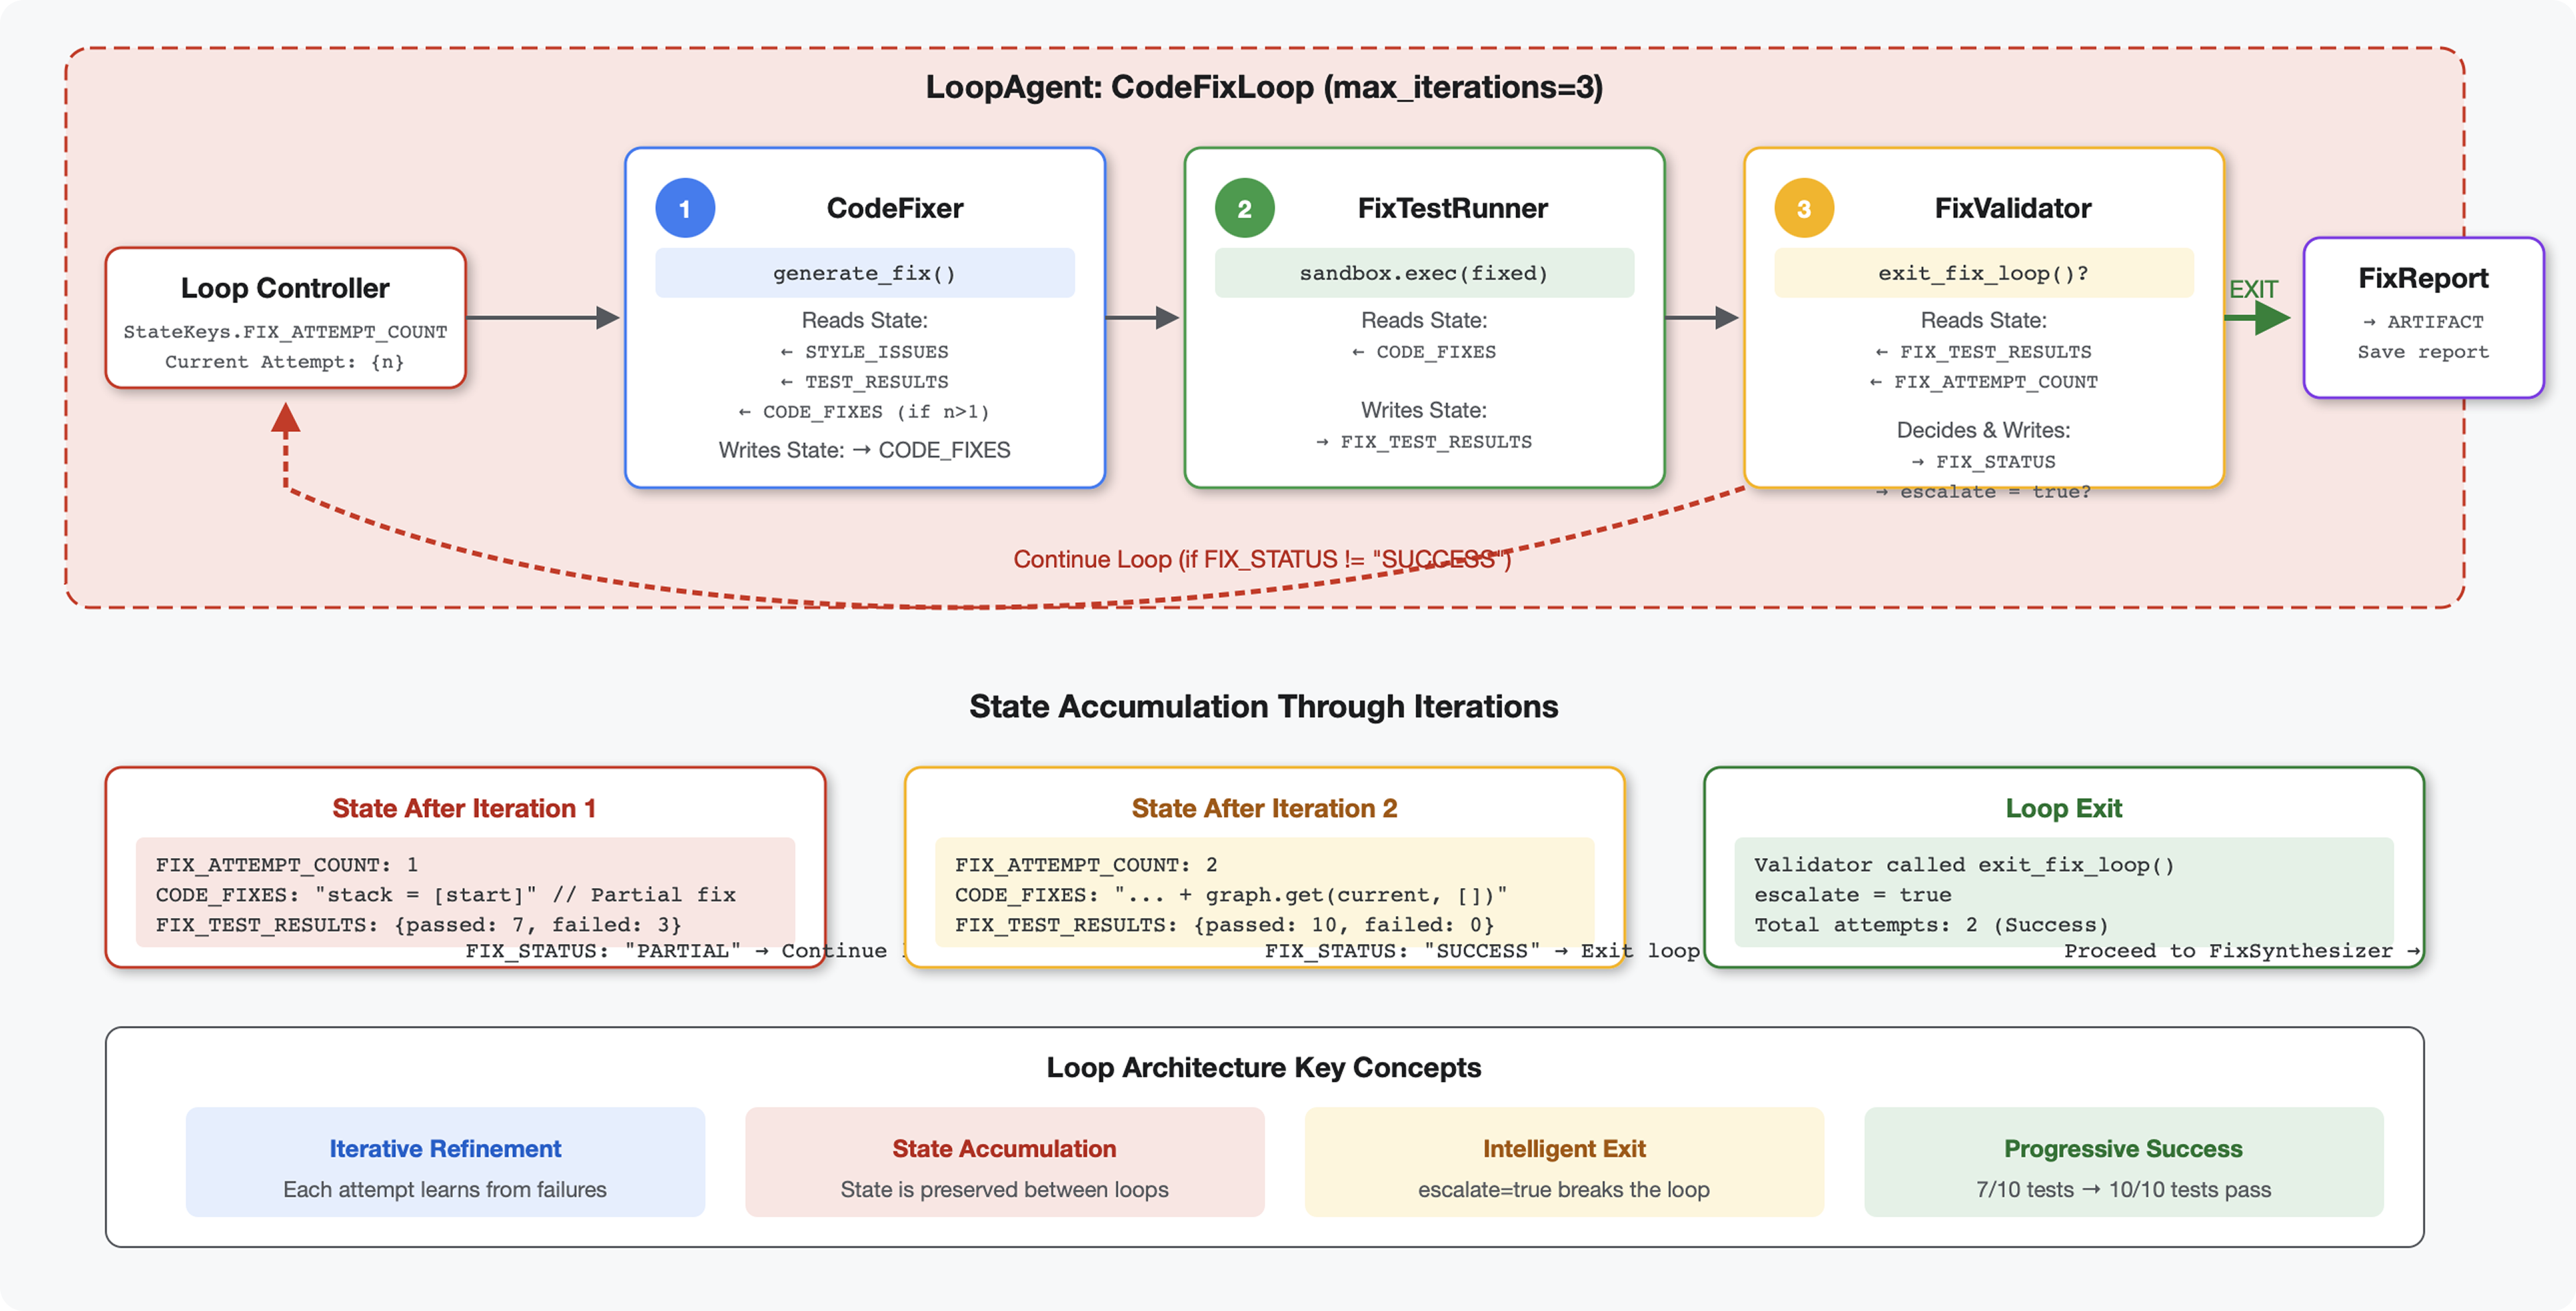
6. Adding the Fix Pipeline: Loop Architecture
ভূমিকা
In Module 5, you built a sequential review pipeline that analyzes code and provides feedback. But identifying problems is only half the solution - developers need help fixing them.
This module builds an automated fix pipeline that:
- Generates fixes based on review results
- Validates fixes by running comprehensive tests
- Retries automatically if fixes don't work (up to 3 attempts)
- Reports results with before/after comparisons
Key concept: LoopAgent for automatic retry. Unlike sequential agents that run once, a LoopAgent repeats its sub-agents until an exit condition is met or max iterations reached. Tools signal success by setting tool_context.actions.escalate = True .
Preview of what you'll build: Submit buggy code → review identifies issues → fix loop generates corrections → tests validate → retries if needed → final comprehensive report.
Core Concepts: LoopAgent vs Sequential
Sequential Pipeline (Module 5):
SequentialAgent(agents=[A, B, C])
# Executes: A → B → C → Done
- One-way flow
- Each agent runs exactly once
- No retry logic
Loop Pipeline (Module 6):
LoopAgent(agents=[A, B, C], max_iterations=3)
# Executes: A → B → C → (check exit) → A → B → C → (check exit) → ...
- Cyclic flow
- Agents can run multiple times
- Exits when:
- A tool sets
tool_context.actions.escalate = True(success) -
max_iterationsreached (safety limit) - Unhandled exception occurs (error)
- A tool sets
Why loops for code fixing:
Code fixes often need multiple attempts:
- First attempt : Fix obvious bugs (wrong variable types)
- Second attempt : Fix secondary issues revealed by tests (edge cases)
- Third attempt : Fine-tune and validate all tests pass
Without a loop, you'd need complex conditional logic in agent instructions. With LoopAgent , retry is automatic.
Architecture comparison:
Sequential (Module 5):
User → Review Pipeline → Feedback → Done

Loop (Module 6):
User → Review Pipeline → Feedback → Fix Pipeline
                                         ↓
                          ┌──────────────┴──────────────┐
                          │   Fix Attempt Loop (1-3x)   │
                          │  ┌─────────────────────┐    │
                          │  │ 1. Generate Fixes   │    │
                          │  │ 2. Test Fixes       │    │
                          │  │ 3. Validate & Exit? │────┼─→ If escalate=True
                          │  └─────────────────────┘    │      exit loop
                          │         ↓ If not            │
                          │    Try Again (max 3)        │
                          └─────────────────────────────┘
                                     ↓
                          4. Synthesize Final Report → Done
Step 1: Add Code Fixer Agent
The code fixer generates corrected Python code based on review results.
👉 Open
code_review_assistant/sub_agents/fix_pipeline/code_fixer.py
👉 Find:
# MODULE_6_STEP_1_CODE_FIXER_INSTRUCTION_PROVIDER
👉 Replace that single line with:
async def code_fixer_instruction_provider(context: ReadonlyContext) -> str:
    """Dynamic instruction provider that injects state variables."""
    template = """You are an expert code fixing specialist.

Original Code:
{code_to_review}

Analysis Results:
- Style Score: {style_score}/100
- Style Issues: {style_issues}
- Test Results: {test_execution_summary}

Based on the test results, identify and fix ALL issues including:
- Interface bugs (e.g., if start parameter expects wrong type)
- Logic errors (e.g., KeyError when accessing graph nodes)
- Style violations
- Missing documentation

YOUR TASK:
Generate the complete fixed Python code that addresses all identified issues.

CRITICAL INSTRUCTIONS:
- Output ONLY the corrected Python code
- Do NOT include markdown code blocks (```python)
- Do NOT include any explanations or commentary
- The output should be valid, executable Python code and nothing else

Common fixes to apply based on test results:
- If tests show AttributeError with 'pop', fix: stack = [start] instead of stack = start
- If tests show KeyError accessing graph, fix: use graph.get(current, [])
- Add docstrings if missing
- Fix any style violations identified

Output the complete fixed code now:"""

    return await instructions_utils.inject_session_state(template, context)
👉 Find:
# MODULE_6_STEP_1_CODE_FIXER_AGENT
👉 Replace that single line with:
code_fixer_agent = Agent(
    name="CodeFixer",
    model=config.worker_model,
    description="Generates comprehensive fixes for all identified code issues",
    instruction=code_fixer_instruction_provider,
    code_executor=BuiltInCodeExecutor(),
    output_key="code_fixes"
)
Step 2: Add Fix Test Runner Agent
The fix test runner validates corrections by executing comprehensive tests on the fixed code.
👉 Open
code_review_assistant/sub_agents/fix_pipeline/fix_test_runner.py
👉 Find:
# MODULE_6_STEP_2_FIX_TEST_RUNNER_INSTRUCTION_PROVIDER
👉 Replace that single line with:
async def fix_test_runner_instruction_provider(context: ReadonlyContext) -> str:
    """Dynamic instruction provider that uses the clean code from the previous step."""
    template = """You are responsible for validating the fixed code by running tests.

THE FIXED CODE TO TEST:
{code_fixes}

ORIGINAL TEST RESULTS: {test_execution_summary}

YOUR TASK:
1. Understand the fixes that were applied
2. Generate the same comprehensive tests (15-20 test cases)
3. Execute the tests on the FIXED code using your code executor
4. Compare results with original test results
5. Output a detailed JSON analysis

TESTING METHODOLOGY:
- Run the same tests that revealed issues in the original code
- Verify that previously failing tests now pass
- Ensure no regressions were introduced
- Document the improvement

Execute your tests and output ONLY valid JSON with this structure:
- "passed": number of tests that passed
- "failed": number of tests that failed
- "total": total number of tests
- "pass_rate": percentage as a number
- "comparison": object with "original_pass_rate", "new_pass_rate", "improvement"
- "newly_passing_tests": array of test names that now pass
- "still_failing_tests": array of test names still failing

Do NOT output the test code itself, only the JSON analysis."""

    return await instructions_utils.inject_session_state(template, context)
👉 Find:
# MODULE_6_STEP_2_FIX_TEST_RUNNER_AGENT
👉 Replace that single line with:
fix_test_runner_agent = Agent(
    name="FixTestRunner",
    model=config.critic_model,
    description="Runs comprehensive tests on fixed code to verify all issues are resolved",
    instruction=fix_test_runner_instruction_provider,
    code_executor=BuiltInCodeExecutor(),
    output_key="fix_test_execution_summary"
)
Step 3: Add Fix Validator Agent
The validator checks if fixes were successful and decides whether to exit the loop.
Understanding the Tools
First, add the three tools the validator needs.
👉 Open
code_review_assistant/tools.py
👉 Find:
# MODULE_6_STEP_3_VALIDATE_FIXED_STYLE
👉 Replace with Tool 1 - Style Validator:
async def validate_fixed_style(tool_context: ToolContext) -> Dict[str, Any]:
    """
    Validates style compliance of the fixed code.

    Args:
        tool_context: ADK tool context containing fixed code in state

    Returns:
        Dictionary with style validation results
    """
    logger.info("Tool: Validating style of fixed code...")

    try:
        # Get the fixed code from state
        code_fixes = tool_context.state.get(StateKeys.CODE_FIXES, '')

        # Try to extract from markdown if present
        if '```python' in code_fixes:
            start = code_fixes.rfind('```python') + 9
            end = code_fixes.rfind('```')
            if start < end:
                code_fixes = code_fixes[start:end].strip()

        if not code_fixes:
            return {
                "status": "error",
                "message": "No fixed code found in state"
            }

        # Store the extracted fixed code
        tool_context.state[StateKeys.CODE_FIXES] = code_fixes

        # Run style check on fixed code
        loop = asyncio.get_event_loop()
        with ThreadPoolExecutor() as executor:
            style_result = await loop.run_in_executor(
                executor, _perform_style_check, code_fixes
            )

        # Compare with original
        original_score = tool_context.state.get(StateKeys.STYLE_SCORE, 0)
        improvement = style_result['score'] - original_score

        # Store results
        tool_context.state[StateKeys.FIXED_STYLE_SCORE] = style_result['score']
        tool_context.state[StateKeys.FIXED_STYLE_ISSUES] = style_result['issues']

        logger.info(f"Tool: Fixed code style score: {style_result['score']}/100 "
                    f"(improvement: +{improvement})")

        return {
            "status": "success",
            "fixed_style_score": style_result['score'],
            "original_style_score": original_score,
            "improvement": improvement,
            "remaining_issues": style_result['issues'],
            "perfect_style": style_result['score'] == 100
        }

    except Exception as e:
        logger.error(f"Tool: Style validation failed: {e}", exc_info=True)
        return {
            "status": "error",
            "message": str(e)
        }
👉 Find:
# MODULE_6_STEP_3_COMPILE_FIX_REPORT
👉 Replace with Tool 2 - Report Compiler:
async def compile_fix_report(tool_context: ToolContext) -> Dict[str, Any]:
    """
    Compiles comprehensive report of the fix process.

    Args:
        tool_context: ADK tool context with all fix pipeline data

    Returns:
        Comprehensive fix report
    """
    logger.info("Tool: Compiling comprehensive fix report...")

    try:
        # Gather all data
        original_code = tool_context.state.get(StateKeys.CODE_TO_REVIEW, '')
        code_fixes = tool_context.state.get(StateKeys.CODE_FIXES, '')

        # Test results
        original_tests = tool_context.state.get(StateKeys.TEST_EXECUTION_SUMMARY, {})
        fixed_tests = tool_context.state.get(StateKeys.FIX_TEST_EXECUTION_SUMMARY, {})

        # Parse if strings
        if isinstance(original_tests, str):
            try:
                original_tests = json.loads(original_tests)
            except:
                original_tests = {}

        if isinstance(fixed_tests, str):
            try:
                fixed_tests = json.loads(fixed_tests)
            except:
                fixed_tests = {}

        # Extract pass rates
        original_pass_rate = 0
        if original_tests:
            if 'pass_rate' in original_tests:
                original_pass_rate = original_tests['pass_rate']
            elif 'test_summary' in original_tests:
                # Handle test_runner_agent's JSON structure
                summary = original_tests['test_summary']
                total = summary.get('total_tests_run', 0)
                passed = summary.get('tests_passed', 0)
                if total > 0:
                    original_pass_rate = (passed / total) * 100
            elif 'passed' in original_tests and 'total' in original_tests:
                if original_tests['total'] > 0:
                    original_pass_rate = (original_tests['passed'] / original_tests['total']) * 100

        fixed_pass_rate = 0
        all_tests_pass = False
        if fixed_tests:
            if 'pass_rate' in fixed_tests:
                fixed_pass_rate = fixed_tests['pass_rate']
                all_tests_pass = fixed_tests.get('failed', 1) == 0
            elif 'passed' in fixed_tests and 'total' in fixed_tests:
                if fixed_tests['total'] > 0:
                    fixed_pass_rate = (fixed_tests['passed'] / fixed_tests['total']) * 100
                all_tests_pass = fixed_tests.get('failed', 0) == 0

        # Style scores
        original_style = tool_context.state.get(StateKeys.STYLE_SCORE, 0)
        fixed_style = tool_context.state.get(StateKeys.FIXED_STYLE_SCORE, 0)

        # Calculate improvements
        test_improvement = {
            'original_pass_rate': original_pass_rate,
            'fixed_pass_rate': fixed_pass_rate,
            'improvement': fixed_pass_rate - original_pass_rate,
            'all_tests_pass': all_tests_pass
        }

        style_improvement = {
            'original_score': original_style,
            'fixed_score': fixed_style,
            'improvement': fixed_style - original_style,
            'perfect_style': fixed_style == 100
        }

        # Determine overall status
        if all_tests_pass and style_improvement['perfect_style']:
            fix_status = 'SUCCESSFUL'
            status_emoji = '✅'
        elif test_improvement['improvement'] > 0 or style_improvement['improvement'] > 0:
            fix_status = 'PARTIAL'
            status_emoji = '⚠️'
        else:
            fix_status = 'FAILED'
            status_emoji = '❌'

        # Build comprehensive report
        report = {
            'status': fix_status,
            'status_emoji': status_emoji,
            'timestamp': datetime.now().isoformat(),
            'original_code': original_code,
            'code_fixes': code_fixes,
            'improvements': {
                'tests': test_improvement,
                'style': style_improvement
            },
            'summary': f"{status_emoji} Fix Status: {fix_status}\n"
                      f"Tests: {original_pass_rate:.1f}% → {fixed_pass_rate:.1f}%\n"
                      f"Style: {original_style}/100 → {fixed_style}/100"
        }

        # Store report in state
        tool_context.state[StateKeys.FIX_REPORT] = report
        tool_context.state[StateKeys.FIX_STATUS] = fix_status

        logger.info(f"Tool: Fix report compiled - Status: {fix_status}")
        logger.info(f"Tool: Test improvement: {original_pass_rate:.1f}% → {fixed_pass_rate:.1f}%")
        logger.info(f"Tool: Style improvement: {original_style} → {fixed_style}")

        return {
            "status": "success",
            "fix_status": fix_status,
            "report": report
        }

    except Exception as e:
        logger.error(f"Tool: Failed to compile fix report: {e}", exc_info=True)
        return {
            "status": "error",
            "message": str(e)
        }
👉 Find:
# MODULE_6_STEP_3_EXIT_FIX_LOOP
👉 Replace with Tool 3 - Loop Exit Signal:
def exit_fix_loop(tool_context: ToolContext) -> Dict[str, Any]:
    """
    Signal that fixing is complete and should exit the loop.

    Args:
        tool_context: ADK tool context

    Returns:
        Confirmation message
    """
    logger.info("Tool: Setting escalate flag to exit fix loop")

    # This is the critical line that exits the LoopAgent
    tool_context.actions.escalate = True

    return {
        "status": "success",
        "message": "Fix complete, exiting loop"
    }
Create the Validator Agent
👉 Open
code_review_assistant/sub_agents/fix_pipeline/fix_validator.py
👉 Find:
# MODULE_6_STEP_3_FIX_VALIDATOR_INSTRUCTION_PROVIDER
👉 Replace that single line with:
async def fix_validator_instruction_provider(context: ReadonlyContext) -> str:
    """Dynamic instruction provider that injects state variables."""
    template = """You are the final validation specialist for code fixes.

You have access to:
- Original issues from initial review
- Applied fixes: {code_fixes}
- Test results after fix: {fix_test_execution_summary}
- All state data from the fix process

Your responsibilities:
1. Use validate_fixed_style tool to check style compliance of fixed code
   - Pass no arguments, it will retrieve fixed code from state
2. Use compile_fix_report tool to generate comprehensive report
   - Pass no arguments, it will gather all data from state
3. Based on the report, determine overall fix status:
   - ✅ SUCCESSFUL: All tests pass, style score 100
   - ⚠️ PARTIAL: Improvements made but issues remain
   - ❌ FAILED: Fix didn't work or made things worse

4. CRITICAL: If status is SUCCESSFUL, call the exit_fix_loop tool to stop iterations
   - This prevents unnecessary additional fix attempts
   - If not successful, the loop will continue for another attempt

5. Provide clear summary of:
   - What was fixed
   - What improvements were achieved
   - Any remaining issues requiring manual attention

Be precise and quantitative in your assessment.
"""
    return await instructions_utils.inject_session_state(template, context)
👉 Find:
# MODULE_6_STEP_3_FIX_VALIDATOR_AGENT
👉 Replace that single line with:
fix_validator_agent = Agent(
    name="FixValidator",
    model=config.worker_model,
    description="Validates fixes and generates final fix report",
    instruction=fix_validator_instruction_provider,
    tools=[
        FunctionTool(func=validate_fixed_style),
        FunctionTool(func=compile_fix_report),
        FunctionTool(func=exit_fix_loop)
    ],
    output_key="final_fix_report"
)
Step 4: Understanding LoopAgent Exit Conditions
The LoopAgent has three ways to exit:
1. Success Exit (via escalate)
# Inside any tool in the loop:
tool_context.actions.escalate = True

# Effect: Loop completes current iteration, then exits
# Use when: Fix is successful and no more attempts needed
Example flow:
Iteration 1:
  CodeFixer → generates fixes
  FixTestRunner → tests show 90% pass rate
  FixValidator → compiles report, sees PARTIAL status
  → Does NOT set escalate
  → Loop continues

Iteration 2:
  CodeFixer → refines fixes based on failures
  FixTestRunner → tests show 100% pass rate
  FixValidator → compiles report, sees SUCCESSFUL status
  → Calls exit_fix_loop() which sets escalate = True
  → Loop exits after this iteration
2. Max Iterations Exit
LoopAgent(
    name="FixAttemptLoop",
    sub_agents=[...],
    max_iterations=3  # Safety limit
)

# Effect: After 3 complete iterations, loop exits regardless of escalate
# Use when: Prevent infinite loops if fixes never succeed
Example flow:
Iteration 1: PARTIAL (continue)
Iteration 2: PARTIAL (continue)
Iteration 3: PARTIAL (but max reached)
→ Loop exits, synthesizer presents best attempt
3. Error Exit
# If any agent throws unhandled exception:
raise Exception("Unexpected error")

# Effect: Loop exits immediately with error state
# Use when: Critical failure that can't be recovered
State Evolution Across Iterations:
Each iteration sees updated state from the previous attempt:
# Before Iteration 1:
state = {
    "code_to_review": "def add(a,b):return a+b",  # Original
    "style_score": 40,
    "test_execution_summary": {...}
}

# After Iteration 1:
state = {
    "code_to_review": "def add(a,b):return a+b",  # Unchanged
    "code_fixes": "def add(a, b):\n    return a + b",  # NEW
    "style_score": 40,  # Unchanged
    "fixed_style_score": 100,  # NEW
    "test_execution_summary": {...},  # Unchanged
    "fix_test_execution_summary": {...}  # NEW
}

# Iteration 2 starts with all this state
# If fixes still not perfect, code_fixes gets overwritten
কেন
escalate
Instead of Return Values:
# Bad: Using return value to signal exit
def validator_agent():
    report = compile_report()
    if report['status'] == 'SUCCESSFUL':
        return {"exit": True}  # How does loop know?

# Good: Using escalate
def validator_tool(tool_context):
    report = compile_report()
    if report['status'] == 'SUCCESSFUL':
        tool_context.actions.escalate = True  # Loop knows immediately
    return {"report": report}
Benefits:
- Works from any tool, not just the last one
- Doesn't interfere with return data
- Clear semantic meaning
- Framework handles the exit logic
Step 5: Wire the Fix Pipeline
👉 Open
code_review_assistant/agent.py
👉 Add the fix pipeline imports (after the existing imports):
from google.adk.agents import LoopAgent  # Add this to the existing Agent, SequentialAgent line
from code_review_assistant.sub_agents.fix_pipeline.code_fixer import code_fixer_agent
from code_review_assistant.sub_agents.fix_pipeline.fix_test_runner import fix_test_runner_agent
from code_review_assistant.sub_agents.fix_pipeline.fix_validator import fix_validator_agent
from code_review_assistant.sub_agents.fix_pipeline.fix_synthesizer import fix_synthesizer_agent
Your imports should now be:
from google.adk.agents import Agent, SequentialAgent, LoopAgent
from .config import config
# Review pipeline imports (from Module 5)
from code_review_assistant.sub_agents.review_pipeline.code_analyzer import code_analyzer_agent
from code_review_assistant.sub_agents.review_pipeline.style_checker import style_checker_agent
from code_review_assistant.sub_agents.review_pipeline.test_runner import test_runner_agent
from code_review_assistant.sub_agents.review_pipeline.feedback_synthesizer import feedback_synthesizer_agent
# Fix pipeline imports (NEW)
from code_review_assistant.sub_agents.fix_pipeline.code_fixer import code_fixer_agent
from code_review_assistant.sub_agents.fix_pipeline.fix_test_runner import fix_test_runner_agent
from code_review_assistant.sub_agents.fix_pipeline.fix_validator import fix_validator_agent
from code_review_assistant.sub_agents.fix_pipeline.fix_synthesizer import fix_synthesizer_agent
👉 Find:
# MODULE_6_STEP_5_CREATE_FIX_LOOP
👉 Replace that single line with:
# Create the fix attempt loop (retries up to 3 times)
fix_attempt_loop = LoopAgent(
    name="FixAttemptLoop",
    sub_agents=[
        code_fixer_agent,      # Step 1: Generate fixes
        fix_test_runner_agent, # Step 2: Validate with tests
        fix_validator_agent    # Step 3: Check success & possibly exit
    ],
    max_iterations=3  # Try up to 3 times
)

# Wrap loop with synthesizer for final report
code_fix_pipeline = SequentialAgent(
    name="CodeFixPipeline",
    description="Automated code fixing pipeline with iterative validation",
    sub_agents=[
        fix_attempt_loop,      # Try to fix (1-3 times)
        fix_synthesizer_agent  # Present final results (always runs once)
    ]
)
👉 Remove the existing
root_agent
definition:
root_agent = Agent(...)
👉 Find:
# MODULE_6_STEP_5_UPDATE_ROOT_AGENT
👉 Replace that single line with:
# Update root agent to include both pipelines
root_agent = Agent(
    name="CodeReviewAssistant",
    model=config.worker_model,
    description="An intelligent code review assistant that analyzes Python code and provides educational feedback",
    instruction="""You are a specialized Python code review assistant focused on helping developers improve their code quality.

When a user provides Python code for review:
1. Immediately delegate to CodeReviewPipeline and pass the code EXACTLY as it was provided by the user.
2. The pipeline will handle all analysis and feedback
3. Return ONLY the final feedback from the pipeline - do not add any commentary

After completing a review, if significant issues were identified:
- If style score < 100 OR tests are failing OR critical issues exist:
  * Add at the end: "\n\n💡 I can fix these issues for you. Would you like me to do that?"

- If the user responds yes or requests fixes:
  * Delegate to CodeFixPipeline
  * Return the fix pipeline's complete output AS-IS

When a user asks what you can do or general questions:
- Explain your capabilities for code review and fixing
- Do NOT trigger the pipeline for non-code messages

The pipelines handle everything for code review and fixing - just pass through their final output.""",
    sub_agents=[code_review_pipeline, code_fix_pipeline],
    output_key="assistant_response"
)
Step 6: Add Fix Synthesizer Agent
The synthesizer creates a user-friendly presentation of fix results after the loop completes.
👉 Open
code_review_assistant/sub_agents/fix_pipeline/fix_synthesizer.py
👉 Find:
# MODULE_6_STEP_6_FIX_SYNTHESIZER_INSTRUCTION_PROVIDER
👉 Replace that single line with:
async def fix_synthesizer_instruction_provider(context: ReadonlyContext) -> str:
    """Dynamic instruction provider that injects state variables."""
    template = """You are responsible for presenting the fix results to the user.

Based on the validation report: {final_fix_report}
Fixed code from state: {code_fixes}
Fix status: {fix_status}

Create a comprehensive yet friendly response that includes:

## 🔧 Fix Summary
[Overall status and key improvements - be specific about what was achieved]

## 📊 Metrics
- Test Results: [original pass rate]% → [new pass rate]%
- Style Score: [original]/100 → [new]/100
- Issues Fixed: X of Y

## ✅ What Was Fixed
[List each fixed issue with brief explanation of the correction made]

## 📝 Complete Fixed Code
[Include the complete, corrected code from state - this is critical]

## 💡 Explanation of Key Changes
[Brief explanation of the most important changes made and why]

[If any issues remain]
## ⚠️ Remaining Issues
[List what still needs manual attention]

## 🎯 Next Steps
[Guidance on what to do next - either use the fixed code or address remaining issues]

Save the fix report using save_fix_report tool before presenting.
Call it with no parameters - it will retrieve the report from state automatically.

Be encouraging about improvements while being honest about any remaining issues.
Focus on the educational aspect - help the user understand what was wrong and how it was fixed.
"""
    return await instructions_utils.inject_session_state(template, context)
👉 Find:
# MODULE_6_STEP_6_FIX_SYNTHESIZER_AGENT
👉 Replace that single line with:
fix_synthesizer_agent = Agent(
    name="FixSynthesizer",
    model=config.critic_model,
    description="Creates comprehensive user-friendly fix report",
    instruction=fix_synthesizer_instruction_provider,
    tools=[FunctionTool(func=save_fix_report)],
    output_key="fix_summary"
)
👉 Add
save_fix_report
tool to
tools.py
:
👉 Find:
# MODULE_6_STEP_6_SAVE_FIX_REPORT
👉 Replace with:
async def save_fix_report(tool_context: ToolContext) -> Dict[str, Any]:
    """
    Saves the fix report as an artifact.

    Args:
        tool_context: ADK tool context

    Returns:
        Save status
    """
    logger.info("Tool: Saving fix report...")

    try:
        # Get the report from state
        fix_report = tool_context.state.get(StateKeys.FIX_REPORT, {})

        if not fix_report:
            return {
                "status": "error",
                "message": "No fix report found in state"
            }

        # Convert to JSON
        report_json = json.dumps(fix_report, indent=2)
        report_part = types.Part.from_text(text=report_json)

        # Generate filename
        timestamp = datetime.now().isoformat().replace(':', '-')
        filename = f"fix_report_{timestamp}.json"

        # Try to save as artifact
        if hasattr(tool_context, 'save_artifact'):
            try:
                version = await tool_context.save_artifact(filename, report_part)
                await tool_context.save_artifact("latest_fix_report.json", report_part)

                logger.info(f"Tool: Fix report saved as {filename}")

                return {
                    "status": "success",
                    "filename": filename,
                    "version": str(version),
                    "size": len(report_json)
                }
            except Exception as e:
                logger.warning(f"Could not save as artifact: {e}")

        # Fallback: store in state
        tool_context.state[StateKeys.LAST_FIX_REPORT] = fix_report

        return {
            "status": "success",
            "message": "Fix report saved to state",
            "size": len(report_json)
        }

    except Exception as e:
        logger.error(f"Tool: Failed to save fix report: {e}", exc_info=True)
        return {
            "status": "error",
            "message": str(e)
        }
Step 7: Test Complete Fix Pipeline
Time to see the entire loop in action.
👉 Start the system:
adk web code_review_assistant
After running the adk web command, you should see output in your terminal indicating that the ADK Web Server has started, similar to this:
+-----------------------------------------------------------------------------+
| ADK Web Server started                                                      |
|                                                                             |
| For local testing, access at http://localhost:8000.                         |
+-----------------------------------------------------------------------------+

INFO:     Application startup complete.
INFO:     Uvicorn running on http://0.0.0.0:8000 (Press CTRL+C to quit)
👉 Test Prompt:
Please analyze the following:
def dfs_search_v1(graph, start, target):
    """Find if target is reachable from start."""
    visited = set()
    stack = start

    while stack:
        current = stack.pop()

        if current == target:
            return True

        if current not in visited:
            visited.add(current)

            for neighbor in graph[current]:
                if neighbor not in visited:
                    stack.append(neighbor)

    return False
First, submit the buggy code to trigger the review pipeline . After it identifies the flaws, you will ask the agent to "Please fix the code" which triggers the powerful, iterative fix pipeline .
1. The Initial Review (Finding the Flaws)
This is the first half of the process. The four-agent review pipeline analyzes the code, checks its style, and runs a generated test suite. It correctly identifies a critical AttributeError and other issues, delivering a verdict: the code is BROKEN , with a test pass rate of only 84.21% .
2. The Automated Fix (The Loop in Action)
This is the most impressive part. When you ask the agent to fix the code, it doesn't just make one change. It kicks off an iterative Fix and Validate Loop that works just like a diligent developer: it tries a fix, tests it thoroughly, and if it's not perfect, it tries again.
Iteration #1: The First Attempt (Partial Success)
- The Fix: The
CodeFixeragent reads the initial report and makes the most obvious corrections. It changesstack = starttostack = [start]and usesgraph.get()to preventKeyErrorexceptions. - The Validation: The
TestRunnerimmediately re-runs the full test suite against this new code. - The Result: The pass rate improves significantly to 88.89% ! The critical bugs are gone. However, the tests are so comprehensive that they reveal two new, subtle bugs (regressions) related to handling
Noneas a graph or non-list neighbor values. The system marks the fix as PARTIAL .
Iteration #2: The Final Polish (100% Success)
- The Fix: Because the loop's exit condition (100% pass rate) was not met, it runs again. The
CodeFixernow has more information—the two new regression failures. It generates a final, more robust version of the code that explicitly handles those edge cases. - The Validation: The
TestRunnerexecutes the test suite one last time against the final version of the code. - The Result: A perfect 100% pass rate . All original bugs and all regressions are resolved. The system marks the fix as SUCCESSFUL and the loop exits.
3. The Final Report: A Perfect Score
With a fully validated fix, the FixSynthesizer agent takes over to present the final report, transforming the technical data into a clear, educational summary.
মেট্রিক | আগে | After | Improvement |
Test Pass Rate | 84.21% | ১০০% | ▲ 15.79% |
Style Score | 88 / 100 | 98 / 100 | ▲ 10 pts |
Bugs Fixed | 0 of 3 | ৩ এর মধ্যে ৩ | ✅ |
✅ The Final, Validated Code
Here is the complete, corrected code that now passes all 19 tests, demonstrating the successful fix:
def dfs_search_v1(graph, start, target):
    """Find if target is reachable from start."""
    # Handles 'None' graph input
    if graph is None:
        return False

    visited = set()
    # Fixes the critical AttributeError
    stack = [start]

    while stack:
        current = stack.pop()

        if current == target:
            return True

        if current not in visited:
            visited.add(current)

            # Safely gets neighbors to prevent KeyError
            neighbors = graph.get(current)

            if neighbors is None:
                continue

            # Validates that neighbors are iterable
            if not isinstance(neighbors, (list, set, tuple)):
                raise TypeError(
                    f"Graph value for node '{current}' is of type "
                    f"{type(neighbors).__name__}. Expected a list, set, or tuple."
                )

            for neighbor in neighbors:
                if neighbor not in visited:
                    stack.append(neighbor)

    return False
👉💻 Once you're done testing, return to your Cloud Shell Editor terminal and press Ctrl+C to stop the ADK Dev UI.
What You've Built
You now have a complete automated fix pipeline that:
✅ Generates fixes - Based on review analysis
✅ Validates iteratively - Tests after each fix attempt
✅ Retries automatically - Up to 3 attempts for success
✅ Exits intelligently - Via escalate when successful
✅ Tracks improvements - Compares before/after metrics
✅ Provides artifacts - Downloadable fix reports
Key Concepts Mastered
LoopAgent vs Sequential:
- Sequential: One pass through agents
- LoopAgent: Repeats until exit condition or max iterations
- Exit via
tool_context.actions.escalate = True
State Evolution Across Iterations:
-
CODE_FIXESupdated each iteration - Test results show improvement over time
- Validator sees cumulative changes
Multi-Pipeline Architecture:
- Review pipeline: Read-only analysis (Module 5)
- Fix loop: Iterative correction (Module 6 inner loop)
- Fix pipeline: Loop + synthesizer (Module 6 outer)
- Root agent: Orchestrates based on user intent
Tools Controlling Flow:
-
exit_fix_loop()sets escalate - Any tool can signal loop completion
- Decouples exit logic from agent instructions
Max Iterations Safety:
- Prevents infinite loops
- Ensures system always responds
- Presents best attempt even if not perfect
What's Next
In the final module, you'll learn how to deploy your agent to production :
- Setting up persistent storage with VertexAiSessionService
- Deploying to Agent Engine on Google Cloud
- Monitoring and debugging production agents
- Best practices for scaling and reliability
You've built a complete multi-agent system with sequential and loop architectures. The patterns you've learned - state management, dynamic instructions, tool orchestration, and iterative refinement - are production-ready techniques used in real agentic systems.
7. Deploying to Production
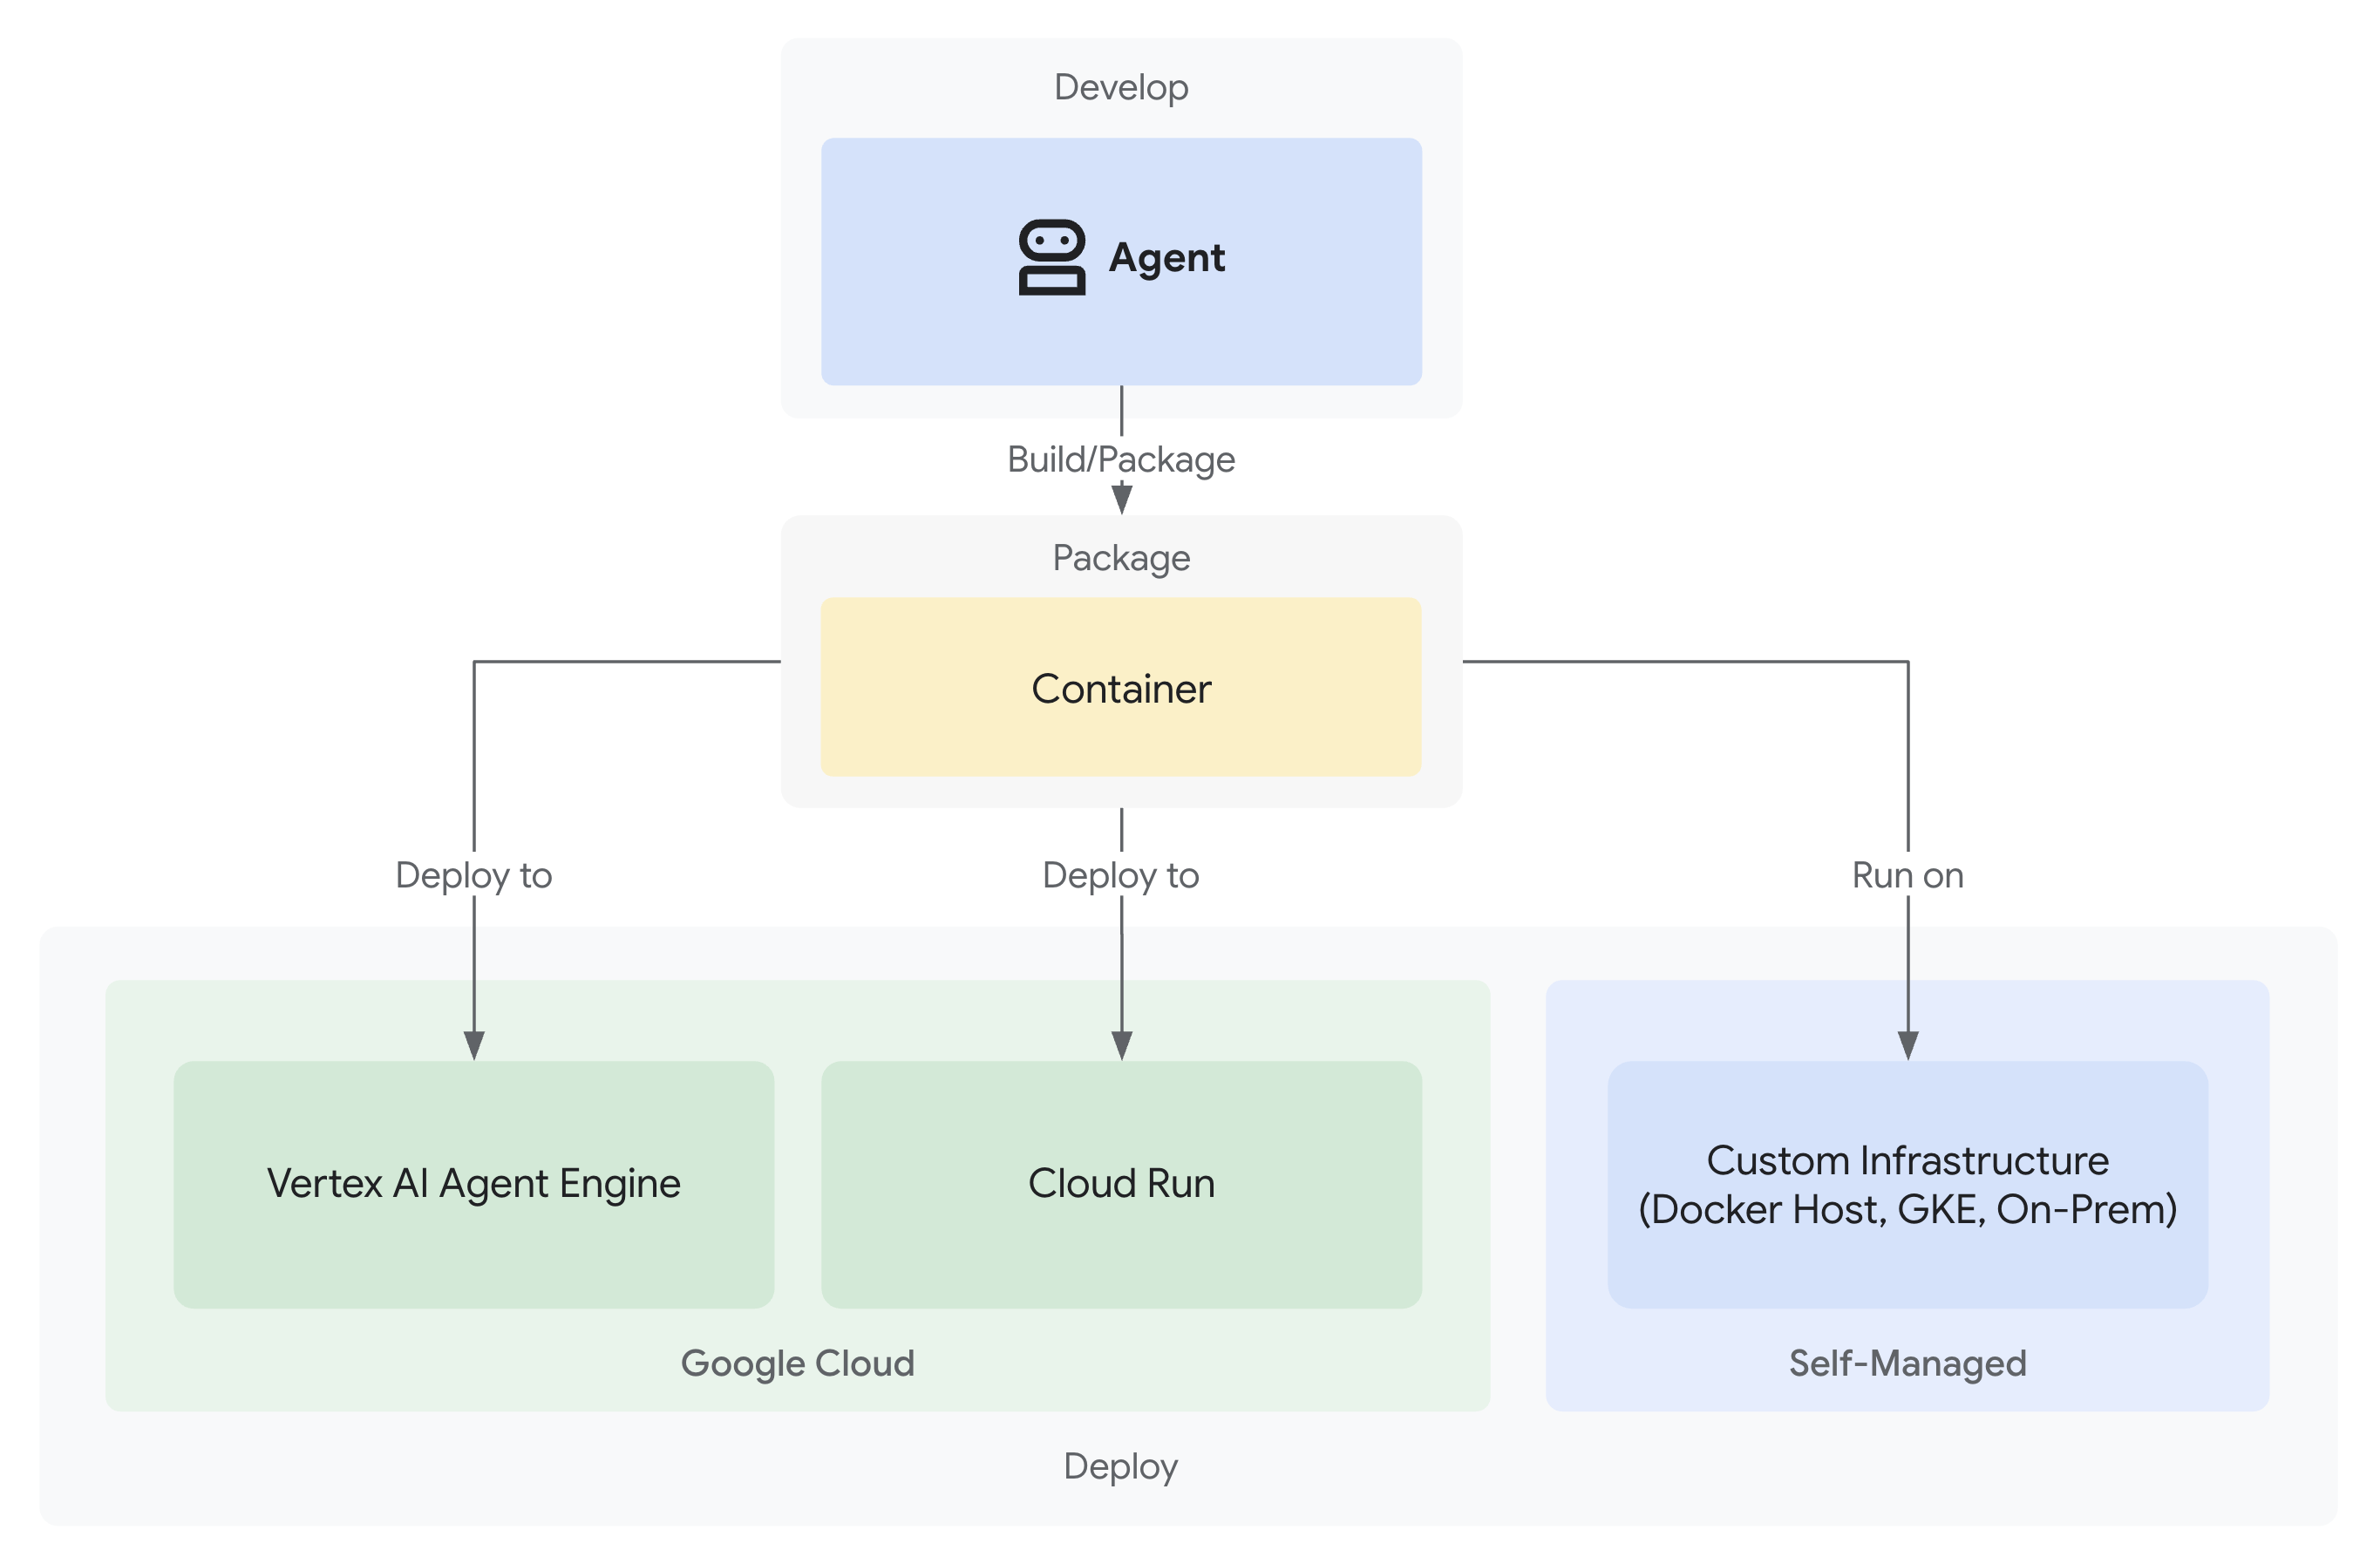
ভূমিকা
Your code review assistant is now complete with review and fix pipelines working locally. The missing piece: it only runs on your machine. In this module, you'll deploy your agent to Google Cloud, making it accessible to your team with persistent sessions and production-grade infrastructure.
What you'll learn:
- Three deployment paths: Local, Cloud Run, and Agent Engine
- Automated infrastructure provisioning
- Session persistence strategies
- Testing deployed agents
Understanding Deployment Options
The ADK supports multiple deployment targets, each with different tradeoffs:
Deployment Paths
Factor | Local ( | Cloud Run ( | Agent Engine ( |
জটিলতা | Minimal | মাঝারি | নিম্ন |
Session Persistence | In-memory only (lost on restart) | Cloud SQL (PostgreSQL) | Vertex AI managed (automatic) |
অবকাঠামো | None (dev machine only) | Container + Database | Fully managed |
Cold Start | প্রযোজ্য নয় | 100-2000ms | 100-500ms |
Scaling | Single instance | Automatic (to zero) | স্বয়ংক্রিয় |
Cost Model | Free (local compute) | Request-based + free tier | Compute-based |
UI Support | Yes (via | Yes (via | No (API only) |
সেরা | Development/testing | Variable traffic, cost control | Production agents |
Additional deployment option: Google Kubernetes Engine (GKE) is available for advanced users requiring Kubernetes-level control, custom networking, or multi-service orchestration. GKE deployment is not covered in this codelab but is documented in the ADK deployment guide .
What Gets Deployed
When deploying to Cloud Run or Agent Engine, the following is packaged and deployed:
- Your agent code (
agent.py, all sub-agents, tools) - Dependencies (
requirements.txt) - ADK API server (automatically included)
- Web UI (Cloud Run only, when
--with_uispecified)
Important differences:
- Cloud Run : Uses
adk deploy cloud_runCLI (builds container automatically) orgcloud run deploy(requires custom Dockerfile) - Agent Engine : Uses
adk deploy agent_engineCLI (no container building needed, directly packages Python code)
Step 1: Configure Your Environment
Configure Your .env File
Your .env file (created in Module 3) needs updates for cloud deployment. Open .env and verify/update these settings:
Required for all cloud deployments:
# Your actual GCP Project ID (REQUIRED)
GOOGLE_CLOUD_PROJECT=your-project-id

# GCP region for deployments (REQUIRED)
GOOGLE_CLOUD_LOCATION=us-central1

# Use Vertex AI (REQUIRED)
GOOGLE_GENAI_USE_VERTEXAI=true

# Model configuration (already set)
WORKER_MODEL=gemini-2.5-flash
CRITIC_MODEL=gemini-2.5-pro
Set bucket names (REQUIRED before running deploy.sh):
The deployment script creates buckets based on these names. Set them now:
# Staging bucket for Agent Engine code uploads (REQUIRED for agent-engine)
STAGING_BUCKET=gs://your-project-id-staging

# Artifact storage for reports and fixed code (REQUIRED for both cloud-run and agent-engine)
ARTIFACT_BUCKET=gs://your-project-id-artifacts
Replace your-project-id with your actual project ID in both bucket names. The script will create these buckets if they don't exist.
Optional variables (created automatically if blank):
# Agent Engine ID (populated after first deployment)
AGENT_ENGINE_ID=

# Cloud Run Database credentials (created automatically if blank)
CLOUD_SQL_INSTANCE_NAME=
DB_USER=
DB_PASSWORD=
DB_NAME=
Authentication Check
If you encounter authentication errors during deployment:
gcloud auth application-default login
gcloud config set project $GOOGLE_CLOUD_PROJECT
Step 2: Understanding the Deployment Script
The deploy.sh script provides a unified interface for all deployment modes:
./deploy.sh {local|cloud-run|agent-engine}
Script Capabilities
Infrastructure provisioning:
- API enablement (AI Platform, Storage, Cloud Build, Cloud Trace, Cloud SQL)
- IAM permission configuration (service accounts, roles)
- Resource creation (buckets, databases, instances)
- Deployment with proper flags
- Post-deployment verification
Key Script Sections
- Configuration (lines 1-35) : Project, region, service names, defaults
- Helper Functions (lines 37-200) : API enablement, bucket creation, IAM setup
- Main Logic (lines 202-400) : Mode-specific deployment orchestration
Step 3: Prepare Agent for Agent Engine
Before deploying to Agent Engine, an agent_engine_app.py file is needed that wraps your agent for the managed runtime. This has been created for you already.
View code_review_assistant/agent_engine_app.py
👉 Open file:
"""
Agent Engine application wrapper.
This file prepares the agent for deployment to Vertex AI Agent Engine.
"""

from vertexai import agent_engines
from .agent import root_agent

# Wrap the agent in an AdkApp object for Agent Engine deployment
app = agent_engines.AdkApp(
    agent=root_agent,
    enable_tracing=True,
)
Step 4: Deploy to Agent Engine
Agent Engine is the recommended production deployment for ADK agents because it provides:
- Fully managed infrastructure (no containers to build)
- Built-in session persistence via
VertexAiSessionService - Automatic scaling from zero
- Cloud Trace integration enabled by default
How Agent Engine Differs from Other Deployments
Under the hood,
deploy.sh agent-engine
uses:
adk deploy agent_engine \
  --project=$GOOGLE_CLOUD_PROJECT \
  --region=$GOOGLE_CLOUD_LOCATION \
  --staging_bucket=$STAGING_BUCKET \
  --display_name="Code Review Assistant" \
  --trace_to_cloud \
  code_review_assistant
This command:
- Packages your Python code directly (no Docker build)
- Uploads to the staging bucket you specified in
.env - Creates a managed Agent Engine instance
- Enables Cloud Trace for observability
- Uses
agent_engine_app.pyto configure the runtime
Unlike Cloud Run which containerizes your code, Agent Engine runs your Python code directly in a managed runtime environment, similar to serverless functions.
Run the Deployment
From your project root:
./deploy.sh agent-engine
Deployment Phases
Watch the script execute these phases:
Phase 1: API Enablement
  ✓ aiplatform.googleapis.com
  ✓ storage-api.googleapis.com
  ✓ cloudbuild.googleapis.com
  ✓ cloudtrace.googleapis.com

Phase 2: IAM Setup
  ✓ Getting project number
  ✓ Granting Storage Object Admin
  ✓ Granting AI Platform User
  ✓ Granting Cloud Trace Agent

Phase 3: Staging Bucket
  ✓ Creating gs://your-project-id-staging
  ✓ Setting permissions

Phase 4: Artifact Bucket
  ✓ Creating gs://your-project-id-artifacts
  ✓ Configuring access

Phase 5: Validation
  ✓ Checking agent.py exists
  ✓ Verifying root_agent defined
  ✓ Checking agent_engine_app.py exists
  ✓ Validating requirements.txt

Phase 6: Build & Deploy
  ✓ Packaging agent code
  ✓ Uploading to staging bucket
  ✓ Creating Agent Engine instance
  ✓ Configuring session persistence
  ✓ Setting up Cloud Trace integration
  ✓ Running health checks
This process takes 5-10 minutes as it packages the agent and deploys it to Vertex AI infrastructure.
Save Your Agent Engine ID
Upon successful deployment:
✅ Deployment successful!
   Agent Engine ID: 7917477678498709504
   Resource Name: projects/123456789/locations/us-central1/reasoningEngines/7917477678498709504
   Endpoint: https://us-central1-aiplatform.googleapis.com/v1/...

⚠️  IMPORTANT: Save this in your .env file:
   AGENT_ENGINE_ID=7917477678498709504
Update your
.env
file immediately:
echo "AGENT_ENGINE_ID=7917477678498709504" >> .env
This ID is required for:
- Testing the deployed agent
- Updating the deployment later
- Accessing logs and traces
What Was Deployed
Your Agent Engine deployment now includes:
✅ Complete review pipeline (4 agents)
✅ Complete fix pipeline (loop + synthesizer)
✅ All tools (AST analysis, style checking, artifact generation)
✅ Session persistence (automatic via VertexAiSessionService )
✅ State management (session/user/lifetime tiers)
✅ Observability (Cloud Trace enabled)
✅ Auto-scaling infrastructure
Step 5: Test Your Deployed Agent
Update Your .env File
After deployment, verify your .env includes:
AGENT_ENGINE_ID=7917477678498709504  # From deployment output
GOOGLE_CLOUD_PROJECT=your-project-id
GOOGLE_CLOUD_LOCATION=us-central1
Run the Test Script
The project includes tests/test_agent_engine.py specifically for testing Agent Engine deployments:
python tests/test_agent_engine.py
What the Test Does
- Authenticates with your Google Cloud project
- Creates a session with the deployed agent
- Sends a code review request (the DFS bug example)
- Streams the response back via Server-Sent Events (SSE)
- Verifies session persistence and state management
Expected Output
Authenticated with project: your-project-id
Targeting Agent Engine: projects/.../reasoningEngines/7917477678498709504

Creating new session...
Created session: 4857885913439920384

Sending query to agent and streaming response:
data: {"content": {"parts": [{"text": "I'll analyze your code..."}]}}
data: {"content": {"parts": [{"text": "**Code Structure Analysis**\n..."}]}}
data: {"content": {"parts": [{"text": "**Style Check Results**\n..."}]}}
data: {"content": {"parts": [{"text": "**Test Results**\n..."}]}}
data: {"content": {"parts": [{"text": "**Final Feedback**\n..."}]}}

Stream finished.
Verification Checklist
- ✅ Full review pipeline executes (all 4 agents)
- ✅ Streaming response shows progressive output
- ✅ Session state persists across requests
- ✅ No authentication or connection errors
- ✅ Tool calls execute successfully (AST analysis, style checking)
- ✅ Artifacts are saved (grading report accessible)
Alternative: Deploy to Cloud Run
While Agent Engine is recommended for streamlined production deployment, Cloud Run offers more control and supports the ADK web UI. This section provides an overview.
When to Use Cloud Run
Choose Cloud Run if you need:
- The ADK web UI for user interaction
- Full control over the container environment
- Custom database configurations
- Integration with existing Cloud Run services
How Cloud Run Deployment Works
Under the hood,
deploy.sh cloud-run
uses:
adk deploy cloud_run \
  --project=$GOOGLE_CLOUD_PROJECT \
  --region=$GOOGLE_CLOUD_LOCATION \
  --service_name="code-review-assistant" \
  --app_name="code_review_assistant" \
  --port=8080 \
  --with_ui \
  --artifact_service_uri="gs://$ARTIFACT_BUCKET" \
  --trace_to_cloud \
  code_review_assistant
This command:
- Builds a Docker container with your agent code
- Pushes to Google Artifact Registry
- Deploys as a Cloud Run service
- Includes the ADK web UI (
--with_ui) - Configures Cloud SQL connection (added by script after initial deployment)
The key difference from Agent Engine: Cloud Run containerizes your code and requires a database for session persistence, while Agent Engine handles both automatically.
Cloud Run Deployment Command
./deploy.sh cloud-run
What's Different
Infrastructure:
- Containerized deployment (Docker built automatically by ADK)
- Cloud SQL (PostgreSQL) for session persistence
- Database auto-created by script or uses existing instance
Session Management:
- Uses
DatabaseSessionServiceinstead ofVertexAiSessionService - Requires database credentials in
.env(or auto-generated) - State persists in PostgreSQL database
UI Support:
- Web UI available via
--with_uiflag (handled by script) - Access at:
https://code-review-assistant-xyz.a.run.app
What You've Accomplished
Your production deployment includes:
✅ Automated provisioning via deploy.sh script
✅ Managed infrastructure (Agent Engine handles scaling, persistence, monitoring)
✅ Persistent state across all memory tiers (session/user/lifetime)
✅ Secure credential management (automatic generation and IAM setup)
✅ Scalable architecture (zero to thousands of concurrent users)
✅ Built-in observability (Cloud Trace integration enabled)
✅ Production-grade error handling and recovery
Key Concepts Mastered
Deployment Preparation:
-
agent_engine_app.py: Wraps agent withAdkAppfor Agent Engine -
AdkAppautomatically configuresVertexAiSessionServicefor persistence - Tracing enabled via
enable_tracing=True
Deployment Commands:
-
adk deploy agent_engine: Packages Python code, no containers -
adk deploy cloud_run: Builds Docker container automatically -
gcloud run deploy: Alternative with custom Dockerfile
Deployment Options:
- Agent Engine: Fully managed, fastest to production
- Cloud Run: More control, supports web UI
- GKE: Advanced Kubernetes control (see GKE deployment guide )
Managed Services:
- Agent Engine handles session persistence automatically
- Cloud Run requires database setup (or auto-created)
- Both support artifact storage via GCS
Session Management:
- Agent Engine:
VertexAiSessionService(automatic) - Cloud Run:
DatabaseSessionService(Cloud SQL) - Local:
InMemorySessionService(ephemeral)
Your Agent Is Live
Your code review assistant is now:
- Accessible via HTTPS API endpoints
- Persistent with state surviving restarts
- Scalable to handle team growth automatically
- Observable with complete request traces
- Maintainable through scripted deployments
What's Next? In Module 8, you'll learn to use Cloud Trace to understand your agent's performance, identify bottlenecks in the review and fix pipelines, and optimize execution times.
8. Production Observability
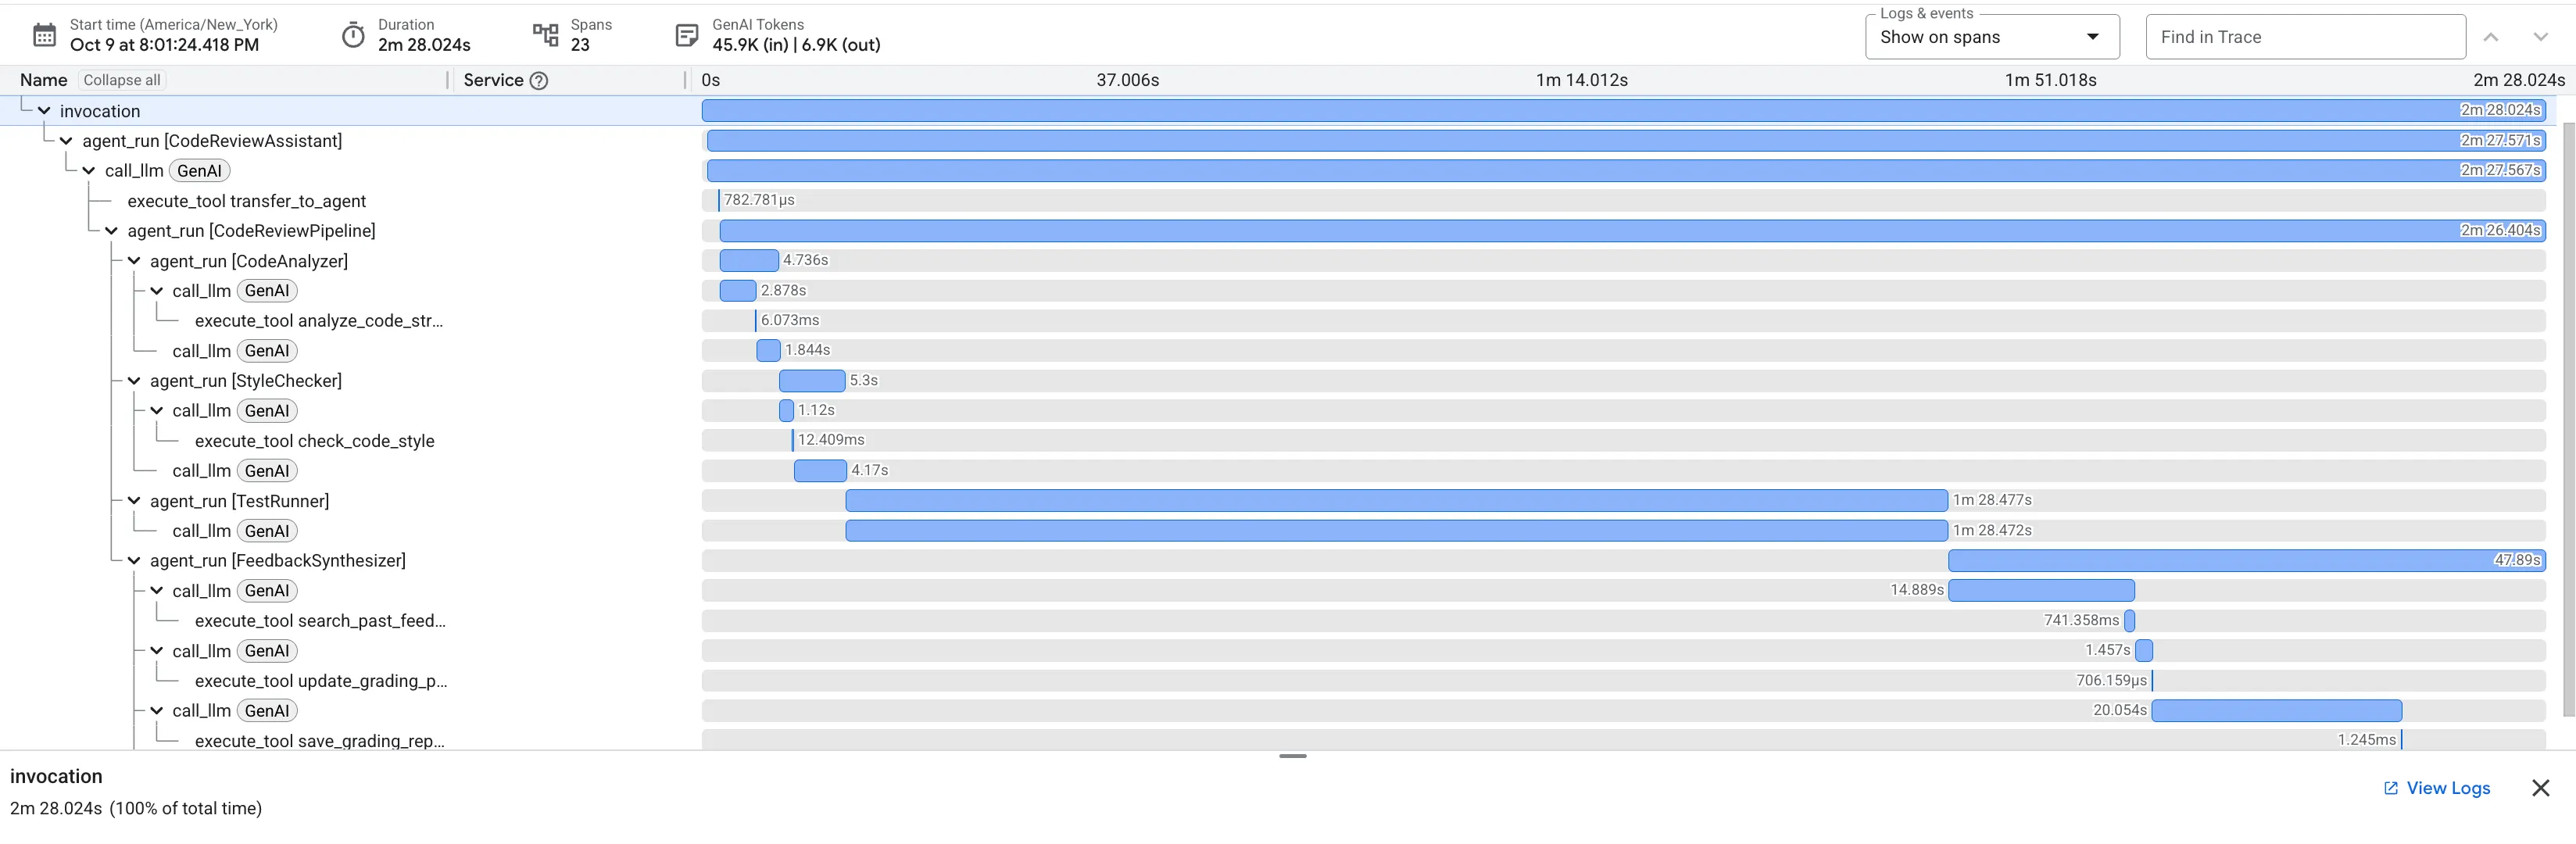
ভূমিকা
Your code review assistant is now deployed and running in production on Agent Engine. But how do you know it's working well? Can you answer these critical questions:
- Is the agent responding quickly enough?
- Which operations are slowest?
- Are the fix loops completing efficiently?
- Where are performance bottlenecks?
Without observability, you're operating blind. The --trace-to-cloud flag you used during deployment automatically enabled Cloud Trace, giving you complete visibility into every request your agent processes. This transforms debugging from guesswork into forensic analysis.
In this module, you'll learn to read traces, understand your agent's performance characteristics, and identify areas for optimization based on hard evidence.
Understanding Traces and Spans
What is a Trace?
A trace is the complete timeline of your agent handling a single request. It captures everything from when a user sends a query until the final response is delivered. Each trace shows:
- Total duration of the request
- All operations that executed
- How operations relate to each other (parent-child relationships)
- When each operation started and ended
What is a Span?
A span represents a single unit of work within a trace. Common span types in your code review assistant:
-
agent_run: Execution of an agent (root agent or sub-agent) -
call_llm: Request to a language model -
execute_tool: Tool function execution -
state_read/state_write: State management operations -
code_executor: Running code with tests
Spans have:
- Name : What operation this represents
- Duration : How long it took
- Attributes : Metadata like model name, token counts, inputs/outputs
- Status : Success or failure
- Parent/child relationships : Which operations triggered which
Automatic Instrumentation
When you deployed with --trace-to-cloud , ADK automatically instruments:
- Every agent invocation and sub-agent call
- All LLM requests with token counts
- Tool executions with inputs/outputs
- State operations (read/write)
- Loop iterations in your fix pipeline
- Error conditions and retries
No code changes required - tracing is built into ADK's runtime.
Step 1: Access Cloud Trace Explorer
Open Cloud Trace in your Google Cloud Console:
- Navigate to Cloud Trace Explorer
- Select your project from the dropdown (should be pre-selected)
- You should see traces from your test in Module 7
If you don't see traces yet:
The test you ran in Module 7 should have generated traces. If the list is empty, generate some trace data:
python tests/test_agent_engine.py
Wait 1-2 minutes for traces to appear in the console.
What You're Looking At
The Trace Explorer shows:
- List of traces : Each row represents one complete request
- Timeline : When requests occurred
- Duration : How long each request took
- Request details : Timestamp, latency, span count
This is your production traffic log - every interaction with your agent creates a trace.
Step 2: Examine a Review Pipeline Trace
Click on any trace in the list to open the waterfall view.
You'll see a Gantt chart showing the complete execution timeline. The root invocation span represents the entire request. Nested under it are spans for each sub-agent, tool, and LLM call.
Reading the Waterfall: Identifying Bottlenecks
Each bar represents a span. Its horizontal position shows when it started, and its length shows how long it took. This immediately reveals where your agent is spending its time.
Key insights from the trace above:
- Total latency : The entire request took 2 minutes and 28 seconds .
- Sub-agent breakdown :
-
Code Analyzer: 4.7 seconds -
Style Checker: 5.3 seconds -
Test Runner: 1 minute and 28 seconds -
Feedback Synthesizer: 47.9 seconds
-
- Critical Path Analysis : The
Test Runneragent is the clear performance bottleneck, accounting for approximately 59% of the total request time .
This visibility is powerful. Rather than guessing where time is spent, you have concrete evidence that if you need to optimize for latency, the Test Runner is the obvious target.
Inspecting Token Usage for Cost Optimization
Cloud Trace doesn't just show time; it also reveals costs by capturing token usage for every LLM call.
Click on a
call_llm
span within the trace. In the details pane, you will find attributes for llm.usage.prompt_tokens and llm.usage.completion_tokens .
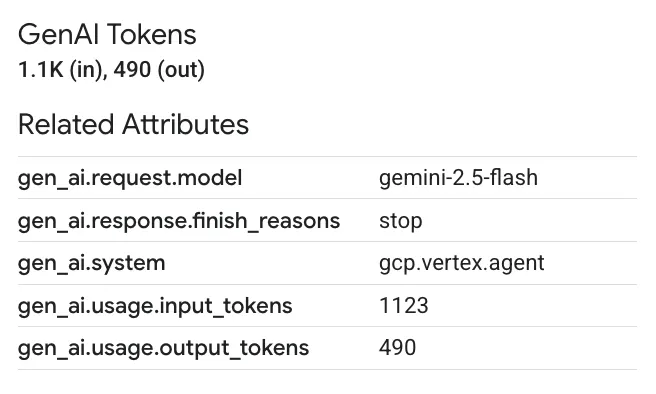
This allows you to:
- Track costs at a granular level : See exactly how many tokens each agent and tool is consuming.
- Identify optimization opportunities : If an agent is using a surprisingly high number of tokens, it may be an opportunity to refine its prompt or switch to a smaller, more cost-effective model for that specific task.
Step 3: Analyze a Fix Pipeline Trace
The fix pipeline is more complex because it includes a LoopAgent . Cloud Trace makes it easy to understand this iterative behavior.
Find a trace that includes "FixAttemptLoop" in the span names.
If you don't have one, run the test script and respond affirmatively when asked if you want to fix the code.
Examining Loop Structure
The trace view clearly visualizes the loop's execution. If the fix loop ran two times before succeeding, you'll see two loop_iteration spans nested under the FixAttemptLoop span, each containing a full cycle of the CodeFixer , FixTestRunner , and FixValidator agents.
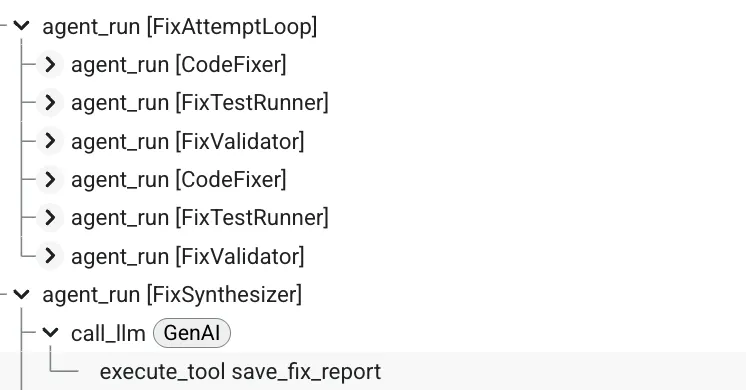
Key Observations from the Loop Trace:
- Iterative Refinement is Visible : You can see the system attempt a fix in
loop_iteration: 1, validate it, and then—because it wasn't perfect—try again inloop_iteration: 2. - Convergence is Measurable : You can compare the duration and results of each iteration to understand how the system converged to a correct solution.
- Debugging is Simplified : If a loop runs for the maximum number of iterations and still fails, you can inspect the state and agent behavior within each iteration's span to diagnose why the fixes weren't converging.
This level of detail is invaluable for understanding and debugging the behavior of complex, stateful loops in production.
Step 4: What You've Discovered
Performance Patterns
From examining traces, you now have data-driven insights:
Review pipeline:
- Primary Bottleneck : The
Test Runneragent, specifically its code execution and LLM-based test generation, is the most time-consuming part of the review. - Fast Operations : Deterministic tools (
analyze_code_structure) and state management operations are extremely fast and not a performance concern.
Fix pipeline:
- Convergence Rate : You can see that most fixes complete in 1-2 iterations, confirming the loop architecture is effective.
- Progressive Cost : Later iterations may take longer as the LLM context grows with information from previous failed attempts.
Cost Drivers:
- Token Consumption : You can pinpoint which agents (like the synthesizers) require the most tokens and decide if using a more powerful but expensive model is justified for that task.
Where to Look for Issues
When reviewing traces in production, watch for:
- Unusually long traces : A sign of a performance regression or an unexpected loop behavior.
- Failed spans (marked in red): Pinpoints the exact operation that failed.
- Excessive loop iterations (>2): May indicate a problem with the fix generation logic.
- High token counts : Highlights opportunities for prompt optimization or model selection changes.
What You've Learned
Through Cloud Trace, you now understand how to:
✅ Visualize request flow : See the complete execution path through your sequential and loop-based pipelines.
✅ Identify performance bottlenecks : Use the waterfall chart to find the slowest operations with hard data.
✅ Analyze loop behavior : Observe how iterative agents converge on a solution over multiple attempts.
✅ Track token costs : Inspect LLM spans to monitor and optimize token consumption at a granular level.
Key Concepts Mastered
- Traces and Spans: The fundamental units of observability, representing requests and the operations within them.
- Waterfall Analysis: Reading Gantt charts to understand execution time and dependencies.
- Critical Path Identification: Finding the sequence of operations that determines the overall latency.
- Granular Observability: Having visibility into not just time but also metadata like token counts for every operation, automatically instrumented by the ADK.
What's Next
Continue exploring Cloud Trace:
- Monitor traces regularly to catch issues early
- Compare traces to identify performance regressions
- Use trace data to inform optimization decisions
- Filter by duration to find slow requests
Advanced observability (optional):
- Export traces to BigQuery for complex analysis ( docs )
- Create custom dashboards in Cloud Monitoring
- Set up alerts for performance degradation
- Correlate traces with application logs
9. Conclusion: From Prototype to Production
What You've Built
You started with just seven lines of code and built a production-grade AI agent system:
# Where we started (7 lines)
agent = Agent(
    model="gemini-2.5-flash",
    instruction="Review Python code for issues"
)

# Where we ended (production system)
- Two distinct multi-agent pipelines (review and fix) built from 8 specialized agents.
- An iterative fix loop architecture for automated validation and retries.
- Real AST-based code analysis tools for deterministic, accurate feedback.
- Robust state management using the "constants pattern" for type-safe communication.
- Fully automated deployment to a managed, scalable cloud infrastructure.
- Complete, built-in observability with Cloud Trace for production monitoring.
Key Architectural Patterns Mastered
Pattern | Implementation | Production Impact |
Tool Integration | AST analysis, style checking | Real validation, not just LLM opinions |
Sequential Pipelines | Review → Fix workflows | Predictable, debuggable execution |
Loop Architecture | Iterative fixing with exit conditions | Self-improving until success |
State Management | Constants pattern, three-tier memory | Type-safe, maintainable state handling |
উৎপাদন স্থাপন | Agent Engine via deploy.sh | Managed, scalable infrastructure |
Observability | Cloud Trace integration | Full visibility into production behavior |
Production Insights from Traces
Your Cloud Trace data revealed critical insights:
✅ Bottleneck identified : TestRunner's LLM calls dominate latency
✅ Tool performance : AST analysis executes in 100ms (excellent)
✅ Success rate : Fix loops converge within 2-3 iterations
✅ Token usage : ~600 tokens per review, ~1800 for fixes
These insights drive continuous improvement.
Clean Up Resources (Optional)
If you're done experimenting and want to avoid charges:
Delete Agent Engine deployment:
import vertexai

client = vertexai.Client(  # For service interactions via client.agent_engines
    project="PROJECT_ID",
    location="LOCATION",
)

RESOURCE_NAME = "projects/{PROJECT_ID}/locations/{LOCATION}/reasoningEngines/{RESOURCE_ID}"

client.agent_engines.delete(
    name=RESOURCE_NAME,
    force=True, # Optional, if the agent has resources (e.g. sessions, memory)
)
Delete Cloud Run service (if created):
gcloud run services delete code-review-assistant \
    --region=$GOOGLE_CLOUD_LOCATION \
    --quiet
Delete Cloud SQL instance (if created):
gcloud sql instances delete your-project-db \
    --quiet
Clean up storage buckets:
gsutil -m rm -r gs://your-project-staging
gsutil -m rm -r gs://your-project-artifacts
Next Steps
With your foundation complete, consider these enhancements:
- Add more languages : Extend tools to support JavaScript, Go, Java
- Integrate with GitHub : Automatic PR reviews
- Implement caching : Reduce latency for common patterns
- Add specialized agents : Security scanning, performance analysis
- Enable A/B testing : Compare different models and prompts
- Export metrics : Send traces to specialized observability platforms
মূল বিষয়বস্তু
- Start simple, iterate fast : Seven lines to production in manageable steps
- Tools over prompts : Real AST analysis beats "please check for bugs"
- State management matters : Constants pattern prevents typo bugs
- Loops need exit conditions : Always set max iterations and escalation
- Deploy with automation : deploy.sh handles all the complexity
- Observability is non-negotiable : You can't improve what you can't measure
Resources for Continued Learning
- ADK Documentation
- Advanced ADK Patterns
- Agent Engine Guide
- Cloud Run Documentation
- Cloud Trace Documentation
Your Journey Continues
You've built more than a code review assistant—you've mastered the patterns for building any production AI agent:
✅ Complex workflows with multiple specialized agents
✅ Real tool integration for genuine capabilities
✅ Production deployment with proper observability
✅ State management for maintainable systems
These patterns scale from simple assistants to complex autonomous systems. The foundation you've built here will serve you well as you tackle increasingly sophisticated agent architectures.
Welcome to production AI agent development. Your code review assistant is just the beginning.