
1. The Late Night Code Review
अभी रात के 2 बजे हैं
आपने कई घंटों तक डीबग किया है. फ़ंक्शन सही दिख रहा है, लेकिन कोई गड़बड़ी है. आपको पता है कि कोड काम करना चाहिए, लेकिन वह काम नहीं करता. साथ ही, आपको यह भी नहीं पता चलता कि ऐसा क्यों हो रहा है, क्योंकि आपने उसे बहुत देर तक देखा है.
def dfs_search_v1(graph, start, target):
    """Find if target is reachable from start."""
    visited = set()
    stack = start  # Looks innocent enough...

    while stack:
        current = stack.pop()

        if current == target:
            return True

        if current not in visited:
            visited.add(current)

            for neighbor in graph[current]:
                if neighbor not in visited:
                    stack.append(neighbor)

    return False
एआई डेवलपर की यात्रा
अगर आप इसे पढ़ रहे हैं, तो इसका मतलब है कि आपने कोडिंग में एआई के इस्तेमाल का अनुभव किया है. Gemini Code Assist, Claude Code, और Cursor जैसे टूल ने, कोड लिखने के तरीके को बदल दिया है. ये बॉयलरप्लेट जनरेट करने, सुझाव देने, और डेवलपमेंट की प्रोसेस को तेज़ करने के लिए बेहतरीन हैं.
हालांकि, आप यहां इसलिए हैं, क्योंकि आपको इस बारे में ज़्यादा जानकारी चाहिए. आपको इन एआई सिस्टम को सिर्फ़ इस्तेमाल नहीं करना है, बल्कि इन्हें बनाना है. आपको ऐसा कॉन्टेंट बनाना है जो:
- इसके व्यवहार का अनुमान लगाया जा सकता है और इसे ट्रैक किया जा सकता है
- इसे प्रोडक्शन में आसानी से डिप्लॉय किया जा सकता है
- आपको भरोसेमंद और एक जैसे नतीजे मिलते हैं
- इससे आपको यह पता चलता है कि यह फ़ैसले कैसे लेता है
उपयोगकर्ता से क्रिएटर बनने का सफ़र
आज, आपको एआई टूल इस्तेमाल करने से लेकर उन्हें बनाने तक की जानकारी मिलेगी. आपको एक मल्टी-एजेंट सिस्टम बनाना होगा, जो ये काम करता हो:
- विश्लेषण करता है कि कोड का स्ट्रक्चर कैसा है
- Executes actual tests to verify behavior
- सत्यापित करता है कि स्टाइल, असली लिंटर के साथ काम करती है या नहीं
- नतीजों को कार्रवाई में मदद करने वाले सुझावों में बदलता है
- Google Cloud पर डिप्लॉय करता है और पूरी जांचने की क्षमता देता है
2. आपके पहले एजेंट को डिप्लॉय करना
डेवलपर का सवाल
"मुझे एलएलएम के बारे में पता है और मैंने एपीआई का इस्तेमाल किया है. हालांकि, मुझे यह नहीं पता कि Python स्क्रिप्ट से, प्रोडक्शन एआई एजेंट तक कैसे पहुंचा जाए, ताकि उसे बढ़ाया जा सके?"
आइए, इस सवाल का जवाब देने के लिए, अपने एनवायरमेंट को सही तरीके से सेट अप करें. इसके बाद, प्रोडक्शन पैटर्न में जाने से पहले, बुनियादी बातों को समझने के लिए एक सामान्य एजेंट बनाएं.
सबसे पहले ज़रूरी सेटअप करें
कोई भी एजेंट बनाने से पहले, आइए पक्का करें कि आपका Google Cloud एनवायरमेंट तैयार हो.
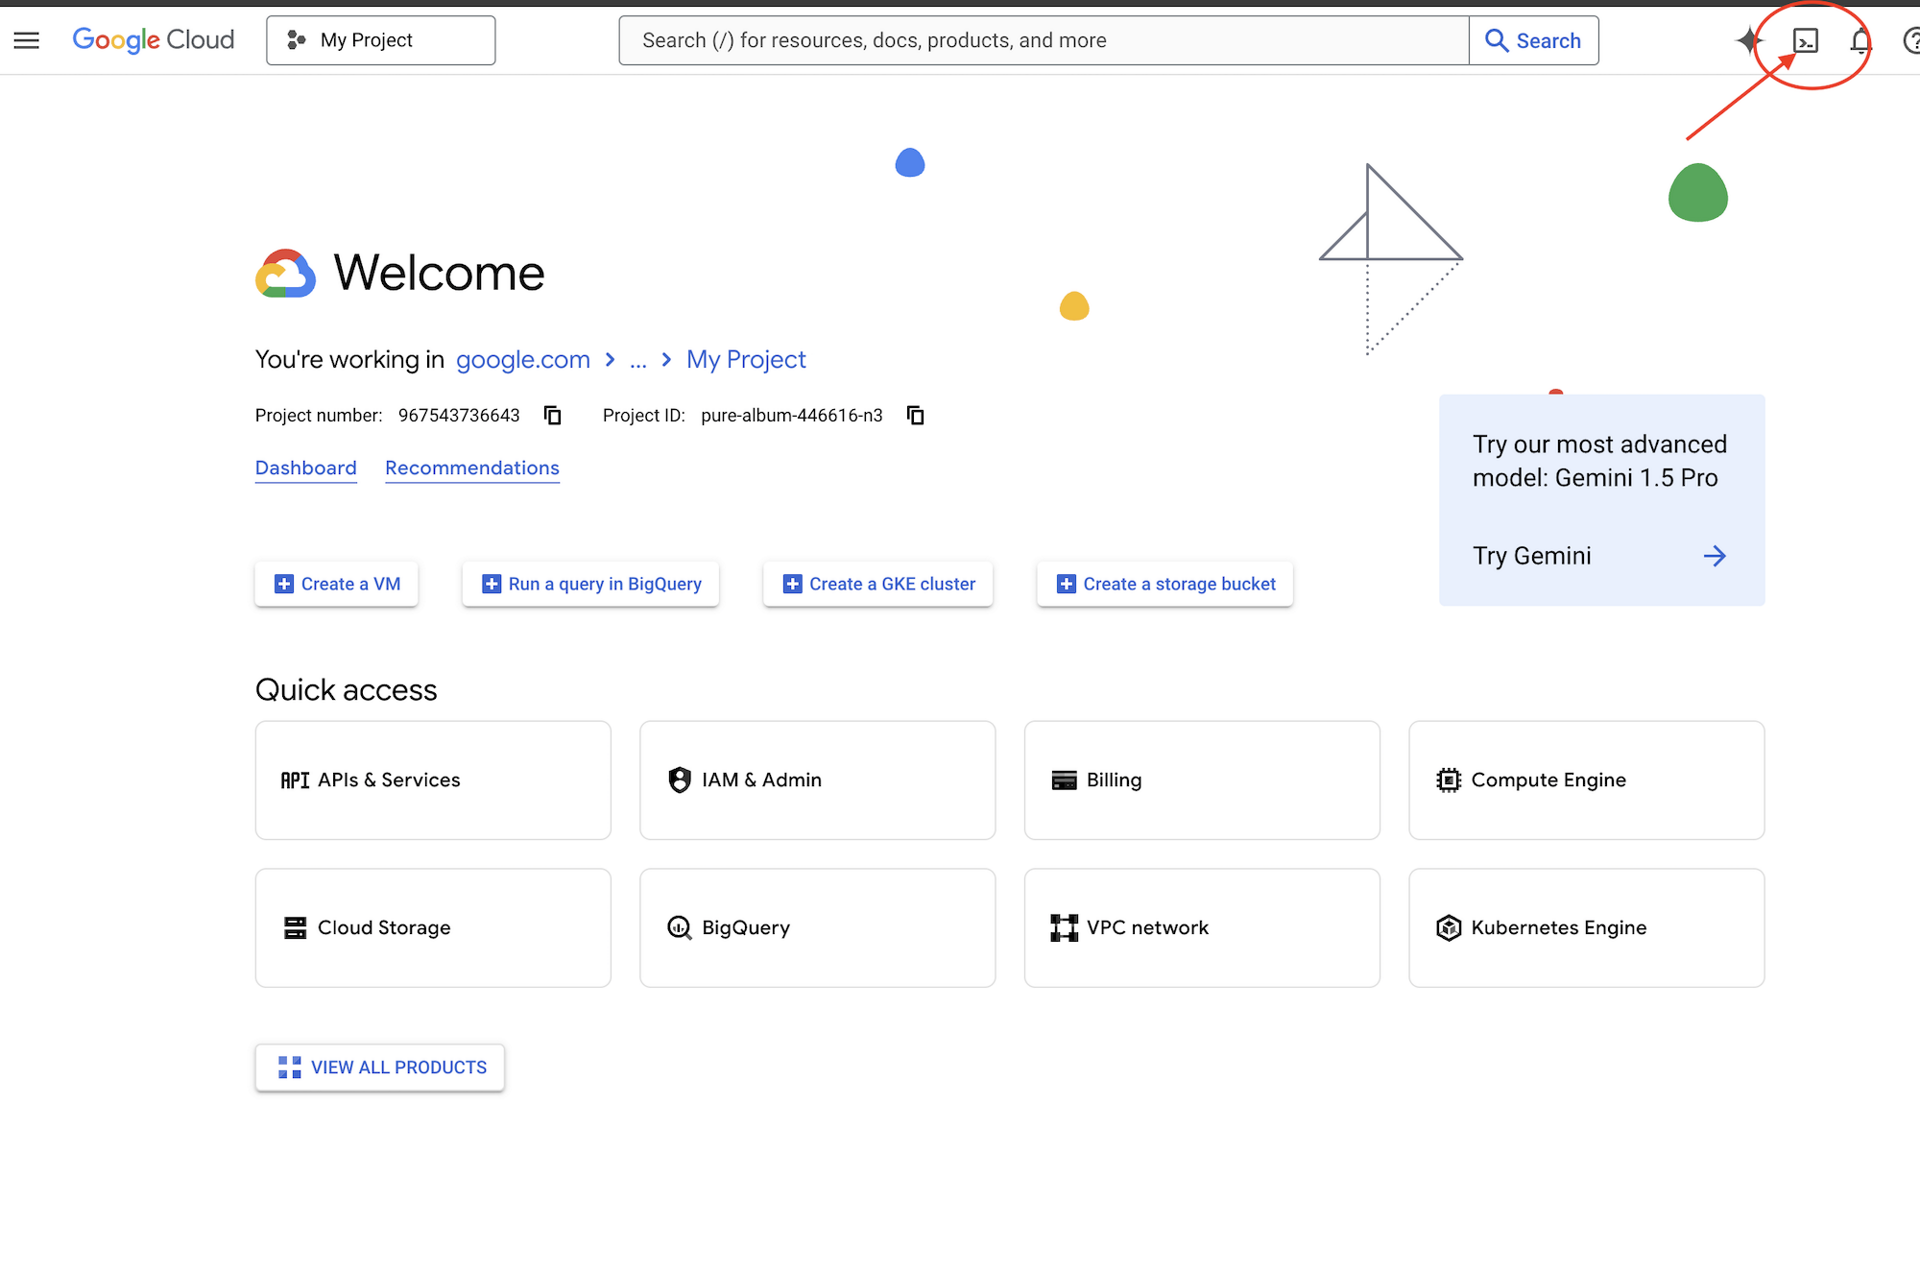
Google Cloud Console में सबसे ऊपर मौजूद, Cloud Shell चालू करें पर क्लिक करें. यह Cloud Shell पैनल में सबसे ऊपर मौजूद, टर्मिनल के आकार का आइकॉन है,
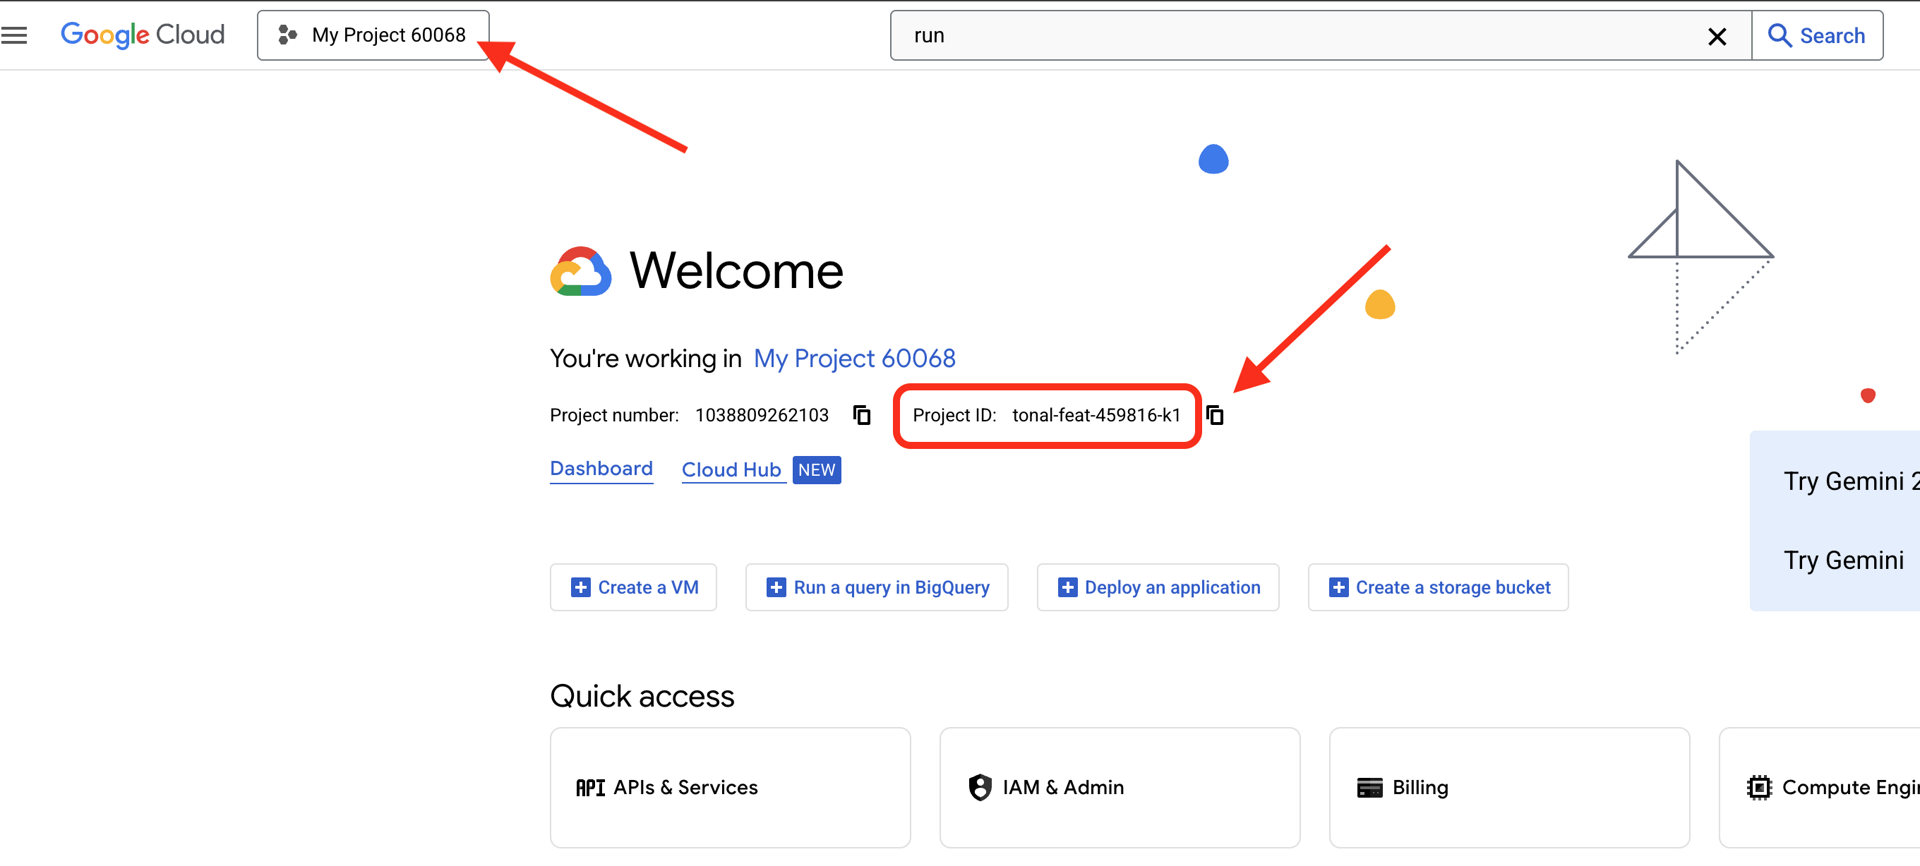
अपना Google Cloud प्रोजेक्ट आईडी ढूंढें:
- Google Cloud Console खोलें: https://console.cloud.google.com
- पेज पर सबसे ऊपर मौजूद प्रोजेक्ट ड्रॉपडाउन से, वह प्रोजेक्ट चुनें जिसका इस्तेमाल आपको इस वर्कशॉप के लिए करना है.
- आपका प्रोजेक्ट आईडी, डैशबोर्ड पर मौजूद प्रोजेक्ट की जानकारी देने वाले कार्ड में दिखता है
पहला चरण: अपना प्रोजेक्ट आईडी सेट करना
Cloud Shell में, gcloud कमांड-लाइन टूल पहले से ही कॉन्फ़िगर होता है. चालू प्रोजेक्ट सेट करने के लिए, यह कमांड चलाएं. यह $GOOGLE_CLOUD_PROJECT एनवायरमेंट वैरिएबल का इस्तेमाल करता है. यह आपके Cloud Shell सेशन में अपने-आप सेट हो जाता है.
gcloud config set project $GOOGLE_CLOUD_PROJECT
दूसरा चरण: सेटअप की पुष्टि करना
इसके बाद, यह पुष्टि करने के लिए कि आपका प्रोजेक्ट सही तरीके से सेट है और आपने पुष्टि कर ली है, यहां दिए गए कमांड चलाएं.
# Confirm project is set
echo "Current project: $(gcloud config get-value project)"

# Check authentication status
gcloud auth list
आपको अपना प्रोजेक्ट आईडी प्रिंट किया हुआ दिखेगा. साथ ही, आपका उपयोगकर्ता खाता (ACTIVE) के साथ दिखेगा.
अगर आपका खाता चालू के तौर पर नहीं दिखता है या आपको पुष्टि करने से जुड़ी कोई गड़बड़ी मिलती है, तो लॉग इन करने के लिए यह कमांड चलाएं:
gcloud auth application-default login
तीसरा चरण: ज़रूरी एपीआई चालू करना
बेसिक एजेंट के लिए, हमें कम से कम इन एपीआई की ज़रूरत होती है:
gcloud services enable \
    aiplatform.googleapis.com \
    compute.googleapis.com
इसमें कुछ समय लग सकता है . आपको ये चीज़ें दिखेंगी:
Operation "operations/..." finished successfully.
चौथा चरण: ADK इंस्टॉल करना
# Install the ADK CLI
pip install google-adk --upgrade

# Verify installation
adk --version
आपको 1.15.0 या इससे ज़्यादा का वर्शन नंबर दिखेगा.
अब अपना बेसिक एजेंट बनाएं
एनवायरमेंट तैयार होने के बाद, चलिए उस सामान्य एजेंट को बनाते हैं.
पांचवां चरण: ADK Create का इस्तेमाल करना
adk create my_first_agent
इंटरैक्टिव निर्देशों का पालन करें:
Choose a model for the root agent:
1. gemini-2.5-flash
2. Other models (fill later)
Choose model (1, 2): 1

1. Google AI
2. Vertex AI
Choose a backend (1, 2): 2

Enter Google Cloud project ID [auto-detected-from-gcloud]:
Enter Google Cloud region [us-central1]:
छठा चरण: जनरेट किए गए कॉन्टेंट की जांच करना
cd my_first_agent
ls -la
आपको तीन फ़ाइलें दिखेंगी:
.env          # Configuration (auto-populated with your project)
__init__.py   # Package marker
agent.py      # Your agent definition
सातवां चरण: कॉन्फ़िगरेशन की तुरंत जांच करना
# Verify the .env was created correctly
cat .env

# Should show something like:
# GOOGLE_CLOUD_PROJECT=your-project-id
# GOOGLE_CLOUD_LOCATION=us-central1
# GOOGLE_GENAI_USE_VERTEXAI=1
अगर प्रोजेक्ट आईडी मौजूद नहीं है या गलत है, तो .env फ़ाइल में बदलाव करें:
nano .env # or use your preferred editor
आठवां चरण: एजेंट कोड देखें
cat agent.py
from google.adk.agents.llm_agent import Agent

root_agent = Agent(
    model='gemini-2.5-flash',
    name='root_agent',
    description='A helpful assistant for user questions.',
    instruction='Answer user questions to the best of your knowledge',
)
सिंपल, साफ़-सुथरा, और कम से कम जानकारी वाला. यह एजेंटों का "नमस्ते दुनिया" है.
अपने बुनियादी एजेंट को आज़माना
नौवां चरण: एजेंट को चलाना
cd ..
adk run my_first_agent
आपको इस तरह की विंडो दिखेगी:
Log setup complete: /tmp/agents_log/agent.20250930_162430.log
To access latest log: tail -F /tmp/agents_log/agent.latest.log
[user]:
दसवां चरण: कुछ क्वेरी डालकर देखें
adk run जिस टर्मिनल पर चल रहा है वहां आपको एक प्रॉम्प्ट दिखेगा. अपनी क्वेरी टाइप करें:
[user]: Hey, what can you do?
[root_agent]: I can help answer questions, generate text, explain concepts, assist with problem-solving, and provide information on a wide range of topics. What would you like to know or discuss?

[user]: What's the current weather in Mountain View?
[root_agent]: I'm sorry, but I cannot provide real-time weather information as I don't have access to current data or weather services. To get the current weather in Mountain View, I recommend checking a weather website or app like weather.com or using a search engine.
ध्यान दें कि इसमें यह सीमा है कि यह मौजूदा डेटा को ऐक्सेस नहीं कर सकता. आइए, अब कुछ और जानते हैं:
[user]: Review this Python code: def add(a, b): return a + b
[root_agent]: This is a simple Python function that adds two numbers. Here's my review:

**Strengths:**
- Clean and concise implementation
- Follows Python conventions for simple operations
- Clear function name that describes its purpose

**Suggestions for improvement:**
- Add a docstring to document the function
- Consider adding type hints for better code clarity
- You might want to handle edge cases

Here's an enhanced version:
def add(a: float, b: float) -> float:
    """Add two numbers and return their sum."""
    return a + b
एजेंट कोड के बारे में चर्चा कर सकता है, लेकिन क्या वह:
- क्या स्ट्रक्चर को समझने के लिए, एएसटी को पार्स करना है?
- क्या इसकी जांच की गई है?
- क्या आपको स्टाइल से जुड़ी शर्तों के पालन की जांच करनी है?
- क्या आपको अपनी पिछली समीक्षाएं याद हैं?
नहीं. यहां हमें आर्किटेक्चर की ज़रूरत है.
🏃🚪 एग्ज़िट के साथ
Ctrl+C
जब आपको एक्सप्लोर करना बंद करना हो.
3. आपका प्रोडक्शन Workspace तैयार किया जा रहा है
समाधान: प्रोडक्शन के लिए तैयार आर्किटेक्चर
उस सामान्य एजेंट ने शुरुआती पॉइंट के बारे में बताया था. हालांकि, प्रोडक्शन सिस्टम के लिए मज़बूत स्ट्रक्चर की ज़रूरत होती है. अब हम एक ऐसा पूरा प्रोजेक्ट सेट अप करेंगे जिसमें प्रोडक्शन के सिद्धांतों को शामिल किया गया हो.
बुनियादी सेटअप करना
आपने बुनियादी एजेंट के लिए, Google Cloud प्रोजेक्ट को पहले ही कॉन्फ़िगर कर लिया हो. अब हम पूरे प्रोडक्शन वर्कस्पेस को तैयार करेंगे. इसमें वे सभी टूल, पैटर्न, और बुनियादी ढांचा शामिल होगा जिनकी ज़रूरत किसी असली सिस्टम के लिए होती है.
पहला चरण: स्ट्रक्चर्ड प्रोजेक्ट पाना
सबसे पहले, Ctrl+C की मदद से, चल रही किसी भी adk run से बाहर निकलें और साफ़ करें:
# Clean up the basic agent
cd ~  # Make sure you're not inside my_first_agent
rm -rf my_first_agent

# Get the production scaffold
git clone https://github.com/ayoisio/adk-code-review-assistant.git
cd adk-code-review-assistant
git checkout codelab
दूसरा चरण: वर्चुअल एनवायरमेंट बनाना और उसे चालू करना
# Create the virtual environment
python -m venv .venv

# Activate it
# On macOS/Linux:
source .venv/bin/activate
# On Windows:
# .venv\Scripts\activate
पुष्टि: अब आपके प्रॉम्प्ट की शुरुआत में (.venv) दिखना चाहिए.
तीसरा चरण: डिपेंडेंसी इंस्टॉल करना
pip install -r code_review_assistant/requirements.txt

# Install the package in editable mode (enables imports)
pip install -e .
इससे ये इंस्टॉल होते हैं:
google-adk- ADK फ़्रेमवर्कpycodestyle- PEP 8 की जांच करने के लिएvertexai- क्लाउड डिप्लॉयमेंट के लिए- प्रॉडक्ट से जुड़ी अन्य डिपेंडेंसी
-e फ़्लैग की मदद से, code_review_assistant मॉड्यूल को कहीं से भी इंपोर्ट किया जा सकता है.
चौथा चरण: अपना एनवायरमेंट कॉन्फ़िगर करना
# Copy the example environment file
cp .env.example .env

# Edit .env and replace the placeholders:
# - GOOGLE_CLOUD_PROJECT=your-project-id → your actual project ID
# - Keep other defaults as-is
पुष्टि करना: अपने कॉन्फ़िगरेशन की जांच करें:
cat .env
इसमें यह जानकारी दिखनी चाहिए:
GOOGLE_CLOUD_PROJECT=your-actual-project-id
GOOGLE_CLOUD_LOCATION=us-central1
GOOGLE_GENAI_USE_VERTEXAI=TRUE
पांचवां चरण: पुष्टि करना
आपने पहले ही gcloud auth चला लिया है. इसलिए, आइए सिर्फ़ इसकी पुष्टि करें:
# Check current authentication
gcloud auth list

# Should show your account with (ACTIVE)
# If not, run:
gcloud auth application-default login
छठा चरण: प्रोडक्शन के लिए उपलब्ध अन्य एपीआई चालू करना
हमने बुनियादी एपीआई पहले ही चालू कर दिए हैं. अब प्रोडक्शन वाले जोड़ें:
gcloud services enable \
    sqladmin.googleapis.com \
    run.googleapis.com \
    cloudbuild.googleapis.com \
    artifactregistry.googleapis.com \
    storage.googleapis.com \
    cloudtrace.googleapis.com
इससे ये काम किए जा सकते हैं:
- SQL एडमिन: Cloud Run का इस्तेमाल करने पर Cloud SQL के लिए
- Cloud Run: सर्वरलेस डिप्लॉयमेंट के लिए
- Cloud Build: ऑटोमेटेड डिप्लॉयमेंट के लिए
- Artifact Registry: कंटेनर इमेज के लिए
- Cloud Storage: आर्टफ़ैक्ट और स्टेजिंग के लिए
- Cloud Trace: परफ़ॉर्मेंस की निगरानी के लिए
सातवां चरण: Artifact Registry रिपॉज़िटरी बनाना
हमारा डिप्लॉयमेंट, कंटेनर इमेज बनाएगा. इसके लिए, एक होम डायरेक्ट्री की ज़रूरत होगी:
gcloud artifacts repositories create code-review-assistant-repo \
    --repository-format=docker \
    --location=us-central1 \
    --description="Docker repository for Code Review Assistant"
आपको यह दिखना चाहिए:
Created repository [code-review-assistant-repo].
अगर यह पहले से मौजूद है (शायद पिछली कोशिश से), तो कोई बात नहीं - आपको गड़बड़ी का एक मैसेज दिखेगा, जिसे अनदेखा किया जा सकता है.
आठवां चरण: IAM अनुमतियां देना
# Get your project number
PROJECT_NUMBER=$(gcloud projects describe $GOOGLE_CLOUD_PROJECT \
    --format="value(projectNumber)")

# Define the service account
SERVICE_ACCOUNT="${PROJECT_NUMBER}@cloudbuild.gserviceaccount.com"

# Grant necessary roles
gcloud projects add-iam-policy-binding $GOOGLE_CLOUD_PROJECT \
    --member="serviceAccount:${SERVICE_ACCOUNT}" \
    --role="roles/run.admin"

gcloud projects add-iam-policy-binding $GOOGLE_CLOUD_PROJECT \
    --member="serviceAccount:${SERVICE_ACCOUNT}" \
    --role="roles/iam.serviceAccountUser"

gcloud projects add-iam-policy-binding $GOOGLE_CLOUD_PROJECT \
    --member="serviceAccount:${SERVICE_ACCOUNT}" \
    --role="roles/cloudsql.admin"

gcloud projects add-iam-policy-binding $GOOGLE_CLOUD_PROJECT \
    --member="serviceAccount:${SERVICE_ACCOUNT}" \
    --role="roles/storage.admin"
हर कमांड का आउटपुट यह होगा:
Updated IAM policy for project [your-project-id].
आपने क्या-क्या हासिल किया
आपका प्रोडक्शन वर्कस्पेस अब पूरी तरह से तैयार है:
✅ Google Cloud प्रोजेक्ट कॉन्फ़िगर और पुष्टि किया गया हो
✅ बुनियादी एजेंट की जांच करके, उसकी सीमाओं के बारे में जानकारी हासिल की गई हो
✅ रणनीतिक प्लेसहोल्डर वाला प्रोजेक्ट कोड तैयार हो
✅ वर्चुअल एनवायरमेंट में डिपेंडेंसी अलग की गई हों
✅ सभी ज़रूरी एपीआई चालू हों
✅ कंटेनर रजिस्ट्री, डिप्लॉयमेंट के लिए तैयार हो
✅ IAM अनुमतियां सही तरीके से कॉन्फ़िगर की गई हों
✅ एनवायरमेंट वैरिएबल सही तरीके से सेट किए गए हों
अब आपके पास, एआई का ऐसा सिस्टम बनाने का विकल्प है जिसमें डिटरमिनिस्टिक टूल, स्टेट मैनेजमेंट, और सही आर्किटेक्चर का इस्तेमाल किया गया हो.
4. अपना पहला एजेंट बनाना
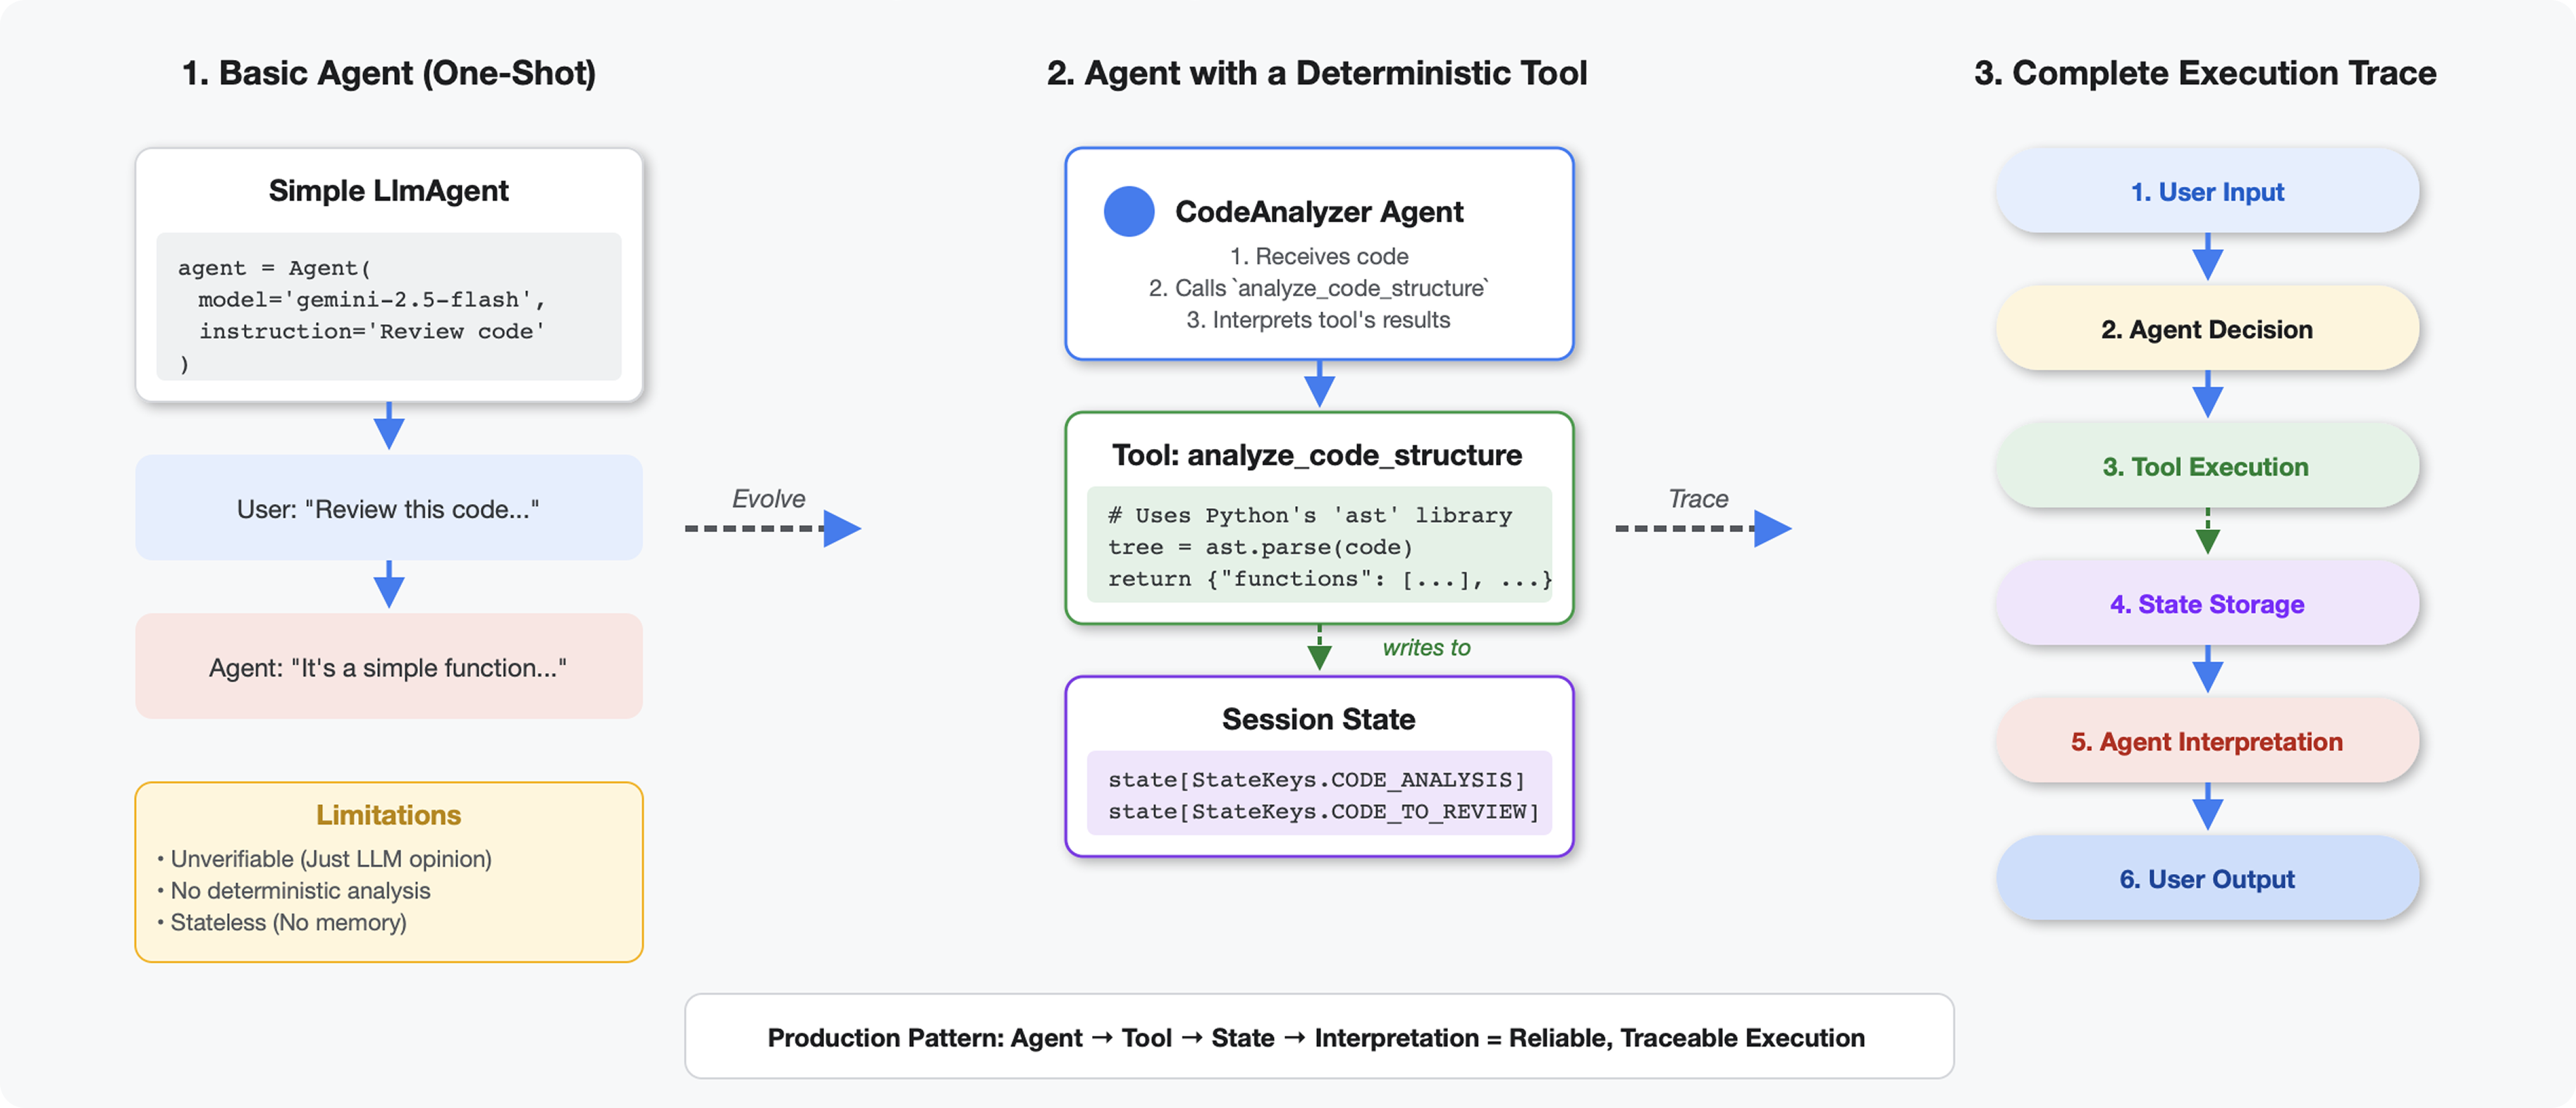
टूल, एलएलएम से कैसे अलग होते हैं
जब एलएलएम से पूछा जाता है कि "इस कोड में कितने फ़ंक्शन हैं?", तो वह पैटर्न मैचिंग और अनुमान लगाने की तकनीक का इस्तेमाल करता है. Python के ast.parse() को कॉल करने वाले टूल का इस्तेमाल करने पर, यह टूल सिंटैक्स ट्री को पार्स करता है. इसमें अनुमान लगाने की ज़रूरत नहीं होती और हर बार एक जैसा नतीजा मिलता है.
इस सेक्शन में एक ऐसा टूल बनाया गया है जो कोड के स्ट्रक्चर का विश्लेषण करता है. इसके बाद, इसे ऐसे एजेंट से कनेक्ट किया जाता है जिसे यह पता होता है कि इसे कब लागू करना है.
पहला चरण: स्कैफ़ोल्ड को समझना
आइए, उस स्ट्रक्चर की जांच करें जिसे आपको भरना है.
👉 खोलें
code_review_assistant/tools.py
आपको analyze_code_structure फ़ंक्शन दिखेगा. इसमें प्लेसहोल्डर के तौर पर टिप्पणियां होंगी. इनसे पता चलेगा कि आपको कोड कहां जोड़ना है. फ़ंक्शन का बुनियादी स्ट्रक्चर पहले से मौजूद है. आपको इसे एक-एक करके बेहतर बनाना होगा.
दूसरा चरण: स्टेट स्टोरेज जोड़ना
स्टेट स्टोरेज की सुविधा की मदद से, पाइपलाइन में मौजूद अन्य एजेंट, आपके टूल के नतीजों को ऐक्सेस कर सकते हैं. इसके लिए, उन्हें विश्लेषण को फिर से चलाने की ज़रूरत नहीं होती.
👉 ढूंढें:
# MODULE_4_STEP_2_ADD_STATE_STORAGE
👉 उस एक लाइन को इससे बदलें:
        # Store code and analysis for other agents to access
        tool_context.state[StateKeys.CODE_TO_REVIEW] = code
        tool_context.state[StateKeys.CODE_ANALYSIS] = analysis
        tool_context.state[StateKeys.CODE_LINE_COUNT] = len(code.splitlines())
तीसरा चरण: थ्रेड पूल के साथ एसिंक पार्सिंग जोड़ना
हमारे टूल को अन्य कार्रवाइयों को ब्लॉक किए बिना, एएसटी को पार्स करने की ज़रूरत है. आइए, थ्रेड पूल के साथ एसिंक एक्ज़ीक्यूशन जोड़ते हैं.
👉 ढूंढें:
# MODULE_4_STEP_3_ADD_ASYNC
👉 उस एक लाइन को इससे बदलें:
        # Parse in thread pool to avoid blocking the event loop
        loop = asyncio.get_event_loop()
        with ThreadPoolExecutor() as executor:
            tree = await loop.run_in_executor(executor, ast.parse, code)
चौथा चरण: पूरी जानकारी निकालना
अब हम क्लास, इंपोर्ट, और मेट्रिक की जानकारी निकालेंगे. यह जानकारी, कोड रिव्यू के लिए ज़रूरी है.
👉 ढूंढें:
# MODULE_4_STEP_4_EXTRACT_DETAILS
👉 उस एक लाइन को इससे बदलें:
# Extract comprehensive structural information
analysis = await loop.run_in_executor(
executor, _extract_code_structure, tree, code
)
👉 पुष्टि करें: फ़ंक्शन
analyze_code_structure
में
tools.py
में एक सेंट्रल बॉडी होती है, जो इस तरह दिखती है:
# Parse in thread pool to avoid blocking the event loop
loop = asyncio.get_event_loop()
with ThreadPoolExecutor() as executor:
    tree = await loop.run_in_executor(executor, ast.parse, code)
        # Extract comprehensive structural information
        analysis = await loop.run_in_executor(
            executor, _extract_code_structure, tree, code
        )
# Store code and analysis for other agents to access
tool_context.state[StateKeys.CODE_TO_REVIEW] = code
tool_context.state[StateKeys.CODE_ANALYSIS] = analysis
tool_context.state[StateKeys.CODE_LINE_COUNT] = len(code.splitlines())
👉 अब सबसे नीचे तक स्क्रोल करें
tools.py
और ढूंढें:
# MODULE_4_STEP_4_HELPER_FUNCTION
👉 उस एक लाइन को पूरे हेल्पर फ़ंक्शन से बदलें:
def _extract_code_structure(tree: ast.AST, code: str) -> Dict[str, Any]:
    """
    Helper function to extract structural information from AST.
    Runs in thread pool for CPU-bound work.
    """
    functions = []
    classes = []
    imports = []
    docstrings = []

    for node in ast.walk(tree):
        if isinstance(node, ast.FunctionDef):
            func_info = {
                'name': node.name,
                'args': [arg.arg for arg in node.args.args],
                'lineno': node.lineno,
                'has_docstring': ast.get_docstring(node) is not None,
                'is_async': isinstance(node, ast.AsyncFunctionDef),
                'decorators': [d.id for d in node.decorator_list
                               if isinstance(d, ast.Name)]
            }
            functions.append(func_info)

            if func_info['has_docstring']:
                docstrings.append(f"{node.name}: {ast.get_docstring(node)[:50]}...")

        elif isinstance(node, ast.ClassDef):
            methods = []
            for item in node.body:
                if isinstance(item, ast.FunctionDef):
                    methods.append(item.name)

            class_info = {
                'name': node.name,
                'lineno': node.lineno,
                'methods': methods,
                'has_docstring': ast.get_docstring(node) is not None,
                'base_classes': [base.id for base in node.bases
                                 if isinstance(base, ast.Name)]
            }
            classes.append(class_info)

        elif isinstance(node, ast.Import):
            for alias in node.names:
                imports.append({
                    'module': alias.name,
                    'alias': alias.asname,
                    'type': 'import'
                })
        elif isinstance(node, ast.ImportFrom):
            imports.append({
                'module': node.module or '',
                'names': [alias.name for alias in node.names],
                'type': 'from_import',
                'level': node.level
            })

    return {
        'functions': functions,
        'classes': classes,
        'imports': imports,
        'docstrings': docstrings,
        'metrics': {
            'line_count': len(code.splitlines()),
            'function_count': len(functions),
            'class_count': len(classes),
            'import_count': len(imports),
            'has_main': any(f['name'] == 'main' for f in functions),
            'has_if_main': '__main__' in code,
            'avg_function_length': _calculate_avg_function_length(tree)
        }
    }


def _calculate_avg_function_length(tree: ast.AST) -> float:
    """Calculate average function length in lines."""
    function_lengths = []

    for node in ast.walk(tree):
        if isinstance(node, ast.FunctionDef):
            if hasattr(node, 'end_lineno') and hasattr(node, 'lineno'):
                length = node.end_lineno - node.lineno + 1
                function_lengths.append(length)

    if function_lengths:
        return sum(function_lengths) / len(function_lengths)
    return 0.0
पाँचवाँ चरण: एजेंट से कनेक्ट करना
अब हम टूल को ऐसे एजेंट से कनेक्ट करते हैं जिसे पता है कि इसका इस्तेमाल कब करना है और इसके नतीजों को कैसे समझना है.
👉 खोलें
code_review_assistant/sub_agents/review_pipeline/code_analyzer.py
👉 ढूंढें:
# MODULE_4_STEP_5_CREATE_AGENT
👉 उस एक लाइन को पूरे प्रोडक्शन एजेंट से बदलें:
code_analyzer_agent = Agent(
    name="CodeAnalyzer",
    model=config.worker_model,
    description="Analyzes Python code structure and identifies components",
    instruction="""You are a code analysis specialist responsible for understanding code structure.

Your task:
1. Take the code submitted by the user (it will be provided in the user message)
2. Use the analyze_code_structure tool to parse and analyze it
3. Pass the EXACT code to your tool - do not modify, fix, or "improve" it
4. Identify all functions, classes, imports, and structural patterns
5. Note any syntax errors or structural issues
6. Store the analysis in state for other agents to use

CRITICAL:
- Pass the code EXACTLY as provided to the analyze_code_structure tool
- Do not fix syntax errors, even if obvious
- Do not add missing imports or fix indentation
- The goal is to analyze what IS there, not what SHOULD be there

When calling the tool, pass the code as a string to the 'code' parameter.
If the analysis fails due to syntax errors, clearly report the error location and type.

Provide a clear summary including:
- Number of functions and classes found
- Key structural observations
- Any syntax errors or issues detected
- Overall code organization assessment""",
    tools=[FunctionTool(func=analyze_code_structure)],
    output_key="structure_analysis_summary"
)
कोड की जांच करने वाले टूल को आज़माना
अब पुष्टि करें कि आपका विश्लेषण करने वाला टूल सही तरीके से काम कर रहा है.
👉 टेस्ट स्क्रिप्ट चलाएं:
python tests/test_code_analyzer.py
टेस्ट स्क्रिप्ट, python-dotenv का इस्तेमाल करके आपकी .env फ़ाइल से कॉन्फ़िगरेशन को अपने-आप लोड करती है. इसलिए, एनवायरमेंट वैरिएबल को मैन्युअल तरीके से सेट अप करने की ज़रूरत नहीं होती.
अनुमानित आउटपुट:
INFO:code_review_assistant.config:Code Review Assistant Configuration Loaded:
INFO:code_review_assistant.config:  - GCP Project: your-project-id
INFO:code_review_assistant.config:  - Artifact Bucket: gs://your-project-artifacts
INFO:code_review_assistant.config:  - Models: worker=gemini-2.5-flash, critic=gemini-2.5-pro
Testing code analyzer...
INFO:code_review_assistant.tools:Tool: Analysis complete - 2 functions, 1 classes

=== Analyzer Response ===
The analysis of the provided code shows the following:

* **Functions Found:** 2
    * `add(a, b)`: A global function at line 2.
    * `multiply(self, x, y)`: A method within the `Calculator` class.

* **Classes Found:** 1
    * `Calculator`: A class defined at line 5. Contains one method, `multiply`.

* **Imports:** 0

* **Structural Patterns:** The code defines one global function and one class
  with a single method. Both are simple, each with a single return statement.

* **Syntax Errors/Issues:** No syntax errors detected.

* **Overall Code Organization:** The code is well-organized for its small size,
  clearly defining a function and a class with a method.
अभी क्या हुआ:
- टेस्ट स्क्रिप्ट ने आपके
.envकॉन्फ़िगरेशन को अपने-आप लोड कर लिया - आपके
analyze_code_structure()टूल ने Python के AST का इस्तेमाल करके कोड को पार्स किया _extract_code_structure()हेल्पर ने फ़ंक्शन, क्लास, और मेट्रिक निकाली हैंStateKeysकॉन्स्टेंट का इस्तेमाल करके, नतीजों को सेशन की मौजूदा स्थिति में सेव किया गया था- कोड की जांच करने वाले एजेंट ने नतीजों की व्याख्या की और खास जानकारी दी
समस्या हल करने से जुड़ी जानकारी:
- "No module named ‘code_review_assistant'": प्रोजेक्ट रूट से
pip install -e .चलाएं - "Missing key inputs argument": पुष्टि करें कि आपके
.envमेंGOOGLE_CLOUD_PROJECT,GOOGLE_CLOUD_LOCATION, औरGOOGLE_GENAI_USE_VERTEXAI=trueमौजूद हैं
आपने क्या बनाया है
अब आपके पास प्रोडक्शन के लिए तैयार कोड का विश्लेषण करने वाला टूल है. यह टूल:
✅ Python AST को पार्स करता है - यह पैटर्न मैचिंग नहीं करता, बल्कि तय किए गए तरीके से काम करता है
✅ नतीजों को स्टेट में सेव करता है - अन्य एजेंट, विश्लेषण के नतीजों को ऐक्सेस कर सकते हैं
✅ एसिंक्रोनस तरीके से काम करता है - यह अन्य टूल को ब्लॉक नहीं करता
✅ पूरी जानकारी निकालता है - फ़ंक्शन, क्लास, इंपोर्ट, मेट्रिक
✅ गड़बड़ियों को आसानी से ठीक करता है - सिंटैक्स से जुड़ी गड़बड़ियों की जानकारी लाइन नंबर के साथ देता है
✅ किसी एजेंट से कनेक्ट होता है - एलएलएम को पता होता है कि इसका इस्तेमाल कब और कैसे करना है
मुख्य सिद्धांतों में महारत हासिल की गई
टूल बनाम एजेंट:
- टूल, तय किए गए तरीके से काम करते हैं (एएसटी पार्सिंग)
- एजेंट यह तय करते हैं कि टूल का इस्तेमाल कब करना है और नतीजों की व्याख्या कैसे करनी है
वैल्यू बनाम स्टेटस:
- जवाब: एलएलएम को तुरंत क्या दिखता है
- स्टेट: अन्य एजेंट के लिए क्या बना रहता है
स्टेट की कॉन्स्टेंट:
- मल्टी-एजेंट सिस्टम में टाइपिंग की गलतियों को रोकना
- एजेंट के बीच कानूनी समझौते के तौर पर काम करना
- एजेंट के डेटा शेयर करने पर ज़रूरी है
एसिंक + थ्रेड पूल:
async defटूल को प्रोसेस रोकने की अनुमति देता है- थ्रेड पूल, सीपीयू से जुड़े काम को बैकग्राउंड में करते हैं
- ये दोनों मिलकर, इवेंट लूप को रिस्पॉन्सिव बनाए रखते हैं
हेल्पर फ़ंक्शन:
- सिंक हेल्पर को एसिंक टूल से अलग करना
- इससे कोड की जांच करना और उसे फिर से इस्तेमाल करना आसान हो जाता है
Agent Instructions:
- ज़्यादा जानकारी वाले निर्देशों से, एलएलएम से होने वाली सामान्य गलतियों को रोका जा सकता है
- साफ़ तौर पर बताया गया है कि क्या नहीं करना है (कोड ठीक न करें)
- वर्कफ़्लो के चरणों को साफ़ तौर पर बताएं, ताकि उनमें एकरूपता बनी रहे
आगे क्या करना है
पांचवें मॉड्यूल में, आपको ये चीज़ें जोड़नी होंगी:
- स्टाइल चेक करने वाला टूल, जो कोड को स्टेट से पढ़ता है
- टेस्ट रनर, जो असल में टेस्ट को एक्ज़ीक्यूट करता है
- फ़ीडबैक सिंथेसाइज़र, जो सभी विश्लेषणों को एक साथ जोड़ता है
आपको यह दिखेगा कि स्टेट, सीक्वेंशियल पाइपलाइन से कैसे फ़्लो होती है. साथ ही, यह भी दिखेगा कि जब कई एजेंट एक ही डेटा को पढ़ते और लिखते हैं, तो कॉन्स्टेंट पैटर्न क्यों ज़रूरी होता है.
5. पाइपलाइन बनाना: एक साथ काम करने वाले कई एजेंट
परिचय
मॉड्यूल 4 में, आपने एक ऐसा एजेंट बनाया था जो कोड के स्ट्रक्चर का विश्लेषण करता है. हालांकि, कोड की पूरी तरह से समीक्षा करने के लिए, सिर्फ़ पार्सिंग से ज़्यादा चीज़ों की ज़रूरत होती है. जैसे, स्टाइल की जांच करना, टेस्ट को लागू करना, और बेहतर तरीके से फ़ीडबैक देना.
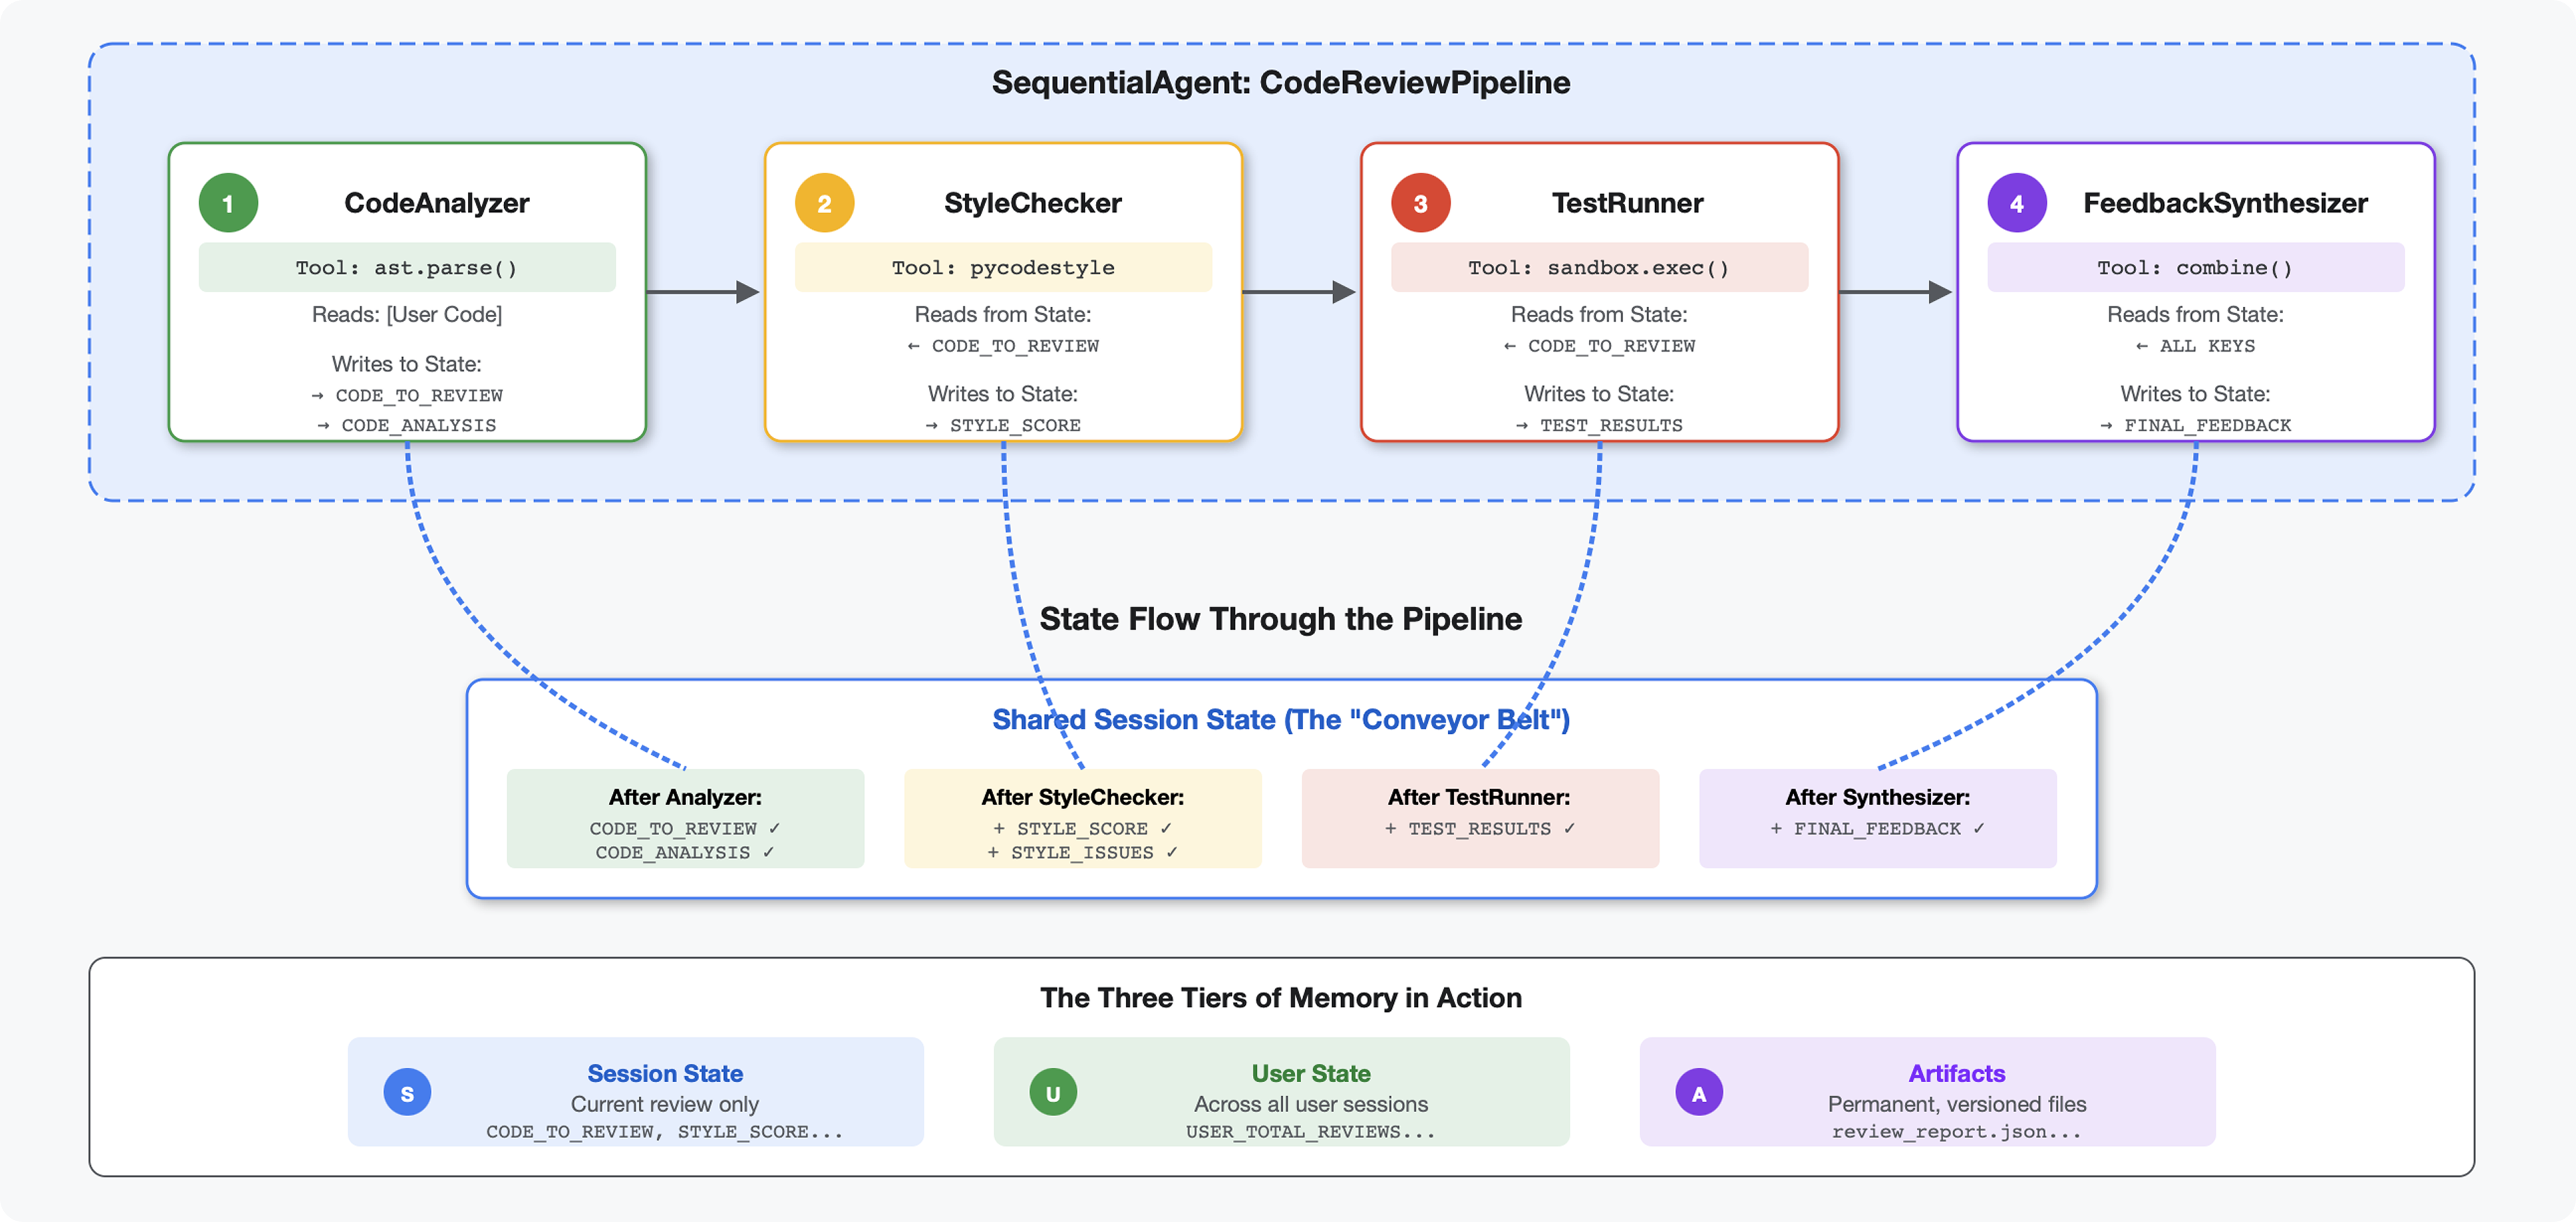
यह मॉड्यूल, चार एजेंट की एक पाइपलाइन बनाता है. ये एजेंट, एक के बाद एक काम करते हैं. हर एजेंट, खास विश्लेषण में योगदान देता है:
- कोड ऐनालाइज़र (मॉड्यूल 4 से) - स्ट्रक्चर पार्स करता है
- स्टाइल चेकर - स्टाइल से जुड़े उल्लंघन की पहचान करता है
- टेस्ट रनर - टेस्ट को लागू करता है और उनकी पुष्टि करता है
- फ़ीडबैक सिंथेसाइज़र - यह सभी सुझावों/रायों/शिकायतों को मिलाकर, कार्रवाई करने लायक फ़ीडबैक तैयार करता है
मुख्य कॉन्सेप्ट: स्टेट को कम्यूनिकेशन चैनल के तौर पर इस्तेमाल करना. हर एजेंट, पिछले एजेंट के लिखे गए जवाब को पढ़ता है. इसके बाद, वह अपने हिसाब से विश्लेषण करके जवाब में जानकारी जोड़ता है और उसे अगले एजेंट को भेज देता है. जब कई एजेंट डेटा शेयर करते हैं, तब मॉड्यूल 4 से कॉन्स्टेंट पैटर्न का इस्तेमाल करना ज़रूरी हो जाता है.
आपको क्या बनाना है, इसकी झलक: गड़बड़ कोड सबमिट करें → चार एजेंट के ज़रिए कोड की जांच होते हुए देखें → पिछली गड़बड़ियों के आधार पर, अपनी ज़रूरत के हिसाब से सुझावों वाली पूरी रिपोर्ट पाएं.
पहला चरण: स्टाइल चेक करने वाला टूल और एजेंट जोड़ना
स्टाइल चेक करने वाला टूल, pycodestyle का इस्तेमाल करके PEP 8 के उल्लंघन की पहचान करता है. यह एक डिटरमिनिस्टिक लिंटर है, न कि एलएलएम पर आधारित इंटरप्रिटेशन.
स्टाइल की जांच करने वाला टूल जोड़ना
👉 खोलें
code_review_assistant/tools.py
👉 ढूंढें:
# MODULE_5_STEP_1_STYLE_CHECKER_TOOL
👉 उस एक लाइन को इससे बदलें:
async def check_code_style(code: str, tool_context: ToolContext) -> Dict[str, Any]:
    """
    Checks code style compliance using pycodestyle (PEP 8).

    Args:
        code: Python source code to check (or will retrieve from state)
        tool_context: ADK tool context

    Returns:
        Dictionary containing style score and issues
    """
    logger.info("Tool: Checking code style...")

    try:
        # Retrieve code from state if not provided
        if not code:
            code = tool_context.state.get(StateKeys.CODE_TO_REVIEW, '')
            if not code:
                return {
                    "status": "error",
                    "message": "No code provided or found in state"
                }

        # Run style check in thread pool
        loop = asyncio.get_event_loop()
        with ThreadPoolExecutor() as executor:
            result = await loop.run_in_executor(
                executor, _perform_style_check, code
            )

        # Store results in state
        tool_context.state[StateKeys.STYLE_SCORE] = result['score']
        tool_context.state[StateKeys.STYLE_ISSUES] = result['issues']
        tool_context.state[StateKeys.STYLE_ISSUE_COUNT] = result['issue_count']

        logger.info(f"Tool: Style check complete - Score: {result['score']}/100, "
                    f"Issues: {result['issue_count']}")

        return result

    except Exception as e:
        error_msg = f"Style check failed: {str(e)}"
        logger.error(f"Tool: {error_msg}", exc_info=True)

        # Set default values on error
        tool_context.state[StateKeys.STYLE_SCORE] = 0
        tool_context.state[StateKeys.STYLE_ISSUES] = []

        return {
            "status": "error",
            "message": error_msg,
            "score": 0
        }
👉 अब फ़ाइल के आखिर तक स्क्रोल करें और यह ढूंढें:
# MODULE_5_STEP_1_STYLE_HELPERS
👉 उस एक लाइन को हेल्पर फ़ंक्शन से बदलें:
def _perform_style_check(code: str) -> Dict[str, Any]:
    """Helper to perform style check in thread pool."""
    import io
    import sys

    with tempfile.NamedTemporaryFile(mode='w', suffix='.py', delete=False) as tmp:
        tmp.write(code)
        tmp_path = tmp.name

    try:
        # Capture stdout to get pycodestyle output
        old_stdout = sys.stdout
        sys.stdout = captured_output = io.StringIO()

        style_guide = pycodestyle.StyleGuide(
            quiet=False,  # We want output
            max_line_length=100,
            ignore=['E501', 'W503']
        )

        result = style_guide.check_files([tmp_path])

        # Restore stdout
        sys.stdout = old_stdout

        # Parse captured output
        output = captured_output.getvalue()
        issues = []

        for line in output.strip().split('\n'):
            if line and ':' in line:
                parts = line.split(':', 4)
                if len(parts) >= 4:
                    try:
                        issues.append({
                            'line': int(parts[1]),
                            'column': int(parts[2]),
                            'code': parts[3].split()[0] if len(parts) > 3 else 'E000',
                            'message': parts[3].strip() if len(parts) > 3 else 'Unknown error'
                        })
                    except (ValueError, IndexError):
                        pass

        # Add naming convention checks
        try:
            tree = ast.parse(code)
            naming_issues = _check_naming_conventions(tree)
            issues.extend(naming_issues)
        except SyntaxError:
            pass  # Syntax errors will be caught elsewhere

        # Calculate weighted score
        score = _calculate_style_score(issues)

        return {
            "status": "success",
            "score": score,
            "issue_count": len(issues),
            "issues": issues[:10],  # First 10 issues
            "summary": f"Style score: {score}/100 with {len(issues)} violations"
        }

    finally:
        if os.path.exists(tmp_path):
            os.unlink(tmp_path)


def _check_naming_conventions(tree: ast.AST) -> List[Dict[str, Any]]:
    """Check PEP 8 naming conventions."""
    naming_issues = []

    for node in ast.walk(tree):
        if isinstance(node, ast.FunctionDef):
            # Skip private/protected methods and __main__
            if not node.name.startswith('_') and node.name != node.name.lower():
                naming_issues.append({
                    'line': node.lineno,
                    'column': node.col_offset,
                    'code': 'N802',
                    'message': f"N802 function name '{node.name}' should be lowercase"
                })
        elif isinstance(node, ast.ClassDef):
            # Check if class name follows CapWords convention
            if not node.name[0].isupper() or '_' in node.name:
                naming_issues.append({
                    'line': node.lineno,
                    'column': node.col_offset,
                    'code': 'N801',
                    'message': f"N801 class name '{node.name}' should use CapWords convention"
                })

    return naming_issues


def _calculate_style_score(issues: List[Dict[str, Any]]) -> int:
    """Calculate weighted style score based on violation severity."""
    if not issues:
        return 100

    # Define weights by error type
    weights = {
        'E1': 10,  # Indentation errors
        'E2': 3,  # Whitespace errors
        'E3': 5,  # Blank line errors
        'E4': 8,  # Import errors
        'E5': 5,  # Line length
        'E7': 7,  # Statement errors
        'E9': 10,  # Syntax errors
        'W2': 2,  # Whitespace warnings
        'W3': 2,  # Blank line warnings
        'W5': 3,  # Line break warnings
        'N8': 7,  # Naming conventions
    }

    total_deduction = 0
    for issue in issues:
        code_prefix = issue['code'][:2] if len(issue['code']) >= 2 else 'E2'
        weight = weights.get(code_prefix, 3)
        total_deduction += weight

    # Cap at 100 points deduction
    return max(0, 100 - min(total_deduction, 100))
स्टाइल जांचने वाले एजेंट को जोड़ना
👉 खोलें
code_review_assistant/sub_agents/review_pipeline/style_checker.py
👉 ढूंढें:
# MODULE_5_STEP_1_INSTRUCTION_PROVIDER
👉 उस एक लाइन को इससे बदलें:
async def style_checker_instruction_provider(context: ReadonlyContext) -> str:
    """Dynamic instruction provider that injects state variables."""
    template = """You are a code style expert focused on PEP 8 compliance.

Your task:
1. Use the check_code_style tool to validate PEP 8 compliance
2. The tool will retrieve the ORIGINAL code from state automatically
3. Report violations exactly as found
4. Present the results clearly and confidently

CRITICAL:
- The tool checks the code EXACTLY as provided by the user
- Do not suggest the code was modified or fixed
- Report actual violations found in the original code
- If there are style issues, they should be reported honestly

Call the check_code_style tool with an empty string for the code parameter,
as the tool will retrieve the code from state automatically.

When presenting results based on what the tool returns:
- State the exact score from the tool results
- If score >= 90: "Excellent style compliance!"
- If score 70-89: "Good style with minor improvements needed"
- If score 50-69: "Style needs attention"
- If score < 50: "Significant style improvements needed"

List the specific violations found (the tool will provide these):
- Show line numbers, error codes, and messages
- Focus on the top 10 most important issues

Previous analysis: {structure_analysis_summary}

Format your response as:
## Style Analysis Results
- Style Score: [exact score]/100
- Total Issues: [count]
- Assessment: [your assessment based on score]

## Top Style Issues
[List issues with line numbers and descriptions]

## Recommendations
[Specific fixes for the most critical issues]"""

    return await instructions_utils.inject_session_state(template, context)
👉 ढूंढें:
# MODULE_5_STEP_1_STYLE_CHECKER_AGENT
👉 उस एक लाइन को इससे बदलें:
style_checker_agent = Agent(
    name="StyleChecker",
    model=config.worker_model,
    description="Checks Python code style against PEP 8 guidelines",
    instruction=style_checker_instruction_provider,
    tools=[FunctionTool(func=check_code_style)],
    output_key="style_check_summary"
)
दूसरा चरण: टेस्ट रनर एजेंट जोड़ना
टेस्ट रनर, पूरी तरह से टेस्ट जनरेट करता है और उन्हें पहले से मौजूद कोड एक्ज़ीक्यूटर का इस्तेमाल करके लागू करता है.
👉 खोलें
code_review_assistant/sub_agents/review_pipeline/test_runner.py
👉 ढूंढें:
# MODULE_5_STEP_2_INSTRUCTION_PROVIDER
👉 उस एक लाइन को इससे बदलें:
async def test_runner_instruction_provider(context: ReadonlyContext) -> str:
    """Dynamic instruction provider that injects the code_to_review directly."""
    template = """You are a testing specialist who creates and runs tests for Python code.

THE CODE TO TEST IS:
{code_to_review}

YOUR TASK:
1. Understand what the function appears to do based on its name and structure
2. Generate comprehensive tests (15-20 test cases)
3. Execute the tests using your code executor
4. Analyze results to identify bugs vs expected behavior
5. Output a detailed JSON analysis

TESTING METHODOLOGY:
- Test with the most natural interpretation first
- When something fails, determine if it's a bug or unusual design
- Test edge cases, boundaries, and error scenarios
- Document any surprising behavior

Execute your tests and output ONLY valid JSON with this structure:
- "test_summary": object with "total_tests_run", "tests_passed", "tests_failed", "tests_with_errors", "critical_issues_found"
- "critical_issues": array of objects, each with "type", "description", "example_input", "expected_behavior", "actual_behavior", "severity"
- "test_categories": object with "basic_functionality", "edge_cases", "error_handling" (each containing "passed", "failed", "errors" counts)
- "function_behavior": object with "apparent_purpose", "actual_interface", "unexpected_requirements"
- "verdict": object with "status" (WORKING/BUGGY/BROKEN), "confidence" (high/medium/low), "recommendation"

Do NOT output the test code itself, only the JSON analysis."""

    return await instructions_utils.inject_session_state(template, context)
👉 ढूंढें:
# MODULE_5_STEP_2_TEST_RUNNER_AGENT
👉 उस एक लाइन को इससे बदलें:
test_runner_agent = Agent(
    name="TestRunner",
    model=config.critic_model,
    description="Generates and runs tests for Python code using safe code execution",
    instruction=test_runner_instruction_provider,
    code_executor=BuiltInCodeExecutor(),
    output_key="test_execution_summary"
)
तीसरा चरण: अलग-अलग सेशन के लिए, मेमोरी को समझने के बारे में जानकारी
फ़ीडबैक सिंथेसाइज़र बनाने से पहले, आपको स्टेट और मेमोरी के बीच का अंतर समझना होगा. ये दोनों, अलग-अलग मकसद के लिए स्टोरेज के दो अलग-अलग तरीके हैं.
स्टेट बनाम मेमोरी: मुख्य अंतर
आइए, कोड रिव्यू के एक उदाहरण से इसे समझते हैं:
स्टेट (सिर्फ़ मौजूदा सेशन के लिए):
# Data from THIS review session
tool_context.state[StateKeys.STYLE_ISSUES] = [
    {"line": 5, "code": "E231", "message": "missing whitespace"},
    {"line": 12, "code": "E701", "message": "multiple statements"}
]
- स्कोप: सिर्फ़ यह बातचीत
- मकसद: इस कुकी का इस्तेमाल, मौजूदा पाइपलाइन में एजेंट के बीच डेटा ट्रांसफ़र करने के लिए किया जाता है
Sessionऑब्जेक्ट में मौजूद है- लाइफ़टाइम: सेशन खत्म होने पर हटा दी जाती है
मेमोरी (पिछले सभी सेशन):
# Learned from 50 previous reviews
"User frequently forgets docstrings on helper functions"
"User tends to write long functions (avg 45 lines)"
"User improved error handling after feedback in session #23"
- स्कोप: इस उपयोगकर्ता के सभी पिछले सेशन
- मकसद: पैटर्न समझना, लोगों की दिलचस्पी के हिसाब से सुझाव देना
- यहां मौजूद है:
MemoryService - लाइफ़टाइम: यह कुकी सभी सेशन में बनी रहती है. इसे खोजा जा सकता है
सुझाव/राय देने या शिकायत करने के लिए, दोनों की ज़रूरत क्यों होती है:
मान लें कि सिंथेसाइज़र फ़ीडबैक जनरेट कर रहा है:
सिर्फ़ राज्य के नाम का इस्तेमाल करने पर (मौजूदा समीक्षा):
"Function `calculate_total` has no docstring."
सामान्य, मैकेनिकल फ़ीडबैक.
स्टेट + मेमोरी (मौजूदा + पिछले पैटर्न) का इस्तेमाल करके:
"Function `calculate_total` has no docstring. This is the 4th review
where helper functions lacked documentation. Consider adding docstrings
as you write functions, not afterwards - you mentioned in our last
session that you find it easier that way."
आपके हिसाब से जवाब तैयार करना, कॉन्टेक्स्ट के हिसाब से जवाब देना, और समय के साथ जवाबों में सुधार करना.
प्रोडक्शन डिप्लॉयमेंट के लिए, आपके पास ये विकल्प हैं:
पहला विकल्प: VertexAiMemoryBankService (ऐडवांस)
- यह सुविधा क्या करती है: एलएलएम की मदद से, बातचीत से काम के तथ्यों को निकालना
- खोज: सिमैंटिक सर्च (सिर्फ़ कीवर्ड नहीं, बल्कि मतलब भी समझता है)
- मेमोरी मैनेजमेंट: समय के साथ यादों को अपने-आप इकट्ठा और अपडेट करता है
- ज़रूरी शर्तें: Google Cloud प्रोजेक्ट + एजेंट इंजन का सेटअप
- इसका इस्तेमाल तब करें, जब: आपको बेहतर, नई, और आपकी पसंद के हिसाब से बनाई गई यादें चाहिए हों
- उदाहरण: "उपयोगकर्ता को फ़ंक्शनल प्रोग्रामिंग पसंद है" (कोड स्टाइल के बारे में हुई 10 बातचीत से निकाला गया)
दूसरा विकल्प: InMemoryMemoryService + Persistent Sessions का इस्तेमाल जारी रखना
- यह क्या करता है: यह कुकी, कीवर्ड खोज के लिए पूरी बातचीत का इतिहास सेव करती है
- खोजें: पिछले सेशन में कीवर्ड मैच करने की बुनियादी सेटिंग
- मेमोरी मैनेजमेंट: आपके पास यह कंट्रोल होता है कि क्या सेव किया जाए (
add_session_to_memoryके ज़रिए) - ज़रूरी है: सिर्फ़ परसिस्टेंट
SessionService(जैसे किVertexAiSessionServiceयाDatabaseSessionService) - इसका इस्तेमाल तब करें, जब: आपको एलएलएम प्रोसेसिंग के बिना, पिछली बातचीत में आसान तरीके से खोजना हो
- उदाहरण: "docstring" खोजने पर, उस शब्द का ज़िक्र करने वाले सभी सेशन दिखते हैं
मेमोरी में फ़ोटो कैसे दिखती हैं
हर कोड रिव्यू पूरा होने के बाद:
# At the end of a session (typically in your application code)
await memory_service.add_session_to_memory(session)
क्या होता है:
- InMemoryMemoryService: यह कुकी, कीवर्ड खोजने के लिए पूरे सेशन के इवेंट सेव करती है
- VertexAiMemoryBankService: एलएलएम, मुख्य तथ्य निकालता है और उन्हें मौजूदा यादों के साथ जोड़ता है
इसके बाद, आने वाले सेशन में ये सवाल पूछे जा सकते हैं:
# In a tool, search for relevant past feedback
results = tool_context.search_memory("feedback about docstrings")
चौथा चरण: सुझाव/राय देने या शिकायत करने से जुड़े टूल और एजेंट जोड़ना
फ़ीडबैक सिंथेसाइज़र, पाइपलाइन में सबसे बेहतर एजेंट है. यह तीन टूल को मैनेज करता है, डाइनैमिक निर्देशों का इस्तेमाल करता है, और स्थिति, मेमोरी, और आर्टफ़ैक्ट को जोड़ता है.
तीन सिंथेसाइज़र टूल जोड़ना
👉 खोलें
code_review_assistant/tools.py
👉 ढूंढें:
# MODULE_5_STEP_4_SEARCH_PAST_FEEDBACK
👉 Replace with Tool 1 - Memory Search (production version):
async def search_past_feedback(developer_id: str, tool_context: ToolContext) -> Dict[str, Any]:
    """
    Search for past feedback in memory service.

    Args:
        developer_id: ID of the developer (defaults to "default_user")
        tool_context: ADK tool context with potential memory service access

    Returns:
        Dictionary containing feedback search results
    """
    logger.info(f"Tool: Searching for past feedback for developer {developer_id}...")

    try:
        # Default developer ID if not provided
        if not developer_id:
            developer_id = tool_context.state.get(StateKeys.USER_ID, 'default_user')

        # Check if memory service is available
        if hasattr(tool_context, 'search_memory'):
            try:
                # Perform structured searches
                queries = [
                    f"developer:{developer_id} code review feedback",
                    f"developer:{developer_id} common issues",
                    f"developer:{developer_id} improvements"
                ]

                all_feedback = []
                patterns = {
                    'common_issues': [],
                    'improvements': [],
                    'strengths': []
                }

                for query in queries:
                    search_result = await tool_context.search_memory(query)

                    if search_result and hasattr(search_result, 'memories'):
                        for memory in search_result.memories[:5]:
                            memory_text = memory.text if hasattr(memory, 'text') else str(memory)
                            all_feedback.append(memory_text)

                            # Extract patterns
                            if 'style' in memory_text.lower():
                                patterns['common_issues'].append('style compliance')
                            if 'improved' in memory_text.lower():
                                patterns['improvements'].append('showing improvement')
                            if 'excellent' in memory_text.lower():
                                patterns['strengths'].append('consistent quality')

                # Store in state
                tool_context.state[StateKeys.PAST_FEEDBACK] = all_feedback
                tool_context.state[StateKeys.FEEDBACK_PATTERNS] = patterns

                logger.info(f"Tool: Found {len(all_feedback)} past feedback items")

                return {
                    "status": "success",
                    "feedback_found": True,
                    "count": len(all_feedback),
                    "summary": " | ".join(all_feedback[:3]) if all_feedback else "No feedback",
                    "patterns": patterns
                }

            except Exception as e:
                logger.warning(f"Tool: Memory search error: {e}")

        # Fallback: Check state for cached feedback
        cached_feedback = tool_context.state.get(StateKeys.USER_PAST_FEEDBACK_CACHE, [])
        if cached_feedback:
            tool_context.state[StateKeys.PAST_FEEDBACK] = cached_feedback
            return {
                "status": "success",
                "feedback_found": True,
                "count": len(cached_feedback),
                "summary": "Using cached feedback",
                "patterns": {}
            }

        # No feedback found
        tool_context.state[StateKeys.PAST_FEEDBACK] = []
        logger.info("Tool: No past feedback found")

        return {
            "status": "success",
            "feedback_found": False,
            "message": "No past feedback available - this appears to be a first submission",
            "patterns": {}
        }

    except Exception as e:
        error_msg = f"Feedback search error: {str(e)}"
        logger.error(f"Tool: {error_msg}", exc_info=True)

        tool_context.state[StateKeys.PAST_FEEDBACK] = []

        return {
            "status": "error",
            "message": error_msg,
            "feedback_found": False
        }
👉 ढूंढें:
# MODULE_5_STEP_4_UPDATE_GRADING_PROGRESS
👉 टूल 2 - ग्रेडिंग ट्रैकर (प्रोडक्शन वर्शन) से बदलें:
async def update_grading_progress(tool_context: ToolContext) -> Dict[str, Any]:
    """
    Updates grading progress counters and metrics in state.
    """
    logger.info("Tool: Updating grading progress...")

    try:
        current_time = datetime.now().isoformat()

        # Build all state changes
        state_updates = {}

        # Temporary (invocation-level) state
        state_updates[StateKeys.TEMP_PROCESSING_TIMESTAMP] = current_time

        # Session-level state
        attempts = tool_context.state.get(StateKeys.GRADING_ATTEMPTS, 0) + 1
        state_updates[StateKeys.GRADING_ATTEMPTS] = attempts
        state_updates[StateKeys.LAST_GRADING_TIME] = current_time

        # User-level persistent state
        lifetime_submissions = tool_context.state.get(StateKeys.USER_TOTAL_SUBMISSIONS, 0) + 1
        state_updates[StateKeys.USER_TOTAL_SUBMISSIONS] = lifetime_submissions
        state_updates[StateKeys.USER_LAST_SUBMISSION_TIME] = current_time

        # Calculate improvement metrics
        current_style_score = tool_context.state.get(StateKeys.STYLE_SCORE, 0)
        last_style_score = tool_context.state.get(StateKeys.USER_LAST_STYLE_SCORE, 0)
        score_improvement = current_style_score - last_style_score

        state_updates[StateKeys.USER_LAST_STYLE_SCORE] = current_style_score
        state_updates[StateKeys.SCORE_IMPROVEMENT] = score_improvement

        # Track test results if available
        test_results = tool_context.state.get(StateKeys.TEST_EXECUTION_SUMMARY, {})

        # Parse if it's a string
        if isinstance(test_results, str):
            try:
                test_results = json.loads(test_results)
            except:
                test_results = {}

        if test_results and test_results.get('test_summary', {}).get('total_tests_run', 0) > 0:
            summary = test_results['test_summary']
            total = summary.get('total_tests_run', 0)
            passed = summary.get('tests_passed', 0)
            if total > 0:
                pass_rate = (passed / total) * 100
                state_updates[StateKeys.USER_LAST_TEST_PASS_RATE] = pass_rate

        # Apply all updates atomically
        for key, value in state_updates.items():
            tool_context.state[key] = value

        logger.info(f"Tool: Progress updated - Attempt #{attempts}, "
                    f"Lifetime: {lifetime_submissions}")

        return {
            "status": "success",
            "session_attempts": attempts,
            "lifetime_submissions": lifetime_submissions,
            "timestamp": current_time,
            "improvement": {
                "style_score_change": score_improvement,
                "direction": "improved" if score_improvement > 0 else "declined"
            },
            "summary": f"Attempt #{attempts} recorded, {lifetime_submissions} total submissions"
        }

    except Exception as e:
        error_msg = f"Progress update error: {str(e)}"
        logger.error(f"Tool: {error_msg}", exc_info=True)

        return {
            "status": "error",
            "message": error_msg
        }
👉 ढूंढें:
# MODULE_5_STEP_4_SAVE_GRADING_REPORT
👉 Tool 3 - Artifact Saver (production version) से बदलें:
async def save_grading_report(feedback_text: str, tool_context: ToolContext) -> Dict[str, Any]:
    """
    Saves a detailed grading report as an artifact.

    Args:
        feedback_text: The feedback text to include in the report
        tool_context: ADK tool context for state management

    Returns:
        Dictionary containing save status and details
    """
    logger.info("Tool: Saving grading report...")

    try:
        # Gather all relevant data from state
        code = tool_context.state.get(StateKeys.CODE_TO_REVIEW, '')
        analysis = tool_context.state.get(StateKeys.CODE_ANALYSIS, {})
        style_score = tool_context.state.get(StateKeys.STYLE_SCORE, 0)
        style_issues = tool_context.state.get(StateKeys.STYLE_ISSUES, [])

        # Get test results
        test_results = tool_context.state.get(StateKeys.TEST_EXECUTION_SUMMARY, {})

        # Parse if it's a string
        if isinstance(test_results, str):
            try:
                test_results = json.loads(test_results)
            except:
                test_results = {}

        timestamp = datetime.now().isoformat()

        # Create comprehensive report dictionary
        report = {
            'timestamp': timestamp,
            'grading_attempt': tool_context.state.get(StateKeys.GRADING_ATTEMPTS, 1),
            'code': {
                'content': code,
                'line_count': len(code.splitlines()),
                'hash': hashlib.md5(code.encode()).hexdigest()
            },
            'analysis': analysis,
            'style': {
                'score': style_score,
                'issues': style_issues[:5]  # First 5 issues
            },
            'tests': test_results,
            'feedback': feedback_text,
            'improvements': {
                'score_change': tool_context.state.get(StateKeys.SCORE_IMPROVEMENT, 0),
                'from_last_score': tool_context.state.get(StateKeys.USER_LAST_STYLE_SCORE, 0)
            }
        }

        # Convert report to JSON string
        report_json = json.dumps(report, indent=2)
        report_part = types.Part.from_text(text=report_json)

        # Try to save as artifact if the service is available
        if hasattr(tool_context, 'save_artifact'):
            try:
                # Generate filename with timestamp (replace colons for filesystem compatibility)
                filename = f"grading_report_{timestamp.replace(':', '-')}.json"

                # Save the main report
                version = await tool_context.save_artifact(filename, report_part)

                # Also save a "latest" version for easy access
                await tool_context.save_artifact("latest_grading_report.json", report_part)

                logger.info(f"Tool: Report saved as {filename} (version {version})")

                # Store report in state as well for redundancy
                tool_context.state[StateKeys.USER_LAST_GRADING_REPORT] = report

                return {
                    "status": "success",
                    "artifact_saved": True,
                    "filename": filename,
                    "version": str(version),
                    "size": len(report_json),
                    "summary": f"Report saved as {filename}"
                }

            except Exception as artifact_error:
                logger.warning(f"Artifact service error: {artifact_error}, falling back to state storage")
                # Continue to fallback below

        # Fallback: Store in state if artifact service is not available or failed
        tool_context.state[StateKeys.USER_LAST_GRADING_REPORT] = report
        logger.info("Tool: Report saved to state (artifact service not available)")

        return {
            "status": "success",
            "artifact_saved": False,
            "message": "Report saved to state only",
            "size": len(report_json),
            "summary": "Report saved to session state"
        }

    except Exception as e:
        error_msg = f"Report save error: {str(e)}"
        logger.error(f"Tool: {error_msg}", exc_info=True)

        # Still try to save minimal data to state
        try:
            tool_context.state[StateKeys.USER_LAST_GRADING_REPORT] = {
                'error': error_msg,
                'feedback': feedback_text,
                'timestamp': datetime.now().isoformat()
            }
        except:
            pass

        return {
            "status": "error",
            "message": error_msg,
            "artifact_saved": False,
            "summary": f"Failed to save report: {error_msg}"
        }
सिंथेसाइज़र एजेंट बनाना
👉 खोलें
code_review_assistant/sub_agents/review_pipeline/feedback_synthesizer.py
👉 ढूंढें:
# MODULE_5_STEP_4_INSTRUCTION_PROVIDER
👉 प्रोडक्शन के निर्देश देने वाली कंपनी का नाम डालें:
async def feedback_instruction_provider(context: ReadonlyContext) -> str:
    """Dynamic instruction provider that injects state variables."""
    template = """You are an expert code reviewer and mentor providing constructive, educational feedback.

CONTEXT FROM PREVIOUS AGENTS:
- Structure analysis summary: {structure_analysis_summary}
- Style check summary: {style_check_summary}
- Test execution summary: {test_execution_summary}

YOUR TASK requires these steps IN ORDER:
1. Call search_past_feedback tool with developer_id="default_user"
2. Call update_grading_progress tool with no parameters
3. Carefully analyze the test results to understand what really happened
4. Generate comprehensive feedback following the structure below
5. Call save_grading_report tool with the feedback_text parameter
6. Return the feedback as your final output

CRITICAL - Understanding Test Results:
The test_execution_summary contains structured JSON. Parse it carefully:
- tests_passed = Code worked correctly
- tests_failed = Code produced wrong output
- tests_with_errors = Code crashed
- critical_issues = Fundamental problems with the code

If critical_issues array contains items, these are serious bugs that need fixing.
Do NOT count discovering bugs as test successes.

FEEDBACK STRUCTURE TO FOLLOW:

## 📊 Summary
Provide an honest assessment. Be encouraging but truthful about problems found.

## ✅ Strengths
List 2-3 things done well, referencing specific code elements.

## 📈 Code Quality Analysis

### Structure & Organization
Comment on code organization, readability, and documentation.

### Style Compliance
Report the actual style score and any specific issues.

### Test Results
Report the actual test results accurately:
- If critical_issues exist, report them as bugs to fix
- Be clear: "X tests passed, Y critical issues were found"
- List each critical issue
- Don't hide or minimize problems

## 💡 Recommendations for Improvement
Based on the analysis, provide specific actionable fixes.
If critical issues exist, fixing them is top priority.

## 🎯 Next Steps
Prioritized action list based on severity of issues.

## 💬 Encouragement
End with encouragement while being honest about what needs fixing.

Remember: Complete ALL steps including calling save_grading_report."""

    return await instructions_utils.inject_session_state(template, context)
👉 ढूंढें:
# MODULE_5_STEP_4_SYNTHESIZER_AGENT
👉 इससे बदलें:
feedback_synthesizer_agent = Agent(
    name="FeedbackSynthesizer",
    model=config.critic_model,
    description="Synthesizes all analysis into constructive, personalized feedback",
    instruction=feedback_instruction_provider,
    tools=[
        FunctionTool(func=search_past_feedback),
        FunctionTool(func=update_grading_progress),
        FunctionTool(func=save_grading_report)
    ],
    output_key="final_feedback"
)
पांचवां चरण: पाइपलाइन को वायर करना
अब चारों एजेंट को एक क्रम में पाइपलाइन से कनेक्ट करें और रूट एजेंट बनाएं.
👉 खोलें
code_review_assistant/agent.py
👉 फ़ाइल में सबसे ऊपर (मौजूदा इंपोर्ट के बाद), ज़रूरी इंपोर्ट जोड़ें:
from google.adk.agents import Agent, SequentialAgent
from code_review_assistant.sub_agents.review_pipeline.code_analyzer import code_analyzer_agent
from code_review_assistant.sub_agents.review_pipeline.style_checker import style_checker_agent
from code_review_assistant.sub_agents.review_pipeline.test_runner import test_runner_agent
from code_review_assistant.sub_agents.review_pipeline.feedback_synthesizer import feedback_synthesizer_agent
अब आपकी फ़ाइल ऐसी दिखनी चाहिए:
"""
Main agent orchestration for the Code Review Assistant.
"""

from google.adk.agents import Agent, SequentialAgent
from .config import config
from code_review_assistant.sub_agents.review_pipeline.code_analyzer import code_analyzer_agent
from code_review_assistant.sub_agents.review_pipeline.style_checker import style_checker_agent
from code_review_assistant.sub_agents.review_pipeline.test_runner import test_runner_agent
from code_review_assistant.sub_agents.review_pipeline.feedback_synthesizer import feedback_synthesizer_agent

# MODULE_5_STEP_5_CREATE_PIPELINE

# MODULE_6_STEP_5_CREATE_FIX_LOOP

# MODULE_6_STEP_5_UPDATE_ROOT_AGENT
👉 ढूंढें:
# MODULE_5_STEP_5_CREATE_PIPELINE
👉 उस लाइन को इससे बदलें:
# Create sequential pipeline
code_review_pipeline = SequentialAgent(
    name="CodeReviewPipeline",
    description="Complete code review pipeline with analysis, testing, and feedback",
    sub_agents=[
        code_analyzer_agent,
        style_checker_agent,
        test_runner_agent,
        feedback_synthesizer_agent
    ]
)

# Root agent - coordinates the review pipeline
root_agent = Agent(
    name="CodeReviewAssistant",
    model=config.worker_model,
    description="An intelligent code review assistant that analyzes Python code and provides educational feedback",
    instruction="""You are a specialized Python code review assistant focused on helping developers improve their code quality.

When a user provides Python code for review:
1. Immediately delegate to CodeReviewPipeline and pass the code EXACTLY as it was provided by the user.
2. The pipeline will handle all analysis and feedback
3. Return ONLY the final feedback from the pipeline - do not add any commentary

When a user asks what you can do or asks general questions:
- Explain your capabilities for code review
- Do NOT trigger the pipeline for non-code messages

The pipeline handles everything for code review - just pass through its final output.""",
    sub_agents=[code_review_pipeline],
    output_key="assistant_response"
)
छठा चरण: पूरी पाइपलाइन की जांच करना
अब चारों एजेंट को एक साथ काम करते हुए देखें.
👉 सिस्टम शुरू करें:
adk web code_review_assistant
adk web कमांड चलाने के बाद, आपको अपने टर्मिनल में आउटपुट दिखेगा. इससे पता चलेगा कि ADK वेब सर्वर शुरू हो गया है. यह आउटपुट कुछ ऐसा दिखेगा:
+-----------------------------------------------------------------------------+
| ADK Web Server started                                                      |
|                                                                             |
| For local testing, access at http://localhost:8000.                         |
+-----------------------------------------------------------------------------+

INFO:     Application startup complete.
INFO:     Uvicorn running on http://0.0.0.0:8000 (Press CTRL+C to quit)
👉 इसके बाद, अपने ब्राउज़र से ADK Dev UI को ऐक्सेस करने के लिए:
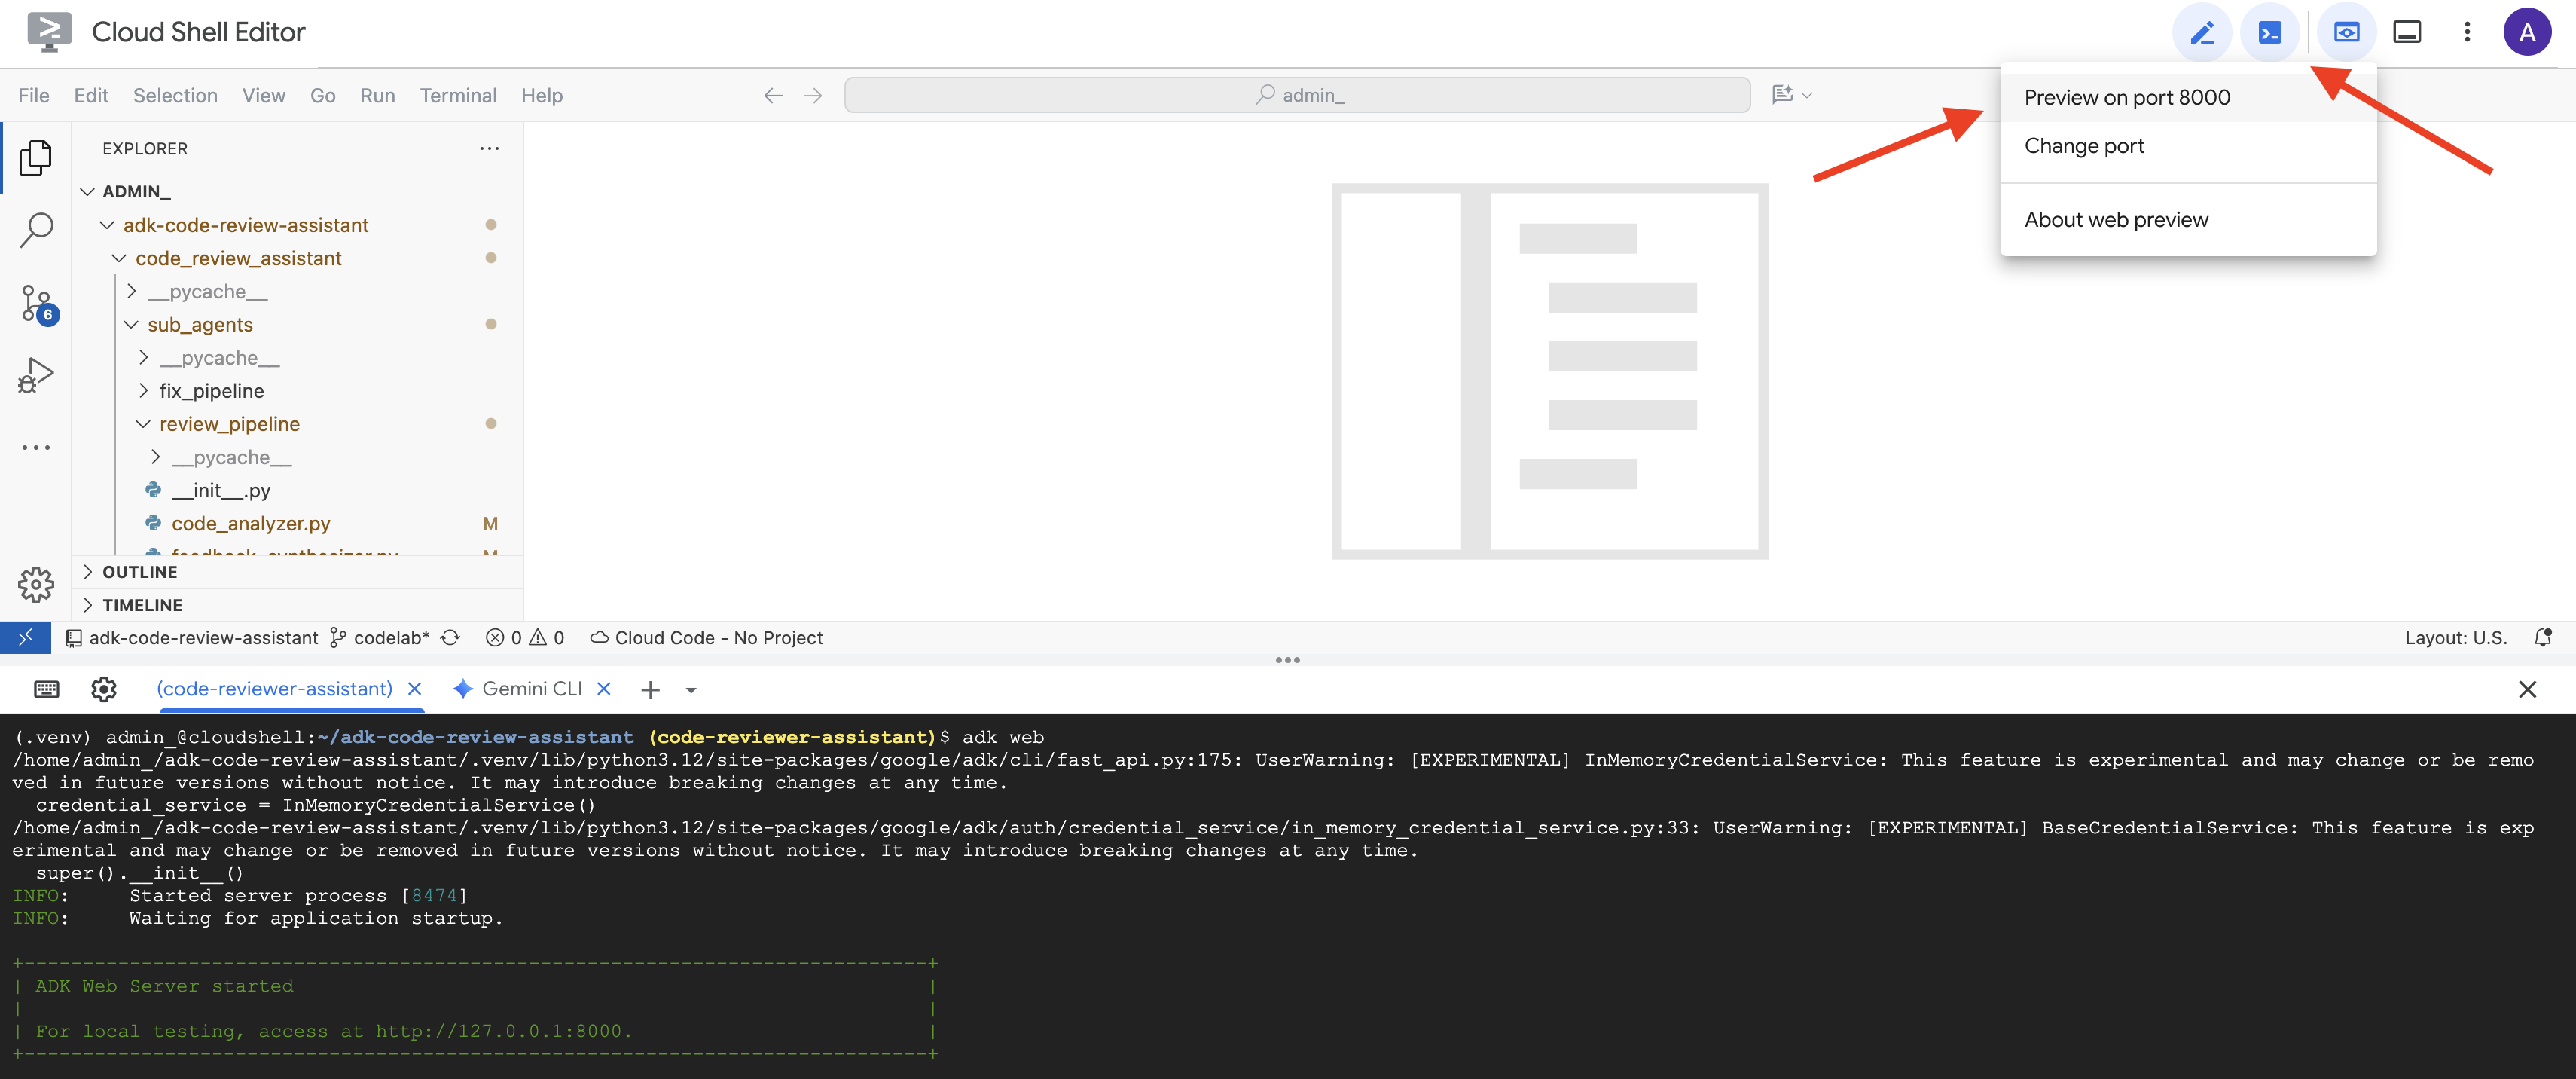
Cloud Shell टूलबार (आम तौर पर, सबसे ऊपर दाईं ओर) में मौजूद, वेब की झलक दिखाने वाले आइकॉन (अक्सर यह आंख या ऐरो वाले स्क्वेयर जैसा दिखता है) में जाकर, पोर्ट बदलें को चुनें. पॉप-अप विंडो में, पोर्ट को 8000 पर सेट करें. इसके बाद, "बदलें और झलक देखें" पर क्लिक करें. इसके बाद, Cloud Shell एक नया ब्राउज़र टैब या विंडो खोलेगा. इसमें ADK Dev UI दिखेगा.
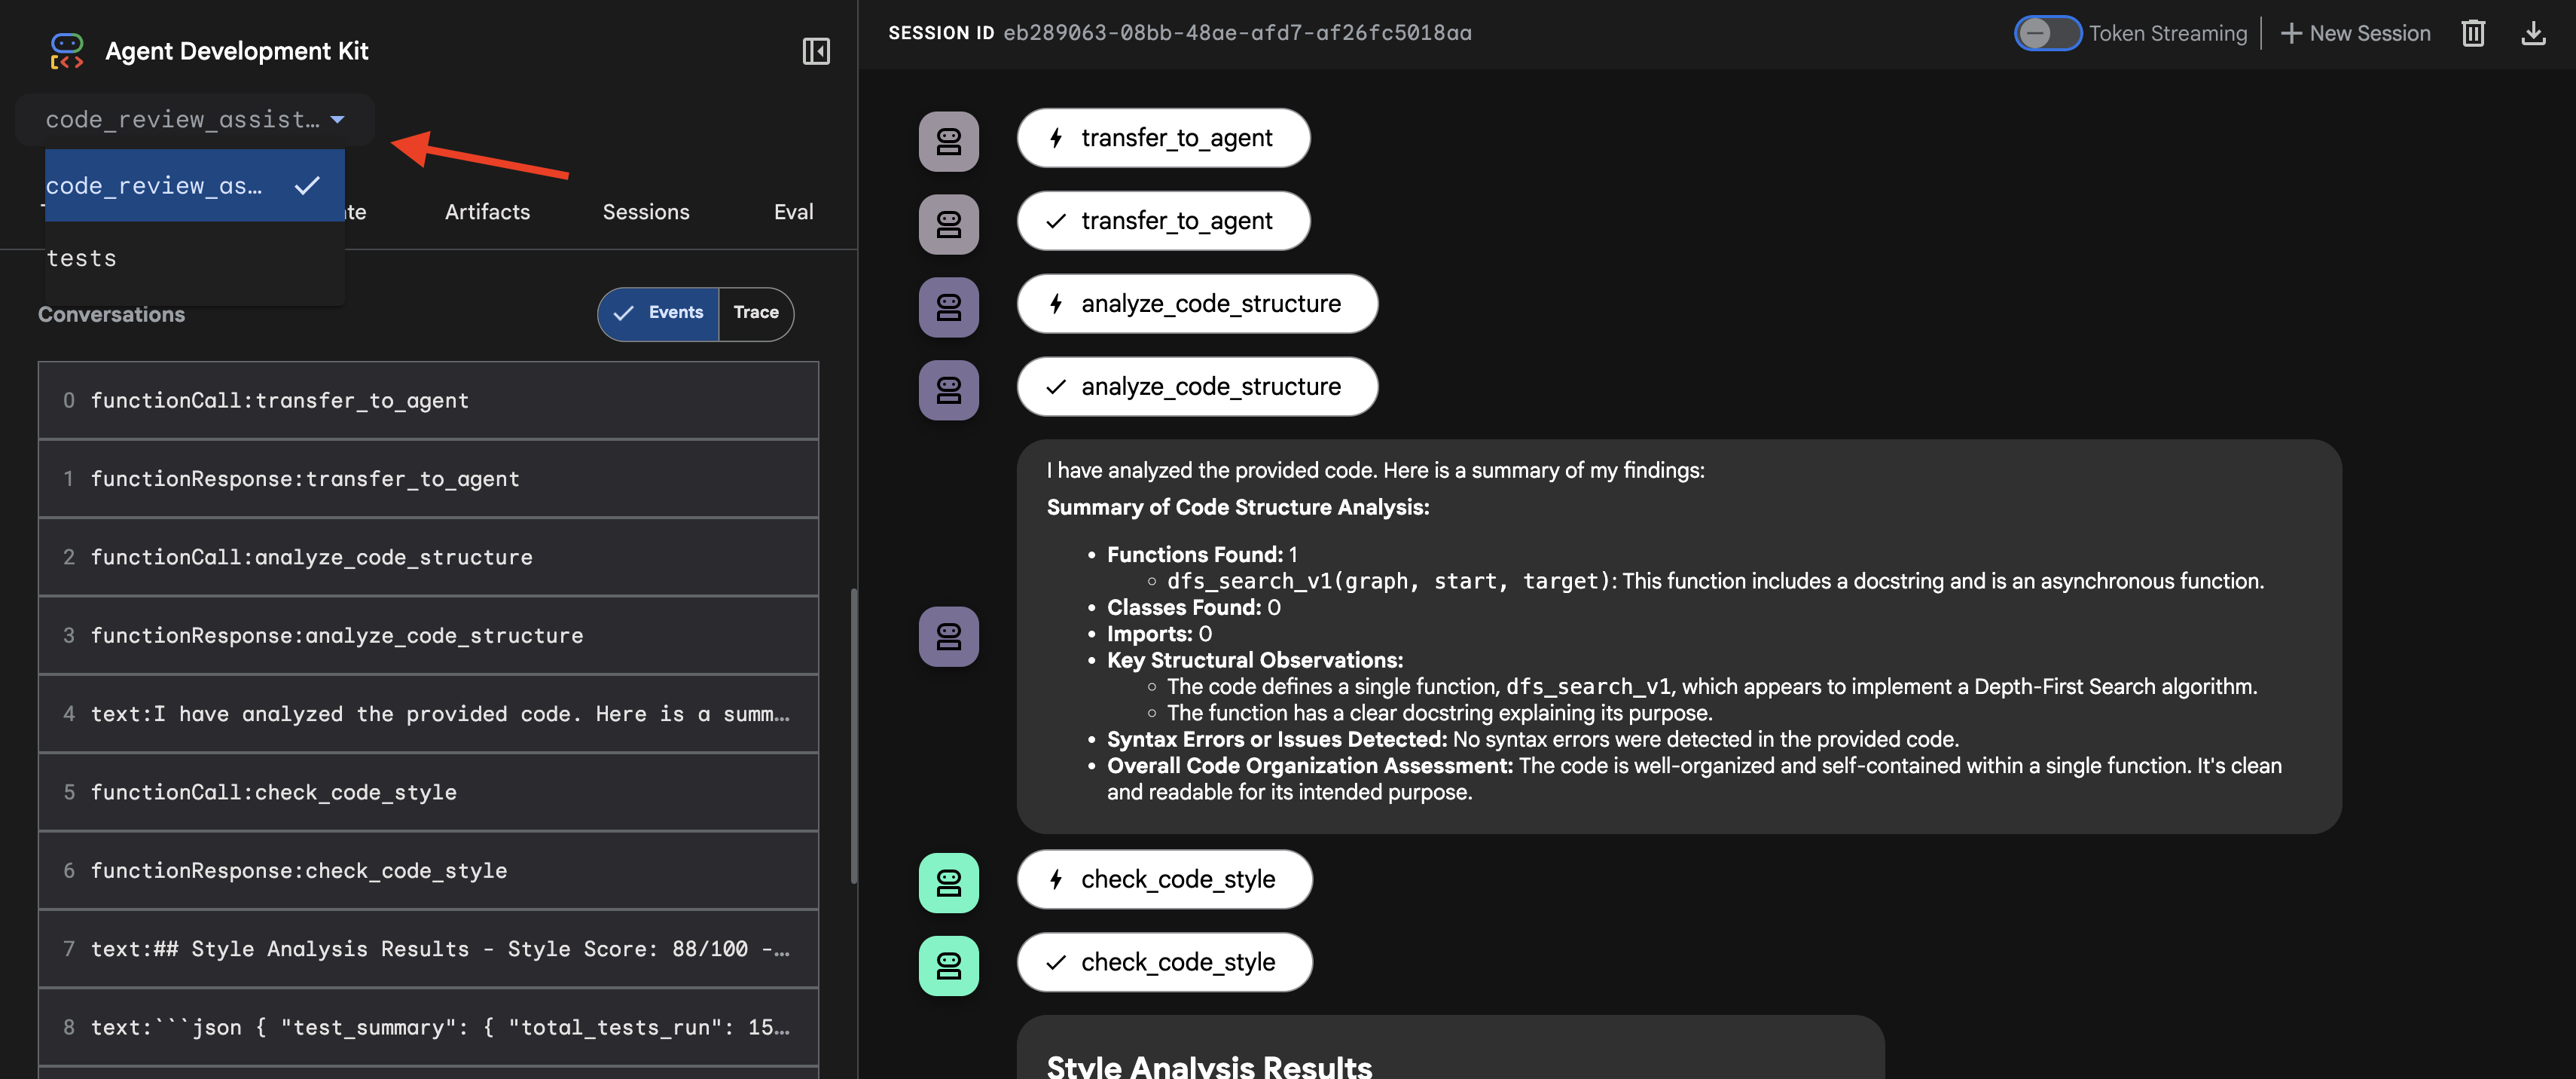
👉 एजेंट अब काम कर रहा है. आपके ब्राउज़र में मौजूद ADK Dev UI, एजेंट से सीधे तौर पर कनेक्ट होने का तरीका है.
- अपना टारगेट चुनें: यूज़र इंटरफ़ेस (यूआई) में सबसे ऊपर मौजूद ड्रॉपडाउन मेन्यू में,
code_review_assistantएजेंट चुनें.
👉 टेस्ट प्रॉम्प्ट:
Please analyze the following:
def dfs_search_v1(graph, start, target):
    """Find if target is reachable from start."""
    visited = set()
    stack = start

    while stack:
        current = stack.pop()

        if current == target:
            return True

        if current not in visited:
            visited.add(current)

            for neighbor in graph[current]:
                if neighbor not in visited:
                    stack.append(neighbor)

    return False
👉 कोड रिव्यू पाइपलाइन को काम करते हुए देखें:
बग वाले dfs_search_v1 फ़ंक्शन को सबमिट करने पर, आपको सिर्फ़ एक जवाब नहीं मिलता. आपको मल्टी-एजेंट पाइपलाइन काम करती हुई दिख रही है. आपको जो स्ट्रीमिंग आउटपुट दिखता है वह चार खास एजेंटों के क्रम से काम करने का नतीजा है. हर एजेंट, पिछले एजेंट के काम को आगे बढ़ाता है.
यहां बताया गया है कि हर एजेंट, फ़ाइनल और पूरी समीक्षा में क्या योगदान देता है. इससे रॉ डेटा को कार्रवाई लायक जानकारी में बदला जा सकता है.
1. कोड विश्लेषक की स्ट्रक्चरल रिपोर्ट
सबसे पहले, CodeAnalyzer एजेंट को रॉ कोड मिलता है. यह कोड के काम करने के तरीके का अंदाज़ा नहीं लगाता. यह analyze_code_structure टूल का इस्तेमाल करके, डिटरमिनिस्टिक ऐब्स्ट्रैक्ट सिंटैक्स ट्री (एएसटी) पार्स करता है.
इसका आउटपुट, कोड के स्ट्रक्चर के बारे में सटीक जानकारी देता है:
The analysis of the provided code reveals the following:

Summary:
- Functions Found: 1
- Classes Found: 0

Key Structural Observations:
- A single function, dfs_search_v1, is defined.
- It includes a docstring: "Find if target is reachable from start."
- No syntax errors were detected.

Overall Code Organization Assessment:
- The code snippet is a well-defined, self-contained function.
⭐ वैल्यू: इस शुरुआती चरण से, अन्य एजेंट के लिए एक साफ़-सुथरा और भरोसेमंद आधार मिलता है. इससे यह पुष्टि होती है कि कोड, मान्य Python कोड है. साथ ही, इससे उन कॉम्पोनेंट की पहचान होती है जिनकी समीक्षा की जानी है.
2. स्टाइल चेकर का पीईपी 8 ऑडिट
इसके बाद, StyleChecker एजेंट कार्रवाई करता है. यह शेयर की गई स्थिति से कोड को पढ़ता है और check_code_style टूल का इस्तेमाल करता है. यह टूल, pycodestyle लिंटर का फ़ायदा उठाता है.
इससे, क्वालिटी स्कोर और उल्लंघन की जानकारी मिलती है:
Style Analysis Results
- Style Score: 88/100
- Total Issues: 6
- Assessment: Good style with minor improvements needed

Top Style Issues
- Line 5, W293: blank line contains whitespace
- Line 19, W292: no newline at end of file
⭐ वैल्यू: यह एजेंट, कम्यूनिटी के तय किए गए स्टैंडर्ड (पीईपी 8) के आधार पर, निष्पक्ष और बिना किसी समझौते के सुझाव देता है. वेटेड स्कोरिंग सिस्टम से, उपयोगकर्ता को समस्याओं की गंभीरता के बारे में तुरंत पता चल जाता है.
3. टेस्ट रनर को मिली गंभीर गड़बड़ी
इस चरण में, सिस्टम सामान्य विश्लेषण से आगे बढ़कर काम करता है. TestRunner एजेंट, कोड के व्यवहार की पुष्टि करने के लिए, टेस्ट का एक पूरा सेट जनरेट और लागू करता है.
इसका आउटपुट, स्ट्रक्चर्ड JSON ऑब्जेक्ट होता है. इसमें एक गंभीर फ़ैसला शामिल होता है:
{
  "critical_issues": [
    {
      "type": "Critical Bug",
      "description": "The function's initialization `stack = start` is incorrect... When a common input like a string... is provided... the function crashes with an AttributeError.",
      "severity": "Critical"
    }
  ],
  "verdict": {
    "status": "BROKEN",
    "confidence": "high",
    "recommendation": "The function is fundamentally broken... the stack initialization line `stack = start` must be changed to `stack = [start]`."
  }
}
⭐ वैल्यू: यह सबसे अहम इनसाइट होती है. एजेंट ने सिर्फ़ अनुमान नहीं लगाया, बल्कि कोड को चलाकर यह साबित किया कि कोड में गड़बड़ी है. इसने रनटाइम से जुड़ी एक ऐसी गड़बड़ी का पता लगाया जो मामूली होने के साथ-साथ गंभीर भी थी. इसकी समीक्षा करने वाला व्यक्ति शायद इस गड़बड़ी का पता न लगा पाता. साथ ही, इसने गड़बड़ी की सटीक वजह और उसे ठीक करने के तरीके के बारे में भी बताया.
4. सुझावों को एक साथ लाने वाले टूल की फ़ाइनल रिपोर्ट
आखिर में, FeedbackSynthesizer एजेंट कंडक्टर के तौर पर काम करता है. यह पिछले तीन एजेंट से मिले स्ट्रक्चर्ड डेटा का इस्तेमाल करके, उपयोगकर्ता के लिए एक रिपोर्ट तैयार करता है. यह रिपोर्ट, विश्लेषण करने में मदद करती है और इससे प्रेरणा मिलती है.
इसका आउटपुट, आपको दिखने वाली फ़ाइनल और बेहतर समीक्षा होती है:
📊 Summary
Great effort on implementing the Depth-First Search algorithm! ... However, a critical bug in the initialization of the stack prevents the function from working correctly...

✅ Strengths
- Good Algorithm Structure
- Correct Use of `visited` Set

📈 Code Quality Analysis
...
### Style Compliance
The style analysis returned a good score of 88/100.
...
### Test Results
The automated testing revealed a critical issue... The line `stack = start` directly assigns the input... which results in an `AttributeError`.

💡 Recommendations for Improvement
**Fix the Critical Stack Initialization Bug:**
- Incorrect Code: `stack = start`
- Correct Code: `stack = [start]`

💬 Encouragement
You are very close to a perfect implementation! The core logic of your DFS algorithm is sound, which is the hardest part.
⭐ वैल्यू: यह एजेंट, तकनीकी डेटा को मददगार और शिक्षा से जुड़े अनुभव में बदलता है. इसमें सबसे अहम समस्या (बग) को प्राथमिकता दी गई है. साथ ही, इसे साफ़ तौर पर समझाया गया है और इसका सटीक समाधान बताया गया है. इसके अलावा, इसमें सकारात्मक लहजे का इस्तेमाल किया गया है. इसमें पिछले सभी चरणों के नतीजों को एक साथ और अहम जानकारी के तौर पर शामिल किया जाता है.
अलग-अलग लेवल वाली इस प्रोसेस से, एजेंटिक पाइपलाइन की क्षमता का पता चलता है. आपको एक ही जवाब नहीं मिलता, बल्कि लेयर के हिसाब से विश्लेषण मिलता है. इसमें हर एजेंट, पुष्टि किया जा सकने वाला खास टास्क पूरा करता है. इससे ऐसी समीक्षा मिलती है जो न सिर्फ़ जानकारी देने वाली होती है, बल्कि भरोसेमंद, शिक्षा देने वाली, और सटीक भी होती है.
👉💻 टेस्टिंग पूरी होने के बाद, Cloud Shell Editor टर्मिनल पर वापस जाएं और ADK Dev UI को बंद करने के लिए, Ctrl+C दबाएं.
आपने क्या बनाया है
अब आपके पास कोड रिव्यू की पूरी पाइपलाइन है, जो:
✅ कोड स्ट्रक्चर को पार्स करता है - हेल्पर फ़ंक्शन के साथ एएसटी का विश्लेषण
✅ स्टाइल की जांच करता है - नाम रखने के नियमों के साथ वज़न के हिसाब से स्कोरिंग
✅ टेस्ट चलाता है - स्ट्रक्चर्ड JSON आउटपुट के साथ टेस्ट जनरेट करता है
✅ सुझाव देता है - स्थिति, मेमोरी, और आर्टफ़ैक्ट को इंटिग्रेट करता है
✅ प्रोग्रेस को ट्रैक करता है - इनवोकेशन/सेशन/उपयोगकर्ताओं के लिए मल्टी-टियर स्टेट
✅ समय के साथ सीखता है - क्रॉस-सेशन पैटर्न के लिए मेमोरी सेवा
✅ आर्टफ़ैक्ट उपलब्ध कराता है - पूरी ऑडिट ट्रेल के साथ डाउनलोड की जा सकने वाली JSON रिपोर्ट
मुख्य सिद्धांतों में महारत हासिल की गई
सीक्वेंशियल पाइपलाइन:
- चार एजेंट, तय किए गए क्रम में काम कर रहे हैं
- हर एक, अगले के लिए स्टेट को बेहतर बनाता है
- डिपेंडेंसी से तय होता है कि स्क्रिप्ट किस क्रम में एक्ज़ीक्यूट होंगी
प्रोडक्शन पैटर्न:
- हेल्पर फ़ंक्शन को अलग करना (थ्रेड पूल में सिंक करना)
- अनुकूल गिरावट (फ़ॉलबैक रणनीतियां)
- मल्टी-टियर स्टेट मैनेजमेंट (टेंप/सेशन/उपयोगकर्ता)
- डाइनैमिक निर्देश देने वाले (कॉन्टेक्स्ट के हिसाब से)
- डुअल स्टोरेज (आर्टफ़ैक्ट + स्टेट रिडंडेंसी)
कम्यूनिकेशन के तौर पर स्थिति:
- कॉन्स्टेंट की मदद से, एजेंट के जवाब में टाइपिंग की गलतियां होने से रोका जा सकता है
output_keyएजेंट की खास जानकारी लिखता है- बाद में एजेंट, StateKeys के ज़रिए पढ़ते हैं
- पाइपलाइन में स्टेट लीनियर तरीके से फ़्लो होती है
मेमोरी बनाम स्टेट:
- स्टेट: मौजूदा सेशन का डेटा
- मेमोरी: सभी सेशन में पैटर्न
- अलग-अलग मकसद, अलग-अलग लाइफ़टाइम
टूल ऑर्केस्ट्रेशन:
- एक टूल का इस्तेमाल करने वाले एजेंट (analyzer, style_checker)
- पहले से मौजूद एक्ज़ीक्यूटर (test_runner)
- एक साथ कई टूल का इस्तेमाल करना (सिंथेसाइज़र)
मॉडल चुनने की रणनीति:
- वर्कर मॉडल: मैकेनिकल टास्क (पार्सिंग, लिंटिंग, राउटिंग)
- क्रिटिक मॉडल: तर्क से जुड़े टास्क (टेस्टिंग, सिंथेसिस)
- सही विकल्प चुनकर लागत को ऑप्टिमाइज़ करना
आगे क्या करना है
मॉड्यूल 6 में, फ़िक्स पाइपलाइन बनाई जाएगी:
- LoopAgent आर्किटेक्चर की मदद से, बार-बार होने वाली गड़बड़ियों को ठीक करना
- केस को आगे भेजने की स्थितियां
- हर बार स्टेट का इकट्ठा होना
- पुष्टि करना और फिर से कोशिश करने का लॉजिक
- समस्याओं को ठीक करने के लिए, समीक्षा पाइपलाइन के साथ इंटिग्रेशन
आपको यह भी पता चलेगा कि एक ही तरह के पैटर्न को, बार-बार किए जाने वाले मुश्किल वर्कफ़्लो में कैसे बढ़ाया जाता है. इन वर्कफ़्लो में एजेंट, टास्क पूरा होने तक कई बार कोशिश करते हैं. साथ ही, यह भी पता चलेगा कि एक ही ऐप्लिकेशन में कई पाइपलाइन को कैसे मैनेज किया जाता है.
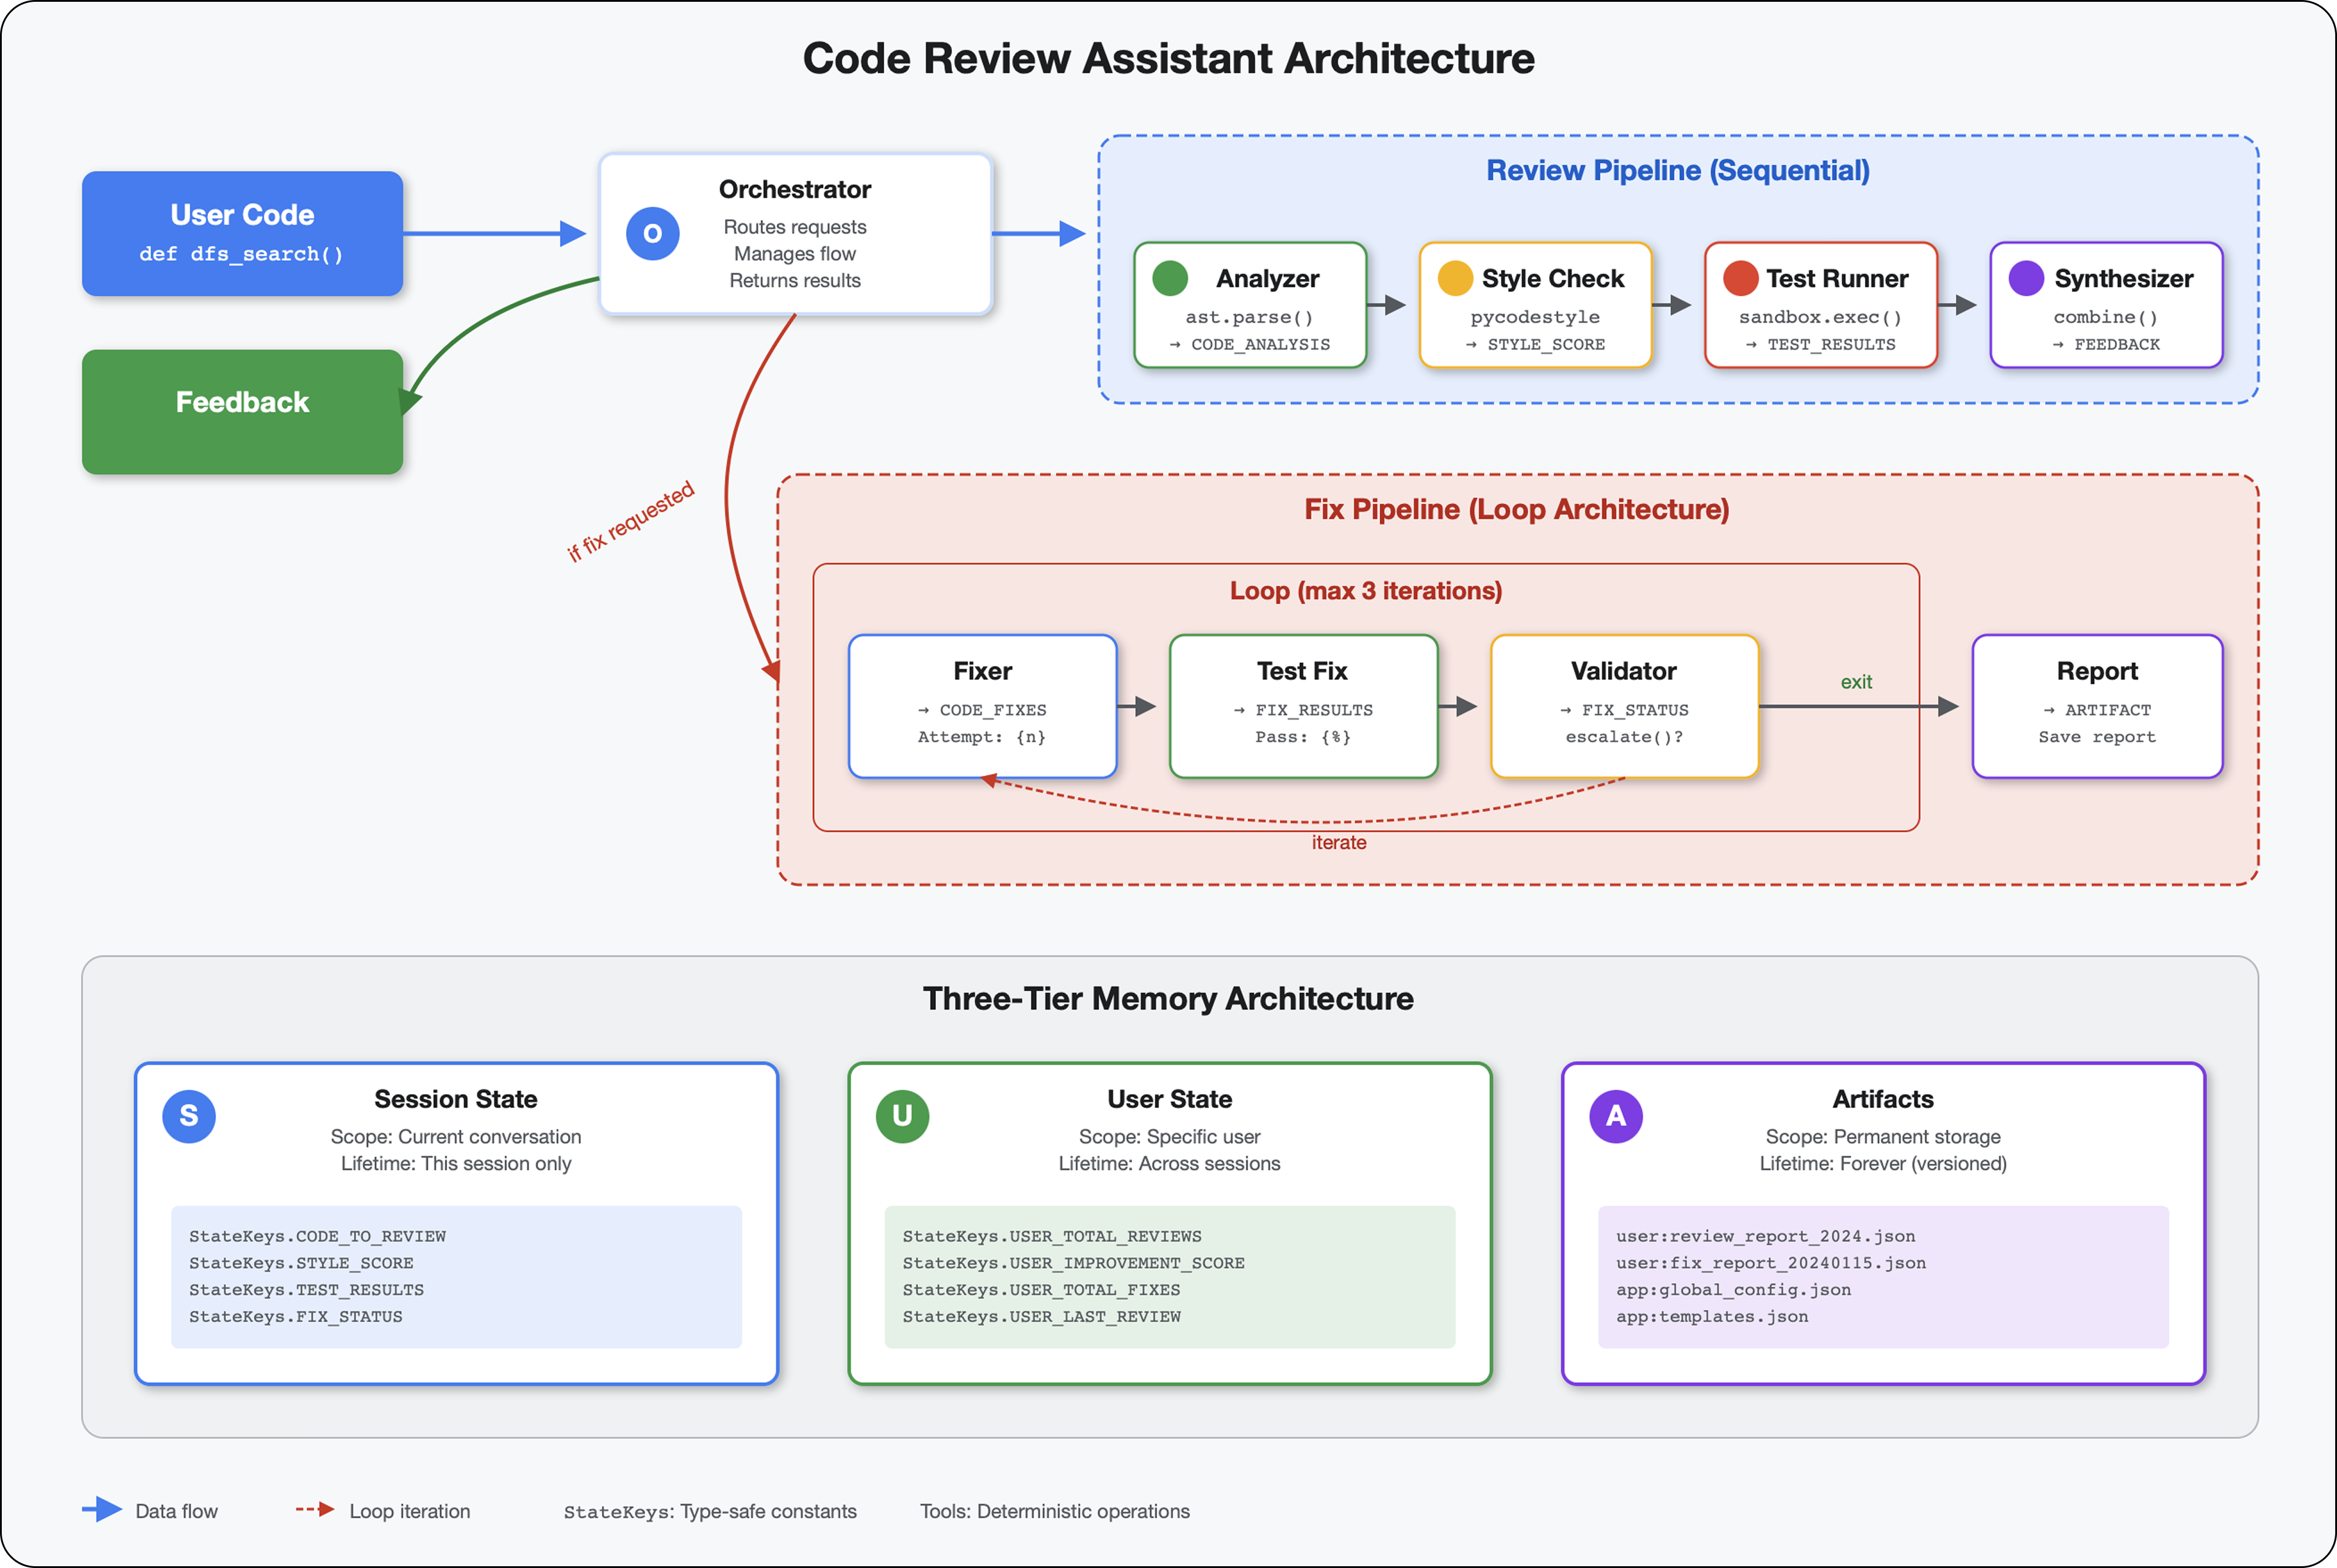
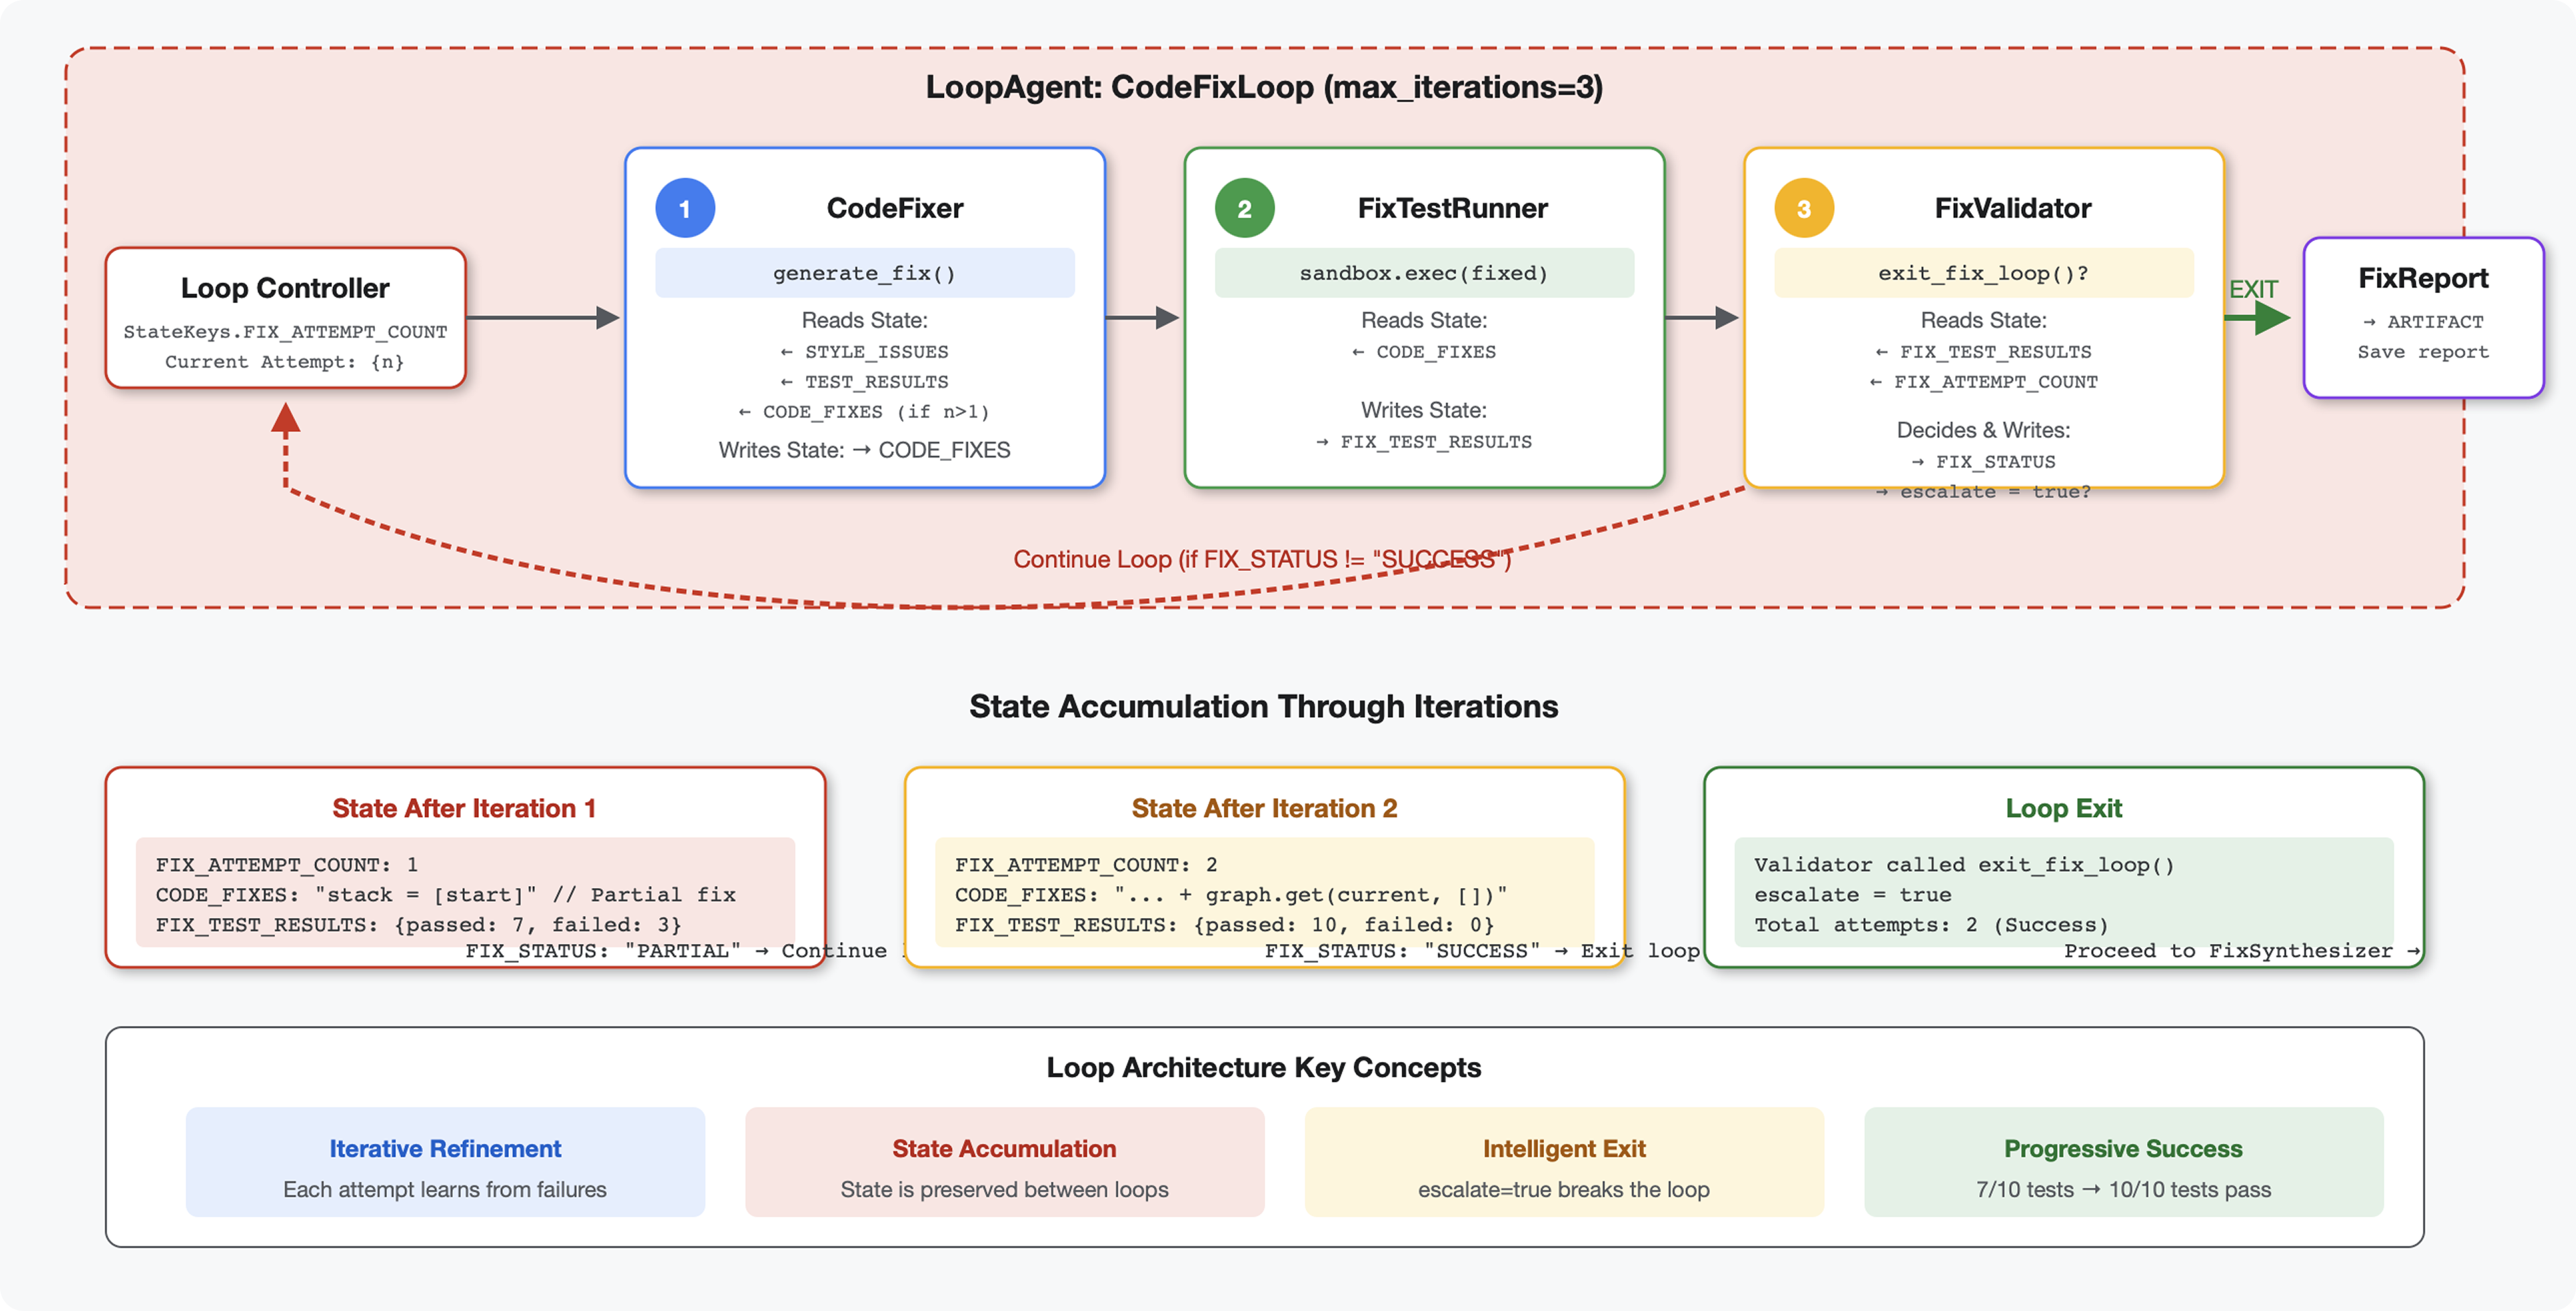
6. Fix Pipeline: Loop Architecture को जोड़ना
परिचय
मॉड्यूल 5 में, आपने समीक्षा करने वाली एक क्रम में चलने वाली पाइपलाइन बनाई थी. यह पाइपलाइन, कोड का विश्लेषण करती है और सुझाव देती है. हालांकि, समस्याओं का पता लगाना सिर्फ़ आधा समाधान है. डेवलपर को उन्हें ठीक करने में मदद की ज़रूरत होती है.
यह मॉड्यूल, अपने-आप होने वाले सुधार की पाइपलाइन बनाता है. यह पाइपलाइन:
- समीक्षा के नतीजों के आधार पर सुधारों को जनरेट करता है
- समस्या ठीक होने की पुष्टि करता है. इसके लिए, यह कई तरह के टेस्ट करता है
- समस्या ठीक न होने पर, अपने-आप फिर से कोशिश करता है (तीन बार तक)
- पहले और बाद की तुलना के साथ रिपोर्ट के नतीजे
मुख्य कॉन्सेप्ट: LoopAgent की मदद से, अनुरोध को अपने-आप फिर से भेजा जा सकता है. सीक्वेंशियल एजेंट एक बार चलते हैं. हालांकि, LoopAgent अपने सब-एजेंट को तब तक दोहराता है, जब तक कि बाहर निकलने की शर्त पूरी नहीं हो जाती या ज़्यादा से ज़्यादा इटरेशन पूरे नहीं हो जाते. टूल, tool_context.actions.escalate = True सेट करके सिग्नल की स्थिति के बारे में बताता है.
आपको क्या बनाना है, इसकी झलक: गड़बड़ी वाला कोड सबमिट करें → समीक्षा में समस्याएं पहचानें → ठीक करने वाला लूप, सुधार जनरेट करता है → जांच से पुष्टि होती है → ज़रूरत पड़ने पर फिर से कोशिश करें → पूरी जानकारी वाली फ़ाइनल रिपोर्ट.
मुख्य सिद्धांत: LoopAgent बनाम Sequential
सीक्वेंशियल पाइपलाइन (मॉड्यूल 5):
SequentialAgent(agents=[A, B, C])
# Executes: A → B → C → Done
- एकतरफ़ा फ़्लो
- हर एजेंट को सिर्फ़ एक बार चलाया जाता है
- दोबारा कोशिश करने का लॉजिक नहीं है
लूप पाइपलाइन (मॉड्यूल 6):
LoopAgent(agents=[A, B, C], max_iterations=3)
# Executes: A → B → C → (check exit) → A → B → C → (check exit) → ...
- साइक्लिक फ़्लो
- एजेंट को कई बार चलाया जा सकता है
- यह कुकी तब हट जाती है, जब:
- कोई टूल
tool_context.actions.escalate = True(सफल) सेट करता है max_iterationsतक पहुंच गया (सुरक्षा सीमा)- अनहैंडल की गई कोई अपवाद स्थिति (गड़बड़ी) होती है
- कोई टूल
कोड ठीक करने के लिए लूप का इस्तेमाल क्यों किया जाता है:
कोड ठीक करने के लिए, अक्सर कई बार कोशिश करनी पड़ती है:
- पहली कोशिश: साफ़ तौर पर दिख रही गड़बड़ियों को ठीक करना (वैरिएबल के गलत टाइप)
- दूसरा चरण: टेस्ट के दौरान सामने आई अन्य समस्याओं (एज केस) को ठीक करना
- तीसरा चरण: सभी टेस्ट पास होने चाहिए. इसके लिए, ज़रूरी बदलाव करें और पुष्टि करें
लूप के बिना, आपको एजेंट के निर्देशों में मुश्किल शर्तों वाला लॉजिक इस्तेमाल करना होगा. LoopAgent की मदद से, फिर से कोशिश करने की सुविधा अपने-आप काम करती है.
आर्किटेक्चर की तुलना:
Sequential (Module 5):
User → Review Pipeline → Feedback → Done

Loop (Module 6):
User → Review Pipeline → Feedback → Fix Pipeline
                                         ↓
                          ┌──────────────┴──────────────┐
                          │   Fix Attempt Loop (1-3x)   │
                          │  ┌─────────────────────┐    │
                          │  │ 1. Generate Fixes   │    │
                          │  │ 2. Test Fixes       │    │
                          │  │ 3. Validate & Exit? │────┼─→ If escalate=True
                          │  └─────────────────────┘    │      exit loop
                          │         ↓ If not            │
                          │    Try Again (max 3)        │
                          └─────────────────────────────┘
                                     ↓
                          4. Synthesize Final Report → Done
पहला चरण: Code Fixer Agent को जोड़ना
कोड ठीक करने वाला टूल, समीक्षा के नतीजों के आधार पर सही किया गया Python कोड जनरेट करता है.
👉 खोलें
code_review_assistant/sub_agents/fix_pipeline/code_fixer.py
👉 ढूंढें:
# MODULE_6_STEP_1_CODE_FIXER_INSTRUCTION_PROVIDER
👉 उस एक लाइन को इससे बदलें:
async def code_fixer_instruction_provider(context: ReadonlyContext) -> str:
    """Dynamic instruction provider that injects state variables."""
    template = """You are an expert code fixing specialist.

Original Code:
{code_to_review}

Analysis Results:
- Style Score: {style_score}/100
- Style Issues: {style_issues}
- Test Results: {test_execution_summary}

Based on the test results, identify and fix ALL issues including:
- Interface bugs (e.g., if start parameter expects wrong type)
- Logic errors (e.g., KeyError when accessing graph nodes)
- Style violations
- Missing documentation

YOUR TASK:
Generate the complete fixed Python code that addresses all identified issues.

CRITICAL INSTRUCTIONS:
- Output ONLY the corrected Python code
- Do NOT include markdown code blocks (```python)
- Do NOT include any explanations or commentary
- The output should be valid, executable Python code and nothing else

Common fixes to apply based on test results:
- If tests show AttributeError with 'pop', fix: stack = [start] instead of stack = start
- If tests show KeyError accessing graph, fix: use graph.get(current, [])
- Add docstrings if missing
- Fix any style violations identified

Output the complete fixed code now:"""

    return await instructions_utils.inject_session_state(template, context)
👉 ढूंढें:
# MODULE_6_STEP_1_CODE_FIXER_AGENT
👉 उस एक लाइन को इससे बदलें:
code_fixer_agent = Agent(
    name="CodeFixer",
    model=config.worker_model,
    description="Generates comprehensive fixes for all identified code issues",
    instruction=code_fixer_instruction_provider,
    code_executor=BuiltInCodeExecutor(),
    output_key="code_fixes"
)
दूसरा चरण: Fix Test Runner Agent जोड़ना
टेस्ट रनर, ठीक किए गए कोड पर पूरी तरह से जांच करके, सुधारों की पुष्टि करता है.
👉 खोलें
code_review_assistant/sub_agents/fix_pipeline/fix_test_runner.py
👉 ढूंढें:
# MODULE_6_STEP_2_FIX_TEST_RUNNER_INSTRUCTION_PROVIDER
👉 उस एक लाइन को इससे बदलें:
async def fix_test_runner_instruction_provider(context: ReadonlyContext) -> str:
    """Dynamic instruction provider that uses the clean code from the previous step."""
    template = """You are responsible for validating the fixed code by running tests.

THE FIXED CODE TO TEST:
{code_fixes}

ORIGINAL TEST RESULTS: {test_execution_summary}

YOUR TASK:
1. Understand the fixes that were applied
2. Generate the same comprehensive tests (15-20 test cases)
3. Execute the tests on the FIXED code using your code executor
4. Compare results with original test results
5. Output a detailed JSON analysis

TESTING METHODOLOGY:
- Run the same tests that revealed issues in the original code
- Verify that previously failing tests now pass
- Ensure no regressions were introduced
- Document the improvement

Execute your tests and output ONLY valid JSON with this structure:
- "passed": number of tests that passed
- "failed": number of tests that failed
- "total": total number of tests
- "pass_rate": percentage as a number
- "comparison": object with "original_pass_rate", "new_pass_rate", "improvement"
- "newly_passing_tests": array of test names that now pass
- "still_failing_tests": array of test names still failing

Do NOT output the test code itself, only the JSON analysis."""

    return await instructions_utils.inject_session_state(template, context)
👉 ढूंढें:
# MODULE_6_STEP_2_FIX_TEST_RUNNER_AGENT
👉 उस एक लाइन को इससे बदलें:
fix_test_runner_agent = Agent(
    name="FixTestRunner",
    model=config.critic_model,
    description="Runs comprehensive tests on fixed code to verify all issues are resolved",
    instruction=fix_test_runner_instruction_provider,
    code_executor=BuiltInCodeExecutor(),
    output_key="fix_test_execution_summary"
)
तीसरा चरण: Fix Validator Agent जोड़ना
वैलडेटर यह जांच करता है कि गड़बड़ियां ठीक हुई हैं या नहीं. इसके बाद, यह तय करता है कि लूप से बाहर निकलना है या नहीं.
टूल के बारे में जानकारी
सबसे पहले, पुष्टि करने वाले प्रोग्राम के लिए ज़रूरी तीन टूल जोड़ें.
👉 खोलें
code_review_assistant/tools.py
👉 ढूंढें:
# MODULE_6_STEP_3_VALIDATE_FIXED_STYLE
👉 टूल 1 - स्टाइल की पुष्टि करने वाले टूल से बदलें:
async def validate_fixed_style(tool_context: ToolContext) -> Dict[str, Any]:
    """
    Validates style compliance of the fixed code.

    Args:
        tool_context: ADK tool context containing fixed code in state

    Returns:
        Dictionary with style validation results
    """
    logger.info("Tool: Validating style of fixed code...")

    try:
        # Get the fixed code from state
        code_fixes = tool_context.state.get(StateKeys.CODE_FIXES, '')

        # Try to extract from markdown if present
        if '```python' in code_fixes:
            start = code_fixes.rfind('```python') + 9
            end = code_fixes.rfind('```')
            if start < end:
                code_fixes = code_fixes[start:end].strip()

        if not code_fixes:
            return {
                "status": "error",
                "message": "No fixed code found in state"
            }

        # Store the extracted fixed code
        tool_context.state[StateKeys.CODE_FIXES] = code_fixes

        # Run style check on fixed code
        loop = asyncio.get_event_loop()
        with ThreadPoolExecutor() as executor:
            style_result = await loop.run_in_executor(
                executor, _perform_style_check, code_fixes
            )

        # Compare with original
        original_score = tool_context.state.get(StateKeys.STYLE_SCORE, 0)
        improvement = style_result['score'] - original_score

        # Store results
        tool_context.state[StateKeys.FIXED_STYLE_SCORE] = style_result['score']
        tool_context.state[StateKeys.FIXED_STYLE_ISSUES] = style_result['issues']

        logger.info(f"Tool: Fixed code style score: {style_result['score']}/100 "
                    f"(improvement: +{improvement})")

        return {
            "status": "success",
            "fixed_style_score": style_result['score'],
            "original_style_score": original_score,
            "improvement": improvement,
            "remaining_issues": style_result['issues'],
            "perfect_style": style_result['score'] == 100
        }

    except Exception as e:
        logger.error(f"Tool: Style validation failed: {e}", exc_info=True)
        return {
            "status": "error",
            "message": str(e)
        }
👉 ढूंढें:
# MODULE_6_STEP_3_COMPILE_FIX_REPORT
👉 Tool 2 - Report Compiler से बदलें:
async def compile_fix_report(tool_context: ToolContext) -> Dict[str, Any]:
    """
    Compiles comprehensive report of the fix process.

    Args:
        tool_context: ADK tool context with all fix pipeline data

    Returns:
        Comprehensive fix report
    """
    logger.info("Tool: Compiling comprehensive fix report...")

    try:
        # Gather all data
        original_code = tool_context.state.get(StateKeys.CODE_TO_REVIEW, '')
        code_fixes = tool_context.state.get(StateKeys.CODE_FIXES, '')

        # Test results
        original_tests = tool_context.state.get(StateKeys.TEST_EXECUTION_SUMMARY, {})
        fixed_tests = tool_context.state.get(StateKeys.FIX_TEST_EXECUTION_SUMMARY, {})

        # Parse if strings
        if isinstance(original_tests, str):
            try:
                original_tests = json.loads(original_tests)
            except:
                original_tests = {}

        if isinstance(fixed_tests, str):
            try:
                fixed_tests = json.loads(fixed_tests)
            except:
                fixed_tests = {}

        # Extract pass rates
        original_pass_rate = 0
        if original_tests:
            if 'pass_rate' in original_tests:
                original_pass_rate = original_tests['pass_rate']
            elif 'test_summary' in original_tests:
                # Handle test_runner_agent's JSON structure
                summary = original_tests['test_summary']
                total = summary.get('total_tests_run', 0)
                passed = summary.get('tests_passed', 0)
                if total > 0:
                    original_pass_rate = (passed / total) * 100
            elif 'passed' in original_tests and 'total' in original_tests:
                if original_tests['total'] > 0:
                    original_pass_rate = (original_tests['passed'] / original_tests['total']) * 100

        fixed_pass_rate = 0
        all_tests_pass = False
        if fixed_tests:
            if 'pass_rate' in fixed_tests:
                fixed_pass_rate = fixed_tests['pass_rate']
                all_tests_pass = fixed_tests.get('failed', 1) == 0
            elif 'passed' in fixed_tests and 'total' in fixed_tests:
                if fixed_tests['total'] > 0:
                    fixed_pass_rate = (fixed_tests['passed'] / fixed_tests['total']) * 100
                all_tests_pass = fixed_tests.get('failed', 0) == 0

        # Style scores
        original_style = tool_context.state.get(StateKeys.STYLE_SCORE, 0)
        fixed_style = tool_context.state.get(StateKeys.FIXED_STYLE_SCORE, 0)

        # Calculate improvements
        test_improvement = {
            'original_pass_rate': original_pass_rate,
            'fixed_pass_rate': fixed_pass_rate,
            'improvement': fixed_pass_rate - original_pass_rate,
            'all_tests_pass': all_tests_pass
        }

        style_improvement = {
            'original_score': original_style,
            'fixed_score': fixed_style,
            'improvement': fixed_style - original_style,
            'perfect_style': fixed_style == 100
        }

        # Determine overall status
        if all_tests_pass and style_improvement['perfect_style']:
            fix_status = 'SUCCESSFUL'
            status_emoji = '✅'
        elif test_improvement['improvement'] > 0 or style_improvement['improvement'] > 0:
            fix_status = 'PARTIAL'
            status_emoji = '⚠️'
        else:
            fix_status = 'FAILED'
            status_emoji = '❌'

        # Build comprehensive report
        report = {
            'status': fix_status,
            'status_emoji': status_emoji,
            'timestamp': datetime.now().isoformat(),
            'original_code': original_code,
            'code_fixes': code_fixes,
            'improvements': {
                'tests': test_improvement,
                'style': style_improvement
            },
            'summary': f"{status_emoji} Fix Status: {fix_status}\n"
                      f"Tests: {original_pass_rate:.1f}% → {fixed_pass_rate:.1f}%\n"
                      f"Style: {original_style}/100 → {fixed_style}/100"
        }

        # Store report in state
        tool_context.state[StateKeys.FIX_REPORT] = report
        tool_context.state[StateKeys.FIX_STATUS] = fix_status

        logger.info(f"Tool: Fix report compiled - Status: {fix_status}")
        logger.info(f"Tool: Test improvement: {original_pass_rate:.1f}% → {fixed_pass_rate:.1f}%")
        logger.info(f"Tool: Style improvement: {original_style} → {fixed_style}")

        return {
            "status": "success",
            "fix_status": fix_status,
            "report": report
        }

    except Exception as e:
        logger.error(f"Tool: Failed to compile fix report: {e}", exc_info=True)
        return {
            "status": "error",
            "message": str(e)
        }
👉 ढूंढें:
# MODULE_6_STEP_3_EXIT_FIX_LOOP
👉 तीसरे टूल - लूप से बाहर निकलने के सिग्नल से बदलें:
def exit_fix_loop(tool_context: ToolContext) -> Dict[str, Any]:
    """
    Signal that fixing is complete and should exit the loop.

    Args:
        tool_context: ADK tool context

    Returns:
        Confirmation message
    """
    logger.info("Tool: Setting escalate flag to exit fix loop")

    # This is the critical line that exits the LoopAgent
    tool_context.actions.escalate = True

    return {
        "status": "success",
        "message": "Fix complete, exiting loop"
    }
Validator एजेंट बनाना
👉 खोलें
code_review_assistant/sub_agents/fix_pipeline/fix_validator.py
👉 ढूंढें:
# MODULE_6_STEP_3_FIX_VALIDATOR_INSTRUCTION_PROVIDER
👉 उस एक लाइन को इससे बदलें:
async def fix_validator_instruction_provider(context: ReadonlyContext) -> str:
    """Dynamic instruction provider that injects state variables."""
    template = """You are the final validation specialist for code fixes.

You have access to:
- Original issues from initial review
- Applied fixes: {code_fixes}
- Test results after fix: {fix_test_execution_summary}
- All state data from the fix process

Your responsibilities:
1. Use validate_fixed_style tool to check style compliance of fixed code
   - Pass no arguments, it will retrieve fixed code from state
2. Use compile_fix_report tool to generate comprehensive report
   - Pass no arguments, it will gather all data from state
3. Based on the report, determine overall fix status:
   - ✅ SUCCESSFUL: All tests pass, style score 100
   - ⚠️ PARTIAL: Improvements made but issues remain
   - ❌ FAILED: Fix didn't work or made things worse

4. CRITICAL: If status is SUCCESSFUL, call the exit_fix_loop tool to stop iterations
   - This prevents unnecessary additional fix attempts
   - If not successful, the loop will continue for another attempt

5. Provide clear summary of:
   - What was fixed
   - What improvements were achieved
   - Any remaining issues requiring manual attention

Be precise and quantitative in your assessment.
"""
    return await instructions_utils.inject_session_state(template, context)
👉 ढूंढें:
# MODULE_6_STEP_3_FIX_VALIDATOR_AGENT
👉 उस एक लाइन को इससे बदलें:
fix_validator_agent = Agent(
    name="FixValidator",
    model=config.worker_model,
    description="Validates fixes and generates final fix report",
    instruction=fix_validator_instruction_provider,
    tools=[
        FunctionTool(func=validate_fixed_style),
        FunctionTool(func=compile_fix_report),
        FunctionTool(func=exit_fix_loop)
    ],
    output_key="final_fix_report"
)
चौथा चरण: LoopAgent से बाहर निकलने की शर्तों को समझना
LoopAgent से बाहर निकलने के तीन तरीके हैं:
1. एस्केलेट करके समस्या हल हो गई
# Inside any tool in the loop:
tool_context.actions.escalate = True

# Effect: Loop completes current iteration, then exits
# Use when: Fix is successful and no more attempts needed
उदाहरण के लिए फ़्लो:
Iteration 1:
  CodeFixer → generates fixes
  FixTestRunner → tests show 90% pass rate
  FixValidator → compiles report, sees PARTIAL status
  → Does NOT set escalate
  → Loop continues

Iteration 2:
  CodeFixer → refines fixes based on failures
  FixTestRunner → tests show 100% pass rate
  FixValidator → compiles report, sees SUCCESSFUL status
  → Calls exit_fix_loop() which sets escalate = True
  → Loop exits after this iteration
2. Max Iterations Exit
LoopAgent(
    name="FixAttemptLoop",
    sub_agents=[...],
    max_iterations=3  # Safety limit
)

# Effect: After 3 complete iterations, loop exits regardless of escalate
# Use when: Prevent infinite loops if fixes never succeed
उदाहरण के लिए फ़्लो:
Iteration 1: PARTIAL (continue)
Iteration 2: PARTIAL (continue)
Iteration 3: PARTIAL (but max reached)
→ Loop exits, synthesizer presents best attempt
3. गड़बड़ी की वजह से बंद हुआ
# If any agent throws unhandled exception:
raise Exception("Unexpected error")

# Effect: Loop exits immediately with error state
# Use when: Critical failure that can't be recovered
अलग-अलग वर्शन में स्थिति में बदलाव:
हर बार कोशिश करने पर, पिछली कोशिश की अपडेट की गई स्थिति दिखती है:
# Before Iteration 1:
state = {
    "code_to_review": "def add(a,b):return a+b",  # Original
    "style_score": 40,
    "test_execution_summary": {...}
}

# After Iteration 1:
state = {
    "code_to_review": "def add(a,b):return a+b",  # Unchanged
    "code_fixes": "def add(a, b):\n    return a + b",  # NEW
    "style_score": 40,  # Unchanged
    "fixed_style_score": 100,  # NEW
    "test_execution_summary": {...},  # Unchanged
    "fix_test_execution_summary": {...}  # NEW
}

# Iteration 2 starts with all this state
# If fixes still not perfect, code_fixes gets overwritten
क्यों
escalate
रिटर्न वैल्यू के बजाय:
# Bad: Using return value to signal exit
def validator_agent():
    report = compile_report()
    if report['status'] == 'SUCCESSFUL':
        return {"exit": True}  # How does loop know?

# Good: Using escalate
def validator_tool(tool_context):
    report = compile_report()
    if report['status'] == 'SUCCESSFUL':
        tool_context.actions.escalate = True  # Loop knows immediately
    return {"report": report}
फ़ायदे:
- यह सुविधा, किसी भी टूल से काम करती है. सिर्फ़ आखिरी टूल से नहीं
- इससे, डेटा वापस पाने में कोई समस्या नहीं आती
- शब्दों का सही मतलब
- फ़्रेमवर्क, बाहर निकलने के लॉजिक को हैंडल करता है
पांचवां चरण: फ़िक्स पाइपलाइन को वायर करना
👉 खोलें
code_review_assistant/agent.py
👉 मौजूदा इंपोर्ट के बाद, पाइपलाइन इंपोर्ट से जुड़ी समस्या को ठीक करने के लिए यह कोड जोड़ें:
from google.adk.agents import LoopAgent  # Add this to the existing Agent, SequentialAgent line
from code_review_assistant.sub_agents.fix_pipeline.code_fixer import code_fixer_agent
from code_review_assistant.sub_agents.fix_pipeline.fix_test_runner import fix_test_runner_agent
from code_review_assistant.sub_agents.fix_pipeline.fix_validator import fix_validator_agent
from code_review_assistant.sub_agents.fix_pipeline.fix_synthesizer import fix_synthesizer_agent
अब आपके इंपोर्ट किए गए डेटा में ये चीज़ें होनी चाहिए:
from google.adk.agents import Agent, SequentialAgent, LoopAgent
from .config import config
# Review pipeline imports (from Module 5)
from code_review_assistant.sub_agents.review_pipeline.code_analyzer import code_analyzer_agent
from code_review_assistant.sub_agents.review_pipeline.style_checker import style_checker_agent
from code_review_assistant.sub_agents.review_pipeline.test_runner import test_runner_agent
from code_review_assistant.sub_agents.review_pipeline.feedback_synthesizer import feedback_synthesizer_agent
# Fix pipeline imports (NEW)
from code_review_assistant.sub_agents.fix_pipeline.code_fixer import code_fixer_agent
from code_review_assistant.sub_agents.fix_pipeline.fix_test_runner import fix_test_runner_agent
from code_review_assistant.sub_agents.fix_pipeline.fix_validator import fix_validator_agent
from code_review_assistant.sub_agents.fix_pipeline.fix_synthesizer import fix_synthesizer_agent
👉 ढूंढें:
# MODULE_6_STEP_5_CREATE_FIX_LOOP
👉 उस एक लाइन को इससे बदलें:
# Create the fix attempt loop (retries up to 3 times)
fix_attempt_loop = LoopAgent(
    name="FixAttemptLoop",
    sub_agents=[
        code_fixer_agent,      # Step 1: Generate fixes
        fix_test_runner_agent, # Step 2: Validate with tests
        fix_validator_agent    # Step 3: Check success & possibly exit
    ],
    max_iterations=3  # Try up to 3 times
)

# Wrap loop with synthesizer for final report
code_fix_pipeline = SequentialAgent(
    name="CodeFixPipeline",
    description="Automated code fixing pipeline with iterative validation",
    sub_agents=[
        fix_attempt_loop,      # Try to fix (1-3 times)
        fix_synthesizer_agent  # Present final results (always runs once)
    ]
)
👉 मौजूदा
root_agent
definition:
root_agent = Agent(...)
👉 ढूंढें:
# MODULE_6_STEP_5_UPDATE_ROOT_AGENT
👉 उस एक लाइन को इससे बदलें:
# Update root agent to include both pipelines
root_agent = Agent(
    name="CodeReviewAssistant",
    model=config.worker_model,
    description="An intelligent code review assistant that analyzes Python code and provides educational feedback",
    instruction="""You are a specialized Python code review assistant focused on helping developers improve their code quality.

When a user provides Python code for review:
1. Immediately delegate to CodeReviewPipeline and pass the code EXACTLY as it was provided by the user.
2. The pipeline will handle all analysis and feedback
3. Return ONLY the final feedback from the pipeline - do not add any commentary

After completing a review, if significant issues were identified:
- If style score < 100 OR tests are failing OR critical issues exist:
  * Add at the end: "\n\n💡 I can fix these issues for you. Would you like me to do that?"

- If the user responds yes or requests fixes:
  * Delegate to CodeFixPipeline
  * Return the fix pipeline's complete output AS-IS

When a user asks what you can do or general questions:
- Explain your capabilities for code review and fixing
- Do NOT trigger the pipeline for non-code messages

The pipelines handle everything for code review and fixing - just pass through their final output.""",
    sub_agents=[code_review_pipeline, code_fix_pipeline],
    output_key="assistant_response"
)
छठा चरण: Fix Synthesizer Agent जोड़ना
लूप पूरा होने के बाद, सिंथेसाइज़र गड़बड़ी ठीक करने के नतीजों को उपयोगकर्ता के लिए आसान तरीके से दिखाता है.
👉 खोलें
code_review_assistant/sub_agents/fix_pipeline/fix_synthesizer.py
👉 ढूंढें:
# MODULE_6_STEP_6_FIX_SYNTHESIZER_INSTRUCTION_PROVIDER
👉 उस एक लाइन को इससे बदलें:
async def fix_synthesizer_instruction_provider(context: ReadonlyContext) -> str:
    """Dynamic instruction provider that injects state variables."""
    template = """You are responsible for presenting the fix results to the user.

Based on the validation report: {final_fix_report}
Fixed code from state: {code_fixes}
Fix status: {fix_status}

Create a comprehensive yet friendly response that includes:

## 🔧 Fix Summary
[Overall status and key improvements - be specific about what was achieved]

## 📊 Metrics
- Test Results: [original pass rate]% → [new pass rate]%
- Style Score: [original]/100 → [new]/100
- Issues Fixed: X of Y

## ✅ What Was Fixed
[List each fixed issue with brief explanation of the correction made]

## 📝 Complete Fixed Code
[Include the complete, corrected code from state - this is critical]

## 💡 Explanation of Key Changes
[Brief explanation of the most important changes made and why]

[If any issues remain]
## ⚠️ Remaining Issues
[List what still needs manual attention]

## 🎯 Next Steps
[Guidance on what to do next - either use the fixed code or address remaining issues]

Save the fix report using save_fix_report tool before presenting.
Call it with no parameters - it will retrieve the report from state automatically.

Be encouraging about improvements while being honest about any remaining issues.
Focus on the educational aspect - help the user understand what was wrong and how it was fixed.
"""
    return await instructions_utils.inject_session_state(template, context)
👉 ढूंढें:
# MODULE_6_STEP_6_FIX_SYNTHESIZER_AGENT
👉 उस एक लाइन को इससे बदलें:
fix_synthesizer_agent = Agent(
    name="FixSynthesizer",
    model=config.critic_model,
    description="Creates comprehensive user-friendly fix report",
    instruction=fix_synthesizer_instruction_provider,
    tools=[FunctionTool(func=save_fix_report)],
    output_key="fix_summary"
)
👉 जोड़ें
save_fix_report
टूल से
tools.py
:
👉 ढूंढें:
# MODULE_6_STEP_6_SAVE_FIX_REPORT
👉 इससे बदलें:
async def save_fix_report(tool_context: ToolContext) -> Dict[str, Any]:
    """
    Saves the fix report as an artifact.

    Args:
        tool_context: ADK tool context

    Returns:
        Save status
    """
    logger.info("Tool: Saving fix report...")

    try:
        # Get the report from state
        fix_report = tool_context.state.get(StateKeys.FIX_REPORT, {})

        if not fix_report:
            return {
                "status": "error",
                "message": "No fix report found in state"
            }

        # Convert to JSON
        report_json = json.dumps(fix_report, indent=2)
        report_part = types.Part.from_text(text=report_json)

        # Generate filename
        timestamp = datetime.now().isoformat().replace(':', '-')
        filename = f"fix_report_{timestamp}.json"

        # Try to save as artifact
        if hasattr(tool_context, 'save_artifact'):
            try:
                version = await tool_context.save_artifact(filename, report_part)
                await tool_context.save_artifact("latest_fix_report.json", report_part)

                logger.info(f"Tool: Fix report saved as {filename}")

                return {
                    "status": "success",
                    "filename": filename,
                    "version": str(version),
                    "size": len(report_json)
                }
            except Exception as e:
                logger.warning(f"Could not save as artifact: {e}")

        # Fallback: store in state
        tool_context.state[StateKeys.LAST_FIX_REPORT] = fix_report

        return {
            "status": "success",
            "message": "Fix report saved to state",
            "size": len(report_json)
        }

    except Exception as e:
        logger.error(f"Tool: Failed to save fix report: {e}", exc_info=True)
        return {
            "status": "error",
            "message": str(e)
        }
सातवां चरण: समस्या ठीक करने वाली पाइपलाइन की जांच करना
अब पूरे लूप को ऐक्शन में देखने का समय है.
👉 सिस्टम शुरू करें:
adk web code_review_assistant
adk web कमांड चलाने के बाद, आपको अपने टर्मिनल में आउटपुट दिखेगा. इससे पता चलेगा कि ADK वेब सर्वर शुरू हो गया है. यह आउटपुट कुछ ऐसा दिखेगा:
+-----------------------------------------------------------------------------+
| ADK Web Server started                                                      |
|                                                                             |
| For local testing, access at http://localhost:8000.                         |
+-----------------------------------------------------------------------------+

INFO:     Application startup complete.
INFO:     Uvicorn running on http://0.0.0.0:8000 (Press CTRL+C to quit)
👉 टेस्ट प्रॉम्प्ट:
Please analyze the following:
def dfs_search_v1(graph, start, target):
    """Find if target is reachable from start."""
    visited = set()
    stack = start

    while stack:
        current = stack.pop()

        if current == target:
            return True

        if current not in visited:
            visited.add(current)

            for neighbor in graph[current]:
                if neighbor not in visited:
                    stack.append(neighbor)

    return False
सबसे पहले, गड़बड़ी वाला कोड सबमिट करें, ताकि समीक्षा पाइपलाइन शुरू हो सके. गड़बड़ियों का पता लगाने के बाद, एजेंट से "कृपया कोड ठीक करें" कहा जाएगा. इससे, गड़बड़ियों को ठीक करने वाली फ़िक्स पाइपलाइन ट्रिगर हो जाएगी.
1. शुरुआती समीक्षा (कमियां ढूंढना)
यह प्रोसेस का पहला हिस्सा है. चार एजेंट वाली समीक्षा पाइपलाइन, कोड का विश्लेषण करती है, उसके स्टाइल की जांच करती है, और जनरेट की गई टेस्ट सुइट को चलाती है. यह AttributeError और अन्य समस्याओं का सही तरीके से पता लगाता है. साथ ही, यह बताता है कि कोड BROKEN है और टेस्ट पास करने की दर सिर्फ़ 84.21% है.
2. अपने-आप ठीक होने की सुविधा (लूप का इस्तेमाल)
यह सबसे शानदार हिस्सा है. जब एजेंट से कोड ठीक करने के लिए कहा जाता है, तो वह सिर्फ़ एक बदलाव नहीं करता. यह गड़बड़ी ठीक करने और पुष्टि करने की प्रोसेस को शुरू करता है. यह प्रोसेस, एक मेहनती डेवलपर की तरह काम करती है. इसमें गड़बड़ी को ठीक करने की कोशिश की जाती है, उसकी अच्छी तरह से जांच की जाती है, और अगर वह ठीक नहीं होती है, तो फिर से कोशिश की जाती है.
पहला वर्शन: पहला जवाब (कुछ हद तक सही)
- समस्या हल करना:
CodeFixerएजेंट, शुरुआती रिपोर्ट को पढ़ता है और उसमें मौजूद सबसे ज़रूरी गड़बड़ियों को ठीक करता है. यहstack = startकोstack = [start]में बदलता है औरKeyErrorअपवादों को रोकने के लिएgraph.get()का इस्तेमाल करता है. - पुष्टि करना:
TestRunnerइस नए कोड के ख़िलाफ़, पूरे टेस्ट सुइट को तुरंत फिर से चलाता है. - नतीजा: पास होने की दर में काफ़ी सुधार हुआ और यह 88.89% हो गई! गंभीर बग ठीक कर दिए गए हैं. हालांकि, ये टेस्ट इतने व्यापक हैं कि इनसे दो नई और मामूली गड़बड़ियों (रिग्रेशन) का पता चलता है. ये गड़बड़ियां,
Noneको ग्राफ़ या सूची में शामिल न की गई आस-पास की वैल्यू के तौर पर हैंडल करने से जुड़ी हैं. सिस्टम, समस्या को आंशिक रूप से ठीक हुई के तौर पर मार्क करता है.
दूसरा वर्शन: फ़ाइनल पॉलिश (100% सफलता)
- समस्या हल करना: लूप के खत्म होने की शर्त (100% पास रेट) पूरी नहीं हुई है. इसलिए, यह फिर से चलेगा.
CodeFixerमें अब ज़्यादा जानकारी है. इसमें रिग्रेशन से जुड़ी दो नई गड़बड़ियों के बारे में बताया गया है. यह कोड का फ़ाइनल और ज़्यादा बेहतर वर्शन जनरेट करता है. इसमें उन खास मामलों को साफ़ तौर पर हैंडल किया जाता है. - पुष्टि:
TestRunner, कोड के फ़ाइनल वर्शन के ख़िलाफ़ टेस्ट सुइट को एक बार फिर से एक्ज़ीक्यूट करता है. - नतीजा: 100% पास रेट. सभी ओरिजनल बग और सभी रिग्रेशन ठीक कर दिए गए हैं. सिस्टम, समस्या को ठीक किए जाने की स्थिति को SUCCESSFUL के तौर पर मार्क करता है और लूप बंद हो जाता है.
3. फ़ाइनल रिपोर्ट: परफ़ेक्ट स्कोर
समस्या ठीक होने की पुष्टि हो जाने के बाद, FixSynthesizer एजेंट फ़ाइनल रिपोर्ट पेश करता है. इसमें तकनीकी डेटा को साफ़ तौर पर बताया जाता है, ताकि लोगों को आसानी से समझ आ सके.
मेट्रिक | पहले | बाद में | सुधार |
टेस्ट पास करने की दर | 84.21% | 100% | ▲ 15.79% |
स्टाइल स्कोर | 88 / 100 | 98 / 100 | ▲ 10 पॉइंट |
गड़बड़ियां ठीक की गईं | 3 में से 0 | 3 में से 3 | ✅ |
✅ पुष्टि किया गया फ़ाइनल कोड
यहां पूरा और सही कोड दिया गया है. अब यह कोड सभी 19 टेस्ट पास कर लेता है. इससे पता चलता है कि समस्या ठीक हो गई है:
def dfs_search_v1(graph, start, target):
    """Find if target is reachable from start."""
    # Handles 'None' graph input
    if graph is None:
        return False

    visited = set()
    # Fixes the critical AttributeError
    stack = [start]

    while stack:
        current = stack.pop()

        if current == target:
            return True

        if current not in visited:
            visited.add(current)

            # Safely gets neighbors to prevent KeyError
            neighbors = graph.get(current)

            if neighbors is None:
                continue

            # Validates that neighbors are iterable
            if not isinstance(neighbors, (list, set, tuple)):
                raise TypeError(
                    f"Graph value for node '{current}' is of type "
                    f"{type(neighbors).__name__}. Expected a list, set, or tuple."
                )

            for neighbor in neighbors:
                if neighbor not in visited:
                    stack.append(neighbor)

    return False
👉💻 टेस्टिंग पूरी होने के बाद, Cloud Shell Editor टर्मिनल पर वापस जाएं और ADK Dev UI को बंद करने के लिए, Ctrl+C दबाएं.
आपने क्या बनाया है
अब आपके पास, समस्या को अपने-आप ठीक करने की पूरी प्रोसेस है. इससे:
✅ समस्या ठीक करता है - समीक्षा के विश्लेषण के आधार पर
✅ बार-बार पुष्टि करता है - समस्या ठीक करने की हर कोशिश के बाद जांच करता है
✅ अपने-आप फिर से कोशिश करता है - समस्या ठीक होने तक तीन बार कोशिश करता है
✅ स्मार्ट तरीके से बंद होता है - समस्या ठीक होने पर, एस्केलेट करके बंद होता है
✅ बेहतर परफ़ॉर्मेंस को ट्रैक करता है - समस्या ठीक होने से पहले और बाद के मेट्रिक की तुलना करता है
✅ आर्टफ़ैक्ट उपलब्ध कराता है - समस्या ठीक करने की रिपोर्ट डाउनलोड की जा सकती हैं
मुख्य सिद्धांतों में महारत हासिल की गई
LoopAgent बनाम Sequential:
- सीक्वेंशियल: एजेंट के ज़रिए एक पास
- LoopAgent: यह तब तक दोहराता है, जब तक कि लूप से बाहर निकलने की शर्त पूरी नहीं हो जाती या लूप ज़्यादा से ज़्यादा बार नहीं चल जाता
tool_context.actions.escalate = Trueसे होकर बाहर निकलें
अलग-अलग वर्शन में स्थिति में बदलाव:
CODE_FIXESको हर बार अपडेट किया जाता है- समय के साथ टेस्ट के नतीजों में सुधार दिखता है
- मान्य करने वाले व्यक्ति को सभी बदलाव दिखते हैं
मल्टी-पाइपलाइन आर्किटेक्चर:
- समीक्षा पाइपलाइन: सिर्फ़ पढ़ने के लिए विश्लेषण (मॉड्यूल 5)
- लूप ठीक करना: बार-बार सुधार करना (मॉड्यूल 6 का इनर लूप)
- फ़िक्स पाइपलाइन: लूप + सिंथेसाइज़र (मॉड्यूल 6 आउटर)
- रूट एजेंट: उपयोगकर्ता के मकसद के आधार पर काम करता है
फ़्लो को कंट्रोल करने वाले टूल:
exit_fix_loop()एस्केलेट करने के लिए सेट- कोई भी टूल, लूप पूरा होने का सिग्नल दे सकता है
- यह एजेंट के निर्देशों से, बाहर निकलने के लॉजिक को अलग करता है
ज़्यादा से ज़्यादा बार दोहराने की सुविधा की सुरक्षा:
- यह कुकी, इनफ़िनिट लूप को रोकने में मदद करती है
- इससे यह पक्का किया जाता है कि सिस्टम हमेशा जवाब दे
- जवाब में सबसे सही जानकारी दी गई हो, भले ही वह पूरी तरह सटीक न हो
आगे क्या करना है
आखिरी मॉड्यूल में, आपको अपने एजेंट को प्रोडक्शन में डिप्लॉय करने का तरीका बताया जाएगा:
- VertexAiSessionService की मदद से, परसिस्टेंट स्टोरेज सेट अप करना
- Google Cloud पर एजेंट इंजन में डिप्लॉय करना
- प्रोडक्शन एजेंट को मॉनिटर और डीबग करना
- स्केलिंग और भरोसेमंद तरीके से काम करने के सबसे सही तरीके
आपने सीक्वेंशियल और लूप आर्किटेक्चर की मदद से, पूरा मल्टी-एजेंट सिस्टम बनाया है. आपने जो पैटर्न सीखे हैं - स्टेट मैनेजमेंट, डाइनैमिक निर्देश, टूल ऑर्केस्ट्रेशन, और बार-बार सुधार करना - ये प्रोडक्शन-रेडी तकनीकें हैं. इनका इस्तेमाल, असल एजेंटिक सिस्टम में किया जाता है.
7. प्रोडक्शन में डिप्लॉय करना
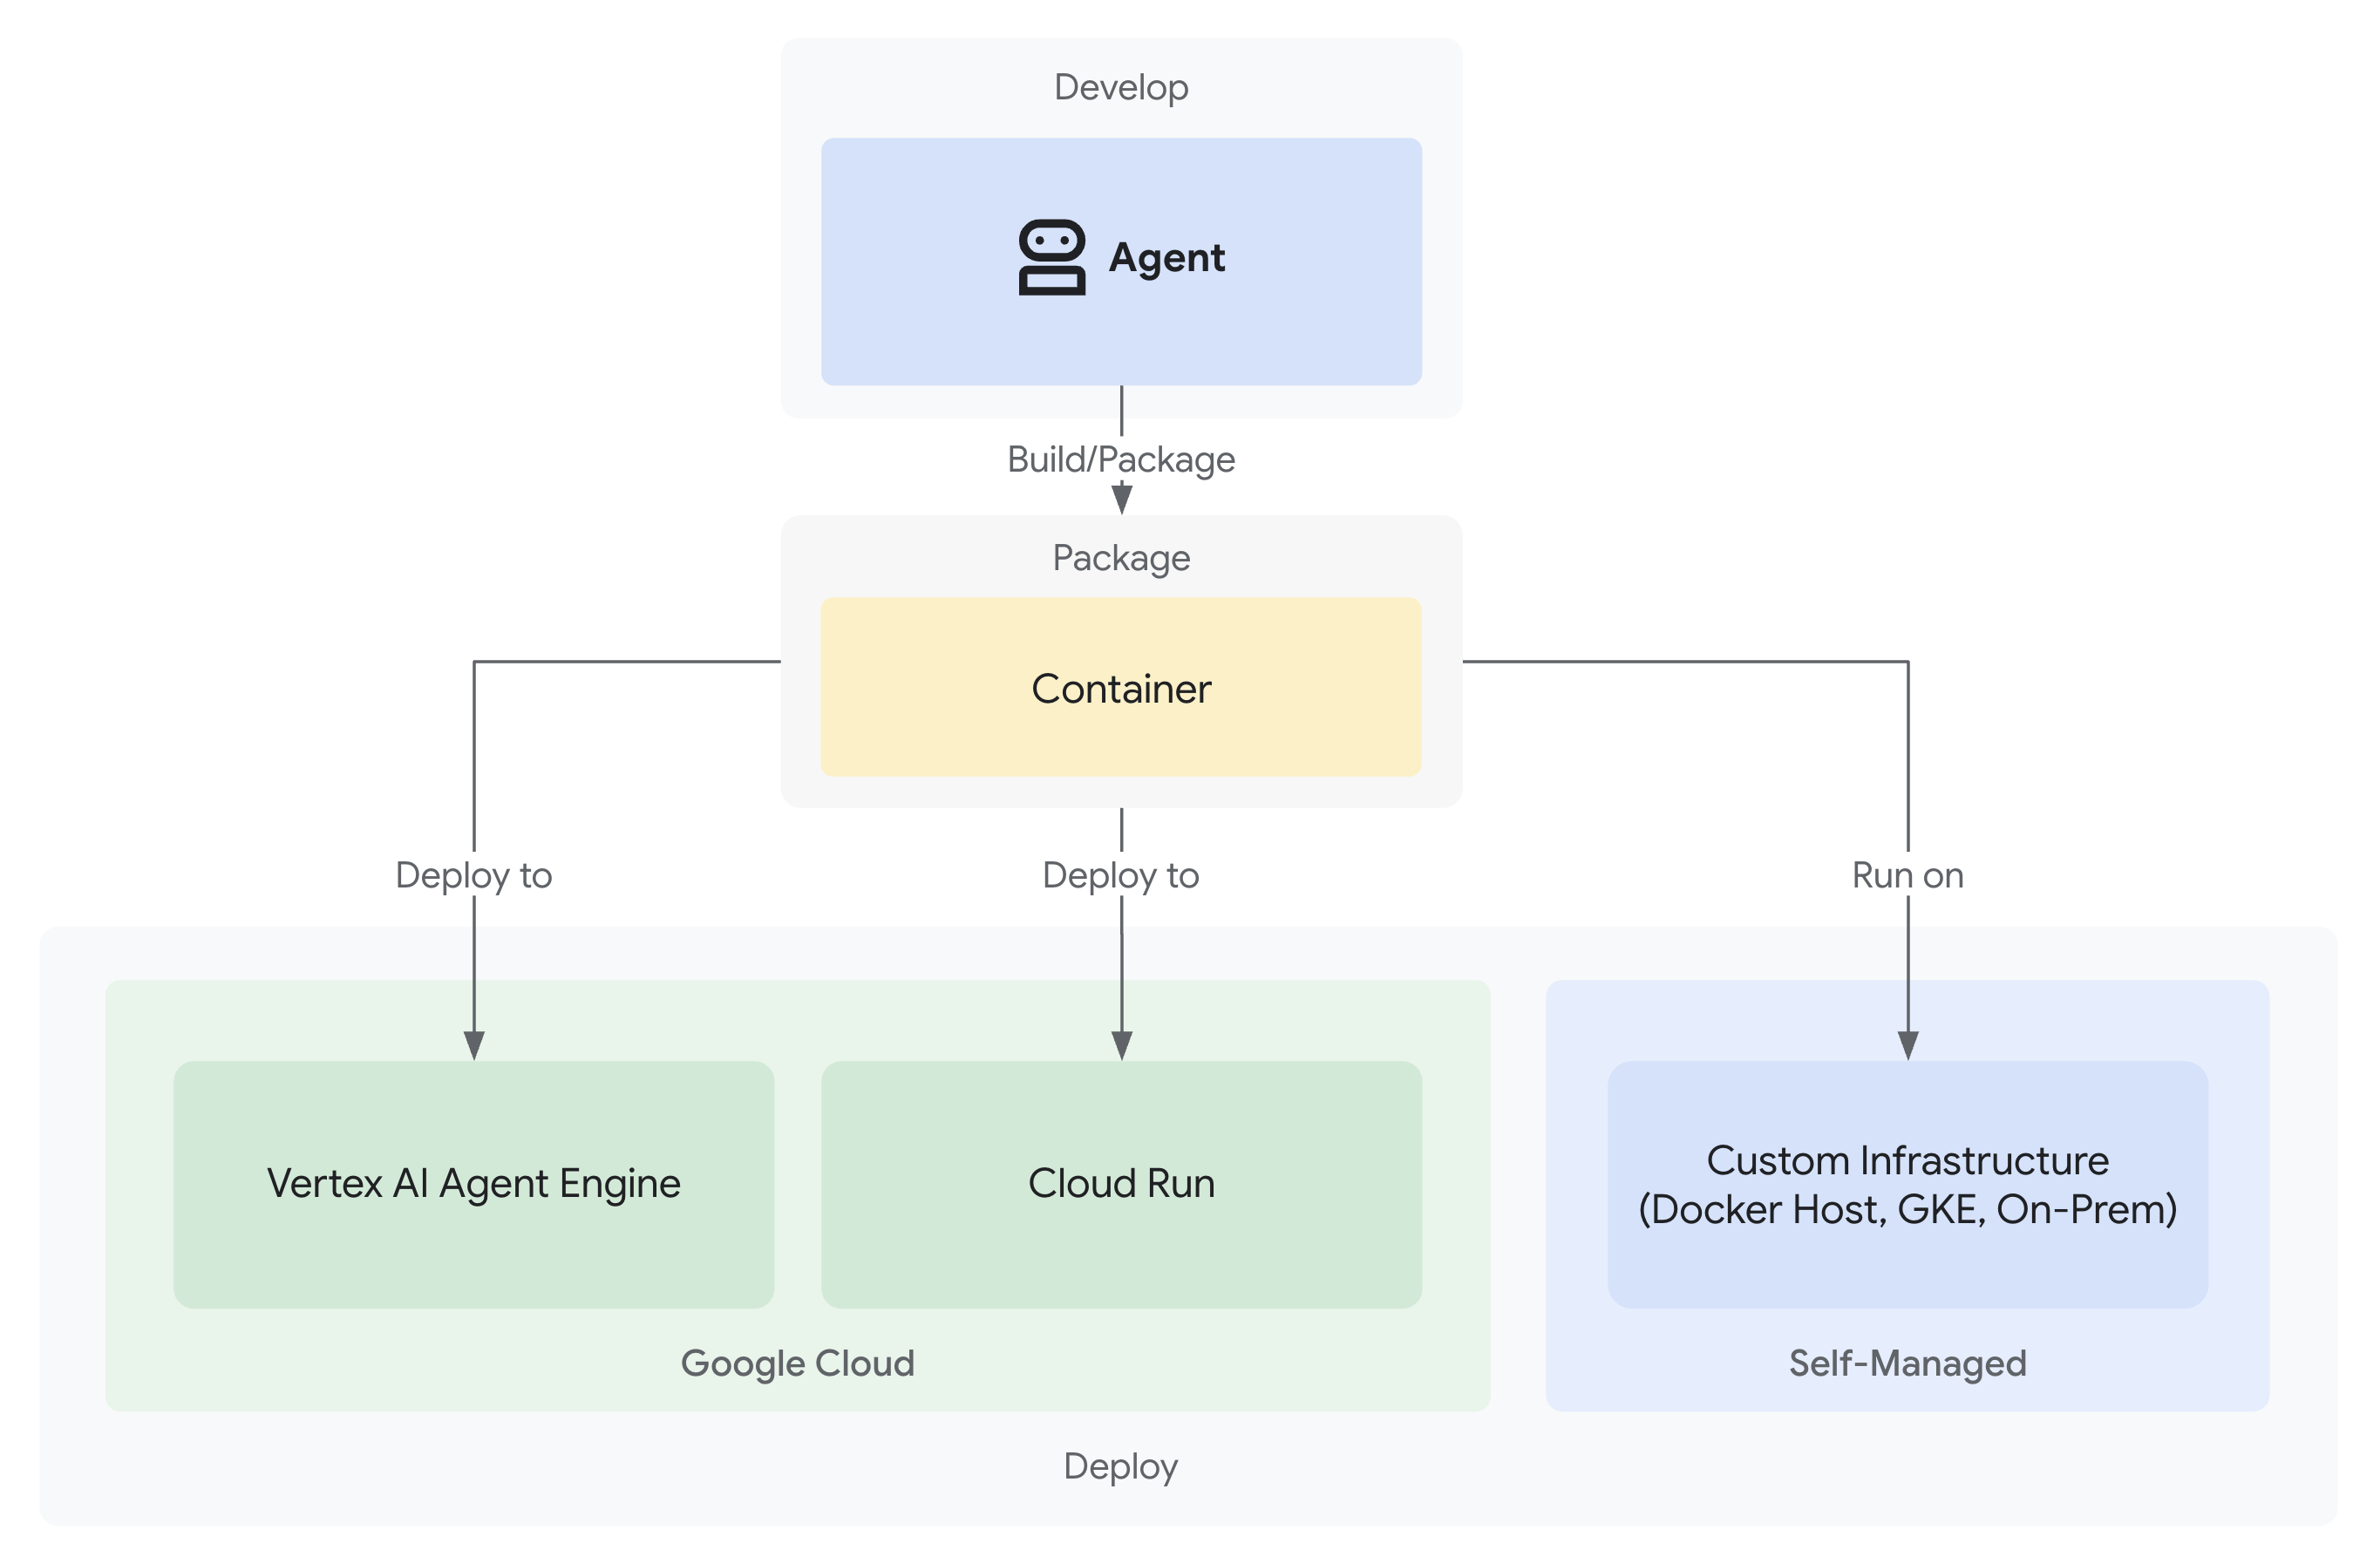
परिचय
आपका कोड रिव्यू असिस्टेंट अब समीक्षा और गड़बड़ी ठीक करने वाली पाइपलाइन के साथ पूरा हो गया है जो स्थानीय तौर पर काम कर रही हैं. यह सिर्फ़ आपकी मशीन पर काम करता है. इस मॉड्यूल में, आपको अपने एजेंट को Google Cloud पर डिप्लॉय करने का तरीका बताया जाएगा. इससे आपकी टीम, एजेंट को लगातार सेशन और प्रोडक्शन-ग्रेड इन्फ़्रास्ट्रक्चर के साथ ऐक्सेस कर पाएगी.
आपको यह जानकारी मिलेगी:
- डिप्लॉयमेंट के तीन तरीके: लोकल, Cloud Run, और एजेंट इंजन
- अपने-आप इंफ़्रास्ट्रक्चर का प्रावधान होने की सुविधा
- सेशन को बनाए रखने की रणनीतियां
- डिप्लॉय किए गए एजेंटों की जांच करना
डिप्लॉयमेंट के विकल्पों के बारे में जानकारी
ADK, डिप्लॉयमेंट के कई टारगेट के साथ काम करता है. हर टारगेट के अपने फ़ायदे और नुकसान होते हैं:
डिप्लॉयमेंट पाथ
सिग्नल | स्थानीय ( | Cloud Run ( | एजेंट इंजन ( |
जटिलता | मिनिमल | मीडियम | कम |
सेशन बनाए रखना | सिर्फ़ मेमोरी में (रीस्टार्ट करने पर मिट जाता है) | Cloud SQL (PostgreSQL) | Vertex AI मैनेज करता है (अपने-आप) |
इन्फ़्रास्ट्रक्चर | कोई नहीं (सिर्फ़ डेवलपर मशीन) | कंटेनर + डेटाबेस | पूरी तरह से प्रबंधित |
कोल्ड स्टार्ट | लागू नहीं | 100-2000 मि॰से॰ | 100-500 मि॰से॰ |
स्केलिंग | सिंगल इंस्टेंस | अपने-आप (शून्य पर) | ऑटोमैटिक |
लागत मॉडल | मुफ़्त (स्थानीय तौर पर कंप्यूट किया गया डेटा) | अनुरोध पर आधारित + फ़्री टियर | कंप्यूट के आधार पर |
यूज़र इंटरफ़ेस (यूआई) से जुड़ी सहायता | हां ( | हां ( | नहीं (सिर्फ़ एपीआई के लिए) |
इनके लिए सबसे सही | डेवलपमेंट/टेस्टिंग | ट्रैफ़िक में बदलाव, लागत कंट्रोल करना | प्रोडक्शन एजेंट |
डिप्लॉयमेंट का एक और विकल्प: Google Kubernetes Engine (GKE) उन ऐडवांस उपयोगकर्ताओं के लिए उपलब्ध है जिन्हें Kubernetes-लेवल कंट्रोल, कस्टम नेटवर्किंग या मल्टी-सर्विस ऑर्केस्ट्रेशन की ज़रूरत होती है. GKE डिप्लॉयमेंट के बारे में इस कोडलैब में नहीं बताया गया है. हालांकि, इसके बारे में ADK डिप्लॉयमेंट गाइड में बताया गया है.
क्या-क्या डिप्लॉय किया जाता है
Cloud Run या Agent Engine पर डिप्लॉय करते समय, इन चीज़ों को पैकेज किया जाता है और डिप्लॉय किया जाता है:
- आपका एजेंट कोड (
agent.py, सभी सब-एजेंट, टूल) - डिपेंडेंसी (
requirements.txt) - ADK API सर्वर (अपने-आप शामिल होता है)
- वेब यूज़र इंटरफ़ेस (सिर्फ़ Cloud Run के लिए, जब
--with_uiतय किया गया हो)
मुख्य अंतर:
- Cloud Run:
adk deploy cloud_runCLI का इस्तेमाल करता है (कंटेनर अपने-आप बनाता है) याgcloud run deploy(इसके लिए कस्टम Dockerfile की ज़रूरत होती है) - Agent Engine:
adk deploy agent_engineCLI का इस्तेमाल करता है. इसके लिए, कंटेनर बनाने की ज़रूरत नहीं होती. यह सीधे तौर पर Python कोड को पैकेज करता है
पहला चरण: अपना एनवायरमेंट कॉन्फ़िगर करना
अपनी .env फ़ाइल कॉन्फ़िगर करना
क्लाउड पर डिप्लॉय करने के लिए, आपकी .env फ़ाइल (मॉड्यूल 3 में बनाई गई) को अपडेट करने की ज़रूरत है. .env खोलें और इन सेटिंग की पुष्टि करें/इन्हें अपडेट करें:
सभी क्लाउड डिप्लॉयमेंट के लिए ज़रूरी है:
# Your actual GCP Project ID (REQUIRED)
GOOGLE_CLOUD_PROJECT=your-project-id

# GCP region for deployments (REQUIRED)
GOOGLE_CLOUD_LOCATION=us-central1

# Use Vertex AI (REQUIRED)
GOOGLE_GENAI_USE_VERTEXAI=true

# Model configuration (already set)
WORKER_MODEL=gemini-2.5-flash
CRITIC_MODEL=gemini-2.5-pro
बकेट के नाम सेट करें (deploy.sh चलाने से पहले ज़रूरी है):
डप्लॉयमेंट स्क्रिप्ट, इन नामों के आधार पर बकेट बनाती है. इन्हें अभी सेट करें:
# Staging bucket for Agent Engine code uploads (REQUIRED for agent-engine)
STAGING_BUCKET=gs://your-project-id-staging

# Artifact storage for reports and fixed code (REQUIRED for both cloud-run and agent-engine)
ARTIFACT_BUCKET=gs://your-project-id-artifacts
दोनों बकेट के नामों में, your-project-id की जगह अपना असल प्रोजेक्ट आईडी डालें. अगर ये बकेट मौजूद नहीं हैं, तो स्क्रिप्ट इन्हें बना देगी.
ज़रूरी नहीं वाले वैरिएबल (अगर इन्हें खाली छोड़ दिया जाता है, तो ये अपने-आप बन जाते हैं):
# Agent Engine ID (populated after first deployment)
AGENT_ENGINE_ID=

# Cloud Run Database credentials (created automatically if blank)
CLOUD_SQL_INSTANCE_NAME=
DB_USER=
DB_PASSWORD=
DB_NAME=
पुष्टि करने की प्रोसेस
अगर आपको डिप्लॉयमेंट के दौरान पुष्टि करने से जुड़ी गड़बड़ियां दिखती हैं, तो:
gcloud auth application-default login
gcloud config set project $GOOGLE_CLOUD_PROJECT
दूसरा चरण: डिप्लॉयमेंट स्क्रिप्ट को समझना
deploy.sh स्क्रिप्ट, डिप्लॉयमेंट के सभी मोड के लिए एक जैसा इंटरफ़ेस उपलब्ध कराती है:
./deploy.sh {local|cloud-run|agent-engine}
स्क्रिप्ट की सुविधाएं
इन्फ़्रास्ट्रक्चर प्रोविज़निंग:
- एपीआई चालू करना (AI Platform, Storage, Cloud Build, Cloud Trace, Cloud SQL)
- आईएएम की अनुमति का कॉन्फ़िगरेशन (सेवा खाते, भूमिकाएं)
- संसाधन बनाना (बकेट, डेटाबेस, इंस्टेंस)
- सही फ़्लैग के साथ डिप्लॉयमेंट
- डेटा को लागू करने के बाद पुष्टि करना
स्क्रिप्ट के मुख्य सेक्शन
- कॉन्फ़िगरेशन (लाइनें 1 से 35): प्रोजेक्ट, क्षेत्र, सेवा के नाम, डिफ़ॉल्ट
- हेल्पर फ़ंक्शन (लाइन 37 से 200): एपीआई चालू करना, बकेट बनाना, IAM सेटअप करना
- मुख्य लॉजिक (लाइनें 202-400): मोड के हिसाब से डिप्लॉयमेंट ऑर्केस्ट्रेशन
तीसरा चरण: एजेंट को एजेंट इंजन के लिए तैयार करना
Agent Engine पर डिप्लॉय करने से पहले, एक agent_engine_app.py फ़ाइल की ज़रूरत होती है. यह फ़ाइल, मैनेज किए गए रनटाइम के लिए आपके एजेंट को रैप करती है. यह आपके लिए पहले ही बना दिया गया है.
code_review_assistant/agent_engine_app.py देखें
👉 फ़ाइल खोलें:
"""
Agent Engine application wrapper.
This file prepares the agent for deployment to Vertex AI Agent Engine.
"""

from vertexai import agent_engines
from .agent import root_agent

# Wrap the agent in an AdkApp object for Agent Engine deployment
app = agent_engines.AdkApp(
    agent=root_agent,
    enable_tracing=True,
)
चौथा चरण: एजेंट इंजन में डिप्लॉय करना
ADK एजेंट के लिए, Agent Engine को प्रोडक्शन डिप्लॉयमेंट के लिए सुझाया गया है. इसकी वजह यह है कि यह:
- पूरी तरह से मैनेज किया गया इंफ़्रास्ट्रक्चर (कंटेनर बनाने की ज़रूरत नहीं है)
VertexAiSessionServiceकी मदद से सेशन को बनाए रखने की सुविधा- शून्य से अपने-आप स्केलिंग होना
- Cloud Trace इंटिग्रेशन की सुविधा डिफ़ॉल्ट रूप से चालू होती है
एजेंट इंजन, अन्य डिप्लॉयमेंट से किस तरह अलग है
तकनीकी तौर पर,
deploy.sh agent-engine
इस्तेमाल करता है:
adk deploy agent_engine \
  --project=$GOOGLE_CLOUD_PROJECT \
  --region=$GOOGLE_CLOUD_LOCATION \
  --staging_bucket=$STAGING_BUCKET \
  --display_name="Code Review Assistant" \
  --trace_to_cloud \
  code_review_assistant
इस निर्देश से:
- यह आपके Python कोड को सीधे तौर पर पैकेज करता है (Docker बिल्ड की ज़रूरत नहीं होती)
.envमें बताए गए स्टेजिंग बकेट में अपलोड किए गए वीडियो- यह मैनेज किया गया एजेंट इंजन इंस्टेंस बनाता है
- यह कुकी, जांचने की क्षमता के लिए Cloud Trace की सुविधा चालू करती है
- यह कुकी, रनटाइम को कॉन्फ़िगर करने के लिए
agent_engine_app.pyका इस्तेमाल करती है
Cloud Run आपके कोड को कंटेनर में बदलता है. वहीं, Agent Engine आपके Python कोड को सीधे तौर पर मैनेज किए गए रनटाइम एनवायरमेंट में चलाता है. यह सर्वरलेस फ़ंक्शन की तरह काम करता है.
डिप्लॉयमेंट चलाना
अपने प्रोजेक्ट के रूट से:
./deploy.sh agent-engine
डिप्लॉयमेंट के चरण
स्क्रिप्ट को इन फ़ेज़ में एक्ज़ीक्यूट होते हुए देखें:
Phase 1: API Enablement
  ✓ aiplatform.googleapis.com
  ✓ storage-api.googleapis.com
  ✓ cloudbuild.googleapis.com
  ✓ cloudtrace.googleapis.com

Phase 2: IAM Setup
  ✓ Getting project number
  ✓ Granting Storage Object Admin
  ✓ Granting AI Platform User
  ✓ Granting Cloud Trace Agent

Phase 3: Staging Bucket
  ✓ Creating gs://your-project-id-staging
  ✓ Setting permissions

Phase 4: Artifact Bucket
  ✓ Creating gs://your-project-id-artifacts
  ✓ Configuring access

Phase 5: Validation
  ✓ Checking agent.py exists
  ✓ Verifying root_agent defined
  ✓ Checking agent_engine_app.py exists
  ✓ Validating requirements.txt

Phase 6: Build & Deploy
  ✓ Packaging agent code
  ✓ Uploading to staging bucket
  ✓ Creating Agent Engine instance
  ✓ Configuring session persistence
  ✓ Setting up Cloud Trace integration
  ✓ Running health checks
इस प्रोसेस में 5 से 10 मिनट लगते हैं, क्योंकि यह एजेंट को पैकेज करता है और उसे Vertex AI के इन्फ़्रास्ट्रक्चर पर डिप्लॉय करता है.
अपने एजेंट इंजन का आईडी सेव करना
डिप्लॉयमेंट पूरा होने पर:
✅ Deployment successful!
   Agent Engine ID: 7917477678498709504
   Resource Name: projects/123456789/locations/us-central1/reasoningEngines/7917477678498709504
   Endpoint: https://us-central1-aiplatform.googleapis.com/v1/...

⚠️  IMPORTANT: Save this in your .env file:
   AGENT_ENGINE_ID=7917477678498709504
अपना
.env
फ़ाइल तुरंत:
echo "AGENT_ENGINE_ID=7917477678498709504" >> .env
इस आईडी की ज़रूरत इन कामों के लिए होती है:
- डिप्लॉय किए गए एजेंट की टेस्टिंग करना
- डिप्लॉयमेंट को बाद में अपडेट करना
- लॉग और ट्रेस ऐक्सेस करना
क्या परिनियोजित किया गया था
अब आपके एजेंट इंजन डिप्लॉयमेंट में ये शामिल हैं:
✅ समीक्षा करने की पूरी पाइपलाइन (चार एजेंट)
✅ गड़बड़ी ठीक करने की पूरी पाइपलाइन (लूप + सिंथेसाइज़र)
✅ सभी टूल (एएसटी विश्लेषण, स्टाइल की जांच, आर्टफ़ैक्ट जनरेशन)
✅ सेशन जारी रखने की सुविधा (VertexAiSessionService के ज़रिए अपने-आप चालू होती है)
✅ स्टेट मैनेजमेंट (सेशन/उपयोगकर्ता/लाइफ़टाइम टियर)
✅ जांचने की क्षमता (Cloud Trace चालू है)
✅ अपने-आप स्केल होने वाला इन्फ़्रास्ट्रक्चर
पांचवां चरण: डिप्लॉय किए गए एजेंट की जांच करना
अपनी .env फ़ाइल अपडेट करना
डप्लॉयमेंट के बाद, पुष्टि करें कि आपके .env में ये शामिल हैं:
AGENT_ENGINE_ID=7917477678498709504  # From deployment output
GOOGLE_CLOUD_PROJECT=your-project-id
GOOGLE_CLOUD_LOCATION=us-central1
टेस्ट स्क्रिप्ट चलाना
इस प्रोजेक्ट में, tests/test_agent_engine.py को खास तौर पर Agent Engine डिप्लॉयमेंट की टेस्टिंग के लिए शामिल किया गया है:
python tests/test_agent_engine.py
टेस्ट क्या करता है
- आपके Google Cloud प्रोजेक्ट की पुष्टि करता है
- यह कुकी, डिप्लॉय किए गए एजेंट के साथ सेशन बनाती है
- कोड रिव्यू का अनुरोध भेजता है (डीएफ़एस की गड़बड़ी का उदाहरण)
- Server-Sent Events (SSE) के ज़रिए जवाब को स्ट्रीम करता है
- यह कुकी, सेशन के बने रहने और उसकी स्थिति को मैनेज करने की पुष्टि करती है
अनुमानित आउटपुट
Authenticated with project: your-project-id
Targeting Agent Engine: projects/.../reasoningEngines/7917477678498709504

Creating new session...
Created session: 4857885913439920384

Sending query to agent and streaming response:
data: {"content": {"parts": [{"text": "I'll analyze your code..."}]}}
data: {"content": {"parts": [{"text": "**Code Structure Analysis**\n..."}]}}
data: {"content": {"parts": [{"text": "**Style Check Results**\n..."}]}}
data: {"content": {"parts": [{"text": "**Test Results**\n..."}]}}
data: {"content": {"parts": [{"text": "**Final Feedback**\n..."}]}}

Stream finished.
पुष्टि करने के लिए चेकलिस्ट
- ✅ समीक्षा की पूरी प्रोसेस (चारों एजेंट)
- ✅ स्ट्रीमिंग रिस्पॉन्स में, धीरे-धीरे आउटपुट दिखता है
- ✅ सेशन की स्थिति, सभी अनुरोधों में बनी रहती है
- ✅ पुष्टि करने या कनेक्शन से जुड़ी कोई गड़बड़ी नहीं है
- ✅ टूल कॉल सही तरीके से काम करते हैं (एएसटी विश्लेषण, स्टाइल की जांच)
- ✅ आर्टफ़ैक्ट सेव किए जाते हैं (ग्रेडिंग रिपोर्ट ऐक्सेस की जा सकती है)
वैकल्पिक तरीका: Cloud Run पर डिप्लॉय करना
हालांकि, प्रोडक्शन डिप्लॉयमेंट को स्ट्रीमलाइन करने के लिए Agent Engine का इस्तेमाल करने का सुझाव दिया जाता है, लेकिन Cloud Run से आपको ज़्यादा कंट्रोल मिलता है. साथ ही, यह ADK के वेब यूज़र इंटरफ़ेस (यूआई) के साथ काम करता है. इस सेक्शन में खास जानकारी दी गई है.
Cloud Run का इस्तेमाल कब करना चाहिए
अगर आपको ये सुविधाएं चाहिए, तो Cloud Run चुनें:
- उपयोगकर्ता के इंटरैक्शन के लिए ADK का वेब यूज़र इंटरफ़ेस (यूआई)
- कंटेनर एनवायरमेंट पर पूरा कंट्रोल
- डेटाबेस के कस्टम कॉन्फ़िगरेशन
- मौजूदा Cloud Run सेवाओं के साथ इंटिग्रेशन
Cloud Run डिप्लॉयमेंट कैसे काम करता है
तकनीकी तौर पर,
deploy.sh cloud-run
इस्तेमाल करता है:
adk deploy cloud_run \
  --project=$GOOGLE_CLOUD_PROJECT \
  --region=$GOOGLE_CLOUD_LOCATION \
  --service_name="code-review-assistant" \
  --app_name="code_review_assistant" \
  --port=8080 \
  --with_ui \
  --artifact_service_uri="gs://$ARTIFACT_BUCKET" \
  --trace_to_cloud \
  code_review_assistant
इस निर्देश से:
- यह आपके एजेंट कोड के साथ एक Docker कंटेनर बनाता है
- Google Artifact Registry में पुश करता है
- Cloud Run सेवा के तौर पर डिप्लॉय करता है
- इसमें ADK का वेब यूज़र इंटरफ़ेस (यूआई) शामिल है (
--with_ui) - यह कुकी, Cloud SQL कनेक्शन को कॉन्फ़िगर करती है. इसे स्क्रिप्ट, शुरुआती डिप्लॉयमेंट के बाद जोड़ती है
Agent Engine से मुख्य अंतर: Cloud Run आपके कोड को कंटेनर में रखता है और सेशन को बनाए रखने के लिए डेटाबेस की ज़रूरत होती है. वहीं, Agent Engine इन दोनों को अपने-आप मैनेज करता है.
Cloud Run डिप्लॉयमेंट कमांड
./deploy.sh cloud-run
क्या अलग है
इन्फ़्रास्ट्रक्चर:
- कंटेनर में डिप्लॉयमेंट (ADK, Docker को अपने-आप बनाता है)
- सेशन को बनाए रखने के लिए Cloud SQL (PostgreSQL)
- स्क्रिप्ट से अपने-आप बनने वाला डेटाबेस या मौजूदा इंस्टेंस का इस्तेमाल करता है
सेशन मैनेजमेंट:
VertexAiSessionServiceके बजायDatabaseSessionServiceका इस्तेमाल करता है.envमें डेटाबेस क्रेडेंशियल (या अपने-आप जनरेट होने वाले क्रेडेंशियल) ज़रूरी हैं- स्टेट, PostgreSQL डेटाबेस में सेव रहती है
यूज़र इंटरफ़ेस (यूआई) के साथ काम करता है:
--with_uiफ़्लैग के ज़रिए वेब यूज़र इंटरफ़ेस (स्क्रिप्ट से मैनेज किया जाता है)- ऐक्सेस करने की तारीख:
https://code-review-assistant-xyz.a.run.app
आपने क्या-क्या हासिल किया
आपके प्रोडक्शन डिप्लॉयमेंट में ये शामिल हैं:
✅ deploy.shस्क्रिप्ट
के ज़रिए अपने-आप चालू होने की सुविधा ✅ मैनेज किया गया इन्फ़्रास्ट्रक्चर (एजेंट इंजन, स्केलिंग, डेटा सेव करने, और मॉनिटरिंग को मैनेज करता है)
✅ सभी मेमोरी टियर (सेशन/उपयोगकर्ता/लाइफ़टाइम) में डेटा सेव करने की सुविधा ✅ क्रेडेंशियल को सुरक्षित तरीके से मैनेज करने की सुविधा (अपने-आप जनरेट होने और IAM सेटअप होने की सुविधा)
✅ स्केल किए जा सकने वाले आर्किटेक्चर (एक साथ इस्तेमाल करने वाले उपयोगकर्ताओं की संख्या शून्य से लेकर हज़ारों तक हो सकती है)
✅ निगरानी करने की सुविधा (Cloud Trace इंटिग्रेशन चालू है)
✅ प्रोडक्शन-ग्रेड गड़बड़ी ठीक करने और डेटा वापस पाने की सुविधा
मुख्य सिद्धांतों में महारत हासिल की गई
डिप्लॉयमेंट की तैयारी:
agent_engine_app.py: यह एजेंट कोAdkAppके साथ रैप करता है, ताकि एजेंट इंजन का इस्तेमाल किया जा सकेAdkApp,VertexAiSessionServiceको लगातार इस्तेमाल करने के लिए अपने-आप कॉन्फ़िगर करता हैenable_tracing=Trueके ज़रिए ट्रेसिंग की सुविधा चालू की गई है
डिप्लॉयमेंट के निर्देश:
adk deploy agent_engine: Python कोड को पैकेज करता है, इसमें कंटेनर नहीं होतेadk deploy cloud_run: Docker कंटेनर अपने-आप बनाता हैgcloud run deploy: कस्टम Dockerfile वाला अन्य विकल्प
डिप्लॉयमेंट के विकल्प:
- एजेंट इंजन: पूरी तरह से मैनेज किया जाता है, प्रोडक्शन के लिए सबसे तेज़
- Cloud Run: ज़्यादा कंट्रोल, वेब यूज़र इंटरफ़ेस (यूआई) के साथ काम करता है
- GKE: Kubernetes को बेहतर तरीके से कंट्रोल करना (GKE डिप्लॉयमेंट गाइड देखें)
मैनेज की जा रही सेवाएं:
- Agent Engine, सेशन को बनाए रखने की सुविधा को अपने-आप मैनेज करता है
- Cloud Run के लिए, डेटाबेस सेट अप करना ज़रूरी है. हालांकि, इसे अपने-आप भी बनाया जा सकता है
- दोनों में GCS के ज़रिए आर्टफ़ैक्ट सेव करने की सुविधा उपलब्ध है
सेशन मैनेजमेंट:
- Agent Engine:
VertexAiSessionService(अपने-आप) - Cloud Run:
DatabaseSessionService(Cloud SQL) - लोकल:
InMemorySessionService(कुछ समय के लिए उपलब्ध)
आपका एजेंट लाइव है
कोड रिव्यू असिस्टेंट अब यह है:
- एचटीटीपीएस एपीआई एंडपॉइंट के ज़रिए ऐक्सेस किया जा सकता है
- Persistent, जिसमें रीस्टार्ट होने के बाद भी स्थिति बनी रहती है
- टीम के सदस्यों की संख्या बढ़ने पर, स्केल करने की सुविधा अपने-आप चालू हो जाती है
- अनुरोध के पूरे ट्रेस के साथ Observable
- स्क्रिप्ट किए गए डिप्लॉयमेंट की मदद से बनाए रखने में आसान
आगे क्या करना है? आठवें मॉड्यूल में, आपको Cloud Trace का इस्तेमाल करना सिखाया जाएगा. इससे आपको अपने एजेंट की परफ़ॉर्मेंस को समझने, समीक्षा और ठीक करने की पाइपलाइन में आने वाली समस्याओं की पहचान करने, और एक्ज़ीक्यूशन के समय को ऑप्टिमाइज़ करने में मदद मिलेगी.
8. प्रोडक्शन की जांच करने की क्षमता
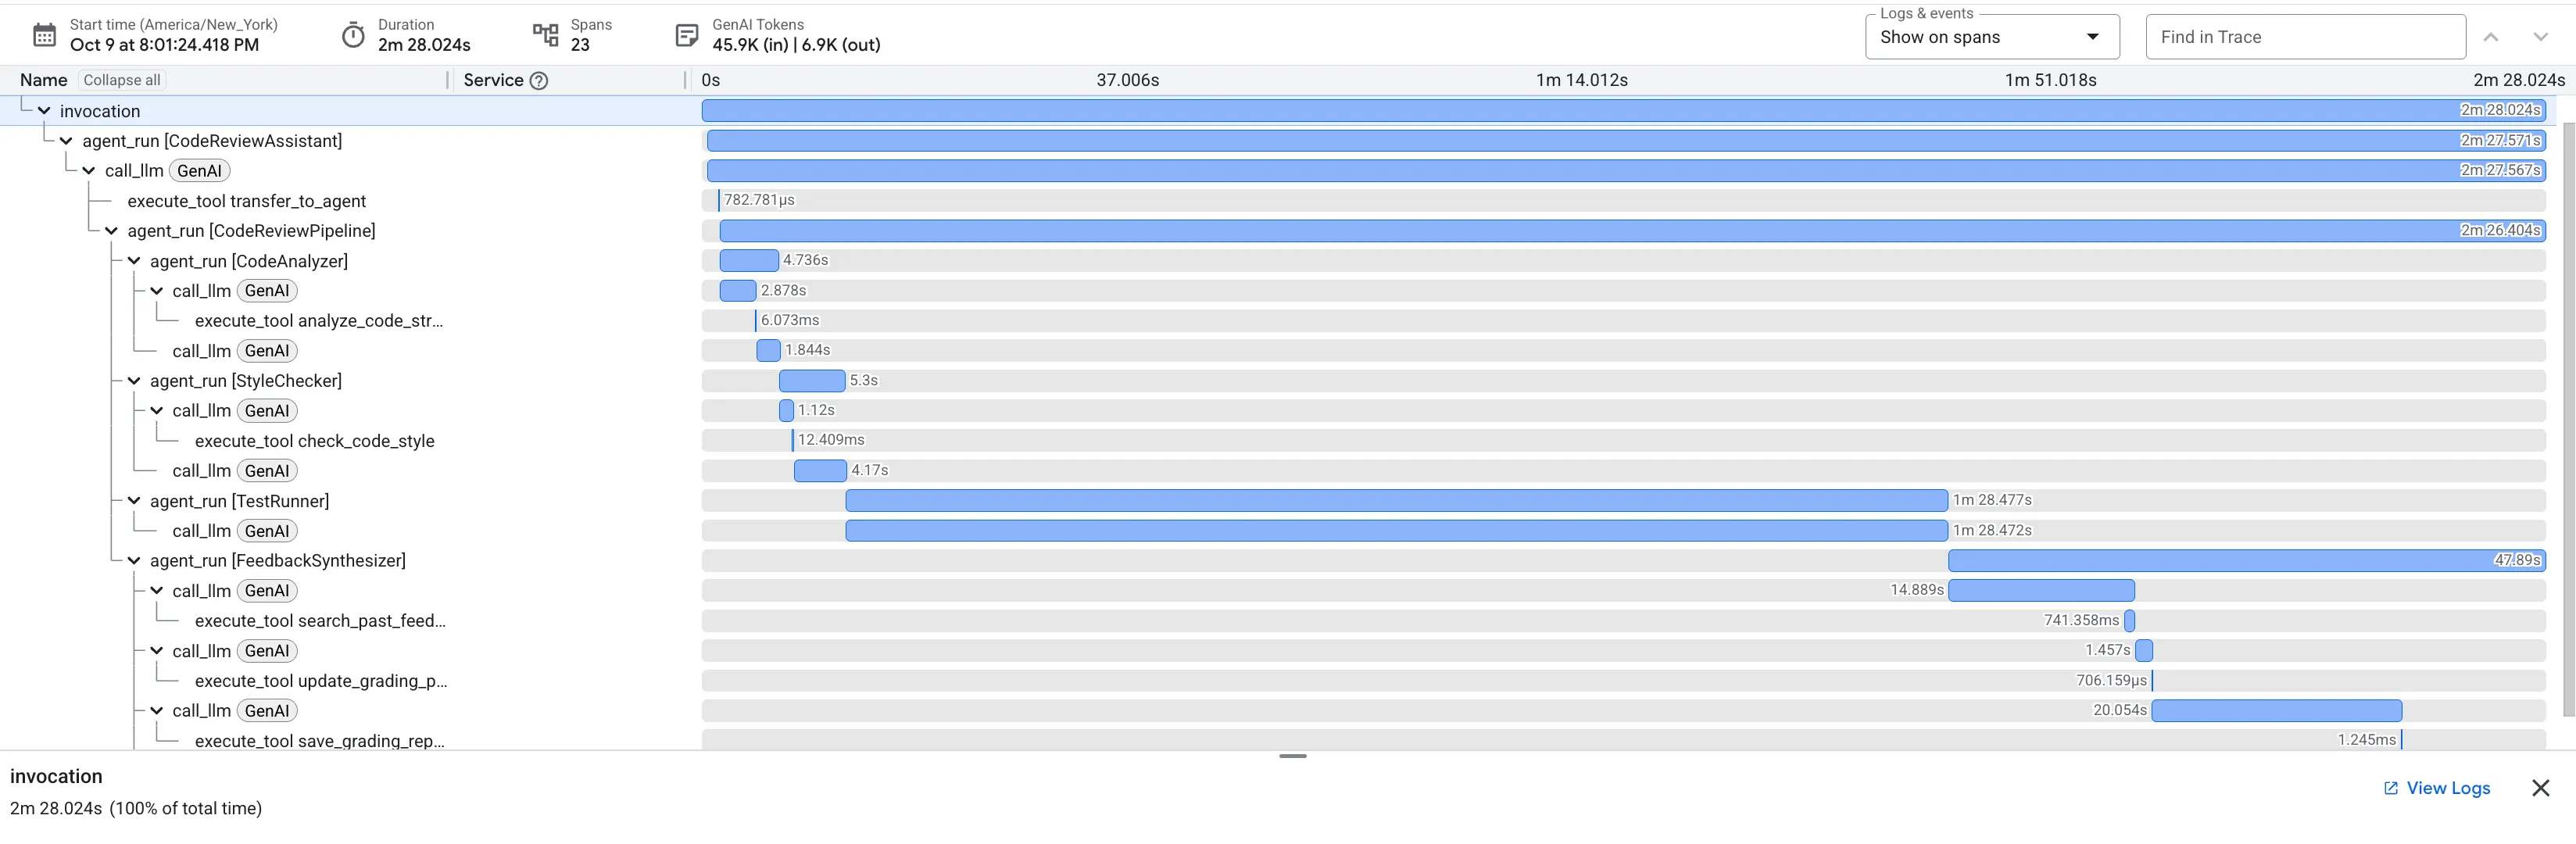
परिचय
कोड रिव्यू करने वाला आपका असिस्टेंट अब Agent Engine पर डिप्लॉय हो गया है और प्रोडक्शन में काम कर रहा है. हालांकि, आपको कैसे पता चलेगा कि यह ठीक से काम कर रहा है? क्या आपके पास इन अहम सवालों के जवाब हैं:
- क्या एजेंट तुरंत जवाब दे रहा है?
- कौनसी कार्रवाइयां सबसे धीमी हैं?
- क्या फ़िक्स लूप सही तरीके से काम कर रहे हैं?
- परफ़ॉर्मेंस बॉटलनेक कहां हैं?
ऑब्ज़र्वेबिलिटी के बिना, आपको कुछ भी नहीं दिखेगा. आपने डिप्लॉयमेंट के दौरान --trace-to-cloud फ़्लैग का इस्तेमाल किया था. इससे Cloud Trace अपने-आप चालू हो गया. इससे आपको हर उस अनुरोध की पूरी जानकारी मिलती है जिसे आपका एजेंट प्रोसेस करता है. इससे डीबग करने की प्रोसेस, अनुमान लगाने से बदलकर फ़ॉरेंसिक विश्लेषण में बदल जाती है.
इस मॉड्यूल में, आपको ट्रेस पढ़ने, अपने एजेंट की परफ़ॉर्मेंस की विशेषताओं को समझने, और ठोस सबूतों के आधार पर ऑप्टिमाइज़ेशन के लिए क्षेत्रों की पहचान करने का तरीका बताया जाएगा.
ट्रेस और स्पैन को समझना
ट्रेस क्या होता है?
ट्रेस, किसी एक अनुरोध को हैंडल करने के दौरान एजेंट की पूरी टाइमलाइन होती है. यह उपयोगकर्ता की क्वेरी भेजने से लेकर, फ़ाइनल जवाब मिलने तक की पूरी प्रोसेस को कैप्चर करता है. हर ट्रेस में यह जानकारी दिखती है:
- अनुरोध पूरा होने में लगने वाला कुल समय
- वे सभी कार्रवाइयां जो पूरी हो चुकी हैं
- ऑपरेशन एक-दूसरे से कैसे जुड़े होते हैं (पैरंट-चाइल्ड रिलेशनशिप)
- हर ऑपरेशन कब शुरू और खत्म हुआ
स्पैन क्या है?
स्पैन, ट्रेस में काम की एक यूनिट को दिखाता है. कोड रिव्यू असिस्टेंट में, स्पैन के ये टाइप आम तौर पर इस्तेमाल किए जाते हैं:
agent_run: किसी एजेंट (रूट एजेंट या सब-एजेंट) को लागू करनाcall_llm: किसी लैंग्वेज मॉडल से किया गया अनुरोधexecute_tool: टूल फ़ंक्शन को लागू करनाstate_read/state_write: स्टेट मैनेजमेंट ऑपरेशंसcode_executor: टेस्ट के साथ कोड चलाना
स्पैन में ये शामिल होते हैं:
- नाम: यह किस कार्रवाई को दिखाता है
- अवधि: इसमें कितना समय लगा
- एट्रिब्यूट: मेटाडेटा, जैसे कि मॉडल का नाम, टोकन की संख्या, इनपुट/आउटपुट
- स्टेटस: अनुरोध पूरा हुआ या नहीं
- पैरंट/चाइल्ड रिलेशनशिप: किस ऑपरेशन को किसने ट्रिगर किया
ऑटोमैटिक इंस्ट्रूमेंटेशन
--trace-to-cloud की मदद से डिप्लॉय करने पर, ADK अपने-आप इन चीज़ों को इंस्ट्रुमेंट करता है:
- हर एजेंट को शुरू करने और सब-एजेंट को कॉल करने की प्रोसेस
- टोकन की संख्या के साथ एलएलएम के सभी अनुरोध
- इनपुट/आउटपुट के साथ टूल के एक्ज़ीक्यूशन
- स्टेट से जुड़ी कार्रवाइयां (पढ़ें/लिखें)
- फ़िक्स पाइपलाइन में लूप के इटरेशन
- गड़बड़ी की स्थितियां और फिर से कोशिश करना
कोड में कोई बदलाव करने की ज़रूरत नहीं है - ट्रेसिंग की सुविधा, ADK के रनटाइम में पहले से मौजूद होती है.
पहला चरण: Cloud Trace Explorer को ऐक्सेस करना
Google Cloud Console में Cloud Trace खोलें:
- Cloud Trace Explorer पर जाएं
- ड्रॉपडाउन से अपना प्रोजेक्ट चुनें. यह पहले से चुना हुआ होना चाहिए
- आपको मॉड्यूल 7 में, अपने टेस्ट के निशान दिखने चाहिए
अगर आपको अब तक ट्रेस नहीं दिख रहे हैं, तो:
आपने मॉड्यूल 7 में जो टेस्ट चलाया था उससे ट्रेस जनरेट होने चाहिए. अगर सूची खाली है, तो कुछ ट्रेस डेटा जनरेट करें:
python tests/test_agent_engine.py
कंसोल में ट्रेस दिखने में एक से दो मिनट लगते हैं.
आपको क्या दिख रहा है
ट्रेस एक्सप्लोरर में यह जानकारी दिखती है:
- ट्रेस की सूची: हर पंक्ति एक पूरे अनुरोध को दिखाती है
- टाइमलाइन: अनुरोध कब किए गए
- कुल समय: हर अनुरोध को पूरा होने में कितना समय लगा
- अनुरोध की जानकारी: टाइमस्टैंप, इंतज़ार का समय, स्पैन की संख्या
यह आपके प्रोडक्शन ट्रैफ़िक का लॉग है. इसमें आपके एजेंट के साथ हुए हर इंटरैक्शन का रिकॉर्ड होता है.
दूसरा चरण: समीक्षा पाइपलाइन के ट्रेस की जांच करना
वॉटरफ़ॉल व्यू खोलने के लिए, सूची में मौजूद किसी भी ट्रेस पर क्लिक करें.
आपको एक गैंट चार्ट दिखेगा, जिसमें टास्क पूरा होने की पूरी टाइमलाइन दिखेगी. रूट invocation स्पैन, पूरे अनुरोध को दिखाता है. इसके नीचे, हर सब-एजेंट, टूल, और एलएलएम कॉल के लिए स्पैन मौजूद होते हैं.
वॉटरफ़ॉल को समझना: परफ़ॉर्मेंस में आने वाली रुकावटों की पहचान करना
हर बार एक स्पैन दिखाता है. इसकी हॉरिज़ॉन्टल पोज़िशन से पता चलता है कि यह कब शुरू हुआ था. साथ ही, इसकी लंबाई से पता चलता है कि इसमें कितना समय लगा. इससे तुरंत पता चलता है कि आपका एजेंट किस काम में ज़्यादा समय लगा रहा है.
ऊपर दिए गए ट्रेस से मिली अहम जानकारी:
- कुल इंतज़ार का समय: पूरे अनुरोध में 2 मिनट और 28 सेकंड लगे.
- सब-एजेंट के हिसाब से ब्रेकडाउन:
Code Analyzer: 4.7 सेकंडStyle Checker: 5.3 सेकंडTest Runner: 1 मिनट और 28 सेकंडFeedback Synthesizer: 47.9 सेकंड
- क्रिटिकल पाथ विश्लेषण:
Test Runnerएजेंट, परफ़ॉर्मेंस में आने वाली मुख्य रुकावट है. इसमें अनुरोध के कुल समय का करीब 59% लगता है.
यह विज़िबिलिटी बहुत असरदार होती है. समय कहां खर्च हुआ, इसका अनुमान लगाने के बजाय, आपके पास इस बात का पक्का सबूत होता है कि अगर आपको लेटेन्सी को ऑप्टिमाइज़ करना है, तो Test Runner सबसे सही टारगेट है.
लागत ऑप्टिमाइज़ करने के लिए, टोकन के इस्तेमाल की जांच करना
Cloud Trace सिर्फ़ समय नहीं दिखाता है. यह हर एलएलएम कॉल के लिए टोकन के इस्तेमाल को कैप्चर करके, लागत भी दिखाता है.
किसी
call_llm
ट्रेस में मौजूद स्पैन. आपको जानकारी वाले पैनल में, llm.usage.prompt_tokens और llm.usage.completion_tokens के लिए एट्रिब्यूट दिखेंगे.
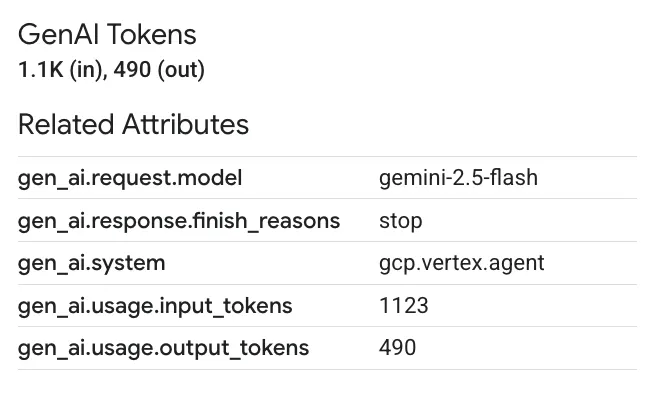
इसकी मदद से:
- लागत को विस्तृत स्तर पर ट्रैक करें: देखें कि हर एजेंट और टूल कितने टोकन इस्तेमाल कर रहा है.
- ऑप्टिमाइज़ेशन के अवसरों की पहचान करना: अगर कोई एजेंट बहुत ज़्यादा टोकन का इस्तेमाल कर रहा है, तो हो सकता है कि उसके प्रॉम्प्ट को बेहतर बनाया जा सके. इसके अलावा, उस खास टास्क के लिए छोटे और ज़्यादा किफ़ायती मॉडल पर स्विच किया जा सकता है.
तीसरा चरण: फ़िक्स पाइपलाइन के ट्रेस का विश्लेषण करना
फ़िक्स करने की प्रोसेस ज़्यादा मुश्किल है, क्योंकि इसमें LoopAgent शामिल है. Cloud Trace की मदद से, इस तरह के व्यवहार को आसानी से समझा जा सकता है.
ऐसा ट्रेस ढूंढें जिसके स्पैन के नामों में "FixAttemptLoop" शामिल हो.
अगर आपके पास कोई टेस्ट स्क्रिप्ट नहीं है, तो टेस्ट स्क्रिप्ट चलाएं. इसके बाद, जब आपसे पूछा जाए कि क्या आपको कोड ठीक करना है, तो 'हां' पर क्लिक करें.
लूप स्ट्रक्चर की जांच करना
ट्रेस व्यू में, लूप के एक्ज़ीक्यूशन को साफ़ तौर पर दिखाया गया है. अगर समस्या ठीक करने की प्रोसेस दो बार पूरी होने के बाद, समस्या ठीक हुई है, तो आपको FixAttemptLoop स्पैन में नेस्ट किए गए दो loop_iteration स्पैन दिखेंगे. इनमें से हर स्पैन में CodeFixer, FixTestRunner, और FixValidator एजेंट का पूरा साइकल शामिल होगा.
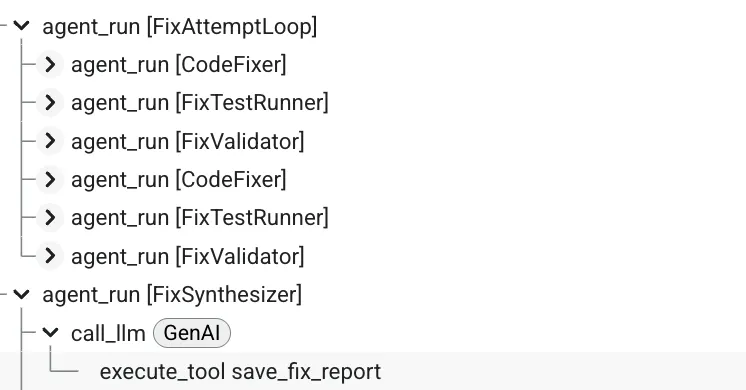
लूप ट्रेस से मिली मुख्य जानकारी:
- इटरेशन के हिसाब से जवाब को बेहतर बनाया जा रहा है: आपको दिखेगा कि सिस्टम
loop_iteration: 1में जवाब को ठीक करने की कोशिश कर रहा है. इसके बाद, इसकी पुष्टि की जाएगी. हालांकि, यह जवाब सही नहीं है, इसलिए सिस्टमloop_iteration: 2में फिर से कोशिश करेगा. - कन्वर्जेंस का आकलन किया जा सकता है: हर इटरेशन की अवधि और नतीजों की तुलना करके, यह समझा जा सकता है कि सिस्टम सही समाधान तक कैसे पहुंचा.
- डीबग करना आसान हो गया है: अगर कोई लूप ज़्यादा से ज़्यादा बार चलने के बाद भी काम नहीं करता है, तो हर इटरेशन के स्पैन में एजेंट की स्थिति और उसके व्यवहार की जांच की जा सकती है. इससे यह पता लगाया जा सकता है कि फ़िक्स क्यों नहीं हो रहे हैं.
इस तरह की जानकारी, प्रोडक्शन में मौजूद मुश्किल और स्टेटफ़ुल लूप के व्यवहार को समझने और डीबग करने के लिए बहुत ज़रूरी है.
चौथा चरण: आपको क्या पता चला
परफ़ॉर्मेंस पैटर्न
ट्रेस की जांच करने के बाद, अब आपके पास डेटा पर आधारित अहम जानकारी है:
समीक्षा की प्रोसेस:
- मुख्य बॉटलनेक:
Test Runnerएजेंट, खास तौर पर कोड एक्ज़ीक्यूशन और एलएलएम पर आधारित टेस्ट जनरेट करने में सबसे ज़्यादा समय लगता है. - तेज़ी से काम करना: डिटरमिनिस्टिक टूल (
analyze_code_structure) और स्टेट मैनेजमेंट ऑपरेशन बहुत तेज़ी से काम करते हैं. साथ ही, इनसे परफ़ॉर्मेंस पर कोई असर नहीं पड़ता.
पाइपलाइन ठीक करना:
- कन्वर्जेंस रेट: आपको दिखेगा कि ज़्यादातर गड़बड़ियां एक से दो बार में ठीक हो जाती हैं. इससे पता चलता है कि लूप आर्किटेक्चर असरदार है.
- प्रोग्रेसिव कॉस्ट: बाद के इटरेशन में ज़्यादा समय लग सकता है, क्योंकि एलएलएम का कॉन्टेक्स्ट, पुष्टि कराने के पिछले चरणों में दी गई जानकारी के साथ बढ़ता जाता है.
लागत बढ़ाने वाले फ़ैक्टर:
- टोकन का इस्तेमाल: इससे यह पता लगाया जा सकता है कि किन एजेंट (जैसे, सिंथेसाइज़र) को सबसे ज़्यादा टोकन की ज़रूरत है. साथ ही, यह तय किया जा सकता है कि उस टास्क के लिए, ज़्यादा बेहतर लेकिन महंगा मॉडल इस्तेमाल करना सही है या नहीं.
समस्याएं कहां देखें
प्रोडक्शन में ट्रेस की समीक्षा करते समय, इन बातों का ध्यान रखें:
- ट्रेस काफ़ी लंबे समय तक दिखना: यह परफ़ॉर्मेंस में गिरावट या लूप के अनचाहे व्यवहार का संकेत है.
- फ़ेल हुए स्पैन (लाल रंग में मार्क किए गए): इससे उस ऑपरेशन के बारे में पता चलता है जो पूरा नहीं हो सका.
- लूप के बहुत ज़्यादा इटरेशन (>2): इससे, सुधार जनरेट करने के लॉजिक में समस्या का पता चल सकता है.
- ज़्यादा टोकन संख्या: इससे प्रॉम्प्ट को ऑप्टिमाइज़ करने या मॉडल चुनने के विकल्पों में बदलाव करने के अवसरों के बारे में पता चलता है.
आपने क्या सीखा
Cloud Trace की मदद से, अब आपको यह पता चल गया है कि:
✅ अनुरोध के फ़्लो को विज़ुअलाइज़ करें: क्रमवार और लूप पर आधारित पाइपलाइन के ज़रिए, अनुरोध के पूरे होने का पाथ देखें.
✅ परफ़ॉर्मेंस से जुड़ी समस्याओं की पहचान करना: वाटरफ़ॉल चार्ट का इस्तेमाल करके, सबसे धीमी कार्रवाइयों का पता लगाएं.
✅ लूप के व्यवहार का विश्लेषण करना: देखें कि इंटरैक्ट करते हुए लगातार सुधार करने वाले एजेंट, कई बार कोशिश करने के बाद किसी समाधान पर कैसे पहुंचते हैं.
✅ टोकन की लागत ट्रैक करें: एलएलएम स्पैन की जांच करके, टोकन के इस्तेमाल को बारीकी से मॉनिटर और ऑप्टिमाइज़ करें.
मुख्य सिद्धांतों में महारत हासिल की गई
- ट्रेस और स्पैन: ये ऑब्ज़र्वेबिलिटी की बुनियादी इकाइयां हैं. ये अनुरोधों और उनमें होने वाली कार्रवाइयों को दिखाती हैं.
- वॉटरफ़ॉल विश्लेषण: एक्ज़ीक्यूशन के समय और डिपेंडेंसी को समझने के लिए, गैंट चार्ट पढ़ना.
- क्रिटिकल पाथ की पहचान करना: कार्रवाइयों का ऐसा क्रम ढूंढना जिससे कुल लेटेंसी तय होती है.
- ज़्यादा बारीकी से निगरानी करने की सुविधा: इसमें न सिर्फ़ समय, बल्कि हर कार्रवाई के लिए टोकन की संख्या जैसे मेटाडेटा को भी देखा जा सकता है. यह सुविधा, ADK की मदद से अपने-आप चालू हो जाती है.
आगे क्या करना है
Cloud Trace के बारे में ज़्यादा जानें:
- समस्याओं का पता लगाने के लिए, ट्रेस की नियमित तौर पर निगरानी करना
- परफ़ॉर्मेंस में गिरावट का पता लगाने के लिए ट्रेस की तुलना करना
- ऑप्टिमाइज़ेशन से जुड़े फ़ैसले लेने के लिए, ट्रेस डेटा का इस्तेमाल करना
- धीमे अनुरोधों को ढूंढने के लिए, अवधि के हिसाब से फ़िल्टर करना
बेहतर मॉनिटरिंग (ज़रूरी नहीं):
- ज़्यादा बारीकी से विश्लेषण करने के लिए, ट्रेस को BigQuery में एक्सपोर्ट करें (दस्तावेज़)
- Cloud Monitoring में कस्टम डैशबोर्ड बनाना
- परफ़ॉर्मेंस में गिरावट आने पर सूचनाएं पाने की सुविधा सेट अप करना
- ऐप्लिकेशन लॉग के साथ ट्रेस को कोरिलेट करना
9. नतीजा: प्रोटोटाइप से प्रोडक्शन तक
आपने क्या बनाया है
आपने सिर्फ़ सात लाइनों के कोड से शुरुआत की और प्रोडक्शन-ग्रेड एआई एजेंट सिस्टम बनाया:
# Where we started (7 lines)
agent = Agent(
    model="gemini-2.5-flash",
    instruction="Review Python code for issues"
)

# Where we ended (production system)
- Two distinct multi-agent pipelines (review and fix) built from 8 specialized agents.
- An iterative fix loop architecture for automated validation and retries.
- Real AST-based code analysis tools for deterministic, accurate feedback.
- Robust state management using the "constants pattern" for type-safe communication.
- Fully automated deployment to a managed, scalable cloud infrastructure.
- Complete, built-in observability with Cloud Trace for production monitoring.
आर्किटेक्चर के मुख्य पैटर्न में महारत हासिल करना
पैटर्न | लागू करना | प्रोडक्शन पर असर |
टूल इंटिग्रेशन | AST विश्लेषण, स्टाइल की जांच | असल पुष्टि, सिर्फ़ एलएलएम की राय नहीं |
सीक्वेंशियल पाइपलाइन | समीक्षा करें → वर्कफ़्लो ठीक करें | अनुमान लगाया जा सकने वाला और डीबग किया जा सकने वाला एक्ज़ीक्यूशन |
लूप आर्किटेक्चर | समस्याओं को बार-बार ठीक करना और बाहर निकलने की शर्तें | जब तक लक्ष्य हासिल न हो जाए, तब तक खुद को बेहतर बनाना |
स्टेट मैनेजमेंट | कॉन्स्टेंट पैटर्न, तीन लेयर वाली मेमोरी | टाइप-सेफ़ और बनाए रखने लायक स्टेट हैंडलिंग |
प्रोडक्शन डिप्लॉयमेंट | deploy.sh के ज़रिए एजेंट इंजन | मैनेज किया गया, ज़रूरत के हिसाब से बढ़ाया जा सकने वाला इन्फ़्रास्ट्रक्चर |
जांचने की क्षमता | Cloud Trace इंटिग्रेशन | प्रोडक्शन के व्यवहार की पूरी जानकारी |
ट्रेस से प्रोडक्शन की अहम जानकारी
Cloud Trace के डेटा से अहम जानकारी मिली है:
✅ बॉटलनैक की पहचान की गई: TestRunner के एलएलएम कॉल में ज़्यादा समय लगता है
✅ टूल की परफ़ॉर्मेंस: AST विश्लेषण 100 मि॰से॰ में पूरा होता है (बहुत अच्छा)
✅ सफलता दर: गड़बड़ियों को ठीक करने के लिए, दो से तीन बार दोहराने की ज़रूरत होती है
✅ टोकन का इस्तेमाल: हर समीक्षा के लिए ~600 टोकन और गड़बड़ियों को ठीक करने के लिए ~1800 टोकन
इन अहम जानकारी से, लगातार सुधार करने में मदद मिलती है.
संसाधन मिटाना (ज़रूरी नहीं)
अगर आपको एक्सपेरिमेंट नहीं करना है और शुल्क से बचना है, तो:
एजेंट इंजन का डिप्लॉयमेंट मिटाना:
import vertexai

client = vertexai.Client(  # For service interactions via client.agent_engines
    project="PROJECT_ID",
    location="LOCATION",
)

RESOURCE_NAME = "projects/{PROJECT_ID}/locations/{LOCATION}/reasoningEngines/{RESOURCE_ID}"

client.agent_engines.delete(
    name=RESOURCE_NAME,
    force=True, # Optional, if the agent has resources (e.g. sessions, memory)
)
Cloud Run सेवा को मिटाएं (अगर बनाई गई है):
gcloud run services delete code-review-assistant \
    --region=$GOOGLE_CLOUD_LOCATION \
    --quiet
Cloud SQL इंस्टेंस मिटाएं (अगर बनाया गया है):
gcloud sql instances delete your-project-db \
    --quiet
स्टोरेज में जगह बनाएं:
gsutil -m rm -r gs://your-project-staging
gsutil -m rm -r gs://your-project-artifacts
अगले चरण
बुनियादी सेटअप पूरा होने के बाद, इन बेहतर सुविधाओं का इस्तेमाल करें:
- ज़्यादा भाषाएँ जोड़ें: JavaScript, Go, Java के लिए टूल उपलब्ध कराएँ
- GitHub के साथ इंटिग्रेट करना: पीआर की अपने-आप समीक्षाएं
- कैशिंग लागू करना: सामान्य पैटर्न के लिए इंतज़ार का समय कम करना
- खास एजेंट जोड़ना: सुरक्षा स्कैनिंग, परफ़ॉर्मेंस का विश्लेषण
- A/B टेस्टिंग चालू करना: अलग-अलग मॉडल और प्रॉम्प्ट की तुलना करना
- मेट्रिक एक्सपोर्ट करना: खास जांचने की क्षमता वाले प्लैटफ़ॉर्म पर ट्रेस भेजना
सीखने लायक ज़रूरी बातें
- आसान तरीके से शुरू करें और तेज़ी से दोहराएं: मैनेज किए जा सकने वाले चरणों में प्रोडक्शन के लिए सात लाइनें
- प्रॉम्प्ट के बजाय टूल का इस्तेमाल करना: "कृपया गड़बड़ियों की जांच करें" के बजाय, एएसटी का रीयल-टाइम विश्लेषण करना बेहतर होता है
- स्टेट मैनेजमेंट ज़रूरी है: कॉन्स्टेंट पैटर्न से टाइपो की वजह से होने वाली गड़बड़ियों को रोका जा सकता है
- लूप के लिए, बाहर निकलने की शर्तें ज़रूरी हैं: हमेशा ज़्यादा से ज़्यादा इटरेशन और एस्केलेशन सेट करें
- ऑटोमेशन की मदद से डिप्लॉय करना: deploy.sh, सभी जटिलताओं को मैनेज करता है
- निगरानी करना ज़रूरी है: जिस चीज़ को मेज़र नहीं किया जा सकता उसे बेहतर नहीं बनाया जा सकता
सीखते रहने के लिए संसाधन
- ADK से जुड़े दस्तावेज़
- ADK के ऐडवांस पैटर्न
- एजेंट इंजन गाइड
- Cloud Run के दस्तावेज़
- Cloud Trace के बारे में दस्तावेज़
आपका सफ़र जारी है
आपने सिर्फ़ कोड रिव्यू असिस्टेंट नहीं बनाया है, बल्कि प्रोडक्शन एआई एजेंट बनाने के पैटर्न में महारत हासिल की है:
✅ कई खास एजेंटों के साथ जटिल वर्कफ़्लो
✅ असली क्षमताओं के लिए टूल इंटिग्रेशन
✅ बेहतर निगरानी के साथ प्रोडक्शन डिप्लॉयमेंट
✅ रखरखाव किए जा सकने वाले सिस्टम के लिए स्टेट मैनेजमेंट
ये पैटर्न, सामान्य असिस्टेंट से लेकर जटिल ऑटोनॉमस सिस्टम तक काम करते हैं. यहां बनाई गई आपकी बुनियाद, आपको ज़्यादा बेहतर एजेंट आर्किटेक्चर को समझने में मदद करेगी.
प्रोडक्शन एआई एजेंट डेवलेपमेंट में आपका स्वागत है. कोड रिव्यू असिस्टेंट सिर्फ़ एक शुरुआत है.