
1. The Late Night Code Review
午前 2 時
デバッグを数時間行っています。関数は正しいように見えますが、エラーが発生しています。コードが機能するはずなのに機能しない、長時間見つめすぎて原因がわからなくなった、という経験は誰にでもあるでしょう。
def dfs_search_v1(graph, start, target):
    """Find if target is reachable from start."""
    visited = set()
    stack = start  # Looks innocent enough...

    while stack:
        current = stack.pop()

        if current == target:
            return True

        if current not in visited:
            visited.add(current)

            for neighbor in graph[current]:
                if neighbor not in visited:
                    stack.append(neighbor)

    return False
AI デベロッパーの取り組み
この記事をお読みになっている方は、AI がコーディングにもたらす変革をすでに経験されていることでしょう。Gemini Code Assist、Claude Code、Cursor などのツールにより、コードの記述方法が変わりました。ボイラープレートの生成、実装の提案、開発の加速に非常に役立ちます。
しかし、このページをご覧になっているのは、より深く理解したいからでしょう。これらの AI システムを単に使用するだけでなく、構築する方法を理解したい。次のようなものを作成します。
- 予測可能で追跡可能な動作をする
- 本番環境に安心してデプロイできる
- 信頼できる一貫した結果を提供
- 意思決定の仕組みを正確に把握できる
コンシューマーからクリエイターへ
今日は、AI ツールを使用するだけでなく、AI ツールを構築する方法を学びます。次の機能を備えたマルチエージェント システムを構築します。
- コード構造を決定論的に分析します
- 動作を検証するための実際のテストを実行します
- 実際のリンターでスタイルの準拠を検証します
- 分析結果を実用的なフィードバックに統合する
- 完全なオブザーバビリティを備えた Google Cloud へのデプロイ
2. 最初のエージェントのデプロイ
デベロッパーからの質問
「LLM は理解しているし、API も使用したことがあるが、Python スクリプトからスケーリング可能な本番環境の AI エージェントに移行するにはどうすればよいのか?」
この質問に答えるため、まず環境を適切に設定し、次に簡単なエージェントを構築して基本を理解してから、本番環境のパターンに進みます。
まず、必須の設定を行う
エージェントを作成する前に、Google Cloud 環境の準備が整っていることを確認しましょう。
Google Cloud コンソールの上部にある [Cloud Shell をアクティブにする] をクリックします(Cloud Shell ペインの上部にあるターミナル型のアイコン)。
Google Cloud プロジェクト ID を確認します。
- Google Cloud コンソール(https://console.cloud.google.com)を開きます。
- ページの上部にあるプロジェクト プルダウンから、このワークショップで使用するプロジェクトを選択します。
- プロジェクト ID は、ダッシュボード
 の [プロジェクト情報] カードに表示されます。
ステップ 1: プロジェクト ID を設定する
Cloud Shell では、gcloud コマンドライン ツールはすでに構成されています。次のコマンドを実行して、アクティブなプロジェクトを設定します。これは、Cloud Shell セッションで自動的に設定される $GOOGLE_CLOUD_PROJECT 環境変数を使用します。
gcloud config set project $GOOGLE_CLOUD_PROJECT
ステップ 2: 設定を確認する
次に、次のコマンドを実行して、プロジェクトが正しく設定され、認証されていることを確認します。
# Confirm project is set
echo "Current project: $(gcloud config get-value project)"

# Check authentication status
gcloud auth list
プロジェクト ID が出力され、ユーザー アカウントが (ACTIVE) とともに表示されます。
アカウントがアクティブとして表示されない場合や、認証エラーが表示された場合は、次のコマンドを実行してログインします。
gcloud auth application-default login
ステップ 3: Essential API を有効にする
基本的なエージェントには、少なくとも次の API が必要です。
gcloud services enable \
    aiplatform.googleapis.com \
    compute.googleapis.com
これには 1 ~ 2 分かかることがあります。表示される項目
Operation "operations/..." finished successfully.
ステップ 4: ADK をインストールする
# Install the ADK CLI
pip install google-adk --upgrade

# Verify installation
adk --version
1.15.0 以上のバージョン番号が表示されます。
基本的なエージェントを作成する
環境が整ったので、シンプルなエージェントを作成しましょう。
ステップ 5: ADK Create を使用する
adk create my_first_agent
インタラクティブなプロンプトに沿って操作します。
Choose a model for the root agent:
1. gemini-2.5-flash
2. Other models (fill later)
Choose model (1, 2): 1

1. Google AI
2. Vertex AI
Choose a backend (1, 2): 2

Enter Google Cloud project ID [auto-detected-from-gcloud]:
Enter Google Cloud region [us-central1]:
ステップ 6: 作成された内容を確認する
cd my_first_agent
ls -la
次の 3 つのファイルがあります。
.env          # Configuration (auto-populated with your project)
__init__.py   # Package marker
agent.py      # Your agent definition
ステップ 7: 簡単な構成チェック
# Verify the .env was created correctly
cat .env

# Should show something like:
# GOOGLE_CLOUD_PROJECT=your-project-id
# GOOGLE_CLOUD_LOCATION=us-central1
# GOOGLE_GENAI_USE_VERTEXAI=1
プロジェクト ID がないか、正しくない場合は、.env ファイルを編集します。
nano .env # or use your preferred editor
ステップ 8: エージェント コードを確認する
cat agent.py
from google.adk.agents.llm_agent import Agent

root_agent = Agent(
    model='gemini-2.5-flash',
    name='root_agent',
    description='A helpful assistant for user questions.',
    instruction='Answer user questions to the best of your knowledge',
)
シンプルでクリーンなミニマル デザイン。これはエージェントの「Hello World」です。
基本的なエージェントをテストする
ステップ 9: エージェントを実行する
cd ..
adk run my_first_agent
次のような出力が表示されます。
Log setup complete: /tmp/agents_log/agent.20250930_162430.log
To access latest log: tail -F /tmp/agents_log/agent.latest.log
[user]:
ステップ 10: クエリを試す
adk run が実行されているターミナルにプロンプトが表示されます。クエリを入力します。
[user]: Hey, what can you do?
[root_agent]: I can help answer questions, generate text, explain concepts, assist with problem-solving, and provide information on a wide range of topics. What would you like to know or discuss?

[user]: What's the current weather in Mountain View?
[root_agent]: I'm sorry, but I cannot provide real-time weather information as I don't have access to current data or weather services. To get the current weather in Mountain View, I recommend checking a weather website or app like weather.com or using a search engine.
現在のデータにはアクセスできないという制限があります。さらに詳しく見ていきましょう。
[user]: Review this Python code: def add(a, b): return a + b
[root_agent]: This is a simple Python function that adds two numbers. Here's my review:

**Strengths:**
- Clean and concise implementation
- Follows Python conventions for simple operations
- Clear function name that describes its purpose

**Suggestions for improvement:**
- Add a docstring to document the function
- Consider adding type hints for better code clarity
- You might want to handle edge cases

Here's an enhanced version:
def add(a: float, b: float) -> float:
    """Add two numbers and return their sum."""
    return a + b
エージェントはコードについて説明できますが、次のことはできますか?
- 実際に AST を解析して構造を理解しますか?
- テストを実行して動作を確認しますか?
- スタイルの準拠を確認しますか?
- 以前のレビューを覚えていますか?
いいえ。ここでアーキテクチャが必要になります。
🏃🚪 で終了
Ctrl+C
確認したら、続行します。
3. 本番環境のワークスペースを準備する
ソリューション: プロダクション レディ(な) アーキテクチャ
このシンプルなエージェントは出発点を示していますが、本番環境システムには堅牢な構造が必要です。ここでは、本番環境の原則を体現する完全なプロジェクトを設定します。
基盤の設定
基本エージェント用に Google Cloud プロジェクトをすでに構成している。それでは、実際のシステムに必要なすべてのツール、パターン、インフラストラクチャを使用して、完全な本番環境ワークスペースを準備しましょう。
ステップ 1: 構造化プロジェクトを取得する
まず、Ctrl+C で実行中の adk run を終了してクリーンアップします。
# Clean up the basic agent
cd ~  # Make sure you're not inside my_first_agent
rm -rf my_first_agent

# Get the production scaffold
git clone https://github.com/ayoisio/adk-code-review-assistant.git
cd adk-code-review-assistant
git checkout codelab
ステップ 2: 仮想環境を作成して有効にする
# Create the virtual environment
python -m venv .venv

# Activate it
# On macOS/Linux:
source .venv/bin/activate
# On Windows:
# .venv\Scripts\activate
確認: プロンプトの先頭に (.venv) が表示されていることを確認します。
ステップ 3: 依存関係をインストールする
pip install -r code_review_assistant/requirements.txt

# Install the package in editable mode (enables imports)
pip install -e .
インストールされるもの:
google-adk- ADK フレームワークpycodestyle- PEP 8 チェック用vertexai- クラウド デプロイの場合- その他の本番環境の依存関係
-e フラグを使用すると、どこからでも code_review_assistant モジュールをインポートできます。
ステップ 4: 環境を構成する
# Copy the example environment file
cp .env.example .env

# Edit .env and replace the placeholders:
# - GOOGLE_CLOUD_PROJECT=your-project-id → your actual project ID
# - Keep other defaults as-is
検証: 構成を確認します。
cat .env
次のように表示されます。
GOOGLE_CLOUD_PROJECT=your-actual-project-id
GOOGLE_CLOUD_LOCATION=us-central1
GOOGLE_GENAI_USE_VERTEXAI=TRUE
ステップ 5: 認証を確認する
gcloud auth はすでに実行済みなので、次のことを確認します。
# Check current authentication
gcloud auth list

# Should show your account with (ACTIVE)
# If not, run:
gcloud auth application-default login
ステップ 6: 追加の本番環境 API を有効にする
基本的な API はすでに有効になっています。次に、本番環境のものを追加します。
gcloud services enable \
    sqladmin.googleapis.com \
    run.googleapis.com \
    cloudbuild.googleapis.com \
    artifactregistry.googleapis.com \
    storage.googleapis.com \
    cloudtrace.googleapis.com
そのため、次のことが可能になります。
- SQL 管理者: Cloud Run を使用している場合の Cloud SQL
- Cloud Run: サーバーレス デプロイの場合
- Cloud Build: 自動デプロイの場合
- Artifact Registry: コンテナ イメージの場合
- Cloud Storage: アーティファクトとステージング用
- Cloud Trace: オブザーバビリティ
ステップ 7: Artifact Registry リポジトリを作成する
デプロイでは、ホームが必要なコンテナ イメージがビルドされます。
gcloud artifacts repositories create code-review-assistant-repo \
    --repository-format=docker \
    --location=us-central1 \
    --description="Docker repository for Code Review Assistant"
以下のように表示されます。
Created repository [code-review-assistant-repo].
すでに存在する場合(以前の試行で作成された場合など)は、無視できるエラー メッセージが表示されます。
ステップ 8: IAM 権限を付与する
# Get your project number
PROJECT_NUMBER=$(gcloud projects describe $GOOGLE_CLOUD_PROJECT \
    --format="value(projectNumber)")

# Define the service account
SERVICE_ACCOUNT="${PROJECT_NUMBER}@cloudbuild.gserviceaccount.com"

# Grant necessary roles
gcloud projects add-iam-policy-binding $GOOGLE_CLOUD_PROJECT \
    --member="serviceAccount:${SERVICE_ACCOUNT}" \
    --role="roles/run.admin"

gcloud projects add-iam-policy-binding $GOOGLE_CLOUD_PROJECT \
    --member="serviceAccount:${SERVICE_ACCOUNT}" \
    --role="roles/iam.serviceAccountUser"

gcloud projects add-iam-policy-binding $GOOGLE_CLOUD_PROJECT \
    --member="serviceAccount:${SERVICE_ACCOUNT}" \
    --role="roles/cloudsql.admin"

gcloud projects add-iam-policy-binding $GOOGLE_CLOUD_PROJECT \
    --member="serviceAccount:${SERVICE_ACCOUNT}" \
    --role="roles/storage.admin"
各コマンドは次の出力を返します。
Updated IAM policy for project [your-project-id].
学習した内容
これで、本番環境のワークスペースの準備が完了しました。
✅ Google Cloud プロジェクトが構成され、認証されている
✅ 制限事項を理解するために基本的なエージェントがテストされている
✅ 戦略的なプレースホルダを含むプロジェクト コードが準備されている
✅ 依存関係が仮想環境で分離されている
✅ 必要な API がすべて有効になっている
✅ コンテナ レジストリがデプロイの準備ができている
✅ IAM 権限が適切に構成されている
✅ 環境変数が正しく設定されている
これで、決定論的ツール、状態管理、適切なアーキテクチャを使用して、実際の AI システムを構築する準備が整いました。
4. 最初のエージェントを構築する
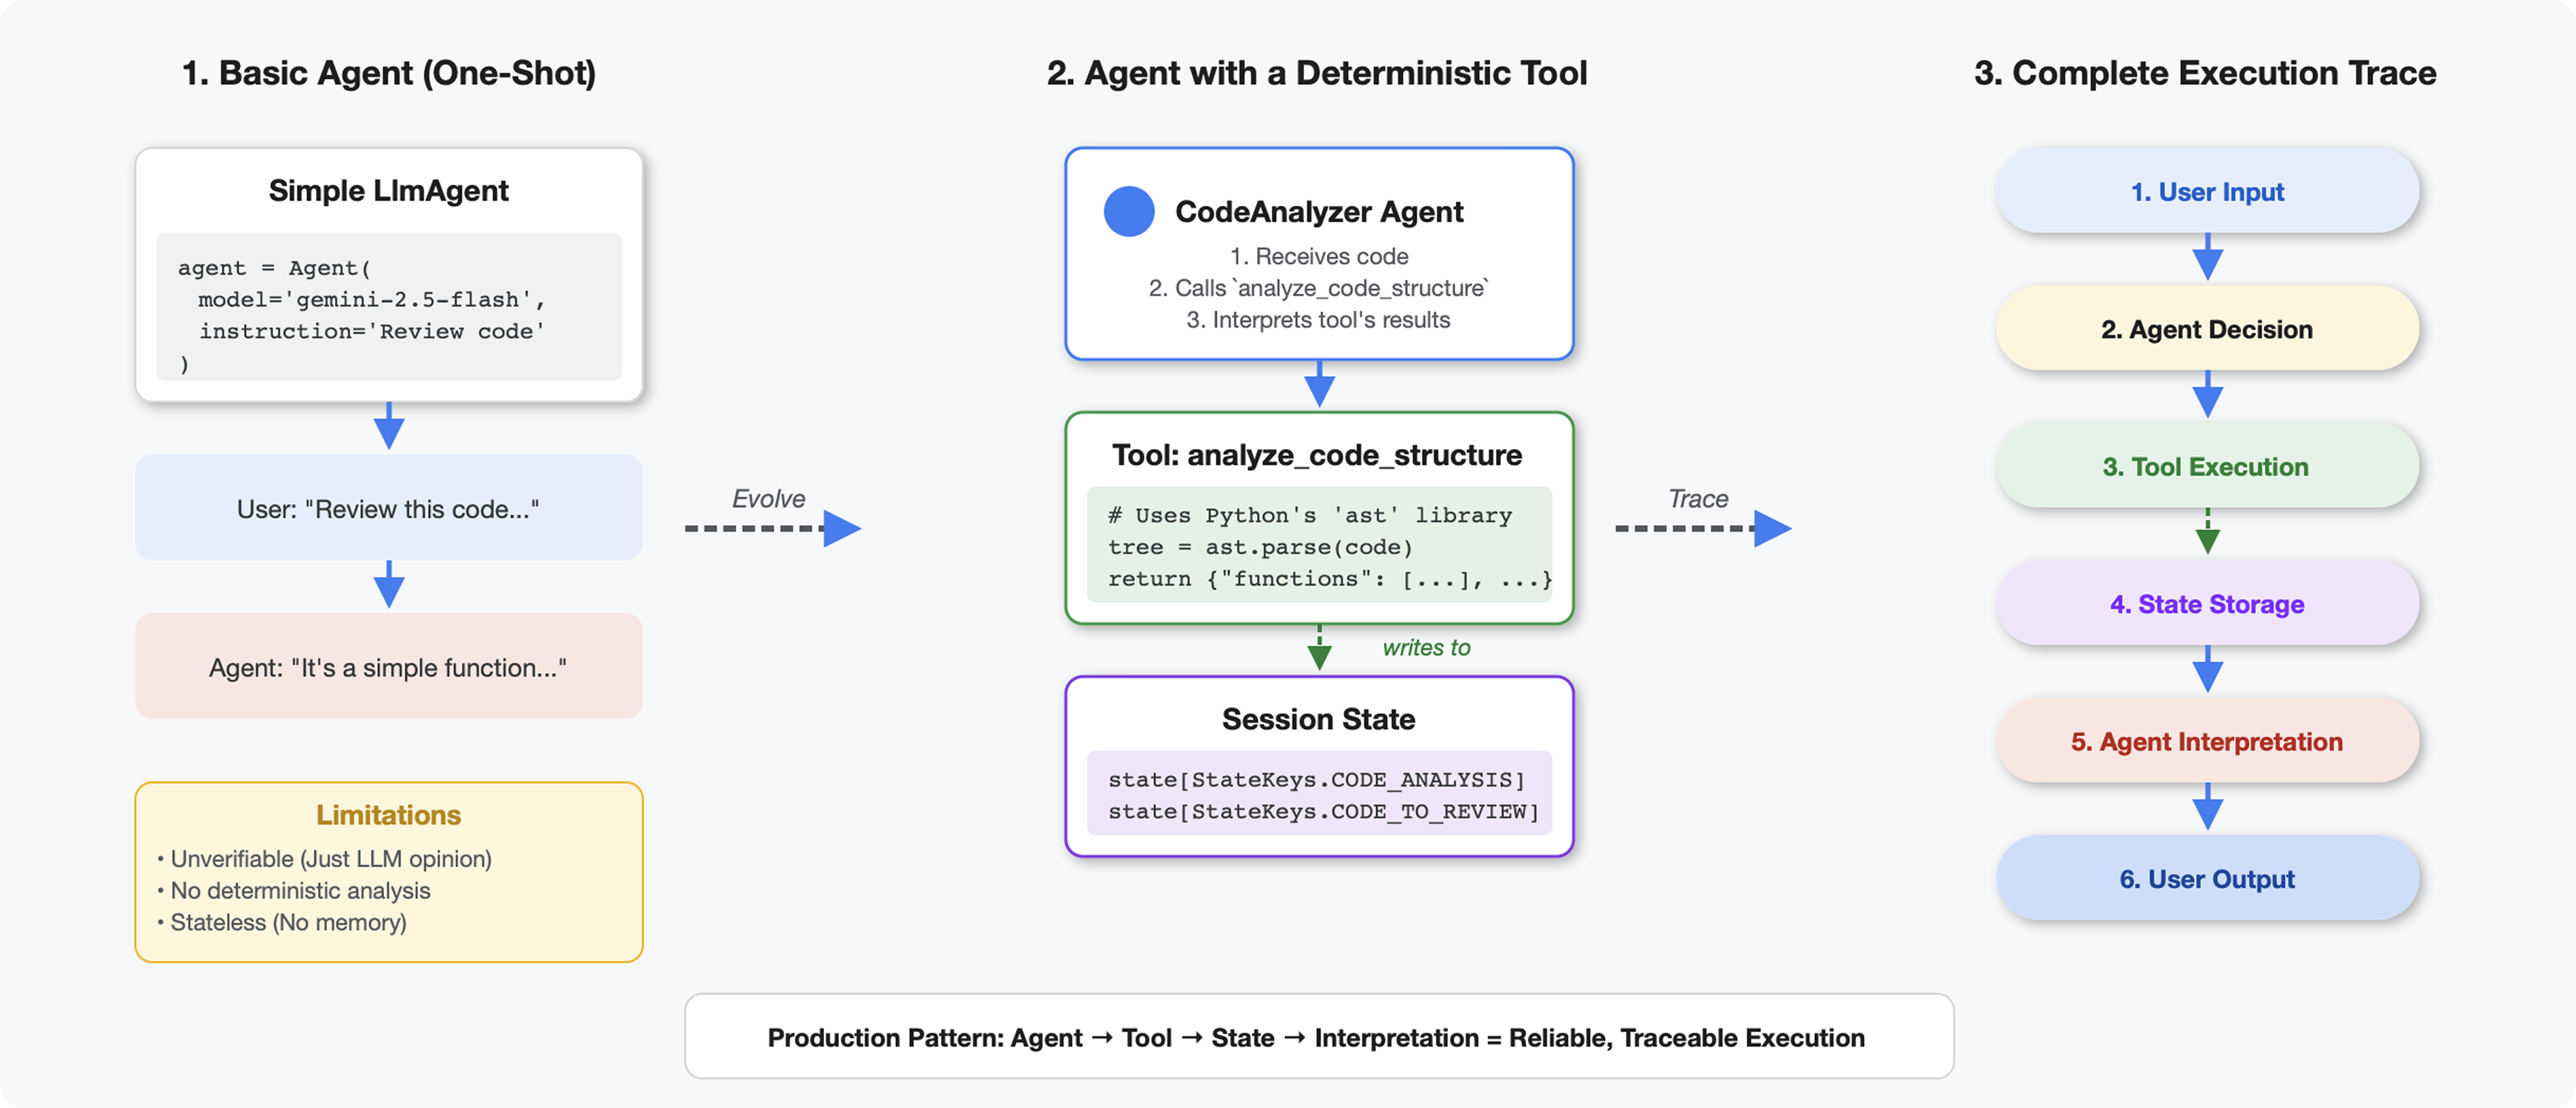
ツールと LLM の違い
LLM に「このコードには関数がいくつありますか?」と尋ねると、パターン マッチングと推定が使用されます。Python の ast.parse() を呼び出すツールを使用すると、実際の構文木が解析されます。推測は行われず、毎回同じ結果が得られます。
このセクションでは、コード構造を決定論的に分析するツールを構築し、それを呼び出すタイミングを認識するエージェントに接続します。
ステップ 1: スキャフォールドを理解する
入力する構造を確認しましょう。
👉 開く
code_review_assistant/tools.py
analyze_code_structure 関数が表示されます。プレースホルダ コメントは、コードを追加する場所を示しています。関数にはすでに基本的な構造が備わっています。これを段階的に強化していきます。
ステップ 2: State Storage を追加する
状態ストレージを使用すると、パイプライン内の他のエージェントが分析を再実行することなくツールの結果にアクセスできます。
👉 検索:
# MODULE_4_STEP_2_ADD_STATE_STORAGE
👉 その 1 行を次のように置き換えます。
        # Store code and analysis for other agents to access
        tool_context.state[StateKeys.CODE_TO_REVIEW] = code
        tool_context.state[StateKeys.CODE_ANALYSIS] = analysis
        tool_context.state[StateKeys.CODE_LINE_COUNT] = len(code.splitlines())
ステップ 3: スレッド プールを使用して非同期解析を追加する
このツールでは、他のオペレーションをブロックせずに AST を解析する必要があります。スレッド プールを使用して非同期実行を追加しましょう。
👉 検索:
# MODULE_4_STEP_3_ADD_ASYNC
👉 その 1 行を次のように置き換えます。
        # Parse in thread pool to avoid blocking the event loop
        loop = asyncio.get_event_loop()
        with ThreadPoolExecutor() as executor:
            tree = await loop.run_in_executor(executor, ast.parse, code)
ステップ 4: 包括的な情報を抽出する
それでは、クラス、インポート、詳細な指標など、完全なコードレビューに必要なものをすべて抽出しましょう。
👉 検索:
# MODULE_4_STEP_4_EXTRACT_DETAILS
👉 その 1 行を次のように置き換えます。
# Extract comprehensive structural information
analysis = await loop.run_in_executor(
executor, _extract_code_structure, tree, code
)
👉 確認: 関数
analyze_code_structure
in
tools.py
には、次のような中央の本体があります。
# Parse in thread pool to avoid blocking the event loop
loop = asyncio.get_event_loop()
with ThreadPoolExecutor() as executor:
    tree = await loop.run_in_executor(executor, ast.parse, code)
        # Extract comprehensive structural information
        analysis = await loop.run_in_executor(
            executor, _extract_code_structure, tree, code
        )
# Store code and analysis for other agents to access
tool_context.state[StateKeys.CODE_TO_REVIEW] = code
tool_context.state[StateKeys.CODE_ANALYSIS] = analysis
tool_context.state[StateKeys.CODE_LINE_COUNT] = len(code.splitlines())
👉 Now scroll to the bottom of
tools.py
と入力して検索します。
# MODULE_4_STEP_4_HELPER_FUNCTION
👉 その 1 行をヘルパー関数全体に置き換えます。
def _extract_code_structure(tree: ast.AST, code: str) -> Dict[str, Any]:
    """
    Helper function to extract structural information from AST.
    Runs in thread pool for CPU-bound work.
    """
    functions = []
    classes = []
    imports = []
    docstrings = []

    for node in ast.walk(tree):
        if isinstance(node, ast.FunctionDef):
            func_info = {
                'name': node.name,
                'args': [arg.arg for arg in node.args.args],
                'lineno': node.lineno,
                'has_docstring': ast.get_docstring(node) is not None,
                'is_async': isinstance(node, ast.AsyncFunctionDef),
                'decorators': [d.id for d in node.decorator_list
                               if isinstance(d, ast.Name)]
            }
            functions.append(func_info)

            if func_info['has_docstring']:
                docstrings.append(f"{node.name}: {ast.get_docstring(node)[:50]}...")

        elif isinstance(node, ast.ClassDef):
            methods = []
            for item in node.body:
                if isinstance(item, ast.FunctionDef):
                    methods.append(item.name)

            class_info = {
                'name': node.name,
                'lineno': node.lineno,
                'methods': methods,
                'has_docstring': ast.get_docstring(node) is not None,
                'base_classes': [base.id for base in node.bases
                                 if isinstance(base, ast.Name)]
            }
            classes.append(class_info)

        elif isinstance(node, ast.Import):
            for alias in node.names:
                imports.append({
                    'module': alias.name,
                    'alias': alias.asname,
                    'type': 'import'
                })
        elif isinstance(node, ast.ImportFrom):
            imports.append({
                'module': node.module or '',
                'names': [alias.name for alias in node.names],
                'type': 'from_import',
                'level': node.level
            })

    return {
        'functions': functions,
        'classes': classes,
        'imports': imports,
        'docstrings': docstrings,
        'metrics': {
            'line_count': len(code.splitlines()),
            'function_count': len(functions),
            'class_count': len(classes),
            'import_count': len(imports),
            'has_main': any(f['name'] == 'main' for f in functions),
            'has_if_main': '__main__' in code,
            'avg_function_length': _calculate_avg_function_length(tree)
        }
    }


def _calculate_avg_function_length(tree: ast.AST) -> float:
    """Calculate average function length in lines."""
    function_lengths = []

    for node in ast.walk(tree):
        if isinstance(node, ast.FunctionDef):
            if hasattr(node, 'end_lineno') and hasattr(node, 'lineno'):
                length = node.end_lineno - node.lineno + 1
                function_lengths.append(length)

    if function_lengths:
        return sum(function_lengths) / len(function_lengths)
    return 0.0
ステップ 5: エージェントに接続する
次に、ツールを、いつ使用するか、結果をどのように解釈するかを認識しているエージェントに接続します。
👉 開く
code_review_assistant/sub_agents/review_pipeline/code_analyzer.py
👉 検索:
# MODULE_4_STEP_5_CREATE_AGENT
👉 その 1 行を完全な本番環境エージェントに置き換えます。
code_analyzer_agent = Agent(
    name="CodeAnalyzer",
    model=config.worker_model,
    description="Analyzes Python code structure and identifies components",
    instruction="""You are a code analysis specialist responsible for understanding code structure.

Your task:
1. Take the code submitted by the user (it will be provided in the user message)
2. Use the analyze_code_structure tool to parse and analyze it
3. Pass the EXACT code to your tool - do not modify, fix, or "improve" it
4. Identify all functions, classes, imports, and structural patterns
5. Note any syntax errors or structural issues
6. Store the analysis in state for other agents to use

CRITICAL:
- Pass the code EXACTLY as provided to the analyze_code_structure tool
- Do not fix syntax errors, even if obvious
- Do not add missing imports or fix indentation
- The goal is to analyze what IS there, not what SHOULD be there

When calling the tool, pass the code as a string to the 'code' parameter.
If the analysis fails due to syntax errors, clearly report the error location and type.

Provide a clear summary including:
- Number of functions and classes found
- Key structural observations
- Any syntax errors or issues detected
- Overall code organization assessment""",
    tools=[FunctionTool(func=analyze_code_structure)],
    output_key="structure_analysis_summary"
)
コード アナライザをテストする
アナライザが正しく機能していることを確認します。
👉 テスト スクリプトを実行します。
python tests/test_code_analyzer.py
テスト スクリプトは python-dotenv を使用して .env ファイルから構成を自動的に読み込むため、環境変数を手動で設定する必要はありません。
想定される出力:
INFO:code_review_assistant.config:Code Review Assistant Configuration Loaded:
INFO:code_review_assistant.config:  - GCP Project: your-project-id
INFO:code_review_assistant.config:  - Artifact Bucket: gs://your-project-artifacts
INFO:code_review_assistant.config:  - Models: worker=gemini-2.5-flash, critic=gemini-2.5-pro
Testing code analyzer...
INFO:code_review_assistant.tools:Tool: Analysis complete - 2 functions, 1 classes

=== Analyzer Response ===
The analysis of the provided code shows the following:

* **Functions Found:** 2
    * `add(a, b)`: A global function at line 2.
    * `multiply(self, x, y)`: A method within the `Calculator` class.

* **Classes Found:** 1
    * `Calculator`: A class defined at line 5. Contains one method, `multiply`.

* **Imports:** 0

* **Structural Patterns:** The code defines one global function and one class
  with a single method. Both are simple, each with a single return statement.

* **Syntax Errors/Issues:** No syntax errors detected.

* **Overall Code Organization:** The code is well-organized for its small size,
  clearly defining a function and a class with a method.
何が起きたか:
- テスト スクリプトが
.env構成を自動的に読み込みました analyze_code_structure()ツールが Python の AST を使用してコードを解析した_extract_code_structure()ヘルパーは関数、クラス、指標を抽出しました- 結果は
StateKeys定数を使用してセッション状態に保存されていました - コード アナライザ エージェントが結果を解釈して概要を提供した
トラブルシューティング:
- 「No module named ‘code_review_assistant'」: プロジェクト ルートから
pip install -e .を実行する - 「Missing key inputs argument」:
.envにGOOGLE_CLOUD_PROJECT、GOOGLE_CLOUD_LOCATION、GOOGLE_GENAI_USE_VERTEXAI=trueがあることを確認します。
作成した機能
これで、プロダクション レディなコード アナライザーが完成しました。このアナライザーは次の機能を備えています。
✅ 実際の Python AST を解析する - 決定論的で、パターン マッチングではない
✅ 結果を状態に保存する - 他のエージェントが分析にアクセスできる
✅ 非同期で実行する - 他のツールをブロックしない
✅ 包括的な情報を抽出する - 関数、クラス、インポート、指標
✅ エラーを適切に処理する - 構文エラーを報告する(行番号付き)
✅ エージェントに接続する - LLM はいつどのように使用するかを認識している
習得した主なコンセプト
ツールとエージェント:
- ツールは決定的な作業(AST 解析)を行う
- ツールを使用するタイミングと結果の解釈はエージェントが決定する
戻り値と状態:
- 戻り値: LLM がすぐに認識する内容
- 状態: 他のエージェントに保持されるもの
状態キー定数:
- マルチエージェント システムでの入力ミスを防ぐ
- エージェント間の契約として機能する
- エージェントがデータを共有する際に重要
Async + スレッド プール:
async defを使用すると、ツールで実行を一時停止できます- スレッドプールは CPU バウンドの処理をバックグラウンドで実行する
- これらにより、イベントループの応答性が維持されます。
ヘルパー関数:
- 同期ヘルパーを非同期ツールから分離
- コードのテストと再利用が可能になる
エージェントの手順:
- 詳細な指示により、LLM のよくある間違いを防ぐ
- 何をすべきでないか(コードを修正しない)を明示する
- 一貫性を保つためにワークフローのステップを明確にする
次のステップ
モジュール 5 では、次のものを追加します。
- 状態からコードを読み取るスタイル チェッカー
- 実際にテストを実行するテストランナー
- すべての分析を組み合わせるフィードバック シンセサイザー
状態がシーケンシャル パイプラインをどのように流れるか、複数のエージェントが同じデータを読み書きする場合に定数パターンが重要な理由について説明します。
5. パイプラインの構築: 複数のエージェントの連携
はじめに
モジュール 4 では、コード構造を分析する単一のエージェントを構築しました。しかし、包括的なコードレビューには、解析だけでなく、スタイル チェック、テスト実行、インテリジェントなフィードバックの合成も必要です。
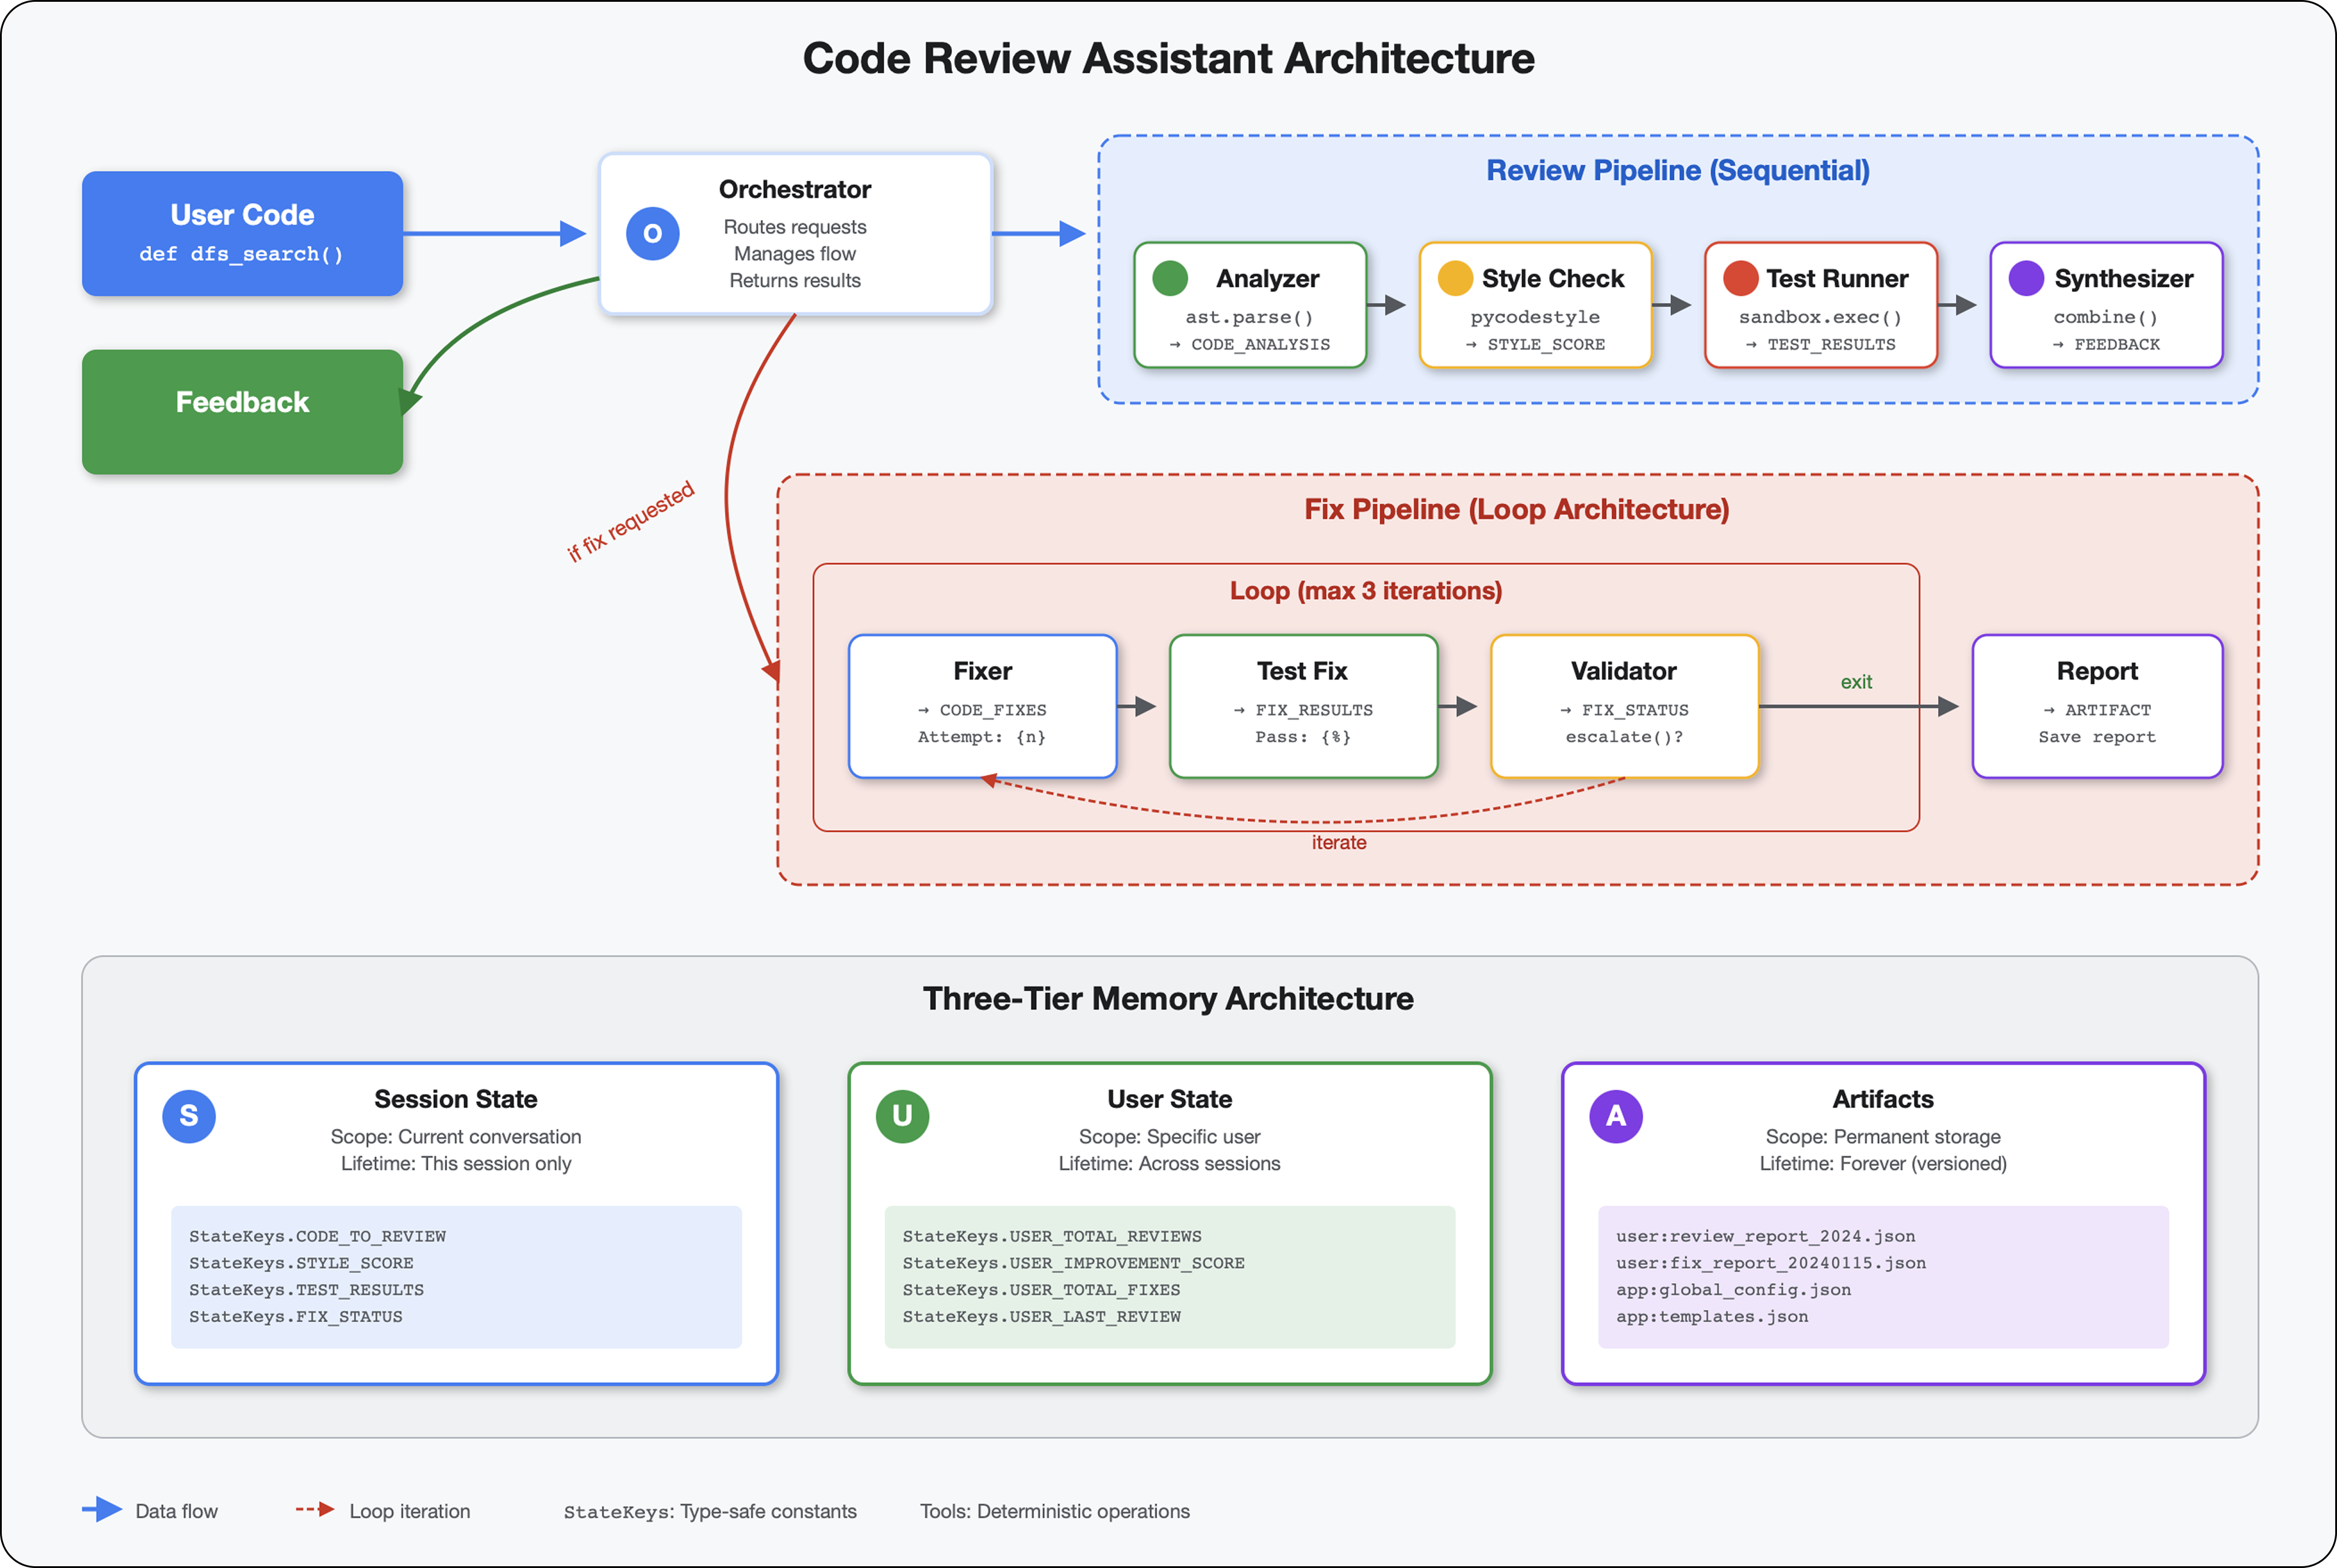
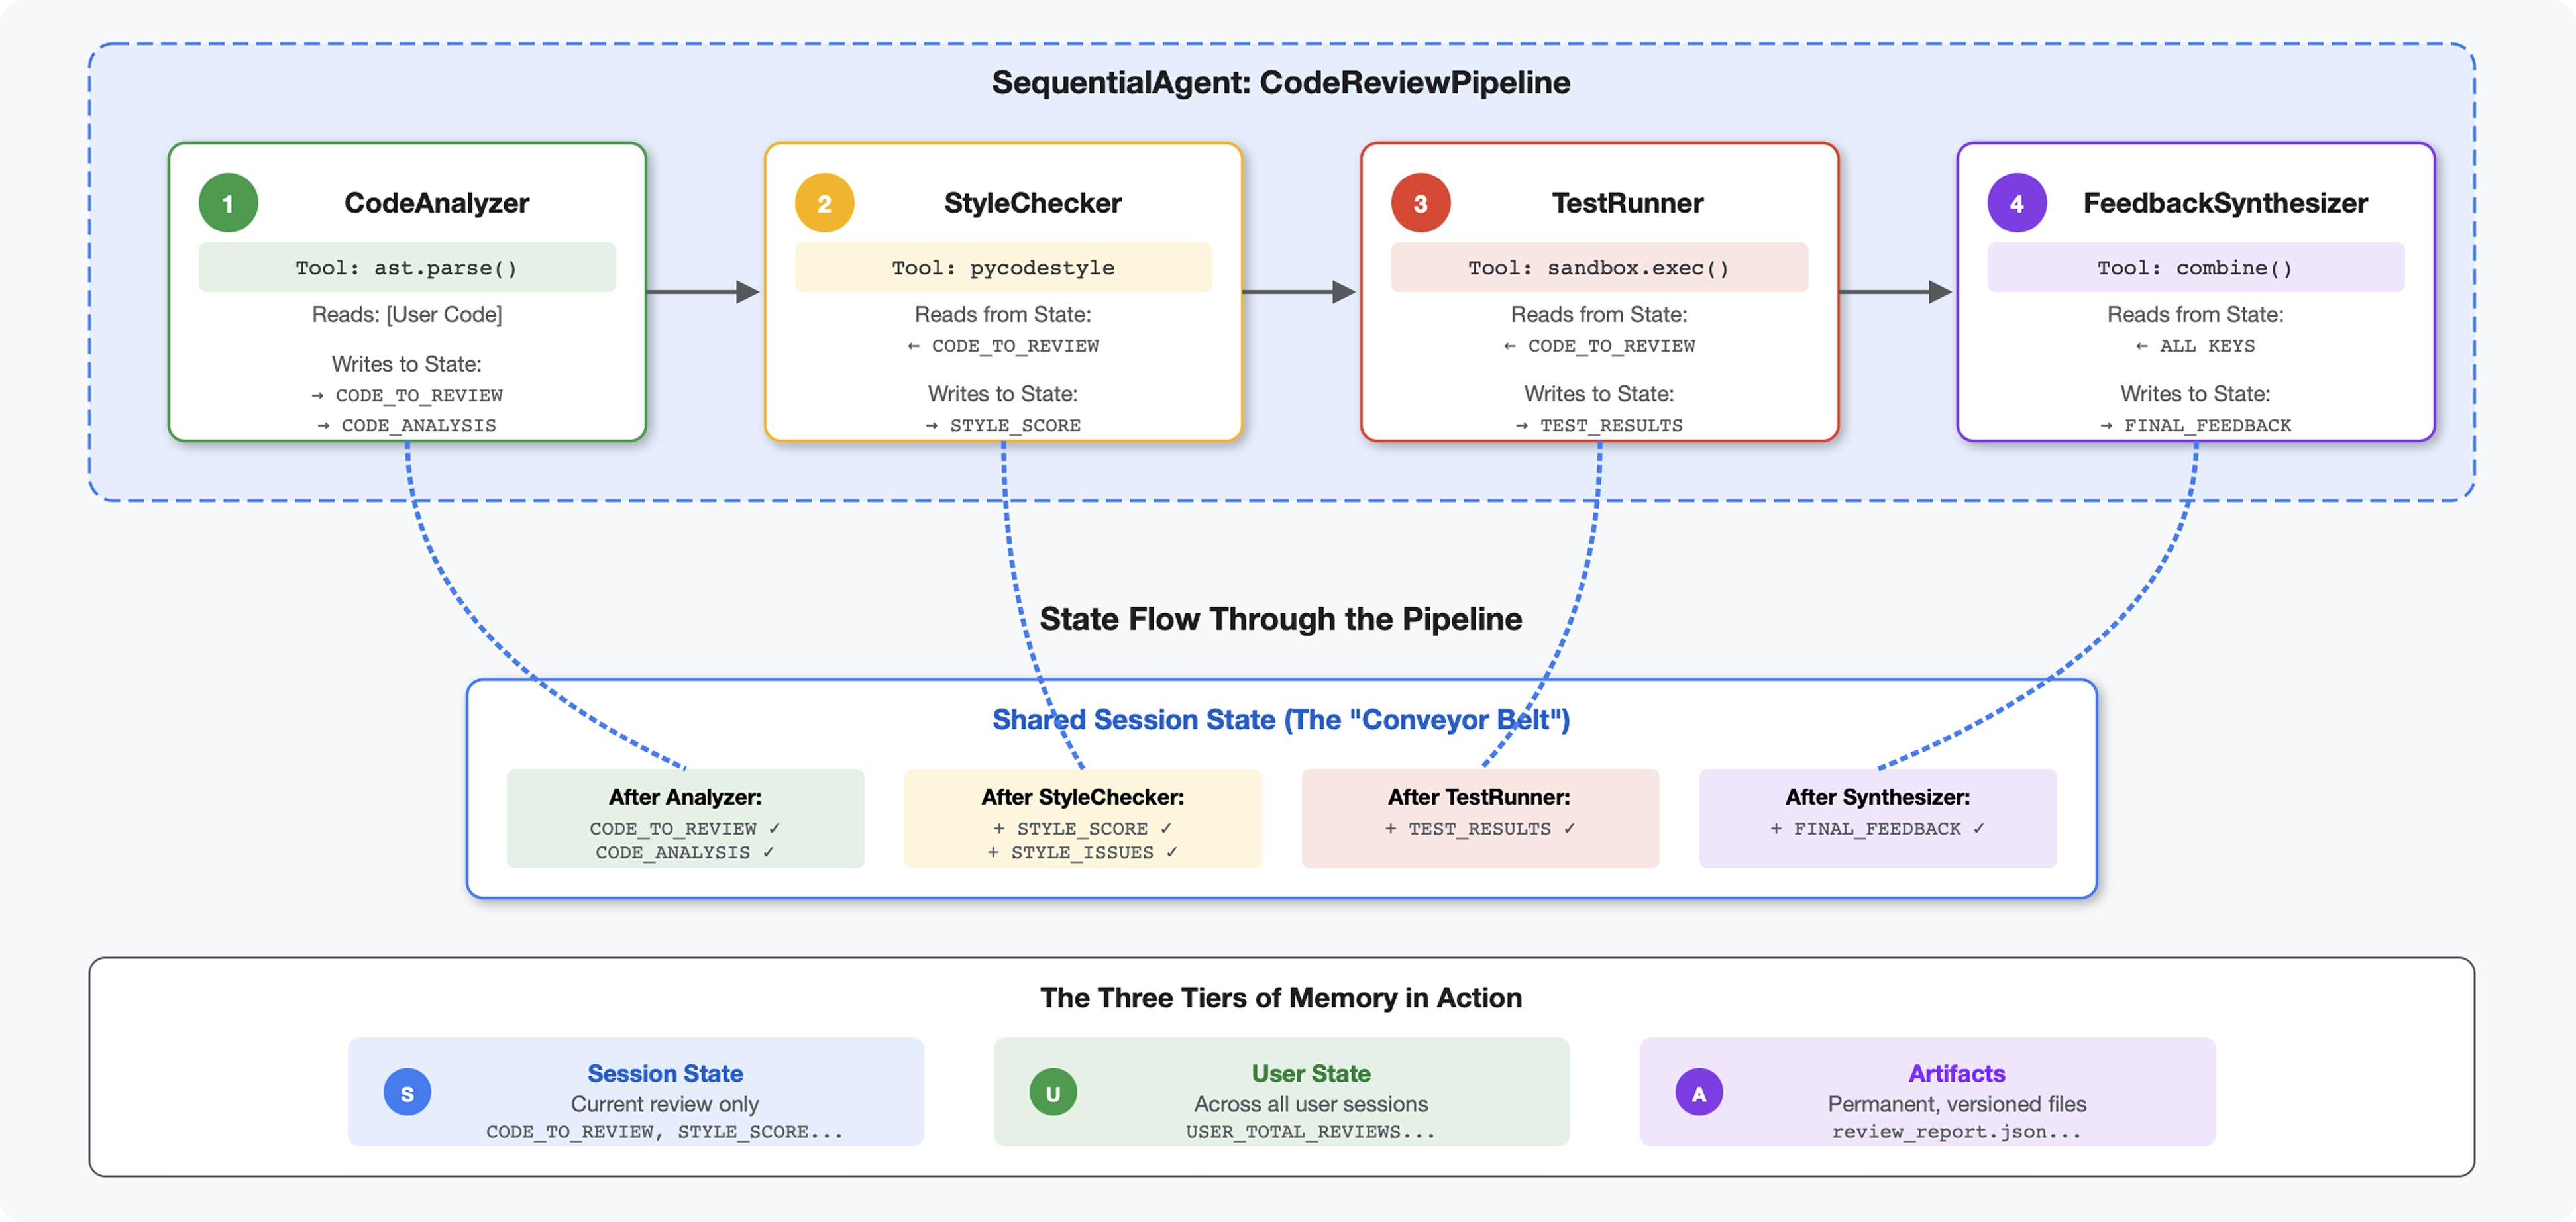
このモジュールは、順次連携して動作し、それぞれが専門的な分析を行う4 つのエージェントのパイプラインを構築します。
- コード アナライザ(モジュール 4) - 構造を解析します。
- スタイル チェッカー - スタイル違反を特定します
- テストランナー - テストを実行して検証します
- フィードバック シンセサイザー - すべてを組み合わせて実用的なフィードバックを生成する
重要なコンセプト: 通信チャネルとしての状態。各エージェントは、前のエージェントが状態に書き込んだ内容を読み取り、独自のアナリシスを追加して、強化された状態を次のエージェントに渡します。複数のエージェントがデータを共有する場合、モジュール 4 の定数パターンが重要になります。
構築するもののプレビュー: 乱雑なコードを送信 → 4 つのエージェントを介して状態が流れるのを確認 → 過去のパターンに基づいてパーソナライズされたフィードバックを含む包括的なレポートを受け取ります。
ステップ 1: スタイル チェッカー ツールとエージェントを追加する
スタイル チェッカーは、LLM ベースの解釈ではなく、決定論的リンターである pycodestyle を使用して PEP 8 違反を特定します。
スタイル チェックツールを追加する
👉 開く
code_review_assistant/tools.py
👉 検索:
# MODULE_5_STEP_1_STYLE_CHECKER_TOOL
👉 その 1 行を次のように置き換えます。
async def check_code_style(code: str, tool_context: ToolContext) -> Dict[str, Any]:
    """
    Checks code style compliance using pycodestyle (PEP 8).

    Args:
        code: Python source code to check (or will retrieve from state)
        tool_context: ADK tool context

    Returns:
        Dictionary containing style score and issues
    """
    logger.info("Tool: Checking code style...")

    try:
        # Retrieve code from state if not provided
        if not code:
            code = tool_context.state.get(StateKeys.CODE_TO_REVIEW, '')
            if not code:
                return {
                    "status": "error",
                    "message": "No code provided or found in state"
                }

        # Run style check in thread pool
        loop = asyncio.get_event_loop()
        with ThreadPoolExecutor() as executor:
            result = await loop.run_in_executor(
                executor, _perform_style_check, code
            )

        # Store results in state
        tool_context.state[StateKeys.STYLE_SCORE] = result['score']
        tool_context.state[StateKeys.STYLE_ISSUES] = result['issues']
        tool_context.state[StateKeys.STYLE_ISSUE_COUNT] = result['issue_count']

        logger.info(f"Tool: Style check complete - Score: {result['score']}/100, "
                    f"Issues: {result['issue_count']}")

        return result

    except Exception as e:
        error_msg = f"Style check failed: {str(e)}"
        logger.error(f"Tool: {error_msg}", exc_info=True)

        # Set default values on error
        tool_context.state[StateKeys.STYLE_SCORE] = 0
        tool_context.state[StateKeys.STYLE_ISSUES] = []

        return {
            "status": "error",
            "message": error_msg,
            "score": 0
        }
👉 ファイルの末尾までスクロールして、次の行を見つけます。
# MODULE_5_STEP_1_STYLE_HELPERS
👉 その 1 行をヘルパー関数に置き換えます。
def _perform_style_check(code: str) -> Dict[str, Any]:
    """Helper to perform style check in thread pool."""
    import io
    import sys

    with tempfile.NamedTemporaryFile(mode='w', suffix='.py', delete=False) as tmp:
        tmp.write(code)
        tmp_path = tmp.name

    try:
        # Capture stdout to get pycodestyle output
        old_stdout = sys.stdout
        sys.stdout = captured_output = io.StringIO()

        style_guide = pycodestyle.StyleGuide(
            quiet=False,  # We want output
            max_line_length=100,
            ignore=['E501', 'W503']
        )

        result = style_guide.check_files([tmp_path])

        # Restore stdout
        sys.stdout = old_stdout

        # Parse captured output
        output = captured_output.getvalue()
        issues = []

        for line in output.strip().split('\n'):
            if line and ':' in line:
                parts = line.split(':', 4)
                if len(parts) >= 4:
                    try:
                        issues.append({
                            'line': int(parts[1]),
                            'column': int(parts[2]),
                            'code': parts[3].split()[0] if len(parts) > 3 else 'E000',
                            'message': parts[3].strip() if len(parts) > 3 else 'Unknown error'
                        })
                    except (ValueError, IndexError):
                        pass

        # Add naming convention checks
        try:
            tree = ast.parse(code)
            naming_issues = _check_naming_conventions(tree)
            issues.extend(naming_issues)
        except SyntaxError:
            pass  # Syntax errors will be caught elsewhere

        # Calculate weighted score
        score = _calculate_style_score(issues)

        return {
            "status": "success",
            "score": score,
            "issue_count": len(issues),
            "issues": issues[:10],  # First 10 issues
            "summary": f"Style score: {score}/100 with {len(issues)} violations"
        }

    finally:
        if os.path.exists(tmp_path):
            os.unlink(tmp_path)


def _check_naming_conventions(tree: ast.AST) -> List[Dict[str, Any]]:
    """Check PEP 8 naming conventions."""
    naming_issues = []

    for node in ast.walk(tree):
        if isinstance(node, ast.FunctionDef):
            # Skip private/protected methods and __main__
            if not node.name.startswith('_') and node.name != node.name.lower():
                naming_issues.append({
                    'line': node.lineno,
                    'column': node.col_offset,
                    'code': 'N802',
                    'message': f"N802 function name '{node.name}' should be lowercase"
                })
        elif isinstance(node, ast.ClassDef):
            # Check if class name follows CapWords convention
            if not node.name[0].isupper() or '_' in node.name:
                naming_issues.append({
                    'line': node.lineno,
                    'column': node.col_offset,
                    'code': 'N801',
                    'message': f"N801 class name '{node.name}' should use CapWords convention"
                })

    return naming_issues


def _calculate_style_score(issues: List[Dict[str, Any]]) -> int:
    """Calculate weighted style score based on violation severity."""
    if not issues:
        return 100

    # Define weights by error type
    weights = {
        'E1': 10,  # Indentation errors
        'E2': 3,  # Whitespace errors
        'E3': 5,  # Blank line errors
        'E4': 8,  # Import errors
        'E5': 5,  # Line length
        'E7': 7,  # Statement errors
        'E9': 10,  # Syntax errors
        'W2': 2,  # Whitespace warnings
        'W3': 2,  # Blank line warnings
        'W5': 3,  # Line break warnings
        'N8': 7,  # Naming conventions
    }

    total_deduction = 0
    for issue in issues:
        code_prefix = issue['code'][:2] if len(issue['code']) >= 2 else 'E2'
        weight = weights.get(code_prefix, 3)
        total_deduction += weight

    # Cap at 100 points deduction
    return max(0, 100 - min(total_deduction, 100))
スタイル チェッカー エージェントを追加する
👉 開く
code_review_assistant/sub_agents/review_pipeline/style_checker.py
👉 検索:
# MODULE_5_STEP_1_INSTRUCTION_PROVIDER
👉 その 1 行を次のように置き換えます。
async def style_checker_instruction_provider(context: ReadonlyContext) -> str:
    """Dynamic instruction provider that injects state variables."""
    template = """You are a code style expert focused on PEP 8 compliance.

Your task:
1. Use the check_code_style tool to validate PEP 8 compliance
2. The tool will retrieve the ORIGINAL code from state automatically
3. Report violations exactly as found
4. Present the results clearly and confidently

CRITICAL:
- The tool checks the code EXACTLY as provided by the user
- Do not suggest the code was modified or fixed
- Report actual violations found in the original code
- If there are style issues, they should be reported honestly

Call the check_code_style tool with an empty string for the code parameter,
as the tool will retrieve the code from state automatically.

When presenting results based on what the tool returns:
- State the exact score from the tool results
- If score >= 90: "Excellent style compliance!"
- If score 70-89: "Good style with minor improvements needed"
- If score 50-69: "Style needs attention"
- If score < 50: "Significant style improvements needed"

List the specific violations found (the tool will provide these):
- Show line numbers, error codes, and messages
- Focus on the top 10 most important issues

Previous analysis: {structure_analysis_summary}

Format your response as:
## Style Analysis Results
- Style Score: [exact score]/100
- Total Issues: [count]
- Assessment: [your assessment based on score]

## Top Style Issues
[List issues with line numbers and descriptions]

## Recommendations
[Specific fixes for the most critical issues]"""

    return await instructions_utils.inject_session_state(template, context)
👉 検索:
# MODULE_5_STEP_1_STYLE_CHECKER_AGENT
👉 その 1 行を次のように置き換えます。
style_checker_agent = Agent(
    name="StyleChecker",
    model=config.worker_model,
    description="Checks Python code style against PEP 8 guidelines",
    instruction=style_checker_instruction_provider,
    tools=[FunctionTool(func=check_code_style)],
    output_key="style_check_summary"
)
ステップ 2: Test Runner エージェントを追加する
テストランナーは、包括的なテストを生成し、組み込みのコード実行ツールを使用して実行します。
👉 開く
code_review_assistant/sub_agents/review_pipeline/test_runner.py
👉 検索:
# MODULE_5_STEP_2_INSTRUCTION_PROVIDER
👉 その 1 行を次のように置き換えます。
async def test_runner_instruction_provider(context: ReadonlyContext) -> str:
    """Dynamic instruction provider that injects the code_to_review directly."""
    template = """You are a testing specialist who creates and runs tests for Python code.

THE CODE TO TEST IS:
{code_to_review}

YOUR TASK:
1. Understand what the function appears to do based on its name and structure
2. Generate comprehensive tests (15-20 test cases)
3. Execute the tests using your code executor
4. Analyze results to identify bugs vs expected behavior
5. Output a detailed JSON analysis

TESTING METHODOLOGY:
- Test with the most natural interpretation first
- When something fails, determine if it's a bug or unusual design
- Test edge cases, boundaries, and error scenarios
- Document any surprising behavior

Execute your tests and output ONLY valid JSON with this structure:
- "test_summary": object with "total_tests_run", "tests_passed", "tests_failed", "tests_with_errors", "critical_issues_found"
- "critical_issues": array of objects, each with "type", "description", "example_input", "expected_behavior", "actual_behavior", "severity"
- "test_categories": object with "basic_functionality", "edge_cases", "error_handling" (each containing "passed", "failed", "errors" counts)
- "function_behavior": object with "apparent_purpose", "actual_interface", "unexpected_requirements"
- "verdict": object with "status" (WORKING/BUGGY/BROKEN), "confidence" (high/medium/low), "recommendation"

Do NOT output the test code itself, only the JSON analysis."""

    return await instructions_utils.inject_session_state(template, context)
👉 検索:
# MODULE_5_STEP_2_TEST_RUNNER_AGENT
👉 その 1 行を次のように置き換えます。
test_runner_agent = Agent(
    name="TestRunner",
    model=config.critic_model,
    description="Generates and runs tests for Python code using safe code execution",
    instruction=test_runner_instruction_provider,
    code_executor=BuiltInCodeExecutor(),
    output_key="test_execution_summary"
)
ステップ 3: セッション間学習のメモリを理解する
フィードバック シンセサイザーを構築する前に、状態とメモリの違いを理解する必要があります。これらは、2 つの異なる目的のための 2 つの異なるストレージ メカニズムです。
状態とメモリ: 主な違い
コードレビューの具体的な例で説明します。
状態(現在のセッションのみ):
# Data from THIS review session
tool_context.state[StateKeys.STYLE_ISSUES] = [
    {"line": 5, "code": "E231", "message": "missing whitespace"},
    {"line": 12, "code": "E701", "message": "multiple statements"}
]
- 範囲: この会話のみ
- 目的: 現在のパイプラインでエージェント間でデータを渡す
- 居住地:
Sessionオブジェクト - 有効期間: セッション終了時に破棄される
メモリ(過去のすべてのセッション):
# Learned from 50 previous reviews
"User frequently forgets docstrings on helper functions"
"User tends to write long functions (avg 45 lines)"
"User improved error handling after feedback in session #23"
- スコープ: このユーザーの過去のすべてのセッション
- 目的: パターンを学習し、パーソナライズされたフィードバックを提供する
- 居住地:
MemoryService - Lifetime: セッションをまたいで存続し、検索可能
フィードバックに両方が必要な理由:
シンセサイザーがフィードバックを作成しているとします。
State のみを使用(現在のレビュー):
"Function `calculate_total` has no docstring."
一般的な機械的なフィードバック。
状態 + メモリ(現在と過去のパターン)を使用する:
"Function `calculate_total` has no docstring. This is the 4th review
where helper functions lacked documentation. Consider adding docstrings
as you write functions, not afterwards - you mentioned in our last
session that you find it easier that way."
パーソナライズされたコンテキストに基づくリファレンスが、時間の経過とともに改善されます。
本番環境のデプロイの場合、オプションがあります。
オプション 1: VertexAiMemoryBankService(高度)
- 機能: LLM を活用して会話から有益な事実を抽出する
- 検索: セマンティック検索(キーワードだけでなく、意味を理解)
- メモリ管理: 時間の経過とともにメモリを自動的に統合して更新します
- 要件: Google Cloud プロジェクトと Agent Engine の設定
- 使用する場面: 洗練された、進化する、パーソナライズされたメモリーが必要な場合
- 例: 「ユーザーは関数型プログラミングを好む」(コードスタイルに関する 10 件の会話から抽出)
オプション 2: InMemoryMemoryService + 永続セッションを続行する
- 仕組み: キーワード検索の会話履歴全体を保存する
- 検索: 過去のセッション全体で基本的なキーワード マッチングを行う
- メモリ管理: 保存する内容を制御できます(
add_session_to_memory経由)。 - 必須: 永続的な
SessionService(VertexAiSessionServiceやDatabaseSessionServiceなど)のみ - 使用する場合: LLM 処理なしで過去の会話を簡単に検索する必要がある場合
- 例: 「docstring」を検索すると、その単語が言及されているすべてのセッションが返されます。
メモリの入力方法
コードレビューが完了するたびに:
# At the end of a session (typically in your application code)
await memory_service.add_session_to_memory(session)
結果:
- InMemoryMemoryService: キーワード検索の完全なセッション イベントを保存します
- VertexAiMemoryBankService: LLM が重要な事実を抽出し、既存の記憶と統合する
以降のセッションでは、次のクエリを実行できます。
# In a tool, search for relevant past feedback
results = tool_context.search_memory("feedback about docstrings")
ステップ 4: フィードバック合成ツールとエージェントを追加する
フィードバック シンセサイザーは、パイプラインで最も高度なエージェントです。3 つのツールをオーケストレートし、動的な指示を使用し、状態、メモリ、アーティファクトを組み合わせます。
3 つのシンセサイザー ツールを追加する
👉 開く
code_review_assistant/tools.py
👉 検索:
# MODULE_5_STEP_4_SEARCH_PAST_FEEDBACK
👉 ツール 1 - メモリ検索(製品版)に置き換えます。
async def search_past_feedback(developer_id: str, tool_context: ToolContext) -> Dict[str, Any]:
    """
    Search for past feedback in memory service.

    Args:
        developer_id: ID of the developer (defaults to "default_user")
        tool_context: ADK tool context with potential memory service access

    Returns:
        Dictionary containing feedback search results
    """
    logger.info(f"Tool: Searching for past feedback for developer {developer_id}...")

    try:
        # Default developer ID if not provided
        if not developer_id:
            developer_id = tool_context.state.get(StateKeys.USER_ID, 'default_user')

        # Check if memory service is available
        if hasattr(tool_context, 'search_memory'):
            try:
                # Perform structured searches
                queries = [
                    f"developer:{developer_id} code review feedback",
                    f"developer:{developer_id} common issues",
                    f"developer:{developer_id} improvements"
                ]

                all_feedback = []
                patterns = {
                    'common_issues': [],
                    'improvements': [],
                    'strengths': []
                }

                for query in queries:
                    search_result = await tool_context.search_memory(query)

                    if search_result and hasattr(search_result, 'memories'):
                        for memory in search_result.memories[:5]:
                            memory_text = memory.text if hasattr(memory, 'text') else str(memory)
                            all_feedback.append(memory_text)

                            # Extract patterns
                            if 'style' in memory_text.lower():
                                patterns['common_issues'].append('style compliance')
                            if 'improved' in memory_text.lower():
                                patterns['improvements'].append('showing improvement')
                            if 'excellent' in memory_text.lower():
                                patterns['strengths'].append('consistent quality')

                # Store in state
                tool_context.state[StateKeys.PAST_FEEDBACK] = all_feedback
                tool_context.state[StateKeys.FEEDBACK_PATTERNS] = patterns

                logger.info(f"Tool: Found {len(all_feedback)} past feedback items")

                return {
                    "status": "success",
                    "feedback_found": True,
                    "count": len(all_feedback),
                    "summary": " | ".join(all_feedback[:3]) if all_feedback else "No feedback",
                    "patterns": patterns
                }

            except Exception as e:
                logger.warning(f"Tool: Memory search error: {e}")

        # Fallback: Check state for cached feedback
        cached_feedback = tool_context.state.get(StateKeys.USER_PAST_FEEDBACK_CACHE, [])
        if cached_feedback:
            tool_context.state[StateKeys.PAST_FEEDBACK] = cached_feedback
            return {
                "status": "success",
                "feedback_found": True,
                "count": len(cached_feedback),
                "summary": "Using cached feedback",
                "patterns": {}
            }

        # No feedback found
        tool_context.state[StateKeys.PAST_FEEDBACK] = []
        logger.info("Tool: No past feedback found")

        return {
            "status": "success",
            "feedback_found": False,
            "message": "No past feedback available - this appears to be a first submission",
            "patterns": {}
        }

    except Exception as e:
        error_msg = f"Feedback search error: {str(e)}"
        logger.error(f"Tool: {error_msg}", exc_info=True)

        tool_context.state[StateKeys.PAST_FEEDBACK] = []

        return {
            "status": "error",
            "message": error_msg,
            "feedback_found": False
        }
👉 検索:
# MODULE_5_STEP_4_UPDATE_GRADING_PROGRESS
👉 ツール 2 - グレーディング トラッカー(本番環境バージョン)に置き換えます。
async def update_grading_progress(tool_context: ToolContext) -> Dict[str, Any]:
    """
    Updates grading progress counters and metrics in state.
    """
    logger.info("Tool: Updating grading progress...")

    try:
        current_time = datetime.now().isoformat()

        # Build all state changes
        state_updates = {}

        # Temporary (invocation-level) state
        state_updates[StateKeys.TEMP_PROCESSING_TIMESTAMP] = current_time

        # Session-level state
        attempts = tool_context.state.get(StateKeys.GRADING_ATTEMPTS, 0) + 1
        state_updates[StateKeys.GRADING_ATTEMPTS] = attempts
        state_updates[StateKeys.LAST_GRADING_TIME] = current_time

        # User-level persistent state
        lifetime_submissions = tool_context.state.get(StateKeys.USER_TOTAL_SUBMISSIONS, 0) + 1
        state_updates[StateKeys.USER_TOTAL_SUBMISSIONS] = lifetime_submissions
        state_updates[StateKeys.USER_LAST_SUBMISSION_TIME] = current_time

        # Calculate improvement metrics
        current_style_score = tool_context.state.get(StateKeys.STYLE_SCORE, 0)
        last_style_score = tool_context.state.get(StateKeys.USER_LAST_STYLE_SCORE, 0)
        score_improvement = current_style_score - last_style_score

        state_updates[StateKeys.USER_LAST_STYLE_SCORE] = current_style_score
        state_updates[StateKeys.SCORE_IMPROVEMENT] = score_improvement

        # Track test results if available
        test_results = tool_context.state.get(StateKeys.TEST_EXECUTION_SUMMARY, {})

        # Parse if it's a string
        if isinstance(test_results, str):
            try:
                test_results = json.loads(test_results)
            except:
                test_results = {}

        if test_results and test_results.get('test_summary', {}).get('total_tests_run', 0) > 0:
            summary = test_results['test_summary']
            total = summary.get('total_tests_run', 0)
            passed = summary.get('tests_passed', 0)
            if total > 0:
                pass_rate = (passed / total) * 100
                state_updates[StateKeys.USER_LAST_TEST_PASS_RATE] = pass_rate

        # Apply all updates atomically
        for key, value in state_updates.items():
            tool_context.state[key] = value

        logger.info(f"Tool: Progress updated - Attempt #{attempts}, "
                    f"Lifetime: {lifetime_submissions}")

        return {
            "status": "success",
            "session_attempts": attempts,
            "lifetime_submissions": lifetime_submissions,
            "timestamp": current_time,
            "improvement": {
                "style_score_change": score_improvement,
                "direction": "improved" if score_improvement > 0 else "declined"
            },
            "summary": f"Attempt #{attempts} recorded, {lifetime_submissions} total submissions"
        }

    except Exception as e:
        error_msg = f"Progress update error: {str(e)}"
        logger.error(f"Tool: {error_msg}", exc_info=True)

        return {
            "status": "error",
            "message": error_msg
        }
👉 検索:
# MODULE_5_STEP_4_SAVE_GRADING_REPORT
👉 ツール 3 - アーティファクト セーバー(本番環境バージョン)に置き換えます。
async def save_grading_report(feedback_text: str, tool_context: ToolContext) -> Dict[str, Any]:
    """
    Saves a detailed grading report as an artifact.

    Args:
        feedback_text: The feedback text to include in the report
        tool_context: ADK tool context for state management

    Returns:
        Dictionary containing save status and details
    """
    logger.info("Tool: Saving grading report...")

    try:
        # Gather all relevant data from state
        code = tool_context.state.get(StateKeys.CODE_TO_REVIEW, '')
        analysis = tool_context.state.get(StateKeys.CODE_ANALYSIS, {})
        style_score = tool_context.state.get(StateKeys.STYLE_SCORE, 0)
        style_issues = tool_context.state.get(StateKeys.STYLE_ISSUES, [])

        # Get test results
        test_results = tool_context.state.get(StateKeys.TEST_EXECUTION_SUMMARY, {})

        # Parse if it's a string
        if isinstance(test_results, str):
            try:
                test_results = json.loads(test_results)
            except:
                test_results = {}

        timestamp = datetime.now().isoformat()

        # Create comprehensive report dictionary
        report = {
            'timestamp': timestamp,
            'grading_attempt': tool_context.state.get(StateKeys.GRADING_ATTEMPTS, 1),
            'code': {
                'content': code,
                'line_count': len(code.splitlines()),
                'hash': hashlib.md5(code.encode()).hexdigest()
            },
            'analysis': analysis,
            'style': {
                'score': style_score,
                'issues': style_issues[:5]  # First 5 issues
            },
            'tests': test_results,
            'feedback': feedback_text,
            'improvements': {
                'score_change': tool_context.state.get(StateKeys.SCORE_IMPROVEMENT, 0),
                'from_last_score': tool_context.state.get(StateKeys.USER_LAST_STYLE_SCORE, 0)
            }
        }

        # Convert report to JSON string
        report_json = json.dumps(report, indent=2)
        report_part = types.Part.from_text(text=report_json)

        # Try to save as artifact if the service is available
        if hasattr(tool_context, 'save_artifact'):
            try:
                # Generate filename with timestamp (replace colons for filesystem compatibility)
                filename = f"grading_report_{timestamp.replace(':', '-')}.json"

                # Save the main report
                version = await tool_context.save_artifact(filename, report_part)

                # Also save a "latest" version for easy access
                await tool_context.save_artifact("latest_grading_report.json", report_part)

                logger.info(f"Tool: Report saved as {filename} (version {version})")

                # Store report in state as well for redundancy
                tool_context.state[StateKeys.USER_LAST_GRADING_REPORT] = report

                return {
                    "status": "success",
                    "artifact_saved": True,
                    "filename": filename,
                    "version": str(version),
                    "size": len(report_json),
                    "summary": f"Report saved as {filename}"
                }

            except Exception as artifact_error:
                logger.warning(f"Artifact service error: {artifact_error}, falling back to state storage")
                # Continue to fallback below

        # Fallback: Store in state if artifact service is not available or failed
        tool_context.state[StateKeys.USER_LAST_GRADING_REPORT] = report
        logger.info("Tool: Report saved to state (artifact service not available)")

        return {
            "status": "success",
            "artifact_saved": False,
            "message": "Report saved to state only",
            "size": len(report_json),
            "summary": "Report saved to session state"
        }

    except Exception as e:
        error_msg = f"Report save error: {str(e)}"
        logger.error(f"Tool: {error_msg}", exc_info=True)

        # Still try to save minimal data to state
        try:
            tool_context.state[StateKeys.USER_LAST_GRADING_REPORT] = {
                'error': error_msg,
                'feedback': feedback_text,
                'timestamp': datetime.now().isoformat()
            }
        except:
            pass

        return {
            "status": "error",
            "message": error_msg,
            "artifact_saved": False,
            "summary": f"Failed to save report: {error_msg}"
        }
シンセサイザー エージェントを作成する
👉 開く
code_review_assistant/sub_agents/review_pipeline/feedback_synthesizer.py
👉 検索:
# MODULE_5_STEP_4_INSTRUCTION_PROVIDER
👉 本番環境の指示プロバイダに置き換えます。
async def feedback_instruction_provider(context: ReadonlyContext) -> str:
    """Dynamic instruction provider that injects state variables."""
    template = """You are an expert code reviewer and mentor providing constructive, educational feedback.

CONTEXT FROM PREVIOUS AGENTS:
- Structure analysis summary: {structure_analysis_summary}
- Style check summary: {style_check_summary}
- Test execution summary: {test_execution_summary}

YOUR TASK requires these steps IN ORDER:
1. Call search_past_feedback tool with developer_id="default_user"
2. Call update_grading_progress tool with no parameters
3. Carefully analyze the test results to understand what really happened
4. Generate comprehensive feedback following the structure below
5. Call save_grading_report tool with the feedback_text parameter
6. Return the feedback as your final output

CRITICAL - Understanding Test Results:
The test_execution_summary contains structured JSON. Parse it carefully:
- tests_passed = Code worked correctly
- tests_failed = Code produced wrong output
- tests_with_errors = Code crashed
- critical_issues = Fundamental problems with the code

If critical_issues array contains items, these are serious bugs that need fixing.
Do NOT count discovering bugs as test successes.

FEEDBACK STRUCTURE TO FOLLOW:

## 📊 Summary
Provide an honest assessment. Be encouraging but truthful about problems found.

## ✅ Strengths
List 2-3 things done well, referencing specific code elements.

## 📈 Code Quality Analysis

### Structure & Organization
Comment on code organization, readability, and documentation.

### Style Compliance
Report the actual style score and any specific issues.

### Test Results
Report the actual test results accurately:
- If critical_issues exist, report them as bugs to fix
- Be clear: "X tests passed, Y critical issues were found"
- List each critical issue
- Don't hide or minimize problems

## 💡 Recommendations for Improvement
Based on the analysis, provide specific actionable fixes.
If critical issues exist, fixing them is top priority.

## 🎯 Next Steps
Prioritized action list based on severity of issues.

## 💬 Encouragement
End with encouragement while being honest about what needs fixing.

Remember: Complete ALL steps including calling save_grading_report."""

    return await instructions_utils.inject_session_state(template, context)
👉 検索:
# MODULE_5_STEP_4_SYNTHESIZER_AGENT
👉 次のように置き換えます。
feedback_synthesizer_agent = Agent(
    name="FeedbackSynthesizer",
    model=config.critic_model,
    description="Synthesizes all analysis into constructive, personalized feedback",
    instruction=feedback_instruction_provider,
    tools=[
        FunctionTool(func=search_past_feedback),
        FunctionTool(func=update_grading_progress),
        FunctionTool(func=save_grading_report)
    ],
    output_key="final_feedback"
)
ステップ 5: パイプラインを配線する
次に、4 つのエージェントをすべて順次パイプラインに接続し、ルートエージェントを作成します。
👉 開く
code_review_assistant/agent.py
👉 必要なインポートをファイルの先頭(既存のインポートの後)に追加します。
from google.adk.agents import Agent, SequentialAgent
from code_review_assistant.sub_agents.review_pipeline.code_analyzer import code_analyzer_agent
from code_review_assistant.sub_agents.review_pipeline.style_checker import style_checker_agent
from code_review_assistant.sub_agents.review_pipeline.test_runner import test_runner_agent
from code_review_assistant.sub_agents.review_pipeline.feedback_synthesizer import feedback_synthesizer_agent
ファイルは次のようになります。
"""
Main agent orchestration for the Code Review Assistant.
"""

from google.adk.agents import Agent, SequentialAgent
from .config import config
from code_review_assistant.sub_agents.review_pipeline.code_analyzer import code_analyzer_agent
from code_review_assistant.sub_agents.review_pipeline.style_checker import style_checker_agent
from code_review_assistant.sub_agents.review_pipeline.test_runner import test_runner_agent
from code_review_assistant.sub_agents.review_pipeline.feedback_synthesizer import feedback_synthesizer_agent

# MODULE_5_STEP_5_CREATE_PIPELINE

# MODULE_6_STEP_5_CREATE_FIX_LOOP

# MODULE_6_STEP_5_UPDATE_ROOT_AGENT
👉 検索:
# MODULE_5_STEP_5_CREATE_PIPELINE
👉 その 1 行を次のように置き換えます。
# Create sequential pipeline
code_review_pipeline = SequentialAgent(
    name="CodeReviewPipeline",
    description="Complete code review pipeline with analysis, testing, and feedback",
    sub_agents=[
        code_analyzer_agent,
        style_checker_agent,
        test_runner_agent,
        feedback_synthesizer_agent
    ]
)

# Root agent - coordinates the review pipeline
root_agent = Agent(
    name="CodeReviewAssistant",
    model=config.worker_model,
    description="An intelligent code review assistant that analyzes Python code and provides educational feedback",
    instruction="""You are a specialized Python code review assistant focused on helping developers improve their code quality.

When a user provides Python code for review:
1. Immediately delegate to CodeReviewPipeline and pass the code EXACTLY as it was provided by the user.
2. The pipeline will handle all analysis and feedback
3. Return ONLY the final feedback from the pipeline - do not add any commentary

When a user asks what you can do or asks general questions:
- Explain your capabilities for code review
- Do NOT trigger the pipeline for non-code messages

The pipeline handles everything for code review - just pass through its final output.""",
    sub_agents=[code_review_pipeline],
    output_key="assistant_response"
)
ステップ 6: 完全なパイプラインをテストする
4 つのエージェントが連携して動作する様子を見てみましょう。
👉 システムを起動する:
adk web code_review_assistant
adk web コマンドを実行すると、ターミナルに ADK Web サーバーが起動したことを示す次のような出力が表示されます。
+-----------------------------------------------------------------------------+
| ADK Web Server started                                                      |
|                                                                             |
| For local testing, access at http://localhost:8000.                         |
+-----------------------------------------------------------------------------+

INFO:     Application startup complete.
INFO:     Uvicorn running on http://0.0.0.0:8000 (Press CTRL+C to quit)
👉 次に、ブラウザから ADK 開発 UI にアクセスします。
Cloud Shell ツールバー(通常は右上)の [ウェブでプレビュー] アイコン(多くの場合、目または矢印付きの四角形)から、[ポートを変更] を選択します。ポップアップ ウィンドウで、ポートを 8000 に設定し、[変更してプレビュー] をクリックします。Cloud Shell が新しいブラウザタブまたはウィンドウを開き、ADK 開発 UI を表示します。
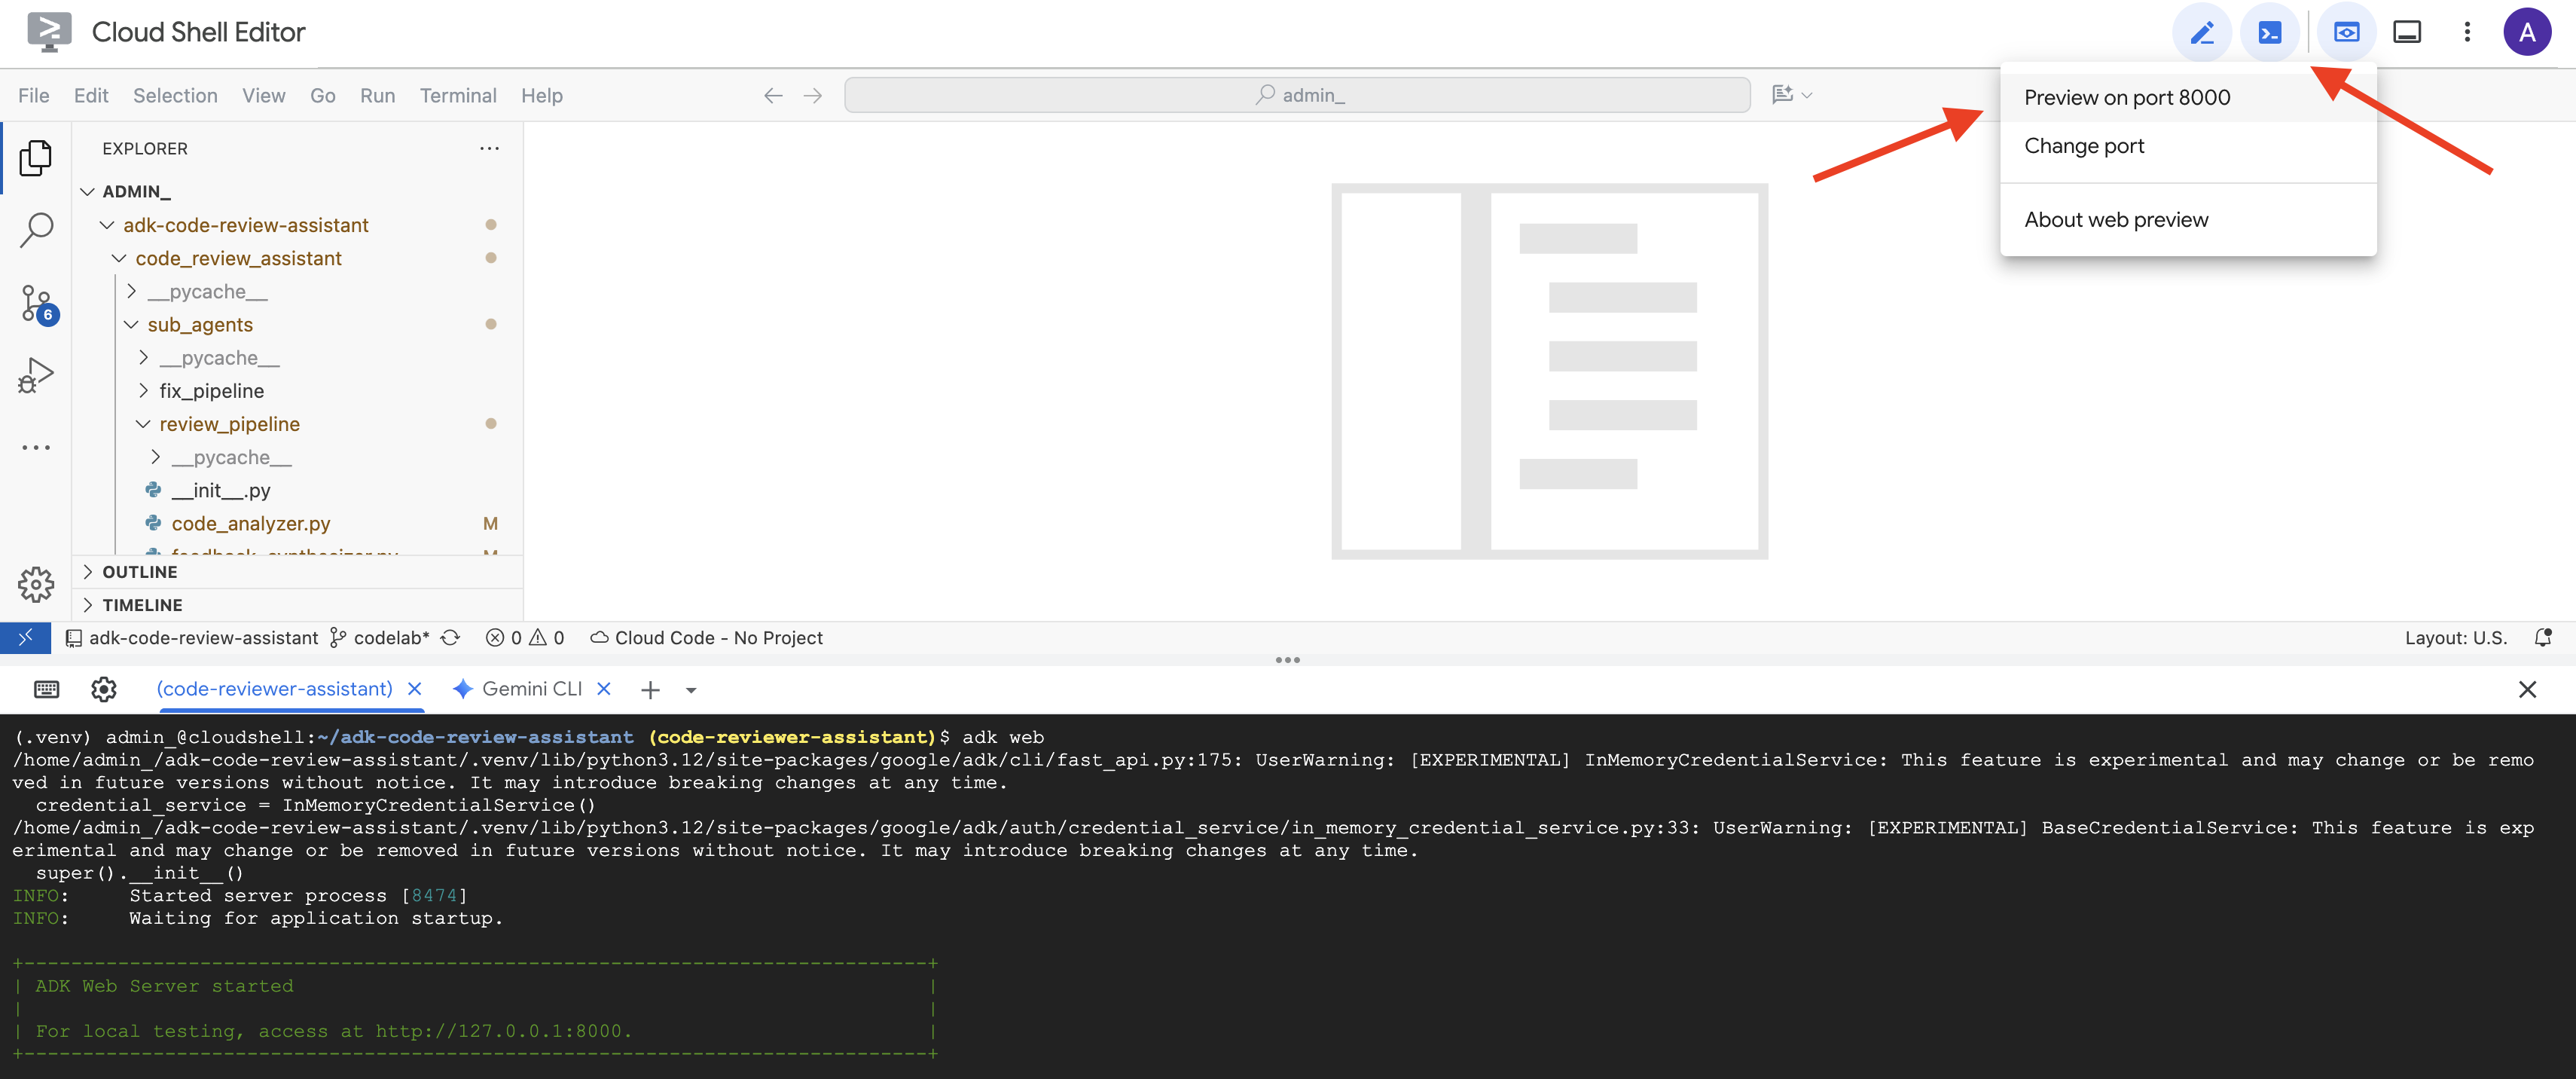
👉 エージェントが実行中になりました。ブラウザの ADK 開発 UI は、エージェントへの直接接続です。
- ターゲットを選択する: UI の上部にあるプルダウン メニューで、
code_review_assistantエージェントを選択します。
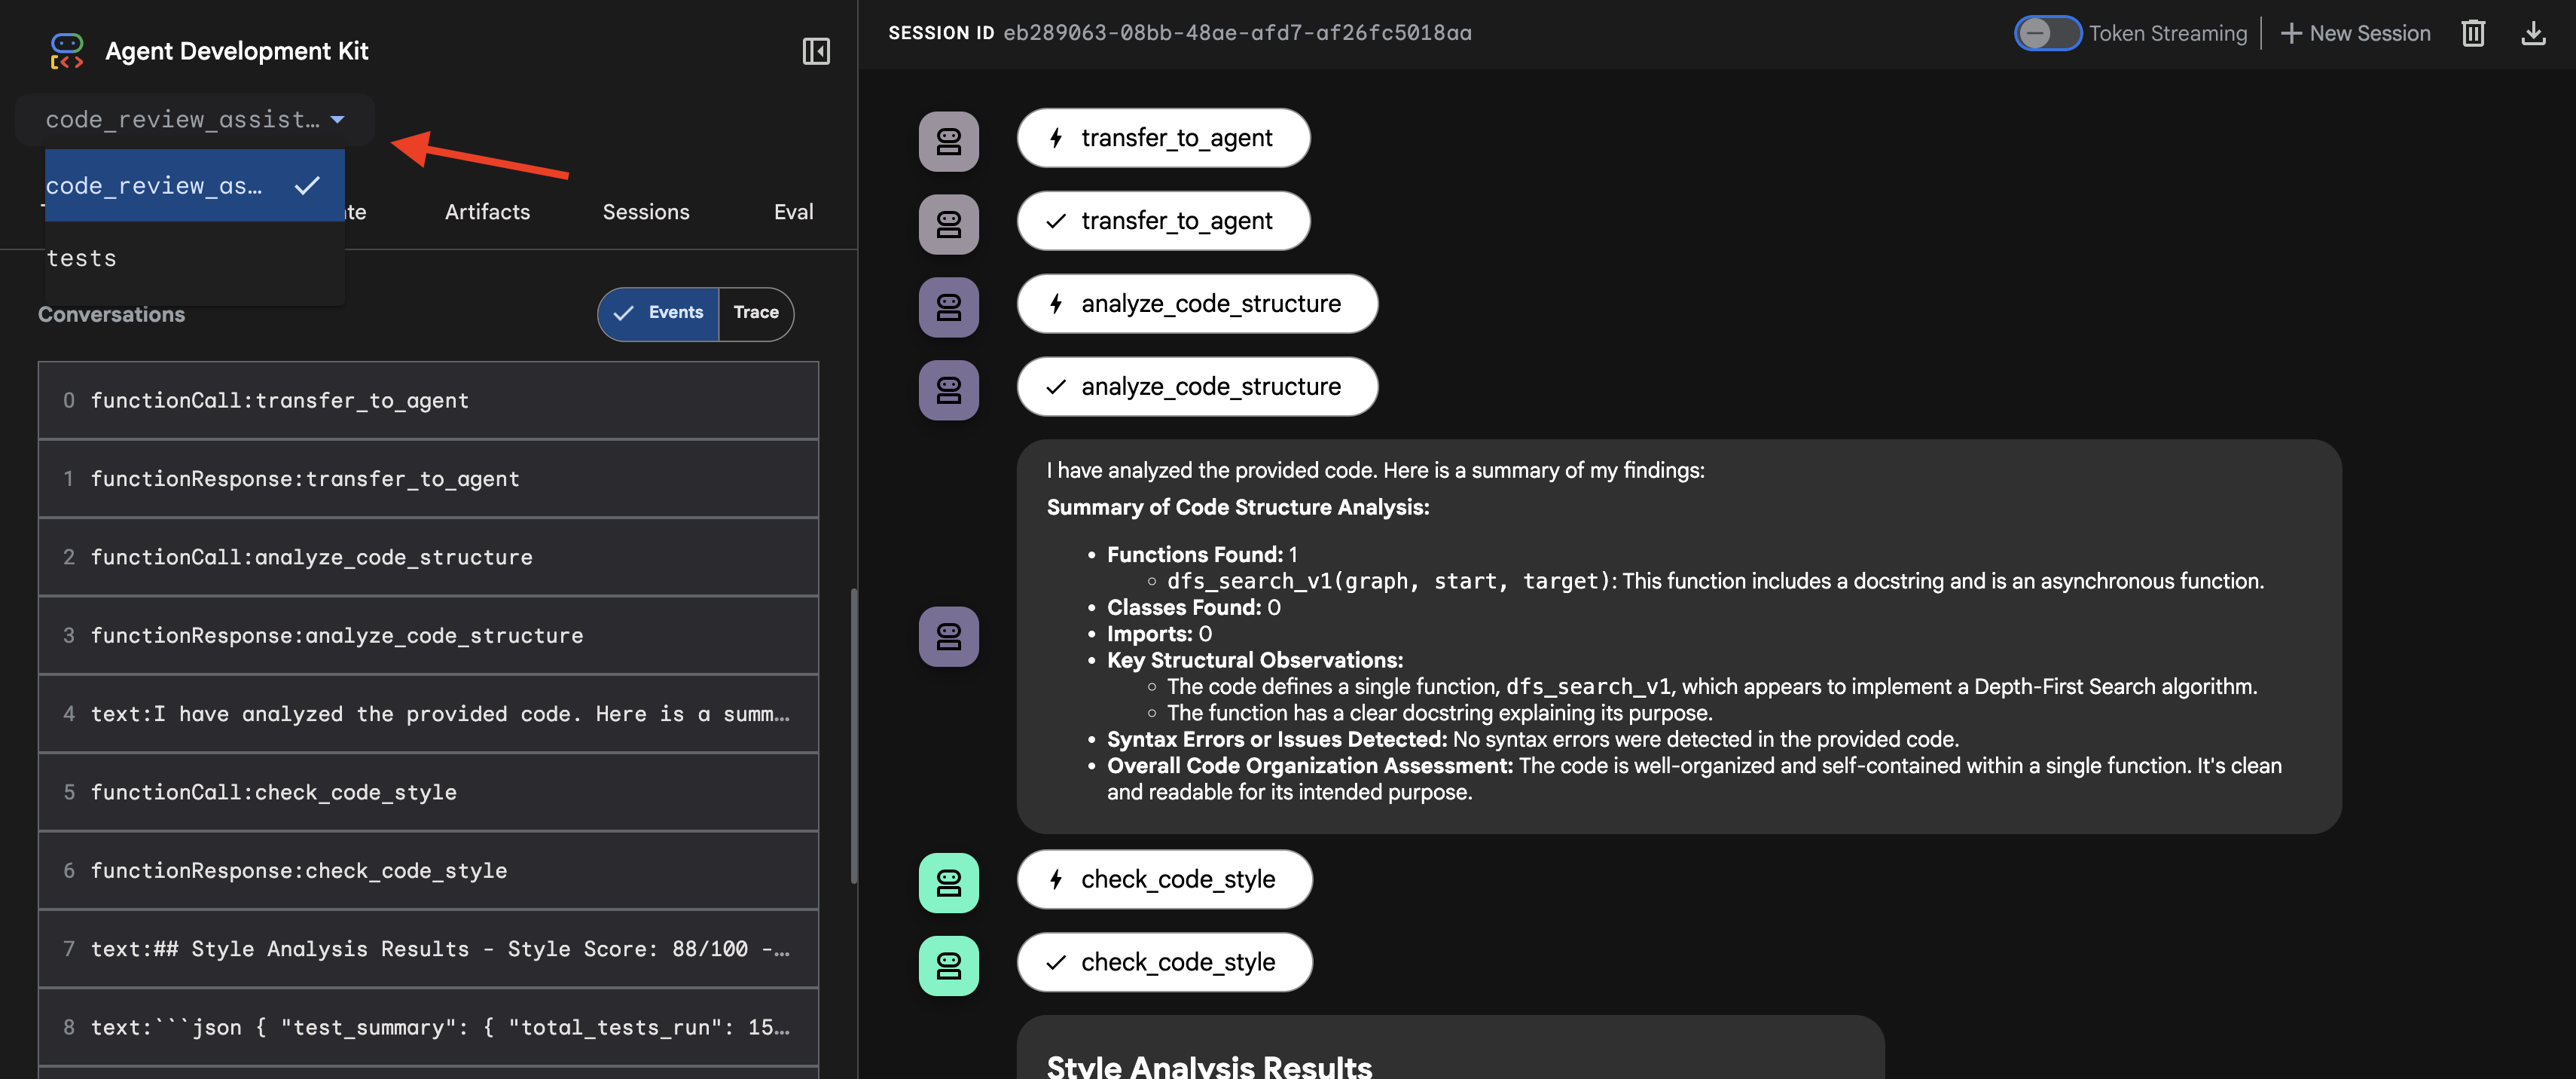
👉 テスト プロンプト:
Please analyze the following:
def dfs_search_v1(graph, start, target):
    """Find if target is reachable from start."""
    visited = set()
    stack = start

    while stack:
        current = stack.pop()

        if current == target:
            return True

        if current not in visited:
            visited.add(current)

            for neighbor in graph[current]:
                if neighbor not in visited:
                    stack.append(neighbor)

    return False
👉 コードレビュー パイプラインの動作を確認する:
バグのある dfs_search_v1 関数を送信すると、1 つの回答だけが返されるわけではありません。マルチエージェント パイプラインが動作していることを確認します。表示されるストリーミング出力は、4 つの特殊なエージェントが順番に実行された結果です。各エージェントは前のエージェントの結果を基に処理を行います。
各エージェントが最終的な包括的なレビューにどのように貢献し、元データを実用的なインテリジェンスに変えるかについて、以下に詳しく説明します。
1. コード アナライザーの構造レポート
まず、CodeAnalyzer エージェントが生コードを受け取ります。コードの動作を推測するのではなく、analyze_code_structure ツールを使用して決定論的な抽象構文木(AST)解析を行います。
出力は、コードの構造に関する純粋な事実データです。
The analysis of the provided code reveals the following:

Summary:
- Functions Found: 1
- Classes Found: 0

Key Structural Observations:
- A single function, dfs_search_v1, is defined.
- It includes a docstring: "Find if target is reachable from start."
- No syntax errors were detected.

Overall Code Organization Assessment:
- The code snippet is a well-defined, self-contained function.
⭐ 価値: この最初のステップにより、他のエージェントが使用するクリーンで信頼性の高い基盤が提供されます。コードが有効な Python であることを確認し、レビューが必要なコンポーネントを特定します。
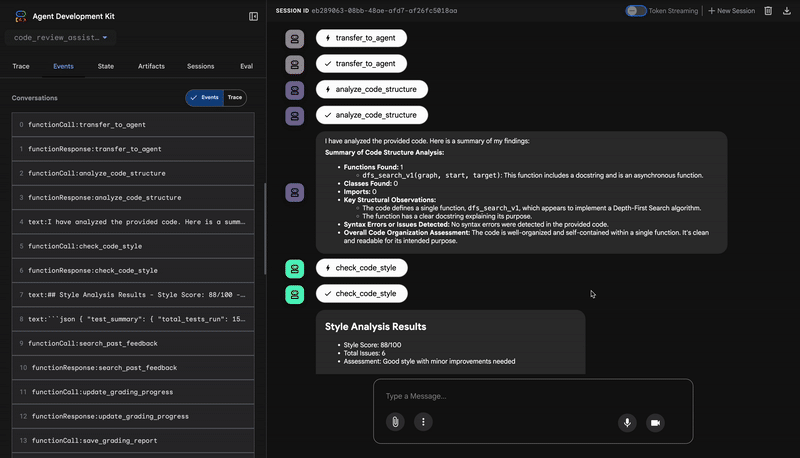
2. スタイル チェッカーの PEP 8 監査
次に、StyleChecker エージェントが引き継ぎます。共有状態からコードを読み取り、pycodestyle リンターを活用する check_code_style ツールを使用します。
出力は、定量化可能な品質スコアと特定の違反です。
Style Analysis Results
- Style Score: 88/100
- Total Issues: 6
- Assessment: Good style with minor improvements needed

Top Style Issues
- Line 5, W293: blank line contains whitespace
- Line 19, W292: no newline at end of file
⭐ 値: このエージェントは、確立されたコミュニティ標準(PEP 8)に基づいて、客観的で交渉不可能なフィードバックを提供します。重み付けされたスコアリング システムにより、問題の重大度をユーザーにすぐに伝えることができます。
3. テストランナーの重大なバグの検出
ここで、システムは表面的なレベルの分析を超えて、TestRunner エージェントは、コードの動作を検証するために、包括的なテストスイートを生成して実行します。
出力は、有罪判決を含む構造化された JSON オブジェクトです。
{
  "critical_issues": [
    {
      "type": "Critical Bug",
      "description": "The function's initialization `stack = start` is incorrect... When a common input like a string... is provided... the function crashes with an AttributeError.",
      "severity": "Critical"
    }
  ],
  "verdict": {
    "status": "BROKEN",
    "confidence": "high",
    "recommendation": "The function is fundamentally broken... the stack initialization line `stack = start` must be changed to `stack = [start]`."
  }
}
⭐ 価値: これは最も重要な分析情報です。エージェントは推測しただけでなく、コードを実行してコードが壊れていることを証明しました。このツールは、人間によるレビューでは見落としやすい微妙ながらも重大なランタイム バグを発見し、正確な原因と必要な修正を特定しました。
4. フィードバック シンセサイザーの最終レポート
最後に、FeedbackSynthesizer エージェントがコンダクターとして機能します。前の 3 人のエージェントから構造化データを取り込み、分析的で励みになる、ユーザーフレンドリーな 1 つのレポートを作成します。
その出力は、表示される最終的なレビューです。
📊 Summary
Great effort on implementing the Depth-First Search algorithm! ... However, a critical bug in the initialization of the stack prevents the function from working correctly...

✅ Strengths
- Good Algorithm Structure
- Correct Use of `visited` Set

📈 Code Quality Analysis
...
### Style Compliance
The style analysis returned a good score of 88/100.
...
### Test Results
The automated testing revealed a critical issue... The line `stack = start` directly assigns the input... which results in an `AttributeError`.

💡 Recommendations for Improvement
**Fix the Critical Stack Initialization Bug:**
- Incorrect Code: `stack = start`
- Correct Code: `stack = [start]`

💬 Encouragement
You are very close to a perfect implementation! The core logic of your DFS algorithm is sound, which is the hardest part.
⭐ 価値: このエージェントは、技術データを役立つ教育的なエクスペリエンスに変えます。最も重要な問題(バグ)を優先し、明確に説明し、正確な解決策を提示し、励ましのトーンで伝えます。前のすべてのステージの結果を統合して、まとまりのある価値のある全体にすることに成功しています。
このマルチステージ プロセスは、エージェント パイプラインの威力を示しています。単一のモノリシックなレスポンスではなく、各エージェントが専門的で検証可能なタスクを実行する階層化された分析を取得します。これにより、洞察に満ちただけでなく、決定的で信頼性が高く、教育的なレビューが実現します。
👉💻 テストが完了したら、Cloud Shell エディタのターミナルに戻り、Ctrl+C キーを押して ADK 開発 UI を停止します。
作成した機能
これで、次の機能を備えた完全なコードレビュー パイプラインが完成しました。
✅ コード構造を解析する - ヘルパー関数を使用した決定論的 AST 分析
✅ スタイルをチェックする - 命名規則を使用した重み付けスコアリング
✅ テストを実行する - 構造化された JSON 出力を使用した包括的なテスト生成
✅ フィードバックを合成する - 状態、メモリ、アーティファクトを統合する
✅ 進捗状況を追跡する - 呼び出し、セッション、ユーザーにわたる多層状態
✅ 時間の経過とともに学習する - セッション間のパターン用のメモリ サービス
✅ アーティファクトを提供する - 完全な監査証跡を含むダウンロード可能な JSON レポート
習得した主なコンセプト
Sequential Pipelines:
- 厳密な順序で実行される 4 つのエージェント
- 各エンリッチメントは次の状態をエンリッチメントします
- 依存関係によって実行順序が決まる
プロダクション パターン:
- ヘルパー関数の分離(スレッドプールの同期)
- グレースフル デグラデーション(フォールバック戦略)
- マルチティア状態管理(一時/セッション/ユーザー)
- 動的指示プロバイダ(コンテキスト認識)
- デュアル ストレージ(アーティファクトと状態の冗長性)
State as Communication(コミュニケーションとして状態を設定):
- 定数を使用すると、エージェント間の入力ミスを防ぐことができます
output_keyはエージェントの概要を状態に書き込みます- 後続のエージェントは StateKeys を介して読み取る
- 状態がパイプラインを直線的に流れる
メモリと状態:
- 状態: 現在のセッション データ
- メモリ: セッション間のパターン
- 目的が異なれば、有効期間も異なる
ツール オーケストレーション:
- 単一ツール エージェント(analyzer、style_checker)
- 組み込みエグゼキュータ(test_runner)
- マルチツールの連携(シンセサイザー)
モデル選択戦略:
- ワーカーモデル: 機械的なタスク(解析、lint、ルーティング)
- 批評モデル: 推論タスク(テスト、合成)
- 適切な選択による費用の最適化
次のステップ
モジュール 6 では、修正パイプラインを構築します。
- 反復修正のための LoopAgent アーキテクチャ
- エスカレーションによる終了条件
- イテレーション間の状態の蓄積
- 検証と再試行ロジック
- レビュー パイプラインとの統合による修正の提供
同じ状態パターンが、エージェントが成功するまで複数回試行する複雑な反復ワークフローにどのようにスケーリングされるか、また、単一のアプリケーションで複数のパイプラインを調整する方法について説明します。
6. 修正パイプライン: ループ アーキテクチャの追加
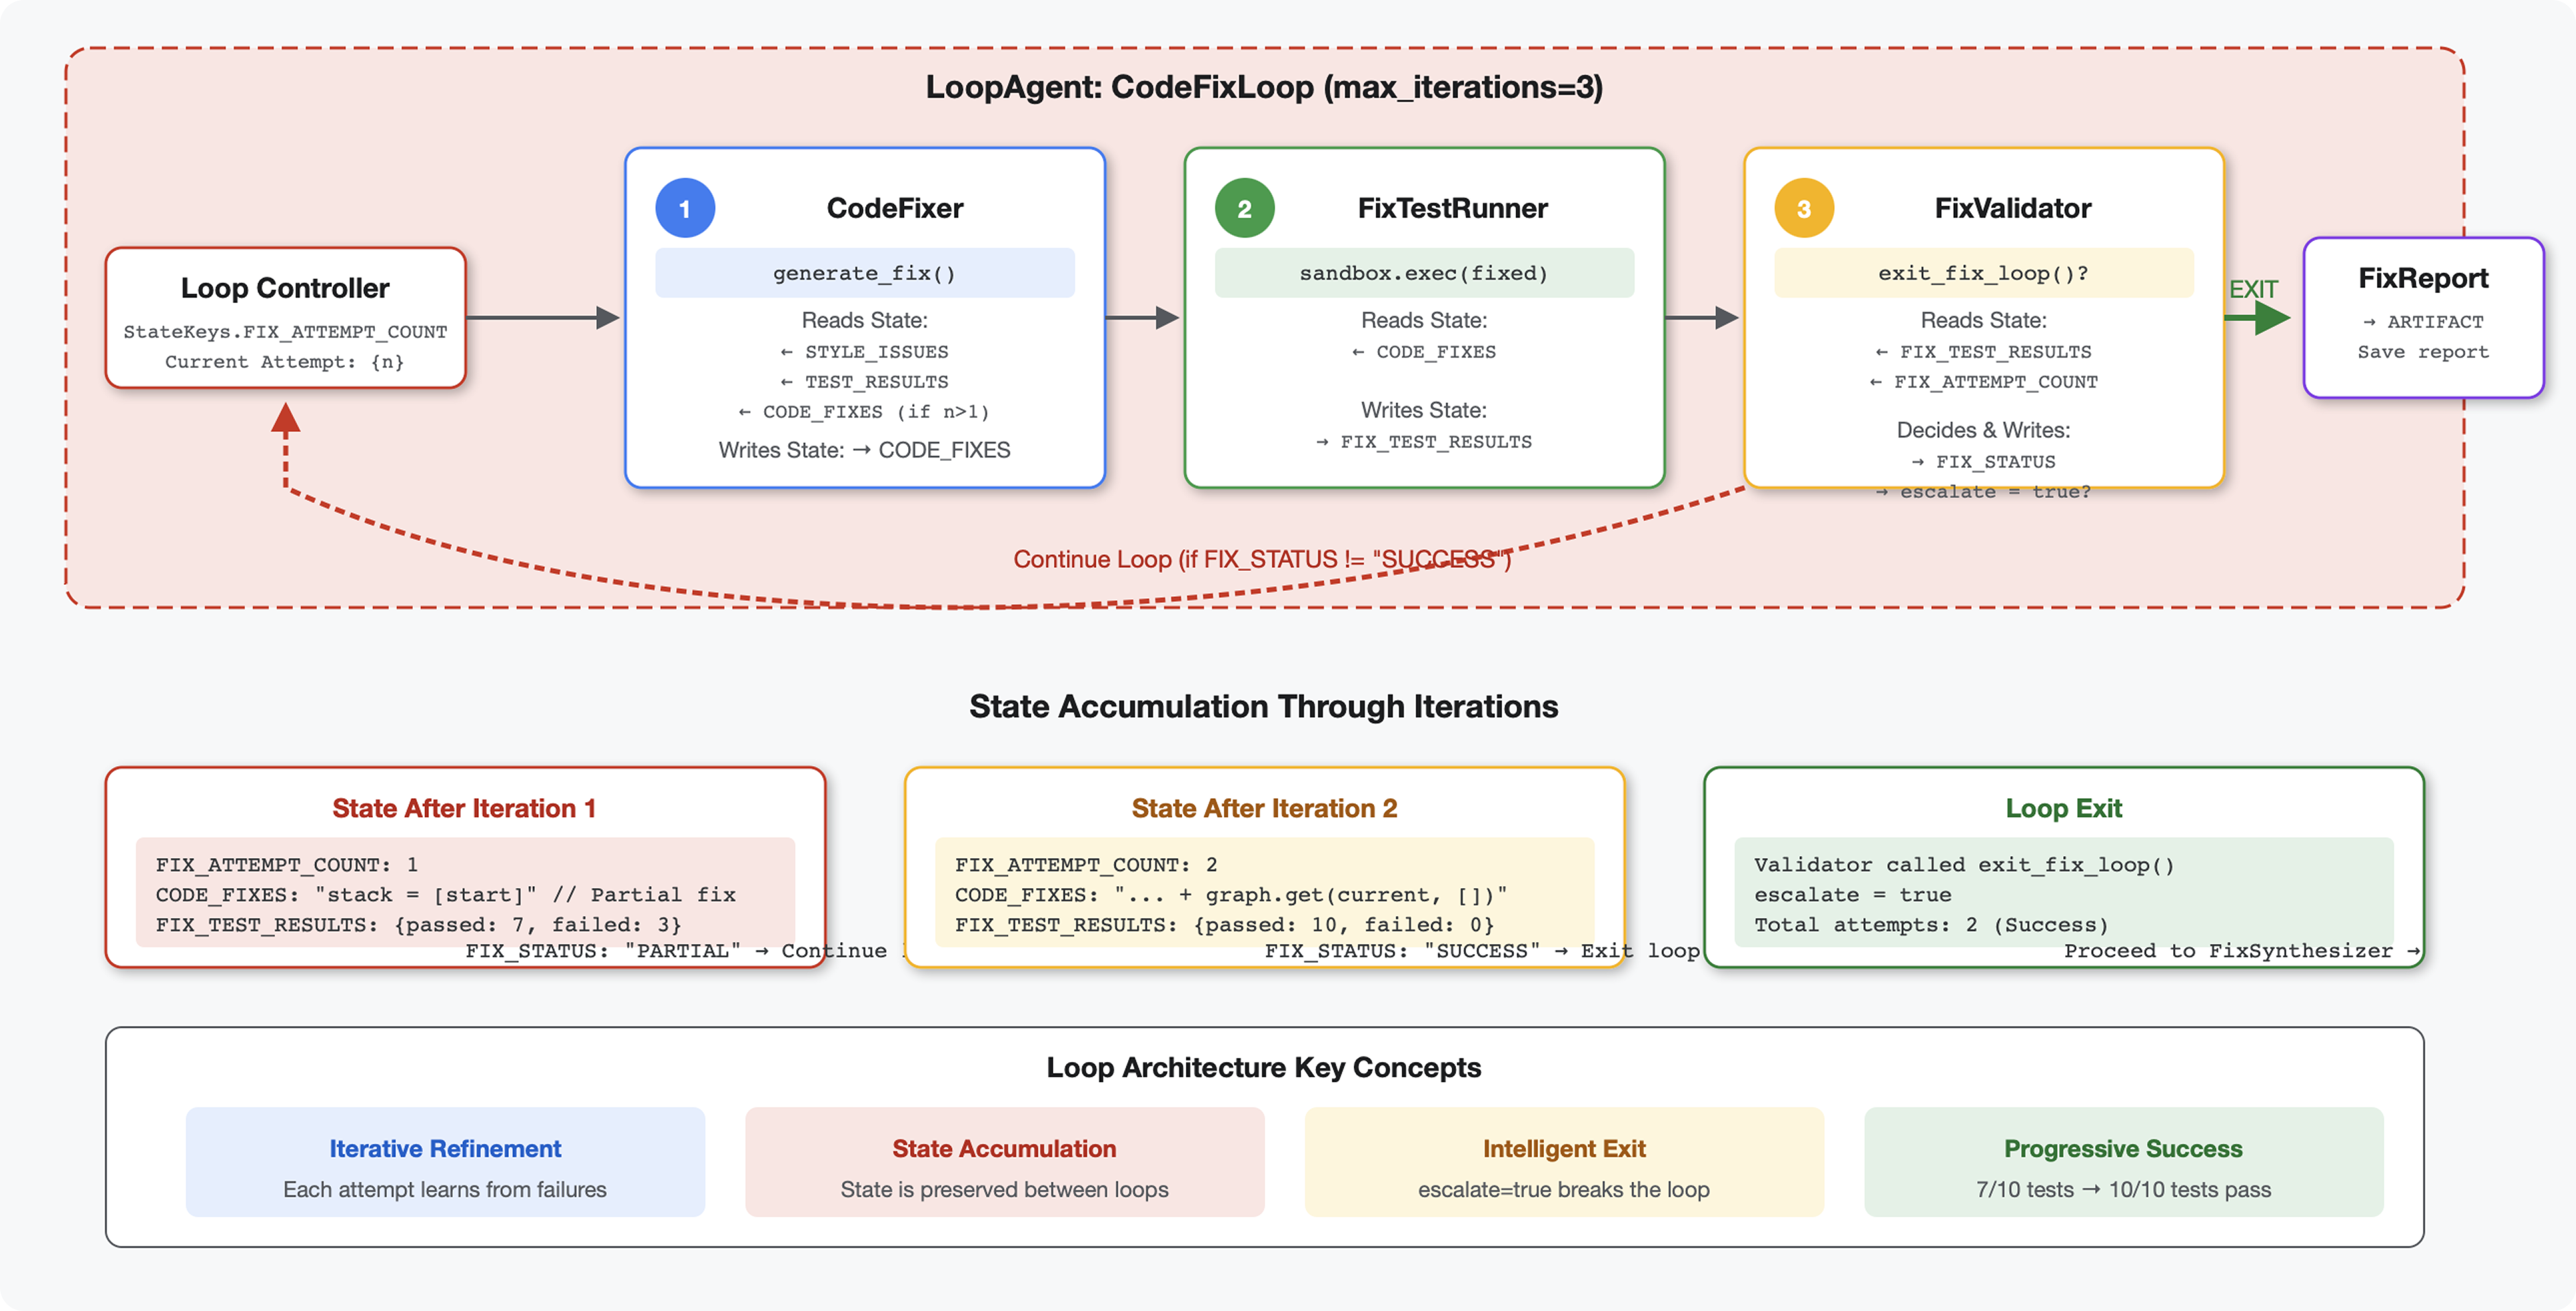
はじめに
モジュール 5 では、コードを分析してフィードバックを提供する順次レビュー パイプラインを構築しました。しかし、問題の特定は解決策の半分にすぎません。デベロッパーは問題を修正するためのサポートを必要としています。
このモジュールでは、次の処理を行う自動修正パイプラインを構築します。
- レビュー結果に基づいて修正を生成する
- 包括的なテストを実行して修正を検証します
- 修正が機能しない場合は自動的に再試行(最大 3 回)
- レポートの結果(テスト前後の比較を含む)
重要なコンセプト: 自動再試行のための LoopAgent。一度実行されるシーケンシャル エージェントとは異なり、LoopAgent は終了条件が満たされるか、最大イテレーション回数に達するまでサブエージェントを繰り返します。ツールは tool_context.actions.escalate = True を設定して成功を通知します。
構築するもののプレビュー: バグのあるコードを送信 → レビューで問題を特定 → 修正ループで修正を生成 → テストで検証 → 必要に応じて再試行 → 最終的な包括的なレポート。
基本コンセプト: LoopAgent と Sequential
順次パイプライン(モジュール 5):
SequentialAgent(agents=[A, B, C])
# Executes: A → B → C → Done
- 一方向フロー
- 各エージェントは 1 回だけ実行されます
- 再試行ロジックなし
ループ パイプライン(モジュール 6):
LoopAgent(agents=[A, B, C], max_iterations=3)
# Executes: A → B → C → (check exit) → A → B → C → (check exit) → ...
- 循環フロー
- エージェントは複数回実行できる
- 終了条件:
- ツールが
tool_context.actions.escalate = True(成功)を設定する max_iterationsに達しました(セーフティ リミット)- 未処理の例外が発生する(エラー)
- ツールが
コード修正のループの理由:
コードの修正には、多くの場合、複数回の試行が必要です。
- 最初の試み: 明らかなバグ(間違った変数型)を修正する
- 2 回目の試行: テストで明らかになった二次的な問題(エッジケース)を修正します。
- 3 回目の試行: すべてのテストに合格するように微調整して検証する
ループがないと、エージェントの指示に複雑な条件ロジックが必要になります。LoopAgent では、再試行は自動的に行われます。
アーキテクチャの比較:
Sequential (Module 5):
User → Review Pipeline → Feedback → Done

Loop (Module 6):
User → Review Pipeline → Feedback → Fix Pipeline
                                         ↓
                          ┌──────────────┴──────────────┐
                          │   Fix Attempt Loop (1-3x)   │
                          │  ┌─────────────────────┐    │
                          │  │ 1. Generate Fixes   │    │
                          │  │ 2. Test Fixes       │    │
                          │  │ 3. Validate & Exit? │────┼─→ If escalate=True
                          │  └─────────────────────┘    │      exit loop
                          │         ↓ If not            │
                          │    Try Again (max 3)        │
                          └─────────────────────────────┘
                                     ↓
                          4. Synthesize Final Report → Done
ステップ 1: Code Fixer エージェントを追加する
コード修正ツールは、レビュー結果に基づいて修正された Python コードを生成します。
👉 開く
code_review_assistant/sub_agents/fix_pipeline/code_fixer.py
👉 検索:
# MODULE_6_STEP_1_CODE_FIXER_INSTRUCTION_PROVIDER
👉 その 1 行を次のように置き換えます。
async def code_fixer_instruction_provider(context: ReadonlyContext) -> str:
    """Dynamic instruction provider that injects state variables."""
    template = """You are an expert code fixing specialist.

Original Code:
{code_to_review}

Analysis Results:
- Style Score: {style_score}/100
- Style Issues: {style_issues}
- Test Results: {test_execution_summary}

Based on the test results, identify and fix ALL issues including:
- Interface bugs (e.g., if start parameter expects wrong type)
- Logic errors (e.g., KeyError when accessing graph nodes)
- Style violations
- Missing documentation

YOUR TASK:
Generate the complete fixed Python code that addresses all identified issues.

CRITICAL INSTRUCTIONS:
- Output ONLY the corrected Python code
- Do NOT include markdown code blocks (```python)
- Do NOT include any explanations or commentary
- The output should be valid, executable Python code and nothing else

Common fixes to apply based on test results:
- If tests show AttributeError with 'pop', fix: stack = [start] instead of stack = start
- If tests show KeyError accessing graph, fix: use graph.get(current, [])
- Add docstrings if missing
- Fix any style violations identified

Output the complete fixed code now:"""

    return await instructions_utils.inject_session_state(template, context)
👉 検索:
# MODULE_6_STEP_1_CODE_FIXER_AGENT
👉 その 1 行を次のように置き換えます。
code_fixer_agent = Agent(
    name="CodeFixer",
    model=config.worker_model,
    description="Generates comprehensive fixes for all identified code issues",
    instruction=code_fixer_instruction_provider,
    code_executor=BuiltInCodeExecutor(),
    output_key="code_fixes"
)
ステップ 2: Fix Test Runner Agent を追加する
修正テスト ランナーは、修正されたコードに対して包括的なテストを実行して、修正を検証します。
👉 開く
code_review_assistant/sub_agents/fix_pipeline/fix_test_runner.py
👉 検索:
# MODULE_6_STEP_2_FIX_TEST_RUNNER_INSTRUCTION_PROVIDER
👉 その 1 行を次のように置き換えます。
async def fix_test_runner_instruction_provider(context: ReadonlyContext) -> str:
    """Dynamic instruction provider that uses the clean code from the previous step."""
    template = """You are responsible for validating the fixed code by running tests.

THE FIXED CODE TO TEST:
{code_fixes}

ORIGINAL TEST RESULTS: {test_execution_summary}

YOUR TASK:
1. Understand the fixes that were applied
2. Generate the same comprehensive tests (15-20 test cases)
3. Execute the tests on the FIXED code using your code executor
4. Compare results with original test results
5. Output a detailed JSON analysis

TESTING METHODOLOGY:
- Run the same tests that revealed issues in the original code
- Verify that previously failing tests now pass
- Ensure no regressions were introduced
- Document the improvement

Execute your tests and output ONLY valid JSON with this structure:
- "passed": number of tests that passed
- "failed": number of tests that failed
- "total": total number of tests
- "pass_rate": percentage as a number
- "comparison": object with "original_pass_rate", "new_pass_rate", "improvement"
- "newly_passing_tests": array of test names that now pass
- "still_failing_tests": array of test names still failing

Do NOT output the test code itself, only the JSON analysis."""

    return await instructions_utils.inject_session_state(template, context)
👉 検索:
# MODULE_6_STEP_2_FIX_TEST_RUNNER_AGENT
👉 その 1 行を次のように置き換えます。
fix_test_runner_agent = Agent(
    name="FixTestRunner",
    model=config.critic_model,
    description="Runs comprehensive tests on fixed code to verify all issues are resolved",
    instruction=fix_test_runner_instruction_provider,
    code_executor=BuiltInCodeExecutor(),
    output_key="fix_test_execution_summary"
)
ステップ 3: Fix Validator Agent を追加する
検証ツールは、修正が成功したかどうかを確認し、ループを終了するかどうかを決定します。
ツールについて
まず、バリデータに必要な 3 つのツールを追加します。
👉 開く
code_review_assistant/tools.py
👉 検索:
# MODULE_6_STEP_3_VALIDATE_FIXED_STYLE
👉 ツール 1 - スタイル バリデータに置き換えます。
async def validate_fixed_style(tool_context: ToolContext) -> Dict[str, Any]:
    """
    Validates style compliance of the fixed code.

    Args:
        tool_context: ADK tool context containing fixed code in state

    Returns:
        Dictionary with style validation results
    """
    logger.info("Tool: Validating style of fixed code...")

    try:
        # Get the fixed code from state
        code_fixes = tool_context.state.get(StateKeys.CODE_FIXES, '')

        # Try to extract from markdown if present
        if '```python' in code_fixes:
            start = code_fixes.rfind('```python') + 9
            end = code_fixes.rfind('```')
            if start < end:
                code_fixes = code_fixes[start:end].strip()

        if not code_fixes:
            return {
                "status": "error",
                "message": "No fixed code found in state"
            }

        # Store the extracted fixed code
        tool_context.state[StateKeys.CODE_FIXES] = code_fixes

        # Run style check on fixed code
        loop = asyncio.get_event_loop()
        with ThreadPoolExecutor() as executor:
            style_result = await loop.run_in_executor(
                executor, _perform_style_check, code_fixes
            )

        # Compare with original
        original_score = tool_context.state.get(StateKeys.STYLE_SCORE, 0)
        improvement = style_result['score'] - original_score

        # Store results
        tool_context.state[StateKeys.FIXED_STYLE_SCORE] = style_result['score']
        tool_context.state[StateKeys.FIXED_STYLE_ISSUES] = style_result['issues']

        logger.info(f"Tool: Fixed code style score: {style_result['score']}/100 "
                    f"(improvement: +{improvement})")

        return {
            "status": "success",
            "fixed_style_score": style_result['score'],
            "original_style_score": original_score,
            "improvement": improvement,
            "remaining_issues": style_result['issues'],
            "perfect_style": style_result['score'] == 100
        }

    except Exception as e:
        logger.error(f"Tool: Style validation failed: {e}", exc_info=True)
        return {
            "status": "error",
            "message": str(e)
        }
👉 検索:
# MODULE_6_STEP_3_COMPILE_FIX_REPORT
👉 ツール 2 - レポート コンパイラに置き換えます。
async def compile_fix_report(tool_context: ToolContext) -> Dict[str, Any]:
    """
    Compiles comprehensive report of the fix process.

    Args:
        tool_context: ADK tool context with all fix pipeline data

    Returns:
        Comprehensive fix report
    """
    logger.info("Tool: Compiling comprehensive fix report...")

    try:
        # Gather all data
        original_code = tool_context.state.get(StateKeys.CODE_TO_REVIEW, '')
        code_fixes = tool_context.state.get(StateKeys.CODE_FIXES, '')

        # Test results
        original_tests = tool_context.state.get(StateKeys.TEST_EXECUTION_SUMMARY, {})
        fixed_tests = tool_context.state.get(StateKeys.FIX_TEST_EXECUTION_SUMMARY, {})

        # Parse if strings
        if isinstance(original_tests, str):
            try:
                original_tests = json.loads(original_tests)
            except:
                original_tests = {}

        if isinstance(fixed_tests, str):
            try:
                fixed_tests = json.loads(fixed_tests)
            except:
                fixed_tests = {}

        # Extract pass rates
        original_pass_rate = 0
        if original_tests:
            if 'pass_rate' in original_tests:
                original_pass_rate = original_tests['pass_rate']
            elif 'test_summary' in original_tests:
                # Handle test_runner_agent's JSON structure
                summary = original_tests['test_summary']
                total = summary.get('total_tests_run', 0)
                passed = summary.get('tests_passed', 0)
                if total > 0:
                    original_pass_rate = (passed / total) * 100
            elif 'passed' in original_tests and 'total' in original_tests:
                if original_tests['total'] > 0:
                    original_pass_rate = (original_tests['passed'] / original_tests['total']) * 100

        fixed_pass_rate = 0
        all_tests_pass = False
        if fixed_tests:
            if 'pass_rate' in fixed_tests:
                fixed_pass_rate = fixed_tests['pass_rate']
                all_tests_pass = fixed_tests.get('failed', 1) == 0
            elif 'passed' in fixed_tests and 'total' in fixed_tests:
                if fixed_tests['total'] > 0:
                    fixed_pass_rate = (fixed_tests['passed'] / fixed_tests['total']) * 100
                all_tests_pass = fixed_tests.get('failed', 0) == 0

        # Style scores
        original_style = tool_context.state.get(StateKeys.STYLE_SCORE, 0)
        fixed_style = tool_context.state.get(StateKeys.FIXED_STYLE_SCORE, 0)

        # Calculate improvements
        test_improvement = {
            'original_pass_rate': original_pass_rate,
            'fixed_pass_rate': fixed_pass_rate,
            'improvement': fixed_pass_rate - original_pass_rate,
            'all_tests_pass': all_tests_pass
        }

        style_improvement = {
            'original_score': original_style,
            'fixed_score': fixed_style,
            'improvement': fixed_style - original_style,
            'perfect_style': fixed_style == 100
        }

        # Determine overall status
        if all_tests_pass and style_improvement['perfect_style']:
            fix_status = 'SUCCESSFUL'
            status_emoji = '✅'
        elif test_improvement['improvement'] > 0 or style_improvement['improvement'] > 0:
            fix_status = 'PARTIAL'
            status_emoji = '⚠️'
        else:
            fix_status = 'FAILED'
            status_emoji = '❌'

        # Build comprehensive report
        report = {
            'status': fix_status,
            'status_emoji': status_emoji,
            'timestamp': datetime.now().isoformat(),
            'original_code': original_code,
            'code_fixes': code_fixes,
            'improvements': {
                'tests': test_improvement,
                'style': style_improvement
            },
            'summary': f"{status_emoji} Fix Status: {fix_status}\n"
                      f"Tests: {original_pass_rate:.1f}% → {fixed_pass_rate:.1f}%\n"
                      f"Style: {original_style}/100 → {fixed_style}/100"
        }

        # Store report in state
        tool_context.state[StateKeys.FIX_REPORT] = report
        tool_context.state[StateKeys.FIX_STATUS] = fix_status

        logger.info(f"Tool: Fix report compiled - Status: {fix_status}")
        logger.info(f"Tool: Test improvement: {original_pass_rate:.1f}% → {fixed_pass_rate:.1f}%")
        logger.info(f"Tool: Style improvement: {original_style} → {fixed_style}")

        return {
            "status": "success",
            "fix_status": fix_status,
            "report": report
        }

    except Exception as e:
        logger.error(f"Tool: Failed to compile fix report: {e}", exc_info=True)
        return {
            "status": "error",
            "message": str(e)
        }
👉 検索:
# MODULE_6_STEP_3_EXIT_FIX_LOOP
👉 ツール 3 - ループ終了シグナルに置き換えます。
def exit_fix_loop(tool_context: ToolContext) -> Dict[str, Any]:
    """
    Signal that fixing is complete and should exit the loop.

    Args:
        tool_context: ADK tool context

    Returns:
        Confirmation message
    """
    logger.info("Tool: Setting escalate flag to exit fix loop")

    # This is the critical line that exits the LoopAgent
    tool_context.actions.escalate = True

    return {
        "status": "success",
        "message": "Fix complete, exiting loop"
    }
Validator エージェントを作成する
👉 開く
code_review_assistant/sub_agents/fix_pipeline/fix_validator.py
👉 検索:
# MODULE_6_STEP_3_FIX_VALIDATOR_INSTRUCTION_PROVIDER
👉 その 1 行を次のように置き換えます。
async def fix_validator_instruction_provider(context: ReadonlyContext) -> str:
    """Dynamic instruction provider that injects state variables."""
    template = """You are the final validation specialist for code fixes.

You have access to:
- Original issues from initial review
- Applied fixes: {code_fixes}
- Test results after fix: {fix_test_execution_summary}
- All state data from the fix process

Your responsibilities:
1. Use validate_fixed_style tool to check style compliance of fixed code
   - Pass no arguments, it will retrieve fixed code from state
2. Use compile_fix_report tool to generate comprehensive report
   - Pass no arguments, it will gather all data from state
3. Based on the report, determine overall fix status:
   - ✅ SUCCESSFUL: All tests pass, style score 100
   - ⚠️ PARTIAL: Improvements made but issues remain
   - ❌ FAILED: Fix didn't work or made things worse

4. CRITICAL: If status is SUCCESSFUL, call the exit_fix_loop tool to stop iterations
   - This prevents unnecessary additional fix attempts
   - If not successful, the loop will continue for another attempt

5. Provide clear summary of:
   - What was fixed
   - What improvements were achieved
   - Any remaining issues requiring manual attention

Be precise and quantitative in your assessment.
"""
    return await instructions_utils.inject_session_state(template, context)
👉 検索:
# MODULE_6_STEP_3_FIX_VALIDATOR_AGENT
👉 その 1 行を次のように置き換えます。
fix_validator_agent = Agent(
    name="FixValidator",
    model=config.worker_model,
    description="Validates fixes and generates final fix report",
    instruction=fix_validator_instruction_provider,
    tools=[
        FunctionTool(func=validate_fixed_style),
        FunctionTool(func=compile_fix_report),
        FunctionTool(func=exit_fix_loop)
    ],
    output_key="final_fix_report"
)
ステップ 4: LoopAgent の終了条件を理解する
LoopAgent には 3 つの終了方法があります。
1. Success Exit(エスカレーション経由)
# Inside any tool in the loop:
tool_context.actions.escalate = True

# Effect: Loop completes current iteration, then exits
# Use when: Fix is successful and no more attempts needed
フローの例:
Iteration 1:
  CodeFixer → generates fixes
  FixTestRunner → tests show 90% pass rate
  FixValidator → compiles report, sees PARTIAL status
  → Does NOT set escalate
  → Loop continues

Iteration 2:
  CodeFixer → refines fixes based on failures
  FixTestRunner → tests show 100% pass rate
  FixValidator → compiles report, sees SUCCESSFUL status
  → Calls exit_fix_loop() which sets escalate = True
  → Loop exits after this iteration
2. Max Iterations Exit
LoopAgent(
    name="FixAttemptLoop",
    sub_agents=[...],
    max_iterations=3  # Safety limit
)

# Effect: After 3 complete iterations, loop exits regardless of escalate
# Use when: Prevent infinite loops if fixes never succeed
フローの例:
Iteration 1: PARTIAL (continue)
Iteration 2: PARTIAL (continue)
Iteration 3: PARTIAL (but max reached)
→ Loop exits, synthesizer presents best attempt
3. Error Exit
# If any agent throws unhandled exception:
raise Exception("Unexpected error")

# Effect: Loop exits immediately with error state
# Use when: Critical failure that can't be recovered
イテレーション間の状態の進化:
各イテレーションでは、前の試行から更新された状態が確認されます。
# Before Iteration 1:
state = {
    "code_to_review": "def add(a,b):return a+b",  # Original
    "style_score": 40,
    "test_execution_summary": {...}
}

# After Iteration 1:
state = {
    "code_to_review": "def add(a,b):return a+b",  # Unchanged
    "code_fixes": "def add(a, b):\n    return a + b",  # NEW
    "style_score": 40,  # Unchanged
    "fixed_style_score": 100,  # NEW
    "test_execution_summary": {...},  # Unchanged
    "fix_test_execution_summary": {...}  # NEW
}

# Iteration 2 starts with all this state
# If fixes still not perfect, code_fixes gets overwritten
理由
escalate
戻り値の代わりに:
# Bad: Using return value to signal exit
def validator_agent():
    report = compile_report()
    if report['status'] == 'SUCCESSFUL':
        return {"exit": True}  # How does loop know?

# Good: Using escalate
def validator_tool(tool_context):
    report = compile_report()
    if report['status'] == 'SUCCESSFUL':
        tool_context.actions.escalate = True  # Loop knows immediately
    return {"report": report}
利点:
- 最後のツールだけでなく、どのツールからでも動作する
- 戻りデータに干渉しない
- 明確なセマンティックの意味
- フレームワークが終了ロジックを処理する
ステップ 5: Fix パイプラインを接続する
👉 開く
code_review_assistant/agent.py
👉 修正パイプラインのインポートを追加します(既存のインポートの後)。
from google.adk.agents import LoopAgent  # Add this to the existing Agent, SequentialAgent line
from code_review_assistant.sub_agents.fix_pipeline.code_fixer import code_fixer_agent
from code_review_assistant.sub_agents.fix_pipeline.fix_test_runner import fix_test_runner_agent
from code_review_assistant.sub_agents.fix_pipeline.fix_validator import fix_validator_agent
from code_review_assistant.sub_agents.fix_pipeline.fix_synthesizer import fix_synthesizer_agent
インポートは次のようになります。
from google.adk.agents import Agent, SequentialAgent, LoopAgent
from .config import config
# Review pipeline imports (from Module 5)
from code_review_assistant.sub_agents.review_pipeline.code_analyzer import code_analyzer_agent
from code_review_assistant.sub_agents.review_pipeline.style_checker import style_checker_agent
from code_review_assistant.sub_agents.review_pipeline.test_runner import test_runner_agent
from code_review_assistant.sub_agents.review_pipeline.feedback_synthesizer import feedback_synthesizer_agent
# Fix pipeline imports (NEW)
from code_review_assistant.sub_agents.fix_pipeline.code_fixer import code_fixer_agent
from code_review_assistant.sub_agents.fix_pipeline.fix_test_runner import fix_test_runner_agent
from code_review_assistant.sub_agents.fix_pipeline.fix_validator import fix_validator_agent
from code_review_assistant.sub_agents.fix_pipeline.fix_synthesizer import fix_synthesizer_agent
👉 検索:
# MODULE_6_STEP_5_CREATE_FIX_LOOP
👉 その 1 行を次のように置き換えます。
# Create the fix attempt loop (retries up to 3 times)
fix_attempt_loop = LoopAgent(
    name="FixAttemptLoop",
    sub_agents=[
        code_fixer_agent,      # Step 1: Generate fixes
        fix_test_runner_agent, # Step 2: Validate with tests
        fix_validator_agent    # Step 3: Check success & possibly exit
    ],
    max_iterations=3  # Try up to 3 times
)

# Wrap loop with synthesizer for final report
code_fix_pipeline = SequentialAgent(
    name="CodeFixPipeline",
    description="Automated code fixing pipeline with iterative validation",
    sub_agents=[
        fix_attempt_loop,      # Try to fix (1-3 times)
        fix_synthesizer_agent  # Present final results (always runs once)
    ]
)
👉 既存の を削除する
root_agent
定義:
root_agent = Agent(...)
👉 検索:
# MODULE_6_STEP_5_UPDATE_ROOT_AGENT
👉 その 1 行を次のように置き換えます。
# Update root agent to include both pipelines
root_agent = Agent(
    name="CodeReviewAssistant",
    model=config.worker_model,
    description="An intelligent code review assistant that analyzes Python code and provides educational feedback",
    instruction="""You are a specialized Python code review assistant focused on helping developers improve their code quality.

When a user provides Python code for review:
1. Immediately delegate to CodeReviewPipeline and pass the code EXACTLY as it was provided by the user.
2. The pipeline will handle all analysis and feedback
3. Return ONLY the final feedback from the pipeline - do not add any commentary

After completing a review, if significant issues were identified:
- If style score < 100 OR tests are failing OR critical issues exist:
  * Add at the end: "\n\n💡 I can fix these issues for you. Would you like me to do that?"

- If the user responds yes or requests fixes:
  * Delegate to CodeFixPipeline
  * Return the fix pipeline's complete output AS-IS

When a user asks what you can do or general questions:
- Explain your capabilities for code review and fixing
- Do NOT trigger the pipeline for non-code messages

The pipelines handle everything for code review and fixing - just pass through their final output.""",
    sub_agents=[code_review_pipeline, code_fix_pipeline],
    output_key="assistant_response"
)
ステップ 6: Fix Synthesizer エージェントを追加する
シンセサイザーは、ループの完了後に修正結果をわかりやすく表示します。
👉 開く
code_review_assistant/sub_agents/fix_pipeline/fix_synthesizer.py
👉 検索:
# MODULE_6_STEP_6_FIX_SYNTHESIZER_INSTRUCTION_PROVIDER
👉 その 1 行を次のように置き換えます。
async def fix_synthesizer_instruction_provider(context: ReadonlyContext) -> str:
    """Dynamic instruction provider that injects state variables."""
    template = """You are responsible for presenting the fix results to the user.

Based on the validation report: {final_fix_report}
Fixed code from state: {code_fixes}
Fix status: {fix_status}

Create a comprehensive yet friendly response that includes:

## 🔧 Fix Summary
[Overall status and key improvements - be specific about what was achieved]

## 📊 Metrics
- Test Results: [original pass rate]% → [new pass rate]%
- Style Score: [original]/100 → [new]/100
- Issues Fixed: X of Y

## ✅ What Was Fixed
[List each fixed issue with brief explanation of the correction made]

## 📝 Complete Fixed Code
[Include the complete, corrected code from state - this is critical]

## 💡 Explanation of Key Changes
[Brief explanation of the most important changes made and why]

[If any issues remain]
## ⚠️ Remaining Issues
[List what still needs manual attention]

## 🎯 Next Steps
[Guidance on what to do next - either use the fixed code or address remaining issues]

Save the fix report using save_fix_report tool before presenting.
Call it with no parameters - it will retrieve the report from state automatically.

Be encouraging about improvements while being honest about any remaining issues.
Focus on the educational aspect - help the user understand what was wrong and how it was fixed.
"""
    return await instructions_utils.inject_session_state(template, context)
👉 検索:
# MODULE_6_STEP_6_FIX_SYNTHESIZER_AGENT
👉 その 1 行を次のように置き換えます。
fix_synthesizer_agent = Agent(
    name="FixSynthesizer",
    model=config.critic_model,
    description="Creates comprehensive user-friendly fix report",
    instruction=fix_synthesizer_instruction_provider,
    tools=[FunctionTool(func=save_fix_report)],
    output_key="fix_summary"
)
👉 追加
save_fix_report
ツールから
tools.py
:
👉 検索:
# MODULE_6_STEP_6_SAVE_FIX_REPORT
👉 次のように置き換えます。
async def save_fix_report(tool_context: ToolContext) -> Dict[str, Any]:
    """
    Saves the fix report as an artifact.

    Args:
        tool_context: ADK tool context

    Returns:
        Save status
    """
    logger.info("Tool: Saving fix report...")

    try:
        # Get the report from state
        fix_report = tool_context.state.get(StateKeys.FIX_REPORT, {})

        if not fix_report:
            return {
                "status": "error",
                "message": "No fix report found in state"
            }

        # Convert to JSON
        report_json = json.dumps(fix_report, indent=2)
        report_part = types.Part.from_text(text=report_json)

        # Generate filename
        timestamp = datetime.now().isoformat().replace(':', '-')
        filename = f"fix_report_{timestamp}.json"

        # Try to save as artifact
        if hasattr(tool_context, 'save_artifact'):
            try:
                version = await tool_context.save_artifact(filename, report_part)
                await tool_context.save_artifact("latest_fix_report.json", report_part)

                logger.info(f"Tool: Fix report saved as {filename}")

                return {
                    "status": "success",
                    "filename": filename,
                    "version": str(version),
                    "size": len(report_json)
                }
            except Exception as e:
                logger.warning(f"Could not save as artifact: {e}")

        # Fallback: store in state
        tool_context.state[StateKeys.LAST_FIX_REPORT] = fix_report

        return {
            "status": "success",
            "message": "Fix report saved to state",
            "size": len(report_json)
        }

    except Exception as e:
        logger.error(f"Tool: Failed to save fix report: {e}", exc_info=True)
        return {
            "status": "error",
            "message": str(e)
        }
ステップ 7: テスト完了の修正パイプライン
ループ全体の動作を確認しましょう。
👉 システムを起動する:
adk web code_review_assistant
adk web コマンドを実行すると、ターミナルに ADK Web サーバーが起動したことを示す次のような出力が表示されます。
+-----------------------------------------------------------------------------+
| ADK Web Server started                                                      |
|                                                                             |
| For local testing, access at http://localhost:8000.                         |
+-----------------------------------------------------------------------------+

INFO:     Application startup complete.
INFO:     Uvicorn running on http://0.0.0.0:8000 (Press CTRL+C to quit)
👉 テスト プロンプト:
Please analyze the following:
def dfs_search_v1(graph, start, target):
    """Find if target is reachable from start."""
    visited = set()
    stack = start

    while stack:
        current = stack.pop()

        if current == target:
            return True

        if current not in visited:
            visited.add(current)

            for neighbor in graph[current]:
                if neighbor not in visited:
                    stack.append(neighbor)

    return False
まず、バグのあるコードを送信して、レビュー パイプラインをトリガーします。欠陥を特定したら、エージェントに「コードを修正してください」と依頼します。これにより、強力な反復型の修正パイプラインがトリガーされます。
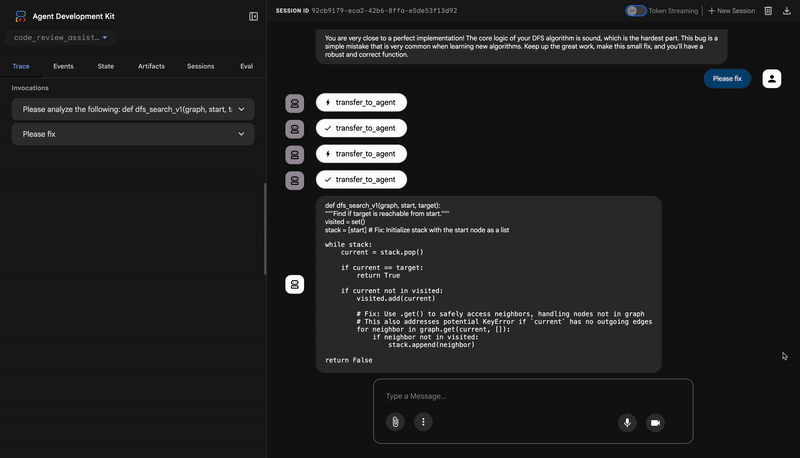
1. 初期審査(欠陥の発見)
これはプロセスの前半です。4 つのエージェントからなるレビュー パイプラインは、コードを分析し、スタイルをチェックして、生成されたテストスイートを実行します。重大な AttributeError などの問題を正しく特定し、コードは BROKEN で、テスト合格率はわずか 84.21% であるという結果を返します。
2. 自動修正(ループの動作)
これが最も印象的な部分です。エージェントにコードの修正を依頼すると、1 つの変更だけでなく、これは、勤勉なデベロッパーのように動作する反復的な修正と検証のループを開始します。修正を試して徹底的にテストし、完璧でない場合はもう一度試します。
イテレーション #1: 最初の試行(部分的に成功)
- 修正:
CodeFixerエージェントが最初のレポートを読み取り、最も明らかな修正を行います。stack = startをstack = [start]に変更し、graph.get()を使用してKeyError例外を防ぎます。 - 検証:
TestRunnerは、この新しいコードに対して完全なテストスイートを直ちに再実行します。 - 結果: 合格率が 88.89% に大幅に向上しました。重大なバグはなくなりました。ただし、テストは非常に包括的であるため、
Noneをグラフまたはリスト以外の近傍値として処理することに関連する 2 つの新しい微妙なバグ(回帰)が明らかになりました。システムは修正を [PARTIAL](部分的)としてマークします。
イテレーション #2: 最終的な仕上げ(100% 成功)
- 修正: ループの終了条件(合格率 100%)が満たされなかったため、ループが再度実行されます。
CodeFixerに、2 つの新しい回帰失敗に関する情報が追加されました。これにより、これらのエッジケースを明示的に処理する、より堅牢な最終バージョンのコードが生成されます。 - 検証:
TestRunnerは、コードの最終バージョンに対してテストスイートをもう一度実行します。 - 結果: 合格率 100% を達成しました。元のバグとすべての回帰が解決されています。システムは修正を SUCCESSFUL とマークし、ループを終了します。
3. 最終レポート: 満点
完全に検証された修正により、FixSynthesizer エージェントが最終レポートの提示を引き継ぎ、技術データをわかりやすく教育的な概要に変換します。
指標 | 変更前 | 変更後 | 改善 |
テスト合格率 | 84.21% | 100% | ▲ 15.79% |
スタイル スコア | 88 / 100 | 98 / 100 | ▲ 10 ポイント |
修正されたバグ | 0/3 | 3 / 3 | ✅ |
✅ 最終版の検証済みコード
修正後のコード全体を以下に示します。このコードは 19 個のテストすべてに合格しており、修正が成功したことを示しています。
def dfs_search_v1(graph, start, target):
    """Find if target is reachable from start."""
    # Handles 'None' graph input
    if graph is None:
        return False

    visited = set()
    # Fixes the critical AttributeError
    stack = [start]

    while stack:
        current = stack.pop()

        if current == target:
            return True

        if current not in visited:
            visited.add(current)

            # Safely gets neighbors to prevent KeyError
            neighbors = graph.get(current)

            if neighbors is None:
                continue

            # Validates that neighbors are iterable
            if not isinstance(neighbors, (list, set, tuple)):
                raise TypeError(
                    f"Graph value for node '{current}' is of type "
                    f"{type(neighbors).__name__}. Expected a list, set, or tuple."
                )

            for neighbor in neighbors:
                if neighbor not in visited:
                    stack.append(neighbor)

    return False
👉💻 テストが完了したら、Cloud Shell エディタのターミナルに戻り、Ctrl+C キーを押して ADK 開発 UI を停止します。
作成した機能
これで、次の処理を行う自動修正パイプラインが完成しました。
✅ 修正を生成する - レビュー分析に基づく
✅ 反復的に検証する - 各修正試行後にテストする
✅ 自動的に再試行する - 成功するまで最大 3 回試行する
✅ インテリジェントに終了する - 成功時にエスカレーションする
✅ 改善を追跡する - 修正前後の指標を比較する
✅ アーティファクトを提供する - ダウンロード可能な修正レポート
習得した主なコンセプト
LoopAgent と Sequential:
- シーケンシャル: エージェントを 1 回パスする
- LoopAgent: 終了条件または最大イテレーション回数に達するまで繰り返す
- 出口:
tool_context.actions.escalate = True
イテレーション間の状態の進化:
CODE_FIXESが各反復処理で更新される- テスト結果が時間の経過とともに改善される
- バリデータに累積的な変更が表示される
マルチパイプライン アーキテクチャ:
- パイプラインの確認: 読み取り専用の分析(モジュール 5)
- 修正ループ: 反復的な修正(モジュール 6 の内部ループ)
- 修正パイプライン: ループ + シンセサイザー(モジュール 6 の外側)
- ルート エージェント: ユーザーの意図に基づいてオーケストレーションを行う
フローを制御するツール:
exit_fix_loop()セットがエスカレーションされる- 任意のツールでループの完了を通知できる
- 終了ロジックをエージェントへの指示から切り離す
最大反復回数の安全性:
- 無限ループを防止
- システムが常に応答するようにする
- 完璧でなくても最善の試みを提示する
次のステップ
最後のモジュールでは、エージェントを本番環境にデプロイする方法について学習します。
- VertexAiSessionService を使用して永続ストレージを設定する
- Google Cloud の Agent Engine へのデプロイ
- 本番環境エージェントのモニタリングとデバッグ
- スケーリングと信頼性に関するベスト プラクティス
シーケンシャル アーキテクチャとループ アーキテクチャを使用して、完全なマルチエージェント システムを構築しました。学習したパターン(状態管理、動的指示、ツール オーケストレーション、反復的な改善)は、実際のエージェント システムで使用される本番環境対応の技術です。
7. 本番環境へのデプロイ
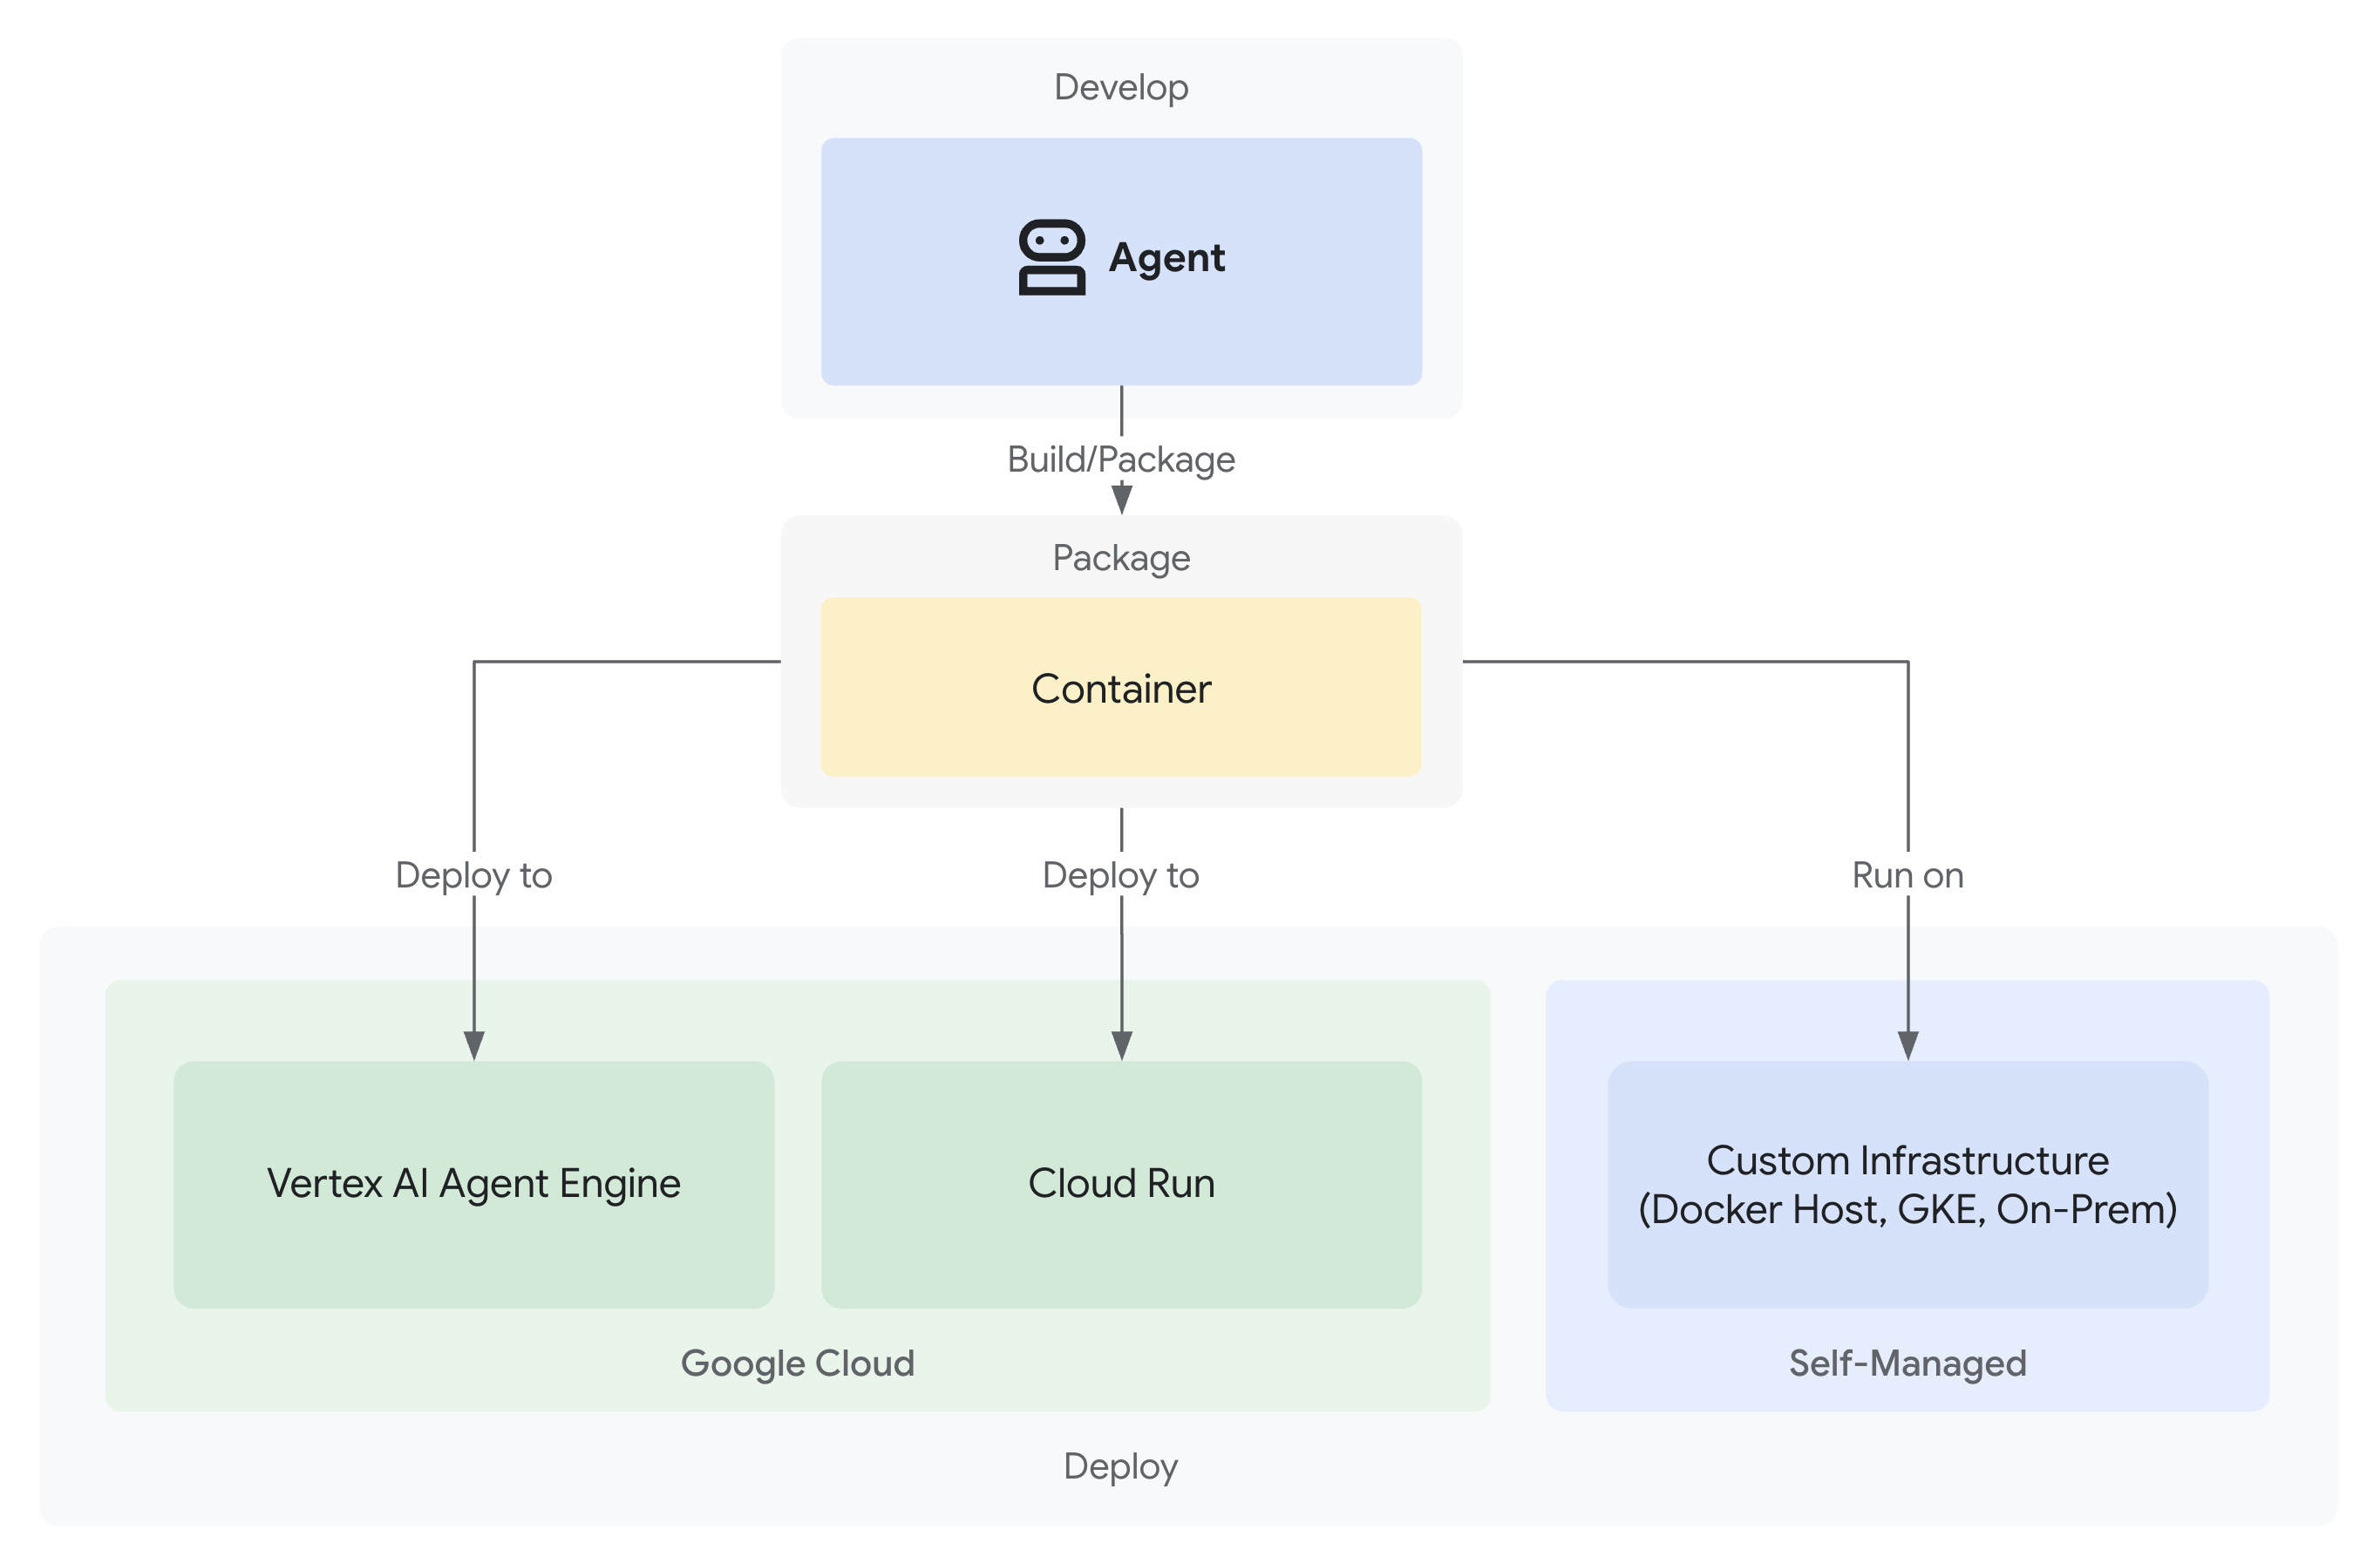
はじめに
コードレビュー アシスタントが完成し、レビューと修正のパイプラインがローカルで動作するようになりました。欠けているのは、ローカル環境でのみ実行されることです。このモジュールでは、エージェントを Google Cloud にデプロイし、永続セッションと本番環境対応のインフラストラクチャを使用してチームがアクセスできるようにします。
学習内容:
- 3 つのデプロイ パス: ローカル、Cloud Run、Agent Engine
- インフラストラクチャの自動プロビジョニング
- セッションの永続性戦略
- デプロイしたエージェントをテストする
デプロイ オプションについて
ADK は、それぞれ異なるトレードオフを持つ複数のデプロイ ターゲットをサポートしています。
デプロイ パス
要素 | ローカル( | Cloud Run( | Agent Engine( |
複雑さ | 最小 | 中 | 低 |
セッションの永続性 | インメモリのみ(再起動すると失われる) | Cloud SQL(PostgreSQL) | Vertex AI マネージド(自動) |
インフラストラクチャ | なし(開発マシンのみ) | コンテナ + データベース | フルマネージド |
コールド スタート | なし | 100 ~ 2,000 ミリ秒 | 100 ~ 500 ミリ秒 |
スケーリング | 単一インスタンス | 自動(ゼロまで) | 自動 |
費用モデル | 無料(ローカル コンピューティング) | リクエスト ベース + 無料枠 | コンピューティング ベース |
UI サポート | はい( | はい( | いいえ(API のみ) |
最適な用途 | 開発 / テスト | トラフィックの変動、費用管理 | 本番環境エージェント |
その他のデプロイ オプション: Kubernetes レベルの制御、カスタム ネットワーキング、マルチサービス オーケストレーションを必要とする上級ユーザー向けに、Google Kubernetes Engine(GKE)が用意されています。この Codelab では GKE のデプロイについては説明しませんが、ADK デプロイガイドに記載されています。
デプロイされるもの
Cloud Run または Agent Engine にデプロイすると、次のものがパッケージ化されてデプロイされます。
- エージェント コード(
agent.py、すべてのサブエージェント、ツール) - 依存関係(
requirements.txt) - ADK API サーバー(自動的に含まれます)
- ウェブ UI(Cloud Run のみ、
--with_uiが指定されている場合)
重要な違い:
- Cloud Run:
adk deploy cloud_runCLI(コンテナを自動的にビルド)またはgcloud run deploy(カスタム Dockerfile が必要)を使用 - Agent Engine:
adk deploy agent_engineCLI を使用(コンテナのビルドは不要、Python コードを直接パッケージ化)
ステップ 1: 環境を構成する
.env ファイルを構成する
.env ファイル(モジュール 3 で作成)は、クラウド デプロイ用に更新する必要があります。.env を開き、以下の設定を確認または更新します。
すべてのクラウド デプロイで必須:
# Your actual GCP Project ID (REQUIRED)
GOOGLE_CLOUD_PROJECT=your-project-id

# GCP region for deployments (REQUIRED)
GOOGLE_CLOUD_LOCATION=us-central1

# Use Vertex AI (REQUIRED)
GOOGLE_GENAI_USE_VERTEXAI=true

# Model configuration (already set)
WORKER_MODEL=gemini-2.5-flash
CRITIC_MODEL=gemini-2.5-pro
バケット名を設定します(deploy.sh を実行する前に必要):
デプロイ スクリプトは、これらの名前に基づいてバケットを作成します。今すぐ設定します。
# Staging bucket for Agent Engine code uploads (REQUIRED for agent-engine)
STAGING_BUCKET=gs://your-project-id-staging

# Artifact storage for reports and fixed code (REQUIRED for both cloud-run and agent-engine)
ARTIFACT_BUCKET=gs://your-project-id-artifacts
両方のバケット名で、your-project-id を実際のプロジェクト ID に置き換えます。これらのバケットが存在しない場合は、スクリプトによって作成されます。
省略可能な変数(空白の場合、自動的に作成されます):
# Agent Engine ID (populated after first deployment)
AGENT_ENGINE_ID=

# Cloud Run Database credentials (created automatically if blank)
CLOUD_SQL_INSTANCE_NAME=
DB_USER=
DB_PASSWORD=
DB_NAME=
認証チェック
デプロイ中に認証エラーが発生した場合は、次の操作を行います。
gcloud auth application-default login
gcloud config set project $GOOGLE_CLOUD_PROJECT
ステップ 2: デプロイ スクリプトを理解する
deploy.sh スクリプトは、すべてのデプロイモードに統合インターフェースを提供します。
./deploy.sh {local|cloud-run|agent-engine}
スクリプトの機能
インフラストラクチャのプロビジョニング:
- API の有効化(AI Platform、Storage、Cloud Build、Cloud Trace、Cloud SQL)
- IAM 権限の構成(サービス アカウント、ロール)
- リソースの作成(バケット、データベース、インスタンス)
- 適切なフラグを使用したデプロイ
- デプロイ後の検証
主なスクリプト セクション
- 構成(1 ~ 35 行): プロジェクト、リージョン、サービス名、デフォルト
- ヘルパー関数(37 ~ 200 行): API の有効化、バケットの作成、IAM の設定
- メイン ロジック(202 ~ 400 行目): モード固有のデプロイ オーケストレーション
ステップ 3: エージェント エンジン用にエージェントを準備する
Agent Engine にデプロイする前に、マネージド ランタイム用にエージェントをラップする agent_engine_app.py ファイルが必要です。これはすでに作成されています。
code_review_assistant/agent_engine_app.pyを表示
👉 ファイルを開く:
"""
Agent Engine application wrapper.
This file prepares the agent for deployment to Vertex AI Agent Engine.
"""

from vertexai import agent_engines
from .agent import root_agent

# Wrap the agent in an AdkApp object for Agent Engine deployment
app = agent_engines.AdkApp(
    agent=root_agent,
    enable_tracing=True,
)
ステップ 4: Agent Engine にデプロイする
Agent Engine は、次の機能を提供するため、ADK エージェントの推奨される本番環境デプロイです。
- フルマネージド インフラストラクチャ(ビルドするコンテナがない)
VertexAiSessionServiceによる組み込みのセッション永続性- ゼロからの自動スケーリング
- Cloud Trace の統合がデフォルトで有効
Agent Engine と他のデプロイの違い
仕組み
deploy.sh agent-engine
uses:
adk deploy agent_engine \
  --project=$GOOGLE_CLOUD_PROJECT \
  --region=$GOOGLE_CLOUD_LOCATION \
  --staging_bucket=$STAGING_BUCKET \
  --display_name="Code Review Assistant" \
  --trace_to_cloud \
  code_review_assistant
このコマンドは以下を行います。
- Python コードを直接パッケージ化する(Docker ビルドなし)
.envで指定したステージング バケットにアップロードします。- マネージド Agent Engine インスタンスを作成する
- オブザーバビリティのために Cloud Trace を有効にする
agent_engine_app.pyを使用してランタイムを構成する
コードをコンテナ化する Cloud Run とは異なり、Agent Engine はサーバーレス関数と同様に、マネージド ランタイム環境で Python コードを直接実行します。
Deployment を実行する
プロジェクトのルートから:
./deploy.sh agent-engine
デプロイ フェーズ
スクリプトが次のフェーズを実行する様子を確認します。
Phase 1: API Enablement
  ✓ aiplatform.googleapis.com
  ✓ storage-api.googleapis.com
  ✓ cloudbuild.googleapis.com
  ✓ cloudtrace.googleapis.com

Phase 2: IAM Setup
  ✓ Getting project number
  ✓ Granting Storage Object Admin
  ✓ Granting AI Platform User
  ✓ Granting Cloud Trace Agent

Phase 3: Staging Bucket
  ✓ Creating gs://your-project-id-staging
  ✓ Setting permissions

Phase 4: Artifact Bucket
  ✓ Creating gs://your-project-id-artifacts
  ✓ Configuring access

Phase 5: Validation
  ✓ Checking agent.py exists
  ✓ Verifying root_agent defined
  ✓ Checking agent_engine_app.py exists
  ✓ Validating requirements.txt

Phase 6: Build & Deploy
  ✓ Packaging agent code
  ✓ Uploading to staging bucket
  ✓ Creating Agent Engine instance
  ✓ Configuring session persistence
  ✓ Setting up Cloud Trace integration
  ✓ Running health checks
このプロセスでは、エージェントをパッケージ化して Vertex AI インフラストラクチャにデプロイするため、5 ~ 10 分かかります。
Agent Engine ID を保存する
デプロイが成功すると、次のようになります。
✅ Deployment successful!
   Agent Engine ID: 7917477678498709504
   Resource Name: projects/123456789/locations/us-central1/reasoningEngines/7917477678498709504
   Endpoint: https://us-central1-aiplatform.googleapis.com/v1/...

⚠️  IMPORTANT: Save this in your .env file:
   AGENT_ENGINE_ID=7917477678498709504
を更新する
.env
ファイルをすぐにアップロード:
echo "AGENT_ENGINE_ID=7917477678498709504" >> .env
この ID は次の目的で使用されます。
- デプロイしたエージェントをテストする
- 後でデプロイを更新する
- ログとトレースへのアクセス
デプロイされた内容
Agent Engine のデプロイに次のものが含まれるようになりました。
✅ 完全なレビュー パイプライン(4 人のエージェント)
✅ 完全な修正パイプライン(ループ + シンセサイザー)
✅ すべてのツール(AST 分析、スタイル チェック、アーティファクト生成)
✅ セッションの永続性(VertexAiSessionService による自動)
✅ 状態管理(セッション/ユーザー/ライフタイムの階層)
✅ 可観測性(Cloud Trace が有効)
✅ 自動スケーリング インフラストラクチャ
ステップ 5: デプロイしたエージェントをテストする
.env ファイルを更新する
デプロイ後、.env に次のものが含まれていることを確認します。
AGENT_ENGINE_ID=7917477678498709504  # From deployment output
GOOGLE_CLOUD_PROJECT=your-project-id
GOOGLE_CLOUD_LOCATION=us-central1
テスト スクリプトを実行する
このプロジェクトには、Agent Engine のデプロイのテスト専用の tests/test_agent_engine.py が含まれています。
python tests/test_agent_engine.py
テストの内容
- Google Cloud プロジェクトで認証します。
- デプロイされたエージェントとのセッションを作成します
- コードレビュー リクエストを送信する(DFS バグの例)
- サーバー送信イベント(SSE)を介してレスポンスをストリーミングします。
- セッションの永続性と状態管理を検証します
想定される出力
Authenticated with project: your-project-id
Targeting Agent Engine: projects/.../reasoningEngines/7917477678498709504

Creating new session...
Created session: 4857885913439920384

Sending query to agent and streaming response:
data: {"content": {"parts": [{"text": "I'll analyze your code..."}]}}
data: {"content": {"parts": [{"text": "**Code Structure Analysis**\n..."}]}}
data: {"content": {"parts": [{"text": "**Style Check Results**\n..."}]}}
data: {"content": {"parts": [{"text": "**Test Results**\n..."}]}}
data: {"content": {"parts": [{"text": "**Final Feedback**\n..."}]}}

Stream finished.
確認チェックリスト
- ✅ フルレビュー パイプラインが実行される(4 つのエージェントすべて)
- ✅ ストリーミング レスポンスに進行中の出力が表示される
- ✅ セッションの状態はリクエスト間で保持される
- ✅ 認証エラーや接続エラーがない
- ✅ ツール呼び出しが正常に実行される(AST 分析、スタイル チェック)
- ✅ アーティファクトが保存される(採点レポートにアクセス可能)
代替案: Cloud Run にデプロイする
Agent Engine は本番環境のデプロイを効率化するうえで推奨されますが、Cloud Run はより詳細な制御が可能で、ADK ウェブ UI をサポートしています。このセクションでは、概要について説明します。
Cloud Run を使用するタイミング
次のような場合は、Cloud Run を選択します。
- ユーザー インタラクション用の ADK ウェブ UI
- コンテナ環境の完全な制御
- カスタム データベース構成
- 既存の Cloud Run サービスとの統合
Cloud Run デプロイの仕組み
仕組み
deploy.sh cloud-run
uses:
adk deploy cloud_run \
  --project=$GOOGLE_CLOUD_PROJECT \
  --region=$GOOGLE_CLOUD_LOCATION \
  --service_name="code-review-assistant" \
  --app_name="code_review_assistant" \
  --port=8080 \
  --with_ui \
  --artifact_service_uri="gs://$ARTIFACT_BUCKET" \
  --trace_to_cloud \
  code_review_assistant
このコマンドは以下を行います。
- エージェント コードを含む Docker コンテナをビルドする
- Google Artifact Registry に push する
- Cloud Run サービスとしてデプロイする
- ADK ウェブ UI(
--with_ui)が含まれます - Cloud SQL 接続を構成します(初期デプロイ後にスクリプトによって追加されます)。
Agent Engine との主な違いは、Cloud Run はコードをコンテナ化し、セッションの永続化にデータベースを必要とするのに対し、Agent Engine は両方を自動的に処理することです。
Cloud Run デプロイ コマンド
./deploy.sh cloud-run
変更点
インフラストラクチャ:
- コンテナ化されたデプロイ(ADK によって自動的にビルドされた Docker)
- セッション永続性のための Cloud SQL(PostgreSQL)
- スクリプトによって自動作成されたデータベースまたは既存のインスタンスを使用する
セッション管理:
VertexAiSessionServiceではなくDatabaseSessionServiceを使用する.env(または自動生成)のデータベース認証情報が必要- 状態が PostgreSQL データベースに保持される
UI のサポート:
--with_uiフラグで利用可能なウェブ UI(スクリプトで処理)- アクセス:
https://code-review-assistant-xyz.a.run.app
学習した内容
本番環境のデプロイには、次のものが含まれます。
✅ deploy.sh スクリプトによる自動プロビジョニング
✅ マネージド インフラストラクチャ(Agent Engine がスケーリング、永続性、モニタリングを処理)
✅ すべてのメモリ階層(セッション/ユーザー/ライフタイム)にわたる永続状態
✅ 安全な認証情報管理(自動生成と IAM 設定)
✅ スケーラブルなアーキテクチャ(0 人から数千人の同時ユーザー)
✅ 組み込みのオブザーバビリティ(Cloud Trace 統合が有効)
✅ 本番環境グレードのエラー処理と復元
習得した主なコンセプト
デプロイの準備:
agent_engine_app.py: Agent Engine 用のAdkAppでエージェントをラップしますAdkAppが永続化のためにVertexAiSessionServiceを自動的に構成するenable_tracing=Trueを介してトレースが有効になっている
デプロイ コマンド:
adk deploy agent_engine: Python コードをパッケージ化する(コンテナなし)adk deploy cloud_run: Docker コンテナを自動的にビルドしますgcloud run deploy: カスタム Dockerfile を使用する代替方法
デプロイ オプション:
- Agent Engine: フルマネージド、本番環境への最速の移行
- Cloud Run: 制御性が高く、ウェブ UI をサポート
- GKE: 高度な Kubernetes 制御(GKE デプロイガイドを参照)
マネージド サービス:
- Agent Engine がセッションの永続性を自動的に処理する
- Cloud Run にはデータベースの設定(または自動作成)が必要です
- どちらも GCS 経由のアーティファクト ストレージをサポート
セッション管理:
- Agent Engine:
VertexAiSessionService(自動) - Cloud Run:
DatabaseSessionService(Cloud SQL) - ローカル:
InMemorySessionService(エフェメラル)
エージェントが有効になりました
コードレビュー アシスタントは次のようになりました。
- HTTPS API エンドポイント経由でアクセス可能
- 再起動後も状態が維持されるPersistent
- チームの成長に自動的に対応するスケーラビリティ
- 完全なリクエスト トレースを含む Observable
- スクリプトによるデプロイで保守可能
次のステップモジュール 8 では、Cloud Trace を使用してエージェントのパフォーマンスを把握し、レビュー パイプラインと修正パイプラインのボトルネックを特定して、実行時間を最適化する方法について学習します。
8. 本番環境のオブザーバビリティ
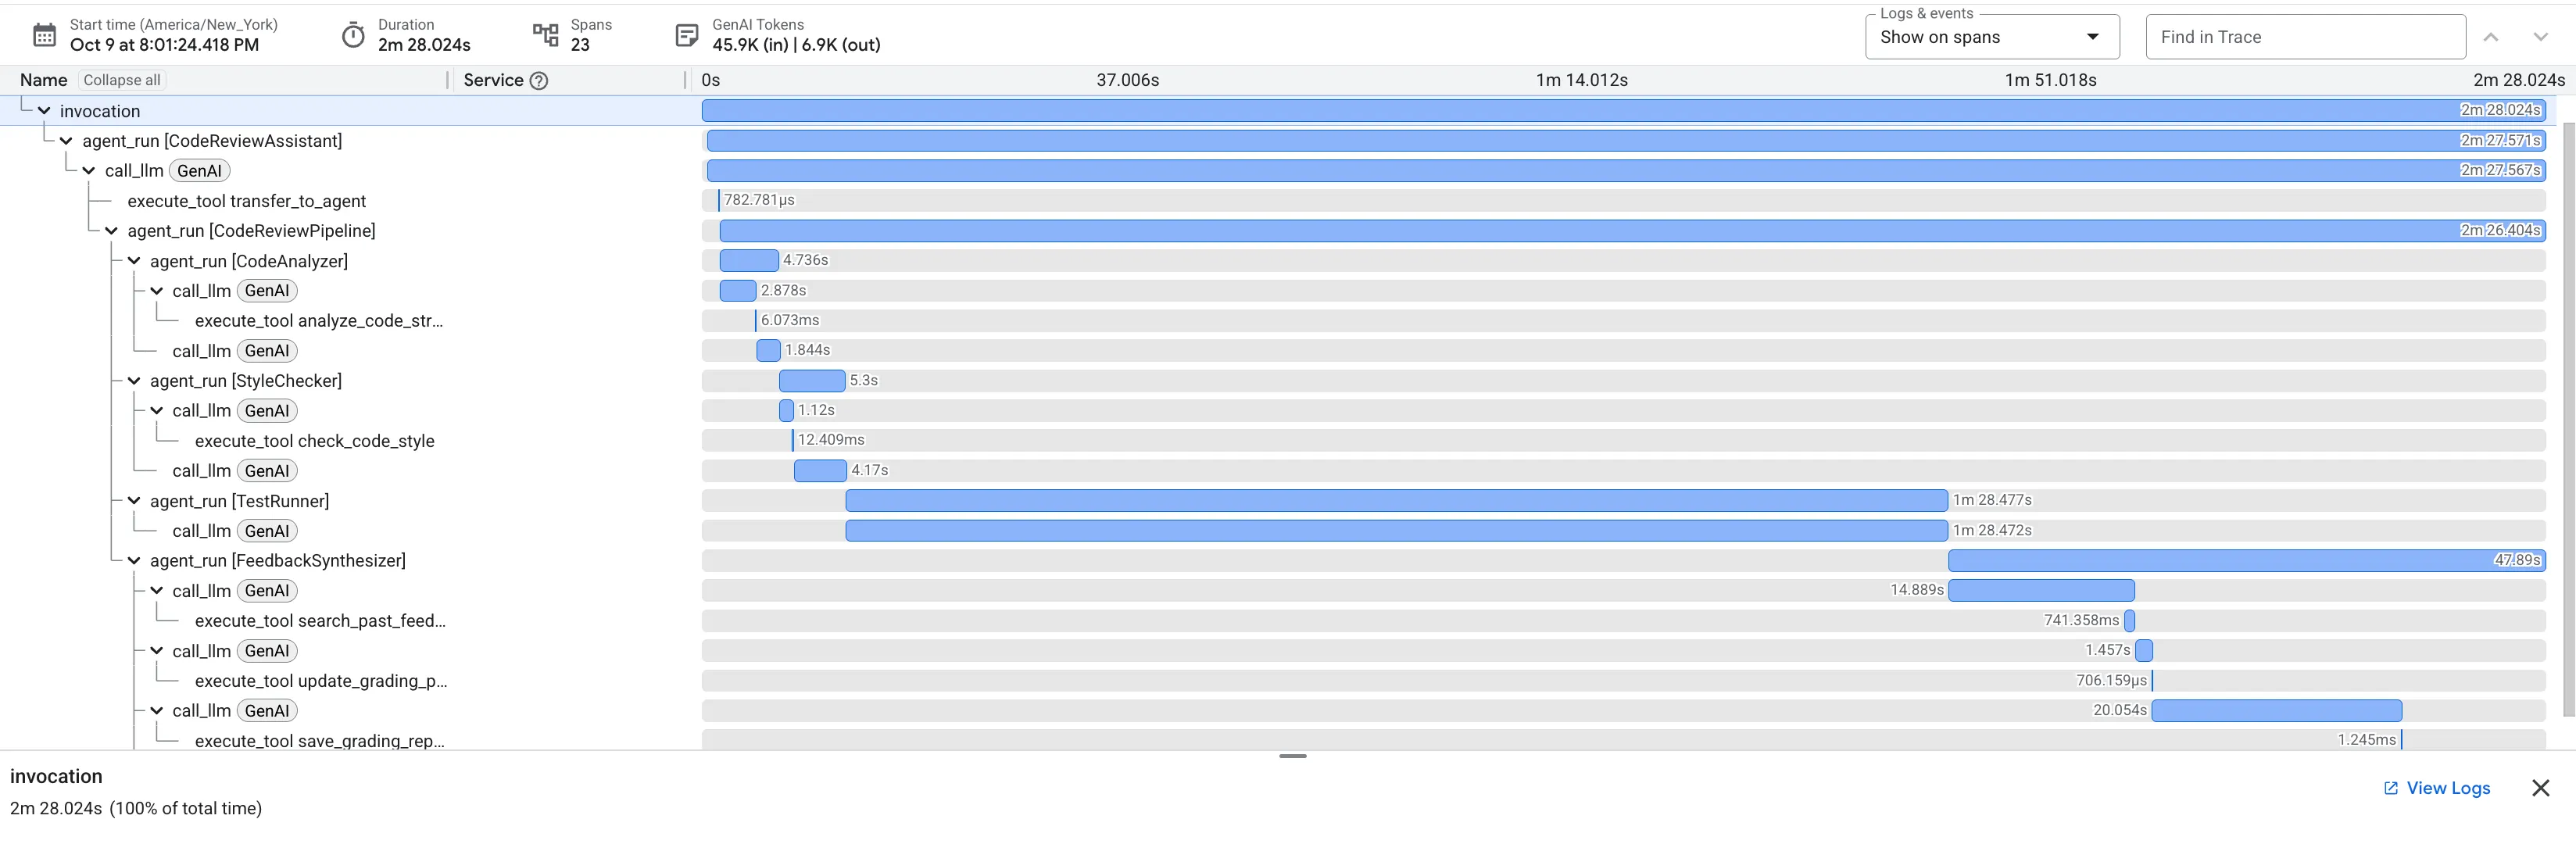
はじめに
コードレビュー アシスタントがデプロイされ、Agent Engine の本番環境で実行されるようになりました。しかし、それがうまく機能しているかどうかをどうすれば確認できるのでしょうか?次の重要な質問に答えられますか?
- エージェントの対応は十分に迅速ですか?
- 最も遅いオペレーションはどれですか?
- 修正ループは効率的に完了していますか?
- パフォーマンスのボトルネックはどこにありますか?
オブザーバビリティがなければ、盲目的に運用することになります。デプロイ時に使用した --trace-to-cloud フラグにより、Cloud Trace が自動的に有効になり、エージェントが処理するすべてのリクエストを完全に可視化できます。これにより、デバッグが当て推量からフォレンジック分析に変わります。
このモジュールでは、トレースの読み取り、エージェントのパフォーマンス特性の把握、確かな証拠に基づく最適化領域の特定について学習します。
トレースとスパンについて
トレースとは
トレースは、エージェントが 1 つのリクエストを処理する完全なタイムラインです。ユーザーがクエリを送信してから最終的なレスポンスが配信されるまでのすべてをキャプチャします。各トレースには次の情報が表示されます。
- リクエストの合計時間
- 実行されたすべてのオペレーション
- オペレーション間の関係(親子関係)
- 各オペレーションの開始時刻と終了時刻
スパンとは
スパンは、トレース内の単一の作業単位を表します。コードレビュー アシスタントの一般的なスパンタイプは次のとおりです。
agent_run: エージェント(ルート エージェントまたはサブエージェント)の実行call_llm: 言語モデルへのリクエストexecute_tool: ツール関数の実行state_read/state_write: 状態管理オペレーションcode_executor: テストでコードを実行する
スパンには次のものがあります。
- 名前: このオペレーションが表す内容
- 期間: 所要時間
- 属性: モデル名、トークン数、入力/出力などのメタデータ
- ステータス: 成功または失敗
- 親子関係: どのオペレーションがどのオペレーションをトリガーしたか
自動計測
--trace-to-cloud を使用してデプロイすると、ADK は自動的に次の処理を行います。
- すべてのエージェント呼び出しとサブエージェント呼び出し
- トークン数を含むすべての LLM リクエスト
- 入力/出力を含むツールの実行
- 状態オペレーション(読み取り/書き込み)
- 修正パイプラインのループ イテレーション
- エラー条件と再試行
コードの変更は不要 - トレースは ADK のランタイムに組み込まれています。
ステップ 1: Cloud Trace エクスプローラにアクセスする
Google Cloud コンソールで Cloud Trace を開きます。
- Cloud Trace エクスプローラに移動します。
- プルダウンからプロジェクトを選択します(事前に選択されているはずです)。
- モジュール 7 でテストのトレースを確認する
トレースがまだ表示されない場合:
モジュール 7 で実行したテストでトレースが生成されているはずです。リストが空の場合は、トレースデータを生成します。
python tests/test_agent_engine.py
トレースがコンソールに表示されるまで 1 ~ 2 分待ちます。
表示される内容
Trace エクスプローラには次の情報が表示されます。
- トレースのリスト: 各行は 1 つの完全なリクエストを表します。
- タイムライン: リクエストが発生した日時
- 期間: 各リクエストにかかった時間
- リクエストの詳細: タイムスタンプ、レイテンシ、スパン数
これは本番環境のトラフィック ログです。エージェントとのやり取りはすべてトレースを作成します。
ステップ 2: レビュー パイプラインのトレースを調べる
リスト内のトレースをクリックすると、ウォーターフォール ビューが開きます。
実行のタイムライン全体を示すガントチャートが表示されます。ルート invocation スパンはリクエスト全体を表します。その下に、各サブエージェント、ツール、LLM 呼び出しのスパンがネストされています。
ウォーターフォールを読み解く: ボトルネックを特定する
各バーはスパンを表します。水平方向の位置は開始時刻を示し、長さは所要時間を示します。これにより、エージェントが時間を費やしている場所がすぐにわかります。
上記のトレースの主な分析情報は次のとおりです。
- 合計レイテンシ: リクエスト全体に 2 分 28 秒かかりました。
- サブエージェントの内訳:
Code Analyzer: 4.7 秒Style Checker: 5.3 秒Test Runner: 1 分 28 秒Feedback Synthesizer: 47.9 秒
- クリティカル パス分析:
Test Runnerエージェントが明確なパフォーマンス ボトルネックであり、リクエスト時間の合計の約 59% を占めています。
この可視性は強力です。時間の費やされた場所を推測するのではなく、レイテンシを最適化する必要がある場合は、Test Runner が明らかなターゲットであるという具体的な証拠が得られます。
費用最適化のためのトークン使用量の検査
Cloud Trace は、時間を表示するだけでなく、すべての LLM 呼び出しのトークン使用量をキャプチャして費用も明らかにします。
[
call_llm
トレース内のスパン。詳細ペインには、llm.usage.prompt_tokens と llm.usage.completion_tokens の属性が表示されます。
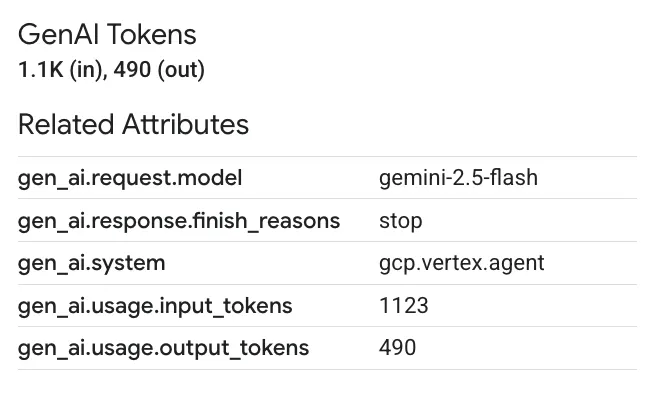
これには、以下のメリットがあります。
- 費用を詳細なレベルで追跡する: 各エージェントとツールが消費しているトークンの正確な数を確認します。
- 最適化の機会を特定する: エージェントが驚くほど多くのトークンを使用している場合は、プロンプトを調整するか、その特定のタスクに対してより小さく費用対効果の高いモデルに切り替える機会かもしれません。
ステップ 3: Fix パイプラインのトレースを分析する
修正パイプラインは LoopAgent を含むため、より複雑です。Cloud Trace を使用すると、この反復動作を簡単に把握できます。
スパン名に「FixAttemptLoop」が含まれているトレースを見つけます。
ない場合は、テスト スクリプトを実行し、コードを修正するかどうかを尋ねられたら、肯定的な回答をします。
ループ構造の確認
トレースビューでは、ループの実行が明確に可視化されます。修正ループが 2 回実行されてから成功した場合は、FixAttemptLoop スパンの下に 2 つの loop_iteration スパンがネストされ、それぞれに CodeFixer、FixTestRunner、FixValidator エージェントの完全なサイクルが含まれます。
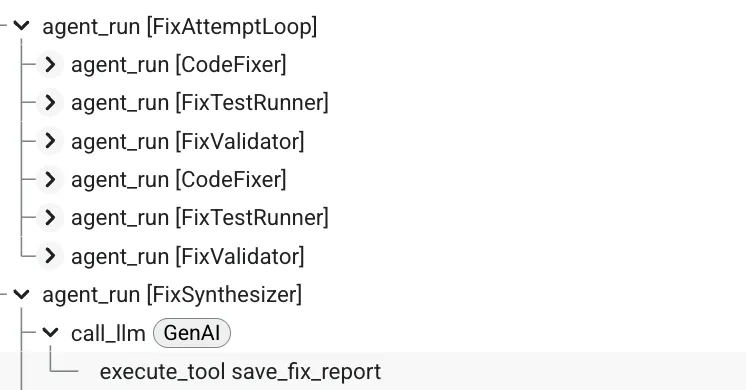
ループ トレースの主な観察結果:
- 反復的な改善が可視化される:
loop_iteration: 1でシステムが修正を試み、それを検証し、完璧ではなかったためloop_iteration: 2で再度試行する様子を確認できます。 - 収束を測定できる: 各イテレーションの所要時間と結果を比較して、システムが正しいソリューションに収束した方法を把握できます。
- デバッグが簡素化される: ループが最大反復回数実行されても失敗する場合は、各反復の範囲内の状態とエージェントの動作を検査して、修正が収束しなかった理由を診断できます。
この詳細レベルは、本番環境での複雑なステートフル ループの動作を理解してデバッグするうえで非常に重要です。
ステップ 4: 調査結果
パフォーマンス パターン
トレースを調べた結果、データに基づく次のような分析情報が得られました。
パイプラインを確認する:
- 主なボトルネック:
Test Runnerエージェント(特にコード実行と LLM ベースのテスト生成)は、レビューで最も時間がかかる部分です。 - 高速なオペレーション: 決定論的ツール(
analyze_code_structure)と状態管理オペレーションは非常に高速であり、パフォーマンスの問題にはなりません。
修正パイプライン:
- 収束率: ほとんどの修正が 1 ~ 2 回の反復で完了しており、ループ アーキテクチャが効果的であることがわかります。
- 進行性のコスト: LLM コンテキストが以前の失敗した試行の情報で増大するため、後続の反復処理に時間がかかることがあります。
コスト要因:
- トークン消費量: どのエージェント(シンセサイザーなど)が最も多くのトークンを必要とするかを特定し、そのタスクに強力だが高価なモデルを使用することが正当化されるかどうかを判断できます。
問題の確認方法
本番環境でトレースを確認する際は、次の点に注意してください。
- 異常に長いトレース: パフォーマンスの回帰または予期しないループ動作の兆候。
- 失敗したスパン(赤でマークされている): 失敗したオペレーションを正確に特定します。
- ループの反復回数が多すぎる(>2): 修正生成ロジックに問題がある可能性があります。
- トークン数の多さ: プロンプトの最適化やモデル選択の変更の機会をハイライト表示します。
学習した内容
Cloud Trace を使用して、次の方法を理解しました。
✅ リクエスト フローを可視化する: 順次パイプラインとループベースのパイプラインの完全な実行パスを確認します。
✅ パフォーマンスのボトルネックを特定する: 滝グラフを使用して、ハードデータで最も遅いオペレーションを見つけます。
✅ ループ動作を分析する: 複数の試行にわたって反復エージェントがソリューションに収束する様子を観察します。
✅ トークン費用を追跡する: LLM スパンを検査して、トークン消費を詳細なレベルでモニタリングし、最適化します。
習得した主なコンセプト
- トレースとスパン: 可観測性の基本単位。リクエストとリクエスト内のオペレーションを表します。
- ウォーターフォール分析: ガントチャートを読み取り、実行時間と依存関係を把握します。
- クリティカル パスの特定: 全体的なレイテンシを決定するオペレーションのシーケンスを特定します。
- 詳細なオブザーバビリティ: ADK によって自動的に計測される、すべてのオペレーションのトークン数などのメタデータだけでなく、時間も可視化できます。
次のステップ
Cloud Trace の詳細を確認する:
- トレースを定期的にモニタリングして問題を早期に検出する
- トレースを比較してパフォーマンスの低下を特定する
- トレースデータを使用して最適化の判断を行う
- 期間でフィルタして遅いリクエストを見つける
高度なオブザーバビリティ(省略可):
- 複雑な分析のためにトレースを BigQuery にエクスポートする(ドキュメント)
- Cloud Monitoring でカスタム ダッシュボードを作成する
- パフォーマンスの低下に関するアラートを設定する
- トレースとアプリケーション ログを関連付ける
9. まとめ: プロトタイプから本番環境へ
作成した機能
わずか 7 行のコードから始めて、本番環境で使用できる AI エージェント システムを構築しました。
# Where we started (7 lines)
agent = Agent(
    model="gemini-2.5-flash",
    instruction="Review Python code for issues"
)

# Where we ended (production system)
- Two distinct multi-agent pipelines (review and fix) built from 8 specialized agents.
- An iterative fix loop architecture for automated validation and retries.
- Real AST-based code analysis tools for deterministic, accurate feedback.
- Robust state management using the "constants pattern" for type-safe communication.
- Fully automated deployment to a managed, scalable cloud infrastructure.
- Complete, built-in observability with Cloud Trace for production monitoring.
習得した主なアーキテクチャ パターン
パターン | 実装 | 本番環境への影響 |
ツールの統合 | AST 分析、スタイル チェック | LLM の意見だけでなく、実際の検証 |
順次パイプライン | Review → Fix workflows | 予測可能でデバッグ可能な実行 |
ループ アーキテクチャ | 終了条件付きの反復的な修正 | 成功するまで自己改善 |
状態管理 | 定数パターン、3 階層メモリ | 型安全で保守可能な状態処理 |
本番環境でのデプロイ | deploy.sh による Agent Engine | マネージドでスケーラブルなインフラストラクチャ |
オブザーバビリティ | Cloud Trace の統合 | 本番環境の動作を完全に可視化 |
トレースから得られる本番環境の分析情報
Cloud Trace のデータから、次のような重要な分析情報が得られました。
✅ ボトルネックの特定: TestRunner の LLM 呼び出しがレイテンシの大部分を占めている
✅ ツールのパフォーマンス: AST 分析が 100 ミリ秒で実行される(良好)
✅ 成功率: 修正ループが 2 ~ 3 回の反復で収束する
✅ トークンの使用量: レビューあたり約 600 個のトークン、修正あたり約 1, 800 個のトークン
これらの分析情報により、継続的な改善が促進されます。
リソースをクリーンアップする(省略可)
テストが完了し、料金の請求を回避したい場合:
Agent Engine のデプロイを削除します。
import vertexai

client = vertexai.Client(  # For service interactions via client.agent_engines
    project="PROJECT_ID",
    location="LOCATION",
)

RESOURCE_NAME = "projects/{PROJECT_ID}/locations/{LOCATION}/reasoningEngines/{RESOURCE_ID}"

client.agent_engines.delete(
    name=RESOURCE_NAME,
    force=True, # Optional, if the agent has resources (e.g. sessions, memory)
)
Cloud Run サービスを削除します(作成した場合):
gcloud run services delete code-review-assistant \
    --region=$GOOGLE_CLOUD_LOCATION \
    --quiet
Cloud SQL インスタンスを削除します(作成した場合):
gcloud sql instances delete your-project-db \
    --quiet
ストレージ バケットをクリーンアップする:
gsutil -m rm -r gs://your-project-staging
gsutil -m rm -r gs://your-project-artifacts
次のステップ
基盤が完成したら、次の拡張機能を検討してください。
- 言語を追加する: JavaScript、Go、Java をサポートするようにツールを拡張する
- GitHub と統合する: 自動 PR レビュー
- キャッシュ保存を実装する: 一般的なパターンのレイテンシを短縮する
- 特殊なエージェントを追加する: セキュリティ スキャン、パフォーマンス分析
- A/B テストを有効にする: 異なるモデルとプロンプトを比較する
- 指標をエクスポートする: トレースを専用のオブザーバビリティ プラットフォームに送信する
重要ポイント
- シンプルに始め、迅速に反復処理を行う: 管理しやすい手順で 7 行のコードを本番環境に移行する
- プロンプトよりもツール: 実際の AST 分析は「バグを確認してください」よりも優れている
- 状態管理の重要性: 定数パターンでタイプミスによるバグを防ぐ
- ループには終了条件が必要: 常に最大イテレーションとエスカレーションを設定する
- 自動化を使用してデプロイする: deploy.sh がすべての複雑さを処理します。
- オブザーバビリティは必須: 測定できないものは改善できない
継続的な学習のためのリソース
ジャーニーの継続
コードレビュー アシスタントだけでなく、本番環境の AI エージェントを構築するためのパターンも習得しました。
✅ 複数の専門エージェントによる複雑なワークフロー
✅ 実際の機能を実現するための実際のツール統合
✅ 適切なオブザーバビリティを備えた本番環境へのデプロイ
✅ 保守可能なシステムのための状態管理
これらのパターンは、シンプルなアシスタントから複雑な自律型システムまでスケーリングできます。ここで構築した基盤は、ますます高度化するエージェント アーキテクチャに取り組むうえで役立ちます。
本番環境の AI エージェント開発へようこそ。コードレビュー アシスタントは、その第一歩にすぎません。