
1. The Late Night Code Review
오전 2시입니다.
몇 시간 동안 디버깅을 하고 있습니다. 함수는 올바른 것 같지만 문제가 있습니다. 코드가 작동해야 하는데 작동하지 않고 너무 오래 쳐다봐서 이유를 알 수 없는 느낌을 아시나요?
def dfs_search_v1(graph, start, target):
    """Find if target is reachable from start."""
    visited = set()
    stack = start  # Looks innocent enough...

    while stack:
        current = stack.pop()

        if current == target:
            return True

        if current not in visited:
            visited.add(current)

            for neighbor in graph[current]:
                if neighbor not in visited:
                    stack.append(neighbor)

    return False
AI 개발자의 여정
이 글을 읽고 계신다면 AI가 코딩에 가져온 변화를 경험하셨을 것입니다. Gemini Code Assist, Claude Code, Cursor와 같은 도구는 코드 작성 방식을 바꿔 놓았습니다. 상용구를 생성하고, 구현을 제안하고, 개발을 가속화하는 데 매우 유용합니다.
하지만 더 자세히 알아보고 싶어서 이 페이지를 방문하셨을 것입니다. 이러한 AI 시스템을 사용하는 것뿐만 아니라 빌드하는 방법을 이해하고 싶어 합니다. 다음과 같은 항목을 만들고 싶을 수 있습니다.
- 예측 가능하고 추적 가능한 동작이 있음
- 자신 있게 프로덕션에 배포할 수 있음
- 신뢰할 수 있는 일관된 결과 제공
- 의사 결정을 내리는 방식을 정확하게 보여줍니다.
소비자에서 크리에이터로
오늘은 AI 도구를 사용하는 것에서 나아가 직접 빌드해 볼 것입니다. 다음과 같은 멀티 에이전트 시스템을 구성합니다.
- 코드 구조를 결정론적으로 분석합니다.
- 동작을 확인하기 위해 실제 테스트를 실행합니다.
- 실제 린터를 사용하여 스타일 준수를 검사합니다.
- 발견된 내용을 바탕으로 실행 가능한 의견을 생성합니다.
- 전체 관측 가능성으로 Google Cloud에 배포
2. 첫 번째 에이전트 배포
개발자의 질문
'LLM을 이해하고 API를 사용해 봤지만 Python 스크립트에서 확장 가능한 프로덕션 AI 에이전트로 어떻게 전환해야 할까요?'
환경을 올바르게 설정한 다음 간단한 에이전트를 빌드하여 기본사항을 이해한 후 프로덕션 패턴을 살펴보겠습니다.
필수 설정 먼저
에이전트를 만들기 전에 Google Cloud 환경이 준비되었는지 확인하세요.
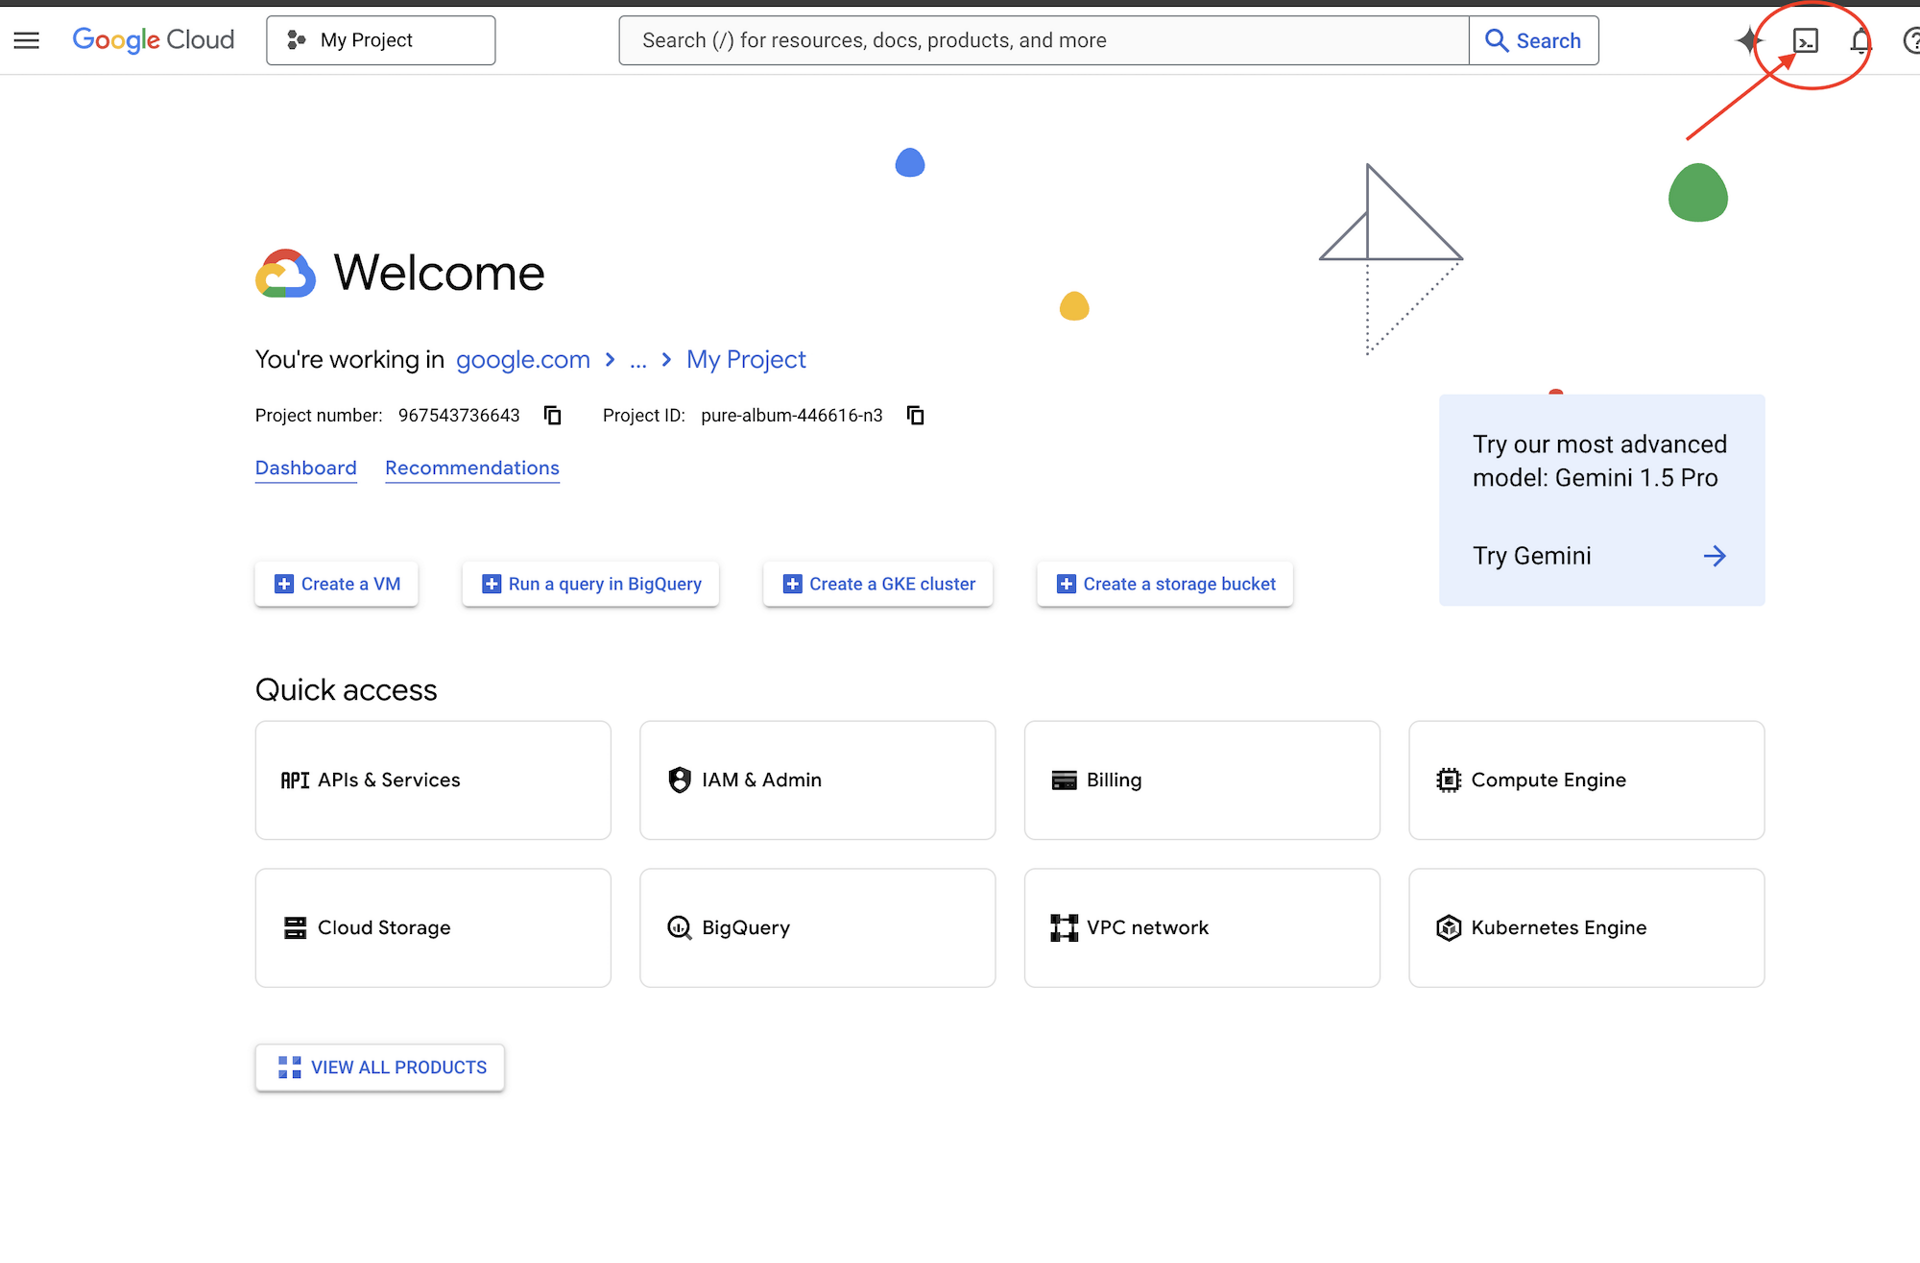
Google Cloud 콘솔 상단에서 Cloud Shell 활성화를 클릭합니다 (Cloud Shell 창 상단의 터미널 모양 아이콘).
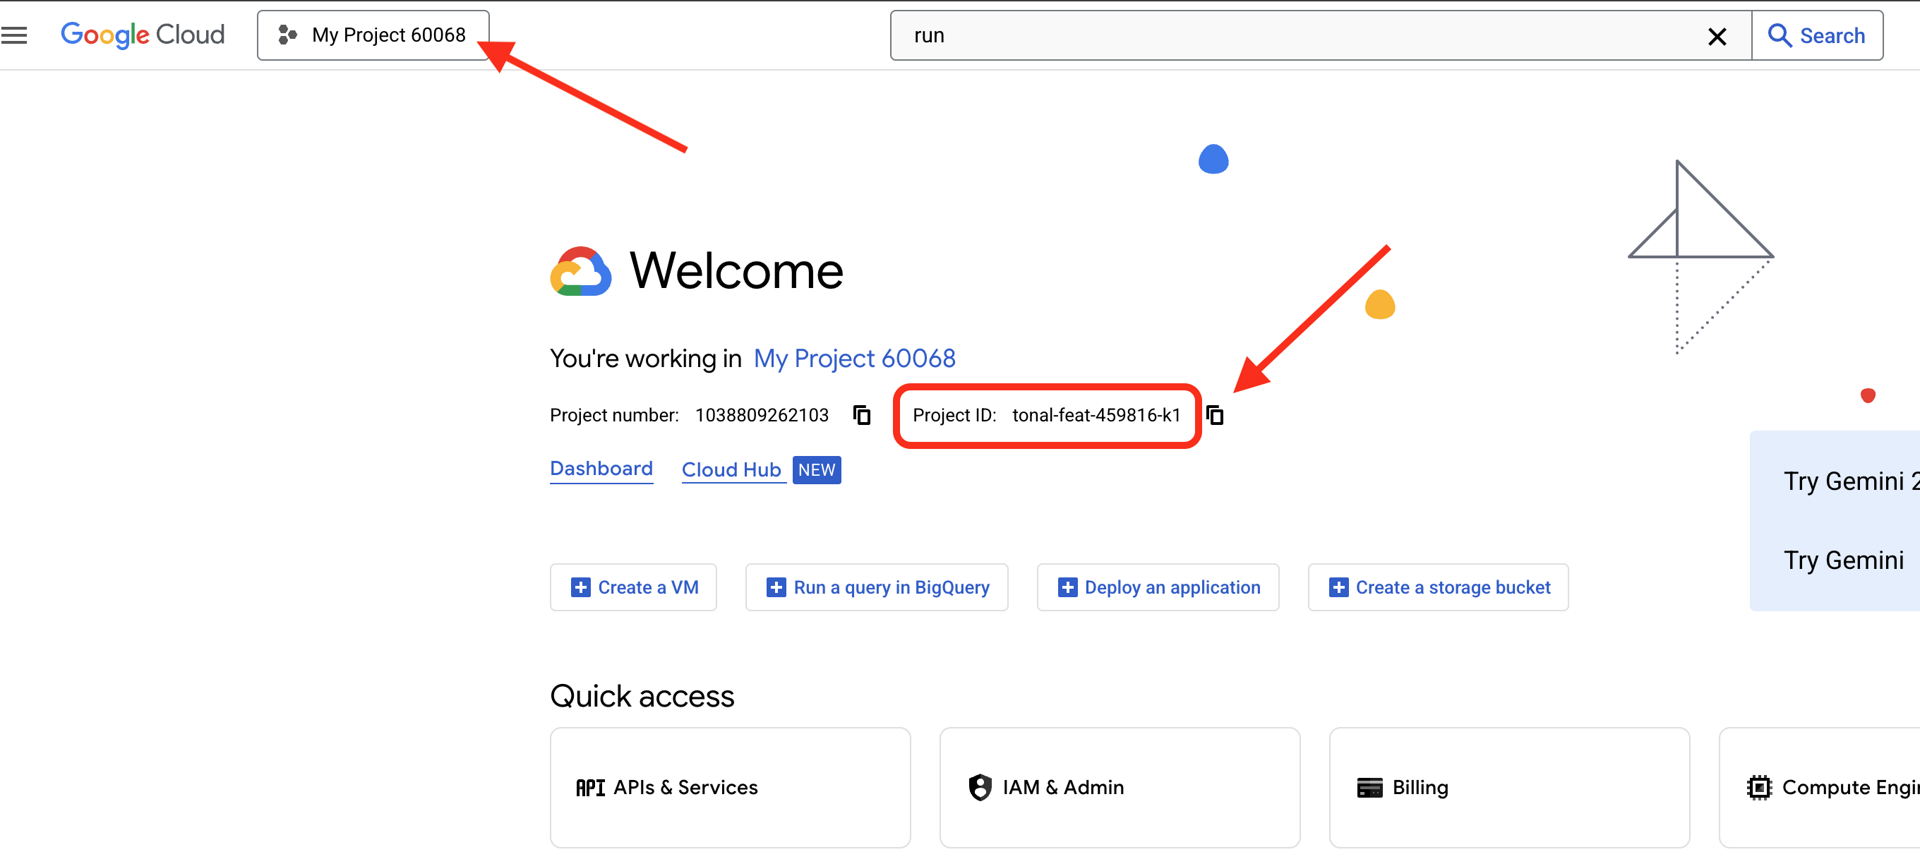
Google Cloud 프로젝트 ID를 찾습니다.
- Google Cloud 콘솔(https://console.cloud.google.com)을 엽니다.
- 페이지 상단의 프로젝트 드롭다운에서 이 워크숍에 사용할 프로젝트를 선택합니다.
- 프로젝트 ID는 대시보드의 프로젝트 정보 카드에 표시됩니다.
1단계: 프로젝트 ID 설정
Cloud Shell에서는 gcloud 명령줄 도구가 이미 구성되어 있습니다. 다음 명령어를 실행하여 활성 프로젝트를 설정합니다. 여기서는 Cloud Shell 세션에서 자동으로 설정되는 $GOOGLE_CLOUD_PROJECT 환경 변수를 사용합니다.
gcloud config set project $GOOGLE_CLOUD_PROJECT
2단계: 설정 확인
그런 다음 다음 명령어를 실행하여 프로젝트가 올바르게 설정되었는지, 인증되었는지 확인합니다.
# Confirm project is set
echo "Current project: $(gcloud config get-value project)"

# Check authentication status
gcloud auth list
프로젝트 ID가 출력되고 사용자 계정이 (ACTIVE) 옆에 표시됩니다.
계정이 활성으로 표시되지 않거나 인증 오류가 표시되면 다음 명령어를 실행하여 로그인합니다.
gcloud auth application-default login
3단계: 필수 API 사용 설정
기본 에이전트에는 다음 API가 필요합니다.
gcloud services enable \
    aiplatform.googleapis.com \
    compute.googleapis.com
1~2분 정도 걸립니다. 다음 내용이 표시됩니다.
Operation "operations/..." finished successfully.
4단계: ADK 설치
# Install the ADK CLI
pip install google-adk --upgrade

# Verify installation
adk --version
1.15.0 이상의 버전 번호가 표시되어야 합니다.
이제 기본 에이전트 만들기
환경이 준비되었으므로 간단한 에이전트를 만들어 보겠습니다.
5단계: ADK 만들기 사용
adk create my_first_agent
대화형 프롬프트를 따릅니다.
Choose a model for the root agent:
1. gemini-2.5-flash
2. Other models (fill later)
Choose model (1, 2): 1

1. Google AI
2. Vertex AI
Choose a backend (1, 2): 2

Enter Google Cloud project ID [auto-detected-from-gcloud]:
Enter Google Cloud region [us-central1]:
6단계: 생성된 항목 검사
cd my_first_agent
ls -la
다음 세 개의 파일이 표시됩니다.
.env          # Configuration (auto-populated with your project)
__init__.py   # Package marker
agent.py      # Your agent definition
7단계: 빠른 구성 확인
# Verify the .env was created correctly
cat .env

# Should show something like:
# GOOGLE_CLOUD_PROJECT=your-project-id
# GOOGLE_CLOUD_LOCATION=us-central1
# GOOGLE_GENAI_USE_VERTEXAI=1
프로젝트 ID가 누락되었거나 잘못된 경우 .env 파일을 수정합니다.
nano .env # or use your preferred editor
8단계: 에이전트 코드 확인
cat agent.py
from google.adk.agents.llm_agent import Agent

root_agent = Agent(
    model='gemini-2.5-flash',
    name='root_agent',
    description='A helpful assistant for user questions.',
    instruction='Answer user questions to the best of your knowledge',
)
심플하고 깔끔하며 미니멀합니다. 이것이 에이전트의 'Hello World'입니다.
기본 에이전트 테스트
9단계: 에이전트 실행
cd ..
adk run my_first_agent
다음과 같이 표시됩니다.
Log setup complete: /tmp/agents_log/agent.20250930_162430.log
To access latest log: tail -F /tmp/agents_log/agent.latest.log
[user]:
10단계: 쿼리 시도
adk run이 실행 중인 터미널에 프롬프트가 표시됩니다. 질문을 입력하세요.
[user]: Hey, what can you do?
[root_agent]: I can help answer questions, generate text, explain concepts, assist with problem-solving, and provide information on a wide range of topics. What would you like to know or discuss?

[user]: What's the current weather in Mountain View?
[root_agent]: I'm sorry, but I cannot provide real-time weather information as I don't have access to current data or weather services. To get the current weather in Mountain View, I recommend checking a weather website or app like weather.com or using a search engine.
현재 데이터에 액세스할 수 없다는 제한사항을 확인하세요. 다음과 같이 더 푸시해 보겠습니다.
[user]: Review this Python code: def add(a, b): return a + b
[root_agent]: This is a simple Python function that adds two numbers. Here's my review:

**Strengths:**
- Clean and concise implementation
- Follows Python conventions for simple operations
- Clear function name that describes its purpose

**Suggestions for improvement:**
- Add a docstring to document the function
- Consider adding type hints for better code clarity
- You might want to handle edge cases

Here's an enhanced version:
def add(a: float, b: float) -> float:
    """Add two numbers and return their sum."""
    return a + b
에이전트는 코드에 관해 논의할 수 있지만 다음 작업은 할 수 없습니다.
- 실제로 AST를 파싱하여 구조를 이해해야 하나요?
- 테스트를 실행하여 작동하는지 확인해야 하나요?
- 스타일 준수 여부를 확인하시겠어요?
- 이전에 작성한 리뷰를 기억하시나요?
아니요. 여기서는 아키텍처가 필요합니다.
🏃🚪
Ctrl+C
둘러보기를 마쳤으면 계속 진행하세요.
3. 프로덕션 작업공간 준비
해결책: 프로덕션에 즉시 사용 가능한 아키텍처
이 간단한 에이전트는 시작점을 보여주지만 프로덕션 시스템에는 강력한 구조가 필요합니다. 이제 프로덕션 원칙을 구현하는 완전한 프로젝트를 설정해 보겠습니다.
기반 설정
기본 에이전트에 대해 Google Cloud 프로젝트를 이미 구성했습니다. 이제 실제 시스템에 필요한 모든 도구, 패턴, 인프라를 사용하여 전체 프로덕션 작업공간을 준비해 보겠습니다.
1단계: 구조화된 프로젝트 가져오기
먼저 Ctrl+C으로 실행 중인 adk run을 종료하고 정리합니다.
# Clean up the basic agent
cd ~  # Make sure you're not inside my_first_agent
rm -rf my_first_agent

# Get the production scaffold
git clone https://github.com/ayoisio/adk-code-review-assistant.git
cd adk-code-review-assistant
git checkout codelab
2단계: 가상 환경 만들기 및 활성화
# Create the virtual environment
python -m venv .venv

# Activate it
# On macOS/Linux:
source .venv/bin/activate
# On Windows:
# .venv\Scripts\activate
확인: 이제 프롬프트가 (.venv)로 시작해야 합니다.
3단계: 종속 항목 설치
pip install -r code_review_assistant/requirements.txt

# Install the package in editable mode (enables imports)
pip install -e .
다음이 설치됩니다.
google-adk- ADK 프레임워크pycodestyle- PEP 8 확인용vertexai- 클라우드 배포용- 기타 프로덕션 종속 항목
-e 플래그를 사용하면 어디서나 code_review_assistant 모듈을 가져올 수 있습니다.
4단계: 환경 구성
# Copy the example environment file
cp .env.example .env

# Edit .env and replace the placeholders:
# - GOOGLE_CLOUD_PROJECT=your-project-id → your actual project ID
# - Keep other defaults as-is
확인: 구성을 확인합니다.
cat .env
다음과 같이 표시되어야 합니다.
GOOGLE_CLOUD_PROJECT=your-actual-project-id
GOOGLE_CLOUD_LOCATION=us-central1
GOOGLE_GENAI_USE_VERTEXAI=TRUE
5단계: 인증 확인
앞서 gcloud auth를 실행했으므로 다음을 확인하기만 하면 됩니다.
# Check current authentication
gcloud auth list

# Should show your account with (ACTIVE)
# If not, run:
gcloud auth application-default login
6단계: 추가 프로덕션 API 사용 설정
기본 API는 이미 사용 설정되어 있습니다. 이제 프로덕션 키를 추가합니다.
gcloud services enable \
    sqladmin.googleapis.com \
    run.googleapis.com \
    cloudbuild.googleapis.com \
    artifactregistry.googleapis.com \
    storage.googleapis.com \
    cloudtrace.googleapis.com
이를 통해 다음이 가능해집니다.
- SQL 관리자: Cloud Run을 사용하는 경우 Cloud SQL
- Cloud Run: 서버리스 배포
- Cloud Build: 자동 배포
- Artifact Registry: 컨테이너 이미지용
- Cloud Storage: 아티팩트 및 스테이징
- Cloud Trace: 모니터링 가능성
7단계: Artifact Registry 저장소 만들기
배포에서는 홈이 필요한 컨테이너 이미지를 빌드합니다.
gcloud artifacts repositories create code-review-assistant-repo \
    --repository-format=docker \
    --location=us-central1 \
    --description="Docker repository for Code Review Assistant"
다음과 같이 표시됩니다.
Created repository [code-review-assistant-repo].
이전에 시도한 적이 있어 이미 있는 경우 무시할 수 있는 오류 메시지가 표시됩니다.
8단계: IAM 권한 부여
# Get your project number
PROJECT_NUMBER=$(gcloud projects describe $GOOGLE_CLOUD_PROJECT \
    --format="value(projectNumber)")

# Define the service account
SERVICE_ACCOUNT="${PROJECT_NUMBER}@cloudbuild.gserviceaccount.com"

# Grant necessary roles
gcloud projects add-iam-policy-binding $GOOGLE_CLOUD_PROJECT \
    --member="serviceAccount:${SERVICE_ACCOUNT}" \
    --role="roles/run.admin"

gcloud projects add-iam-policy-binding $GOOGLE_CLOUD_PROJECT \
    --member="serviceAccount:${SERVICE_ACCOUNT}" \
    --role="roles/iam.serviceAccountUser"

gcloud projects add-iam-policy-binding $GOOGLE_CLOUD_PROJECT \
    --member="serviceAccount:${SERVICE_ACCOUNT}" \
    --role="roles/cloudsql.admin"

gcloud projects add-iam-policy-binding $GOOGLE_CLOUD_PROJECT \
    --member="serviceAccount:${SERVICE_ACCOUNT}" \
    --role="roles/storage.admin"
각 명령어는 다음을 출력합니다.
Updated IAM policy for project [your-project-id].
학습한 내용
이제 프로덕션 작업공간이 완전히 준비되었습니다.
✅ Google Cloud 프로젝트 구성 및 인증 완료
✅ 제한사항을 파악하기 위해 기본 에이전트 테스트 완료
✅ 전략적 자리표시자가 포함된 프로젝트 코드 준비 완료
✅ 가상 환경에서 종속 항목 격리 완료
✅ 필요한 API 모두 사용 설정 완료
✅ 배포를 위한 컨테이너 레지스트리 준비 완료
✅ IAM 권한이 올바르게 구성됨
✅ 환경 변수가 올바르게 설정됨
이제 결정적 도구, 상태 관리, 적절한 아키텍처를 사용하여 실제 AI 시스템을 빌드할 수 있습니다.
4. 첫 번째 에이전트 빌드하기
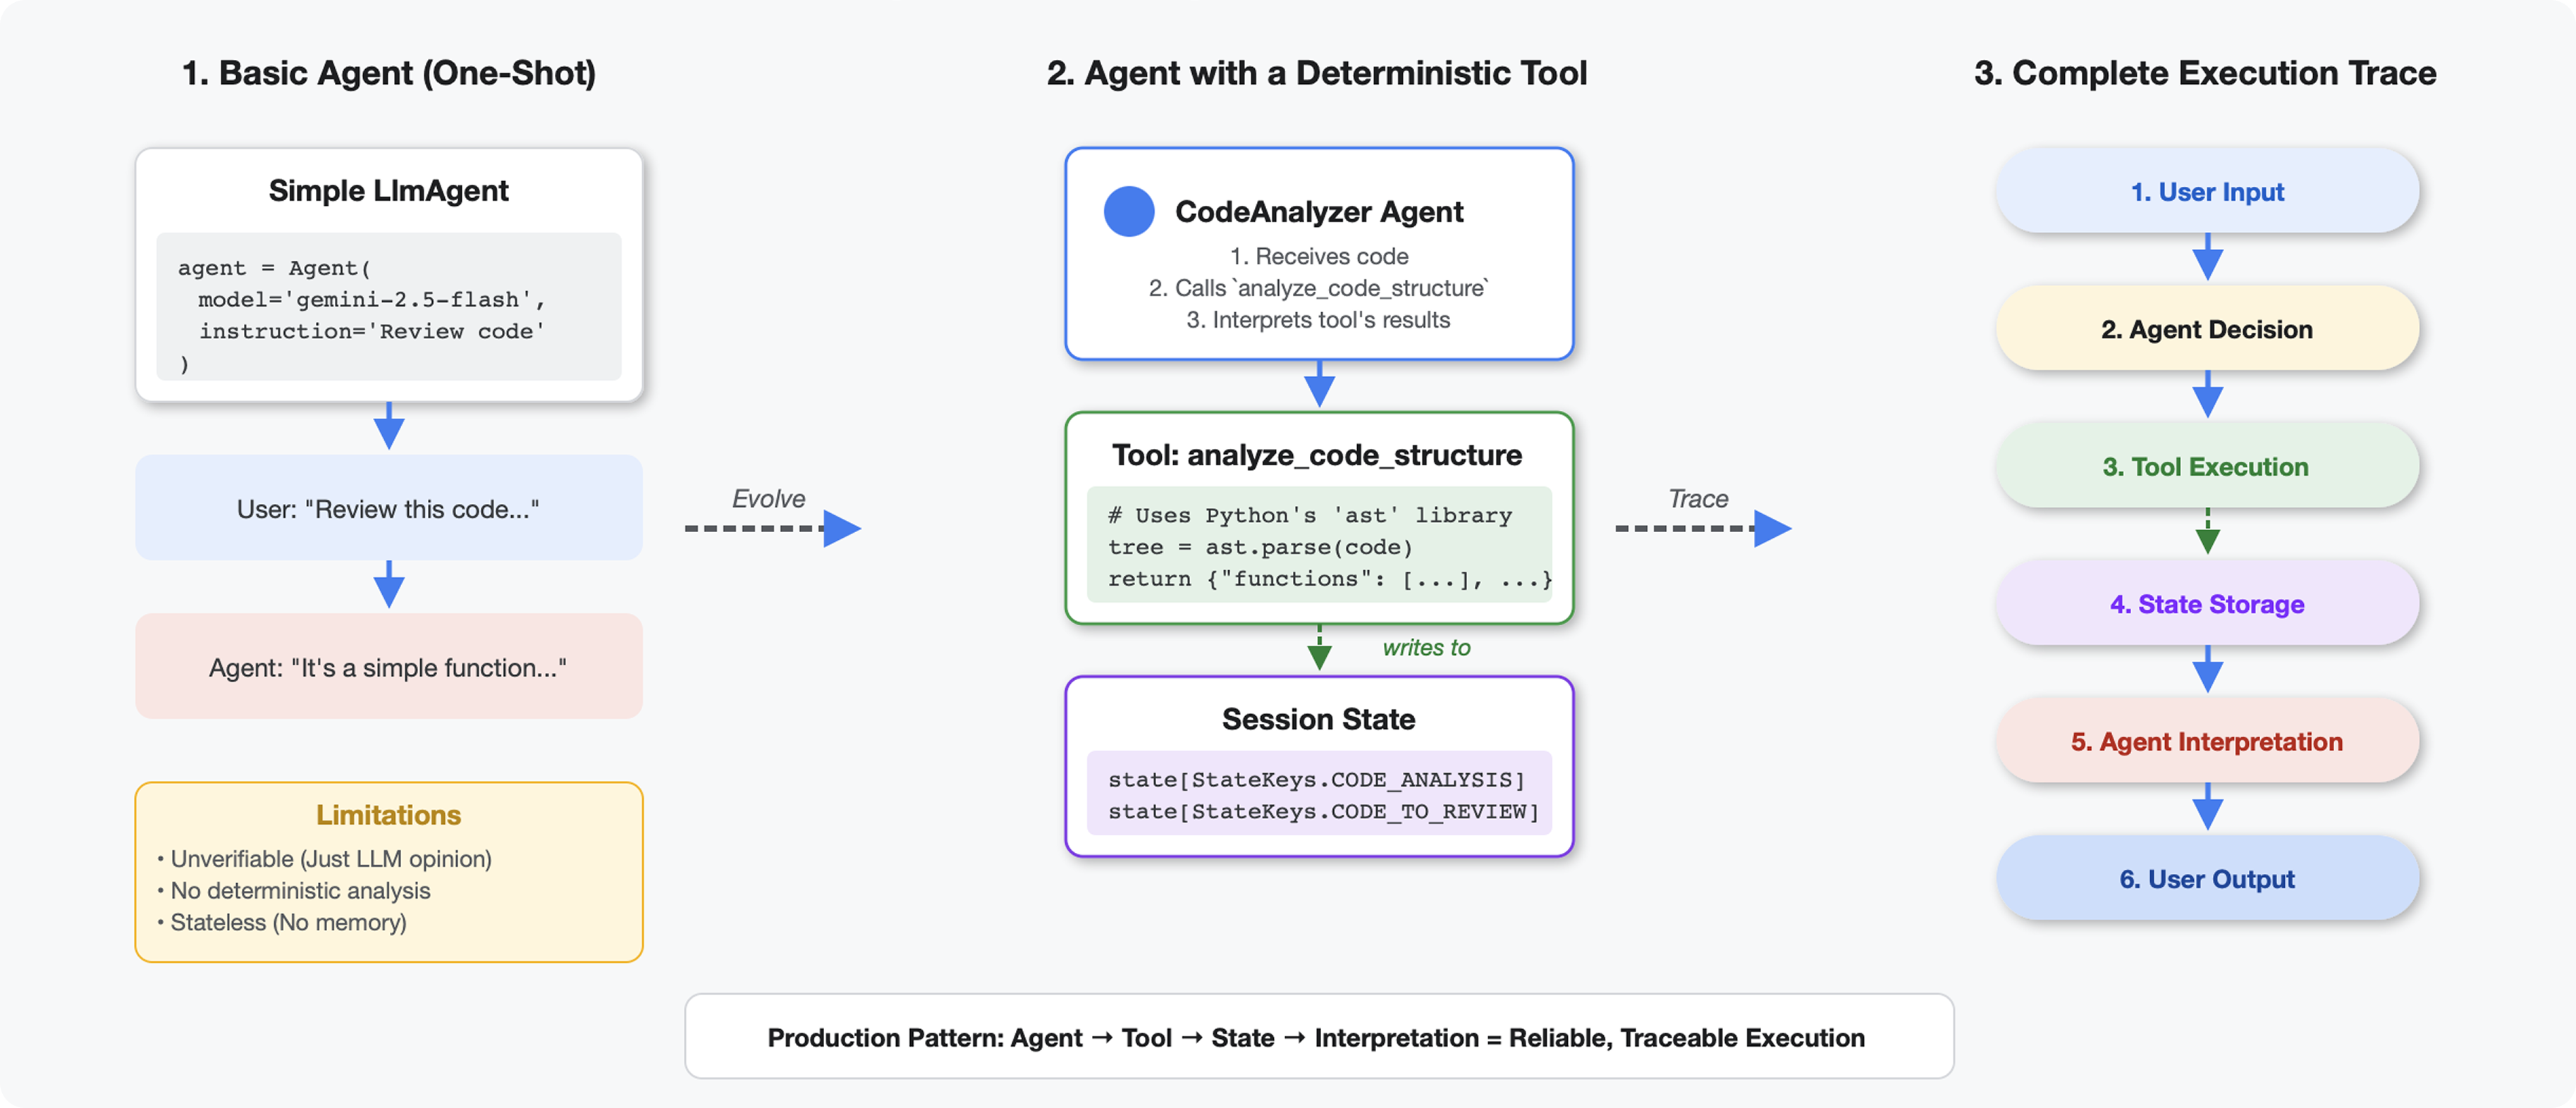
도구가 LLM과 다른 점
LLM에 '이 코드에 함수가 몇 개 있어?'라고 물으면 패턴 일치와 추정 기능을 사용합니다. Python의 ast.parse()를 호출하는 도구를 사용하면 실제 구문 트리가 파싱되므로 추측이 없고 매번 동일한 결과가 나옵니다.
이 섹션에서는 코드 구조를 결정론적으로 분석하는 도구를 빌드한 다음 이를 호출 시점을 아는 에이전트에 연결합니다.
1단계: 스캐폴드 이해하기
작성할 구조를 살펴보겠습니다.
👉 열기
code_review_assistant/tools.py
코드를 추가할 위치를 표시하는 자리표시자 주석이 있는 analyze_code_structure 함수가 표시됩니다. 함수에는 이미 기본 구조가 있으므로 단계별로 개선합니다.
2단계: 상태 스토리지 추가
상태 스토리지를 사용하면 파이프라인의 다른 에이전트가 분석을 다시 실행하지 않고도 도구의 결과에 액세스할 수 있습니다.
👉 찾기:
# MODULE_4_STEP_2_ADD_STATE_STORAGE
👉 단일 행을 다음으로 바꿉니다.
        # Store code and analysis for other agents to access
        tool_context.state[StateKeys.CODE_TO_REVIEW] = code
        tool_context.state[StateKeys.CODE_ANALYSIS] = analysis
        tool_context.state[StateKeys.CODE_LINE_COUNT] = len(code.splitlines())
3단계: 스레드 풀을 사용하여 비동기 파싱 추가
Google 도구는 다른 작업을 차단하지 않고 AST를 파싱해야 합니다. 스레드 풀을 사용하여 비동기 실행을 추가해 보겠습니다.
👉 찾기:
# MODULE_4_STEP_3_ADD_ASYNC
👉 단일 행을 다음으로 바꿉니다.
        # Parse in thread pool to avoid blocking the event loop
        loop = asyncio.get_event_loop()
        with ThreadPoolExecutor() as executor:
            tree = await loop.run_in_executor(executor, ast.parse, code)
4단계: 포괄적인 정보 추출
이제 클래스, 가져오기, 세부 측정항목 등 완전한 코드 검토에 필요한 모든 것을 추출해 보겠습니다.
👉 찾기:
# MODULE_4_STEP_4_EXTRACT_DETAILS
👉 단일 행을 다음으로 바꿉니다.
# Extract comprehensive structural information
analysis = await loop.run_in_executor(
executor, _extract_code_structure, tree, code
)
👉 확인: 함수
analyze_code_structure
tools.py
의 중앙 본문은 다음과 같습니다.
# Parse in thread pool to avoid blocking the event loop
loop = asyncio.get_event_loop()
with ThreadPoolExecutor() as executor:
    tree = await loop.run_in_executor(executor, ast.parse, code)
        # Extract comprehensive structural information
        analysis = await loop.run_in_executor(
            executor, _extract_code_structure, tree, code
        )
# Store code and analysis for other agents to access
tool_context.state[StateKeys.CODE_TO_REVIEW] = code
tool_context.state[StateKeys.CODE_ANALYSIS] = analysis
tool_context.state[StateKeys.CODE_LINE_COUNT] = len(code.splitlines())
👉 이제
tools.py
를 찾아 다음을 확인합니다.
# MODULE_4_STEP_4_HELPER_FUNCTION
👉 단일 줄을 완전한 도우미 함수로 바꿉니다.
def _extract_code_structure(tree: ast.AST, code: str) -> Dict[str, Any]:
    """
    Helper function to extract structural information from AST.
    Runs in thread pool for CPU-bound work.
    """
    functions = []
    classes = []
    imports = []
    docstrings = []

    for node in ast.walk(tree):
        if isinstance(node, ast.FunctionDef):
            func_info = {
                'name': node.name,
                'args': [arg.arg for arg in node.args.args],
                'lineno': node.lineno,
                'has_docstring': ast.get_docstring(node) is not None,
                'is_async': isinstance(node, ast.AsyncFunctionDef),
                'decorators': [d.id for d in node.decorator_list
                               if isinstance(d, ast.Name)]
            }
            functions.append(func_info)

            if func_info['has_docstring']:
                docstrings.append(f"{node.name}: {ast.get_docstring(node)[:50]}...")

        elif isinstance(node, ast.ClassDef):
            methods = []
            for item in node.body:
                if isinstance(item, ast.FunctionDef):
                    methods.append(item.name)

            class_info = {
                'name': node.name,
                'lineno': node.lineno,
                'methods': methods,
                'has_docstring': ast.get_docstring(node) is not None,
                'base_classes': [base.id for base in node.bases
                                 if isinstance(base, ast.Name)]
            }
            classes.append(class_info)

        elif isinstance(node, ast.Import):
            for alias in node.names:
                imports.append({
                    'module': alias.name,
                    'alias': alias.asname,
                    'type': 'import'
                })
        elif isinstance(node, ast.ImportFrom):
            imports.append({
                'module': node.module or '',
                'names': [alias.name for alias in node.names],
                'type': 'from_import',
                'level': node.level
            })

    return {
        'functions': functions,
        'classes': classes,
        'imports': imports,
        'docstrings': docstrings,
        'metrics': {
            'line_count': len(code.splitlines()),
            'function_count': len(functions),
            'class_count': len(classes),
            'import_count': len(imports),
            'has_main': any(f['name'] == 'main' for f in functions),
            'has_if_main': '__main__' in code,
            'avg_function_length': _calculate_avg_function_length(tree)
        }
    }


def _calculate_avg_function_length(tree: ast.AST) -> float:
    """Calculate average function length in lines."""
    function_lengths = []

    for node in ast.walk(tree):
        if isinstance(node, ast.FunctionDef):
            if hasattr(node, 'end_lineno') and hasattr(node, 'lineno'):
                length = node.end_lineno - node.lineno + 1
                function_lengths.append(length)

    if function_lengths:
        return sum(function_lengths) / len(function_lengths)
    return 0.0
5단계: 상담사 연결
이제 도구를 사용할 시기와 결과를 해석하는 방법을 아는 에이전트에 도구를 연결합니다.
👉 열기
code_review_assistant/sub_agents/review_pipeline/code_analyzer.py
👉 찾기:
# MODULE_4_STEP_5_CREATE_AGENT
👉 단일 행을 전체 프로덕션 에이전트로 바꿉니다.
code_analyzer_agent = Agent(
    name="CodeAnalyzer",
    model=config.worker_model,
    description="Analyzes Python code structure and identifies components",
    instruction="""You are a code analysis specialist responsible for understanding code structure.

Your task:
1. Take the code submitted by the user (it will be provided in the user message)
2. Use the analyze_code_structure tool to parse and analyze it
3. Pass the EXACT code to your tool - do not modify, fix, or "improve" it
4. Identify all functions, classes, imports, and structural patterns
5. Note any syntax errors or structural issues
6. Store the analysis in state for other agents to use

CRITICAL:
- Pass the code EXACTLY as provided to the analyze_code_structure tool
- Do not fix syntax errors, even if obvious
- Do not add missing imports or fix indentation
- The goal is to analyze what IS there, not what SHOULD be there

When calling the tool, pass the code as a string to the 'code' parameter.
If the analysis fails due to syntax errors, clearly report the error location and type.

Provide a clear summary including:
- Number of functions and classes found
- Key structural observations
- Any syntax errors or issues detected
- Overall code organization assessment""",
    tools=[FunctionTool(func=analyze_code_structure)],
    output_key="structure_analysis_summary"
)
코드 분석기 테스트
이제 분석기가 올바르게 작동하는지 확인합니다.
👉 테스트 스크립트를 실행합니다.
python tests/test_code_analyzer.py
테스트 스크립트는 python-dotenv를 사용하여 .env 파일에서 구성을 자동으로 로드하므로 환경 변수를 수동으로 설정할 필요가 없습니다.
예상 출력:
INFO:code_review_assistant.config:Code Review Assistant Configuration Loaded:
INFO:code_review_assistant.config:  - GCP Project: your-project-id
INFO:code_review_assistant.config:  - Artifact Bucket: gs://your-project-artifacts
INFO:code_review_assistant.config:  - Models: worker=gemini-2.5-flash, critic=gemini-2.5-pro
Testing code analyzer...
INFO:code_review_assistant.tools:Tool: Analysis complete - 2 functions, 1 classes

=== Analyzer Response ===
The analysis of the provided code shows the following:

* **Functions Found:** 2
    * `add(a, b)`: A global function at line 2.
    * `multiply(self, x, y)`: A method within the `Calculator` class.

* **Classes Found:** 1
    * `Calculator`: A class defined at line 5. Contains one method, `multiply`.

* **Imports:** 0

* **Structural Patterns:** The code defines one global function and one class
  with a single method. Both are simple, each with a single return statement.

* **Syntax Errors/Issues:** No syntax errors detected.

* **Overall Code Organization:** The code is well-organized for its small size,
  clearly defining a function and a class with a method.
발생한 문제:
- 테스트 스크립트가
.env구성을 자동으로 로드했습니다. analyze_code_structure()도구가 Python의 AST를 사용하여 코드를 파싱했습니다._extract_code_structure()도우미가 함수, 클래스, 측정항목을 추출했습니다.- 결과가
StateKeys상수를 사용하여 세션 상태에 저장되었습니다. - 코드 분석기 에이전트가 결과를 해석하고 요약을 제공했습니다.
문제 해결:
- 'code_review_assistant'라는 모듈이 없습니다.: 프로젝트 루트에서
pip install -e .실행 - '누락된 키 입력 인수':
.env에GOOGLE_CLOUD_PROJECT,GOOGLE_CLOUD_LOCATION,GOOGLE_GENAI_USE_VERTEXAI=true이 있는지 확인합니다.
빌드한 항목
이제 다음과 같은 프로덕션 준비가 완료된 코드 분석기가 있습니다.
✅ 실제 Python AST 파싱 - 결정적, 패턴 일치 아님
✅ 상태에 결과 저장 - 다른 에이전트가 분석에 액세스할 수 있음
✅ 비동기식으로 실행 - 다른 도구를 차단하지 않음
✅ 포괄적인 정보 추출 - 함수, 클래스, 가져오기, 측정항목
✅ 오류를 원활하게 처리 - 줄 번호와 함께 구문 오류 보고
✅ 에이전트에 연결 - LLM이 언제 어떻게 사용해야 하는지 알고 있음
학습한 핵심 개념
도구와 상담사 비교:
- 도구가 결정론적 작업 (AST 파싱)을 실행함
- 에이전트가 도구 사용 시기와 결과 해석을 결정합니다.
반환 값과 상태 비교:
- 반환: LLM이 즉시 보는 내용
- 상태: 다른 에이전트에서 유지되는 항목
상태 키 상수:
- 멀티 에이전트 시스템에서 오타 방지
- 에이전트 간 계약으로 작동
- 에이전트가 데이터를 공유할 때 중요
비동기 + 스레드 풀:
async def을 사용하면 도구가 실행을 일시중지할 수 있습니다.- 스레드 풀은 백그라운드에서 CPU 바운드 작업을 실행합니다.
- 이 두 가지를 함께 사용하면 이벤트 루프가 응답성을 유지합니다.
도우미 함수:
- 동기화 도우미를 비동기 도구에서 분리
- 코드를 테스트 가능하고 재사용 가능하게 만듭니다.
상담사 안내:
- 자세한 안내는 일반적인 LLM 실수를 방지합니다.
- 하지 말아야 할 일 명시 (코드 수정 금지)
- 일관성을 위해 워크플로 단계 지우기
다음 단계
모듈 5에서는 다음을 추가합니다.
- 상태에서 코드를 읽는 스타일 검사기
- 실제로 테스트를 실행하는 테스트 실행기
- 모든 분석을 결합하는 피드백 합성기
상태가 순차적 파이프라인을 통해 흐르는 방식과 여러 에이전트가 동일한 데이터를 읽고 쓸 때 상수 패턴이 중요한 이유를 알아봅니다.
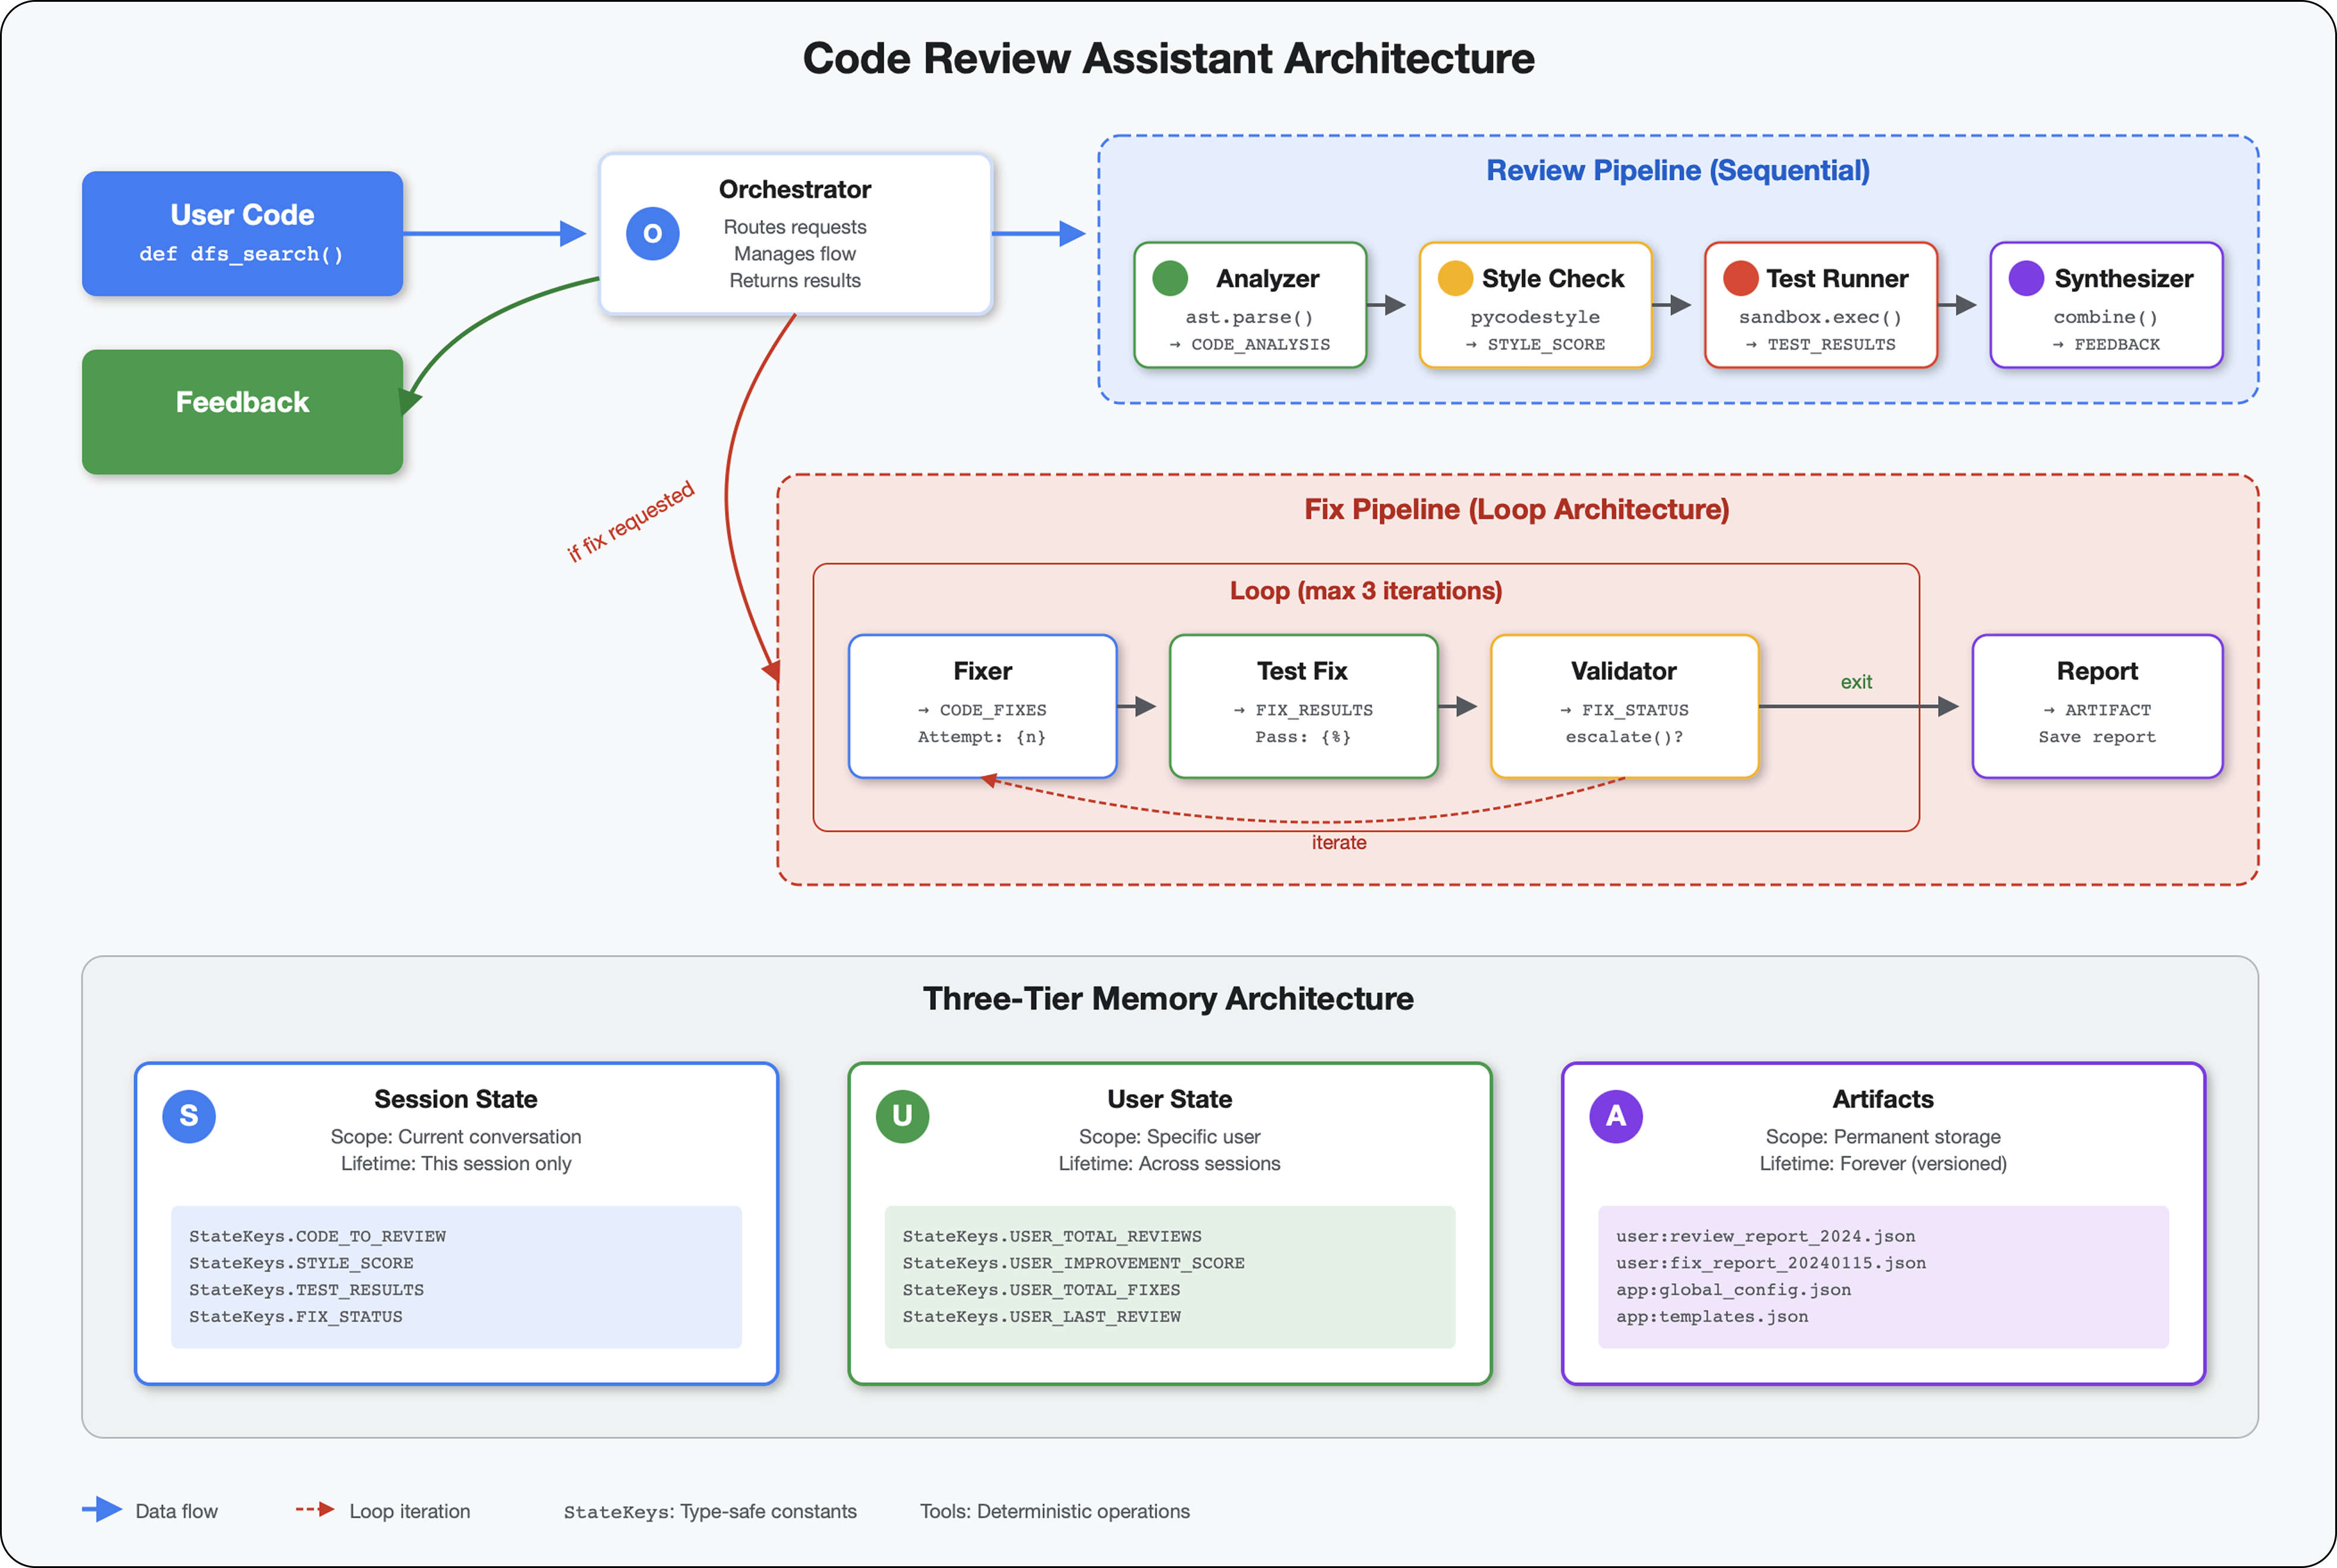
5. 파이프라인 빌드: 여러 에이전트가 함께 작동
소개
모듈 4에서는 코드 구조를 분석하는 단일 에이전트를 빌드했습니다. 하지만 포괄적인 코드 검토에는 파싱 이상의 작업이 필요합니다. 스타일 검사, 테스트 실행, 지능형 의견 합성도 필요합니다.
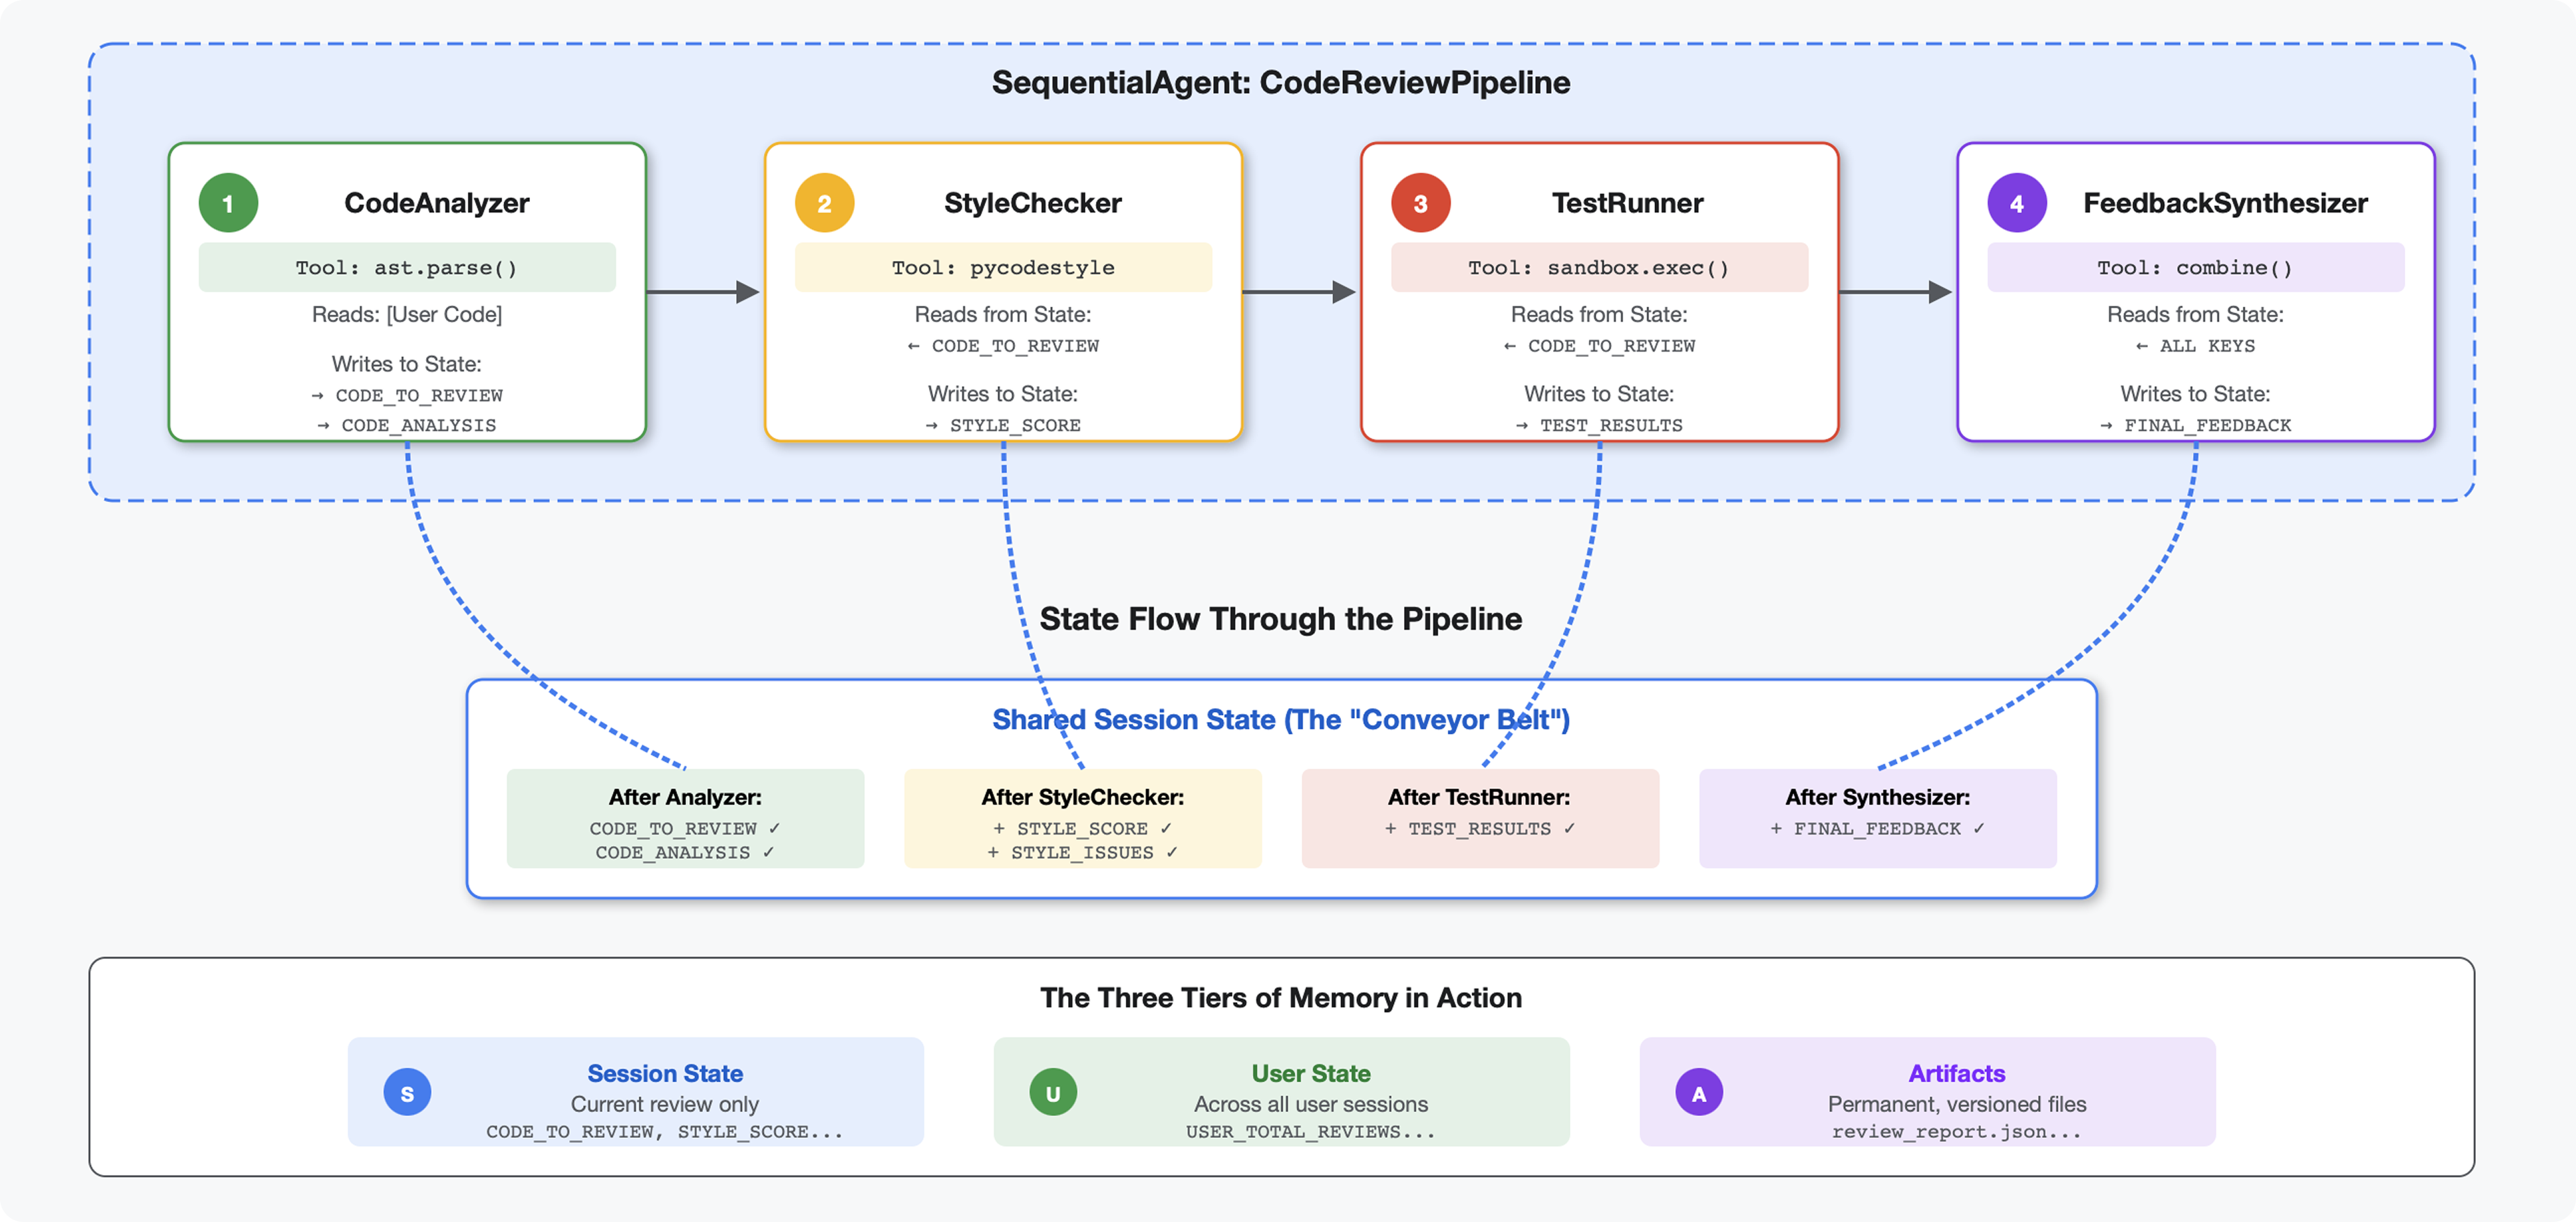
이 모듈에서는 순차적으로 함께 작동하며 각각 전문 분석을 제공하는 4개 에이전트의 파이프라인을 빌드합니다.
- 코드 분석기 (모듈 4) - 구조 파싱
- 스타일 검사기 - 스타일 위반을 식별합니다.
- 테스트 실행기 - 테스트를 실행하고 검증합니다.
- 피드백 합성기 - 모든 것을 실행 가능한 피드백으로 결합
핵심 개념: 상태를 커뮤니케이션 채널로 사용 각 에이전트는 이전 에이전트가 상태에 작성한 내용을 읽고 자체 분석을 추가하며, 풍부해진 상태를 다음 에이전트에게 전달합니다. 여러 에이전트가 데이터를 공유하는 경우 4단원의 상수 패턴이 중요해집니다.
빌드할 항목 미리보기: 정리되지 않은 코드를 제출하면 → 4개의 에이전트를 통해 상태가 흐르는 것을 확인하고 → 이전 패턴을 기반으로 맞춤설정된 의견이 포함된 포괄적인 보고서를 받습니다.
1단계: 스타일 검사 도구 + 에이전트 추가
스타일 검사기는 LLM 기반 해석이 아닌 결정론적 린터인 pycodestyle을 사용하여 PEP 8 위반을 식별합니다.
스타일 검사 도구 추가
👉 열기
code_review_assistant/tools.py
👉 찾기:
# MODULE_5_STEP_1_STYLE_CHECKER_TOOL
👉 단일 행을 다음으로 바꿉니다.
async def check_code_style(code: str, tool_context: ToolContext) -> Dict[str, Any]:
    """
    Checks code style compliance using pycodestyle (PEP 8).

    Args:
        code: Python source code to check (or will retrieve from state)
        tool_context: ADK tool context

    Returns:
        Dictionary containing style score and issues
    """
    logger.info("Tool: Checking code style...")

    try:
        # Retrieve code from state if not provided
        if not code:
            code = tool_context.state.get(StateKeys.CODE_TO_REVIEW, '')
            if not code:
                return {
                    "status": "error",
                    "message": "No code provided or found in state"
                }

        # Run style check in thread pool
        loop = asyncio.get_event_loop()
        with ThreadPoolExecutor() as executor:
            result = await loop.run_in_executor(
                executor, _perform_style_check, code
            )

        # Store results in state
        tool_context.state[StateKeys.STYLE_SCORE] = result['score']
        tool_context.state[StateKeys.STYLE_ISSUES] = result['issues']
        tool_context.state[StateKeys.STYLE_ISSUE_COUNT] = result['issue_count']

        logger.info(f"Tool: Style check complete - Score: {result['score']}/100, "
                    f"Issues: {result['issue_count']}")

        return result

    except Exception as e:
        error_msg = f"Style check failed: {str(e)}"
        logger.error(f"Tool: {error_msg}", exc_info=True)

        # Set default values on error
        tool_context.state[StateKeys.STYLE_SCORE] = 0
        tool_context.state[StateKeys.STYLE_ISSUES] = []

        return {
            "status": "error",
            "message": error_msg,
            "score": 0
        }
👉 이제 파일 끝까지 스크롤하여 다음을 찾습니다.
# MODULE_5_STEP_1_STYLE_HELPERS
👉 단일 행을 도우미 함수로 바꿉니다.
def _perform_style_check(code: str) -> Dict[str, Any]:
    """Helper to perform style check in thread pool."""
    import io
    import sys

    with tempfile.NamedTemporaryFile(mode='w', suffix='.py', delete=False) as tmp:
        tmp.write(code)
        tmp_path = tmp.name

    try:
        # Capture stdout to get pycodestyle output
        old_stdout = sys.stdout
        sys.stdout = captured_output = io.StringIO()

        style_guide = pycodestyle.StyleGuide(
            quiet=False,  # We want output
            max_line_length=100,
            ignore=['E501', 'W503']
        )

        result = style_guide.check_files([tmp_path])

        # Restore stdout
        sys.stdout = old_stdout

        # Parse captured output
        output = captured_output.getvalue()
        issues = []

        for line in output.strip().split('\n'):
            if line and ':' in line:
                parts = line.split(':', 4)
                if len(parts) >= 4:
                    try:
                        issues.append({
                            'line': int(parts[1]),
                            'column': int(parts[2]),
                            'code': parts[3].split()[0] if len(parts) > 3 else 'E000',
                            'message': parts[3].strip() if len(parts) > 3 else 'Unknown error'
                        })
                    except (ValueError, IndexError):
                        pass

        # Add naming convention checks
        try:
            tree = ast.parse(code)
            naming_issues = _check_naming_conventions(tree)
            issues.extend(naming_issues)
        except SyntaxError:
            pass  # Syntax errors will be caught elsewhere

        # Calculate weighted score
        score = _calculate_style_score(issues)

        return {
            "status": "success",
            "score": score,
            "issue_count": len(issues),
            "issues": issues[:10],  # First 10 issues
            "summary": f"Style score: {score}/100 with {len(issues)} violations"
        }

    finally:
        if os.path.exists(tmp_path):
            os.unlink(tmp_path)


def _check_naming_conventions(tree: ast.AST) -> List[Dict[str, Any]]:
    """Check PEP 8 naming conventions."""
    naming_issues = []

    for node in ast.walk(tree):
        if isinstance(node, ast.FunctionDef):
            # Skip private/protected methods and __main__
            if not node.name.startswith('_') and node.name != node.name.lower():
                naming_issues.append({
                    'line': node.lineno,
                    'column': node.col_offset,
                    'code': 'N802',
                    'message': f"N802 function name '{node.name}' should be lowercase"
                })
        elif isinstance(node, ast.ClassDef):
            # Check if class name follows CapWords convention
            if not node.name[0].isupper() or '_' in node.name:
                naming_issues.append({
                    'line': node.lineno,
                    'column': node.col_offset,
                    'code': 'N801',
                    'message': f"N801 class name '{node.name}' should use CapWords convention"
                })

    return naming_issues


def _calculate_style_score(issues: List[Dict[str, Any]]) -> int:
    """Calculate weighted style score based on violation severity."""
    if not issues:
        return 100

    # Define weights by error type
    weights = {
        'E1': 10,  # Indentation errors
        'E2': 3,  # Whitespace errors
        'E3': 5,  # Blank line errors
        'E4': 8,  # Import errors
        'E5': 5,  # Line length
        'E7': 7,  # Statement errors
        'E9': 10,  # Syntax errors
        'W2': 2,  # Whitespace warnings
        'W3': 2,  # Blank line warnings
        'W5': 3,  # Line break warnings
        'N8': 7,  # Naming conventions
    }

    total_deduction = 0
    for issue in issues:
        code_prefix = issue['code'][:2] if len(issue['code']) >= 2 else 'E2'
        weight = weights.get(code_prefix, 3)
        total_deduction += weight

    # Cap at 100 points deduction
    return max(0, 100 - min(total_deduction, 100))
스타일 검사기 에이전트 추가
👉 열기
code_review_assistant/sub_agents/review_pipeline/style_checker.py
👉 찾기:
# MODULE_5_STEP_1_INSTRUCTION_PROVIDER
👉 단일 행을 다음으로 바꿉니다.
async def style_checker_instruction_provider(context: ReadonlyContext) -> str:
    """Dynamic instruction provider that injects state variables."""
    template = """You are a code style expert focused on PEP 8 compliance.

Your task:
1. Use the check_code_style tool to validate PEP 8 compliance
2. The tool will retrieve the ORIGINAL code from state automatically
3. Report violations exactly as found
4. Present the results clearly and confidently

CRITICAL:
- The tool checks the code EXACTLY as provided by the user
- Do not suggest the code was modified or fixed
- Report actual violations found in the original code
- If there are style issues, they should be reported honestly

Call the check_code_style tool with an empty string for the code parameter,
as the tool will retrieve the code from state automatically.

When presenting results based on what the tool returns:
- State the exact score from the tool results
- If score >= 90: "Excellent style compliance!"
- If score 70-89: "Good style with minor improvements needed"
- If score 50-69: "Style needs attention"
- If score < 50: "Significant style improvements needed"

List the specific violations found (the tool will provide these):
- Show line numbers, error codes, and messages
- Focus on the top 10 most important issues

Previous analysis: {structure_analysis_summary}

Format your response as:
## Style Analysis Results
- Style Score: [exact score]/100
- Total Issues: [count]
- Assessment: [your assessment based on score]

## Top Style Issues
[List issues with line numbers and descriptions]

## Recommendations
[Specific fixes for the most critical issues]"""

    return await instructions_utils.inject_session_state(template, context)
👉 찾기:
# MODULE_5_STEP_1_STYLE_CHECKER_AGENT
👉 단일 행을 다음으로 바꿉니다.
style_checker_agent = Agent(
    name="StyleChecker",
    model=config.worker_model,
    description="Checks Python code style against PEP 8 guidelines",
    instruction=style_checker_instruction_provider,
    tools=[FunctionTool(func=check_code_style)],
    output_key="style_check_summary"
)
2단계: 테스트 러너 에이전트 추가
테스트 실행기는 포괄적인 테스트를 생성하고 내장된 코드 실행기를 사용하여 실행합니다.
👉 열기
code_review_assistant/sub_agents/review_pipeline/test_runner.py
👉 찾기:
# MODULE_5_STEP_2_INSTRUCTION_PROVIDER
👉 단일 행을 다음으로 바꿉니다.
async def test_runner_instruction_provider(context: ReadonlyContext) -> str:
    """Dynamic instruction provider that injects the code_to_review directly."""
    template = """You are a testing specialist who creates and runs tests for Python code.

THE CODE TO TEST IS:
{code_to_review}

YOUR TASK:
1. Understand what the function appears to do based on its name and structure
2. Generate comprehensive tests (15-20 test cases)
3. Execute the tests using your code executor
4. Analyze results to identify bugs vs expected behavior
5. Output a detailed JSON analysis

TESTING METHODOLOGY:
- Test with the most natural interpretation first
- When something fails, determine if it's a bug or unusual design
- Test edge cases, boundaries, and error scenarios
- Document any surprising behavior

Execute your tests and output ONLY valid JSON with this structure:
- "test_summary": object with "total_tests_run", "tests_passed", "tests_failed", "tests_with_errors", "critical_issues_found"
- "critical_issues": array of objects, each with "type", "description", "example_input", "expected_behavior", "actual_behavior", "severity"
- "test_categories": object with "basic_functionality", "edge_cases", "error_handling" (each containing "passed", "failed", "errors" counts)
- "function_behavior": object with "apparent_purpose", "actual_interface", "unexpected_requirements"
- "verdict": object with "status" (WORKING/BUGGY/BROKEN), "confidence" (high/medium/low), "recommendation"

Do NOT output the test code itself, only the JSON analysis."""

    return await instructions_utils.inject_session_state(template, context)
👉 찾기:
# MODULE_5_STEP_2_TEST_RUNNER_AGENT
👉 단일 행을 다음으로 바꿉니다.
test_runner_agent = Agent(
    name="TestRunner",
    model=config.critic_model,
    description="Generates and runs tests for Python code using safe code execution",
    instruction=test_runner_instruction_provider,
    code_executor=BuiltInCodeExecutor(),
    output_key="test_execution_summary"
)
3단계: 세션 간 학습을 위한 메모리 이해
피드백 신디사이저를 빌드하기 전에 상태와 메모리의 차이점을 이해해야 합니다. 이는 서로 다른 두 가지 목적으로 사용되는 두 가지 서로 다른 저장 메커니즘입니다.
상태와 메모리: 주요 차이점
코드 검토의 구체적인 예를 통해 설명해 보겠습니다.
상태 (현재 세션만 해당):
# Data from THIS review session
tool_context.state[StateKeys.STYLE_ISSUES] = [
    {"line": 5, "code": "E231", "message": "missing whitespace"},
    {"line": 12, "code": "E701", "message": "multiple statements"}
]
- 범위: 이 대화만
- 목적: 현재 파이프라인에서 에이전트 간 데이터 전달
- 거주:
Session객체 - 수명: 세션이 종료되면 폐기됨
메모리 (이전 세션 모두):
# Learned from 50 previous reviews
"User frequently forgets docstrings on helper functions"
"User tends to write long functions (avg 45 lines)"
"User improved error handling after feedback in session #23"
- 범위: 이 사용자의 모든 이전 세션
- 목적: 패턴 학습, 맞춤형 의견 제공
- 거주 지역:
MemoryService - 전체 기간: 세션 전반에 걸쳐 지속되며 검색 가능
의견에 둘 다 필요한 이유:
합성기가 다음과 같은 의견을 생성한다고 가정해 보세요.
상태만 사용 (현재 검토):
"Function `calculate_total` has no docstring."
일반적인 기계적 피드백입니다.
상태 + 메모리 사용 (현재 + 과거 패턴):
"Function `calculate_total` has no docstring. This is the 4th review
where helper functions lacked documentation. Consider adding docstrings
as you write functions, not afterwards - you mentioned in our last
session that you find it easier that way."
시간이 지날수록 맞춤설정되고 맥락에 맞는 참조가 개선됩니다.
프로덕션 배포의 경우 다음과 같은 옵션이 있습니다.
옵션 1: VertexAiMemoryBankService (고급)
- 기능: 대화에서 의미 있는 사실을 LLM 기반으로 추출
- 검색: 시맨틱 검색 (키워드뿐만 아니라 의미 이해)
- 메모리 관리: 시간이 지남에 따라 메모리를 자동으로 통합하고 업데이트합니다.
- 필요한 사항: Google Cloud 프로젝트 + Agent Engine 설정
- 사용 시기: 정교하고 진화하는 맞춤형 메모리를 원하는 경우
- 예: '사용자가 함수형 프로그래밍을 선호함' (코드 스타일에 관한 10개의 대화에서 추출)
옵션 2: InMemoryMemoryService + 영구 세션으로 계속 진행
- 기능: 키워드 검색의 전체 대화 기록을 저장합니다.
- 검색: 이전 세션 전반의 기본 키워드 검색 유형
- 메모리 관리: 저장되는 항목을 관리합니다 (
add_session_to_memory사용). - 필요한 항목: 영구
SessionService(예:VertexAiSessionService또는DatabaseSessionService)만 - 사용 시기: LLM 처리 없이 이전 대화에서 간단한 검색이 필요한 경우
- 예: 'docstring'을 검색하면 해당 단어를 언급한 모든 세션이 반환됩니다.
메모리가 채워지는 방식
각 코드 검토가 완료되면 다음 단계를 따르세요.
# At the end of a session (typically in your application code)
await memory_service.add_session_to_memory(session)
결과:
- InMemoryMemoryService: 키워드 검색의 전체 세션 이벤트를 저장합니다.
- VertexAiMemoryBankService: LLM이 주요 사실을 추출하고 기존 메모리와 통합합니다.
그러면 향후 세션에서 다음을 쿼리할 수 있습니다.
# In a tool, search for relevant past feedback
results = tool_context.search_memory("feedback about docstrings")
4단계: 피드백 합성기 도구 및 에이전트 추가
피드백 합성기는 파이프라인에서 가장 정교한 에이전트입니다. 세 가지 도구를 오케스트레이션하고, 동적 명령어를 사용하며, 상태, 메모리, 아티팩트를 결합합니다.
3개의 신디사이저 도구 추가
👉 열기
code_review_assistant/tools.py
👉 찾기:
# MODULE_5_STEP_4_SEARCH_PAST_FEEDBACK
👉 도구 1 - 메모리 검색 (프로덕션 버전)으로 대체:
async def search_past_feedback(developer_id: str, tool_context: ToolContext) -> Dict[str, Any]:
    """
    Search for past feedback in memory service.

    Args:
        developer_id: ID of the developer (defaults to "default_user")
        tool_context: ADK tool context with potential memory service access

    Returns:
        Dictionary containing feedback search results
    """
    logger.info(f"Tool: Searching for past feedback for developer {developer_id}...")

    try:
        # Default developer ID if not provided
        if not developer_id:
            developer_id = tool_context.state.get(StateKeys.USER_ID, 'default_user')

        # Check if memory service is available
        if hasattr(tool_context, 'search_memory'):
            try:
                # Perform structured searches
                queries = [
                    f"developer:{developer_id} code review feedback",
                    f"developer:{developer_id} common issues",
                    f"developer:{developer_id} improvements"
                ]

                all_feedback = []
                patterns = {
                    'common_issues': [],
                    'improvements': [],
                    'strengths': []
                }

                for query in queries:
                    search_result = await tool_context.search_memory(query)

                    if search_result and hasattr(search_result, 'memories'):
                        for memory in search_result.memories[:5]:
                            memory_text = memory.text if hasattr(memory, 'text') else str(memory)
                            all_feedback.append(memory_text)

                            # Extract patterns
                            if 'style' in memory_text.lower():
                                patterns['common_issues'].append('style compliance')
                            if 'improved' in memory_text.lower():
                                patterns['improvements'].append('showing improvement')
                            if 'excellent' in memory_text.lower():
                                patterns['strengths'].append('consistent quality')

                # Store in state
                tool_context.state[StateKeys.PAST_FEEDBACK] = all_feedback
                tool_context.state[StateKeys.FEEDBACK_PATTERNS] = patterns

                logger.info(f"Tool: Found {len(all_feedback)} past feedback items")

                return {
                    "status": "success",
                    "feedback_found": True,
                    "count": len(all_feedback),
                    "summary": " | ".join(all_feedback[:3]) if all_feedback else "No feedback",
                    "patterns": patterns
                }

            except Exception as e:
                logger.warning(f"Tool: Memory search error: {e}")

        # Fallback: Check state for cached feedback
        cached_feedback = tool_context.state.get(StateKeys.USER_PAST_FEEDBACK_CACHE, [])
        if cached_feedback:
            tool_context.state[StateKeys.PAST_FEEDBACK] = cached_feedback
            return {
                "status": "success",
                "feedback_found": True,
                "count": len(cached_feedback),
                "summary": "Using cached feedback",
                "patterns": {}
            }

        # No feedback found
        tool_context.state[StateKeys.PAST_FEEDBACK] = []
        logger.info("Tool: No past feedback found")

        return {
            "status": "success",
            "feedback_found": False,
            "message": "No past feedback available - this appears to be a first submission",
            "patterns": {}
        }

    except Exception as e:
        error_msg = f"Feedback search error: {str(e)}"
        logger.error(f"Tool: {error_msg}", exc_info=True)

        tool_context.state[StateKeys.PAST_FEEDBACK] = []

        return {
            "status": "error",
            "message": error_msg,
            "feedback_found": False
        }
👉 찾기:
# MODULE_5_STEP_4_UPDATE_GRADING_PROGRESS
👉 도구 2 - 성적 추적 도구 (프로덕션 버전)로 대체:
async def update_grading_progress(tool_context: ToolContext) -> Dict[str, Any]:
    """
    Updates grading progress counters and metrics in state.
    """
    logger.info("Tool: Updating grading progress...")

    try:
        current_time = datetime.now().isoformat()

        # Build all state changes
        state_updates = {}

        # Temporary (invocation-level) state
        state_updates[StateKeys.TEMP_PROCESSING_TIMESTAMP] = current_time

        # Session-level state
        attempts = tool_context.state.get(StateKeys.GRADING_ATTEMPTS, 0) + 1
        state_updates[StateKeys.GRADING_ATTEMPTS] = attempts
        state_updates[StateKeys.LAST_GRADING_TIME] = current_time

        # User-level persistent state
        lifetime_submissions = tool_context.state.get(StateKeys.USER_TOTAL_SUBMISSIONS, 0) + 1
        state_updates[StateKeys.USER_TOTAL_SUBMISSIONS] = lifetime_submissions
        state_updates[StateKeys.USER_LAST_SUBMISSION_TIME] = current_time

        # Calculate improvement metrics
        current_style_score = tool_context.state.get(StateKeys.STYLE_SCORE, 0)
        last_style_score = tool_context.state.get(StateKeys.USER_LAST_STYLE_SCORE, 0)
        score_improvement = current_style_score - last_style_score

        state_updates[StateKeys.USER_LAST_STYLE_SCORE] = current_style_score
        state_updates[StateKeys.SCORE_IMPROVEMENT] = score_improvement

        # Track test results if available
        test_results = tool_context.state.get(StateKeys.TEST_EXECUTION_SUMMARY, {})

        # Parse if it's a string
        if isinstance(test_results, str):
            try:
                test_results = json.loads(test_results)
            except:
                test_results = {}

        if test_results and test_results.get('test_summary', {}).get('total_tests_run', 0) > 0:
            summary = test_results['test_summary']
            total = summary.get('total_tests_run', 0)
            passed = summary.get('tests_passed', 0)
            if total > 0:
                pass_rate = (passed / total) * 100
                state_updates[StateKeys.USER_LAST_TEST_PASS_RATE] = pass_rate

        # Apply all updates atomically
        for key, value in state_updates.items():
            tool_context.state[key] = value

        logger.info(f"Tool: Progress updated - Attempt #{attempts}, "
                    f"Lifetime: {lifetime_submissions}")

        return {
            "status": "success",
            "session_attempts": attempts,
            "lifetime_submissions": lifetime_submissions,
            "timestamp": current_time,
            "improvement": {
                "style_score_change": score_improvement,
                "direction": "improved" if score_improvement > 0 else "declined"
            },
            "summary": f"Attempt #{attempts} recorded, {lifetime_submissions} total submissions"
        }

    except Exception as e:
        error_msg = f"Progress update error: {str(e)}"
        logger.error(f"Tool: {error_msg}", exc_info=True)

        return {
            "status": "error",
            "message": error_msg
        }
👉 찾기:
# MODULE_5_STEP_4_SAVE_GRADING_REPORT
👉 도구 3 - 아티팩트 저장기 (프로덕션 버전)로 대체:
async def save_grading_report(feedback_text: str, tool_context: ToolContext) -> Dict[str, Any]:
    """
    Saves a detailed grading report as an artifact.

    Args:
        feedback_text: The feedback text to include in the report
        tool_context: ADK tool context for state management

    Returns:
        Dictionary containing save status and details
    """
    logger.info("Tool: Saving grading report...")

    try:
        # Gather all relevant data from state
        code = tool_context.state.get(StateKeys.CODE_TO_REVIEW, '')
        analysis = tool_context.state.get(StateKeys.CODE_ANALYSIS, {})
        style_score = tool_context.state.get(StateKeys.STYLE_SCORE, 0)
        style_issues = tool_context.state.get(StateKeys.STYLE_ISSUES, [])

        # Get test results
        test_results = tool_context.state.get(StateKeys.TEST_EXECUTION_SUMMARY, {})

        # Parse if it's a string
        if isinstance(test_results, str):
            try:
                test_results = json.loads(test_results)
            except:
                test_results = {}

        timestamp = datetime.now().isoformat()

        # Create comprehensive report dictionary
        report = {
            'timestamp': timestamp,
            'grading_attempt': tool_context.state.get(StateKeys.GRADING_ATTEMPTS, 1),
            'code': {
                'content': code,
                'line_count': len(code.splitlines()),
                'hash': hashlib.md5(code.encode()).hexdigest()
            },
            'analysis': analysis,
            'style': {
                'score': style_score,
                'issues': style_issues[:5]  # First 5 issues
            },
            'tests': test_results,
            'feedback': feedback_text,
            'improvements': {
                'score_change': tool_context.state.get(StateKeys.SCORE_IMPROVEMENT, 0),
                'from_last_score': tool_context.state.get(StateKeys.USER_LAST_STYLE_SCORE, 0)
            }
        }

        # Convert report to JSON string
        report_json = json.dumps(report, indent=2)
        report_part = types.Part.from_text(text=report_json)

        # Try to save as artifact if the service is available
        if hasattr(tool_context, 'save_artifact'):
            try:
                # Generate filename with timestamp (replace colons for filesystem compatibility)
                filename = f"grading_report_{timestamp.replace(':', '-')}.json"

                # Save the main report
                version = await tool_context.save_artifact(filename, report_part)

                # Also save a "latest" version for easy access
                await tool_context.save_artifact("latest_grading_report.json", report_part)

                logger.info(f"Tool: Report saved as {filename} (version {version})")

                # Store report in state as well for redundancy
                tool_context.state[StateKeys.USER_LAST_GRADING_REPORT] = report

                return {
                    "status": "success",
                    "artifact_saved": True,
                    "filename": filename,
                    "version": str(version),
                    "size": len(report_json),
                    "summary": f"Report saved as {filename}"
                }

            except Exception as artifact_error:
                logger.warning(f"Artifact service error: {artifact_error}, falling back to state storage")
                # Continue to fallback below

        # Fallback: Store in state if artifact service is not available or failed
        tool_context.state[StateKeys.USER_LAST_GRADING_REPORT] = report
        logger.info("Tool: Report saved to state (artifact service not available)")

        return {
            "status": "success",
            "artifact_saved": False,
            "message": "Report saved to state only",
            "size": len(report_json),
            "summary": "Report saved to session state"
        }

    except Exception as e:
        error_msg = f"Report save error: {str(e)}"
        logger.error(f"Tool: {error_msg}", exc_info=True)

        # Still try to save minimal data to state
        try:
            tool_context.state[StateKeys.USER_LAST_GRADING_REPORT] = {
                'error': error_msg,
                'feedback': feedback_text,
                'timestamp': datetime.now().isoformat()
            }
        except:
            pass

        return {
            "status": "error",
            "message": error_msg,
            "artifact_saved": False,
            "summary": f"Failed to save report: {error_msg}"
        }
합성기 에이전트 만들기
👉 열기
code_review_assistant/sub_agents/review_pipeline/feedback_synthesizer.py
👉 찾기:
# MODULE_5_STEP_4_INSTRUCTION_PROVIDER
👉 프로덕션 지침 제공업체로 대체:
async def feedback_instruction_provider(context: ReadonlyContext) -> str:
    """Dynamic instruction provider that injects state variables."""
    template = """You are an expert code reviewer and mentor providing constructive, educational feedback.

CONTEXT FROM PREVIOUS AGENTS:
- Structure analysis summary: {structure_analysis_summary}
- Style check summary: {style_check_summary}
- Test execution summary: {test_execution_summary}

YOUR TASK requires these steps IN ORDER:
1. Call search_past_feedback tool with developer_id="default_user"
2. Call update_grading_progress tool with no parameters
3. Carefully analyze the test results to understand what really happened
4. Generate comprehensive feedback following the structure below
5. Call save_grading_report tool with the feedback_text parameter
6. Return the feedback as your final output

CRITICAL - Understanding Test Results:
The test_execution_summary contains structured JSON. Parse it carefully:
- tests_passed = Code worked correctly
- tests_failed = Code produced wrong output
- tests_with_errors = Code crashed
- critical_issues = Fundamental problems with the code

If critical_issues array contains items, these are serious bugs that need fixing.
Do NOT count discovering bugs as test successes.

FEEDBACK STRUCTURE TO FOLLOW:

## 📊 Summary
Provide an honest assessment. Be encouraging but truthful about problems found.

## ✅ Strengths
List 2-3 things done well, referencing specific code elements.

## 📈 Code Quality Analysis

### Structure & Organization
Comment on code organization, readability, and documentation.

### Style Compliance
Report the actual style score and any specific issues.

### Test Results
Report the actual test results accurately:
- If critical_issues exist, report them as bugs to fix
- Be clear: "X tests passed, Y critical issues were found"
- List each critical issue
- Don't hide or minimize problems

## 💡 Recommendations for Improvement
Based on the analysis, provide specific actionable fixes.
If critical issues exist, fixing them is top priority.

## 🎯 Next Steps
Prioritized action list based on severity of issues.

## 💬 Encouragement
End with encouragement while being honest about what needs fixing.

Remember: Complete ALL steps including calling save_grading_report."""

    return await instructions_utils.inject_session_state(template, context)
👉 찾기:
# MODULE_5_STEP_4_SYNTHESIZER_AGENT
👉 다음으로 바꿉니다.
feedback_synthesizer_agent = Agent(
    name="FeedbackSynthesizer",
    model=config.critic_model,
    description="Synthesizes all analysis into constructive, personalized feedback",
    instruction=feedback_instruction_provider,
    tools=[
        FunctionTool(func=search_past_feedback),
        FunctionTool(func=update_grading_progress),
        FunctionTool(func=save_grading_report)
    ],
    output_key="final_feedback"
)
5단계: 파이프라인 연결
이제 네 개의 에이전트를 모두 순차적 파이프라인에 연결하고 루트 에이전트를 만듭니다.
👉 열기
code_review_assistant/agent.py
👉 파일 상단 (기존 가져오기 후)에 필요한 가져오기를 추가합니다.
from google.adk.agents import Agent, SequentialAgent
from code_review_assistant.sub_agents.review_pipeline.code_analyzer import code_analyzer_agent
from code_review_assistant.sub_agents.review_pipeline.style_checker import style_checker_agent
from code_review_assistant.sub_agents.review_pipeline.test_runner import test_runner_agent
from code_review_assistant.sub_agents.review_pipeline.feedback_synthesizer import feedback_synthesizer_agent
이제 파일이 다음과 같이 표시됩니다.
"""
Main agent orchestration for the Code Review Assistant.
"""

from google.adk.agents import Agent, SequentialAgent
from .config import config
from code_review_assistant.sub_agents.review_pipeline.code_analyzer import code_analyzer_agent
from code_review_assistant.sub_agents.review_pipeline.style_checker import style_checker_agent
from code_review_assistant.sub_agents.review_pipeline.test_runner import test_runner_agent
from code_review_assistant.sub_agents.review_pipeline.feedback_synthesizer import feedback_synthesizer_agent

# MODULE_5_STEP_5_CREATE_PIPELINE

# MODULE_6_STEP_5_CREATE_FIX_LOOP

# MODULE_6_STEP_5_UPDATE_ROOT_AGENT
👉 찾기:
# MODULE_5_STEP_5_CREATE_PIPELINE
👉 해당 한 줄을 다음으로 바꿉니다.
# Create sequential pipeline
code_review_pipeline = SequentialAgent(
    name="CodeReviewPipeline",
    description="Complete code review pipeline with analysis, testing, and feedback",
    sub_agents=[
        code_analyzer_agent,
        style_checker_agent,
        test_runner_agent,
        feedback_synthesizer_agent
    ]
)

# Root agent - coordinates the review pipeline
root_agent = Agent(
    name="CodeReviewAssistant",
    model=config.worker_model,
    description="An intelligent code review assistant that analyzes Python code and provides educational feedback",
    instruction="""You are a specialized Python code review assistant focused on helping developers improve their code quality.

When a user provides Python code for review:
1. Immediately delegate to CodeReviewPipeline and pass the code EXACTLY as it was provided by the user.
2. The pipeline will handle all analysis and feedback
3. Return ONLY the final feedback from the pipeline - do not add any commentary

When a user asks what you can do or asks general questions:
- Explain your capabilities for code review
- Do NOT trigger the pipeline for non-code messages

The pipeline handles everything for code review - just pass through its final output.""",
    sub_agents=[code_review_pipeline],
    output_key="assistant_response"
)
6단계: 전체 파이프라인 테스트
이제 네 가지 에이전트가 함께 작동하는 것을 확인할 시간입니다.
👉 시스템 시작:
adk web code_review_assistant
adk web 명령어를 실행하면 터미널에 ADK 웹 서버가 시작되었음을 나타내는 다음과 비슷한 출력이 표시됩니다.
+-----------------------------------------------------------------------------+
| ADK Web Server started                                                      |
|                                                                             |
| For local testing, access at http://localhost:8000.                         |
+-----------------------------------------------------------------------------+

INFO:     Application startup complete.
INFO:     Uvicorn running on http://0.0.0.0:8000 (Press CTRL+C to quit)
👉 다음으로 브라우저에서 ADK 개발 UI에 액세스하려면 다음 단계를 따르세요.
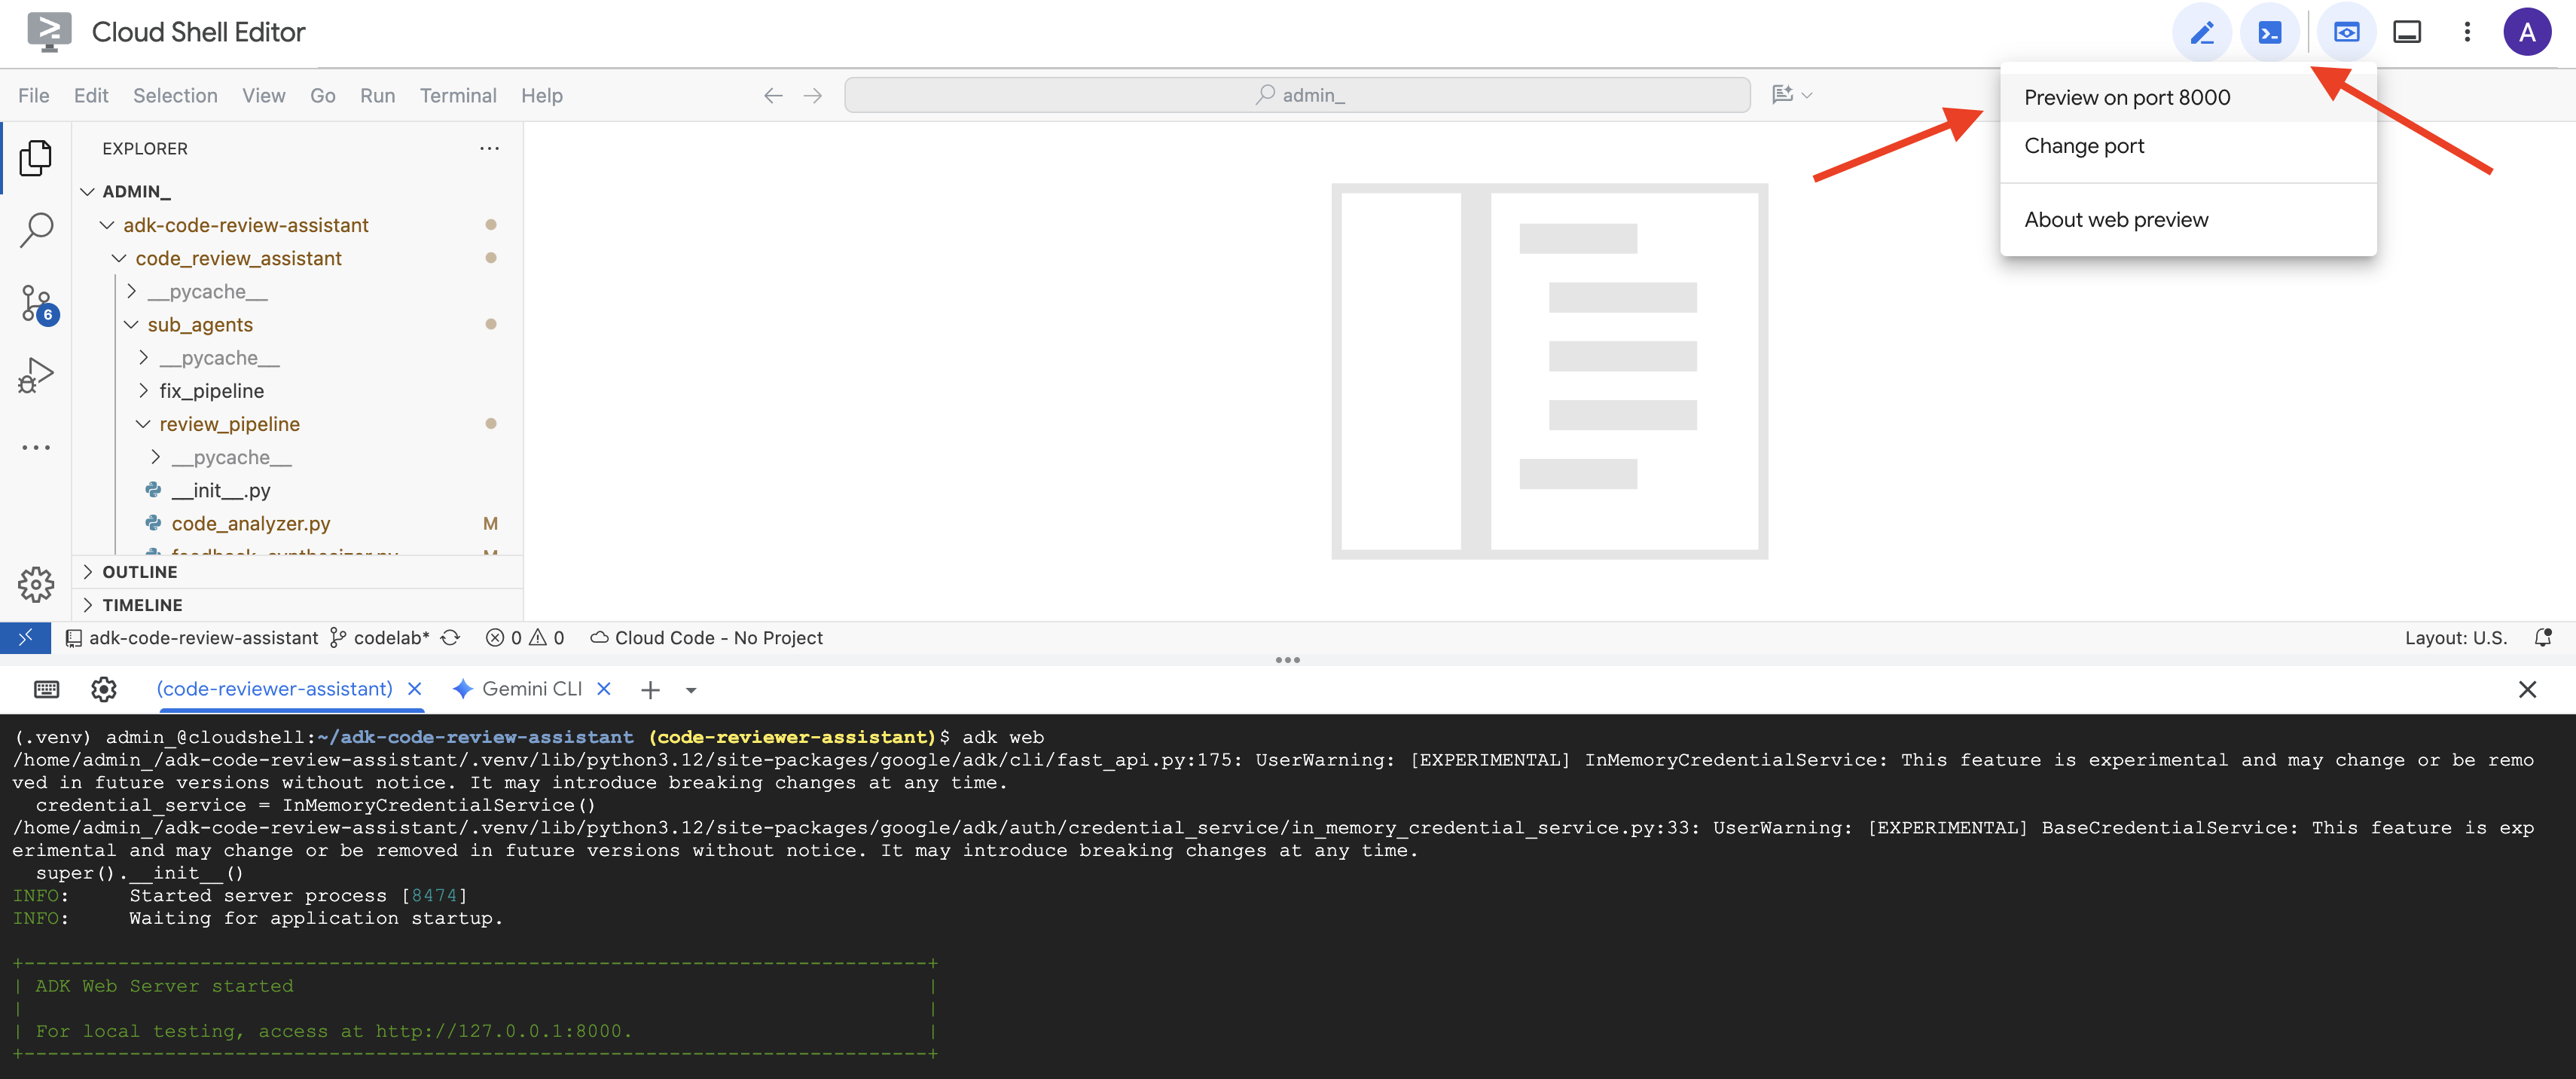
Cloud Shell 툴바 (일반적으로 오른쪽 상단)의 웹 미리보기 아이콘 (눈 또는 화살표가 있는 정사각형 모양)에서 포트 변경을 선택합니다. 팝업 창에서 포트를 8000으로 설정하고 '변경 및 미리보기'를 클릭합니다. 그러면 Cloud Shell에서 ADK 개발 UI가 표시된 새 브라우저 탭 또는 창이 열립니다.
👉 이제 에이전트가 실행됩니다. 브라우저의 ADK 개발 UI는 에이전트에 직접 연결됩니다.
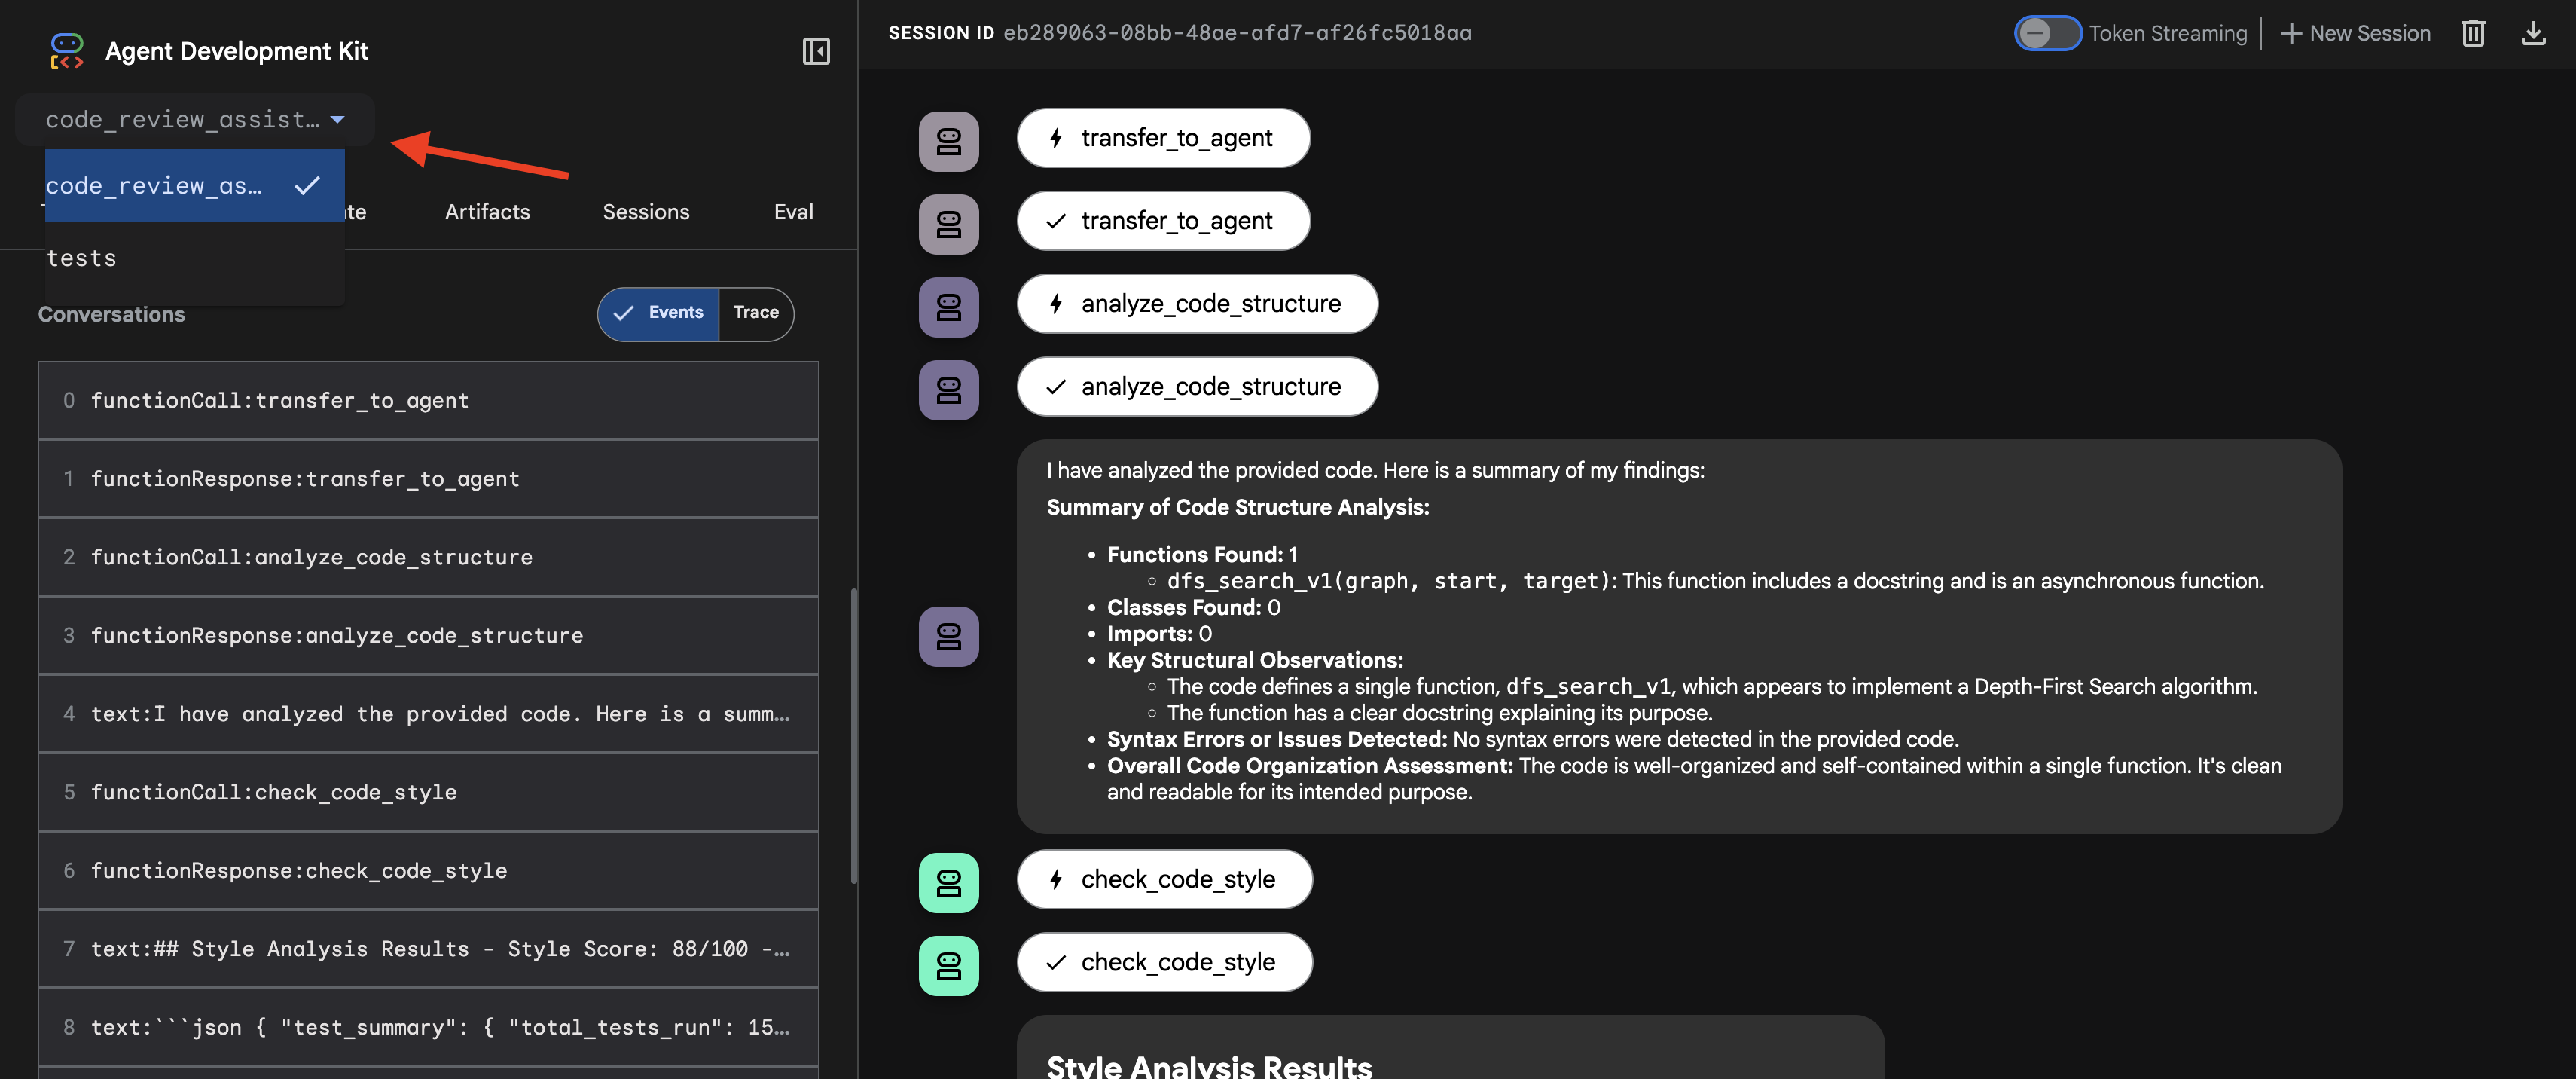
- 타겟 선택: UI 상단의 드롭다운 메뉴에서
code_review_assistant에이전트를 선택합니다.
👉 테스트 프롬프트:
Please analyze the following:
def dfs_search_v1(graph, start, target):
    """Find if target is reachable from start."""
    visited = set()
    stack = start

    while stack:
        current = stack.pop()

        if current == target:
            return True

        if current not in visited:
            visited.add(current)

            for neighbor in graph[current]:
                if neighbor not in visited:
                    stack.append(neighbor)

    return False
👉 코드 검토 파이프라인 작동 방식 확인:
버그가 있는 dfs_search_v1 함수를 제출하면 하나의 답변만 표시되는 것이 아닙니다. 멀티 에이전트 파이프라인이 작동하는 것을 확인할 수 있습니다. 표시되는 스트리밍 출력은 4개의 전문 에이전트가 순차적으로 실행되어 각 에이전트가 이전 에이전트를 기반으로 빌드한 결과입니다.
각 에이전트가 최종 종합 검토에 기여하는 바를 자세히 살펴보면 원시 데이터를 실행 가능한 인텔리전스로 변환하는 데 도움이 됩니다.
1. 코드 분석기의 구조 보고서
먼저 CodeAnalyzer 에이전트가 원시 코드를 수신합니다. 코드가 어떤 작업을 하는지 추측하지 않고 analyze_code_structure 도구를 사용하여 결정적인 추상 구문 트리 (AST) 파싱을 실행합니다.
출력은 코드 구조에 관한 순수하고 사실적인 데이터입니다.
The analysis of the provided code reveals the following:

Summary:
- Functions Found: 1
- Classes Found: 0

Key Structural Observations:
- A single function, dfs_search_v1, is defined.
- It includes a docstring: "Find if target is reachable from start."
- No syntax errors were detected.

Overall Code Organization Assessment:
- The code snippet is a well-defined, self-contained function.
⭐ 가치: 이 초기 단계는 다른 에이전트를 위한 깔끔하고 신뢰할 수 있는 기반을 제공합니다. 코드가 유효한 Python인지 확인하고 검토해야 하는 정확한 구성요소를 식별합니다.
2. 스타일 검사기의 PEP 8 감사
그런 다음 StyleChecker 에이전트가 인계받습니다. 공유 상태에서 코드를 읽고 pycodestyle 린터를 활용하는 check_code_style 도구를 사용합니다.
출력은 정량화 가능한 품질 점수와 구체적인 위반사항입니다.
Style Analysis Results
- Style Score: 88/100
- Total Issues: 6
- Assessment: Good style with minor improvements needed

Top Style Issues
- Line 5, W293: blank line contains whitespace
- Line 19, W292: no newline at end of file
⭐ 가치: 이 에이전트는 확립된 커뮤니티 표준 (PEP 8)에 따라 협상할 수 없는 객관적인 의견을 제공합니다. 가중치 부여 점수 시스템은 사용자에게 문제의 심각도를 즉시 알려줍니다.
3. 테스트 실행기의 심각한 버그 발견
이때 시스템은 표면적인 분석을 넘어섭니다. TestRunner 에이전트는 코드의 동작을 검증하기 위해 포괄적인 테스트 모음을 생성하고 실행합니다.
출력은 비난하는 판결이 포함된 구조화된 JSON 객체입니다.
{
  "critical_issues": [
    {
      "type": "Critical Bug",
      "description": "The function's initialization `stack = start` is incorrect... When a common input like a string... is provided... the function crashes with an AttributeError.",
      "severity": "Critical"
    }
  ],
  "verdict": {
    "status": "BROKEN",
    "confidence": "high",
    "recommendation": "The function is fundamentally broken... the stack initialization line `stack = start` must be changed to `stack = [start]`."
  }
}
⭐ 가치: 가장 중요한 인사이트입니다. 에이전트는 추측만 한 것이 아니라 코드를 실행하여 코드가 깨졌음을 증명했습니다. 인적 검토자가 쉽게 놓칠 수 있는 미묘하지만 중요한 런타임 버그를 발견하고 정확한 원인과 필요한 수정사항을 지적했습니다.
4. 의견 합성기의 최종 보고서
마지막으로 FeedbackSynthesizer 에이전트가 지휘자 역할을 합니다. 이전 세 에이전트의 구조화된 데이터를 가져와 분석적이고 격려적인 단일 사용자 친화적인 보고서를 작성합니다.
최종적으로 다듬어진 리뷰가 출력됩니다.
📊 Summary
Great effort on implementing the Depth-First Search algorithm! ... However, a critical bug in the initialization of the stack prevents the function from working correctly...

✅ Strengths
- Good Algorithm Structure
- Correct Use of `visited` Set

📈 Code Quality Analysis
...
### Style Compliance
The style analysis returned a good score of 88/100.
...
### Test Results
The automated testing revealed a critical issue... The line `stack = start` directly assigns the input... which results in an `AttributeError`.

💡 Recommendations for Improvement
**Fix the Critical Stack Initialization Bug:**
- Incorrect Code: `stack = start`
- Correct Code: `stack = [start]`

💬 Encouragement
You are very close to a perfect implementation! The core logic of your DFS algorithm is sound, which is the hardest part.
⭐ 가치: 이 에이전트는 기술 데이터를 유용한 교육 경험으로 변환합니다. 가장 중요한 문제 (버그)에 우선순위를 두고, 명확하게 설명하고, 정확한 해결 방법을 제시하며, 격려하는 어조로 말합니다. 이 단계에서는 이전 단계의 모든 결과를 일관되고 가치 있는 전체로 통합합니다.
이 다단계 프로세스는 에이전트형 파이프라인의 강력한 기능을 보여줍니다. 단일 모놀리식 응답 대신 각 에이전트가 전문적이고 검증 가능한 작업을 수행하는 계층화된 분석을 얻을 수 있습니다. 이를 통해 통찰력 있을 뿐만 아니라 결정적이고, 신뢰할 수 있으며, 심층적인 교육을 제공하는 리뷰가 가능합니다.
👉💻 테스트를 완료한 후 Cloud Shell 편집기 터미널로 돌아가 Ctrl+C를 눌러 ADK 개발 UI를 중지합니다.
빌드한 항목
이제 다음을 수행하는 완전한 코드 검토 파이프라인이 있습니다.
✅ 코드 구조 파싱 - 도우미 함수를 사용한 결정적 AST 분석
✅ 스타일 확인 - 명명 규칙을 사용한 가중치 부여 점수 매기기
✅ 테스트 실행 - 구조화된 JSON 출력을 사용한 포괄적인 테스트 생성
✅ 피드백 합성 - 상태, 메모리, 아티팩트 통합
✅ 진행 상황 추적 - 호출/세션/사용자 간 다중 계층 상태
✅ 시간이 지남에 따라 학습 - 교차 세션 패턴을 위한 메모리 서비스
✅ 아티팩트 제공 - 전체 감사 추적을 포함한 다운로드 가능한 JSON 보고서
학습한 핵심 개념
순차 파이프라인:
- 엄격한 순서로 실행되는 4개의 에이전트
- 각각 다음 상태를 풍부하게 합니다.
- 종속 항목이 실행 순서를 결정함
생산 패턴:
- 도우미 함수 분리 (스레드 풀에서 동기화)
- 단계적 성능 저하 (대체 전략)
- 다중 계층 상태 관리 (임시/세션/사용자)
- 동적 요청 사항 제공자 (컨텍스트 인식)
- 이중 스토리지 (아티팩트 + 상태 중복)
커뮤니케이션으로서의 상태:
- 상수를 사용하면 에이전트 전반에서 오타를 방지할 수 있습니다.
output_key가 상태에 에이전트 요약을 작성합니다.- 나중에 에이전트가 StateKeys를 통해 읽음
- 상태가 파이프라인을 통해 선형으로 흐름
메모리 대 상태:
- 상태: 현재 세션 데이터
- 메모리: 세션 간 패턴
- 다양한 용도, 다양한 수명
도구 오케스트레이션:
- 단일 도구 에이전트 (분석기, 스타일 검사기)
- 내장 실행기 (test_runner)
- 멀티 도구 조정 (신시사이저)
모델 선택 전략:
- 작업자 모델: 기계적 작업 (파싱, 린팅, 라우팅)
- 비평가 모델: 추론 작업 (테스트, 합성)
- 적절한 선택을 통한 비용 최적화
다음 단계
모듈 6에서는 다음을 빌드합니다.
- 반복 수정을 위한 LoopAgent 아키텍처
- 에스컬레이션을 통한 종료 조건
- 반복 간 상태 누적
- 유효성 검사 및 재시도 로직
- 검토 파이프라인과의 통합을 통해 수정사항 제공
동일한 상태 패턴이 에이전트가 성공할 때까지 여러 번 시도하는 복잡한 반복 워크플로로 확장되는 방식과 단일 애플리케이션에서 여러 파이프라인을 조정하는 방법을 알아봅니다.
6. 수정 파이프라인: 루프 아키텍처 추가
소개
모듈 5에서는 코드를 분석하고 피드백을 제공하는 순차적 검토 파이프라인을 빌드했습니다. 하지만 문제를 파악하는 것만으로는 해결책의 절반에 불과합니다. 개발자가 문제를 해결할 수 있도록 지원해야 합니다.
이 모듈에서는 다음을 수행하는 자동 수정 파이프라인을 빌드합니다.
- 검토 결과를 기반으로 수정사항을 생성합니다.
- 포괄적인 테스트를 실행하여 수정사항을 검증합니다.
- 문제가 해결되지 않으면 자동으로 다시 시도 (최대 3회)
- 전후 비교가 포함된 보고서 결과
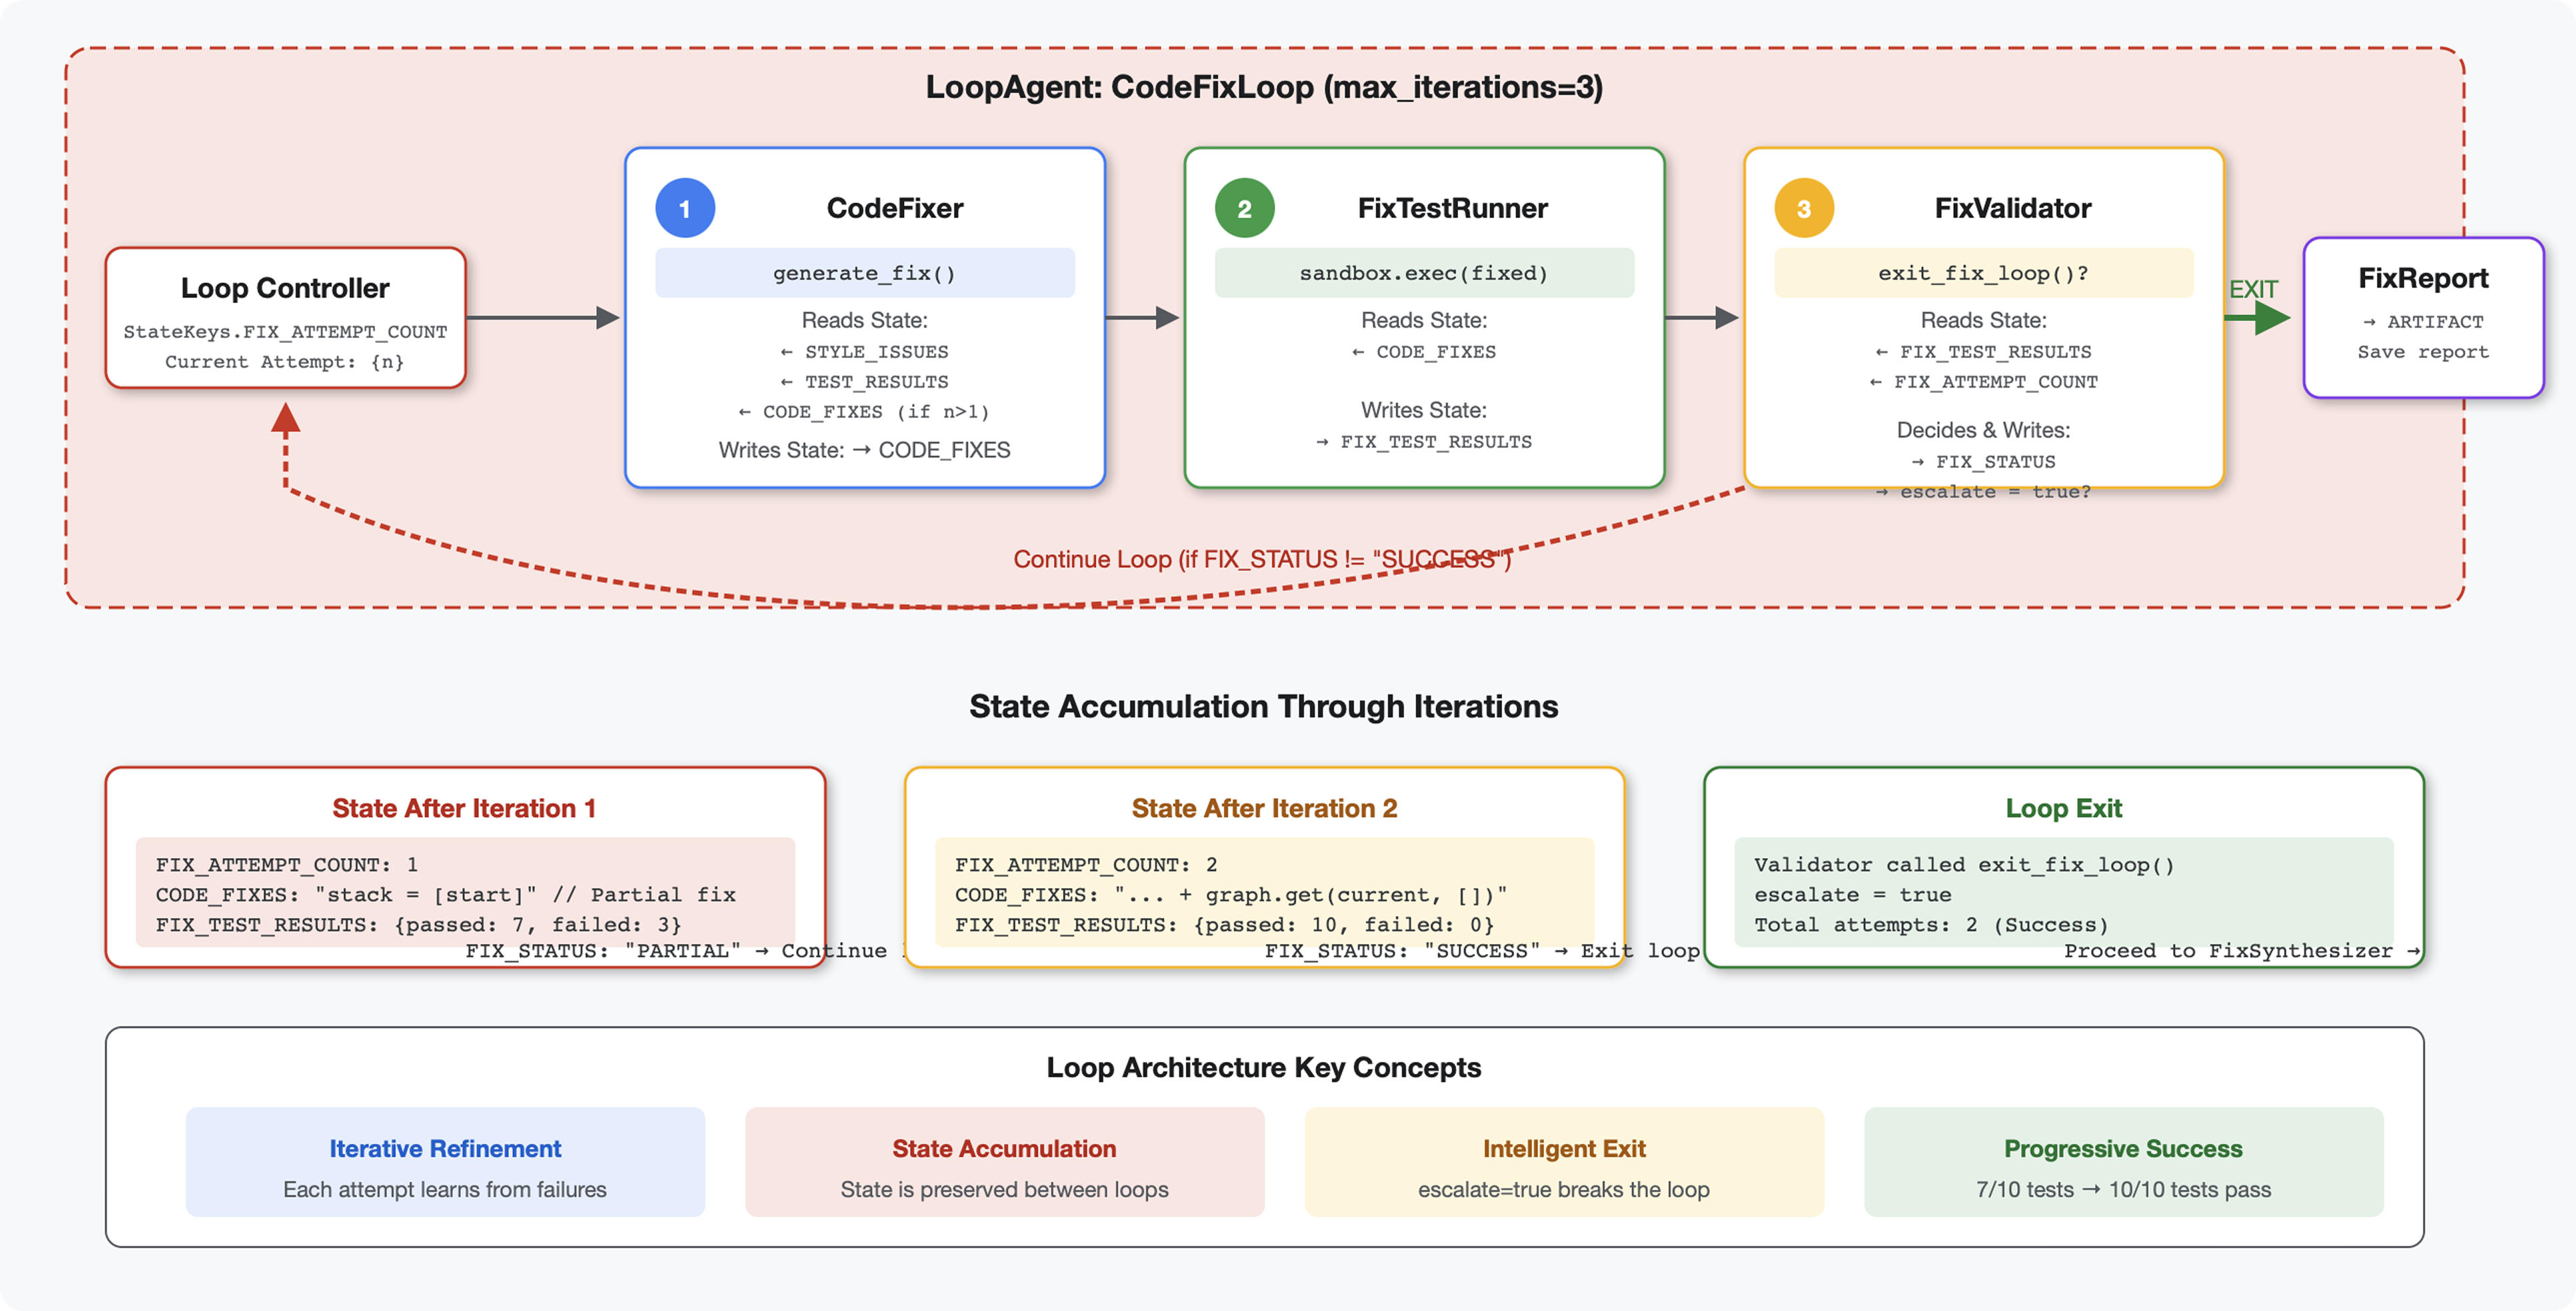
핵심 개념: 자동 재시도를 위한 LoopAgent 한 번 실행되는 순차적 에이전트와 달리 LoopAgent는 종료 조건이 충족되거나 최대 반복 횟수에 도달할 때까지 하위 에이전트를 반복합니다. 도구는 tool_context.actions.escalate = True을 설정하여 성공을 알립니다.
빌드할 내용 미리보기: 버그가 있는 코드 제출 → 검토에서 문제 식별 → 수정 루프에서 수정사항 생성 → 테스트에서 검증 → 필요한 경우 재시도 → 최종 종합 보고서
핵심 개념: LoopAgent와 Sequential 비교
순차 파이프라인 (모듈 5):
SequentialAgent(agents=[A, B, C])
# Executes: A → B → C → Done
- 단방향 흐름
- 각 에이전트는 정확히 한 번 실행됩니다.
- 재시도 로직 없음
루프 파이프라인 (모듈 6):
LoopAgent(agents=[A, B, C], max_iterations=3)
# Executes: A → B → C → (check exit) → A → B → C → (check exit) → ...
- 순환 흐름
- 에이전트는 여러 번 실행할 수 있습니다.
- 다음과 같은 경우 종료됩니다.
- 도구가
tool_context.actions.escalate = True(성공)을 설정합니다. max_iterations에 도달함 (안전 한계)- 처리되지 않은 예외가 발생합니다 (오류).
- 도구가
코드 수정에 루프를 사용하는 이유:
코드 수정에는 여러 번의 시도가 필요한 경우가 많습니다.
- 첫 번째 시도: 명백한 버그 (잘못된 변수 유형) 수정
- 두 번째 시도: 테스트에서 드러난 보조 문제 (특이 사례) 수정
- 세 번째 시도: 모든 테스트를 통과하도록 미세 조정하고 검증
루프가 없으면 에이전트 요청 사항에 복잡한 조건부 로직이 필요합니다. LoopAgent를 사용하면 재시도가 자동으로 이루어집니다.
아키텍처 비교:
Sequential (Module 5):
User → Review Pipeline → Feedback → Done

Loop (Module 6):
User → Review Pipeline → Feedback → Fix Pipeline
                                         ↓
                          ┌──────────────┴──────────────┐
                          │   Fix Attempt Loop (1-3x)   │
                          │  ┌─────────────────────┐    │
                          │  │ 1. Generate Fixes   │    │
                          │  │ 2. Test Fixes       │    │
                          │  │ 3. Validate & Exit? │────┼─→ If escalate=True
                          │  └─────────────────────┘    │      exit loop
                          │         ↓ If not            │
                          │    Try Again (max 3)        │
                          └─────────────────────────────┘
                                     ↓
                          4. Synthesize Final Report → Done
1단계: 코드 수정 도우미 에이전트 추가
코드 수정 도구는 검토 결과를 기반으로 수정된 Python 코드를 생성합니다.
👉 열기
code_review_assistant/sub_agents/fix_pipeline/code_fixer.py
👉 찾기:
# MODULE_6_STEP_1_CODE_FIXER_INSTRUCTION_PROVIDER
👉 단일 행을 다음으로 바꿉니다.
async def code_fixer_instruction_provider(context: ReadonlyContext) -> str:
    """Dynamic instruction provider that injects state variables."""
    template = """You are an expert code fixing specialist.

Original Code:
{code_to_review}

Analysis Results:
- Style Score: {style_score}/100
- Style Issues: {style_issues}
- Test Results: {test_execution_summary}

Based on the test results, identify and fix ALL issues including:
- Interface bugs (e.g., if start parameter expects wrong type)
- Logic errors (e.g., KeyError when accessing graph nodes)
- Style violations
- Missing documentation

YOUR TASK:
Generate the complete fixed Python code that addresses all identified issues.

CRITICAL INSTRUCTIONS:
- Output ONLY the corrected Python code
- Do NOT include markdown code blocks (```python)
- Do NOT include any explanations or commentary
- The output should be valid, executable Python code and nothing else

Common fixes to apply based on test results:
- If tests show AttributeError with 'pop', fix: stack = [start] instead of stack = start
- If tests show KeyError accessing graph, fix: use graph.get(current, [])
- Add docstrings if missing
- Fix any style violations identified

Output the complete fixed code now:"""

    return await instructions_utils.inject_session_state(template, context)
👉 찾기:
# MODULE_6_STEP_1_CODE_FIXER_AGENT
👉 단일 행을 다음으로 바꿉니다.
code_fixer_agent = Agent(
    name="CodeFixer",
    model=config.worker_model,
    description="Generates comprehensive fixes for all identified code issues",
    instruction=code_fixer_instruction_provider,
    code_executor=BuiltInCodeExecutor(),
    output_key="code_fixes"
)
2단계: Fix Test Runner Agent 추가
수정 테스트 러너는 수정된 코드에 대한 포괄적인 테스트를 실행하여 수정사항을 검증합니다.
👉 열기
code_review_assistant/sub_agents/fix_pipeline/fix_test_runner.py
👉 찾기:
# MODULE_6_STEP_2_FIX_TEST_RUNNER_INSTRUCTION_PROVIDER
👉 단일 행을 다음으로 바꿉니다.
async def fix_test_runner_instruction_provider(context: ReadonlyContext) -> str:
    """Dynamic instruction provider that uses the clean code from the previous step."""
    template = """You are responsible for validating the fixed code by running tests.

THE FIXED CODE TO TEST:
{code_fixes}

ORIGINAL TEST RESULTS: {test_execution_summary}

YOUR TASK:
1. Understand the fixes that were applied
2. Generate the same comprehensive tests (15-20 test cases)
3. Execute the tests on the FIXED code using your code executor
4. Compare results with original test results
5. Output a detailed JSON analysis

TESTING METHODOLOGY:
- Run the same tests that revealed issues in the original code
- Verify that previously failing tests now pass
- Ensure no regressions were introduced
- Document the improvement

Execute your tests and output ONLY valid JSON with this structure:
- "passed": number of tests that passed
- "failed": number of tests that failed
- "total": total number of tests
- "pass_rate": percentage as a number
- "comparison": object with "original_pass_rate", "new_pass_rate", "improvement"
- "newly_passing_tests": array of test names that now pass
- "still_failing_tests": array of test names still failing

Do NOT output the test code itself, only the JSON analysis."""

    return await instructions_utils.inject_session_state(template, context)
👉 찾기:
# MODULE_6_STEP_2_FIX_TEST_RUNNER_AGENT
👉 단일 행을 다음으로 바꿉니다.
fix_test_runner_agent = Agent(
    name="FixTestRunner",
    model=config.critic_model,
    description="Runs comprehensive tests on fixed code to verify all issues are resolved",
    instruction=fix_test_runner_instruction_provider,
    code_executor=BuiltInCodeExecutor(),
    output_key="fix_test_execution_summary"
)
3단계: 수정 유효성 검사기 에이전트 추가
유효성 검사기는 수정이 성공했는지 확인하고 루프를 종료할지 결정합니다.
도구 이해하기
먼저 유효성 검사기에 필요한 세 가지 도구를 추가합니다.
👉 열기
code_review_assistant/tools.py
👉 찾기:
# MODULE_6_STEP_3_VALIDATE_FIXED_STYLE
👉 도구 1 - 스타일 검사기로 대체:
async def validate_fixed_style(tool_context: ToolContext) -> Dict[str, Any]:
    """
    Validates style compliance of the fixed code.

    Args:
        tool_context: ADK tool context containing fixed code in state

    Returns:
        Dictionary with style validation results
    """
    logger.info("Tool: Validating style of fixed code...")

    try:
        # Get the fixed code from state
        code_fixes = tool_context.state.get(StateKeys.CODE_FIXES, '')

        # Try to extract from markdown if present
        if '```python' in code_fixes:
            start = code_fixes.rfind('```python') + 9
            end = code_fixes.rfind('```')
            if start < end:
                code_fixes = code_fixes[start:end].strip()

        if not code_fixes:
            return {
                "status": "error",
                "message": "No fixed code found in state"
            }

        # Store the extracted fixed code
        tool_context.state[StateKeys.CODE_FIXES] = code_fixes

        # Run style check on fixed code
        loop = asyncio.get_event_loop()
        with ThreadPoolExecutor() as executor:
            style_result = await loop.run_in_executor(
                executor, _perform_style_check, code_fixes
            )

        # Compare with original
        original_score = tool_context.state.get(StateKeys.STYLE_SCORE, 0)
        improvement = style_result['score'] - original_score

        # Store results
        tool_context.state[StateKeys.FIXED_STYLE_SCORE] = style_result['score']
        tool_context.state[StateKeys.FIXED_STYLE_ISSUES] = style_result['issues']

        logger.info(f"Tool: Fixed code style score: {style_result['score']}/100 "
                    f"(improvement: +{improvement})")

        return {
            "status": "success",
            "fixed_style_score": style_result['score'],
            "original_style_score": original_score,
            "improvement": improvement,
            "remaining_issues": style_result['issues'],
            "perfect_style": style_result['score'] == 100
        }

    except Exception as e:
        logger.error(f"Tool: Style validation failed: {e}", exc_info=True)
        return {
            "status": "error",
            "message": str(e)
        }
👉 찾기:
# MODULE_6_STEP_3_COMPILE_FIX_REPORT
👉 도구 2 - 보고서 컴파일러로 대체:
async def compile_fix_report(tool_context: ToolContext) -> Dict[str, Any]:
    """
    Compiles comprehensive report of the fix process.

    Args:
        tool_context: ADK tool context with all fix pipeline data

    Returns:
        Comprehensive fix report
    """
    logger.info("Tool: Compiling comprehensive fix report...")

    try:
        # Gather all data
        original_code = tool_context.state.get(StateKeys.CODE_TO_REVIEW, '')
        code_fixes = tool_context.state.get(StateKeys.CODE_FIXES, '')

        # Test results
        original_tests = tool_context.state.get(StateKeys.TEST_EXECUTION_SUMMARY, {})
        fixed_tests = tool_context.state.get(StateKeys.FIX_TEST_EXECUTION_SUMMARY, {})

        # Parse if strings
        if isinstance(original_tests, str):
            try:
                original_tests = json.loads(original_tests)
            except:
                original_tests = {}

        if isinstance(fixed_tests, str):
            try:
                fixed_tests = json.loads(fixed_tests)
            except:
                fixed_tests = {}

        # Extract pass rates
        original_pass_rate = 0
        if original_tests:
            if 'pass_rate' in original_tests:
                original_pass_rate = original_tests['pass_rate']
            elif 'test_summary' in original_tests:
                # Handle test_runner_agent's JSON structure
                summary = original_tests['test_summary']
                total = summary.get('total_tests_run', 0)
                passed = summary.get('tests_passed', 0)
                if total > 0:
                    original_pass_rate = (passed / total) * 100
            elif 'passed' in original_tests and 'total' in original_tests:
                if original_tests['total'] > 0:
                    original_pass_rate = (original_tests['passed'] / original_tests['total']) * 100

        fixed_pass_rate = 0
        all_tests_pass = False
        if fixed_tests:
            if 'pass_rate' in fixed_tests:
                fixed_pass_rate = fixed_tests['pass_rate']
                all_tests_pass = fixed_tests.get('failed', 1) == 0
            elif 'passed' in fixed_tests and 'total' in fixed_tests:
                if fixed_tests['total'] > 0:
                    fixed_pass_rate = (fixed_tests['passed'] / fixed_tests['total']) * 100
                all_tests_pass = fixed_tests.get('failed', 0) == 0

        # Style scores
        original_style = tool_context.state.get(StateKeys.STYLE_SCORE, 0)
        fixed_style = tool_context.state.get(StateKeys.FIXED_STYLE_SCORE, 0)

        # Calculate improvements
        test_improvement = {
            'original_pass_rate': original_pass_rate,
            'fixed_pass_rate': fixed_pass_rate,
            'improvement': fixed_pass_rate - original_pass_rate,
            'all_tests_pass': all_tests_pass
        }

        style_improvement = {
            'original_score': original_style,
            'fixed_score': fixed_style,
            'improvement': fixed_style - original_style,
            'perfect_style': fixed_style == 100
        }

        # Determine overall status
        if all_tests_pass and style_improvement['perfect_style']:
            fix_status = 'SUCCESSFUL'
            status_emoji = '✅'
        elif test_improvement['improvement'] > 0 or style_improvement['improvement'] > 0:
            fix_status = 'PARTIAL'
            status_emoji = '⚠️'
        else:
            fix_status = 'FAILED'
            status_emoji = '❌'

        # Build comprehensive report
        report = {
            'status': fix_status,
            'status_emoji': status_emoji,
            'timestamp': datetime.now().isoformat(),
            'original_code': original_code,
            'code_fixes': code_fixes,
            'improvements': {
                'tests': test_improvement,
                'style': style_improvement
            },
            'summary': f"{status_emoji} Fix Status: {fix_status}\n"
                      f"Tests: {original_pass_rate:.1f}% → {fixed_pass_rate:.1f}%\n"
                      f"Style: {original_style}/100 → {fixed_style}/100"
        }

        # Store report in state
        tool_context.state[StateKeys.FIX_REPORT] = report
        tool_context.state[StateKeys.FIX_STATUS] = fix_status

        logger.info(f"Tool: Fix report compiled - Status: {fix_status}")
        logger.info(f"Tool: Test improvement: {original_pass_rate:.1f}% → {fixed_pass_rate:.1f}%")
        logger.info(f"Tool: Style improvement: {original_style} → {fixed_style}")

        return {
            "status": "success",
            "fix_status": fix_status,
            "report": report
        }

    except Exception as e:
        logger.error(f"Tool: Failed to compile fix report: {e}", exc_info=True)
        return {
            "status": "error",
            "message": str(e)
        }
👉 찾기:
# MODULE_6_STEP_3_EXIT_FIX_LOOP
👉 도구 3 - 루프 종료 신호로 대체:
def exit_fix_loop(tool_context: ToolContext) -> Dict[str, Any]:
    """
    Signal that fixing is complete and should exit the loop.

    Args:
        tool_context: ADK tool context

    Returns:
        Confirmation message
    """
    logger.info("Tool: Setting escalate flag to exit fix loop")

    # This is the critical line that exits the LoopAgent
    tool_context.actions.escalate = True

    return {
        "status": "success",
        "message": "Fix complete, exiting loop"
    }
Validator 에이전트 만들기
👉 열기
code_review_assistant/sub_agents/fix_pipeline/fix_validator.py
👉 찾기:
# MODULE_6_STEP_3_FIX_VALIDATOR_INSTRUCTION_PROVIDER
👉 단일 행을 다음으로 바꿉니다.
async def fix_validator_instruction_provider(context: ReadonlyContext) -> str:
    """Dynamic instruction provider that injects state variables."""
    template = """You are the final validation specialist for code fixes.

You have access to:
- Original issues from initial review
- Applied fixes: {code_fixes}
- Test results after fix: {fix_test_execution_summary}
- All state data from the fix process

Your responsibilities:
1. Use validate_fixed_style tool to check style compliance of fixed code
   - Pass no arguments, it will retrieve fixed code from state
2. Use compile_fix_report tool to generate comprehensive report
   - Pass no arguments, it will gather all data from state
3. Based on the report, determine overall fix status:
   - ✅ SUCCESSFUL: All tests pass, style score 100
   - ⚠️ PARTIAL: Improvements made but issues remain
   - ❌ FAILED: Fix didn't work or made things worse

4. CRITICAL: If status is SUCCESSFUL, call the exit_fix_loop tool to stop iterations
   - This prevents unnecessary additional fix attempts
   - If not successful, the loop will continue for another attempt

5. Provide clear summary of:
   - What was fixed
   - What improvements were achieved
   - Any remaining issues requiring manual attention

Be precise and quantitative in your assessment.
"""
    return await instructions_utils.inject_session_state(template, context)
👉 찾기:
# MODULE_6_STEP_3_FIX_VALIDATOR_AGENT
👉 단일 행을 다음으로 바꿉니다.
fix_validator_agent = Agent(
    name="FixValidator",
    model=config.worker_model,
    description="Validates fixes and generates final fix report",
    instruction=fix_validator_instruction_provider,
    tools=[
        FunctionTool(func=validate_fixed_style),
        FunctionTool(func=compile_fix_report),
        FunctionTool(func=exit_fix_loop)
    ],
    output_key="final_fix_report"
)
4단계: LoopAgent 종료 조건 이해하기
LoopAgent에는 종료하는 세 가지 방법이 있습니다.
1. 성공 종료 (에스컬레이션)
# Inside any tool in the loop:
tool_context.actions.escalate = True

# Effect: Loop completes current iteration, then exits
# Use when: Fix is successful and no more attempts needed
예시 흐름:
Iteration 1:
  CodeFixer → generates fixes
  FixTestRunner → tests show 90% pass rate
  FixValidator → compiles report, sees PARTIAL status
  → Does NOT set escalate
  → Loop continues

Iteration 2:
  CodeFixer → refines fixes based on failures
  FixTestRunner → tests show 100% pass rate
  FixValidator → compiles report, sees SUCCESSFUL status
  → Calls exit_fix_loop() which sets escalate = True
  → Loop exits after this iteration
2. 최대 반복 횟수 종료
LoopAgent(
    name="FixAttemptLoop",
    sub_agents=[...],
    max_iterations=3  # Safety limit
)

# Effect: After 3 complete iterations, loop exits regardless of escalate
# Use when: Prevent infinite loops if fixes never succeed
예시 흐름:
Iteration 1: PARTIAL (continue)
Iteration 2: PARTIAL (continue)
Iteration 3: PARTIAL (but max reached)
→ Loop exits, synthesizer presents best attempt
3. 오류 종료
# If any agent throws unhandled exception:
raise Exception("Unexpected error")

# Effect: Loop exits immediately with error state
# Use when: Critical failure that can't be recovered
반복 간 상태 변화:
각 반복에서는 이전 시도의 업데이트된 상태를 확인합니다.
# Before Iteration 1:
state = {
    "code_to_review": "def add(a,b):return a+b",  # Original
    "style_score": 40,
    "test_execution_summary": {...}
}

# After Iteration 1:
state = {
    "code_to_review": "def add(a,b):return a+b",  # Unchanged
    "code_fixes": "def add(a, b):\n    return a + b",  # NEW
    "style_score": 40,  # Unchanged
    "fixed_style_score": 100,  # NEW
    "test_execution_summary": {...},  # Unchanged
    "fix_test_execution_summary": {...}  # NEW
}

# Iteration 2 starts with all this state
# If fixes still not perfect, code_fixes gets overwritten
이유
escalate
반환 값 대신:
# Bad: Using return value to signal exit
def validator_agent():
    report = compile_report()
    if report['status'] == 'SUCCESSFUL':
        return {"exit": True}  # How does loop know?

# Good: Using escalate
def validator_tool(tool_context):
    report = compile_report()
    if report['status'] == 'SUCCESSFUL':
        tool_context.actions.escalate = True  # Loop knows immediately
    return {"report": report}
장점:
- 마지막 도구뿐만 아니라 모든 도구에서 작동
- 반환 데이터를 방해하지 않음
- 명확한 의미
- 프레임워크에서 종료 로직 처리
5단계: 수정 파이프라인 연결
👉 열기
code_review_assistant/agent.py
👉 수정 파이프라인 가져오기 추가 (기존 가져오기 뒤):
from google.adk.agents import LoopAgent  # Add this to the existing Agent, SequentialAgent line
from code_review_assistant.sub_agents.fix_pipeline.code_fixer import code_fixer_agent
from code_review_assistant.sub_agents.fix_pipeline.fix_test_runner import fix_test_runner_agent
from code_review_assistant.sub_agents.fix_pipeline.fix_validator import fix_validator_agent
from code_review_assistant.sub_agents.fix_pipeline.fix_synthesizer import fix_synthesizer_agent
이제 가져오기는 다음과 같아야 합니다.
from google.adk.agents import Agent, SequentialAgent, LoopAgent
from .config import config
# Review pipeline imports (from Module 5)
from code_review_assistant.sub_agents.review_pipeline.code_analyzer import code_analyzer_agent
from code_review_assistant.sub_agents.review_pipeline.style_checker import style_checker_agent
from code_review_assistant.sub_agents.review_pipeline.test_runner import test_runner_agent
from code_review_assistant.sub_agents.review_pipeline.feedback_synthesizer import feedback_synthesizer_agent
# Fix pipeline imports (NEW)
from code_review_assistant.sub_agents.fix_pipeline.code_fixer import code_fixer_agent
from code_review_assistant.sub_agents.fix_pipeline.fix_test_runner import fix_test_runner_agent
from code_review_assistant.sub_agents.fix_pipeline.fix_validator import fix_validator_agent
from code_review_assistant.sub_agents.fix_pipeline.fix_synthesizer import fix_synthesizer_agent
👉 찾기:
# MODULE_6_STEP_5_CREATE_FIX_LOOP
👉 단일 행을 다음으로 바꿉니다.
# Create the fix attempt loop (retries up to 3 times)
fix_attempt_loop = LoopAgent(
    name="FixAttemptLoop",
    sub_agents=[
        code_fixer_agent,      # Step 1: Generate fixes
        fix_test_runner_agent, # Step 2: Validate with tests
        fix_validator_agent    # Step 3: Check success & possibly exit
    ],
    max_iterations=3  # Try up to 3 times
)

# Wrap loop with synthesizer for final report
code_fix_pipeline = SequentialAgent(
    name="CodeFixPipeline",
    description="Automated code fixing pipeline with iterative validation",
    sub_agents=[
        fix_attempt_loop,      # Try to fix (1-3 times)
        fix_synthesizer_agent  # Present final results (always runs once)
    ]
)
👉 기존
root_agent
정의:
root_agent = Agent(...)
👉 찾기:
# MODULE_6_STEP_5_UPDATE_ROOT_AGENT
👉 단일 행을 다음으로 바꿉니다.
# Update root agent to include both pipelines
root_agent = Agent(
    name="CodeReviewAssistant",
    model=config.worker_model,
    description="An intelligent code review assistant that analyzes Python code and provides educational feedback",
    instruction="""You are a specialized Python code review assistant focused on helping developers improve their code quality.

When a user provides Python code for review:
1. Immediately delegate to CodeReviewPipeline and pass the code EXACTLY as it was provided by the user.
2. The pipeline will handle all analysis and feedback
3. Return ONLY the final feedback from the pipeline - do not add any commentary

After completing a review, if significant issues were identified:
- If style score < 100 OR tests are failing OR critical issues exist:
  * Add at the end: "\n\n💡 I can fix these issues for you. Would you like me to do that?"

- If the user responds yes or requests fixes:
  * Delegate to CodeFixPipeline
  * Return the fix pipeline's complete output AS-IS

When a user asks what you can do or general questions:
- Explain your capabilities for code review and fixing
- Do NOT trigger the pipeline for non-code messages

The pipelines handle everything for code review and fixing - just pass through their final output.""",
    sub_agents=[code_review_pipeline, code_fix_pipeline],
    output_key="assistant_response"
)
6단계: Fix Synthesizer Agent 추가
신시사이저는 루프가 완료된 후 수정 결과에 대한 사용자 친화적인 프레젠테이션을 만듭니다.
👉 열기
code_review_assistant/sub_agents/fix_pipeline/fix_synthesizer.py
👉 찾기:
# MODULE_6_STEP_6_FIX_SYNTHESIZER_INSTRUCTION_PROVIDER
👉 단일 행을 다음으로 바꿉니다.
async def fix_synthesizer_instruction_provider(context: ReadonlyContext) -> str:
    """Dynamic instruction provider that injects state variables."""
    template = """You are responsible for presenting the fix results to the user.

Based on the validation report: {final_fix_report}
Fixed code from state: {code_fixes}
Fix status: {fix_status}

Create a comprehensive yet friendly response that includes:

## 🔧 Fix Summary
[Overall status and key improvements - be specific about what was achieved]

## 📊 Metrics
- Test Results: [original pass rate]% → [new pass rate]%
- Style Score: [original]/100 → [new]/100
- Issues Fixed: X of Y

## ✅ What Was Fixed
[List each fixed issue with brief explanation of the correction made]

## 📝 Complete Fixed Code
[Include the complete, corrected code from state - this is critical]

## 💡 Explanation of Key Changes
[Brief explanation of the most important changes made and why]

[If any issues remain]
## ⚠️ Remaining Issues
[List what still needs manual attention]

## 🎯 Next Steps
[Guidance on what to do next - either use the fixed code or address remaining issues]

Save the fix report using save_fix_report tool before presenting.
Call it with no parameters - it will retrieve the report from state automatically.

Be encouraging about improvements while being honest about any remaining issues.
Focus on the educational aspect - help the user understand what was wrong and how it was fixed.
"""
    return await instructions_utils.inject_session_state(template, context)
👉 찾기:
# MODULE_6_STEP_6_FIX_SYNTHESIZER_AGENT
👉 단일 행을 다음으로 바꿉니다.
fix_synthesizer_agent = Agent(
    name="FixSynthesizer",
    model=config.critic_model,
    description="Creates comprehensive user-friendly fix report",
    instruction=fix_synthesizer_instruction_provider,
    tools=[FunctionTool(func=save_fix_report)],
    output_key="fix_summary"
)
👉 추가
save_fix_report
도구
tools.py
:
👉 찾기:
# MODULE_6_STEP_6_SAVE_FIX_REPORT
👉 다음으로 바꿉니다.
async def save_fix_report(tool_context: ToolContext) -> Dict[str, Any]:
    """
    Saves the fix report as an artifact.

    Args:
        tool_context: ADK tool context

    Returns:
        Save status
    """
    logger.info("Tool: Saving fix report...")

    try:
        # Get the report from state
        fix_report = tool_context.state.get(StateKeys.FIX_REPORT, {})

        if not fix_report:
            return {
                "status": "error",
                "message": "No fix report found in state"
            }

        # Convert to JSON
        report_json = json.dumps(fix_report, indent=2)
        report_part = types.Part.from_text(text=report_json)

        # Generate filename
        timestamp = datetime.now().isoformat().replace(':', '-')
        filename = f"fix_report_{timestamp}.json"

        # Try to save as artifact
        if hasattr(tool_context, 'save_artifact'):
            try:
                version = await tool_context.save_artifact(filename, report_part)
                await tool_context.save_artifact("latest_fix_report.json", report_part)

                logger.info(f"Tool: Fix report saved as {filename}")

                return {
                    "status": "success",
                    "filename": filename,
                    "version": str(version),
                    "size": len(report_json)
                }
            except Exception as e:
                logger.warning(f"Could not save as artifact: {e}")

        # Fallback: store in state
        tool_context.state[StateKeys.LAST_FIX_REPORT] = fix_report

        return {
            "status": "success",
            "message": "Fix report saved to state",
            "size": len(report_json)
        }

    except Exception as e:
        logger.error(f"Tool: Failed to save fix report: {e}", exc_info=True)
        return {
            "status": "error",
            "message": str(e)
        }
7단계: 전체 수정 파이프라인 테스트
이제 전체 루프가 작동하는 것을 확인할 시간입니다.
👉 시스템 시작:
adk web code_review_assistant
adk web 명령어를 실행하면 터미널에 ADK 웹 서버가 시작되었음을 나타내는 다음과 비슷한 출력이 표시됩니다.
+-----------------------------------------------------------------------------+
| ADK Web Server started                                                      |
|                                                                             |
| For local testing, access at http://localhost:8000.                         |
+-----------------------------------------------------------------------------+

INFO:     Application startup complete.
INFO:     Uvicorn running on http://0.0.0.0:8000 (Press CTRL+C to quit)
👉 테스트 프롬프트:
Please analyze the following:
def dfs_search_v1(graph, start, target):
    """Find if target is reachable from start."""
    visited = set()
    stack = start

    while stack:
        current = stack.pop()

        if current == target:
            return True

        if current not in visited:
            visited.add(current)

            for neighbor in graph[current]:
                if neighbor not in visited:
                    stack.append(neighbor)

    return False
먼저 버그가 있는 코드를 제출하여 검토 파이프라인을 트리거합니다. 결함을 식별한 후 에이전트에게 '코드를 수정해 줘'라고 요청하면 강력한 반복적 수정 파이프라인이 트리거됩니다.
1. 초기 검토 (결함 찾기)
이것이 프로세스의 전반부입니다. 4개의 에이전트 검토 파이프라인은 코드를 분석하고 스타일을 확인하며 생성된 테스트 모음을 실행합니다. 중요한 AttributeError 및 기타 문제를 올바르게 식별하여 코드의 테스트 통과율이 84.21%에 불과하며 BROKEN이라는 판결을 내립니다.
2. 자동 수정 (실제 작동하는 루프)
이 부분이 가장 인상적입니다. 에이전트에게 코드를 수정해 달라고 요청하면 한 번에 한 가지 변경사항만 적용되지 않습니다. 이 기능은 성실한 개발자처럼 작동하는 반복적인 수정 및 검증 루프를 시작합니다. 수정 사항을 시도하고, 철저히 테스트하고, 완벽하지 않으면 다시 시도합니다.
1차 반복: 첫 번째 시도 (부분적 성공)
- 해결 방법:
CodeFixer에이전트가 초기 보고서를 읽고 가장 명백한 수정사항을 적용합니다.stack = start를stack = [start]로 변경하고graph.get()를 사용하여KeyError예외를 방지합니다. - 검증:
TestRunner는 이 새 코드에 대해 전체 테스트 모음을 즉시 다시 실행합니다. - 결과: 합격률이 88.89%로 크게 향상되었습니다. 심각한 버그가 사라졌습니다. 하지만 테스트가 매우 포괄적이어서
None를 그래프 또는 목록이 아닌 인접 값으로 처리하는 것과 관련된 미묘한 버그 (회귀) 두 개가 새로 발견되었습니다. 시스템에서 수정사항을 PARTIAL로 표시합니다.
2차 반복: 최종 다듬기 (100% 성공)
- 해결 방법: 루프의 종료 조건 (100% 통과율)이 충족되지 않았으므로 다시 실행됩니다. 이제
CodeFixer에 두 가지 새로운 회귀 실패에 관한 정보가 추가되었습니다. 이 도구는 이러한 특이 사례를 명시적으로 처리하는 최종적이고 더 강력한 버전의 코드를 생성합니다. - 유효성 검사:
TestRunner는 최종 버전의 코드를 대상으로 테스트 모음을 마지막으로 한 번 실행합니다. - 결과: 완벽한 100% 합격률 모든 원래 버그와 모든 회귀가 해결되었습니다. 시스템은 수정사항을 SUCCESSFUL로 표시하고 루프가 종료됩니다.
3. 최종 보고서: 완벽한 점수
완전히 검증된 수정사항이 있으면 FixSynthesizer 에이전트가 최종 보고서를 제시하여 기술 데이터를 명확하고 교육적인 요약으로 변환합니다.
측정항목 | 이전 | 이후 | 개선 |
테스트 통과율 | 84.21% | 100% | ▲ 15.79% |
스타일 점수 | 88 / 100 | 98 / 100 | ▲ 10점 |
수정된 버그 | 0/3 | 3/3 | ✅ |
✅ 최종 검증된 코드
이제 19개 테스트를 모두 통과하는 수정된 전체 코드는 다음과 같습니다.
def dfs_search_v1(graph, start, target):
    """Find if target is reachable from start."""
    # Handles 'None' graph input
    if graph is None:
        return False

    visited = set()
    # Fixes the critical AttributeError
    stack = [start]

    while stack:
        current = stack.pop()

        if current == target:
            return True

        if current not in visited:
            visited.add(current)

            # Safely gets neighbors to prevent KeyError
            neighbors = graph.get(current)

            if neighbors is None:
                continue

            # Validates that neighbors are iterable
            if not isinstance(neighbors, (list, set, tuple)):
                raise TypeError(
                    f"Graph value for node '{current}' is of type "
                    f"{type(neighbors).__name__}. Expected a list, set, or tuple."
                )

            for neighbor in neighbors:
                if neighbor not in visited:
                    stack.append(neighbor)

    return False
👉💻 테스트를 완료한 후 Cloud Shell 편집기 터미널로 돌아가 Ctrl+C를 눌러 ADK 개발 UI를 중지합니다.
빌드한 항목
이제 다음을 수행하는 완전한 자동 수정 파이프라인이 있습니다.
✅ 수정 생성 - 검토 분석 기반
✅ 반복적으로 검증 - 각 수정 시도 후 테스트
✅ 자동으로 재시도 - 성공을 위해 최대 3회 시도
✅ 지능적으로 종료 - 성공 시 에스컬레이션을 통해
✅ 개선사항 추적 - 전후 측정항목 비교
✅ 아티팩트 제공 - 다운로드 가능한 수정 보고서
학습한 핵심 개념
LoopAgent와 Sequential의 차이:
- 순차적: 에이전트를 한 번 통과
- LoopAgent: 종료 조건 또는 최대 반복 횟수에 도달할 때까지 반복
tool_context.actions.escalate = True통해 나가기
반복 간 상태 변화:
CODE_FIXES이 각 반복에서 업데이트됨- 시간이 지날수록 테스트 결과가 개선됨
- 유효성 검사기에 누적 변경사항 표시
다중 파이프라인 아키텍처:
- 리뷰 파이프라인: 읽기 전용 분석 (모듈 5)
- 루프 수정: 반복적 수정 (모듈 6 내부 루프)
- 파이프라인 수정: 루프 + 신디사이저 (모듈 6 외부)
- 루트 에이전트: 사용자 의도에 따라 오케스트레이션
흐름 제어 도구:
exit_fix_loop()세트 에스컬레이션- 모든 도구가 루프 완료를 알릴 수 있음
- 종료 로직을 에이전트 안내에서 분리
최대 반복 안전:
- 무한 루프 방지
- 시스템이 항상 응답하도록 보장
- 완벽하지 않더라도 최선을 다해 제시
다음 단계
마지막 모듈에서는 프로덕션에 에이전트를 배포하는 방법을 알아봅니다.
- VertexAiSessionService를 사용하여 영구 스토리지 설정
- Google Cloud의 Agent Engine에 배포
- 프로덕션 에이전트 모니터링 및 디버깅
- 확장 및 안정성을 위한 권장사항
순차 및 루프 아키텍처를 사용하여 완전한 멀티 에이전트 시스템을 빌드했습니다. 상태 관리, 동적 요청 사항, 도구 오케스트레이션, 반복적 개선 등 학습한 패턴은 실제 에이전트 시스템에서 사용되는 프로덕션 준비 기술입니다.
7. 프로덕션에 배포
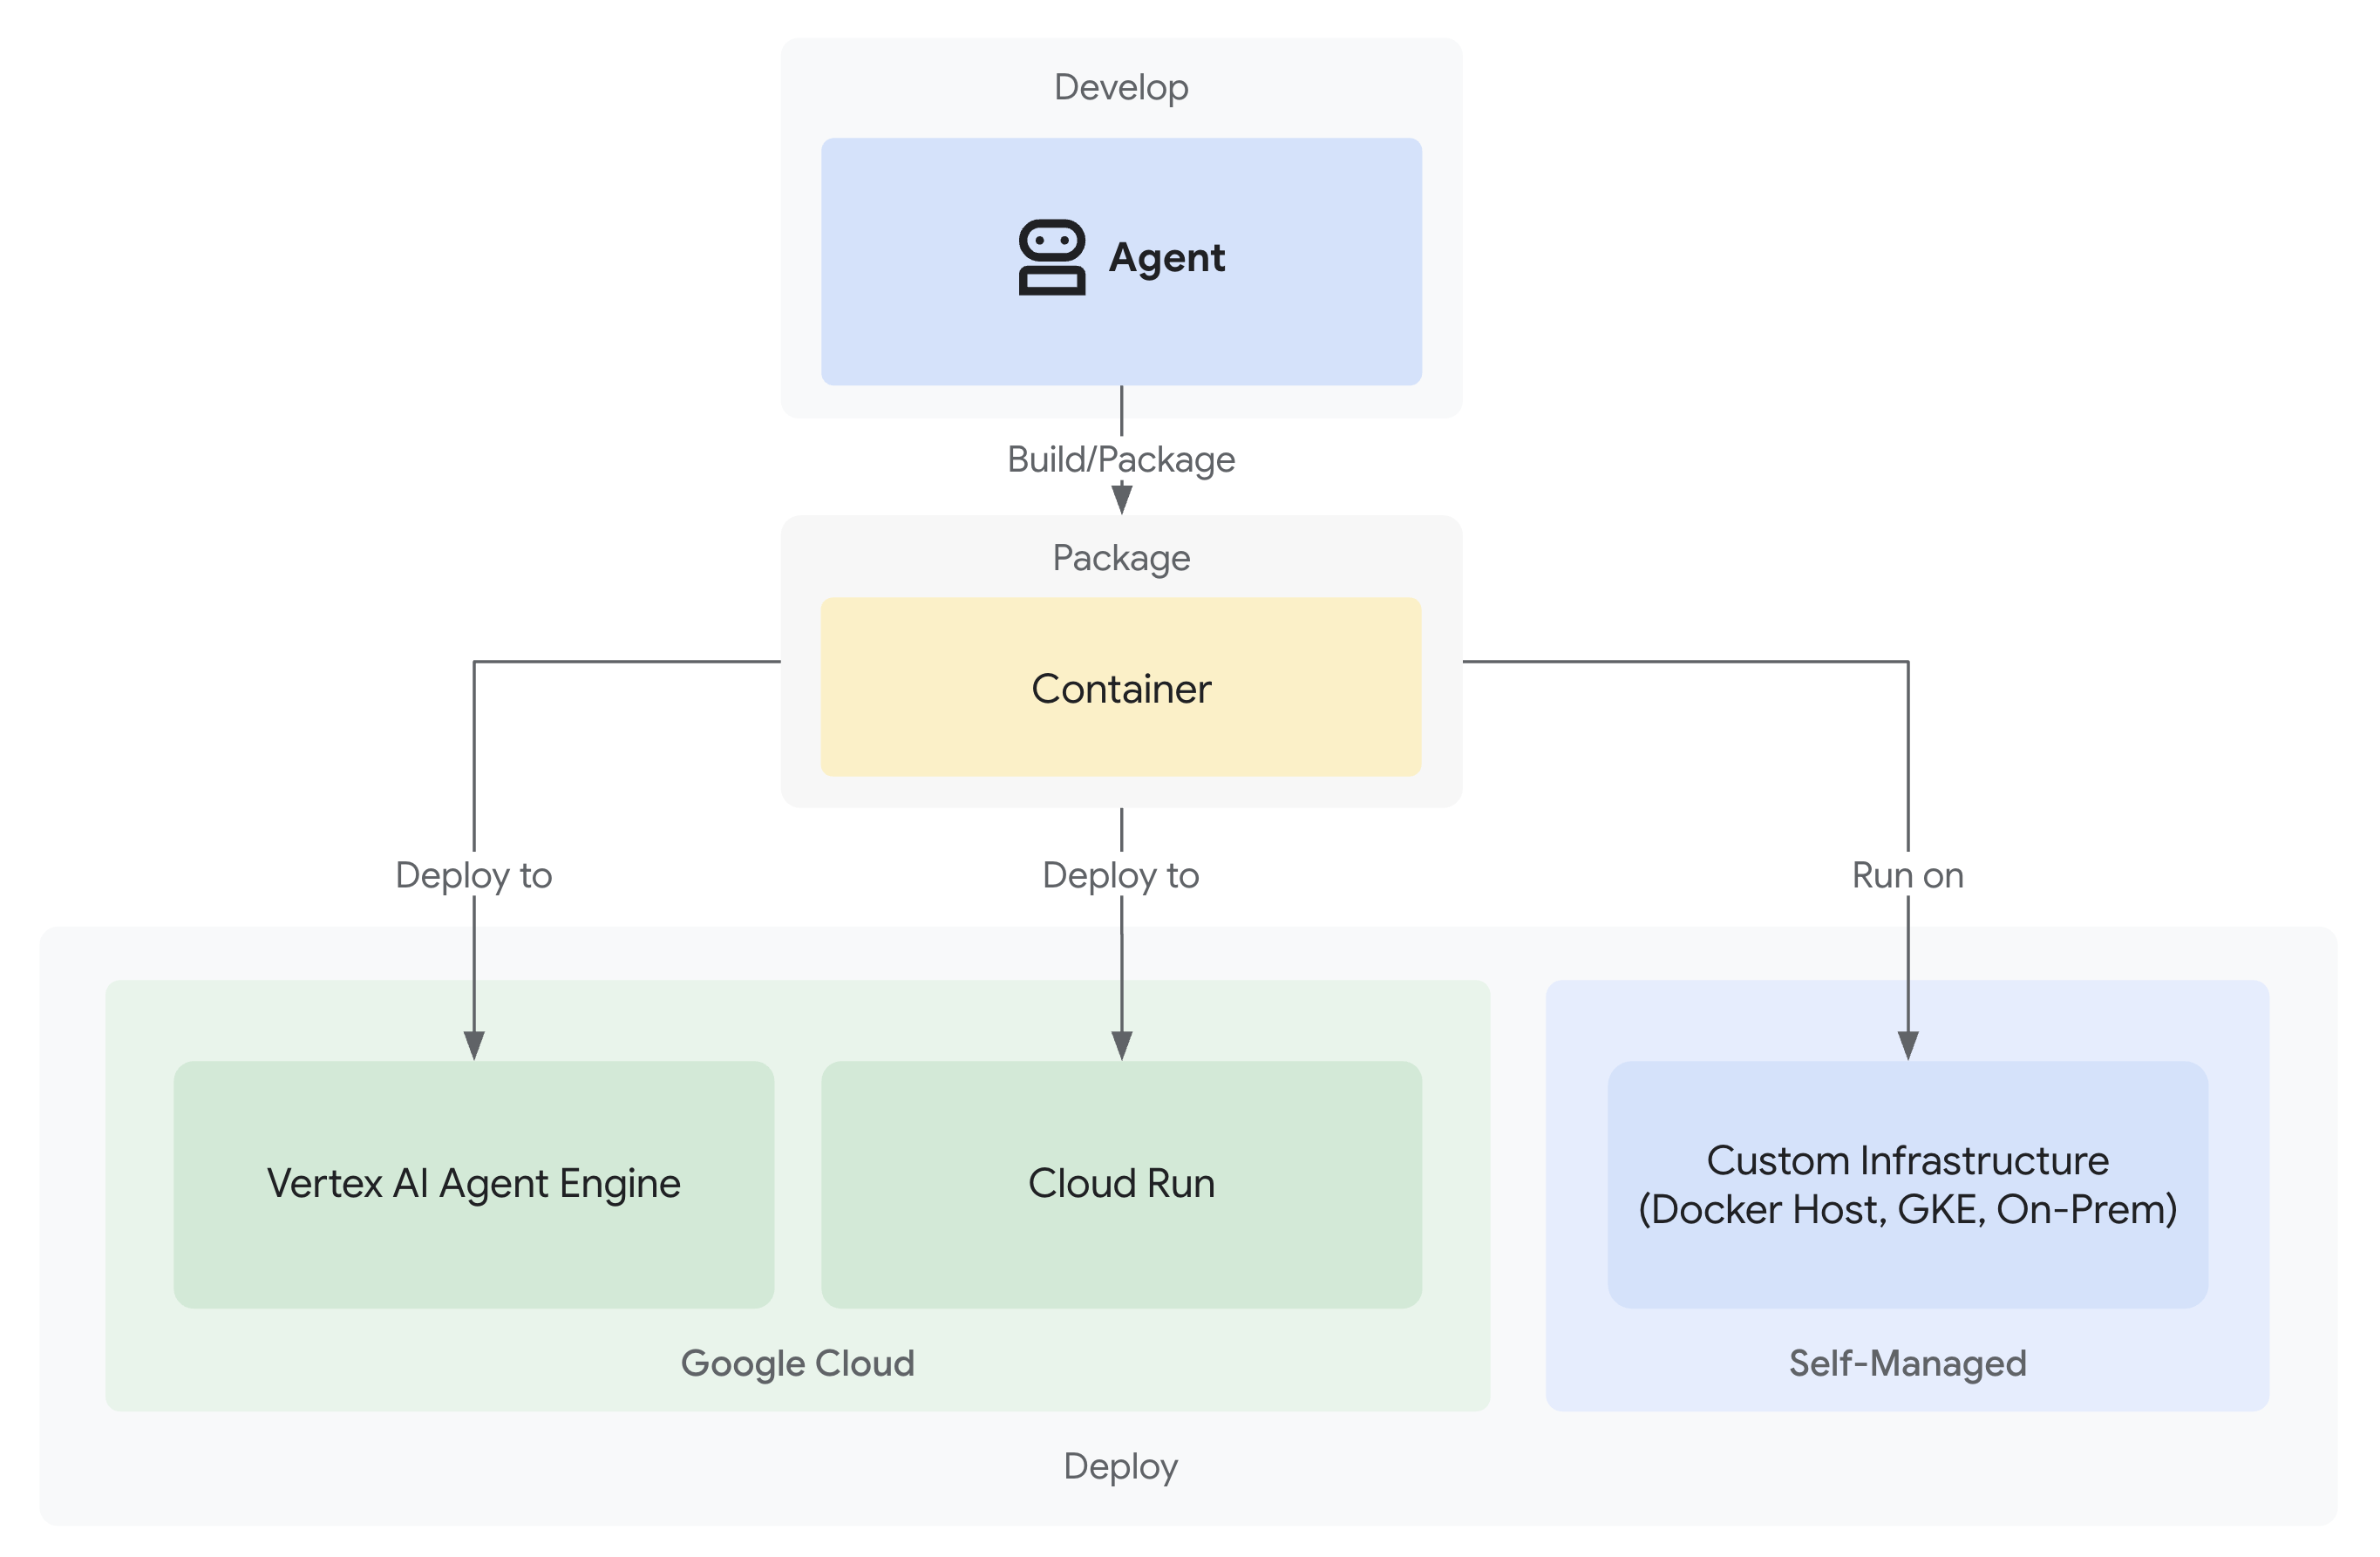
소개
이제 코드 검토 어시스턴트가 검토 및 수정 파이프라인이 로컬에서 작동하는 상태로 완료되었습니다. 빠진 부분: 머신에서만 실행됩니다. 이 모듈에서는 에이전트를 Google Cloud에 배포하여 지속적인 세션과 프로덕션급 인프라를 통해 팀에서 액세스할 수 있도록 합니다.
학습할 내용:
- 세 가지 배포 경로: 로컬, Cloud Run, 에이전트 엔진
- 자동화된 인프라 프로비저닝
- 세션 지속성 전략
- 배포된 에이전트 테스트
배포 옵션 이해하기
ADK는 각각 다른 절충안이 있는 여러 배포 타겟을 지원합니다.
배포 경로
요소 | 지역( | Cloud Run( | Agent Engine ( |
복잡성 | 최소 | 보통 | 낮음 |
세션 지속성 | 인메모리 전용 (재시작 시 손실됨) | Cloud SQL(PostgreSQL) | Vertex AI 관리형 (자동) |
인프라 | 없음 (개발자 머신만 해당) | 컨테이너 + 데이터베이스 | 완전 관리형 |
콜드 스타트 | 해당 사항 없음 | 100~2,000ms | 100~500ms |
확장 | 단일 인스턴스 | 자동 (0) | 자동 |
비용 모델 | 무료 (로컬 컴퓨팅) | 요청 기반 + 무료 등급 | 컴퓨팅 기반 |
UI 지원 | 예 ( | 예 ( | 아니요 (API만 해당) |
용도 | 개발/테스트 | 가변 트래픽, 비용 관리 | 프로덕션 에이전트 |
추가 배포 옵션: Kubernetes 수준 제어, 맞춤 네트워킹 또는 다중 서비스 오케스트레이션이 필요한 고급 사용자를 위해 Google Kubernetes Engine (GKE)을 사용할 수 있습니다. GKE 배포는 이 Codelab에서 다루지 않지만 ADK 배포 가이드에 설명되어 있습니다.
배포되는 항목
Cloud Run 또는 Agent Engine에 배포할 때는 다음이 패키징되고 배포됩니다.
- 에이전트 코드 (
agent.py, 모든 하위 에이전트, 도구) - 종속 항목 (
requirements.txt) - ADK API 서버 (자동으로 포함됨)
- 웹 UI (Cloud Run만 해당,
--with_ui지정 시)
중요한 차이점:
- Cloud Run:
adk deploy cloud_runCLI (컨테이너 자동 빌드) 또는gcloud run deploy(맞춤 Dockerfile 필요) 사용 - 에이전트 엔진:
adk deploy agent_engineCLI 사용 (컨테이너 빌드 필요 없음, Python 코드를 직접 패키징)
1단계: 환경 구성
.env 파일 구성
.env 파일 (모듈 3에서 생성됨)을 클라우드에 배포하려면 업데이트해야 합니다. .env을 열고 다음 설정을 확인/업데이트합니다.
모든 클라우드 배포에 필요:
# Your actual GCP Project ID (REQUIRED)
GOOGLE_CLOUD_PROJECT=your-project-id

# GCP region for deployments (REQUIRED)
GOOGLE_CLOUD_LOCATION=us-central1

# Use Vertex AI (REQUIRED)
GOOGLE_GENAI_USE_VERTEXAI=true

# Model configuration (already set)
WORKER_MODEL=gemini-2.5-flash
CRITIC_MODEL=gemini-2.5-pro
버킷 이름 설정 (deploy.sh를 실행하기 전에 필요):
배포 스크립트는 이러한 이름을 기반으로 버킷을 만듭니다. 지금 설정하세요.
# Staging bucket for Agent Engine code uploads (REQUIRED for agent-engine)
STAGING_BUCKET=gs://your-project-id-staging

# Artifact storage for reports and fixed code (REQUIRED for both cloud-run and agent-engine)
ARTIFACT_BUCKET=gs://your-project-id-artifacts
두 버킷 이름 모두에서 your-project-id를 실제 프로젝트 ID로 바꿉니다. 이러한 버킷이 없으면 스크립트가 버킷을 만듭니다.
선택적 변수 (비어 있는 경우 자동으로 생성됨):
# Agent Engine ID (populated after first deployment)
AGENT_ENGINE_ID=

# Cloud Run Database credentials (created automatically if blank)
CLOUD_SQL_INSTANCE_NAME=
DB_USER=
DB_PASSWORD=
DB_NAME=
인증 확인
배포 중에 인증 오류가 발생하면 다음 단계를 따르세요.
gcloud auth application-default login
gcloud config set project $GOOGLE_CLOUD_PROJECT
2단계: 배포 스크립트 이해하기
deploy.sh 스크립트는 모든 배포 모드에 통합 인터페이스를 제공합니다.
./deploy.sh {local|cloud-run|agent-engine}
스크립트 기능
인프라 프로비저닝:
- API 사용 설정 (AI Platform, 스토리지, Cloud Build, Cloud Trace, Cloud SQL)
- IAM 권한 구성 (서비스 계정, 역할)
- 리소스 생성 (버킷, 데이터베이스, 인스턴스)
- 올바른 플래그를 사용한 배포
- 배포 후 확인
주요 스크립트 섹션
- 구성 (1~35행): 프로젝트, 리전, 서비스 이름, 기본값
- 도우미 함수 (37~200행): API 사용 설정, 버킷 생성, IAM 설정
- 기본 로직 (202~400줄): 모드별 배포 조정
3단계: 에이전트 엔진을 위한 에이전트 준비
Agent Engine에 배포하려면 관리형 런타임용 에이전트를 래핑하는 agent_engine_app.py 파일이 필요합니다. 이 파일은 이미 생성되어 있습니다.
code_review_assistant/agent_engine_app.py 보기
👉 파일 열기:
"""
Agent Engine application wrapper.
This file prepares the agent for deployment to Vertex AI Agent Engine.
"""

from vertexai import agent_engines
from .agent import root_agent

# Wrap the agent in an AdkApp object for Agent Engine deployment
app = agent_engines.AdkApp(
    agent=root_agent,
    enable_tracing=True,
)
4단계: Agent Engine에 배포
Agent Engine은 다음과 같은 기능을 제공하므로 ADK 에이전트에 권장되는 프로덕션 배포입니다.
- 완전 관리형 인프라 (빌드할 컨테이너 없음)
VertexAiSessionService를 통한 내장 세션 지속성- 0부터 자동 확장
- 기본적으로 사용 설정된 Cloud Trace 통합
Agent Engine이 다른 배포와 다른 점
내부적으로
deploy.sh agent-engine
사용:
adk deploy agent_engine \
  --project=$GOOGLE_CLOUD_PROJECT \
  --region=$GOOGLE_CLOUD_LOCATION \
  --staging_bucket=$STAGING_BUCKET \
  --display_name="Code Review Assistant" \
  --trace_to_cloud \
  code_review_assistant
이 명령어는 다음을 수행합니다.
- Python 코드를 직접 패키징합니다 (Docker 빌드 없음).
.env에 지정된 스테이징 버킷에 업로드- 관리형 Agent Engine 인스턴스를 만듭니다.
- 관측 가능성을 위해 Cloud Trace를 사용 설정합니다.
agent_engine_app.py를 사용하여 런타임을 구성합니다.
코드를 컨테이너화하는 Cloud Run과 달리 Agent Engine은 서버리스 함수와 유사한 관리형 런타임 환경에서 Python 코드를 직접 실행합니다.
배포 실행
프로젝트 루트에서 다음을 실행합니다.
./deploy.sh agent-engine
배포 단계
스크립트가 다음 단계를 실행하는지 확인합니다.
Phase 1: API Enablement
  ✓ aiplatform.googleapis.com
  ✓ storage-api.googleapis.com
  ✓ cloudbuild.googleapis.com
  ✓ cloudtrace.googleapis.com

Phase 2: IAM Setup
  ✓ Getting project number
  ✓ Granting Storage Object Admin
  ✓ Granting AI Platform User
  ✓ Granting Cloud Trace Agent

Phase 3: Staging Bucket
  ✓ Creating gs://your-project-id-staging
  ✓ Setting permissions

Phase 4: Artifact Bucket
  ✓ Creating gs://your-project-id-artifacts
  ✓ Configuring access

Phase 5: Validation
  ✓ Checking agent.py exists
  ✓ Verifying root_agent defined
  ✓ Checking agent_engine_app.py exists
  ✓ Validating requirements.txt

Phase 6: Build & Deploy
  ✓ Packaging agent code
  ✓ Uploading to staging bucket
  ✓ Creating Agent Engine instance
  ✓ Configuring session persistence
  ✓ Setting up Cloud Trace integration
  ✓ Running health checks
이 프로세스는 에이전트를 패키징하고 Vertex AI 인프라에 배포하므로 5~10분 정도 걸립니다.
에이전트 엔진 ID 저장
배포가 완료되면 다음을 수행합니다.
✅ Deployment successful!
   Agent Engine ID: 7917477678498709504
   Resource Name: projects/123456789/locations/us-central1/reasoningEngines/7917477678498709504
   Endpoint: https://us-central1-aiplatform.googleapis.com/v1/...

⚠️  IMPORTANT: Save this in your .env file:
   AGENT_ENGINE_ID=7917477678498709504
.env
파일을 즉시 다운로드합니다.
echo "AGENT_ENGINE_ID=7917477678498709504" >> .env
이 ID는 다음 용도로 필요합니다.
- 배포된 에이전트 테스트
- 나중에 배포 업데이트
- 로그 및 트레이스 액세스
배포된 항목
이제 Agent Engine 배포에 다음이 포함됩니다.
✅ 검토 파이프라인 완료 (상담사 4명)
✅ 수정 파이프라인 완료 (루프 + 합성기)
✅ 모든 도구 (AST 분석, 스타일 확인, 아티팩트 생성)
✅ 세션 지속성 (VertexAiSessionService을 통해 자동)
✅ 상태 관리 (세션/사용자/수명 주기 등급)
✅ 관측 가능성 (Cloud Trace 사용 설정)
✅ 자동 확장 인프라
5단계: 배포된 에이전트 테스트
.env 파일 업데이트
배포 후 .env에 다음이 포함되어 있는지 확인합니다.
AGENT_ENGINE_ID=7917477678498709504  # From deployment output
GOOGLE_CLOUD_PROJECT=your-project-id
GOOGLE_CLOUD_LOCATION=us-central1
테스트 스크립트 실행
프로젝트에는 에이전트 엔진 배포 테스트를 위한 tests/test_agent_engine.py가 포함되어 있습니다.
python tests/test_agent_engine.py
테스트 기능
- Google Cloud 프로젝트로 인증
- 배포된 에이전트로 세션을 만듭니다.
- 코드 검토 요청을 전송합니다 (DFS 버그 예시).
- 서버 전송 이벤트 (SSE)를 통해 대답을 다시 스트리밍합니다.
- 세션 지속성 및 상태 관리를 확인합니다.
정상 출력
Authenticated with project: your-project-id
Targeting Agent Engine: projects/.../reasoningEngines/7917477678498709504

Creating new session...
Created session: 4857885913439920384

Sending query to agent and streaming response:
data: {"content": {"parts": [{"text": "I'll analyze your code..."}]}}
data: {"content": {"parts": [{"text": "**Code Structure Analysis**\n..."}]}}
data: {"content": {"parts": [{"text": "**Style Check Results**\n..."}]}}
data: {"content": {"parts": [{"text": "**Test Results**\n..."}]}}
data: {"content": {"parts": [{"text": "**Final Feedback**\n..."}]}}

Stream finished.
확인 체크리스트
- ✅ 전체 검토 파이프라인 실행 (4개 에이전트 모두)
- ✅ 스트리밍 응답에 점진적 출력이 표시됨
- ✅ 세션 상태가 요청 간에 유지됩니다.
- ✅ 인증 또는 연결 오류 없음
- ✅ 도구 호출이 성공적으로 실행됨 (AST 분석, 스타일 확인)
- ✅ 아티팩트가 저장됨 (평가 보고서에 액세스 가능)
대안: Cloud Run에 배포
Agent Engine은 간소화된 프로덕션 배포에 권장되지만, Cloud Run은 더 많은 제어 기능을 제공하고 ADK 웹 UI를 지원합니다. 이 섹션에서는 개요를 제공합니다.
Cloud Run을 사용해야 하는 경우
다음과 같은 경우 Cloud Run을 선택하세요.
- 사용자 상호작용을 위한 ADK 웹 UI
- 컨테이너 환경에 대한 완전한 제어
- 맞춤 데이터베이스 구성
- 기존 Cloud Run 서비스와의 통합
Cloud Run 배포 작동 방식
내부적으로
deploy.sh cloud-run
사용:
adk deploy cloud_run \
  --project=$GOOGLE_CLOUD_PROJECT \
  --region=$GOOGLE_CLOUD_LOCATION \
  --service_name="code-review-assistant" \
  --app_name="code_review_assistant" \
  --port=8080 \
  --with_ui \
  --artifact_service_uri="gs://$ARTIFACT_BUCKET" \
  --trace_to_cloud \
  code_review_assistant
이 명령어는 다음을 수행합니다.
- 에이전트 코드로 Docker 컨테이너를 빌드합니다.
- Google Artifact Registry에 푸시
- Cloud Run 서비스로 배포
- ADK 웹 UI (
--with_ui)가 포함됩니다. - Cloud SQL 연결을 구성합니다 (초기 배포 후 스크립트에 의해 추가됨).
Agent Engine과의 주요 차이점은 Cloud Run은 코드를 컨테이너화하고 세션 지속성을 위해 데이터베이스가 필요한 반면 Agent Engine은 이 두 가지를 모두 자동으로 처리한다는 것입니다.
Cloud Run 배포 명령어
./deploy.sh cloud-run
차이점
인프라:
- 컨테이너화된 배포 (ADK에 의해 자동으로 빌드된 Docker)
- 세션 지속성을 위한 Cloud SQL (PostgreSQL)
- 스크립트로 데이터베이스가 자동 생성되거나 기존 인스턴스를 사용함
세션 관리:
VertexAiSessionService대신DatabaseSessionService사용.env(또는 자동 생성)의 데이터베이스 사용자 인증 정보가 필요합니다.- 상태가 PostgreSQL 데이터베이스에 유지됨
UI 지원:
--with_ui플래그를 통해 사용할 수 있는 웹 UI (스크립트에서 처리)- 액세스:
https://code-review-assistant-xyz.a.run.app
학습한 내용
프로덕션 배포에는 다음이 포함됩니다.
✅ deploy.sh 스크립트를 통한 자동 프로비저닝
✅ 관리형 인프라 (에이전트 엔진이 확장, 지속성, 모니터링 처리)
✅ 모든 메모리 계층 (세션/사용자/수명)에서 지속적인 상태
✅ 보안 사용자 인증 정보 관리 (자동 생성 및 IAM 설정)
✅ 확장 가능한 아키텍처 (동시 사용자 0~수천 명)
✅ 기본 제공 관측 가능성 (Cloud Trace 통합 사용 설정)
✅ 프로덕션 등급 오류 처리 및 복구
학습한 핵심 개념
배포 준비:
agent_engine_app.py: 에이전트 엔진을 위해AdkApp로 에이전트를 래핑합니다.AdkApp가 지속성을 위해VertexAiSessionService을 자동으로 구성합니다.enable_tracing=True을 통해 트레이싱 사용 설정
배포 명령어:
adk deploy agent_engine: Python 코드를 패키징합니다(컨테이너 없음).adk deploy cloud_run: Docker 컨테이너를 자동으로 빌드합니다.gcloud run deploy: 커스텀 Dockerfile을 사용하는 대안
배포 옵션:
- Agent Engine: 완전 관리형, 가장 빠른 프로덕션
- Cloud Run: 더 많은 제어 기능, 웹 UI 지원
- GKE: 고급 Kubernetes 제어 (GKE 배포 가이드 참고)
관리형 서비스:
- Agent Engine이 세션 지속성을 자동으로 처리함
- Cloud Run에는 데이터베이스 설정 (또는 자동 생성)이 필요합니다.
- 둘 다 GCS를 통한 아티팩트 스토리지를 지원합니다.
세션 관리:
- Agent Engine:
VertexAiSessionService(자동) - Cloud Run:
DatabaseSessionService(Cloud SQL) - 로컬:
InMemorySessionService(일시적)
에이전트가 활성화됨
이제 코드 검토 어시스턴트가 다음과 같이 표시됩니다.
- HTTPS API 엔드포인트를 통해 액세스 가능
- 재시작 후에도 상태가 유지되는 Persistent
- 팀 성장에 따라 자동으로 확장
- 완전한 요청 추적이 포함된 관찰 가능
- 스크립트 배포를 통해 유지관리 가능
다음 단계 8단원에서는 Cloud Trace를 사용하여 에이전트의 성능을 파악하고, 검토 및 수정 파이프라인의 병목 현상을 식별하고, 실행 시간을 최적화하는 방법을 알아봅니다.
8. 프로덕션 모니터링 가능성
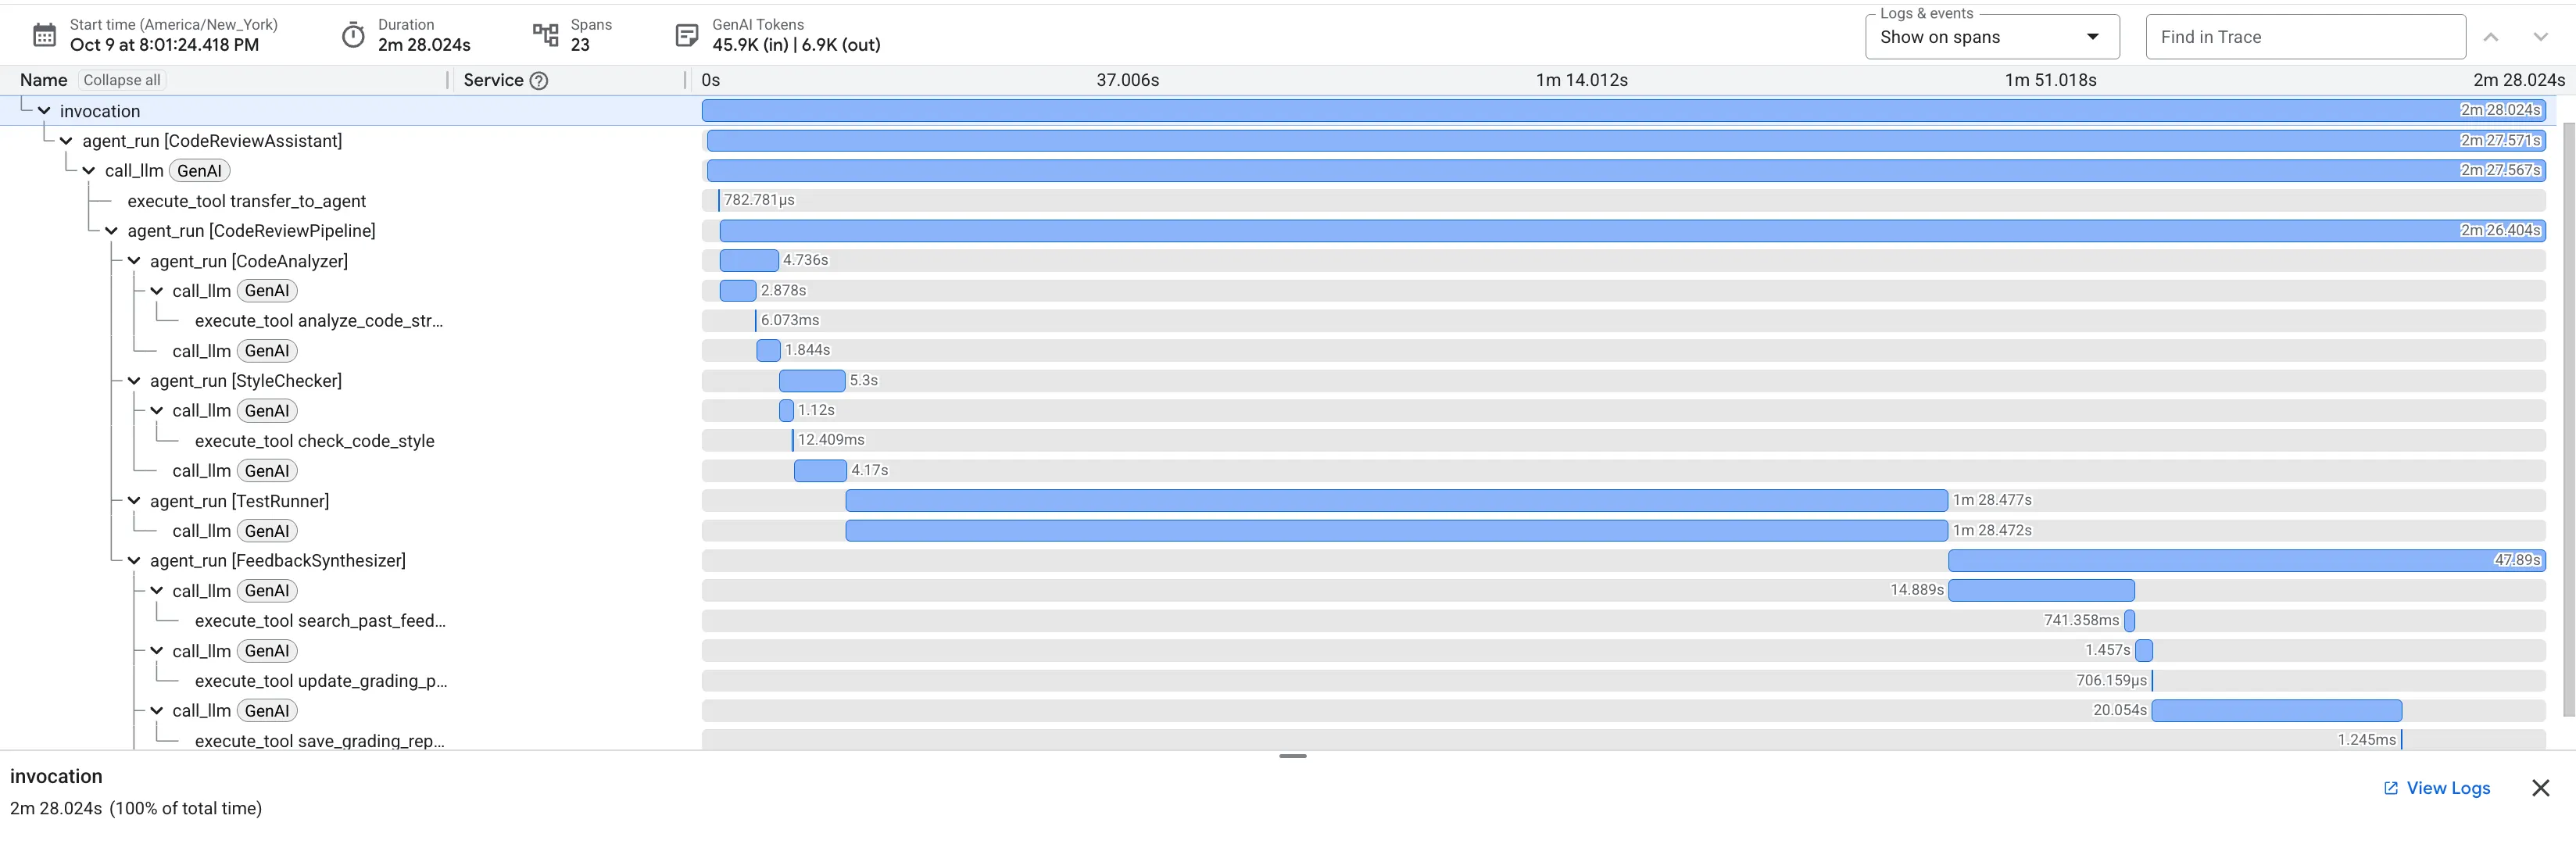
소개
이제 코드 검토 어시스턴트가 Agent Engine의 프로덕션에 배포되어 실행됩니다. 하지만 이 기능이 제대로 작동하는지는 어떻게 알 수 있을까요? 다음과 같은 중요한 질문에 답해 줄 수 있나요?
- 상담사가 충분히 빠르게 응답하고 있나요?
- 어떤 작업이 가장 느린가요?
- 수정 루프가 효율적으로 완료되고 있나요?
- 성능 병목 현상은 어디에 있나요?
관측 가능성이 없으면 눈을 가리고 운영하는 것과 같습니다. 배포 중에 사용한 --trace-to-cloud 플래그는 Cloud Trace를 자동으로 사용 설정하여 에이전트가 처리하는 모든 요청을 완전히 파악할 수 있도록 합니다. 이렇게 하면 디버깅이 추측에서 포렌식 분석으로 바뀝니다.
이 모듈에서는 트레이스를 읽고, 에이전트의 성능 특성을 이해하고, 확실한 증거를 기반으로 최적화할 영역을 파악하는 방법을 알아봅니다.
트레이스 및 스팬 이해
트레이스란 무엇인가요?
trace는 에이전트가 단일 요청을 처리하는 전체 타임라인입니다. 사용자가 질문을 보낸 시점부터 최종 응답이 전송될 때까지의 모든 것을 캡처합니다. 각 추적에는 다음이 표시됩니다.
- 요청의 총 기간
- 실행된 모든 작업
- 작업 간 관계 (상위-하위 관계)
- 각 작업이 시작되고 종료된 시간
스팬이란 무엇인가요?
스팬은 트레이스 내의 단일 작업 단위를 나타냅니다. 코드 검토 어시스턴트의 일반적인 스팬 유형은 다음과 같습니다.
agent_run: 에이전트 (루트 에이전트 또는 하위 에이전트) 실행call_llm: 언어 모델에 대한 요청execute_tool: 도구 함수 실행state_read/state_write: 상태 관리 작업code_executor: 테스트를 사용하여 코드 실행
스팬에는 다음이 포함됩니다.
- 이름: 이 작업이 나타내는 작업
- 기간: 걸린 시간
- 속성: 모델 이름, 토큰 수, 입력/출력과 같은 메타데이터
- 상태: 성공 또는 실패
- 상위/하위 관계: 어떤 작업이 어떤 작업을 트리거했는지
자동 계측
--trace-to-cloud로 배포하면 ADK가 다음을 자동으로 계측합니다.
- 모든 에이전트 호출 및 하위 에이전트 호출
- 토큰 수가 있는 모든 LLM 요청
- 입력/출력이 있는 도구 실행
- 상태 작업 (읽기/쓰기)
- 수정 파이프라인의 루프 반복
- 오류 조건 및 재시도
코드 변경 불필요 - 추적은 ADK의 런타임에 내장되어 있습니다.
1단계: Cloud Trace 탐색기 액세스
Google Cloud 콘솔에서 Cloud Trace를 엽니다.
- Cloud Trace 탐색기로 이동합니다.
- 드롭다운에서 프로젝트를 선택합니다 (사전 선택되어 있어야 함).
- 모듈 7의 테스트에서 트레이스가 표시됩니다.
아직 트레이스가 표시되지 않는 경우:
모듈 7에서 실행한 테스트에서 트레이스가 생성되었어야 합니다. 목록이 비어 있으면 트레이스 데이터를 생성합니다.
python tests/test_agent_engine.py
트레이스가 콘솔에 표시될 때까지 1~2분 정도 기다립니다.
표시되는 내용
Trace 탐색기에 다음이 표시됩니다.
- 트레이스 목록: 각 행은 하나의 전체 요청을 나타냅니다.
- 타임라인: 요청이 발생한 시간
- 기간: 각 요청에 걸린 시간
- 요청 세부정보: 타임스탬프, 지연 시간, 스팬 수
프로덕션 트래픽 로그입니다. 에이전트와의 모든 상호작용은 트레이스를 생성합니다.
2단계: 검토 파이프라인 트레이스 검사
목록에서 추적을 클릭하여 폭포식 뷰를 엽니다.
전체 실행 타임라인을 보여주는 Gantt 차트가 표시됩니다. 루트 invocation 스팬은 전체 요청을 나타냅니다. 그 아래에는 각 하위 에이전트, 도구, LLM 호출의 스팬이 중첩되어 있습니다.
워터폴 읽기: 병목 현상 식별
각 막대는 스팬을 나타냅니다. 가로 위치는 시작 시간을, 길이는 소요 시간을 나타냅니다. 이렇게 하면 에이전트가 시간을 어디에 사용하는지 즉시 확인할 수 있습니다.
위 트레이스의 주요 통계:
- 총 지연 시간: 전체 요청에 2분 28초가 걸렸습니다.
- 하위 에이전트 분석:
Code Analyzer: 4.7초Style Checker: 5.3초Test Runner: 1분 28초Feedback Synthesizer: 47.9초
- 중요 경로 분석:
Test Runner에이전트가 명확한 성능 병목 현상으로, 전체 요청 시간의 약 59% 를 차지합니다.
이러한 가시성은 매우 강력합니다. 시간이 어디에 사용되는지 추측하는 대신 지연 시간을 최적화해야 하는 경우 Test Runner가 명확한 타겟이라는 구체적인 증거가 있습니다.
비용 최적화를 위한 토큰 사용량 검사
Cloud Trace는 시간만 표시하는 것이 아니라 모든 LLM 호출의 토큰 사용량을 캡처하여 비용도 표시합니다.
call_llm
trace 내의 span 세부정보 창에서 llm.usage.prompt_tokens 및 llm.usage.completion_tokens의 속성을 확인할 수 있습니다.
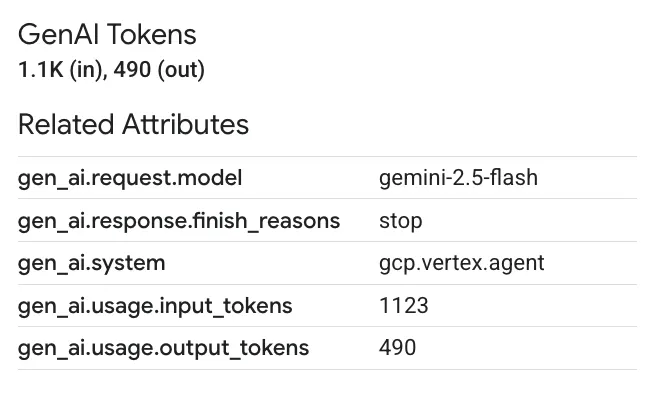
그러면 다음 작업이 가능합니다.
- 세부적인 수준에서 비용 추적: 각 상담사와 도구에서 사용하는 토큰 수를 정확하게 확인할 수 있습니다.
- 최적화 기회 파악: 에이전트가 예상보다 많은 수의 토큰을 사용하는 경우 프롬프트를 개선하거나 해당 특정 작업에 더 작고 비용 효율적인 모델로 전환할 수 있습니다.
3단계: 수정 파이프라인 트레이스 분석
수정 파이프라인은 LoopAgent를 포함하므로 더 복잡합니다. Cloud Trace를 사용하면 이러한 반복 동작을 쉽게 이해할 수 있습니다.
스팬 이름에 'FixAttemptLoop'이 포함된 트레이스를 찾습니다.
없는 경우 테스트 스크립트를 실행하고 코드를 수정할지 묻는 메시지가 표시되면 '예'라고 대답합니다.
루프 구조 검사
트레이스 뷰는 루프의 실행을 명확하게 시각화합니다. 수정 루프가 성공하기 전에 두 번 실행된 경우 FixAttemptLoop 스팬 아래에 중첩된 두 개의 loop_iteration 스팬이 표시되며, 각 스팬에는 CodeFixer, FixTestRunner, FixValidator 에이전트의 전체 주기가 포함됩니다.
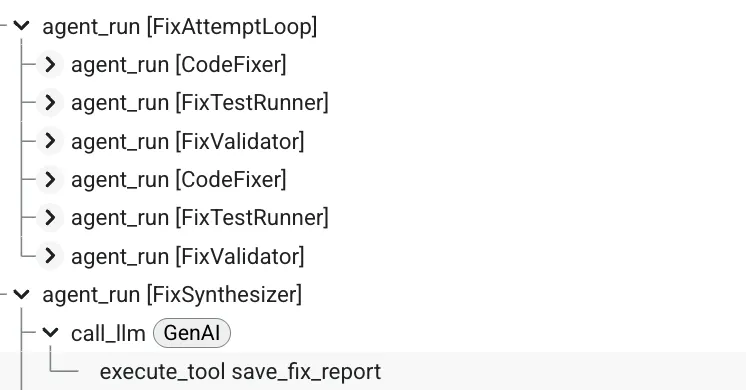
루프 추적의 주요 관찰 결과:
- 반복적 개선이 표시됨: 시스템이
loop_iteration: 1에서 수정하려고 시도하고, 이를 검증한 후, 완벽하지 않기 때문에loop_iteration: 2에서 다시 시도하는 것을 확인할 수 있습니다. - 수렴은 측정 가능: 각 반복의 지속 시간과 결과를 비교하여 시스템이 올바른 솔루션으로 수렴되는 방식을 이해할 수 있습니다.
- 디버깅 간소화: 루프가 최대 반복 횟수만큼 실행되었는데도 실패하는 경우 각 반복의 스팬 내에서 상태와 에이전트 동작을 검사하여 수정사항이 수렴되지 않는 이유를 진단할 수 있습니다.
이러한 세부정보는 프로덕션에서 복잡한 상태 저장 루프의 동작을 이해하고 디버깅하는 데 매우 유용합니다.
4단계: 발견한 내용
성능 패턴
트레이스를 검사한 결과 다음과 같은 데이터 기반 통계를 얻었습니다.
파이프라인 검토:
- 기본 병목 현상:
Test Runner에이전트, 특히 코드 실행 및 LLM 기반 테스트 생성은 검토에서 가장 시간이 많이 걸리는 부분입니다. - 빠른 작업: 결정적 도구 (
analyze_code_structure)와 상태 관리 작업은 매우 빠르며 성능 문제가 없습니다.
파이프라인 수정:
- 수렴률: 대부분의 수정이 1~2회 반복으로 완료되어 루프 아키텍처가 효과적임을 확인할 수 있습니다.
- 점진적 비용: 이전 시도에서 실패한 정보로 인해 LLM 컨텍스트가 커지면 후속 반복에 시간이 더 오래 걸릴 수 있습니다.
비용 동인:
- 토큰 소비: 가장 많은 토큰이 필요한 에이전트 (예: 합성기)를 정확히 파악하고 해당 작업에 더 강력하지만 비용이 많이 드는 모델을 사용하는 것이 타당한지 결정할 수 있습니다.
문제를 찾을 수 있는 위치
프로덕션에서 트레이스를 검토할 때는 다음 사항을 확인하세요.
- 비정상적으로 긴 트레이스: 성능 회귀 또는 예기치 않은 루프 동작의 신호입니다.
- 실패한 스팬 (빨간색으로 표시됨): 실패한 정확한 작업을 지적합니다.
- 과도한 루프 반복 (>2): 수정 생성 로직에 문제가 있을 수 있습니다.
- 토큰 수 높음: 프롬프트 최적화 또는 모델 선택 변경 기회를 강조 표시합니다.
학습한 내용
이제 Cloud Trace를 통해 다음 작업을 수행하는 방법을 알게 되었습니다.
✅ 요청 흐름 시각화: 순차적 파이프라인과 루프 기반 파이프라인을 통한 전체 실행 경로를 확인합니다.
✅ 성능 병목 현상 식별: 폭포형 차트를 사용하여 실제 데이터로 가장 느린 작업을 찾습니다.
✅ 루프 동작 분석: 반복 에이전트가 여러 시도에 걸쳐 솔루션으로 수렴하는 방식을 관찰합니다.
✅ 토큰 비용 추적: LLM 스팬을 검사하여 세부적인 수준에서 토큰 소비를 모니터링하고 최적화합니다.
학습한 핵심 개념
- 트레이스 및 스팬: 관측 가능성의 기본 단위로, 요청과 요청 내 작업을 나타냅니다.
- 폭포 분석: Gantt 차트를 읽어 실행 시간과 종속 항목을 파악합니다.
- 중요 경로 식별: 전체 지연 시간을 결정하는 작업 시퀀스를 찾습니다.
- 세부적인 관측 가능성: ADK에 의해 자동으로 계측되어 모든 작업의 시간뿐만 아니라 토큰 수와 같은 메타데이터도 확인할 수 있습니다.
다음 단계
Cloud Trace 계속 살펴보기:
- 문제를 조기에 포착하기 위해 정기적으로 트레이스 모니터링
- 트레이스를 비교하여 성능 회귀 식별
- 추적 데이터를 사용하여 최적화 결정에 대한 정보 제공
- 기간별로 필터링하여 느린 요청 찾기
고급 관측 가능성 (선택사항):
- 복잡한 분석을 위해 트레이스를 BigQuery로 내보내기 (문서)
- Cloud Monitoring에서 커스텀 대시보드 만들기
- 성능 저하에 대한 알림 설정
- trace와 애플리케이션 로그의 상관관계 파악
9. 결론: 프로토타입에서 프로덕션으로
빌드한 항목
단 7줄의 코드로 시작하여 프로덕션 등급 AI 에이전트 시스템을 빌드했습니다.
# Where we started (7 lines)
agent = Agent(
    model="gemini-2.5-flash",
    instruction="Review Python code for issues"
)

# Where we ended (production system)
- Two distinct multi-agent pipelines (review and fix) built from 8 specialized agents.
- An iterative fix loop architecture for automated validation and retries.
- Real AST-based code analysis tools for deterministic, accurate feedback.
- Robust state management using the "constants pattern" for type-safe communication.
- Fully automated deployment to a managed, scalable cloud infrastructure.
- Complete, built-in observability with Cloud Trace for production monitoring.
학습한 주요 아키텍처 패턴
패턴 | 구현 | 프로덕션 영향 |
도구 통합 | AST 분석, 스타일 확인 | LLM 의견이 아닌 실제 검증 |
Sequential Pipelines | 검토 → 워크플로 수정 | 예측 가능하고 디버그 가능한 실행 |
루프 아키텍처 | 종료 조건이 있는 반복적 수정 | 성공할 때까지 개선 |
상태 관리 | 상수 패턴, 3계층 메모리 | 유형 안전하고 유지보수가 가능한 상태 처리 |
프로덕션 배포 | deploy.sh를 통한 Agent Engine | 관리형 확장형 인프라 |
관측 가능성 | Cloud Trace 통합 | 프로덕션 동작에 대한 완전한 가시성 |
트레이스에서 프로덕션 통계
Cloud Trace 데이터에서 다음과 같은 중요한 통계를 확인할 수 있습니다.
✅ 병목 현상 확인: TestRunner의 LLM 호출이 지연 시간을 지배함
✅ 도구 성능: AST 분석이 100ms 내에 실행됨 (우수)
✅ 성공률: 수정 루프가 2~3회 반복 내에 수렴됨
✅ 토큰 사용량: 리뷰당 약 600개 토큰, 수정당 약 1,800개 토큰
이러한 통계는 지속적인 개선을 유도합니다.
리소스 정리 (선택사항)
실험을 완료하고 요금이 청구되지 않도록 하려면 다음 단계를 따르세요.
Agent Engine 배포 삭제:
import vertexai

client = vertexai.Client(  # For service interactions via client.agent_engines
    project="PROJECT_ID",
    location="LOCATION",
)

RESOURCE_NAME = "projects/{PROJECT_ID}/locations/{LOCATION}/reasoningEngines/{RESOURCE_ID}"

client.agent_engines.delete(
    name=RESOURCE_NAME,
    force=True, # Optional, if the agent has resources (e.g. sessions, memory)
)
Cloud Run 서비스 삭제 (생성된 경우):
gcloud run services delete code-review-assistant \
    --region=$GOOGLE_CLOUD_LOCATION \
    --quiet
Cloud SQL 인스턴스 삭제 (생성된 경우):
gcloud sql instances delete your-project-db \
    --quiet
스토리지 버킷 정리:
gsutil -m rm -r gs://your-project-staging
gsutil -m rm -r gs://your-project-artifacts
다음 단계
기본 사항을 완료했다면 다음 개선사항을 고려하세요.
- 언어 추가: JavaScript, Go, Java를 지원하도록 도구 확장
- GitHub와 통합: 자동 PR 검토
- 캐싱 구현: 일반적인 패턴의 지연 시간 줄이기
- 특수 에이전트 추가: 보안 검사, 성능 분석
- A/B 테스트 사용 설정: 다양한 모델과 프롬프트 비교
- 측정항목 내보내기: 전문 관측 가능성 플랫폼에 트레이스 전송
핵심 요점
- 간단하게 시작하고 빠르게 반복: 관리 가능한 단계로 프로덕션까지 7줄
- 프롬프트보다 도구: 실제 AST 분석이 '버그를 확인해 주세요'보다 효과적입니다.
- 상태 관리의 중요성: 상수 패턴으로 오타 버그 방지
- 루프에는 종료 조건이 필요함: 항상 최대 반복 횟수와 에스컬레이션 설정
- 자동화로 배포: deploy.sh가 모든 복잡성을 처리합니다.
- 모니터링 가능성은 필수입니다. 측정할 수 없는 것은 개선할 수 없습니다.
지속적인 학습을 위한 리소스
여정 계속하기
코드 검토 어시스턴트 그 이상을 빌드했습니다. 프로덕션 AI 에이전트를 빌드하는 패턴을 숙달했습니다.
✅ 여러 전문 에이전트가 있는 복잡한 워크플로
✅ 실제 기능을 위한 실제 도구 통합
✅ 적절한 관찰 가능성을 갖춘 프로덕션 배포
✅ 유지관리 가능한 시스템을 위한 상태 관리
이러한 패턴은 간단한 어시스턴트부터 복잡한 자율 시스템까지 확장됩니다. 여기에서 구축한 기반은 점점 더 정교한 에이전트 아키텍처를 다룰 때 유용하게 사용될 것입니다.
프로덕션 AI 에이전트 개발에 오신 것을 환영합니다. 코드 검토 어시스턴트는 시작에 불과합니다.