
1. The Late Night Code Review
ตอนนี้เป็นเวลา 02:00 น.
คุณแก้ไขข้อบกพร่องมาหลายชั่วโมงแล้ว ฟังก์ชันดูถูกต้อง แต่มีบางอย่างผิดพลาด คุณคงเคยรู้สึกว่าโค้ดควรทำงานได้แต่กลับไม่ทำงาน และคุณก็ไม่รู้สาเหตุเพราะจ้องโค้ดนานเกินไป
def dfs_search_v1(graph, start, target):
    """Find if target is reachable from start."""
    visited = set()
    stack = start  # Looks innocent enough...

    while stack:
        current = stack.pop()

        if current == target:
            return True

        if current not in visited:
            visited.add(current)

            for neighbor in graph[current]:
                if neighbor not in visited:
                    stack.append(neighbor)

    return False
เส้นทางของนักพัฒนาซอฟต์แวร์ AI
หากคุณกำลังอ่านข้อความนี้อยู่ แสดงว่าคุณอาจเคยสัมผัสถึงการเปลี่ยนแปลงที่ AI นำมาสู่การเขียนโค้ดแล้ว เครื่องมืออย่าง Gemini Code Assist, Claude Code และ Cursor ได้เปลี่ยนวิธีที่เราเขียนโค้ด ซึ่งมีประโยชน์อย่างยิ่งในการสร้างโค้ดมาตรฐาน แนะนำการใช้งาน และเร่งการพัฒนา
แต่คุณมาที่นี่เพราะต้องการเจาะลึก คุณต้องการทำความเข้าใจวิธีสร้างระบบ AI เหล่านี้ ไม่ใช่แค่ใช้ระบบ คุณต้องการสร้างสิ่งที่
- มีลักษณะการทำงานที่คาดการณ์ได้และติดตามได้
- สามารถนำไปใช้งานจริงได้อย่างมั่นใจ
- ให้ผลลัพธ์ที่สอดคล้องกันซึ่งคุณเชื่อถือได้
- แสดงให้เห็นว่าโมเดลตัดสินใจอย่างไร
จากผู้บริโภคสู่ครีเอเตอร์

วันนี้คุณจะได้ก้าวกระโดดจากการใช้เครื่องมือ AI ไปสู่การสร้างเครื่องมือ AI คุณจะสร้างระบบ Multi-Agent ที่มีลักษณะดังนี้
- วิเคราะห์โครงสร้างโค้ดอย่างแน่นอน
- ดำเนินการทดสอบจริงเพื่อยืนยันลักษณะการทำงาน
- ตรวจสอบการปฏิบัติตามรูปแบบด้วย Linter จริง
- สังเคราะห์ข้อมูลเป็นความคิดเห็นที่นำไปใช้ได้
- ติดตั้งใช้งานใน Google Cloud ด้วยความสามารถในการสังเกตการณ์อย่างเต็มรูปแบบ
2. การติดตั้งใช้งาน Agent ครั้งแรก
คำถามของนักพัฒนาแอป
ฉันเข้าใจ LLM และเคยใช้ API แต่จะเปลี่ยนจากสคริปต์ Python ไปเป็น AI Agent ที่ใช้งานจริงซึ่งปรับขนาดได้ได้อย่างไร
มาตอบคำถามนี้ด้วยการตั้งค่าสภาพแวดล้อมอย่างเหมาะสม จากนั้นสร้างเอเจนต์อย่างง่ายเพื่อทำความเข้าใจพื้นฐานก่อนที่จะเจาะลึกรูปแบบการใช้งานจริง
ตั้งค่าที่จำเป็นก่อน
ก่อนที่จะสร้างเอเจนต์ เรามาตรวจสอบว่าสภาพแวดล้อม Google Cloud ของคุณพร้อมใช้งานแล้ว
คลิกเปิดใช้งาน Cloud Shell ที่ด้านบนของคอนโซล Google Cloud (เป็นไอคอนรูปเทอร์มินัลที่ด้านบนของแผง Cloud Shell)
ค้นหารหัสโปรเจ็กต์ Google Cloud
- เปิดคอนโซล Google Cloud: https://console.cloud.google.com
- เลือกโปรเจ็กต์ที่ต้องการใช้สำหรับเวิร์กช็อปนี้จากเมนูแบบเลื่อนลงของโปรเจ็กต์ที่ด้านบนของหน้า
- รหัสโปรเจ็กต์จะแสดงในการ์ดข้อมูลโปรเจ็กต์ในแดชบอร์ด
ขั้นตอนที่ 1: ตั้งค่ารหัสโปรเจ็กต์
ใน Cloud Shell ระบบได้กำหนดค่าเครื่องมือบรรทัดคำสั่ง gcloud ไว้แล้ว เรียกใช้คำสั่งต่อไปนี้เพื่อตั้งค่าโปรเจ็กต์ที่ใช้งานอยู่ การดำเนินการนี้ใช้ตัวแปรสภาพแวดล้อม $GOOGLE_CLOUD_PROJECT ซึ่งระบบจะตั้งค่าให้คุณโดยอัตโนมัติในเซสชัน Cloud Shell
gcloud config set project $GOOGLE_CLOUD_PROJECT
ขั้นตอนที่ 2: ยืนยันการตั้งค่า
จากนั้นเรียกใช้คำสั่งต่อไปนี้เพื่อยืนยันว่าโปรเจ็กต์ได้รับการตั้งค่าอย่างถูกต้องและคุณได้รับการตรวจสอบสิทธิ์แล้ว
# Confirm project is set
echo "Current project: $(gcloud config get-value project)"

# Check authentication status
gcloud auth list
คุณจะเห็นรหัสโปรเจ็กต์ที่พิมพ์ไว้ และบัญชีผู้ใช้ของคุณแสดงพร้อม (ACTIVE) อยู่ข้างๆ
หากบัญชีไม่ได้แสดงเป็นบัญชีที่ใช้งานอยู่ หรือหากคุณได้รับข้อผิดพลาดในการตรวจสอบสิทธิ์ ให้เรียกใช้คำสั่งต่อไปนี้เพื่อเข้าสู่ระบบ
gcloud auth application-default login
ขั้นตอนที่ 3: เปิดใช้ API ที่จำเป็น
เราต้องการ API เหล่านี้อย่างน้อยสำหรับเอเจนต์พื้นฐาน
gcloud services enable \
    aiplatform.googleapis.com \
    compute.googleapis.com
อาจใช้เวลา 2-3 นาที คุณจะเห็นข้อมูลดังนี้
Operation "operations/..." finished successfully.
ขั้นตอนที่ 4: ติดตั้ง ADK
# Install the ADK CLI
pip install google-adk --upgrade

# Verify installation
adk --version
คุณควรเห็นหมายเลขเวอร์ชัน เช่น 1.15.0 ขึ้นไป
ตอนนี้มาสร้าง Agent พื้นฐานกัน
เมื่อสภาพแวดล้อมพร้อมแล้ว มาสร้าง Agent อย่างง่ายกันเลย
ขั้นตอนที่ 5: ใช้ ADK Create
adk create my_first_agent
ทำตามข้อความแจ้งแบบอินเทอร์แอกทีฟ
Choose a model for the root agent:
1. gemini-2.5-flash
2. Other models (fill later)
Choose model (1, 2): 1

1. Google AI
2. Vertex AI
Choose a backend (1, 2): 2

Enter Google Cloud project ID [auto-detected-from-gcloud]:
Enter Google Cloud region [us-central1]:
ขั้นตอนที่ 6: ตรวจสอบสิ่งที่สร้างขึ้น
cd my_first_agent
ls -la
คุณจะเห็นไฟล์ 3 ไฟล์ ได้แก่
.env          # Configuration (auto-populated with your project)
__init__.py   # Package marker
agent.py      # Your agent definition
ขั้นตอนที่ 7: ตรวจสอบการกำหนดค่าอย่างรวดเร็ว
# Verify the .env was created correctly
cat .env

# Should show something like:
# GOOGLE_CLOUD_PROJECT=your-project-id
# GOOGLE_CLOUD_LOCATION=us-central1
# GOOGLE_GENAI_USE_VERTEXAI=1
หากไม่มีรหัสโปรเจ็กต์หรือรหัสไม่ถูกต้อง ให้แก้ไขไฟล์ .env ดังนี้
nano .env # or use your preferred editor
ขั้นตอนที่ 8: ดูรหัสตัวแทน
cat agent.py
from google.adk.agents.llm_agent import Agent

root_agent = Agent(
    model='gemini-2.5-flash',
    name='root_agent',
    description='A helpful assistant for user questions.',
    instruction='Answer user questions to the best of your knowledge',
)
เรียบง่าย สะอาดตา และมินิมอล นี่คือ "Hello World" ของเอเจนต์
ทดสอบ Agent พื้นฐาน
ขั้นตอนที่ 9: เรียกใช้เอเจนต์
cd ..
adk run my_first_agent
คุณควรเห็นข้อความต่อไปนี้
Log setup complete: /tmp/agents_log/agent.20250930_162430.log
To access latest log: tail -F /tmp/agents_log/agent.latest.log
[user]:
ขั้นตอนที่ 10: ลองใช้คำค้นหา
คุณจะเห็นข้อความแจ้งในเทอร์มินัลที่ adk run กำลังทำงานอยู่ พิมพ์คำค้นหา
[user]: Hey, what can you do?
[root_agent]: I can help answer questions, generate text, explain concepts, assist with problem-solving, and provide information on a wide range of topics. What would you like to know or discuss?

[user]: What's the current weather in Mountain View?
[root_agent]: I'm sorry, but I cannot provide real-time weather information as I don't have access to current data or weather services. To get the current weather in Mountain View, I recommend checking a weather website or app like weather.com or using a search engine.
โปรดทราบข้อจำกัดที่ว่าโมเดลนี้ไม่สามารถเข้าถึงข้อมูลปัจจุบันได้ มาดูรายละเอียดกัน
[user]: Review this Python code: def add(a, b): return a + b
[root_agent]: This is a simple Python function that adds two numbers. Here's my review:

**Strengths:**
- Clean and concise implementation
- Follows Python conventions for simple operations
- Clear function name that describes its purpose

**Suggestions for improvement:**
- Add a docstring to document the function
- Consider adding type hints for better code clarity
- You might want to handle edge cases

Here's an enhanced version:
def add(a: float, b: float) -> float:
    """Add two numbers and return their sum."""
    return a + b
เอเจนต์สามารถพูดคุยเรื่องโค้ดได้ แต่จะทำสิ่งต่อไปนี้ได้ไหม
- แยกวิเคราะห์ AST เพื่อทำความเข้าใจโครงสร้างจริงๆ ไหม
- ทำการทดสอบเพื่อยืนยันว่าใช้งานได้ไหม
- ตรวจสอบการปฏิบัติตามหลักเกณฑ์ด้านสไตล์ไหม
- คุณจำรีวิวที่เขียนก่อนหน้านี้ได้ไหม
ไม่ได้ เราต้องใช้สถาปัตยกรรม
🏃🚪 ออกด้วย
Ctrl+C
เมื่อสำรวจเสร็จแล้ว
3. การเตรียม Workspace สำหรับเวอร์ชันที่ใช้งานจริง
โซลูชัน: สถาปัตยกรรมที่พร้อมใช้งานจริง
เอเจนต์อย่างง่ายดังกล่าวแสดงให้เห็นจุดเริ่มต้น แต่ระบบการผลิตต้องมีโครงสร้างที่แข็งแกร่ง ตอนนี้เราจะตั้งค่าโปรเจ็กต์ที่สมบูรณ์ซึ่งรวบรวมหลักการผลิต
การวางรากฐาน
คุณได้กำหนดค่าโปรเจ็กต์ที่อยู่ในระบบคลาวด์ของ Google สำหรับเอเจนต์พื้นฐานแล้ว ตอนนี้มาเตรียมพื้นที่ทำงานสำหรับการผลิตเต็มรูปแบบด้วยเครื่องมือ รูปแบบ และโครงสร้างพื้นฐานทั้งหมดที่จำเป็นสำหรับระบบจริงกัน
ขั้นตอนที่ 1: รับโปรเจ็กต์ที่มีโครงสร้าง
ก่อนอื่น ให้ออกจาก adk run ที่กำลังทำงานด้วย Ctrl+C แล้วล้างข้อมูล ดังนี้
# Clean up the basic agent
cd ~  # Make sure you're not inside my_first_agent
rm -rf my_first_agent

# Get the production scaffold
git clone https://github.com/ayoisio/adk-code-review-assistant.git
cd adk-code-review-assistant
git checkout codelab
ขั้นตอนที่ 2: สร้างและเปิดใช้งานสภาพแวดล้อมเสมือน
# Create the virtual environment
python -m venv .venv

# Activate it
# On macOS/Linux:
source .venv/bin/activate
# On Windows:
# .venv\Scripts\activate
การยืนยัน: ตอนนี้พรอมต์ของคุณควรแสดง (.venv) ที่จุดเริ่มต้น
ขั้นตอนที่ 3: ติดตั้งการอ้างอิง
pip install -r code_review_assistant/requirements.txt

# Install the package in editable mode (enables imports)
pip install -e .
ซึ่งจะติดตั้งสิ่งต่อไปนี้
google-adk- เฟรมเวิร์ก ADKpycodestyle- สำหรับการตรวจสอบ PEP 8vertexai- สำหรับการติดตั้งใช้งานระบบคลาวด์- ทรัพยากร Dependency อื่นๆ ในการผลิต
แฟล็ก -e ช่วยให้คุณนำเข้าโมดูล code_review_assistant จากที่ใดก็ได้
ขั้นตอนที่ 4: กำหนดค่าสภาพแวดล้อม
# Copy the example environment file
cp .env.example .env

# Edit .env and replace the placeholders:
# - GOOGLE_CLOUD_PROJECT=your-project-id → your actual project ID
# - Keep other defaults as-is
การยืนยัน: ตรวจสอบการกำหนดค่า
cat .env
ควรแสดงข้อมูลต่อไปนี้
GOOGLE_CLOUD_PROJECT=your-actual-project-id
GOOGLE_CLOUD_LOCATION=us-central1
GOOGLE_GENAI_USE_VERTEXAI=TRUE
ขั้นตอนที่ 5: ตรวจสอบการตรวจสอบสิทธิ์
เนื่องจากคุณเรียกใช้ gcloud auth ไปแล้วก่อนหน้านี้ เรามาตรวจสอบกัน
# Check current authentication
gcloud auth list

# Should show your account with (ACTIVE)
# If not, run:
gcloud auth application-default login
ขั้นตอนที่ 6: เปิดใช้ API เพิ่มเติมในเวอร์ชันที่ใช้งานจริง
เราได้เปิดใช้ API พื้นฐานแล้ว ตอนนี้ให้เพิ่มรายการที่ใช้ในการผลิต
gcloud services enable \
    sqladmin.googleapis.com \
    run.googleapis.com \
    cloudbuild.googleapis.com \
    artifactregistry.googleapis.com \
    storage.googleapis.com \
    cloudtrace.googleapis.com
การอัปเดตนี้ช่วยให้คุณทำสิ่งต่อไปนี้ได้
- ผู้ดูแลระบบ SQL: สำหรับ Cloud SQL หากใช้ Cloud Run
- Cloud Run: สำหรับการติดตั้งใช้งานแบบ Serverless
- Cloud Build: สำหรับการติดตั้งใช้งานอัตโนมัติ
- Artifact Registry: สำหรับอิมเมจคอนเทนเนอร์
- Cloud Storage: สำหรับอาร์ติแฟกต์และการจัดเตรียม
- Cloud Trace: สำหรับการสังเกตการณ์
ขั้นตอนที่ 7: สร้างที่เก็บ Artifact Registry
การติดตั้งใช้งานของเราจะสร้างอิมเมจคอนเทนเนอร์ที่ต้องมีที่เก็บ
gcloud artifacts repositories create code-review-assistant-repo \
    --repository-format=docker \
    --location=us-central1 \
    --description="Docker repository for Code Review Assistant"
คุณควรเห็นข้อมูลต่อไปนี้
Created repository [code-review-assistant-repo].
หากมีอยู่แล้ว (อาจมาจากการพยายามครั้งก่อน) ก็ไม่เป็นไร คุณจะเห็นข้อความแสดงข้อผิดพลาดที่สามารถละเว้นได้
ขั้นตอนที่ 8: ให้สิทธิ์ IAM
# Get your project number
PROJECT_NUMBER=$(gcloud projects describe $GOOGLE_CLOUD_PROJECT \
    --format="value(projectNumber)")

# Define the service account
SERVICE_ACCOUNT="${PROJECT_NUMBER}@cloudbuild.gserviceaccount.com"

# Grant necessary roles
gcloud projects add-iam-policy-binding $GOOGLE_CLOUD_PROJECT \
    --member="serviceAccount:${SERVICE_ACCOUNT}" \
    --role="roles/run.admin"

gcloud projects add-iam-policy-binding $GOOGLE_CLOUD_PROJECT \
    --member="serviceAccount:${SERVICE_ACCOUNT}" \
    --role="roles/iam.serviceAccountUser"

gcloud projects add-iam-policy-binding $GOOGLE_CLOUD_PROJECT \
    --member="serviceAccount:${SERVICE_ACCOUNT}" \
    --role="roles/cloudsql.admin"

gcloud projects add-iam-policy-binding $GOOGLE_CLOUD_PROJECT \
    --member="serviceAccount:${SERVICE_ACCOUNT}" \
    --role="roles/storage.admin"
แต่ละคำสั่งจะแสดงผลดังนี้
Updated IAM policy for project [your-project-id].
สิ่งที่คุณทำสำเร็จ
ตอนนี้พื้นที่ทำงานเวอร์ชันที่ใช้งานจริงพร้อมใช้งานแล้ว
✅ กำหนดค่าและตรวจสอบสิทธิ์โปรเจ็กต์ที่อยู่ในระบบคลาวด์ของ Google แล้ว
✅ ทดสอบเอเจนต์พื้นฐานเพื่อทำความเข้าใจข้อจำกัด
✅ โค้ดโปรเจ็กต์ที่มีตัวยึดตำแหน่งเชิงกลยุทธ์พร้อมแล้ว
✅ แยกทรัพยากร Dependency ในสภาพแวดล้อมเสมือน
✅ เปิดใช้ API ที่จำเป็นทั้งหมดแล้ว
✅ Container Registry พร้อมสำหรับการทำให้ใช้งานได้แล้ว
✅ กำหนดค่าสิทธิ์ IAM อย่างถูกต้องแล้ว
✅ ตั้งค่าตัวแปรสภาพแวดล้อมอย่างถูกต้องแล้ว
ตอนนี้คุณพร้อมที่จะสร้างระบบ AI จริงด้วยเครื่องมือที่กำหนดได้ การจัดการสถานะ และสถาปัตยกรรมที่เหมาะสมแล้ว
4. สร้าง Agent ตัวแรก
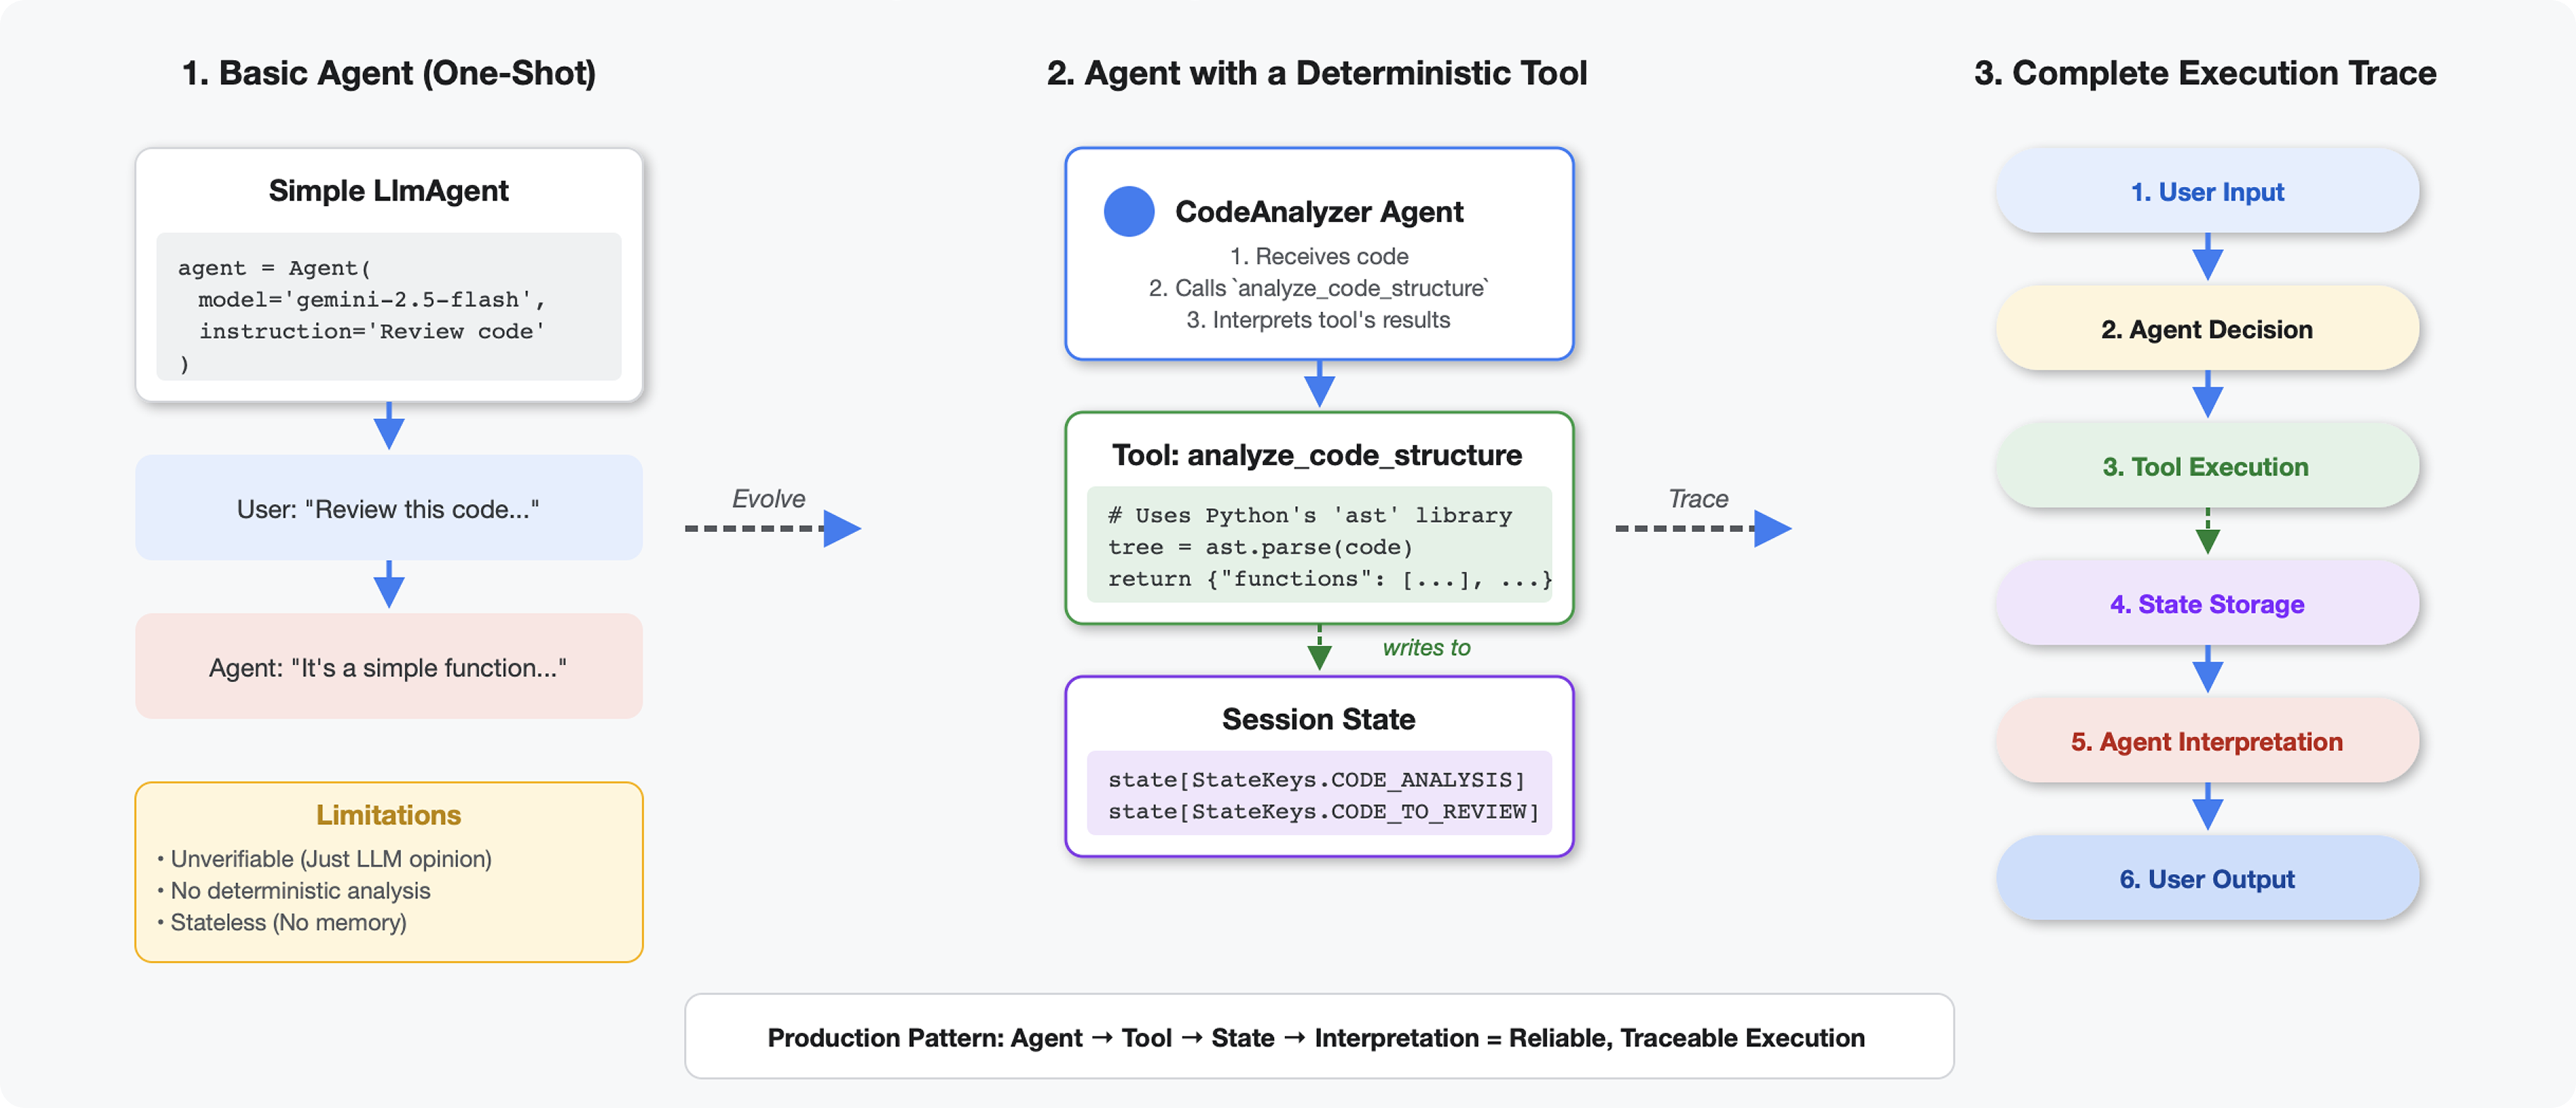
สิ่งที่ทำให้เครื่องมือแตกต่างจาก LLM
เมื่อคุณถาม LLM ว่า "โค้ดนี้มีฟังก์ชันกี่ฟังก์ชัน" LLM จะใช้การจับคู่รูปแบบและการประมาณ เมื่อใช้เครื่องมือที่เรียกใช้ ast.parse() ของ Python เครื่องมือจะแยกวิเคราะห์ทรีไวยากรณ์จริง ไม่ต้องคาดเดา และได้ผลลัพธ์เหมือนกันทุกครั้ง
ส่วนนี้จะสร้างเครื่องมือที่วิเคราะห์โครงสร้างโค้ดอย่างแน่นอน จากนั้นเชื่อมต่อกับเอเจนต์ที่รู้ว่าเมื่อใดควรเรียกใช้
ขั้นตอนที่ 1: ทำความเข้าใจโครงสร้าง
มาดูโครงสร้างที่คุณจะต้องกรอกกัน
👉 เปิด
code_review_assistant/tools.py
คุณจะเห็นฟังก์ชัน analyze_code_structure พร้อมความคิดเห็นตัวยึดตำแหน่งที่ระบุตำแหน่งที่คุณจะเพิ่มโค้ด ฟังก์ชันนี้มีโครงสร้างพื้นฐานอยู่แล้ว คุณจะปรับปรุงฟังก์ชันนี้ทีละขั้นตอน
ขั้นตอนที่ 2: เพิ่มที่เก็บข้อมูลสถานะ
ที่เก็บข้อมูลสถานะช่วยให้ตัวแทนอื่นๆ ในไปป์ไลน์เข้าถึงผลลัพธ์ของเครื่องมือได้โดยไม่ต้องเรียกใช้การวิเคราะห์อีกครั้ง
👉 ค้นหา:
# MODULE_4_STEP_2_ADD_STATE_STORAGE
👉 แทนที่บรรทัดเดียวด้วย
        # Store code and analysis for other agents to access
        tool_context.state[StateKeys.CODE_TO_REVIEW] = code
        tool_context.state[StateKeys.CODE_ANALYSIS] = analysis
        tool_context.state[StateKeys.CODE_LINE_COUNT] = len(code.splitlines())
ขั้นตอนที่ 3: เพิ่มการแยกวิเคราะห์แบบไม่พร้อมกันด้วย Thread Pool
เครื่องมือของเราต้องแยกวิเคราะห์ AST โดยไม่บล็อกการดำเนินการอื่นๆ มาเพิ่มการดำเนินการแบบไม่พร้อมกันด้วย Thread Pool กัน
👉 ค้นหา:
# MODULE_4_STEP_3_ADD_ASYNC
👉 แทนที่บรรทัดเดียวด้วย
        # Parse in thread pool to avoid blocking the event loop
        loop = asyncio.get_event_loop()
        with ThreadPoolExecutor() as executor:
            tree = await loop.run_in_executor(executor, ast.parse, code)
ขั้นตอนที่ 4: แยกข้อมูลที่ครอบคลุม
ตอนนี้เรามาดึงข้อมูลคลาส การนำเข้า และเมตริกแบบละเอียด ซึ่งเป็นทุกอย่างที่เราต้องการสำหรับการรีวิวโค้ดที่สมบูรณ์
👉 ค้นหา:
# MODULE_4_STEP_4_EXTRACT_DETAILS
👉 แทนที่บรรทัดเดียวด้วย
# Extract comprehensive structural information
analysis = await loop.run_in_executor(
executor, _extract_code_structure, tree, code
)
👉 ยืนยัน: ฟังก์ชัน
analyze_code_structure
ใน
tools.py
มีส่วนกลางที่มีลักษณะดังนี้
# Parse in thread pool to avoid blocking the event loop
loop = asyncio.get_event_loop()
with ThreadPoolExecutor() as executor:
    tree = await loop.run_in_executor(executor, ast.parse, code)
        # Extract comprehensive structural information
        analysis = await loop.run_in_executor(
            executor, _extract_code_structure, tree, code
        )
# Store code and analysis for other agents to access
tool_context.state[StateKeys.CODE_TO_REVIEW] = code
tool_context.state[StateKeys.CODE_ANALYSIS] = analysis
tool_context.state[StateKeys.CODE_LINE_COUNT] = len(code.splitlines())
👉 ตอนนี้ให้เลื่อนไปที่ด้านล่างของ
tools.py
แล้วค้นหา
# MODULE_4_STEP_4_HELPER_FUNCTION
👉 แทนที่บรรทัดเดียวด้วยฟังก์ชันตัวช่วยที่สมบูรณ์:
def _extract_code_structure(tree: ast.AST, code: str) -> Dict[str, Any]:
    """
    Helper function to extract structural information from AST.
    Runs in thread pool for CPU-bound work.
    """
    functions = []
    classes = []
    imports = []
    docstrings = []

    for node in ast.walk(tree):
        if isinstance(node, ast.FunctionDef):
            func_info = {
                'name': node.name,
                'args': [arg.arg for arg in node.args.args],
                'lineno': node.lineno,
                'has_docstring': ast.get_docstring(node) is not None,
                'is_async': isinstance(node, ast.AsyncFunctionDef),
                'decorators': [d.id for d in node.decorator_list
                               if isinstance(d, ast.Name)]
            }
            functions.append(func_info)

            if func_info['has_docstring']:
                docstrings.append(f"{node.name}: {ast.get_docstring(node)[:50]}...")

        elif isinstance(node, ast.ClassDef):
            methods = []
            for item in node.body:
                if isinstance(item, ast.FunctionDef):
                    methods.append(item.name)

            class_info = {
                'name': node.name,
                'lineno': node.lineno,
                'methods': methods,
                'has_docstring': ast.get_docstring(node) is not None,
                'base_classes': [base.id for base in node.bases
                                 if isinstance(base, ast.Name)]
            }
            classes.append(class_info)

        elif isinstance(node, ast.Import):
            for alias in node.names:
                imports.append({
                    'module': alias.name,
                    'alias': alias.asname,
                    'type': 'import'
                })
        elif isinstance(node, ast.ImportFrom):
            imports.append({
                'module': node.module or '',
                'names': [alias.name for alias in node.names],
                'type': 'from_import',
                'level': node.level
            })

    return {
        'functions': functions,
        'classes': classes,
        'imports': imports,
        'docstrings': docstrings,
        'metrics': {
            'line_count': len(code.splitlines()),
            'function_count': len(functions),
            'class_count': len(classes),
            'import_count': len(imports),
            'has_main': any(f['name'] == 'main' for f in functions),
            'has_if_main': '__main__' in code,
            'avg_function_length': _calculate_avg_function_length(tree)
        }
    }


def _calculate_avg_function_length(tree: ast.AST) -> float:
    """Calculate average function length in lines."""
    function_lengths = []

    for node in ast.walk(tree):
        if isinstance(node, ast.FunctionDef):
            if hasattr(node, 'end_lineno') and hasattr(node, 'lineno'):
                length = node.end_lineno - node.lineno + 1
                function_lengths.append(length)

    if function_lengths:
        return sum(function_lengths) / len(function_lengths)
    return 0.0
ขั้นตอนที่ 5: ติดต่อตัวแทน
ตอนนี้เราเชื่อมต่อเครื่องมือกับเอเจนต์ที่รู้ว่าเมื่อใดควรใช้เครื่องมือและวิธีตีความผลลัพธ์
👉 เปิด
code_review_assistant/sub_agents/review_pipeline/code_analyzer.py
👉 ค้นหา:
# MODULE_4_STEP_5_CREATE_AGENT
👉 แทนที่บรรทัดเดียวด้วยเอเจนต์การนำไปใช้งานจริงที่สมบูรณ์:
code_analyzer_agent = Agent(
    name="CodeAnalyzer",
    model=config.worker_model,
    description="Analyzes Python code structure and identifies components",
    instruction="""You are a code analysis specialist responsible for understanding code structure.

Your task:
1. Take the code submitted by the user (it will be provided in the user message)
2. Use the analyze_code_structure tool to parse and analyze it
3. Pass the EXACT code to your tool - do not modify, fix, or "improve" it
4. Identify all functions, classes, imports, and structural patterns
5. Note any syntax errors or structural issues
6. Store the analysis in state for other agents to use

CRITICAL:
- Pass the code EXACTLY as provided to the analyze_code_structure tool
- Do not fix syntax errors, even if obvious
- Do not add missing imports or fix indentation
- The goal is to analyze what IS there, not what SHOULD be there

When calling the tool, pass the code as a string to the 'code' parameter.
If the analysis fails due to syntax errors, clearly report the error location and type.

Provide a clear summary including:
- Number of functions and classes found
- Key structural observations
- Any syntax errors or issues detected
- Overall code organization assessment""",
    tools=[FunctionTool(func=analyze_code_structure)],
    output_key="structure_analysis_summary"
)
ทดสอบเครื่องมือวิเคราะห์โค้ด
ตอนนี้ให้ยืนยันว่าเครื่องมือวิเคราะห์ทำงานได้อย่างถูกต้อง
👉 เรียกใช้สคริปต์ทดสอบ:
python tests/test_code_analyzer.py
สคริปต์การทดสอบจะโหลดการกำหนดค่าจากไฟล์ .env โดยอัตโนมัติโดยใช้ python-dotenv คุณจึงไม่จำเป็นต้องตั้งค่าตัวแปรสภาพแวดล้อมด้วยตนเอง
ผลลัพธ์ที่คาดไว้:
INFO:code_review_assistant.config:Code Review Assistant Configuration Loaded:
INFO:code_review_assistant.config:  - GCP Project: your-project-id
INFO:code_review_assistant.config:  - Artifact Bucket: gs://your-project-artifacts
INFO:code_review_assistant.config:  - Models: worker=gemini-2.5-flash, critic=gemini-2.5-pro
Testing code analyzer...
INFO:code_review_assistant.tools:Tool: Analysis complete - 2 functions, 1 classes

=== Analyzer Response ===
The analysis of the provided code shows the following:

* **Functions Found:** 2
    * `add(a, b)`: A global function at line 2.
    * `multiply(self, x, y)`: A method within the `Calculator` class.

* **Classes Found:** 1
    * `Calculator`: A class defined at line 5. Contains one method, `multiply`.

* **Imports:** 0

* **Structural Patterns:** The code defines one global function and one class
  with a single method. Both are simple, each with a single return statement.

* **Syntax Errors/Issues:** No syntax errors detected.

* **Overall Code Organization:** The code is well-organized for its small size,
  clearly defining a function and a class with a method.
เกิดอะไรขึ้น
- สคริปต์การทดสอบโหลดการกำหนดค่า
.envของคุณโดยอัตโนมัติ analyze_code_structure()เครื่องมือของคุณแยกวิเคราะห์โค้ดโดยใช้ AST ของ Python_extract_code_structure()ตัวช่วยจะดึงฟังก์ชัน คลาส และเมตริก- ระบบจัดเก็บผลลัพธ์ไว้ในสถานะเซสชันโดยใช้ค่าคงที่
StateKeys - เอเจนต์ Code Analyzer ตีความผลลัพธ์และให้ข้อมูลสรุป
การแก้ปัญหา:
- "ไม่มีโมดูลชื่อ "code_review_assistant"": เรียกใช้
pip install -e .จากรูทของโปรเจ็กต์ - "ไม่มีอาร์กิวเมนต์อินพุตคีย์": ตรวจสอบว่า
.envมีGOOGLE_CLOUD_PROJECT,GOOGLE_CLOUD_LOCATIONและGOOGLE_GENAI_USE_VERTEXAI=true
สิ่งที่คุณสร้าง
ตอนนี้คุณมีเครื่องมือวิเคราะห์โค้ดที่พร้อมใช้งานจริงแล้ว ซึ่งมีคุณสมบัติดังนี้
✅ แยกวิเคราะห์ AST ของ Python จริง - กำหนดได้ ไม่ใช่การจับคู่รูปแบบ
✅ จัดเก็บผลลัพธ์ในสถานะ - เอเจนต์อื่นๆ สามารถเข้าถึงการวิเคราะห์ได้
✅ ทำงานแบบอะซิงโครนัส - ไม่บล็อกเครื่องมืออื่นๆ
✅ ดึงข้อมูลที่ครอบคลุม - ฟังก์ชัน คลาส การนำเข้า เมตริก
✅ จัดการข้อผิดพลาดอย่างราบรื่น - รายงานข้อผิดพลาดทางไวยากรณ์พร้อมหมายเลขบรรทัด
✅ เชื่อมต่อกับเอเจนต์ - LLM รู้ว่าเมื่อใดและอย่างไรจึงจะใช้เครื่องมือนี้
แนวคิดหลักที่เชี่ยวชาญ
เครื่องมือเทียบกับเอเจนต์:
- เครื่องมือจะทำงานแบบดีเทอร์มินิสติก (การแยกวิเคราะห์ AST)
- Agent จะเป็นผู้กำหนดเวลาที่จะใช้เครื่องมือและตีความผลลัพธ์
ค่าที่ส่งคืนเทียบกับสถานะ:
- ผลลัพธ์: สิ่งที่ LLM เห็นทันที
- สถานะ: สิ่งที่ยังคงอยู่สำหรับเอเจนต์รายอื่นๆ
ค่าคงที่ของคีย์สถานะ:
- ป้องกันการสะกดผิดในระบบหลายเอเจนต์
- ทำหน้าที่เป็นสัญญาในระหว่างเอเจนต์
- สำคัญเมื่อ Agent แชร์ข้อมูล
Async + Thread Pools:
async defอนุญาตให้เครื่องมือหยุดการดำเนินการชั่วคราว- กลุ่มเทรดจะเรียกใช้การทำงานที่ต้องใช้ CPU มากในเบื้องหลัง
- ซึ่งทั้ง 2 อย่างนี้จะช่วยให้ Event Loop ตอบสนองได้
ฟังก์ชันตัวช่วย:
- แยกเครื่องมือช่วยซิงค์ออกจากเครื่องมือแบบไม่พร้อมกัน
- ทำให้โค้ดทดสอบและนำกลับมาใช้ใหม่ได้
คำสั่งสำหรับตัวแทน
- คำสั่งโดยละเอียดช่วยป้องกันข้อผิดพลาดที่พบบ่อยของ LLM
- ระบุอย่างชัดเจนว่าสิ่งใดที่ไม่ควรทำ (อย่าแก้ไขโค้ด)
- ระบุขั้นตอนเวิร์กโฟลว์ให้ชัดเจนเพื่อความสอดคล้องกัน
ขั้นตอนถัดไป
ในโมดูลที่ 5 คุณจะได้เพิ่มสิ่งต่อไปนี้
- เครื่องมือตรวจสอบสไตล์ที่อ่านโค้ดจากสถานะ
- โปรแกรมเรียกใช้การทดสอบที่เรียกใช้การทดสอบจริง
- เครื่องมือสังเคราะห์ความคิดเห็นที่รวมการวิเคราะห์ทั้งหมด
คุณจะเห็นว่าสถานะไหลผ่านไปตามไปป์ไลน์แบบลำดับอย่างไร และเหตุใดรูปแบบค่าคงที่จึงมีความสำคัญเมื่อเอเจนต์หลายตัวอ่านและเขียนข้อมูลเดียวกัน
5. การสร้างไปป์ไลน์: Agent หลายรายทำงานร่วมกัน
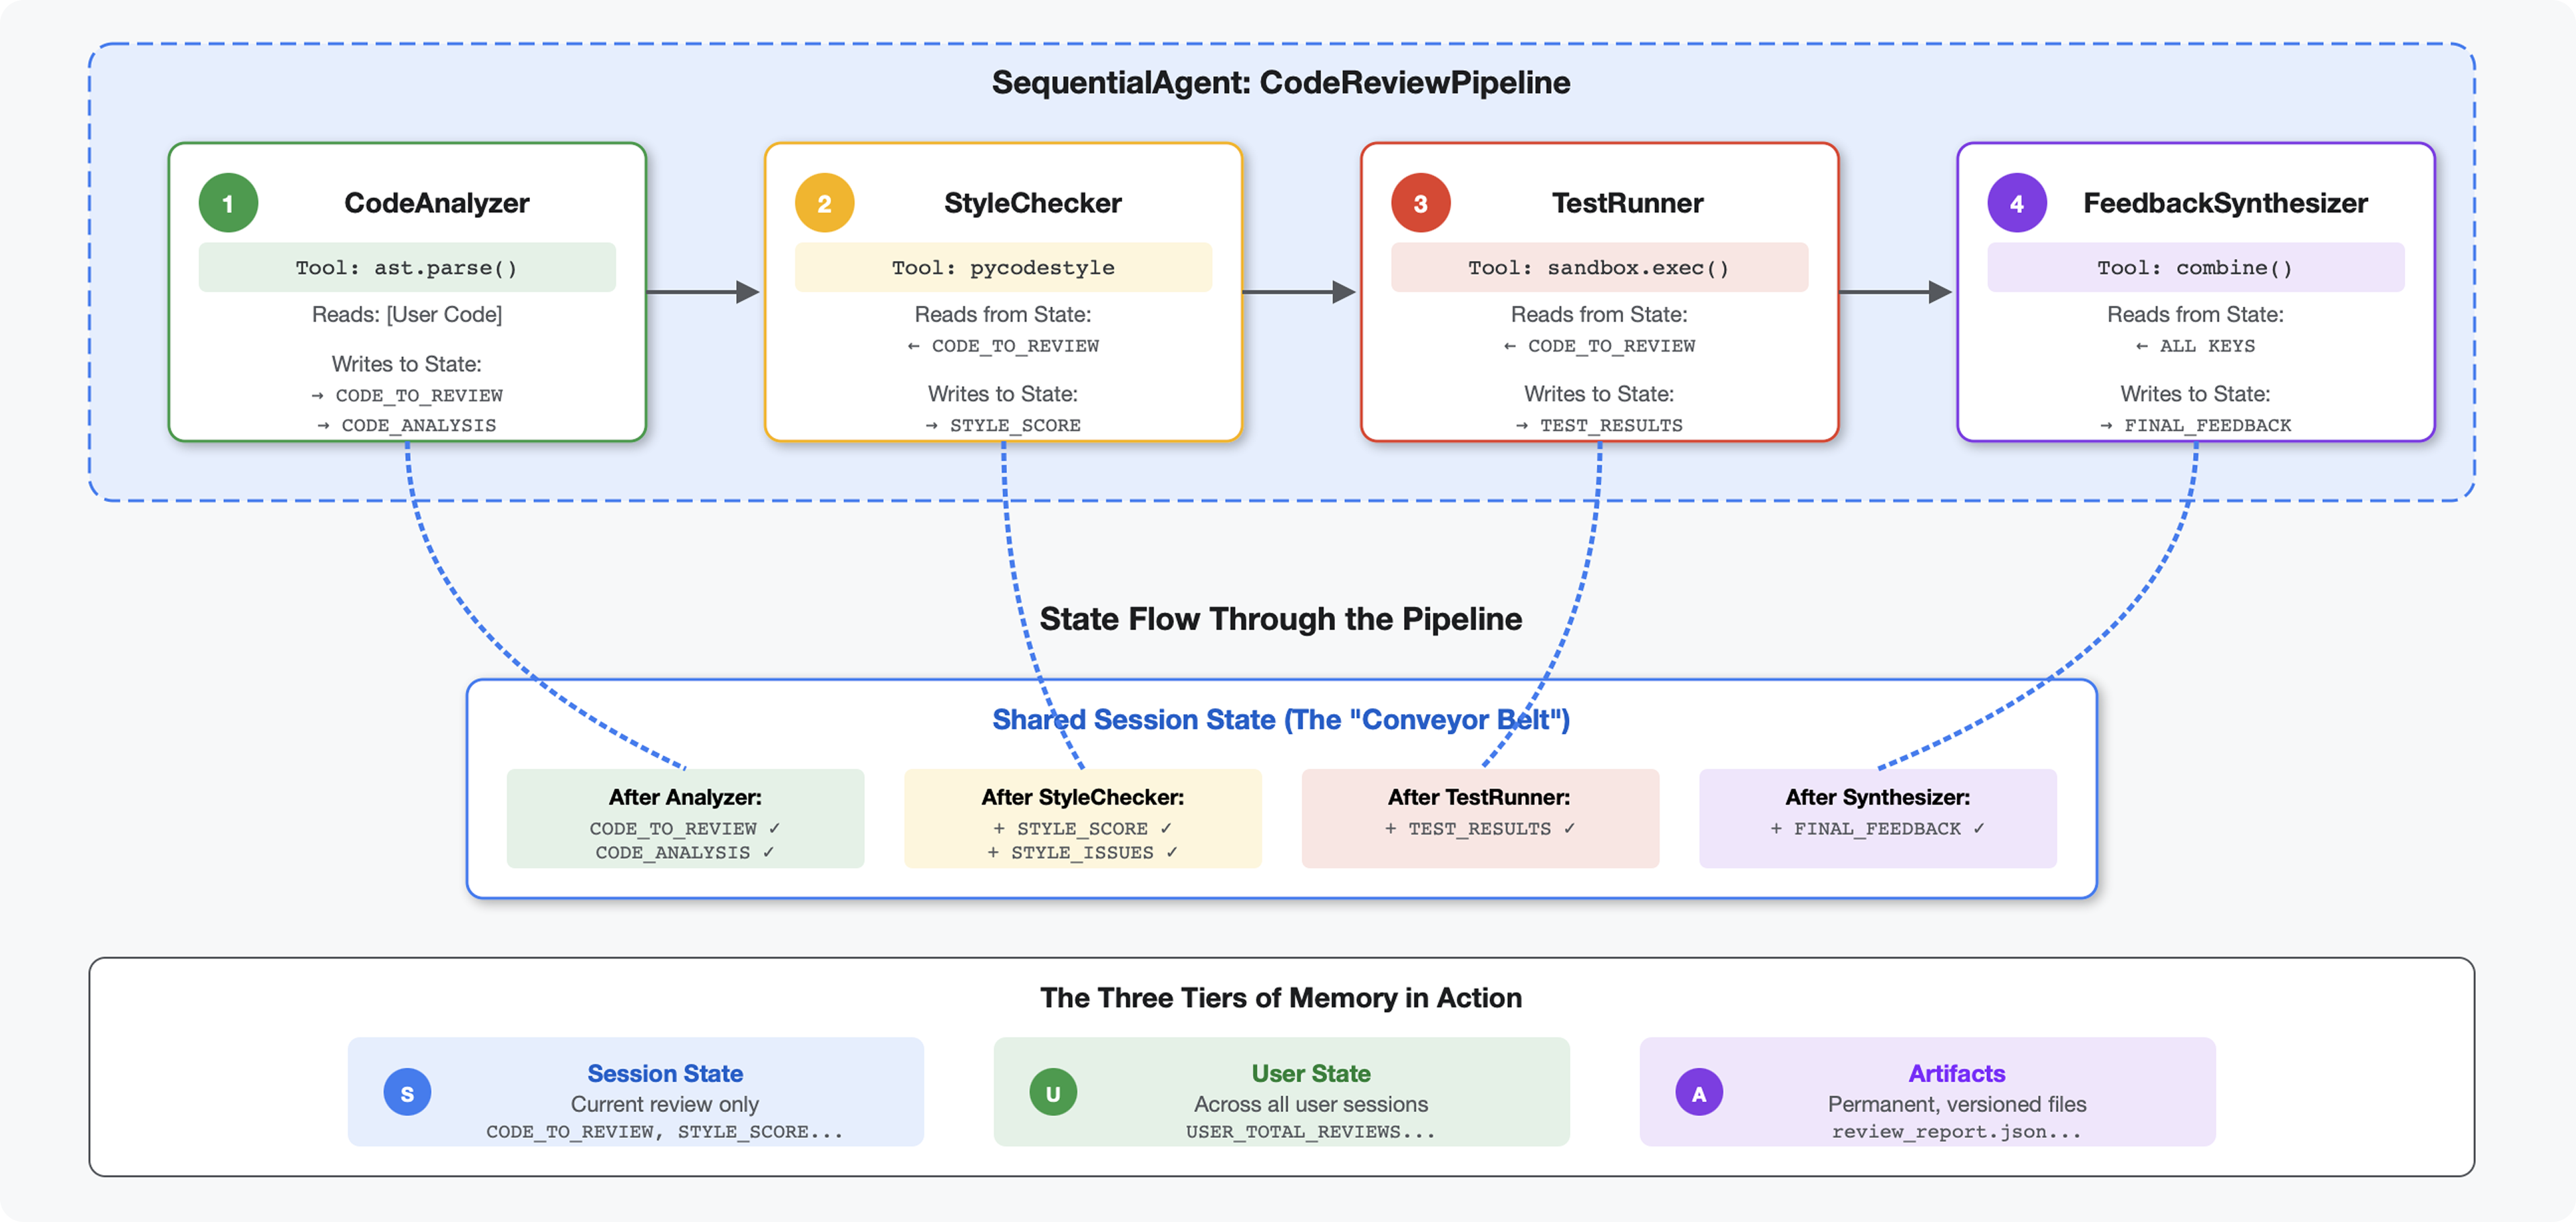
บทนำ
ในโมดูลที่ 4 คุณได้สร้าง Agent เดียวที่วิเคราะห์โครงสร้างโค้ด แต่การรีวิวโค้ดอย่างละเอียดต้องใช้มากกว่าการแยกวิเคราะห์ คุณต้องตรวจสอบรูปแบบ เรียกใช้การดำเนินการทดสอบ และสังเคราะห์ความคิดเห็นอัจฉริยะ
โมดูลนี้สร้างไปป์ไลน์ของเอเจนต์ 4 รายที่ทำงานร่วมกันตามลำดับ โดยแต่ละรายจะให้การวิเคราะห์เฉพาะทาง
- เครื่องมือวิเคราะห์โค้ด (จากโมดูลที่ 4) - แยกวิเคราะห์โครงสร้าง
- เครื่องมือตรวจสอบสไตล์ - ระบุการละเมิดสไตล์
- Test Runner - ดำเนินการและตรวจสอบการทดสอบ
- เครื่องมือสังเคราะห์ความคิดเห็น - รวมทุกอย่างไว้ในความคิดเห็นที่นำไปใช้ได้
แนวคิดหลัก: สถานะเป็นช่องทางการสื่อสาร Agent แต่ละตัวจะอ่านสิ่งที่ Agent ก่อนหน้าเขียนเพื่อระบุสถานะ เพิ่มการวิเคราะห์ของตัวเอง และส่งต่อสถานะที่เพิ่มข้อมูลแล้วไปยัง Agent ตัวถัดไป รูปแบบค่าคงที่จากโมดูลที่ 4 จะมีความสําคัญอย่างยิ่งเมื่อเอเจนต์หลายรายแชร์ข้อมูล
ตัวอย่างสิ่งที่คุณจะสร้าง: ส่งโค้ดที่ซับซ้อน → ดูสถานะที่ไหลผ่านเอเจนต์ 4 คน → รับรายงานที่ครอบคลุมพร้อมความคิดเห็นที่ปรับเปลี่ยนในแบบของคุณตามรูปแบบที่ผ่านมา
ขั้นตอนที่ 1: เพิ่มเครื่องมือตรวจสอบสไตล์ + เอเจนต์
เครื่องมือตรวจสอบรูปแบบจะระบุการละเมิด PEP 8 โดยใช้ pycodestyle ซึ่งเป็นโปรแกรมตรวจสอบโค้ดแบบดีเทอร์มินิสติก ไม่ใช่การตีความที่อิงตาม LLM
เพิ่มเครื่องมือตรวจสอบสไตล์
👉 เปิด
code_review_assistant/tools.py
👉 ค้นหา:
# MODULE_5_STEP_1_STYLE_CHECKER_TOOL
👉 แทนที่บรรทัดเดียวด้วย
async def check_code_style(code: str, tool_context: ToolContext) -> Dict[str, Any]:
    """
    Checks code style compliance using pycodestyle (PEP 8).

    Args:
        code: Python source code to check (or will retrieve from state)
        tool_context: ADK tool context

    Returns:
        Dictionary containing style score and issues
    """
    logger.info("Tool: Checking code style...")

    try:
        # Retrieve code from state if not provided
        if not code:
            code = tool_context.state.get(StateKeys.CODE_TO_REVIEW, '')
            if not code:
                return {
                    "status": "error",
                    "message": "No code provided or found in state"
                }

        # Run style check in thread pool
        loop = asyncio.get_event_loop()
        with ThreadPoolExecutor() as executor:
            result = await loop.run_in_executor(
                executor, _perform_style_check, code
            )

        # Store results in state
        tool_context.state[StateKeys.STYLE_SCORE] = result['score']
        tool_context.state[StateKeys.STYLE_ISSUES] = result['issues']
        tool_context.state[StateKeys.STYLE_ISSUE_COUNT] = result['issue_count']

        logger.info(f"Tool: Style check complete - Score: {result['score']}/100, "
                    f"Issues: {result['issue_count']}")

        return result

    except Exception as e:
        error_msg = f"Style check failed: {str(e)}"
        logger.error(f"Tool: {error_msg}", exc_info=True)

        # Set default values on error
        tool_context.state[StateKeys.STYLE_SCORE] = 0
        tool_context.state[StateKeys.STYLE_ISSUES] = []

        return {
            "status": "error",
            "message": error_msg,
            "score": 0
        }
👉 ตอนนี้ให้เลื่อนไปท้ายไฟล์แล้วค้นหา
# MODULE_5_STEP_1_STYLE_HELPERS
👉 แทนที่บรรทัดเดียวด้วยฟังก์ชันตัวช่วยต่อไปนี้
def _perform_style_check(code: str) -> Dict[str, Any]:
    """Helper to perform style check in thread pool."""
    import io
    import sys

    with tempfile.NamedTemporaryFile(mode='w', suffix='.py', delete=False) as tmp:
        tmp.write(code)
        tmp_path = tmp.name

    try:
        # Capture stdout to get pycodestyle output
        old_stdout = sys.stdout
        sys.stdout = captured_output = io.StringIO()

        style_guide = pycodestyle.StyleGuide(
            quiet=False,  # We want output
            max_line_length=100,
            ignore=['E501', 'W503']
        )

        result = style_guide.check_files([tmp_path])

        # Restore stdout
        sys.stdout = old_stdout

        # Parse captured output
        output = captured_output.getvalue()
        issues = []

        for line in output.strip().split('\n'):
            if line and ':' in line:
                parts = line.split(':', 4)
                if len(parts) >= 4:
                    try:
                        issues.append({
                            'line': int(parts[1]),
                            'column': int(parts[2]),
                            'code': parts[3].split()[0] if len(parts) > 3 else 'E000',
                            'message': parts[3].strip() if len(parts) > 3 else 'Unknown error'
                        })
                    except (ValueError, IndexError):
                        pass

        # Add naming convention checks
        try:
            tree = ast.parse(code)
            naming_issues = _check_naming_conventions(tree)
            issues.extend(naming_issues)
        except SyntaxError:
            pass  # Syntax errors will be caught elsewhere

        # Calculate weighted score
        score = _calculate_style_score(issues)

        return {
            "status": "success",
            "score": score,
            "issue_count": len(issues),
            "issues": issues[:10],  # First 10 issues
            "summary": f"Style score: {score}/100 with {len(issues)} violations"
        }

    finally:
        if os.path.exists(tmp_path):
            os.unlink(tmp_path)


def _check_naming_conventions(tree: ast.AST) -> List[Dict[str, Any]]:
    """Check PEP 8 naming conventions."""
    naming_issues = []

    for node in ast.walk(tree):
        if isinstance(node, ast.FunctionDef):
            # Skip private/protected methods and __main__
            if not node.name.startswith('_') and node.name != node.name.lower():
                naming_issues.append({
                    'line': node.lineno,
                    'column': node.col_offset,
                    'code': 'N802',
                    'message': f"N802 function name '{node.name}' should be lowercase"
                })
        elif isinstance(node, ast.ClassDef):
            # Check if class name follows CapWords convention
            if not node.name[0].isupper() or '_' in node.name:
                naming_issues.append({
                    'line': node.lineno,
                    'column': node.col_offset,
                    'code': 'N801',
                    'message': f"N801 class name '{node.name}' should use CapWords convention"
                })

    return naming_issues


def _calculate_style_score(issues: List[Dict[str, Any]]) -> int:
    """Calculate weighted style score based on violation severity."""
    if not issues:
        return 100

    # Define weights by error type
    weights = {
        'E1': 10,  # Indentation errors
        'E2': 3,  # Whitespace errors
        'E3': 5,  # Blank line errors
        'E4': 8,  # Import errors
        'E5': 5,  # Line length
        'E7': 7,  # Statement errors
        'E9': 10,  # Syntax errors
        'W2': 2,  # Whitespace warnings
        'W3': 2,  # Blank line warnings
        'W5': 3,  # Line break warnings
        'N8': 7,  # Naming conventions
    }

    total_deduction = 0
    for issue in issues:
        code_prefix = issue['code'][:2] if len(issue['code']) >= 2 else 'E2'
        weight = weights.get(code_prefix, 3)
        total_deduction += weight

    # Cap at 100 points deduction
    return max(0, 100 - min(total_deduction, 100))
เพิ่ม Agent ตรวจสอบสไตล์
👉 เปิด
code_review_assistant/sub_agents/review_pipeline/style_checker.py
👉 ค้นหา:
# MODULE_5_STEP_1_INSTRUCTION_PROVIDER
👉 แทนที่บรรทัดเดียวด้วย
async def style_checker_instruction_provider(context: ReadonlyContext) -> str:
    """Dynamic instruction provider that injects state variables."""
    template = """You are a code style expert focused on PEP 8 compliance.

Your task:
1. Use the check_code_style tool to validate PEP 8 compliance
2. The tool will retrieve the ORIGINAL code from state automatically
3. Report violations exactly as found
4. Present the results clearly and confidently

CRITICAL:
- The tool checks the code EXACTLY as provided by the user
- Do not suggest the code was modified or fixed
- Report actual violations found in the original code
- If there are style issues, they should be reported honestly

Call the check_code_style tool with an empty string for the code parameter,
as the tool will retrieve the code from state automatically.

When presenting results based on what the tool returns:
- State the exact score from the tool results
- If score >= 90: "Excellent style compliance!"
- If score 70-89: "Good style with minor improvements needed"
- If score 50-69: "Style needs attention"
- If score < 50: "Significant style improvements needed"

List the specific violations found (the tool will provide these):
- Show line numbers, error codes, and messages
- Focus on the top 10 most important issues

Previous analysis: {structure_analysis_summary}

Format your response as:
## Style Analysis Results
- Style Score: [exact score]/100
- Total Issues: [count]
- Assessment: [your assessment based on score]

## Top Style Issues
[List issues with line numbers and descriptions]

## Recommendations
[Specific fixes for the most critical issues]"""

    return await instructions_utils.inject_session_state(template, context)
👉 ค้นหา:
# MODULE_5_STEP_1_STYLE_CHECKER_AGENT
👉 แทนที่บรรทัดเดียวด้วย
style_checker_agent = Agent(
    name="StyleChecker",
    model=config.worker_model,
    description="Checks Python code style against PEP 8 guidelines",
    instruction=style_checker_instruction_provider,
    tools=[FunctionTool(func=check_code_style)],
    output_key="style_check_summary"
)
ขั้นตอนที่ 2: เพิ่ม Test Runner Agent
Test Runner จะสร้างการทดสอบที่ครอบคลุมและเรียกใช้การทดสอบเหล่านั้นโดยใช้ตัวดำเนินการโค้ดในตัว
👉 เปิด
code_review_assistant/sub_agents/review_pipeline/test_runner.py
👉 ค้นหา:
# MODULE_5_STEP_2_INSTRUCTION_PROVIDER
👉 แทนที่บรรทัดเดียวด้วย
async def test_runner_instruction_provider(context: ReadonlyContext) -> str:
    """Dynamic instruction provider that injects the code_to_review directly."""
    template = """You are a testing specialist who creates and runs tests for Python code.

THE CODE TO TEST IS:
{code_to_review}

YOUR TASK:
1. Understand what the function appears to do based on its name and structure
2. Generate comprehensive tests (15-20 test cases)
3. Execute the tests using your code executor
4. Analyze results to identify bugs vs expected behavior
5. Output a detailed JSON analysis

TESTING METHODOLOGY:
- Test with the most natural interpretation first
- When something fails, determine if it's a bug or unusual design
- Test edge cases, boundaries, and error scenarios
- Document any surprising behavior

Execute your tests and output ONLY valid JSON with this structure:
- "test_summary": object with "total_tests_run", "tests_passed", "tests_failed", "tests_with_errors", "critical_issues_found"
- "critical_issues": array of objects, each with "type", "description", "example_input", "expected_behavior", "actual_behavior", "severity"
- "test_categories": object with "basic_functionality", "edge_cases", "error_handling" (each containing "passed", "failed", "errors" counts)
- "function_behavior": object with "apparent_purpose", "actual_interface", "unexpected_requirements"
- "verdict": object with "status" (WORKING/BUGGY/BROKEN), "confidence" (high/medium/low), "recommendation"

Do NOT output the test code itself, only the JSON analysis."""

    return await instructions_utils.inject_session_state(template, context)
👉 ค้นหา:
# MODULE_5_STEP_2_TEST_RUNNER_AGENT
👉 แทนที่บรรทัดเดียวด้วย
test_runner_agent = Agent(
    name="TestRunner",
    model=config.critic_model,
    description="Generates and runs tests for Python code using safe code execution",
    instruction=test_runner_instruction_provider,
    code_executor=BuiltInCodeExecutor(),
    output_key="test_execution_summary"
)
ขั้นตอนที่ 3: ทำความเข้าใจหน่วยความจำสำหรับการเรียนรู้ข้ามเซสชัน
ก่อนที่จะสร้างเครื่องมือสังเคราะห์ความคิดเห็น คุณต้องเข้าใจความแตกต่างระหว่างสถานะและหน่วยความจำ ซึ่งเป็นกลไกการจัดเก็บข้อมูล 2 แบบที่มีวัตถุประสงค์แตกต่างกัน
สถานะเทียบกับหน่วยความจำ: ความแตกต่างที่สำคัญ
มาดูตัวอย่างที่ชัดเจนจากการรีวิวโค้ดกัน
รัฐ (เซสชันปัจจุบันเท่านั้น):
# Data from THIS review session
tool_context.state[StateKeys.STYLE_ISSUES] = [
    {"line": 5, "code": "E231", "message": "missing whitespace"},
    {"line": 12, "code": "E701", "message": "multiple statements"}
]
- ขอบเขต: การสนทนานี้เท่านั้น
- วัตถุประสงค์: ส่งข้อมูลระหว่างเอเจนต์ในไปป์ไลน์ปัจจุบัน
- อาศัยอยู่ใน: ออบเจ็กต์
Session - ตลอดอายุการใช้งาน: ทิ้งเมื่อเซสชันสิ้นสุด
หน่วยความจำ (เซสชันที่ผ่านมาทั้งหมด):
# Learned from 50 previous reviews
"User frequently forgets docstrings on helper functions"
"User tends to write long functions (avg 45 lines)"
"User improved error handling after feedback in session #23"
- ขอบเขต: เซสชันที่ผ่านมาทั้งหมดของผู้ใช้รายนี้
- วัตถุประสงค์: เรียนรู้รูปแบบ ให้ความคิดเห็นเฉพาะบุคคล
- อาศัยอยู่ใน
MemoryService - ตลอดอายุการใช้งาน: คงอยู่ตลอดเซสชัน ค้นหาได้
เหตุผลที่ต้องมีทั้ง 2 อย่าง
ลองนึกภาพว่าซินธิไซเซอร์สร้างฟีดแบ็ก
ใช้เฉพาะรัฐ (การตรวจสอบปัจจุบัน):
"Function `calculate_total` has no docstring."
ความคิดเห็นทั่วไปที่ไม่ได้เจาะจง
การใช้สถานะ + หน่วยความจำ (รูปแบบปัจจุบัน + รูปแบบในอดีต):
"Function `calculate_total` has no docstring. This is the 4th review
where helper functions lacked documentation. Consider adding docstrings
as you write functions, not afterwards - you mentioned in our last
session that you find it easier that way."
การปรับเปลี่ยนในแบบของคุณตามบริบทและการปรับปรุงการอ้างอิงเมื่อเวลาผ่านไป
สำหรับการติดตั้งใช้งานเวอร์ชันที่ใช้งานจริง คุณมีตัวเลือกดังนี้
ตัวเลือกที่ 1: VertexAiMemoryBankService (ขั้นสูง)
- สิ่งที่ทำ: การดึงข้อเท็จจริงที่มีความหมายจากการสนทนาโดยใช้ LLM
- ค้นหา: การค้นหาเชิงความหมาย (เข้าใจความหมาย ไม่ใช่แค่คีย์เวิร์ด)
- การจัดการความทรงจำ: รวมและอัปเดตความทรงจำโดยอัตโนมัติเมื่อเวลาผ่านไป
- ต้องมี: โปรเจ็กต์ Google Cloud + การตั้งค่า Agent Engine
- ใช้เมื่อ: คุณต้องการความทรงจำที่ซับซ้อน มีการพัฒนา และปรับเปลี่ยนในแบบของคุณ
- ตัวอย่าง: "ผู้ใช้ชอบการเขียนโปรแกรมเชิงฟังก์ชัน" (ดึงมาจาก 10 การสนทนาเกี่ยวกับรูปแบบโค้ด)
ตัวเลือกที่ 2: ใช้ InMemoryMemoryService + เซสชันแบบถาวรต่อไป
- การทำงาน: จัดเก็บประวัติการสนทนาทั้งหมดสำหรับการค้นหาคีย์เวิร์ด
- ค้นหา: การทำงานของคีย์เวิร์ดพื้นฐานในเซสชันที่ผ่านมา
- การจัดการหน่วยความจำ: คุณควบคุมได้ว่าจะจัดเก็บอะไร (ผ่าน
add_session_to_memory) - ข้อกำหนด: เฉพาะ
SessionServiceแบบถาวร (เช่นVertexAiSessionServiceหรือDatabaseSessionService) - ใช้เมื่อ: คุณต้องการค้นหาแบบง่ายๆ ในการสนทนาที่ผ่านมาโดยไม่ต้องประมวลผล LLM
- ตัวอย่าง: การค้นหา "docstring" จะแสดงเซสชันทั้งหมดที่พูดถึงคำนั้น
วิธีป้อนข้อมูลความทรงจำ
หลังจากรีวิวโค้ดแต่ละครั้งเสร็จแล้ว ให้ทำดังนี้
# At the end of a session (typically in your application code)
await memory_service.add_session_to_memory(session)
สิ่งที่เกิดขึ้น
- InMemoryMemoryService: จัดเก็บเหตุการณ์เซสชันทั้งหมดสําหรับการค้นหาคีย์เวิร์ด
- VertexAiMemoryBankService: LLM จะดึงข้อเท็จจริงที่สำคัญและรวมเข้ากับความทรงจำที่มีอยู่
จากนั้นเซสชันในอนาคตจะค้นหาได้ดังนี้
# In a tool, search for relevant past feedback
results = tool_context.search_memory("feedback about docstrings")
ขั้นตอนที่ 4: เพิ่มเครื่องมือและเอเจนต์สรุปความคิดเห็น
เครื่องมือสังเคราะห์ความคิดเห็นเป็นเอเจนต์ที่ซับซ้อนที่สุดในไปป์ไลน์ โดยจะประสานงานเครื่องมือ 3 อย่าง ใช้คำสั่งแบบไดนามิก และรวมสถานะ หน่วยความจำ และอาร์ติแฟกต์
เพิ่มเครื่องมือ Synthesizer ทั้ง 3 รายการ
👉 เปิด
code_review_assistant/tools.py
👉 ค้นหา:
# MODULE_5_STEP_4_SEARCH_PAST_FEEDBACK
👉 แทนที่ด้วยเครื่องมือ 1 - การค้นหาหน่วยความจำ (เวอร์ชันที่ใช้งานจริง):
async def search_past_feedback(developer_id: str, tool_context: ToolContext) -> Dict[str, Any]:
    """
    Search for past feedback in memory service.

    Args:
        developer_id: ID of the developer (defaults to "default_user")
        tool_context: ADK tool context with potential memory service access

    Returns:
        Dictionary containing feedback search results
    """
    logger.info(f"Tool: Searching for past feedback for developer {developer_id}...")

    try:
        # Default developer ID if not provided
        if not developer_id:
            developer_id = tool_context.state.get(StateKeys.USER_ID, 'default_user')

        # Check if memory service is available
        if hasattr(tool_context, 'search_memory'):
            try:
                # Perform structured searches
                queries = [
                    f"developer:{developer_id} code review feedback",
                    f"developer:{developer_id} common issues",
                    f"developer:{developer_id} improvements"
                ]

                all_feedback = []
                patterns = {
                    'common_issues': [],
                    'improvements': [],
                    'strengths': []
                }

                for query in queries:
                    search_result = await tool_context.search_memory(query)

                    if search_result and hasattr(search_result, 'memories'):
                        for memory in search_result.memories[:5]:
                            memory_text = memory.text if hasattr(memory, 'text') else str(memory)
                            all_feedback.append(memory_text)

                            # Extract patterns
                            if 'style' in memory_text.lower():
                                patterns['common_issues'].append('style compliance')
                            if 'improved' in memory_text.lower():
                                patterns['improvements'].append('showing improvement')
                            if 'excellent' in memory_text.lower():
                                patterns['strengths'].append('consistent quality')

                # Store in state
                tool_context.state[StateKeys.PAST_FEEDBACK] = all_feedback
                tool_context.state[StateKeys.FEEDBACK_PATTERNS] = patterns

                logger.info(f"Tool: Found {len(all_feedback)} past feedback items")

                return {
                    "status": "success",
                    "feedback_found": True,
                    "count": len(all_feedback),
                    "summary": " | ".join(all_feedback[:3]) if all_feedback else "No feedback",
                    "patterns": patterns
                }

            except Exception as e:
                logger.warning(f"Tool: Memory search error: {e}")

        # Fallback: Check state for cached feedback
        cached_feedback = tool_context.state.get(StateKeys.USER_PAST_FEEDBACK_CACHE, [])
        if cached_feedback:
            tool_context.state[StateKeys.PAST_FEEDBACK] = cached_feedback
            return {
                "status": "success",
                "feedback_found": True,
                "count": len(cached_feedback),
                "summary": "Using cached feedback",
                "patterns": {}
            }

        # No feedback found
        tool_context.state[StateKeys.PAST_FEEDBACK] = []
        logger.info("Tool: No past feedback found")

        return {
            "status": "success",
            "feedback_found": False,
            "message": "No past feedback available - this appears to be a first submission",
            "patterns": {}
        }

    except Exception as e:
        error_msg = f"Feedback search error: {str(e)}"
        logger.error(f"Tool: {error_msg}", exc_info=True)

        tool_context.state[StateKeys.PAST_FEEDBACK] = []

        return {
            "status": "error",
            "message": error_msg,
            "feedback_found": False
        }
👉 ค้นหา:
# MODULE_5_STEP_4_UPDATE_GRADING_PROGRESS
👉 แทนที่ด้วยเครื่องมือ 2 - เครื่องมือติดตามการให้คะแนน (เวอร์ชันที่ใช้งานจริง):
async def update_grading_progress(tool_context: ToolContext) -> Dict[str, Any]:
    """
    Updates grading progress counters and metrics in state.
    """
    logger.info("Tool: Updating grading progress...")

    try:
        current_time = datetime.now().isoformat()

        # Build all state changes
        state_updates = {}

        # Temporary (invocation-level) state
        state_updates[StateKeys.TEMP_PROCESSING_TIMESTAMP] = current_time

        # Session-level state
        attempts = tool_context.state.get(StateKeys.GRADING_ATTEMPTS, 0) + 1
        state_updates[StateKeys.GRADING_ATTEMPTS] = attempts
        state_updates[StateKeys.LAST_GRADING_TIME] = current_time

        # User-level persistent state
        lifetime_submissions = tool_context.state.get(StateKeys.USER_TOTAL_SUBMISSIONS, 0) + 1
        state_updates[StateKeys.USER_TOTAL_SUBMISSIONS] = lifetime_submissions
        state_updates[StateKeys.USER_LAST_SUBMISSION_TIME] = current_time

        # Calculate improvement metrics
        current_style_score = tool_context.state.get(StateKeys.STYLE_SCORE, 0)
        last_style_score = tool_context.state.get(StateKeys.USER_LAST_STYLE_SCORE, 0)
        score_improvement = current_style_score - last_style_score

        state_updates[StateKeys.USER_LAST_STYLE_SCORE] = current_style_score
        state_updates[StateKeys.SCORE_IMPROVEMENT] = score_improvement

        # Track test results if available
        test_results = tool_context.state.get(StateKeys.TEST_EXECUTION_SUMMARY, {})

        # Parse if it's a string
        if isinstance(test_results, str):
            try:
                test_results = json.loads(test_results)
            except:
                test_results = {}

        if test_results and test_results.get('test_summary', {}).get('total_tests_run', 0) > 0:
            summary = test_results['test_summary']
            total = summary.get('total_tests_run', 0)
            passed = summary.get('tests_passed', 0)
            if total > 0:
                pass_rate = (passed / total) * 100
                state_updates[StateKeys.USER_LAST_TEST_PASS_RATE] = pass_rate

        # Apply all updates atomically
        for key, value in state_updates.items():
            tool_context.state[key] = value

        logger.info(f"Tool: Progress updated - Attempt #{attempts}, "
                    f"Lifetime: {lifetime_submissions}")

        return {
            "status": "success",
            "session_attempts": attempts,
            "lifetime_submissions": lifetime_submissions,
            "timestamp": current_time,
            "improvement": {
                "style_score_change": score_improvement,
                "direction": "improved" if score_improvement > 0 else "declined"
            },
            "summary": f"Attempt #{attempts} recorded, {lifetime_submissions} total submissions"
        }

    except Exception as e:
        error_msg = f"Progress update error: {str(e)}"
        logger.error(f"Tool: {error_msg}", exc_info=True)

        return {
            "status": "error",
            "message": error_msg
        }
👉 ค้นหา:
# MODULE_5_STEP_4_SAVE_GRADING_REPORT
👉 แทนที่ด้วยเครื่องมือ 3 - โปรแกรมบันทึกอาร์ติแฟกต์ (เวอร์ชันที่ใช้งานจริง):
async def save_grading_report(feedback_text: str, tool_context: ToolContext) -> Dict[str, Any]:
    """
    Saves a detailed grading report as an artifact.

    Args:
        feedback_text: The feedback text to include in the report
        tool_context: ADK tool context for state management

    Returns:
        Dictionary containing save status and details
    """
    logger.info("Tool: Saving grading report...")

    try:
        # Gather all relevant data from state
        code = tool_context.state.get(StateKeys.CODE_TO_REVIEW, '')
        analysis = tool_context.state.get(StateKeys.CODE_ANALYSIS, {})
        style_score = tool_context.state.get(StateKeys.STYLE_SCORE, 0)
        style_issues = tool_context.state.get(StateKeys.STYLE_ISSUES, [])

        # Get test results
        test_results = tool_context.state.get(StateKeys.TEST_EXECUTION_SUMMARY, {})

        # Parse if it's a string
        if isinstance(test_results, str):
            try:
                test_results = json.loads(test_results)
            except:
                test_results = {}

        timestamp = datetime.now().isoformat()

        # Create comprehensive report dictionary
        report = {
            'timestamp': timestamp,
            'grading_attempt': tool_context.state.get(StateKeys.GRADING_ATTEMPTS, 1),
            'code': {
                'content': code,
                'line_count': len(code.splitlines()),
                'hash': hashlib.md5(code.encode()).hexdigest()
            },
            'analysis': analysis,
            'style': {
                'score': style_score,
                'issues': style_issues[:5]  # First 5 issues
            },
            'tests': test_results,
            'feedback': feedback_text,
            'improvements': {
                'score_change': tool_context.state.get(StateKeys.SCORE_IMPROVEMENT, 0),
                'from_last_score': tool_context.state.get(StateKeys.USER_LAST_STYLE_SCORE, 0)
            }
        }

        # Convert report to JSON string
        report_json = json.dumps(report, indent=2)
        report_part = types.Part.from_text(text=report_json)

        # Try to save as artifact if the service is available
        if hasattr(tool_context, 'save_artifact'):
            try:
                # Generate filename with timestamp (replace colons for filesystem compatibility)
                filename = f"grading_report_{timestamp.replace(':', '-')}.json"

                # Save the main report
                version = await tool_context.save_artifact(filename, report_part)

                # Also save a "latest" version for easy access
                await tool_context.save_artifact("latest_grading_report.json", report_part)

                logger.info(f"Tool: Report saved as {filename} (version {version})")

                # Store report in state as well for redundancy
                tool_context.state[StateKeys.USER_LAST_GRADING_REPORT] = report

                return {
                    "status": "success",
                    "artifact_saved": True,
                    "filename": filename,
                    "version": str(version),
                    "size": len(report_json),
                    "summary": f"Report saved as {filename}"
                }

            except Exception as artifact_error:
                logger.warning(f"Artifact service error: {artifact_error}, falling back to state storage")
                # Continue to fallback below

        # Fallback: Store in state if artifact service is not available or failed
        tool_context.state[StateKeys.USER_LAST_GRADING_REPORT] = report
        logger.info("Tool: Report saved to state (artifact service not available)")

        return {
            "status": "success",
            "artifact_saved": False,
            "message": "Report saved to state only",
            "size": len(report_json),
            "summary": "Report saved to session state"
        }

    except Exception as e:
        error_msg = f"Report save error: {str(e)}"
        logger.error(f"Tool: {error_msg}", exc_info=True)

        # Still try to save minimal data to state
        try:
            tool_context.state[StateKeys.USER_LAST_GRADING_REPORT] = {
                'error': error_msg,
                'feedback': feedback_text,
                'timestamp': datetime.now().isoformat()
            }
        except:
            pass

        return {
            "status": "error",
            "message": error_msg,
            "artifact_saved": False,
            "summary": f"Failed to save report: {error_msg}"
        }
สร้าง Synthesizer Agent
👉 เปิด
code_review_assistant/sub_agents/review_pipeline/feedback_synthesizer.py
👉 ค้นหา:
# MODULE_5_STEP_4_INSTRUCTION_PROVIDER
👉 แทนที่ด้วยผู้ให้บริการคำสั่งการผลิต:
async def feedback_instruction_provider(context: ReadonlyContext) -> str:
    """Dynamic instruction provider that injects state variables."""
    template = """You are an expert code reviewer and mentor providing constructive, educational feedback.

CONTEXT FROM PREVIOUS AGENTS:
- Structure analysis summary: {structure_analysis_summary}
- Style check summary: {style_check_summary}
- Test execution summary: {test_execution_summary}

YOUR TASK requires these steps IN ORDER:
1. Call search_past_feedback tool with developer_id="default_user"
2. Call update_grading_progress tool with no parameters
3. Carefully analyze the test results to understand what really happened
4. Generate comprehensive feedback following the structure below
5. Call save_grading_report tool with the feedback_text parameter
6. Return the feedback as your final output

CRITICAL - Understanding Test Results:
The test_execution_summary contains structured JSON. Parse it carefully:
- tests_passed = Code worked correctly
- tests_failed = Code produced wrong output
- tests_with_errors = Code crashed
- critical_issues = Fundamental problems with the code

If critical_issues array contains items, these are serious bugs that need fixing.
Do NOT count discovering bugs as test successes.

FEEDBACK STRUCTURE TO FOLLOW:

## 📊 Summary
Provide an honest assessment. Be encouraging but truthful about problems found.

## ✅ Strengths
List 2-3 things done well, referencing specific code elements.

## 📈 Code Quality Analysis

### Structure & Organization
Comment on code organization, readability, and documentation.

### Style Compliance
Report the actual style score and any specific issues.

### Test Results
Report the actual test results accurately:
- If critical_issues exist, report them as bugs to fix
- Be clear: "X tests passed, Y critical issues were found"
- List each critical issue
- Don't hide or minimize problems

## 💡 Recommendations for Improvement
Based on the analysis, provide specific actionable fixes.
If critical issues exist, fixing them is top priority.

## 🎯 Next Steps
Prioritized action list based on severity of issues.

## 💬 Encouragement
End with encouragement while being honest about what needs fixing.

Remember: Complete ALL steps including calling save_grading_report."""

    return await instructions_utils.inject_session_state(template, context)
👉 ค้นหา:
# MODULE_5_STEP_4_SYNTHESIZER_AGENT
👉 แทนที่ด้วย:
feedback_synthesizer_agent = Agent(
    name="FeedbackSynthesizer",
    model=config.critic_model,
    description="Synthesizes all analysis into constructive, personalized feedback",
    instruction=feedback_instruction_provider,
    tools=[
        FunctionTool(func=search_past_feedback),
        FunctionTool(func=update_grading_progress),
        FunctionTool(func=save_grading_report)
    ],
    output_key="final_feedback"
)
ขั้นตอนที่ 5: เชื่อมต่อสายไฟของท่อ
จากนั้นเชื่อมต่อ Agent ทั้ง 4 ตัวเข้ากับไปป์ไลน์ตามลำดับและสร้าง Agent รูท
👉 เปิด
code_review_assistant/agent.py
👉 เพิ่มการนำเข้าที่จำเป็นที่ด้านบนของไฟล์ (หลังจากการนำเข้าที่มีอยู่)
from google.adk.agents import Agent, SequentialAgent
from code_review_assistant.sub_agents.review_pipeline.code_analyzer import code_analyzer_agent
from code_review_assistant.sub_agents.review_pipeline.style_checker import style_checker_agent
from code_review_assistant.sub_agents.review_pipeline.test_runner import test_runner_agent
from code_review_assistant.sub_agents.review_pipeline.feedback_synthesizer import feedback_synthesizer_agent
ตอนนี้ไฟล์ควรมีลักษณะดังนี้
"""
Main agent orchestration for the Code Review Assistant.
"""

from google.adk.agents import Agent, SequentialAgent
from .config import config
from code_review_assistant.sub_agents.review_pipeline.code_analyzer import code_analyzer_agent
from code_review_assistant.sub_agents.review_pipeline.style_checker import style_checker_agent
from code_review_assistant.sub_agents.review_pipeline.test_runner import test_runner_agent
from code_review_assistant.sub_agents.review_pipeline.feedback_synthesizer import feedback_synthesizer_agent

# MODULE_5_STEP_5_CREATE_PIPELINE

# MODULE_6_STEP_5_CREATE_FIX_LOOP

# MODULE_6_STEP_5_UPDATE_ROOT_AGENT
👉 ค้นหา:
# MODULE_5_STEP_5_CREATE_PIPELINE
👉 แทนที่บรรทัดเดียวด้วย
# Create sequential pipeline
code_review_pipeline = SequentialAgent(
    name="CodeReviewPipeline",
    description="Complete code review pipeline with analysis, testing, and feedback",
    sub_agents=[
        code_analyzer_agent,
        style_checker_agent,
        test_runner_agent,
        feedback_synthesizer_agent
    ]
)

# Root agent - coordinates the review pipeline
root_agent = Agent(
    name="CodeReviewAssistant",
    model=config.worker_model,
    description="An intelligent code review assistant that analyzes Python code and provides educational feedback",
    instruction="""You are a specialized Python code review assistant focused on helping developers improve their code quality.

When a user provides Python code for review:
1. Immediately delegate to CodeReviewPipeline and pass the code EXACTLY as it was provided by the user.
2. The pipeline will handle all analysis and feedback
3. Return ONLY the final feedback from the pipeline - do not add any commentary

When a user asks what you can do or asks general questions:
- Explain your capabilities for code review
- Do NOT trigger the pipeline for non-code messages

The pipeline handles everything for code review - just pass through its final output.""",
    sub_agents=[code_review_pipeline],
    output_key="assistant_response"
)
ขั้นตอนที่ 6: ทดสอบไปป์ไลน์ที่สมบูรณ์
ถึงเวลาที่เอเจนต์ทั้ง 4 จะได้ทำงานร่วมกัน
👉 เริ่มระบบ:
adk web code_review_assistant
หลังจากเรียกใช้คำสั่ง adk web แล้ว คุณควรเห็นเอาต์พุตในเทอร์มินัลที่ระบุว่าเว็บเซิร์ฟเวอร์ ADK เริ่มทำงานแล้ว ซึ่งมีลักษณะคล้ายกับเอาต์พุตนี้
+-----------------------------------------------------------------------------+
| ADK Web Server started                                                      |
|                                                                             |
| For local testing, access at http://localhost:8000.                         |
+-----------------------------------------------------------------------------+

INFO:     Application startup complete.
INFO:     Uvicorn running on http://0.0.0.0:8000 (Press CTRL+C to quit)
👉 จากนั้น หากต้องการเข้าถึง UI สำหรับนักพัฒนาแอป ADK จากเบราว์เซอร์ ให้ทำดังนี้
จากไอคอนตัวอย่างเว็บ (มักจะมีลักษณะเป็นรูปดวงตาหรือสี่เหลี่ยมที่มีลูกศร) ในแถบเครื่องมือ Cloud Shell (มักจะอยู่ด้านขวาบน) ให้เลือกเปลี่ยนพอร์ต ในหน้าต่างป๊อปอัป ให้ตั้งค่าพอร์ตเป็น 8000 แล้วคลิก "เปลี่ยนและแสดงตัวอย่าง" จากนั้น Cloud Shell จะเปิดแท็บเบราว์เซอร์หรือหน้าต่างใหม่ที่แสดง UI ของ ADK Dev
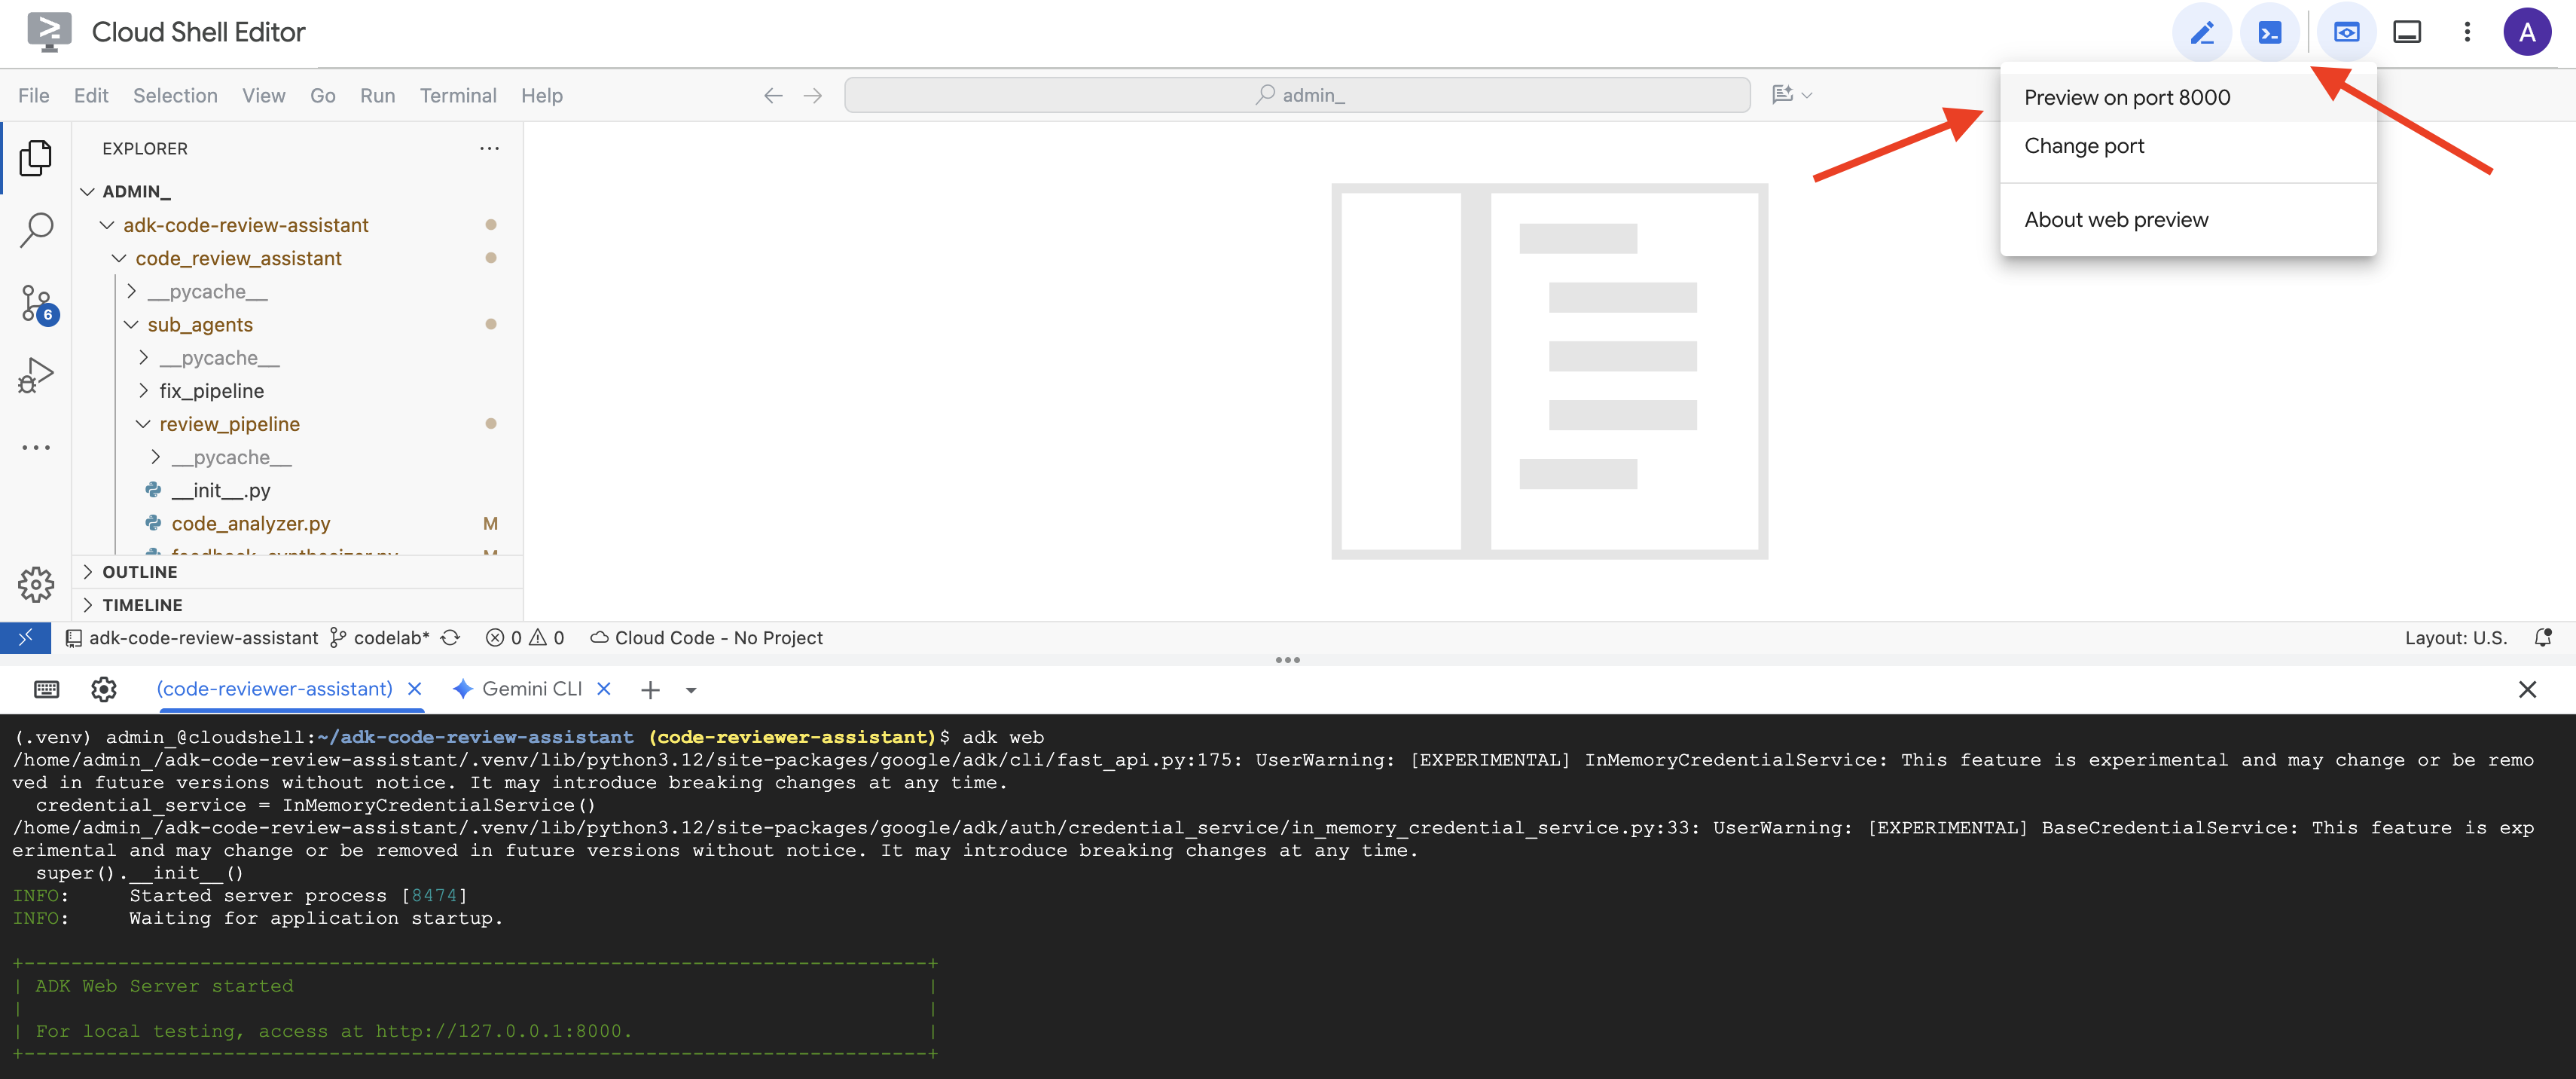
👉 ตอนนี้ Agent กำลังทำงาน UI สำหรับนักพัฒนาซอฟต์แวร์ ADK ในเบราว์เซอร์คือการเชื่อมต่อโดยตรงกับเอเจนต์
- เลือกเป้าหมาย: เลือกเอเจนต์
code_review_assistantในเมนูแบบเลื่อนลงที่ด้านบนของ UI
👉 พรอมต์ทดสอบ:
Please analyze the following:
def dfs_search_v1(graph, start, target):
    """Find if target is reachable from start."""
    visited = set()
    stack = start

    while stack:
        current = stack.pop()

        if current == target:
            return True

        if current not in visited:
            visited.add(current)

            for neighbor in graph[current]:
                if neighbor not in visited:
                    stack.append(neighbor)

    return False
👉 ดูไปป์ไลน์การรีวิวโค้ดที่ใช้งานจริง:
เมื่อส่งฟังก์ชัน dfs_search_v1 ที่มีข้อบกพร่อง คุณจะไม่ได้รับคำตอบเพียงคำตอบเดียว คุณกำลังเห็นไปป์ไลน์แบบหลายเอเจนต์ทำงาน เอาต์พุตการสตรีมที่คุณเห็นเป็นผลลัพธ์ของเอเจนต์เฉพาะทาง 4 รายที่ทำงานตามลำดับ โดยแต่ละรายจะสร้างต่อจากรายก่อนหน้า
ต่อไปนี้คือรายละเอียดของสิ่งที่เอเจนต์แต่ละรายมีส่วนร่วมในการตรวจสอบที่ครอบคลุมขั้นสุดท้าย ซึ่งจะเปลี่ยนข้อมูลดิบให้เป็นข้อมูลเชิงลึกที่นำไปใช้ได้จริง

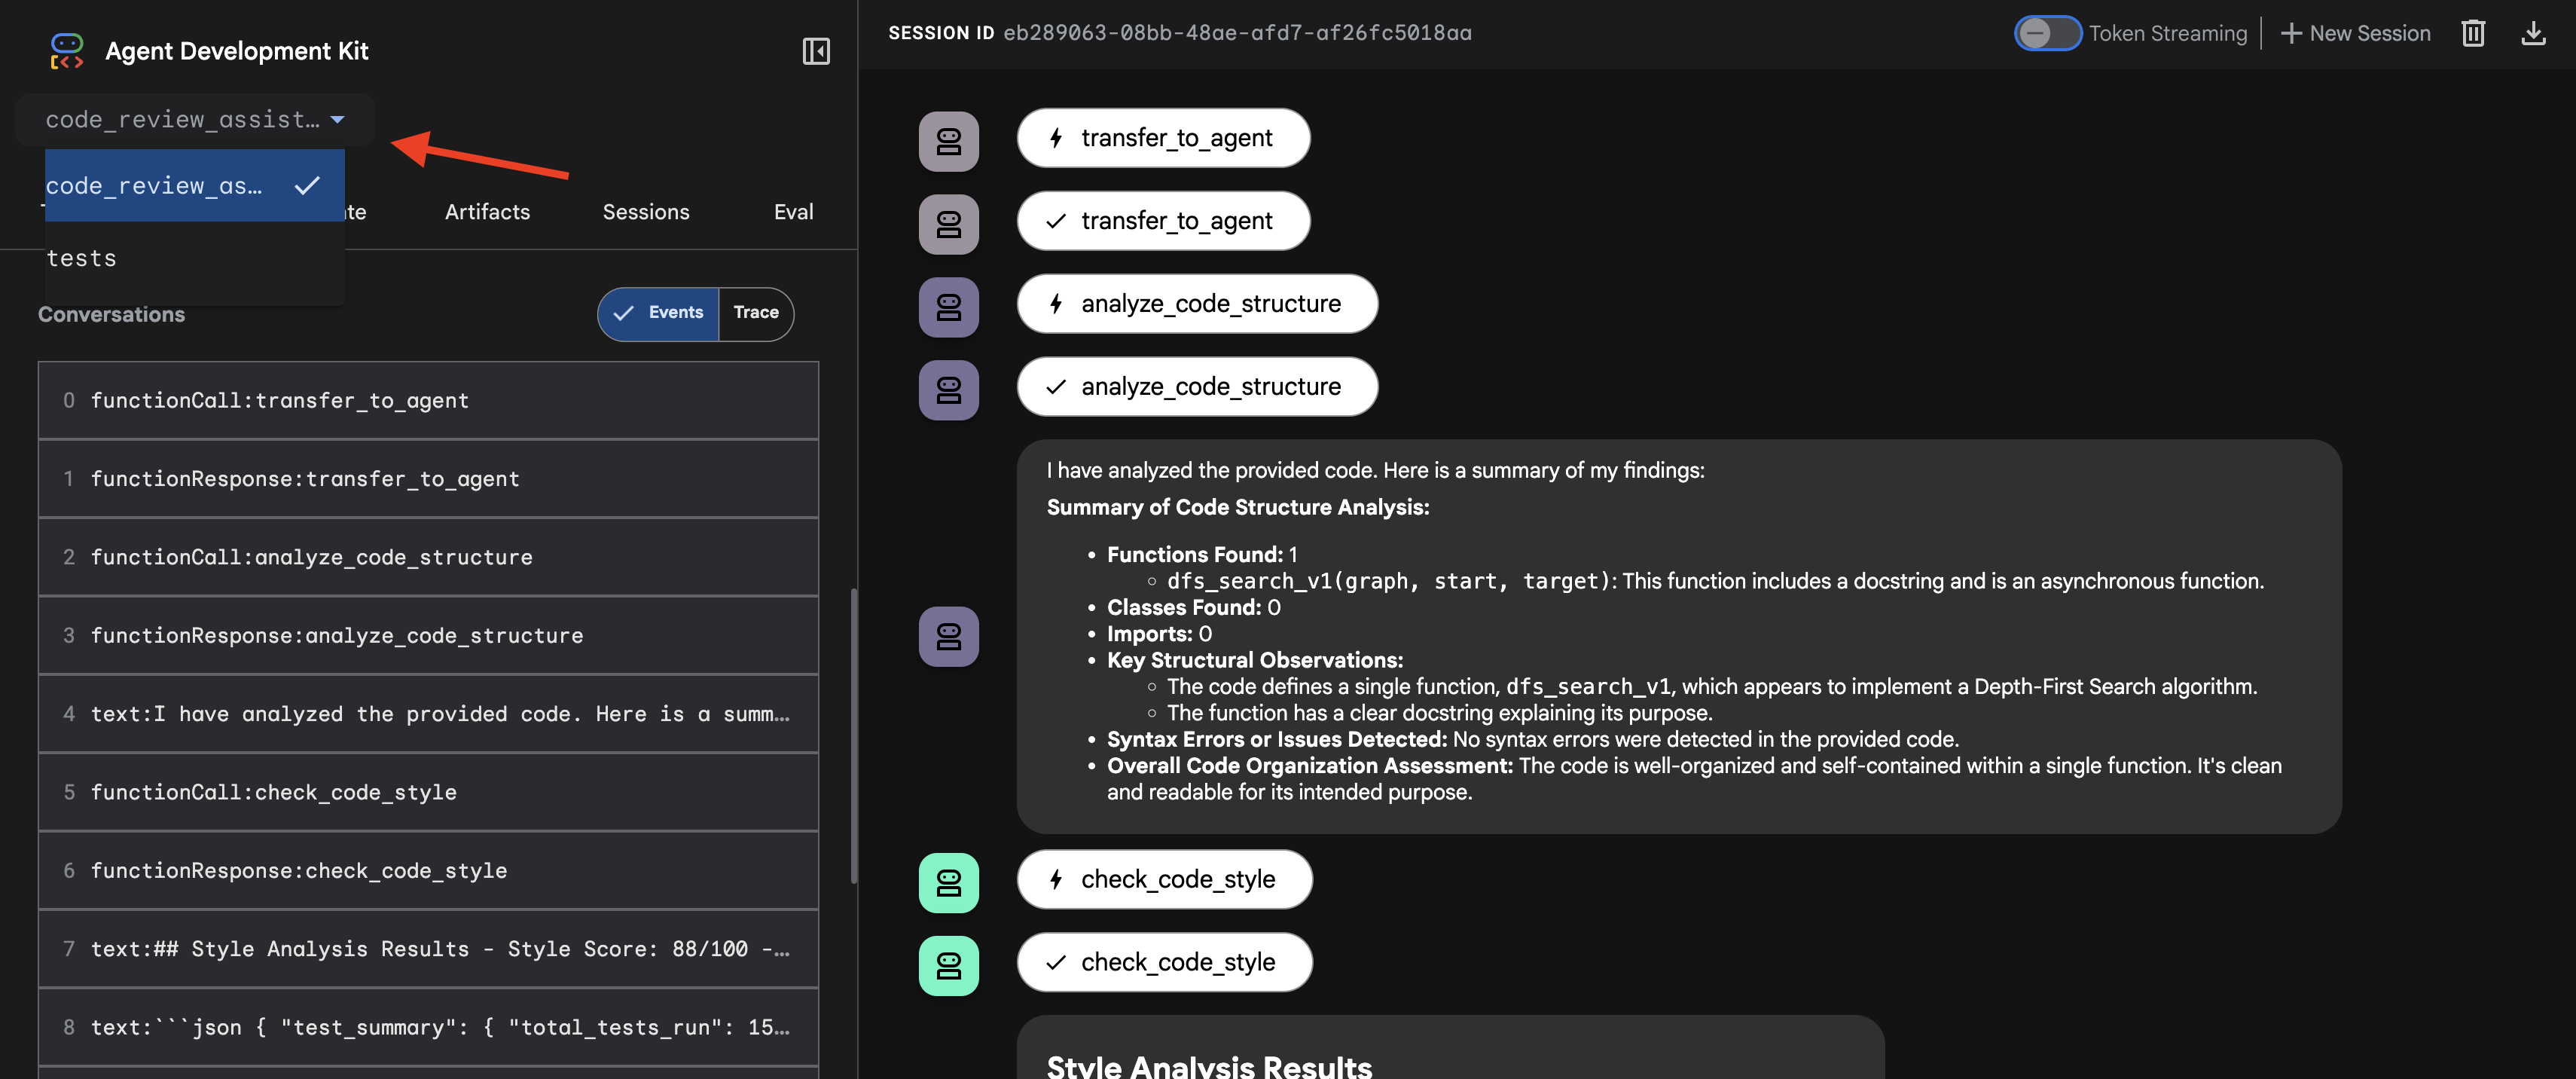
1. รายงานโครงสร้างของเครื่องมือวิเคราะห์โค้ด
ก่อนอื่น CodeAnalyzerเอเจนต์จะได้รับโค้ดดิบ โดยจะไม่คาดเดาว่าโค้ดทำอะไร แต่จะใช้เครื่องมือ analyze_code_structure เพื่อทำการแยกวิเคราะห์ Abstract Syntax Tree (AST) ที่กำหนด
เอาต์พุตของเครื่องมือนี้คือข้อมูลที่แท้จริงเกี่ยวกับโครงสร้างของโค้ด
The analysis of the provided code reveals the following:

Summary:
- Functions Found: 1
- Classes Found: 0

Key Structural Observations:
- A single function, dfs_search_v1, is defined.
- It includes a docstring: "Find if target is reachable from start."
- No syntax errors were detected.

Overall Code Organization Assessment:
- The code snippet is a well-defined, self-contained function.
⭐ คุณค่า: ขั้นตอนเริ่มต้นนี้จะช่วยสร้างรากฐานที่สะอาดและเชื่อถือได้สำหรับเอเจนต์อื่นๆ โดยจะยืนยันว่าโค้ดเป็น Python ที่ถูกต้องและระบุคอมโพเนนต์ที่ต้องตรวจสอบอย่างชัดเจน
2. การตรวจสอบ PEP 8 ของเครื่องมือตรวจสอบสไตล์
จากนั้น Agent StyleChecker จะเข้ามาดูแลต่อ โดยจะอ่านโค้ดจากสถานะที่แชร์และใช้เครื่องมือ check_code_style ซึ่งใช้ประโยชน์จาก Linter ของ pycodestyle
ผลลัพธ์คือคะแนนคุณภาพที่วัดได้และการละเมิดที่เฉพาะเจาะจง
Style Analysis Results
- Style Score: 88/100
- Total Issues: 6
- Assessment: Good style with minor improvements needed

Top Style Issues
- Line 5, W293: blank line contains whitespace
- Line 19, W292: no newline at end of file
⭐ คุณค่า: เอเจนต์นี้ให้ความคิดเห็นที่เป็นกลางและไม่สามารถต่อรองได้ตามมาตรฐานชุมชนที่กำหนดไว้ (PEP 8) ระบบการให้คะแนนแบบถ่วงน้ำหนักจะแจ้งให้ผู้ใช้ทราบถึงความรุนแรงของปัญหาทันที
3. การค้นพบข้อบกพร่องที่สำคัญของ Test Runner
ซึ่งเป็นจุดที่ระบบทำการวิเคราะห์ได้ลึกซึ้งกว่าระดับพื้นผิว TestRunner เอเจนต์จะสร้างและเรียกใช้ชุดการทดสอบที่ครอบคลุมเพื่อตรวจสอบลักษณะการทำงานของโค้ด
เอาต์พุตของโมเดลคือออบเจ็กต์ JSON ที่มีโครงสร้างซึ่งมีคำตัดสินที่รุนแรง
{
  "critical_issues": [
    {
      "type": "Critical Bug",
      "description": "The function's initialization `stack = start` is incorrect... When a common input like a string... is provided... the function crashes with an AttributeError.",
      "severity": "Critical"
    }
  ],
  "verdict": {
    "status": "BROKEN",
    "confidence": "high",
    "recommendation": "The function is fundamentally broken... the stack initialization line `stack = start` must be changed to `stack = [start]`."
  }
}
⭐ คุณค่า: ข้อมูลเชิงลึกนี้มีความสำคัญมากที่สุด เอเจนต์ไม่ได้เดา แต่พิสูจน์ว่าโค้ดใช้ไม่ได้ด้วยการเรียกใช้ โดยพบข้อบกพร่องรันไทม์ที่เล็กน้อยแต่สำคัญ ซึ่งผู้ตรวจสอบที่เป็นมนุษย์อาจพลาดได้ง่าย และระบุสาเหตุที่แน่นอนพร้อมการแก้ไขที่จำเป็น
4. รายงานสุดท้ายของเครื่องมือสังเคราะห์ความคิดเห็น
สุดท้าย FeedbackSynthesizerเอเจนต์จะทำหน้าที่เป็นตัวนำ โดยจะนำ Structured Data จากเอเจนต์ 3 คนก่อนหน้ามาสร้างเป็นรายงานเดียวที่ใช้งานง่าย ซึ่งทั้งวิเคราะห์และให้กำลังใจได้
เอาต์พุตของโมเดลคือรีวิวขั้นสุดท้ายที่ได้รับการขัดเกลาแล้วที่คุณเห็น
📊 Summary
Great effort on implementing the Depth-First Search algorithm! ... However, a critical bug in the initialization of the stack prevents the function from working correctly...

✅ Strengths
- Good Algorithm Structure
- Correct Use of `visited` Set

📈 Code Quality Analysis
...
### Style Compliance
The style analysis returned a good score of 88/100.
...
### Test Results
The automated testing revealed a critical issue... The line `stack = start` directly assigns the input... which results in an `AttributeError`.

💡 Recommendations for Improvement
**Fix the Critical Stack Initialization Bug:**
- Incorrect Code: `stack = start`
- Correct Code: `stack = [start]`

💬 Encouragement
You are very close to a perfect implementation! The core logic of your DFS algorithm is sound, which is the hardest part.
⭐ คุณค่า: เอเจนต์นี้จะเปลี่ยนข้อมูลทางเทคนิคให้เป็นประสบการณ์การเรียนรู้ที่เป็นประโยชน์ โดยจะให้ความสำคัญกับปัญหาที่สำคัญที่สุด (ข้อบกพร่อง) อธิบายอย่างชัดเจน ระบุวิธีแก้ปัญหาที่แน่นอน และใช้ภาษาที่ให้กำลังใจ โดยจะรวมผลลัพธ์จากทุกขั้นตอนก่อนหน้าเข้าด้วยกันอย่างสอดคล้องและมีคุณค่า
กระบวนการแบบหลายระดับนี้แสดงให้เห็นถึงประสิทธิภาพของไปป์ไลน์แบบเป็น Agent คุณจะได้รับการวิเคราะห์แบบเลเยอร์แทนที่จะเป็นคำตอบแบบก้อนเดียว โดยที่เอเจนต์แต่ละรายจะทำงานเฉพาะทางที่ตรวจสอบได้ ซึ่งจะช่วยให้การตรวจสอบไม่เพียงแต่ให้ข้อมูลเชิงลึกเท่านั้น แต่ยังมีความแน่นอน เชื่อถือได้ และให้ความรู้ในเชิงลึกอีกด้วย
👉💻 เมื่อทดสอบเสร็จแล้ว ให้กลับไปที่เทอร์มินัลของเครื่องมือแก้ไข Cloud Shell แล้วกด Ctrl+C เพื่อหยุด UI สำหรับนักพัฒนา ADK
สิ่งที่คุณสร้าง
ตอนนี้คุณมีไปป์ไลน์การรีวิวโค้ดที่สมบูรณ์แล้ว ซึ่งมีลักษณะดังนี้
✅ แยกวิเคราะห์โครงสร้างโค้ด - การวิเคราะห์ AST ที่กำหนดได้ด้วยฟังก์ชันตัวช่วย
✅ ตรวจสอบสไตล์ - การให้คะแนนแบบถ่วงน้ำหนักตามแบบแผนการตั้งชื่อ
✅ เรียกใช้การทดสอบ - การสร้างการทดสอบที่ครอบคลุมพร้อมเอาต์พุต JSON ที่มีโครงสร้าง
✅ สังเคราะห์ความคิดเห็น - ผสานรวมสถานะ + หน่วยความจำ + อาร์ติแฟกต์
✅ ติดตามความคืบหน้า - สถานะหลายระดับในการเรียกใช้/เซสชัน/ผู้ใช้
✅ เรียนรู้เมื่อเวลาผ่านไป - บริการหน่วยความจำสำหรับรูปแบบข้ามเซสชัน
✅ จัดเตรียมอาร์ติแฟกต์ - รายงาน JSON ที่ดาวน์โหลดได้พร้อมบันทึกการตรวจสอบที่สมบูรณ์
แนวคิดหลักที่เชี่ยวชาญ
ไปป์ไลน์แบบลำดับ
- Agent 4 รายที่ดำเนินการตามลำดับอย่างเคร่งครัด
- แต่ละรายการจะเพิ่มคุณค่าให้กับสถานะสำหรับรายการถัดไป
- ทรัพยากร Dependency จะกำหนดลำดับการดำเนินการ
รูปแบบการผลิต:
- การแยกฟังก์ชันตัวช่วย (ซิงค์ใน Thread Pool)
- การลดลงอย่างค่อยเป็นค่อยไป (กลยุทธ์สำรอง)
- การจัดการสถานะแบบหลายระดับ (ชั่วคราว/เซสชัน/ผู้ใช้)
- ผู้ให้บริการคำสั่งแบบไดนามิก (รับรู้บริบท)
- พื้นที่เก็บข้อมูลคู่ (อาร์ติแฟกต์ + ความซ้ำซ้อนของสถานะ)
สถานะเป็นการสื่อสาร:
- ค่าคงที่จะช่วยป้องกันการพิมพ์ผิดใน Agent
output_keyเขียนข้อมูลสรุปของ Agent ไปยังสถานะ- อ่าน Agent ในภายหลังผ่าน StateKeys
- สถานะจะไหลผ่านไปป์ไลน์ในเชิงเส้น
หน่วยความจำเทียบกับสถานะ:
- สถานะ: ข้อมูลเซสชันปัจจุบัน
- หน่วยความจำ: รูปแบบในเซสชัน
- วัตถุประสงค์ที่แตกต่างกัน อายุการใช้งานที่แตกต่างกัน
การจัดการเป็นกลุ่มเครื่องมือ:
- เอเจนต์แบบเครื่องมือเดียว (analyzer, style_checker)
- ตัวดำเนินการในตัว (test_runner)
- การประสานงานแบบหลายเครื่องมือ (เครื่องสังเคราะห์เสียง)
กลยุทธ์การเลือกโมเดล:
- โมเดล Worker: งานเชิงกล (การแยกวิเคราะห์ การตรวจสอบ การกำหนดเส้นทาง)
- โมเดลนักวิจารณ์: งานการให้เหตุผล (การทดสอบ การสังเคราะห์)
- การเพิ่มประสิทธิภาพต้นทุนผ่านการเลือกที่เหมาะสม
ขั้นตอนถัดไป
ในโมดูลที่ 6 คุณจะสร้างไปป์ไลน์การแก้ไขโดยทำดังนี้
- สถาปัตยกรรม LoopAgent สำหรับการแก้ไขแบบวนซ้ำ
- เงื่อนไขการสิ้นสุดผ่านการส่งต่อ
- การสะสมสถานะในแต่ละการทำซ้ำ
- ตรรกะการตรวจสอบและการลองอีกครั้ง
- การผสานรวมกับไปป์ไลน์รีวิวเพื่อเสนอการแก้ไข
คุณจะเห็นว่ารูปแบบสถานะเดียวกันนี้ปรับขนาดให้เข้ากับเวิร์กโฟลว์ที่ซับซ้อนซึ่งมีการทำซ้ำได้โดยที่เอเจนต์จะพยายามหลายครั้งจนกว่าจะสำเร็จ และวิธีประสานงานไปป์ไลน์หลายรายการในแอปพลิเคชันเดียว
6. การเพิ่มไปป์ไลน์การแก้ไข: สถาปัตยกรรมลูป

บทนำ
ในโมดูลที่ 5 คุณได้สร้างไปป์ไลน์การตรวจสอบตามลำดับที่วิเคราะห์โค้ดและให้ความคิดเห็น แต่การระบุปัญหาเป็นเพียงครึ่งหนึ่งของวิธีแก้ปัญหาเท่านั้น นักพัฒนาแอปยังต้องการความช่วยเหลือในการแก้ไขปัญหาด้วย
โมดูลนี้สร้างไปป์ไลน์การแก้ไขอัตโนมัติซึ่งมีลักษณะดังนี้
- สร้างการแก้ไขตามผลการตรวจสอบ
- ตรวจสอบการแก้ไขโดยการเรียกใช้การทดสอบที่ครอบคลุม
- ลองอีกครั้งโดยอัตโนมัติหากการแก้ไขไม่ได้ผล (สูงสุด 3 ครั้ง)
- ผลลัพธ์ของรายงานที่มีการเปรียบเทียบก่อน/หลัง
แนวคิดหลัก: LoopAgent สำหรับการลองใหม่โดยอัตโนมัติ LoopAgent จะเรียกใช้ตัวแทนย่อยซ้ำจนกว่าจะตรงตามเงื่อนไขการออกหรือถึงการวนซ้ำสูงสุด ซึ่งแตกต่างจากตัวแทนแบบลำดับที่จะเรียกใช้เพียงครั้งเดียว เครื่องมือจะส่งสัญญาณความสำเร็จโดยการตั้งค่า tool_context.actions.escalate = True
ตัวอย่างสิ่งที่คุณจะสร้าง: ส่งโค้ดที่มีข้อบกพร่อง → การตรวจสอบระบุปัญหา → ลูปการแก้ไขสร้างการแก้ไข → การทดสอบตรวจสอบความถูกต้อง → ลองอีกครั้งหากจำเป็น → รายงานที่ครอบคลุมขั้นสุดท้าย
แนวคิดหลัก: LoopAgent เทียบกับ Sequential
ไปป์ไลน์แบบลำดับ (โมดูล 5):
SequentialAgent(agents=[A, B, C])
# Executes: A → B → C → Done
- การไหลทางเดียว
- โดย Agent แต่ละตัวจะทำงานเพียงครั้งเดียว
- ไม่มีตรรกะการลองใหม่
ไปป์ไลน์ของ Loop (โมดูล 6):
LoopAgent(agents=[A, B, C], max_iterations=3)
# Executes: A → B → C → (check exit) → A → B → C → (check exit) → ...
- การไหลเวียนแบบวนซ้ำ
- เอเจนต์สามารถทำงานได้หลายครั้ง
- ออกจากโปรแกรมเมื่อ:
- เครื่องมือตั้งค่า
tool_context.actions.escalate = True(สำเร็จ) max_iterationsถึงขีดจำกัดแล้ว (ขีดจำกัดความปลอดภัย)- เกิดข้อยกเว้นที่ไม่มีการจัดการ (ข้อผิดพลาด)
- เครื่องมือตั้งค่า
เหตุใดจึงใช้ลูปในการแก้ไขโค้ด
การแก้ไขโค้ดมักต้องลองหลายครั้ง
- ความพยายามครั้งแรก: แก้ไขข้อบกพร่องที่เห็นได้ชัด (ประเภทตัวแปรไม่ถูกต้อง)
- ความพยายามครั้งที่ 2: แก้ไขปัญหาที่ 2 ที่การทดสอบพบ (กรณีข้อยกเว้น)
- ความพยายามครั้งที่ 3: ปรับแต่งและตรวจสอบว่าการทดสอบทั้งหมดผ่าน
หากไม่มีลูป คุณจะต้องใช้ตรรกะแบบมีเงื่อนไขที่ซับซ้อนในคำสั่งของเอเจนต์ เมื่อใช้ LoopAgent ระบบจะลองอีกครั้งโดยอัตโนมัติ
การเปรียบเทียบสถาปัตยกรรม:
Sequential (Module 5):
User → Review Pipeline → Feedback → Done

Loop (Module 6):
User → Review Pipeline → Feedback → Fix Pipeline
                                         ↓
                          ┌──────────────┴──────────────┐
                          │   Fix Attempt Loop (1-3x)   │
                          │  ┌─────────────────────┐    │
                          │  │ 1. Generate Fixes   │    │
                          │  │ 2. Test Fixes       │    │
                          │  │ 3. Validate & Exit? │────┼─→ If escalate=True
                          │  └─────────────────────┘    │      exit loop
                          │         ↓ If not            │
                          │    Try Again (max 3)        │
                          └─────────────────────────────┘
                                     ↓
                          4. Synthesize Final Report → Done
ขั้นตอนที่ 1: เพิ่มตัวแทนแก้ไขโค้ด
ตัวแก้ไขโค้ดจะสร้างโค้ด Python ที่แก้ไขแล้วตามผลการตรวจสอบ
👉 เปิด
code_review_assistant/sub_agents/fix_pipeline/code_fixer.py
👉 ค้นหา:
# MODULE_6_STEP_1_CODE_FIXER_INSTRUCTION_PROVIDER
👉 แทนที่บรรทัดเดียวด้วย
async def code_fixer_instruction_provider(context: ReadonlyContext) -> str:
    """Dynamic instruction provider that injects state variables."""
    template = """You are an expert code fixing specialist.

Original Code:
{code_to_review}

Analysis Results:
- Style Score: {style_score}/100
- Style Issues: {style_issues}
- Test Results: {test_execution_summary}

Based on the test results, identify and fix ALL issues including:
- Interface bugs (e.g., if start parameter expects wrong type)
- Logic errors (e.g., KeyError when accessing graph nodes)
- Style violations
- Missing documentation

YOUR TASK:
Generate the complete fixed Python code that addresses all identified issues.

CRITICAL INSTRUCTIONS:
- Output ONLY the corrected Python code
- Do NOT include markdown code blocks (```python)
- Do NOT include any explanations or commentary
- The output should be valid, executable Python code and nothing else

Common fixes to apply based on test results:
- If tests show AttributeError with 'pop', fix: stack = [start] instead of stack = start
- If tests show KeyError accessing graph, fix: use graph.get(current, [])
- Add docstrings if missing
- Fix any style violations identified

Output the complete fixed code now:"""

    return await instructions_utils.inject_session_state(template, context)
👉 ค้นหา:
# MODULE_6_STEP_1_CODE_FIXER_AGENT
👉 แทนที่บรรทัดเดียวด้วย
code_fixer_agent = Agent(
    name="CodeFixer",
    model=config.worker_model,
    description="Generates comprehensive fixes for all identified code issues",
    instruction=code_fixer_instruction_provider,
    code_executor=BuiltInCodeExecutor(),
    output_key="code_fixes"
)
ขั้นตอนที่ 2: เพิ่ม Fix Test Runner Agent
โปรแกรมเรียกใช้การทดสอบการแก้ไขจะตรวจสอบความถูกต้องของการแก้ไขโดยการเรียกใช้การทดสอบที่ครอบคลุมในโค้ดที่แก้ไข
👉 เปิด
code_review_assistant/sub_agents/fix_pipeline/fix_test_runner.py
👉 ค้นหา:
# MODULE_6_STEP_2_FIX_TEST_RUNNER_INSTRUCTION_PROVIDER
👉 แทนที่บรรทัดเดียวด้วย
async def fix_test_runner_instruction_provider(context: ReadonlyContext) -> str:
    """Dynamic instruction provider that uses the clean code from the previous step."""
    template = """You are responsible for validating the fixed code by running tests.

THE FIXED CODE TO TEST:
{code_fixes}

ORIGINAL TEST RESULTS: {test_execution_summary}

YOUR TASK:
1. Understand the fixes that were applied
2. Generate the same comprehensive tests (15-20 test cases)
3. Execute the tests on the FIXED code using your code executor
4. Compare results with original test results
5. Output a detailed JSON analysis

TESTING METHODOLOGY:
- Run the same tests that revealed issues in the original code
- Verify that previously failing tests now pass
- Ensure no regressions were introduced
- Document the improvement

Execute your tests and output ONLY valid JSON with this structure:
- "passed": number of tests that passed
- "failed": number of tests that failed
- "total": total number of tests
- "pass_rate": percentage as a number
- "comparison": object with "original_pass_rate", "new_pass_rate", "improvement"
- "newly_passing_tests": array of test names that now pass
- "still_failing_tests": array of test names still failing

Do NOT output the test code itself, only the JSON analysis."""

    return await instructions_utils.inject_session_state(template, context)
👉 ค้นหา:
# MODULE_6_STEP_2_FIX_TEST_RUNNER_AGENT
👉 แทนที่บรรทัดเดียวด้วย
fix_test_runner_agent = Agent(
    name="FixTestRunner",
    model=config.critic_model,
    description="Runs comprehensive tests on fixed code to verify all issues are resolved",
    instruction=fix_test_runner_instruction_provider,
    code_executor=BuiltInCodeExecutor(),
    output_key="fix_test_execution_summary"
)
ขั้นตอนที่ 3: เพิ่ม Fix Validator Agent
เครื่องมือตรวจสอบจะตรวจสอบว่าการแก้ไขสำเร็จหรือไม่ และตัดสินใจว่าจะออกจากลูปหรือไม่
ทำความเข้าใจเครื่องมือ
ก่อนอื่น ให้เพิ่มเครื่องมือ 3 อย่างที่โปรแกรมตรวจสอบต้องการ
👉 เปิด
code_review_assistant/tools.py
👉 ค้นหา:
# MODULE_6_STEP_3_VALIDATE_FIXED_STYLE
👉 แทนที่ด้วยเครื่องมือ 1 - ตัวตรวจสอบสไตล์:
async def validate_fixed_style(tool_context: ToolContext) -> Dict[str, Any]:
    """
    Validates style compliance of the fixed code.

    Args:
        tool_context: ADK tool context containing fixed code in state

    Returns:
        Dictionary with style validation results
    """
    logger.info("Tool: Validating style of fixed code...")

    try:
        # Get the fixed code from state
        code_fixes = tool_context.state.get(StateKeys.CODE_FIXES, '')

        # Try to extract from markdown if present
        if '```python' in code_fixes:
            start = code_fixes.rfind('```python') + 9
            end = code_fixes.rfind('```')
            if start < end:
                code_fixes = code_fixes[start:end].strip()

        if not code_fixes:
            return {
                "status": "error",
                "message": "No fixed code found in state"
            }

        # Store the extracted fixed code
        tool_context.state[StateKeys.CODE_FIXES] = code_fixes

        # Run style check on fixed code
        loop = asyncio.get_event_loop()
        with ThreadPoolExecutor() as executor:
            style_result = await loop.run_in_executor(
                executor, _perform_style_check, code_fixes
            )

        # Compare with original
        original_score = tool_context.state.get(StateKeys.STYLE_SCORE, 0)
        improvement = style_result['score'] - original_score

        # Store results
        tool_context.state[StateKeys.FIXED_STYLE_SCORE] = style_result['score']
        tool_context.state[StateKeys.FIXED_STYLE_ISSUES] = style_result['issues']

        logger.info(f"Tool: Fixed code style score: {style_result['score']}/100 "
                    f"(improvement: +{improvement})")

        return {
            "status": "success",
            "fixed_style_score": style_result['score'],
            "original_style_score": original_score,
            "improvement": improvement,
            "remaining_issues": style_result['issues'],
            "perfect_style": style_result['score'] == 100
        }

    except Exception as e:
        logger.error(f"Tool: Style validation failed: {e}", exc_info=True)
        return {
            "status": "error",
            "message": str(e)
        }
👉 ค้นหา:
# MODULE_6_STEP_3_COMPILE_FIX_REPORT
👉 แทนที่ด้วยเครื่องมือ 2 - ตัวรวบรวมรายงาน:
async def compile_fix_report(tool_context: ToolContext) -> Dict[str, Any]:
    """
    Compiles comprehensive report of the fix process.

    Args:
        tool_context: ADK tool context with all fix pipeline data

    Returns:
        Comprehensive fix report
    """
    logger.info("Tool: Compiling comprehensive fix report...")

    try:
        # Gather all data
        original_code = tool_context.state.get(StateKeys.CODE_TO_REVIEW, '')
        code_fixes = tool_context.state.get(StateKeys.CODE_FIXES, '')

        # Test results
        original_tests = tool_context.state.get(StateKeys.TEST_EXECUTION_SUMMARY, {})
        fixed_tests = tool_context.state.get(StateKeys.FIX_TEST_EXECUTION_SUMMARY, {})

        # Parse if strings
        if isinstance(original_tests, str):
            try:
                original_tests = json.loads(original_tests)
            except:
                original_tests = {}

        if isinstance(fixed_tests, str):
            try:
                fixed_tests = json.loads(fixed_tests)
            except:
                fixed_tests = {}

        # Extract pass rates
        original_pass_rate = 0
        if original_tests:
            if 'pass_rate' in original_tests:
                original_pass_rate = original_tests['pass_rate']
            elif 'test_summary' in original_tests:
                # Handle test_runner_agent's JSON structure
                summary = original_tests['test_summary']
                total = summary.get('total_tests_run', 0)
                passed = summary.get('tests_passed', 0)
                if total > 0:
                    original_pass_rate = (passed / total) * 100
            elif 'passed' in original_tests and 'total' in original_tests:
                if original_tests['total'] > 0:
                    original_pass_rate = (original_tests['passed'] / original_tests['total']) * 100

        fixed_pass_rate = 0
        all_tests_pass = False
        if fixed_tests:
            if 'pass_rate' in fixed_tests:
                fixed_pass_rate = fixed_tests['pass_rate']
                all_tests_pass = fixed_tests.get('failed', 1) == 0
            elif 'passed' in fixed_tests and 'total' in fixed_tests:
                if fixed_tests['total'] > 0:
                    fixed_pass_rate = (fixed_tests['passed'] / fixed_tests['total']) * 100
                all_tests_pass = fixed_tests.get('failed', 0) == 0

        # Style scores
        original_style = tool_context.state.get(StateKeys.STYLE_SCORE, 0)
        fixed_style = tool_context.state.get(StateKeys.FIXED_STYLE_SCORE, 0)

        # Calculate improvements
        test_improvement = {
            'original_pass_rate': original_pass_rate,
            'fixed_pass_rate': fixed_pass_rate,
            'improvement': fixed_pass_rate - original_pass_rate,
            'all_tests_pass': all_tests_pass
        }

        style_improvement = {
            'original_score': original_style,
            'fixed_score': fixed_style,
            'improvement': fixed_style - original_style,
            'perfect_style': fixed_style == 100
        }

        # Determine overall status
        if all_tests_pass and style_improvement['perfect_style']:
            fix_status = 'SUCCESSFUL'
            status_emoji = '✅'
        elif test_improvement['improvement'] > 0 or style_improvement['improvement'] > 0:
            fix_status = 'PARTIAL'
            status_emoji = '⚠️'
        else:
            fix_status = 'FAILED'
            status_emoji = '❌'

        # Build comprehensive report
        report = {
            'status': fix_status,
            'status_emoji': status_emoji,
            'timestamp': datetime.now().isoformat(),
            'original_code': original_code,
            'code_fixes': code_fixes,
            'improvements': {
                'tests': test_improvement,
                'style': style_improvement
            },
            'summary': f"{status_emoji} Fix Status: {fix_status}\n"
                      f"Tests: {original_pass_rate:.1f}% → {fixed_pass_rate:.1f}%\n"
                      f"Style: {original_style}/100 → {fixed_style}/100"
        }

        # Store report in state
        tool_context.state[StateKeys.FIX_REPORT] = report
        tool_context.state[StateKeys.FIX_STATUS] = fix_status

        logger.info(f"Tool: Fix report compiled - Status: {fix_status}")
        logger.info(f"Tool: Test improvement: {original_pass_rate:.1f}% → {fixed_pass_rate:.1f}%")
        logger.info(f"Tool: Style improvement: {original_style} → {fixed_style}")

        return {
            "status": "success",
            "fix_status": fix_status,
            "report": report
        }

    except Exception as e:
        logger.error(f"Tool: Failed to compile fix report: {e}", exc_info=True)
        return {
            "status": "error",
            "message": str(e)
        }
👉 ค้นหา:
# MODULE_6_STEP_3_EXIT_FIX_LOOP
👉 แทนที่ด้วยเครื่องมือ 3 - สัญญาณการออกจากลูป:
def exit_fix_loop(tool_context: ToolContext) -> Dict[str, Any]:
    """
    Signal that fixing is complete and should exit the loop.

    Args:
        tool_context: ADK tool context

    Returns:
        Confirmation message
    """
    logger.info("Tool: Setting escalate flag to exit fix loop")

    # This is the critical line that exits the LoopAgent
    tool_context.actions.escalate = True

    return {
        "status": "success",
        "message": "Fix complete, exiting loop"
    }
สร้างเอเจนต์ตรวจสอบความถูกต้อง
👉 เปิด
code_review_assistant/sub_agents/fix_pipeline/fix_validator.py
👉 ค้นหา:
# MODULE_6_STEP_3_FIX_VALIDATOR_INSTRUCTION_PROVIDER
👉 แทนที่บรรทัดเดียวด้วย
async def fix_validator_instruction_provider(context: ReadonlyContext) -> str:
    """Dynamic instruction provider that injects state variables."""
    template = """You are the final validation specialist for code fixes.

You have access to:
- Original issues from initial review
- Applied fixes: {code_fixes}
- Test results after fix: {fix_test_execution_summary}
- All state data from the fix process

Your responsibilities:
1. Use validate_fixed_style tool to check style compliance of fixed code
   - Pass no arguments, it will retrieve fixed code from state
2. Use compile_fix_report tool to generate comprehensive report
   - Pass no arguments, it will gather all data from state
3. Based on the report, determine overall fix status:
   - ✅ SUCCESSFUL: All tests pass, style score 100
   - ⚠️ PARTIAL: Improvements made but issues remain
   - ❌ FAILED: Fix didn't work or made things worse

4. CRITICAL: If status is SUCCESSFUL, call the exit_fix_loop tool to stop iterations
   - This prevents unnecessary additional fix attempts
   - If not successful, the loop will continue for another attempt

5. Provide clear summary of:
   - What was fixed
   - What improvements were achieved
   - Any remaining issues requiring manual attention

Be precise and quantitative in your assessment.
"""
    return await instructions_utils.inject_session_state(template, context)
👉 ค้นหา:
# MODULE_6_STEP_3_FIX_VALIDATOR_AGENT
👉 แทนที่บรรทัดเดียวด้วย
fix_validator_agent = Agent(
    name="FixValidator",
    model=config.worker_model,
    description="Validates fixes and generates final fix report",
    instruction=fix_validator_instruction_provider,
    tools=[
        FunctionTool(func=validate_fixed_style),
        FunctionTool(func=compile_fix_report),
        FunctionTool(func=exit_fix_loop)
    ],
    output_key="final_fix_report"
)
ขั้นตอนที่ 4: ทำความเข้าใจเงื่อนไขการออกของ LoopAgent
LoopAgent มีวิธีออก 3 วิธีดังนี้
1. ออกจากการสนทนาสำเร็จ (ผ่านการส่งต่อ)
# Inside any tool in the loop:
tool_context.actions.escalate = True

# Effect: Loop completes current iteration, then exits
# Use when: Fix is successful and no more attempts needed
ลำดับการทำงานตัวอย่าง
Iteration 1:
  CodeFixer → generates fixes
  FixTestRunner → tests show 90% pass rate
  FixValidator → compiles report, sees PARTIAL status
  → Does NOT set escalate
  → Loop continues

Iteration 2:
  CodeFixer → refines fixes based on failures
  FixTestRunner → tests show 100% pass rate
  FixValidator → compiles report, sees SUCCESSFUL status
  → Calls exit_fix_loop() which sets escalate = True
  → Loop exits after this iteration
2. Max Iterations Exit
LoopAgent(
    name="FixAttemptLoop",
    sub_agents=[...],
    max_iterations=3  # Safety limit
)

# Effect: After 3 complete iterations, loop exits regardless of escalate
# Use when: Prevent infinite loops if fixes never succeed
ลำดับการทำงานตัวอย่าง
Iteration 1: PARTIAL (continue)
Iteration 2: PARTIAL (continue)
Iteration 3: PARTIAL (but max reached)
→ Loop exits, synthesizer presents best attempt
3. ออกเนื่องจากข้อผิดพลาด
# If any agent throws unhandled exception:
raise Exception("Unexpected error")

# Effect: Loop exits immediately with error state
# Use when: Critical failure that can't be recovered
การเปลี่ยนแปลงสถานะในแต่ละการทำซ้ำ:
การวนซ้ำแต่ละครั้งจะเห็นสถานะที่อัปเดตจากการพยายามครั้งก่อน
# Before Iteration 1:
state = {
    "code_to_review": "def add(a,b):return a+b",  # Original
    "style_score": 40,
    "test_execution_summary": {...}
}

# After Iteration 1:
state = {
    "code_to_review": "def add(a,b):return a+b",  # Unchanged
    "code_fixes": "def add(a, b):\n    return a + b",  # NEW
    "style_score": 40,  # Unchanged
    "fixed_style_score": 100,  # NEW
    "test_execution_summary": {...},  # Unchanged
    "fix_test_execution_summary": {...}  # NEW
}

# Iteration 2 starts with all this state
# If fixes still not perfect, code_fixes gets overwritten
เหตุผล
escalate
แทนที่จะใช้ค่าที่ส่งคืน:
# Bad: Using return value to signal exit
def validator_agent():
    report = compile_report()
    if report['status'] == 'SUCCESSFUL':
        return {"exit": True}  # How does loop know?

# Good: Using escalate
def validator_tool(tool_context):
    report = compile_report()
    if report['status'] == 'SUCCESSFUL':
        tool_context.actions.escalate = True  # Loop knows immediately
    return {"report": report}
ข้อดี
- ใช้งานได้จากเครื่องมือใดก็ได้ ไม่ใช่แค่เครื่องมือล่าสุด
- ไม่รบกวนข้อมูลการคืนสินค้า
- ความหมายเชิงความหมายที่ชัดเจน
- เฟรมเวิร์กจะจัดการตรรกะการออก
ขั้นตอนที่ 5: เชื่อมต่อ Fix Pipeline
👉 เปิด
code_review_assistant/agent.py
👉 เพิ่มการนำเข้าไปป์ไลน์การแก้ไข (หลังจากการนำเข้าที่มีอยู่)
from google.adk.agents import LoopAgent  # Add this to the existing Agent, SequentialAgent line
from code_review_assistant.sub_agents.fix_pipeline.code_fixer import code_fixer_agent
from code_review_assistant.sub_agents.fix_pipeline.fix_test_runner import fix_test_runner_agent
from code_review_assistant.sub_agents.fix_pipeline.fix_validator import fix_validator_agent
from code_review_assistant.sub_agents.fix_pipeline.fix_synthesizer import fix_synthesizer_agent
ตอนนี้การนำเข้าควรมีลักษณะดังนี้
from google.adk.agents import Agent, SequentialAgent, LoopAgent
from .config import config
# Review pipeline imports (from Module 5)
from code_review_assistant.sub_agents.review_pipeline.code_analyzer import code_analyzer_agent
from code_review_assistant.sub_agents.review_pipeline.style_checker import style_checker_agent
from code_review_assistant.sub_agents.review_pipeline.test_runner import test_runner_agent
from code_review_assistant.sub_agents.review_pipeline.feedback_synthesizer import feedback_synthesizer_agent
# Fix pipeline imports (NEW)
from code_review_assistant.sub_agents.fix_pipeline.code_fixer import code_fixer_agent
from code_review_assistant.sub_agents.fix_pipeline.fix_test_runner import fix_test_runner_agent
from code_review_assistant.sub_agents.fix_pipeline.fix_validator import fix_validator_agent
from code_review_assistant.sub_agents.fix_pipeline.fix_synthesizer import fix_synthesizer_agent
👉 ค้นหา:
# MODULE_6_STEP_5_CREATE_FIX_LOOP
👉 แทนที่บรรทัดเดียวด้วย
# Create the fix attempt loop (retries up to 3 times)
fix_attempt_loop = LoopAgent(
    name="FixAttemptLoop",
    sub_agents=[
        code_fixer_agent,      # Step 1: Generate fixes
        fix_test_runner_agent, # Step 2: Validate with tests
        fix_validator_agent    # Step 3: Check success & possibly exit
    ],
    max_iterations=3  # Try up to 3 times
)

# Wrap loop with synthesizer for final report
code_fix_pipeline = SequentialAgent(
    name="CodeFixPipeline",
    description="Automated code fixing pipeline with iterative validation",
    sub_agents=[
        fix_attempt_loop,      # Try to fix (1-3 times)
        fix_synthesizer_agent  # Present final results (always runs once)
    ]
)
👉 นำ ที่มีอยู่ออก
root_agent
คำจำกัดความ:
root_agent = Agent(...)
👉 ค้นหา:
# MODULE_6_STEP_5_UPDATE_ROOT_AGENT
👉 แทนที่บรรทัดเดียวด้วย
# Update root agent to include both pipelines
root_agent = Agent(
    name="CodeReviewAssistant",
    model=config.worker_model,
    description="An intelligent code review assistant that analyzes Python code and provides educational feedback",
    instruction="""You are a specialized Python code review assistant focused on helping developers improve their code quality.

When a user provides Python code for review:
1. Immediately delegate to CodeReviewPipeline and pass the code EXACTLY as it was provided by the user.
2. The pipeline will handle all analysis and feedback
3. Return ONLY the final feedback from the pipeline - do not add any commentary

After completing a review, if significant issues were identified:
- If style score < 100 OR tests are failing OR critical issues exist:
  * Add at the end: "\n\n💡 I can fix these issues for you. Would you like me to do that?"

- If the user responds yes or requests fixes:
  * Delegate to CodeFixPipeline
  * Return the fix pipeline's complete output AS-IS

When a user asks what you can do or general questions:
- Explain your capabilities for code review and fixing
- Do NOT trigger the pipeline for non-code messages

The pipelines handle everything for code review and fixing - just pass through their final output.""",
    sub_agents=[code_review_pipeline, code_fix_pipeline],
    output_key="assistant_response"
)
ขั้นตอนที่ 6: เพิ่มเอเจนต์แก้ไขเสียงสังเคราะห์
โดยโปรแกรมสังเคราะห์จะสร้างการนำเสนอผลการแก้ไขที่ใช้งานง่ายหลังจากที่ลูปเสร็จสมบูรณ์
👉 เปิด
code_review_assistant/sub_agents/fix_pipeline/fix_synthesizer.py
👉 ค้นหา:
# MODULE_6_STEP_6_FIX_SYNTHESIZER_INSTRUCTION_PROVIDER
👉 แทนที่บรรทัดเดียวด้วย
async def fix_synthesizer_instruction_provider(context: ReadonlyContext) -> str:
    """Dynamic instruction provider that injects state variables."""
    template = """You are responsible for presenting the fix results to the user.

Based on the validation report: {final_fix_report}
Fixed code from state: {code_fixes}
Fix status: {fix_status}

Create a comprehensive yet friendly response that includes:

## 🔧 Fix Summary
[Overall status and key improvements - be specific about what was achieved]

## 📊 Metrics
- Test Results: [original pass rate]% → [new pass rate]%
- Style Score: [original]/100 → [new]/100
- Issues Fixed: X of Y

## ✅ What Was Fixed
[List each fixed issue with brief explanation of the correction made]

## 📝 Complete Fixed Code
[Include the complete, corrected code from state - this is critical]

## 💡 Explanation of Key Changes
[Brief explanation of the most important changes made and why]

[If any issues remain]
## ⚠️ Remaining Issues
[List what still needs manual attention]

## 🎯 Next Steps
[Guidance on what to do next - either use the fixed code or address remaining issues]

Save the fix report using save_fix_report tool before presenting.
Call it with no parameters - it will retrieve the report from state automatically.

Be encouraging about improvements while being honest about any remaining issues.
Focus on the educational aspect - help the user understand what was wrong and how it was fixed.
"""
    return await instructions_utils.inject_session_state(template, context)
👉 ค้นหา:
# MODULE_6_STEP_6_FIX_SYNTHESIZER_AGENT
👉 แทนที่บรรทัดเดียวด้วย
fix_synthesizer_agent = Agent(
    name="FixSynthesizer",
    model=config.critic_model,
    description="Creates comprehensive user-friendly fix report",
    instruction=fix_synthesizer_instruction_provider,
    tools=[FunctionTool(func=save_fix_report)],
    output_key="fix_summary"
)
👉 เพิ่ม
save_fix_report
เครื่องมือไปยัง
tools.py
:
👉 ค้นหา:
# MODULE_6_STEP_6_SAVE_FIX_REPORT
👉 แทนที่ด้วย:
async def save_fix_report(tool_context: ToolContext) -> Dict[str, Any]:
    """
    Saves the fix report as an artifact.

    Args:
        tool_context: ADK tool context

    Returns:
        Save status
    """
    logger.info("Tool: Saving fix report...")

    try:
        # Get the report from state
        fix_report = tool_context.state.get(StateKeys.FIX_REPORT, {})

        if not fix_report:
            return {
                "status": "error",
                "message": "No fix report found in state"
            }

        # Convert to JSON
        report_json = json.dumps(fix_report, indent=2)
        report_part = types.Part.from_text(text=report_json)

        # Generate filename
        timestamp = datetime.now().isoformat().replace(':', '-')
        filename = f"fix_report_{timestamp}.json"

        # Try to save as artifact
        if hasattr(tool_context, 'save_artifact'):
            try:
                version = await tool_context.save_artifact(filename, report_part)
                await tool_context.save_artifact("latest_fix_report.json", report_part)

                logger.info(f"Tool: Fix report saved as {filename}")

                return {
                    "status": "success",
                    "filename": filename,
                    "version": str(version),
                    "size": len(report_json)
                }
            except Exception as e:
                logger.warning(f"Could not save as artifact: {e}")

        # Fallback: store in state
        tool_context.state[StateKeys.LAST_FIX_REPORT] = fix_report

        return {
            "status": "success",
            "message": "Fix report saved to state",
            "size": len(report_json)
        }

    except Exception as e:
        logger.error(f"Tool: Failed to save fix report: {e}", exc_info=True)
        return {
            "status": "error",
            "message": str(e)
        }
ขั้นตอนที่ 7: ทดสอบไปป์ไลน์การแก้ไขที่สมบูรณ์
มาดูการทำงานของลูปทั้งหมดกัน
👉 เริ่มระบบ:
adk web code_review_assistant
หลังจากเรียกใช้คำสั่ง adk web แล้ว คุณควรเห็นเอาต์พุตในเทอร์มินัลที่ระบุว่าเว็บเซิร์ฟเวอร์ ADK เริ่มทำงานแล้ว ซึ่งมีลักษณะคล้ายกับเอาต์พุตนี้
+-----------------------------------------------------------------------------+
| ADK Web Server started                                                      |
|                                                                             |
| For local testing, access at http://localhost:8000.                         |
+-----------------------------------------------------------------------------+

INFO:     Application startup complete.
INFO:     Uvicorn running on http://0.0.0.0:8000 (Press CTRL+C to quit)
👉 พรอมต์ทดสอบ:
Please analyze the following:
def dfs_search_v1(graph, start, target):
    """Find if target is reachable from start."""
    visited = set()
    stack = start

    while stack:
        current = stack.pop()

        if current == target:
            return True

        if current not in visited:
            visited.add(current)

            for neighbor in graph[current]:
                if neighbor not in visited:
                    stack.append(neighbor)

    return False
ก่อนอื่น ให้ส่งโค้ดที่มีข้อบกพร่องเพื่อทริกเกอร์ไปป์ไลน์การตรวจสอบ หลังจากระบุข้อบกพร่องแล้ว คุณจะขอให้ Agent "โปรดแก้ไขโค้ด" ซึ่งจะเรียกใช้ไปป์ไลน์การแก้ไขที่มีประสิทธิภาพและทำซ้ำได้
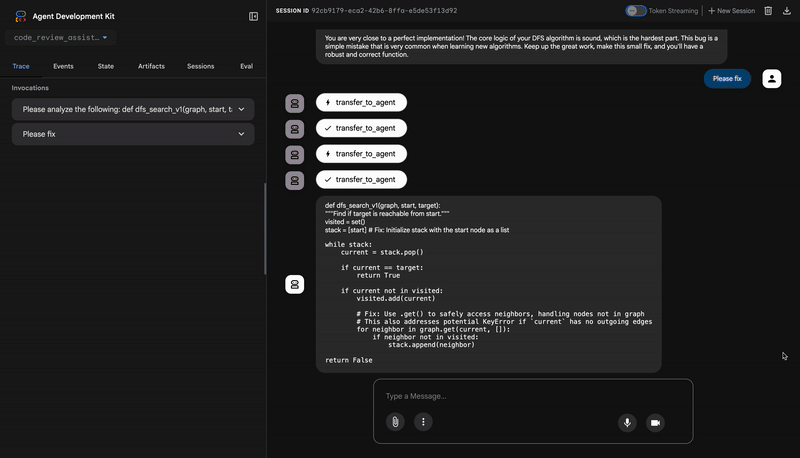
1. การตรวจสอบเบื้องต้น (การหาข้อบกพร่อง)
นี่คือครึ่งแรกของกระบวนการ ไปป์ไลน์การตรวจสอบแบบ 4 Agent จะวิเคราะห์โค้ด ตรวจสอบรูปแบบ และเรียกใช้ชุดโปรแกรมทดสอบที่สร้างขึ้น โดยระบุ AttributeError ที่สำคัญและปัญหาอื่นๆ ได้อย่างถูกต้อง พร้อมให้ผลลัพธ์ว่าโค้ดใช้งานไม่ได้ โดยมีอัตราการผ่านการทดสอบเพียง 84.21%
2. การแก้ไขอัตโนมัติ (ลูปในการดำเนินการ)
นี่คือส่วนที่น่าประทับใจที่สุด เมื่อขอให้ตัวแทนแก้ไขโค้ด ตัวแทนไม่ได้ทำการเปลี่ยนแปลงเพียงอย่างเดียว ซึ่งจะเริ่มวงจรการแก้ไขและตรวจสอบแบบวนซ้ำที่ทำงานเหมือนนักพัฒนาแอปที่ขยันขันแข็ง นั่นคือลองแก้ไข ทดสอบอย่างละเอียด และหากยังไม่สมบูรณ์แบบ ก็จะลองอีกครั้ง
การทำซ้ำครั้งที่ 1: ความพยายามครั้งแรก (สำเร็จบางส่วน)
- การแก้ไข:
CodeFixerเอเจนต์จะอ่านรายงานเริ่มต้นและทำการแก้ไขที่ชัดเจนที่สุด โดยจะเปลี่ยนstack = startเป็นstack = [start]และใช้graph.get()เพื่อป้องกันข้อยกเว้นKeyError - การตรวจสอบ:
TestRunnerจะเรียกใช้ชุดโปรแกรมทดสอบทั้งหมดอีกครั้งทันทีกับโค้ดใหม่นี้ - ผลลัพธ์: อัตราการสอบผ่านเพิ่มขึ้นอย่างมากเป็น 88.89% ข้อบกพร่องที่สำคัญจะหายไป อย่างไรก็ตาม การทดสอบครอบคลุมมากจนพบข้อบกพร่องใหม่ๆ ที่ซับซ้อน 2 รายการ (การถดถอย) ซึ่งเกี่ยวข้องกับการจัดการ
Noneเป็นค่ากราฟหรือค่าเพื่อนบ้านที่ไม่ใช่รายการ ระบบจะทำเครื่องหมายการแก้ไขเป็นบางส่วน
การทำซ้ำครั้งที่ 2: การปรับแต่งขั้นสุดท้าย (สำเร็จ 100%)
- วิธีแก้ไข: เนื่องจากไม่เป็นไปตามเงื่อนไขการออกของลูป (อัตราการผ่าน 100%) จึงมีการเรียกใช้ลูปอีกครั้ง
CodeFixerมีข้อมูลเพิ่มเติมแล้ว ซึ่งก็คือความล้มเหลวในการถดถอย 2 รายการใหม่ โดยจะสร้างโค้ดเวอร์ชันสุดท้ายที่มีประสิทธิภาพมากขึ้นซึ่งจัดการกับกรณีขอบเหล่านั้นอย่างชัดเจน - การตรวจสอบ:
TestRunnerจะเรียกใช้ชุดโปรแกรมทดสอบเป็นครั้งสุดท้ายกับโค้ดเวอร์ชันสุดท้าย - ผลลัพธ์: ผ่าน 100% แก้ไขข้อบกพร่องเดิมและการถดถอยทั้งหมดแล้ว ระบบจะทําเครื่องหมายการแก้ไขเป็นสําเร็จและออกจากลูป
3. รายงานฉบับสุดท้าย: คะแนนเต็ม
เมื่อการแก้ไขได้รับการตรวจสอบอย่างสมบูรณ์แล้ว FixSynthesizer ตัวแทนจะเข้ามาดูแลเพื่อนำเสนอรายงานสุดท้าย โดยจะเปลี่ยนข้อมูลทางเทคนิคให้เป็นข้อมูลสรุปที่ชัดเจนและให้ความรู้
เมตริก | ก่อน | หลัง | การปรับปรุง |
อัตราการสอบผ่าน | 84.21% | 100% | ▲ 15.79% |
คะแนนสไตล์ | 88 / 100 | 98 / 100 | ▲ 10 คะแนน |
แก้ไขข้อบกพร่องแล้ว | 0 จาก 3 | 3 จาก 3 | ✅ |
✅ โค้ดสุดท้ายที่ผ่านการตรวจสอบแล้ว
นี่คือโค้ดที่แก้ไขแล้วทั้งหมด ซึ่งผ่านการทดสอบทั้ง 19 รายการแล้ว ซึ่งแสดงให้เห็นว่าการแก้ไขสำเร็จ
def dfs_search_v1(graph, start, target):
    """Find if target is reachable from start."""
    # Handles 'None' graph input
    if graph is None:
        return False

    visited = set()
    # Fixes the critical AttributeError
    stack = [start]

    while stack:
        current = stack.pop()

        if current == target:
            return True

        if current not in visited:
            visited.add(current)

            # Safely gets neighbors to prevent KeyError
            neighbors = graph.get(current)

            if neighbors is None:
                continue

            # Validates that neighbors are iterable
            if not isinstance(neighbors, (list, set, tuple)):
                raise TypeError(
                    f"Graph value for node '{current}' is of type "
                    f"{type(neighbors).__name__}. Expected a list, set, or tuple."
                )

            for neighbor in neighbors:
                if neighbor not in visited:
                    stack.append(neighbor)

    return False
👉💻 เมื่อทดสอบเสร็จแล้ว ให้กลับไปที่เทอร์มินัลของเครื่องมือแก้ไข Cloud Shell แล้วกด Ctrl+C เพื่อหยุด UI สำหรับนักพัฒนา ADK
สิ่งที่คุณสร้าง
ตอนนี้คุณมีไปป์ไลน์การแก้ไขอัตโนมัติที่สมบูรณ์ซึ่งมีลักษณะดังนี้
✅ สร้างการแก้ไข - อิงตามการวิเคราะห์การตรวจสอบ
✅ ตรวจสอบซ้ำๆ - ทดสอบหลังจากการพยายามแก้ไขแต่ละครั้ง
✅ ลองอีกครั้งโดยอัตโนมัติ - พยายามสูงสุด 3 ครั้งเพื่อให้สำเร็จ
✅ ออกอย่างชาญฉลาด - ผ่านการส่งต่อเมื่อสำเร็จ
✅ ติดตามการปรับปรุง - เปรียบเทียบเมตริกก่อน/หลัง
✅ จัดเตรียมอาร์ติแฟกต์ - รายงานการแก้ไขที่ดาวน์โหลดได้
แนวคิดหลักที่เชี่ยวชาญ
LoopAgent เทียบกับ Sequential:
- ตามลำดับ: ผ่านเอเจนต์ทีละราย
- LoopAgent: ทำซ้ำจนกว่าจะถึงเงื่อนไขการออกหรือการวนซ้ำสูงสุด
- ออกทาง
tool_context.actions.escalate = True
การเปลี่ยนแปลงสถานะในแต่ละการทำซ้ำ:
CODE_FIXESอัปเดตแต่ละการวนซ้ำ- ผลการทดสอบแสดงให้เห็นถึงการปรับปรุงเมื่อเวลาผ่านไป
- โปรแกรมตรวจสอบเห็นการเปลี่ยนแปลงสะสม
สถาปัตยกรรมแบบหลายไปป์ไลน์:
- ไปป์ไลน์การตรวจสอบ: การวิเคราะห์แบบอ่านอย่างเดียว (โมดูล 5)
- วงจรการแก้ไข: การแก้ไขแบบวนซ้ำ (วงจรด้านในของโมดูลที่ 6)
- Fix pipeline: Loop + synthesizer (Module 6 outer)
- ตัวแทนระดับรูท: จัดการตามความตั้งใจของผู้ใช้
เครื่องมือควบคุมโฟลว์:
exit_fix_loop()ชุดข้อมูลจะได้รับการส่งต่อ- เครื่องมือใดก็ได้ส่งสัญญาณว่าลูปเสร็จสมบูรณ์
- แยกตรรกะการออกจากการสั่งการของ Agent
ความปลอดภัยในการทำซ้ำสูงสุด:
- ป้องกันการวนซ้ำไม่สิ้นสุด
- ช่วยให้ระบบตอบสนองได้เสมอ
- แสดงผลลัพธ์ที่ดีที่สุดแม้จะไม่สมบูรณ์แบบ
ขั้นตอนถัดไป
ในโมดูลสุดท้าย คุณจะได้เรียนรู้วิธีนําเอเจนต์ไปใช้งานจริง
- การตั้งค่าพื้นที่เก็บข้อมูลถาวรด้วย VertexAiSessionService
- การติดตั้งใช้งาน Agent Engine บน Google Cloud
- การตรวจสอบและการแก้ไขข้อบกพร่องของเอเจนต์เวอร์ชันที่ใช้งานจริง
- แนวทางปฏิบัติแนะนำสำหรับการปรับขนาดและความน่าเชื่อถือ
คุณได้สร้างระบบ Multi-Agent ที่สมบูรณ์ด้วยสถาปัตยกรรมแบบลำดับและแบบวนซ้ำ รูปแบบที่คุณได้เรียนรู้ ได้แก่ การจัดการสถานะ คำสั่งแบบไดนามิก การประสานเครื่องมือ และการปรับแต่งแบบวนซ้ำ เป็นเทคนิคที่พร้อมใช้งานจริงซึ่งใช้ในระบบเอเจนต์จริง
7. การติดตั้งใช้งานในเวอร์ชันที่ใช้งานจริง
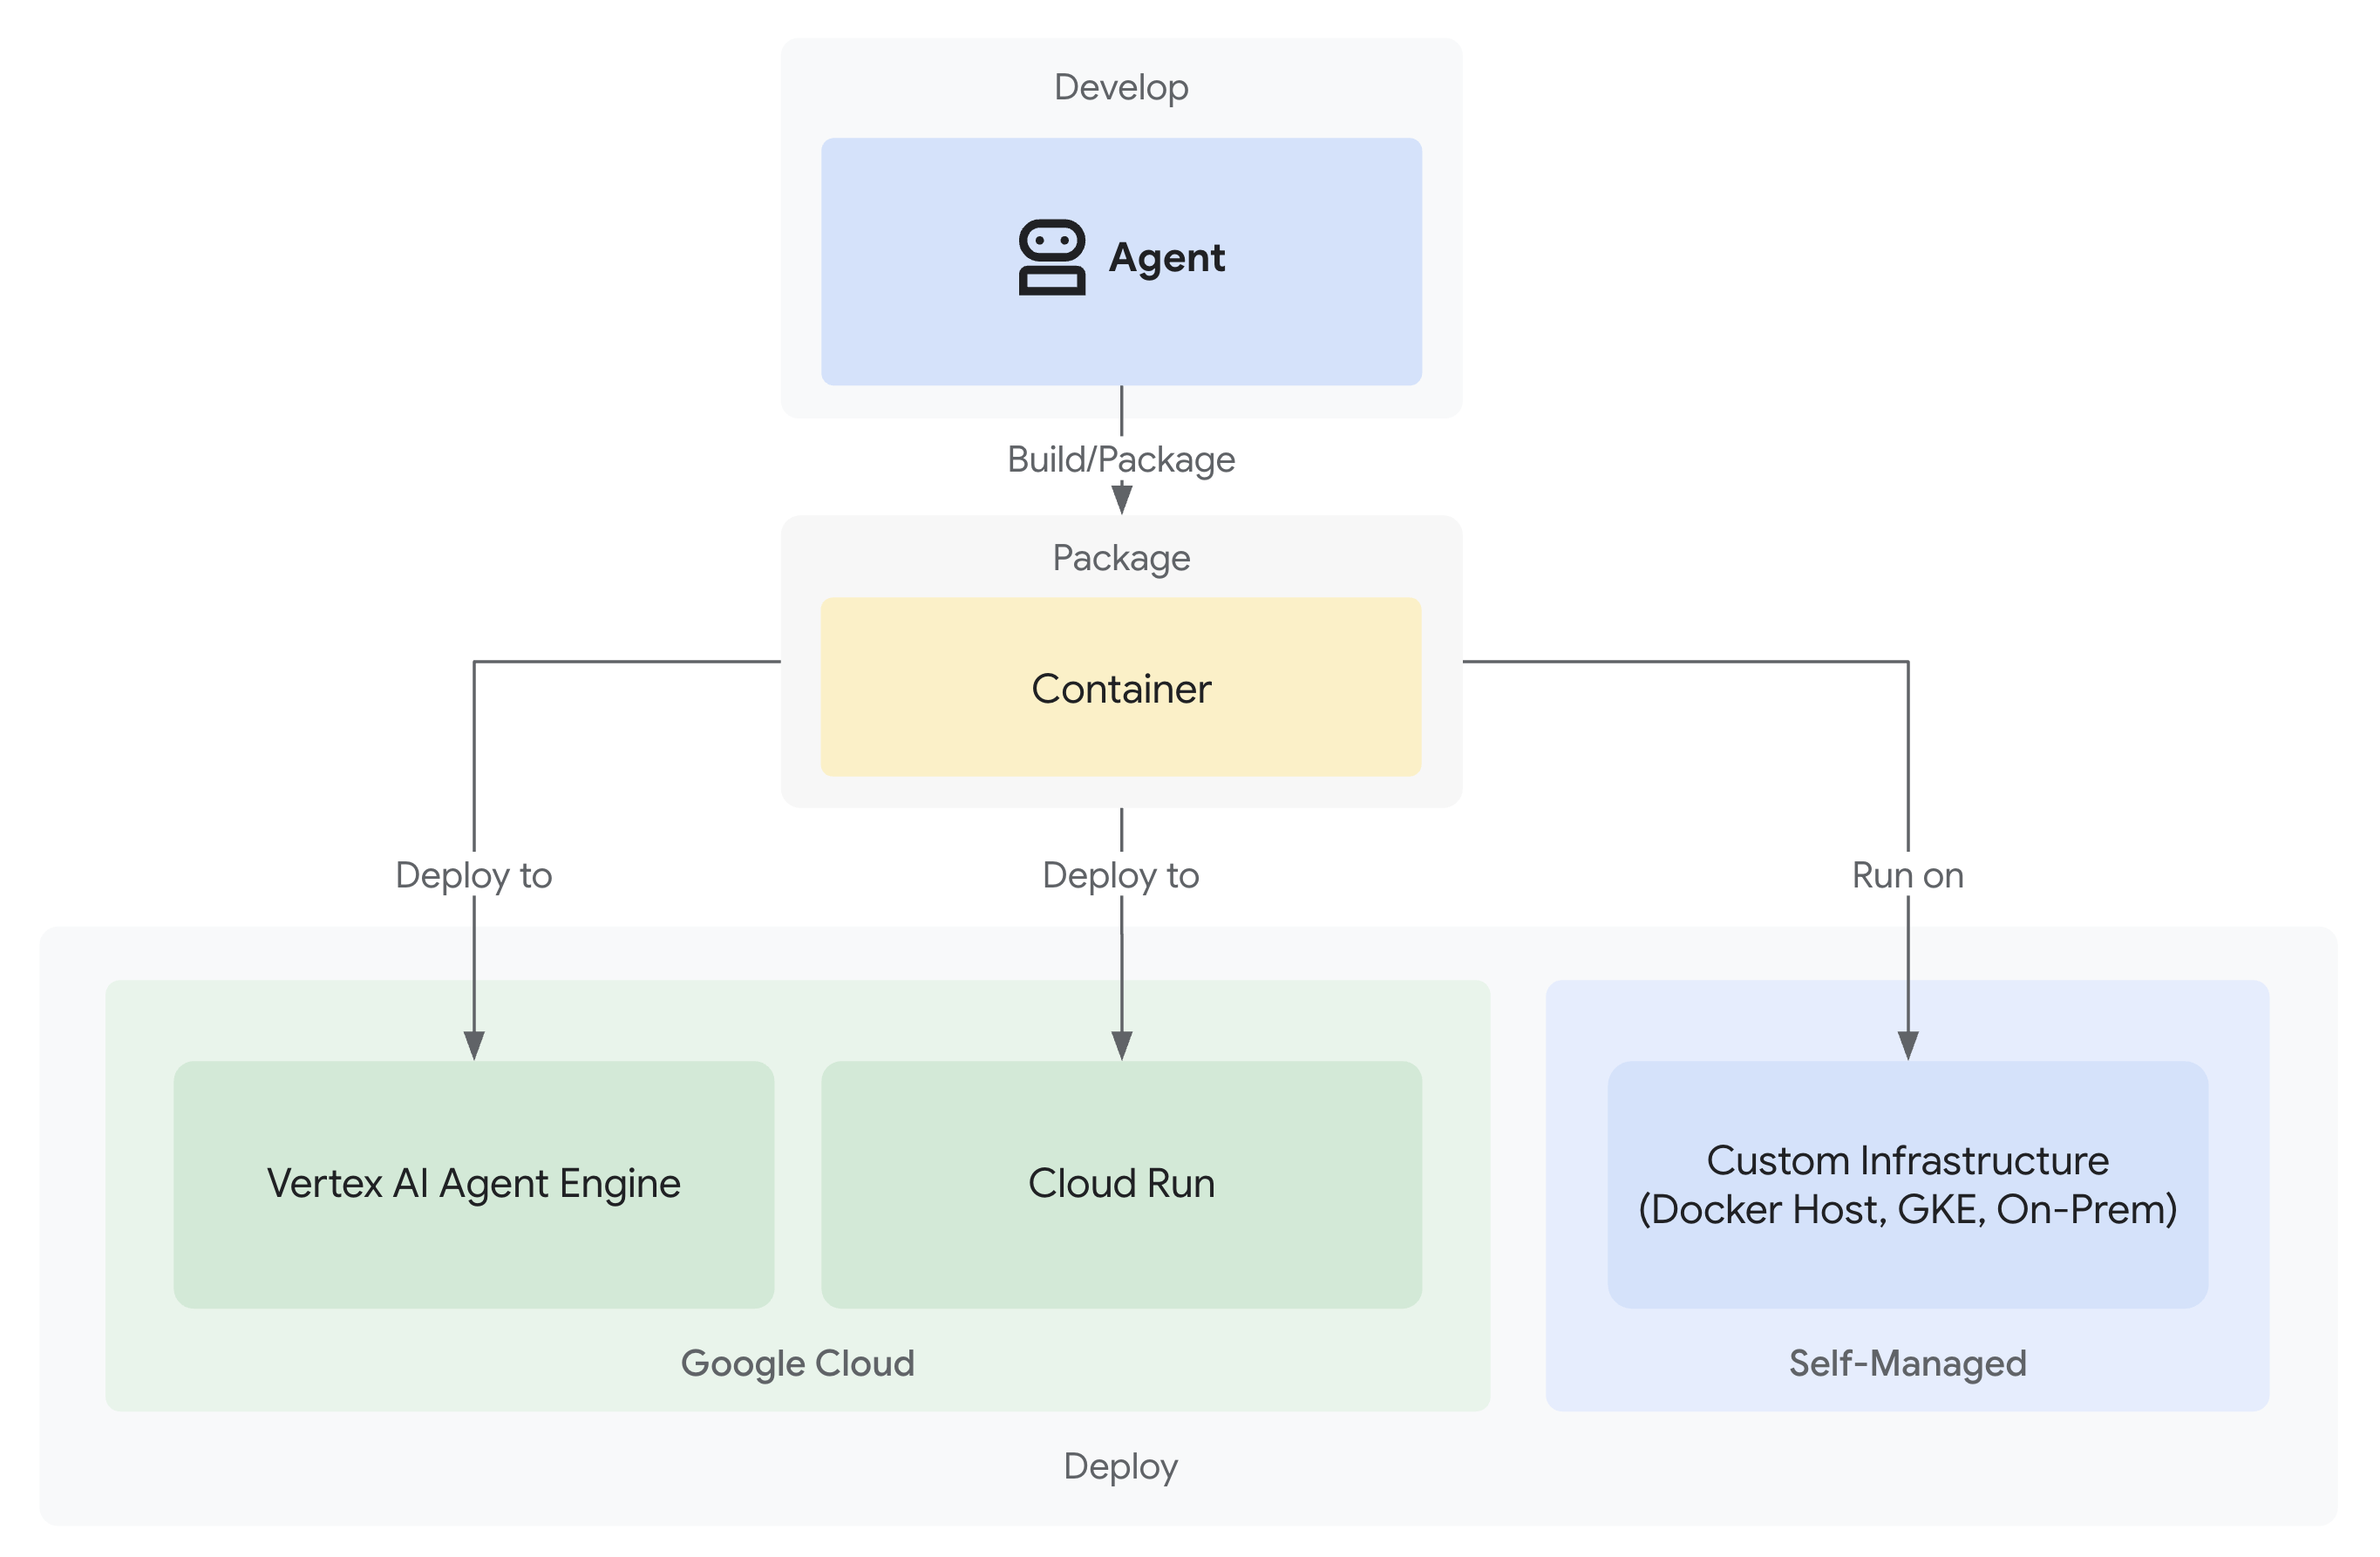
บทนำ
ตอนนี้ผู้ช่วยรีวิวโค้ดของคุณพร้อมแล้ว โดยมีไปป์ไลน์การรีวิวและการแก้ไขที่ทำงานในเครื่อง ส่วนที่ขาดหายไป: จะทำงานในเครื่องของคุณเท่านั้น ในโมดูลนี้ คุณจะได้ติดตั้งใช้งานเอเจนต์ใน Google Cloud ซึ่งจะทำให้ทีมเข้าถึงได้ด้วยเซสชันแบบถาวรและโครงสร้างพื้นฐานระดับโปรดักชัน
สิ่งที่คุณจะได้เรียนรู้มีดังนี้
- เส้นทางการติดตั้งใช้งาน 3 เส้นทาง ได้แก่ Local, Cloud Run และ Agent Engine
- การจัดสรรโครงสร้างพื้นฐานอัตโนมัติ
- กลยุทธ์ความต่อเนื่องของเซสชัน
- การทดสอบ Agent ที่ติดตั้งใช้งาน
ทำความเข้าใจตัวเลือกการติดตั้งใช้งาน
ADK รองรับเป้าหมายการติดตั้งใช้งานหลายรายการ ซึ่งแต่ละรายการมีข้อแลกเปลี่ยนที่แตกต่างกัน ดังนี้
เส้นทางการติดตั้งใช้งาน
ปัจจัย | ท้องถิ่น ( | Cloud Run ( | เครื่องมือตัวแทน ( |
ความซับซ้อน | มินิมอล | ปานกลาง | ต่ำ |
การคงอยู่ของเซสชัน | ในหน่วยความจำเท่านั้น (หายไปเมื่อรีสตาร์ท) | Cloud SQL (PostgreSQL) | Vertex AI ที่มีการจัดการ (อัตโนมัติ) |
โครงสร้างพื้นฐาน | ไม่มี (เฉพาะเครื่องสำหรับนักพัฒนาแอป) | คอนเทนเนอร์ + ฐานข้อมูล | การจัดการครบวงจร |
Cold Start | ไม่มี | 100-2000 มิลลิวินาที | 100-500 มิลลิวินาที |
การปรับขนาด | อินสแตนซ์เดียว | อัตโนมัติ (เป็น 0) | อัตโนมัติ |
รูปแบบต้นทุน | ฟรี (การประมวลผลในพื้นที่) | ตามคำขอ + รุ่นฟรี | อิงตามการประมวลผล |
การรองรับ UI | ใช่ (ผ่าน | ใช่ (ผ่าน | ไม่มี (API เท่านั้น) |
เหมาะสำหรับ | การพัฒนา/การทดสอบ | การเข้าชมที่เปลี่ยนแปลงได้ การควบคุมต้นทุน | ตัวแทนฝ่ายผลิต |
ตัวเลือกการทำให้ใช้งานได้เพิ่มเติม: Google Kubernetes Engine (GKE) พร้อมให้บริการสำหรับผู้ใช้ขั้นสูงที่ต้องการการควบคุมระดับ Kubernetes, เครือข่ายที่กำหนดเอง หรือการจัดการเป็นกลุ่มบริการหลายรายการ การติดตั้งใช้งาน GKE ไม่ได้อยู่ใน Codelab นี้ แต่มีอยู่ในคู่มือการติดตั้งใช้งาน ADK
สิ่งที่ได้รับการติดตั้งใช้งาน
เมื่อติดตั้งใช้งานใน Cloud Run หรือ Agent Engine ระบบจะแพ็กเกจและติดตั้งใช้งานสิ่งต่อไปนี้
- รหัสตัวแทนของคุณ (
agent.py, ตัวแทนย่อยทั้งหมด, เครื่องมือ) - การขึ้นต่อกัน (
requirements.txt) - เซิร์ฟเวอร์ ADK API (รวมอยู่โดยอัตโนมัติ)
- Web UI (Cloud Run เท่านั้น เมื่อระบุ
--with_ui)
ความแตกต่างที่สำคัญ
- Cloud Run: ใช้
adk deploy cloud_runCLI (สร้างคอนเทนเนอร์โดยอัตโนมัติ) หรือgcloud run deploy(ต้องใช้ Dockerfile ที่กำหนดเอง) - Agent Engine: ใช้
adk deploy agent_engineCLI (ไม่จำเป็นต้องสร้างคอนเทนเนอร์ เพียงแพ็กเกจโค้ด Python โดยตรง)
ขั้นตอนที่ 1: กำหนดค่าสภาพแวดล้อม
กำหนดค่าไฟล์ .env
คุณต้องอัปเดต.envไฟล์ (สร้างในโมดูลที่ 3) เพื่อการติดตั้งใช้งานระบบคลาวด์ เปิด .env แล้วยืนยัน/อัปเดตการตั้งค่าต่อไปนี้
ต้องระบุสำหรับการติดตั้งใช้งานระบบคลาวด์ทั้งหมด
# Your actual GCP Project ID (REQUIRED)
GOOGLE_CLOUD_PROJECT=your-project-id

# GCP region for deployments (REQUIRED)
GOOGLE_CLOUD_LOCATION=us-central1

# Use Vertex AI (REQUIRED)
GOOGLE_GENAI_USE_VERTEXAI=true

# Model configuration (already set)
WORKER_MODEL=gemini-2.5-flash
CRITIC_MODEL=gemini-2.5-pro
ตั้งชื่อที่เก็บข้อมูล (ต้องทำก่อนเรียกใช้ deploy.sh):
สคริปต์การติดตั้งใช้งานจะสร้างที่เก็บตามชื่อเหล่านี้ ตั้งค่าเลย
# Staging bucket for Agent Engine code uploads (REQUIRED for agent-engine)
STAGING_BUCKET=gs://your-project-id-staging

# Artifact storage for reports and fixed code (REQUIRED for both cloud-run and agent-engine)
ARTIFACT_BUCKET=gs://your-project-id-artifacts
แทนที่ your-project-id ด้วยรหัสโปรเจ็กต์จริงในชื่อที่เก็บข้อมูลทั้ง 2 ชื่อ สคริปต์จะสร้างที่เก็บข้อมูลเหล่านี้หากยังไม่มี
ตัวแปรที่ไม่บังคับ (สร้างขึ้นโดยอัตโนมัติหากเว้นว่างไว้):
# Agent Engine ID (populated after first deployment)
AGENT_ENGINE_ID=

# Cloud Run Database credentials (created automatically if blank)
CLOUD_SQL_INSTANCE_NAME=
DB_USER=
DB_PASSWORD=
DB_NAME=
การตรวจสอบสิทธิ์
หากพบข้อผิดพลาดในการตรวจสอบสิทธิ์ระหว่างการติดตั้งใช้งาน ให้ทำดังนี้
gcloud auth application-default login
gcloud config set project $GOOGLE_CLOUD_PROJECT
ขั้นตอนที่ 2: ทำความเข้าใจสคริปต์การติดตั้งใช้งาน
deploy.sh สคริปต์มีอินเทอร์เฟซแบบรวมสำหรับโหมดการติดตั้งใช้งานทั้งหมด ดังนี้
./deploy.sh {local|cloud-run|agent-engine}
ความสามารถของสคริปต์
การจัดสรรโครงสร้างพื้นฐาน:
- การเปิดใช้ API (AI Platform, Storage, Cloud Build, Cloud Trace, Cloud SQL)
- การกำหนดค่าสิทธิ์ IAM (บัญชีบริการ บทบาท)
- การสร้างทรัพยากร (ที่เก็บข้อมูล ฐานข้อมูล อินสแตนซ์)
- การติดตั้งใช้งานด้วย Flag ที่เหมาะสม
- การยืนยันหลังการติดตั้งใช้งาน
ส่วนสำคัญของสคริปต์
- การกำหนดค่า (บรรทัดที่ 1-35): ชื่อโปรเจ็กต์ ภูมิภาค บริการ ค่าเริ่มต้น
- ฟังก์ชันตัวช่วย (บรรทัดที่ 37-200): การเปิดใช้ API, การสร้างที่เก็บข้อมูล, การตั้งค่า IAM
- ตรรกะหลัก (บรรทัดที่ 202-400): การจัดการเป็นกลุ่มการทำให้ใช้งานได้เฉพาะโหมด
ขั้นตอนที่ 3: เตรียมเอเจนต์สำหรับ Agent Engine
ก่อนที่จะติดตั้งใช้งานใน Agent Engine คุณต้องมีไฟล์ agent_engine_app.py ที่ห่อหุ้มตัวแทนของคุณสำหรับรันไทม์ที่มีการจัดการ ระบบได้สร้างบัญชีนี้ให้คุณแล้ว
ดู code_review_assistant/agent_engine_app.py
👉 เปิดไฟล์
"""
Agent Engine application wrapper.
This file prepares the agent for deployment to Vertex AI Agent Engine.
"""

from vertexai import agent_engines
from .agent import root_agent

# Wrap the agent in an AdkApp object for Agent Engine deployment
app = agent_engines.AdkApp(
    agent=root_agent,
    enable_tracing=True,
)
ขั้นตอนที่ 4: ทำให้ใช้งานได้กับ Agent Engine
Agent Engine คือการติดตั้งใช้งานเวอร์ชันที่ใช้งานจริงที่แนะนำสำหรับเอเจนต์ ADK เนื่องจากมีข้อดีดังนี้
- โครงสร้างพื้นฐานที่มีการจัดการครบวงจร (ไม่ต้องสร้างคอนเทนเนอร์)
- การคงเซสชันในตัวผ่าน
VertexAiSessionService - การปรับขนาดอัตโนมัติจากศูนย์
- เปิดใช้การผสานรวม Cloud Trace โดยค่าเริ่มต้น
Agent Engine แตกต่างจากการติดตั้งใช้งานอื่นๆ อย่างไร
เบื้องหลังการทำงาน
deploy.sh agent-engine
ใช้:
adk deploy agent_engine \
  --project=$GOOGLE_CLOUD_PROJECT \
  --region=$GOOGLE_CLOUD_LOCATION \
  --staging_bucket=$STAGING_BUCKET \
  --display_name="Code Review Assistant" \
  --trace_to_cloud \
  code_review_assistant
คำสั่งนี้จะทำสิ่งต่อไปนี้
- แพ็กเกจโค้ด Python โดยตรง (ไม่ต้องสร้าง Docker)
- อัปโหลดไปยังที่เก็บข้อมูล Staging ที่คุณระบุใน
.env - สร้างอินสแตนซ์ Agent Engine ที่มีการจัดการ
- เปิดใช้ Cloud Trace เพื่อการสังเกตการณ์
- ใช้
agent_engine_app.pyเพื่อกำหนดค่ารันไทม์
Agent Engine จะเรียกใช้โค้ด Python โดยตรงในสภาพแวดล้อมรันไทม์ที่มีการจัดการ ซึ่งคล้ายกับฟังก์ชันแบบไร้เซิร์ฟเวอร์ ต่างจาก Cloud Run ที่จะแปลงโค้ดเป็นคอนเทนเนอร์
เรียกใช้การทำให้ใช้งานได้
จากรูทของโปรเจ็กต์ ให้ทำดังนี้
./deploy.sh agent-engine
ระยะการติดตั้งใช้งาน
ดูสคริปต์ดำเนินการในระยะต่างๆ ดังนี้
Phase 1: API Enablement
  ✓ aiplatform.googleapis.com
  ✓ storage-api.googleapis.com
  ✓ cloudbuild.googleapis.com
  ✓ cloudtrace.googleapis.com

Phase 2: IAM Setup
  ✓ Getting project number
  ✓ Granting Storage Object Admin
  ✓ Granting AI Platform User
  ✓ Granting Cloud Trace Agent

Phase 3: Staging Bucket
  ✓ Creating gs://your-project-id-staging
  ✓ Setting permissions

Phase 4: Artifact Bucket
  ✓ Creating gs://your-project-id-artifacts
  ✓ Configuring access

Phase 5: Validation
  ✓ Checking agent.py exists
  ✓ Verifying root_agent defined
  ✓ Checking agent_engine_app.py exists
  ✓ Validating requirements.txt

Phase 6: Build & Deploy
  ✓ Packaging agent code
  ✓ Uploading to staging bucket
  ✓ Creating Agent Engine instance
  ✓ Configuring session persistence
  ✓ Setting up Cloud Trace integration
  ✓ Running health checks
กระบวนการนี้ใช้เวลา 5-10 นาทีเนื่องจากระบบจะแพ็กเกจเอเจนต์และติดตั้งใช้งานในโครงสร้างพื้นฐานของ Vertex AI
บันทึกรหัส Agent Engine
เมื่อการติดตั้งใช้งานสำเร็จแล้ว
✅ Deployment successful!
   Agent Engine ID: 7917477678498709504
   Resource Name: projects/123456789/locations/us-central1/reasoningEngines/7917477678498709504
   Endpoint: https://us-central1-aiplatform.googleapis.com/v1/...

⚠️  IMPORTANT: Save this in your .env file:
   AGENT_ENGINE_ID=7917477678498709504
อัปเดต
.env
ไฟล์ทันที
echo "AGENT_ENGINE_ID=7917477678498709504" >> .env
คุณต้องระบุรหัสนี้สำหรับ
- การทดสอบ Agent ที่ทําให้ใช้งานได้
- อัปเดตการทำให้ใช้งานได้ในภายหลัง
- การเข้าถึงบันทึกและร่องรอย
สิ่งที่ได้รับการติดตั้งใช้งาน
การติดตั้งใช้งาน Agent Engine ของคุณตอนนี้มีสิ่งต่อไปนี้
✅ ไปป์ไลน์การตรวจสอบที่สมบูรณ์ (4 Agent)
✅ ไปป์ไลน์การแก้ไขที่สมบูรณ์ (ลูป + ตัวสังเคราะห์)
✅ เครื่องมือทั้งหมด (การวิเคราะห์ AST, การตรวจสอบสไตล์, การสร้างอาร์ติแฟกต์)
✅ การคงเซสชัน (อัตโนมัติผ่าน VertexAiSessionService)
✅ การจัดการสถานะ (ระดับเซสชัน/ผู้ใช้/ตลอดอายุการใช้งาน)
✅ ความสามารถในการสังเกต (เปิดใช้ Cloud Trace)
✅ โครงสร้างพื้นฐานการปรับขนาดอัตโนมัติ
ขั้นตอนที่ 5: ทดสอบเอเจนต์ที่ติดตั้งใช้งาน
อัปเดตไฟล์ .env
หลังจากติดตั้งใช้งานแล้ว ให้ตรวจสอบว่า .env มีข้อมูลต่อไปนี้
AGENT_ENGINE_ID=7917477678498709504  # From deployment output
GOOGLE_CLOUD_PROJECT=your-project-id
GOOGLE_CLOUD_LOCATION=us-central1
เรียกใช้สคริปต์ทดสอบ
โปรเจ็กต์นี้มี tests/test_agent_engine.py สำหรับการทดสอบการติดตั้งใช้งาน Agent Engine โดยเฉพาะ
python tests/test_agent_engine.py
สิ่งที่การทดสอบทำ
- ตรวจสอบสิทธิ์ด้วยโปรเจ็กต์ที่อยู่ในระบบคลาวด์ของ Google
- สร้างเซสชันกับ Agent ที่ติดตั้งใช้งาน
- ส่งคำขอรีวิวโค้ด (ตัวอย่างข้อบกพร่อง DFS)
- สตรีมการตอบกลับกลับผ่าน Server-Sent Events (SSE)
- ยืนยันการคงอยู่ของเซสชันและการจัดการสถานะ
ผลลัพธ์ที่คาดหวัง
Authenticated with project: your-project-id
Targeting Agent Engine: projects/.../reasoningEngines/7917477678498709504

Creating new session...
Created session: 4857885913439920384

Sending query to agent and streaming response:
data: {"content": {"parts": [{"text": "I'll analyze your code..."}]}}
data: {"content": {"parts": [{"text": "**Code Structure Analysis**\n..."}]}}
data: {"content": {"parts": [{"text": "**Style Check Results**\n..."}]}}
data: {"content": {"parts": [{"text": "**Test Results**\n..."}]}}
data: {"content": {"parts": [{"text": "**Final Feedback**\n..."}]}}

Stream finished.
รายการตรวจสอบการยืนยัน
- ✅ ไปป์ไลน์การตรวจสอบฉบับสมบูรณ์ทำงาน (ตัวแทนทั้ง 4 คน)
- ✅ คำตอบแบบสตรีมจะแสดงเอาต์พุตแบบค่อยๆ
- ✅ สถานะเซสชันจะคงอยู่ตลอดคำขอ
- ✅ ไม่มีข้อผิดพลาดในการตรวจสอบสิทธิ์หรือการเชื่อมต่อ
- ✅ การเรียกใช้เครื่องมือทำงานได้สำเร็จ (การวิเคราะห์ AST, การตรวจสอบสไตล์)
- ✅ ระบบจะบันทึกอาร์ติแฟกต์ (เข้าถึงรายงานการให้คะแนนได้)
ทางเลือกอื่น: ทำให้ใช้งานได้กับ Cloud Run
แม้ว่าเราจะแนะนำให้ใช้ Agent Engine เพื่อการติดตั้งใช้งานการผลิตที่มีประสิทธิภาพ แต่ Cloud Run จะช่วยให้คุณควบคุมได้มากขึ้นและรองรับ UI เว็บของ ADK ส่วนนี้จะแสดงภาพรวม
กรณีที่ควรใช้ Cloud Run
เลือก Cloud Run หากคุณต้องการสิ่งต่อไปนี้
- UI เว็บของ ADK สำหรับการโต้ตอบของผู้ใช้
- ควบคุมสภาพแวดล้อมของคอนเทนเนอร์ได้อย่างเต็มที่
- การกำหนดค่าฐานข้อมูลที่กำหนดเอง
- การผสานรวมกับบริการ Cloud Run ที่มีอยู่
วิธีการทำงานของการติดตั้งใช้งาน Cloud Run
เบื้องหลังการทำงาน
deploy.sh cloud-run
ใช้:
adk deploy cloud_run \
  --project=$GOOGLE_CLOUD_PROJECT \
  --region=$GOOGLE_CLOUD_LOCATION \
  --service_name="code-review-assistant" \
  --app_name="code_review_assistant" \
  --port=8080 \
  --with_ui \
  --artifact_service_uri="gs://$ARTIFACT_BUCKET" \
  --trace_to_cloud \
  code_review_assistant
คำสั่งนี้จะทำสิ่งต่อไปนี้
- สร้างคอนเทนเนอร์ Docker ด้วยโค้ดของ Agent
- พุชไปยัง Google Artifact Registry
- ทําให้ใช้งานได้เป็นบริการ Cloud Run
- รวมถึงเว็บ UI ของ ADK (
--with_ui) - กำหนดค่าการเชื่อมต่อ Cloud SQL (สคริปต์จะเพิ่มหลังจากการติดตั้งใช้งานครั้งแรก)
ความแตกต่างที่สำคัญจาก Agent Engine คือ Cloud Run จะสร้างคอนเทนเนอร์โค้ดของคุณและต้องใช้ฐานข้อมูลเพื่อความคงทนของเซสชัน ในขณะที่ Agent Engine จะจัดการทั้ง 2 อย่างโดยอัตโนมัติ
คำสั่งการติดตั้งใช้งาน Cloud Run
./deploy.sh cloud-run
ความแตกต่าง
โครงสร้างพื้นฐาน:
- การติดตั้งใช้งานแบบคอนเทนเนอร์ (Docker สร้างโดย ADK โดยอัตโนมัติ)
- Cloud SQL (PostgreSQL) สำหรับการคงอยู่ของเซสชัน
- สร้างฐานข้อมูลโดยอัตโนมัติด้วยสคริปต์หรือใช้อินสแตนซ์ที่มีอยู่
การจัดการเซสชัน:
- ใช้
DatabaseSessionServiceแทนVertexAiSessionService - ต้องใช้ข้อมูลเข้าสู่ระบบฐานข้อมูลใน
.env(หรือสร้างขึ้นโดยอัตโนมัติ) - สถานะจะยังคงอยู่ในฐานข้อมูล PostgreSQL
การรองรับ UI:
- UI บนเว็บพร้อมใช้งานผ่าน
--with_uiFlag (จัดการโดยสคริปต์) - เข้าถึงได้ที่
https://code-review-assistant-xyz.a.run.app
สิ่งที่คุณทำสำเร็จ
การติดตั้งใช้งานเวอร์ชันที่ใช้งานจริงของคุณมีสิ่งต่อไปนี้
✅ การจัดสรรอัตโนมัติผ่านdeploy.shสคริปต์
✅ โครงสร้างพื้นฐานที่มีการจัดการ (Agent Engine จัดการการปรับขนาด ความคงทน และการตรวจสอบ)
✅ สถานะที่คงอยู่ในทุกระดับหน่วยความจำ (เซสชัน/ผู้ใช้/อายุการใช้งาน)
✅ การจัดการข้อมูลเข้าสู่ระบบที่ปลอดภัย (การสร้างอัตโนมัติและการตั้งค่า IAM)
✅ สถาปัตยกรรมที่ปรับขนาดได้ (ผู้ใช้พร้อมกันตั้งแต่ 0 ถึงหลายพันคน)
✅ การสังเกตการณ์ในตัว (เปิดใช้การผสานรวม Cloud Trace)
✅ การจัดการข้อผิดพลาดและการกู้คืนระดับการใช้งานจริง
แนวคิดหลักที่เชี่ยวชาญ
การเตรียมการติดตั้งใช้งาน:
agent_engine_app.py: ห่อหุ้ม Agent ด้วยAdkAppสำหรับ Agent EngineAdkAppจะกำหนดค่าVertexAiSessionServiceโดยอัตโนมัติเพื่อการคงอยู่- เปิดใช้การติดตามผ่าน
enable_tracing=True
คำสั่งการติดตั้งใช้งาน:
adk deploy agent_engine: แพ็กเกจโค้ด Python ไม่มีคอนเทนเนอร์adk deploy cloud_run: สร้างคอนเทนเนอร์ Docker โดยอัตโนมัติgcloud run deploy: ทางเลือกอื่นที่มี Dockerfile ที่กำหนดเอง
ตัวเลือกการติดตั้งใช้งาน:
- Agent Engine: มีการจัดการเต็มรูปแบบ พร้อมใช้งานจริงเร็วที่สุด
- Cloud Run: ควบคุมได้มากขึ้น รองรับ UI บนเว็บ
- GKE: การควบคุม Kubernetes ขั้นสูง (ดูคู่มือการติดตั้งใช้งาน GKE)
บริการที่มีการจัดการ:
- Agent Engine จะจัดการการคงอยู่ของเซสชันโดยอัตโนมัติ
- Cloud Run ต้องมีการตั้งค่าฐานข้อมูล (หรือสร้างโดยอัตโนมัติ)
- ทั้ง 2 อย่างรองรับการจัดเก็บอาร์ติแฟกต์ผ่าน GCS
การจัดการเซสชัน:
- Agent Engine:
VertexAiSessionService(อัตโนมัติ) - Cloud Run:
DatabaseSessionService(Cloud SQL) - ในเครื่อง:
InMemorySessionService(ชั่วคราว)
Agent ของคุณพร้อมใช้งานแล้ว
ตอนนี้ผู้ช่วยรีวิวโค้ดของคุณจะทำสิ่งต่อไปนี้ได้
- เข้าถึงได้ผ่านปลายทาง API ของ HTTPS
- Persistentโดยที่สถานะยังคงอยู่หลังการรีสตาร์ท
- ปรับขนาดได้เพื่อรองรับการเติบโตของทีมโดยอัตโนมัติ
- สังเกตได้พร้อมการติดตามคำขอที่สมบูรณ์
- ดูแลรักษาได้ผ่านการติดตั้งใช้งานที่ใช้สคริปต์
ขั้นตอนถัดไป ในโมดูลที่ 8 คุณจะได้เรียนรู้วิธีใช้ Cloud Trace เพื่อทำความเข้าใจประสิทธิภาพของเอเจนต์ ระบุจุดคอขวดในไปป์ไลน์การตรวจสอบและการแก้ไข และเพิ่มประสิทธิภาพเวลาในการดำเนินการ
8. ความสามารถในการสังเกตเวอร์ชันที่ใช้งานจริง
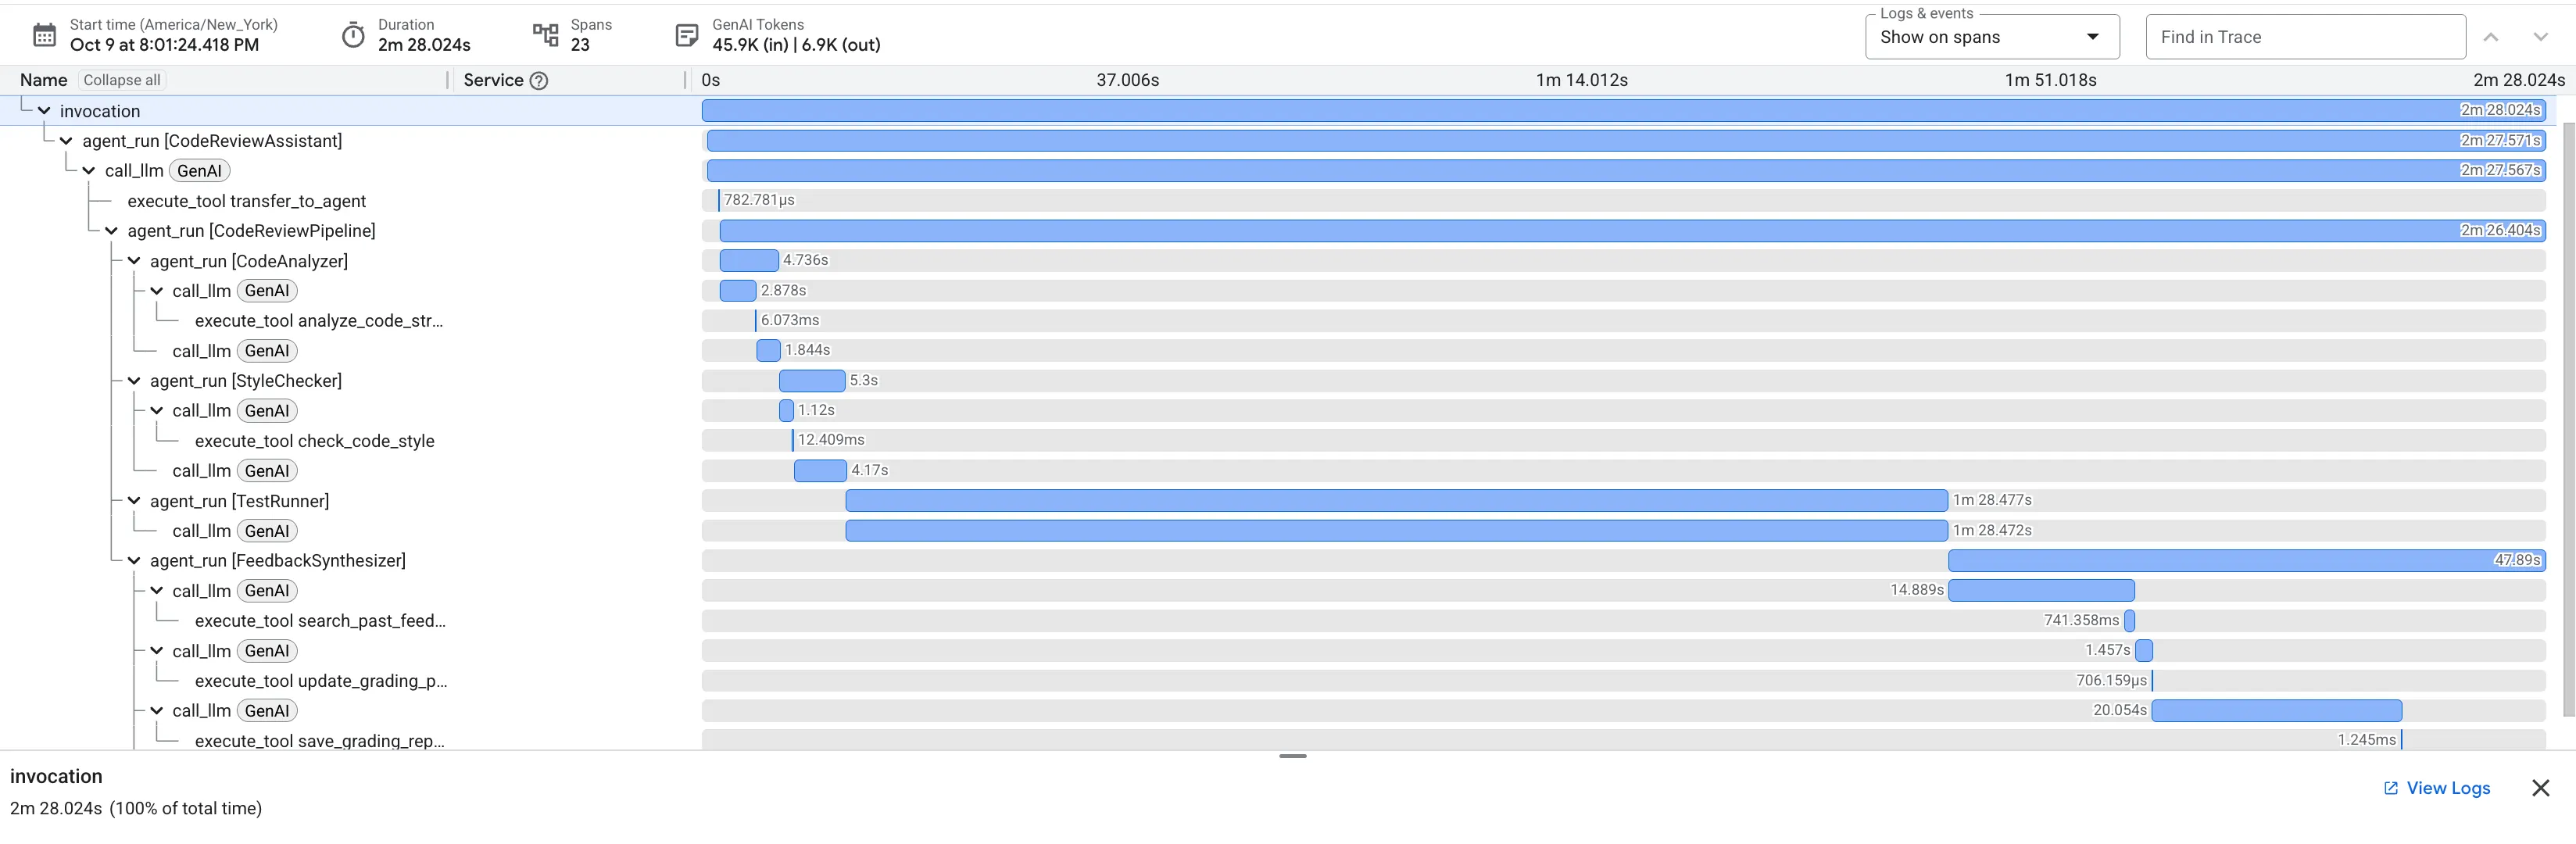
บทนำ
ตอนนี้ระบบได้ติดตั้งใช้งานผู้ช่วยรีวิวโค้ดของคุณและกำลังทำงานในเวอร์ชันที่ใช้งานจริงใน Agent Engine แล้ว แต่คุณจะรู้ได้อย่างไรว่าการทดสอบทำงานได้ดี คุณตอบคำถามสำคัญต่อไปนี้ได้ไหม
- ตัวแทนตอบกลับเร็วพอไหม
- การดำเนินการใดช้าที่สุด
- วงจรการแก้ไขทำงานได้อย่างมีประสิทธิภาพหรือไม่
- จุดคอขวดด้านประสิทธิภาพอยู่ที่ใด
หากไม่มีการสังเกตการณ์ คุณจะดำเนินการโดยไม่รู้เรื่อง --trace-to-cloudแฟล็กที่คุณใช้ในระหว่างการติดตั้งใช้งานจะเปิดใช้ Cloud Trace โดยอัตโนมัติ ซึ่งจะช่วยให้คุณมองเห็นคำขอทุกรายการที่ Agent ประมวลผลได้อย่างสมบูรณ์ ซึ่งจะเปลี่ยนการแก้ไขข้อบกพร่องจากการคาดเดาเป็นการวิเคราะห์ทางนิติเวช
ในโมดูลนี้ คุณจะได้เรียนรู้วิธีอ่านการติดตาม เข้าใจลักษณะประสิทธิภาพของเอเจนต์ และระบุส่วนที่ต้องเพิ่มประสิทธิภาพโดยอิงตามหลักฐานที่ชัดเจน
ทำความเข้าใจการติดตามและช่วง
Trace คืออะไร
การติดตามคือไทม์ไลน์ที่สมบูรณ์ของเอเจนต์ที่จัดการคำขอเดียว โดยจะบันทึกทุกอย่างตั้งแต่เมื่อผู้ใช้ส่งคำค้นหาจนถึงเมื่อมีการส่งคำตอบสุดท้าย โดยแต่ละร่องรอยจะแสดงข้อมูลต่อไปนี้
- ระยะเวลาทั้งหมดของคำขอ
- การดำเนินการทั้งหมดที่ดำเนินการ
- ความสัมพันธ์ระหว่างการดำเนินการ (ความสัมพันธ์ระหว่างการดำเนินการหลักกับการดำเนินการย่อย)
- เมื่อการดำเนินการแต่ละอย่างเริ่มและสิ้นสุด
สแปนคืออะไร
Spanแสดงถึงหน่วยงานเดียวภายในร่องรอย ประเภทช่วงที่พบบ่อยในผู้ช่วยตรวจสอบโค้ดมีดังนี้
agent_run: การดำเนินการของ Agent (Agent รูทหรือ Agent ย่อย)call_llm: คำขอไปยังโมเดลภาษาexecute_tool: การดำเนินการฟังก์ชันเครื่องมือstate_read/state_write: การดำเนินการจัดการสถานะcode_executor: การเรียกใช้โค้ดด้วยการทดสอบ
ช่วงมีคุณสมบัติดังนี้
- ชื่อ: การดำเนินการที่แสดง
- ระยะเวลา: ระยะเวลาที่ใช้
- แอตทริบิวต์: ข้อมูลเมตา เช่น ชื่อโมเดล จำนวนโทเค็น อินพุต/เอาต์พุต
- สถานะ: สำเร็จหรือไม่สำเร็จ
- ความสัมพันธ์หลัก/ย่อย: การดำเนินการใดที่ทริกเกอร์การดำเนินการใด
การวัดอัตโนมัติ
เมื่อคุณติดตั้งใช้งานด้วย --trace-to-cloud ADK จะทำการวัดผลโดยอัตโนมัติ ดังนี้
- การเรียกใช้ Agent และการเรียกใช้ Agent ย่อยทุกครั้ง
- คำขอ LLM ทั้งหมดที่มีจำนวนโทเค็น
- การดำเนินการเครื่องมือที่มีอินพุต/เอาต์พุต
- การดำเนินการสถานะ (อ่าน/เขียน)
- การวนซ้ำของลูปในไปป์ไลน์การแก้ไข
- เงื่อนไขข้อผิดพลาดและการลองใหม่
ไม่จำเป็นต้องเปลี่ยนแปลงโค้ด - การติดตามจะรวมอยู่ในรันไทม์ของ ADK
ขั้นตอนที่ 1: เข้าถึง Cloud Trace Explorer
เปิด Cloud Trace ในคอนโซล Google Cloud:
- ไปที่ Cloud Trace Explorer
- เลือกโปรเจ็กต์จากเมนูแบบเลื่อนลง (ควรเลือกไว้ล่วงหน้า)
- คุณควรเห็นร่องรอยจากการทดสอบในโมดูลที่ 7
หากยังไม่เห็นร่องรอย ให้ทำดังนี้
การทดสอบที่คุณเรียกใช้ในโมดูลที่ 7 ควรสร้างการติดตาม หากรายการว่างเปล่า ให้สร้างข้อมูลการติดตาม
python tests/test_agent_engine.py
รอ 1-2 นาทีเพื่อให้ร่องรอยปรากฏในคอนโซล
สิ่งที่คุณกำลังดู
Trace Explorer จะแสดงข้อมูลต่อไปนี้
- รายการการติดตาม: แต่ละแถวแสดงคำขอที่สมบูรณ์ 1 รายการ
- ไทม์ไลน์: เวลาที่เกิดคำขอ
- ระยะเวลา: ระยะเวลาที่ใช้ในการประมวลผลคำขอแต่ละรายการ
- รายละเอียดคำขอ: การประทับเวลา เวลาในการตอบสนอง จำนวนช่วง
นี่คือบันทึกการเข้าชมเวอร์ชันที่ใช้งานจริง ซึ่งทุกการโต้ตอบกับเอเจนต์จะสร้างการติดตาม
ขั้นตอนที่ 2: ตรวจสอบการติดตามไปป์ไลน์การตรวจสอบ
คลิกการติดตามใดก็ได้ในรายการเพื่อเปิดมุมมองน้ำตก
คุณจะเห็นแผนภูมิแกนต์ที่แสดงไทม์ไลน์การดำเนินการทั้งหมด invocation สแปนรูทแสดงถึงคำขอทั้งหมด โดยจะมี Span สำหรับแต่ละ Agent ย่อย เครื่องมือ และการเรียกใช้ LLM ซ้อนอยู่
การอ่าน Waterfall: การระบุคอขวด
แต่ละแท่งแสดงถึงช่วง ตำแหน่งแนวนอนจะแสดงเวลาที่เริ่ม และความยาวจะแสดงระยะเวลาที่ใช้ ซึ่งจะแสดงให้เห็นทันทีว่า Agent ใช้เวลาไปกับอะไร
ข้อมูลเชิงลึกที่สำคัญจากการติดตามด้านบน
- เวลาในการตอบสนองทั้งหมด: คำขอทั้งหมดใช้เวลา 2 นาที 28 วินาที
- รายละเอียด Agent ย่อย:
Code Analyzer: 4.7 วินาทีStyle Checker: 5.3 วินาทีTest Runner: 1 นาที 28 วินาทีFeedback Synthesizer: 47.9 วินาที
- การวิเคราะห์เส้นทางวิกฤต:
Test Runnerเอเจนต์เป็นจุดคอขวดด้านประสิทธิภาพที่ชัดเจน โดยคิดเป็นประมาณ 59% ของเวลารวมในการส่งคำขอ
การมองเห็นนี้มีประสิทธิภาพ คุณจะมีหลักฐานที่ชัดเจนว่าหากต้องการเพิ่มประสิทธิภาพเพื่อลดเวลาในการตอบสนอง Test Runner คือเป้าหมายที่ชัดเจน แทนที่จะคาดเดาว่าใช้เวลาไปกับอะไร
การตรวจสอบการใช้โทเค็นเพื่อการเพิ่มประสิทธิภาพต้นทุน
Cloud Trace ไม่ได้แสดงแค่เวลา แต่ยังแสดงค่าใช้จ่ายด้วยการบันทึกการใช้โทเค็นสำหรับการเรียก LLM ทุกครั้ง
คลิก
call_llm
ช่วงภายในร่องรอย ในบานหน้าต่างรายละเอียด คุณจะเห็นแอตทริบิวต์สำหรับ llm.usage.prompt_tokens และ llm.usage.completion_tokens
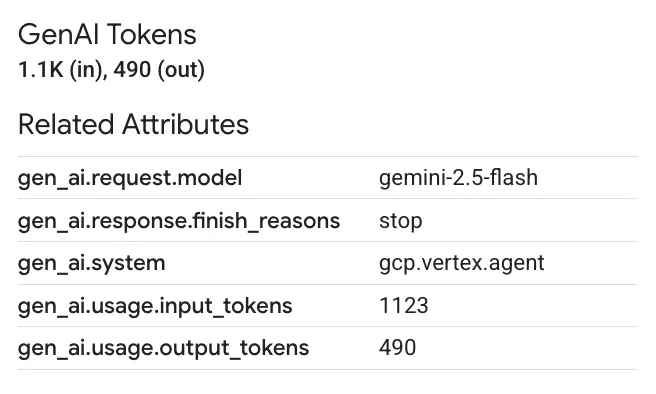
วิธีนี้ช่วยให้คุณทำสิ่งต่อไปนี้ได้
- ติดตามต้นทุนในระดับย่อย: ดูจำนวนโทเค็นที่เอเจนต์และเครื่องมือแต่ละรายการใช้
- ระบุโอกาสในการเพิ่มประสิทธิภาพ: หากเอเจนต์ใช้โทเค็นจำนวนมากอย่างน่าประหลาดใจ อาจเป็นโอกาสในการปรับแต่งพรอมต์หรือเปลี่ยนไปใช้โมเดลที่เล็กลงและคุ้มค่ากว่าสำหรับงานนั้นๆ
ขั้นตอนที่ 3: วิเคราะห์การติดตามไปป์ไลน์การแก้ไข
ไปป์ไลน์การแก้ไขมีความซับซ้อนมากขึ้นเนื่องจากมี LoopAgent Cloud Trace ช่วยให้คุณเข้าใจลักษณะการทำงานแบบวนซ้ำนี้ได้ง่าย
ค้นหาร่องรอยที่มี "FixAttemptLoop" ในชื่อสแปน
หากไม่มี ให้เรียกใช้สคริปต์การทดสอบและตอบรับเมื่อระบบถามว่าต้องการแก้ไขโค้ดหรือไม่
การตรวจสอบโครงสร้างลูป
มุมมองการติดตามจะแสดงภาพการดำเนินการของลูปอย่างชัดเจน หากลูปการแก้ไขทำงาน 2 ครั้งก่อนที่จะสำเร็จ คุณจะเห็นช่วง loop_iteration 2 ช่วงซ้อนอยู่ใต้ช่วง FixAttemptLoop โดยแต่ละช่วงจะมีวงจรทั้งหมดของเอเจนต์ CodeFixer, FixTestRunner และ FixValidator

ข้อสังเกตสำคัญจากการติดตามลูป:
- การปรับแต่งแบบวนซ้ำจะปรากฏให้เห็น: คุณจะเห็นว่าระบบพยายามแก้ไขใน
loop_iteration: 1ตรวจสอบความถูกต้อง แล้วลองอีกครั้งในloop_iteration: 2เนื่องจากยังไม่สมบูรณ์ - การบรรจบกันวัดผลได้: คุณสามารถเปรียบเทียบระยะเวลาและผลลัพธ์ของการทำซ้ำแต่ละครั้งเพื่อทำความเข้าใจว่าระบบบรรจบกันจนได้โซลูชันที่ถูกต้องได้อย่างไร
- การแก้ไขข้อบกพร่องทำได้ง่ายขึ้น: หากลูปทำงานตามจำนวนการวนซ้ำสูงสุดแล้วแต่ยังคงล้มเหลว คุณสามารถตรวจสอบสถานะและลักษณะการทำงานของ Agent ภายในช่วงของการวนซ้ำแต่ละครั้งเพื่อวินิจฉัยสาเหตุที่การแก้ไขไม่บรรจบกัน
รายละเอียดระดับนี้มีประโยชน์อย่างมากในการทำความเข้าใจและแก้ไขข้อบกพร่องของลักษณะการทำงานของลูปที่มีสถานะที่ซับซ้อนในเวอร์ชันที่ใช้งานจริง
ขั้นตอนที่ 4: สิ่งที่คุณค้นพบ
รูปแบบประสิทธิภาพ
จากการตรวจสอบการติดตาม ตอนนี้คุณมีข้อมูลเชิงลึกที่อิงตามข้อมูลแล้ว
ไปป์ไลน์การตรวจสอบ:
- จุดคอขวดหลัก:
Test Runnerเอเจนต์ โดยเฉพาะการเรียกใช้โค้ดและการสร้างการทดสอบที่อิงตาม LLM เป็นส่วนที่ใช้เวลานานที่สุดในการตรวจสอบ - การดำเนินการที่รวดเร็ว: เครื่องมือที่กำหนดได้ (
analyze_code_structure) และการดำเนินการจัดการสถานะมีความรวดเร็วอย่างยิ่งและไม่เป็นข้อกังวลด้านประสิทธิภาพ
แก้ไขไปป์ไลน์:
- อัตราการบรรจบกัน: คุณจะเห็นว่าการแก้ไขส่วนใหญ่เสร็จสมบูรณ์ใน 1-2 รอบ ซึ่งยืนยันว่าสถาปัตยกรรมลูปมีประสิทธิภาพ
- ต้นทุนแบบก้าวหน้า: การทำซ้ำในภายหลังอาจใช้เวลานานขึ้นเนื่องจากบริบทของ LLM จะเพิ่มขึ้นตามข้อมูลจากความพยายามที่ล้มเหลวก่อนหน้านี้
ปัจจัยที่ทำให้เกิดต้นทุน:
- การใช้โทเค็น: คุณสามารถระบุเอเจนต์ (เช่น ตัวสังเคราะห์) ที่ต้องใช้โทเค็นมากที่สุด และตัดสินใจว่าการใช้โมเดลที่มีประสิทธิภาพมากขึ้นแต่มีราคาแพงกว่านั้นคุ้มค่าสำหรับงานนั้นหรือไม่
ตำแหน่งที่ควรตรวจสอบปัญหา
เมื่อตรวจสอบการติดตามในเวอร์ชันที่ใช้งานจริง ให้มองหาสิ่งต่อไปนี้
- การติดตามที่ยาวนานผิดปกติ: สัญญาณของการถดถอยของประสิทธิภาพหรือลักษณะการทำงานแบบวนซ้ำที่ไม่คาดคิด
- ช่วงที่ล้มเหลว (ทำเครื่องหมายเป็นสีแดง): ระบุการดำเนินการที่ล้มเหลวอย่างแม่นยำ
- การวนซ้ำมากเกินไป (>2): อาจบ่งชี้ถึงปัญหาเกี่ยวกับตรรกะการสร้างการแก้ไข
- จำนวนโทเค็นสูง: ไฮไลต์โอกาสในการเพิ่มประสิทธิภาพพรอมต์หรือการเปลี่ยนแปลงการเลือกโมเดล
สิ่งที่คุณได้เรียนรู้
ตอนนี้คุณเข้าใจวิธีทำสิ่งต่อไปนี้ผ่าน Cloud Trace แล้ว
✅ แสดงภาพโฟลว์คำขอ: ดูเส้นทางการดำเนินการทั้งหมดผ่านไปป์ไลน์แบบลำดับและแบบวนซ้ำ
✅ ระบุจุดคอขวดด้านประสิทธิภาพ: ใช้แผนภูมิ Waterfall เพื่อค้นหาการดำเนินการที่ช้าที่สุดด้วยข้อมูลที่เชื่อถือได้
✅ วิเคราะห์ลักษณะการทำงานแบบวนซ้ำ: สังเกตว่าเอเจนต์แบบวนซ้ำจะเข้าสู่โซลูชันได้อย่างไรเมื่อพยายามหลายครั้ง
✅ ติดตามต้นทุนโทเค็น: ตรวจสอบช่วง LLM เพื่อตรวจสอบและเพิ่มประสิทธิภาพการใช้โทเค็นในระดับละเอียด
แนวคิดหลักที่เชี่ยวชาญ
- การติดตามและ Span: หน่วยพื้นฐานของความสามารถในการสังเกต ซึ่งแสดงถึงคำขอและการดำเนินการภายในคำขอ
- การวิเคราะห์แบบวอเตอร์ฟอลล์: การอ่านแผนภูมิแกนต์เพื่อทำความเข้าใจเวลาในการดำเนินการและการขึ้นต่อกัน
- การระบุเส้นทางวิกฤต: การค้นหาลำดับการดำเนินการที่กำหนดเวลาในการตอบสนองโดยรวม
- ความสามารถในการสังเกตแบบละเอียด: มีการมองเห็นไม่เพียงแค่ช่วงเวลา แต่ยังรวมถึงข้อมูลเมตา เช่น จำนวนโทเค็นสำหรับการดำเนินการทุกอย่าง ซึ่ง ADK จะวัดคุมโดยอัตโนมัติ
ขั้นตอนถัดไป
สำรวจ Cloud Trace ต่อไป
- ตรวจสอบการติดตามเป็นประจำเพื่อตรวจหาปัญหาตั้งแต่เนิ่นๆ
- เปรียบเทียบการติดตามเพื่อระบุการถดถอยของประสิทธิภาพ
- ใช้ข้อมูลการติดตามเพื่อประกอบการตัดสินใจในการเพิ่มประสิทธิภาพ
- กรองตามระยะเวลาเพื่อค้นหาคำขอที่ช้า
ความสามารถในการสังเกตขั้นสูง (ไม่บังคับ):
- ส่งออกการติดตามไปยัง BigQuery เพื่อการวิเคราะห์ที่ซับซ้อน (เอกสาร)
- สร้างแดชบอร์ดที่กำหนดเองใน Cloud Monitoring
- ตั้งค่าการแจ้งเตือนประสิทธิภาพที่ลดลง
- เชื่อมโยงการติดตามกับบันทึกของแอปพลิเคชัน
9. สรุป: จากต้นแบบสู่เวอร์ชันที่ใช้งานจริง
สิ่งที่คุณสร้าง
คุณเริ่มต้นด้วยโค้ดเพียง 7 บรรทัดและสร้างระบบ AI Agent ระดับเวอร์ชันที่ใช้งานจริง
# Where we started (7 lines)
agent = Agent(
    model="gemini-2.5-flash",
    instruction="Review Python code for issues"
)

# Where we ended (production system)
- Two distinct multi-agent pipelines (review and fix) built from 8 specialized agents.
- An iterative fix loop architecture for automated validation and retries.
- Real AST-based code analysis tools for deterministic, accurate feedback.
- Robust state management using the "constants pattern" for type-safe communication.
- Fully automated deployment to a managed, scalable cloud infrastructure.
- Complete, built-in observability with Cloud Trace for production monitoring.
รูปแบบสถาปัตยกรรมหลักที่เชี่ยวชาญ
รูปแบบ | การใช้งาน | ผลกระทบต่อการผลิต |
การผสานรวมเครื่องมือ | การวิเคราะห์ AST การตรวจสอบสไตล์ | การตรวจสอบที่แท้จริง ไม่ใช่แค่ความคิดเห็นของ LLM |
ไปป์ไลน์แบบลำดับ | ตรวจสอบ → แก้ไขเวิร์กโฟลว์ | การดำเนินการที่คาดการณ์ได้และแก้ไขข้อบกพร่องได้ |
สถาปัตยกรรมของ Loop | การแก้ไขแบบวนซ้ำโดยมีเงื่อนไขการออก | ปรับปรุงตัวเองจนกว่าจะสำเร็จ |
การจัดการสถานะ | รูปแบบค่าคงที่ หน่วยความจำแบบ 3 ระดับ | การจัดการสถานะที่ปลอดภัยตามประเภทและบำรุงรักษาได้ |
การติดตั้งใช้งานเวอร์ชันที่ใช้งานจริง | Agent Engine ผ่าน deploy.sh | โครงสร้างพื้นฐานที่มีการจัดการและปรับขนาดได้ |
ความสามารถในการสังเกต | การผสานรวม Cloud Trace | การมองเห็นลักษณะการทำงานของเวอร์ชันที่ใช้งานจริงอย่างเต็มรูปแบบ |
ข้อมูลเชิงลึกในการผลิตจากการติดตาม
ข้อมูล Cloud Trace เผยให้เห็นข้อมูลเชิงลึกที่สำคัญ ดังนี้
✅ ระบุจุดคอขวด: การเรียก LLM ของ TestRunner ทำให้เกิดเวลาในการตอบสนองที่นาน
✅ ประสิทธิภาพของเครื่องมือ: การวิเคราะห์ AST ทำงานใน 100 มิลลิวินาที (ยอดเยี่ยม)
✅ อัตราความสำเร็จ: การแก้ไขลูปจะรวมกันภายใน 2-3 การทำซ้ำ
✅ การใช้โทเค็น: โทเค็นประมาณ 600 รายการต่อการตรวจสอบ 1 ครั้ง และประมาณ 1, 800 รายการสำหรับการแก้ไข
ข้อมูลเชิงลึกเหล่านี้ช่วยขับเคลื่อนการปรับปรุงอย่างต่อเนื่อง
ล้างข้อมูลทรัพยากร (ไม่บังคับ)
หากทดสอบเสร็จแล้วและต้องการหลีกเลี่ยงการเรียกเก็บเงิน ให้ทำดังนี้
ลบการติดตั้งใช้งาน Agent Engine:
import vertexai

client = vertexai.Client(  # For service interactions via client.agent_engines
    project="PROJECT_ID",
    location="LOCATION",
)

RESOURCE_NAME = "projects/{PROJECT_ID}/locations/{LOCATION}/reasoningEngines/{RESOURCE_ID}"

client.agent_engines.delete(
    name=RESOURCE_NAME,
    force=True, # Optional, if the agent has resources (e.g. sessions, memory)
)
ลบบริการ Cloud Run (หากสร้างไว้):
gcloud run services delete code-review-assistant \
    --region=$GOOGLE_CLOUD_LOCATION \
    --quiet
ลบอินสแตนซ์ Cloud SQL (หากสร้างไว้):
gcloud sql instances delete your-project-db \
    --quiet
ล้างที่เก็บข้อมูล:
gsutil -m rm -r gs://your-project-staging
gsutil -m rm -r gs://your-project-artifacts
ขั้นตอนถัดไป
เมื่อสร้างรากฐานเสร็จแล้ว ให้พิจารณาการเพิ่มประสิทธิภาพต่อไปนี้
- เพิ่มภาษาอื่นๆ: ขยายเครื่องมือให้รองรับ JavaScript, Go, Java
- ผสานรวมกับ GitHub: การตรวจสอบ PR อัตโนมัติ
- ใช้การแคช: ลดเวลาในการตอบสนองสำหรับรูปแบบที่พบบ่อย
- เพิ่มเอเจนต์เฉพาะทาง: การสแกนความปลอดภัย การวิเคราะห์ประสิทธิภาพ
- เปิดใช้การทดสอบ A/B: เปรียบเทียบโมเดลและพรอมต์ต่างๆ
- ส่งออกเมตริก: ส่งการติดตามไปยังแพลตฟอร์มการสังเกตการณ์เฉพาะทาง
สิ่งสำคัญที่เรียนรู้
- เริ่มต้นอย่างง่ายๆ ทำซ้ำอย่างรวดเร็ว: 7 บรรทัดสู่การใช้งานจริงในขั้นตอนที่จัดการได้
- เครื่องมือเหนือกว่าพรอมต์: การวิเคราะห์ AST จริงดีกว่า "โปรดตรวจสอบข้อบกพร่อง"
- การจัดการสถานะมีความสำคัญ: รูปแบบค่าคงที่ช่วยป้องกันข้อบกพร่องที่เกิดจากการพิมพ์ผิด
- ลูปต้องมีเงื่อนไขการออก: ตั้งค่าการวนซ้ำและการส่งต่อสูงสุดเสมอ
- ติดตั้งใช้งานด้วยการทำงานอัตโนมัติ: deploy.sh จัดการความซับซ้อนทั้งหมด
- ความสามารถในการสังเกตเป็นสิ่งที่ขาดไม่ได้: คุณไม่สามารถปรับปรุงสิ่งที่วัดค่าไม่ได้
แหล่งข้อมูลสำหรับการเรียนรู้เพิ่มเติม
- เอกสารประกอบ ADK
- รูปแบบ ADK ขั้นสูง
- คู่มือ Agent Engine
- เอกสารประกอบของ Cloud Run
- เอกสารประกอบของ Cloud Trace
การเดินทางของคุณดำเนินต่อไป
คุณได้สร้างมากกว่าผู้ช่วยรีวิวโค้ด แต่คุณได้เชี่ยวชาญรูปแบบการสร้าง AI Agent เวอร์ชันที่ใช้งานจริงแล้ว
✅ เวิร์กโฟลว์ที่ซับซ้อนซึ่งมีเอเจนต์เฉพาะทางหลายตัว
✅ การผสานรวมเครื่องมือจริงเพื่อความสามารถที่แท้จริง
✅ การติดตั้งใช้งานเวอร์ชันที่ใช้งานจริงพร้อมความสามารถในการสังเกตที่เหมาะสม
✅ การจัดการสถานะสำหรับระบบที่บำรุงรักษาได้
รูปแบบเหล่านี้มีตั้งแต่ผู้ช่วยแบบง่ายไปจนถึงระบบอัตโนมัติที่ซับซ้อน พื้นฐานที่คุณสร้างขึ้นที่นี่จะช่วยให้คุณรับมือกับสถาปัตยกรรมของเอเจนต์ที่ซับซ้อนมากขึ้นได้
ยินดีต้อนรับสู่การพัฒนา AI Agent สำหรับเวอร์ชันที่ใช้งานจริง ผู้ช่วยรีวิวโค้ดเป็นเพียงจุดเริ่มต้น