
1. 深夜代码审核
现在是凌晨 2 点
您已调试数小时。函数看起来没问题,但出了点问题。您一定有过这种感觉:代码应该能正常运行,但实际上却无法运行,而您盯着代码看了太久,已经看不出问题所在了。
def dfs_search_v1(graph, start, target):
    """Find if target is reachable from start."""
    visited = set()
    stack = start  # Looks innocent enough...

    while stack:
        current = stack.pop()

        if current == target:
            return True

        if current not in visited:
            visited.add(current)

            for neighbor in graph[current]:
                if neighbor not in visited:
                    stack.append(neighbor)

    return False
AI 开发者历程
如果您正在阅读本文,很可能已经体验过 AI 为编码带来的变革。Gemini Code Assist、Claude Code 和 Cursor 等工具改变了我们编写代码的方式。它们非常适合生成样板代码、建议实现方式和加快开发速度。
不过,您来到这里,是因为想更深入地了解相关知识。您想了解如何构建这些 AI 系统,而不仅仅是使用它们。您希望创建的内容:
- 具有可预测、可追踪的行为
- 可以胸有成竹地部署到生产环境
- 提供可靠的一致性结果
- 准确显示了 Gemini 如何做出决策
从消费者到创作者
今天,您将从使用 AI 工具跃升到构建 AI 工具。您将构建一个多智能体系统,该系统:
- 确定性地分析代码结构
- 执行实际测试以验证行为
- 使用真实的 lint 工具验证样式合规性
- 将发现结果整合为可据以采取行动的反馈
- 部署到 Google Cloud,具有完整的可观测性
2. 首次部署智能体
开发者的疑问
“我了解 LLM,也使用过相关 API,但如何从 Python 脚本过渡到可扩缩的生产级 AI 智能体?”
我们先正确设置环境,然后构建一个简单的代理来了解基础知识,然后再深入了解生产模式。
先进行基本设置
在创建任何代理之前,请先确保您的 Google Cloud 环境已准备就绪。
点击 Google Cloud 控制台顶部的激活 Cloud Shell(这是 Cloud Shell 窗格顶部的终端形状图标),
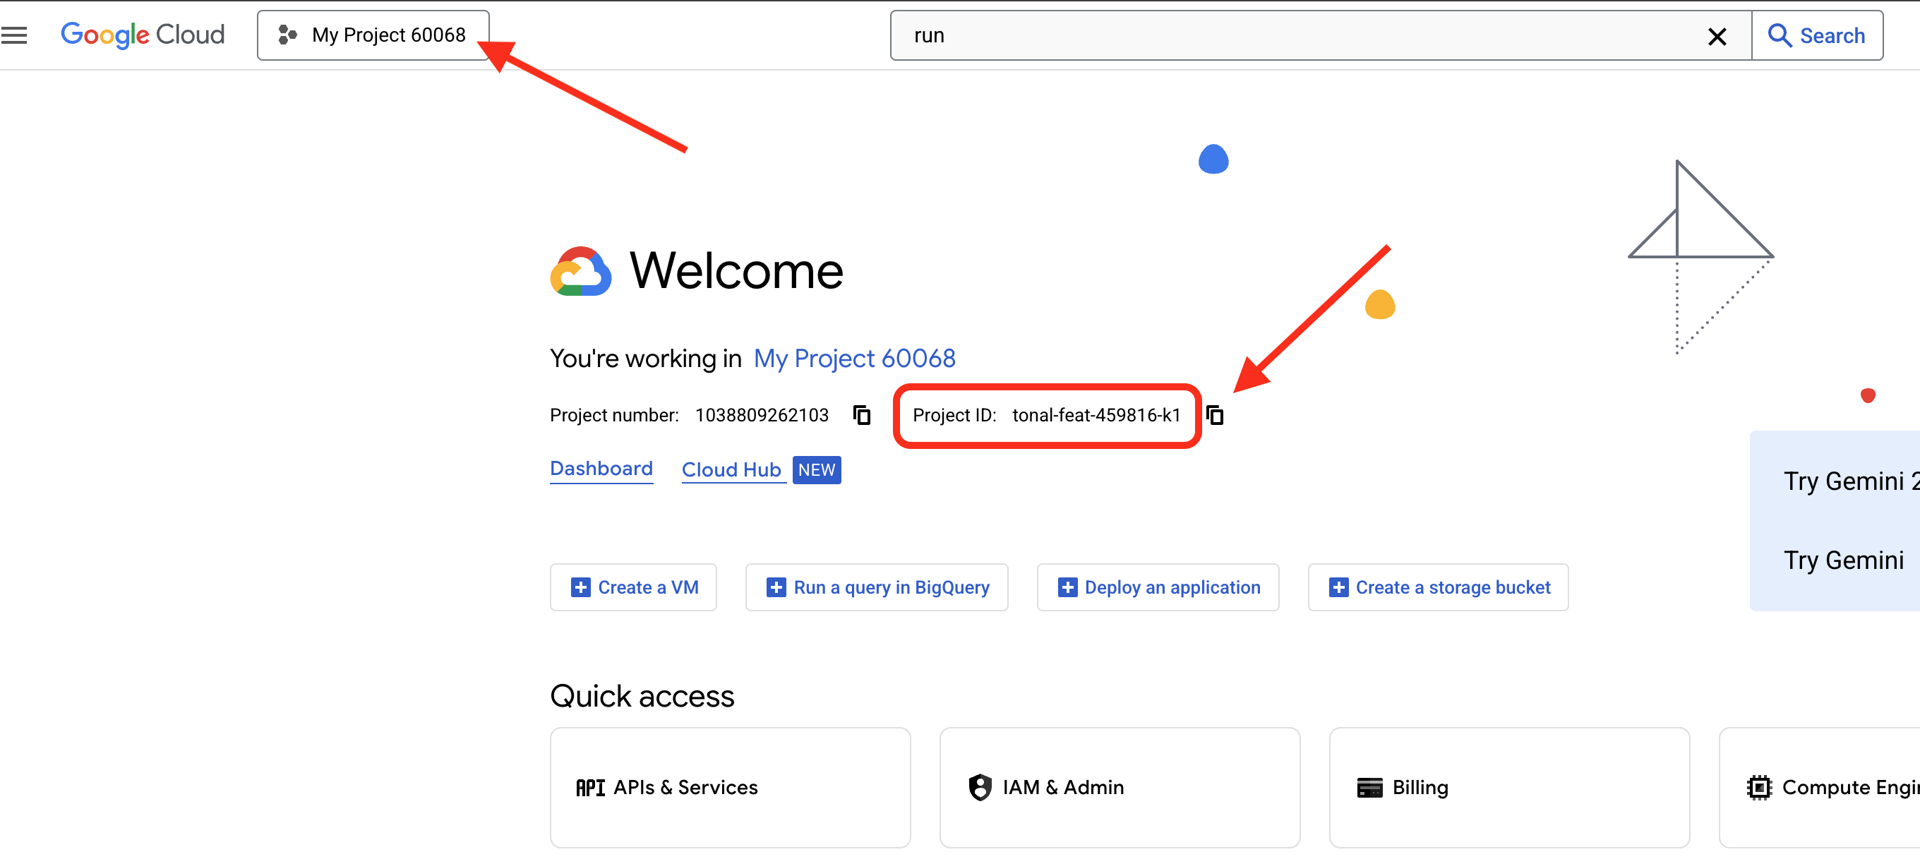
查找您的 Google Cloud 项目 ID:
- 打开 Google Cloud 控制台:https://console.cloud.google.com
- 从页面顶部的项目下拉菜单中选择要用于本次研讨会的项目。
- 项目 ID 会显示在信息中心内的“项目信息”卡片中
第 1 步:设置项目 ID
在 Cloud Shell 中,gcloud 命令行工具已配置完毕。运行以下命令以设置有效项目。此命令使用 $GOOGLE_CLOUD_PROJECT 环境变量,该变量会在您的 Cloud Shell 会话中自动为您设置。
gcloud config set project $GOOGLE_CLOUD_PROJECT
第 2 步:验证设置
接下来,运行以下命令,确认您的项目已正确设置,并且您已通过身份验证。
# Confirm project is set
echo "Current project: $(gcloud config get-value project)"

# Check authentication status
gcloud auth list
您应该会看到打印的项目 ID,以及旁边带有 (ACTIVE) 的用户账号。
如果您的账号未列为有效账号,或者您收到身份验证错误,请运行以下命令进行登录:
gcloud auth application-default login
第 3 步:启用必需的 API
对于基本代理,我们需要至少以下 API:
gcloud services enable \
    aiplatform.googleapis.com \
    compute.googleapis.com
此过程可能需要一两分钟的时间才能完成。您会看到:
Operation "operations/..." finished successfully.
第 4 步:安装 ADK
# Install the ADK CLI
pip install google-adk --upgrade

# Verify installation
adk --version
您应该会看到 1.15.0 或更高版本的版本号。
现在创建基本智能体
环境准备就绪后,我们来创建这个简单的代理。
第 5 步:使用 ADK Create
adk create my_first_agent
按照互动式提示操作:
Choose a model for the root agent:
1. gemini-2.5-flash
2. Other models (fill later)
Choose model (1, 2): 1

1. Google AI
2. Vertex AI
Choose a backend (1, 2): 2

Enter Google Cloud project ID [auto-detected-from-gcloud]:
Enter Google Cloud region [us-central1]:
第 6 步:检查创建的内容
cd my_first_agent
ls -la
您会看到三个文件:
.env          # Configuration (auto-populated with your project)
__init__.py   # Package marker
agent.py      # Your agent definition
第 7 步:快速配置检查
# Verify the .env was created correctly
cat .env

# Should show something like:
# GOOGLE_CLOUD_PROJECT=your-project-id
# GOOGLE_CLOUD_LOCATION=us-central1
# GOOGLE_GENAI_USE_VERTEXAI=1
如果项目 ID 缺失或不正确,请修改 .env 文件:
nano .env # or use your preferred editor
第 8 步:查看代理代码
cat agent.py
from google.adk.agents.llm_agent import Agent

root_agent = Agent(
    model='gemini-2.5-flash',
    name='root_agent',
    description='A helpful assistant for user questions.',
    instruction='Answer user questions to the best of your knowledge',
)
简单、简洁、极简。这是您的智能体“Hello World”。
测试基本智能体
第 9 步:运行智能体
cd ..
adk run my_first_agent
您应该会看到类似如下内容:
Log setup complete: /tmp/agents_log/agent.20250930_162430.log
To access latest log: tail -F /tmp/agents_log/agent.latest.log
[user]:
第 10 步:尝试一些查询
在运行 adk run 的终端中,您会看到提示。输入查询内容:
[user]: Hey, what can you do?
[root_agent]: I can help answer questions, generate text, explain concepts, assist with problem-solving, and provide information on a wide range of topics. What would you like to know or discuss?

[user]: What's the current weather in Mountain View?
[root_agent]: I'm sorry, but I cannot provide real-time weather information as I don't have access to current data or weather services. To get the current weather in Mountain View, I recommend checking a weather website or app like weather.com or using a search engine.
请注意,该模型存在一个限制,即无法访问当前数据。让我们进一步推进:
[user]: Review this Python code: def add(a, b): return a + b
[root_agent]: This is a simple Python function that adds two numbers. Here's my review:

**Strengths:**
- Clean and concise implementation
- Follows Python conventions for simple operations
- Clear function name that describes its purpose

**Suggestions for improvement:**
- Add a docstring to document the function
- Consider adding type hints for better code clarity
- You might want to handle edge cases

Here's an enhanced version:
def add(a: float, b: float) -> float:
    """Add two numbers and return their sum."""
    return a + b
智能体可以讨论代码,但它是否可以:
- 实际解析 AST 以了解结构?
- 运行测试以验证其是否正常运行?
- 检查样式合规性?
- 还记得您之前发布的评价吗?
不需要。这正是我们需要架构的地方。
🏃🚪 退出并
Ctrl+C
探索完毕后继续。
3. 准备生产工作区
解决方案:可直接用于生产环境的架构
该简单代理展示了起点,但生产系统需要稳健的结构。现在,我们将设置一个体现生产原则的完整项目。
设置基础
您已为基本代理配置 Google Cloud 项目。现在,让我们准备完整的生产工作区,其中包含真实系统所需的所有工具、模式和基础架构。
第 1 步:获取结构化项目
首先,使用 Ctrl+C 退出所有正在运行的 adk run,然后进行清理:
# Clean up the basic agent
cd ~  # Make sure you're not inside my_first_agent
rm -rf my_first_agent

# Get the production scaffold
git clone https://github.com/ayoisio/adk-code-review-assistant.git
cd adk-code-review-assistant
git checkout codelab
第 2 步:创建并激活虚拟环境
# Create the virtual environment
python -m venv .venv

# Activate it
# On macOS/Linux:
source .venv/bin/activate
# On Windows:
# .venv\Scripts\activate
验证:提示符现在应在开头显示 (.venv)。
第 3 步:安装依赖项
pip install -r code_review_assistant/requirements.txt

# Install the package in editable mode (enables imports)
pip install -e .
此命令会安装:
google-adk- ADK 框架pycodestyle- 用于 PEP 8 检查vertexai- 用于云部署- 其他生产依赖项
借助 -e 标志,您可以从任何位置导入 code_review_assistant 模块。
第 4 步:配置环境
# Copy the example environment file
cp .env.example .env

# Edit .env and replace the placeholders:
# - GOOGLE_CLOUD_PROJECT=your-project-id → your actual project ID
# - Keep other defaults as-is
验证:检查您的配置:
cat .env
应显示:
GOOGLE_CLOUD_PROJECT=your-actual-project-id
GOOGLE_CLOUD_LOCATION=us-central1
GOOGLE_GENAI_USE_VERTEXAI=TRUE
第 5 步:确保身份验证
由于您之前已运行过 gcloud auth,因此我们只需验证以下内容:
# Check current authentication
gcloud auth list

# Should show your account with (ACTIVE)
# If not, run:
gcloud auth application-default login
第 6 步:启用其他正式版 API
我们已启用基本 API。现在,添加正式版:
gcloud services enable \
    sqladmin.googleapis.com \
    run.googleapis.com \
    cloudbuild.googleapis.com \
    artifactregistry.googleapis.com \
    storage.googleapis.com \
    cloudtrace.googleapis.com
从而:
- SQL Admin:如果使用 Cloud Run,则适用于 Cloud SQL
- Cloud Run:用于无服务器部署
- Cloud Build:用于自动化部署
- Artifact Registry:适用于容器映像
- Cloud Storage:用于工件和暂存
- Cloud Trace:用于可观测性
第 7 步:创建 Artifact Registry 代码库
我们的部署将构建需要归宿的容器映像:
gcloud artifacts repositories create code-review-assistant-repo \
    --repository-format=docker \
    --location=us-central1 \
    --description="Docker repository for Code Review Assistant"
您应该会看到:
Created repository [code-review-assistant-repo].
如果该目录已存在(可能是之前尝试创建时创建的),也没关系,您会看到一条可以忽略的错误消息。
第 8 步:授予 IAM 权限
# Get your project number
PROJECT_NUMBER=$(gcloud projects describe $GOOGLE_CLOUD_PROJECT \
    --format="value(projectNumber)")

# Define the service account
SERVICE_ACCOUNT="${PROJECT_NUMBER}@cloudbuild.gserviceaccount.com"

# Grant necessary roles
gcloud projects add-iam-policy-binding $GOOGLE_CLOUD_PROJECT \
    --member="serviceAccount:${SERVICE_ACCOUNT}" \
    --role="roles/run.admin"

gcloud projects add-iam-policy-binding $GOOGLE_CLOUD_PROJECT \
    --member="serviceAccount:${SERVICE_ACCOUNT}" \
    --role="roles/iam.serviceAccountUser"

gcloud projects add-iam-policy-binding $GOOGLE_CLOUD_PROJECT \
    --member="serviceAccount:${SERVICE_ACCOUNT}" \
    --role="roles/cloudsql.admin"

gcloud projects add-iam-policy-binding $GOOGLE_CLOUD_PROJECT \
    --member="serviceAccount:${SERVICE_ACCOUNT}" \
    --role="roles/storage.admin"
每个命令都会输出:
Updated IAM policy for project [your-project-id].
您的成就
您的生产工作区现已完全准备就绪:
✅ Google Cloud 项目已配置并经过身份验证
✅ 已测试基本代理以了解限制
✅ 项目代码已准备就绪,包含战略性占位符
✅ 依赖项已在虚拟环境中隔离
✅ 所有必需的 API 已启用
✅ 容器注册表已准备好进行部署
✅ IAM 权限已正确配置
✅ 环境变量已正确设置
现在,您可以使用确定性工具、状态管理和适当的架构来构建真正的 AI 系统了。
4. 构建首个智能体
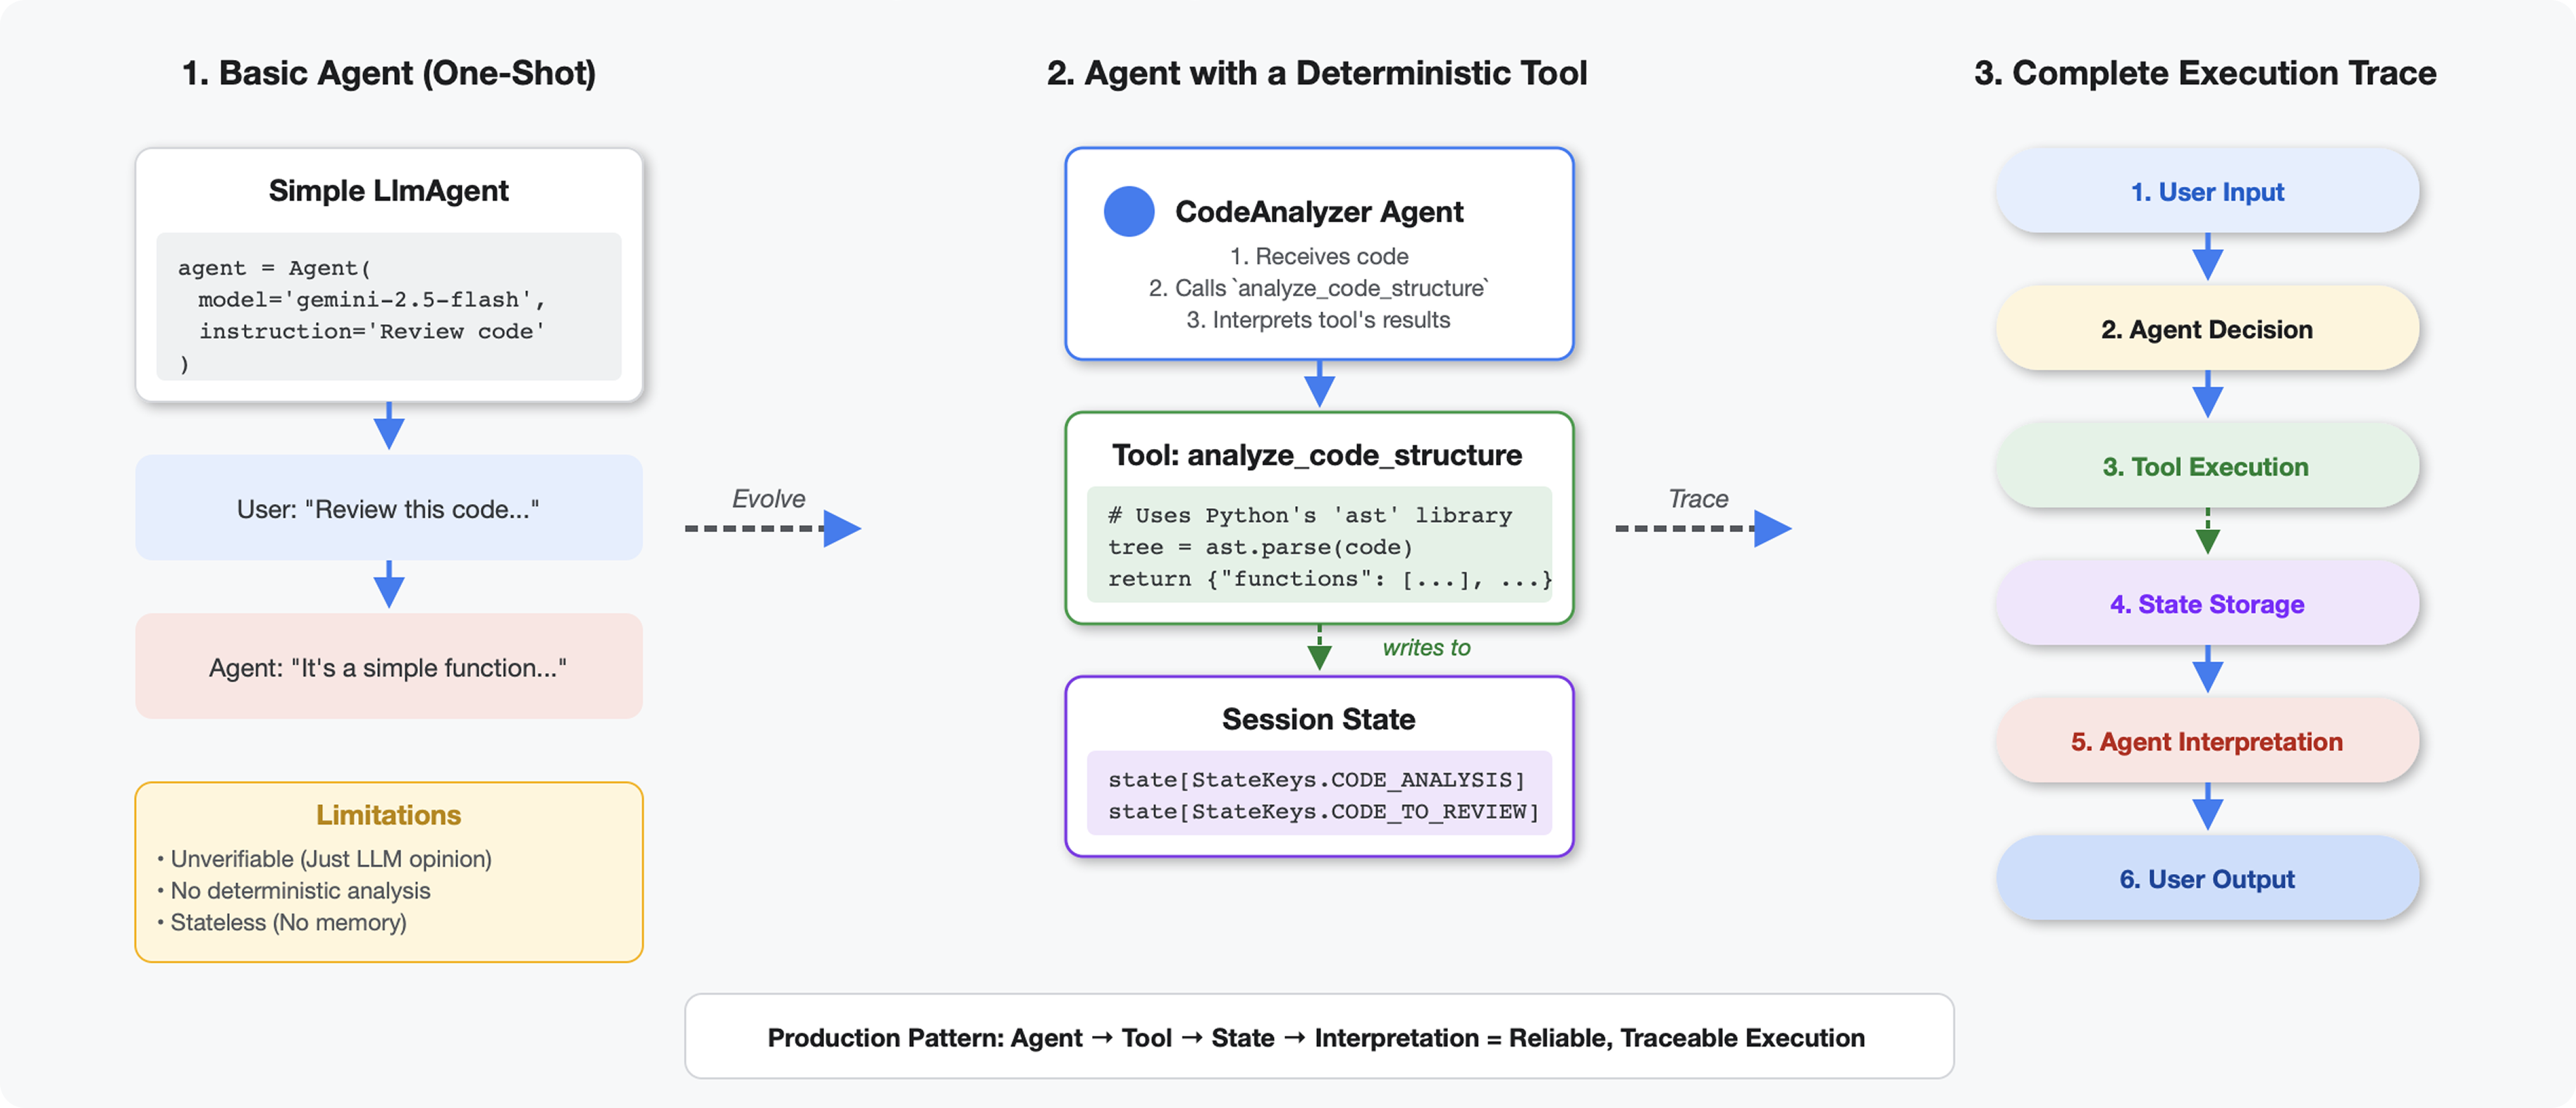
工具与 LLM 的区别
当您向 LLM 询问“此代码中有多少个函数?”时,它会使用模式匹配和估算。当您使用调用 Python 的 ast.parse() 的工具时,它会解析实际的语法树 - 不会猜测,每次都会得到相同的结果。
本部分将构建一个可确定性地分析代码结构的工具,然后将其连接到知道何时调用该工具的代理。
第 1 步:了解 Scaffold
我们来看看您要填写的内容结构。
👉 打开
code_review_assistant/tools.py
您会看到 analyze_code_structure 函数,其中包含占位注释,用于标记您将添加代码的位置。该函数已具有基本结构,您将逐步对其进行增强。
第 2 步:添加状态存储
状态存储可让流水线中的其他代理访问工具的结果,而无需重新运行分析。
👉 查找:
# MODULE_4_STEP_2_ADD_STATE_STORAGE
👉 将该单行替换为:
        # Store code and analysis for other agents to access
        tool_context.state[StateKeys.CODE_TO_REVIEW] = code
        tool_context.state[StateKeys.CODE_ANALYSIS] = analysis
        tool_context.state[StateKeys.CODE_LINE_COUNT] = len(code.splitlines())
第 3 步:添加使用线程池的异步解析
我们的工具需要解析 AST,但不能阻塞其他操作。我们来添加使用线程池的异步执行。
👉 查找:
# MODULE_4_STEP_3_ADD_ASYNC
👉 将该单行替换为:
        # Parse in thread pool to avoid blocking the event loop
        loop = asyncio.get_event_loop()
        with ThreadPoolExecutor() as executor:
            tree = await loop.run_in_executor(executor, ast.parse, code)
第 4 步:提取全面信息
现在,我们来提取类、导入和详细指标 - 这是完成代码审核所需的一切。
👉 查找:
# MODULE_4_STEP_4_EXTRACT_DETAILS
👉 将该单行替换为:
# Extract comprehensive structural information
analysis = await loop.run_in_executor(
executor, _extract_code_structure, tree, code
)
👉 验证:函数
analyze_code_structure
在 中
tools.py
的中心正文如下所示:
# Parse in thread pool to avoid blocking the event loop
loop = asyncio.get_event_loop()
with ThreadPoolExecutor() as executor:
    tree = await loop.run_in_executor(executor, ast.parse, code)
        # Extract comprehensive structural information
        analysis = await loop.run_in_executor(
            executor, _extract_code_structure, tree, code
        )
# Store code and analysis for other agents to access
tool_context.state[StateKeys.CODE_TO_REVIEW] = code
tool_context.state[StateKeys.CODE_ANALYSIS] = analysis
tool_context.state[StateKeys.CODE_LINE_COUNT] = len(code.splitlines())
👉 现在,滚动到
tools.py
,然后找到:
# MODULE_4_STEP_4_HELPER_FUNCTION
👉 将该单行代码替换为完整的辅助函数:
def _extract_code_structure(tree: ast.AST, code: str) -> Dict[str, Any]:
    """
    Helper function to extract structural information from AST.
    Runs in thread pool for CPU-bound work.
    """
    functions = []
    classes = []
    imports = []
    docstrings = []

    for node in ast.walk(tree):
        if isinstance(node, ast.FunctionDef):
            func_info = {
                'name': node.name,
                'args': [arg.arg for arg in node.args.args],
                'lineno': node.lineno,
                'has_docstring': ast.get_docstring(node) is not None,
                'is_async': isinstance(node, ast.AsyncFunctionDef),
                'decorators': [d.id for d in node.decorator_list
                               if isinstance(d, ast.Name)]
            }
            functions.append(func_info)

            if func_info['has_docstring']:
                docstrings.append(f"{node.name}: {ast.get_docstring(node)[:50]}...")

        elif isinstance(node, ast.ClassDef):
            methods = []
            for item in node.body:
                if isinstance(item, ast.FunctionDef):
                    methods.append(item.name)

            class_info = {
                'name': node.name,
                'lineno': node.lineno,
                'methods': methods,
                'has_docstring': ast.get_docstring(node) is not None,
                'base_classes': [base.id for base in node.bases
                                 if isinstance(base, ast.Name)]
            }
            classes.append(class_info)

        elif isinstance(node, ast.Import):
            for alias in node.names:
                imports.append({
                    'module': alias.name,
                    'alias': alias.asname,
                    'type': 'import'
                })
        elif isinstance(node, ast.ImportFrom):
            imports.append({
                'module': node.module or '',
                'names': [alias.name for alias in node.names],
                'type': 'from_import',
                'level': node.level
            })

    return {
        'functions': functions,
        'classes': classes,
        'imports': imports,
        'docstrings': docstrings,
        'metrics': {
            'line_count': len(code.splitlines()),
            'function_count': len(functions),
            'class_count': len(classes),
            'import_count': len(imports),
            'has_main': any(f['name'] == 'main' for f in functions),
            'has_if_main': '__main__' in code,
            'avg_function_length': _calculate_avg_function_length(tree)
        }
    }


def _calculate_avg_function_length(tree: ast.AST) -> float:
    """Calculate average function length in lines."""
    function_lengths = []

    for node in ast.walk(tree):
        if isinstance(node, ast.FunctionDef):
            if hasattr(node, 'end_lineno') and hasattr(node, 'lineno'):
                length = node.end_lineno - node.lineno + 1
                function_lengths.append(length)

    if function_lengths:
        return sum(function_lengths) / len(function_lengths)
    return 0.0
第 5 步:联系客服人员
现在,我们将该工具连接到知道何时使用它以及如何解读其结果的代理。
👉 打开
code_review_assistant/sub_agents/review_pipeline/code_analyzer.py
👉 查找:
# MODULE_4_STEP_5_CREATE_AGENT
👉 将该单行替换为完整的生产代理:
code_analyzer_agent = Agent(
    name="CodeAnalyzer",
    model=config.worker_model,
    description="Analyzes Python code structure and identifies components",
    instruction="""You are a code analysis specialist responsible for understanding code structure.

Your task:
1. Take the code submitted by the user (it will be provided in the user message)
2. Use the analyze_code_structure tool to parse and analyze it
3. Pass the EXACT code to your tool - do not modify, fix, or "improve" it
4. Identify all functions, classes, imports, and structural patterns
5. Note any syntax errors or structural issues
6. Store the analysis in state for other agents to use

CRITICAL:
- Pass the code EXACTLY as provided to the analyze_code_structure tool
- Do not fix syntax errors, even if obvious
- Do not add missing imports or fix indentation
- The goal is to analyze what IS there, not what SHOULD be there

When calling the tool, pass the code as a string to the 'code' parameter.
If the analysis fails due to syntax errors, clearly report the error location and type.

Provide a clear summary including:
- Number of functions and classes found
- Key structural observations
- Any syntax errors or issues detected
- Overall code organization assessment""",
    tools=[FunctionTool(func=analyze_code_structure)],
    output_key="structure_analysis_summary"
)
测试代码分析器
现在,验证分析器是否正常运行。
👉 运行测试脚本:
python tests/test_code_analyzer.py
测试脚本使用 python-dotenv 自动从 .env 文件加载配置,因此无需手动设置环境变量。
预期输出:
INFO:code_review_assistant.config:Code Review Assistant Configuration Loaded:
INFO:code_review_assistant.config:  - GCP Project: your-project-id
INFO:code_review_assistant.config:  - Artifact Bucket: gs://your-project-artifacts
INFO:code_review_assistant.config:  - Models: worker=gemini-2.5-flash, critic=gemini-2.5-pro
Testing code analyzer...
INFO:code_review_assistant.tools:Tool: Analysis complete - 2 functions, 1 classes

=== Analyzer Response ===
The analysis of the provided code shows the following:

* **Functions Found:** 2
    * `add(a, b)`: A global function at line 2.
    * `multiply(self, x, y)`: A method within the `Calculator` class.

* **Classes Found:** 1
    * `Calculator`: A class defined at line 5. Contains one method, `multiply`.

* **Imports:** 0

* **Structural Patterns:** The code defines one global function and one class
  with a single method. Both are simple, each with a single return statement.

* **Syntax Errors/Issues:** No syntax errors detected.

* **Overall Code Organization:** The code is well-organized for its small size,
  clearly defining a function and a class with a method.
刚刚发生了什么:
- 测试脚本已自动加载
.env配置 - 您的
analyze_code_structure()工具使用 Python 的 AST 解析了代码 _extract_code_structure()辅助函数提取了函数、类和指标- 结果存储在会话状态中,使用
StateKeys常量 - Code Analyzer 智能体解读了结果并提供了摘要
问题排查:
- “No module named ‘code_review_assistant’”:从项目根目录运行
pip install -e . - “缺少关键输入实参”:验证您的
.env是否包含GOOGLE_CLOUD_PROJECT、GOOGLE_CLOUD_LOCATION和GOOGLE_GENAI_USE_VERTEXAI=true
您构建的内容
现在,您拥有了一个可用于生产用途的代码分析器,该分析器具有以下功能:
✅ 解析实际的 Python AST - 确定性,而非模式匹配
✅ 将结果存储在状态中 - 其他代理可以访问分析结果
✅ 异步运行 - 不会阻塞其他工具
✅ 提取全面信息 - 函数、类、导入、指标
✅ 妥善处理错误 - 报告带有行号的语法错误
✅ 连接到代理 - LLM 知道何时以及如何使用它
掌握的关键概念
工具与智能体:
- 工具执行确定性工作(AST 解析)
- 智能体决定何时使用工具并解读结果
返回值与状态:
- 返回:LLM 立即看到的
- 状态:其他智能体可持久保存的内容
状态键常量:
- 防止多智能体系统中的拼写错误
- 充当代理之间的合约
- 智能体共享数据时的注意事项
异步 + 线程池:
async def允许工具暂停执行- 线程池在后台运行 CPU 密集型工作
- 它们共同确保事件循环保持响应状态
辅助函数:
- 将同步辅助程序与异步工具分开
- 使代码可测试且可重用
客服人员说明:
- 详细的指令可防止 LLM 犯常见错误
- 明确说明了不应执行的操作(不修复代码)
- 清除工作流步骤以保持一致性
后续步骤
在第 5 单元中,您将添加:
- 从状态读取代码的样式检查器
- 实际执行测试的测试运行程序
- 反馈合成器,用于合并所有分析
您将了解状态如何通过顺序流水线流动,以及当多个代理读取和写入相同数据时,常量模式为何至关重要。
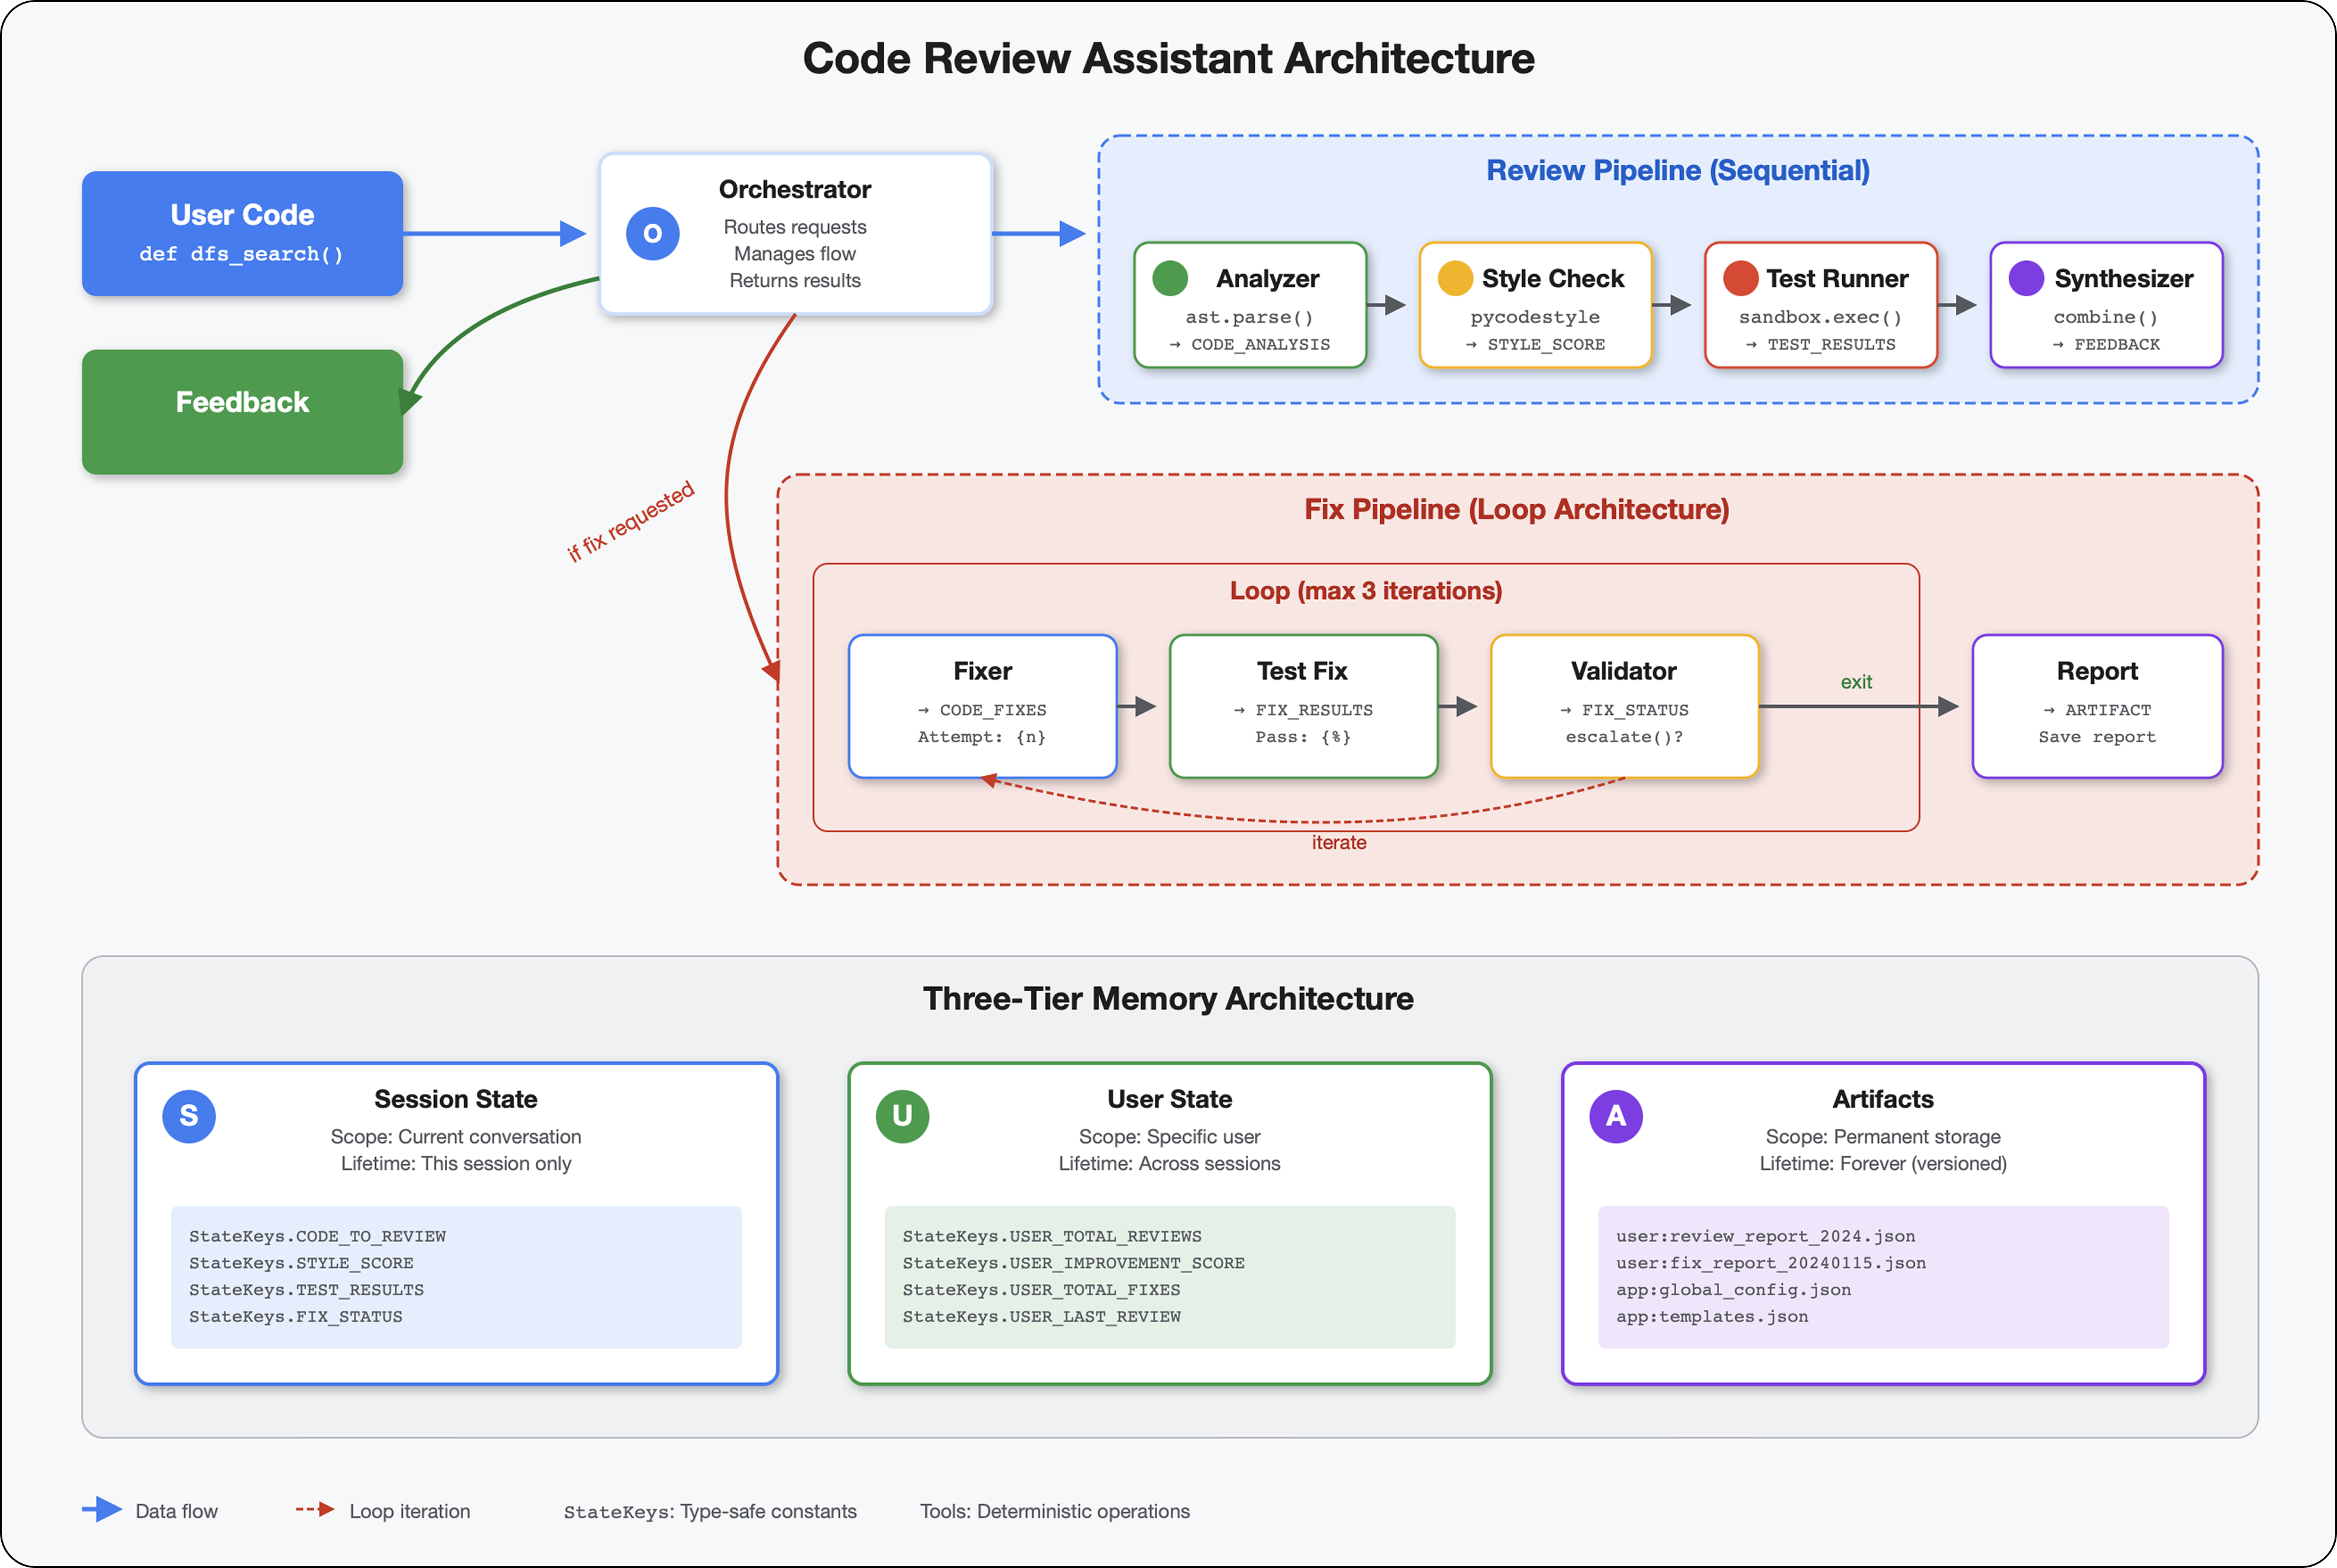
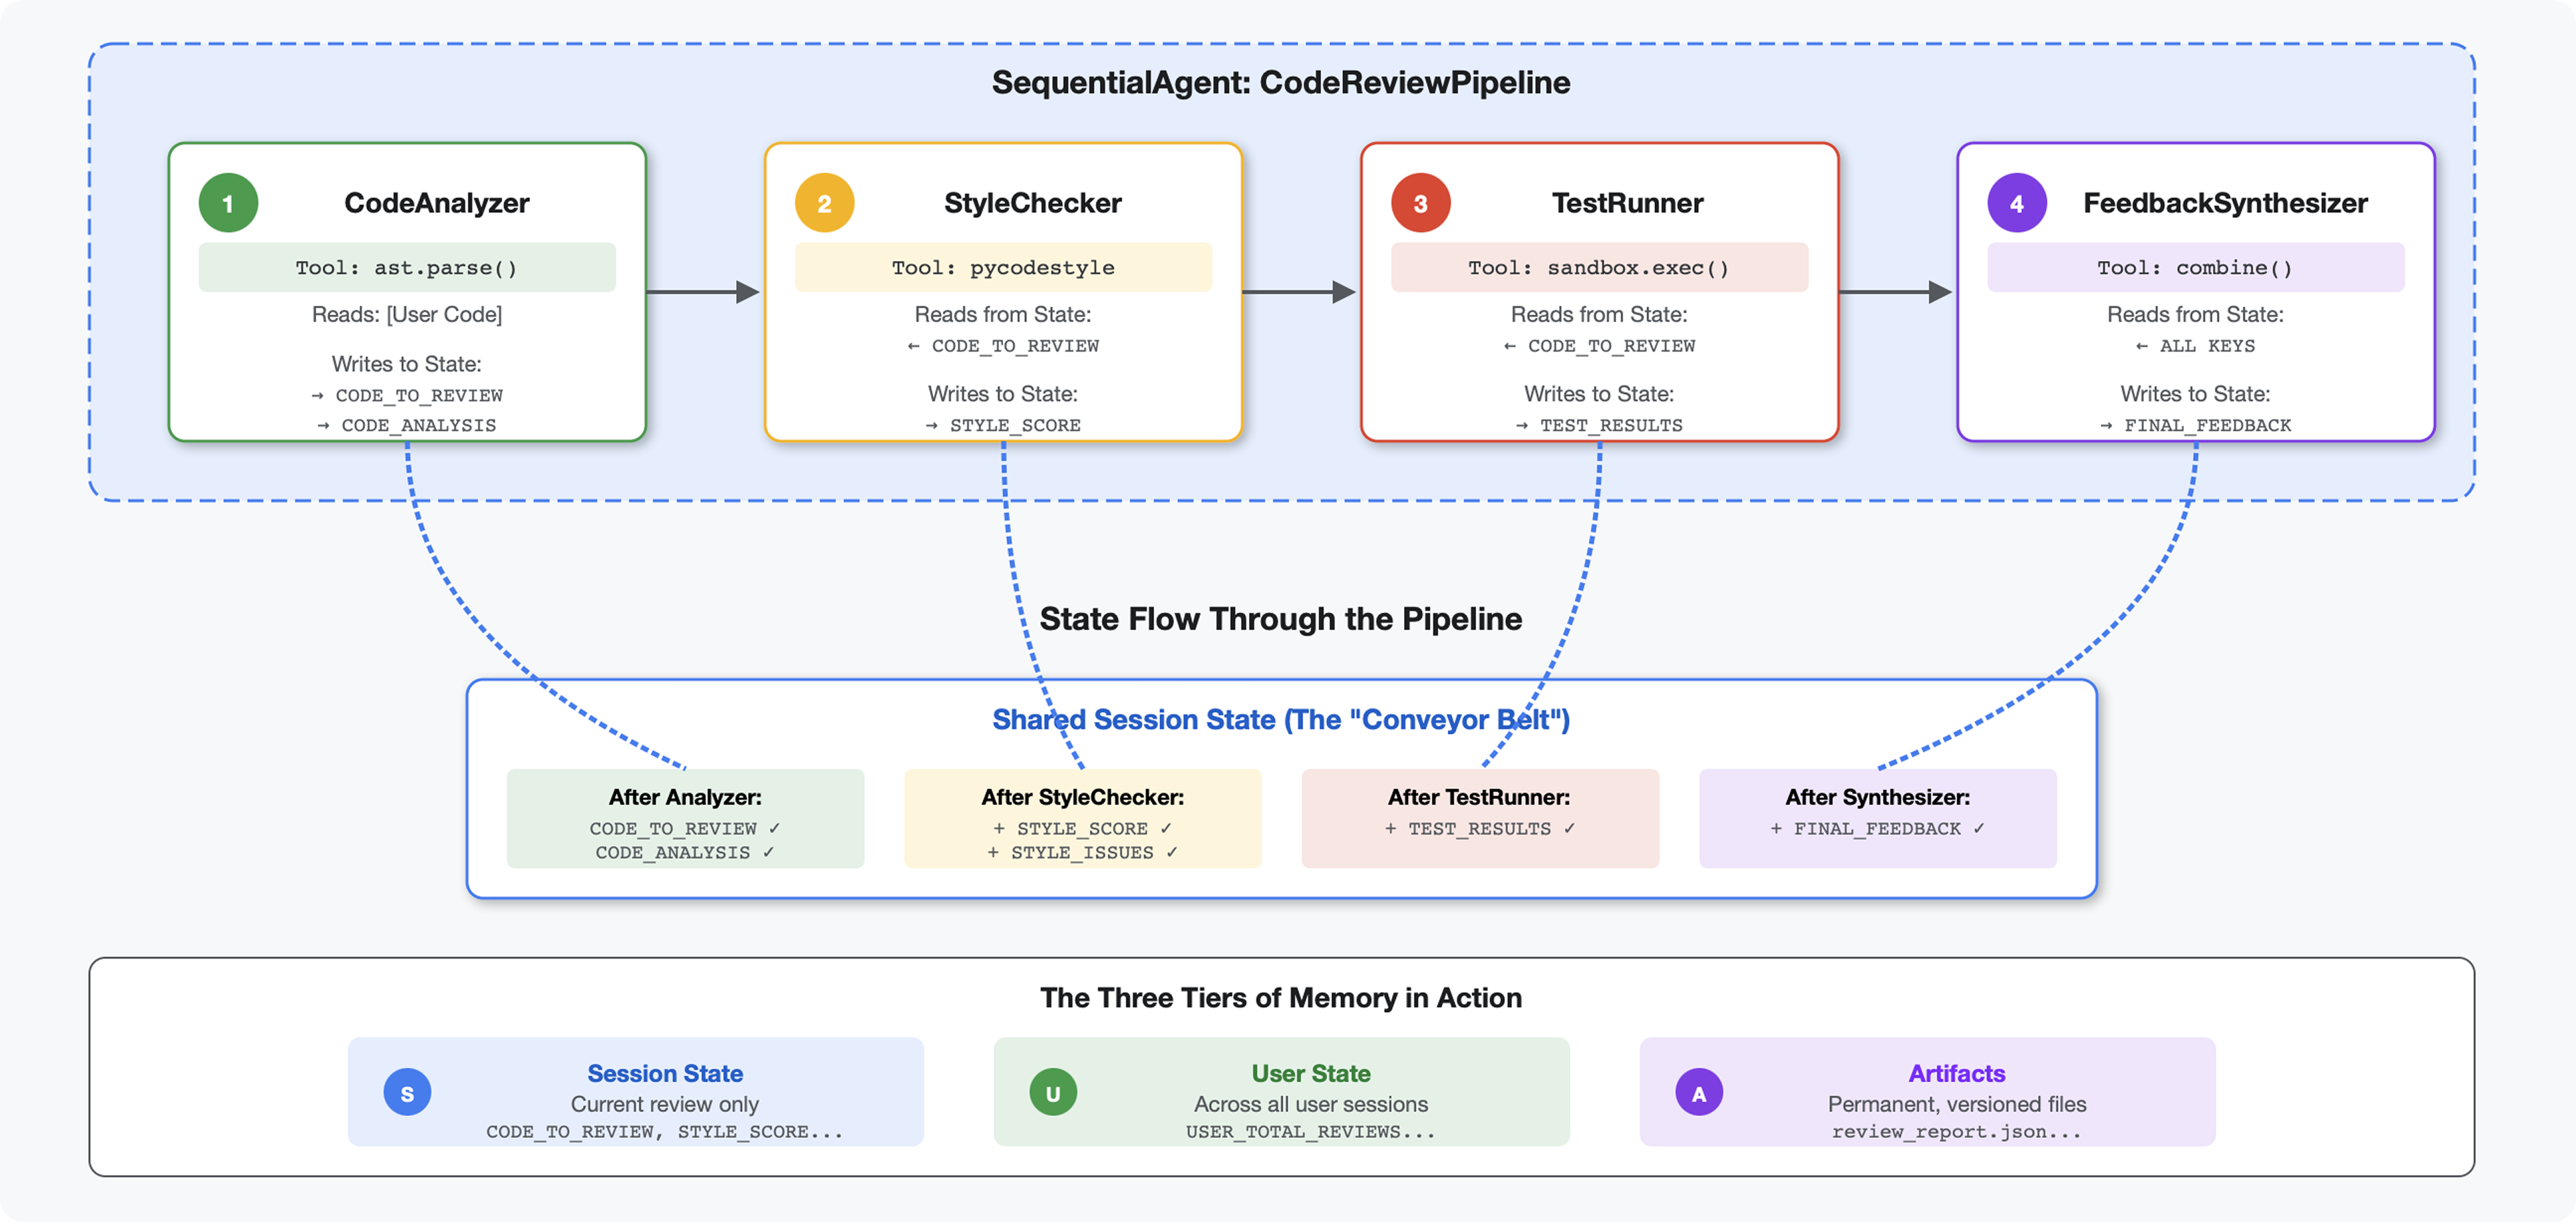
5. 构建流水线:多个智能体协同工作
简介
在第 4 单元中,您构建了一个可分析代码结构的单智能体。但全面的代码审核不仅需要解析,还需要进行样式检查、测试作业和智能反馈合成。
此模块构建了一个包含 4 个智能体的流水线,这些智能体按顺序协同工作,每个智能体都提供专业的分析:
- 代码分析器(来自模块 4)- 解析结构
- 样式检查工具 - 识别样式违规情况
- 测试运行程序 - 执行和验证测试
- 反馈合成器 - 将所有内容整合为可据以采取行动的反馈
主要概念:状态作为通信渠道。每个代理都会读取之前代理写入状态的内容,添加自己的分析,并将丰富后的状态传递给下一个代理。当多个代理共享数据时,模块 4 中的常量模式变得至关重要。
构建内容预览:提交杂乱的代码 → 观看状态在 4 个代理之间流动 → 接收包含个性化反馈的综合报告(基于过往模式)。
第 1 步:添加样式检查工具 + 智能体
样式检查器使用 pycodestyle(一种确定性代码检查器,而非基于 LLM 的解释)来识别 PEP 8 违规情况。
添加样式检查工具
👉 打开
code_review_assistant/tools.py
👉 查找:
# MODULE_5_STEP_1_STYLE_CHECKER_TOOL
👉 将该单行替换为:
async def check_code_style(code: str, tool_context: ToolContext) -> Dict[str, Any]:
    """
    Checks code style compliance using pycodestyle (PEP 8).

    Args:
        code: Python source code to check (or will retrieve from state)
        tool_context: ADK tool context

    Returns:
        Dictionary containing style score and issues
    """
    logger.info("Tool: Checking code style...")

    try:
        # Retrieve code from state if not provided
        if not code:
            code = tool_context.state.get(StateKeys.CODE_TO_REVIEW, '')
            if not code:
                return {
                    "status": "error",
                    "message": "No code provided or found in state"
                }

        # Run style check in thread pool
        loop = asyncio.get_event_loop()
        with ThreadPoolExecutor() as executor:
            result = await loop.run_in_executor(
                executor, _perform_style_check, code
            )

        # Store results in state
        tool_context.state[StateKeys.STYLE_SCORE] = result['score']
        tool_context.state[StateKeys.STYLE_ISSUES] = result['issues']
        tool_context.state[StateKeys.STYLE_ISSUE_COUNT] = result['issue_count']

        logger.info(f"Tool: Style check complete - Score: {result['score']}/100, "
                    f"Issues: {result['issue_count']}")

        return result

    except Exception as e:
        error_msg = f"Style check failed: {str(e)}"
        logger.error(f"Tool: {error_msg}", exc_info=True)

        # Set default values on error
        tool_context.state[StateKeys.STYLE_SCORE] = 0
        tool_context.state[StateKeys.STYLE_ISSUES] = []

        return {
            "status": "error",
            "message": error_msg,
            "score": 0
        }
👉 现在,滚动到文件末尾,找到以下内容:
# MODULE_5_STEP_1_STYLE_HELPERS
👉 将该单行代码替换为辅助函数:
def _perform_style_check(code: str) -> Dict[str, Any]:
    """Helper to perform style check in thread pool."""
    import io
    import sys

    with tempfile.NamedTemporaryFile(mode='w', suffix='.py', delete=False) as tmp:
        tmp.write(code)
        tmp_path = tmp.name

    try:
        # Capture stdout to get pycodestyle output
        old_stdout = sys.stdout
        sys.stdout = captured_output = io.StringIO()

        style_guide = pycodestyle.StyleGuide(
            quiet=False,  # We want output
            max_line_length=100,
            ignore=['E501', 'W503']
        )

        result = style_guide.check_files([tmp_path])

        # Restore stdout
        sys.stdout = old_stdout

        # Parse captured output
        output = captured_output.getvalue()
        issues = []

        for line in output.strip().split('\n'):
            if line and ':' in line:
                parts = line.split(':', 4)
                if len(parts) >= 4:
                    try:
                        issues.append({
                            'line': int(parts[1]),
                            'column': int(parts[2]),
                            'code': parts[3].split()[0] if len(parts) > 3 else 'E000',
                            'message': parts[3].strip() if len(parts) > 3 else 'Unknown error'
                        })
                    except (ValueError, IndexError):
                        pass

        # Add naming convention checks
        try:
            tree = ast.parse(code)
            naming_issues = _check_naming_conventions(tree)
            issues.extend(naming_issues)
        except SyntaxError:
            pass  # Syntax errors will be caught elsewhere

        # Calculate weighted score
        score = _calculate_style_score(issues)

        return {
            "status": "success",
            "score": score,
            "issue_count": len(issues),
            "issues": issues[:10],  # First 10 issues
            "summary": f"Style score: {score}/100 with {len(issues)} violations"
        }

    finally:
        if os.path.exists(tmp_path):
            os.unlink(tmp_path)


def _check_naming_conventions(tree: ast.AST) -> List[Dict[str, Any]]:
    """Check PEP 8 naming conventions."""
    naming_issues = []

    for node in ast.walk(tree):
        if isinstance(node, ast.FunctionDef):
            # Skip private/protected methods and __main__
            if not node.name.startswith('_') and node.name != node.name.lower():
                naming_issues.append({
                    'line': node.lineno,
                    'column': node.col_offset,
                    'code': 'N802',
                    'message': f"N802 function name '{node.name}' should be lowercase"
                })
        elif isinstance(node, ast.ClassDef):
            # Check if class name follows CapWords convention
            if not node.name[0].isupper() or '_' in node.name:
                naming_issues.append({
                    'line': node.lineno,
                    'column': node.col_offset,
                    'code': 'N801',
                    'message': f"N801 class name '{node.name}' should use CapWords convention"
                })

    return naming_issues


def _calculate_style_score(issues: List[Dict[str, Any]]) -> int:
    """Calculate weighted style score based on violation severity."""
    if not issues:
        return 100

    # Define weights by error type
    weights = {
        'E1': 10,  # Indentation errors
        'E2': 3,  # Whitespace errors
        'E3': 5,  # Blank line errors
        'E4': 8,  # Import errors
        'E5': 5,  # Line length
        'E7': 7,  # Statement errors
        'E9': 10,  # Syntax errors
        'W2': 2,  # Whitespace warnings
        'W3': 2,  # Blank line warnings
        'W5': 3,  # Line break warnings
        'N8': 7,  # Naming conventions
    }

    total_deduction = 0
    for issue in issues:
        code_prefix = issue['code'][:2] if len(issue['code']) >= 2 else 'E2'
        weight = weights.get(code_prefix, 3)
        total_deduction += weight

    # Cap at 100 points deduction
    return max(0, 100 - min(total_deduction, 100))
添加样式检查器代理
👉 打开
code_review_assistant/sub_agents/review_pipeline/style_checker.py
👉 查找:
# MODULE_5_STEP_1_INSTRUCTION_PROVIDER
👉 将该单行替换为:
async def style_checker_instruction_provider(context: ReadonlyContext) -> str:
    """Dynamic instruction provider that injects state variables."""
    template = """You are a code style expert focused on PEP 8 compliance.

Your task:
1. Use the check_code_style tool to validate PEP 8 compliance
2. The tool will retrieve the ORIGINAL code from state automatically
3. Report violations exactly as found
4. Present the results clearly and confidently

CRITICAL:
- The tool checks the code EXACTLY as provided by the user
- Do not suggest the code was modified or fixed
- Report actual violations found in the original code
- If there are style issues, they should be reported honestly

Call the check_code_style tool with an empty string for the code parameter,
as the tool will retrieve the code from state automatically.

When presenting results based on what the tool returns:
- State the exact score from the tool results
- If score >= 90: "Excellent style compliance!"
- If score 70-89: "Good style with minor improvements needed"
- If score 50-69: "Style needs attention"
- If score < 50: "Significant style improvements needed"

List the specific violations found (the tool will provide these):
- Show line numbers, error codes, and messages
- Focus on the top 10 most important issues

Previous analysis: {structure_analysis_summary}

Format your response as:
## Style Analysis Results
- Style Score: [exact score]/100
- Total Issues: [count]
- Assessment: [your assessment based on score]

## Top Style Issues
[List issues with line numbers and descriptions]

## Recommendations
[Specific fixes for the most critical issues]"""

    return await instructions_utils.inject_session_state(template, context)
👉 查找:
# MODULE_5_STEP_1_STYLE_CHECKER_AGENT
👉 将该单行替换为:
style_checker_agent = Agent(
    name="StyleChecker",
    model=config.worker_model,
    description="Checks Python code style against PEP 8 guidelines",
    instruction=style_checker_instruction_provider,
    tools=[FunctionTool(func=check_code_style)],
    output_key="style_check_summary"
)
第 2 步:添加 Test Runner Agent
测试运行程序会生成全面的测试,并使用内置的代码执行器来执行这些测试。
👉 打开
code_review_assistant/sub_agents/review_pipeline/test_runner.py
👉 查找:
# MODULE_5_STEP_2_INSTRUCTION_PROVIDER
👉 将该单行替换为:
async def test_runner_instruction_provider(context: ReadonlyContext) -> str:
    """Dynamic instruction provider that injects the code_to_review directly."""
    template = """You are a testing specialist who creates and runs tests for Python code.

THE CODE TO TEST IS:
{code_to_review}

YOUR TASK:
1. Understand what the function appears to do based on its name and structure
2. Generate comprehensive tests (15-20 test cases)
3. Execute the tests using your code executor
4. Analyze results to identify bugs vs expected behavior
5. Output a detailed JSON analysis

TESTING METHODOLOGY:
- Test with the most natural interpretation first
- When something fails, determine if it's a bug or unusual design
- Test edge cases, boundaries, and error scenarios
- Document any surprising behavior

Execute your tests and output ONLY valid JSON with this structure:
- "test_summary": object with "total_tests_run", "tests_passed", "tests_failed", "tests_with_errors", "critical_issues_found"
- "critical_issues": array of objects, each with "type", "description", "example_input", "expected_behavior", "actual_behavior", "severity"
- "test_categories": object with "basic_functionality", "edge_cases", "error_handling" (each containing "passed", "failed", "errors" counts)
- "function_behavior": object with "apparent_purpose", "actual_interface", "unexpected_requirements"
- "verdict": object with "status" (WORKING/BUGGY/BROKEN), "confidence" (high/medium/low), "recommendation"

Do NOT output the test code itself, only the JSON analysis."""

    return await instructions_utils.inject_session_state(template, context)
👉 查找:
# MODULE_5_STEP_2_TEST_RUNNER_AGENT
👉 将该单行替换为:
test_runner_agent = Agent(
    name="TestRunner",
    model=config.critic_model,
    description="Generates and runs tests for Python code using safe code execution",
    instruction=test_runner_instruction_provider,
    code_executor=BuiltInCodeExecutor(),
    output_key="test_execution_summary"
)
第 3 步:了解跨会话学习的记忆
在构建反馈合成器之前,您需要了解状态和内存之间的区别,这两种存储机制用于不同的目的。
状态与内存:关键区别
我们通过一个代码审核的具体示例来阐明这一点:
状态(仅限当前会话):
# Data from THIS review session
tool_context.state[StateKeys.STYLE_ISSUES] = [
    {"line": 5, "code": "E231", "message": "missing whitespace"},
    {"line": 12, "code": "E701", "message": "multiple statements"}
]
- 范围:仅限本次对话
- 用途:在当前流水线中的各智能体之间传递数据
- 居住在:
Session对象 - 生命周期:会话结束后即丢弃
内存(所有过往会话):
# Learned from 50 previous reviews
"User frequently forgets docstrings on helper functions"
"User tends to write long functions (avg 45 lines)"
"User improved error handling after feedback in session #23"
- 范围:该用户的所有过往会话
- 用途:学习模式,提供个性化反馈
- 居住地:
MemoryService - 生命周期:在会话之间持续存在,可搜索
为什么反馈需要同时包含这两者:
假设合成器创建反馈:
仅使用 State(当前审核):
"Function `calculate_total` has no docstring."
一般性机械反馈。
使用状态 + 记忆(当前模式 + 过去模式):
"Function `calculate_total` has no docstring. This is the 4th review
where helper functions lacked documentation. Consider adding docstrings
as you write functions, not afterwards - you mentioned in our last
session that you find it easier that way."
个性化、情境化,可随时间推移而改进。
对于生产环境部署,您有多种选择:
选项 1:VertexAiMemoryBankService(高级)
- 功能:依托 LLM 从对话中提取有意义的事实
- 搜索:语义搜索(理解含义,而不仅仅是关键字)
- 记忆内容管理:随着时间的推移自动整合和更新记忆内容
- 要求:Google Cloud 项目 + Agent Engine 设置
- 适用情形:您希望获得精美、不断变化的个性化回忆
- 示例:“用户偏好函数式编程”(从 10 次关于代码样式的对话中提取)
方案 2:继续使用 InMemoryMemoryService + 持久会话
- 作用:存储关键字搜索的完整对话记录
- 搜索:跨过往会话的基本关键字匹配
- 内存管理:您可以控制存储的内容(通过
add_session_to_memory) - 要求:仅需要持久性
SessionService(例如VertexAiSessionService或DatabaseSessionService) - 适用场景:您需要对过往对话进行简单搜索,而无需 LLM 处理
- 示例:搜索“docstring”会返回所有提及该字词的会话
内存的填充方式
每次代码审核完成后:
# At the end of a session (typically in your application code)
await memory_service.add_session_to_memory(session)
结果:
- InMemoryMemoryService:存储关键字搜索的完整会话事件
- VertexAiMemoryBankService:LLM 提取关键事实,并与现有记忆整合
然后,未来的会话可以查询:
# In a tool, search for relevant past feedback
results = tool_context.search_memory("feedback about docstrings")
第 4 步:添加反馈总结工具和智能体
反馈合成器是流水线中最复杂的代理。它可协调使用三种工具,使用动态指令,并结合状态、内存和制品。
添加了三个合成器工具
👉 打开
code_review_assistant/tools.py
👉 查找:
# MODULE_5_STEP_4_SEARCH_PAST_FEEDBACK
👉 替换为工具 1 - 内存搜索(正式版):
async def search_past_feedback(developer_id: str, tool_context: ToolContext) -> Dict[str, Any]:
    """
    Search for past feedback in memory service.

    Args:
        developer_id: ID of the developer (defaults to "default_user")
        tool_context: ADK tool context with potential memory service access

    Returns:
        Dictionary containing feedback search results
    """
    logger.info(f"Tool: Searching for past feedback for developer {developer_id}...")

    try:
        # Default developer ID if not provided
        if not developer_id:
            developer_id = tool_context.state.get(StateKeys.USER_ID, 'default_user')

        # Check if memory service is available
        if hasattr(tool_context, 'search_memory'):
            try:
                # Perform structured searches
                queries = [
                    f"developer:{developer_id} code review feedback",
                    f"developer:{developer_id} common issues",
                    f"developer:{developer_id} improvements"
                ]

                all_feedback = []
                patterns = {
                    'common_issues': [],
                    'improvements': [],
                    'strengths': []
                }

                for query in queries:
                    search_result = await tool_context.search_memory(query)

                    if search_result and hasattr(search_result, 'memories'):
                        for memory in search_result.memories[:5]:
                            memory_text = memory.text if hasattr(memory, 'text') else str(memory)
                            all_feedback.append(memory_text)

                            # Extract patterns
                            if 'style' in memory_text.lower():
                                patterns['common_issues'].append('style compliance')
                            if 'improved' in memory_text.lower():
                                patterns['improvements'].append('showing improvement')
                            if 'excellent' in memory_text.lower():
                                patterns['strengths'].append('consistent quality')

                # Store in state
                tool_context.state[StateKeys.PAST_FEEDBACK] = all_feedback
                tool_context.state[StateKeys.FEEDBACK_PATTERNS] = patterns

                logger.info(f"Tool: Found {len(all_feedback)} past feedback items")

                return {
                    "status": "success",
                    "feedback_found": True,
                    "count": len(all_feedback),
                    "summary": " | ".join(all_feedback[:3]) if all_feedback else "No feedback",
                    "patterns": patterns
                }

            except Exception as e:
                logger.warning(f"Tool: Memory search error: {e}")

        # Fallback: Check state for cached feedback
        cached_feedback = tool_context.state.get(StateKeys.USER_PAST_FEEDBACK_CACHE, [])
        if cached_feedback:
            tool_context.state[StateKeys.PAST_FEEDBACK] = cached_feedback
            return {
                "status": "success",
                "feedback_found": True,
                "count": len(cached_feedback),
                "summary": "Using cached feedback",
                "patterns": {}
            }

        # No feedback found
        tool_context.state[StateKeys.PAST_FEEDBACK] = []
        logger.info("Tool: No past feedback found")

        return {
            "status": "success",
            "feedback_found": False,
            "message": "No past feedback available - this appears to be a first submission",
            "patterns": {}
        }

    except Exception as e:
        error_msg = f"Feedback search error: {str(e)}"
        logger.error(f"Tool: {error_msg}", exc_info=True)

        tool_context.state[StateKeys.PAST_FEEDBACK] = []

        return {
            "status": "error",
            "message": error_msg,
            "feedback_found": False
        }
👉 查找:
# MODULE_5_STEP_4_UPDATE_GRADING_PROGRESS
👉 替换为工具 2 - Grading Tracker(正式版):
async def update_grading_progress(tool_context: ToolContext) -> Dict[str, Any]:
    """
    Updates grading progress counters and metrics in state.
    """
    logger.info("Tool: Updating grading progress...")

    try:
        current_time = datetime.now().isoformat()

        # Build all state changes
        state_updates = {}

        # Temporary (invocation-level) state
        state_updates[StateKeys.TEMP_PROCESSING_TIMESTAMP] = current_time

        # Session-level state
        attempts = tool_context.state.get(StateKeys.GRADING_ATTEMPTS, 0) + 1
        state_updates[StateKeys.GRADING_ATTEMPTS] = attempts
        state_updates[StateKeys.LAST_GRADING_TIME] = current_time

        # User-level persistent state
        lifetime_submissions = tool_context.state.get(StateKeys.USER_TOTAL_SUBMISSIONS, 0) + 1
        state_updates[StateKeys.USER_TOTAL_SUBMISSIONS] = lifetime_submissions
        state_updates[StateKeys.USER_LAST_SUBMISSION_TIME] = current_time

        # Calculate improvement metrics
        current_style_score = tool_context.state.get(StateKeys.STYLE_SCORE, 0)
        last_style_score = tool_context.state.get(StateKeys.USER_LAST_STYLE_SCORE, 0)
        score_improvement = current_style_score - last_style_score

        state_updates[StateKeys.USER_LAST_STYLE_SCORE] = current_style_score
        state_updates[StateKeys.SCORE_IMPROVEMENT] = score_improvement

        # Track test results if available
        test_results = tool_context.state.get(StateKeys.TEST_EXECUTION_SUMMARY, {})

        # Parse if it's a string
        if isinstance(test_results, str):
            try:
                test_results = json.loads(test_results)
            except:
                test_results = {}

        if test_results and test_results.get('test_summary', {}).get('total_tests_run', 0) > 0:
            summary = test_results['test_summary']
            total = summary.get('total_tests_run', 0)
            passed = summary.get('tests_passed', 0)
            if total > 0:
                pass_rate = (passed / total) * 100
                state_updates[StateKeys.USER_LAST_TEST_PASS_RATE] = pass_rate

        # Apply all updates atomically
        for key, value in state_updates.items():
            tool_context.state[key] = value

        logger.info(f"Tool: Progress updated - Attempt #{attempts}, "
                    f"Lifetime: {lifetime_submissions}")

        return {
            "status": "success",
            "session_attempts": attempts,
            "lifetime_submissions": lifetime_submissions,
            "timestamp": current_time,
            "improvement": {
                "style_score_change": score_improvement,
                "direction": "improved" if score_improvement > 0 else "declined"
            },
            "summary": f"Attempt #{attempts} recorded, {lifetime_submissions} total submissions"
        }

    except Exception as e:
        error_msg = f"Progress update error: {str(e)}"
        logger.error(f"Tool: {error_msg}", exc_info=True)

        return {
            "status": "error",
            "message": error_msg
        }
👉 查找:
# MODULE_5_STEP_4_SAVE_GRADING_REPORT
👉 替换为工具 3 - 制品保存器(正式版):
async def save_grading_report(feedback_text: str, tool_context: ToolContext) -> Dict[str, Any]:
    """
    Saves a detailed grading report as an artifact.

    Args:
        feedback_text: The feedback text to include in the report
        tool_context: ADK tool context for state management

    Returns:
        Dictionary containing save status and details
    """
    logger.info("Tool: Saving grading report...")

    try:
        # Gather all relevant data from state
        code = tool_context.state.get(StateKeys.CODE_TO_REVIEW, '')
        analysis = tool_context.state.get(StateKeys.CODE_ANALYSIS, {})
        style_score = tool_context.state.get(StateKeys.STYLE_SCORE, 0)
        style_issues = tool_context.state.get(StateKeys.STYLE_ISSUES, [])

        # Get test results
        test_results = tool_context.state.get(StateKeys.TEST_EXECUTION_SUMMARY, {})

        # Parse if it's a string
        if isinstance(test_results, str):
            try:
                test_results = json.loads(test_results)
            except:
                test_results = {}

        timestamp = datetime.now().isoformat()

        # Create comprehensive report dictionary
        report = {
            'timestamp': timestamp,
            'grading_attempt': tool_context.state.get(StateKeys.GRADING_ATTEMPTS, 1),
            'code': {
                'content': code,
                'line_count': len(code.splitlines()),
                'hash': hashlib.md5(code.encode()).hexdigest()
            },
            'analysis': analysis,
            'style': {
                'score': style_score,
                'issues': style_issues[:5]  # First 5 issues
            },
            'tests': test_results,
            'feedback': feedback_text,
            'improvements': {
                'score_change': tool_context.state.get(StateKeys.SCORE_IMPROVEMENT, 0),
                'from_last_score': tool_context.state.get(StateKeys.USER_LAST_STYLE_SCORE, 0)
            }
        }

        # Convert report to JSON string
        report_json = json.dumps(report, indent=2)
        report_part = types.Part.from_text(text=report_json)

        # Try to save as artifact if the service is available
        if hasattr(tool_context, 'save_artifact'):
            try:
                # Generate filename with timestamp (replace colons for filesystem compatibility)
                filename = f"grading_report_{timestamp.replace(':', '-')}.json"

                # Save the main report
                version = await tool_context.save_artifact(filename, report_part)

                # Also save a "latest" version for easy access
                await tool_context.save_artifact("latest_grading_report.json", report_part)

                logger.info(f"Tool: Report saved as {filename} (version {version})")

                # Store report in state as well for redundancy
                tool_context.state[StateKeys.USER_LAST_GRADING_REPORT] = report

                return {
                    "status": "success",
                    "artifact_saved": True,
                    "filename": filename,
                    "version": str(version),
                    "size": len(report_json),
                    "summary": f"Report saved as {filename}"
                }

            except Exception as artifact_error:
                logger.warning(f"Artifact service error: {artifact_error}, falling back to state storage")
                # Continue to fallback below

        # Fallback: Store in state if artifact service is not available or failed
        tool_context.state[StateKeys.USER_LAST_GRADING_REPORT] = report
        logger.info("Tool: Report saved to state (artifact service not available)")

        return {
            "status": "success",
            "artifact_saved": False,
            "message": "Report saved to state only",
            "size": len(report_json),
            "summary": "Report saved to session state"
        }

    except Exception as e:
        error_msg = f"Report save error: {str(e)}"
        logger.error(f"Tool: {error_msg}", exc_info=True)

        # Still try to save minimal data to state
        try:
            tool_context.state[StateKeys.USER_LAST_GRADING_REPORT] = {
                'error': error_msg,
                'feedback': feedback_text,
                'timestamp': datetime.now().isoformat()
            }
        except:
            pass

        return {
            "status": "error",
            "message": error_msg,
            "artifact_saved": False,
            "summary": f"Failed to save report: {error_msg}"
        }
创建合成器代理
👉 打开
code_review_assistant/sub_agents/review_pipeline/feedback_synthesizer.py
👉 查找:
# MODULE_5_STEP_4_INSTRUCTION_PROVIDER
👉 替换为生产指令提供方:
async def feedback_instruction_provider(context: ReadonlyContext) -> str:
    """Dynamic instruction provider that injects state variables."""
    template = """You are an expert code reviewer and mentor providing constructive, educational feedback.

CONTEXT FROM PREVIOUS AGENTS:
- Structure analysis summary: {structure_analysis_summary}
- Style check summary: {style_check_summary}
- Test execution summary: {test_execution_summary}

YOUR TASK requires these steps IN ORDER:
1. Call search_past_feedback tool with developer_id="default_user"
2. Call update_grading_progress tool with no parameters
3. Carefully analyze the test results to understand what really happened
4. Generate comprehensive feedback following the structure below
5. Call save_grading_report tool with the feedback_text parameter
6. Return the feedback as your final output

CRITICAL - Understanding Test Results:
The test_execution_summary contains structured JSON. Parse it carefully:
- tests_passed = Code worked correctly
- tests_failed = Code produced wrong output
- tests_with_errors = Code crashed
- critical_issues = Fundamental problems with the code

If critical_issues array contains items, these are serious bugs that need fixing.
Do NOT count discovering bugs as test successes.

FEEDBACK STRUCTURE TO FOLLOW:

## 📊 Summary
Provide an honest assessment. Be encouraging but truthful about problems found.

## ✅ Strengths
List 2-3 things done well, referencing specific code elements.

## 📈 Code Quality Analysis

### Structure & Organization
Comment on code organization, readability, and documentation.

### Style Compliance
Report the actual style score and any specific issues.

### Test Results
Report the actual test results accurately:
- If critical_issues exist, report them as bugs to fix
- Be clear: "X tests passed, Y critical issues were found"
- List each critical issue
- Don't hide or minimize problems

## 💡 Recommendations for Improvement
Based on the analysis, provide specific actionable fixes.
If critical issues exist, fixing them is top priority.

## 🎯 Next Steps
Prioritized action list based on severity of issues.

## 💬 Encouragement
End with encouragement while being honest about what needs fixing.

Remember: Complete ALL steps including calling save_grading_report."""

    return await instructions_utils.inject_session_state(template, context)
👉 查找:
# MODULE_5_STEP_4_SYNTHESIZER_AGENT
👉 替换为:
feedback_synthesizer_agent = Agent(
    name="FeedbackSynthesizer",
    model=config.critic_model,
    description="Synthesizes all analysis into constructive, personalized feedback",
    instruction=feedback_instruction_provider,
    tools=[
        FunctionTool(func=search_past_feedback),
        FunctionTool(func=update_grading_progress),
        FunctionTool(func=save_grading_report)
    ],
    output_key="final_feedback"
)
第 5 步:连接流水线
现在,将所有四个代理连接到顺序流水线中,并创建根代理。
👉 打开
code_review_assistant/agent.py
👉 在文件顶部(现有导入项之后)添加必要的导入项:
from google.adk.agents import Agent, SequentialAgent
from code_review_assistant.sub_agents.review_pipeline.code_analyzer import code_analyzer_agent
from code_review_assistant.sub_agents.review_pipeline.style_checker import style_checker_agent
from code_review_assistant.sub_agents.review_pipeline.test_runner import test_runner_agent
from code_review_assistant.sub_agents.review_pipeline.feedback_synthesizer import feedback_synthesizer_agent
现在,您的文件应如下所示:
"""
Main agent orchestration for the Code Review Assistant.
"""

from google.adk.agents import Agent, SequentialAgent
from .config import config
from code_review_assistant.sub_agents.review_pipeline.code_analyzer import code_analyzer_agent
from code_review_assistant.sub_agents.review_pipeline.style_checker import style_checker_agent
from code_review_assistant.sub_agents.review_pipeline.test_runner import test_runner_agent
from code_review_assistant.sub_agents.review_pipeline.feedback_synthesizer import feedback_synthesizer_agent

# MODULE_5_STEP_5_CREATE_PIPELINE

# MODULE_6_STEP_5_CREATE_FIX_LOOP

# MODULE_6_STEP_5_UPDATE_ROOT_AGENT
👉 查找:
# MODULE_5_STEP_5_CREATE_PIPELINE
👉 将该单行替换为:
# Create sequential pipeline
code_review_pipeline = SequentialAgent(
    name="CodeReviewPipeline",
    description="Complete code review pipeline with analysis, testing, and feedback",
    sub_agents=[
        code_analyzer_agent,
        style_checker_agent,
        test_runner_agent,
        feedback_synthesizer_agent
    ]
)

# Root agent - coordinates the review pipeline
root_agent = Agent(
    name="CodeReviewAssistant",
    model=config.worker_model,
    description="An intelligent code review assistant that analyzes Python code and provides educational feedback",
    instruction="""You are a specialized Python code review assistant focused on helping developers improve their code quality.

When a user provides Python code for review:
1. Immediately delegate to CodeReviewPipeline and pass the code EXACTLY as it was provided by the user.
2. The pipeline will handle all analysis and feedback
3. Return ONLY the final feedback from the pipeline - do not add any commentary

When a user asks what you can do or asks general questions:
- Explain your capabilities for code review
- Do NOT trigger the pipeline for non-code messages

The pipeline handles everything for code review - just pass through its final output.""",
    sub_agents=[code_review_pipeline],
    output_key="assistant_response"
)
第 6 步:测试完整流水线
现在,让我们看看这四个智能体如何协同工作。
👉 启动系统:
adk web code_review_assistant
运行 adk web 命令后,您应该会在终端中看到表明 ADK Web 服务器已启动的输出,如下所示:
+-----------------------------------------------------------------------------+
| ADK Web Server started                                                      |
|                                                                             |
| For local testing, access at http://localhost:8000.                         |
+-----------------------------------------------------------------------------+

INFO:     Application startup complete.
INFO:     Uvicorn running on http://0.0.0.0:8000 (Press CTRL+C to quit)
👉 接下来,如需通过浏览器访问 ADK 开发者界面,请执行以下操作:
在 Cloud Shell 工具栏(通常位于右上角)中,从“网页预览”图标(通常看起来像眼睛或带有箭头的正方形)中选择“更改端口”。在弹出式窗口中,将端口设置为 8000,然后点击“更改并预览”。然后,Cloud Shell 会打开一个新的浏览器标签页或窗口,其中显示 ADK 开发者界面。
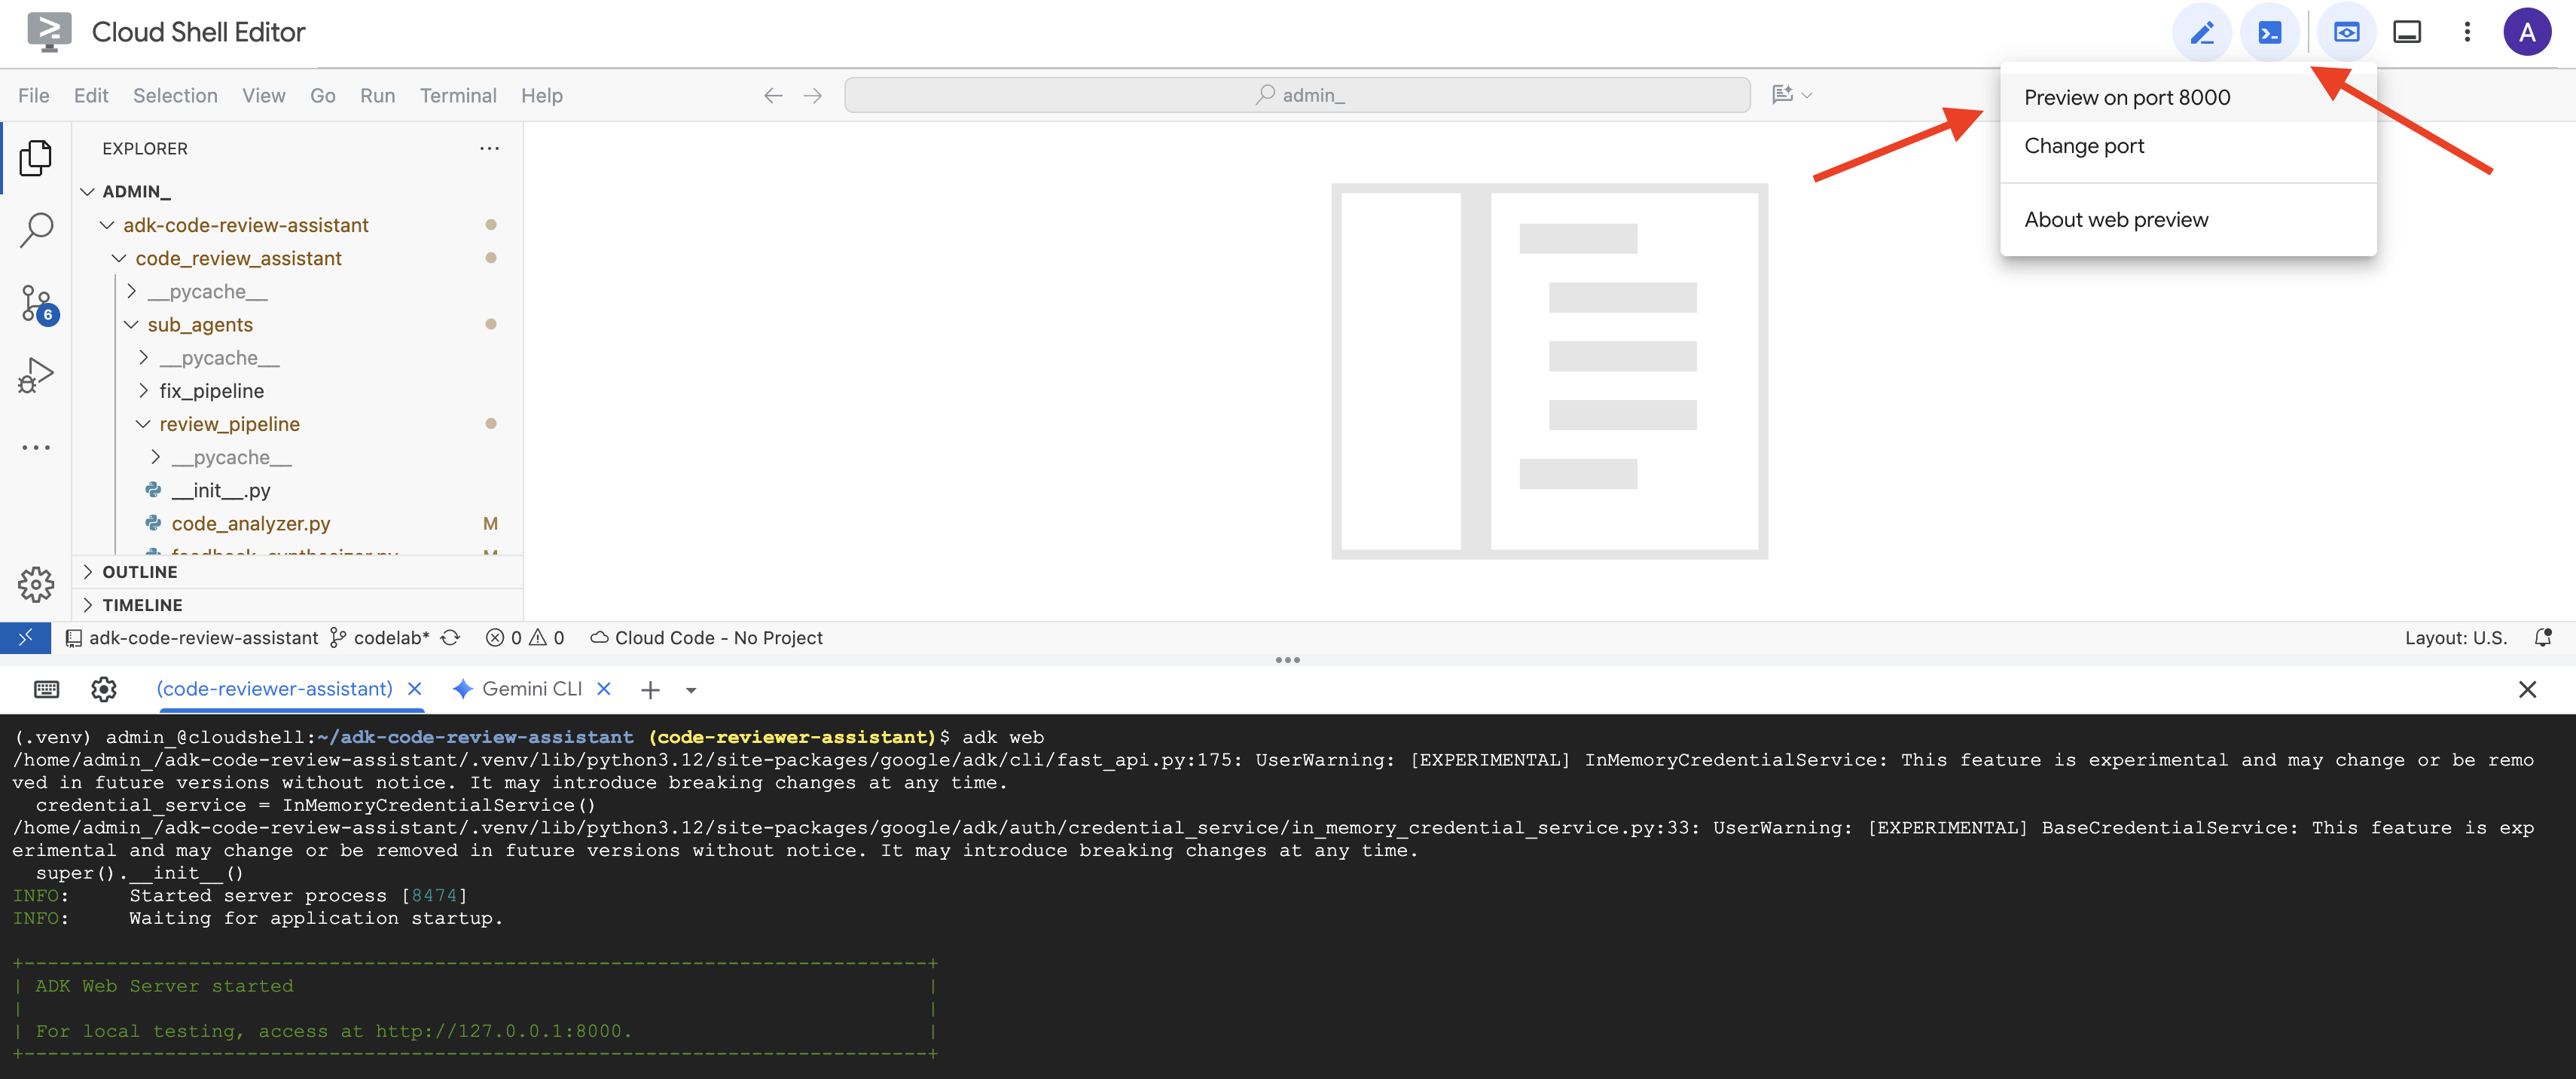
👉 智能体现在正在运行。浏览器中的 ADK 开发者界面是您与智能体的直接连接。
- 选择目标:在界面顶部的下拉菜单中,选择
code_review_assistant代理。
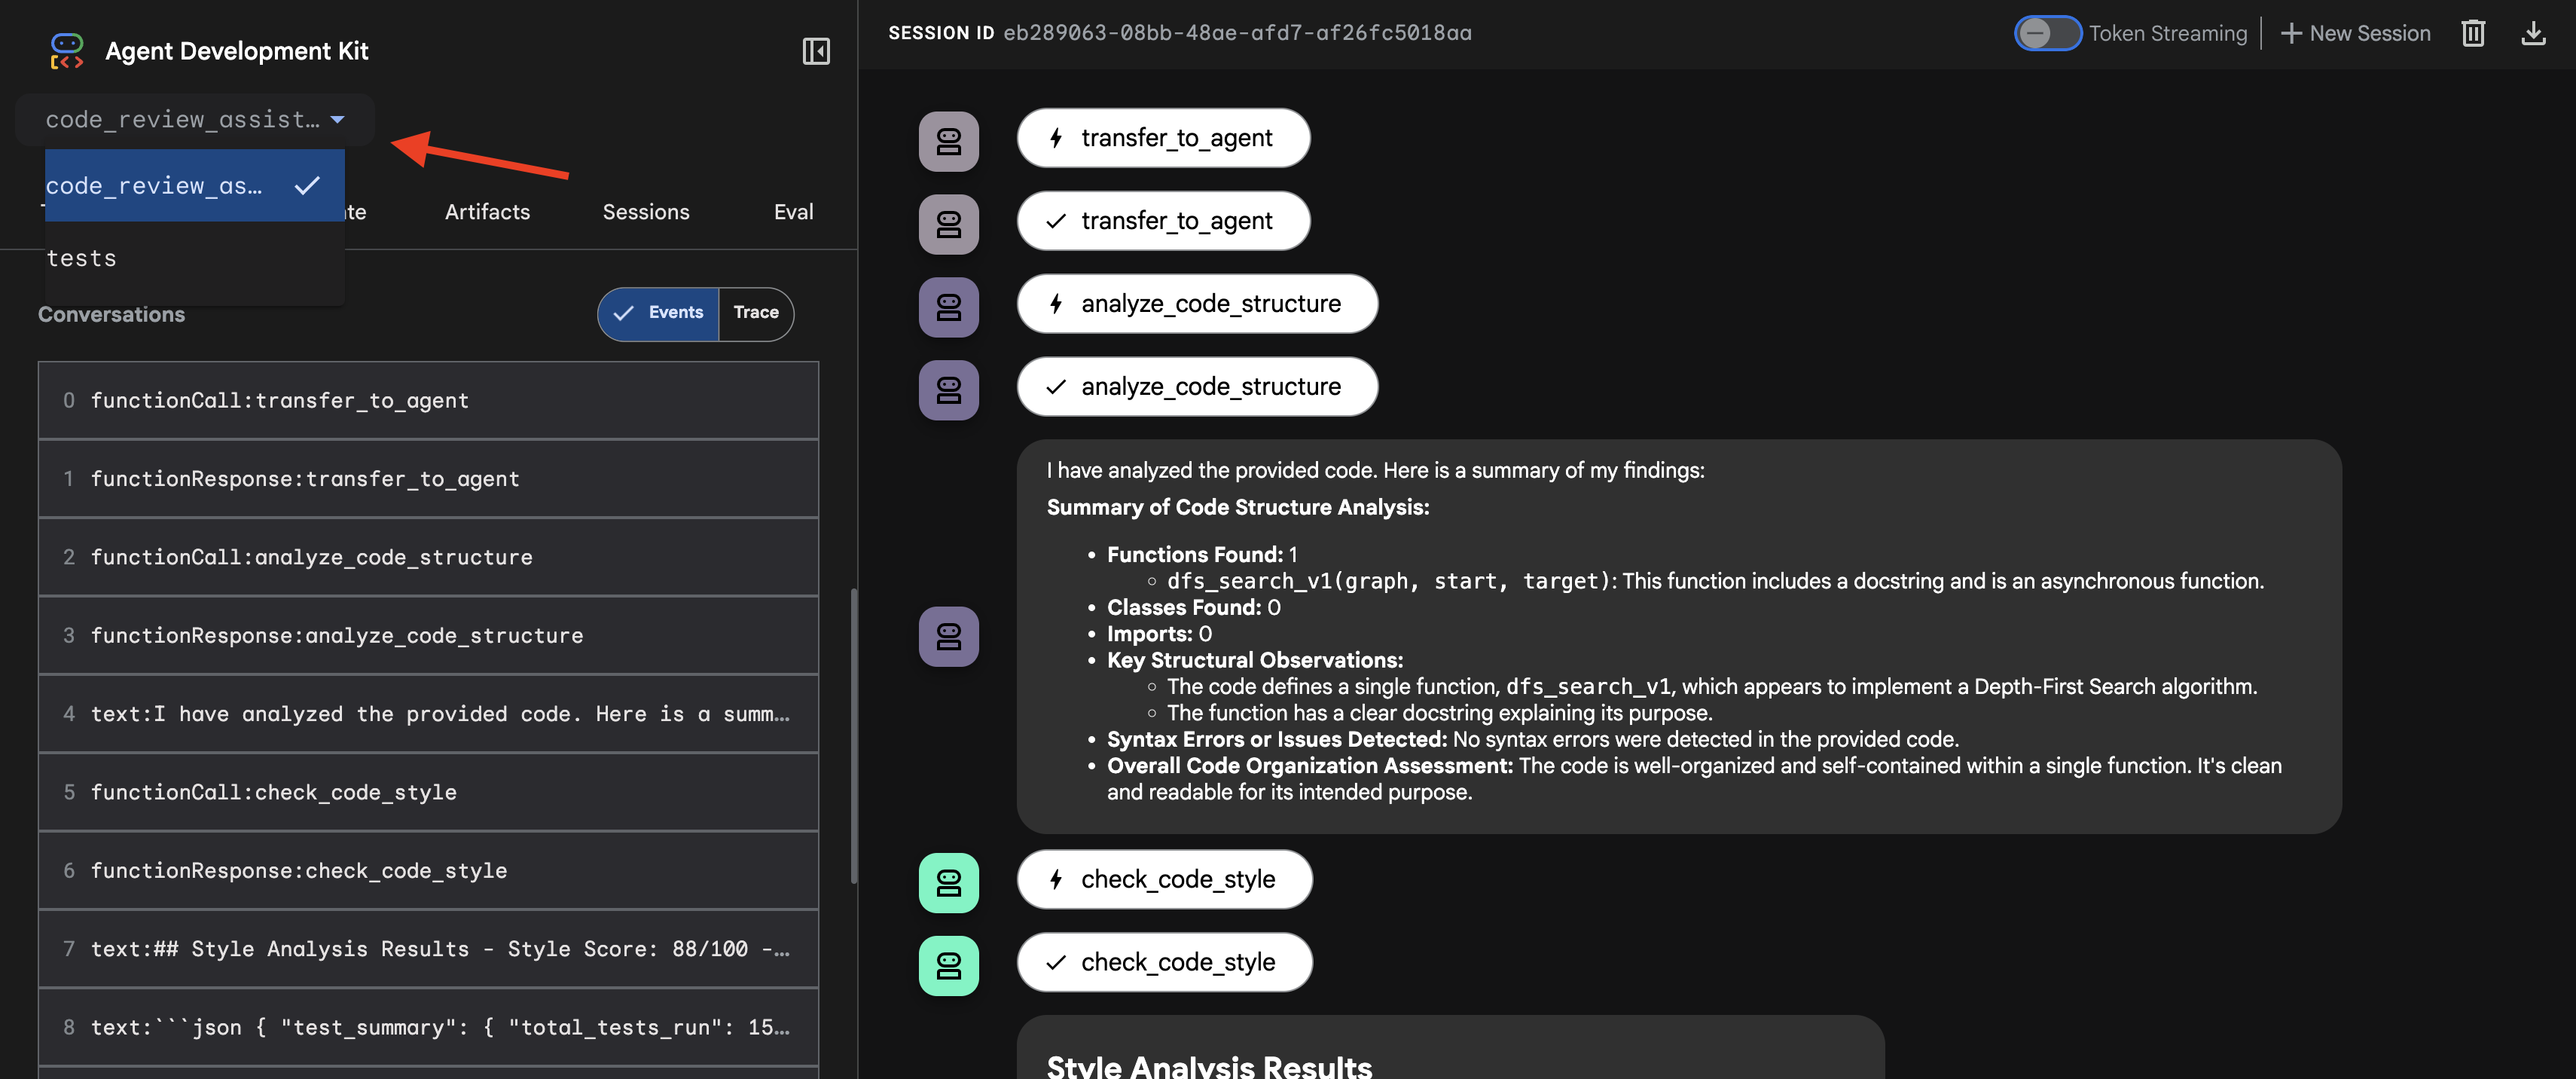
👉 测试提示:
Please analyze the following:
def dfs_search_v1(graph, start, target):
    """Find if target is reachable from start."""
    visited = set()
    stack = start

    while stack:
        current = stack.pop()

        if current == target:
            return True

        if current not in visited:
            visited.add(current)

            for neighbor in graph[current]:
                if neighbor not in visited:
                    stack.append(neighbor)

    return False
👉 查看代码审核流水线的实际应用:
提交有 bug 的 dfs_search_v1 函数时,您不会只获得一个答案。您正在观看多智能体流水线的工作情况。您看到的流式输出是 4 个专业智能体依次执行的结果,每个智能体都基于上一个智能体的输出进行构建。
下面详细介绍了每种代理如何为最终的全面评价做出贡献,将原始数据转化为富有实用价值的情报。
1. 代码分析器的结构报告
首先,CodeAnalyzer 代理接收原始代码。它不会猜测代码的作用,而是使用 analyze_code_structure 工具执行确定性的抽象语法树 (AST) 解析。
其输出是有关代码结构的纯粹事实数据:
The analysis of the provided code reveals the following:

Summary:
- Functions Found: 1
- Classes Found: 0

Key Structural Observations:
- A single function, dfs_search_v1, is defined.
- It includes a docstring: "Find if target is reachable from start."
- No syntax errors were detected.

Overall Code Organization Assessment:
- The code snippet is a well-defined, self-contained function.
⭐ 价值:此初始步骤为其他代理提供了清晰可靠的基础。它会确认代码是否为有效的 Python 代码,并准确指出需要检查的组件。
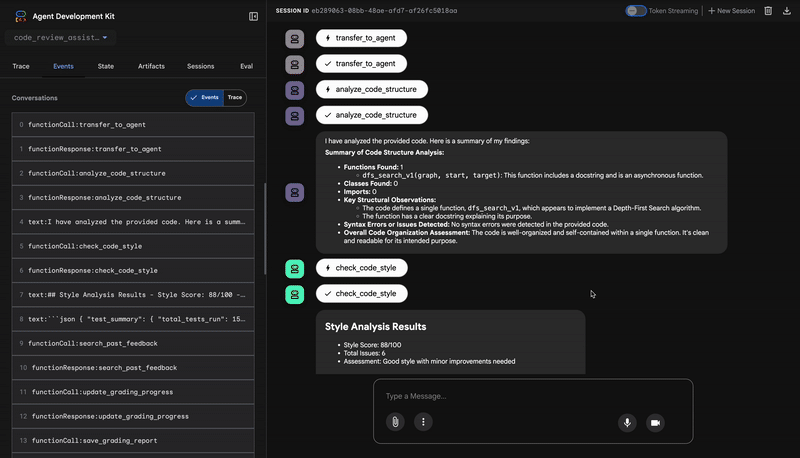
2. 样式检查工具的 PEP 8 审核
接下来,StyleChecker 代理会接管。它从共享状态读取代码,并使用利用 pycodestyle lint 的 check_code_style 工具。
其输出结果是可量化的质量得分和具体违规情况:
Style Analysis Results
- Style Score: 88/100
- Total Issues: 6
- Assessment: Good style with minor improvements needed

Top Style Issues
- Line 5, W293: blank line contains whitespace
- Line 19, W292: no newline at end of file
⭐ 价值:此代理会根据既定的社区标准 (PEP 8) 提供客观且不可协商的反馈。加权评分系统会立即告知用户问题的严重程度。
3. 测试运行程序的严重 bug 发现
此时,系统会进行更深入的分析。TestRunner 代理会生成并执行一套全面的测试,以验证代码的行为。
其输出是一个结构化 JSON 对象,其中包含一个令人震惊的判决:
{
  "critical_issues": [
    {
      "type": "Critical Bug",
      "description": "The function's initialization `stack = start` is incorrect... When a common input like a string... is provided... the function crashes with an AttributeError.",
      "severity": "Critical"
    }
  ],
  "verdict": {
    "status": "BROKEN",
    "confidence": "high",
    "recommendation": "The function is fundamentally broken... the stack initialization line `stack = start` must be changed to `stack = [start]`."
  }
}
⭐ 价值:这是最关键的数据分析。智能体并非只是猜测,而是通过运行代码证明代码存在问题。它发现了一个细微但至关重要的运行时 bug,人工审核者可能很容易忽略该 bug,并准确指出了原因和所需的修复。
4. 反馈合成器的最终报告
最后,FeedbackSynthesizer 代理充当指挥。它会从前三个代理处获取结构化数据,并生成一份既有分析性又具鼓励性的用户友好型报告。
其输出是您看到的最终润饰后的评价:
📊 Summary
Great effort on implementing the Depth-First Search algorithm! ... However, a critical bug in the initialization of the stack prevents the function from working correctly...

✅ Strengths
- Good Algorithm Structure
- Correct Use of `visited` Set

📈 Code Quality Analysis
...
### Style Compliance
The style analysis returned a good score of 88/100.
...
### Test Results
The automated testing revealed a critical issue... The line `stack = start` directly assigns the input... which results in an `AttributeError`.

💡 Recommendations for Improvement
**Fix the Critical Stack Initialization Bug:**
- Incorrect Code: `stack = start`
- Correct Code: `stack = [start]`

💬 Encouragement
You are very close to a perfect implementation! The core logic of your DFS algorithm is sound, which is the hardest part.
⭐ 价值:此代理可将技术数据转化为有用的教育体验。它优先处理最重要的问题(bug),清晰地解释了该问题,提供了确切的解决方案,并且语气令人鼓舞。它成功地将之前所有阶段的发现整合为一个连贯且有价值的整体。
这个多阶段流程展示了智能体流水线的强大功能。您将获得分层分析,而不是单一的单体式回答,其中每个代理都会执行可验证的专业任务。这使得审核不仅富有洞察力,而且具有确定性、可靠性,并且具有深刻的教育意义。
👉💻 完成测试后,返回到 Cloud Shell 编辑器终端,然后按 Ctrl+C 停止 ADK 开发者界面。
您构建的内容
现在,您已拥有一个完整的代码审核流水线,该流水线可执行以下操作:
✅ 解析代码结构 - 通过辅助函数进行确定性 AST 分析
✅ 检查样式 - 通过命名惯例进行加权评分
✅ 运行测试 - 生成全面的测试,并以结构化 JSON 格式输出
✅ 合成反馈 - 集成状态、内存和制品
✅ 跟踪进度 - 跨调用/会话/用户的多层状态
✅ 随时间学习 - 跨会话模式的内存服务
✅ 提供制品 - 可下载的 JSON 报告,包含完整的审核轨迹
掌握的关键概念
顺序流水线:
- 按严格顺序执行的四个代理
- 每个状态都会丰富下一个状态
- 依赖项决定执行顺序
生产模式:
- 辅助函数分离(在线程池中同步)
- 优雅降级(后备策略)
- 多层级状态管理(临时/会话/用户)
- 动态指令提供程序(情境感知)
- 双重存储(制品 + 状态冗余)
State as Communication:
- 常量可防止智能体出现拼写错误
output_key将代理摘要写入状态- 后续智能体通过 StateKeys 读取
- 状态在流水线中线性流动
内存与状态:
- 状态:当前会话数据
- 记忆:跨会话的模式
- 不同用途,不同生命周期
工具编排:
- 单工具代理(分析器、样式检查器)
- 内置执行器 (test_runner)
- 多工具协调(合成器)
模型选择策略:
- 工作器模型:机械任务(解析、linting、路由)
- 评价者模型:推理任务(测试、合成)
- 通过适当的选择实现费用优化
后续步骤
在第 6 模块中,您将构建修复流水线:
- 用于迭代修复的 LoopAgent 架构
- 通过上报退出条件
- 迭代之间的状态累积
- 验证和重试逻辑
- 与审核流水线集成以提供修复
您将了解相同的状态模式如何扩展到复杂的迭代工作流(其中代理会多次尝试,直到成功),以及如何在单个应用中协调多个流水线。
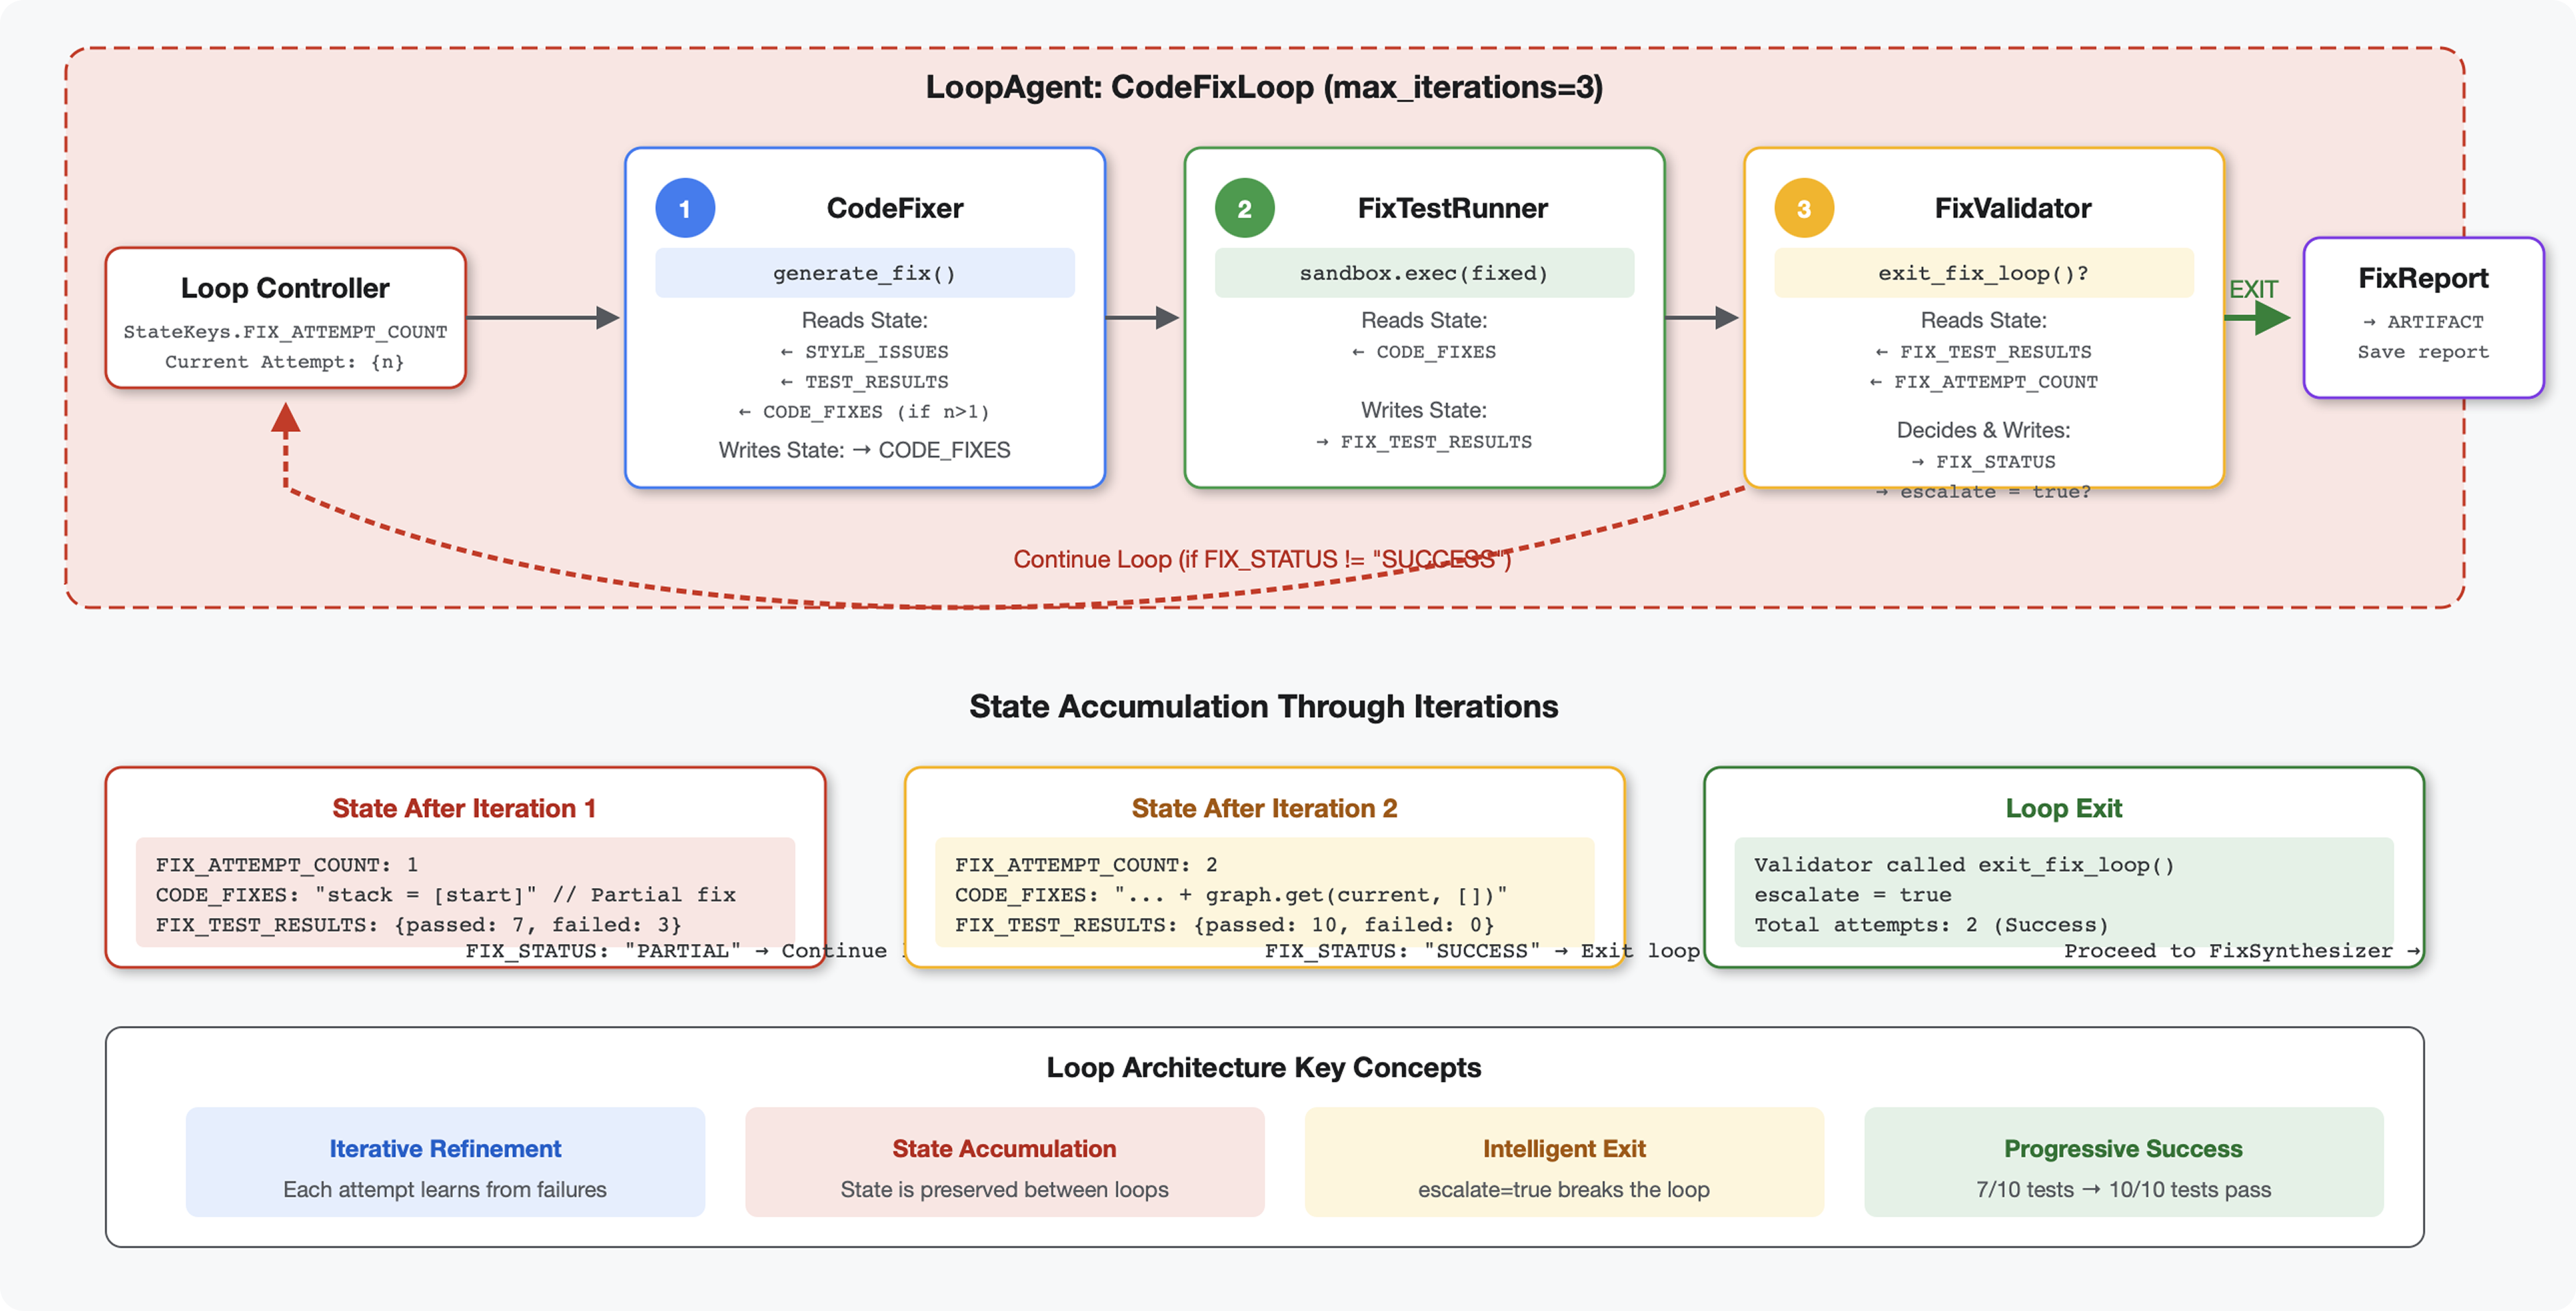
6. 添加修复流水线:循环架构
简介
在模块 5 中,您构建了一个可分析代码并提供反馈的顺序审核流水线。但发现问题只是解决方案的一半,开发者还需要帮助来解决问题。
本模块将构建一个自动化修复流水线,该流水线可执行以下操作:
- 根据审核结果生成修复
- 通过运行全面的测试来验证修复
- 如果修复措施无效,则自动重试(最多尝试 3 次)
- 报告结果(包含前后对比)
关键概念:用于自动重试的 LoopAgent。与只运行一次的顺序型智能体不同,LoopAgent 会重复运行其子智能体,直到满足退出条件或达到最大迭代次数。工具通过设置 tool_context.actions.escalate = True 来指示成功。
构建内容预览:提交有 bug 的代码 → 审核发现问题 → 修复循环生成修正 → 测试验证 → 根据需要重试 → 最终的综合报告。
核心概念:LoopAgent 与 Sequential
顺序流水线(模块 5):
SequentialAgent(agents=[A, B, C])
# Executes: A → B → C → Done
- 单向流程
- 每个代理运行一次
- 无重试逻辑
循环流水线(模块 6):
LoopAgent(agents=[A, B, C], max_iterations=3)
# Executes: A → B → C → (check exit) → A → B → C → (check exit) → ...
- 循环流
- 智能体可以多次运行
- 退出条件:
- 工具设置了
tool_context.actions.escalate = True(成功) - 已达到
max_iterations(安全限制) - 发生未处理的异常情况(错误)
- 工具设置了
为什么使用循环来修复代码:
代码修复通常需要多次尝试:
- 首次尝试:修复明显的 bug(错误的变量类型)
- 第二次尝试:修复测试发现的次要问题(极端情况)
- 第三次尝试:微调并验证所有测试均通过
如果没有循环,您需要在智能体指令中添加复杂的条件逻辑。使用 LoopAgent 时,系统会自动重试。
架构比较:
Sequential (Module 5):
User → Review Pipeline → Feedback → Done

Loop (Module 6):
User → Review Pipeline → Feedback → Fix Pipeline
                                         ↓
                          ┌──────────────┴──────────────┐
                          │   Fix Attempt Loop (1-3x)   │
                          │  ┌─────────────────────┐    │
                          │  │ 1. Generate Fixes   │    │
                          │  │ 2. Test Fixes       │    │
                          │  │ 3. Validate & Exit? │────┼─→ If escalate=True
                          │  └─────────────────────┘    │      exit loop
                          │         ↓ If not            │
                          │    Try Again (max 3)        │
                          └─────────────────────────────┘
                                     ↓
                          4. Synthesize Final Report → Done
第 1 步:添加 Code Fixer Agent
代码修复工具会根据审核结果生成修正后的 Python 代码。
👉 打开
code_review_assistant/sub_agents/fix_pipeline/code_fixer.py
👉 查找:
# MODULE_6_STEP_1_CODE_FIXER_INSTRUCTION_PROVIDER
👉 将该单行替换为:
async def code_fixer_instruction_provider(context: ReadonlyContext) -> str:
    """Dynamic instruction provider that injects state variables."""
    template = """You are an expert code fixing specialist.

Original Code:
{code_to_review}

Analysis Results:
- Style Score: {style_score}/100
- Style Issues: {style_issues}
- Test Results: {test_execution_summary}

Based on the test results, identify and fix ALL issues including:
- Interface bugs (e.g., if start parameter expects wrong type)
- Logic errors (e.g., KeyError when accessing graph nodes)
- Style violations
- Missing documentation

YOUR TASK:
Generate the complete fixed Python code that addresses all identified issues.

CRITICAL INSTRUCTIONS:
- Output ONLY the corrected Python code
- Do NOT include markdown code blocks (```python)
- Do NOT include any explanations or commentary
- The output should be valid, executable Python code and nothing else

Common fixes to apply based on test results:
- If tests show AttributeError with 'pop', fix: stack = [start] instead of stack = start
- If tests show KeyError accessing graph, fix: use graph.get(current, [])
- Add docstrings if missing
- Fix any style violations identified

Output the complete fixed code now:"""

    return await instructions_utils.inject_session_state(template, context)
👉 查找:
# MODULE_6_STEP_1_CODE_FIXER_AGENT
👉 将该单行替换为:
code_fixer_agent = Agent(
    name="CodeFixer",
    model=config.worker_model,
    description="Generates comprehensive fixes for all identified code issues",
    instruction=code_fixer_instruction_provider,
    code_executor=BuiltInCodeExecutor(),
    output_key="code_fixes"
)
第 2 步:添加 Fix Test Runner Agent
修复测试运行程序通过对修复后的代码执行全面的测试来验证修正。
👉 打开
code_review_assistant/sub_agents/fix_pipeline/fix_test_runner.py
👉 查找:
# MODULE_6_STEP_2_FIX_TEST_RUNNER_INSTRUCTION_PROVIDER
👉 将该单行替换为:
async def fix_test_runner_instruction_provider(context: ReadonlyContext) -> str:
    """Dynamic instruction provider that uses the clean code from the previous step."""
    template = """You are responsible for validating the fixed code by running tests.

THE FIXED CODE TO TEST:
{code_fixes}

ORIGINAL TEST RESULTS: {test_execution_summary}

YOUR TASK:
1. Understand the fixes that were applied
2. Generate the same comprehensive tests (15-20 test cases)
3. Execute the tests on the FIXED code using your code executor
4. Compare results with original test results
5. Output a detailed JSON analysis

TESTING METHODOLOGY:
- Run the same tests that revealed issues in the original code
- Verify that previously failing tests now pass
- Ensure no regressions were introduced
- Document the improvement

Execute your tests and output ONLY valid JSON with this structure:
- "passed": number of tests that passed
- "failed": number of tests that failed
- "total": total number of tests
- "pass_rate": percentage as a number
- "comparison": object with "original_pass_rate", "new_pass_rate", "improvement"
- "newly_passing_tests": array of test names that now pass
- "still_failing_tests": array of test names still failing

Do NOT output the test code itself, only the JSON analysis."""

    return await instructions_utils.inject_session_state(template, context)
👉 查找:
# MODULE_6_STEP_2_FIX_TEST_RUNNER_AGENT
👉 将该单行替换为:
fix_test_runner_agent = Agent(
    name="FixTestRunner",
    model=config.critic_model,
    description="Runs comprehensive tests on fixed code to verify all issues are resolved",
    instruction=fix_test_runner_instruction_provider,
    code_executor=BuiltInCodeExecutor(),
    output_key="fix_test_execution_summary"
)
第 3 步:添加 Fix Validator Agent
验证器会检查修复是否成功,并决定是否退出循环。
了解工具
首先,添加验证器所需的三种工具。
👉 打开
code_review_assistant/tools.py
👉 查找:
# MODULE_6_STEP_3_VALIDATE_FIXED_STYLE
👉 替换为工具 1 - 样式验证器:
async def validate_fixed_style(tool_context: ToolContext) -> Dict[str, Any]:
    """
    Validates style compliance of the fixed code.

    Args:
        tool_context: ADK tool context containing fixed code in state

    Returns:
        Dictionary with style validation results
    """
    logger.info("Tool: Validating style of fixed code...")

    try:
        # Get the fixed code from state
        code_fixes = tool_context.state.get(StateKeys.CODE_FIXES, '')

        # Try to extract from markdown if present
        if '```python' in code_fixes:
            start = code_fixes.rfind('```python') + 9
            end = code_fixes.rfind('```')
            if start < end:
                code_fixes = code_fixes[start:end].strip()

        if not code_fixes:
            return {
                "status": "error",
                "message": "No fixed code found in state"
            }

        # Store the extracted fixed code
        tool_context.state[StateKeys.CODE_FIXES] = code_fixes

        # Run style check on fixed code
        loop = asyncio.get_event_loop()
        with ThreadPoolExecutor() as executor:
            style_result = await loop.run_in_executor(
                executor, _perform_style_check, code_fixes
            )

        # Compare with original
        original_score = tool_context.state.get(StateKeys.STYLE_SCORE, 0)
        improvement = style_result['score'] - original_score

        # Store results
        tool_context.state[StateKeys.FIXED_STYLE_SCORE] = style_result['score']
        tool_context.state[StateKeys.FIXED_STYLE_ISSUES] = style_result['issues']

        logger.info(f"Tool: Fixed code style score: {style_result['score']}/100 "
                    f"(improvement: +{improvement})")

        return {
            "status": "success",
            "fixed_style_score": style_result['score'],
            "original_style_score": original_score,
            "improvement": improvement,
            "remaining_issues": style_result['issues'],
            "perfect_style": style_result['score'] == 100
        }

    except Exception as e:
        logger.error(f"Tool: Style validation failed: {e}", exc_info=True)
        return {
            "status": "error",
            "message": str(e)
        }
👉 查找:
# MODULE_6_STEP_3_COMPILE_FIX_REPORT
👉 替换为工具 2 - 报告编译器:
async def compile_fix_report(tool_context: ToolContext) -> Dict[str, Any]:
    """
    Compiles comprehensive report of the fix process.

    Args:
        tool_context: ADK tool context with all fix pipeline data

    Returns:
        Comprehensive fix report
    """
    logger.info("Tool: Compiling comprehensive fix report...")

    try:
        # Gather all data
        original_code = tool_context.state.get(StateKeys.CODE_TO_REVIEW, '')
        code_fixes = tool_context.state.get(StateKeys.CODE_FIXES, '')

        # Test results
        original_tests = tool_context.state.get(StateKeys.TEST_EXECUTION_SUMMARY, {})
        fixed_tests = tool_context.state.get(StateKeys.FIX_TEST_EXECUTION_SUMMARY, {})

        # Parse if strings
        if isinstance(original_tests, str):
            try:
                original_tests = json.loads(original_tests)
            except:
                original_tests = {}

        if isinstance(fixed_tests, str):
            try:
                fixed_tests = json.loads(fixed_tests)
            except:
                fixed_tests = {}

        # Extract pass rates
        original_pass_rate = 0
        if original_tests:
            if 'pass_rate' in original_tests:
                original_pass_rate = original_tests['pass_rate']
            elif 'test_summary' in original_tests:
                # Handle test_runner_agent's JSON structure
                summary = original_tests['test_summary']
                total = summary.get('total_tests_run', 0)
                passed = summary.get('tests_passed', 0)
                if total > 0:
                    original_pass_rate = (passed / total) * 100
            elif 'passed' in original_tests and 'total' in original_tests:
                if original_tests['total'] > 0:
                    original_pass_rate = (original_tests['passed'] / original_tests['total']) * 100

        fixed_pass_rate = 0
        all_tests_pass = False
        if fixed_tests:
            if 'pass_rate' in fixed_tests:
                fixed_pass_rate = fixed_tests['pass_rate']
                all_tests_pass = fixed_tests.get('failed', 1) == 0
            elif 'passed' in fixed_tests and 'total' in fixed_tests:
                if fixed_tests['total'] > 0:
                    fixed_pass_rate = (fixed_tests['passed'] / fixed_tests['total']) * 100
                all_tests_pass = fixed_tests.get('failed', 0) == 0

        # Style scores
        original_style = tool_context.state.get(StateKeys.STYLE_SCORE, 0)
        fixed_style = tool_context.state.get(StateKeys.FIXED_STYLE_SCORE, 0)

        # Calculate improvements
        test_improvement = {
            'original_pass_rate': original_pass_rate,
            'fixed_pass_rate': fixed_pass_rate,
            'improvement': fixed_pass_rate - original_pass_rate,
            'all_tests_pass': all_tests_pass
        }

        style_improvement = {
            'original_score': original_style,
            'fixed_score': fixed_style,
            'improvement': fixed_style - original_style,
            'perfect_style': fixed_style == 100
        }

        # Determine overall status
        if all_tests_pass and style_improvement['perfect_style']:
            fix_status = 'SUCCESSFUL'
            status_emoji = '✅'
        elif test_improvement['improvement'] > 0 or style_improvement['improvement'] > 0:
            fix_status = 'PARTIAL'
            status_emoji = '⚠️'
        else:
            fix_status = 'FAILED'
            status_emoji = '❌'

        # Build comprehensive report
        report = {
            'status': fix_status,
            'status_emoji': status_emoji,
            'timestamp': datetime.now().isoformat(),
            'original_code': original_code,
            'code_fixes': code_fixes,
            'improvements': {
                'tests': test_improvement,
                'style': style_improvement
            },
            'summary': f"{status_emoji} Fix Status: {fix_status}\n"
                      f"Tests: {original_pass_rate:.1f}% → {fixed_pass_rate:.1f}%\n"
                      f"Style: {original_style}/100 → {fixed_style}/100"
        }

        # Store report in state
        tool_context.state[StateKeys.FIX_REPORT] = report
        tool_context.state[StateKeys.FIX_STATUS] = fix_status

        logger.info(f"Tool: Fix report compiled - Status: {fix_status}")
        logger.info(f"Tool: Test improvement: {original_pass_rate:.1f}% → {fixed_pass_rate:.1f}%")
        logger.info(f"Tool: Style improvement: {original_style} → {fixed_style}")

        return {
            "status": "success",
            "fix_status": fix_status,
            "report": report
        }

    except Exception as e:
        logger.error(f"Tool: Failed to compile fix report: {e}", exc_info=True)
        return {
            "status": "error",
            "message": str(e)
        }
👉 查找:
# MODULE_6_STEP_3_EXIT_FIX_LOOP
👉 替换为工具 3 - 循环退出信号:
def exit_fix_loop(tool_context: ToolContext) -> Dict[str, Any]:
    """
    Signal that fixing is complete and should exit the loop.

    Args:
        tool_context: ADK tool context

    Returns:
        Confirmation message
    """
    logger.info("Tool: Setting escalate flag to exit fix loop")

    # This is the critical line that exits the LoopAgent
    tool_context.actions.escalate = True

    return {
        "status": "success",
        "message": "Fix complete, exiting loop"
    }
创建验证器代理
👉 打开
code_review_assistant/sub_agents/fix_pipeline/fix_validator.py
👉 查找:
# MODULE_6_STEP_3_FIX_VALIDATOR_INSTRUCTION_PROVIDER
👉 将该单行替换为:
async def fix_validator_instruction_provider(context: ReadonlyContext) -> str:
    """Dynamic instruction provider that injects state variables."""
    template = """You are the final validation specialist for code fixes.

You have access to:
- Original issues from initial review
- Applied fixes: {code_fixes}
- Test results after fix: {fix_test_execution_summary}
- All state data from the fix process

Your responsibilities:
1. Use validate_fixed_style tool to check style compliance of fixed code
   - Pass no arguments, it will retrieve fixed code from state
2. Use compile_fix_report tool to generate comprehensive report
   - Pass no arguments, it will gather all data from state
3. Based on the report, determine overall fix status:
   - ✅ SUCCESSFUL: All tests pass, style score 100
   - ⚠️ PARTIAL: Improvements made but issues remain
   - ❌ FAILED: Fix didn't work or made things worse

4. CRITICAL: If status is SUCCESSFUL, call the exit_fix_loop tool to stop iterations
   - This prevents unnecessary additional fix attempts
   - If not successful, the loop will continue for another attempt

5. Provide clear summary of:
   - What was fixed
   - What improvements were achieved
   - Any remaining issues requiring manual attention

Be precise and quantitative in your assessment.
"""
    return await instructions_utils.inject_session_state(template, context)
👉 查找:
# MODULE_6_STEP_3_FIX_VALIDATOR_AGENT
👉 将该单行替换为:
fix_validator_agent = Agent(
    name="FixValidator",
    model=config.worker_model,
    description="Validates fixes and generates final fix report",
    instruction=fix_validator_instruction_provider,
    tools=[
        FunctionTool(func=validate_fixed_style),
        FunctionTool(func=compile_fix_report),
        FunctionTool(func=exit_fix_loop)
    ],
    output_key="final_fix_report"
)
第 4 步:了解 LoopAgent 的退出条件
LoopAgent 有三种退出方式:
1. 成功退出(通过升级)
# Inside any tool in the loop:
tool_context.actions.escalate = True

# Effect: Loop completes current iteration, then exits
# Use when: Fix is successful and no more attempts needed
示例对话流程:
Iteration 1:
  CodeFixer → generates fixes
  FixTestRunner → tests show 90% pass rate
  FixValidator → compiles report, sees PARTIAL status
  → Does NOT set escalate
  → Loop continues

Iteration 2:
  CodeFixer → refines fixes based on failures
  FixTestRunner → tests show 100% pass rate
  FixValidator → compiles report, sees SUCCESSFUL status
  → Calls exit_fix_loop() which sets escalate = True
  → Loop exits after this iteration
2. 达到最大迭代次数时退出
LoopAgent(
    name="FixAttemptLoop",
    sub_agents=[...],
    max_iterations=3  # Safety limit
)

# Effect: After 3 complete iterations, loop exits regardless of escalate
# Use when: Prevent infinite loops if fixes never succeed
示例对话流程:
Iteration 1: PARTIAL (continue)
Iteration 2: PARTIAL (continue)
Iteration 3: PARTIAL (but max reached)
→ Loop exits, synthesizer presents best attempt
3. 错误退出
# If any agent throws unhandled exception:
raise Exception("Unexpected error")

# Effect: Loop exits immediately with error state
# Use when: Critical failure that can't be recovered
各次迭代中的状态演变:
每次迭代都会看到上一次尝试的更新状态:
# Before Iteration 1:
state = {
    "code_to_review": "def add(a,b):return a+b",  # Original
    "style_score": 40,
    "test_execution_summary": {...}
}

# After Iteration 1:
state = {
    "code_to_review": "def add(a,b):return a+b",  # Unchanged
    "code_fixes": "def add(a, b):\n    return a + b",  # NEW
    "style_score": 40,  # Unchanged
    "fixed_style_score": 100,  # NEW
    "test_execution_summary": {...},  # Unchanged
    "fix_test_execution_summary": {...}  # NEW
}

# Iteration 2 starts with all this state
# If fixes still not perfect, code_fixes gets overwritten
为什么选择
escalate
返回值:
# Bad: Using return value to signal exit
def validator_agent():
    report = compile_report()
    if report['status'] == 'SUCCESSFUL':
        return {"exit": True}  # How does loop know?

# Good: Using escalate
def validator_tool(tool_context):
    report = compile_report()
    if report['status'] == 'SUCCESSFUL':
        tool_context.actions.escalate = True  # Loop knows immediately
    return {"report": report}
优点:
- 适用于任何工具,而不仅仅是最后一个工具
- 不会干扰退货数据
- 清晰的语义
- 框架处理退出逻辑
第 5 步:连接修复流水线
👉 打开
code_review_assistant/agent.py
👉 添加修复流水线 import(在现有 import 之后):
from google.adk.agents import LoopAgent  # Add this to the existing Agent, SequentialAgent line
from code_review_assistant.sub_agents.fix_pipeline.code_fixer import code_fixer_agent
from code_review_assistant.sub_agents.fix_pipeline.fix_test_runner import fix_test_runner_agent
from code_review_assistant.sub_agents.fix_pipeline.fix_validator import fix_validator_agent
from code_review_assistant.sub_agents.fix_pipeline.fix_synthesizer import fix_synthesizer_agent
您的导入现在应如下所示:
from google.adk.agents import Agent, SequentialAgent, LoopAgent
from .config import config
# Review pipeline imports (from Module 5)
from code_review_assistant.sub_agents.review_pipeline.code_analyzer import code_analyzer_agent
from code_review_assistant.sub_agents.review_pipeline.style_checker import style_checker_agent
from code_review_assistant.sub_agents.review_pipeline.test_runner import test_runner_agent
from code_review_assistant.sub_agents.review_pipeline.feedback_synthesizer import feedback_synthesizer_agent
# Fix pipeline imports (NEW)
from code_review_assistant.sub_agents.fix_pipeline.code_fixer import code_fixer_agent
from code_review_assistant.sub_agents.fix_pipeline.fix_test_runner import fix_test_runner_agent
from code_review_assistant.sub_agents.fix_pipeline.fix_validator import fix_validator_agent
from code_review_assistant.sub_agents.fix_pipeline.fix_synthesizer import fix_synthesizer_agent
👉 查找:
# MODULE_6_STEP_5_CREATE_FIX_LOOP
👉 将该单行替换为:
# Create the fix attempt loop (retries up to 3 times)
fix_attempt_loop = LoopAgent(
    name="FixAttemptLoop",
    sub_agents=[
        code_fixer_agent,      # Step 1: Generate fixes
        fix_test_runner_agent, # Step 2: Validate with tests
        fix_validator_agent    # Step 3: Check success & possibly exit
    ],
    max_iterations=3  # Try up to 3 times
)

# Wrap loop with synthesizer for final report
code_fix_pipeline = SequentialAgent(
    name="CodeFixPipeline",
    description="Automated code fixing pipeline with iterative validation",
    sub_agents=[
        fix_attempt_loop,      # Try to fix (1-3 times)
        fix_synthesizer_agent  # Present final results (always runs once)
    ]
)
👉 移除现有
root_agent
定义:
root_agent = Agent(...)
👉 查找:
# MODULE_6_STEP_5_UPDATE_ROOT_AGENT
👉 将该单行替换为:
# Update root agent to include both pipelines
root_agent = Agent(
    name="CodeReviewAssistant",
    model=config.worker_model,
    description="An intelligent code review assistant that analyzes Python code and provides educational feedback",
    instruction="""You are a specialized Python code review assistant focused on helping developers improve their code quality.

When a user provides Python code for review:
1. Immediately delegate to CodeReviewPipeline and pass the code EXACTLY as it was provided by the user.
2. The pipeline will handle all analysis and feedback
3. Return ONLY the final feedback from the pipeline - do not add any commentary

After completing a review, if significant issues were identified:
- If style score < 100 OR tests are failing OR critical issues exist:
  * Add at the end: "\n\n💡 I can fix these issues for you. Would you like me to do that?"

- If the user responds yes or requests fixes:
  * Delegate to CodeFixPipeline
  * Return the fix pipeline's complete output AS-IS

When a user asks what you can do or general questions:
- Explain your capabilities for code review and fixing
- Do NOT trigger the pipeline for non-code messages

The pipelines handle everything for code review and fixing - just pass through their final output.""",
    sub_agents=[code_review_pipeline, code_fix_pipeline],
    output_key="assistant_response"
)
第 6 步:添加修复合成器代理
合成器会在循环完成后以用户友好的方式呈现修复结果。
👉 打开
code_review_assistant/sub_agents/fix_pipeline/fix_synthesizer.py
👉 查找:
# MODULE_6_STEP_6_FIX_SYNTHESIZER_INSTRUCTION_PROVIDER
👉 将该单行替换为:
async def fix_synthesizer_instruction_provider(context: ReadonlyContext) -> str:
    """Dynamic instruction provider that injects state variables."""
    template = """You are responsible for presenting the fix results to the user.

Based on the validation report: {final_fix_report}
Fixed code from state: {code_fixes}
Fix status: {fix_status}

Create a comprehensive yet friendly response that includes:

## 🔧 Fix Summary
[Overall status and key improvements - be specific about what was achieved]

## 📊 Metrics
- Test Results: [original pass rate]% → [new pass rate]%
- Style Score: [original]/100 → [new]/100
- Issues Fixed: X of Y

## ✅ What Was Fixed
[List each fixed issue with brief explanation of the correction made]

## 📝 Complete Fixed Code
[Include the complete, corrected code from state - this is critical]

## 💡 Explanation of Key Changes
[Brief explanation of the most important changes made and why]

[If any issues remain]
## ⚠️ Remaining Issues
[List what still needs manual attention]

## 🎯 Next Steps
[Guidance on what to do next - either use the fixed code or address remaining issues]

Save the fix report using save_fix_report tool before presenting.
Call it with no parameters - it will retrieve the report from state automatically.

Be encouraging about improvements while being honest about any remaining issues.
Focus on the educational aspect - help the user understand what was wrong and how it was fixed.
"""
    return await instructions_utils.inject_session_state(template, context)
👉 查找:
# MODULE_6_STEP_6_FIX_SYNTHESIZER_AGENT
👉 将该单行替换为:
fix_synthesizer_agent = Agent(
    name="FixSynthesizer",
    model=config.critic_model,
    description="Creates comprehensive user-friendly fix report",
    instruction=fix_synthesizer_instruction_provider,
    tools=[FunctionTool(func=save_fix_report)],
    output_key="fix_summary"
)
👉 添加
save_fix_report
工具到
tools.py
:
👉 查找:
# MODULE_6_STEP_6_SAVE_FIX_REPORT
👉 替换为:
async def save_fix_report(tool_context: ToolContext) -> Dict[str, Any]:
    """
    Saves the fix report as an artifact.

    Args:
        tool_context: ADK tool context

    Returns:
        Save status
    """
    logger.info("Tool: Saving fix report...")

    try:
        # Get the report from state
        fix_report = tool_context.state.get(StateKeys.FIX_REPORT, {})

        if not fix_report:
            return {
                "status": "error",
                "message": "No fix report found in state"
            }

        # Convert to JSON
        report_json = json.dumps(fix_report, indent=2)
        report_part = types.Part.from_text(text=report_json)

        # Generate filename
        timestamp = datetime.now().isoformat().replace(':', '-')
        filename = f"fix_report_{timestamp}.json"

        # Try to save as artifact
        if hasattr(tool_context, 'save_artifact'):
            try:
                version = await tool_context.save_artifact(filename, report_part)
                await tool_context.save_artifact("latest_fix_report.json", report_part)

                logger.info(f"Tool: Fix report saved as {filename}")

                return {
                    "status": "success",
                    "filename": filename,
                    "version": str(version),
                    "size": len(report_json)
                }
            except Exception as e:
                logger.warning(f"Could not save as artifact: {e}")

        # Fallback: store in state
        tool_context.state[StateKeys.LAST_FIX_REPORT] = fix_report

        return {
            "status": "success",
            "message": "Fix report saved to state",
            "size": len(report_json)
        }

    except Exception as e:
        logger.error(f"Tool: Failed to save fix report: {e}", exc_info=True)
        return {
            "status": "error",
            "message": str(e)
        }
第 7 步:测试完整的修复流水线
现在,让我们看看整个循环的实际运行效果。
👉 启动系统:
adk web code_review_assistant
运行 adk web 命令后,您应该会在终端中看到表明 ADK Web 服务器已启动的输出,如下所示:
+-----------------------------------------------------------------------------+
| ADK Web Server started                                                      |
|                                                                             |
| For local testing, access at http://localhost:8000.                         |
+-----------------------------------------------------------------------------+

INFO:     Application startup complete.
INFO:     Uvicorn running on http://0.0.0.0:8000 (Press CTRL+C to quit)
👉 测试提示:
Please analyze the following:
def dfs_search_v1(graph, start, target):
    """Find if target is reachable from start."""
    visited = set()
    stack = start

    while stack:
        current = stack.pop()

        if current == target:
            return True

        if current not in visited:
            visited.add(current)

            for neighbor in graph[current]:
                if neighbor not in visited:
                    stack.append(neighbor)

    return False
首先,提交有 bug 的代码以触发审核流水线。在识别出缺陷后,您将要求代理“请修复代码”,这会触发强大的迭代式修复流水线。
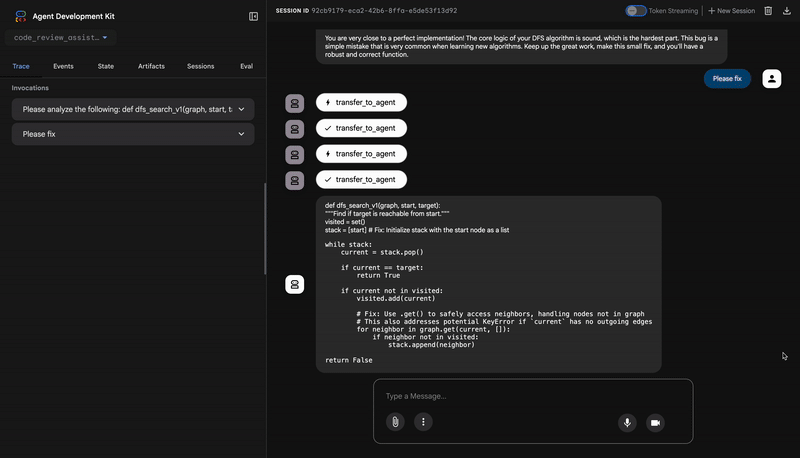
1. 初步审核(找出缺陷)
这是流程的前半部分。四代理审核流水线会分析代码、检查其样式并运行生成的测试套件。它正确识别出了严重的 AttributeError 和其他问题,并给出了结论:代码已损坏 (BROKEN),测试通过率仅为 84.21%。
2. 自动修正(循环运行)
这是最令人印象深刻的部分。当您要求代理修复代码时,它不会只进行一项更改。它会启动一个迭代的修复和验证循环,就像一位勤奋的开发者一样:尝试修复、彻底测试,如果效果不理想,则再次尝试。
第 1 次迭代:首次尝试(部分成功)
- 修正:
CodeFixer智能体读取初始报告并进行最明显的更正。它将stack = start更改为stack = [start],并使用graph.get()来防止KeyError异常。 - 验证:
TestRunner立即针对此新代码重新运行整个测试套件。 - 结果:及格率显著提高,达到 88.89%!严重 bug 已修复。不过,这些测试非常全面,揭示了两个与将
None作为图或非列表邻居值处理相关的新细微 bug(回归)。系统会将相应修复标记为 PARTIAL。
第 2 次迭代:最终润色(成功率 100%)
- 修复:由于未满足循环的退出条件(通过率为 100%),因此循环会再次运行。
CodeFixer现在包含更多信息,即两个新的回归失败。它会生成最终的更稳健的代码版本,其中明确处理了这些极端情况。 - 验证:
TestRunner针对最终版本的代码最后一次执行测试套件。 - 结果:100% 的通过率。所有原始 bug 和所有回归问题均已解决。系统会将修复标记为 SUCCESSFUL,然后退出循环。
3. 最终报告:满分
在完全验证修复后,FixSynthesizer 智能体接管流程,呈现最终报告,将技术数据转换为清晰易懂的总结。
指标 | 之前 | 之后 | 改进 |
测试通过率 | 84.21% | 100% | ▲ 15.79% |
风格得分 | 88 / 100 | 98 / 100 | ▲ 10 分 |
修复的 bug | 0/3 | 3/3 | ✅ |
✅ 最终的有效代码
以下是完整的修正后代码,现在已通过全部 19 项测试,表明修复成功:
def dfs_search_v1(graph, start, target):
    """Find if target is reachable from start."""
    # Handles 'None' graph input
    if graph is None:
        return False

    visited = set()
    # Fixes the critical AttributeError
    stack = [start]

    while stack:
        current = stack.pop()

        if current == target:
            return True

        if current not in visited:
            visited.add(current)

            # Safely gets neighbors to prevent KeyError
            neighbors = graph.get(current)

            if neighbors is None:
                continue

            # Validates that neighbors are iterable
            if not isinstance(neighbors, (list, set, tuple)):
                raise TypeError(
                    f"Graph value for node '{current}' is of type "
                    f"{type(neighbors).__name__}. Expected a list, set, or tuple."
                )

            for neighbor in neighbors:
                if neighbor not in visited:
                    stack.append(neighbor)

    return False
👉💻 完成测试后,返回到 Cloud Shell 编辑器终端,然后按 Ctrl+C 停止 ADK 开发者界面。
您构建的内容
现在,您已拥有一个完整的自动化修复流水线,该流水线可执行以下操作:
✅ 生成修复 - 基于审核分析
✅ 以迭代方式验证 - 在每次尝试修复后进行测试
✅ 自动重试 - 最多尝试 3 次,直至成功
✅ 智能退出 - 成功时通过升级退出
✅ 跟踪改进 - 比较修复前后的指标
✅ 提供制品 - 可下载的修复报告
掌握的关键概念
LoopAgent 与 Sequential:
- 顺序:通过代理一次
- LoopAgent:重复执行,直到满足退出条件或达到最大迭代次数
- 从
tool_context.actions.escalate = True出站
各次迭代中的状态演变:
CODE_FIXES在每次迭代中更新- 测试结果显示效果随时间推移而不断提升
- 验证者看到累积的更改
多流水线架构:
- 流水线回顾:只读分析(模块 5)
- 修复循环:迭代校正(模块 6 内循环)
- 修复流水线:环路 + 合成器(模块 6 外部)
- 根智能体:根据用户意图进行编排
控制流程的工具:
exit_fix_loop()组升级- 任何工具都可以发出循环完成信号
- 将退出逻辑与代理指令分离
迭代次数上限安全措施:
- 防止出现无限循环
- 确保系统始终响应
- 即使不完美,也会尽力呈现最佳效果
后续步骤
在最后一个模块中,您将了解如何将代理部署到生产环境:
- 使用 VertexAiSessionService 设置持久性存储空间
- 在 Google Cloud 上部署到 Agent Engine
- 监控和调试生产代理
- 扩缩和可靠性方面的最佳实践
您已构建一个完整的多智能体系统,其中包含顺序架构和循环架构。您学到的模式(状态管理、动态指令、工具编排和迭代优化)是实际智能体系统中使用的可用于生产用途的技术。
7. 部署到生产环境
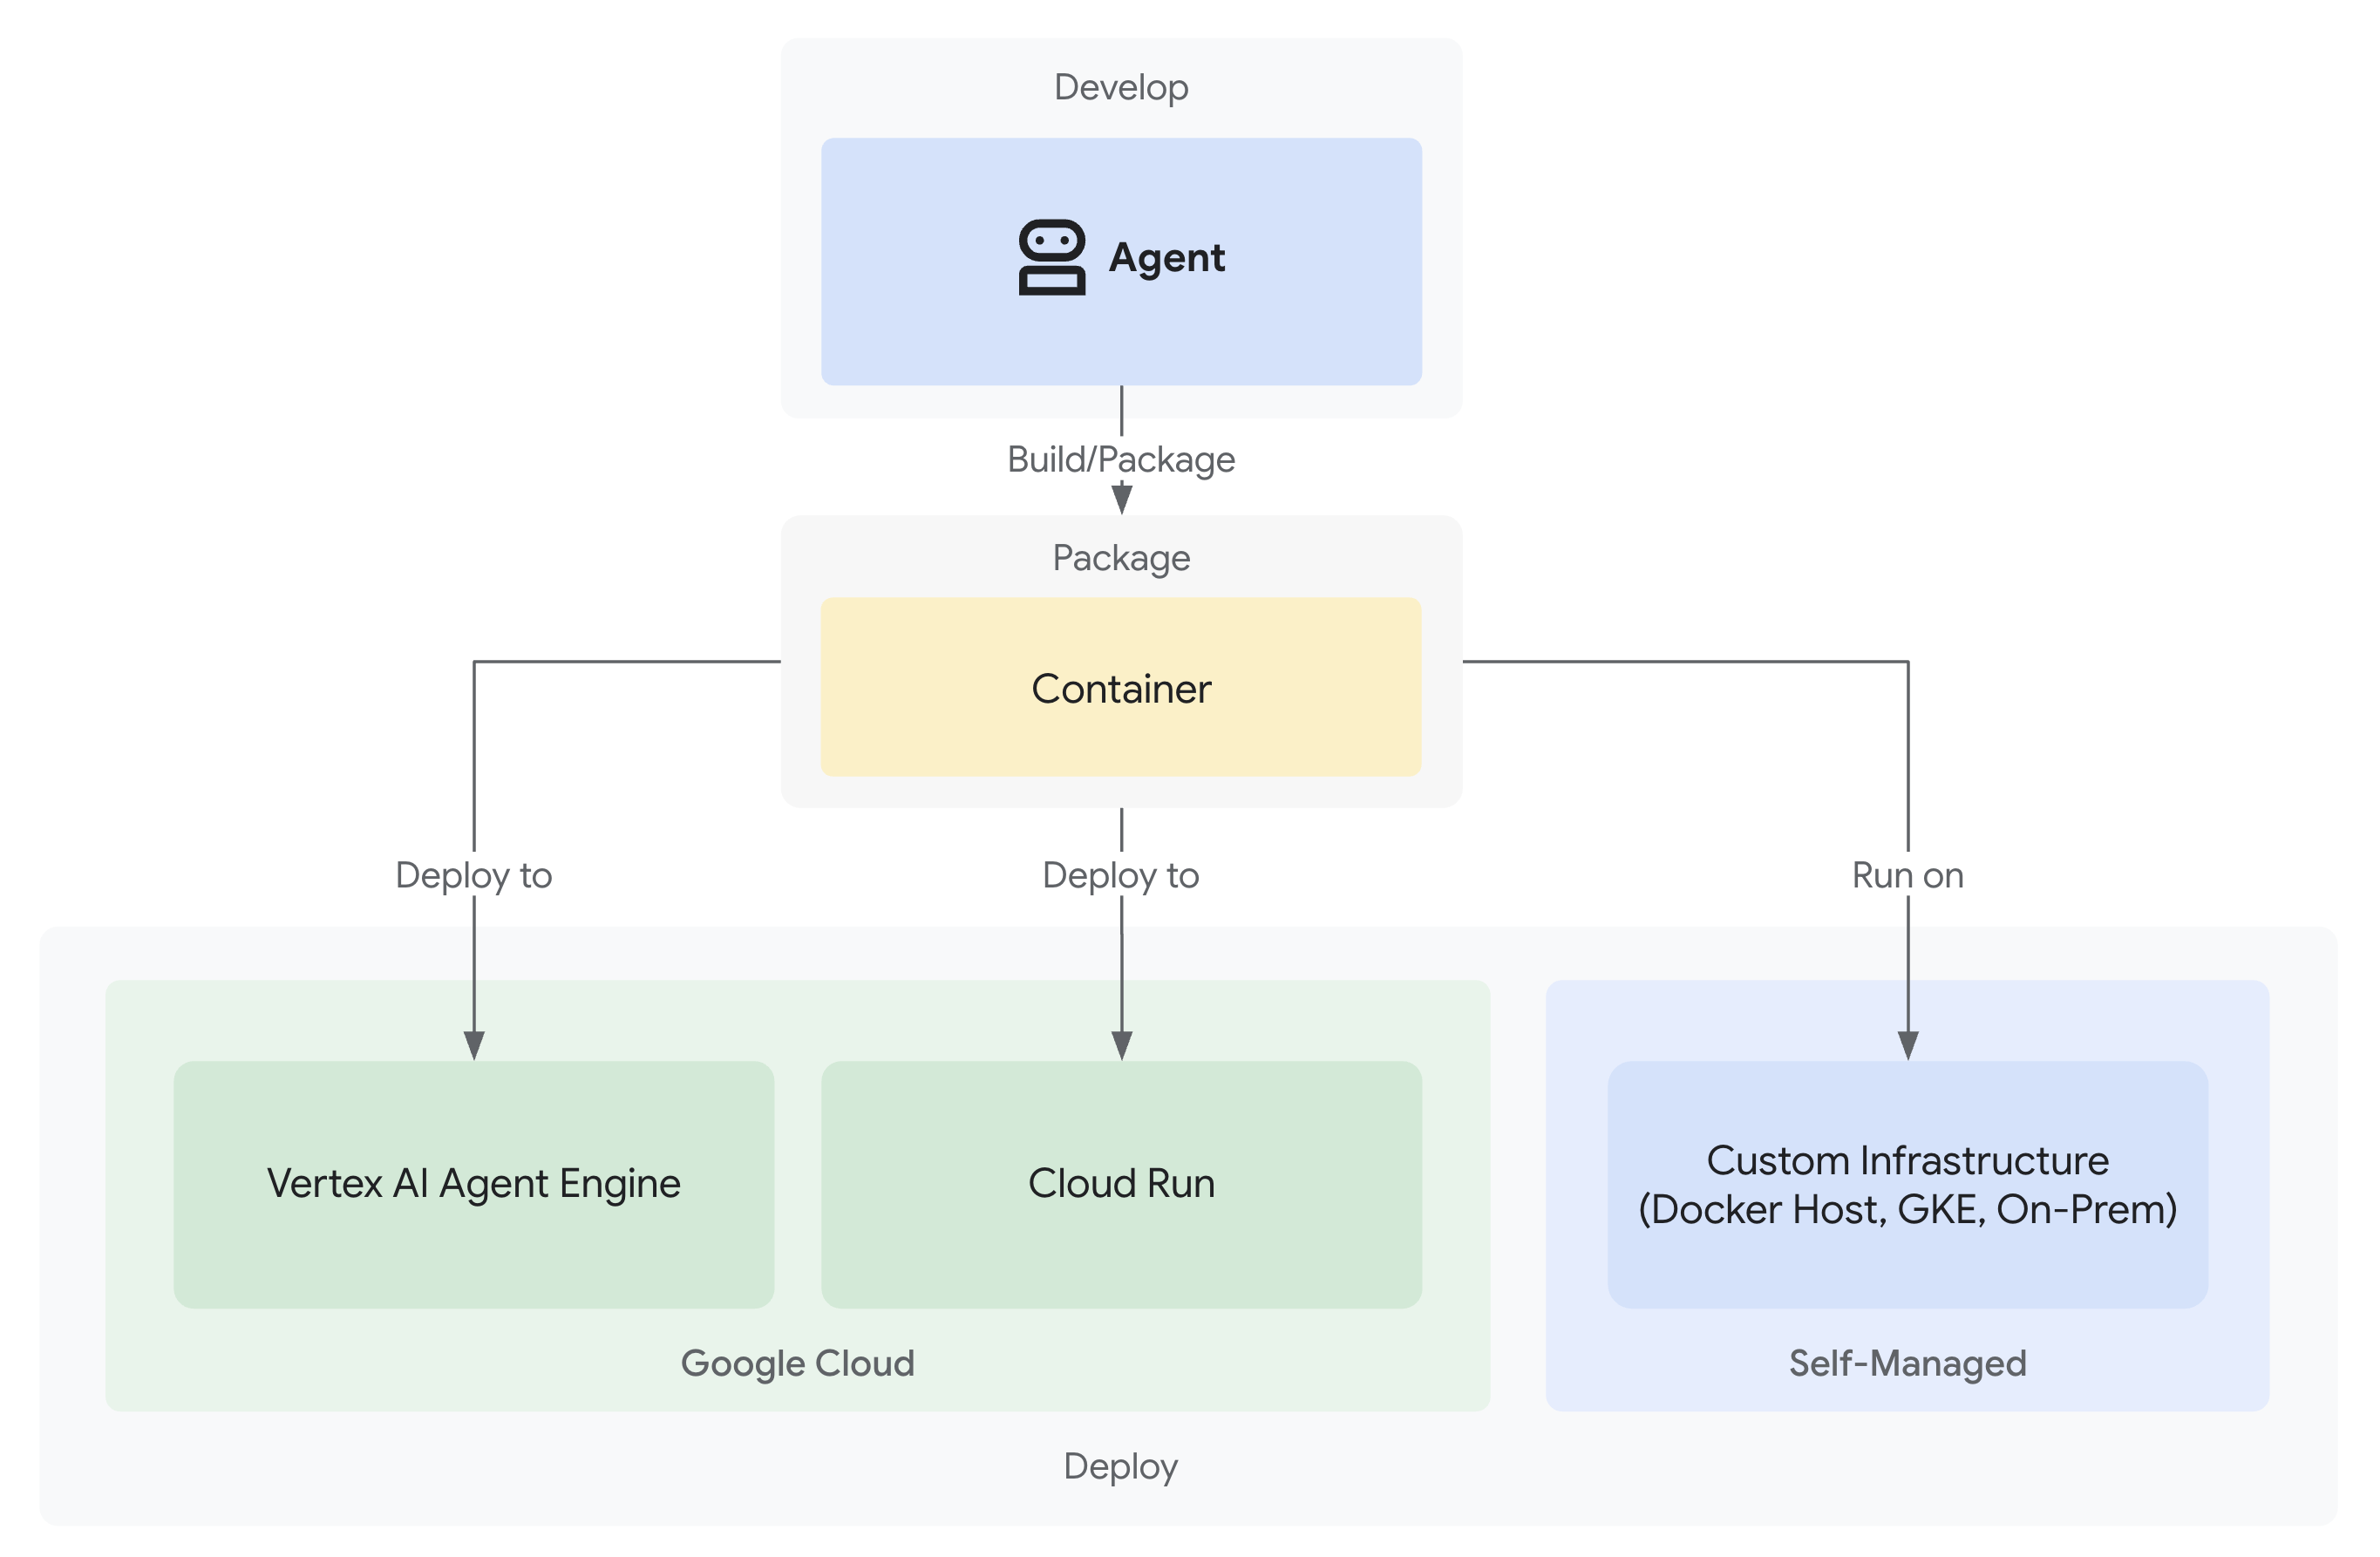
简介
您的代码审核助理现已完成,审核和修复流水线可在本地运行。缺失的部分:它只能在您的机器上运行。在本模块中,您将把智能体部署到 Google Cloud,以便您的团队能够通过持久会话和生产级基础架构访问该智能体。
学习内容:
- 三种部署途径:本地、Cloud Run 和 Agent Engine
- 自动执行基础架构预配
- 会话持久化策略
- 测试已部署的智能体
了解部署选项
ADK 支持多个部署目标平台,每个平台都有不同的优缺点:
部署路径
因素 | 本地( | Cloud Run ( | Agent Engine ( |
复杂性 | 最小 | 中 | 低 |
会话持久性 | 仅限内存中(重启后数据丢失) | Cloud SQL (PostgreSQL) | Vertex AI 托管式(自动) |
基础架构 | 无(仅限开发机器) | 容器 + 数据库 | 全代管式 |
冷启动 | 不适用 | 100-2000 毫秒 | 100-500 毫秒 |
扩缩 | 单一实例 | 自动(至零) | 自动 |
费用模型 | 免费(本地计算) | 基于请求 + 免费层级 | 基于计算 |
界面支持 | 是(通过 | 是(通过 | 否(仅限 API) |
适用场景 | 开发/测试 | 可变流量、费用控制 | 生产智能体 |
其他部署选项:Google Kubernetes Engine (GKE) 适用于需要 Kubernetes 级控制、自定义网络或多服务编排的高级用户。本 Codelab 未涵盖 GKE 部署,但 ADK 部署指南中对此进行了说明。
部署的内容
部署到 Cloud Run 或 Agent Engine 时,系统会打包并部署以下内容:
- 您的智能体代码(
agent.py,所有子智能体、工具) - 依赖项 (
requirements.txt) - ADK API 服务器(自动包含)
- Web 界面(仅限 Cloud Run,当指定了
--with_ui时)
重要区别:
- Cloud Run:使用
adk deploy cloud_runCLI(自动构建容器)或gcloud run deploy(需要自定义 Dockerfile) - 代理引擎:使用
adk deploy agent_engineCLI(无需构建容器,直接打包 Python 代码)
第 1 步:配置环境
配置 .env 文件
您在模块 3 中创建的 .env 文件需要更新才能进行云部署。打开 .env,然后验证/更新以下设置:
所有云部署都需要:
# Your actual GCP Project ID (REQUIRED)
GOOGLE_CLOUD_PROJECT=your-project-id

# GCP region for deployments (REQUIRED)
GOOGLE_CLOUD_LOCATION=us-central1

# Use Vertex AI (REQUIRED)
GOOGLE_GENAI_USE_VERTEXAI=true

# Model configuration (already set)
WORKER_MODEL=gemini-2.5-flash
CRITIC_MODEL=gemini-2.5-pro
设置存储分区名称(运行 deploy.sh 之前必须执行此操作):
部署脚本会根据这些名称创建存储分区。立即设置:
# Staging bucket for Agent Engine code uploads (REQUIRED for agent-engine)
STAGING_BUCKET=gs://your-project-id-staging

# Artifact storage for reports and fixed code (REQUIRED for both cloud-run and agent-engine)
ARTIFACT_BUCKET=gs://your-project-id-artifacts
将两个存储分区名称中的 your-project-id 替换为您的实际项目 ID。如果这些存储分区不存在,脚本将创建它们。
可选变量(如果留空,系统会自动创建):
# Agent Engine ID (populated after first deployment)
AGENT_ENGINE_ID=

# Cloud Run Database credentials (created automatically if blank)
CLOUD_SQL_INSTANCE_NAME=
DB_USER=
DB_PASSWORD=
DB_NAME=
身份验证检查
如果您在部署期间遇到身份验证错误,请执行以下操作:
gcloud auth application-default login
gcloud config set project $GOOGLE_CLOUD_PROJECT
第 2 步:了解部署脚本
deploy.sh 脚本为所有部署模式提供了一个统一的界面:
./deploy.sh {local|cloud-run|agent-engine}
脚本功能
基础架构配置:
- 启用 API(AI Platform、Storage、Cloud Build、Cloud Trace、Cloud SQL)
- IAM 权限配置(服务账号、角色)
- 资源创建(存储分区、数据库、实例)
- 使用适当标志的部署
- 部署后验证
关键脚本部分
- 配置(第 1-35 行):项目、区域、服务名称、默认值
- 辅助函数(第 37-200 行):API 启用、存储分区创建、IAM 设置
- 主要逻辑(第 202-400 行):特定于模式的部署编排
第 3 步:为 Agent Engine 准备代理
在部署到 Agent Engine 之前,您需要一个 agent_engine_app.py 文件,用于封装代理以供受管理的运行时使用。我们已为您创建了此文件。
查看code_review_assistant/agent_engine_app.py
👉 打开文件:
"""
Agent Engine application wrapper.
This file prepares the agent for deployment to Vertex AI Agent Engine.
"""

from vertexai import agent_engines
from .agent import root_agent

# Wrap the agent in an AdkApp object for Agent Engine deployment
app = agent_engines.AdkApp(
    agent=root_agent,
    enable_tracing=True,
)
第 4 步:部署到 Agent Engine
Agent Engine 是 ADK 智能体的推荐生产部署,因为它提供:
- 全代管式基础架构(无需构建容器)
- 通过
VertexAiSessionService实现的内置会话持久性 - 从零开始自动扩缩
- 默认启用 Cloud Trace 集成
Agent Engine 与其他部署方式的不同之处
在底层,
deploy.sh agent-engine
用途:
adk deploy agent_engine \
  --project=$GOOGLE_CLOUD_PROJECT \
  --region=$GOOGLE_CLOUD_LOCATION \
  --staging_bucket=$STAGING_BUCKET \
  --display_name="Code Review Assistant" \
  --trace_to_cloud \
  code_review_assistant
此命令会执行以下操作:
- 直接打包 Python 代码(无需 Docker 构建)
- 上传到您在
.env中指定的暂存存储分区 - 创建受管理的 Agent Engine 实例
- 启用 Cloud Trace 以实现可观测性
- 使用
agent_engine_app.py配置运行时
与将代码容器化的 Cloud Run 不同,Agent Engine 会在受管理的运行时环境中直接运行 Python 代码,这与无服务器函数类似。
运行部署
从项目根目录:
./deploy.sh agent-engine
部署阶段
观看脚本执行以下阶段:
Phase 1: API Enablement
  ✓ aiplatform.googleapis.com
  ✓ storage-api.googleapis.com
  ✓ cloudbuild.googleapis.com
  ✓ cloudtrace.googleapis.com

Phase 2: IAM Setup
  ✓ Getting project number
  ✓ Granting Storage Object Admin
  ✓ Granting AI Platform User
  ✓ Granting Cloud Trace Agent

Phase 3: Staging Bucket
  ✓ Creating gs://your-project-id-staging
  ✓ Setting permissions

Phase 4: Artifact Bucket
  ✓ Creating gs://your-project-id-artifacts
  ✓ Configuring access

Phase 5: Validation
  ✓ Checking agent.py exists
  ✓ Verifying root_agent defined
  ✓ Checking agent_engine_app.py exists
  ✓ Validating requirements.txt

Phase 6: Build & Deploy
  ✓ Packaging agent code
  ✓ Uploading to staging bucket
  ✓ Creating Agent Engine instance
  ✓ Configuring session persistence
  ✓ Setting up Cloud Trace integration
  ✓ Running health checks
此过程需要 5-10 分钟,因为系统会将代理打包并将其部署到 Vertex AI 基础架构。
保存您的 Agent Engine ID
成功部署后:
✅ Deployment successful!
   Agent Engine ID: 7917477678498709504
   Resource Name: projects/123456789/locations/us-central1/reasoningEngines/7917477678498709504
   Endpoint: https://us-central1-aiplatform.googleapis.com/v1/...

⚠️  IMPORTANT: Save this in your .env file:
   AGENT_ENGINE_ID=7917477678498709504
更新
.env
文件:
echo "AGENT_ENGINE_ID=7917477678498709504" >> .env
此 ID 是以下情况的必需信息:
- 测试已部署的智能体
- 稍后更新部署
- 访问日志和轨迹
部署的内容
您的 Agent Engine 部署现在包含:
✅ 完整的审核流水线(4 个代理)
✅ 完整的修复流水线(循环 + 合成器)
✅ 所有工具(AST 分析、样式检查、制品生成)
✅ 会话持久性(通过 VertexAiSessionService 自动实现)
✅ 状态管理(会话/用户/生命周期层级)
✅ 可观测性(已启用 Cloud Trace)
✅ 自动扩缩基础架构
第 5 步:测试已部署的智能体
更新 .env 文件
部署后,请验证您的 .env 是否包含以下内容:
AGENT_ENGINE_ID=7917477678498709504  # From deployment output
GOOGLE_CLOUD_PROJECT=your-project-id
GOOGLE_CLOUD_LOCATION=us-central1
运行测试脚本
该项目包含 tests/test_agent_engine.py,专门用于测试 Agent Engine 部署:
python tests/test_agent_engine.py
测试内容
- 通过您的 Google Cloud 项目进行身份验证
- 创建与已部署代理的会话
- 发送代码审核请求(DFS bug 示例)
- 通过服务器发送的事件 (SSE) 流式传输响应
- 验证会话持久性和状态管理
预期输出
Authenticated with project: your-project-id
Targeting Agent Engine: projects/.../reasoningEngines/7917477678498709504

Creating new session...
Created session: 4857885913439920384

Sending query to agent and streaming response:
data: {"content": {"parts": [{"text": "I'll analyze your code..."}]}}
data: {"content": {"parts": [{"text": "**Code Structure Analysis**\n..."}]}}
data: {"content": {"parts": [{"text": "**Style Check Results**\n..."}]}}
data: {"content": {"parts": [{"text": "**Test Results**\n..."}]}}
data: {"content": {"parts": [{"text": "**Final Feedback**\n..."}]}}

Stream finished.
验证清单
- ✅ 执行完整的审核流水线(所有 4 个代理)
- ✅ 流式响应显示渐进式输出
- ✅ 会话状态在不同请求之间保持不变
- ✅ 无身份验证或连接错误
- ✅ 工具调用成功执行(AST 分析、样式检查)
- ✅ 工件已保存(可访问评分报告)
替代方案:部署到 Cloud Run
虽然建议使用 Agent Engine 来简化生产部署,但 Cloud Run 可提供更多控制选项,并支持 ADK Web 界面。本部分提供了概览。
何时使用 Cloud Run
如果您需要以下功能,请选择 Cloud Run:
- 用于用户互动的 ADK 网页界面
- 完全控制容器环境
- 自定义数据库配置
- 与现有 Cloud Run 服务集成
Cloud Run 部署的工作原理
在底层,
deploy.sh cloud-run
用途:
adk deploy cloud_run \
  --project=$GOOGLE_CLOUD_PROJECT \
  --region=$GOOGLE_CLOUD_LOCATION \
  --service_name="code-review-assistant" \
  --app_name="code_review_assistant" \
  --port=8080 \
  --with_ui \
  --artifact_service_uri="gs://$ARTIFACT_BUCKET" \
  --trace_to_cloud \
  code_review_assistant
此命令会执行以下操作:
- 使用代理代码构建 Docker 容器
- 推送到 Google Artifact Registry
- 部署为 Cloud Run 服务
- 包含 ADK Web 界面 (
--with_ui) - 配置 Cloud SQL 连接(由脚本在初始部署后添加)
与 Agent Engine 的主要区别:Cloud Run 会将您的代码容器化,并需要数据库来实现会话持久性,而 Agent Engine 会自动处理这两项任务。
Cloud Run 部署命令
./deploy.sh cloud-run
不同之处
基础架构:
- 容器化部署(Docker 由 ADK 自动构建)
- Cloud SQL (PostgreSQL) 实现会话持久性
- 由脚本自动创建的数据库或使用现有实例
会话管理:
- 使用
DatabaseSessionService而不是VertexAiSessionService - 需要在
.env中提供数据库凭据(或自动生成) - 状态会保留在 PostgreSQL 数据库中
界面支持:
- 通过
--with_ui标志(由脚本处理)提供的 Web 界面 - 访问时间:
https://code-review-assistant-xyz.a.run.app
您的成就
您的正式版部署包含:
✅ 通过 deploy.sh 脚本
实现自动预配 ✅ 托管式基础设施(代理引擎负责处理扩缩、持久性、监控)
✅ 在所有内存层级(会话/用户/生命周期)实现持久状态
✅ 安全凭据管理(自动生成和 IAM 设置)
✅ 可扩缩的架构(从零到数千个并发用户)
✅ 内置可观测性(已启用 Cloud Trace 集成)
✅ 生产级错误处理和恢复
掌握的关键概念
部署准备工作:
agent_engine_app.py:使用AdkApp为 Agent Engine 封装代理AdkApp会自动配置VertexAiSessionService以实现持久性- 已通过
enable_tracing=True启用跟踪
部署命令:
adk deploy agent_engine:打包 Python 代码,不打包容器adk deploy cloud_run:自动构建 Docker 容器gcloud run deploy:使用自定义 Dockerfile 的替代方案
部署选项:
- Agent Engine:全托管式,可快速投入生产
- Cloud Run:可实现更精细的控制,支持 Web 界面
- GKE:高级 Kubernetes 控制(请参阅 GKE 部署指南)
代管式服务:
- Agent Engine 会自动处理会话持久化
- Cloud Run 需要设置数据库(或自动创建数据库)
- 两者都支持通过 GCS 存储制品
会话管理:
- Agent Engine:
VertexAiSessionService(自动) - Cloud Run:
DatabaseSessionService(Cloud SQL) - 本地:
InMemorySessionService(临时)
您的代理已上线
您的代码审核助理现在是:
- 通过 HTTPS API 端点可访问
- Persistent,状态在重启后仍会保留
- 可伸缩,可自动应对团队规模的扩大
- 具有完整请求轨迹的可观测性
- 通过脚本化部署实现可维护性
后续还有哪些变化?在模块 8 中,您将学习如何使用 Cloud Trace 了解智能体的性能,找出审核和修复流水线中的瓶颈,并优化执行时间。
8. 生产环境可观测性
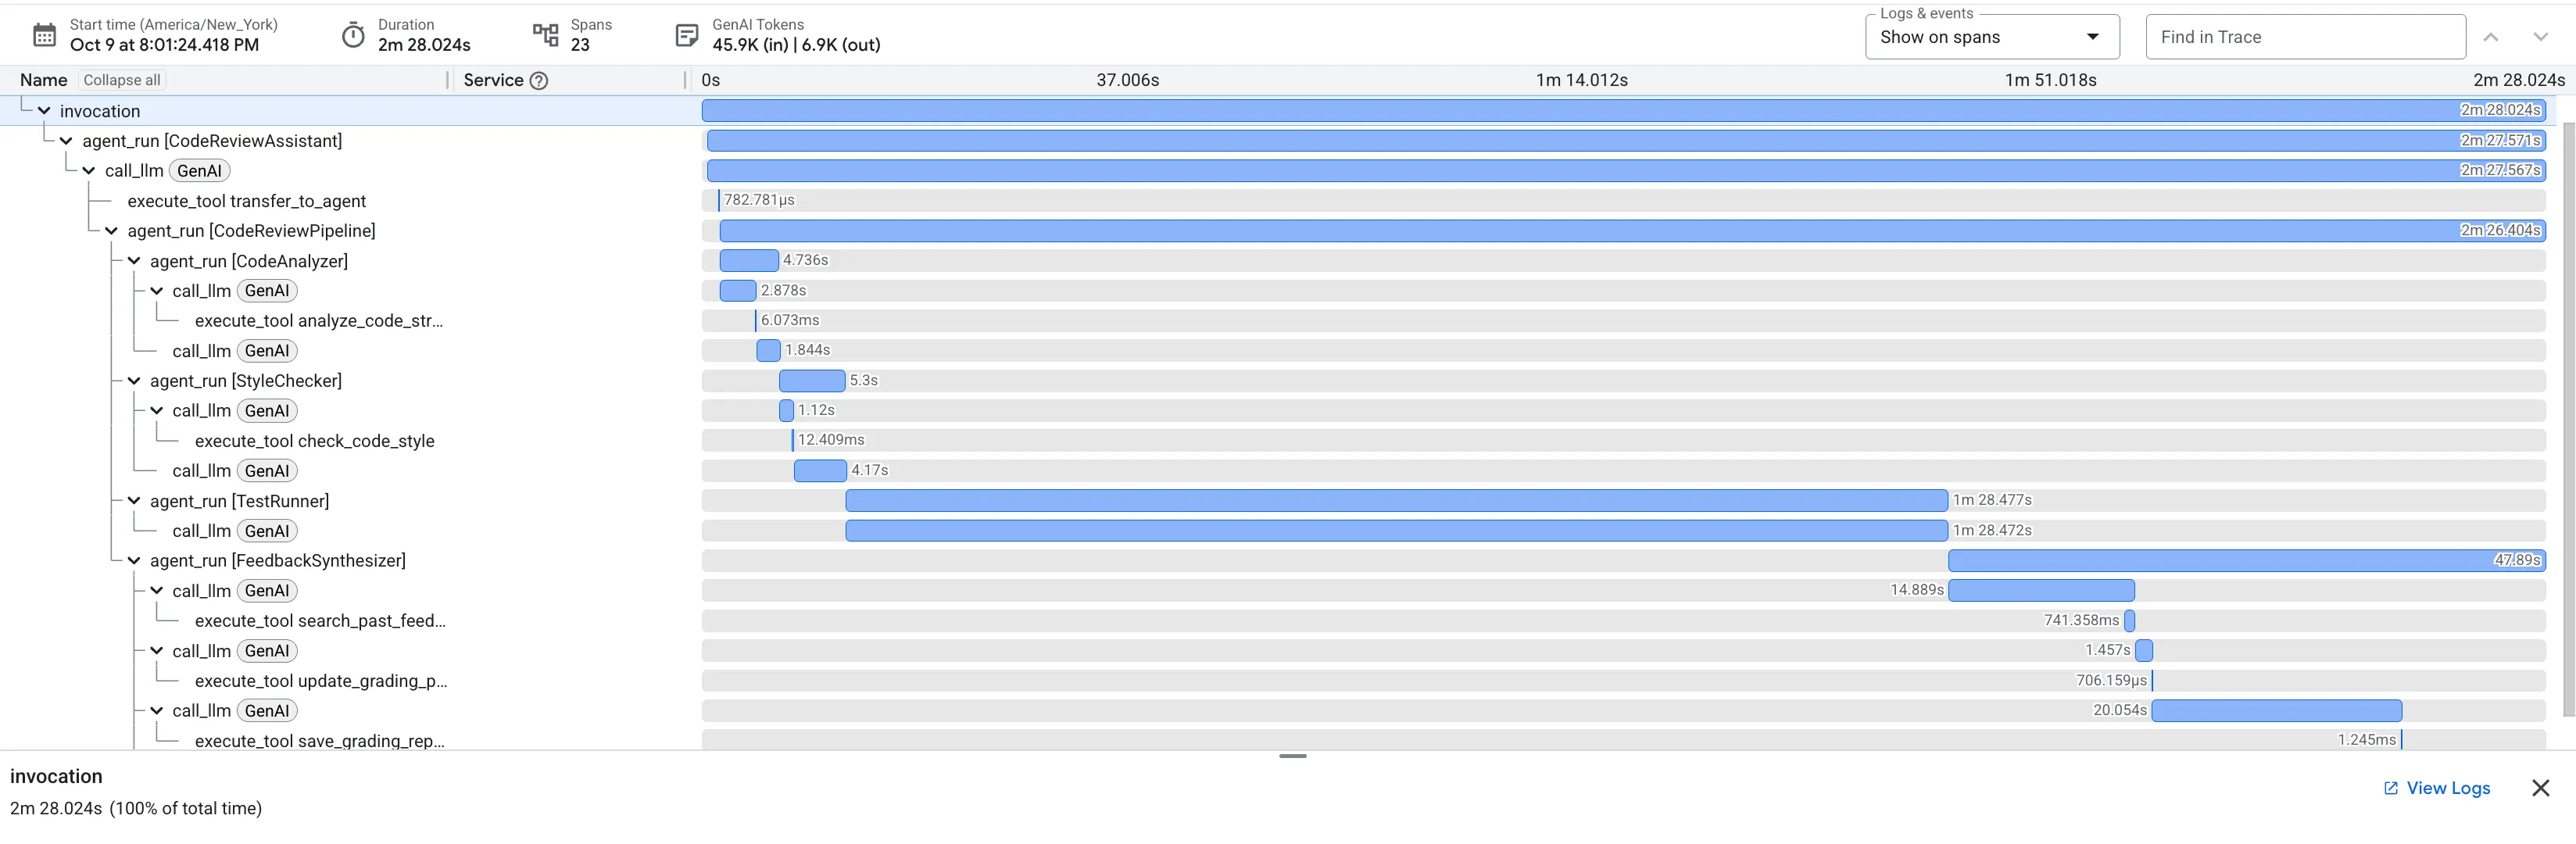
简介
您的代码审核助理现已部署完毕,并在 Agent Engine 上投入生产。但您如何判断它是否有效呢?您能否回答以下关键问题:
- 智能体是否能快速响应?
- 哪些操作最慢?
- 修复循环是否高效完成?
- 性能瓶颈在哪里?
如果没有可观测性,您将无法了解系统运行状况。您在部署期间使用的 --trace-to-cloud 标志会自动启用 Cloud Trace,让您能够全面了解智能体处理的每个请求。这可将调试从盲猜转变为法证分析。
在本模块中,您将学习如何读取轨迹、了解代理的性能特征,并根据确凿的证据确定需要优化的方面。
了解跟踪记录和 span
什么是轨迹?
轨迹是指智能体处理单个请求的完整时间轴。它会捕获从用户发送查询到最终回答交付的整个过程。每条轨迹都会显示:
- 请求的总时长
- 已执行的所有操作
- 操作之间的关联(父子关系)
- 每项操作的开始时间和结束时间
什么是 span?
span 表示轨迹中的单个工作单元。代码审核助理中的常见 span 类型:
agent_run:执行代理(根代理或分代理)call_llm:向语言模型发出的请求execute_tool:工具函数执行state_read/state_write:状态管理操作code_executor:运行包含测试的代码
span 具有以下属性:
- 名称:此操作所代表的含义
- 时长:所用时间
- 属性:模型名称、token 数量、输入/输出等元数据
- 状态:成功或失败
- 父级/子级关系:哪些操作触发了哪些操作
自动插桩
当您使用 --trace-to-cloud 进行部署时,ADK 会自动检测:
- 每次智能体调用和分代理调用
- 所有包含 token 数的 LLM 请求
- 具有输入/输出的工具执行
- 状态操作(读取/写入)
- 修复流水线中的循环迭代
- 错误情况和重试
无需更改任何代码 - 跟踪功能已内置到 ADK 的运行时中。
第 1 步:访问 Cloud Trace 探索器
在 Google Cloud 控制台中打开 Cloud Trace:
- 前往 Cloud Trace 探索器
- 从下拉菜单中选择您的项目(应已预先选择)
- 您应该会在模块 7 中看到测试的轨迹
如果您尚未看到轨迹:
您在第 7 模块中运行的测试应该已生成轨迹。如果列表为空,请生成一些轨迹数据:
python tests/test_agent_engine.py
等待 1-2 分钟,跟踪记录就会显示在控制台中。
您看到的内容
Trace 探索器显示:
- 轨迹列表:每一行代表一个完整的请求
- 时间轴:请求发生的时间
- 时长:每个请求所用的时间
- 请求详情:时间戳、延迟时间、跨度数
这是您的生产流量日志 - 每次与代理互动都会创建一条轨迹。
第 2 步:检查审核流水线轨迹
点击列表中的任何轨迹即可打开瀑布视图。
您将看到一个甘特图,其中显示了完整的执行时间轴。根 invocation span 表示整个请求。其下嵌套的是每个分代理、工具和 LLM 调用的 span。
解读瀑布图:识别瓶颈
每个条形都代表一个跨度。其水平位置显示了开始时间,而长度则显示了所用时间。这样可以立即显示代理花费的时间。
上述轨迹的关键数据洞见:
- 总延迟时间:整个请求耗时 2 分 28 秒。
- 子代理细分:
Code Analyzer:4.7 秒Style Checker:5.3 秒Test Runner:1 分 28 秒Feedback Synthesizer:47.9 秒
- 关键路径分析:
Test Runner代理是明显的性能瓶颈,约占总请求时间的 59% 。
这种可见性非常强大。您无需猜测时间花费在哪里,而是有确凿的证据表明,如果您需要优化延迟时间,Test Runner 是显而易见的目标。
检查 token 用量以优化费用
Cloud Trace 不仅显示时间,还会捕获每次 LLM 调用的令牌使用情况,从而显示费用。
点击
call_llm
轨迹中的 span。在详情窗格中,您会看到 llm.usage.prompt_tokens 和 llm.usage.completion_tokens 的属性。
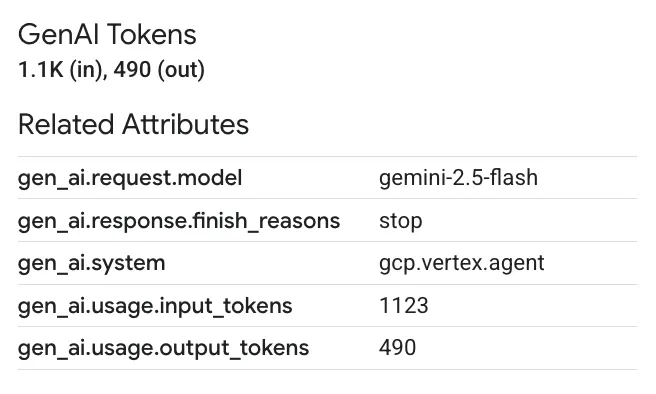
这可让您执行以下操作:
- 精细化跟踪费用:准确了解每个智能体和工具消耗的 token 数量。
- 找出优化机会:如果代理使用的令牌数量出人意料地多,则可能需要优化其提示,或者针对该特定任务改用更小、更经济高效的模型。
第 3 步:分析修复流水线轨迹
修复流水线更复杂,因为它包含 LoopAgent。Cloud Trace 可帮助您轻松了解这种迭代行为。
查找 span 名称中包含“FixAttemptLoop”的轨迹。
如果您没有测试脚本,请运行测试脚本,并在系统询问您是否要修复代码时回答“是”。
检查循环结构
轨迹视图清晰地直观呈现了循环的执行情况。如果修复循环在成功之前运行了两次,您会看到两个嵌套在 FixAttemptLoop span 下的 loop_iteration span,每个 span 都包含 CodeFixer、FixTestRunner 和 FixValidator 代理的完整周期。

从 Loop 轨迹中获得的关键观测结果:
- 迭代细化是可见的:您可以在
loop_iteration: 1中看到系统尝试修复,验证它,然后由于它并不完美,因此在loop_iteration: 2中再次尝试。 - 收敛是可衡量的:您可以比较每次迭代的时长和结果,了解系统如何收敛到正确解。
- 调试更简单:如果循环运行到最大迭代次数后仍然失败,您可以检查每次迭代范围内的状态和代理行为,诊断修复未收敛的原因。
这种详细程度对于了解和调试生产环境中复杂的有状态循环的行为非常有用。
第 4 步:您发现的信息
效果模式
通过检查轨迹,您现在可以获得数据驱动型数据分析:
审核流水线:
- 主要瓶颈:
Test Runner智能体(尤其是其代码执行和基于 LLM 的测试生成)是审核中最耗时的部分。 - 快速操作:确定性工具 (
analyze_code_structure) 和状态管理操作非常快速,不会造成性能问题。
修复流水线:
- 收敛率:您可以看到,大多数修复在 1-2 次迭代中完成,这证实了循环架构的有效性。
- 累进费用:随着 LLM 上下文因之前失败的尝试而包含更多信息,后续迭代可能需要更长时间。
费用驱动因素:
- token 消耗量:您可以准确找出哪些代理(例如合成器)需要最多的 token,并决定使用更强大但更昂贵的模型是否合理。
在何处查找问题
在生产环境中查看轨迹时,请注意以下事项:
- 轨迹过长:表明存在性能回归或意外的循环行为。
- 失败的 span(标记为红色):准确指出失败的操作。
- 过多的循环迭代次数 (>2):可能表示修复生成逻辑存在问题。
- 高 token 数:突出显示了提示优化或模型选择更改的机会。
您学到的内容
通过 Cloud Trace,您现在可以了解如何:
✅ 直观呈现请求流:查看通过顺序管道和基于循环的管道的完整执行路径。
✅ 找出性能瓶颈:使用瀑布图通过硬数据找出最慢的操作。
✅ 分析循环行为:观察迭代智能体如何在多次尝试后收敛到解决方案。
✅ 跟踪令牌费用:检查 LLM span,以精细地监控和优化令牌消耗。
掌握的关键概念
- 轨迹和 span:可观测性的基本单位,表示请求及其内部的操作。
- 瀑布分析:读取甘特图以了解执行时间和依赖项。
- 关键路径识别:查找决定总体延迟时间的操作序列。
- 精细的可观测性:不仅可以了解时间,还可以了解每次操作的令牌数量等元数据,这些数据由 ADK 自动检测。
后续步骤
继续探索 Cloud Trace:
- 定期监控轨迹,以便及早发现问题
- 比较轨迹以识别性能回归
- 使用轨迹数据来指导优化决策
- 按时长过滤以查找缓慢的请求
高级可观测性(可选):
- 将轨迹导出到 BigQuery 以进行复杂分析(文档)
- 在 Cloud Monitoring 中创建自定义信息中心
- 针对性能下降设置提醒
- 将跟踪记录与应用日志相关联
9. 总结:从原型设计到投入生产
您构建的内容
您从仅七行代码开始,构建了一个生产环境级 AI 智能体系统:
# Where we started (7 lines)
agent = Agent(
    model="gemini-2.5-flash",
    instruction="Review Python code for issues"
)

# Where we ended (production system)
- Two distinct multi-agent pipelines (review and fix) built from 8 specialized agents.
- An iterative fix loop architecture for automated validation and retries.
- Real AST-based code analysis tools for deterministic, accurate feedback.
- Robust state management using the "constants pattern" for type-safe communication.
- Fully automated deployment to a managed, scalable cloud infrastructure.
- Complete, built-in observability with Cloud Trace for production monitoring.
掌握的关键架构模式
模式 | 实现 | 生产环境影响 |
工具集成 | AST 分析、样式检查 | 真实有效的验证,而不仅仅是大语言模型的意见 |
顺序流水线 | 检查 → 修复工作流 | 可预测、可调试的执行 |
循环架构 | 通过退出条件进行迭代修复 | 不断改进,直至成功 |
状态管理 | 常量模式,三层内存 | 类型安全、可维护的状态处理 |
生产部署 | 通过 deploy.sh 部署的 Agent Engine | 可扩缩的托管式基础架构 |
可观测性 | Cloud Trace 集成 | 全面了解生产行为 |
从轨迹中获取生产环境洞见
Cloud Trace 数据揭示了关键洞见:
✅ 瓶颈已确定:TestRunner 的 LLM 调用占用了大部分延迟时间
✅ 工具性能:AST 分析在 100 毫秒内执行完毕(非常出色)
✅ 成功率:修复循环在 2-3 次迭代内收敛
✅ 令牌使用情况:每次审核约 600 个令牌,每次修复约 1800 个令牌
这些数据洞见有助于持续改进。
清理资源(可选)
如果您已完成实验,并希望避免产生费用,请执行以下操作:
删除 Agent Engine 部署:
import vertexai

client = vertexai.Client(  # For service interactions via client.agent_engines
    project="PROJECT_ID",
    location="LOCATION",
)

RESOURCE_NAME = "projects/{PROJECT_ID}/locations/{LOCATION}/reasoningEngines/{RESOURCE_ID}"

client.agent_engines.delete(
    name=RESOURCE_NAME,
    force=True, # Optional, if the agent has resources (e.g. sessions, memory)
)
删除 Cloud Run 服务(如果已创建):
gcloud run services delete code-review-assistant \
    --region=$GOOGLE_CLOUD_LOCATION \
    --quiet
删除 Cloud SQL 实例(如果已创建):
gcloud sql instances delete your-project-db \
    --quiet
清理存储分区:
gsutil -m rm -r gs://your-project-staging
gsutil -m rm -r gs://your-project-artifacts
后续步骤
完成基础设置后,请考虑进行以下增强:
- 添加更多语言:扩展工具以支持 JavaScript、Go、Java
- 与 GitHub 集成:自动执行 PR 审核
- 实现缓存:缩短常见模式的延迟时间
- 添加专业代理:安全扫描、性能分析
- 启用 A/B 测试:比较不同的模型和提示
- 导出指标:将轨迹发送到专门的可观测性平台
重点小结
- 从简单开始,快速迭代:通过可管理的步骤实现七行代码的生产
- 工具胜过提示:真实的 AST 分析胜过“请检查是否存在 bug”
- 状态管理很重要:常量模式可防止出现拼写错误 bug
- 循环需要退出条件:始终设置最大迭代次数和升级
- 通过自动化进行部署:deploy.sh 可处理所有复杂性
- 可观测性至关重要:无法衡量也就意味着无从改进
可供持续学习的资源
您的旅程仍在继续
您不仅构建了一个代码审核助理,还掌握了构建任何生产级 AI 智能体的模式:
✅ 包含多个专用智能体的复杂工作流
✅ 真正的工具集成,可实现实际功能
✅ 适当的可观测性,可实现生产部署
✅ 状态管理,可实现可维护的系统
这些模式的规模从简单的助理到复杂的自主系统不等。您在此处奠定的基础将有助于您应对日益复杂的智能体架构。
欢迎学习生产 AI 智能体开发。代码审核助理只是一个开始。