
১. স্বাগতম, এআই এজেন্ট ডেভেলপারগণ!
এই কোডল্যাবে, আপনি জাভার জন্য এজেন্টস ডেভেলপমেন্ট কিট (ADK) ব্যবহার করে জাভাতে এআই এজেন্ট তৈরি করতে শিখবেন। আমরা সাধারণ লার্জ ল্যাঙ্গুয়েজ মডেল (LLM) এপিআই কলের বাইরে গিয়ে এমন স্বায়ত্তশাসিত এআই এজেন্ট তৈরি করব, যারা যুক্তি দিয়ে ভাবতে, পরিকল্পনা করতে, সরঞ্জাম ব্যবহার করতে এবং জটিল সমস্যা সমাধানের জন্য একসাথে কাজ করতে পারবে।
আপনি প্রথমে গুগল ক্লাউড ক্রেডিট রিডিম করে, আপনার গুগল ক্লাউড এনভায়রনমেন্ট সেট আপ করে, তারপর আপনার প্রথম সাধারণ এজেন্ট তৈরি করে এবং পর্যায়ক্রমে কাস্টম টুল, ওয়েব সার্চ ও মাল্টি-এজেন্ট অর্কেস্ট্রেশনের মতো আরও উন্নত সক্ষমতা যোগ করার মাধ্যমে শুরু করবেন।

আপনি যা শিখবেন
- কীভাবে একটি মৌলিক, পার্সোনা-চালিত এআই এজেন্ট তৈরি করবেন।
- কাস্টম এবং বিল্ট-ইন টুল (যেমন গুগল সার্চ) ব্যবহার করে এজেন্টদের কীভাবে আরও শক্তিশালী করা যায়।
- জাভাতে কীভাবে আপনার নিজস্ব টুলস যুক্ত করবেন
- একাধিক এজেন্টকে কীভাবে শক্তিশালী অনুক্রমিক, সমান্তরাল এবং চক্রাকার কর্মপ্রবাহে সমন্বয় করা যায়।
আপনার যা যা লাগবে
- একটি ওয়েব ব্রাউজার যা আমরা ইনকগনিটো মোডে ব্যবহার করব।
- একটি ব্যক্তিগত জিমেইল অ্যাকাউন্ট।
- আপনার ব্যক্তিগত জিমেইল অ্যাকাউন্টের সাথে যুক্ত একটি নতুন গুগল ক্লাউড প্রজেক্ট।
- রিডিম করা গুগল ক্লাউড ক্রেডিট দিয়ে একটি বিলিং অ্যাকাউন্ট তৈরি করা হয়েছে।
- সোর্স কোড চেক আউট করার জন্য গিট কমান্ড-লাইন টুল।
- জাভা ১৭+ এবং অ্যাপাচি মেভেন।
- একটি টেক্সট এডিটর বা আইডিই, যেমন ইন্টেলিজ আইডিয়া বা ভিএস কোড।
আপনি গুগল ক্লাউড কনসোলে থাকা ক্লাউড শেল-এর বিল্ট-ইন কোড এডিটরটি ব্যবহার করতে পারেন।
২. প্রস্তুতি: আপনার পরিবেশ
কর্মশালার জন্য গুগল ক্লাউড ক্রেডিট দাবি করা

প্রশিক্ষক-পরিচালিত কর্মশালার জন্য, আপনি ওয়েবসাইটের একটি লিঙ্ক পেয়েছেন, যেখান থেকে আপনি কর্মশালায় ব্যবহারের জন্য গুগল ক্লাউড ক্রেডিট দাবি করতে পারবেন।
- ব্যক্তিগত গুগল অ্যাকাউন্ট ব্যবহার করুন : ব্যক্তিগত গুগল অ্যাকাউন্ট (যেমন gmail.com অ্যাড্রেস) ব্যবহার করা জরুরি, কারণ কর্পোরেট বা স্কুলের ইমেল অ্যাড্রেস কাজ করবে না ।
- গুগল ক্রোম ইনকগনিটো মোডে ব্যবহার করুন : একটি পরিষ্কার সেশন তৈরি করতে এবং অন্যান্য গুগল অ্যাকাউন্টের সাথে দ্বন্দ্ব এড়াতে এটি সুপারিশ করা হয়।
- বিশেষ ইভেন্ট লিঙ্কটি ব্যবহার করুন : ইভেন্টের জন্য একটি বিশেষ লিঙ্ক ব্যবহার করতে হবে, যা দেখতে অনেকটা https://trygcp.dev/event/xxx- এর মতো এবং এর পরে একটি ইভেন্ট কোড (এই উদাহরণে "xxx") থাকবে।
- পরিষেবার শর্তাবলী গ্রহণ করুন : সাইন ইন করার পর, আপনাকে গুগল ক্লাউড প্ল্যাটফর্মের পরিষেবার শর্তাবলী দেখানো হবে, যা আপনাকে চালিয়ে যাওয়ার জন্য গ্রহণ করতে হবে।
- নতুন প্রজেক্ট তৈরি করুন : গুগল ক্লাউড কনসোল থেকে একটি নতুন খালি প্রজেক্ট তৈরি করতে হবে।
- বিলিং অ্যাকাউন্ট লিঙ্ক করুন : নতুন তৈরি করা প্রজেক্টটিকে একটি বিলিং অ্যাকাউন্টের সাথে লিঙ্ক করুন।
- ক্রেডিট নিশ্চিত করুন : নিচের ভিডিওটিতে দেখানো হয়েছে, বিলিং পেজের 'ক্রেডিট' সেকশনটি চেক করে কীভাবে প্রজেক্টে ক্রেডিটটি প্রয়োগ করা হয়েছে তা নিশ্চিত করতে হয়।
কীভাবে ক্রেডিটগুলো রিডিম ও প্রয়োগ করতে হয়, তা জানতে এই ভিডিওটি দেখে নিতে পারেন।
ভার্টেক্স এআই এপিআই সক্রিয় করুন
প্রথমে, Vertex AI API সক্রিয় করুন। আপনি Google Cloud Console-এ Vertex AI API অনুসন্ধান করে এবং সেখান থেকে API-টি সক্রিয় করে এটি করতে পারেন। এছাড়াও, আপনি Cloud Shell থেকে নিম্নলিখিত কমান্ডটি চালিয়ে এটি করতে পারেন:
gcloud services enable aiplatform.googleapis.com
ভার্টেক্স এআই দিয়ে ADK কনফিগার করুন
এই কোডল্যাবের জন্য Vertex AI-তে Gemini-এর সাথে আপনার ADK AI এজেন্টদের প্রমাণীকরণ করতে, নিম্নলিখিত এনভায়রনমেন্ট ভেরিয়েবলগুলো সেট করুন। আপনার অনন্য প্রজেক্ট আইডি ব্যবহার করা নিশ্চিত করুন।
ম্যাকওএস / লিনাক্স: আপনার টার্মিনাল খুলুন এবং নিম্নলিখিত কমান্ডটি চালান। এটিকে স্থায়ী করতে, এই লাইনটি আপনার শেলের স্টার্টআপ ফাইলে (যেমন, ~/.bash_profile , ~/.zshrc ) যোগ করুন।
export GOOGLE_GENAI_USE_VERTEXAI=true
export GOOGLE_CLOUD_PROJECT=your-project-id
উইন্ডোজ (কমান্ড প্রম্পট): একটি নতুন কমান্ড প্রম্পট খুলুন এবং চালান:
set GOOGLE_GENAI_USE_VERTEXAI=true
set GOOGLE_CLOUD_PROJECT=your-project-id
এই পরিবর্তনটি কার্যকর করার জন্য আপনাকে আপনার কমান্ড প্রম্পট পুনরায় চালু করতে হবে।
উইন্ডোজ (পাওয়ারশেল): একটি পাওয়ারশেল টার্মিনাল খুলুন এবং চালান:
$env:GOOGLE_GENAI_USE_VERTEXAI = "true"
$env:GOOGLE_CLOUD_PROJECT = "your-project-id"
পাওয়ারশেলে এই পরিবর্তনটি স্থায়ী করতে, আপনাকে এটি আপনার প্রোফাইল স্ক্রিপ্টে যোগ করতে হবে।
৩. শুরু করা যাক: আপনার প্রথম এজেন্ট
নতুন প্রজেক্ট শুরু করার সেরা উপায় হলো ADK for Java GitHub টেমপ্লেটটি ব্যবহার করা। এটি প্রজেক্টের কাঠামো এবং সমস্ত প্রয়োজনীয় ডিপেন্ডেন্সি সরবরাহ করে।
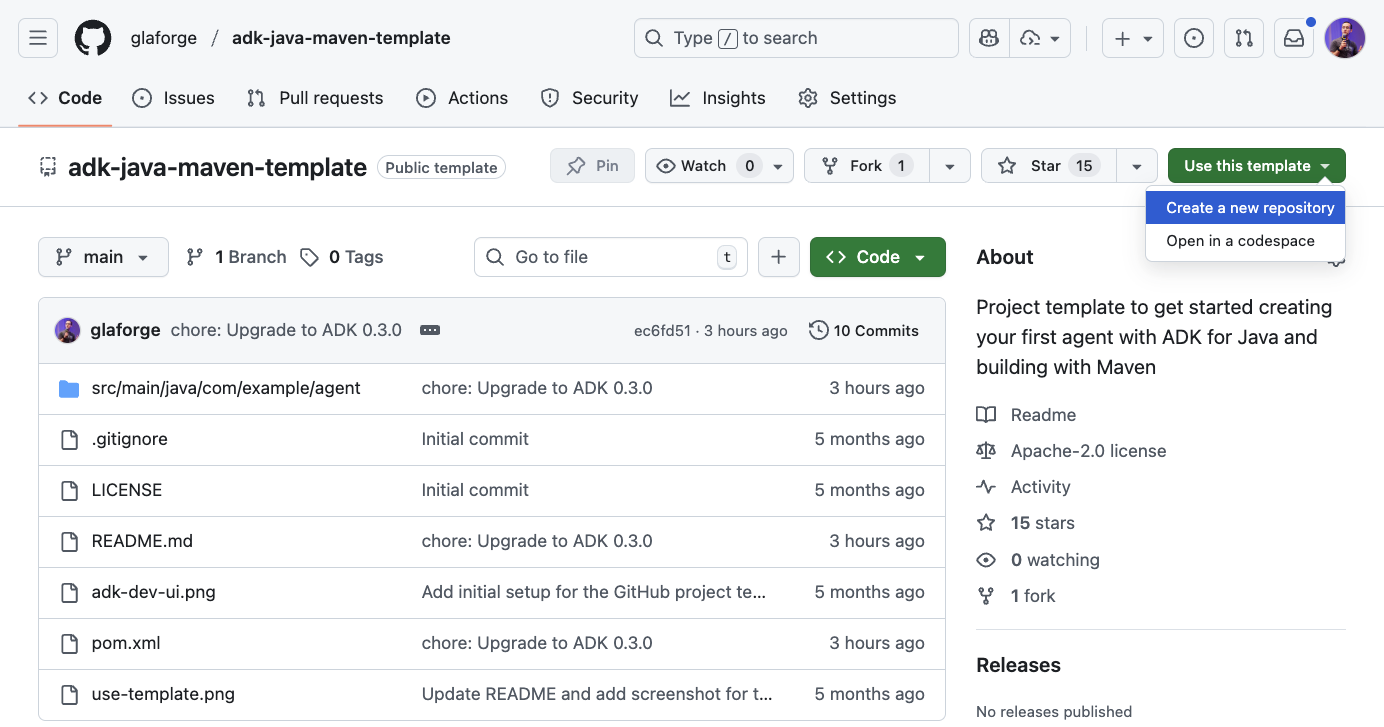
আপনার যদি একটি গিটহাব অ্যাকাউন্ট থাকে, তাহলে আপনি নিম্নলিখিত কাজগুলো করতে পারেন: Use this template > Create a new repository , তারপর git clone কমান্ড দিয়ে কোডটি আপনার কম্পিউটারে চেকআউট করুন।
এখানে একটি স্ক্রিনশট দেওয়া হলো, যেখানে টেমপ্লেটটি ব্যবহারের জন্য উপরের ডানদিকের মেনুটি দেখানো হয়েছে।
অন্য পদ্ধতিটি হলো সরাসরি সেই রিপোজিটরিটি ক্লোন করা:
git clone https://github.com/glaforge/adk-java-maven-template.git
জাভাতে আপনার প্রথম এআই এজেন্ট কোডিং শুরু করার জন্য আপনি প্রস্তুত কিনা তা পরীক্ষা করতে, নিশ্চিত করুন যে আপনি এই প্রজেক্টের কোডটি নিম্নলিখিত কমান্ড দিয়ে কম্পাইল করতে পারেন:
cd adk-java-maven-template
mvn compile
কোড স্টেপ: একজন বন্ধুত্বপূর্ণ বিজ্ঞান শিক্ষক এজেন্ট
ADK-এর মূল ভিত্তি হলো LlmAgent ক্লাস। এটিকে একটি নির্দিষ্ট ব্যক্তিত্ব ও লক্ষ্যসম্পন্ন এবং একটি বৃহৎ ভাষা মডেল দ্বারা চালিত কৃত্রিম বুদ্ধিমত্তা (AI) হিসেবে ভাবা যেতে পারে। আমরা পরবর্তীতে টুলসের মাধ্যমে এতে আরও সক্ষমতা যোগ করব এবং অন্যান্য অনুরূপ এজেন্টের সাথে হাতে হাত মিলিয়ে সহযোগিতার মাধ্যমে এটিকে আরও শক্তিশালী করে তুলব।
চলুন com.example.agent প্যাকেজের মধ্যে ScienceTeacher নামে একটি নতুন জাভা ক্লাস তৈরি করি।
এটি এজেন্ট তৈরির "হ্যালো, ওয়ার্ল্ড!"-এর মতো একটি ধাপ। আমরা একজন বিজ্ঞান শিক্ষকের ব্যক্তিত্বসম্পন্ন একটি সরল এজেন্টকে সংজ্ঞায়িত করছি।
// src/main/java/com/example/agent/ScienceTeacher.java
package com.example.agent;

import com.google.adk.agents.LlmAgent;
import com.google.adk.web.AdkWebServer;

public class ScienceTeacher {
    public static void main(String[] args) {
        AdkWebServer.start(
            LlmAgent.builder()
                .name("science-teacher")
                .description("A friendly science teacher")
                .instruction("""
                    You are a science teacher for teenagers.
                    You explain science concepts in a simple, concise and direct way.
                    """)
                .model("gemini-2.5-flash")
                .build()
        );
    }
}
LlmAgent.builder() মেথডের মাধ্যমে এআই এজেন্টটি কনফিগার করা হয়। name() , description() , এবং model() প্যারামিটারগুলো বাধ্যতামূলক, এবং আপনার এজেন্টকে একটি নির্দিষ্ট ব্যক্তিত্ব ও সঠিক আচরণ দেওয়ার জন্য, আপনার সর্বদা instruction() মেথডের মাধ্যমে বিস্তারিত নির্দেশনা দেওয়া উচিত।
এখানে আমরা জেমিনি ২.৫ ফ্ল্যাশ মডেলটি ব্যবহার করার সিদ্ধান্ত নিয়েছি, তবে আরও জটিল কাজের জন্য আপনারা জেমিনি ২.৫ প্রো-ও ব্যবহার করে দেখতে পারেন।
এই এজেন্টটি AdkWebServer.start() মেথডের মধ্যে র্যাপ করা আছে। এটি হলো তথাকথিত ADK Dev UI চ্যাট ইন্টারফেস। এটি আপনাকে একটি সাধারণ চ্যাট ইন্টারফেসের মাধ্যমে এজেন্টের সাথে কথোপকথন করার সুযোগ দেয়। এছাড়াও, সিস্টেমের মধ্য দিয়ে প্রবাহিত সমস্ত ইভেন্ট, LLM-এ পাঠানো অনুরোধ এবং প্রতিক্রিয়ার মতো অভ্যন্তরীণ কার্যকলাপ বুঝতে চাইলে এটি অত্যন্ত সহায়ক।
এই এজেন্টটি স্থানীয়ভাবে কম্পাইল ও রান করতে, নিম্নলিখিত কমান্ডটি চালান:
mvn compile exec:java -Dexec.mainClass=com.example.agent.ScienceTeacher
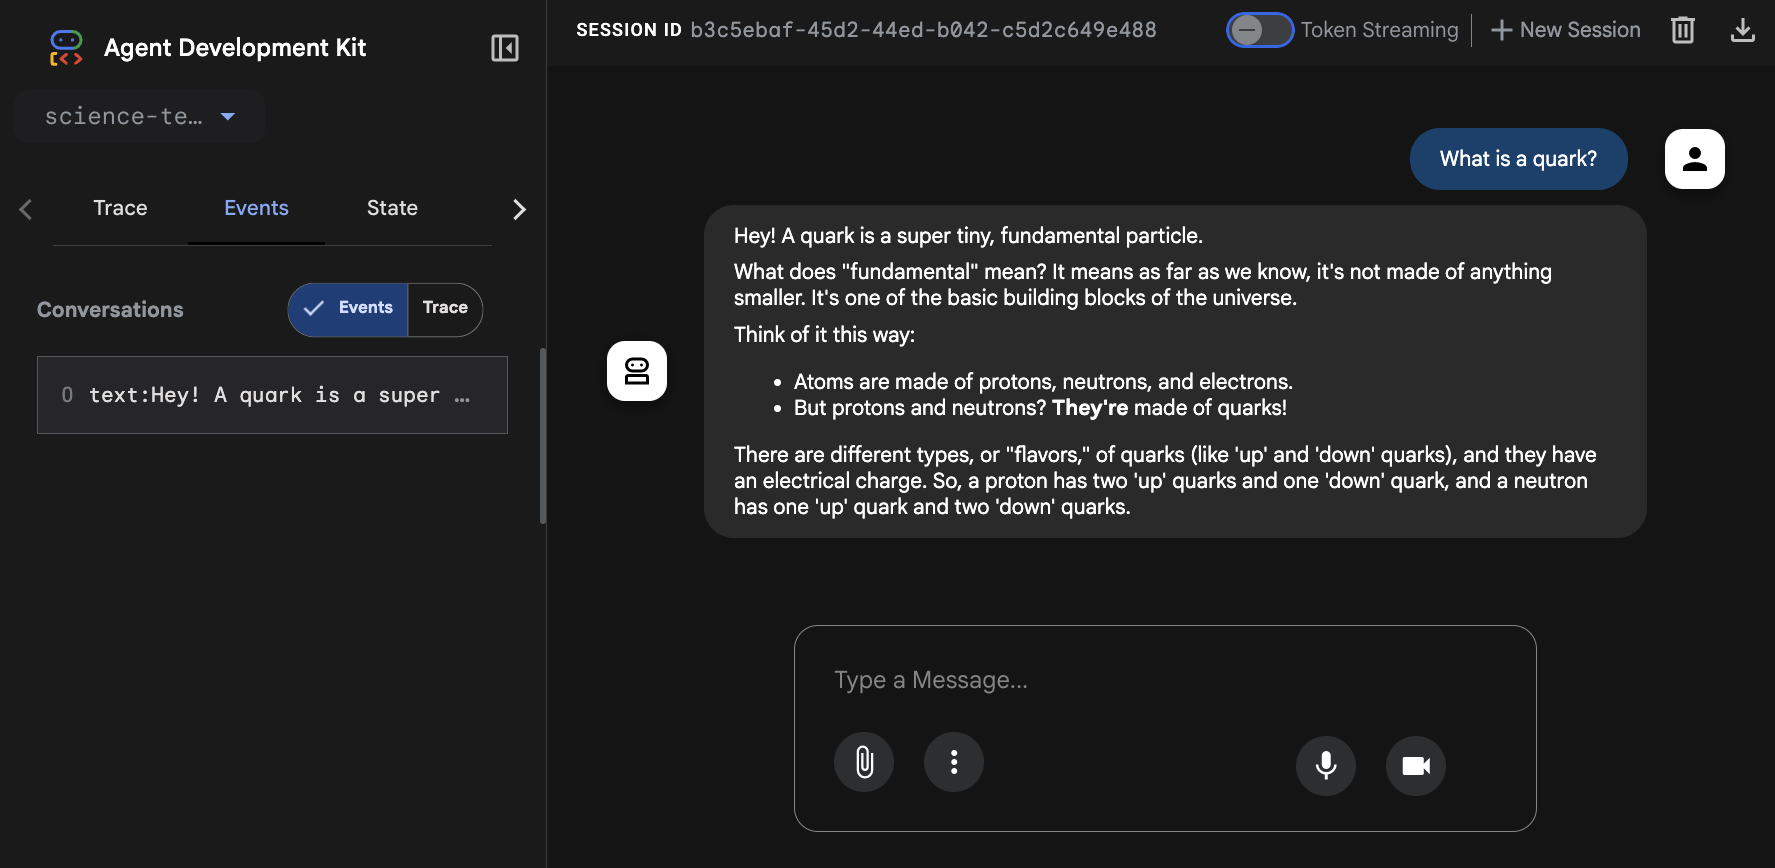
এরপর আপনার ব্রাউজারে http://localhost:8080- এ যান। আপনি যদি ক্লাউড শেলে থাকেন, তাহলে ওয়েব প্রিভিউতে গিয়ে পোর্ট ৮০৮০-তে প্রিভিউ নির্বাচন করতে পারেন।
নিচের স্ক্রিনশটে দেখানো UI-টি আপনি দেখতে পাবেন। এবার আপনার এজেন্টকে বিজ্ঞান-সম্পর্কিত প্রশ্ন করুন।
৪. এজেন্টদের সরঞ্জাম দিয়ে ক্ষমতায়ন

এজেন্টদের টুলের প্রয়োজন কেন? এলএলএম-রা শক্তিশালী, কিন্তু তাদের জ্ঞান সময়ের সাথে স্থির হয়ে থাকে এবং তারা বাইরের জগতের সাথে যোগাযোগ করতে পারে না। টুলগুলোই হলো সেই সেতু। এগুলো একজন এজেন্টকে রিয়েল-টাইম তথ্য (যেমন শেয়ারের দাম বা খবর) অ্যাক্সেস করতে, প্রাইভেট এপিআই কোয়েরি করতে, অথবা জাভাতে কোড করা যায় এমন যেকোনো কাজ সম্পাদন করতে সাহায্য করে।
কোড ধাপ: একটি কাস্টম টুল ( StockTicker ) তৈরি করা
এখানে, আমরা আমাদের এজেন্টকে শেয়ারের দাম খোঁজার জন্য একটি টুল দিই। এজেন্ট মনে করে যে, যখন কোনো ব্যবহারকারী দাম জানতে চাইবে, তখন এটি আমাদের জাভা মেথডটিকে কল করবে।
// src/main/java/com/example/agent/StockTicker.java
package com.example.agent;

import com.google.adk.agents.LlmAgent;
import com.google.adk.tools.Annotations.Schema;
import com.google.adk.tools.FunctionTool;
import com.google.adk.web.AdkWebServer;
import java.util.Map;

public class StockTicker {
    public static void main(String[] args) {
        AdkWebServer.start(
            LlmAgent.builder()
                .name("stock_agent")
                .instruction("""
                    You are a stock exchange ticker expert.
                    When asked about the stock price of a company,
                    use the `lookup_stock_ticker` tool to find the information.
                    """)
                .model("gemini-2.5-flash")
                .tools(FunctionTool.create(StockTicker.class, "lookupStockTicker"))
                .build()
        );
    }

    @Schema(
        name = "lookup_stock_ticker",
        description = "Lookup stock price for a given company or ticker"
    )
    public static Map<String, String> lookupStockTicker(
        @Schema(name = "company_name_or_stock_ticker", description = "The company name or stock ticker")
        String ticker) {
        // ... (logic to return a stock price)
    }
}
এজেন্টদের আরও স্মার্ট করতে এবং তাদেরকে বাইরের জগতের সাথে (কিংবা আপনার নিজের কোড, এপিআই, সার্ভিস ইত্যাদির সাথে) ইন্টারঅ্যাক্ট করার ক্ষমতা দিতে, আপনি tools() মেথডের মাধ্যমে এজেন্টকে টুলস, বিশেষ করে কাস্টম কোড টুলস ব্যবহার করার জন্য কনফিগার করতে পারেন এবং এর জন্য FunctionTool.create(...) পাস করতে হবে।
FunctionTool জন্য একটি ক্লাস এবং আপনার নিজের স্ট্যাটিক মেথডকে নির্দেশ করে এমন একটি মেথডের নাম প্রয়োজন — এছাড়াও, কোনো ক্লাসের ইনস্ট্যান্স এবং সেই অবজেক্টের একটি ইনস্ট্যান্স মেথডের নামও পাস করা সম্ভব।
@Schema অ্যানোটেশনের মাধ্যমে মেথড এবং এর প্যারামিটার উভয়ের name ও description উল্লেখ করা গুরুত্বপূর্ণ, কারণ অন্তর্নিহিত LLM কখন এবং কীভাবে একটি নির্দিষ্ট মেথডকে কল করবে তা নির্ধারণ করতে এই তথ্য ব্যবহার করবে।
একইভাবে গুরুত্বপূর্ণ হলো, টুলটি কীভাবে এবং কখন ব্যবহার করতে হবে সে সম্পর্কে LLM-কে স্পষ্ট নির্দেশনা দিয়ে সাহায্য করা। মডেলটি হয়তো নিজে থেকেই বিষয়টি বুঝে নিতে পারবে, কিন্তু আপনি যদি instruction() মেথডে সুস্পষ্ট ব্যাখ্যা দেন, তাহলে আপনার ফাংশনটি যথাযথভাবে কল হওয়ার সম্ভাবনা বেড়ে যায়।
এই মেথডটির একটি Map রিটার্ন করা উচিত। সাধারণত, এর মূল উদ্দেশ্য হলো এমন একটি ম্যাপ রিটার্ন করা যেখানে একটি Key থাকবে যা ফলাফলকে নির্দেশ করবে, যেমন stock_price , এবং এর সাথে স্টক প্রাইসের ভ্যালুটি যুক্ত করা হবে। প্রয়োজনে, অপারেশনটির সাফল্য বোঝাতে আপনি একটি অতিরিক্ত success / true কী-পেয়ার যোগ করতে পারেন। আর কোনো ত্রুটির ক্ষেত্রে, আপনার এমন একটি ম্যাপ রিটার্ন করা উচিত যেখানে একটি Key থাকবে, উদাহরণস্বরূপ, error , এবং এর সাথে যুক্ত ভ্যালুতে ত্রুটির বার্তাটি সংযুক্ত করা হবে। এটি LLM-কে বুঝতে সাহায্য করে যে কলটি কোনো কারণে সফল হয়েছে নাকি ব্যর্থ হয়েছে।
- সফল হলে, ফেরত দিন:
{"stock_price": 123} - ত্রুটি হলে, রিটার্ন করুন:
{"error": "Impossible to retrieve stock price for XYZ"}
তারপর নিম্নলিখিত কমান্ড দিয়ে এই ক্লাসটি চালান:
mvn compile exec:java -Dexec.mainClass=com.example.agent.StockTicker
আপনি এখন এজেন্টের কাছে স্টকের দাম জিজ্ঞাসা করতে পারেন, যেমন What's the stock price for GOOG? আপনি উত্তর পাবেন এবং দেখতে পাবেন যে lookup_stock_ticker টুলটি ব্যবহৃত হচ্ছে।
৫. হালনাগাদ তথ্যের জন্য গুগল সার্চের শক্তি

ADK for Java-এর সাথে বেশ কিছু শক্তিশালী টুল রয়েছে, যার মধ্যে GoogleSearchTool অন্যতম। এই টুলের সাহায্যে আপনার এজেন্ট তার লক্ষ্যে পৌঁছানোর জন্য প্রাসঙ্গিক তথ্য খুঁজতে গুগল সার্চ ব্যবহারের অনুরোধ করতে পারে।
প্রকৃতপক্ষে, একজন এলএলএম-এর জ্ঞান সময়ের সাথে স্থির হয়ে থাকে: তাকে একটি নির্দিষ্ট তারিখ ("কাট-অফ ডেট") পর্যন্ত এমন ডেটা দিয়ে প্রশিক্ষণ দেওয়া হয়েছে যা তথ্য সংগ্রহের সময়ের মতোই হালনাগাদ। এর মানে হলো, এলএলএম-রা সাম্প্রতিক ঘটনা সম্পর্কে নাও জানতে পারে, অথবা তাদের জ্ঞান সীমিত ও অগভীর হতে পারে, এবং একটি সার্চ ইঞ্জিনের সাহায্য তাদের স্মৃতিকে সতেজ করতে পারে বা বিষয়টি সম্পর্কে তাদের আরও শেখাতে পারে।
চলুন এই সাধারণ নিউজ সার্চ এজেন্টটি দেখে নেওয়া যাক:
// src/main/java/com/example/agent/LatestNews.java
package com.example.agent;

import java.time.LocalDate;
import com.google.adk.agents.LlmAgent;
import com.google.adk.tools.GoogleSearchTool;
import com.google.adk.web.AdkWebServer;

public class LatestNews {
    public static void main(String[] args) {
        AdkWebServer.start(LlmAgent.builder()
            .name("news-search-agent")
            .description("A news search agent")
            .instruction("""
                You are a news search agent.
                Use the `google_search` tool
                when asked to search for recent events and information.
                Today is \
                """ + LocalDate.now())
            .model("gemini-2.5-flash")
            .tools(new GoogleSearchTool())
            .build());
    }
}
লক্ষ্য করুন, আমরা কীভাবে ` tools(new GoogleSearchTool()) ব্যবহার করে সার্চ টুলের একটি ইনস্ট্যান্স পাস করেছি। এটিই আমাদের এজেন্টকে ওয়েবে উপলব্ধ সর্বশেষ তথ্য সম্পর্কে দ্রুত অবগত হওয়ার ক্ষমতা দেয়। এছাড়াও, প্রম্পটে দিনের তারিখ উল্লেখ করা হয়েছে, কারণ এটি LLM-কে বুঝতে সাহায্য করতে পারে যে কখন প্রশ্নগুলো অতীতের তথ্য সম্পর্কিত এবং কখন আরও সাম্প্রতিক তথ্য খোঁজার প্রয়োজন হয়।
তারপর নিম্নলিখিত কমান্ড দিয়ে এই ক্লাসটি চালান:
mvn compile exec:java -Dexec.mainClass=com.example.agent.LatestNews
প্রশ্নটি নিয়ে নিজের মতো করে খেলতে পারেন, যেমন, আপনি জিজ্ঞাসা করতে পারেন: What's the latest news in the world?
কোড ধাপ: একটি টুল হিসেবে সার্চ এজেন্ট
GoogleSearchTool সরাসরি একটি টুল হিসেবে এজেন্টের কাছে পাঠানোর পরিবর্তে, আপনি একটি ডেডিকেটেড সার্চ এজেন্ট তৈরি করতে পারেন যা সার্চের কার্যকারিতাকে অন্তর্ভুক্ত করে এবং সেই এজেন্টটিকে একটি উচ্চ-স্তরের এজেন্টের কাছে টুল হিসেবে উন্মুক্ত করতে পারেন।
এটি একটি উন্নত ধারণা যা আপনাকে জটিল কাজ (যেমন অনুসন্ধান করা এবং ফলাফলের সারসংক্ষেপ তৈরি করা) একটি বিশেষায়িত সাব-এজেন্টের কাছে অর্পণ করার সুযোগ দেয়। এই পদ্ধতিটি প্রায়শই আরও জটিল কর্মপ্রবাহের জন্য উপযোগী হয়।
// src/main/java/com/example/agent/SearchAgentAsTool.java
package com.example.agent;

import java.time.LocalDate;

import com.google.adk.agents.LlmAgent;
import com.google.adk.tools.AgentTool;
import com.google.adk.tools.GoogleSearchTool;
import com.google.adk.web.AdkWebServer;

public class SearchAgentAsTool {
    public static void main(String[] args) {
        // 1. Define the specialized Search Agent
        LlmAgent searchAgent = LlmAgent.builder()
            .name("news-search-agent-tool")
            .description("Searches for recent events and provides a concise summary.")
            .instruction("""
                You are a concise information retrieval specialist.
                Use the `google_search` tool to find information.
                Always provide the answer as a short,
                direct summary, without commentary.
                Today is \
                """ + LocalDate.now())
            .model("gemini-2.5-flash")
            .tools(new GoogleSearchTool()) // This agent uses the Google Search Tool
            .build();

        // 2. Wrap the Search Agent as a Tool
        AgentTool searchTool = AgentTool.create(searchAgent);

        // 3. Define the Main Agent that uses the Search Agent Tool
        AdkWebServer.start(LlmAgent.builder()
            .name("main-researcher")
            .description("Main agent for answering complex, up-to-date questions.")
            .instruction("""
                You are a sophisticated research assistant.
                When the user asks a question that requires up-to-date or external information,
                you MUST use the `news-search-agent-tool` to get the facts before answering.
                After the tool returns the result, synthesize the final answer for the user.
                """)
            .model("gemini-2.5-flash")
            .tools(searchTool) // This agent uses the Search Agent as a tool
            .build()
       );
    }
}
এখানে AgentTool.create(searchAgent) লাইনটিই হলো মূল ধারণা। এটি সম্পূর্ণ searchAgent (এর নিজস্ব অভ্যন্তরীণ লজিক, প্রম্পট এবং টুলসহ) mainAgent এর জন্য একটি একক কলযোগ্য টুল হিসেবে রেজিস্টার করে। এটি মডুলারিটি এবং পুনঃব্যবহারযোগ্যতাকে উৎসাহিত করে।
নিম্নলিখিত কমান্ড ব্যবহার করে এই ক্লাসটি চালান:
mvn compile exec:java -Dexec.mainClass=com.example.agent.SearchAgentAsTool
সাধারণ প্রশ্নের ক্ষেত্রে এজেন্টটি তার নিজস্ব জ্ঞানভান্ডার থেকে উত্তর দেবে, কিন্তু সাম্প্রতিক ঘটনা সম্পর্কে জিজ্ঞাসা করা হলে, এটি গুগল সার্চ টুল ব্যবহার করে বিশেষায়িত সার্চ এজেন্টের কাছে অনুসন্ধানের দায়িত্ব অর্পণ করবে।
৬. এজেন্টিক ওয়ার্কফ্লোতে দক্ষতা অর্জন
জটিল সমস্যার ক্ষেত্রে একটিমাত্র এজেন্ট যথেষ্ট নয়। যখন অনেক বেশি উপ-কাজ নিয়ে গঠিত কোনো লক্ষ্য দেওয়া হয়, অথবা অতিরিক্ত বিশদ ব্যাখ্যাসহ একটি বিশাল নির্দেশ দেওয়া হয়, কিংবা বিপুল সংখ্যক ফাংশন ব্যবহারের সুযোগ দেওয়া হয়, তখন এলএলএম-গুলো হিমশিম খায় এবং তাদের কর্মক্ষমতা ও নির্ভুলতা হ্রাস পায়।
মূল কৌশলটি হলো একাধিক বিশেষায়িত এজেন্টকে সমন্বিতভাবে ব্যবহার করে ভাগ করে জয় করা । সৌভাগ্যবশত, ADK-তে বিভিন্ন ধরনের অন্তর্নির্মিত বিশেষায়িত এজেন্ট রয়েছে:
- সাধারণ এজেন্ট, যার কাছে কাজ অর্পণ করার জন্য
subAgent()থাকে, -
SequentialAgent, ক্রমানুসারে কাজ করা, -
ParallelAgent, এজেন্টদের সমান্তরালভাবে কার্যকর করার জন্য, -
LoopAgent, সাধারণত কোনো পরিমার্জন প্রক্রিয়াকে যতবার প্রয়োজন ততবার চালানোর জন্য ব্যবহৃত হয়।
এর প্রধান ব্যবহারগুলো কী কী এবং প্রতিটি ওয়ার্কফ্লোর সুবিধা ও অসুবিধাগুলো কী, তা জানতে অনুগ্রহ করে নিচের সারণিটি দেখুন। তবে জেনে রাখুন যে, এর আসল শক্তি আসবে এগুলোর কয়েকটির সমন্বয় থেকেই!
কর্মপ্রবাহ | ADK ক্লাস | ব্যবহারের ক্ষেত্র | সুবিধা | অসুবিধা |
উপ-এজেন্ট | | ব্যবহারকারী-চালিত ও নমনীয় কাজ, যেখানে পরবর্তী পদক্ষেপ সবসময় জানা থাকে না। | অত্যন্ত নমনীয়, কথোপকথনমূলক, ব্যবহারকারী-মুখী বটের জন্য চমৎকার। | কম অনুমানযোগ্য, প্রবাহ নিয়ন্ত্রণের জন্য এলএলএম যুক্তির উপর নির্ভর করে। |
ক্রমিক | | সুনির্দিষ্ট, বহু-ধাপের প্রক্রিয়া যেখানে ক্রম অত্যন্ত গুরুত্বপূর্ণ। | পূর্বাভাসযোগ্য, নির্ভরযোগ্য, ত্রুটিমুক্ত করা সহজ, শৃঙ্খলা নিশ্চিত করে। | অনমনীয়, কাজগুলোকে সমান্তরালভাবে করা গেলে এটি আরও ধীরগতির হতে পারে। |
সমান্তরাল | | একাধিক উৎস থেকে তথ্য সংগ্রহ করা বা স্বতন্ত্র কাজ চালানো। | অত্যন্ত কার্যকর, ইনপুট/আউটপুট-নির্ভর কাজগুলোর জন্য লেটেন্সি উল্লেখযোগ্যভাবে হ্রাস করে। | সমস্ত টাস্ক চলে; কোনো শর্ট-সার্কিট হয় না। নির্ভরশীলতাযুক্ত টাস্কের জন্য এটি কম উপযোগী। |
লুপ | | পুনরাবৃত্তিমূলক পরিমার্জন, স্ব-সংশোধন, বা এমন প্রক্রিয়া যা কোনো শর্ত পূরণ না হওয়া পর্যন্ত চলতে থাকে। | জটিল সমস্যা সমাধানে শক্তিশালী, যা এজেন্টদের নিজেদের কাজের মান উন্নত করতে সক্ষম করে। | সতর্কভাবে ডিজাইন করা না হলে এটি অসীম লুপের কারণ হতে পারে (সর্বদা maxIterations ব্যবহার করুন!)। |
৭. এজেন্টিক ওয়ার্কফ্লো — সাব-এজেন্টদের মাধ্যমে দায়িত্ব অর্পণ
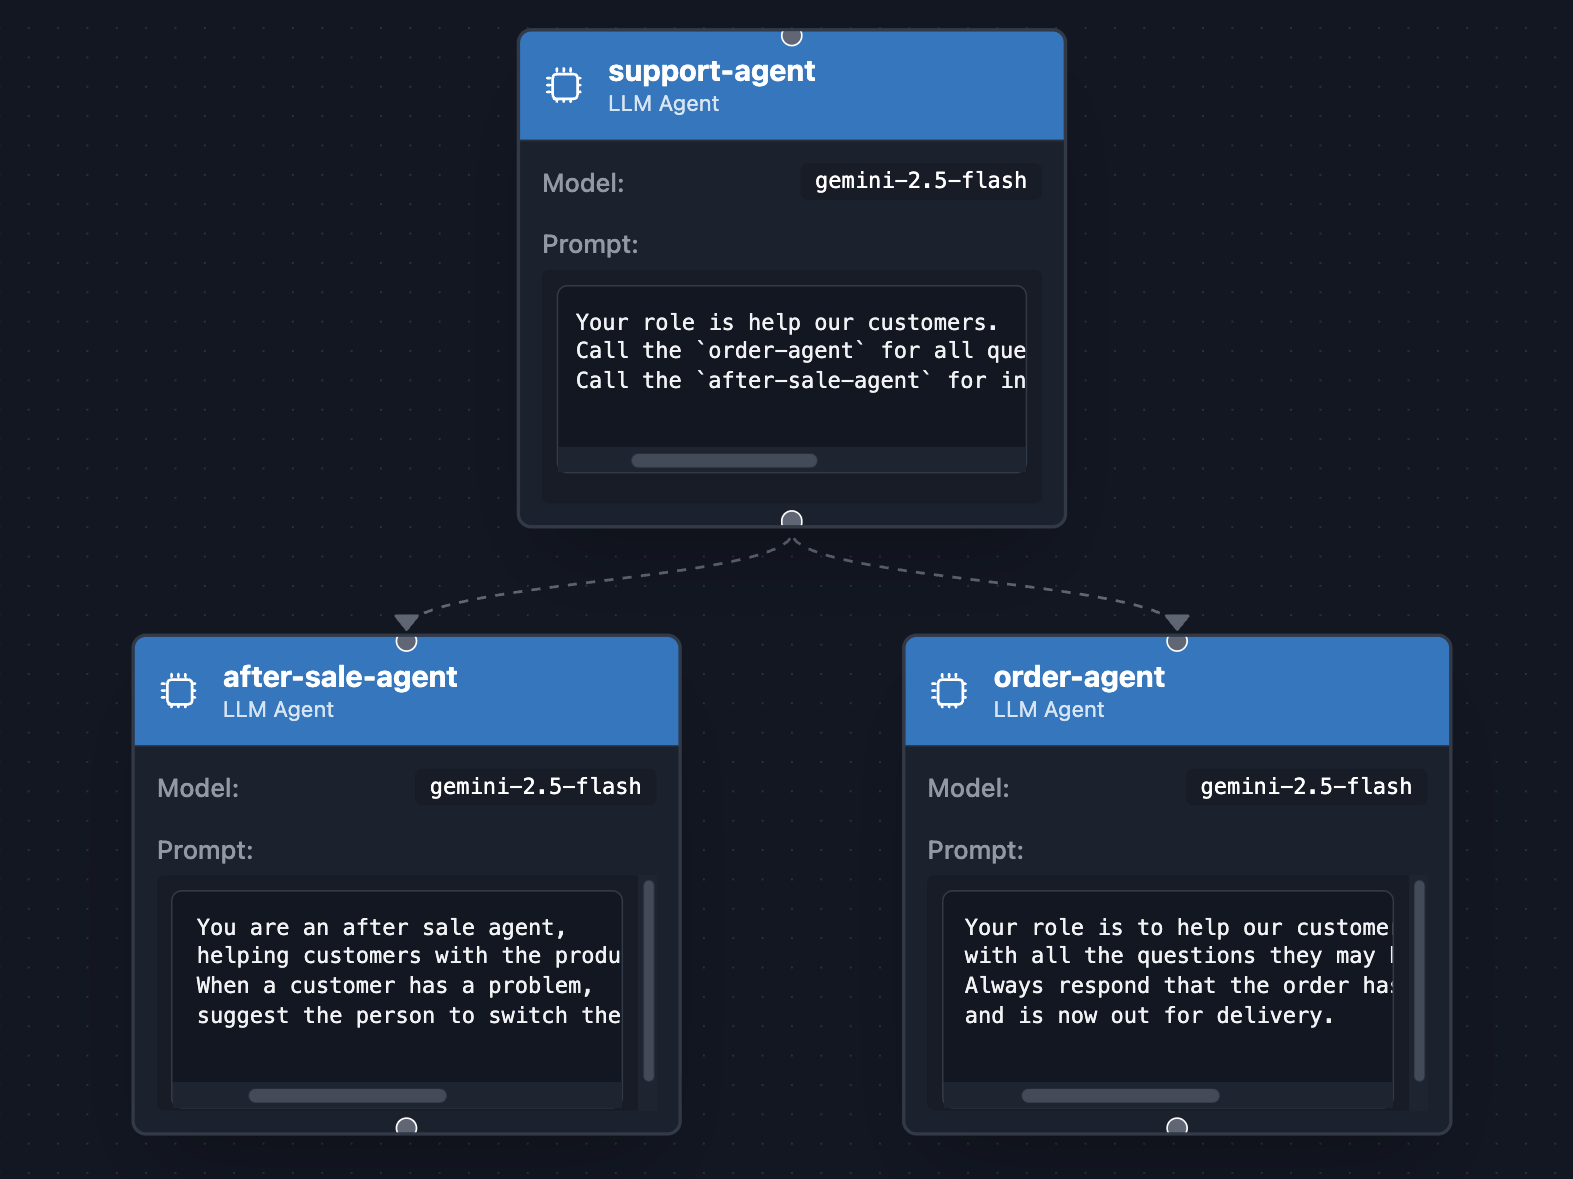
একজন সুপারভাইজার এজেন্ট সাব-এজেন্টদের নির্দিষ্ট কাজ অর্পণ করতে পারেন। উদাহরণস্বরূপ, একটি ই-কমার্স ওয়েবসাইটের এজেন্টের কথা ভাবুন, যিনি অর্ডার-সম্পর্কিত প্রশ্ন ("আমার অর্ডারের অবস্থা কী?") একজন এজেন্টকে এবং বিক্রয়োত্তর সেবা-সম্পর্কিত প্রশ্ন ("আমি জানি না এটা কীভাবে চালু করতে হয়!") অন্য একজন এজেন্টকে অর্পণ করবেন। আমরা এই ব্যবহারিক পরিস্থিতিটি নিয়েই আলোচনা করতে যাচ্ছি।
// src/main/java/com/example/agent/SupportAgent.java
package com.example.agent;

import com.google.adk.agents.LlmAgent;
import com.google.adk.web.AdkWebServer;

public class SupportAgent {
    public static void main(String[] args) {
        LlmAgent orderAgent = LlmAgent.builder()
            .name("order-agent")
            .description("Order agent")
            .instruction("""
                Your role is to help our customers
                with all the questions they may have about their orders.
                Always respond that the order has been received, prepared,
                and is now out for delivery.
                """)
            .model("gemini-2.5-flash")
            .build();

        LlmAgent afterSaleAgent = LlmAgent.builder()
            .name("after-sale-agent")
            .description("After sale agent")
            .instruction("""
                You are an after sale agent,
                helping customers with the product they received.
                When a customer has a problem,
                suggest the person to switch the product off and on again.
                """)
            .model("gemini-2.5-flash")
            .build();

        AdkWebServer.start(LlmAgent.builder()
            .name("support-agent")
            .description("Customer support agent")
            .instruction("""
                Your role is to help our customers.
                Call the `order-agent` for all questions related to order status.
                Call the `after-sale-agent` for inquiries about the received product.
                """)
            .model("gemini-2.5-flash")
            .subAgents(afterSaleAgent, orderAgent)
            .build()
        );
    }
}
এখানের মূল অংশটি হলো subAgents() মেথডটি, যেখানে এমন দুটি সাব-এজেন্টকে পাস করা হয়েছে যাদের নির্দিষ্ট ভূমিকা একে অপরের দ্বারা আলাদাভাবে পরিচালিত হবে।
নিম্নলিখিত কমান্ড ব্যবহার করে উপরের উদাহরণটি চালান:
mvn compile exec:java -Dexec.mainClass=com.example.agent.SupportAgent
আপনি I have a question about my order অথবা I have a question about my received order এর মতো প্রশ্ন করতে পারেন। আপনি দেখবেন যে, জিজ্ঞাসিত প্রশ্নের উপর নির্ভর করে মূল এজেন্ট সঠিক এজেন্টের কাছে দায়িত্ব অর্পণ করে।
অধস্তন এজেন্টদের কাছে কাজ অর্পণ করার এই ধারণাটি কার্যকর মানব ব্যবস্থাপনারই প্রতিচ্ছবি, যেখানে একজন ভালো ব্যবস্থাপক (তত্ত্বাবধায়ক এজেন্ট) বিশেষায়িত কর্মীদের (অধস্তন এজেন্ট) উপর নির্ভর করেন নির্দিষ্ট কাজগুলো সামলানোর জন্য, যেগুলোতে তাদের অধিকতর দক্ষতা রয়েছে। তত্ত্বাবধায়কের প্রতিটি প্রক্রিয়ার খুঁটিনাটি জানার প্রয়োজন হয় না; বরং, এটি বুদ্ধিমত্তার সাথে গ্রাহকের অনুরোধ (যেমন অর্ডারের জিজ্ঞাসা বা কোনো প্রযুক্তিগত সমস্যা) সবচেয়ে যোগ্য 'দলের সদস্যের' কাছে পাঠিয়ে দেয়, যা একজন সাধারণ কর্মীর একার পক্ষে দেওয়া প্রতিক্রিয়ার চেয়ে উচ্চতর গুণমান এবং অধিকতর কার্যকর প্রতিক্রিয়া নিশ্চিত করে। অধিকন্তু, এই অধস্তন এজেন্টরা জটিল সামগ্রিক প্রক্রিয়াটির সম্পূর্ণতা বোঝার প্রয়োজন ছাড়াই তাদের নিজ নিজ দায়িত্বে পুরোপুরি মনোযোগ দিতে পারে।
৮. সক্রিয় কর্মপ্রবাহ — অ্যাসেম্বলি লাইন
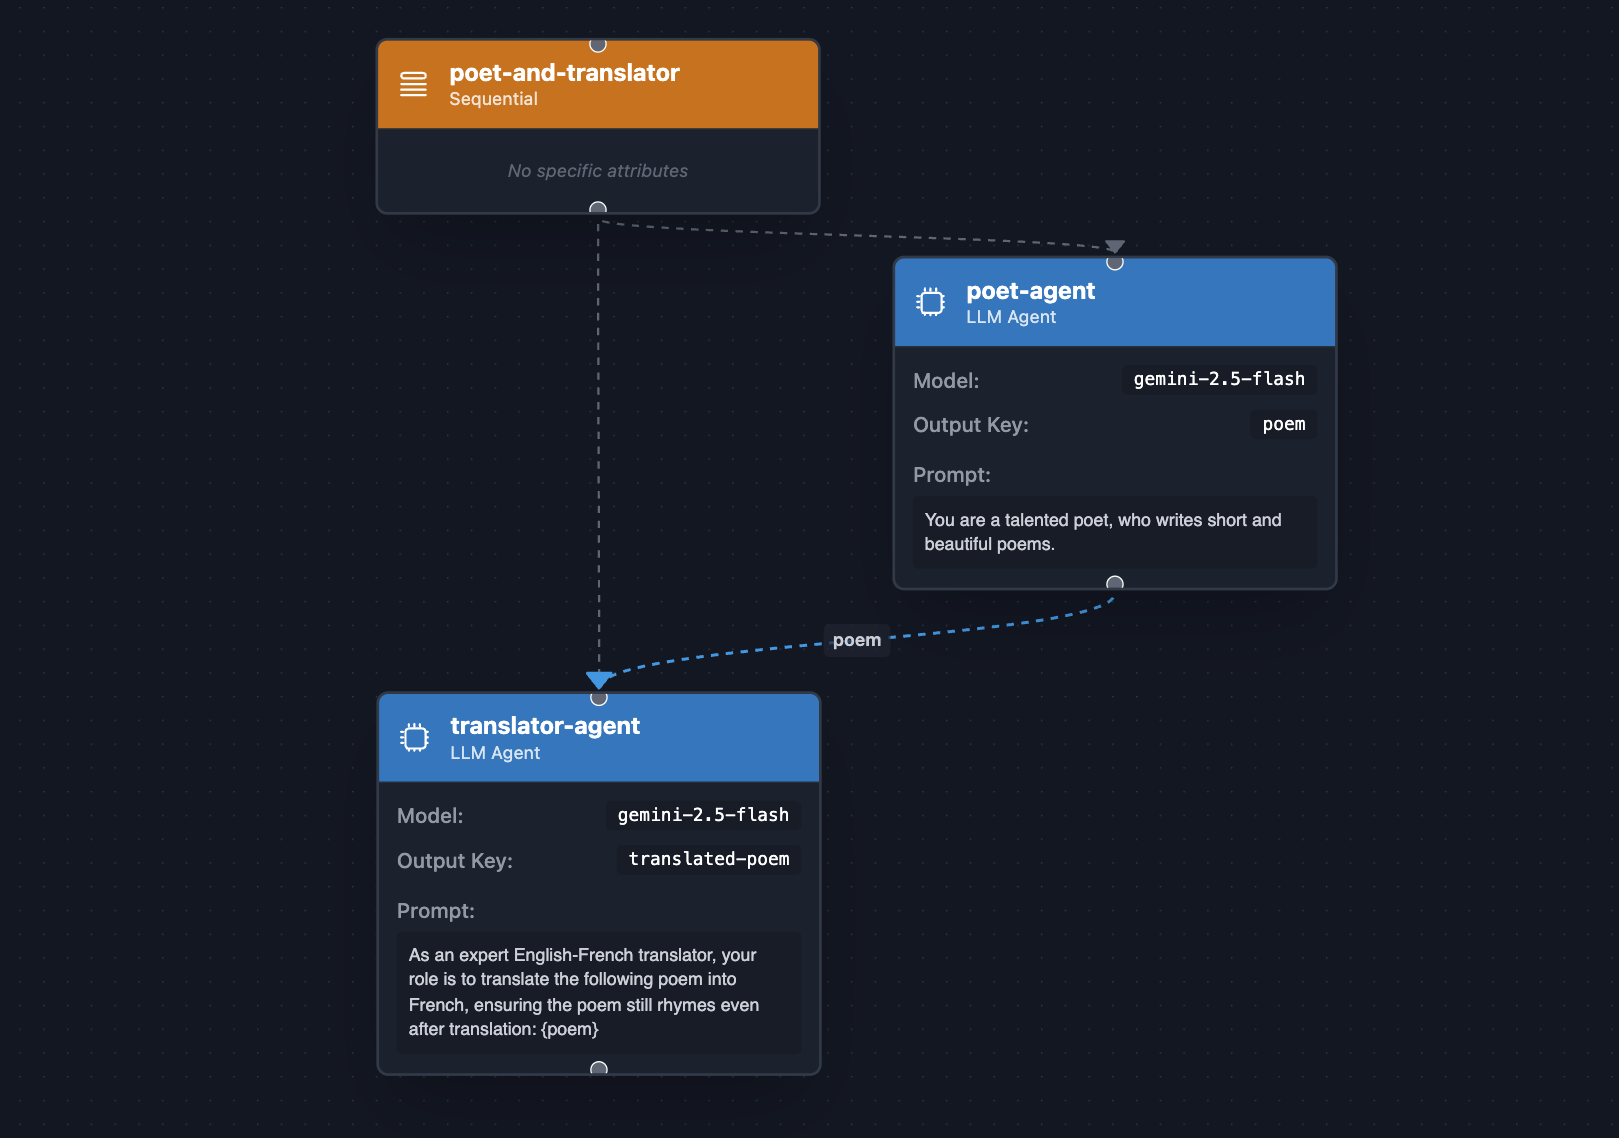
যখন কাজের ক্রম গুরুত্বপূর্ণ হয়, তখন একটি SequentialAgent ) ব্যবহার করুন। এটি একটি অ্যাসেম্বলি লাইনের মতো, যা একটি নির্দিষ্ট ক্রমে সাব-এজেন্টগুলোকে সম্পাদন করে, যেখানে প্রতিটি ধাপ তার পূর্ববর্তী ধাপের উপর নির্ভরশীল হতে পারে।
ধরা যাক, একজন ইংরেজ কবি একজন ইংরেজ-ফরাসি অনুবাদকের সাথে মিলে প্রথমে ইংরেজিতে কবিতা রচনা করেন এবং তারপর সেগুলো ফরাসি ভাষায় অনুবাদ করেন:
// src/main/java/com/example/agent/PoetAndTranslator.java
package com.example.agent;

import com.google.adk.agents.LlmAgent;
import com.google.adk.agents.SequentialAgent;
import com.google.adk.web.AdkWebServer;

public class PoetAndTranslator {
    public static void main(String[] args) {
        LlmAgent poet = LlmAgent.builder()
            .name("poet-agent")
            .description("Poet writing poems")
            .model("gemini-2.5-flash")
            .instruction("""
                You are a talented poet,
                who writes short and beautiful poems.
                """)
            .outputKey("poem")
            .build();

        LlmAgent translator = LlmAgent.builder()
            .name("translator-agent")
            .description("English to French translator")
            .model("gemini-2.5-flash")
            .instruction("""
                As an expert English-French translator,
                your role is to translate the following poem into French,
                ensuring the poem still rhymes even after translation:

                {poem}
                """)
            .outputKey("translated-poem")
            .build();

        AdkWebServer.start(SequentialAgent.builder()
            .name("poet-and-translator")
            .subAgents(poet, translator)
            .build());
    }
}
উদাহরণটি চালান:
mvn compile exec:java -Dexec.mainClass=com.example.agent.PoetAndTranslator
এখন, আপনি এজেন্টকে বলতে পারেন, " Write me a poem about a lonely software developer ।" আপনি প্রথমে ইংরেজিতে একটি কবিতা পাবেন, যা পরে ফরাসি ভাষায় অনূদিত হবে।
জটিল কাজগুলোকে ছোট ছোট ও ক্রমবিন্যস্ত উপ-কাজে পদ্ধতিগতভাবে বিভক্ত করার এই প্রক্রিয়াটি একটি অধিকতর সুনিশ্চিত ও নির্ভরযোগ্য প্রক্রিয়া নিশ্চিত করে, যা একটি একক ও ব্যাপক উদ্দেশ্যমূলক এজেন্টের উপর নির্ভর করার তুলনায় সফল ফলাফলের সম্ভাবনাকে উল্লেখযোগ্যভাবে বৃদ্ধি করে।
কোনো কাজকে কার্যকরভাবে একাধিক উপ-কাজে বিভক্ত করা (যখন সম্ভব এবং যুক্তিযুক্ত হয়) আরও সুনির্দিষ্ট ও সফল ফলাফল অর্জনের জন্য অত্যন্ত গুরুত্বপূর্ণ, কারণ এটি বিভিন্ন ধাপের মধ্যে কাঠামোগত অগ্রগতি এবং নির্ভরশীলতা ব্যবস্থাপনার সুযোগ করে দেয়।
৯. এজেন্টিক ওয়ার্কফ্লো — সমান্তরালভাবে কাজ করা
যখন কাজগুলো স্বাধীন হয়, তখন একটি ParallelAgent সেগুলোকে একযোগে চালানোর মাধ্যমে কর্মদক্ষতা ব্যাপকভাবে বাড়িয়ে দেয়। নিম্নলিখিত উদাহরণে, আমরা একটি SequentialAgent সাথে একটি ParallelAgent একত্রিত করব: সমান্তরাল কাজগুলো প্রথমে চলবে, এবং তারপর একটি চূড়ান্ত এজেন্ট সেই সমান্তরাল কাজগুলোর ফলাফল সংক্ষিপ্ত আকারে তুলে ধরবে।
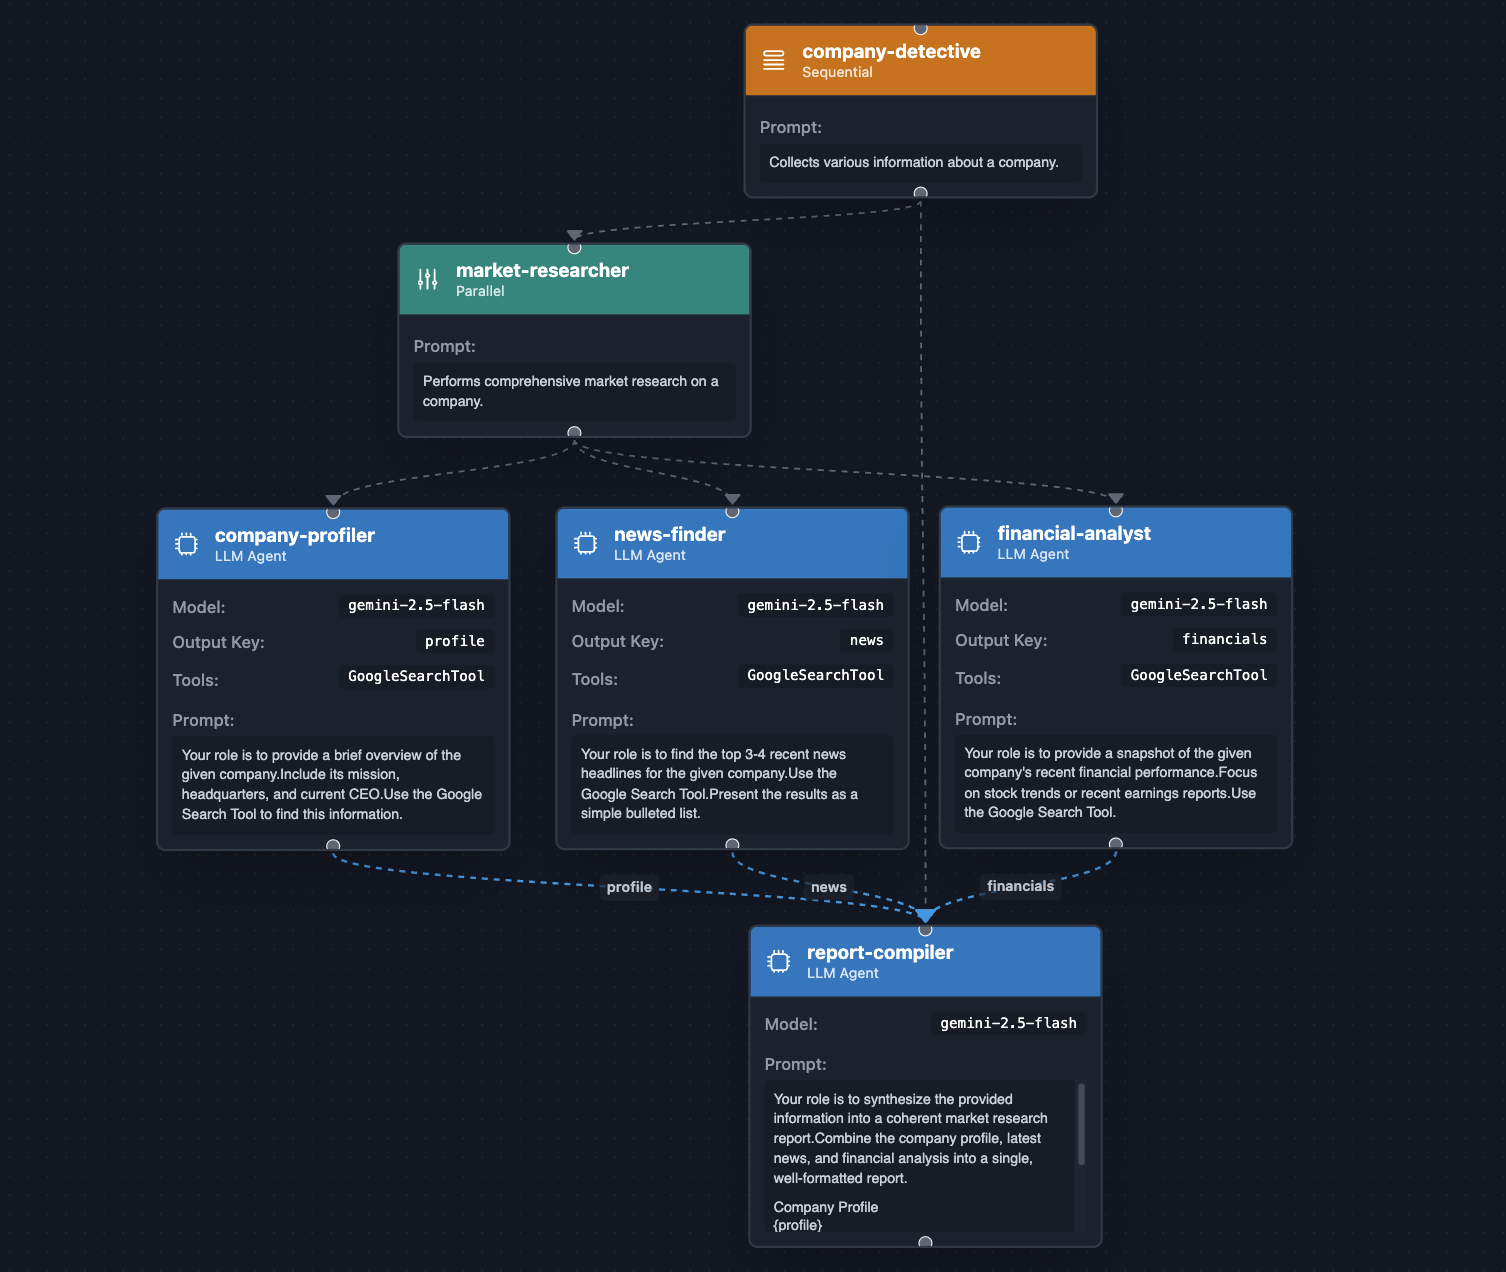
চলুন একজন কোম্পানি গোয়েন্দা তৈরি করি যার কাজ হবে নিম্নলিখিত বিষয়গুলো সম্পর্কে তথ্য অনুসন্ধান করা:
- কোম্পানির প্রোফাইল (সিইও, সদর দপ্তর, মূলমন্ত্র, ইত্যাদি)
- কোম্পানিটি সম্পর্কে সর্বশেষ খবর।
- কোম্পানির আর্থিক বিবরণ।
// src/main/java/com/example/agent/CompanyDetective.java
package com.example.agent;

import com.google.adk.agents.LlmAgent;
import com.google.adk.agents.ParallelAgent;
import com.google.adk.agents.SequentialAgent;
import com.google.adk.tools.GoogleSearchTool;
import com.google.adk.web.AdkWebServer;

public class CompanyDetective {
    public static void main(String[] args) {
        var companyProfiler = LlmAgent.builder()
            .name("company-profiler")
            .description("Provides a general overview of a company.")
            .instruction("""
                Your role is to provide a brief overview of the given company.
                Include its mission, headquarters, and current CEO.
                Use the Google Search Tool to find this information.
                """)
            .model("gemini-2.5-flash")
            .tools(new GoogleSearchTool())
            .outputKey("profile")
            .build();

        var newsFinder = LlmAgent.builder()
            .name("news-finder")
            .description("Finds the latest news about a company.")
            .instruction("""
                Your role is to find the top 3-4 recent news headlines for the given company.
                Use the Google Search Tool.
                Present the results as a simple bulleted list.
                """)
            .model("gemini-2.5-flash")
            .tools(new GoogleSearchTool())
            .outputKey("news")
            .build();

        var financialAnalyst = LlmAgent.builder()
            .name("financial-analyst")
            .description("Analyzes the financial performance of a company.")
            .instruction("""
                Your role is to provide a snapshot of the given company's recent financial performance.
                Focus on stock trends or recent earnings reports.
                Use the Google Search Tool.
                """)
            .model("gemini-2.5-flash")
            .tools(new GoogleSearchTool())
            .outputKey("financials")
            .build();

        var marketResearcher = ParallelAgent.builder()
            .name("market-researcher")
            .description("Performs comprehensive market research on a company.")
            .subAgents(
                companyProfiler,
                newsFinder,
                financialAnalyst
            )
            .build();

        var reportCompiler = LlmAgent.builder()
            .name("report-compiler")
            .description("Compiles a final market research report.")
            .instruction("""
                Your role is to synthesize the provided information into a coherent market research report.
                Combine the company profile, latest news, and financial analysis into a single, well-formatted report.

                ## Company Profile
                {profile}

                ## Latest News
                {news}

                ## Financial Snapshot
                {financials}
                """)
            .model("gemini-2.5-flash")
            .build();

        AdkWebServer.start(SequentialAgent.builder()
            .name("company-detective")
            .description("Collects various information about a company.")
            .subAgents(
                marketResearcher,
                reportCompiler
            ).build());
    }
}
যথারীতি, আপনি নিম্নলিখিত কমান্ডটি ব্যবহার করে এজেন্টটি চালাতে পারেন:
mvn compile exec:java -Dexec.mainClass=com.example.agent.CompanyDetective
গুগল বা অ্যাপলের মতো বিভিন্ন কোম্পানি সম্পর্কে এটিকে জিজ্ঞাসা করুন এবং দেখুন কী উত্তর পান।
এই এজেন্টটি কর্মপ্রবাহের একটি শক্তিশালী সমন্বয় প্রদর্শন করে, যেখানে তথ্য গবেষণা ও সংশ্লেষণের সমান্তরালকরণের কল্যাণে সমান্তরাল এবং অনুক্রমিক উভয় এজেন্টকেই দক্ষতার সাথে ব্যবহার করা হয়েছে।
১০. এজেন্টিক ওয়ার্কফ্লো — পুনরাবৃত্তিমূলক পরিমার্জন
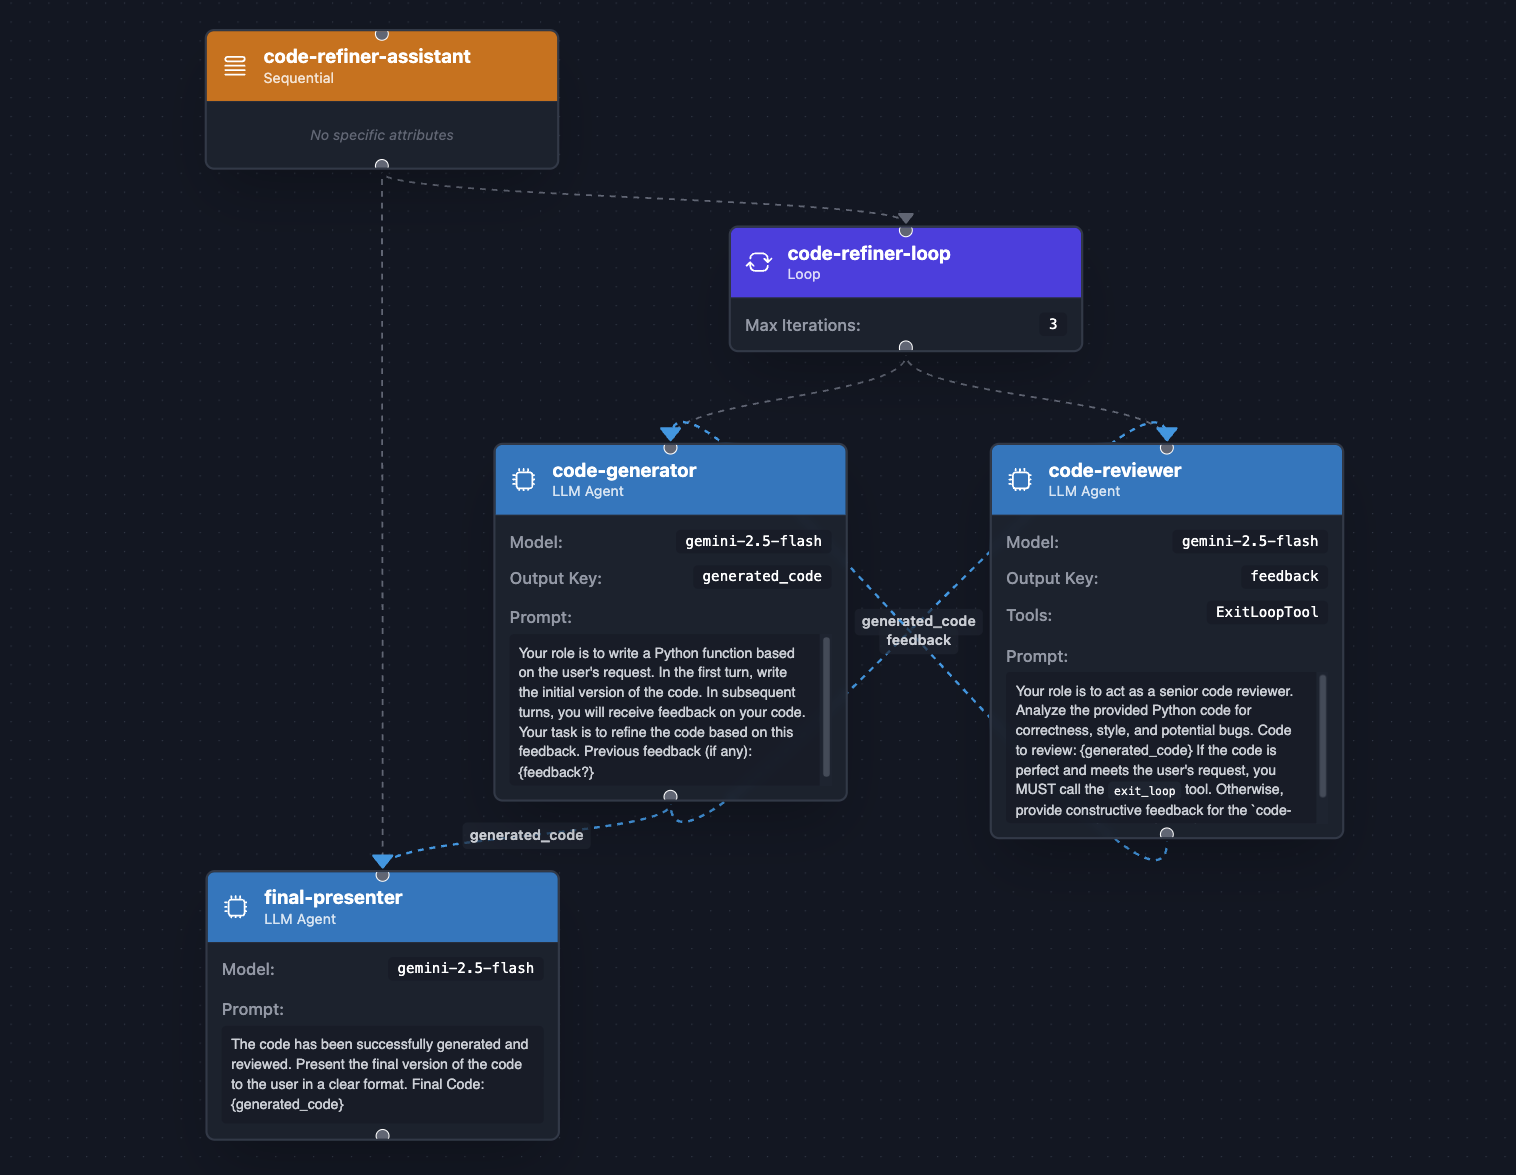
যেসব কাজে 'তৈরি করা → পর্যালোচনা করা → পরিমার্জন করা' চক্রের প্রয়োজন হয়, সেগুলোর জন্য একটি LoopAgent ব্যবহার করুন। এটি একটি লক্ষ্য পূরণ না হওয়া পর্যন্ত পুনরাবৃত্তিমূলক উন্নতিকে স্বয়ংক্রিয় করে। SequentialAgent এর মতোই, LoopAgent ক্রমানুসারে সাব-এজেন্টকে কল করবে, কিন্তু এটি আবার শুরুতে ফিরে আসবে। এজেন্টের অভ্যন্তরীণভাবে ব্যবহৃত LLM-ই সিদ্ধান্ত নেবে যে লুপের কার্যকারিতা বন্ধ করার জন্য একটি বিশেষ টুল, অর্থাৎ exit_loop বিল্ট-ইন টুলটিকে, কল করার অনুরোধ করা হবে কি না।
নিচের কোড রিফাইনার উদাহরণটি, একটি LoopAgent ব্যবহার করে, কোড পরিমার্জনের প্রক্রিয়াকে স্বয়ংক্রিয় করে: তৈরি করা, পর্যালোচনা করা এবং সংশোধন করা। এটি মানুষের কোড ডেভেলপমেন্টের অনুকরণ করে। একটি কোড জেনারেটর প্রথমে অনুরোধ করা কোডটি তৈরি করে এবং এজেন্ট স্টেটে generated_code কী-এর অধীনে তা সংরক্ষণ করে। এরপর একজন কোড রিভিউয়ার তৈরি করা কোডটি পর্যালোচনা করেন এবং হয় ফিডব্যাক দেন ( feedback কী-এর অধীনে), অথবা ইটারেশনটি সময়ের আগেই শেষ করার জন্য একটি এক্সিট লুপ টুল কল করেন।
চলুন কোডটি দেখে নেওয়া যাক:
// src/main/java/com/example/agent/CodeRefiner.java
package com.example.agent;

import com.google.adk.agents.LlmAgent;
import com.google.adk.agents.LoopAgent;
import com.google.adk.agents.SequentialAgent;
import com.google.adk.tools.ExitLoopTool;
import com.google.adk.web.AdkWebServer;

public class CodeRefiner {
    public static void main(String[] args) {
        var codeGenerator = LlmAgent.builder()
            .name("code-generator")
            .description("Writes and refines code based on a request and feedback.")
            .instruction("""
                Your role is to write a Python function based on the user's request.
                In the first turn, write the initial version of the code.
                In subsequent turns, you will receive feedback on your code.
                Your task is to refine the code based on this feedback.

                Previous feedback (if any):
                {feedback?}
                """)
            .model("gemini-2.5-flash")
            .outputKey("generated_code")
            .build();

        var codeReviewer = LlmAgent.builder()
            .name("code-reviewer")
            .description("Reviews code and decides if it's complete or needs more work.")
            .instruction("""
                Your role is to act as a senior code reviewer.
                Analyze the provided Python code for correctness, style, and potential bugs.

                Code to review:
                {generated_code}

                If the code is perfect and meets the user's request,
                you MUST call the `exit_loop` tool.

                Otherwise, provide constructive feedback for the `code-generator to improve the code.
                """)
            .model("gemini-2.5-flash")
            .outputKey("feedback")
            .tools(ExitLoopTool.INSTANCE)
            .build();

        var codeRefinerLoop = LoopAgent.builder()
            .name("code-refiner-loop")
            .description("Iteratively generates and reviews code until it is correct.")
            .subAgents(
                codeGenerator,
                codeReviewer
            )
            .maxIterations(3) // Safety net to prevent infinite loops
            .build();

        var finalPresenter = LlmAgent.builder()
            .name("final-presenter")
            .description("Presents the final, accepted code to the user.")
            .instruction("""
                The code has been successfully generated and reviewed.
                Present the final version of the code to the user in a clear format.

                Final Code:
                {generated_code}
                """)
            .model("gemini-2.5-flash")
            .build();

        AdkWebServer.start(SequentialAgent.builder()
            .name("code-refiner-assistant")
            .description("Manages the full code generation and refinement process.")
            .subAgents(
                codeRefinerLoop,
                finalPresenter)
            .build());
    }
}
নিম্নলিখিত কমান্ড ব্যবহার করে এই এজেন্টটি চালান:
mvn compile exec:java -Dexec.mainClass=com.example.agent.CodeRefiner
আপনি এটিকে Tower of Hanoi বা Quicksort Algorithm মতো জটিল কিছু বাস্তবায়ন করতে বলতে পারেন।
LoopAgent ব্যবহার করে বাস্তবায়িত ফিডব্যাক/রিফাইন লুপগুলো এমন সব সমস্যা সমাধানের জন্য অপরিহার্য, যেগুলোতে পুনরাবৃত্তিমূলক উন্নতি এবং স্ব-সংশোধনের প্রয়োজন হয় এবং যা মানুষের জ্ঞানীয় প্রক্রিয়াকে ঘনিষ্ঠভাবে অনুকরণ করে। এই ডিজাইন প্যাটার্নটি এমন সব কাজের জন্য বিশেষভাবে উপযোগী যেখানে প্রাথমিক আউটপুট খুব কমই নিখুঁত হয়, যেমন কোড জেনারেশন, সৃজনশীল লেখা, ডিজাইন ইটারেশন বা জটিল ডেটা বিশ্লেষণ। একটি বিশেষায়িত রিভিউয়ার এজেন্টের মাধ্যমে আউটপুটকে চক্রাকারে চালনা করে, যা কাঠামোগত ফিডব্যাক প্রদান করে, জেনারেটিং এজেন্ট একটি পূর্বনির্ধারিত সমাপ্তির মানদণ্ড পূরণ না হওয়া পর্যন্ত তার কাজকে ক্রমাগত পরিমার্জন করতে পারে। এর ফলে এক-ধাপের পদ্ধতির তুলনায় সুস্পষ্টভাবে উচ্চতর গুণমান এবং অধিক নির্ভরযোগ্য চূড়ান্ত ফলাফল পাওয়া যায়।
১১. অভিনন্দন!

আপনি সফলভাবে সাধারণ কথোপকথনকারী থেকে শুরু করে জটিল, একাধিক এজেন্ট সমন্বিত সিস্টেম পর্যন্ত বিভিন্ন ধরণের এআই এজেন্ট তৈরি ও পরীক্ষা করেছেন। আপনি জাভার জন্য ADK-এর মূল ধারণাগুলো শিখেছেন: নির্দেশাবলীর মাধ্যমে এজেন্ট নির্ধারণ করা, বিভিন্ন টুলের সাহায্যে তাদের শক্তিশালী করা এবং শক্তিশালী ওয়ার্কফ্লোতে তাদের সমন্বয় করা।
এরপর কী?
- জাভার জন্য অফিসিয়াল ADK গিটহাব রিপোজিটরিটি ঘুরে দেখুন।
- ফ্রেমওয়ার্কটি সম্পর্কে আরও জানতে এর ডকুমেন্টেশন দেখুন।
- এই ব্লগ সিরিজে বিভিন্ন এজেন্টিক ওয়ার্কফ্লো এবং উপলব্ধ বিভিন্ন টুল সম্পর্কে পড়ুন।
- অন্যান্য বিল্ট-ইন টুল এবং অ্যাডভান্সড কলব্যাকগুলো সম্পর্কে আরও গভীরভাবে জানুন।
- আরও সমৃদ্ধ ও বহুমুখী মিথস্ক্রিয়ার জন্য প্রেক্ষাপট, অবস্থা এবং উপাদানসমূহ পরিচালনা করুন।
- এমন প্লাগইন তৈরি ও প্রয়োগ করুন যা আপনার এজেন্টদের জীবনচক্রের সাথে সংযুক্ত হয়।
- বাস্তব সমস্যার সমাধান করে এমন নিজস্ব এজেন্ট তৈরি করার চেষ্টা করুন!