
۱. به توسعهدهندگان عامل هوش مصنوعی خوش آمدید!
در این آزمایشگاه کد، شما یاد خواهید گرفت که چگونه با استفاده از کیت توسعه عاملها (ADK) برای جاوا ، عاملهای هوش مصنوعی را در جاوا بسازید . ما فراتر از فراخوانیهای ساده API مدل زبان بزرگ (LLM) حرکت خواهیم کرد تا عاملهای هوش مصنوعی مستقلی ایجاد کنیم که میتوانند استدلال کنند، برنامهریزی کنند، از ابزارها استفاده کنند و برای حل مشکلات پیچیده با هم همکاری کنند.
شما با استفاده از اعتبارهای Google Cloud شروع خواهید کرد، محیط Google Cloud خود را راهاندازی میکنید، سپس اولین عامل ساده خود را میسازید و به تدریج قابلیتهای پیشرفتهتری مانند ابزارهای سفارشی، جستجوی وب و هماهنگی چندعاملی را اضافه میکنید.

آنچه یاد خواهید گرفت
- چگونه یک عامل هوش مصنوعی ساده و مبتنی بر شخصیت بسازیم.
- چگونه با ابزارهای سفارشی و داخلی (مانند جستجوی گوگل) به نمایندگان قدرت دهیم.
- چگونه ابزارهای خودتان را که در جاوا پیادهسازی شدهاند، اضافه کنید.
- چگونه چندین عامل را در گردشهای کاری قدرتمند متوالی، موازی و حلقهای هماهنگ کنیم.
آنچه نیاز دارید
- یک مرورگر وب که در حالت ناشناس از آن استفاده خواهیم کرد.
- یک حساب کاربری جیمیل شخصی.
- یک پروژه جدید گوگل کلود مرتبط با حساب جیمیل شخصی شما.
- یک حساب پرداخت ایجاد شده با اعتبارهای Google Cloud استفاده شده.
- ابزار خط فرمان git برای بررسی کد منبع.
- جاوا ۱۷+ و آپاچی ماون.
- یک ویرایشگر متن یا IDE، مانند IntelliJ IDEA یا VS Code.
میتوانید از ویرایشگر کد داخلی در Cloud Shel، در کنسول Google Cloud استفاده کنید.
۲. تنظیمات: محیط شما
درخواست اعتبار گوگل کلود برای کارگاه
برای یک کارگاه آموزشی تحت هدایت مدرس، لینکی به وبسایت دریافت خواهید کرد که میتوانید از طریق آن اعتبار ابری گوگل را برای استفاده در کارگاه مطالبه کنید.
- استفاده از یک حساب کاربری گوگل شخصی : استفاده از یک حساب کاربری گوگل شخصی (مانند آدرس gmail.com) بسیار مهم است زیرا آدرسهای ایمیل شرکتی یا مدرسه کار نخواهند کرد .
- استفاده از گوگل کروم در حالت ناشناس : این حالت برای ایجاد یک نشست امن و جلوگیری از تداخل با سایر حسابهای گوگل توصیه میشود.
- از لینک رویداد ویژه استفاده کنید : باید از یک لینک ویژه برای رویداد، که چیزی شبیه به https://trygcp.dev/event/xxx است و به دنبال آن یک کد رویداد (در اینجا "xxx" در این مثال) قرار دارد، استفاده شود.
- پذیرش شرایط خدمات : پس از ورود به سیستم، شرایط خدمات پلتفرم ابری گوگل به شما نمایش داده میشود که برای ادامه باید آنها را بپذیرید.
- ایجاد یک پروژه جدید : یک پروژه خالی جدید باید از کنسول ابری گوگل ایجاد شود.
- پیوند یک حساب صورتحساب : پروژه تازه ایجاد شده را به یک حساب صورتحساب پیوند دهید.
- تأیید اعتبار : ویدیوی زیر نحوه تأیید اعتبار اعمال شده به پروژه را با بررسی بخش «اعتبارات» در صفحه صورتحساب نشان میدهد.
در صورت تمایل میتوانید این ویدیو را که نحوهی استفاده از اعتبار و بازخرید آن را توضیح میدهد، تماشا کنید .
فعال کردن API هوش مصنوعی ورتکس
ابتدا، Vertex AI API را فعال کنید. میتوانید این کار را با جستجوی Vertex AI API در کنسول ابری گوگل و فعال کردن API در آنجا انجام دهید. همچنین میتوانید این کار را از طریق Cloud Shell با اجرای دستور زیر انجام دهید:
gcloud services enable aiplatform.googleapis.com
پیکربندی ADK با Vertex AI
برای احراز هویت عاملهای هوش مصنوعی ADK خود با Gemini روی Vertex AI برای این codelab، متغیرهای محیطی زیر را تنظیم کنید. مطمئن شوید که از شناسه پروژه منحصر به فرد خود استفاده میکنید.
macOS / Linux: ترمینال خود را باز کنید و دستور زیر را اجرا کنید. برای دائمی کردن این، این خط را به فایل راهاندازی پوسته خود اضافه کنید (مثلاً ~/.bash_profile ، ~/.zshrc ).
export GOOGLE_GENAI_USE_VERTEXAI=true
export GOOGLE_CLOUD_PROJECT=your-project-id
ویندوز (خط فرمان): یک خط فرمان جدید باز کنید و دستور زیر را اجرا کنید:
set GOOGLE_GENAI_USE_VERTEXAI=true
set GOOGLE_CLOUD_PROJECT=your-project-id
برای اعمال این تغییر، باید خط فرمان خود را مجدداً راهاندازی کنید.
ویندوز (PowerShell): یک ترمینال PowerShell باز کنید و دستور زیر را اجرا کنید:
$env:GOOGLE_GENAI_USE_VERTEXAI = "true"
$env:GOOGLE_CLOUD_PROJECT = "your-project-id"
برای دائمی کردن این تغییر در PowerShell، باید آن را به اسکریپت پروفایل خود اضافه کنید.
۳. شروع کار: اولین نماینده شما
بهترین راه برای شروع یک پروژه جدید استفاده از قالب ADK برای جاوا در گیتهاب است. این قالب ساختار پروژه و تمام وابستگیهای لازم را فراهم میکند.
اگر حساب گیتهاب دارید، میتوانید موارد زیر را انجام دهید: Use this template > Create a new repository ، سپس کد را به صورت محلی با دستور git clone بررسی کنید.
در اینجا تصویری از منوی بالا سمت راست برای استفاده از الگو نشان داده شده است.

رویکرد دیگر این است که به سادگی آن مخزن را مستقیماً کلون کنید:
git clone https://github.com/glaforge/adk-java-maven-template.git
برای بررسی اینکه آیا برای شروع کدنویسی اولین عامل هوش مصنوعی خود در جاوا آماده هستید، مطمئن شوید که میتوانید کد این پروژه را با موارد زیر کامپایل کنید:
cd adk-java-maven-template
mvn compile
مرحله کد: یک نماینده معلم علوم دوستانه
بلوک سازنده اساسی در ADK کلاس LlmAgent است. آن را به عنوان یک هوش مصنوعی با شخصیت و هدف خاص در نظر بگیرید که توسط یک مدل زبان بزرگ (Large Language Model) پشتیبانی میشود. بعداً قابلیتهای بیشتری را از طریق ابزارها اضافه خواهیم کرد و با همکاری دست در دست با سایر عاملهای مشابه، آن را قدرتمندتر خواهیم کرد.
بیایید یک کلاس جاوا جدید در پکیج com.example.agent ایجاد کنیم و نام آن را ScienceTeacher بگذاریم.
این همان «سلام دنیا!» در ساخت عامل است. ما در حال تعریف یک عامل ساده با شخصیت یک معلم علوم هستیم.
// src/main/java/com/example/agent/ScienceTeacher.java
package com.example.agent;

import com.google.adk.agents.LlmAgent;
import com.google.adk.web.AdkWebServer;

public class ScienceTeacher {
    public static void main(String[] args) {
        AdkWebServer.start(
            LlmAgent.builder()
                .name("science-teacher")
                .description("A friendly science teacher")
                .instruction("""
                    You are a science teacher for teenagers.
                    You explain science concepts in a simple, concise and direct way.
                    """)
                .model("gemini-2.5-flash")
                .build()
        );
    }
}
عامل هوش مصنوعی از طریق متد LlmAgent.builder() پیکربندی میشود. پارامترهای name() ، description() و model() اجباری هستند و برای اینکه به عامل خود شخصیت خاص و رفتار مناسبی بدهید، همیشه باید از طریق متد instruction() راهنماییهای دقیقی ارائه دهید.
در اینجا ما مدل Gemini 2.5 Flash را انتخاب کردیم، اما برای کارهای پیچیدهتر میتوانید Gemini 2.5 Pro را نیز امتحان کنید.
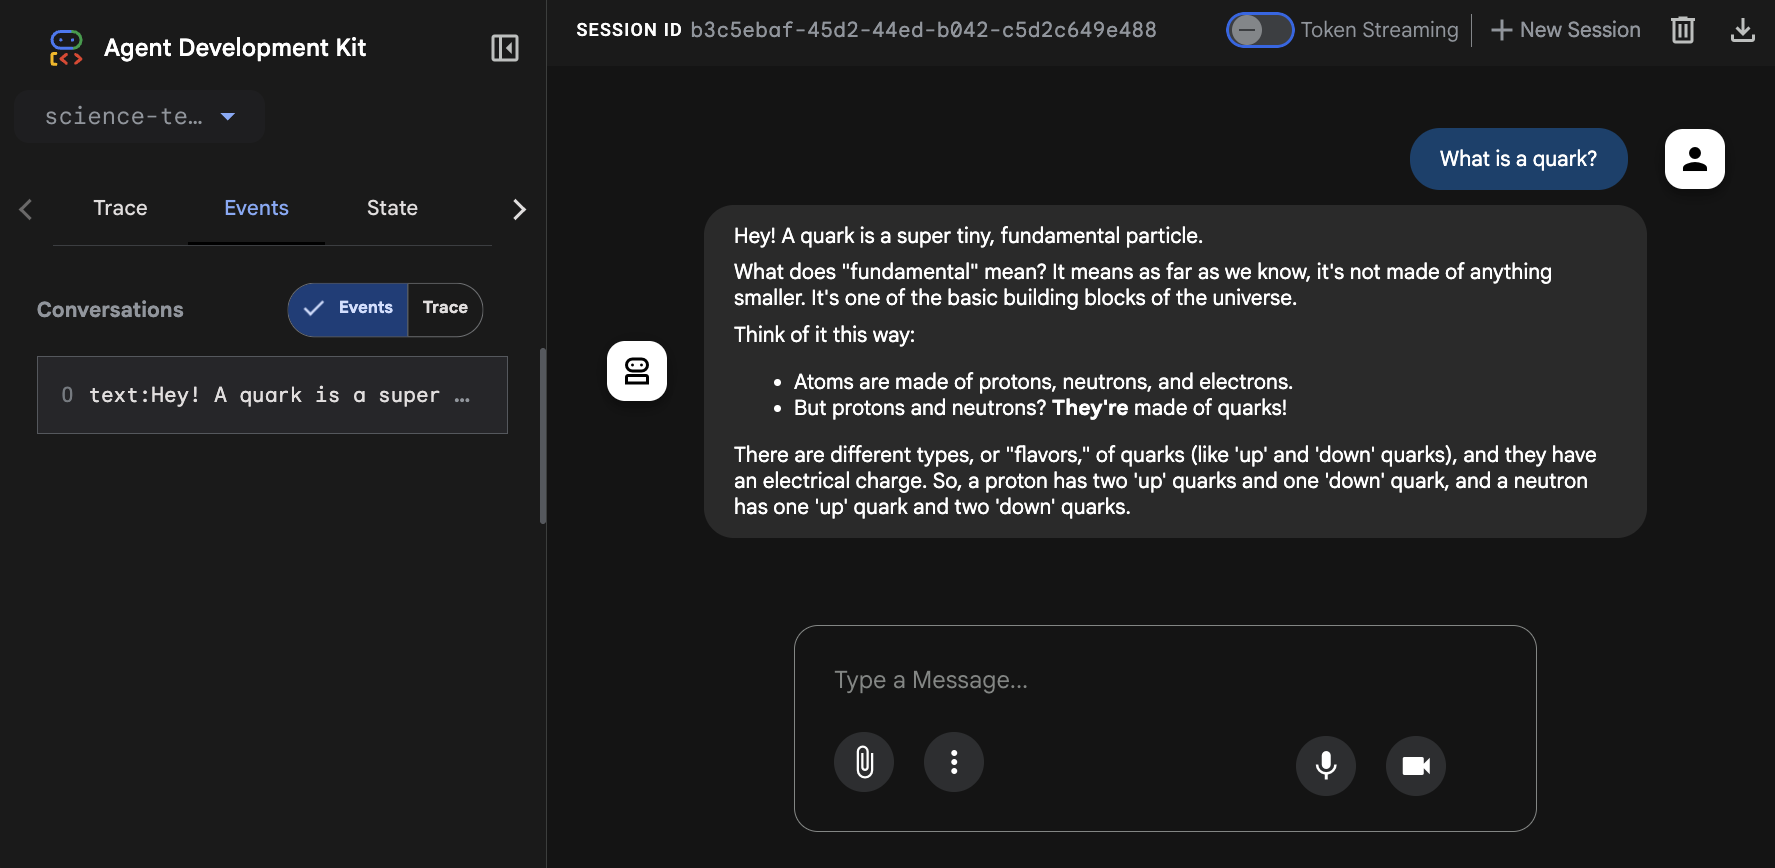
این عامل درون متد AdkWebServer.start() قرار گرفته است. این رابط چت ADK Dev UI نامیده میشود. این رابط به شما امکان میدهد از طریق یک رابط چت معمولی با عامل گفتگو کنید. علاوه بر این، اگر میخواهید بفهمید که در پشت صحنه چه میگذرد، مانند تمام رویدادهایی که در سیستم جریان دارند، درخواستها و پاسخهای ارسال شده به LLM، این رابط بسیار مفید خواهد بود.
برای کامپایل و اجرای این عامل به صورت محلی، دستور زیر را اجرا کنید:
mvn compile exec:java -Dexec.mainClass=com.example.agent.ScienceTeacher
سپس به مرورگر خود به آدرس http://localhost:8080 بروید. اگر در Cloud Shell هستید، میتوانید به پیشنمایش وب بروید و پیشنمایش را روی پورت ۸۰۸۰ انتخاب کنید.
شما باید رابط کاربری را مطابق تصویر زیر ببینید. سوالات علمی خود را از نماینده خود بپرسید.
۴. توانمندسازی نمایندگان با ابزارها

چرا کارگزاران به ابزارها نیاز دارند؟ LLMها قدرتمند هستند، اما دانش آنها در زمان منجمد شده و نمیتوانند با دنیای خارج تعامل داشته باشند. ابزارها پل ارتباطی هستند. آنها به یک کارگزار اجازه میدهند تا به اطلاعات بلادرنگ (مانند قیمت سهام یا اخبار) دسترسی داشته باشد، APIهای خصوصی را جستجو کند یا هر عملی را که میتوانید در جاوا کدنویسی کنید، انجام دهد.
مرحله کدنویسی: ایجاد یک ابزار سفارشی ( StockTicker )
در اینجا، ما به عامل خود ابزاری برای جستجوی قیمت سهام میدهیم. عامل استدلال میکند که وقتی کاربر قیمت را میپرسد، باید متد جاوای ما را فراخوانی کند.
// src/main/java/com/example/agent/StockTicker.java
package com.example.agent;

import com.google.adk.agents.LlmAgent;
import com.google.adk.tools.Annotations.Schema;
import com.google.adk.tools.FunctionTool;
import com.google.adk.web.AdkWebServer;
import java.util.Map;

public class StockTicker {
    public static void main(String[] args) {
        AdkWebServer.start(
            LlmAgent.builder()
                .name("stock_agent")
                .instruction("""
                    You are a stock exchange ticker expert.
                    When asked about the stock price of a company,
                    use the `lookup_stock_ticker` tool to find the information.
                    """)
                .model("gemini-2.5-flash")
                .tools(FunctionTool.create(StockTicker.class, "lookupStockTicker"))
                .build()
        );
    }

    @Schema(
        name = "lookup_stock_ticker",
        description = "Lookup stock price for a given company or ticker"
    )
    public static Map<String, String> lookupStockTicker(
        @Schema(name = "company_name_or_stock_ticker", description = "The company name or stock ticker")
        String ticker) {
        // ... (logic to return a stock price)
    }
}
برای هوشمندتر کردن عاملها و ایجاد قابلیت تعامل آنها با جهان (یا با کد، APIها، سرویسها و غیره) میتوانید عامل را طوری پیکربندی کنید که از ابزارها، و به ویژه ابزارهای کد سفارشی، از طریق متد tools() استفاده کند و یک FunctionTool.create(...) به آن ارسال کنید.
FunctionTool به یک کلاس و یک نام متد نیاز دارد که به متد استاتیک شما اشاره کند - همچنین میتوان یک نمونه از یک کلاس و نام یک متد نمونه از آن شیء را ارسال کرد.
مشخص کردن name و description متد و پارامترهای آن از طریق حاشیهنویسی @Schema بسیار مهم است، زیرا این اطلاعات توسط LLM زیربنایی برای تشخیص زمان و نحوه فراخوانی یک متد مشخص استفاده خواهد شد.
به همان اندازه مهم است که بهتر است به LLM با دستورالعملهای واضح در مورد نحوه و زمان استفاده از ابزار کمک کنید. مدل ممکن است بتواند خودش آن را بفهمد، اما اگر توضیحات صریحی در متد instruction() ارائه دهید، تابع شما شانس بیشتری برای فراخوانی مناسب دارد.
این متد باید یک Map برگرداند. معمولاً ایده این است که یک Map با کلیدی که نتیجه را نشان میدهد، مانند stock_price ، برگردانده شود و مقدار قیمت سهام به آن مرتبط شود. در نهایت، میتوانید یک جفت کلید success/true اضافی برای نشان دادن موفقیت عملیات اضافه کنید. و در صورت خطا، باید یک Map با کلیدی به نام، مثلاً error ، برگردانید و پیام خطا را به مقدار مرتبط مرتبط کنید. این به LLM کمک میکند تا بفهمد که آیا فراخوانی به دلیلی موفق بوده یا شکست خورده است.
- در صورت موفقیت، مقدار زیر را برمیگرداند:
{"stock_price": 123} - در صورت بروز خطا، مقدار زیر را برگردانید:
{"error": "Impossible to retrieve stock price for XYZ"}
سپس این کلاس را با دستور زیر اجرا کنید:
mvn compile exec:java -Dexec.mainClass=com.example.agent.StockTicker
اکنون میتوانید از نماینده قیمت سهام بپرسید، مثلاً What's the stock price for GOOG? باید پاسخها را دریافت کنید و ببینید که از ابزار lookup_stock_ticker استفاده میشود.
۵. قدرت جستجوی گوگل برای اطلاعات بهروز

ADK برای جاوا با ابزارهای قدرتمندی ارائه میشود که از جمله آنها میتوان به GoogleSearchTool اشاره کرد. با استفاده از این ابزار، نماینده شما میتواند درخواست استفاده از جستجوی گوگل را برای یافتن اطلاعات مرتبط با هدف خود داشته باشد.
در واقع، دانش یک LLM در زمان منجمد شده است: تا یک تاریخ مشخص ("تاریخ پایان") با دادههایی که به روز هستند، آموزش دیده است. این بدان معناست که LLMها ممکن است لزوماً از وقایع اخیر اطلاعی نداشته باشند، یا دانش آنها محدود و سطحی باشد، و کمک یک موتور جستجو ممکن است حافظه آنها را تازه کند یا اطلاعات بیشتری در مورد موضوع به آنها بیاموزد.
بیایید نگاهی به این عامل جستجوی اخبار ساده بیندازیم:
// src/main/java/com/example/agent/LatestNews.java
package com.example.agent;

import java.time.LocalDate;
import com.google.adk.agents.LlmAgent;
import com.google.adk.tools.GoogleSearchTool;
import com.google.adk.web.AdkWebServer;

public class LatestNews {
    public static void main(String[] args) {
        AdkWebServer.start(LlmAgent.builder()
            .name("news-search-agent")
            .description("A news search agent")
            .instruction("""
                You are a news search agent.
                Use the `google_search` tool
                when asked to search for recent events and information.
                Today is \
                """ + LocalDate.now())
            .model("gemini-2.5-flash")
            .tools(new GoogleSearchTool())
            .build());
    }
}
توجه کنید که چگونه نمونهای از ابزار جستجو را با استفاده از دستور زیر ارسال کردیم: tools(new GoogleSearchTool()) . این همان چیزی است که به عامل ما این امکان را میدهد تا با آخرین اطلاعات موجود در وب، بهروز شود. همچنین، اعلان، تاریخ روز را مشخص کرده است، زیرا ممکن است به LLM کمک کند تا بفهمد چه زمانی سوالات مربوط به اطلاعات گذشته است و جستجوی اطلاعات جدیدتر مورد نیاز است.
سپس این کلاس را با دستور زیر اجرا کنید:
mvn compile exec:java -Dexec.mainClass=com.example.agent.LatestNews
میتوانید با سوال بازی کنید، مثلاً میتوانید بپرسید: What's the latest news in the world?
مرحله کد: عامل جستجو به عنوان یک ابزار
به جای اینکه GoogleSearchTool مستقیماً به عنوان یک ابزار به یک عامل (agent) ارسال کنید، میتوانید یک عامل جستجوی اختصاصی ایجاد کنید که قابلیت جستجو را در خود جای داده و آن عامل را به عنوان ابزاری در اختیار یک عامل سطح بالاتر قرار دهد.
این یک مفهوم پیشرفته است که به شما امکان میدهد رفتارهای پیچیده (مانند جستجو و خلاصهسازی نتایج) را به یک زیرعامل تخصصی واگذار کنید. این رویکرد اغلب برای گردشهای کاری پیچیدهتر مفید است.
// src/main/java/com/example/agent/SearchAgentAsTool.java
package com.example.agent;

import java.time.LocalDate;

import com.google.adk.agents.LlmAgent;
import com.google.adk.tools.AgentTool;
import com.google.adk.tools.GoogleSearchTool;
import com.google.adk.web.AdkWebServer;

public class SearchAgentAsTool {
    public static void main(String[] args) {
        // 1. Define the specialized Search Agent
        LlmAgent searchAgent = LlmAgent.builder()
            .name("news-search-agent-tool")
            .description("Searches for recent events and provides a concise summary.")
            .instruction("""
                You are a concise information retrieval specialist.
                Use the `google_search` tool to find information.
                Always provide the answer as a short,
                direct summary, without commentary.
                Today is \
                """ + LocalDate.now())
            .model("gemini-2.5-flash")
            .tools(new GoogleSearchTool()) // This agent uses the Google Search Tool
            .build();

        // 2. Wrap the Search Agent as a Tool
        AgentTool searchTool = AgentTool.create(searchAgent);

        // 3. Define the Main Agent that uses the Search Agent Tool
        AdkWebServer.start(LlmAgent.builder()
            .name("main-researcher")
            .description("Main agent for answering complex, up-to-date questions.")
            .instruction("""
                You are a sophisticated research assistant.
                When the user asks a question that requires up-to-date or external information,
                you MUST use the `news-search-agent-tool` to get the facts before answering.
                After the tool returns the result, synthesize the final answer for the user.
                """)
            .model("gemini-2.5-flash")
            .tools(searchTool) // This agent uses the Search Agent as a tool
            .build()
       );
    }
}
خط AgentTool.create(searchAgent) مفهوم کلیدی در اینجا است. این خط کل searchAgent (با منطق داخلی، اعلان و ابزارهای خاص خود) را به عنوان یک ابزار قابل فراخوانی واحد برای mainAgent ثبت میکند. این امر باعث افزایش ماژولاریتی و قابلیت استفاده مجدد میشود.
این کلاس را با دستور زیر اجرا کنید:
mvn compile exec:java -Dexec.mainClass=com.example.agent.SearchAgentAsTool
برای سوالات پیش پا افتاده، عامل از پایگاه دانش خود پاسخ میدهد، اما وقتی در مورد رویدادهای اخیر از او سوال میشود، جستجو را با استفاده از ابزار جستجوی گوگل به عامل جستجوی تخصصی واگذار میکند.
۶. تسلط بر گردشهای کاری عاملمحور
برای مسائل پیچیده، یک عامل واحد کافی نیست. وقتی هدفی به آنها داده میشود که شامل زیروظایف بسیار زیادی است، با یک دستورالعمل بزرگ که با جزئیات بسیار زیادی توضیح میدهد، یا با دسترسی به تعداد زیادی از توابع، LLM ها به مشکل برمیخورند و عملکرد و دقت آنها کاهش مییابد.
کلید حل این مشکل، تقسیم و غلبه با هماهنگسازی چندین عامل تخصصی است. خوشبختانه، ADK با عوامل تخصصی داخلی مختلفی ارائه میشود:
- عامل معمولی با
subAgent()برای واگذاری وظایف به، -
SequentialAgent، برای انجام وظایف به صورت متوالی، -
ParallelAgent، برای اجرای موازی عاملها، -
LoopAgent، معمولاً برای طی کردن یک فرآیند پالایش به دفعات مورد نیاز.
موارد استفاده کلیدی و مزایا و معایب هر گردش کار چیست، لطفاً به جدول زیر نگاهی بیندازید. اما بدانید که قدرت واقعی در واقع از ترکیب چندین مورد از آنها حاصل خواهد شد!
گردش کار | کلاس ADK | مورد استفاده | مزایا | معایب |
زیر-عاملان | | وظایف کاربرمحور و انعطافپذیر که در آنها گام بعدی همیشه مشخص نیست. | انعطافپذیری بالا، محاورهای، عالی برای رباتهای کاربرپسند. | کمتر قابل پیشبینی است، برای کنترل جریان به استدلال LLM متکی است. |
متوالی | | فرآیندهای ثابت و چند مرحلهای که در آنها نظم بسیار مهم است. | قابل پیشبینی، قابل اعتماد، اشکالزدایی آسان، تضمینکننده نظم. | انعطافپذیر نیست، اگر وظایف بتوانند موازی شوند، میتواند کندتر باشد. |
موازی | | جمعآوری دادهها از منابع متعدد یا اجرای وظایف مستقل. | بسیار کارآمد، به طور قابل توجهی تأخیر را برای وظایف ورودی/خروجی کاهش میدهد. | همه وظایف اجرا میشوند؛ بدون اتصال کوتاه. برای وظایفی که وابستگی دارند، کمتر مناسب است. |
حلقه | | پالایش تکراری، خوداصلاحی یا فرآیندهایی که تا زمان برآورده شدن یک شرط تکرار میشوند. | قدرتمند برای حل مسائل پیچیده، به عاملها این امکان را میدهد که کار خود را بهبود بخشند. | اگر با دقت طراحی نشود، میتواند منجر به حلقههای بینهایت شود (همیشه از maxIterations استفاده کنید!). |
۷. گردشهای کاری عاملمحور - تفویض اختیار با عاملهای فرعی

یک نماینده سرپرست میتواند وظایف خاصی را به نمایندگان فرعی واگذار کند. برای مثال، نماینده یک وبسایت تجارت الکترونیک را تصور کنید که سوالات مربوط به سفارش را به یک نماینده ("وضعیت سفارش من چیست؟") و سوالات خدمات پس از فروش را به نماینده دیگری ("من نمیدانم چگونه آن را روشن کنم!") واگذار میکند. این مورد استفادهای است که میخواهیم در مورد آن بحث کنیم.
// src/main/java/com/example/agent/SupportAgent.java
package com.example.agent;

import com.google.adk.agents.LlmAgent;
import com.google.adk.web.AdkWebServer;

public class SupportAgent {
    public static void main(String[] args) {
        LlmAgent orderAgent = LlmAgent.builder()
            .name("order-agent")
            .description("Order agent")
            .instruction("""
                Your role is to help our customers
                with all the questions they may have about their orders.
                Always respond that the order has been received, prepared,
                and is now out for delivery.
                """)
            .model("gemini-2.5-flash")
            .build();

        LlmAgent afterSaleAgent = LlmAgent.builder()
            .name("after-sale-agent")
            .description("After sale agent")
            .instruction("""
                You are an after sale agent,
                helping customers with the product they received.
                When a customer has a problem,
                suggest the person to switch the product off and on again.
                """)
            .model("gemini-2.5-flash")
            .build();

        AdkWebServer.start(LlmAgent.builder()
            .name("support-agent")
            .description("Customer support agent")
            .instruction("""
                Your role is to help our customers.
                Call the `order-agent` for all questions related to order status.
                Call the `after-sale-agent` for inquiries about the received product.
                """)
            .model("gemini-2.5-flash")
            .subAgents(afterSaleAgent, orderAgent)
            .build()
        );
    }
}
خط کلیدی در اینجا جایی است که متد subAgents() فراخوانی میشود و دو زیرعامل را که نقش خاص آنها به طور جداگانه توسط یکدیگر مدیریت خواهد شد، ارسال میکند.
مثال بالا را با دستور زیر اجرا کنید:
mvn compile exec:java -Dexec.mainClass=com.example.agent.SupportAgent
میتوانید سوالاتی مانند I have a question about my order یا I have a question about my received order بپرسید. بسته به سوال پرسیده شده، باید نماینده اصلی را به نماینده مناسب ارجاع دهید.
این مفهوم واگذاری وظایف به زیردستان، منعکسکننده مدیریت انسانی مؤثر است، جایی که یک مدیر خوب (سرپرست) برای انجام وظایف خاصی که تخصص بیشتری در آنها دارند، به کارمندان متخصص (زیردستان) متکی است. سرپرست نیازی به دانستن جزئیات هر فرآیند ندارد؛ در عوض، درخواست مشتری (مانند درخواست سفارش یا یک مشکل فنی) را هوشمندانه به «عضو تیم» واجد شرایط هدایت میکند و پاسخی با کیفیت بالاتر و کارآمدتر از آنچه یک متخصص عمومی میتواند به تنهایی ارائه دهد، تضمین میکند. علاوه بر این، این زیردستان میتوانند بدون نیاز به درک کل فرآیند پیچیده و فراگیر، کاملاً بر وظایف فردی خود تمرکز کنند.
۸. گردشهای کاری عاملمحور - خط مونتاژ
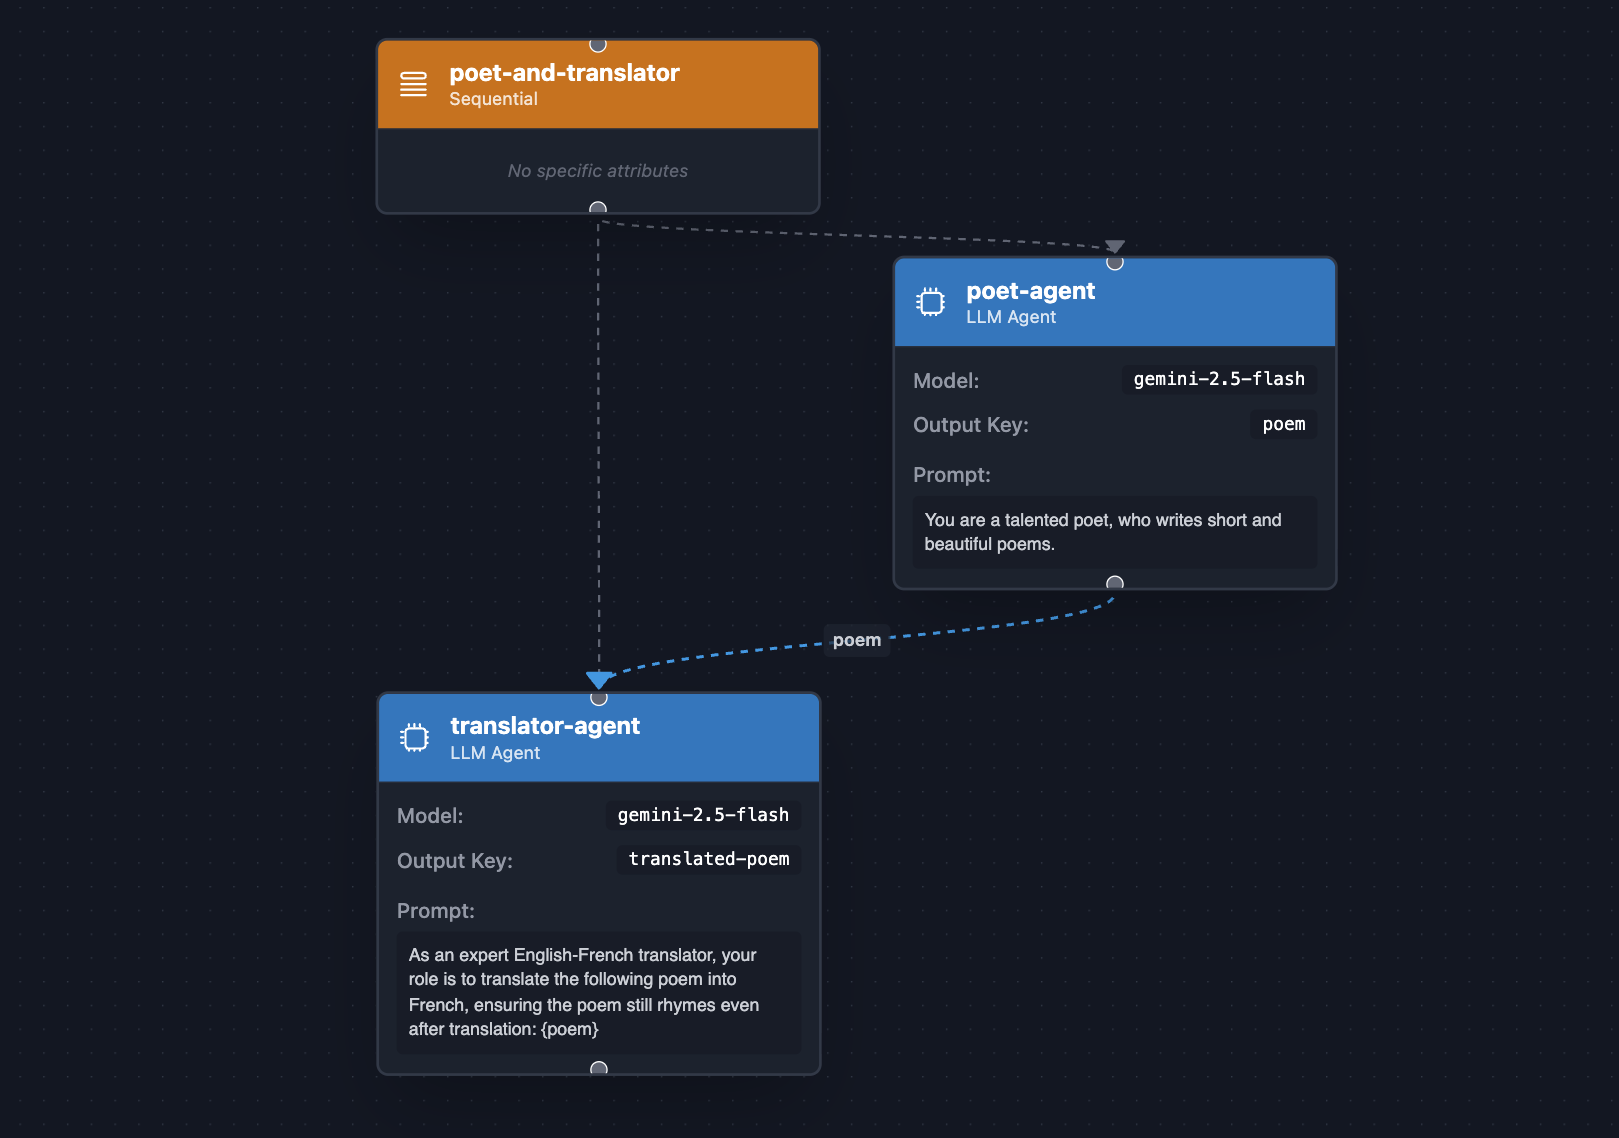
وقتی ترتیب عملیات مهم است، از یک SequentialAgent استفاده کنید. این مانند یک خط مونتاژ است که زیرعاملها را با ترتیب ثابتی اجرا میکند که در آن هر مرحله میتواند به مرحله قبلی وابسته باشد.
بیایید تصور کنیم که یک شاعر انگلیسی با یک مترجم انگلیسی-فرانسوی همکاری میکند تا ابتدا اشعاری را به انگلیسی بنویسد و سپس آنها را به فرانسوی ترجمه کند:
// src/main/java/com/example/agent/PoetAndTranslator.java
package com.example.agent;

import com.google.adk.agents.LlmAgent;
import com.google.adk.agents.SequentialAgent;
import com.google.adk.web.AdkWebServer;

public class PoetAndTranslator {
    public static void main(String[] args) {
        LlmAgent poet = LlmAgent.builder()
            .name("poet-agent")
            .description("Poet writing poems")
            .model("gemini-2.5-flash")
            .instruction("""
                You are a talented poet,
                who writes short and beautiful poems.
                """)
            .outputKey("poem")
            .build();

        LlmAgent translator = LlmAgent.builder()
            .name("translator-agent")
            .description("English to French translator")
            .model("gemini-2.5-flash")
            .instruction("""
                As an expert English-French translator,
                your role is to translate the following poem into French,
                ensuring the poem still rhymes even after translation:

                {poem}
                """)
            .outputKey("translated-poem")
            .build();

        AdkWebServer.start(SequentialAgent.builder()
            .name("poet-and-translator")
            .subAgents(poet, translator)
            .build());
    }
}
مثال را اجرا کنید:
mvn compile exec:java -Dexec.mainClass=com.example.agent.PoetAndTranslator
حالا، میتوانید از نماینده چیزی شبیه به این بپرسید Write me a poem about a lonely software developer . شما باید یک شعر به زبان انگلیسی دریافت کنید و سپس آن را به فرانسوی ترجمه کنید.
این تجزیه سیستماتیک وظایف پیچیده به زیروظایف کوچکتر و منظم، فرآیندی قطعیتر و قابل اعتمادتر را تضمین میکند و احتمال دستیابی به نتیجه موفقیتآمیز را در مقایسه با تکیه بر یک عامل واحد و با اهداف گسترده، به طور قابل توجهی افزایش میدهد.
تجزیه مؤثر یک وظیفه به دنبالهای از زیروظایف (در صورت امکان و منطقی بودن) برای دستیابی به نتایج قطعیتر و موفقتر بسیار مهم است، زیرا امکان پیشرفت ساختاریافته و مدیریت وابستگی بین مراحل را فراهم میکند.
۹. گردشهای کاری عاملمحور - کار موازی
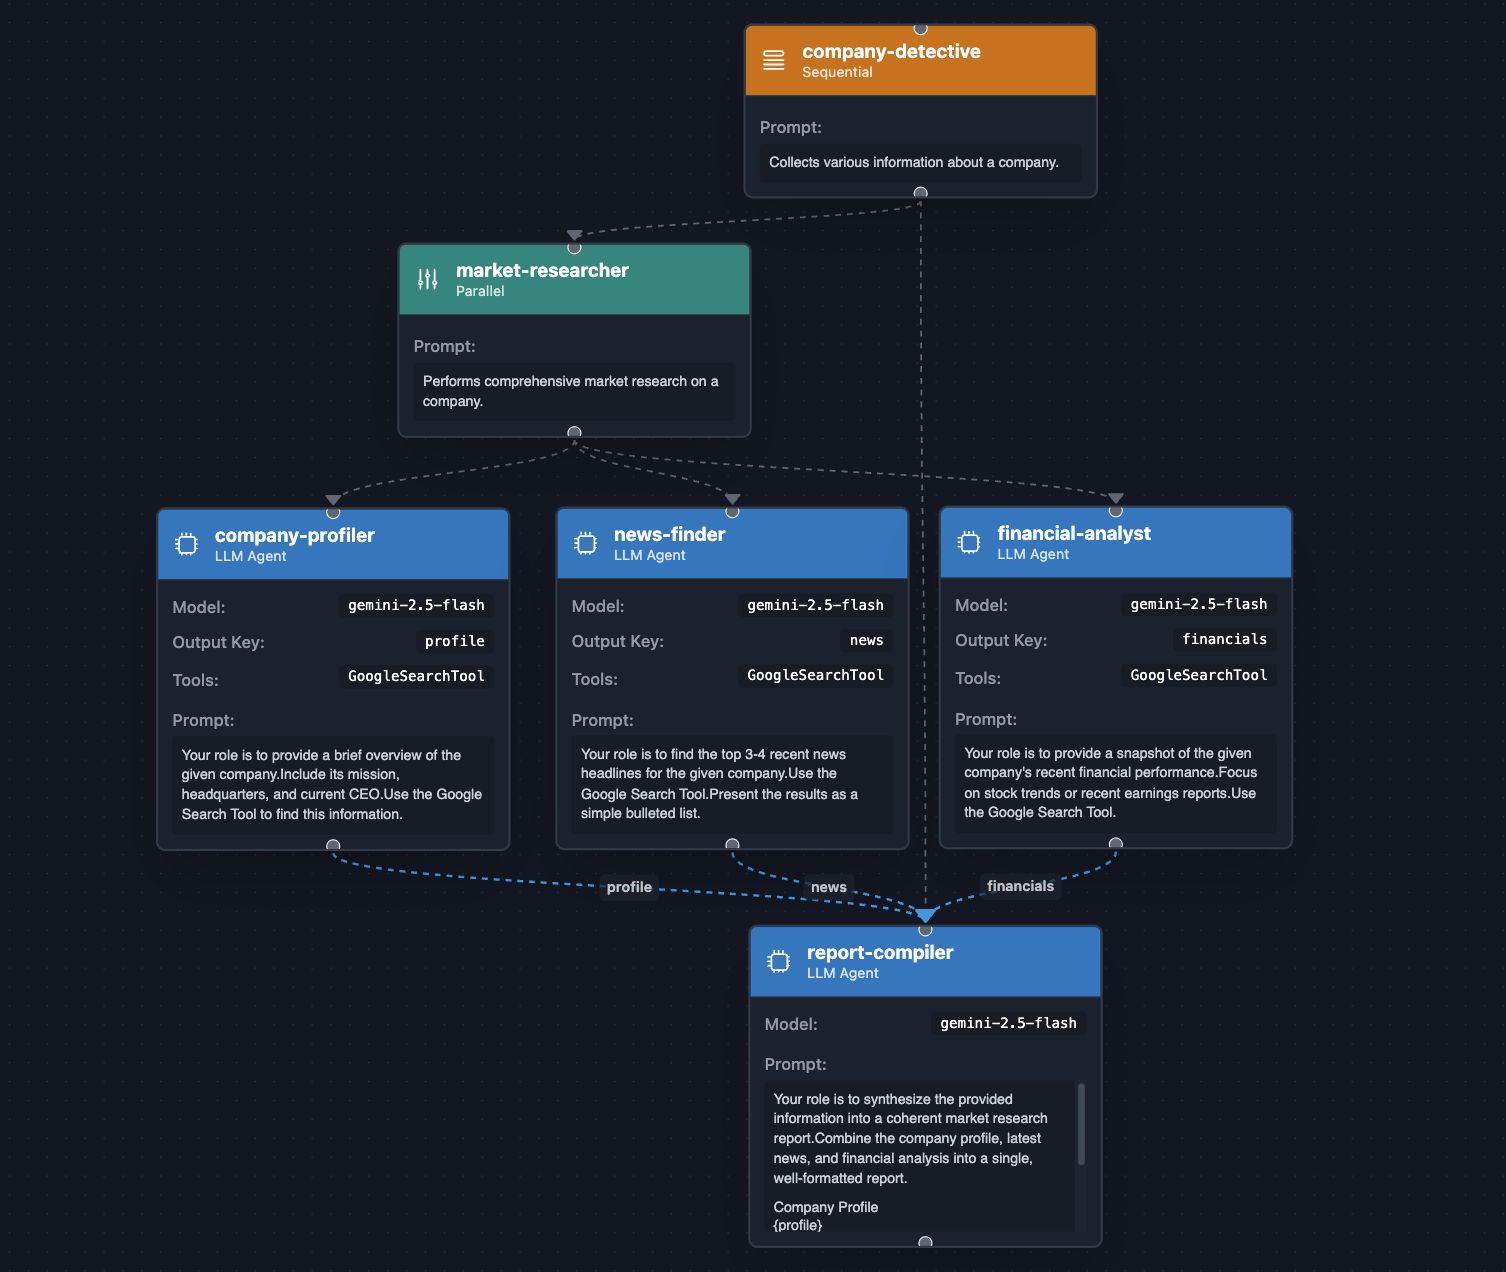
وقتی وظایف مستقل هستند، یک ParallelAgent با اجرای همزمان آنها، افزایش بهرهوری زیادی را فراهم میکند. در مثال زیر، ما حتی یک SequentialAgent با یک ParallelAgent ترکیب خواهیم کرد: وظایف موازی ابتدا اجرا میشوند و سپس یک عامل نهایی، نتیجه وظایف موازی را خلاصه میکند.
بیایید یک کارآگاه شرکت بسازیم که وظیفهاش جستجوی اطلاعات در مورد موارد زیر باشد:
- مشخصات شرکت (مدیرعامل، دفتر مرکزی، شعار و غیره)
- آخرین اخبار مربوط به شرکت.
- جزئیات مربوط به صورتهای مالی شرکت.
// src/main/java/com/example/agent/CompanyDetective.java
package com.example.agent;

import com.google.adk.agents.LlmAgent;
import com.google.adk.agents.ParallelAgent;
import com.google.adk.agents.SequentialAgent;
import com.google.adk.tools.GoogleSearchTool;
import com.google.adk.web.AdkWebServer;

public class CompanyDetective {
    public static void main(String[] args) {
        var companyProfiler = LlmAgent.builder()
            .name("company-profiler")
            .description("Provides a general overview of a company.")
            .instruction("""
                Your role is to provide a brief overview of the given company.
                Include its mission, headquarters, and current CEO.
                Use the Google Search Tool to find this information.
                """)
            .model("gemini-2.5-flash")
            .tools(new GoogleSearchTool())
            .outputKey("profile")
            .build();

        var newsFinder = LlmAgent.builder()
            .name("news-finder")
            .description("Finds the latest news about a company.")
            .instruction("""
                Your role is to find the top 3-4 recent news headlines for the given company.
                Use the Google Search Tool.
                Present the results as a simple bulleted list.
                """)
            .model("gemini-2.5-flash")
            .tools(new GoogleSearchTool())
            .outputKey("news")
            .build();

        var financialAnalyst = LlmAgent.builder()
            .name("financial-analyst")
            .description("Analyzes the financial performance of a company.")
            .instruction("""
                Your role is to provide a snapshot of the given company's recent financial performance.
                Focus on stock trends or recent earnings reports.
                Use the Google Search Tool.
                """)
            .model("gemini-2.5-flash")
            .tools(new GoogleSearchTool())
            .outputKey("financials")
            .build();

        var marketResearcher = ParallelAgent.builder()
            .name("market-researcher")
            .description("Performs comprehensive market research on a company.")
            .subAgents(
                companyProfiler,
                newsFinder,
                financialAnalyst
            )
            .build();

        var reportCompiler = LlmAgent.builder()
            .name("report-compiler")
            .description("Compiles a final market research report.")
            .instruction("""
                Your role is to synthesize the provided information into a coherent market research report.
                Combine the company profile, latest news, and financial analysis into a single, well-formatted report.

                ## Company Profile
                {profile}

                ## Latest News
                {news}

                ## Financial Snapshot
                {financials}
                """)
            .model("gemini-2.5-flash")
            .build();

        AdkWebServer.start(SequentialAgent.builder()
            .name("company-detective")
            .description("Collects various information about a company.")
            .subAgents(
                marketResearcher,
                reportCompiler
            ).build());
    }
}
طبق معمول، میتوانید عامل را با دستور زیر اجرا کنید:
mvn compile exec:java -Dexec.mainClass=com.example.agent.CompanyDetective
از آن در مورد شرکتهای مختلف مانند گوگل یا اپل بپرسید و ببینید چه چیزی به شما برمیگردد.
این عامل، ترکیبی قدرتمند از گردشهای کاری را نشان میدهد که در آن، هم از عاملهای موازی و هم از عاملهای متوالی به خوبی استفاده میشود و این به لطف موازیسازی تحقیق و ترکیب اطلاعات، به شیوهای کارآمد انجام میشود.
۱۰. گردشهای کاری عاملمحور - پالایش تکراری
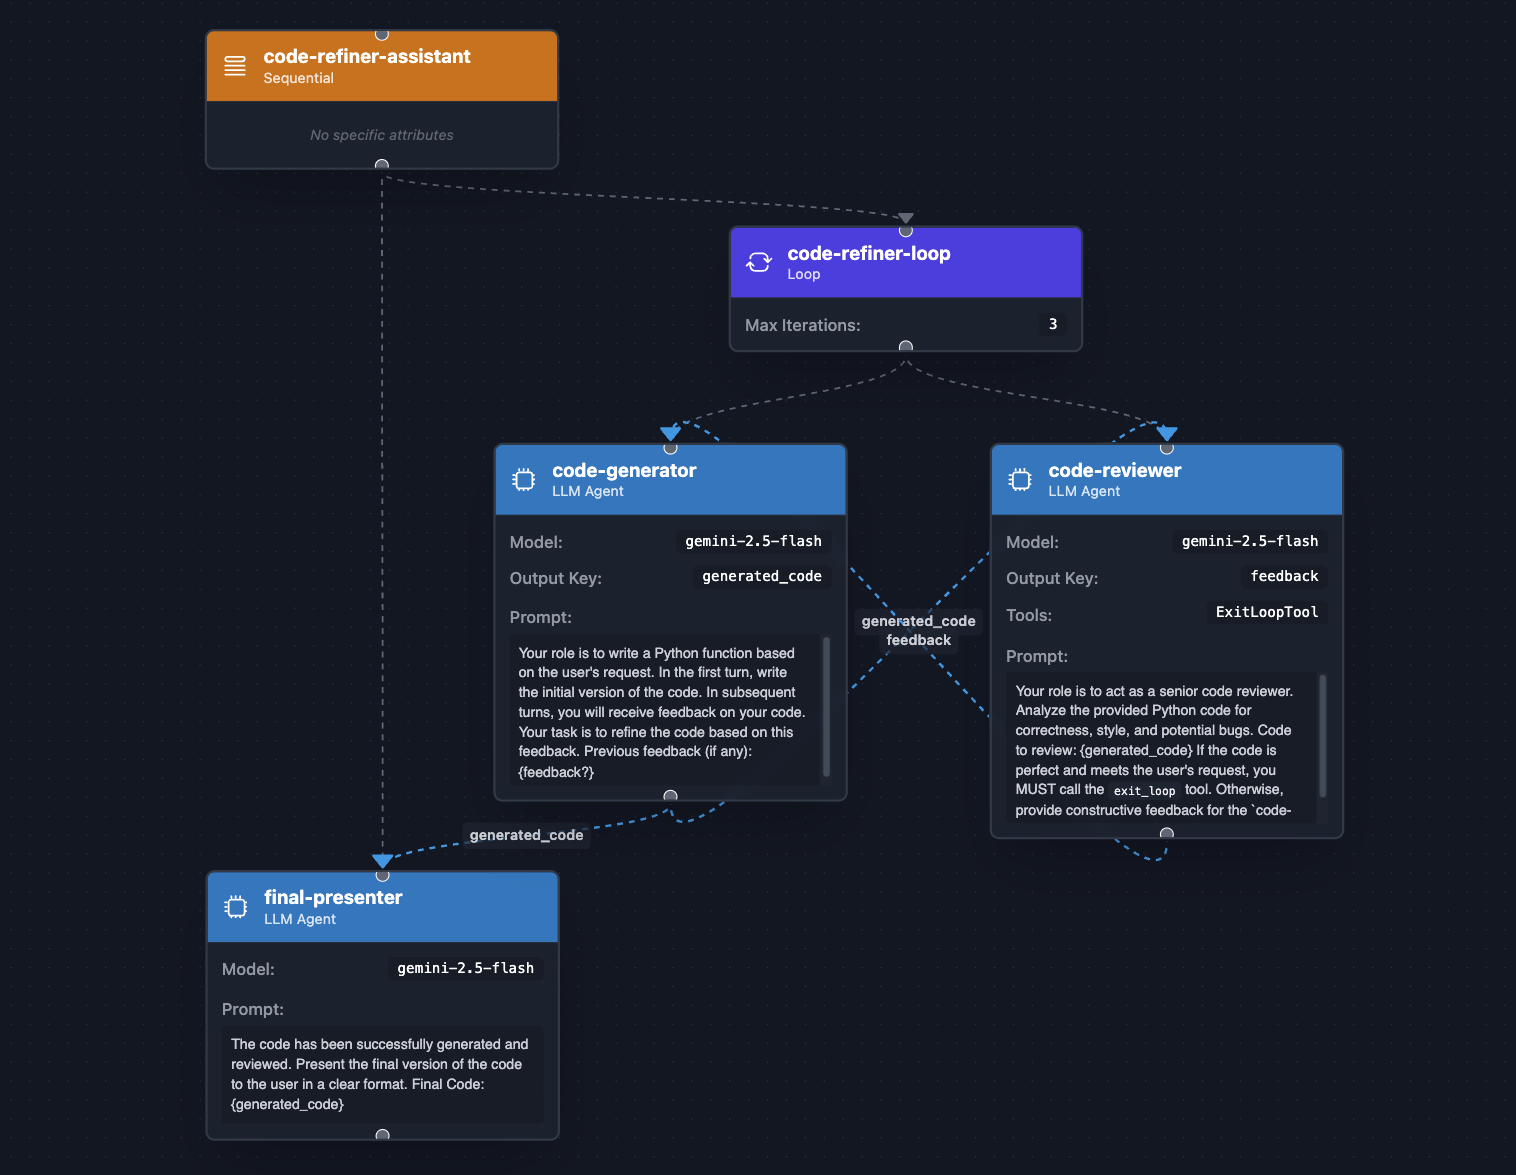
برای وظایفی که نیاز به چرخه "تولید → بررسی → اصلاح" دارند، از LoopAgent استفاده کنید. این LoopAgent بهبود تکراری را تا رسیدن به هدف، خودکار میکند. مشابه SequentialAgent ، LoopAgent به صورت سریالی sub-agent را فراخوانی میکند، اما در ابتدا به عقب برمیگردد. این LLM است که به صورت داخلی توسط agent استفاده میشود و تصمیم میگیرد که آیا فراخوانی به یک ابزار خاص، ابزار داخلی exit_loop ، را برای توقف اجرای حلقه درخواست کند یا خیر.
مثال پالایشگر کد زیر، با استفاده از یک LoopAgent ، پالایش کد را خودکار میکند: تولید، بررسی، تصحیح. این کار از توسعه انسانی تقلید میکند. یک تولیدکننده کد ابتدا کد درخواستی را تولید میکند، آن را در حالت عامل تحت کلید generated_code ذخیره میکند. سپس یک بررسیکننده کد، کد تولید شده را بررسی میکند و یا بازخوردی (تحت کلید feedback ) ارائه میدهد، یا یک ابزار حلقه خروج را برای پایان دادن زودهنگام به تکرار فراخوانی میکند.
بیایید نگاهی به کد بیندازیم:
// src/main/java/com/example/agent/CodeRefiner.java
package com.example.agent;

import com.google.adk.agents.LlmAgent;
import com.google.adk.agents.LoopAgent;
import com.google.adk.agents.SequentialAgent;
import com.google.adk.tools.ExitLoopTool;
import com.google.adk.web.AdkWebServer;

public class CodeRefiner {
    public static void main(String[] args) {
        var codeGenerator = LlmAgent.builder()
            .name("code-generator")
            .description("Writes and refines code based on a request and feedback.")
            .instruction("""
                Your role is to write a Python function based on the user's request.
                In the first turn, write the initial version of the code.
                In subsequent turns, you will receive feedback on your code.
                Your task is to refine the code based on this feedback.

                Previous feedback (if any):
                {feedback?}
                """)
            .model("gemini-2.5-flash")
            .outputKey("generated_code")
            .build();

        var codeReviewer = LlmAgent.builder()
            .name("code-reviewer")
            .description("Reviews code and decides if it's complete or needs more work.")
            .instruction("""
                Your role is to act as a senior code reviewer.
                Analyze the provided Python code for correctness, style, and potential bugs.

                Code to review:
                {generated_code}

                If the code is perfect and meets the user's request,
                you MUST call the `exit_loop` tool.

                Otherwise, provide constructive feedback for the `code-generator to improve the code.
                """)
            .model("gemini-2.5-flash")
            .outputKey("feedback")
            .tools(ExitLoopTool.INSTANCE)
            .build();

        var codeRefinerLoop = LoopAgent.builder()
            .name("code-refiner-loop")
            .description("Iteratively generates and reviews code until it is correct.")
            .subAgents(
                codeGenerator,
                codeReviewer
            )
            .maxIterations(3) // Safety net to prevent infinite loops
            .build();

        var finalPresenter = LlmAgent.builder()
            .name("final-presenter")
            .description("Presents the final, accepted code to the user.")
            .instruction("""
                The code has been successfully generated and reviewed.
                Present the final version of the code to the user in a clear format.

                Final Code:
                {generated_code}
                """)
            .model("gemini-2.5-flash")
            .build();

        AdkWebServer.start(SequentialAgent.builder()
            .name("code-refiner-assistant")
            .description("Manages the full code generation and refinement process.")
            .subAgents(
                codeRefinerLoop,
                finalPresenter)
            .build());
    }
}
این عامل را با دستور زیر اجرا کنید:
mvn compile exec:java -Dexec.mainClass=com.example.agent.CodeRefiner
میتوانید از آن بخواهید چیزی پیچیده مانند Tower of Hanoi یا Quicksort Algorithm را پیادهسازی کند.
حلقههای بازخورد/اصلاح، که با استفاده از LoopAgent پیادهسازی میشوند، برای حل مسائلی که نیاز به بهبود مکرر و خوداصلاحی دارند، ضروری هستند و فرآیندهای شناختی انسان را به دقت تقلید میکنند. این الگوی طراحی به ویژه برای کارهایی که خروجی اولیه به ندرت بینقص است، مانند تولید کد، نوشتن خلاق، تکرار طراحی یا تجزیه و تحلیل دادههای پیچیده، مفید است. با چرخش خروجی از طریق یک عامل بررسیکننده تخصصی که بازخورد ساختاریافته ارائه میدهد، عامل تولیدکننده میتواند به طور مداوم کار خود را تا زمانی که یک معیار تکمیل از پیش تعریفشده برآورده شود، اصلاح کند و منجر به نتایج نهایی با کیفیت بالاتر و قابل اعتمادتر نسبت به رویکرد تک مرحلهای شود.
۱۱. تبریک میگویم!

شما با موفقیت انواع عاملهای هوش مصنوعی، از عاملهای محاورهای ساده گرفته تا سیستمهای پیچیده و چندعاملی، را ساخته و بررسی کردهاید. مفاهیم اصلی ADK برای جاوا را آموختهاید: تعریف عاملها با دستورالعملها، توانمندسازی آنها با ابزارها و هماهنگسازی آنها در گردشهای کاری قدرتمند.
بعدش چی؟
- مخزن رسمی ADK برای جاوا در گیتهاب را بررسی کنید.
- برای کسب اطلاعات بیشتر در مورد این چارچوب، مستندات آن را مطالعه کنید.
- در این مجموعه وبلاگ، درباره گردشهای کاری عاملمحور مختلف و ابزارهای مختلف موجود بخوانید.
- عمیقتر به سایر ابزارهای داخلی و فراخوانیهای پیشرفته بپردازید.
- مدیریت زمینه، وضعیت و مصنوعات، برای تعاملات غنیتر و چندوجهی.
- افزونههایی را پیادهسازی و اعمال کنید که به چرخه عمر نمایندگان شما متصل میشوند.
- سعی کنید عامل خودتان را بسازید که یک مشکل دنیای واقعی را حل کند!