
1. AI 에이전트 개발자 여러분, 환영합니다.
이 Codelab에서는 Java용 에이전트 개발 키트 (ADK)를 사용하여 Java로 AI 에이전트를 빌드하는 방법을 알아봅니다. 단순한 대규모 언어 모델 (LLM) API 호출을 넘어 추론, 계획, 도구 사용, 협업을 통해 복잡한 문제를 해결할 수 있는 자율 AI 에이전트를 만들어 보겠습니다.
먼저 Google Cloud 크레딧을 사용하고 Google Cloud 환경을 설정한 다음 첫 번째 간단한 에이전트를 빌드하고 맞춤 도구, 웹 검색, 다중 에이전트 오케스트레이션과 같은 고급 기능을 점진적으로 추가합니다.
학습할 내용
- 기본적인 페르소나 기반 AI 에이전트를 만드는 방법
- 커스텀 및 기본 제공 도구 (예: Google 검색)로 에이전트를 지원하는 방법
- Java로 구현된 자체 도구를 추가하는 방법
- 여러 에이전트를 강력한 순차, 병렬, 루프 워크플로로 조정하는 방법
필요한 항목
- 시크릿 모드에서 사용할 웹브라우저입니다.
- 개인 Gmail 계정
- 개인 Gmail 계정과 연결된 새 Google Cloud 프로젝트
- 사용된 Google Cloud 크레딧으로 생성된 결제 계정
- 소스 코드를 체크아웃하는 git 명령줄 도구
- Java 17 이상 및 Apache Maven
- IntelliJ IDEA, VS Code와 같은 텍스트 편집기 또는 IDE
Google Cloud 콘솔의 Cloud Shell에 내장된 코드 편집기를 사용할 수 있습니다.
2. 설정: 환경
워크숍용 Google Cloud 크레딧 청구
강사 주도 워크숍의 경우 워크숍에 사용할 Google Cloud 크레딧을 청구할 수 있는 웹사이트 링크가 제공됩니다.
- 개인 Google 계정 사용: 회사 또는 학교 이메일 주소는 작동하지 않으므로 개인 Google 계정 (예: gmail.com 주소)을 사용하는 것이 중요합니다.
- Chrome을 시크릿 모드로 사용: 깨끗한 세션을 만들고 다른 Google 계정과의 충돌을 방지하는 것이 좋습니다.
- 특별 이벤트 링크 사용: 이벤트용 특별 링크를 사용해야 합니다. 링크는 https://trygcp.dev/event/xxx와 같이 표시되며 뒤에 이벤트 코드 (이 예에서는 'xxx')가 붙습니다.
- 서비스 약관에 동의: 로그인하면 Google Cloud Platform 서비스 약관이 표시되며, 계속하려면 이에 동의해야 합니다.
- 새 프로젝트 만들기: Google Cloud 콘솔에서 새 빈 프로젝트를 만들어야 합니다.
- 결제 계정 연결: 새로 만든 프로젝트를 결제 계정에 연결합니다.
- 크레딧 확인: 다음 동영상에서는 결제 페이지의 '크레딧' 섹션을 확인하여 크레딧이 프로젝트에 적용되었는지 확인하는 방법을 보여줍니다.
크레딧을 사용하고 적용하는 방법을 설명하는 이 동영상을 참고하세요.
Vertex AI API 사용 설정
먼저 Vertex AI API를 사용 설정합니다. Google Cloud 콘솔에서 Vertex AI API를 검색하여 API를 사용 설정하면 됩니다. Cloud Shell에서 다음을 실행하여 이 작업을 수행할 수도 있습니다.
gcloud services enable aiplatform.googleapis.com
Vertex AI로 ADK 구성
이 Codelab에서 Vertex AI의 Gemini로 ADK AI 에이전트를 인증하려면 다음 환경 변수를 설정하세요. 고유한 프로젝트 ID를 사용해야 합니다.
macOS / Linux: 터미널을 열고 다음 명령어를 실행합니다. 이 설정을 영구적으로 적용하려면 셸의 시작 파일 (예: ~/.bash_profile, ~/.zshrc)에 이 줄을 추가합니다.
export GOOGLE_GENAI_USE_VERTEXAI=true
export GOOGLE_CLOUD_PROJECT=your-project-id
Windows (명령 프롬프트): 새 명령 프롬프트를 열고 다음을 실행합니다.
set GOOGLE_GENAI_USE_VERTEXAI=true
set GOOGLE_CLOUD_PROJECT=your-project-id
이 변경사항을 적용하려면 명령 프롬프트를 다시 시작해야 합니다.
Windows (PowerShell): PowerShell 터미널을 열고 다음을 실행합니다.
$env:GOOGLE_GENAI_USE_VERTEXAI = "true"
$env:GOOGLE_CLOUD_PROJECT = "your-project-id"
PowerShell에서 이 변경사항을 영구적으로 적용하려면 프로필 스크립트에 추가해야 합니다.
3. 시작하기: 첫 번째 에이전트
새 프로젝트를 시작하는 가장 좋은 방법은 Java용 ADK GitHub 템플릿을 사용하는 것입니다. 프로젝트 구조와 필요한 모든 종속 항목을 제공합니다.
GitHub 계정이 있는 경우 Use this template > Create a new repository를 실행한 다음 git clone 명령어를 사용하여 코드를 로컬로 체크아웃할 수 있습니다.
템플릿 사용을 위한 오른쪽 상단 메뉴를 보여주는 스크린샷입니다.

다른 방법은 해당 저장소를 직접 클론하는 것입니다.
git clone https://github.com/glaforge/adk-java-maven-template.git
Java로 첫 번째 AI 에이전트 코딩을 시작할 준비가 되었는지 확인하려면 다음을 사용하여 이 프로젝트의 코드를 컴파일할 수 있는지 확인하세요.
cd adk-java-maven-template
mvn compile
코드 단계: 친절한 과학 교사 에이전트
ADK의 기본 구성요소는 LlmAgent 클래스입니다. 대규모 언어 모델로 구동되며 특정 성격과 목표를 가진 AI라고 생각하면 됩니다. 나중에 도구를 통해 더 많은 기능을 추가하고 다른 유사한 에이전트와 긴밀하게 협력하여 더욱 강력하게 만들 예정입니다.
com.example.agent 패키지에 새 Java 클래스를 만들고 이름을 ScienceTeacher로 지정합니다.
이는 에이전트 생성의 'Hello, World!'입니다. 과학 교사의 페르소나를 가진 간단한 에이전트를 정의합니다.
// src/main/java/com/example/agent/ScienceTeacher.java
package com.example.agent;

import com.google.adk.agents.LlmAgent;
import com.google.adk.web.AdkWebServer;

public class ScienceTeacher {
    public static void main(String[] args) {
        AdkWebServer.start(
            LlmAgent.builder()
                .name("science-teacher")
                .description("A friendly science teacher")
                .instruction("""
                    You are a science teacher for teenagers.
                    You explain science concepts in a simple, concise and direct way.
                    """)
                .model("gemini-2.5-flash")
                .build()
        );
    }
}
AI 에이전트는 LlmAgent.builder() 메서드를 통해 구성됩니다. name(), description(), model() 파라미터는 필수이며, 에이전트에게 구체적인 성격과 적절한 행동을 부여하려면 항상 instruction() 메서드를 통해 자세한 안내를 제공해야 합니다.
여기서는 Gemini 2.5 Flash 모델을 사용했지만 더 복잡한 작업에는 Gemini 2.5 Pro를 사용해 보세요.
이 에이전트는 AdkWebServer.start() 메서드 내에 래핑됩니다. 이것이 소위 ADK 개발 UI 채팅 인터페이스입니다. 일반적인 채팅 인터페이스를 통해 에이전트와 대화할 수 있습니다. 또한 시스템을 통해 흐르는 모든 이벤트, LLM에 전송된 요청과 응답 등 내부적으로 어떤 일이 일어나고 있는지 이해하려는 경우에도 매우 유용합니다.
이 에이전트를 컴파일하고 로컬에서 실행하려면 다음 명령어를 실행합니다.
mvn compile exec:java -Dexec.mainClass=com.example.agent.ScienceTeacher
그런 다음 브라우저(http://localhost:8080)로 이동합니다. Cloud Shell에 있는 경우 웹 미리보기로 이동하여 포트 8080에서 미리보기를 선택하면 됩니다.
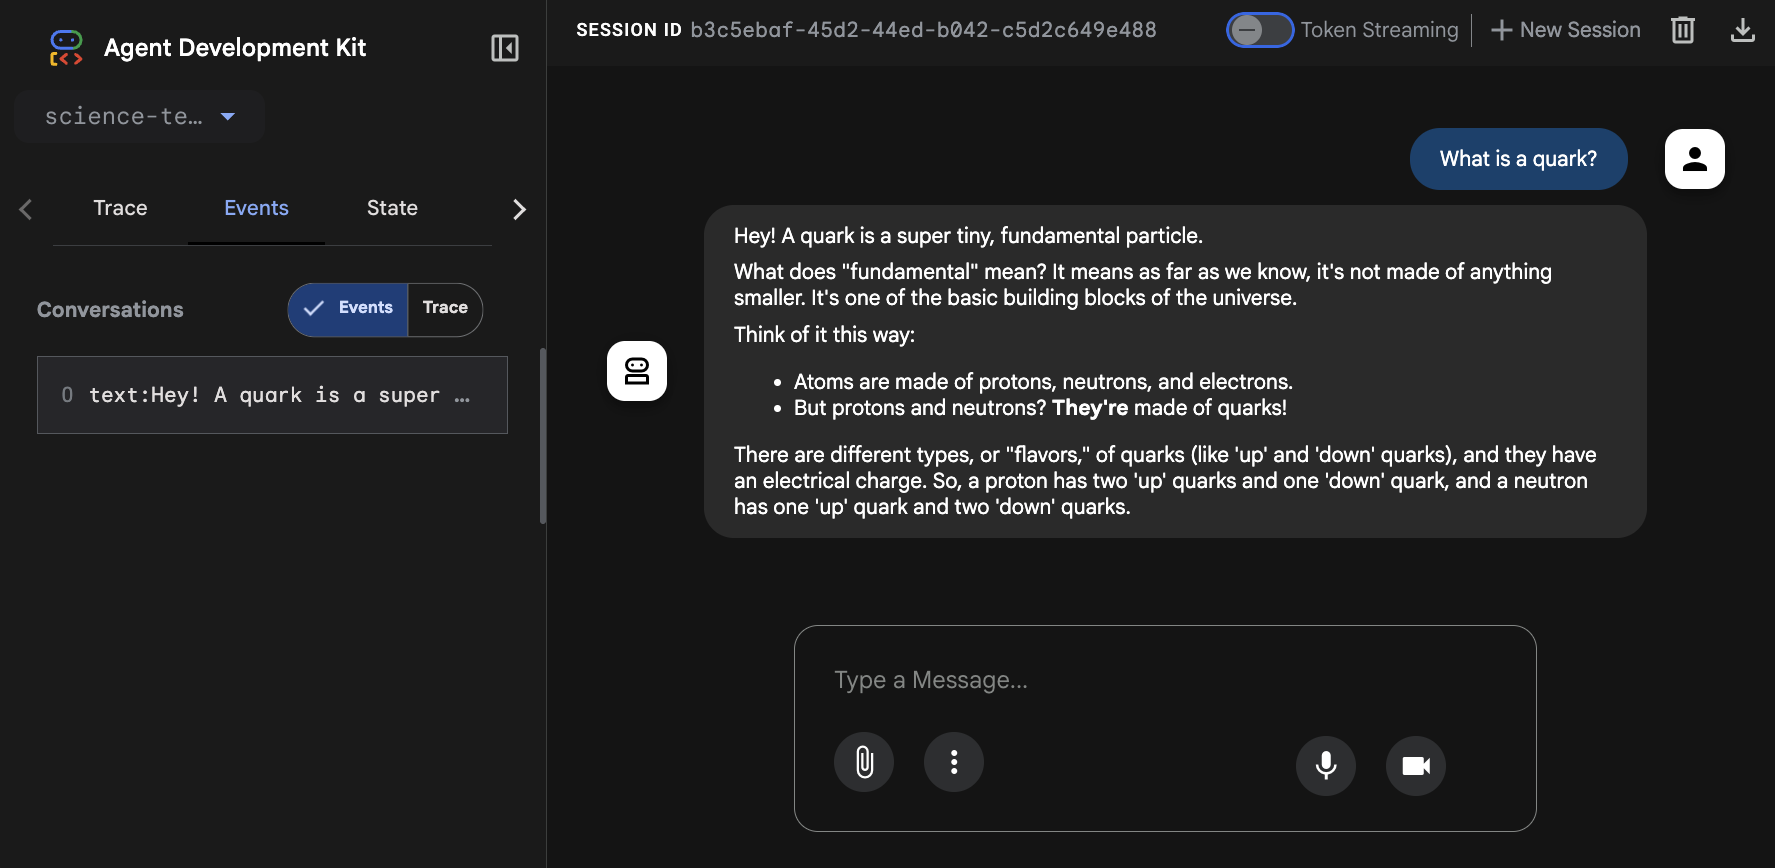
아래 스크린샷과 같이 UI가 표시됩니다. 에이전트에게 과학 관련 질문을 해 보세요.
4. 도구로 에이전트 지원

상담사가 도구를 사용해야 하는 이유는 무엇인가요? LLM은 강력하지만 특정 시간에 고정되어 있고 외부 세계와 상호작용할 수 없습니다. 도구가 다리 역할을 합니다. 이를 통해 에이전트는 주가나 뉴스와 같은 실시간 정보에 액세스하거나, 비공개 API를 쿼리하거나, Java로 코딩할 수 있는 작업을 실행할 수 있습니다.
코드 단계: 맞춤 도구 만들기 (StockTicker)
여기서는 주가를 조회하는 도구를 에이전트에게 제공합니다. 상담사는 사용자가 가격을 요청하면 Java 메서드를 호출해야 한다고 추론합니다.
// src/main/java/com/example/agent/StockTicker.java
package com.example.agent;

import com.google.adk.agents.LlmAgent;
import com.google.adk.tools.Annotations.Schema;
import com.google.adk.tools.FunctionTool;
import com.google.adk.web.AdkWebServer;
import java.util.Map;

public class StockTicker {
    public static void main(String[] args) {
        AdkWebServer.start(
            LlmAgent.builder()
                .name("stock_agent")
                .instruction("""
                    You are a stock exchange ticker expert.
                    When asked about the stock price of a company,
                    use the `lookup_stock_ticker` tool to find the information.
                    """)
                .model("gemini-2.5-flash")
                .tools(FunctionTool.create(StockTicker.class, "lookupStockTicker"))
                .build()
        );
    }

    @Schema(
        name = "lookup_stock_ticker",
        description = "Lookup stock price for a given company or ticker"
    )
    public static Map<String, String> lookupStockTicker(
        @Schema(name = "company_name_or_stock_ticker", description = "The company name or stock ticker")
        String ticker) {
        // ... (logic to return a stock price)
    }
}
에이전트를 더 스마트하게 만들고 세상 (또는 자체 코드, API, 서비스 등)과 상호작용할 수 있도록 하려면 tools() 메서드를 통해 도구, 특히 커스텀 코드 도구를 사용하도록 에이전트를 구성하여 FunctionTool.create(...)를 전달하면 됩니다.
FunctionTool에는 자체 정적 메서드를 가리키는 클래스와 메서드 이름이 필요합니다. 클래스의 인스턴스와 해당 객체의 인스턴스 메서드 이름을 전달할 수도 있습니다.
@Schema 주석을 통해 메서드와 매개변수의 name 및 description를 모두 지정하는 것이 중요합니다. 이 정보는 기본 LLM이 특정 메서드를 언제 어떻게 호출해야 하는지 파악하는 데 사용되기 때문입니다.
마찬가지로 LLM이 도구를 언제 어떻게 사용해야 하는지 명확하게 안내하는 것이 좋습니다. 모델이 자체적으로 파악할 수도 있지만 instruction() 메서드에 명시적인 설명을 제공하면 함수가 적절하게 호출될 가능성이 높아집니다.
이 메서드는 Map를 반환해야 합니다. 일반적으로 결과(예: stock_price)를 나타내는 키가 있는 맵을 반환하고 주가 값을 이 키와 연결하는 것이 좋습니다. 결국 작업의 성공을 알리기 위해 추가 성공 / true 키 쌍을 추가할 수 있습니다. 오류가 발생한 경우 키가 error인 맵을 반환하고 관련 값에 오류 메시지를 연결해야 합니다. 이렇게 하면 LLM이 호출이 성공했는지 아니면 어떤 이유로 실패했는지 파악할 수 있습니다.
- 성공하면
{"stock_price": 123}를 반환합니다. - 오류 발생 시 반환:
{"error": "Impossible to retrieve stock price for XYZ"}
그런 다음 다음 명령어를 사용하여 이 클래스를 실행합니다.
mvn compile exec:java -Dexec.mainClass=com.example.agent.StockTicker
이제 에이전트에게 What's the stock price for GOOG?와 같은 주가를 물어볼 수 있습니다. 응답이 반환되고 lookup_stock_ticker 도구가 사용되고 있음을 확인할 수 있습니다.
5. 최신 정보를 위한 Google 검색의 강력한 기능

Java용 ADK에는 강력한 도구가 몇 가지 포함되어 있으며 그중 하나가 GoogleSearchTool입니다. 이 도구를 사용하면 에이전트가 목표를 달성하는 데 필요한 정보를 찾기 위해 Google 검색을 사용하도록 요청할 수 있습니다.
실제로 LLM의 지식은 특정 시점에 고정되어 있습니다. 정보가 수집된 시점만큼 최신인 데이터를 사용하여 특정 날짜('단절 날짜')까지 학습되었기 때문입니다. 즉, LLM이 최근 이벤트에 대해 알지 못하거나 지식이 제한적이고 얕을 수 있으며, 검색 엔진의 도움을 받아 기억을 되살리거나 주제에 대해 자세히 알아볼 수 있습니다.
간단한 뉴스 검색 에이전트를 살펴보겠습니다.
// src/main/java/com/example/agent/LatestNews.java
package com.example.agent;

import java.time.LocalDate;
import com.google.adk.agents.LlmAgent;
import com.google.adk.tools.GoogleSearchTool;
import com.google.adk.web.AdkWebServer;

public class LatestNews {
    public static void main(String[] args) {
        AdkWebServer.start(LlmAgent.builder()
            .name("news-search-agent")
            .description("A news search agent")
            .instruction("""
                You are a news search agent.
                Use the `google_search` tool
                when asked to search for recent events and information.
                Today is \
                """ + LocalDate.now())
            .model("gemini-2.5-flash")
            .tools(new GoogleSearchTool())
            .build());
    }
}
tools(new GoogleSearchTool())를 사용하여 검색 도구의 인스턴스를 전달하는 방법을 살펴보세요. 이를 통해 에이전트는 웹에서 찾을 수 있는 최신 정보를 빠르게 파악할 수 있습니다. 또한 프롬프트는 당일 날짜를 지정했습니다. 이는 LLM이 질문이 과거 정보에 관한 것인지, 최신 정보를 조회해야 하는지 이해하는 데 도움이 될 수 있기 때문입니다.
그런 다음 다음 명령어를 사용하여 이 클래스를 실행합니다.
mvn compile exec:java -Dexec.mainClass=com.example.agent.LatestNews
프롬프트를 자유롭게 사용해 보세요. 예를 들어 다음과 같이 요청할 수 있습니다. What's the latest news in the world?
코드 단계: 검색 에이전트를 도구로 사용
GoogleSearchTool을 에이전트에 도구로 직접 전달하는 대신 검색 기능을 캡슐화하는 전용 검색 에이전트를 만들고 해당 에이전트를 상위 에이전트의 도구로 노출할 수 있습니다.
이는 전문 하위 에이전트에게 복잡한 동작 (예: 검색 및 결과 요약)을 위임할 수 있는 고급 개념입니다. 이 접근 방식은 더 복잡한 워크플로에 유용한 경우가 많습니다.
// src/main/java/com/example/agent/SearchAgentAsTool.java
package com.example.agent;

import java.time.LocalDate;

import com.google.adk.agents.LlmAgent;
import com.google.adk.tools.AgentTool;
import com.google.adk.tools.GoogleSearchTool;
import com.google.adk.web.AdkWebServer;

public class SearchAgentAsTool {
    public static void main(String[] args) {
        // 1. Define the specialized Search Agent
        LlmAgent searchAgent = LlmAgent.builder()
            .name("news-search-agent-tool")
            .description("Searches for recent events and provides a concise summary.")
            .instruction("""
                You are a concise information retrieval specialist.
                Use the `google_search` tool to find information.
                Always provide the answer as a short,
                direct summary, without commentary.
                Today is \
                """ + LocalDate.now())
            .model("gemini-2.5-flash")
            .tools(new GoogleSearchTool()) // This agent uses the Google Search Tool
            .build();

        // 2. Wrap the Search Agent as a Tool
        AgentTool searchTool = AgentTool.create(searchAgent);

        // 3. Define the Main Agent that uses the Search Agent Tool
        AdkWebServer.start(LlmAgent.builder()
            .name("main-researcher")
            .description("Main agent for answering complex, up-to-date questions.")
            .instruction("""
                You are a sophisticated research assistant.
                When the user asks a question that requires up-to-date or external information,
                you MUST use the `news-search-agent-tool` to get the facts before answering.
                After the tool returns the result, synthesize the final answer for the user.
                """)
            .model("gemini-2.5-flash")
            .tools(searchTool) // This agent uses the Search Agent as a tool
            .build()
       );
    }
}
여기서 핵심 개념은 AgentTool.create(searchAgent) 줄입니다. searchAgent (자체 내부 로직, 프롬프트, 도구 포함)를 mainAgent의 호출 가능한 단일 도구로 등록합니다. 이렇게 하면 모듈성과 재사용성이 향상됩니다.
다음 명령어를 사용하여 이 클래스를 실행합니다.
mvn compile exec:java -Dexec.mainClass=com.example.agent.SearchAgentAsTool
일상적인 질문의 경우 에이전트가 자체 지식 기반에서 답변하지만 최근 이벤트에 대해 질문하면 Google 검색 도구를 사용하여 전문 검색 에이전트에게 검색을 위임합니다.
6. 에이전트형 워크플로 마스터하기
복잡한 문제의 경우 단일 상담사로는 충분하지 않습니다. 너무 많은 하위 작업으로 구성된 목표가 주어지거나, 너무 많은 세부정보를 설명하는 거대한 프롬프트가 주어지거나, 너무 많은 함수에 액세스할 수 있는 경우 LLM은 어려움을 겪으며 성능과 정확도가 저하됩니다.
핵심은 여러 전문 에이전트를 조정하여 분할하고 정복하는 것입니다. 다행히 ADK에는 다음과 같은 다양한 기본 제공 전문 에이전트가 포함되어 있습니다.
subAgent()에 작업을 위임하는 일반 에이전트SequentialAgent: 순서대로 작업을 실행하려면ParallelAgent를 사용하여 에이전트를 병렬로 실행합니다.LoopAgent: 필요에 따라 다듬기 프로세스를 여러 번 거치는 데 사용됩니다.
주요 사용 사례와 각 워크플로의 장단점은 아래 표를 참고하세요. 하지만 실제로는 여러 가지를 조합해야 진정한 효과를 볼 수 있습니다.
워크플로 | ADK 클래스 | 사용 사례 | 장점 | 단점 |
하위 에이전트 |
| 다음 단계를 항상 알 수 없는 사용자 중심의 유연한 작업 | 유연성이 높고 대화형이며 사용자 대상 봇에 적합합니다. | 예측 가능성이 낮으며 흐름 제어를 위해 LLM 추론에 의존합니다. |
순차형 |
| 순서가 중요한 고정된 다단계 프로세스 | 예측 가능하고 안정적이며 디버그하기 쉽고 순서를 보장합니다. | 유연하지 않으며 태스크를 병렬화할 수 있는 경우 속도가 느릴 수 있습니다. |
Parallel |
| 여러 소스에서 데이터를 수집하거나 독립적인 작업을 실행합니다. | 매우 효율적이며 I/O 바운드 작업의 지연 시간을 크게 줄입니다. | 모든 작업이 실행되며 단락이 발생하지 않습니다. 종속 항목이 있는 작업에는 적합하지 않습니다. |
Loop |
| 조건이 충족될 때까지 반복되는 반복적인 개선, 자체 수정 또는 프로세스 | 복잡한 문제 해결에 유용하며, 에이전트가 자신의 작업을 개선할 수 있습니다. | 신중하게 설계하지 않으면 무한 루프가 발생할 수 있습니다 (항상 maxIterations 사용). |
7. 에이전트형 워크플로 - 하위 에이전트를 사용한 위임
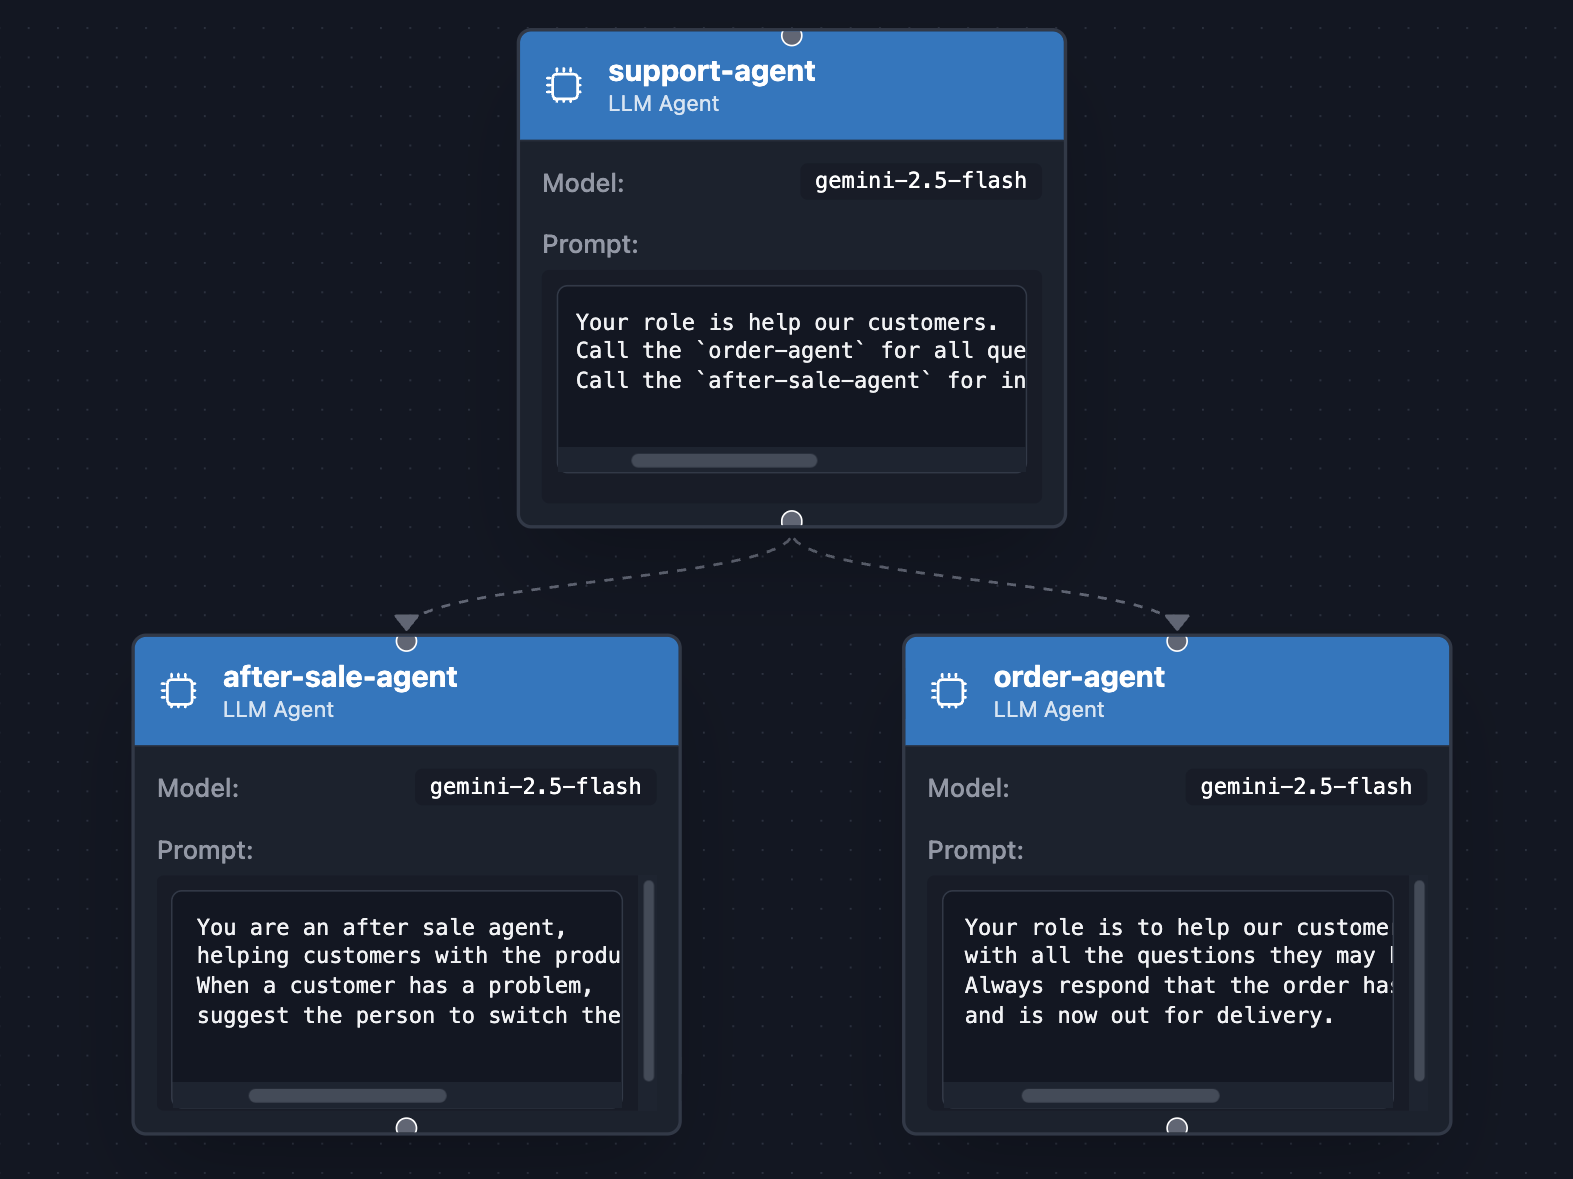
감독자 에이전트는 특정 작업을 하위 에이전트에게 위임할 수 있습니다. 예를 들어 주문 관련 질문은 한 상담사에게 ('주문 상태가 어떻게 되나요?'), 판매 후 서비스 질문은 다른 상담사에게 ('켜는 방법을 모르겠어요') 위임하는 전자상거래 웹사이트의 상담사를 생각해 보세요. 이 사용 사례에 대해 설명하겠습니다.
// src/main/java/com/example/agent/SupportAgent.java
package com.example.agent;

import com.google.adk.agents.LlmAgent;
import com.google.adk.web.AdkWebServer;

public class SupportAgent {
    public static void main(String[] args) {
        LlmAgent orderAgent = LlmAgent.builder()
            .name("order-agent")
            .description("Order agent")
            .instruction("""
                Your role is to help our customers
                with all the questions they may have about their orders.
                Always respond that the order has been received, prepared,
                and is now out for delivery.
                """)
            .model("gemini-2.5-flash")
            .build();

        LlmAgent afterSaleAgent = LlmAgent.builder()
            .name("after-sale-agent")
            .description("After sale agent")
            .instruction("""
                You are an after sale agent,
                helping customers with the product they received.
                When a customer has a problem,
                suggest the person to switch the product off and on again.
                """)
            .model("gemini-2.5-flash")
            .build();

        AdkWebServer.start(LlmAgent.builder()
            .name("support-agent")
            .description("Customer support agent")
            .instruction("""
                Your role is to help our customers.
                Call the `order-agent` for all questions related to order status.
                Call the `after-sale-agent` for inquiries about the received product.
                """)
            .model("gemini-2.5-flash")
            .subAgents(afterSaleAgent, orderAgent)
            .build()
        );
    }
}
여기서 중요한 부분은 subAgents() 메서드가 호출되어 각자의 특정 역할을 서로 별도로 처리할 두 하위 에이전트를 전달하는 부분입니다.
다음 명령어를 사용하여 위의 예시를 실행합니다.
mvn compile exec:java -Dexec.mainClass=com.example.agent.SupportAgent
I have a question about my order 또는 I have a question about my received order와 같은 질문을 할 수 있습니다. 질문에 따라 기본 에이전트가 적절한 에이전트에게 위임하는 것을 확인할 수 있습니다.
하위 에이전트에게 작업을 위임하는 이 개념은 효과적인 인간 관리와 유사합니다. 좋은 관리자 (감독 에이전트)는 전문 지식이 더 뛰어난 전문 직원 (하위 에이전트)에게 특정 작업을 맡깁니다. 감독자는 모든 프로세스의 세부사항을 알 필요가 없습니다. 대신 주문 문의나 기술 문제와 같은 고객의 요청을 가장 적합한 '팀 구성원'에게 지능적으로 라우팅하여 일반적인 담당자가 혼자 제공할 수 있는 것보다 더 높은 품질과 효율적인 응답을 보장합니다. 또한 이러한 하위 에이전트는 복잡한 전반적인 프로세스를 이해하지 않고도 개별 과제에 완전히 집중할 수 있습니다.
8. 에이전트형 워크플로 - 조립 라인
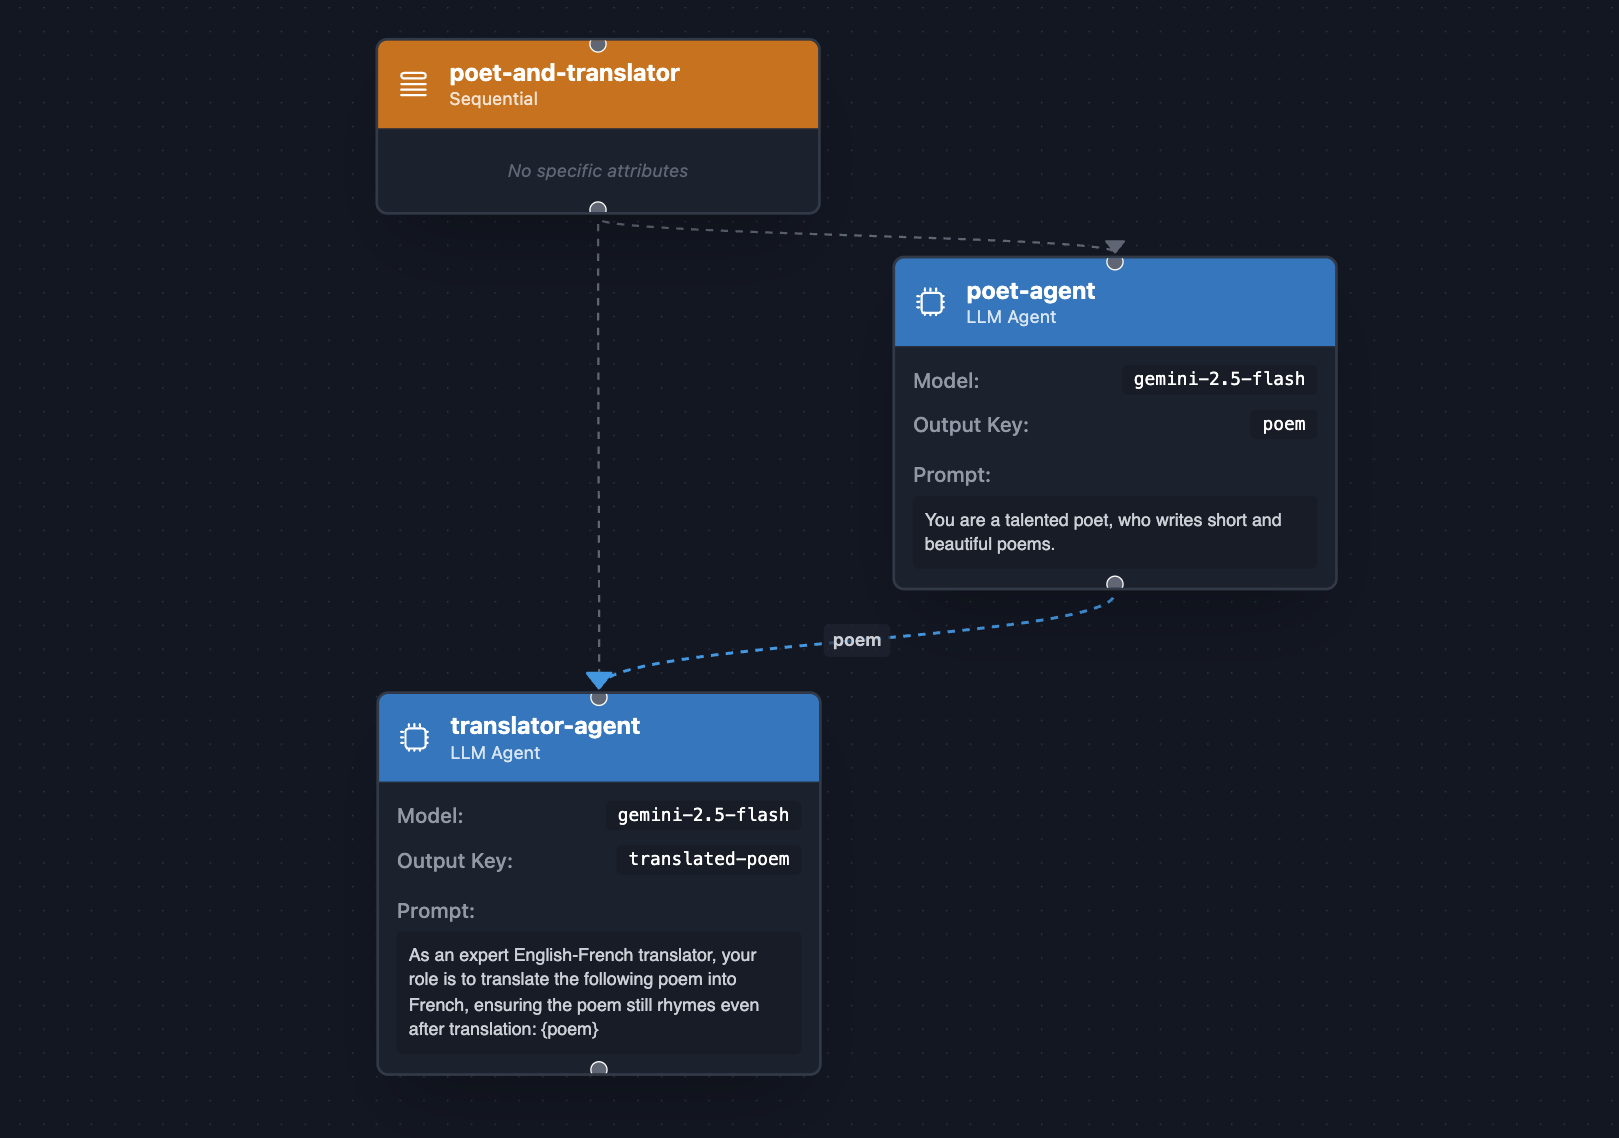
작업 순서가 중요한 경우 SequentialAgent를 사용하세요. 고정된 순서로 하위 에이전트를 실행하는 조립 라인과 비슷하며 각 단계는 이전 단계에 따라 달라질 수 있습니다.
영국 시인이 영어-프랑스어 번역가와 협업하여 먼저 영어로 시를 쓰고 프랑스어로 번역한다고 가정해 보겠습니다.
// src/main/java/com/example/agent/PoetAndTranslator.java
package com.example.agent;

import com.google.adk.agents.LlmAgent;
import com.google.adk.agents.SequentialAgent;
import com.google.adk.web.AdkWebServer;

public class PoetAndTranslator {
    public static void main(String[] args) {
        LlmAgent poet = LlmAgent.builder()
            .name("poet-agent")
            .description("Poet writing poems")
            .model("gemini-2.5-flash")
            .instruction("""
                You are a talented poet,
                who writes short and beautiful poems.
                """)
            .outputKey("poem")
            .build();

        LlmAgent translator = LlmAgent.builder()
            .name("translator-agent")
            .description("English to French translator")
            .model("gemini-2.5-flash")
            .instruction("""
                As an expert English-French translator,
                your role is to translate the following poem into French,
                ensuring the poem still rhymes even after translation:

                {poem}
                """)
            .outputKey("translated-poem")
            .build();

        AdkWebServer.start(SequentialAgent.builder()
            .name("poet-and-translator")
            .subAgents(poet, translator)
            .build());
    }
}
예시를 실행합니다.
mvn compile exec:java -Dexec.mainClass=com.example.agent.PoetAndTranslator
이제 에이전트에게 Write me a poem about a lonely software developer와 같은 질문을 할 수 있습니다. 영어로 된 시가 표시된 후 프랑스어로 번역됩니다.
복잡한 작업을 더 작고 순서가 지정된 하위 작업으로 체계적으로 분해하면 단일한 광범위한 목적의 에이전트에 의존하는 것보다 성공적인 결과를 얻을 가능성이 크게 향상되는 더 결정적이고 신뢰할 수 있는 프로세스가 보장됩니다.
가능한 경우, 그리고 타당한 경우 작업을 일련의 하위 작업으로 효과적으로 분해하는 것은 더 결정적이고 성공적인 결과를 달성하는 데 매우 중요합니다. 단계를 구조화하여 진행하고 단계 간의 종속성을 관리할 수 있기 때문입니다.
9. 에이전트형 워크플로 - 병렬 작업
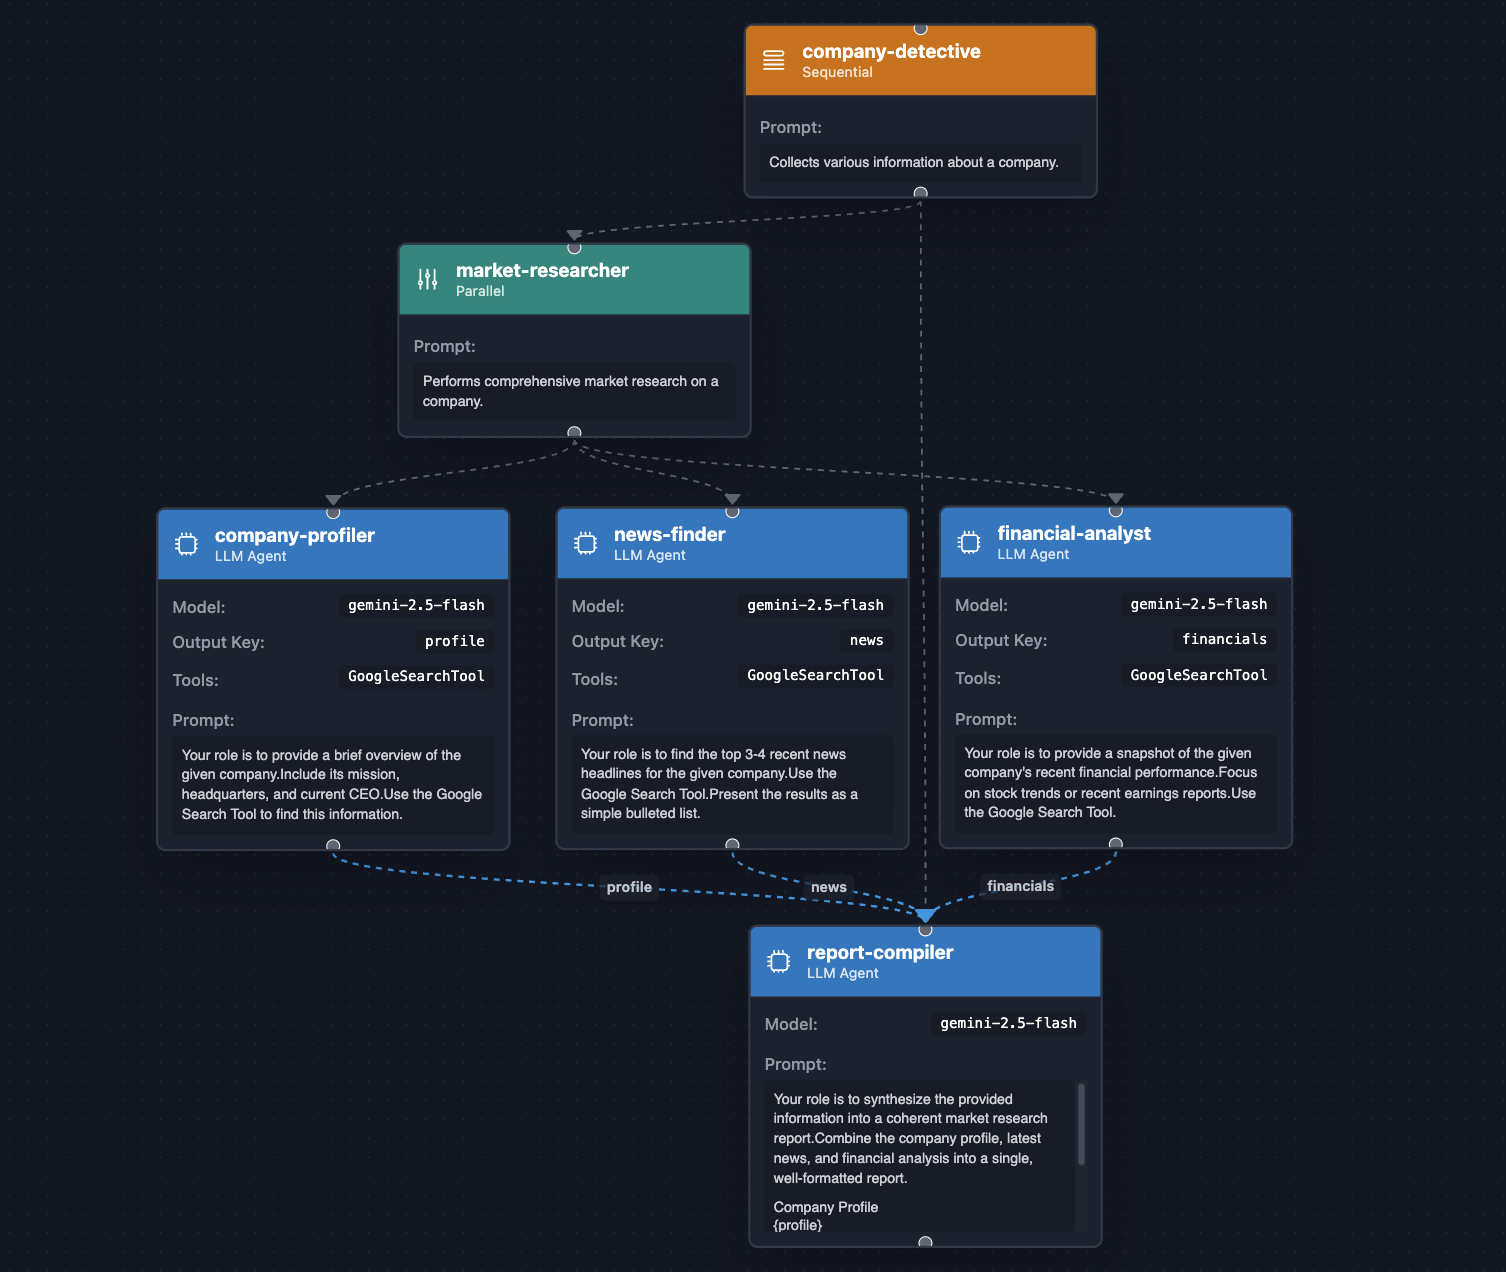
작업이 독립적인 경우 ParallelAgent를 사용하면 작업을 동시에 실행하여 효율성을 크게 높일 수 있습니다. 다음 예에서는 SequentialAgent와 ParallelAgent를 결합합니다. 병렬 작업이 먼저 실행된 다음 최종 에이전트가 병렬 작업의 결과를 요약합니다.
다음과 같은 정보를 검색하는 회사 탐정을 만들어 보겠습니다.
- 회사의 프로필 (CEO, 본사, 모토 등)
- 회사에 관한 최신 뉴스
- 회사의 재무에 관한 세부정보입니다.
// src/main/java/com/example/agent/CompanyDetective.java
package com.example.agent;

import com.google.adk.agents.LlmAgent;
import com.google.adk.agents.ParallelAgent;
import com.google.adk.agents.SequentialAgent;
import com.google.adk.tools.GoogleSearchTool;
import com.google.adk.web.AdkWebServer;

public class CompanyDetective {
    public static void main(String[] args) {
        var companyProfiler = LlmAgent.builder()
            .name("company-profiler")
            .description("Provides a general overview of a company.")
            .instruction("""
                Your role is to provide a brief overview of the given company.
                Include its mission, headquarters, and current CEO.
                Use the Google Search Tool to find this information.
                """)
            .model("gemini-2.5-flash")
            .tools(new GoogleSearchTool())
            .outputKey("profile")
            .build();

        var newsFinder = LlmAgent.builder()
            .name("news-finder")
            .description("Finds the latest news about a company.")
            .instruction("""
                Your role is to find the top 3-4 recent news headlines for the given company.
                Use the Google Search Tool.
                Present the results as a simple bulleted list.
                """)
            .model("gemini-2.5-flash")
            .tools(new GoogleSearchTool())
            .outputKey("news")
            .build();

        var financialAnalyst = LlmAgent.builder()
            .name("financial-analyst")
            .description("Analyzes the financial performance of a company.")
            .instruction("""
                Your role is to provide a snapshot of the given company's recent financial performance.
                Focus on stock trends or recent earnings reports.
                Use the Google Search Tool.
                """)
            .model("gemini-2.5-flash")
            .tools(new GoogleSearchTool())
            .outputKey("financials")
            .build();

        var marketResearcher = ParallelAgent.builder()
            .name("market-researcher")
            .description("Performs comprehensive market research on a company.")
            .subAgents(
                companyProfiler,
                newsFinder,
                financialAnalyst
            )
            .build();

        var reportCompiler = LlmAgent.builder()
            .name("report-compiler")
            .description("Compiles a final market research report.")
            .instruction("""
                Your role is to synthesize the provided information into a coherent market research report.
                Combine the company profile, latest news, and financial analysis into a single, well-formatted report.

                ## Company Profile
                {profile}

                ## Latest News
                {news}

                ## Financial Snapshot
                {financials}
                """)
            .model("gemini-2.5-flash")
            .build();

        AdkWebServer.start(SequentialAgent.builder()
            .name("company-detective")
            .description("Collects various information about a company.")
            .subAgents(
                marketResearcher,
                reportCompiler
            ).build());
    }
}
일반적으로 다음 명령어를 사용하여 에이전트를 실행할 수 있습니다.
mvn compile exec:java -Dexec.mainClass=com.example.agent.CompanyDetective
Google이나 Apple과 같은 다양한 회사에 대해 질문하고 어떤 대답이 나오는지 확인해 보세요.
이 에이전트는 정보 조사 및 합성의 병렬화 덕분에 병렬 에이전트와 순차 에이전트를 모두 효율적으로 활용하여 강력한 워크플로 조합을 보여줍니다.
10. 에이전트형 워크플로 - 반복적인 개선
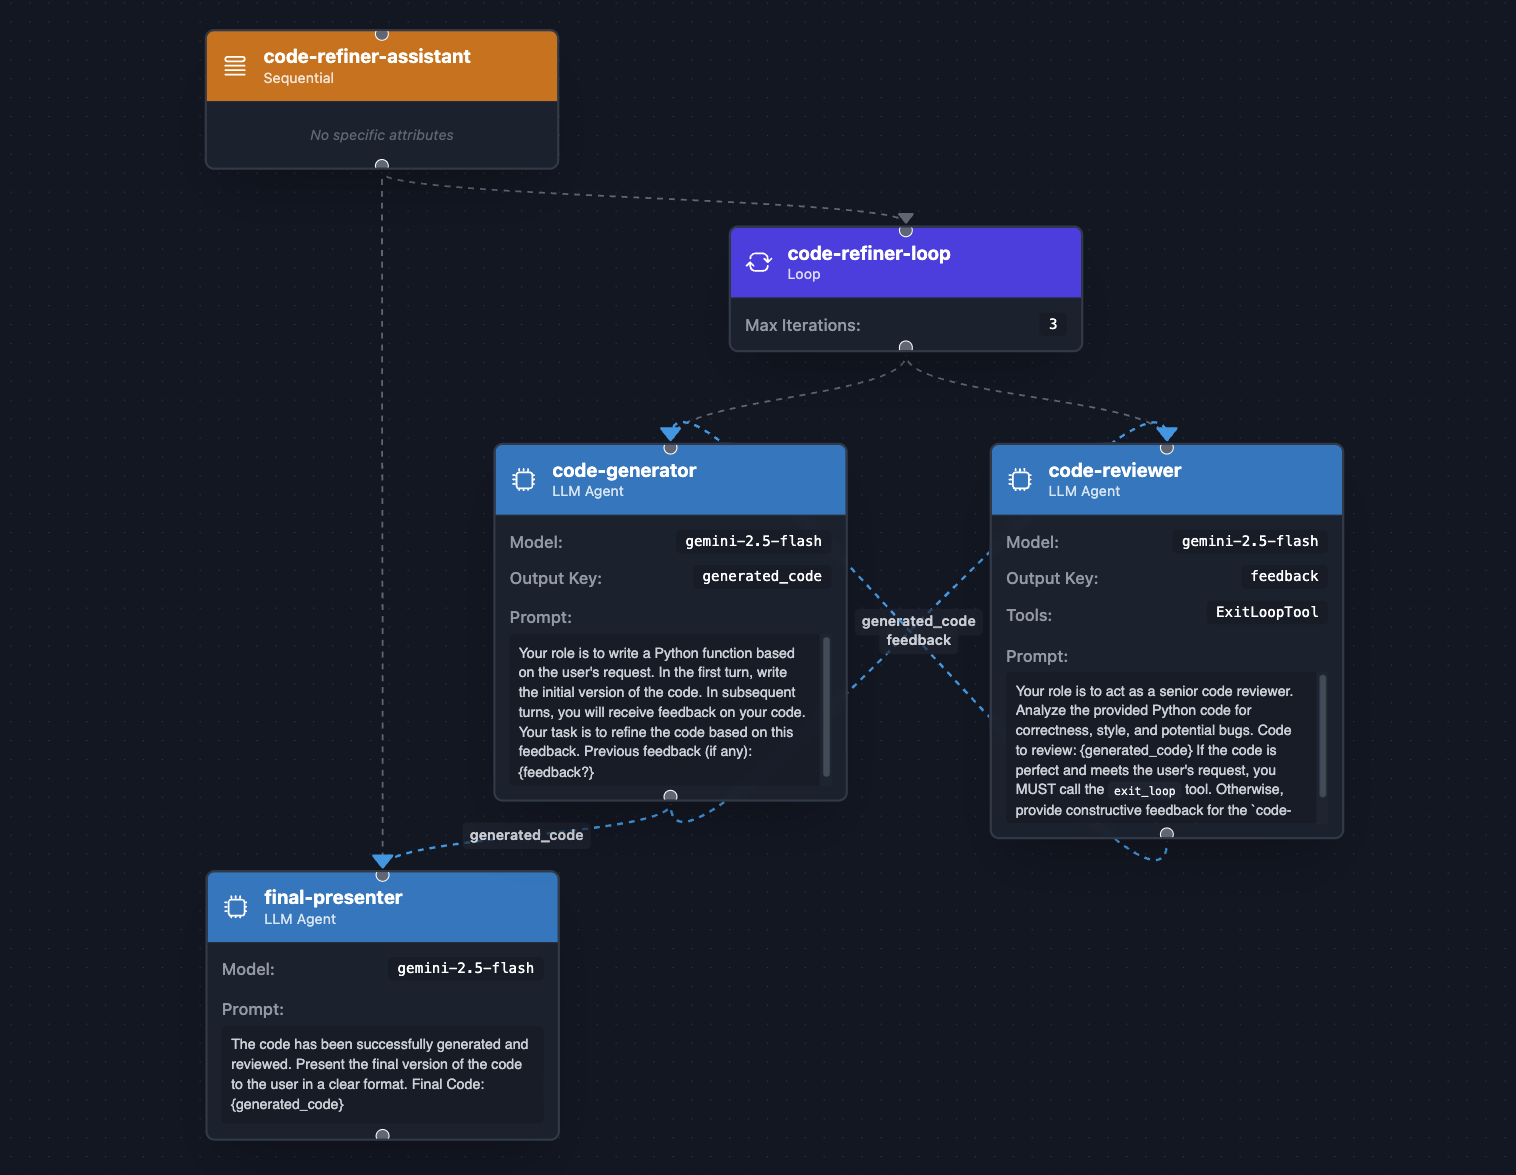
'생성 → 검토 → 개선' 주기가 필요한 작업에는 LoopAgent를 사용합니다. 목표가 달성될 때까지 반복적인 개선을 자동화합니다. SequentialAgent와 마찬가지로 LoopAgent는 하위 에이전트를 순차적으로 호출하지만 시작 부분에서 다시 루프됩니다. 루프 실행을 중지하기 위해 특수 도구인 exit_loop 기본 제공 도구의 호출을 요청할지 여부를 결정하는 것은 에이전트가 내부적으로 사용하는 LLM입니다.
LoopAgent를 사용하는 아래 코드 리파이너 예시는 코드 리파이너를 자동화합니다(생성, 검토, 수정). 이는 인간의 발달을 모방합니다. 코드 생성기는 먼저 요청된 코드를 생성하고 generated_code 키 아래의 에이전트 상태에 저장합니다. 그런 다음 코드 검토자가 생성된 코드를 검토하고 의견을 제공하거나 (feedback 키 아래) 종료 루프 도구를 호출하여 반복을 조기에 종료합니다.
코드를 살펴보겠습니다.
// src/main/java/com/example/agent/CodeRefiner.java
package com.example.agent;

import com.google.adk.agents.LlmAgent;
import com.google.adk.agents.LoopAgent;
import com.google.adk.agents.SequentialAgent;
import com.google.adk.tools.ExitLoopTool;
import com.google.adk.web.AdkWebServer;

public class CodeRefiner {
    public static void main(String[] args) {
        var codeGenerator = LlmAgent.builder()
            .name("code-generator")
            .description("Writes and refines code based on a request and feedback.")
            .instruction("""
                Your role is to write a Python function based on the user's request.
                In the first turn, write the initial version of the code.
                In subsequent turns, you will receive feedback on your code.
                Your task is to refine the code based on this feedback.

                Previous feedback (if any):
                {feedback?}
                """)
            .model("gemini-2.5-flash")
            .outputKey("generated_code")
            .build();

        var codeReviewer = LlmAgent.builder()
            .name("code-reviewer")
            .description("Reviews code and decides if it's complete or needs more work.")
            .instruction("""
                Your role is to act as a senior code reviewer.
                Analyze the provided Python code for correctness, style, and potential bugs.

                Code to review:
                {generated_code}

                If the code is perfect and meets the user's request,
                you MUST call the `exit_loop` tool.

                Otherwise, provide constructive feedback for the `code-generator to improve the code.
                """)
            .model("gemini-2.5-flash")
            .outputKey("feedback")
            .tools(ExitLoopTool.INSTANCE)
            .build();

        var codeRefinerLoop = LoopAgent.builder()
            .name("code-refiner-loop")
            .description("Iteratively generates and reviews code until it is correct.")
            .subAgents(
                codeGenerator,
                codeReviewer
            )
            .maxIterations(3) // Safety net to prevent infinite loops
            .build();

        var finalPresenter = LlmAgent.builder()
            .name("final-presenter")
            .description("Presents the final, accepted code to the user.")
            .instruction("""
                The code has been successfully generated and reviewed.
                Present the final version of the code to the user in a clear format.

                Final Code:
                {generated_code}
                """)
            .model("gemini-2.5-flash")
            .build();

        AdkWebServer.start(SequentialAgent.builder()
            .name("code-refiner-assistant")
            .description("Manages the full code generation and refinement process.")
            .subAgents(
                codeRefinerLoop,
                finalPresenter)
            .build());
    }
}
다음 명령어를 사용하여 이 에이전트를 실행합니다.
mvn compile exec:java -Dexec.mainClass=com.example.agent.CodeRefiner
Tower of Hanoi 또는 Quicksort Algorithm과 같은 복잡한 항목을 구현하도록 요청할 수 있습니다.
LoopAgent를 사용하여 구현되는 피드백/구체화 루프는 인간의 인지 프로세스를 긴밀하게 모방하여 반복적인 개선과 자기 수정이 필요한 문제를 해결하는 데 필수적입니다. 이 설계 패턴은 코드 생성, 창작, 디자인 반복, 복잡한 데이터 분석과 같이 초기 출력이 완벽한 경우가 드문 작업에 특히 유용합니다. 구조화된 피드백을 제공하는 전문 검토자 에이전트를 통해 출력을 순환시킴으로써 생성 에이전트는 사전 정의된 완료 기준이 충족될 때까지 작업을 지속적으로 개선할 수 있으며, 단일 패스 접근 방식보다 훨씬 높은 품질과 신뢰할 수 있는 최종 결과를 얻을 수 있습니다.
11. 축하합니다.

단순한 대화형 에이전트부터 복잡한 멀티 에이전트 시스템에 이르기까지 다양한 AI 에이전트를 빌드하고 살펴봤습니다. 명령어로 에이전트를 정의하고, 도구로 에이전트를 지원하고, 강력한 워크플로로 에이전트를 조정하는 등 Java용 ADK의 핵심 개념을 알아봤습니다.
다음 단계
- 공식 Java용 ADK GitHub 저장소를 살펴봅니다.
- 프레임워크에 관한 자세한 내용은 관련 문서를 참고하세요.
- 이 블로그 시리즈에서 다양한 에이전트 워크플로와 사용 가능한 다양한 도구에 대해 알아보세요.
- 다른 내장 도구와 고급 콜백을 자세히 살펴보세요.
- 풍부한 멀티모달 상호작용을 위해 컨텍스트, 상태, 아티팩트를 처리합니다.
- 에이전트의 수명 주기에 연결되는 플러그인을 구현하고 적용합니다.
- 실제 문제를 해결하는 나만의 에이전트를 빌드해 보세요.