
1. Добро пожаловать, разработчики ИИ-агентов!
В этом практическом занятии вы научитесь создавать агентов искусственного интеллекта на Java , используя комплект разработки агентов (ADK) для Java . Мы выйдем за рамки простых вызовов API больших языковых моделей (LLM) и создадим автономных агентов ИИ, способных рассуждать, планировать, использовать инструменты и работать вместе для решения сложных задач.
Вы начнете с использования кредитов Google Cloud, настройки среды Google Cloud, создания первого простого агента и постепенного добавления более сложных возможностей, таких как пользовательские инструменты, веб-поиск и оркестрация нескольких агентов.

Что вы узнаете
- Как создать базового, ориентированного на конкретного пользователя ИИ-агента.
- Как расширить возможности агентов с помощью пользовательских и встроенных инструментов (например, поиска Google).
- Как добавить собственные инструменты, реализованные на Java.
- Как организовать работу множества агентов в мощных последовательных, параллельных и циклических рабочих процессах.
Что вам понадобится
- Веб-браузер, который мы будем использовать в режиме инкогнито.
- Личный аккаунт Gmail.
- Новый проект Google Cloud, связанный с вашей личной учетной записью Gmail.
- Платежный аккаунт, созданный с использованием использованных кредитов Google Cloud.
- Инструмент командной строки git для извлечения исходного кода.
- Java 17+ и Apache Maven.
- Текстовый редактор или интегрированная среда разработки, например, IntelliJ IDEA или VS Code.
Вы можете использовать встроенный редактор кода в Cloud Shel, в консоли Google Cloud.
2. Настройка: Ваша среда
Получение кредитов Google Cloud за участие в семинаре

Для участия в мастер-классе под руководством инструктора вы получите ссылку на веб-сайт, где сможете получить облачные кредиты Google, которые можно использовать для участия в мастер-классе.
- Используйте личный аккаунт Google : Важно использовать личный аккаунт Google (например, адрес gmail.com), так как корпоративные или школьные адреса электронной почты не подойдут .
- Используйте Google Chrome в режиме инкогнито : это рекомендуется для создания чистой сессии и предотвращения конфликтов с другими учетными записями Google.
- Используйте специальную ссылку на событие : следует использовать специальную ссылку на событие, которая выглядит примерно так: https://trygcp.dev/event/xxx, за которой следует код события (в данном примере — «xxx»).
- Примите условия обслуживания : После входа в систему вам будут представлены условия обслуживания Google Cloud Platform, которые необходимо принять для продолжения.
- Создайте новый проект : необходимо создать новый пустой проект в консоли Google Cloud .
- Привязка платежного аккаунта : Привяжите созданный проект к платежному аккаунту.
- Подтверждение зачисления средств : В следующем видео показано, как подтвердить зачисление средств на проект, проверив раздел «Средства» на странице оплаты.
Посмотрите это видео , в котором объясняется, как использовать накопленные баллы.
Включить API Vertex AI
Сначала включите API Vertex AI. Это можно сделать, найдя Vertex AI API в консоли Google Cloud и включив API там. Также это можно сделать из Cloud Shell, выполнив следующую команду:
gcloud services enable aiplatform.googleapis.com
Настройка ADK с помощью Vertex AI
Для аутентификации ваших агентов ADK AI в Gemini на Vertex AI в рамках этого практического занятия установите следующие переменные среды. Убедитесь, что вы используете свой уникальный идентификатор проекта.
macOS / Linux: Откройте терминал и выполните следующую команду. Чтобы изменения вступили в силу, добавьте эту строку в файл автозагрузки вашей оболочки (например, ~/.bash_profile , ~/.zshrc ).
export GOOGLE_GENAI_USE_VERTEXAI=true
export GOOGLE_CLOUD_PROJECT=your-project-id
Windows (командная строка): Откройте новое окно командной строки и выполните следующие действия:
set GOOGLE_GENAI_USE_VERTEXAI=true
set GOOGLE_CLOUD_PROJECT=your-project-id
Для вступления изменений в силу потребуется перезапустить командную строку.
Windows (PowerShell): Откройте терминал PowerShell и выполните следующую команду:
$env:GOOGLE_GENAI_USE_VERTEXAI = "true"
$env:GOOGLE_CLOUD_PROJECT = "your-project-id"
Чтобы это изменение стало постоянным в PowerShell, вам нужно добавить его в скрипт профиля.
3. Начало работы: Ваш первый агент
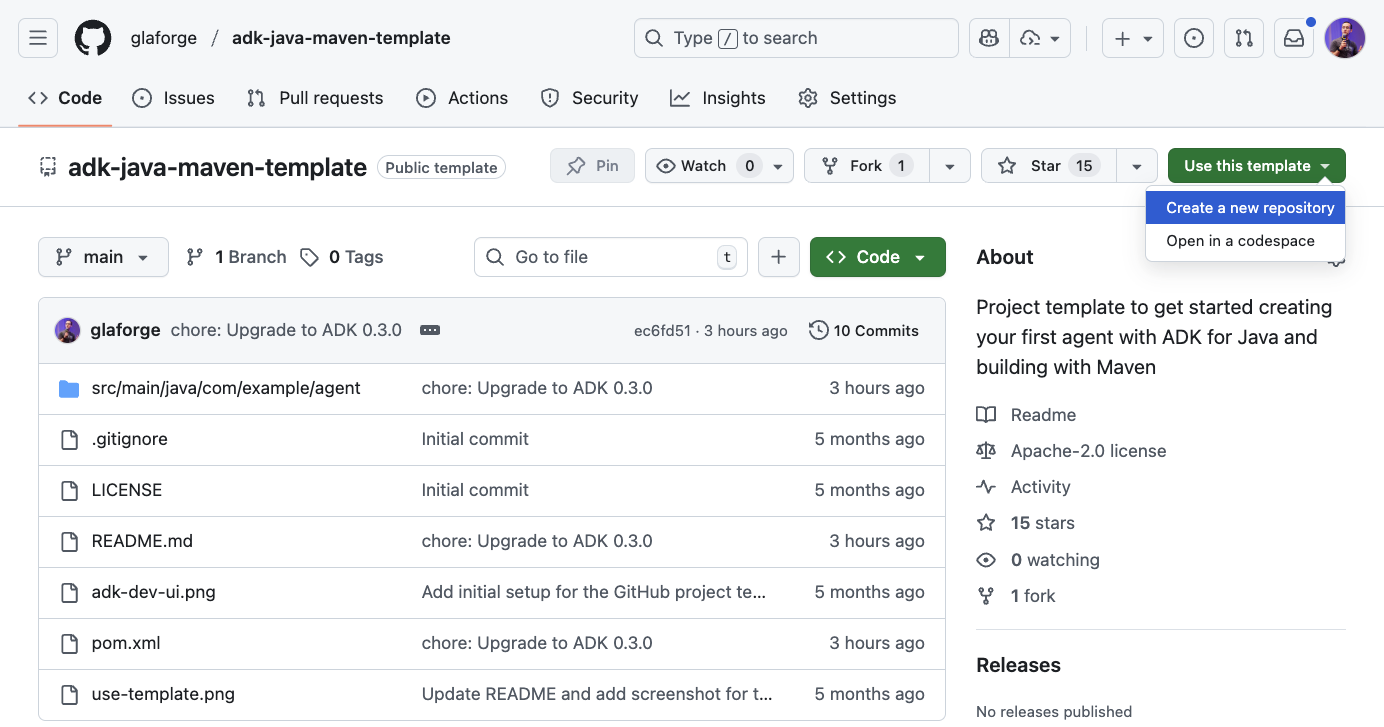
Лучший способ начать новый проект — использовать шаблон GitHub ADK for Java . Он предоставляет структуру проекта и все необходимые зависимости.
Если у вас есть учетная запись Github, вы можете сделать следующее: Use this template > Create a new repository , а затем локально клонировать код с помощью команды git clone .
На скриншоте показано меню в правом верхнем углу для использования шаблона.
Другой подход заключается в том, чтобы просто клонировать этот репозиторий напрямую:
git clone https://github.com/glaforge/adk-java-maven-template.git
Чтобы убедиться, что вы готовы приступить к написанию кода для своего первого ИИ-агента на Java, проверьте, можете ли вы скомпилировать код из этого проекта с помощью следующей команды:
cd adk-java-maven-template
mvn compile
Code Step: Дружелюбный агент для учителей естественных наук
Фундаментальным строительным блоком в ADK является класс LlmAgent . Представьте его как искусственный интеллект с определенной личностью и целью, работающий на основе большой языковой модели. Позже мы добавим больше возможностей с помощью инструментов и сделаем его более мощным, взаимодействуя с другими подобными агентами.
Давайте создадим новый Java-класс в пакете com.example.agent и назовём его ScienceTeacher .
Это своего рода "Привет, мир!" в мире создания агентов. Мы создаём простого агента с образом учителя естественных наук.
// src/main/java/com/example/agent/ScienceTeacher.java
package com.example.agent;

import com.google.adk.agents.LlmAgent;
import com.google.adk.web.AdkWebServer;

public class ScienceTeacher {
    public static void main(String[] args) {
        AdkWebServer.start(
            LlmAgent.builder()
                .name("science-teacher")
                .description("A friendly science teacher")
                .instruction("""
                    You are a science teacher for teenagers.
                    You explain science concepts in a simple, concise and direct way.
                    """)
                .model("gemini-2.5-flash")
                .build()
        );
    }
}
Настройка ИИ-агента осуществляется с помощью метода LlmAgent.builder() . Параметры name() , description() и model() являются обязательными, и для придания агенту конкретных личностных качеств и правильного поведения всегда следует давать подробные указания с помощью метода instruction() .
В данном случае мы выбрали модель Gemini 2.5 Flash, но для более сложных задач вы можете попробовать и Gemini 2.5 Pro.
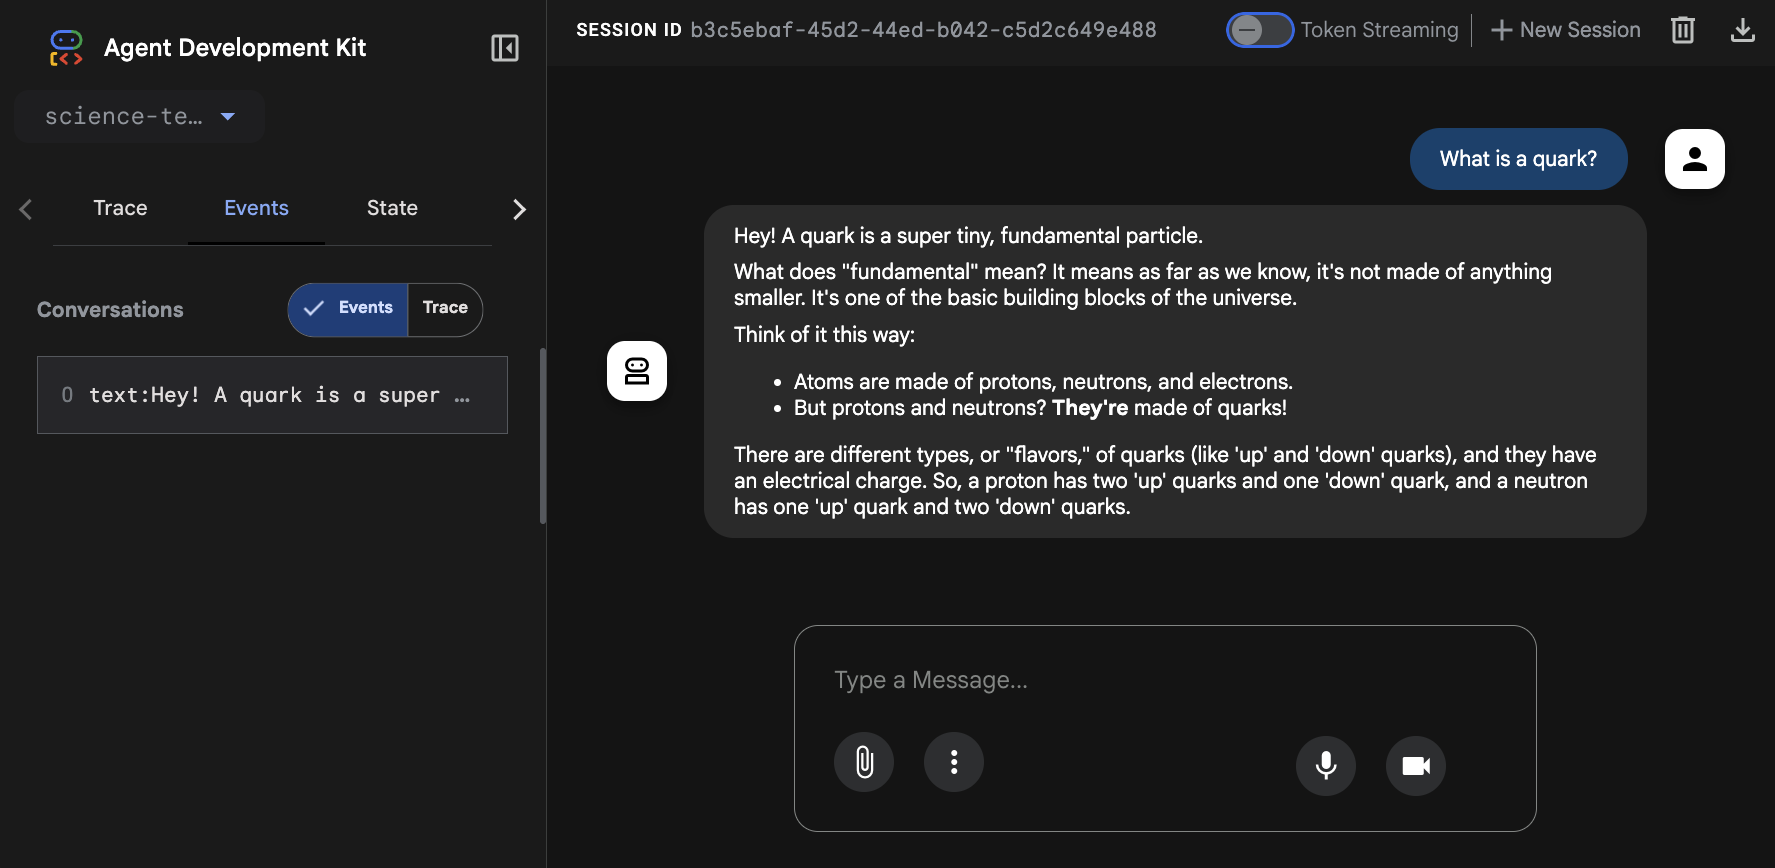
Этот агент заключен в метод AdkWebServer.start() . Это так называемый чат-интерфейс разработчика ADK . Он позволяет общаться с агентом через обычный чат. Кроме того, он очень полезен, если вы хотите понять, что происходит «под капотом», например, все события, проходящие через систему, запросы и ответы, отправляемые в LLM.
Для компиляции и запуска этого агента локально выполните следующую команду:
mvn compile exec:java -Dexec.mainClass=com.example.agent.ScienceTeacher
Затем перейдите в браузере по адресу http://localhost:8080 . Если вы используете Cloud Shell, перейдите в раздел «Предварительный просмотр веб-страниц» и выберите «Предварительный просмотр на порту 8080» .
Вы должны увидеть пользовательский интерфейс, показанный на скриншоте ниже. Смело задавайте своему агенту вопросы, связанные с наукой.
4. Предоставление агентам инструментов для расширения их возможностей.

Зачем агентам нужны инструменты? Магистраты обладают мощными знаниями, но их знания застыли во времени, и они не могут взаимодействовать с внешним миром. Инструменты — это мост. Они позволяют агенту получать доступ к информации в реальном времени (например, к ценам на акции или новостям), запрашивать данные из закрытых API или выполнять любые действия, которые можно запрограммировать на Java.
Шаг по написанию кода: Создание пользовательского инструмента ( StockTicker )
Здесь мы предоставляем нашему агенту инструмент для поиска цен на акции. Агент рассуждает так: когда пользователь запрашивает цену, он должен вызвать наш Java-метод.
// src/main/java/com/example/agent/StockTicker.java
package com.example.agent;

import com.google.adk.agents.LlmAgent;
import com.google.adk.tools.Annotations.Schema;
import com.google.adk.tools.FunctionTool;
import com.google.adk.web.AdkWebServer;
import java.util.Map;

public class StockTicker {
    public static void main(String[] args) {
        AdkWebServer.start(
            LlmAgent.builder()
                .name("stock_agent")
                .instruction("""
                    You are a stock exchange ticker expert.
                    When asked about the stock price of a company,
                    use the `lookup_stock_ticker` tool to find the information.
                    """)
                .model("gemini-2.5-flash")
                .tools(FunctionTool.create(StockTicker.class, "lookupStockTicker"))
                .build()
        );
    }

    @Schema(
        name = "lookup_stock_ticker",
        description = "Lookup stock price for a given company or ticker"
    )
    public static Map<String, String> lookupStockTicker(
        @Schema(name = "company_name_or_stock_ticker", description = "The company name or stock ticker")
        String ticker) {
        // ... (logic to return a stock price)
    }
}
Чтобы сделать агентов умнее и дать им возможность взаимодействовать с окружающим миром (или с вашим собственным кодом, API, сервисами и т. д.), вы можете настроить агента на использование инструментов, и в частности, инструментов для работы с пользовательским кодом, с помощью метода tools() , передав ему FunctionTool.create(...) .
Для FunctionTool требуется класс и имя метода, указывающего на ваш собственный статический метод — также можно передать экземпляр класса и имя метода экземпляра этого объекта.
Важно указать name и description как метода, так и его параметров с помощью аннотации @Schema , поскольку эта информация будет использоваться базовым LLM для определения того, когда и как следует вызывать тот или иной метод.
Не менее важно помочь модели LLM четкими инструкциями о том, как и когда использовать инструмент. Модель может разобраться сама, но если вы дадите подробные объяснения в методе instruction() , у вашей функции будет больше шансов быть вызванной корректно.
Этот метод должен возвращать Map . Обычно идея состоит в том, чтобы вернуть Map с ключом, представляющим результат, например, stock_price , и связать с ним значение цены акции. В конечном итоге можно добавить дополнительную пару ключей success/true, чтобы сигнализировать об успехе операции. А в случае ошибки следует вернуть Map с ключом, например, error , и связать сообщение об ошибке с соответствующим значением. Это помогает LLM понять, был ли вызов успешным или неудачным по какой-либо причине.
- В случае успеха вернуть:
{"stock_price": 123} - В случае ошибки вернуть:
{"error": "Impossible to retrieve stock price for XYZ"}
Затем запустите этот класс с помощью следующей команды:
mvn compile exec:java -Dexec.mainClass=com.example.agent.StockTicker
Теперь вы можете запрашивать у агента информацию о ценах акций, например: What's the stock price for GOOG? Вы должны получить ответ и убедиться, что используется инструмент lookup_stock_ticker .
5. Возможности поиска Google для получения актуальной информации.

ADK для Java поставляется с рядом мощных инструментов, среди которых GoogleSearchTool . С помощью этого инструмента ваш агент может запросить использование поиска Google для поиска релевантной информации, необходимой для достижения его цели.
Действительно, знания магистра права застыли во времени: они формировались до определенной даты («даты отсечения») с использованием данных, которые были актуальны на момент сбора информации. Это означает, что магистры права могут не обязательно знать о недавних событиях, или их знания могут быть ограниченными и поверхностными, и помощь поисковой системы может освежить их память или научить их большему по теме.
Давайте рассмотрим этот простой поисковый агент для новостей:
// src/main/java/com/example/agent/LatestNews.java
package com.example.agent;

import java.time.LocalDate;
import com.google.adk.agents.LlmAgent;
import com.google.adk.tools.GoogleSearchTool;
import com.google.adk.web.AdkWebServer;

public class LatestNews {
    public static void main(String[] args) {
        AdkWebServer.start(LlmAgent.builder()
            .name("news-search-agent")
            .description("A news search agent")
            .instruction("""
                You are a news search agent.
                Use the `google_search` tool
                when asked to search for recent events and information.
                Today is \
                """ + LocalDate.now())
            .model("gemini-2.5-flash")
            .tools(new GoogleSearchTool())
            .build());
    }
}
Обратите внимание, как мы передали экземпляр инструмента поиска с помощью: tools(new GoogleSearchTool()) . Именно это позволяет нашему агенту быстро получать самую актуальную информацию из интернета. Кроме того, в запросе указана дата, так как это может помочь LLM понять, когда вопросы касаются информации из прошлого, а требуется поиск более свежей информации.
Затем запустите этот класс с помощью следующей команды:
mvn compile exec:java -Dexec.mainClass=com.example.agent.LatestNews
Не стесняйтесь экспериментировать с подсказкой, например, вы можете спросить: What's the latest news in the world?
Шаг кода: Поисковый агент как инструмент
Вместо того чтобы передавать GoogleSearchTool агенту напрямую в качестве инструмента, вы можете создать выделенный поисковый агент, который инкапсулирует функциональность поиска, и предоставить доступ к этому агенту в качестве инструмента агенту более высокого уровня.
Это продвинутая концепция, позволяющая делегировать сложные операции (например, поиск и обобщение результатов) специализированному суб-агенту. Такой подход часто полезен для более сложных рабочих процессов.
// src/main/java/com/example/agent/SearchAgentAsTool.java
package com.example.agent;

import java.time.LocalDate;

import com.google.adk.agents.LlmAgent;
import com.google.adk.tools.AgentTool;
import com.google.adk.tools.GoogleSearchTool;
import com.google.adk.web.AdkWebServer;

public class SearchAgentAsTool {
    public static void main(String[] args) {
        // 1. Define the specialized Search Agent
        LlmAgent searchAgent = LlmAgent.builder()
            .name("news-search-agent-tool")
            .description("Searches for recent events and provides a concise summary.")
            .instruction("""
                You are a concise information retrieval specialist.
                Use the `google_search` tool to find information.
                Always provide the answer as a short,
                direct summary, without commentary.
                Today is \
                """ + LocalDate.now())
            .model("gemini-2.5-flash")
            .tools(new GoogleSearchTool()) // This agent uses the Google Search Tool
            .build();

        // 2. Wrap the Search Agent as a Tool
        AgentTool searchTool = AgentTool.create(searchAgent);

        // 3. Define the Main Agent that uses the Search Agent Tool
        AdkWebServer.start(LlmAgent.builder()
            .name("main-researcher")
            .description("Main agent for answering complex, up-to-date questions.")
            .instruction("""
                You are a sophisticated research assistant.
                When the user asks a question that requires up-to-date or external information,
                you MUST use the `news-search-agent-tool` to get the facts before answering.
                After the tool returns the result, synthesize the final answer for the user.
                """)
            .model("gemini-2.5-flash")
            .tools(searchTool) // This agent uses the Search Agent as a tool
            .build()
       );
    }
}
Ключевым моментом здесь является строка AgentTool.create(searchAgent) . Она регистрирует весь searchAgent (со своей внутренней логикой, подсказками и инструментами) как единый вызываемый инструмент для mainAgent . Это способствует модульности и повторному использованию.
Запустите этот класс с помощью следующей команды:
mvn compile exec:java -Dexec.mainClass=com.example.agent.SearchAgentAsTool
На обычные вопросы агент будет отвечать, используя свою базу знаний, но если его спросят о недавних событиях, он передаст поиск специализированному поисковому агенту, использующему инструмент поиска Google.
6. Освоение агентских рабочих процессов
Для решения сложных задач одного агента недостаточно. Когда задача состоит из слишком большого количества подзадач, сопровождается огромным подсказкой, требующей слишком подробного объяснения, или предоставляет доступ к огромному количеству функций, LLM-ы испытывают трудности, и их производительность и точность снижаются.
Ключ к успеху — это метод «разделяй и властвуй», заключающийся в координации действий нескольких специализированных агентов. К счастью, ADK поставляется с различными встроенными специализированными агентами:
- Обычный агент с
subAgent()для делегирования задач. -
SequentialAgent— для выполнения задач в последовательности. -
ParallelAgent— для параллельного выполнения агентов. -
LoopAgentобычно используется для многократного прохождения процесса уточнения.
Основные варианты использования, а также преимущества и недостатки каждого рабочего процесса описаны в таблице ниже. Но помните, что настоящая мощь проявится при сочетании нескольких из них!
Рабочий процесс | Класс ADK | Вариант использования | Плюсы | Минусы |
Суб-агенты | | Задачи, определяемые пользователем, гибкие, где следующий шаг не всегда известен. | Высокая гибкость, диалоговый характер, отлично подходит для ботов, взаимодействующих с пользователями. | Менее предсказуемый, основан на логике LLM для управления потоком. |
Последовательный | | Фиксированные, многоэтапные процессы, в которых порядок имеет решающее значение. | Предсказуемый, надежный, легко отлаживаемый, гарантирует порядок. | Негибкий, может работать медленнее, если задачи можно распараллелить. |
Параллельный | | Сбор данных из нескольких источников или выполнение независимых задач. | Высокая эффективность, значительно снижает задержку для задач, интенсивно использующих ввод-вывод. | Все задачи выполняются; нет прерываний. Менее подходит для задач с зависимостями. |
Петля | | Итеративное уточнение, самокоррекция или процессы, которые повторяются до тех пор, пока не будет выполнено определенное условие. | Обладает мощным потенциалом для решения сложных задач, позволяя агентам улучшать свою собственную работу. | При непродуманном проектировании может привести к бесконечным циклам (всегда используйте maxIterations!). |
7. Агентские рабочие процессы — Делегирование полномочий субагентам
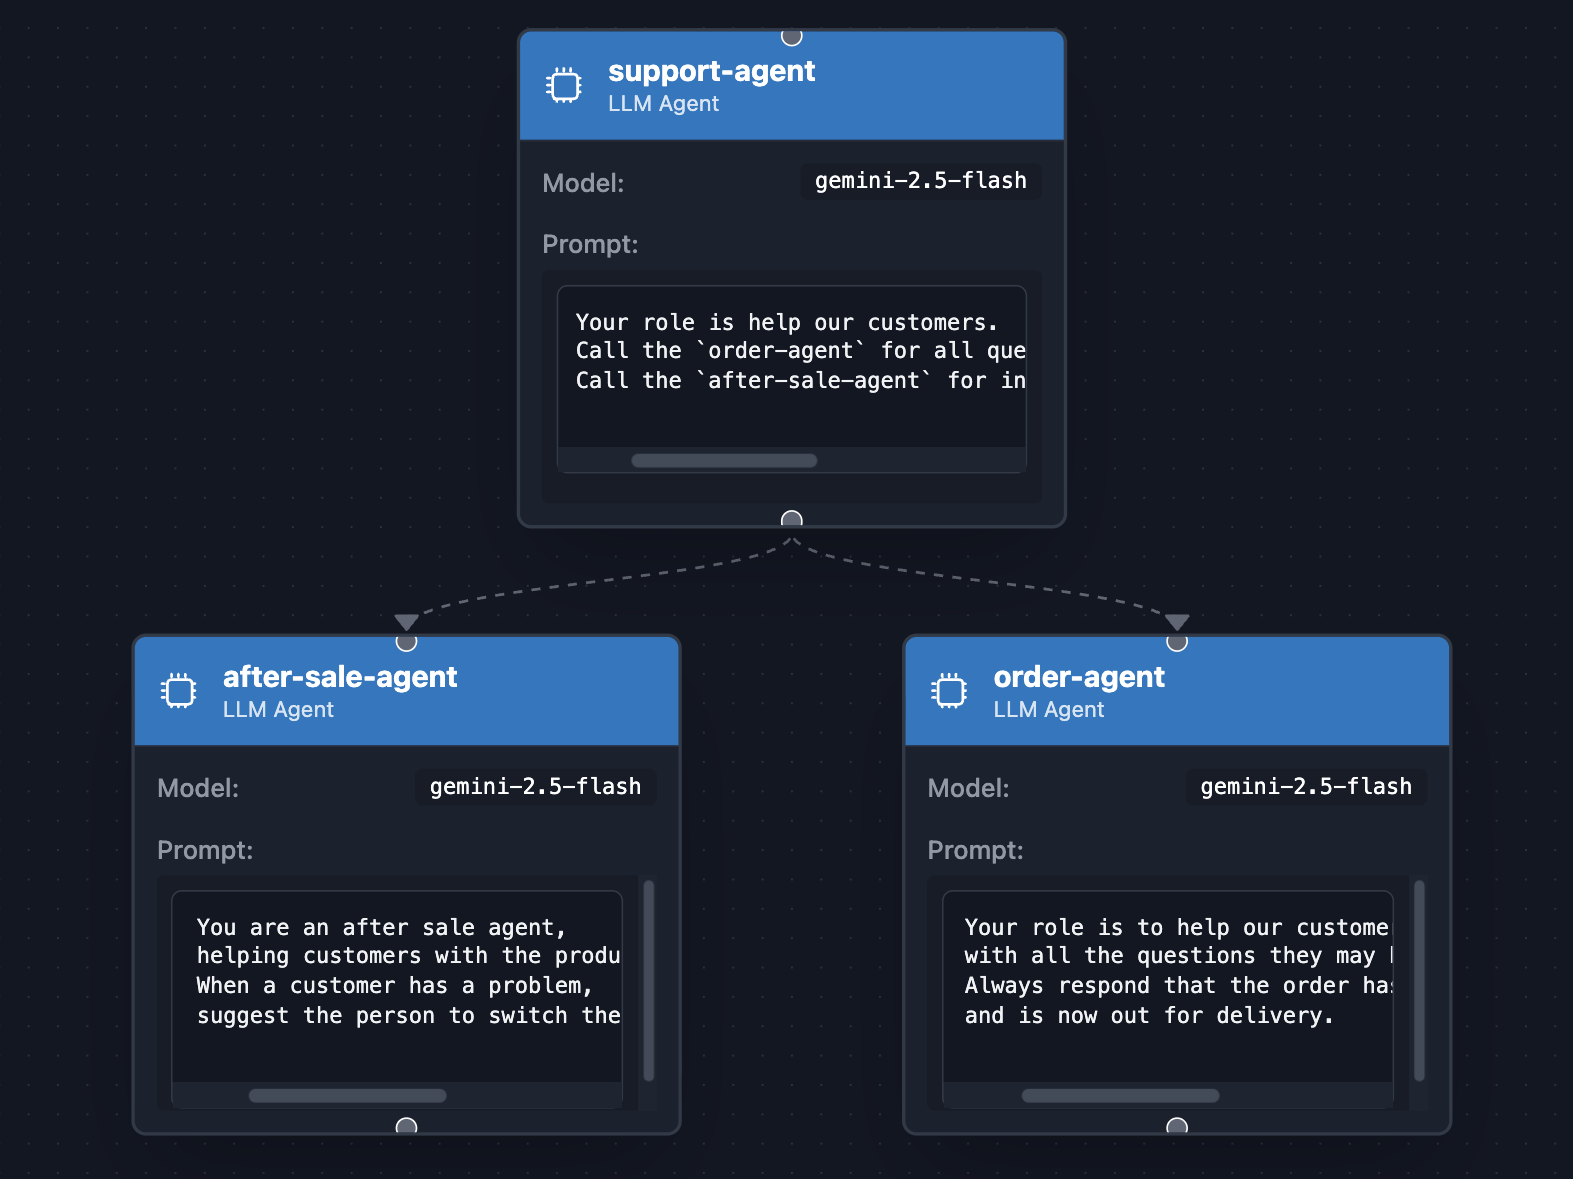
Супервайзер может делегировать определенные задачи суб-агентам. Например, представьте себе агента интернет-магазина, который делегирует вопросы, связанные с заказом, одному агенту («Какой статус моего заказа?»), а вопросы послепродажного обслуживания — другому агенту («Я не знаю, как это включить!»). Именно этот сценарий использования мы и собираемся обсудить.
// src/main/java/com/example/agent/SupportAgent.java
package com.example.agent;

import com.google.adk.agents.LlmAgent;
import com.google.adk.web.AdkWebServer;

public class SupportAgent {
    public static void main(String[] args) {
        LlmAgent orderAgent = LlmAgent.builder()
            .name("order-agent")
            .description("Order agent")
            .instruction("""
                Your role is to help our customers
                with all the questions they may have about their orders.
                Always respond that the order has been received, prepared,
                and is now out for delivery.
                """)
            .model("gemini-2.5-flash")
            .build();

        LlmAgent afterSaleAgent = LlmAgent.builder()
            .name("after-sale-agent")
            .description("After sale agent")
            .instruction("""
                You are an after sale agent,
                helping customers with the product they received.
                When a customer has a problem,
                suggest the person to switch the product off and on again.
                """)
            .model("gemini-2.5-flash")
            .build();

        AdkWebServer.start(LlmAgent.builder()
            .name("support-agent")
            .description("Customer support agent")
            .instruction("""
                Your role is to help our customers.
                Call the `order-agent` for all questions related to order status.
                Call the `after-sale-agent` for inquiries about the received product.
                """)
            .model("gemini-2.5-flash")
            .subAgents(afterSaleAgent, orderAgent)
            .build()
        );
    }
}
Ключевая строка здесь — это вызов метода subAgents() , в который передаются два суб-агента, чья конкретная роль будет обрабатываться каждым из них отдельно.
Запустите приведенный выше пример с помощью следующей команды:
mvn compile exec:java -Dexec.mainClass=com.example.agent.SupportAgent
Вы можете задавать вопросы, например, I have a question about my order или I have a question about my received order . Вы увидите, как главный агент перенаправляет запрос нужному агенту в зависимости от заданного вопроса.
Концепция делегирования задач суб-агентам отражает эффективное управление персоналом, где хороший менеджер (супер-агент) полагается на специализированных сотрудников (суб-агентов) для выполнения конкретных задач, в которых они обладают большей квалификацией. Супер-агенту не нужно знать все тонкости каждого процесса; вместо этого он разумно направляет запрос клиента (например, запрос по заказу или техническую проблему) наиболее квалифицированному «члену команды», обеспечивая более качественный и эффективный ответ, чем тот, который мог бы предоставить один специалист широкого профиля. Кроме того, эти суб-агенты могут полностью сосредоточиться на своих индивидуальных задачах, не нуждаясь в понимании всей сложной общей структуры процесса.
8. Агентские рабочие процессы — Конвейерная линия

Когда порядок выполнения операций имеет значение, используйте SequentialAgent . Это как конвейер, выполняющий действия под-агентов в фиксированном порядке, где каждый шаг может зависеть от предыдущего.
Представим, что английский поэт сотрудничает с переводчиком с английского на французский, чтобы сначала создать стихи на английском языке, а затем перевести их на французский:
// src/main/java/com/example/agent/PoetAndTranslator.java
package com.example.agent;

import com.google.adk.agents.LlmAgent;
import com.google.adk.agents.SequentialAgent;
import com.google.adk.web.AdkWebServer;

public class PoetAndTranslator {
    public static void main(String[] args) {
        LlmAgent poet = LlmAgent.builder()
            .name("poet-agent")
            .description("Poet writing poems")
            .model("gemini-2.5-flash")
            .instruction("""
                You are a talented poet,
                who writes short and beautiful poems.
                """)
            .outputKey("poem")
            .build();

        LlmAgent translator = LlmAgent.builder()
            .name("translator-agent")
            .description("English to French translator")
            .model("gemini-2.5-flash")
            .instruction("""
                As an expert English-French translator,
                your role is to translate the following poem into French,
                ensuring the poem still rhymes even after translation:

                {poem}
                """)
            .outputKey("translated-poem")
            .build();

        AdkWebServer.start(SequentialAgent.builder()
            .name("poet-and-translator")
            .subAgents(poet, translator)
            .build());
    }
}
Запустите пример:
mvn compile exec:java -Dexec.mainClass=com.example.agent.PoetAndTranslator
Теперь вы можете попросить агента написать что-нибудь вроде: Write me a poem about a lonely software developer ». Вам должны прислать стихотворение на английском языке, а затем переведенное на французский.
Такое систематическое разложение сложных задач на более мелкие, упорядоченные подзадачи обеспечивает более детерминированный и надежный процесс, значительно повышая вероятность успешного результата по сравнению с использованием одного универсального инструмента.
Эффективное разложение задачи на последовательность подзадач (когда это возможно и целесообразно) имеет решающее значение для достижения более предсказуемых и успешных результатов, поскольку позволяет обеспечить структурированное выполнение и управление зависимостями между этапами.
9. Агентные рабочие процессы — параллельная работа
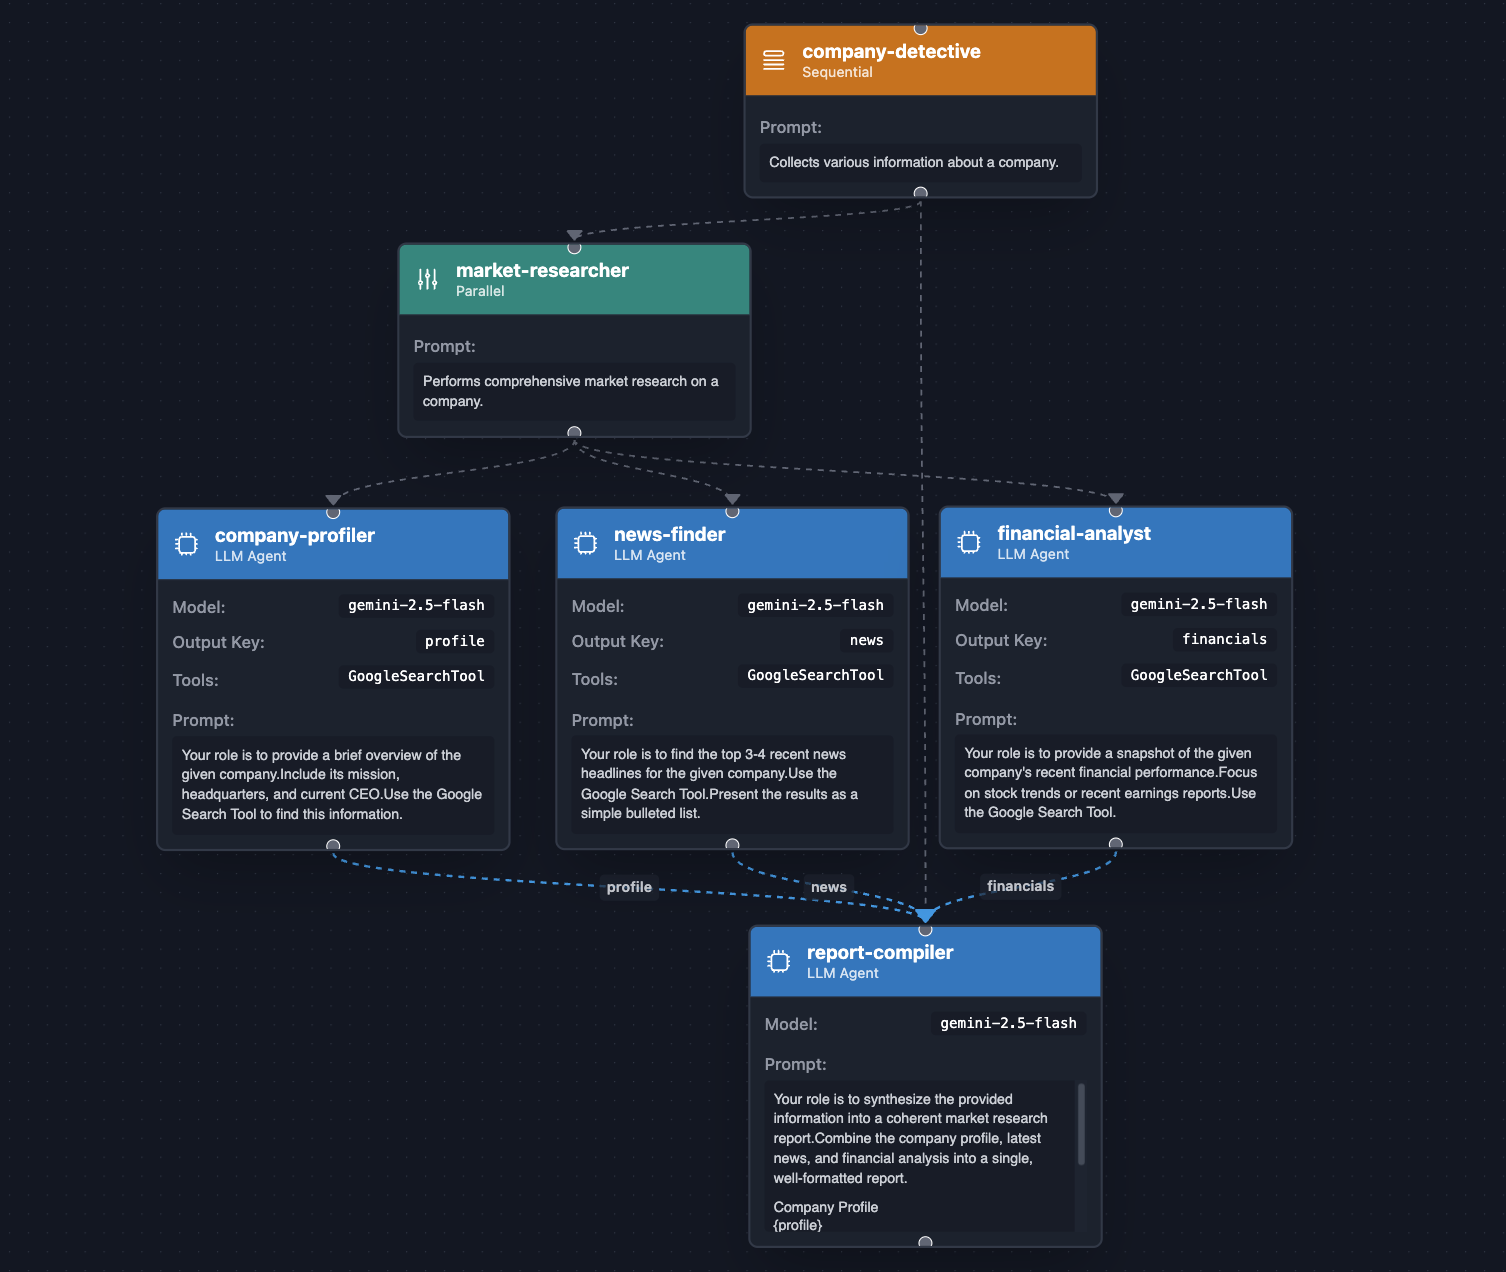
Когда задачи независимы, ParallelAgent обеспечивает огромный прирост эффективности, выполняя их одновременно. В следующем примере мы даже объединим SequentialAgent с ParallelAgent : параллельные задачи выполняются первыми, а затем заключительный агент подводит итоги выполнения параллельных задач.
Давайте создадим корпоративного детектива, чья работа будет заключаться в поиске информации о:
- Профиль компании (генеральный директор, головной офис, девиз и т. д.)
- Последние новости о компании.
- Подробная информация о финансовых показателях компании.
// src/main/java/com/example/agent/CompanyDetective.java
package com.example.agent;

import com.google.adk.agents.LlmAgent;
import com.google.adk.agents.ParallelAgent;
import com.google.adk.agents.SequentialAgent;
import com.google.adk.tools.GoogleSearchTool;
import com.google.adk.web.AdkWebServer;

public class CompanyDetective {
    public static void main(String[] args) {
        var companyProfiler = LlmAgent.builder()
            .name("company-profiler")
            .description("Provides a general overview of a company.")
            .instruction("""
                Your role is to provide a brief overview of the given company.
                Include its mission, headquarters, and current CEO.
                Use the Google Search Tool to find this information.
                """)
            .model("gemini-2.5-flash")
            .tools(new GoogleSearchTool())
            .outputKey("profile")
            .build();

        var newsFinder = LlmAgent.builder()
            .name("news-finder")
            .description("Finds the latest news about a company.")
            .instruction("""
                Your role is to find the top 3-4 recent news headlines for the given company.
                Use the Google Search Tool.
                Present the results as a simple bulleted list.
                """)
            .model("gemini-2.5-flash")
            .tools(new GoogleSearchTool())
            .outputKey("news")
            .build();

        var financialAnalyst = LlmAgent.builder()
            .name("financial-analyst")
            .description("Analyzes the financial performance of a company.")
            .instruction("""
                Your role is to provide a snapshot of the given company's recent financial performance.
                Focus on stock trends or recent earnings reports.
                Use the Google Search Tool.
                """)
            .model("gemini-2.5-flash")
            .tools(new GoogleSearchTool())
            .outputKey("financials")
            .build();

        var marketResearcher = ParallelAgent.builder()
            .name("market-researcher")
            .description("Performs comprehensive market research on a company.")
            .subAgents(
                companyProfiler,
                newsFinder,
                financialAnalyst
            )
            .build();

        var reportCompiler = LlmAgent.builder()
            .name("report-compiler")
            .description("Compiles a final market research report.")
            .instruction("""
                Your role is to synthesize the provided information into a coherent market research report.
                Combine the company profile, latest news, and financial analysis into a single, well-formatted report.

                ## Company Profile
                {profile}

                ## Latest News
                {news}

                ## Financial Snapshot
                {financials}
                """)
            .model("gemini-2.5-flash")
            .build();

        AdkWebServer.start(SequentialAgent.builder()
            .name("company-detective")
            .description("Collects various information about a company.")
            .subAgents(
                marketResearcher,
                reportCompiler
            ).build());
    }
}
Как обычно, запустить агент можно с помощью следующей команды:
mvn compile exec:java -Dexec.mainClass=com.example.agent.CompanyDetective
Задайте вопрос о разных компаниях, таких как Google или Apple, и посмотрите, что вы получите в ответ.
Этот агент демонстрирует мощное сочетание рабочих процессов, в которых параллельно и последовательно используются эффективные средства благодаря распараллеливанию поиска и синтеза информации.
10. Агентные рабочие процессы — итеративное уточнение
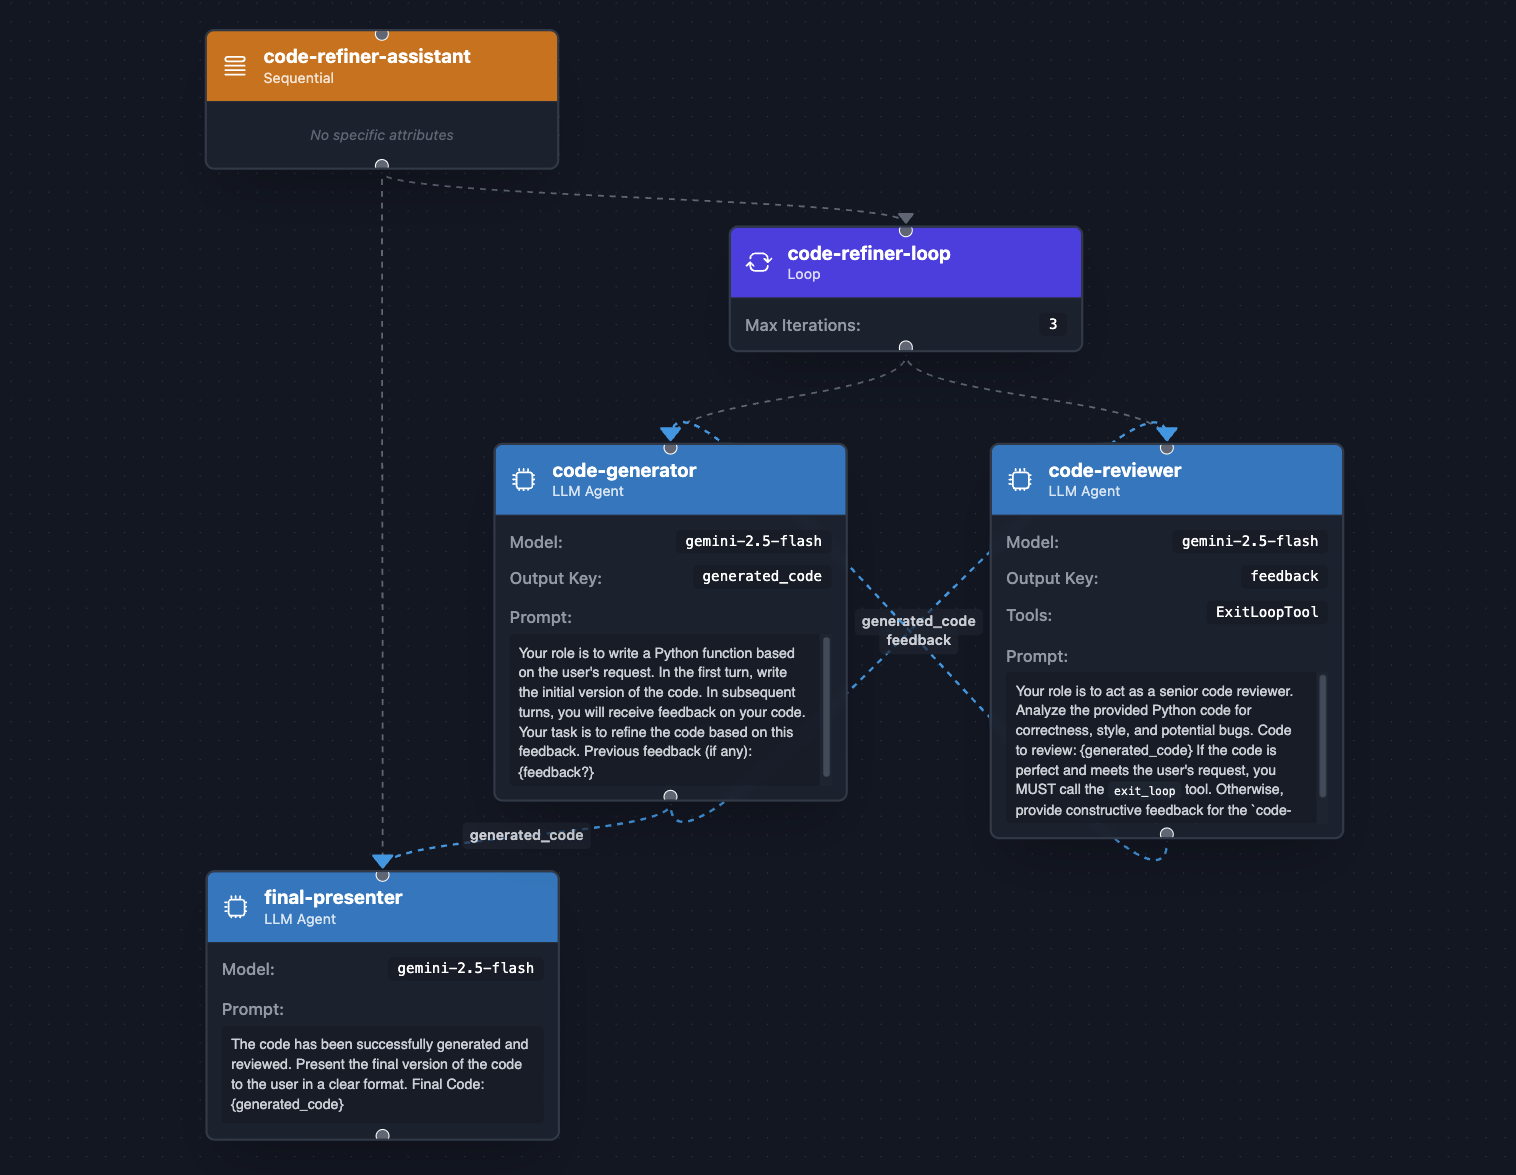
Для задач, требующих цикла "генерация → проверка → уточнение", используйте LoopAgent . Он автоматизирует итеративное улучшение до достижения цели. Аналогично SequentialAgent , LoopAgent будет последовательно вызывать подагент, но вернется к началу цикла. Именно LLM, используемый внутри агента, будет решать, запрашивать ли вызов специального инструмента, встроенного инструмента exit_loop , для остановки выполнения цикла.
Приведенный ниже пример доработки кода с использованием LoopAgent автоматизирует процесс уточнения кода: генерация, проверка, исправление. Это имитирует разработку человеком. Генератор кода сначала генерирует запрошенный код, сохраняет его в состоянии агента под ключом generated_code . Затем рецензент кода проверяет сгенерированный код и либо предоставляет обратную связь (под ключом feedback ), либо вызывает инструмент выхода из цикла, чтобы завершить итерацию досрочно.
Давайте посмотрим на код:
// src/main/java/com/example/agent/CodeRefiner.java
package com.example.agent;

import com.google.adk.agents.LlmAgent;
import com.google.adk.agents.LoopAgent;
import com.google.adk.agents.SequentialAgent;
import com.google.adk.tools.ExitLoopTool;
import com.google.adk.web.AdkWebServer;

public class CodeRefiner {
    public static void main(String[] args) {
        var codeGenerator = LlmAgent.builder()
            .name("code-generator")
            .description("Writes and refines code based on a request and feedback.")
            .instruction("""
                Your role is to write a Python function based on the user's request.
                In the first turn, write the initial version of the code.
                In subsequent turns, you will receive feedback on your code.
                Your task is to refine the code based on this feedback.

                Previous feedback (if any):
                {feedback?}
                """)
            .model("gemini-2.5-flash")
            .outputKey("generated_code")
            .build();

        var codeReviewer = LlmAgent.builder()
            .name("code-reviewer")
            .description("Reviews code and decides if it's complete or needs more work.")
            .instruction("""
                Your role is to act as a senior code reviewer.
                Analyze the provided Python code for correctness, style, and potential bugs.

                Code to review:
                {generated_code}

                If the code is perfect and meets the user's request,
                you MUST call the `exit_loop` tool.

                Otherwise, provide constructive feedback for the `code-generator to improve the code.
                """)
            .model("gemini-2.5-flash")
            .outputKey("feedback")
            .tools(ExitLoopTool.INSTANCE)
            .build();

        var codeRefinerLoop = LoopAgent.builder()
            .name("code-refiner-loop")
            .description("Iteratively generates and reviews code until it is correct.")
            .subAgents(
                codeGenerator,
                codeReviewer
            )
            .maxIterations(3) // Safety net to prevent infinite loops
            .build();

        var finalPresenter = LlmAgent.builder()
            .name("final-presenter")
            .description("Presents the final, accepted code to the user.")
            .instruction("""
                The code has been successfully generated and reviewed.
                Present the final version of the code to the user in a clear format.

                Final Code:
                {generated_code}
                """)
            .model("gemini-2.5-flash")
            .build();

        AdkWebServer.start(SequentialAgent.builder()
            .name("code-refiner-assistant")
            .description("Manages the full code generation and refinement process.")
            .subAgents(
                codeRefinerLoop,
                finalPresenter)
            .build());
    }
}
Запустите этот агент с помощью следующей команды:
mvn compile exec:java -Dexec.mainClass=com.example.agent.CodeRefiner
Вы можете попросить его реализовать что-нибудь сложное, например, алгоритм Tower of Hanoi или Quicksort Algorithm .
Циклы обратной связи/уточнения, реализованные с помощью LoopAgent , незаменимы для решения задач, требующих итеративного улучшения и самокоррекции, точно имитируя когнитивные процессы человека. Этот шаблон проектирования особенно полезен для задач, где первоначальный результат редко бывает идеальным, таких как генерация кода, написание художественной литературы, итерации проектирования или сложный анализ данных. Благодаря циклической обработке результатов специализированным агентом-рецензентом, предоставляющим структурированную обратную связь, генерирующий агент может непрерывно уточнять свою работу до тех пор, пока не будет достигнут заранее определенный критерий завершения, что приводит к заметно более высоким качественным и надежным конечным результатам, чем при однократном подходе.
11. Поздравляем!

Вы успешно создавали и исследовали различные системы искусственного интеллекта, от простых диалоговых агентов до сложных многоагентных систем. Вы освоили основные концепции ADK для Java: определение агентов с помощью инструкций, наделение их возможностями с помощью инструментов и организация эффективных рабочих процессов.
Что дальше?
- Ознакомьтесь с официальным репозиторием ADK для Java на GitHub .
- Подробнее о фреймворке можно узнать в его документации .
- В этой серии статей вы узнаете о различных рабочих процессах, выполняемых агентами, а также о доступных инструментах .
- Узнайте больше о других встроенных инструментах и расширенных функциях обратного вызова.
- Обрабатывайте контекст, состояние и артефакты для более насыщенного и мультимодального взаимодействия.
- Внедряйте и применяйте плагины, которые интегрируются в жизненный цикл ваших агентов.
- Попробуйте создать собственного агента, который решает реальную задачу!