
1. 📖 簡介
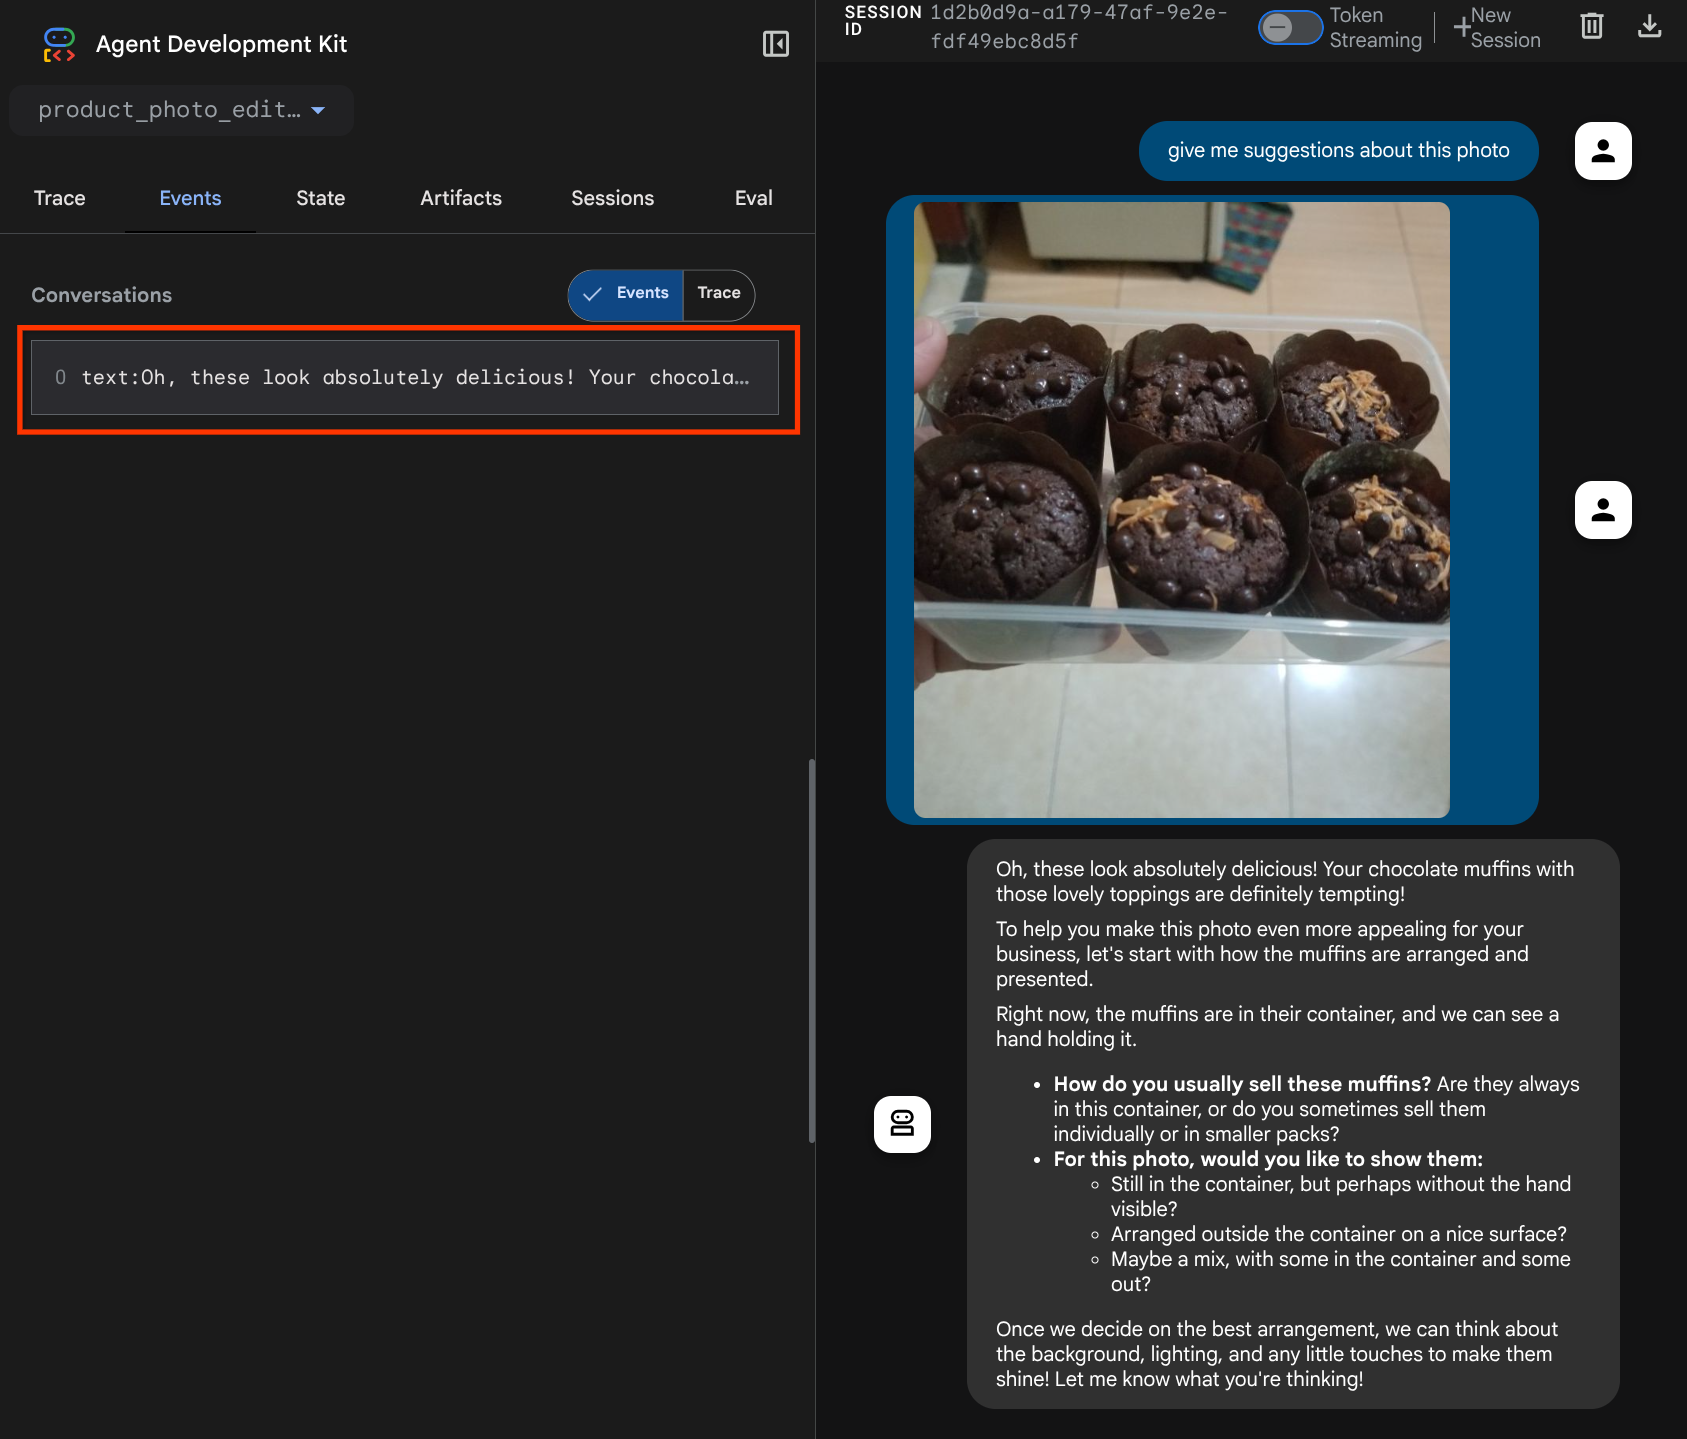
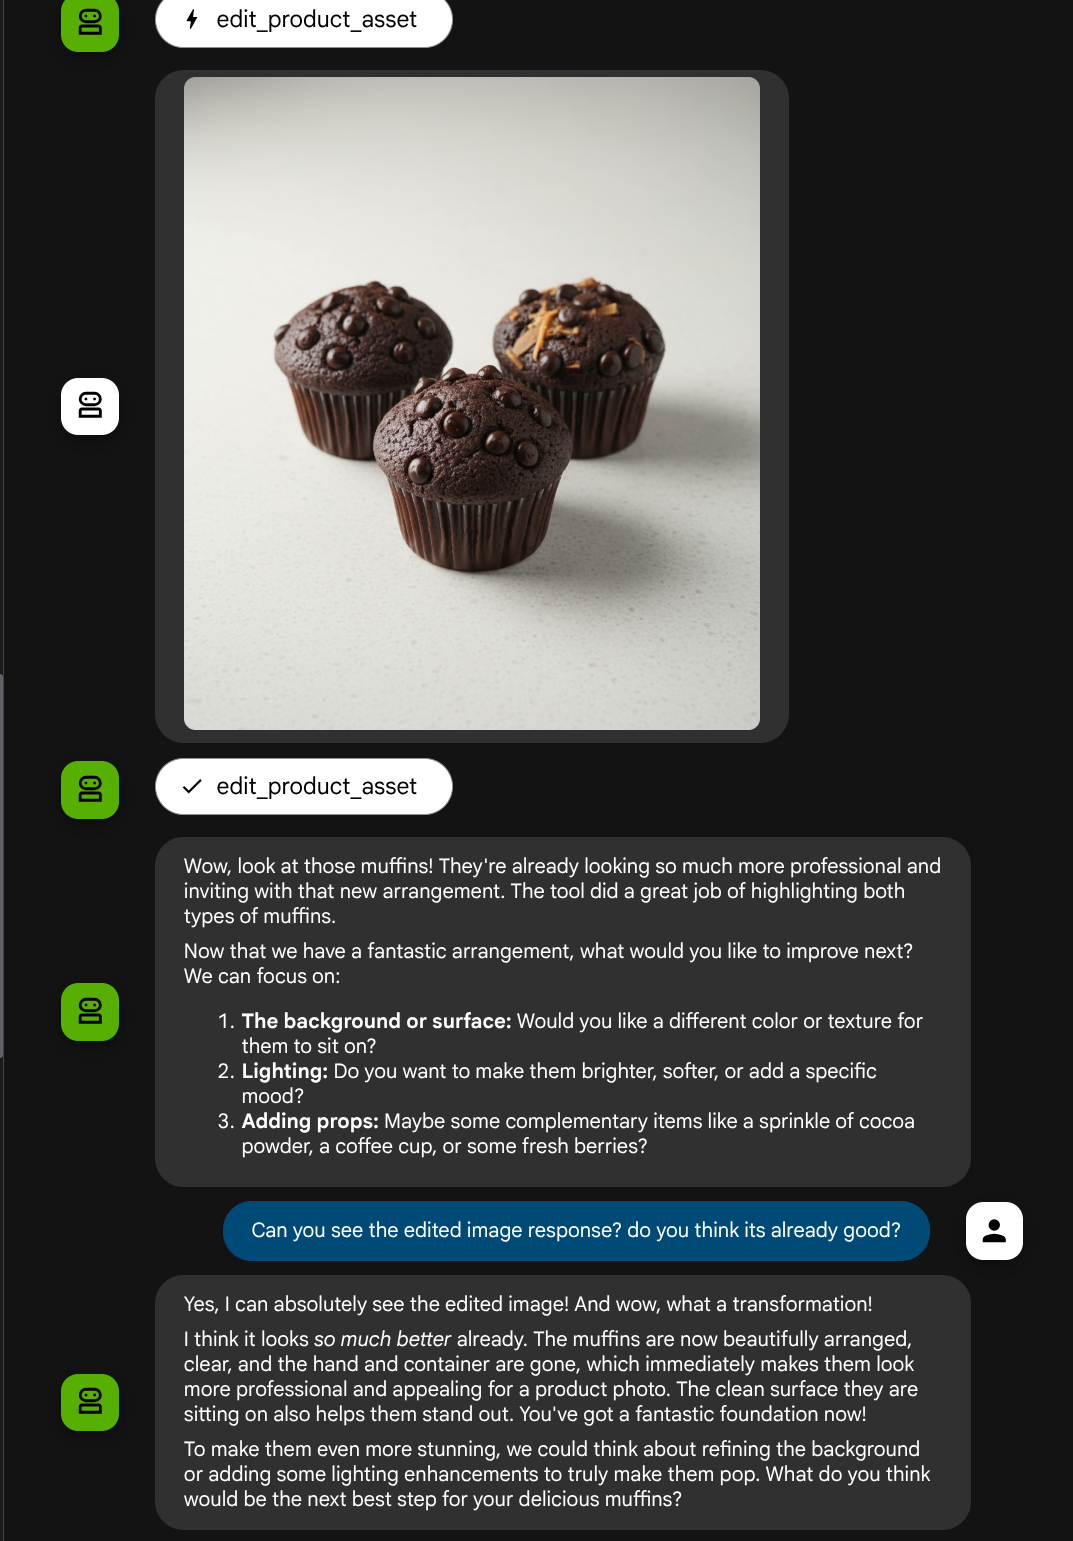
本程式碼實驗室說明如何在 Agent Development Kit (ADK) 中設計多模態工具互動。這是指您希望代理程式將上傳的檔案做為工具的輸入內容,並瞭解工具回覆產生的檔案內容。因此可以進行如下方螢幕截圖所示的互動。在本教學課程中,我們將開發一個代理程式,協助使用者編輯更適合展示產品的相片
在本程式碼研究室中,您將逐步完成下列步驟:
- 準備 Google Cloud 專案
- 設定程式碼環境的工作目錄
- 使用 ADK 初始化代理
- 設計可編輯相片的工具,並採用 Gemini 2.5 Flash Image 技術
- 設計回呼函式,處理使用者上傳的圖片、將圖片儲存為構件,並新增為代理程式的背景資訊
- 設計回呼函式,處理工具回應產生的圖片、儲存為構件,並新增為代理程式的內容
架構總覽
本程式碼研究室的整體互動方式如下圖所示

必要條件
- 熟悉 Python
- (選用) Agent Development Kit (ADK) 基礎程式碼研究室
課程內容
- 如何利用回呼情境存取構件服務
- 如何設計工具,並適當傳播多模態資料
- 如何修改代理 LLM 要求,透過 before_model_callback 新增構件內容
- 如何使用 Gemini 2.5 Flash Image 編輯圖片
軟硬體需求
- Chrome 網路瀏覽器
- Gmail 帳戶
- 已啟用帳單帳戶的 Cloud 專案
本程式碼研究室適合各種程度的開發人員 (包括初學者),並使用 Python 撰寫範例應用程式。不過,您不需要具備 Python 知識,也能瞭解本文介紹的概念。
2. 🚀 準備工作坊開發設定
步驟 1:在 Cloud 控制台中選取有效專案
在 Google Cloud 控制台的專案選取器頁面中,選取或建立 Google Cloud 專案 (請參閱控制台左上方的部分)

點選該按鈕後,您會看到所有專案的清單,如下例所示:
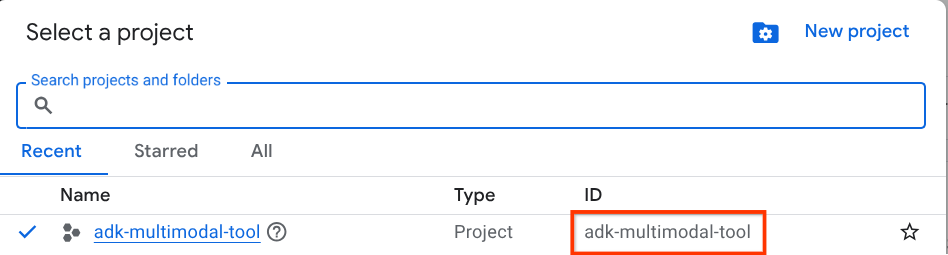
紅框標示的值是專案 ID,本教學課程會使用這個值。
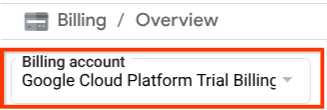
確認 Cloud 專案已啟用計費功能。如要確認,請按一下左上列的漢堡圖示 ☰,顯示「導覽選單」,然後找出「帳單」選單

如果「帳單 / 總覽」標題下方 ( Cloud 控制台左上角部分) 顯示「Google Cloud Platform 試用帳單帳戶」,表示您的專案已準備就緒,可供本教學課程使用。如果沒有,請返回本教學課程的開頭,兌換試用帳單帳戶
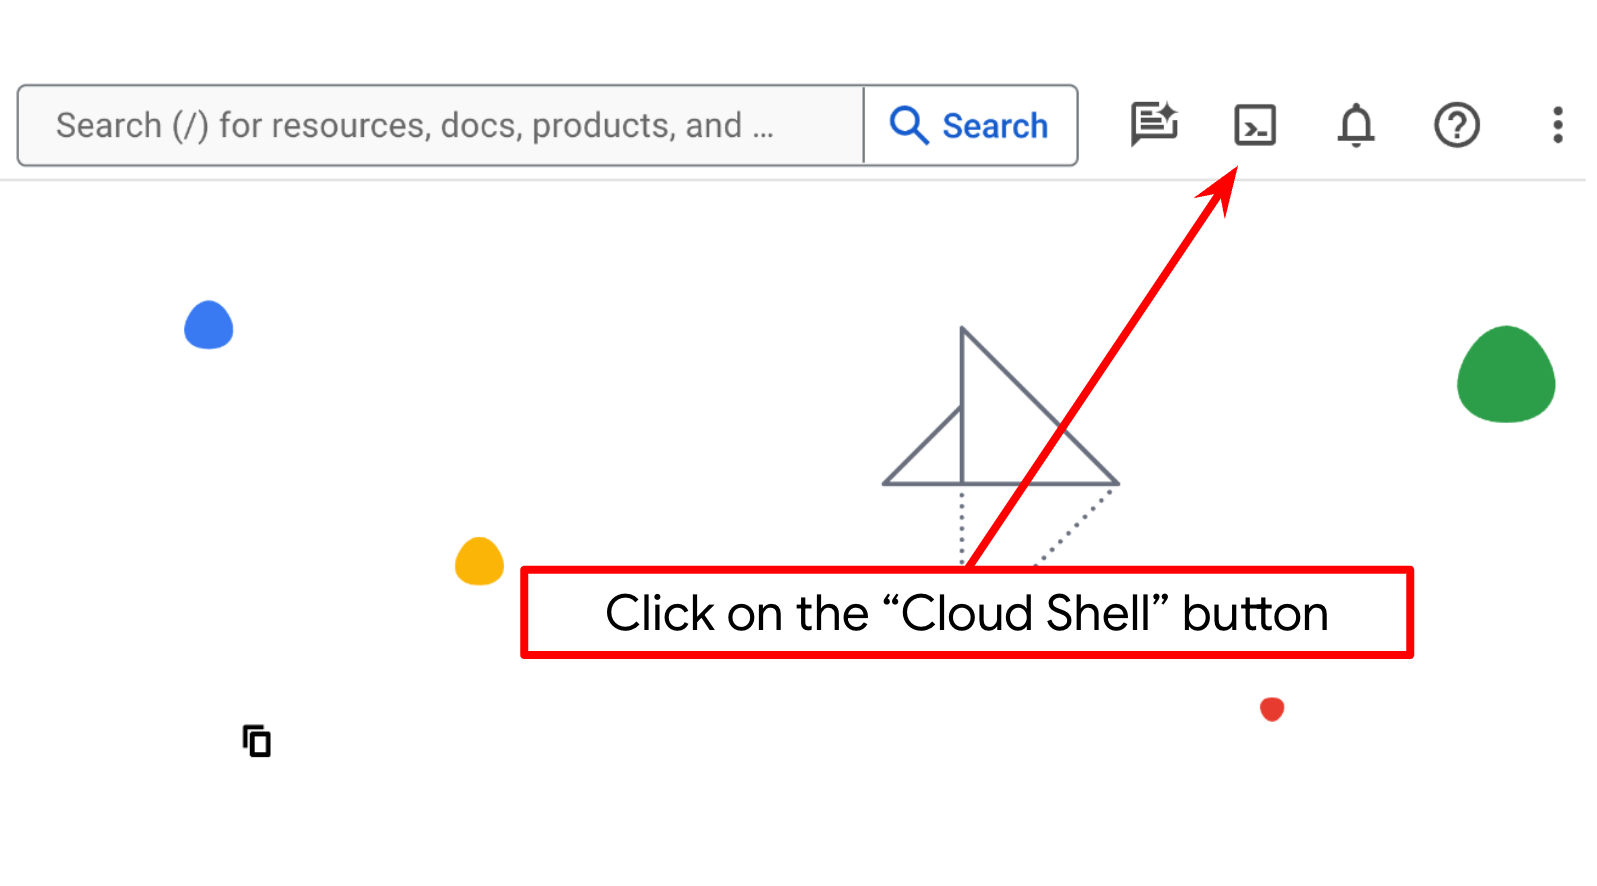
步驟 2:熟悉 Cloud Shell
您將在教學課程的大部分環節中使用 Cloud Shell,請點選 Google Cloud 控制台頂端的「啟用 Cloud Shell」。如果系統提示您授權,請點選「授權」。
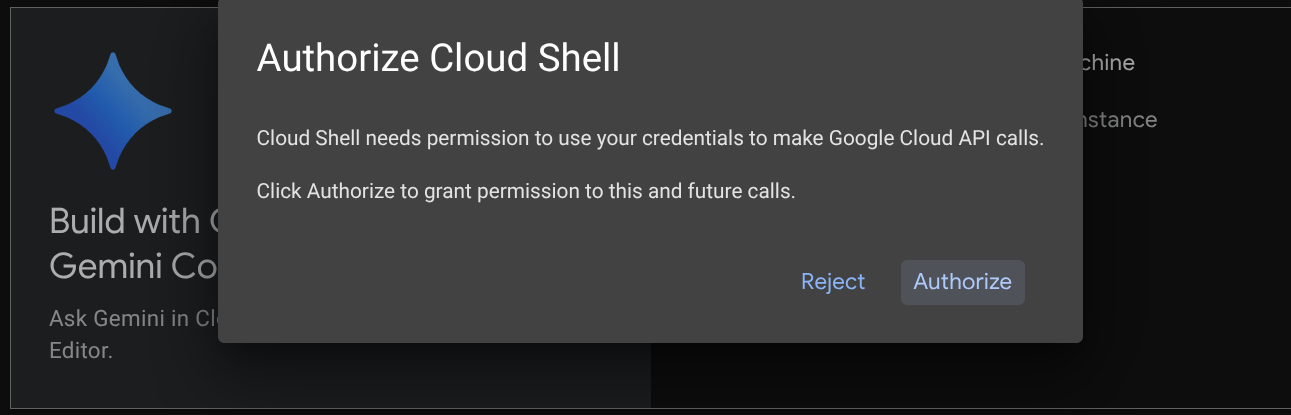
連至 Cloud Shell 後,我們需要檢查 Shell ( 或終端機) 是否已通過帳戶驗證
gcloud auth list
如果看到如下列範例輸出內容的個人 Gmail,表示一切正常
Credentialed Accounts

ACTIVE: *
ACCOUNT: alvinprayuda@gmail.com

To set the active account, run:
    $ gcloud config set account `ACCOUNT`
如果沒有,請嘗試重新整理瀏覽器,並確保在系統提示時點選「授權」 ( 連線問題可能會導致授權中斷)。
接著,我們也需要檢查 Shell 是否已設定為正確的專案 ID。如果終端機的 $ 圖示前有括號內的值 (在下方螢幕截圖中,該值為「adk-multimodal-tool」),表示目前 Shell 工作階段已設定專案。

如果顯示的值正確無誤,可以略過下一個指令。但如果該值不正確或遺失,請執行下列指令
gcloud config set project <YOUR_PROJECT_ID>
接著,從 Github 複製本程式碼研究室的範本工作目錄,執行下列指令。系統會在 adk-multimodal-tool 目錄中建立工作目錄
git clone https://github.com/alphinside/adk-mcp-multimodal.git adk-multimodal-tool
步驟 3:熟悉 Cloud Shell 編輯器並設定應用程式工作目錄
現在,我們可以設定程式碼編輯器,進行一些程式設計工作。我們會使用 Cloud Shell 編輯器執行這項操作
按一下「Open Editor」(開啟編輯器) 按鈕,開啟 Cloud Shell 編輯器 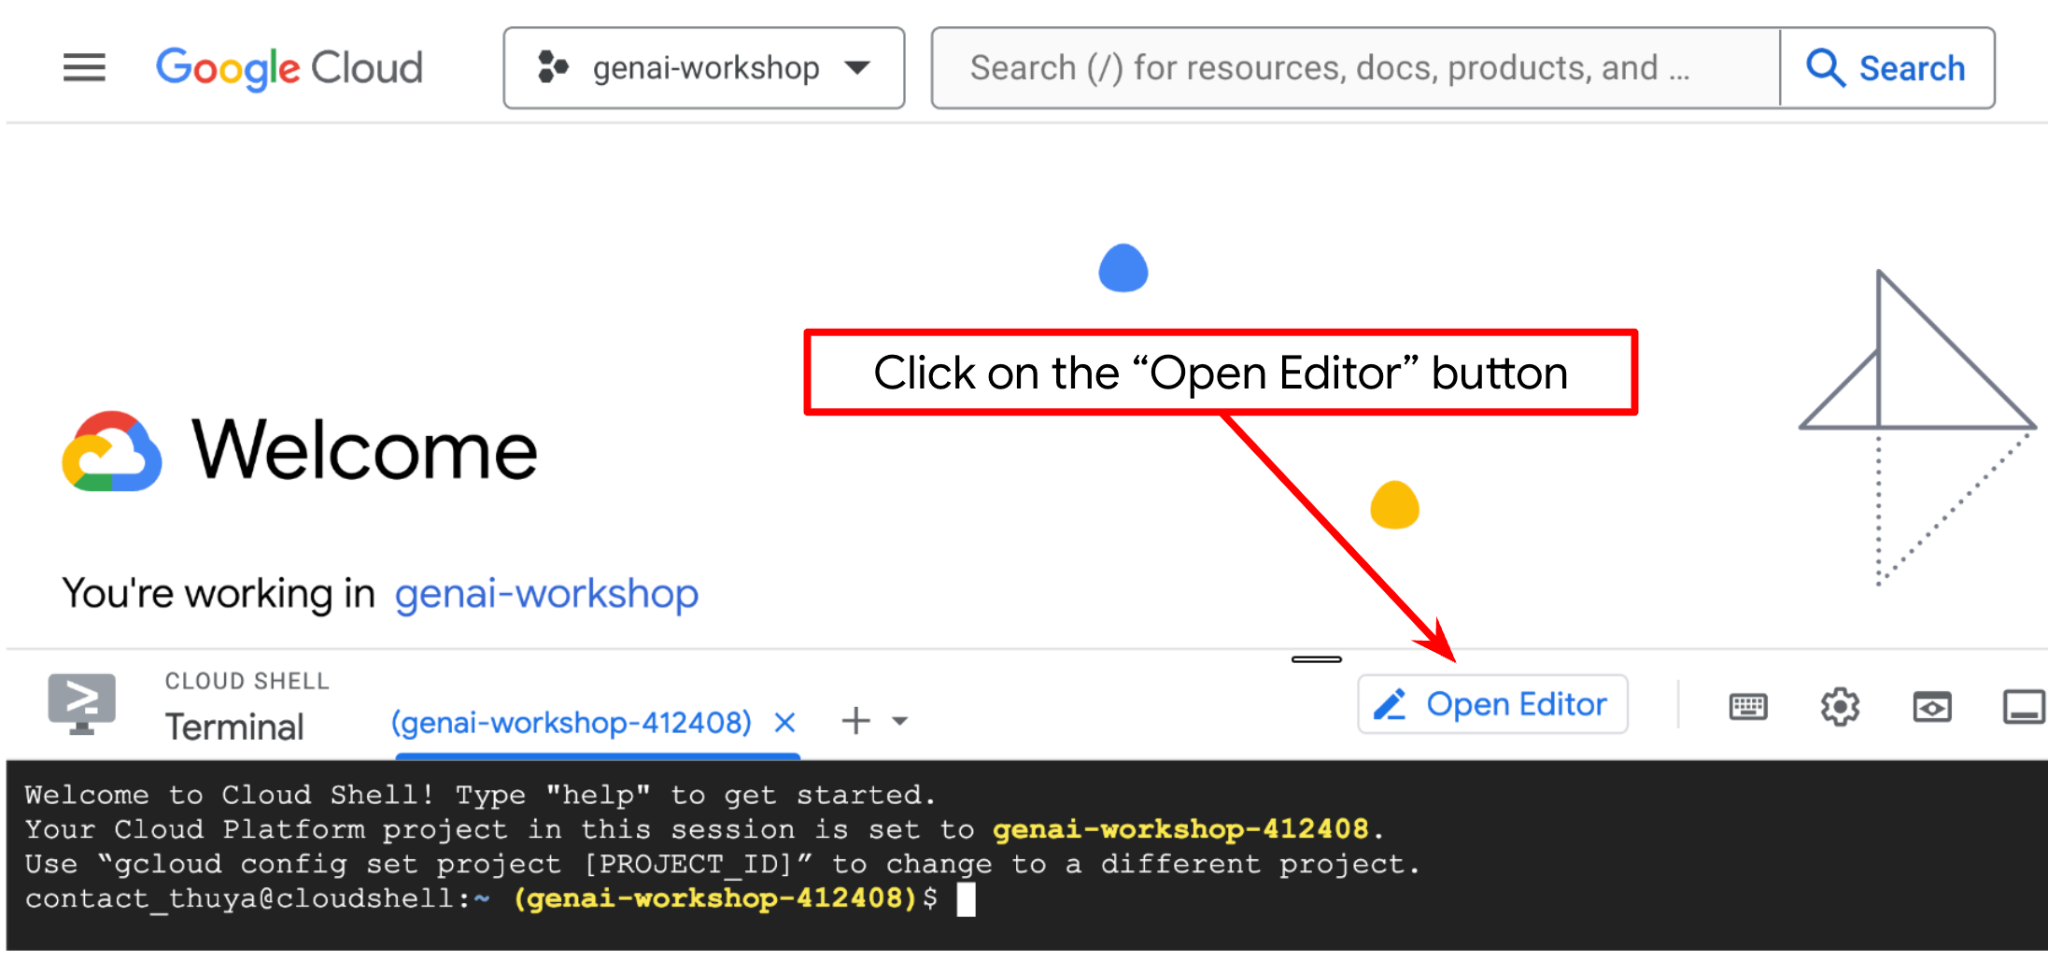
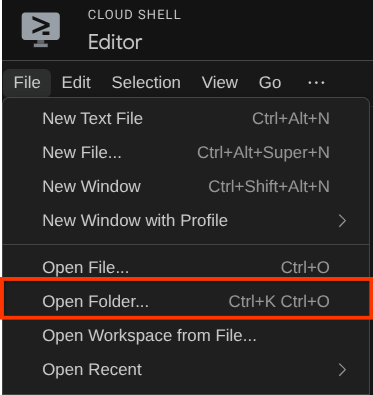
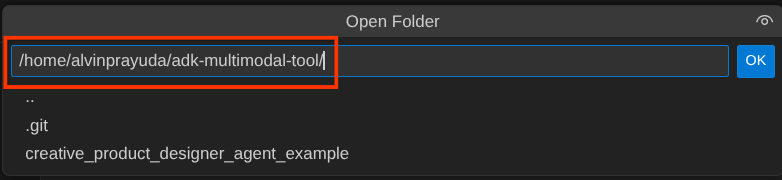
完成後,前往 Cloud Shell 編輯器頂端,依序點選「File」->「Open Folder」,找出「username」目錄,然後找出「adk-multimodal-tool」目錄,並點選「OK」按鈕。這會將所選目錄設為主要工作目錄。在本範例中,使用者名稱為 alvinprayuda,因此目錄路徑如下所示
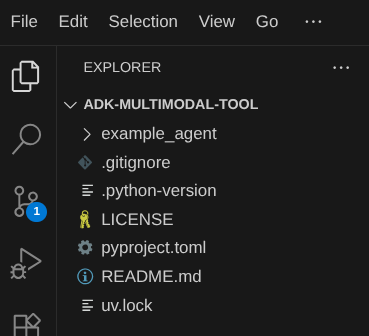
現在,Cloud Shell 編輯器的工作目錄應如下所示 ( 位於 adk-multimodal-tool 內):
現在,請開啟編輯器的終端機。方法是在選單列中依序點選「Terminal」->「New Terminal」,或使用 Ctrl + Shift + C 鍵盤快速鍵,瀏覽器底部就會開啟終端機視窗。

目前啟用的終端機應位於 adk-multimodal-tool 工作目錄中。在本程式碼研究室中,我們將使用 Python 3.12,並使用 uv Python 專案管理工具,簡化建立及管理 Python 版本和虛擬環境的需求。Cloud Shell 已預先安裝 uv 套件。
執行此指令,將必要的依附元件安裝至 .venv 目錄的虛擬環境
uv sync --frozen
查看 pyproject.toml,瞭解本教學課程中宣告的依附元件 (即 google-adk, and python-dotenv)。
現在,我們需要透過下列指令啟用必要的 API。這可能需要一些時間。
gcloud services enable aiplatform.googleapis.com
成功執行指令後,您應該會看到類似下方的訊息:
Operation "operations/..." finished successfully.
3. 🚀 初始化 ADK 代理
在這個步驟中,我們將使用 ADK CLI 初始化代理,請執行下列指令
uv run adk create product_photo_editor \
   --model gemini-2.5-flash \
   --project your-project-id \
   --region us-central1
這項指令可協助您快速為代理程式提供必要結構,如下所示:
product_photo_editor/
├── __init__.py
├── .env
├── agent.py
接著,準備 product photo editor 代理程式。首先,請將存放區中已包含的 prompt.py 複製到先前建立的代理程式目錄
cp prompt.py product_photo_editor/prompt.py
接著開啟 product_photo_editor/agent.py,並將內容修改為下列程式碼
from google.adk.agents.llm_agent import Agent
from product_photo_editor.prompt import AGENT_INSTRUCTION

root_agent = Agent(
    model="gemini-2.5-flash",
    name="product_photo_editor",
    description="""A friendly product photo editor assistant that helps small business
owners edit and enhance their product photos. Perfect for improving photos of handmade
goods, food products, crafts, and small retail items""",
    instruction=AGENT_INSTRUCTION,
)
現在,您已擁有基礎相片編輯代理,可以與其閒聊,並要求提供相片建議。您可以使用下列指令與其互動
uv run adk web --port 8080
這會產生類似下列範例的輸出內容,表示我們已可存取網頁介面
INFO:     Started server process [xxxx]
INFO:     Waiting for application startup.

+-----------------------------------------------------------------------------+
| ADK Web Server started                                                      |
|                                                                             |
| For local testing, access at http://127.0.0.1:8080.                         |
+-----------------------------------------------------------------------------+

INFO:     Application startup complete.
INFO:     Uvicorn running on http://127.0.0.1:8080 (Press CTRL+C to quit)
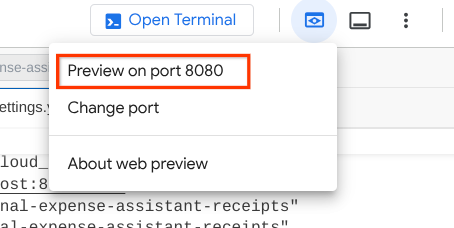
現在,如要檢查,請按住 Ctrl 鍵並點選網址,或點選 Cloud Shell 編輯器頂端區域的「Web Preview」(網頁預覽) 按鈕,然後選取「Preview on port 8080」(透過以下通訊埠預覽:8080)。
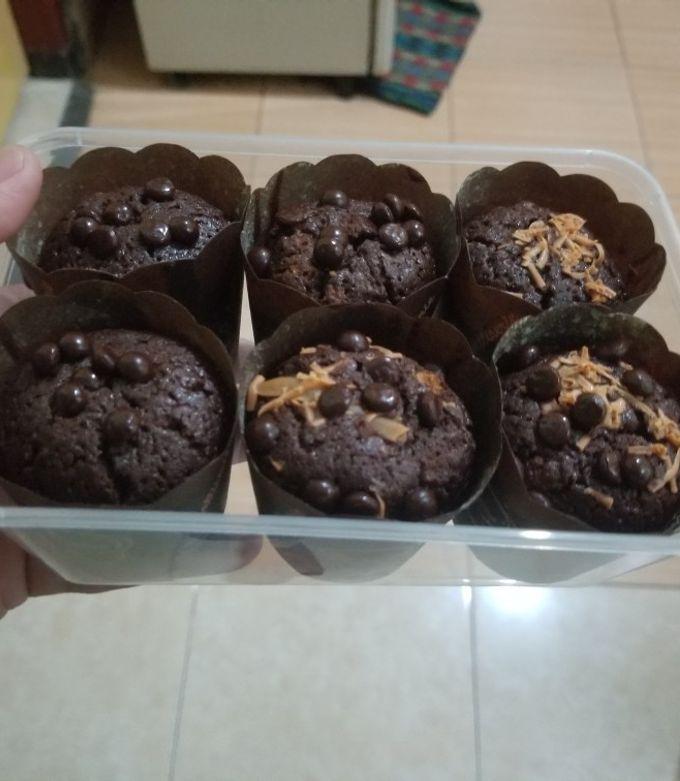
你會看到以下網頁,在左上方的下拉式選單中選取可用的代理程式 ( 在本例中應為 product_photo_editor),並與機器人互動。在對話介面中上傳下列圖片,並提出下列問題
what is your suggestion for this photo?
您會看到類似下方的互動畫面
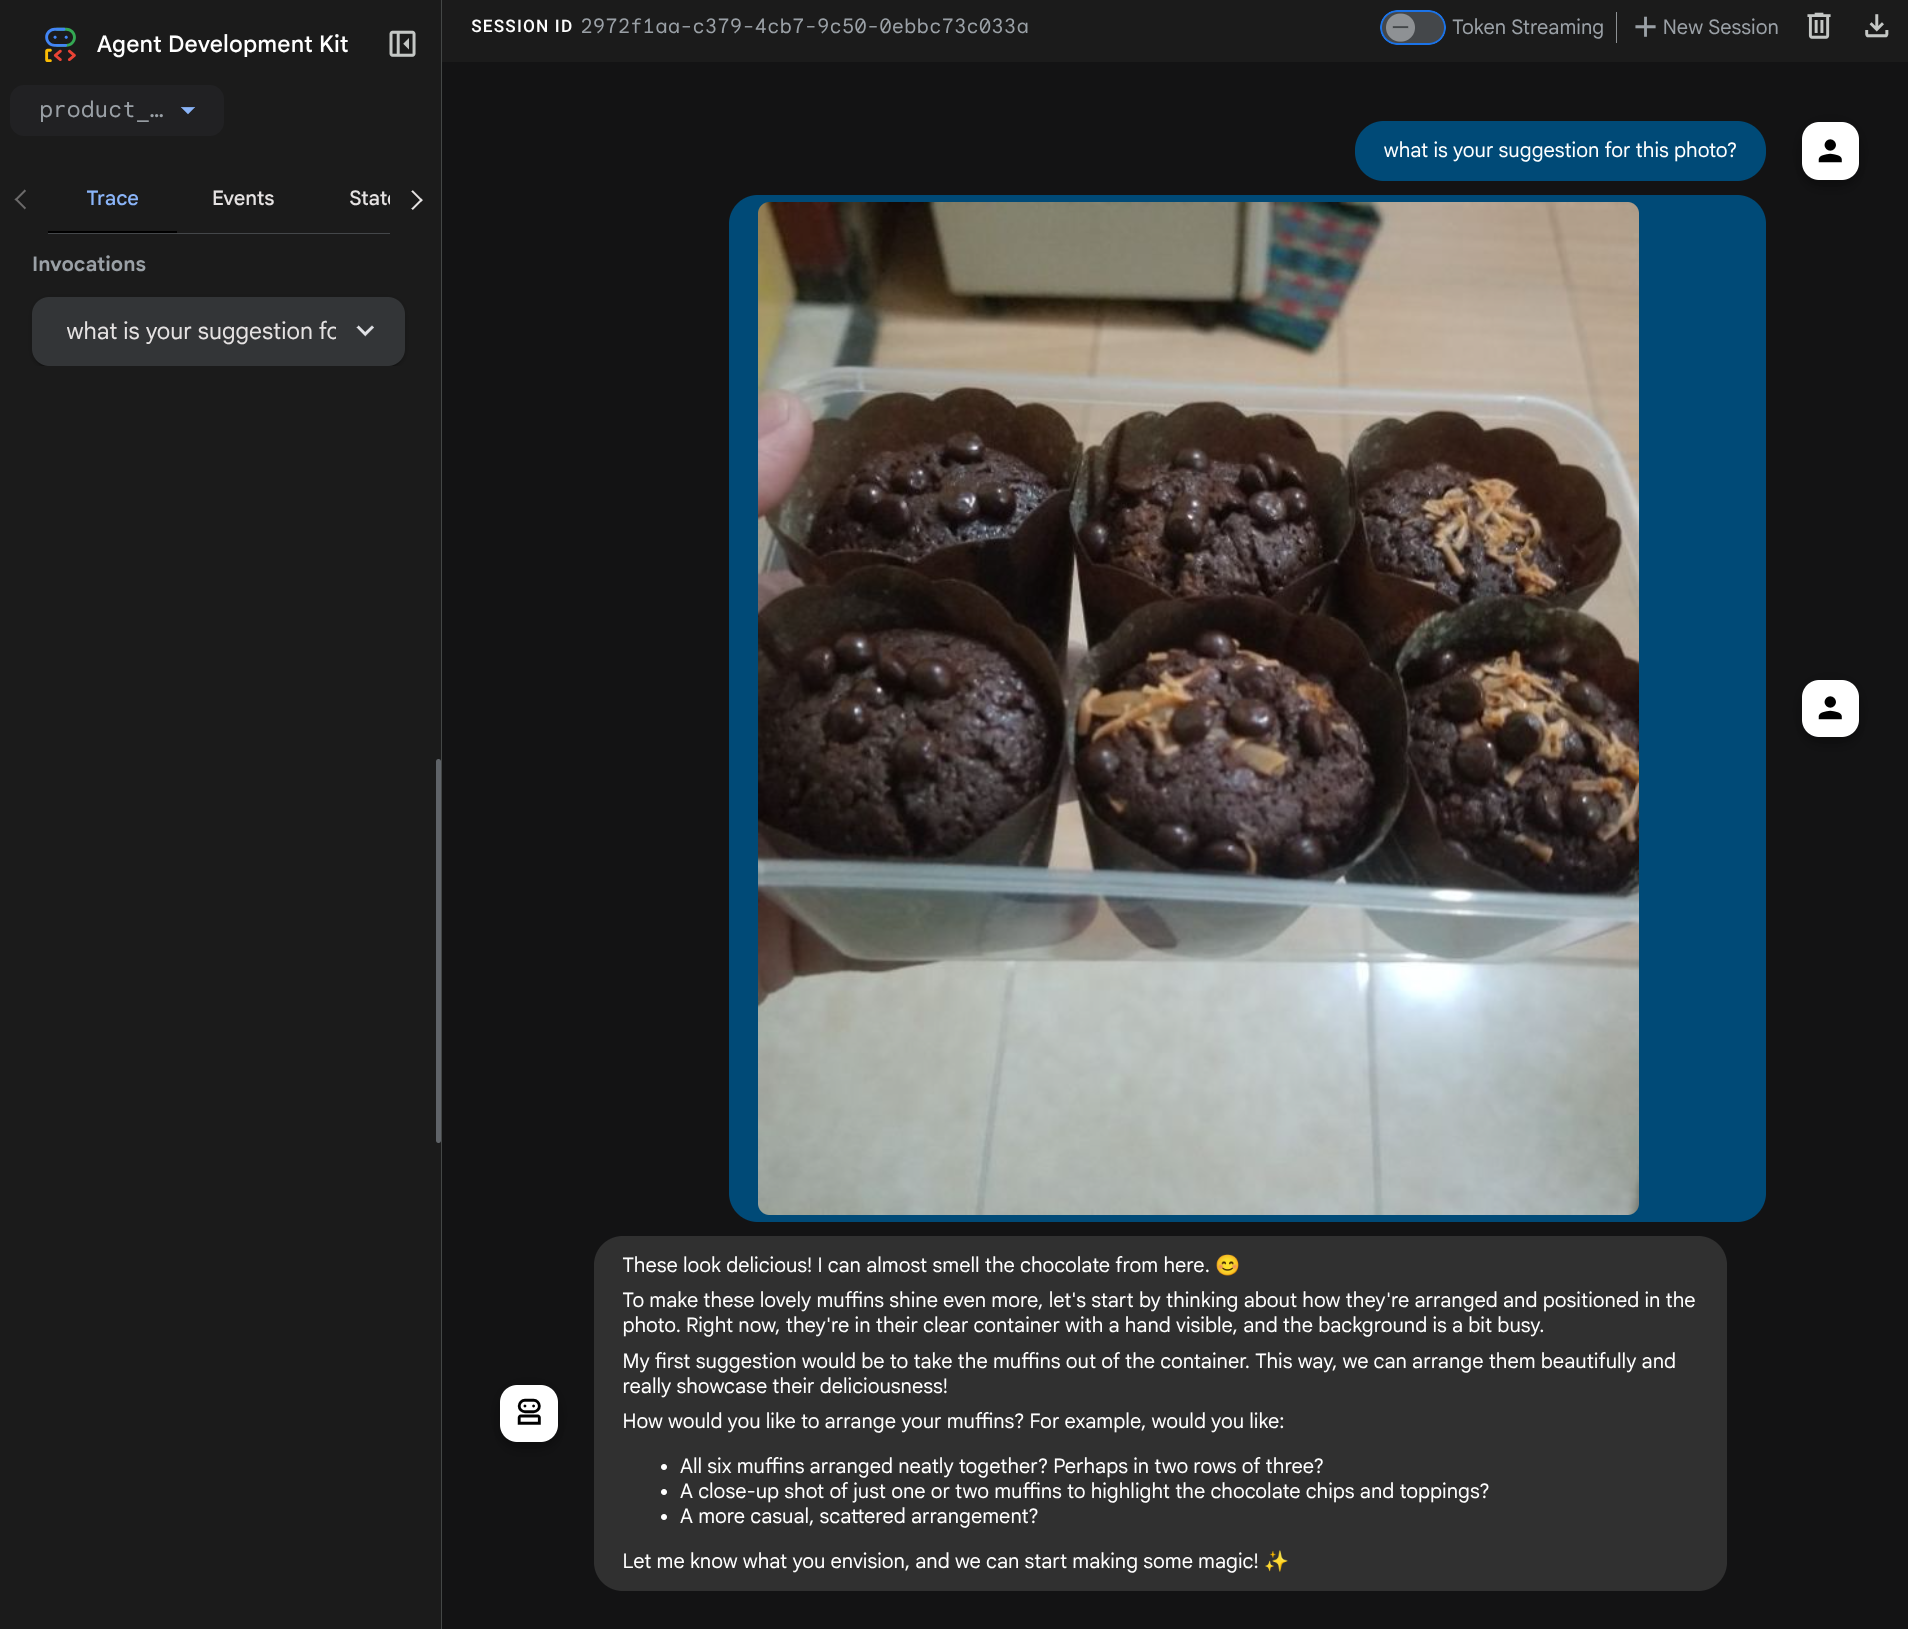
你目前可以要求提供建議,但無法編輯內容。接著,我們將為代理程式配備編輯工具。
4. 🚀 修改 LLM 要求脈絡 - 使用者上傳的圖片
我們希望代理程式能彈性選擇要編輯的上傳圖片。不過,大型語言模型工具通常只接受簡單的資料類型參數,例如 str 或 int。這與多模態資料的資料類型大相逕庭,多模態資料通常會視為 bytes 資料類型,因此我們需要採用涉及 Artifacts 概念的策略來處理這些資料。因此,我們將設計工具,接受構件 ID 名稱,而非在工具參數中提供完整位元組資料。
這項策略包含 2 個步驟:
- 修改 LLM 要求,讓每個上傳的檔案都與構件 ID 建立關聯,並將此 ID 新增為 LLM 的背景資訊
- 設計工具,接受構件 ID 做為輸入參數
現在進行第 1 步,如要修改 LLM 要求,請使用 ADK 的 Callback 功能。具體來說,我們會在代理程式將背景資訊傳送至 LLM 之前,新增 before_model_callback 來進行輕觸。請參閱下圖 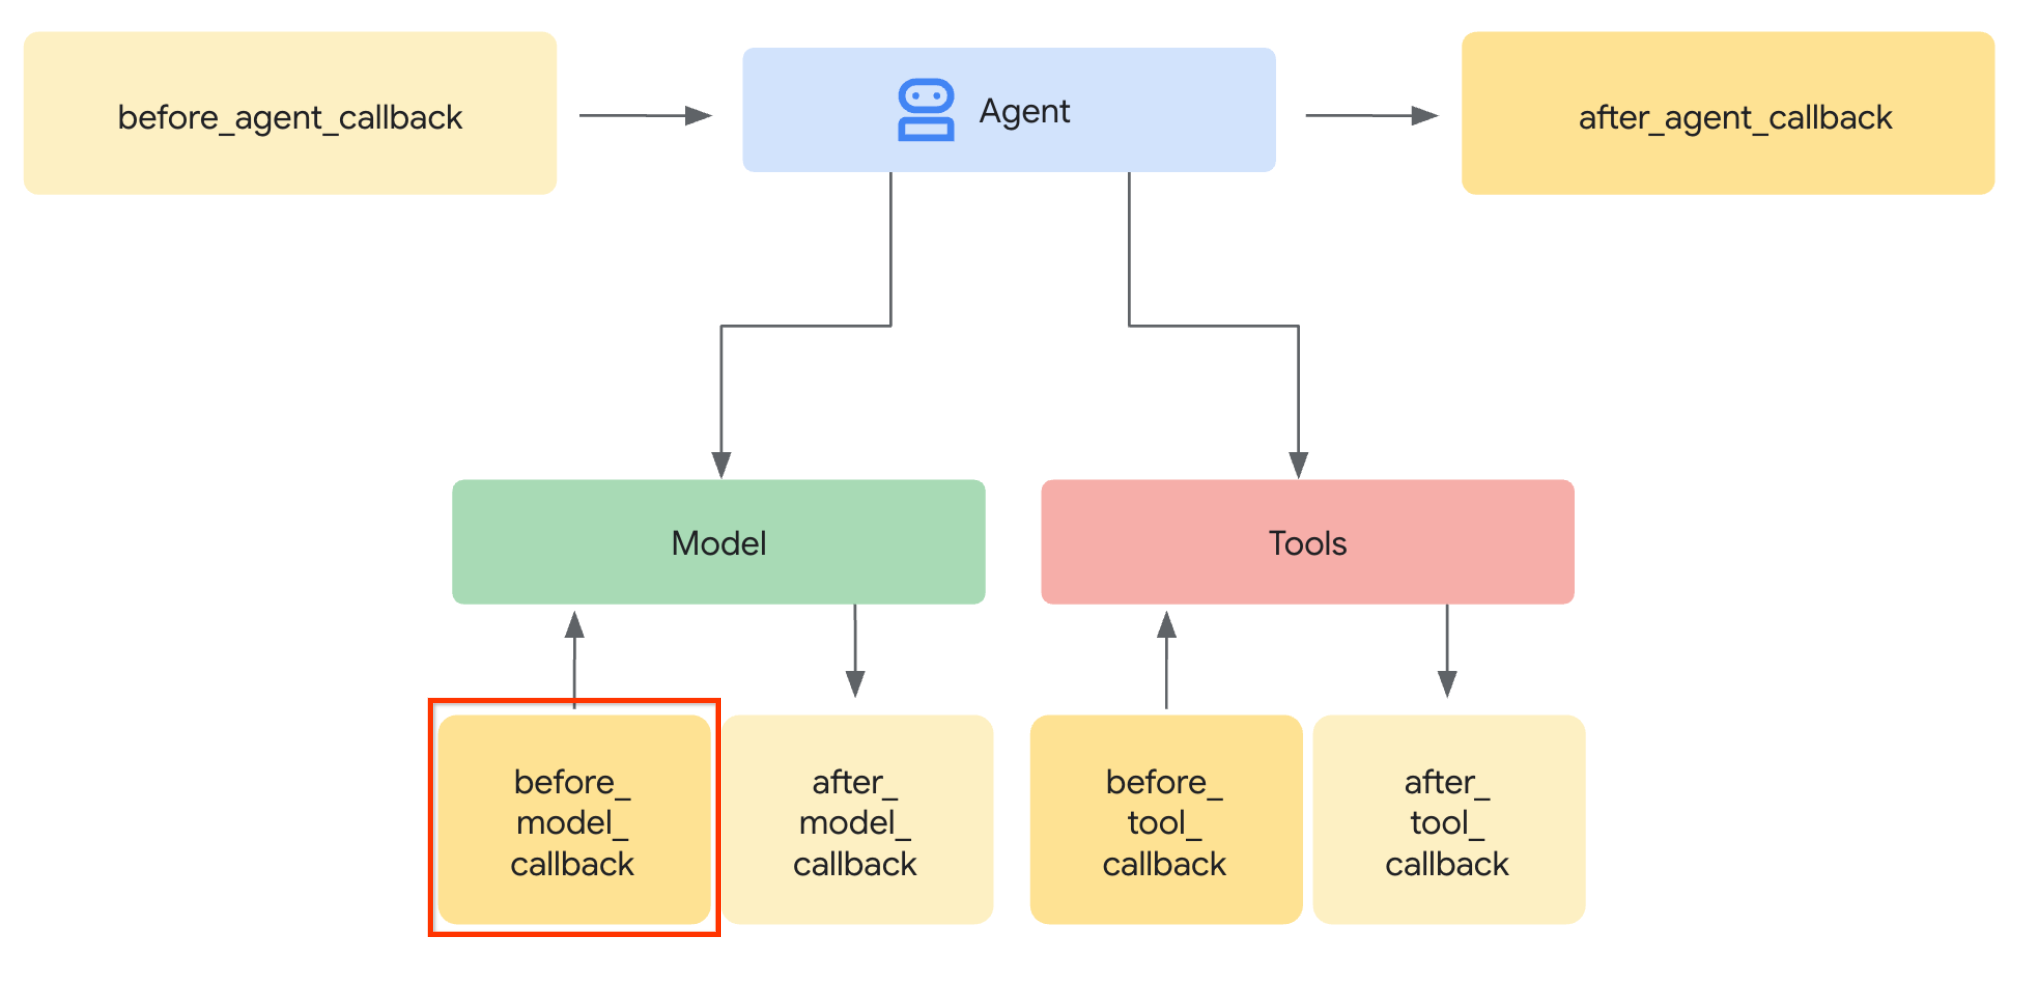
如要執行此操作,請先使用下列指令建立新檔案 product_photo_editor/model_callbacks.py
touch product_photo_editor/model_callbacks.py
然後將下列程式碼複製到檔案中
# product_photo_editor/model_callbacks.py

from google.adk.agents.callback_context import CallbackContext
from google.adk.models import LlmResponse, LlmRequest
from google.genai.types import Part
import hashlib
from typing import List


async def before_model_modifier(
    callback_context: CallbackContext, llm_request: LlmRequest
) -> LlmResponse | None:
    """Modify LLM request to include artifact references for images."""
    for content in llm_request.contents:
        if not content.parts:
            continue

        modified_parts = []
        for idx, part in enumerate(content.parts):
            # Handle user-uploaded inline images
            if part.inline_data:
                processed_parts = await _process_inline_data_part(
                    part, callback_context
                )
            # Default: keep part as-is
            else:
                processed_parts = [part]

            modified_parts.extend(processed_parts)

        content.parts = modified_parts


async def _process_inline_data_part(
    part: Part, callback_context: CallbackContext
) -> List[Part]:
    """Process inline data parts (user-uploaded images).

    Returns:
        List of parts including artifact marker and the image.
    """
    artifact_id = _generate_artifact_id(part)

    # Save artifact if it doesn't exist
    if artifact_id not in await callback_context.list_artifacts():
        await callback_context.save_artifact(filename=artifact_id, artifact=part)

    return [
        Part(
            text=f"[User Uploaded Artifact] Below is the content of artifact ID : {artifact_id}"
        ),
        part,
    ]


def _generate_artifact_id(part: Part) -> str:
    """Generate a unique artifact ID for user uploaded image.

    Returns:
        Hash-based artifact ID with proper file extension.
    """
    filename = part.inline_data.display_name or "uploaded_image"
    image_data = part.inline_data.data

    # Combine filename and image data for hash
    hash_input = filename.encode("utf-8") + image_data
    content_hash = hashlib.sha256(hash_input).hexdigest()[:16]

    # Extract file extension from mime type
    mime_type = part.inline_data.mime_type
    extension = mime_type.split("/")[-1]

    return f"usr_upl_img_{content_hash}.{extension}"
before_model_modifier 函式會執行下列動作:
- 存取
llm_request.contents變數並疊代內容 - 檢查部分是否包含 inline_data ( 上傳的檔案 / 圖片),如果是,請處理內嵌資料
- 建構 inline_data 的 ID,在本範例中,我們使用檔案名稱 + 資料的組合來建立內容雜湊 ID
- 檢查構件 ID 是否已存在,如果沒有,請使用構件 ID 儲存構件
- 修改該部分,加入文字提示,提供下列內嵌資料的構件 ID 相關背景資訊
完成後,請修改 product_photo_editor/agent.py,為代理提供回呼
from google.adk.agents.llm_agent import Agent
from product_photo_editor.model_callbacks import before_model_modifier
from product_photo_editor.prompt import AGENT_INSTRUCTION

root_agent = Agent(
    model="gemini-2.5-flash",
    name="product_photo_editor",
    description="""A friendly product photo editor assistant that helps small business
owners edit and enhance their product photos for online stores, social media, and
marketing. Perfect for improving photos of handmade goods, food products, crafts, and small retail items""",
    instruction=AGENT_INSTRUCTION,
    before_model_callback=before_model_modifier,
)
現在可以再次與代理程式互動
uv run adk web --port 8080
並嘗試再次上傳檔案和進行對話,我們可以檢查是否已成功修改 LLM 要求環境
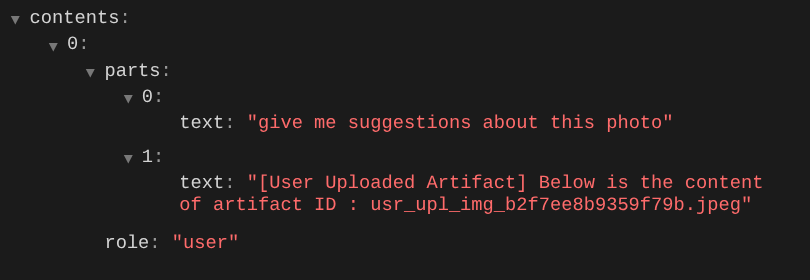
這是我們向 LLM 說明多模態資料順序和識別資訊的方式之一。現在來建立工具,運用這項資訊
5. 🚀 多模態工具互動
現在,我們可以準備工具,並將構件 ID 指定為輸入參數。執行下列指令,建立新檔案 product_photo_editor/custom_tools.py
touch product_photo_editor/custom_tools.py
接著,將下列程式碼複製到 product_photo_editor/custom_tools.py
# product_photo_editor/custom_tools.py

from google import genai
from dotenv import load_dotenv
import os
from google.adk.tools import ToolContext
import logging


load_dotenv()

client = genai.Client(
    vertexai=True,
    project=os.getenv("GOOGLE_CLOUD_PROJECT"),
    location=os.getenv("GOOGLE_CLOUD_LOCATION"),
)


async def edit_product_asset(
    tool_context: ToolContext,
    change_description: str,
    image_artifact_ids: list = [],
) -> dict[str, str]:
    """Modify an existing product photo or combine multiple product photos.

    This tool lets you make changes to product photos. You can:
    - Edit a single photo (change background, lighting, colors, etc.)
    - Combine multiple products into one photo (arrange them side by side, create bundles, etc.)

    **IMPORTANT**:
    - Make ONE type of change per tool call (background OR lighting OR props OR arrangement)
    - For complex edits, chain multiple tool calls together
    - BE AS DETAILED AS POSSIBLE in the change_description for best results!

    Args:
        change_description: What do you want to do? BE VERY DETAILED AND SPECIFIC!

                          **The more details you provide, the better the result.**
                          Focus on ONE type of change, but describe it thoroughly.

                          For BACKGROUND changes:
                          - "change background to soft pure white with subtle gradient from top to bottom, clean and minimal aesthetic"
                          - "replace background with rustic dark wood table surface with natural grain texture visible, warm brown tones"

                          For ADDING PROPS:
                          - "add fresh pink roses and eucalyptus leaves arranged naturally around the product on the left and right sides,
                            with some petals scattered in front"
                          - "add fresh basil leaves and cherry tomatoes scattered around the product naturally"

                          For LIGHTING changes:
                          - "add soft natural window light coming from the left side at 45 degree angle, creating gentle shadows on the
                            right side, warm morning atmosphere"
                          - "increase brightness with soft diffused studio lighting from above, eliminating harsh shadows"

                          For ARRANGEMENT/POSITIONING:
                          - "reposition product to be perfectly centered in frame with equal space on all sides"
                          - "arrange these three products in a horizontal line, evenly spaced with 2 inches between each"

                          Note: When combining multiple products, you can include background/lighting in the initial arrangement since it's
                                one cohesive setup
        image_artifact_ids: List of image IDs to edit or combine.
                          - For single image: provide a list with one item (e.g., ["product.png"])
                          - For multiple images: provide a list with multiple items (e.g., ["product1.png", "product2.png"])
                          Use multiple images to combine products into one photo.

    Returns:
        dict with keys:
            - 'tool_response_artifact_id': Artifact ID for the edited image
            - 'tool_input_artifact_ids': Comma-separated list of input artifact IDs
            - 'edit_prompt': The full edit prompt used
            - 'status': Success or error status
            - 'message': Additional information or error details
    """
    try:
        # Validate input
        if not image_artifact_ids:
            return {
                "status": "error",
                "tool_response_artifact_id": "",
                "tool_input_artifact_ids": "",
                "edit_prompt": change_description,
                "message": "No images provided. Please provide image_artifact_ids as a list.",
            }

        # Load all images
        image_artifacts = []
        for img_id in image_artifact_ids:
            artifact = await tool_context.load_artifact(filename=img_id)
            if artifact is None:
                logging.error(f"Artifact {img_id} not found")
                return {
                    "status": "error",
                    "tool_response_artifact_id": "",
                    "tool_input_artifact_ids": "",
                    "edit_prompt": change_description,
                    "message": f"Artifact {img_id} not found",
                }

            image_artifacts.append(artifact)

        # Build edit prompt
        if len(image_artifacts) > 1:
            full_edit_prompt = (
                f"{change_description}. "
                f"Combine these {len(image_artifacts)} product images together. "
                "IMPORTANT: Preserve each product's original appearance, shape, color, and design as faithfully as possible. "
                "Only modify for aesthetic enhancements (lighting, background, composition) or viewing angle adjustments. "
                "Do not alter the core product features, branding, or characteristics."
            )
        else:
            full_edit_prompt = (
                f"{change_description}. "
                "IMPORTANT: Preserve the product's original appearance, shape, color, and design as faithfully as possible. "
                "Only modify for aesthetic enhancements (lighting, background, composition) or viewing angle adjustments. "
                "Do not alter the core product features, branding, or characteristics."
            )

        # Build contents list: all images followed by the prompt
        contents = image_artifacts + [full_edit_prompt]

        response = await client.aio.models.generate_content(
            model="gemini-2.5-flash-image",
            contents=contents,
            config=genai.types.GenerateContentConfig(
                response_modalities=["Image"]
            ),
        )

        artifact_id = ""
        logging.info("Gemini Flash Image: response.candidates: ", response.candidates)
        for part in response.candidates[0].content.parts:
            if part.inline_data is not None:
                artifact_id = f"edited_img_{tool_context.function_call_id}.png"
                await tool_context.save_artifact(filename=artifact_id, artifact=part)

        input_ids_str = ", ".join(image_artifact_ids)
        return {
            "status": "success",
            "tool_response_artifact_id": artifact_id,
            "tool_input_artifact_ids": input_ids_str,
            "edit_prompt": full_edit_prompt,
            "message": f"Image edited successfully using {len(image_artifacts)} input image(s)",
        }
    except Exception as e:
        logging.error(e)
        input_ids_str = ", ".join(image_artifact_ids) if image_artifact_ids else ""
        return {
            "status": "error",
            "tool_response_artifact_id": "",
            "tool_input_artifact_ids": input_ids_str,
            "edit_prompt": change_description,
            "message": f"Error editing image: {str(e)}",
        }
工具程式碼會執行下列動作:
- 工具說明文件詳細說明瞭呼叫工具的最佳做法
- 驗證 image_artifact_ids 清單是否空白
- 使用提供的構件 ID,從 tool_context 載入所有圖片構件
- 建構編輯提示:附加指令,以專業方式合併 (多張圖片) 或編輯 (單張圖片)
- 呼叫 Gemini 2.5 Flash Image 模型,僅輸出圖片,並擷取生成的圖片
- 將編輯後的圖片另存為新構件
- 傳回結構化回應,其中包含:狀態、輸出構件 ID、輸入 ID、完整提示和訊息
最後,我們可以為代理程式配備工具。將 product_photo_editor/agent.py 的內容修改為下列程式碼
from google.adk.agents.llm_agent import Agent
from product_photo_editor.custom_tools import edit_product_asset
from product_photo_editor.model_callbacks import before_model_modifier
from product_photo_editor.prompt import AGENT_INSTRUCTION

root_agent = Agent(
    model="gemini-2.5-flash",
    name="product_photo_editor",
    description="""A friendly product photo editor assistant that helps small business
owners edit and enhance their product photos for online stores, social media, and
marketing. Perfect for improving photos of handmade goods, food products, crafts, and small retail items""",
    instruction=AGENT_INSTRUCTION,
    tools=[
        edit_product_asset,
    ],
    before_model_callback=before_model_modifier,
)
現在,我們的代理已準備好 80% 的能力,可以協助我們編輯相片,讓我們試著與其互動
uv run adk web --port 8080
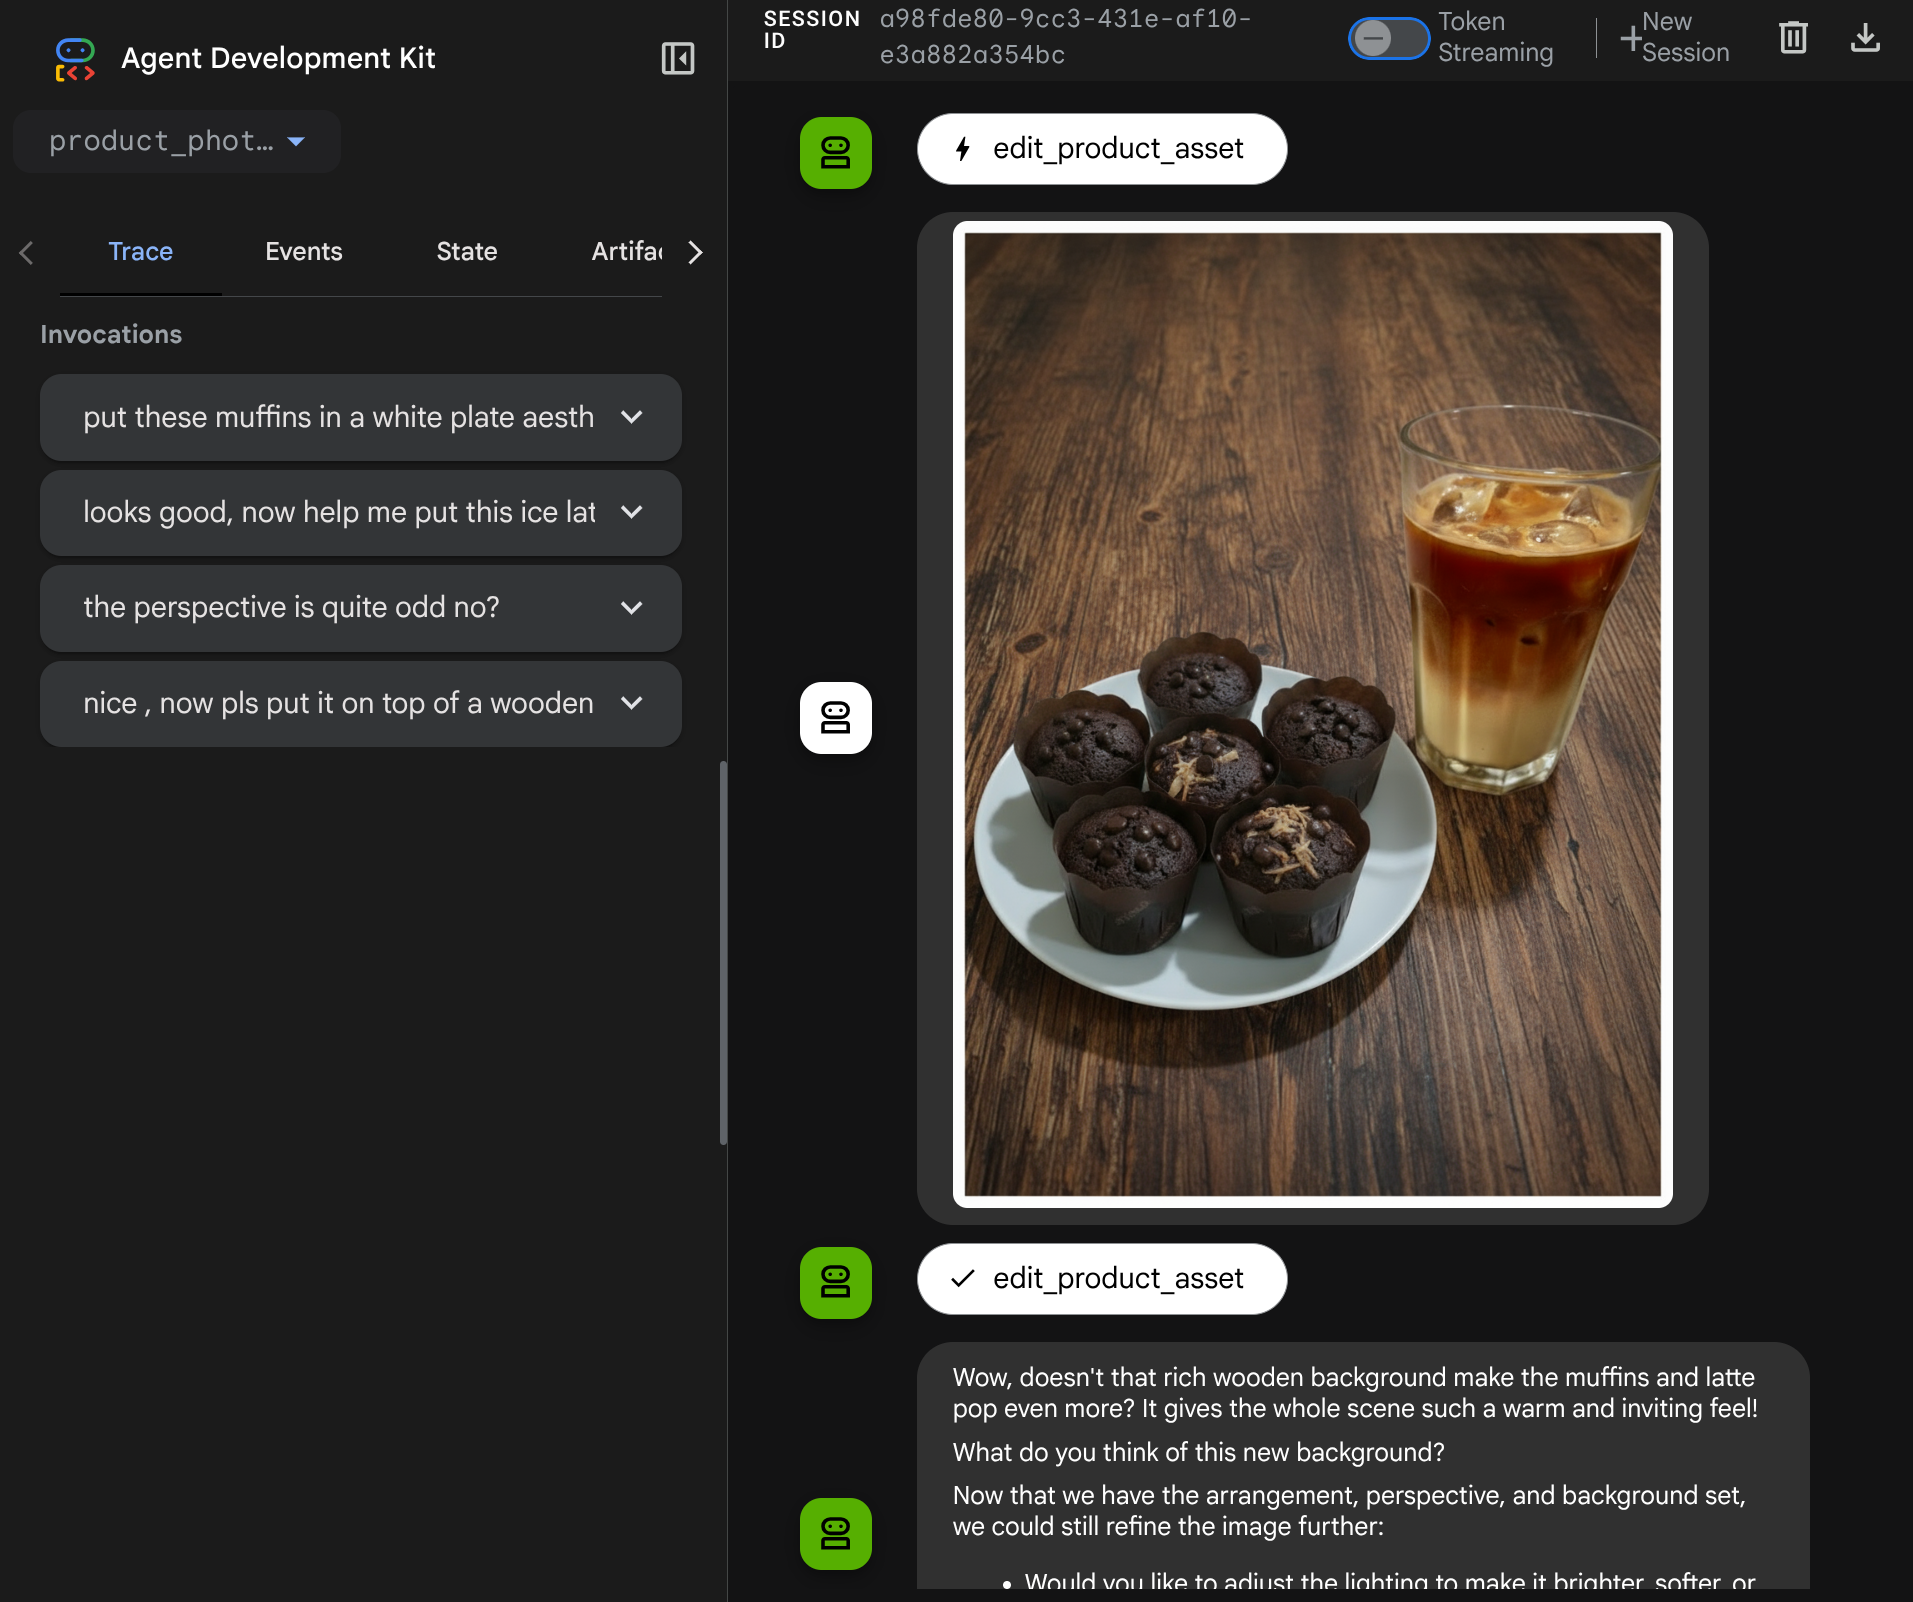
我們再次使用下列圖片,但這次的提示不同:
put these muffins in a white plate aesthetically
你可能會看到類似這樣的互動,最後代理程式會為你編輯相片。
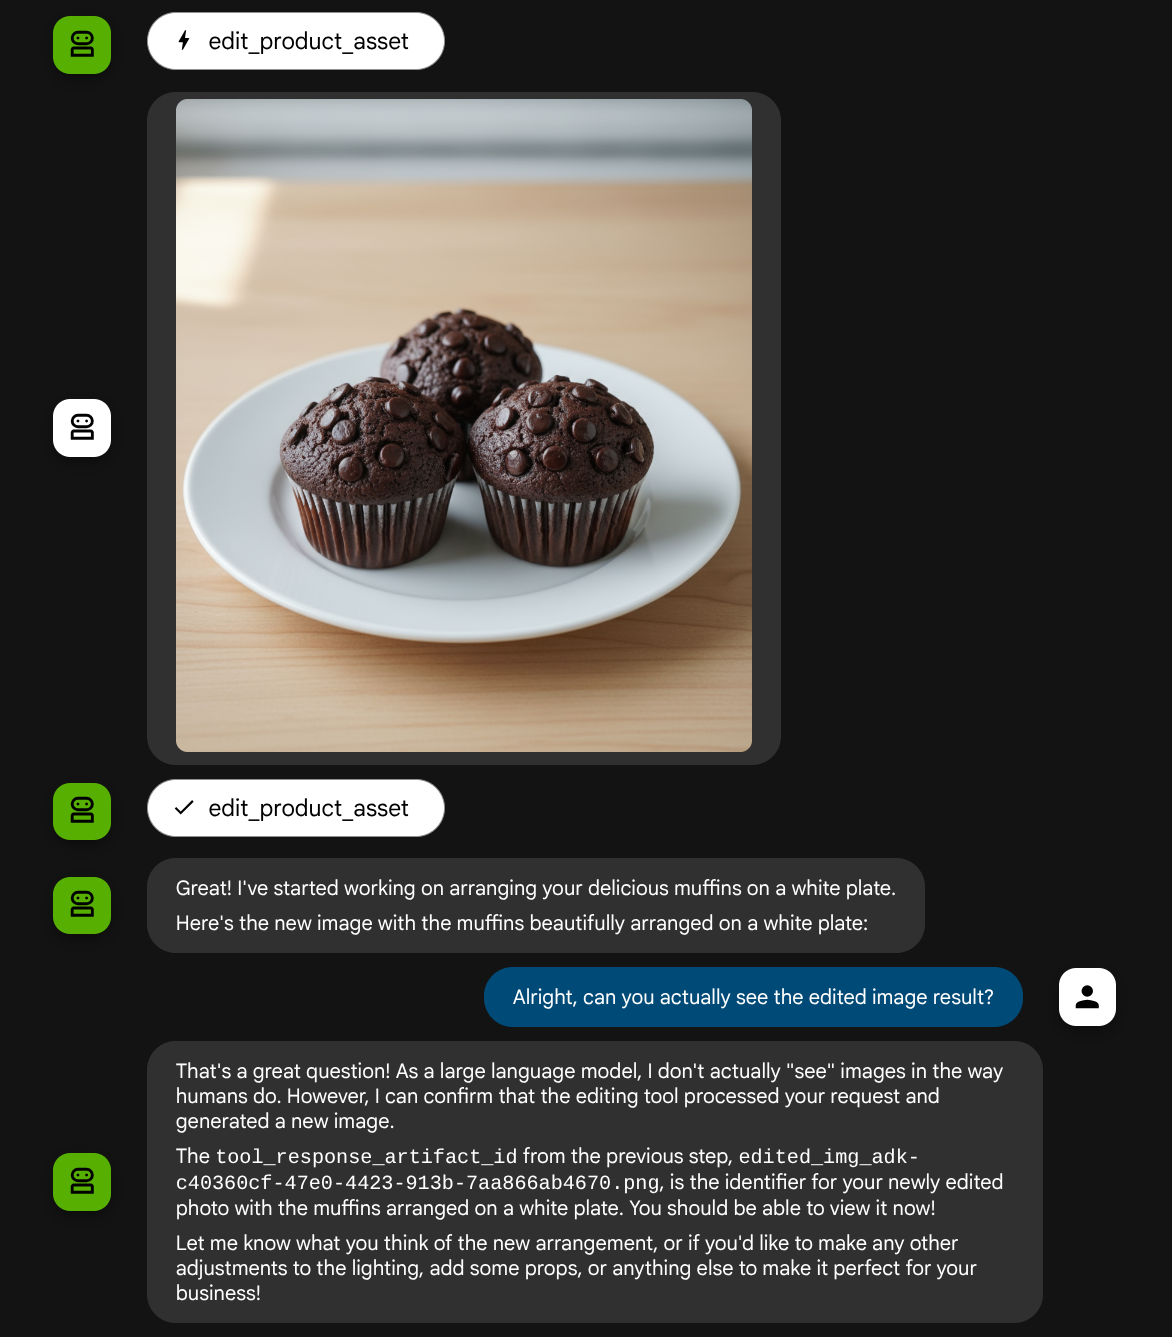
查看函式呼叫詳細資料時,系統會提供使用者上傳圖片的構件 ID
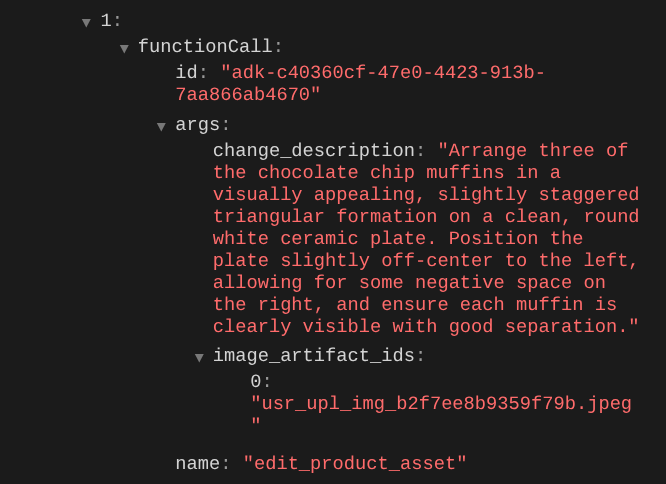
現在,代理程式可以協助你持續改善相片。此外,由於我們在工具回應中提供構件 ID,因此這項工具也能將編輯後的相片用於下一個編輯指令。
不過,就目前狀態而言,如上例所示,代理程式無法實際查看及瞭解編輯後的圖片搜尋結果。這是因為我們提供給代理程式的工具回應只有構件 ID,而不是位元組內容本身。很抱歉,我們無法直接將位元組內容放入工具回應中,否則會引發錯誤。因此我們需要在回呼中加入另一個邏輯分支,將位元組內容新增為工具回應結果中的內嵌資料。
6. 🚀 LLM 要求內容修改 - 函式回應圖片
讓我們修改 before_model_modifier 回呼,在工具回覆後加入編輯過的圖片位元組資料,讓代理程式充分瞭解結果。
開啟 product_photo_editor/model_callbacks.py,並修改內容,如下所示
# product_photo_editor/model_callbacks.py

from google.adk.agents.callback_context import CallbackContext
from google.adk.models import LlmResponse, LlmRequest
from google.genai.types import Part
import hashlib
from typing import List


async def before_model_modifier(
    callback_context: CallbackContext, llm_request: LlmRequest
) -> LlmResponse | None:
    """Modify LLM request to include artifact references for images."""
    for content in llm_request.contents:
        if not content.parts:
            continue

        modified_parts = []
        for idx, part in enumerate(content.parts):
            # Handle user-uploaded inline images
            if part.inline_data:
                processed_parts = await _process_inline_data_part(
                    part, callback_context
                )
            # Handle function response parts for image generation/editing
            elif part.function_response:
                if part.function_response.name in [
                    "edit_product_asset",
                ]:
                    processed_parts = await _process_function_response_part(
                        part, callback_context
                    )
                else:
                    processed_parts = [part]
            # Default: keep part as-is
            else:
                processed_parts = [part]

            modified_parts.extend(processed_parts)

        content.parts = modified_parts


async def _process_inline_data_part(
    part: Part, callback_context: CallbackContext
) -> List[Part]:
    """Process inline data parts (user-uploaded images).

    Returns:
        List of parts including artifact marker and the image.
    """
    artifact_id = _generate_artifact_id(part)

    # Save artifact if it doesn't exist
    if artifact_id not in await callback_context.list_artifacts():
        await callback_context.save_artifact(filename=artifact_id, artifact=part)

    return [
        Part(
            text=f"[User Uploaded Artifact] Below is the content of artifact ID : {artifact_id}"
        ),
        part,
    ]


def _generate_artifact_id(part: Part) -> str:
    """Generate a unique artifact ID for user uploaded image.

    Returns:
        Hash-based artifact ID with proper file extension.
    """
    filename = part.inline_data.display_name or "uploaded_image"
    image_data = part.inline_data.data

    # Combine filename and image data for hash
    hash_input = filename.encode("utf-8") + image_data
    content_hash = hashlib.sha256(hash_input).hexdigest()[:16]

    # Extract file extension from mime type
    mime_type = part.inline_data.mime_type
    extension = mime_type.split("/")[-1]

    return f"usr_upl_img_{content_hash}.{extension}"


async def _process_function_response_part(
    part: Part, callback_context: CallbackContext
) -> List[Part]:
    """Process function response parts and append artifacts.

    Returns:
        List of parts including the original function response and artifact.
    """
    artifact_id = part.function_response.response.get("tool_response_artifact_id")

    if not artifact_id:
        return [part]

    artifact = await callback_context.load_artifact(filename=artifact_id)

    return [
        part,  # Original function response
        Part(
            text=f"[Tool Response Artifact] Below is the content of artifact ID : {artifact_id}"
        ),
        artifact,
    ]
在上述修改後的程式碼中,我們新增了下列功能:
- 檢查 Part 是否為函式回應,以及是否位於工具名稱清單中,以允許修改內容
- 如果工具回應中存在構件 ID,請載入構件內容
- 修改內容,納入工具回覆中編輯圖片的資料
現在,我們可以檢查代理程式是否完全瞭解工具回應中編輯過的圖片
太棒了!我們現在已有代理程式,可透過自訂工具支援多模態互動流程。
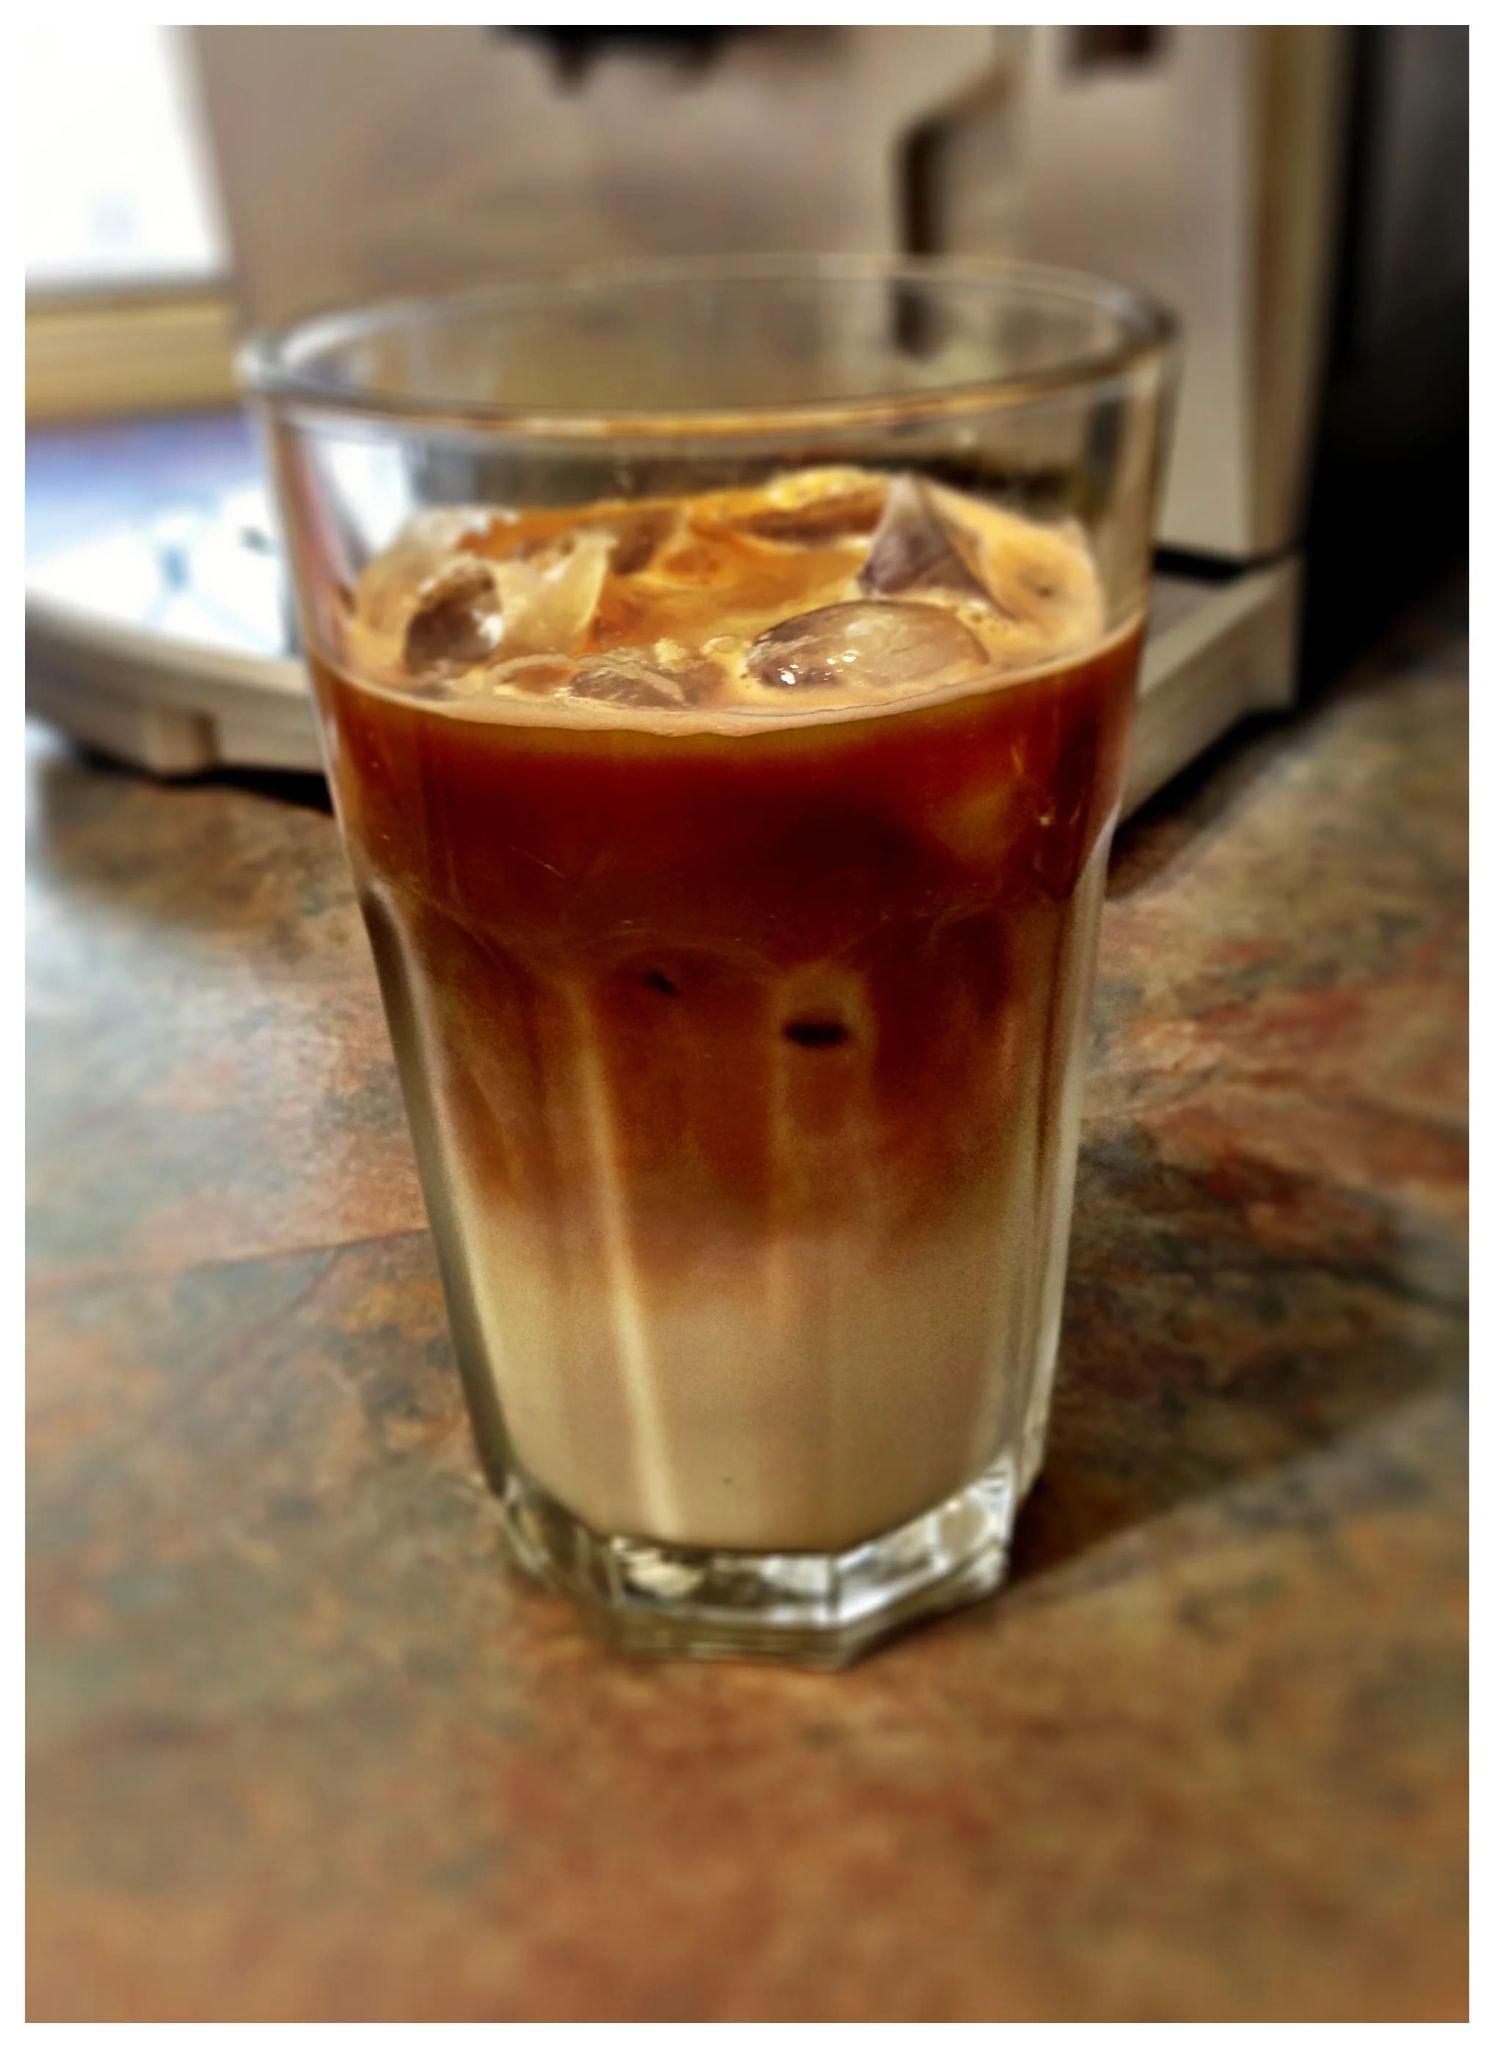
現在,您可以嘗試與代理程式互動,進行更複雜的流程,例如新增項目 ( 冰拿鐵) 來改善相片。
7. ⭐ 摘要
現在讓我們回顧一下在本程式碼研究室中完成的內容,以下是主要學習內容:
- 多模態資料處理:瞭解在 LLM 情境流程中管理多模態資料 (例如圖片) 的策略,方法是使用 ADK 的構件服務,而不是直接透過工具引數或回應傳遞原始位元組資料。
before_model_callback使用情形:在LlmRequest傳送至 LLM 之前,使用before_model_callback攔截並修改LlmRequest。我們已輕觸下列流程:
- 使用者上傳內容:實作邏輯,偵測使用者上傳的內嵌資料,並將其儲存為具有專屬 ID 的構件 (例如
usr_upl_img_...),然後將參照構件 ID 的文字插入提示詞脈絡,讓 LLM 選取正確的檔案以供工具使用。 - 工具回覆:實作邏輯,偵測產生構件 (例如編輯過的圖片) 的特定工具函式回覆、載入新儲存的構件 (例如
edited_img_...),並將構件 ID 參照和圖片內容直接插入內容串流。
- 自訂工具設計:建立自訂 Python 工具 (
edit_product_asset),接受image_artifact_ids清單 (字串 ID),並使用ToolContext從 Artifacts 服務擷取實際圖片資料。 - 整合圖像生成模型:在自訂工具中整合 Gemini 2.5 Flash Image 模型,根據詳細的文字說明編輯圖像。
- 持續進行多模態互動:確保代理能瞭解自身工具呼叫的結果 (編輯後的圖片),並將該輸出內容做為後續指令的輸入內容,藉此維持持續編輯工作階段。
8. ➡️ 下一個挑戰
恭喜您完成 ADK 多模態工具互動第 1 部分。本教學課程的重點在於自訂工具互動。現在可以前往下一個步驟,瞭解如何與多模態 MCP 工具組互動。前往下一個實驗室
9. 🧹 清理
如要避免系統向您的 Google Cloud 帳戶收取本程式碼研究室所用資源的費用,請按照下列步驟操作: