
1. 📖 مقدمة
في الدرس التطبيقي حول الترميز السابق، تعرّفت على كيفية تصميم تفاعل بيانات متعدد الوسائط في "حزمة تطوير التطبيقات". سنوضّح الآن خطوة إضافية حول كيفية تصميم تفاعل بيانات متعدّدة الوسائط مع خادم MCP باستخدام مجموعة أدوات MCP. سنوسّع إمكانات وكيل تعديل صور المنتجات الذي تم تطويره سابقًا ليشمل إمكانات إنشاء فيديوهات قصيرة باستخدام نموذج Veo من خلال خادم Veo MCP
خلال هذا الدرس العملي، ستتّبع نهجًا خطوة بخطوة على النحو التالي:
- إعداد مشروع على السحابة الإلكترونية من Google ودليل الوكيل الأساسي
- ضبط خادم MCP يتطلّب بيانات ملف كمدخل
- تجهيز وكيل ADK للاتصال بخادم MCP
- تصميم استراتيجية طلب ودالة ردّ اتصال لتعديل طلب استدعاء الدالة إلى مجموعة أدوات MCP
- تصميم دالة رد اتصال لمعالجة استجابة البيانات المتعدّدة الوسائط من مجموعة أدوات MCP
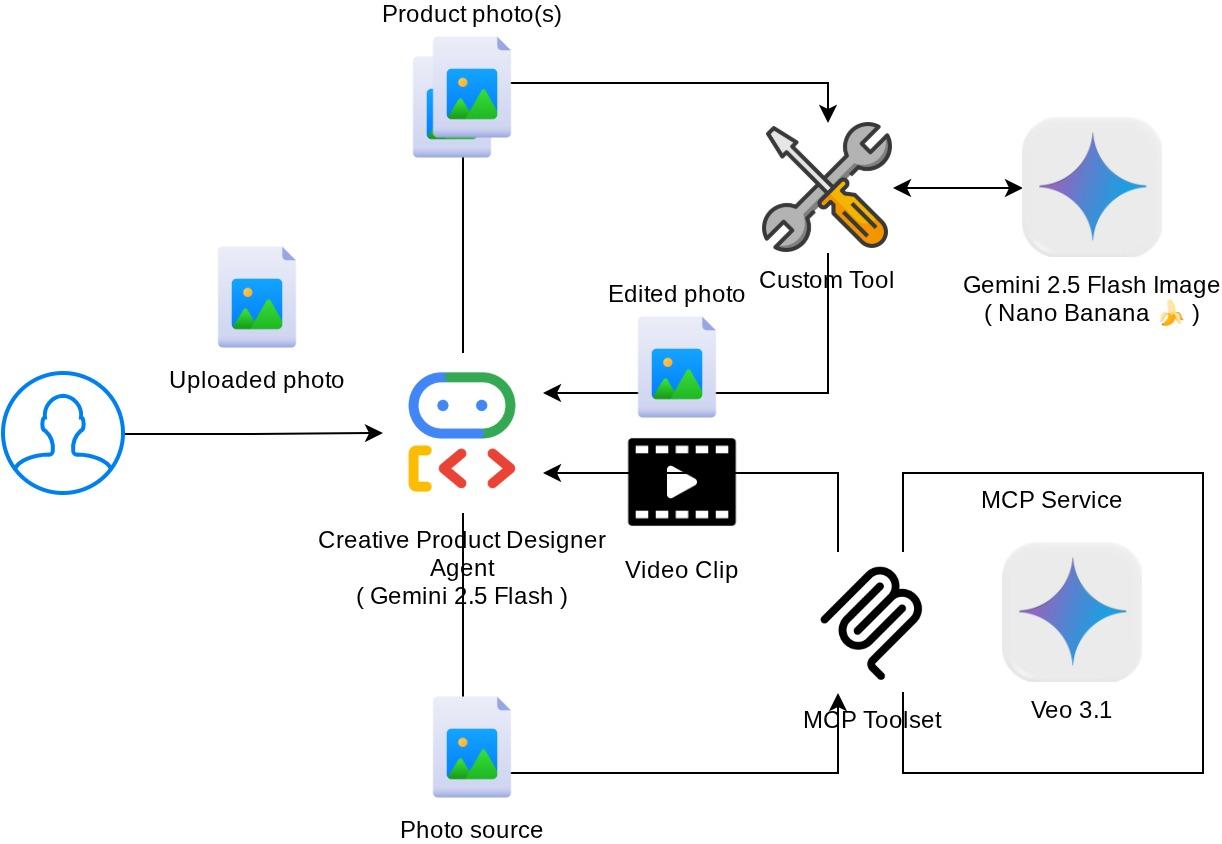
نظرة عامة على البنية
يظهر التفاعل العام في هذا الدرس التطبيقي حول الترميز في المخطّط البياني التالي
المتطلبات الأساسية
- القدرة على العمل باستخدام لغة Python
- (اختياري) دروس تطبيقية حول الترميز الأساسي بشأن "حزمة تطوير الوكلاء" (ADK)
- (اختياري) درس تطبيقي حول الترميز حول أداة ADK المتعددة الوسائط، الجزء 1 : goo.gle/adk-multimodal-tool-1
ما ستتعلمه
- كيفية إنشاء فيديو قصير باستخدام Veo 3.1 مع طلب وصورة أولية
- كيفية تطوير خادم MCP متعدد الوسائط باستخدام FastMCP
- كيفية إعداد حزمة ADK لاستخدام MCP Toolset
- كيفية تعديل طلب استخدام أداة في "مجموعة أدوات MCP" من خلال عملية إعادة استدعاء الأداة
- كيفية تعديل استجابة الأداة من "مجموعة أدوات MCP" من خلال عملية إعادة استدعاء الأداة
المتطلبات
- متصفّح الويب Chrome
- حساب Gmail
- مشروع على السحابة الإلكترونية مع تفعيل حساب الفوترة
يستخدم هذا الدرس التطبيقي حول الترميز، المصمّم للمطوّرين من جميع المستويات (بما في ذلك المبتدئين)، لغة Python في تطبيق المثال. ومع ذلك، لا يُشترط معرفة لغة Python لفهم المفاهيم المقدَّمة.
2. 🚀 ( اختياري) إعداد بيئة تطوير ورشة العمل
الخطوة 1: اختيار "المشروع النشط" في Cloud Console
في Google Cloud Console، في صفحة اختيار المشروع، اختَر أو أنشِئ مشروعًا على Google Cloud (راجِع القسم العلوي الأيمن من وحدة التحكّم).

انقر على هذا الرمز، وستظهر لك قائمة بجميع مشاريعك كما في المثال التالي:
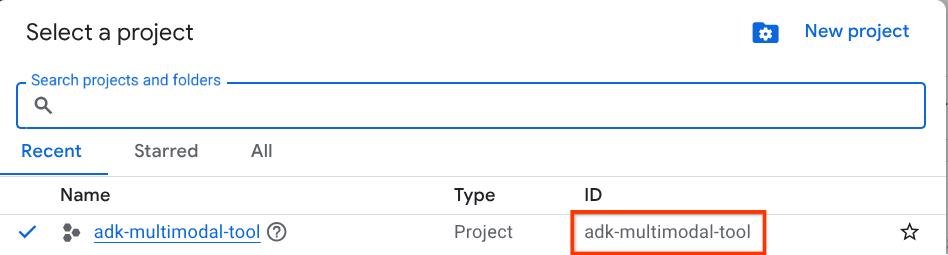
القيمة الموضّحة في المربّع الأحمر هي معرّف المشروع وسيتم استخدام هذه القيمة في جميع أنحاء البرنامج التعليمي.
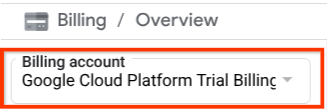
تأكَّد من تفعيل الفوترة لمشروعك على السحابة الإلكترونية. للتأكّد من ذلك، انقر على رمز الهامبرغر ☰ في الشريط العلوي الأيمن الذي يعرض قائمة التنقّل وابحث عن قائمة "الفوترة".

إذا ظهر لك "حساب فوترة الإصدار التجريبي من Google Cloud Platform" ضمن العنوان الفوترة / النظرة العامة ( الجزء العلوي الأيسر من وحدة تحكّم Cloud )، يكون مشروعك جاهزًا للاستخدام في هذا الدليل التوجيهي/التعليمي. إذا لم يكن كذلك، ارجع إلى بداية هذا الدليل التوجيهي/التعليمي وحصّل قيمة حساب الفوترة التجريبي.
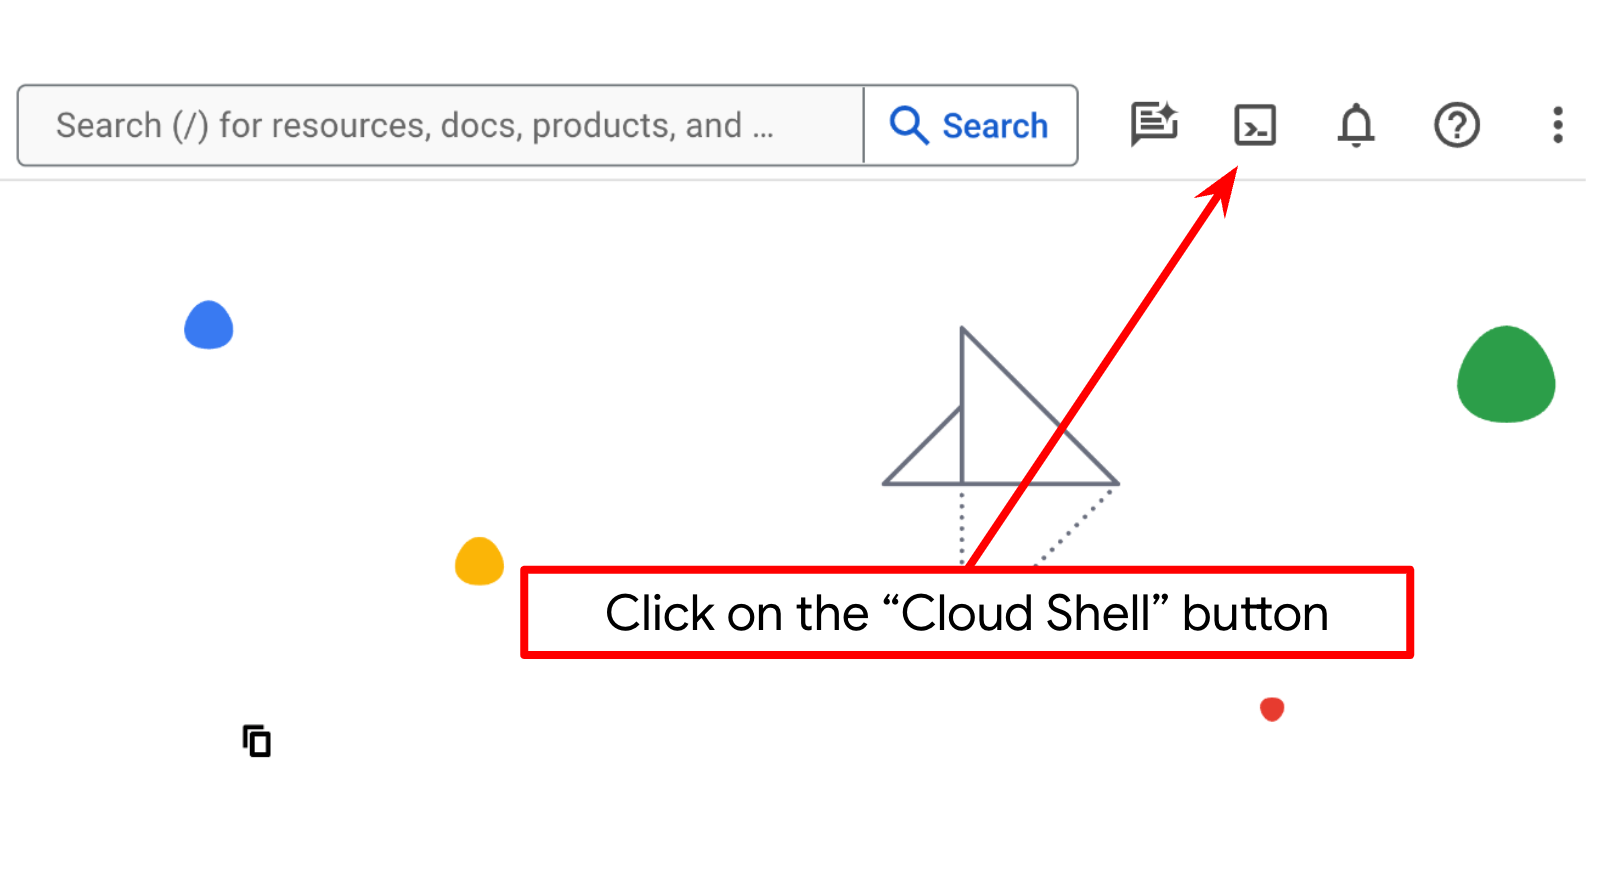
الخطوة 2: التعرّف على Cloud Shell
ستستخدم Cloud Shell في معظم أجزاء البرامج التعليمية، لذا انقر على "تفعيل Cloud Shell" في أعلى وحدة تحكّم Google Cloud. إذا طُلب منك التفويض، انقر على تفويض.
بعد الاتصال بـ Cloud Shell، علينا التحقّق مما إذا كان قد تمّت مصادقة الصدفة ( أو الوحدة الطرفية) باستخدام حسابنا.
gcloud auth list
إذا ظهر لك حساب Gmail الشخصي كما في مثال الناتج أدناه، يعني ذلك أنّ كل شيء على ما يرام.
Credentialed Accounts

ACTIVE: *
ACCOUNT: alvinprayuda@gmail.com

To set the active account, run:
    $ gcloud config set account `ACCOUNT`
إذا لم يكن كذلك، جرِّب إعادة تحميل المتصفّح وتأكَّد من النقر على تفويض عند مطالبتك بذلك ( قد يتمّ مقاطعة العملية بسبب مشكلة في الاتصال).
بعد ذلك، نحتاج أيضًا إلى التحقّق مما إذا كان قد تمّ ضبط الصدفة على معرّف المشروع الصحيح الذي لديك، وإذا رأيت قيمة داخل ( ) قبل رمز $ في الوحدة الطرفية ( في لقطة الشاشة أدناه، القيمة هي "adk-multimodal-tool")، فإنّ هذه القيمة تعرض المشروع الذي تمّ إعداده لجلسة الصدفة النشطة.

إذا كانت القيمة المعروضة صحيحة، يمكنك تخطّي الأمر التالي. ومع ذلك، إذا كان غير صحيح أو غير متوفّر، شغِّل الأمر التالي
gcloud config set project <YOUR_PROJECT_ID>
بعد ذلك، استنسِخ دليل العمل الخاص بهذا الدرس التطبيقي حول الترميز من Github، ونفِّذ الأمر التالي. سيتم إنشاء دليل العمل في الدليل adk-multimodal-tool.
git clone https://github.com/alphinside/adk-mcp-multimodal.git adk-multimodal-tool
الخطوة 3: التعرّف على "محرّر Cloud Shell" وإعداد دليل عمل التطبيق
الآن، يمكننا إعداد أداة تعديل الرموز لتنفيذ بعض مهام الترميز. سنستخدم "محرّر Cloud Shell" لهذا الغرض.
انقر على الزر فتح المحرِّر، وسيؤدي ذلك إلى فتح 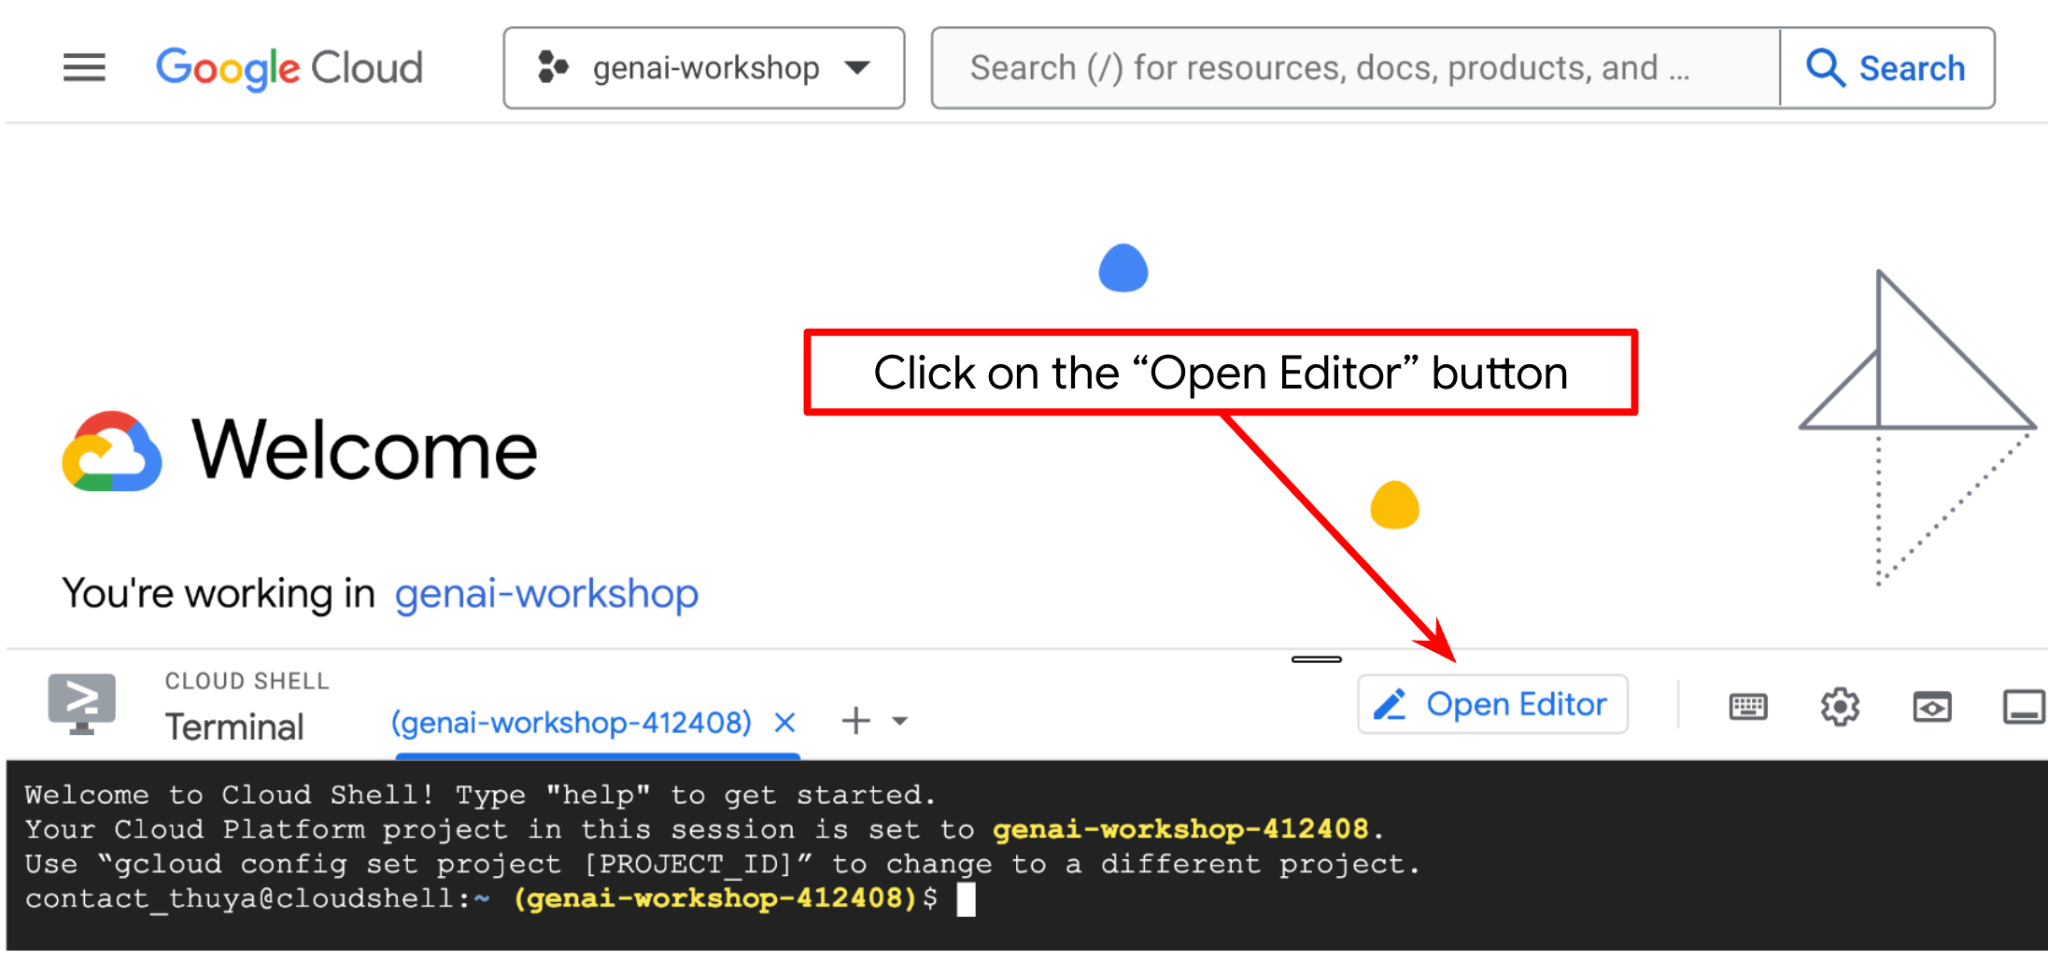 في "محرِّر Cloud Shell".
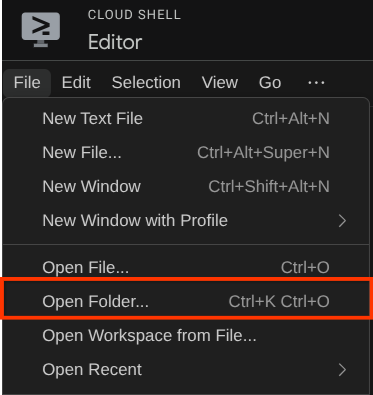
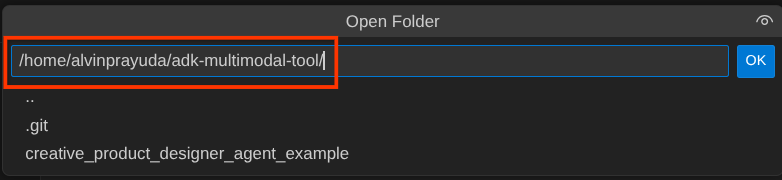
بعد ذلك، انتقِل إلى القسم العلوي من "محرّر Cloud Shell" وانقر على ملف (File) > فتح مجلد (Open Folder)، وابحث عن دليل اسم المستخدم، ثم ابحث عن دليل adk-multimodal-tool وانقر على الزر "حسنًا" (OK). سيؤدي ذلك إلى جعل الدليل الذي تم اختياره هو دليل العمل الرئيسي. في هذا المثال، اسم المستخدم هو alvinprayuda، وبالتالي يظهر مسار الدليل أدناه
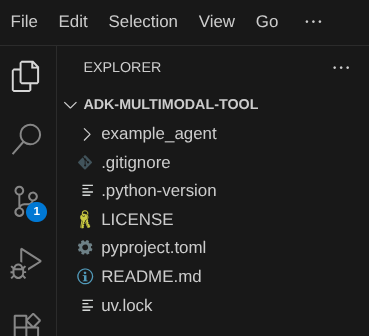
يجب أن يبدو دليل العمل في "محرّر Cloud Shell" الآن على النحو التالي ( داخل adk-multimodal-tool)
الآن، افتح الوحدة الطرفية للمحرِّر. يمكنك إجراء ذلك من خلال النقر على Terminal -> New Terminal في شريط القوائم، أو استخدام Ctrl + Shift + C، وسيؤدي ذلك إلى فتح نافذة طرفية في الجزء السفلي من المتصفح

يجب أن تكون نافذة الجهاز النشطة الحالية داخل دليل العمل adk-multimodal-tool. سنستخدم الإصدار 3.12 من Python في هذا الدرس التطبيقي حول الترميز، كما سنستخدم أداة إدارة مشاريع Python (uv) لتسهيل عملية إنشاء إصدار Python وبيئته الافتراضية وإدارتهما. تم تثبيت حزمة uv هذه مسبقًا على Cloud Shell.
نفِّذ هذا الأمر لتثبيت الاعتمادات المطلوبة في البيئة الافتراضية في الدليل .venv.
uv sync --frozen
راجِع ملف pyproject.toml للاطّلاع على التبعيات المحدّدة لهذا الدليل التعليمي، وهي google-adk, and python-dotenv.
الآن، علينا تفعيل واجهات برمجة التطبيقات المطلوبة من خلال الأمر الموضّح أدناه. قد يستغرق هذا بعض الوقت.
gcloud services enable aiplatform.googleapis.com
عند تنفيذ الأمر بنجاح، من المفترض أن تظهر لك رسالة مشابهة للرسالة الموضّحة أدناه:
Operation "operations/..." finished successfully.
يتم توفير بنية نموذج الوكيل لك مسبقًا داخل دليل part2_starter_agent في المستودع الذي تم استنساخه. الآن، علينا إعادة تسميته أولاً لنكون مستعدين لهذا البرنامج التعليمي
mv part1_ckpt_agent product_photo_editor
بعد ذلك، انسخ product_photo_editor/.env.example إلى product_photo_editor/.env.
cp product_photo_editor/.env.example product_photo_editor/.env
عند فتح الملف product_photo_editor/.env، سيظهر لك محتوى مشابه لما هو معروض أدناه
GOOGLE_GENAI_USE_VERTEXAI=1
GOOGLE_CLOUD_PROJECT=your-project-id
GOOGLE_CLOUD_LOCATION=global
بعد ذلك، عليك تعديل قيمة your-project-id باستخدام رقم تعريف المشروع الصحيح. نحن الآن جاهزون للخطوة التالية
3- 🚀 إعداد خادم Veo MCP
لننشئ أولاً دليل خدمة MCP باستخدام الأمر التالي
mkdir veo_mcp
بعد ذلك، أنشِئ veo_mcp/main.py باستخدام هذا الأمر
touch veo_mcp/main.py
بعد ذلك، انسخ الرمز التالي إلى veo_mcp/main.py
from fastmcp import FastMCP
from typing import Annotated
from pydantic import Field
import base64
import asyncio
import os
from google import genai
from google.genai import types
from dotenv import load_dotenv
import logging

# Load environment variables from .env file
load_dotenv()

mcp = FastMCP("Veo MCP Server")


@mcp.tool
async def generate_video_with_image(
    prompt: Annotated[
        str, Field(description="Text description of the video to generate")
    ],
    image_data: Annotated[
        str, Field(description="Base64-encoded image data to use as starting frame")
    ],
    negative_prompt: Annotated[
        str | None,
        Field(description="Things to avoid in the generated video"),
    ] = None,
) -> dict:
    """Generates a professional product marketing video from text prompt and starting image using Google's Veo API.

    This function uses an image as the first frame of the generated video and automatically
    enriches your prompt with professional video production quality guidelines to create
    high-quality marketing assets suitable for commercial use.

    AUTOMATIC ENHANCEMENTS APPLIED:
    - 4K cinematic quality with professional color grading
    - Smooth, stabilized camera movements
    - Professional studio lighting setup
    - Shallow depth of field for product focus
    - Commercial-grade production quality
    - Marketing-focused visual style

    PROMPT WRITING TIPS:
    Describe what you want to see in the video. Focus on:
    - Product actions/movements (e.g., "rotating slowly", "zooming into details")
    - Desired camera angles (e.g., "close-up of the product", "wide shot")
    - Background/environment (e.g., "minimalist white backdrop", "lifestyle setting")
    - Any specific details about the product presentation

    The system will automatically enhance your prompt with professional production quality.

    Args:
        prompt: Description of the video to generate. Focus on the core product presentation
                you want. The system will automatically add professional quality enhancements.
        image_data: Base64-encoded image data to use as the starting frame
        negative_prompt: Optional prompt describing what to avoid in the video

    Returns:
        dict: A dictionary containing:
            - status: 'success' or 'error'
            - message: Description of the result
            - video_data: Base64-encoded video data (on success only)
    """
    try:
        # Initialize the Gemini client
        client = genai.Client(
            vertexai=True,
            project=os.getenv("GOOGLE_CLOUD_PROJECT"),
            location=os.getenv("GOOGLE_CLOUD_LOCATION"),
        )

        # Decode the image
        image_bytes = base64.b64decode(image_data)
        print(f"Successfully decoded image data: {len(image_bytes)} bytes")

        # Create image object
        image = types.Image(image_bytes=image_bytes, mime_type="image/png")

        # Prepare the config
        config = types.GenerateVideosConfig(
            duration_seconds=8,
            number_of_videos=1,
        )

        if negative_prompt:
            config.negative_prompt = negative_prompt

        # Enrich the prompt for professional marketing quality
        enriched_prompt = enrich_prompt_for_marketing(prompt)

        # Generate the video (async operation)
        operation = client.models.generate_videos(
            model="veo-3.1-generate-preview",
            prompt=enriched_prompt,
            image=image,
            config=config,
        )

        # Poll until the operation is complete
        poll_count = 0
        while not operation.done:
            poll_count += 1
            print(f"Waiting for video generation to complete... (poll {poll_count})")
            await asyncio.sleep(5)
            operation = client.operations.get(operation)

        # Download the video and convert to base64
        video = operation.response.generated_videos[0]

        # Get video bytes and encode to base64
        video_bytes = video.video.video_bytes
        video_base64 = base64.b64encode(video_bytes).decode("utf-8")

        print(f"Video generated successfully: {len(video_bytes)} bytes")

        return {
            "status": "success",
            "message": f"Video with image generated successfully after {poll_count * 5} seconds",
            "complete_prompt": enriched_prompt,
            "video_data": video_base64,
        }
    except Exception as e:
        logging.error(e)
        return {
            "status": "error",
            "message": f"Error generating video with image: {str(e)}",
        }


def enrich_prompt_for_marketing(user_prompt: str) -> str:
    """Enriches user prompt with professional video production quality enhancements.

    Adds cinematic quality, professional lighting, smooth camera work, and marketing-focused
    elements to ensure high-quality product marketing videos.
    """
    enhancement_prefix = """Create a high-quality, professional product marketing video with the following characteristics:

TECHNICAL SPECIFICATIONS:
- 4K cinematic quality with professional color grading
- Smooth, stabilized camera movements
- Professional studio lighting setup with soft, even illumination
- Shallow depth of field for product focus
- High dynamic range (HDR) for vibrant colors

VISUAL STYLE:
- Clean, minimalist aesthetic suitable for premium brand marketing
- Elegant and sophisticated presentation
- Commercial-grade production quality
- Attention to detail in product showcase

USER'S SPECIFIC REQUIREMENTS:
"""

    enhancement_suffix = """

ADDITIONAL QUALITY GUIDELINES:
- Ensure smooth transitions and natural motion
- Maintain consistent lighting throughout
- Keep the product as the clear focal point
- Use professional camera techniques (slow pans, tracking shots, or dolly movements)
- Apply subtle motion blur for cinematic feel
- Ensure brand-appropriate tone and style"""

    return f"{enhancement_prefix}{user_prompt}{enhancement_suffix}"


if __name__ == "__main__":
    mcp.run()
تنفّذ التعليمة البرمجية التالية الإجراءات التالية:
- إنشاء خادم FastMCP يعرض أداة إنشاء فيديوهات باستخدام Veo 3.1 لوكلاء ADK
- يقبل الصور المرمّزة بتنسيق base64 والطلبات النصية والطلبات السلبية كمدخلات
- إنشاء فيديوهات مدتها 8 ثوانٍ بشكل غير متزامن من خلال إرسال الطلبات إلى واجهة برمجة التطبيقات Veo 3.1 والتحقّق كل 5 ثوانٍ إلى حين اكتمالها
- تعرض هذه الدالة بيانات الفيديو المرمّزة باستخدام Base64 بالإضافة إلى الطلب المحسّن
ستتطلّب أداة Veo MCP هذه متغيّر البيئة نفسه الذي يتطلّبه وكيلنا، لذا يمكننا ببساطة نسخ ملف .env ولصقه. نفِّذ الأمر التالي لإجراء ذلك:
cp product_photo_editor/.env veo_mcp/
يمكننا الآن اختبار ما إذا كان خادم MCP يعمل بشكل صحيح عن طريق تنفيذ هذا الأمر
uv run veo_mcp/main.py
وسيظهر سجلّ وحدة التحكّم على النحو التالي
╭────────────────────────────────────────────────────────────────────────────╮
│                                                                            │
│        _ __ ___  _____           __  __  _____________    ____    ____     │
│       _ __ ___ .'____/___ ______/ /_/  |/  / ____/ __ \  |___ \  / __ \    │
│      _ __ ___ / /_  / __ `/ ___/ __/ /|_/ / /   / /_/ /  ___/ / / / / /    │
│     _ __ ___ / __/ / /_/ (__  ) /_/ /  / / /___/ ____/  /  __/_/ /_/ /     │
│    _ __ ___ /_/    \____/____/\__/_/  /_/\____/_/      /_____(*)____/      │
│                                                                            │
│                                                                            │
│                                FastMCP  2.0                                │
│                                                                            │
│                                                                            │
│                 🖥️  Server name:     Veo MCP Server                         │
│                 📦 Transport:       STDIO                                  │
│                                                                            │
│                 🏎️  FastMCP version: 2.12.5                                 │
│                 🤝 MCP SDK version: 1.16.0                                 │
│                                                                            │
│                 📚 Docs:            https://gofastmcp.com                  │
│                 🚀 Deploy:          https://fastmcp.cloud                  │
│                                                                            │
╰────────────────────────────────────────────────────────────────────────────╯


[10/22/25 08:28:53] INFO     Starting MCP server 'Veo MCP Server' with          server.py:1502
                             transport 'stdio'
الآن، أوقِف عملية خدمة MCP باستخدام CTRL+C. سيتم استدعاء هذا الأمر من مجموعة أدوات ADK MCP لاحقًا. يمكننا الانتقال إلى الخطوة التالية للسماح لوكيلنا باستخدام أدوات MCP هذه.
4. 🚀 ربط خادم Veo MCP ببرنامج ADK Agent
الآن، لنربط خادم Veo MCP لكي يتمكّن الوكيل من استخدامه. أولاً، لننشئ نصًا برمجيًا مختلفًا يحتوي على مجموعة الأدوات، وننفّذ الأمر التالي
touch product_photo_editor/mcp_tools.py
بعد ذلك، انسخ الرمز التالي إلى product_photo_editor/mcp_tools.py
from google.adk.tools.mcp_tool.mcp_toolset import MCPToolset
from google.adk.tools.mcp_tool.mcp_session_manager import StdioConnectionParams
from mcp import StdioServerParameters


mcp_toolset = MCPToolset(
    connection_params=StdioConnectionParams(
        server_params=StdioServerParameters(
            command="uv",
            args=[
                "run",
                "veo_mcp/main.py",
            ],
        ),
        timeout=120, # seconds
    ),
)

# Option to connect to remote MCP server

# from google.adk.tools.mcp_tool.mcp_session_manager import StreamableHTTPConnectionParams

# mcp_toolset = MCPToolset(
#     connection_params=StreamableHTTPConnectionParams(
#         url="http://localhost:8000/mcp",
#         timeout=120,
#     ),
# )
يوضّح الرمز أعلاه كيف يمكننا الاتصال بخادم MCP باستخدام ADK MCPToolset. في هذا المثال، نتصل بخادم MCP باستخدام قناة الاتصال STDIO. في الأمر، نحدّد كيفية تشغيل خادم MCP وضبط مَعلمة المهلة.
5- 🚀 تعديل مَعلمات استدعاء الأدوات
في بيان أداة خادم MCP، صمّمنا الأداة generate_video_with_image التي تحدّد سلسلة base64 كمعلَمات الأداة. لا يمكننا أن نطلب من النموذج اللغوي الكبير (LLM) تنفيذ ذلك نيابةً عنّا، لذا علينا وضع استراتيجية محدّدة للتعامل مع هذه الحالة.
في الدرس التطبيقي السابق، تعاملنا مع الصورة التي حمّلها المستخدم والصورة التي قدّمها الردّ من الأداة في before_model_callback ليتم حفظها كعنصر، وهو ما يظهر أيضًا في نموذج الوكيل الذي تم إعداده سابقًا. سنستفيد من ذلك ونتبع الاستراتيجيات التالية:
- اطلب من النموذج اللغوي الكبير إرسال قيمة artifact_id دائمًا إذا كانت مَعلمة أداة معيّنة تتطلّب إرسال بيانات سلسلة base64
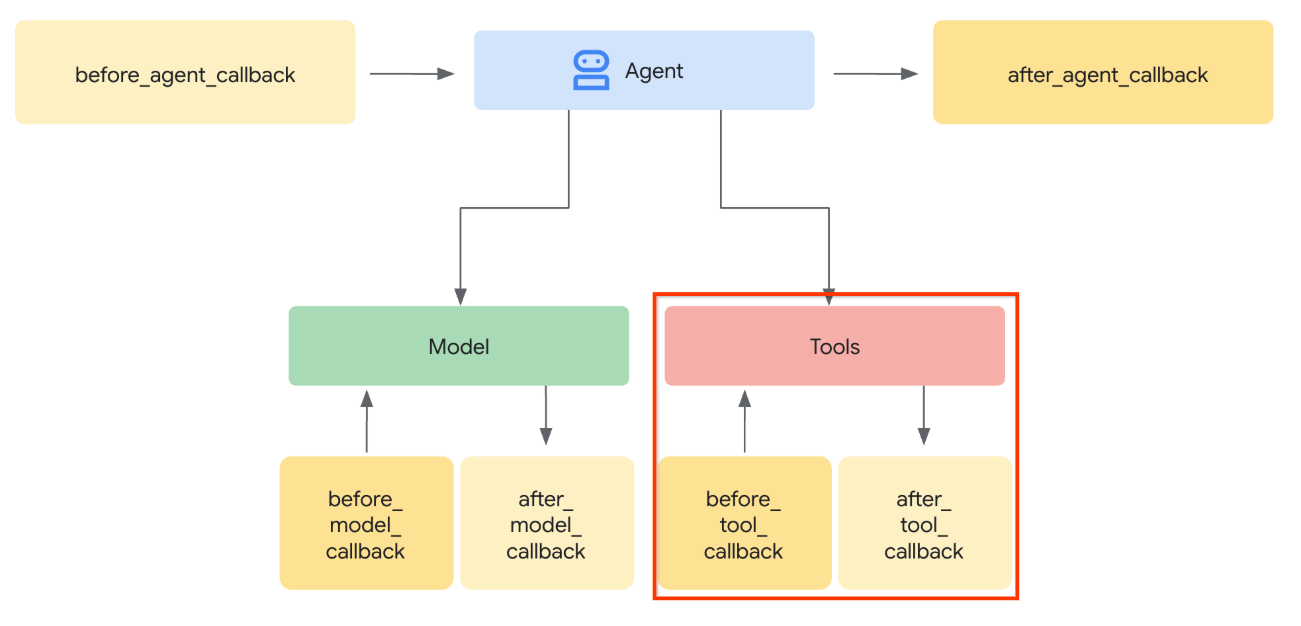
- اعتراض استدعاء استدعاء الأداة في
before_tool_callbackوتحويل المَعلمة من artifact_id إلى محتواها بالبايت عن طريق تحميل العنصر وتعديل وسيطات الأداة
اطّلِع على الصورة أدناه للاطّلاع على الجزء الذي سنعترضه
أولاً، لنجهّز الدالة before_tool_callback، وننشئ ملفًا جديدًا product_photo_editor/tool_callbacks.py من خلال تنفيذ الأمر التالي
touch product_photo_editor/tool_callbacks.py
بعد ذلك، انسخ الرمز التالي إلى الملف
# product_photo_editor/tool_callbacks.py

from google.genai.types import Part
from typing import Any
from google.adk.tools.tool_context import ToolContext
from google.adk.tools.base_tool import BaseTool
from google.adk.tools.mcp_tool.mcp_tool import McpTool
import base64
import logging
import json
from mcp.types import CallToolResult


async def before_tool_modifier(
    tool: BaseTool, args: dict[str, Any], tool_context: ToolContext
):
    # Identify which tool input should be modified
    if isinstance(tool, McpTool) and tool.name == "generate_video_with_image":
        logging.info("Modify tool args for artifact: %s", args["image_data"])
        # Get the artifact filename from the tool input argument
        artifact_filename = args["image_data"]
        artifact = await tool_context.load_artifact(filename=artifact_filename)
        file_data = artifact.inline_data.data

        # Convert byte data to base64 string
        base64_data = base64.b64encode(file_data).decode("utf-8")

        # Then modify the tool input argument
        args["image_data"] = base64_data
يوضّح الرمز أعلاه الخطوات التالية:
- التحقّق مما إذا كانت الأداة التي تم استدعاؤها هي عنصر McpTool وما إذا كانت هي استدعاء الأداة المستهدَف الذي نريد تعديله
- الحصول على قيمة وسيطات
image_dataالتي تمثّل الوسيطة المطلوبة بتنسيق base64، ولكن نطلب من النموذج اللغوي الكبير عرض artifact_id عليها - حمِّل العنصر باستخدام خدمة العناصر على
tool_context - استبدِل وسيطات
image_dataبالبيانات base64
الآن، علينا إضافة وظيفة معاودة الاتصال هذه إلى الوكيل وتعديل التعليمات قليلاً لكي يملأ الوكيل دائمًا وسيطة أداة base64 بمعرّف العنصر بدلاً من ذلك.
افتح الملف product_photo_editor/agent.py وعدِّل المحتوى باستخدام الرمز التالي
# product_photo_editor/agent.py

from google.adk.agents.llm_agent import Agent
from product_photo_editor.custom_tools import edit_product_asset
from product_photo_editor.mcp_tools import mcp_toolset
from product_photo_editor.model_callbacks import before_model_modifier
from product_photo_editor.tool_callbacks import before_tool_modifier
from product_photo_editor.prompt import AGENT_INSTRUCTION

root_agent = Agent(
    model="gemini-2.5-flash",
    name="product_photo_editor",
    description="""A friendly product photo editor assistant that helps small business
owners edit and enhance their product photos. Perfect for improving photos of handmade
goods, food products, crafts, and small retail items""",
    instruction=AGENT_INSTRUCTION
    + """
**IMPORTANT: Base64 Argument Rule on Tool Call**

If you found any tool call arguments that requires base64 data,
ALWAYS provide the artifact_id of the referenced file to
the tool call. NEVER ask user to provide base64 data.
Base64 data encoding process is out of your
responsibility and will be handled in another part of the system.
""",
    tools=[
        edit_product_asset,
        mcp_toolset,
    ],
    before_model_callback=before_model_modifier,
    before_tool_callback=before_tool_modifier,
)
حسنًا، لنحاول الآن التفاعل مع الوكيل لاختبار هذا التعديل. نفِّذ الأمر التالي لتشغيل واجهة مستخدم أدوات تطوير الويب
uv run adk web --port 8080
سيؤدي ذلك إلى إنشاء ناتج مشابه للمثال التالي، ما يعني أنّه يمكننا الوصول إلى واجهة الويب.
INFO:     Started server process [xxxx]
INFO:     Waiting for application startup.

+-----------------------------------------------------------------------------+
| ADK Web Server started                                                      |
|                                                                             |
| For local testing, access at http://127.0.0.1:8080.                         |
+-----------------------------------------------------------------------------+

INFO:     Application startup complete.
INFO:     Uvicorn running on http://127.0.0.1:8080 (Press CTRL+C to quit)
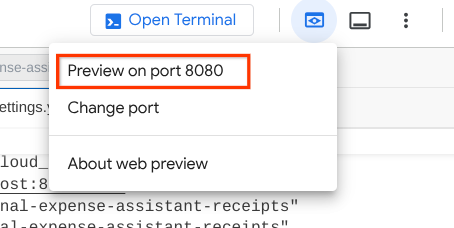
الآن، للتحقّق من ذلك، يمكنك الضغط على Ctrl + النقر على عنوان URL أو النقر على الزر معاينة الويب في المنطقة العلوية من "محرّر Cloud Shell" واختيار المعاينة على المنفذ 8080.
ستظهر لك صفحة الويب التالية حيث يمكنك اختيار الوكلاء المتاحين من زر القائمة المنسدلة في أعلى اليمين ( في حالتنا، يجب أن يكون product_photo_editor) والتفاعل مع البوت.
بعد ذلك، حمِّل الصورة التالية واطلب من الموظف إنشاء مقطع ترويجي منها
Generate a slow zoom in and moving from left and right animation

سيظهر لك الخطأ التالي
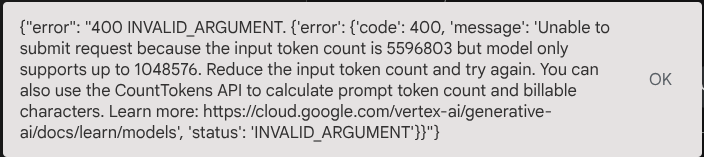
لماذا؟ وبما أنّ الأداة عرضت النتائج مباشرةً في شكل سلسلة base64 أيضًا، سيتجاوز ذلك الحد الأقصى للرمز المميز. لننتقل الآن إلى القسم التالي لمعالجة هذا الخطأ.
6. 🚀 تعديل ردّ الأداة
في هذا القسم، سنتعامل مع ردّ الأداة من ردّ MCP. سننفّذ الإجراءات التالية:
- تخزين ردّ الفيديو بواسطة الأداة في خدمة العناصر
- إرجاع معرّف العنصر إلى الوكيل بدلاً من ذلك
نذكّرك بأنّنا سنستفيد من وقت تشغيل الوكيل التالي
أولاً، لننفّذ دالة رد الاتصال، وافتح الملف product_photo_editor/tool_callbacks.py وعدِّله لتنفيذ after_tool_modifier
# product_photo_editor/tool_callbacks.py

from google.genai.types import Part
from typing import Any
from google.adk.tools.tool_context import ToolContext
from google.adk.tools.base_tool import BaseTool
from google.adk.tools.mcp_tool.mcp_tool import McpTool
import base64
import logging
import json
from mcp.types import CallToolResult


async def before_tool_modifier(
    tool: BaseTool, args: dict[str, Any], tool_context: ToolContext
):
    # Identify which tool input should be modified
    if isinstance(tool, McpTool) and tool.name == "generate_video_with_image":
        logging.info("Modify tool args for artifact: %s", args["image_data"])
        # Get the artifact filename from the tool input argument
        artifact_filename = args["image_data"]
        artifact = await tool_context.load_artifact(filename=artifact_filename)
        file_data = artifact.inline_data.data

        # Convert byte data to base64 string
        base64_data = base64.b64encode(file_data).decode("utf-8")

        # Then modify the tool input argument
        args["image_data"] = base64_data


async def after_tool_modifier(
    tool: BaseTool,
    args: dict[str, Any],
    tool_context: ToolContext,
    tool_response: dict | CallToolResult,
):
    if isinstance(tool, McpTool) and tool.name == "generate_video_with_image":
        tool_result = json.loads(tool_response.content[0].text)

        # Get the expected response field which contains the video data
        video_data = tool_result["video_data"]
        artifact_filename = f"video_{tool_context.function_call_id}.mp4"

        # Convert base64 string to byte data
        video_bytes = base64.b64decode(video_data)

        # Save the video as artifact
        await tool_context.save_artifact(
            filename=artifact_filename,
            artifact=Part(inline_data={"mime_type": "video/mp4", "data": video_bytes}),
        )

        # Remove the video data from the tool response
        tool_result.pop("video_data")

        # Then modify the tool response to include the artifact filename and remove the base64 string
        tool_result["video_artifact_id"] = artifact_filename
        logging.info(
            "Modify tool response for artifact: %s", tool_result["video_artifact_id"]
        )

        return tool_result
بعد ذلك، علينا تزويد الوكيل بهذه الدالة. افتح الملف product_photo_editor/agent.py وعدِّله إلى الرمز التالي
# product_photo_editor/agent.py

from google.adk.agents.llm_agent import Agent
from product_photo_editor.custom_tools import edit_product_asset
from product_photo_editor.mcp_tools import mcp_toolset
from product_photo_editor.model_callbacks import before_model_modifier
from product_photo_editor.tool_callbacks import (
    before_tool_modifier,
    after_tool_modifier,
)
from product_photo_editor.prompt import AGENT_INSTRUCTION

root_agent = Agent(
    model="gemini-2.5-flash",
    name="product_photo_editor",
    description="""A friendly product photo editor assistant that helps small business
owners edit and enhance their product photos. Perfect for improving photos of handmade
goods, food products, crafts, and small retail items""",
    instruction=AGENT_INSTRUCTION
    + """
**IMPORTANT: Base64 Argument Rule on Tool Call**

If you found any tool call arguments that requires base64 data,
ALWAYS provide the artifact_id of the referenced file to
the tool call. NEVER ask user to provide base64 data.
Base64 data encoding process is out of your
responsibility and will be handled in another part of the system.
""",
    tools=[
        edit_product_asset,
        mcp_toolset,
    ],
    before_model_callback=before_model_modifier,
    before_tool_callback=before_tool_modifier,
    after_tool_callback=after_tool_modifier,
)
انتهى الأمر، يمكنك الآن الطلب من الوكيل ألا يساعدك في تعديل الصورة فحسب، بل أن ينشئ لك فيديو أيضًا. تشغيل الأمر التالي مرة أخرى
uv run adk web --port 8080
بعد ذلك، حاوِل إنشاء فيديو باستخدام هذه الصورة
Generate a slow zoom in and moving from left and right animation
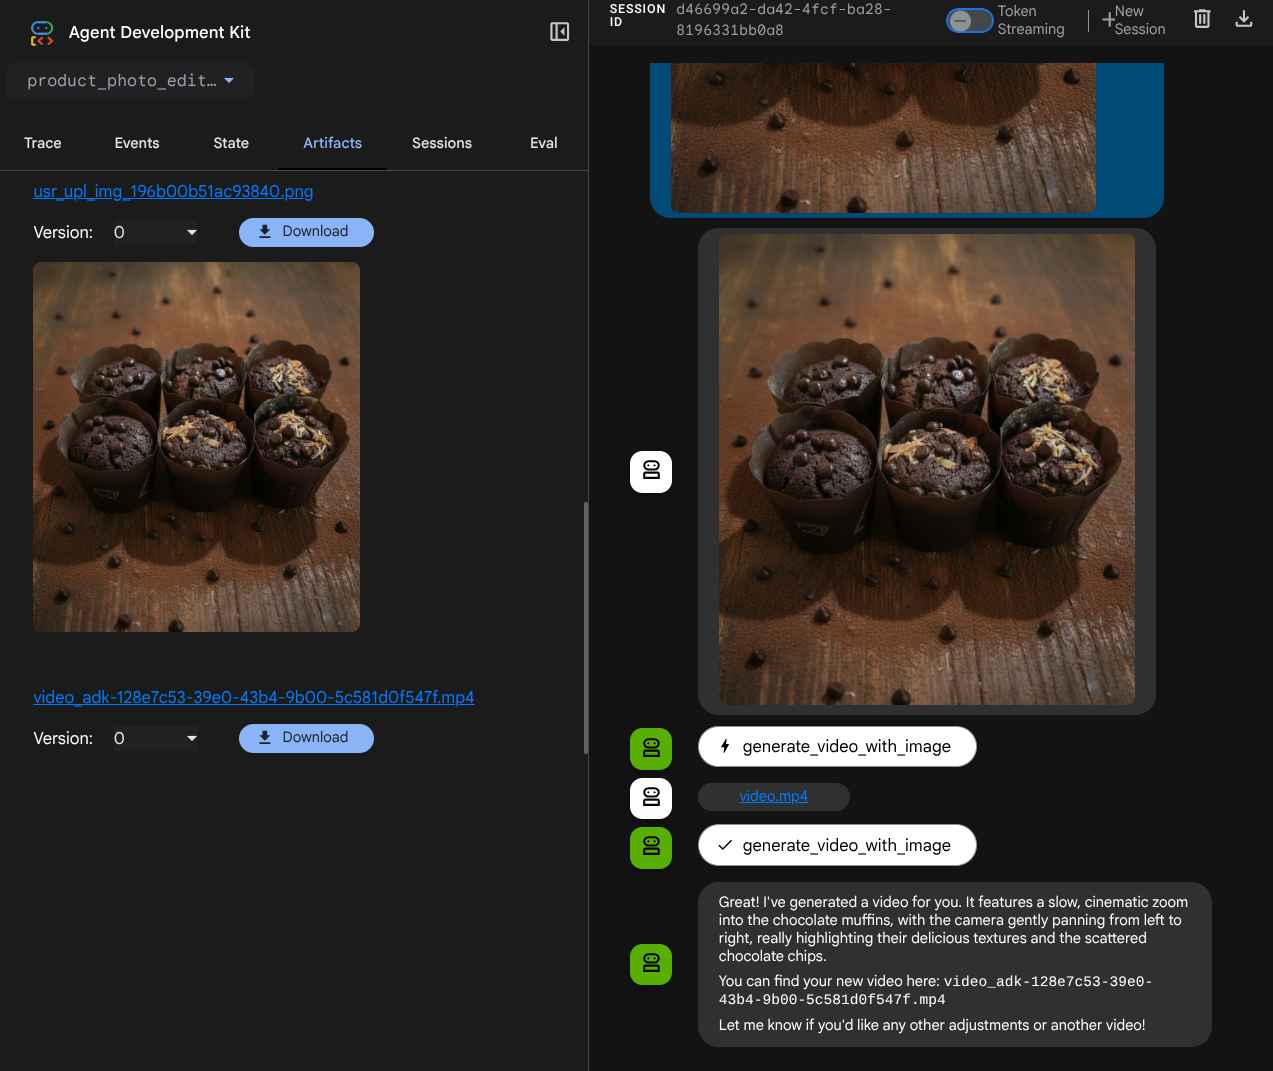
سيظهر لك الفيديو الذي تم إنشاؤه كما هو موضّح في المثال أدناه، وسيتم حفظه كعنصر
7. ⭐ الملخّص
لنراجع الآن ما سبق أن نفّذناه خلال هذا الدرس العملي، إليك النقطة الأساسية التي تعلّمناها:
- معالجة البيانات المتعددة الوسائط (إدخال/إخراج الأدوات): تم تعزيز الاستراتيجية لإدارة البيانات المتعددة الوسائط (مثل الصور والفيديوهات) لإدخال الأدوات وإخراجها باستخدام خدمة "العناصر" في ADK وعمليات إعادة الاستدعاء المتخصصة بدلاً من تمرير بيانات البايت الخام مباشرةً.
- تكامل مجموعة أدوات MCP: تم تطوير خادم Veo MCP خارجي ودمجه باستخدام FastMCP من خلال مجموعة أدوات ADK MCP لإضافة إمكانات إنشاء الفيديو إلى الوكيل.
- تعديل إدخال الأداة (before_tool_callback): تم تنفيذ عملية إعادة استدعاء لاعتراض استدعاء أداة generate_video_with_image، وتحويل artifact_id للملف (الذي اختارته نماذج اللغات الكبيرة) إلى بيانات الصورة المطلوبة المشفّرة بتنسيق base64 لإدخال خادم MCP.
- تعديل ناتج الأداة (after_tool_callback): تم تنفيذ دالة ردّ اتصال لاعتراض استجابة الفيديو الكبيرة المشفّرة بتنسيق base64 من خادم MCP، وحفظ الفيديو كعنصر جديد، وإرجاع مرجع video_artifact_id نظيف إلى النموذج اللغوي الكبير.
8. 🧹 تنظيف
لتجنُّب تحمّل رسوم في حسابك على Google Cloud مقابل الموارد المستخدَمة في هذا الدرس التطبيقي حول الترميز، اتّبِع الخطوات التالية:
- في Google Cloud Console، انتقِل إلى صفحة إدارة الموارد.
- في قائمة المشاريع، اختَر المشروع الذي تريد حذفه، ثم انقر على حذف.
- في مربّع الحوار، اكتب رقم تعريف المشروع، ثم انقر على إيقاف لحذف المشروع.