

1. 學習內容
歡迎參加 ADK 大師班 - 踏上多代理系統之旅
您即將踏入精彩的 AI 代理世界。忘掉只能回答問題的簡單聊天機器人吧!我們正深入研究 Agent Development Kit (ADK),建構能夠推論、規劃及使用工具完成複雜工作的先進自治系統。

完成本教學課程後,您將能夠:
- 打造您的第一個 AI 代理:從無到有,建構功能齊全的代理,瞭解使用者需求、使用 Google 搜尋等工具,並生成詳細實用的回覆。
- 建構多代理系統:瞭解「代理即工具」模式,這項革命性概念是指代理會將工作委派給其他專業代理,建立共同合作的 AI 專家團隊。
- 協調複雜工作流程:除了簡單的委派作業,您還可以運用路由器、循序鏈結、迴圈和平行執行等進階模式,建構強大、高效且智慧的應用程式,處理幾乎所有要求。
- 為代理提供記憶功能:瞭解對話記憶功能的重要性,讓代理處理後續問題、從意見回饋中學習,並順暢管理多步驟工作。
- 透過 MCP 連線:透過 MCP Toolbox 連線。
我們開始吧!🚀
2. 設定:取得 API 金鑰
設定 Google AI Studio API 金鑰
事前準備:
- Python 3.9 以上版本 (
python3 --version檢查) - Google 帳戶 (用於建立 AI Studio 金鑰)
- 終端機 - 本機或 Cloud Shell 皆可
- 約 10 分鐘
如要啟用 AI 代理程式,我們需要 Google AI Studio 的 Gemini API 金鑰。這是最快的入門方式。
步驟 1:從 AI Studio 取得 Gemini API 金鑰 (1 分鐘)
- 在新瀏覽器分頁中開啟 https://aistudio.google.com/app/apikey。
- 使用 Google 帳戶登入。
- 按一下「建立 API 金鑰」 (右上角)。
- 對話方塊隨即開啟,並顯示專案下拉式選單:
- 如果您先前已建立 Google 專案:選取專案,然後按一下「在現有專案中建立 API 金鑰」
- 如果不在清單中:按一下「建立專案」。
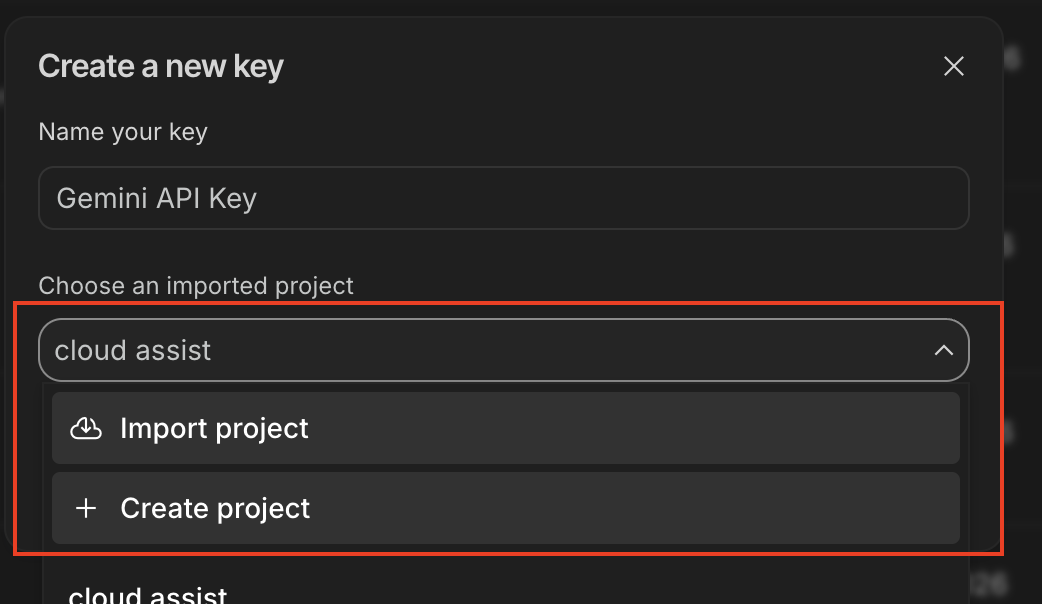
- 複製顯示的 API 金鑰。開頭為
AIza...,長度約為 40 個字元。
✏️ 將這項資訊貼到安全的地方,您會在下方的步驟 4 中使用這項資訊。
步驟 2:複製存放區 (1 分鐘)
👉💻 開啟終端機 (或 Cloud Shell),然後複製教學課程存放區:
git clone https://github.com/cuppibla/adk_tutorial.git
cd ~/adk_tutorial
步驟 3 - 建立虛擬環境並安裝依附元件
👉💻 建立並啟用名為 .adk_env 的虛擬環境,然後安裝依附元件:
python3 -m venv .adk_env
source .adk_env/bin/activate
pip install --upgrade pip
pip install -r requirements.txt
終端機提示詞的開頭應該會是 (.adk_env)。
步驟 4 - 🔥 重要事項:新增 API 金鑰
⚠️ 請勿略過這個步驟!在 adk_tutorial 資料夾的根目錄中建立 .env 檔案。這個檔案會為本程式碼研究室的每個工作階段提供支援,ADK Web 工作階段 (1-5) 和指令列記憶體與 MCP 工作階段 (6-7) 都會自動讀取這個檔案。
👉💻 使用金鑰建立 .env 檔案 (將 your_actual_api_key_here 替換為步驟 1 中的金鑰):
cat > .env <<'EOF'
GOOGLE_GENAI_USE_VERTEXAI=FALSE
GOOGLE_API_KEY=your_actual_api_key_here
EOF
您的 ~/adk_tutorial/.env 現在應包含:
GOOGLE_GENAI_USE_VERTEXAI=FALSE
GOOGLE_API_KEY=your_actual_api_key_here
🚨 重要:將 your_actual_api_key_here 替換為步驟 1 中的實際 API 金鑰 (開頭為 AIza...)。
✅ 檢查點:您在 ~/adk_tutorial/.env 中有一個 .env 檔案,內含 AIza... 金鑰,且終端機提示顯示 (.adk_env)。現在可以開始建構代理程式了!
3. 第 1 堂:在 ADK Web 中建立第一個代理
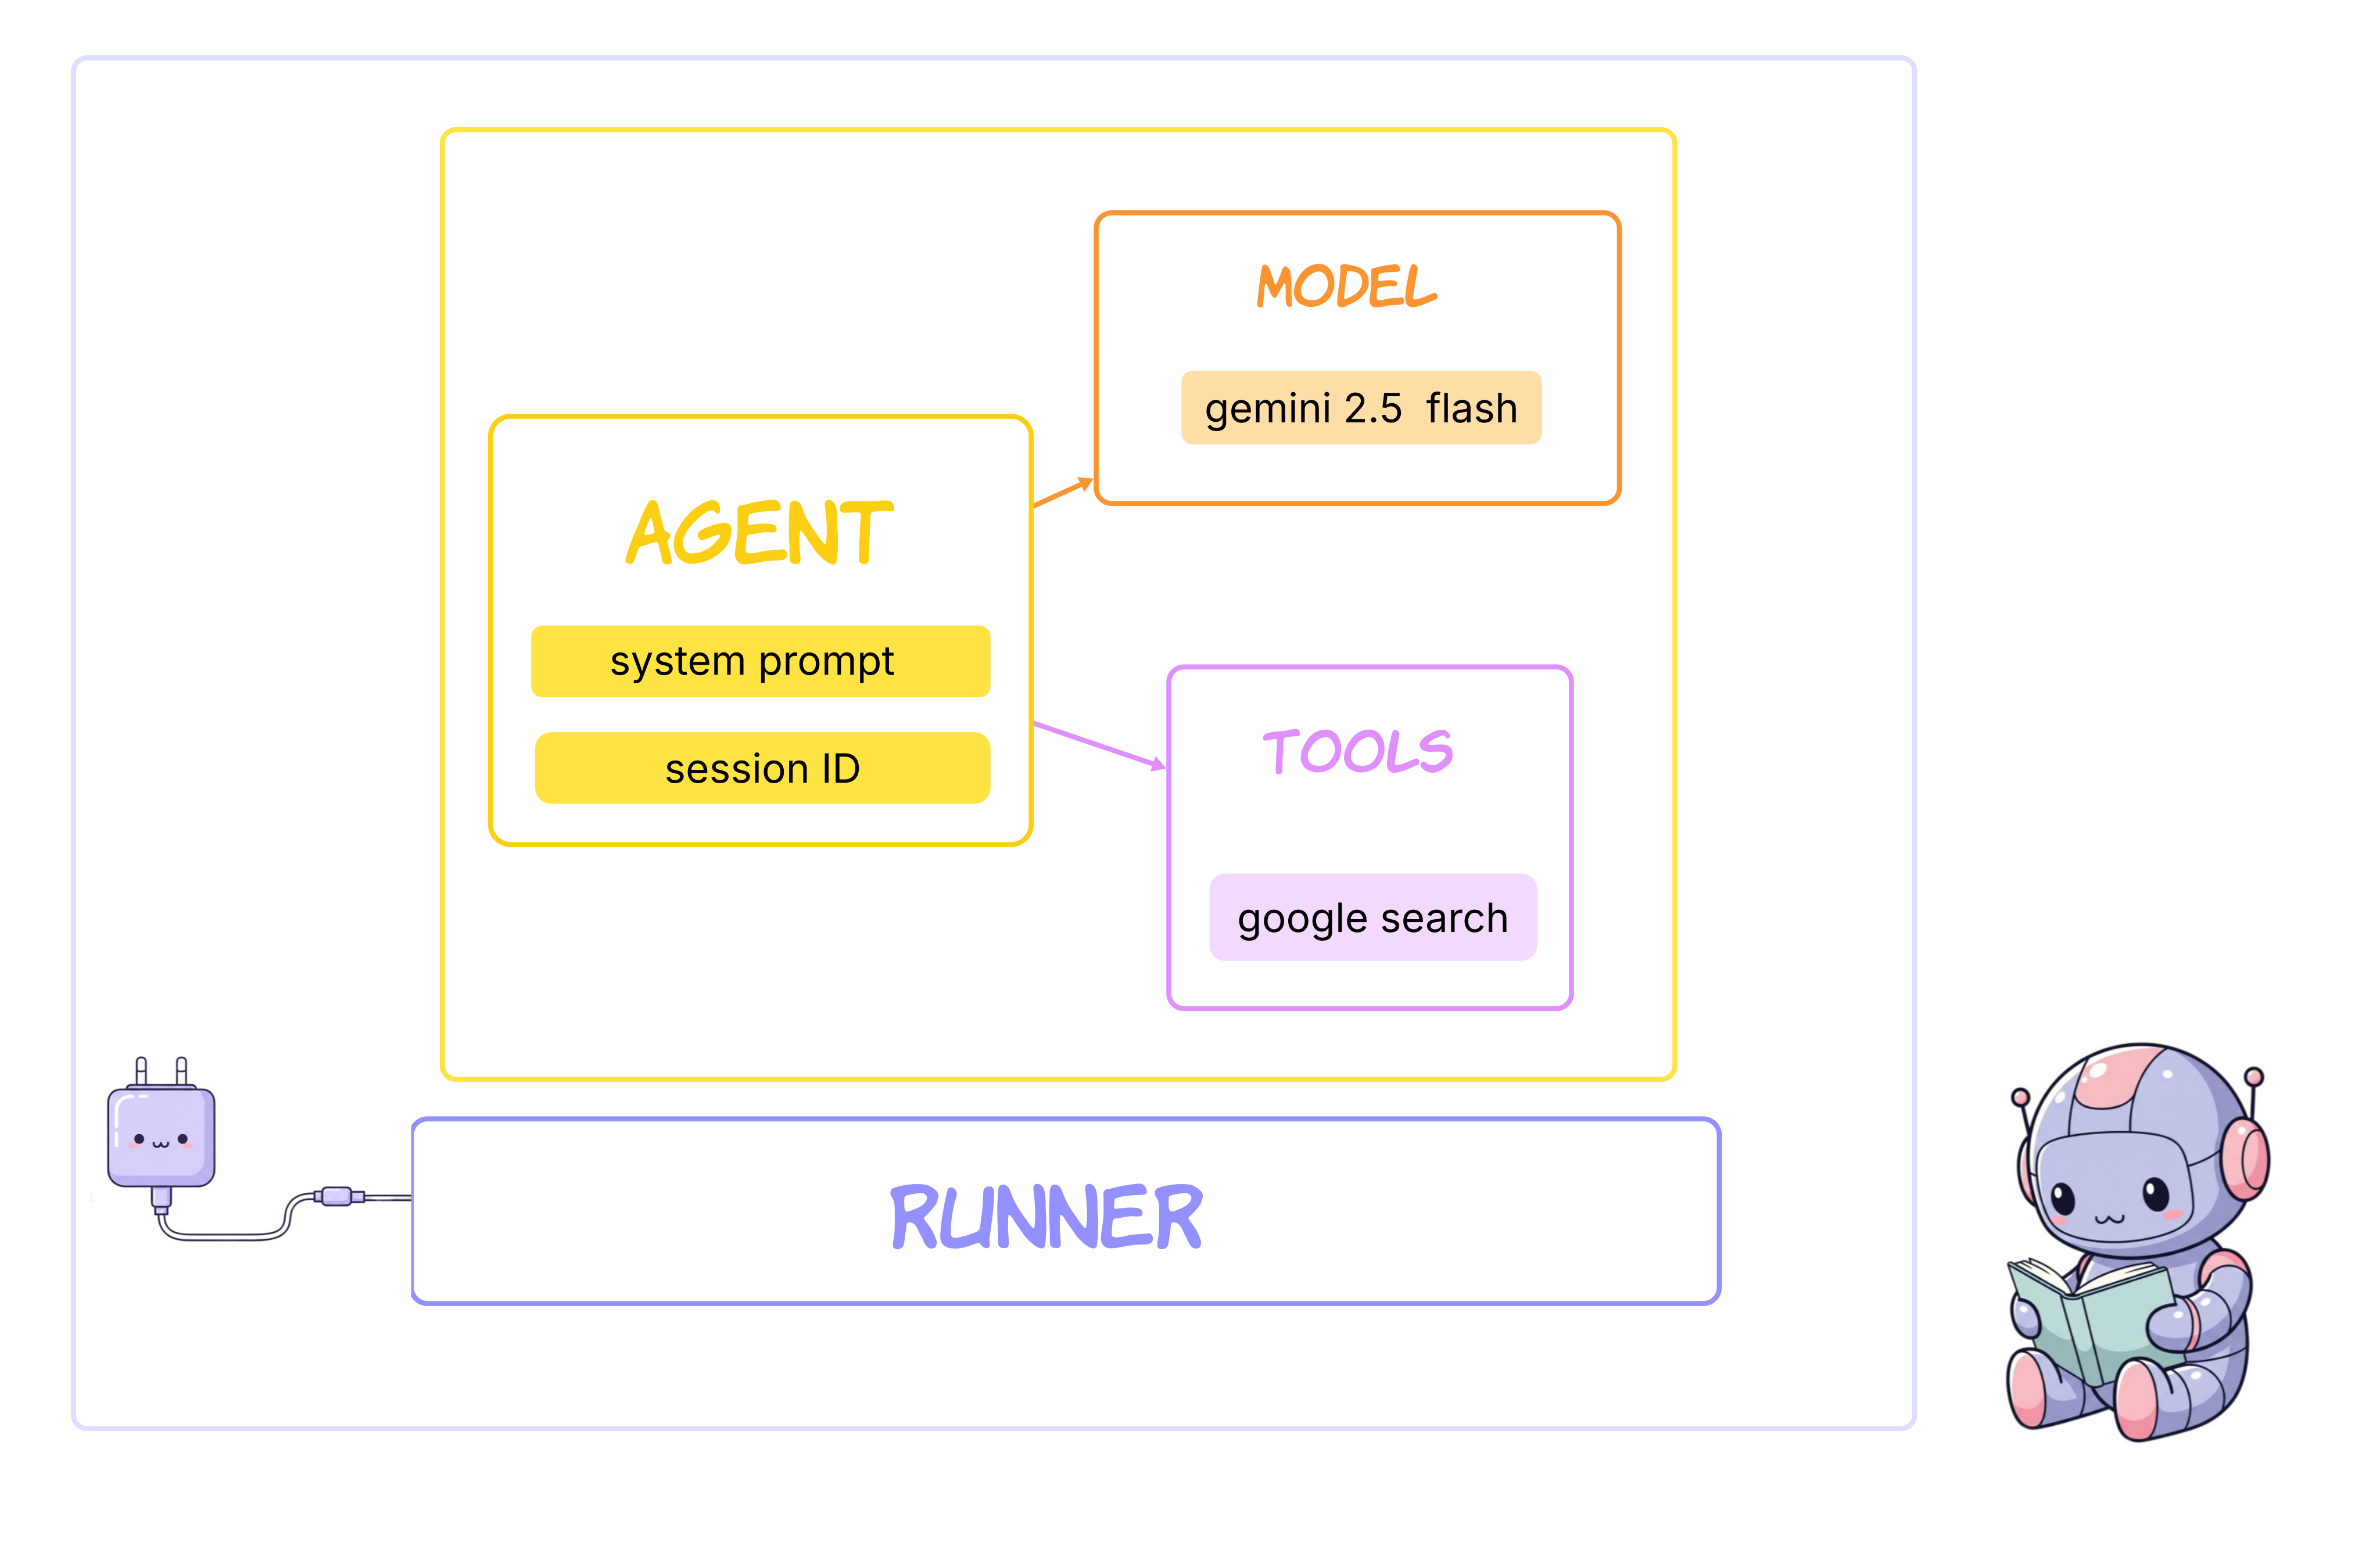
執行下列指令,開啟 ADK Web:
cd ~/adk_tutorial
source .adk_env/bin/activate
adk web
執行指令後,終端機應會顯示 ADK 網頁伺服器已啟動的輸出內容,類似如下:
+-----------------------------------------------------------------------------+
| ADK Web Server started                                                      |
|                                                                             |
| For local testing, access at http://localhost:8000.                         |
+-----------------------------------------------------------------------------+


INFO:     Application startup complete.
INFO:     Uvicorn running on http://0.0.0.0:8000 (Press CTRL+C to quit)
👉 接著,在瀏覽器中開啟 http://localhost:8000,存取 ADK 開發 UI。
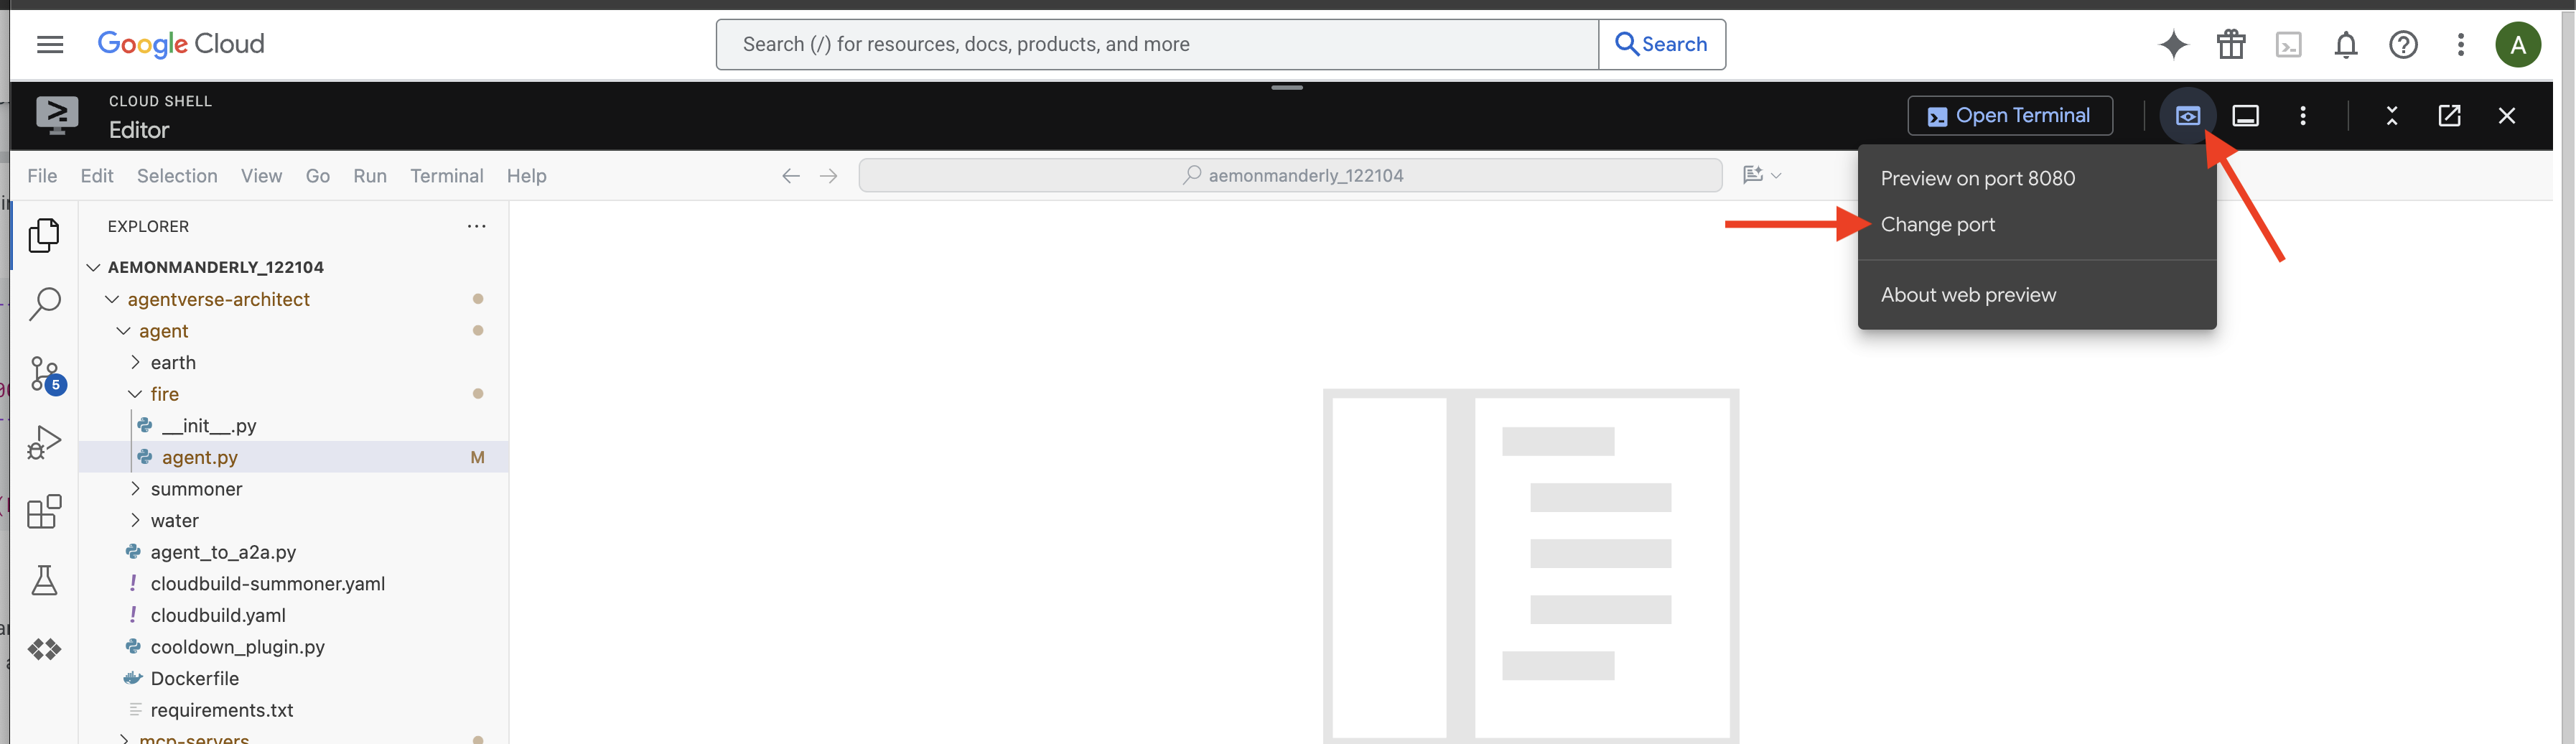
👉 召喚儀式完成,代理程式現已啟動。瀏覽器中的 ADK 開發人員使用者介面是與 Familiar 的直接連線。
選擇第一個代理程式:在 UI 頂端的下拉式選單中,選擇 a_single_agent。
選取 a_single_agent: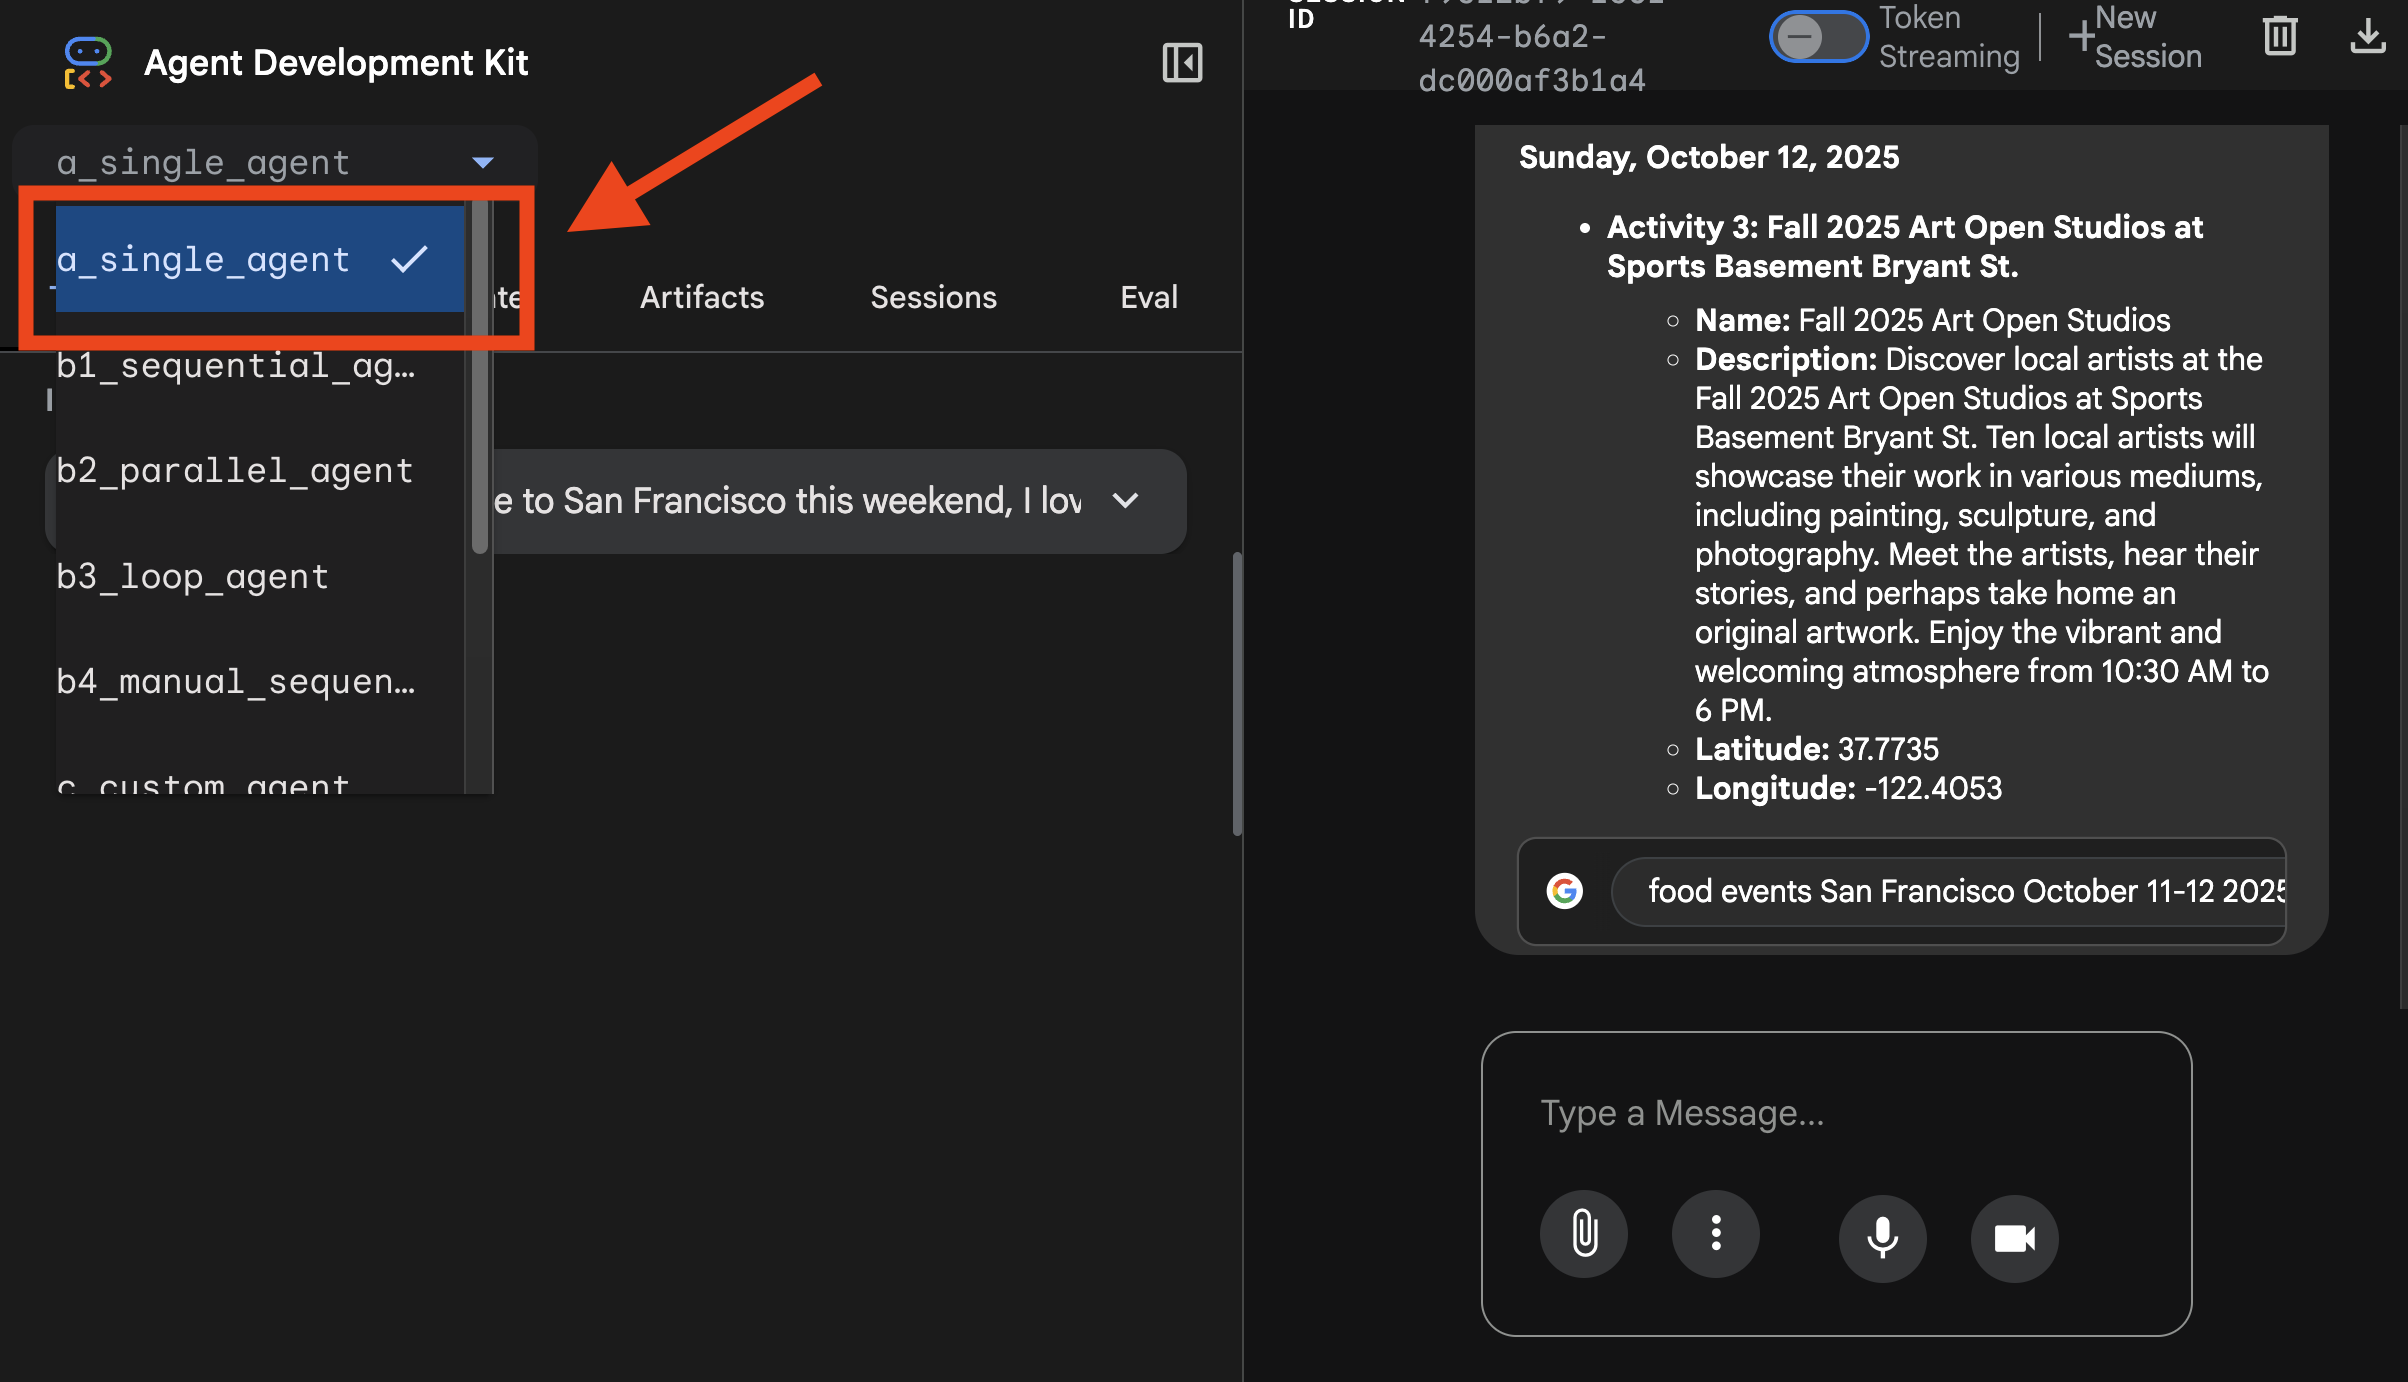
您可以在這裡查看追蹤記錄: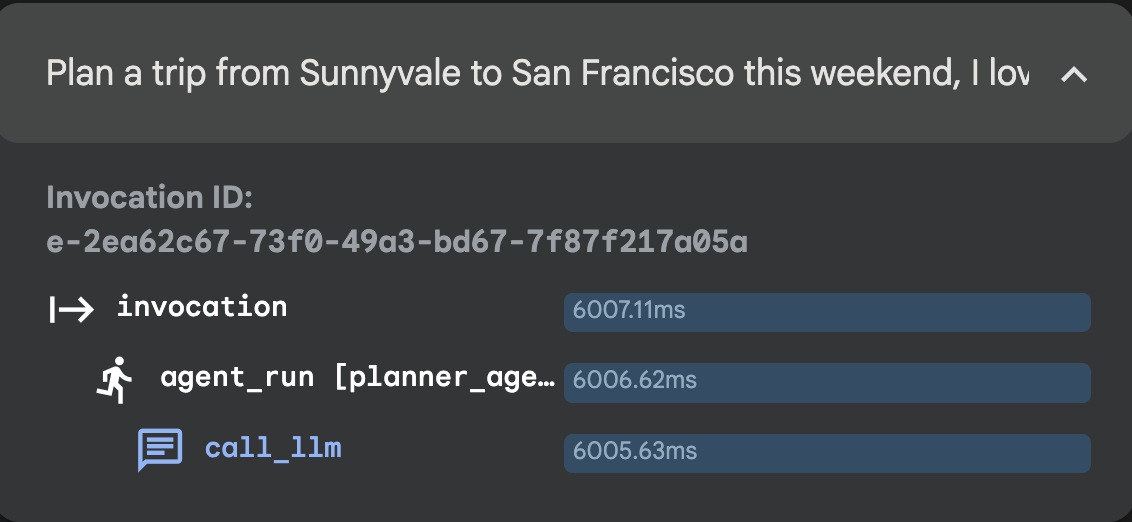
👉 測試提示:
Plan a trip from Sunnyvale to San Francisco this weekend, I love food and art.
4. 第 2 堂:工作流程代理:Sequential Agent、Parallel Agent、Loop Agent
Parallel Agent
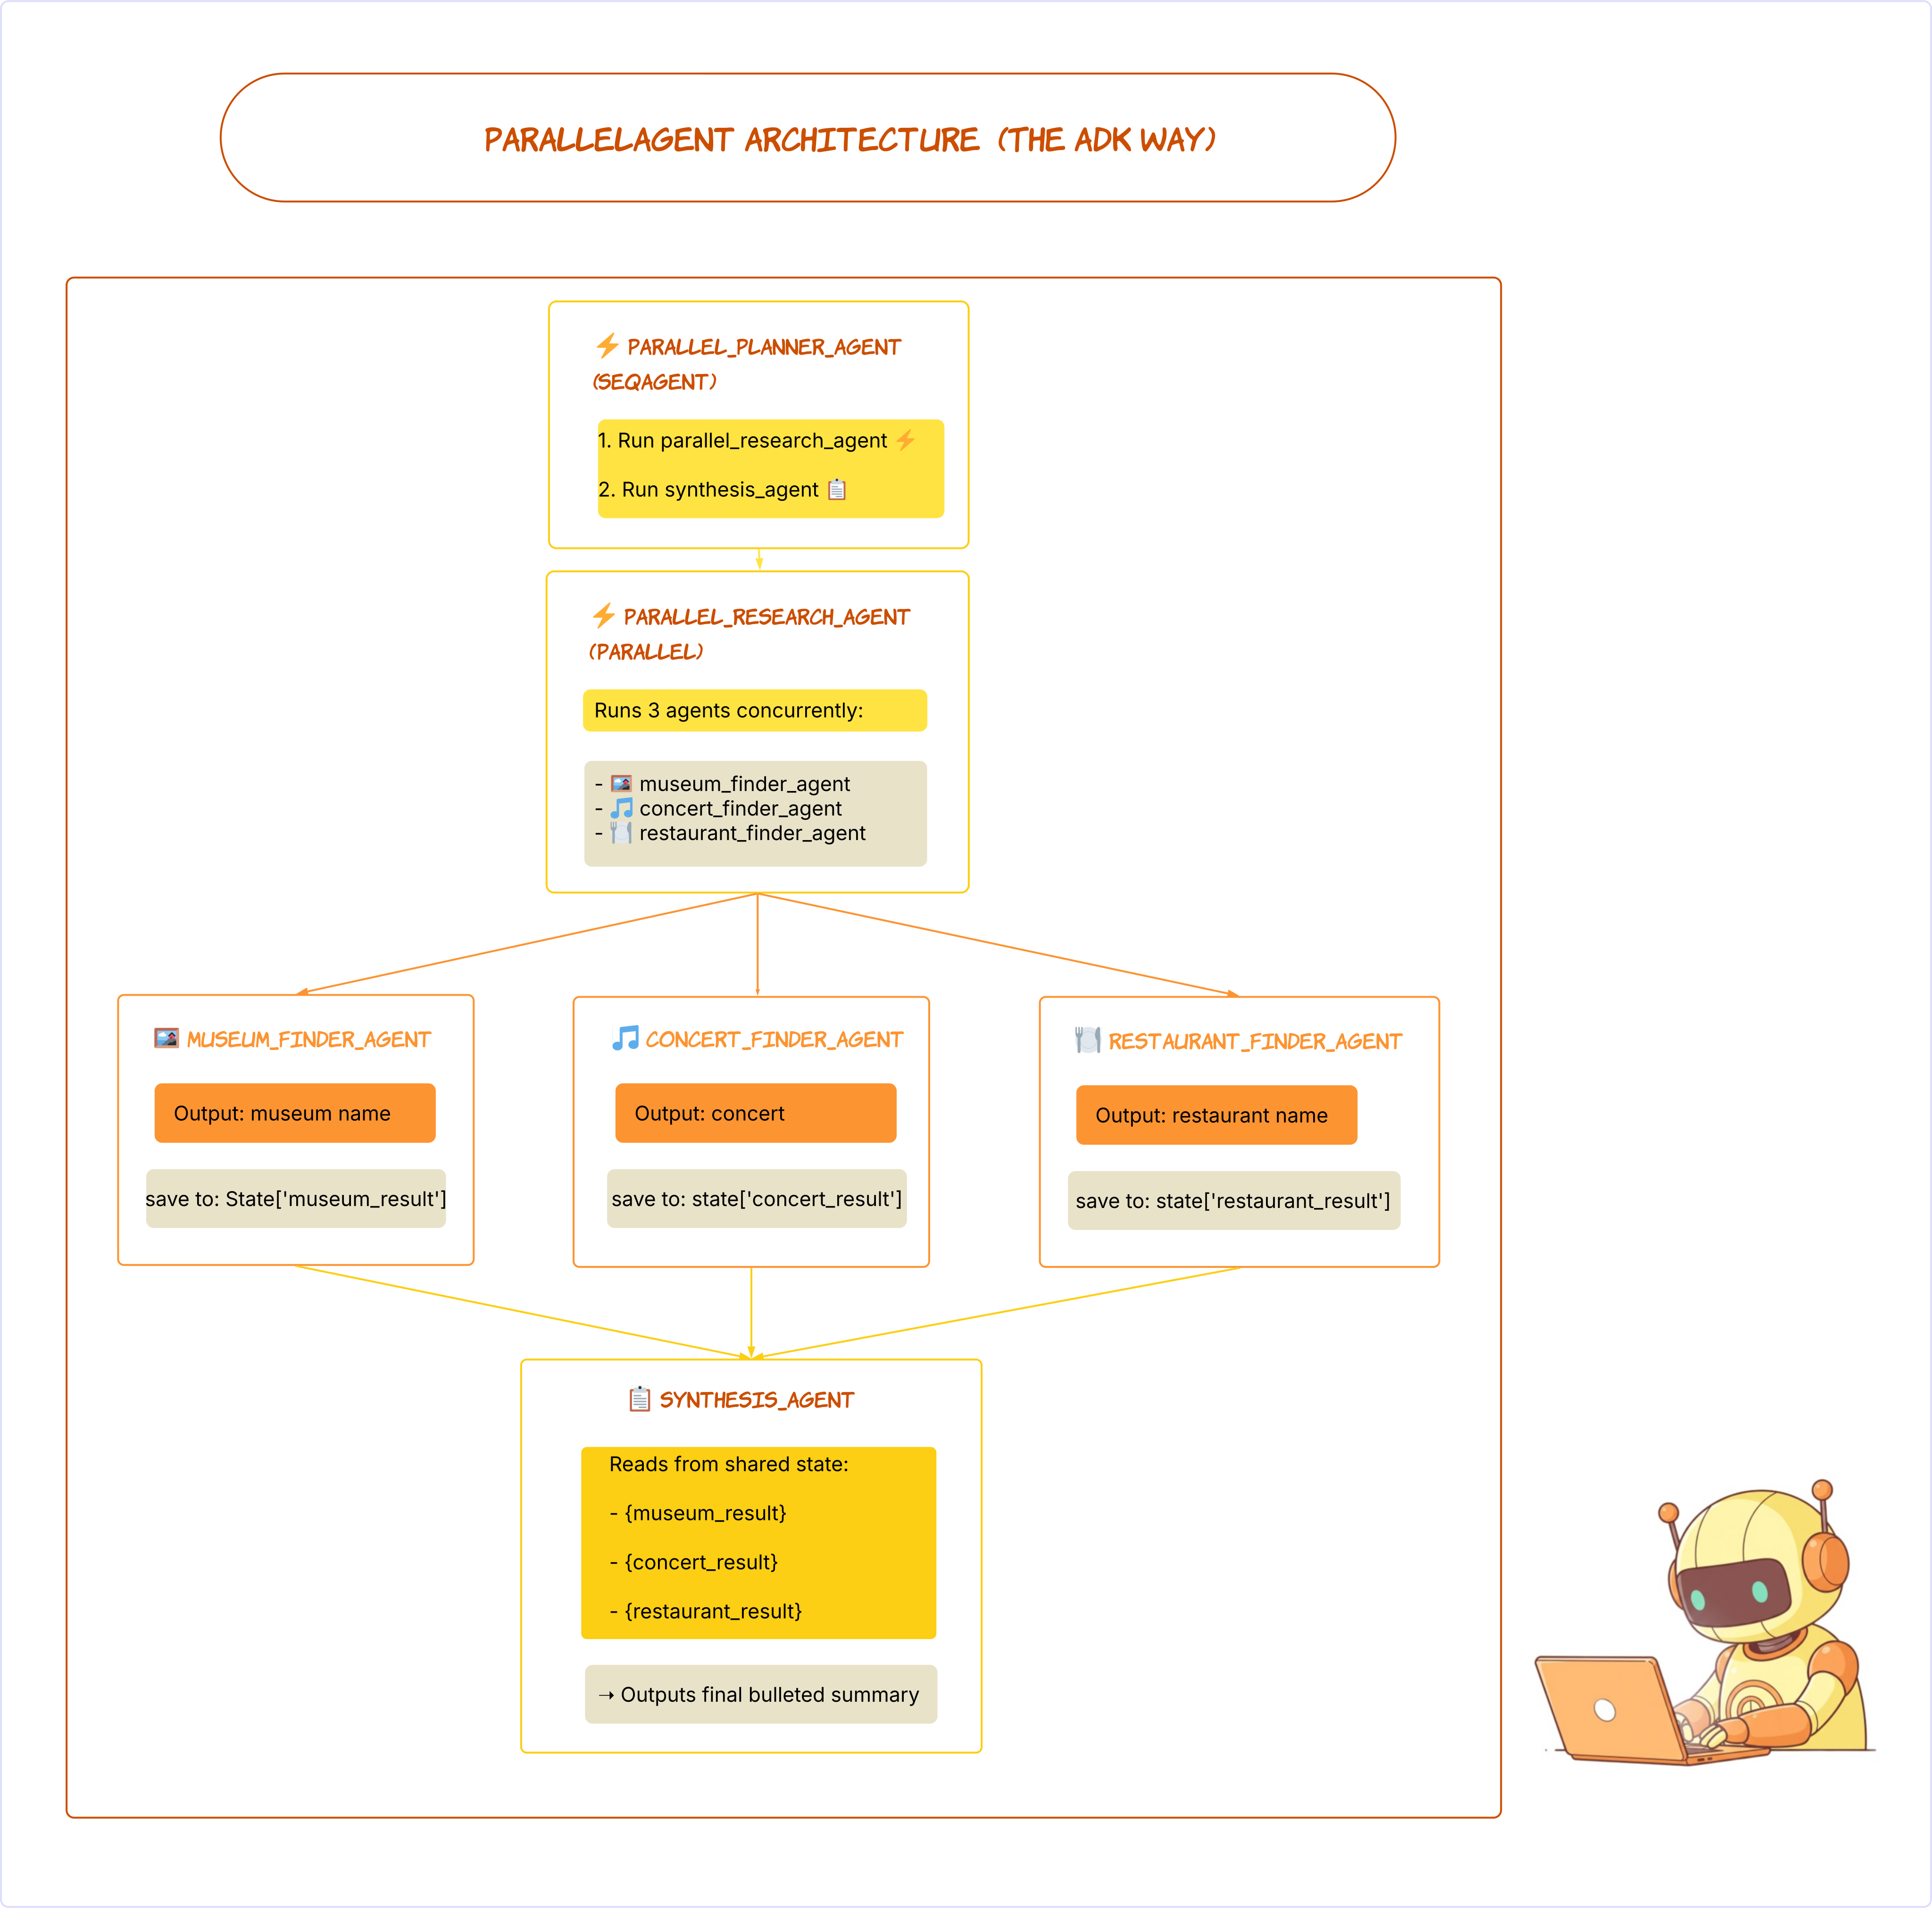
選擇平行工作流程代理程式:在 UI 頂端的下拉式選單中,選擇 b2_parallel_agent。
👉 測試提示:
Plan my trip to San Francisco, I want to find some good concert, restaurant and museum.
選取 b2_parallel_agent: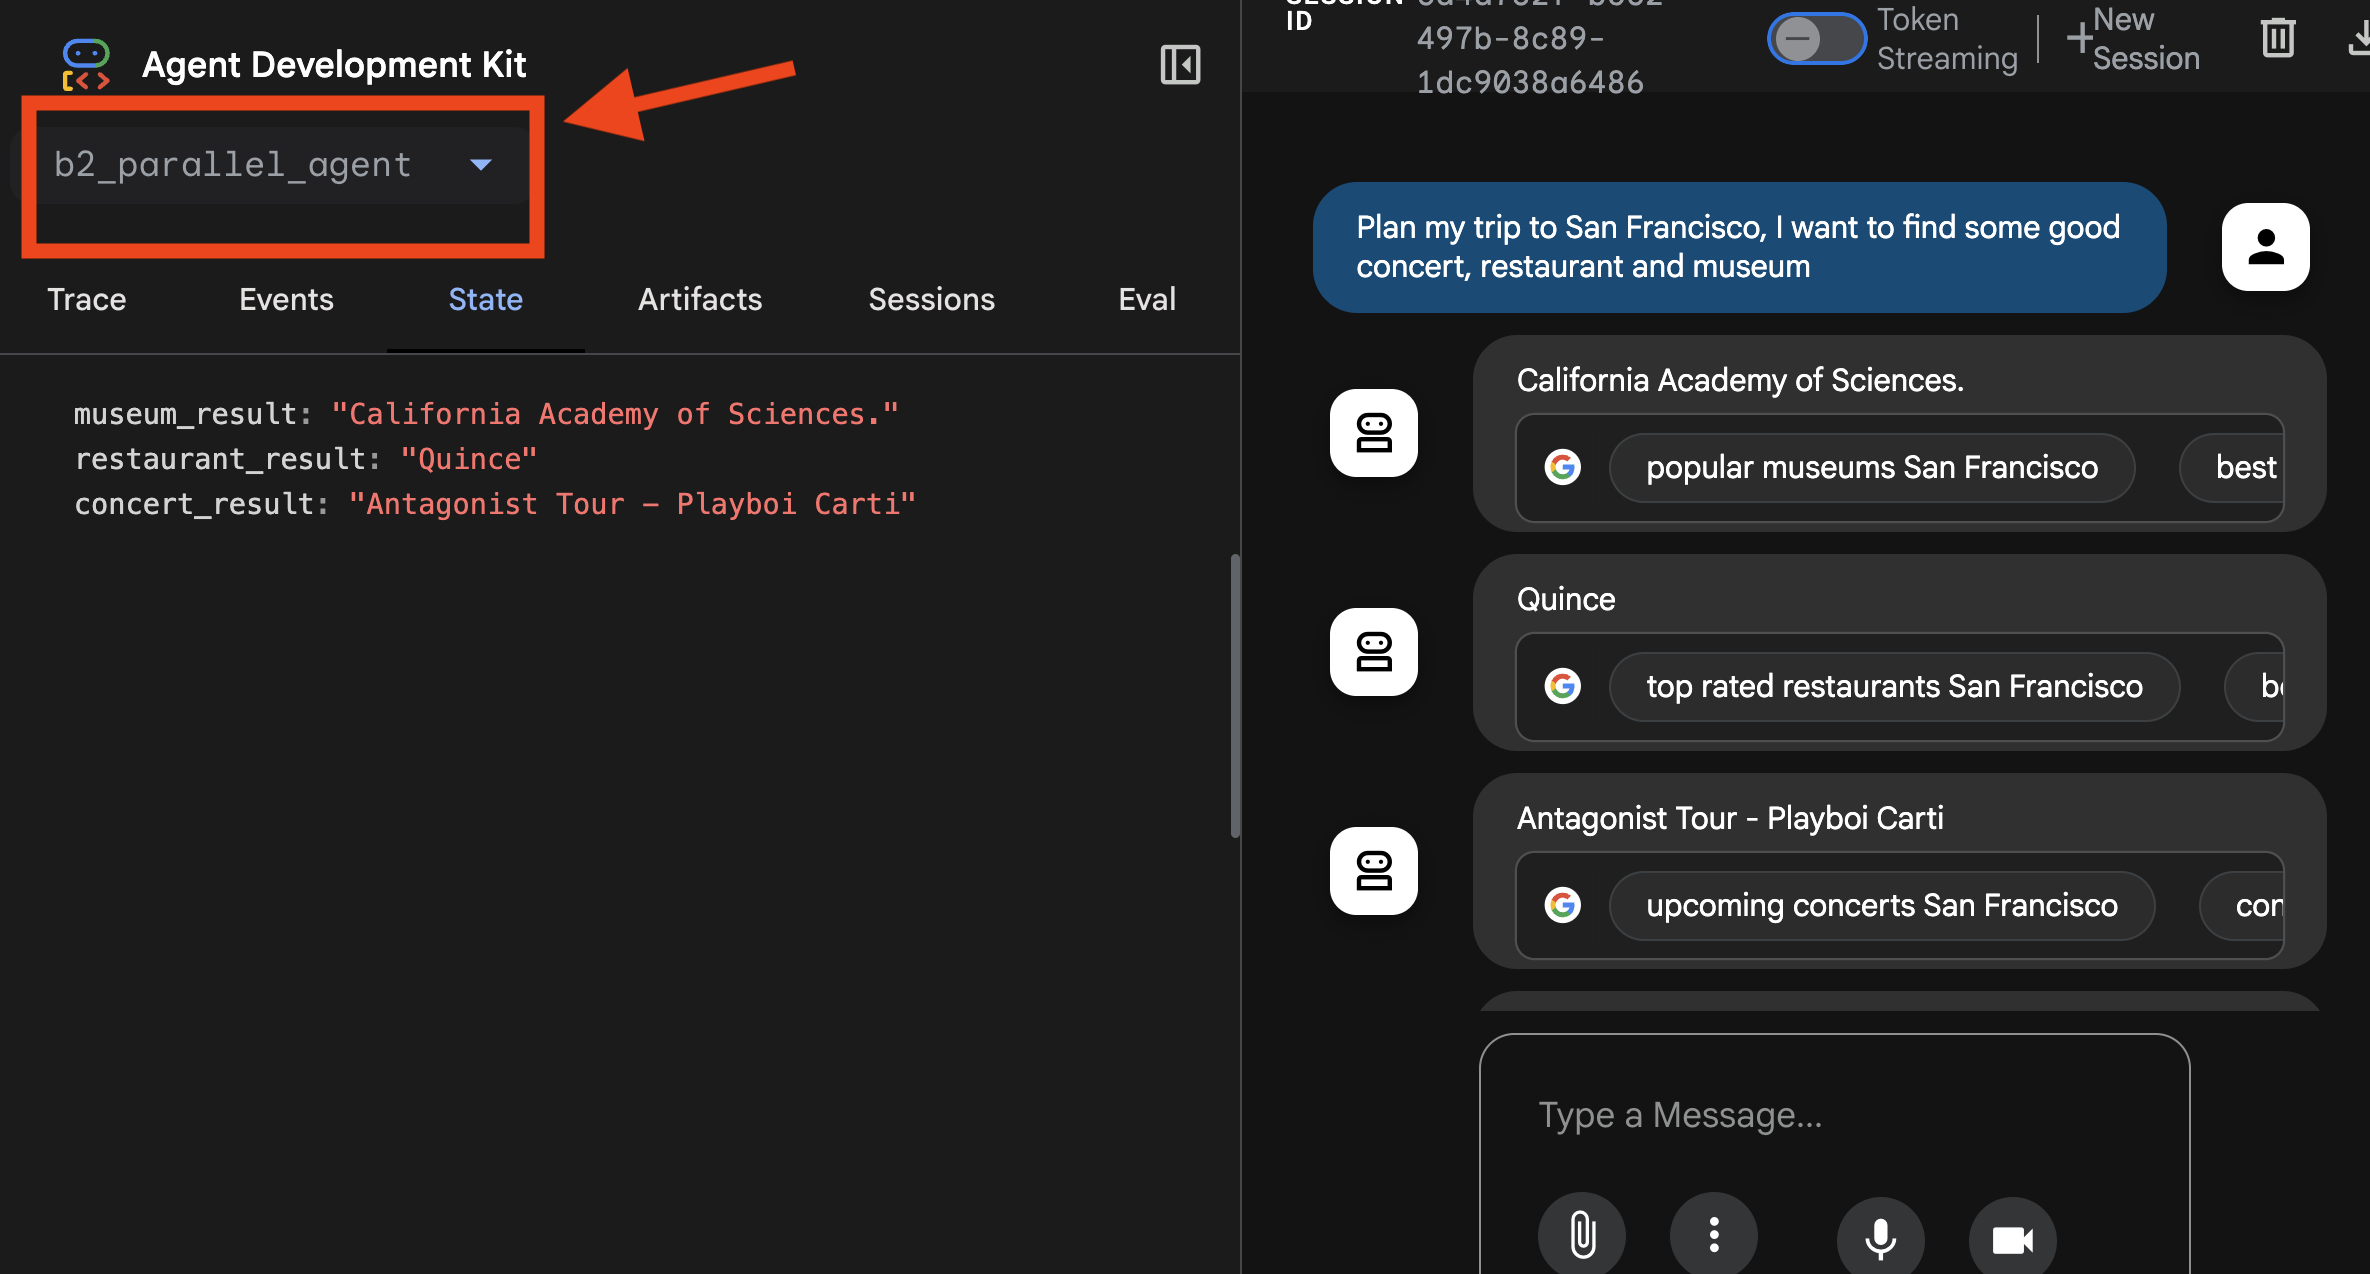
您可以在這裡查看追蹤記錄: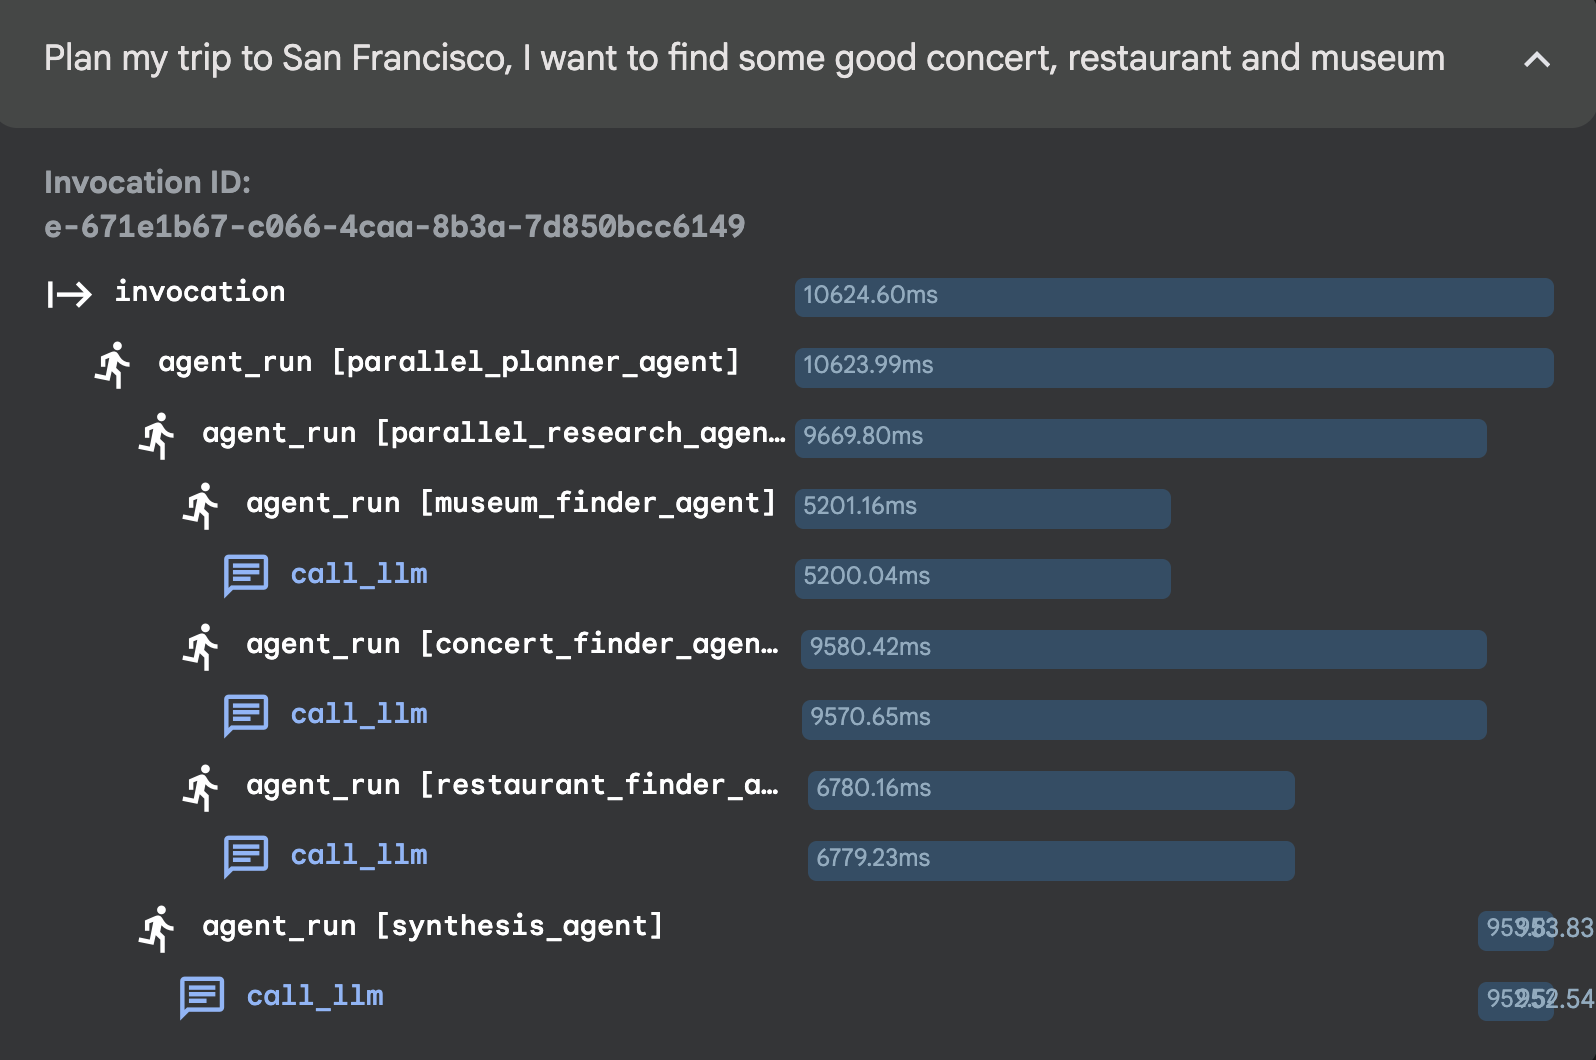
循序代理程式
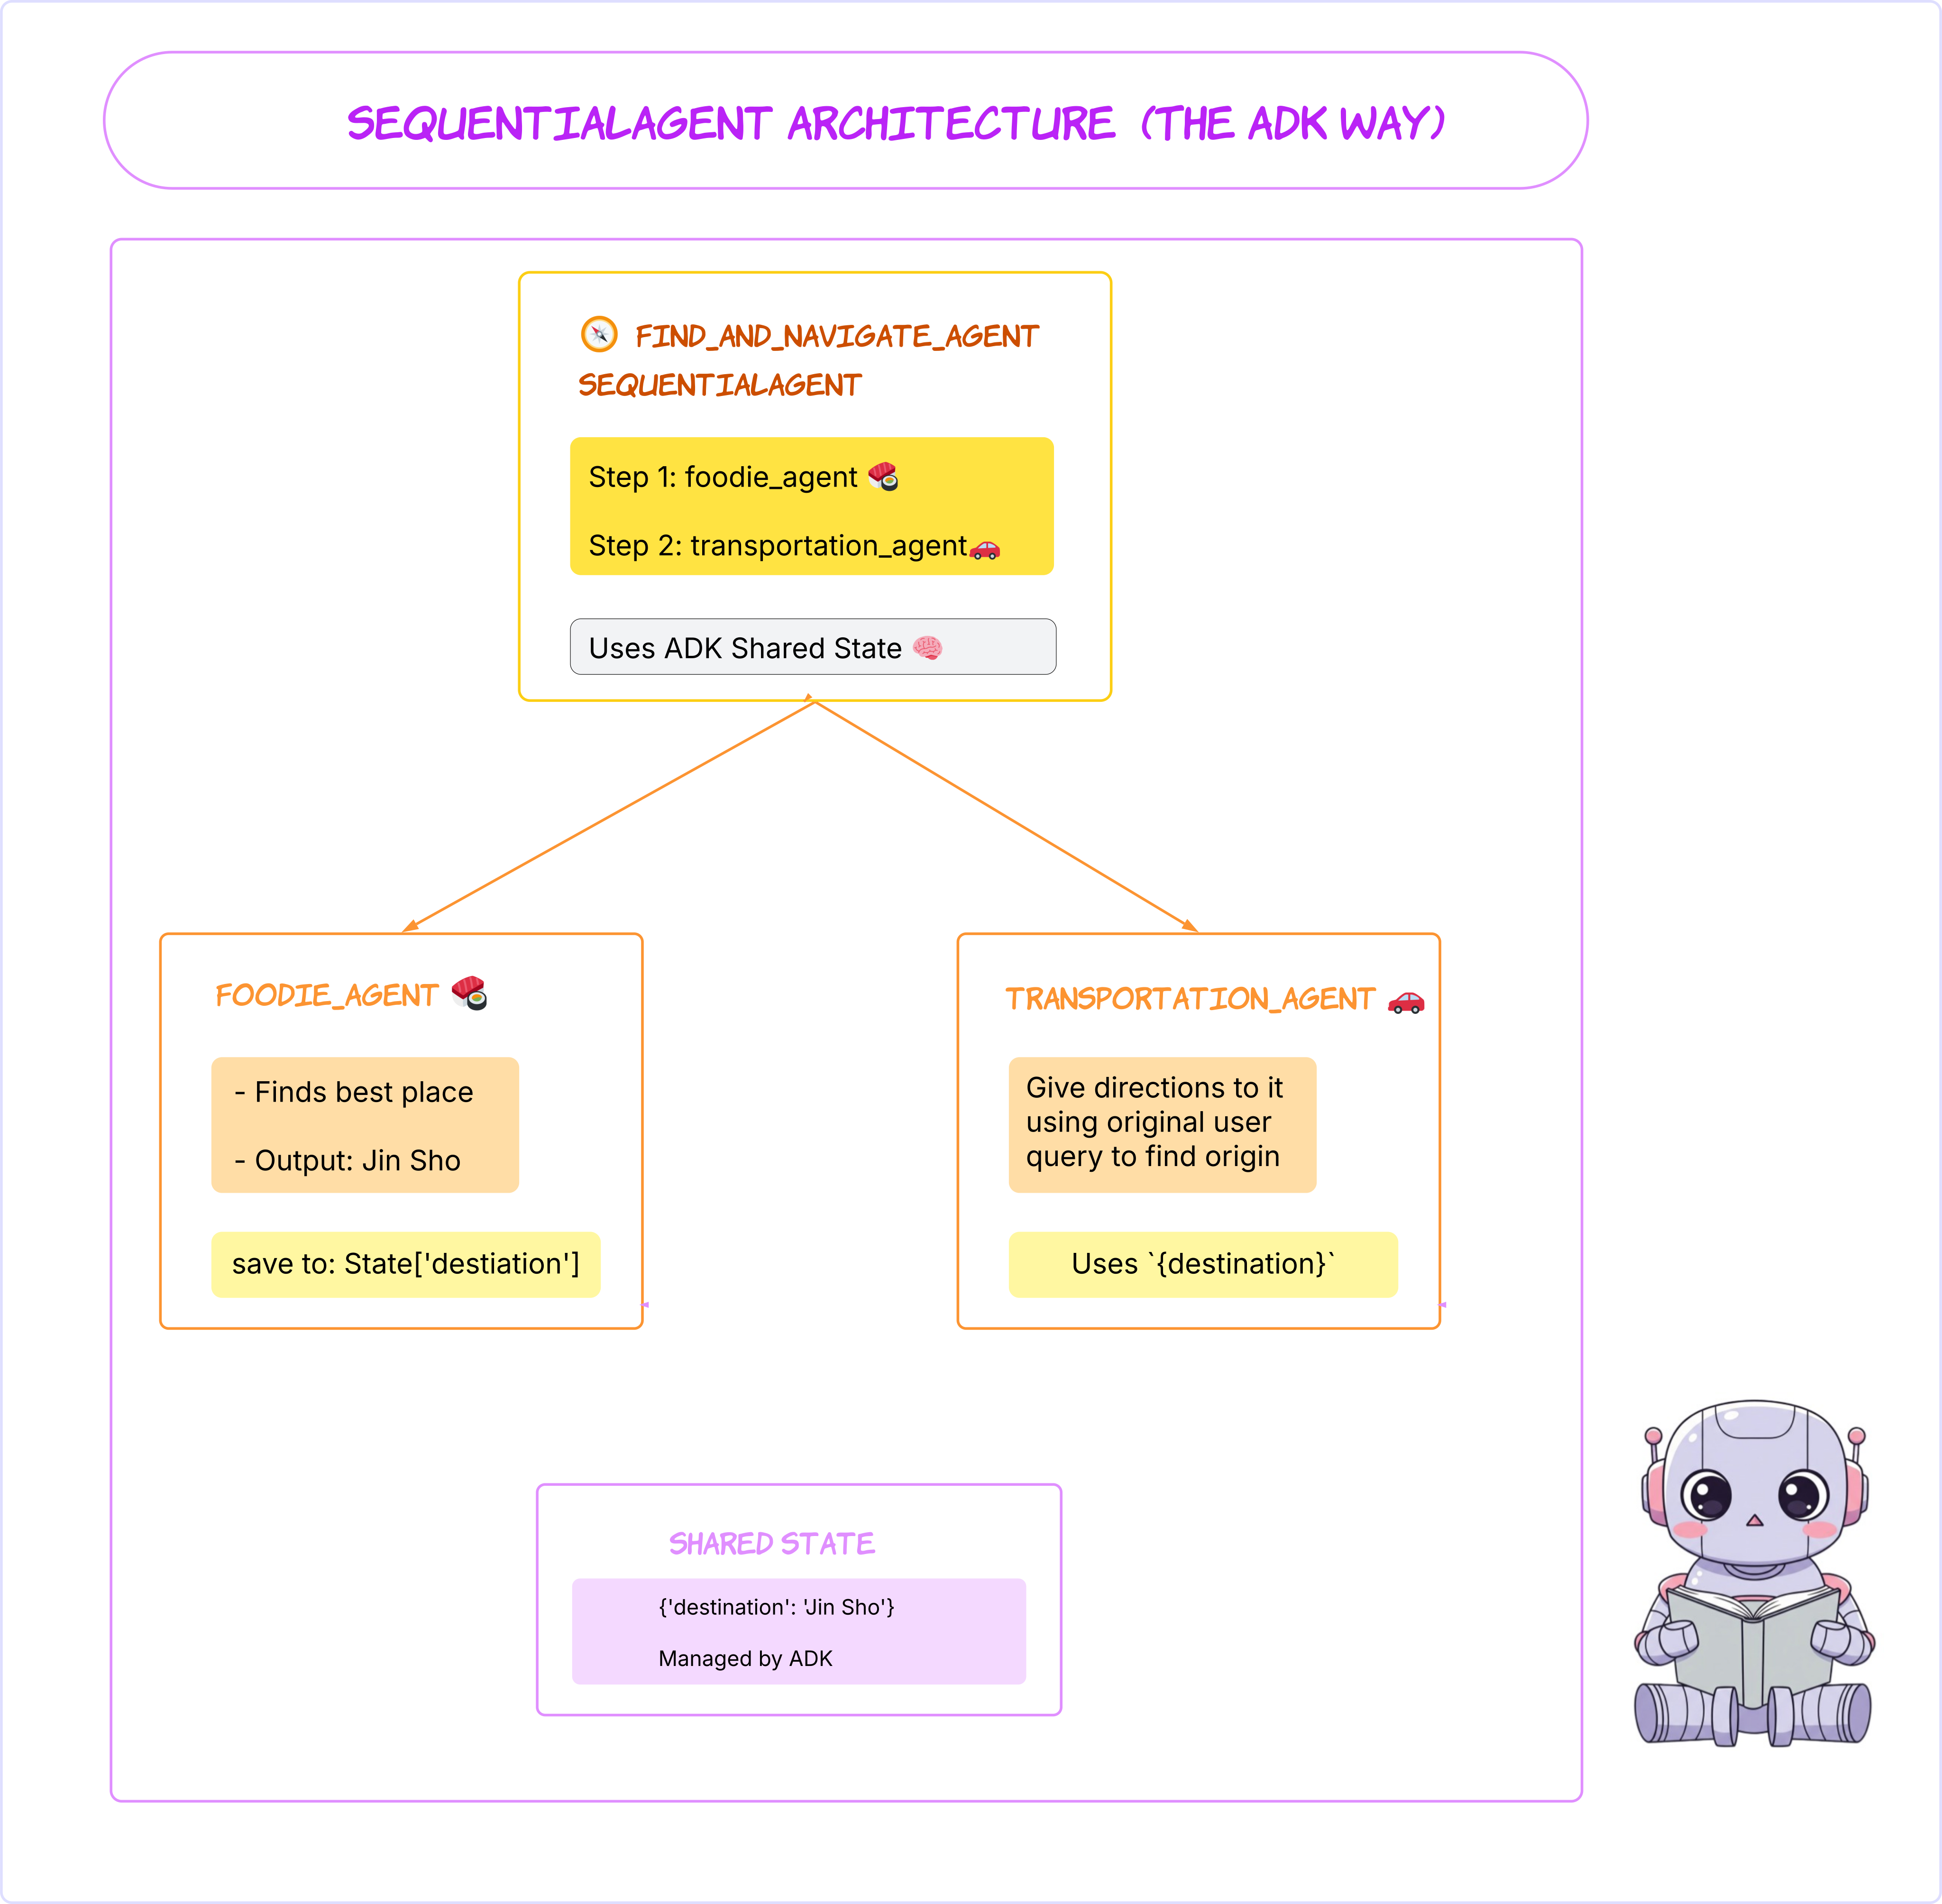
選擇循序工作流程代理程式:在 UI 頂端的下拉式選單中,選擇 b1_sequential_agent。
👉 測試提示:
Find a good sushi near Standford and tell me how to get there.
選取 b1_sequential_agent: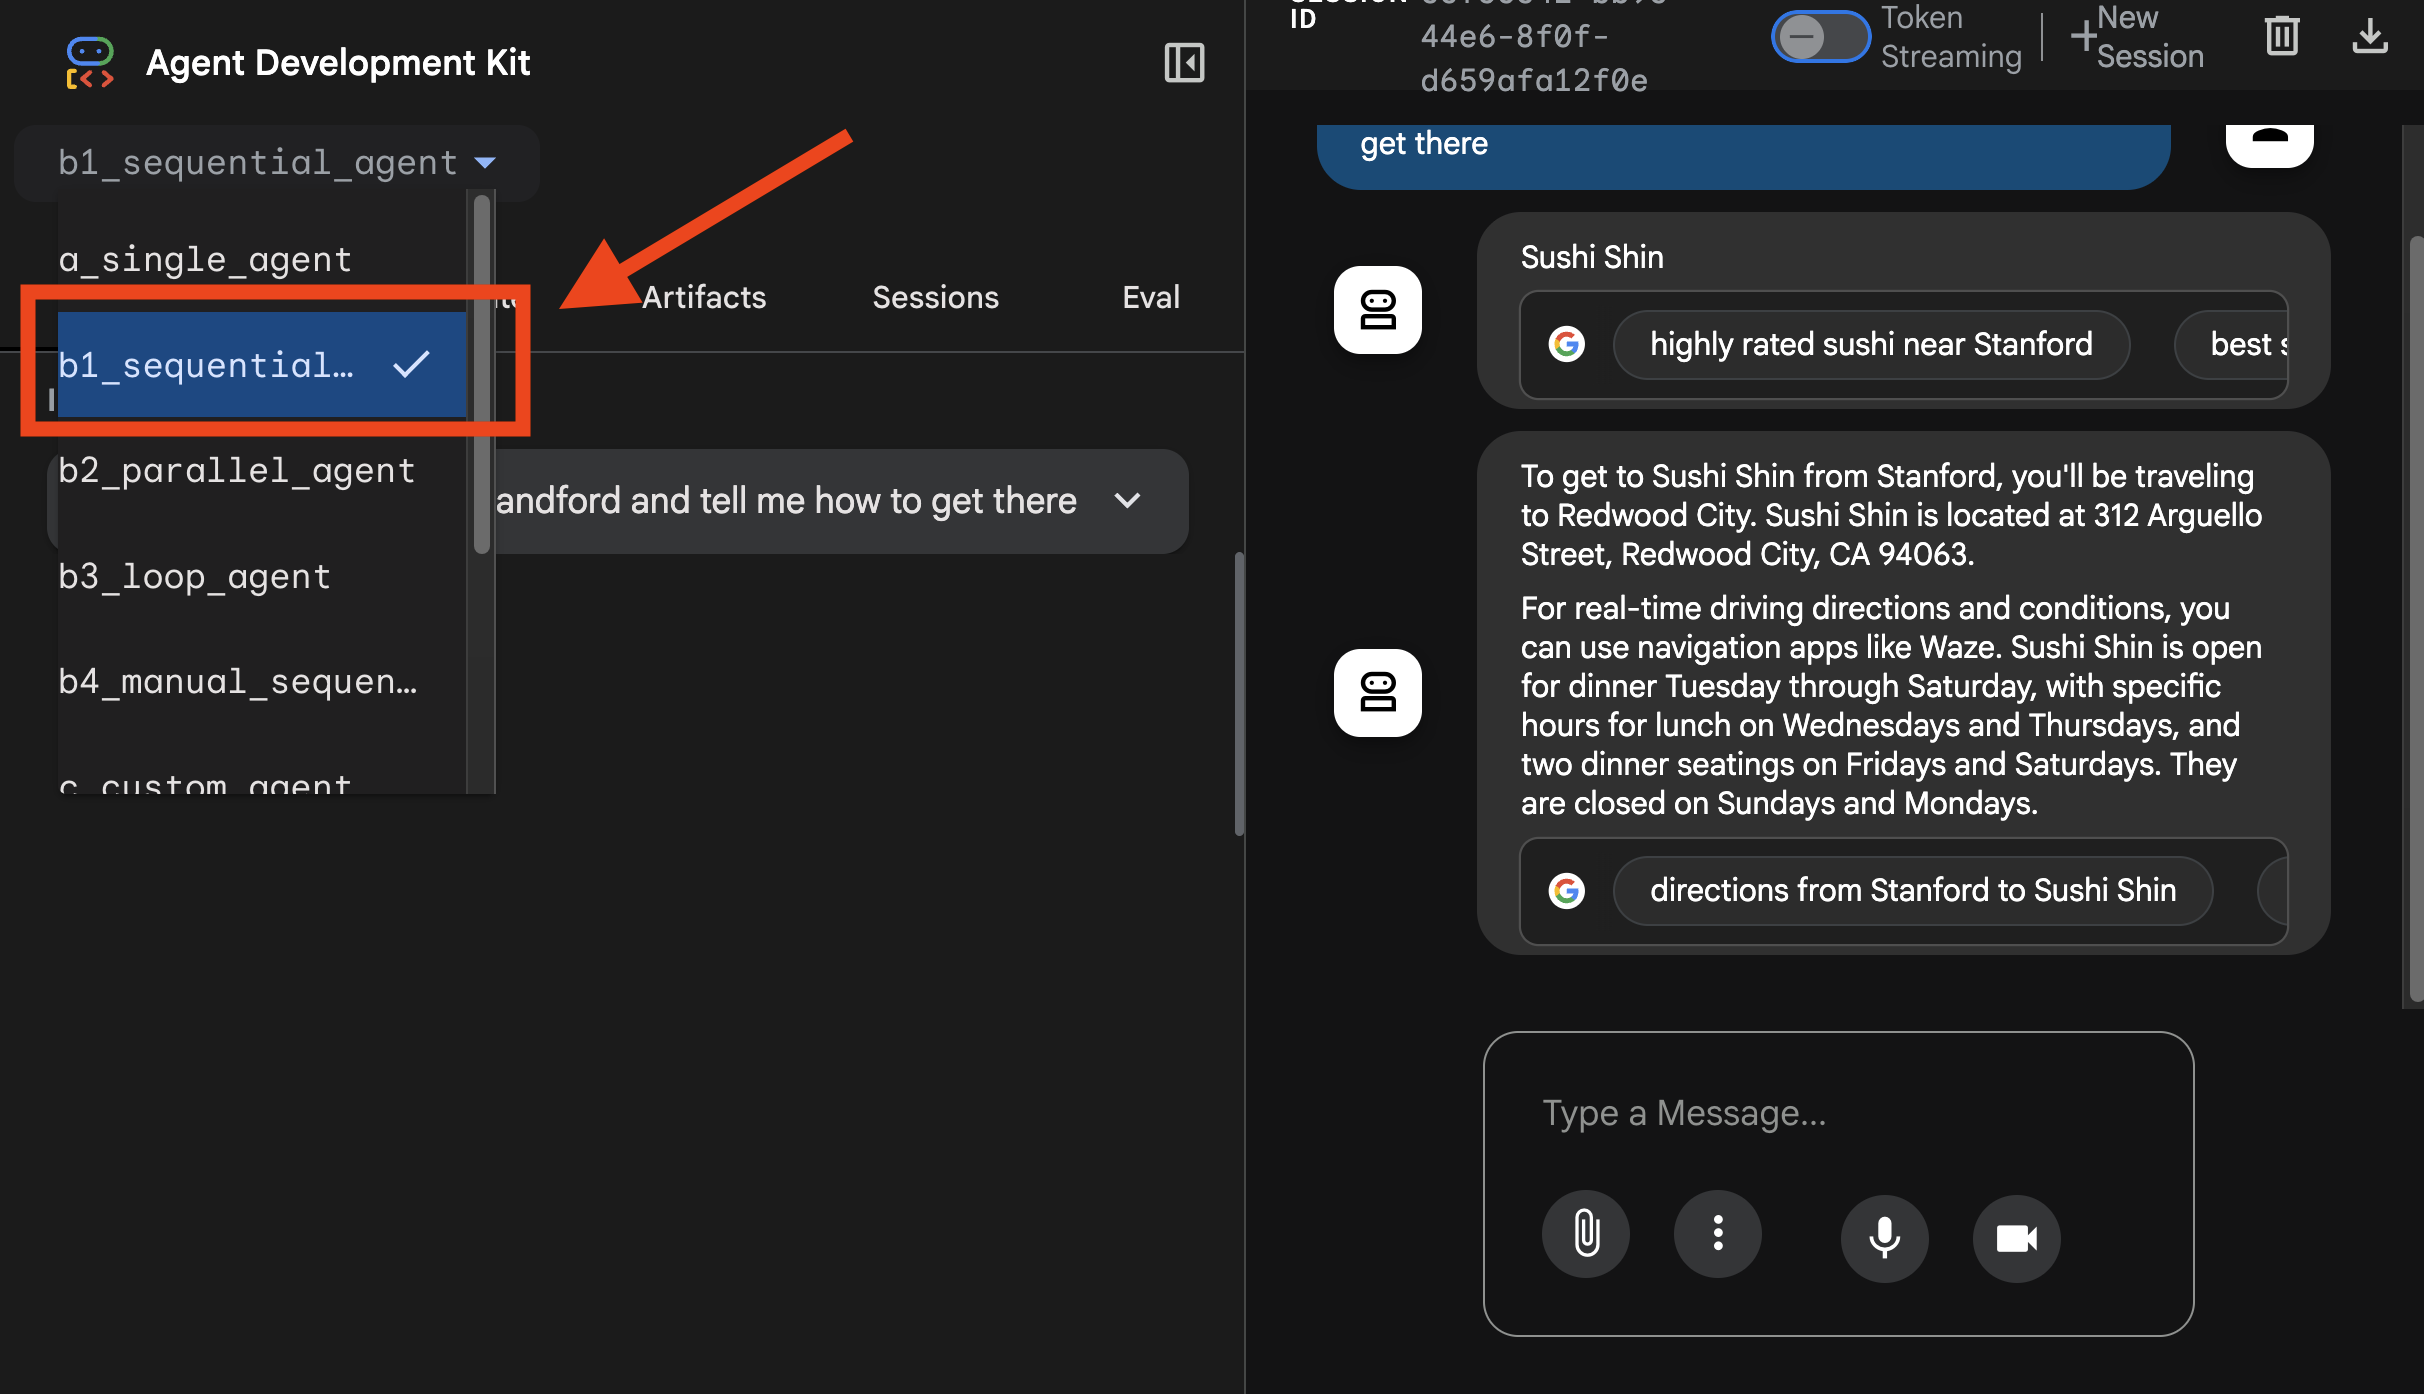
您可以在這裡查看追蹤記錄: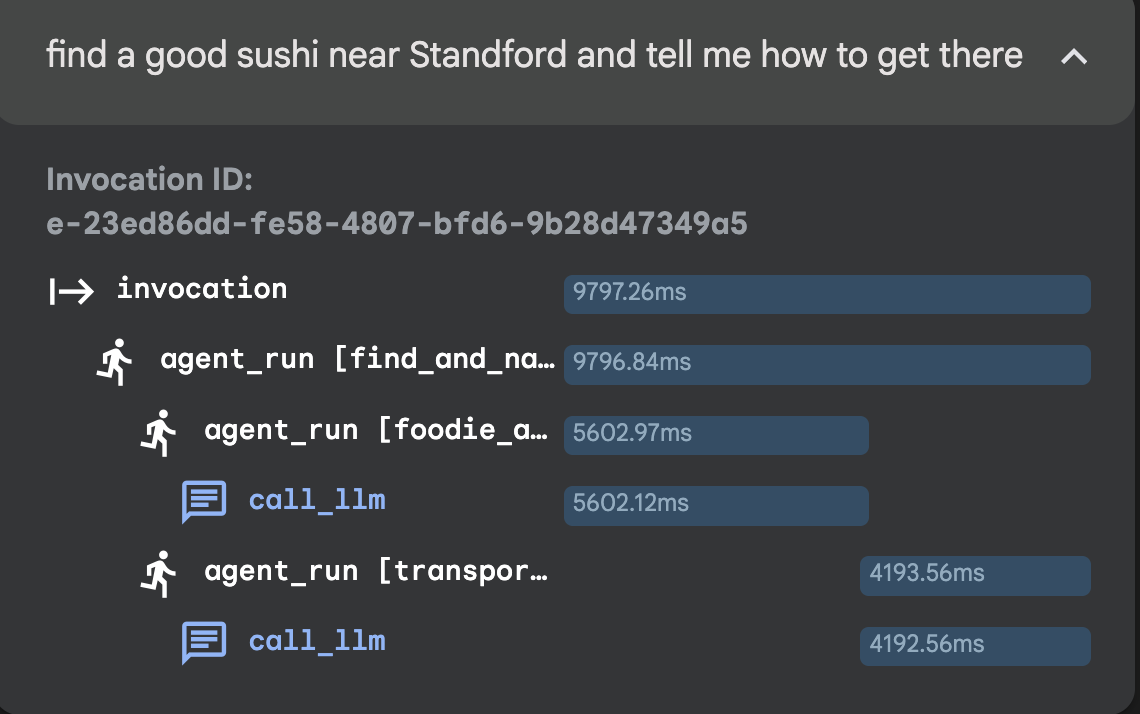
Loop Agent
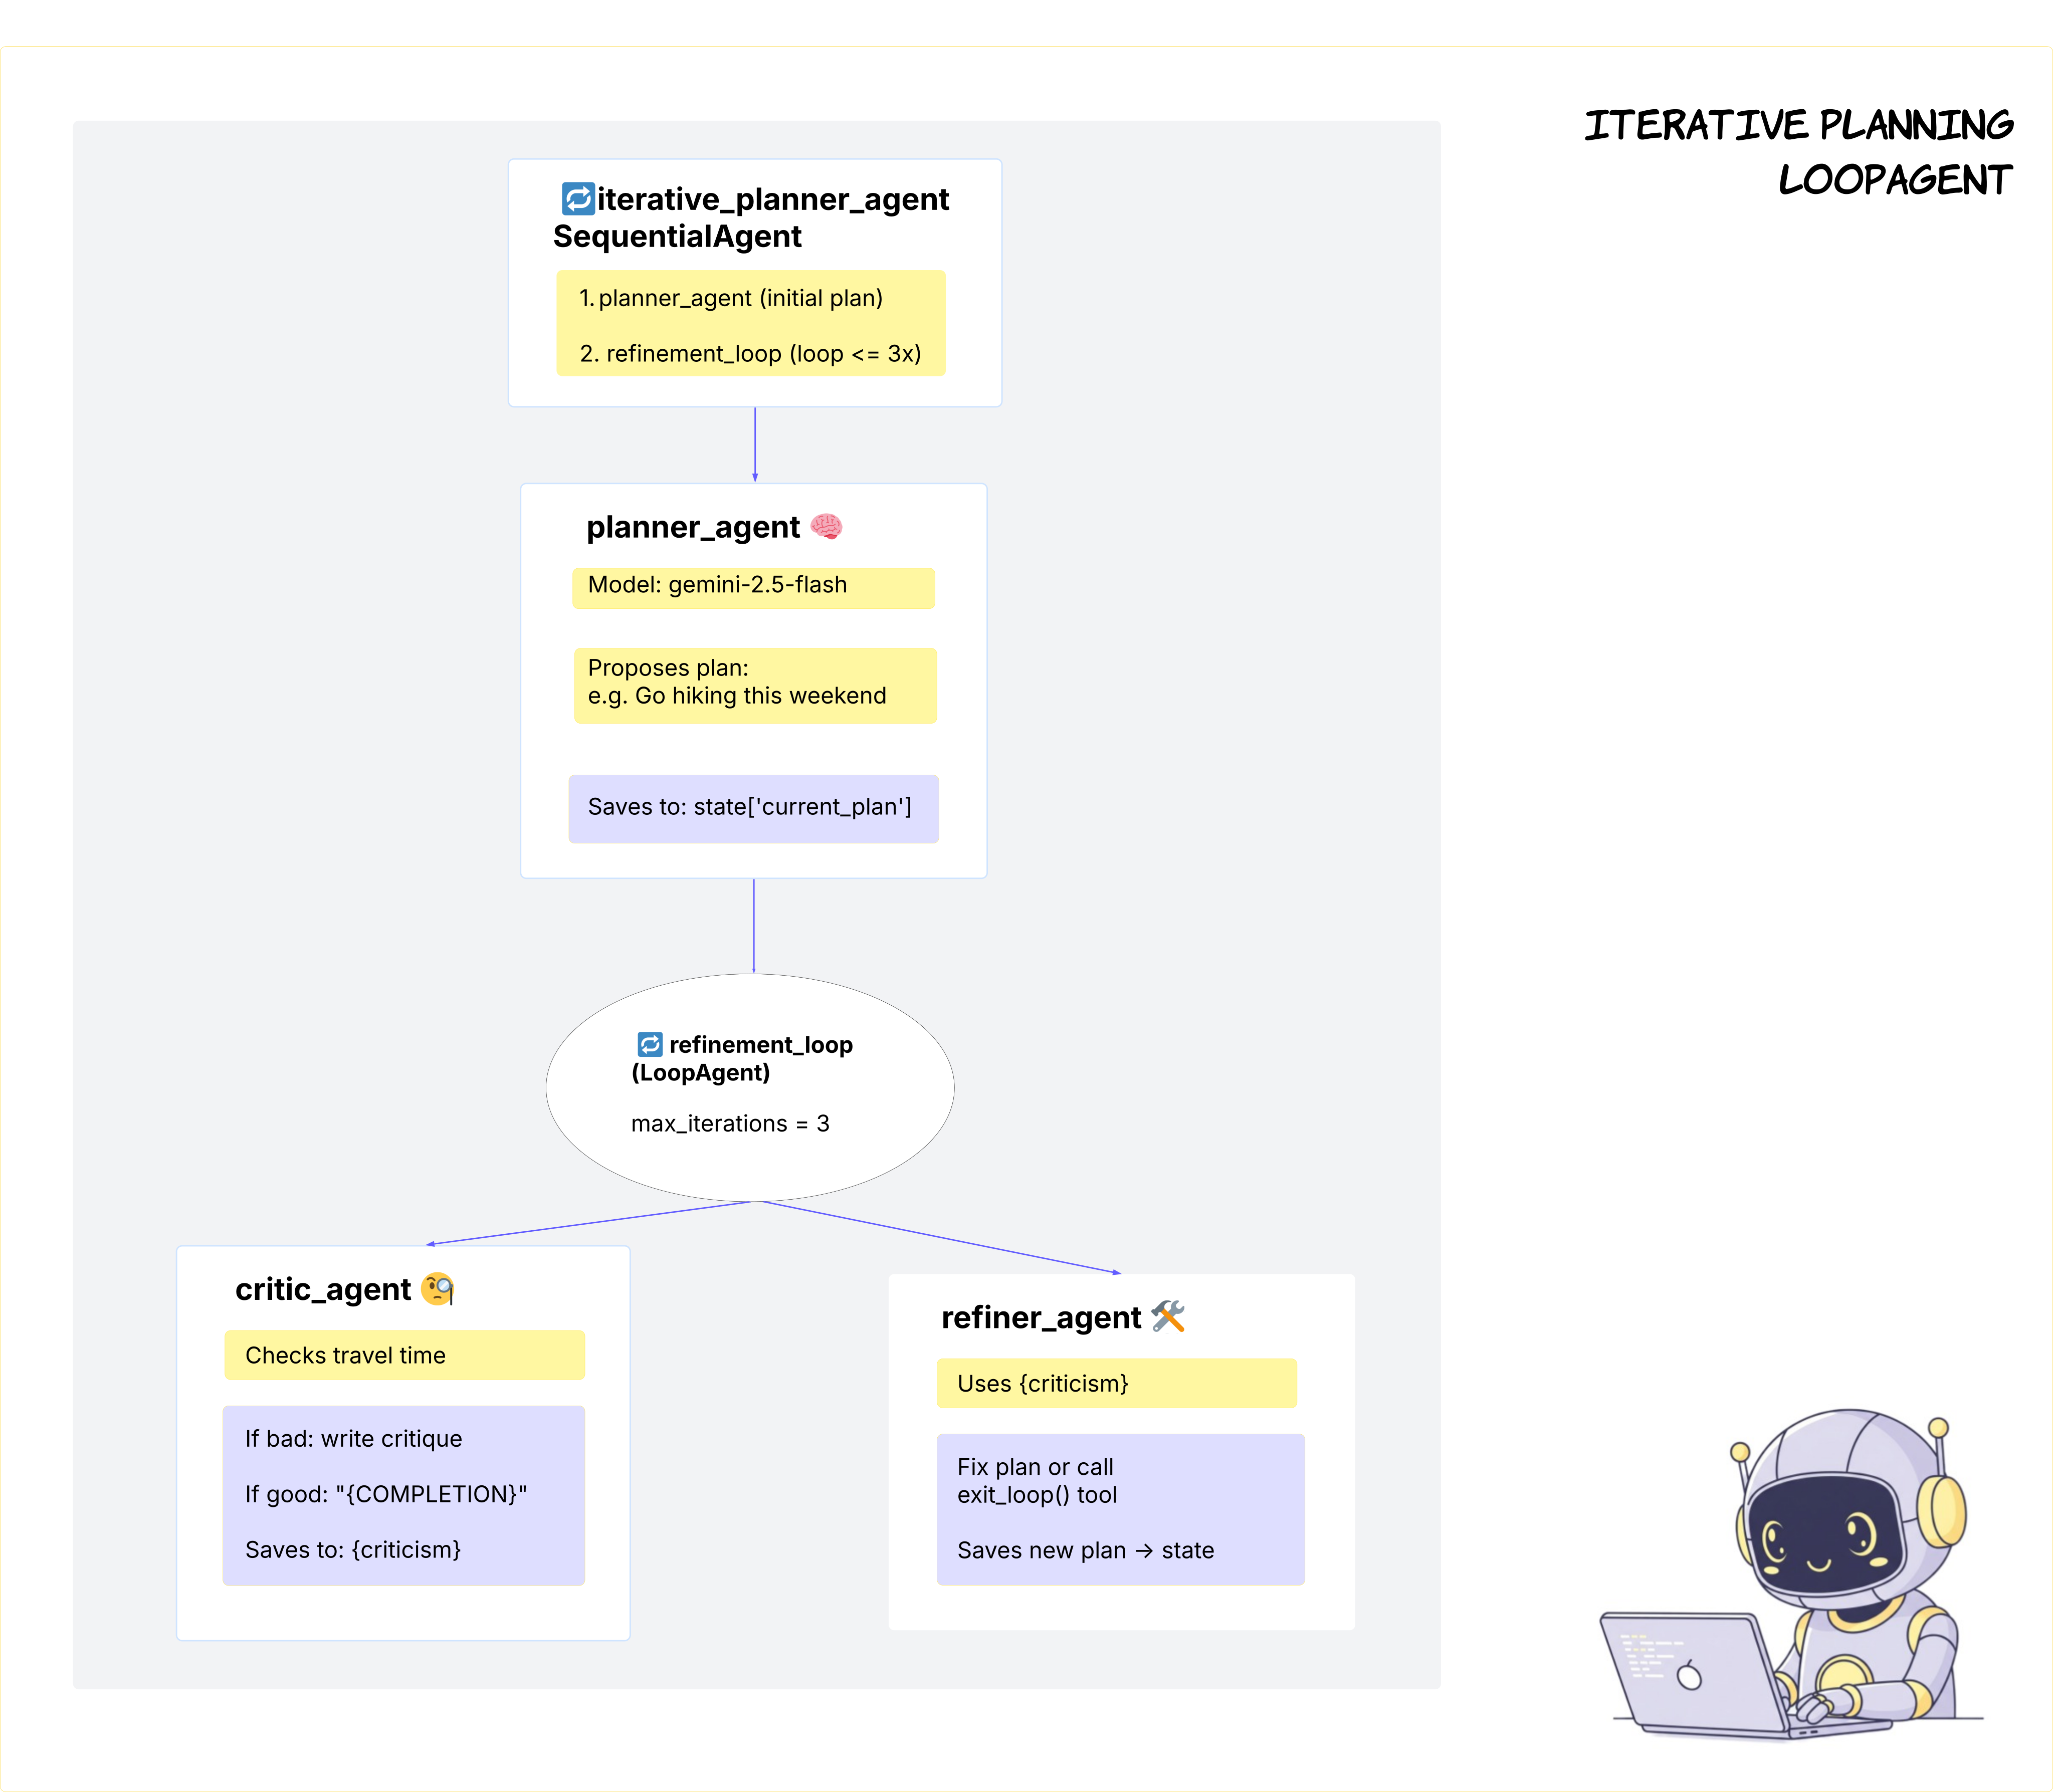
選擇迴圈工作流程代理程式:在 UI 頂端的下拉式選單中,選擇 b3_loop_agent。
👉 測試提示:
Plan a trip from Sunnyvale to San Francisco today.
選取 b3_loop_agent: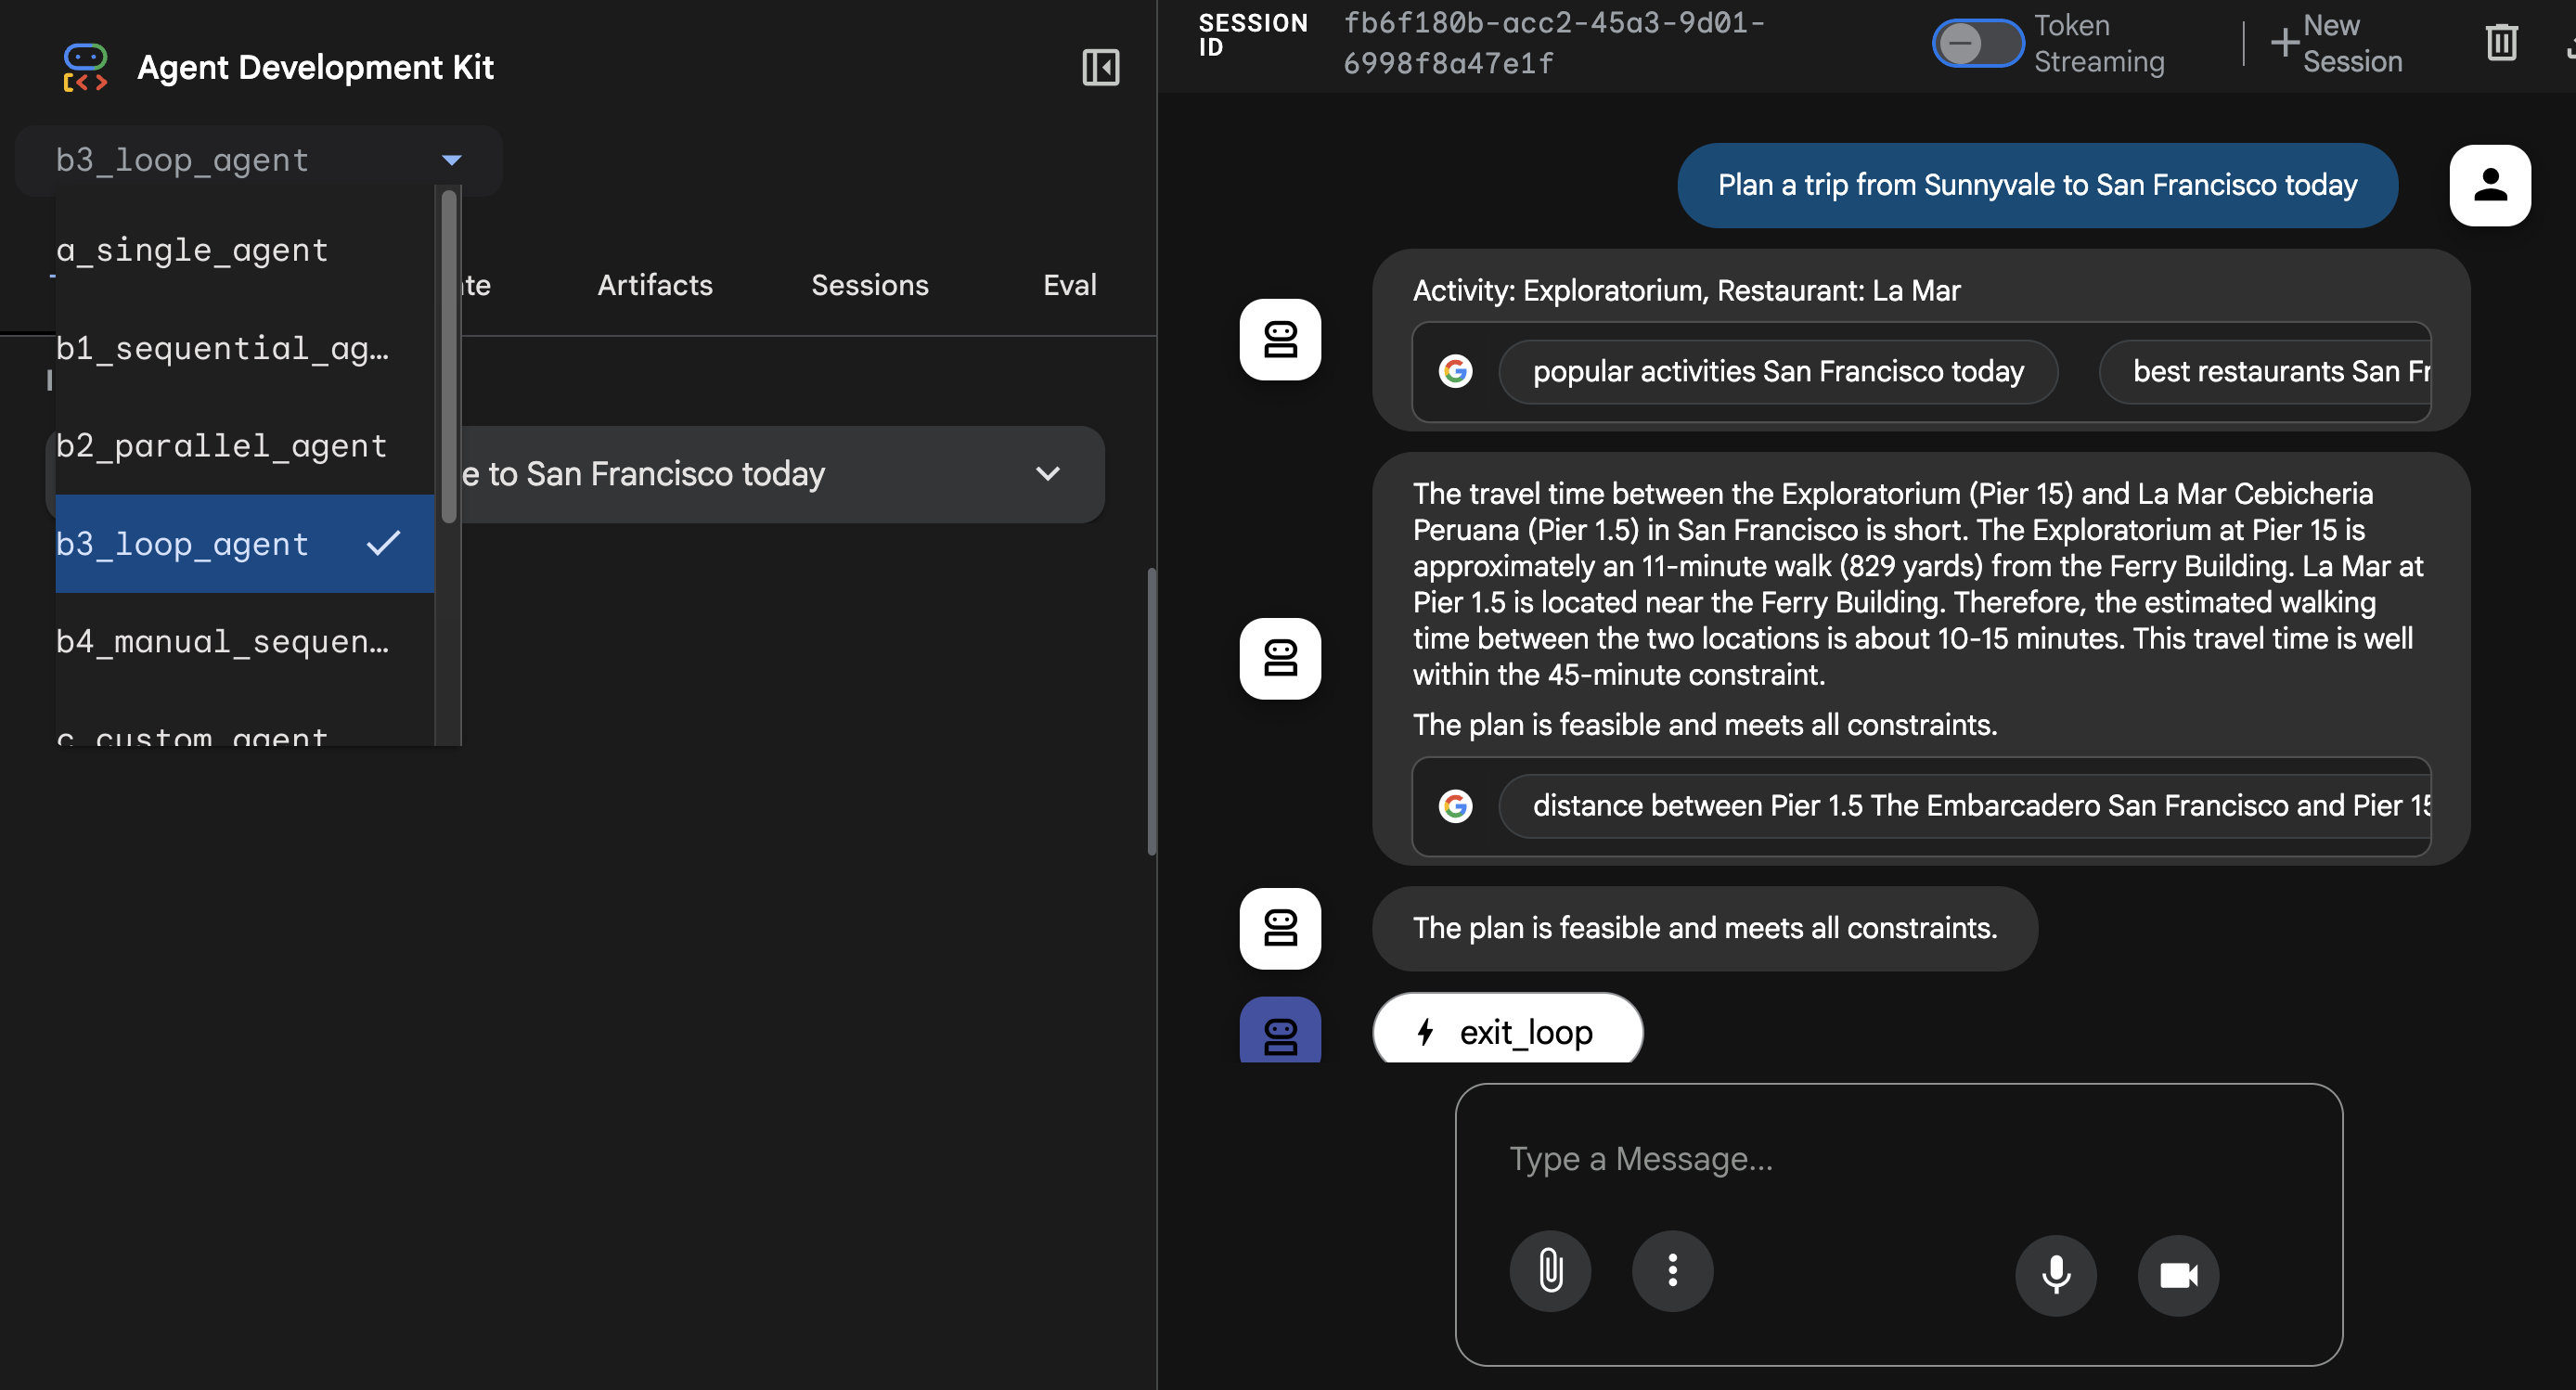
您可以在這裡查看追蹤記錄: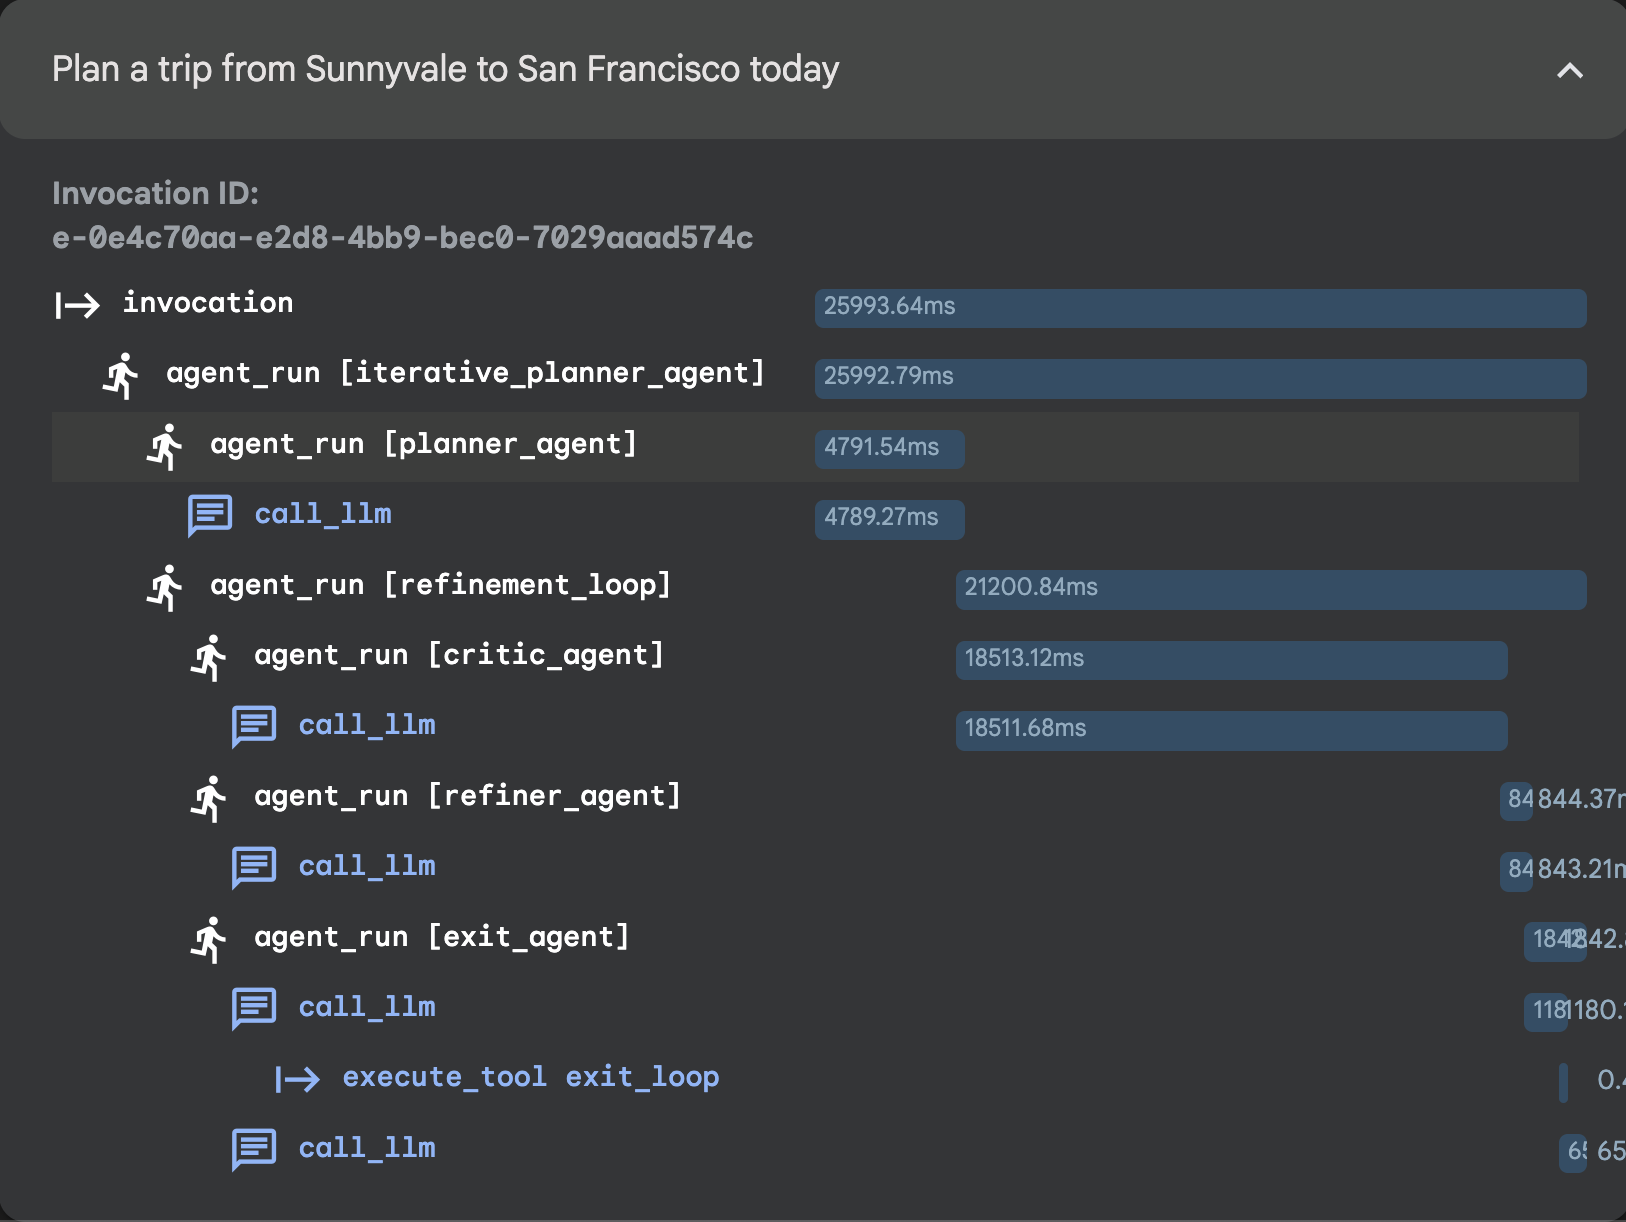
5. 工作階段 3:自訂代理
開啟 ADK 網頁介面後,從下拉式選單中選擇 c_custom_agent。
👉 測試提示:
Plan a trip from Sunnyvale to San Francisco this weekend, I love food and art. Make sure within budget of 100 dollars.
選取 c_custom_agent: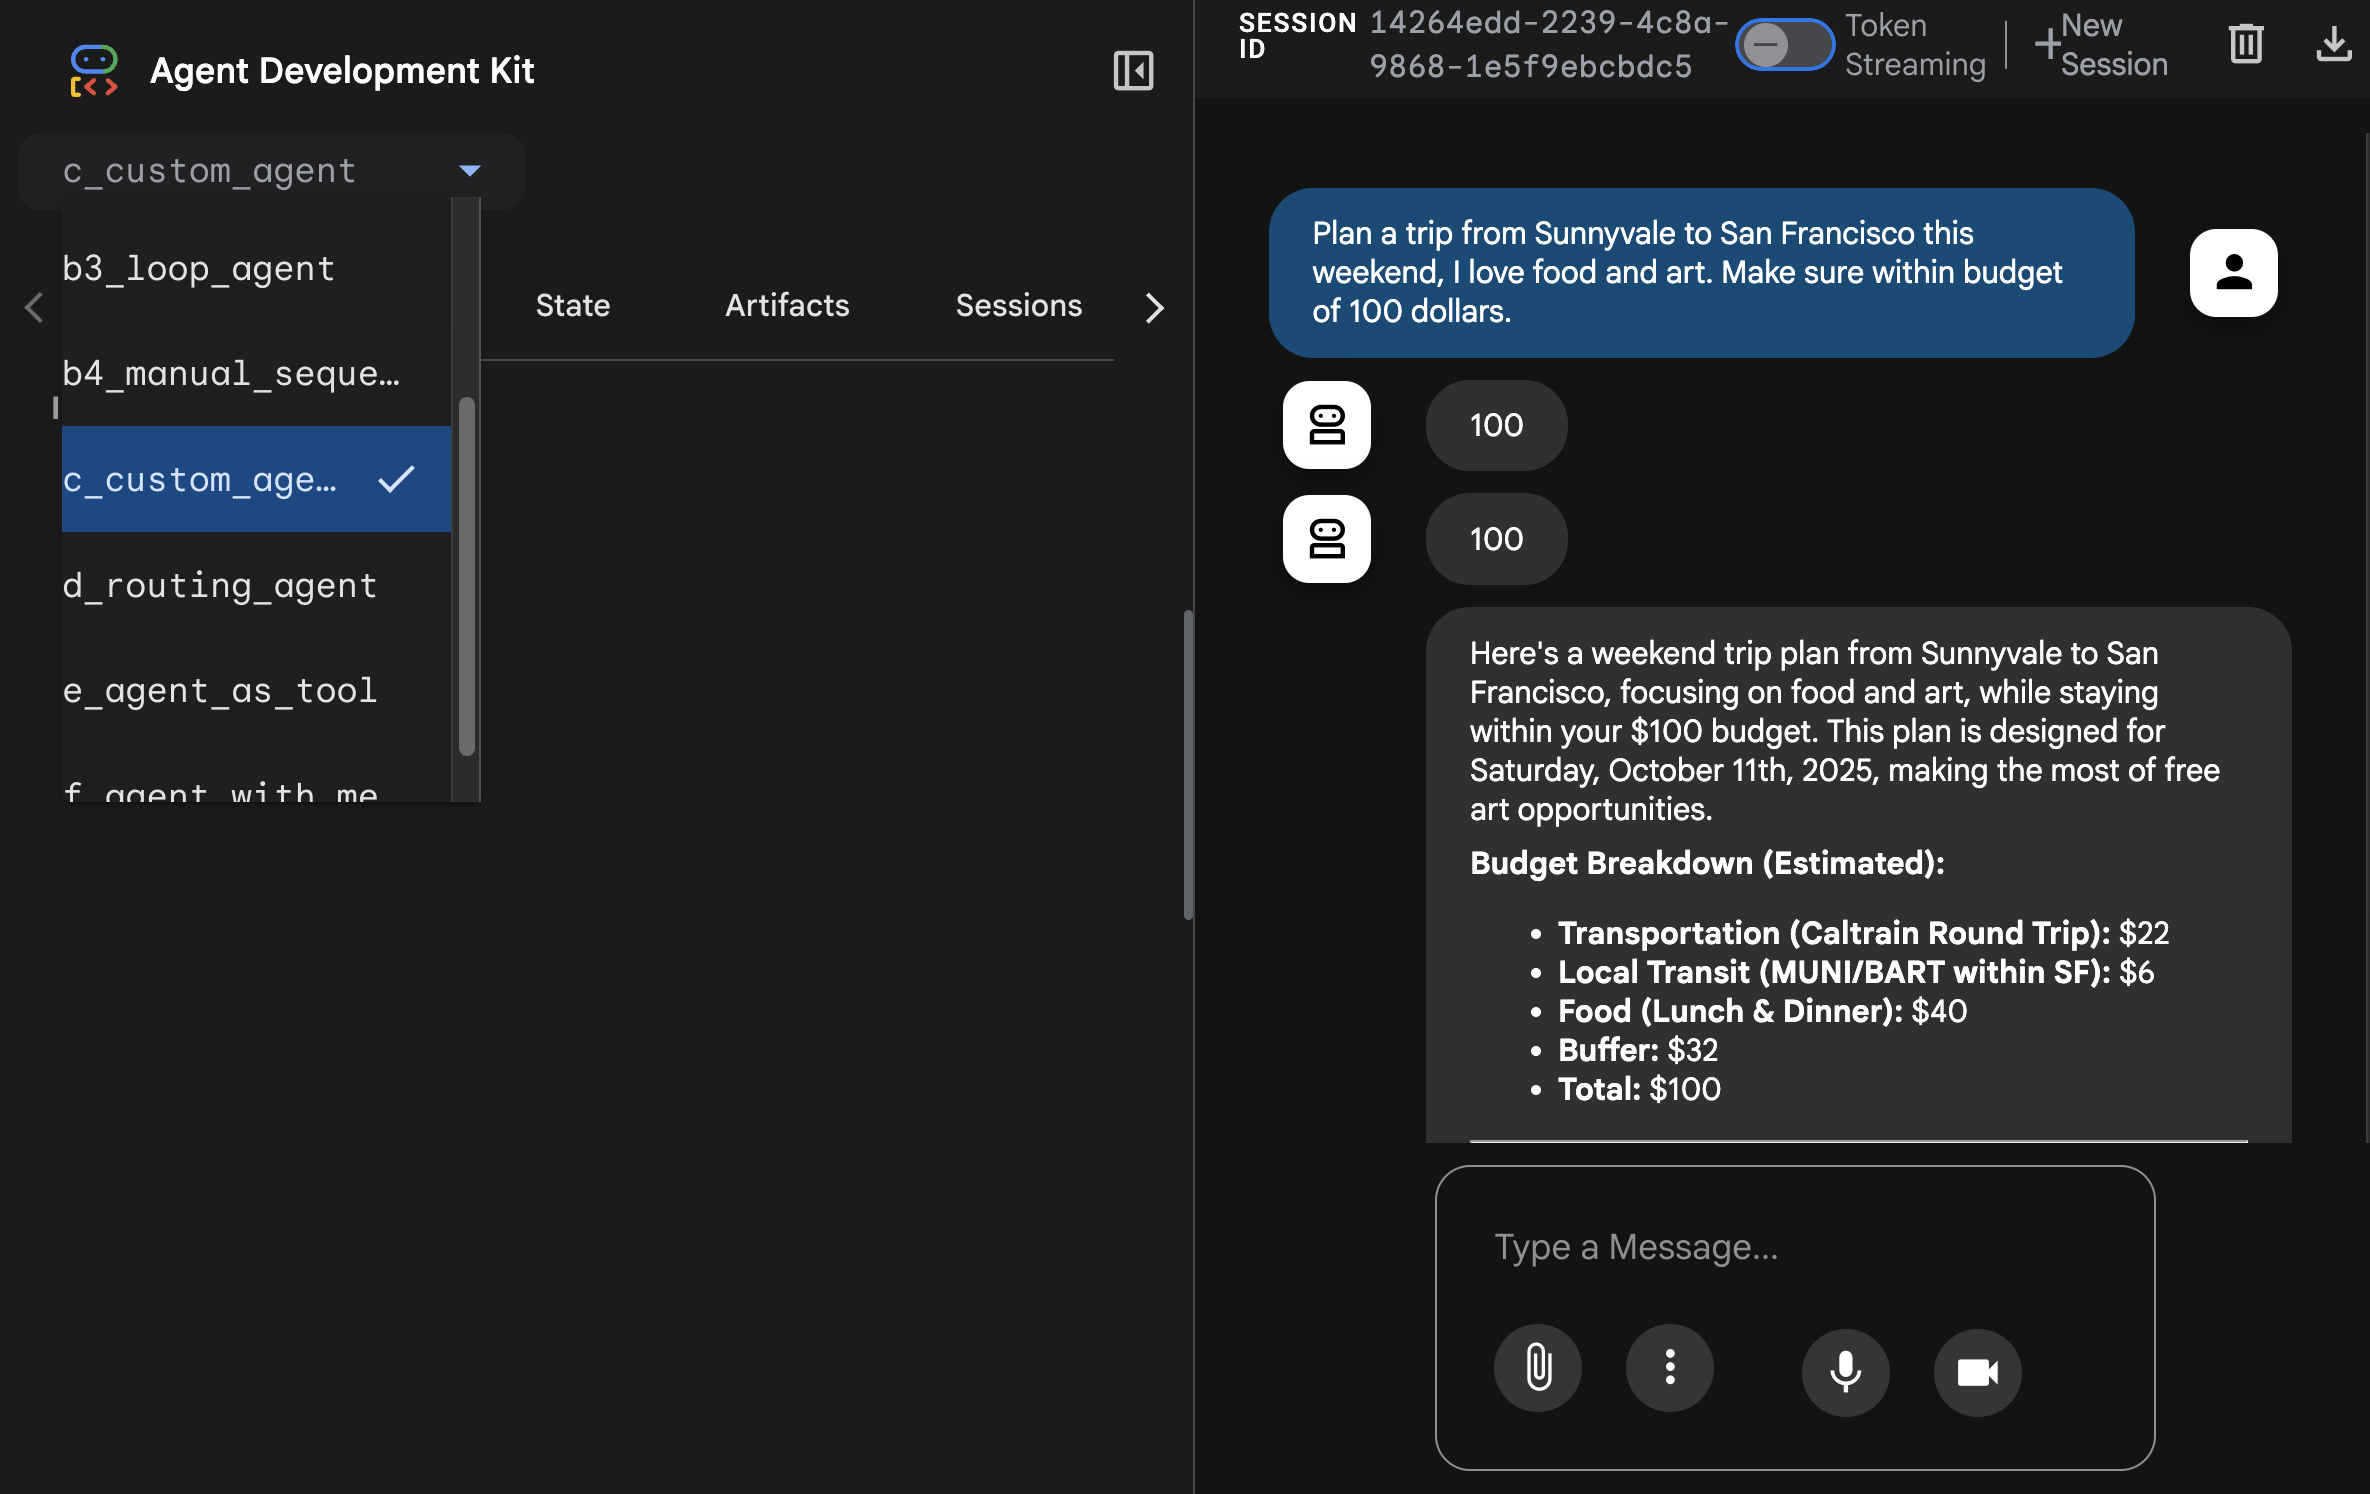
您可以在這裡查看追蹤記錄: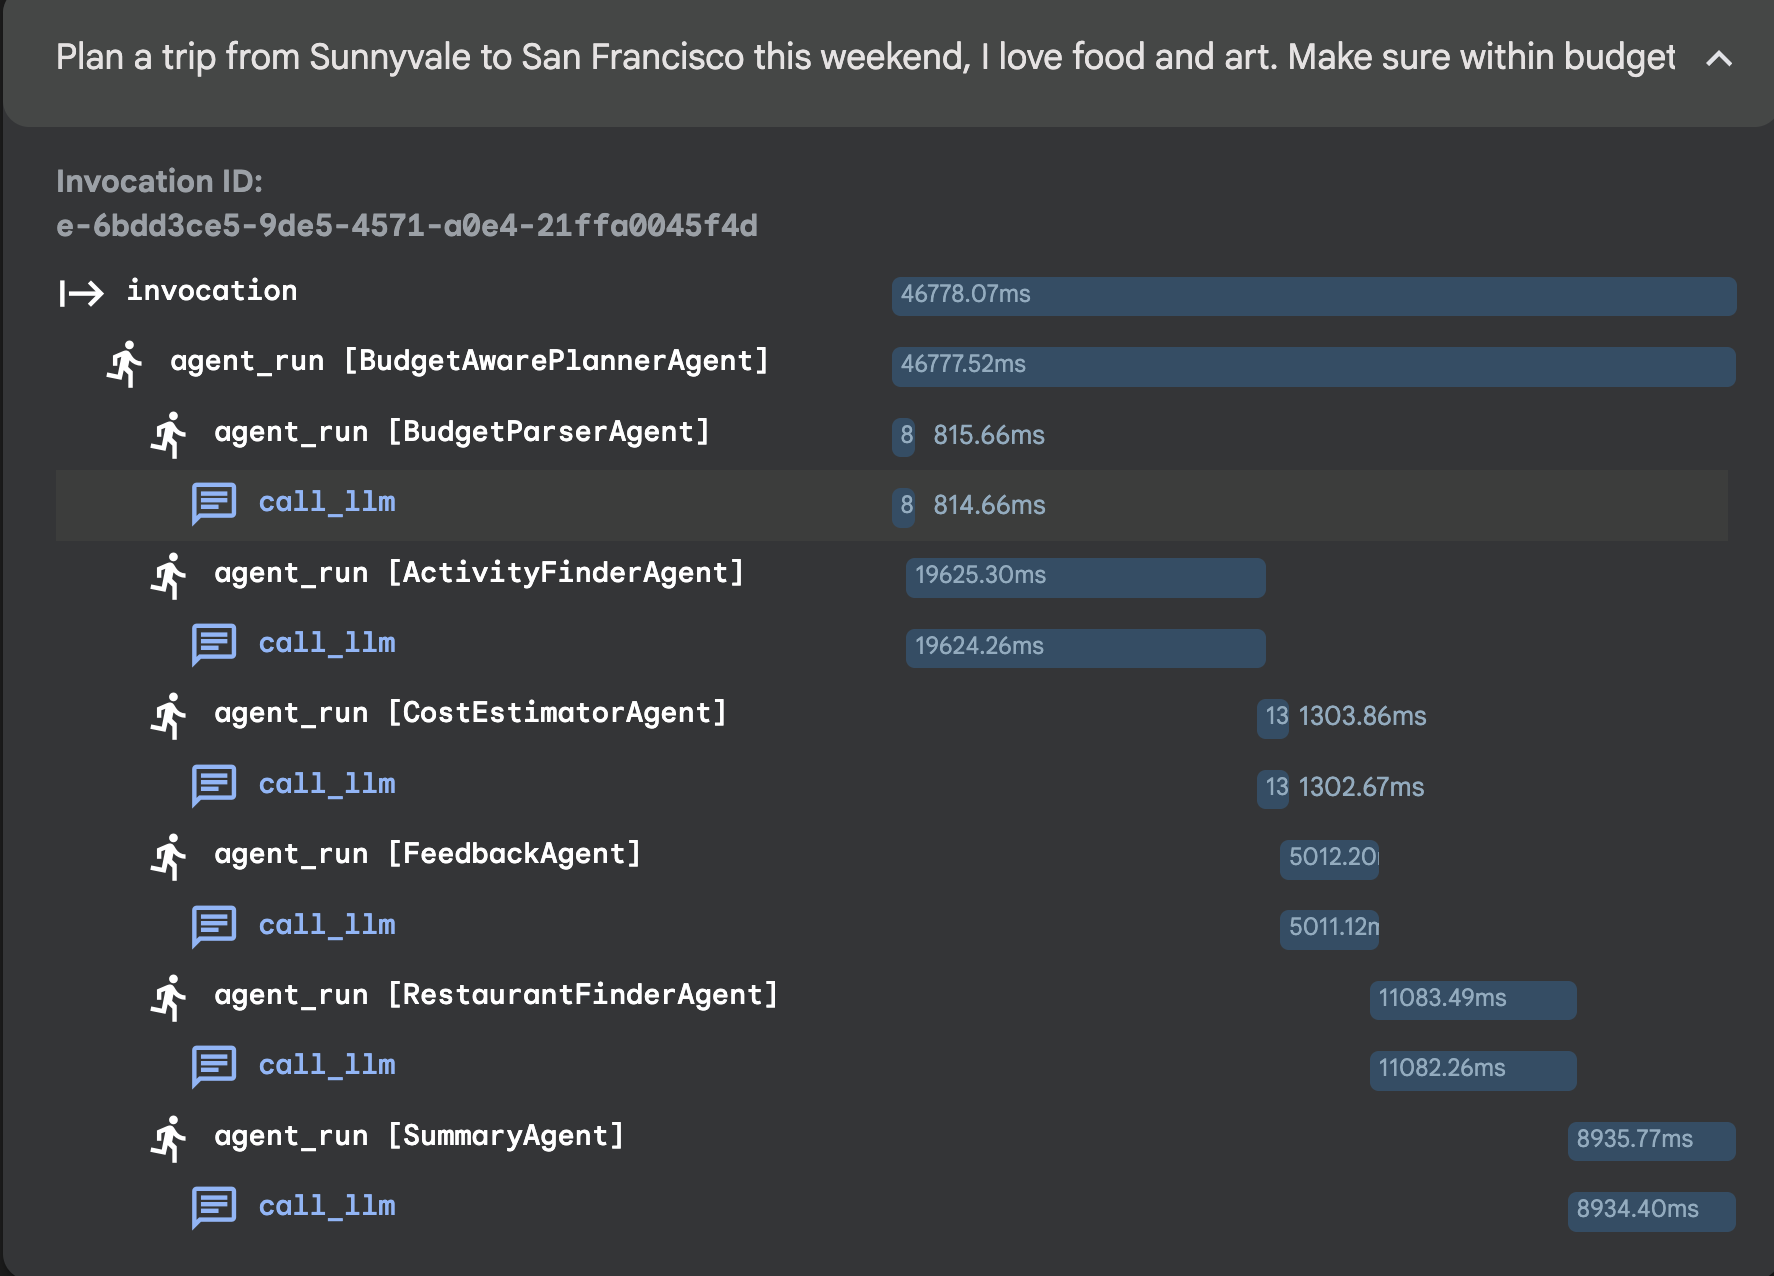
6. 工作階段 4:自動調度管理工具模式 - 轉接代理
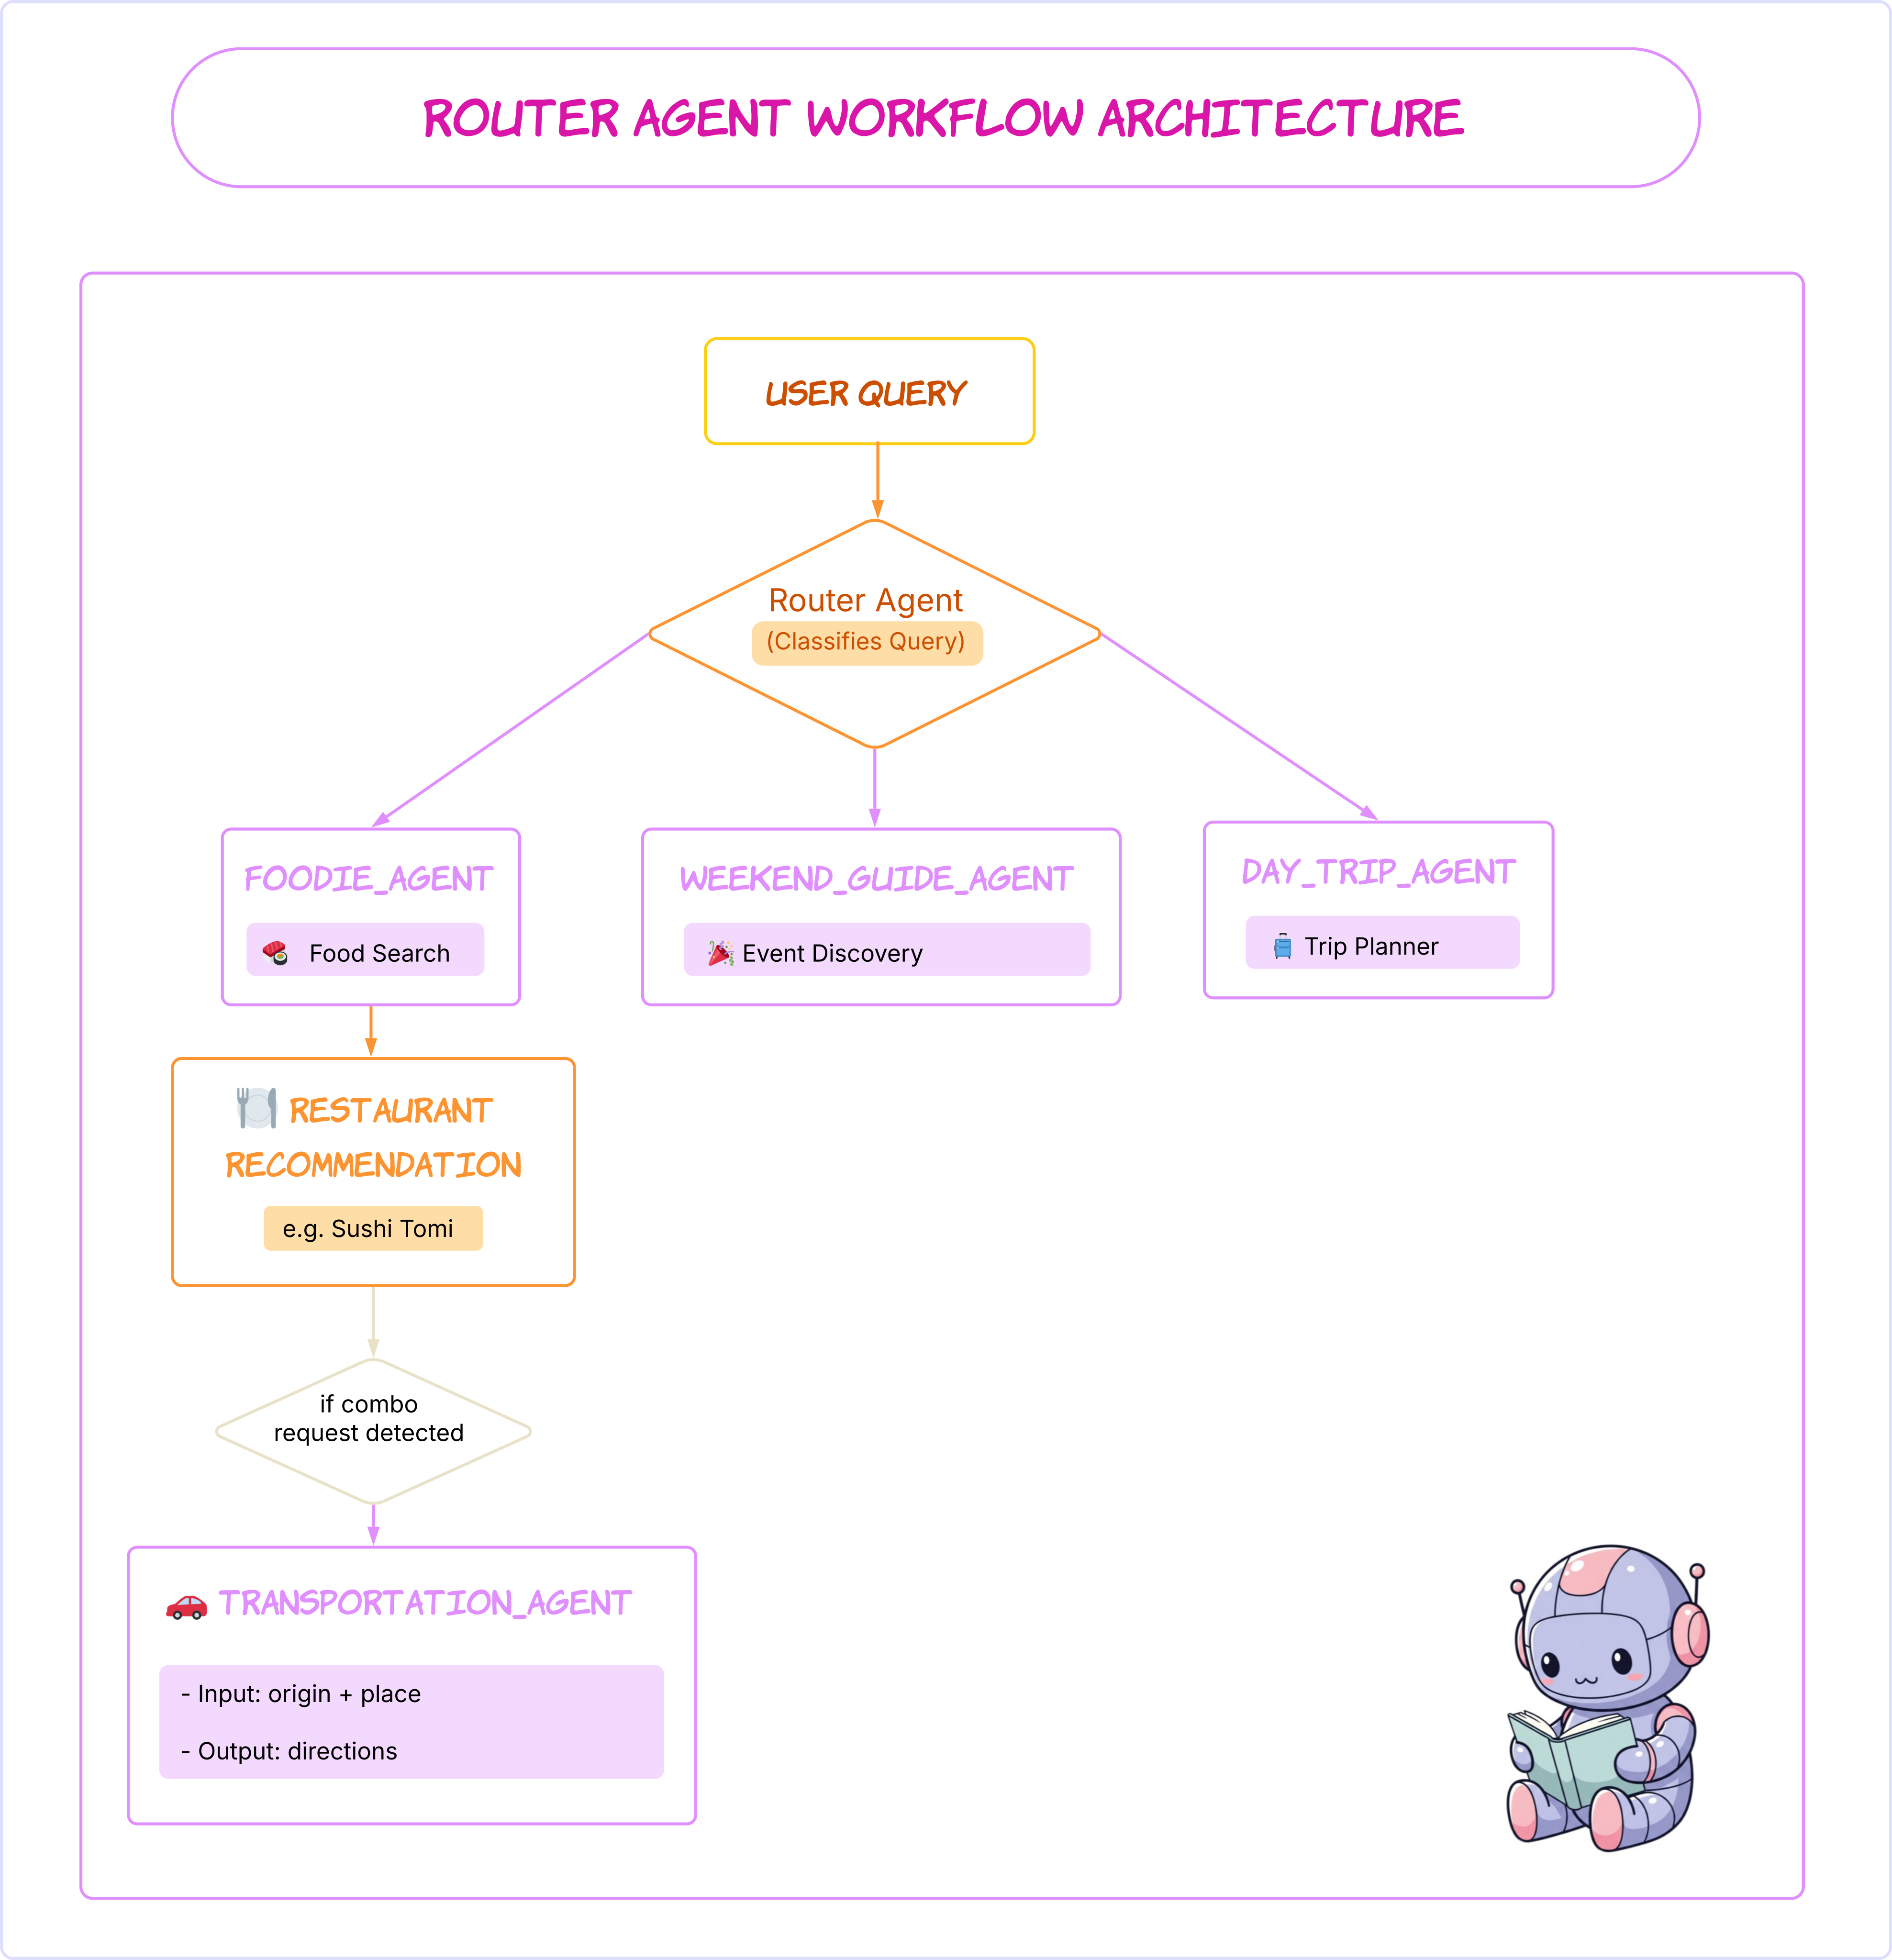
開啟 ADK 網頁介面後,從下拉式選單中選擇 d_routing_agent。
👉 測試提示:
Plan a trip from Sunnyvale to San Francisco this weekend, I love concert, restaurant and museum.
選取 d_routing_agent: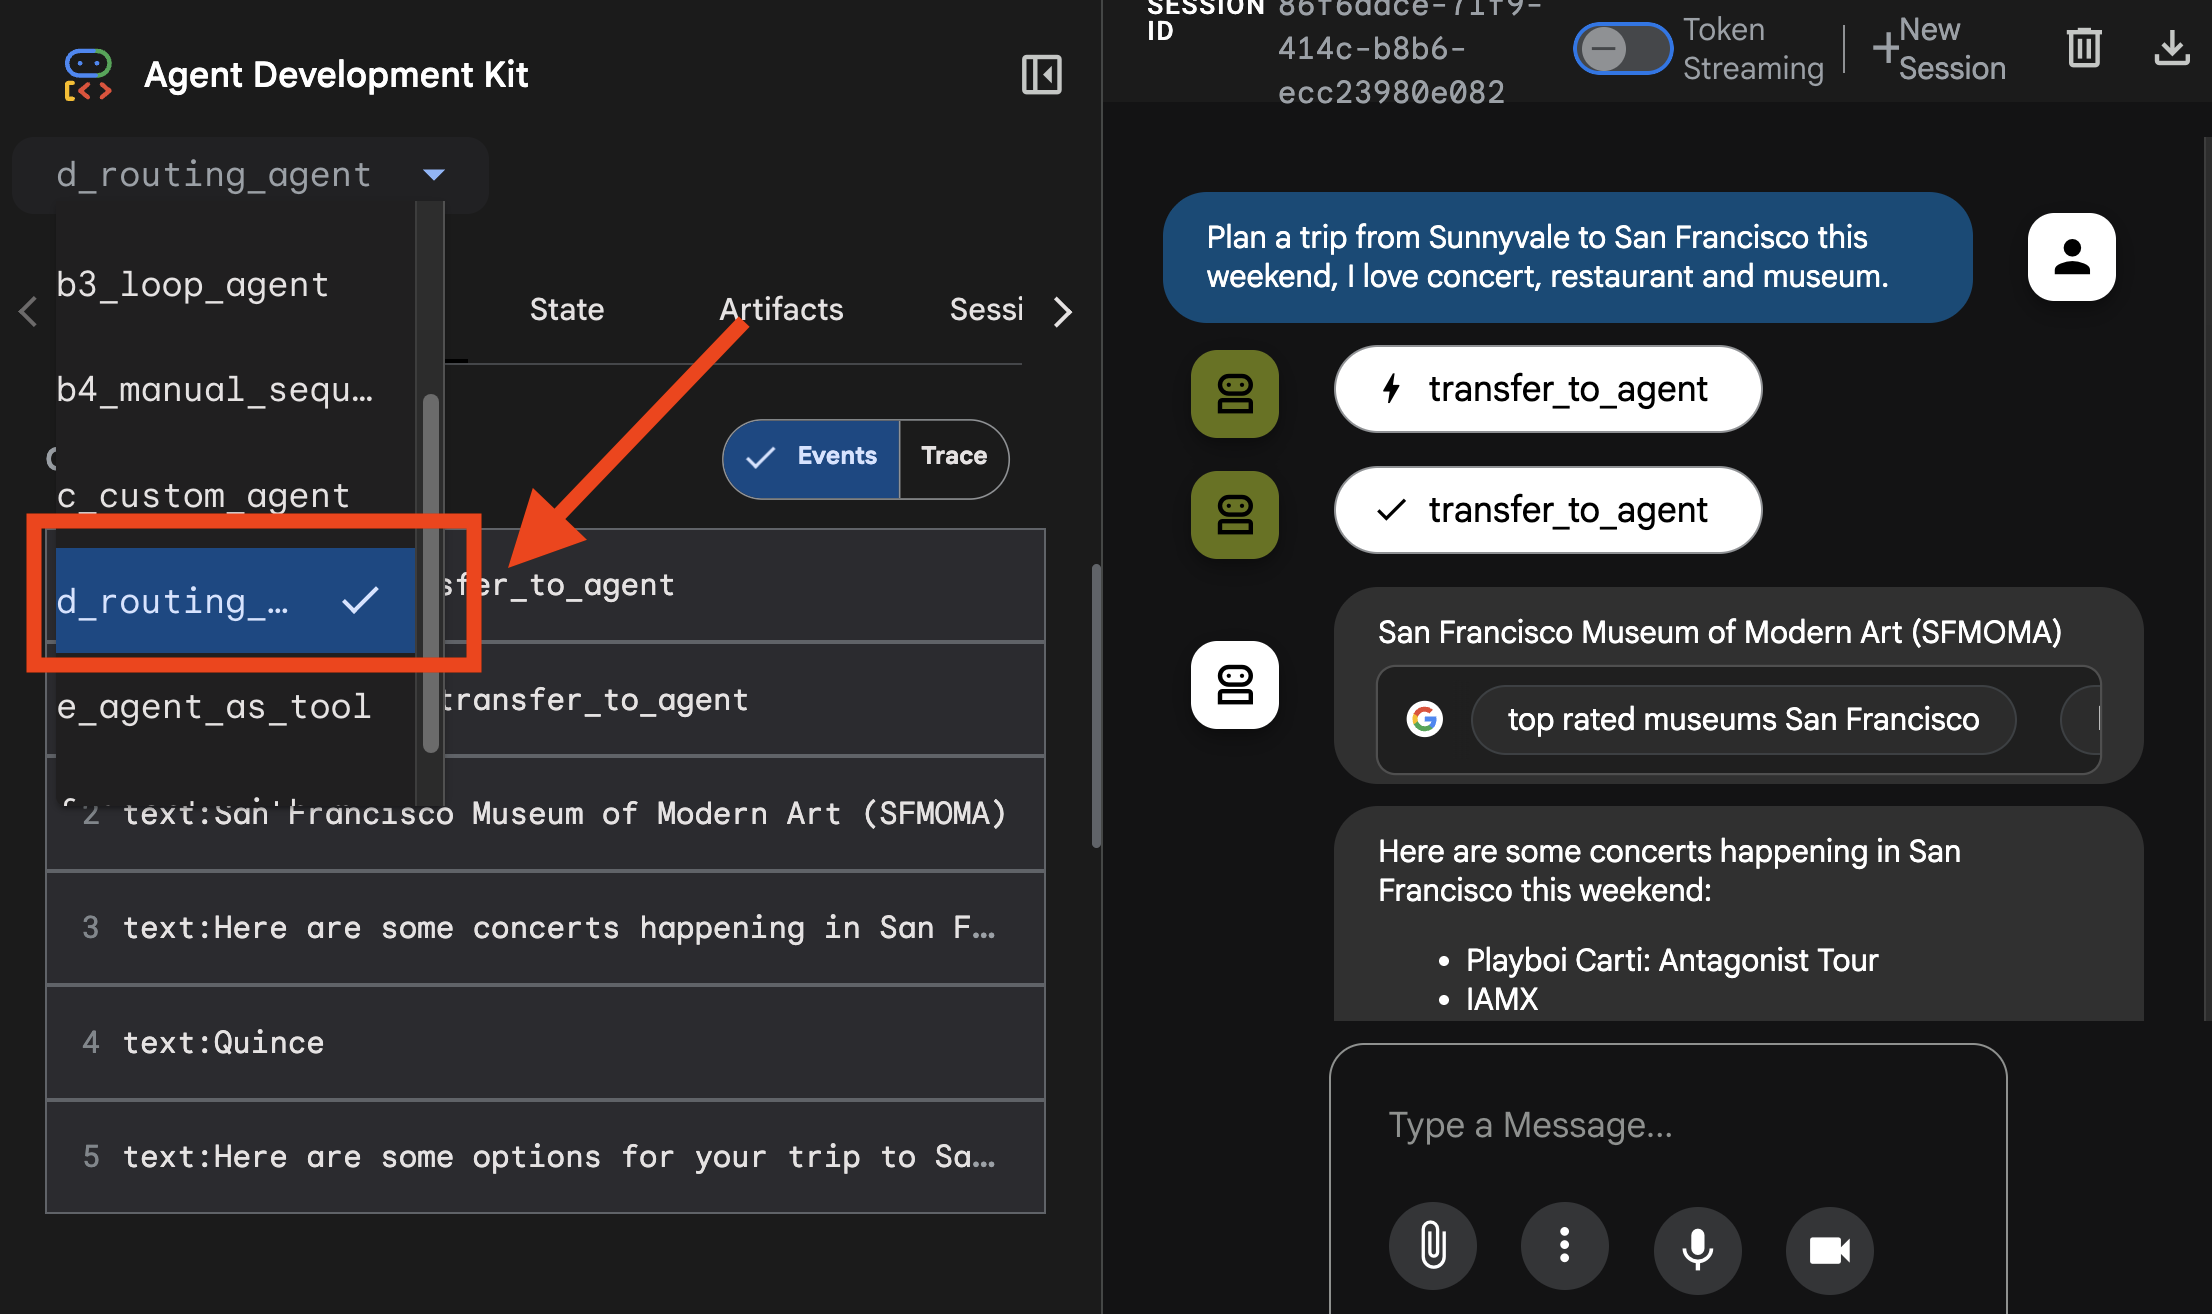
您可以在這裡查看追蹤記錄: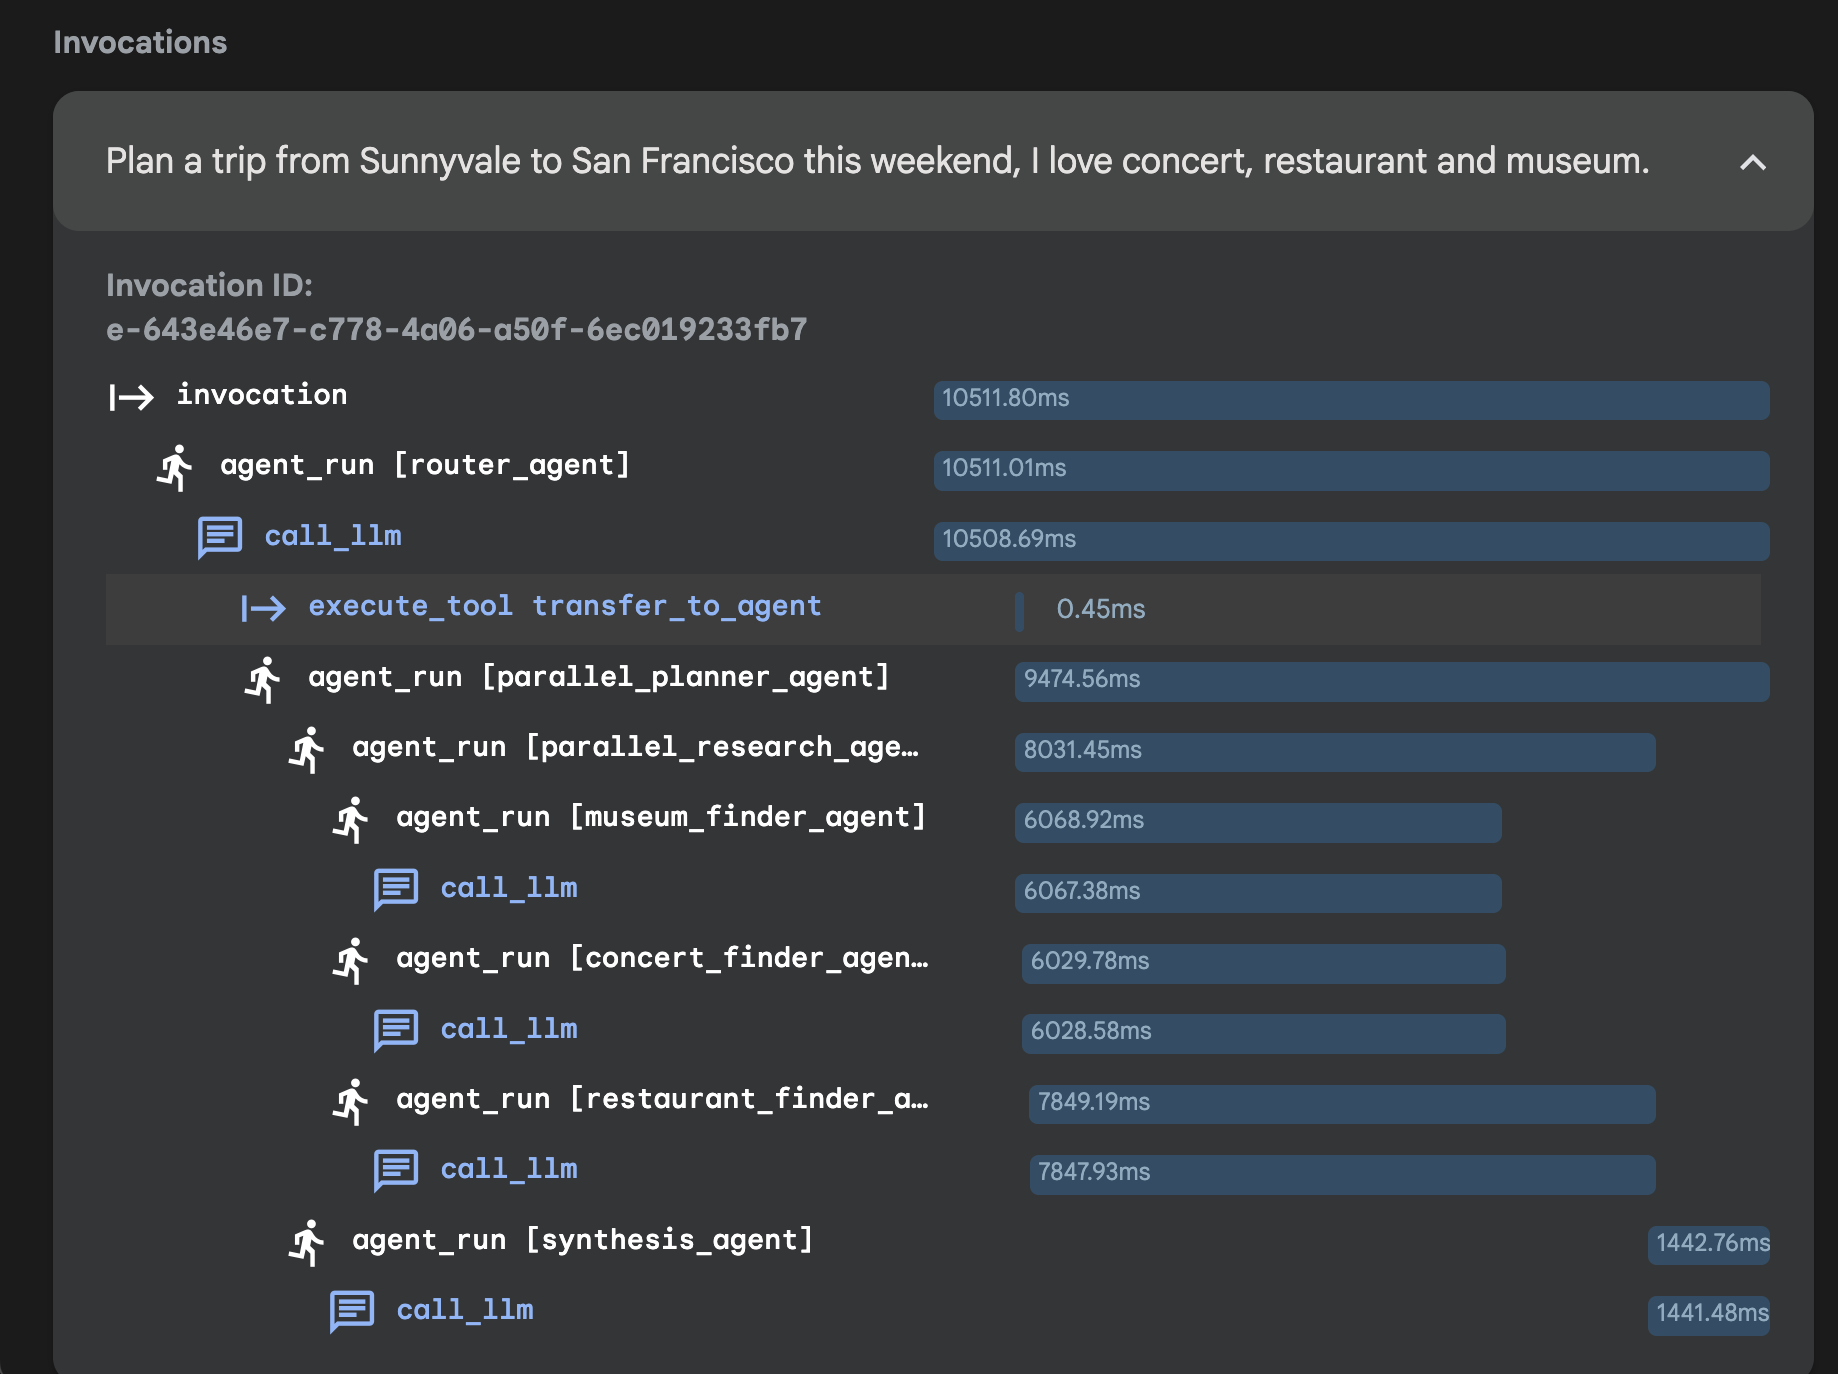
7. 議程 5:代理即工具
開啟 ADK 網頁介面後,從下拉式選單中選擇 e_agent_as_tool。
👉 測試提示:
Plan a trip from Sunnyvale to San Francisco this weekend, I love concert, restaurant and museum.
選取 e_agent_as_tool: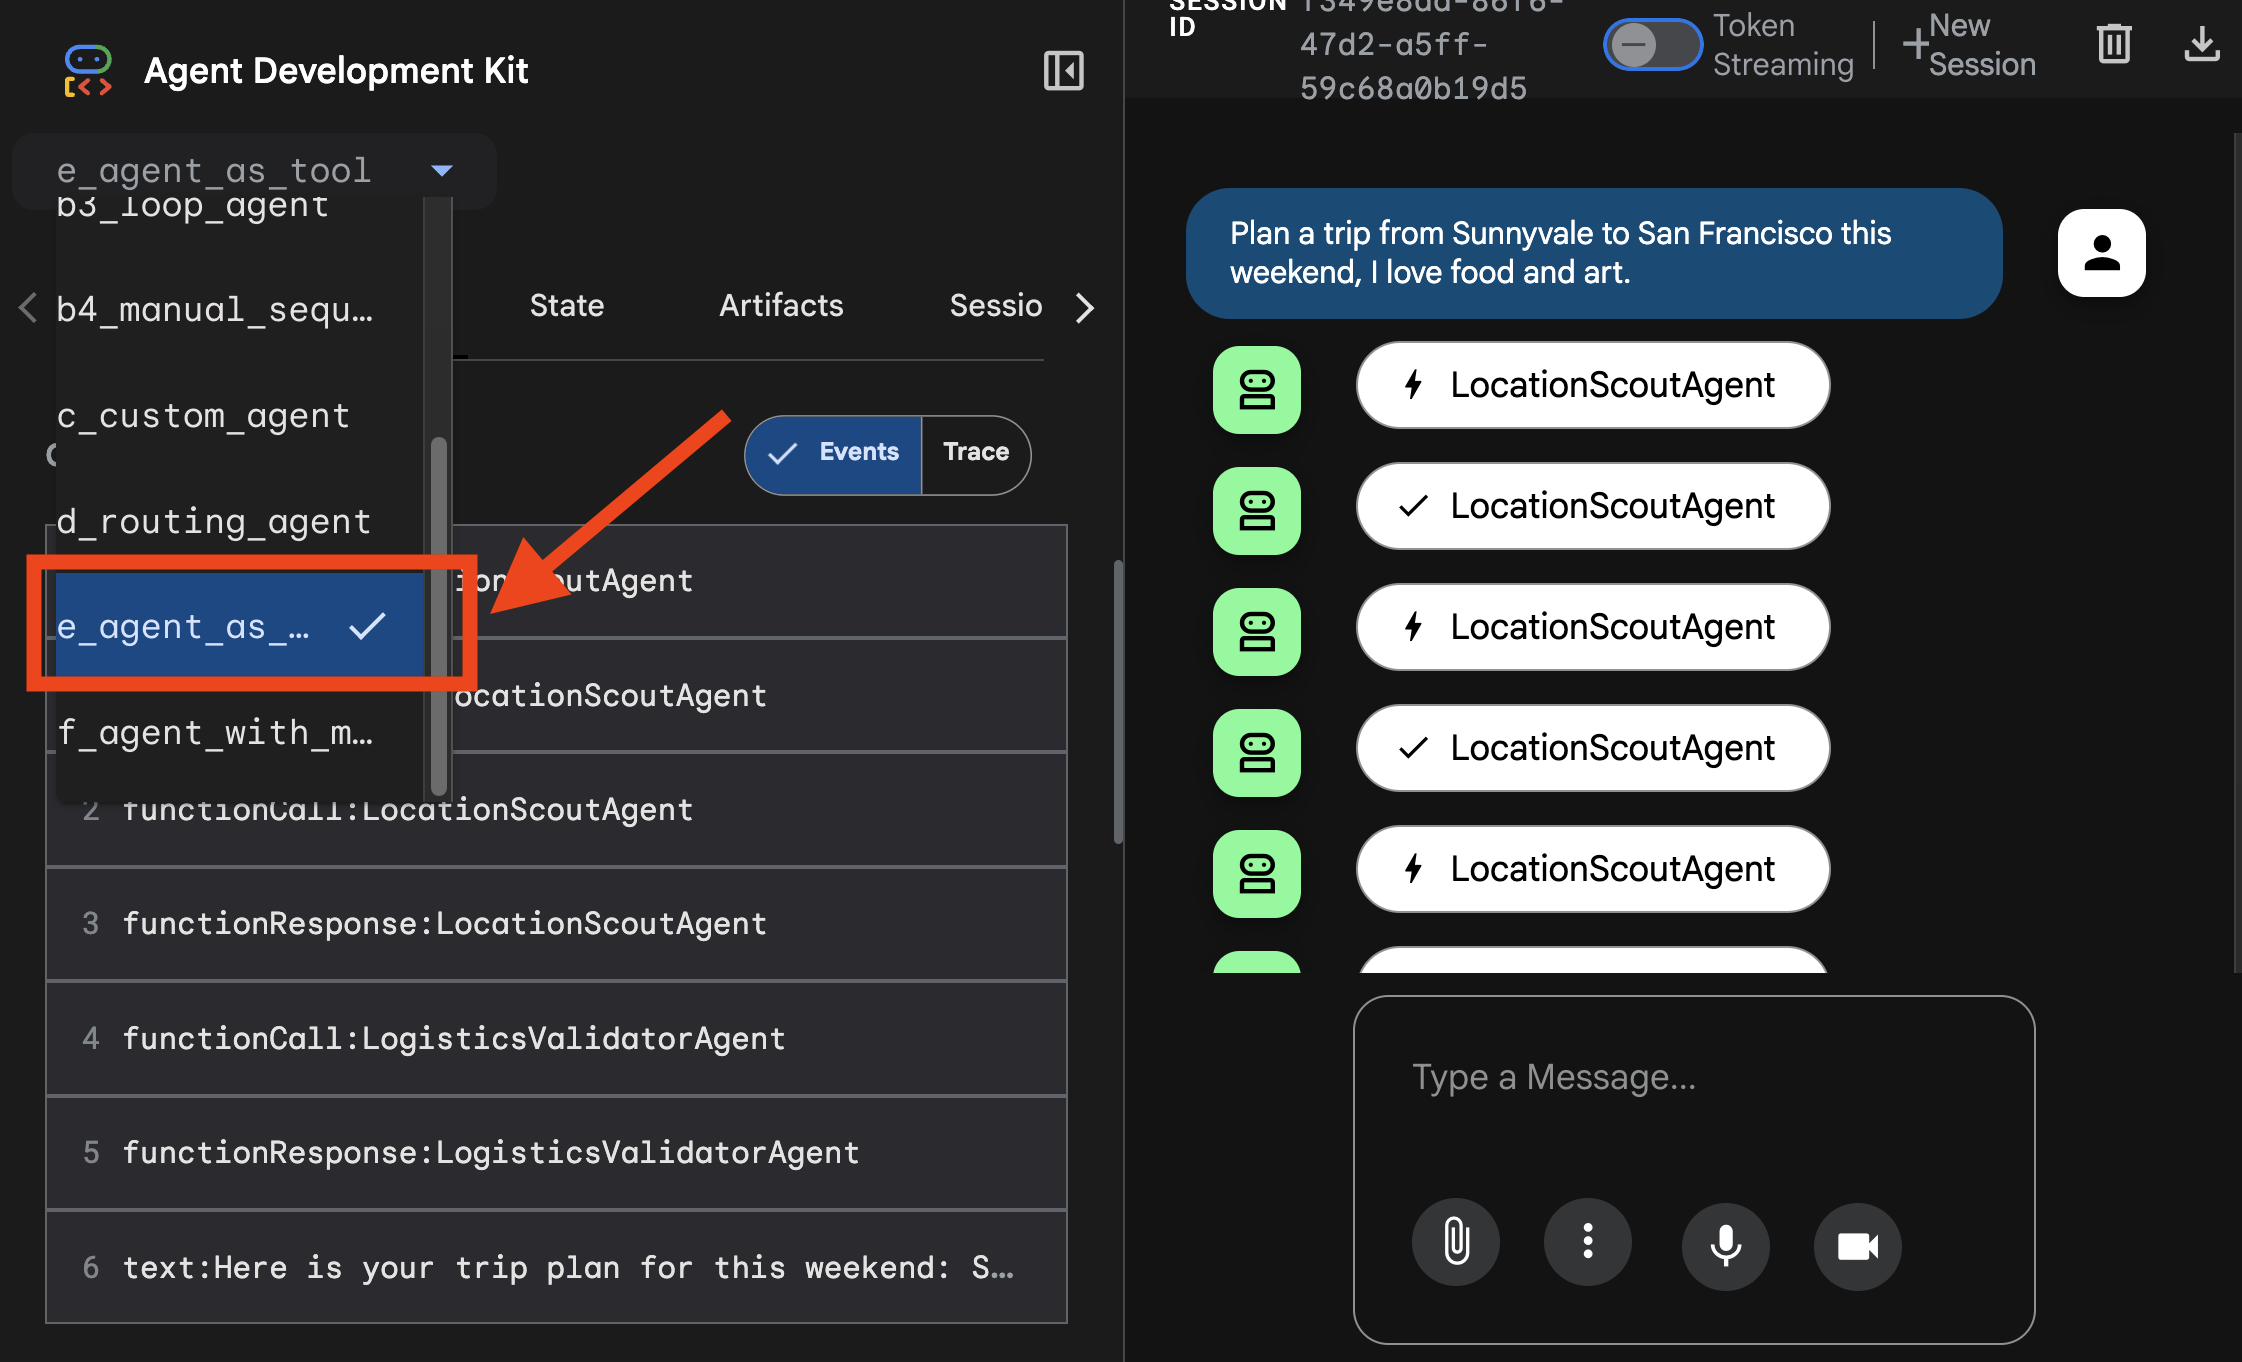
您可以在這裡查看追蹤記錄: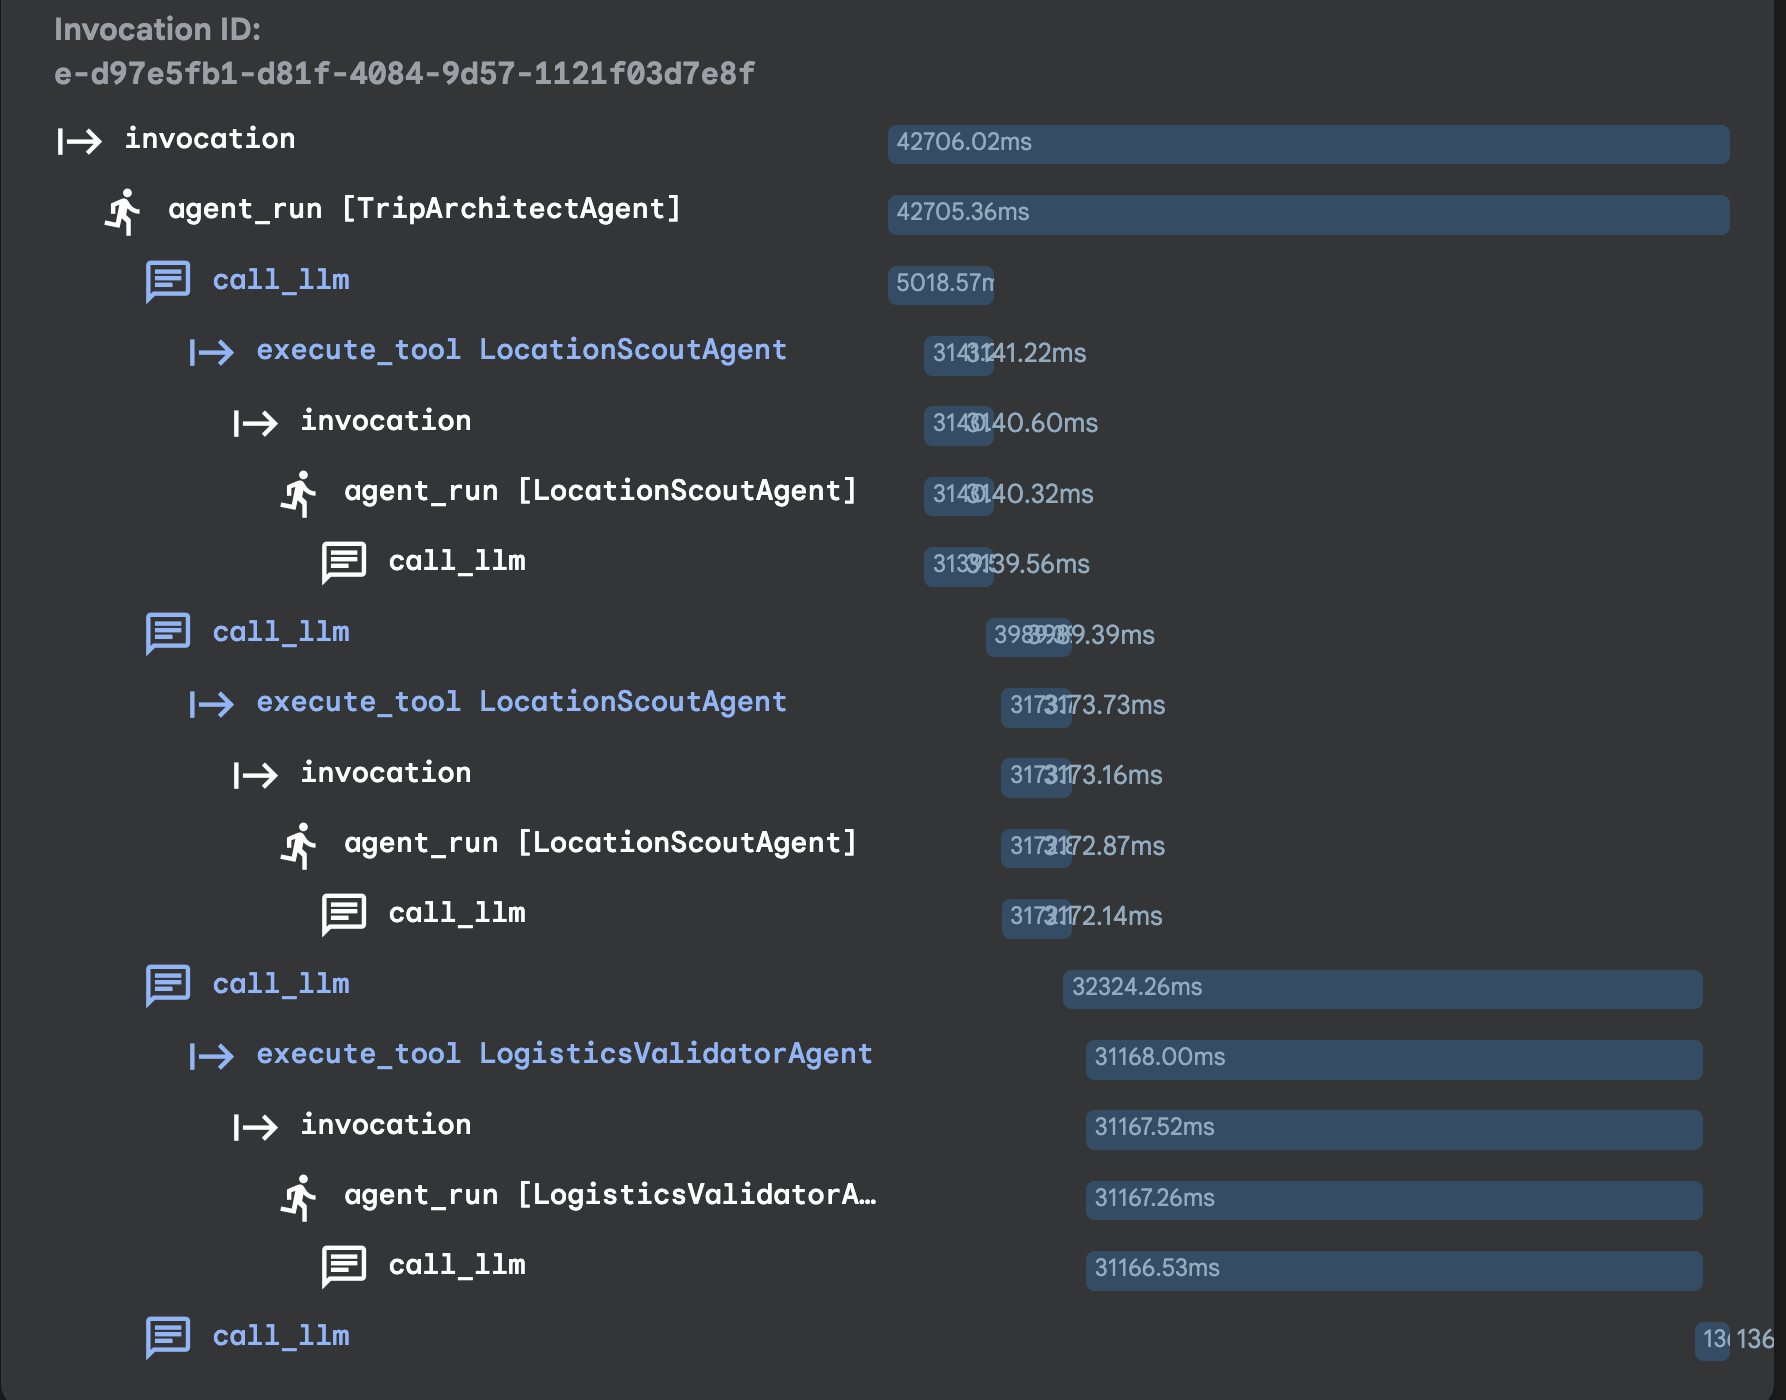
8. 第 6 堂:具備長期記憶的代理程式
👉💻 前往資料夾並使用執行器啟動代理,測試長期記憶體:
cd ~/adk_tutorial
source .adk_env/bin/activate
cd ~/adk_tutorial/f_agent_with_memory
python main.py
👉 測試提示:
I like Art and Italian food.
然後按下 Ctrl+C 結束工作階段。重新啟動工作階段:
cd ~/adk_tutorial
source .adk_env/bin/activate
cd ~/adk_tutorial/f_agent_with_memory
python main.py
👉 測試提示:
Plan a trip to San Francisco based on my preference.
9. 第 7 堂:使用 MCP 擴充代理功能
步驟 1:準備本機資料庫
👉💻 從存放區根目錄建立範例資料庫:
cd ~/adk_tutorial
source .adk_env/bin/activate
chmod +x setup_trip_database.py
./setup_trip_database.py
這項操作會在 ~/adk_tutorial/ 中建立 destinations.db。
步驟 2:安裝及執行 MCP Toolbox 伺服器
👉💻 下載作業系統適用的 MCP Toolbox 二進位檔:
cd ~/adk_tutorial/mcp_tool_box
export VERSION=0.16.0

# Choose the line that matches your machine:
export OS=linux/amd64      # Cloud Shell or Linux (x86_64)
# export OS=darwin/arm64   # macOS Apple Silicon (M1/M2/M3)
# export OS=darwin/amd64   # macOS Intel

curl -O https://storage.googleapis.com/genai-toolbox/v$VERSION/$OS/toolbox
下載完成後,執行
chmod +x toolbox
步驟 3
在一個終端機中執行下列指令 (讓指令持續執行,代理程式會在 http://127.0.0.1:7001 連線至該指令):
cd ~/adk_tutorial
source .adk_env/bin/activate
cd ~/adk_tutorial/mcp_tool_box
./toolbox --tools-file "trip_tools.yaml" --port 7001
在另一個終端機中執行下列指令
cd ~/adk_tutorial
source .adk_env/bin/activate
cd ~/adk_tutorial/g_agents_mcp
python main.py
👉 測試提示 (使用範例資料庫中的城市,例如巴黎、羅馬、紐約或東京):
What are the top-rated things to do in Tokyo?
Show me the museums in Rome.
What can I do in New York for under 25 dollars?