1. Introduction
A Private Service Connect interface is a resource that lets a producer Virtual Private Cloud (VPC) network initiate connections to various destinations in a consumer VPC network. Producer and consumer networks can be in different projects and organizations.
If a network attachment accepts a connection from a Private Service Connect interface, Google Cloud allocates the interface an IP address from a consumer subnet that's specified by the network attachment. The consumer and producer networks are connected and can communicate by using internal IP addresses.
A connection between a network attachment and a Private Service Connect interface is similar to the connection between a Private Service Connect endpoint and a service attachment, but it has two key differences:
- A network attachment lets a producer network initiate connections to a consumer network (managed service egress), while an endpoint lets a consumer network initiate connections to a producer network (managed service ingress).
- A Private Service Connect interface connection is transitive. This means that a producer network can communicate with other networks that are connected to the consumer network.
Vertex AI PSC-Interface reachability considerations
- PSC-Interface is capable of routing traffic to VPC or on-premesis based destinations within the RFC1918 address block.
- PSC-Interface targeting non rfc-1918 address blocks requires an explicit proxy deployed in the consumer's VPC with a rfc-1918 address. Within the Vertex AI deployment, the proxy must be defined along with a FQDN of the target endpoint.
- When you configure your deployment with only a PSC Interface, it retains its default internet access. This outbound traffic egresses directly from the secure, Google-managed tenant network.
Vertex AI PSC-Interface VPC-SC considerations
- When your project is part of a VPC Service Controls perimeter, the Google-managed tenants default internet access is blocked by the perimeter to prevent data exfiltration.
- To allow the deployment access to the public internet in this scenario, you must explicitly configure a secure egress path that routes traffic through your VPC.
- The recommended way to achieve this is by setting up a proxy server inside your VPC perimeter with a RFC1918 address and creating a Cloud NAT gateway to allow the proxy VM to access the internet.
For additional information, refer to the following resources:
Deploy an agent | Generative AI on Vertex AI | Google Cloud
Set up a Private Service Connect interface for Vertex AI resources | Google Cloud
What you'll build
In this tutorial, you're going to build a comprehensive Agent Engine deployed with Private Service Connect (PSC) Interface to allow connectivity to a public site (https://api.frankfurter.app/) through a Proxy VM deployed in the consumer's VPC with a RFC1918 address. The example deployment is applicable in a VPC-SC enabled project or for administrators that require internet egress through the customers network instead of the tenant vpc.
Figure 1
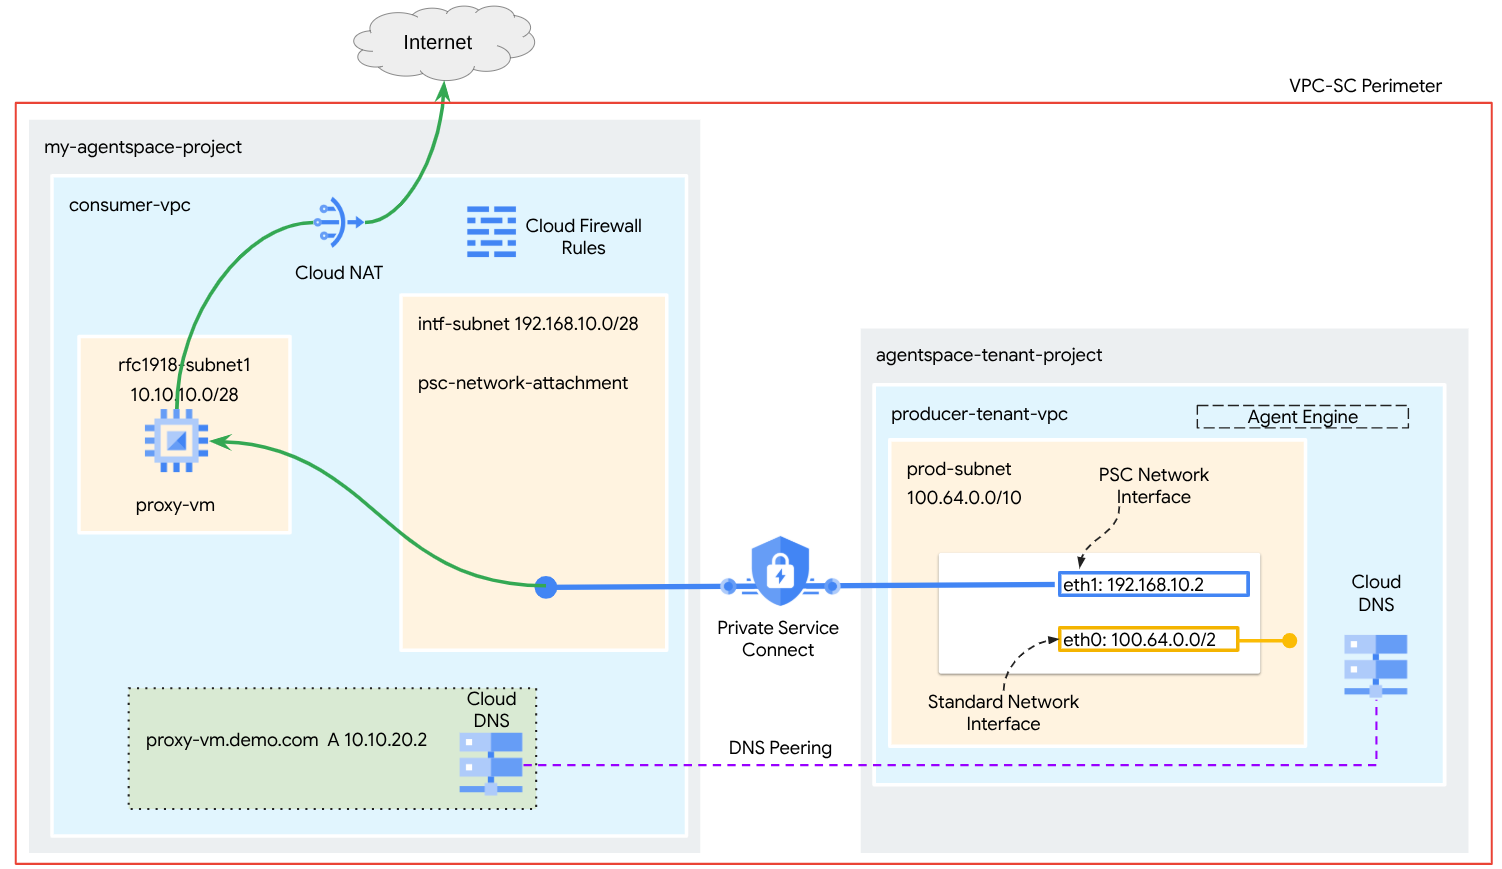
You'll create a single psc-network-attachment in the consumer VPC leveraging DNS peering to resolve the consumer network proxy-vm in the tenant project hosting Agent Engine resulting in the following use cases:
Deploy Agent Engine and configuring a proxy VM to act as an explicit proxy, allowing it to reach a public URL https://api.frankfurter.app
What you'll learn
- How to create a network attachment
- How a producer can use a network attachment to create a PSC interface
- How to establish communication from the producer to the consumer using DNS Peering
- How to deploy and use a proxy vm for internet egress
What you'll need
Google Cloud Project
IAM Permissions
- Compute Network Admin (roles/compute.networkAdmin)
- Compute Instance Admin (roles/compute.instanceAdmin)
- Compute Security Admin (roles/compute.securityAdmin)
- DNS Administrator (roles/dns.admin)
- IAP-secured Tunnel User (roles/iap.tunnelResourceAccessor)
- Logging Admin (roles/logging.admin)
- Notebooks Admin (roles/notebooks.admin)
- Project IAM Admin (roles/resourcemanager.projectIamAdmin)
- Service Account Admin (roles/iam.serviceAccountAdmin)
- Service Usage Admin (roles/serviceusage.serviceUsageAdmin)
2. Before you begin
Update the project to support the tutorial
This tutorial makes use of $variables to aid gcloud configuration implementation in Cloud Shell.
Inside Cloud Shell, perform the following:
gcloud config list project
gcloud config set project [YOUR-PROJECT-NAME]
projectid=YOUR-PROJECT-NAME
echo $projectid
API Enablement
Inside Cloud Shell, perform the following:
gcloud services enable "compute.googleapis.com"
gcloud services enable "aiplatform.googleapis.com"
gcloud services enable "dns.googleapis.com"
gcloud services enable "notebooks.googleapis.com"
gcloud services enable "storage.googleapis.com"
gcloud services enable "iap.googleapis.com"
Verify that the APIs are enabled successfully
gcloud services list --enabled
3. Consumer Setup
Create the Consumer VPC
This VPC resides in a customer project. Following resources will be created in this VPC
- Consumer Subnet
- Network Attachment Subnet
- Cloud Router (Required for Cloud NAT)
- Cloud NAT
Inside Cloud Shell, perform the following:
gcloud compute networks create consumer-vpc --project=$projectid --subnet-mode=custom
Create the consumer subnets
Inside Cloud Shell, create the subnet for the Proxy VM:
gcloud compute networks subnets create rfc1918-subnet1 --project=$projectid --range=10.10.10.0/28 --network=consumer-vpc --region=us-central1
Create the Private Service Connect Network Attachment subnet
Inside Cloud Shell, create the subnet for the PSC Network Attachment:
gcloud compute networks subnets create intf-subnet --project=$projectid --range=192.168.10.0/28 --network=consumer-vpc --region=us-central1
Cloud Router and NAT configuration
In this tutorial, Cloud NAT is used to provide internet access for the proxy VM, which doesn't have a public IP address. Cloud NAT makes it possible for VMs with only private IP addresses to connect to the internet, allowing them to perform tasks like installing software packages.
Inside Cloud Shell, create the Cloud Router.
gcloud compute routers create cloud-router-for-nat --network consumer-vpc --region us-central1
Inside Cloud Shell, create the NAT gateway with logging enabled. We will use logging to validate access to the public ip for Frankfurter API (https://api.frankfurter.app/).
gcloud compute routers nats create cloud-nat-us-central1 --router=cloud-router-for-nat --auto-allocate-nat-external-ips --nat-all-subnet-ip-ranges --region us-central1 --enable-logging --log-filter=ALL
4. Enable IAP
To allow IAP to connect to your VM instances, create a firewall rule that:
- Applies to all VM instances that you want to be accessible by using IAP.
- Allows ingress traffic from the IP range 35.235.240.0/20. This range contains all IP addresses that IAP uses for TCP forwarding.
Inside Cloud Shell, create the IAP firewall rule.
gcloud compute firewall-rules create ssh-iap-consumer \
    --network consumer-vpc \
    --allow tcp:22 \
    --source-ranges=35.235.240.0/20
5. Create consumer VM instances
Within Cloud Shell, create the consumer VM instance, proxy-vm, which will serve as the explicit proxy for Agent Engine. We will utilize tinyproxy as the application for proxying HTTP traffic.
gcloud compute instances create proxy-vm \
    --project=$projectid \
    --machine-type=e2-micro \
    --image-family debian-11 \
    --no-address \
    --can-ip-forward \
    --image-project debian-cloud \
    --zone us-central1-a \
    --subnet=rfc1918-subnet1 \
    --shielded-secure-boot \
    --metadata startup-script="#! /bin/bash
      sudo apt-get update
      sudo apt-get install tcpdump
      sudo apt-get install tinyproxy -y
      sudo apt-get install apache2 -y
      sudo service apache2 restart
      echo 'proxy server !!' | tee /var/www/html/index.html
      EOF"
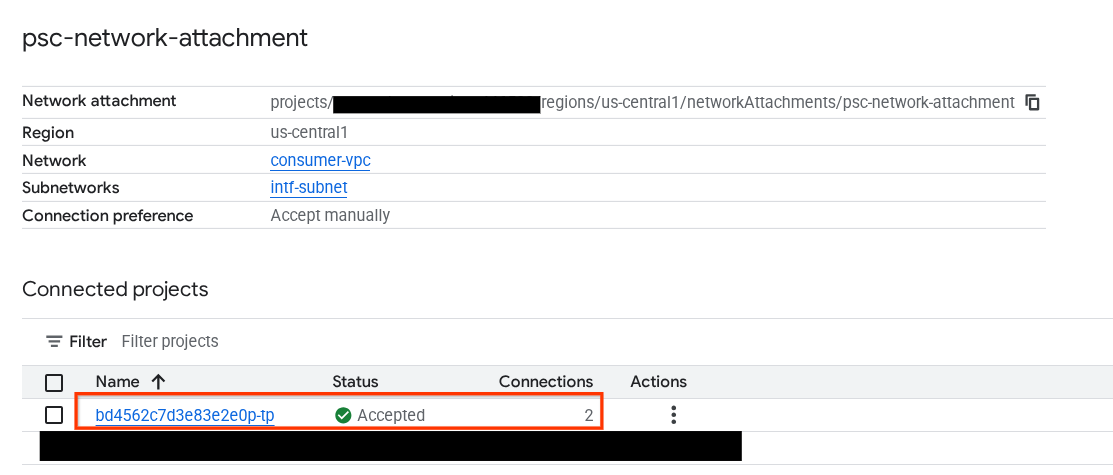
6. Private Service Connect network attachment
Network attachments are regional resources that represent the consumer side of a Private Service Connect interface. You associate a single subnet with a network attachment, and the producer assigns IPs to the Private Service Connect interface from that subnet. The subnet must be in the same region as the network attachment. A network attachment must be in the same region as the producer service.
Create the network attachment
Inside Cloud Shell, create the network attachment.
gcloud compute network-attachments create psc-network-attachment \
    --region=us-central1 \
    --connection-preference=ACCEPT_AUTOMATIC \
    --subnets=intf-subnet
List the network attachments
Inside Cloud Shell, list the network attachment.
gcloud compute network-attachments list
Describe the network attachments
Inside Cloud Shell, describe the network attachment.
gcloud compute network-attachments describe psc-network-attachment --region=us-central1
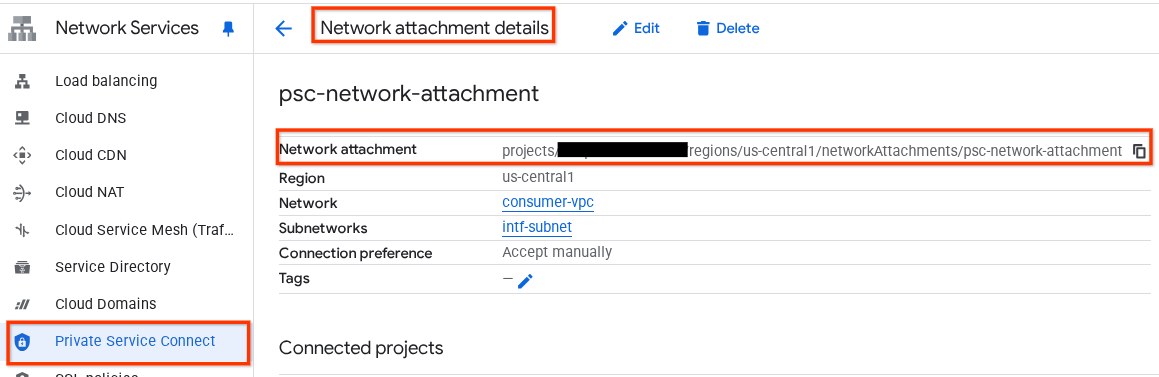
Make note of the PSC Network Attachmentname, psc-network-attachment, that will be used by the producer when creating the Private Service Connect Interface.
To view the PSC Network Attachment URL in Cloud Console, navigate to the following:
Network Services → Private Service Connect → Network Attachment → psc-network-attachment
7. Private DNS Zone
You'll create a Cloud DNS Zone for demo.com and populate it with an A record that points to your proxy-vm's IP addresses. Later, DNS peering will be deployed in Agent Engine, which will allow access to the consumer's DNS records.
Inside Cloud Shell, perform the following that creates a DNS name demo.com.
gcloud dns --project=$projectid managed-zones create private-dns-codelab --description="" --dns-name="demo.com." --visibility="private" --networks="https://compute.googleapis.com/compute/v1/projects/$projectid/global/networks/consumer-vpc"
Obtain and store the IP Addresses of the instances used for DNS A records.
Inside Cloud Shell, perform a describe against the VM instances.
gcloud compute instances describe proxy-vm --zone=us-central1-a | grep networkIP:
Inside Cloud Shell, create the records set for the VM, proxy-vm.demo.com, ensure to update the IP Address based on your environment's output.
gcloud dns --project=$projectid record-sets create proxy-vm.demo.com. --zone="private-dns-codelab" --type="A" --ttl="300" --rrdatas="10.10.10.2"
Create a Cloud Firewall rule to allow access from the PSC Interface
In the following section, create a firewall rule that allows traffic originating from the PSC Network Attachment access to the proxy-vm in Consumer VPC.
In Cloud Shell, create the ingress firewall rule.
gcloud compute firewall-rules create allow-access-to-compute \
    --network=consumer-vpc \
    --action=ALLOW \
    --rules=ALL \
    --direction=INGRESS \
    --priority=1000 \
    --source-ranges="192.168.10.0/28" \
    --destination-ranges="10.10.10.0/28" \
    --enable-logging
8. Create a Jupyter Notebook
The following section guides you through creating a Jupyter Notebook. This notebook will be used to deploy Agent Engine targeting an explicit proxy for Internet Egress.
Create a user managed service account
In the following section, you will create a service account that will be associated with the Vertex AI Workbench instance used in the tutorial.
In the tutorial, the service account will have the following roles applied:
Inside Cloud Shell, create the service account.
gcloud iam service-accounts create notebook-sa \
    --display-name="notebook-sa"
Inside Cloud Shell, update the service account with the role Storage Admin.
gcloud projects add-iam-policy-binding $projectid --member="serviceAccount:notebook-sa@$projectid.iam.gserviceaccount.com" --role="roles/storage.admin"
Inside Cloud Shell, update the service account with the role Vertex AI User.
gcloud projects add-iam-policy-binding $projectid --member="serviceAccount:notebook-sa@$projectid.iam.gserviceaccount.com" --role="roles/aiplatform.user"
Inside Cloud Shell, update the service account with the role Artifact Registry Admin.
gcloud projects add-iam-policy-binding $projectid --member="serviceAccount:notebook-sa@$projectid.iam.gserviceaccount.com" --role="roles/artifactregistry.admin"
Inside Cloud Shell, allow the notebook service account to use the Compute Engine default service account.
gcloud iam service-accounts add-iam-policy-binding \
    $(gcloud projects describe $(gcloud config get-value project) --format='value(projectNumber)')-compute@developer.gserviceaccount.com \
    --member="serviceAccount:notebook-sa@$projectid.iam.gserviceaccount.com" \
    --role="roles/iam.serviceAccountUser"
9. Update the explicit proxy
In the following section, you will need to ssh into the explicit proxy and update tinyproxy.conf configuration file followed by performing a reset.
From Cloud Shell
gcloud compute ssh --zone us-central1-a "proxy-vm" --tunnel-through-iap --project $projectid
Open the tinyproxy config file, update using an editor or your choice. Below is an example using VIM.
sudo vim /etc/tinyproxy/tinyproxy.conf

# Locate the "Listen" configuration line to restrict listening to only its private IP address of the Proxy-VM, rather than all interfaces.

Listen 10.10.10.2

# Locate the "Allow" configuration line to allow requests ONLY from the PSC Network Attachment Subnet

Allow 192.168.10.0/24

Save the configs by the following steps:
1. Press the `ESC` key to enter Command Mode.
2. Type `:wq` to save (w) and quit (q).
3. Press `Enter`

Restart the tinyproxy service to apply the changes:
sudo systemctl restart tinyproxy

Validate the tinyproxy service is running:
sudo systemctl status tinyproxy

Perform an exit returning to cloud shell
exit
10. Create a Vertex AI Workbench Instance
In the following section, create a Vertex AI Workbench instance that incorporates the previously created service account, notebook-sa.
Inside Cloud Shell create the private-client instance.
gcloud workbench instances create workbench-tutorial --vm-image-project=cloud-notebooks-managed --vm-image-family=workbench-instances --machine-type=n1-standard-4 --location=us-central1-a --subnet-region=us-central1 --subnet=rfc1918-subnet1 --disable-public-ip --shielded-secure-boot=true --shielded-integrity-monitoring=true --shielded-vtpm=true --service-account-email=notebook-sa@$projectid.iam.gserviceaccount.com
11. Vertex AI Service Agent Update
Vertex AI acts on your behalf to perform operations such as obtaining an IP Address from the PSC Network Attachment subnet used to create the PSC Interface. To do so, Vertex AI uses a service agent (listed below) that requires Network Admin permission:
service-$projectnumber@gcp-sa-aiplatform.iam.gserviceaccount.com
Inside Cloud Shell, obtain your project number.
gcloud projects describe $projectid | grep projectNumber
Inside Cloud Shell, set your project number.
projectnumber=YOUR-PROJECT-Number
Inside Cloud Shell, create a service account for AI Platform. Skip this step if you have an existing service account in your project.
gcloud beta services identity create --service=aiplatform.googleapis.com --project=$projectnumber
Inside Cloud Shell, update the service agent account with the role compute.networkAdmin.
gcloud projects add-iam-policy-binding $projectid --member="serviceAccount:service-$projectnumber@gcp-sa-aiplatform.iam.gserviceaccount.com" --role="roles/compute.networkAdmin"
Inside Cloud Shell, update the service agent account with the role dns.peer
gcloud projects add-iam-policy-binding $projectid --member="serviceAccount:service-$projectnumber@gcp-sa-aiplatform.iam.gserviceaccount.com" --role="roles/dns.peer"
Default Service Account Update
Grant your default service account access to Vertex AI. Note that it might take some time for the access change to propagate.
Inside Cloud Shell, update the default service account with the role aiplatform.user
gcloud projects add-iam-policy-binding $projectid \
  --member="serviceAccount:$projectnumber-compute@developer.gserviceaccount.com" \
    --role="roles/aiplatform.user"
12. Proxy VM Tcpdump
To validate IP connectivity from the Agent Engine, we can use TCPDUMP. This will allow us to observe communication originating from the PSC Network Attachment subnet, 192.168.10.0/28 when invoking the get request from Agent Engine to the public URL.
From Cloud Shell ssh into the proxy vm.
gcloud compute ssh --zone us-central1-a "proxy-vm" --tunnel-through-iap --project $projectid
From the proxy-vm OS execute tcpdump.
sudo tcpdump -i any net 192.168.10.0/28 -nn
13. Deploy Agent Engine
Note: We will use GCP console and JupyterLab notebook to complete the tasks in this section
In the following section, you will create a notebook that performs the following tasks:
- Uses the Frankfurter API (https://api.frankfurter.app/) to obtain exchange rate data
- References an explicit proxy (proxy_server) targeting the proxy-vm in the consumers vpc using FQDN proxy-vm.demo.com
- Define dnsPeeringConfigs "domain": "demo.com."
Run the training job in the Vertex AI Workbench instance.
- In the Google Cloud console, Navigate to Vertex AI → Workbench
- Next to your Vertex AI Workbench instance's name (workbench-tutorial), click Open JupyterLab. Your Vertex AI Workbench instance opens in JupyterLab.
- Select File > New > Notebook
- Select Kernel > Python 3
Install necessary Python libraries: Install libraries required for Agent Engine, including pyyaml, google-cloud-aiplatform, cloudpickle, google-cloud-api-keys, and langchain-google-vertexai.
In your JupyterLab notebook, create a new cell and run the following.
!pip install pyyaml
!pip install google-cloud-aiplatform[agent_engines,langchain]==1.96.0
!pip install cloudpickle==3.1.1
!pip install google-cloud-api-keys
!pip install langchain-google-vertexai==2.0.24
Restart Jupyter Notebook kernel: Ensure that newly installed libraries are correctly loaded.
In your JupyterLab notebook, create a new cell and run the following.
# Restart the notebook kernel after install, so you can run langchain successfully.

import IPython

app = IPython.Application.instance()
app.kernel.do_shutdown(True)
Set project and bucket variables: Define your Google Cloud project ID, project number, service name, GCS directory, endpoint, bucket name, and location.
Update the following fields before you run the cell
- PROJECT_ID = "enter-your-projectid"
- PROJECT_NUMBER = "enter-your-projectnumber"
- BUCKET= "enter-a-unique-bucket-name"
Note: We will use the BUCKET variable to create a Cloud Storage bucket in the next step.
In your JupyterLab notebook, create a new cell, update and run the following.
PROJECT_ID = "enter-your-projectid"  #@param {type:"string"}
PROJECT_NUMBER = "enter-your-projectnumber"  #@param {type:"string"}
SERVICE_NAME = "aiplatform"  #@param ["autopush-aiplatform", "staging-aiplatform", "aiplatform"]
# @markdown  Specify where your agent code should be written in GCS:
GCS_DIR = "reasoning-engine-test"  #@param {type:"string"}
ENDPOINT = "https://us-central1-aiplatform.googleapis.com" # @param ["https://us-central1-aiplatform.googleapis.com", "https://us-central1-autopush-aiplatform.sandbox.googleapis.com", "https://us-central1-staging-aiplatform.sandbox.googleapis.com"]
BUCKET= "enter-a-unique-bucket-name" #@param {type:"string"}
LOCATION="us-central1" #@param {type:"string"}
Create a GCS bucket: Create a Cloud Storage bucket for storing agent code.
In your JupyterLab notebook, create a new cell and run the following.
!gcloud storage buckets create gs://{BUCKET}
Define network attachment name: Specify the name of your Private Service Connect network attachment.
In your JupyterLab notebook, create a new cell and run the following.
NETWORK_ATTACHMENT_NAME = 'psc-network-attachment' #@param {type:"string"}
Initialize Python client libraries: Set up necessary client libraries for Google Cloud services.
In your JupyterLab notebook, create a new cell and run the following.
import json
import pprint

import cloudpickle
from google import auth as google_auth
from google.auth.transport import requests as google_requests
from google.cloud import storage
import yaml


def get_identity_token():
    """Gets ID token for calling Cloud Run."""
    credentials, _ = google_auth.default()
    auth_request = google_requests.Request()
    credentials.refresh(auth_request)
    return credentials.id_token

if not GCS_DIR or "your_ldap" in GCS_DIR:
    raise ValueError("GCS_DIR must be set or you must set your ldap.")

if not PROJECT_ID:
    raise ValueError("PROJECT_ID must be set.")


client = storage.Client(project=PROJECT_ID)
bucket = client.get_bucket(BUCKET)
Configure agent and tools: Define the StreamingAgent class and the get_exchange_rate function to fetch currency exchange rates using the Frankfurter API via the explicit proxy.
In your JupyterLab notebook, create a new cell and run the config below, note the following highlights:
- def get_exchange_rate function will use the Frankfurter API (https://api.frankfurter.app/) to obtain the exchange rate data.
- proxy_server = "http://proxy-vm.demo.com:8888" FQDN is associated with the proxy vm deployed in the consumer VPC. We are using DNS peering to resolve the FQDN in a later step.
from langchain_google_vertexai import ChatVertexAI
from langchain.agents import AgentExecutor
from langchain.agents.format_scratchpad.tools import format_to_tool_messages
from langchain.agents.output_parsers.tools import ToolsAgentOutputParser
from langchain.tools.base import StructuredTool
from langchain_core import prompts
from re import S
from typing import Callable, Sequence
import google.auth
import vertexai


class StreamingAgent:

    def __init__(
            self,
            model: str,
            tools: Sequence[Callable],
            project_id: str,
        ):
        self.model_name = model
        self.tools = tools
        self.project_id = project_id

    def set_up(self):
        """All unpickle-able logic should go here.

        The .set_up() method should not be called for an object that is being
        prepared for deployment.
        """
        creds, _ = google.auth.default(quota_project_id=self.project_id)
        vertexai.init(project=self.project_id, location="us-central1", credentials=creds)

        prompt = {
            "input": lambda x: x["input"],
            "agent_scratchpad": (
                lambda x: format_to_tool_messages(x["intermediate_steps"])
            ),
        } | prompts.ChatPromptTemplate.from_messages([
            ("user", "{input}"),
            prompts.MessagesPlaceholder(variable_name="agent_scratchpad"),
        ])

        llm = ChatVertexAI(model_name=self.model_name)
        if self.tools:
            llm = llm.bind_tools(tools=self.tools)

        self.agent_executor = AgentExecutor(
            agent=prompt | llm | ToolsAgentOutputParser(),
            tools=[StructuredTool.from_function(tool) for tool in self.tools],
        )

    def query(self, input: str):
        """Query the application.

        Args:
            input: The user prompt.

        Returns:
            The output of querying the application with the given input.
        """
        return self.agent_executor.invoke(input={"input": input})

    def stream_query(self, input: str):
        """Query the application and stream the output.

        Args:
            input: The user prompt.

        Yields:
            Chunks of the response as they become available.
        """
        for chunk in self.agent_executor.stream(input={"input": input}):
            yield chunk

def get_exchange_rate(
    currency_from: str = "USD",
    currency_to: str = "EUR",
    currency_date: str = "latest",
):
    """Retrieves the exchange rate between two currencies on a specified date.

    Uses the Frankfurter API (https://api.frankfurter.app/) to obtain
    exchange rate data.

    Args:
        currency_from: The base currency (3-letter currency code).
            Defaults to "USD" (US Dollar).
        currency_to: The target currency (3-letter currency code).
            Defaults to "EUR" (Euro).
        currency_date: The date for which to retrieve the exchange rate.
            Defaults to "latest" for the most recent exchange rate data.
            Can be specified in YYYY-MM-DD format for historical rates.

    Returns:
        dict: A dictionary containing the exchange rate information.
            Example: {"amount": 1.0, "base": "USD", "date": "2023-11-24",
                "rates": {"EUR": 0.95534}}
    """
    import requests

    proxy_server = "http://proxy-vm.demo.com:8888" # This is the VM's FQDN to reach the proxy vm in the consumers network

    proxies = {
       "http": proxy_server,
       "https": proxy_server,
    }
    response = requests.get(
        f"https://api.frankfurter.app/{currency_date}",
        params={"from": currency_from, "to": currency_to},
        proxies=proxies,
    )
    return response.json()
Upload agent files to Cloud Storage: Upload the serialized agent and its requirements to your designated GCS bucket.
In your JupyterLab notebook, create a new cell and run the following:
# Upload files to Cloud Storage.
if not GCS_DIR:
    raise ValueError("GCS_DIR must be set.")

FILE = "streaming_agent.pkl"
blob = bucket.blob(f"{GCS_DIR}/{FILE}")
with blob.open("wb") as f:
    cloudpickle.dump(
        StreamingAgent(
            model="gemini-2.0-flash-001",  # Required.
            tools=[get_exchange_rate],  # Optional.
            project_id=PROJECT_ID
        ), f)


requirements = """
google-cloud-aiplatform[agent_engines,langchain]==1.96.0
cloudpickle==3.1.1
"""

blob = bucket.blob(f"{GCS_DIR}/requirements-streaming.txt")
blob.upload_from_string(requirements)

!gsutil ls gs://{BUCKET}/{GCS_DIR}
Deploy Agent Engine: Deploy the Agent Engine, configuring it with the PSC interface and DNS peering to resolve the proxy VM's FQDN in the consumer VPC.
In your JupyterLab notebook, create and run the cell below, note the following highlights:
- DNS Peering to consumer VPCs is configured using dnsPeeringConfigs (dnsPeeringConfigs) for the domain name demo.com.
import requests


token = !gcloud auth application-default print-access-token

response = requests.post(
    f"{ENDPOINT}/v1beta1/projects/{PROJECT_ID}/locations/{LOCATION}/reasoningEngines",
    headers={
        "Content-Type": "application/json; charset=utf-8",
        "Authorization": f"Bearer {token[0]}"
    },
    data=json.dumps({
        "displayName": "PSC-I Explicit Proxy",
        "description": "test psc-i agent + proxy vm",
        "spec": {
            "packageSpec": {
                "pickleObjectGcsUri": f"gs://{BUCKET}/{GCS_DIR}/streaming_agent.pkl",
                "requirementsGcsUri": f"gs://{BUCKET}/{GCS_DIR}/requirements-streaming.txt",
                "pythonVersion": "3.10"
            },
            "deploymentSpec": {
                "pscInterfaceConfig": {
                    "networkAttachment": NETWORK_ATTACHMENT_NAME,
                    "dnsPeeringConfigs": [
                    {
                      "domain": "demo.com.",
                      "targetProject": PROJECT_ID,
                      "targetNetwork": "consumer-vpc", #Consumer VPC
                    },
                  ],
                }
            }
        },
    })
)

pprint.pprint(json.loads(response.content))
reasoning_engine_id = json.loads(response.content)["name"].split("/")[5]
pprint.pprint(reasoning_engine_id)
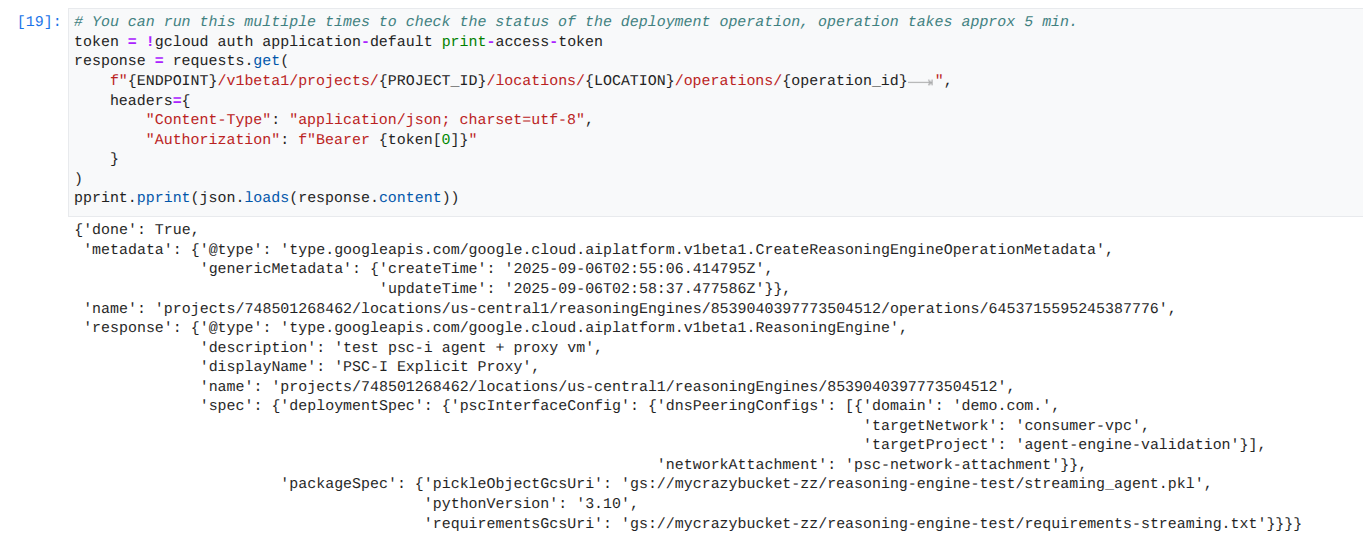
Monitor deployment status: Check the status of the Agent Engine deployment operation.
In your JupyterLab notebook, create a new cell and run the following.
operation_id = json.loads(response.content)["name"].split("/")[7]
pprint.pprint(operation_id)
In your JupyterLab notebook, create a new cell and run the following.
Note: This operation can take around 5 mins to complete. Re-run the cell to check the progress. Please do not proceed to the next section until you see an output similar to the screenshot below.
# You can run this multiple times to check the status of the deployment operation, operation takes approx 5 min.
token = !gcloud auth application-default print-access-token
response = requests.get(
    f"{ENDPOINT}/v1beta1/projects/{PROJECT_ID}/locations/{LOCATION}/operations/{operation_id}        ",
    headers={
        "Content-Type": "application/json; charset=utf-8",
        "Authorization": f"Bearer {token[0]}"
    }
)
pprint.pprint(json.loads(response.content))
Example of a successful run:
Query the deployed agent: Send a query to the deployed Agent Engine to test its functionality.
In your JupyterLab notebook, create a new cell and run the following.
response = requests.post(
    f"{ENDPOINT}/v1beta1/projects/{PROJECT_ID}/locations/{LOCATION}/reasoningEngines/{reasoning_engine_id}:query",
    headers={
        "Content-Type": "application/json; charset=utf-8",
        "Authorization": f"Bearer {token[0]}"
    },
    data=json.dumps({ "input": {"input": "What is the exchange rate from US dollars to Euro?"} })
)
print(response.text)
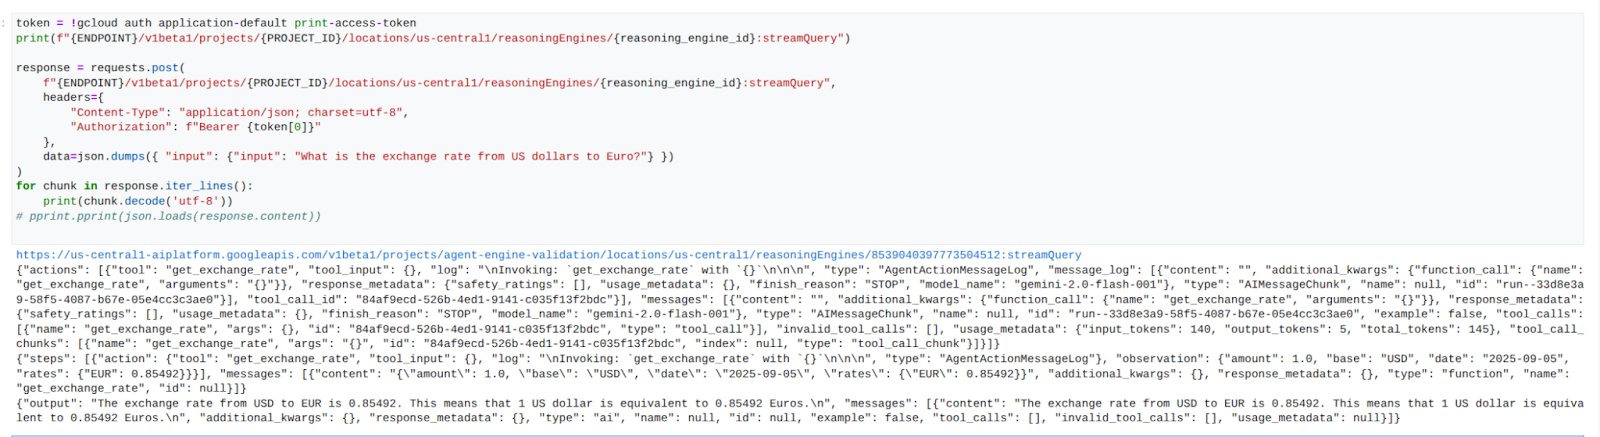
Stream query results: Stream the output from the Agent Engine query.
In your JupyterLab notebook, create a new cell and run the following that will trigger the API call to the public URL using the explicit proxy in the consumers VPC.
token = !gcloud auth application-default print-access-token
print(f"{ENDPOINT}/v1beta1/projects/{PROJECT_ID}/locations/us-central1/reasoningEngines/{reasoning_engine_id}:streamQuery")

response = requests.post(
    f"{ENDPOINT}/v1beta1/projects/{PROJECT_ID}/locations/us-central1/reasoningEngines/{reasoning_engine_id}:streamQuery",
    headers={
        "Content-Type": "application/json; charset=utf-8",
        "Authorization": f"Bearer {token[0]}"
    },
    data=json.dumps({ "input": {"input": "What is the exchange rate from US dollars to Euro?"} })
)
for chunk in response.iter_lines():
    print(chunk.decode('utf-8'))
# pprint.pprint(json.loads(response.content))
Example of a successful run:
14. Tcpdump Validation
View the tcpdump output that details communication between the PSC Network Attachment IP address used by Agent Engine and the Prox-VM upon the request post.
user@proxy-vm:~$ sudo tcpdump -i any net 192.168.10.0/28 -nn
tcpdump: data link type LINUX_SLL2
tcpdump: verbose output suppressed, use -v[v]... for full protocol decode
listening on any, link-type LINUX_SLL2 (Linux cooked v2), snapshot length 262144 bytes
22:17:53.983212 ens4  In  IP 192.168.10.2.22261 > 10.10.10.2.8888: Flags [S], seq 3841740961, win 28800, options [mss 1440,sackOK,TS val 4245243253 ecr 0,nop,wscale 7], length 0
22:17:53.983252 ens4  Out IP 10.10.10.2.8888 > 192.168.10.2.22261: Flags [S.], seq 2232973833, ack 3841740962, win 64768, options [mss 1420,sackOK,TS val 2251247643 ecr 4245243253,nop,wscale 7], length 0
22:17:53.985167 ens4  In  IP 192.168.10.2.22261 > 10.10.10.2.8888: Flags [.], ack 1, win 225, options [nop,nop,TS val 4245243256 ecr 2251247643], length 0
22:17:53.986476 ens4  In  IP 192.168.10.2.22261 > 10.10.10.2.8888: Flags [P.], seq 1:45, ack 1, win 16384, options [nop,nop,TS val 4245243256 ecr 2251247643], length 44
22:17:53.986485 ens4  Out IP 10.10.10.2.8888 > 192.168.10.2.22261: Flags [.], ack 45, win 506, options [nop,nop,TS val 2251247646 ecr 4245243256], length 0
22:17:54.043347 ens4  Out IP 10.10.10.2.8888 > 192.168.10.2.22261: Flags [P.], seq 1:71, ack 45, win 506, options [nop,nop,TS val 2251247703 ecr 4245243256], length 70
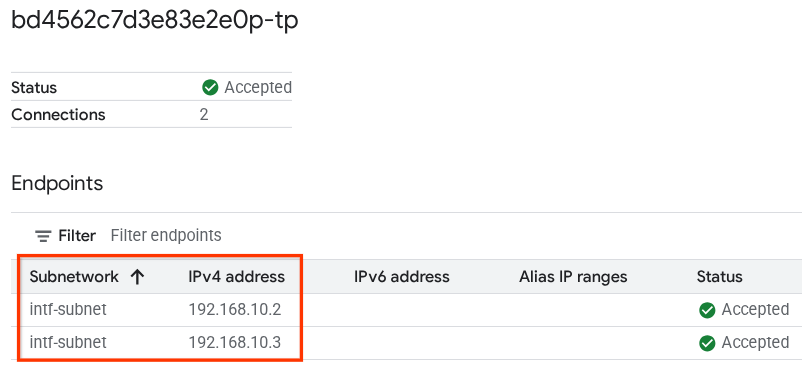
15. PSC Interface Validation
You can also view the Network Attachment IPs used by Agent Engine by navigating to the following:
Network Services → Private Service Connect → Network Attachment → psc-network-attachment
Select the tenant project (project name ending in -tp)
The highlighted field denotes the IP address used by Agent Engine from the PSC Network Attachment.
16. Cloud Logging Validation
Exit from the proxy-vm TCPDump session and perform a PING to Frankfurter api.frankfurter.app to obtain the associated public IP Address.
ping -c4 api.frankfurter.app
Example identifies 104.26.1.198 as the public IP for api.frankfurter.app
user@proxy-vm:~$ ping -c4 api.frankfurter.app
PING api.frankfurter.app (104.26.1.198) 56(84) bytes of data.
64 bytes from 104.26.1.198 (104.26.1.198): icmp_seq=1 ttl=61 time=10.9 ms
64 bytes from 104.26.1.198 (104.26.1.198): icmp_seq=2 ttl=61 time=10.9 ms
64 bytes from 104.26.1.198 (104.26.1.198): icmp_seq=3 ttl=61 time=10.9 ms
64 bytes from 104.26.1.198 (104.26.1.198): icmp_seq=4 ttl=61 time=10.9 ms
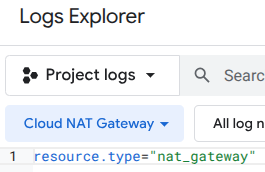
Let's take a look at NAT Logging to view if traffic for 104.26.1.198 is observed.
Navigate to the following:
Monitoring → Log Explorer
Use the following filter:
resource.type="nat_gateway"
Select the time period, then Run Query
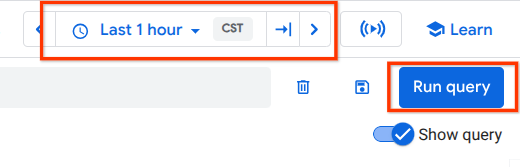
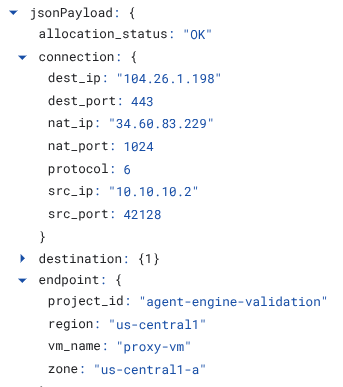
Expand the log entry that identifies the (destination) public IP (104.26.1.198) of api.frankfurter.app and source IP Address and name of the proxy-vm that validates the use of the explicit proxy for internet egress.
17. Clean up
In your JupyterLab notebook, create a new cell and run the following that will trigger deletion of the Agent Engine deployment.
token = !gcloud auth application-default print-access-token

response = requests.delete(
    f"{ENDPOINT}/v1beta1/projects/{PROJECT_ID}/locations/us-central1/reasoningEngines/{reasoning_engine_id}",
    headers={
        "Content-Type": "application/json; charset=utf-8",
        "Authorization": f"Bearer {token[0]}"
    },
)
print(response.text)
From Cloud Shell, delete tutorial components.
gcloud dns record-sets delete proxy-vm.demo.com --zone=private-dns-codelab  --type=A

gcloud dns managed-zones delete private-dns-codelab

gcloud compute instances delete proxy-vm --zone=us-central1-a --quiet

gcloud compute instances delete workbench-tutorial --zone=us-central1-a --quiet

gcloud compute routers delete cloud-router-for-nat --region=us-central1 --quiet

gcloud compute network-attachments delete psc-network-attachment --region=us-central1 --quiet

gcloud compute networks subnets delete intf-subnet rfc1918-subnet1 --region=us-central1 --quiet

gcloud compute networks delete consumer-vpc --quiet
18. Congratulations
Congratulations, you've successfully configured and validated Agent Engine deployed with Private Service Connect Interface with internet egress performed through an explicit proxy.
You created the consumer infrastructure, and you added a network attachment that allowed the producer to create a multi nic vm to bridge consumer and producer communication. You learned how to create an explicit proxy and DNS peering that allowed Internet connectivity.
Cosmopup thinks tutorials are awesome!!