1. מבוא
ממשק Private Service Connect הוא משאב שמאפשר לרשת של ענן וירטואלי פרטי (VPC) של בעל שירות ליזום חיבורים ליעדים שונים ברשת VPC של צרכן. רשתות של יצרנים וצרכנים יכולות להיות בפרויקטים ובארגונים שונים.
אם קובץ מצורף עם הרשת מקבל חיבור מממשק Private Service Connect, מערכת Google Cloud מקצה לממשק כתובת IP מרשת משנה של צרכן שצוינה על ידי הקובץ המצורף עם הרשת. הרשתות של הצרכנים והיצרנים מחוברות ויכולות לתקשר באמצעות כתובות IP פנימיות.
חיבור בין קובץ מצורף עם הרשת לבין ממשק Private Service Connect דומה לחיבור בין נקודת קצה של Private Service Connect לבין קובץ מצורף עם השירות, אבל יש שני הבדלים עיקריים:
- צירוף רשת מאפשר לרשת של ספק ליזום חיבורים לרשת של צרכן (תעבורת נתונים יוצאת (egress) של שירות מנוהל), ואילו נקודת קצה (endpoint) מאפשרת לרשת של צרכן ליזום חיבורים לרשת של ספק (תעבורת נתונים נכנסת (ingress) של שירות מנוהל).
- חיבור ממשק Private Service Connect הוא טרנזיטיבי. המשמעות היא שרשת יצרן יכולה לתקשר עם רשתות אחרות שמחוברות לרשת הצרכן.
שיקולים לגבי נגישות של Vertex AI PSC-Interface
- ממשק PSC יכול לנתב תנועה ליעדים מבוססי VPC או מקומיים בתוך בלוק הכתובות RFC1918.
- טירגוט של בלוקים של כתובות שאינן rfc-1918 באמצעות PSC-Interface מחייב פריסה של שרת proxy מפורש ב-VPC של הלקוח עם כתובת rfc-1918. בפריסת Vertex AI, צריך להגדיר את ה-proxy יחד עם שם דומיין מלא (FQDN) של נקודת הקצה של היעד.
- כשמגדירים פריסה עם ממשק PSC בלבד, הגישה לאינטרנט נשארת כברירת המחדל. תעבורת הנתונים היוצאת הזו יוצאת ישירות מרשת הדיירים המאובטחת שמנוהלת על ידי Google.
שיקולים לגבי Vertex AI PSC-Interface VPC-SC
- כשהפרויקט שלכם הוא חלק ממערך של VPC Service Controls, הגישה לאינטרנט של הדיירים שמנוהלים על ידי Google נחסמת כברירת מחדל על ידי המערך כדי למנוע זליגת נתונים.
- כדי לאפשר לפריסה גישה לאינטרנט הציבורי בתרחיש הזה, צריך להגדיר במפורש נתיב יציאה מאובטח שמעביר את התנועה דרך ה-VPC.
- הדרך המומלצת לעשות זאת היא להגדיר שרת proxy בתוך היקף ה-VPC עם כתובת RFC1918 וליצור שער Cloud NAT כדי לאפשר למכונת ה-proxy הווירטואלית לגשת לאינטרנט.
למידע נוסף, אפשר לעיין במקורות המידע הבאים:
פריסת סוכן | AI גנרטיבי ב-Vertex AI | Google Cloud
הגדרת ממשק Private Service Connect למשאבי Vertex AI | Google Cloud
מה תפַתחו
במדריך הזה תבנו מנוע סוכן מקיף שמוטמע באמצעות ממשק Private Service Connect (PSC) כדי לאפשר קישוריות לאתר ציבורי (https://api.frankfurter.app/) דרך מכונה וירטואלית של שרת proxy שמוטמעת ב-VPC של הצרכן עם כתובת RFC1918. הפריסה לדוגמה רלוונטית בפרויקט שמופעל בו VPC-SC או לאדמינים שנדרשת להם תעבורת נתונים יוצאת באינטרנט דרך הרשת של הלקוח במקום דרך ה-VPC של הדייר.
איור 1
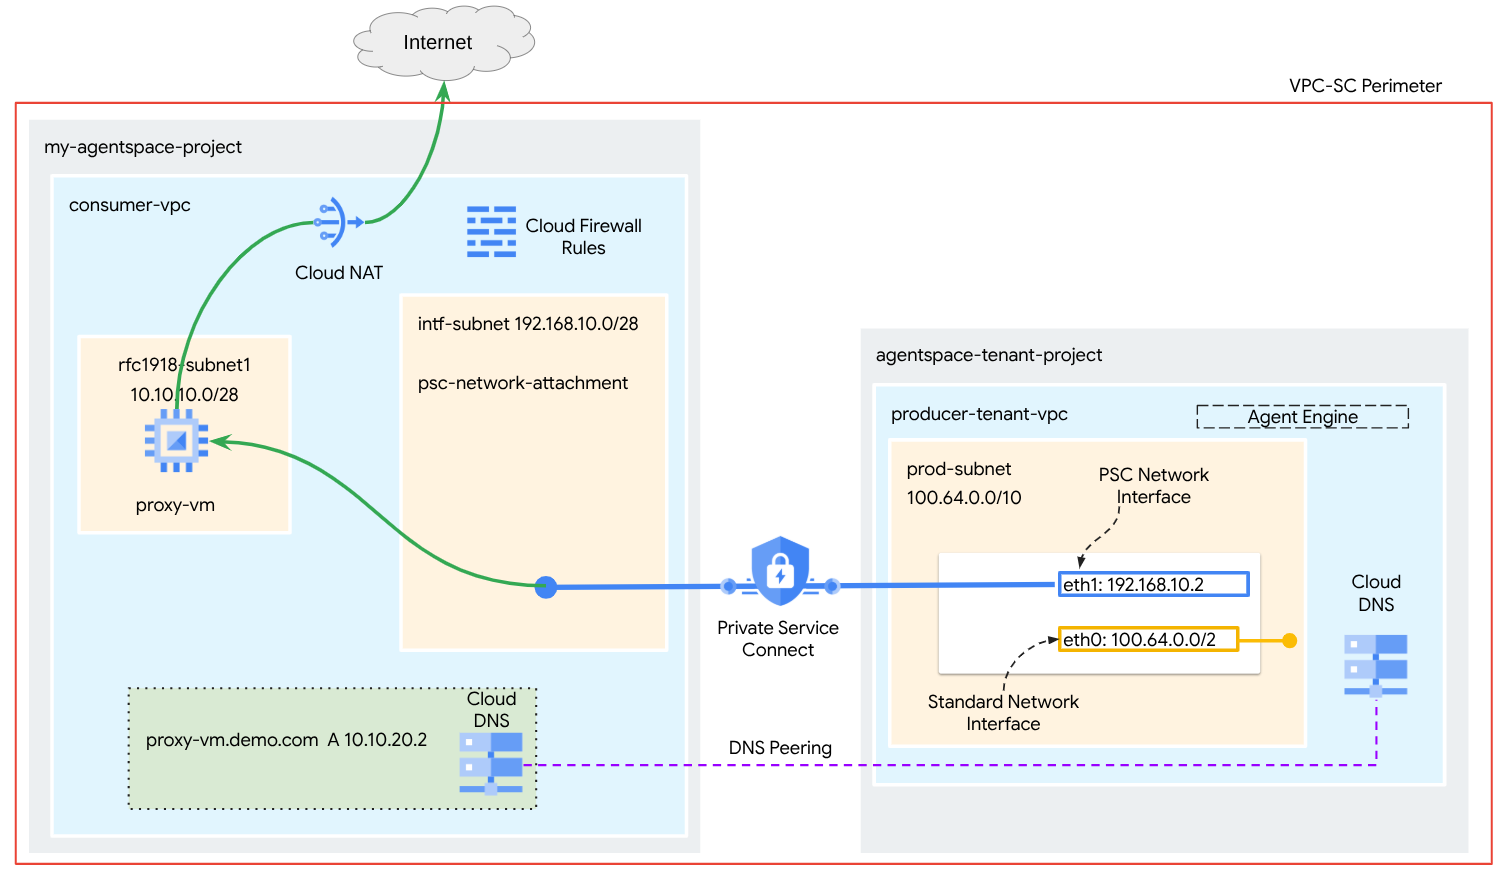
תיצרו קובץ יחיד של psc-network-attachment ב-VPC של הצרכן באמצעות DNS peering כדי לפתור את בעיית ה-proxy-vm של רשת הצרכן בפרויקט הדייר שמארח את Agent Engine, וכך יתקבלו תרחישי השימוש הבאים:
פריסת Agent Engine והגדרת מכונת VM שתפעל כ-proxy מפורש, כדי לאפשר לה להגיע לכתובת URL ציבורית https://api.frankfurter.app
מה תלמדו
- איך יוצרים קובץ מצורף לרשת
- איך מפיק יכול להשתמש בקובץ מצורף לרשת כדי ליצור ממשק PSC
- איך יוצרים תקשורת מהמפיק לצרכן באמצעות קישור בין רשתות שכנות (peering) של DNS
- איך פורסים מכונת proxy וירטואלית ומשתמשים בה ליציאה מהאינטרנט
מה תצטרכו
פרויקט ב-Google Cloud
הרשאות IAM
- אדמין של רשת מחשוב (roles/compute.networkAdmin)
- אדמין מכונות של Compute (roles/compute.instanceAdmin)
- אדמין לענייני אבטחה ב-Compute (roles/compute.securityAdmin)
- אדמין DNS (roles/dns.admin)
- משתמש מנהרה באבטחת IAP (roles/iap.tunnelResourceAccessor)
- אדמין לניהול יומנים (roles/logging.admin)
- אדמין של Notebooks (roles/notebooks.admin)
- אדמין IAM בפרויקט (roles/resourcemanager.projectIamAdmin)
- אדמין בחשבון שירות (roles/iam.serviceAccountAdmin)
- אדמין של שימוש בשירות (roles/serviceusage.serviceUsageAdmin)
2. לפני שמתחילים
עדכון הפרויקט כדי לתמוך במדריך
במדריך הזה נעשה שימוש ב-$variables כדי לעזור בהטמעה של הגדרות gcloud ב-Cloud Shell.
ב-Cloud Shell, מבצעים את הפעולות הבאות:
gcloud config list project
gcloud config set project [YOUR-PROJECT-NAME]
projectid=YOUR-PROJECT-NAME
echo $projectid
הפעלת API
ב-Cloud Shell, מבצעים את הפעולות הבאות:
gcloud services enable "compute.googleapis.com"
gcloud services enable "aiplatform.googleapis.com"
gcloud services enable "dns.googleapis.com"
gcloud services enable "notebooks.googleapis.com"
gcloud services enable "storage.googleapis.com"
gcloud services enable "iap.googleapis.com"
אימות שממשקי ה-API הופעלו בהצלחה
gcloud services list --enabled
3. הגדרת צרכן
יצירת VPC של צרכן
ה-VPC הזה נמצא בפרויקט של לקוח. המשאבים הבאים ייווצרו ב-VPC הזה
- Consumer Subnet
- תת-רשת של צירוף רשת
- Cloud Router (נדרש ל-Cloud NAT)
- Cloud NAT
ב-Cloud Shell, מבצעים את הפעולות הבאות:
gcloud compute networks create consumer-vpc --project=$projectid --subnet-mode=custom
יצירת רשתות משנה לצרכנים
ב-Cloud Shell, יוצרים את תת-הרשת של מכונת ה-Proxy:
gcloud compute networks subnets create rfc1918-subnet1 --project=$projectid --range=10.10.10.0/28 --network=consumer-vpc --region=us-central1
יצירת תת-רשת של צירוף רשת של Private Service Connect
ב-Cloud Shell, יוצרים את תת-הרשת לחיבור הרשת של PSC:
gcloud compute networks subnets create intf-subnet --project=$projectid --range=192.168.10.0/28 --network=consumer-vpc --region=us-central1
הגדרת Cloud Router ו-NAT
במדריך הזה, Cloud NAT משמש כדי לספק גישה לאינטרנט למכונה הווירטואלית של ה-proxy, שאין לה כתובת IP ציבורית. שירות Cloud NAT מאפשר למכונות וירטואליות עם כתובות IP פרטיות בלבד להתחבר לאינטרנט, וכך לבצע משימות כמו התקנת חבילות תוכנה.
ב-Cloud Shell, יוצרים את Cloud Router.
gcloud compute routers create cloud-router-for-nat --network consumer-vpc --region us-central1
בתוך Cloud Shell, יוצרים את שער ה-NAT עם רישום ביומן. נשתמש ברישום ביומן כדי לאמת את הגישה לכתובת ה-IP הציבורית של Frankfurter API (https://api.frankfurter.app/).
gcloud compute routers nats create cloud-nat-us-central1 --router=cloud-router-for-nat --auto-allocate-nat-external-ips --nat-all-subnet-ip-ranges --region us-central1 --enable-logging --log-filter=ALL
4. הפעלת IAP
כדי לאפשר ל-IAP להתחבר למכונות הווירטואליות, צריך ליצור כלל חומת אש ש:
- רלוונטי לכל מכונות ה-VM שרוצים לגשת אליהן באמצעות IAP.
- מאפשר תנועה נכנסת מטווח כתובות ה-IP 35.235.240.0/20. הטווח הזה מכיל את כל כתובות ה-IP שמשמשות את IAP להעברת TCP.
ב-Cloud Shell, יוצרים את הכלל בחומת האש של IAP.
gcloud compute firewall-rules create ssh-iap-consumer \
    --network consumer-vpc \
    --allow tcp:22 \
    --source-ranges=35.235.240.0/20
5. יצירת מכונות וירטואליות לצרכנים
ב-Cloud Shell, יוצרים את מופע ה-VM של הצרכן, proxy-vm, שישמש כשרת proxy מפורש ל-Agent Engine. נשתמש ב-tinyproxy כאפליקציה להעברת תעבורת HTTP דרך proxy.
gcloud compute instances create proxy-vm \
    --project=$projectid \
    --machine-type=e2-micro \
    --image-family debian-11 \
    --no-address \
    --can-ip-forward \
    --image-project debian-cloud \
    --zone us-central1-a \
    --subnet=rfc1918-subnet1 \
    --shielded-secure-boot \
    --metadata startup-script="#! /bin/bash
      sudo apt-get update
      sudo apt-get install tcpdump
      sudo apt-get install tinyproxy -y
      sudo apt-get install apache2 -y
      sudo service apache2 restart
      echo 'proxy server !!' | tee /var/www/html/index.html
      EOF"
6. קובץ מצורף עם הרשת של Private Service Connect
קבצים מצורפים עם הרשת הם משאבים אזוריים שמייצגים את הצד של הצרכן בממשק Private Service Connect. משייכים תת-רשת אחת לקובץ מצורף לרשת, והבעלים של השירות המנוהל מקצה כתובות IP לממשק Private Service Connect מתוך תת-הרשת הזו. רשת המשנה צריכה להיות באותו אזור שבו נמצאת ההצמדה לרשת. קובץ מצורף לרשת חייב להיות באותו אזור כמו שירות היצרן.
יצירת קובץ מצורף לרשת
ב-Cloud Shell, יוצרים את קובץ הרשת המצורף.
gcloud compute network-attachments create psc-network-attachment \
    --region=us-central1 \
    --connection-preference=ACCEPT_AUTOMATIC \
    --subnets=intf-subnet
הצגת הקבצים המצורפים לרשת
ב-Cloud Shell, מציגים את רשימת קבצים מצורפים לרשת.
gcloud compute network-attachments list
תיאור של הקבצים המצורפים לרשת
ב-Cloud Shell, מתארים את קובץ הרשת המצורף.
gcloud compute network-attachments describe psc-network-attachment --region=us-central1
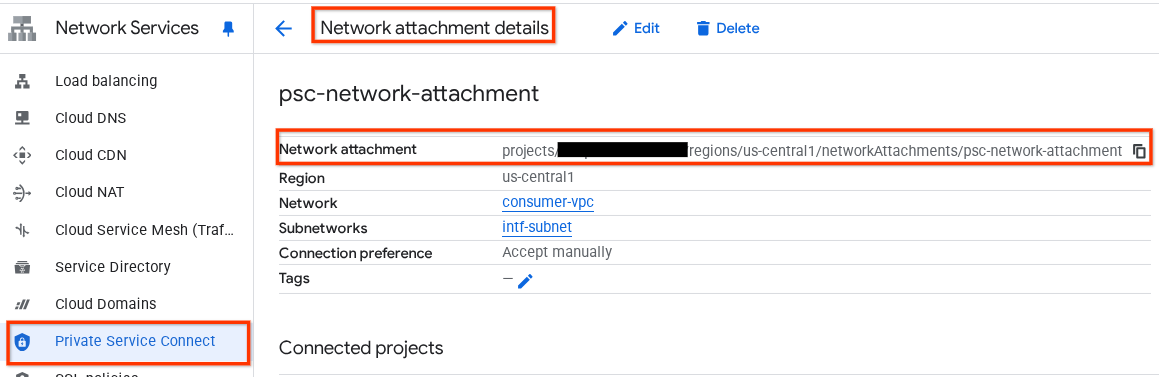
רושמים את השם של קובץ מצורף עם הרשת של PSC, psc-network-attachment, שישמש את הספק ליצירת הממשק של Private Service Connect.
כדי לראות את כתובת ה-URL של PSC Network Attachment במסוף Cloud, עוברים אל:
Network Services (שירותי רשת) → Private Service Connect → Network Attachment (קובץ מצורף עם הרשת) → psc-network-attachment
7. תחום DNS פרטי
תצטרכו ליצור תחום (Zone) ב-Cloud DNS בשביל demo.com ולאכלס אותו ברשומת A שמפנה לכתובות ה-IP של מכונת ה-VM של ה-proxy. בהמשך, תתבצע פריסת DNS Peering ב-Agent Engine, שתאפשר גישה לרשומות ה-DNS של הצרכן.
ב-Cloud Shell, מבצעים את הפעולות הבאות כדי ליצור שם DNS demo.com.
gcloud dns --project=$projectid managed-zones create private-dns-codelab --description="" --dns-name="demo.com." --visibility="private" --networks="https://compute.googleapis.com/compute/v1/projects/$projectid/global/networks/consumer-vpc"
קבלת כתובות ה-IP של המופעים שמשמשים לרשומות DNS A ושמירתן.
ב-Cloud Shell, מריצים פקודת describe על המכונות הווירטואליות.
gcloud compute instances describe proxy-vm --zone=us-central1-a | grep networkIP:
ב-Cloud Shell, יוצרים את קבוצת הרשומות של המכונה הווירטואלית, proxy-vm.demo.com, ומוודאים שמעדכנים את כתובת ה-IP בהתאם לפלט של הסביבה.
gcloud dns --project=$projectid record-sets create proxy-vm.demo.com. --zone="private-dns-codelab" --type="A" --ttl="300" --rrdatas="10.10.10.2"
יצירת כלל חומת אש של Cloud כדי לאפשר גישה מממשק ה-PSC
בקטע הבא, יוצרים כלל חומת אש שמאפשר תעבורת נתונים שמגיעה מ-PSC Network Attachment גישה ל-proxy-vm ב-Consumer VPC.
ב-Cloud Shell, יוצרים את כלל חומת האש לתעבורת נתונים נכנסת.
gcloud compute firewall-rules create allow-access-to-compute \
    --network=consumer-vpc \
    --action=ALLOW \
    --rules=ALL \
    --direction=INGRESS \
    --priority=1000 \
    --source-ranges="192.168.10.0/28" \
    --destination-ranges="10.10.10.0/28" \
    --enable-logging
8. יצירת Jupyter Notebook
בקטע הבא מוסבר איך ליצור Jupyter Notebook. ה-notebook הזה ישמש לפריסת Agent Engine שמטרגט שרת proxy מפורש ליציאה מהאינטרנט.
יצירה של חשבון שירות שמנוהל על ידי משתמש
בקטע הבא תיצרו חשבון שירות שישויך למופע Vertex AI Workbench שבו נעשה שימוש במדריך.
במדריך הזה, התפקידים הבאים יוקצו לחשבון השירות:
ב-Cloud Shell, יוצרים את חשבון השירות.
gcloud iam service-accounts create notebook-sa \
    --display-name="notebook-sa"
ב-Cloud Shell, מעדכנים את חשבון השירות עם התפקיד Storage Admin (אדמין אחסון).
gcloud projects add-iam-policy-binding $projectid --member="serviceAccount:notebook-sa@$projectid.iam.gserviceaccount.com" --role="roles/storage.admin"
ב-Cloud Shell, מעדכנים את חשבון השירות עם התפקיד Vertex AI User.
gcloud projects add-iam-policy-binding $projectid --member="serviceAccount:notebook-sa@$projectid.iam.gserviceaccount.com" --role="roles/aiplatform.user"
ב-Cloud Shell, מעדכנים את חשבון השירות עם התפקיד Artifact Registry Admin.
gcloud projects add-iam-policy-binding $projectid --member="serviceAccount:notebook-sa@$projectid.iam.gserviceaccount.com" --role="roles/artifactregistry.admin"
ב-Cloud Shell, מאפשרים לחשבון השירות של מחברת ה-notebook להשתמש בחשבון השירות שמוגדר כברירת מחדל של Compute Engine.
gcloud iam service-accounts add-iam-policy-binding \
    $(gcloud projects describe $(gcloud config get-value project) --format='value(projectNumber)')-compute@developer.gserviceaccount.com \
    --member="serviceAccount:notebook-sa@$projectid.iam.gserviceaccount.com" \
    --role="roles/iam.serviceAccountUser"
9. עדכון שרת ה-proxy המפורש
בקטע הבא, תצטרכו להתחבר לשרת ה-Proxy המפורש באמצעות SSH ולעדכן את קובץ התצורה tinyproxy.conf, ואז לבצע איפוס.
מ-Cloud Shell
gcloud compute ssh --zone us-central1-a "proxy-vm" --tunnel-through-iap --project $projectid
פותחים את קובץ התצורה של tinyproxy ומעדכנים אותו באמצעות כלי עריכה או כלי אחר לבחירתכם. הנה דוגמה לשימוש ב-VIM.
sudo vim /etc/tinyproxy/tinyproxy.conf

# Locate the "Listen" configuration line to restrict listening to only its private IP address of the Proxy-VM, rather than all interfaces.

Listen 10.10.10.2

# Locate the "Allow" configuration line to allow requests ONLY from the PSC Network Attachment Subnet

Allow 192.168.10.0/24

Save the configs by the following steps:
1. Press the `ESC` key to enter Command Mode.
2. Type `:wq` to save (w) and quit (q).
3. Press `Enter`

Restart the tinyproxy service to apply the changes:
sudo systemctl restart tinyproxy

Validate the tinyproxy service is running:
sudo systemctl status tinyproxy

Perform an exit returning to cloud shell
exit
10. יצירת מכונה של Vertex AI Workbench
בקטע הבא, יוצרים מכונה של Vertex AI Workbench שמשלבת את חשבון השירות שיצרתם קודם, notebook-sa.
ב-Cloud Shell, יוצרים את המכונה private-client.
gcloud workbench instances create workbench-tutorial --vm-image-project=cloud-notebooks-managed --vm-image-family=workbench-instances --machine-type=n1-standard-4 --location=us-central1-a --subnet-region=us-central1 --subnet=rfc1918-subnet1 --disable-public-ip --shielded-secure-boot=true --shielded-integrity-monitoring=true --shielded-vtpm=true --service-account-email=notebook-sa@$projectid.iam.gserviceaccount.com
11. עדכון של סוכן השירות של Vertex AI
Vertex AI פועל בשמכם כדי לבצע פעולות כמו קבלת כתובת IP מרשת המשנה של קובץ ה-PSC Network Attachment שמשמש ליצירת ממשק ה-PSC. לשם כך, ב-Vertex AI נעשה שימוש בסוכן שירות (שמפורט בהמשך) שנדרשת לו הרשאת אדמין רשת:
service-$projectnumber@gcp-sa-aiplatform.iam.gserviceaccount.com
ב-Cloud Shell, מאתרים את מספר הפרויקט.
gcloud projects describe $projectid | grep projectNumber
ב-Cloud Shell, מגדירים את מספר הפרויקט.
projectnumber=YOUR-PROJECT-Number
ב-Cloud Shell, יוצרים חשבון שירות ל-AI Platform. אם כבר יש לכם חשבון שירות בפרויקט, אפשר לדלג על השלב הזה.
gcloud beta services identity create --service=aiplatform.googleapis.com --project=$projectnumber
ב-Cloud Shell, מעדכנים את חשבון סוכן השירות עם התפקיד compute.networkAdmin.
gcloud projects add-iam-policy-binding $projectid --member="serviceAccount:service-$projectnumber@gcp-sa-aiplatform.iam.gserviceaccount.com" --role="roles/compute.networkAdmin"
ב-Cloud Shell, מעדכנים את חשבון סוכן השירות בתפקיד dns.peer.
gcloud projects add-iam-policy-binding $projectid --member="serviceAccount:service-$projectnumber@gcp-sa-aiplatform.iam.gserviceaccount.com" --role="roles/dns.peer"
עדכון חשבון השירות שמוגדר כברירת מחדל
מעניקים לחשבון השירות שמוגדר כברירת מחדל גישה ל-Vertex AI. חשוב לזכור: יכול להיות שיעבור זמן עד שהשינוי בהרשאות יתעדכן.
ב-Cloud Shell, מעדכנים את חשבון השירות שמוגדר כברירת מחדל עם התפקיד aiplatform.user.
gcloud projects add-iam-policy-binding $projectid \
  --member="serviceAccount:$projectnumber-compute@developer.gserviceaccount.com" \
    --role="roles/aiplatform.user"
12. Proxy VM Tcpdump
כדי לאמת את הקישוריות של כתובת ה-IP מ-Agent Engine, אפשר להשתמש ב-TCPDUMP. כך נוכל לעקוב אחרי תקשורת שמקורה ברשת המשנה של רכיב PSC Network Attachment, 192.168.10.0/28, כשמפעילים את בקשת ה-GET מ-Agent Engine לכתובת ה-URL הציבורית.
מ-Cloud Shell, מתחברים באמצעות SSH למכונה הווירטואלית של ה-proxy.
gcloud compute ssh --zone us-central1-a "proxy-vm" --tunnel-through-iap --project $projectid
ממערכת ההפעלה של מכונת ה-VM של ה-proxy, מריצים את הפקודה tcpdump.
sudo tcpdump -i any net 192.168.10.0/28 -nn
13. פריסת Agent Engine
הערה: כדי להשלים את המשימות בקטע הזה, נשתמש במסוף GCP ובקובץ notebook של JupyterLab.
בקטע הבא תיצרו מחברת שמבצעת את המשימות הבאות:
- משתמש ב-Frankfurter API (https://api.frankfurter.app/) כדי לקבל נתוני שער חליפין
- הפניה לשרת proxy מפורש (proxy_server) שמטרגט את מכונת ה-proxy ב-VPC של הצרכנים באמצעות FQDN proxy-vm.demo.com
- הגדרה של dnsPeeringConfigs "domain": "demo.com."
מריצים את משימת האימון במכונת Vertex AI Workbench.
- במסוף Google Cloud, עוברים אל Vertex AI → Workbench.
- ליד השם של מופע Vertex AI Workbench (workbench-tutorial), לוחצים על Open JupyterLab. המכונה של Vertex AI Workbench תיפתח ב-JupyterLab.
- בוחרים באפשרות 'קובץ' > 'חדש' > 'מחברת'.
- בוחרים באפשרות Kernel (ליבה) > Python 3.
מתקינים את ספריות Python הנדרשות: מתקינים את הספריות שנדרשות ל-Agent Engine, כולל pyyaml, google-cloud-aiplatform, cloudpickle, google-cloud-api-keys ו-langchain-google-vertexai.
במחברת JupyterLab, יוצרים תא חדש ומריצים את הפקודה הבאה.
!pip install pyyaml
!pip install google-cloud-aiplatform[agent_engines,langchain]==1.96.0
!pip install cloudpickle==3.1.1
!pip install google-cloud-api-keys
!pip install langchain-google-vertexai==2.0.24
הפעלה מחדש של ליבת Jupyter Notebook: מוודאים שהספריות שהותקנו לאחרונה נטענות בצורה תקינה.
במחברת JupyterLab, יוצרים תא חדש ומריצים את הפקודה הבאה.
# Restart the notebook kernel after install, so you can run langchain successfully.

import IPython

app = IPython.Application.instance()
app.kernel.do_shutdown(True)
הגדרת משתני פרויקט וקטגוריה: מגדירים את מזהה הפרויקט בענן ב-Google Cloud, מספר הפרויקט, שם השירות, ספריית GCS, נקודת הקצה, שם הקטגוריה והמיקום.
לפני שמריצים את התא, צריך לעדכן את השדות הבאים
- PROJECT_ID = "enter-your-projectid"
- PROJECT_NUMBER = "enter-your-projectnumber"
- BUCKET= "enter-a-unique-bucket-name"
הערה: בשלב הבא נשתמש במשתנה BUCKET כדי ליצור קטגוריה של Cloud Storage.
במחברת JupyterLab, יוצרים תא חדש, מעדכנים ומריצים את הפקודה הבאה.
PROJECT_ID = "enter-your-projectid"  #@param {type:"string"}
PROJECT_NUMBER = "enter-your-projectnumber"  #@param {type:"string"}
SERVICE_NAME = "aiplatform"  #@param ["autopush-aiplatform", "staging-aiplatform", "aiplatform"]
# @markdown  Specify where your agent code should be written in GCS:
GCS_DIR = "reasoning-engine-test"  #@param {type:"string"}
ENDPOINT = "https://us-central1-aiplatform.googleapis.com" # @param ["https://us-central1-aiplatform.googleapis.com", "https://us-central1-autopush-aiplatform.sandbox.googleapis.com", "https://us-central1-staging-aiplatform.sandbox.googleapis.com"]
BUCKET= "enter-a-unique-bucket-name" #@param {type:"string"}
LOCATION="us-central1" #@param {type:"string"}
יצירת קטגוריה ב-GCS: יצירת קטגוריה ב-Cloud Storage לאחסון קוד הסוכן.
במחברת JupyterLab, יוצרים תא חדש ומריצים את הפקודה הבאה.
!gcloud storage buckets create gs://{BUCKET}
הגדרת שם של קובץ מצורף עם הרשת: מציינים את השם של קובץ מצורף עם הרשת של Private Service Connect.
במחברת JupyterLab, יוצרים תא חדש ומריצים את הפקודה הבאה.
NETWORK_ATTACHMENT_NAME = 'psc-network-attachment' #@param {type:"string"}
מאתחלים ספריות לקוח של Python: מגדירים את ספריות הלקוח הנדרשות לשירותי Google Cloud.
במחברת JupyterLab, יוצרים תא חדש ומריצים את הפקודה הבאה.
import json
import pprint

import cloudpickle
from google import auth as google_auth
from google.auth.transport import requests as google_requests
from google.cloud import storage
import yaml


def get_identity_token():
    """Gets ID token for calling Cloud Run."""
    credentials, _ = google_auth.default()
    auth_request = google_requests.Request()
    credentials.refresh(auth_request)
    return credentials.id_token

if not GCS_DIR or "your_ldap" in GCS_DIR:
    raise ValueError("GCS_DIR must be set or you must set your ldap.")

if not PROJECT_ID:
    raise ValueError("PROJECT_ID must be set.")


client = storage.Client(project=PROJECT_ID)
bucket = client.get_bucket(BUCKET)
הגדרת הסוכן והכלים: מגדירים את המחלקה StreamingAgent ואת הפונקציה get_exchange_rate כדי לאחזר שערי חליפין באמצעות Frankfurter API דרך ה-proxy המפורש.
במחברת JupyterLab, יוצרים תא חדש ומריצים את ההגדרות שבהמשך. שימו לב לנקודות הבאות:
- הפונקציה def get_exchange_rate תשתמש ב-Frankfurter API (https://api.frankfurter.app/) כדי לקבל את נתוני שער החליפין.
- proxy_server = "http://proxy-vm.demo.com:8888" FQDN משויך למכונת ה-VM של ה-proxy שנפרסה ב-VPC של הצרכן. אנחנו משתמשים ב-DNS peering כדי לפתור את ה-FQDN בשלב מאוחר יותר.
from langchain_google_vertexai import ChatVertexAI
from langchain.agents import AgentExecutor
from langchain.agents.format_scratchpad.tools import format_to_tool_messages
from langchain.agents.output_parsers.tools import ToolsAgentOutputParser
from langchain.tools.base import StructuredTool
from langchain_core import prompts
from re import S
from typing import Callable, Sequence
import google.auth
import vertexai


class StreamingAgent:

    def __init__(
            self,
            model: str,
            tools: Sequence[Callable],
            project_id: str,
        ):
        self.model_name = model
        self.tools = tools
        self.project_id = project_id

    def set_up(self):
        """All unpickle-able logic should go here.

        The .set_up() method should not be called for an object that is being
        prepared for deployment.
        """
        creds, _ = google.auth.default(quota_project_id=self.project_id)
        vertexai.init(project=self.project_id, location="us-central1", credentials=creds)

        prompt = {
            "input": lambda x: x["input"],
            "agent_scratchpad": (
                lambda x: format_to_tool_messages(x["intermediate_steps"])
            ),
        } | prompts.ChatPromptTemplate.from_messages([
            ("user", "{input}"),
            prompts.MessagesPlaceholder(variable_name="agent_scratchpad"),
        ])

        llm = ChatVertexAI(model_name=self.model_name)
        if self.tools:
            llm = llm.bind_tools(tools=self.tools)

        self.agent_executor = AgentExecutor(
            agent=prompt | llm | ToolsAgentOutputParser(),
            tools=[StructuredTool.from_function(tool) for tool in self.tools],
        )

    def query(self, input: str):
        """Query the application.

        Args:
            input: The user prompt.

        Returns:
            The output of querying the application with the given input.
        """
        return self.agent_executor.invoke(input={"input": input})

    def stream_query(self, input: str):
        """Query the application and stream the output.

        Args:
            input: The user prompt.

        Yields:
            Chunks of the response as they become available.
        """
        for chunk in self.agent_executor.stream(input={"input": input}):
            yield chunk

def get_exchange_rate(
    currency_from: str = "USD",
    currency_to: str = "EUR",
    currency_date: str = "latest",
):
    """Retrieves the exchange rate between two currencies on a specified date.

    Uses the Frankfurter API (https://api.frankfurter.app/) to obtain
    exchange rate data.

    Args:
        currency_from: The base currency (3-letter currency code).
            Defaults to "USD" (US Dollar).
        currency_to: The target currency (3-letter currency code).
            Defaults to "EUR" (Euro).
        currency_date: The date for which to retrieve the exchange rate.
            Defaults to "latest" for the most recent exchange rate data.
            Can be specified in YYYY-MM-DD format for historical rates.

    Returns:
        dict: A dictionary containing the exchange rate information.
            Example: {"amount": 1.0, "base": "USD", "date": "2023-11-24",
                "rates": {"EUR": 0.95534}}
    """
    import requests

    proxy_server = "http://proxy-vm.demo.com:8888" # This is the VM's FQDN to reach the proxy vm in the consumers network

    proxies = {
       "http": proxy_server,
       "https": proxy_server,
    }
    response = requests.get(
        f"https://api.frankfurter.app/{currency_date}",
        params={"from": currency_from, "to": currency_to},
        proxies=proxies,
    )
    return response.json()
העלאת קובצי סוכן ל-Cloud Storage: מעלים את הסוכן שעבר סריאליזציה ואת הדרישות שלו לקטגוריית GCS שמוגדרת לכך.
במחברת JupyterLab, יוצרים תא חדש ומריצים את הפקודה הבאה:
# Upload files to Cloud Storage.
if not GCS_DIR:
    raise ValueError("GCS_DIR must be set.")

FILE = "streaming_agent.pkl"
blob = bucket.blob(f"{GCS_DIR}/{FILE}")
with blob.open("wb") as f:
    cloudpickle.dump(
        StreamingAgent(
            model="gemini-2.0-flash-001",  # Required.
            tools=[get_exchange_rate],  # Optional.
            project_id=PROJECT_ID
        ), f)


requirements = """
google-cloud-aiplatform[agent_engines,langchain]==1.96.0
cloudpickle==3.1.1
"""

blob = bucket.blob(f"{GCS_DIR}/requirements-streaming.txt")
blob.upload_from_string(requirements)

!gsutil ls gs://{BUCKET}/{GCS_DIR}
פריסת Agent Engine: פורסים את Agent Engine, מגדירים אותו באמצעות ממשק ה-PSC וחיבור DNS כדי לפתור את ה-FQDN של מכונת ה-proxy הווירטואלית ב-VPC של הלקוח.
במחברת JupyterLab, יוצרים את התא הבא ומריצים אותו. שימו לב לנקודות הבאות:
- הגדרת DNS Peering ל-VPC לצרכנים מתבצעת באמצעות dnsPeeringConfigs (dnsPeeringConfigs) עבור שם הדומיין demo.com.
import requests


token = !gcloud auth application-default print-access-token

response = requests.post(
    f"{ENDPOINT}/v1beta1/projects/{PROJECT_ID}/locations/{LOCATION}/reasoningEngines",
    headers={
        "Content-Type": "application/json; charset=utf-8",
        "Authorization": f"Bearer {token[0]}"
    },
    data=json.dumps({
        "displayName": "PSC-I Explicit Proxy",
        "description": "test psc-i agent + proxy vm",
        "spec": {
            "packageSpec": {
                "pickleObjectGcsUri": f"gs://{BUCKET}/{GCS_DIR}/streaming_agent.pkl",
                "requirementsGcsUri": f"gs://{BUCKET}/{GCS_DIR}/requirements-streaming.txt",
                "pythonVersion": "3.10"
            },
            "deploymentSpec": {
                "pscInterfaceConfig": {
                    "networkAttachment": NETWORK_ATTACHMENT_NAME,
                    "dnsPeeringConfigs": [
                    {
                      "domain": "demo.com.",
                      "targetProject": PROJECT_ID,
                      "targetNetwork": "consumer-vpc", #Consumer VPC
                    },
                  ],
                }
            }
        },
    })
)

pprint.pprint(json.loads(response.content))
reasoning_engine_id = json.loads(response.content)["name"].split("/")[5]
pprint.pprint(reasoning_engine_id)
מעקב אחרי סטטוס הפריסה: בודקים את הסטטוס של פעולת הפריסה של Agent Engine.
במחברת JupyterLab, יוצרים תא חדש ומריצים את הפקודה הבאה.
operation_id = json.loads(response.content)["name"].split("/")[7]
pprint.pprint(operation_id)
במחברת JupyterLab, יוצרים תא חדש ומריצים את הפקודה הבאה.
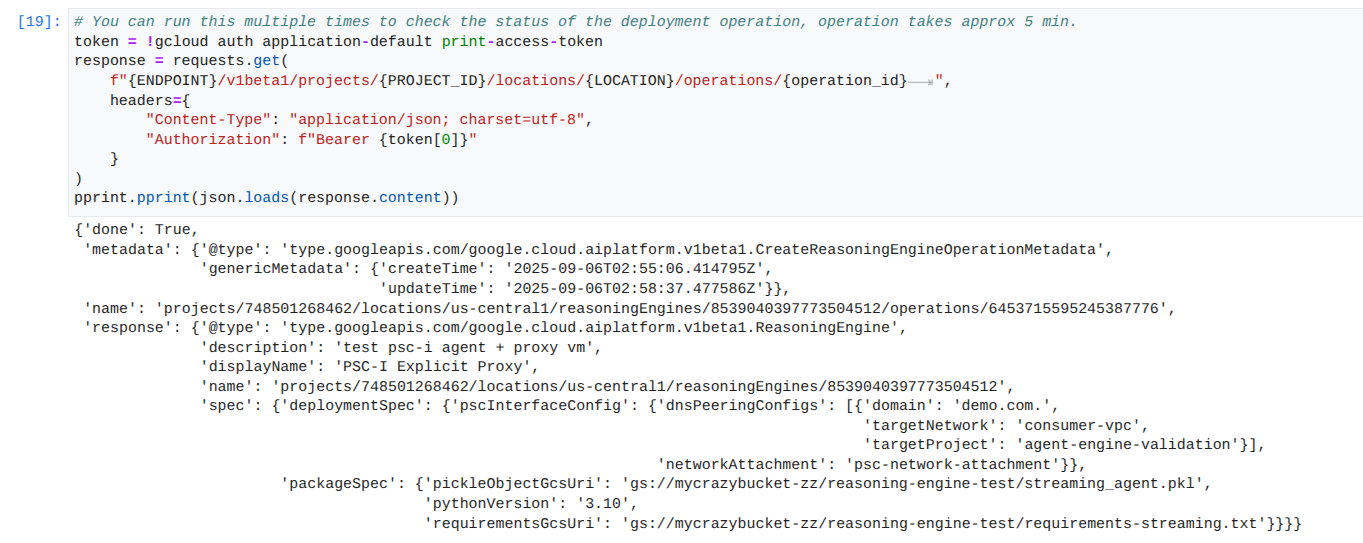
הערה: הפעולה הזו יכולה להימשך כ-5 דקות. מריצים מחדש את התא כדי לבדוק את ההתקדמות. אל תמשיכו לקטע הבא עד שיוצג פלט שדומה לזה שמופיע בצילום המסך שלמטה.
# You can run this multiple times to check the status of the deployment operation, operation takes approx 5 min.
token = !gcloud auth application-default print-access-token
response = requests.get(
    f"{ENDPOINT}/v1beta1/projects/{PROJECT_ID}/locations/{LOCATION}/operations/{operation_id}        ",
    headers={
        "Content-Type": "application/json; charset=utf-8",
        "Authorization": f"Bearer {token[0]}"
    }
)
pprint.pprint(json.loads(response.content))
דוגמה להרצה מוצלחת:
שליחת שאילתה לסוכן שפרסתם: שולחים שאילתה ל-Agent Engine שפרסתם כדי לבדוק את הפונקציונליות שלו.
במחברת JupyterLab, יוצרים תא חדש ומריצים את הפקודה הבאה.
response = requests.post(
    f"{ENDPOINT}/v1beta1/projects/{PROJECT_ID}/locations/{LOCATION}/reasoningEngines/{reasoning_engine_id}:query",
    headers={
        "Content-Type": "application/json; charset=utf-8",
        "Authorization": f"Bearer {token[0]}"
    },
    data=json.dumps({ "input": {"input": "What is the exchange rate from US dollars to Euro?"} })
)
print(response.text)
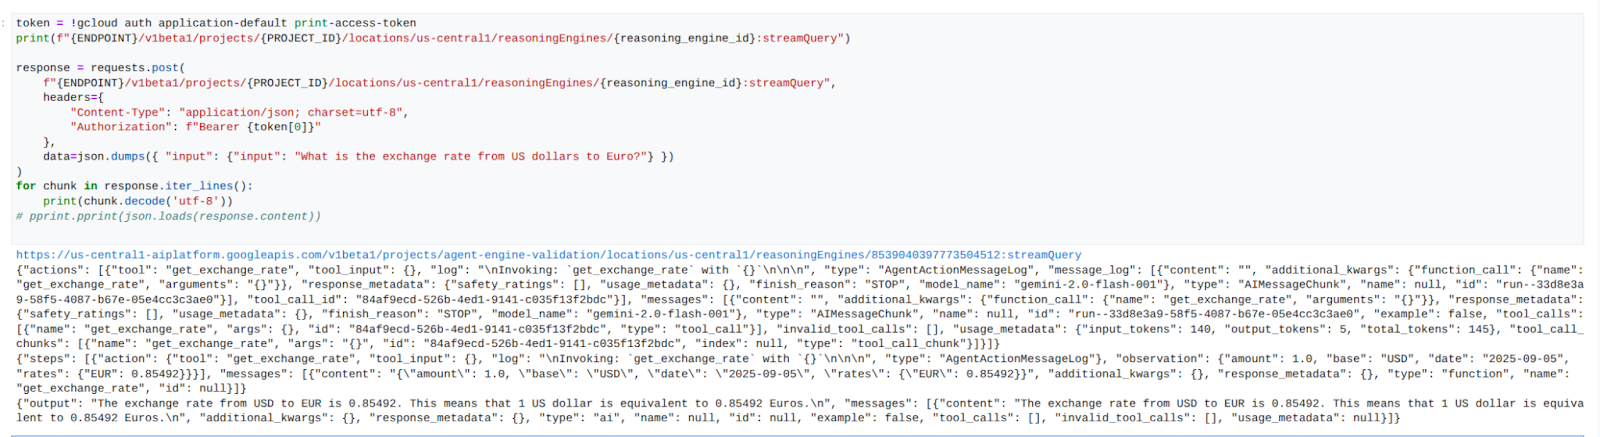
הזרמת תוצאות של שאילתות: הזרמת הפלט משאילתת Agent Engine.
במחברת JupyterLab, יוצרים תא חדש ומריצים את הפקודה הבאה שתפעיל את קריאת ה-API לכתובת ה-URL הציבורית באמצעות שרת proxy מפורש ב-VPC של הצרכנים.
token = !gcloud auth application-default print-access-token
print(f"{ENDPOINT}/v1beta1/projects/{PROJECT_ID}/locations/us-central1/reasoningEngines/{reasoning_engine_id}:streamQuery")

response = requests.post(
    f"{ENDPOINT}/v1beta1/projects/{PROJECT_ID}/locations/us-central1/reasoningEngines/{reasoning_engine_id}:streamQuery",
    headers={
        "Content-Type": "application/json; charset=utf-8",
        "Authorization": f"Bearer {token[0]}"
    },
    data=json.dumps({ "input": {"input": "What is the exchange rate from US dollars to Euro?"} })
)
for chunk in response.iter_lines():
    print(chunk.decode('utf-8'))
# pprint.pprint(json.loads(response.content))
דוגמה להרצה מוצלחת:
14. אימות Tcpdump
מעיינים בפלט של tcpdump שמפרט את התקשורת בין כתובת ה-IP של קובץ הרשת של PSC שמשמש את Agent Engine לבין Prox-VM אחרי פרסום הבקשה.
user@proxy-vm:~$ sudo tcpdump -i any net 192.168.10.0/28 -nn
tcpdump: data link type LINUX_SLL2
tcpdump: verbose output suppressed, use -v[v]... for full protocol decode
listening on any, link-type LINUX_SLL2 (Linux cooked v2), snapshot length 262144 bytes
22:17:53.983212 ens4  In  IP 192.168.10.2.22261 > 10.10.10.2.8888: Flags [S], seq 3841740961, win 28800, options [mss 1440,sackOK,TS val 4245243253 ecr 0,nop,wscale 7], length 0
22:17:53.983252 ens4  Out IP 10.10.10.2.8888 > 192.168.10.2.22261: Flags [S.], seq 2232973833, ack 3841740962, win 64768, options [mss 1420,sackOK,TS val 2251247643 ecr 4245243253,nop,wscale 7], length 0
22:17:53.985167 ens4  In  IP 192.168.10.2.22261 > 10.10.10.2.8888: Flags [.], ack 1, win 225, options [nop,nop,TS val 4245243256 ecr 2251247643], length 0
22:17:53.986476 ens4  In  IP 192.168.10.2.22261 > 10.10.10.2.8888: Flags [P.], seq 1:45, ack 1, win 16384, options [nop,nop,TS val 4245243256 ecr 2251247643], length 44
22:17:53.986485 ens4  Out IP 10.10.10.2.8888 > 192.168.10.2.22261: Flags [.], ack 45, win 506, options [nop,nop,TS val 2251247646 ecr 4245243256], length 0
22:17:54.043347 ens4  Out IP 10.10.10.2.8888 > 192.168.10.2.22261: Flags [P.], seq 1:71, ack 45, win 506, options [nop,nop,TS val 2251247703 ecr 4245243256], length 70
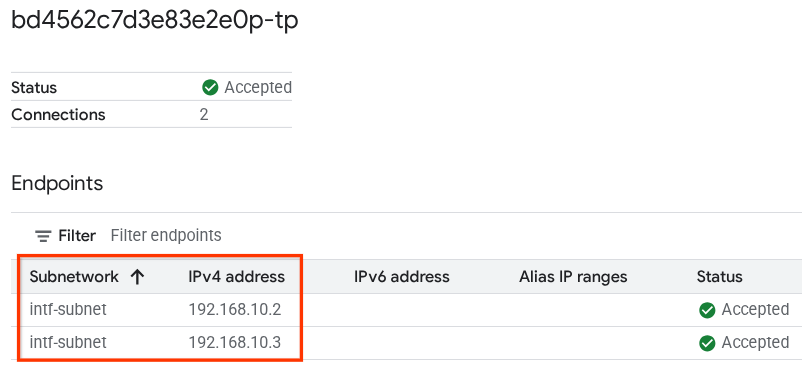
15. אימות של ממשק PSC
אפשר גם לראות את כתובות ה-IP של Network Attachment שבהן נעשה שימוש ב-Agent Engine. לשם כך, עוברים אל:
Network Services (שירותי רשת) → Private Service Connect → Network Attachment (קובץ מצורף עם הרשת) → psc-network-attachment
בוחרים את הפרויקט של הדייר (שם הפרויקט מסתיים ב-tp)
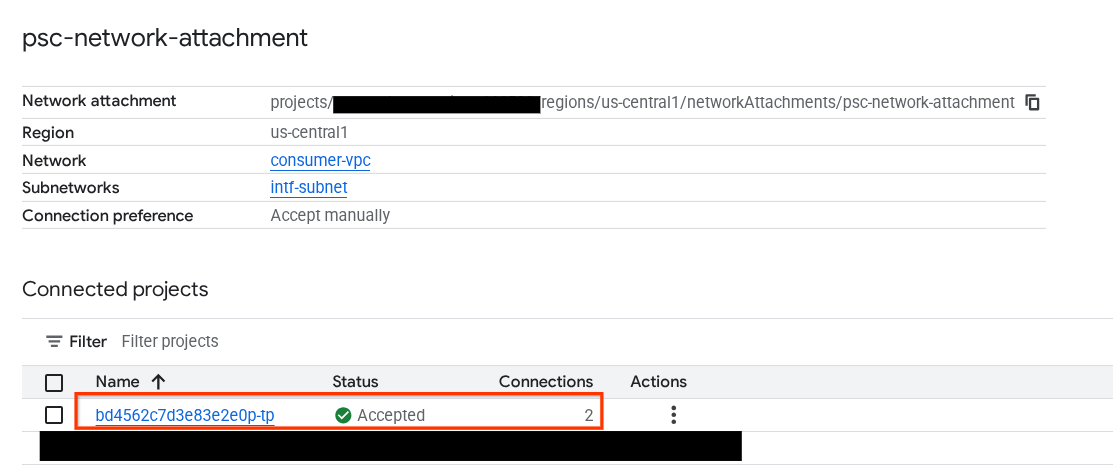
השדה המודגש מציין את כתובת ה-IP שמשמשת את Agent Engine מחיבור הרשת של PSC.
16. אימות ב-Cloud Logging
יוצאים מהסשן של TCPDump במכונת ה-proxy הווירטואלית ומבצעים PING ל-Frankfurter api.frankfurter.app כדי לקבל את כתובת ה-IP הציבורית המשויכת.
ping -c4 api.frankfurter.app
בדוגמה, הכתובת 104.26.1.198 מזוהה ככתובת ה-IP הציבורית של api.frankfurter.app
user@proxy-vm:~$ ping -c4 api.frankfurter.app
PING api.frankfurter.app (104.26.1.198) 56(84) bytes of data.
64 bytes from 104.26.1.198 (104.26.1.198): icmp_seq=1 ttl=61 time=10.9 ms
64 bytes from 104.26.1.198 (104.26.1.198): icmp_seq=2 ttl=61 time=10.9 ms
64 bytes from 104.26.1.198 (104.26.1.198): icmp_seq=3 ttl=61 time=10.9 ms
64 bytes from 104.26.1.198 (104.26.1.198): icmp_seq=4 ttl=61 time=10.9 ms
נבדוק את הרישום ביומן של NAT כדי לראות אם נצפתה תעבורת נתונים עבור 104.26.1.198.
עוברים אל:
מעקב → כלי לבדיקת יומנים
משתמשים במסנן הבא:
resource.type="nat_gateway"
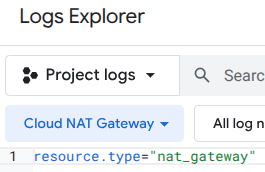
בוחרים את תקופת הזמן ולוחצים על 'הפעלת שאילתה'.

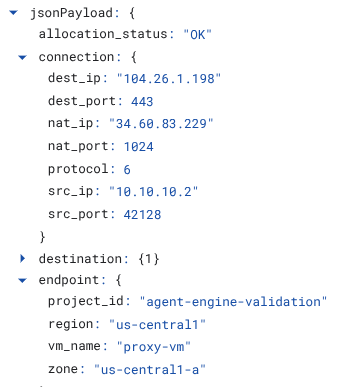
מרחיבים את רשומה ביומן שמזהה את כתובת ה-IP הציבורית (יעד) (104.26.1.198) של api.frankfurter.app ואת כתובת ה-IP של המקור ואת השם של מכונת ה-proxy שמאמתת את השימוש ב-proxy מפורש ליציאה מהאינטרנט.
17. הסרת המשאבים
במחברת JupyterLab, יוצרים תא חדש ומריצים את הפקודה הבאה שתפעיל את המחיקה של פריסת Agent Engine.
token = !gcloud auth application-default print-access-token

response = requests.delete(
    f"{ENDPOINT}/v1beta1/projects/{PROJECT_ID}/locations/us-central1/reasoningEngines/{reasoning_engine_id}",
    headers={
        "Content-Type": "application/json; charset=utf-8",
        "Authorization": f"Bearer {token[0]}"
    },
)
print(response.text)
ב-Cloud Shell, מוחקים את רכיבי ההדרכה.
gcloud dns record-sets delete proxy-vm.demo.com --zone=private-dns-codelab  --type=A

gcloud dns managed-zones delete private-dns-codelab

gcloud compute instances delete proxy-vm --zone=us-central1-a --quiet

gcloud compute instances delete workbench-tutorial --zone=us-central1-a --quiet

gcloud compute routers delete cloud-router-for-nat --region=us-central1 --quiet

gcloud compute network-attachments delete psc-network-attachment --region=us-central1 --quiet

gcloud compute networks subnets delete intf-subnet rfc1918-subnet1 --region=us-central1 --quiet

gcloud compute networks delete consumer-vpc --quiet
18. מזל טוב
הגדרתם ואימתתם בהצלחה את Agent Engine שנפרס באמצעות ממשק Private Service Connect עם יציאה לאינטרנט שמתבצעת דרך שרת proxy מפורש.
יצרתם את התשתית של הצרכן והוספתם קובץ מצורף לרשת שמאפשר ליצרן ליצור מכונת VM עם כמה כרטיסי NIC כדי לגשר על התקשורת בין הצרכן ליצרן. למדתם איך ליצור שרת proxy מפורש וקישור בין רשתות שכנות (peering) של DNS שמאפשרים קישוריות לאינטרנט.
Cosmopup חושב שסרטוני הדרכה הם מדהימים!!