1. 소개
Private Service Connect 인터페이스는 프로듀서 가상 프라이빗 클라우드 (VPC) 네트워크가 소비자 VPC 네트워크의 다양한 대상에 연결을 시작할 수 있게 해주는 리소스입니다. 프로듀서 및 소비자 네트워크는 다른 프로젝트 및 조직에 포함될 수 있습니다.
네트워크 연결이 Private Service Connect 인터페이스의 연결을 수락하면 Google Cloud는 네트워크 연결에 지정된 소비자 서브넷의 IP 주소를 인터페이스에 할당합니다. 소비자 및 프로듀서 네트워크는 내부 IP 주소를 사용하여 연결되고 통신할 수 있습니다.
네트워크 연결과 Private Service Connect 인터페이스 간의 연결은 Private Service Connect 엔드포인트와 서비스 연결 간의 연결과 유사하지만 여기에는 두 가지 주요 차이점이 있습니다.
- 네트워크 연결을 사용하면 프로듀서 네트워크가 소비자 네트워크 (관리형 서비스 이그레스)로의 연결을 시작할 수 있고, 엔드포인트를 사용하면 소비자 네트워크가 프로듀서 네트워크 (관리형 서비스 인그레스)에 대한 연결을 시작할 수 있습니다.
- Private Service Connect 인터페이스 연결은 전환됩니다. 즉, 프로듀서 네트워크는 소비자 네트워크에 연결된 다른 네트워크와 통신할 수 있습니다.
Vertex AI PSC 인터페이스 도달 가능성 고려사항
- PSC 인터페이스는 RFC1918 주소 블록 내의 VPC 또는 온프레미스 기반 대상으로 트래픽을 라우팅할 수 있습니다.
- 비 RFC-1918 주소 블록을 타겟팅하는 PSC 인터페이스에는 RFC-1918 주소를 사용하여 소비자의 VPC에 배포된 명시적 프록시가 필요합니다. Vertex AI 배포 내에서 프록시는 대상 엔드포인트의 FQDN과 함께 정의되어야 합니다.
- PSC 인터페이스만 사용하여 배포를 구성하면 기본 인터넷 액세스가 유지됩니다. 이 아웃바운드 트래픽은 안전한 Google 관리 테넌트 네트워크에서 직접 나갑니다.
Vertex AI PSC-Interface VPC-SC 고려사항
- 프로젝트가 VPC 서비스 제어 경계에 속하는 경우 데이터 무단 반출이 방지되도록 경계에서 Google 관리 테넌트 기본 인터넷 액세스를 차단합니다.
- 이 시나리오에서 배포가 공용 인터넷에 액세스하도록 허용하려면 트래픽이 VPC를 경유하도록 보안 이그레스 경로를 명시적으로 구성해야 합니다.
- 이를 달성하기 위한 권장 방법은 RFC1918 주소를 사용하여 VPC 경계 내에 프록시 서버를 설정하고 프록시 VM이 인터넷에 액세스할 수 있도록 Cloud NAT 게이트웨이를 만드는 것입니다.
자세한 내용은 다음 리소스를 참고하세요.
에이전트 배포 | Vertex AI의 생성형 AI | Google Cloud
Vertex AI 리소스에 대한 Private Service Connect 인터페이스 설정 | Google Cloud
빌드할 항목
이 튜토리얼에서는 Private Service Connect (PSC) 인터페이스로 배포된 포괄적인 에이전트 엔진을 빌드하여 RFC1918 주소로 소비자의 VPC에 배포된 프록시 VM을 통해 공개 사이트 (https://api.frankfurter.app/)에 연결할 수 있도록 합니다. 이 예시 배포는 VPC-SC 지원 프로젝트 또는 테넌트 VPC 대신 고객 네트워크를 통해 인터넷 이그레스가 필요한 관리자에게 적용됩니다.
그림 1
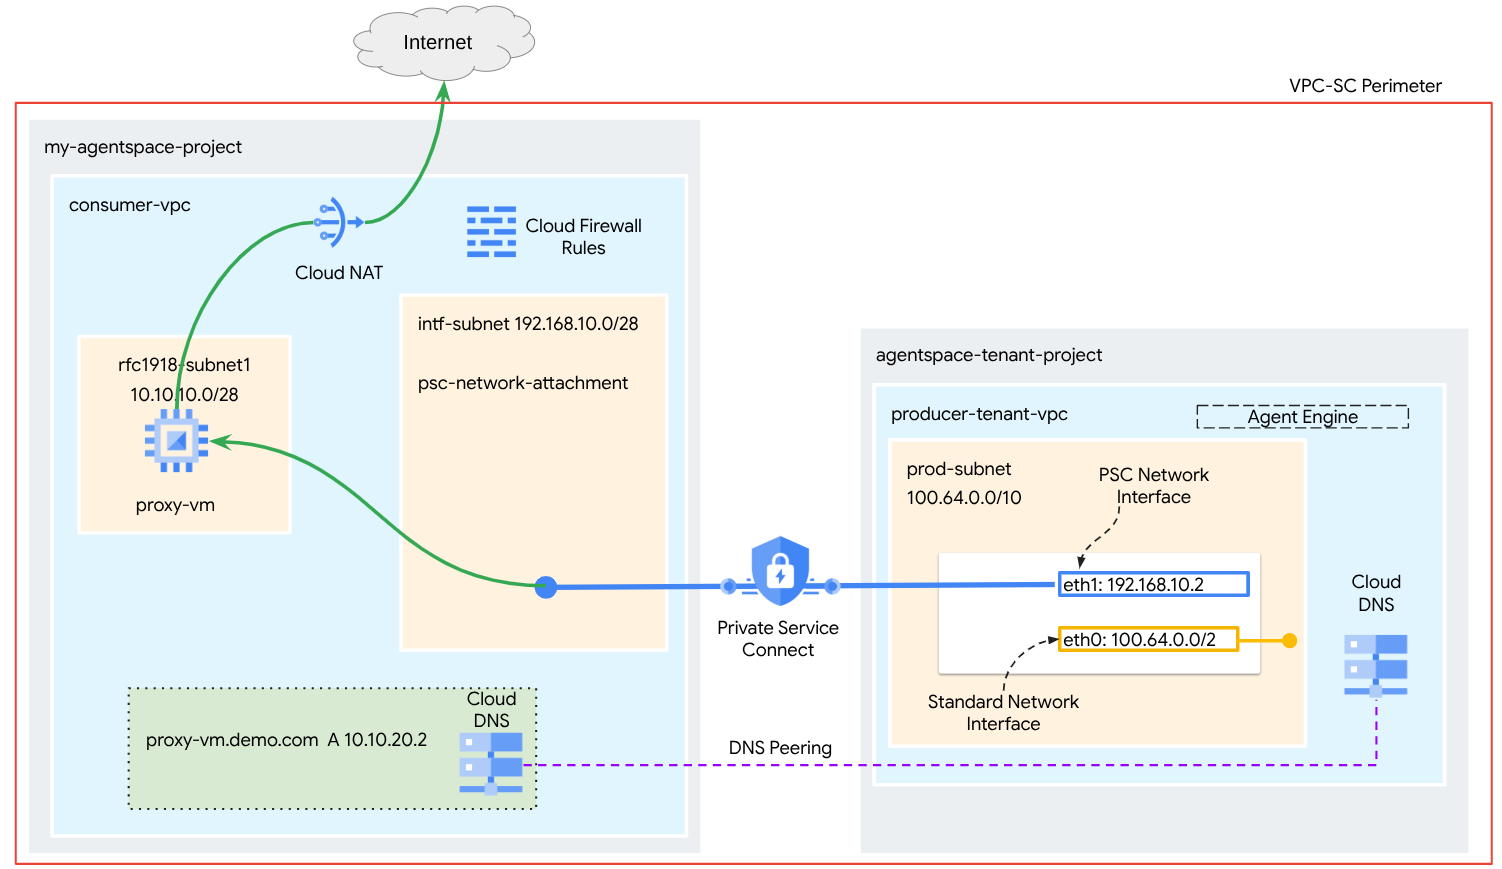
DNS 피어링을 활용하여 에이전트 엔진을 호스팅하는 테넌트 프로젝트에서 소비자 네트워크 proxy-vm을 확인하는 소비자 VPC에 단일 psc-network-attachment를 만들어 다음과 같은 사용 사례를 만듭니다.
명시적 프록시 역할을 하도록 에이전트 엔진을 배포하고 프록시 VM을 구성하여 공개 URL https://api.frankfurter.app에 도달할 수 있도록 합니다.
학습할 내용
- 네트워크 연결을 만드는 방법
- 프로듀서가 네트워크 연결을 사용하여 PSC 인터페이스를 만드는 방법
- DNS 피어링을 사용하여 공급자에서 소비자로 통신을 설정하는 방법
- 인터넷 이그레스를 위한 프록시 VM을 배포하고 사용하는 방법
필요한 항목
Google Cloud 프로젝트
IAM 권한
- Compute 네트워크 관리자 (roles/compute.networkAdmin)
- Compute 인스턴스 관리자 (roles/compute.instanceAdmin)
- Compute 보안 관리자 (roles/compute.securityAdmin)
- DNS 관리자 (roles/dns.admin)
- IAP 보안 터널 사용자 (roles/iap.tunnelResourceAccessor)
- 로깅 관리자 (roles/logging.admin)
- Notebooks 관리자 (roles/notebooks.admin)
- 프로젝트 IAM 관리자 (roles/resourcemanager.projectIamAdmin)
- 서비스 계정 관리자 (roles/iam.serviceAccountAdmin)
- 서비스 사용량 관리자 (roles/serviceusage.serviceUsageAdmin)
2. 시작하기 전에
튜토리얼을 지원하도록 프로젝트 업데이트
이 튜토리얼에서는 Cloud Shell에서 gcloud 구성 구현을 지원하기 위해 $variables를 사용합니다.
Cloud Shell 내에서 다음을 실행합니다.
gcloud config list project
gcloud config set project [YOUR-PROJECT-NAME]
projectid=YOUR-PROJECT-NAME
echo $projectid
API 사용 설정
Cloud Shell 내에서 다음을 실행합니다.
gcloud services enable "compute.googleapis.com"
gcloud services enable "aiplatform.googleapis.com"
gcloud services enable "dns.googleapis.com"
gcloud services enable "notebooks.googleapis.com"
gcloud services enable "storage.googleapis.com"
gcloud services enable "iap.googleapis.com"
API가 사용 설정되었는지 확인
gcloud services list --enabled
3. 소비자 설정
소비자 VPC 만들기
이 VPC는 고객 프로젝트에 있습니다. 다음 리소스가 이 VPC에 생성됩니다.
- 컨슈머 서브넷
- 네트워크 연결 서브넷
- Cloud Router (Cloud NAT에 필요)
- Cloud NAT
Cloud Shell 내에서 다음을 실행합니다.
gcloud compute networks create consumer-vpc --project=$projectid --subnet-mode=custom
소비자 서브넷 만들기
Cloud Shell 내에서 프록시 VM의 서브넷을 만듭니다.
gcloud compute networks subnets create rfc1918-subnet1 --project=$projectid --range=10.10.10.0/28 --network=consumer-vpc --region=us-central1
Private Service Connect 네트워크 연결 서브넷 만들기
Cloud Shell 내에서 PSC 네트워크 연결의 서브넷을 만듭니다.
gcloud compute networks subnets create intf-subnet --project=$projectid --range=192.168.10.0/28 --network=consumer-vpc --region=us-central1
Cloud Router 및 NAT 구성
이 튜토리얼에서는 공개 IP 주소가 없는 프록시 VM에 인터넷 액세스를 제공하기 위해 Cloud NAT를 사용합니다. Cloud NAT를 사용하면 비공개 IP 주소만 있는 VM이 인터넷에 연결하여 소프트웨어 패키지 설치와 같은 작업을 실행할 수 있습니다.
Cloud Shell 내에서 Cloud Router를 만듭니다.
gcloud compute routers create cloud-router-for-nat --network consumer-vpc --region us-central1
Cloud Shell 내에서 로깅이 사용 설정된 NAT 게이트웨이를 만듭니다. 로깅을 사용하여 Frankfurter API (https://api.frankfurter.app/)의 공개 IP에 대한 액세스를 검증합니다.
gcloud compute routers nats create cloud-nat-us-central1 --router=cloud-router-for-nat --auto-allocate-nat-external-ips --nat-all-subnet-ip-ranges --region us-central1 --enable-logging --log-filter=ALL
4. IAP 사용 설정
IAP가 VM 인스턴스에 연결하도록 하려면 다음과 같은 방화벽 규칙을 만드세요.
- IAP를 사용하여 액세스할 수 있는 모든 VM 인스턴스에 적용됩니다.
- IP 범위 35.235.240.0/20에서의 인그레스 트래픽을 허용합니다. 이 범위에는 IAP가 TCP 전달을 위해 사용하는 모든 IP 주소가 포함됩니다.
Cloud Shell 내에서 IAP 방화벽 규칙을 만듭니다.
gcloud compute firewall-rules create ssh-iap-consumer \
    --network consumer-vpc \
    --allow tcp:22 \
    --source-ranges=35.235.240.0/20
5. 컨슈머 VM 인스턴스 만들기
Cloud Shell 내에서 Agent Engine의 명시적 프록시 역할을 할 소비자 VM 인스턴스인 proxy-vm을 만듭니다. HTTP 트래픽을 프록시하는 애플리케이션으로 tinyproxy를 사용합니다.
gcloud compute instances create proxy-vm \
    --project=$projectid \
    --machine-type=e2-micro \
    --image-family debian-11 \
    --no-address \
    --can-ip-forward \
    --image-project debian-cloud \
    --zone us-central1-a \
    --subnet=rfc1918-subnet1 \
    --shielded-secure-boot \
    --metadata startup-script="#! /bin/bash
      sudo apt-get update
      sudo apt-get install tcpdump
      sudo apt-get install tinyproxy -y
      sudo apt-get install apache2 -y
      sudo service apache2 restart
      echo 'proxy server !!' | tee /var/www/html/index.html
      EOF"
6. Private Service Connect 네트워크 연결
네트워크 연결은 Private Service Connect 인터페이스의 소비자 측을 나타내는 리전별 리소스입니다. 단일 서브넷을 네트워크 연결과 연결하면 프로듀서가 해당 서브넷에서 Private Service Connect 인터페이스에 IP를 할당합니다. 서브넷은 네트워크 연결과 동일한 리전에 있어야 합니다. 네트워크 연결은 프로듀서 서비스와 동일한 리전에 있어야 합니다.
네트워크 연결 만들기
Cloud Shell 내에서 네트워크 연결을 만듭니다.
gcloud compute network-attachments create psc-network-attachment \
    --region=us-central1 \
    --connection-preference=ACCEPT_AUTOMATIC \
    --subnets=intf-subnet
네트워크 연결 나열
Cloud Shell에서 네트워크 연결을 나열합니다.
gcloud compute network-attachments list
네트워크 연결 설명
Cloud Shell 내에서 네트워크 연결을 설명합니다.
gcloud compute network-attachments describe psc-network-attachment --region=us-central1
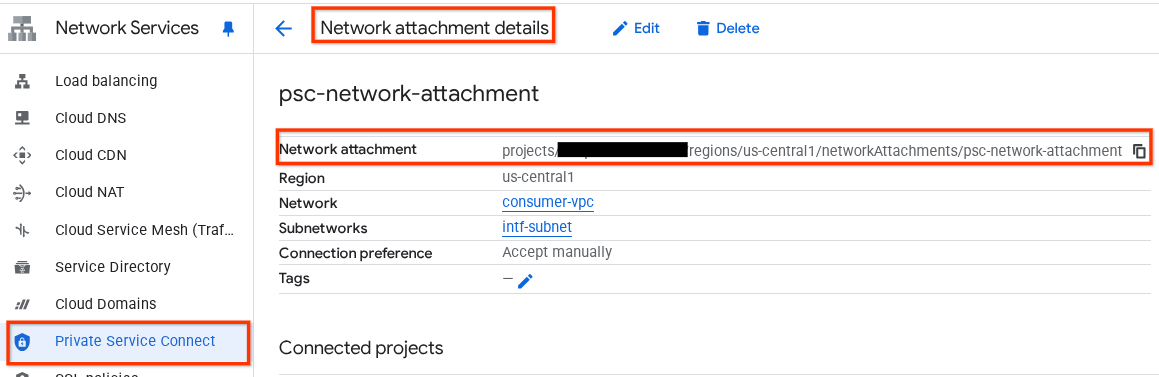
프로듀서가 Private Service Connect 인터페이스를 만들 때 사용할 PSC 네트워크 연결 이름(psc-network-attachment)을 기록해 둡니다.
Cloud 콘솔에서 PSC 네트워크 연결 URL을 보려면 다음으로 이동하세요.
네트워크 서비스 → Private Service Connect → 네트워크 연결 → psc-network-attachment
7. 비공개 DNS 영역
demo.com의 Cloud DNS 영역을 만들고 프록시 VM의 IP 주소를 가리키는 A 레코드로 채웁니다. 나중에 DNS 피어링이 Agent Engine에 배포되어 소비자의 DNS 레코드에 액세스할 수 있게 됩니다.
Cloud Shell 내에서 DNS 이름 demo.com을 만드는 다음 단계를 실행합니다.
gcloud dns --project=$projectid managed-zones create private-dns-codelab --description="" --dns-name="demo.com." --visibility="private" --networks="https://compute.googleapis.com/compute/v1/projects/$projectid/global/networks/consumer-vpc"
DNS A 레코드에 사용되는 인스턴스의 IP 주소를 가져와 저장합니다.
Cloud Shell 내에서 VM 인스턴스에 대해 describe를 실행합니다.
gcloud compute instances describe proxy-vm --zone=us-central1-a | grep networkIP:
Cloud Shell 내에서 VM(proxy-vm.demo.com)의 레코드 세트를 만들고 환경의 출력에 따라 IP 주소를 업데이트해야 합니다.
gcloud dns --project=$projectid record-sets create proxy-vm.demo.com. --zone="private-dns-codelab" --type="A" --ttl="300" --rrdatas="10.10.10.2"
PSC 인터페이스에서 액세스를 허용하는 Cloud 방화벽 규칙 만들기
다음 섹션에서는 PSC 네트워크 연결에서 시작된 트래픽이 소비자 VPC의 프록시 VM에 액세스하도록 허용하는 방화벽 규칙을 만듭니다.
Cloud Shell에서 인그레스 방화벽 규칙을 만듭니다.
gcloud compute firewall-rules create allow-access-to-compute \
    --network=consumer-vpc \
    --action=ALLOW \
    --rules=ALL \
    --direction=INGRESS \
    --priority=1000 \
    --source-ranges="192.168.10.0/28" \
    --destination-ranges="10.10.10.0/28" \
    --enable-logging
8. Jupyter 노트북 만들기
다음 섹션에서는 Jupyter 노트북을 만드는 방법을 안내합니다. 이 노트북은 인터넷 이그레스의 명시적 프록시를 타겟팅하는 Agent Engine을 배포하는 데 사용됩니다.
사용자 관리형 서비스 계정 만들기
다음 섹션에서는 튜토리얼에서 사용되는 Vertex AI Workbench 인스턴스와 연결될 서비스 계정을 만듭니다.
튜토리얼에서 서비스 계정에는 다음 역할이 적용됩니다.
Cloud Shell 내에서 서비스 계정을 만듭니다.
gcloud iam service-accounts create notebook-sa \
    --display-name="notebook-sa"
Cloud Shell 내에서 스토리지 관리자 역할이 있는 서비스 계정을 업데이트합니다.
gcloud projects add-iam-policy-binding $projectid --member="serviceAccount:notebook-sa@$projectid.iam.gserviceaccount.com" --role="roles/storage.admin"
Cloud Shell 내에서 서비스 계정을 Vertex AI 사용자 역할로 업데이트합니다.
gcloud projects add-iam-policy-binding $projectid --member="serviceAccount:notebook-sa@$projectid.iam.gserviceaccount.com" --role="roles/aiplatform.user"
Cloud Shell 내에서 Artifact Registry 관리자 역할로 서비스 계정을 업데이트합니다.
gcloud projects add-iam-policy-binding $projectid --member="serviceAccount:notebook-sa@$projectid.iam.gserviceaccount.com" --role="roles/artifactregistry.admin"
Cloud Shell 내에서 노트북 서비스 계정이 Compute Engine 기본 서비스 계정을 사용하도록 허용합니다.
gcloud iam service-accounts add-iam-policy-binding \
    $(gcloud projects describe $(gcloud config get-value project) --format='value(projectNumber)')-compute@developer.gserviceaccount.com \
    --member="serviceAccount:notebook-sa@$projectid.iam.gserviceaccount.com" \
    --role="roles/iam.serviceAccountUser"
9. 명시적 프록시 업데이트
다음 섹션에서는 명시적 프록시에 SSH로 연결하고 tinyproxy.conf 구성 파일을 업데이트한 후 재설정을 실행해야 합니다.
Cloud Shell 사용
gcloud compute ssh --zone us-central1-a "proxy-vm" --tunnel-through-iap --project $projectid
tinyproxy 구성 파일을 열고 원하는 편집기를 사용하여 업데이트합니다. 다음은 VIM을 사용하는 예입니다.
sudo vim /etc/tinyproxy/tinyproxy.conf

# Locate the "Listen" configuration line to restrict listening to only its private IP address of the Proxy-VM, rather than all interfaces.

Listen 10.10.10.2

# Locate the "Allow" configuration line to allow requests ONLY from the PSC Network Attachment Subnet

Allow 192.168.10.0/24

Save the configs by the following steps:
1. Press the `ESC` key to enter Command Mode.
2. Type `:wq` to save (w) and quit (q).
3. Press `Enter`

Restart the tinyproxy service to apply the changes:
sudo systemctl restart tinyproxy

Validate the tinyproxy service is running:
sudo systemctl status tinyproxy

Perform an exit returning to cloud shell
exit
10. Vertex AI Workbench 인스턴스 만들기
다음 섹션에서는 이전에 만든 서비스 계정(notebook-sa)을 통합하는 Vertex AI Workbench 인스턴스를 만듭니다.
Cloud Shell 내에서 private-client 인스턴스를 만듭니다.
gcloud workbench instances create workbench-tutorial --vm-image-project=cloud-notebooks-managed --vm-image-family=workbench-instances --machine-type=n1-standard-4 --location=us-central1-a --subnet-region=us-central1 --subnet=rfc1918-subnet1 --disable-public-ip --shielded-secure-boot=true --shielded-integrity-monitoring=true --shielded-vtpm=true --service-account-email=notebook-sa@$projectid.iam.gserviceaccount.com
11. Vertex AI 서비스 에이전트 업데이트
Vertex AI는 PSC 인터페이스를 만드는 데 사용되는 PSC 네트워크 연결 서브넷에서 IP 주소를 가져오는 등의 작업을 사용자를 대신하여 실행합니다. 이를 위해 Vertex AI는 네트워크 관리자 권한이 필요한 서비스 에이전트 (아래에 나열됨)를 사용합니다.
service-$projectnumber@gcp-sa-aiplatform.iam.gserviceaccount.com
Cloud Shell 내에서 프로젝트 번호를 가져옵니다.
gcloud projects describe $projectid | grep projectNumber
Cloud Shell 내에서 프로젝트 번호를 설정합니다.
projectnumber=YOUR-PROJECT-Number
Cloud Shell 내에서 AI Platform용 서비스 계정을 만듭니다. 프로젝트에 기존 서비스 계정이 있으면 이 단계를 건너뜁니다.
gcloud beta services identity create --service=aiplatform.googleapis.com --project=$projectnumber
Cloud Shell 내에서 compute.networkAdmin 역할이 있는 서비스 에이전트 계정을 업데이트합니다.
gcloud projects add-iam-policy-binding $projectid --member="serviceAccount:service-$projectnumber@gcp-sa-aiplatform.iam.gserviceaccount.com" --role="roles/compute.networkAdmin"
Cloud Shell 내에서 dns.peer 역할로 서비스 에이전트 계정을 업데이트합니다.
gcloud projects add-iam-policy-binding $projectid --member="serviceAccount:service-$projectnumber@gcp-sa-aiplatform.iam.gserviceaccount.com" --role="roles/dns.peer"
기본 서비스 계정 업데이트
기본 서비스 계정에 Vertex AI 액세스 권한을 부여합니다. 액세스 변경사항이 전파되는 데 다소 시간이 걸릴 수 있습니다.
Cloud Shell 내에서 기본 서비스 계정을 aiplatform.user 역할로 업데이트합니다.
gcloud projects add-iam-policy-binding $projectid \
  --member="serviceAccount:$projectnumber-compute@developer.gserviceaccount.com" \
    --role="roles/aiplatform.user"
12. 프록시 VM Tcpdump
에이전트 엔진에서 IP 연결을 검증하려면 TCPDUMP를 사용하면 됩니다. 이렇게 하면 에이전트 엔진에서 공개 URL로 get 요청을 호출할 때 PSC 네트워크 연결 서브넷(192.168.10.0/28)에서 시작되는 통신을 관찰할 수 있습니다.
Cloud Shell에서 프록시 VM으로 ssh합니다.
gcloud compute ssh --zone us-central1-a "proxy-vm" --tunnel-through-iap --project $projectid
프록시 VM OS에서 tcpdump를 실행합니다.
sudo tcpdump -i any net 192.168.10.0/28 -nn
13. Agent Engine 배포
참고: 이 섹션의 작업을 완료하는 데 GCP 콘솔과 JupyterLab 노트북이 사용됩니다.
다음 섹션에서는 다음 작업을 수행하는 노트북을 만듭니다.
- Frankfurter API (https://api.frankfurter.app/)를 사용하여 환율 데이터를 가져옵니다.
- FQDN proxy-vm.demo.com을 사용하여 소비자 VPC의 프록시 VM을 타겟팅하는 명시적 프록시 (proxy_server)를 참조합니다.
- dnsPeeringConfigs 정의 'domain': 'demo.com.'
Vertex AI Workbench 인스턴스에서 학습 작업을 실행합니다.
- Google Cloud 콘솔에서 Vertex AI → Workbench로 이동합니다.
- Vertex AI Workbench 인스턴스 이름 (workbench-tutorial) 옆에 있는 JupyterLab 열기를 클릭합니다. Vertex AI Workbench 인스턴스가 JupyterLab을 엽니다.
- 파일 > 새로 만들기 > 노트북을 선택합니다.
- 커널 > Python 3 선택
필요한 Python 라이브러리 설치: pyyaml, google-cloud-aiplatform, cloudpickle, google-cloud-api-keys, langchain-google-vertexai를 비롯해 Agent Engine에 필요한 라이브러리를 설치합니다.
JupyterLab 노트북에서 새 셀을 만들고 다음을 실행합니다.
!pip install pyyaml
!pip install google-cloud-aiplatform[agent_engines,langchain]==1.96.0
!pip install cloudpickle==3.1.1
!pip install google-cloud-api-keys
!pip install langchain-google-vertexai==2.0.24
Jupyter Notebook 커널 다시 시작: 새로 설치된 라이브러리가 올바르게 로드되었는지 확인합니다.
JupyterLab 노트북에서 새 셀을 만들고 다음을 실행합니다.
# Restart the notebook kernel after install, so you can run langchain successfully.

import IPython

app = IPython.Application.instance()
app.kernel.do_shutdown(True)
프로젝트 및 버킷 변수 설정: Google Cloud 프로젝트 ID, 프로젝트 번호, 서비스 이름, GCS 디렉터리, 엔드포인트, 버킷 이름, 위치를 정의합니다.
셀을 실행하기 전에 다음 필드를 업데이트합니다.
- PROJECT_ID = "enter-your-projectid"
- PROJECT_NUMBER = "enter-your-projectnumber"
- BUCKET= "enter-a-unique-bucket-name"
참고: 다음 단계에서 BUCKET 변수를 사용하여 Cloud Storage 버킷을 만듭니다.
JupyterLab 노트북에서 새 셀을 만들고 다음을 업데이트하여 실행합니다.
PROJECT_ID = "enter-your-projectid"  #@param {type:"string"}
PROJECT_NUMBER = "enter-your-projectnumber"  #@param {type:"string"}
SERVICE_NAME = "aiplatform"  #@param ["autopush-aiplatform", "staging-aiplatform", "aiplatform"]
# @markdown  Specify where your agent code should be written in GCS:
GCS_DIR = "reasoning-engine-test"  #@param {type:"string"}
ENDPOINT = "https://us-central1-aiplatform.googleapis.com" # @param ["https://us-central1-aiplatform.googleapis.com", "https://us-central1-autopush-aiplatform.sandbox.googleapis.com", "https://us-central1-staging-aiplatform.sandbox.googleapis.com"]
BUCKET= "enter-a-unique-bucket-name" #@param {type:"string"}
LOCATION="us-central1" #@param {type:"string"}
GCS 버킷 만들기: 에이전트 코드를 저장할 Cloud Storage 버킷을 만듭니다.
JupyterLab 노트북에서 새 셀을 만들고 다음을 실행합니다.
!gcloud storage buckets create gs://{BUCKET}
네트워크 연결 이름 정의: Private Service Connect 네트워크 연결의 이름을 지정합니다.
JupyterLab 노트북에서 새 셀을 만들고 다음을 실행합니다.
NETWORK_ATTACHMENT_NAME = 'psc-network-attachment' #@param {type:"string"}
Python 클라이언트 라이브러리 초기화: Google Cloud 서비스에 필요한 클라이언트 라이브러리를 설정합니다.
JupyterLab 노트북에서 새 셀을 만들고 다음을 실행합니다.
import json
import pprint

import cloudpickle
from google import auth as google_auth
from google.auth.transport import requests as google_requests
from google.cloud import storage
import yaml


def get_identity_token():
    """Gets ID token for calling Cloud Run."""
    credentials, _ = google_auth.default()
    auth_request = google_requests.Request()
    credentials.refresh(auth_request)
    return credentials.id_token

if not GCS_DIR or "your_ldap" in GCS_DIR:
    raise ValueError("GCS_DIR must be set or you must set your ldap.")

if not PROJECT_ID:
    raise ValueError("PROJECT_ID must be set.")


client = storage.Client(project=PROJECT_ID)
bucket = client.get_bucket(BUCKET)
에이전트 및 도구 구성: 명시적 프록시를 통해 Frankfurter API를 사용하여 환율을 가져오도록 StreamingAgent 클래스와 get_exchange_rate 함수를 정의합니다.
JupyterLab 노트북에서 새 셀을 만들고 아래 구성을 실행합니다. 다음 사항에 유의하세요.
- def get_exchange_rate 함수는 Frankfurter API (https://api.frankfurter.app/)를 사용하여 환율 데이터를 가져옵니다.
- proxy_server = "http://proxy-vm.demo.com:8888" FQDN은 소비자 VPC에 배포된 프록시 VM과 연결됩니다. 이후 단계에서 DNS 피어링을 사용하여 FQDN을 확인합니다.
from langchain_google_vertexai import ChatVertexAI
from langchain.agents import AgentExecutor
from langchain.agents.format_scratchpad.tools import format_to_tool_messages
from langchain.agents.output_parsers.tools import ToolsAgentOutputParser
from langchain.tools.base import StructuredTool
from langchain_core import prompts
from re import S
from typing import Callable, Sequence
import google.auth
import vertexai


class StreamingAgent:

    def __init__(
            self,
            model: str,
            tools: Sequence[Callable],
            project_id: str,
        ):
        self.model_name = model
        self.tools = tools
        self.project_id = project_id

    def set_up(self):
        """All unpickle-able logic should go here.

        The .set_up() method should not be called for an object that is being
        prepared for deployment.
        """
        creds, _ = google.auth.default(quota_project_id=self.project_id)
        vertexai.init(project=self.project_id, location="us-central1", credentials=creds)

        prompt = {
            "input": lambda x: x["input"],
            "agent_scratchpad": (
                lambda x: format_to_tool_messages(x["intermediate_steps"])
            ),
        } | prompts.ChatPromptTemplate.from_messages([
            ("user", "{input}"),
            prompts.MessagesPlaceholder(variable_name="agent_scratchpad"),
        ])

        llm = ChatVertexAI(model_name=self.model_name)
        if self.tools:
            llm = llm.bind_tools(tools=self.tools)

        self.agent_executor = AgentExecutor(
            agent=prompt | llm | ToolsAgentOutputParser(),
            tools=[StructuredTool.from_function(tool) for tool in self.tools],
        )

    def query(self, input: str):
        """Query the application.

        Args:
            input: The user prompt.

        Returns:
            The output of querying the application with the given input.
        """
        return self.agent_executor.invoke(input={"input": input})

    def stream_query(self, input: str):
        """Query the application and stream the output.

        Args:
            input: The user prompt.

        Yields:
            Chunks of the response as they become available.
        """
        for chunk in self.agent_executor.stream(input={"input": input}):
            yield chunk

def get_exchange_rate(
    currency_from: str = "USD",
    currency_to: str = "EUR",
    currency_date: str = "latest",
):
    """Retrieves the exchange rate between two currencies on a specified date.

    Uses the Frankfurter API (https://api.frankfurter.app/) to obtain
    exchange rate data.

    Args:
        currency_from: The base currency (3-letter currency code).
            Defaults to "USD" (US Dollar).
        currency_to: The target currency (3-letter currency code).
            Defaults to "EUR" (Euro).
        currency_date: The date for which to retrieve the exchange rate.
            Defaults to "latest" for the most recent exchange rate data.
            Can be specified in YYYY-MM-DD format for historical rates.

    Returns:
        dict: A dictionary containing the exchange rate information.
            Example: {"amount": 1.0, "base": "USD", "date": "2023-11-24",
                "rates": {"EUR": 0.95534}}
    """
    import requests

    proxy_server = "http://proxy-vm.demo.com:8888" # This is the VM's FQDN to reach the proxy vm in the consumers network

    proxies = {
       "http": proxy_server,
       "https": proxy_server,
    }
    response = requests.get(
        f"https://api.frankfurter.app/{currency_date}",
        params={"from": currency_from, "to": currency_to},
        proxies=proxies,
    )
    return response.json()
Cloud Storage에 에이전트 파일 업로드: 직렬화된 에이전트와 요구사항을 지정된 GCS 버킷에 업로드합니다.
JupyterLab 노트북에서 새 셀을 만들고 다음을 실행합니다.
# Upload files to Cloud Storage.
if not GCS_DIR:
    raise ValueError("GCS_DIR must be set.")

FILE = "streaming_agent.pkl"
blob = bucket.blob(f"{GCS_DIR}/{FILE}")
with blob.open("wb") as f:
    cloudpickle.dump(
        StreamingAgent(
            model="gemini-2.0-flash-001",  # Required.
            tools=[get_exchange_rate],  # Optional.
            project_id=PROJECT_ID
        ), f)


requirements = """
google-cloud-aiplatform[agent_engines,langchain]==1.96.0
cloudpickle==3.1.1
"""

blob = bucket.blob(f"{GCS_DIR}/requirements-streaming.txt")
blob.upload_from_string(requirements)

!gsutil ls gs://{BUCKET}/{GCS_DIR}
Agent Engine 배포: PSC 인터페이스 및 DNS 피어링으로 구성된 Agent Engine을 배포하여 소비자 VPC에서 프록시 VM의 FQDN을 확인합니다.
JupyterLab 노트북에서 아래 셀을 만들고 실행합니다. 다음 사항에 유의하세요.
- 소비자 VPC에 대한 DNS 피어링은 도메인 이름 demo.com에 대해 dnsPeeringConfigs (dnsPeeringConfigs)를 사용하여 구성됩니다.
import requests


token = !gcloud auth application-default print-access-token

response = requests.post(
    f"{ENDPOINT}/v1beta1/projects/{PROJECT_ID}/locations/{LOCATION}/reasoningEngines",
    headers={
        "Content-Type": "application/json; charset=utf-8",
        "Authorization": f"Bearer {token[0]}"
    },
    data=json.dumps({
        "displayName": "PSC-I Explicit Proxy",
        "description": "test psc-i agent + proxy vm",
        "spec": {
            "packageSpec": {
                "pickleObjectGcsUri": f"gs://{BUCKET}/{GCS_DIR}/streaming_agent.pkl",
                "requirementsGcsUri": f"gs://{BUCKET}/{GCS_DIR}/requirements-streaming.txt",
                "pythonVersion": "3.10"
            },
            "deploymentSpec": {
                "pscInterfaceConfig": {
                    "networkAttachment": NETWORK_ATTACHMENT_NAME,
                    "dnsPeeringConfigs": [
                    {
                      "domain": "demo.com.",
                      "targetProject": PROJECT_ID,
                      "targetNetwork": "consumer-vpc", #Consumer VPC
                    },
                  ],
                }
            }
        },
    })
)

pprint.pprint(json.loads(response.content))
reasoning_engine_id = json.loads(response.content)["name"].split("/")[5]
pprint.pprint(reasoning_engine_id)
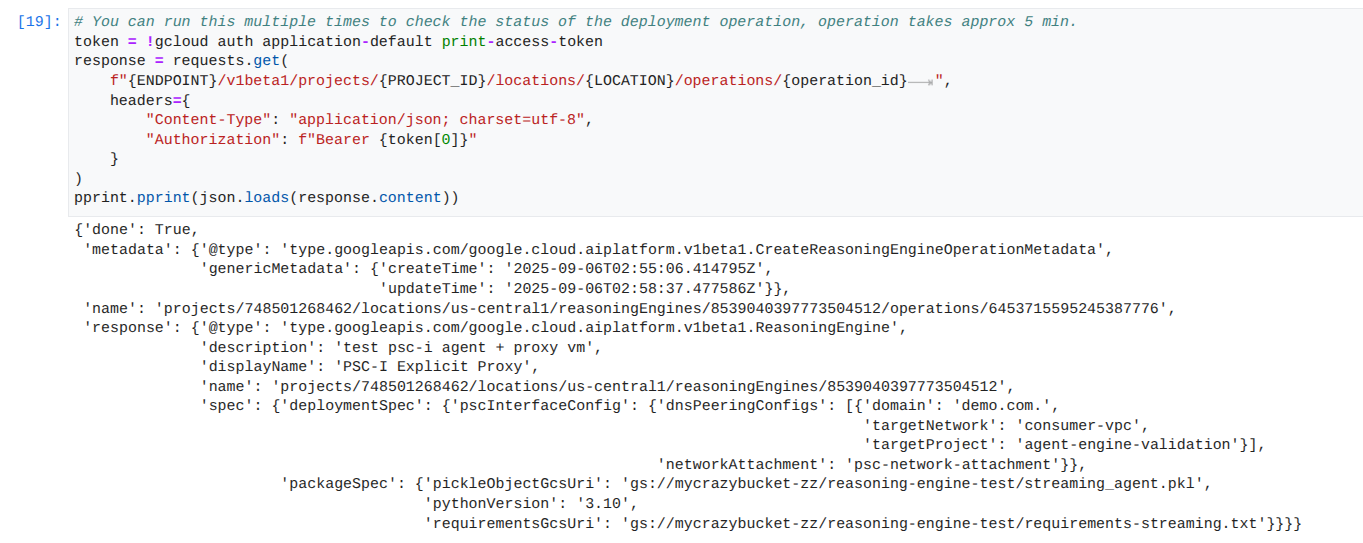
배포 상태 모니터링: 에이전트 엔진 배포 작업의 상태를 확인합니다.
JupyterLab 노트북에서 새 셀을 만들고 다음을 실행합니다.
operation_id = json.loads(response.content)["name"].split("/")[7]
pprint.pprint(operation_id)
JupyterLab 노트북에서 새 셀을 만들고 다음을 실행합니다.
참고: 이 작업은 완료하는 데 약 5분이 걸릴 수 있습니다. 셀을 다시 실행하여 진행 상황을 확인합니다. 아래 스크린샷과 비슷한 출력이 표시될 때까지 다음 섹션으로 진행하지 마세요.
# You can run this multiple times to check the status of the deployment operation, operation takes approx 5 min.
token = !gcloud auth application-default print-access-token
response = requests.get(
    f"{ENDPOINT}/v1beta1/projects/{PROJECT_ID}/locations/{LOCATION}/operations/{operation_id}        ",
    headers={
        "Content-Type": "application/json; charset=utf-8",
        "Authorization": f"Bearer {token[0]}"
    }
)
pprint.pprint(json.loads(response.content))
성공적인 실행의 예:
배포된 에이전트 쿼리: 배포된 Agent Engine에 쿼리를 전송하여 기능을 테스트합니다.
JupyterLab 노트북에서 새 셀을 만들고 다음을 실행합니다.
response = requests.post(
    f"{ENDPOINT}/v1beta1/projects/{PROJECT_ID}/locations/{LOCATION}/reasoningEngines/{reasoning_engine_id}:query",
    headers={
        "Content-Type": "application/json; charset=utf-8",
        "Authorization": f"Bearer {token[0]}"
    },
    data=json.dumps({ "input": {"input": "What is the exchange rate from US dollars to Euro?"} })
)
print(response.text)
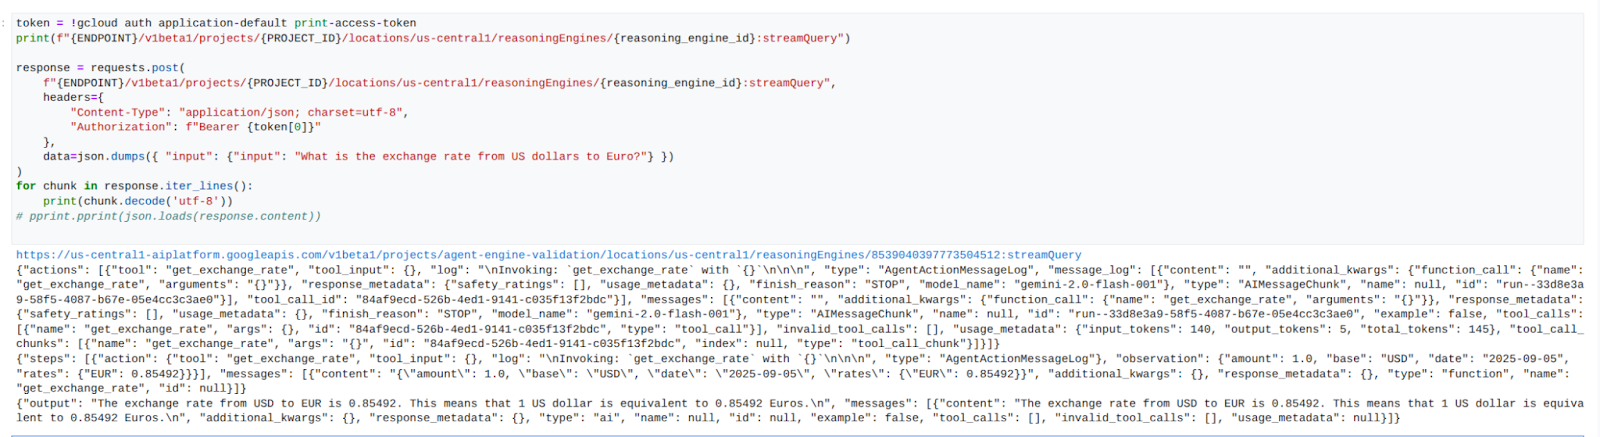
스트림 쿼리 결과: Agent Engine 쿼리의 출력을 스트리밍합니다.
JupyterLab 노트북에서 새 셀을 만들고 다음을 실행하여 소비자의 VPC에서 명시적 프록시를 사용하여 공개 URL에 대한 API 호출을 트리거합니다.
token = !gcloud auth application-default print-access-token
print(f"{ENDPOINT}/v1beta1/projects/{PROJECT_ID}/locations/us-central1/reasoningEngines/{reasoning_engine_id}:streamQuery")

response = requests.post(
    f"{ENDPOINT}/v1beta1/projects/{PROJECT_ID}/locations/us-central1/reasoningEngines/{reasoning_engine_id}:streamQuery",
    headers={
        "Content-Type": "application/json; charset=utf-8",
        "Authorization": f"Bearer {token[0]}"
    },
    data=json.dumps({ "input": {"input": "What is the exchange rate from US dollars to Euro?"} })
)
for chunk in response.iter_lines():
    print(chunk.decode('utf-8'))
# pprint.pprint(json.loads(response.content))
성공적인 실행의 예:
14. Tcpdump 유효성 검사
요청 게시 시 에이전트 엔진에서 사용하는 PSC 네트워크 연결 IP 주소와 Prox-VM 간의 통신을 자세히 설명하는 tcpdump 출력을 확인합니다.
user@proxy-vm:~$ sudo tcpdump -i any net 192.168.10.0/28 -nn
tcpdump: data link type LINUX_SLL2
tcpdump: verbose output suppressed, use -v[v]... for full protocol decode
listening on any, link-type LINUX_SLL2 (Linux cooked v2), snapshot length 262144 bytes
22:17:53.983212 ens4  In  IP 192.168.10.2.22261 > 10.10.10.2.8888: Flags [S], seq 3841740961, win 28800, options [mss 1440,sackOK,TS val 4245243253 ecr 0,nop,wscale 7], length 0
22:17:53.983252 ens4  Out IP 10.10.10.2.8888 > 192.168.10.2.22261: Flags [S.], seq 2232973833, ack 3841740962, win 64768, options [mss 1420,sackOK,TS val 2251247643 ecr 4245243253,nop,wscale 7], length 0
22:17:53.985167 ens4  In  IP 192.168.10.2.22261 > 10.10.10.2.8888: Flags [.], ack 1, win 225, options [nop,nop,TS val 4245243256 ecr 2251247643], length 0
22:17:53.986476 ens4  In  IP 192.168.10.2.22261 > 10.10.10.2.8888: Flags [P.], seq 1:45, ack 1, win 16384, options [nop,nop,TS val 4245243256 ecr 2251247643], length 44
22:17:53.986485 ens4  Out IP 10.10.10.2.8888 > 192.168.10.2.22261: Flags [.], ack 45, win 506, options [nop,nop,TS val 2251247646 ecr 4245243256], length 0
22:17:54.043347 ens4  Out IP 10.10.10.2.8888 > 192.168.10.2.22261: Flags [P.], seq 1:71, ack 45, win 506, options [nop,nop,TS val 2251247703 ecr 4245243256], length 70
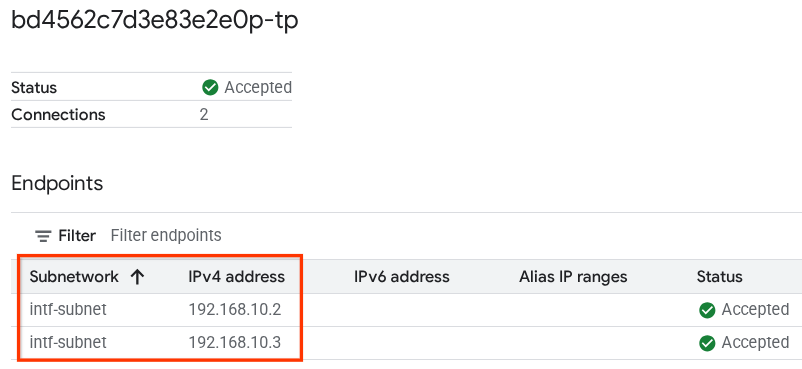
15. PSC 인터페이스 검사
다음으로 이동하여 에이전트 엔진에서 사용하는 네트워크 연결 IP를 확인할 수도 있습니다.
네트워크 서비스 → Private Service Connect → 네트워크 연결 → psc-network-attachment
테넌트 프로젝트(-tp로 끝나는 프로젝트 이름)를 선택합니다.
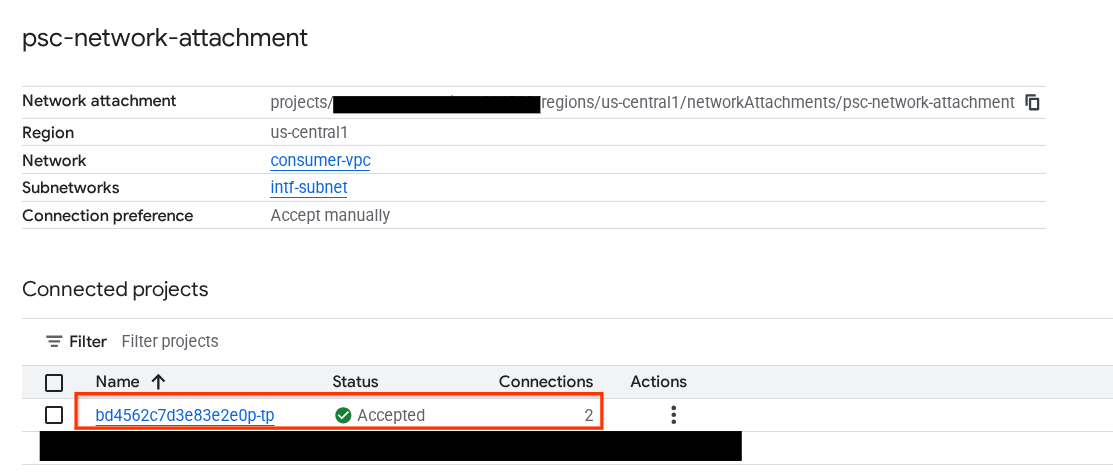
강조 표시된 필드는 PSC 네트워크 연결에서 에이전트 엔진이 사용하는 IP 주소를 나타냅니다.
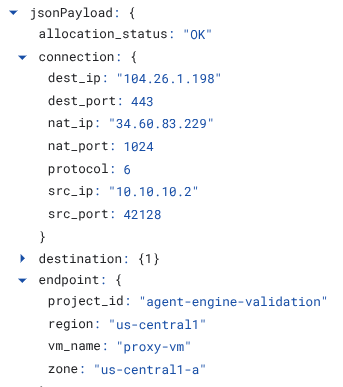
16. Cloud Logging 유효성 검사
프록시 VM TCPDump 세션에서 종료하고 Frankfurter api.frankfurter.app에 PING을 실행하여 연결된 공개 IP 주소를 가져옵니다.
ping -c4 api.frankfurter.app
예시에서는 104.26.1.198을 api.frankfurter.app의 공개 IP로 식별합니다.
user@proxy-vm:~$ ping -c4 api.frankfurter.app
PING api.frankfurter.app (104.26.1.198) 56(84) bytes of data.
64 bytes from 104.26.1.198 (104.26.1.198): icmp_seq=1 ttl=61 time=10.9 ms
64 bytes from 104.26.1.198 (104.26.1.198): icmp_seq=2 ttl=61 time=10.9 ms
64 bytes from 104.26.1.198 (104.26.1.198): icmp_seq=3 ttl=61 time=10.9 ms
64 bytes from 104.26.1.198 (104.26.1.198): icmp_seq=4 ttl=61 time=10.9 ms
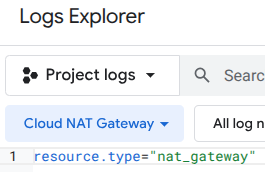
NAT 로깅을 살펴보고 104.26.1.198의 트래픽이 관찰되는지 확인해 보겠습니다.
다음으로 이동합니다.
모니터링 → 로그 탐색기
다음 필터를 사용합니다.
resource.type="nat_gateway"
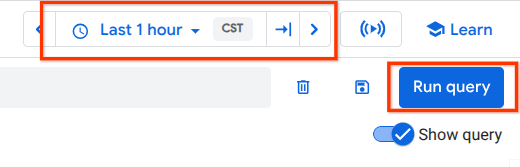
기간을 선택한 다음 쿼리 실행
인터넷 이그레스에 명시적 프록시 사용을 검증하는 프록시-vm의 (대상) 공개 IP (104.26.1.198)와 소스 IP 주소 및 이름을 식별하는 로그 항목을 펼칩니다.
17. 삭제
JupyterLab 노트북에서 새 셀을 만들고 에이전트 엔진 배포 삭제를 트리거하는 다음 코드를 실행합니다.
token = !gcloud auth application-default print-access-token

response = requests.delete(
    f"{ENDPOINT}/v1beta1/projects/{PROJECT_ID}/locations/us-central1/reasoningEngines/{reasoning_engine_id}",
    headers={
        "Content-Type": "application/json; charset=utf-8",
        "Authorization": f"Bearer {token[0]}"
    },
)
print(response.text)
Cloud Shell에서 튜토리얼 구성요소를 삭제합니다.
gcloud dns record-sets delete proxy-vm.demo.com --zone=private-dns-codelab  --type=A

gcloud dns managed-zones delete private-dns-codelab

gcloud compute instances delete proxy-vm --zone=us-central1-a --quiet

gcloud compute instances delete workbench-tutorial --zone=us-central1-a --quiet

gcloud compute routers delete cloud-router-for-nat --region=us-central1 --quiet

gcloud compute network-attachments delete psc-network-attachment --region=us-central1 --quiet

gcloud compute networks subnets delete intf-subnet rfc1918-subnet1 --region=us-central1 --quiet

gcloud compute networks delete consumer-vpc --quiet
18. 축하합니다
축하합니다. 명시적 프록시를 통해 인터넷 이그레스가 실행되는 Private Service Connect 인터페이스로 배포된 Agent Engine을 성공적으로 구성하고 검증했습니다.
소비자 인프라를 만들고 프로듀서가 소비자 및 프로듀서 통신을 연결하는 다중 NIC VM을 만들 수 있도록 네트워크 연결을 추가했습니다. 인터넷 연결을 허용하는 명시적 프록시 및 DNS 피어링을 만드는 방법을 알아봤습니다.
Cosmopup은 튜토리얼이 멋지다고 생각합니다.