1. บทนำ
อินเทอร์เฟซ Private Service Connect เป็นทรัพยากรที่ช่วยให้เครือข่าย Virtual Private Cloud (VPC) ของผู้ผลิตเริ่มการเชื่อมต่อกับปลายทางต่างๆ ในเครือข่าย VPC ของผู้ใช้บริการได้ เครือข่ายผู้ผลิตและผู้บริโภคสามารถอยู่ในโปรเจ็กต์และองค์กรที่แตกต่างกันได้
หากไฟล์แนบเครือข่ายยอมรับการเชื่อมต่อจากอินเทอร์เฟซ Private Service Connect ทาง Google Cloud จะจัดสรรที่อยู่ IP จากซับเน็ตของผู้ใช้ที่ไฟล์แนบเครือข่ายระบุไว้ให้กับอินเทอร์เฟซ เครือข่ายผู้บริโภคและเครือข่ายผู้ผลิตเชื่อมต่อกันและสื่อสารกันได้โดยใช้ที่อยู่ IP ภายใน
การเชื่อมต่อระหว่างไฟล์แนบเครือข่ายกับอินเทอร์เฟซ Private Service Connect จะคล้ายกับการเชื่อมต่อระหว่างปลายทาง Private Service Connect กับไฟล์แนบบริการ แต่มีความแตกต่างที่สำคัญ 2 ประการดังนี้
- ไฟล์แนบเครือข่ายช่วยให้เครือข่ายผู้ผลิตเริ่มการเชื่อมต่อกับเครือข่ายผู้บริโภค (ขาออกของบริการที่มีการจัดการ) ในขณะที่ปลายทางช่วยให้เครือข่ายผู้บริโภคเริ่มการเชื่อมต่อกับเครือข่ายผู้ผลิต (ขาเข้าของบริการที่มีการจัดการ)
- การเชื่อมต่ออินเทอร์เฟซ Private Service Connect เป็นแบบทรานซิทีฟ ซึ่งหมายความว่าเครือข่ายผู้ผลิตจะสื่อสารกับเครือข่ายอื่นๆ ที่เชื่อมต่อกับเครือข่ายผู้บริโภคได้
ข้อควรพิจารณาเกี่ยวกับความสามารถในการเข้าถึงอินเทอร์เฟซ PSC ของ Vertex AI
- PSC-Interface สามารถกำหนดเส้นทางการรับส่งข้อมูลไปยังปลายทาง VPC หรือปลายทางในองค์กรภายในบล็อกที่อยู่ RFC1918
- การกำหนดเป้าหมาย PSC-Interface ที่ไม่ใช่บล็อกที่อยู่ rfc-1918 ต้องมีการติดตั้งใช้งานพร็อกซีอย่างชัดเจนใน VPC ของผู้บริโภคที่มีที่อยู่ rfc-1918 ในการติดตั้งใช้งาน Vertex AI คุณต้องกำหนดพร็อกซีพร้อมกับ FQDN ของปลายทางเป้าหมาย
- เมื่อกำหนดค่าการติดตั้งใช้งานที่มีเฉพาะอินเทอร์เฟซ PSC การติดตั้งใช้งานจะยังคงมีการเข้าถึงอินเทอร์เน็ตเริ่มต้น การรับส่งข้อมูลขาออกนี้จะออกจากเครือข่ายผู้เช่าที่ปลอดภัยซึ่ง Google จัดการโดยตรง
ข้อควรพิจารณาเกี่ยวกับ VPC-SC ของอินเทอร์เฟซ PSC ของ Vertex AI
- เมื่อโปรเจ็กต์เป็นส่วนหนึ่งของขอบเขตการควบคุมบริการ VPC ขอบเขตจะบล็อกการเข้าถึงอินเทอร์เน็ตเริ่มต้นของผู้เช่าที่ Google จัดการเพื่อป้องกันการกรองข้อมูล
- หากต้องการอนุญาตให้การติดตั้งใช้งานเข้าถึงอินเทอร์เน็ตสาธารณะในสถานการณ์นี้ คุณต้องกำหนดค่าเส้นทางการออกที่ปลอดภัยอย่างชัดเจนซึ่งกำหนดเส้นทางการรับส่งข้อมูลผ่าน VPC
- วิธีที่แนะนำในการดำเนินการนี้คือการตั้งค่าพร็อกซีเซิร์ฟเวอร์ภายในขอบเขต VPC ด้วยที่อยู่ RFC1918 และสร้างเกตเวย์ Cloud NAT เพื่ออนุญาตให้ VM พร็อกซีเข้าถึงอินเทอร์เน็ต
ดูข้อมูลเพิ่มเติมได้ที่แหล่งข้อมูลต่อไปนี้
ติดตั้งใช้งาน Agent | Generative AI ใน Vertex AI | Google Cloud
ตั้งค่าอินเทอร์เฟซ Private Service Connect สำหรับทรัพยากร Vertex AI | Google Cloud
สิ่งที่คุณจะสร้าง
ในบทแนะนำนี้ คุณจะได้สร้าง Agent Engine ที่ครอบคลุมซึ่งติดตั้งใช้งานด้วยอินเทอร์เฟซ Private Service Connect (PSC) เพื่ออนุญาตการเชื่อมต่อกับเว็บไซต์สาธารณะ (https://api.frankfurter.app/) ผ่าน VM พร็อกซีที่ติดตั้งใช้งานใน VPC ของผู้บริโภคด้วยที่อยู่ RFC1918 การติดตั้งใช้งานตัวอย่างใช้ได้ในโปรเจ็กต์ที่เปิดใช้ VPC-SC หรือสำหรับผู้ดูแลระบบที่ต้องการการรับส่งข้อมูลขาออกจากอินเทอร์เน็ตผ่านเครือข่ายของลูกค้าแทนที่จะเป็น VPC ของผู้เช่า
รูปที่ 1
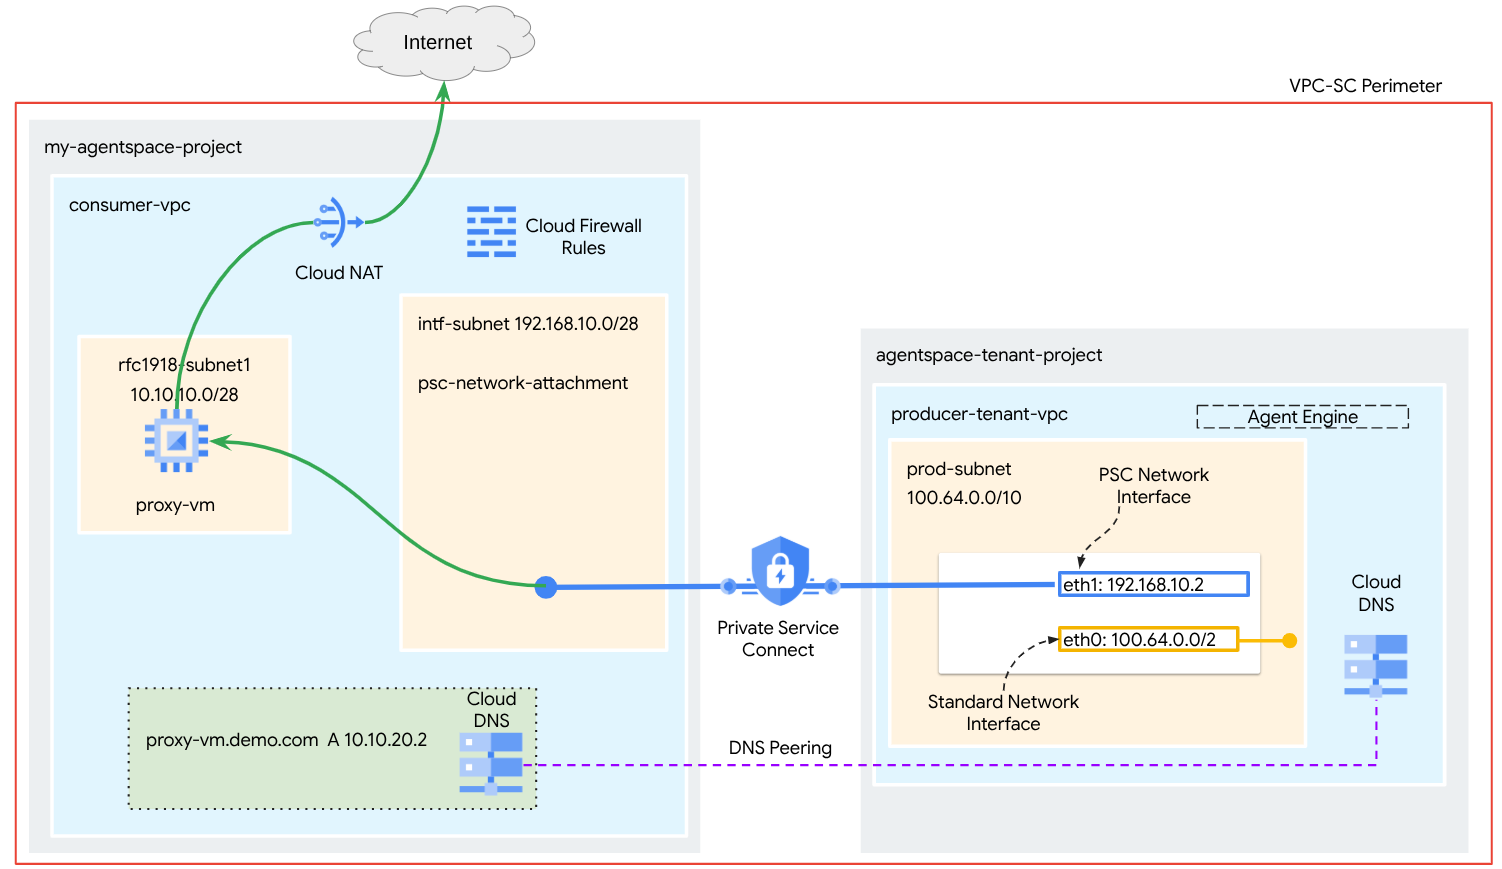
คุณจะสร้าง psc-network-attachment รายการเดียวใน VPC ของผู้บริโภคโดยใช้ประโยชน์จากการเพียร์ DNS เพื่อแก้ปัญหา proxy-vm ของเครือข่ายผู้บริโภคในโปรเจ็กต์ผู้เช่าที่โฮสต์ Agent Engine ซึ่งจะส่งผลให้เกิดกรณีการใช้งานต่อไปนี้
ติดตั้งใช้งาน Agent Engine และกำหนดค่า VM พร็อกซีให้ทำหน้าที่เป็นพร็อกซีที่ชัดเจน ซึ่งจะช่วยให้เข้าถึง URL สาธารณะ https://api.frankfurter.app ได้
สิ่งที่คุณจะได้เรียนรู้
- วิธีสร้างการเชื่อมต่อเครือข่าย
- วิธีที่โปรดิวเซอร์ใช้การเชื่อมต่อเครือข่ายเพื่อสร้างอินเทอร์เฟซ PSC
- วิธีสร้างการสื่อสารจากผู้ผลิตไปยังผู้บริโภคโดยใช้การ Peering ของ DNS
- วิธีติดตั้งใช้งานและใช้ VM พร็อกซีสำหรับการรับส่งข้อมูลอินเทอร์เน็ตขาออก
สิ่งที่คุณต้องมี
โปรเจ็กต์ Google Cloud
สิทธิ์ IAM
- ผู้ดูแลระบบเครือข่าย Compute (roles/compute.networkAdmin)
- ผู้ดูแลระบบอินสแตนซ์ Compute (roles/compute.instanceAdmin)
- ผู้ดูแลระบบความปลอดภัยของ Compute (roles/compute.securityAdmin)
- ผู้ดูแลระบบ DNS (roles/dns.admin)
- ผู้ใช้อุโมงค์ข้อมูลที่รักษาความปลอดภัยด้วย IAP (roles/iap.tunnelResourceAccessor)
- ผู้ดูแลระบบการบันทึก (roles/logging.admin)
- ผู้ดูแลระบบ Notebooks (roles/notebooks.admin)
- ผู้ดูแลระบบ IAM ของโปรเจ็กต์ (roles/resourcemanager.projectIamAdmin)
- ผู้ดูแลระบบบัญชีบริการ (roles/iam.serviceAccountAdmin)
- ผู้ดูแลระบบการใช้บริการ (roles/serviceusage.serviceUsageAdmin)
2. ก่อนเริ่มต้น
อัปเดตโปรเจ็กต์เพื่อรองรับบทแนะนำ
บทแนะนำนี้ใช้ $variables เพื่อช่วยในการติดตั้งใช้งานการกำหนดค่า gcloud ใน Cloud Shell
ใน Cloud Shell ให้ทำดังนี้
gcloud config list project
gcloud config set project [YOUR-PROJECT-NAME]
projectid=YOUR-PROJECT-NAME
echo $projectid
การเปิดใช้ API
ใน Cloud Shell ให้ทำดังนี้
gcloud services enable "compute.googleapis.com"
gcloud services enable "aiplatform.googleapis.com"
gcloud services enable "dns.googleapis.com"
gcloud services enable "notebooks.googleapis.com"
gcloud services enable "storage.googleapis.com"
gcloud services enable "iap.googleapis.com"
ยืนยันว่าเปิดใช้ API สำเร็จแล้ว
gcloud services list --enabled
3. การตั้งค่าสำหรับผู้บริโภค
สร้าง VPC ของผู้ใช้
VPC นี้อยู่ในโปรเจ็กต์ของลูกค้า ระบบจะสร้างทรัพยากรต่อไปนี้ใน VPC นี้
- เครือข่ายย่อยสำหรับผู้บริโภค
- ซับเน็ตการแนบเครือข่าย
- Cloud Router (ต้องระบุสำหรับ Cloud NAT)
- Cloud NAT
ใน Cloud Shell ให้ทำดังนี้
gcloud compute networks create consumer-vpc --project=$projectid --subnet-mode=custom
สร้างซับเน็ตของผู้บริโภค
สร้างซับเน็ตสำหรับ VM พร็อกซีภายใน Cloud Shell โดยทำดังนี้
gcloud compute networks subnets create rfc1918-subnet1 --project=$projectid --range=10.10.10.0/28 --network=consumer-vpc --region=us-central1
สร้างซับเน็ตไฟล์แนบเครือข่าย Private Service Connect
สร้างซับเน็ตสำหรับการเชื่อมต่อเครือข่าย PSC ภายใน Cloud Shell โดยทำดังนี้
gcloud compute networks subnets create intf-subnet --project=$projectid --range=192.168.10.0/28 --network=consumer-vpc --region=us-central1
การกำหนดค่า Cloud Router และ NAT
ในบทแนะนำนี้ Cloud NAT ใช้เพื่อให้สิทธิ์เข้าถึงอินเทอร์เน็ตสำหรับ VM พร็อกซีที่ไม่มีที่อยู่ IP สาธารณะ Cloud NAT ช่วยให้ VM ที่มีเฉพาะที่อยู่ IP ส่วนตัวเชื่อมต่อกับอินเทอร์เน็ตได้ ทำให้ VM สามารถทำงานต่างๆ เช่น ติดตั้งแพ็กเกจซอฟต์แวร์
สร้าง Cloud Router ภายใน Cloud Shell
gcloud compute routers create cloud-router-for-nat --network consumer-vpc --region us-central1
สร้างเกตเวย์ NAT โดยเปิดใช้การบันทึกใน Cloud Shell เราจะใช้การบันทึกเพื่อตรวจสอบสิทธิ์การเข้าถึง IP สาธารณะสำหรับ Frankfurter API (https://api.frankfurter.app/)
gcloud compute routers nats create cloud-nat-us-central1 --router=cloud-router-for-nat --auto-allocate-nat-external-ips --nat-all-subnet-ip-ranges --region us-central1 --enable-logging --log-filter=ALL
4. เปิดใช้ IAP
หากต้องการอนุญาตให้ IAP เชื่อมต่อกับอินสแตนซ์ VM ให้สร้างกฎไฟร์วอลล์ที่มีลักษณะดังนี้
- มีผลกับอินสแตนซ์ VM ทั้งหมดที่คุณต้องการให้เข้าถึงได้โดยใช้ IAP
- อนุญาตการรับส่งข้อมูลขาเข้าจากช่วง IP 35.235.240.0/20 ช่วงนี้มีที่อยู่ IP ทั้งหมดที่ IAP ใช้สำหรับการส่งต่อ TCP
สร้างกฎไฟร์วอลล์ IAP ภายใน Cloud Shell
gcloud compute firewall-rules create ssh-iap-consumer \
    --network consumer-vpc \
    --allow tcp:22 \
    --source-ranges=35.235.240.0/20
5. สร้างอินสแตนซ์ VM สำหรับผู้บริโภค
สร้างอินสแตนซ์ VM ของผู้ใช้ proxy-vm ภายใน Cloud Shell ซึ่งจะทำหน้าที่เป็นพร็อกซีที่ชัดเจนสำหรับ Agent Engine เราจะใช้ tinyproxy เป็นแอปพลิเคชันสำหรับพร็อกซีการรับส่งข้อมูล HTTP
gcloud compute instances create proxy-vm \
    --project=$projectid \
    --machine-type=e2-micro \
    --image-family debian-11 \
    --no-address \
    --can-ip-forward \
    --image-project debian-cloud \
    --zone us-central1-a \
    --subnet=rfc1918-subnet1 \
    --shielded-secure-boot \
    --metadata startup-script="#! /bin/bash
      sudo apt-get update
      sudo apt-get install tcpdump
      sudo apt-get install tinyproxy -y
      sudo apt-get install apache2 -y
      sudo service apache2 restart
      echo 'proxy server !!' | tee /var/www/html/index.html
      EOF"
6. ไฟล์แนบเครือข่าย Private Service Connect
ไฟล์แนบเครือข่ายเป็นทรัพยากรระดับภูมิภาคที่แสดงฝั่งผู้บริโภคของอินเทอร์เฟซ Private Service Connect คุณจะเชื่อมโยงซับเน็ตเดียวกับการเชื่อมต่อเครือข่าย และผู้ผลิตจะกำหนด IP ให้กับอินเทอร์เฟซ Private Service Connect จากซับเน็ตนั้น ซับเน็ตต้องอยู่ในภูมิภาคเดียวกับการเชื่อมต่อเครือข่าย การเชื่อมต่อเครือข่ายต้องอยู่ในภูมิภาคเดียวกับบริการผู้ผลิต
สร้างการเชื่อมต่อเครือข่าย
สร้างการเชื่อมต่อเครือข่ายภายใน Cloud Shell
gcloud compute network-attachments create psc-network-attachment \
    --region=us-central1 \
    --connection-preference=ACCEPT_AUTOMATIC \
    --subnets=intf-subnet
แสดงรายการการเชื่อมต่อเครือข่าย
ใน Cloud Shell ให้แสดงรายการการเชื่อมต่อเครือข่าย
gcloud compute network-attachments list
อธิบายสิ่งที่แนบมากับเครือข่าย
อธิบายไฟล์แนบเครือข่ายภายใน Cloud Shell
gcloud compute network-attachments describe psc-network-attachment --region=us-central1
จดชื่อไฟล์แนบเครือข่าย PSC, psc-network-attachment ซึ่งผู้ผลิตจะใช้เมื่อสร้างอินเทอร์เฟซ Private Service Connect
หากต้องการดู URL ของการเชื่อมต่อเครือข่าย PSC ใน Cloud Console ให้ไปที่
บริการเครือข่าย → Private Service Connect → ไฟล์แนบเครือข่าย → psc-network-attachment

7. โซน DNS ส่วนตัว
คุณจะสร้างโซน Cloud DNS สำหรับ demo.com และป้อนระเบียน A ที่ชี้ไปยังที่อยู่ IP ของ proxy-vm ในภายหลัง ระบบจะติดตั้งใช้งานการ Peering DNS ใน Agent Engine ซึ่งจะช่วยให้เข้าถึงระเบียน DNS ของผู้บริโภคได้
ใน Cloud Shell ให้ทำดังนี้เพื่อสร้างชื่อ DNS demo.com
gcloud dns --project=$projectid managed-zones create private-dns-codelab --description="" --dns-name="demo.com." --visibility="private" --networks="https://compute.googleapis.com/compute/v1/projects/$projectid/global/networks/consumer-vpc"
รับและจัดเก็บที่อยู่ IP ของอินสแตนซ์ที่ใช้สำหรับระเบียน A ของ DNS
ภายใน Cloud Shell ให้เรียกใช้คำสั่ง describe กับอินสแตนซ์ VM
gcloud compute instances describe proxy-vm --zone=us-central1-a | grep networkIP:
สร้างชุดระเบียนสำหรับ VM, proxy-vm.demo.com ใน Cloud Shell และตรวจสอบว่าได้อัปเดตที่อยู่ IP ตามเอาต์พุตของสภาพแวดล้อมแล้ว
gcloud dns --project=$projectid record-sets create proxy-vm.demo.com. --zone="private-dns-codelab" --type="A" --ttl="300" --rrdatas="10.10.10.2"
สร้างกฎไฟร์วอลล์ของ Cloud เพื่ออนุญาตการเข้าถึงจากอินเทอร์เฟซ PSC
ในส่วนต่อไปนี้ ให้สร้างกฎไฟร์วอลล์ที่อนุญาตให้การรับส่งข้อมูลที่มาจาก PSC Network Attachment เข้าถึง proxy-vm ใน VPC ของผู้บริโภค
สร้างกฎไฟร์วอลล์ขาเข้าใน Cloud Shell
gcloud compute firewall-rules create allow-access-to-compute \
    --network=consumer-vpc \
    --action=ALLOW \
    --rules=ALL \
    --direction=INGRESS \
    --priority=1000 \
    --source-ranges="192.168.10.0/28" \
    --destination-ranges="10.10.10.0/28" \
    --enable-logging
8. สร้างสมุดบันทึก Jupyter
ส่วนต่อไปนี้จะแนะนำวิธีสร้างสมุดบันทึก Jupyter Notebook นี้จะใช้เพื่อติดตั้งใช้งาน Agent Engine ที่กำหนดเป้าหมายเป็นพร็อกซีที่ชัดเจนสำหรับอินเทอร์เน็ตขาออก
สร้างบัญชีบริการที่ผู้ใช้จัดการ
ในส่วนต่อไปนี้ คุณจะสร้างบัญชีบริการที่จะเชื่อมโยงกับอินสแตนซ์ Vertex AI Workbench ที่ใช้ในบทแนะนำ
ในบทแนะนำ บัญชีบริการจะมีบทบาทต่อไปนี้
สร้างบัญชีบริการภายใน Cloud Shell
gcloud iam service-accounts create notebook-sa \
    --display-name="notebook-sa"
ใน Cloud Shell ให้อัปเดตบัญชีบริการด้วยบทบาทผู้ดูแลระบบพื้นที่เก็บข้อมูล
gcloud projects add-iam-policy-binding $projectid --member="serviceAccount:notebook-sa@$projectid.iam.gserviceaccount.com" --role="roles/storage.admin"
ใน Cloud Shell ให้อัปเดตบัญชีบริการด้วยบทบาทผู้ใช้ Vertex AI
gcloud projects add-iam-policy-binding $projectid --member="serviceAccount:notebook-sa@$projectid.iam.gserviceaccount.com" --role="roles/aiplatform.user"
ใน Cloud Shell ให้อัปเดตบัญชีบริการด้วยบทบาทผู้ดูแลระบบ Artifact Registry
gcloud projects add-iam-policy-binding $projectid --member="serviceAccount:notebook-sa@$projectid.iam.gserviceaccount.com" --role="roles/artifactregistry.admin"
ใน Cloud Shell ให้สิทธิ์บัญชีบริการของ Notebook ในการใช้บัญชีบริการเริ่มต้นของ Compute Engine
gcloud iam service-accounts add-iam-policy-binding \
    $(gcloud projects describe $(gcloud config get-value project) --format='value(projectNumber)')-compute@developer.gserviceaccount.com \
    --member="serviceAccount:notebook-sa@$projectid.iam.gserviceaccount.com" \
    --role="roles/iam.serviceAccountUser"
9. อัปเดตพร็อกซีที่ชัดเจน
ในส่วนต่อไปนี้ คุณจะต้อง SSH ไปยังพร็อกซีที่ชัดเจนและอัปเดตไฟล์การกำหนดค่า tinyproxy.conf จากนั้นทำการรีเซ็ต
จาก Cloud Shell
gcloud compute ssh --zone us-central1-a "proxy-vm" --tunnel-through-iap --project $projectid
เปิดไฟล์การกำหนดค่า tinyproxy แล้วอัปเดตโดยใช้โปรแกรมแก้ไขหรือโปรแกรมที่คุณเลือก ด้านล่างนี้เป็นตัวอย่างการใช้ VIM
sudo vim /etc/tinyproxy/tinyproxy.conf

# Locate the "Listen" configuration line to restrict listening to only its private IP address of the Proxy-VM, rather than all interfaces.

Listen 10.10.10.2

# Locate the "Allow" configuration line to allow requests ONLY from the PSC Network Attachment Subnet

Allow 192.168.10.0/24

Save the configs by the following steps:
1. Press the `ESC` key to enter Command Mode.
2. Type `:wq` to save (w) and quit (q).
3. Press `Enter`

Restart the tinyproxy service to apply the changes:
sudo systemctl restart tinyproxy

Validate the tinyproxy service is running:
sudo systemctl status tinyproxy

Perform an exit returning to cloud shell
exit
10. สร้างอินสแตนซ์ Vertex AI Workbench
ในส่วนต่อไปนี้ ให้สร้างอินสแตนซ์ Vertex AI Workbench ที่รวมบัญชีบริการ notebook-sa ที่สร้างไว้ก่อนหน้านี้
สร้างอินสแตนซ์ไคลเอ็นต์ส่วนตัวภายใน Cloud Shell
gcloud workbench instances create workbench-tutorial --vm-image-project=cloud-notebooks-managed --vm-image-family=workbench-instances --machine-type=n1-standard-4 --location=us-central1-a --subnet-region=us-central1 --subnet=rfc1918-subnet1 --disable-public-ip --shielded-secure-boot=true --shielded-integrity-monitoring=true --shielded-vtpm=true --service-account-email=notebook-sa@$projectid.iam.gserviceaccount.com
11. การอัปเดตตัวแทนบริการ Vertex AI
Vertex AI จะดำเนินการในนามของคุณเพื่อดำเนินการต่างๆ เช่น การขอที่อยู่ IP จากซับเน็ตการแนบเครือข่าย PSC ที่ใช้สร้างอินเทอร์เฟซ PSC โดย Vertex AI จะใช้ตัวแทนบริการ (แสดงอยู่ด้านล่าง) ที่ต้องมีสิทธิ์ผู้ดูแลระบบเครือข่าย
service-$projectnumber@gcp-sa-aiplatform.iam.gserviceaccount.com
รับหมายเลขโปรเจ็กต์ภายใน Cloud Shell
gcloud projects describe $projectid | grep projectNumber
ตั้งค่าหมายเลขโปรเจ็กต์ภายใน Cloud Shell
projectnumber=YOUR-PROJECT-Number
สร้างบัญชีบริการสำหรับ AI Platform ใน Cloud Shell ข้ามขั้นตอนนี้หากคุณมีบัญชีบริการในโปรเจ็กต์อยู่แล้ว
gcloud beta services identity create --service=aiplatform.googleapis.com --project=$projectnumber
ใน Cloud Shell ให้อัปเดตบัญชีตัวแทนบริการด้วยบทบาท compute.networkAdmin
gcloud projects add-iam-policy-binding $projectid --member="serviceAccount:service-$projectnumber@gcp-sa-aiplatform.iam.gserviceaccount.com" --role="roles/compute.networkAdmin"
ใน Cloud Shell ให้อัปเดตบัญชีตัวแทนบริการด้วยบทบาท dns.peer
gcloud projects add-iam-policy-binding $projectid --member="serviceAccount:service-$projectnumber@gcp-sa-aiplatform.iam.gserviceaccount.com" --role="roles/dns.peer"
การอัปเดตบัญชีบริการเริ่มต้น
ให้สิทธิ์เข้าถึง Vertex AI แก่บัญชีบริการเริ่มต้น โปรดทราบว่าระบบอาจใช้เวลาสักครู่ในการเผยแพร่การเปลี่ยนแปลงสิทธิ์เข้าถึง
ใน Cloud Shell ให้อัปเดตบัญชีบริการเริ่มต้นด้วยบทบาท aiplatform.user
gcloud projects add-iam-policy-binding $projectid \
  --member="serviceAccount:$projectnumber-compute@developer.gserviceaccount.com" \
    --role="roles/aiplatform.user"
12. Tcpdump ของ VM พร็อกซี
หากต้องการตรวจสอบการเชื่อมต่อ IP จาก Agent Engine เราสามารถใช้ TCPDUMP ได้ ซึ่งจะช่วยให้เราสังเกตการสื่อสารที่มาจากซับเน็ตการเชื่อมต่อเครือข่าย PSC, 192.168.10.0/28 เมื่อเรียกใช้คำขอรับจาก Agent Engine ไปยัง URL สาธารณะได้
จาก Cloud Shell ให้ ssh ไปยัง VM พร็อกซี
gcloud compute ssh --zone us-central1-a "proxy-vm" --tunnel-through-iap --project $projectid
เรียกใช้ tcpdump จากระบบปฏิบัติการของ VM พร็อกซี
sudo tcpdump -i any net 192.168.10.0/28 -nn
13. ติดตั้งใช้งาน Agent Engine
หมายเหตุ: เราจะใช้คอนโซล GCP และสมุดบันทึก JupyterLab เพื่อดำเนินงานในส่วนนี้ให้เสร็จสมบูรณ์
ในส่วนต่อไปนี้ คุณจะสร้าง Notebook ที่ทำงานต่อไปนี้
- ใช้ Frankfurter API (https://api.frankfurter.app/) เพื่อรับข้อมูลอัตราแลกเปลี่ยน
- อ้างอิงพร็อกซีที่ชัดเจน (proxy_server) ที่กำหนดเป้าหมายเป็น proxy-vm ใน VPC ของผู้ใช้โดยใช้ FQDN proxy-vm.demo.com
- กำหนด dnsPeeringConfigs "domain": "demo.com."
เรียกใช้งานการฝึกในอินสแตนซ์ Vertex AI Workbench
- ในคอนโซล Google Cloud ให้ไปที่ Vertex AI → Workbench
- คลิก Open JupyterLab ข้างชื่ออินสแตนซ์ Vertex AI Workbench (workbench-tutorial) อินสแตนซ์ Vertex AI Workbench จะเปิดขึ้นใน JupyterLab
- เลือกไฟล์ > ใหม่ > Notebook
- เลือก Kernel > Python 3
ติดตั้งไลบรารี Python ที่จำเป็น: ติดตั้งไลบรารีที่จำเป็นสำหรับ Agent Engine ซึ่งรวมถึง pyyaml, google-cloud-aiplatform, cloudpickle, google-cloud-api-keys และ langchain-google-vertexai
สร้างเซลล์ใหม่ในสมุดบันทึก JupyterLab แล้วเรียกใช้คำสั่งต่อไปนี้
!pip install pyyaml
!pip install google-cloud-aiplatform[agent_engines,langchain]==1.96.0
!pip install cloudpickle==3.1.1
!pip install google-cloud-api-keys
!pip install langchain-google-vertexai==2.0.24
รีสตาร์ทเคอร์เนล Jupyter Notebook: ตรวจสอบว่าโหลดไลบรารีที่ติดตั้งใหม่ได้อย่างถูกต้อง
สร้างเซลล์ใหม่ในสมุดบันทึก JupyterLab แล้วเรียกใช้คำสั่งต่อไปนี้
# Restart the notebook kernel after install, so you can run langchain successfully.

import IPython

app = IPython.Application.instance()
app.kernel.do_shutdown(True)
ตั้งค่าตัวแปรโปรเจ็กต์และ Bucket: กำหนดรหัสโปรเจ็กต์ Google Cloud, หมายเลขโปรเจ็กต์, ชื่อบริการ, ไดเรกทอรี GCS, จุดสิ้นสุด, ชื่อ Bucket และสถานที่ตั้ง
อัปเดตช่องต่อไปนี้ก่อนเรียกใช้เซลล์
- PROJECT_ID = "enter-your-projectid"
- PROJECT_NUMBER = "enter-your-projectnumber"
- BUCKET= "enter-a-unique-bucket-name"
หมายเหตุ: เราจะใช้ตัวแปร BUCKET เพื่อสร้าง Bucket ของ Cloud Storage ในขั้นตอนถัดไป
ในสมุดบันทึก JupyterLab ให้สร้างเซลล์ใหม่ อัปเดตและเรียกใช้รายการต่อไปนี้
PROJECT_ID = "enter-your-projectid"  #@param {type:"string"}
PROJECT_NUMBER = "enter-your-projectnumber"  #@param {type:"string"}
SERVICE_NAME = "aiplatform"  #@param ["autopush-aiplatform", "staging-aiplatform", "aiplatform"]
# @markdown  Specify where your agent code should be written in GCS:
GCS_DIR = "reasoning-engine-test"  #@param {type:"string"}
ENDPOINT = "https://us-central1-aiplatform.googleapis.com" # @param ["https://us-central1-aiplatform.googleapis.com", "https://us-central1-autopush-aiplatform.sandbox.googleapis.com", "https://us-central1-staging-aiplatform.sandbox.googleapis.com"]
BUCKET= "enter-a-unique-bucket-name" #@param {type:"string"}
LOCATION="us-central1" #@param {type:"string"}
สร้างที่เก็บข้อมูล GCS: สร้างที่เก็บข้อมูล Cloud Storage สำหรับจัดเก็บโค้ดของเอเจนต์
สร้างเซลล์ใหม่ในสมุดบันทึก JupyterLab แล้วเรียกใช้คำสั่งต่อไปนี้
!gcloud storage buckets create gs://{BUCKET}
กำหนดชื่อไฟล์แนบเครือข่าย: ระบุชื่อไฟล์แนบเครือข่าย Private Service Connect
สร้างเซลล์ใหม่ในสมุดบันทึก JupyterLab แล้วเรียกใช้คำสั่งต่อไปนี้
NETWORK_ATTACHMENT_NAME = 'psc-network-attachment' #@param {type:"string"}
เริ่มต้นไลบรารีของไคลเอ็นต์ Python: ตั้งค่าไลบรารีของไคลเอ็นต์ที่จำเป็นสำหรับบริการ Google Cloud
สร้างเซลล์ใหม่ในสมุดบันทึก JupyterLab แล้วเรียกใช้คำสั่งต่อไปนี้
import json
import pprint

import cloudpickle
from google import auth as google_auth
from google.auth.transport import requests as google_requests
from google.cloud import storage
import yaml


def get_identity_token():
    """Gets ID token for calling Cloud Run."""
    credentials, _ = google_auth.default()
    auth_request = google_requests.Request()
    credentials.refresh(auth_request)
    return credentials.id_token

if not GCS_DIR or "your_ldap" in GCS_DIR:
    raise ValueError("GCS_DIR must be set or you must set your ldap.")

if not PROJECT_ID:
    raise ValueError("PROJECT_ID must be set.")


client = storage.Client(project=PROJECT_ID)
bucket = client.get_bucket(BUCKET)
กำหนดค่าเอเจนต์และเครื่องมือ: กำหนดคลาส StreamingAgent และฟังก์ชัน get_exchange_rate เพื่อดึงอัตราแลกเปลี่ยนสกุลเงินโดยใช้ Frankfurter API ผ่านพร็อกซีที่ชัดเจน
ในสมุดบันทึก JupyterLab ให้สร้างเซลล์ใหม่และเรียกใช้การกำหนดค่าด้านล่าง โดยสังเกตไฮไลต์ต่อไปนี้
- ฟังก์ชัน def get_exchange_rate จะใช้ Frankfurter API (https://api.frankfurter.app/) เพื่อรับข้อมูลอัตราแลกเปลี่ยน
- proxy_server = "http://proxy-vm.demo.com:8888" FQDN เชื่อมโยงกับ VM พร็อกซีที่ทําให้ใช้งานได้ใน VPC ของผู้ใช้ เราใช้การ Peering DNS เพื่อแก้ปัญหา FQDN ในขั้นตอนถัดไป
from langchain_google_vertexai import ChatVertexAI
from langchain.agents import AgentExecutor
from langchain.agents.format_scratchpad.tools import format_to_tool_messages
from langchain.agents.output_parsers.tools import ToolsAgentOutputParser
from langchain.tools.base import StructuredTool
from langchain_core import prompts
from re import S
from typing import Callable, Sequence
import google.auth
import vertexai


class StreamingAgent:

    def __init__(
            self,
            model: str,
            tools: Sequence[Callable],
            project_id: str,
        ):
        self.model_name = model
        self.tools = tools
        self.project_id = project_id

    def set_up(self):
        """All unpickle-able logic should go here.

        The .set_up() method should not be called for an object that is being
        prepared for deployment.
        """
        creds, _ = google.auth.default(quota_project_id=self.project_id)
        vertexai.init(project=self.project_id, location="us-central1", credentials=creds)

        prompt = {
            "input": lambda x: x["input"],
            "agent_scratchpad": (
                lambda x: format_to_tool_messages(x["intermediate_steps"])
            ),
        } | prompts.ChatPromptTemplate.from_messages([
            ("user", "{input}"),
            prompts.MessagesPlaceholder(variable_name="agent_scratchpad"),
        ])

        llm = ChatVertexAI(model_name=self.model_name)
        if self.tools:
            llm = llm.bind_tools(tools=self.tools)

        self.agent_executor = AgentExecutor(
            agent=prompt | llm | ToolsAgentOutputParser(),
            tools=[StructuredTool.from_function(tool) for tool in self.tools],
        )

    def query(self, input: str):
        """Query the application.

        Args:
            input: The user prompt.

        Returns:
            The output of querying the application with the given input.
        """
        return self.agent_executor.invoke(input={"input": input})

    def stream_query(self, input: str):
        """Query the application and stream the output.

        Args:
            input: The user prompt.

        Yields:
            Chunks of the response as they become available.
        """
        for chunk in self.agent_executor.stream(input={"input": input}):
            yield chunk

def get_exchange_rate(
    currency_from: str = "USD",
    currency_to: str = "EUR",
    currency_date: str = "latest",
):
    """Retrieves the exchange rate between two currencies on a specified date.

    Uses the Frankfurter API (https://api.frankfurter.app/) to obtain
    exchange rate data.

    Args:
        currency_from: The base currency (3-letter currency code).
            Defaults to "USD" (US Dollar).
        currency_to: The target currency (3-letter currency code).
            Defaults to "EUR" (Euro).
        currency_date: The date for which to retrieve the exchange rate.
            Defaults to "latest" for the most recent exchange rate data.
            Can be specified in YYYY-MM-DD format for historical rates.

    Returns:
        dict: A dictionary containing the exchange rate information.
            Example: {"amount": 1.0, "base": "USD", "date": "2023-11-24",
                "rates": {"EUR": 0.95534}}
    """
    import requests

    proxy_server = "http://proxy-vm.demo.com:8888" # This is the VM's FQDN to reach the proxy vm in the consumers network

    proxies = {
       "http": proxy_server,
       "https": proxy_server,
    }
    response = requests.get(
        f"https://api.frankfurter.app/{currency_date}",
        params={"from": currency_from, "to": currency_to},
        proxies=proxies,
    )
    return response.json()
อัปโหลดไฟล์ตัวแทนไปยัง Cloud Storage: อัปโหลดตัวแทนที่แปลงเป็นอนุกรมและข้อกำหนดของตัวแทนไปยังที่เก็บข้อมูล GCS ที่กำหนด
สร้างเซลล์ใหม่ในสมุดบันทึก JupyterLab แล้วเรียกใช้คำสั่งต่อไปนี้
# Upload files to Cloud Storage.
if not GCS_DIR:
    raise ValueError("GCS_DIR must be set.")

FILE = "streaming_agent.pkl"
blob = bucket.blob(f"{GCS_DIR}/{FILE}")
with blob.open("wb") as f:
    cloudpickle.dump(
        StreamingAgent(
            model="gemini-2.0-flash-001",  # Required.
            tools=[get_exchange_rate],  # Optional.
            project_id=PROJECT_ID
        ), f)


requirements = """
google-cloud-aiplatform[agent_engines,langchain]==1.96.0
cloudpickle==3.1.1
"""

blob = bucket.blob(f"{GCS_DIR}/requirements-streaming.txt")
blob.upload_from_string(requirements)

!gsutil ls gs://{BUCKET}/{GCS_DIR}
ติดตั้งใช้งาน Agent Engine: ติดตั้งใช้งาน Agent Engine โดยกำหนดค่าด้วยอินเทอร์เฟซ PSC และการ Peering DNS เพื่อแก้ไข FQDN ของ VM พร็อกซีใน VPC ของผู้บริโภค
สร้างและเรียกใช้เซลล์ด้านล่างใน Notebook ของ JupyterLab โดยสังเกตไฮไลต์ต่อไปนี้
- การเชื่อมต่อ DNS กับ VPC ของผู้บริโภคได้รับการกำหนดค่าโดยใช้ dnsPeeringConfigs (dnsPeeringConfigs) สำหรับชื่อโดเมน demo.com
import requests


token = !gcloud auth application-default print-access-token

response = requests.post(
    f"{ENDPOINT}/v1beta1/projects/{PROJECT_ID}/locations/{LOCATION}/reasoningEngines",
    headers={
        "Content-Type": "application/json; charset=utf-8",
        "Authorization": f"Bearer {token[0]}"
    },
    data=json.dumps({
        "displayName": "PSC-I Explicit Proxy",
        "description": "test psc-i agent + proxy vm",
        "spec": {
            "packageSpec": {
                "pickleObjectGcsUri": f"gs://{BUCKET}/{GCS_DIR}/streaming_agent.pkl",
                "requirementsGcsUri": f"gs://{BUCKET}/{GCS_DIR}/requirements-streaming.txt",
                "pythonVersion": "3.10"
            },
            "deploymentSpec": {
                "pscInterfaceConfig": {
                    "networkAttachment": NETWORK_ATTACHMENT_NAME,
                    "dnsPeeringConfigs": [
                    {
                      "domain": "demo.com.",
                      "targetProject": PROJECT_ID,
                      "targetNetwork": "consumer-vpc", #Consumer VPC
                    },
                  ],
                }
            }
        },
    })
)

pprint.pprint(json.loads(response.content))
reasoning_engine_id = json.loads(response.content)["name"].split("/")[5]
pprint.pprint(reasoning_engine_id)
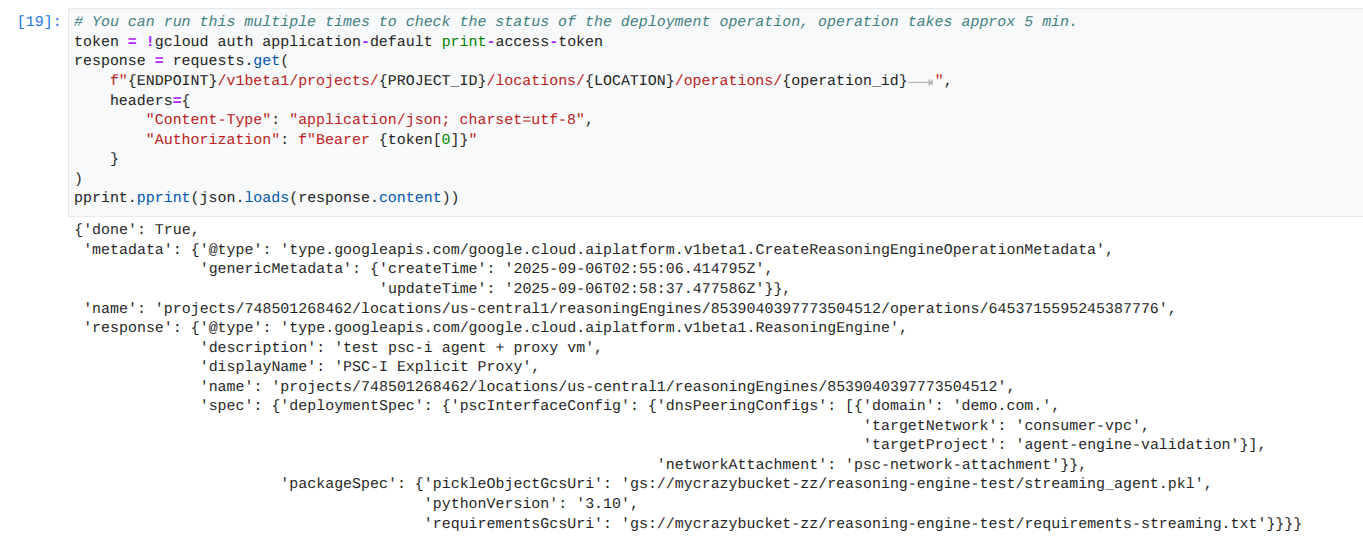
ตรวจสอบสถานะการติดตั้งใช้งาน: ตรวจสอบสถานะของการดำเนินการติดตั้งใช้งาน Agent Engine
สร้างเซลล์ใหม่ในสมุดบันทึก JupyterLab แล้วเรียกใช้คำสั่งต่อไปนี้
operation_id = json.loads(response.content)["name"].split("/")[7]
pprint.pprint(operation_id)
สร้างเซลล์ใหม่ในสมุดบันทึก JupyterLab แล้วเรียกใช้คำสั่งต่อไปนี้
หมายเหตุ: การดำเนินการนี้อาจใช้เวลาประมาณ 5 นาทีจึงจะเสร็จสมบูรณ์ เรียกใช้เซลล์อีกครั้งเพื่อตรวจสอบความคืบหน้า โปรดอย่าไปยังส่วนถัดไปจนกว่าคุณจะเห็นเอาต์พุตที่คล้ายกับภาพหน้าจอด้านล่าง
# You can run this multiple times to check the status of the deployment operation, operation takes approx 5 min.
token = !gcloud auth application-default print-access-token
response = requests.get(
    f"{ENDPOINT}/v1beta1/projects/{PROJECT_ID}/locations/{LOCATION}/operations/{operation_id}        ",
    headers={
        "Content-Type": "application/json; charset=utf-8",
        "Authorization": f"Bearer {token[0]}"
    }
)
pprint.pprint(json.loads(response.content))
ตัวอย่างการเรียกใช้ที่สําเร็จ
ส่งคำค้นหาไปยังเอเจนต์ที่ใช้งานจริง: ส่งคำค้นหาไปยัง Agent Engine ที่ใช้งานจริงเพื่อทดสอบฟังก์ชันการทำงาน
สร้างเซลล์ใหม่ในสมุดบันทึก JupyterLab แล้วเรียกใช้คำสั่งต่อไปนี้
response = requests.post(
    f"{ENDPOINT}/v1beta1/projects/{PROJECT_ID}/locations/{LOCATION}/reasoningEngines/{reasoning_engine_id}:query",
    headers={
        "Content-Type": "application/json; charset=utf-8",
        "Authorization": f"Bearer {token[0]}"
    },
    data=json.dumps({ "input": {"input": "What is the exchange rate from US dollars to Euro?"} })
)
print(response.text)
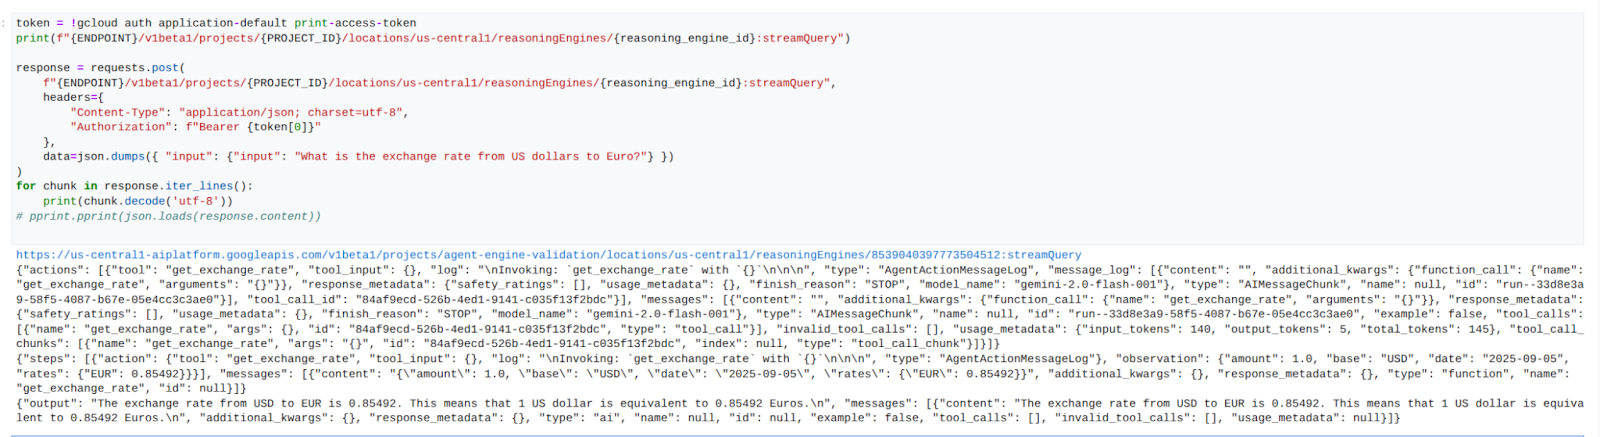
สตรีมผลการค้นหา: สตรีมเอาต์พุตจากการค้นหาของ Agent Engine
ในสมุดบันทึก JupyterLab ให้สร้างเซลล์ใหม่และเรียกใช้คำสั่งต่อไปนี้ ซึ่งจะทริกเกอร์การเรียก API ไปยัง URL สาธารณะโดยใช้พร็อกซีที่ชัดเจนใน VPC ของผู้ใช้
token = !gcloud auth application-default print-access-token
print(f"{ENDPOINT}/v1beta1/projects/{PROJECT_ID}/locations/us-central1/reasoningEngines/{reasoning_engine_id}:streamQuery")

response = requests.post(
    f"{ENDPOINT}/v1beta1/projects/{PROJECT_ID}/locations/us-central1/reasoningEngines/{reasoning_engine_id}:streamQuery",
    headers={
        "Content-Type": "application/json; charset=utf-8",
        "Authorization": f"Bearer {token[0]}"
    },
    data=json.dumps({ "input": {"input": "What is the exchange rate from US dollars to Euro?"} })
)
for chunk in response.iter_lines():
    print(chunk.decode('utf-8'))
# pprint.pprint(json.loads(response.content))
ตัวอย่างการเรียกใช้ที่สําเร็จ
14. การตรวจสอบความถูกต้องของ Tcpdump
ดูเอาต์พุต tcpdump ที่แสดงรายละเอียดการสื่อสารระหว่างที่อยู่ IP ของการแนบเครือข่าย PSC ที่ใช้โดย Agent Engine กับ Prox-VM เมื่อมีการโพสต์คำขอ
user@proxy-vm:~$ sudo tcpdump -i any net 192.168.10.0/28 -nn
tcpdump: data link type LINUX_SLL2
tcpdump: verbose output suppressed, use -v[v]... for full protocol decode
listening on any, link-type LINUX_SLL2 (Linux cooked v2), snapshot length 262144 bytes
22:17:53.983212 ens4  In  IP 192.168.10.2.22261 > 10.10.10.2.8888: Flags [S], seq 3841740961, win 28800, options [mss 1440,sackOK,TS val 4245243253 ecr 0,nop,wscale 7], length 0
22:17:53.983252 ens4  Out IP 10.10.10.2.8888 > 192.168.10.2.22261: Flags [S.], seq 2232973833, ack 3841740962, win 64768, options [mss 1420,sackOK,TS val 2251247643 ecr 4245243253,nop,wscale 7], length 0
22:17:53.985167 ens4  In  IP 192.168.10.2.22261 > 10.10.10.2.8888: Flags [.], ack 1, win 225, options [nop,nop,TS val 4245243256 ecr 2251247643], length 0
22:17:53.986476 ens4  In  IP 192.168.10.2.22261 > 10.10.10.2.8888: Flags [P.], seq 1:45, ack 1, win 16384, options [nop,nop,TS val 4245243256 ecr 2251247643], length 44
22:17:53.986485 ens4  Out IP 10.10.10.2.8888 > 192.168.10.2.22261: Flags [.], ack 45, win 506, options [nop,nop,TS val 2251247646 ecr 4245243256], length 0
22:17:54.043347 ens4  Out IP 10.10.10.2.8888 > 192.168.10.2.22261: Flags [P.], seq 1:71, ack 45, win 506, options [nop,nop,TS val 2251247703 ecr 4245243256], length 70
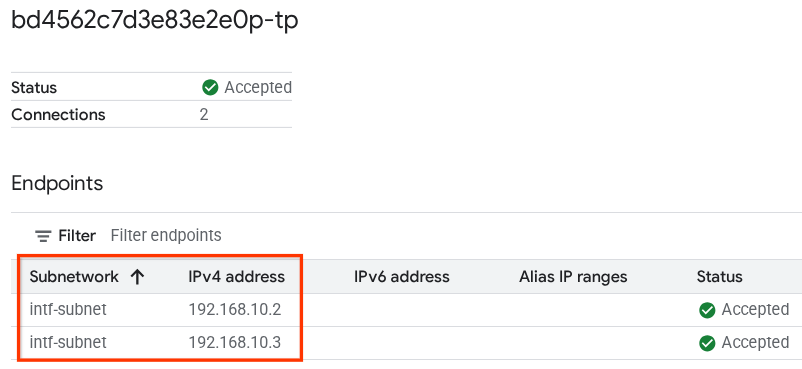
15. การตรวจสอบอินเทอร์เฟซ PSC
นอกจากนี้ คุณยังดู IP การเชื่อมต่อเครือข่ายที่ Agent Engine ใช้ได้โดยไปที่
บริการเครือข่าย → Private Service Connect → ไฟล์แนบเครือข่าย → psc-network-attachment
เลือกโปรเจ็กต์ผู้เช่า (ชื่อโปรเจ็กต์ที่ลงท้ายด้วย -tp)
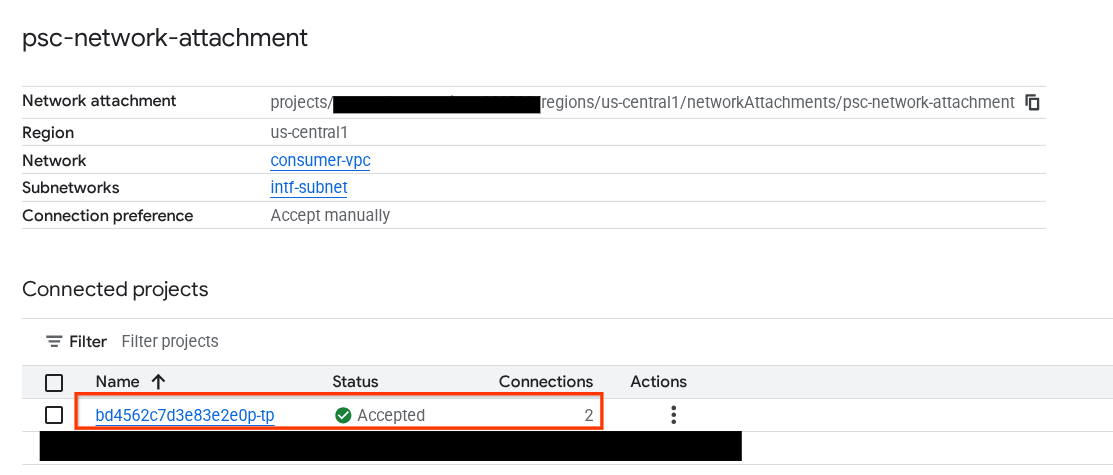
ฟิลด์ที่ไฮไลต์แสดงถึงที่อยู่ IP ที่ Agent Engine ใช้จากการเชื่อมต่อเครือข่าย PSC
16. การตรวจสอบ Cloud Logging
ออกจากเซสชัน TCPDump ของ proxy-vm แล้ว PING ไปยัง Frankfurter api.frankfurter.app เพื่อรับที่อยู่ IP สาธารณะที่เชื่อมโยง
ping -c4 api.frankfurter.app
ตัวอย่างระบุ 104.26.1.198 เป็น IP สาธารณะสำหรับ api.frankfurter.app
user@proxy-vm:~$ ping -c4 api.frankfurter.app
PING api.frankfurter.app (104.26.1.198) 56(84) bytes of data.
64 bytes from 104.26.1.198 (104.26.1.198): icmp_seq=1 ttl=61 time=10.9 ms
64 bytes from 104.26.1.198 (104.26.1.198): icmp_seq=2 ttl=61 time=10.9 ms
64 bytes from 104.26.1.198 (104.26.1.198): icmp_seq=3 ttl=61 time=10.9 ms
64 bytes from 104.26.1.198 (104.26.1.198): icmp_seq=4 ttl=61 time=10.9 ms
มาดูการบันทึก NAT เพื่อดูว่ามีการสังเกตการเข้าชมสำหรับ 104.26.1.198 หรือไม่
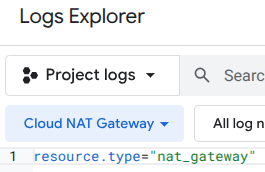
ไปที่ส่วนต่อไปนี้
การตรวจสอบ → เครื่องมือสำรวจบันทึก
ใช้ตัวกรองต่อไปนี้
resource.type="nat_gateway"
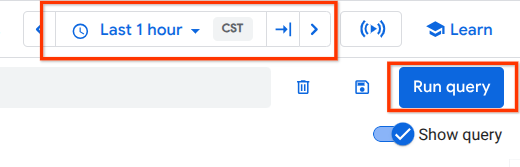
เลือกระยะเวลา แล้วเรียกใช้คำค้นหา
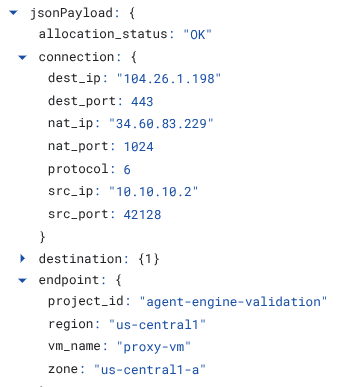
ขยายรายการบันทึกที่ระบุ IP สาธารณะ (ปลายทาง) (104.26.1.198) ของ api.frankfurter.app และที่อยู่ IP ต้นทาง รวมถึงชื่อของ proxy-vm ที่ตรวจสอบการใช้พร็อกซีที่ชัดเจนสำหรับการรับส่งข้อมูลอินเทอร์เน็ตขาออก
17. ล้างข้อมูล
ใน Notebook ของ JupyterLab ให้สร้างเซลล์ใหม่และเรียกใช้โค้ดต่อไปนี้ที่จะทริกเกอร์การลบการติดตั้งใช้งาน Agent Engine
token = !gcloud auth application-default print-access-token

response = requests.delete(
    f"{ENDPOINT}/v1beta1/projects/{PROJECT_ID}/locations/us-central1/reasoningEngines/{reasoning_engine_id}",
    headers={
        "Content-Type": "application/json; charset=utf-8",
        "Authorization": f"Bearer {token[0]}"
    },
)
print(response.text)
ลบคอมโพเนนต์ของบทแนะนำจาก Cloud Shell
gcloud dns record-sets delete proxy-vm.demo.com --zone=private-dns-codelab  --type=A

gcloud dns managed-zones delete private-dns-codelab

gcloud compute instances delete proxy-vm --zone=us-central1-a --quiet

gcloud compute instances delete workbench-tutorial --zone=us-central1-a --quiet

gcloud compute routers delete cloud-router-for-nat --region=us-central1 --quiet

gcloud compute network-attachments delete psc-network-attachment --region=us-central1 --quiet

gcloud compute networks subnets delete intf-subnet rfc1918-subnet1 --region=us-central1 --quiet

gcloud compute networks delete consumer-vpc --quiet
18. ขอแสดงความยินดี
ยินดีด้วย คุณกำหนดค่าและตรวจสอบ Agent Engine ที่ติดตั้งใช้งานด้วยอินเทอร์เฟซ Private Service Connect เรียบร้อยแล้ว โดยมีการส่งออกอินเทอร์เน็ตที่ดำเนินการผ่านพร็อกซีที่ชัดเจน
คุณสร้างโครงสร้างพื้นฐานของผู้บริโภค และเพิ่มไฟล์แนบเครือข่ายที่อนุญาตให้ผู้ผลิตสร้าง VM แบบหลาย NIC เพื่อเชื่อมต่อการสื่อสารระหว่างผู้บริโภคและผู้ผลิต คุณได้เรียนรู้วิธีสร้างพร็อกซีที่ชัดเจนและการเชื่อมต่อ DNS Peering ที่อนุญาตการเชื่อมต่ออินเทอร์เน็ต
Cosmopup คิดว่าบทแนะนำนั้นยอดเยี่ยมมาก!!