1. 簡介
Private Service Connect 介面是一種資源,可讓供應商虛擬私有雲 (VPC) 網路啟動與用戶虛擬私有雲網路中各種目的地的連線。供應商和用戶網路可以位於不同專案和機構中。
如果網路連結接受來自 Private Service Connect 介面的連線,Google Cloud 會從網路連結指定的消費者子網路,為介面分配 IP 位址。消費者和生產者網路已連線,可使用內部 IP 位址通訊。
網路連結與 Private Service Connect 介面之間的連線,類似於 Private Service Connect 端點與服務連結之間的連線,但有兩項主要差異:
- 網路連結可讓供應商網路啟動與消費者網路的連線 (代管服務輸出),而端點則可讓消費者網路啟動與供應商網路的連線 (代管服務輸入)。
- Private Service Connect 介面連線是可遞移的。也就是說,生產端網路可以與連線至消費端網路的其他網路通訊。
Vertex AI PSC 介面可連線性考量
- PSC 介面可將流量轉送至 RFC1918 位址區塊內的 VPC 或內部部署目的地。
- 如果 PSC 介面指定非 RFC-1918 位址區塊,則必須在消費者 VPC 中部署具有 RFC-1918 位址的明確 Proxy。在 Vertex AI 部署作業中,必須定義 Proxy,以及目標端點的 FQDN。
- 如果您只使用 PSC 介面設定部署作業,系統會保留預設的網際網路存取權。這類傳出流量會直接從 Google 代管的安全租戶網路輸出。
Vertex AI PSC 介面 VPC-SC 注意事項
- 如果專案屬於 VPC Service Controls 範圍,範圍會封鎖 Google 代管的租戶預設網際網路存取權,防止資料外洩。
- 如要允許部署作業在此情境中存取公開網際網路,您必須明確設定安全輸出路徑,透過 VPC 傳送流量。
- 建議您在 VPC 邊界內設定具有 RFC1918 位址的 Proxy 伺服器,並建立 Cloud NAT 閘道,允許 Proxy VM 存取網際網路。
如需更多資訊,請參閱下列資源:
部署代理程式 | Vertex AI 生成式 AI | Google Cloud
為 Vertex AI 資源設定 Private Service Connect 介面 | Google Cloud
建構項目
在本教學課程中,您將建構透過 Private Service Connect (PSC) 介面部署的完整 Agent Engine,以便透過部署在消費者虛擬私有雲的 Proxy VM (具有 RFC1918 位址),連線至公開網站 (https://api.frankfurter.app/)。這個範例部署作業適用於啟用 VPC-SC 的專案,或適用於需要透過客戶網路 (而非租戶虛擬私有雲) 傳輸網際網路輸出流量的管理員。
圖 1
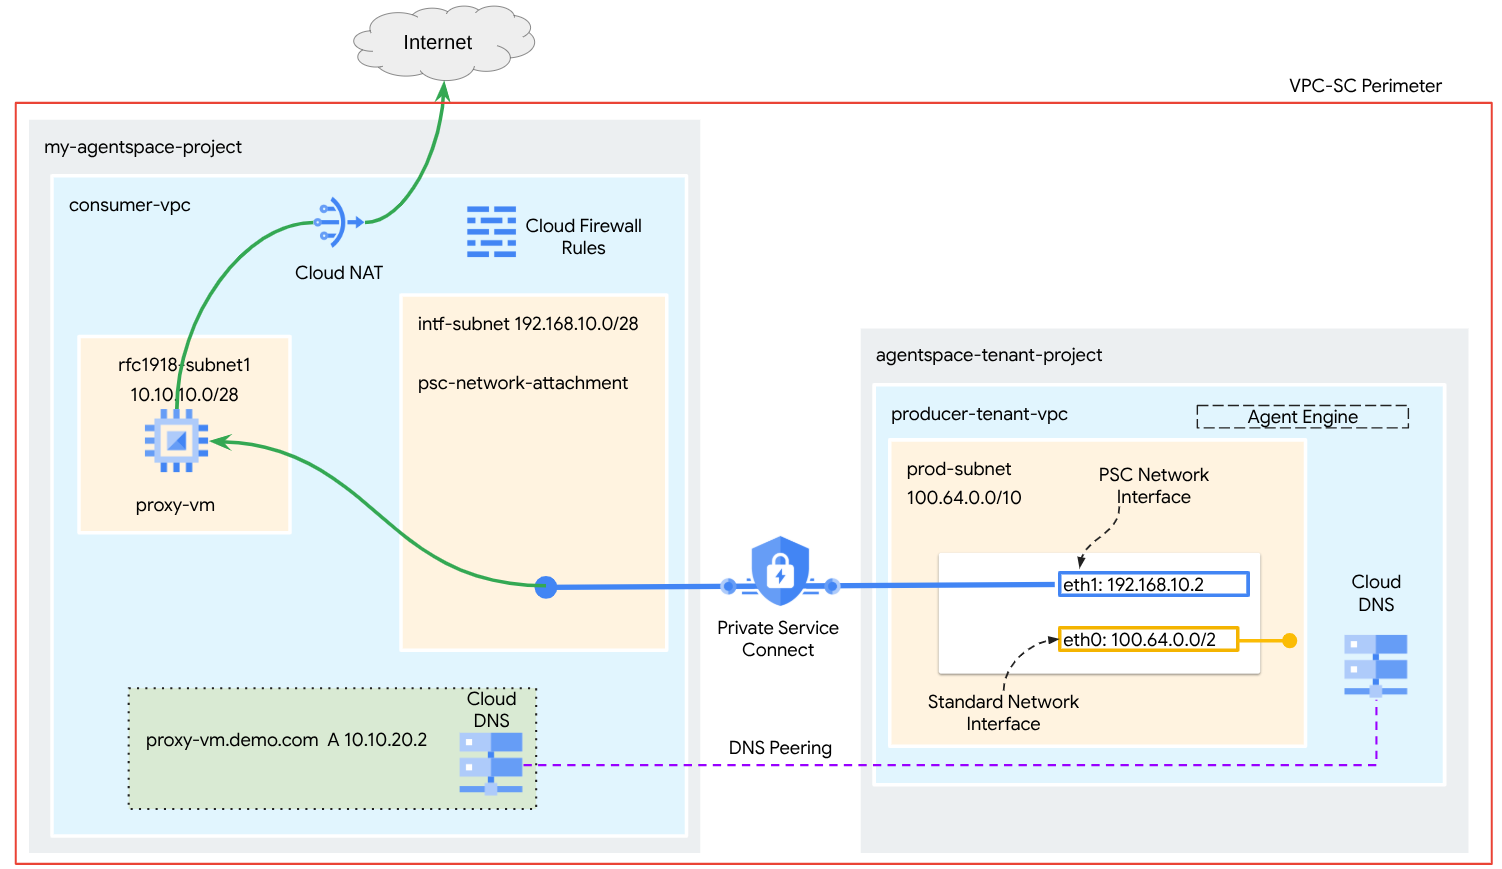
您會在用戶端 VPC 中建立單一 psc-network-attachment,利用 DNS 對接來解析代管 Agent Engine 的租戶專案中的用戶端網路 proxy-vm,進而實現下列用途:
部署 Agent Engine,並設定 Proxy VM 做為明確的 Proxy,允許其連線至公開網址 https://api.frankfurter.app
課程內容
- 如何建立網路連結
- 生產者如何使用網路連結建立 PSC 介面
- 如何使用 DNS 對接,建立從生產端到消費端的通訊
- 如何部署及使用 Proxy VM 進行網際網路輸出
軟硬體需求
Google Cloud 專案
IAM 權限
- Compute 網路管理員 (roles/compute.networkAdmin)
- Compute 執行個體管理員 (roles/compute.instanceAdmin)
- Compute 安全管理員 (roles/compute.securityAdmin)
- DNS 管理員 (roles/dns.admin)
- 受 IAP 保護的通道使用者 (roles/iap.tunnelResourceAccessor)
- 記錄管理員 (roles/logging.admin)
- Notebooks 管理員 (roles/notebooks.admin)
- 專案 IAM 管理員 (roles/resourcemanager.projectIamAdmin)
- 服務帳戶管理員 (roles/iam.serviceAccountAdmin)
- 服務使用情形管理員 (roles/serviceusage.serviceUsageAdmin)
2. 事前準備
更新專案以支援教學課程
本教學課程會使用 $variables,協助您在 Cloud Shell 中實作 gcloud 設定。
在 Cloud Shell 中執行下列操作:
gcloud config list project
gcloud config set project [YOUR-PROJECT-NAME]
projectid=YOUR-PROJECT-NAME
echo $projectid
啟用 API
在 Cloud Shell 中執行下列操作:
gcloud services enable "compute.googleapis.com"
gcloud services enable "aiplatform.googleapis.com"
gcloud services enable "dns.googleapis.com"
gcloud services enable "notebooks.googleapis.com"
gcloud services enable "storage.googleapis.com"
gcloud services enable "iap.googleapis.com"
確認 API 已成功啟用
gcloud services list --enabled
3. 消費者設定
建立 Consumer VPC
這個虛擬私有雲位於客戶專案中。這個虛擬私有雲中會建立下列資源
- 消費者子網路
- 網路連結子網路
- Cloud Router (Cloud NAT 必備)
- Cloud NAT
在 Cloud Shell 中執行下列操作:
gcloud compute networks create consumer-vpc --project=$projectid --subnet-mode=custom
建立消費者子網路
在 Cloud Shell 中,為 Proxy VM 建立子網路:
gcloud compute networks subnets create rfc1918-subnet1 --project=$projectid --range=10.10.10.0/28 --network=consumer-vpc --region=us-central1
建立 Private Service Connect 網路連結子網路
在 Cloud Shell 中,為 PSC 網路附件建立子網路:
gcloud compute networks subnets create intf-subnet --project=$projectid --range=192.168.10.0/28 --network=consumer-vpc --region=us-central1
Cloud Router 和 NAT 設定
在本教學課程中,Cloud NAT 用於為沒有公開 IP 位址的 Proxy VM 提供網際網路存取權。有了 Cloud NAT,只有私人 IP 位址的 VM 也能連上網際網路,執行安裝軟體套件等工作。
在 Cloud Shell 中建立 Cloud Router。
gcloud compute routers create cloud-router-for-nat --network consumer-vpc --region us-central1
在 Cloud Shell 中,建立已啟用記錄功能的 NAT 閘道。我們會使用記錄檔驗證對 Frankfurter API (https://api.frankfurter.app/) 公開 IP 的存取權。
gcloud compute routers nats create cloud-nat-us-central1 --router=cloud-router-for-nat --auto-allocate-nat-external-ips --nat-all-subnet-ip-ranges --region us-central1 --enable-logging --log-filter=ALL
4. 啟用 IAP
如要允許 IAP 連線至您的 VM 執行個體,請根據以下條件建立防火牆規則:
- 套用至所有您希望能透過 IAP 存取的 VM 執行個體。
- 允許來自 IP 範圍 35.235.240.0/20 的輸入流量。這個範圍包含 IAP 用於 TCP 轉送的所有 IP 位址。
在 Cloud Shell 中,建立 IAP 防火牆規則。
gcloud compute firewall-rules create ssh-iap-consumer \
    --network consumer-vpc \
    --allow tcp:22 \
    --source-ranges=35.235.240.0/20
5. 建立消費者 VM 執行個體
在 Cloud Shell 中建立用戶端 VM 執行個體 proxy-vm,做為 Agent Engine 的明確 Proxy。我們會使用 tinyproxy 做為 Proxy HTTP 流量的應用程式。
gcloud compute instances create proxy-vm \
    --project=$projectid \
    --machine-type=e2-micro \
    --image-family debian-11 \
    --no-address \
    --can-ip-forward \
    --image-project debian-cloud \
    --zone us-central1-a \
    --subnet=rfc1918-subnet1 \
    --shielded-secure-boot \
    --metadata startup-script="#! /bin/bash
      sudo apt-get update
      sudo apt-get install tcpdump
      sudo apt-get install tinyproxy -y
      sudo apt-get install apache2 -y
      sudo service apache2 restart
      echo 'proxy server !!' | tee /var/www/html/index.html
      EOF"
6. Private Service Connect 網路連結
網路連結是區域資源,代表 Private Service Connect 介面的用戶端。您會將單一子網路與網路連結建立關聯,而生產端會從該子網路將 IP 指派給 Private Service Connect 介面。子網路必須與網路連結位於同一地區。網路連結必須與生產者服務位於相同區域。
建立網路連結
在 Cloud Shell 中建立網路連結。
gcloud compute network-attachments create psc-network-attachment \
    --region=us-central1 \
    --connection-preference=ACCEPT_AUTOMATIC \
    --subnets=intf-subnet
列出網路連結
在 Cloud Shell 中列出網路連結。
gcloud compute network-attachments list
說明網路連結
在 Cloud Shell 中,說明網路附件。
gcloud compute network-attachments describe psc-network-attachment --region=us-central1
請記下 PSC 網路連結名稱 psc-network-attachment,供應商建立 Private Service Connect 介面時會用到這個名稱。
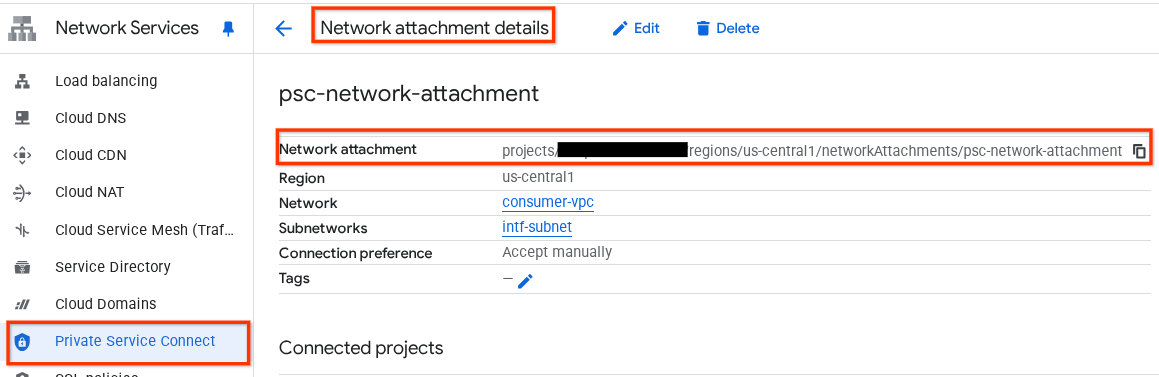
如要在 Cloud 控制台中查看 PSC 網路附件網址,請前往下列位置:
「網路服務」→「Private Service Connect」→「網路連結」→「psc-network-attachment」
7. 私人 DNS 區域
您將為 demo.com 建立 Cloud DNS 區域,並填入指向 proxy-vm IP 位址的 A 記錄。稍後,系統會在 Agent Engine 中部署 DNS 對等互連,允許存取消費者的 DNS 記錄。
在 Cloud Shell 中執行下列指令,建立 DNS 名稱 demo.com。
gcloud dns --project=$projectid managed-zones create private-dns-codelab --description="" --dns-name="demo.com." --visibility="private" --networks="https://compute.googleapis.com/compute/v1/projects/$projectid/global/networks/consumer-vpc"
取得並儲存用於 DNS A 記錄的執行個體 IP 位址。
在 Cloud Shell 中,對 VM 執行個體執行說明。
gcloud compute instances describe proxy-vm --zone=us-central1-a | grep networkIP:
在 Cloud Shell 中,為 VM (proxy-vm.demo.com) 建立記錄集,並根據環境的輸出內容更新 IP 位址。
gcloud dns --project=$projectid record-sets create proxy-vm.demo.com. --zone="private-dns-codelab" --type="A" --ttl="300" --rrdatas="10.10.10.2"
建立 Cloud Firewall 規則,允許從 PSC 介面存取
在下一節中,請建立防火牆規則,允許來自 PSC 網路附件的流量存取 Consumer VPC 中的 proxy-vm。
在 Cloud Shell 中建立輸入防火牆規則。
gcloud compute firewall-rules create allow-access-to-compute \
    --network=consumer-vpc \
    --action=ALLOW \
    --rules=ALL \
    --direction=INGRESS \
    --priority=1000 \
    --source-ranges="192.168.10.0/28" \
    --destination-ranges="10.10.10.0/28" \
    --enable-logging
8. 建立 Jupyter Notebook
下一節將引導您建立 Jupyter Notebook。這個筆記本將用於部署 Agent Engine,以明確的 Proxy 做為網際網路輸出目標。
建立使用者管理的服務帳戶
在下一節中,您將建立與本教學課程所用 Vertex AI Workbench 執行個體相關聯的服務帳戶。
在本教學課程中,服務帳戶會套用下列角色:
在 Cloud Shell 中建立服務帳戶。
gcloud iam service-accounts create notebook-sa \
    --display-name="notebook-sa"
在 Cloud Shell 中,將服務帳戶更新為 Storage 管理員角色。
gcloud projects add-iam-policy-binding $projectid --member="serviceAccount:notebook-sa@$projectid.iam.gserviceaccount.com" --role="roles/storage.admin"
在 Cloud Shell 中,使用 Vertex AI 使用者角色更新服務帳戶。
gcloud projects add-iam-policy-binding $projectid --member="serviceAccount:notebook-sa@$projectid.iam.gserviceaccount.com" --role="roles/aiplatform.user"
在 Cloud Shell 中,更新服務帳戶,並指派 Artifact Registry 管理員角色。
gcloud projects add-iam-policy-binding $projectid --member="serviceAccount:notebook-sa@$projectid.iam.gserviceaccount.com" --role="roles/artifactregistry.admin"
在 Cloud Shell 中,允許筆記本服務帳戶使用 Compute Engine 預設服務帳戶。
gcloud iam service-accounts add-iam-policy-binding \
    $(gcloud projects describe $(gcloud config get-value project) --format='value(projectNumber)')-compute@developer.gserviceaccount.com \
    --member="serviceAccount:notebook-sa@$projectid.iam.gserviceaccount.com" \
    --role="roles/iam.serviceAccountUser"
9. 更新明確 Proxy
在下一節中,您需要透過 SSH 連線至明確的 Proxy,更新 tinyproxy.conf 設定檔,然後執行重設。
透過 Cloud Shell
gcloud compute ssh --zone us-central1-a "proxy-vm" --tunnel-through-iap --project $projectid
開啟 tinyproxy 設定檔,使用編輯器或您選擇的工具更新。以下是使用 VIM 的範例。
sudo vim /etc/tinyproxy/tinyproxy.conf

# Locate the "Listen" configuration line to restrict listening to only its private IP address of the Proxy-VM, rather than all interfaces.

Listen 10.10.10.2

# Locate the "Allow" configuration line to allow requests ONLY from the PSC Network Attachment Subnet

Allow 192.168.10.0/24

Save the configs by the following steps:
1. Press the `ESC` key to enter Command Mode.
2. Type `:wq` to save (w) and quit (q).
3. Press `Enter`

Restart the tinyproxy service to apply the changes:
sudo systemctl restart tinyproxy

Validate the tinyproxy service is running:
sudo systemctl status tinyproxy

Perform an exit returning to cloud shell
exit
10. 建立 Vertex AI Workbench 執行個體
在下一節中,建立納入先前建立的服務帳戶 notebook-sa 的 Vertex AI Workbench 執行個體。
在 Cloud Shell 中建立 private-client 執行個體。
gcloud workbench instances create workbench-tutorial --vm-image-project=cloud-notebooks-managed --vm-image-family=workbench-instances --machine-type=n1-standard-4 --location=us-central1-a --subnet-region=us-central1 --subnet=rfc1918-subnet1 --disable-public-ip --shielded-secure-boot=true --shielded-integrity-monitoring=true --shielded-vtpm=true --service-account-email=notebook-sa@$projectid.iam.gserviceaccount.com
11. 更新 Vertex AI 服務代理
Vertex AI 會代表您執行作業,例如從用於建立 PSC 介面的 PSC 網路連結子網路取得 IP 位址。為此,Vertex AI 會使用服務代理程式 (如下所列),該代理程式需要網路管理員權限:
service-$projectnumber@gcp-sa-aiplatform.iam.gserviceaccount.com
在 Cloud Shell 中取得專案編號。
gcloud projects describe $projectid | grep projectNumber
在 Cloud Shell 中設定專案編號。
projectnumber=YOUR-PROJECT-Number
在 Cloud Shell 中,為 AI Platform 建立服務帳戶。如果專案中已有服務帳戶,請略過這個步驟。
gcloud beta services identity create --service=aiplatform.googleapis.com --project=$projectnumber
在 Cloud Shell 中,使用 compute.networkAdmin 角色更新服務代理人帳戶。
gcloud projects add-iam-policy-binding $projectid --member="serviceAccount:service-$projectnumber@gcp-sa-aiplatform.iam.gserviceaccount.com" --role="roles/compute.networkAdmin"
在 Cloud Shell 中,使用 dns.peer 角色更新服務代理程式帳戶
gcloud projects add-iam-policy-binding $projectid --member="serviceAccount:service-$projectnumber@gcp-sa-aiplatform.iam.gserviceaccount.com" --role="roles/dns.peer"
更新預設服務帳戶
授予預設服務帳戶 Vertex AI 的存取權。請注意,存取權變更可能需要一段時間才會生效。
在 Cloud Shell 中,使用 aiplatform.user 角色更新預設服務帳戶
gcloud projects add-iam-policy-binding $projectid \
  --member="serviceAccount:$projectnumber-compute@developer.gserviceaccount.com" \
    --role="roles/aiplatform.user"
12. Proxy VM Tcpdump
如要驗證 Agent Engine 的 IP 連線,可以使用 TCPDUMP。這樣一來,當您從 Agent Engine 叫用對公開網址的 GET 要求時,我們就能觀察源自 PSC 網路附加元件子網路 (192.168.10.0/28) 的通訊。
從 Cloud Shell 透過 SSH 連線至 Proxy VM。
gcloud compute ssh --zone us-central1-a "proxy-vm" --tunnel-through-iap --project $projectid
從 proxy-vm OS 執行 tcpdump。
sudo tcpdump -i any net 192.168.10.0/28 -nn
13. 部署 Agent Engine
注意:我們會使用 GCP 主控台和 JupyterLab 筆記本,完成本節中的工作
在下一節中,您將建立執行下列工作的筆記本:
- 使用 Frankfurter API (https://api.frankfurter.app/) 取得匯率資料
- 參考明確的 Proxy (proxy_server),使用 FQDN proxy-vm.demo.com,以消費者 VPC 中的 proxy-vm 為目標
- 定義 dnsPeeringConfigs "domain": "demo.com."
在 Vertex AI Workbench 執行個體中執行訓練工作。
- 在 Google Cloud 控制台中,前往「Vertex AI」→「Workbench」
- 按一下 Vertex AI Workbench 執行個體名稱 (workbench-tutorial) 旁的「Open JupyterLab」。Vertex AI Workbench 執行個體會在 JupyterLab 中開啟。
- 依序選取「檔案」>「新增」>「筆記本」
- 選取「Kernel」>「Python 3」
安裝必要的 Python 程式庫:安裝 Agent Engine 必要的程式庫,包括 pyyaml、google-cloud-aiplatform、cloudpickle、google-cloud-api-keys 和 langchain-google-vertexai。
在 JupyterLab 筆記本中,建立新儲存格並執行下列程式碼。
!pip install pyyaml
!pip install google-cloud-aiplatform[agent_engines,langchain]==1.96.0
!pip install cloudpickle==3.1.1
!pip install google-cloud-api-keys
!pip install langchain-google-vertexai==2.0.24
重新啟動 Jupyter Notebook 核心:確保新安裝的程式庫已正確載入。
在 JupyterLab 筆記本中,建立新儲存格並執行下列程式碼。
# Restart the notebook kernel after install, so you can run langchain successfully.

import IPython

app = IPython.Application.instance()
app.kernel.do_shutdown(True)
設定專案和 bucket 變數:定義 Google Cloud 專案 ID、專案編號、服務名稱、GCS 目錄、端點、bucket 名稱和位置。
請先更新下列欄位,再執行儲存格
- PROJECT_ID = "enter-your-projectid"
- PROJECT_NUMBER = "enter-your-projectnumber"
- BUCKET= "enter-a-unique-bucket-name"
注意:我們會在下一個步驟中使用 BUCKET 變數建立 Cloud Storage bucket。
在 JupyterLab 筆記本中建立新儲存格,然後更新並執行下列項目。
PROJECT_ID = "enter-your-projectid"  #@param {type:"string"}
PROJECT_NUMBER = "enter-your-projectnumber"  #@param {type:"string"}
SERVICE_NAME = "aiplatform"  #@param ["autopush-aiplatform", "staging-aiplatform", "aiplatform"]
# @markdown  Specify where your agent code should be written in GCS:
GCS_DIR = "reasoning-engine-test"  #@param {type:"string"}
ENDPOINT = "https://us-central1-aiplatform.googleapis.com" # @param ["https://us-central1-aiplatform.googleapis.com", "https://us-central1-autopush-aiplatform.sandbox.googleapis.com", "https://us-central1-staging-aiplatform.sandbox.googleapis.com"]
BUCKET= "enter-a-unique-bucket-name" #@param {type:"string"}
LOCATION="us-central1" #@param {type:"string"}
建立 GCS bucket:建立 Cloud Storage bucket,用於儲存代理程式碼。
在 JupyterLab 筆記本中,建立新儲存格並執行下列程式碼。
!gcloud storage buckets create gs://{BUCKET}
定義網路連結名稱:指定 Private Service Connect 網路連結的名稱。
在 JupyterLab 筆記本中,建立新儲存格並執行下列程式碼。
NETWORK_ATTACHMENT_NAME = 'psc-network-attachment' #@param {type:"string"}
初始化 Python 用戶端程式庫:設定 Google Cloud 服務的必要用戶端程式庫。
在 JupyterLab 筆記本中,建立新儲存格並執行下列程式碼。
import json
import pprint

import cloudpickle
from google import auth as google_auth
from google.auth.transport import requests as google_requests
from google.cloud import storage
import yaml


def get_identity_token():
    """Gets ID token for calling Cloud Run."""
    credentials, _ = google_auth.default()
    auth_request = google_requests.Request()
    credentials.refresh(auth_request)
    return credentials.id_token

if not GCS_DIR or "your_ldap" in GCS_DIR:
    raise ValueError("GCS_DIR must be set or you must set your ldap.")

if not PROJECT_ID:
    raise ValueError("PROJECT_ID must be set.")


client = storage.Client(project=PROJECT_ID)
bucket = client.get_bucket(BUCKET)
設定代理程式和工具:定義 StreamingAgent 類別和 get_exchange_rate 函式,透過明確的 Proxy 使用 Frankfurter API 擷取匯率。
在 JupyterLab 筆記本中建立新儲存格,然後執行下列設定,並注意以下重點:
- def get_exchange_rate 函式會使用 Frankfurter API (https://api.frankfurter.app/) 取得匯率資料。
- proxy_server = "http://proxy-vm.demo.com:8888" FQDN 與部署在消費者 VPC 中的 Proxy VM 相關聯。我們會在後續步驟中使用 DNS 對等互連來解析 FQDN。
from langchain_google_vertexai import ChatVertexAI
from langchain.agents import AgentExecutor
from langchain.agents.format_scratchpad.tools import format_to_tool_messages
from langchain.agents.output_parsers.tools import ToolsAgentOutputParser
from langchain.tools.base import StructuredTool
from langchain_core import prompts
from re import S
from typing import Callable, Sequence
import google.auth
import vertexai


class StreamingAgent:

    def __init__(
            self,
            model: str,
            tools: Sequence[Callable],
            project_id: str,
        ):
        self.model_name = model
        self.tools = tools
        self.project_id = project_id

    def set_up(self):
        """All unpickle-able logic should go here.

        The .set_up() method should not be called for an object that is being
        prepared for deployment.
        """
        creds, _ = google.auth.default(quota_project_id=self.project_id)
        vertexai.init(project=self.project_id, location="us-central1", credentials=creds)

        prompt = {
            "input": lambda x: x["input"],
            "agent_scratchpad": (
                lambda x: format_to_tool_messages(x["intermediate_steps"])
            ),
        } | prompts.ChatPromptTemplate.from_messages([
            ("user", "{input}"),
            prompts.MessagesPlaceholder(variable_name="agent_scratchpad"),
        ])

        llm = ChatVertexAI(model_name=self.model_name)
        if self.tools:
            llm = llm.bind_tools(tools=self.tools)

        self.agent_executor = AgentExecutor(
            agent=prompt | llm | ToolsAgentOutputParser(),
            tools=[StructuredTool.from_function(tool) for tool in self.tools],
        )

    def query(self, input: str):
        """Query the application.

        Args:
            input: The user prompt.

        Returns:
            The output of querying the application with the given input.
        """
        return self.agent_executor.invoke(input={"input": input})

    def stream_query(self, input: str):
        """Query the application and stream the output.

        Args:
            input: The user prompt.

        Yields:
            Chunks of the response as they become available.
        """
        for chunk in self.agent_executor.stream(input={"input": input}):
            yield chunk

def get_exchange_rate(
    currency_from: str = "USD",
    currency_to: str = "EUR",
    currency_date: str = "latest",
):
    """Retrieves the exchange rate between two currencies on a specified date.

    Uses the Frankfurter API (https://api.frankfurter.app/) to obtain
    exchange rate data.

    Args:
        currency_from: The base currency (3-letter currency code).
            Defaults to "USD" (US Dollar).
        currency_to: The target currency (3-letter currency code).
            Defaults to "EUR" (Euro).
        currency_date: The date for which to retrieve the exchange rate.
            Defaults to "latest" for the most recent exchange rate data.
            Can be specified in YYYY-MM-DD format for historical rates.

    Returns:
        dict: A dictionary containing the exchange rate information.
            Example: {"amount": 1.0, "base": "USD", "date": "2023-11-24",
                "rates": {"EUR": 0.95534}}
    """
    import requests

    proxy_server = "http://proxy-vm.demo.com:8888" # This is the VM's FQDN to reach the proxy vm in the consumers network

    proxies = {
       "http": proxy_server,
       "https": proxy_server,
    }
    response = requests.get(
        f"https://api.frankfurter.app/{currency_date}",
        params={"from": currency_from, "to": currency_to},
        proxies=proxies,
    )
    return response.json()
將代理程式檔案上傳至 Cloud Storage:將序列化代理程式及其需求上傳至指定 GCS bucket。
在 JupyterLab 筆記本中,建立新的儲存格並執行下列程式碼:
# Upload files to Cloud Storage.
if not GCS_DIR:
    raise ValueError("GCS_DIR must be set.")

FILE = "streaming_agent.pkl"
blob = bucket.blob(f"{GCS_DIR}/{FILE}")
with blob.open("wb") as f:
    cloudpickle.dump(
        StreamingAgent(
            model="gemini-2.0-flash-001",  # Required.
            tools=[get_exchange_rate],  # Optional.
            project_id=PROJECT_ID
        ), f)


requirements = """
google-cloud-aiplatform[agent_engines,langchain]==1.96.0
cloudpickle==3.1.1
"""

blob = bucket.blob(f"{GCS_DIR}/requirements-streaming.txt")
blob.upload_from_string(requirements)

!gsutil ls gs://{BUCKET}/{GCS_DIR}
部署 Agent Engine:部署 Agent Engine,並透過 PSC 介面和 DNS 對接設定,在用戶端虛擬私有雲中解析 Proxy VM 的 FQDN。
在 JupyterLab 筆記本中建立並執行下列儲存格,請注意以下重點:
- 使用網域名稱 demo.com 的 dnsPeeringConfigs (dnsPeeringConfigs),設定與消費者 VPC 的 DNS 對等互連。
import requests


token = !gcloud auth application-default print-access-token

response = requests.post(
    f"{ENDPOINT}/v1beta1/projects/{PROJECT_ID}/locations/{LOCATION}/reasoningEngines",
    headers={
        "Content-Type": "application/json; charset=utf-8",
        "Authorization": f"Bearer {token[0]}"
    },
    data=json.dumps({
        "displayName": "PSC-I Explicit Proxy",
        "description": "test psc-i agent + proxy vm",
        "spec": {
            "packageSpec": {
                "pickleObjectGcsUri": f"gs://{BUCKET}/{GCS_DIR}/streaming_agent.pkl",
                "requirementsGcsUri": f"gs://{BUCKET}/{GCS_DIR}/requirements-streaming.txt",
                "pythonVersion": "3.10"
            },
            "deploymentSpec": {
                "pscInterfaceConfig": {
                    "networkAttachment": NETWORK_ATTACHMENT_NAME,
                    "dnsPeeringConfigs": [
                    {
                      "domain": "demo.com.",
                      "targetProject": PROJECT_ID,
                      "targetNetwork": "consumer-vpc", #Consumer VPC
                    },
                  ],
                }
            }
        },
    })
)

pprint.pprint(json.loads(response.content))
reasoning_engine_id = json.loads(response.content)["name"].split("/")[5]
pprint.pprint(reasoning_engine_id)
監控部署狀態:檢查 Agent Engine 部署作業的狀態。
在 JupyterLab 筆記本中,建立新儲存格並執行下列程式碼。
operation_id = json.loads(response.content)["name"].split("/")[7]
pprint.pprint(operation_id)
在 JupyterLab 筆記本中,建立新儲存格並執行下列程式碼。
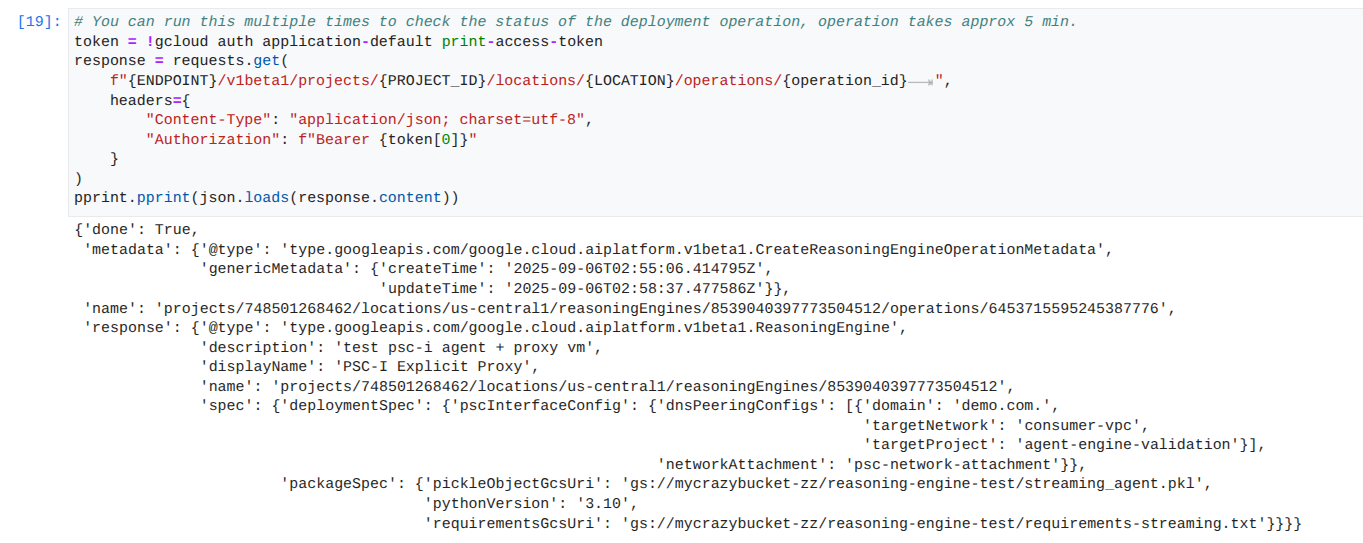
注意:這項作業大約需要 5 分鐘才能完成。重新執行儲存格,查看進度。請務必看到類似下方螢幕截圖的輸出內容,再繼續下一個章節。
# You can run this multiple times to check the status of the deployment operation, operation takes approx 5 min.
token = !gcloud auth application-default print-access-token
response = requests.get(
    f"{ENDPOINT}/v1beta1/projects/{PROJECT_ID}/locations/{LOCATION}/operations/{operation_id}        ",
    headers={
        "Content-Type": "application/json; charset=utf-8",
        "Authorization": f"Bearer {token[0]}"
    }
)
pprint.pprint(json.loads(response.content))
成功執行的範例:
查詢已部署的代理程式:向已部署的 Agent Engine 傳送查詢,測試其功能。
在 JupyterLab 筆記本中,建立新儲存格並執行下列程式碼。
response = requests.post(
    f"{ENDPOINT}/v1beta1/projects/{PROJECT_ID}/locations/{LOCATION}/reasoningEngines/{reasoning_engine_id}:query",
    headers={
        "Content-Type": "application/json; charset=utf-8",
        "Authorization": f"Bearer {token[0]}"
    },
    data=json.dumps({ "input": {"input": "What is the exchange rate from US dollars to Euro?"} })
)
print(response.text)
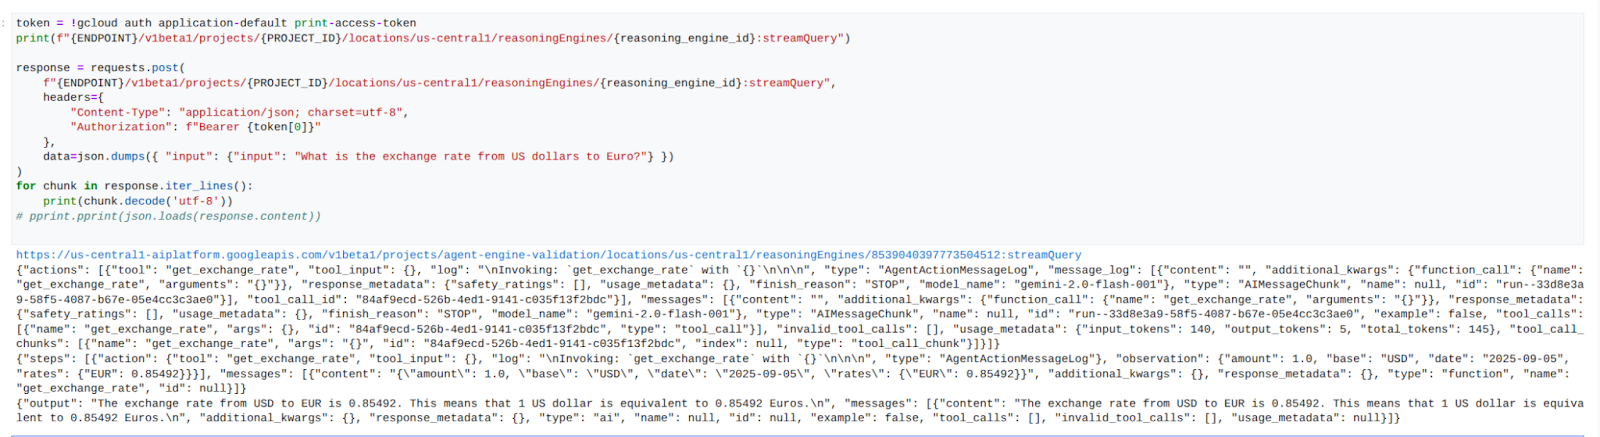
串流查詢結果:串流來自 Agent Engine 查詢的輸出內容。
在 JupyterLab 筆記本中建立新儲存格,然後執行下列程式碼,透過消費者 VPC 中的明確 Proxy,觸發對公開網址的 API 呼叫。
token = !gcloud auth application-default print-access-token
print(f"{ENDPOINT}/v1beta1/projects/{PROJECT_ID}/locations/us-central1/reasoningEngines/{reasoning_engine_id}:streamQuery")

response = requests.post(
    f"{ENDPOINT}/v1beta1/projects/{PROJECT_ID}/locations/us-central1/reasoningEngines/{reasoning_engine_id}:streamQuery",
    headers={
        "Content-Type": "application/json; charset=utf-8",
        "Authorization": f"Bearer {token[0]}"
    },
    data=json.dumps({ "input": {"input": "What is the exchange rate from US dollars to Euro?"} })
)
for chunk in response.iter_lines():
    print(chunk.decode('utf-8'))
# pprint.pprint(json.loads(response.content))
成功執行的範例:
14. Tcpdump 驗證
查看 tcpdump 輸出內容,其中詳細說明 Agent Engine 使用的 PSC 網路附加 IP 位址與 Prox-VM 之間的通訊 (要求發布後)。
user@proxy-vm:~$ sudo tcpdump -i any net 192.168.10.0/28 -nn
tcpdump: data link type LINUX_SLL2
tcpdump: verbose output suppressed, use -v[v]... for full protocol decode
listening on any, link-type LINUX_SLL2 (Linux cooked v2), snapshot length 262144 bytes
22:17:53.983212 ens4  In  IP 192.168.10.2.22261 > 10.10.10.2.8888: Flags [S], seq 3841740961, win 28800, options [mss 1440,sackOK,TS val 4245243253 ecr 0,nop,wscale 7], length 0
22:17:53.983252 ens4  Out IP 10.10.10.2.8888 > 192.168.10.2.22261: Flags [S.], seq 2232973833, ack 3841740962, win 64768, options [mss 1420,sackOK,TS val 2251247643 ecr 4245243253,nop,wscale 7], length 0
22:17:53.985167 ens4  In  IP 192.168.10.2.22261 > 10.10.10.2.8888: Flags [.], ack 1, win 225, options [nop,nop,TS val 4245243256 ecr 2251247643], length 0
22:17:53.986476 ens4  In  IP 192.168.10.2.22261 > 10.10.10.2.8888: Flags [P.], seq 1:45, ack 1, win 16384, options [nop,nop,TS val 4245243256 ecr 2251247643], length 44
22:17:53.986485 ens4  Out IP 10.10.10.2.8888 > 192.168.10.2.22261: Flags [.], ack 45, win 506, options [nop,nop,TS val 2251247646 ecr 4245243256], length 0
22:17:54.043347 ens4  Out IP 10.10.10.2.8888 > 192.168.10.2.22261: Flags [P.], seq 1:71, ack 45, win 506, options [nop,nop,TS val 2251247703 ecr 4245243256], length 70
15. PSC 介面驗證
您也可以前往下列位置,查看 Agent Engine 使用的網路附加 IP:
「網路服務」→「Private Service Connect」→「網路連結」→「psc-network-attachment」
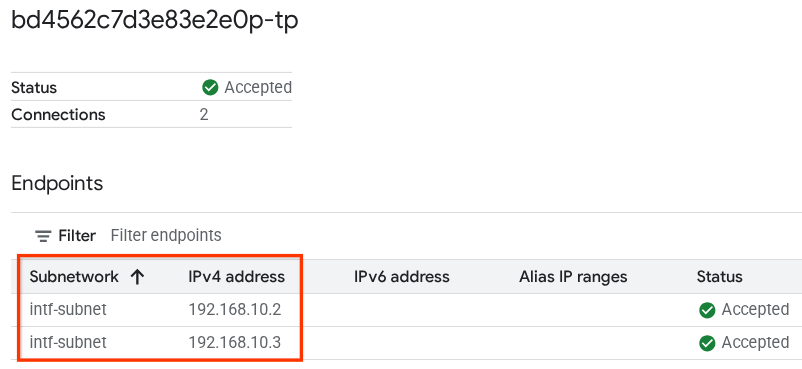
選取租戶專案 (專案名稱結尾為「-tp」)
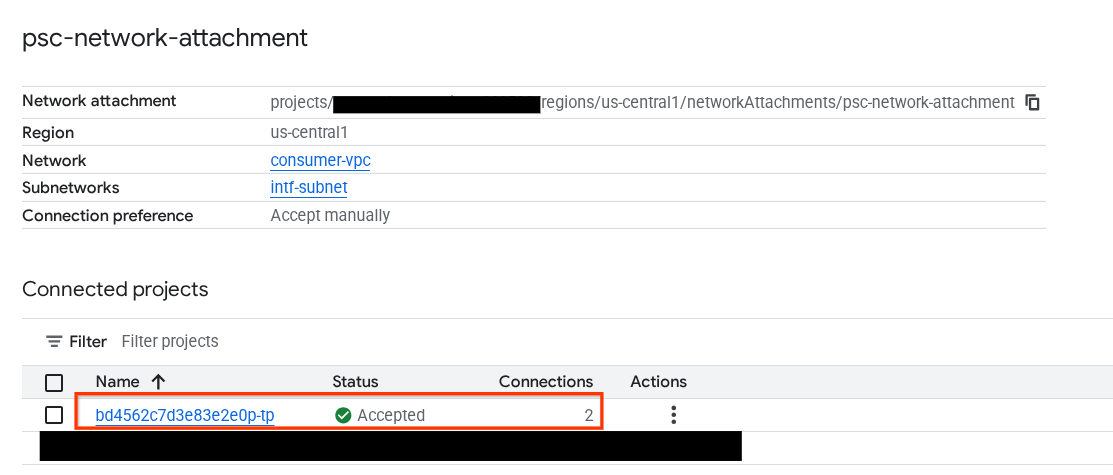
醒目顯示的欄位表示 Agent Engine 從 PSC 網路附件使用的 IP 位址。
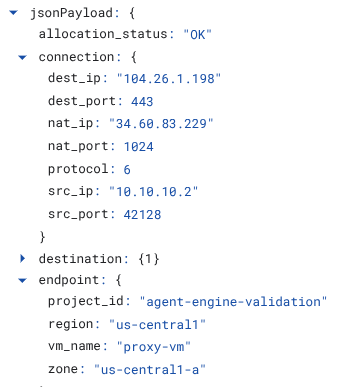
16. Cloud Logging 驗證
結束 proxy-vm TCPDump 工作階段,並對 Frankfurter api.frankfurter.app 執行 PING,取得相關聯的公開 IP 位址。
ping -c4 api.frankfurter.app
範例會將 104.26.1.198 識別為 api.frankfurter.app 的公開 IP
user@proxy-vm:~$ ping -c4 api.frankfurter.app
PING api.frankfurter.app (104.26.1.198) 56(84) bytes of data.
64 bytes from 104.26.1.198 (104.26.1.198): icmp_seq=1 ttl=61 time=10.9 ms
64 bytes from 104.26.1.198 (104.26.1.198): icmp_seq=2 ttl=61 time=10.9 ms
64 bytes from 104.26.1.198 (104.26.1.198): icmp_seq=3 ttl=61 time=10.9 ms
64 bytes from 104.26.1.198 (104.26.1.198): icmp_seq=4 ttl=61 time=10.9 ms
讓我們查看 NAT 記錄,看看是否觀察到 104.26.1.198 的流量。
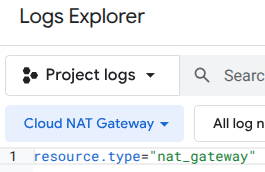
前往下列位置:
「監控」→「記錄檔探索工具」
使用下列篩選條件:
resource.type="nat_gateway"
選取時間範圍,然後執行查詢
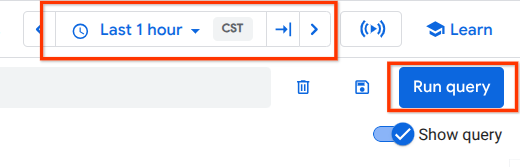
展開記錄項目,找出 api.frankfurter.app 的 (目的地) 公開 IP (104.26.1.198) 和來源 IP 位址,以及驗證網際網路輸出明確 Proxy 使用情形的 proxy-vm 名稱。
17. 清理
在 JupyterLab 筆記本中,建立新儲存格並執行下列程式碼,觸發刪除 Agent Engine 部署作業。
token = !gcloud auth application-default print-access-token

response = requests.delete(
    f"{ENDPOINT}/v1beta1/projects/{PROJECT_ID}/locations/us-central1/reasoningEngines/{reasoning_engine_id}",
    headers={
        "Content-Type": "application/json; charset=utf-8",
        "Authorization": f"Bearer {token[0]}"
    },
)
print(response.text)
在 Cloud Shell 中刪除教學課程元件。
gcloud dns record-sets delete proxy-vm.demo.com --zone=private-dns-codelab  --type=A

gcloud dns managed-zones delete private-dns-codelab

gcloud compute instances delete proxy-vm --zone=us-central1-a --quiet

gcloud compute instances delete workbench-tutorial --zone=us-central1-a --quiet

gcloud compute routers delete cloud-router-for-nat --region=us-central1 --quiet

gcloud compute network-attachments delete psc-network-attachment --region=us-central1 --quiet

gcloud compute networks subnets delete intf-subnet rfc1918-subnet1 --region=us-central1 --quiet

gcloud compute networks delete consumer-vpc --quiet
18. 恭喜
恭喜!您已成功設定並驗證透過 Private Service Connect 介面部署的 Agent Engine,並透過明確的 Proxy 執行網際網路輸出。
您已建立消費者基礎架構,並新增網路附件,讓生產者可以建立多重 NIC VM,以橋接消費者和生產者通訊。您已學會如何建立允許網際網路連線的明確 Proxy 和 DNS 對等互連。
Cosmopup 認為教學課程很棒!