
1. Introduction
A Private Service Connect interface is a resource that lets a producer Virtual Private Cloud (VPC) network initiate connections to various destinations in a consumer VPC network. Producer and consumer networks can be in different projects and organizations.
If a network attachment accepts a connection from a Private Service Connect interface, Google Cloud allocates the interface an IP address from a consumer subnet that's specified by the network attachment. The consumer and producer networks are connected and can communicate by using internal IP addresses.
A connection between a network attachment and a Private Service Connect interface is similar to the connection between a Private Service Connect endpoint and a service attachment, but it has two key differences:
- A network attachment lets a producer network initiate connections to a consumer network (managed service egress), while an endpoint lets a consumer network initiate connections to a producer network (managed service ingress).
- A Private Service Connect interface connection is transitive. This means that a producer network can communicate with other networks that are connected to the consumer network.
Vertex AI PSC-Interface reachability considerations
- PSC-Interface is capable of routing traffic to VPC or on-premesis based destinations learned by the VPC network.
- To limit the scope of reachability from the network attachment used by Agent Engine to the VPC network, the implementation of egress firewall rules is the best practice.
- To limit the scope of network egress traffic originating from the Agent Engine's network attachment subnet, a VPC egress firewall rule should be deployed. This rule will explicitly allow traffic from the Agent Engine to the SWP, while denying all other outbound traffic.
Vertex AI PSC-Interface VPC-SC considerations
- You must provide internet egress connectivity within the customer VPC for the Agent Engine PSC-Interface to function, even if VPC Service Controls are enabled.
Secure Web Proxy
Secure Web Proxy is a managed, cloud-native service that gives you granular control and security for your outbound traffic (HTTP/HTTPS). It acts as a central gateway, letting you enforce security policies on connections initiated from Agent Engine deployed with PSC Interface to VPC resources, such as VMs, GKE, internet and multicloud environments.
What It Solves
- Prevents data exfiltration: Blocks unauthorized uploads or communication with malicious sites.
- Enforces compliance: Ensures outbound traffic adheres to your organization's security and data handling policies.
- Reduces operational overhead: As a fully managed service, Secure Web Proxy eliminates the need to deploy, scale, or maintain your own proxy VMs.
- Provides deep visibility: Enables inspection of Transport Layer Security (TLS)-encrypted traffic to detect hidden threats.
For additional information, refer to the following resources:
Deploy an agent | Generative AI on Vertex AI | Google Cloud
Set up a Private Service Connect interface for Vertex AI resources | Google Cloud
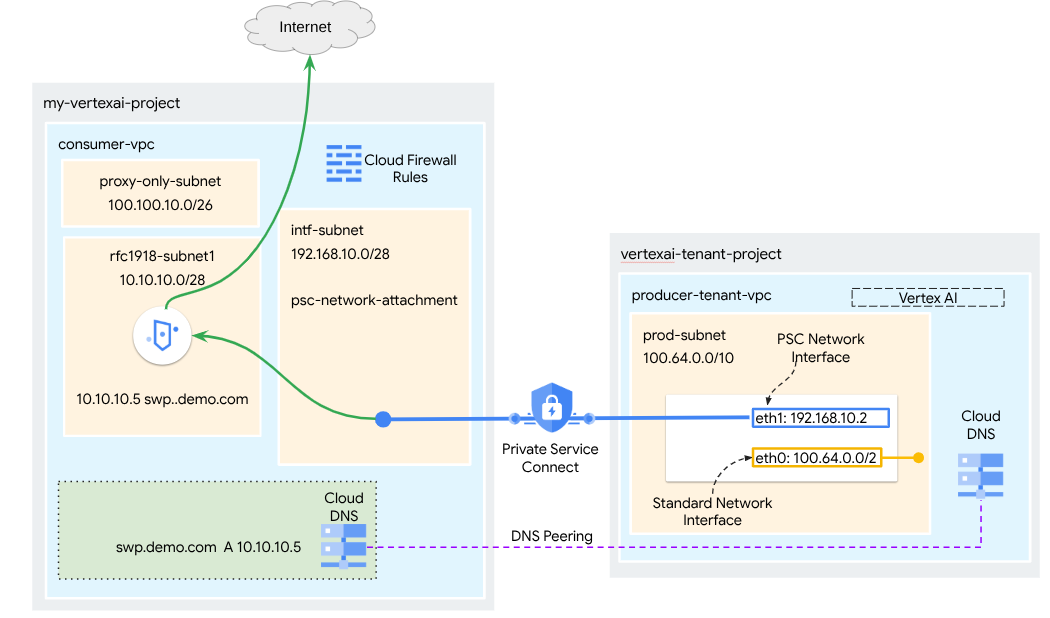
What you'll build
In this tutorial, you're going to build a comprehensive Agent Engine deployed with Private Service Connect (PSC) Interface integrated with SWP to perform the following using ADK libraries:
- Deploy DNS peering in Agent Engine to resolve the SWPs Fully Qualified Domain Name used in the proxy configuration.
- Allow connectivity to a public site (https://api.frankfurter.app/) through a Secure Web Proxy deployed in the consumer's VPC with a RFC1918 address.
- Allow traffic from the Network Attachment Subnet to the SWP while denying everything else.
Figure 1
What you'll learn
- How to create a network attachment
- How a producer can use a network attachment to create a PSC interface
- How to establish communication from the producer to the consumer using DNS Peering
- How to deploy and use a SWP for internet egress
- How to define egress firewall rules to reduce Agent Engine network reachability
What you'll need
Google Cloud Project
IAM Permissions
- Compute Network Admin (roles/compute.networkAdmin)
- Compute Instance Admin (roles/compute.instanceAdmin)
- Compute Security Admin (roles/compute.securityAdmin)
- DNS Administrator (roles/dns.admin)
- IAP-secured Tunnel User (roles/iap.tunnelResourceAccessor)
- Logging Admin (roles/logging.admin)
- Notebooks Admin (roles/notebooks.admin)
- Project IAM Admin (roles/resourcemanager.projectIamAdmin)
- Service Account Admin (roles/iam.serviceAccountAdmin)
- Service Usage Admin (roles/serviceusage.serviceUsageAdmin)
2. Before you begin
Update the project to support the tutorial
This tutorial makes use of $variables to aid gcloud configuration implementation in Cloud Shell.
Inside Cloud Shell, perform the following:
gcloud config set project [YOUR-PROJECT-NAME]
projectid=YOUR-PROJECT-NAME
echo $projectid
API Enablement
Inside Cloud Shell, perform the following:
gcloud services enable "compute.googleapis.com"
gcloud services enable "aiplatform.googleapis.com"
gcloud services enable "dns.googleapis.com"
gcloud services enable "notebooks.googleapis.com"
gcloud services enable "storage.googleapis.com"
gcloud services enable "iap.googleapis.com"
gcloud services enable "networksecurity.googleapis.com"
gcloud services enable "networkservices.googleapis.com"
gcloud services enable "cloudresourcemanager.googleapis.com"
Verify that the APIs are enabled successfully
gcloud services list --enabled
3. Consumer Setup
Create the Consumer VPC
This VPC resides in a customer project. Following resources will be created in this VPC
- Consumer Subnet
- Network Attachment Subnet
- Proxy only subnet
- Firewall Rules
- Cloud DNS
Inside Cloud Shell, perform the following:
gcloud compute networks create consumer-vpc --project=$projectid --subnet-mode=custom
Create the consumer subnets
Inside Cloud Shell, create the subnet for the SWP:
gcloud compute networks subnets create swp-subnet --project=$projectid --range=10.10.10.0/28 --network=consumer-vpc --region=us-central1 --enable-private-ip-google-access
Create the Private Service Connect Network Attachment subnet
Inside Cloud Shell, create the subnet for the PSC Network Attachment:
gcloud compute networks subnets create intf-subnet --project=$projectid --range=192.168.10.0/28 --network=consumer-vpc --region=us-central1 --enable-private-ip-google-access
Create the regional proxy subnet
Inside Cloud Shell, create the proxy-only subnet required for Envoy-based products like Secure Web Proxy and Regional Internal/External Application Load Balancers. The –purpose flag must be set to REGIONAL_MANAGED_PROXY:
gcloud compute networks subnets create proxy-subnet \
  --purpose=REGIONAL_MANAGED_PROXY \
  --role=ACTIVE \
  --region=us-central1 \
  --network=consumer-vpc \
  --range=100.100.10.0/26
Create the notebook subnet
Inside Cloud Shell, create the subnet for the notebook instance:
gcloud compute networks subnets create notebook-subnet --project=$projectid --range=192.168.20.0/28 --network=consumer-vpc --region=us-central1 --enable-private-ip-google-access
4. Create Secure Web Proxy
Secure Web Proxy's Explicit Mode (or Explicit Proxy Routing Mode) is a deployment method where the client workloads must be explicitly configured to use the SWP's internal IP address or Fully Qualified Domain Name and port as their forwarding proxy.
This policy will contain the rules that govern the traffic through the Secure web proxy based on a session match, host() == 'api.frankfurter.app' & application match request.method == 'GET'
In the steps below, ensure to modify YOUR-PROJECT-ID to your Project ID
Inside Cloud Shell, create a policy.yaml file:
cat > policy.yaml << EOF
name: projects/$projectid/locations/us-central1/gatewaySecurityPolicies/my-swp-policy
description: "My basic SWP policy"
EOF
Inside Cloud Shell, import the policy:
gcloud network-security gateway-security-policies import my-swp-policy \
    --source=policy.yaml \
    --location=us-central1
Create Secure Web Proxy Rules
Define rules within the policy to specify what traffic is allowed or denied. Rules are evaluated based on priority.
Inside Cloud Shell, Create a rule.yaml file to allow access to the internet endpoint used by agent engine, api.frankfurter.app:
cat > rule.yaml << EOF
name: "projects/$projectid/locations/us-central1/gatewaySecurityPolicies/my-swp-policy/rules/allow-example"
description: "Allow frankfurter API"
enabled: true
priority: 10
basicProfile: ALLOW
sessionMatcher: "host() == 'api.frankfurter.app'"
EOF
In Cloud Shell, generate security policy rule:
gcloud network-security gateway-security-policies rules import allow-example \
    --source=rule.yaml \
    --location=us-central1 \
    --gateway-security-policy=my-swp-policy
Create Secure Web Proxy Rules
The SWP instance, which is deployed in explicit routing mode, must be created so that the Agent Engine is required to specify the SWP's IP address or FQDN within the ADK proxy configuration, as defined in the gateway YAML file. This configuration also links the instance to the corresponding policy, network, and subnet.
Inside Cloud Shell, Create a gateway.yaml file used to deploy the SWP.
Be sure to save the YAML file after updating the following variables with your environment's details: PROJECT_ID, REGION, NETWORK_NAME, and PROXY_ONLY_SUBNET_NAME. The port 8888 specified is the outer tunnel port mapped to the proxy configuration within Agent Engine.
cat > gateway.yaml << EOF
name: "projects/$projectid/locations/us-central1/gateways/my-swp-instance"
type: SECURE_WEB_GATEWAY
ports: [8888]
addresses: ["10.10.10.5"]
gatewaySecurityPolicy: "projects/$projectid/locations/us-central1/gatewaySecurityPolicies/my-swp-policy"
network: "projects/$projectid/global/networks/consumer-vpc"
subnetwork: "projects/$projectid/regions/us-central1/subnetworks/swp-subnet"
routingMode: EXPLICIT_ROUTING_MODE
EOF
Inside Cloud Shell, import the gateway:
gcloud network-services gateways import my-swp-instance \
    --source=gateway.yaml \
    --location=us-central1
5. Private Service Connect network attachment
Network attachments are regional resources that represent the consumer side of a Private Service Connect interface. You associate a single subnet with a network attachment, and the producer assigns IPs to the Private Service Connect interface from that subnet. The subnet must be in the same region as the network attachment. A network attachment must be in the same region as the producer service.
Create the network attachment
Inside Cloud Shell, create the network attachment.
gcloud compute network-attachments create psc-network-attachment \
    --region=us-central1 \
    --connection-preference=ACCEPT_AUTOMATIC \
    --subnets=intf-subnet
List the network attachments
Inside Cloud Shell, list the network attachment.
gcloud compute network-attachments list
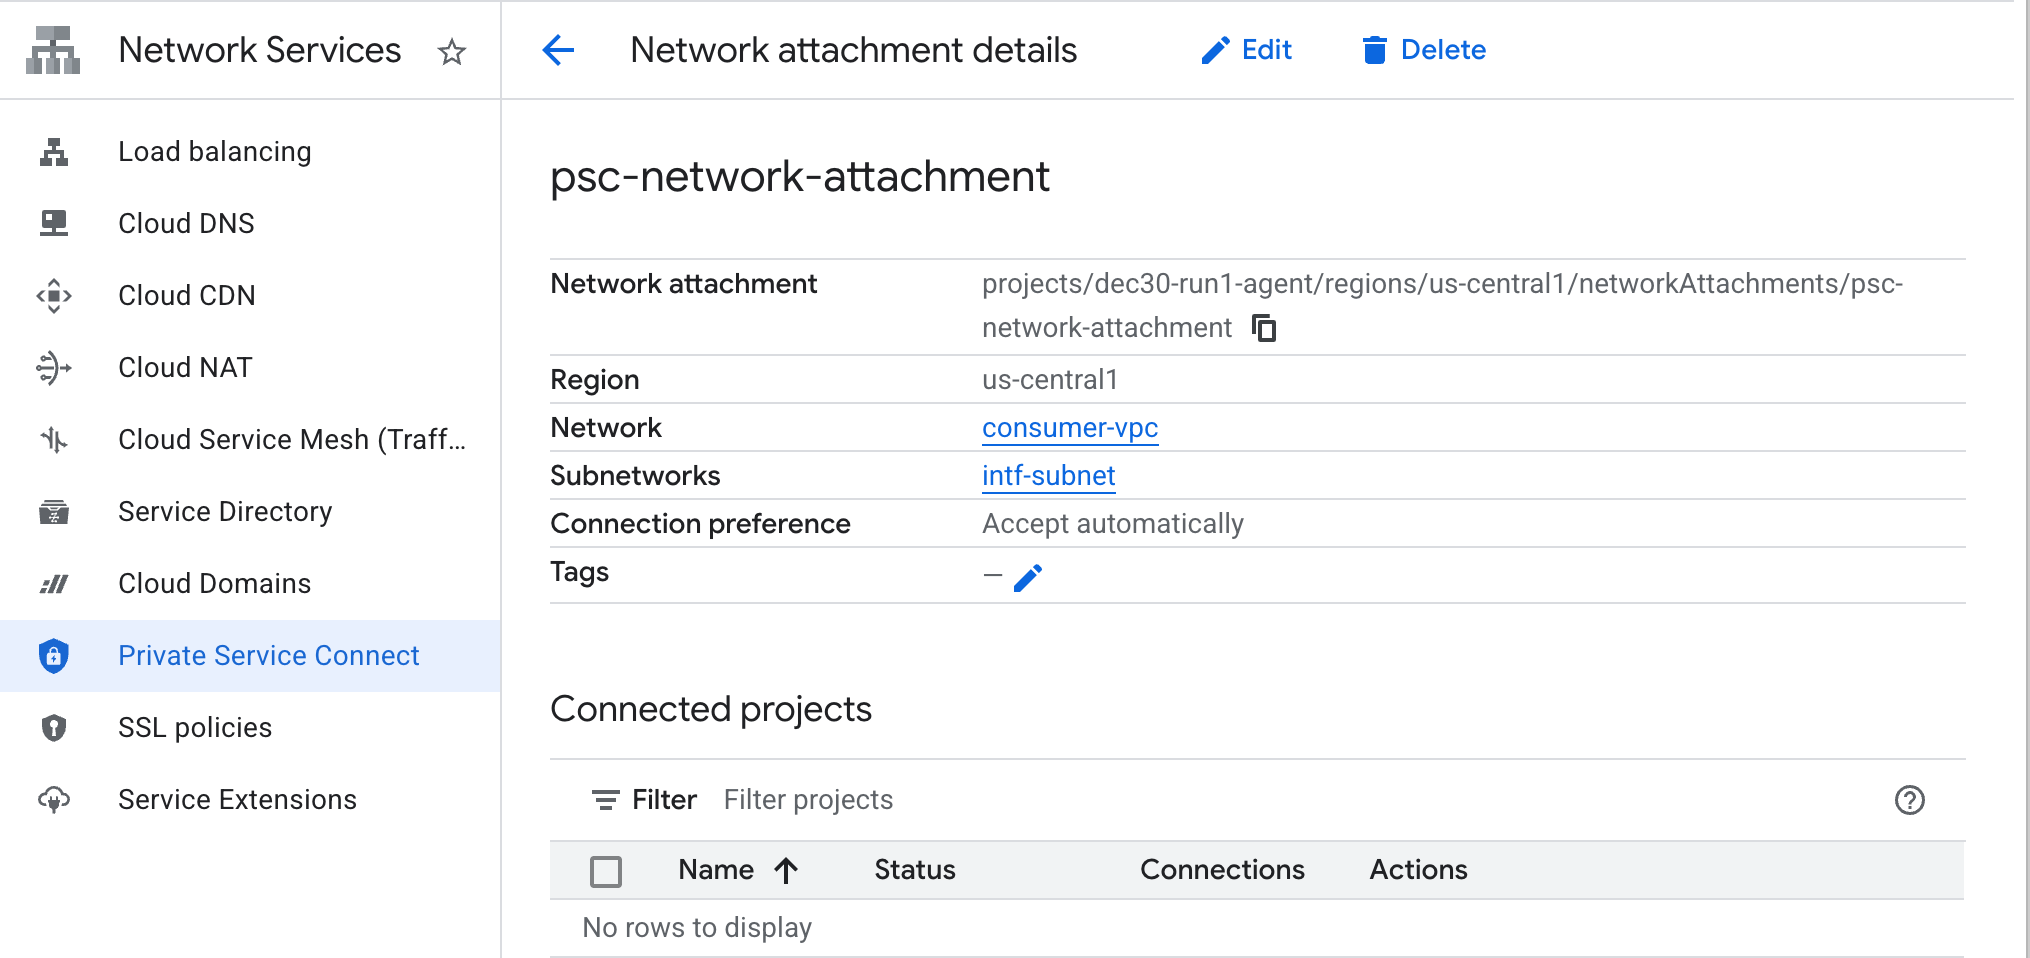
Describe the network attachments
Inside Cloud Shell, describe the network attachment.
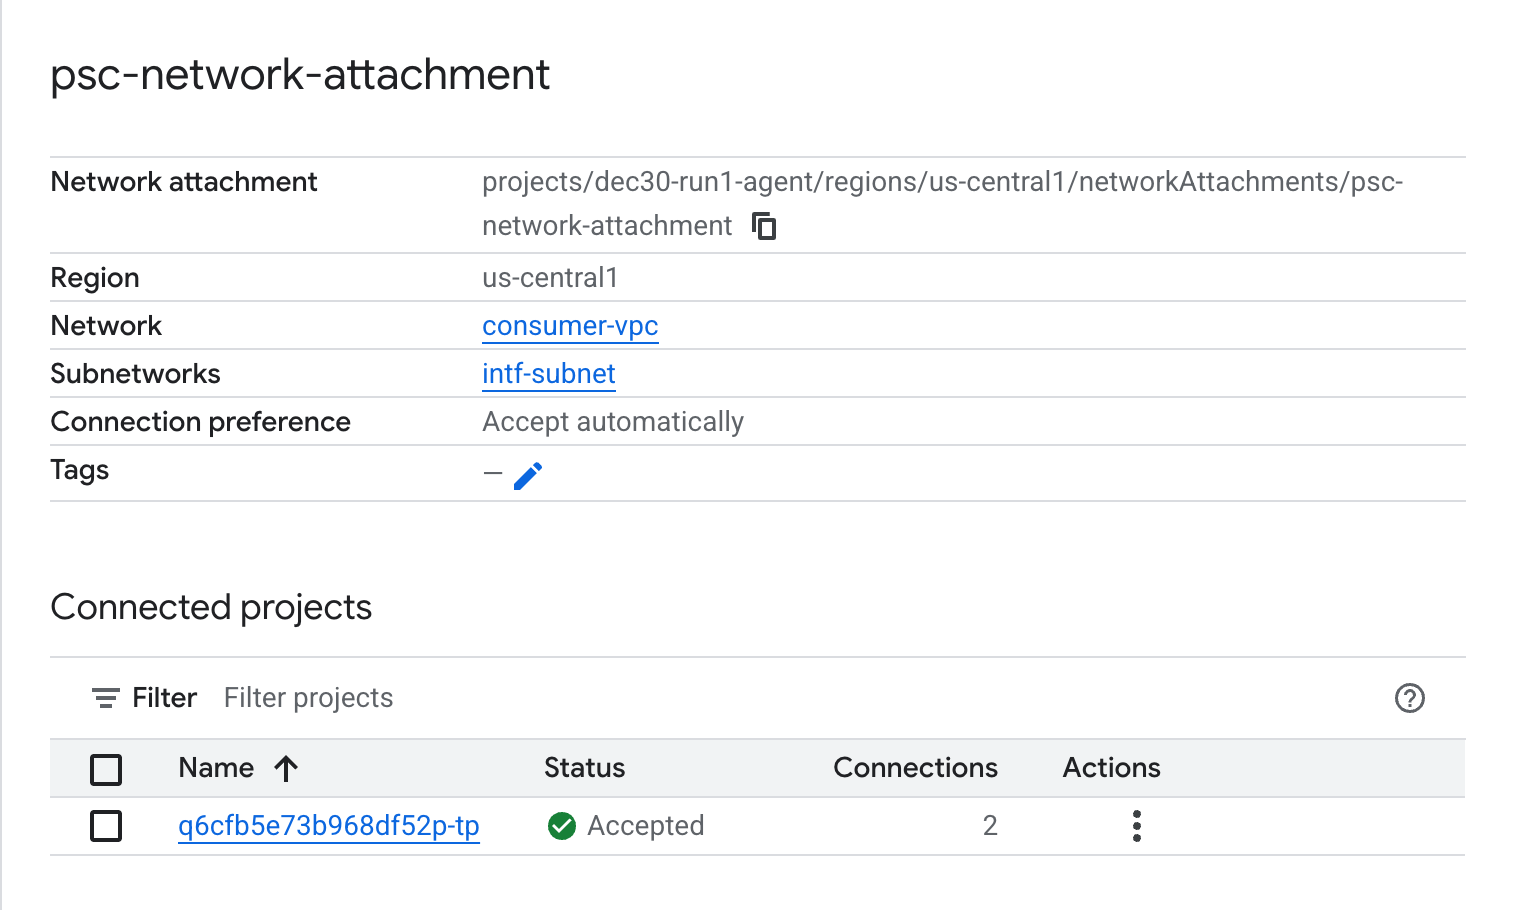
gcloud compute network-attachments describe psc-network-attachment --region=us-central1
Make note of the PSC Network Attachmentname, psc-network-attachment, that will be used by the producer when creating the Private Service Connect Interface.
To view the PSC Network Attachment URL in Cloud Console, navigate to the following:
Network Services → Private Service Connect → Network Attachment → psc-network-attachment
6. Private DNS Zone
You'll create a Cloud DNS Zone for demo.com and populate it with an A record that points to your SWPs IP addresses. Later, DNS peering will be deployed in Agent Engine, which will allow access to the consumer's DNS records.
Inside Cloud Shell, perform the following that creates a DNS name demo.com.
gcloud dns --project=$projectid managed-zones create private-dns-codelab --description="" --dns-name="demo.com." --visibility="private" --networks="https://compute.googleapis.com/compute/v1/projects/$projectid/global/networks/consumer-vpc"
Obtain and store the IP Addresses of the SWP used for the DNS A record.
Inside Cloud Shell, perform a describe against the swp, my-swp-instance:
gcloud network-services gateways describe my-swp-instance --location=us-central1
Inside Cloud Shell, create the records set for the SWP, swp.demo.com, ensure to update the IP Address based on your environment's output.
gcloud dns --project=$projectid record-sets create swp.demo.com. --zone="private-dns-codelab" --type="A" --ttl="300" --rrdatas="10.10.10.5"
Firewall Configuration
Create a Cloud Firewall rule to allow access from the PSC Interface
In the following section, create a firewall rule that allows traffic originating from the PSC Network Attachment access to the SWP subnet in Consumer VPC. For heightened security, you can specify the SWP IP Address as the only destination.
In Cloud Shell, create the egress firewall rule allowing access from network attachment to SWP:
gcloud compute firewall-rules create allow-access-to-swp \
    --network=consumer-vpc \
    --action=ALLOW \
    --rules=ALL \
    --direction=EGRESS \
    --priority=1000 \
    --source-ranges="192.168.10.0/28" \
    --destination-ranges="10.10.10.5/32" \
    --enable-logging
In Cloud Shell, create the egress firewall rule denying all traffic from the network attachment:
gcloud compute firewall-rules create deny-all \
    --network=consumer-vpc \
    --action=DENY \
    --rules=ALL \
    --direction=EGRESS \
    --priority=65534 \
    --source-ranges="192.168.10.0/28" \
    --destination-ranges="0.0.0.0/0" \
    --enable-logging
7. Create a Firewall Policy to the VPC Network to ensure Threat Intelligence:
In the following section, create a firewall policy that allows you to leverage Google's managed threat lists to block known malicious sites before traffic received by the SWP.
In Cloud Shell, create the global firewall policy:
gcloud compute network-firewall-policies create psc-secure-policy \
    --global \
    --description="Policy to protect VPC with Threat Intelligence"
In Cloud Shell, associate the Policy with your VPC:
gcloud compute network-firewall-policies associations create \
    --firewall-policy=psc-secure-policy \
    --network=consumer-vpc \
    --name=psc-swp-association \
    --global-firewall-policy
In Cloud Shell, add the Threat Intelligence Rules:
These rules will drop traffic to known malicious actors before initiating the traffic from the Agent. In this example, we added rules to Block Tor Exit Nodes (Egress), and Block Known Malicious IPs (Egress), Block Known Anonymous Proxies(Egress), Block Crypto Miners to prevent unauthorized resource usage (Egress),
gcloud compute network-firewall-policies rules create 100 \
    --firewall-policy=psc-secure-policy \
    --action=deny \
    --direction=EGRESS \
    --dest-threat-intelligence=iplist-tor-exit-nodes \
    --layer4-configs=all \
    --enable-logging \
    --description="Block anonymous Tor traffic" \
    --global-firewall-policy
gcloud compute network-firewall-policies rules create 110 \
    --firewall-policy=psc-secure-policy \
    --action=deny \
    --direction=EGRESS \
    --dest-threat-intelligence=iplist-known-malicious-ips \
    --layer4-configs=all \
    --enable-logging \
    --description="Block known botnets and malware sources" \
    --global-firewall-policy
gcloud compute network-firewall-policies rules create 120 \
    --firewall-policy=psc-secure-policy \
    --action=deny \
    --direction=EGRESS \
    --dest-threat-intelligence=iplist-anon-proxies \
    --layer4-configs=all \
    --enable-logging \
    --description="Block Known Anonymous Proxies" \
    --global-firewall-policy
gcloud compute network-firewall-policies rules create 130 \
    --firewall-policy=psc-secure-policy \
    --action=deny \
    --direction=EGRESS \
    --dest-threat-intelligence=iplist-crypto-miners \
    --layer4-configs=all \
    --enable-logging \
    --description="Block Crypto Miners (Prevent unauthorized resource usage)" \
    --global-firewall-policy
8. Create a Jupyter Notebook
The following section guides you through creating a Jupyter Notebook. This notebook will be used to deploy Agent Engine targeting an explicit proxy for Internet Egress.
Create a user managed service account
In the following section, you will create a service account that will be associated with the Vertex AI Workbench instance used in the tutorial.
In the tutorial, the service account will have the following roles applied:
Inside Cloud Shell, create the service account.
gcloud iam service-accounts create notebook-sa \
    --display-name="notebook-sa"
Inside Cloud Shell, update the service account with the role Storage Admin.
gcloud projects add-iam-policy-binding $projectid --member="serviceAccount:notebook-sa@$projectid.iam.gserviceaccount.com" --role="roles/storage.admin"
Inside Cloud Shell, update the service account with the role Vertex AI User.
gcloud projects add-iam-policy-binding $projectid --member="serviceAccount:notebook-sa@$projectid.iam.gserviceaccount.com" --role="roles/aiplatform.user"
Inside Cloud Shell, update the service account with the role Artifact Registry Admin.
gcloud projects add-iam-policy-binding $projectid --member="serviceAccount:notebook-sa@$projectid.iam.gserviceaccount.com" --role="roles/artifactregistry.admin"
Inside Cloud Shell, allow the notebook service account to use the Compute Engine default service account.
gcloud iam service-accounts add-iam-policy-binding \
    $(gcloud projects describe $(gcloud config get-value project) --format='value(projectNumber)')-compute@developer.gserviceaccount.com \
    --member="serviceAccount:notebook-sa@$projectid.iam.gserviceaccount.com" \
    --role="roles/iam.serviceAccountUser"
9. Create a Vertex AI Workbench Instance
In the following section, create a Vertex AI Workbench instance that incorporates the previously created service account, notebook-sa.
Inside Cloud Shell create the private-client instance.
gcloud workbench instances create workbench-tutorial --vm-image-project=cloud-notebooks-managed --vm-image-family=workbench-instances --machine-type=n1-standard-4 --location=us-central1-a --subnet-region=us-central1 --subnet=notebook-subnet --disable-public-ip --shielded-secure-boot=true --shielded-integrity-monitoring=true --shielded-vtpm=true --service-account-email=notebook-sa@$projectid.iam.gserviceaccount.com
Add another rule in the existing Secure Web Proxy to forward the traffic from this notebook instance:
In Cloud Shell, Create the rule-notebook.yaml file using a text editor, ensure to update the YAML with your Project ID
cat > rule-notebook.yaml << EOF
name: projects/$projectid/locations/us-central1/gatewaySecurityPolicies/my-swp-policy/rules/allow-notebook-subnet
description: Allow Internet access for notebook subnet
enabled: true
priority: 2
basicProfile: ALLOW
sessionMatcher: inIpRange(source.ip,'192.168.20.2')
EOF
In Cloud Shell, generate security policy rule:
gcloud network-security gateway-security-policies rules import allow-notebook-subnet \
    --source=rule-notebook.yaml \
    --location=us-central1 \
    --gateway-security-policy=my-swp-policy
10. Vertex AI Service Agent Update
Vertex AI acts on your behalf to perform operations such as obtaining an IP Address from the PSC Network Attachment subnet used to create the PSC Interface. To do so, Vertex AI uses a service agent (listed below) that requires Network Admin permission:
service-$projectnumber@gcp-sa-aiplatform.iam.gserviceaccount.com
Inside Cloud Shell, obtain your project number.
gcloud projects describe $projectid | grep projectNumber
Inside Cloud Shell, set your project number.
projectnumber=YOUR-PROJECT-NUMBER
Inside Cloud Shell, create a service account for AI Platform. Skip this step if you have an existing service account in your project.
gcloud beta services identity create --service=aiplatform.googleapis.com --project=$projectnumber
Inside Cloud Shell, update the service agent account with the role compute.networkAdmin.
gcloud projects add-iam-policy-binding $projectid --member="serviceAccount:service-$projectnumber@gcp-sa-aiplatform.iam.gserviceaccount.com" --role="roles/compute.networkAdmin"
Inside Cloud Shell, update the service agent account with the role dns.peer
gcloud projects add-iam-policy-binding $projectid --member="serviceAccount:service-$projectnumber@gcp-sa-aiplatform.iam.gserviceaccount.com" --role="roles/dns.peer"
Default Service Account Update
Grant your default service account access to Vertex AI. Note that it might take some time for the access change to propagate.
Inside Cloud Shell, update the default service account with the role aiplatform.user
gcloud projects add-iam-policy-binding $projectid \
  --member="serviceAccount:$projectnumber-compute@developer.gserviceaccount.com" \
    --role="roles/aiplatform.user"
11. Deploy Agent Engine
Note: We will use GCP console and JupyterLab notebook to complete the tasks in this section
In the following section, you will create a notebook that performs the following tasks:
- Uses the Frankfurter API (https://api.frankfurter.app/) to obtain exchange rate data
- References an explicit proxy (proxy_server) targeting the SWP in the consumers vpc using FQDN swp.demo.com
- Define dnsPeeringConfigs "domain": "demo.com."
Run the training job in the Vertex AI Workbench instance.
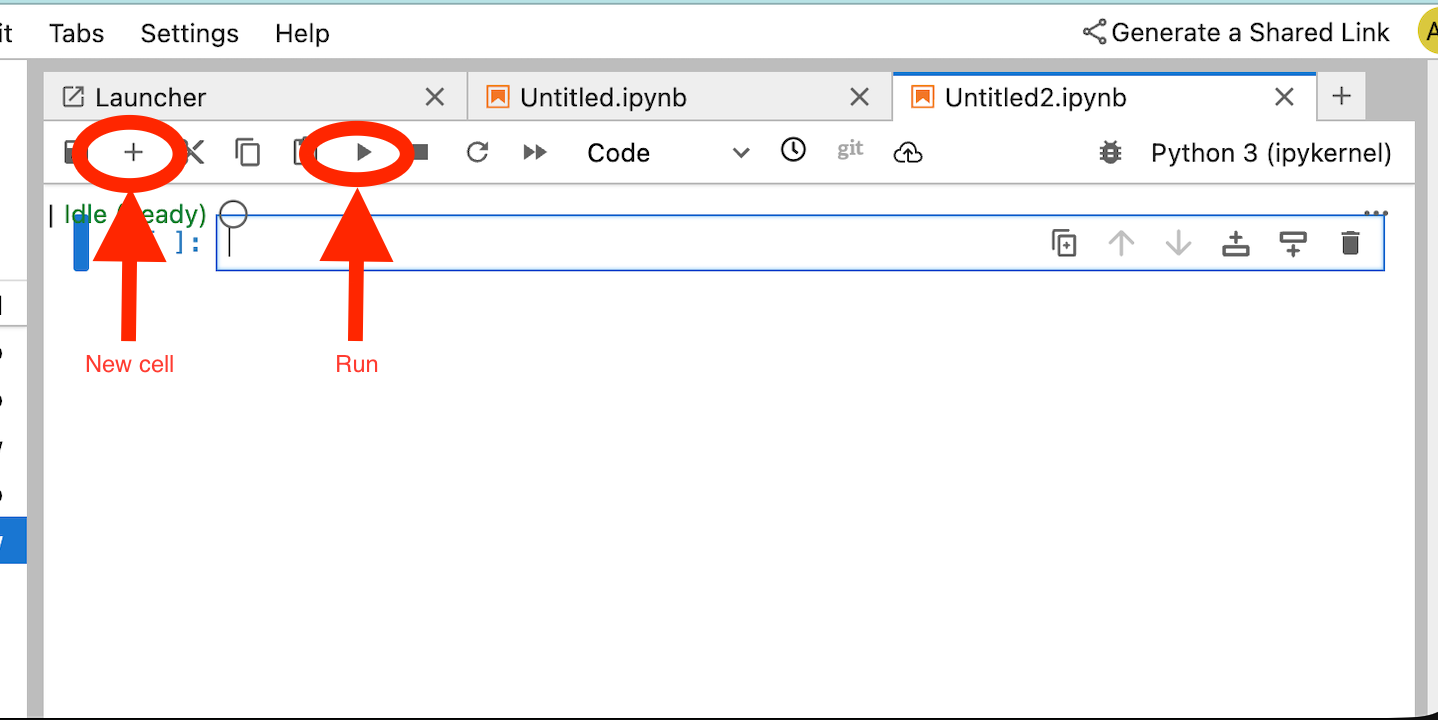
- In the Google Cloud console, Navigate to
Vertex AI → Workbench - Next to your Vertex AI Workbench instance's name (workbench-tutorial), click Open JupyterLab. Your Vertex AI Workbench instance opens in JupyterLab.
- Select
File > New > Notebook - Select
Kernel > Python 3
Install necessary Python libraries: Install libraries required for Agent Engine, including pyyaml, google-cloud-aiplatform, cloudpickle, google-cloud-api-keys, and langchain-google-vertexai.
In your JupyterLab notebook, create a new cell and run the following specifying the SWPs IP address
!pip install --proxy http://10.10.10.5:8888 --upgrade google-cloud-aiplatform[agent_engines,adk]
Define the following variables based on your environment in the following code snippet:
- PROJECT_ID
- BUCKET_NAME
- AGENT_NAME
In this lab, you will use the variables BUCKET_NAME and AGENT_NAME to initialize and configure your storage bucket that is globally available
In the following section the PROXY_SERVER is defined e.g swp.demo.com that requires DNS peering for name resolution. In the configuration, the AGENT_PEER_DOMAIN is deployed as demo.com. that corresponds to the private DNS zone created in an earlier step within the AGENT_PEER_NETWORK, consumer-vpc.
In your JupyterLab notebook, create a new cell and run the following:
# --- Fundamental Project Configuration ---
PROJECT_ID = "YOUR_PROJECT_ID"
LOCATION = "us-central1" # e.g., "us-central1"
BUCKET_NAME = "YOUR_BUCKET_NAME" # A GCS bucket in the same location

# --- Agent Configuration ---
AGENT_NAME = "YOUR_AGENT_NAME"
MODEL = "gemini-2.5-flash" # Or another suitable model

# --- Network and Proxy Configuration ---
# The agent will call the Frankfurter API via this proxy
PROXY_SERVER = "http://swp.demo.com:8888"

# --- Deployment Configuration (PSC & DNS Peering) ---
# This should be a pre-existing Network Attachment
NETWORK_ATTACHMENT_NAME = f"projects/{PROJECT_ID}/regions/{LOCATION}/networkAttachments/psc-network-attachment"
# Optional DNS Peering config
AGENT_PEER_DOMAIN = "demo.com."
AGENT_PEER_NETWORK = "consumer-vpc"

# --- Initialize Vertex AI SDK ---
import vertexai
STAGING_BUCKET = f"gs://{BUCKET_NAME}"

vertexai.init(project=PROJECT_ID, location=LOCATION, staging_bucket=STAGING_BUCKET)

print(f"Vertex AI SDK initialized for project {PROJECT_ID} in {LOCATION}.")
In your JupyterLab notebook, create a new cell, and run the following.
!adk create $AGENT_NAME --model=$MODEL --project=$PROJECT_ID --region=$LOCATION
In your JupyterLab notebook, create a new cell, and run the following to create the proxy variable that corresponds to the SWPs FQDN and port.
import os
os.environ["PROXY_SERVER_URL"] = "http://swp.demo.com:8888"
The following code cell demonstrates the explicit proxy configuration for Agent Engine to access the internet endpoint api.frankfurter.app by specifying the SWP, using PROXY_SERVER_TO_USE that maps to os.environ["PROXY_SERVER_URL"].
import requests
# Use the globally defined proxy server URL
    proxies = {
       "http": PROXY_SERVER_TO_USE,
       "https": PROXY_SERVER_TO_USE,
    }
    try:
        response = requests.get(
            f"https://api.frankfurter.app/{currency_date}",
            params={"from": currency_from, "to": currency_to},
            proxies=proxies,
)
response.raise_for_status()
print(response.json())
except requests.exceptions.RequestException as e: print(f"An error occurred: {e}")
In your JupyterLab notebook, create a new cell and run the following that defines the tool implementation for currency exchange targeting api.frankfurther.app.
%%writefile $AGENT_NAME/agent.py
from google.adk.agents.llm_agent import Agent
import os
import requests


# Get Proxy Server URL
# This is the VM's FQDN to reach the proxy vm in the consumers network
if "PROXY_SERVER_URL" not in os.environ:
    raise ValueError("Missing required environment variable: PROXY_SERVER_URL is not set.")
PROXY_SERVER_TO_USE = os.environ["PROXY_SERVER_URL"]

# Mock tool implementation
def get_exchange_rate(
    currency_from: str = "USD",
    currency_to: str = "EUR",
    currency_date: str = "latest",
):
    """Retrieves the exchange rate between two currencies on a specified date.

    Uses the Frankfurter API (https://api.frankfurter.app/) to obtain
    exchange rate data.

    Args:
        currency_from: The base currency (3-letter currency code).
            Defaults to "USD" (US Dollar).
        currency_to: The target currency (3-letter currency code).
            Defaults to "EUR" (Euro).
        currency_date: The date for which to retrieve the exchange rate.
            Defaults to "latest" for the most recent exchange rate data.
            Can be specified in YYYY-MM-DD format for historical rates.

    Returns:
        dict: A dictionary containing the exchange rate information.
            Example: {"amount": 1.0, "base": "USD", "date": "2023-11-24",
                "rates": {"EUR": 0.95534}}
    """
    # Use the globally defined proxy server URL
    proxies = {
       "http": PROXY_SERVER_TO_USE,
       "https": PROXY_SERVER_TO_USE,
    }

    try:
        response = requests.get(
            f"https://api.frankfurter.app/{currency_date}",
            params={"from": currency_from, "to": currency_to},
            proxies=proxies,
        )
        response.raise_for_status()  # Raise an error for bad responses
        return response.json()
    except Exception as e:
        return f"An unexpected error occurred: {e}"

root_agent = Agent(
    model='gemini-2.5-flash',
    name='root_agent',
    description="Provides the currency exchange rates between two currencies",
    instruction="You are a helpful assistant that provides the currency exchange rates between two currencies. Use the 'get_exchange_rate' tool for this purpose.",
    tools=[get_exchange_rate],
)
In your JupyterLab notebook, create a new cell and run the following.
# 1. Set your variables
CURRENCY_DATE="latest"
CURRENCY_FROM="USD"
CURRENCY_TO="EUR"
PROXY_SERVER="http://swp.demo.com:8888"

# 2. Run the curl command
!curl -x "$PROXY_SERVER" "https://api.frankfurter.app/$CURRENCY_DATE?from=$CURRENCY_FROM&to=$CURRENCY_TO"
In your JupyterLab notebook, create a new cell and run the following that invokes the psc interface configuration used by Agent Engine, in addition to the DNS peering.
import json
import os

CONFIG_FILE_PATH = os.path.join(AGENT_NAME, ".agent_engine_config.json")
# Create your config as a Python dictionary ---
config_data = {
    "requirements": [
        "google-cloud-aiplatform[agent_engines,adk]",
        "requests",
    ],
    "psc_interface_config": {
        "network_attachment": NETWORK_ATTACHMENT_NAME,
        "dns_peering_configs": [
            {
                "domain": AGENT_PEER_DOMAIN,
                "target_project": PROJECT_ID,
                "target_network": AGENT_PEER_NETWORK,
            },
        ],
    },
}

# Write the dictionary to a JSON file ---
os.makedirs(AGENT_NAME, exist_ok=True) # Ensure the directory exists
with open(CONFIG_FILE_PATH, 'w') as f:
    json.dump(config_data, f, indent=4)

print(f"Successfully created {CONFIG_FILE_PATH} with your variables.")
In your JupyterLab notebook, create a new cell and run the following.
import json
import os

CONFIG_FILE_PATH = os.path.join(AGENT_NAME, ".agent_engine_config.json")
# Create your config as a Python dictionary ---
config_data = {

    "psc_interface_config": {
        "network_attachment": NETWORK_ATTACHMENT_NAME,
        "dns_peering_configs": [
            {
                "domain": AGENT_PEER_DOMAIN,
                "target_project": PROJECT_ID,
                "target_network": AGENT_PEER_NETWORK,
            },
        ],
    },
}

# Write the dictionary to a JSON file ---
os.makedirs(AGENT_NAME, exist_ok=True) # Ensure the directory exists
with open(CONFIG_FILE_PATH, 'w') as f:
    json.dump(config_data, f, indent=4)

print(f"Successfully created {CONFIG_FILE_PATH} with your variables.")
In your JupyterLab notebook, create a new cell and run the following.
%%writefile $AGENT_NAME/.env

GOOGLE_CLOUD_PROJECT=PROJECT_ID
GOOGLE_CLOUD_LOCATION=us-central1
GOOGLE_GENAI_USE_VERTEXAI=1


PROXY_SERVER_URL=http://swp.demo.com:8888
In your JupyterLab notebook, create a new cell and run the following that creates the Agent.
!adk deploy agent_engine $AGENT_NAME --staging_bucket=$STAGING_BUCKET --env_file=$AGENT_NAME/.env --agent_engine_config_file=$AGENT_NAME/.agent_engine_config.json --display_name=$AGENT_NAME
A reasoning engine ID will be generated upon execution of the cell. For the next step, you will need the generated ID, which is 3235268984265768960 in this example.
✅ Created agent engine: projects/9315891080/locations/us-central1/reasoningEngines/3235268984265768960
In your JupyterLab notebook, create a new cell and run the following, ensuring to update with your Project Number and Agent Engine reasoning ID from the previous output:
from vertexai import agent_engines
remote_app = agent_engines.get("projects/PROJECT_NUMBER/locations/us-central1/reasoningEngines/ENTER_YOUR_ID")
In your JupyterLab notebook, create a new cell and run the following.
def print_event_nicely_with_thoughts(event):
"""
Parses and prints streaming query events, including thoughts.
"""
try:
content = event.get('content', {})
role = content.get('role')
parts = content.get('parts', [{}])
if not parts:
print("...")
return
part = parts[0] # Get the first part
# Event 1: Model is thinking (calling a tool or just text)
if role == 'model':
# Check for and print any explicit 'thought' text
if 'thought' in part:
print(f"🧠 Thought: {part['thought']}")
# Check for a function call
if 'function_call' in part:
# If we haven't *already* printed an explicit thought,
# print a generic one.
if 'thought' not in part:
print("🧠 Thinking... (decided to use a tool)")
call = part['function_call']
print(f" 🔧 Tool Call: {call.get('name')}()")
print(f" Args: {call.get('args')}")
# Check for the final text answer
elif 'text' in part:
text = part.get('text', '')
print(f"\n💬 Model: {text}")
# Event 2: The tool returns its result
elif role == 'user' and 'function_response' in part:
resp = part['function_response']
print(f"⚙️ Tool Response (from {resp.get('name')}):")
print(f" Output: {resp.get('response')}")
# Other event types (like progress messages)
else:
print("...") # Show progress for other events
except Exception as e:
print(f"Error processing event: {e}")
# print(f"Raw event: {event}") # Uncomment to debug
for event in remote_app.stream_query(
user_id="u_456",
# session_id=remote_session["id"],
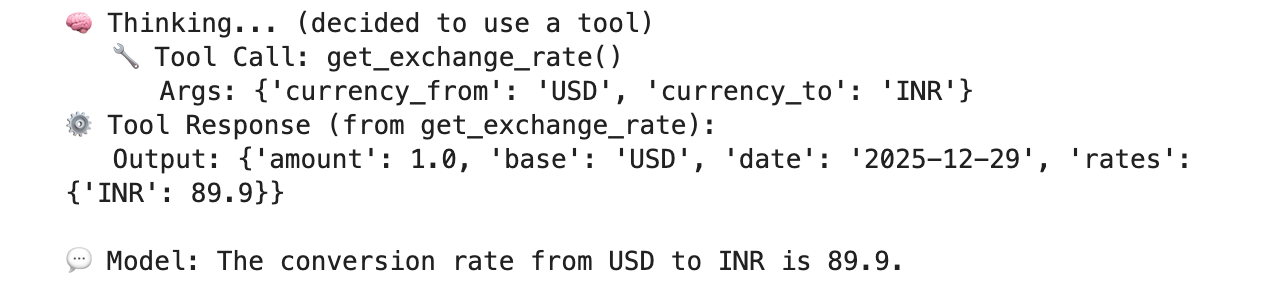
message="Provide USD to INR conversion rate",
):
print_event_nicely_with_thoughts(event)
Example of a successful execution that validates connectivity to the public endpoint api.frankfurther.app through the SWP based on the USD to INR conversion rate.
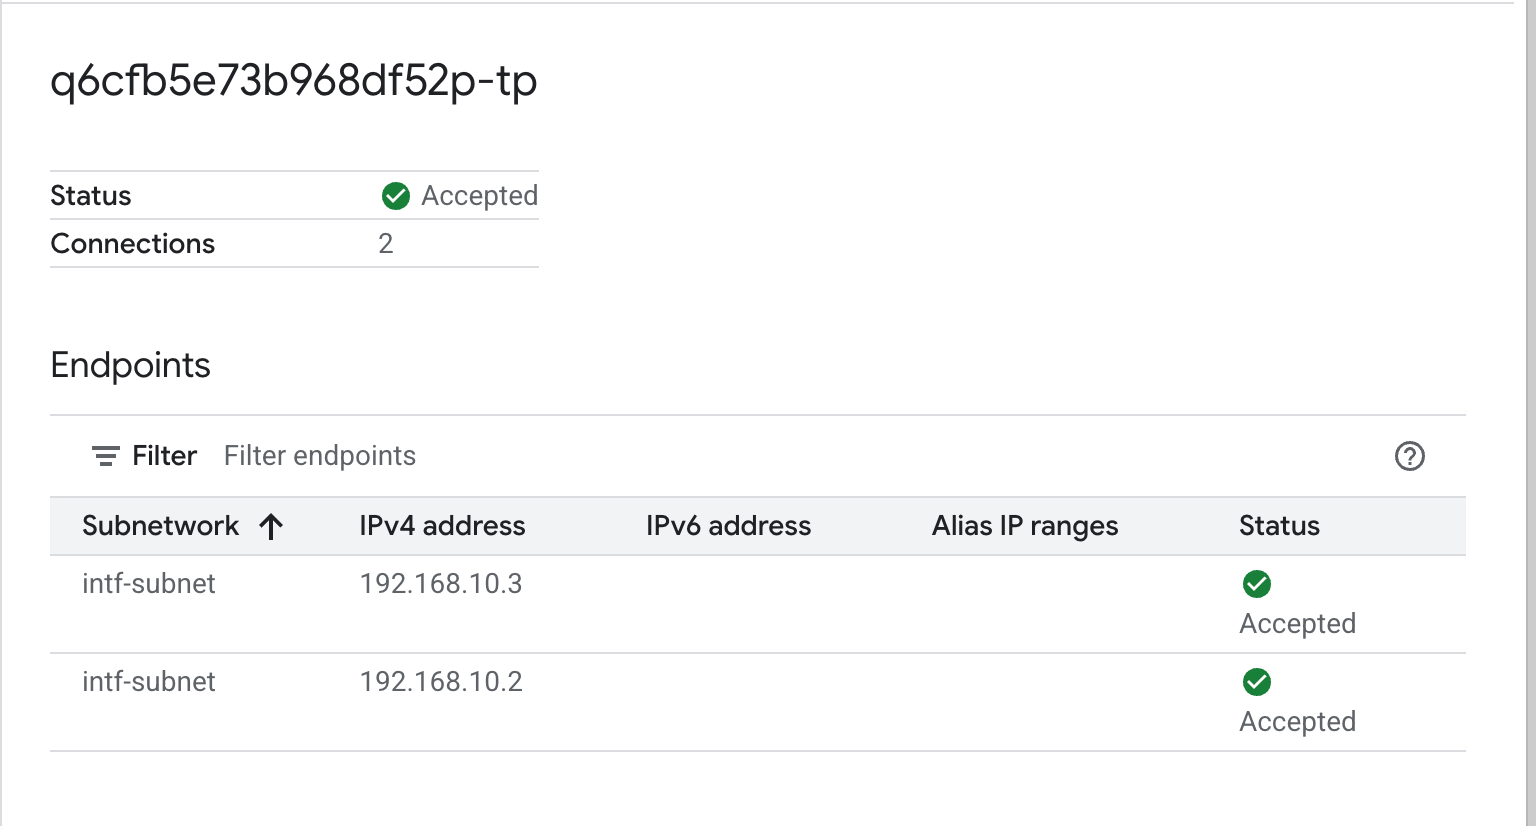
12. PSC Interface Validation
You can also view the Network Attachment IPs used by Agent Engine by navigating to the following:
Network Services → Private Service Connect → Network Attachment → psc-network-attachment
Select the tenant project (project name ending in -tp)
The highlighted field denotes the IP address used by Agent Engine from the PSC Network Attachment.
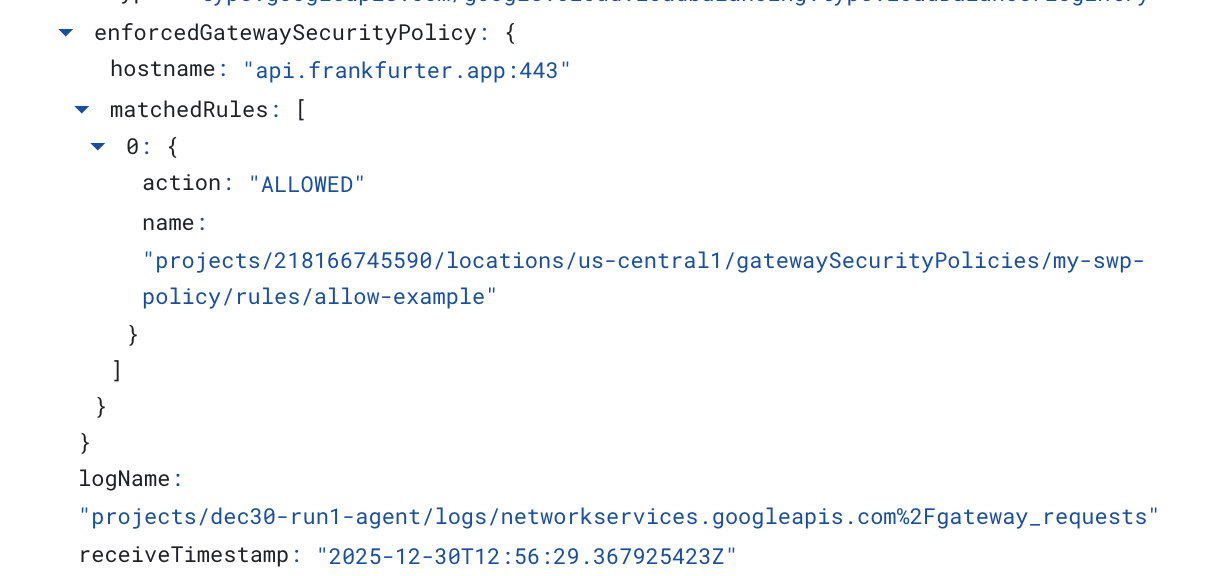
13. SWP - Cloud Logging Validation
You can view Cloud Logging to validate internet egress performed by the SWP, navigate to the following:
Monitoring → Logs Explorer
Insert the query: resource.type=" networkservices.googleapis.com/Gateway" then Click Run Query. Below is an example that confirms the destination endpoint, api.frankfurter.app.

The following Cloud Logging example validates the following:
Destination_range: Agent Engine PSC Interface IP Address
Source_range: Proxy Only Subnet Dest_ip: Secure Web Proxy IP Address
Make sure to change the project_id for the cloud logging query.
logName:("projects/project_id/logs/compute.googleapis.com%2Ffirewall") AND jsonPayload.rule_details.reference:("network:consumer-vpc/firewall:allow-access-to-swp")
{
  "insertId": "1j9ym95fmu8g6o",
  "jsonPayload": {
    "vpc": {
      "project_id": "XXXXXXXXXXXXX",
      "subnetwork_name": "intf-subnet",
      "vpc_name": "consumer-vpc"
    },
    "rule_details": {
      "destination_range": [
        "10.10.10.5/32"
      ],
      "reference": "network:consumer-vpc/firewall:allow-access-to-swp",
      "priority": 1000,
      "source_range": [
        "192.168.10.0/28"
      ],
      "direction": "EGRESS",
      "ip_port_info": [
        {
          "ip_protocol": "ALL"
        }
      ],
      "action": "ALLOW"
    },
    "disposition": "ALLOWED",
    "remote_instance": {
      "region": "us-central1"
    },
    "remote_vpc": {
      "vpc_name": "consumer-vpc",
      "project_id": "XXXXXXXXXXXXXXX",
      "subnetwork_name": "swp-subnet"
    },
    "connection": {
      "src_ip": "192.168.10.2",
      "src_port": 48640,
      "dest_port": 8888,
      "dest_ip": "10.10.10.5",
      "protocol": 6
    }
  },
  "resource": {
    "type": "gce_subnetwork",
    "labels": {
      "subnetwork_id": "7147084067647653041",
      "project_id": "XXXXXXXXXXXXXX",
      "location": "us-central1",
      "subnetwork_name": "intf-subnet"
    }
  },
  "timestamp": "2025-12-30T12:51:36.628538815Z",
  "logName": "projects/dec30-run1-agent/logs/compute.googleapis.com%2Ffirewall",
  "receiveTimestamp": "2025-12-30T12:51:40.846652708Z"
}
14. Clean up
In your JupyterLab notebook, create a new cell and run the following that will trigger deletion of the Agent Engine deployment.
Make sure that you are updating "project number" and "reasoningEngines token"
import requests
token = !gcloud auth application-default print-access-token
ENDPOINT = "https://us-central1-aiplatform.googleapis.com"
response = requests.delete(
    f"{ENDPOINT}/v1beta1/projects/218166745590/locations/us-central1/reasoningEngines/3086854705725308928",
    params={"force": "true"},
    headers={
        "Content-Type": "application/json; charset=utf-8",
        "Authorization": f"Bearer {token[0]}"
    },
)
print(response.text)
From Cloud Shell, delete tutorial components.
gcloud workbench instances delete workbench-tutorial --project=$projectid --location=us-central1-a

gcloud network-security gateway-security-policies rules delete allow-notebook-subnet \
    --gateway-security-policy=my-swp-policy \
    --location=us-central1

gcloud network-security gateway-security-policies rules delete allow-example \
    --gateway-security-policy=my-swp-policy \
    --location=us-central1

gcloud network-security gateway-security-policies delete my-swp-policy \
    --location=us-central1
gcloud network-services gateways delete my-swp-instance\
    --location=us-central1

gcloud dns record-sets delete swp.demo.com --zone=private-dns-codelab  --type=A

gcloud dns managed-zones delete private-dns-codelab


gcloud compute network-attachments delete psc-network-attachment --region=us-central1 --quiet

export ROUTER_NAME=$(gcloud compute routers list --regions=us-central1 \
    --filter="name ~ swg-autogen-router" --format="value(name)")


 gcloud compute routers nats delete swg-autogen-nat --router=$ROUTER_NAME --region=us-central1 --quiet

gcloud compute routers delete $ROUTER_NAME --region=us-central1 --quiet

gcloud compute networks subnets delete intf-subnet rfc1918-subnet1 --region=us-central1 --quiet

gcloud compute networks subnets delete intf-subnet swp-subnet
 --region=us-central1 --quiet

gcloud compute networks subnets delete intf-subnet intf-subnet --region=us-central1 --quiet

gcloud compute networks subnets delete intf-subnet proxy-subnet
 --region=us-central1 --quiet

gcloud compute networks subnets delete intf-subnet notebook-subnet
--region=us-central1 --quiet

gcloud compute networks delete consumer-vpc --quiet
15. Congratulations
Congratulations, you've successfully configured and validated Agent Engine deployed with Private Service Connect Interface with internet egress performed through an explicit proxy.
You created the consumer infrastructure, and you added a network attachment that allowed the producer to create a multi nic vm to bridge consumer and producer communication. You learned how to create an explicit proxy and DNS peering that allowed Internet connectivity.
Cosmopup thinks tutorials are awesome!!
