1. מבוא
ממשק Private Service Connect הוא משאב שמאפשר לרשת של ענן וירטואלי פרטי (VPC) של בעל שירות ליזום חיבורים ליעדים שונים ברשת VPC של צרכן. רשתות של יצרנים וצרכנים יכולות להיות בפרויקטים ובארגונים שונים.
אם קובץ מצורף עם הרשת מקבל חיבור מממשק Private Service Connect, מערכת Google Cloud מקצה לממשק כתובת IP מרשת משנה של צרכן שצוינה על ידי הקובץ המצורף עם הרשת. הרשתות של הצרכנים והיצרנים מחוברות ויכולות לתקשר באמצעות כתובות IP פנימיות.
חיבור בין קובץ מצורף עם הרשת לבין ממשק Private Service Connect דומה לחיבור בין נקודת קצה של Private Service Connect לבין קובץ מצורף עם השירות, אבל יש שני הבדלים עיקריים:
- צירוף רשת מאפשר לרשת של ספק ליזום חיבורים לרשת של צרכן (תעבורת נתונים יוצאת (egress) של שירות מנוהל), ואילו נקודת קצה (endpoint) מאפשרת לרשת של צרכן ליזום חיבורים לרשת של ספק (תעבורת נתונים נכנסת (ingress) של שירות מנוהל).
- חיבור ממשק Private Service Connect הוא טרנזיטיבי. המשמעות היא שרשת יצרן יכולה לתקשר עם רשתות אחרות שמחוברות לרשת הצרכן.
שיקולים לגבי נגישות של Vertex AI PSC-Interface
- ממשק PSC יכול לנתב תעבורת נתונים ליעדים מבוססי VPC או מקומיים, שנלמדו על ידי רשת ה-VPC.
- כדי להגביל את היקף הנגישות מהרשת המצורפת שבה נעשה שימוש ב-Agent Engine לרשת ה-VPC, מומלץ להטמיע כללי חומת אש לתעבורת נתונים יוצאת (egress).
- כדי להגביל את היקף תעבורת הנתונים היוצאת מהרשת שמקורה ברשת המשנה של צירוף הרשת של Agent Engine, צריך לפרוס כלל חומת אש של VPC לתעבורת נתונים יוצאת. הכלל הזה יאפשר באופן מפורש תנועה מ-Agent Engine אל SWP, וידחה את כל התנועה היוצאת האחרת.
שיקולים לגבי Vertex AI PSC-Interface VPC-SC
- כדי שממשק ה-PSC של Agent Engine יפעל, אתם צריכים לספק קישוריות יציאה לאינטרנט בתוך ה-VPC של הלקוח, גם אם הפעלתם את VPC Service Controls.
Secure Web Proxy
Secure Web Proxy הוא שירות מנוהל מבוסס-ענן שמאפשר לכם שליטה וביטחון ברמת גרנולרית בתעבורת הנתונים היוצאת (HTTP/HTTPS). הוא פועל כשער מרכזי ומאפשר לאכוף מדיניות אבטחה על חיבורים שנוצרו מ-Agent Engine שנפרס עם ממשק PSC למשאבי VPC, כמו מכונות וירטואליות, GKE, אינטרנט וסביבות מרובות עננים.
מה הפתרון
- מניעת זליגת נתונים: חסימת העלאות לא מורשות או תקשורת עם אתרים זדוניים.
- אכיפת תאימות: מוודא שתעבורת הנתונים היוצאת עומדת בדרישות של מדיניות האבטחה והטיפול בנתונים של הארגון.
- מפחית את התקורה התפעולית: כיוון ש-Secure Web Proxy הוא שירות מנוהל באופן מלא, אין צורך לפרוס, לשנות את קנה המידה או לתחזק מכונות וירטואליות של proxy משלכם.
- מספק שקיפות מלאה: מאפשר בדיקה של תעבורה מוצפנת בתקן Transport Layer Security (TLS) כדי לזהות איומים נסתרים.
למידע נוסף, אפשר לעיין במקורות המידע הבאים:
פריסת סוכן | AI גנרטיבי ב-Vertex AI | Google Cloud
הגדרת ממשק Private Service Connect למשאבי Vertex AI | Google Cloud
מה תפַתחו
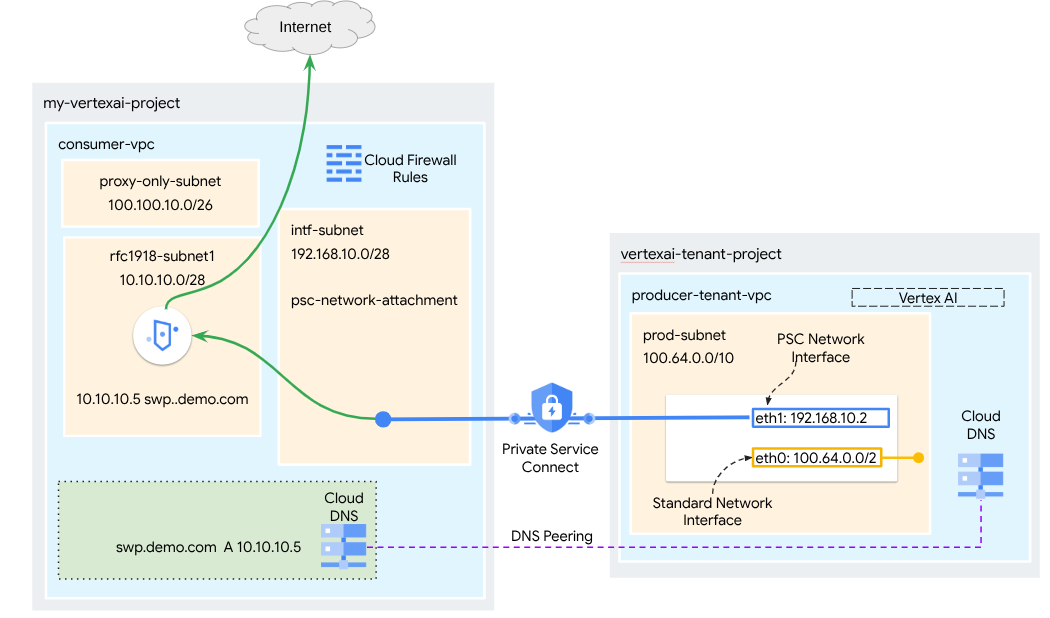
במדריך הזה תבנו Agent Engine מקיף שמוטמע עם ממשק Private Service Connect (PSC) שמשולב עם SWP, כדי לבצע את הפעולות הבאות באמצעות ספריות ADK:
- פריסת DNS Peering ב-Agent Engine כדי לפתור את שם דומיין שמוגדר במלואו של ה-SWP שמשמש בהגדרת ה-Proxy.
- אפשר קישוריות לאתר ציבורי (https://api.frankfurter.app/) דרך Secure Web Proxy שנפרס ב-VPC של הצרכן עם כתובת RFC1918.
- לאפשר תעבורת נתונים מרשת המשנה של Network Attachment אל SWP, ולחסום את כל השאר.
איור 1
מה תלמדו
- איך יוצרים קובץ מצורף לרשת
- איך מפיק יכול להשתמש בקובץ מצורף לרשת כדי ליצור ממשק PSC
- איך יוצרים תקשורת מהמפיק לצרכן באמצעות קישור בין רשתות שכנות (peering) של DNS
- איך פורסים SWP ומשתמשים בו לתעבורת נתונים יוצאת (egress) מהאינטרנט
- איך מגדירים כללי חומת אש ליציאה כדי לצמצם את יכולת ההגעה של Agent Engine לרשת
מה תצטרכו
פרויקט ב-Google Cloud
הרשאות IAM
- אדמין של רשת מחשוב (roles/compute.networkAdmin)
- אדמין מכונות של Compute (roles/compute.instanceAdmin)
- אדמין לענייני אבטחה ב-Compute (roles/compute.securityAdmin)
- אדמין DNS (roles/dns.admin)
- משתמש מנהרה באבטחת IAP (roles/iap.tunnelResourceAccessor)
- אדמין לניהול יומנים (roles/logging.admin)
- אדמין של Notebooks (roles/notebooks.admin)
- אדמין IAM בפרויקט (roles/resourcemanager.projectIamAdmin)
- אדמין בחשבון שירות (roles/iam.serviceAccountAdmin)
- אדמין של שימוש בשירות (roles/serviceusage.serviceUsageAdmin)
2. לפני שמתחילים
עדכון הפרויקט כדי לתמוך במדריך
במדריך הזה נעשה שימוש ב-$variables כדי לעזור בהטמעה של הגדרות gcloud ב-Cloud Shell.
ב-Cloud Shell, מבצעים את הפעולות הבאות:
gcloud config set project [YOUR-PROJECT-NAME]
projectid=YOUR-PROJECT-NAME
echo $projectid
הפעלת API
ב-Cloud Shell, מבצעים את הפעולות הבאות:
gcloud services enable "compute.googleapis.com"
gcloud services enable "aiplatform.googleapis.com"
gcloud services enable "dns.googleapis.com"
gcloud services enable "notebooks.googleapis.com"
gcloud services enable "storage.googleapis.com"
gcloud services enable "iap.googleapis.com"
gcloud services enable "networksecurity.googleapis.com"
gcloud services enable "networkservices.googleapis.com"
gcloud services enable "cloudresourcemanager.googleapis.com"
אימות שממשקי ה-API הופעלו בהצלחה
gcloud services list --enabled
3. הגדרת צרכן
יצירת VPC של צרכן
ה-VPC הזה נמצא בפרויקט של לקוח. המשאבים הבאים ייווצרו ב-VPC הזה
- Consumer Subnet
- תת-רשת של צירוף רשת
- תת-רשת של שרת proxy בלבד
- כללי חומת אש
- Cloud DNS
ב-Cloud Shell, מבצעים את הפעולות הבאות:
gcloud compute networks create consumer-vpc --project=$projectid --subnet-mode=custom
יצירת רשתות משנה לצרכנים
ב-Cloud Shell, יוצרים את תת-הרשת עבור ה-SWP:
gcloud compute networks subnets create swp-subnet --project=$projectid --range=10.10.10.0/28 --network=consumer-vpc --region=us-central1 --enable-private-ip-google-access
יצירת תת-רשת של צירוף רשת של Private Service Connect
ב-Cloud Shell, יוצרים את תת-הרשת לחיבור הרשת של PSC:
gcloud compute networks subnets create intf-subnet --project=$projectid --range=192.168.10.0/28 --network=consumer-vpc --region=us-central1 --enable-private-ip-google-access
יצירת תת-רשת של שרת proxy אזורי
ב-Cloud Shell, יוצרים את רשת המשנה מסוג proxy-only שנדרשת למוצרים מבוססי Envoy כמו Secure Web Proxy ומאזני עומסים אזוריים פנימיים/חיצוניים של אפליקציות. צריך להגדיר את הדגל –purpose לערך REGIONAL_MANAGED_PROXY:
gcloud compute networks subnets create proxy-subnet \
  --purpose=REGIONAL_MANAGED_PROXY \
  --role=ACTIVE \
  --region=us-central1 \
  --network=consumer-vpc \
  --range=100.100.10.0/26
יצירת רשת משנה של Notebook
ב-Cloud Shell, יוצרים את תת-הרשת של מכונת ה-Notebook:
gcloud compute networks subnets create notebook-subnet --project=$projectid --range=192.168.20.0/28 --network=consumer-vpc --region=us-central1 --enable-private-ip-google-access
4. יצירת Secure Web Proxy
מצב Explicit (או מצב ניתוב Explicit Proxy) של Secure Web Proxy הוא שיטת פריסה שבה צריך להגדיר באופן מפורש את עומסי העבודה של הלקוח כך שישתמשו בכתובת ה-IP הפנימית של SWP או בשם הדומיין שמוגדר במלואו (FQDN) וביציאה כשרת proxy להעברה.
מדיניות זו תכלול את הכללים ששולטים בתעבורת הנתונים דרך Secure Web Proxy על סמך התאמה לסשן, host() == 'api.frankfurter.app' והתאמה לאפליקציה request.method == 'GET'
בשלבים הבאים, צריך לשנות את YOUR-PROJECT-ID למזהה הפרויקט
ב-Cloud Shell, יוצרים קובץ policy.yaml:
cat > policy.yaml << EOF
name: projects/$projectid/locations/us-central1/gatewaySecurityPolicies/my-swp-policy
description: "My basic SWP policy"
EOF
ב-Cloud Shell, מייבאים את המדיניות:
gcloud network-security gateway-security-policies import my-swp-policy \
    --source=policy.yaml \
    --location=us-central1
יצירת כללים של Secure Web Proxy
מגדירים כללים במדיניות כדי לציין איזו תעבורה מותרת או נדחית. הערכת הכללים מתבצעת לפי סדר העדיפות.
בתוך Cloud Shell, יוצרים קובץ rule.yaml כדי לאפשר גישה לנקודת הקצה באינטרנט שמשמשת את מנוע הסוכן, api.frankfurter.app:
cat > rule.yaml << EOF
name: "projects/$projectid/locations/us-central1/gatewaySecurityPolicies/my-swp-policy/rules/allow-example"
description: "Allow frankfurter API"
enabled: true
priority: 10
basicProfile: ALLOW
sessionMatcher: "host() == 'api.frankfurter.app'"
EOF
ב-Cloud Shell, יוצרים כלל למדיניות האבטחה:
gcloud network-security gateway-security-policies rules import allow-example \
    --source=rule.yaml \
    --location=us-central1 \
    --gateway-security-policy=my-swp-policy
יצירת כללים של Secure Web Proxy
צריך ליצור את מופע ה-SWP, שנפרס במצב ניתוב מפורש, כך שמנוע הסוכן יידרש לציין את כתובת ה-IP או את ה-FQDN של ה-SWP בתצורת ה-proxy של ה-ADK, כפי שמוגדר בקובץ ה-YAML של השער. ההגדרה הזו גם מקשרת את המופע למדיניות, לרשת ולרשת המשנה המתאימות.
בתוך Cloud Shell, יוצרים קובץ gateway.yaml שמשמש לפריסת ה-SWP.
חשוב לשמור את קובץ ה-YAML אחרי שמעדכנים את המשתנים הבאים בפרטים של הסביבה שלכם: PROJECT_ID, REGION, NETWORK_NAME ו-PROXY_ONLY_SUBNET_NAME. היציאה 8888 שצוינה היא היציאה החיצונית של המנהרה שממופה להגדרת ה-proxy ב-Agent Engine.
cat > gateway.yaml << EOF
name: "projects/$projectid/locations/us-central1/gateways/my-swp-instance"
type: SECURE_WEB_GATEWAY
ports: [8888]
addresses: ["10.10.10.5"]
gatewaySecurityPolicy: "projects/$projectid/locations/us-central1/gatewaySecurityPolicies/my-swp-policy"
network: "projects/$projectid/global/networks/consumer-vpc"
subnetwork: "projects/$projectid/regions/us-central1/subnetworks/swp-subnet"
routingMode: EXPLICIT_ROUTING_MODE
EOF
ב-Cloud Shell, מייבאים את השער:
gcloud network-services gateways import my-swp-instance \
    --source=gateway.yaml \
    --location=us-central1
5. קובץ מצורף עם הרשת של Private Service Connect
קבצים מצורפים עם הרשת הם משאבים אזוריים שמייצגים את הצד של הצרכן בממשק Private Service Connect. משייכים תת-רשת אחת לקובץ מצורף לרשת, והבעלים של השירות המנוהל מקצה כתובות IP לממשק Private Service Connect מתוך תת-הרשת הזו. רשת המשנה צריכה להיות באותו אזור שבו נמצאת ההצמדה לרשת. קובץ מצורף לרשת חייב להיות באותו אזור כמו שירות היצרן.
יצירת קובץ מצורף לרשת
ב-Cloud Shell, יוצרים את קובץ הרשת המצורף.
gcloud compute network-attachments create psc-network-attachment \
    --region=us-central1 \
    --connection-preference=ACCEPT_AUTOMATIC \
    --subnets=intf-subnet
הצגת הקבצים המצורפים לרשת
ב-Cloud Shell, מציגים את רשימת קבצים מצורפים לרשת.
gcloud compute network-attachments list
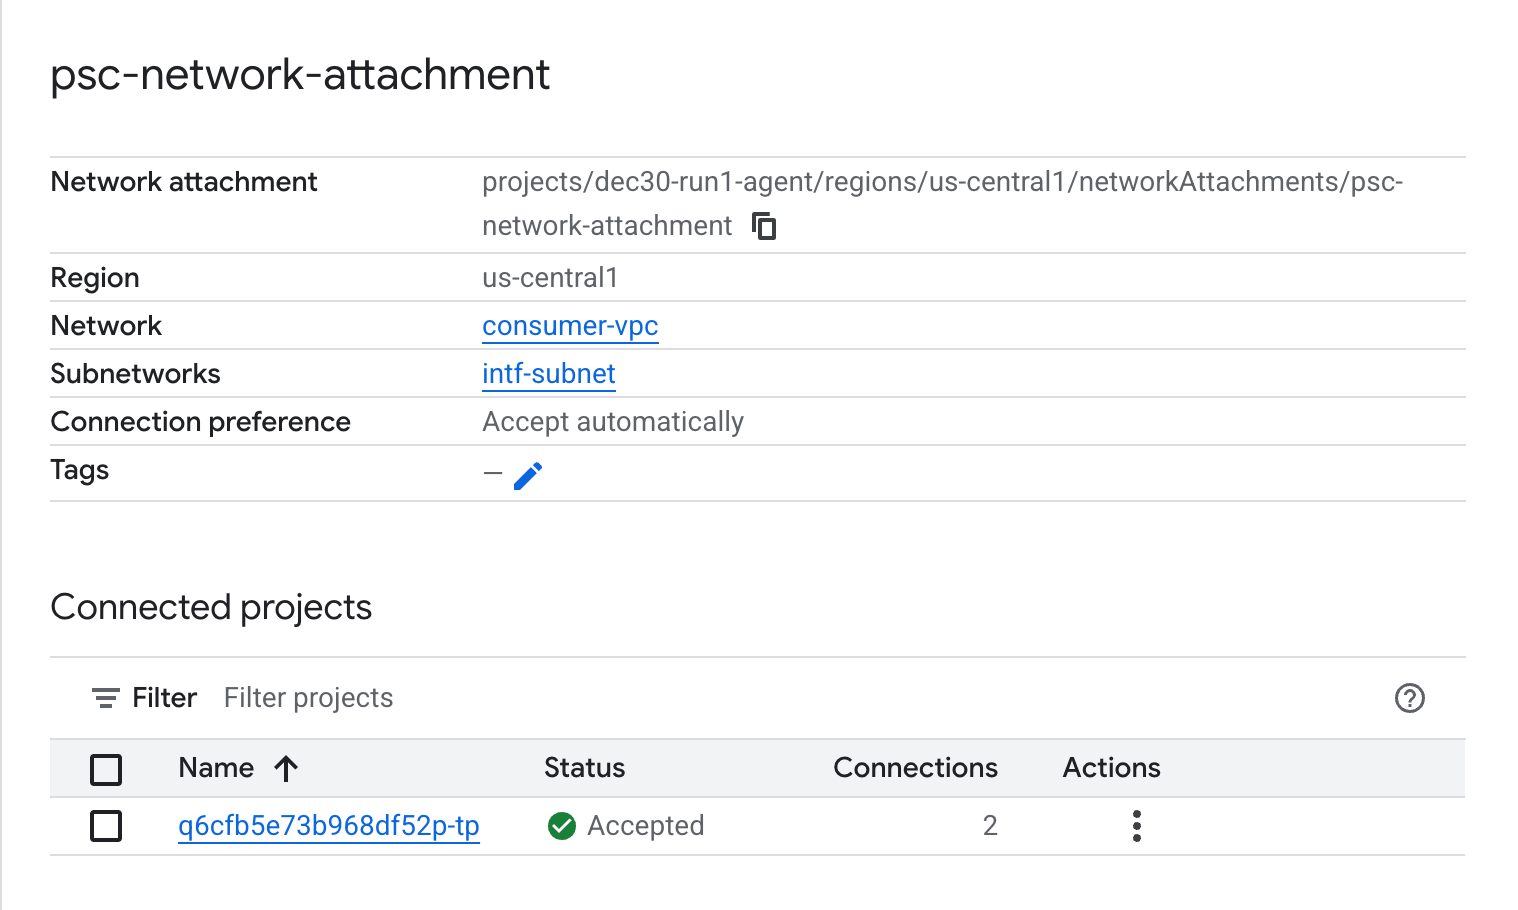
תיאור של הקבצים המצורפים לרשת
ב-Cloud Shell, מתארים את קובץ הרשת המצורף.
gcloud compute network-attachments describe psc-network-attachment --region=us-central1
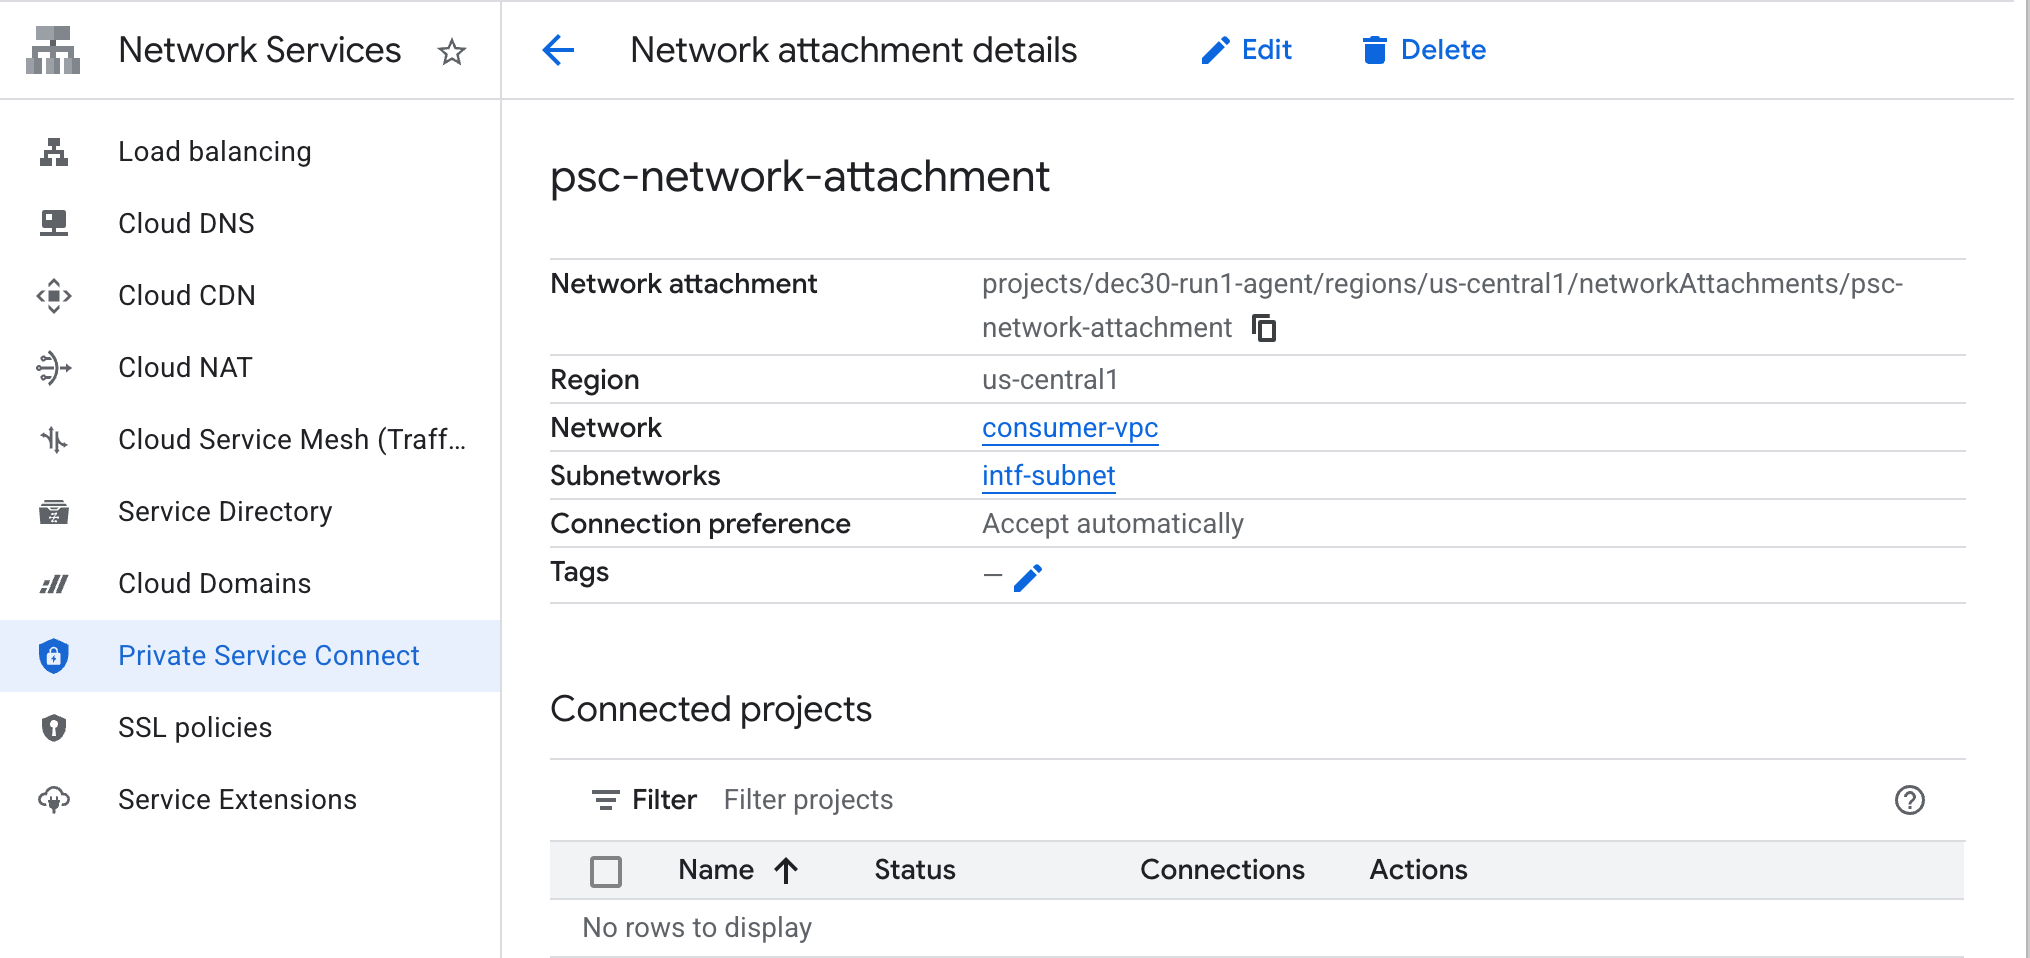
רושמים את השם של קובץ מצורף עם הרשת של PSC, psc-network-attachment, שישמש את הספק ליצירת הממשק של Private Service Connect.
כדי לראות את כתובת ה-URL של PSC Network Attachment במסוף Cloud, עוברים אל:
Network Services → Private Service Connect → Network Attachment → psc-network-attachment
6. תחום DNS פרטי
תצטרכו ליצור תחום (Zone) ב-Cloud DNS בשביל demo.com ולאכלס אותו ברשומת A שמפנה לכתובות ה-IP של ה-SWP. בהמשך, תתבצע פריסת DNS Peering ב-Agent Engine, שתאפשר גישה לרשומות ה-DNS של הצרכן.
ב-Cloud Shell, מבצעים את הפעולות הבאות כדי ליצור שם DNS demo.com.
gcloud dns --project=$projectid managed-zones create private-dns-codelab --description="" --dns-name="demo.com." --visibility="private" --networks="https://compute.googleapis.com/compute/v1/projects/$projectid/global/networks/consumer-vpc"
מקבלים ושומרים את כתובות ה-IP של ה-SWP שמשמשות לרשומת ה-A של ה-DNS.
ב-Cloud Shell, מריצים פקודת describe על ה-SWP, my-swp-instance:
gcloud network-services gateways describe my-swp-instance --location=us-central1
ב-Cloud Shell, יוצרים את קבוצת הרשומות עבור ה-SWP, swp.demo.com, ומוודאים שמעדכנים את כתובת ה-IP בהתאם לפלט של הסביבה.
gcloud dns --project=$projectid record-sets create swp.demo.com. --zone="private-dns-codelab" --type="A" --ttl="300" --rrdatas="10.10.10.5"
הגדרת חומת אש
יצירת כלל ב-Cloud Firewall כדי לאפשר גישה מממשק ה-PSC
בקטע הבא, יוצרים כלל חומת אש שמאפשר גישה לתעבורת נתונים שמגיעה מ-PSC Network Attachment לתת-הרשת SWP ב-Consumer VPC. כדי להגביר את האבטחה, אפשר לציין את כתובת ה-IP של SWP כיעד היחיד.
ב-Cloud Shell, יוצרים את כלל חומת האש לתעבורת נתונים יוצאת שמאפשר גישה מחיבור הרשת ל-SWP:
gcloud compute firewall-rules create allow-access-to-swp \
    --network=consumer-vpc \
    --action=ALLOW \
    --rules=ALL \
    --direction=EGRESS \
    --priority=1000 \
    --source-ranges="192.168.10.0/28" \
    --destination-ranges="10.10.10.5/32" \
    --enable-logging
ב-Cloud Shell, יוצרים את כלל חומת האש לתעבורה יוצאת (egress) שחוסם את כל התעבורה מהרשת המצורפת:
gcloud compute firewall-rules create deny-all \
    --network=consumer-vpc \
    --action=DENY \
    --rules=ALL \
    --direction=EGRESS \
    --priority=65534 \
    --source-ranges="192.168.10.0/28" \
    --destination-ranges="0.0.0.0/0" \
    --enable-logging
7. יוצרים מדיניות חומת אש לרשת ה-VPC כדי להבטיח מודיעין איומים:
בקטע הבא, יוצרים מדיניות חומת אש שמאפשרת להשתמש ברשימות המנוהלות של Google לאיומים כדי לחסום אתרים זדוניים מוכרים לפני שהתעבורה מתקבלת על ידי ה-SWP.
ב-Cloud Shell, יוצרים את מדיניות חומת האש הגלובלית:
gcloud compute network-firewall-policies create psc-secure-policy \
    --global \
    --description="Policy to protect VPC with Threat Intelligence"
ב-Cloud Shell, משייכים את המדיניות ל-VPC:
gcloud compute network-firewall-policies associations create \
    --firewall-policy=psc-secure-policy \
    --network=consumer-vpc \
    --name=psc-swp-association \
    --global-firewall-policy
ב-Cloud Shell, מוסיפים את הכללים של Threat Intelligence:
הכללים האלה יפסיקו את התנועה לשחקנים זדוניים מוכרים לפני הפעלת התנועה מהסוכן. בדוגמה הזו, הוספנו כללים לחסימה של צמתי יציאה של Tor (תעבורת נתונים יוצאת), לחסימה של כתובות IP זדוניות ידועות (תעבורת נתונים יוצאת), לחסימה של שרתי proxy אנונימיים ידועים(תעבורת נתונים יוצאת) ולחסימה של כריית מטבעות קריפטוגרפיים כדי למנוע שימוש לא מורשה במשאבים (תעבורת נתונים יוצאת).
gcloud compute network-firewall-policies rules create 100 \
    --firewall-policy=psc-secure-policy \
    --action=deny \
    --direction=EGRESS \
    --dest-threat-intelligence=iplist-tor-exit-nodes \
    --layer4-configs=all \
    --enable-logging \
    --description="Block anonymous Tor traffic" \
    --global-firewall-policy
gcloud compute network-firewall-policies rules create 110 \
    --firewall-policy=psc-secure-policy \
    --action=deny \
    --direction=EGRESS \
    --dest-threat-intelligence=iplist-known-malicious-ips \
    --layer4-configs=all \
    --enable-logging \
    --description="Block known botnets and malware sources" \
    --global-firewall-policy
gcloud compute network-firewall-policies rules create 120 \
    --firewall-policy=psc-secure-policy \
    --action=deny \
    --direction=EGRESS \
    --dest-threat-intelligence=iplist-anon-proxies \
    --layer4-configs=all \
    --enable-logging \
    --description="Block Known Anonymous Proxies" \
    --global-firewall-policy
gcloud compute network-firewall-policies rules create 130 \
    --firewall-policy=psc-secure-policy \
    --action=deny \
    --direction=EGRESS \
    --dest-threat-intelligence=iplist-crypto-miners \
    --layer4-configs=all \
    --enable-logging \
    --description="Block Crypto Miners (Prevent unauthorized resource usage)" \
    --global-firewall-policy
8. יצירת Jupyter Notebook
בקטע הבא מוסבר איך ליצור Jupyter Notebook. ה-notebook הזה ישמש לפריסת Agent Engine שמטרגט שרת proxy מפורש ליציאה מהאינטרנט.
יצירה של חשבון שירות שמנוהל על ידי משתמש
בקטע הבא תיצרו חשבון שירות שישויך למופע Vertex AI Workbench שבו נעשה שימוש במדריך.
במדריך הזה, התפקידים הבאים יוקצו לחשבון השירות:
ב-Cloud Shell, יוצרים את חשבון השירות.
gcloud iam service-accounts create notebook-sa \
    --display-name="notebook-sa"
ב-Cloud Shell, מעדכנים את חשבון השירות עם התפקיד Storage Admin (אדמין אחסון).
gcloud projects add-iam-policy-binding $projectid --member="serviceAccount:notebook-sa@$projectid.iam.gserviceaccount.com" --role="roles/storage.admin"
ב-Cloud Shell, מעדכנים את חשבון השירות עם התפקיד Vertex AI User.
gcloud projects add-iam-policy-binding $projectid --member="serviceAccount:notebook-sa@$projectid.iam.gserviceaccount.com" --role="roles/aiplatform.user"
ב-Cloud Shell, מעדכנים את חשבון השירות עם התפקיד Artifact Registry Admin.
gcloud projects add-iam-policy-binding $projectid --member="serviceAccount:notebook-sa@$projectid.iam.gserviceaccount.com" --role="roles/artifactregistry.admin"
ב-Cloud Shell, מאפשרים לחשבון השירות של מחברת ה-notebook להשתמש בחשבון השירות שמוגדר כברירת מחדל של Compute Engine.
gcloud iam service-accounts add-iam-policy-binding \
    $(gcloud projects describe $(gcloud config get-value project) --format='value(projectNumber)')-compute@developer.gserviceaccount.com \
    --member="serviceAccount:notebook-sa@$projectid.iam.gserviceaccount.com" \
    --role="roles/iam.serviceAccountUser"
9. יצירת מכונה של Vertex AI Workbench
בקטע הבא, יוצרים מכונה של Vertex AI Workbench שמשלבת את חשבון השירות שיצרתם קודם, notebook-sa.
ב-Cloud Shell, יוצרים את המכונה private-client.
gcloud workbench instances create workbench-tutorial --vm-image-project=cloud-notebooks-managed --vm-image-family=workbench-instances --machine-type=n1-standard-4 --location=us-central1-a --subnet-region=us-central1 --subnet=notebook-subnet --disable-public-ip --shielded-secure-boot=true --shielded-integrity-monitoring=true --shielded-vtpm=true --service-account-email=notebook-sa@$projectid.iam.gserviceaccount.com
מוסיפים עוד כלל ב-Secure Web Proxy הקיים כדי להעביר את תעבורת הנתונים ממופע המחברת הזה:
ב-Cloud Shell, יוצרים את הקובץ rule-notebook.yaml באמצעות עורך טקסט. חשוב לעדכן את קובץ ה-YAML עם מזהה הפרויקט.
cat > rule-notebook.yaml << EOF
name: projects/$projectid/locations/us-central1/gatewaySecurityPolicies/my-swp-policy/rules/allow-notebook-subnet
description: Allow Internet access for notebook subnet
enabled: true
priority: 2
basicProfile: ALLOW
sessionMatcher: inIpRange(source.ip,'192.168.20.2')
EOF
ב-Cloud Shell, יוצרים כלל למדיניות האבטחה:
gcloud network-security gateway-security-policies rules import allow-notebook-subnet \
    --source=rule-notebook.yaml \
    --location=us-central1 \
    --gateway-security-policy=my-swp-policy
10. עדכון של סוכן השירות של Vertex AI
Vertex AI פועל בשמכם כדי לבצע פעולות כמו קבלת כתובת IP מרשת המשנה של קובץ ה-PSC Network Attachment שמשמש ליצירת ממשק ה-PSC. לשם כך, ב-Vertex AI נעשה שימוש בסוכן שירות (שמפורט בהמשך) שנדרשת לו הרשאת אדמין רשת:
service-$projectnumber@gcp-sa-aiplatform.iam.gserviceaccount.com
ב-Cloud Shell, מאתרים את מספר הפרויקט.
gcloud projects describe $projectid | grep projectNumber
ב-Cloud Shell, מגדירים את מספר הפרויקט.
projectnumber=YOUR-PROJECT-NUMBER
ב-Cloud Shell, יוצרים חשבון שירות ל-AI Platform. אם כבר יש לכם חשבון שירות בפרויקט, אפשר לדלג על השלב הזה.
gcloud beta services identity create --service=aiplatform.googleapis.com --project=$projectnumber
ב-Cloud Shell, מעדכנים את חשבון סוכן השירות עם התפקיד compute.networkAdmin.
gcloud projects add-iam-policy-binding $projectid --member="serviceAccount:service-$projectnumber@gcp-sa-aiplatform.iam.gserviceaccount.com" --role="roles/compute.networkAdmin"
ב-Cloud Shell, מעדכנים את חשבון סוכן השירות בתפקיד dns.peer.
gcloud projects add-iam-policy-binding $projectid --member="serviceAccount:service-$projectnumber@gcp-sa-aiplatform.iam.gserviceaccount.com" --role="roles/dns.peer"
עדכון חשבון השירות שמוגדר כברירת מחדל
מעניקים לחשבון השירות שמוגדר כברירת מחדל גישה ל-Vertex AI. חשוב לזכור: יכול להיות שיעבור זמן עד שהשינוי בהרשאות יתעדכן.
ב-Cloud Shell, מעדכנים את חשבון השירות שמוגדר כברירת מחדל עם התפקיד aiplatform.user.
gcloud projects add-iam-policy-binding $projectid \
  --member="serviceAccount:$projectnumber-compute@developer.gserviceaccount.com" \
    --role="roles/aiplatform.user"
11. פריסת Agent Engine
הערה: כדי להשלים את המשימות בקטע הזה, נשתמש במסוף GCP ובקובץ notebook של JupyterLab.
בקטע הבא תיצרו מחברת שמבצעת את המשימות הבאות:
- משתמש ב-Frankfurter API (https://api.frankfurter.app/) כדי לקבל נתוני שער חליפין
- הפניה ל-proxy מפורש (proxy_server) שמטרגט את ה-SWP ב-VPC של הצרכנים באמצעות FQDN swp.demo.com
- הגדרה של dnsPeeringConfigs "domain": "demo.com."
מריצים את משימת האימון במכונת Vertex AI Workbench.
- במסוף Google Cloud, עוברים אל
Vertex AI → Workbench - ליד השם של מופע Vertex AI Workbench (workbench-tutorial), לוחצים על Open JupyterLab. המכונה של Vertex AI Workbench תיפתח ב-JupyterLab.
- בחירה באפשרות
File > New > Notebook - בחירה באפשרות
Kernel > Python 3
מתקינים את ספריות Python הנדרשות: מתקינים את הספריות שנדרשות ל-Agent Engine, כולל pyyaml, google-cloud-aiplatform, cloudpickle, google-cloud-api-keys ו-langchain-google-vertexai.
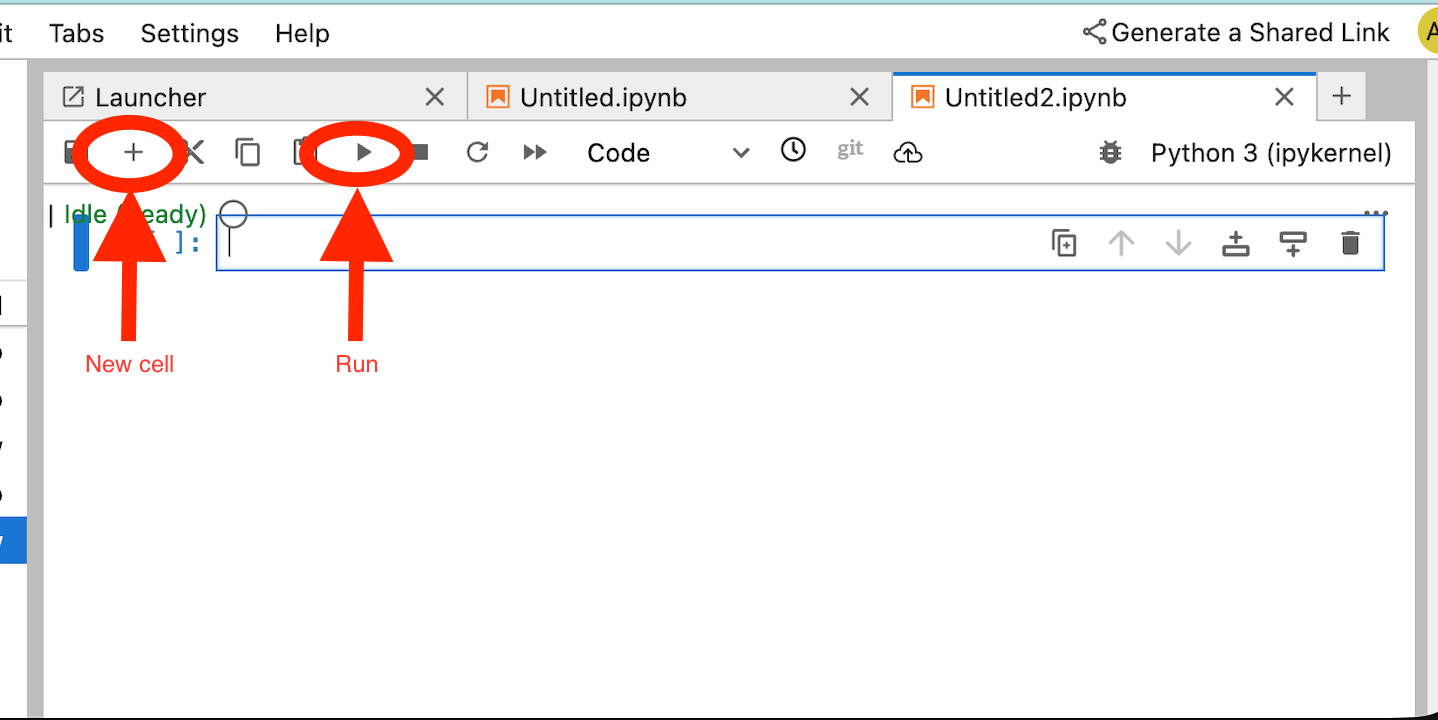
במחברת JupyterLab, יוצרים תא חדש ומריצים את הפקודה הבאה, תוך ציון כתובת ה-IP של SWP
!pip install --proxy http://10.10.10.5:8888 --upgrade google-cloud-aiplatform[agent_engines,adk]
מגדירים את המשתנים הבאים על סמך הסביבה שלכם בקטע הקוד הבא:
- PROJECT_ID
- BUCKET_NAME
- AGENT_NAME
בשיעור ה-Lab הזה תשתמשו במשתנים BUCKET_NAME ו-AGENT_NAME כדי לאתחל ולהגדיר את קטגוריית האחסון שלכם, שזמינה באופן גלובלי.
בקטע הבא מוגדר PROXY_SERVER, למשל swp.demo.com, שנדרש לו DNS peering לפתרון שמות. בהגדרה, AGENT_PEER_DOMAIN נפרס כ-demo.com, שמתאים לתחום ה-DNS הפרטי שנוצר בשלב קודם ב-AGENT_PEER_NETWORK, consumer-vpc.
במחברת JupyterLab, יוצרים תא חדש ומריצים את הפקודה הבאה:
# --- Fundamental Project Configuration ---
PROJECT_ID = "YOUR_PROJECT_ID"
LOCATION = "us-central1" # e.g., "us-central1"
BUCKET_NAME = "YOUR_BUCKET_NAME" # A GCS bucket in the same location

# --- Agent Configuration ---
AGENT_NAME = "YOUR_AGENT_NAME"
MODEL = "gemini-2.5-flash" # Or another suitable model

# --- Network and Proxy Configuration ---
# The agent will call the Frankfurter API via this proxy
PROXY_SERVER = "http://swp.demo.com:8888"

# --- Deployment Configuration (PSC & DNS Peering) ---
# This should be a pre-existing Network Attachment
NETWORK_ATTACHMENT_NAME = f"projects/{PROJECT_ID}/regions/{LOCATION}/networkAttachments/psc-network-attachment"
# Optional DNS Peering config
AGENT_PEER_DOMAIN = "demo.com."
AGENT_PEER_NETWORK = "consumer-vpc"

# --- Initialize Vertex AI SDK ---
import vertexai
STAGING_BUCKET = f"gs://{BUCKET_NAME}"

vertexai.init(project=PROJECT_ID, location=LOCATION, staging_bucket=STAGING_BUCKET)

print(f"Vertex AI SDK initialized for project {PROJECT_ID} in {LOCATION}.")
במחברת JupyterLab, יוצרים תא חדש ומריצים את הפקודה הבאה.
!adk create $AGENT_NAME --model=$MODEL --project=$PROJECT_ID --region=$LOCATION
במחברת JupyterLab, יוצרים תא חדש ומריצים את הפקודה הבאה כדי ליצור את משתנה ה-proxy שמתאים ל-FQDN ולפורט של קובצי ה-SWP.
import os
os.environ["PROXY_SERVER_URL"] = "http://swp.demo.com:8888"
בתא הקוד הבא מוצגת הגדרת שרת proxy מפורשת ל-Agent Engine כדי לגשת ל-API של נקודת הקצה באינטרנט api.frankfurter.app על ידי ציון ה-SWP, באמצעות PROXY_SERVER_TO_USE שממופה ל-os.environ["PROXY_SERVER_URL"].
import requests
# Use the globally defined proxy server URL
    proxies = {
       "http": PROXY_SERVER_TO_USE,
       "https": PROXY_SERVER_TO_USE,
    }
    try:
        response = requests.get(
            f"https://api.frankfurter.app/{currency_date}",
            params={"from": currency_from, "to": currency_to},
            proxies=proxies,
)
response.raise_for_status()
print(response.json())
except requests.exceptions.RequestException as e: print(f"An error occurred: {e}")
במחברת JupyterLab, יוצרים תא חדש ומריצים את הפקודה הבאה שמגדירה את הטמעת הכלי עבור ה-API של טירגוט המרות מטבעות: api.frankfurther.app.
%%writefile $AGENT_NAME/agent.py
from google.adk.agents.llm_agent import Agent
import os
import requests


# Get Proxy Server URL
# This is the VM's FQDN to reach the proxy vm in the consumers network
if "PROXY_SERVER_URL" not in os.environ:
    raise ValueError("Missing required environment variable: PROXY_SERVER_URL is not set.")
PROXY_SERVER_TO_USE = os.environ["PROXY_SERVER_URL"]

# Mock tool implementation
def get_exchange_rate(
    currency_from: str = "USD",
    currency_to: str = "EUR",
    currency_date: str = "latest",
):
    """Retrieves the exchange rate between two currencies on a specified date.

    Uses the Frankfurter API (https://api.frankfurter.app/) to obtain
    exchange rate data.

    Args:
        currency_from: The base currency (3-letter currency code).
            Defaults to "USD" (US Dollar).
        currency_to: The target currency (3-letter currency code).
            Defaults to "EUR" (Euro).
        currency_date: The date for which to retrieve the exchange rate.
            Defaults to "latest" for the most recent exchange rate data.
            Can be specified in YYYY-MM-DD format for historical rates.

    Returns:
        dict: A dictionary containing the exchange rate information.
            Example: {"amount": 1.0, "base": "USD", "date": "2023-11-24",
                "rates": {"EUR": 0.95534}}
    """
    # Use the globally defined proxy server URL
    proxies = {
       "http": PROXY_SERVER_TO_USE,
       "https": PROXY_SERVER_TO_USE,
    }

    try:
        response = requests.get(
            f"https://api.frankfurter.app/{currency_date}",
            params={"from": currency_from, "to": currency_to},
            proxies=proxies,
        )
        response.raise_for_status()  # Raise an error for bad responses
        return response.json()
    except Exception as e:
        return f"An unexpected error occurred: {e}"

root_agent = Agent(
    model='gemini-2.5-flash',
    name='root_agent',
    description="Provides the currency exchange rates between two currencies",
    instruction="You are a helpful assistant that provides the currency exchange rates between two currencies. Use the 'get_exchange_rate' tool for this purpose.",
    tools=[get_exchange_rate],
)
במחברת JupyterLab, יוצרים תא חדש ומריצים את הפקודה הבאה.
# 1. Set your variables
CURRENCY_DATE="latest"
CURRENCY_FROM="USD"
CURRENCY_TO="EUR"
PROXY_SERVER="http://swp.demo.com:8888"

# 2. Run the curl command
!curl -x "$PROXY_SERVER" "https://api.frankfurter.app/$CURRENCY_DATE?from=$CURRENCY_FROM&to=$CURRENCY_TO"
במחברת JupyterLab, יוצרים תא חדש ומריצים את הפקודה הבאה שמפעילה את הגדרת ממשק ה-PSC שמשמשת את Agent Engine, בנוסף ל-DNS peering.
import json
import os

CONFIG_FILE_PATH = os.path.join(AGENT_NAME, ".agent_engine_config.json")
# Create your config as a Python dictionary ---
config_data = {
    "requirements": [
        "google-cloud-aiplatform[agent_engines,adk]",
        "requests",
    ],
    "psc_interface_config": {
        "network_attachment": NETWORK_ATTACHMENT_NAME,
        "dns_peering_configs": [
            {
                "domain": AGENT_PEER_DOMAIN,
                "target_project": PROJECT_ID,
                "target_network": AGENT_PEER_NETWORK,
            },
        ],
    },
}

# Write the dictionary to a JSON file ---
os.makedirs(AGENT_NAME, exist_ok=True) # Ensure the directory exists
with open(CONFIG_FILE_PATH, 'w') as f:
    json.dump(config_data, f, indent=4)

print(f"Successfully created {CONFIG_FILE_PATH} with your variables.")
במחברת JupyterLab, יוצרים תא חדש ומריצים את הפקודה הבאה.
import json
import os

CONFIG_FILE_PATH = os.path.join(AGENT_NAME, ".agent_engine_config.json")
# Create your config as a Python dictionary ---
config_data = {

    "psc_interface_config": {
        "network_attachment": NETWORK_ATTACHMENT_NAME,
        "dns_peering_configs": [
            {
                "domain": AGENT_PEER_DOMAIN,
                "target_project": PROJECT_ID,
                "target_network": AGENT_PEER_NETWORK,
            },
        ],
    },
}

# Write the dictionary to a JSON file ---
os.makedirs(AGENT_NAME, exist_ok=True) # Ensure the directory exists
with open(CONFIG_FILE_PATH, 'w') as f:
    json.dump(config_data, f, indent=4)

print(f"Successfully created {CONFIG_FILE_PATH} with your variables.")
במחברת JupyterLab, יוצרים תא חדש ומריצים את הפקודה הבאה.
%%writefile $AGENT_NAME/.env

GOOGLE_CLOUD_PROJECT=PROJECT_ID
GOOGLE_CLOUD_LOCATION=us-central1
GOOGLE_GENAI_USE_VERTEXAI=1


PROXY_SERVER_URL=http://swp.demo.com:8888
במחברת JupyterLab, יוצרים תא חדש ומריצים את הפקודה הבאה שיוצרת את הסוכן.
!adk deploy agent_engine $AGENT_NAME --staging_bucket=$STAGING_BUCKET --env_file=$AGENT_NAME/.env --agent_engine_config_file=$AGENT_NAME/.agent_engine_config.json --display_name=$AGENT_NAME
מזהה של מנוע נימוקים ייווצר אחרי הפעלת התא. בשלב הבא תצטרכו את המזהה שנוצר, שהוא 3235268984265768960 בדוגמה הזו.
✅ Created agent engine: projects/9315891080/locations/us-central1/reasoningEngines/3235268984265768960
ב-notebook של JupyterLab, יוצרים תא חדש ומריצים את הפקודה הבאה. חשוב לעדכן את מספר הפרויקט ואת מזהה הנימוקים של Agent Engine מהפלט הקודם:
from vertexai import agent_engines
remote_app = agent_engines.get("projects/PROJECT_NUMBER/locations/us-central1/reasoningEngines/ENTER_YOUR_ID")
במחברת JupyterLab, יוצרים תא חדש ומריצים את הפקודה הבאה.
def print_event_nicely_with_thoughts(event):
"""
Parses and prints streaming query events, including thoughts.
"""
try:
content = event.get('content', {})
role = content.get('role')
parts = content.get('parts', [{}])
if not parts:
print("...")
return
part = parts[0] # Get the first part
# Event 1: Model is thinking (calling a tool or just text)
if role == 'model':
# Check for and print any explicit 'thought' text
if 'thought' in part:
print(f"🧠 Thought: {part['thought']}")
# Check for a function call
if 'function_call' in part:
# If we haven't *already* printed an explicit thought,
# print a generic one.
if 'thought' not in part:
print("🧠 Thinking... (decided to use a tool)")
call = part['function_call']
print(f" 🔧 Tool Call: {call.get('name')}()")
print(f" Args: {call.get('args')}")
# Check for the final text answer
elif 'text' in part:
text = part.get('text', '')
print(f"\n💬 Model: {text}")
# Event 2: The tool returns its result
elif role == 'user' and 'function_response' in part:
resp = part['function_response']
print(f"⚙️ Tool Response (from {resp.get('name')}):")
print(f" Output: {resp.get('response')}")
# Other event types (like progress messages)
else:
print("...") # Show progress for other events
except Exception as e:
print(f"Error processing event: {e}")
# print(f"Raw event: {event}") # Uncomment to debug
for event in remote_app.stream_query(
user_id="u_456",
# session_id=remote_session["id"],
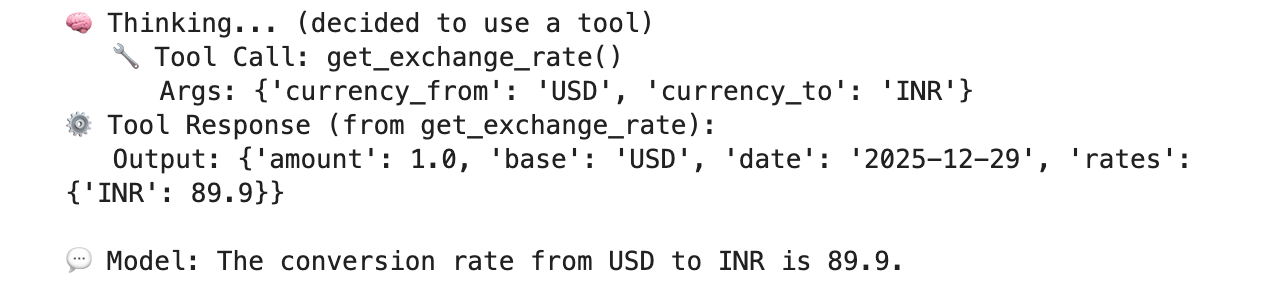
message="Provide USD to INR conversion rate",
):
print_event_nicely_with_thoughts(event)
דוגמה להפעלה מוצלחת שמאמתת את הקישוריות לנקודת הקצה הציבורית api.frankfurther.app דרך ה-SWP על סמך שער ההמרה מ-USD ל-INR.
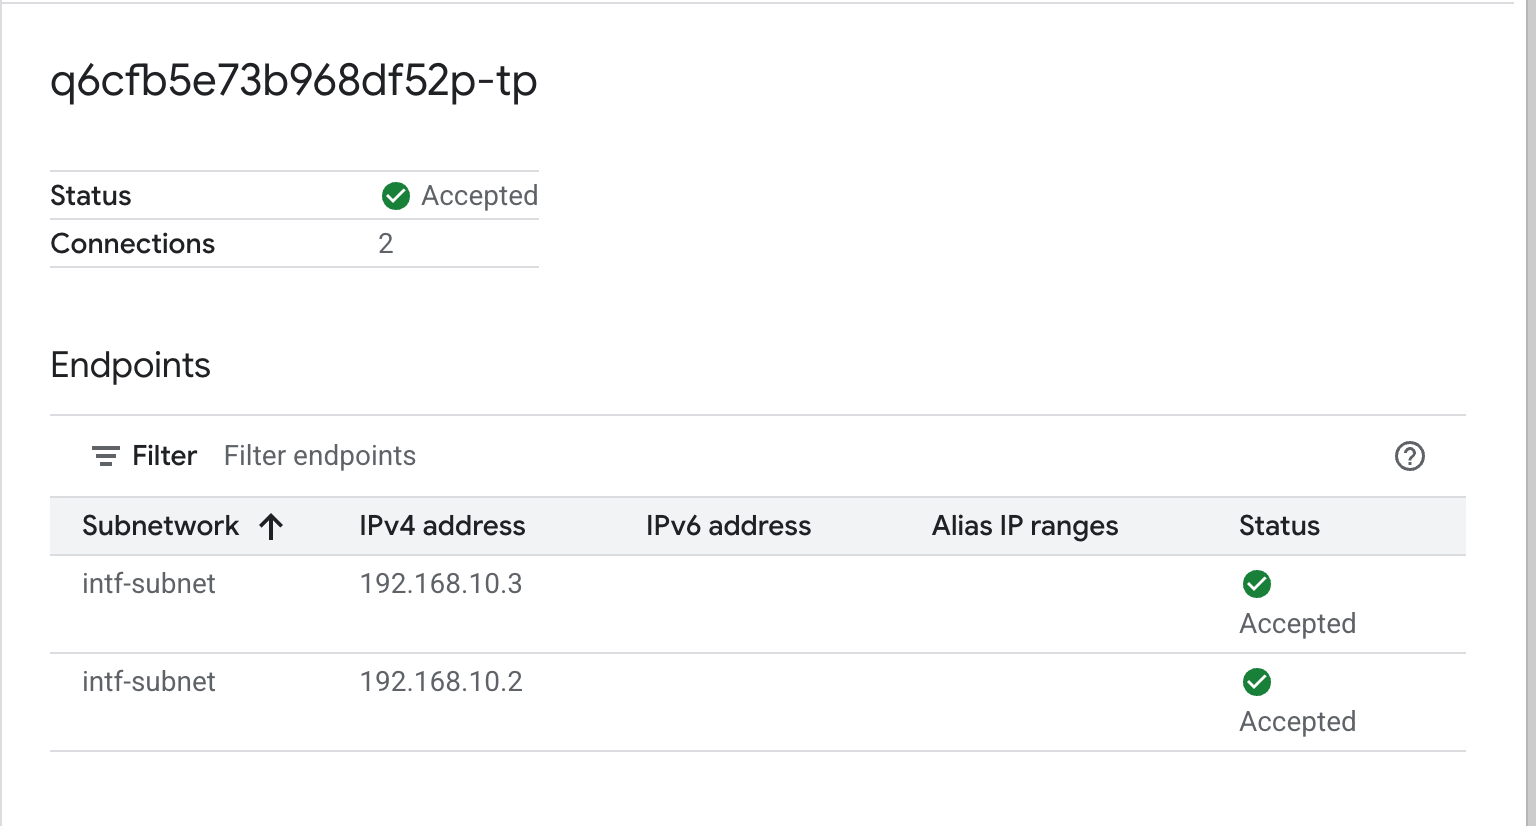
12. אימות של ממשק PSC
אפשר גם לראות את כתובות ה-IP של Network Attachment שבהן נעשה שימוש ב-Agent Engine. לשם כך, עוברים אל:
Network Services (שירותי רשת) → Private Service Connect → Network Attachment (קובץ מצורף עם הרשת) → psc-network-attachment
בוחרים את הפרויקט של הדייר (שם הפרויקט מסתיים ב-tp)
השדה המודגש מציין את כתובת ה-IP שמשמשת את Agent Engine מחיבור הרשת של PSC.
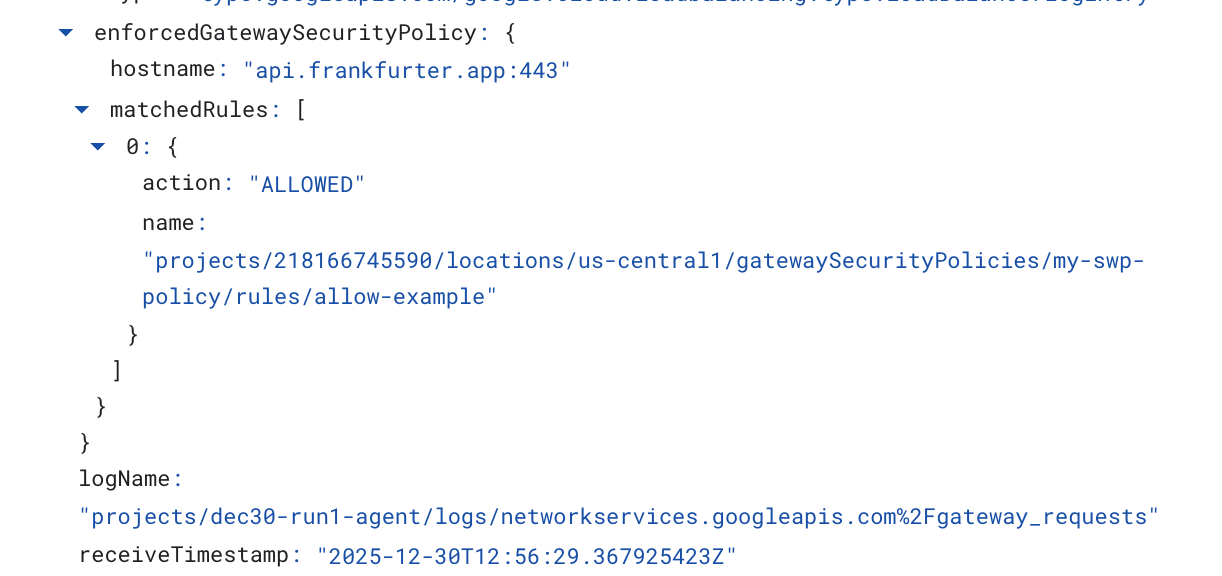
13. SWP - Cloud Logging Validation
כדי לראות את הפעולות שבוצעו על ידי SWP ב-Cloud Logging, עוברים אל:
מעקב → Logs Explorer
מזינים את השאילתה: resource.type=" networkservices.googleapis.com/Gateway" ואז לוחצים על Run Query. בהמשך מוצגת דוגמה שמאשרת את נקודת הקצה של היעד, api.frankfurter.app.

בדוגמה הבאה של Cloud Logging מתבצע אימות של:
Destination_range: כתובת ה-IP של ממשק ה-PSC של Agent Engine
Source_range: רשת משנה של Proxy בלבד Dest_ip: כתובת ה-IP של Secure Web Proxy
חשוב לוודא ששיניתם את השדה project_id בשאילתת הרישום ביומן ב-Cloud.
logName:("projects/project_id/logs/compute.googleapis.com%2Ffirewall") AND jsonPayload.rule_details.reference:("network:consumer-vpc/firewall:allow-access-to-swp")
{
  "insertId": "1j9ym95fmu8g6o",
  "jsonPayload": {
    "vpc": {
      "project_id": "XXXXXXXXXXXXX",
      "subnetwork_name": "intf-subnet",
      "vpc_name": "consumer-vpc"
    },
    "rule_details": {
      "destination_range": [
        "10.10.10.5/32"
      ],
      "reference": "network:consumer-vpc/firewall:allow-access-to-swp",
      "priority": 1000,
      "source_range": [
        "192.168.10.0/28"
      ],
      "direction": "EGRESS",
      "ip_port_info": [
        {
          "ip_protocol": "ALL"
        }
      ],
      "action": "ALLOW"
    },
    "disposition": "ALLOWED",
    "remote_instance": {
      "region": "us-central1"
    },
    "remote_vpc": {
      "vpc_name": "consumer-vpc",
      "project_id": "XXXXXXXXXXXXXXX",
      "subnetwork_name": "swp-subnet"
    },
    "connection": {
      "src_ip": "192.168.10.2",
      "src_port": 48640,
      "dest_port": 8888,
      "dest_ip": "10.10.10.5",
      "protocol": 6
    }
  },
  "resource": {
    "type": "gce_subnetwork",
    "labels": {
      "subnetwork_id": "7147084067647653041",
      "project_id": "XXXXXXXXXXXXXX",
      "location": "us-central1",
      "subnetwork_name": "intf-subnet"
    }
  },
  "timestamp": "2025-12-30T12:51:36.628538815Z",
  "logName": "projects/dec30-run1-agent/logs/compute.googleapis.com%2Ffirewall",
  "receiveTimestamp": "2025-12-30T12:51:40.846652708Z"
}
14. הסרת המשאבים
במחברת JupyterLab, יוצרים תא חדש ומריצים את הפקודה הבאה שתפעיל את המחיקה של פריסת Agent Engine.
חשוב לוודא שאתם מעדכנים את "project number" ואת "reasoningEngines token"
import requests
token = !gcloud auth application-default print-access-token
ENDPOINT = "https://us-central1-aiplatform.googleapis.com"
response = requests.delete(
    f"{ENDPOINT}/v1beta1/projects/218166745590/locations/us-central1/reasoningEngines/3086854705725308928",
    params={"force": "true"},
    headers={
        "Content-Type": "application/json; charset=utf-8",
        "Authorization": f"Bearer {token[0]}"
    },
)
print(response.text)
ב-Cloud Shell, מוחקים את רכיבי ההדרכה.
gcloud workbench instances delete workbench-tutorial --project=$projectid --location=us-central1-a

gcloud network-security gateway-security-policies rules delete allow-notebook-subnet \
    --gateway-security-policy=my-swp-policy \
    --location=us-central1

gcloud network-security gateway-security-policies rules delete allow-example \
    --gateway-security-policy=my-swp-policy \
    --location=us-central1

gcloud network-security gateway-security-policies delete my-swp-policy \
    --location=us-central1
gcloud network-services gateways delete my-swp-instance\
    --location=us-central1

gcloud dns record-sets delete swp.demo.com --zone=private-dns-codelab  --type=A

gcloud dns managed-zones delete private-dns-codelab


gcloud compute network-attachments delete psc-network-attachment --region=us-central1 --quiet

export ROUTER_NAME=$(gcloud compute routers list --regions=us-central1 \
    --filter="name ~ swg-autogen-router" --format="value(name)")


 gcloud compute routers nats delete swg-autogen-nat --router=$ROUTER_NAME --region=us-central1 --quiet

gcloud compute routers delete $ROUTER_NAME --region=us-central1 --quiet

gcloud compute networks subnets delete intf-subnet rfc1918-subnet1 --region=us-central1 --quiet

gcloud compute networks subnets delete intf-subnet swp-subnet
 --region=us-central1 --quiet

gcloud compute networks subnets delete intf-subnet intf-subnet --region=us-central1 --quiet

gcloud compute networks subnets delete intf-subnet proxy-subnet
 --region=us-central1 --quiet

gcloud compute networks subnets delete intf-subnet notebook-subnet
--region=us-central1 --quiet

gcloud compute networks delete consumer-vpc --quiet
15. מזל טוב
הגדרתם ואימתתם בהצלחה את Agent Engine שנפרס באמצעות ממשק Private Service Connect עם יציאה לאינטרנט שמתבצעת דרך שרת proxy מפורש.
יצרתם את התשתית של הצרכן והוספתם קובץ מצורף לרשת שמאפשר ליצרן ליצור מכונת VM עם כמה כרטיסי NIC כדי לגשר על התקשורת בין הצרכן ליצרן. למדתם איך ליצור שרת proxy מפורש וקישור בין רשתות שכנות (peering) של DNS שמאפשרים קישוריות לאינטרנט.
Cosmopup חושב שסרטוני הדרכה הם מדהימים!!