1. บทนำ
อินเทอร์เฟซ Private Service Connect เป็นทรัพยากรที่ช่วยให้เครือข่าย Virtual Private Cloud (VPC) ของผู้ผลิตเริ่มการเชื่อมต่อกับปลายทางต่างๆ ในเครือข่าย VPC ของผู้ใช้บริการได้ เครือข่ายผู้ผลิตและผู้บริโภคสามารถอยู่ในโปรเจ็กต์และองค์กรที่แตกต่างกันได้
หากไฟล์แนบเครือข่ายยอมรับการเชื่อมต่อจากอินเทอร์เฟซ Private Service Connect ทาง Google Cloud จะจัดสรรที่อยู่ IP จากซับเน็ตของผู้ใช้ที่ไฟล์แนบเครือข่ายระบุไว้ให้กับอินเทอร์เฟซ เครือข่ายผู้บริโภคและเครือข่ายผู้ผลิตเชื่อมต่อกันและสื่อสารกันได้โดยใช้ที่อยู่ IP ภายใน
การเชื่อมต่อระหว่างไฟล์แนบเครือข่ายกับอินเทอร์เฟซ Private Service Connect จะคล้ายกับการเชื่อมต่อระหว่างปลายทาง Private Service Connect กับไฟล์แนบบริการ แต่มีความแตกต่างที่สำคัญ 2 ประการดังนี้
- ไฟล์แนบเครือข่ายช่วยให้เครือข่ายผู้ผลิตเริ่มการเชื่อมต่อกับเครือข่ายผู้บริโภค (ขาออกของบริการที่มีการจัดการ) ในขณะที่ปลายทางช่วยให้เครือข่ายผู้บริโภคเริ่มการเชื่อมต่อกับเครือข่ายผู้ผลิต (ขาเข้าของบริการที่มีการจัดการ)
- การเชื่อมต่ออินเทอร์เฟซ Private Service Connect เป็นแบบทรานซิทีฟ ซึ่งหมายความว่าเครือข่ายผู้ผลิตจะสื่อสารกับเครือข่ายอื่นๆ ที่เชื่อมต่อกับเครือข่ายผู้บริโภคได้
ข้อควรพิจารณาเกี่ยวกับความสามารถในการเข้าถึงอินเทอร์เฟซ PSC ของ Vertex AI
- PSC-Interface สามารถกำหนดเส้นทางการรับส่งข้อมูลไปยัง VPC หรือปลายทางในองค์กรตามที่เครือข่าย VPC เรียนรู้
- การใช้กฎไฟร์วอลล์ขาออกเป็นแนวทางปฏิบัติแนะนำในการจำกัดขอบเขตของการเข้าถึงจาก Network Attachment ที่ Agent Engine ใช้ไปยังเครือข่าย VPC
- หากต้องการจำกัดขอบเขตของการรับส่งข้อมูลขาออกจากเครือข่ายที่มาจากซับเน็ตการเชื่อมต่อเครือข่ายของ Agent Engine คุณควรติดตั้งใช้งานกฎไฟร์วอลล์ขาออกของ VPC กฎนี้จะอนุญาตการเข้าชมจาก Agent Engine ไปยัง SWP อย่างชัดเจน ในขณะที่ปฏิเสธการเข้าชมขาออกอื่นๆ ทั้งหมด
ข้อควรพิจารณาเกี่ยวกับ VPC-SC ของอินเทอร์เฟซ PSC ของ Vertex AI
- คุณต้องระบุการเชื่อมต่อขาออกของอินเทอร์เน็ตภายใน VPC ของลูกค้าเพื่อให้ Agent Engine PSC-Interface ทำงานได้ แม้ว่าจะเปิดใช้การควบคุมบริการ VPC แล้วก็ตาม
เว็บพร็อกซีที่ปลอดภัย
Secure Web Proxy เป็นบริการแบบเนทีฟในระบบคลาวด์ที่มีการจัดการ ซึ่งช่วยให้คุณควบคุมและรักษาความปลอดภัยของการรับส่งข้อมูลขาออก (HTTP/HTTPS) ได้อย่างละเอียด โดยจะทำหน้าที่เป็นเกตเวย์ส่วนกลางที่ช่วยให้คุณบังคับใช้นโยบายความปลอดภัยกับการเชื่อมต่อที่เริ่มต้นจาก Agent Engine ที่ติดตั้งใช้งานด้วยอินเทอร์เฟซ PSC ไปยังทรัพยากร VPC เช่น VM, GKE, อินเทอร์เน็ต และสภาพแวดล้อมแบบมัลติคลาวด์
สิ่งที่ฟีเจอร์นี้ช่วยแก้ปัญหา
- ป้องกันการขโมยข้อมูล: บล็อกการอัปโหลดหรือการสื่อสารกับเว็บไซต์ที่เป็นอันตรายโดยไม่ได้รับอนุญาต
- บังคับใช้การปฏิบัติตามข้อกำหนด: ตรวจสอบว่าการรับส่งข้อมูลขาออกเป็นไปตามนโยบายด้านความปลอดภัยและการจัดการข้อมูลขององค์กร
- ลดค่าใช้จ่ายในการดำเนินงาน: Secure Web Proxy เป็นบริการที่มีการจัดการเต็มรูปแบบ จึงไม่จำเป็นต้องติดตั้งใช้งาน ปรับขนาด หรือบำรุงรักษา VM พร็อกซีของคุณเอง
- ให้การมองเห็นเชิงลึก: ช่วยให้ตรวจสอบการรับส่งข้อมูลที่เข้ารหัส Transport Layer Security (TLS) เพื่อตรวจหาภัยคุกคามที่ซ่อนอยู่ได้
ดูข้อมูลเพิ่มเติมได้ที่แหล่งข้อมูลต่อไปนี้
ติดตั้งใช้งาน Agent | Generative AI ใน Vertex AI | Google Cloud
ตั้งค่าอินเทอร์เฟซ Private Service Connect สำหรับทรัพยากร Vertex AI | Google Cloud
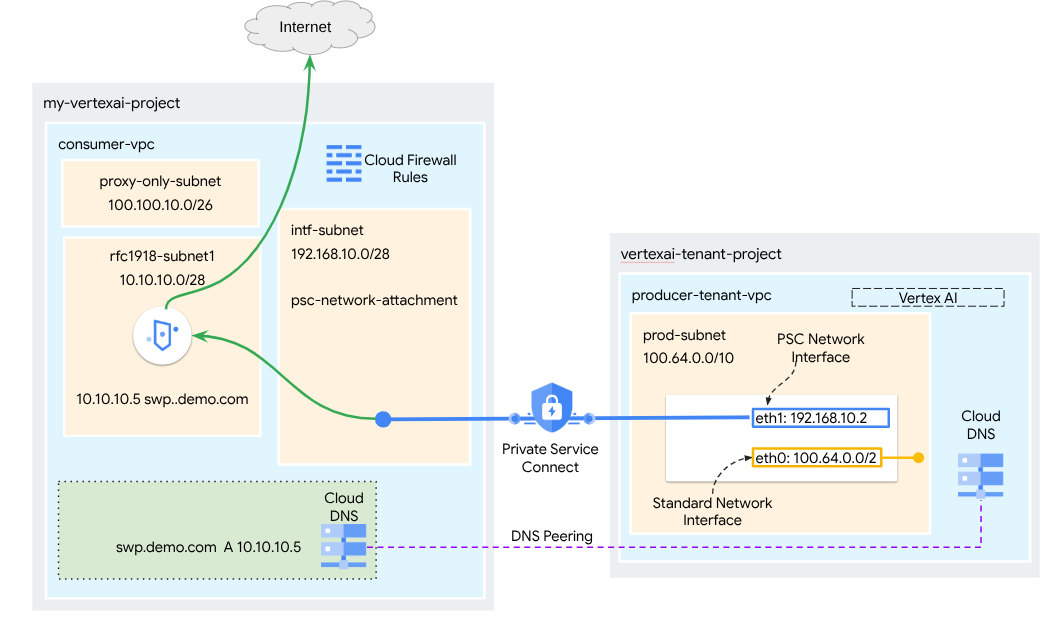
สิ่งที่คุณจะสร้าง
ในบทแนะนำนี้ คุณจะได้สร้าง Agent Engine ที่ครอบคลุมซึ่งติดตั้งใช้งานด้วยอินเทอร์เฟซ Private Service Connect (PSC) ที่ผสานรวมกับ SWP เพื่อดำเนินการต่อไปนี้โดยใช้ไลบรารี ADK
- ติดตั้งใช้งานการ Peering DNS ใน Agent Engine เพื่อแก้ไขชื่อโดเมนที่สมบูรณ์ของ SWP ที่ใช้ในการกำหนดค่าพร็อกซี
- อนุญาตการเชื่อมต่อกับเว็บไซต์สาธารณะ (https://api.frankfurter.app/) ผ่านเว็บพร็อกซีที่ปลอดภัยซึ่งติดตั้งใช้งานใน VPC ของผู้บริโภคที่มีที่อยู่ RFC1918
- อนุญาตการรับส่งข้อมูลจากซับเน็ตการแนบเครือข่ายไปยัง SWP ขณะที่ปฏิเสธการรับส่งข้อมูลอื่นๆ ทั้งหมด
รูปที่ 1
สิ่งที่คุณจะได้เรียนรู้
- วิธีสร้างการเชื่อมต่อเครือข่าย
- วิธีที่โปรดิวเซอร์ใช้การเชื่อมต่อเครือข่ายเพื่อสร้างอินเทอร์เฟซ PSC
- วิธีสร้างการสื่อสารจากผู้ผลิตไปยังผู้บริโภคโดยใช้การ Peering ของ DNS
- วิธีติดตั้งใช้งานและใช้ SWP สำหรับอินเทอร์เน็ตขาออก
- วิธีกำหนดกฎไฟร์วอลล์ขาออกเพื่อลดการเข้าถึงเครือข่ายของ Agent Engine
สิ่งที่คุณต้องมี
โปรเจ็กต์ Google Cloud
สิทธิ์ IAM
- ผู้ดูแลระบบเครือข่าย Compute (roles/compute.networkAdmin)
- ผู้ดูแลระบบอินสแตนซ์ Compute (roles/compute.instanceAdmin)
- ผู้ดูแลระบบความปลอดภัยของ Compute (roles/compute.securityAdmin)
- ผู้ดูแลระบบ DNS (roles/dns.admin)
- ผู้ใช้อุโมงค์ข้อมูลที่รักษาความปลอดภัยด้วย IAP (roles/iap.tunnelResourceAccessor)
- ผู้ดูแลระบบการบันทึก (roles/logging.admin)
- ผู้ดูแลระบบ Notebooks (roles/notebooks.admin)
- ผู้ดูแลระบบ IAM ของโปรเจ็กต์ (roles/resourcemanager.projectIamAdmin)
- ผู้ดูแลระบบบัญชีบริการ (roles/iam.serviceAccountAdmin)
- ผู้ดูแลระบบการใช้บริการ (roles/serviceusage.serviceUsageAdmin)
2. ก่อนเริ่มต้น
อัปเดตโปรเจ็กต์เพื่อรองรับบทแนะนำ
บทแนะนำนี้ใช้ $variables เพื่อช่วยในการติดตั้งใช้งานการกำหนดค่า gcloud ใน Cloud Shell
ใน Cloud Shell ให้ทำดังนี้
gcloud config set project [YOUR-PROJECT-NAME]
projectid=YOUR-PROJECT-NAME
echo $projectid
การเปิดใช้ API
ใน Cloud Shell ให้ทำดังนี้
gcloud services enable "compute.googleapis.com"
gcloud services enable "aiplatform.googleapis.com"
gcloud services enable "dns.googleapis.com"
gcloud services enable "notebooks.googleapis.com"
gcloud services enable "storage.googleapis.com"
gcloud services enable "iap.googleapis.com"
gcloud services enable "networksecurity.googleapis.com"
gcloud services enable "networkservices.googleapis.com"
gcloud services enable "cloudresourcemanager.googleapis.com"
ยืนยันว่าเปิดใช้ API สำเร็จแล้ว
gcloud services list --enabled
3. การตั้งค่าสำหรับผู้บริโภค
สร้าง VPC ของผู้ใช้
VPC นี้อยู่ในโปรเจ็กต์ของลูกค้า ระบบจะสร้างทรัพยากรต่อไปนี้ใน VPC นี้
- เครือข่ายย่อยสำหรับผู้บริโภค
- ซับเน็ตการแนบเครือข่าย
- ซับเน็ตเฉพาะพร็อกซี
- กฎไฟร์วอลล์
- Cloud DNS
ใน Cloud Shell ให้ทำดังนี้
gcloud compute networks create consumer-vpc --project=$projectid --subnet-mode=custom
สร้างซับเน็ตของผู้บริโภค
สร้างเครือข่ายย่อยสำหรับ SWP ภายใน Cloud Shell โดยทำดังนี้
gcloud compute networks subnets create swp-subnet --project=$projectid --range=10.10.10.0/28 --network=consumer-vpc --region=us-central1 --enable-private-ip-google-access
สร้างซับเน็ตไฟล์แนบเครือข่าย Private Service Connect
สร้างซับเน็ตสำหรับการเชื่อมต่อเครือข่าย PSC ภายใน Cloud Shell โดยทำดังนี้
gcloud compute networks subnets create intf-subnet --project=$projectid --range=192.168.10.0/28 --network=consumer-vpc --region=us-central1 --enable-private-ip-google-access
สร้างซับเน็ตพร็อกซีระดับภูมิภาค
สร้างซับเน็ตเฉพาะพร็อกซีที่จำเป็นสำหรับผลิตภัณฑ์ที่ใช้ Envoy เช่น Secure Web Proxy และตัวจัดสรรภาระงานของแอปพลิเคชันภายใน/ภายนอกระดับภูมิภาคภายใน Cloud Shell ต้องตั้งค่าแฟล็ก -purpose เป็น REGIONAL_MANAGED_PROXY
gcloud compute networks subnets create proxy-subnet \
  --purpose=REGIONAL_MANAGED_PROXY \
  --role=ACTIVE \
  --region=us-central1 \
  --network=consumer-vpc \
  --range=100.100.10.0/26
สร้างซับเน็ตของ Notebook
สร้างเครือข่ายย่อยสำหรับอินสแตนซ์ Notebook ภายใน Cloud Shell โดยใช้คำสั่งต่อไปนี้
gcloud compute networks subnets create notebook-subnet --project=$projectid --range=192.168.20.0/28 --network=consumer-vpc --region=us-central1 --enable-private-ip-google-access
4. สร้างเว็บพร็อกซีที่ปลอดภัย
โหมดที่ชัดเจนของ Secure Web Proxy (หรือโหมดการกำหนดเส้นทางพร็อกซีที่ชัดเจน) เป็นวิธีการติดตั้งใช้งานที่ต้องกำหนดค่าภาระงานของไคลเอ็นต์อย่างชัดเจนเพื่อใช้ที่อยู่ IP ภายในหรือชื่อโดเมนแบบเต็มและพอร์ตของ SWP เป็นพร็อกซีการส่งต่อ
นโยบายนี้จะมีกฎที่ควบคุมการรับส่งข้อมูลผ่านเว็บพร็อกซีที่ปลอดภัยตามการจับคู่เซสชัน host() == 'api.frankfurter.app' และการจับคู่แอปพลิเคชัน request.method == 'GET'
ในขั้นตอนด้านล่าง ให้แก้ไข YOUR-PROJECT-ID เป็นรหัสโปรเจ็กต์ของคุณ
สร้างไฟล์ policy.yaml ใน Cloud Shell โดยทำดังนี้
cat > policy.yaml << EOF
name: projects/$projectid/locations/us-central1/gatewaySecurityPolicies/my-swp-policy
description: "My basic SWP policy"
EOF
ใน Cloud Shell ให้นำเข้านโยบายโดยทำดังนี้
gcloud network-security gateway-security-policies import my-swp-policy \
    --source=policy.yaml \
    --location=us-central1
สร้างกฎเว็บพร็อกซีที่ปลอดภัย
กำหนดกฎภายในนโยบายเพื่อระบุการรับส่งข้อมูลที่อนุญาตหรือปฏิเสธ ระบบจะประเมินกฎตามลำดับความสำคัญ
ใน Cloud Shell ให้สร้างไฟล์ rule.yaml เพื่ออนุญาตการเข้าถึงปลายทางอินเทอร์เน็ตที่ใช้โดยเครื่องมือ Agent, api.frankfurter.app:
cat > rule.yaml << EOF
name: "projects/$projectid/locations/us-central1/gatewaySecurityPolicies/my-swp-policy/rules/allow-example"
description: "Allow frankfurter API"
enabled: true
priority: 10
basicProfile: ALLOW
sessionMatcher: "host() == 'api.frankfurter.app'"
EOF
สร้างกฎนโยบายความปลอดภัยใน Cloud Shell โดยทำดังนี้
gcloud network-security gateway-security-policies rules import allow-example \
    --source=rule.yaml \
    --location=us-central1 \
    --gateway-security-policy=my-swp-policy
สร้างกฎเว็บพร็อกซีที่ปลอดภัย
ต้องสร้างอินสแตนซ์ SWP ซึ่งทําให้ใช้งานได้ในโหมดการกำหนดเส้นทางที่ชัดเจนเพื่อให้ Agent Engine ต้องระบุที่อยู่ IP หรือ FQDN ของ SWP ภายในการกำหนดค่าพร็อกซี ADK ตามที่กำหนดไว้ในไฟล์ YAML ของเกตเวย์ การกำหนดค่านี้ยังลิงก์อินสแตนซ์กับนโยบาย เครือข่าย และซับเน็ตที่เกี่ยวข้องด้วย
สร้างไฟล์ gateway.yaml ที่ใช้ในการติดตั้งใช้งาน SWP ภายใน Cloud Shell
อย่าลืมบันทึกไฟล์ YAML หลังจากอัปเดตตัวแปรต่อไปนี้ด้วยรายละเอียดของสภาพแวดล้อมของคุณ: PROJECT_ID, REGION, NETWORK_NAME และ PROXY_ONLY_SUBNET_NAME พอร์ต 8888 ที่ระบุคือพอร์ตอุโมงค์ด้านนอกที่แมปกับการกำหนดค่าพร็อกซีภายใน Agent Engine
cat > gateway.yaml << EOF
name: "projects/$projectid/locations/us-central1/gateways/my-swp-instance"
type: SECURE_WEB_GATEWAY
ports: [8888]
addresses: ["10.10.10.5"]
gatewaySecurityPolicy: "projects/$projectid/locations/us-central1/gatewaySecurityPolicies/my-swp-policy"
network: "projects/$projectid/global/networks/consumer-vpc"
subnetwork: "projects/$projectid/regions/us-central1/subnetworks/swp-subnet"
routingMode: EXPLICIT_ROUTING_MODE
EOF
นำเข้าเกตเวย์ภายใน Cloud Shell โดยทำดังนี้
gcloud network-services gateways import my-swp-instance \
    --source=gateway.yaml \
    --location=us-central1
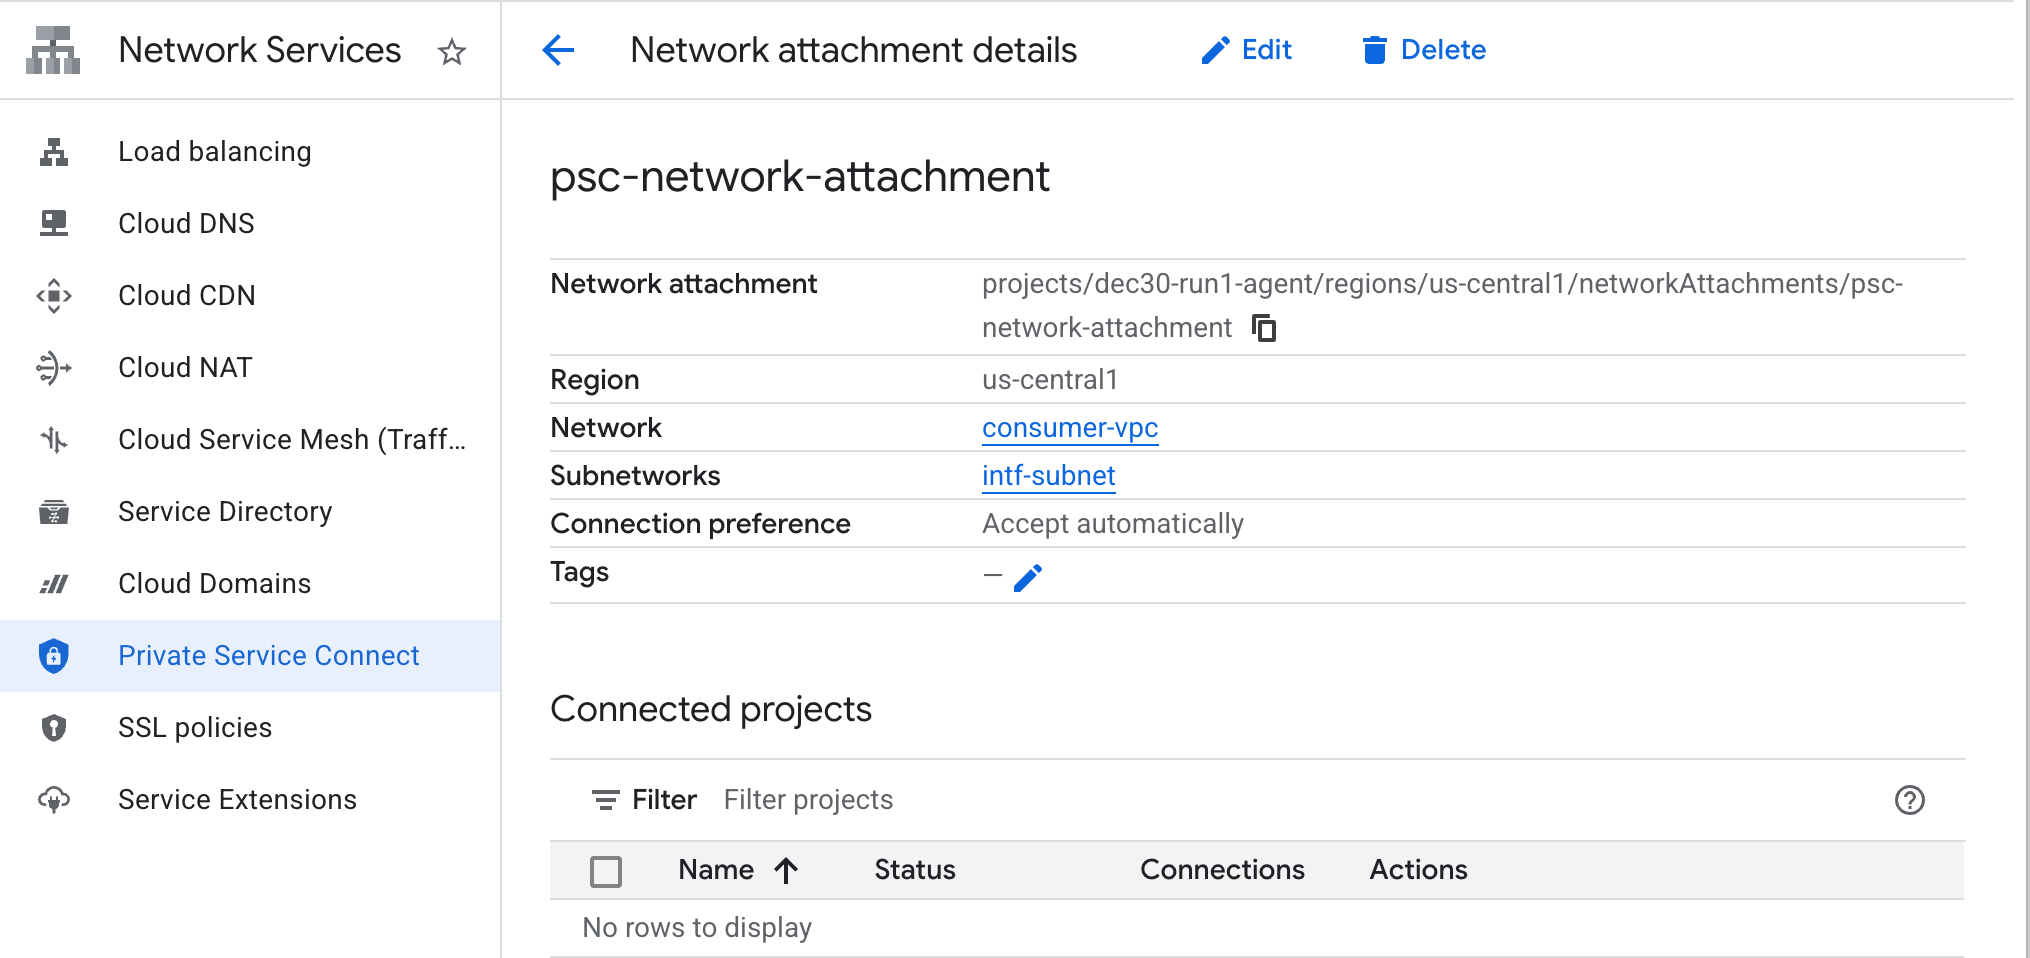
5. ไฟล์แนบเครือข่าย Private Service Connect
ไฟล์แนบเครือข่ายเป็นทรัพยากรระดับภูมิภาคที่แสดงฝั่งผู้บริโภคของอินเทอร์เฟซ Private Service Connect คุณจะเชื่อมโยงซับเน็ตเดียวกับการเชื่อมต่อเครือข่าย และผู้ผลิตจะกำหนด IP ให้กับอินเทอร์เฟซ Private Service Connect จากซับเน็ตนั้น ซับเน็ตต้องอยู่ในภูมิภาคเดียวกับการเชื่อมต่อเครือข่าย การเชื่อมต่อเครือข่ายต้องอยู่ในภูมิภาคเดียวกับบริการผู้ผลิต
สร้างการเชื่อมต่อเครือข่าย
สร้างการเชื่อมต่อเครือข่ายภายใน Cloud Shell
gcloud compute network-attachments create psc-network-attachment \
    --region=us-central1 \
    --connection-preference=ACCEPT_AUTOMATIC \
    --subnets=intf-subnet
แสดงรายการการเชื่อมต่อเครือข่าย
ใน Cloud Shell ให้แสดงรายการการเชื่อมต่อเครือข่าย
gcloud compute network-attachments list
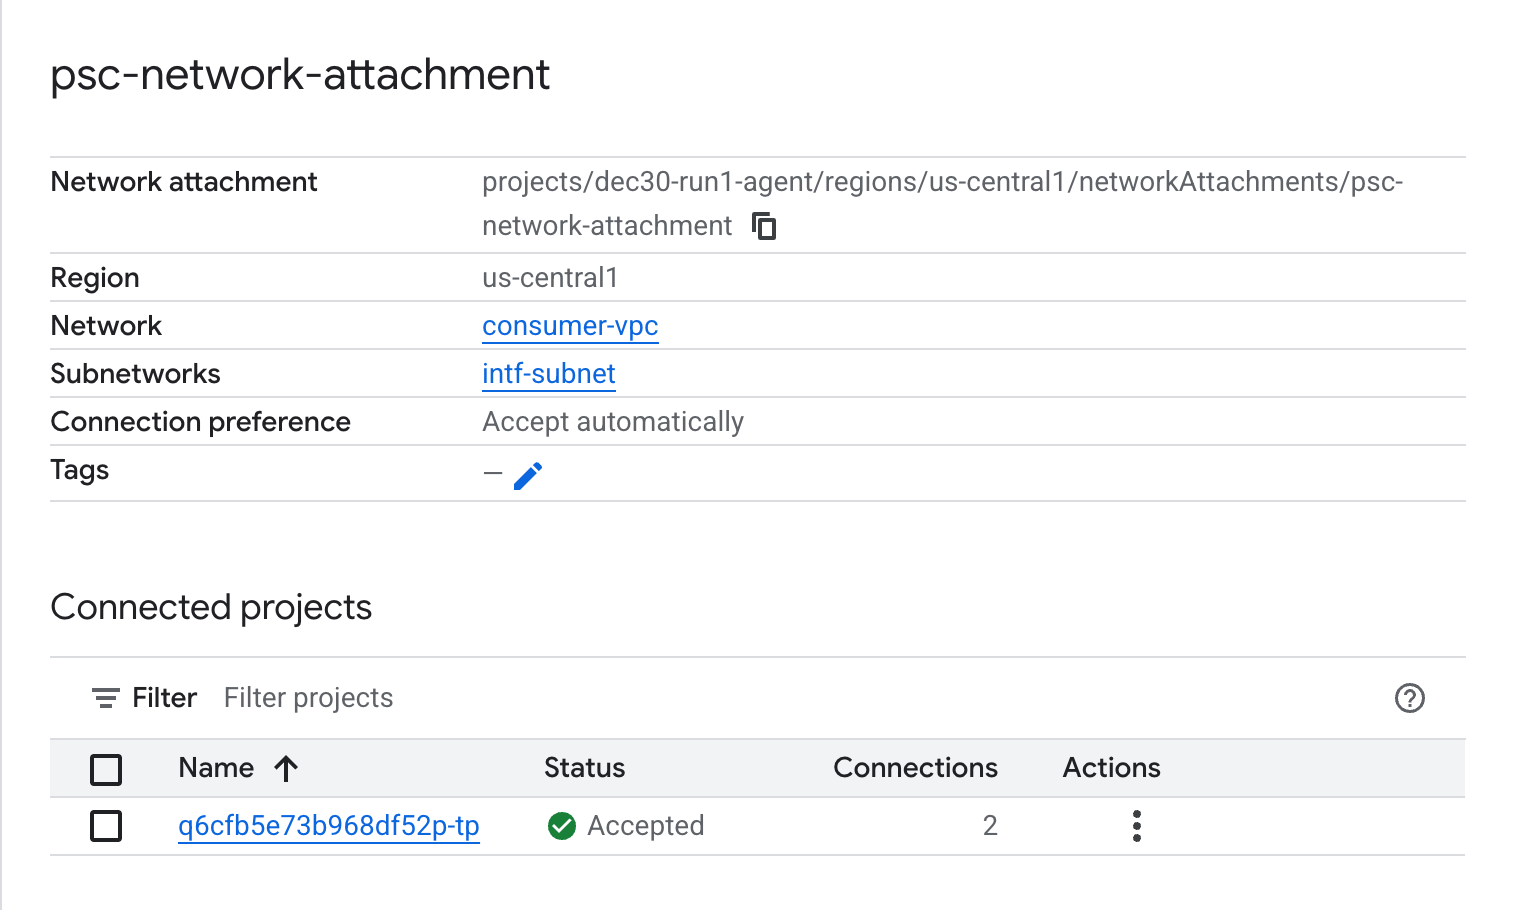
อธิบายสิ่งที่แนบมากับเครือข่าย
อธิบายไฟล์แนบเครือข่ายภายใน Cloud Shell
gcloud compute network-attachments describe psc-network-attachment --region=us-central1
จดชื่อไฟล์แนบเครือข่าย PSC, psc-network-attachment ซึ่งผู้ผลิตจะใช้เมื่อสร้างอินเทอร์เฟซ Private Service Connect
หากต้องการดู URL ของการเชื่อมต่อเครือข่าย PSC ใน Cloud Console ให้ไปที่
Network Services → Private Service Connect → Network Attachment → psc-network-attachment
6. โซน DNS ส่วนตัว
คุณจะสร้างโซน Cloud DNS สำหรับ demo.com และป้อนข้อมูลลงในโซนด้วยระเบียน A ที่ชี้ไปยังที่อยู่ IP ของ SWP ในภายหลัง ระบบจะติดตั้งใช้งานการ Peering DNS ใน Agent Engine ซึ่งจะช่วยให้เข้าถึงระเบียน DNS ของผู้บริโภคได้
ใน Cloud Shell ให้ทำดังนี้เพื่อสร้างชื่อ DNS demo.com
gcloud dns --project=$projectid managed-zones create private-dns-codelab --description="" --dns-name="demo.com." --visibility="private" --networks="https://compute.googleapis.com/compute/v1/projects/$projectid/global/networks/consumer-vpc"
รับและจัดเก็บที่อยู่ IP ของ SWP ที่ใช้สำหรับระเบียน DNS A
ใน Cloud Shell ให้เรียกใช้คำสั่ง describe กับ swp, my-swp-instance ดังนี้
gcloud network-services gateways describe my-swp-instance --location=us-central1
ใน Cloud Shell ให้สร้างชุดระเบียนสำหรับ SWP, swp.demo.com และตรวจสอบว่าได้อัปเดตที่อยู่ IP ตามเอาต์พุตของสภาพแวดล้อมแล้ว
gcloud dns --project=$projectid record-sets create swp.demo.com. --zone="private-dns-codelab" --type="A" --ttl="300" --rrdatas="10.10.10.5"
การกำหนดค่าไฟร์วอลล์
สร้างกฎไฟร์วอลล์ของ Cloud เพื่ออนุญาตการเข้าถึงจากอินเทอร์เฟซ PSC
ในส่วนต่อไปนี้ ให้สร้างกฎไฟร์วอลล์ที่อนุญาตให้การรับส่งข้อมูลที่มาจาก PSC Network Attachment เข้าถึงซับเน็ต SWP ใน VPC ของผู้ใช้ คุณสามารถระบุที่อยู่ IP ของ SWP เป็นปลายทางเดียวเพื่อเพิ่มความปลอดภัย
ใน Cloud Shell ให้สร้างกฎไฟร์วอลล์ขาออกที่อนุญาตการเข้าถึงจาก Network Attachment ไปยัง SWP ดังนี้
gcloud compute firewall-rules create allow-access-to-swp \
    --network=consumer-vpc \
    --action=ALLOW \
    --rules=ALL \
    --direction=EGRESS \
    --priority=1000 \
    --source-ranges="192.168.10.0/28" \
    --destination-ranges="10.10.10.5/32" \
    --enable-logging
ใน Cloud Shell ให้สร้างกฎไฟร์วอลล์ขาออกที่ปฏิเสธการรับส่งข้อมูลทั้งหมดจากการเชื่อมต่อเครือข่าย
gcloud compute firewall-rules create deny-all \
    --network=consumer-vpc \
    --action=DENY \
    --rules=ALL \
    --direction=EGRESS \
    --priority=65534 \
    --source-ranges="192.168.10.0/28" \
    --destination-ranges="0.0.0.0/0" \
    --enable-logging
7. สร้างนโยบายไฟร์วอลล์ให้กับเครือข่าย VPC เพื่อให้มั่นใจว่าข้อมูลภัยคุกคามจะทำงานได้ดังนี้
ในส่วนต่อไปนี้ ให้สร้างนโยบายไฟร์วอลล์ที่ช่วยให้คุณใช้ประโยชน์จากรายการภัยคุกคามที่มีการจัดการของ Google เพื่อบล็อกเว็บไซต์ที่เป็นอันตรายที่รู้จักก่อนที่ SWP จะได้รับการรับส่งข้อมูล
สร้างนโยบายไฟร์วอลล์ส่วนกลางใน Cloud Shell โดยใช้คำสั่งต่อไปนี้
gcloud compute network-firewall-policies create psc-secure-policy \
    --global \
    --description="Policy to protect VPC with Threat Intelligence"
ใน Cloud Shell ให้เชื่อมโยงนโยบายกับ VPC ดังนี้
gcloud compute network-firewall-policies associations create \
    --firewall-policy=psc-secure-policy \
    --network=consumer-vpc \
    --name=psc-swp-association \
    --global-firewall-policy
ใน Cloud Shell ให้เพิ่มกฎข่าวกรองภัยคุกคามโดยทำดังนี้
กฎเหล่านี้จะทิ้งการรับส่งข้อมูลไปยังผู้ไม่ประสงค์ดีที่รู้จักก่อนที่จะเริ่มการรับส่งข้อมูลจากเอเจนต์ ในตัวอย่างนี้ เราได้เพิ่มกฎเพื่อบล็อกโหนดทางออกของ Tor (ขาออก) และบล็อก IP ที่เป็นอันตรายที่ทราบ (ขาออก), บล็อกพร็อกซีแบบไม่ระบุชื่อที่ทราบ(ขาออก), บล็อกโปรแกรมขุดคริปโตเพื่อป้องกันการใช้ทรัพยากรที่ไม่ได้รับอนุญาต (ขาออก)
gcloud compute network-firewall-policies rules create 100 \
    --firewall-policy=psc-secure-policy \
    --action=deny \
    --direction=EGRESS \
    --dest-threat-intelligence=iplist-tor-exit-nodes \
    --layer4-configs=all \
    --enable-logging \
    --description="Block anonymous Tor traffic" \
    --global-firewall-policy
gcloud compute network-firewall-policies rules create 110 \
    --firewall-policy=psc-secure-policy \
    --action=deny \
    --direction=EGRESS \
    --dest-threat-intelligence=iplist-known-malicious-ips \
    --layer4-configs=all \
    --enable-logging \
    --description="Block known botnets and malware sources" \
    --global-firewall-policy
gcloud compute network-firewall-policies rules create 120 \
    --firewall-policy=psc-secure-policy \
    --action=deny \
    --direction=EGRESS \
    --dest-threat-intelligence=iplist-anon-proxies \
    --layer4-configs=all \
    --enable-logging \
    --description="Block Known Anonymous Proxies" \
    --global-firewall-policy
gcloud compute network-firewall-policies rules create 130 \
    --firewall-policy=psc-secure-policy \
    --action=deny \
    --direction=EGRESS \
    --dest-threat-intelligence=iplist-crypto-miners \
    --layer4-configs=all \
    --enable-logging \
    --description="Block Crypto Miners (Prevent unauthorized resource usage)" \
    --global-firewall-policy
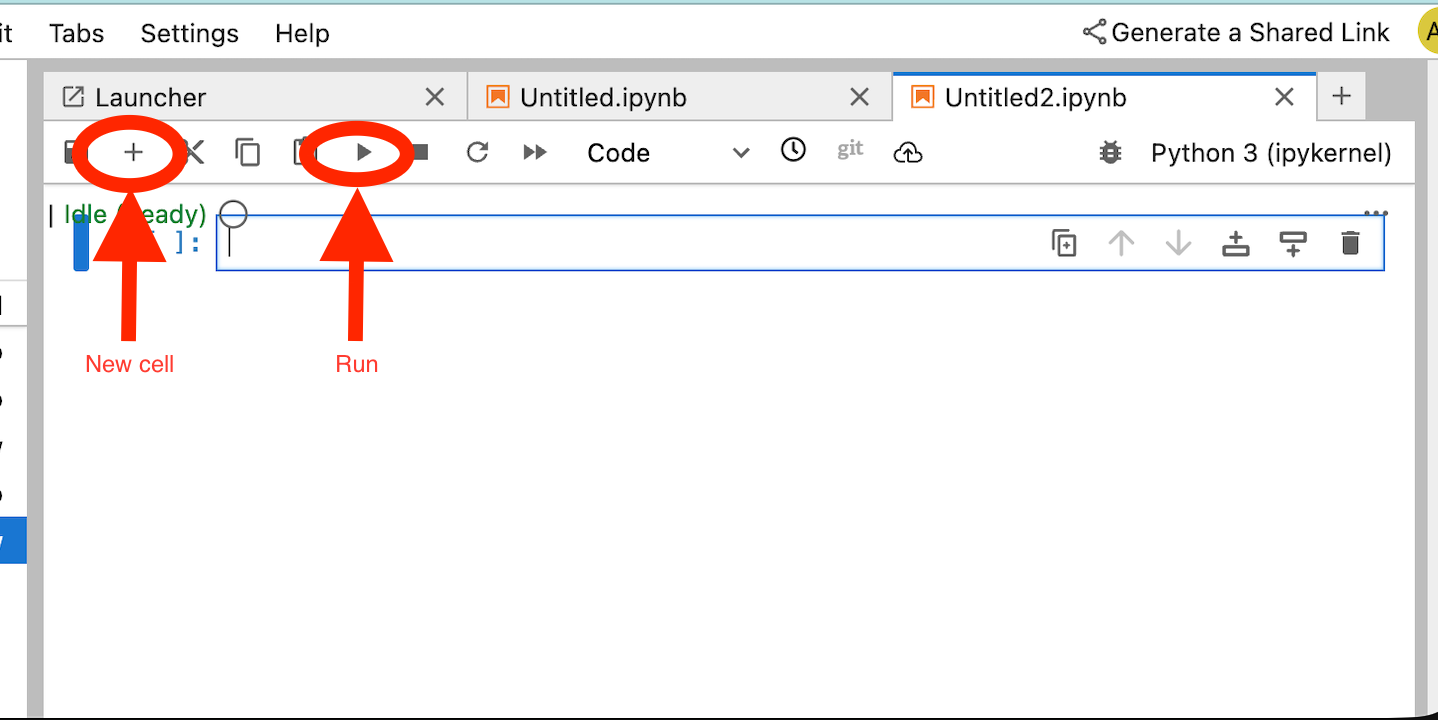
8. สร้างสมุดบันทึก Jupyter
ส่วนต่อไปนี้จะแนะนำวิธีสร้างสมุดบันทึก Jupyter Notebook นี้จะใช้เพื่อติดตั้งใช้งาน Agent Engine ที่กำหนดเป้าหมายเป็นพร็อกซีที่ชัดเจนสำหรับอินเทอร์เน็ตขาออก
สร้างบัญชีบริการที่ผู้ใช้จัดการ
ในส่วนต่อไปนี้ คุณจะสร้างบัญชีบริการที่จะเชื่อมโยงกับอินสแตนซ์ Vertex AI Workbench ที่ใช้ในบทแนะนำ
ในบทแนะนำ บัญชีบริการจะมีบทบาทต่อไปนี้
สร้างบัญชีบริการภายใน Cloud Shell
gcloud iam service-accounts create notebook-sa \
    --display-name="notebook-sa"
ใน Cloud Shell ให้อัปเดตบัญชีบริการด้วยบทบาทผู้ดูแลระบบพื้นที่เก็บข้อมูล
gcloud projects add-iam-policy-binding $projectid --member="serviceAccount:notebook-sa@$projectid.iam.gserviceaccount.com" --role="roles/storage.admin"
ใน Cloud Shell ให้อัปเดตบัญชีบริการด้วยบทบาทผู้ใช้ Vertex AI
gcloud projects add-iam-policy-binding $projectid --member="serviceAccount:notebook-sa@$projectid.iam.gserviceaccount.com" --role="roles/aiplatform.user"
ใน Cloud Shell ให้อัปเดตบัญชีบริการด้วยบทบาทผู้ดูแลระบบ Artifact Registry
gcloud projects add-iam-policy-binding $projectid --member="serviceAccount:notebook-sa@$projectid.iam.gserviceaccount.com" --role="roles/artifactregistry.admin"
ใน Cloud Shell ให้สิทธิ์บัญชีบริการของ Notebook ในการใช้บัญชีบริการเริ่มต้นของ Compute Engine
gcloud iam service-accounts add-iam-policy-binding \
    $(gcloud projects describe $(gcloud config get-value project) --format='value(projectNumber)')-compute@developer.gserviceaccount.com \
    --member="serviceAccount:notebook-sa@$projectid.iam.gserviceaccount.com" \
    --role="roles/iam.serviceAccountUser"
9. สร้างอินสแตนซ์ Vertex AI Workbench
ในส่วนต่อไปนี้ ให้สร้างอินสแตนซ์ Vertex AI Workbench ที่รวมบัญชีบริการ notebook-sa ที่สร้างไว้ก่อนหน้านี้
สร้างอินสแตนซ์ไคลเอ็นต์ส่วนตัวภายใน Cloud Shell
gcloud workbench instances create workbench-tutorial --vm-image-project=cloud-notebooks-managed --vm-image-family=workbench-instances --machine-type=n1-standard-4 --location=us-central1-a --subnet-region=us-central1 --subnet=notebook-subnet --disable-public-ip --shielded-secure-boot=true --shielded-integrity-monitoring=true --shielded-vtpm=true --service-account-email=notebook-sa@$projectid.iam.gserviceaccount.com
เพิ่มกฎอีกข้อในเว็บพร็อกซีที่ปลอดภัยที่มีอยู่เพื่อส่งต่อการเข้าชมจากอินสแตนซ์ Notebook นี้
ใน Cloud Shell ให้สร้างไฟล์ rule-notebook.yaml โดยใช้โปรแกรมแก้ไขข้อความ และตรวจสอบว่าได้อัปเดต YAML ด้วยรหัสโปรเจ็กต์ของคุณแล้ว
cat > rule-notebook.yaml << EOF
name: projects/$projectid/locations/us-central1/gatewaySecurityPolicies/my-swp-policy/rules/allow-notebook-subnet
description: Allow Internet access for notebook subnet
enabled: true
priority: 2
basicProfile: ALLOW
sessionMatcher: inIpRange(source.ip,'192.168.20.2')
EOF
สร้างกฎนโยบายความปลอดภัยใน Cloud Shell โดยทำดังนี้
gcloud network-security gateway-security-policies rules import allow-notebook-subnet \
    --source=rule-notebook.yaml \
    --location=us-central1 \
    --gateway-security-policy=my-swp-policy
10. การอัปเดตตัวแทนบริการ Vertex AI
Vertex AI จะดำเนินการในนามของคุณเพื่อดำเนินการต่างๆ เช่น การขอที่อยู่ IP จากซับเน็ตการแนบเครือข่าย PSC ที่ใช้สร้างอินเทอร์เฟซ PSC โดย Vertex AI จะใช้ตัวแทนบริการ (แสดงอยู่ด้านล่าง) ที่ต้องมีสิทธิ์ผู้ดูแลระบบเครือข่าย
service-$projectnumber@gcp-sa-aiplatform.iam.gserviceaccount.com
รับหมายเลขโปรเจ็กต์ภายใน Cloud Shell
gcloud projects describe $projectid | grep projectNumber
ตั้งค่าหมายเลขโปรเจ็กต์ภายใน Cloud Shell
projectnumber=YOUR-PROJECT-NUMBER
สร้างบัญชีบริการสำหรับ AI Platform ใน Cloud Shell ข้ามขั้นตอนนี้หากคุณมีบัญชีบริการในโปรเจ็กต์อยู่แล้ว
gcloud beta services identity create --service=aiplatform.googleapis.com --project=$projectnumber
ใน Cloud Shell ให้อัปเดตบัญชีตัวแทนบริการด้วยบทบาท compute.networkAdmin
gcloud projects add-iam-policy-binding $projectid --member="serviceAccount:service-$projectnumber@gcp-sa-aiplatform.iam.gserviceaccount.com" --role="roles/compute.networkAdmin"
ใน Cloud Shell ให้อัปเดตบัญชีตัวแทนบริการด้วยบทบาท dns.peer
gcloud projects add-iam-policy-binding $projectid --member="serviceAccount:service-$projectnumber@gcp-sa-aiplatform.iam.gserviceaccount.com" --role="roles/dns.peer"
การอัปเดตบัญชีบริการเริ่มต้น
ให้สิทธิ์เข้าถึง Vertex AI แก่บัญชีบริการเริ่มต้น โปรดทราบว่าระบบอาจใช้เวลาสักครู่ในการเผยแพร่การเปลี่ยนแปลงสิทธิ์เข้าถึง
ใน Cloud Shell ให้อัปเดตบัญชีบริการเริ่มต้นด้วยบทบาท aiplatform.user
gcloud projects add-iam-policy-binding $projectid \
  --member="serviceAccount:$projectnumber-compute@developer.gserviceaccount.com" \
    --role="roles/aiplatform.user"
11. ติดตั้งใช้งาน Agent Engine
หมายเหตุ: เราจะใช้คอนโซล GCP และสมุดบันทึก JupyterLab เพื่อดำเนินงานในส่วนนี้ให้เสร็จสมบูรณ์
ในส่วนต่อไปนี้ คุณจะสร้าง Notebook ที่ทำงานต่อไปนี้
- ใช้ Frankfurter API (https://api.frankfurter.app/) เพื่อรับข้อมูลอัตราแลกเปลี่ยน
- อ้างอิงถึงพร็อกซีที่ชัดเจน (proxy_server) ที่กำหนดเป้าหมายไปยัง SWP ใน VPC ของผู้บริโภคโดยใช้ FQDN swp.demo.com
- กำหนด dnsPeeringConfigs "domain": "demo.com."
เรียกใช้งานการฝึกในอินสแตนซ์ Vertex AI Workbench
- ในคอนโซล Google Cloud ให้ไปที่
Vertex AI → Workbench - คลิก Open JupyterLab ข้างชื่ออินสแตนซ์ Vertex AI Workbench (workbench-tutorial) อินสแตนซ์ Vertex AI Workbench จะเปิดขึ้นใน JupyterLab
- เลือก
File > New > Notebook - เลือก
Kernel > Python 3
ติดตั้งไลบรารี Python ที่จำเป็น: ติดตั้งไลบรารีที่จำเป็นสำหรับ Agent Engine ซึ่งรวมถึง pyyaml, google-cloud-aiplatform, cloudpickle, google-cloud-api-keys และ langchain-google-vertexai
ในสมุดบันทึก JupyterLab ให้สร้างเซลล์ใหม่และเรียกใช้คำสั่งต่อไปนี้โดยระบุที่อยู่ IP ของ SWP
!pip install --proxy http://10.10.10.5:8888 --upgrade google-cloud-aiplatform[agent_engines,adk]
กำหนดตัวแปรต่อไปนี้ตามสภาพแวดล้อมของคุณในข้อมูลโค้ดต่อไปนี้
- PROJECT_ID
- BUCKET_NAME
- AGENT_NAME
ใน Lab นี้ คุณจะใช้ตัวแปร BUCKET_NAME และ AGENT_NAME เพื่อเริ่มต้นและกำหนดค่า Bucket ของพื้นที่เก็บข้อมูลที่พร้อมใช้งานทั่วโลก
ในส่วนต่อไปนี้ PROXY_SERVER จะได้รับการกำหนด เช่น swp.demo.com ซึ่งต้องมีการ Peering DNS สำหรับการเปลี่ยนชื่อ ในการกำหนดค่า AGENT_PEER_DOMAIN จะได้รับการติดตั้งใช้งานเป็น demo.com ซึ่งสอดคล้องกับโซน DNS ส่วนตัวที่สร้างขึ้นในขั้นตอนก่อนหน้าภายใน AGENT_PEER_NETWORK, consumer-vpc
สร้างเซลล์ใหม่ในสมุดบันทึก JupyterLab แล้วเรียกใช้คำสั่งต่อไปนี้
# --- Fundamental Project Configuration ---
PROJECT_ID = "YOUR_PROJECT_ID"
LOCATION = "us-central1" # e.g., "us-central1"
BUCKET_NAME = "YOUR_BUCKET_NAME" # A GCS bucket in the same location

# --- Agent Configuration ---
AGENT_NAME = "YOUR_AGENT_NAME"
MODEL = "gemini-2.5-flash" # Or another suitable model

# --- Network and Proxy Configuration ---
# The agent will call the Frankfurter API via this proxy
PROXY_SERVER = "http://swp.demo.com:8888"

# --- Deployment Configuration (PSC & DNS Peering) ---
# This should be a pre-existing Network Attachment
NETWORK_ATTACHMENT_NAME = f"projects/{PROJECT_ID}/regions/{LOCATION}/networkAttachments/psc-network-attachment"
# Optional DNS Peering config
AGENT_PEER_DOMAIN = "demo.com."
AGENT_PEER_NETWORK = "consumer-vpc"

# --- Initialize Vertex AI SDK ---
import vertexai
STAGING_BUCKET = f"gs://{BUCKET_NAME}"

vertexai.init(project=PROJECT_ID, location=LOCATION, staging_bucket=STAGING_BUCKET)

print(f"Vertex AI SDK initialized for project {PROJECT_ID} in {LOCATION}.")
สร้างเซลล์ใหม่ในสมุดบันทึก JupyterLab แล้วเรียกใช้คำสั่งต่อไปนี้
!adk create $AGENT_NAME --model=$MODEL --project=$PROJECT_ID --region=$LOCATION
ในสมุดบันทึก JupyterLab ให้สร้างเซลล์ใหม่ แล้วเรียกใช้คำสั่งต่อไปนี้เพื่อสร้างตัวแปรพร็อกซีที่สอดคล้องกับ FQDN และพอร์ตของ SWP
import os
os.environ["PROXY_SERVER_URL"] = "http://swp.demo.com:8888"
เซลล์โค้ดต่อไปนี้แสดงการกำหนดค่าพร็อกซีแบบ Explicit สำหรับ Agent Engine เพื่อเข้าถึง API ปลายทางอินเทอร์เน็ต api.frankfurter.app โดยการระบุ SWP โดยใช้ PROXY_SERVER_TO_USE ที่แมปกับ os.environ["PROXY_SERVER_URL"].
import requests
# Use the globally defined proxy server URL
    proxies = {
       "http": PROXY_SERVER_TO_USE,
       "https": PROXY_SERVER_TO_USE,
    }
    try:
        response = requests.get(
            f"https://api.frankfurter.app/{currency_date}",
            params={"from": currency_from, "to": currency_to},
            proxies=proxies,
)
response.raise_for_status()
print(response.json())
except requests.exceptions.RequestException as e: print(f"An error occurred: {e}")
ใน Notebook ของ JupyterLab ให้สร้างเซลล์ใหม่และเรียกใช้โค้ดต่อไปนี้ซึ่งกำหนดการติดตั้งใช้งานเครื่องมือสำหรับ API การกำหนดเป้าหมายการแลกเปลี่ยนสกุลเงิน api.frankfurther.app
%%writefile $AGENT_NAME/agent.py
from google.adk.agents.llm_agent import Agent
import os
import requests


# Get Proxy Server URL
# This is the VM's FQDN to reach the proxy vm in the consumers network
if "PROXY_SERVER_URL" not in os.environ:
    raise ValueError("Missing required environment variable: PROXY_SERVER_URL is not set.")
PROXY_SERVER_TO_USE = os.environ["PROXY_SERVER_URL"]

# Mock tool implementation
def get_exchange_rate(
    currency_from: str = "USD",
    currency_to: str = "EUR",
    currency_date: str = "latest",
):
    """Retrieves the exchange rate between two currencies on a specified date.

    Uses the Frankfurter API (https://api.frankfurter.app/) to obtain
    exchange rate data.

    Args:
        currency_from: The base currency (3-letter currency code).
            Defaults to "USD" (US Dollar).
        currency_to: The target currency (3-letter currency code).
            Defaults to "EUR" (Euro).
        currency_date: The date for which to retrieve the exchange rate.
            Defaults to "latest" for the most recent exchange rate data.
            Can be specified in YYYY-MM-DD format for historical rates.

    Returns:
        dict: A dictionary containing the exchange rate information.
            Example: {"amount": 1.0, "base": "USD", "date": "2023-11-24",
                "rates": {"EUR": 0.95534}}
    """
    # Use the globally defined proxy server URL
    proxies = {
       "http": PROXY_SERVER_TO_USE,
       "https": PROXY_SERVER_TO_USE,
    }

    try:
        response = requests.get(
            f"https://api.frankfurter.app/{currency_date}",
            params={"from": currency_from, "to": currency_to},
            proxies=proxies,
        )
        response.raise_for_status()  # Raise an error for bad responses
        return response.json()
    except Exception as e:
        return f"An unexpected error occurred: {e}"

root_agent = Agent(
    model='gemini-2.5-flash',
    name='root_agent',
    description="Provides the currency exchange rates between two currencies",
    instruction="You are a helpful assistant that provides the currency exchange rates between two currencies. Use the 'get_exchange_rate' tool for this purpose.",
    tools=[get_exchange_rate],
)
สร้างเซลล์ใหม่ในสมุดบันทึก JupyterLab แล้วเรียกใช้คำสั่งต่อไปนี้
# 1. Set your variables
CURRENCY_DATE="latest"
CURRENCY_FROM="USD"
CURRENCY_TO="EUR"
PROXY_SERVER="http://swp.demo.com:8888"

# 2. Run the curl command
!curl -x "$PROXY_SERVER" "https://api.frankfurter.app/$CURRENCY_DATE?from=$CURRENCY_FROM&to=$CURRENCY_TO"
ในสมุดบันทึก JupyterLab ให้สร้างเซลล์ใหม่และเรียกใช้คำสั่งต่อไปนี้ซึ่งจะเรียกใช้การกำหนดค่าอินเทอร์เฟซ psc ที่ Agent Engine ใช้ นอกเหนือจากการ Peering DNS
import json
import os

CONFIG_FILE_PATH = os.path.join(AGENT_NAME, ".agent_engine_config.json")
# Create your config as a Python dictionary ---
config_data = {
    "requirements": [
        "google-cloud-aiplatform[agent_engines,adk]",
        "requests",
    ],
    "psc_interface_config": {
        "network_attachment": NETWORK_ATTACHMENT_NAME,
        "dns_peering_configs": [
            {
                "domain": AGENT_PEER_DOMAIN,
                "target_project": PROJECT_ID,
                "target_network": AGENT_PEER_NETWORK,
            },
        ],
    },
}

# Write the dictionary to a JSON file ---
os.makedirs(AGENT_NAME, exist_ok=True) # Ensure the directory exists
with open(CONFIG_FILE_PATH, 'w') as f:
    json.dump(config_data, f, indent=4)

print(f"Successfully created {CONFIG_FILE_PATH} with your variables.")
สร้างเซลล์ใหม่ในสมุดบันทึก JupyterLab แล้วเรียกใช้คำสั่งต่อไปนี้
import json
import os

CONFIG_FILE_PATH = os.path.join(AGENT_NAME, ".agent_engine_config.json")
# Create your config as a Python dictionary ---
config_data = {

    "psc_interface_config": {
        "network_attachment": NETWORK_ATTACHMENT_NAME,
        "dns_peering_configs": [
            {
                "domain": AGENT_PEER_DOMAIN,
                "target_project": PROJECT_ID,
                "target_network": AGENT_PEER_NETWORK,
            },
        ],
    },
}

# Write the dictionary to a JSON file ---
os.makedirs(AGENT_NAME, exist_ok=True) # Ensure the directory exists
with open(CONFIG_FILE_PATH, 'w') as f:
    json.dump(config_data, f, indent=4)

print(f"Successfully created {CONFIG_FILE_PATH} with your variables.")
สร้างเซลล์ใหม่ในสมุดบันทึก JupyterLab แล้วเรียกใช้คำสั่งต่อไปนี้
%%writefile $AGENT_NAME/.env

GOOGLE_CLOUD_PROJECT=PROJECT_ID
GOOGLE_CLOUD_LOCATION=us-central1
GOOGLE_GENAI_USE_VERTEXAI=1


PROXY_SERVER_URL=http://swp.demo.com:8888
ในสมุดบันทึก JupyterLab ให้สร้างเซลล์ใหม่และเรียกใช้โค้ดต่อไปนี้เพื่อสร้าง Agent
!adk deploy agent_engine $AGENT_NAME --staging_bucket=$STAGING_BUCKET --env_file=$AGENT_NAME/.env --agent_engine_config_file=$AGENT_NAME/.agent_engine_config.json --display_name=$AGENT_NAME
ระบบจะสร้างรหัสเครื่องมือให้เหตุผลเมื่อมีการเรียกใช้เซลล์ สำหรับขั้นตอนถัดไป คุณจะต้องใช้รหัสที่สร้างขึ้น ซึ่งในตัวอย่างนี้คือ 3235268984265768960
✅ Created agent engine: projects/9315891080/locations/us-central1/reasoningEngines/3235268984265768960
ในสมุดบันทึก JupyterLab ให้สร้างเซลล์ใหม่และเรียกใช้คำสั่งต่อไปนี้ โดยตรวจสอบว่าได้อัปเดตหมายเลขโปรเจ็กต์และรหัสการให้เหตุผลของ Agent Engine จากเอาต์พุตก่อนหน้าแล้ว
from vertexai import agent_engines
remote_app = agent_engines.get("projects/PROJECT_NUMBER/locations/us-central1/reasoningEngines/ENTER_YOUR_ID")
สร้างเซลล์ใหม่ในสมุดบันทึก JupyterLab แล้วเรียกใช้คำสั่งต่อไปนี้
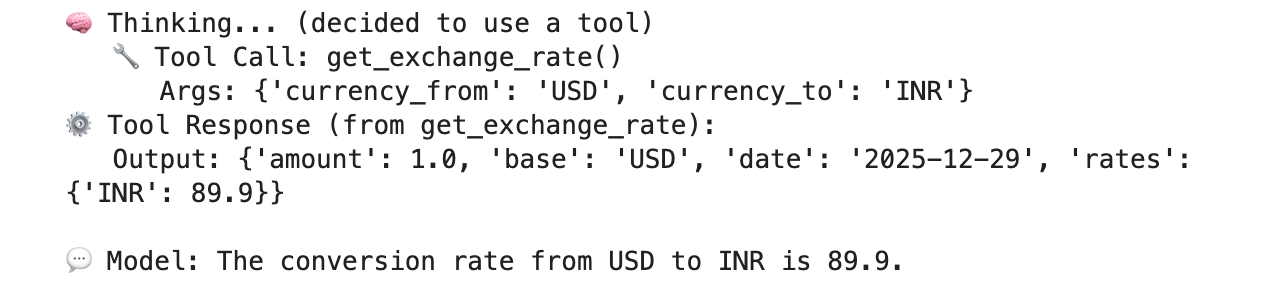
def print_event_nicely_with_thoughts(event):
    """
    Parses and prints streaming query events, including thoughts.
    """
    try:
        content = event.get('content', {})
        role = content.get('role')
        parts = content.get('parts', [{}])

        if not parts:
            print("...")
            return

        part = parts[0] # Get the first part

        # Event 1: Model is thinking (calling a tool or just text)
        if role == 'model':

            # Check for and print any explicit 'thought' text
            if 'thought' in part:
                print(f"🧠 Thought: {part['thought']}")

            # Check for a function call
            if 'function_call' in part:
                # If we haven't *already* printed an explicit thought,
                # print a generic one.
                if 'thought' not in part:
                    print("🧠 Thinking... (decided to use a tool)")

                call = part['function_call']
                print(f"   🔧 Tool Call: {call.get('name')}()")
                print(f"      Args: {call.get('args')}")

            # Check for the final text answer
            elif 'text' in part:
                text = part.get('text', '')
                print(f"\n💬 Model: {text}")

        # Event 2: The tool returns its result
        elif role == 'user' and 'function_response' in part:
            resp = part['function_response']
            print(f"⚙️ Tool Response (from {resp.get('name')}):")
            print(f"   Output: {resp.get('response')}")

        # Other event types (like progress messages)
        else:
            print("...") # Show progress for other events

    except Exception as e:
        print(f"Error processing event: {e}")
        # print(f"Raw event: {event}") # Uncomment to debug


for event in remote_app.stream_query(
    user_id="u_456",
    # session_id=remote_session["id"],
    message="Provide USD to INR conversion rate",
):
    print_event_nicely_with_thoughts(event)
ตัวอย่างการดำเนินการที่สําเร็จซึ่งตรวจสอบการเชื่อมต่อกับ API ปลายทางสาธารณะ api.frankfurther.app ผ่าน SWP ตามอัตราการแปลง USD เป็น INR
12. การตรวจสอบอินเทอร์เฟซ PSC
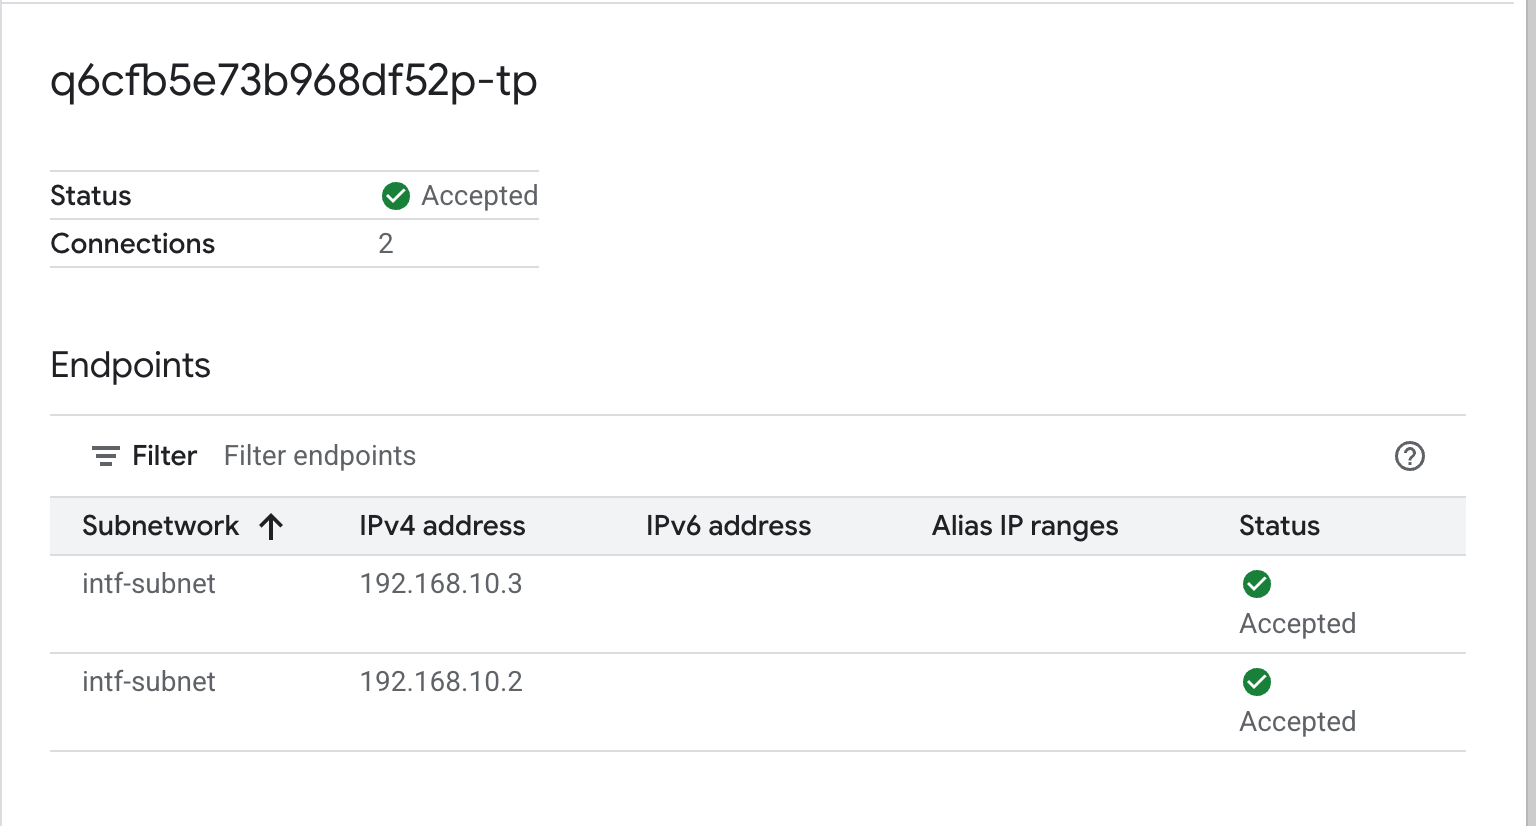
นอกจากนี้ คุณยังดู IP การเชื่อมต่อเครือข่ายที่ Agent Engine ใช้ได้โดยไปที่
บริการเครือข่าย → Private Service Connect → ไฟล์แนบเครือข่าย → psc-network-attachment
เลือกโปรเจ็กต์ผู้เช่า (ชื่อโปรเจ็กต์ที่ลงท้ายด้วย -tp)
ฟิลด์ที่ไฮไลต์แสดงถึงที่อยู่ IP ที่ Agent Engine ใช้จากการเชื่อมต่อเครือข่าย PSC
13. SWP - การตรวจสอบ Cloud Logging
คุณดู Cloud Logging เพื่อตรวจสอบการส่งออกทางอินเทอร์เน็ตที่ SWP ดำเนินการได้โดยไปที่
การตรวจสอบ → เครื่องมือสำรวจบันทึก
แทรกคําค้นหา: resource.type=" networkservices.googleapis.com/Gateway" แล้วคลิกเรียกใช้คําค้นหา ด้านล่างนี้คือตัวอย่างที่ยืนยันปลายทางปลายทาง api.frankfurter.app

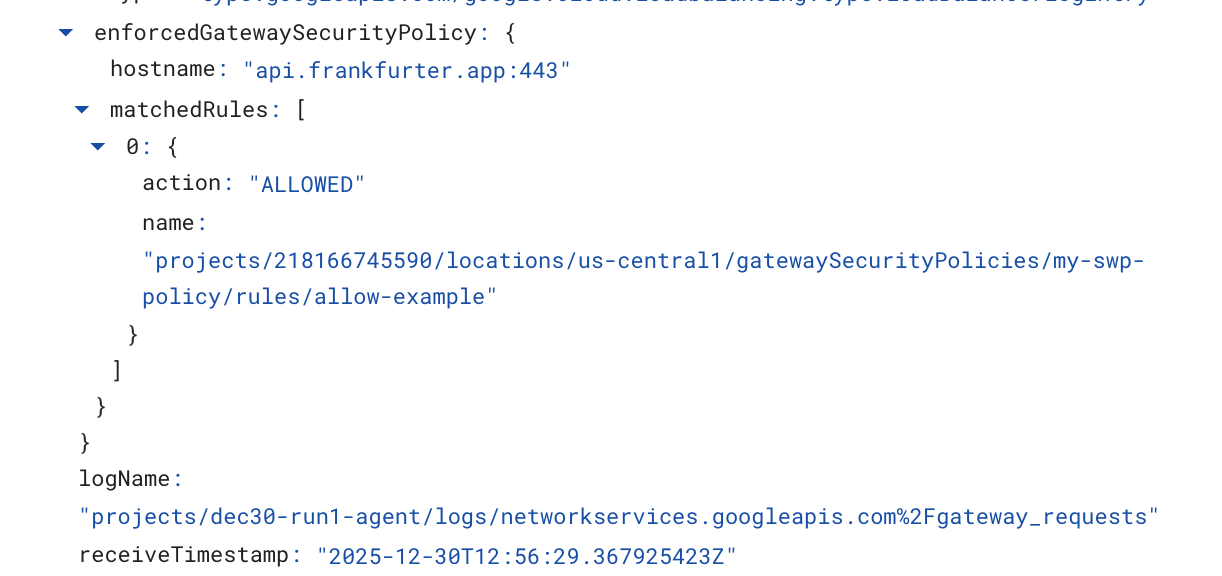
ตัวอย่าง Cloud Logging ต่อไปนี้จะตรวจสอบสิ่งต่อไปนี้
Destination_range: ที่อยู่ IP ของอินเทอร์เฟซ PSC ของ Agent Engine
Source_range: Proxy Only Subnet Dest_ip: Secure Web Proxy IP Address
อย่าลืมเปลี่ยน project_id สำหรับการค้นหาการบันทึกของระบบคลาวด์
logName:("projects/project_id/logs/compute.googleapis.com%2Ffirewall") AND jsonPayload.rule_details.reference:("network:consumer-vpc/firewall:allow-access-to-swp")
{
  "insertId": "1j9ym95fmu8g6o",
  "jsonPayload": {
    "vpc": {
      "project_id": "XXXXXXXXXXXXX",
      "subnetwork_name": "intf-subnet",
      "vpc_name": "consumer-vpc"
    },
    "rule_details": {
      "destination_range": [
        "10.10.10.5/32"
      ],
      "reference": "network:consumer-vpc/firewall:allow-access-to-swp",
      "priority": 1000,
      "source_range": [
        "192.168.10.0/28"
      ],
      "direction": "EGRESS",
      "ip_port_info": [
        {
          "ip_protocol": "ALL"
        }
      ],
      "action": "ALLOW"
    },
    "disposition": "ALLOWED",
    "remote_instance": {
      "region": "us-central1"
    },
    "remote_vpc": {
      "vpc_name": "consumer-vpc",
      "project_id": "XXXXXXXXXXXXXXX",
      "subnetwork_name": "swp-subnet"
    },
    "connection": {
      "src_ip": "192.168.10.2",
      "src_port": 48640,
      "dest_port": 8888,
      "dest_ip": "10.10.10.5",
      "protocol": 6
    }
  },
  "resource": {
    "type": "gce_subnetwork",
    "labels": {
      "subnetwork_id": "7147084067647653041",
      "project_id": "XXXXXXXXXXXXXX",
      "location": "us-central1",
      "subnetwork_name": "intf-subnet"
    }
  },
  "timestamp": "2025-12-30T12:51:36.628538815Z",
  "logName": "projects/dec30-run1-agent/logs/compute.googleapis.com%2Ffirewall",
  "receiveTimestamp": "2025-12-30T12:51:40.846652708Z"
}
14. ล้างข้อมูล
ใน Notebook ของ JupyterLab ให้สร้างเซลล์ใหม่และเรียกใช้โค้ดต่อไปนี้ที่จะทริกเกอร์การลบการติดตั้งใช้งาน Agent Engine
ตรวจสอบว่าคุณกำลังอัปเดต "project number" และ "reasoningEngines token"
import requests
token = !gcloud auth application-default print-access-token
ENDPOINT = "https://us-central1-aiplatform.googleapis.com"
response = requests.delete(
    f"{ENDPOINT}/v1beta1/projects/218166745590/locations/us-central1/reasoningEngines/3086854705725308928",
    params={"force": "true"},
    headers={
        "Content-Type": "application/json; charset=utf-8",
        "Authorization": f"Bearer {token[0]}"
    },
)
print(response.text)
ลบคอมโพเนนต์ของบทแนะนำจาก Cloud Shell
gcloud workbench instances delete workbench-tutorial --project=$projectid --location=us-central1-a

gcloud network-security gateway-security-policies rules delete allow-notebook-subnet \
    --gateway-security-policy=my-swp-policy \
    --location=us-central1

gcloud network-security gateway-security-policies rules delete allow-example \
    --gateway-security-policy=my-swp-policy \
    --location=us-central1

gcloud network-security gateway-security-policies delete my-swp-policy \
    --location=us-central1
gcloud network-services gateways delete my-swp-instance\
    --location=us-central1

gcloud dns record-sets delete swp.demo.com --zone=private-dns-codelab  --type=A

gcloud dns managed-zones delete private-dns-codelab


gcloud compute network-attachments delete psc-network-attachment --region=us-central1 --quiet

export ROUTER_NAME=$(gcloud compute routers list --regions=us-central1 \
    --filter="name ~ swg-autogen-router" --format="value(name)")


 gcloud compute routers nats delete swg-autogen-nat --router=$ROUTER_NAME --region=us-central1 --quiet

gcloud compute routers delete $ROUTER_NAME --region=us-central1 --quiet

gcloud compute networks subnets delete intf-subnet rfc1918-subnet1 --region=us-central1 --quiet

gcloud compute networks subnets delete intf-subnet swp-subnet
 --region=us-central1 --quiet

gcloud compute networks subnets delete intf-subnet intf-subnet --region=us-central1 --quiet

gcloud compute networks subnets delete intf-subnet proxy-subnet
 --region=us-central1 --quiet

gcloud compute networks subnets delete intf-subnet notebook-subnet
--region=us-central1 --quiet

gcloud compute networks delete consumer-vpc --quiet
15. ขอแสดงความยินดี
ยินดีด้วย คุณกำหนดค่าและตรวจสอบ Agent Engine ที่ติดตั้งใช้งานด้วยอินเทอร์เฟซ Private Service Connect เรียบร้อยแล้ว โดยมีการส่งออกอินเทอร์เน็ตที่ดำเนินการผ่านพร็อกซีที่ชัดเจน
คุณสร้างโครงสร้างพื้นฐานของผู้บริโภค และเพิ่มไฟล์แนบเครือข่ายที่อนุญาตให้ผู้ผลิตสร้าง VM แบบหลาย NIC เพื่อเชื่อมต่อการสื่อสารระหว่างผู้บริโภคและผู้ผลิต คุณได้เรียนรู้วิธีสร้างพร็อกซีที่ชัดเจนและการเชื่อมต่อ DNS Peering ที่อนุญาตการเชื่อมต่ออินเทอร์เน็ต
Cosmopup คิดว่าบทแนะนำนั้นยอดเยี่ยมมาก!!