1. 简介
Private Service Connect 接口是一种资源,允许提供方 Virtual Private Cloud (VPC) 网络发起与使用方 VPC 网络中的各种目的地的连接。提供方网络与使用方网络可以位于不同的项目和组织中。
如果网络连接接受来自 Private Service Connect 接口的连接,Google Cloud 会为该接口分配由网络连接指定的使用方子网的 IP 地址。使用方和提供方网络已连接,可以使用内部 IP 地址进行通信。
网络连接与 Private Service Connect 接口之间的连接与 Private Service Connect 端点与服务连接之间的连接类似,但存在以下两个主要区别:
- 网络连接允许提供方网络发起与使用方网络的连接(托管式服务出站流量),而端点则允许使用方网络发起与提供方网络的连接(托管式服务入站流量)。
- Private Service Connect 接口连接具有传递性。这意味着提供方网络可以与连接到使用方网络的其他网络通信。
Vertex AI PSC 接口可达性注意事项
- PSC 接口能够将流量路由到 VPC 网络学习到的 VPC 或本地目标。
- 为了限制从 Agent Engine 使用的网络连接到 VPC 网络的可达范围,最佳实践是实现出站防火墙规则。
- 为了限制源自 Agent Engine 网络连接子网的网络出站流量的范围,应部署 VPC 出站流量防火墙规则。此规则将明确允许从代理引擎到 SWP 的流量,同时拒绝所有其他出站流量。
Vertex AI PSC 接口 VPC-SC 注意事项
- 即使启用了 VPC Service Controls,您也必须在客户 VPC 内提供互联网出站连接,以便 Agent Engine PSC 接口正常运行。
安全 Web 代理
Secure Web Proxy 是一种代管式云原生服务,可让您对出站流量 (HTTP/HTTPS) 进行精细的控制并提供安全保障。它充当中央网关,让您可以对从部署了 PSC 接口的 Agent Engine 发起的连接强制执行安全政策,以连接到 VPC 资源,例如虚拟机、GKE、互联网和多云环境。
解决的问题
- 防止数据渗漏:阻止未经授权的上传或与恶意网站的通信。
- 强制执行合规性:确保出站流量符合组织的安全和数据处理政策。
- 减少运营开销:作为全托管式服务,Secure Web Proxy 无需您部署、扩缩或维护自己的代理虚拟机。
- 提供深入的可视性:支持检查传输层安全协议 (TLS) 加密的流量,以检测隐藏的威胁。
如需了解详情,请参阅以下资源:
部署代理 | Vertex AI 上的生成式 AI | Google Cloud
为 Vertex AI 资源设置 Private Service Connect 接口 | Google Cloud
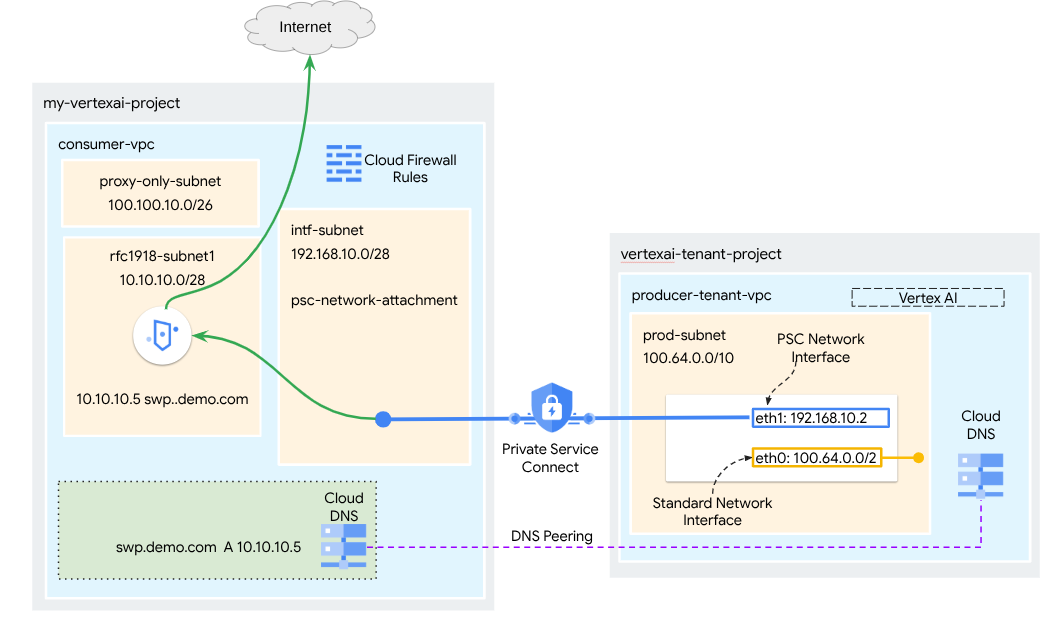
构建内容
在本教程中,您将构建一个全面的 Agent Engine,该引擎部署了与 SWP 集成的 Private Service Connect (PSC) 接口,以使用 ADK 库执行以下操作:
- 在 Agent Engine 中部署 DNS 对等互连,以解析代理配置中使用的 SWP 完全限定域名。
- 允许通过部署在消费者 VPC 中且具有 RFC1918 地址的 Secure Web Proxy 连接到公共网站 (https://api.frankfurter.app/)。
- 允许流量从网络附加子网流向 SWP,同时拒绝所有其他流量。
图 1
学习内容
- 如何创建网络连接
- 提供方如何使用网络连接创建 PSC 接口
- 如何使用 DNS 对等互连建立从提供方到使用方的通信
- 如何部署和使用 SWP 进行互联网出站流量
- 如何定义出站流量防火墙规则以减少 Agent Engine 网络可访问性
所需条件
Google Cloud 项目
IAM 权限
- Compute Network Admin (roles/compute.networkAdmin)
- Compute Instance Admin (roles/compute.instanceAdmin)
- Compute Security Admin (roles/compute.securityAdmin)
- DNS Administrator (roles/dns.admin)
- IAP-secured Tunnel User (roles/iap.tunnelResourceAccessor)
- Logging Admin (roles/logging.admin)
- Notebooks Admin (roles/notebooks.admin)
- Project IAM Admin (roles/resourcemanager.projectIamAdmin)
- Service Account Admin (roles/iam.serviceAccountAdmin)
- Service Usage Admin (roles/serviceusage.serviceUsageAdmin)
2. 准备工作
更新项目以支持本教程
本教程使用 $变量来帮助在 Cloud Shell 中实现 gcloud 配置。
在 Cloud Shell 中,执行以下操作:
gcloud config set project [YOUR-PROJECT-NAME]
projectid=YOUR-PROJECT-NAME
echo $projectid
API 启用
在 Cloud Shell 中,执行以下操作:
gcloud services enable "compute.googleapis.com"
gcloud services enable "aiplatform.googleapis.com"
gcloud services enable "dns.googleapis.com"
gcloud services enable "notebooks.googleapis.com"
gcloud services enable "storage.googleapis.com"
gcloud services enable "iap.googleapis.com"
gcloud services enable "networksecurity.googleapis.com"
gcloud services enable "networkservices.googleapis.com"
gcloud services enable "cloudresourcemanager.googleapis.com"
验证 API 是否已成功启用
gcloud services list --enabled
3. 使用方设置
创建使用方 VPC
此 VPC 位于客户项目中。系统将在此 VPC 中创建以下资源
- 消费类子网
- 网络连接子网
- 代理专用子网
- 防火墙规则
- Cloud DNS
在 Cloud Shell 中,执行以下操作:
gcloud compute networks create consumer-vpc --project=$projectid --subnet-mode=custom
创建使用方子网
在 Cloud Shell 中,为 SWP 创建子网:
gcloud compute networks subnets create swp-subnet --project=$projectid --range=10.10.10.0/28 --network=consumer-vpc --region=us-central1 --enable-private-ip-google-access
创建 Private Service Connect 网络连接子网
在 Cloud Shell 中,为 PSC 网络连接创建子网:
gcloud compute networks subnets create intf-subnet --project=$projectid --range=192.168.10.0/28 --network=consumer-vpc --region=us-central1 --enable-private-ip-google-access
创建区域级代理子网
在 Cloud Shell 中,创建基于 Envoy 的产品(例如 Secure Web Proxy 和区域级内部/外部应用负载平衡器)所需的代理专用子网。必须将 --purpose 标志设置为 REGIONAL_MANAGED_PROXY:
gcloud compute networks subnets create proxy-subnet \
  --purpose=REGIONAL_MANAGED_PROXY \
  --role=ACTIVE \
  --region=us-central1 \
  --network=consumer-vpc \
  --range=100.100.10.0/26
创建笔记本子网
在 Cloud Shell 中,为笔记本实例创建子网:
gcloud compute networks subnets create notebook-subnet --project=$projectid --range=192.168.20.0/28 --network=consumer-vpc --region=us-central1 --enable-private-ip-google-access
4. 创建 Secure Web Proxy
安全 Web 代理的显式模式(或显式代理路由模式)是一种部署方法,其中必须明确配置客户端工作负载,以使用 SWP 的内部 IP 地址或完全限定域名和端口作为其转发代理。
此政策将包含根据会话匹配 host() == 'api.frankfurter.app' 和应用匹配 request.method == 'GET' 来管理通过 Secure Web Proxy 的流量的规则
在以下步骤中,请务必将 YOUR-PROJECT-ID 修改为您的项目 ID
在 Cloud Shell 中,创建 policy.yaml 文件:
cat > policy.yaml << EOF
name: projects/$projectid/locations/us-central1/gatewaySecurityPolicies/my-swp-policy
description: "My basic SWP policy"
EOF
在 Cloud Shell 中,导入政策:
gcloud network-security gateway-security-policies import my-swp-policy \
    --source=policy.yaml \
    --location=us-central1
创建 Secure Web Proxy 规则
在政策中定义规则,以指定允许或拒绝哪些流量。系统会根据优先级评估规则。
在 Cloud Shell 中,创建一个 rule.yaml 文件,以允许访问代理引擎使用的互联网端点 api.frankfurter.app:
cat > rule.yaml << EOF
name: "projects/$projectid/locations/us-central1/gatewaySecurityPolicies/my-swp-policy/rules/allow-example"
description: "Allow frankfurter API"
enabled: true
priority: 10
basicProfile: ALLOW
sessionMatcher: "host() == 'api.frankfurter.app'"
EOF
在 Cloud Shell 中,生成安全政策规则:
gcloud network-security gateway-security-policies rules import allow-example \
    --source=rule.yaml \
    --location=us-central1 \
    --gateway-security-policy=my-swp-policy
创建 Secure Web Proxy 规则
必须以显式路由模式部署 SWP 实例,以便代理引擎必须在 ADK 代理配置中指定 SWP 的 IP 地址或 FQDN,如网关 YAML 文件中所定义。此配置还会将实例与相应的政策、网络和子网相关联。
在 Cloud Shell 中,创建一个用于部署 SWP 的 gateway.yaml 文件。
请务必在更新以下变量后保存 YAML 文件,这些变量应包含您环境的详细信息:PROJECT_ID、REGION、NETWORK_NAME 和 PROXY_ONLY_SUBNET_NAME。指定的端口 8888 是映射到 Agent Engine 内代理配置的外部隧道端口。
cat > gateway.yaml << EOF
name: "projects/$projectid/locations/us-central1/gateways/my-swp-instance"
type: SECURE_WEB_GATEWAY
ports: [8888]
addresses: ["10.10.10.5"]
gatewaySecurityPolicy: "projects/$projectid/locations/us-central1/gatewaySecurityPolicies/my-swp-policy"
network: "projects/$projectid/global/networks/consumer-vpc"
subnetwork: "projects/$projectid/regions/us-central1/subnetworks/swp-subnet"
routingMode: EXPLICIT_ROUTING_MODE
EOF
在 Cloud Shell 中,导入网关:
gcloud network-services gateways import my-swp-instance \
    --source=gateway.yaml \
    --location=us-central1
5. Private Service Connect 网络连接
网络连接是区域级资源,表示 Private Service Connect 接口的使用方端。您将单个子网与一个网络连接相关联,而提供方将该子网的 IP 分配给 Private Service Connect 接口。子网必须与网络连接位于同一区域。网络连接必须与提供方服务位于同一区域。
创建网络连接
在 Cloud Shell 中,创建网络连接。
gcloud compute network-attachments create psc-network-attachment \
    --region=us-central1 \
    --connection-preference=ACCEPT_AUTOMATIC \
    --subnets=intf-subnet
列出网络连接
在 Cloud Shell 中,列出网络连接。
gcloud compute network-attachments list
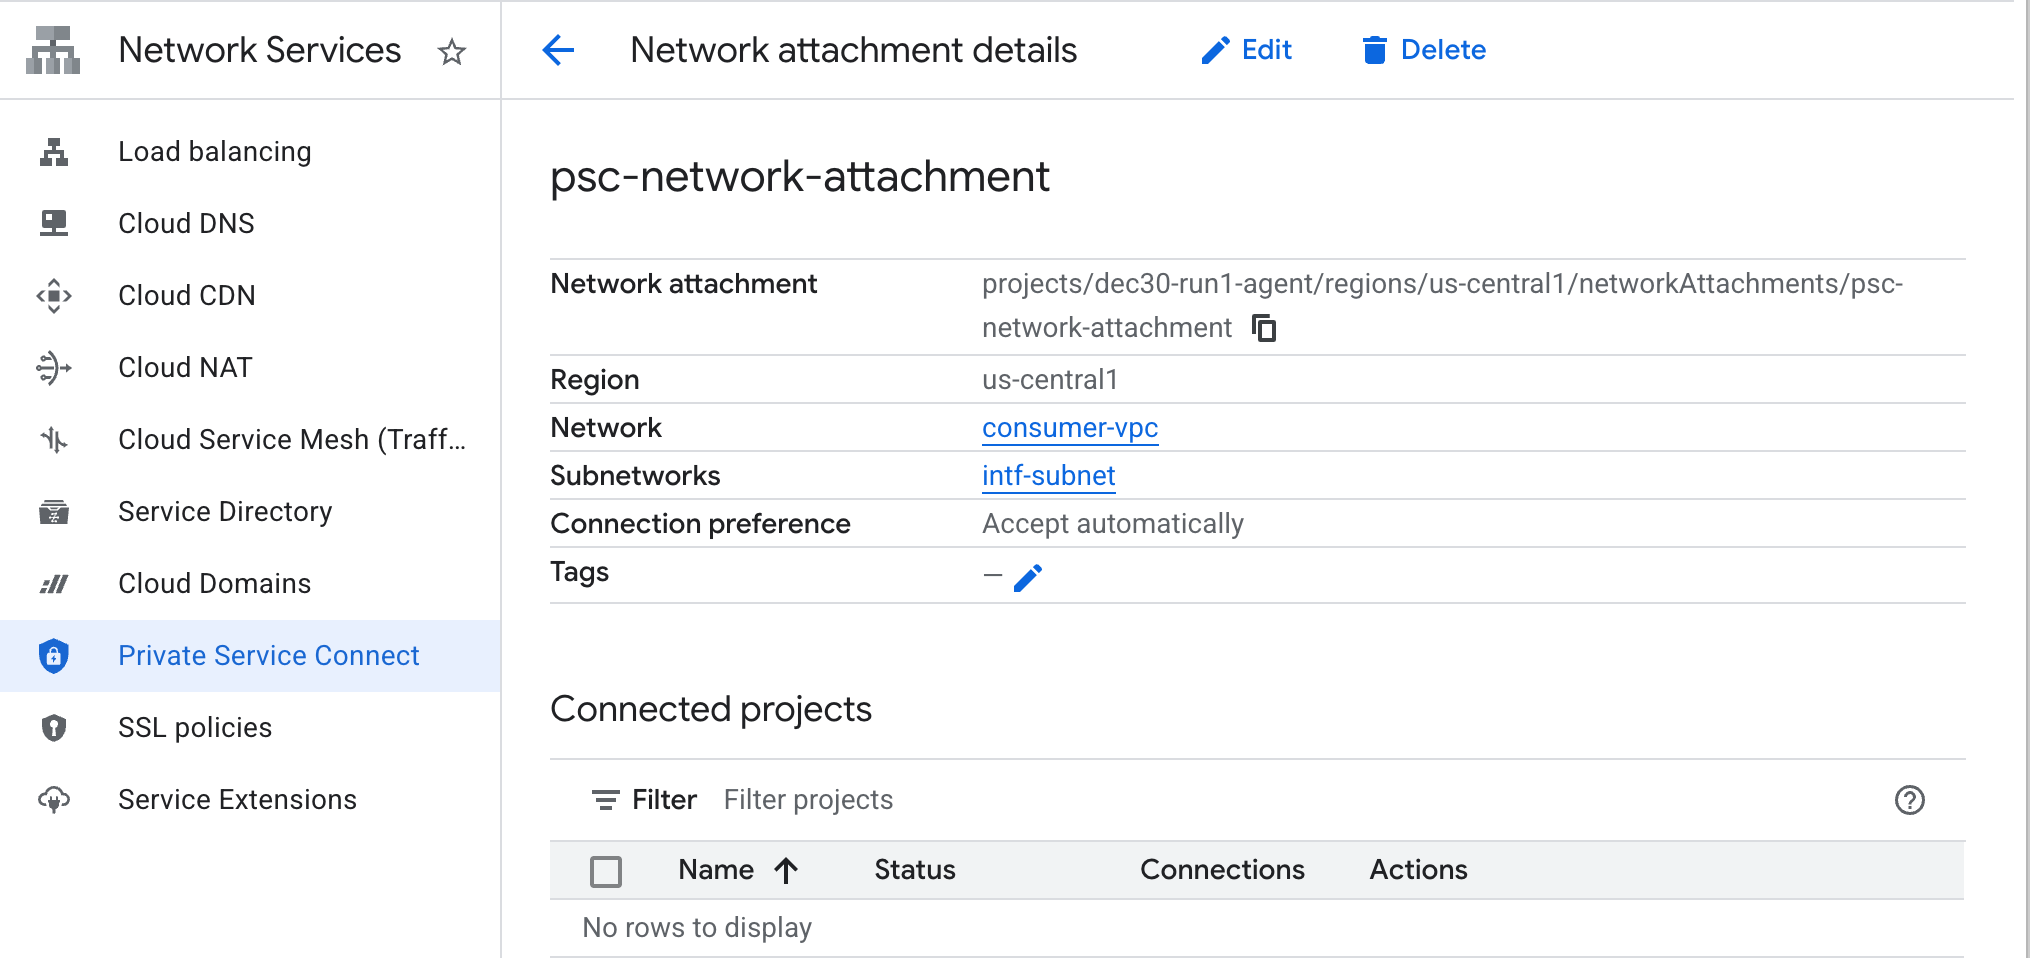
描述网络连接
在 Cloud Shell 中,描述网络连接。
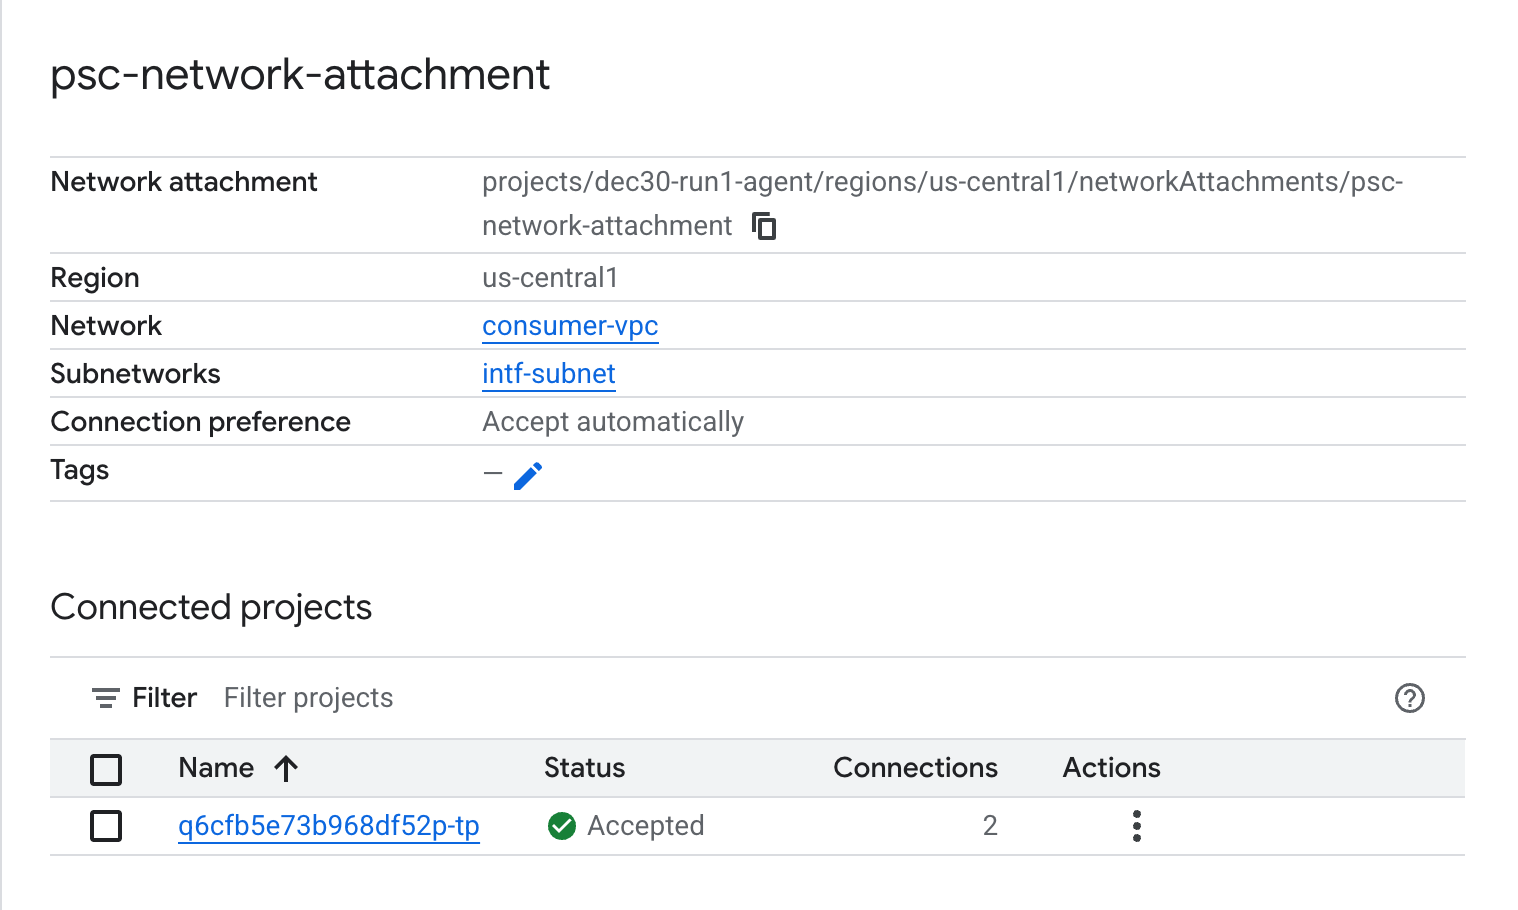
gcloud compute network-attachments describe psc-network-attachment --region=us-central1
记下 PSC 网络连接名称 psc-network-attachment,提供方在创建 Private Service Connect 接口时将使用该名称。
如需在 Cloud 控制台中查看 PSC 网络附加网址,请前往以下位置:
Network Services → Private Service Connect → Network Attachment → psc-network-attachment
6. 专用 DNS 区域
您将为 demo.com 创建一个 Cloud DNS 区域,并使用指向 SWP IP 地址的 A 记录填充该区域。之后,DNS 对等互连将部署在 Agent Engine 中,从而允许访问使用方的 DNS 记录。
在 Cloud Shell 中,执行以下操作以创建 DNS 名称 demo.com。
gcloud dns --project=$projectid managed-zones create private-dns-codelab --description="" --dns-name="demo.com." --visibility="private" --networks="https://compute.googleapis.com/compute/v1/projects/$projectid/global/networks/consumer-vpc"
获取并存储用于 DNS A 记录的 SWP 的 IP 地址。
在 Cloud Shell 中,针对交换区“my-swp-instance”执行 describe 操作:
gcloud network-services gateways describe my-swp-instance --location=us-central1
在 Cloud Shell 中,为 SWP (swp.demo.com) 创建记录集,确保根据您环境的输出更新 IP 地址。
gcloud dns --project=$projectid record-sets create swp.demo.com. --zone="private-dns-codelab" --type="A" --ttl="300" --rrdatas="10.10.10.5"
防火墙配置
创建 Cloud 防火墙规则以允许从 PSC 接口进行访问
在下一部分中,创建一条防火墙规则,允许源自 PSC 网络连接的流量访问使用方 VPC 中的 SWP 子网。为了提高安全性,您可以将 SWP IP 地址指定为唯一目的地。
在 Cloud Shell 中,创建出站流量防火墙规则,以允许从网络连接到 SWP 的访问:
gcloud compute firewall-rules create allow-access-to-swp \
    --network=consumer-vpc \
    --action=ALLOW \
    --rules=ALL \
    --direction=EGRESS \
    --priority=1000 \
    --source-ranges="192.168.10.0/28" \
    --destination-ranges="10.10.10.5/32" \
    --enable-logging
在 Cloud Shell 中,创建出站防火墙规则,拒绝来自网络连接的所有流量:
gcloud compute firewall-rules create deny-all \
    --network=consumer-vpc \
    --action=DENY \
    --rules=ALL \
    --direction=EGRESS \
    --priority=65534 \
    --source-ranges="192.168.10.0/28" \
    --destination-ranges="0.0.0.0/0" \
    --enable-logging
7. 为 VPC 网络创建防火墙政策,以确保威胁情报:
在下一部分中,您将创建一个防火墙政策,以便在 SWP 收到流量之前,利用 Google 的受管理威胁列表来屏蔽已知的恶意网站。
在 Cloud Shell 中,创建全球防火墙政策:
gcloud compute network-firewall-policies create psc-secure-policy \
    --global \
    --description="Policy to protect VPC with Threat Intelligence"
在 Cloud Shell 中,将政策与您的 VPC 相关联:
gcloud compute network-firewall-policies associations create \
    --firewall-policy=psc-secure-policy \
    --network=consumer-vpc \
    --name=psc-swp-association \
    --global-firewall-policy
在 Cloud Shell 中,添加威胁情报规则:
这些规则会在代理发起流量之前,将流量丢弃给已知的恶意方。在此示例中,我们添加了以下规则:阻止 Tor 退出节点(出站流量)、阻止已知恶意 IP(出站流量)、阻止已知匿名代理(出站流量)、阻止加密货币挖矿程序以防止未经授权的资源使用(出站流量)、
gcloud compute network-firewall-policies rules create 100 \
    --firewall-policy=psc-secure-policy \
    --action=deny \
    --direction=EGRESS \
    --dest-threat-intelligence=iplist-tor-exit-nodes \
    --layer4-configs=all \
    --enable-logging \
    --description="Block anonymous Tor traffic" \
    --global-firewall-policy
gcloud compute network-firewall-policies rules create 110 \
    --firewall-policy=psc-secure-policy \
    --action=deny \
    --direction=EGRESS \
    --dest-threat-intelligence=iplist-known-malicious-ips \
    --layer4-configs=all \
    --enable-logging \
    --description="Block known botnets and malware sources" \
    --global-firewall-policy
gcloud compute network-firewall-policies rules create 120 \
    --firewall-policy=psc-secure-policy \
    --action=deny \
    --direction=EGRESS \
    --dest-threat-intelligence=iplist-anon-proxies \
    --layer4-configs=all \
    --enable-logging \
    --description="Block Known Anonymous Proxies" \
    --global-firewall-policy
gcloud compute network-firewall-policies rules create 130 \
    --firewall-policy=psc-secure-policy \
    --action=deny \
    --direction=EGRESS \
    --dest-threat-intelligence=iplist-crypto-miners \
    --layer4-configs=all \
    --enable-logging \
    --description="Block Crypto Miners (Prevent unauthorized resource usage)" \
    --global-firewall-policy
8. 创建 Jupyter 笔记本
以下部分将指导您创建 Jupyter 笔记本。此笔记本将用于部署以明确代理为目标的 Agent Engine,以实现互联网出站流量。
创建用户管理的托管式服务账号
在下一部分中,您将创建一个服务账号,该账号将与本教程中使用的 Vertex AI Workbench 实例相关联。
在本教程中,服务账号将具有以下角色:
在 Cloud Shell 中,创建服务账号。
gcloud iam service-accounts create notebook-sa \
    --display-name="notebook-sa"
在 Cloud Shell 中,使用 Storage Admin 角色更新服务账号。
gcloud projects add-iam-policy-binding $projectid --member="serviceAccount:notebook-sa@$projectid.iam.gserviceaccount.com" --role="roles/storage.admin"
在 Cloud Shell 中,使用 Vertex AI User 角色更新服务账号。
gcloud projects add-iam-policy-binding $projectid --member="serviceAccount:notebook-sa@$projectid.iam.gserviceaccount.com" --role="roles/aiplatform.user"
在 Cloud Shell 中,使用 Artifact Registry Admin 角色更新服务账号。
gcloud projects add-iam-policy-binding $projectid --member="serviceAccount:notebook-sa@$projectid.iam.gserviceaccount.com" --role="roles/artifactregistry.admin"
在 Cloud Shell 中,允许笔记本服务账号使用 Compute Engine 默认服务账号。
gcloud iam service-accounts add-iam-policy-binding \
    $(gcloud projects describe $(gcloud config get-value project) --format='value(projectNumber)')-compute@developer.gserviceaccount.com \
    --member="serviceAccount:notebook-sa@$projectid.iam.gserviceaccount.com" \
    --role="roles/iam.serviceAccountUser"
9. 创建 Vertex AI Workbench 实例
在下一部分中,创建一个包含之前创建的服务账号 notebook-sa 的 Vertex AI Workbench 实例。
在 Cloud Shell 中,创建 private-client 实例。
gcloud workbench instances create workbench-tutorial --vm-image-project=cloud-notebooks-managed --vm-image-family=workbench-instances --machine-type=n1-standard-4 --location=us-central1-a --subnet-region=us-central1 --subnet=notebook-subnet --disable-public-ip --shielded-secure-boot=true --shielded-integrity-monitoring=true --shielded-vtpm=true --service-account-email=notebook-sa@$projectid.iam.gserviceaccount.com
在现有的 Secure Web Proxy 中添加另一条规则,以转发来自此笔记本实例的流量:
在 Cloud Shell 中,使用文本编辑器创建 rule-notebook.yaml 文件,确保使用您的项目 ID 更新 YAML
cat > rule-notebook.yaml << EOF
name: projects/$projectid/locations/us-central1/gatewaySecurityPolicies/my-swp-policy/rules/allow-notebook-subnet
description: Allow Internet access for notebook subnet
enabled: true
priority: 2
basicProfile: ALLOW
sessionMatcher: inIpRange(source.ip,'192.168.20.2')
EOF
在 Cloud Shell 中,生成安全政策规则:
gcloud network-security gateway-security-policies rules import allow-notebook-subnet \
    --source=rule-notebook.yaml \
    --location=us-central1 \
    --gateway-security-policy=my-swp-policy
10. Vertex AI Service Agent 更新
Vertex AI 会代表您执行操作,例如从用于创建 PSC 接口的 PSC 网络连接子网获取 IP 地址。为此,Vertex AI 使用需要 Network Admin 权限的服务代理(如下所示):
service-$projectnumber@gcp-sa-aiplatform.iam.gserviceaccount.com
在 Cloud Shell 中,获取您的项目编号。
gcloud projects describe $projectid | grep projectNumber
在 Cloud Shell 中,设置您的项目编号。
projectnumber=YOUR-PROJECT-NUMBER
在 Cloud Shell 中,为 AI Platform 创建服务账号。如果您的项目中有现有服务账号,请跳过此步骤。
gcloud beta services identity create --service=aiplatform.googleapis.com --project=$projectnumber
在 Cloud Shell 中,使用角色 compute.networkAdmin 更新服务代理账号。
gcloud projects add-iam-policy-binding $projectid --member="serviceAccount:service-$projectnumber@gcp-sa-aiplatform.iam.gserviceaccount.com" --role="roles/compute.networkAdmin"
在 Cloud Shell 中,使用角色 dns.peer 更新服务代理账号
gcloud projects add-iam-policy-binding $projectid --member="serviceAccount:service-$projectnumber@gcp-sa-aiplatform.iam.gserviceaccount.com" --role="roles/dns.peer"
默认服务账号更新
向您的默认服务账号授予对 Vertex AI 的访问权限。请注意,访问权限更改可能需要一段时间才能拓展。
在 Cloud Shell 中,使用 aiplatform.user 角色更新默认服务账号
gcloud projects add-iam-policy-binding $projectid \
  --member="serviceAccount:$projectnumber-compute@developer.gserviceaccount.com" \
    --role="roles/aiplatform.user"
11. 部署 Agent Engine
注意:我们将使用 GCP 控制台和 JupyterLab 笔记本完成本部分中的任务
在下一部分中,您将创建一个笔记本,该笔记本将执行以下任务:
- 使用 Frankfurter API (https://api.frankfurter.app/) 获取汇率数据
- 引用使用 FQDN swp.demo.com 定位到消费者 VPC 中的 SWP 的显式代理 (proxy_server)
- 定义 dnsPeeringConfigs “domain”: “demo.com.”
在 Vertex AI Workbench 实例中运行训练作业。
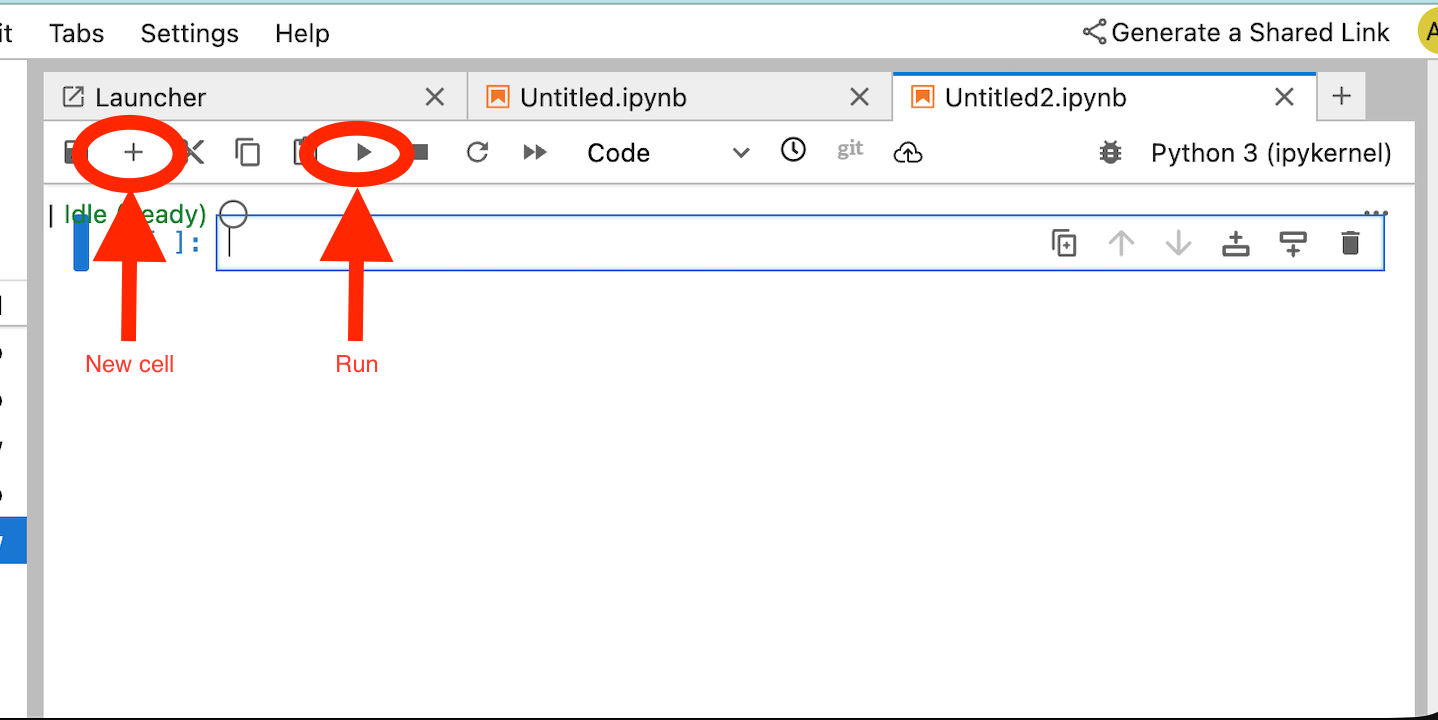
- 在 Google Cloud 控制台中,前往
Vertex AI → Workbench - 在 Vertex AI Workbench 实例名称 (workbench-tutorial) 旁边,点击“打开 JupyterLab”。您的 Vertex AI Workbench 实例会打开 JupyterLab。
- 选择
File > New > Notebook - 选择
Kernel > Python 3
安装必要的 Python 库:安装 Agent Engine 所需的库,包括 pyyaml、google-cloud-aiplatform、cloudpickle、google-cloud-api-keys 和 langchain-google-vertexai。
在 JupyterLab 笔记本中,创建一个新单元格并运行以下命令,指定 SWP 的 IP 地址
!pip install --proxy http://10.10.10.5:8888 --upgrade google-cloud-aiplatform[agent_engines,adk]
根据您的环境,在以下代码段中定义以下变量:
- PROJECT_ID
- BUCKET_NAME
- AGENT_NAME
在本实验中,您将使用变量 BUCKET_NAME 和 AGENT_NAME 来初始化和配置全局可用的存储分区
在以下部分中,PROXY_SERVER 定义为需要 DNS 对等互连才能进行名称解析的 swp.demo.com。在配置中,AGENT_PEER_DOMAIN 部署为 demo.com,这与在 AGENT_PEER_NETWORK(即 consumer-vpc)中之前创建的专用 DNS 区域相对应。
在 JupyterLab 笔记本中,创建一个新单元格并运行以下代码:
# --- Fundamental Project Configuration ---
PROJECT_ID = "YOUR_PROJECT_ID"
LOCATION = "us-central1" # e.g., "us-central1"
BUCKET_NAME = "YOUR_BUCKET_NAME" # A GCS bucket in the same location

# --- Agent Configuration ---
AGENT_NAME = "YOUR_AGENT_NAME"
MODEL = "gemini-2.5-flash" # Or another suitable model

# --- Network and Proxy Configuration ---
# The agent will call the Frankfurter API via this proxy
PROXY_SERVER = "http://swp.demo.com:8888"

# --- Deployment Configuration (PSC & DNS Peering) ---
# This should be a pre-existing Network Attachment
NETWORK_ATTACHMENT_NAME = f"projects/{PROJECT_ID}/regions/{LOCATION}/networkAttachments/psc-network-attachment"
# Optional DNS Peering config
AGENT_PEER_DOMAIN = "demo.com."
AGENT_PEER_NETWORK = "consumer-vpc"

# --- Initialize Vertex AI SDK ---
import vertexai
STAGING_BUCKET = f"gs://{BUCKET_NAME}"

vertexai.init(project=PROJECT_ID, location=LOCATION, staging_bucket=STAGING_BUCKET)

print(f"Vertex AI SDK initialized for project {PROJECT_ID} in {LOCATION}.")
在 JupyterLab 笔记本中,创建一个新单元格,然后运行以下代码。
!adk create $AGENT_NAME --model=$MODEL --project=$PROJECT_ID --region=$LOCATION
在 JupyterLab 笔记本中,创建一个新单元格,然后运行以下命令以创建与 SWP 的 FQDN 和端口对应的代理变量。
import os
os.environ["PROXY_SERVER_URL"] = "http://swp.demo.com:8888"
以下代码单元格演示了 Agent Engine 的显式代理配置,通过指定 SWP(使用映射到 os.environ["PROXY_SERVER_URL"]. 的 PROXY_SERVER_TO_USE)来访问互联网端点 api.frankfurter.app
import requests
# Use the globally defined proxy server URL
    proxies = {
       "http": PROXY_SERVER_TO_USE,
       "https": PROXY_SERVER_TO_USE,
    }
    try:
        response = requests.get(
            f"https://api.frankfurter.app/{currency_date}",
            params={"from": currency_from, "to": currency_to},
            proxies=proxies,
)
response.raise_for_status()
print(response.json())
except requests.exceptions.RequestException as e: print(f"An error occurred: {e}")
在 JupyterLab 笔记本中,创建一个新单元格并运行以下代码,该代码定义了以 api.frankfurter.app 为目标的货币兑换工具实现。
%%writefile $AGENT_NAME/agent.py
from google.adk.agents.llm_agent import Agent
import os
import requests


# Get Proxy Server URL
# This is the VM's FQDN to reach the proxy vm in the consumers network
if "PROXY_SERVER_URL" not in os.environ:
    raise ValueError("Missing required environment variable: PROXY_SERVER_URL is not set.")
PROXY_SERVER_TO_USE = os.environ["PROXY_SERVER_URL"]

# Mock tool implementation
def get_exchange_rate(
    currency_from: str = "USD",
    currency_to: str = "EUR",
    currency_date: str = "latest",
):
    """Retrieves the exchange rate between two currencies on a specified date.

    Uses the Frankfurter API (https://api.frankfurter.app/) to obtain
    exchange rate data.

    Args:
        currency_from: The base currency (3-letter currency code).
            Defaults to "USD" (US Dollar).
        currency_to: The target currency (3-letter currency code).
            Defaults to "EUR" (Euro).
        currency_date: The date for which to retrieve the exchange rate.
            Defaults to "latest" for the most recent exchange rate data.
            Can be specified in YYYY-MM-DD format for historical rates.

    Returns:
        dict: A dictionary containing the exchange rate information.
            Example: {"amount": 1.0, "base": "USD", "date": "2023-11-24",
                "rates": {"EUR": 0.95534}}
    """
    # Use the globally defined proxy server URL
    proxies = {
       "http": PROXY_SERVER_TO_USE,
       "https": PROXY_SERVER_TO_USE,
    }

    try:
        response = requests.get(
            f"https://api.frankfurter.app/{currency_date}",
            params={"from": currency_from, "to": currency_to},
            proxies=proxies,
        )
        response.raise_for_status()  # Raise an error for bad responses
        return response.json()
    except Exception as e:
        return f"An unexpected error occurred: {e}"

root_agent = Agent(
    model='gemini-2.5-flash',
    name='root_agent',
    description="Provides the currency exchange rates between two currencies",
    instruction="You are a helpful assistant that provides the currency exchange rates between two currencies. Use the 'get_exchange_rate' tool for this purpose.",
    tools=[get_exchange_rate],
)
在 JupyterLab 笔记本中,创建一个新单元格并运行以下代码。
# 1. Set your variables
CURRENCY_DATE="latest"
CURRENCY_FROM="USD"
CURRENCY_TO="EUR"
PROXY_SERVER="http://swp.demo.com:8888"

# 2. Run the curl command
!curl -x "$PROXY_SERVER" "https://api.frankfurter.app/$CURRENCY_DATE?from=$CURRENCY_FROM&to=$CURRENCY_TO"
在 JupyterLab 笔记本中,创建一个新单元格并运行以下代码,以调用 Agent Engine 使用的 psc 接口配置(除了 DNS 对等互连之外)。
import json
import os

CONFIG_FILE_PATH = os.path.join(AGENT_NAME, ".agent_engine_config.json")
# Create your config as a Python dictionary ---
config_data = {
    "requirements": [
        "google-cloud-aiplatform[agent_engines,adk]",
        "requests",
    ],
    "psc_interface_config": {
        "network_attachment": NETWORK_ATTACHMENT_NAME,
        "dns_peering_configs": [
            {
                "domain": AGENT_PEER_DOMAIN,
                "target_project": PROJECT_ID,
                "target_network": AGENT_PEER_NETWORK,
            },
        ],
    },
}

# Write the dictionary to a JSON file ---
os.makedirs(AGENT_NAME, exist_ok=True) # Ensure the directory exists
with open(CONFIG_FILE_PATH, 'w') as f:
    json.dump(config_data, f, indent=4)

print(f"Successfully created {CONFIG_FILE_PATH} with your variables.")
在 JupyterLab 笔记本中,创建一个新单元格并运行以下代码。
import json
import os

CONFIG_FILE_PATH = os.path.join(AGENT_NAME, ".agent_engine_config.json")
# Create your config as a Python dictionary ---
config_data = {

    "psc_interface_config": {
        "network_attachment": NETWORK_ATTACHMENT_NAME,
        "dns_peering_configs": [
            {
                "domain": AGENT_PEER_DOMAIN,
                "target_project": PROJECT_ID,
                "target_network": AGENT_PEER_NETWORK,
            },
        ],
    },
}

# Write the dictionary to a JSON file ---
os.makedirs(AGENT_NAME, exist_ok=True) # Ensure the directory exists
with open(CONFIG_FILE_PATH, 'w') as f:
    json.dump(config_data, f, indent=4)

print(f"Successfully created {CONFIG_FILE_PATH} with your variables.")
在 JupyterLab 笔记本中,创建一个新单元格并运行以下代码。
%%writefile $AGENT_NAME/.env

GOOGLE_CLOUD_PROJECT=PROJECT_ID
GOOGLE_CLOUD_LOCATION=us-central1
GOOGLE_GENAI_USE_VERTEXAI=1


PROXY_SERVER_URL=http://swp.demo.com:8888
在 JupyterLab 笔记本中,创建一个新单元格并运行以下代码以创建代理。
!adk deploy agent_engine $AGENT_NAME --staging_bucket=$STAGING_BUCKET --env_file=$AGENT_NAME/.env --agent_engine_config_file=$AGENT_NAME/.agent_engine_config.json --display_name=$AGENT_NAME
执行单元后,系统会生成推理引擎 ID。在下一步中,您将需要生成的 ID,在本示例中为 3235268984265768960。
✅ Created agent engine: projects/9315891080/locations/us-central1/reasoningEngines/3235268984265768960
在 JupyterLab 笔记本中,创建一个新单元格并运行以下代码,确保根据上一次输出中的项目编号和 Agent Engine 推理 ID 进行更新:
from vertexai import agent_engines
remote_app = agent_engines.get("projects/PROJECT_NUMBER/locations/us-central1/reasoningEngines/ENTER_YOUR_ID")
在 JupyterLab 笔记本中,创建一个新单元格并运行以下代码。
def print_event_nicely_with_thoughts(event):
"""
Parses and prints streaming query events, including thoughts.
"""
try:
content = event.get('content', {})
role = content.get('role')
parts = content.get('parts', [{}])
if not parts:
print("...")
return
part = parts[0] # Get the first part
# Event 1: Model is thinking (calling a tool or just text)
if role == 'model':
# Check for and print any explicit 'thought' text
if 'thought' in part:
print(f"🧠 Thought: {part['thought']}")
# Check for a function call
if 'function_call' in part:
# If we haven't *already* printed an explicit thought,
# print a generic one.
if 'thought' not in part:
print("🧠 Thinking... (decided to use a tool)")
call = part['function_call']
print(f" 🔧 Tool Call: {call.get('name')}()")
print(f" Args: {call.get('args')}")
# Check for the final text answer
elif 'text' in part:
text = part.get('text', '')
print(f"\n💬 Model: {text}")
# Event 2: The tool returns its result
elif role == 'user' and 'function_response' in part:
resp = part['function_response']
print(f"⚙️ Tool Response (from {resp.get('name')}):")
print(f" Output: {resp.get('response')}")
# Other event types (like progress messages)
else:
print("...") # Show progress for other events
except Exception as e:
print(f"Error processing event: {e}")
# print(f"Raw event: {event}") # Uncomment to debug
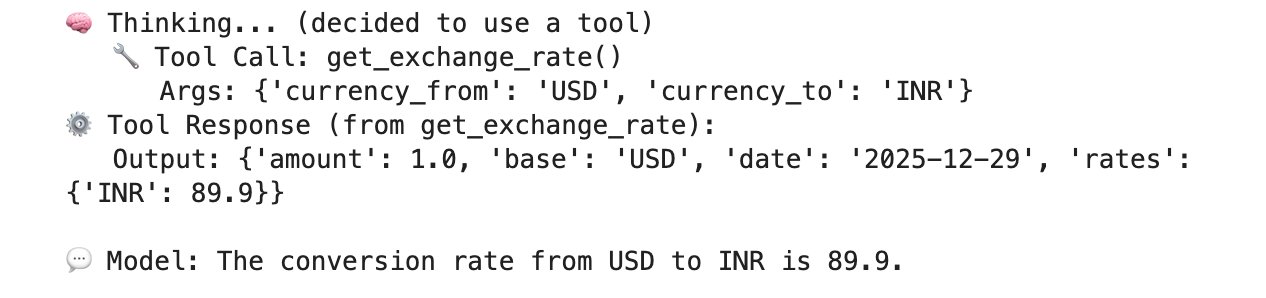
for event in remote_app.stream_query(
user_id="u_456",
# session_id=remote_session["id"],
message="Provide USD to INR conversion rate",
):
print_event_nicely_with_thoughts(event)
成功执行的示例,该示例基于美元到印度卢比的换算汇率验证了与公共端点 api.frankfurther.app 的连接。
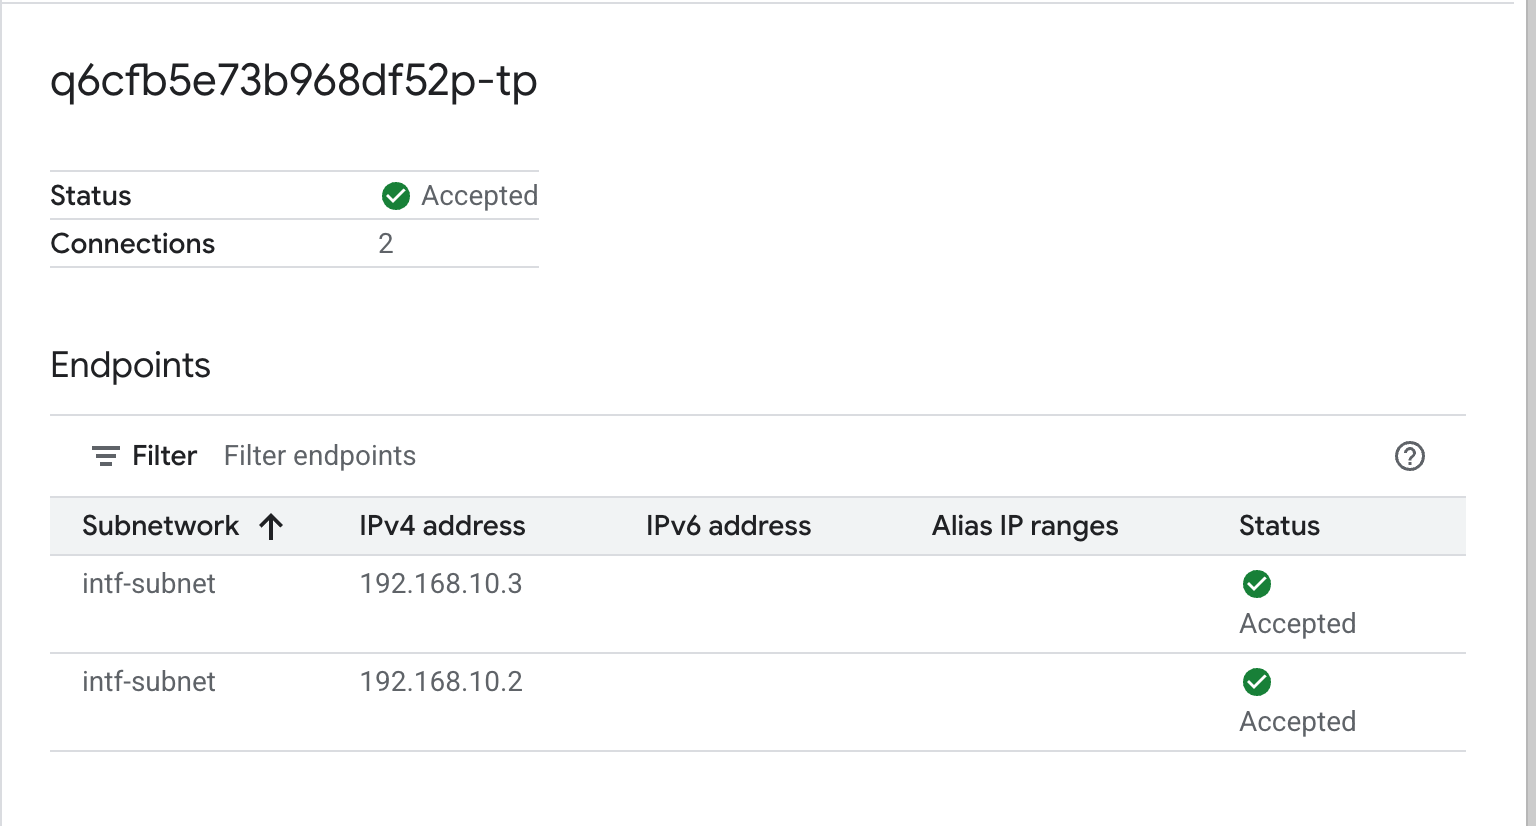
12. PSC 接口验证
您还可以通过前往以下位置来查看 Agent Engine 使用的网络附件 IP:
网络服务 → Private Service Connect → 网络连接 → psc-network-attachment
选择租户项目(项目名称以 -tp 结尾)
突出显示的字段表示 Agent Engine 从 PSC 网络连接使用的 IP 地址。
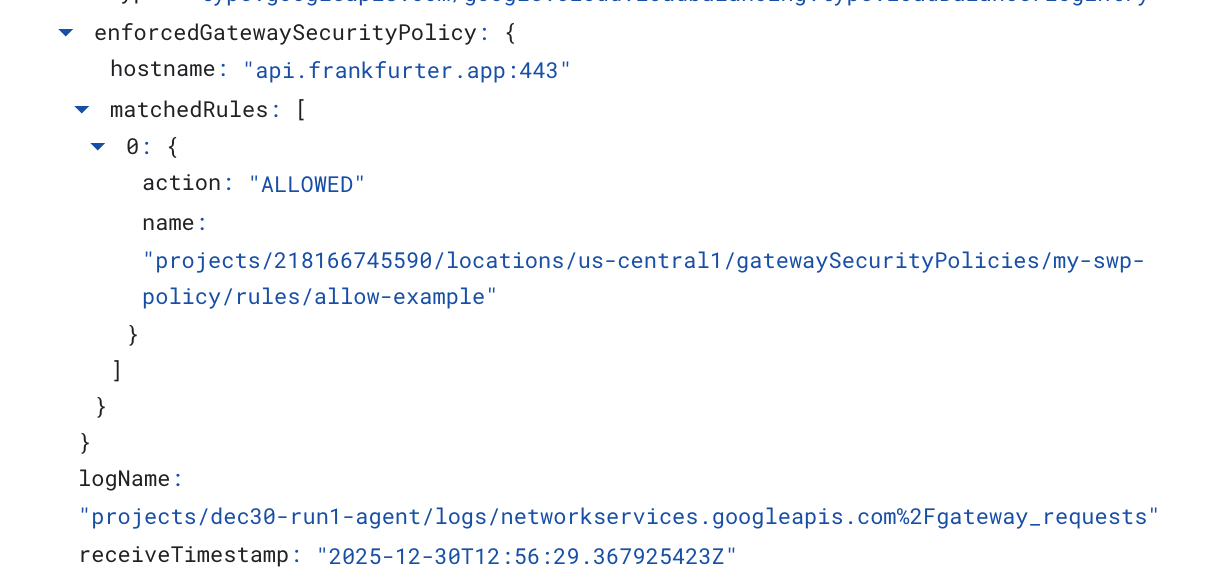
13. SWP - Cloud Logging 验证
您可以查看 Cloud Logging 以验证 SWP 执行的互联网出站流量,方法是前往以下位置:
监控 → Logs Explorer
插入查询:resource.type=" networkservices.googleapis.com/Gateway",然后点击“运行查询”。以下示例确认了目标端点 api.frankfurter.app。

以下 Cloud Logging 示例验证了以下内容:
Destination_range:代理引擎 PSC 接口 IP 地址
Source_range:仅代理子网 Dest_ip:Secure Web Proxy IP 地址
请务必更改云日志记录查询的 project_id。
logName:("projects/project_id/logs/compute.googleapis.com%2Ffirewall") AND jsonPayload.rule_details.reference:("network:consumer-vpc/firewall:allow-access-to-swp")
{
  "insertId": "1j9ym95fmu8g6o",
  "jsonPayload": {
    "vpc": {
      "project_id": "XXXXXXXXXXXXX",
      "subnetwork_name": "intf-subnet",
      "vpc_name": "consumer-vpc"
    },
    "rule_details": {
      "destination_range": [
        "10.10.10.5/32"
      ],
      "reference": "network:consumer-vpc/firewall:allow-access-to-swp",
      "priority": 1000,
      "source_range": [
        "192.168.10.0/28"
      ],
      "direction": "EGRESS",
      "ip_port_info": [
        {
          "ip_protocol": "ALL"
        }
      ],
      "action": "ALLOW"
    },
    "disposition": "ALLOWED",
    "remote_instance": {
      "region": "us-central1"
    },
    "remote_vpc": {
      "vpc_name": "consumer-vpc",
      "project_id": "XXXXXXXXXXXXXXX",
      "subnetwork_name": "swp-subnet"
    },
    "connection": {
      "src_ip": "192.168.10.2",
      "src_port": 48640,
      "dest_port": 8888,
      "dest_ip": "10.10.10.5",
      "protocol": 6
    }
  },
  "resource": {
    "type": "gce_subnetwork",
    "labels": {
      "subnetwork_id": "7147084067647653041",
      "project_id": "XXXXXXXXXXXXXX",
      "location": "us-central1",
      "subnetwork_name": "intf-subnet"
    }
  },
  "timestamp": "2025-12-30T12:51:36.628538815Z",
  "logName": "projects/dec30-run1-agent/logs/compute.googleapis.com%2Ffirewall",
  "receiveTimestamp": "2025-12-30T12:51:40.846652708Z"
}
14. 清理
在 JupyterLab 笔记本中,创建一个新单元格并运行以下命令,以触发删除 Agent Engine 部署。
请确保您正在更新 "project number" 和 "reasoningEngines token"
import requests
token = !gcloud auth application-default print-access-token
ENDPOINT = "https://us-central1-aiplatform.googleapis.com"
response = requests.delete(
    f"{ENDPOINT}/v1beta1/projects/218166745590/locations/us-central1/reasoningEngines/3086854705725308928",
    params={"force": "true"},
    headers={
        "Content-Type": "application/json; charset=utf-8",
        "Authorization": f"Bearer {token[0]}"
    },
)
print(response.text)
从 Cloud Shell 中删除教程组件。
gcloud workbench instances delete workbench-tutorial --project=$projectid --location=us-central1-a

gcloud network-security gateway-security-policies rules delete allow-notebook-subnet \
    --gateway-security-policy=my-swp-policy \
    --location=us-central1

gcloud network-security gateway-security-policies rules delete allow-example \
    --gateway-security-policy=my-swp-policy \
    --location=us-central1

gcloud network-security gateway-security-policies delete my-swp-policy \
    --location=us-central1
gcloud network-services gateways delete my-swp-instance\
    --location=us-central1

gcloud dns record-sets delete swp.demo.com --zone=private-dns-codelab  --type=A

gcloud dns managed-zones delete private-dns-codelab


gcloud compute network-attachments delete psc-network-attachment --region=us-central1 --quiet

export ROUTER_NAME=$(gcloud compute routers list --regions=us-central1 \
    --filter="name ~ swg-autogen-router" --format="value(name)")


 gcloud compute routers nats delete swg-autogen-nat --router=$ROUTER_NAME --region=us-central1 --quiet

gcloud compute routers delete $ROUTER_NAME --region=us-central1 --quiet

gcloud compute networks subnets delete intf-subnet rfc1918-subnet1 --region=us-central1 --quiet

gcloud compute networks subnets delete intf-subnet swp-subnet
 --region=us-central1 --quiet

gcloud compute networks subnets delete intf-subnet intf-subnet --region=us-central1 --quiet

gcloud compute networks subnets delete intf-subnet proxy-subnet
 --region=us-central1 --quiet

gcloud compute networks subnets delete intf-subnet notebook-subnet
--region=us-central1 --quiet

gcloud compute networks delete consumer-vpc --quiet
15. 恭喜
恭喜!您已成功配置并验证了通过显式代理执行互联网出站流量的 Agent Engine(部署时使用了 Private Service Connect 接口)。
您创建了使用方基础设施,并添加了网络连接,以允许提供方创建多网卡虚拟机来桥接使用方和提供方之间的通信。您学习了如何创建允许互联网连接的显式代理和 DNS 对等互连。
Cosmopup 认为教程很棒!