
1. Introduction
An agent with its own credential with a broad permission sees everyone's data. In this codelab you'll build an agent that calls a third-party API with the signed-in user's own credentials, so it sees exactly what that person can see and nothing more.
You will build it with the Google Agent Development Kit (ADK) and Gemini Enterprise.
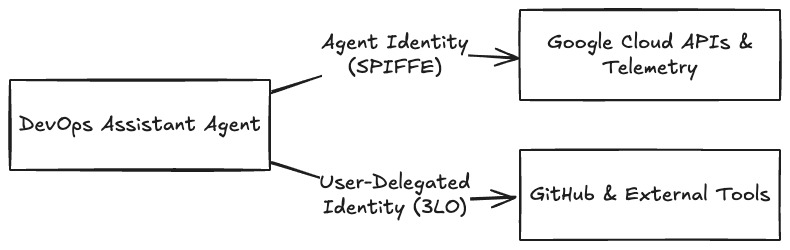
Specifically, you will learn how to design a dual-identity architecture where:
- The agent acts on its own behalf (Agent Identity): Using a SPIFFE-backed Agent Identity, the agent invokes Auth Manager, stores telemetry, and calls Google Cloud APIs.
- The agent acts on the user's behalf (User-Delegated Identity): To access external resources like GitHub, the agent triggers a 3-legged OAuth (3LO) consent flow to securely query tools using the user's credentials.
To achieve this, you will learn how to:
- Build an ADK Agent that connects to GitHub's Model Context Protocol (MCP) server.
- Update the agent's tool from a static GitHub PAT (personal access token) to 3-legged OAuth (3LO) flow using Google Cloud Auth Manager.
- Deploy the agent securely to Agent Runtime and provision Agent Identity.
- Configure IAM roles to provide the agent's identity access to the token vault on the user's behalf.
- Understand the end-to-end 3LO flow for Auth Manager in Google Cloud.
Prerequisites
Before you begin, ensure you have:
- A Google Cloud Project with billing enabled.
- The Google Cloud SDK (
gcloudCLI) installed and authenticated to your project on your local machine. Version 586.0.0 or newer is required — rungcloud components update. - Python 3.10 to 3.13 installed locally.
- The
uvpackage manager installed (pip install uv). - A GitHub account to register an OAuth application and create tokens. If you don't have a github account, you can substitute any third party MCP server that supports three-legged OAuth 2.0.
2. Project Setup
1. Authenticate to Google Cloud
Authenticate to Google Cloud from your local command line to ensure your environment has the necessary permissions to deploy to Agent Runtime, provision Agent Identity, and configure Auth Manager during this lab:
Run the following commands to login to your Google Cloud account to configure Application Default Credentials (ADC):
gcloud auth login
gcloud auth application-default login
2. Enable Required Google Cloud Services
Enable the necessary APIs in your Google Cloud project to run this lab. Run the following command in your terminal:
gcloud services enable \
    agentidentity.googleapis.com \
    agentregistry.googleapis.com \
    aiplatform.googleapis.com \
    apphub.googleapis.com
This command may take a minute to execute; once finished, it will return to the command prompt confirming the APIs are active.
3. Install agents CLI and setup the project
agents-cli is the command-line tool used to scaffold, manage, test, and deploy ADK agents to Gemini Enterprise. Install it locally:
uvx google-agents-cli setup
Verify your installation:
agents-cli --help
You should see the CLI's help menu displaying available commands (such as deploy, run, and status).
Generate the initial project scaffolding. You will start with a local prototype and enhance it later for Agent Runtime deployment:
agents-cli create secure-agent-demo --prototype --yes
This creates the secure-agent-demo directory containing your foundational agent code, dependencies, and test files.
4. Add the required ADK extras
The generated pyproject.toml ships google-adk[gcp,otel-gcp], which is missing two extras this agent needs: mcp for the GitHub toolset, and agent-identity for Auth Manager later in the lab. Open secure-agent-demo/pyproject.toml and change the google-adk line to:
"google-adk[agent-identity,gcp,mcp,otel-gcp]>=2.5.0,<3.0.0",
Then install:
cd secure-agent-demo
agents-cli install
3. Build and test the agent
1. Create the agent
Inside your project, replace the code in agent.py file with the following:
# app/agent.py

from google.adk.agents import Agent
from google.adk.apps import App
from google.adk.models import Gemini
from google.genai import types

from app.tools import github_toolset

import os
import google.auth

_, project_id = google.auth.default()
os.environ["GOOGLE_CLOUD_PROJECT"] = project_id
os.environ["GOOGLE_CLOUD_LOCATION"] = "global"
os.environ["GOOGLE_GENAI_USE_VERTEXAI"] = "True"

INSTRUCTION = """You are the DevOps Assistant. You help developers list and triage their GitHub issues and pull requests.
Your capabilities: You have a GitHub MCP toolset that you can use to perform actions that the user requests.

Rules:
- NEVER write, update, or delete. You are only allowed read access.
- Act on behalf of the signed-in user.
- If a tool returns an authentication or authorization error, guide the user to sign in.
- NEVER fabricate information. Only report real issues returned by tools.
"""

root_agent = Agent(
    name="root_agent",
    model=Gemini(
        model="gemini-3.8-flash",
        retry_options=types.HttpRetryOptions(attempts=3),
    ),
    instruction=INSTRUCTION,
    tools=[github_toolset()],
)

app = App(
    root_agent=root_agent,
    name="app",
)
This file defines three key components of the agent:
- System Instruction (
INSTRUCTION): Sets the persona, scopes the assistant to GitHub triage, and enforces strict safety rules (like read-only access and guiding users to authenticate if errors occur). - Agent Configuration (
root_agent): Instantiates an ADKAgentusing thegemini-3.8-flashmodel, configures HTTP retry logic, and equips the agent with the GitHub toolset. - App Wrapper (
app): Encapsulates the root agent into an ADKAppcontainer, making it deployable to Agent Runtime.
2. Add the GitHub MCP Tool
The agent connects to GitHub via the Model Context Protocol (MCP). Create a new file called tools.py under the app/ folder to register the MCP gateway connection parameters. Copy-paste the following code:
# app/tools.py

from __future__ import annotations
import os
from google.adk.tools.mcp_tool import McpToolset
from google.adk.tools.mcp_tool.mcp_session_manager import StreamableHTTPConnectionParams

GITHUB_MCP_URL = "https://api.githubcopilot.com/mcp/"
GITHUB_TOKEN = os.environ.get("GITHUB_TOKEN", "")

def github_toolset() -> McpToolset:
    """Returns the McpToolset connecting to the public GitHub Copilot MCP gateway."""
    return McpToolset(
        connection_params=StreamableHTTPConnectionParams(
            url=GITHUB_MCP_URL,
            headers={
                "Authorization": f"Bearer {GITHUB_TOKEN}",
                "X-MCP-Toolsets": "all",
                "X-MCP-Readonly": "true",
            },
        )
    )
This function creates a tool that calls GitHub's MCP server:
- MCP Toolset (
McpToolset): Dynamically discovers and registers GitHub capabilities as callable agent tools. - Connection Parameters (
StreamableHTTPConnectionParams): Points the toolset to GitHub's public MCP gateway. - Authorization Headers: Injects the
GITHUB_TOKENas a Bearer token and enforces read-only mode (X-MCP-Readonly: true) directly at the transport layer.
3. Test Locally with a GitHub PAT (Personal Access Token)
To run the agent locally with static credentials:
- Create a GitHub Personal Access Token. Grant it read access to your repositories, otherwise the agent can only see public data and the prompt below returns nothing.
- Set it in your environment:
export GITHUB_TOKEN="your_github_pat_here" - Navigate to the
secure-agent-demofolder. Run:cd secure-agent-demo agents-cli playground - Open the playground interface, select the folder "app" from the dropdown. In the chatbox, type
"Fetch my contributions across my private repositories over the last 6 months", and verify that the agent calls the GitHub tool and returns data from your private repositories.
4. Configure Auth Manager
While hardcoding static credentials (like a PAT) is convenient for prototyping, it exposes production applications to credential leakage, manual token refresh downtime, and a lack of cloud-native access controls.
To solve this, Google Cloud provides Agent Identity Auth Manager. Agent Identity auth manager is a credential vault designed to help protect credentials. It lets agents authenticate using an API key or OAuth client ID and secret, or on behalf of a user through OAuth delegation using end-user access tokens.
Within Auth Manager, you configure auth providers that define the authentication type and credentials for specific third-party applications. Auth providers are regional, and the region must match the region you deploy the agent to. The end-to-end Auth Manager workflow operates as follows:
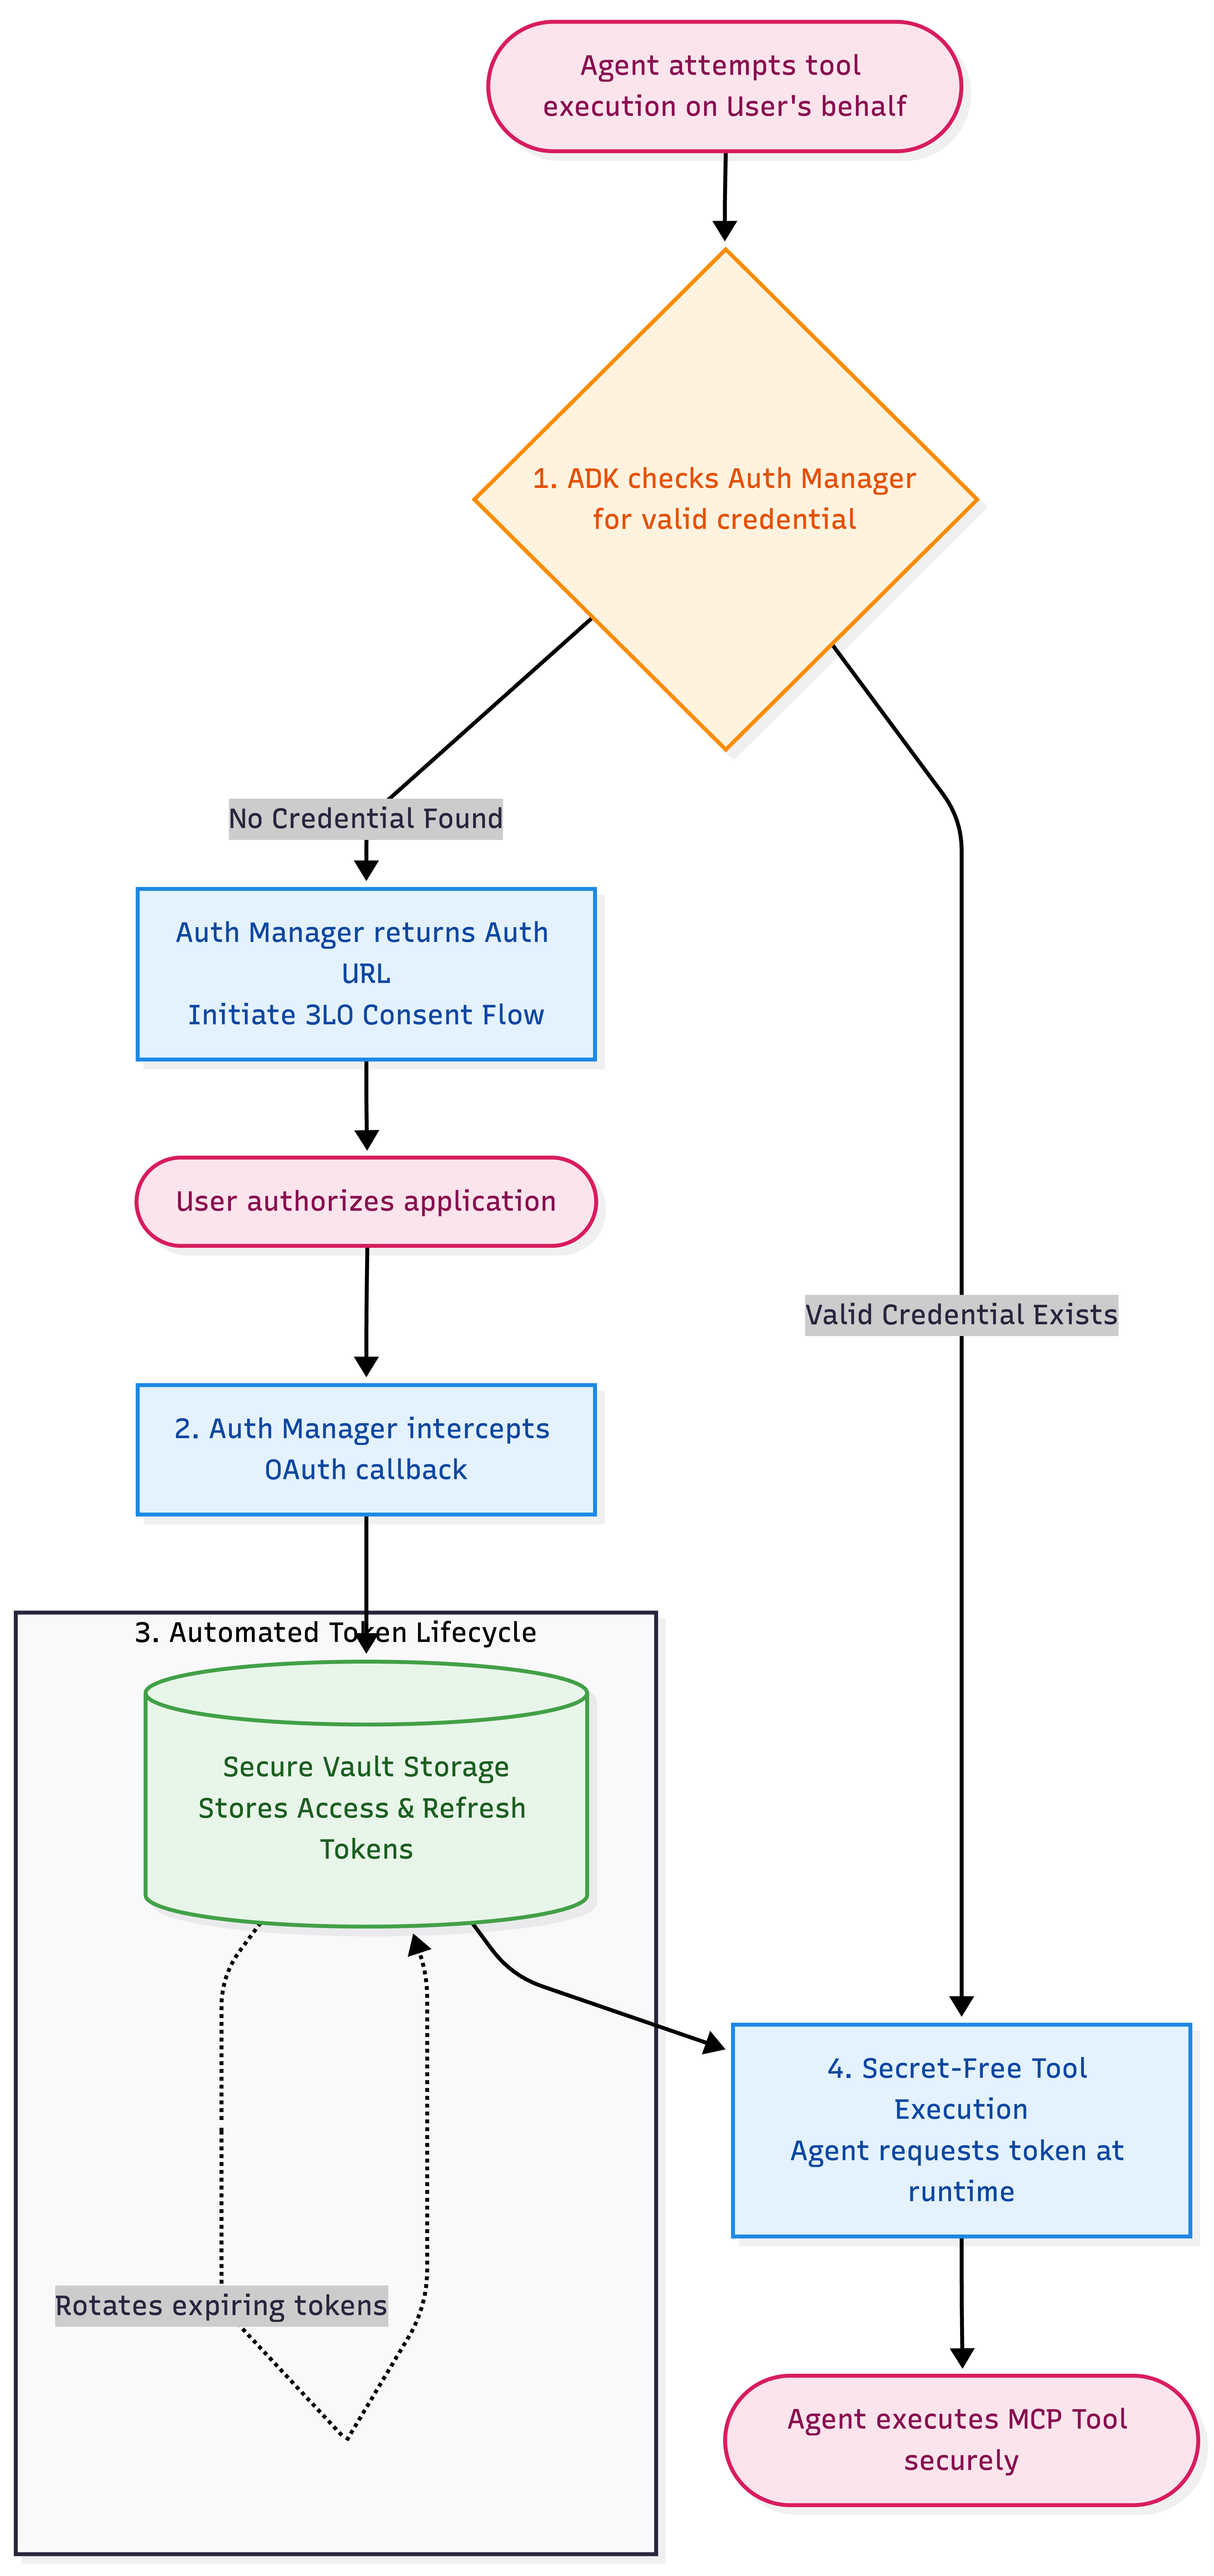
- Dynamic Consent Interception: When the agent attempts to execute a tool on behalf of a user, the ADK checks Auth Manager for an existing valid credential. If none exists, Auth Manager returns an authorization URL to initiate a 3-legged OAuth (3LO) consent flow.
- Secure Vault Storage: Once the end-user authorizes the application, Auth Manager automatically intercepts the OAuth callback and stores the resulting user access and refresh tokens in a secure, Google-managed credential vault.
- Automated Token Lifecycle: Auth Manager fully manages token expiration and rotation in the background, eliminating the need for manual token refresh logic or downtime.
- Secret-Free Tool Execution: For subsequent actions, the agent (authenticating via its SPIFFE Agent Identity) dynamically requests the user's delegated access token from Auth Manager at runtime, keeping both client and agent code entirely secret-free.
Step A: Configure GitHub as an Auth Provider
Run the following gcloud command to create a GitHub auth provider in your Google Cloud project. You supply the client ID and secret later: GitHub won't issue them until it knows this provider's callback URL.
gcloud agent-identity auth-providers create github-oauth-provider \
    --project="${PROJECT_ID}" \
    --location="us-central1" \
    --three-legged-oauth-authorization-url="https://github.com/login/oauth/authorize" \
    --three-legged-oauth-token-url="https://github.com/login/oauth/access_token"
Describe the provider to retrieve the generated OAuth redirect URL:
gcloud agent-identity auth-providers describe github-oauth-provider \
    --project="${PROJECT_ID}" \
    --location="us-central1"
The field is redirectUrl, nested under authProviderTypeParams.threeLeggedOauth. To read it directly:
gcloud agent-identity auth-providers describe github-oauth-provider \
    --project="${PROJECT_ID}" --location="us-central1" \
    --format="value(authProviderTypeParams.threeLeggedOauth.redirectUrl)"
It looks like https://agentidentitycredentials.googleapis.com/v1/projects/YOUR_PROJECT_ID/locations/us-central1/authProviders/github-oauth-provider/oauthcallback.
Step B: Register the OAuth App in GitHub
- Navigate to the GitHub Developer Settings page and click Register a new OAuth app.
- For the Homepage URL, enter the URL of your frontend application (e.g.,
http://localhost:8501for local prototyping. You can later change it to your deployed URL in production. - Set the Redirect URI to the
redirectUrlretrieved in the previous step. - Click Register application, then click Generate a new client secret and save both the Client ID and Client Secret.
Step C: Add the GitHub credentials to the auth provider
Replace your Project ID, Client ID and Client Secret and run this command:
gcloud agent-identity auth-providers update github-oauth-provider \
    --project="YOUR_PROJECT_ID" \
    --location="us-central1" \
    --three-legged-oauth-client-id="YOUR_GITHUB_CLIENT_ID" \
    --three-legged-oauth-client-secret="YOUR_GITHUB_CLIENT_SECRET"
The command echoes the provider back with clientId visible; the secret is not echoed.
👉 With this step completed, your Google Cloud Auth Manager is now fully configured with your GitHub OAuth application credentials, setting up Google Cloud to act as the secure vault that handles consent and token lifecycles.
5. Switch PAT token to Auth Manager
Now that the Auth Manager is fully configured, the next step is to update the agent's tool code. Replace your app/tools.py with the following code.
👉 Replace the project ID and location in the OAUTH_PROVIDER_NAME variable below.
# app/tools.py

from __future__ import annotations
import os
from google.adk.auth.credential_manager import CredentialManager
from google.adk.integrations.agent_identity import GcpAuthProvider, GcpAuthProviderScheme
from google.adk.tools.mcp_tool import McpToolset
from google.adk.tools.mcp_tool.mcp_session_manager import StreamableHTTPConnectionParams

# 1. Register the GCP Auth Provider in the global Credential Manager
CredentialManager.register_auth_provider(GcpAuthProvider())

# 2. Replace YOUR_PROJECT_ID with your project ID.
OAUTH_PROVIDER_NAME = "projects/YOUR_PROJECT_ID/locations/us-central1/authProviders/github-oauth-provider"

# 3. The frontend callback URL where the user is redirected after authorizing GitHub. Resolved from the environment variable.
OAUTH_CONTINUE_URI = os.environ.get(
    "OAUTH_CONTINUE_URI",
    "http://localhost:8501/validateUserId"
)

def github_toolset() -> McpToolset:
    """Returns the McpToolset using 3LO credentials retrieved via GCP Auth Manager."""
    auth_scheme = GcpAuthProviderScheme(
        name=OAUTH_PROVIDER_NAME,
        # Required to read private repositories. Auth Manager currently supports a
        # single scope for GitHub.
        scopes=["repo"],
        continue_uri=OAUTH_CONTINUE_URI,
    )
    return McpToolset(
        connection_params=StreamableHTTPConnectionParams(
            url="https://api.githubcopilot.com/mcp/",
            headers={
                "X-MCP-Toolsets": "all",
                "X-MCP-Readonly": "true",
            },
        ),
        auth_scheme=auth_scheme,
    )
Understanding the Tool Code
The key change is auth_scheme. Attaching it to the toolset means that whenever the agent calls GitHub, ADK first asks Auth Manager for that user's token — and if there isn't one yet, it prompts the user to sign in instead of failing. The hardcoded GITHUB_TOKEN is gone entirely.
6. Deploy Agent to Agent Runtime
Now that we have updated the GitHub MCP tool to use Auth Manager in place, the next step is to deploy the agent to Agent Runtime. Deploying it with Agent Identity enabled provisions a unique SPIFFE ID for the agent.
Let's begin by initializing the deployment configuration for the project. Run in terminal:
agents-cli scaffold enhance . --deployment-target agent_runtime --prototype --yes
This command inspects your project structure for ADK compatibility, prepares the underlying container packaging configurations, and generates an agents-cli-manifest.yaml file in your project root pre-populated with default deployment settings.
👉 Open the newly created agents-cli-manifest.yaml file and verify or update the region field to us-central1 to ensure your agent is deployed in the same region as your auth provider:
region: "us-central1"
Deploy the Agent with an Agent Identity
Deploy with adk deploy agent_engine. This provisions the agent with its own Agent Identity — a unique, SPIFFE-backed cryptographic identity belonging to this deployment, which the agent uses to authenticate to Auth Manager and other Google Cloud services.
👉 Replace YOUR_PROJECT_ID before running these commands:
# Request a SPIFFE-backed Agent Identity for this deployment
echo '{ "identity_type": "AGENT_IDENTITY" }' > app/.agent_engine_config.json

# Generate the dependency list the build will install
uv export --no-emit-workspace --no-hashes --format requirements.txt \
    --output-file app/requirements.txt

uv run adk deploy agent_engine app \
    --project="YOUR_PROJECT_ID" \
    --region="us-central1"
The deployment takes a few minutes to build and upload the container. Once finished, the CLI prints the deployed resource name. Take note of the reasoningEngines/ENGINE_ID value, as you need it to authorize your agent and to point the UI client at it.
Authorize the Agent Identity
Now that your agent is running in the cloud, it needs permission to access the credentials stored in Auth Manager. By default, the agent's SPIFFE identity has no access to external cloud resources.
Run the following gcloud command to grant the roles/agentidentity.user role to your agent's identity on the auth provider resource. This grants your agent the exact permissions it needs to request user tokens from the vault, and nothing wider.
👉 Replace YOUR_PROJECT_ID, YOUR_ORG_ID, YOUR_PROJECT_NUMBER, and YOUR_ENGINE_ID (the engine ID is in the deploy output above).
To obtain YOUR_ORG_ID, run the command below:
gcloud projects get-ancestors $(gcloud config get-value project) \
  --filter="type=organization" \
  --format="value(id)"
gcloud agent-identity auth-providers add-iam-policy-binding github-oauth-provider \
    --project="YOUR_PROJECT_ID" \
    --location="us-central1" \
    --role="roles/agentidentity.user" \
    --member="principal://agents.global.org-YOUR_ORG_ID.system.id.goog/resources/aiplatform/projects/YOUR_PROJECT_NUMBER/locations/us-central1/reasoningEngines/YOUR_ENGINE_ID"
Now grant your own account the same role on the provider. The UI client you run in the next step calls the credential-finalization API with your Application Default Credentials, so without this the consent flow fails with a 403 on agentidentity.authProviders.retrieveCredentials:
gcloud agent-identity auth-providers add-iam-policy-binding github-oauth-provider \
    --project="YOUR_PROJECT_ID" \
    --location="us-central1" \
    --role="roles/agentidentity.user" \
    --member="user:YOUR_EMAIL_ADDRESS"
7. Understanding the 3LO Consent Flow
Now that the agent is deployed to Agent Runtime with a secure Agent Identity, the next step is to provide a custom frontend interface for users to chat with it. More importantly, Google Cloud Auth Manager requires a client application callback handler to complete the authentication loop.
While Google Cloud Auth Manager securely manage user credentials inside a vault, it cannot finalize the OAuth token exchange on its own. The 3LO handshake relies on the client application to bridge the gap:
- When a user authorizes the GitHub app, GitHub redirects them back to the Agent Identity auth provider's
redirectUrl. - Auth Manager then redirects the user's browser popup back to a client-side callback URL (
continue_uri). - It is the client application's responsibility to intercept this redirect, read the nonce from the browser's cookies, and call Google Cloud's
credentials:finalizeendpoint to complete the handshake. - Once the client finalizes the exchange, Google Cloud securely saves the token in the auth provider's vault, allowing the agent to call the GitHub tool.
Without this custom client hosting the callback endpoint, the handshake remains incomplete, and the vault cannot store the credentials.
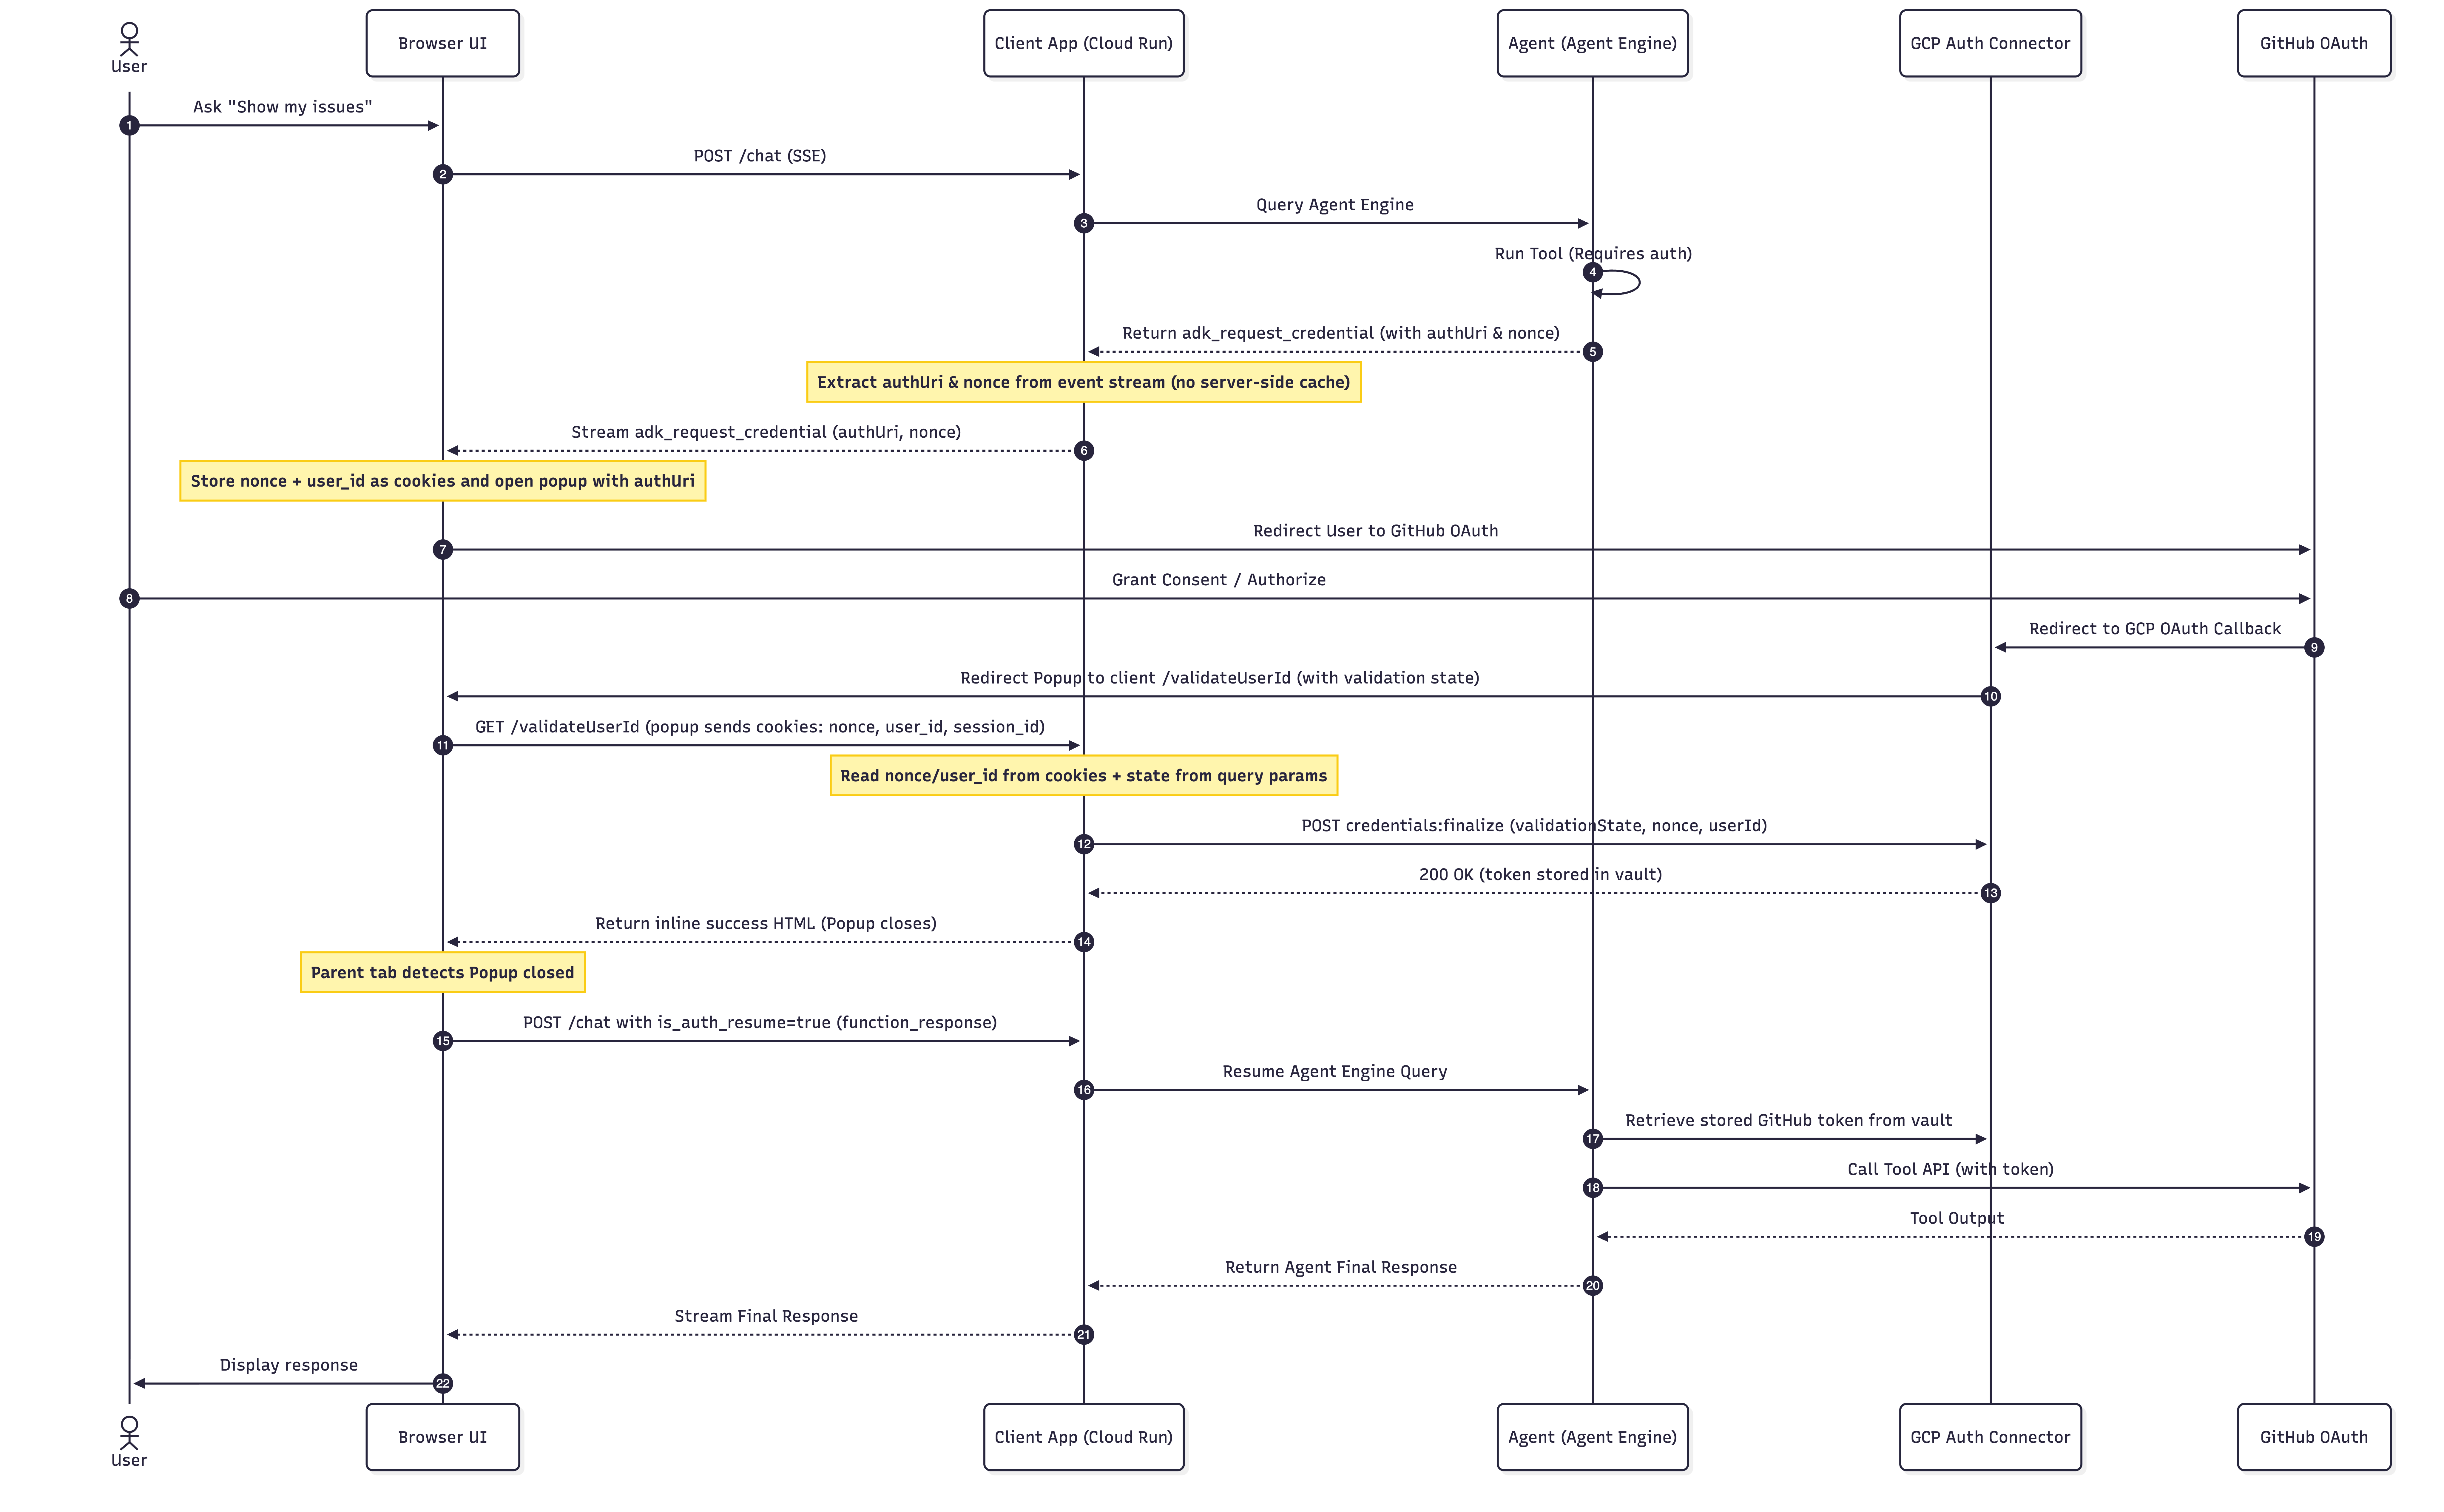
The interactive OAuth 3LO flow spans across multiple layers. Here is the full execution lifecycle of a tool request. We'll break this down in the explanation below and in the next step.
👉 Click on the image to enlarge it.
The Client's Core Responsibilities in the Handshake
- Relay the consent challenge (Steps 5-6): the agent emits an
adk_request_credentialcarrying the consent URL and a single-use nonce; the client opens the popup and stores the nonce as a cookie. - Host the redirect callback (Steps 10-11):
/validateUserId, where Auth Manager sends the popup after consent. - Finalize the token (Steps 12-14): combine the validation state from the redirect with the cached nonce and call
credentials:finalize, which stores the token in the vault.
Building your own client
You don't need to write this client for the lab — the next step runs a pre-built one. When you come to implement this in your own application, these are the two references to work from:
- Update your client-side application in the Auth Manager documentation, which covers handling the consent challenge and calling
credentials:finalize. - The runnable sample client in the adk-python repository. Read
main.pythere for a complete, working implementation of the three responsibilities above.
8. Run the UI Client Locally
As we traced in the 3LO Consent Flow sequence diagram, Auth Manager needs to redirect the browser popup back to a client-side callback endpoint. The sample client hosts that endpoint at /validateUserId. Let's run it locally.
Copy client files to Local
Navigate to the gcp_auth/client folder in the adk-python GitHub repository. This folder contains the assets required to build our chat client container.
👉 Copy all the files under gcp_auth/client to your local environment:
main.py: The FastAPI application script containing the token finalization callback (/validateUserId) that we discussed in the previous section.static/: Contains the HTML pages.
Alternatively, you can also do a sparse checkout of the folder:
git clone --filter=blob:none --no-checkout https://github.com/google/adk-python.git
cd adk-python
git sparse-checkout init --cone
git sparse-checkout set contributing/samples/integrations/gcp_auth/client
git checkout
Run the client
- Navigate to the
clientfolder that you just copied:cd adk-python/contributing/samples/integrations/gcp_auth/client - Create a virtual environment and install the client's dependencies. The folder ships a
requirements.txtand nopyproject.toml, souv run uvicorn ...on its own fails withFailed to spawn: uvicorn:uv venv --python 3.13 .venv source .venv/bin/activate uv pip install --python .venv/bin/python -r requirements.txt - Point the client at the agent you deployed, then start it on port
8501:export GOOGLE_CLOUD_PROJECT=YOUR_PROJECT_ID export GOOGLE_CLOUD_LOCATION=us-central1 export AGENT_ID=YOUR_ENGINE_ID .venv/bin/uvicorn main:app --port 8501 - Verify that the server started successfully and is listening on
http://localhost:8501.
9. Test the OAuth Flow
Now that all services are deployed, IAM bindings are configured, and environment variables are set, you are ready to test the secure end-to-end user-delegated authorization flow!
Step A: Initiate Tool Execution
- Open a browser tab and navigate to your Client URL:
http://localhost:8501. - In the left pane, set the Agent Type to
Remote Agent Engine. - Type your Google Cloud Project and Location. Click on
Load Remote Agents. This should load all the agents deployed to your project. - Select the right agent from the dropdown and save the settings.
- In the chat box, type:
Fetch my contributions across my private repositories over the last 6 months - Observe the chat UI: Because the agent has no credentials for your user session yet, it receives an authentication challenge and displays the Authentication Required card in the conversation thread.
Step B: Complete the 3-Legged OAuth Consent
- A separate browser popup window will open, redirecting you through Google Cloud's Auth Manager to the GitHub OAuth authorization page.
- Review the requested permissions and click Authorize.
- GitHub will redirect back to Google Cloud, which redirects the popup to your
localhostcallback URL/validateUserId. - The callback service processes and finalizes the credentials handshake.
Step C: Resume
- Once the popup window closes, the parent chat tab automatically detects the closure.
- The frontend sends a resume payload back to the agent.
- The agent retrieves the newly exchanged token securely from Google Cloud Auth Manager, calls the GitHub MCP tools on your behalf, and streams data from your private repositories directly back into the chat window — data the agent could not have reached on its own.
Step D: Inspect the Cloud Logs
To verify that the token exchange and finalization were processed securely:
- Go to the Google Cloud Console Logs Explorer.
- Locate the server logs confirming the nonce extraction and successful validation:
INFO:secure-agent-client:Caching consent nonce for session_id: session-xxxxxxx INFO:secure-agent-client:Successfully finalized auth provider credentials. - Inspect Agent Runtime Logs: Alternatively, you can view execution logs directly inside the Agent Platform Console:
- Navigate to the Agent Runtime Console.
- Click on your deployed agent from the list.
- Switch to the Playground tab; this will display the live agent logs in the bottom pane, showing you the agent's reasoning loop, tool execution details and token retrieval lifecycle in real time.
10. Clean Up
To avoid ongoing charges on Google Cloud, clean up your deployed resources:
# Follow the instructions here to delete the deployed Agent Runtime resource
# https://docs.cloud.google.com/gemini-enterprise-agent-platform/scale/runtime/manage-deployed-agents#console_3

# Delete the auth provider
gcloud agent-identity auth-providers delete github-oauth-provider \
    --project=YOUR_PROJECT_ID --location=us-central1

# Note: deleted providers sit in soft-delete for 30 days, and the name is not
# reusable until roughly a day after that. Pick a fresh name if you repeat this lab.

# Optionally, you could also delete your Google Cloud Project
gcloud projects delete YOUR_PROJECT_ID

# Optionally, delete the GitHub PAT Token and the OAuth app:
# https://github.com/settings/personal-access-tokens
Clean up Local Files
Optionally, to fully clean up your local environment:
- Stop the local uvicorn server by pressing Ctrl+C in the terminal where it is running.
- Remove the project directories created during this lab:
# cd to the correct folder
rm -rf secure-agent-demo client adk-python
11. Congratulations!
You have successfully built and secured an agent that acts on behalf of the signed-in user!
What you learned:
- Agent System Identity: How the agent operates under its own Account identity to securely interface with GCP infrastructure, manage telemetry logs, and call credential finalization APIs.
- User Delegated Identity: How the agent requests authorization to act on the user's behalf on external platforms (like GitHub) by triggering a 3-legged OAuth (3LO) consent flow.
- Secure Tool Integration: How to connect ADK Agents to Model Context Protocol (MCP) servers using Google Cloud Auth Manager to dynamically fetch user tokens instead of using hardcoded secrets.
- IAM Policy Configuration: How to set up fine-grained permission bindings to authorize both the Agent Runtime identity and your own account on the auth provider.
Further Reading
- Agent Identity Auth Manager to understand authentication flow configuration and scopes.
- Agent Runtime Overview
- ADK Documentation
- Model Context Protocol