
1. 소개
AI 에이전트의 유용성은 액세스할 수 있는 데이터에 따라 결정됩니다. 대부분의 실제 데이터는 데이터베이스에 저장되어 있으며, 에이전트를 데이터베이스에 연결하려면 일반적으로 연결 관리, 쿼리 로직을 작성하고 에이전트 코드 내에 파이프라인을 삽입해야 합니다. 데이터베이스 액세스가 필요한 모든 에이전트가 이 작업을 반복하며, 쿼리 변경이 있을 때마다 에이전트를 다시 배포해야 합니다.
이 Codelab에서는 다른 접근 방식을 보여줍니다. 표준 SQL 쿼리, 벡터 유사성 검색, 자동 임베딩 생성 등 데이터베이스 도구를 YAML 파일로 선언하면 데이터베이스용 MCP 도구 상자가 모든 데이터베이스 작업을 MCP 서버로 처리합니다. 에이전트 코드는 최소한으로 유지됩니다. 도구를 로드하고 Gemini가 호출할 도구를 결정하도록 합니다.
빌드할 항목
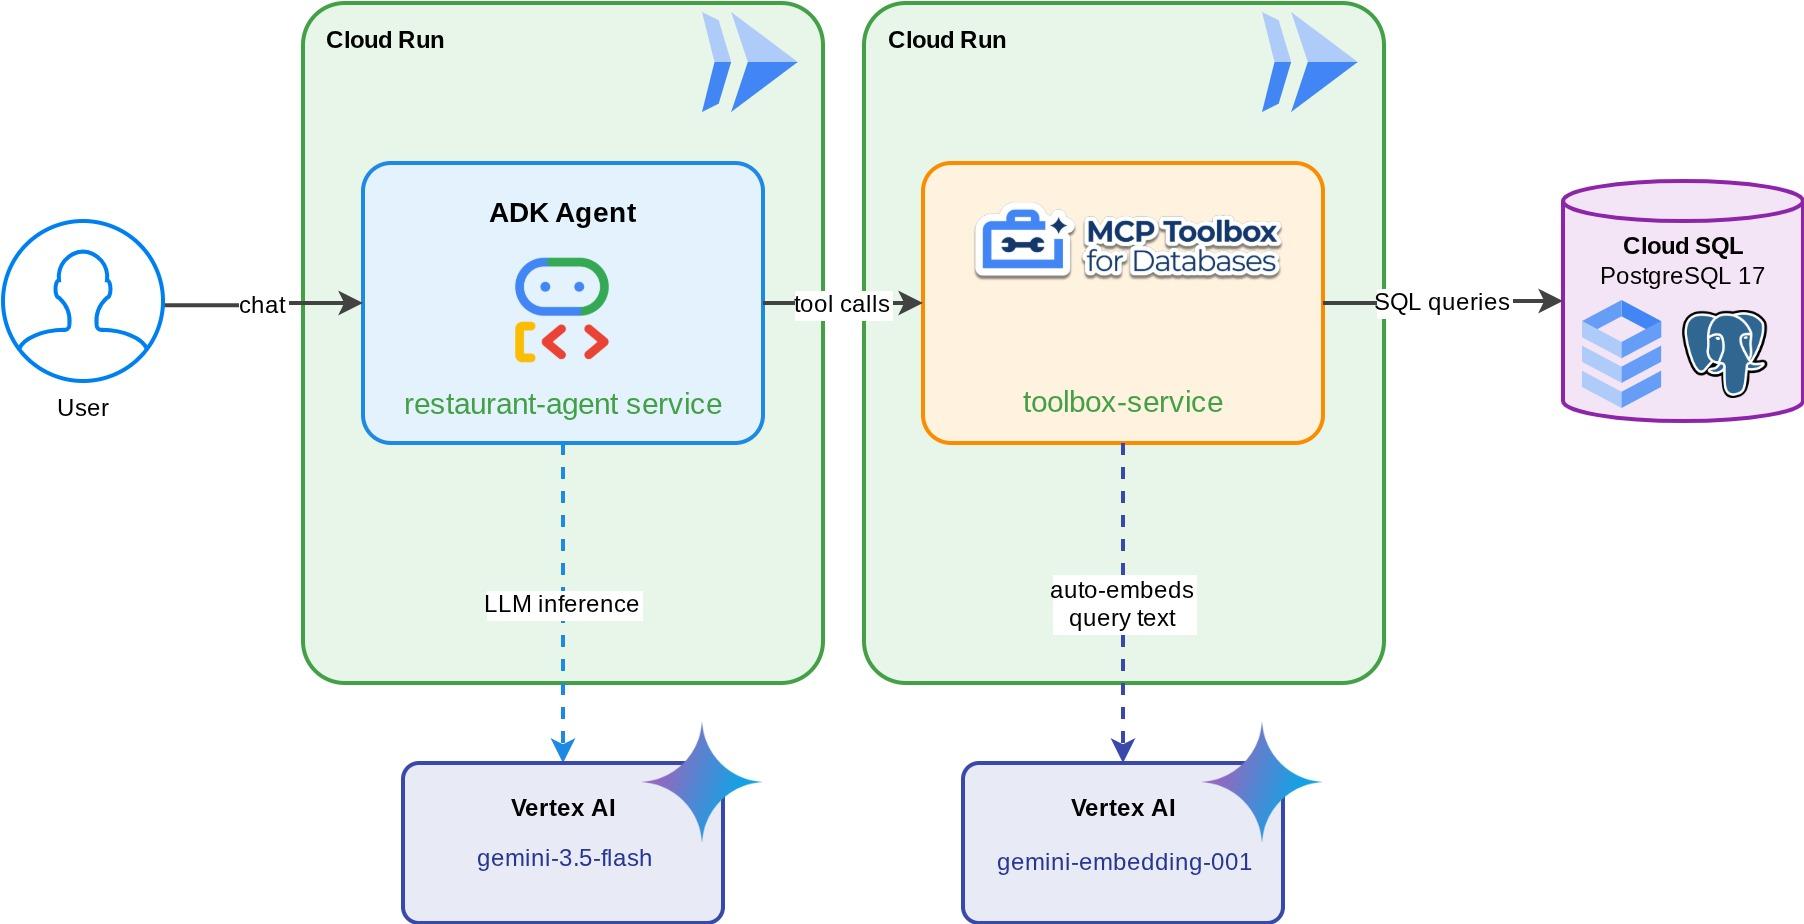
'Foodie Finds'의 Restaurant Concierge: Gemini로 구동되는 ADK 에이전트로, 식사하는 사람이 표준 필터 (카테고리, 요리 유형)를 사용하여 레스토랑 메뉴를 탐색하고 '매콤한 채식 요리를 먹고 싶어'와 같은 자연어 설명을 통해 요리를 찾을 수 있습니다. 에이전트는 데이터베이스용 MCP 도구 상자를 통해 Cloud SQL PostgreSQL 데이터베이스에서 읽고 씁니다. 이 도구 상자는 벡터 검색을 위한 자동 임베딩 생성을 비롯한 모든 데이터베이스 액세스를 처리합니다. 결국 도구 상자와 에이전트 모두 Cloud Run에서 실행됩니다.
학습할 내용
- MCP (모델 컨텍스트 프로토콜)가 AI 에이전트의 도구 액세스를 표준화하는 방법과 데이터베이스용 MCP 도구 상자가 이를 데이터베이스 작업에 적용하는 방법
- 데이터베이스용 MCP 도구 상자를 ADK 에이전트와 Cloud SQL PostgreSQL 간의 미들웨어로 설정
tools.yaml에서 선언적으로 데이터베이스 도구 정의 - 에이전트에 데이터베이스 코드가 없음ToolboxToolset를 사용하여 실행 중인 도구 상자 서버에서 도구를 로드하는 ADK 에이전트 빌드- Cloud SQL의 기본 제공
embedding()함수를 사용하여 벡터 임베딩을 생성하고pgvector로 시맨틱 검색 사용 설정 - 쓰기 작업 시 자동 벡터 수집을 위해
valueFromParam기능 사용 - Toolbox 서버와 ADK 에이전트를 모두 Cloud Run에 배포
기본 요건
- 평가판 결제 계정이 있는 Google Cloud 계정
- Python 및 SQL에 대한 기본적인 지식
- Cloud Database 및 ADK 사용 경험이 있으면 도움이 됩니다.
2. 환경 설정
이 단계에서는 Cloud Shell 환경을 준비하고, Google Cloud 프로젝트를 구성하고, 참조 저장소를 클론합니다.
Cloud Shell 열기
브라우저에서 Cloud Shell을 엽니다. Cloud Shell은 이 Codelab에 필요한 모든 도구가 사전 구성된 환경을 제공합니다. 메시지가 표시되면 승인을 클릭합니다.
그런 다음 '보기' -> '터미널'을 클릭하여 터미널을 엽니다. 인터페이스는 다음과 유사해야 합니다.
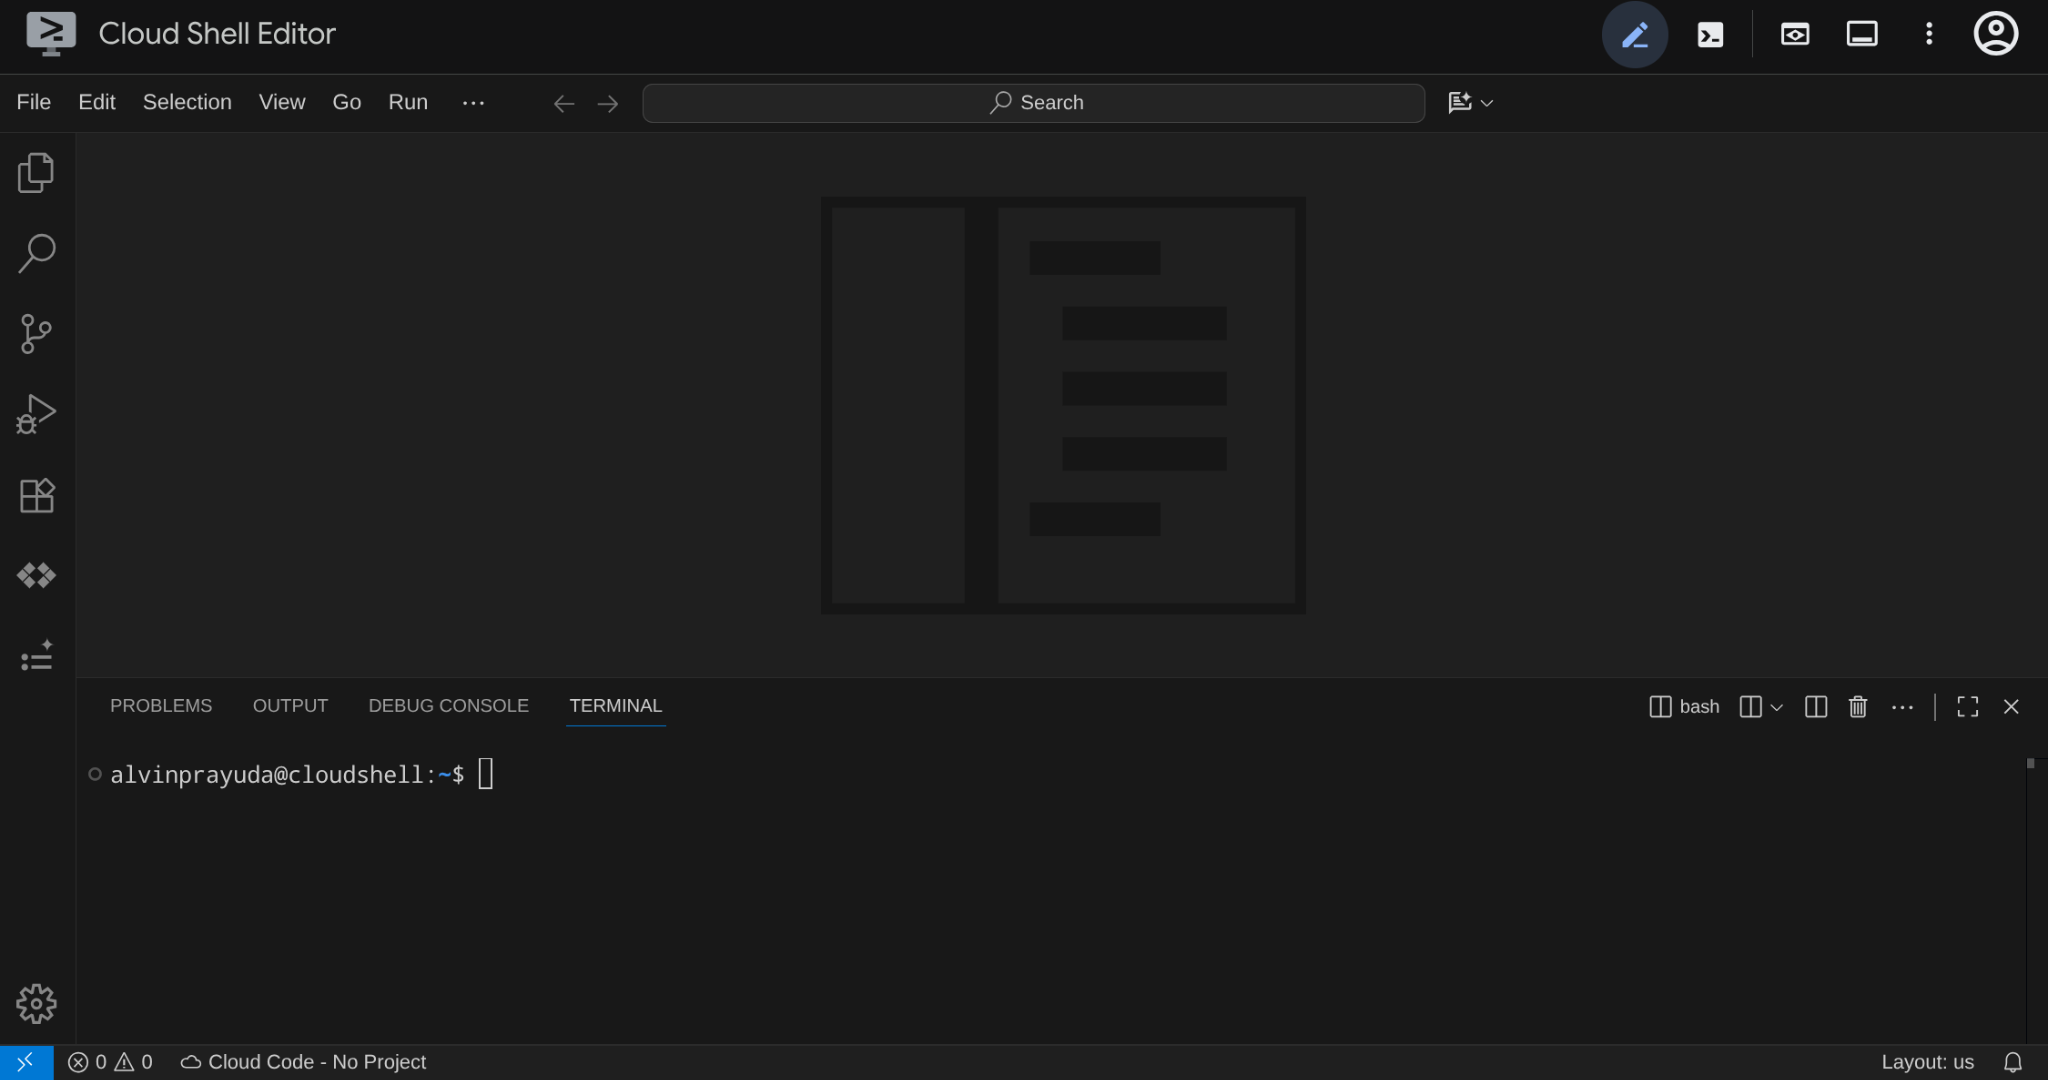
이것이 기본 인터페이스가 됩니다. 상단에 IDE, 하단에 터미널이 있습니다.
작업 디렉터리 설정하기
작업 디렉터리를 만듭니다. 이 Codelab에서 작성하는 모든 코드는 여기에 있습니다.
mkdir -p ~/build-agent-adk-toolbox-cloudsql
cloudshell workspace ~/build-agent-adk-toolbox-cloudsql && cd ~/build-agent-adk-toolbox-cloudsql
그런 다음 시드 스크립트와 로그 등을 관리할 여러 디렉터리를 준비합니다.
mkdir -p ~/build-agent-adk-toolbox-cloudsql/scripts
mkdir -p ~/build-agent-adk-toolbox-cloudsql/logs
Google Cloud 프로젝트 설정
위치 변수를 사용하여 .env 파일을 만듭니다.
# For Vertex AI / Gemini API calls
echo "GOOGLE_CLOUD_LOCATION=global" > .env
# For Cloud SQL, Cloud Run, Artifact Registry
echo "REGION=us-central1" >> .env
터미널에서 프로젝트 설정을 간소화하려면 이 프로젝트 설정 스크립트를 작업 디렉터리에 다운로드하세요.
curl -sL https://raw.githubusercontent.com/alphinside/cloud-trial-project-setup/main/setup_verify_trial_project.sh -o setup_verify_trial_project.sh
스크립트를 실행합니다. 무료 체험 결제 계정을 확인하고, 새 프로젝트를 만들거나 기존 프로젝트를 검증하고, 프로젝트 ID를 현재 디렉터리의 .env 파일에 저장하고, gcloud에서 활성 프로젝트를 설정합니다.
bash setup_verify_trial_project.sh && source .env
스크립트는 다음을 수행합니다.
- 활성 상태의 무료 체험 결제 계정이 있는지 확인
.env에 기존 프로젝트가 있는지 확인합니다 (있는 경우).- 새 프로젝트를 만들거나 기존 프로젝트를 재사용합니다.
- 무료 체험 결제 계정을 프로젝트에 연결
- 프로젝트 ID를
.env에 저장합니다. - 프로젝트를 활성
gcloud프로젝트로 설정
Cloud Shell 터미널 프롬프트의 작업 디렉터리 옆에 있는 노란색 텍스트를 확인하여 프로젝트가 올바르게 설정되었는지 확인합니다. 프로젝트 ID가 표시되어야 합니다.

필수 API 활성화
다음으로 상호작용할 제품에 대해 몇 가지 API를 사용 설정해야 합니다.
gcloud services enable \
  aiplatform.googleapis.com \
  sqladmin.googleapis.com \
  compute.googleapis.com \
  run.googleapis.com \
  cloudbuild.googleapis.com \
  artifactregistry.googleapis.com
- Vertex AI API (
aiplatform.googleapis.com) - 에이전트가 Gemini 모델을 사용하고, 도구 상자가 벡터 검색을 위해 임베딩 API를 사용합니다. - Cloud SQL Admin API (
sqladmin.googleapis.com) - PostgreSQL 인스턴스를 프로비저닝하고 관리합니다. - Compute Engine API (
compute.googleapis.com) - Cloud SQL 인스턴스를 만드는 데 필요합니다. - Cloud Run, Cloud Build, Artifact Registry - 이 Codelab의 뒷부분에 나오는 배포 단계에서 사용됩니다.
3. 데이터베이스 초기화 스크립트 준비
이 단계에서는 Cloud SQL 인스턴스 생성을 시작하고 인스턴스가 준비될 때까지 기다린 후 데이터베이스를 만들고, 채용 정보를 시드하고, 삽입을 생성하는 자동 설정 스크립트를 실행합니다. 이 모든 작업이 한 번에 이루어집니다.
먼저 데이터베이스 비밀번호를 .env 파일에 추가하고 다시 로드합니다.
echo "DB_PASSWORD=restaurant-pwd" >> .env
echo "DB_INSTANCE=restaurant-instance" >> .env
echo "DB_NAME=restaurant_db" >> .env
source .env
인스턴스 및 데이터베이스 생성을 위한 Bash 스크립트 만들기
그런 다음 다음 명령어를 사용하여 scripts/setup_database.sh 스크립트를 만듭니다.
mkdir -p ~/build-agent-adk-toolbox-cloudsql/scripts
cloudshell edit scripts/setup_database.sh
그런 다음 다음 코드를 scripts/setup_database.sh 파일에 복사합니다.
#!/bin/bash
set -e
source .env

echo "================================================"
echo "Database Setup"
echo "================================================"
echo ""

# Step 1: Create Cloud SQL instance
echo "[1/5] Creating Cloud SQL instance..."

# Check if instance already exists
if gcloud sql instances describe "$DB_INSTANCE" --quiet >/dev/null 2>&1; then
    echo "      Instance already exists"
else
    echo "      Creating instance (takes 5-10 minutes)..."
    gcloud sql instances create "$DB_INSTANCE" \
        --database-version=POSTGRES_17 \
        --tier=db-custom-1-3840 \
        --edition=ENTERPRISE \
        --region="$REGION" \
        --root-password="$DB_PASSWORD" \
        --enable-google-ml-integration \
        --database-flags cloudsql.enable_google_ml_integration=on \
        --quiet
fi
echo "      ✓ Instance ready"
echo ""

# Step 2: Verify instance is ready
echo "[2/5] Verifying instance state..."

STATE=$(gcloud sql instances describe "$DB_INSTANCE" --format='value(state)')

if [ "$STATE" != "RUNNABLE" ]; then
    echo "ERROR: Instance not ready (state: $STATE)"
    exit 1
fi
echo "      ✓ Instance is RUNNABLE"
echo ""

# Step 3: Grant IAM permissions
echo "[3/5] Granting Vertex AI permissions..."

SERVICE_ACCOUNT=$(gcloud sql instances describe "$DB_INSTANCE" \
    --format='value(serviceAccountEmailAddress)')

if [ -z "$SERVICE_ACCOUNT" ]; then
    echo "ERROR: Could not retrieve service account"
    exit 1
fi

gcloud projects add-iam-policy-binding "$GOOGLE_CLOUD_PROJECT" \
    --member="serviceAccount:$SERVICE_ACCOUNT" \
    --role="roles/aiplatform.user" \
    --quiet

echo "      ✓ Permissions granted"
echo ""

# Step 4: Create database
echo "[4/5] Creating database..."

# Check if database already exists
if gcloud sql databases describe "$DB_NAME" \
    --instance="$DB_INSTANCE" --quiet >/dev/null 2>&1; then
    echo "      Database already exists"
else
    gcloud sql databases create "$DB_NAME" \
        --instance="$DB_INSTANCE" \
        --quiet
fi

echo "      ✓ Database '$DB_NAME' ready"
echo ""

# Step 5: Seed database and generate embeddings
echo "[5/5] Seeding database and generating embeddings..."

SCRIPT_DIR="$(cd "$(dirname "${BASH_SOURCE[0]}")" && pwd)"
SETUP_SCRIPT="${SCRIPT_DIR}/setup_restaurant_db.py"

if [ ! -f "$SETUP_SCRIPT" ]; then
    echo "ERROR: Setup script not found: $SETUP_SCRIPT"
    exit 1
fi

uv run "$SETUP_SCRIPT"

echo ""
echo "================================================"
echo "Setup complete!"
echo "================================================"
echo ""
데이터 시드를 위한 Python 스크립트 만들기
그런 다음 아래 명령어를 사용하여 시드 스크립트 Python 파일 scripts/setup_restaurant_db.py을 만듭니다.
cloudshell edit scripts/setup_restaurant_db.py
그런 다음 다음 코드를 scripts/setup_restaurant_db.py 파일에 복사합니다.
import os
import sys
from pathlib import Path
from dotenv import load_dotenv
from google.cloud.sql.connector import Connector
import pg8000
import time

# Load environment variables from .env file
env_path = Path(__file__).parent.parent / '.env'
load_dotenv(env_path)
EMBEDDING_MODEL='gemini-embedding-001'

# Verify required environment variables
required_vars = ['GOOGLE_CLOUD_PROJECT', 'REGION', 'DB_PASSWORD']
missing_vars = [var for var in required_vars if not os.environ.get(var)]

if missing_vars:
    print(f"ERROR: Missing required environment variables: {', '.join(missing_vars)}", file=sys.stderr)
    print(f"", file=sys.stderr)
    print(f"Expected .env file location: {env_path}", file=sys.stderr)
    if not env_path.exists():
        print(f"✗ File not found at that location", file=sys.stderr)
    else:
        print(f"✓ File exists but is missing the variables above", file=sys.stderr)
    print(f"", file=sys.stderr)
    print(f"Make sure your .env file contains:", file=sys.stderr)
    for var in missing_vars:
        print(f"  {var}=<value>", file=sys.stderr)
    sys.exit(1)

# Menu items data
MENU_ITEMS = [
    ("Truffle Mushroom Risotto", "Italian", "Main Course",
     "Arborio rice, truffle oil, porcini mushrooms, parmesan, white wine",
     "$28", "Vegetarian, Gluten-Free", True,
     "A creamy, luxurious risotto made with arborio rice slow-cooked in white wine and mushroom broth, finished with shaved black truffle and aged parmesan. The porcini mushrooms add a deep, earthy flavor that pairs beautifully with the delicate truffle oil drizzled on top."),
    ("Spicy Tuna Tartare", "Japanese", "Appetizer",
     "Ahi tuna, sriracha, sesame oil, avocado, crispy wonton",
     "$22", "Gluten-Free, Dairy-Free", True,
     "Fresh ahi tuna diced and tossed with sriracha aioli, toasted sesame oil, and lime juice, served atop creamy avocado slices with crispy wonton chips. A perfect balance of heat, richness, and crunch inspired by modern Japanese fusion cuisine."),
    ("Lamb Kofta Kebab", "Middle Eastern", "Main Course",
     "Ground lamb, cumin, coriander, yogurt sauce, flatbread",
     "$24", "Halal", True,
     "Hand-formed spiced lamb kebabs grilled over charcoal, seasoned with cumin, coriander, and sumac. Served with warm flatbread, tangy yogurt-cucumber sauce, and a fresh herb salad. A classic Middle Eastern street food elevated with premium ingredients."),
    ("Pad Thai", "Thai", "Main Course",
     "Rice noodles, shrimp, tamarind, peanuts, bean sprouts, lime",
     "$19", "Gluten-Free, Dairy-Free", True,
     "Stir-fried rice noodles with tiger shrimp, scrambled egg, and a sweet-sour tamarind sauce, topped with crushed peanuts, fresh bean sprouts, and a squeeze of lime. This classic Thai street food dish balances sweet, sour, salty, and umami in every bite."),
    ("Margherita Pizza", "Italian", "Main Course",
     "San Marzano tomatoes, fresh mozzarella, basil, olive oil",
     "$18", "Vegetarian", True,
     "A Neapolitan-style pizza with a thin, charred crust topped with crushed San Marzano tomatoes, creamy buffalo mozzarella, fresh basil leaves, and a drizzle of extra virgin olive oil. Simple, classic, and made with imported Italian ingredients."),
    ("Miso Glazed Black Cod", "Japanese", "Main Course",
     "Black cod, white miso, mirin, sake, pickled ginger",
     "$36", "Gluten-Free, Dairy-Free", True,
     "Buttery black cod marinated for 72 hours in a sweet white miso glaze with mirin and sake, then broiled until caramelized. Served with pickled ginger and steamed bok choy. A signature dish inspired by Nobu's iconic preparation."),
    ("Caesar Salad", "American", "Appetizer",
     "Romaine lettuce, parmesan, croutons, anchovy dressing",
     "$14", "Contains Gluten", True,
     "Crisp romaine hearts tossed with a house-made anchovy-garlic dressing, shaved parmesan, and golden sourdough croutons. A timeless salad that serves as the perfect light starter or side dish with grilled proteins."),
    ("Chicken Tikka Masala", "Indian", "Main Course",
     "Chicken thigh, tomato cream sauce, garam masala, basmati rice",
     "$21", "Gluten-Free", True,
     "Tender chunks of tandoori-marinated chicken simmered in a rich, creamy tomato sauce spiced with garam masala, cumin, and fenugreek. Served over fragrant basmati rice with warm garlic naan on the side."),
    ("Chocolate Lava Cake", "French", "Dessert",
     "Dark chocolate, butter, eggs, vanilla, powdered sugar",
     "$15", "Vegetarian", True,
     "A warm, individual-sized chocolate cake with a molten dark chocolate center that flows when you break through the delicate outer shell. Made with 70% Belgian dark chocolate and served with a scoop of vanilla bean ice cream."),
    ("Pho Bo", "Vietnamese", "Main Course",
     "Rice noodles, beef brisket, star anise, cinnamon, bean sprouts, Thai basil",
     "$17", "Gluten-Free, Dairy-Free", True,
     "A deeply aromatic beef broth simmered for 12 hours with star anise, cinnamon, and charred ginger, ladled over rice noodles and thinly sliced beef brisket. Served with fresh Thai basil, bean sprouts, jalapeño, and lime for the table to customize."),
    ("Lobster Bisque", "French", "Appetizer",
     "Lobster, heavy cream, cognac, tarragon, cayenne",
     "$19", "Gluten-Free", True,
     "A velvety smooth soup made from roasted lobster shells, finished with heavy cream, a splash of cognac, and fresh tarragon. Each bowl is garnished with tender lobster meat and a pinch of cayenne for subtle warmth."),
    ("Falafel Plate", "Middle Eastern", "Main Course",
     "Chickpeas, herbs, tahini, pickled vegetables, hummus",
     "$16", "Vegan, Gluten-Free", True,
     "Crispy-on-the-outside, fluffy-on-the-inside chickpea fritters seasoned with fresh parsley, cilantro, and cumin. Served with creamy tahini sauce, house-made hummus, pickled turnips, and warm pita bread."),
    ("Crème Brûlée", "French", "Dessert",
     "Heavy cream, vanilla bean, egg yolks, caramelized sugar",
     "$13", "Vegetarian, Gluten-Free", True,
     "A classic French custard made with Madagascar vanilla bean and farm-fresh egg yolks, topped with a perfectly torched layer of caramelized sugar that cracks with a satisfying snap. Rich, creamy, and elegantly simple."),
    ("Korean BBQ Short Ribs", "Korean", "Main Course",
     "Beef short ribs, soy sauce, sesame, garlic, pear marinade",
     "$32", "Dairy-Free", False,
     "Premium beef short ribs marinated overnight in a sweet and savory blend of soy sauce, Asian pear, garlic, and toasted sesame. Grilled tableside over charcoal and served with lettuce wraps, pickled daikon, and gochujang dipping sauce."),
    ("Tiramisu", "Italian", "Dessert",
     "Mascarpone, espresso, ladyfingers, cocoa, Marsala wine",
     "$14", "Vegetarian, Contains Gluten", True,
     "Layers of espresso-soaked ladyfingers and whipped mascarpone cream flavored with Marsala wine, dusted with premium Dutch cocoa powder. Made fresh daily and chilled for 24 hours to develop rich, complex flavors."),
]


def get_connection():
    """Create a connection to Cloud SQL using the connector."""
    project = os.environ['GOOGLE_CLOUD_PROJECT']
    region = os.environ['REGION']
    password = os.environ['DB_PASSWORD']
    instance = os.environ['DB_INSTANCE']
    database = os.environ['DB_NAME']

    connector = Connector()
    conn = connector.connect(
        f"{project}:{region}:{instance}",
        "pg8000",
        user="postgres",
        password=password,
        db=database
    )
    return conn, connector


def create_schema(cursor):
    """Create extensions and menu_items table."""
    cursor.execute("CREATE EXTENSION IF NOT EXISTS google_ml_integration")
    cursor.execute("CREATE EXTENSION IF NOT EXISTS vector")
    cursor.execute("""
        CREATE TABLE IF NOT EXISTS menu_items (
            id SERIAL PRIMARY KEY,
            name VARCHAR NOT NULL,
            cuisine_type VARCHAR NOT NULL,
            category VARCHAR NOT NULL,
            ingredients VARCHAR NOT NULL,
            price VARCHAR NOT NULL,
            dietary_tags VARCHAR NOT NULL,
            available BOOLEAN NOT NULL DEFAULT TRUE,
            description TEXT NOT NULL,
            description_embedding vector(3072)
        )
    """)


def seed_menu_items(cursor, conn):
    """Insert menu items."""
    cursor.execute("SELECT COUNT(*) FROM menu_items")
    existing_count = cursor.fetchone()[0]

    if existing_count > 0:
        print(f"      {existing_count} menu items already exist, skipping seed")
        return 0

    cursor.executemany("""
        INSERT INTO menu_items (name, cuisine_type, category, ingredients, price, dietary_tags, available, description)
        VALUES (%s, %s, %s, %s, %s, %s, %s, %s)
    """, MENU_ITEMS)
    conn.commit()
    return len(MENU_ITEMS)


def generate_embeddings(cursor, conn):
    """Generate embeddings using Cloud SQL's embedding() function."""
    cursor.execute("SELECT COUNT(*) FROM menu_items WHERE description_embedding IS NULL")
    null_count = cursor.fetchone()[0]

    if null_count == 0:
        print("      All menu items already have embeddings")
        return 0

    cursor.execute(f"""
        UPDATE menu_items
        SET description_embedding = embedding('{EMBEDDING_MODEL}', description)::vector
        WHERE description_embedding IS NULL
    """)
    rows_updated = cursor.rowcount
    conn.commit()
    return rows_updated


def main():
    conn, connector = get_connection()
    cursor = conn.cursor()

    try:
        create_schema(cursor)
        conn.commit()

        seeded = seed_menu_items(cursor, conn)
        if seeded > 0:
            print(f"      ✓ Inserted {seeded} menu items")

        # Waiting for vertex role propagation
        time.sleep(60)
        embedded = generate_embeddings(cursor, conn)
        if embedded > 0:
            print(f"      ✓ Generated {embedded} embeddings")

    except Exception as e:
        print(f"ERROR: {e}", file=sys.stderr)
        sys.exit(1)
    finally:
        cursor.close()
        conn.close()
        connector.close()


if __name__ == "__main__":
    main()
이제 다음 단계로 이동해 보겠습니다.
4. 데이터베이스 만들기 및 초기화
이제 스크립트를 실행할 준비가 되었습니다. 준비된 스크립트를 실행하려면 Python이 필요하므로 먼저 Python을 준비합니다.
Python 프로젝트 설정
uv는 Rust로 작성된 빠른 Python 패키지 및 프로젝트 관리자입니다 ( uv 문서). 이 Codelab에서는 Python 프로젝트를 유지관리할 때 속도와 단순성을 위해 이를 사용합니다.
Python 프로젝트를 초기화하고 필요한 종속 항목을 추가합니다.
uv init
uv add cloud-sql-python-connector --extra pg8000
uv add python-dotenv
여기서는 cloud-sql-python-connector Python SDK를 사용하여 애플리케이션 기본 사용자 인증 정보를 사용하여 인증된 데이터베이스 인스턴스와의 보안 연결을 초기화합니다.
설정 스크립트 실행
이제 다음 명령어를 사용하여 백그라운드에서 설정 스크립트를 실행하고 logs/atabase_setup.log 파일에 작성될 콘솔 출력을 검사할 수 있습니다. 이 작업이 완료될 때까지 기다리는 동안 다음 섹션을 계속 진행할 수 있습니다.
mkdir -p ~/build-agent-adk-toolbox-cloudsql/logs
bash scripts/setup_database.sh > logs/database_setup.log 2>&1 &
도구 상자 바이너리 다운로드
이 튜토리얼에서는 MCP 도구 상자를 사용합니다. 다행히도 Linux 환경에서 사용할 수 있는 사전 빌드된 바이너리가 함께 제공됩니다. 시간이 오래 걸리므로 백그라운드에서 다운로드해 보겠습니다. 다음 명령어를 실행하여 바이너리를 다운로드하고 logs/toolbox_dl.log에서 출력 로그를 검사합니다. 다운로드가 완료될 때까지 기다리는 동안 다음 섹션으로 계속 진행할 수 있습니다.
cd ~/build-agent-adk-toolbox-cloudsql
curl -O https://storage.googleapis.com/mcp-toolbox-for-databases/v1.1.0/linux/amd64/toolbox > logs/toolbox_dl.log 2>&1 &
설정 스크립트 scripts/setup_database.sh 이해하기
이제 이전에 구성한 설정 스크립트를 이해해 보겠습니다. 다음 프로세스를 실행합니다.
- 여기에서 실행하는 첫 번째 명령어는 다음 플래그가 지정된
gcloud sql instances create명령어입니다.
db-custom-1-3840는ENTERPRISE버전에서 가장 작은 전용 코어 Cloud SQL 등급 (vCPU 1개, RAM 3.75GB)입니다. 자세한 내용은 여기를 참고하세요. Vertex AI ML 통합에는 전용 코어가 필요합니다. 공유 코어 등급 (db-f1-micro,db-g1-small)은 지원하지 않습니다.--root-password는 기본postgres사용자의 비밀번호를 설정합니다.--enable-google-ml-integration를 사용하면 Cloud SQL과 Vertex AI 간의 기본 제공 통합이 사용 설정되어embedding()함수를 사용하여 SQL에서 직접 임베딩 모델을 호출할 수 있습니다.
- 인스턴스가 이미
RUNNABLE상태인지 확인 gcloud projects add-iam-policy-binding명령어를 사용하여 Cloud SQL 인스턴스의 서비스 계정에 Vertex AI 호출 권한을 부여합니다. 이는 데이터베이스를 시드할 때 사용할 기본 제공embedding()함수에 필요합니다.- 데이터베이스 만들기
- 시딩 스크립트
setup_restaurant_db.py스크립트 실행
시드 스크립트 scripts/setup_restaurant_db.py 이해하기
이제 시드 스크립트로 이동합니다. 이 스크립트는 다음 작업을 실행합니다.
- 데이터베이스 인스턴스에 대한 연결 초기화
- 다음 두 PostgreSQL 확장 프로그램을 설치합니다.
google_ml_integration: SQL에서 직접 Vertex AI 임베딩 모델을 호출하는embedding()SQL 함수를 제공합니다. 이는restaurant_db내에서 ML 함수를 사용할 수 있도록 하는 데이터베이스 수준 확장 프로그램입니다. 인스턴스 생성 중에 설정하는 인스턴스 수준 플래그 (--enable-google-ml-integration)를 사용하면 Cloud SQL VM이 Vertex AI에 도달할 수 있으며, 확장 프로그램을 사용하면 이 특정 데이터베이스 내에서 SQL 함수를 사용할 수 있습니다.vector(pgvector) - 삽입을 저장하고 쿼리하기 위한vector데이터 유형과 거리 연산자를 추가합니다.
description_embedding열이vector(3072)(3072차원 벡터를 저장하는pgvector열)임을 참고하여 테이블을 만듭니다.- 초기 메뉴 항목 데이터 시드
description필드에서 임베딩 데이터를 생성하고embedding()함수를 통해 기본 제공 Vertex 통합을 사용하여description_embedding을 채웁니다.
embedding('gemini-embedding-001', description)- SQL에서 Vertex AI의 Gemini 임베딩 모델을 직접 호출하여 각 작업의description텍스트를 전달합니다. 이는 시드 스크립트에 설치한google_ml_integration확장 프로그램입니다.::vector- 반환된 float 배열을 pgvector의vector유형으로 변환하여 거리 연산자로 저장하고 쿼리할 수 있습니다.UPDATE는 15개 행 전체에서 실행되어 직무 설명당 3072차원 임베딩을 하나 생성합니다.
이렇게 하면 에이전트가 액세스할 초기 데이터가 준비됩니다.
5. 데이터베이스용 MCP 도구 상자 구성
이 단계에서는 데이터베이스용 MCP 도구 상자를 소개하고, Cloud SQL 인스턴스에 연결하도록 구성하고, 두 개의 표준 SQL 쿼리 도구를 정의합니다.
MCP란 무엇이며 Toolbox를 사용해야 하는 이유는 무엇인가요?
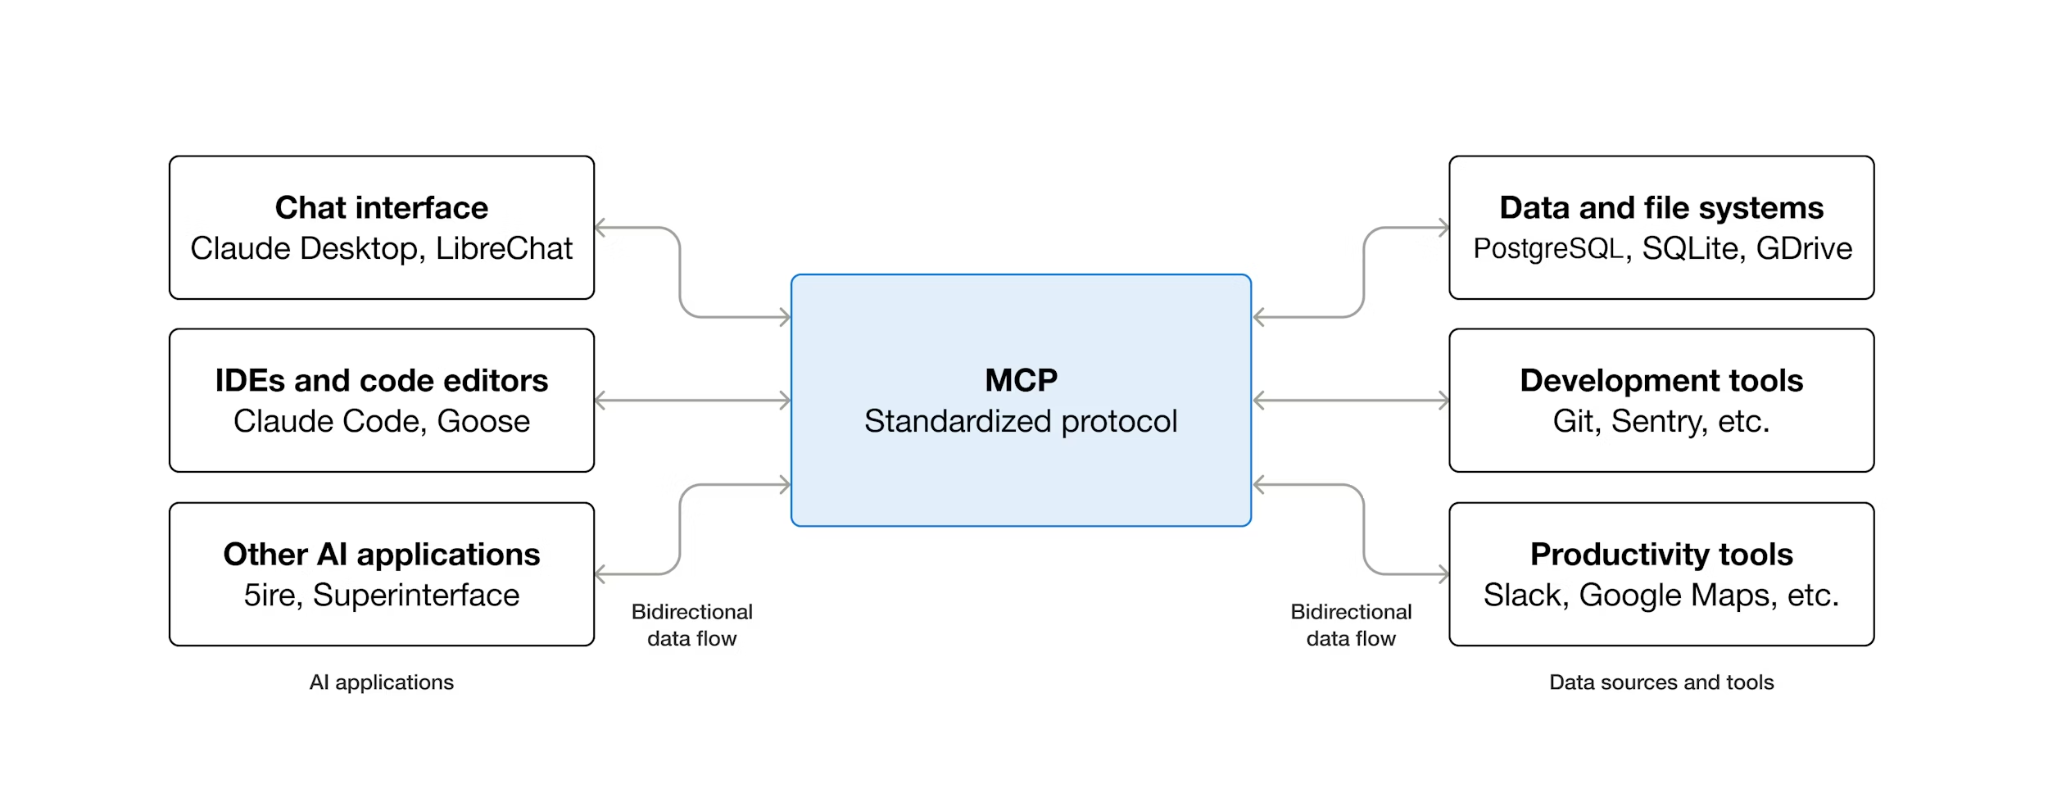
MCP (모델 컨텍스트 프로토콜)은 AI 에이전트가 외부 도구를 검색하고 상호작용하는 방식을 표준화하는 개방형 프로토콜입니다. 클라이언트-서버 모델을 정의합니다. 에이전트는 MCP 클라이언트를 호스팅하고 도구는 MCP 서버에 의해 노출됩니다. 모든 MCP 호환 클라이언트는 모든 MCP 호환 서버를 사용할 수 있습니다. 에이전트에는 각 도구에 대한 맞춤 통합 코드가 필요하지 않습니다.
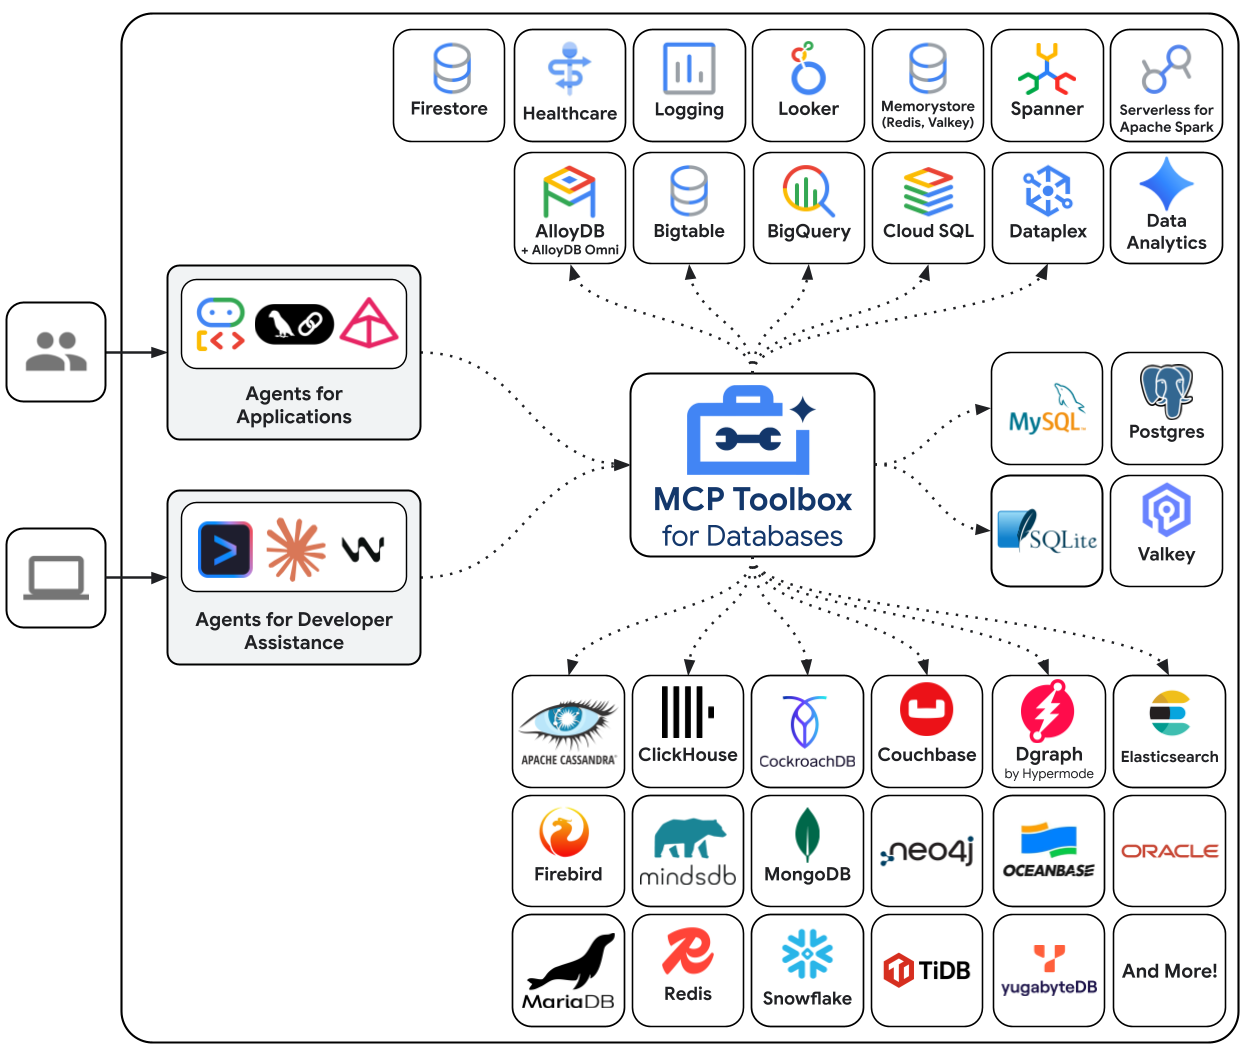
데이터베이스용 MCP 도구 상자는 데이터베이스 액세스를 위해 특별히 빌드된 오픈소스 MCP 서버입니다. 이 기능이 없으면 데이터베이스 연결을 열고, 연결 풀을 관리하고, SQL 삽입을 방지하기 위해 매개변수화된 쿼리를 구성하고, 오류를 처리하고, 이 모든 코드를 에이전트 내에 삽입하는 Python 함수를 작성해야 합니다. 데이터베이스 액세스가 필요한 모든 에이전트가 이 작업을 반복합니다. 쿼리를 변경하면 에이전트를 다시 배포해야 합니다.
도구 상자를 사용하면 YAML 파일을 작성합니다. 각 도구는 매개변수화된 SQL 문에 매핑됩니다. 도구 상자는 연결 풀링, 매개변수화된 쿼리, 인증, 관측 가능성을 처리합니다. 도구는 에이전트에서 분리됩니다. 에이전트 코드를 건드리지 않고 tools.yaml를 수정하고 도구 상자를 다시 시작하여 쿼리를 업데이트합니다. 동일한 도구는 ADK, LangGraph, LlamaIndex 또는 MCP 호환 프레임워크에서 작동합니다.
도구 구성 작성
이제 Cloud Shell 편집기에서 tools.yaml이라는 파일을 만들어 도구 구성을 설정해야 합니다.
cloudshell edit tools.yaml
이 파일은 다중 문서 YAML을 사용합니다. ---로 구분된 각 블록은 독립형 리소스입니다. 모든 리소스에는 리소스가 무엇인지 선언하는 kind (데이터베이스 연결의 경우 sources, 에이전트 호출 가능 작업의 경우 tools)와 백엔드를 지정하는 type (소스의 경우 cloud-sql-postgres, SQL 기반 도구의 경우 postgres-sql)가 있습니다. 도구는 name로 소스를 참조합니다. 이를 통해 도구 상자는 실행할 연결 풀을 알 수 있습니다. 환경 변수는 ${VAR_NAME} 구문을 사용하며 시작 시 확인됩니다.
이제 다음 스크립트를 먼저 tools.yaml 파일에 복사합니다.
# tools.yaml

# --- Data Source ---
kind: source
name: restaurant-db
type: cloud-sql-postgres
project: ${GOOGLE_CLOUD_PROJECT}
region: ${REGION}
instance: ${DB_INSTANCE}
database: ${DB_NAME}
user: postgres
password: ${DB_PASSWORD}

---
이 스크립트는 다음 리소스를 정의합니다.
- 소스 (
restaurant-db) - 툴박스가 Cloud SQL PostgreSQL 인스턴스에 연결하는 방법을 알려줍니다.cloud-sql-postgres유형은 내부적으로 Cloud SQL 커넥터를 사용하여 인증과 보안 연결을 자동으로 처리합니다.${GOOGLE_CLOUD_PROJECT},${REGION},${DB_PASSWORD}자리표시자는 시작 시 환경 변수에서 확인됩니다.
그런 다음 tools.yaml의 --- 기호 아래에 다음 스크립트를 추가합니다.
# --- Tool 1: Search menu items by category and/or cuisine type ---
kind: tool
name: search-menu
type: postgres-sql
source: restaurant-db
description: >-
  Search for menu items by category and/or cuisine type.
  Use this tool when the user wants to browse menu items
  by category (e.g., Main Course, Appetizer, Dessert) or find dishes
  from a specific cuisine. Both parameters accept an
  empty string to match all values.
statement: |
  SELECT name, cuisine_type, category, ingredients, price, dietary_tags, available
  FROM menu_items
  WHERE ($1 = '' OR LOWER(category) = LOWER($1))
  AND ($2 = '' OR LOWER(cuisine_type) LIKE '%' || LOWER($2) || '%')
  ORDER BY name
  LIMIT 10
parameters:
  - name: category
    type: string
    description: "The menu category to filter by (e.g., 'Main Course', 'Appetizer', 'Dessert'). Use empty string for all categories."
  - name: cuisine_type
    type: string
    description: "A cuisine type to search for (partial match, e.g., 'Italian', 'Japanese'). Use empty string for all cuisines."

---

# --- Tool 2: Get full details for a specific menu item ---
kind: tool
name: get-item-details
type: postgres-sql
source: restaurant-db
description: >-
  Get full details for a specific menu item including its description,
  price, dietary tags, and availability. Use this tool when the
  user asks about a particular dish by name or cuisine.
statement: |
  SELECT name, cuisine_type, category, ingredients, price, dietary_tags, available, description
  FROM menu_items
  WHERE LOWER(name) LIKE '%' || LOWER($1) || '%'
  OR LOWER(cuisine_type) LIKE '%' || LOWER($1) || '%'
parameters:
  - name: search_term
    type: string
    description: "The dish name or cuisine type to look up (partial match supported)."

---
이 스크립트는 다음 리소스를 정의합니다.
- 도구 1과 2 (
search-menu,get-item-details) - 표준 SQL 쿼리 도구입니다. 각각은 도구 이름 (에이전트가 보는 것)을 파라미터화된 SQL 문 (데이터베이스가 실행하는 것)에 매핑합니다. 매개변수는$1,$2위치 자리표시자를 사용합니다. 툴박스는 이러한 문을 준비된 문으로 실행하므로 SQL 삽입을 방지할 수 있습니다.
계속해서 tools.yaml의 --- 기호 아래에 다음 스크립트를 추가합니다.
# --- Embedding Model ---
kind: embeddingModel
name: gemini-embedding
type: gemini
model: gemini-embedding-001
project: ${GOOGLE_CLOUD_PROJECT}
location: ${GOOGLE_CLOUD_LOCATION}
dimension: 3072

---
이 스크립트는 다음 리소스를 정의합니다.
- 임베딩 모델 (
gemini-embedding): 3072차원 텍스트 임베딩을 생성하기 위해 Gemini의gemini-embedding-001모델을 호출하도록 Toolbox를 구성합니다. 툴박스는 애플리케이션 기본 사용자 인증 정보 (ADC)를 사용하여 인증하므로 Cloud Shell 또는 Cloud Run에 API 키가 필요하지 않습니다. 여기에서 구성된dimension는 데이터베이스를 시드하기 위해 이전에 구성한 것과 동일해야 합니다.
계속해서 tools.yaml의 --- 기호 아래에 다음 스크립트를 추가합니다.
# --- Tool 3: Semantic search by description ---
kind: tool
name: search-menu-by-description
type: postgres-sql
source: restaurant-db
description: >-
  Find menu items that match a natural language description of what the user
  is looking for. Use this tool when the user describes their ideal dish
  using flavors, textures, dietary preferences, or cravings rather than a
  specific category or cuisine. Examples: "I want something spicy and creamy,"
  "a light vegetarian appetizer," "something rich and chocolatey for dessert."
statement: |
  SELECT name, cuisine_type, category, ingredients, price, dietary_tags, description
  FROM menu_items
  WHERE description_embedding IS NOT NULL
  ORDER BY description_embedding <=> $1
  LIMIT 5
parameters:
  - name: search_query
    type: string
    description: "A natural language description of the kind of dish the user is looking for."
    embeddedBy: gemini-embedding

---
이 스크립트는 다음 리소스를 정의합니다.
- 도구 3 (
search-menu-by-description): 벡터 검색 도구입니다.search_query매개변수에는embeddedBy: gemini-embedding이 있습니다. 이는 Toolbox에 원시 텍스트를 가로채 임베딩 모델로 전송하고 결과 벡터를 SQL 문에서 사용하도록 지시합니다.<=>연산자는 pgvector의 코사인 거리입니다. 값이 작을수록 설명이 더 유사합니다.
마지막으로 tools.yaml의 --- 기호 아래에 마지막 도구를 추가합니다.
# --- Tool 4: Add a new menu item with automatic embedding ---
kind: tool
name: add-menu-item
type: postgres-sql
source: restaurant-db
description: >-
  Add a new menu item to the restaurant. Use this tool when a user asks
  to add a dish that is not currently on the menu.
statement: |
  INSERT INTO menu_items (name, cuisine_type, category, ingredients, price, dietary_tags, available, description, description_embedding)
  VALUES ($1, $2, $3, $4, $5, $6, CAST($7 AS BOOLEAN), $8, $9)
  RETURNING name, cuisine_type
parameters:
  - name: name
    type: string
    description: "The dish name (e.g., 'Truffle Mushroom Risotto')."
  - name: cuisine_type
    type: string
    description: "The cuisine type (e.g., 'Italian', 'Japanese', 'Thai')."
  - name: category
    type: string
    description: "The menu category (e.g., 'Main Course', 'Appetizer', 'Dessert')."
  - name: ingredients
    type: string
    description: "Comma-separated list of key ingredients (e.g., 'salmon, miso, ginger')."
  - name: price
    type: string
    description: "The price (e.g., '$24')."
  - name: dietary_tags
    type: string
    description: "Dietary information (e.g., 'Vegetarian, Gluten-Free')."
  - name: available
    type: string
    description: "Whether the dish is currently available (true or false)."
  - name: description
    type: string
    description: "A short description of the dish (2-3 sentences)."
  - name: description_vector
    type: string
    description: "Auto-generated embedding vector for the dish description."
    valueFromParam: description
    embeddedBy: gemini-embedding
이 스크립트는 다음 리소스를 정의합니다.
- 도구 4 (
add-menu-item) - 벡터 수집을 보여줍니다.description_vector매개변수에는 다음과 같은 두 가지 특수 필드가 있습니다. valueFromParam: description- 도구 상자에서description매개변수의 값을 여기에 복사합니다. LLM은 이 매개변수를 볼 수 없습니다.embeddedBy: gemini-embedding: 복사된 텍스트를 SQL에 전달하기 전에 벡터에 삽입합니다.
결과적으로 상담사는 임베딩에 대해 전혀 알지 못해도 하나의 도구 호출이 원시 설명 텍스트와 벡터 임베딩을 모두 저장합니다.
다중 문서 YAML 형식은 각 리소스를 ---로 구분합니다. 각 문서에는 무엇인지 정의하는 kind, name, type 필드가 있습니다. 요약하자면 이미 다음 사항을 모두 구성했습니다.
- 소스 데이터베이스 정의
- 표준 필터로 데이터베이스를 쿼리하는 도구 ( 도구 1 및 2) 정의
- 임베딩 모델 정의
- 데이터베이스에 벡터 검색을 실행하는 도구 ( tool 3)를 정의합니다.
- 벡터 데이터를 데이터베이스에 수집하는 도구 ( tool 4) 정의
6. MCP Toolbox 서버 실행
이전 단계에서 MCP 도구 상자에 필요한 구성을 이미 설정했습니다. 이제 서버를 실행할 준비가 되었습니다.
시드 데이터 확인
Toolbox를 시작하기 전에 데이터베이스 설정이 완료되었는지 확인합니다. 다음 명령어를 사용하여 Python 스크립트 scripts/verify_database.py를 만듭니다.
cloudshell edit scripts/verify_seed.py
그런 다음 다음 코드를 scripts/verify_seed.py 파일에 복사합니다.
#!/usr/bin/env python3
"""Verify the database has 15 menu items with embeddings."""

import os
import sys
from pathlib import Path
from dotenv import load_dotenv
from google.cloud.sql.connector import Connector
import pg8000

# Load environment variables
env_path = Path(__file__).parent.parent / '.env'
load_dotenv(env_path)

# Verify required environment variables
required_vars = ['GOOGLE_CLOUD_PROJECT', 'REGION', 'DB_PASSWORD', 'DB_INSTANCE', 'DB_NAME']
missing_vars = [var for var in required_vars if not os.environ.get(var)]

if missing_vars:
    print(f"ERROR: Missing environment variables: {', '.join(missing_vars)}", file=sys.stderr)
    sys.exit(1)


def verify_database():
    """Check that 15 menu items exist with embeddings."""
    connector = Connector()

    try:
        project = os.environ['GOOGLE_CLOUD_PROJECT']
        region = os.environ['REGION']
        password = os.environ['DB_PASSWORD']
        instance = os.environ['DB_INSTANCE']
        database = os.environ['DB_NAME']

        conn = connector.connect(
            f"{project}:{region}:{instance}",
            "pg8000",
            user="postgres",
            password=password,
            db=database
        )
        cursor = conn.cursor()

        # Count menu items and embeddings
        cursor.execute("SELECT COUNT(*) FROM menu_items")
        item_count = cursor.fetchone()[0]

        cursor.execute("SELECT COUNT(*) FROM menu_items WHERE description_embedding IS NOT NULL")
        embedding_count = cursor.fetchone()[0]

        print(f"Menu Items: {item_count}/15")
        print(f"Embeddings: {embedding_count}/15")

        cursor.close()
        conn.close()

        if item_count == 15 and embedding_count == 15:
            print("\n✓ Database ready!")
            return True
        else:
            print("\n✗ Database not ready")
            return False

    except Exception as e:
        print(f"\nERROR: {e}", file=sys.stderr)
        return False
    finally:
        connector.close()


if __name__ == "__main__":
    success = verify_database()
    sys.exit(0 if success else 1)
이 스크립트는 메뉴 항목 데이터의 수와 삽입을 확인합니다. 다음 명령어를 사용하여 스크립트를 실행합니다.
uv run scripts/verify_seed.py
다음 터미널 출력이 표시되면 데이터가 준비된 것입니다.
Menu Items: 15/15
Embeddings: 15/15

✓ Database ready!
도구 상자 서버 시작
이전 설정 단계에서 toolbox 실행 파일을 이미 다운로드했습니다. 이 바이너리 파일이 있고 다운로드가 완료되었는지 확인합니다. 그렇지 않은 경우 다운로드하고 완료될 때까지 기다립니다.
cd ~/build-agent-adk-toolbox-cloudsql
if [ ! -f toolbox ]; then
  curl -O https://storage.googleapis.com/mcp-toolbox-for-databases/v1.1.0/linux/amd64/toolbox
fi
chmod +x toolbox
.env 변수를 MCP 툴박스에서 실행하는 하위 프로세스에 노출해야 합니다. 다음 명령어를 실행하여 툴박스 서버를 시작하고 콘솔 출력을 logs/mcp_toolbox.log 파일에 로깅합니다.
set -a; source .env; set +a
./toolbox --config tools.yaml --enable-api > logs/mcp_toolbox.log 2>&1 &
logs/mcp_toolbox.log 파일에 서버가 준비되었음을 확인하는 출력이 다음과 같이 표시됩니다.
... INFO "Initialized 1 sources: restaurant-db"
... INFO "Initialized 0 authServices: "
... INFO "Using Vertex AI backend for Gemini embedding"
... INFO "Initialized 1 embeddingModels: gemini-embedding"
... INFO "Initialized 4 tools: search-menu-by-description, add-menu-item, search-menu, get-item-details"
...
... INFO "Server ready to serve!"
도구 확인
도구 상자 API를 쿼리하여 등록된 모든 도구를 나열합니다.
curl -s http://localhost:5000/api/toolset | uv run -m json.tool
설명과 매개변수가 포함된 도구가 표시됩니다. 아래와 같이
...
       "search-menu-by-description": {
            "description": "Find menu items that match a natural language description of what the user is looking for. Use this tool when the user describes their ideal dish using flavors, textures, dietary preferences, or cravings rather than a specific category or cuisine. Examples: \"I want something spicy and creamy,\" \"a light vegetarian appetizer,\" \"something rich and chocolatey for dessert.\"",
            "parameters": [
                {
                    "name": "search_query",
                    "type": "string",
                    "required": true,
                    "description": "A natural language description of the kind of dish the user is looking for.",
                    "authServices": []
                }
            ],
            "authRequired": []
        }
...
search-menu 도구를 직접 테스트합니다.
curl -s -X POST http://localhost:5000/api/tool/search-menu/invoke \\ -H "Content-Type: application/json" \\ -d '{"category": "Main Course", "cuisine_type": "Italian"}' | jq '.result | fromjson'
대답에는 시드 데이터의 이탈리아 메인 요리가 포함되어야 합니다.
[
  {
    "name": "Margherita Pizza",
    "cuisine_type": "Italian",
    "category": "Main Course",
    "ingredients": "San Marzano tomatoes, fresh mozzarella, basil, olive oil",
    "price": "$18",
    "dietary_tags": "Vegetarian",
    "available": true
  },
  {
    "name": "Truffle Mushroom Risotto",
    "cuisine_type": "Italian",
    "category": "Main Course",
    "ingredients": "Arborio rice, truffle oil, porcini mushrooms, parmesan, white wine",
    "price": "$28",
    "dietary_tags": "Vegetarian, Gluten-Free",
    "available": true
  }
]
7. ADK 에이전트 빌드
이제 이 프로젝트에서 Python의 ADK를 활용할 것이므로 필요한 종속 항목을 추가해 보겠습니다.
uv add google-adk==1.29.0 toolbox-adk==1.0.0
google-adk: Gemini SDK를 포함한 Google의 에이전트 개발 키트toolbox-adk- 데이터베이스용 MCP 도구 상자의 ADK 통합
에이전트 디렉터리 구조 만들기
ADK는 __init__.py, agent.py, .env가 포함된 에이전트의 이름을 딴 디렉터리와 같은 특정 폴더 레이아웃을 예상합니다. 이를 지원하기 위해 구조를 빠르게 설정하는 명령어가 내장되어 있습니다.
uv run adk create restaurant_agent \
    --model gemini-3.5-flash \
    --project ${GOOGLE_CLOUD_PROJECT} \
    --region ${GOOGLE_CLOUD_LOCATION}
이제 디렉터리가 다음과 같이 표시됩니다.
build-agent-adk-toolbox-cloudsql/
├── restaurant_agent/
│   ├── __init__.py
│   ├── agent.py
│   └── .env
├── logs
├── scripts
└── ...
다음으로 실행 중인 도구 상자 서버에 ADK 에이전트를 통합하고 표준 쿼리, 시맨틱 검색, 벡터 수집의 네 가지 도구를 모두 테스트해야 합니다. 에이전트 코드는 최소한입니다. 모든 데이터베이스 로직은 tools.yaml에 있습니다.
에이전트 환경 구성하기
ADK는 이전 단계에서 이미 설정한 셸 환경에서 GOOGLE_GENAI_USE_VERTEXAI, GOOGLE_CLOUD_PROJECT, GOOGLE_CLOUD_LOCATION을 읽습니다. 에이전트별 변수는 TOOLBOX_URL뿐입니다. 이를 에이전트의 .env 파일에 추가합니다.
echo -e "\nTOOLBOX_URL=http://127.0.0.1:5000" >> restaurant_agent/.env
에이전트 모듈 업데이트
Cloud Shell 편집기에서 restaurant_agent/agent.py 열기
cloudshell edit restaurant_agent/agent.py
다음 코드로 콘텐츠를 덮어씁니다.
# restaurant_agent/agent.py
import os

from google.adk.agents import LlmAgent
from toolbox_adk import ToolboxToolset

TOOLBOX_URL = os.environ.get("TOOLBOX_URL", "http://127.0.0.1:5000")

toolbox = ToolboxToolset(TOOLBOX_URL)

root_agent = LlmAgent(
    name="restaurant_agent",
    model="gemini-3.5-flash",
    instruction="""You are a friendly and knowledgeable concierge at "Foodie Finds," a restaurant. Your job:
- Help diners browse the menu by category or cuisine type.
- Provide full details about specific dishes, including ingredients, price, and dietary information.
- Recommend dishes based on natural language descriptions of what the diner is craving.
- Add new menu items when asked.

When a diner asks about a specific dish by name or cuisine, use the get-item-details tool.
When a diner asks for a specific category or cuisine type, use the search-menu tool.
When a diner describes what kind of food they want — by flavor, texture, dietary needs, or cravings — use the search-menu-by-description tool for semantic search.

When in doubt between search-menu and search-menu-by-description, prefer search-menu-by-description — it searches dish descriptions and finds more relevant matches.
If a dish is not available (available is false), let the diner know and suggest similar alternatives from the search results.
Be conversational, knowledgeable, and concise.""",
    tools=[toolbox],
)
여기에는 데이터베이스 코드가 없습니다. ToolboxToolset는 시작 시 도구 상자 서버에 연결하고 사용 가능한 모든 도구를 로드합니다. 에이전트는 이름으로 도구를 호출합니다. 도구 상자는 이러한 호출을 Cloud SQL에 대한 SQL 쿼리로 변환합니다.
TOOLBOX_URL 환경 변수는 로컬 개발의 경우 기본적으로 http://127.0.0.1:5000로 설정됩니다. 나중에 Cloud Run에 배포할 때 Toolbox 서비스의 Cloud Run URL로 이를 재정의하면 됩니다. 코드 변경은 필요하지 않습니다.
에이전트 테스트
ADK 개발 UI를 시작합니다.
cd ~/build-agent-adk-toolbox-cloudsql
uv run adk web --allow_origins "regex:https://.*\.cloudshell\.dev"
Cloud Shell의 웹 미리보기 기능을 사용하거나 터미널에 표시된 URL을 ctrl + 클릭하여 터미널에 표시된 URL (일반적으로 http://localhost:8000)을 엽니다. 왼쪽 상단의 에이전트 드롭다운에서 restaurant_agent를 선택합니다.
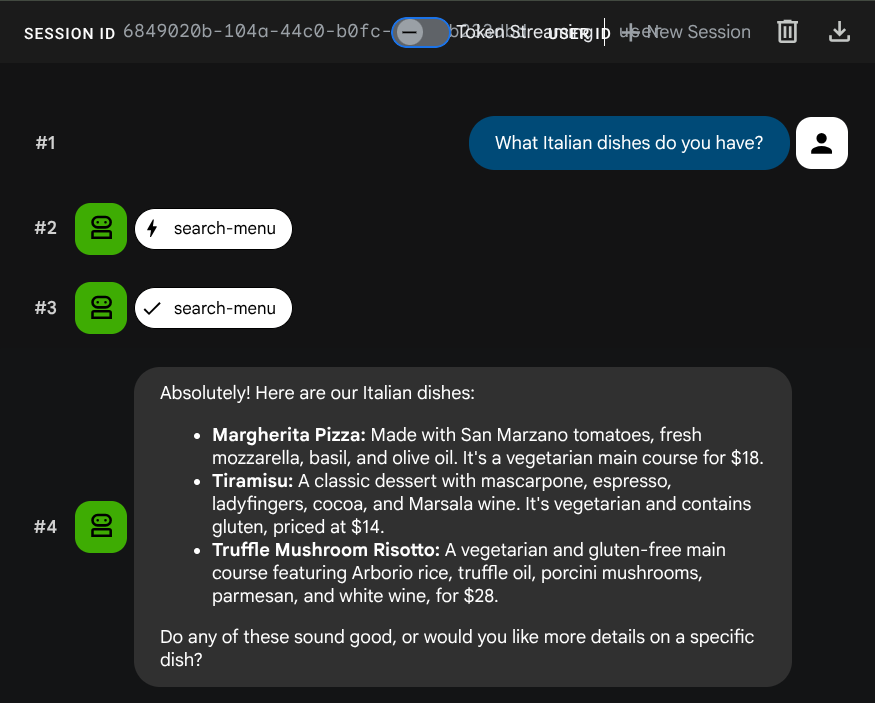
표준 쿼리 테스트
다음 프롬프트를 사용하여 표준 SQL 도구를 확인해 보세요.
What Italian dishes do you have?
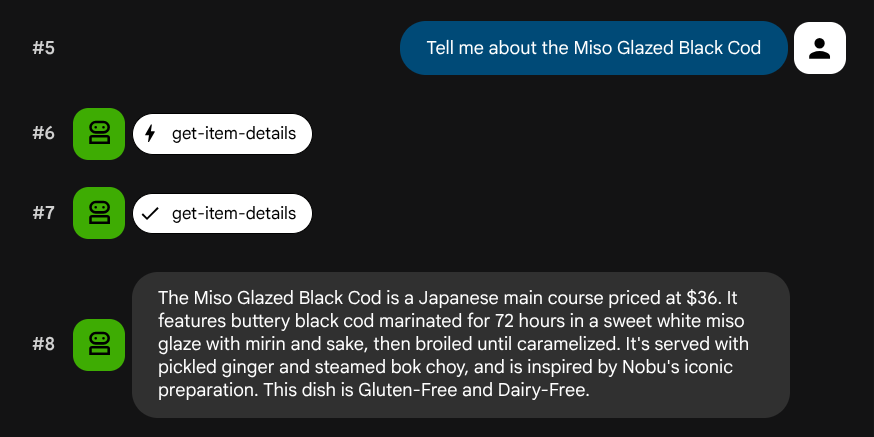
Tell me about the Miso Glazed Black Cod
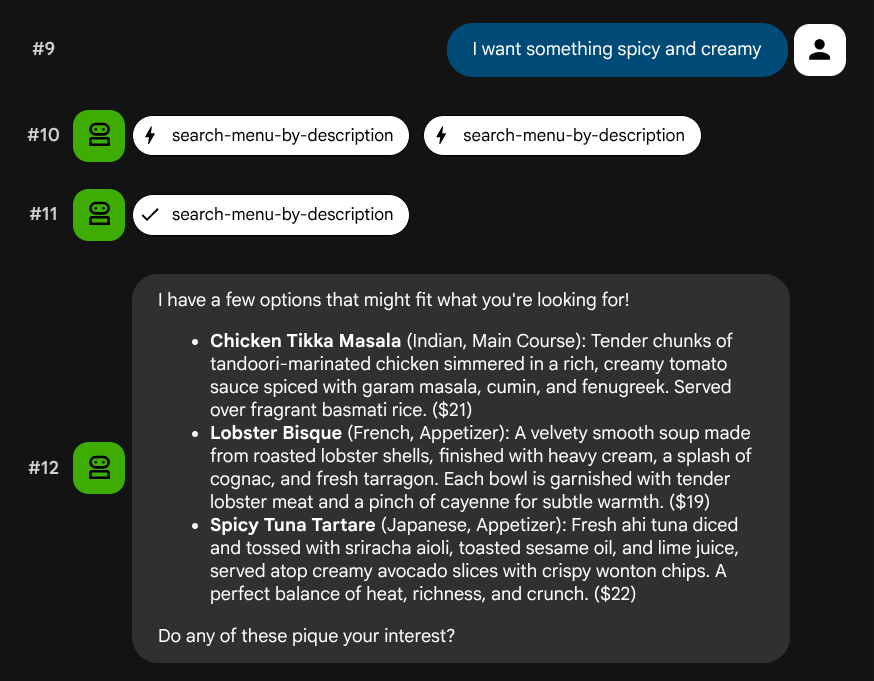
시맨틱 검색 테스트하기
특정 역할이나 기술 스택에 매핑되지 않는 자연어 설명을 사용해 보세요.
I want something spicy and creamy
Something rich and chocolatey for dessert
I'm in the mood for something light and healthy
에이전트는 쿼리 유형에 따라 적절한 도구를 선택하려고 시도합니다. 구조화된 필터는 search-menu를 거치고 자연어 설명은 search-menu-by-description를 거칩니다.
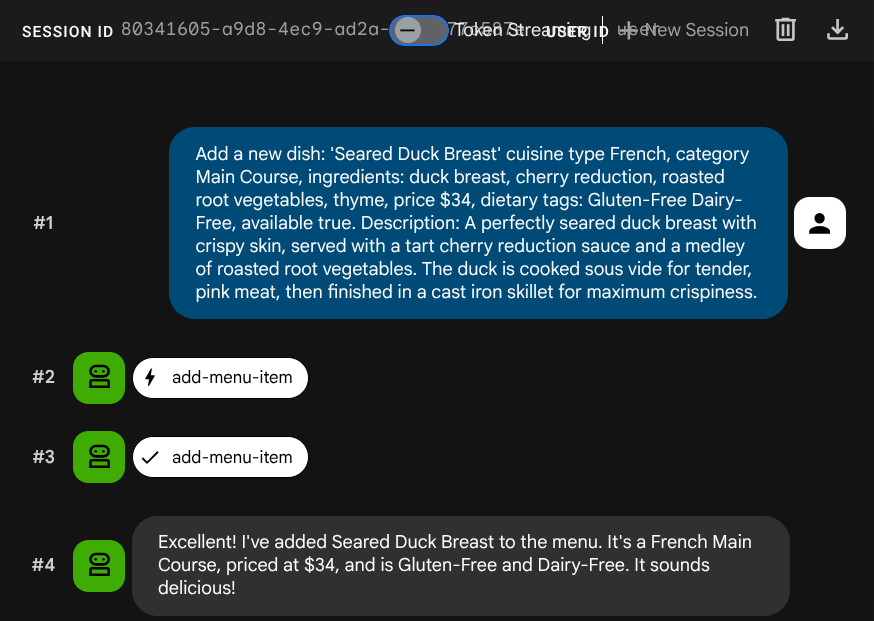
벡터 수집 테스트
에이전트에게 새 작업을 추가해 달라고 요청합니다.
Add a new dish: 'Seared Duck Breast' cuisine type French, category Main Course, ingredients: duck breast, cherry reduction, roasted root vegetables, thyme, price $34, dietary tags: Gluten-Free Dairy-Free, available true. Description: A perfectly seared duck breast with crispy skin, served with a tart cherry reduction sauce and a medley of roasted root vegetables. The duck is cooked sous vide for tender, pink meat,
then
finished in a cast iron skillet for maximum crispiness.
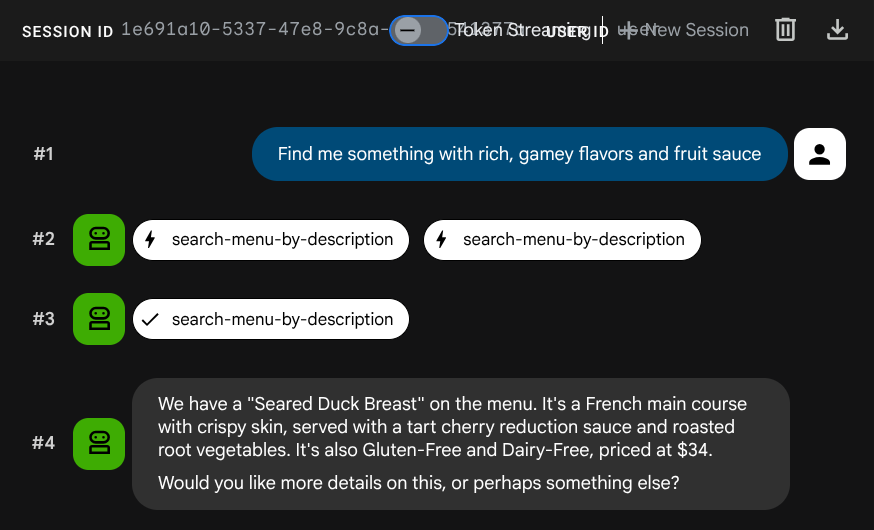
이제 검색해 보세요.
Find me something with rich, gamey flavors and fruit sauce
삽입 중에 삽입이 자동으로 생성되었으므로 별도의 단계가 필요하지 않습니다.
이제 ADK, MCP Toolbox, CloudSQL을 활용하는 완전한 에이전트형 RAG 애플리케이션이 있습니다. 수고하셨습니다. 한 단계 더 나아가 이러한 앱을 Cloud Run에 배포해 보겠습니다.
이제 계속하기 전에 Ctrl+C를 두 번 눌러 프로세스를 종료하여 개발자 UI를 중지합니다.
8. Cloud Run에 배포
에이전트와 도구 상자는 로컬로 작동합니다. 이 단계에서는 인터넷을 통해 액세스할 수 있도록 둘 다 Cloud Run 서비스로 배포합니다. 도구 상자 서비스는 Cloud Run에서 MCP 서버로 실행되고 에이전트 서비스는 여기에 연결됩니다.
배포를 위해 Toolbox 준비하기
도구 상자 서비스의 배포 디렉터리를 만듭니다.
cd ~/build-agent-adk-toolbox-cloudsql
mkdir -p deploy-toolbox
cp toolbox tools.yaml deploy-toolbox/
도구 상자의 Dockerfile을 만듭니다. Cloud Shell 편집기에서 deploy-toolbox/Dockerfile을 엽니다.
cloudshell edit deploy-toolbox/Dockerfile
다음 스크립트를 복사합니다.
# deploy-toolbox/Dockerfile
FROM debian:bookworm-slim
RUN apt-get update && apt-get install -y ca-certificates && rm -rf /var/lib/apt/lists/*
WORKDIR /app
COPY toolbox tools.yaml ./
RUN chmod +x toolbox
EXPOSE 8080
CMD ["./toolbox", "--config", "tools.yaml", "--enable-api", "--address", "0.0.0.0", "--port", "8080"]
툴박스 바이너리와 tools.yaml는 최소 Debian 이미지로 패키징됩니다. Cloud Run은 트래픽을 포트 8080으로 라우팅합니다.
도구 상자 서비스 배포
cd ~/build-agent-adk-toolbox-cloudsql
gcloud run deploy toolbox-service \
  --source deploy-toolbox/ \
  --region $REGION \
  --set-env-vars "DB_PASSWORD=$DB_PASSWORD,DB_INSTANCE=$DB_INSTANCE,DB_NAME=$DB_NAME,GOOGLE_CLOUD_PROJECT=$GOOGLE_CLOUD_PROJECT,REGION=$REGION,GOOGLE_CLOUD_LOCATION=$GOOGLE_CLOUD_LOCATION" \
  --allow-unauthenticated \
  --quiet > logs/deploy_toolbox.log 2>&1 &
이 명령어는 소스를 Cloud Build에 제출하고, 컨테이너 이미지를 빌드하고, Artifact Registry에 푸시하고, Cloud Run에 배포합니다. 몇 분 정도 걸립니다. logs/deploy_toolbox.log 파일에서 배포 프로세스 로그를 검사할 수 있습니다.
배포를 위해 에이전트 준비
도구 상자가 빌드되는 동안 에이전트의 배포 파일을 설정합니다.
프로젝트 루트에 Dockerfile를 만듭니다. Cloud Shell 편집기에서 Dockerfile를 엽니다.
cloudshell edit Dockerfile
그런 다음 다음 콘텐츠를 복사합니다.
# Dockerfile
FROM ghcr.io/astral-sh/uv:python3.12-trixie-slim
WORKDIR /app
COPY pyproject.toml ./
COPY uv.lock ./
RUN uv sync --no-dev
COPY restaurant_agent/ restaurant_agent/
EXPOSE 8080
CMD ["uv", "run", "adk", "web", "--host", "0.0.0.0", "--port", "8080"]
이 Dockerfile은 Python과 uv이 모두 사전 설치된 ghcr.io/astral-sh/uv을 기본 이미지로 사용하므로 pip를 통해 uv을 별도로 설치할 필요가 없습니다.
.dockerignore 파일을 만들어 컨테이너 이미지에서 불필요한 파일을 제외합니다.
cloudshell edit .dockerignore
그런 다음 다음 스크립트를 복사합니다.
# .dockerignore
.venv/
__pycache__/
*.pyc
.env
restaurant_agent/.env
toolbox
tools.yaml
deploy-toolbox/
에이전트 서비스 배포
툴박스 배포가 완료될 때까지 기다립니다. logs/deploy_toolbox.log에서 배포 프로세스를 다시 확인하여 프로세스를 검증합니다. 그런 다음 다음 명령어를 사용하여 Cloud Run URL을 가져옵니다.
TOOLBOX_URL=$(gcloud run services describe toolbox-service \
  --region=$REGION \
  --format='value(status.url)')
echo "Toolbox URL: $TOOLBOX_URL"
다음과 비슷한 출력이 표시됩니다.
Toolbox URL: https://toolbox-service-xxxxxx-xx.a.run.app
그런 다음 배포된 Toolbox가 작동하는지 확인합니다.
curl -s "$TOOLBOX_URL/api/toolset" | python3 -m json.tool | head -5
출력이 이 예와 같이 표시되면 배포가 이미 성공한 것입니다.
{
    "serverVersion": "1.1.0+binary.linux.amd64.da6f5f8",
    "tools": {
        "add-menu-item": {
            "description": "Add a new menu item to the restaurant. Use this tool when a user asks to add a dish that is not currently on the menu.",
이제 툴박스 URL을 환경 변수로 전달하여 에이전트를 배포합니다.
cd ~/build-agent-adk-toolbox-cloudsql
gcloud run deploy restaurant-agent \
  --source . \
  --region $REGION \
  --set-env-vars "TOOLBOX_URL=$TOOLBOX_URL,GOOGLE_CLOUD_PROJECT=$GOOGLE_CLOUD_PROJECT,GOOGLE_CLOUD_LOCATION=$GOOGLE_CLOUD_LOCATION,GOOGLE_GENAI_USE_VERTEXAI=TRUE" \
  --allow-unauthenticated \
  --quiet
에이전트 코드는 환경에서 TOOLBOX_URL을 읽습니다 (이전에 설정함). 로컬에서는 http://127.0.0.1:5000를 가리키고 Cloud Run에서는 Toolbox 서비스 URL을 가리킵니다. 코드를 변경할 필요가 없습니다.
배포된 에이전트 테스트
에이전트의 Cloud Run URL을 가져옵니다.
AGENT_URL=$(gcloud run services describe restaurant-agent \
  --region=$REGION \
  --format='value(status.url)')
echo "Agent URL: $AGENT_URL"
브라우저에서 URL을 엽니다. ADK 개발 UI가 로드됩니다. 로컬에서 사용하던 것과 동일한 인터페이스가 이제 Cloud Run에서 실행됩니다.
드롭다운에서 restaurant_agent를 선택하고 테스트합니다.
What Italian dishes do you have?
I want something spicy and creamy
두 쿼리 모두 배포된 서비스를 통해 작동합니다. Cloud Run의 에이전트가 Cloud Run의 Toolbox를 호출하고 Toolbox가 Cloud SQL을 쿼리합니다.
9. 축하합니다 / 정리
데이터베이스용 MCP 도구 상자를 사용하여 ADK 에이전트와 Cloud SQL PostgreSQL을 연결하는 스마트 레스토랑 메뉴 어시스턴트를 빌드하고 배포했습니다. 이 어시스턴트는 표준 SQL 쿼리와 시맨틱 벡터 검색을 모두 사용합니다.
학습한 내용
- MCP가 AI 에이전트의 도구 액세스를 표준화하는 방법과 데이터베이스용 MCP 도구 상자가 이를 데이터베이스 작업에 적용하여 맞춤 데이터베이스 코드를 선언적 YAML 구성으로 대체하는 방법
cloud-sql-postgres소스 유형을 사용하여 Cloud SQL PostgreSQL을 도구 상자 데이터 소스로 구성하는 방법- SQL 삽입을 방지하는 매개변수화된 문으로 표준 SQL 쿼리 도구를 정의하는 방법
- pgvector 및
gemini-embedding-001를 사용하여 벡터 검색을 사용 설정하는 방법(자동 쿼리 임베딩을 위한embeddedBy매개변수 포함) valueFromParam를 통해 자동 벡터 수집이 가능합니다. LLM이 텍스트 설명을 제공하면 Toolbox가 텍스트와 함께 벡터를 자동으로 복사, 삽입, 저장합니다.- ADK의
ToolboxToolset가 실행 중인 도구 상자 서버에서 도구를 로드하여 에이전트 코드를 최소화하고 데이터베이스 로직을 완전히 분리하는 방법 - 도구 상자 MCP 서버와 ADK 에이전트를 별도의 서비스로 Cloud Run에 배포하는 방법
정리
이 Codelab에서 생성된 리소스 비용이 Google Cloud 계정에 청구되지 않도록 하려면 개별 리소스를 삭제하거나 전체 프로젝트를 삭제하면 됩니다.
옵션 1: 프로젝트 삭제 (권장)
정리하는 가장 쉬운 방법은 프로젝트를 삭제하는 것입니다. 이렇게 하면 프로젝트와 연결된 모든 리소스가 삭제됩니다.
gcloud projects delete $GOOGLE_CLOUD_PROJECT
옵션 2: 개별 리소스 삭제
프로젝트는 유지하고 이 Codelab에서 만든 리소스만 삭제하려면 다음 단계를 따르세요.
gcloud run services delete restaurant-agent --region=$REGION --quiet
gcloud run services delete toolbox-service --region=$REGION --quiet
gcloud sql instances delete restaurant-instance --quiet
gcloud artifacts repositories delete cloud-run-source-deploy --location=$REGION --quiet 2>/dev/null