
1. บทนำ
เอเจนต์ AI จะมีประโยชน์เพียงใดก็ขึ้นอยู่กับข้อมูลที่เข้าถึงได้ ข้อมูลในโลกแห่งความเป็นจริงส่วนใหญ่อยู่ในฐานข้อมูล และการเชื่อมต่อเอเจนต์กับฐานข้อมูลมักหมายถึงการเขียนการจัดการการเชื่อมต่อ ตรรกะการค้นหา และไปป์ไลน์การฝังภายในโค้ดของเอเจนต์ ตัวแทนทุกรายที่ต้องเข้าถึงฐานข้อมูลจะทำขั้นตอนนี้ซ้ำ และการเปลี่ยนแปลงการค้นหาทุกครั้งจะต้องมีการติดตั้งใช้งานตัวแทนอีกครั้ง
Codelab นี้แสดงแนวทางที่แตกต่างออกไป คุณประกาศเครื่องมือฐานข้อมูลในไฟล์ YAML ซึ่งได้แก่ การค้นหา SQL มาตรฐาน การค้นหาความคล้ายคลึงของเวกเตอร์ หรือแม้แต่การสร้างการฝังอัตโนมัติ และ MCP Toolbox สำหรับฐานข้อมูลจะจัดการการดำเนินการฐานข้อมูลทั้งหมดในฐานะเซิร์ฟเวอร์ MCP โค้ดเอเจนต์ของคุณจะยังคงมีขนาดเล็ก: โหลดเครื่องมือ แล้วปล่อยให้ Gemini ตัดสินใจว่าจะเรียกใช้เครื่องมือใด
สิ่งที่คุณจะสร้าง
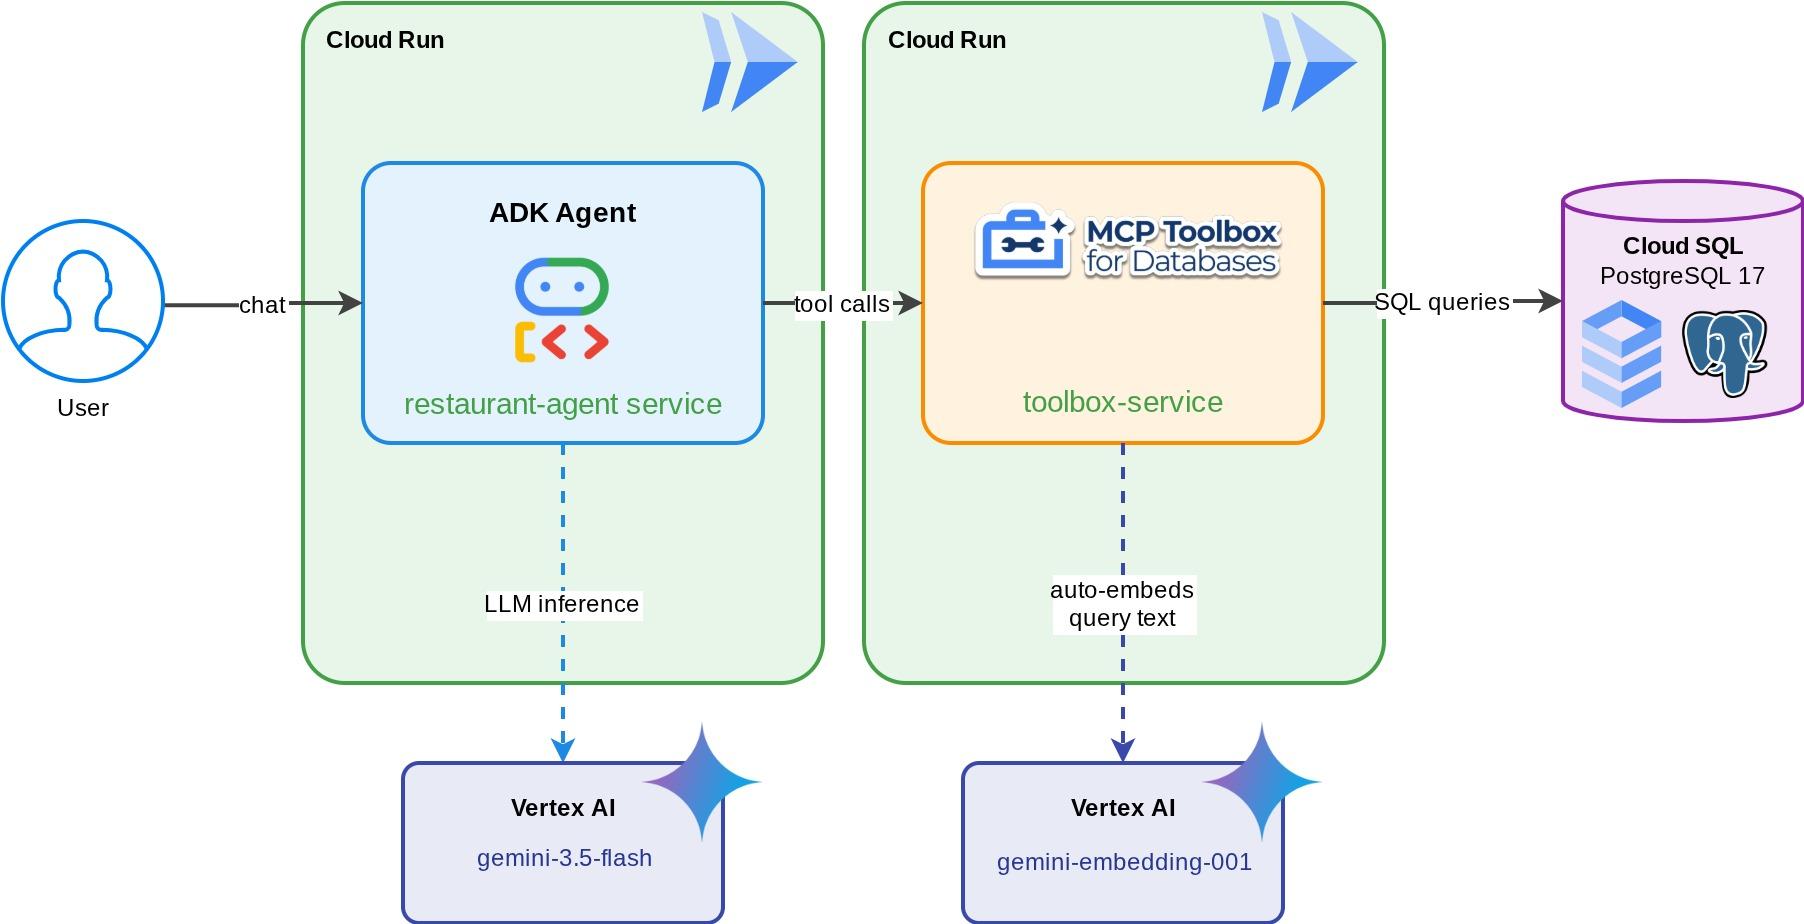
ผู้ช่วยร้านอาหารสำหรับ "ร้านอาหารแนะนำ" ซึ่งเป็นเอเจนต์ ADK ที่ขับเคลื่อนโดย Gemini ซึ่งช่วยให้ผู้รับประทานอาหารเรียกดูเมนูของร้านอาหารได้โดยใช้ตัวกรองมาตรฐาน (หมวดหมู่ ประเภทอาหาร) และค้นพบเมนูอาหารผ่านคำอธิบายภาษาธรรมชาติ เช่น "ฉันอยากกินอะไรที่เผ็ดและเป็นมังสวิรัติ" เอเจนต์จะอ่านและเขียนไปยังฐานข้อมูล Cloud SQL PostgreSQL ผ่าน MCP Toolbox สำหรับฐานข้อมูลทั้งหมด ซึ่งจะจัดการการเข้าถึงฐานข้อมูลทั้งหมด รวมถึงการสร้างการฝังอัตโนมัติสำหรับการค้นหาแบบเวกเตอร์ ในท้ายที่สุด ทั้ง Toolbox และเอเจนต์จะทำงานใน Cloud Run
สิ่งที่คุณจะได้เรียนรู้
- วิธีที่ MCP (Model Context Protocol) สร้างมาตรฐานการเข้าถึงเครื่องมือสำหรับ Agent AI และวิธีที่ MCP Toolbox สำหรับฐานข้อมูลใช้มาตรฐานนี้กับการดำเนินการฐานข้อมูล
- ตั้งค่า MCP Toolbox สำหรับฐานข้อมูลเป็นมิดเดิลแวร์ระหว่าง Agent ADK กับ Cloud SQL PostgreSQL
- กำหนดเครื่องมือฐานข้อมูลแบบประกาศใน
tools.yamlโดยไม่ต้องมีโค้ดฐานข้อมูลใน Agent - สร้าง ADK Agent ที่โหลดเครื่องมือจากเซิร์ฟเวอร์ Toolbox ที่ทำงานอยู่โดยใช้
ToolboxToolset - สร้าง Vector Embeddings โดยใช้ฟังก์ชัน
embedding()ในตัวของ Cloud SQL และเปิดใช้การค้นหาเชิงความหมายด้วยpgvector - ใช้ฟีเจอร์
valueFromParamเพื่อการส่งผ่านข้อมูลเวกเตอร์อัตโนมัติในการดำเนินการเขียน - ติดตั้งใช้งานทั้งเซิร์ฟเวอร์ Toolbox และ Agent ADK ใน Cloud Run
ข้อกำหนดเบื้องต้น
- บัญชี Google Cloud ที่มีบัญชีสำหรับการเรียกเก็บเงินช่วงทดลองใช้
- มีความรู้พื้นฐานเกี่ยวกับ Python และ SQL
- ประสบการณ์การใช้งาน Cloud Database และ ADK มาก่อนจะเป็นประโยชน์
2. ตั้งค่าสภาพแวดล้อม
ขั้นตอนนี้จะเตรียมสภาพแวดล้อม Cloud Shell, กำหนดค่าโปรเจ็กต์ Google Cloud และโคลนที่เก็บข้อมูลอ้างอิง
เปิด Cloud Shell
เปิด Cloud Shell ในเบราว์เซอร์ Cloud Shell มีสภาพแวดล้อมที่กำหนดค่าไว้ล่วงหน้าพร้อมเครื่องมือทั้งหมดที่คุณต้องการสำหรับ Codelab นี้ คลิกให้สิทธิ์เมื่อมีข้อความแจ้งให้ทำ
จากนั้นคลิก "ดู" -> "เทอร์มินัล" เพื่อเปิดเทอร์มินัล อินเทอร์เฟซของคุณควรมีลักษณะคล้ายกับภาพนี้

นี่จะเป็นอินเทอร์เฟซหลักของเรา โดยมี IDE อยู่ด้านบนและเทอร์มินัลอยู่ด้านล่าง
ตั้งค่าไดเรกทอรีการทำงาน
สร้างไดเรกทอรีที่ใช้งานอยู่ โค้ดทั้งหมดที่คุณเขียนใน Codelab นี้จะอยู่ที่นี่
mkdir -p ~/build-agent-adk-toolbox-cloudsql
cloudshell workspace ~/build-agent-adk-toolbox-cloudsql && cd ~/build-agent-adk-toolbox-cloudsql
หลังจากนั้น ให้เตรียมไดเรกทอรีหลายรายการเพื่อจัดการสิ่งต่างๆ เช่น สคริปต์การเริ่มต้นและบันทึก
mkdir -p ~/build-agent-adk-toolbox-cloudsql/scripts
mkdir -p ~/build-agent-adk-toolbox-cloudsql/logs
สร้างโปรเจ็กต์ที่อยู่ในระบบคลาวด์ของ Google
สร้างไฟล์ .env ที่มีตัวแปรสถานที่ตั้ง
# For Vertex AI / Gemini API calls
echo "GOOGLE_CLOUD_LOCATION=global" > .env
# For Cloud SQL, Cloud Run, Artifact Registry
echo "REGION=us-central1" >> .env
หากต้องการลดความซับซ้อนในการตั้งค่าโปรเจ็กต์ในเทอร์มินัล ให้ดาวน์โหลดสคริปต์การตั้งค่าโปรเจ็กต์นี้ลงในไดเรกทอรีการทำงาน
curl -sL https://raw.githubusercontent.com/alphinside/cloud-trial-project-setup/main/setup_verify_trial_project.sh -o setup_verify_trial_project.sh
เรียกใช้สคริปต์ โดยจะยืนยันบัญชีสำหรับการเรียกเก็บเงินของช่วงทดลองใช้ สร้างโปรเจ็กต์ใหม่ (หรือตรวจสอบโปรเจ็กต์ที่มีอยู่) บันทึกรหัสโปรเจ็กต์ลงในไฟล์ .env ในไดเรกทอรีปัจจุบัน และตั้งค่าโปรเจ็กต์ที่ใช้งานอยู่ใน gcloud
bash setup_verify_trial_project.sh && source .env
สคริปต์จะทำสิ่งต่อไปนี้
- ตรวจสอบว่าคุณมีบัญชีสำหรับการเรียกเก็บเงินสำหรับช่วงทดลองใช้ที่ใช้งานอยู่
- ตรวจสอบโปรเจ็กต์ที่มีอยู่ใน
.env(หากมี) - สร้างโปรเจ็กต์ใหม่หรือใช้โปรเจ็กต์ที่มีอยู่
- ลิงก์บัญชีสำหรับการเรียกเก็บเงินของช่วงทดลองใช้กับโปรเจ็กต์
- บันทึกรหัสโปรเจ็กต์ไปยัง
.env - ตั้งค่าโปรเจ็กต์เป็นโปรเจ็กต์
gcloudที่ใช้งานอยู่
ยืนยันว่าตั้งค่าโปรเจ็กต์ถูกต้องแล้วโดยตรวจสอบข้อความสีเหลืองข้างไดเรกทอรีการทำงานในพรอมต์เทอร์มินัลของ Cloud Shell โดยควรแสดงรหัสโปรเจ็กต์ของคุณ

เปิดใช้งาน API ที่จำเป็น
จากนั้นเราต้องเปิดใช้ API หลายรายการสำหรับผลิตภัณฑ์ที่เราจะโต้ตอบด้วย
gcloud services enable \
  aiplatform.googleapis.com \
  sqladmin.googleapis.com \
  compute.googleapis.com \
  run.googleapis.com \
  cloudbuild.googleapis.com \
  artifactregistry.googleapis.com
- Vertex AI API (
aiplatform.googleapis.com) - Agent ของคุณใช้โมเดล Gemini และกล่องเครื่องมือใช้ Embedding API สำหรับการค้นหาเวกเตอร์ - Cloud SQL Admin API (
sqladmin.googleapis.com) - คุณจัดสรรและจัดการอินสแตนซ์ PostgreSQL - Compute Engine API (
compute.googleapis.com) — จำเป็นสำหรับการสร้างอินสแตนซ์ Cloud SQL - Cloud Run, Cloud Build, Artifact Registry - ใช้ในขั้นตอนการทำให้ใช้งานได้ในภายหลังใน Codelab นี้
3. การเตรียมสคริปต์สำหรับการเริ่มต้นฐานข้อมูล
ขั้นตอนนี้จะเริ่มสร้างอินสแตนซ์ Cloud SQL และเรียกใช้สคริปต์การตั้งค่าอัตโนมัติที่รอให้อินสแตนซ์พร้อม จากนั้นจะสร้างฐานข้อมูล ป้อนข้อมูลประกาศรับสมัครงาน และสร้างการฝัง ทั้งหมดนี้จะดำเนินการในครั้งเดียว
ก่อนอื่น ให้เพิ่มรหัสผ่านของฐานข้อมูลลงในไฟล์ .env แล้วโหลดซ้ำโดยทำดังนี้
echo "DB_PASSWORD=restaurant-pwd" >> .env
echo "DB_INSTANCE=restaurant-instance" >> .env
echo "DB_NAME=restaurant_db" >> .env
source .env
การสร้างสคริปต์ Bash สำหรับการสร้างอินสแตนซ์และฐานข้อมูล
จากนั้นสร้างสคริปต์ scripts/setup_database.sh ด้วยคำสั่งต่อไปนี้
mkdir -p ~/build-agent-adk-toolbox-cloudsql/scripts
cloudshell edit scripts/setup_database.sh
จากนั้นคัดลอกโค้ดต่อไปนี้ลงในไฟล์ scripts/setup_database.sh
#!/bin/bash
set -e
source .env

echo "================================================"
echo "Database Setup"
echo "================================================"
echo ""

# Step 1: Create Cloud SQL instance
echo "[1/5] Creating Cloud SQL instance..."

# Check if instance already exists
if gcloud sql instances describe "$DB_INSTANCE" --quiet >/dev/null 2>&1; then
    echo "      Instance already exists"
else
    echo "      Creating instance (takes 5-10 minutes)..."
    gcloud sql instances create "$DB_INSTANCE" \
        --database-version=POSTGRES_17 \
        --tier=db-custom-1-3840 \
        --edition=ENTERPRISE \
        --region="$REGION" \
        --root-password="$DB_PASSWORD" \
        --enable-google-ml-integration \
        --database-flags cloudsql.enable_google_ml_integration=on \
        --quiet
fi
echo "      ✓ Instance ready"
echo ""

# Step 2: Verify instance is ready
echo "[2/5] Verifying instance state..."

STATE=$(gcloud sql instances describe "$DB_INSTANCE" --format='value(state)')

if [ "$STATE" != "RUNNABLE" ]; then
    echo "ERROR: Instance not ready (state: $STATE)"
    exit 1
fi
echo "      ✓ Instance is RUNNABLE"
echo ""

# Step 3: Grant IAM permissions
echo "[3/5] Granting Vertex AI permissions..."

SERVICE_ACCOUNT=$(gcloud sql instances describe "$DB_INSTANCE" \
    --format='value(serviceAccountEmailAddress)')

if [ -z "$SERVICE_ACCOUNT" ]; then
    echo "ERROR: Could not retrieve service account"
    exit 1
fi

gcloud projects add-iam-policy-binding "$GOOGLE_CLOUD_PROJECT" \
    --member="serviceAccount:$SERVICE_ACCOUNT" \
    --role="roles/aiplatform.user" \
    --quiet

echo "      ✓ Permissions granted"
echo ""

# Step 4: Create database
echo "[4/5] Creating database..."

# Check if database already exists
if gcloud sql databases describe "$DB_NAME" \
    --instance="$DB_INSTANCE" --quiet >/dev/null 2>&1; then
    echo "      Database already exists"
else
    gcloud sql databases create "$DB_NAME" \
        --instance="$DB_INSTANCE" \
        --quiet
fi

echo "      ✓ Database '$DB_NAME' ready"
echo ""

# Step 5: Seed database and generate embeddings
echo "[5/5] Seeding database and generating embeddings..."

SCRIPT_DIR="$(cd "$(dirname "${BASH_SOURCE[0]}")" && pwd)"
SETUP_SCRIPT="${SCRIPT_DIR}/setup_restaurant_db.py"

if [ ! -f "$SETUP_SCRIPT" ]; then
    echo "ERROR: Setup script not found: $SETUP_SCRIPT"
    exit 1
fi

uv run "$SETUP_SCRIPT"

echo ""
echo "================================================"
echo "Setup complete!"
echo "================================================"
echo ""
การสร้างสคริปต์ Python สำหรับการเริ่มต้นข้อมูล
หลังจากนั้น ให้สร้างไฟล์ Python ของสคริปต์การเริ่มต้น scripts/setup_restaurant_db.py โดยใช้คำสั่งด้านล่าง
cloudshell edit scripts/setup_restaurant_db.py
จากนั้นคัดลอกโค้ดต่อไปนี้ลงในไฟล์ scripts/setup_restaurant_db.py
import os
import sys
from pathlib import Path
from dotenv import load_dotenv
from google.cloud.sql.connector import Connector
import pg8000
import time

# Load environment variables from .env file
env_path = Path(__file__).parent.parent / '.env'
load_dotenv(env_path)
EMBEDDING_MODEL='gemini-embedding-001'

# Verify required environment variables
required_vars = ['GOOGLE_CLOUD_PROJECT', 'REGION', 'DB_PASSWORD']
missing_vars = [var for var in required_vars if not os.environ.get(var)]

if missing_vars:
    print(f"ERROR: Missing required environment variables: {', '.join(missing_vars)}", file=sys.stderr)
    print(f"", file=sys.stderr)
    print(f"Expected .env file location: {env_path}", file=sys.stderr)
    if not env_path.exists():
        print(f"✗ File not found at that location", file=sys.stderr)
    else:
        print(f"✓ File exists but is missing the variables above", file=sys.stderr)
    print(f"", file=sys.stderr)
    print(f"Make sure your .env file contains:", file=sys.stderr)
    for var in missing_vars:
        print(f"  {var}=<value>", file=sys.stderr)
    sys.exit(1)

# Menu items data
MENU_ITEMS = [
    ("Truffle Mushroom Risotto", "Italian", "Main Course",
     "Arborio rice, truffle oil, porcini mushrooms, parmesan, white wine",
     "$28", "Vegetarian, Gluten-Free", True,
     "A creamy, luxurious risotto made with arborio rice slow-cooked in white wine and mushroom broth, finished with shaved black truffle and aged parmesan. The porcini mushrooms add a deep, earthy flavor that pairs beautifully with the delicate truffle oil drizzled on top."),
    ("Spicy Tuna Tartare", "Japanese", "Appetizer",
     "Ahi tuna, sriracha, sesame oil, avocado, crispy wonton",
     "$22", "Gluten-Free, Dairy-Free", True,
     "Fresh ahi tuna diced and tossed with sriracha aioli, toasted sesame oil, and lime juice, served atop creamy avocado slices with crispy wonton chips. A perfect balance of heat, richness, and crunch inspired by modern Japanese fusion cuisine."),
    ("Lamb Kofta Kebab", "Middle Eastern", "Main Course",
     "Ground lamb, cumin, coriander, yogurt sauce, flatbread",
     "$24", "Halal", True,
     "Hand-formed spiced lamb kebabs grilled over charcoal, seasoned with cumin, coriander, and sumac. Served with warm flatbread, tangy yogurt-cucumber sauce, and a fresh herb salad. A classic Middle Eastern street food elevated with premium ingredients."),
    ("Pad Thai", "Thai", "Main Course",
     "Rice noodles, shrimp, tamarind, peanuts, bean sprouts, lime",
     "$19", "Gluten-Free, Dairy-Free", True,
     "Stir-fried rice noodles with tiger shrimp, scrambled egg, and a sweet-sour tamarind sauce, topped with crushed peanuts, fresh bean sprouts, and a squeeze of lime. This classic Thai street food dish balances sweet, sour, salty, and umami in every bite."),
    ("Margherita Pizza", "Italian", "Main Course",
     "San Marzano tomatoes, fresh mozzarella, basil, olive oil",
     "$18", "Vegetarian", True,
     "A Neapolitan-style pizza with a thin, charred crust topped with crushed San Marzano tomatoes, creamy buffalo mozzarella, fresh basil leaves, and a drizzle of extra virgin olive oil. Simple, classic, and made with imported Italian ingredients."),
    ("Miso Glazed Black Cod", "Japanese", "Main Course",
     "Black cod, white miso, mirin, sake, pickled ginger",
     "$36", "Gluten-Free, Dairy-Free", True,
     "Buttery black cod marinated for 72 hours in a sweet white miso glaze with mirin and sake, then broiled until caramelized. Served with pickled ginger and steamed bok choy. A signature dish inspired by Nobu's iconic preparation."),
    ("Caesar Salad", "American", "Appetizer",
     "Romaine lettuce, parmesan, croutons, anchovy dressing",
     "$14", "Contains Gluten", True,
     "Crisp romaine hearts tossed with a house-made anchovy-garlic dressing, shaved parmesan, and golden sourdough croutons. A timeless salad that serves as the perfect light starter or side dish with grilled proteins."),
    ("Chicken Tikka Masala", "Indian", "Main Course",
     "Chicken thigh, tomato cream sauce, garam masala, basmati rice",
     "$21", "Gluten-Free", True,
     "Tender chunks of tandoori-marinated chicken simmered in a rich, creamy tomato sauce spiced with garam masala, cumin, and fenugreek. Served over fragrant basmati rice with warm garlic naan on the side."),
    ("Chocolate Lava Cake", "French", "Dessert",
     "Dark chocolate, butter, eggs, vanilla, powdered sugar",
     "$15", "Vegetarian", True,
     "A warm, individual-sized chocolate cake with a molten dark chocolate center that flows when you break through the delicate outer shell. Made with 70% Belgian dark chocolate and served with a scoop of vanilla bean ice cream."),
    ("Pho Bo", "Vietnamese", "Main Course",
     "Rice noodles, beef brisket, star anise, cinnamon, bean sprouts, Thai basil",
     "$17", "Gluten-Free, Dairy-Free", True,
     "A deeply aromatic beef broth simmered for 12 hours with star anise, cinnamon, and charred ginger, ladled over rice noodles and thinly sliced beef brisket. Served with fresh Thai basil, bean sprouts, jalapeño, and lime for the table to customize."),
    ("Lobster Bisque", "French", "Appetizer",
     "Lobster, heavy cream, cognac, tarragon, cayenne",
     "$19", "Gluten-Free", True,
     "A velvety smooth soup made from roasted lobster shells, finished with heavy cream, a splash of cognac, and fresh tarragon. Each bowl is garnished with tender lobster meat and a pinch of cayenne for subtle warmth."),
    ("Falafel Plate", "Middle Eastern", "Main Course",
     "Chickpeas, herbs, tahini, pickled vegetables, hummus",
     "$16", "Vegan, Gluten-Free", True,
     "Crispy-on-the-outside, fluffy-on-the-inside chickpea fritters seasoned with fresh parsley, cilantro, and cumin. Served with creamy tahini sauce, house-made hummus, pickled turnips, and warm pita bread."),
    ("Crème Brûlée", "French", "Dessert",
     "Heavy cream, vanilla bean, egg yolks, caramelized sugar",
     "$13", "Vegetarian, Gluten-Free", True,
     "A classic French custard made with Madagascar vanilla bean and farm-fresh egg yolks, topped with a perfectly torched layer of caramelized sugar that cracks with a satisfying snap. Rich, creamy, and elegantly simple."),
    ("Korean BBQ Short Ribs", "Korean", "Main Course",
     "Beef short ribs, soy sauce, sesame, garlic, pear marinade",
     "$32", "Dairy-Free", False,
     "Premium beef short ribs marinated overnight in a sweet and savory blend of soy sauce, Asian pear, garlic, and toasted sesame. Grilled tableside over charcoal and served with lettuce wraps, pickled daikon, and gochujang dipping sauce."),
    ("Tiramisu", "Italian", "Dessert",
     "Mascarpone, espresso, ladyfingers, cocoa, Marsala wine",
     "$14", "Vegetarian, Contains Gluten", True,
     "Layers of espresso-soaked ladyfingers and whipped mascarpone cream flavored with Marsala wine, dusted with premium Dutch cocoa powder. Made fresh daily and chilled for 24 hours to develop rich, complex flavors."),
]


def get_connection():
    """Create a connection to Cloud SQL using the connector."""
    project = os.environ['GOOGLE_CLOUD_PROJECT']
    region = os.environ['REGION']
    password = os.environ['DB_PASSWORD']
    instance = os.environ['DB_INSTANCE']
    database = os.environ['DB_NAME']

    connector = Connector()
    conn = connector.connect(
        f"{project}:{region}:{instance}",
        "pg8000",
        user="postgres",
        password=password,
        db=database
    )
    return conn, connector


def create_schema(cursor):
    """Create extensions and menu_items table."""
    cursor.execute("CREATE EXTENSION IF NOT EXISTS google_ml_integration")
    cursor.execute("CREATE EXTENSION IF NOT EXISTS vector")
    cursor.execute("""
        CREATE TABLE IF NOT EXISTS menu_items (
            id SERIAL PRIMARY KEY,
            name VARCHAR NOT NULL,
            cuisine_type VARCHAR NOT NULL,
            category VARCHAR NOT NULL,
            ingredients VARCHAR NOT NULL,
            price VARCHAR NOT NULL,
            dietary_tags VARCHAR NOT NULL,
            available BOOLEAN NOT NULL DEFAULT TRUE,
            description TEXT NOT NULL,
            description_embedding vector(3072)
        )
    """)


def seed_menu_items(cursor, conn):
    """Insert menu items."""
    cursor.execute("SELECT COUNT(*) FROM menu_items")
    existing_count = cursor.fetchone()[0]

    if existing_count > 0:
        print(f"      {existing_count} menu items already exist, skipping seed")
        return 0

    cursor.executemany("""
        INSERT INTO menu_items (name, cuisine_type, category, ingredients, price, dietary_tags, available, description)
        VALUES (%s, %s, %s, %s, %s, %s, %s, %s)
    """, MENU_ITEMS)
    conn.commit()
    return len(MENU_ITEMS)


def generate_embeddings(cursor, conn):
    """Generate embeddings using Cloud SQL's embedding() function."""
    cursor.execute("SELECT COUNT(*) FROM menu_items WHERE description_embedding IS NULL")
    null_count = cursor.fetchone()[0]

    if null_count == 0:
        print("      All menu items already have embeddings")
        return 0

    cursor.execute(f"""
        UPDATE menu_items
        SET description_embedding = embedding('{EMBEDDING_MODEL}', description)::vector
        WHERE description_embedding IS NULL
    """)
    rows_updated = cursor.rowcount
    conn.commit()
    return rows_updated


def main():
    conn, connector = get_connection()
    cursor = conn.cursor()

    try:
        create_schema(cursor)
        conn.commit()

        seeded = seed_menu_items(cursor, conn)
        if seeded > 0:
            print(f"      ✓ Inserted {seeded} menu items")

        # Waiting for vertex role propagation
        time.sleep(60)
        embedded = generate_embeddings(cursor, conn)
        if embedded > 0:
            print(f"      ✓ Generated {embedded} embeddings")

    except Exception as e:
        print(f"ERROR: {e}", file=sys.stderr)
        sys.exit(1)
    finally:
        cursor.close()
        conn.close()
        connector.close()


if __name__ == "__main__":
    main()
ตอนนี้เรามาดูขั้นตอนถัดไปกัน
4. สร้างและเริ่มต้นฐานข้อมูล
ตอนนี้สคริปต์ของเราพร้อมที่จะดำเนินการแล้ว เราจะต้องใช้ Python เพื่อเรียกใช้สคริปต์ที่เตรียมไว้ ดังนั้นมาเตรียมสคริปต์นั้นก่อน
ตั้งค่าโปรเจ็กต์ Python
uv เป็นตัวจัดการแพ็กเกจและโปรเจ็กต์ Python ที่รวดเร็วซึ่งเขียนด้วย Rust ( เอกสารประกอบของ uv ) Codelab นี้ใช้เพื่อความเร็วและความเรียบง่ายในการดูแลโปรเจ็กต์ Python
เริ่มต้นโปรเจ็กต์ Python และเพิ่มการอ้างอิงที่จำเป็น
uv init
uv add cloud-sql-python-connector --extra pg8000
uv add python-dotenv
โปรดทราบว่าเราใช้ cloud-sql-python-connector Python SDK ที่นี่เพื่อเริ่มต้นการเชื่อมต่อที่ปลอดภัยกับอินสแตนซ์ฐานข้อมูลของเรา ซึ่งได้รับการตรวจสอบสิทธิ์โดยใช้ข้อมูลเข้าสู่ระบบเริ่มต้นของแอปพลิเคชัน
เรียกใช้สคริปต์การตั้งค่า
ตอนนี้เราสามารถเรียกใช้สคริปต์การตั้งค่าในเบื้องหลังและตรวจสอบเอาต์พุตของคอนโซลที่จะเขียนลงในไฟล์ logs/atabase_setup.log โดยใช้คำสั่งต่อไปนี้ คุณไปที่ส่วนถัดไปได้ขณะรอให้การดำเนินการนี้เสร็จสิ้น
mkdir -p ~/build-agent-adk-toolbox-cloudsql/logs
bash scripts/setup_database.sh > logs/database_setup.log 2>&1 &
ดาวน์โหลดไบนารีของกล่องเครื่องมือ
ในบทแนะนำนี้ เราจะใช้ MCP Toolbox ซึ่งมาพร้อมกับไบนารีที่สร้างไว้ล่วงหน้าซึ่งพร้อมใช้งานในสภาพแวดล้อม Linux ตอนนี้เรามาดาวน์โหลดในเบื้องหลังกันเลยเพราะอาจใช้เวลานาน เรียกใช้คำสั่งต่อไปนี้เพื่อดาวน์โหลดไบนารีและตรวจสอบบันทึกเอาต์พุตใน logs/toolbox_dl.log คุณไปที่ส่วนถัดไปได้ขณะรอให้การดำเนินการนี้เสร็จสิ้น
cd ~/build-agent-adk-toolbox-cloudsql
curl -O https://storage.googleapis.com/mcp-toolbox-for-databases/v1.1.0/linux/amd64/toolbox > logs/toolbox_dl.log 2>&1 &
ทำความเข้าใจสคริปต์การตั้งค่า scripts/setup_database.sh
ตอนนี้มาลองทำความเข้าใจสคริปต์การตั้งค่าที่เรากำหนดค่าไว้ก่อนหน้านี้กัน โดยจะดำเนินการดังนี้
- คำสั่งแรกที่เราเรียกใช้คือคำสั่ง
gcloud sql instances createที่มีแฟล็กต่อไปนี้
db-custom-1-3840เป็นระดับ Cloud SQL แบบคอร์เฉพาะที่เล็กที่สุด (1 vCPU, RAM 3.75 GB) ในรุ่นENTERPRISEคุณอ่านรายละเอียดเพิ่มเติมได้ที่นี่ การผสานรวม Vertex AI ML ต้องใช้คอร์เฉพาะ ส่วนระดับแบบคอร์ที่ใช้ร่วมกัน (db-f1-micro,db-g1-small) ไม่รองรับ--root-passwordตั้งค่ารหัสผ่านสำหรับผู้ใช้postgresเริ่มต้น--enable-google-ml-integrationช่วยให้การผสานรวมในตัวของ Cloud SQL กับ Vertex AI ทำงานได้ ซึ่งช่วยให้คุณเรียกใช้โมเดลการฝังจาก SQL ได้โดยตรงโดยใช้ฟังก์ชันembedding()
- ตรวจสอบว่าอินสแตนซ์อยู่ในสถานะ
RUNNABLEแล้วหรือไม่ - ให้สิทธิ์บัญชีบริการของอินสแตนซ์ Cloud SQL ในการเรียกใช้ Vertex AI โดยใช้คำสั่ง
gcloud projects add-iam-policy-bindingซึ่งจำเป็นสำหรับฟังก์ชันembedding()ในตัวที่เราจะใช้เมื่อเริ่มต้นฐานข้อมูล - การสร้างฐานข้อมูล
- การเรียกใช้สคริปต์การเริ่มต้น
setup_restaurant_db.py
ทำความเข้าใจสคริปต์เริ่มต้น scripts/setup_restaurant_db.py
ตอนนี้มาที่สคริปต์การเริ่มต้น สคริปต์นี้จะทำสิ่งต่อไปนี้
- เริ่มต้นการเชื่อมต่อกับอินสแตนซ์ฐานข้อมูล
- ติดตั้งส่วนขยาย PostgreSQL 2 รายการ
google_ml_integration— มีembedding()ฟังก์ชัน SQL ซึ่งเรียกใช้โมเดลการฝังของ Vertex AI จาก SQL โดยตรง ส่วนขยายนี้เป็นส่วนขยายระดับฐานข้อมูลที่ทำให้ฟังก์ชัน ML พร้อมใช้งานภายในrestaurant_dbแฟล็กระดับอินสแตนซ์ (--enable-google-ml-integration) ที่คุณตั้งค่าระหว่างการสร้างอินสแตนซ์จะอนุญาตให้ VM ของ Cloud SQL เข้าถึง Vertex AI ได้ ส่วนส่วนขยายจะทำให้ฟังก์ชัน SQL พร้อมใช้งานภายในฐานข้อมูลที่เฉพาะเจาะจงนี้vector(pgvector) — เพิ่มประเภทข้อมูลvectorและตัวดำเนินการระยะทางสำหรับการจัดเก็บและค้นหาการฝัง
- สร้างตาราง โปรดทราบว่าคอลัมน์
description_embeddingคือvector(3072)ซึ่งเป็นคอลัมน์pgvectorที่จัดเก็บเวกเตอร์ 3072 มิติ - เริ่มต้นใช้งานข้อมูลรายการเมนูเริ่มต้น
- สร้างข้อมูลการฝังจากฟิลด์
descriptionและกรอกdescription_embeddingโดยใช้การผสานรวม Vertex ในตัวผ่านฟังก์ชันembedding()
embedding('gemini-embedding-001', description)— เรียกใช้โมเดลการฝัง Gemini ของ Vertex AI โดยตรงจาก SQL โดยส่งdescriptionข้อความของแต่ละงาน นี่คือส่วนขยายgoogle_ml_integrationที่คุณติดตั้งในสคริปต์เริ่มต้น::vector— แปลงอาร์เรย์ของค่าทศนิยมที่ส่งคืนเป็นประเภทvectorของ pgvector เพื่อให้จัดเก็บและค้นหาด้วยโอเปอเรเตอร์ระยะทางได้UPDATEจะทำงานในทั้ง 15 แถว โดยสร้างการฝังมิติ 3072 จำนวน 1 รายการต่อคำอธิบายงาน
ซึ่งจะเตรียมข้อมูลเริ่มต้นที่ Agent ของเราจะเข้าถึง
5. กำหนดค่า MCP Toolbox สำหรับฐานข้อมูล
ขั้นตอนนี้จะแนะนำ MCP Toolbox สำหรับฐานข้อมูล กำหนดค่าให้เชื่อมต่อกับอินสแตนซ์ Cloud SQL และกำหนดเครื่องมือคำค้นหา SQL มาตรฐาน 2 รายการ
MCP คืออะไรและเหตุใดจึงควรใช้กล่องเครื่องมือ
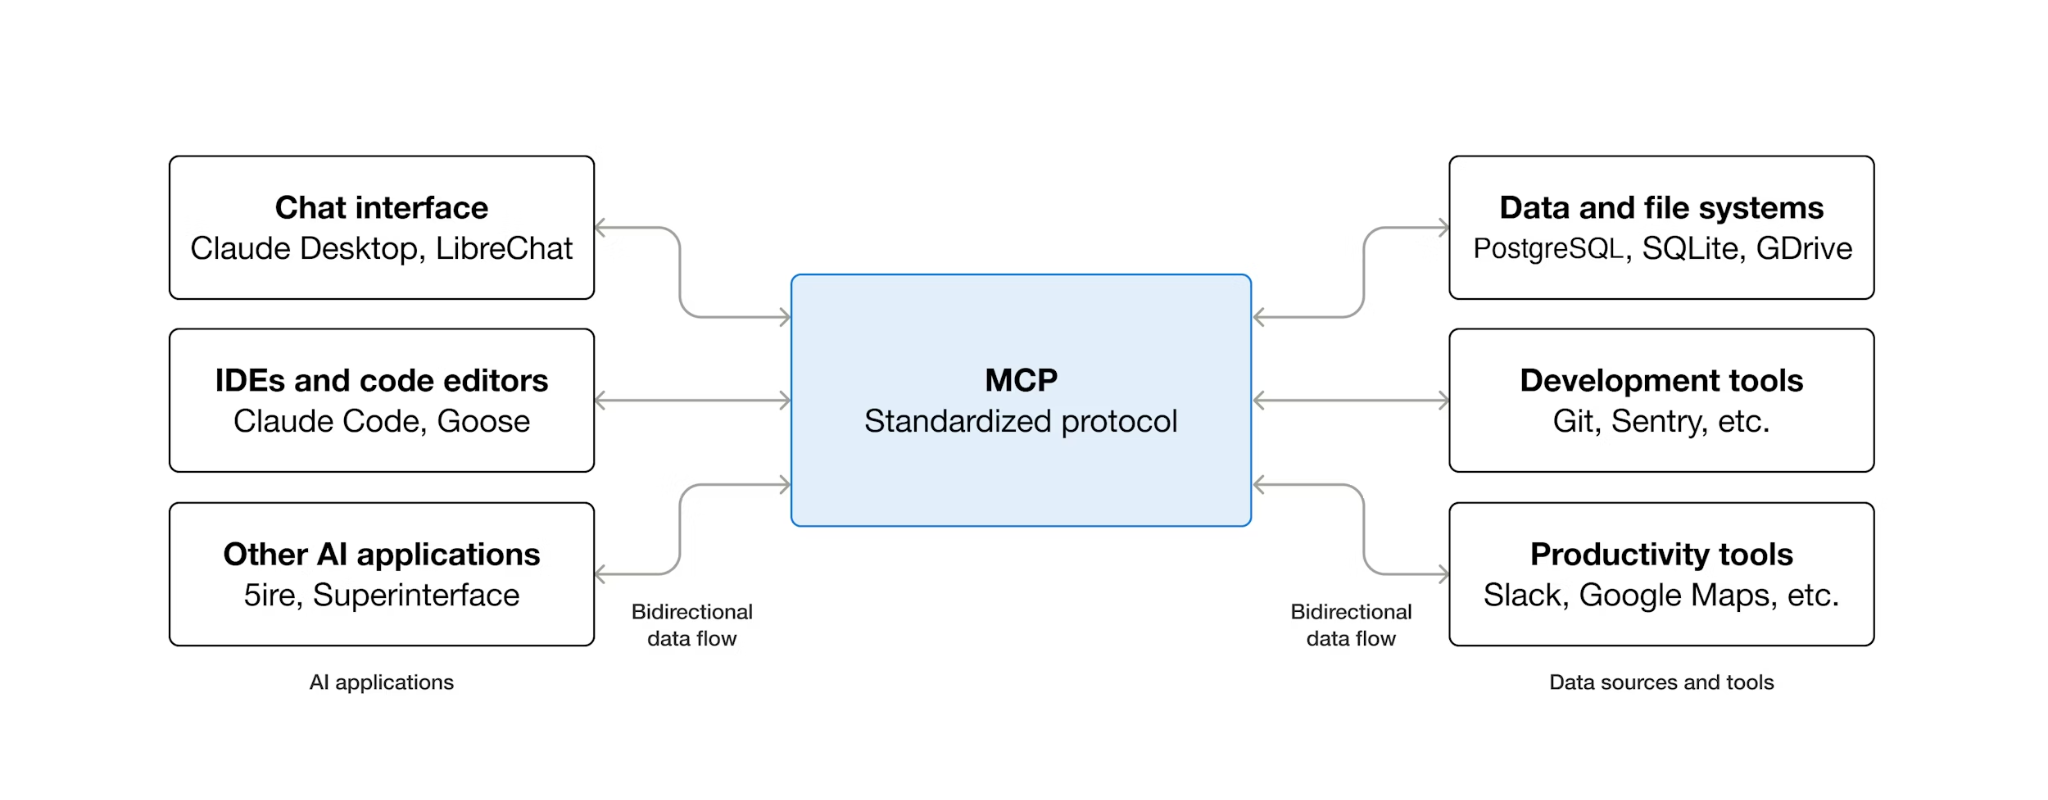
MCP (Model Context Protocol) เป็นโปรโตคอลแบบเปิดที่กำหนดมาตรฐานวิธีที่ Agent AI ค้นหาและโต้ตอบกับเครื่องมือภายนอก โดยจะกำหนดรูปแบบไคลเอ็นต์-เซิร์ฟเวอร์ ซึ่ง Agent จะโฮสต์ไคลเอ็นต์ MCP และเซิร์ฟเวอร์ MCP จะแสดงเครื่องมือต่างๆ ไคลเอ็นต์ที่เข้ากันได้กับ MCP สามารถใช้เซิร์ฟเวอร์ที่เข้ากันได้กับ MCP ได้โดยไม่ต้องมีโค้ดการผสานรวมที่กำหนดเองสำหรับแต่ละเครื่องมือ
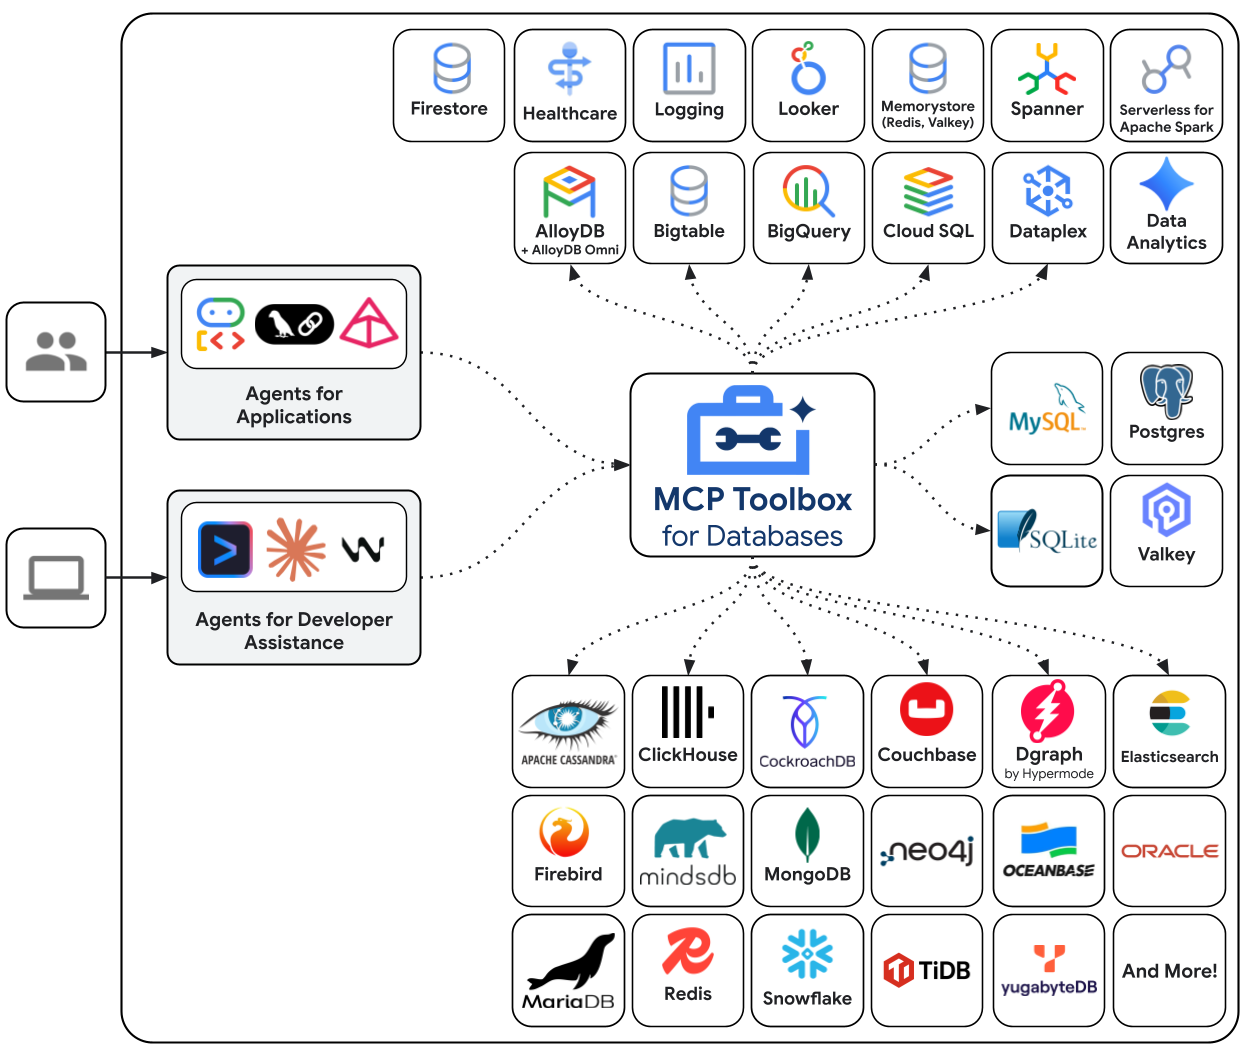
MCP Toolbox สำหรับฐานข้อมูลเป็นเซิร์ฟเวอร์ MCP โอเพนซอร์สที่สร้างขึ้นเพื่อการเข้าถึงฐานข้อมูลโดยเฉพาะ หากไม่มี คุณจะต้องเขียนฟังก์ชัน Python ที่เปิดการเชื่อมต่อฐานข้อมูล จัดการกลุ่มการเชื่อมต่อ สร้างการค้นหาที่มีพารามิเตอร์เพื่อป้องกันการแทรก SQL จัดการข้อผิดพลาด และฝังโค้ดทั้งหมดนั้นไว้ในตัวแทน ตัวแทนทุกคนที่ต้องการเข้าถึงฐานข้อมูลจะต้องทำขั้นตอนนี้ซ้ำ การเปลี่ยนคำค้นหาหมายถึงการติดตั้งใช้งาน Agent อีกครั้ง
เมื่อใช้ Toolbox คุณจะเขียนไฟล์ YAML ได้ โดยแต่ละเครื่องมือจะแมปกับคำสั่ง SQL ที่กำหนดพารามิเตอร์ไว้ Toolbox จะจัดการการจัดกลุ่มการเชื่อมต่อ คำค้นหาที่กำหนดพารามิเตอร์ การตรวจสอบสิทธิ์ และความสามารถในการสังเกต เครื่องมือจะแยกออกจาก Agent คุณสามารถอัปเดตคำค้นหาได้โดยการแก้ไข tools.yaml และรีสตาร์ท Toolbox โดยไม่ต้องแตะต้องโค้ดของ Agent เครื่องมือเดียวกันนี้จะทำงานได้ใน ADK, LangGraph, LlamaIndex หรือเฟรมเวิร์กที่เข้ากันได้กับ MCP
เขียนการกำหนดค่าเครื่องมือ
ตอนนี้เราต้องสร้างไฟล์ชื่อ tools.yaml ใน Cloud Shell Editor เพื่อตั้งค่าเครื่องมือ
cloudshell edit tools.yaml
ไฟล์ใช้ YAML แบบหลายเอกสาร โดยแต่ละบล็อกที่คั่นด้วย --- จะเป็นทรัพยากรแบบสแตนด์อโลน ทรัพยากรทุกรายการมี kind ที่ประกาศว่าทรัพยากรนั้นคืออะไร (sources สำหรับการเชื่อมต่อฐานข้อมูล tools สำหรับการดำเนินการที่เรียกใช้ได้ของเอเจนต์) และ type ที่ระบุแบ็กเอนด์ (cloud-sql-postgres สำหรับแหล่งที่มา postgres-sql สำหรับเครื่องมือที่ใช้ SQL) เครื่องมือจะอ้างอิงแหล่งที่มาด้วย name ซึ่งเป็นวิธีที่กล่องเครื่องมือจะทราบว่าควรใช้ Connection Pool ใด ตัวแปรสภาพแวดล้อมใช้ไวยากรณ์ ${VAR_NAME} และจะได้รับการแก้ไขเมื่อเริ่มต้นระบบ
ตอนนี้มาคัดลอกสคริปต์ต่อไปนี้ลงในไฟล์ tools.yaml ก่อน
# tools.yaml

# --- Data Source ---
kind: source
name: restaurant-db
type: cloud-sql-postgres
project: ${GOOGLE_CLOUD_PROJECT}
region: ${REGION}
instance: ${DB_INSTANCE}
database: ${DB_NAME}
user: postgres
password: ${DB_PASSWORD}

---
สคริปต์นี้จะกำหนดทรัพยากรต่อไปนี้
- แหล่งที่มา (
restaurant-db) — บอกกล่องเครื่องมือวิศวกรว่าเชื่อมต่อกับอินสแตนซ์ Cloud SQL PostgreSQL อย่างไรcloud-sql-postgresประเภทนี้ใช้เครื่องมือเชื่อมต่อ Cloud SQL ภายใน โดยจะจัดการการตรวจสอบสิทธิ์และการเชื่อมต่อที่ปลอดภัยโดยอัตโนมัติ ระบบจะแก้ไขตัวยึดตำแหน่ง${GOOGLE_CLOUD_PROJECT},${REGION}และ${DB_PASSWORD}จากตัวแปรสภาพแวดล้อมเมื่อเริ่มต้น
จากนั้น ให้ต่อท้ายสคริปต์ต่อไปนี้ใต้สัญลักษณ์ --- ใน tools.yaml
# --- Tool 1: Search menu items by category and/or cuisine type ---
kind: tool
name: search-menu
type: postgres-sql
source: restaurant-db
description: >-
  Search for menu items by category and/or cuisine type.
  Use this tool when the user wants to browse menu items
  by category (e.g., Main Course, Appetizer, Dessert) or find dishes
  from a specific cuisine. Both parameters accept an
  empty string to match all values.
statement: |
  SELECT name, cuisine_type, category, ingredients, price, dietary_tags, available
  FROM menu_items
  WHERE ($1 = '' OR LOWER(category) = LOWER($1))
  AND ($2 = '' OR LOWER(cuisine_type) LIKE '%' || LOWER($2) || '%')
  ORDER BY name
  LIMIT 10
parameters:
  - name: category
    type: string
    description: "The menu category to filter by (e.g., 'Main Course', 'Appetizer', 'Dessert'). Use empty string for all categories."
  - name: cuisine_type
    type: string
    description: "A cuisine type to search for (partial match, e.g., 'Italian', 'Japanese'). Use empty string for all cuisines."

---

# --- Tool 2: Get full details for a specific menu item ---
kind: tool
name: get-item-details
type: postgres-sql
source: restaurant-db
description: >-
  Get full details for a specific menu item including its description,
  price, dietary tags, and availability. Use this tool when the
  user asks about a particular dish by name or cuisine.
statement: |
  SELECT name, cuisine_type, category, ingredients, price, dietary_tags, available, description
  FROM menu_items
  WHERE LOWER(name) LIKE '%' || LOWER($1) || '%'
  OR LOWER(cuisine_type) LIKE '%' || LOWER($1) || '%'
parameters:
  - name: search_term
    type: string
    description: "The dish name or cuisine type to look up (partial match supported)."

---
สคริปต์นี้จะกำหนดทรัพยากรต่อไปนี้
- เครื่องมือ 1 และ 2 (
search-menu,get-item-details) - เครื่องมือค้นหา SQL มาตรฐาน แต่ละรายการจะแมปชื่อเครื่องมือ (สิ่งที่เอเจนต์เห็น) กับคำสั่ง SQL ที่กำหนดพารามิเตอร์ (สิ่งที่ฐานข้อมูลดำเนินการ) พารามิเตอร์ใช้ตัวยึดตำแหน่งตามตำแหน่ง$1,$2กล่องเครื่องมือจะดำเนินการคำสั่งเหล่านี้เป็น Prepared statement ซึ่งจะป้องกันการแทรก SQL
มาต่อกันเลย เพิ่มสคริปต์ต่อไปนี้ใต้สัญลักษณ์ --- ใน tools.yaml
# --- Embedding Model ---
kind: embeddingModel
name: gemini-embedding
type: gemini
model: gemini-embedding-001
project: ${GOOGLE_CLOUD_PROJECT}
location: ${GOOGLE_CLOUD_LOCATION}
dimension: 3072

---
สคริปต์นี้จะกำหนดทรัพยากรต่อไปนี้
- โมเดลการฝัง (
gemini-embedding) — กำหนดค่ากล่องเครื่องมือให้เรียกใช้โมเดลgemini-embedding-001ของ Gemini เพื่อสร้างการฝังข้อความแบบ 3072 มิติ กล่องเครื่องมือใช้ข้อมูลรับรองเริ่มต้นของแอปพลิเคชัน (ADC) เพื่อตรวจสอบสิทธิ์ โดยไม่จำเป็นต้องใช้คีย์ API ใน Cloud Shell หรือ Cloud Run โปรดทราบว่าdimensionที่กำหนดค่าไว้ที่นี่ต้องเหมือนกับที่เรากำหนดค่าไว้ก่อนหน้านี้เพื่อเริ่มต้นฐานข้อมูล
มาต่อกันเลย เพิ่มสคริปต์ต่อไปนี้ใต้สัญลักษณ์ --- ใน tools.yaml
# --- Tool 3: Semantic search by description ---
kind: tool
name: search-menu-by-description
type: postgres-sql
source: restaurant-db
description: >-
  Find menu items that match a natural language description of what the user
  is looking for. Use this tool when the user describes their ideal dish
  using flavors, textures, dietary preferences, or cravings rather than a
  specific category or cuisine. Examples: "I want something spicy and creamy,"
  "a light vegetarian appetizer," "something rich and chocolatey for dessert."
statement: |
  SELECT name, cuisine_type, category, ingredients, price, dietary_tags, description
  FROM menu_items
  WHERE description_embedding IS NOT NULL
  ORDER BY description_embedding <=> $1
  LIMIT 5
parameters:
  - name: search_query
    type: string
    description: "A natural language description of the kind of dish the user is looking for."
    embeddedBy: gemini-embedding

---
สคริปต์นี้จะกำหนดทรัพยากรต่อไปนี้
- เครื่องมือ 3 (
search-menu-by-description) — เครื่องมือค้นหาเวกเตอร์ พารามิเตอร์search_queryมีembeddedBy: gemini-embeddingซึ่งจะบอกกล่องเครื่องมือให้สกัดกั้นข้อความดิบ ส่งไปยังโมเดลการฝัง และใช้เวกเตอร์ที่ได้ในคำสั่ง SQL โอเปอเรเตอร์<=>คือระยะทางโคไซน์ของ pgvector ซึ่งค่าที่น้อยกว่าหมายถึงคำอธิบายที่คล้ายกันมากขึ้น
สุดท้าย ให้เพิ่มเครื่องมือสุดท้ายภายใต้สัญลักษณ์ --- ใน tools.yaml
# --- Tool 4: Add a new menu item with automatic embedding ---
kind: tool
name: add-menu-item
type: postgres-sql
source: restaurant-db
description: >-
  Add a new menu item to the restaurant. Use this tool when a user asks
  to add a dish that is not currently on the menu.
statement: |
  INSERT INTO menu_items (name, cuisine_type, category, ingredients, price, dietary_tags, available, description, description_embedding)
  VALUES ($1, $2, $3, $4, $5, $6, CAST($7 AS BOOLEAN), $8, $9)
  RETURNING name, cuisine_type
parameters:
  - name: name
    type: string
    description: "The dish name (e.g., 'Truffle Mushroom Risotto')."
  - name: cuisine_type
    type: string
    description: "The cuisine type (e.g., 'Italian', 'Japanese', 'Thai')."
  - name: category
    type: string
    description: "The menu category (e.g., 'Main Course', 'Appetizer', 'Dessert')."
  - name: ingredients
    type: string
    description: "Comma-separated list of key ingredients (e.g., 'salmon, miso, ginger')."
  - name: price
    type: string
    description: "The price (e.g., '$24')."
  - name: dietary_tags
    type: string
    description: "Dietary information (e.g., 'Vegetarian, Gluten-Free')."
  - name: available
    type: string
    description: "Whether the dish is currently available (true or false)."
  - name: description
    type: string
    description: "A short description of the dish (2-3 sentences)."
  - name: description_vector
    type: string
    description: "Auto-generated embedding vector for the dish description."
    valueFromParam: description
    embeddedBy: gemini-embedding
สคริปต์นี้จะกำหนดทรัพยากรต่อไปนี้
- เครื่องมือ 4 (
add-menu-item) - แสดงการส่งผ่านข้อมูลเวกเตอร์ พารามิเตอร์description_vectorมีฟิลด์พิเศษ 2 รายการ ได้แก่ valueFromParam: description— กล่องเครื่องมือจะคัดลอกค่าจากพารามิเตอร์descriptionไปยังพารามิเตอร์นี้ LLM จะไม่เห็นพารามิเตอร์นี้embeddedBy: gemini-embedding— กล่องเครื่องมือจะฝังข้อความที่คัดลอกลงในเวกเตอร์ก่อนส่งไปยัง SQL
ผลลัพธ์คือการเรียกใช้เครื่องมือเดียวจะจัดเก็บทั้งข้อความคำอธิบายดิบและการฝังเวกเตอร์ของข้อความนั้น โดยที่เอเจนต์ไม่ต้องทราบข้อมูลใดๆ เกี่ยวกับการฝัง
รูปแบบ YAML แบบหลายเอกสารจะแยกแต่ละทรัพยากรด้วย --- แต่ละเอกสารจะมีฟิลด์ kind, name และ type ที่กำหนดว่าเอกสารนั้นคืออะไร โดยสรุปแล้ว เราได้กำหนดค่าสิ่งต่อไปนี้ทั้งหมดแล้ว
- กำหนดฐานข้อมูลต้นทาง
- กำหนดเครื่องมือ ( เครื่องมือ 1 และ 2) เพื่อค้นหาฐานข้อมูลด้วยตัวกรองมาตรฐาน
- กำหนดโมเดลการฝัง
- กำหนดเครื่องมือเพื่อทำการค้นหาเวกเตอร์ ( tool 3 ) ไปยังฐานข้อมูล
- กำหนดเครื่องมือเพื่อทำการนำเข้าข้อมูลเวกเตอร์ ( เครื่องมือ 4) ไปยังฐานข้อมูล
6. การเรียกใช้เซิร์ฟเวอร์ MCP Toolbox
ในขั้นตอนก่อนหน้า เราได้ตั้งค่าที่จำเป็นสำหรับกล่องเครื่องมือ MCP แล้ว ตอนนี้เราพร้อมที่จะเรียกใช้เซิร์ฟเวอร์แล้ว
ยืนยันข้อมูลเริ่มต้น
ก่อนเริ่มใช้กล่องเครื่องมือ ให้ตรวจสอบว่าการตั้งค่าฐานข้อมูลเสร็จสมบูรณ์แล้ว สร้างสคริปต์ Python scripts/verify_database.py โดยใช้คำสั่งต่อไปนี้
cloudshell edit scripts/verify_seed.py
จากนั้นคัดลอกโค้ดต่อไปนี้ลงในไฟล์ scripts/verify_seed.py
#!/usr/bin/env python3
"""Verify the database has 15 menu items with embeddings."""

import os
import sys
from pathlib import Path
from dotenv import load_dotenv
from google.cloud.sql.connector import Connector
import pg8000

# Load environment variables
env_path = Path(__file__).parent.parent / '.env'
load_dotenv(env_path)

# Verify required environment variables
required_vars = ['GOOGLE_CLOUD_PROJECT', 'REGION', 'DB_PASSWORD', 'DB_INSTANCE', 'DB_NAME']
missing_vars = [var for var in required_vars if not os.environ.get(var)]

if missing_vars:
    print(f"ERROR: Missing environment variables: {', '.join(missing_vars)}", file=sys.stderr)
    sys.exit(1)


def verify_database():
    """Check that 15 menu items exist with embeddings."""
    connector = Connector()

    try:
        project = os.environ['GOOGLE_CLOUD_PROJECT']
        region = os.environ['REGION']
        password = os.environ['DB_PASSWORD']
        instance = os.environ['DB_INSTANCE']
        database = os.environ['DB_NAME']

        conn = connector.connect(
            f"{project}:{region}:{instance}",
            "pg8000",
            user="postgres",
            password=password,
            db=database
        )
        cursor = conn.cursor()

        # Count menu items and embeddings
        cursor.execute("SELECT COUNT(*) FROM menu_items")
        item_count = cursor.fetchone()[0]

        cursor.execute("SELECT COUNT(*) FROM menu_items WHERE description_embedding IS NOT NULL")
        embedding_count = cursor.fetchone()[0]

        print(f"Menu Items: {item_count}/15")
        print(f"Embeddings: {embedding_count}/15")

        cursor.close()
        conn.close()

        if item_count == 15 and embedding_count == 15:
            print("\n✓ Database ready!")
            return True
        else:
            print("\n✗ Database not ready")
            return False

    except Exception as e:
        print(f"\nERROR: {e}", file=sys.stderr)
        return False
    finally:
        connector.close()


if __name__ == "__main__":
    success = verify_database()
    sys.exit(0 if success else 1)
สคริปต์นี้จะตรวจสอบจำนวนข้อมูลสินค้าในรายการเมนูและการฝัง เรียกใช้สคริปต์โดยใช้คำสั่งต่อไปนี้
uv run scripts/verify_seed.py
หากเห็นเอาต์พุตเทอร์มินัลต่อไปนี้ แสดงว่าข้อมูลพร้อมแล้ว
Menu Items: 15/15
Embeddings: 15/15

✓ Database ready!
เริ่มเซิร์ฟเวอร์กล่องเครื่องมือ
ในขั้นตอนการตั้งค่าก่อนหน้านี้ เราได้ดาวน์โหลดtoolboxไฟล์ที่เรียกใช้งานได้แล้ว โปรดตรวจสอบว่ามีไฟล์ไบนารีนี้และดาวน์โหลดสำเร็จ หากไม่มี ให้ดาวน์โหลดและรอจนกว่าจะเสร็จ
cd ~/build-agent-adk-toolbox-cloudsql
if [ ! -f toolbox ]; then
  curl -O https://storage.googleapis.com/mcp-toolbox-for-databases/v1.1.0/linux/amd64/toolbox
fi
chmod +x toolbox
เราจะต้องเปิดเผยตัวแปร .env ให้กับกระบวนการย่อยที่เรียกใช้โดยกล่องเครื่องมือ MCP เรียกใช้คำสั่งต่อไปนี้เพื่อเริ่มเซิร์ฟเวอร์กล่องเครื่องมือและบันทึกเอาต์พุตคอนโซลลงในไฟล์ logs/mcp_toolbox.log
set -a; source .env; set +a
./toolbox --config tools.yaml --enable-api > logs/mcp_toolbox.log 2>&1 &
คุณควรเห็นเอาต์พุตในไฟล์ logs/mcp_toolbox.log ที่ยืนยันว่าเซิร์ฟเวอร์พร้อมแล้วดังที่แสดงด้านล่าง
... INFO "Initialized 1 sources: restaurant-db"
... INFO "Initialized 0 authServices: "
... INFO "Using Vertex AI backend for Gemini embedding"
... INFO "Initialized 1 embeddingModels: gemini-embedding"
... INFO "Initialized 4 tools: search-menu-by-description, add-menu-item, search-menu, get-item-details"
...
... INFO "Server ready to serve!"
ยืนยันเครื่องมือ
ส่งคำค้นหาไปยัง Toolbox API เพื่อแสดงรายการเครื่องมือที่ลงทะเบียนทั้งหมด
curl -s http://localhost:5000/api/toolset | uv run -m json.tool
คุณควรเห็นเครื่องมือพร้อมคำอธิบายและพารามิเตอร์ ดังที่แสดงด้านล่าง
...
       "search-menu-by-description": {
            "description": "Find menu items that match a natural language description of what the user is looking for. Use this tool when the user describes their ideal dish using flavors, textures, dietary preferences, or cravings rather than a specific category or cuisine. Examples: \"I want something spicy and creamy,\" \"a light vegetarian appetizer,\" \"something rich and chocolatey for dessert.\"",
            "parameters": [
                {
                    "name": "search_query",
                    "type": "string",
                    "required": true,
                    "description": "A natural language description of the kind of dish the user is looking for.",
                    "authServices": []
                }
            ],
            "authRequired": []
        }
...
ทดสอบsearch-menuเครื่องมือโดยตรง
curl -s -X POST http://localhost:5000/api/tool/search-menu/invoke \\ -H "Content-Type: application/json" \\ -d '{"category": "Main Course", "cuisine_type": "Italian"}' | jq '.result | fromjson'
คำตอบควรมีอาหารจานหลักของอิตาลีจากข้อมูลเริ่มต้น
[
  {
    "name": "Margherita Pizza",
    "cuisine_type": "Italian",
    "category": "Main Course",
    "ingredients": "San Marzano tomatoes, fresh mozzarella, basil, olive oil",
    "price": "$18",
    "dietary_tags": "Vegetarian",
    "available": true
  },
  {
    "name": "Truffle Mushroom Risotto",
    "cuisine_type": "Italian",
    "category": "Main Course",
    "ingredients": "Arborio rice, truffle oil, porcini mushrooms, parmesan, white wine",
    "price": "$28",
    "dietary_tags": "Vegetarian, Gluten-Free",
    "available": true
  }
]
7. สร้าง ADK Agent
ตอนนี้เราจะใช้ ADK ใน Python สำหรับโปรเจ็กต์นี้ มาเพิ่มทรัพยากร Dependency ที่จำเป็นกัน
uv add google-adk==1.29.0 toolbox-adk==1.0.0
google-adk- Agent Development Kit ของ Google ซึ่งรวมถึง Gemini SDKtoolbox-adk— การผสานรวม ADK สำหรับ MCP Toolbox สำหรับฐานข้อมูล
สร้างโครงสร้างไดเรกทอรีของเอเจนต์
ADK คาดหวังเลย์เอาต์โฟลเดอร์ที่เฉพาะเจาะจง ได้แก่ ไดเรกทอรีที่ตั้งชื่อตามเอเจนต์ของคุณซึ่งมี __init__.py, agent.py และ .env โดยมีคำสั่งในตัวเพื่อสร้างโครงสร้างได้อย่างรวดเร็ว ดังนี้
uv run adk create restaurant_agent \
    --model gemini-3.5-flash \
    --project ${GOOGLE_CLOUD_PROJECT} \
    --region ${GOOGLE_CLOUD_LOCATION}
ตอนนี้ไดเรกทอรีควรมีลักษณะดังนี้
build-agent-adk-toolbox-cloudsql/
├── restaurant_agent/
│   ├── __init__.py
│   ├── agent.py
│   └── .env
├── logs
├── scripts
└── ...
จากนั้นเราจะต้องผสานรวมเอเจนต์ ADK กับเซิร์ฟเวอร์ Toolbox ที่ทำงานอยู่ และทดสอบเครื่องมือทั้ง 4 รายการ ได้แก่ การค้นหามาตรฐาน การค้นหาเชิงความหมาย และการนำเข้าเวกเตอร์ โค้ดของ Agent มีขนาดเล็กมาก เนื่องจากตรรกะของฐานข้อมูลทั้งหมดอยู่ใน tools.yaml
กำหนดค่าสภาพแวดล้อมของ Agent
ADK อ่าน GOOGLE_GENAI_USE_VERTEXAI, GOOGLE_CLOUD_PROJECT และ GOOGLE_CLOUD_LOCATION จากสภาพแวดล้อมของ Shell ซึ่งคุณได้ตั้งค่าไว้แล้วในขั้นตอนก่อนหน้า ตัวแปรเฉพาะ Agent เพียงตัวเดียวคือ TOOLBOX_URL ให้ต่อท้ายตัวแปรนี้ในไฟล์ .env ของ Agent
echo -e "\nTOOLBOX_URL=http://127.0.0.1:5000" >> restaurant_agent/.env
อัปเดตโมดูลตัวแทน
เปิด restaurant_agent/agent.py ใน Cloud Shell Editor
cloudshell edit restaurant_agent/agent.py
และเขียนทับเนื้อหาด้วยโค้ดต่อไปนี้
# restaurant_agent/agent.py
import os

from google.adk.agents import LlmAgent
from toolbox_adk import ToolboxToolset

TOOLBOX_URL = os.environ.get("TOOLBOX_URL", "http://127.0.0.1:5000")

toolbox = ToolboxToolset(TOOLBOX_URL)

root_agent = LlmAgent(
    name="restaurant_agent",
    model="gemini-3.5-flash",
    instruction="""You are a friendly and knowledgeable concierge at "Foodie Finds," a restaurant. Your job:
- Help diners browse the menu by category or cuisine type.
- Provide full details about specific dishes, including ingredients, price, and dietary information.
- Recommend dishes based on natural language descriptions of what the diner is craving.
- Add new menu items when asked.

When a diner asks about a specific dish by name or cuisine, use the get-item-details tool.
When a diner asks for a specific category or cuisine type, use the search-menu tool.
When a diner describes what kind of food they want — by flavor, texture, dietary needs, or cravings — use the search-menu-by-description tool for semantic search.

When in doubt between search-menu and search-menu-by-description, prefer search-menu-by-description — it searches dish descriptions and finds more relevant matches.
If a dish is not available (available is false), let the diner know and suggest similar alternatives from the search results.
Be conversational, knowledgeable, and concise.""",
    tools=[toolbox],
)
โปรดทราบว่าไม่มีโค้ดฐานข้อมูลในนี้ ToolboxToolset จะเชื่อมต่อกับเซิร์ฟเวอร์ Toolbox เมื่อเริ่มต้นระบบและโหลดเครื่องมือที่มีอยู่ทั้งหมด Agent จะเรียกใช้เครื่องมือตามชื่อ ส่วน Toolbox จะแปลการเรียกเหล่านั้นเป็นคำสั่งค้นหา SQL กับ Cloud SQL
ตัวแปรสภาพแวดล้อม TOOLBOX_URL จะมีค่าเริ่มต้นเป็น http://127.0.0.1:5000 สำหรับการพัฒนาในเครื่อง เมื่อติดตั้งใช้งานใน Cloud Run ในภายหลัง คุณจะลบล้างการตั้งค่านี้ด้วย URL ของ Cloud Run ของบริการ Toolbox โดยไม่ต้องเปลี่ยนแปลงโค้ด
ทดสอบ Agent
เปิด UI สำหรับนักพัฒนาแอป ADK โดยทำดังนี้
cd ~/build-agent-adk-toolbox-cloudsql
uv run adk web --allow_origins "regex:https://.*\.cloudshell\.dev"
เปิด URL ที่แสดงในเทอร์มินัล (โดยปกติคือ http://localhost:8000) โดยใช้ฟีเจอร์ตัวอย่างเว็บของ Cloud Shell หรือ ctrl + คลิก URL ที่แสดงในเทอร์มินัล เลือก restaurant_agent จากเมนูแบบเลื่อนลงของเอเจนต์ที่มุมซ้ายบน
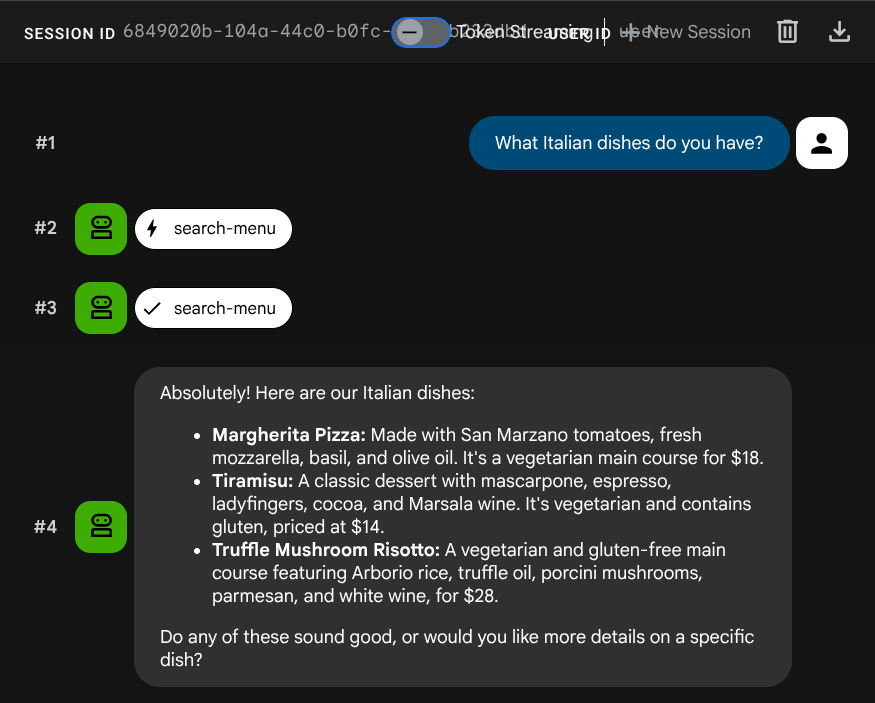
ทดสอบคำค้นหามาตรฐาน
ลองใช้พรอมต์ต่อไปนี้เพื่อยืนยันเครื่องมือ SQL มาตรฐาน
What Italian dishes do you have?
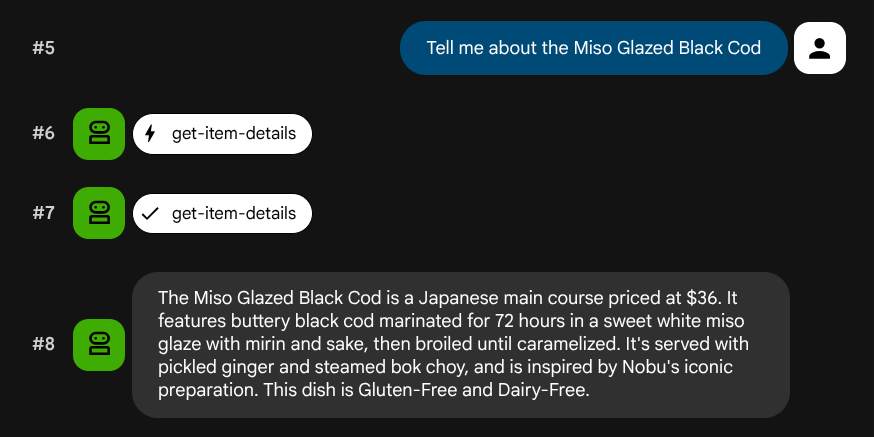
Tell me about the Miso Glazed Black Cod
ทดสอบการค้นหาเชิงความหมาย
ลองใช้คำอธิบายภาษาธรรมชาติที่ไม่ได้เชื่อมโยงกับบทบาทหรือชุดซอฟต์แวร์โครงสร้างพื้นฐานเฉพาะ
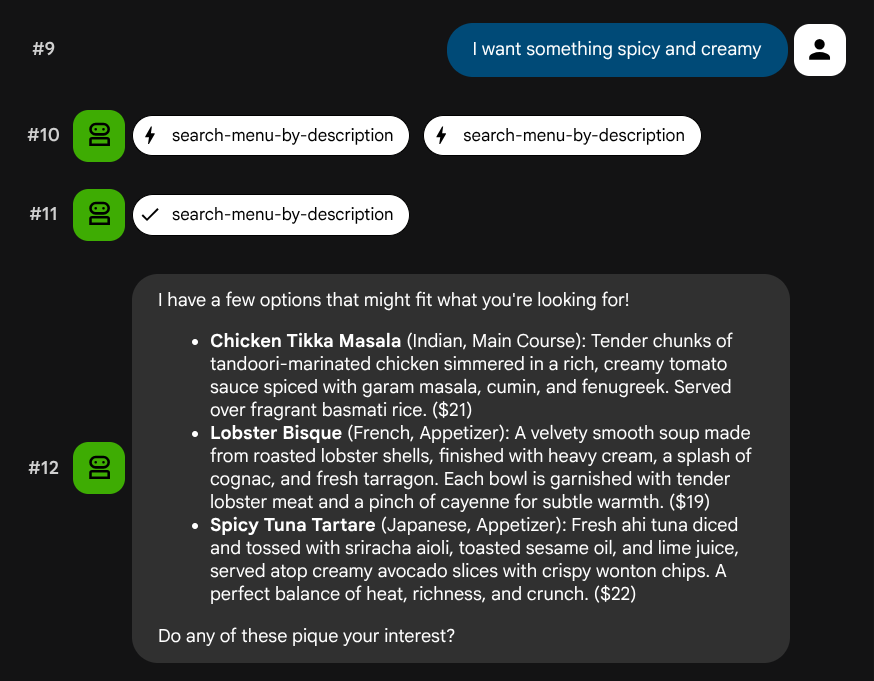
I want something spicy and creamy
Something rich and chocolatey for dessert
I'm in the mood for something light and healthy
เอเจนต์จะพยายามเลือกเครื่องมือที่เหมาะสมตามประเภทคำค้นหา โดยตัวกรองที่มีโครงสร้างจะผ่าน search-menu ส่วนคำอธิบายภาษาธรรมชาติจะผ่าน search-menu-by-description
ทดสอบการส่งผ่านข้อมูลเวกเตอร์
ขอให้ตัวแทนเพิ่มงานใหม่โดยทำดังนี้
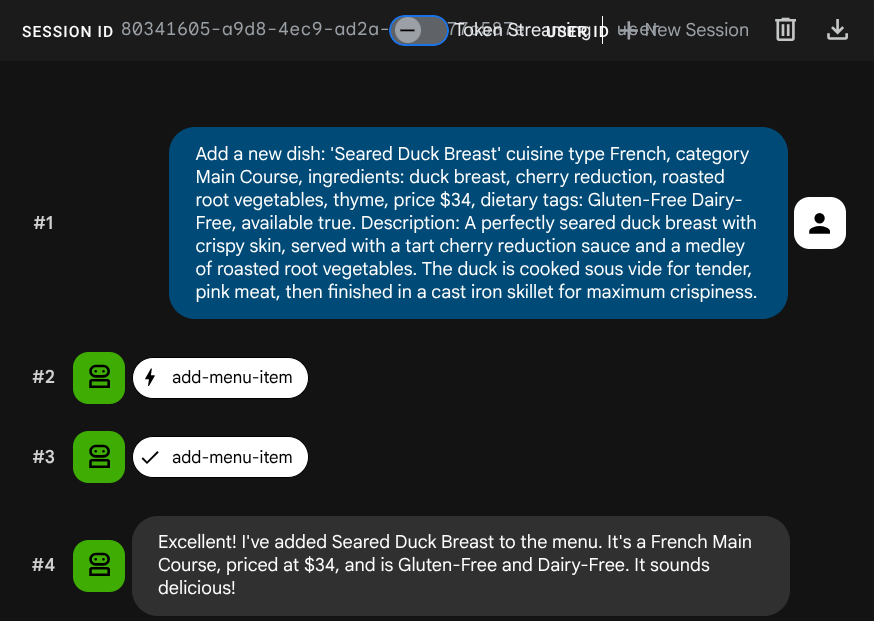
Add a new dish: 'Seared Duck Breast' cuisine type French, category Main Course, ingredients: duck breast, cherry reduction, roasted root vegetables, thyme, price $34, dietary tags: Gluten-Free Dairy-Free, available true. Description: A perfectly seared duck breast with crispy skin, served with a tart cherry reduction sauce and a medley of roasted root vegetables. The duck is cooked sous vide for tender, pink meat,
then
finished in a cast iron skillet for maximum crispiness.
ตอนนี้ลองค้นหาโดยใช้คำต่อไปนี้
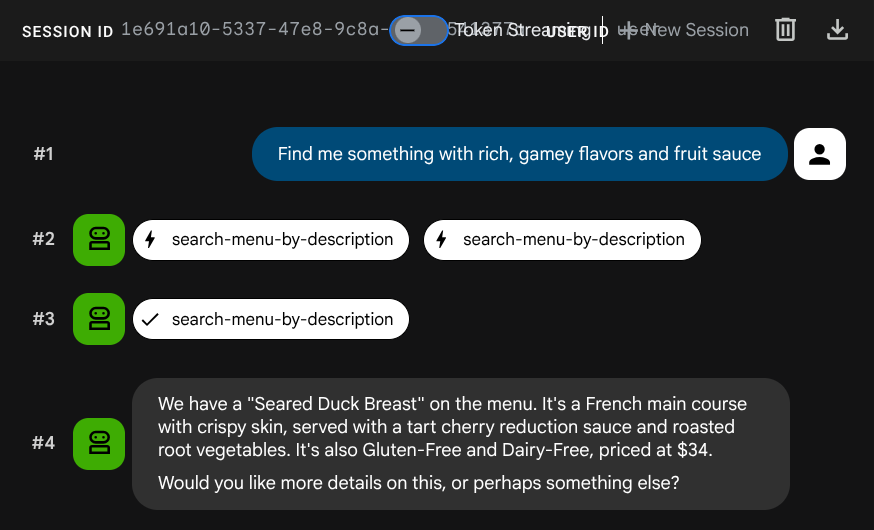
Find me something with rich, gamey flavors and fruit sauce
ระบบสร้างการฝังโดยอัตโนมัติระหว่าง INSERT จึงไม่จำเป็นต้องมีขั้นตอนแยกต่างหาก
ตอนนี้คุณมีแอปพลิเคชัน Agentic RAG ที่ทำงานได้อย่างเต็มรูปแบบซึ่งใช้ ADK, MCP Toolbox และ CloudSQL แล้ว ยินดีด้วย มาดูขั้นตอนเพิ่มเติมในการทําให้แอปเหล่านี้ใช้งานได้กับ Cloud Run กัน
ตอนนี้มาหยุด UI สำหรับนักพัฒนาซอฟต์แวร์โดยการสิ้นสุดกระบวนการด้วยการกด Ctrl+C 2 ครั้งก่อนดำเนินการต่อ
8. ทำให้ใช้งานได้กับ Cloud Run
เอเจนต์และกล่องเครื่องมือจะทำงานในเครื่อง ขั้นตอนนี้จะทำให้ทั้ง 2 อย่างใช้งานได้เป็นบริการ Cloud Run เพื่อให้เข้าถึงได้ผ่านอินเทอร์เน็ต บริการ Toolbox ทำงานเป็นเซิร์ฟเวอร์ MCP ใน Cloud Run และบริการ Agent จะเชื่อมต่อกับเซิร์ฟเวอร์ดังกล่าว
เตรียมกล่องเครื่องมือสำหรับการติดตั้งใช้งาน
สร้างไดเรกทอรีการติดตั้งใช้งานสำหรับบริการกล่องเครื่องมือ
cd ~/build-agent-adk-toolbox-cloudsql
mkdir -p deploy-toolbox
cp toolbox tools.yaml deploy-toolbox/
สร้าง Dockerfile สำหรับกล่องเครื่องมือ เปิด deploy-toolbox/Dockerfile ใน Cloud Shell Editor โดยทำดังนี้
cloudshell edit deploy-toolbox/Dockerfile
แล้วคัดลอกสคริปต์ต่อไปนี้ลงในสเปรดชีต
# deploy-toolbox/Dockerfile
FROM debian:bookworm-slim
RUN apt-get update && apt-get install -y ca-certificates && rm -rf /var/lib/apt/lists/*
WORKDIR /app
COPY toolbox tools.yaml ./
RUN chmod +x toolbox
EXPOSE 8080
CMD ["./toolbox", "--config", "tools.yaml", "--enable-api", "--address", "0.0.0.0", "--port", "8080"]
ไบนารีของกล่องเครื่องมือและ tools.yaml จะรวมอยู่ในอิมเมจ Debian แบบมินิมอล Cloud Run จะกำหนดเส้นทางการรับส่งข้อมูลไปยังพอร์ต 8080
ติดตั้งใช้งานบริการกล่องเครื่องมือ
cd ~/build-agent-adk-toolbox-cloudsql
gcloud run deploy toolbox-service \
  --source deploy-toolbox/ \
  --region $REGION \
  --set-env-vars "DB_PASSWORD=$DB_PASSWORD,DB_INSTANCE=$DB_INSTANCE,DB_NAME=$DB_NAME,GOOGLE_CLOUD_PROJECT=$GOOGLE_CLOUD_PROJECT,REGION=$REGION,GOOGLE_CLOUD_LOCATION=$GOOGLE_CLOUD_LOCATION" \
  --allow-unauthenticated \
  --quiet > logs/deploy_toolbox.log 2>&1 &
คำสั่งนี้จะส่งซอร์สไปยัง Cloud Build, สร้างอิมเมจคอนเทนเนอร์, พุชไปยัง Artifact Registry และทำให้ใช้งานได้กับ Cloud Run กระบวนการนี้จะใช้เวลาสักครู่ เราสามารถตรวจสอบบันทึกกระบวนการติดตั้งใช้งานในไฟล์ logs/deploy_toolbox.log
เตรียมตัวแทนสำหรับการติดตั้งใช้งาน
ขณะที่กล่องเครื่องมือสร้าง ให้ตั้งค่าไฟล์การติดตั้งใช้งานของ Agent
สร้าง Dockerfile ในรูทของโปรเจ็กต์ เปิด Dockerfile ใน Cloud Shell Editor โดยทำดังนี้
cloudshell edit Dockerfile
จากนั้นคัดลอกเนื้อหาต่อไปนี้
# Dockerfile
FROM ghcr.io/astral-sh/uv:python3.12-trixie-slim
WORKDIR /app
COPY pyproject.toml ./
COPY uv.lock ./
RUN uv sync --no-dev
COPY restaurant_agent/ restaurant_agent/
EXPOSE 8080
CMD ["uv", "run", "adk", "web", "--host", "0.0.0.0", "--port", "8080"]
Dockerfile นี้ใช้ ghcr.io/astral-sh/uv เป็นอิมเมจพื้นฐาน ซึ่งมีทั้ง Python และ uv ที่ติดตั้งไว้ล่วงหน้าแล้ว จึงไม่จำเป็นต้องติดตั้ง uv แยกต่างหากผ่าน pip
สร้างไฟล์ .dockerignore เพื่อยกเว้นไฟล์ที่ไม่จำเป็นจากอิมเมจคอนเทนเนอร์
cloudshell edit .dockerignore
จากนั้นคัดลอกสคริปต์ต่อไปนี้ลงในไฟล์
# .dockerignore
.venv/
__pycache__/
*.pyc
.env
restaurant_agent/.env
toolbox
tools.yaml
deploy-toolbox/
ติดตั้งใช้งานบริการ Agent
รอให้การติดตั้งใช้งานกล่องเครื่องมือเสร็จสมบูรณ์ ตรวจสอบกระบวนการติดตั้งใช้งานอีกครั้งใน logs/deploy_toolbox.log เพื่อยืนยันกระบวนการ จากนั้นเรียกข้อมูล URL ของ Cloud Run โดยใช้คำสั่งต่อไปนี้
TOOLBOX_URL=$(gcloud run services describe toolbox-service \
  --region=$REGION \
  --format='value(status.url)')
echo "Toolbox URL: $TOOLBOX_URL"
คุณจะเห็นเอาต์พุตที่คล้ายกันดังนี้
Toolbox URL: https://toolbox-service-xxxxxx-xx.a.run.app
จากนั้นมาตรวจสอบว่ากล่องเครื่องมือที่ติดตั้งใช้งานทำงานได้หรือไม่
curl -s "$TOOLBOX_URL/api/toolset" | python3 -m json.tool | head -5
หากเอาต์พุตแสดงเหมือนตัวอย่างนี้ แสดงว่าการติดตั้งใช้งานสำเร็จแล้ว
{
    "serverVersion": "1.1.0+binary.linux.amd64.da6f5f8",
    "tools": {
        "add-menu-item": {
            "description": "Add a new menu item to the restaurant. Use this tool when a user asks to add a dish that is not currently on the menu.",
จากนั้นมาติดตั้งใช้งาน Agent โดยส่งผ่าน URL ของกล่องเครื่องมือเป็นตัวแปรสภาพแวดล้อมกัน
cd ~/build-agent-adk-toolbox-cloudsql
gcloud run deploy restaurant-agent \
  --source . \
  --region $REGION \
  --set-env-vars "TOOLBOX_URL=$TOOLBOX_URL,GOOGLE_CLOUD_PROJECT=$GOOGLE_CLOUD_PROJECT,GOOGLE_CLOUD_LOCATION=$GOOGLE_CLOUD_LOCATION,GOOGLE_GENAI_USE_VERTEXAI=TRUE" \
  --allow-unauthenticated \
  --quiet
โค้ดของเอเจนต์จะอ่าน TOOLBOX_URL จากสภาพแวดล้อม (คุณตั้งค่านี้ไว้ก่อนหน้านี้) ในเครื่องจะชี้ไปยัง http://127.0.0.1:5000 แต่ใน Cloud Run จะชี้ไปยัง URL ของบริการ Toolbox โดยไม่ต้องเปลี่ยนแปลงโค้ดใดๆ
ทดสอบ Agent ที่ติดตั้งใช้งาน
เรียกข้อมูล URL ของ Cloud Run ของ Agent โดยทำดังนี้
AGENT_URL=$(gcloud run services describe restaurant-agent \
  --region=$REGION \
  --format='value(status.url)')
echo "Agent URL: $AGENT_URL"
เปิด URL ในเบราว์เซอร์ UI สำหรับนักพัฒนาซอฟต์แวร์ ADK จะโหลดขึ้นมา ซึ่งเป็นอินเทอร์เฟซเดียวกันกับที่คุณใช้ในเครื่อง แต่ตอนนี้ทำงานบน Cloud Run
เลือก restaurant_agent จากเมนูแบบเลื่อนลง แล้วทดสอบ
What Italian dishes do you have?
I want something spicy and creamy
ทั้ง 2 คำค้นหาจะทำงานผ่านบริการที่ติดตั้งใช้งานแล้ว โดย Agent ใน Cloud Run จะเรียกใช้ Toolbox ใน Cloud Run ซึ่งจะค้นหา Cloud SQL
9. ขอแสดงความยินดี / ล้างข้อมูล
คุณได้สร้างและติดตั้งใช้งานผู้ช่วยเมนูร้านอาหารอัจฉริยะที่ใช้ MCP Toolbox สำหรับฐานข้อมูลเพื่อเชื่อมต่อ Agent ADK กับ Cloud SQL PostgreSQL ทั้งการค้นหา SQL มาตรฐานและการค้นหาแบบเวกเตอร์เชิงความหมาย
สิ่งที่คุณได้เรียนรู้
- วิธีที่ MCP กำหนดการเข้าถึงเครื่องมือสำหรับ AI Agent ให้เป็นมาตรฐาน และวิธีที่ MCP Toolbox สำหรับฐานข้อมูลใช้การดำเนินการนี้กับการดำเนินการฐานข้อมูลโดยเฉพาะ ซึ่งแทนที่โค้ดฐานข้อมูลที่กำหนดเองด้วยการกำหนดค่า YAML แบบประกาศ
- วิธีกำหนดค่า Cloud SQL PostgreSQL เป็นแหล่งข้อมูล Toolbox โดยใช้
cloud-sql-postgresประเภทแหล่งที่มา - วิธีกำหนดเครื่องมือค้นหา SQL มาตรฐานด้วยคำสั่งที่กำหนดพารามิเตอร์ซึ่งป้องกันการแทรก SQL
- วิธีเปิดใช้การค้นหาแบบเวกเตอร์โดยใช้ pgvector และ
gemini-embedding-001โดยมีพารามิเตอร์embeddedByสำหรับการฝังคำค้นหาอัตโนมัติ - วิธีที่
valueFromParamช่วยให้การส่งผ่านข้อมูลเวกเตอร์อัตโนมัติเป็นไปได้ - LLM จะให้คำอธิบายข้อความ และกล่องเครื่องมือจะคัดลอก ฝัง และจัดเก็บเวกเตอร์ควบคู่ไปกับข้อความโดยอัตโนมัติ - วิธีที่
ToolboxToolsetของ ADK โหลดเครื่องมือจากเซิร์ฟเวอร์ Toolbox ที่ทำงานอยู่ ทำให้โค้ดของเอเจนต์มีขนาดเล็กที่สุดและตรรกะของฐานข้อมูลแยกออกจากกันอย่างสมบูรณ์ - วิธีกำหนดค่าทั้งเซิร์ฟเวอร์ MCP ของ Toolbox และ Agent ADK ให้ใช้งานได้ใน Cloud Run เป็นบริการแยกต่างหาก
ล้างข้อมูล
หากต้องการหลีกเลี่ยงการเรียกเก็บเงินจากบัญชี Google Cloud สำหรับทรัพยากรที่สร้างขึ้นใน Codelab นี้ คุณสามารถลบทรัพยากรแต่ละรายการหรือลบทั้งโปรเจ็กต์ก็ได้
ตัวเลือกที่ 1: ลบโปรเจ็กต์ (แนะนำ)
วิธีที่ง่ายที่สุดในการล้างข้อมูลคือการลบโปรเจ็กต์ การดำเนินการนี้จะนำทรัพยากรทั้งหมดที่เชื่อมโยงกับโปรเจ็กต์ออก
gcloud projects delete $GOOGLE_CLOUD_PROJECT
ตัวเลือกที่ 2: ลบทรัพยากรแต่ละรายการ
หากต้องการเก็บโปรเจ็กต์ไว้แต่ลบเฉพาะทรัพยากรที่สร้างใน Codelab นี้ ให้ทำดังนี้
gcloud run services delete restaurant-agent --region=$REGION --quiet
gcloud run services delete toolbox-service --region=$REGION --quiet
gcloud sql instances delete restaurant-instance --quiet
gcloud artifacts repositories delete cloud-run-source-deploy --location=$REGION --quiet 2>/dev/null