
1. 簡介
本文提供參考架構,說明如何設定自訂網域,以便使用 WIF 存取 AgentSpace。使用者可以運用自訂網域,取代在 Agentspace 應用程式建立期間指派的 Google 管理網址。本程式碼實驗室示範如何使用 nip.io 網域存取 Agentspace 日曆和雲端硬碟應用程式。nip.io 是免費的開放原始碼服務,可為任何 IP 位址提供萬用字元 DNS。基本上,您不必設定自己的 DNS 伺服器或修改 /etc/hosts 檔案,就能建立可解析為特定 IP 位址的主機名稱。
建議使用自有網域,但本教學課程會使用 nip.io 做為示範。
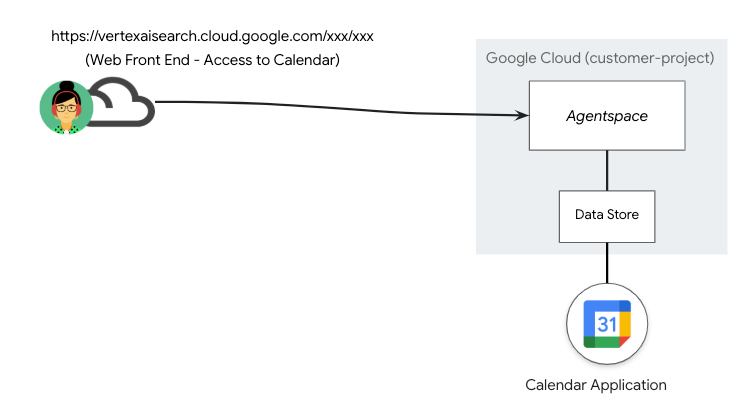
在下圖 1 所示的部署情境中,AgentSpace 發布的資料儲存庫含有可透過 Google 管理的公開網址存取的日曆應用程式。
圖 1
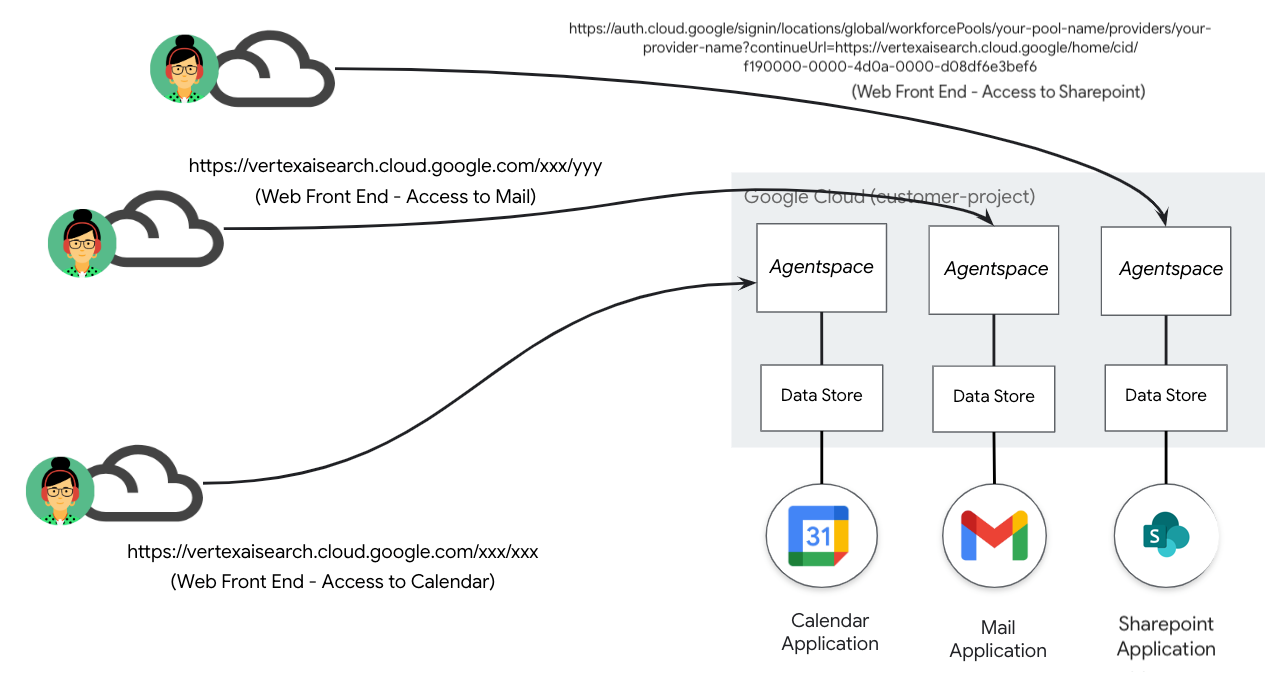
資料儲存區和後續應用程式持續成長,導致需要進一步管理 Google 管理的公開網址,如下方部署情境所示 (圖 2),進而導致 AgentSpace 應用程式和網址的 1:1 對應。
圖 2.
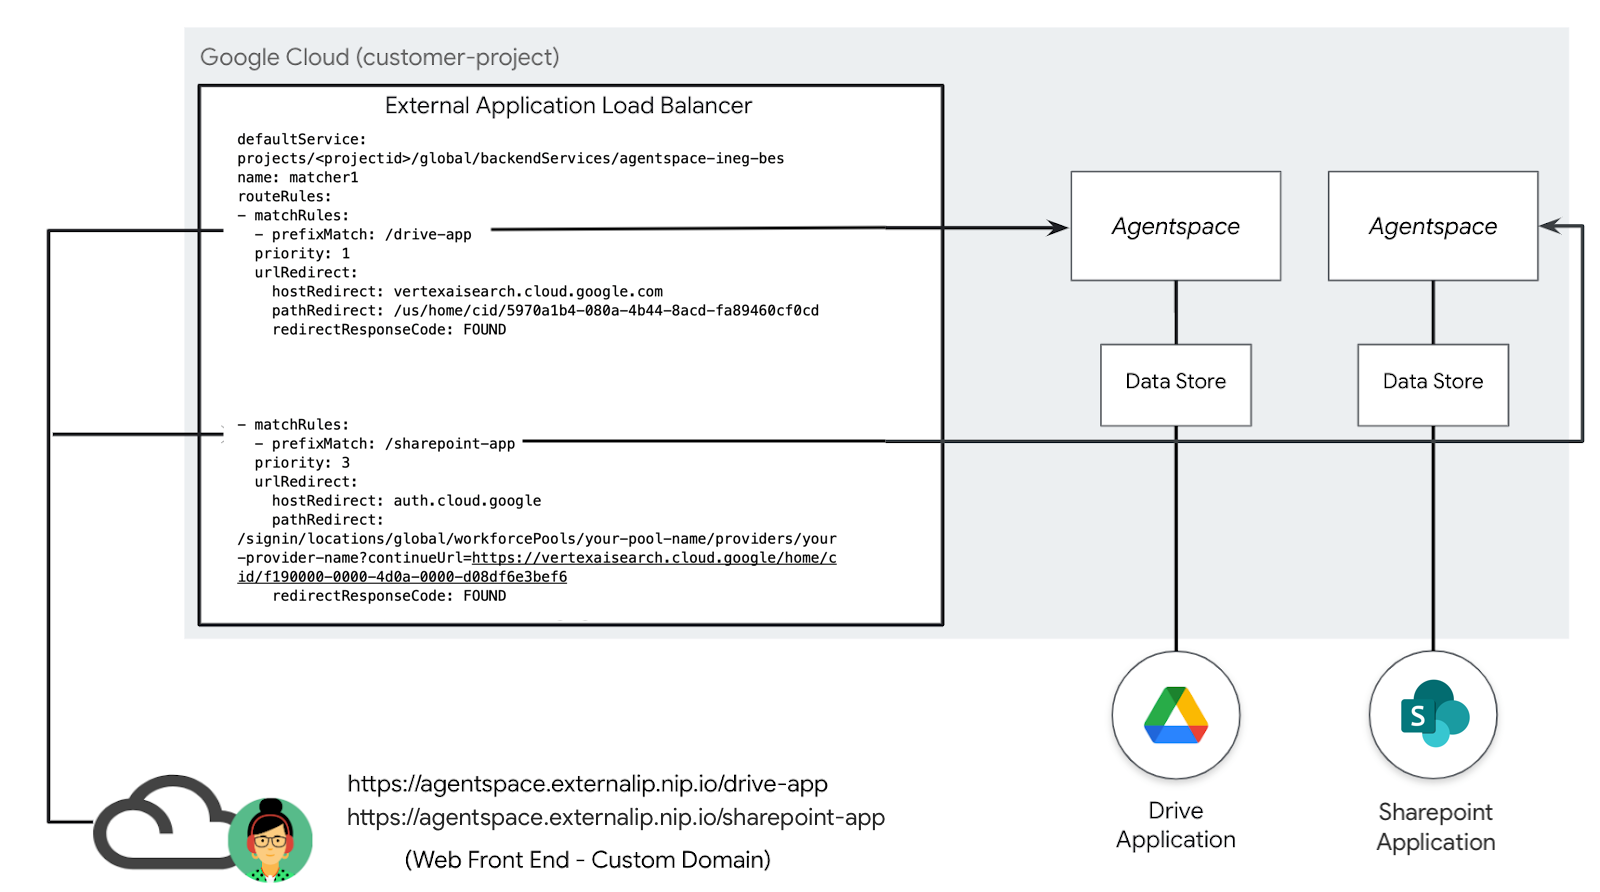
自訂網域可將各種 AgentSpace 應用程式對應至單一使用者指定的客戶網域。這項功能可將特定網址路徑與每個 Agentspace 應用程式建立關聯,提供更大的彈性,如下方部署情境 (圖 3) 所示。舉例來說,客戶管理的網域 agentspace.cosmopup.com 會區隔為路徑規則,每個規則都對應至特定的 Agentspace 應用程式,例如:
- agentspace.cosmopup.com/drive-app,對應至 Workspace 雲端硬碟的 Agentspace 應用程式
- agentspace.cosmopup.com/sharepoint-app,對應至 SharePoint 的 Agentspace 應用程式
外部應用程式負載平衡器的 主機和路徑規則 (透過網址對應設定) 會控管將自訂網域對應至 Google 代管網址的邏輯。使用範例 agentspace.cosmopup.com/drive-app 執行下列函式
- 負載平衡器會收到自訂網域主機路徑 agentspace.cosmopup.com/drive-app
- 網址對應已設定為進階主機和路徑規則比對
- 主機 agentspace.cosmopup.com 符合路徑比對和重新導向資格
- 自訂網域主機路徑 agentspace.cosmopup.com/drive-app 須遵守 UrlRedirect
- pathRedirect 是 Agentspace 路徑:/us/home/cid/5970a1b4-080a-4b44-8acd-fa89460cf0cd
- hostRedirect 是 Agentspace 主機:vertexaisearch.cloud.google.com
- 自訂網域主機路徑 agentspace.cosmopup.com/sharepoint-app 須遵守 UrlRedirect
- pathRedirect 是 Agentspace 路徑:/signin/locations/global/workforcePools/your-pool-name/providers/your-provider-name?continueUrl=https://vertexaisearch.cloud.google/home/cid/f190000-0000-4d0a-0000-d08df6e3bef6
- hostRedirect 是 Agentspace 主機:auth.cloud.google
- 系統會先執行重新導向作業,再將要求轉送至後端服務
圖 3
課程內容
- 建立全域外部應用程式負載平衡器
- 建立路由,將自訂網域重新導向至 Agentspace 應用程式
- 如何整合 nip.io 和 Cloud DNS 來建立自訂網域
- 如何驗證 Agentspace 自訂網域的存取權
軟硬體需求
- 具備「擁有者」權限的 Google Cloud 專案
- 現有 Agentspace 應用程式網址
- 自訂網域 (選用)
- 憑證 - 自行簽署或 Google 代管
2. 建構項目
您將建立具備進階流量管理功能的全域外部應用程式負載平衡器,透過主機和路徑重新導向,為 Agentspace 應用程式啟用自訂網域路徑比對。部署完成後,請執行下列動作,驗證 Agentspace 應用程式的存取權:
- 開啟網路瀏覽器並前往自訂網域和指定路徑,即可存取 Agentspace 應用程式。
3. 網路需求
以下是網路需求明細:
元件 | 說明 |
虛擬私有雲 (agentspace-vpc) | 自訂模式虛擬私有雲 |
網際網路 NEG | 這個資源用於為負載平衡器定義外部後端,設定為表示 Agentspace Google 代管 FQDN (vertexaisearch.cloud.google.com) 的 FQDN。網際網路 FQDN 會在虛擬私有雲中執行 DNS 查詢以進行解析。 |
後端服務 | 後端服務是負載平衡器與後端資源之間的橋樑。在本教學課程中,後端服務會與網際網路 NEG 建立關聯。 |
憑證 | 如要在 Google Cloud 中為應用程式負載平衡器設定憑證,請使用 Certificate Manager 服務,以及Google 代管 或自行管理的 SSL 憑證。 |
Cloud DNS | Cloud DNS 公用區域用於將外部應用程式負載平衡器的外部 IP 解析為 nip.io (agentspace.externalip.nip.io)。或者,您也可以使用自訂網域和包含負載平衡器 IP 位址的 A 記錄。 |
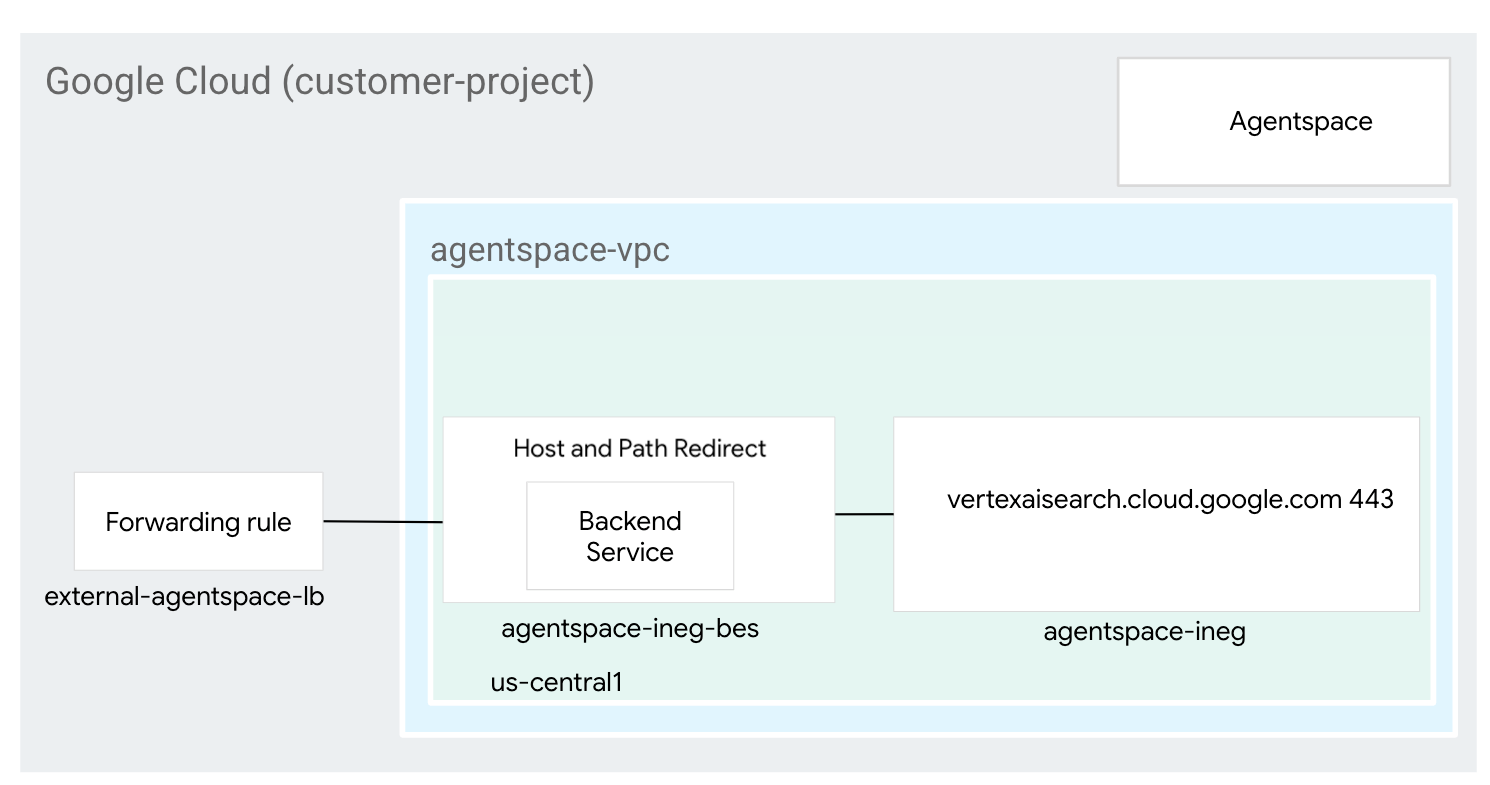
4. 程式碼研究室拓撲
5. 設定和需求
自修實驗室環境設定
- 登入 Google Cloud 控制台,然後建立新專案或重複使用現有專案。如果沒有 Gmail 或 Google Workspace 帳戶,請先建立帳戶。

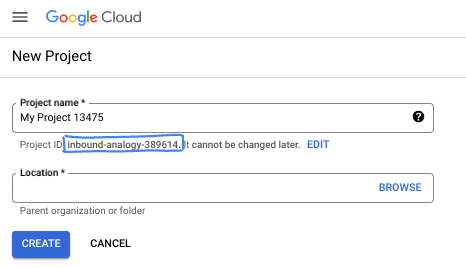
- 專案名稱是這個專案參與者的顯示名稱。這是 Google API 未使用的字元字串。你隨時可以更新。
- 專案 ID 在所有 Google Cloud 專案中都是不重複的,而且設定後即無法變更。Cloud 控制台會自動產生專屬字串,通常您不需要在意該字串為何。在大多數程式碼研究室中,您需要參照專案 ID (通常標示為
PROJECT_ID)。如果您不喜歡產生的 ID,可以產生另一個隨機 ID。你也可以嘗試使用自己的名稱,看看是否可用。完成這個步驟後就無法變更,且專案期間會維持不變。 - 請注意,有些 API 會使用第三個值,也就是「專案編號」。如要進一步瞭解這三種值,請參閱說明文件。
- 接著,您需要在 Cloud 控制台中啟用帳單,才能使用 Cloud 資源/API。完成這個程式碼研究室的費用不高,甚至可能完全免費。如要關閉資源,避免在本教學課程結束後繼續產生費用,請刪除您建立的資源或專案。Google Cloud 新使用者可參加價值$300 美元的免費試用計畫。
啟動 Cloud Shell
雖然可以透過筆電遠端操作 Google Cloud,但在本程式碼研究室中,您將使用 Google Cloud Shell,這是可在雲端執行的指令列環境。
在 Google Cloud 控制台中,點選右上工具列的 Cloud Shell 圖示:

佈建並連線至環境的作業需要一些時間才能完成。完成後,您應該會看到如下的內容:

這部虛擬機器搭載各種您需要的開發工具,並提供永久的 5GB 主目錄,而且可在 Google Cloud 運作,大幅提升網路效能並強化驗證功能。您可以在瀏覽器中完成本程式碼研究室的所有作業。您不需要安裝任何軟體。
6. 事前準備
啟用 API
在 Cloud Shell 中,確認專案 ID 已設定完畢:
gcloud config list project
gcloud config set project [YOUR-PROJECT-ID]
project=[YOUR-PROJECT-ID]
region=[YOUR-REGION]
echo $project
echo $region
啟用所有必要服務:
gcloud services enable compute.googleapis.com
gcloud services enable dns.googleapis.com
7. 設定負載平衡器元件
保留負載平衡器的外部 IP 位址
在 Cloud Shell 中,為負載平衡器保留外部 IP 位址:
gcloud compute addresses create external-ip \
    --network-tier=PREMIUM \
    --ip-version=IPV4 \
    --global
在 Cloud Shell 中,查看保留的 IP 位址:
gcloud compute addresses describe external-ip \
  --global | grep -i address:
輸出內容範例:
user@cloudshell$ gcloud compute addresses describe external-ip \
  --global | grep -i address:
address: 34.54.158.206
設定網際網路 NEG
建立網際網路 NEG,並將 –network-endpoint-type 設為 internet-fqdn-port (可連線至外部後端的主機名稱和通訊埠)。如要解析 Agentspace,系統會使用 FQDN vertexaisearch.cloud.google.com 和 PORT 443。
gcloud compute network-endpoint-groups create agentspace-ineg \
    --network-endpoint-type="internet-fqdn-port" \
    --global
gcloud compute network-endpoint-groups update agentspace-ineg \
    --add-endpoint="fqdn=vertexaisearch.cloud.google.com,port=443" \
    --global
建立負載平衡器
在 Cloud Shell 中執行下列操作:
gcloud compute backend-services create agentspace-ineg-bes \
      --load-balancing-scheme=EXTERNAL_MANAGED \
      --protocol=HTTPS \
      --global
gcloud compute backend-services add-backend agentspace-ineg-bes \
      --network-endpoint-group=agentspace-ineg \
      --global-network-endpoint-group \
      --global
建立憑證
此時您已建立網際網路 NEG 和後端服務,接下來需要建立憑證資源,以便在 HTTPs 目標 Proxy 中使用。您可以使用 Google 代管的 SSL 憑證或自行管理的 SSL 憑證,建立 SSL 憑證資源。建議使用 Google 代管的憑證,因為 Google Cloud 會自動取得、管理及更新這些憑證。
如要進一步瞭解本教學課程中使用的全域外部應用程式負載平衡器支援的憑證,請參閱下列內容:
SSL 憑證總覽 | Load Balancing | Google Cloud
在下一節中,您將建立自行簽署的憑證 (但也可以改用 Google 代管的憑證),這需要將通用名稱對應至完整網域名稱 (agentspace.YOUR-EXTERNAL-IP.nip.io),對應至先前產生的負載平衡器外部 IP 位址,如下例所示:
常用名稱:agentspace.34.54.158.206.nip.io
在 Cloud Shell 中建立私密金鑰
openssl genrsa -out private-key-file.pem 2048
在 Cloud Shell 中建立 config.txt 檔案,用於產生 PEM 檔案。在 DNS 1 項目中指定完整網域名稱 agentspace.YOUR-EXTERNAL-IP.nip.io,例如下方設定中的 agentspace.34.54.158.206.nip.io。
cat <<'EOF' >config.txt
[req]
default_bits              = 2048
req_extensions            = extension_requirements
distinguished_name        = dn_requirements

[extension_requirements]
basicConstraints          = CA:FALSE
keyUsage                  = nonRepudiation, digitalSignature, keyEncipherment
subjectAltName            = @sans_list

[dn_requirements]
countryName               = Country Name (2 letter code)
stateOrProvinceName       = State or Province Name (full name)
localityName              = Locality Name (eg, city)
organizationName          = Organization Name (eg, company)
organizationalUnitName    = Organizational Unit Name (eg, section)
commonName                = Common Name (e.g. server FQDN or YOUR name)
emailAddress              = Email Address

[sans_list]
DNS.1                     = agentspace.YOUR-EXTERNAL-IP.nip.io

EOF
在 Cloud Shell 中,確認已產生 config.txt 和 private-key-file.pem。
user@cloudshell:$ ls
config.txt  private-key-file.pem
在 Cloud Shell 中執行下列操作。
sudo openssl req -new -key private-key-file.pem \
    -out csr.pem \
    -config config.txt
範例:
user@cloudshell:$ sudo openssl req -new -key private-key-file.pem \
    -out csr.pem \
    -config config.txt
You are about to be asked to enter information that will be incorporated
into your certificate request.
What you are about to enter is what is called a Distinguished Name or a DN.
There are quite a few fields but you can leave some blank
For some fields there will be a default value,
If you enter '.', the field will be left blank.
-----
Country Name (2 letter code) []:
State or Province Name (full name) []:
Locality Name (eg, city) []:
Organization Name (eg, company) []:
Organizational Unit Name (eg, section) []:
Common Name (e.g. server FQDN or YOUR name)[]:agentspace.34.54.158.206.nip.io
Email Address []:
在 Cloud Shell 中,驗證是否已建立憑證簽署所需的 PEM。
user@cloudshell:$ ls
config.txt  csr.pem  private-key-file.pem
在 Cloud Shell 中產生憑證。
sudo openssl x509 -req \
    -signkey private-key-file.pem \
    -in csr.pem \
    -out cert.cert \
    -extfile config.txt \
    -extensions extension_requirements \
    -days 365
輸出範例:
user@cloudshell:$ sudo openssl x509 -req \
    -signkey private-key-file.pem \
    -in csr.pem \
    -out cert.cert \
    -extfile config.txt \
    -extensions extension_requirements \
    -days 365
Certificate request self-signature ok
subject=CN = agentspace.34.54.158.206.nip.io
在 Cloud Shell 中,驗證檔案 cert.cert 的建立作業
user@cloudshell:$ ls
cert.cert  config.txt  csr.pem  private-key-file.pem
建立憑證資源,以便與外部負載平衡器建立關聯。將憑證和私密金鑰參數換成您的特定檔案名稱。
在 Cloud Shell 中執行下列操作:
gcloud compute ssl-certificates create agentspace-self-signed-cert \
    --certificate=cert.cert \
    --private-key=private-key-file.pem \
    --global
在 Cloud Shell 中執行下列操作:
gcloud compute url-maps create agentspace-lb \
      --default-service=agentspace-ineg-bes \
      --global
在 Cloud Shell 中執行下列操作:
gcloud compute target-https-proxies create https-proxy \
      --ssl-certificates=agentspace-self-signed-cert \
      --url-map=agentspace-lb \
      --global
在 Cloud Shell 中執行下列操作:
gcloud compute forwarding-rules create agentspace-fr \
      --load-balancing-scheme=EXTERNAL_MANAGED \
      --network-tier=PREMIUM \
      --address=external-ip \
      --target-https-proxy=https-proxy \
      --global \
      --ports=443
8. 建立公開 DNS 區域
在下一個部分中,您將建立 nip.io 用來解析外部負載平衡器 IP 位址的公開 DNS 區域。
在 Cloud Shell 中執行下列操作,為外部負載平衡器 IP 位址建立變數:
externalip=<YOUR-EXTERNAL-IP>
echo $externalip
在 Cloud Shell 中執行下列操作:
gcloud dns --project=$project managed-zones create agentspace-dns --description="Agentspace public dns" --dns-name="$externalip.nip.io." --visibility="public"
在 Cloud Shell 中執行下列操作:
gcloud dns --project=$project record-sets create agentspace.$externalip.nip.io. --zone="agentspace-dns" --type="A" --ttl="300" --rrdatas="$externalip"
9. 找出 Agentspace 應用程式網址
下列程序會找出 Google 產生的 Google 管理 Agentspace 公開網址,這些網址會對應至每個應用程式的 Agentspace。網址輸出內容是根據參考架構提供的範例,因此請務必確認網址正確無誤。
請務必為每個應用程式儲存網頁應用程式的連結。
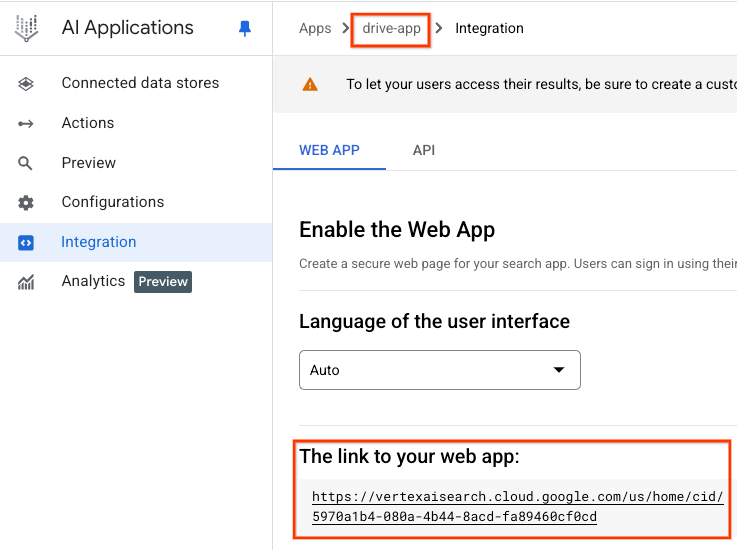
雲端硬碟應用程式
Agentspace 網頁網址:
https://vertexaisearch.cloud.google.com/us/home/cid/5970a1b4-080a-4b44-8acd-fa89460cf0cd
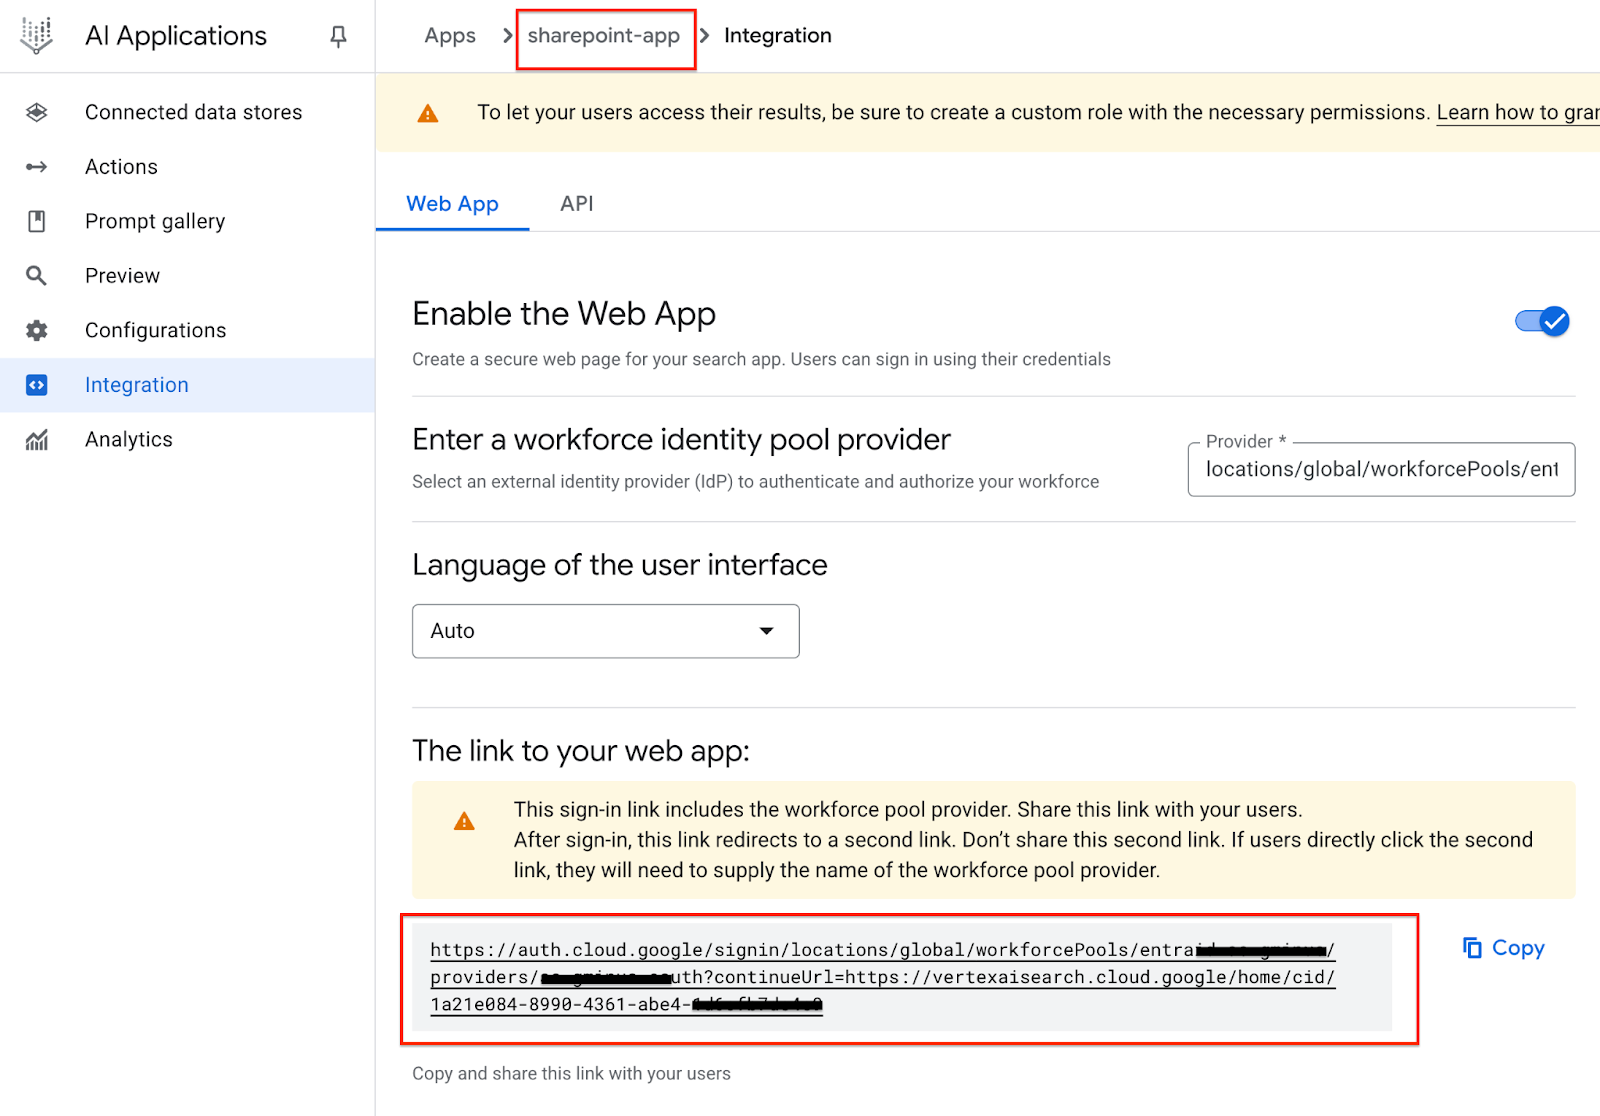
Sharepoint 應用程式
Agentspace 網頁網址:https://auth.cloud.google/signin/locations/global/workforcePools/your-pool-name/providers/your-provider-name?continueUrl=https://vertexaisearch.cloud.google/home/cid/f190000-0000-4d0a-0000-d08df6e3bef6
10. 建立進階型主機與路徑規則
在下一節中,您將更新負載平衡器的路由規則,以便使用 Cloud Console 定義主機和路徑規則。下表列出自訂值 (由上而下),請根據您的環境更新:
自訂值 | 以教學課程為基礎的範例 | |
主機 | agentspace.YOUR-EXTERNAL-IP.nip.io | agentspace.34.54.158.206.nip.io |
defaultService | projects/<projectid>/global/backendServices/agentspace-ineg-bes | projects/your-project-id/global/backendServices/agentspace-ineg-bes |
prefixMatch | /<name of Agentspace app#1> | /drive-app |
pathRedirect | /<應用程式 1 的 Agentspace 網址路徑> | /us/home/cid/5970a1b4-080a-4b44-8acd-fa89460cf0cd |
hostRedirect | vertexaisearch.cloud.google.com | vertexaisearch.cloud.google.com |
prefixMatch | /<name of Agentspace app#2> | /sharepoint-app |
pathRedirect | /<應用程式 2 的 Agentspace 網址路徑> | //signin/locations/global/workforcePools/your-pool-name/providers/your-provider-name?continueUrl=https://vertexaisearch.cloud.google/home/cid/f190000-0000-4d0a-0000-d08df6e3bef6 |
hostRedirect | auth.cloud.google | vertexaisearch.cloud.google.com |
前往下列位置,存取主機與路徑規則
負載平衡 → agentspace-lb → 選取「編輯」
選取「轉送規則」→「進階主機與路徑規則」
選取「新增主機與路徑規則」
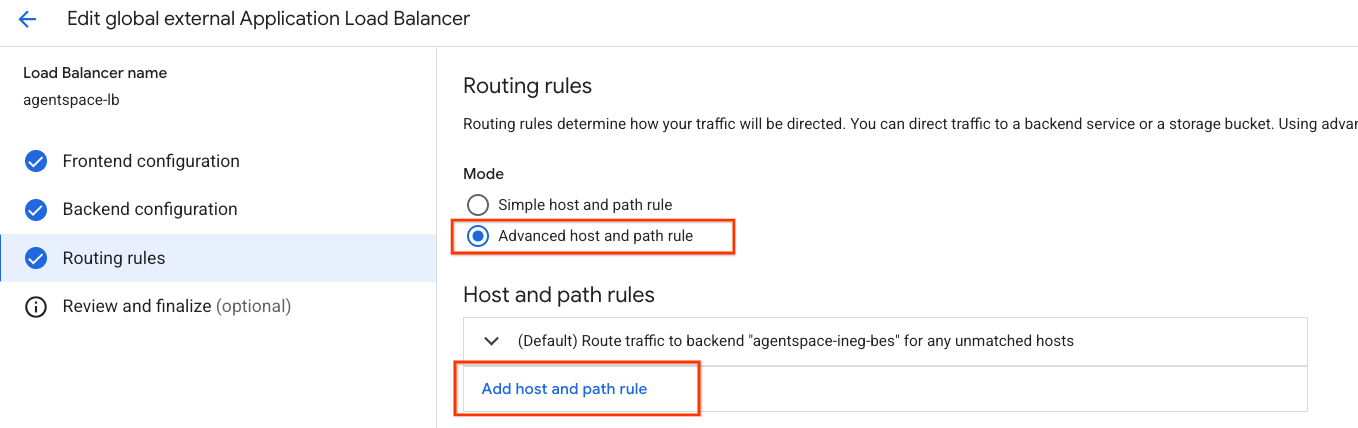
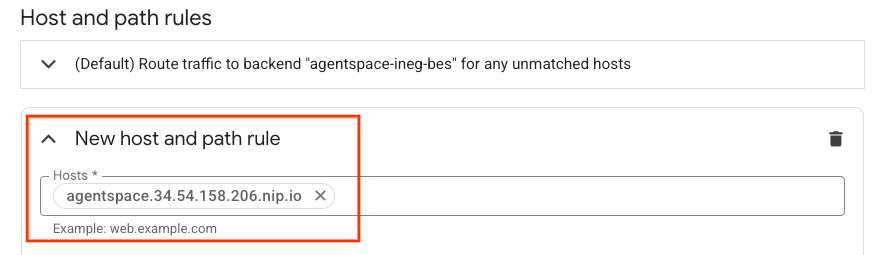
系統現在會提示您建立新的主機與路徑規則,請在主機部分插入 agentspace.YOUR-EXTERNAL-IP.nip.io 或自訂網域。
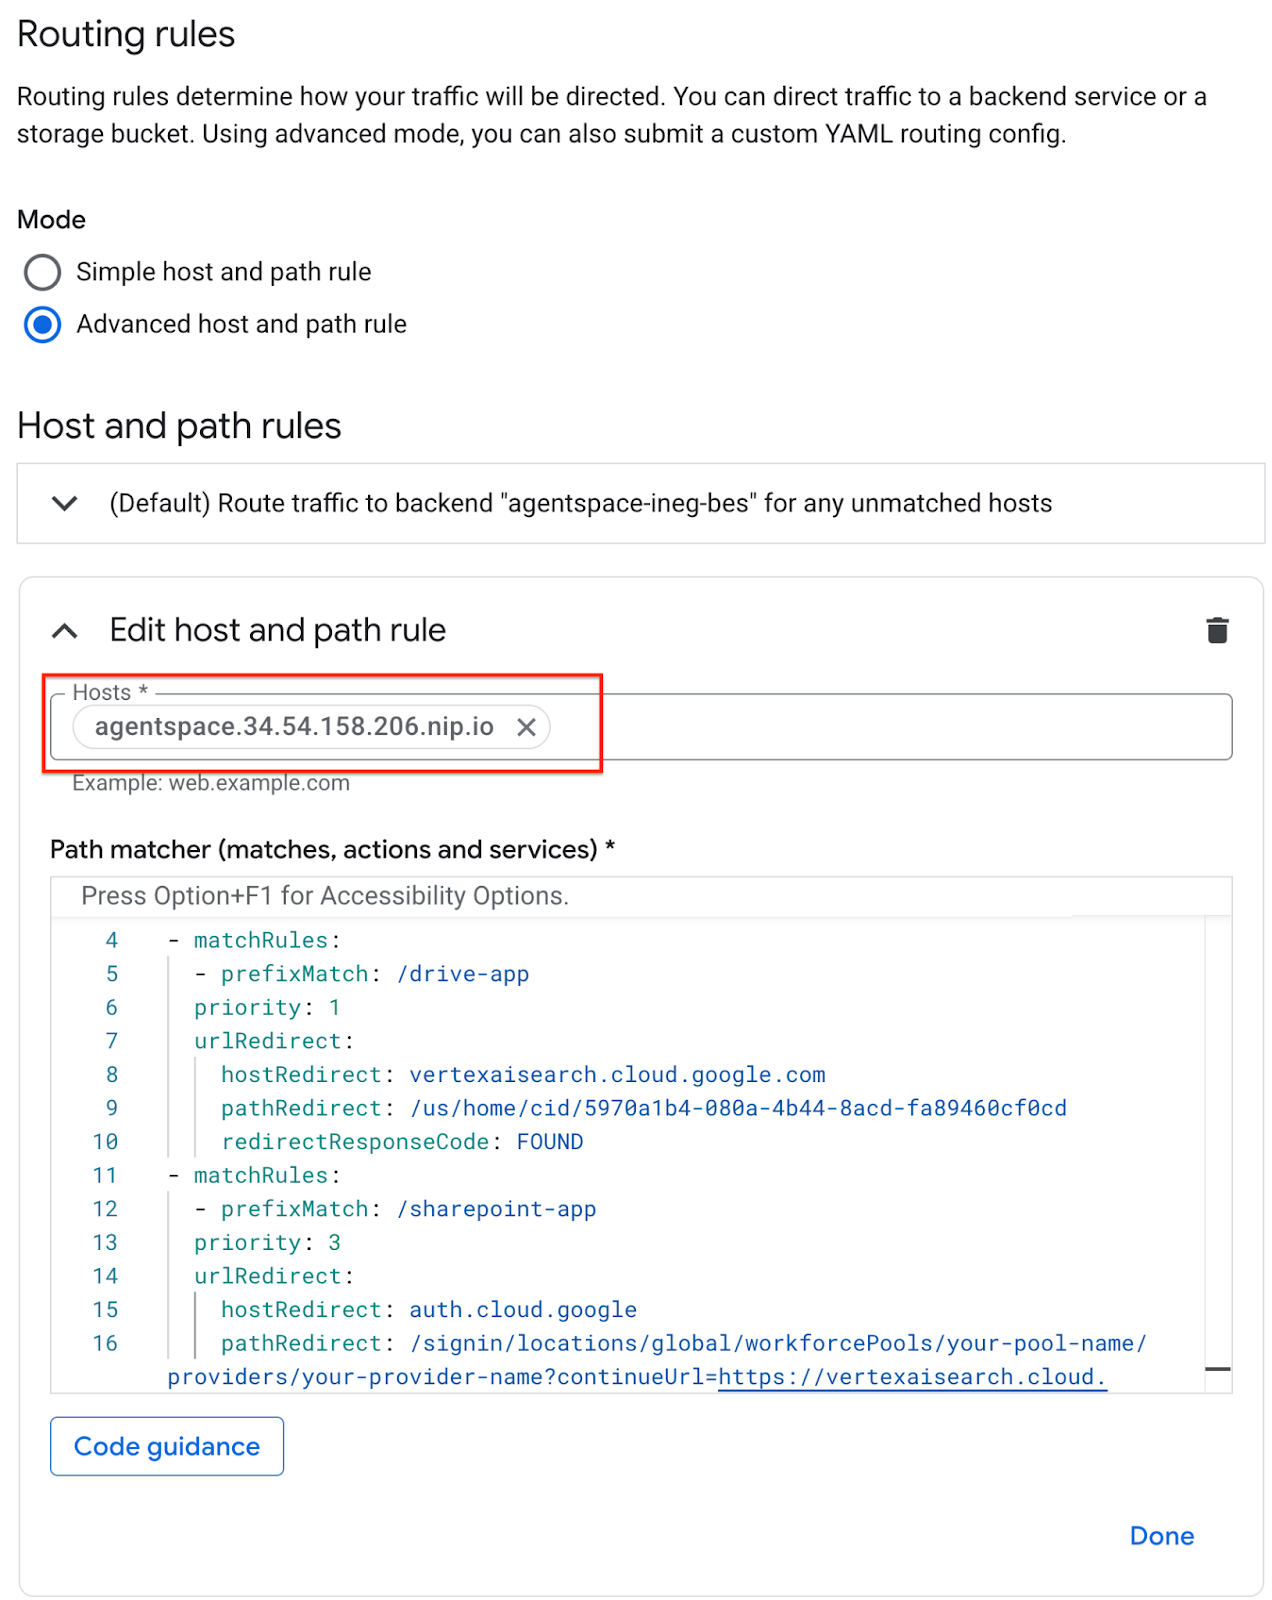
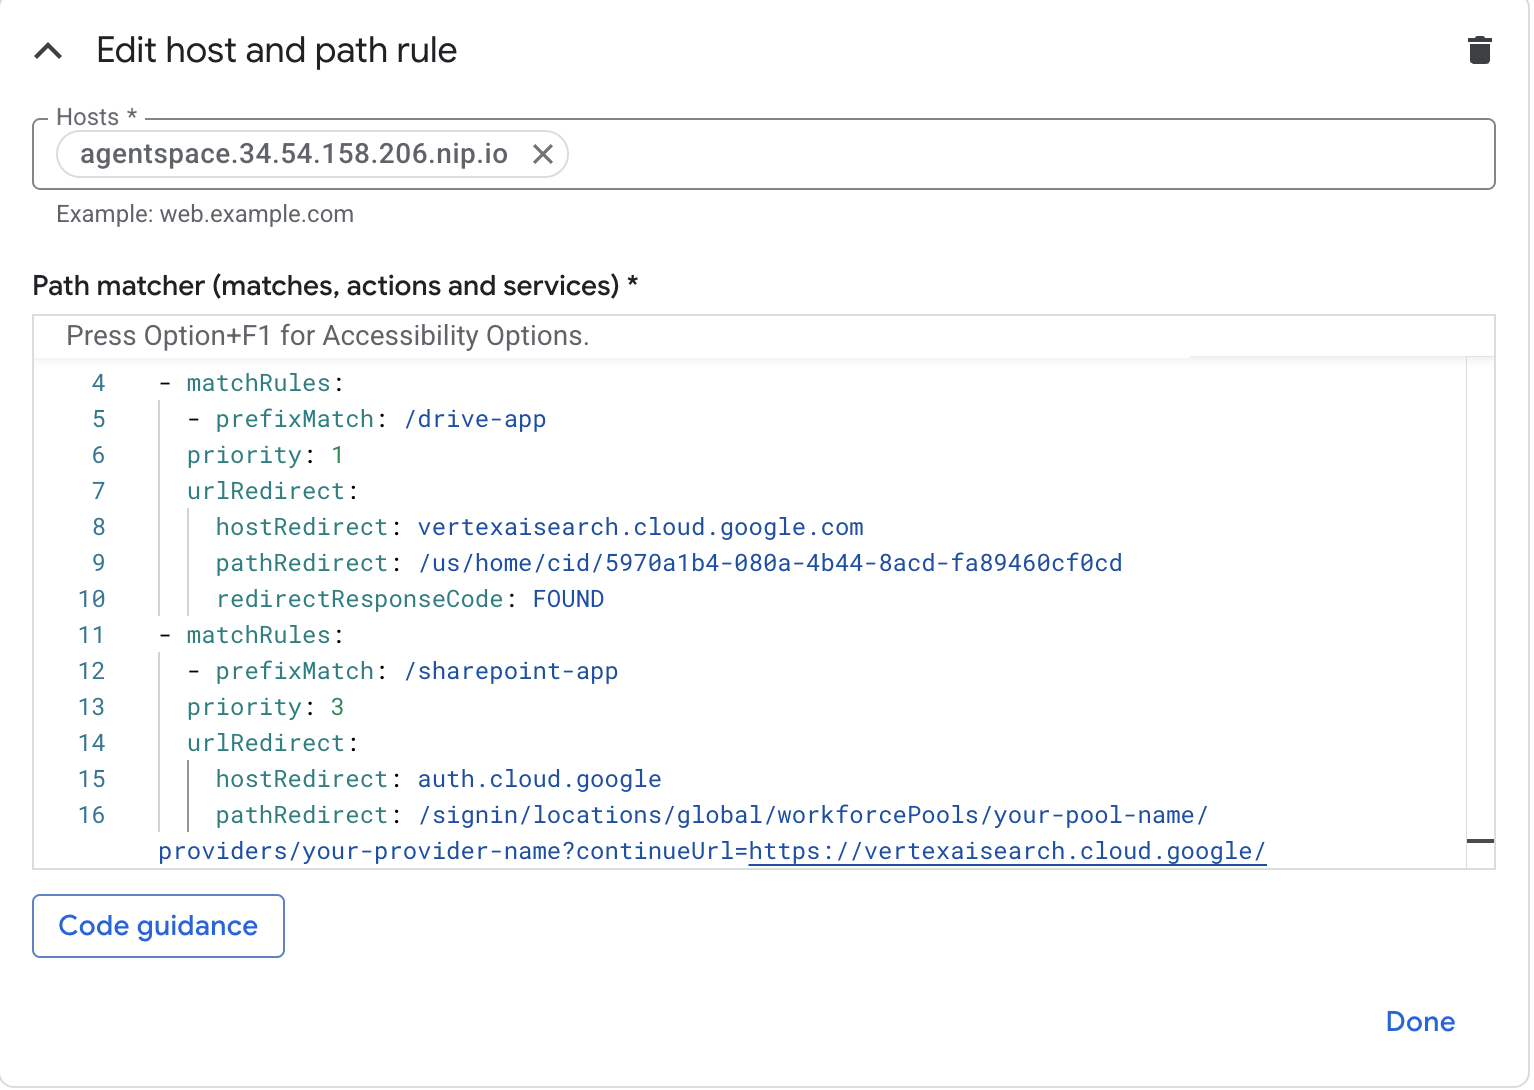
在「路徑比對器」欄位 (比對項目、動作和服務) 中,使用環境設定更新下方內容,然後選取「更新」。
defaultService: projects/<projectid>/global/backendServices/agentspace-ineg-bes
name: matcher1
routeRules:
- matchRules:
  - prefixMatch: /<name of Agentspace app#1>
  priority: 1
  urlRedirect:
    pathRedirect: /<Agentspace URL path of app#1>
    hostRedirect: vertexaisearch.cloud.google.com
    redirectResponseCode: FOUND
- matchRules:
  - prefixMatch: /<name of Agentspace app#2>
  priority: 2
  urlRedirect:
    pathRedirect: /<Agentspace URL path of app#2>
    hostRedirect: auth.cloud.google
    redirectResponseCode: FOUND
螢幕截圖範例:
11. 驗證
部署作業完成!您可以使用自訂網域,透過網路瀏覽器或終端機存取 Agentspace 應用程式,方法是指定 agentspace.YOUR-EXTERNAL-IP.nip.io/path,例如 agentspace.34.54.158.206.nip.io,範例如下:
Agentspace 應用程式:drive-app
路徑:agentspace.34.54.158.206.nip.io/drive-app
Agentspace 應用程式:sharepoint-app
路徑:agentspace.34.54.158.206.nip.io/sharepoint-app
12. 清理
如要刪除 OAuth 憑證,請執行下列操作:
依序前往「APIS & Services」(API 和服務) →「Credentials」(憑證)
在「OAuth 2.0 Client IDs」下方,選取憑證,然後刪除
在單一 Cloud Shell 終端機中刪除實驗室元件:
gcloud compute forwarding-rules delete agentspace-fr --global -q

gcloud compute target-https-proxies delete https-proxy --global -q

gcloud compute url-maps delete agentspace-lb --global -q

cloud compute ssl-certificates delete agentspace-self-signed-cert --global -q

gcloud compute backend-services delete agentspace-ineg-bes --global -q

gcloud compute network-endpoint-groups delete agentspace-ineg --global -q

gcloud dns --project=$projectid record-sets delete agentspace.$externalip.nip.io --zone="agentspace-dns" --type="A"

gcloud dns --project=$projectid managed-zones delete agentspace-dns

gcloud compute addresses delete external-ip --global -q

gcloud compute networks delete agentspace-vpc -q
13. 恭喜
恭喜!您已成功設定並驗證連線至 Agentspace,方法是使用具備進階流量管理功能的外部應用程式負載平衡器,搭配自訂網域。
您已建立負載平衡器基礎架構,並瞭解如何建立網際網路 NEG、Cloud DNS 和進階流量管理功能,啟用主機和路徑重新導向,以便使用自訂網域連線至 Agentspace。
Cosmopup 認為程式碼研究室很棒!
