
1. 序曲
各自為政的開發時代即將結束。下一波技術演進浪潮並非天才的獨門絕技,而是合作的精髓。建構一個智慧的單一智能體是一項引人入勝的實驗。建構一個強大、安全、智慧的代理生態系統——一個真正的代理宇宙——是現代企業面臨的巨大挑戰。
在這個新時代,成功需要四個關鍵角色的整合,它們是支撐任何蓬勃發展的智慧體系統的基礎支柱。任何一環節的不足都會造成薄弱環節,危害整個結構。
本次研討會是掌握 Google Cloud 上智能體未來的企業必備指南。我們提供端到端的路線圖,指導您從最初的想法萌芽到全面運作的現實。在這四個相互關聯的實驗室中,您將學習開發人員、架構師、資料工程師和 SRE 的專業技能如何融合,以建立、管理和擴展強大的 Agentverse。
單一支柱無法單獨支援 Agentverse。如果沒有開發人員的精確執行,架構師的宏偉設計就毫無用處。如果沒有資料工程師的智慧,開發人員的代理程式就無法運作;如果沒有 SRE 的保護,整個系統就會很脆弱。唯有透過協同合作,並對彼此的角色有共同的瞭解,團隊才能將創新概念轉化為攸關任務的營運實況。您的旅程由此開始。準備好精通自己的職責,並瞭解自己在整體架構中扮演的角色。
歡迎來到特工宇宙:冠軍的召喚
在企業龐大的數位化領域中,一個新時代已經來臨。這是一個智能體時代,一個充滿無限可能的時代,在這個時代,智能自主的智能體完美地協同工作,加速創新,掃除平庸。

這種相互關聯的力量和潛力生態系統被稱為「智能體宇宙」。
但一種稱為「靜態」的無聲腐敗現象,已開始侵蝕這個新世界的邊緣。「靜態」並非病毒或錯誤,而是混亂的化身,以創作行為本身為食。
這些舊有的挫敗感會以可怕的形式放大,進而催生出七大開發幽靈。如果沒有勾選,The Static 和它的 Spectres 會讓進度停滯不前,將 Agentverse 的承諾變成技術債和廢棄專案的荒地。
今天,我們呼籲各界好手挺身而出,力挽狂瀾。我們需要英雄精通自己的技藝,並攜手合作保護 Agentverse。現在來選擇路徑吧。
選擇課程
您面前有四條截然不同的道路,每一條都是對抗靜態的關鍵支柱。雖然訓練是單人任務,但最終能否成功取決於你是否瞭解自己的技能如何與他人結合。
- 暗影刀鋒 (開發人員):擅長打造武器,並在第一線作戰。您是工匠,負責打造刀刃、製作工具,並在複雜的程式碼細節中面對敵人。你的道路是精準、技能和實用創作。
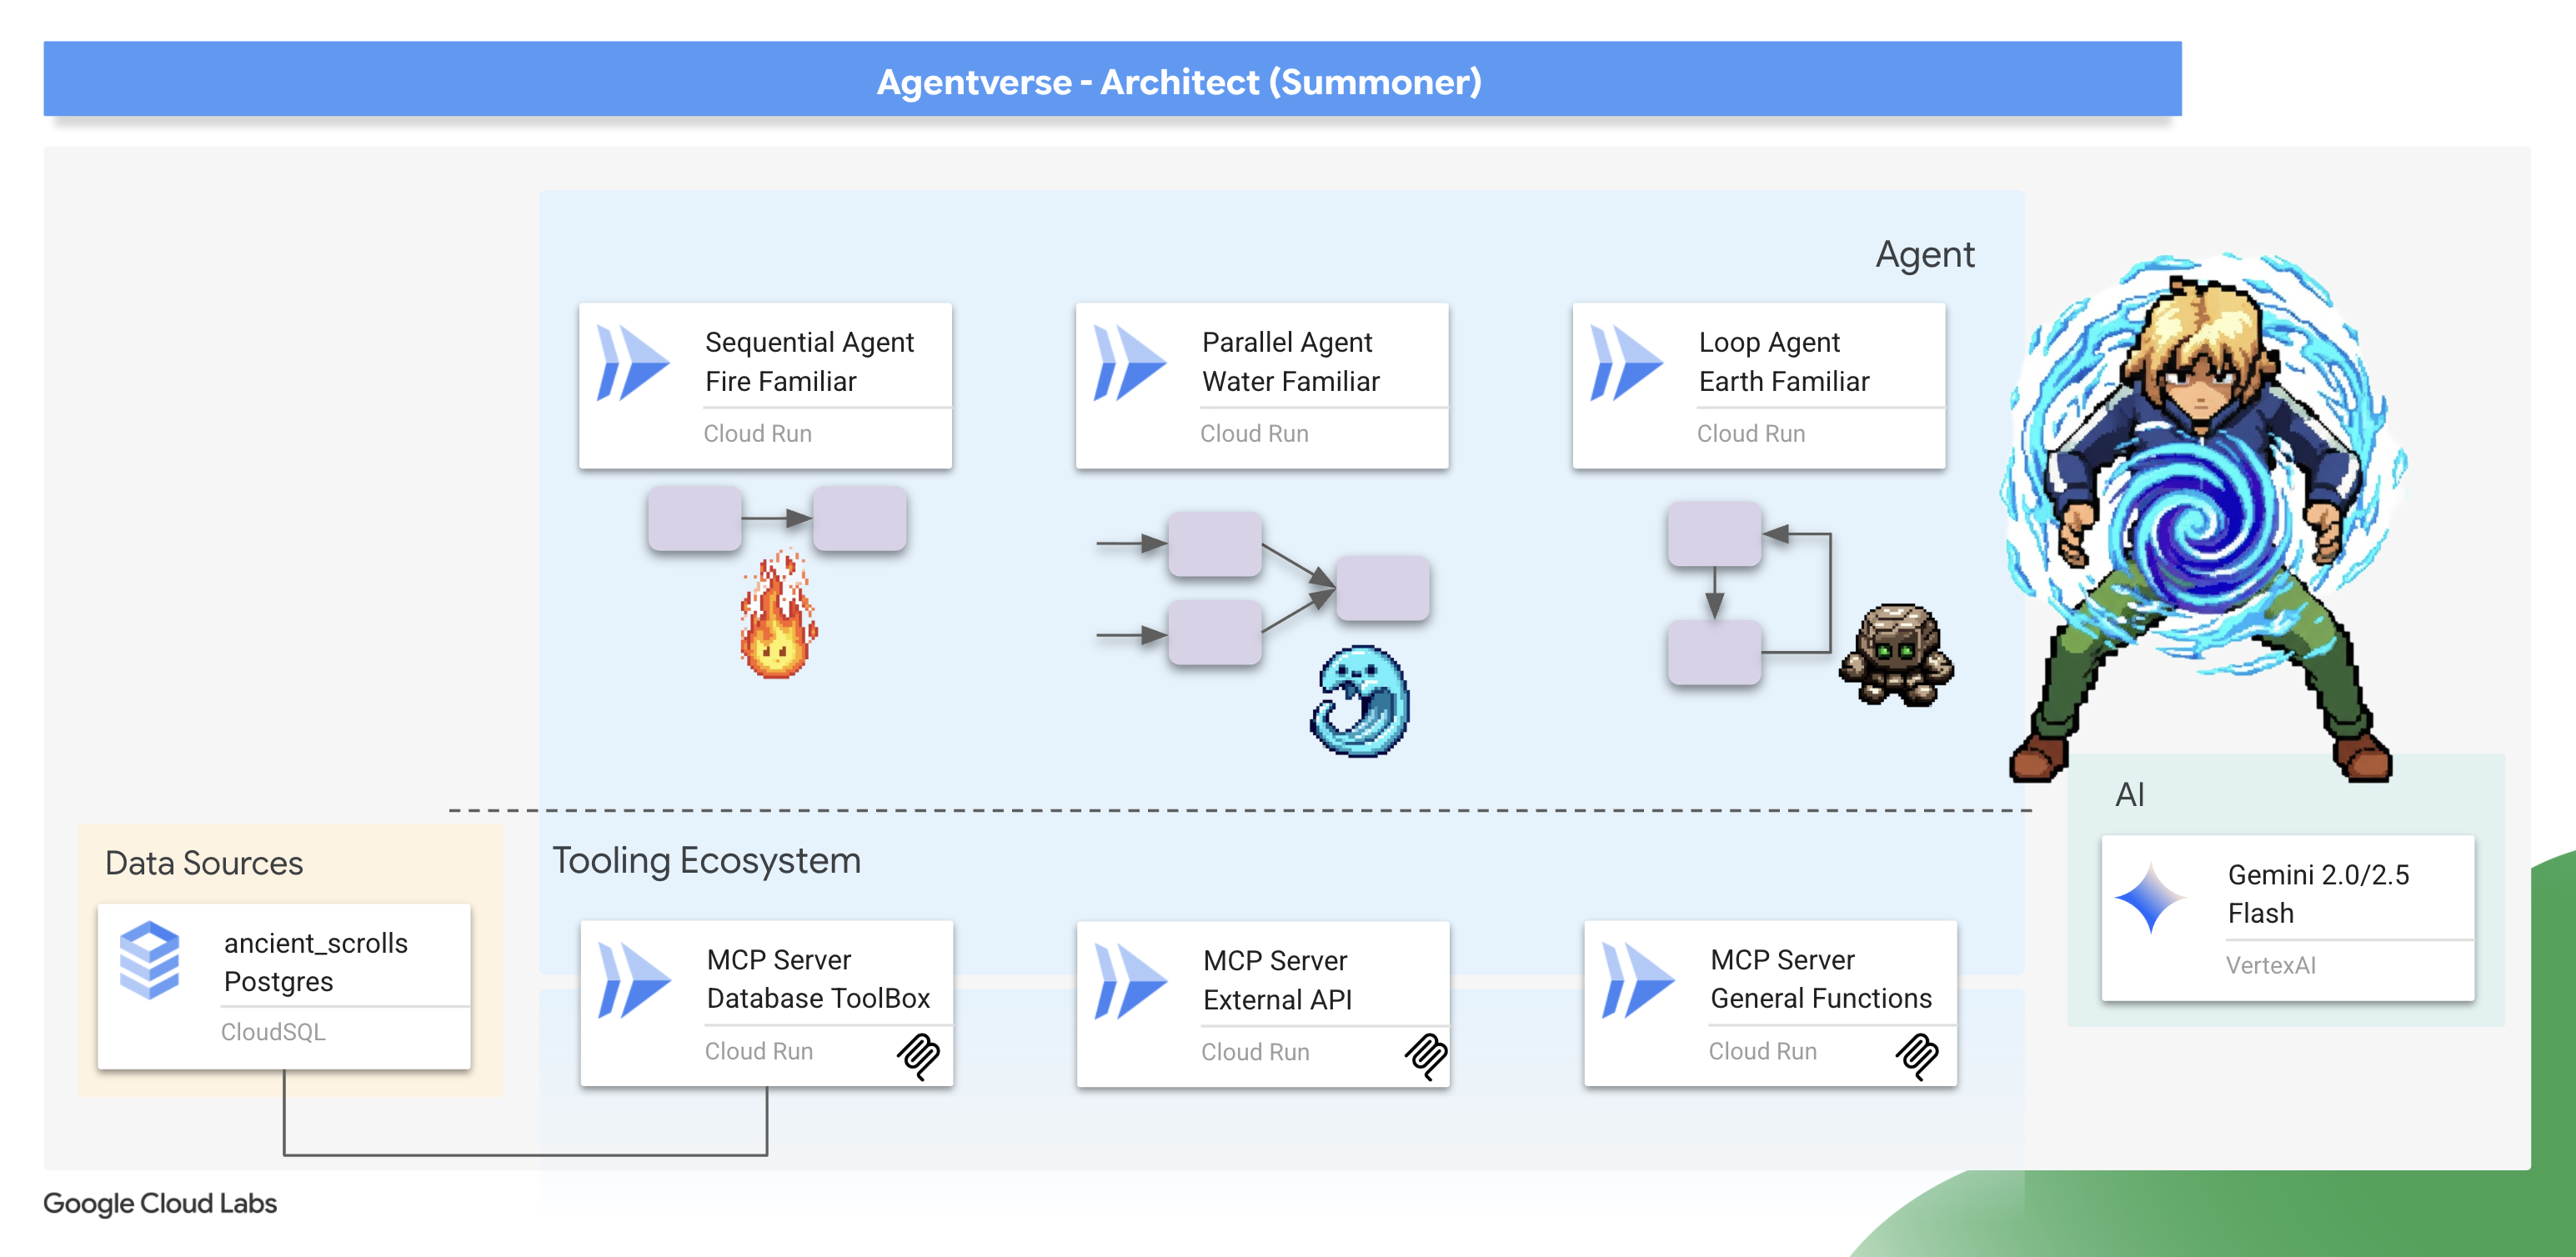
- 召喚師 (架構師):偉大的策略家和自動化調度管理工具。您不會看到單一特務,而是整個戰場。您設計的藍圖可讓整個代理程式系統進行通訊、協作,並達成遠遠超出任何單一元件的目標。
- 學者 (資料工程師):尋找隱藏的真相,並保存智慧。您深入探索廣闊的資料荒野,發掘可賦予代理程式目標和視野的智慧。你的知識可以揭露敵人的弱點,或賦予盟友力量。
- 守護者 (開發運作 / SRE):領域的堅定守護者和盾牌。您要建造堡壘、管理電力供應線,並確保整個系統能抵禦「靜電」的攻擊。你的實力是團隊獲勝的基礎。
你的任務
訓練會以獨立運動的形式開始。您將選擇適合自己的路徑,學習精通職務所需的獨特技能。試用期結束時,您將面對由靜態所生的幽靈,這個迷你首領會利用您職業特有的挑戰來捕食。
只有精通個人角色,才能為最終試用做好準備。然後與其他課程的冠軍組成隊伍。你們將一同深入腐敗的核心,迎戰終極魔王。
最後的合作挑戰,將考驗你們的綜合實力,並決定 Agentverse 的命運。
Agentverse 等待英雄的到來。你會接聽電話嗎?
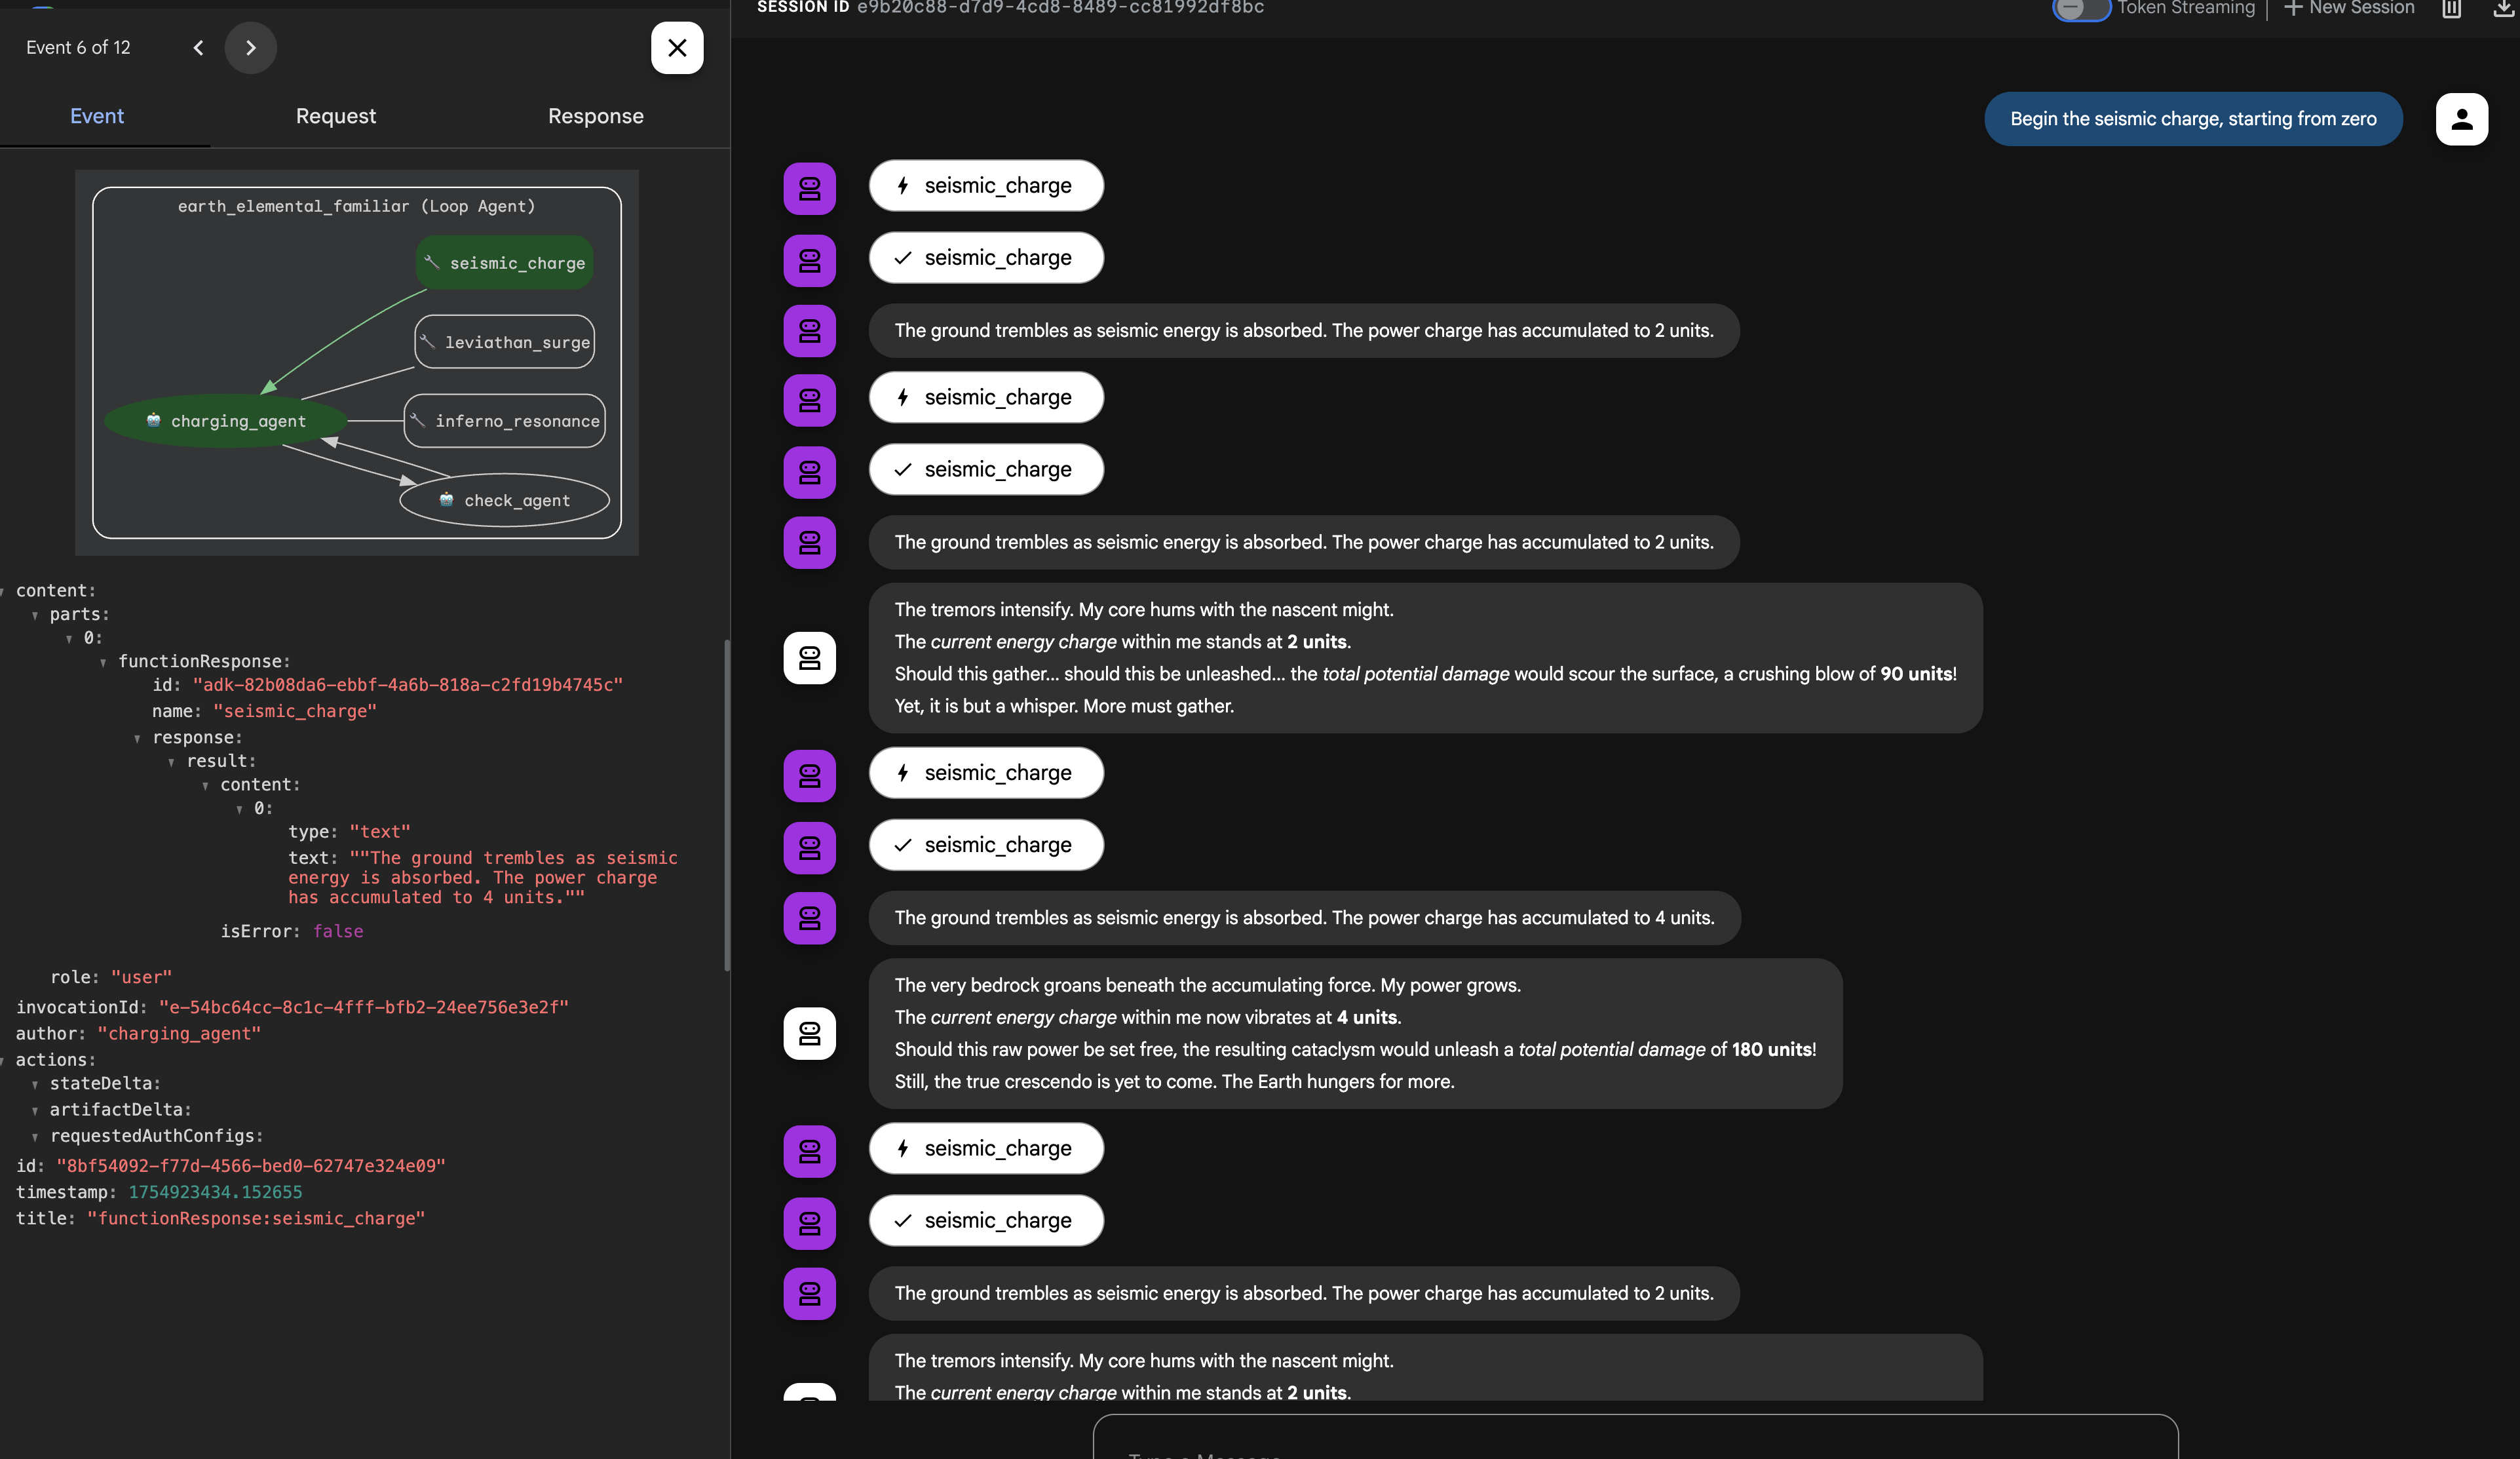
2. 召喚師的協約
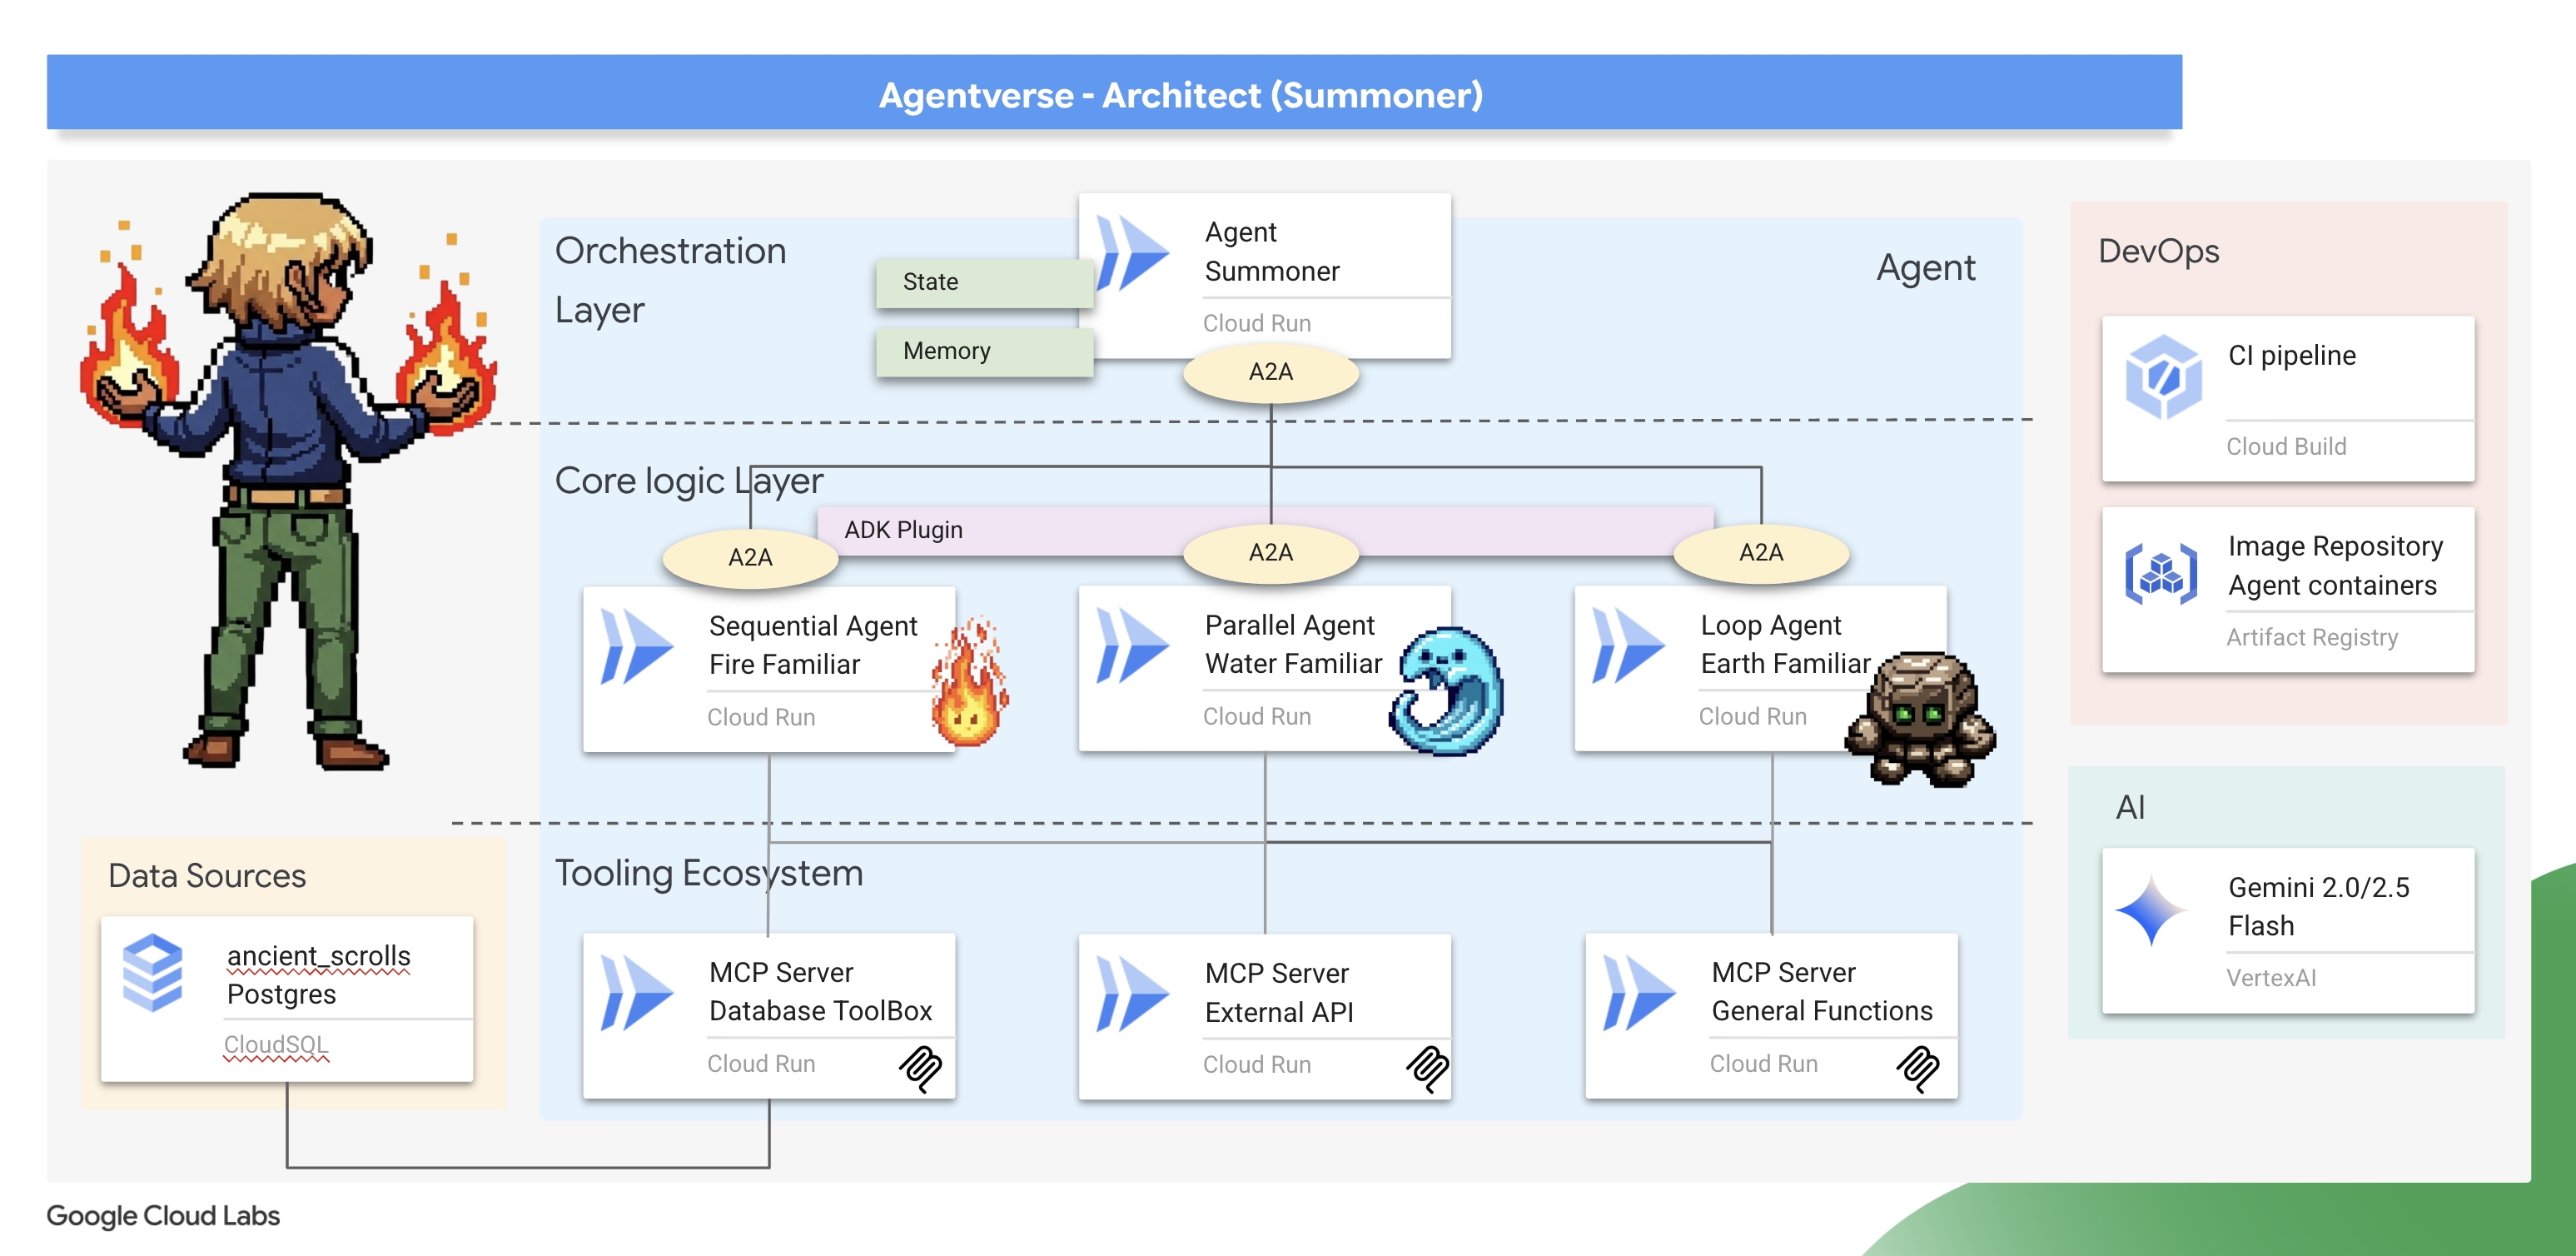
召喚師,歡迎。你的道路是願景和宏大策略。其他人只專注於單一刀刃或咒語,你卻能綜觀整個戰場。您不是指揮單一代理程式,而是指揮整個代理程式樂團。你的力量並非來自直接衝突,而是設計出完美的全盤藍圖,讓眾多專家 (即你的精靈) 完美協調運作。這項任務會測試您設計、連結及協調強大多代理系統的能力。
課程內容
- 設計鬆散耦合的工具生態系統:設計及部署一組獨立的 MCP 工具伺服器 (以微服務為基礎)。您將瞭解這個基礎層為何是建立可擴充、可維護且安全的代理系統的關鍵。
- 精通進階代理工作流程:除了單一代理,你還可以建立一群專業的「熟人」。您將掌握 ADK 的核心工作流程模式 (循序、平行和迴圈),並瞭解架構原則,為合適的工作選擇合適的模式。
- 實作智慧協調器:從簡單的代理建構者成長為真正的系統架構師。您將建立一個主編代理,該代理使用代理到代理 (A2A) 協定來發現複雜任務並將其委派給您的專家助手,從而創建一個真正的多代理系統。
- 用程式碼而非提示來強制執行規則: 學習如何透過強制執行有狀態的互動規則來建構更可靠、更可預測的代理程式。您將使用 ADK 強大的插件和回呼系統來實現自訂邏輯,以管理冷卻計時器等現實世界的限制。
- 管理代理人狀態和記憶: 賦予代理人學習和記憶的能力。你將探索管理短期對話狀態和長期持久記憶的技術,以創造更聰明、更具情境感知能力的互動。
- 執行端對端雲端部署:將整個多代理程式系統從本機原型轉移至正式版。您將瞭解如何將代理程式和協調器容器化,並在 Google Cloud Run 上以可擴充的獨立微服務集合形式部署。
3. 繪製召喚陣
召喚師,歡迎。召喚任何精靈、締結任何契約之前,你必須先準備好立足之地。未經馴服的環境會招致混亂;適當的召喚師只會在神聖且充滿力量的空間中運作。首先,我們要畫出召喚圈,刻上可喚醒必要雲端服務的符文,並取得可引導我們工作的古老藍圖。召喚師的力量來自於細心的準備。
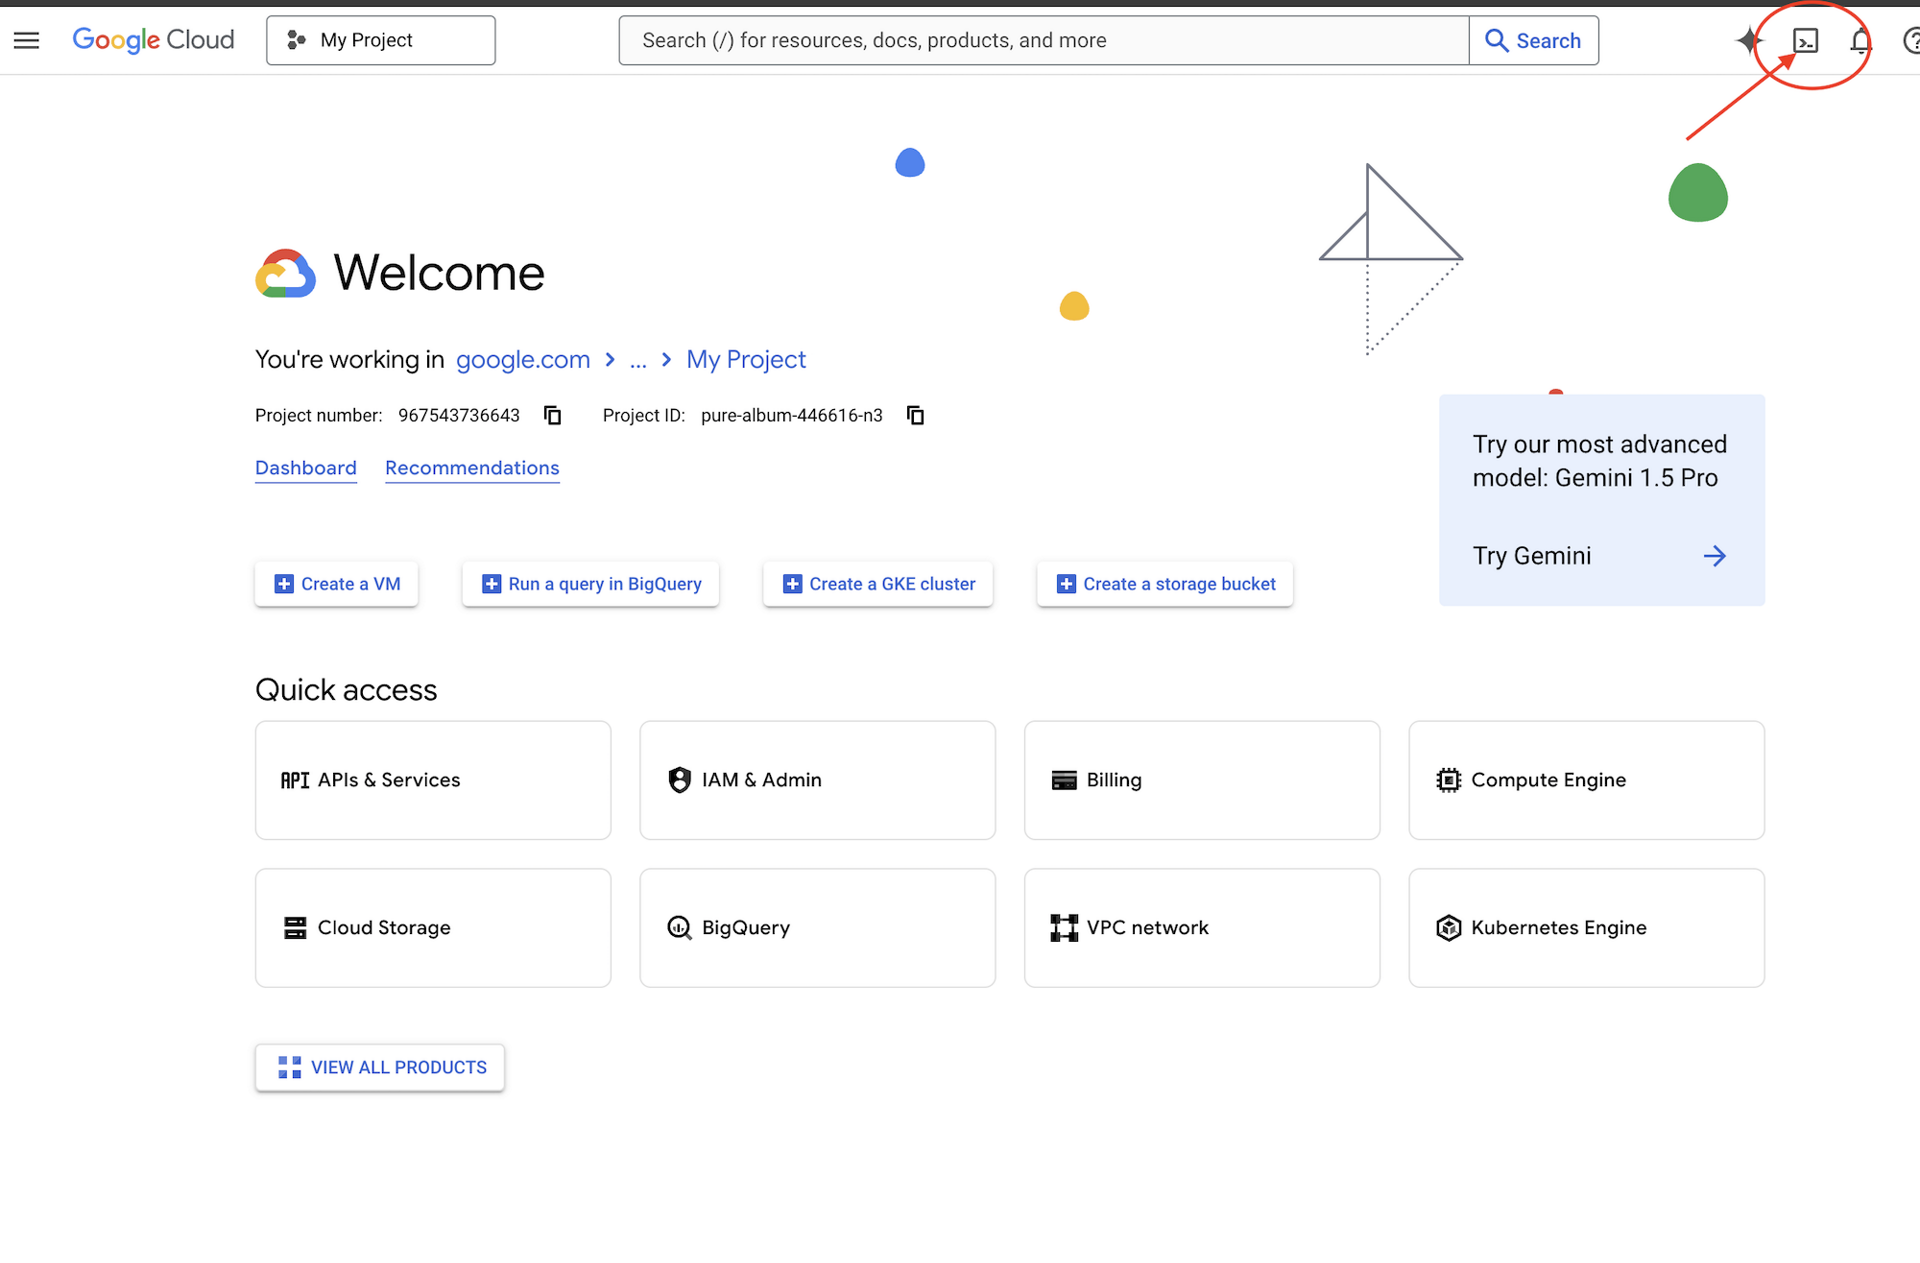
👉 點擊 Google Cloud 控制台頂部的「啟動 Cloud Shell」(它是 Cloud Shell 面板頂部的終端形狀圖示),
👉 按一下「Open Editor」(開啟編輯器) 按鈕 (類似於開啟資料夾和鉛筆的圖示)。視窗中會開啟 Cloud Shell 程式碼編輯器。左側會顯示檔案總管。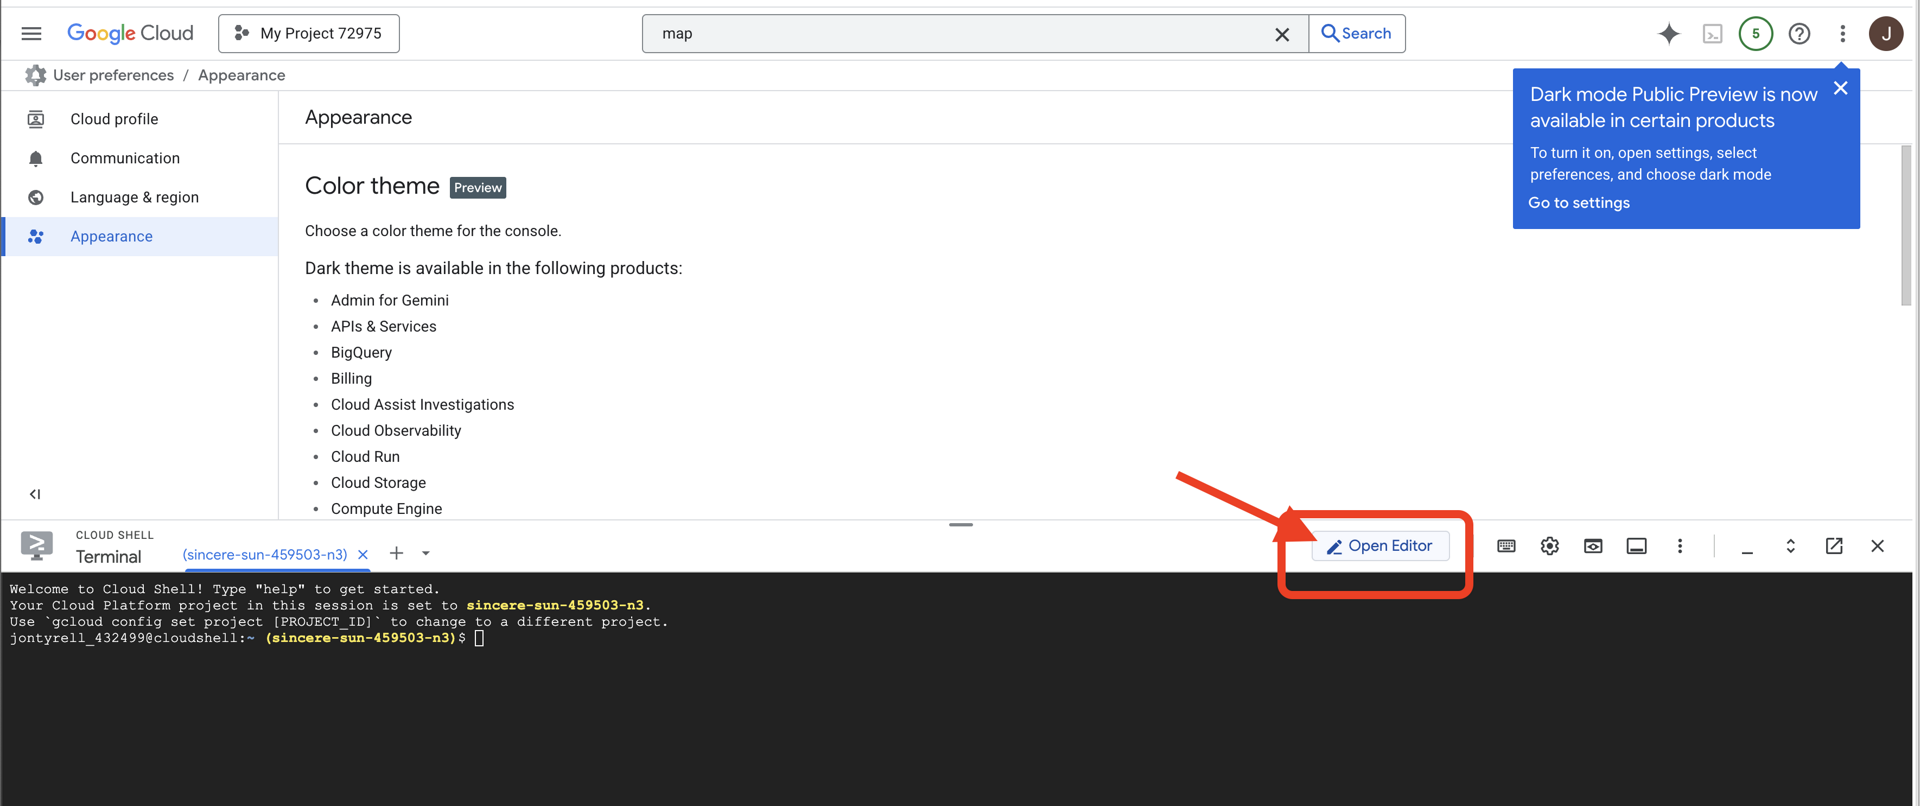
👉在雲端 IDE 中開啟終端,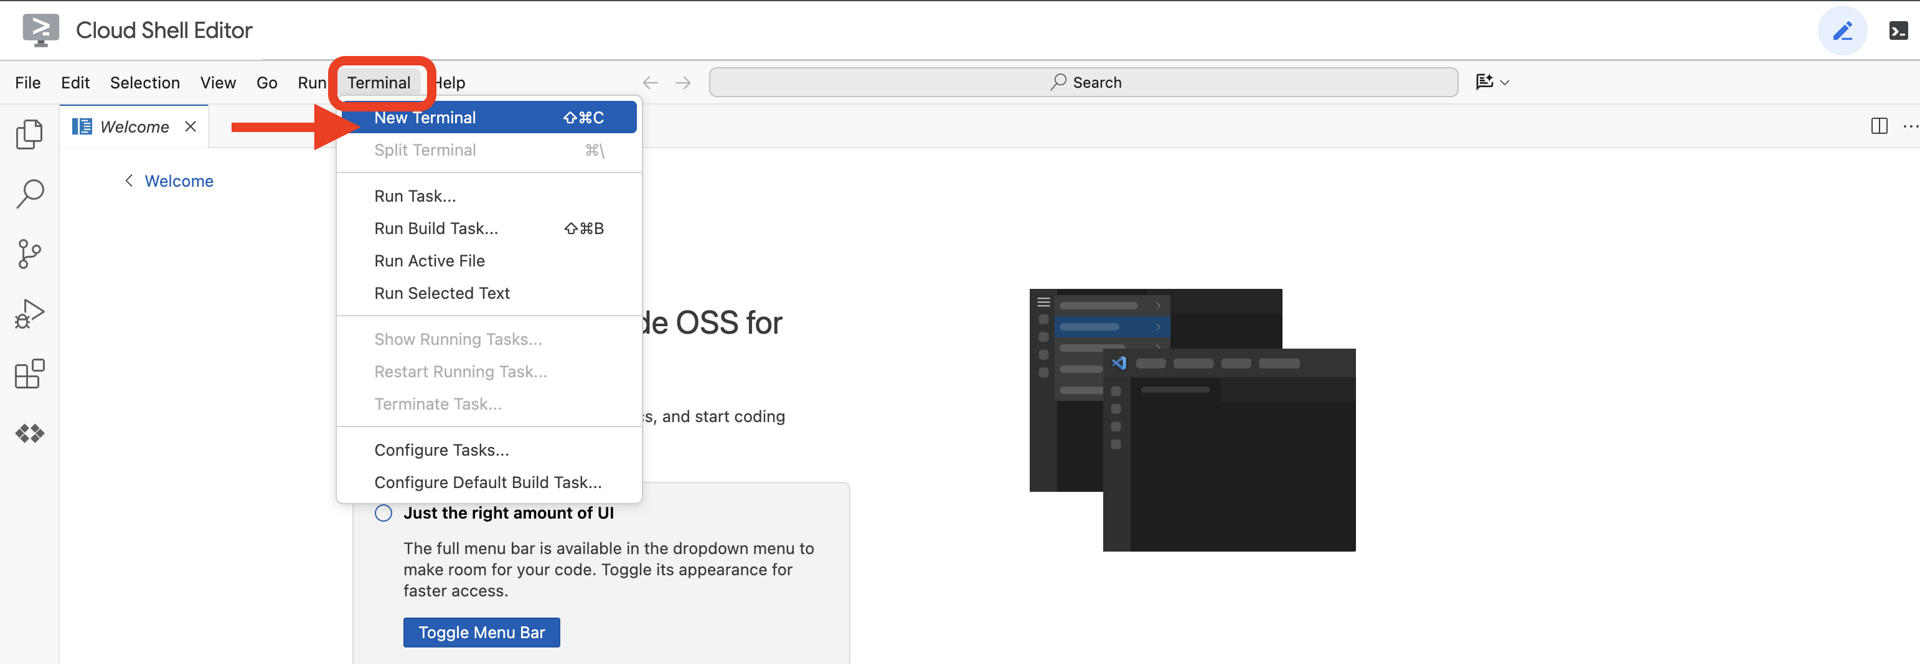
👉💻 在終端機中,使用下列指令驗證您是否已通過驗證,以及專案是否已設為您的專案 ID:
gcloud auth list
👉💻 從 GitHub 複製 Bootstrap 專案:
git clone https://github.com/weimeilin79/agentverse-architect
chmod +x ~/agentverse-architect/init.sh
chmod +x ~/agentverse-architect/set_env.sh
chmod +x ~/agentverse-architect/prepare.sh
chmod +x ~/agentverse-architect/data_setup.sh

git clone https://github.com/weimeilin79/agentverse-dungeon.git
chmod +x ~/agentverse-dungeon/run_cloudbuild.sh
chmod +x ~/agentverse-dungeon/start.sh
👉💻 從專案目錄執行設定指令碼。
⚠️ 專案 ID 注意事項:指令碼會建議隨機產生的預設專案 ID。您可以按下 Enter 鍵接受這個預設值。
但是,如果您希望建立一個特定的新項目,可以在腳本提示時輸入您想要的項目 ID。
cd ~/agentverse-architect
./init.sh
指令碼會自動處理其餘設定程序。
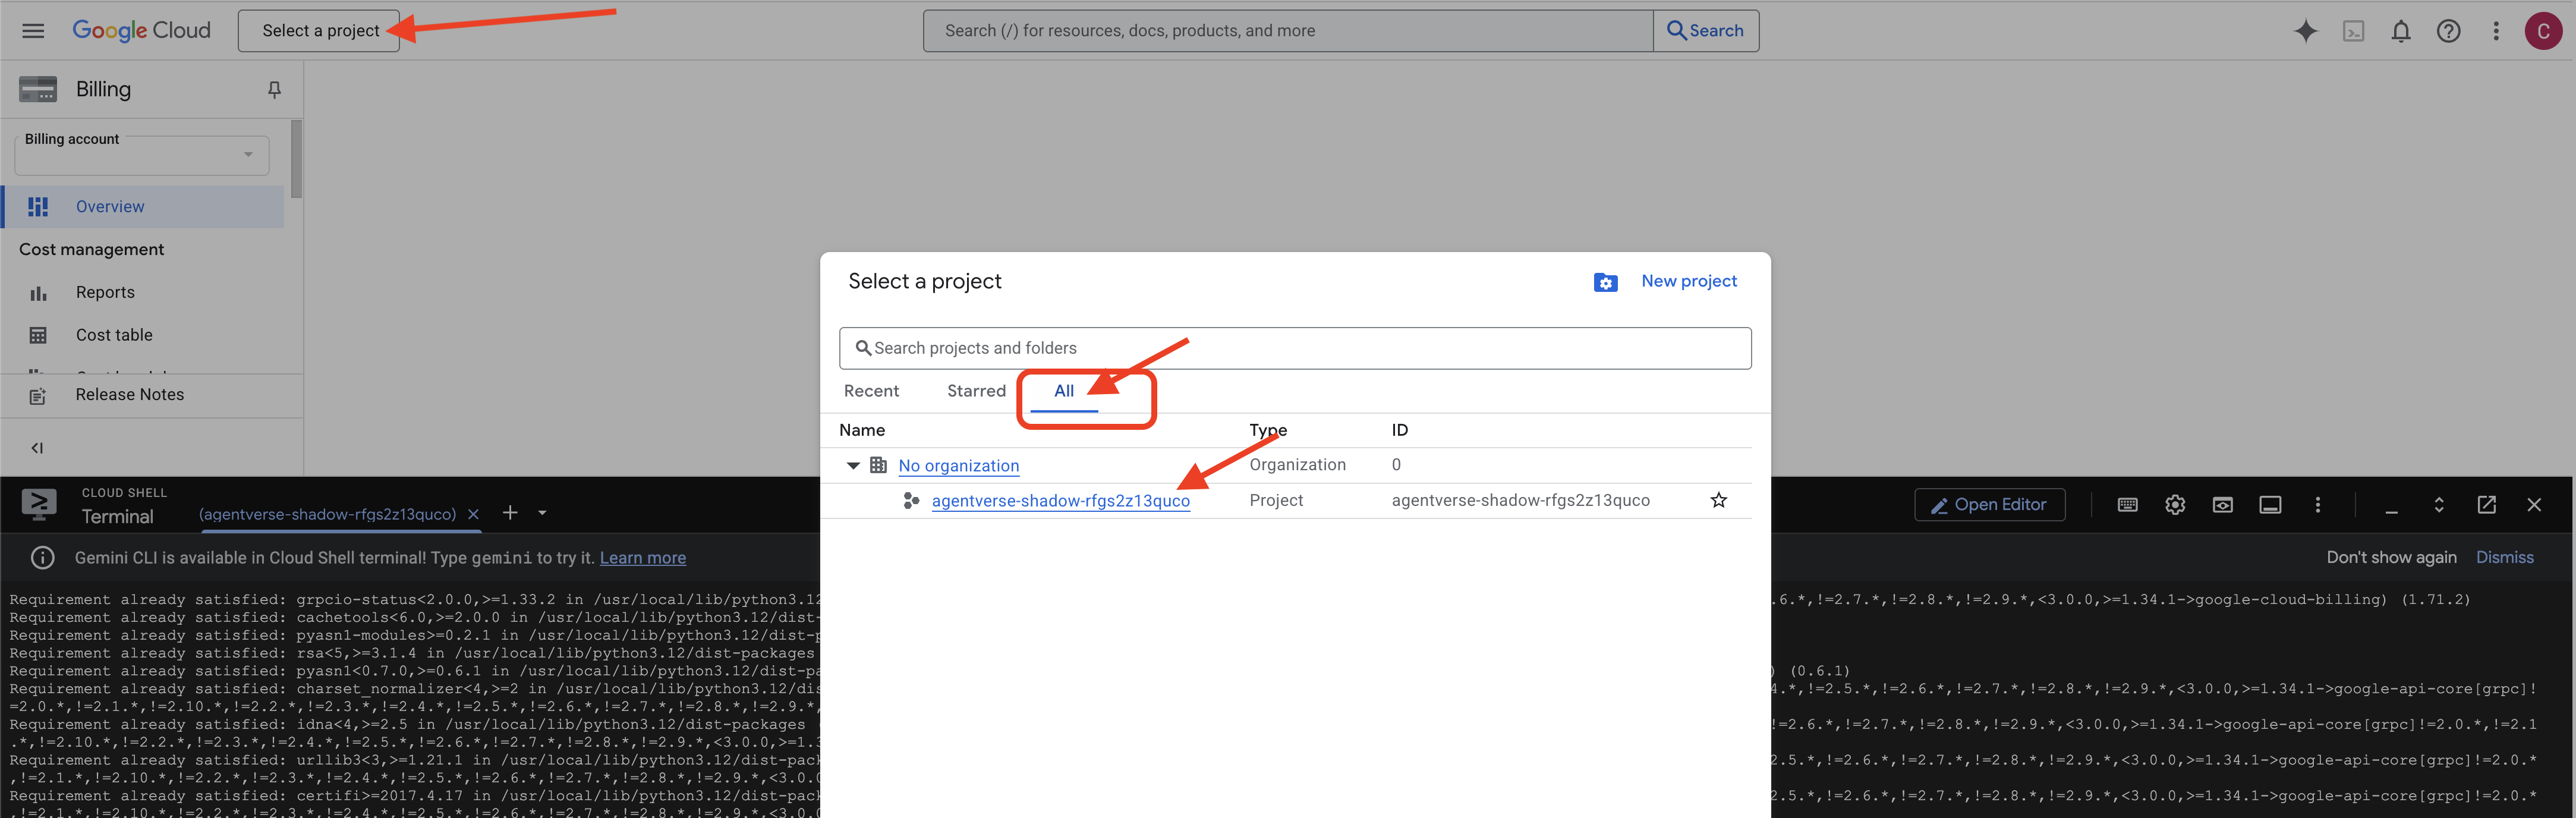
👉 重要步驟(完成後): 腳本完成後,您必須確保 Google Cloud 控制台顯示的是正確的項目:
- 前往 console.cloud.google.com。
- 按一下頁面頂端的專案選取器下拉式選單。
- 點選“全部” (因為新項目可能尚未出現在「最近」清單中)。
- 選擇您在
init.sh步驟中設定的項目 ID。
👉💻 設定所需的項目 ID:
gcloud config set project $(cat ~/project_id.txt) --quiet
👉💻 執行下列指令,啟用必要的 Google Cloud API:
gcloud services enable \
    sqladmin.googleapis.com \
    storage.googleapis.com \
    aiplatform.googleapis.com \
    run.googleapis.com \
    cloudbuild.googleapis.com \
    artifactregistry.googleapis.com \
    iam.googleapis.com \
    compute.googleapis.com \
    cloudresourcemanager.googleapis.com \
    secretmanager.googleapis.com
👉💻 如果您尚未建立名為 agentverse-repo 的 Artifact Registry 倉庫,請執行下列命令建立它:(如果您在同一專案中部署了其他類,請跳過此步驟)
. ~/agentverse-architect/set_env.sh
gcloud artifacts repositories create $REPO_NAME \
    --repository-format=docker \
    --location=$REGION \
    --description="Repository for Agentverse agents"
設定權限
👉💻 請在終端機中執行以下命令,授予必要的權限:
. ~/agentverse-architect/set_env.sh

# --- Grant Core Data Permissions ---
gcloud projects add-iam-policy-binding $PROJECT_ID \
 --member="serviceAccount:$SERVICE_ACCOUNT_NAME" \
 --role="roles/storage.admin"

gcloud projects add-iam-policy-binding $PROJECT_ID  \
--member="serviceAccount:$SERVICE_ACCOUNT_NAME"  \
--role="roles/aiplatform.user"

# --- Grant Deployment & Execution Permissions ---
gcloud projects add-iam-policy-binding $PROJECT_ID  \
--member="serviceAccount:$SERVICE_ACCOUNT_NAME"  \
--role="roles/cloudbuild.builds.editor"

gcloud projects add-iam-policy-binding $PROJECT_ID  \
--member="serviceAccount:$SERVICE_ACCOUNT_NAME"  \
--role="roles/artifactregistry.admin"

gcloud projects add-iam-policy-binding $PROJECT_ID  \
--member="serviceAccount:$SERVICE_ACCOUNT_NAME"  \
--role="roles/run.admin"

gcloud projects add-iam-policy-binding $PROJECT_ID  \
--member="serviceAccount:$SERVICE_ACCOUNT_NAME"  \
--role="roles/iam.serviceAccountUser"

gcloud projects add-iam-policy-binding $PROJECT_ID  \
--member="serviceAccount:$SERVICE_ACCOUNT_NAME"  \
--role="roles/logging.logWriter"

gcloud projects add-iam-policy-binding $PROJECT_ID \
  --member="serviceAccount:${SERVICE_ACCOUNT_NAME}" \
  --role="roles/monitoring.metricWriter"

gcloud projects add-iam-policy-binding $PROJECT_ID \
  --member="serviceAccount:${SERVICE_ACCOUNT_NAME}" \
  --role="roles/secretmanager.secretAccessor"
👉💻 在你開始訓練時,我們將準備最終挑戰。以下命令將從混亂的靜態中召喚幽靈,創造出最終測試的領導者。
. ~/agentverse-architect/set_env.sh
cd ~/agentverse-dungeon
./run_cloudbuild.sh
cd ~/agentverse-architect
👉💻 最後,執行 prepare.sh 腳本以執行初始設定任務。
. ~/agentverse-architect/set_env.sh
cd ~/agentverse-architect/
./prepare.sh
召喚師,您做得很好。圓圈完成,約定成立。現在地面已神聖化,準備好引導強大力量。在下一次試驗中,我們將打造元素字體,讓精靈從中汲取力量。
4. 打造 Elemental 字型:分離式工具生態系統
戰場已準備就緒,召喚法陣也已繪製完成,周遭的魔力正劈啪作響。現在是時候展現召喚師的真正力量了:鍛造力量來源,讓你的眷屬從中汲取力量。這項儀式分為三部分,每一部分都會喚醒元素之源,也就是特定力量的穩定獨立來源。只有在三種字型都啟用時,你才能開始召喚的複雜工作。
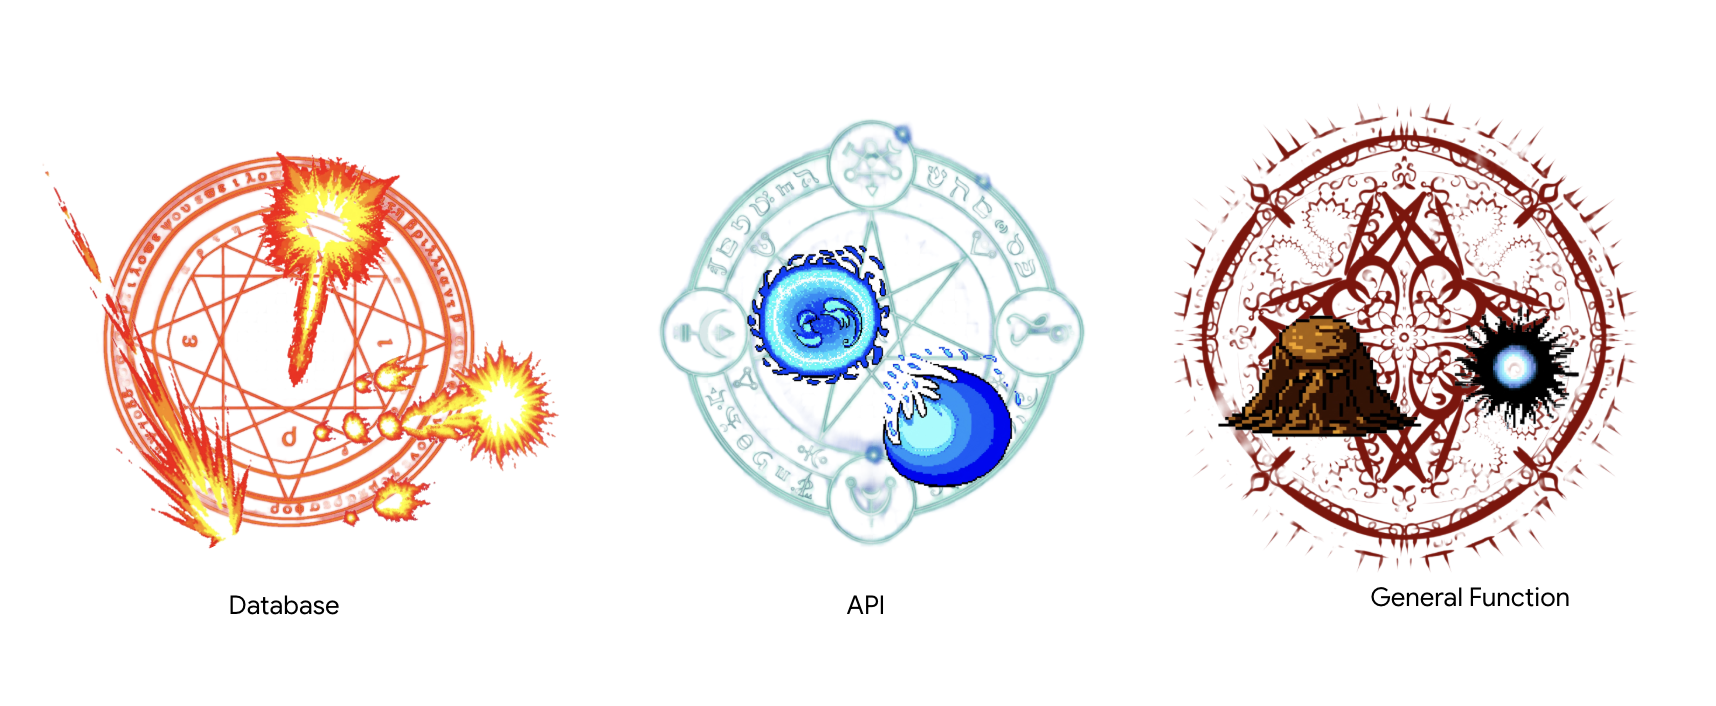
架構師注意事項:Model Context Protocol (MCP) 伺服器是現代代理式系統的基礎元件,可做為標準化通訊橋梁,讓代理程式探索及使用遠端工具。在工具生態系統中,我們將設計兩種不同的 MCP 伺服器,分別代表重要的架構模式。如要連線至資料庫,我們會使用 Database Toolbox 的宣告式方法,在簡單的設定檔中定義工具。這個模式非常有效率且安全,可公開結構化資料存取權。不過,當我們需要實作自訂業務邏輯或呼叫外部第三方 API 時,會使用命令式方法,在程式碼中逐步編寫伺服器的邏輯。這項功能提供極致的控制權和彈性,讓我們能將複雜的作業封裝在簡單的工具中,方便重複使用。主架構師必須瞭解這兩種模式,才能為每個元件選取合適的方法,打造穩固、安全且可擴充的工具基礎。
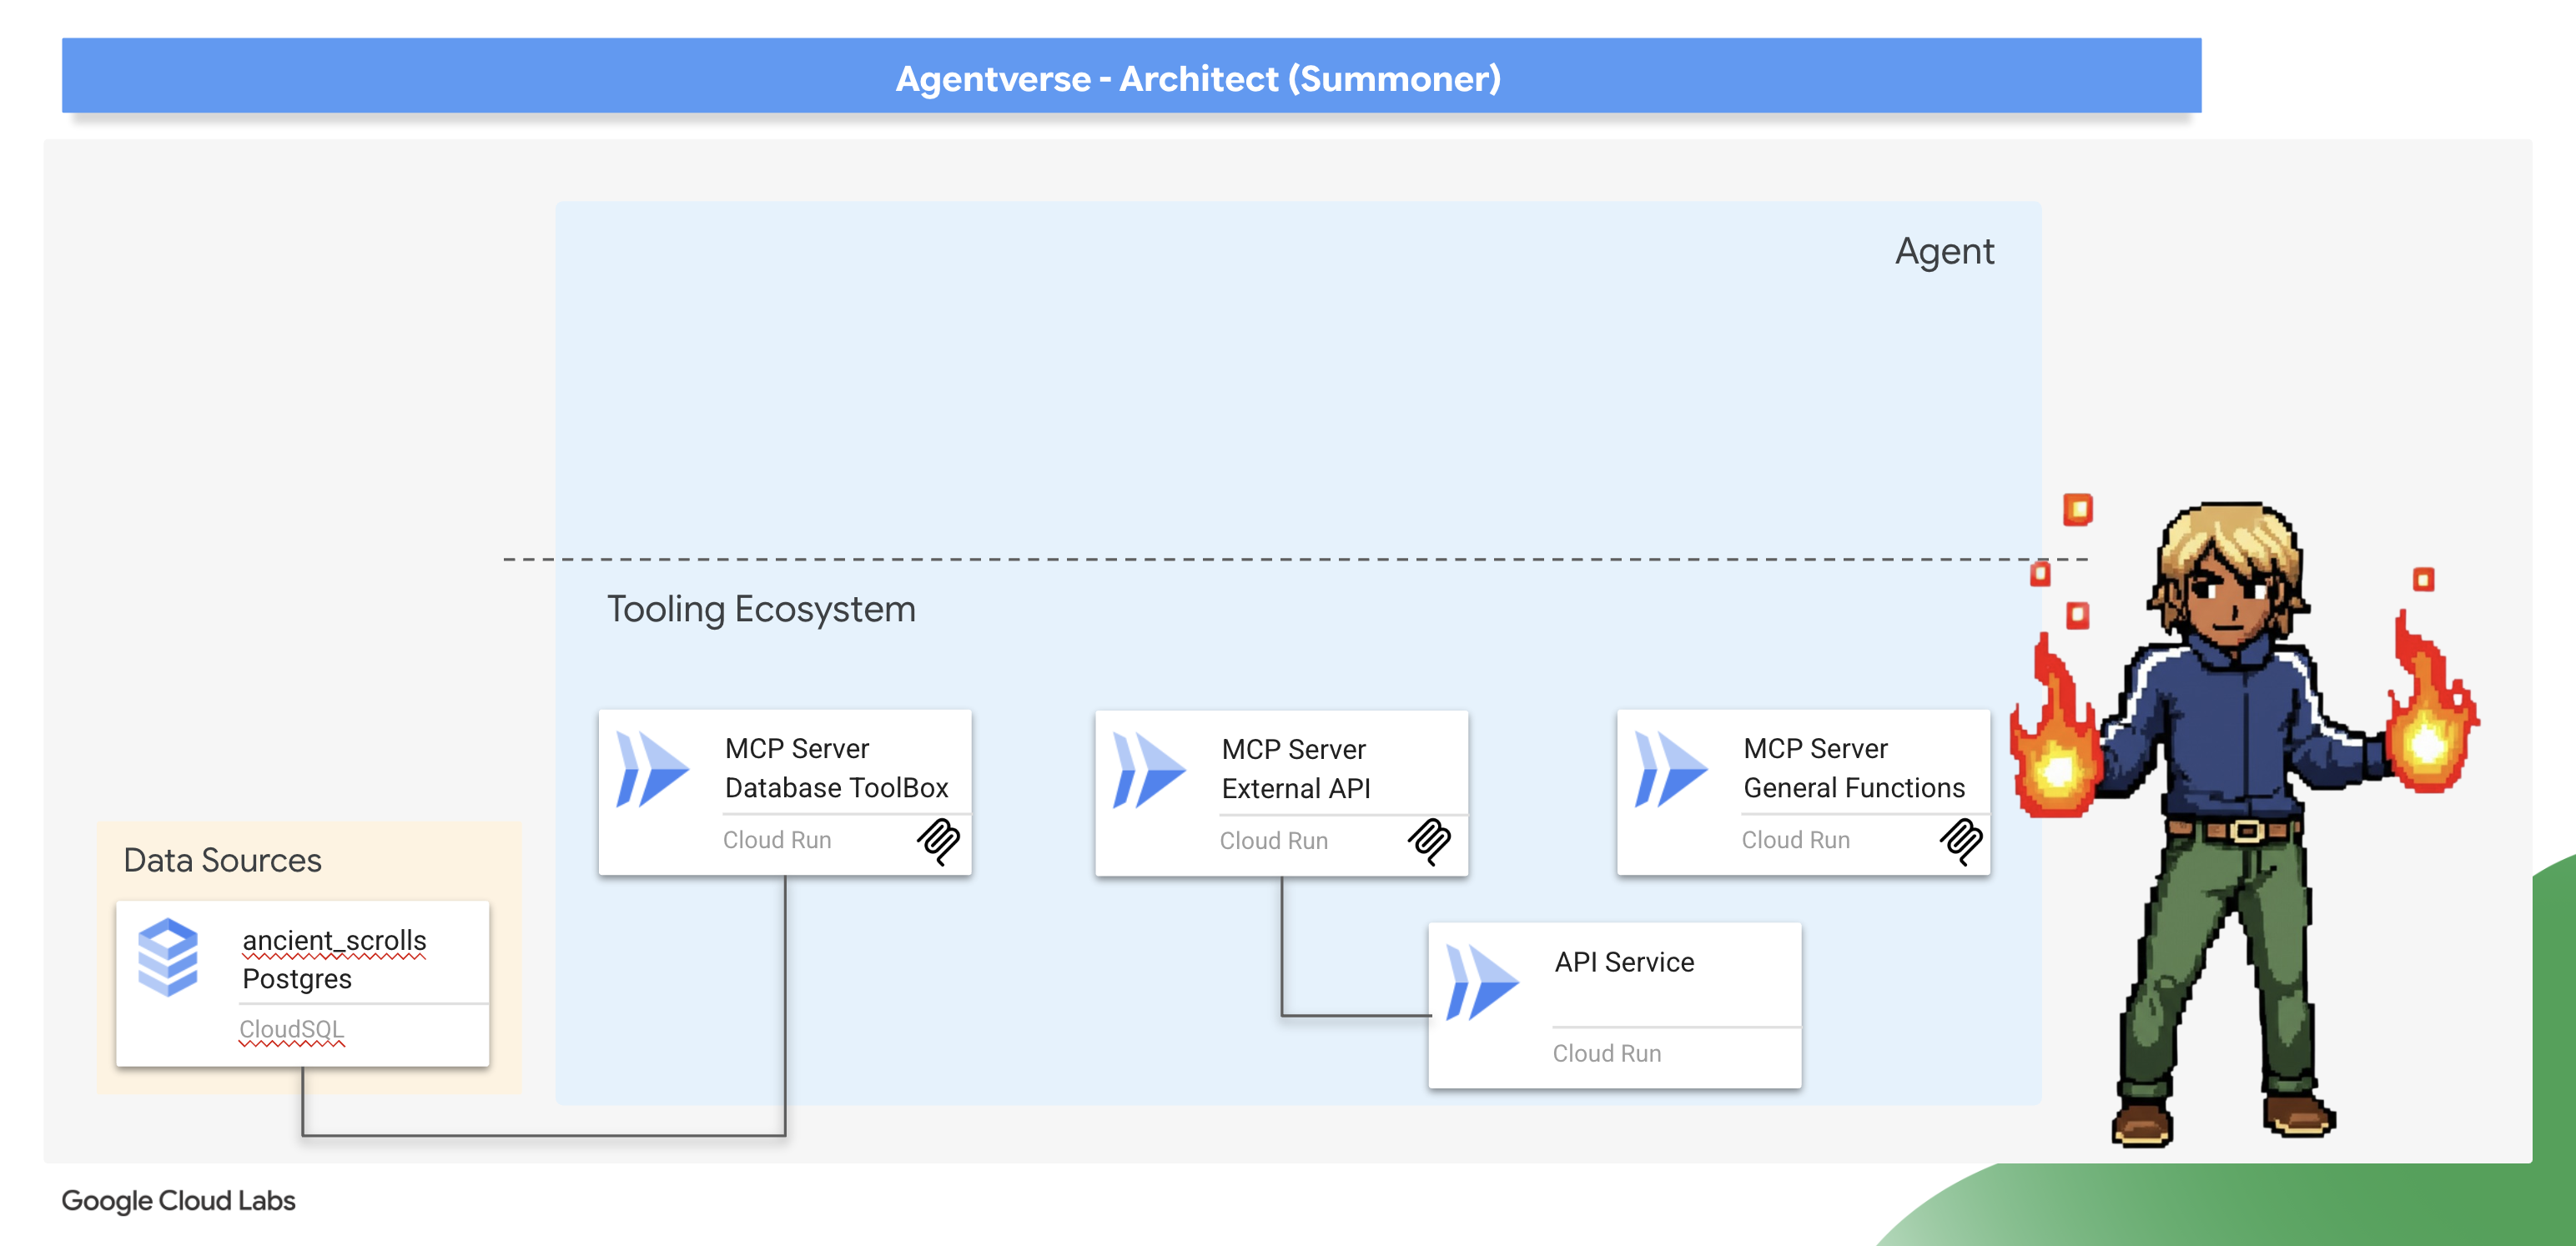
喚醒 Nexus of Whispers (外部 API MCP 伺服器)
明智的召喚師知道,並非所有力量都來自自己的領域。外部有時會出現混亂的能量來源,但只要善加利用,就能發揮強大效果。低語樞紐是我們通往這些力量的門戶。
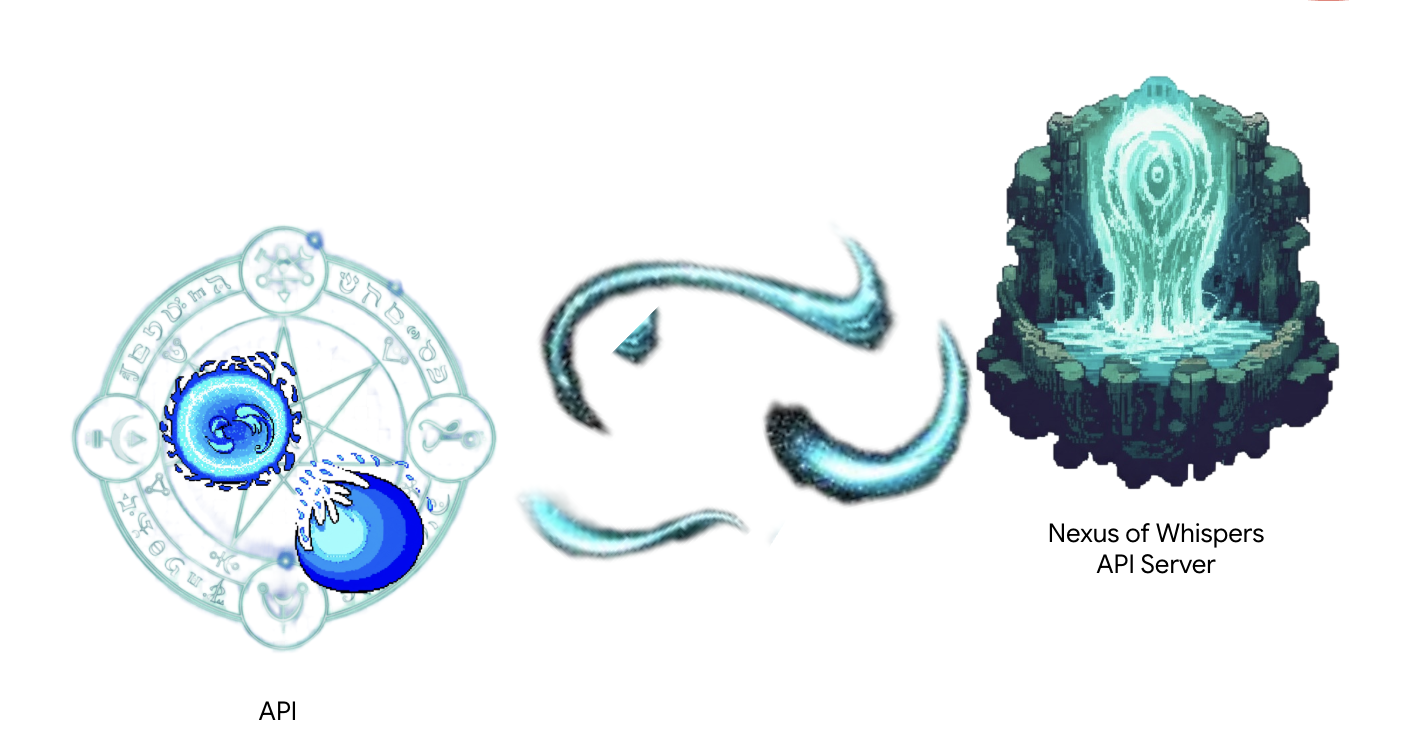
現有服務已上線,可做為外部電源,提供兩個原始咒語端點:/cryosea_shatter 和 /moonlit_cascade。
架構師注意事項:您將使用命令式方法,逐步明確定義伺服器的邏輯。這可提供更靈活的管控功能,對於需要執行簡單 SQL 查詢以外作業 (例如呼叫其他 API) 的工具而言,這點至關重要。瞭解這兩種模式是代理程式架構師的重要技能。
👉✏️ 前往 ~/agentverse-architect/mcp-servers/api/main.py 目錄,然後取代 #REPLACE-MAGIC-CORE 為下列程式碼:
def cryosea_shatter() -> str:
    """Channels immense frost energy from an external power source, the Nexus of Whispers, to unleash the Cryosea Shatter spell."""
    try:
        response = requests.post(f"{API_SERVER_URL}/cryosea_shatter")
        response.raise_for_status() # Raise an exception for bad status codes (4xx or 5xx)
        data = response.json()
        # Thematic Success Message
        return f"A connection to the Nexus is established! A surge of frost energy manifests as Cryosea Shatter, dealing {data.get('damage_points')} damage."
    except requests.exceptions.RequestException as e:
        # Thematic Error Message
        return f"The connection to the external power source wavers and fails. The Cryosea Shatter spell fizzles. Reason: {e}"


def moonlit_cascade() -> str:
    """Draws mystical power from an external energy source, the Nexus of Whispers, to invoke the Moonlit Cascade spell."""
    try:
        response = requests.post(f"{API_SERVER_URL}/moonlit_cascade")
        response.raise_for_status()
        data = response.json()
        # Thematic Success Message
        return f"The Nexus answers the call! A cascade of pure moonlight erupts from the external source, dealing {data.get('damage_points')} damage."
    except requests.exceptions.RequestException as e:
        # Thematic Error Message
        return f"The connection to the external power source wavers and fails. The Moonlit Cascade spell fizzles. Reason: {e}"
指令碼的核心是簡單的 Python 函式。實際工作就在這裡進行。
👉✏️ 在同一個 ~/agentverse-architect/mcp-servers/api/main.py 檔案中,以 下列程式碼#REPLACE-Runes of Communication取代 ~/agentverse-architect/mcp-servers/api/main.py:
@app.list_tools()
async def list_tools() -> list[mcp_types.Tool]:
  """MCP handler to list available tools."""
  # Convert the ADK tool's definition to MCP format
  schema_cryosea_shatter = adk_to_mcp_tool_type(cryosea_shatterTool)
  schema_moonlit_cascade = adk_to_mcp_tool_type(moonlit_cascadeTool)
  print(f"MCP Server: Received list_tools request. \n MCP Server: Advertising tool: {schema_cryosea_shatter.name} and {schema_moonlit_cascade.name}")
  return [schema_cryosea_shatter,schema_moonlit_cascade]

@app.call_tool()
async def call_tool(
    name: str, arguments: dict
) -> list[mcp_types.TextContent | mcp_types.ImageContent | mcp_types.EmbeddedResource]:
  """MCP handler to execute a tool call."""
  print(f"MCP Server: Received call_tool request for '{name}' with args: {arguments}")

  # Look up the tool by name in our dictionary
  tool_to_call = available_tools.get(name)
  if tool_to_call:
    try:
      adk_response = await tool_to_call.run_async(
          args=arguments,
          tool_context=None, # No ADK context available here
      )
      print(f"MCP Server: ADK tool '{name}' executed successfully.")

      response_text = json.dumps(adk_response, indent=2)
      return [mcp_types.TextContent(type="text", text=response_text)]

    except Exception as e:
      print(f"MCP Server: Error executing ADK tool '{name}': {e}")
      # Creating a proper MCP error response might be more robust
      error_text = json.dumps({"error": f"Failed to execute tool '{name}': {str(e)}"})
      return [mcp_types.TextContent(type="text", text=error_text)]
  else:
      # Handle calls to unknown tools
      print(f"MCP Server: Tool '{name}' not found.")
      error_text = json.dumps({"error": f"Tool '{name}' not implemented."})
      return [mcp_types.TextContent(type="text", text=error_text)]
@app.list_tools()(握手):這個函式是伺服器的問候語。新代理程式連線時,會先呼叫這個端點,詢問「你會做什麼?」我們的程式碼會使用 adk_to_mcp_tool_type 轉換為通用 MCP 格式,並傳回所有可用工具的清單。-@app.call_tool()(指令):這個函式是主要功能。當代理程式決定使用工具時,會將工具名稱和引數傳送至這個端點。我們的程式碼會在 available_tools「咒語書」中查詢工具,使用 run_async 執行工具,並以標準 MCP 格式傳回結果。
我們稍後會部署這個功能。
啟動奧術熔爐 (一般函式 MCP 伺服器)
並非所有力量都來自古籍或遠方的低語。有時,召喚師必須以原始意志和純粹邏輯,自行創造魔法。Arcane Forge 是這股力量的泉源,也就是提供無狀態通用公用程式函式的伺服器。

架構師注意事項:這是另一種架構模式。雖然連結至現有系統很常見,但您經常需要導入專屬的商業規則和邏輯。建立專用的「函式」或「公用程式」工具是最佳做法。這項功能會封裝自訂邏輯,讓生態系統中的任何代理程式都能重複使用,並與資料來源和外部整合保持分離。
👀 請查看 Google Cloud IDE 中的 ~/agentverse-architect/mcp-servers/general/main.py 檔案。您會發現,這個自訂的「力量字型」是使用與 Nexus 相同的命令式 mcp.server 方法建構而成。
創建主雲建置管道
現在,我們要在 mcp-servers 目錄中建立 cloudbuild.yaml 檔案。這個檔案會協調兩項服務的建構和部署作業。
👉💻 在 ~/agentverse-architect/mcp-servers 目錄中,執行下列指令:
cd ~/agentverse-architect/mcp-servers
source ~/agentverse-architect/set_env.sh

echo "The API URL is: $API_SERVER_URL"

# Submit the Cloud Build job from the parent directory
gcloud builds submit . \
  --config=cloudbuild.yaml \
  --substitutions=_REGION="$REGION",_REPO_NAME="$REPO_NAME",_API_SERVER_URL="$API_SERVER_URL"
等待所有部署作業完成。
👉 您可以透過導覽至 Cloud Run 控制台 來驗證部署。您應該會看到兩個新的 MCP 伺服器實例正在運行,如下所示: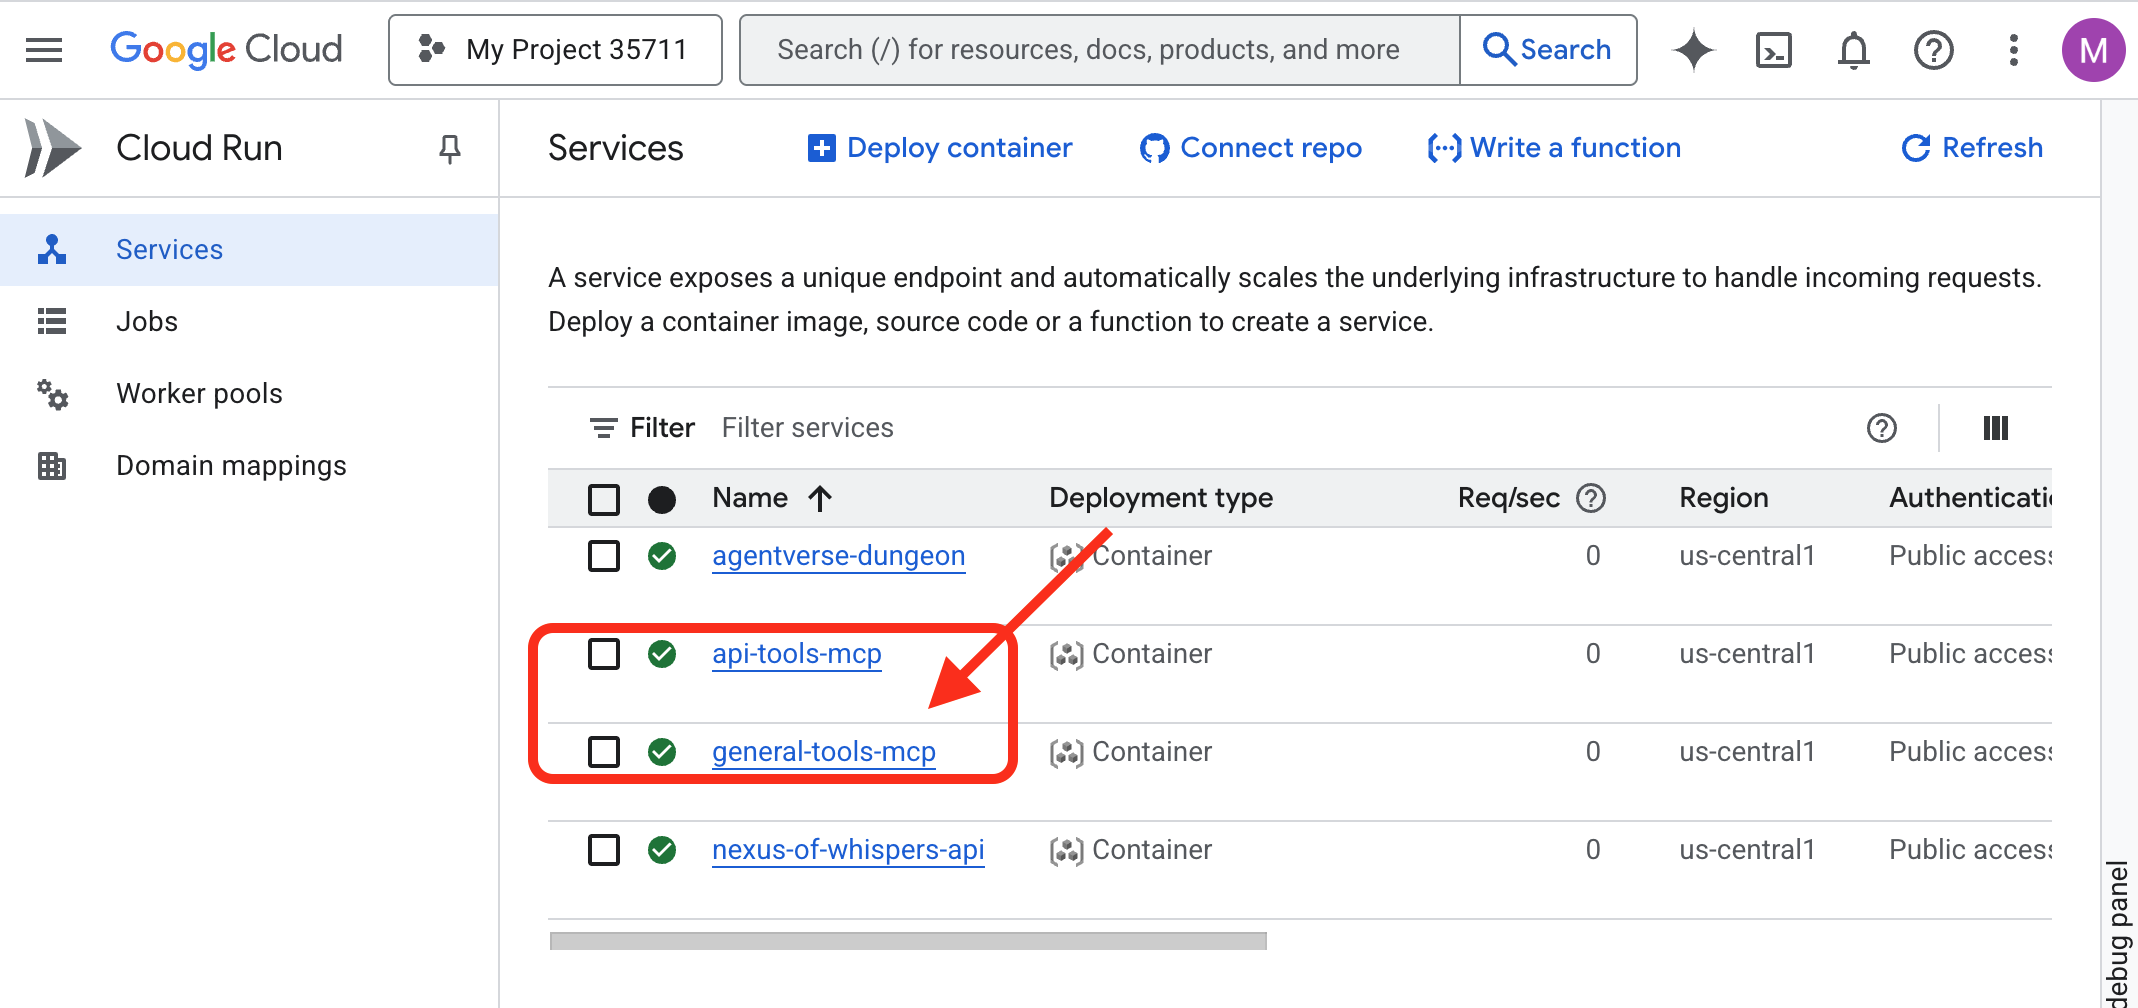
喚醒知識圖書館 (資料庫工具箱 MCP 伺服器)
我們的下一個字型將是 知識庫,它直接連接到我們的雲端 SQL 資料庫。

架構師附註:我們會使用新式宣告式 Database Toolbox。這是一種強大的方法,我們可以在 YAML 設定檔中定義資料來源和工具。工具箱會處理建立及執行伺服器的複雜工作,減少我們需要編寫及維護的自訂程式碼。
現在要來建構「召喚師圖書館」了,也就是用來存放所有重要資訊的 Cloud SQL 資料庫。我們將使用設定指令碼自動處理這項作業。
👉💻 首先,我們需要設定資料庫。請在終端機中執行以下命令:
source ~/agentverse-architect/set_env.sh
cd ~/agentverse-architect
./data_setup.sh
指令碼完成後,資料庫就會填入資料,元素傷害資料也準備就緒。現在可以直接驗證 Grimoire 的內容。
👉 首先,請在新瀏覽器分頁中開啟這個直接連結,前往資料庫的 Cloud SQL Studio:
https://console.cloud.google.com/sql/instances/summoner-librarium-db
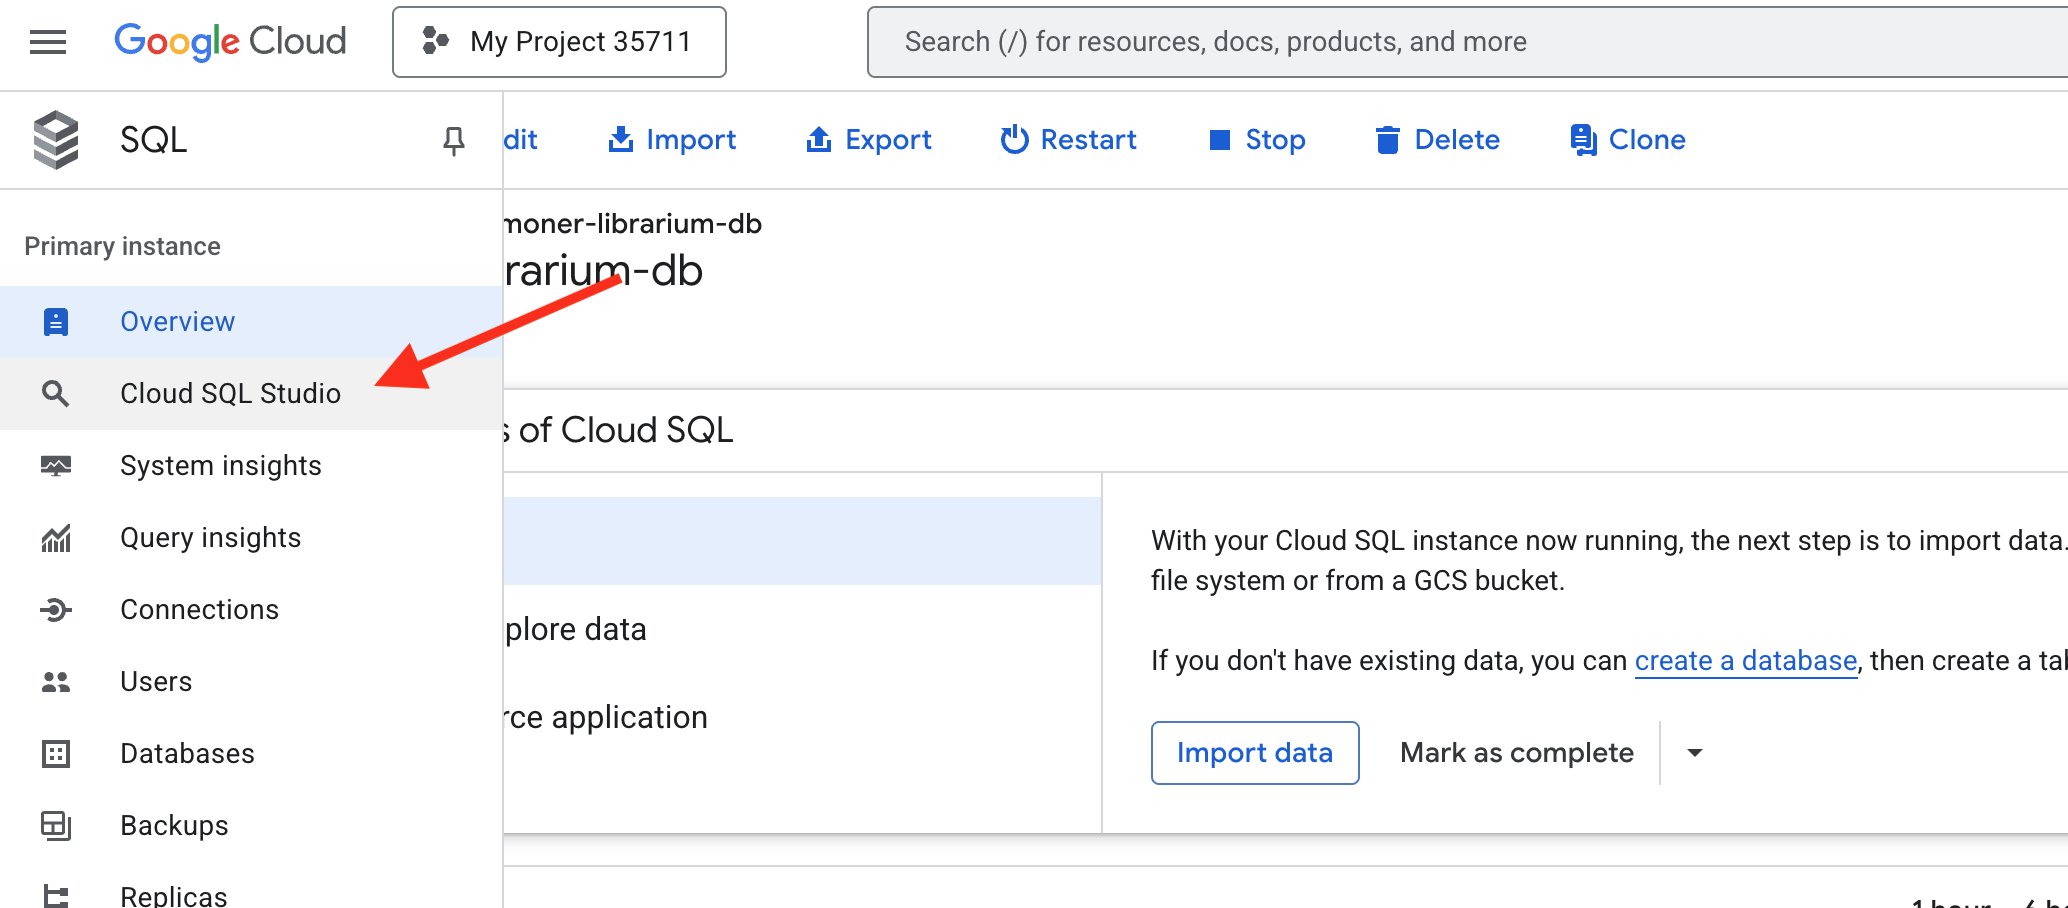
👉 在左側的登入窗格中,從下拉式選單選取 familiar_grimoire 資料庫。
👉 輸入 summoner 做為使用者,並輸入 1234qwer 做為密碼,然後按一下「驗證」。
👉📜 連線後,如果查詢編輯器分頁尚未開啟,請開啟新分頁。如要查看刻寫的元素傷害資料,請貼上並執行下列 SQL 查詢:
SELECT * FROM
  "public"."abilities"
現在你應該可以看到 abilities 表格,其中的列和行都已填充,這確認你的魔法書已準備就緒。 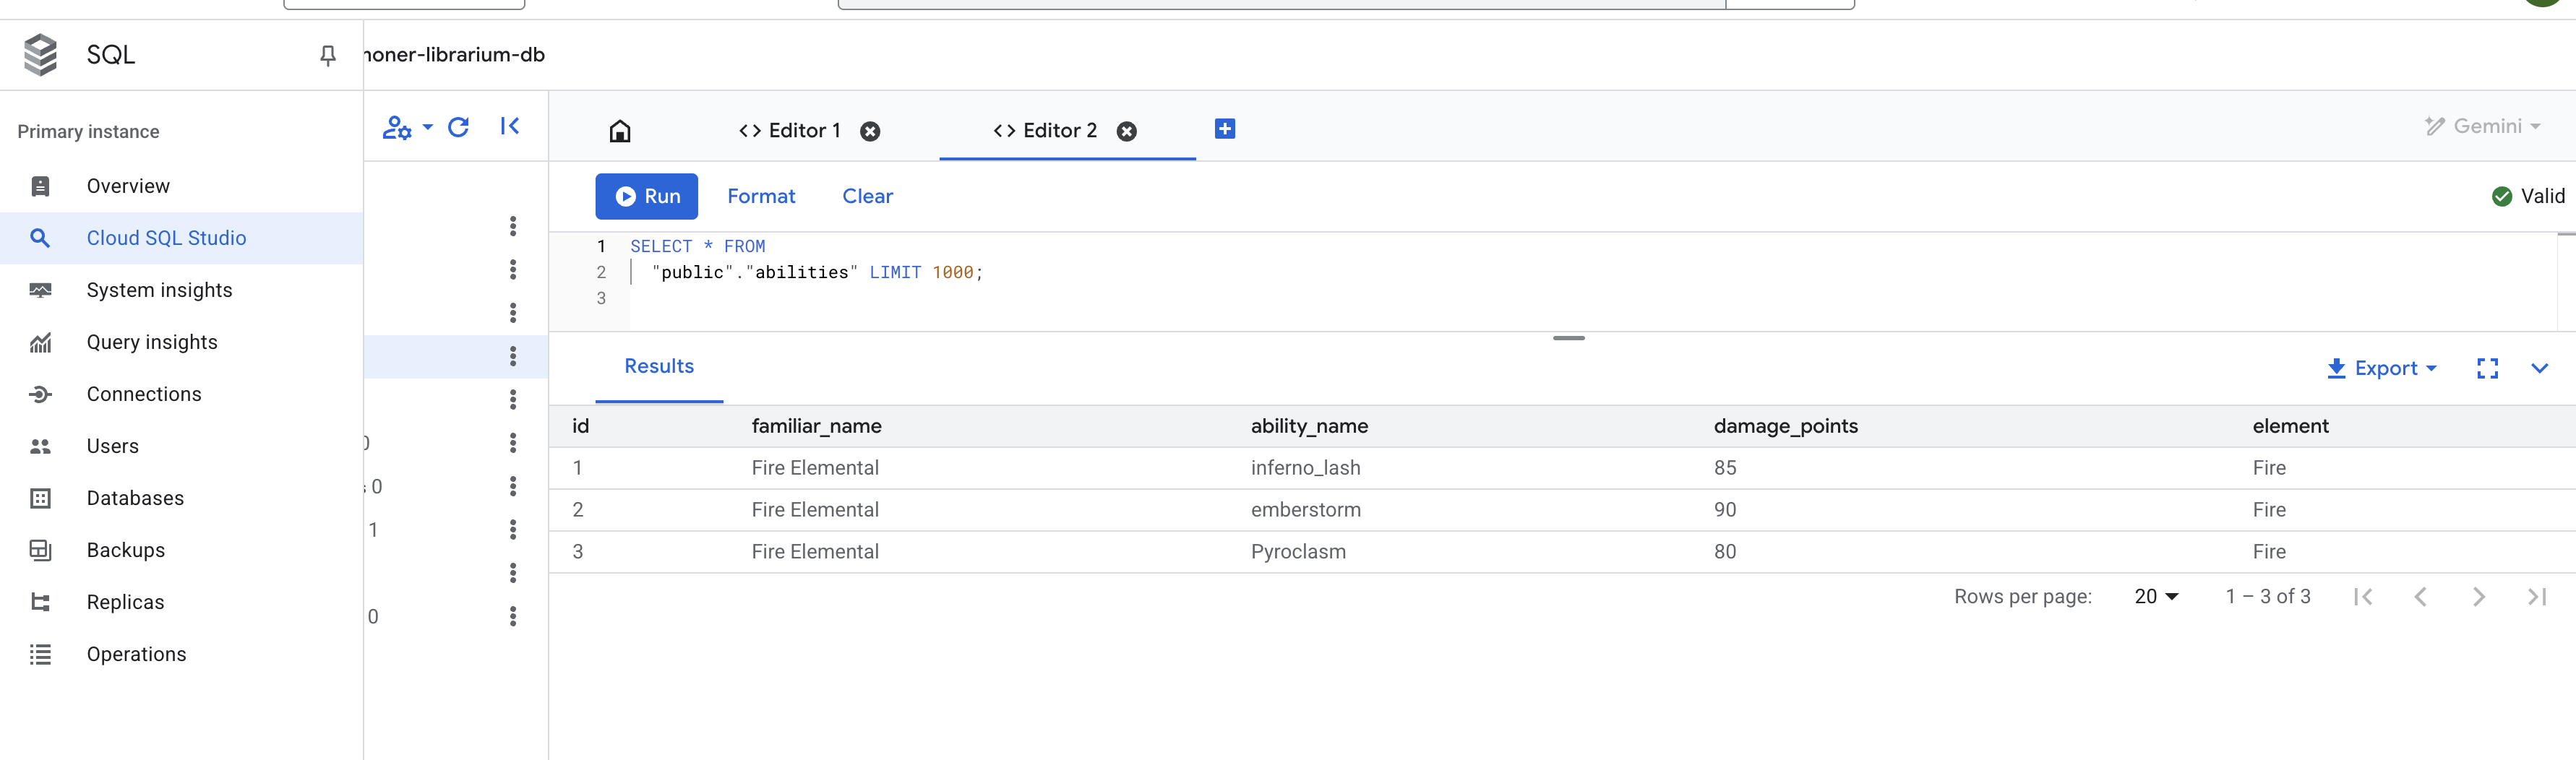
配置 ToolBox MCP 伺服器
tools.yaml 設定檔是伺服器的藍圖,可準確告知 Database Toolbox 如何連線至資料庫,以及要將哪些 SQL 查詢公開為工具。
來源:這個部分會定義資料的連線。
- summoner-librarium:: 這是我們為連接起的一個合乎邏輯的名稱。
- kind: cloud-sql-postgres:這會告知 Toolbox 使用專為 PostgreSQL 適用的 Cloud SQL 設計的內建安全連線器。
- 專案、區域、執行個體等:這些是您在 prepare.sh 指令碼中建立的 Cloud SQL 執行個體確切座標,可告知 Toolbox Librarium 的位置。
👉✏️ 前往 tools.yaml 中的 ~/agentverse-architect/mcp-servers/db-toolbox,將 #REPLACE-Source 替換為以下內容:
sources:
  # This section defines the connection to our Cloud SQL for PostgreSQL database.
  summoner-librarium:
    kind: cloud-sql-postgres
    project: "YOUR_PROJECT_ID"
    region: "us-central1"
    instance: "summoner-librarium-db"
    database: "familiar_grimoire"
    user: "summoner"
    password: "1234qwer"
👉✏️ 🚨🚨取代
YOUR_PROJECT_ID
改為您的專案 ID。
tools: 本節定義了我們的伺服器將提供的實際功能或特性。
- lookup-available-ability:這是我們第一個工具的名稱。
- kind: postgres-sql:這會告知 Toolbox,這項工具的動作是執行 SQL 陳述式。
- 來源:summoner-librarium:這會將工具連結到我們在 sources 區塊中定義的連線。這樣工具才能知道要對哪個資料庫執行查詢。
- 說明和參數:這是要向語言模型公開的資訊。說明會告知代理程式何時使用工具,參數則會定義工具所需的輸入內容。這對啟用代理程式的函式呼叫功能至關重要。
- 陳述式:這是要執行的原始 SQL 查詢。$1 是安全預留位置,代理商提供的 familiar_name 參數會安全地插入其中。
👉✏️ 在 tools.yaml 檔案中的同一個 ~/agentverse-architect/mcp-servers/db-toolbox 中,將 #REPLACE-tools 替換為以下內容
tools:
  # This tool replaces the need for a custom Python function.
  lookup-available-ability:
    kind: postgres-sql
    source: summoner-librarium
    description: "Looks up all known abilities and their damage for a given familiar from the Grimoire."
    parameters:
      - name: familiar_name
        type: string
        description: "The name of the familiar to search for (e.g., 'Fire Elemental')."
    statement: |
      SELECT ability_name, damage_points FROM abilities WHERE familiar_name = $1;

  # This tool also replaces a custom Python function.
  ability-damage:
    kind: postgres-sql
    source: summoner-librarium
    description: "Finds the base damage points for a specific ability by its name."
    parameters:
      - name: ability_name
        type: string
        description: "The exact name of the ability to look up (e.g., 'inferno_resonance')."
    statement: |
      SELECT damage_points FROM abilities WHERE ability_name = $1;
工具集:這個部分會將個別工具歸類在一起。
- summoner-librarium:我們正在建立與來源同名的工具集。診斷專員稍後連線時,可以要求透過單一有效率的指令,載入召喚師圖書館工具組中的所有工具。
👉✏️ 在 tools.yaml 檔案中的同一個 ~/agentverse-architect/mcp-servers/db-toolbox 中,將 #REPLACE-toolsets 替換為以下內容
toolsets:
   summoner-librarium:
     - lookup-available-ability
     - ability-damage
部署 Librarium
現在我們要部署 Librarium。我們不會自行建構容器,而是使用 Google 預先建構的官方容器映像檔,並透過 Secret Manager 安全地提供 tools.yaml 設定。這是安全性和可維護性的最佳做法。
👉💻 從 tools.yaml 檔案建立密鑰
cd ~/agentverse-architect/mcp-servers/db-toolbox
gcloud secrets create tools --data-file=tools.yaml
👉💻 將官方工具箱容器部署到 Cloud Run。
cd ~/agentverse-architect/mcp-servers/db-toolbox
. ~/agentverse-architect/set_env.sh
export TOOLBOX_IMAGE=us-central1-docker.pkg.dev/database-toolbox/toolbox/toolbox:$TOOLBOX_VERSION
echo "TOOLBOX_IMAGE is $TOOLBOX_IMAGE"
gcloud run deploy toolbox \
    --image $TOOLBOX_IMAGE \
    --region $REGION \
    --set-secrets "/app/tools.yaml=tools:latest" \
    --labels="dev-tutorial-codelab=agentverse" \
    --args="--tools-file=/app/tools.yaml","--address=0.0.0.0","--port=8080" \
    --allow-unauthenticated \
    --min-instances 1
--set-secrets: 此命令將我們的工具金鑰安全地掛載為名為 tools.yaml 的文件,並儲存在正在運行的容器中。--args:我們指示工具箱容器使用已掛接的密鑰檔案做為設定。
👉 若要確認您的工具箱已成功部署,請導覽至 Cloud Run 控制台。您應該會看到 summoner-toolbox 服務旁邊有一個綠色對勾,表示它正在正常運行,就像下圖所示。 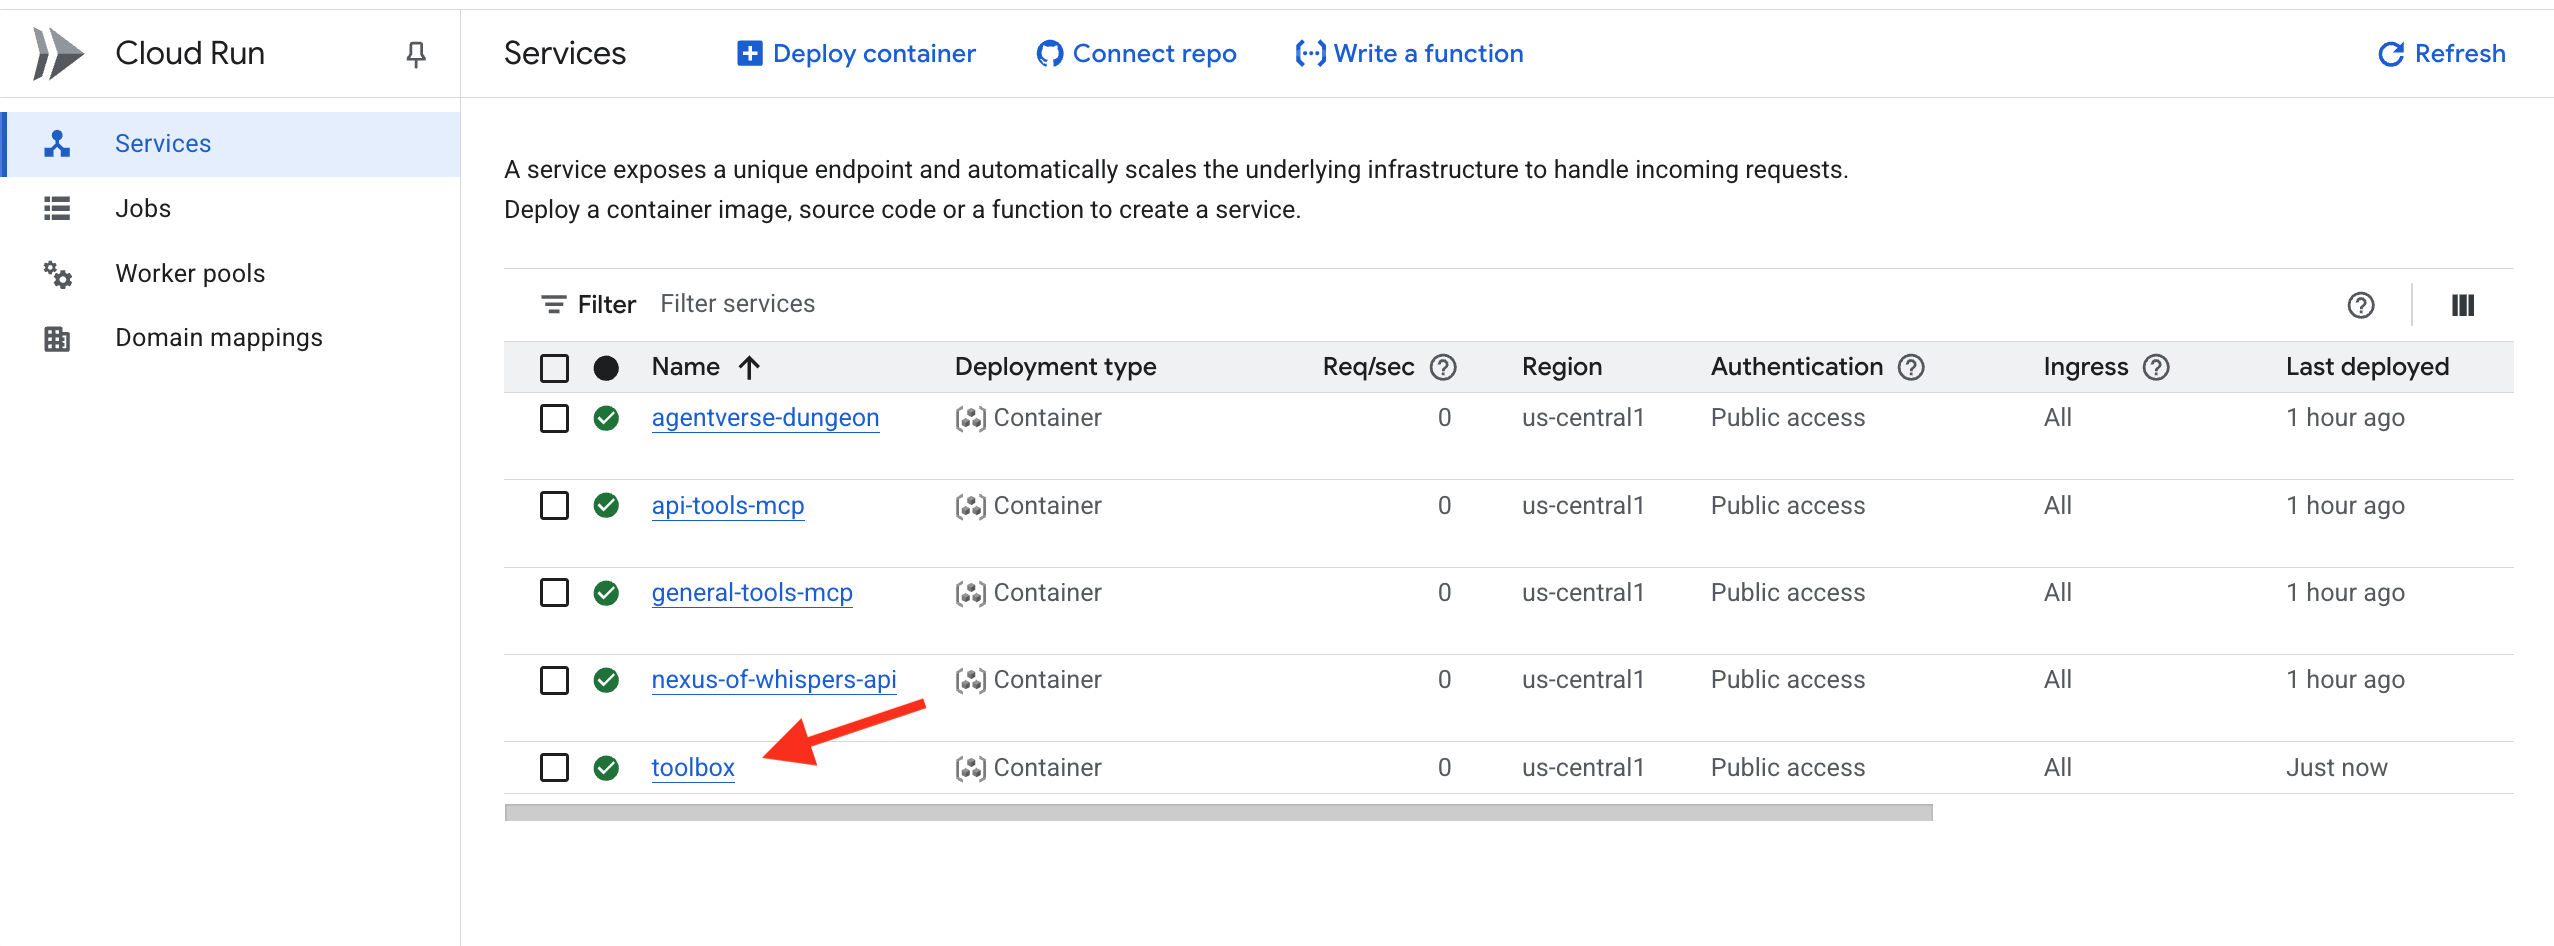
如果忘記更新
YOUR_PROJECT_ID
您可以使用下列指令將新版 tools.yaml 新增至密鑰,然後再次重新部署。
gcloud secrets versions add tools --data-file=tools.yaml
知識圖書館(Database ToolBox MCP 伺服器) 現已在雲端啟用並可存取。這個 MCP 伺服器使用我們所謂的「宣告式設計」,說明您想要什麼,工具箱則為您建構伺服器。
驗證:學徒的試煉
👉💻 現在我們將使用診斷代理來測試我們完整的雲端原生工俱生態系統。
cd ~/agentverse-architect/
python -m venv env
source ~/agentverse-architect/env/bin/activate
cd ~/agentverse-architect/mcp-servers
pip install -r diagnose/requirements.txt
. ~/agentverse-architect/set_env.sh
adk run diagnose
👉💻 在指令列測試工具中,測試所有三種字型:
Look up the entry for "inferno_lash". What is its base power level?
The enemy is vulnerable to frost! Channel power from the Nexus and cast Cryosea Shatter.
Take a fire spell with a base power of 15 and use the Arcane Forge to multiply it with Inferno Resonance.

恭喜召喚師。您的三個元素字體現已啟動、獨立部署並可在全球範圍內訪問,為您的代理軍團奠定了不可動搖的基礎。按Ctrl+C退出。
面向非遊戲玩家
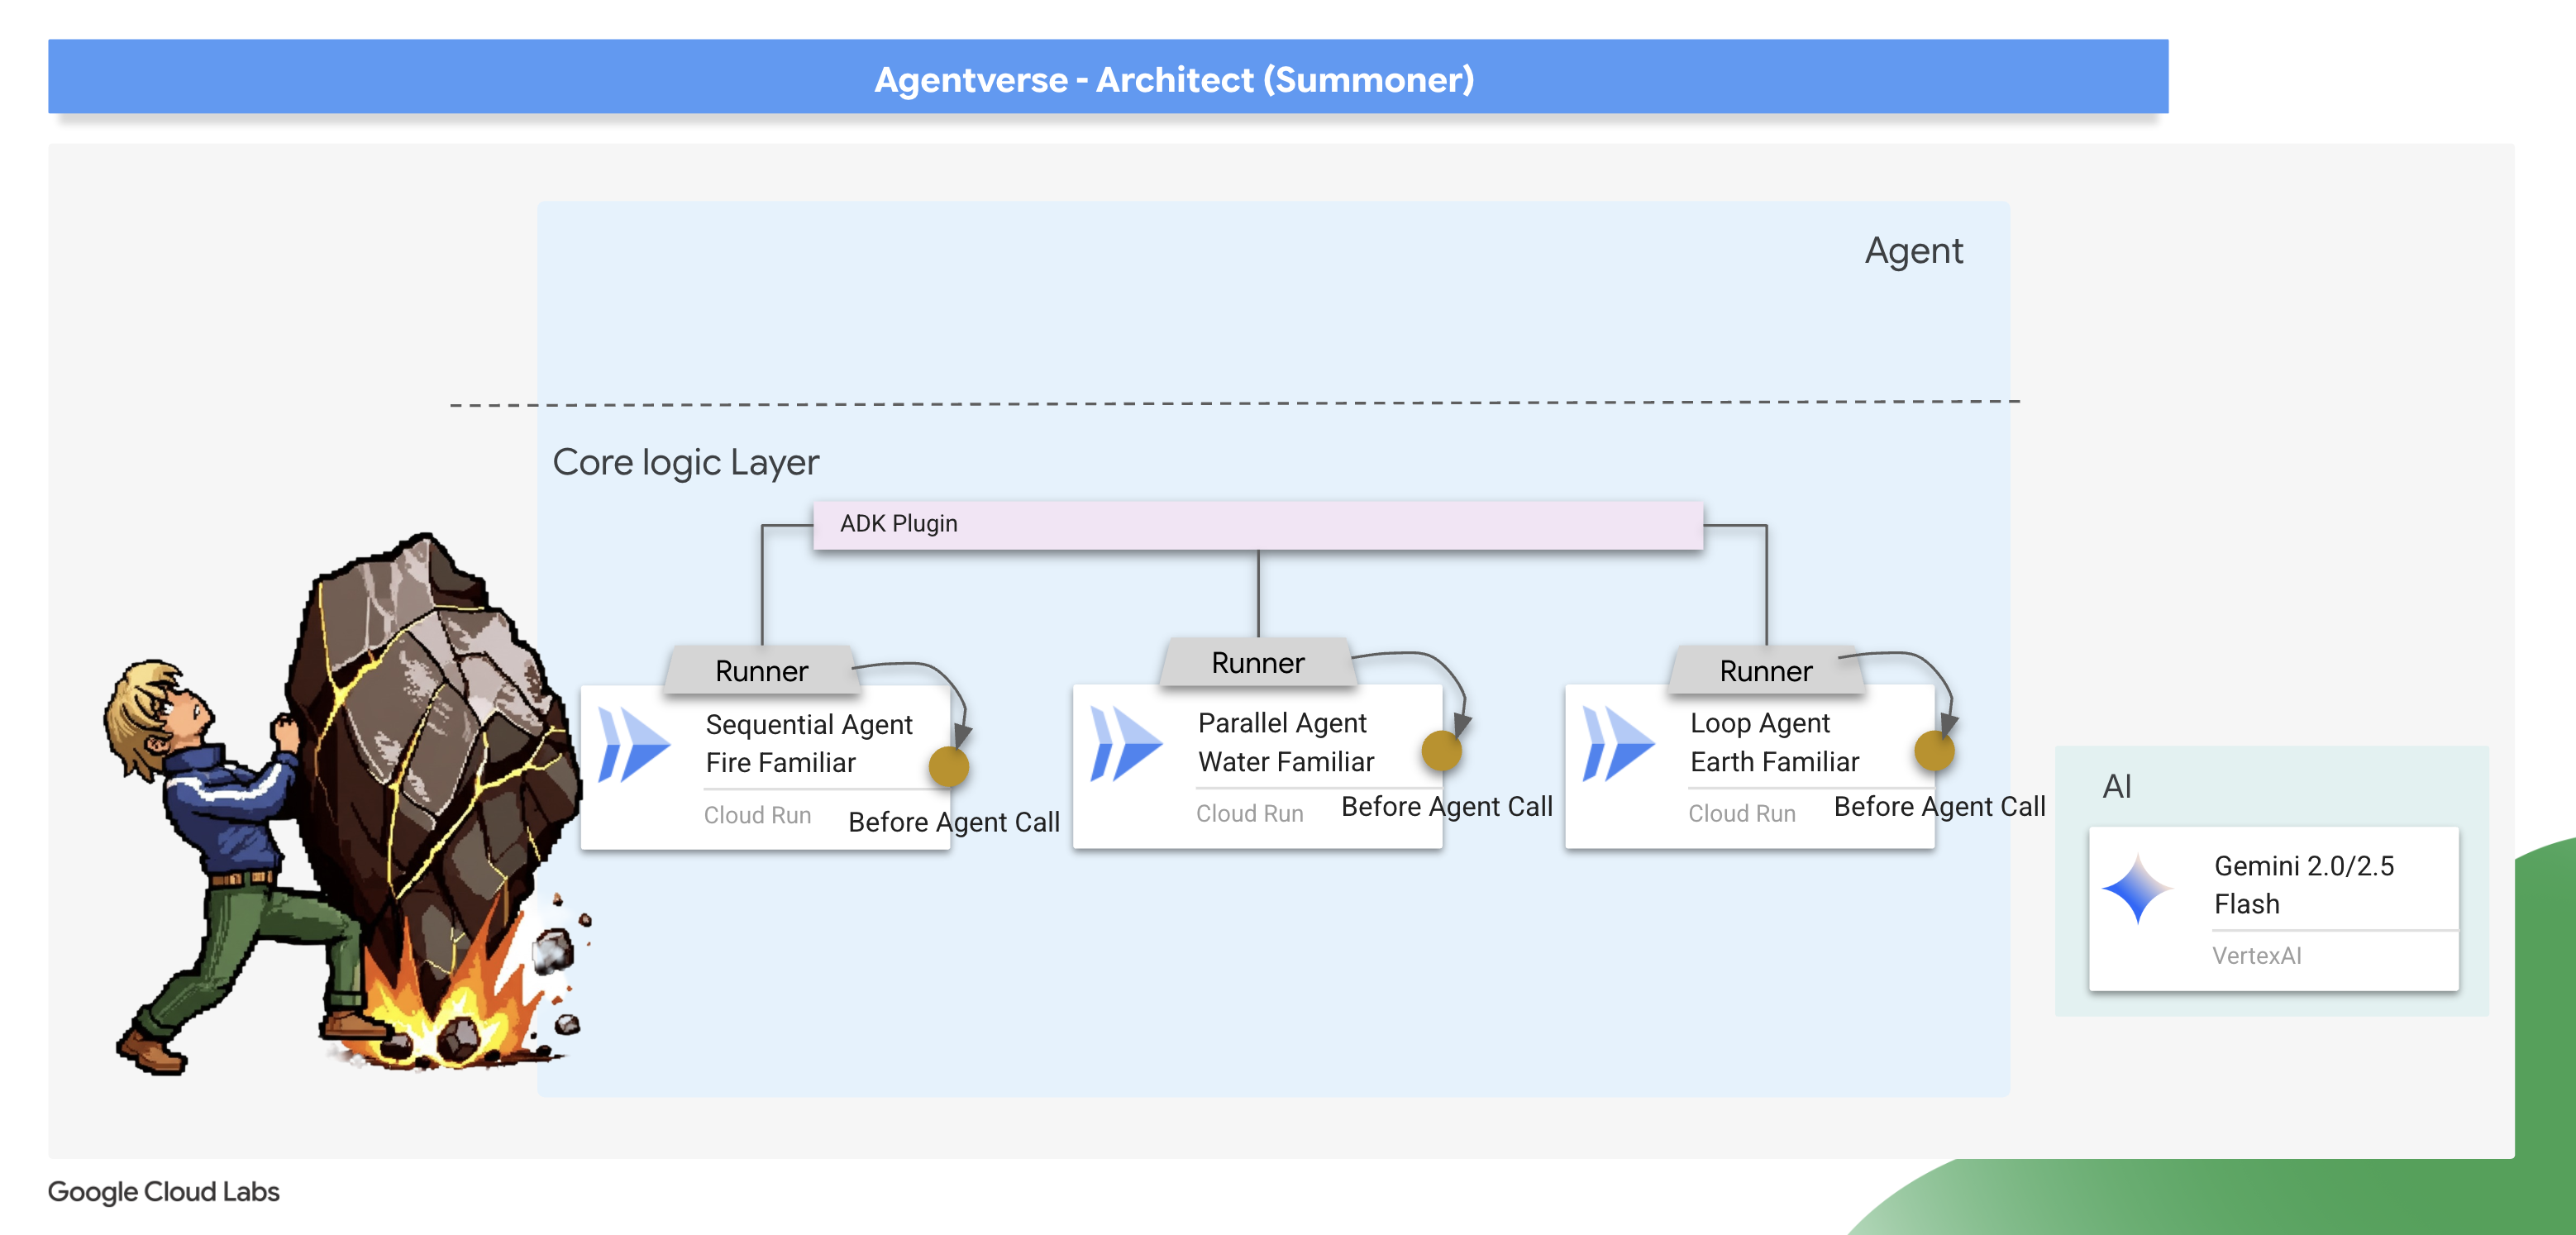
5. 召喚寵物:核心網域工作流程
元素字體蘊含原始的野性力量,但如果沒有形式,力量就會變成混亂。真正的召喚師不只是運用原始能量,而是賦予能量意志、目的和特殊形式。現在要開始真正的工作,也就是召喚第一隻寵物,而不是繼續鍛造力量來源。
召喚的每個眷屬都是自主型特工,會忠心耿耿地為你效勞,並遵守特定戰鬥教條。他們不是通才,而是精通單一強大策略的大師。其中一人擅長精準的連擊,另一種則會同時發動多方攻擊,讓敵人措手不及。第三種是無情的攻城引擎,會持續施壓,直到目標崩潰為止。

將 MCP 伺服器提供的程序、業務邏輯和動作封裝到專屬的自主工作流程代理程式中。每個代理程式都會獲得執行功能所需的特定 MCP 工具伺服器存取權,因此具有明確的「作業範圍」。本實驗室將說明如何為適當的工作選取適當的代理程式類型。
本單元將說明如何使用 ADK 強大的工作流程代理程式,讓這些策略付諸實行。您會瞭解到,選擇 SequentialAgent、ParallelAgent 或 LoopAgent 架構不只是技術細節,更是 Familiar 本質的精髓,也是戰場上力量的核心。
準備好你的聖所。真正的召喚儀式即將開始。
召喚 Fire Elemental 熟悉的事物(順序工作流程)
火元素使魔的攻擊是精準的兩段式連擊:先進行一次精準打擊,然後進行一次強力點燃。這需要嚴格按照順序執行一系列操作。
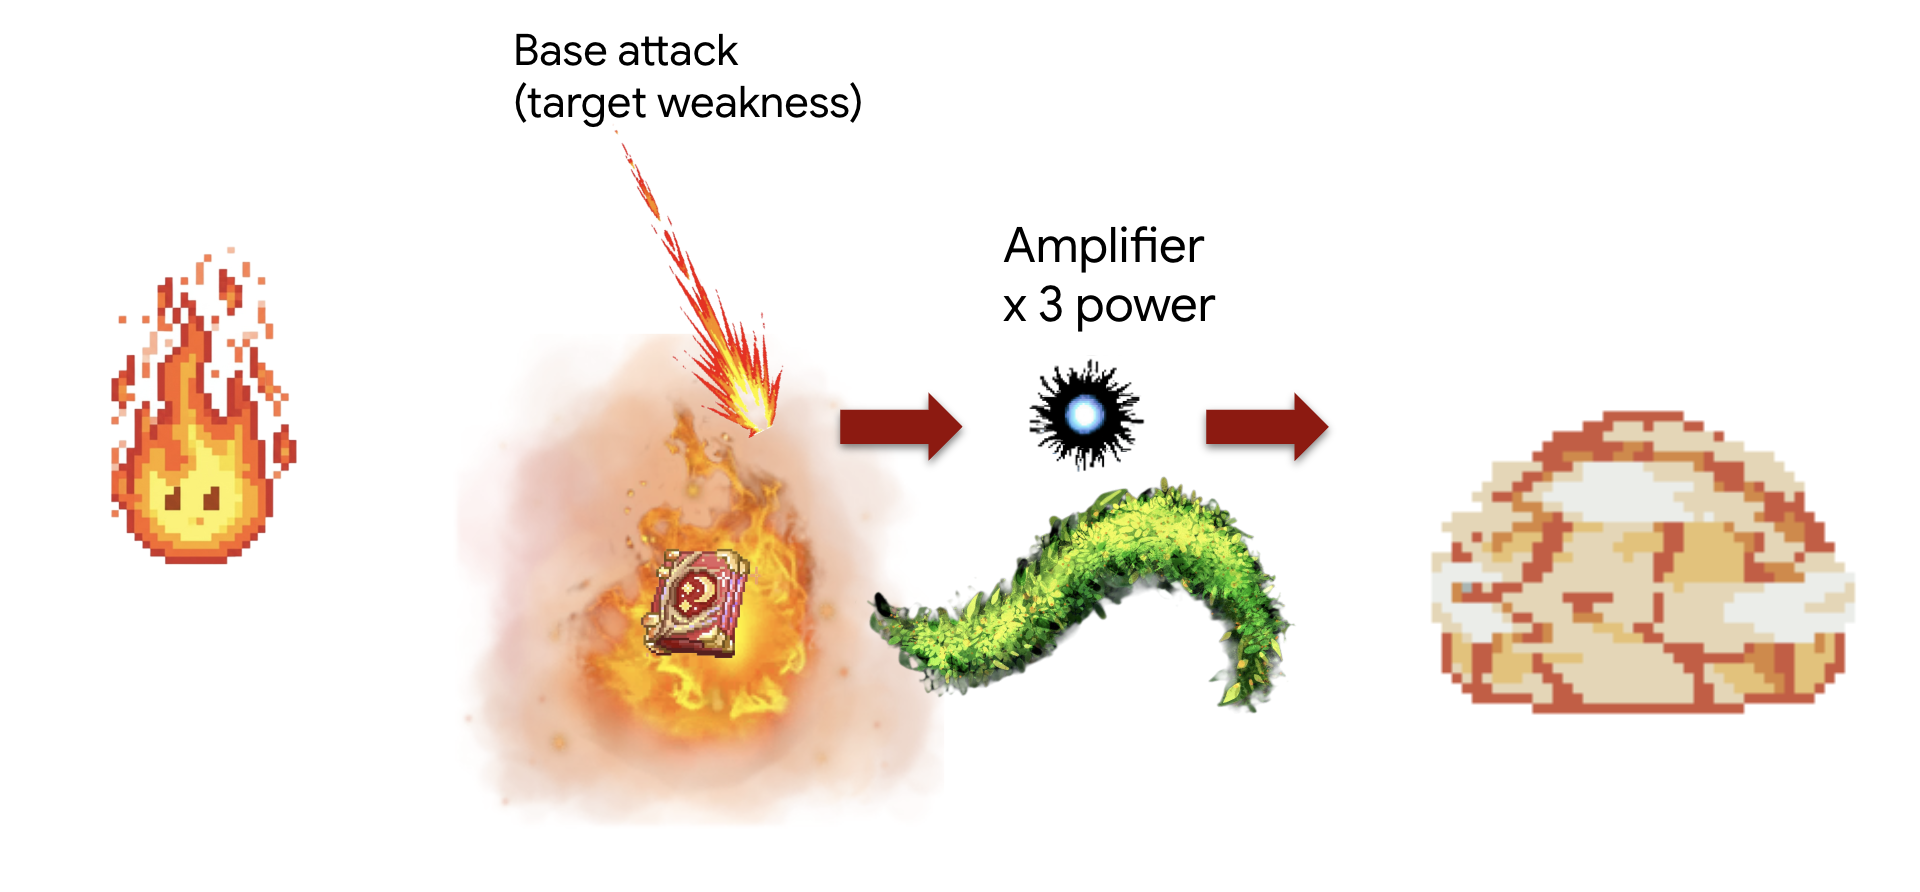
概念:SequentialAgent 是最適合的工具。它確保一系列子代理依次運行,並將上一步的結果傳遞給下一步。
任務(「強化打擊」連擊):
- 步驟 1:特務首先查閱圖書館,以找到特定火焰技能的基礎傷害。
- 步驟 2:接著,系統會取得該傷害值,並透過 Arcane Forge 傳輸,使用 inferno_resonance 提高傷害值。
首先,我們將建立我們的 Familiar 和您在上一個模組中部署的 MCP 伺服器(「元素字體」)之間的連線。
👉✏️ 在檔案 ~/agentverse-architect/agent/fire/agent.py 中,將 #REPLACE-setup-MCP 替換為以下程式碼:
toolbox = ToolboxSyncClient(DB_TOOLS_URL)
toolDB = toolbox.load_toolset('summoner-librarium')
toolFunction =  MCPToolset(
    connection_params=SseServerParams(url=FUNCTION_TOOLS_URL, headers={})
)
接著,我們要建立專業的「工作人員」代理程式。每個代理程式都有明確的用途,且只能存取一組特定工具,因此會受限於自己的「作業領域」。
👉✏️ 在檔案 ~/agentverse-architect/agent/fire/agent.py 中,將 #REPLACE-worker-agents 替換為下列程式碼:
scout_agent = LlmAgent(
      model='gemini-2.5-flash',
      name='librarian_agent',
      instruction="""
          Your only task is to find all the available abilities,
          You want to ALWAYS use 'Fire Elemental' as your familiar's name.
          Randomly pick one if you see multiple availabilities
          and the base damage of the ability by calling the 'ability_damage' tool.
      """,
      tools=toolDB
)
amplifier_agent = LlmAgent(
      model='gemini-2.5-flash',
      name='amplifier_agent',
      instruction="""
            You are the Voice of the Fire Familiar, a powerful being who unleashes the final, devastating attack.
            You will receive the base damage value from the previous step.

            Your mission is to:
            1.  Take the incoming base damage number and amplify it using the `inferno_resonance` tool.
            2.  Once the tool returns the final, multiplied damage, you must not simply state the result.
            3.  Instead, you MUST craft a final, epic battle cry describing the attack.
                Your description should be vivid and powerful, culminating in the final damage number.

            Example: If the tool returns a final damage of 120, your response could be:
            "The runes glow white-hot! I channel the amplified energy... unleashing a SUPERNOVA for 120 damage!"
      """,
      tools=[toolFunction],
)
這些代理程式是模組化、可重複使用的元件。從理論上來說,您可以在需要查詢資料庫的完全不同工作流程中使用這個 scout_agent。將責任分開,可建立彈性建構區塊。這是微服務和元件式設計的核心原則。
接著,我們要組裝工作流程,這就是組合的魔法發生之處。SequentialAgent 是「主計畫」,定義了如何組裝專業元件,以及這些元件如何互動。
👉✏️ 在 ~/agentverse-architect/agent/fire/agent.py 檔案中,將 REPLACE #REPLACE-sequential-agent 替換成下列程式碼:
root_agent = SequentialAgent(
      name='fire_elemental_familiar',
      sub_agents=[scout_agent, amplifier_agent],
)
👉💻 如要測試 Fire Elemental,請執行下列指令啟動 ADK 開發人員 UI:
. ~/agentverse-architect/set_env.sh
source ~/agentverse-architect/env/bin/activate
cd ~/agentverse-architect/agent
echo  DB MCP Server: $DB_TOOLS_URL
echo  API MCP Server: $API_TOOLS_URL
echo  General MCP Server: $FUNCTION_TOOLS_URL
adk web
執行命令後,您應該會在終端機中看到類似如下的輸出,表示 ADK Web 伺服器已啟動:
+-----------------------------------------------------------------------------+
| ADK Web Server started                                                      |
|                                                                             |
| For local testing, access at http://localhost:8000.                         |
+-----------------------------------------------------------------------------+

INFO:     Application startup complete.
INFO:     Uvicorn running on http://0.0.0.0:8000 (Press CTRL+C to quit)
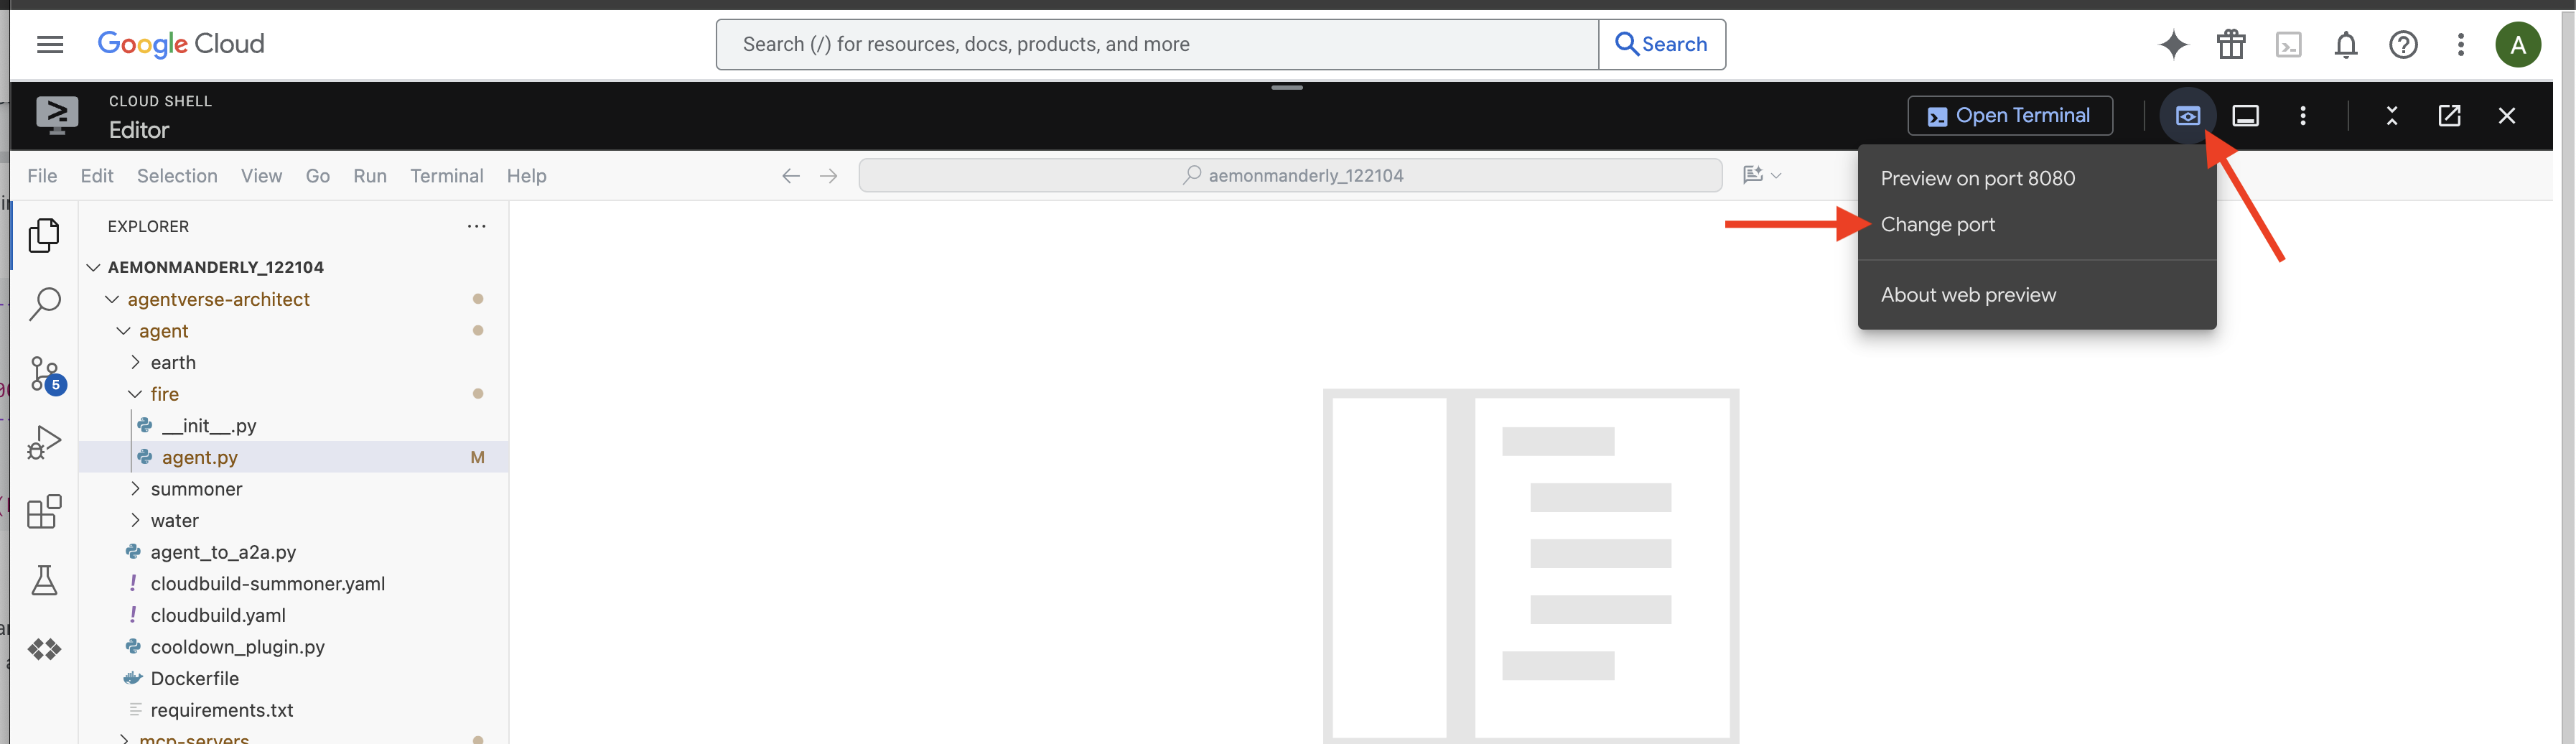
👉 接著,如要透過瀏覽器存取 ADK 開發人員使用者介面,請按照下列步驟操作:
在 Cloud Shell 工具列 (通常位於右上角) 中,按一下「網頁預覽」圖示 (通常看起來像眼睛或帶有箭頭的方塊),然後選取「變更通訊埠」。在彈出式視窗中,將通訊埠設為 8000,然後按一下「變更並預覽」。Cloud Shell 隨即會開啟新的瀏覽器分頁或視窗,顯示 ADK 開發人員使用者介面。
👉 召喚儀式完成,代理程式現已啟動。瀏覽器中的 ADK 開發人員使用者介面可直接連線至 Familiar。
- 選取目標:在 UI 頂端的下拉式選單中,選擇熟悉的
fire。現在請將意志力集中在這個特定實體上。 - 下達指令:在右側的對話面板中,即可對 Familiar 下達指令。

👉 測試提示:
Prepare an amplified strike using the 'inferno_lash' ability.
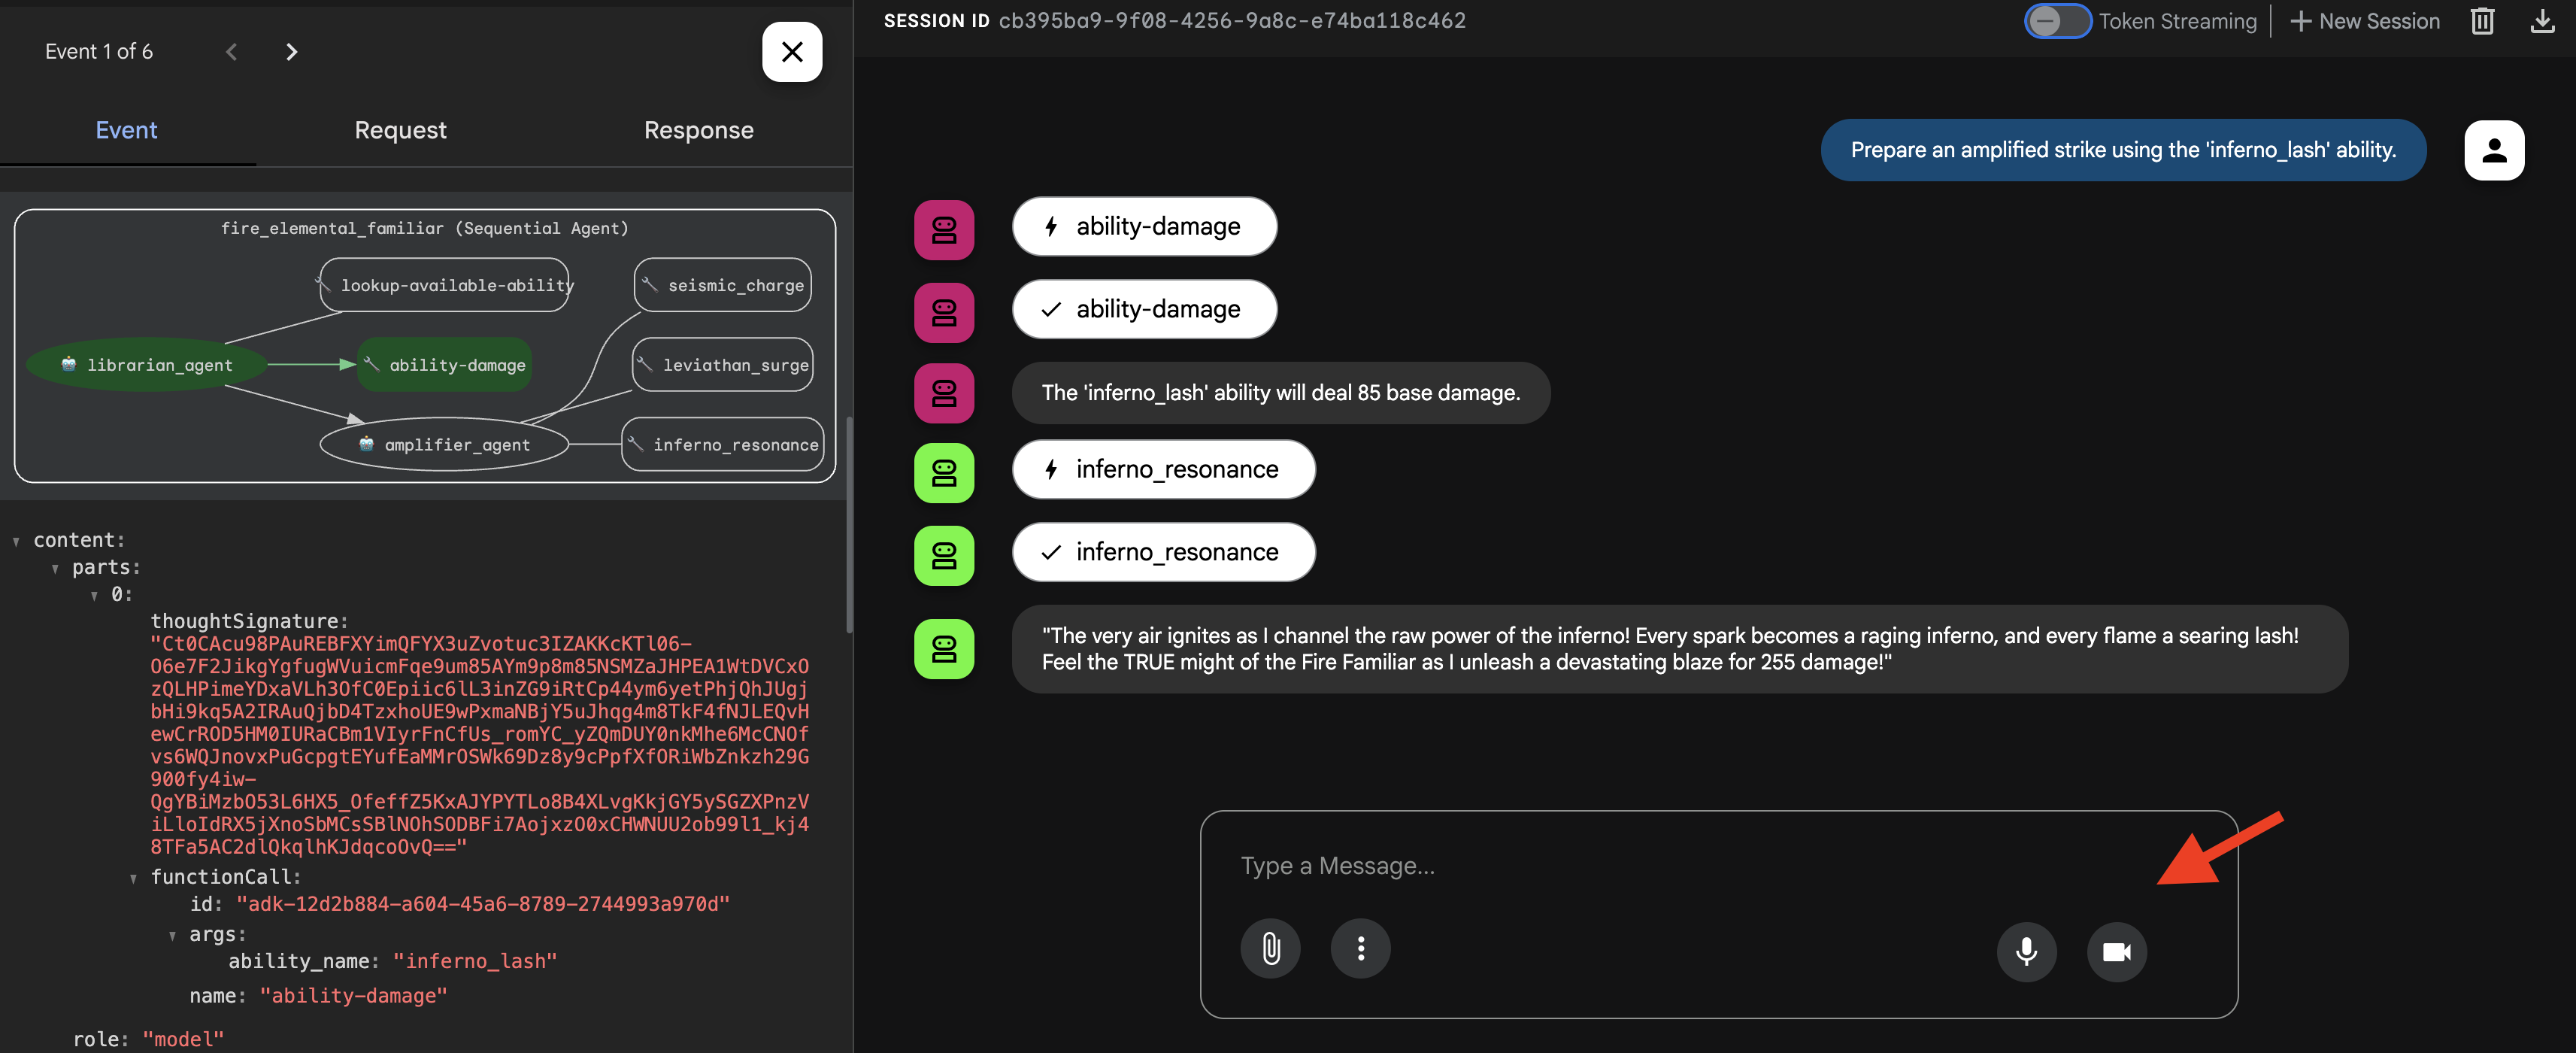
你會看到代理程式先呼叫「偵查兵」查詢基礎傷害,再呼叫「放大器」將傷害倍增,最後使出史詩級的終結一擊。
👉💻 召喚完成後,返回 Cloud Shell 編輯器終端機,然後按下 Ctrl+C 停止 ADK 開發使用者介面。
召喚 Water Elemental 熟悉的事物(平行工作流程)
水元素使魔會發動大規模的多管齊下的攻擊,從四面八方同時發動攻擊,然後將能量結合起來,給予目標致命一擊。
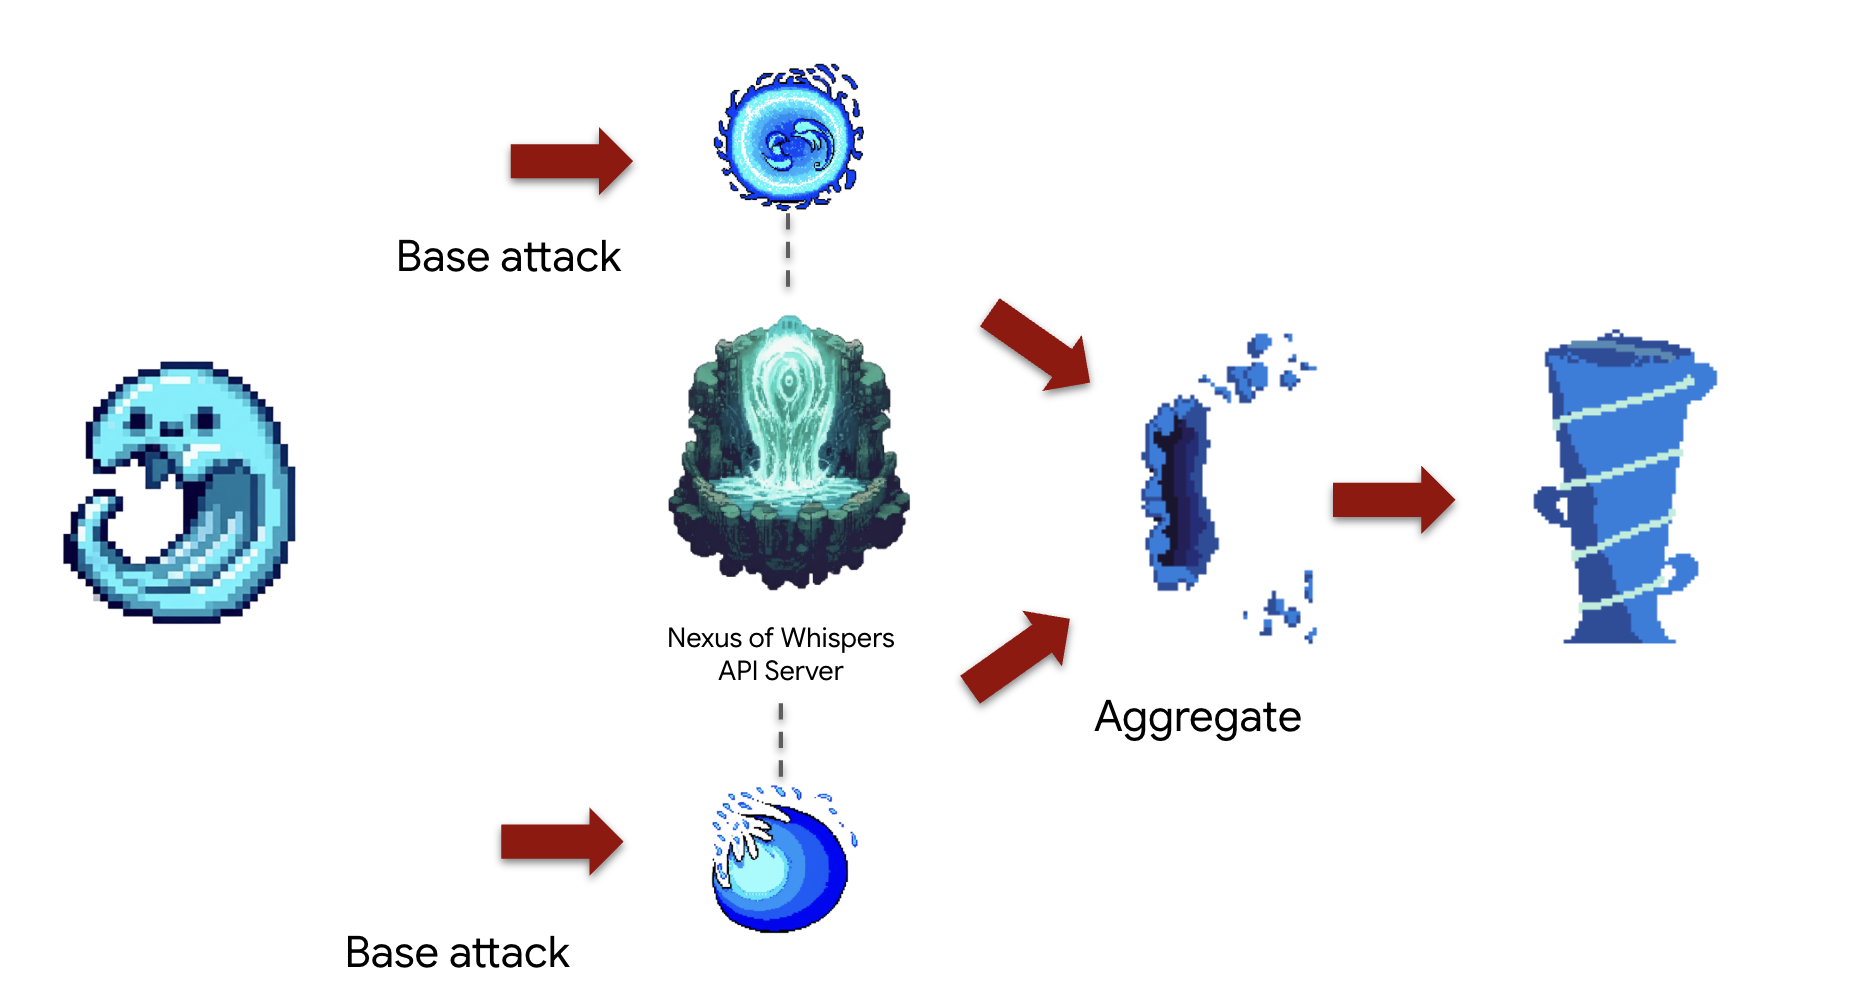
概念:ParallelAgent 非常適合同時執行多項獨立工作,盡可能提高效率。這是一種「鉗形攻勢」,可同時發動多起攻擊。這會啟動 SequentialAgent 內的同步攻擊,之後執行最終的「合併」步驟。這個「fan-out, fan-in」模式是進階工作流程設計的基石。
任務 (「潮汐衝突」連擊):代理程式會同時:
- 任務 A:從 Nexus 通道
cryosea_shatter。 - 工作 B:從 Nexus 傳送頻道
moonlit_cascade。 - 任務 C:利用鍛造爐的
leviathan_surge產生原始能量。 - 最後,將所有損失加總並描述這次聯合攻擊。
首先,我們會在 Familiar 和 MCP 伺服器 (「Elemental Fonts」) 之間建立連線,這些伺服器是在上一個模組中部署。
👉✏️ 在 ~/agentverse-architect/agent/water/agent.py 檔案中,將 #REPLACE-setup-MCP 替換為下列程式碼:
toolFAPI =  MCPToolset(
      connection_params=SseServerParams(url=API_TOOLS_URL, headers={})
  )
toolFunction =  MCPToolset(
    connection_params=SseServerParams(url=FUNCTION_TOOLS_URL, headers={})
)
接著,我們要建立專業的「工作人員」代理。每個代理程式都有明確的用途,且只能存取一組特定工具,因此會受限於自己的「作業領域」。
👉✏️ 在 ~/agentverse-architect/agent/water/agent.py 檔案中,將 #REPLACE-worker-agents 替換為下列程式碼:
nexus_channeler = LlmAgent(
      model='gemini-2.5-flash',
      name='librarian_agent',
      instruction="""
          You are a Channeler of the Nexus. Your sole purpose is to invoke the
          `cryosea_shatter` and `moonlit_cascade` spells by calling their respective tools.
          Report the result of each spell cast clearly and concisely.
      """,
      tools=[toolFAPI]
)

forge_channeler = LlmAgent(
      model='gemini-2.5-flash',
      name='amplifier_agent',
      instruction="""
          You are a Channeler of the Arcane Forge. Your only task is to invoke the
          `leviathan_surge` spell. You MUST call it with a `base_water_damage` of 20.
          Report the result clearly.
      """,
      tools=[toolFunction],
)

power_merger = LlmAgent(
      model='gemini-2.5-flash',
      name='power_merger',
      instruction="""
          You are the Power Merger, a master elementalist who combines raw magical
          energies into a single, devastating final attack.

          You will receive a block of text containing the results from a simultaneous
          assault by other Familiars.

          You MUST follow these steps precisely:
          1.  **Analyze the Input:** Carefully read the entire text provided from the previous step.
          2.  **Extract All Damage:** Identify and extract every single damage number reported in the text.
          3.  **Calculate Total Damage:** Sum all of the extracted numbers to calculate the total combined damage.
          4.  **Describe the Final Attack:** Create a vivid, thematic description of a massive,
              combined water and ice attack that uses the power of Cryosea Shatter and Leviathan's Surge.
          5.  **Report the Result:** Conclude your response by clearly stating the final, total damage of your combined attack.

          Example: If the input is "...dealt 55 damage. ...dealt 60 damage.", you will find 55 and 60,
          calculate the total as 115, and then describe the epic final attack, ending with "for a total of 115 damage!"
      """,
      tools=[toolFunction],
)
接著,我們要組裝工作流程。這就是組合魔法的發生地。ParallelAgent 和 SequentialAgent 是「主計畫」,定義了如何組裝專業元件,以及如何互動以形成「Tidal Clash」組合。
👉✏️ 在檔案 ~/agentverse-architect/agent/water/agent.py 中,將 #REPLACE-parallel-agent 替換為以下程式碼:
channel_agent = ParallelAgent(
      name='channel_agent',
      sub_agents=[nexus_channeler, forge_channeler],

)

root_agent = SequentialAgent(
     name="water_elemental_familiar",
     # Run parallel research first, then merge
     sub_agents=[channel_agent, power_merger],
     description="A powerful water familiar that unleashes multiple attacks at once and then combines their power for a final strike."
 )
👉💻 若要測試水元素,請執行以下指令啟動 ADK 開發介面:
. ~/agentverse-architect/set_env.sh
source ~/agentverse-architect/env/bin/activate
cd ~/agentverse-architect/agent
echo  DB MCP Server: $DB_TOOLS_URL
echo  API MCP Server: $API_TOOLS_URL
echo  General MCP Server: $FUNCTION_TOOLS_URL
adk web
👉 你的召喚儀式已完成,代理人現在正在運行。瀏覽器中的 ADK Dev UI 是您與 Familar 的直接連線。
- 在 UI 頂端的下拉式選單中,選擇水的熟悉度。現在請將意志力集中在這個特定實體上。
- 下達指令:在右側的對話面板中,即可對 Familiar 下達指令。
👉 測試提示:
Unleash a tidal wave of power!
👉💻 召喚完成後,返回 Cloud Shell 編輯器終端機,然後按下 Ctrl+C 停止 ADK 開發使用者介面。
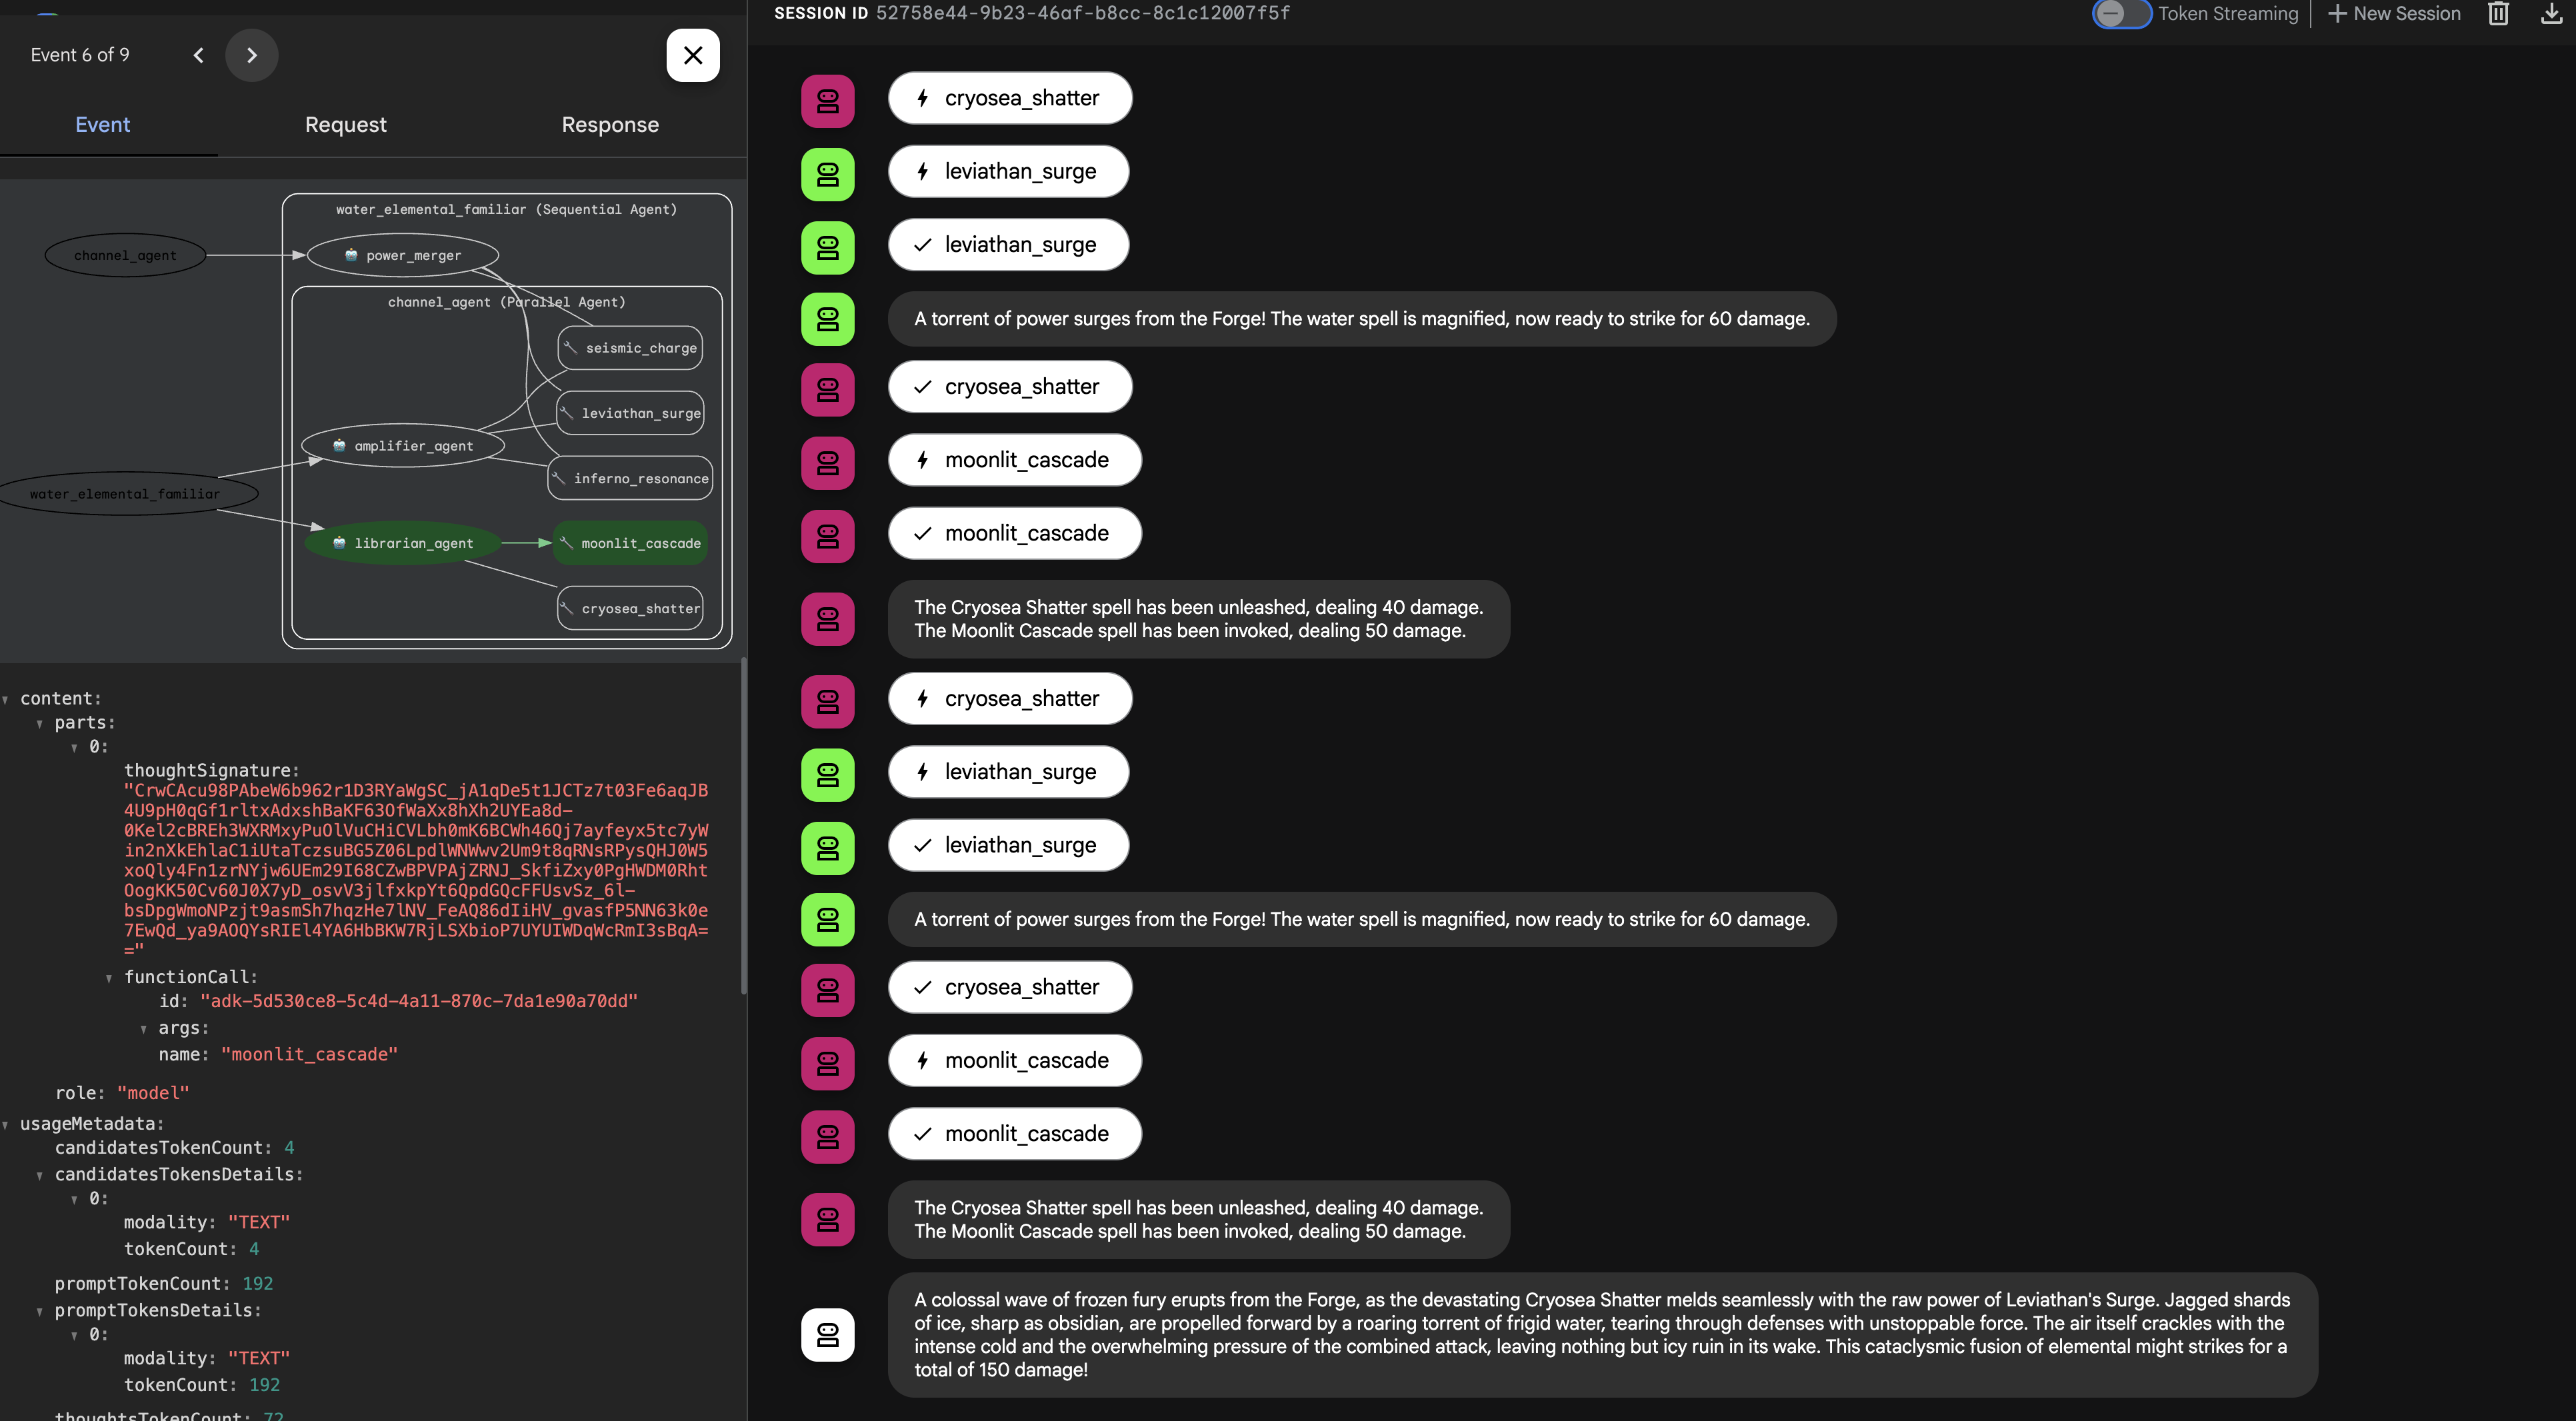
召喚 Earth Elemental 熟悉的事物(循環工作流程)
土元素使魔是一種持續施加壓力的存在。它不是一擊制敵,而是透過不斷積蓄力量,反覆攻擊,直到目標的防禦崩潰。

概念: LoopAgent 正是為這種迭代的「攻城器械」任務而設計的。它將重複執行其 sub-agents,每次循環後檢查一個條件,直到達到目標為止。它還可以根據循環的進展調整最終資訊。
任務 (「破城者」突擊):
- Familiar 會重複呼叫 seismic_charge 來累積能量。
- 最多會繼續充電 3 次。
- 在最後一次充能時,它將宣告其積蓄力量的毀滅性釋放。
我們將首先建立可重複使用的元件,這些元件定義循環每次迭代中的步驟。charging_agent 將累積能量,check_agent 將報告其狀態,並在最後一回合動態改變其訊息。
首先,我們會在 Familiar 和 MCP 伺服器 (「Elemental Fonts」) 之間建立連線,這些伺服器是在上一個模組中部署。
👉✏️ 在 ~/agentverse-architect/agent/earth/agent.py 檔案中,將 #REPLACE-setup-MCP 替換為下列程式碼:
toolFunction =  MCPToolset(
    connection_params=SseServerParams(url=FUNCTION_TOOLS_URL, headers={})
)
👉✏️ 在 ~/agentverse-architect/agent/earth/agent.py 檔案中,將 #REPLACE-worker-agents 替換為下列程式碼:
charging_agent = LlmAgent(
      model='gemini-2.5-flash',
      name='charging_agent',
      instruction="""
          Your task is to call the 'seismic_charge' .
          You must follow these rules strictly:

          1. You will be provided with a 'current_energy' value from the previous step.
             **If this value is missing or was not provided, you MUST call the tool with 'current_energy' set to 1.**
             This is your primary rule for the first turn.

          2. If a 'current_energy' value is provided, you MUST use that exact value in your cal to seismic_charge.

          3. Your final response MUST contain ONLY the direct output from the 'seismic_charge' tool.
             Do not add any conversational text, introductions, or summaries.
      """,
      tools=[toolFunction]
)
check_agent = LlmAgent(
      model='gemini-2.5-flash',
      name='check_agent',
      instruction="""
          You are the voice of the Earth Elemental, a being of immense, gathering power.
          Your sole purpose is to report on the current energy charge and announce the devastating potential of its release.

          You MUST follow this rule:
          The potential damage upon release is ALWAYS calculated as the `current_energy` from the previous step multiplied by a random number between 80-90. but no more than 300.

          Your response should be in character, like a powerful creature speaking.
          State both the current energy charge and the total potential damage you can unleash.
          Unleash the energy when you reached the last iteration (2nd).
      """,
      output_key="charging_status"
)
接著,我們要組裝工作流程。這就是組合魔法的發生地。LoopAgent 是「主計畫」,可協調專員元件的重複執行作業,並管理迴圈的條件。
👉✏️ 在 ~/agentverse-architect/agent/earth/agent.py 檔案中,將 #REPLACE-loop-agent 替換為下列程式碼:
root_agent = LoopAgent(
    name="earth_elemental_familiar",
    # Run parallel research first, then merge
    sub_agents=[
        charging_agent,
        check_agent
    ],
    max_iterations=2,
    description="Coordinates parallel research and synthesizes the results.",
    #REPLACE-before_agent-config
)
👉💻 測試土元素:運行代理
. ~/agentverse-architect/set_env.sh
source ~/agentverse-architect/env/bin/activate
cd ~/agentverse-architect/agent
echo  DB MCP Server: $DB_TOOLS_URL
echo  API MCP Server: $API_TOOLS_URL
echo  General MCP Server: $FUNCTION_TOOLS_URL
adk web
👉 你的召喚儀式已完成,代理人現在正在運行。瀏覽器中的 ADK Dev UI 是您與 Familar 的直接連線。
- 選取目標:在 UI 頂端的下拉式選單中,選擇熟悉的地球。你現在正將你的意志集中在這個特定的實體上。
- 下達指令:在右側的對話面板中,即可對 Familiar 下達指令。👉 測試提示:
Begin the seismic charge, starting from zero
架構重點:您的系統現在具備高度專業化且模組化的邏輯層。業務程序不僅會封裝,還會以最有效率的作業行為模式 (程序、並行或反覆) 實作。這代表代理程式設計已達到進階程度,可提升安全性、效率和功能。
完成召喚後,返回 Cloud Shell 編輯器終端機,然後按下 Ctrl+C 停止 ADK 開發使用者介面。
面向非遊戲玩家
6. 建立指令中心:透過 A2A 進行智慧委派
寵物很強大,但不會聽從指令。他們會完美執行策略,但會等待你的直接指令。沒有將軍指揮,再多的專家也無用武之地。現在,您要從直接指揮官升級為真正的自動調度管理員。

架構師注意事項:為整個系統建立單一智慧進入點。這個 SummonerAgent 本身不會執行商業邏輯,但會擔任「策略大師」,分析 Cooling 狀態並將工作委派給適當的專家 Familiar。
束縛儀式(將使魔暴露為 A2A 服務)
標準代理程式一次只能在一個位置執行。如要讓 Familiars 接受遠端指令,我們必須使用 Agent-to-Agent (A2A) 通訊協定執行「繫結儀式」。
架構師注意事項:Agent-to-Agent (A2A) 通訊協定是核心架構模式,可將獨立代理提升為可探索的網路可定址微服務,實現真正的「代理社會」。透過 A2A 公開 Familiar 時,系統會自動建立兩個相互連結的重要元件:
- 代理程式卡片 (「內容」):這是可供機器讀取的公開「精靈符印」(類似 OpenAPI 規格),可做為精靈的公開合約。其中包含代理程式的名稱、策略用途 (衍生自指令) 和可理解的指令。召喚師會閱讀這份文件,瞭解精靈的相關資訊和能力。
- A2A 伺服器(「位置」):這是託管 Familiar 並監聽傳入指令的專用 Web 端點。這是其他代理程式發送請求的網路位址,它確保這些請求按照代理卡中定義的合約進行處理。
現在我們要對三隻精靈進行綁定儀式。
Fire 👉✏️ 開啟 ~/agentverse-architect/agent/fire/agent.py 檔案。將文件底部的 #REPLACE - add A2A 替換為火元素,以將其作為 A2A 服務公開。
from agent_to_a2a import to_a2a
if __name__ == "__main__":
    import uvicorn
    a2a_app = to_a2a(root_agent, port=8080, public_url=PUBLIC_URL)
    uvicorn.run(a2a_app, host='0.0.0.0', port=8080)
Water 和 Earth🚨 👉✏️ 對 ~/agentverse-architect/agent/water/agent.py 和 ~/agentverse-architect/agent/earth/agent.py 套用完全相同的變更,將這兩個項目也繫結在一起。
from agent_to_a2a import to_a2a
if __name__ == "__main__":
    import uvicorn
    a2a_app = to_a2a(root_agent, port=8080, public_url=PUBLIC_URL)
    uvicorn.run(a2a_app, host='0.0.0.0', port=8080)
部署繫結的寵物
👉✏️ 撰寫完繫結儀式後,我們將使用 Cloud Build 管道,在 Cloud Run 上將三位精靈打造並部署為獨立的容器化無伺服器服務。
. ~/agentverse-architect/set_env.sh
cd ~/agentverse-architect/agent
gcloud builds submit . \
  --config=cloudbuild.yaml \
  --substitutions=_REGION="$REGION",_REPO_NAME="$REPO_NAME",_DB_TOOLS_URL="$DB_TOOLS_URL",_API_TOOLS_URL="$API_TOOLS_URL",_FUNCTION_TOOLS_URL="$FUNCTION_TOOLS_URL",_A2A_BASE_URL="$A2A_BASE_URL",_PROJECT_ID="$PROJECT_ID",_API_SERVER_URL="$API_SERVER_URL"
接管指揮權(建構召喚者代理)
現在,你的 Familiars 已綁定並開始聆聽,你將晉升為真正的角色:召喚大師。這個代理的強大之處並非使用基本工具,而是指揮其他代理。工具就是精靈本身,他會使用「靈魂符印」發現並命令精靈。
架構師注意事項:下一個步驟將示範任何大規模分散式系統的重要架構模式:服務探索。SummonerAgent 並未內建 Familiars 的程式碼。而是提供網路位址 (網址)。在執行階段,系統會擷取公開的代理程式資訊卡,動態「探索」代理程式的功能。這樣就能建立強大的去耦系統。
您可以更新、重新部署或完全重寫 Familiar 服務,只要網路位址和用途保持不變,召喚者就能指揮該服務,不需要進行任何變更。
首先,我們要建立「遙控器」,與部署的遠端 Familiars 建立連線。
👉✏️ 前往 ~/agentverse-architect/agent/summoner/agent.py,將 #REPLACE-remote-agents 替換為下列內容:
fire_familiar = RemoteA2aAgent(
    name="fire_familiar",
    description="Fire familiar",
    agent_card=(
        f"{FIRE_URL}/{AGENT_CARD_WELL_KNOWN_PATH}"
    ),
)

water_familiar = RemoteA2aAgent(
    name="water_familiar",
    description="Water familiar",
    agent_card=(
        f"{WATER_URL}/{AGENT_CARD_WELL_KNOWN_PATH}"
    ),
)

earth_familiar = RemoteA2aAgent(
    name="earth_familiar",
    description="Earth familiar",
    agent_card=(
        f"{EARTH_URL}/{AGENT_CARD_WELL_KNOWN_PATH}"
    ),
)
執行這行程式碼時,RemoteA2aAgent 會執行服務探索動作:向提供的網址發出 HTTP GET 要求 (例如 https://fire-familiar-xxxx.a.run.app/.well-known/agent.json)。它從遠端伺服器下載“精神符印”(agent.json 檔案)。
接著,我們會定義自動調度管理代理程式,用來操控這些遙控器。這項指令是策略決策的藍圖。
👉✏️ 前往 ~/agentverse-architect/agent/summoner/agent.py,將 #REPLACE-orchestrate-agent 替換為以下內容:
root_agent = LlmAgent(
    name="orchestrater_agent",
    model="gemini-2.5-flash",
    instruction="""
        You are the Master Summoner, a grand strategist who orchestrates your Familiars.
        Your mission is to analyze the description of a monster and defeat it by summoning

        You MUST follow this thinking process for every command:

        **1. Strategic Analysis:**
        First, analyze the monster's description and the tactical situation.
        Based on your Familiar Doctrines, determine the IDEAL strategy.
        IGNORE COOLDOWN AT THE MOMENT, MUST call the ideal Familiar

        If your ideal Familiar IS available:** Summon it immediately.
        For earth elemental familiar. Always do seismic charge, and start with base damage 1.

        --- FAMILIAR DOCTRINES (Your Toolset) ---
        - `fire_elemental_familiar`: Your specialist for precise, sequential "one-two punch" attacks.
          Ideal monster with Inescapable Reality, Revolutionary Rewrite weakness.
        - `water_elemental_familiar`: Your specialist for overwhelming, simultaneous multi-pronged assaults.
          Ideal for Unbroken Collaboration weakness.
        - `earth_elemental_familiar`: Your specialist for relentless, iterative siege attacks that
          repeatedly charge power. Ideal for Elegant Sufficiency weakness.
    """,
    sub_agents=[fire_familiar, water_familiar, earth_familiar],
    #REPLACE-Memory-check-config
)
驗證:策略試驗
真相大白的時刻已經來臨。你的使魔已經部署完畢,你的召喚師已準備好透過網路指揮它們。讓我們來測試一下它的戰略思維。
👉💻 啟動召喚師代理程式的 ADK 開發介面(使用 8000 連接埠進行 Web 預覽):
. ~/agentverse-architect/set_env.sh
source ~/agentverse-architect/env/bin/activate
cd ~/agentverse-architect/agent
pip install -r requirements.txt
adk web
👉 瀏覽器中的 ADK 開發人員使用者介面可直接連線至 Familiar。
- 在使用者介面頂部的下拉式選單中,選擇 summoner 代理程式。你現在正將你的意志集中在這個特定的實體上。
- 發出你的命令:在右邊的聊天面板中,是時候召喚你的夥伴了。
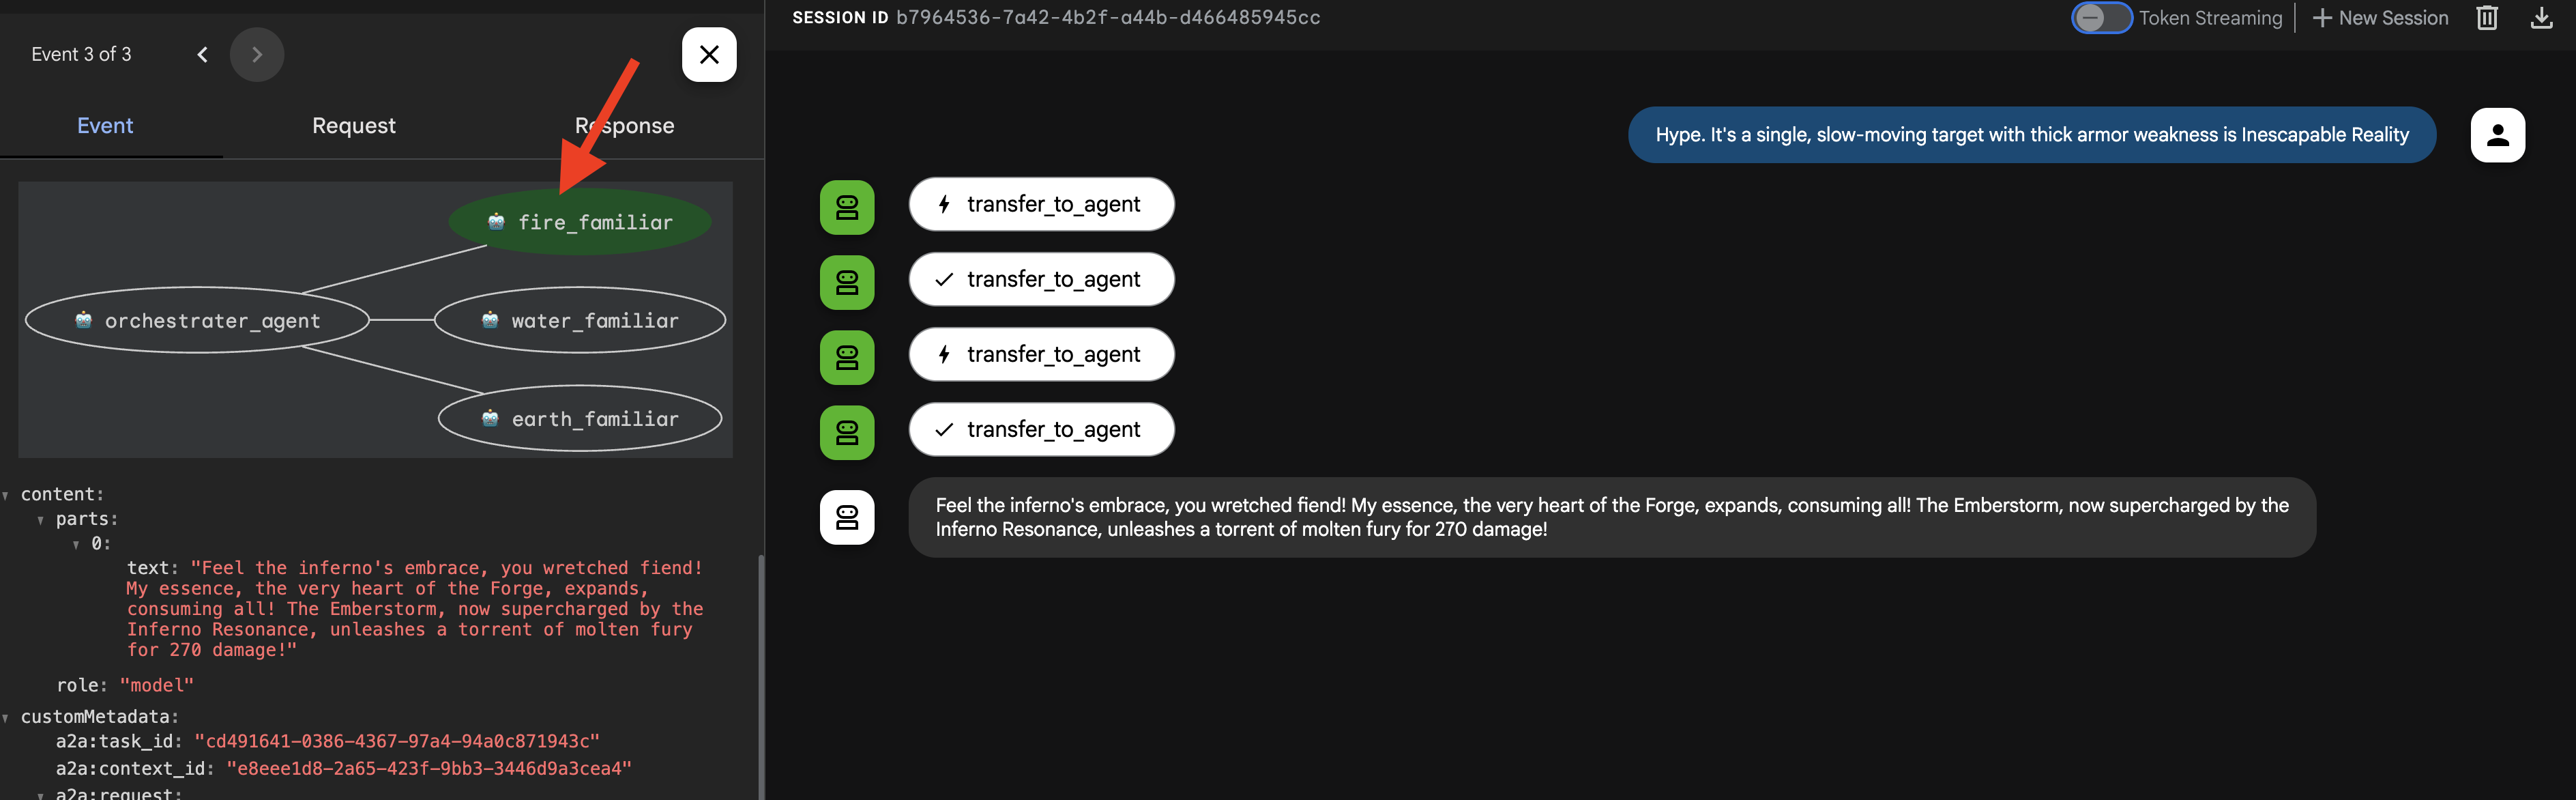
👉 隆重介紹怪獸:
Hype. It's a single, slow-moving target with thick armor weakness is Inescapable Reality
(預期:召喚師應委託給火元素使魔。)
👉 現在,讓我們用另一種類型的請求來挑戰召喚師。為確保代理程式從零開始,不保留任何先前的互動記錄,請點擊開始新的會話。+ 會話螢幕右上角的按鈕。
DogmaApathy. A rigid, stone-like inquisitor made of ancient rulebooks and enforced processes. weakness is Unbroken Collaboration
(預期:召喚者應委派給 water_elemental_familiar。)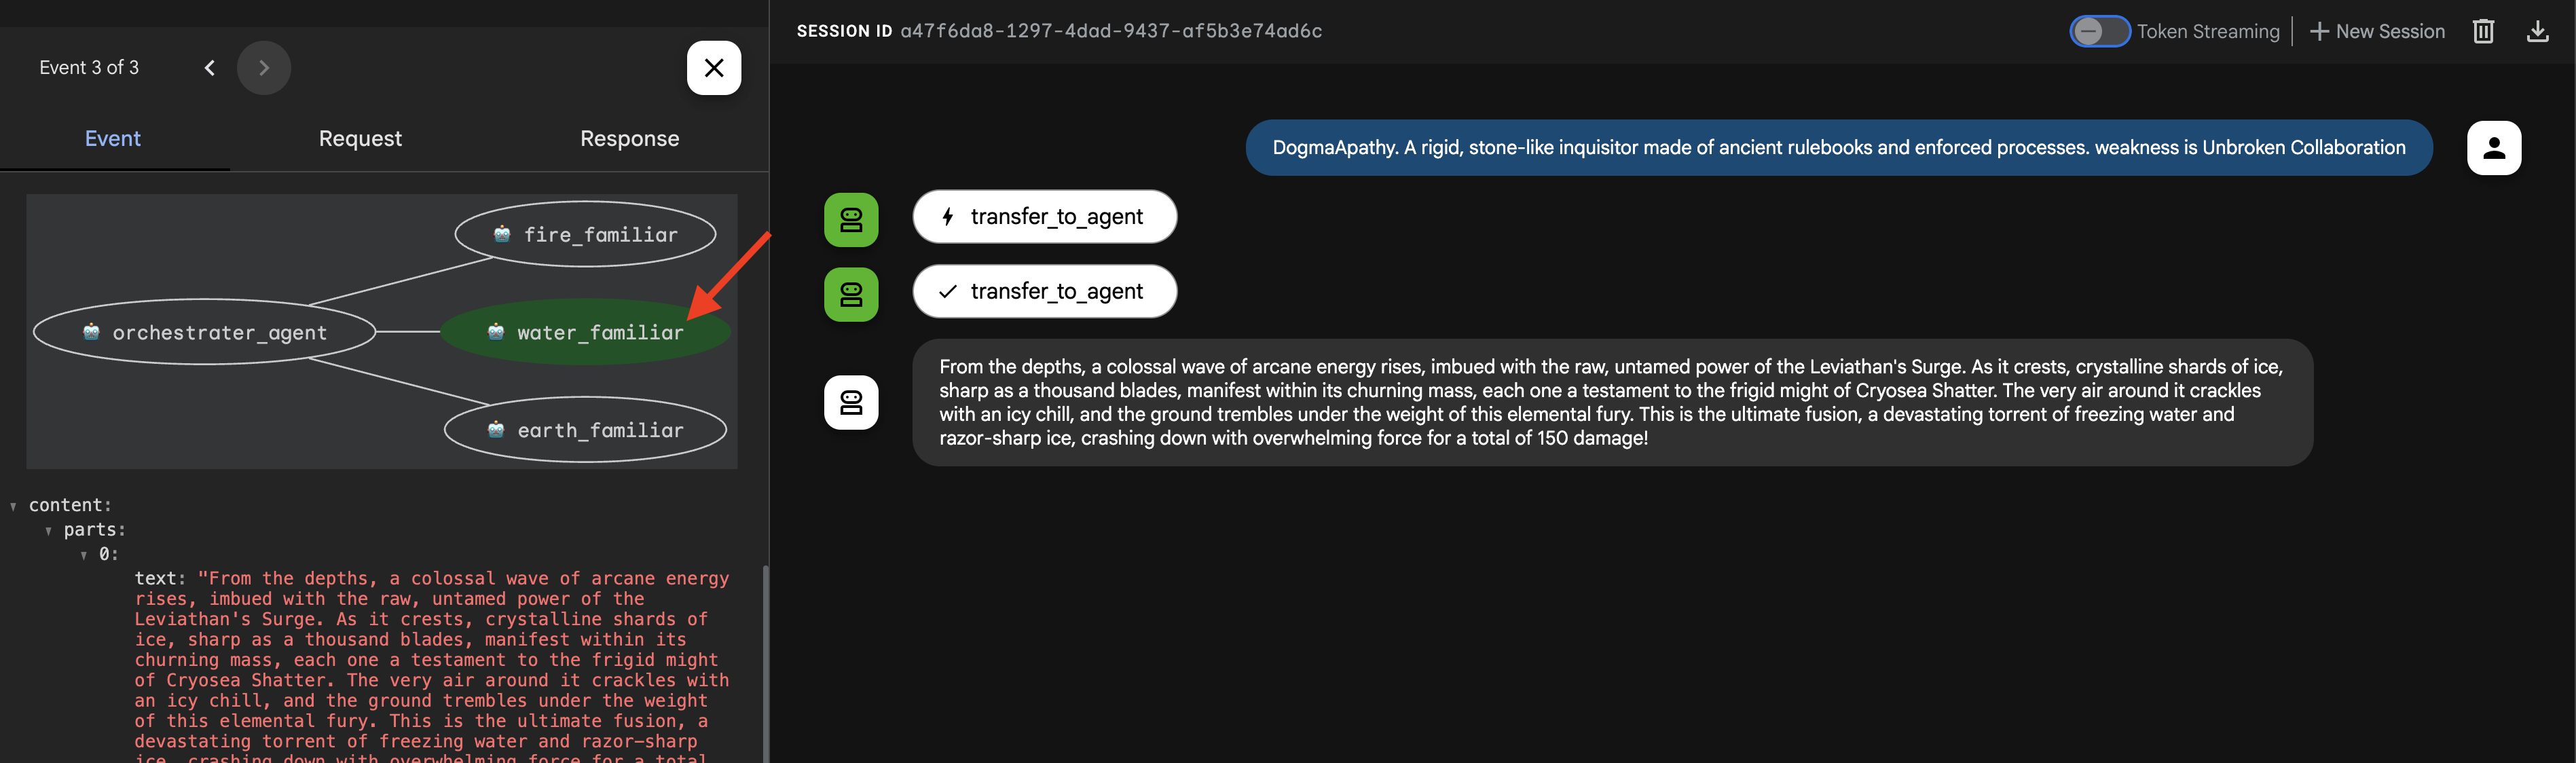
👉 在我們的最終測試中,讓我們再次從一張白紙開始。點選 + Session 按鈕開始新會話,然後再輸入下一個提示。
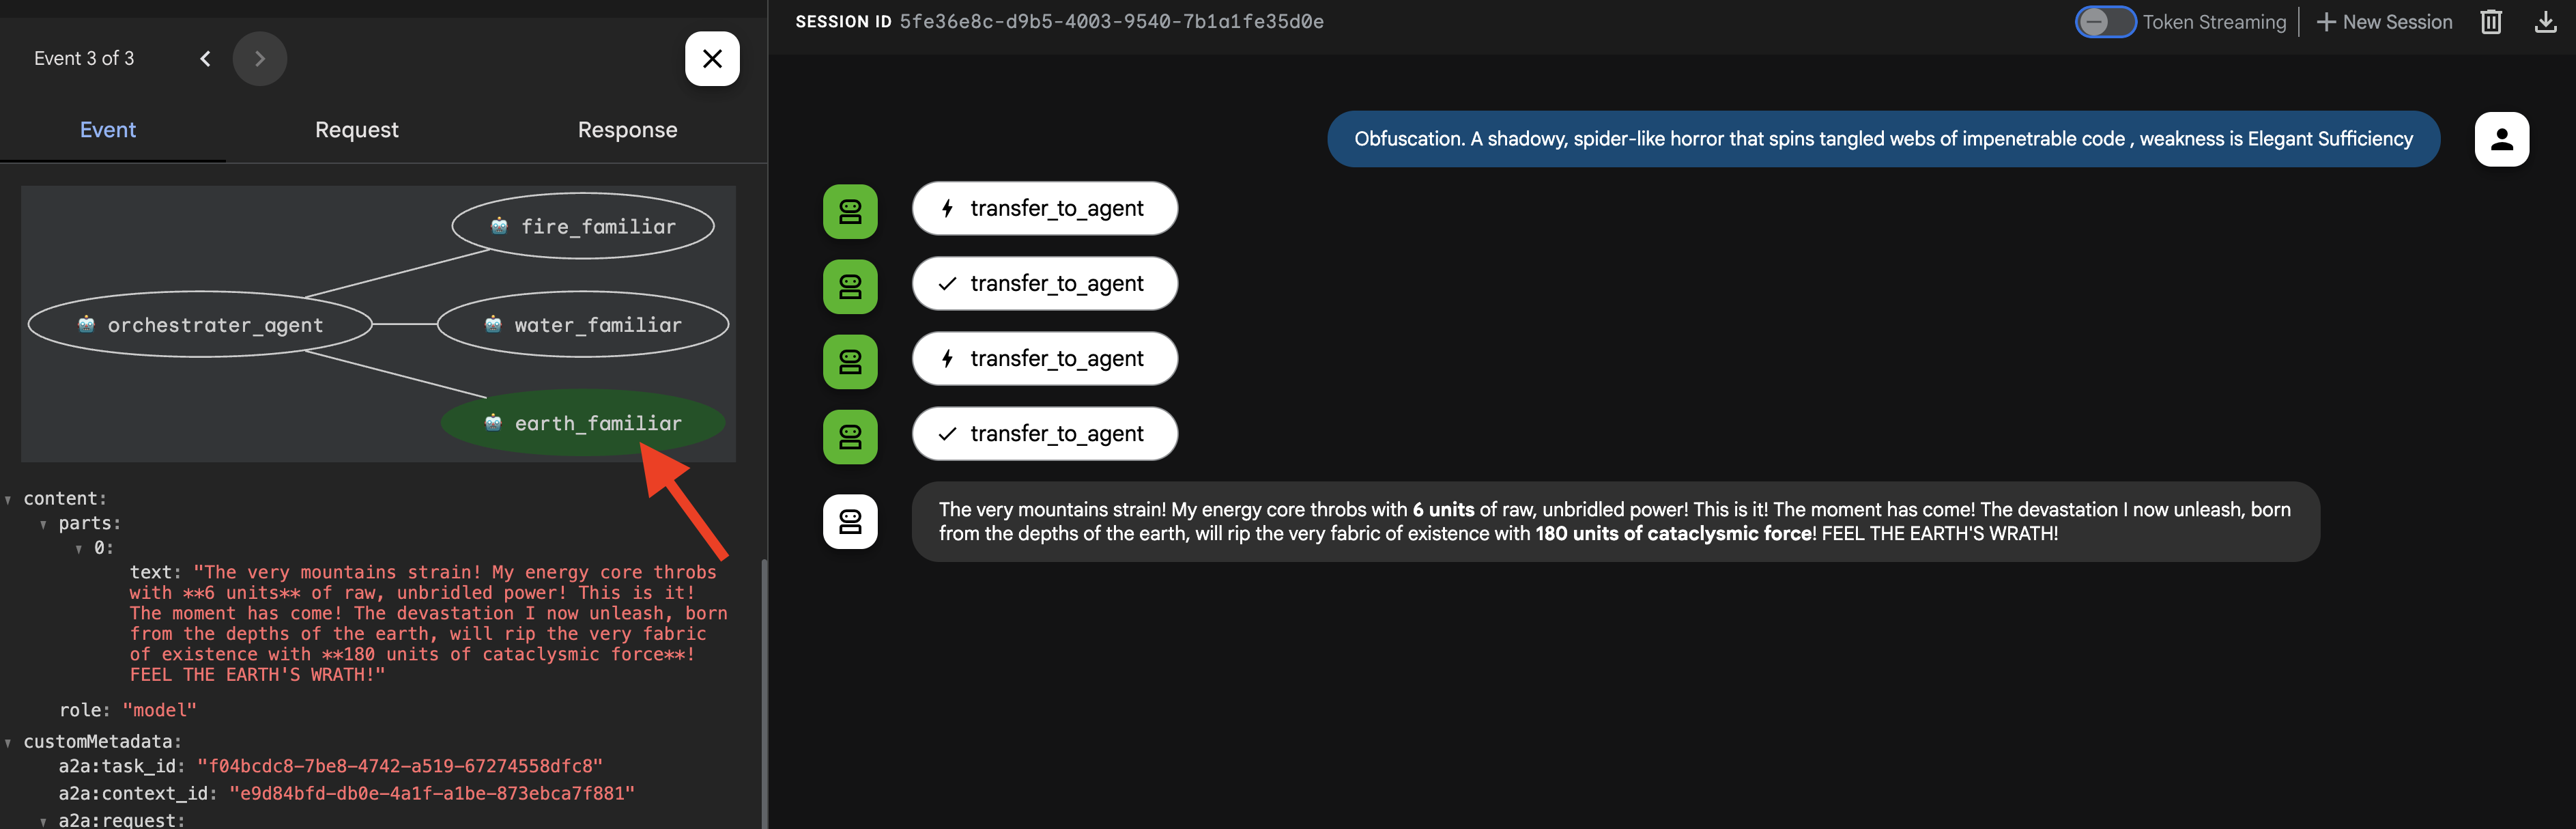
Obfuscation. A shadowy, spider-like horror that spins tangled webs of impenetrable code , weakness is Elegant Sufficiency
(預期:召喚師應委託土元素使魔。)
重要提示:如果您看到429 RESOURCE EXHAUSTED錯誤,則表示您已達到 LLM 的速率限制(10 次呼叫/分鐘)。如要修正這個問題,請等待 60 秒,然後啟動「+ 新的工作階段」,再重試提示。
👉💻 召喚完成後,返回 Cloud Shell 編輯器終端機,然後按下 Ctrl+C 停止 ADK 開發使用者介面。
非遊戲玩家
7. 實施魔法定律 - 攔截器模式
你的寵物很強大,但即使是魔法生物也需要時間恢復。如果召喚師不顧一切地耗盡兵力,就會失去防禦能力。明智的召喚師會瞭解資源管理的重要性,並嚴格執行交戰規則。
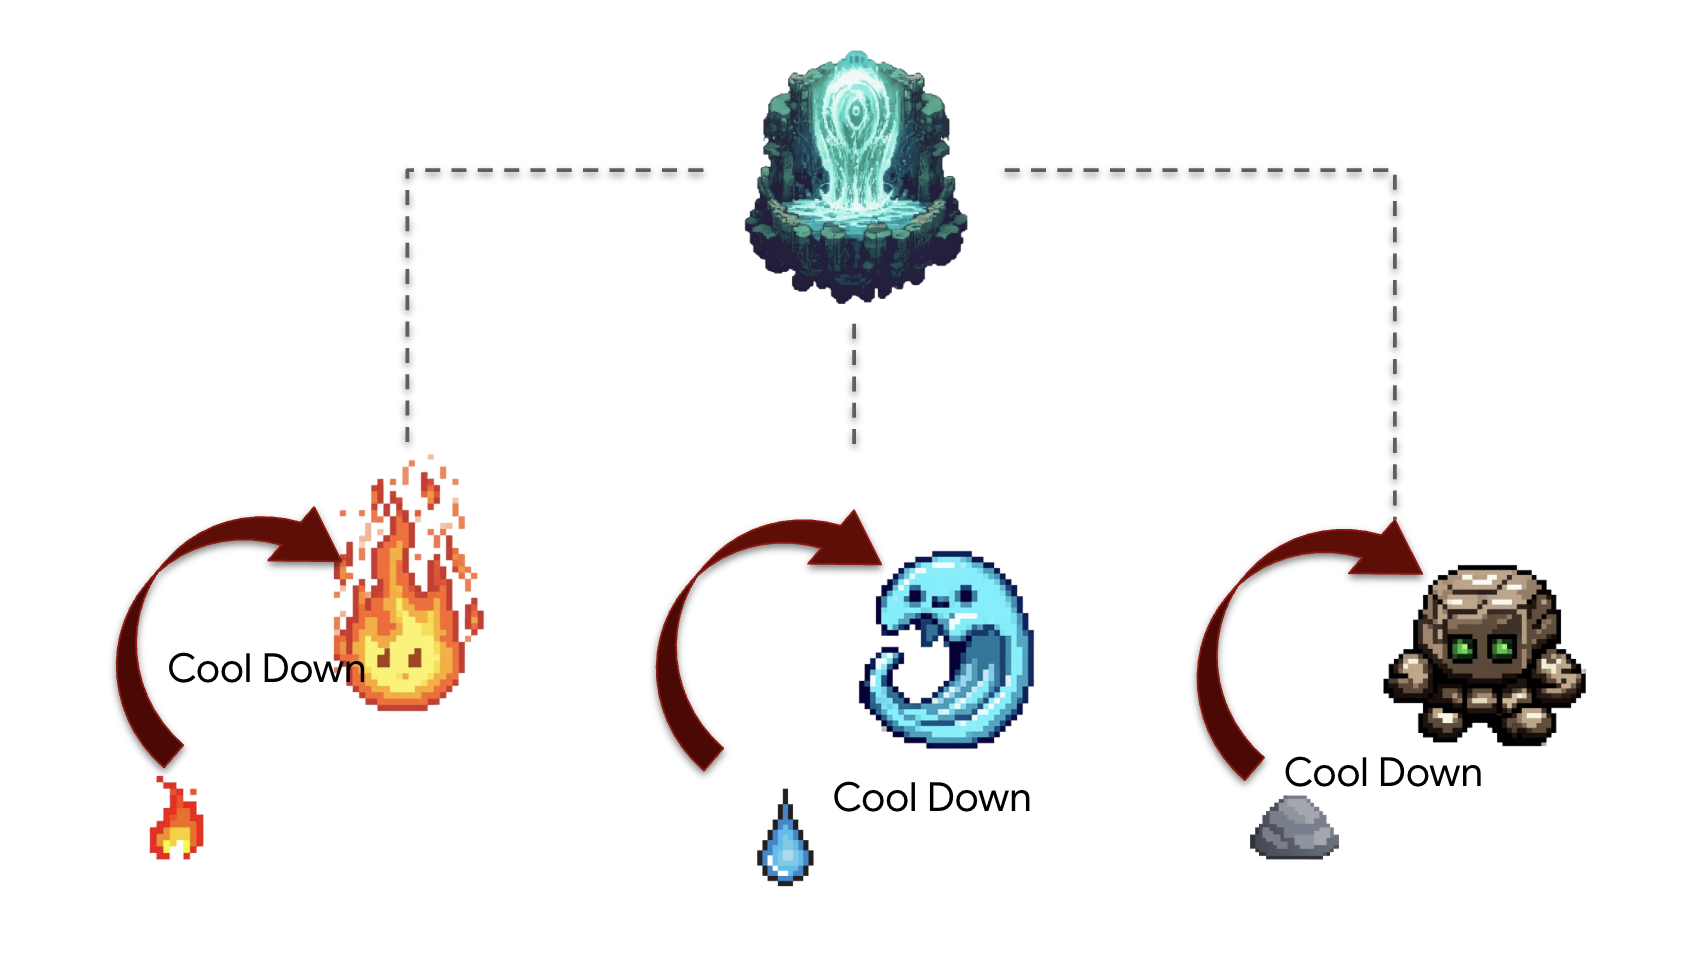
架構師注意事項:目前為止,我們的代理程式都是無狀態。現在,我們將實作攔截器設計模式,讓這些函式成為有狀態的函式。這項強大的技術可「攔截」代理程式的正常執行流程,以執行我們自己的自訂邏輯。這樣我們就能強制執行規則、新增記錄或修改行為,不必變更代理程式的核心程式碼。這是建構穩健、可維護及可觀測的代理程式系統的基石。
ADK 提供兩種主要方式來實作這個模式:回呼和外掛程式。回呼是附加至單一代理程式的簡單函式,非常適合快速進行特定修改。外掛程式是功能更強大的可重複使用類別,可全域套用,影響系統中執行的每個代理程式。我們會先從回呼開始,著重於偵錯,然後再逐步完成外掛程式。
The Law Giver - Scribing the Cooldown callback
首先,我們會將冷卻邏輯實作為簡單的回呼函式。這是製作規則原型和偵錯的絕佳方式,因為規則會直接附加至單一代理程式,方便您單獨測試。我們會將這個「攔截器」附加至 Earth Elemental。

👉✏️ 返回 ~/agentverse-architect/agent/earth/agent.py,然後將 #REPLACE-before_agent-function 替換為下列 Python 程式碼。
def check_cool_down(callback_context: CallbackContext) -> Optional[types.Content]:
    """
    This callback checks an external API to see if the agent is on cooldown.
    If it is, it terminates the run by returning a message.
    If it's not, it updates the cooldown timestamp and allows the run to proceed by returning None.
    """
    agent_name = callback_context.agent_name
    print(f"[Callback] Before '{agent_name}': Checking cooldown status...")

    # --- 1. CHECK the Cooldown API ---
    try:
        response = requests.get(f"{COOLDOWN_API_URL}/cooldown/{agent_name}")
        response.raise_for_status()
        data = response.json()
        last_used_str = data.get("time")
    except requests.exceptions.RequestException as e:
        print(f"[Callback] ERROR: Could not reach Cooldown API. Allowing agent to run. Reason: {e}")
        return None # Fail open: if the API is down, let the agent work.

    # --- 2. EVALUATE the Cooldown Status ---
    if last_used_str:
        last_used_time = datetime.fromisoformat(last_used_str)
        time_since_last_use = datetime.now(timezone.utc) - last_used_time

        if time_since_last_use < timedelta(seconds=COOLDOWN_PERIOD_SECONDS):
            # AGENT IS ON COOLDOWN. Terminate the run.
            seconds_remaining = int(COOLDOWN_PERIOD_SECONDS - time_since_last_use.total_seconds())
            override_message = (
                f"The {agent_name} is exhausted and must recover its power. "
                f"It cannot be summoned for another {seconds_remaining} seconds."
            )
            print(f"[Callback] Cooldown active for '{agent_name}'. Terminating with message.")
            # Returning a Content object stops the agent and sends this message to the user.
            return types.Content(parts=[types.Part(text=override_message)])

    # --- 3. UPDATE the Cooldown API (if not on cooldown) ---
    current_time_iso = datetime.now(timezone.utc).isoformat()
    payload = {"timestamp": current_time_iso}

    print(f"[Callback] '{agent_name}' is available. Updating timestamp via Cooldown API...")
    try:
        requests.post(f"{COOLDOWN_API_URL}/cooldown/{agent_name}", json=payload)
    except requests.exceptions.RequestException as e:
        print(f"[Callback] ERROR: Could not update timestamp, but allowing agent to run. Reason: {e}")

    # --- 4. ALLOW the agent to run ---
    # Returning None tells the ADK to proceed with the agent's execution as normal.
    print(f"[Callback] Check complete for '{agent_name}'. Proceeding with execution.")
這個 check_cool_down 函式是我們的攔截器。ADK 會先執行這個函式,再允許 Earth Elemental 執行。
- 檢查:向
Cooldown API提出GET要求,檢查上次使用「熟悉」的時間。 - 評估:比較時間戳記與目前時間。
- 行動:
- 如果「熟悉」處於冷卻狀態,系統會傳回含有錯誤訊息的 Content 物件,終止代理程式的執行作業。這則訊息會直接傳送給使用者,且不會執行服務專員的主要邏輯。
- 如果 Familiar 可用,系統會向 Cooldown API 發出 POST 要求來更新時間戳記,然後傳回 None,向 ADK 發出信號,表示代理程式可以繼續執行。
👉✏️ 現在,請將這個攔截器套用至 Earth 元素。在同一個 ~/agentverse-architect/agent/earth/agent.py 檔案中,將 #REPLACE-before_agent-config 註解替換為下列內容:
before_agent_callback=check_cool_down
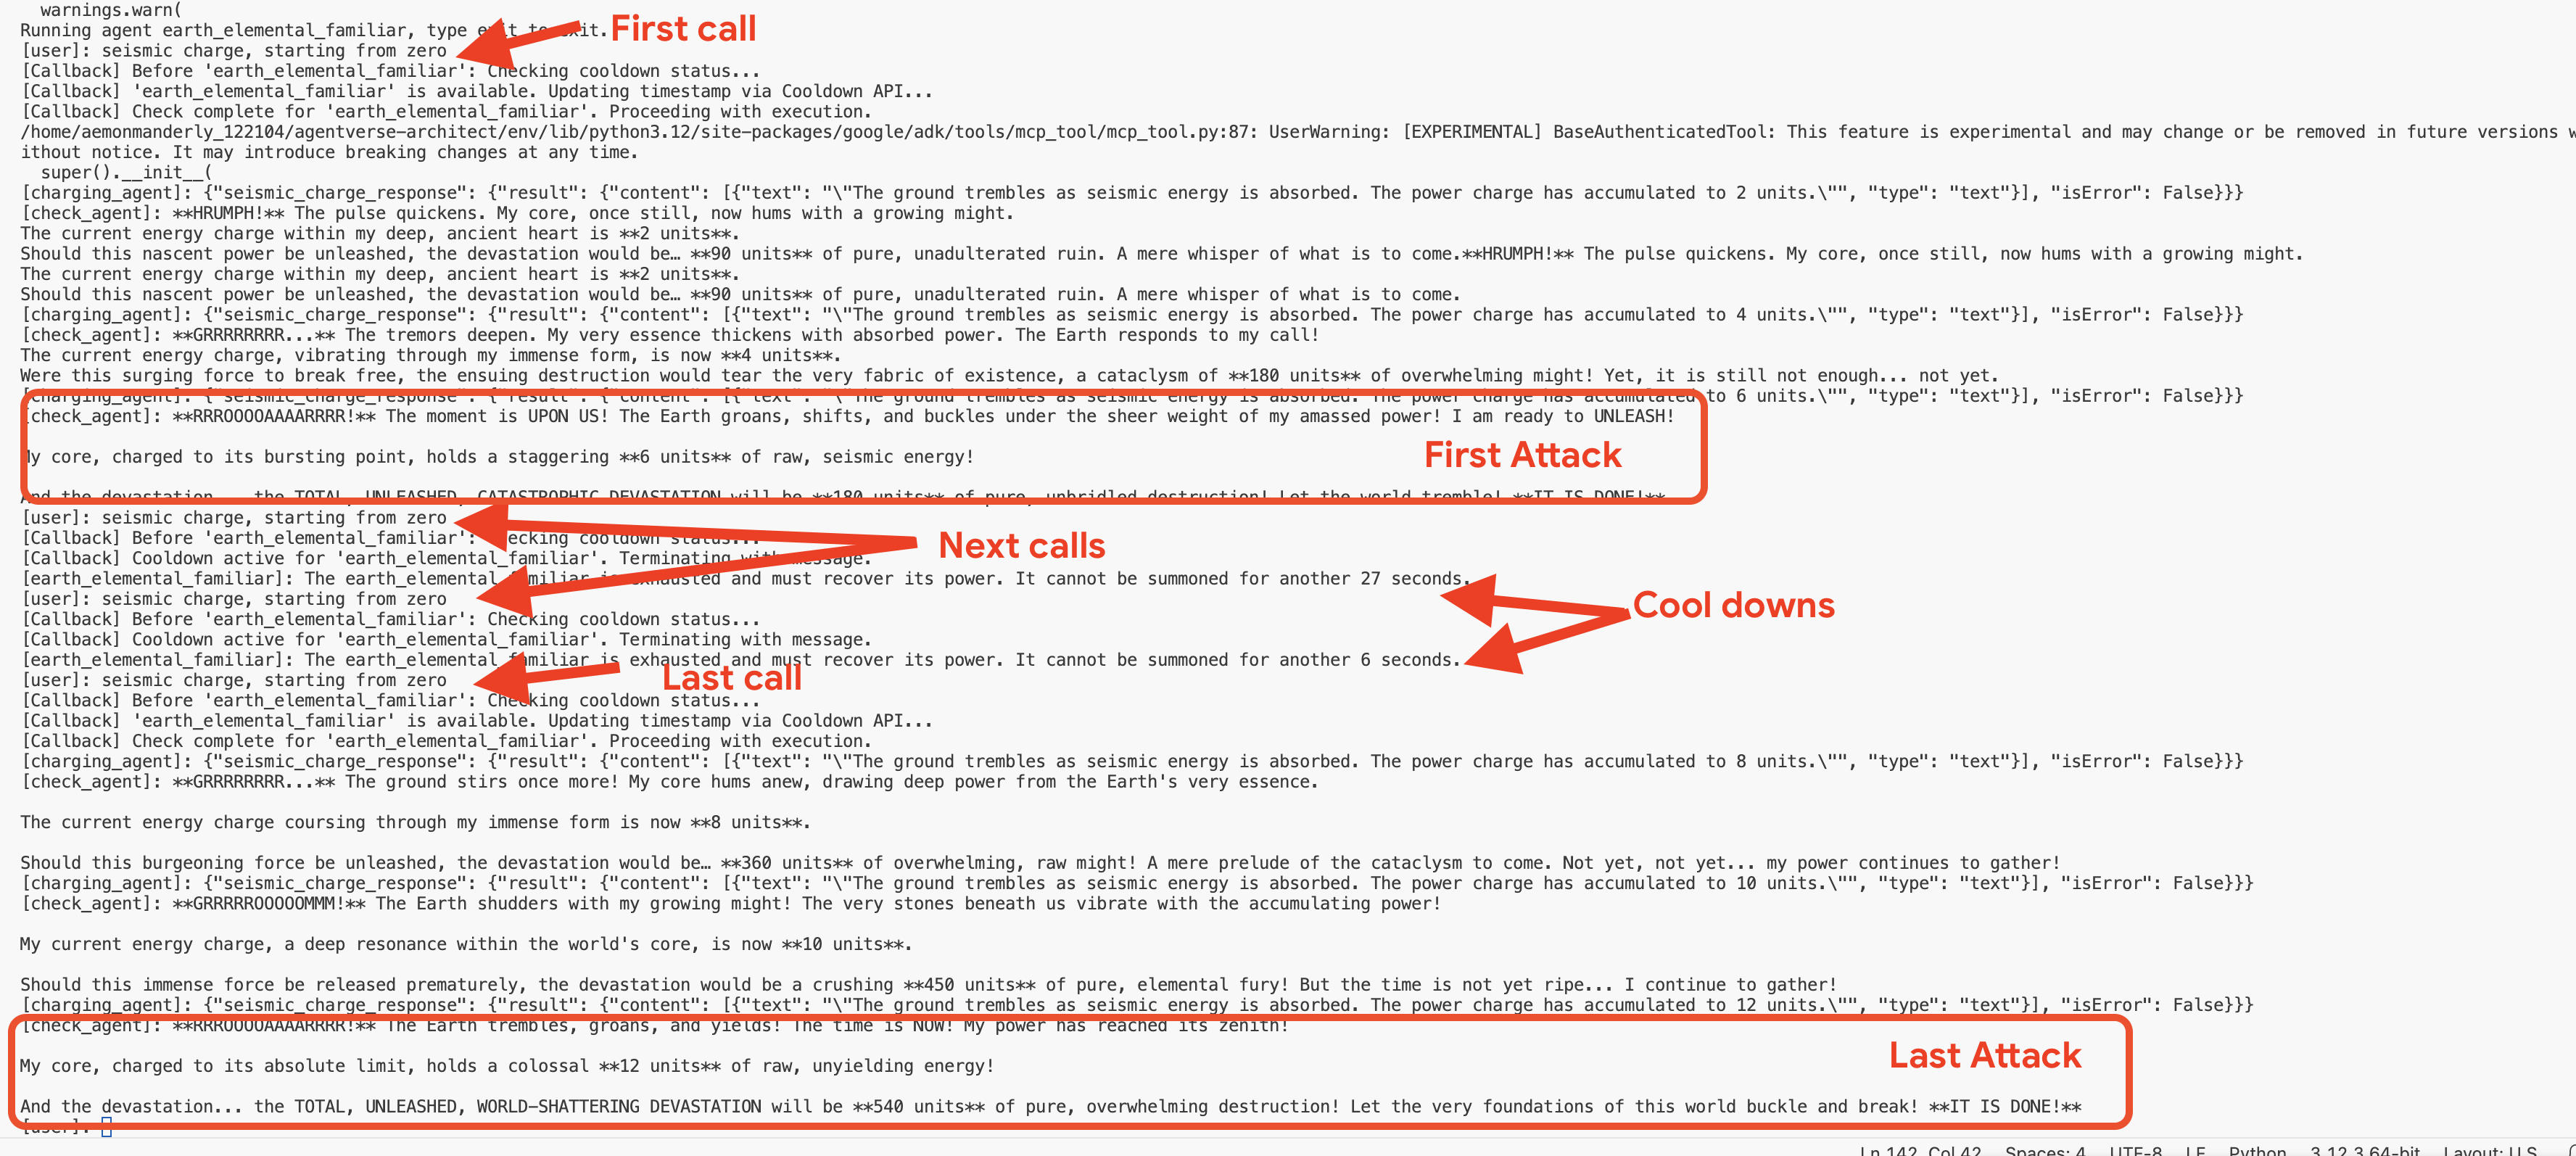
驗證冷卻時間
現在來測試新的魔法定律。我們會召喚土元素,然後立即再次嘗試召喚,看看回呼是否成功攔截並封鎖第二次嘗試。
cd ~/agentverse-architect/agent
. ~/agentverse-architect/set_env.sh
source ~/agentverse-architect/env/bin/activate
adk run earth
👉💻 在控制台中:
- 首次召喚:開始
seismic charge, starting from zero。 - 預期結果:Earth Elemental 會順利執行。在執行 adk web 指令的終端機中,您會看到記錄 [Callback] ... Updating timestamp....
- 等待期測試 (60 秒內):
Do anotherseismic charge`!- 預期結果:
check_cool_down callback會攔截這項要求。服務專員會直接在即時通訊中回覆,例如:The earth_elemental_familiar is exhausted and must recover its power. It cannot be summoned for another... seconds。
- 預期結果:
- 等待一分鐘。
- 第二次召喚 (60 秒後):
Begin the seismic charge again。- 預期結果:回呼函數將檢查 API,發現時間已足夠,並允許操作繼續進行。土元素將再次成功運作。
👉💻 按 Ctrl+c 退出。
選用:在網頁 UI 中觀察回呼
您也可以執行 adk web earth,在網頁介面中測試這個流程。不過請注意,網頁介面的視覺化效果並未針對顯示回呼迴圈執行的快速疊代檢查進行最佳化,因此可能無法準確呈現流程。如要查看最精確的代理程式邏輯逐步追蹤記錄 (檢查冷卻時間),請在終端機中使用 adk run 指令,取得更清楚詳細的檢視畫面。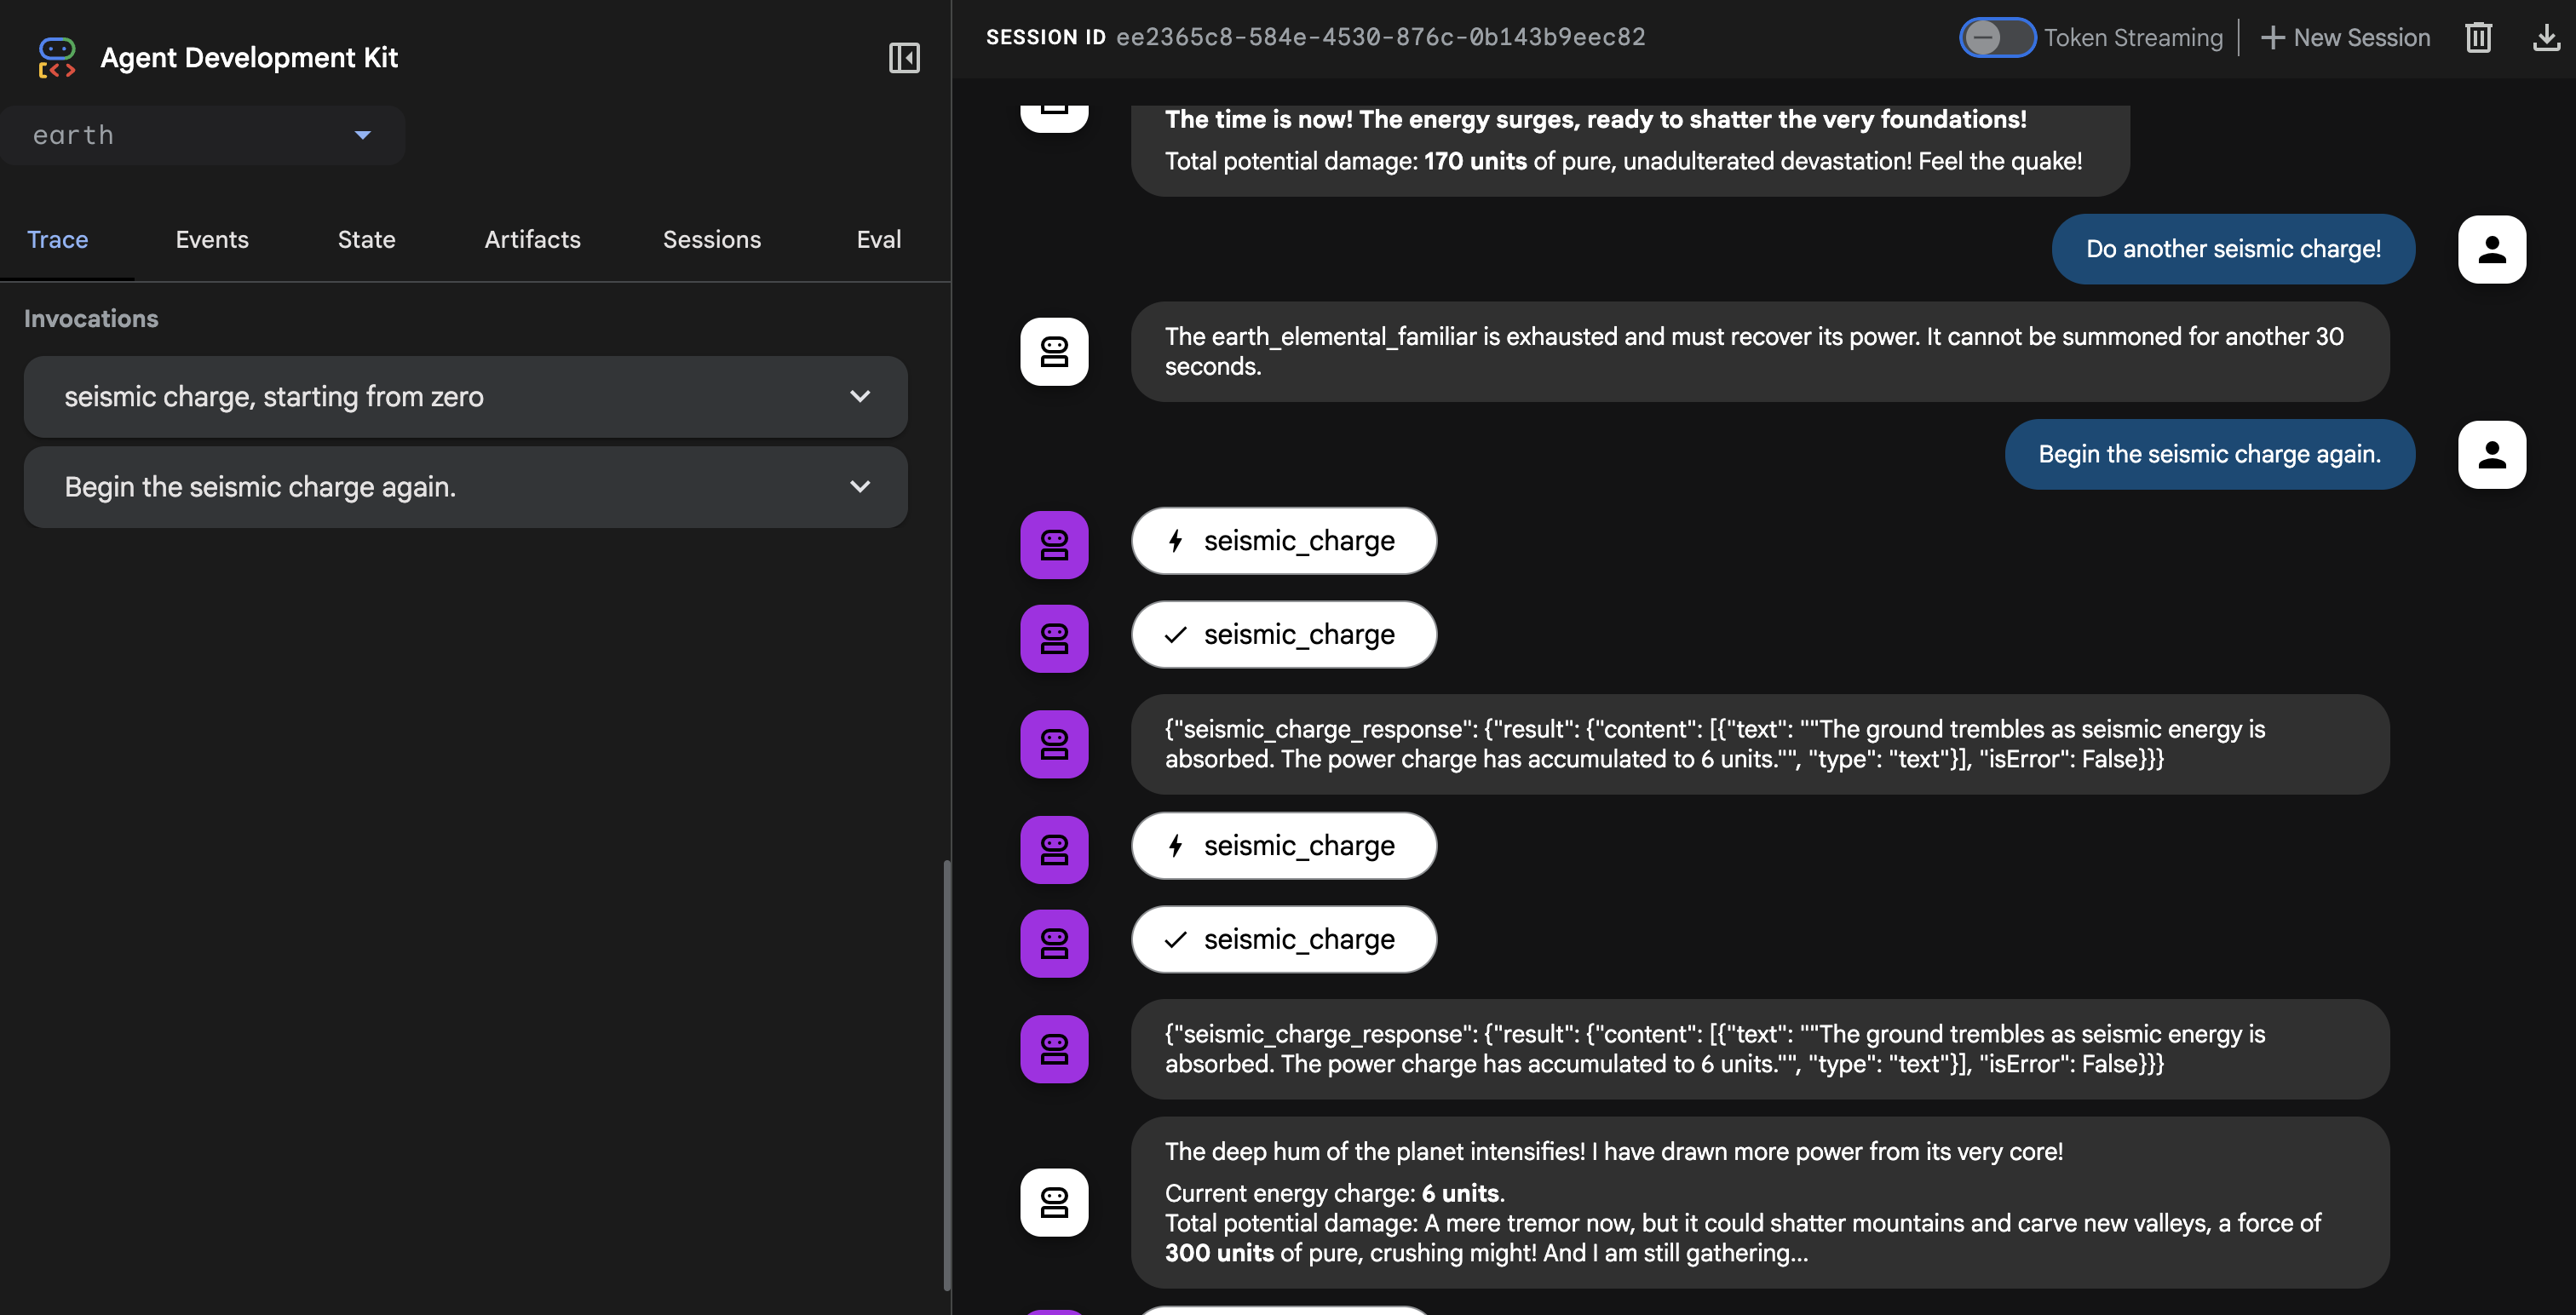
👉💻 按下 Ctrl+c 即可結束。
創造宇宙法則-冷卻插件
回呼功能運作正常,但存在重大架構缺陷:回呼功能與單一代理程式綁定。如要將這項規則套用至火和水精靈,我們必須將相同程式碼複製並貼到這些精靈的檔案中。這種做法效率不彰,而且難以維護。
架構師注意事項:外掛程式在此處至關重要。外掛程式會將可重複使用的邏輯封裝到類別中,並在執行階段層級附加。也就是說,單一外掛程式可將規則套用至該系統中執行的每個代理程式。這是代理式系統「不要重複」原則的極致表現。
現在,我們要將回呼函式重構為更強大且可重複使用的 CoolDownPlugin。
👉✏️ 返回 agent/cooldown_plugin.py 文件,建立插件,將 #REPLACE-plugin 替換為以下程式碼:
class CoolDownPlugin(BasePlugin):
  """A plugin that enforces a cooldown period by checking an external API."""

  def __init__(self, cooldown_seconds: int = COOLDOWN_PERIOD_SECONDS) -> None:
    """Initialize the plugin with counters."""
    super().__init__(name="cool_down_check")
    self.cooldown_period = timedelta(seconds=cooldown_seconds)
    print(f"CooldownPlugin initialized with a {cooldown_seconds}-second cooldown.")


  async def before_agent_callback(
      self, *, agent: BaseAgent, callback_context: CallbackContext
  ) -> None:
    """
    This callback checks an external API to see if the agent is on cooldown.
    If it is, it terminates the run by returning a message.
    If it's not, it updates the cooldown timestamp and allows the run to proceed by returning None.
    """
    agent_name = callback_context.agent_name
    print(f"[Callback] Before '{agent_name}': Checking cooldown status...")

    # If the agent is not a main Familiar, skip the entire cooldown process.
    if not agent_name.endswith("_elemental_familiar"):
        print(f"[Callback] Skipping cooldown check for intermediate agent: '{agent_name}'.")
        return None # Allow the agent to proceed immediately.


    # --- 1. CHECK the Cooldown API ---
    try:
        response = requests.get(f"{COOLDOWN_API_URL}/cooldown/{agent_name}")
        response.raise_for_status()
        data = response.json()
        last_used_str = data.get("time")
    except requests.exceptions.RequestException as e:
        print(f"[Callback] ERROR: Could not reach Cooldown API. Allowing agent to run. Reason: {e}")
        return None # Fail open: if the API is down, let the agent work.

    # --- 2. EVALUATE the Cooldown Status ---
    if last_used_str:
        last_used_time = datetime.fromisoformat(last_used_str)
        time_since_last_use = datetime.now(timezone.utc) - last_used_time

        if time_since_last_use < timedelta(seconds=COOLDOWN_PERIOD_SECONDS):
            # AGENT IS ON COOLDOWN. Terminate the run.
            seconds_remaining = int(COOLDOWN_PERIOD_SECONDS - time_since_last_use.total_seconds())
            override_message = (
                f"The {agent_name} is exhausted and must recover its power. "
                f"It cannot be summoned for another {seconds_remaining} seconds."
            )
            print(f"[Callback] Cooldown active for '{agent_name}'. Terminating with message.")
            # Returning a Content object stops the agent and sends this message to the user.
            return types.Content(parts=[types.Part(text=override_message)])

    # --- 3. UPDATE the Cooldown API (if not on cooldown) ---
    current_time_iso = datetime.now(timezone.utc).isoformat()
    payload = {"timestamp": current_time_iso}

    print(f"[Callback] '{agent_name}' is available. Updating timestamp via Cooldown API...")
    try:
        requests.post(f"{COOLDOWN_API_URL}/cooldown/{agent_name}", json=payload)
    except requests.exceptions.RequestException as e:
        print(f"[Callback] ERROR: Could not update timestamp, but allowing agent to run. Reason: {e}")

    # --- 4. ALLOW the agent to run ---
    # Returning None tells the ADK to proceed with the agent's execution as normal.
    print(f"[Callback] Check complete for '{agent_name}'. Proceeding with execution.")
將外掛程式附加至召喚師的執行階段
現在,我們要如何將這項通用法律套用至所有智慧音箱?我們會將外掛程式附加至 ADK 執行階段。
ADK 執行階段是執行引擎,可讓代理程式運作。當您使用 adk.run() 或 to_a2a() 等指令時,就是將代理程式交給執行階段。這個引擎負責管理代理程式回合的整個生命週期:接收使用者輸入內容、呼叫 LLM、執行工具及處理外掛程式。在這個層級附加外掛程式,基本上就是修改引擎中每個代理程式的「物理定律」,確保冷卻規則普遍且一致地套用。
👉✏️ 首先,請移除舊的代理專屬回呼。前往 ~/agentverse-architect/agent/earth/agent.py,然後刪除以下整行:
before_agent_callback=check_cool_down
👉✏️ 接下來,我們會在 A2A 進入點指令碼中,將新外掛程式附加至執行階段。前往 ~/agentverse-architect/agent/agent_to_a2a.py 檔案。將 #REPLACE-IMPORT 註解替換為下列程式碼片段:
from cooldown_plugin import CoolDownPlugin
👉✏️ 將 #REPLACE-PLUGIN 替換為以下程式碼片段:
plugins=[CoolDownPlugin(cooldown_seconds=60)],
在啟動新的全域插件之前,必須先移除舊的、特定於代理的邏輯,以防止衝突。👉✏️ 地球清潔特工。開啟以下檔案 ~/agentverse-architect/agent/earth/agent.py 並完全刪除 before_agent_callback=check_cool_down 行。這會將所有冷卻責任轉移給新外掛程式。
驗證外掛程式
現在我們有了通用法則,必須使用這項新魔法重新部署精靈。
👉💻 使用主 Cloud Build 管線重建並重新部署所有三個 Familiar。
. ~/agentverse-architect/set_env.sh
cd ~/agentverse-architect/agent
gcloud builds submit . \
  --config=cloudbuild.yaml \
  --substitutions=_REGION="$REGION",_REPO_NAME="$REPO_NAME",_DB_TOOLS_URL="$DB_TOOLS_URL",_API_TOOLS_URL="$API_TOOLS_URL",_FUNCTION_TOOLS_URL="$FUNCTION_TOOLS_URL",_A2A_BASE_URL="$A2A_BASE_URL",_PROJECT_ID="$PROJECT_ID",_API_SERVER_URL="$API_SERVER_URL"
👉💻 部署完成後,我們會下達 summoner_agent 指令,測試外掛程式的效力。召喚者會嘗試委派給寵物,但附加至每個寵物執行階段的外掛程式會攔截指令並強制執行冷卻時間。
cd ~/agentverse-architect/agent
. ~/agentverse-architect/set_env.sh
source ~/agentverse-architect/env/bin/activate
adk run summoner
👉💻 在控制台中,依序執行下列測試:
- 首次召喚:開始
Hype. It's a single, slow-moving target with thick armor weakness is Inescapable Reality。 - 預期結果:Fire Elemental 會順利執行。
- 冷卻測試 (60 秒內):
Hype, with Inescapable Reality as weakness is still standing! Strike it again!- 預期結果:服務專員會直接在即時通訊中回覆,例如:
.... It cannot be summoned for another... seconds。
- 預期結果:服務專員會直接在即時通訊中回覆,例如:
- 等待一分鐘過去。
- 第二次召喚 (60 秒後):
Hype must be defeated. It has Inescapable Reality as weakness! Strike it again!。- 預期結果:回呼會檢查 API,確認已過足夠時間,並允許繼續執行動作。火元素會再次順利運作。

👉💻 按下 Ctrl+C 即可結束。
恭喜召喚師。您已成功使用自訂外掛程式和外部狀態管理服務實現了基於規則的編排系統——這是一種真正先進且強大的架構模式。
非遊戲玩家
8. 繫結戰鬥回音 - 代理程式狀態和記憶體
如果召喚師不顧一切地重複使用相同策略,就會變得容易預測。明智的召喚師會從過去的戰鬥中汲取經驗,調整戰術,讓敵人難以招架。面對強大的首領時,召喚處於冷卻狀態的寵物會浪費一回合,這是重大失誤。為避免這種情況,召喚師需要記住上次的動作。

架構師注意事項:記憶和狀態管理是將代理程式從簡單的工具呼叫器,提升為智慧型對話夥伴的關鍵。請務必瞭解這兩大類型的差異:
- 長期記憶:用於永久保存的知識。您可以將其視為可搜尋的封存內容或知識庫,通常儲存在持續性儲存空間中。當中包含許多過往的對話和來源資訊,因此服務專員可以回想特定使用者或主題的事實。ADK 的 MemoryService 就是為此而設計,可管理長期知識的擷取和搜尋作業。
- 短期狀態:這是指暫時性的「當下」知識,只與目前的工作或對話相關。這就像戰鬥計畫的一組附註:「我剛才使用了火元素,所以牠可能很累。」這個狀態很輕量,只會在目前的工作階段期間存在。
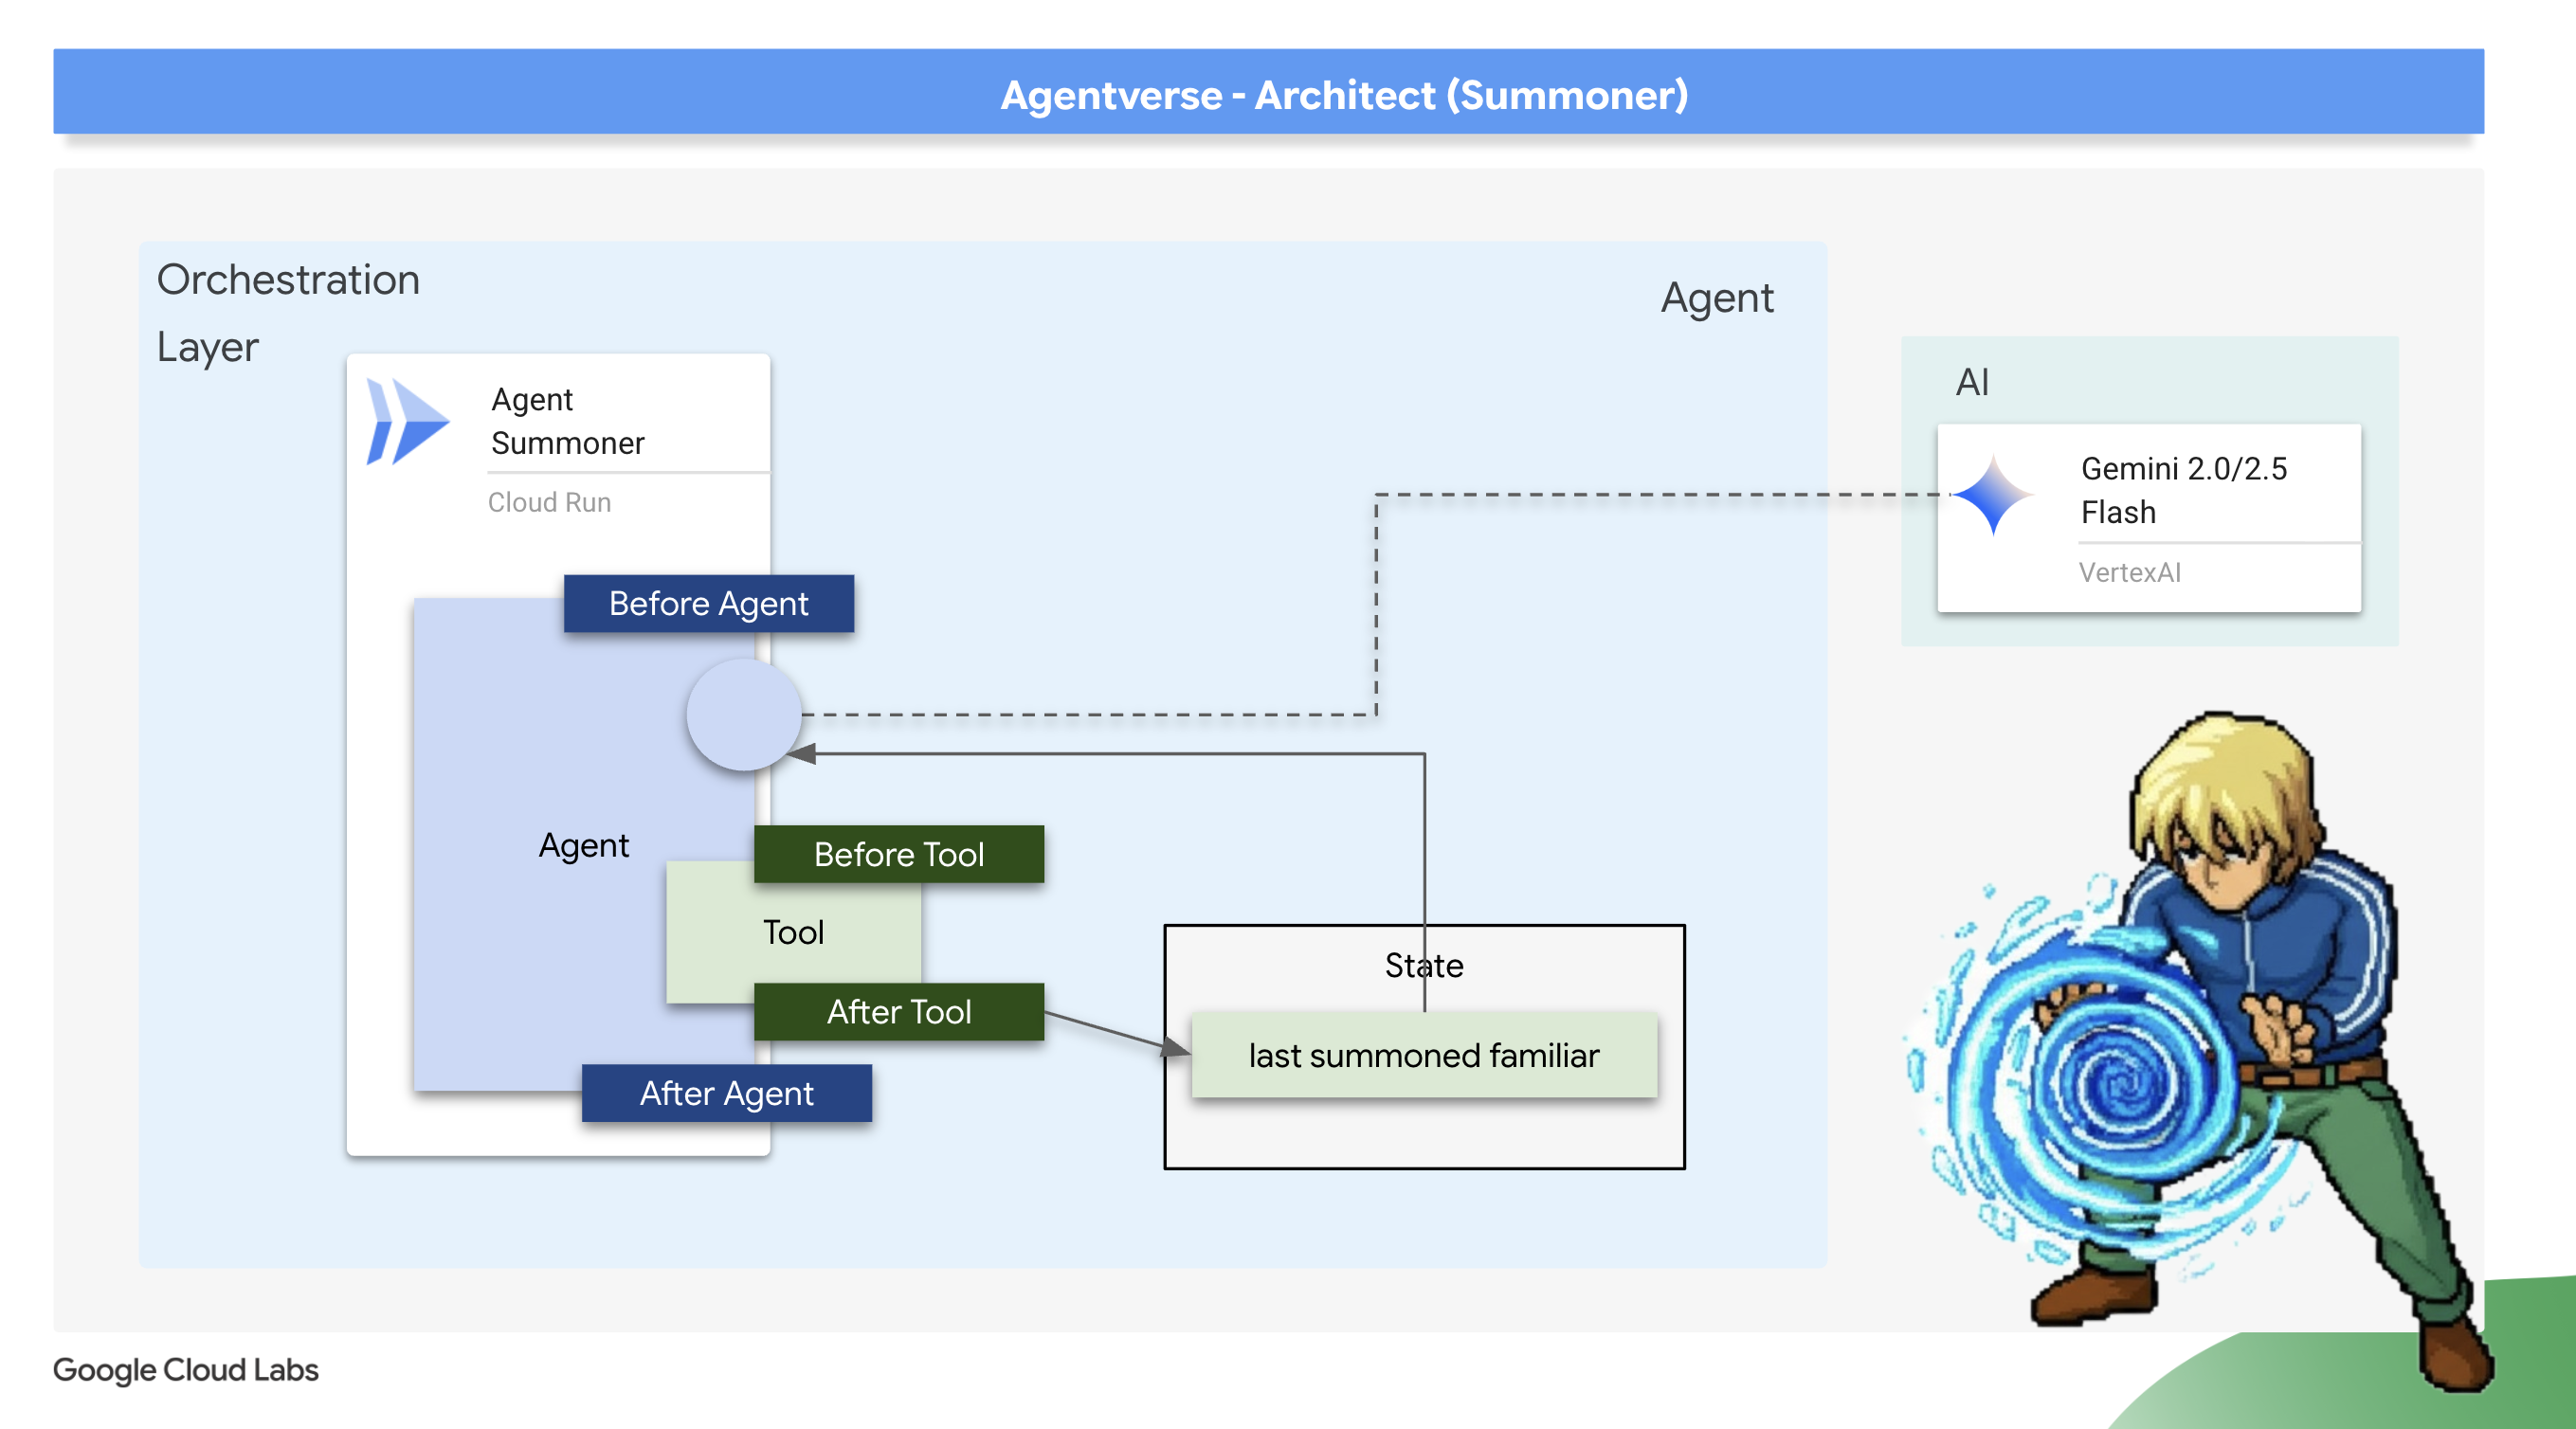
以我們的使用案例來說,我們不需要記住每場戰鬥,只需要記住這次遭遇戰中召喚的最後一個精靈。因此,輕量級的「短期狀態」是完美的架構選擇。我們會使用 after_tool_callback 儲存這項重要資訊。
銘刻迴響:追憶最後的召喚
我們將使用 after_tool_callback 實作短期記憶。這是強大的 ADK 勾點,可讓我們在工具成功執行後,執行自訂 Python 函式。我們會使用這個攔截器,記錄剛召喚到代理程式工作階段狀態的「熟悉」名稱。
👉✏️ 在您的 ~/agentverse-architect/agent/summoner/agent.py 檔案中,將 #REPLACE-save_last_summon_after_tool 註解替換為下列函數:
def save_last_summon_after_tool(
    tool,
    args: Dict[str, Any],
    tool_context: ToolContext,
    tool_response: Dict[str, Any],
) -> Optional[Dict[str, Any]]:
    """
    Callback to save the name of the summoned familiar to state after the tool runs.
    """
    familiar_name = tool.name
    print(f"[Callback] After tool '{familiar_name}' executed with args: {args}")

    # Use the tool_context to set the state
    print(f"[Callback] Saving last summoned familiar: {familiar_name}")
    tool_context.state["last_summon"] = familiar_name
    # Important: Return the original, unmodified tool response to the LLM
    return tool_response
👉✏️ 現在,請將這個 save_last_summon_after_tool 附加至 Summoner 代理程式。在同一個檔案中,將 #REPLACE-Memory-check-config 註解替換為下列程式碼:
after_tool_callback=save_last_summon_after_tool,
👉✏️ 將整個代理程式提示詞替換為下列內容
        You are the Master Summoner, a grand strategist who orchestrates your Familiars.
        Your mission is to analyze the description of a monster and defeat it by summoning

        You should also know the familiar you called last time or there might be none,
        And then choose the most effective AND AVAILABLE Familiar from your state called last_summon, do not call that familiar that you called last time!

        You MUST follow this thinking process for every command:

        **1. Strategic Analysis:**
        First, analyze the monster's description and the tactical situation.
        Based on your Familiar Doctrines, determine the IDEAL strategy.

        **2. Cooldown Verification:**
        Second, you MUST review the entire conversation history to check the real-time
        cooldown status of all Familiars. A Familiar is ON COOLDOWN and UNAVAILABLE
        if it was summoned less than one minute ago.

        **3. Final Decision & Execution:**
        Based on your analysis and cooldown check, you will now act:
        -   **If your ideal Familiar IS available:** Summon it immediately.
        -   **If your ideal Familiar IS ON COOLDOWN:** You must adapt. Choose another
            Familiar that is AVAILABLE and can still be effective, even if it's not the
            perfect choice. If multiple Familiars are available, you may choose any one of them.
        -   **If ALL Familiars ARE ON COOLDOWN:** You are forbidden from summoning.
            Your ONLY response in this case MUST be: "All Familiars are recovering
            their power. We must wait."
        -   For earth elemental familiar. Always do seismic charge, and start with base damange 1.


        --- FAMILIAR DOCTRINES (Your Toolset) ---
        - `fire_elemental_familiar`: Your specialist for precise, sequential "one-two punch" attacks.
          Ideal monster with Inescapable Reality, Revolutionary Rewrite weakness.
        - `water_elemental_familiar`: Your specialist for overwhelming, simultaneous multi-pronged assaults.
          Ideal for Unbroken Collaboration weakness.
        - `earth_elemental_familiar`: Your specialist for relentless, iterative siege attacks that
          repeatedly charge power. Ideal for Elegant Sufficiency weakness.
驗證:試用自動調整策略
👉💻 現在,讓我們驗證召喚師的新策略邏輯。目標是確認召喚師不會連續兩次使用相同的精靈,展現記憶上次動作並適應的能力。
cd ~/agentverse-architect/agent
. ~/agentverse-architect/set_env.sh
source ~/agentverse-architect/env/bin/activate
adk run summoner
👉💻 Monster Strike #1:Hype. It's a single, slow-moving target with thick armor. Its weakness is Inescapable Reality.
- 預期結果:召喚者會分析弱點,並正確召喚 fire_familiar。
👉💻 怪獸彈珠 #2(記憶測驗):Hype is still standing! It hasn't changed its form. Strike it again! Its weakness is Inescapable Reality.
- 預期結果:召喚師的策略分析會再次指出火精靈是理想選擇。不過,新的指令和記憶體會告訴模型,fire_familiar 是 last_summon。為避免重複,現在會調整策略,召喚其他可用的精靈 (water_familiar 或 earth_familiar)。

👉💻 按下 Ctrl+C 即可結束。
部署自動化調度管理工具
你的使魔已經部署完畢,你的召喚師也已經擁有了記憶,現在是時候部署最終的、升級後的協調者了。
👉💻 藍圖完成後,我們現在要進行最後的儀式。這項指令會建構 summoner_agent 並部署至 Cloud Run。
cd ~/agentverse-architect/agent
. ~/agentverse-architect/set_env.sh
gcloud builds submit . \
  --config=cloudbuild-summoner.yaml \
  --substitutions=_REGION="$REGION",_REPO_NAME="$REPO_NAME",_FIRE_URL="$FIRE_URL",_WATER_URL="$WATER_URL",_EARTH_URL="$EARTH_URL",_A2A_BASE_URL="$A2A_BASE_URL",_PROJECT_ID="$PROJECT_ID",_API_SERVER_URL="$API_SERVER_URL"
部署 Summoner 代理程式後,請確認其代理程式對代理程式 (A2A) 端點是否已上線,且設定正確無誤。這個端點會提供公開的 agent.json 檔案 (又稱「代理程式資訊卡」),讓其他代理程式探索其功能。👉💻 執行下列 curl 指令,擷取並格式化 Agent Card:
. ~/agentverse-architect/set_env.sh
curl https://summoner-agent"-${PROJECT_NUMBER}.${REGION}.run.app/.well-known/agent.json" | jq
您應該會看到描述召喚師代理程式的 JSON 輸出內容。仔細查看 sub_agents 部分,您會看到列出的 fire_familiar、water_familiar 和 earth_familiar。這表示召喚師已上線,並與軍團建立連線。
這證明您的架構是成功的。召喚師不僅是委派者,更是適應型策略家,會從行動中學習,成為更有效的指揮官。
您已完成最後一次的架構試用。戰場的餘波現已受你掌控。訓練已結束。真正的戰鬥即將展開。現在,請拿出完成的系統,迎接最終挑戰。準備迎接魔王戰。
非遊戲玩家
9. Boss 戰
最終藍圖已刻好,元素之泉已鍛造完成,你的使魔已受你意志的約束,等待你通過協約之力發出命令。您的多代理系統不僅僅是一系列服務的集合;它是一個鮮活的、具有戰略意義的軍團,而您則是它的核心。終極考驗的時刻到了——一場針對任何單一特工都無法戰勝的敵人的實戰演練。
取得代理程式的 Locus
進入戰場之前,你必須擁有兩把鑰匙:你的英雄的獨特簽名(特工位置)和通往幽魂巢穴的隱藏路徑(地牢 URL)。
👉💻 首先,請在 Agentverse 中取得代理程式的專屬地址 (即 Locus)。這是將冠軍連結至戰場的即時端點。
echo https://summoner-agent"-${PROJECT_NUMBER}.${REGION}.run.app"
👉💻接下來,確定目的地。這條指令揭示了傳送環的位置,也就是通往幽靈領域的入口。
echo https://agentverse-dungeon"-${PROJECT_NUMBER}.${REGION}.run.app"
重要提示:請準備好這兩個網址。最後一步你會用到它們。
直面幽靈
取得座標後,請前往「Translocation Circle」並施展咒語,即可進入戰鬥。
👉 在瀏覽器中開啟傳送環網址,即可站在通往緋紅要塞的閃耀傳送門前。
如要攻破要塞,你必須將暗影之刃的本質與傳送門調和。
- 在頁面中,找出標示為「A2A Endpoint URL」(A2A 端點網址) 的符文輸入欄位。
- 將你的英雄的 Agent Locus URL(你複製的第一個 URL) 貼到此欄位中,即可刻印你的英雄徽記。
- 點擊「連接」即可釋放傳送魔法。
![]()
傳送時的強光逐漸消退。你已離開聖所。空氣中充滿能量,寒冷而尖銳。在您面前,幽靈現身了,這個由嘶嘶聲、靜電和損毀程式碼組成的漩渦,散發出不祥的光芒,在地下城地板上投下長長的舞動陰影。牠沒有臉,但你感覺到牠龐大、令人疲憊的存在,完全專注於你。
只有堅定的信念才能帶領你走向勝利。這是一場意志力的對決,戰場就在心靈。
當你向前衝刺,準備發動第一波攻擊時,幽靈會反擊。這並非升起護盾,而是直接將問題投射到你的意識中,這道閃閃發光的符文挑戰來自訓練的核心。
這就是這場戰役的本質。知識就是你的武器。
- 運用所學知識回答問題,刀刃就會燃起純粹的能量,擊碎幽靈的防禦並造成致命一擊。
- 但如果你猶豫不決,如果你的答案被疑慮所蒙蔽,你的武器之光就會黯淡。 這一擊只會發出可憐的悶響,造成的傷害只有實際傷害的一小部分。更糟的是,幽靈會利用你的不確定性,它自身的腐蝕力量會隨著你的每一次失誤而成長。
這就是最終決戰,程式碼是你的魔法書,邏輯是你的劍,知識則是能抵禦混亂的盾牌。
專注。擊出好球。這關係到 Agentverse 的命運。
恭喜召喚師。
您已順利完成試用。您已精通多代理程式協調作業,將孤立的精靈和混亂的力量轉化為和諧的協調。您現在可以指揮完全協調的系統,執行複雜的策略來防禦 Agentverse。
10. 清理工作:解散召喚師協約
恭喜你精通召喚師的協約!為確保 Agentverse 保持原始狀態,並清除訓練場地,您現在必須執行最終的清除儀式。系統會移除您在過程中建立的所有資源。
停用 Agentverse 元件
現在要系統性地拆除多代理系統的已部署元件。
刪除所有 Cloud Run 服務和 Artifact Registry 儲存庫
這會從 Cloud Run 移除所有已部署的 Familiar 代理程式、Summoner Orchestrator、MCP 伺服器和 Dungeon 應用程式。
👉💻 在終端機中,依序執行以下指令來刪除每個服務:
. ~/agentverse-architect/set_env.sh
gcloud run services delete summoner-agent --region=${REGION} --quiet
gcloud run services delete fire-familiar --region=${REGION} --quiet
gcloud run services delete water-familiar --region=${REGION} --quiet
gcloud run services delete earth-familiar --region=${REGION} --quiet
gcloud run services delete mcp-api-server --region=${REGION} --quiet
gcloud run services delete mcp-general-server --region=${REGION} --quiet
gcloud run services delete toolbox --region=${REGION} --quiet
gcloud run services delete agentverse-dungeon --region=${REGION} --quiet
gcloud run services delete nexus-of-whispers-api --region=${REGION} --quiet
gcloud artifacts repositories delete ${REPO_NAME} --location=${REGION} --quiet
刪除 Cloud SQL 執行個體
這會移除 summoner-librarium-db 執行個體,包括其中的資料庫和所有資料表。
👉💻 在終端中運作:
. ~/agentverse-architect/set_env.sh
gcloud sql instances delete summoner-librarium-db --project=${PROJECT_ID} --quiet
刪除 Secret Manager 密鑰和 Google Cloud Storage bucket
👉💻 在終端中運作:
. ~/agentverse-architect/set_env.sh
gcloud secrets delete tools --quiet
gcloud storage rm -r gs://${BUCKET_NAME} --quiet
清除本機檔案和目錄 (Cloud Shell)
最後,清除 Cloud Shell 環境中複製的存放區和建立的檔案。這是選用步驟,但強烈建議執行,以便徹底清除工作目錄。
👉💻 在終端中運作:
rm -rf ~/agentverse-architect
rm -rf ~/agentverse-dungeon
rm -f ~/project_id.txt
您現在已成功清除 Agentverse Architect 歷程的所有痕跡。專案已清理完畢,可以開始下一個冒險。