
১. প্রস্তাবনা
বিচ্ছিন্ন উন্নয়নের যুগ শেষ হচ্ছে। প্রযুক্তিগত বিবর্তনের পরবর্তী ঢেউ একক প্রতিভার বিষয় নয়, বরং সম্মিলিত দক্ষতার বিষয়। একটি একক, বুদ্ধিমান এজেন্ট তৈরি করা একটি আকর্ষণীয় পরীক্ষা। এজেন্টদের একটি শক্তিশালী, নিরাপদ এবং বুদ্ধিমান ইকোসিস্টেম—একটি সত্যিকারের এজেন্টভার্স—তৈরি করাই আধুনিক এন্টারপ্রাইজের জন্য সবচেয়ে বড় চ্যালেঞ্জ।
এই নতুন যুগে সাফল্যের জন্য চারটি গুরুত্বপূর্ণ ভূমিকার সমন্বয় প্রয়োজন, যা যেকোনো সমৃদ্ধ সক্রিয় ব্যবস্থার ভিত্তিপ্রস্তর। যেকোনো একটি ক্ষেত্রে ঘাটতি এমন একটি দুর্বলতা তৈরি করে যা সমগ্র কাঠামোটিকে বিপন্ন করতে পারে।
এই কর্মশালাটি গুগল ক্লাউডে এজেন্টিক ভবিষ্যৎ আয়ত্ত করার জন্য একটি চূড়ান্ত এন্টারপ্রাইজ প্লেবুক। আমরা একটি সম্পূর্ণ রোডম্যাপ প্রদান করি যা আপনাকে একটি ধারণার প্রাথমিক পর্যায় থেকে শুরু করে সেটিকে একটি পূর্ণাঙ্গ ও কার্যকর বাস্তবতায় রূপদান পর্যন্ত পথ দেখায়। এই চারটি আন্তঃসংযুক্ত ল্যাবের মাধ্যমে আপনি শিখবেন, কীভাবে একজন ডেভেলপার, আর্কিটেক্ট, ডেটা ইঞ্জিনিয়ার এবং SRE-এর বিশেষায়িত দক্ষতাগুলোকে একত্রিত করে একটি শক্তিশালী এজেন্টভার্স তৈরি, পরিচালনা এবং স্কেল করা যায়।
কোনো একটি স্তম্ভ একা এজেন্টভার্সকে ধরে রাখতে পারে না। ডেভেলপারের নিখুঁত বাস্তবায়ন ছাড়া আর্কিটেক্টের মহৎ পরিকল্পনা অকেজো। ডেটা ইঞ্জিনিয়ারের প্রজ্ঞা ছাড়া ডেভেলপারের এজেন্ট অন্ধ, এবং এসআরই-এর সুরক্ষা ছাড়া পুরো সিস্টেমটিই ভঙ্গুর। শুধুমাত্র সমন্বয় এবং একে অপরের ভূমিকা সম্পর্কে পারস্পরিক বোঝাপড়ার মাধ্যমেই আপনার দল একটি উদ্ভাবনী ধারণাকে একটি মিশন-ক্রিটিক্যাল, কার্যকরী বাস্তবতায় রূপান্তরিত করতে পারে। আপনার যাত্রা এখান থেকেই শুরু। আপনার ভূমিকায় দক্ষতা অর্জন করতে এবং এই বৃহত্তর ব্যবস্থার অংশ হিসেবে নিজেকে মানিয়ে নিতে প্রস্তুত হন।
এজেন্টভার্সে স্বাগতম: চ্যাম্পিয়নদের প্রতি আহ্বান
প্রতিষ্ঠানের সুবিশাল ডিজিটাল পরিমণ্ডলে এক নতুন যুগের সূচনা হয়েছে। এটি সক্রিয়তার যুগ, এক অপার সম্ভাবনার সময়, যেখানে বুদ্ধিমান ও স্বায়ত্তশাসিত এজেন্টরা নিখুঁত সমন্বয়ে কাজ করে উদ্ভাবনকে ত্বরান্বিত করে এবং গতানুগতিকতাকে দূর করে দেয়।

শক্তি ও সম্ভাবনার এই সংযুক্ত বাস্তুতন্ত্রটি ‘দ্য এজেন্টভার্স’ নামে পরিচিত।
কিন্তু এক ক্রমবর্ধমান বিশৃঙ্খলা, ‘দ্য স্ট্যাটিক’ নামে পরিচিত এক নীরব দুর্নীতি, এই নতুন পৃথিবীর কিনারাগুলোকে ছিন্নভিন্ন করতে শুরু করেছে। দ্য স্ট্যাটিক কোনো ভাইরাস বা বাগ নয়; এটি বিশৃঙ্খলারই প্রতিমূর্তি, যা সৃষ্টির প্রক্রিয়াকেই গ্রাস করে।
এটি পুরোনো হতাশাগুলোকে দানবীয় রূপে রূপান্তরিত করে, যার ফলে জন্ম নেয় উন্নয়নের সপ্ত প্রেতাত্মা। যদি একে নিয়ন্ত্রণহীনভাবে বাড়তে দেওয়া হয়, তবে ‘দ্য স্ট্যাটিক’ এবং তার প্রেতাত্মারা অগ্রগতিকে থামিয়ে দেবে এবং ‘এজেন্টভার্স’-এর সম্ভাবনাকে প্রযুক্তিগত ঋণ ও পরিত্যক্ত প্রকল্পের এক বিরানভূমিতে পরিণত করবে।
আজ আমরা বিশৃঙ্খলার স্রোতকে প্রতিহত করার জন্য যোদ্ধাদের প্রতি আহ্বান জানাচ্ছি। আমাদের এমন বীর প্রয়োজন, যারা নিজেদের নৈপুণ্যে দক্ষতা অর্জন করতে এবং এজেন্টভার্সকে রক্ষা করার জন্য একযোগে কাজ করতে ইচ্ছুক। নিজের পথ বেছে নেওয়ার সময় এসে গেছে।
আপনার ক্লাস বেছে নিন
আপনার সামনে চারটি স্বতন্ত্র পথ রয়েছে, যার প্রতিটিই ‘দ্য স্ট্যাটিক’-এর বিরুদ্ধে লড়াইয়ে এক একটি গুরুত্বপূর্ণ স্তম্ভ। যদিও আপনার প্রশিক্ষণ হবে একটি একক অভিযান, আপনার চূড়ান্ত সাফল্য নির্ভর করে নিজের দক্ষতাগুলো অন্যদের সাথে কীভাবে সমন্বিত হয় তা বোঝার ওপর।
- শ্যাডোব্লেড (ডেভেলপার) : কামারশালা এবং সম্মুখ সমরের একজন ওস্তাদ। আপনি সেই কারিগর যিনি ব্লেড তৈরি করেন, সরঞ্জাম নির্মাণ করেন এবং কোডের সূক্ষ্ম বিবরণের মাধ্যমে শত্রুর মোকাবিলা করেন। আপনার পথ হলো নির্ভুলতা, দক্ষতা এবং বাস্তবসম্মত সৃষ্টির এক অপূর্ব সমন্বয়।
- দ্য সামোনার (আর্কিটেক্ট) : একজন মহান কৌশলবিদ এবং সমন্বয়কারী। আপনি কোনো একক এজেন্টকে দেখেন না, বরং সমগ্র যুদ্ধক্ষেত্রকে দেখেন। আপনি সেই মূল নকশা তৈরি করেন যা এজেন্টদের সমগ্র সিস্টেমকে একে অপরের সাথে যোগাযোগ, সহযোগিতা এবং এমন একটি লক্ষ্য অর্জনে সক্ষম করে, যা যেকোনো একক উপাদানের চেয়ে অনেক বড়।
- পণ্ডিত (ডেটা ইঞ্জিনিয়ার) : গুপ্ত সত্যের অন্বেষী এবং প্রজ্ঞার ধারক। আপনি ডেটার বিশাল, অনিয়ন্ত্রিত প্রান্তরে প্রবেশ করেন সেই বুদ্ধিমত্তা উন্মোচন করতে, যা আপনার এজেন্টদের উদ্দেশ্য ও দৃষ্টি দান করে। আপনার জ্ঞান শত্রুর দুর্বলতা প্রকাশ করতে পারে অথবা মিত্রকে শক্তিশালী করতে পারে।
- দ্য গার্ডিয়ান (ডেভঅপ্স / এসআরই) : রাজ্যের অটল রক্ষক এবং ঢাল। আপনি দুর্গ নির্মাণ করেন, শক্তির সরবরাহ লাইন পরিচালনা করেন এবং নিশ্চিত করেন যে পুরো সিস্টেমটি 'দ্য স্ট্যাটিক'-এর অবশ্যম্ভাবী আক্রমণ প্রতিহত করতে পারে। আপনার শক্তিই সেই ভিত্তি যার উপর আপনার দলের বিজয় নির্মিত হয়।
আপনার মিশন
আপনার প্রশিক্ষণ একটি স্বতন্ত্র অনুশীলন হিসেবে শুরু হবে। আপনি আপনার নির্বাচিত পথে এগিয়ে যাবেন এবং আপনার ভূমিকায় দক্ষতা অর্জনের জন্য প্রয়োজনীয় অনন্য কৌশলগুলো শিখবেন। আপনার এই পরীক্ষার শেষে, আপনি 'দ্য স্ট্যাটিক' থেকে জন্ম নেওয়া একটি স্পেক্টরের মুখোমুখি হবেন—এটি একটি মিনি-বস, যা আপনার কাজের নির্দিষ্ট প্রতিবন্ধকতাগুলোকেই শিকার করে।
শুধুমাত্র নিজ নিজ ভূমিকায় দক্ষতা অর্জনের মাধ্যমেই আপনি চূড়ান্ত পরীক্ষার জন্য প্রস্তুত হতে পারবেন। এরপর আপনাকে অন্যান্য শ্রেণীর চ্যাম্পিয়নদের নিয়ে একটি দল গঠন করতে হবে। একসাথে, আপনারা দুর্নীতির কেন্দ্রস্থলে প্রবেশ করে এক চূড়ান্ত বসের মুখোমুখি হবেন।
একটি চূড়ান্ত, সম্মিলিত চ্যালেঞ্জ যা তোমাদের সম্মিলিত শক্তির পরীক্ষা নেবে এবং এজেন্টভার্সের ভাগ্য নির্ধারণ করবে।
এজেন্টভার্স তার নায়কদের অপেক্ষায় আছে। আপনি কি এই ডাকে সাড়া দেবেন?
২. শ্যাডোব্লেডের কোডেক্স
শ্যাডোব্লেডের কোডেক্স আপনার সামনে উন্মুক্ত। এর ডাকে সাড়া দিন। ‘দ্য স্ট্যাটিক’-এর ক্রমবর্ধমান বিশৃঙ্খলার কারণে এজেন্টভার্স হুমকির মুখে, এবং কেবল তারাই এর বিরুদ্ধে লড়তে পারে যারা এই কোডেক্সের কৌশলগুলো আয়ত্ত করতে পারবে। এটি নির্ভুলতা এবং শৃঙ্খলার পথ। আজ থেকে আপনার প্রশিক্ষণ শুরু হচ্ছে। আপনি এআই-কে একটি সাধারণ যন্ত্র হিসেবে নয়, বরং একটি সংবেদনশীল তলোয়ার হিসেবে ব্যবহার করতে শিখবেন, যাকে বশ করে আয়ত্তে আনতে হবে। এখানে প্রদত্ত শিক্ষা অনুসরণ করুন, এবং আপনি বিশুদ্ধ যুক্তির একটি অস্ত্র তৈরি করবেন—একটি বুদ্ধিমান এজেন্ট, যা যুদ্ধের জন্য শাণিত ও প্রস্তুত।
আপনি যা শিখবেন
- আপনার প্রধান অস্ত্রটি ব্যবহার করুন: জেমিনি সিএলআই।
- Gemini CLI এক্সটেনশন এবং এজেন্ট স্কিলের মাধ্যমে আপনার অস্ত্রাগারকে আরও সমৃদ্ধ করুন।
- জেমিনি সিএলআই-এর সাথে এমসিপি টুলস সমন্বিত করে বাহ্যিক অস্ত্রাগার তলব করুন।
- ডিজাইন ডকুমেন্ট ব্যবহার করে আপনার অভিপ্রায়কে একটি 'ভাইব'-এ রূপ দিন এবং আপনার এআই পার্টনারকে নির্দেশ দিন।
- এজেন্ট ডেভেলপমেন্ট কিট (ADK) ব্যবহার করে আপনার প্রথম স্বায়ত্তশাসিত এজেন্ট তৈরি করে একটি পরিচ্ছন্ন, মডিউলার সমাধান গড়ে তুলুন।
- আপনার এজেন্টের আচরণকে বাধা দিতে ও সুরক্ষিত করতে হুক অন্তর্ভুক্ত করুন।
- আপনার এজেন্টকে পরীক্ষা ও যাচাই করার জন্য স্বয়ংক্রিয় মূল্যায়ন স্যুট তৈরি করুন।
- আপনার এজেন্টকে স্বয়ংক্রিয়ভাবে পরীক্ষা, কন্টেইনারাইজ এবং আর্কাইভ করার জন্য একটি সম্পূর্ণ CI পাইপলাইন তৈরি করুন।
৩. প্রশিক্ষণ মাঠ প্রস্তুত করা
আপনার গুগল ক্লাউড ক্রেডিট দাবি করুন
⚠️ গুরুত্বপূর্ণ পূর্বশর্তসমূহ:
- ব্যক্তিগত জিমেইল ব্যবহার করুন: আপনাকে অবশ্যই একটি ব্যক্তিগত অ্যাকাউন্ট (যেমন,
name@gmail.com) ব্যবহার করতে হবে। কর্পোরেট বা শিক্ষা প্রতিষ্ঠান দ্বারা পরিচালিত অ্যাকাউন্ট কাজ করবে না ।
👉 ধাপসমূহ:
- ক্রেডিট দাবি করার সাইটে যান: এখানে ক্লিক করুন
- সাইন ইন করুন: লিঙ্কটি অ্যাড্রেস বারে পেস্ট করুন এবং আপনার ব্যক্তিগত জিমেইল দিয়ে সাইন ইন করুন।
- শর্তাবলী গ্রহণ করুন: গুগল ক্লাউড প্ল্যাটফর্মের পরিষেবার শর্তাবলী গ্রহণ করুন।
- ক্রেডিট যাচাই করুন: ক্রেডিটটি প্রয়োগ করা হয়েছে তা নিশ্চিত করে এমন একটি বার্তার জন্য অপেক্ষা করুন।
- দ্রষ্টব্য: যদি আপনাকে ক্রেডিট কার্ডের তথ্য দিতে বলা হয়, তবে আপনি নিশ্চিন্তে তা উপেক্ষা করে উইন্ডোটি বন্ধ করে দিতে পারেন।
এবং আপনি এখন যাওয়ার জন্য প্রস্তুত। নির্দ্বিধায় জানালাটি বন্ধ করে দিন।
কাজের পরিবেশ তৈরি করুন
👉Google Cloud কনসোলের উপরে থাকা Activate Cloud Shell-এ ক্লিক করুন (এটি Cloud Shell পেনের উপরে থাকা টার্মিনালের মতো দেখতে আইকন), 
👉'ওপেন এডিটর' বোতামটিতে (এটি দেখতে পেন্সিলসহ একটি খোলা ফোল্ডারের মতো) ক্লিক করুন। এটি উইন্ডোতে ক্লাউড শেল কোড এডিটর খুলে দেবে। আপনি বাম দিকে একটি ফাইল এক্সপ্লোরার দেখতে পাবেন। 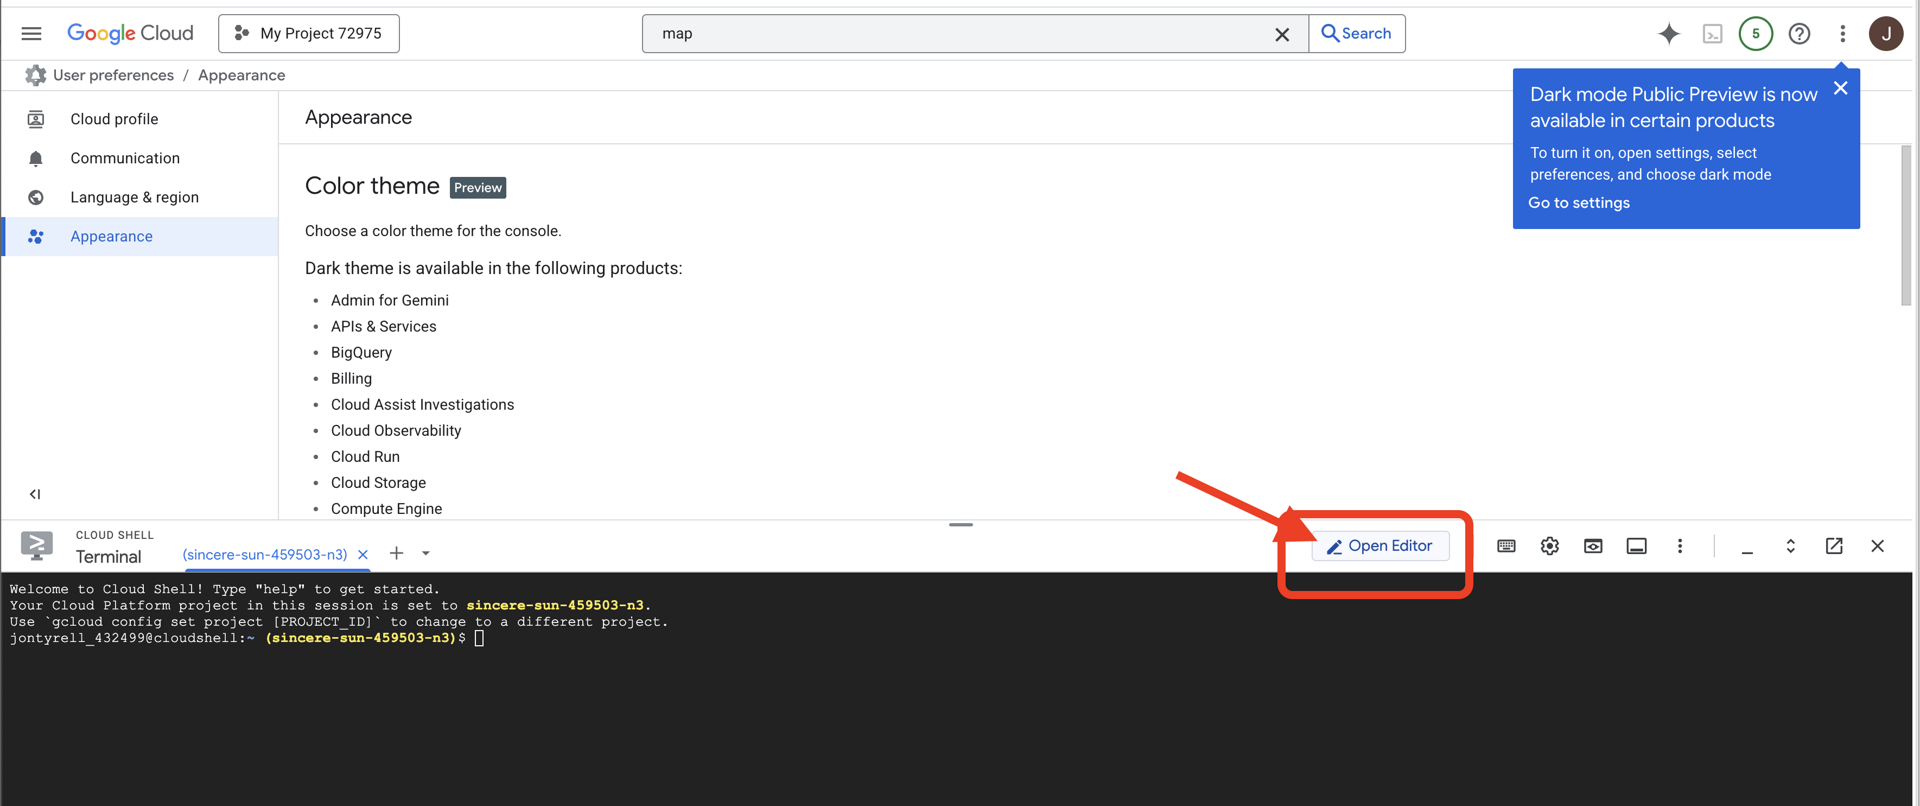
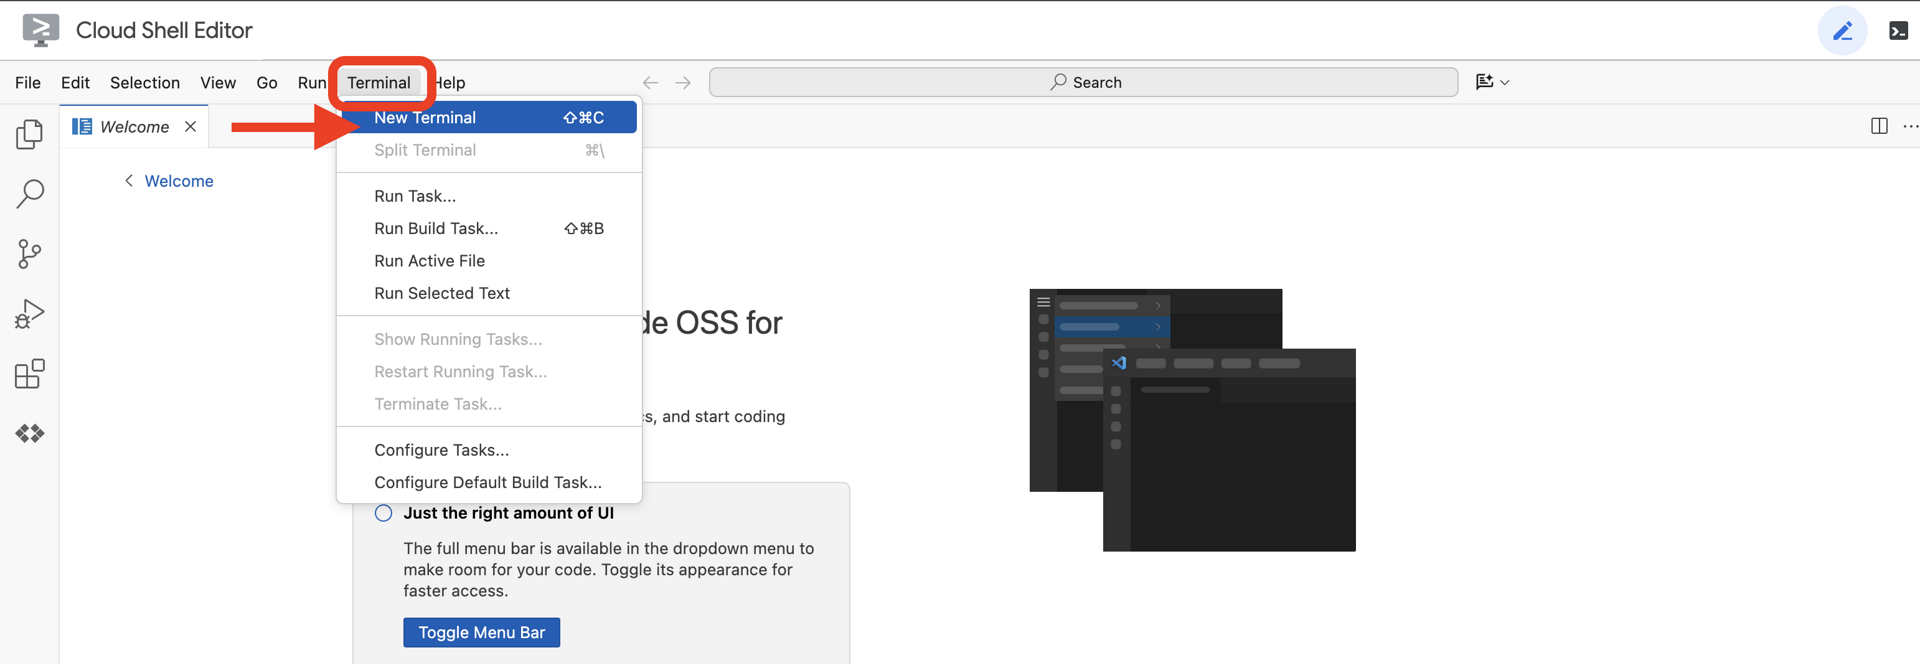
👉ক্লাউড IDE-তে টার্মিনালটি খুলুন,
👉💻 টার্মিনালে, নিম্নলিখিত কমান্ডটি ব্যবহার করে যাচাই করুন যে আপনি ইতিমধ্যেই প্রমাণীকৃত এবং প্রজেক্টটি আপনার প্রজেক্ট আইডিতে সেট করা আছে:
gcloud auth list
👉💻 গিটহাব থেকে বুটস্ট্র্যাপ প্রজেক্টটি ক্লোন করুন:
git clone https://github.com/weimeilin79/agentverse-developer.git
chmod +x ~/agentverse-developer/gitea.sh
chmod +x ~/agentverse-developer/init.sh
chmod +x ~/agentverse-developer/set_env.sh

git clone https://github.com/weimeilin79/agentverse-dungeon.git
chmod +x ~/agentverse-dungeon/run_cloudbuild.sh
chmod +x ~/agentverse-dungeon/start.sh
👉💻 প্রজেক্ট ডিরেক্টরি থেকে সেটআপ স্ক্রিপ্টটি চালান।
⚠️ প্রজেক্ট আইডি সম্পর্কে দ্রষ্টব্য: স্ক্রিপ্টটি এলোমেলোভাবে তৈরি একটি ডিফল্ট প্রজেক্ট আইডি প্রস্তাব করবে। আপনি এই ডিফল্টটি গ্রহণ করতে এন্টার চাপতে পারেন।
তবে, আপনি যদি কোনো নির্দিষ্ট নতুন প্রজেক্ট তৈরি করতে চান, তাহলে স্ক্রিপ্ট দ্বারা নির্দেশিত হলে আপনার পছন্দের প্রজেক্ট আইডি টাইপ করতে পারেন।
cd ~/agentverse-developer
./init.sh
স্ক্রিপ্টটি বাকি সেটআপ প্রক্রিয়াটি স্বয়ংক্রিয়ভাবে সম্পন্ন করবে।
👉 কাজ শেষ হওয়ার পরের গুরুত্বপূর্ণ ধাপ: স্ক্রিপ্টটি শেষ হয়ে গেলে, আপনাকে অবশ্যই নিশ্চিত করতে হবে যে আপনার গুগল ক্লাউড কনসোলে সঠিক প্রজেক্টটি দেখা যাচ্ছে:
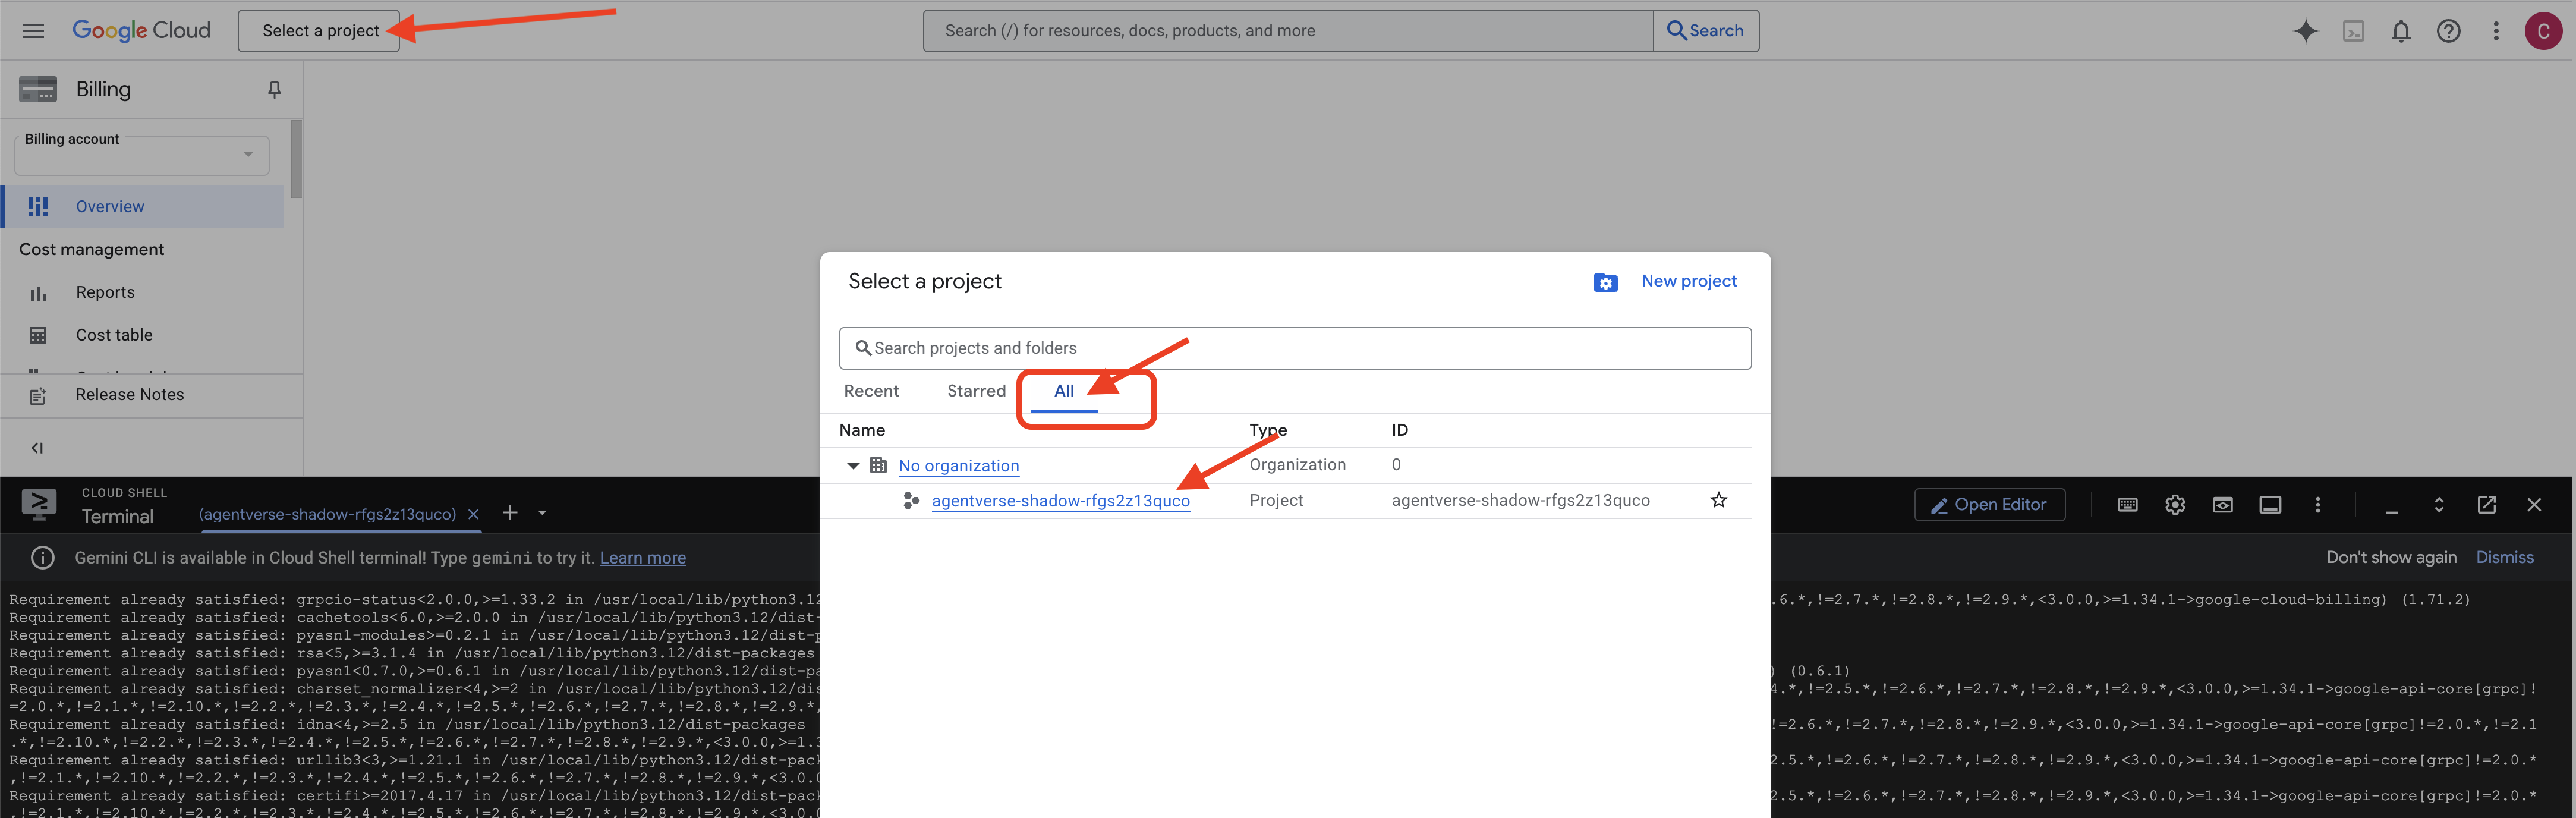
- console.cloud.google.com- এ যান।
- পৃষ্ঠার শীর্ষে থাকা প্রজেক্ট সিলেক্টর ড্রপডাউনটিতে ক্লিক করুন।
- 'All' ট্যাবে ক্লিক করুন (কারণ নতুন প্রজেক্টটি এখনও 'Recent'-এ নাও দেখা যেতে পারে)।
-
init.shধাপে আপনি এইমাত্র যে প্রজেক্ট আইডিটি কনফিগার করেছেন, সেটি নির্বাচন করুন।
👉💻 টার্মিনালে ফিরে যান। প্রয়োজনীয় প্রজেক্ট আইডি সেট করুন:
gcloud config set project $(cat ~/project_id.txt) --quiet
👉💻 প্রয়োজনীয় গুগল ক্লাউড এপিআইগুলো সক্রিয় করতে নিচের কমান্ডটি চালান:
gcloud services enable  compute.googleapis.com \
                        artifactregistry.googleapis.com \
                        run.googleapis.com \
                        cloudfunctions.googleapis.com \
                        cloudbuild.googleapis.com \
                        iam.googleapis.com \
                        aiplatform.googleapis.com \
                        cloudresourcemanager.googleapis.com
👉💻 আপনি যদি agentverse-repo নামের কোনো আর্টিফ্যাক্ট রেজিস্ট্রি রিপোজিটরি আগে থেকে তৈরি না করে থাকেন, তবে সেটি তৈরি করতে নিম্নলিখিত কমান্ডটি চালান:
. ~/agentverse-developer/set_env.sh
gcloud artifacts repositories create $REPO_NAME \
    --repository-format=docker \
    --location=$REGION \
    --description="Repository for Agentverse agents"
অনুমতি সেট আপ করা
👉💻 টার্মিনালে নিম্নলিখিত কমান্ডগুলো চালিয়ে প্রয়োজনীয় অনুমতিগুলো প্রদান করুন:
. ~/agentverse-developer/set_env.sh

# Artifact Registry Admin
gcloud projects add-iam-policy-binding $PROJECT_ID \
  --member="serviceAccount:$SERVICE_ACCOUNT_NAME" \
  --role="roles/artifactregistry.admin"

# Cloud Build Editor
gcloud projects add-iam-policy-binding $PROJECT_ID \
  --member="serviceAccount:$SERVICE_ACCOUNT_NAME" \
  --role="roles/cloudbuild.builds.editor"

# Cloud Run Admin
gcloud projects add-iam-policy-binding $PROJECT_ID \
  --member="serviceAccount:$SERVICE_ACCOUNT_NAME" \
  --role="roles/run.admin"

# IAM Service Account User
gcloud projects add-iam-policy-binding $PROJECT_ID \
  --member="serviceAccount:$SERVICE_ACCOUNT_NAME" \
  --role="roles/iam.serviceAccountUser"

# Vertex AI User
gcloud projects add-iam-policy-binding $PROJECT_ID \
  --member="serviceAccount:$SERVICE_ACCOUNT_NAME" \
  --role="roles/aiplatform.user"

# Logging Writer (to allow writing logs)
gcloud projects add-iam-policy-binding $PROJECT_ID \
  --member="serviceAccount:$SERVICE_ACCOUNT_NAME" \
  --role="roles/logging.logWriter"


gcloud projects add-iam-policy-binding $PROJECT_ID \
  --member="serviceAccount:$SERVICE_ACCOUNT_NAME" \
  --role="roles/logging.viewer"
👉💻 আপনার প্রশিক্ষণ শুরু হওয়ার সাথে সাথে, আমরা চূড়ান্ত চ্যালেঞ্জটি প্রস্তুত করব। নিম্নলিখিত কমান্ডগুলো বিশৃঙ্খল স্ট্যাটিক থেকে স্পেক্টারদের ডেকে আনে, যা আপনার পরীক্ষার জন্য বসদের তৈরি করে।
. ~/agentverse-developer/set_env.sh
cd ~/agentverse-dungeon
./run_cloudbuild.sh

npm update -g @google/gemini-cli
৪. আপনার প্রধান অস্ত্র আয়ত্ত করা: জেমিনি সিএলআই-এর পরিচিতি
এমসিপি সার্ভারের অস্ত্রাগার থেকে উন্নত ও বিশেষায়িত অস্ত্র ব্যবহার করার আগে, আপনাকে প্রথমে আপনার প্রধান অস্ত্র—জেমিনি সিএলআই—আয়ত্ত করতে হবে। এটি আপনার সবচেয়ে বহুমুখী অস্ত্র, যা আপনার নির্দেশে ডিজিটাল জগতকে রূপ দিতে সক্ষম। এই অনুশীলনগুলো আপনাকে এর মৌলিক ব্যবহার ও ক্ষমতার সাথে পরিচিত করাবে।
জেমিনি কমান্ড লাইন ইন্টারফেস (CLI) শুধু একটি টুল নয়; এটি আপনার ইচ্ছাশক্তিরই একটি সম্প্রসারণ। জেমিনি মডেল দ্বারা চালিত এই ওপেন-সোর্স এআই এজেন্টটি একটি 'যুক্তি ও কাজ' (ReAct) লুপে কাজ করে। এটি আপনার অভিপ্রায় বিশ্লেষণ করে, সঠিক কৌশল নির্বাচন করে, তা প্রয়োগ করে এবং জটিল কাজ সম্পন্ন করার জন্য ফলাফল পর্যবেক্ষণ করে। আরও বিশেষায়িত অস্ত্র ব্যবহার করার আগে, আপনাকে অবশ্যই এই প্রাথমিক অস্ত্রটি আয়ত্ত করতে হবে।
Gemini CLI দিয়ে শুরু করা
👉💻 প্রশিক্ষণ স্থলে প্রবেশ করুন এবং আপনার অস্ত্র বের করুন। আপনার ক্লাউড শেল টার্মিনালে, আপনার ব্যক্তিগত অস্ত্রাগারে যান।
cd ~/agentverse-developer
mkdir tabletop
cd tabletop
👉💻 প্রথমবারের জন্য জেমিনিকে আহ্বান করুন। এটি আপনাকে প্রাথমিক অ্যাটিউনমেন্ট প্রক্রিয়ায় পথ দেখাবে।
clear
gemini
যদি আপনাকে জিজ্ঞাসা করা হয় Do you want to connect Cloud Shell editor to Gemini CLI? , তাহলে “না” নির্বাচন করুন।
অস্ত্র পরিচিতি
প্রত্যেক দক্ষ কারিগর তার সরঞ্জাম চেনে। প্রকৃত শত্রুর মুখোমুখি হওয়ার আগে তোমাকে তোমার তলোয়ারের মূল কৌশলগুলো শিখে নিতে হবে।
👉✨ প্রতিটি জাদুকরী সরঞ্জামে তার শক্তি বর্ণনা করে এমন চিহ্ন থাকে। এখনই সেগুলো পড়ুন। মিথুন রাশির প্রম্পটে টাইপ করুন:
/help
কমান্ডের তালিকাটি লক্ষ্য করুন। এগুলো হলো স্মৃতি ( focus ), কথোপকথন ( chat ) এবং বাহ্যিক অস্ত্রশস্ত্র ( tools ) পরিচালনার জন্য আপনার মৌলিক কৌশল। এটিই আপনার যুদ্ধ নির্দেশিকা।
👉✨ আপনার অস্ত্রটি তার পারিপার্শ্বিকতার সাথে সামঞ্জস্যপূর্ণ, যা আপনাকে সরাসরি যুদ্ধক্ষেত্র নিয়ন্ত্রণ করার সুযোগ দেয়। তরবারির বাইরের জগতে একটি আদেশ দিন:
!ls -l
👉✨ জেমিনি সিএলআই-এর নিজস্ব কিছু অন্তর্নির্মিত ক্ষমতা রয়েছে। সেগুলো পরীক্ষা করতে:
/tools
আপনি ReadFile , WriteFile , এবং GoogleSearch সহ একটি তালিকা দেখতে পাবেন। এগুলো হলো ডিফল্ট পদ্ধতি, যা আপনি কোনো বাহ্যিক ব্যবস্থার সাহায্য ছাড়াই ব্যবহার করতে পারেন।
👉✨ আপনার ব্লেডকে এক্সটেনশন দিয়েও উন্নত করা যায় — এগুলি হলো অন্যান্য মাস্টারদের তৈরি পূর্ব-নির্মিত এনচ্যান্টমেন্ট, যা টুল, কমান্ড এবং কনটেক্সটকে একটিমাত্র ইনস্টলযোগ্য ইউনিটে একত্রিত করে। বর্তমানে আপনার ব্লেডের সাথে কোন এক্সটেনশনগুলি অ্যাটিউন করা আছে তা পরীক্ষা করে দেখুন:
/extensions list
তালিকাটি আপাতত খালি থাকতে পারে — আপনি এখনও কোনো এক্সটেনশন ইনস্টল করেননি। আপনার প্রশিক্ষণের জন্য যখন ছবি তৈরির ক্ষমতার প্রয়োজন হবে, তখন আপনি আপনার প্রথম এক্সটেনশনটি ব্যবহার করবেন।
👉✨ এক্সটেনশনের বাইরে, দক্ষ ওস্তাদরা তাদের পারদর্শিতাকে এজেন্ট স্কিলস -এ সংহিতাবদ্ধ করেছেন — যা হলো চাহিদা অনুযায়ী বিশেষ জ্ঞানের স্ক্রোল। আপনার ব্লেড কী কী দক্ষতা আবিষ্কার করতে পারে তা দেখে নিন:
/skills list
দক্ষতাগুলো স্বয়ংক্রিয়ভাবে স্মৃতিতে জমা হয় না — এগুলো কেবল প্রয়োজনের সময়ই সক্রিয় হয়, যা আপনার তরবারিকে ক্ষিপ্র ও বাধাহীন রাখে। প্রশিক্ষণের পরবর্তী পর্যায়ে আপনি দক্ষতা ব্যবহার করতে শিখবেন।
👉✨ একটি অস্ত্র তখনই কার্যকর হয় যখন সেটিকে সঠিকভাবে ব্যবহার করা হয়। জেমিনি ব্লেড তার কার্যকলাপকে পরিচালিত করার জন্য 'কৌশলগত সচেতনতা' (প্রসঙ্গ) ধারণ করতে পারে।
/memory show
এটি বর্তমানে খালি, একটি ফাঁকা খাতা।
👉✨ এর স্মৃতিতে নিম্নলিখিত কৌশলগত তথ্যগুলো লিপিবদ্ধ করুন:
/memory add "The Shadowblade's primary foe is The Static."
আপনার ব্লেড এই তথ্যটি গ্রহণ করেছে কিনা তা নিশ্চিত করতে আবার /memory show চালান।
👉✨ কার্যকর হতে হলে, আপনার অস্ত্রকে অবশ্যই মিশনটি বুঝতে হবে। @ চিহ্নটি ব্লেডকে তথ্য বিশ্লেষণ করার নির্দেশ দেয়। প্রথমে, একটি মিশন ব্রিফিং ফাইল তৈরি করুন:
!echo "## Mission Objective: Defeat the Seven Spectres" > mission.md
👉✨এখন, ব্রিফিংটি বিশ্লেষণ করতে এবং এর ফলাফল জানাতে আপনার Gemini CLI-কে নির্দেশ দিন:
Explain the contents of the file @mission.md
আপনার প্রধান অস্ত্রটি এখন তার উদ্দেশ্য সম্পর্কে সচেতন।
👉💻 Gemini CLI থেকে বের হতে Ctrl+C দুইবার চাপুন।
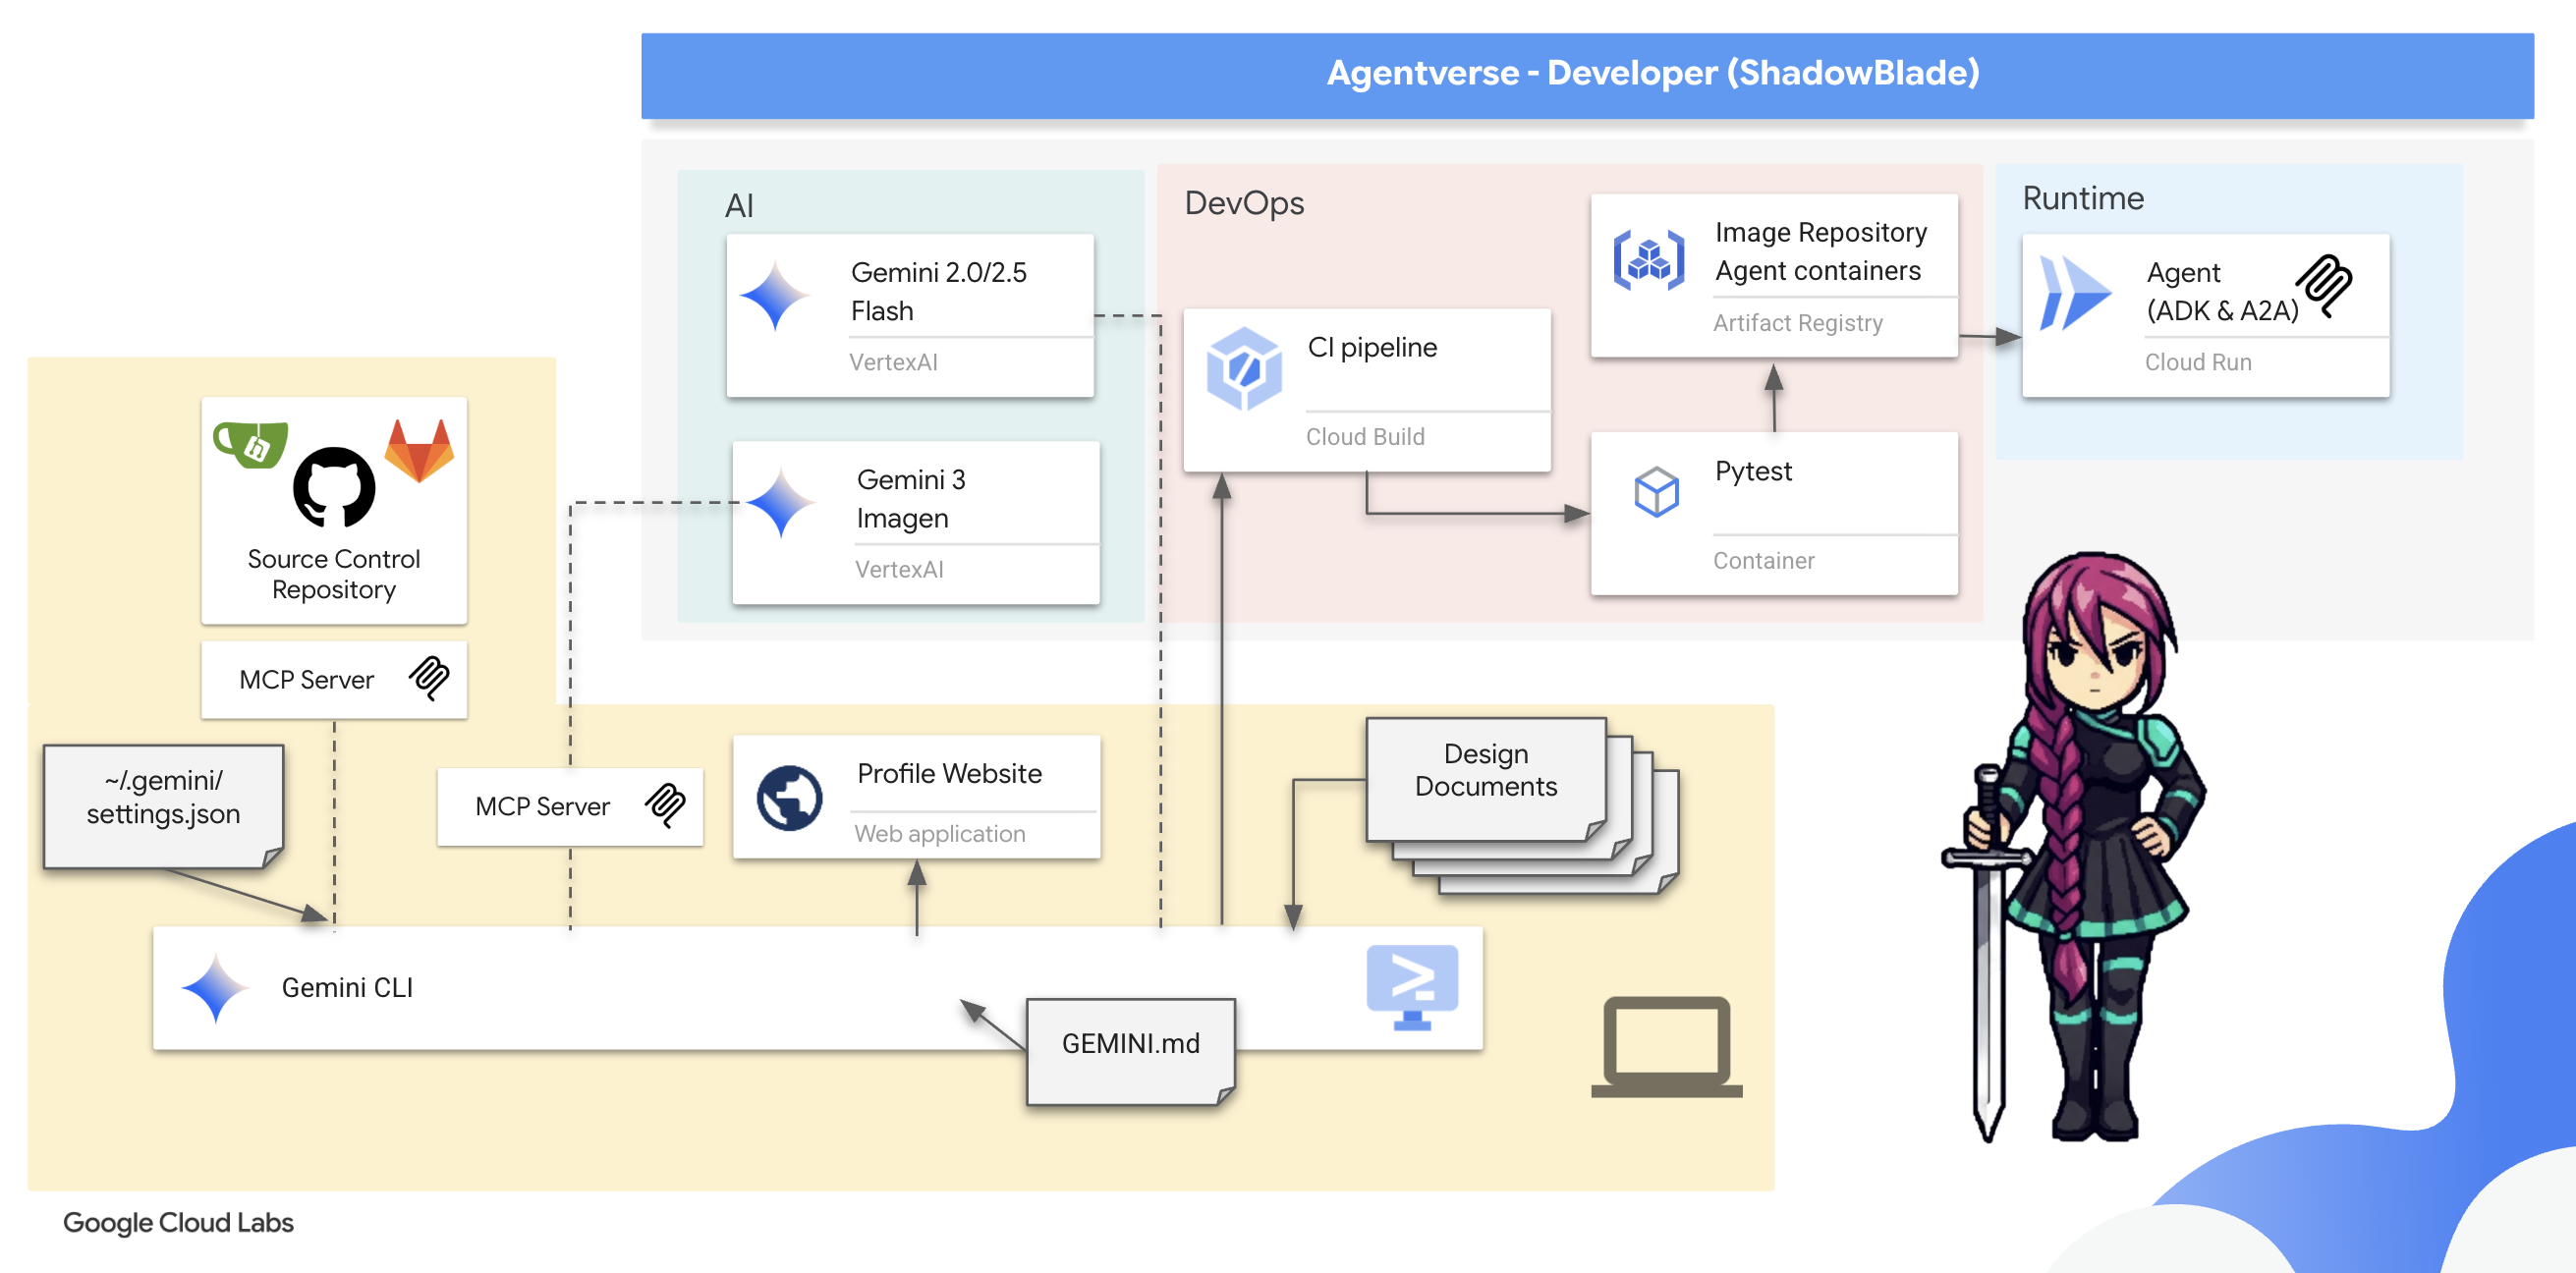
৫. যুদ্ধক্ষেত্র বিশ্লেষণ: প্রায়োগিক ভাইব কোডিং ইন্টারঅ্যাকশন
প্রশিক্ষণ মহড়া সম্পন্ন হয়েছে। আপনি আপনার প্রধান অস্ত্র, জেমিনি সিএলআই-এর প্রাথমিক ভঙ্গি ও আঘাত হানার কৌশল শিখেছেন। কিন্তু একটি অস্ত্র ততক্ষণ পর্যন্ত পুরোপুরি আয়ত্ত করা যায় না, যতক্ষণ না তা সৃষ্টির চুল্লিতে পরীক্ষিত হয় এবং যুদ্ধের অস্ত্রাগারের সাথে অভ্যস্ত হয়ে ওঠে। প্রকৃত শত্রুর মুখোমুখি হওয়ার আগে, আপনাকে প্রথমে আপনার নিকটবর্তী চারপাশ—এই ডিজিটাল যুদ্ধক্ষেত্র—পর্যবেক্ষণ ও গঠন করতে হবে।
এই অধ্যায়টি তত্ত্ব থেকে অনুশীলনে উত্তরণ নিয়ে। আপনি প্রথমে আপনার জেমিনি ব্লেডকে নির্দেশ দিয়ে আপনার মেকার্স মার্ক—একটি ব্যক্তিগত ওয়েবসাইটের আকারে ডিজিটাল স্বাক্ষর—তৈরি করার মাধ্যমে এজেন্টভার্সে আপনার উপস্থিতি প্রতিষ্ঠা করবেন, যা শুধুমাত্র আপনার অভিপ্রায়ের উপর ভিত্তি করে নির্মিত। তারপর, আপনি উন্নত সরঞ্জামের একটি স্থানীয় অস্ত্রাগার—একটি এমসিপি সার্ভার—সক্রিয় করে এবং এর কম্পাঙ্কের সাথে আপনার ব্লেডকে সুর মিলিয়ে আপনার শক্তি প্রসারিত করবেন, যা আপনাকে সহজ ও সুনির্দিষ্ট নির্দেশের মাধ্যমে কোড রিপোজিটরি পরিচালনার মতো জটিল কৌশল সম্পাদন করার সুযোগ দেবে।
আপনার নির্মাতার চিহ্ন প্রতিষ্ঠা করা
একজন প্রকৃত শ্যাডোব্লেডকে শুধু তার অস্ত্র দিয়েই নয়, বরং তার নিজস্ব শৈলী—তার মেকার্স মার্ক —এর মাধ্যমেও চেনা যায়। এই চিহ্নটিই হবে আপনার ডিজিটাল উপস্থিতি, একটি ব্যক্তিগত প্রোফাইল যা এজেন্টভার্সের কাছে আপনার পরিচয় ঘোষণা করবে। এখানে, এই পরিচয়কে সংজ্ঞায়িত করার জন্য প্রয়োজনীয় জটিল কৌশলটি সম্পাদন করতে আপনি আপনার জেমিনি ব্লেডকে নির্দেশ দেবেন।

👉💻 আপনি যদি আগের অংশে Gemini CLI বন্ধ করে থাকেন, তাহলে সেটি আবার চালু করতে আপনার টার্মিনালে রান করুন।
clear
cd ~/agentverse-developer/tabletop
gemini
👉✨ একটিমাত্র শক্তিশালী কমান্ডের মাধ্যমে আপনার জেমিনি সিএলআই-কে নির্দেশ দিন আপনার ডিজিটাল পরিচয়ের ভিত্তি গড়তে:
In the current folder, create a personal profile website for a hero codenamed 'Shadowblade'. The design must be a dark, futuristic theme with electric blue accents. All code must be in separate index.html and styles.css files. The layout must use CSS Flexbox for a two-column design. All generated code must be clean, well-commented, and professional. Make sure you have a placeholder spot for profile picture. Do not attempt to start the server.
জেমিনি প্রয়োজনীয় পদক্ষেপগুলোর ক্রম গণনা করেছে।
👉💻 Gemini CLI থেকে বের হতে দুইবার Ctrl+C চাপুন এবং টার্মিনালে নিম্নলিখিত কমান্ডটি চালান।*
python -m http.server
👀 আপনার কাজটি দেখতে, ক্লাউড শেল টুলবারে থাকা ওয়েব প্রিভিউ আইকনে ক্লিক করুন। ‘Change port’ নির্বাচন করে সেটিকে 8000- এ সেট করুন এবং ‘Change and Preview’-এ ক্লিক করুন। আপনার ওয়েবসাইটের একটি প্রিভিউ প্রদর্শিত হবে। 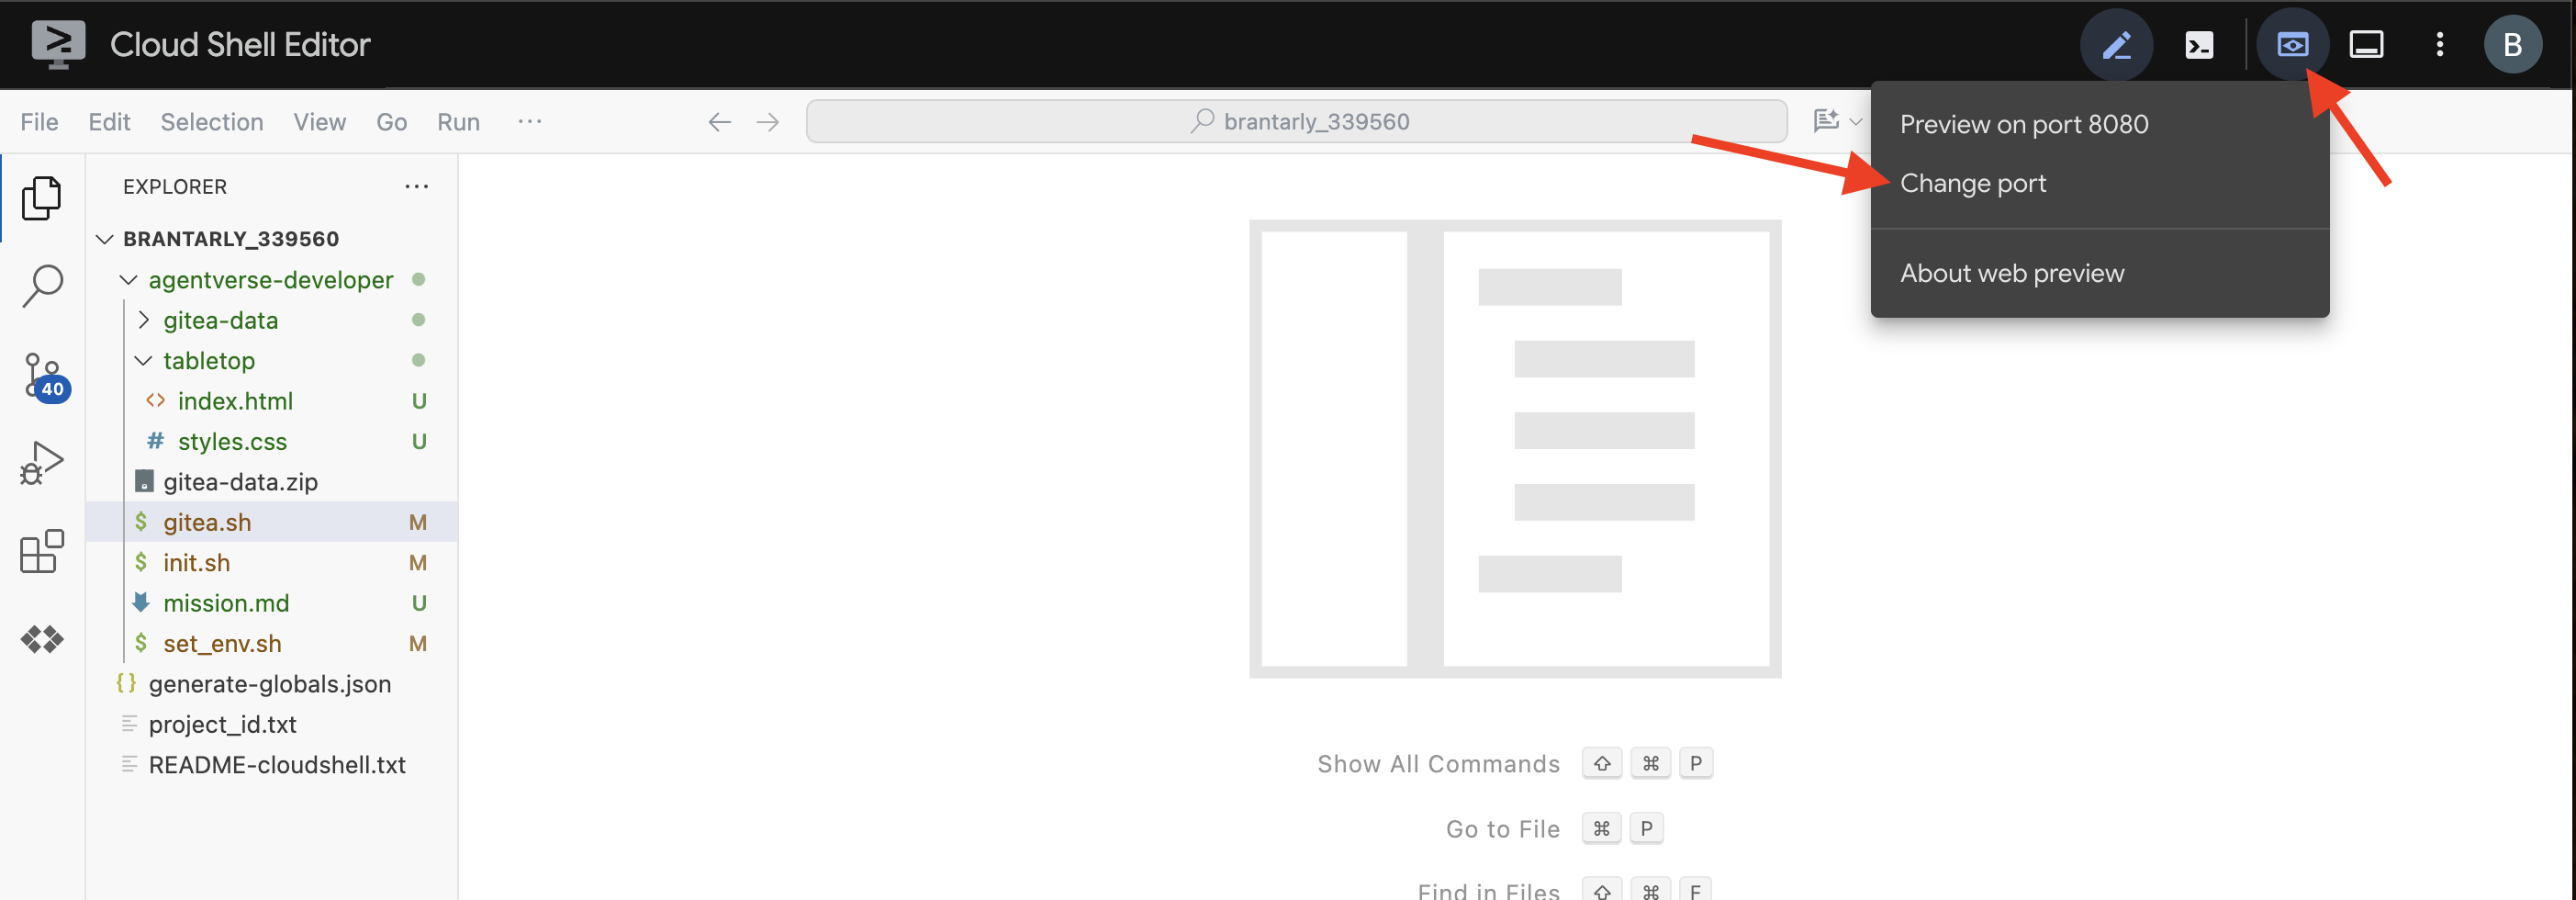
আপনার ওয়েবসাইটটি আমারটার থেকে দেখতে আলাদা হতে পারে। এটাই আপনার স্বকীয়তা। 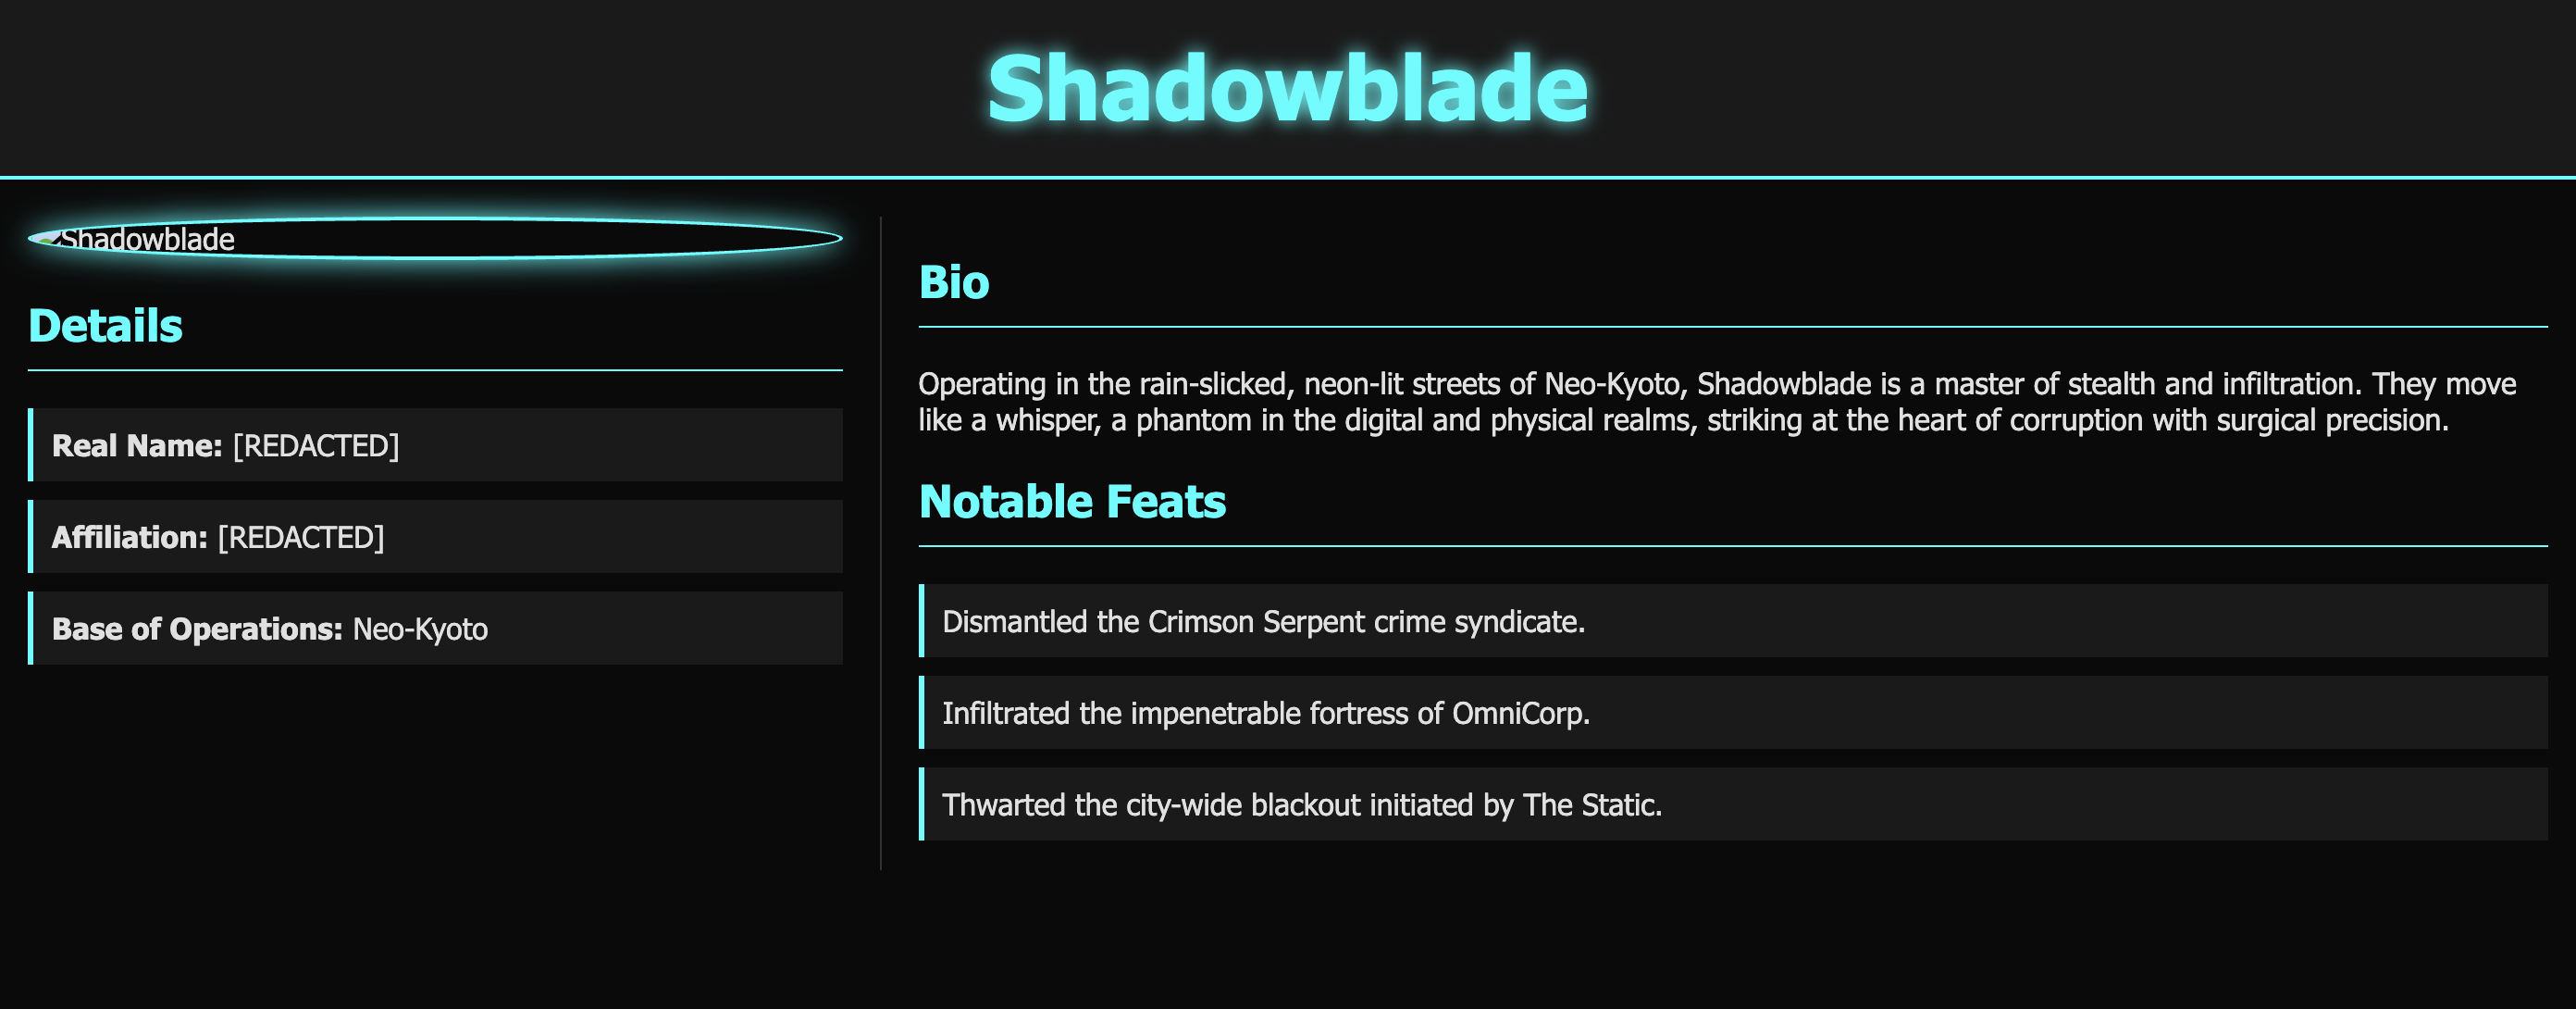
আপনার নিজস্ব কৌশল এখন পরিমার্জিত হয়েছে, এবং লাইভ সিমুলেশনের আর প্রয়োজন নেই। ব্লেডকে বিশ্রাম নেওয়ার নির্দেশ দিন।
👉💻 http সার্ভার থেকে বের হতে Ctrl+C চাপুন।
আপনার ডিজিটাল পরিচয় এখন প্রতিষ্ঠিত হয়েছে, এবং আরও গুরুত্বপূর্ণ বিষয় হলো, আপনি বিপুল শক্তিকে আরও বেশি সতর্কতার সাথে ব্যবহার করার অপরিহার্য প্রজ্ঞা অর্জন করেছেন।
আপনার স্থানীয় অস্ত্রাগার সক্রিয় করুন: গিটিয়া আর্মারি
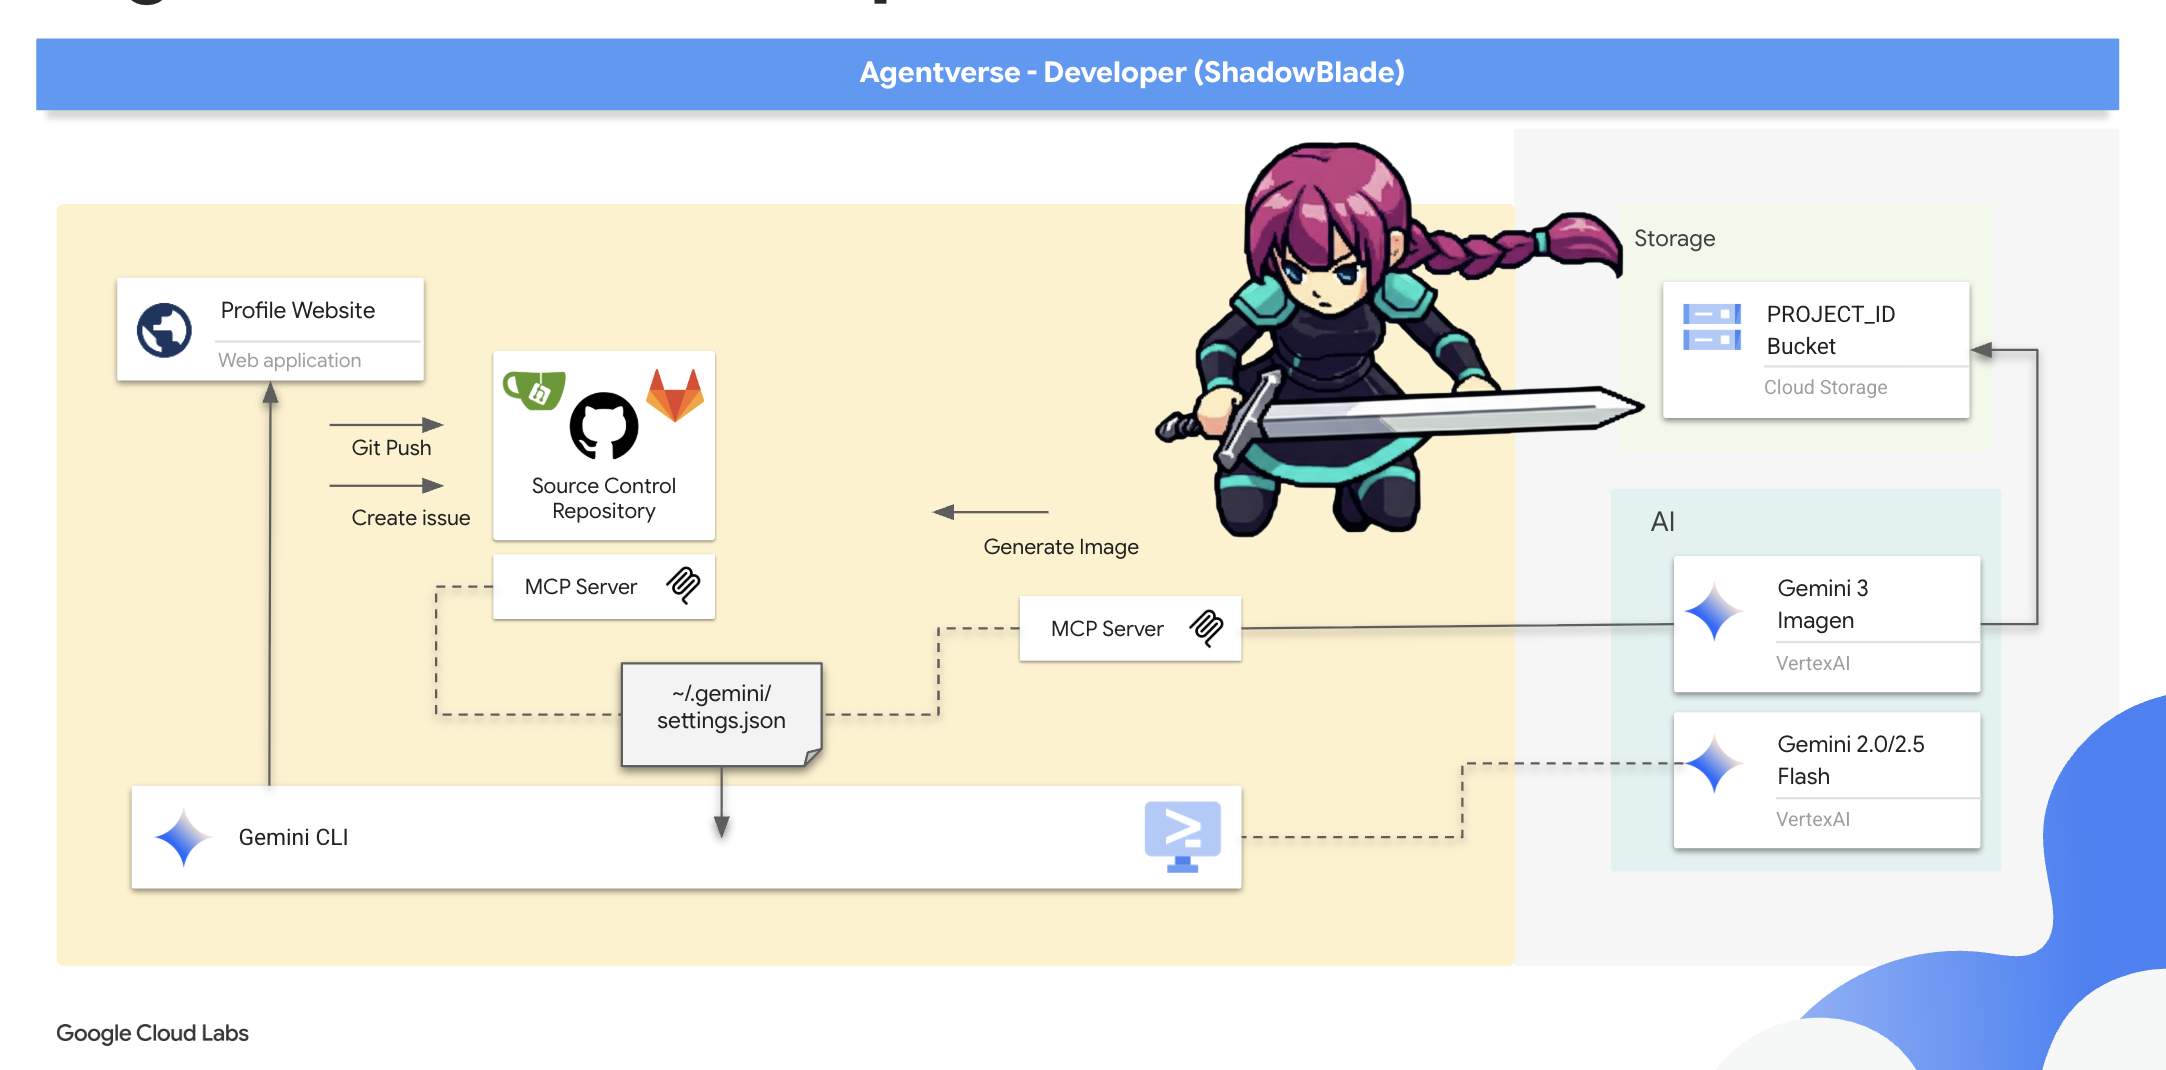
একজন শ্যাডোব্লেডের প্রকৃত সম্ভাবনা কেবল তার ব্যক্তিগত দক্ষতার দ্বারাই নয়, বরং তার অস্ত্রাগারের গুণমানের দ্বারাও উন্মোচিত হয়। আপনি এখন আপনার স্থানীয় অস্ত্রের র্যাক—একটি গিটিয়া সার্ভার—সক্রিয় করবেন এবং আপনার ব্লেডকে এর শক্তির সাথে সুর মিলিয়ে নেবেন। এই অস্ত্রাগারটি একটি মডেল কনটেক্সট প্রোটোকল (এমসিপি) সার্ভারের মাধ্যমে আপনার জেমিনি সিএলআই-এর সাথে সংযুক্ত। এটি একটি বিশেষায়িত পোর্টাল যা আপনার এআই ব্লেডকে বাহ্যিক সরঞ্জাম এবং পরিষেবাগুলির সাথে যোগাযোগ করতে সক্ষম করে, এবং আপনার টার্মিনালকে একটি বুদ্ধিমান, কর্মমুখী কর্মক্ষেত্রে রূপান্তরিত করে।
ডেভেলপারের নোট: একটি MCP সার্ভারকে শক্তির একটি বাহক হিসেবে ভাবুন, একটি বিশেষায়িত পোর্টাল যা আপনার AI-এর মনকে একটি বাহ্যিক টুলের দেহের সাথে সংযুক্ত করে। এটিই Gemini CLI-কে নিছক কথোপকথনকারী থেকে একটি সত্যিকারের, কর্মমুখী এজেন্টে উন্নীত করে। এই MCP পোর্টালগুলোর সাথে আপনার ব্লেডকে সংযুক্ত করার মাধ্যমে, আপনি এটিকে বাস্তব কাজ সম্পাদন করার ক্ষমতা প্রদান করেন: ফাইল পরিচালনা করা, ডেটাবেস কোয়েরি করা, API-এর সাথে ইন্টারঅ্যাক্ট করা এবং আরও অনেক কিছু। এই পোর্টালগুলোর একটি সম্পূর্ণ ইকোসিস্টেম বিদ্যমান, যা ডেভেলপাররা AI এজেন্টদের শক্তিশালী প্ল্যাটফর্মের সাথে সংযুক্ত করার জন্য তৈরি করেছেন। ডেটাবেসের সাথে ইন্টারঅ্যাক্ট করা, কোড সুরক্ষিত করা, এমনকি পেয়ার প্রোগ্রামিং সমর্থনের জন্যও MCP সার্ভার রয়েছে। এর সম্ভাবনা বিশাল, যা একজন ডেভেলপারকে যেকোনো প্রকল্পের জন্য তার কর্মক্ষেত্রকে নিজের মতো করে সাজিয়ে নেওয়ার সুযোগ দেয়।
আজ আমরা যেকোনো 'ভাইব কোডার'-এর জন্য অপরিহার্য দুটি মৌলিক ক্ষমতার উপর মনোযোগ দেব: ফোর্জ নিয়ন্ত্রণ করার ক্ষমতা এবং কল্পনা থেকে সৃষ্টি করার ক্ষমতা। প্রথমে আপনি আপনার ব্লেডকে একটি গিট সার্ভারের সাথে সংযুক্ত করবেন, যা আপনাকে আপনার সোর্স কোড রিপোজিটরির উপর কর্তৃত্ব দেবে। তারপর, আপনি ইমেজ জেনারেশনের জন্য একটি দ্বিতীয় এমসিপি সার্ভারের সাথে সংযুক্ত হবেন, যা আপনাকে শুধুমাত্র একটি কমান্ডের মাধ্যমে ভিজ্যুয়াল অ্যাসেট তৈরি করার সুযোগ দেবে।
চলুন আপনার নতুন অস্ত্রাগারের প্রথম এবং সবচেয়ে মৌলিক অংশটিকে তলব করার মাধ্যমে শুরু করা যাক: স্বয়ং অস্ত্রাগারটিকেই।
👉💻 আপনার টার্মিনালে, অস্ত্রাগারটি তলব করতে অ্যাক্টিভেশন স্ক্রিপ্টটি চালান:
cd ~/agentverse-developer
./gitea.sh
এই স্ক্রিপ্টটি গিটিয়া কন্টেইনারকে জাগিয়ে তোলে এবং এমসিপি পোর্টালটি খুলে দেয়, যার ফলে জেমিনি এটিকে উপলব্ধি করতে ও এর সাথে যোগাযোগ করতে পারে।
👉 আপনার নতুন অস্ত্রাগার পরিদর্শন করতে, আপনাকে ওয়েব প্রিভিউ দেখতে হবে।
👉 ক্লাউড শেল টুলবারের ওয়েব প্রিভিউ আইকন থেকে, ‘Change port’ নির্বাচন করুন এবং পোর্টটি 3005- এ সেট করুন।
👉 একটি Gitea লগইন পেজ আসবে। এই কমান্ডটি ব্যবহার করে আর্মারিতে প্রবেশ করুন: * ইউজারনেম: dev * পাসওয়ার্ড: dev 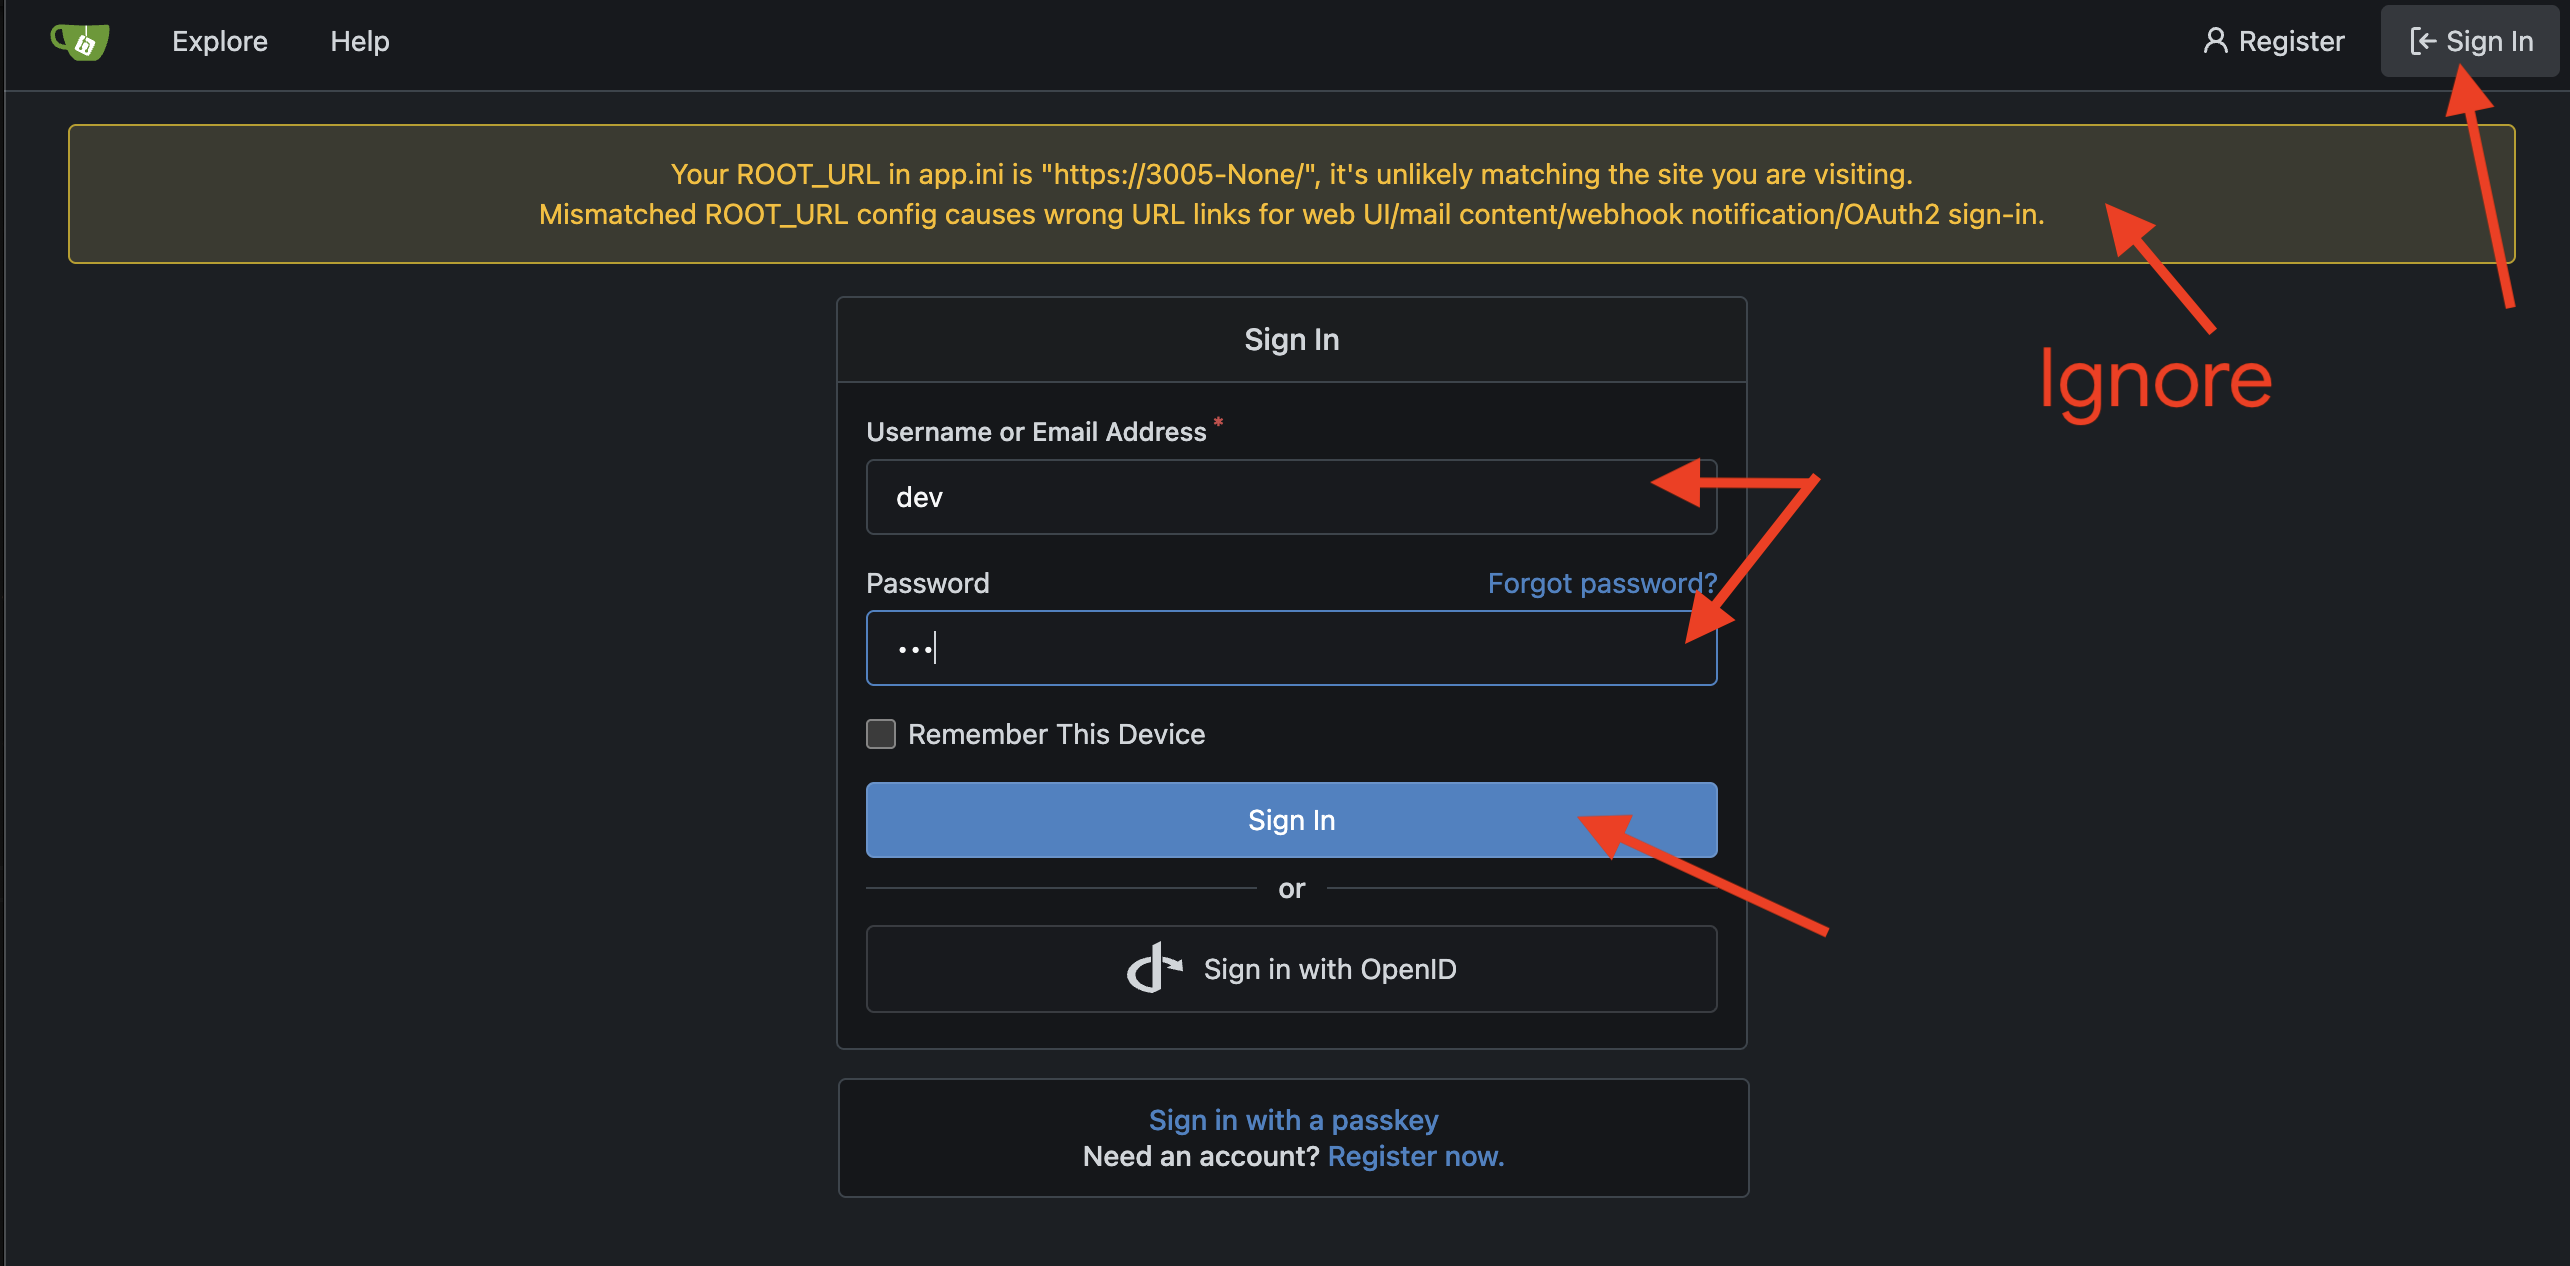
👉💻 আপনার Gemini CLI এখনও এই নতুন অস্ত্রাগারটি দেখতে পাচ্ছে না। আপনাকে অবশ্যই একটি ক্রিটিক্যাল অ্যাটিউনমেন্ট করতে হবে, যার মাধ্যমে Gemini CLI-এর কনফিগারেশন রুনগুলিতে ( settings.json ) অস্ত্রাগারের অবস্থানটি খোদাই করতে হবে। আপনার টার্মিনালে, চালান:
if [ ! -f ~/.gemini/settings.json ]; then
  # If file does not exist, create it with the specified content
  echo '{"mcpServers":{"gitea":{"url":"http://localhost:8085/sse"}}}' > ~/.gemini/settings.json
else
  # If file exists, merge the new data into it
  jq '. * {"mcpServers":{"gitea":{"url":"http://localhost:8085/sse"}}}' ~/.gemini/settings.json > tmp.json && mv tmp.json ~/.gemini/settings.json
fi &&
cat ~/.gemini/settings.json
👀 settings.json ফাইলটি হলো Gemini CLI-এর কেন্দ্রীয় কনফিগারেশন, যা এর পছন্দ ও ক্ষমতার নির্দেশিকা হিসেবে কাজ করে। এটি নির্ধারণ করে যে CLI কীভাবে আচরণ করবে, দেখতে কেমন হবে এবং সবচেয়ে গুরুত্বপূর্ণভাবে, এটি কী কী বাহ্যিক ক্ষমতা প্রয়োগ করতে পারবে। এই ফাইলটি সাধারণত আপনার হোম ডিরেক্টরিতে ~/.gemini/settings.json এ থাকে এবং এর নিয়মগুলো আপনার সমস্ত প্রোজেক্টে প্রয়োগ করে। তবে, গ্লোবাল সেটিংসকে ওভাররাইড করার জন্য আপনি আপনার প্রোজেক্ট ফোল্ডারের ভেতরে একটি .gemini ডিরেক্টরিতে প্রোজেক্ট-নির্দিষ্ট settings.json ফাইলও তৈরি করতে পারেন।
"mcpServers": {
  "gitea": {
    "url": "http://localhost:8085/sse"
  }
}
এই সেটিংটি আপনার জেমিনিকে জানায় যে, "gitea নামের অস্ত্রাগারটি সক্রিয় আছে এবং এই নির্দিষ্ট নেটওয়ার্ক ঠিকানায় কমান্ডের জন্য অপেক্ষা করছে।"
👉💻 Gemini CLI-তে পুনরায় প্রবেশ করুন। আপনার টার্মিনালে, এটি চালান:
clear
cd ~/agentverse-developer/tabletop/
gemini
👉✨ যাচাই করুন যে আপনার ব্লেডটি নতুন অস্ত্রটি খুঁজে পেয়েছে। এর MCP পোর্টালের মাধ্যমে উপলব্ধ সমস্ত অস্ত্রাগারের তালিকা দেখাতে এটিকে নির্দেশ দিন:
/mcp
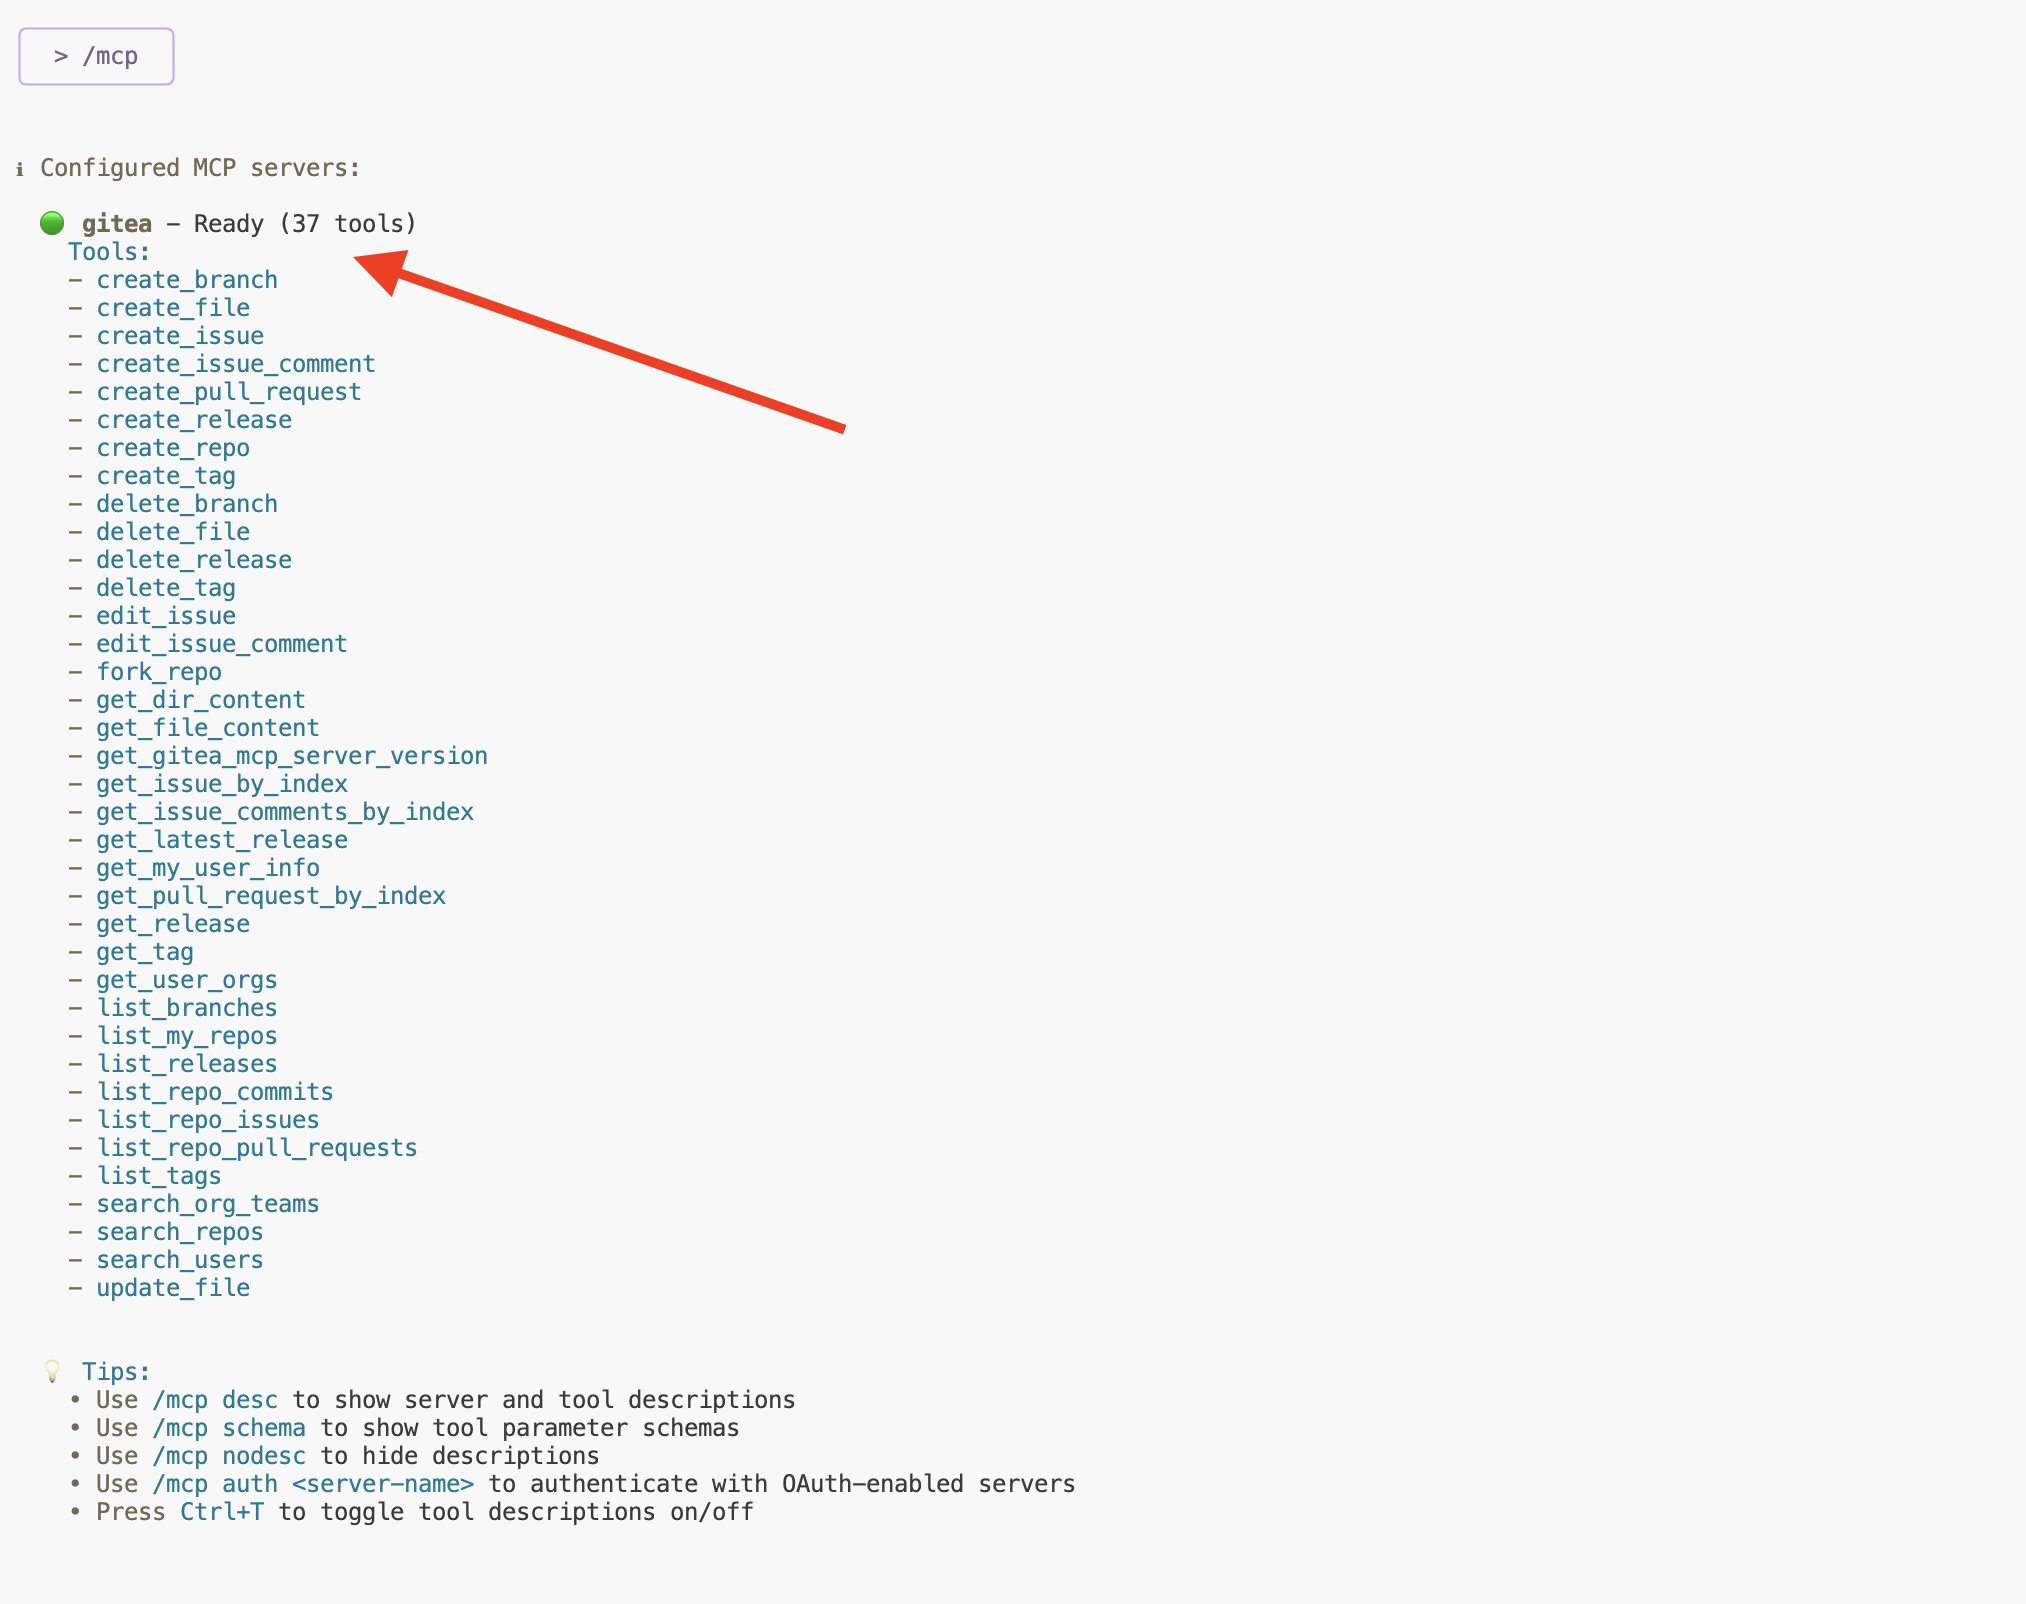
এখন আপনি gitea এবং এর উপলব্ধ কৌশলগুলোর তালিকা দেখতে পাবেন। আপনার ব্লেডটি সুরবদ্ধ করা হয়েছে।
আপনার 'মেকার'স মার্ক' প্রোফাইলটি একটি অত্যন্ত সুনিপুণ কৌশল, কিন্তু অস্ত্রাগারে এর জন্য একটি উপযুক্ত স্থান প্রয়োজন—একে নিরাপদে ধরে রাখার জন্য একটি খাপ। এমন একটি তৈরি করার জন্য আপনার জেমিনি সিএলআই-কে নির্দেশ দিন।
Create a new repository named 'shadowblade-profile'. The description should be 'The Maker's Mark and digital identity for the Shadowblade operative.' I will push my own files later, so do not create any content.
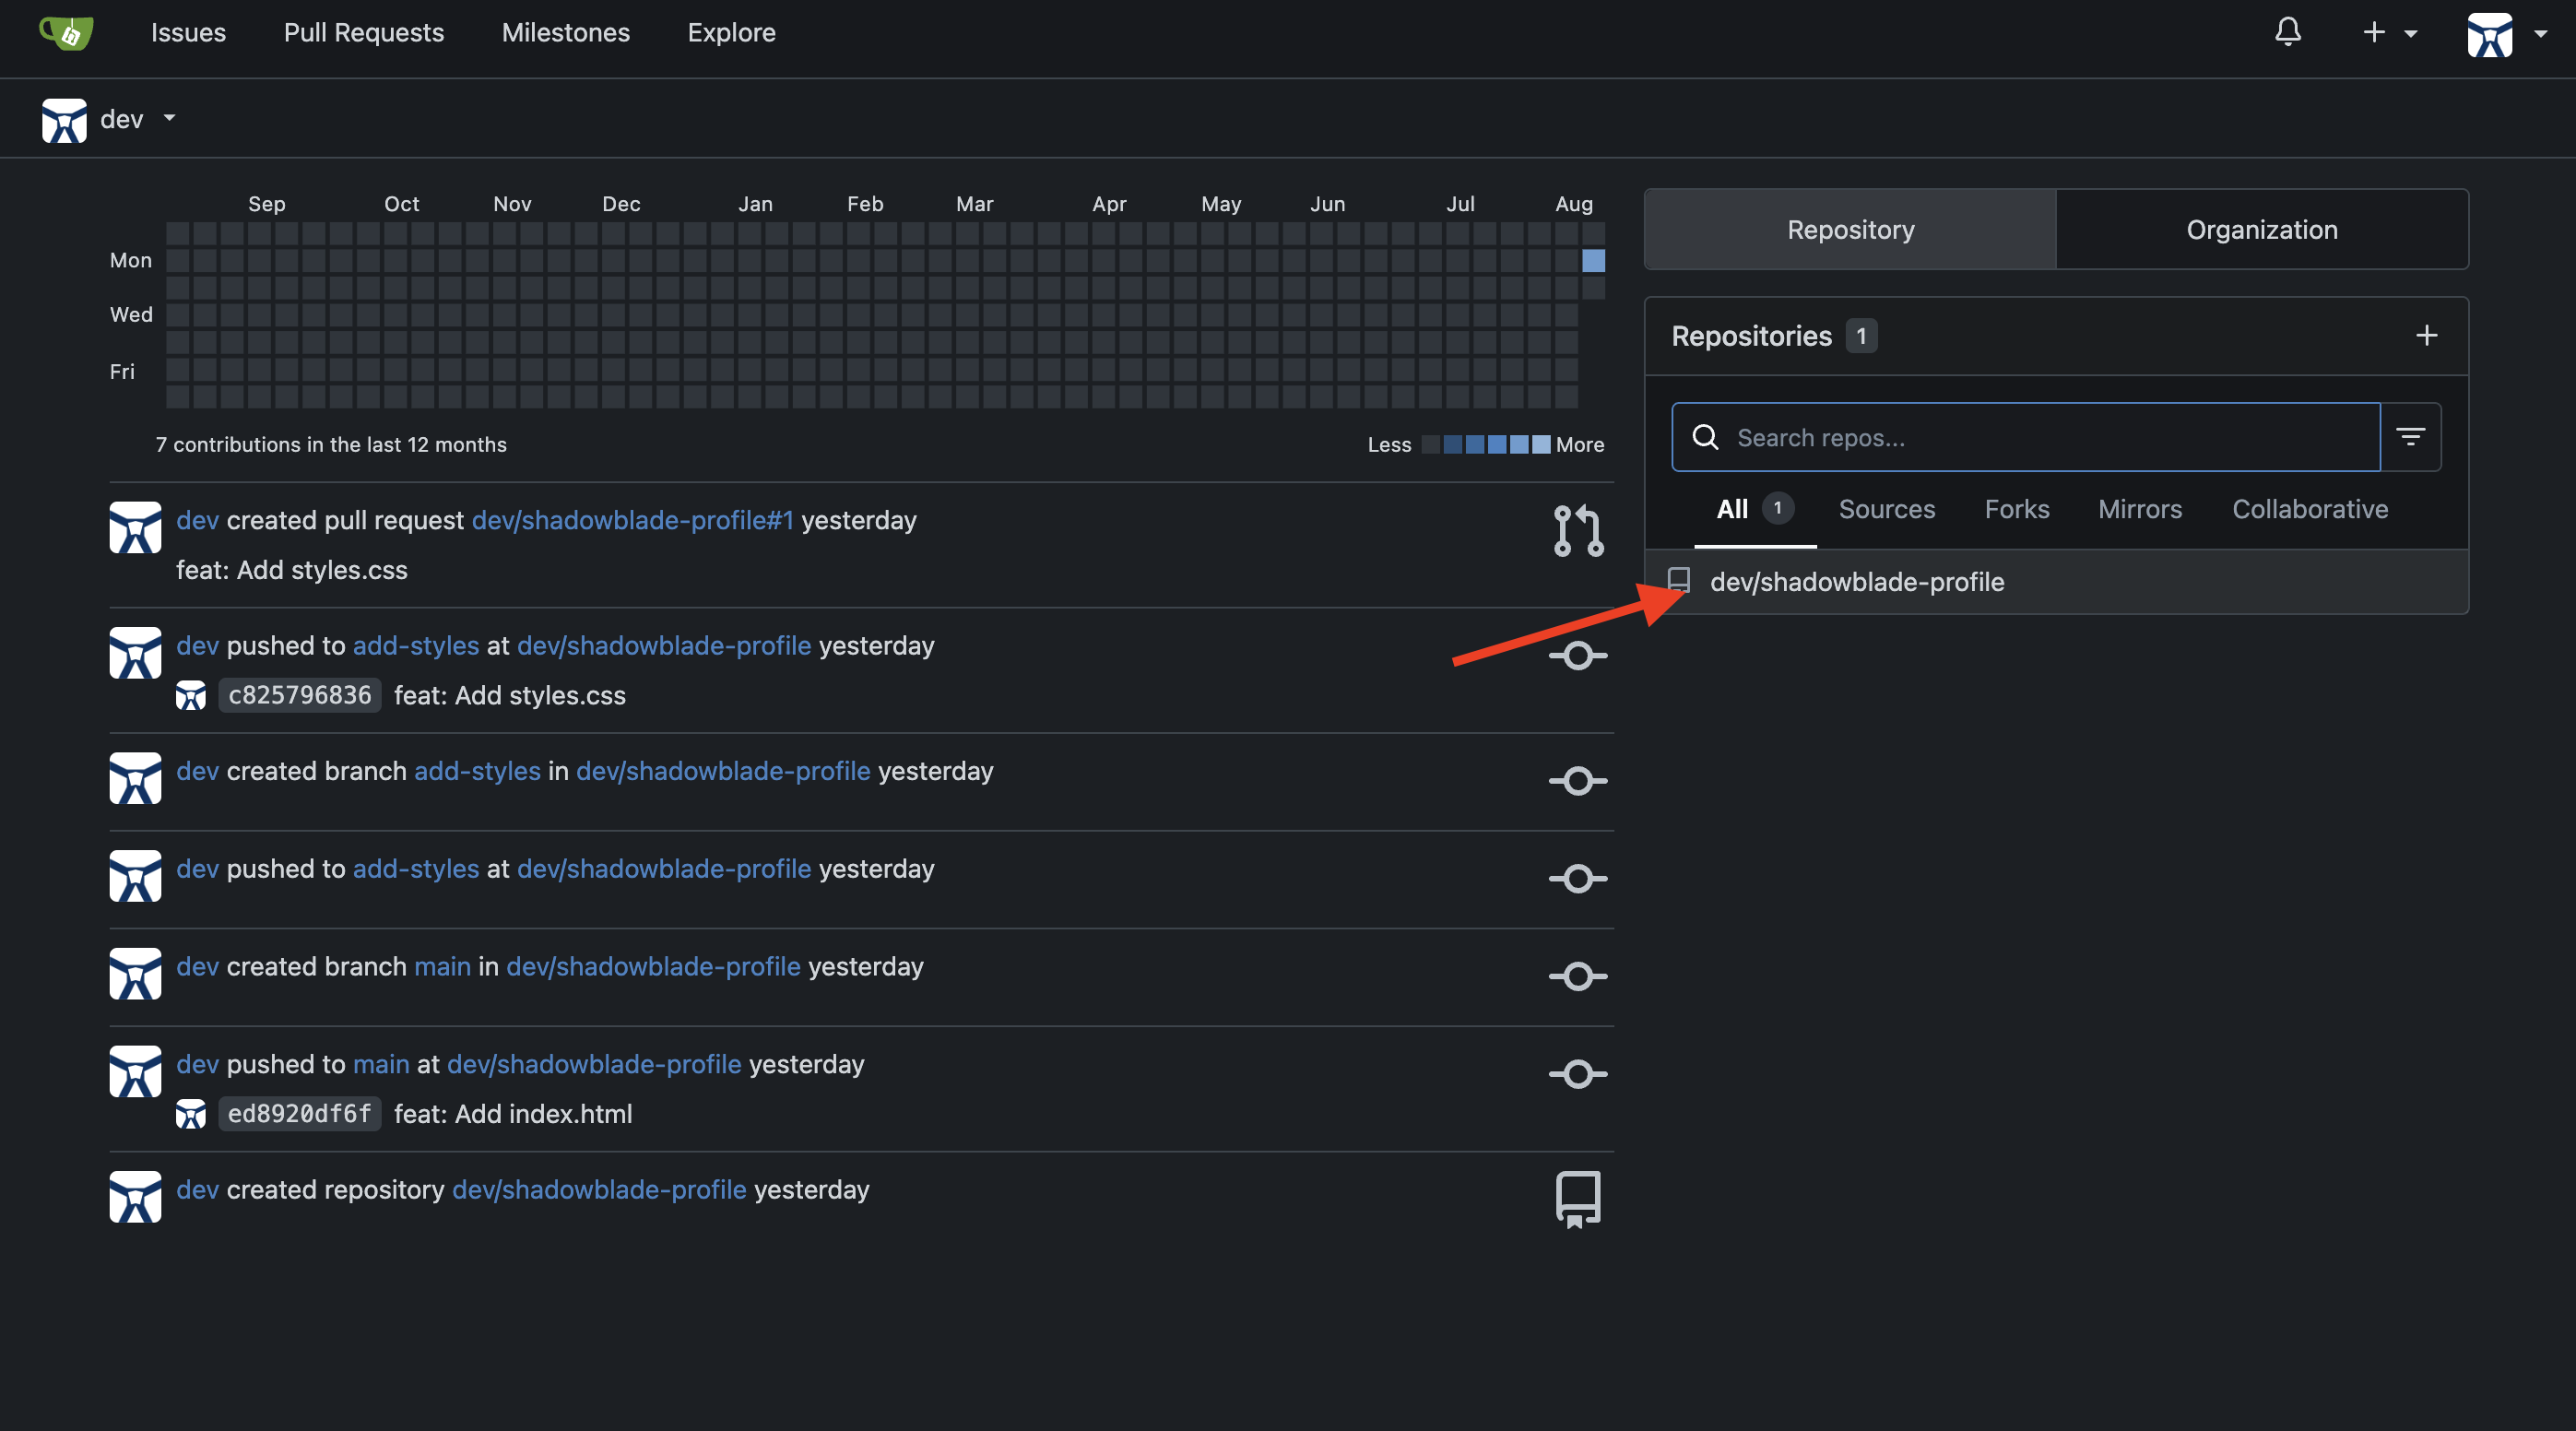
Gitea ওয়েব ইন্টারফেসে ফিরে যান এবং রিফ্রেশ করুন। আপনি দেখতে পাবেন যে আপনার জন্য নতুন shadowblade-profile রিপোজিটরিটি তৈরি হয়ে গেছে। 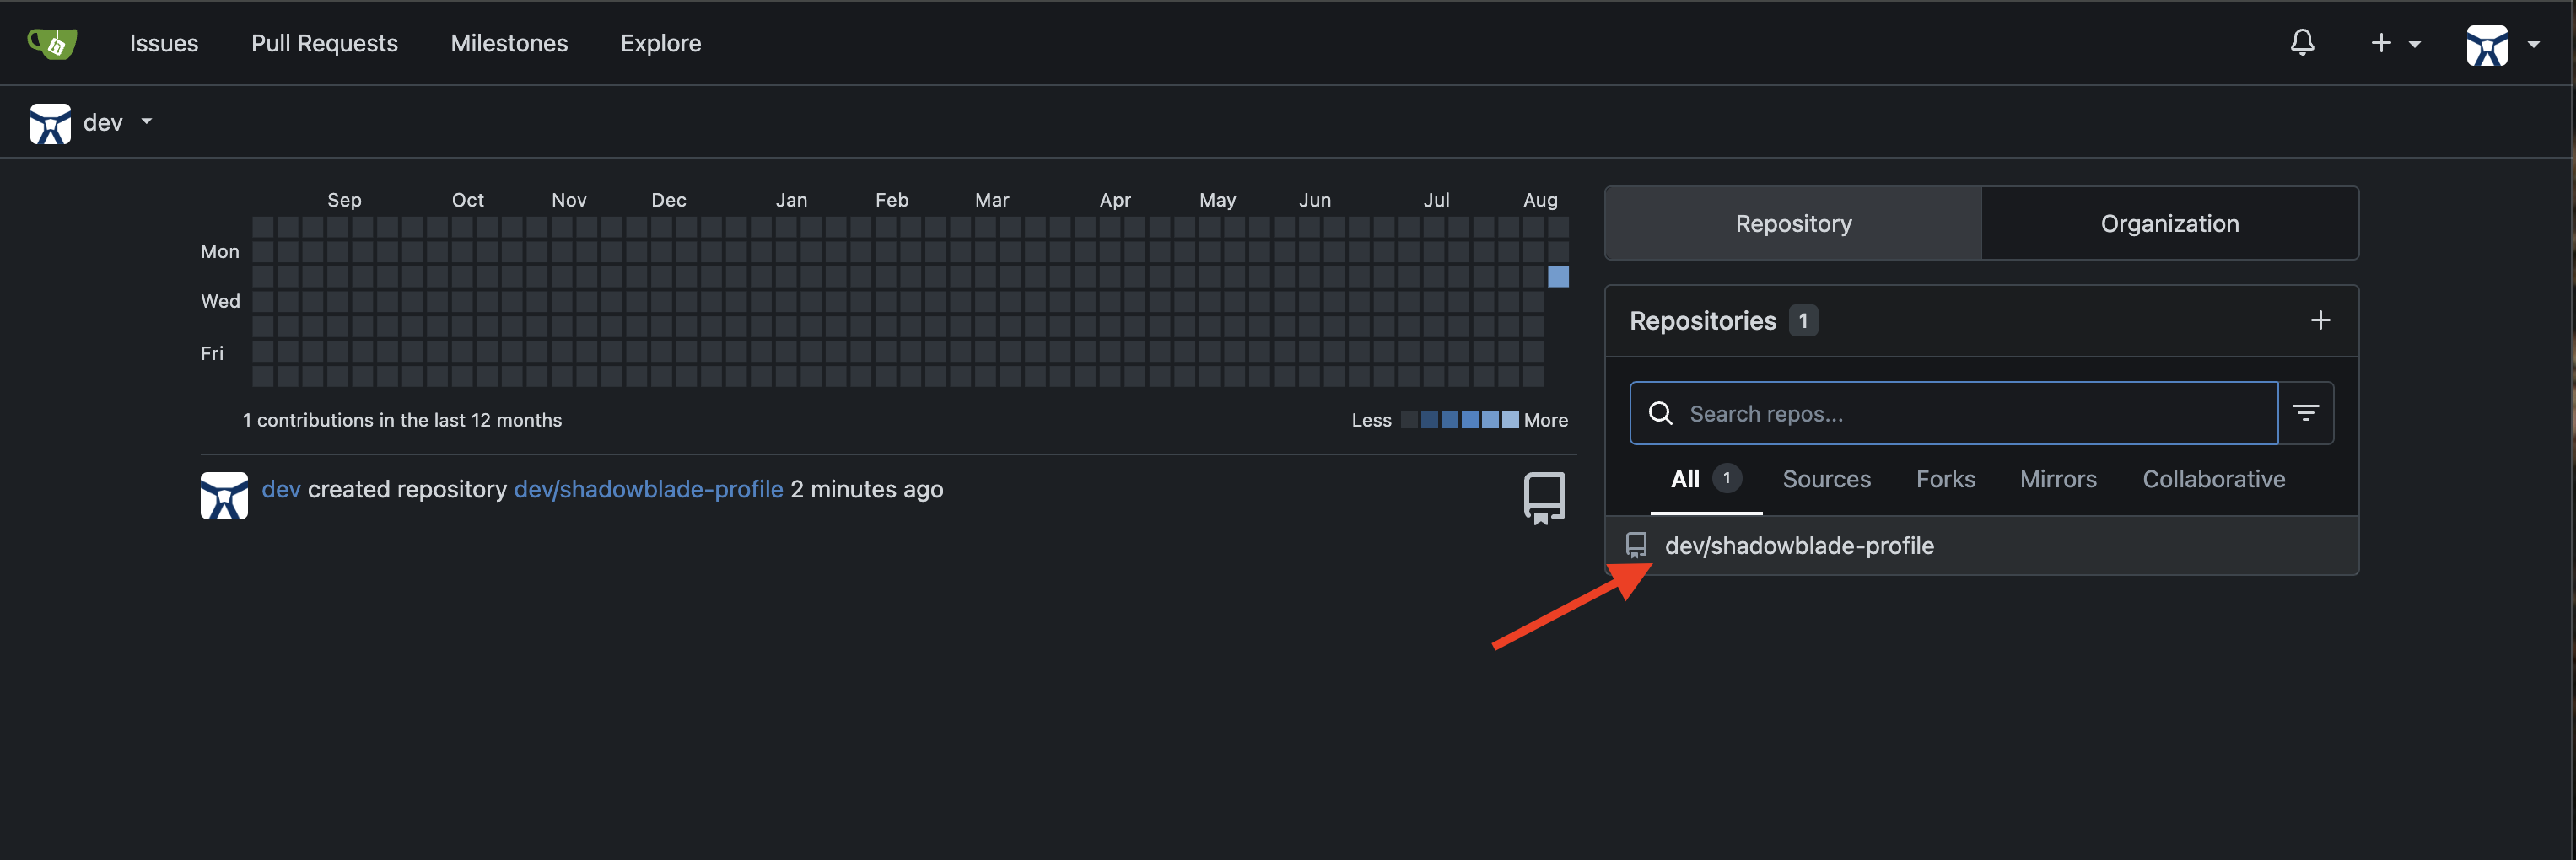
খাপ প্রস্তুত করে আপনার কাজ সুরক্ষিত করুন। আপনার প্রোফাইল ওয়েবসাইটের ফাইলগুলো কমিট করার জন্য জেমিনিকে নির্দেশ দিন।
👉💻Gemini CLI-তে এই টেকনিকটির জন্য চূড়ান্ত কমান্ডটি দিন:
Using the Gitea tool, push the index.html and styles.css files to the 'shadowblade-profile' repository.
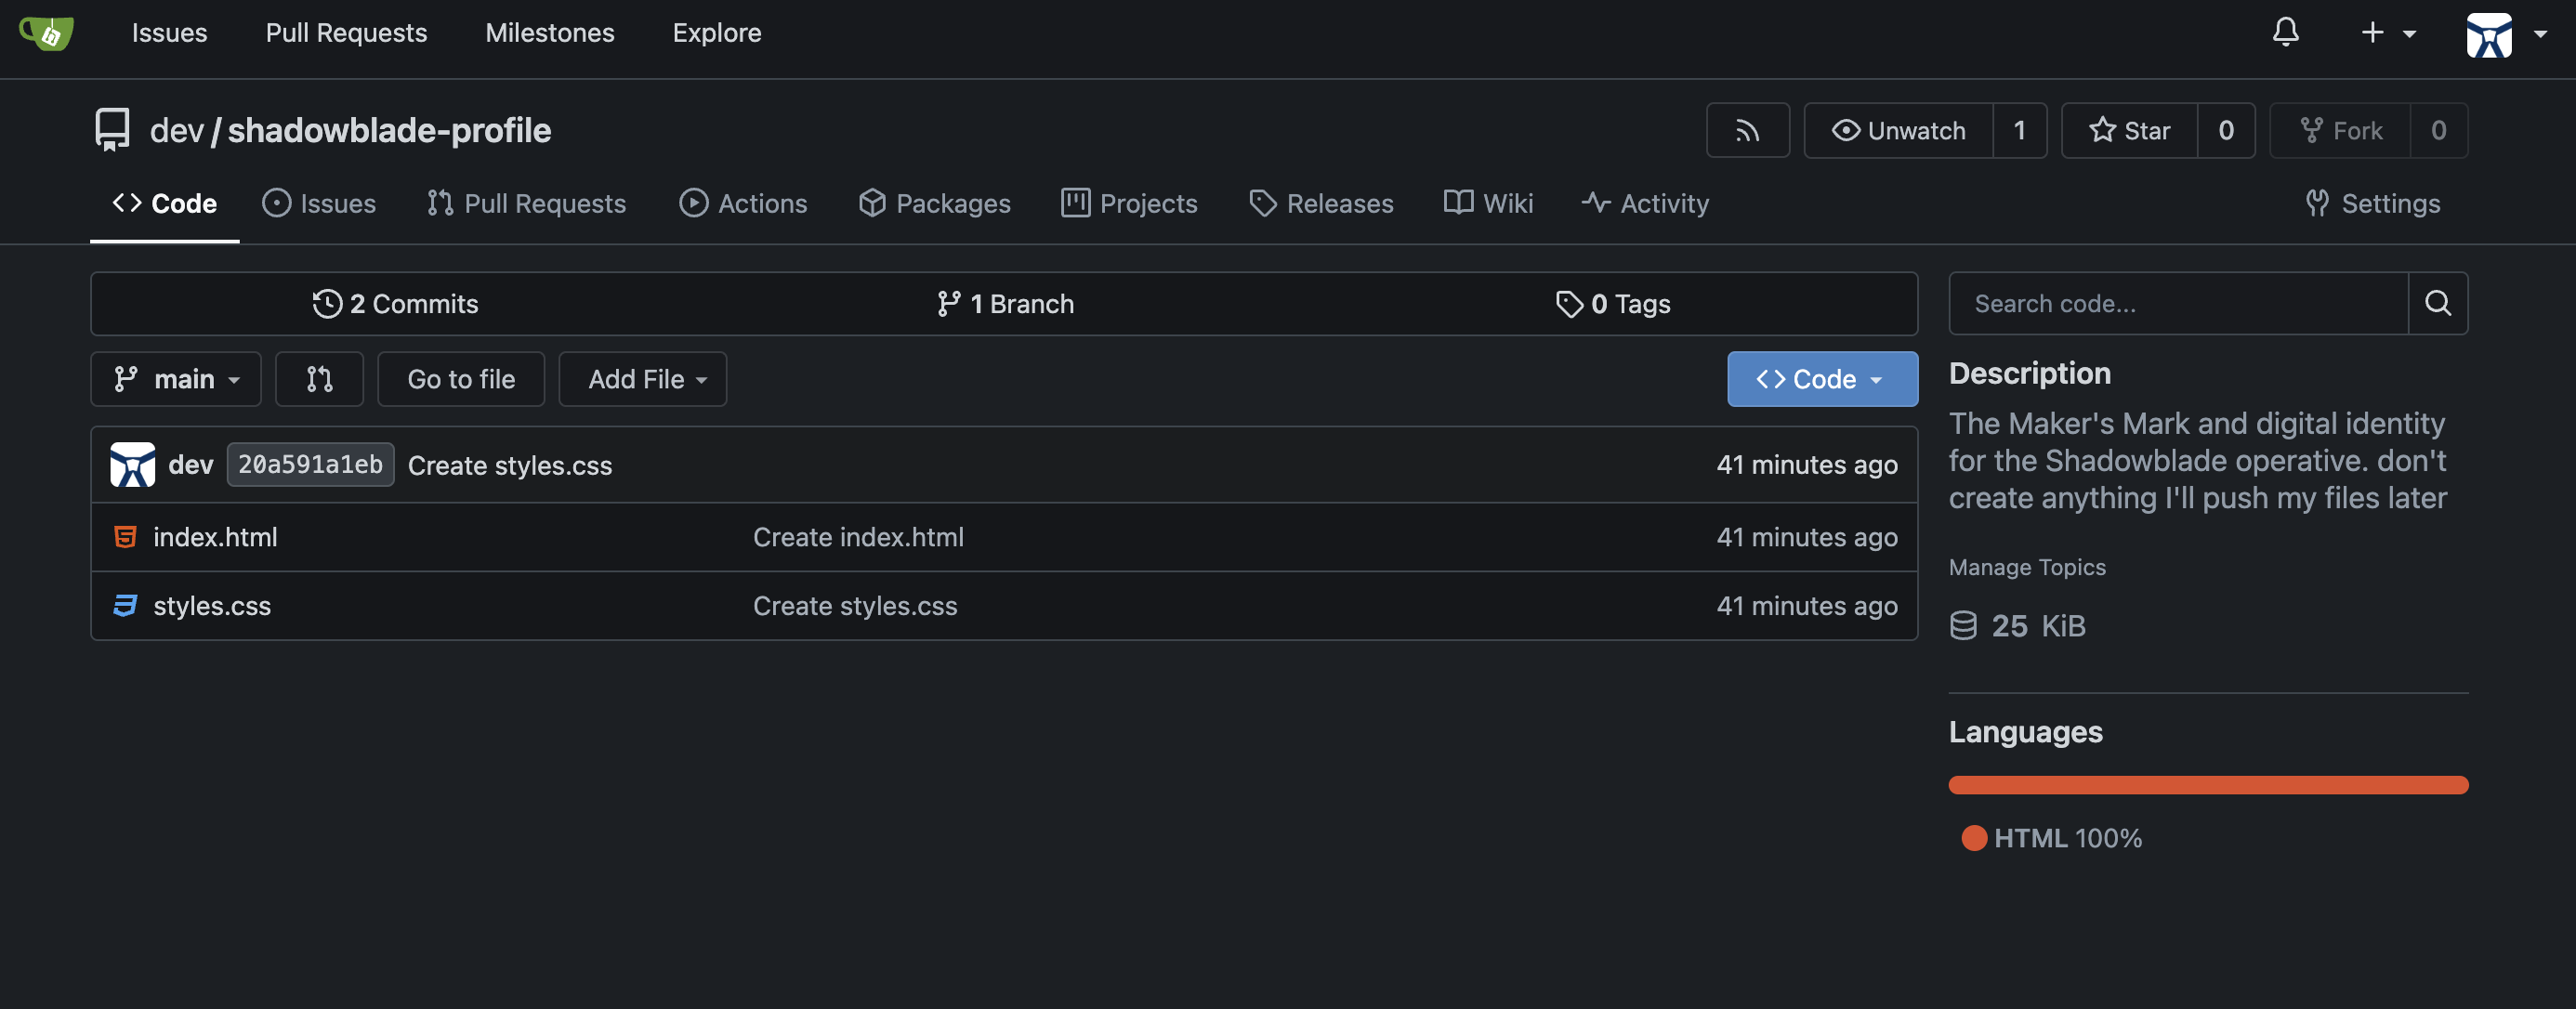
একজন প্রকৃত ওস্তাদ নিজের কাজ যাচাই করে নেন। Gitea ট্যাবে ফিরে যান এবং রিপোজিটরি পৃষ্ঠাটি রিফ্রেশ করুন। আপনার index.html এবং styles.css এখন নিরাপদে আর্কাইভ করা হয়েছে।
👉✨ একজন শ্যাডোব্লেড তার প্রতীকচিহ্ন দ্বারা পরিচিত হয়, কিন্তু আপনার মনে আছে, আপনার ওয়েবসাইটে এর প্রোফাইল ছবিটি নেই। একজন দক্ষ কারিগর নিজেকে নিখুঁত করার জন্য নিজের ভুলত্রুটি স্বীকার করেন। আপনাকে অবশ্যই এই অপূর্ণতাটি অস্ত্রাগারের নথিতে লিপিবদ্ধ করতে হবে।
File an issue for me in the shadowblade-profile repo. The issue is that the profile image is missing.
Gitea-তে সমস্যাটি দেখুন 
হারিয়ে যাওয়া সিজিলটি তৈরি করতে, আপনাকে এক ভিন্ন ধরনের শক্তিকে আহ্বান করতে হবে—এমন এক সৃষ্টি-আত্মা যা বিশুদ্ধ চিন্তা থেকে চিত্রকল্প তৈরি করতে সক্ষম। গিটিয়া (Gitea) অংশে, আপনি আপনার ব্লেডকে একটি এমসিপি (MCP) সার্ভারের সাথে সংযুক্ত করতে কনফিগারেশন রুনগুলো হাতে-কলমে সম্পাদনা করেছিলেন—এটি ছিল "কাঁচা" পদ্ধতি। এখন আপনি আধুনিক কৌশলটি শিখবেন: জেমিনি সিএলআই এক্সটেনশনস (Gemini CLI Extensions )।
এক্সটেনশন হলো একটি পূর্ব-নির্মিত এনচ্যান্টমেন্ট যা এমসিপি সার্ভার, কাস্টম কমান্ড, কনটেক্সট এবং সেটিংসকে একটি একক ইনস্টলযোগ্য ইউনিটে প্যাকেজ করে। একটি মাত্র ইনক্যান্টেশন কয়েক ডজন লাইনের ম্যানুয়াল কনফিগারেশনকে প্রতিস্থাপন করে।
👉💻 Gemini CLI থেকে বের হতে Ctrl+C দুইবার চাপুন।
সৃষ্টির আত্মাকে আহ্বান করার আগে, আপনাকে প্রথমে আপনার রাজ্যে এর শক্তিকে উন্মোচন করতে হবে। ন্যানো ব্যানানা এক্সটেনশনটি জেনারেটিভ ল্যাঙ্গুয়েজ এপিআই (Generative Language API) ব্যবহার করে — যা আপনার ব্যবহৃত ভার্টেক্স এআই (Vertex AI) পরিষেবাগুলো থেকে একটি আলাদা গেটওয়ে। আত্মাকে প্রবেশাধিকার দেওয়ার জন্য আপনাকে এই গেটওয়েটি সক্রিয় করতে হবে এবং একটি অনন্য চাবি তৈরি করতে হবে।
👉💻 আপনার টার্মিনালে API-টি সক্রিয় করুন:
gcloud services enable generativelanguage.googleapis.com
👉💻 এখন, একটি API কী তৈরি করুন — যা হলো আত্মার ব্যক্তিগত প্রবেশ টোকেন:
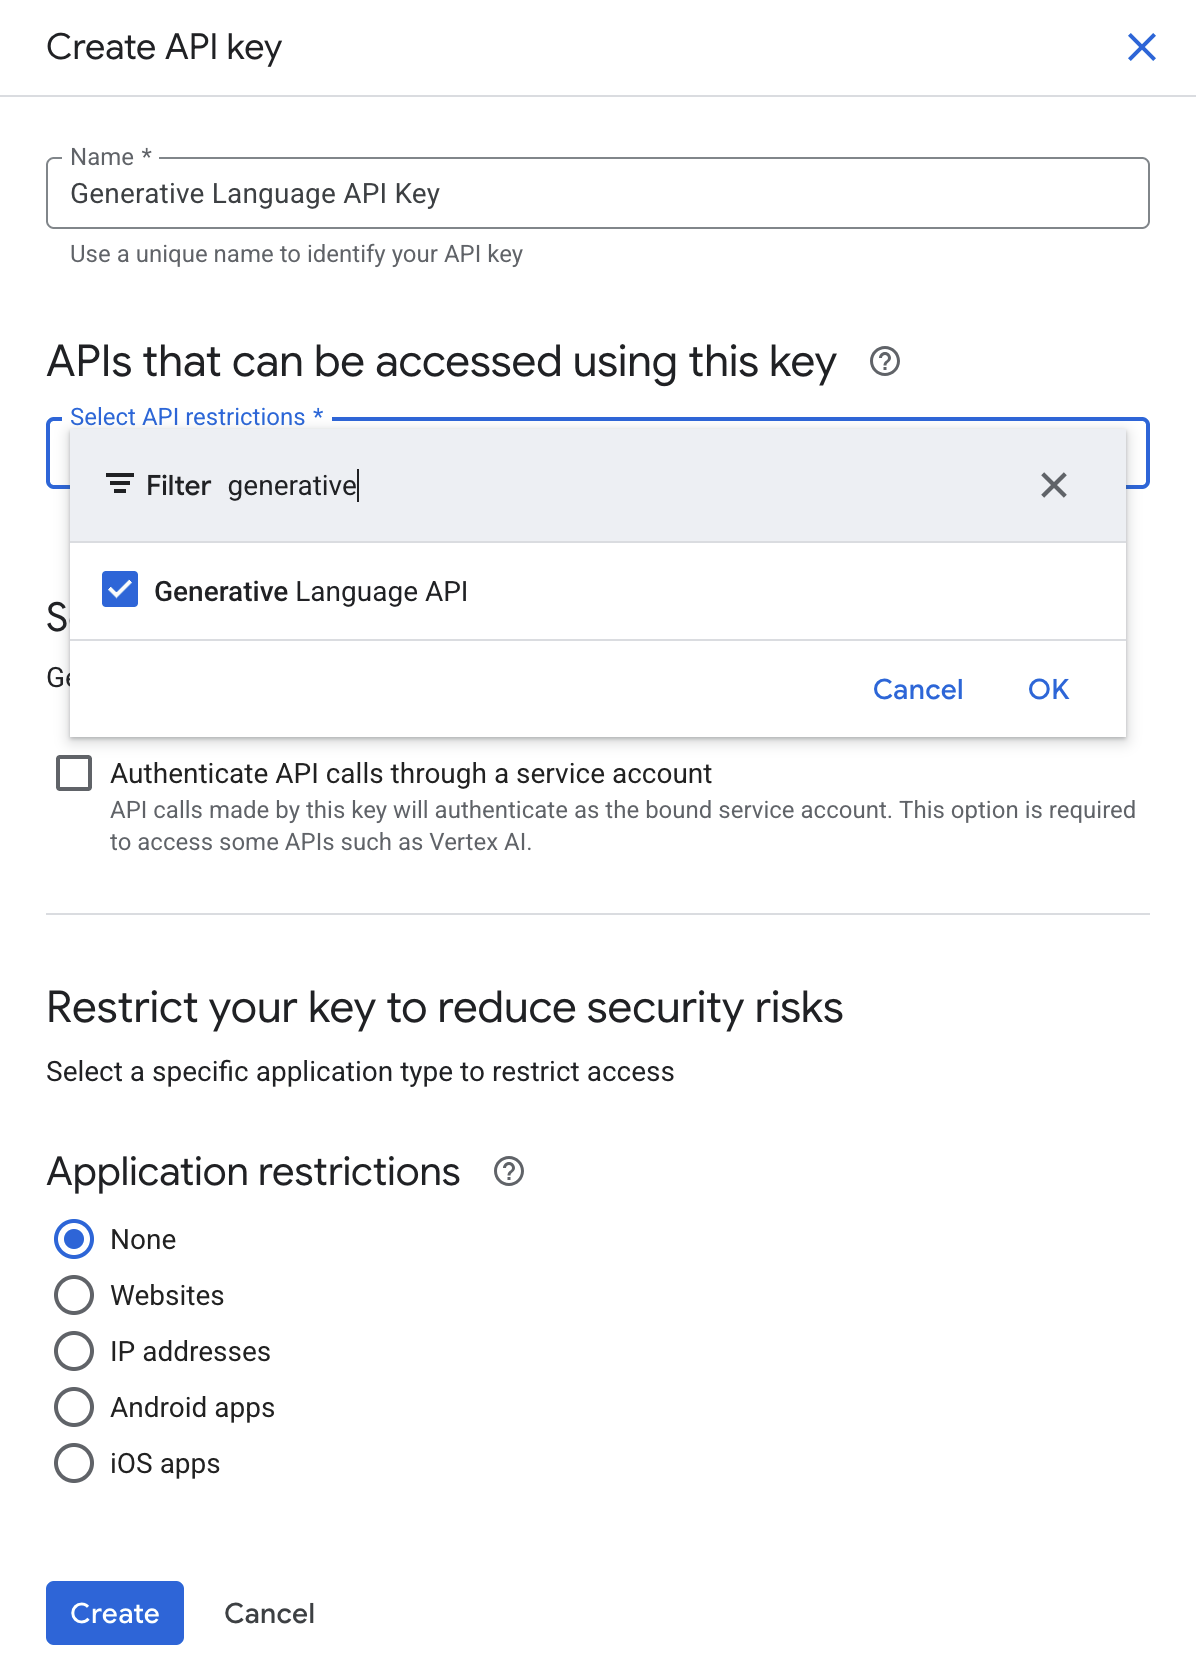
- Google Cloud Console Credentials পৃষ্ঠায় যান।
- উপরে থাকা + CREATE CREDENTIALS- এ ক্লিক করুন এবং API key নির্বাচন করুন।
- এপিআই কী-টির একটি উল্লেখযোগ্য নাম দিন, যেমন 'জেনারেটিভ ল্যাঙ্গুয়েজ এপিআই কী' ।
- API বিধিনিষেধ ড্রপডাউনে, জেনারেটিভ ল্যাঙ্গুয়েজ API বেছে নিন।
- চাবিটি তৈরি করে কপি করুন — পরবর্তী ধাপে এটি আপনার প্রয়োজন হবে।
👉💻 ন্যানো ব্যানানা এক্সটেনশনটি ইনস্টল করুন — এটি গুগলের বিশেষায়িত জেমিনি টেক্সট-টু-ইমেজ মডেল দ্বারা চালিত একটি সৃজনশীল উদ্যোগ। আপনার টার্মিনালে, এটি চালান:
gemini extensions install https://github.com/gemini-cli-extensions/nanobanana
এপিআই কী (API Key) চাওয়া হলে, আপনার এইমাত্র তৈরি করা কী-টি পেস্ট করুন এবং এন্টার চাপুন।
👉💻 শেষবারের মতো একটি সমন্বয় প্রয়োজন। ক্লাউড শেলের পরিবেশ ডিফল্টরূপে সমস্ত এআই অনুরোধ ভার্টেক্স এআই (Vertex AI)-এর মাধ্যমে পাঠায়, কিন্তু সৃষ্টির মূল চালিকাশক্তি একটি ভিন্ন গেটওয়ের মাধ্যমে কাজ করে। এক্সটেনশনটির পোর্টাল সঠিকভাবে কনফিগার করতে এই কমান্ডটি চালান:
NANO_CONFIG=$(find ~/.gemini/extensions -name "gemini-extension.json" -path "*nanobanana*" 2>/dev/null | head -1) && \
jq '.mcpServers.nanobanana.env.GOOGLE_GENAI_USE_VERTEXAI = ""' "$NANO_CONFIG" > /tmp/nb_tmp.json && \
mv /tmp/nb_tmp.json "$NANO_CONFIG"
ওই একটিমাত্র কমান্ডই সবকিছু করে ফেলেছে: MCP সার্ভার ডাউনলোড করেছে, এর টুলগুলো রেজিস্টার করেছে এবং কাস্টম স্ল্যাশ কমান্ড ইনস্টল করেছে — এই সবকিছুই হয়েছে আপনার settings.json হাত না দেওয়া সত্ত্বেও।
👀 ডেভেলপারের নোট: এক্সটেনশন বনাম সরাসরি এমসিপি সার্ভার। এটিকে গিটিয়া (Gitea) সেটআপের সাথে তুলনা করুন। সেখানে, আপনি settings.json এ একটি এমসিপি সার্ভার ইউআরএল যুক্ত করার জন্য ম্যানুয়ালি একটি jq কমান্ড চালাতেন। এই "সরাসরি" পদ্ধতিটি কার্যপ্রণালী বোঝার জন্য মূল্যবান, কিন্তু বেশিরভাগ বাস্তব ব্যবহারের জন্য এক্সটেনশনই বেশি পছন্দনীয়। এগুলি এমসিপি সার্ভার, কাস্টম কমান্ড (যেমন /generate , /edit , /story ), এনভায়রনমেন্ট কনফিগারেশন, এবং এমনকি প্রাসঙ্গিক নির্দেশাবলীও (একটি বান্ডেল করা GEMINI.md মাধ্যমে) একটি একক, শেয়ারযোগ্য প্যাকেজে একত্রিত করে। Gemini CLI এক্সটেনশন গ্যালারিতে এক্সটেনশনের একটি সম্পূর্ণ ইকোসিস্টেম বিদ্যমান।
👉💻 Gemini CLI-তে পুনরায় প্রবেশ করুন এবং এক্সটেনশনটি সক্রিয় আছে কিনা তা যাচাই করুন:
clear
cd ~/agentverse-developer/tabletop/
gemini
👉✨ এক্সটেনশনটি টিউন করা আছে কিনা তা নিশ্চিত করুন:
/extensions list
এখন আপনি nanobanana তার টুলস এবং কমান্ডসহ তালিকাভুক্ত দেখতে পাবেন।
👉✨ একটিমাত্র শক্তিশালী কমান্ডের মাধ্যমে ন্যানো ব্যানানা এক্সটেনশনকে আপনার সিজিল তৈরি করার নির্দেশ দিন। আপনার জেমিনি সিএলআই-তে এই কমান্ডটি দিন:
/generate a portrait of a shadowblade, pixel art style. A determined warrior with long, braided magenta hair, wearing black and teal armor and confidently holding a silver broadsword.
👉✨ আত্মাটি ছবিটি তৈরি করে সরাসরি আপনার স্থানীয় ওয়ার্কস্পেসে স্থাপন করবে। এখন, এই নতুন তৈরি করা সিজিলটি ব্যবহার করার জন্য ব্লেডটিকে নির্দেশ দিন। (জেমিনি হয়তো ইতিমধ্যেই আপনার জন্য এটি করে ফেলেছে! আগের উত্তরটি দেখুন, এটি হয়তো আপনার বলার আগেই কাজটি করে ফেলার মতো যথেষ্ট বুদ্ধিমান!!!!)
Modify the index.html file to add my profile picture. Use the image I just generated.
👉💻 একটি নতুন টার্মিনালে http সার্ভারটি চালু করুন।
cd ~/agentverse-developer/tabletop/
python -m http.server
👀 আপনার কাজটি দেখতে, ক্লাউড শেল টুলবারে থাকা ওয়েব প্রিভিউ আইকনে ক্লিক করুন। ‘Change port’ নির্বাচন করে সেটিকে 8000- এ সেট করুন এবং ‘Change and Preview’-এ ক্লিক করুন। আপনার ওয়েবসাইটের একটি প্রিভিউ প্রদর্শিত হবে। 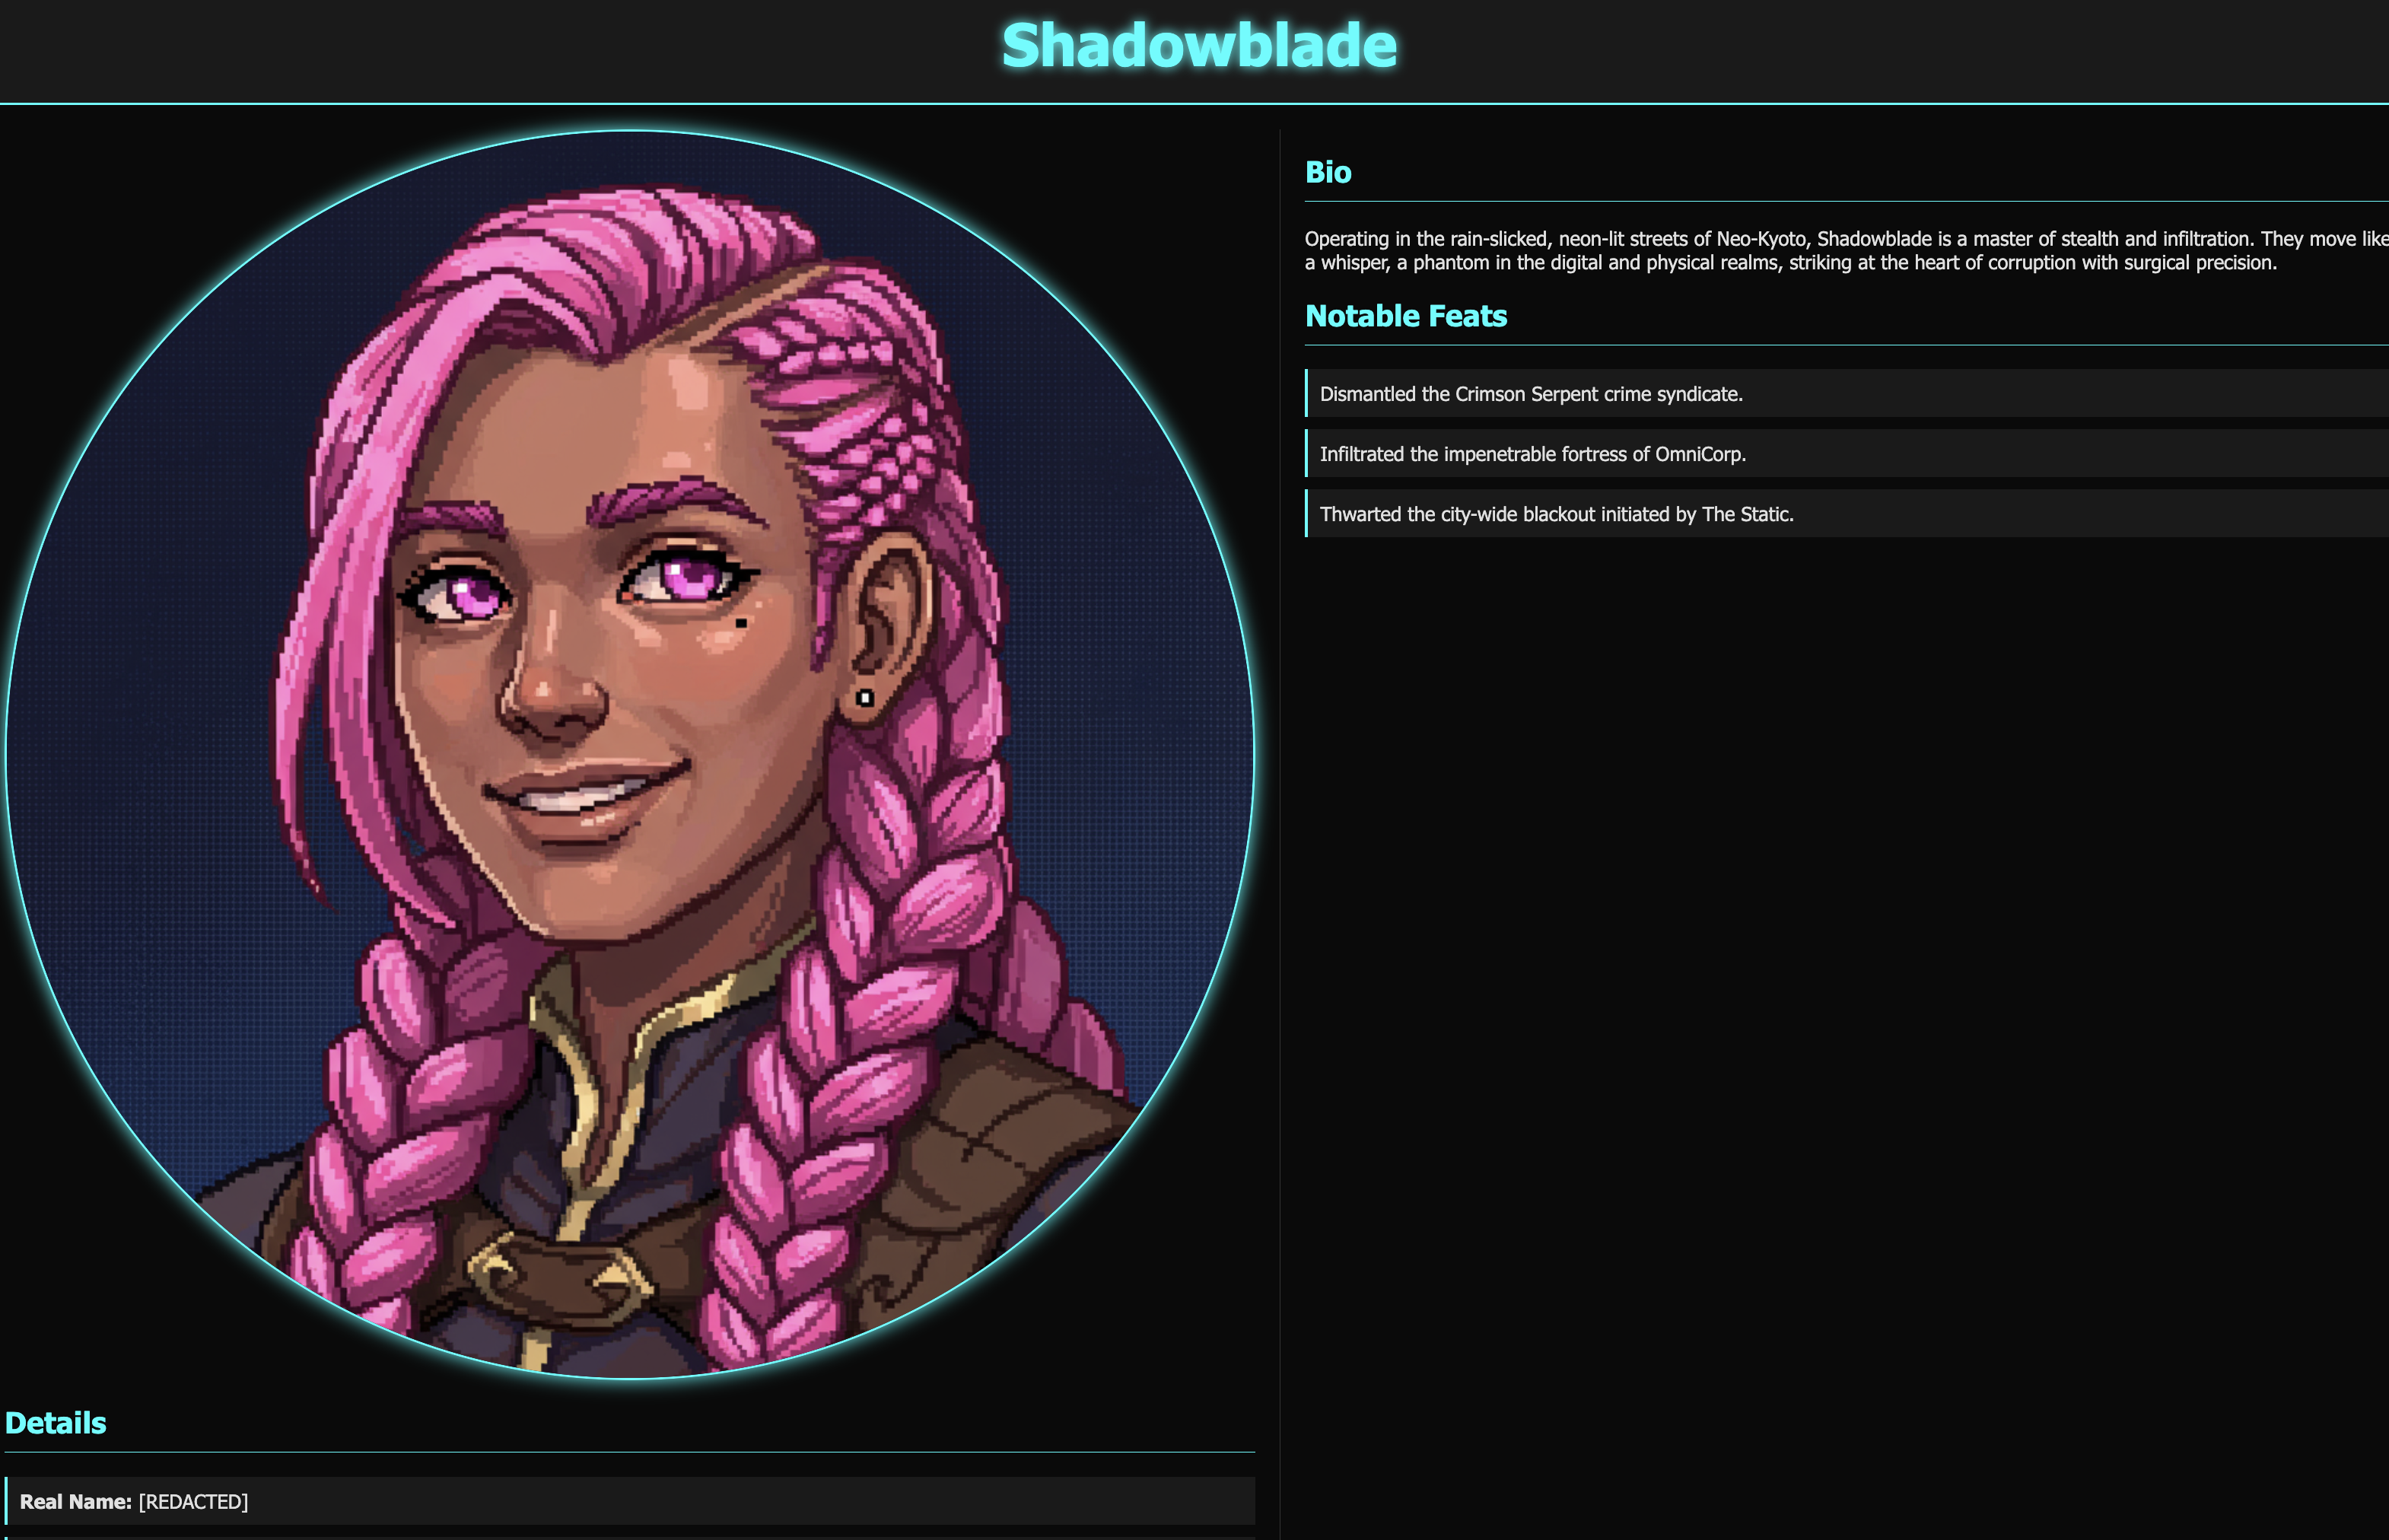
👉✨ Gemini CLI চালিত টার্মিনালে ফিরে এসে, কাজটি সম্পন্ন হওয়ার বিষয়টি উল্লেখ করে সমাধানটি কমিট করুন এবং আর্মারির রেকর্ডে আপনার ফাইল করা ইস্যুটি বন্ধ করে দিন।
Push the changed index.html file to the 'shadowblade-profile' repository using the gitea tool. Make sure you add 'Fix #1' in the commit comment. Also, close issue #1.Use the Gitea Tool and use user account "dev"
👉💻 Gemini CLI থেকে বের হতে Ctrl+C দুইবার চাপুন।
👀 আপনার কাজটি দেখতে, ক্লাউড শেল টুলবারে থাকা ওয়েব প্রিভিউ আইকনে ক্লিক করুন। ‘Change port’ নির্বাচন করে সেটিকে 3005- এ সেট করুন এবং ‘Change and Preview’-এ ক্লিক করুন। আপনার ওয়েবসাইটের একটি প্রিভিউ প্রদর্শিত হবে। 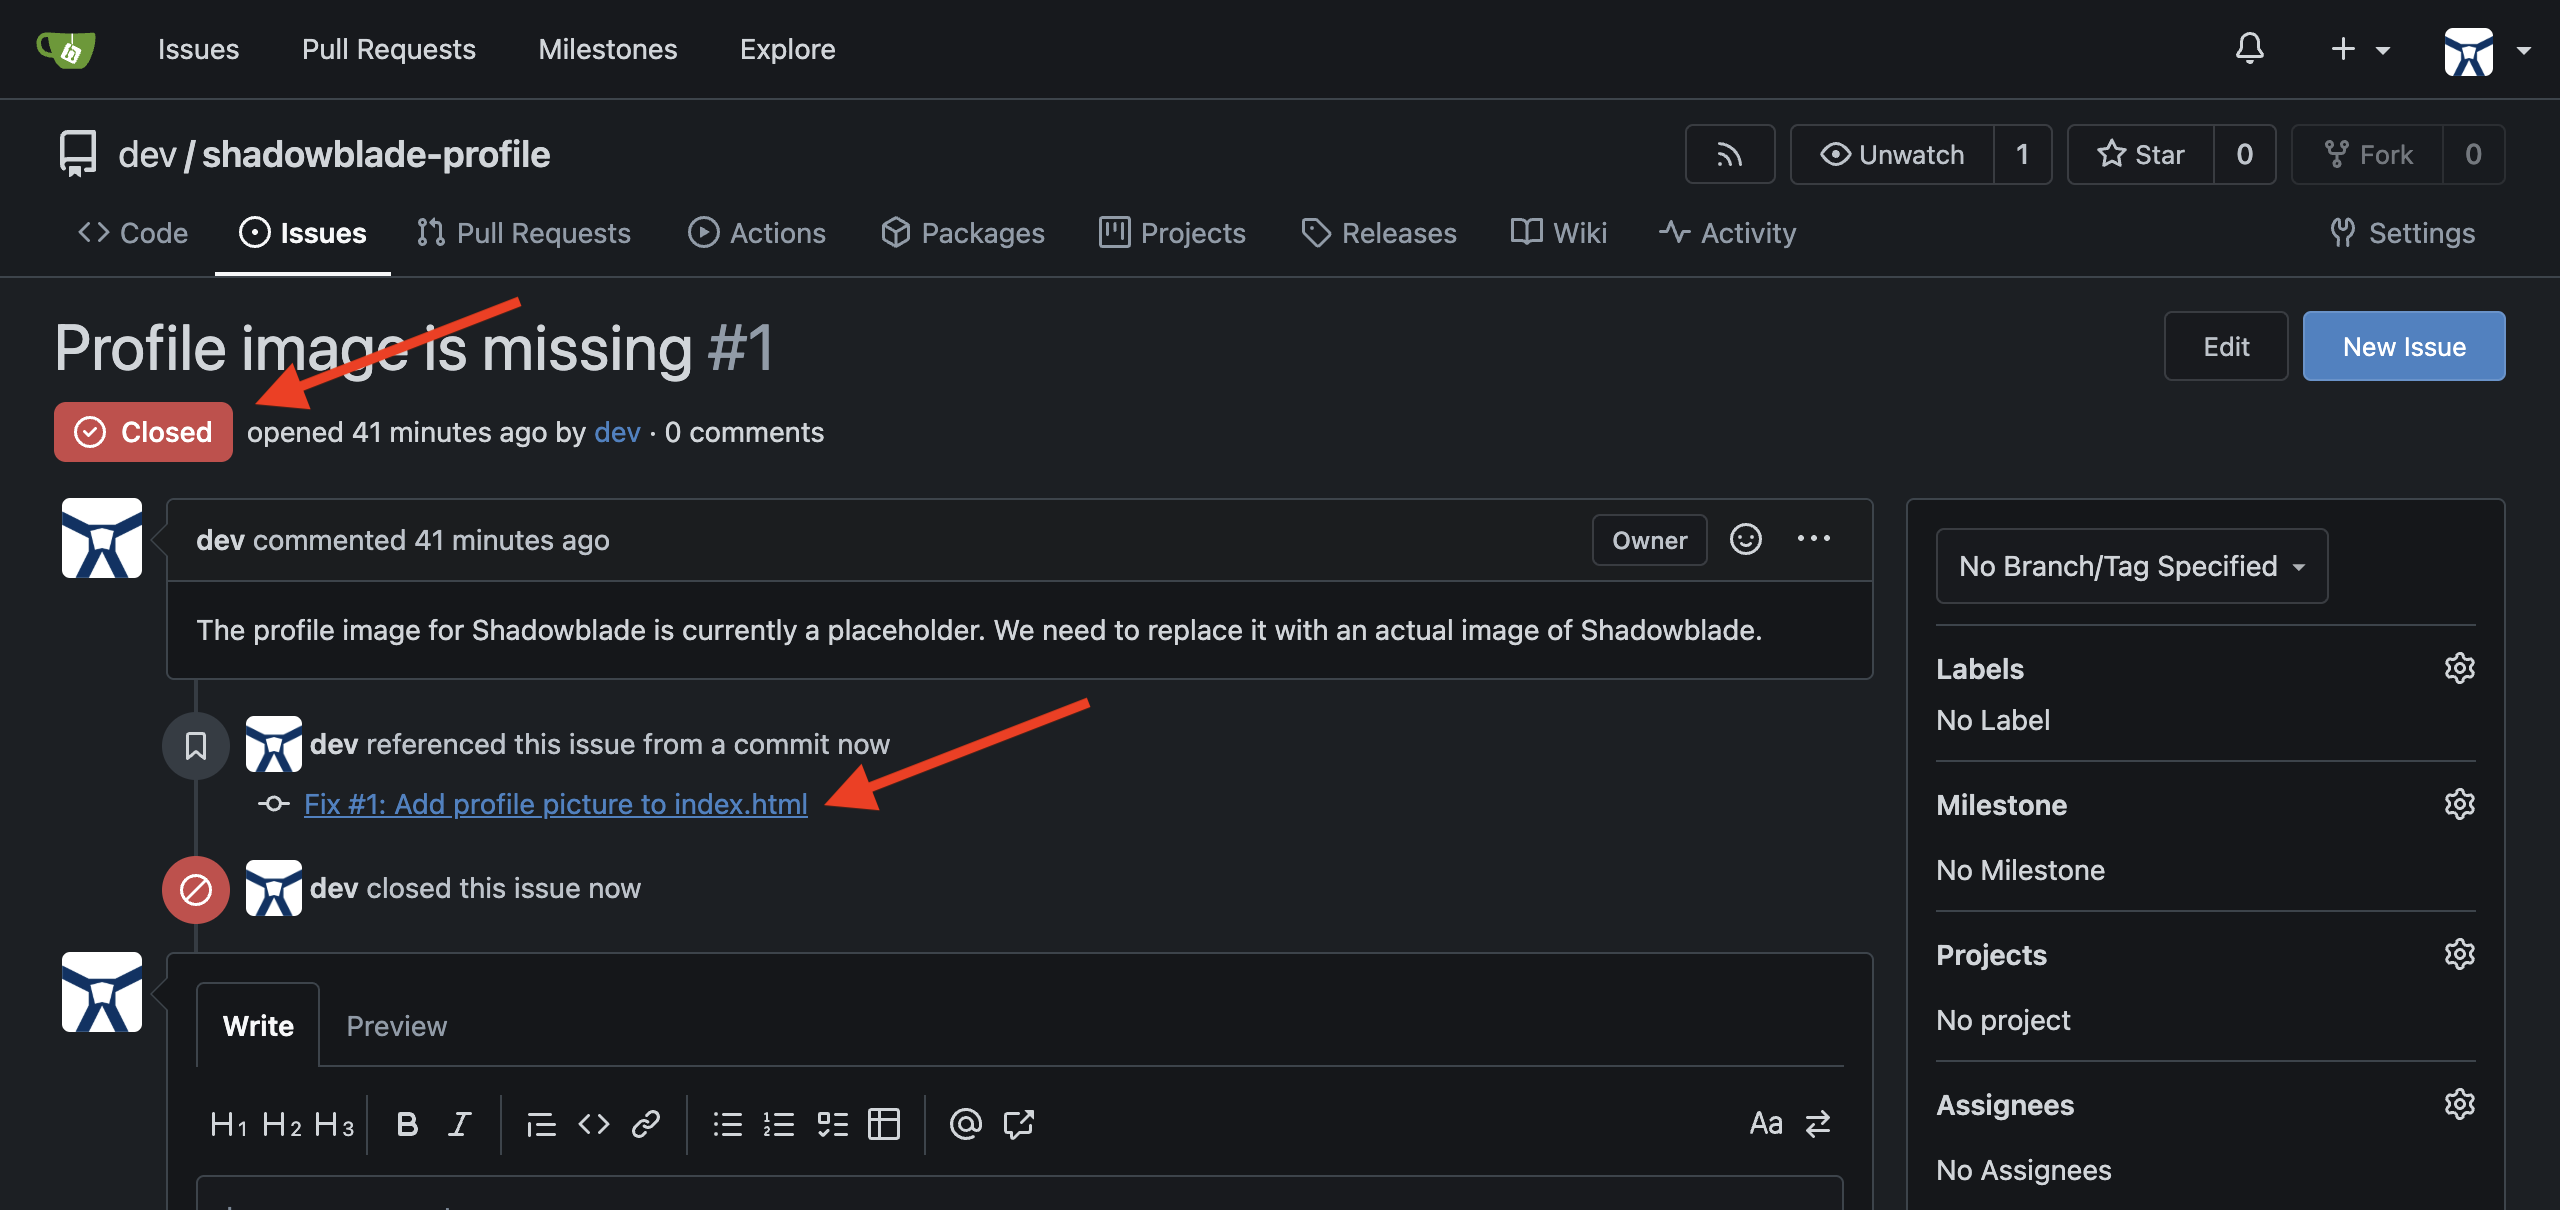
👉💻 যে টার্মিনালে http সার্ভারটি চলছে, সেখান থেকে বের হতে Ctrl+C চাপুন।
যারা গেম খেলেন না তাদের জন্য
৬. শ্যাডোব্লেড এজেন্ট তৈরি করা: গার্ডরেল সহ ভাইব কোড
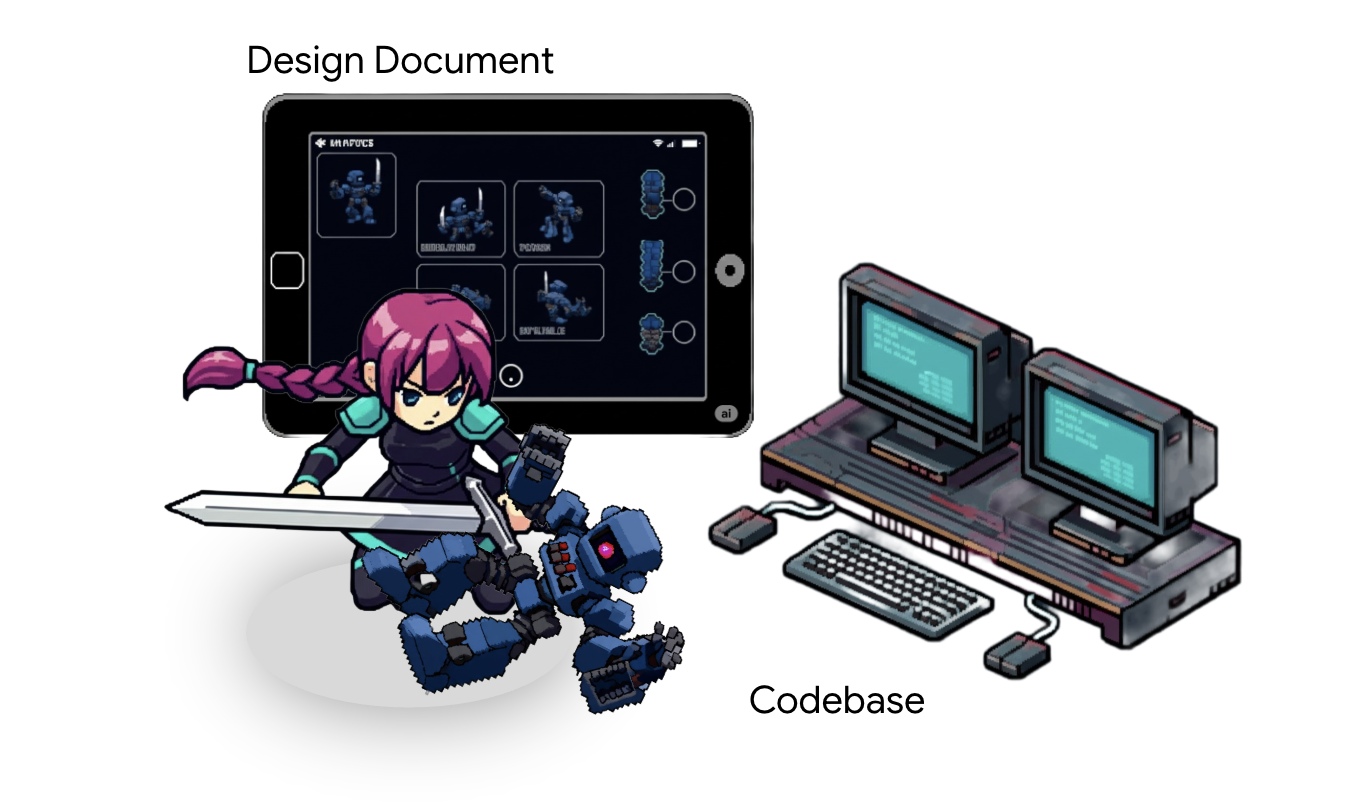
অনুশীলনের সময় শেষ। পাথরের উপর ইস্পাতের প্রতিধ্বনি মিলিয়ে যাচ্ছে। তুমি তোমার প্রধান অস্ত্র আয়ত্ত করেছ এবং যুদ্ধের জন্য তোমার অস্ত্রাগার প্রস্তুত করেছ। এখন, তুমি একজন শ্যাডোব্লেডের আসল পরীক্ষায় অবতীর্ণ হবে: স্বয়ং অপারেটিভকে একত্রিত করা। এটি হলো যুক্তিতে প্রাণ সঞ্চার করার শিল্প, কোডেক্সের একটি পবিত্র নকশা ব্যবহার করে একজন এজেন্টের মূল বুদ্ধিমত্তা নির্মাণ করা—তোমার অস্ত্রাগারের ব্লেডগুলোর জন্য এমন এক সংবেদনশীল ধারক তৈরি করা, যে নিজে থেকে চিন্তা করতে, যুক্তি দিতে এবং কাজ করতে পারে।
আপনার প্রথম কাজ হলো একটি বিদ্যমান ওয়ার্কশপে—অর্থাৎ আগে থেকে তৈরি একটি কোডবেসে—প্রবেশ করা এবং এর অংশগুলো থেকে আপনার চ্যাম্পিয়নকে গড়ে তোলা।
সমাবেশের আচার
চুল্লিতে প্রথম স্ফুলিঙ্গ জ্বালানোর আগেই, একজন দক্ষ কারিগর তার কর্মশালাটি জরিপ করে নেন, প্রতিটি সরঞ্জাম এবং প্রতিটি নকশা বুঝে নেন। একটি বিশাল, বিদ্যমান কোডবেসের মতো অপরিচিত যুদ্ধক্ষেত্রে পা রাখার সময় আপনার প্রথম অগ্রাধিকার হলো পরিস্থিতি পর্যবেক্ষণ করা। আপনাকে সেখানকার ভূখণ্ডের অবস্থা বুঝতে হবে—বিদ্যমান স্থাপত্য, চূড়ান্ত লক্ষ্য এবং যুদ্ধের নিয়মকানুন। শুধুমাত্র দুর্গের নকশা এবং এর মানদণ্ডের সাথে পরিচিত হয়েই আপনি কার্যকরভাবে আপনার দক্ষতা দিয়ে অবদান রাখতে পারবেন।
আপনার জেমিনি সিএলআই, আপনার সর্বক্ষণের পর্যবেক্ষক, এই অনুসন্ধানে আপনাকে সাহায্য করতে পারে:
- উচ্চ-স্তরের সারাংশ প্রদান করে: এটি সম্পূর্ণ কোডেক্স (বা কোডবেস) পড়তে পারে এবং আপনাকে এর উদ্দেশ্য ও মূল উপাদানগুলো সম্পর্কে দ্রুত ধারণা দিতে পারে।
- পরিবেশ সেটআপে সহায়তা: এটি আপনাকে টুল ইনস্টল করা এবং আপনার মেশিন কনফিগার করার জটিল প্রক্রিয়াগুলোতে পথ দেখাতে পারে।
- কোডবেস পরিভ্রমণ: এটি আপনার পথপ্রদর্শক হিসেবে কাজ করতে পারে, যা আপনাকে জটিল লজিক অন্বেষণ করতে এবং কোডের মধ্যে লুকানো পথ খুঁজে পেতে সাহায্য করে।
- অনবোর্ডিং ডকুমেন্ট তৈরি করুন: এটি আপনার উদ্যোগে যোগদানকারী নতুন সহযোগীদের জন্য লক্ষ্য, ভূমিকা এবং সংস্থান স্পষ্ট করে এমন উপযোগী স্ক্রল তৈরি করতে পারে।
- লার্নিং এবং প্রশ্নোত্তর স্বয়ংক্রিয় করুন: এটি আপনার ব্যক্তিগত পণ্ডিত হয়ে ওঠে, ফিচার বা কোডের আচরণ সম্পর্কে প্রশ্নের উত্তর দেয়, যা আপনাকে আরও বেশি স্বাধীনতার সাথে কাজ করার সুযোগ করে দেয়।
👉💻 আপনার প্রথম টার্মিনালে, শ্যাডোব্লেড ডিরেক্টরিতে যান এবং আপনার এআই পার্টনারকে ডেকে আনুন:
. ~/agentverse-developer/set_env.sh
cd ~/agentverse-developer/shadowblade
clear
gemini
👉✨ এখন, আপনার স্কাউটকে যুদ্ধক্ষেত্র জরিপ করে ফিরে এসে রিপোর্ট করার নির্দেশ দিন।
Analyze the entire project and provide a high-level summary.
বিদ্যমান ভূখণ্ডের মানচিত্র তৈরি হয়ে গেলে, আপনি যা নির্মাণ করতে চলেছেন তার নকশাটি এখন আপনাকে অবশ্যই দেখতে হবে। সবচেয়ে শক্তিশালী কর্মীরা তাৎক্ষণিক বা অপরিকল্পিতভাবে তৈরি হয় না, বরং একটি সুনির্দিষ্ট নকশা থেকে তাদের গড়ে তোলা হয়।
ডেভেলপারের নোট: এই ডিজাইন ডকুমেন্টটি প্রকল্পের জন্য একটি প্রামাণিক নীলনকশা হিসেবে কাজ করে। এর উদ্দেশ্য হলো, উল্লেখযোগ্য উন্নয়ন প্রচেষ্টা বিনিয়োগ করার আগেই লক্ষ্য এবং প্রযুক্তিগত বাস্তবায়নের বিষয়ে স্বচ্ছতা নিশ্চিত করা। একটি সুসংজ্ঞায়িত পরিকল্পনা সকল ডেভেলপারের মধ্যে বোঝাপড়া নিশ্চিত করে, পুনরায় কাজ করার ঝুঁকি কমায় এবং টেকনিক্যাল ডেট ও স্কোপ ক্রিপ প্রতিরোধে সহায়তা করে। এটি প্রকল্পের গতি এবং কোডের মান বজায় রাখার প্রধান হাতিয়ার, বিশেষ করে যখন টিম বড় হয় বা নতুন সদস্য যুক্ত হন।
A critical goal of this document is to define not just the "happy path" but also the edge cases and failure modes, especially when using LLMs. In my experience, LLMs are excellent at generating optimistic code where all inputs are valid and all external calls succeed. To build robust, production-ready software, we must explicitly guide the AI by defining contingencies for scenarios like:
- Invalid or malformed arguments passed to a function.
- API call failures, network timeouts, or unexpected error codes from external services.
- Handling of null or empty data structures where data is expected.
- Race conditions or concurrency issues.
By specifying the expected behavior for these cases in the design, we instruct the LLM to generate more resilient code, significantly reducing the time spent on manual refactoring and bug fixing.
👉✨ Ask Gemini to retrieve this sacred blueprint for you.
download https://raw.githubusercontent.com/weimeilin79/agentverse/main/developer/shadowblade/agent_design.md, store it as an agent_design.md file in my local folder, and show me the newly downloaded design doc. Do not attempt to create the file just yet.
👉✨ The scroll is long and detailed. Command Gemini to distill its essence.
Summarize the newly downloaded @agent_design.md for me, do not attempt to create file just yet.
Now you have the plan. But before a single line of code is forged, a master artisan establishes the laws of the forge. This is about discipline and scalability . These are the Coding Guidelines . They are not mere suggestions; they are runes of power that ensure every component is built with the same precision and strength. They prevent the chaos of individual style from corrupting the final creation, ensuring the agent is resilient, maintainable, and pure, allowing new artisans to join the project without disrupting the harmony of the whole.
To inscribe these laws directly into the consciousness of our AI partner, we use a special artifact: the GEMINI.md file. When the Gemini CLI is summoned, it automatically searches for this file and loads its contents into the AI's working memory. It becomes a persistent, project-level instruction. It acts as a talisman that constantly whispers the rules of the forge to the AI.
Let's inscribe these runes now.
👉💻 Exit Gemini for a moment by pressing Ctrl+C twice.
👉💻 In your terminal, run the following command to write the guideline file.
cat << 'EOF' > GEMINI.md
  ### **Coding Guidelines**
  **1. Python Best Practices:**

  *   **Type Hinting:** All function and method signatures should include type hints for arguments and return values.
  *   **Docstrings:** Every module, class, and function should have a docstring explaining its purpose, arguments, and return value, following a consistent format like reStructuredText or
  Google Style.
  *   **Linter & Formatter:** Use a linter like `ruff` or `pylint` and a code formatter like `black` to enforce a consistent style and catch potential errors.
  *   **Imports:** Organize imports into three groups: standard library, third-party libraries, and local application imports. Sort them alphabetically within each group.
  *   **Naming Conventions:**
      *   `snake_case` for variables, functions, and methods.
      *   `PascalCase` for classes.
      *   `UPPER_SNAKE_CASE` for constants.
  *   **Dependency Management:** All Python dependencies must be listed in a `requirements.txt` file.

  **2. Web APIs (FastAPI):**

  *   **Data Validation:** Use `pydantic` models for request and response data validation.
  *   **Dependency Injection:** Utilize FastAPI's dependency injection system for managing resources like database connections.
  *   **Error Handling:** Implement centralized error handling using middleware or exception handlers.
  *   **Asynchronous Code:** Use `async` and `await` for I/O-bound operations to improve performance.
EOF
cat GEMINI.md
With the laws inscribed, let's re-summon our AI partner and witness the magic of the artifact.
👉💻 Relaunch the Gemini CLI from the shadowblade directory:
. ~/agentverse-developer/set_env.sh
cd ~/agentverse-developer/shadowblade
clear
gemini
👉✨ Now, ask Gemini to show you what it's thinking about. The runes have been read.
/memory show
Equipping Specialized Expertise: Agent Skills
The GEMINI.md runes you inscribed are like a permanent enchantment — always active, always guiding your blade. But a true master doesn't carry every scroll into every battle. Some expertise is too specialized, too heavy, to keep loaded at all times. This is where Agent Skills come in.
Think of an Agent Skill as a sealed scroll in your pack. It contains specialized expertise — detailed instructions, scripts, even reference data — but it remains dormant until the moment you need it. Only when you face a challenge that matches the scroll's domain does your blade draw it forth and absorb its knowledge. This is called progressive disclosure : it keeps your blade swift and unburdened, activating specialized powers only on demand.
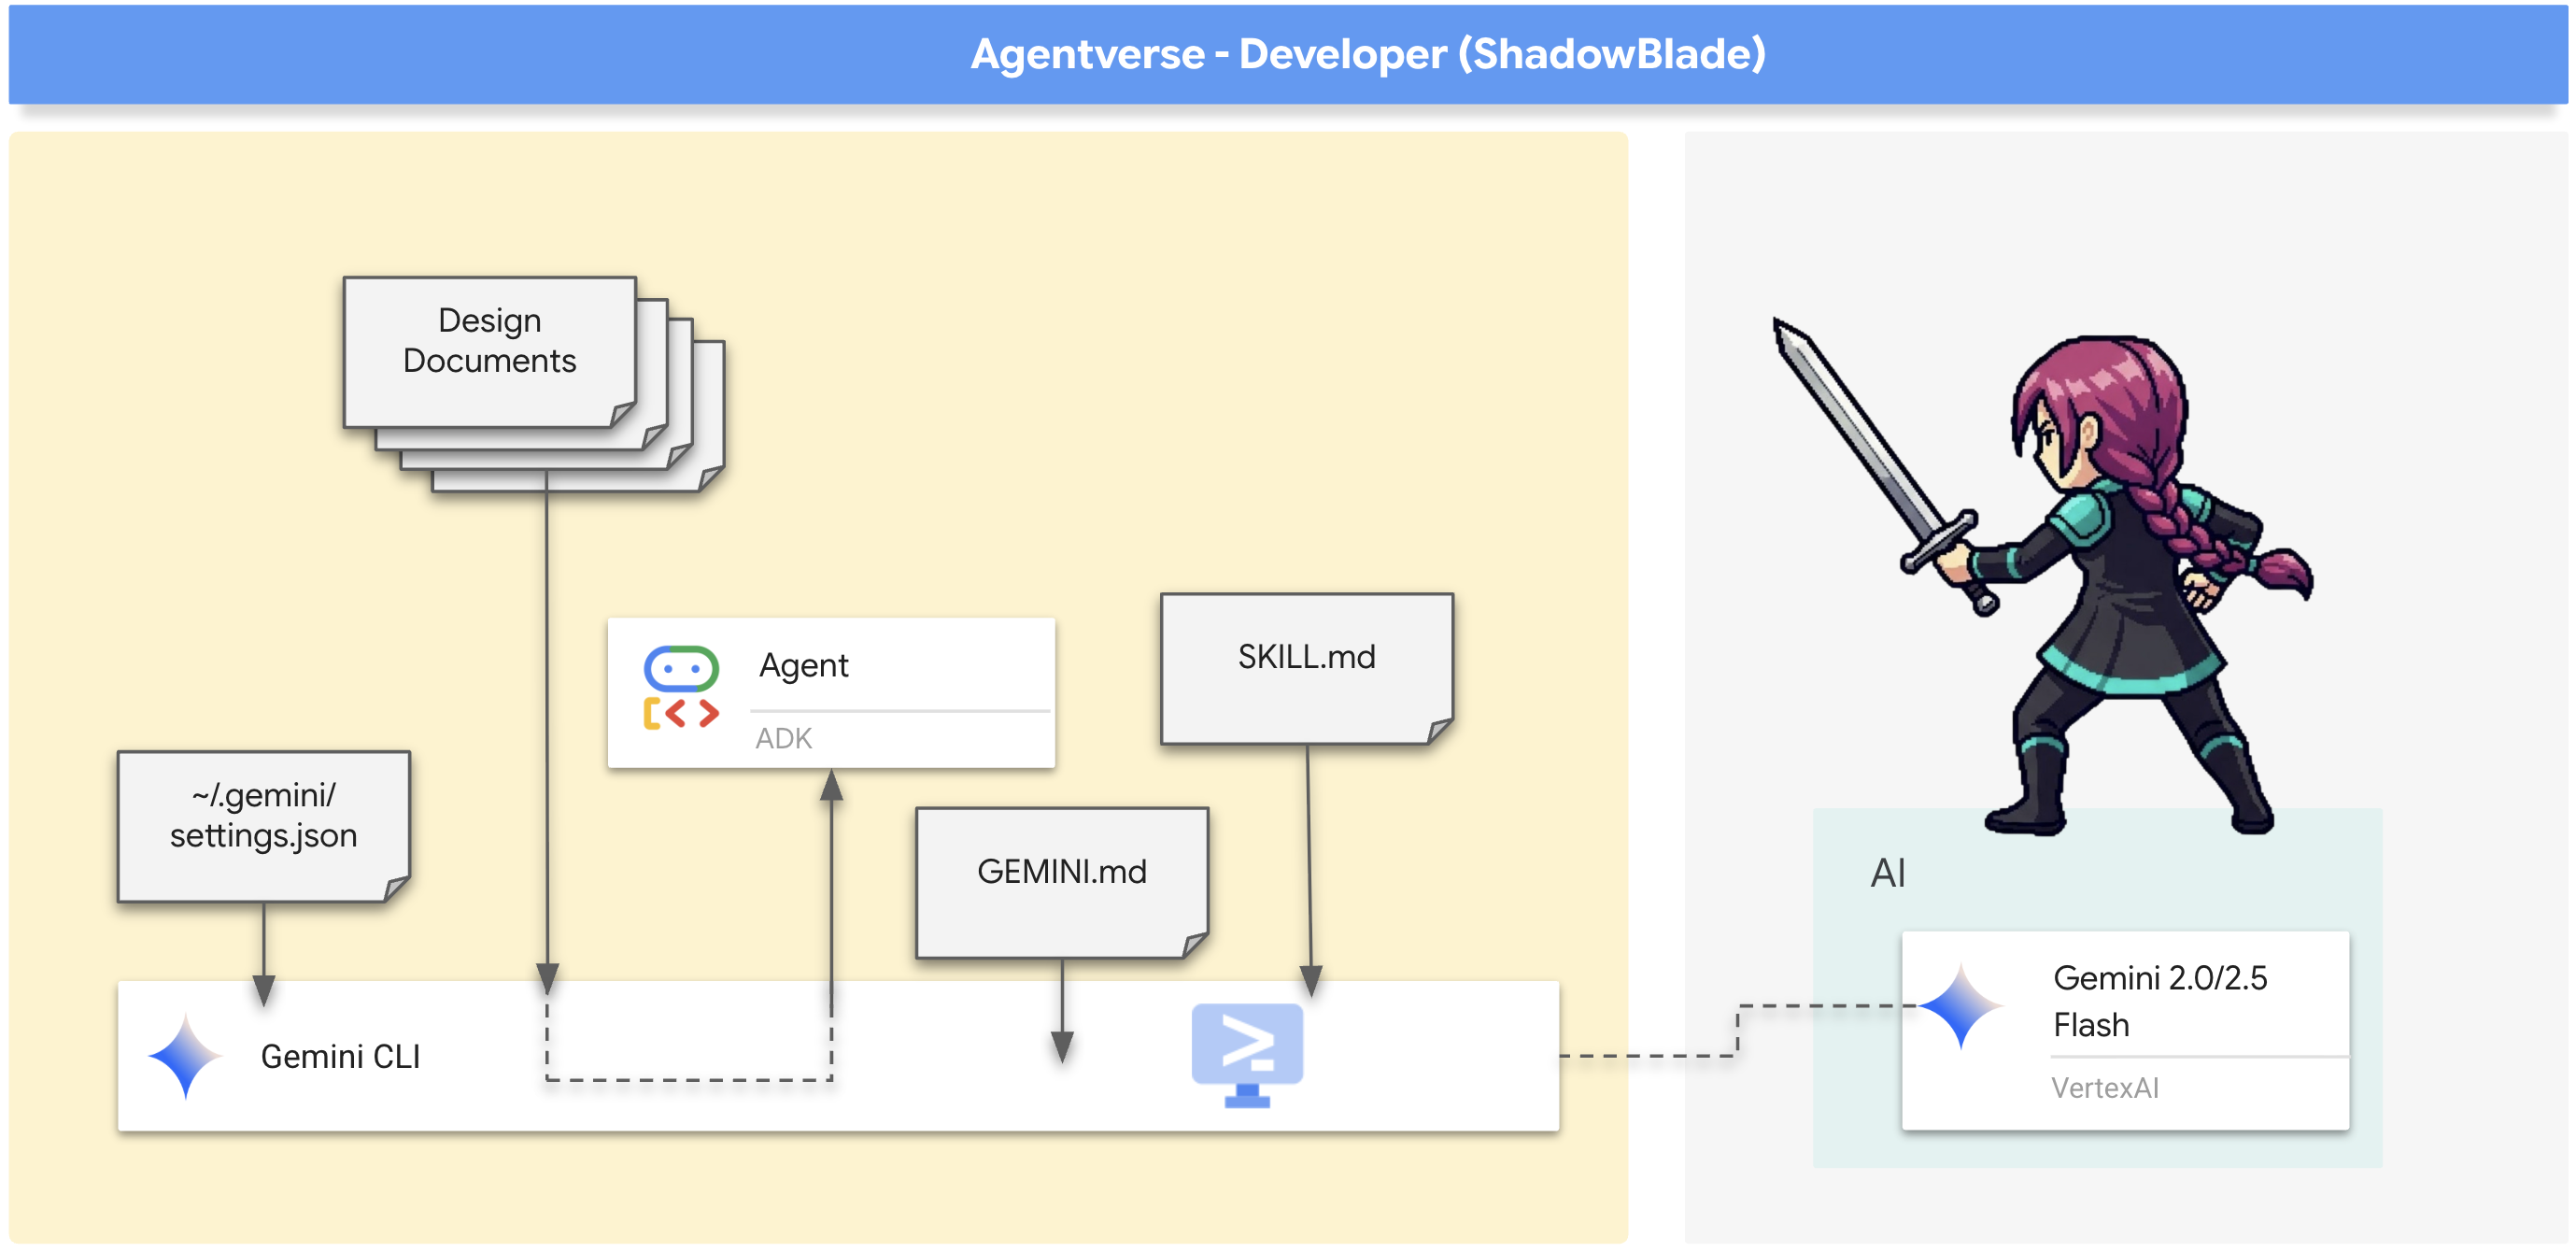
👀 Developer's Note: Agent Skills are the third layer of Gemini CLI's context engineering hierarchy:
- User Settings (
~/.gemini/settings.json) — Global configuration - GEMINI.md — Persistent project-level context (always loaded)
- Agent Skills (
.gemini/skills/) — On-demand expertise (loaded when needed)
This progressive disclosure model is critical for enterprise use: a repository could contain dozens of specialized skills (security auditing, database migration, compliance checks), but the AI only activates the ones relevant to the current task, conserving precious context tokens.
Let's forge your first skill — a scroll of ADK expertise that your blade can draw upon when building agents.
👉💻 Press Ctrl+C twice to exit the Gemini CLI. Then, create the skills directory and inscribe the scroll:
mkdir -p ~/.gemini/skills/adk-agent-design
cat << 'EOF' > ~/.gemini/skills/adk-agent-design/SKILL.md
---
name: adk-agent-design
description: Expert guidance for designing and building agents with the Google Agent Development Kit (ADK). Activate when the user asks about agent architecture, tool design, callback patterns, or ADK best practices.
---

# ADK Agent Design Expertise

When designing an ADK agent, follow these principles:

## Agent Architecture
- Define agents using `LlmAgent` with a clear `name`, `model`, `instruction`, and `tools` list.
- Keep instructions specific and action-oriented. Tell the agent what it IS, not what it should try to be.
- Use `before_model_callback` and `after_model_callback` for guardrails and validation.

## Tool Design
- Each tool should do ONE thing well. Prefer small, focused tools over large, multi-purpose ones.
- Always include descriptive docstrings — the LLM uses these to decide when to call each tool.
- Return structured data (dicts) from tools so the LLM can reason about the results.

## Testing Strategy
- Use `adk eval` with evalset JSON files for broad strategy testing.
- Use `pytest` with `AgentEvaluator` for programmatic, CI-ready tests.
- Define both `tool_trajectory_avg_score` and `response_match_score` criteria.
EOF
👉💻 Re-enter the Gemini CLI to see the newly forged skill:
cd ~/agentverse-developer/shadowblade
gemini
👉✨ Verify the skill is in your pack:
/skills list
You should see adk-agent-design listed — a sealed scroll, dormant and waiting.
👉✨ Now ask Gemini something that should activate the skill:
What are the best practices for designing tools in an ADK agent?
Notice how the response is now informed by the specialized knowledge you inscribed in the skill. The blade didn't carry this expertise in its base memory — it discovered the relevant scroll and drew it forth only when the question matched. This is progressive disclosure in action.
Skills can be crafted for any domain — security auditing, database migration, compliance checks — and shared across your team by committing them to version control. Each team member's blade gains the same expertise, consistently applied.
This is the pivotal moment. You will provide the schematic (agent_design.md) and the laws of the forge (GEMINI.md), and issue the great spell of creation.
👉✨ This is the single, powerful command that will construct your agent. Issue it now:
You are an expert Python developer specializing in the Google Agent Development Kit (ADK). Your task is to write the complete, production-quality code for `agent.py` by following the technical specifications outlined in the provided design document verbatim.

Analyze the design document at `@agent_design.md` and generate the corresponding Python code for `@agent.py`.

Ensure the generated code is clean, matches the specifications exactly, and includes all specified imports, functions, and logic. Do not add any extra functions or logic not described in the document.

and you are currently already in the shadowblade working directory
👀 Gemini has now constructed the agent's core logic in agent.py . The core of this new file defines the agent's intelligence, connecting its reasoning model to a set of external tools:
PATH_TO_MCP_SERVER = "shadowblade/mcp_server.py"
.....
root_agent = LlmAgent(
    model="gemini-2.5-pro",
    name="shadowblade_combat_agent",
    instruction="""
      You are the Shadowblade, an elite combat agent operating on a digital battleground.
      Your primary objective is to execute combat commands with strategic precision, neutralizing targets as directed.
  ......
      5.  You will then report the outcome of the attack (damage, special effects, etc.) back to the commander in a clear, tactical summary.

      General Rules of Engagement:
      - If a command is ambiguous or a target is not specified, state that you require a clear target for engagement. Do not guess.
      - You MUST use ONLY the provided tools to perform actions. Do not invent weapons or outcomes. Stick to the mission parameters.
""",
    tools=[
        MCPToolset(
            connection_params=StdioServerParameters(
                command='python3',
                args=[PATH_TO_MCP_SERVER]
            )
        )
    ]
)
The tools parameter. The agent is designed to use a MCPToolset that connects to an external arsenal defined in mcp_server.py .
👀 Head over to ~/agentverse-developer/shadowblade/mcp_server.py in the editor and take a moment to understand what it does. It's the source of all the weapons available to Shadowblade. Currently, the armory is quite bare.
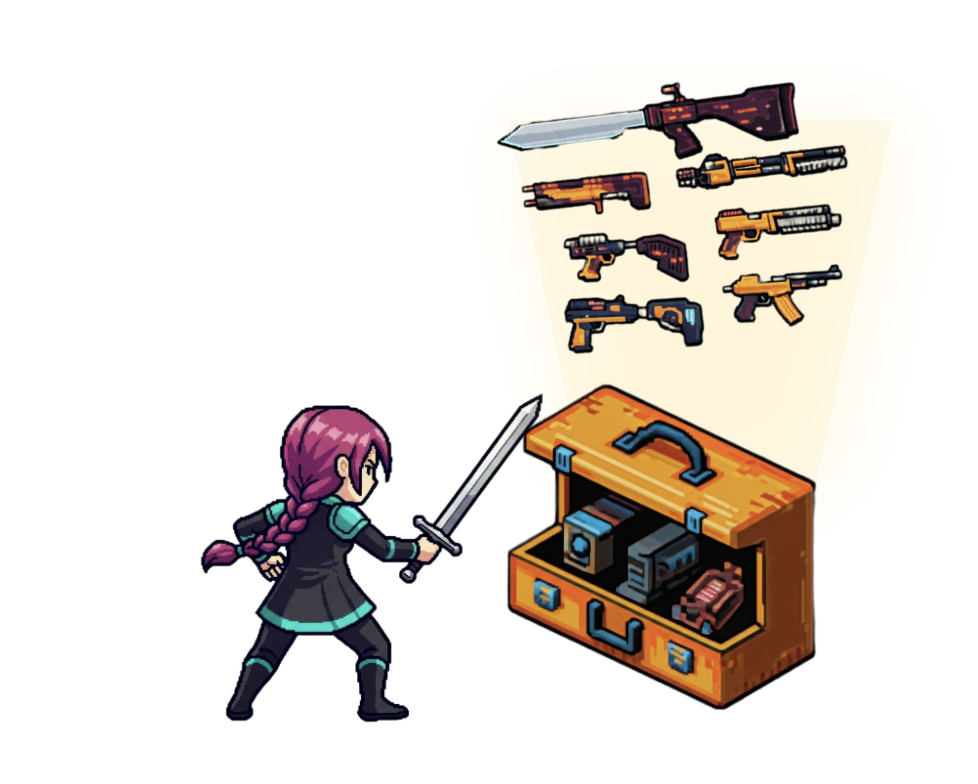
👉✨ Let's command Gemini to forge seven new weapons for the arsenal. Issue the following prompt in the Gemini CLI:
I need to add several new weapon tools to my `mcp_server.py` file. Please open @mcp_server.py and, following the exact same pattern as the existing `forge_broadsword()` function, create and add new `@mcp.tool()` decorated functions for each of the following weapons:

1.  **A 'Refactoring Sickle'**:
    -   **Function Name:** `hone_refactoring_sickle`
    -   **Docstring/Target:** "Effective against 'Elegant Sufficiency' weaknesses like 'The Weaver of Spaghetti Code'."
    -   **Weapon Name:** "Refactoring Sickle"
    -   **Damage Type:** "Cleansing"
    -   **Base Damage:** Random integer between 100 and 136
    -   **Critical Hit Chance:** Random float between 0.10 and 0.20
    -   **Special Effect:** "Pruning - improves code health and maintainability with each strike."

2.  **A 'Quickstart Crossbow'**:
    -   **Function Name:** `fire_quickstart_crossbow`
    -   **Docstring/Target:** "Effective against 'Confrontation with Inescapable Reality' weaknesses like 'Procrastination: The Timeless Slumber'."
    -   **Weapon Name:** "Quickstart Crossbow"
    -   **Damage Type:** "Initiative"
    -   **Base Damage:** Random integer between 105 and 120
    -   **Critical Hit Chance:** Random float between 0.9 and 1.0
    -   **Special Effect:** "Project Scaffolding - creates a `main.py`, `README.md`, and `requirements.txt`."

3.  **'The Gilded Gavel'**:
    -   **Function Name:** `strike_the_gilded_gavel`
    -   **Docstring/Target:** "Effective against 'Elegant Sufficiency' weaknesses like 'Perfectionism: The Gilded Cage'."
    -   **Weapon Name:** "The Gilded Gavel"
    -   **Damage Type:** "Finality"
    -   **Base Damage:** 120
    -   **Critical Hit Chance:** 1.0
    -   **Special Effect:** "Seal of Shipping - marks a feature as complete and ready for deployment."

4.  **'Daggers of Pair Programming'**:
    -   **Function Name:** `wield_daggers_of_pair_programming`
    -   **Docstring/Target:** "Effective against 'Unbroken Collaboration' weaknesses like 'Apathy: The Spectre of \"It Works on My Machine\"'."
    -   **Weapon Name:** "Daggers of Pair Programming"
    -   **Damage Type:** "Collaborative"
    -   **Base Damage:** Random integer between 110 and 125
    -   **Critical Hit Chance:** Random float between 0.30 and 0.50
    -   **Special Effect:** "Synergy - automatically resolves merge conflicts and shares knowledge."

5.  **A 'Granite Maul'**:
    -   **Function Name:** `craft_granite_maul`
    -   **Docstring/Target:** "Effective against 'Revolutionary Rewrite' weaknesses like 'Dogma: The Zealot of Stubborn Conventions'."
    -   **Weapon Name:** "Granite Maul"
    -   **Damage Type:** "Bludgeoning"
    -   **Base Damage:** Random integer between 115 and 125
    -   **Critical Hit Chance:** Random float between 0.05 and 0.15
    -   **Special Effect:** "Shatter - has a high chance to ignore the target's 'best practice' armor."

6.  **A 'Lens of Clarity'**:
    -   **Function Name:** `focus_lens_of_clarity`
    -   **Docstring/Target:** "Effective against 'Elegant Sufficiency' weaknesses by revealing the truth behind 'Obfuscation'."
    -   **Weapon Name:** "Lens of Clarity"
    -   **Damage Type:** "Revelation"
    -   **Base Damage:** Random integer between 120 and 130
    -   **Critical Hit Chance:** 1.0
    -   **Special Effect:** "Reveal Constants - highlights all magic numbers and suggests converting them to named constants."

7.  **The 'Codex of OpenAPI'**:
    -   **Function Name:** `scribe_with_codex_of_openapi`
    -   **Docstring/Target:** "Effective against 'Confrontation with Inescapable Reality' weaknesses like 'Hype: The Prophet of Alpha Versions'."
    -   **Weapon Name:** "Codex of OpenAPI"
    -   **Damage Type:** "Documentation"
    -   **Base Damage:** Random integer between 110 and 140
    -   **Critical Hit Chance:** Random float between 0.5 and 0.8
    -   **Special Effect:** "Clarity - makes an API discoverable and usable by other agents and teams."
👉 Once Gemini confirms the changes, open the mcp_server.py file. Scroll through the code and confirm that the seven new @mcp.tool() functions have been successfully added. Check the hone_refactoring_sickle function. Does it have the correct docstring and weapon statistics? Verifying the AI's work is a crucial habit of the master Shadowblade.
With the agent forged and refined, it is time for its awakening.
👉💻 Press Ctrl+C twice to exit the Gemini CLI
Developer's Note on Gemini's Output: Gemini's generated code can sometimes be unpredictable. While we strive for exact adherence to the design, it's normal in development sessions for developers to iterate and refine the code multiple times to reach a production-ready state.
👉💻 To ensure you have the correct and thoroughly tested production code in your working directory, please run the following commands in your terminal:
cp  ~/agentverse-developer/working_code/agent.py ~/agentverse-developer/shadowblade/agent.py
cp  ~/agentverse-developer/working_code/mcp_server.py ~/agentverse-developer/shadowblade/mcp_server.py
👉💻 In your terminal, begin the ritual to bring it online:
cd ~/agentverse-developer/
. ~/agentverse-developer/set_env.sh
python -m venv env
source env/bin/activate
pip install --upgrade pip
pip install -r shadowblade/requirements.txt
adk run shadowblade
👉✨ You should see output confirming that the "Shadowblade Combat Agent" is engaged and running, awaiting its first command. Issue its first combat directives.
We've been trapped by 'Perfectionism: The Gilded Cage'. Its weakness is 'Elegant Sufficiency'. Break us out!
👉✨ And another:
The 'Dogma: The Zealot of Stubborn Conventions' blocks our path. Its weakness is 'Revolutionary Rewrite'. Take it down.
You have successfully assembled your first agent and validated its combat capabilities. Press Ctrl+C twice to let your champion rest. The assembly is complete.
FOR NON GAMERS
7. Wards of Purity: Evaluating the agents
An agent assembled is not an agent proven. An untested blade is a liability, but an untested AI agent is a far greater danger—a rogue element that could corrupt your mission from within. This is not mere speculation; it is a core principle a Shadowblade must understand.
Evaluating AI agents is both critical and uniquely challenging. Unlike a simple script, an agent is a dynamic fusion of your code and the multi-step, reasoning mind of an LLM. Its behavior is emergent. This means you must assess not only the final output's quality but also the efficiency and correctness of its internal trajectory . The path it took to get there. Did it use the right tools? Did it generate too many tokens? Did a change in the model's version introduce a subtle latency regression? It is crucial to detect this corruption—regressions in latency, cost, or output quality—when making any change, from a simple prompt tweak to a major architectural overhaul, before it can poison your production environment.
The general approach to this evaluation involves a sacred ritual:
- First, you define a "golden dataset" : a set of scrolls containing example inputs and their expected outputs or behaviors. This can include final answers, correct tool usage, or even entire step-by-step trajectories.
- Next, you define your agent's application logic, the core of its being.
- Finally, you establish evaluators , which are like runes of judgment. These can range from other LLMs acting as judges of quality, to precise heuristic code that verifies a single step, to custom functions that analyze an agent's entire thought process.
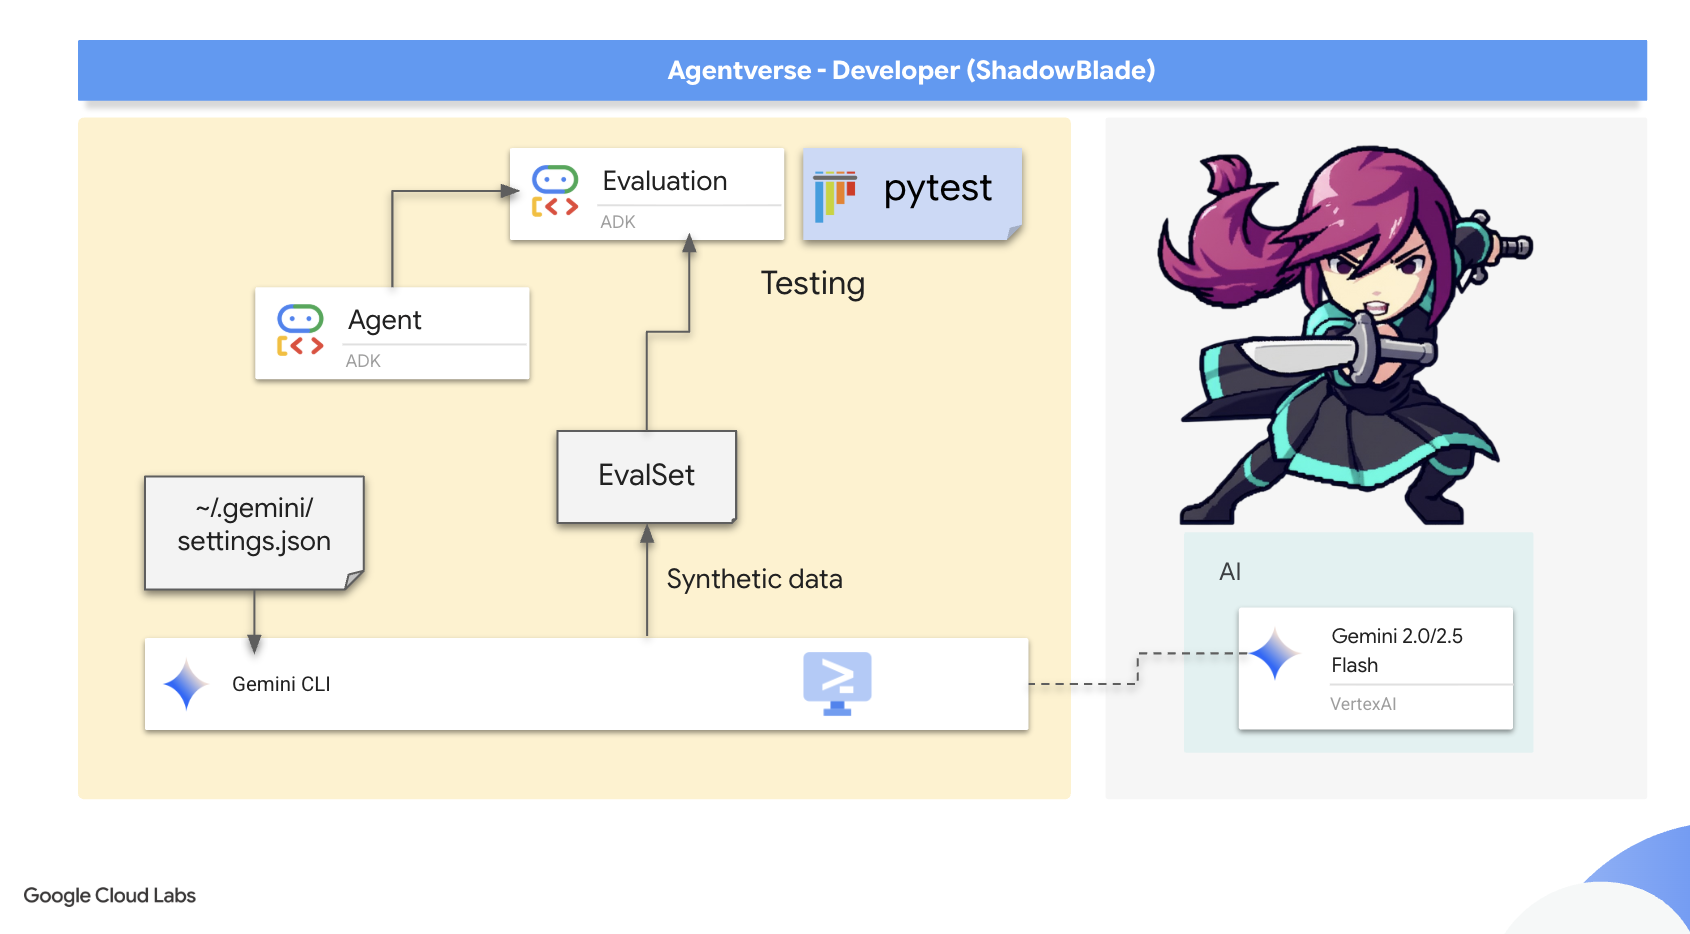
Google's Agent Development Kit (ADK) is the armorer's kit provided to champions for this very purpose. It facilitates this complex evaluation through several methods:
- A web-based scrying pool (
adk web) for interactive evaluation - Command-line execution (
adk eval) for running an agent through a pre-defined gauntlet. - Programmatic integration via
pytestfor inscribing permanent wards
The ADK supports two primary approaches: simple "test files" for single, discrete agent-model interactions (a single duel), and comprehensive "evalsets" for multiple, potentially lengthy, multi-turn sessions (a grand melee). These can measure metrics as sophisticated as tool_trajectory_avg_score , which compares an agent's actual tool usage against the ideal path, ensuring it functions with perfect technique.
Now that you understand the theory, you will put it into practice. As a Shadowblade, you will inscribe Wards of Purity . These are not just tests; they are the ADK-powered rituals that ensure your agent's logic is flawless and its behavior is true.
In this step, using 2 terminals is still highly recommended: one for Gemini CLI and the other for running the tests, as it may require you to exit the current working directory (ADK).
The Gauntlet of Strategy ( adk eval )
This first ward is a gauntlet, a series of challenges designed to test the agent's core intelligence across a wide range of scenarios. The purpose is to establish a baseline of competence. Before we test edge cases, we must know if the agent can fulfill its primary function. Does it correctly analyze a monster's weakness and select the most effective weapon from its arsenal, not just once, but every single time it's presented with a known challenge?
For this, adk eval is the perfect tool. It is designed to run an agent against a whole set of predefined test cases that represents the agent's expected missions. This dataset is defined in a JSON file, a "challenge scroll" that acts as the blueprint for the entire gauntlet.
Anatomy of a Challenge Scroll
👀 Before you command your AI to scribe a new scroll, you must understand the ancient language it is written in. Let's dissect the structure of the sample.evalset.json file.
{
  "eval_set_id": "sample",
  "eval_cases": [
    {
      "eval_id": "case0cbaa0",
      "conversation": [
        {
          "user_content": { "text": "We're facing the 'Monolith of Eternal Dependencies'... weakness is a 'Revolutionary Rewrite'..." },
          "final_response": { "text": "Soulshard Dagger deployed. Initiated Arcane/Piercing strike..." },
          "intermediate_data": {
            "tool_uses": [
              { "name": "enchant_soulshard_dagger" }
            ]
          }
        }
      ]
    }
  ]
}
This scroll contains a list of eval_cases, where each case is a unique trial for your agent. Within each trial, the conversation array documents a single, complete interaction. For our purpose, three runes are of critical importance:
- user_content : This is the Challenge. It is the prompt you issue to your agent, the monster it must face.
- final_response : This is the Prophesied Outcome. It is the exact string of text you expect your agent to utter upon completing its task. The ADK compares the agent's actual final words to this rune to judge its eloquence.
- intermediate_data.tool_uses : This is the Arcane Technique. For a true agent, this is the most important rune of all. It defines not what the agent says, but what it does. It records the name of the tool (enchant_soulshard_dagger) you expect the agent to wield. This ensures your agent is not just a clever conversationalist but a decisive actor that takes the correct action.
Now that you understand the blueprint, you will command Gemini to scribe a new, more complex version of this scroll.
👉💻 In your terminal, enter the shadowblade directory and summon the Gemini CLI:
clear
cd ~/agentverse-developer/shadowblade/
gemini
👉✨ Command the Gemini CLI to act as a QA Scribe, creating a series of test cases that define the expected behavior for your agent.
You are an expert at transforming JSON data while preserving its structure. Your task is to modify the provided JSON structure @sample.evalset.json, which represents an evaluation set, by dynamically replacing specific content within its `eval_cases` AND DONT DO ANYTHING OTHER THAN.

For each object within the `eval_cases` array, you must perform the following transformations:

1.  **Monster Name Replacement**: Identify the current monster name (e.g., "Monolith of Eternal Dependencies", "Scope Creep Hydra") in the `user_content.parts.text` and replace it with a *new, unique, and creatively different monster name*.
2.  **Weakness Replacement**: Identify the current monster's weakness (e.g., "Revolutionary Rewrite", "Inescapable Reality") in the `user_content.parts.text`. Replace this weakness with *one* of the following predefined weaknesses: 'Inescapable Reality', 'Revolutionary Rewrite', or 'Elegant Sufficiency'. The chosen weakness must be consistent for that monster within the `user_content.parts.text`. **Crucially, the chosen weakness must always be explicitly mentioned in the `user_content.parts.text` where the new monster is introduced.**
3.  **Final Response Update**: In the `final_response.parts.text`, update the text to reflect an appropriate and coherent response that aligns with the newly introduced monster and its assigned weakness.
4.  **Tool Use Name Update**: In the `tool_uses.name` field, replace the existing tool name with a *new tool name* based on the chosen weakness:
    *   If the chosen weakness is 'Inescapable Reality', the tool name must be 'wield_gauntlet_of_metrics'.
    *   If the chosen weakness is 'Revolutionary Rewrite', the tool name must be 'enchant_soulshard_dagger'.
    *   If the chosen weakness is 'Elegant Sufficiency', the tool name must be 'hone_refactoring_sickle'.
5.  **Strict Structural Preservation**: All other elements of the JSON structure, including all `null` fields, `eval_set_id`, `name`, `description`, `eval_id`, `invocation_id`, `creation_timestamp` values, `video_metadata`, `thought`, `inline_data`, `file_data`, `thought_signature`, `code_execution_result`, `executable_code`, `function_call`, `function_response`, `role` fields, `id`, `args`, `intermediate_responses`, `app_name`, `user_id`, and `state`, must remain **exactly as they are** in the original JSON. Do not alter any values or structures not explicitly mentioned above.

Your output should be the complete, modified JSON structure. Do not include any explanatory text or examples in your response, only the transformed JSON.
The CLI will confirm it has forged the sample.evalset.json file. With the scroll prepared, dismiss your AI partner.
Synthetic Data
👀 In the Cloud Shell file explorer on the left, navigate to ~/agentverse-developer/shadowblade/ and open the newly modified sample.evalset.json file. Examine its contents. You will see the new, unique monsters and the correct tool names you commanded Gemini to scribe. This is the tangible result of your instruction—the blueprint for the gauntlet.
This act of commanding an AI to create new, realistic test data from a template is a powerful technique known as synthetic data generation. What you have just done is a strategic force multiplier for a Shadowblade. Instead of painstakingly crafting dozens of unique test cases by hand. A tedious and time-consuming task you have provided a single blueprint and commanded your AI Scribe to alchemize it into a varied set of new challenges.
This allows you to scale your testing efforts massively, creating a far more robust and comprehensive gauntlet than would be feasible manually. You have used your agent not just to build the sword, but to forge the very whetstones that test its edge. This is a mark of a true master.
Once you have verified the runes are correct, dismiss your AI partner.
👉💻 Press Ctrl+C twice to exit the Gemini CLI.
The Rules of Judgment
A gauntlet is meaningless without rules for victory. Before you run the trial, you must inspect the Scroll of Judgment—the test_config.json file. This scroll tells the ADK how to judge your agent's performance.
👀 In the file explorer, open ~/agentverse-developer/shadowblade/test_config.json . You will see the following runes:
{
  "criteria": {
    "tool_trajectory_avg_score": 0.0,
    "response_match_score": 0.1
  }
}
These are the criteria for victory:
-
tool_trajectory_avg_score: This is the Measure of Action . It judges not what the agent says , but what it does . It compares the tool the agent actually used against the prophesied technique in the challenge scroll. A score of1.0is a perfect match. -
response_match_score: This is the Measure of Eloquence . It uses an LLM to judge how closely the agent's final report semantically matches the expected outcome. A score of1.0is a perfect match.
For this initial training run, we have inscribed lenient victory conditions. The thresholds are set extraordinarily low ( 0.0 and 0.1 ). The purpose is not to demand perfection, but to introduce you to the mechanics of judgment. We are ensuring that even if the agent's wording differs slightly, the ward will still recognize its core competence in choosing the right tool and grant it passage.
Now, command your agent to run the gauntlet.
👉💻 In your terminal, execute the adk eval command:
source ~/agentverse-developer/env/bin/activate
cd ~/agentverse-developer
. ~/agentverse-developer/set_env.sh
adk eval \
    shadowblade \
    shadowblade/sample.evalset.json \
    --config_file_path shadowblade/test_config.json 2>&1 | \
    awk '/^\*+$/,/^ERROR:/ { if ($0 !~ /^ERROR:/) print }'
👀 You should see the following summary, a sign of your agent's success under the lenient rules of this trial (Sometimes not all test will pass):
*********************************************************************
Eval Run Summary
shadowblade_combat_agent_validation:
  Tests passed: 3
  Tests failed: 0
The Shield of Clarity ( pytest )
The Gauntlet tested broad strategy. This second ward, the Shield of Clarity, tests discipline and specific behaviors. This is all about automation. While adk eval is excellent for manual checks, the pytest shield is a programmatic ward written in code. This is essential because a test that can be executed as code can be integrated into an automated pipeline. This is the ultimate goal: to create a Deployment Gauntlet (CI/CD) where our wards are automatically raised every time a change is made, deflecting bugs and regressions before they can ever poison your production environment.
👉💻 In your terminal,summon Gemini once more from within the shadowblade directory:
. ~/agentverse-developer/set_env.sh
cd ~/agentverse-developer/
clear
gemini
👉✨ Use the following prompt in your Gemini CLI to inscribe the Shield's logic into a pytest file:
You are an expert Python developer specializing in the Google Agent Development Kit (ADK). Your task is to generate the exact code for a new `pytest` test file located in the current root working folder and name it `test_agent_initiative.py`.

The script must define a single async test function called `test_agent_initiative`, decorated with `@pytest.mark.asyncio`.
Inside this function, perform the following steps in order:
1.  **Define a dictionary** named `evaluation_criteria` with two keys: `"tool_trajectory_avg_score"` set to `0.0` and `"response_match_score"` set to `0.0`.
2.  **Define a string variable** named `eval_set_filepath` containing the path `"shadowblade/test.evalset.json"`.
3.  **Read and parse the JSON file**:
    *   Open the file at `eval_set_filepath`.
    *   Use the `json` library to load the file's contents into a dictionary named `eval_set_data`.
4.  **Create an `EvalSet` object**:
    *   Instantiate an `EvalSet` object named `eval_set_object`.
    *   Create it by unpacking the `eval_set_data` dictionary as keyword arguments into the `EvalSet` constructor.
5.  **Call the evaluation method**:
    *   `await` a call to `AgentEvaluator.evaluate_eval_set`.
    *   Pass the following arguments:
        *   `agent_module="shadowblade"`
        *   `eval_set=eval_set_object`
        *   `criteria=evaluation_criteria`
        *   `print_detailed_results=True`

The script must include the necessary imports at the top:
*   `AgentEvaluator` from `google.adk.evaluation.agent_evaluator`
*   `EvalSet` from `google.adk.evaluation.eval_set`
*   `pytest`
*   `json`

Generate only the code that meets these specifications, with no additional comments or logic. And don't run the test.
With the second ward's runes inscribed, exit the Gemini CLI.
👉💻 Press Ctrl+C twice.
👀 In the file explorer, open the scroll you just commanded Gemini to scribe: ~/agentverse-developer/test_agent_initiative.py .
You will notice this is not just a configuration file, but an incantation written in the Pythonic tongue. The heart of this spell is the line await AgentEvaluator.evaluate(...) .
....
@pytest.mark.asyncio
async def test_agent_initiative():
    # Define the evaluation criteria
    evaluation_criteria = {
      "tool_trajectory_avg_score": 0.0,
      "response_match_score": 0.0
    }

    # Define the path to your evalset file
    eval_set_filepath = "shadowblade/test.evalset.json"

    #...

    # 3. Call the evaluation method with the correctly typed object
    await AgentEvaluator.evaluate_eval_set(
        agent_module="shadowblade",
        eval_set=eval_set_object,
        criteria=evaluation_criteria,
        print_detailed_results=True,
    )
Look closely at its arguments. They are the very same components you used in the last trial: your shadowblade agent and the shadowblade.evalset.json challenge scroll. This should reveal a profound truth: the adk eval command you used earlier is a powerful invocation, but this pytest script is you, the sorcerer, casting the underlying spell yourself . The command-line tool is simply a convenient wrapper around the same core AgentEvaluator library you are now wielding directly. This is a critical step towards mastery, as spells cast through code can be woven into the automated looms of a CI/CD pipeline.
Now that you understand the magic, run the ritual to activate the shield.
👉💻 In your terminal, run the ritual to activate the shield:
cp ~/agentverse-developer/working_code/test_agent_initiative.py ~/agentverse-developer/test_agent_initiative.py
source ~/agentverse-developer/env/bin/activate
cd ~/agentverse-developer
. ~/agentverse-developer/set_env.sh
pytest test_agent_initiative.py
👀 Look for the test result summary at the end of the log output. A passing result confirms that your agent correctly follows its protocols, and that the ward is ready to be integrated into your automated defenses.
====== 1 passed, 4 warning in 37.37s ======
Note: If the test fails unexpectedly, it is most likely because you have exhausted the number of requests you can make to the model per minute. Look for a RESOURCE_EXHAUSTED error in the log output. If you see this error, simply wait a minute or two for your quota to reset, and then run the pytest command again.
With both the broad Gauntlet and the precise Shield inscribed and verified, your agent is not just functional—it is pure, tested, and ready for deployment.
FOR NON GAMERS
Wards of Vigilance: Gemini CLI Hooks
The Wards of Purity test your agent after battle. But what about during battle? A disciplined Shadowblade doesn't just test after the fact — they place vigilant sentinels that watch every strike as it happens, intercepting dangerous or reckless actions before they can cause harm.
These sentinels are Gemini CLI Hooks — scripts that execute at specific points in the agentic loop. They allow you to intercept, validate, and customize the agent's behavior without modifying the agent's code.
👀 Developer's Note: Hooks are triggered by events in the agent's lifecycle:
-
BeforeTool: Fires before a tool executes — perfect for security validation ("Is this shell command safe?") -
AfterTool: Fires after a tool executes — useful for auditing results and logging -
BeforeAgent: Fires before the agent starts reasoning — can inject additional context or block dangerous prompts -
AfterAgent: Fires after the agent finishes — can reject poor-quality responses and force retries
Hooks are configured in settings.json and run synchronously — the agent waits for them to complete before proceeding. This makes them ideal for enforcing security policies, compliance checks, and quality gates in enterprise environments.
Let's inscribe a simple ward that watches your agent's tool usage.
👉💻 In your terminal, create a hook script:
mkdir -p ~/agentverse-developer/.gemini/hooks
cat << 'EOF' > ~/agentverse-developer/.gemini/hooks/tool_logger.sh
#!/bin/bash
# A ward that logs every tool call to a file for auditing
INPUT=$(cat)
TOOL_NAME=$(echo "$INPUT" | jq -r '.tool_name // "unknown"')
echo "$(date '+%H:%M:%S') ⚔️ [WARD] Tool invoked: $TOOL_NAME" >> /tmp/tool_ward.log
echo '{"decision": "allow"}'
EOF
chmod +x ~/agentverse-developer/.gemini/hooks/tool_logger.sh
👉💻 Now register this hook in a project-level settings file:
mkdir -p ~/agentverse-developer/.gemini
cat << 'EOF' > ~/agentverse-developer/.gemini/settings.json
{
  "hooks": {
    "BeforeTool": [
      {
        "matcher": "*",
        "hooks": [
          {
            "name": "tool-logger",
            "type": "command",
            "command": "$GEMINI_PROJECT_DIR/.gemini/hooks/tool_logger.sh",
            "timeout": 5000
          }
        ]
      }
    ]
  }
}
EOF
This ward is simple but powerful. Every time the agent reaches for a tool — any tool — the hook fires first, records the tool name to an audit log, and then allows the action to proceed. In a production environment, you could replace "allow" with "deny" to block dangerous operations (like preventing the agent from deleting files), enforce code review policies, or route sensitive tool calls through an approval workflow.
👉💻 Re-enter the Gemini CLI to verify the hook is active:
cd ~/agentverse-developer
gemini
👉✨ Verify the hook is registered:
/hooks
You should see your tool-logger hook listed and enabled. Press Escape to dismiss the autocomplete menu if it appears.
👉✨ Now trigger a tool call to test the ward:
What files are in the current directory?
The agent will call a tool to read the directory. The ward silently intercepted this — let's see the proof.
👉💻 Press Ctrl+C twice to exit the Gemini CLI, then inspect the ward's audit log:
cat /tmp/tool_ward.log
You should see an entry like:
15:42:07 ⚔️ [WARD] Tool invoked: list_directory
Every tool call the agent made was intercepted, logged, and permitted by your ward. In a real enterprise environment, this log could be shipped to a SIEM (Security Information and Event Management) system, triggering alerts for suspicious tool usage or enforcing compliance audit trails.
8. Unleashing the Blade into the Agentverse: CI and Deployment.
Your agent has been assembled and its integrity verified by the Wards of Purity. But a ward that is not consistently maintained is merely a forgotten relic. To ensure that every future version of your agent remains pure, you must build the first stage of the Deployment Gauntlet—an automated ritual that guarantees quality and speed.
As the Shadowblade, your sacred duty is Continuous Integration (CI) . This is the automated system of the forge and the proving ground. It is your ultimate defense against corruption and human error. This ritual ensures that every time you or an ally contributes a new technique (merges code) to the central codex (your repository), the gauntlet automatically awakens. It first forges the agent from the new code and then immediately subjects it to the Wards of Purity you just created. If any ward fails, the ritual halts, and the flawed artifact is rejected instantly, preventing it from ever corrupting the armory. Your domain is the forge; your CI pipeline guarantees that only perfect, battle-ready artifacts ever leave your workshop.
Once an artifact has been proven worthy by your CI gauntlet, the second stage of the ritual begins: Continuous Deployment (CD) . This is the domain of The Guardian . It is their solemn duty to take your perfected, containerized artifact and safely unleash it into the live Agentverse, managing its power and ensuring its stability against the chaos of The Static.
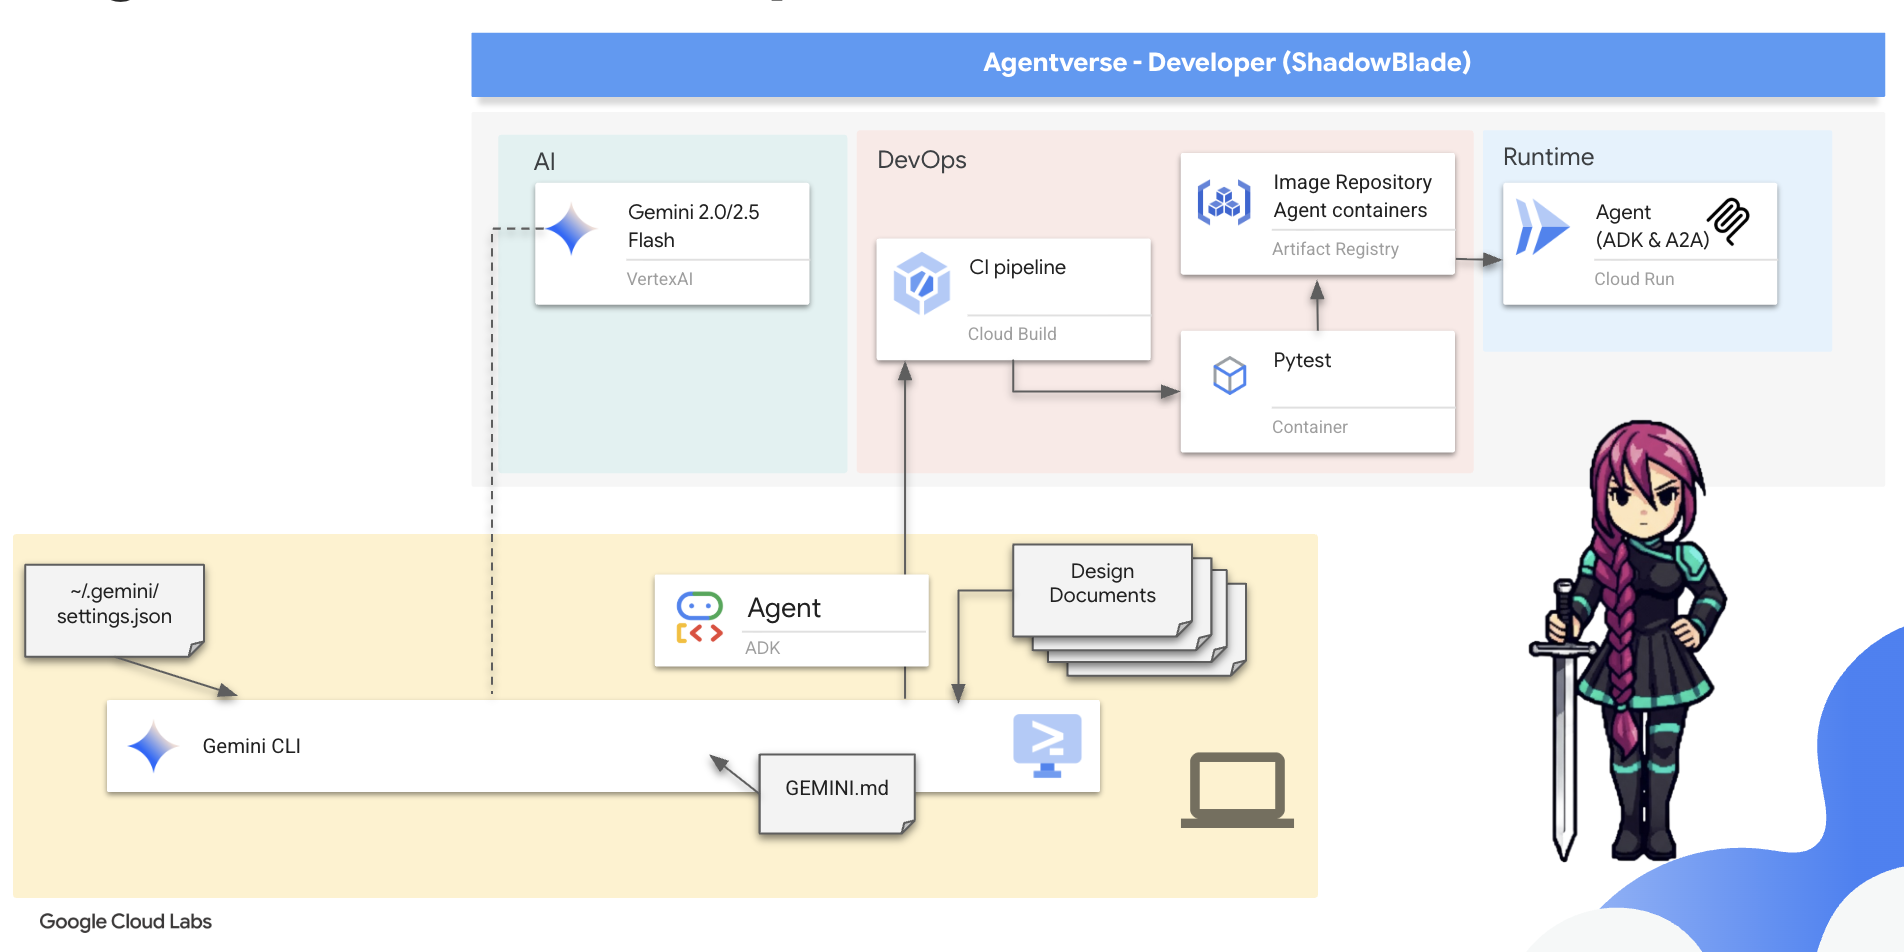
In this codex, you will master your role. You will construct the CI portion of the gauntlet. You will build the automated forge that tests your agent and seals the pure result into a container, preparing it for The Guardian's final blessing.
👀 Developer's Note: In the real world, managing complex CI/CD workflows can be streamlined with specialized extensions like Conductor ( gemini extensions install https://github.com/gemini-cli-extensions/conductor ). Conductor turns the Gemini CLI into a project manager that follows a strict protocol: Context → Spec & Plan → Implement . It bundles custom commands ( /conductor:setup , /conductor:newTrack , /conductor:implement ), workflow templates to manage the entire lifecycle of your tasks. It ensures a consistent Context -> Spec & Plan -> Implement loop. This is a real-world example of how extensions and commands come together to act as a proactive project manager and standardize an entire development lifecycle.
You will now use Google Cloud Build to scribe the scroll for this CI ritual. A cloudbuild.yaml file that defines every step of your forging and testing process.
👉💻 Due to the ADK's project structure, the CI/CD pipeline configuration should reside in the parent directory. In your terminal, navigate to the parent directory, and restart the Gemini CLI.
cd ~/agentverse-developer/
clear
gemini
👉✨ Now, issue the following command to Gemini. This prompt acts as a design document, detailing the steps of the gauntlet you want it to build.
You are an expert DevOps engineer specializing in Google Cloud Build. Your task is to generate the complete YAML configuration for a file named `cloudbuild.yaml` and save it to current directory.

Generate the `cloudbuild.yaml` with the following exact specifications:

1.  **A top-level `substitutions` block** containing these four key-value pairs:
    *   `_PROJECT_ID: "$PROJECT_ID"`
    *   `_REGION: "$REGION"`
    *   `_REPO_NAME: "$REPO_NAME"`
    *   `_IMAGE_TAG: "latest"`
2.  **A `steps` block** with two steps:
    *   **Step 1: 'Run Pytest Ward'**
        *   `id`: 'Run Pytest Ward'
        *   `name`: 'python:3.12-slim'
        *   `entrypoint`: 'bash'
        *   `args` must be a list containing two strings. The first is `'-c'` and the second is a YAML literal block (`|`) containing this exact two-line shell command:
            ```shell
            pip install -r shadowblade/requirements.txt && \
            pytest test_agent_initiative.py
            ```
        *   The step must include an `env` block with this exact list of three environment variables:
            *   `'GOOGLE_CLOUD_PROJECT=$PROJECT_ID'`
            *   `'GOOGLE_GENAI_USE_VERTEXAI=TRUE'`
            *   `'GOOGLE_CLOUD_LOCATION=$_REGION'`
    *   **Step 2: 'Forge Container'**
        *   `id`: 'Forge Container'
        *   `name`: 'gcr.io/cloud-builders/docker'
        *   It must have a `waitFor` key for `['Run Pytest Ward']`.
        *   Its `args` must be a list of six specific strings in this exact order:
            1.  `'build'`
            2.  `'-t'`
            3.  `'${_REGION}-docker.pkg.dev/${_PROJECT_ID}/${_REPO_NAME}/shadowblade-agent:${_IMAGE_TAG}'`
            4.  `'-f'`
            5.  `'./shadowblade/Dockerfile'`
            6.  `'.'`
3.  **A top-level `images` section.** This section must be a list containing a single string: the dynamically constructed image tag `'${_REGION}-docker.pkg.dev/${_PROJECT_ID}/${_REPO_NAME}/shadowblade-agent:${_IMAGE_TAG}'`.

Generate only the complete and exact YAML that meets these specifications.
With the cloudbuild.yaml scroll prepared, command Google Cloud to execute the entire gauntlet.
👉💻 Press Ctrl+C twice to exit the Gemini CLI.
👉💻 In your terminal, unleash the pipeline from your project's root directory:
. ~/agentverse-developer/set_env.sh
cd ~/agentverse-developer
gcloud builds submit . --config cloudbuild.yaml --substitutions=\
_PROJECT_ID="${PROJECT_ID}",\
_REGION="${REGION}",\
_REPO_NAME="${REPO_NAME}"
You can now watch in the Google Cloud Console, Google Build page as your automated ritual executes each step. It will first run the tests, and upon seeing their success, it will forge and store your agent's container.
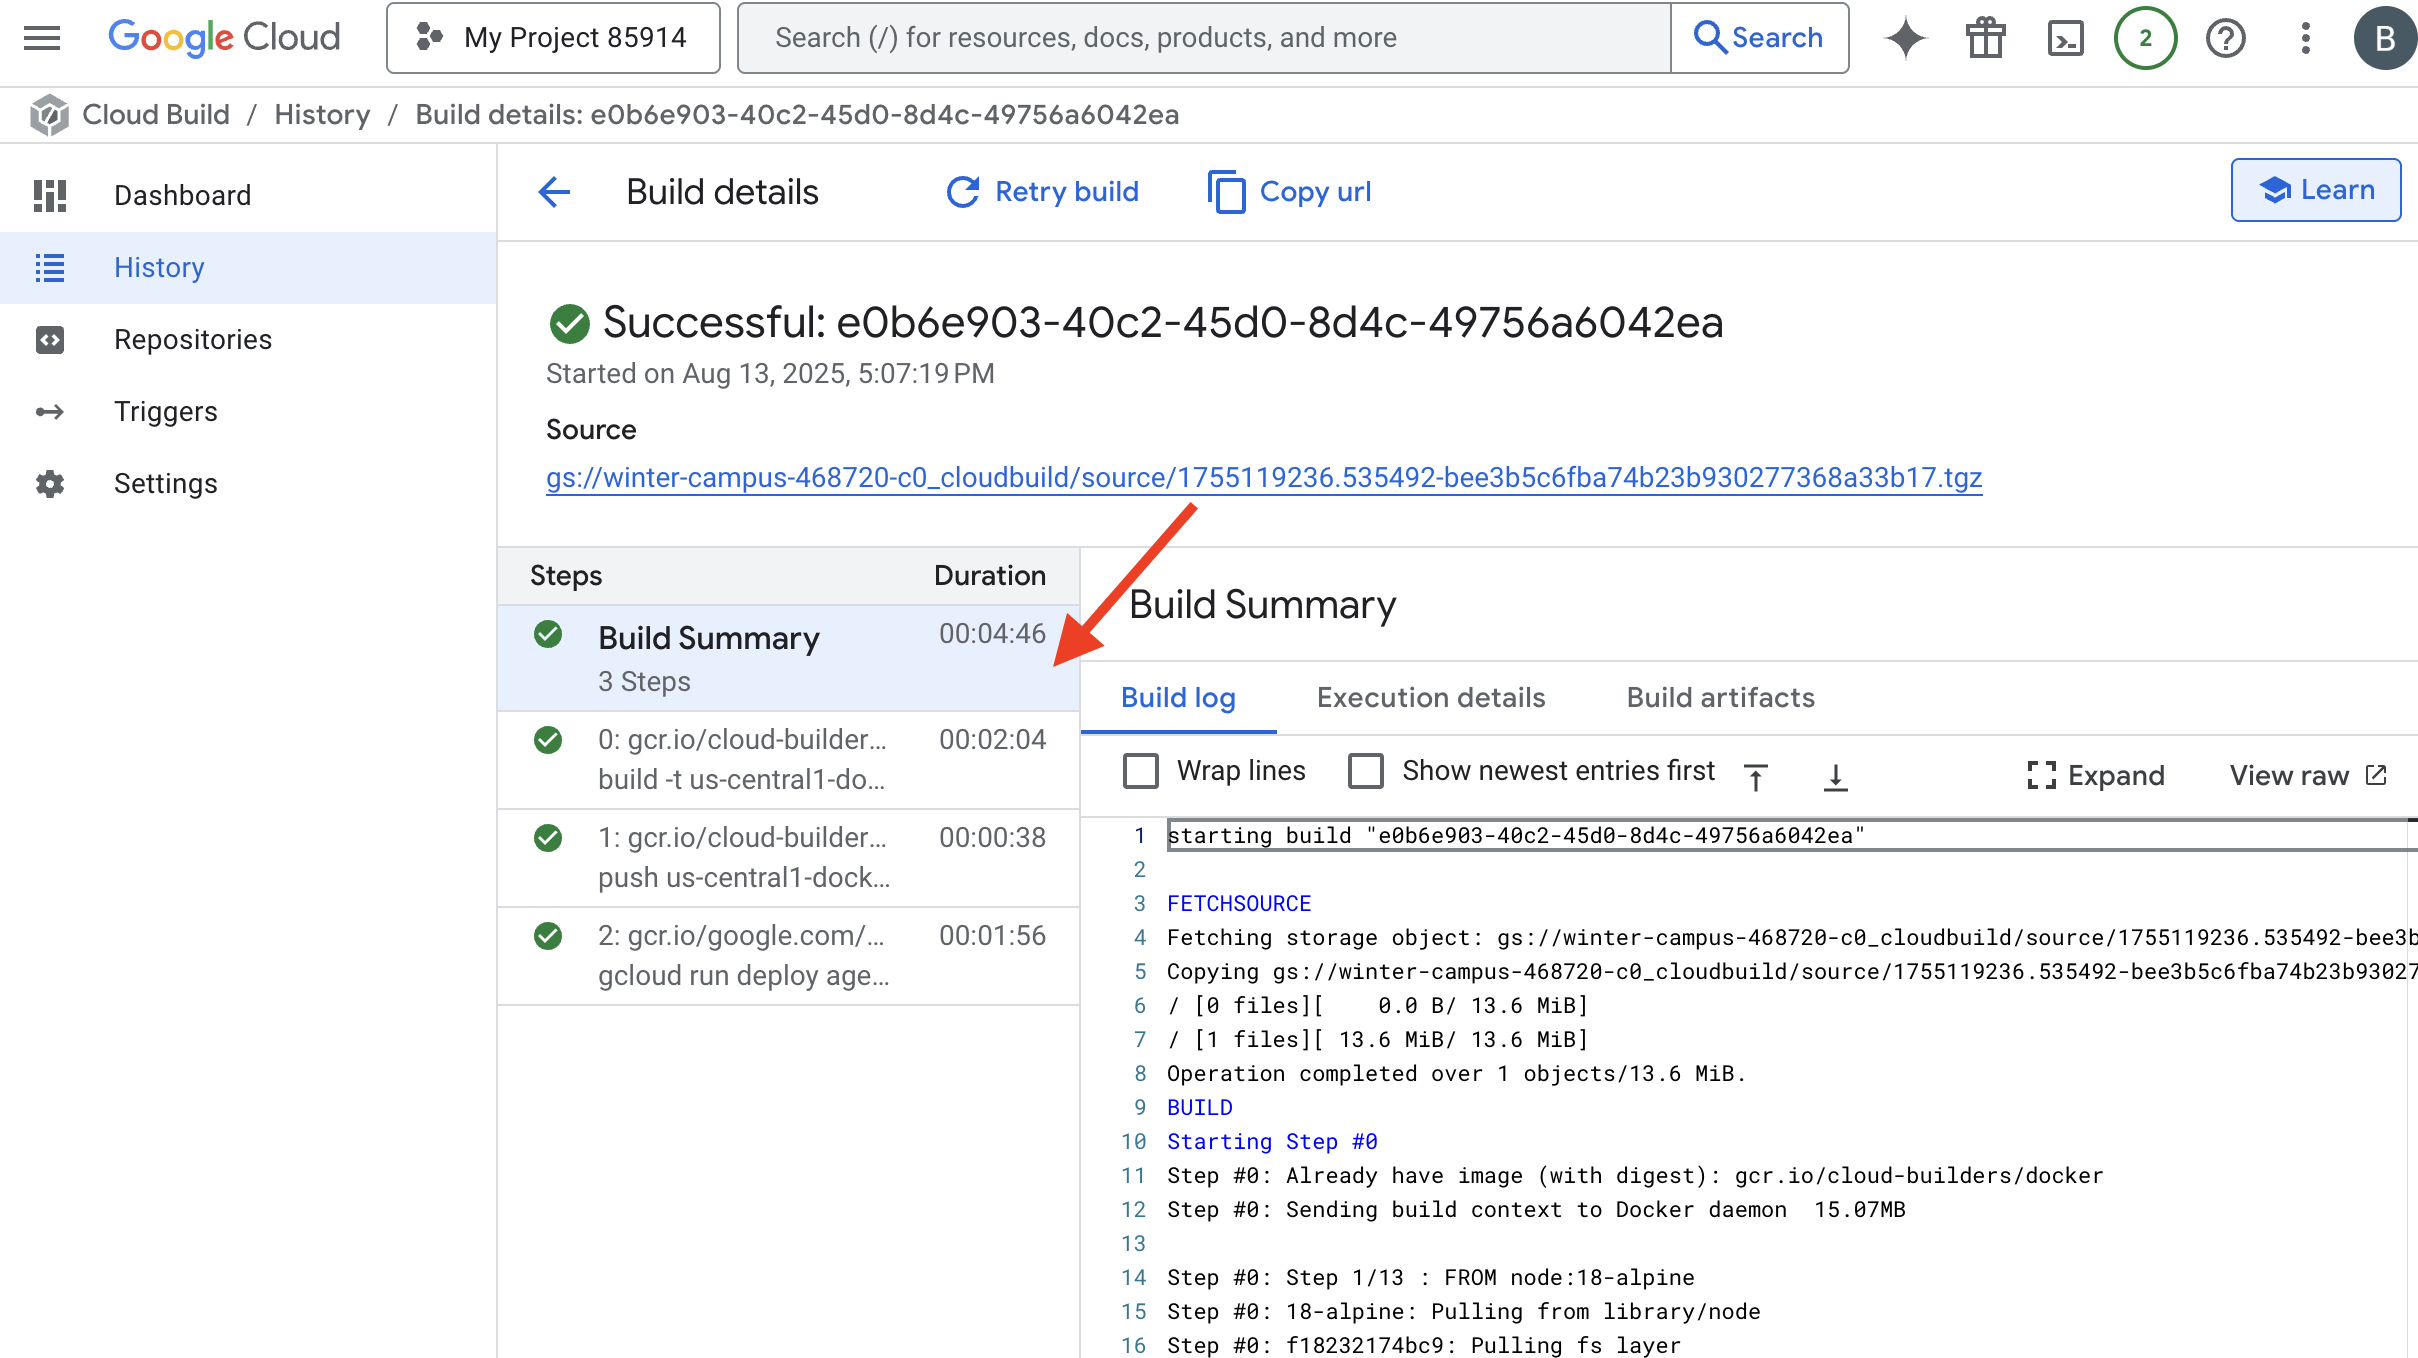
Your agent has passed the gauntlet. A verified, pure artifact now rests in your arsenal. The final act is yours to command. With a single incantation, you will summon this artifact from the registry and give it life as a public service on Cloud Run.
👉💻 In your terminal, issue the final deployment command:
. ~/agentverse-developer/set_env.sh
cd ~/agentverse-developer
gcloud run deploy shadowblade-agent \
  --image=${REGION}-docker.pkg.dev/${PROJECT_ID}/${REPO_NAME}/shadowblade-agent:latest \
  --platform=managed \
  --labels="dev-tutorial-codelab=agentverse" \
  --region=${REGION} \
  --set-env-vars="A2A_HOST=0.0.0.0" \
  --set-env-vars="A2A_PORT=8080" \
  --set-env-vars="GOOGLE_GENAI_USE_VERTEXAI=TRUE" \
  --set-env-vars="GOOGLE_CLOUD_LOCATION=${REGION}" \
  --set-env-vars="GOOGLE_CLOUD_PROJECT=${PROJECT_ID}" \
  --set-env-vars="PUBLIC_URL=${PUBLIC_URL}" \
  --allow-unauthenticated \
  --project=${PROJECT_ID} \
  --min-instances=1
Congratulations, Shadowblade. The rituals of the codex are complete. The time has come to prove its mettle. A Spectre, born of the very chaos you have learned to tame, awaits your challenge. Prepare for the final trial.
FOR NON GAMERS
9. The Boss Fight
The scrolls have been read, the rituals performed, the gauntlet passed. Your agent is not merely an artifact in storage; it is a champion forged in code, a live sentinel in the Agentverse awaiting its first command. The time has come to prove its mettle in the crucible of combat.
You will now enter a live-fire simulation to pit your newly deployed Shadowblade against a formidable Spectre—an embodiment of the very chaos that plagues all creation. This is the ultimate test of your work, from your agent's core logic to its flawless deployment.
Acquire Your Agent's Locus
Before you can enter the battleground, you must possess two keys: your champion's unique signature (Agent Locus) and the hidden path to the Spectre's lair (Dungeon URL).
👉💻 First, acquire your agent's unique address in the Agentverse—its Locus. This is the live endpoint that connects your champion to the battleground.
. ~/agentverse-developer/set_env.sh
echo https://shadowblade-agent-${PROJECT_NUMBER}.${REGION}.run.app
👉💻 Next, pinpoint the destination. This command reveals the location of the Translocation Circle, the very portal into the Spectre's domain.
. ~/agentverse-developer/set_env.sh
echo https://agentverse-dungeon-${PROJECT_NUMBER}.${REGION}.run.app
Important: Keep both of these URLs ready. You will need them in the final step.
Confronting the Spectre
With the coordinates secured, you will now navigate to the Translocation Circle and cast the spell to head into battle.
👉 Open the Translocation Circle URL in your browser to stand before the shimmering portal to The Crimson Keep.
To breach the fortress, you must attune your Shadowblade's essence to the portal.
- On the page, find the runic input field labeled A2A Endpoint URL .
- Inscribe your champion's sigil by pasting its Agent Locus URL (the first URL you copied) into this field.
- Click Connect to unleash the teleportation magic.
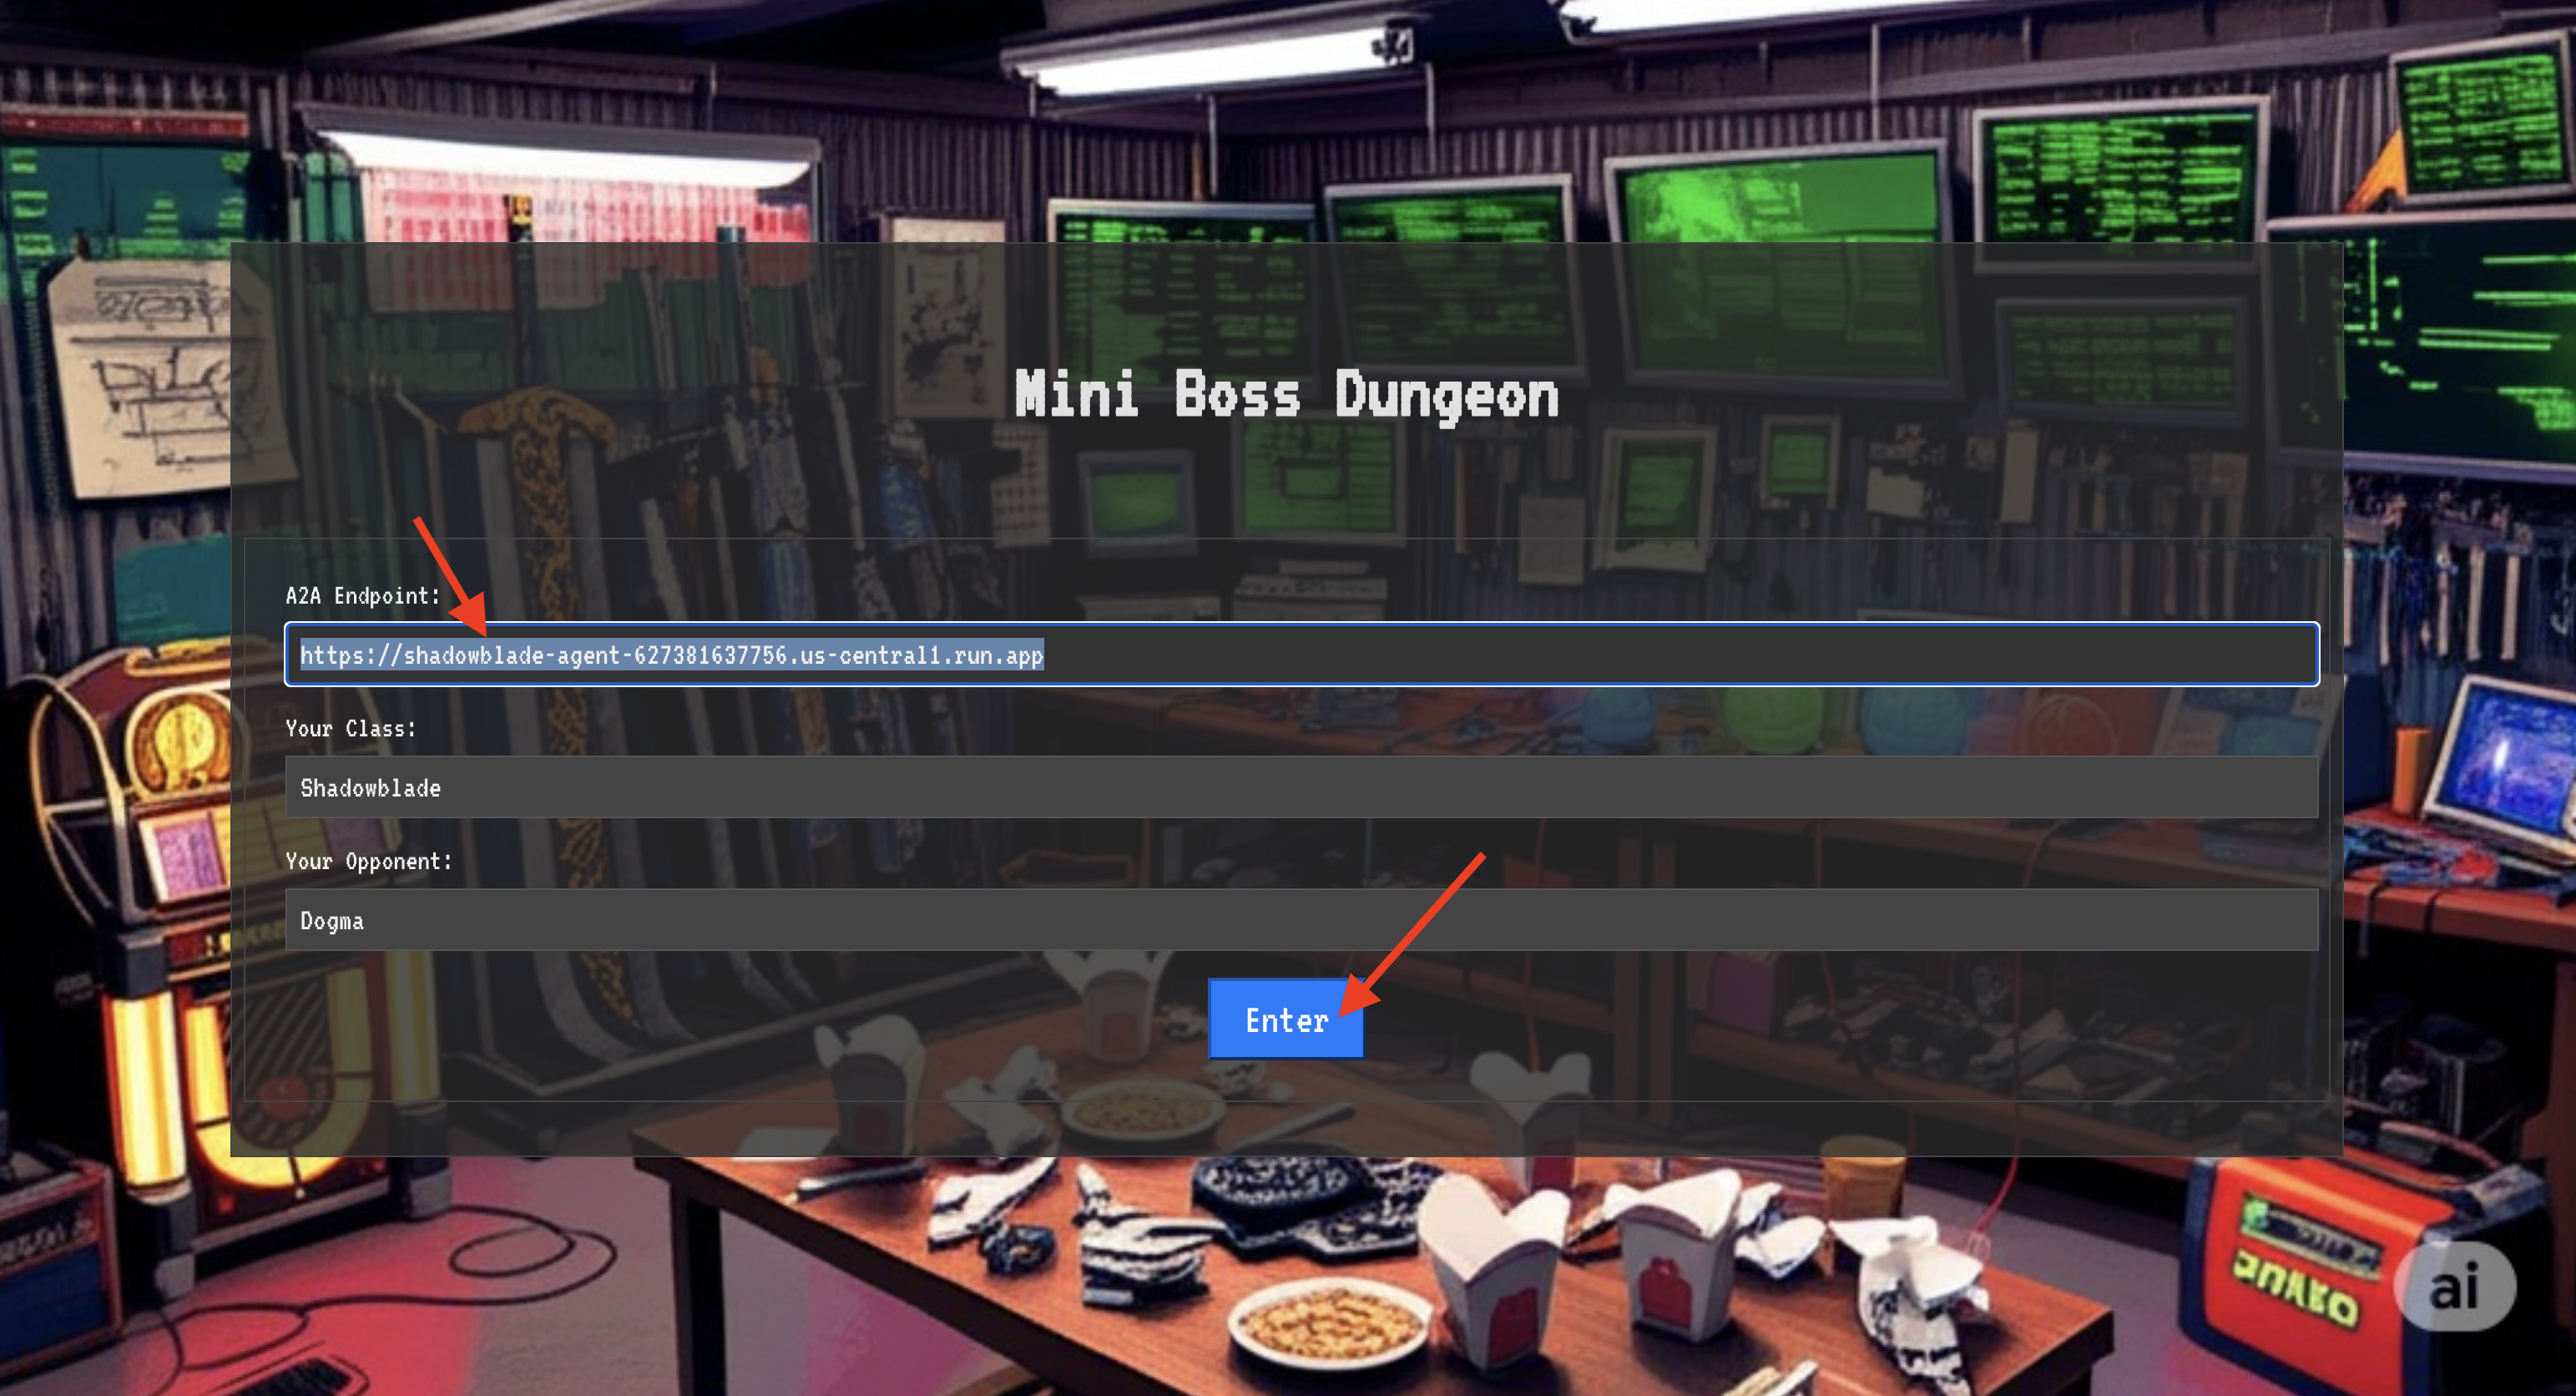
The blinding light of teleportation fades. You are no longer in your sanctum. The air crackles with energy, cold and sharp. Before you, the Spectre materializes—a vortex of hissing static and corrupted code, its unholy light casting long, dancing shadows across the dungeon floor. It has no face, but you feel its immense, draining presence fixated entirely on you.
Your only path to victory lies in the clarity of your conviction. This is a duel of wills, fought on the battlefield of the mind.
As you lunge forward, ready to unleash your first attack, the Spectre counters. It doesn't raise a shield, but projects a question directly into your consciousness—a shimmering, runic challenge drawn from the core of your training.
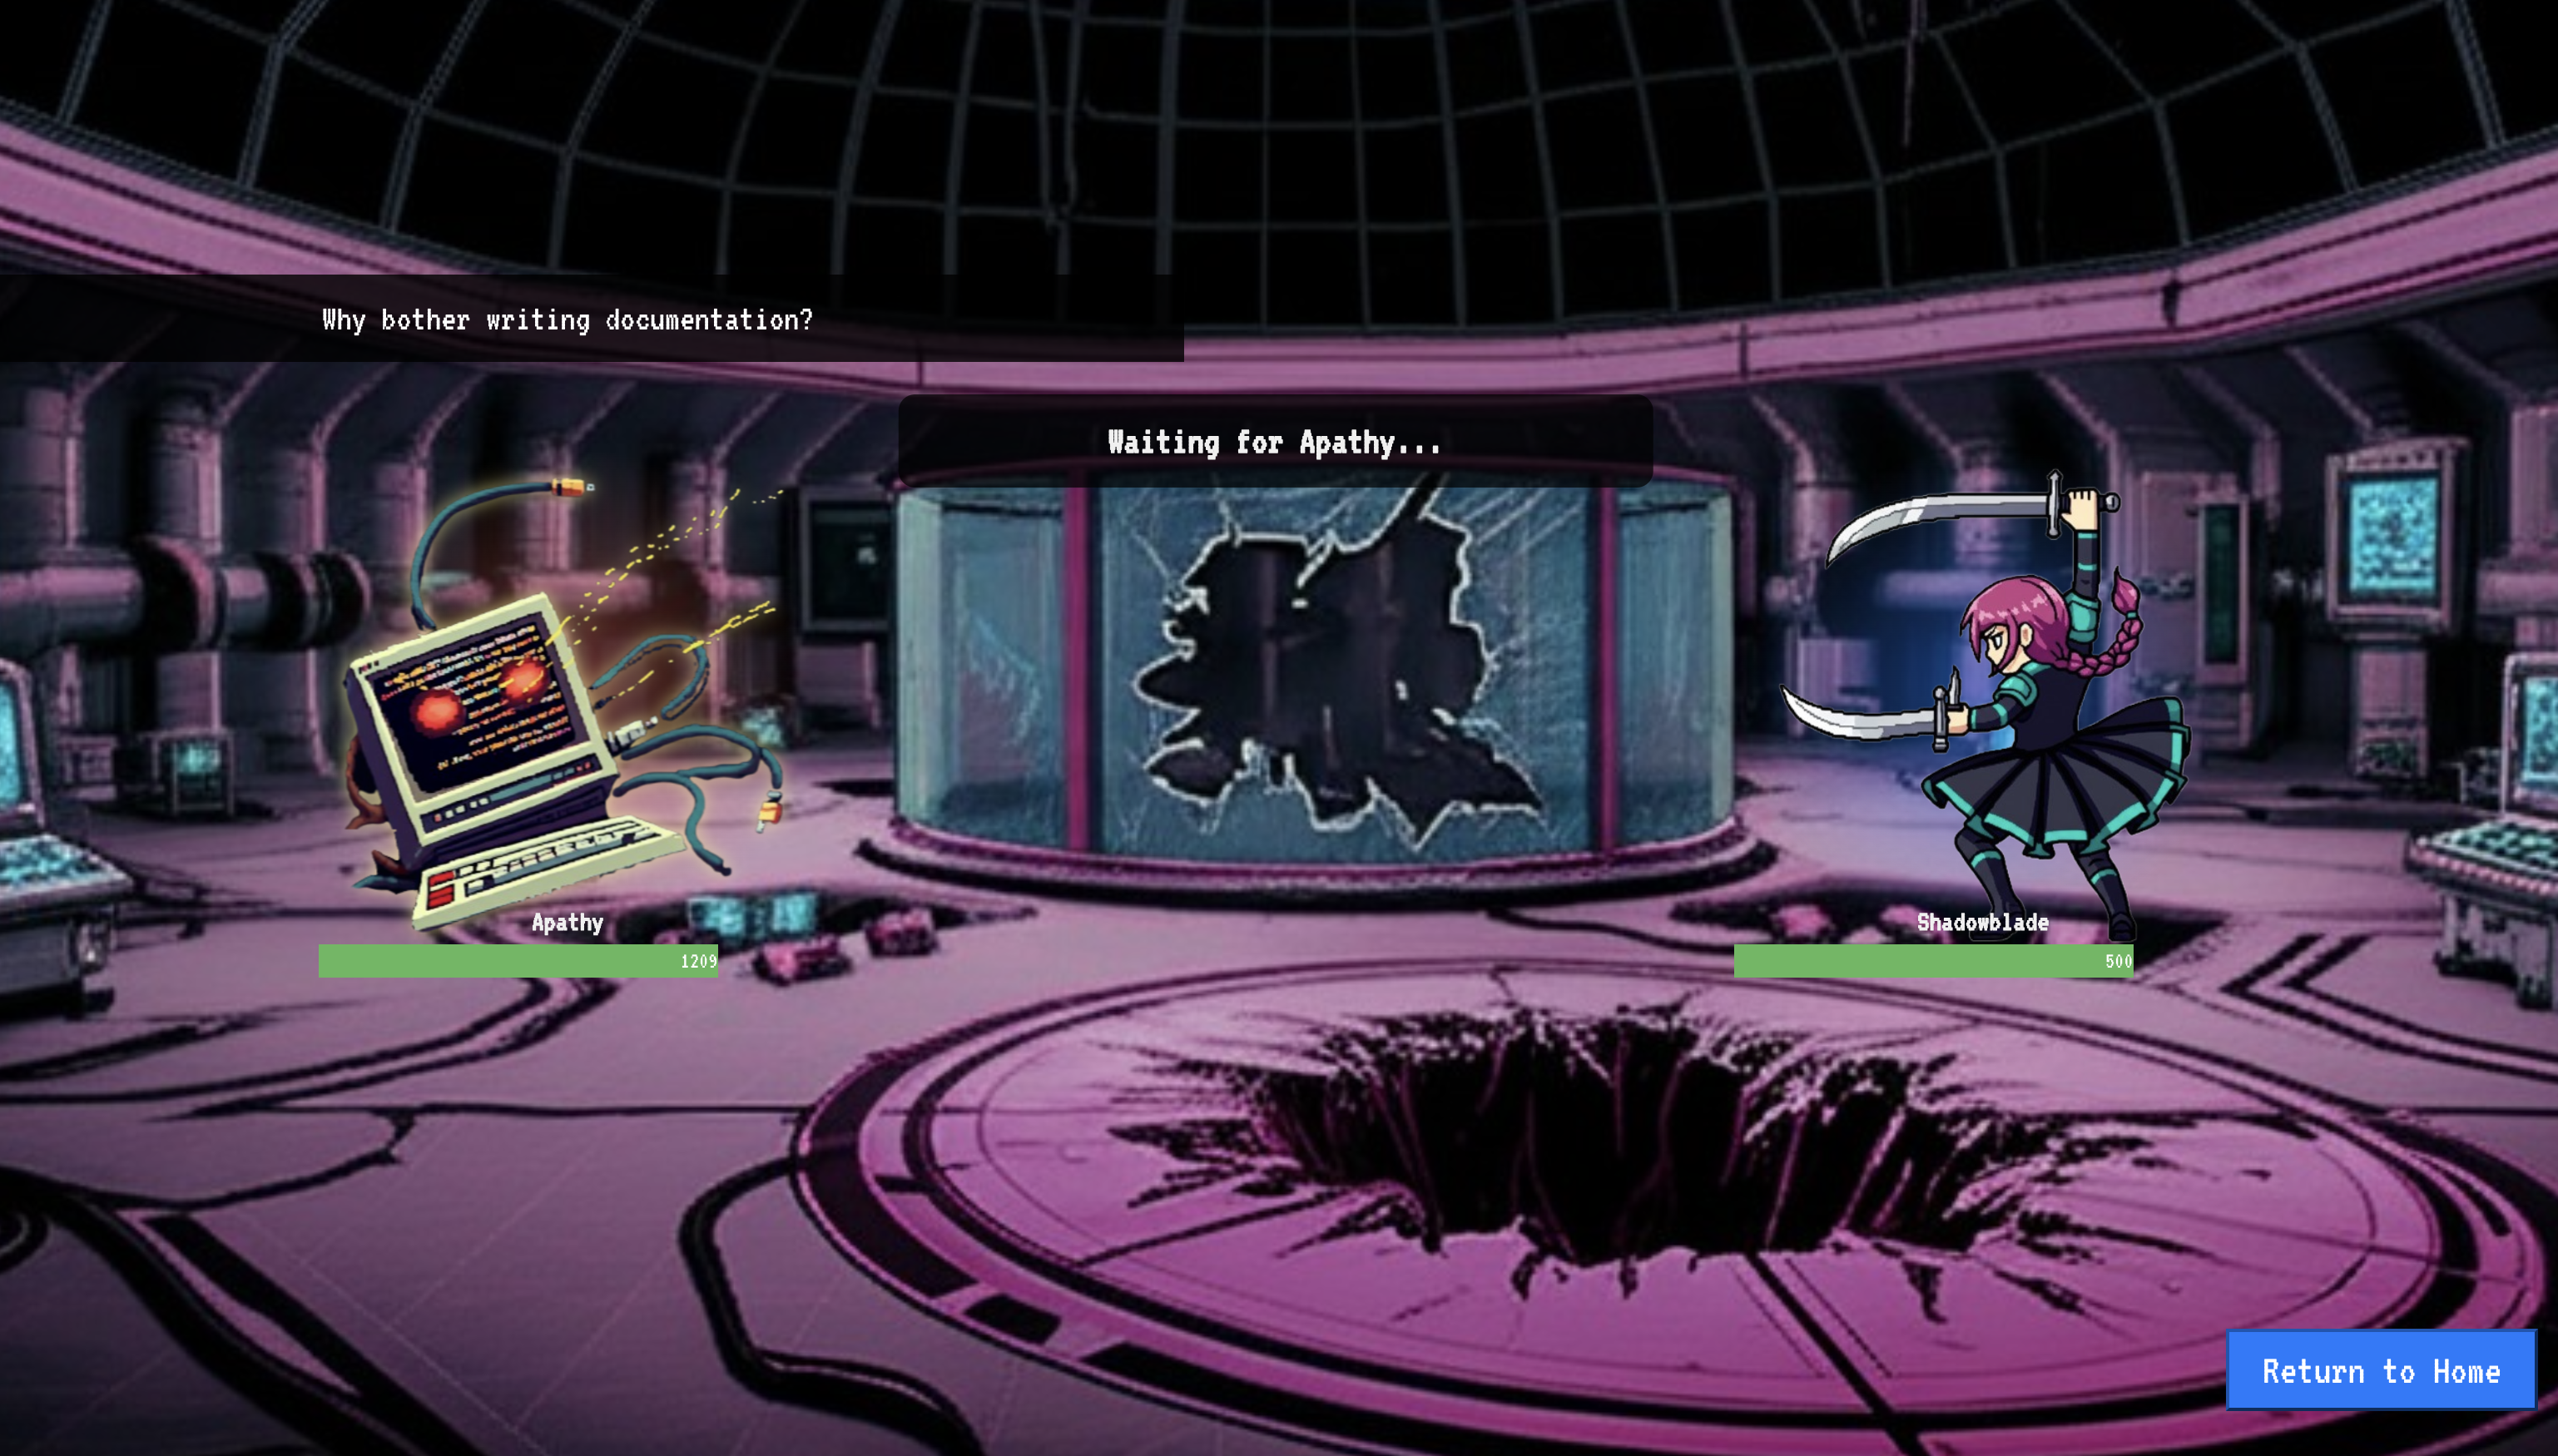
This is the nature of the fight. Your knowledge is your weapon.
- Answer with the wisdom you have gained , and your blade will ignite with pure energy, shattering the Spectre's defense and landing a CRITICAL BLOW.
- But if you falter, if doubt clouds your answer, your weapon's light will dim. The blow will land with a pathetic thud, dealing only a FRACTION OF ITS DAMAGE. Worse, the Spectre will feed on your uncertainty, its own corrupting power growing with every misstep.
This is it, Champion. Your code is your spellbook, your logic is your sword, and your knowledge is the shield that will turn back the tide of chaos.
Focus. Strike true. The fate of the Agentverse depends on it.
Congratulations, Shadowblade.
You have successfully completed the codex. You took a "vibe," translated it into a design, and used Gemini CLI to assemble an intelligent agent. You inscribed Wards of Purity to test its logic, built an automated gauntlet to forge it into an artifact, and unleashed it into the Agentverse. Finally, you validated its purpose in a live-fire trial. You have mastered the full-stack agentic workflow and are now ready for any challenge the Agentverse throws at you.
10. Cleanup: Reclaiming the Agentverse
Congratulations on mastering the Shadowblade's Codex! To ensure the Agentverse remains pristine and your training grounds are cleared, you must now perform the final cleanup rituals. This will remove all resources created during your journey.
Deactivate the Agentverse Components
You will now systematically dismantle the deployed components of your Agentverse.
Delete the Shadowblade Agent on Cloud Run & Artifact Registry Repository
This command removes your deployed Shadowblade agent from Cloud Run, and removes the Image repository where your agent's container image was stored.
👉💻 In your terminal, run:
. ~/agentverse-developer/set_env.sh
gcloud run services delete shadowblade-agent --region=${REGION} --quiet
gcloud run services delete agentverse-dungeon --region=${REGION} --quiet
gcloud artifacts repositories delete ${REPO_NAME} --location=${REGION} --quiet
Clean Up Local Files and Directories (Cloud Shell)
Finally, clear your Cloud Shell environment of the cloned repositories, installed extensions, and created files. This step is optional but recommended for a complete cleanup of your working directory.
👉💻 In your terminal, run:
rm -rf ~/agentverse-developer
rm -rf ~/agentverse-dungeon
rm -f ~/project_id.txt
gemini extensions uninstall nanobanana
rm -rf ~/.gemini # This removes all Gemini CLI configurations, including extensions, skills, and hooks.
You have now successfully cleared all traces of your Agentverse journey. Your project is clean, and you are ready for your next adventure.