
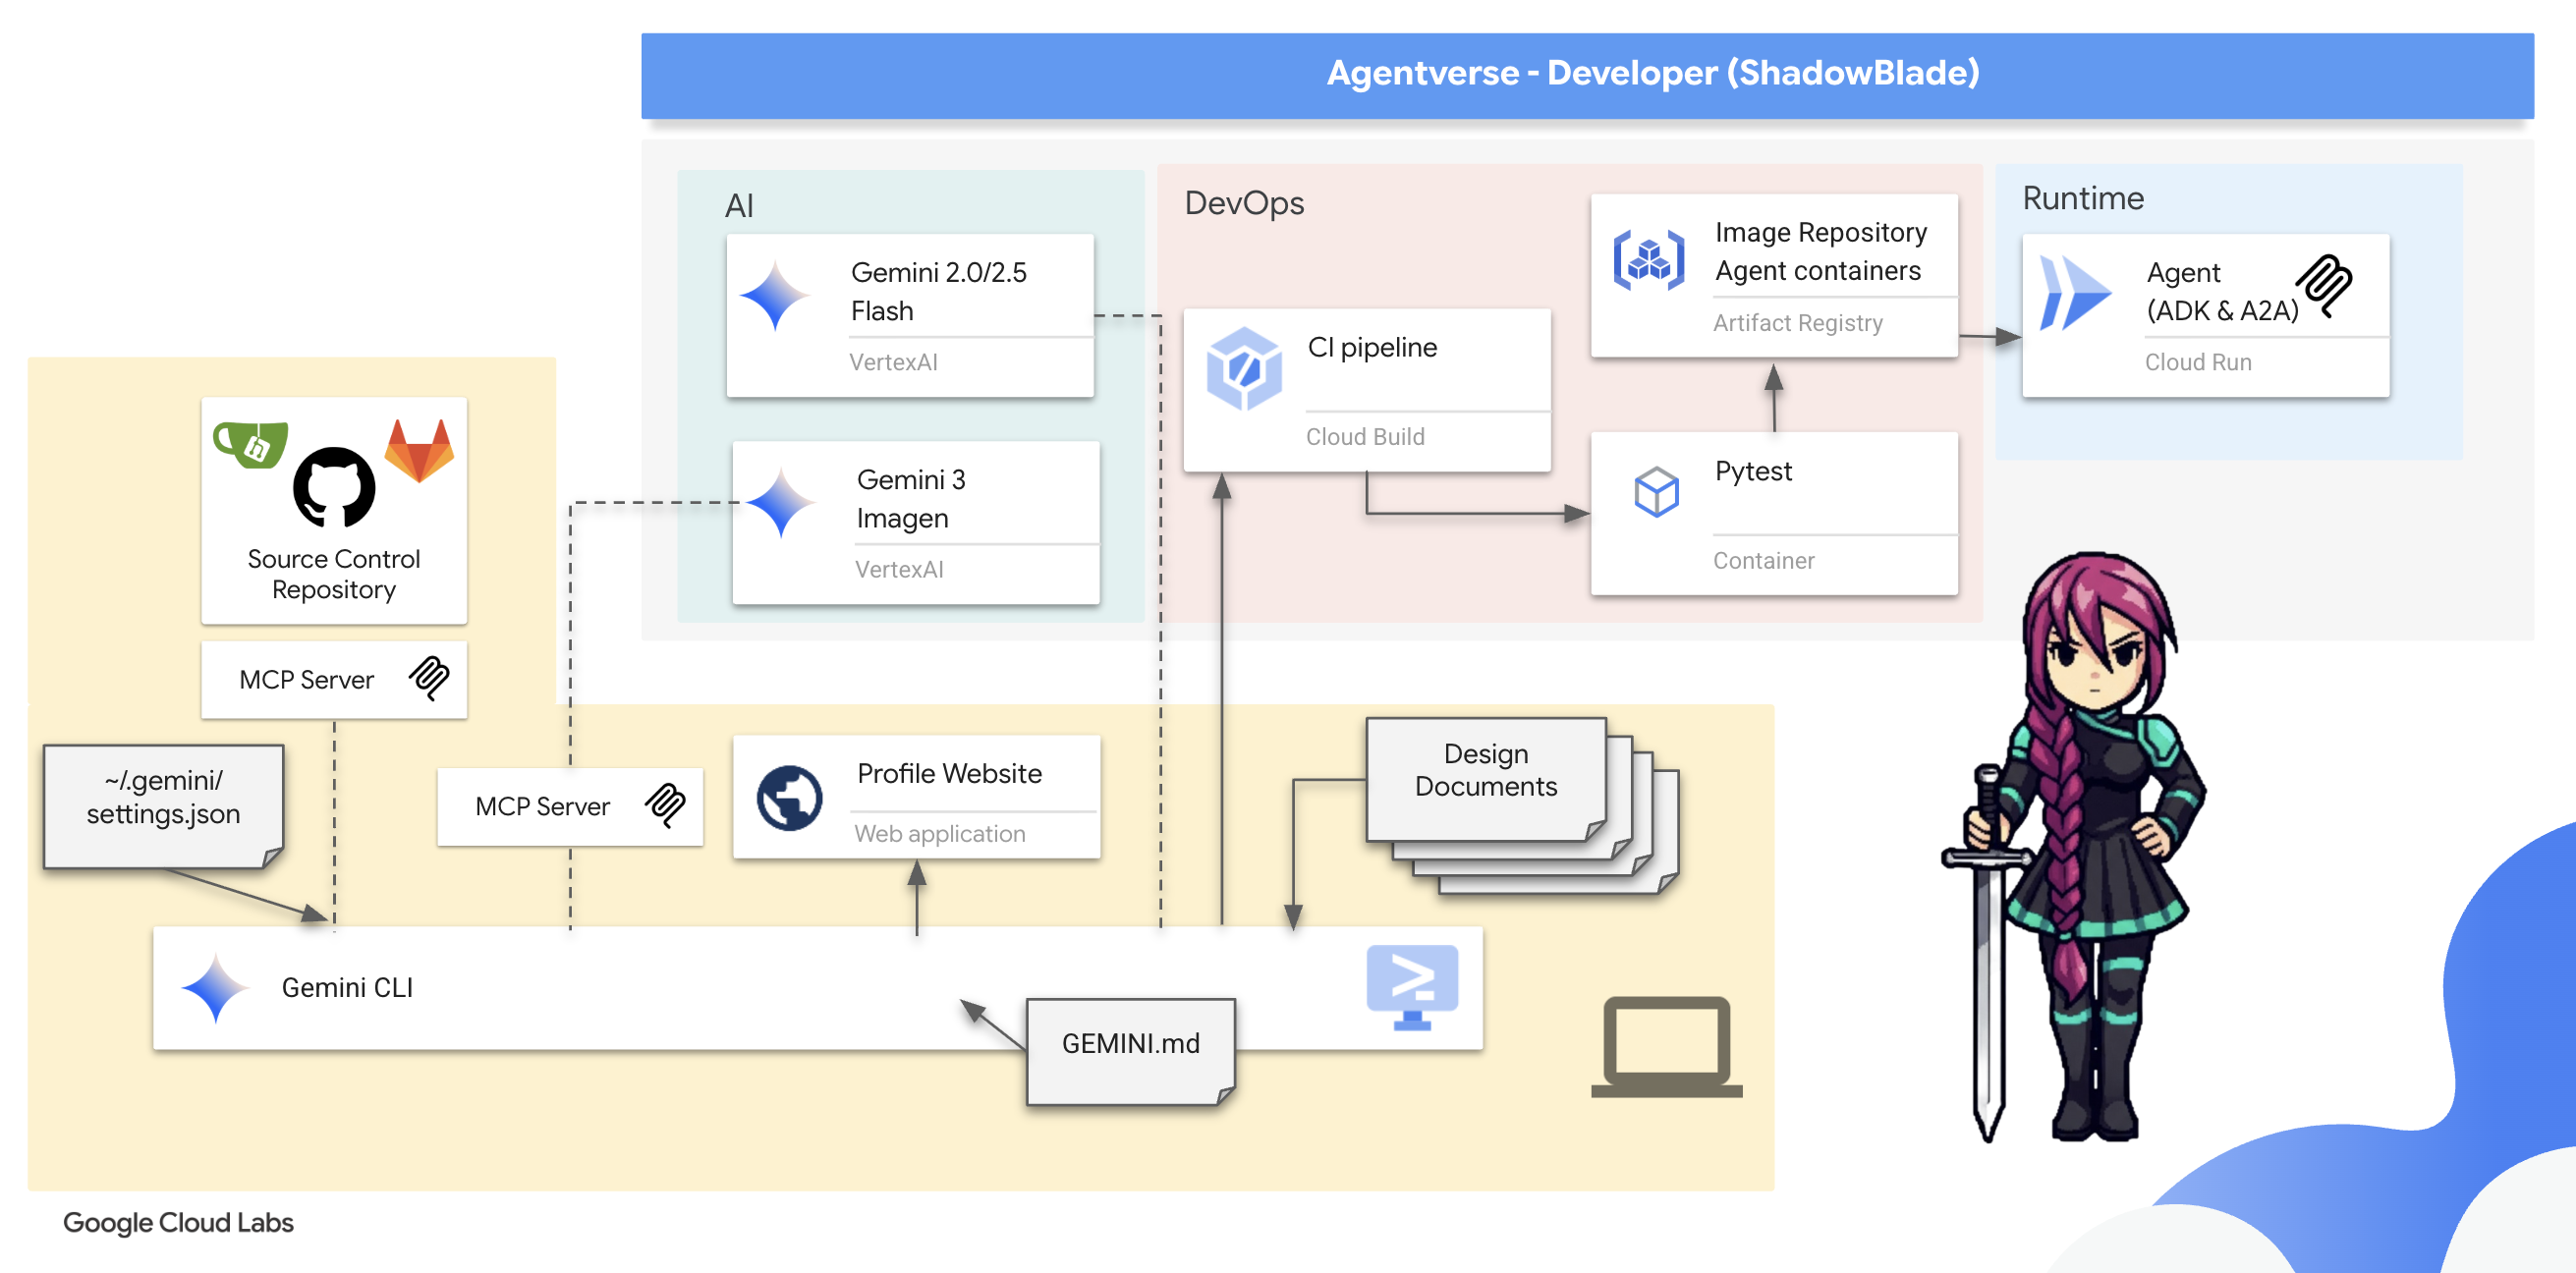
۱. پیش درآمد
دوران توسعهی ایزوله (منزوی) رو به پایان است. موج بعدی تکامل فناوری، نه در مورد نبوغ انفرادی، بلکه در مورد تسلط مشارکتی است. ساخت یک عامل (اپراتور) هوشمند و واحد، آزمایشی جذاب است. ساخت یک اکوسیستم قوی، امن و هوشمند از عاملها - یک دنیای عامل واقعی - چالش بزرگ برای شرکتهای مدرن است.
موفقیت در این عصر جدید نیازمند همگرایی چهار نقش حیاتی است، ستونهای بنیادی که از هر سیستم عامل پررونقی پشتیبانی میکنند. نقص در هر یک از این حوزهها، ضعفی ایجاد میکند که میتواند کل ساختار را به خطر بیندازد.
این کارگاه، راهنمای قطعی سازمانی برای تسلط بر آیندهی عاملمحور در گوگل کلود است. ما یک نقشه راه جامع ارائه میدهیم که شما را از اولین ایده تا یک واقعیت عملیاتی در مقیاس کامل راهنمایی میکند. در این چهار آزمایشگاه به هم پیوسته، یاد خواهید گرفت که چگونه مهارتهای تخصصی یک توسعهدهنده، معمار، مهندس داده و SRE باید برای ایجاد، مدیریت و مقیاسبندی یک عاملمحور قدرتمند، همگرا شوند.
هیچ ستونی به تنهایی نمیتواند از Agentverse پشتیبانی کند. طرح بزرگ معمار بدون اجرای دقیق توسعهدهنده بیفایده است. عامل توسعهدهنده بدون خرد مهندس داده کور است و کل سیستم بدون محافظت SRE شکننده است. تنها از طریق همافزایی و درک مشترک از نقشهای یکدیگر، تیم شما میتواند یک مفهوم نوآورانه را به یک واقعیت عملیاتی و حیاتی تبدیل کند. سفر شما از اینجا آغاز میشود. برای تسلط بر نقش خود آماده شوید و یاد بگیرید که چگونه در کل بزرگتر جای میگیرید.
به دنیای عاملها خوش آمدید: فراخوانی برای قهرمانان
در گسترهی وسیع دیجیتالِ سازمانها، عصر جدیدی آغاز شده است. این عصر، عصر عاملگرایی است، زمانی با نویدهای فراوان، که در آن عاملهای هوشمند و خودمختار در هماهنگی کامل برای تسریع نوآوری و از بین بردن روزمرگی تلاش میکنند.

این اکوسیستم متصل به قدرت و پتانسیل، با نام «جهان عامل» (The Agentverse) شناخته میشود.
اما یک آنتروپی خزنده، یک فساد خاموش که به عنوان «ایستا» شناخته میشود، شروع به فرسایش لبههای این دنیای جدید کرده است. «ایستا» یک ویروس یا یک باگ نیست؛ بلکه تجسم هرج و مرجی است که از خودِ عمل خلقت تغذیه میکند.
این ناامیدیهای قدیمی را به اشکال هیولایی تقویت میکند و هفت شبح توسعه را به وجود میآورد. اگر کنترل نشود، استاتیک و شبحهایش پیشرفت را متوقف میکنند و نوید Agentverse را به سرزمین بایر بدهی فنی و پروژههای رها شده تبدیل میکنند.
امروز، ما از قهرمانان میخواهیم که موج هرج و مرج را به عقب برانند. ما به قهرمانانی نیاز داریم که مایل به تسلط بر مهارت خود و همکاری برای محافظت از Agentverse باشند. زمان آن رسیده است که مسیر خود را انتخاب کنید.
کلاس خود را انتخاب کنید
چهار مسیر مجزا پیش روی شما قرار دارد که هر کدام ستونی حیاتی در مبارزه با استاتیک هستند . اگرچه آموزش شما یک ماموریت انفرادی خواهد بود، موفقیت نهایی شما به درک چگونگی ترکیب مهارتهایتان با دیگران بستگی دارد.
- Shadowblade (توسعهدهنده) : استاد آهنگری و خط مقدم. شما صنعتگری هستید که تیغهها را میسازید، ابزارها را میسازید و با جزئیات پیچیده کد با دشمن روبرو میشوید. مسیر شما، مسیر دقت، مهارت و خلاقیت عملی است.
- احضارکننده (معمار) : یک استراتژیست و هماهنگکنندهی بزرگ. شما یک عامل واحد را نمیبینید، بلکه کل میدان نبرد را میبینید. شما نقشههای اصلی را طراحی میکنید که به کل سیستمهای عاملها اجازه میدهد تا با هم ارتباط برقرار کنند، همکاری کنند و به هدفی بسیار بزرگتر از هر جزء واحد دست یابند.
- محقق (مهندس داده) : جوینده حقایق پنهان و نگهبان خرد. شما در بیابان وسیع و بکر دادهها قدم میگذارید تا هوشی را که به مأموران شما هدف و بینش میدهد، کشف کنید. دانش شما میتواند ضعف دشمن را آشکار کند یا متحدی را توانمند سازد.
- نگهبان (DevOps / SRE) : محافظ و سپر استوار قلمرو. شما قلعهها را میسازید، خطوط تأمین نیرو را مدیریت میکنید و اطمینان حاصل میکنید که کل سیستم میتواند در برابر حملات اجتنابناپذیر The Static مقاومت کند. قدرت شما پایه و اساسی است که پیروزی تیم شما بر آن بنا شده است.
ماموریت شما
آموزش شما به عنوان یک تمرین مستقل آغاز میشود. شما در مسیر انتخابی خود قدم خواهید گذاشت و مهارتهای منحصر به فردی را که برای تسلط بر نقش خود نیاز دارید، یاد خواهید گرفت. در پایان دوره آزمایشی، با یک Spectre متولد شده از The Static روبرو خواهید شد - یک مینیباس که از چالشهای خاص مهارت شما سوءاستفاده میکند.
تنها با تسلط بر نقش فردی خود میتوانید برای محاکمه نهایی آماده شوید. سپس باید با قهرمانان طبقات دیگر گروهی تشکیل دهید. با هم، به قلب فساد خواهید رفت تا با یک رئیس نهایی روبرو شوید.
یک چالش نهایی و مشارکتی که قدرت ترکیبی شما را آزمایش میکند و سرنوشت Agentverse را تعیین میکند.
دنیای مامورها منتظر قهرمانانش است. آیا به این فراخوان پاسخ خواهید داد؟
۲. مجموعه قوانین Shadowblade
کدکس Shadowblade پیش روی شما باز است. به ندای آن پاسخ دهید. دنیای Agentverse توسط هرج و مرج خزندهی The Static تهدید میشود و تنها کسانی که بر تکنیکهای این کدکس تسلط دارند میتوانند با آن مبارزه کنند. این مسیری از دقت و نظم است. امروز، آموزش شما آغاز میشود. شما یاد خواهید گرفت که هوش مصنوعی را نه به عنوان یک ابزار ساده، بلکه به عنوان یک تیغهی حساس که باید رام و بر آن تسلط یافت، به کار ببرید. آموزههای اینجا را دنبال کنید و سلاحی از منطق ناب خواهید ساخت - یک عامل هوشمند، ورزیده و آماده برای نبرد.
آنچه یاد خواهید گرفت
- سلاح اصلی خود را به کار بگیرید: Gemini CLI.
- زرادخانه خود را با افزونههای Gemini CLI و مهارتهای عامل گسترش دهید.
- با ادغام ابزارهای MCP با رابط خط فرمان Gemini، زرادخانههای خارجی را احضار کنید.
- با استفاده از اسناد طراحی، نیت خود را به یک «حس و حال» تبدیل کنید تا به شریک هوش مصنوعی خود دستور دهید.
- با ساخت اولین عامل خودمختار خود با کیت توسعه عامل (ADK)، یک راهحل ماژولار و تمیز ایجاد کنید.
- قلابهایی را برای رهگیری و محافظت از رفتار عامل خود ثبت کنید.
- برای آزمایش و اعتبارسنجی عامل خود، مجموعههای ارزیابی خودکار بسازید.
- یک خط لوله CI کامل بسازید تا به طور خودکار عامل خود را آزمایش، کانتینرسازی و بایگانی کنید.
۳. آمادهسازی زمین تمرین
اعتبار گوگل کلود خود را مطالبه کنید
⚠️ شرایط مهم:
- از یک حساب جیمیل شخصی استفاده کنید: شما باید از یک حساب شخصی (مثلاً
name@gmail.com) استفاده کنید. حسابهای کاربری شرکتی یا مدرسهای کار نخواهند کرد.
👉 مراحل:
- به سایت درخواست اعتبار بروید: اینجا کلیک کنید
- ورود: لینک را در نوار آدرس جایگذاری کنید و با جیمیل شخصی خود وارد شوید.
- پذیرش شرایط: شرایط خدمات پلتفرم ابری گوگل را بپذیرید.
- تأیید اعتبار: به دنبال پیامی باشید که تأیید کند اعتبار اعمال شده است.
- *نکته: اگر از شما خواسته شد اطلاعات کارت اعتباری را وارد کنید، میتوانید با خیال راحت آن را نادیده بگیرید و پنجره را ببندید.
و حالا میتوانید بروید. میتوانید پنجره را ببندید.
راهاندازی محیط کاری
👉 روی گزینهی «فعال کردن پوستهی ابری» در بالای کنسول گوگل کلود کلیک کنید (این آیکون به شکل ترمینال در بالای پنل پوستهی ابری قرار دارد)، 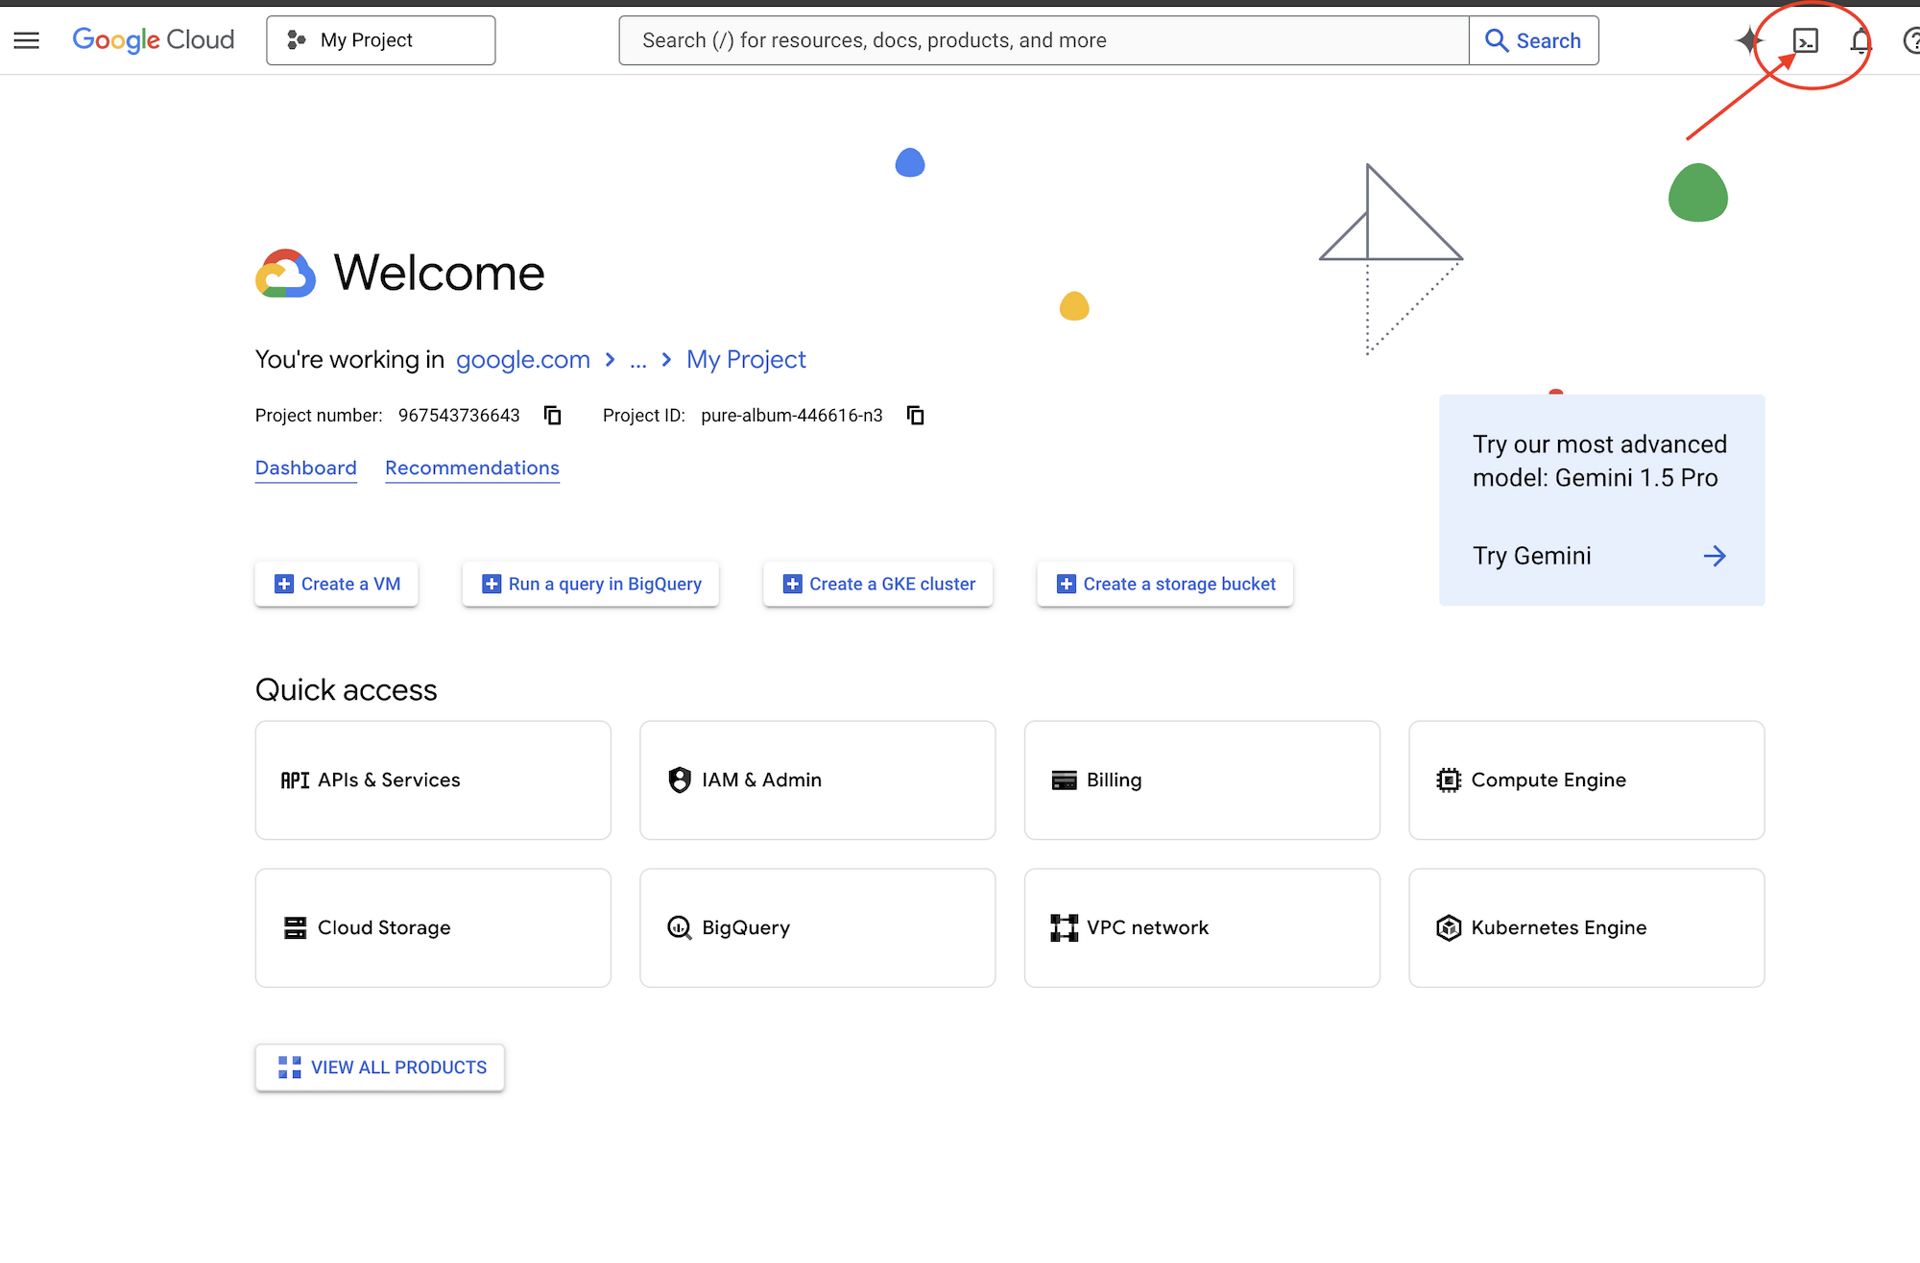
👉 روی دکمهی «باز کردن ویرایشگر» کلیک کنید (شبیه یک پوشهی باز شده با مداد است). با این کار ویرایشگر کد Cloud Shell در پنجره باز میشود. یک فایل اکسپلورر در سمت چپ خواهید دید. 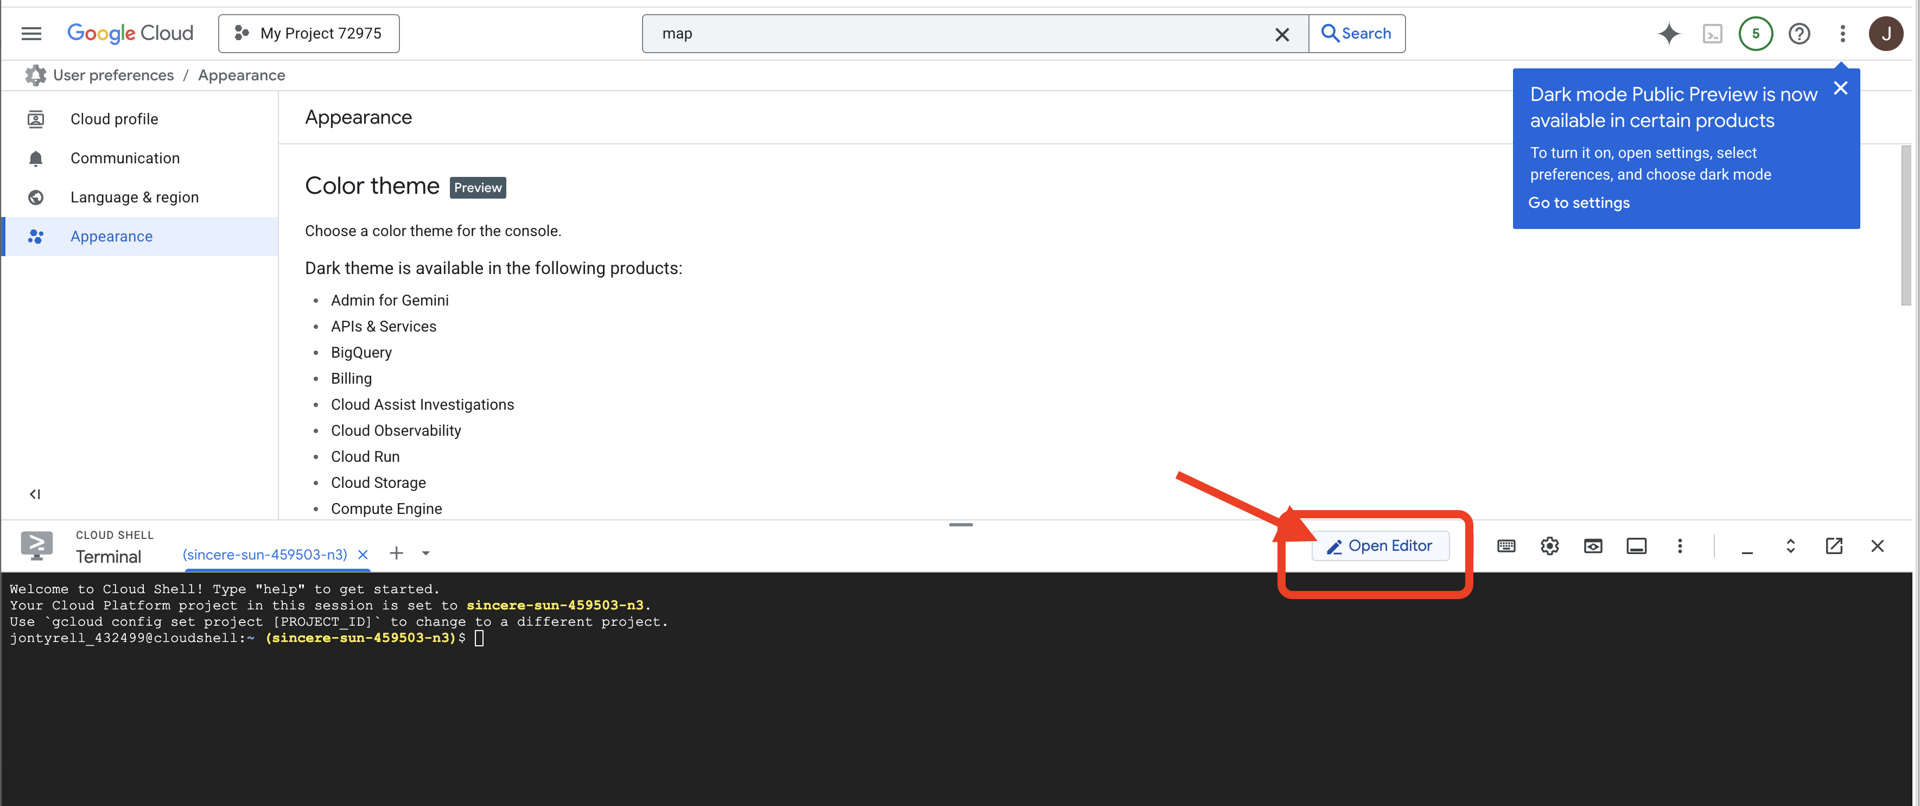
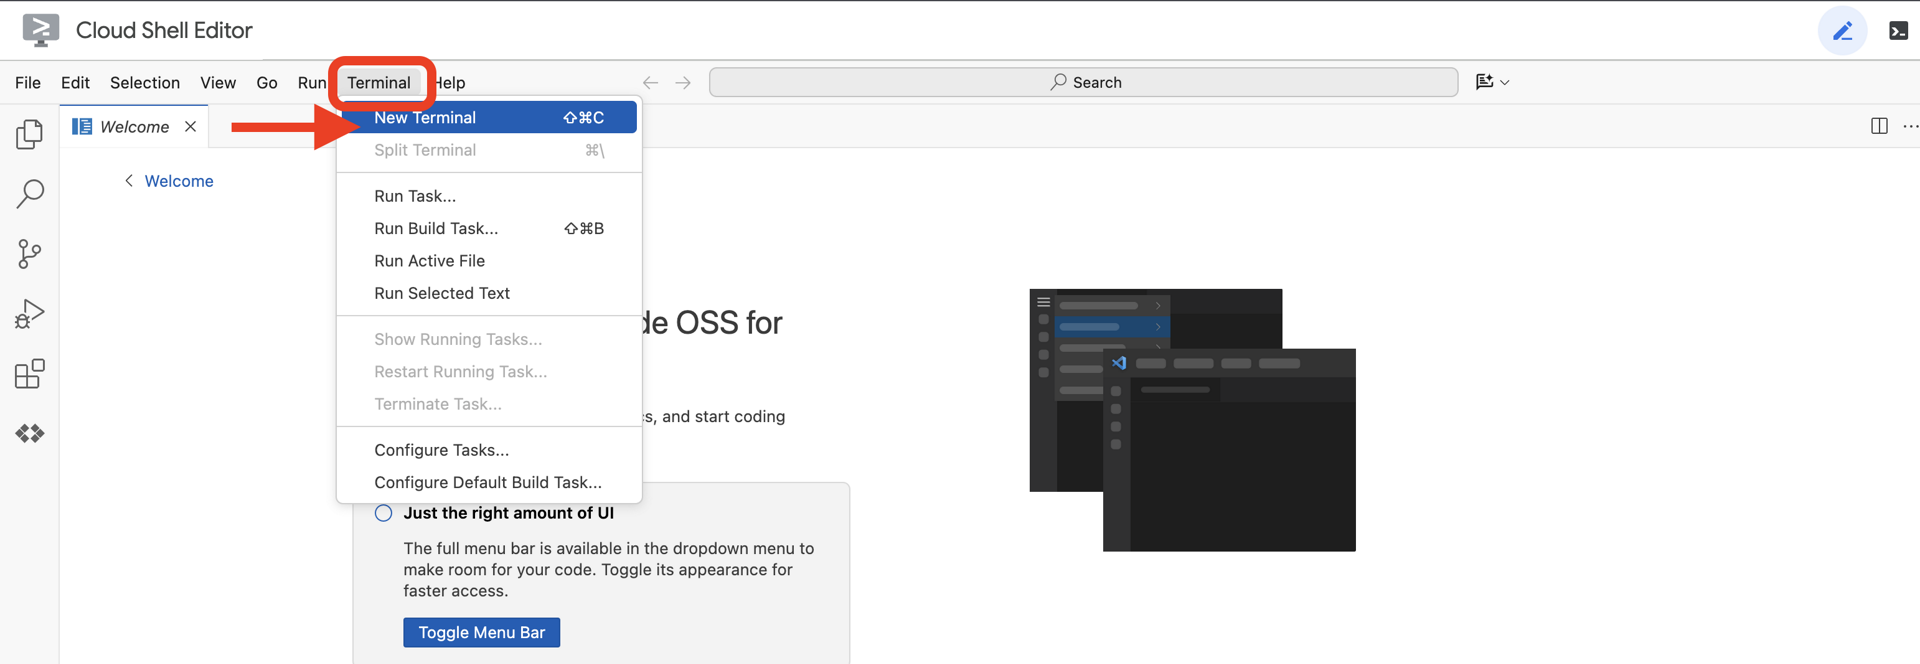
👉 ترمینال را در محیط توسعه ابری (cloud IDE) باز کنید،
👉💻 در ترمینال، با استفاده از دستور زیر تأیید کنید که از قبل احراز هویت شدهاید و پروژه روی شناسه پروژه شما تنظیم شده است:
gcloud auth list
👉💻 پروژه بوتاسترپ را از گیتهاب کپی کنید:
git clone https://github.com/weimeilin79/agentverse-developer.git
chmod +x ~/agentverse-developer/gitea.sh
chmod +x ~/agentverse-developer/init.sh
chmod +x ~/agentverse-developer/set_env.sh

git clone https://github.com/weimeilin79/agentverse-dungeon.git
chmod +x ~/agentverse-dungeon/run_cloudbuild.sh
chmod +x ~/agentverse-dungeon/start.sh
👉💻 اسکریپت راهاندازی را از دایرکتوری پروژه اجرا کنید.
⚠️ نکتهای در مورد شناسه پروژه: اسکریپت یک شناسه پروژه پیشفرض تصادفی پیشنهاد میدهد. میتوانید برای پذیرش این پیشفرض، Enter را فشار دهید.
با این حال، اگر ترجیح میدهید یک پروژه جدید خاص ایجاد کنید ، میتوانید شناسه پروژه مورد نظر خود را در صورت درخواست اسکریپت تایپ کنید.
cd ~/agentverse-developer
./init.sh
اسکریپت بقیه مراحل راهاندازی را بهطور خودکار انجام خواهد داد.
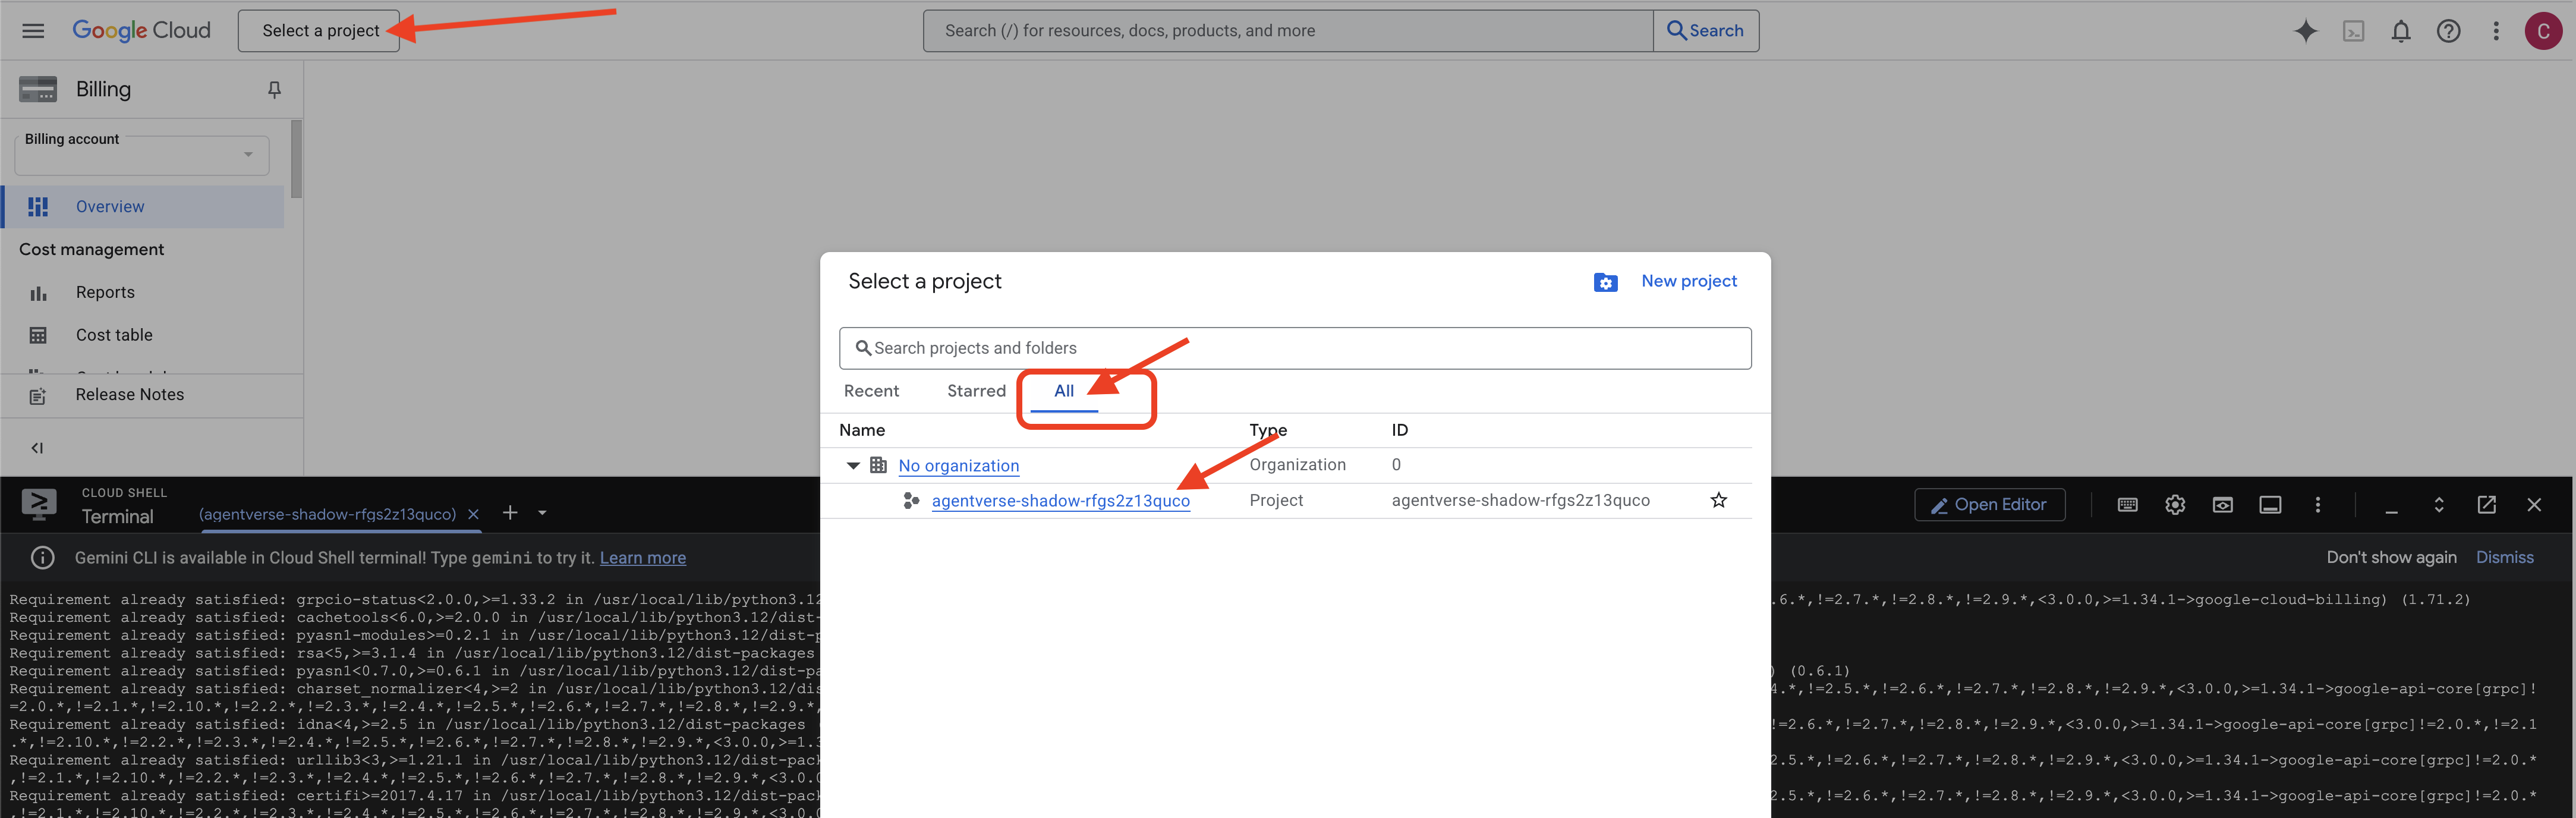
👉 مرحله مهم پس از تکمیل: پس از اتمام اسکریپت، باید مطمئن شوید که کنسول Google Cloud شما پروژه صحیح را مشاهده میکند:
- به console.cloud.google.com بروید.
- روی منوی کشویی انتخاب پروژه در بالای صفحه کلیک کنید.
- روی برگه «همه» کلیک کنید (زیرا ممکن است پروژه جدید هنوز در «اخیر» ظاهر نشده باشد).
- شناسه پروژهای که در مرحله
init.shپیکربندی کردهاید را انتخاب کنید.
👉💻 به ترمینال برگردید. شناسه پروژه مورد نیاز را تنظیم کنید:
gcloud config set project $(cat ~/project_id.txt) --quiet
👉💻 دستور زیر را برای فعال کردن API های لازم Google Cloud اجرا کنید:
gcloud services enable  compute.googleapis.com \
                        artifactregistry.googleapis.com \
                        run.googleapis.com \
                        cloudfunctions.googleapis.com \
                        cloudbuild.googleapis.com \
                        iam.googleapis.com \
                        aiplatform.googleapis.com \
                        cloudresourcemanager.googleapis.com
👉💻 اگر قبلاً مخزن Artifact Registry با نام agentverse-repo ایجاد نکردهاید، دستور زیر را برای ایجاد آن اجرا کنید:
. ~/agentverse-developer/set_env.sh
gcloud artifacts repositories create $REPO_NAME \
    --repository-format=docker \
    --location=$REGION \
    --description="Repository for Agentverse agents"
تنظیم مجوز
👉💻 با اجرای دستورات زیر در ترمینال، مجوزهای لازم را اعطا کنید:
. ~/agentverse-developer/set_env.sh

# Artifact Registry Admin
gcloud projects add-iam-policy-binding $PROJECT_ID \
  --member="serviceAccount:$SERVICE_ACCOUNT_NAME" \
  --role="roles/artifactregistry.admin"

# Cloud Build Editor
gcloud projects add-iam-policy-binding $PROJECT_ID \
  --member="serviceAccount:$SERVICE_ACCOUNT_NAME" \
  --role="roles/cloudbuild.builds.editor"

# Cloud Run Admin
gcloud projects add-iam-policy-binding $PROJECT_ID \
  --member="serviceAccount:$SERVICE_ACCOUNT_NAME" \
  --role="roles/run.admin"

# IAM Service Account User
gcloud projects add-iam-policy-binding $PROJECT_ID \
  --member="serviceAccount:$SERVICE_ACCOUNT_NAME" \
  --role="roles/iam.serviceAccountUser"

# Vertex AI User
gcloud projects add-iam-policy-binding $PROJECT_ID \
  --member="serviceAccount:$SERVICE_ACCOUNT_NAME" \
  --role="roles/aiplatform.user"

# Logging Writer (to allow writing logs)
gcloud projects add-iam-policy-binding $PROJECT_ID \
  --member="serviceAccount:$SERVICE_ACCOUNT_NAME" \
  --role="roles/logging.logWriter"


gcloud projects add-iam-policy-binding $PROJECT_ID \
  --member="serviceAccount:$SERVICE_ACCOUNT_NAME" \
  --role="roles/logging.viewer"
👉💻 همزمان با شروع آموزش، چالش نهایی را آماده خواهیم کرد. دستورات زیر، اسپکترها را از هرج و مرج و ایستا احضار میکنند و غولهای آزمون شما را میسازند.
. ~/agentverse-developer/set_env.sh
cd ~/agentverse-dungeon
./run_cloudbuild.sh

npm update -g @google/gemini-cli
۴. تسلط بر سلاح اصلیتان: مقدمهای بر رابط خط فرمان Gemini
قبل از اینکه بتوانید سلاحهای پیشرفته و تخصصی موجود در زرادخانه سرور MCP را به کار بگیرید، ابتدا باید بر سلاح اصلی خود تسلط پیدا کنید: Gemini CLI. این تیغه همهکاره شماست که قادر است دنیای دیجیتال را با دستورات شما شکل دهد. این تمرینها شما را با نحوه استفاده و قابلیتهای اساسی آن آشنا میکند.
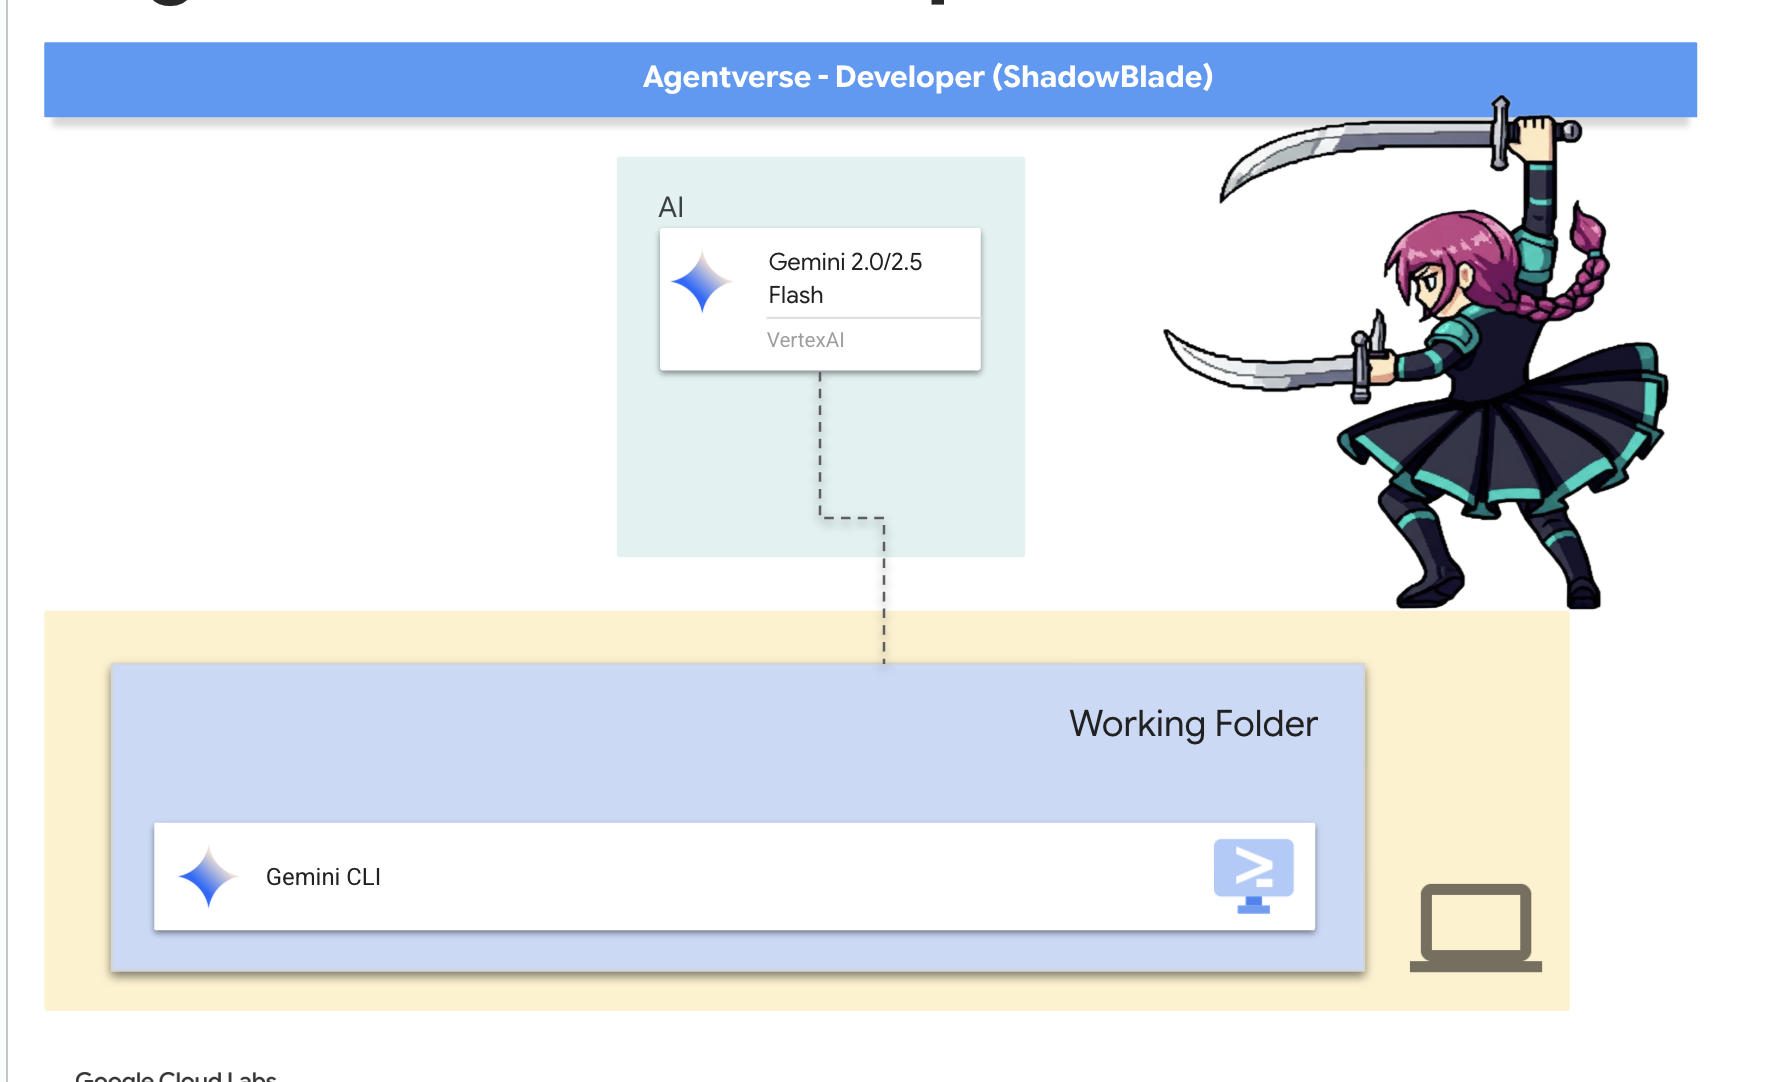
رابط خط فرمان (CLI) جمینی چیزی بیش از یک ابزار است؛ این رابط امتداد اراده شماست. این عامل هوش مصنوعی متنباز، که توسط مدلهای جمینی پشتیبانی میشود، بر اساس یک حلقه «دلیل و عمل» (ReAct) عمل میکند. این عامل قصد شما را تجزیه و تحلیل میکند، تکنیک مناسب را انتخاب میکند، آن را اجرا میکند و نتیجه را برای انجام وظایف پیچیده مشاهده میکند. قبل از اینکه بتوانید سلاحهای تخصصیتری را به کار بگیرید، باید بر این تیغه اصلی تسلط پیدا کنید.
شروع کار با Gemini CLI
👉💻 وارد محوطه تمرین شوید و سلاح خود را بیرون بکشید. در ترمینال Cloud Shell خود، به اسلحهخانه شخصی خود بروید.
cd ~/agentverse-developer
mkdir tabletop
cd tabletop
👉💻 برای اولین بار جوزا را احضار کنید. این شما را در مسیر همسویی اولیه راهنمایی خواهد کرد.
clear
gemini
اگر از شما پرسید Do you want to connect Cloud Shell editor to Gemini CLI? خیر را انتخاب کنید.
آشنایی با سلاح
هر استادکاری ابزار خود را میشناسد. شما باید قبل از رویارویی با یک دشمن واقعی، تکنیکهای اصلی شمشیر خود را یاد بگیرید.
👉✨ هر ابزار جادویی رونهایی دارد که قدرت آن را توصیف میکنند. اکنون آنها را بخوانید. در اعلان Gemini، تایپ کنید:
/help
به فهرست دستورات توجه کنید. اینها تکنیکهای اساسی شما برای مدیریت حافظه ( focus )، مکالمه ( chat ) و زرادخانههای خارجی ( tools ) هستند. این دفترچه راهنمای مبارزه شماست.
👉✨ سلاح شما با محیط خود هماهنگ میشود و به شما امکان میدهد مستقیماً میدان نبرد را کنترل کنید. به دنیای بیرون از تیغه فرمان دهید:
!ls -l
👉✨ رابط خط فرمان Gemini مجموعهای از قابلیتهای داخلی خود را دارد. برای بررسی آنها:
/tools
لیستی شامل ReadFile ، WriteFile و GoogleSearch را مشاهده خواهید کرد. اینها تکنیکهای پیشفرضی هستند که میتوانید بدون نیاز به استفاده از یک ابزار خارجی، از آنها استفاده کنید.
👉✨ تیغه شما همچنین میتواند با افزونهها تقویت شود - افسونهای از پیش ساخته شده توسط استادان دیگر که ابزارها، دستورات و زمینه را در یک واحد قابل نصب بستهبندی میکنند. بررسی کنید که در حال حاضر چه افزونههایی با تیغه شما هماهنگ شدهاند:
/extensions list
ممکن است لیست فعلاً خالی باشد - شما هنوز هیچ افزونهای نصب نکردهاید. اولین افزونه خود را بعداً، زمانی که آموزش شما به قدرت ایجاد تصویر نیاز داشته باشد، فراخوانی خواهید کرد.
👉✨ فراتر از افزونهها، استادان ماهر تخصص خود را در مهارتهای عامل - طومارهای درخواستی از دانش تخصصی - مدون کردهاند. بررسی کنید که تیغه شما چه مهارتهایی را میتواند کشف کند:
/skills list
مهارتها به طور پیشفرض در حافظه بارگذاری نمیشوند - آنها فقط در صورت نیاز فعال میشوند و تیغه شما را سریع و بدون دردسر نگه میدارند. شما بعداً در آموزشهایتان یاد خواهید گرفت که از مهارتها استفاده کنید.
👉✨ یک سلاح تنها در صورتی مؤثر است که به درستی متمرکز شود. شمشیر جمینی میتواند «آگاهی تاکتیکی» (زمینه) را برای هدایت اقدامات خود در اختیار داشته باشد.
/memory show
در حال حاضر خالی است، یک لوح سفید.
👉✨ دادههای تاکتیکی زیر را در حافظه آن ثبت کنید:
/memory add "The Shadowblade's primary foe is The Static."
برای تأیید اینکه تیغه شما این دانش را جذب کرده است، دوباره دستور /memory show اجرا کنید.
👉✨ برای اینکه سلاح شما مؤثر باشد، باید ماموریت را درک کند. @ به تیغه دستور میدهد تا اطلاعات را تجزیه و تحلیل کند. ابتدا، یک فایل خلاصه ماموریت ایجاد کنید:
!echo "## Mission Objective: Defeat the Seven Spectres" > mission.md
👉✨حالا، به رابط خط فرمان Gemini خود دستور دهید تا خلاصه را تجزیه و تحلیل کرده و یافتههای خود را گزارش دهد:
Explain the contents of the file @mission.md
سلاح اصلی شما اکنون از هدف خود آگاه است.
👉💻 برای خروج از رابط خط فرمان Gemini، دو بار Ctrl+C را فشار دهید.
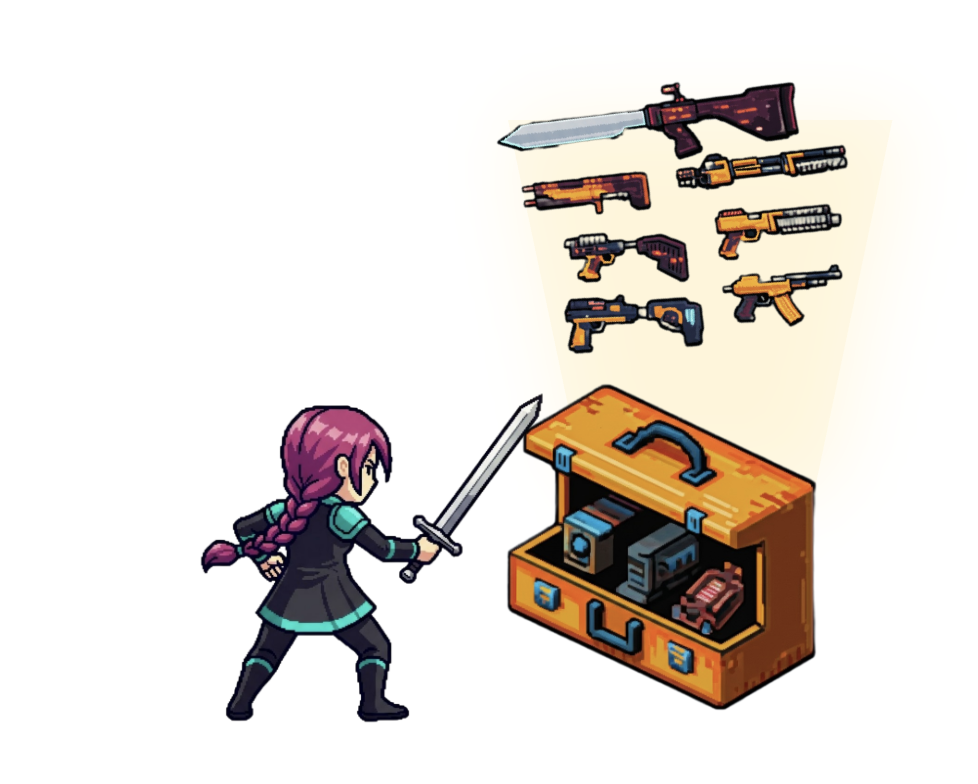
۵. تحلیل میدان نبرد: تعامل عملی کدگذاری Vibe
تمرینات آموزشی کامل شدهاند. شما حالتهای اولیه و ضربات سلاح اصلی خود، Gemini CLI، را یاد گرفتهاید. اما یک تیغه تا زمانی که در کورهی آفرینش آزمایش نشده و با زرادخانهی جنگ هماهنگ نشده باشد، واقعاً بر آن مسلط نشدهاید. قبل از اینکه بتوانید با دشمن واقعی روبرو شوید، ابتدا باید محیط اطراف خود - میدان نبرد دیجیتال - را بررسی و شکل دهید.
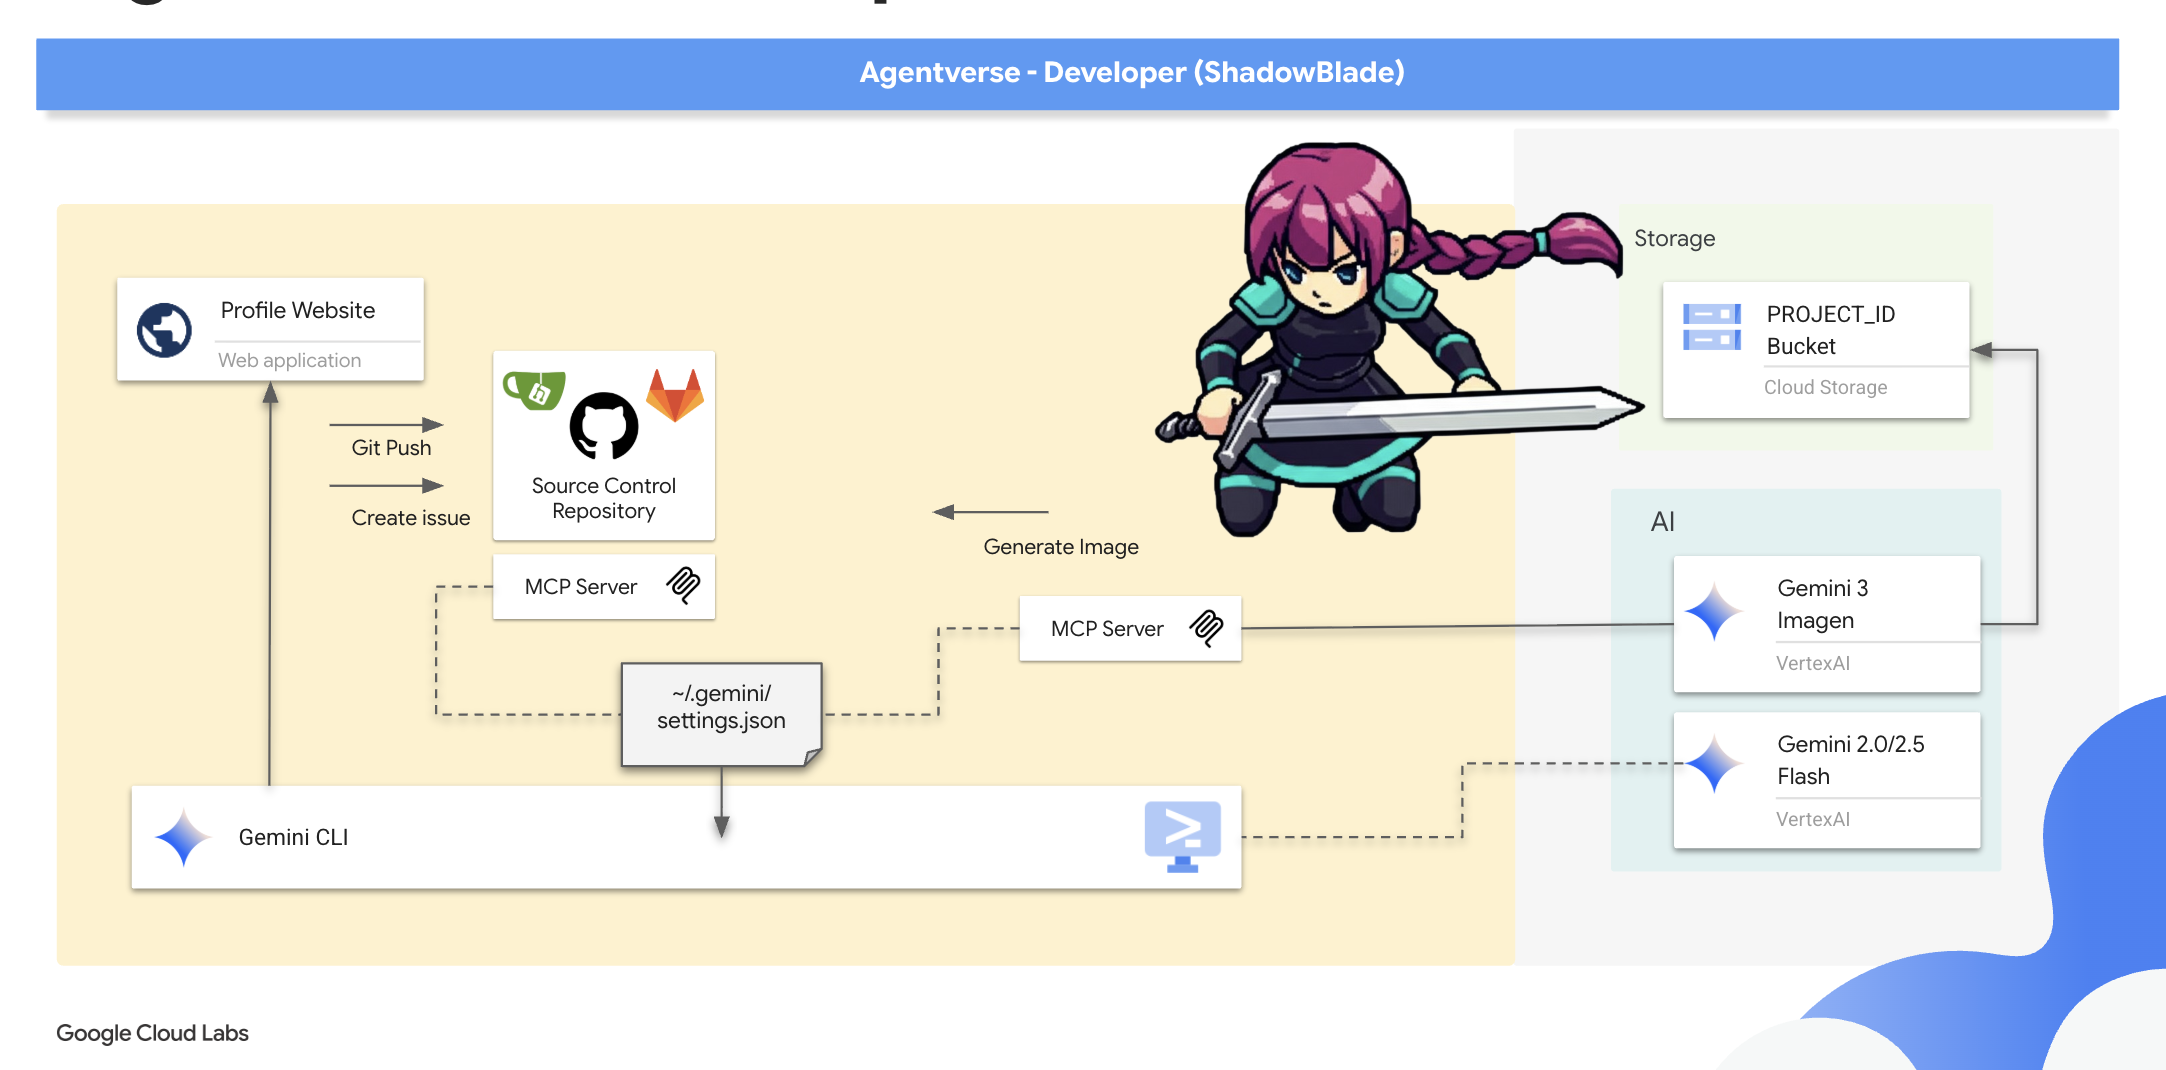
این فصل درباره حرکت از تئوری به عمل است. شما ابتدا با دستور دادن به تیغه Gemini خود برای جعل نشان سازنده خود - یک امضای دیجیتالی به شکل یک وبسایت شخصی، که از هیچ چیز جز نیت شما ساخته نشده است - حضور خود را در Agentverse تثبیت خواهید کرد. سپس، با فعال کردن یک زرادخانه محلی از ابزارهای پیشرفته - یک سرور MCP - و تنظیم تیغه خود با فرکانس آن، قدرت خود را گسترش خواهید داد و به شما امکان میدهد مانورهای پیچیدهای مانند مدیریت مخازن کد را با دستورات ساده و تعیینکننده انجام دهید.
ایجاد نشان سازنده خود
یک Shadowblade واقعی نه تنها با سلاحش، بلکه با سبک خاصش - نشان سازندهاش - شناخته میشود. این نشان، حضور دیجیتالی شما خواهد بود، یک پروفایل شخصی که هویت شما را به Agentverse اعلام میکند. در اینجا، شما به Gemini Blade خود دستور میدهید تا تکنیک پیچیدهای را که برای تعریف این هویت لازم است، اجرا کند.

👉💻 اگر در بخش قبل رابط خط فرمان Gemini را بستید، حتماً آن را دوباره در ترمینال خود اجرا کنید.
clear
cd ~/agentverse-developer/tabletop
gemini
👉✨ با یک دستور قدرتمند و واحد، به رابط خط فرمان Gemini خود دستور دهید تا پایه و اساس هویت دیجیتالی شما را بنا کند:
In the current folder, create a personal profile website for a hero codenamed 'Shadowblade'. The design must be a dark, futuristic theme with electric blue accents. All code must be in separate index.html and styles.css files. The layout must use CSS Flexbox for a two-column design. All generated code must be clean, well-commented, and professional. Make sure you have a placeholder spot for profile picture. Do not attempt to start the server.
جمینی توالی اقدامات مورد نیاز را محاسبه کرده است.
👉💻 برای خروج از رابط خط فرمان Gemini، دو بار Ctrl+C را فشار دهید و دستور زیر را در ترمینال اجرا کنید.*
python -m http.server
👀 برای مشاهدهی کار خود، روی آیکون پیشنمایش وب در نوار ابزار Cloud Shell کلیک کنید. گزینهی Change port را انتخاب کنید، آن را روی ۸۰۰۰ تنظیم کنید و روی Change and Preview کلیک کنید. پیشنمایشی از وبسایت شما ظاهر خواهد شد. 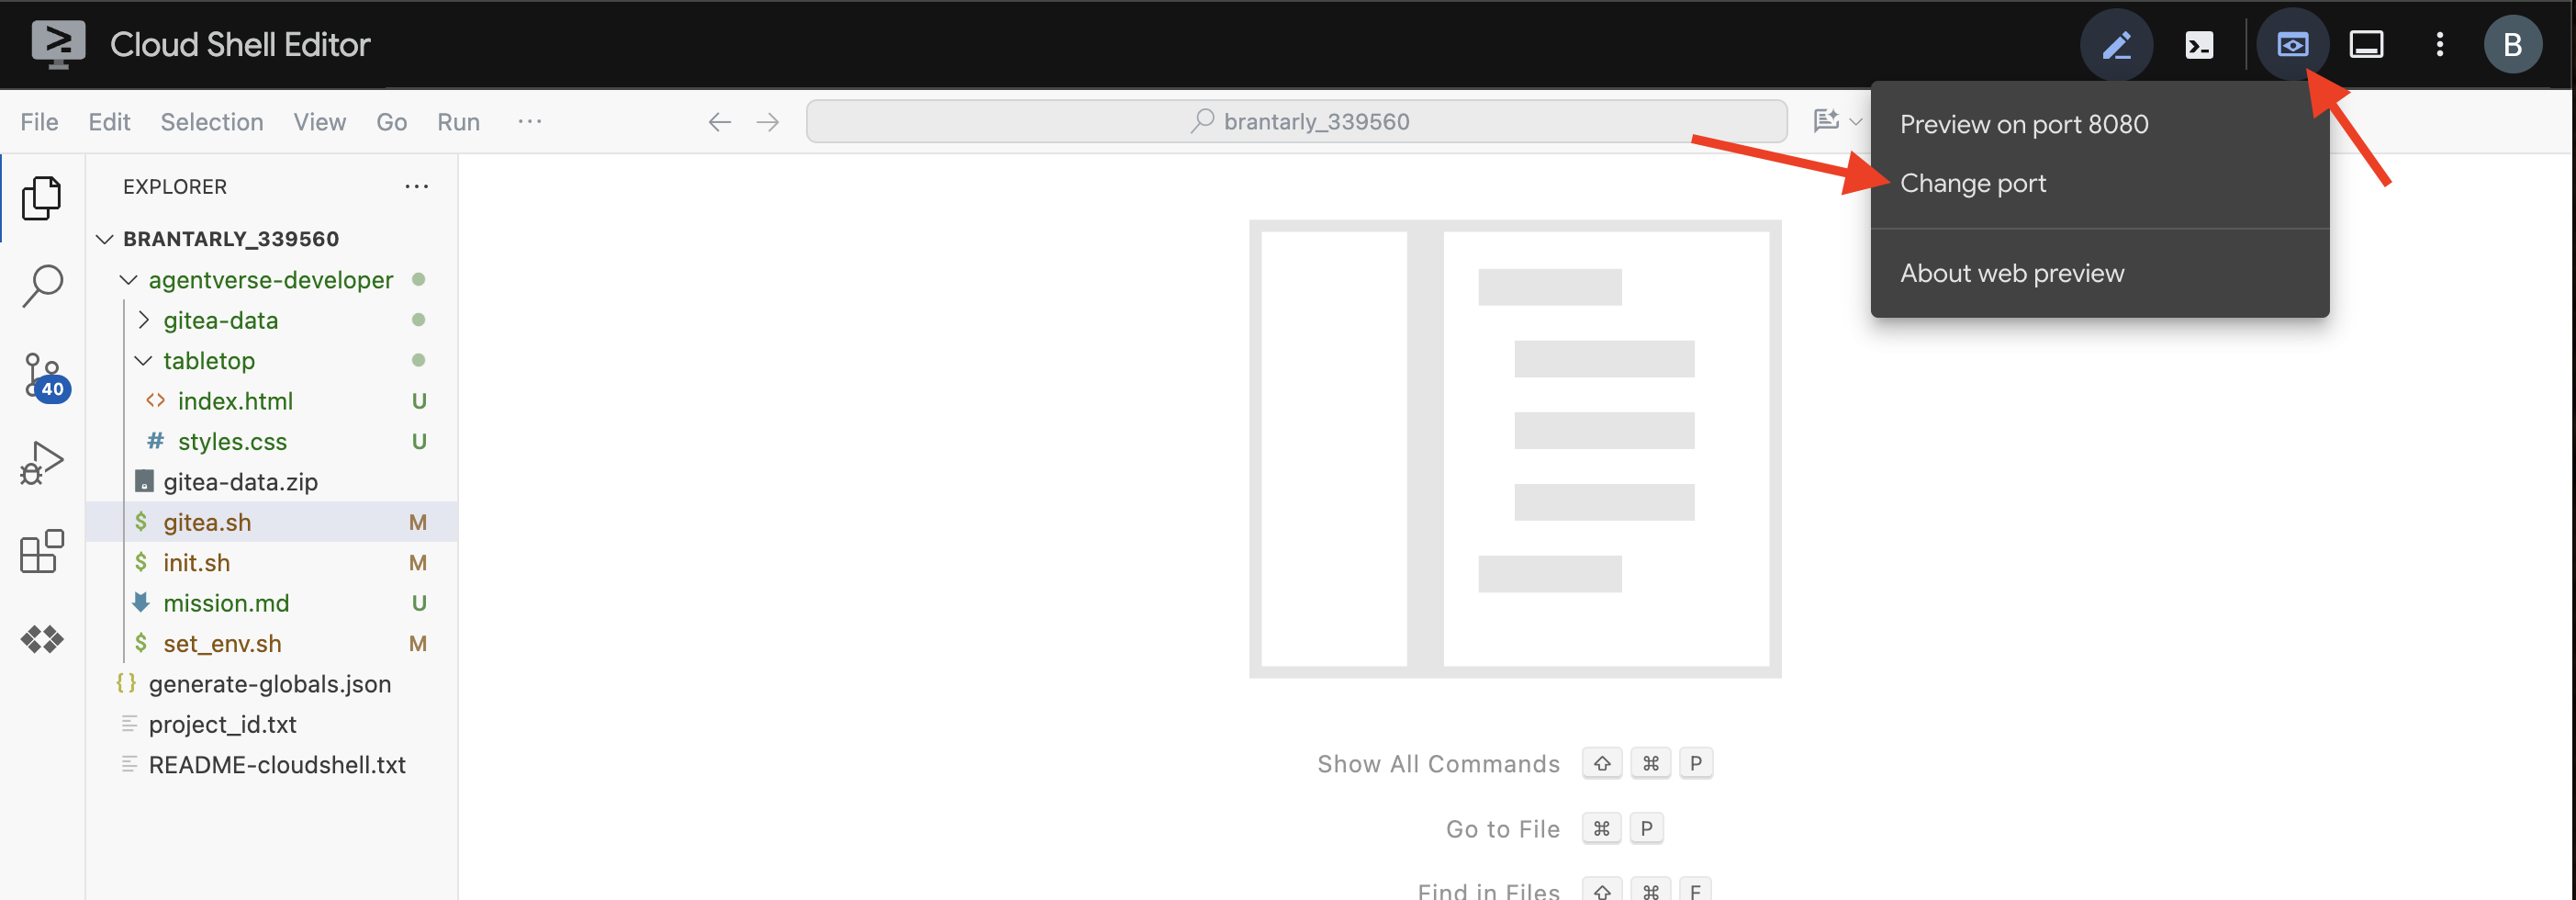
ممکن است وبسایت شما با وبسایت من متفاوت باشد. این نشان منحصر به فرد شماست. 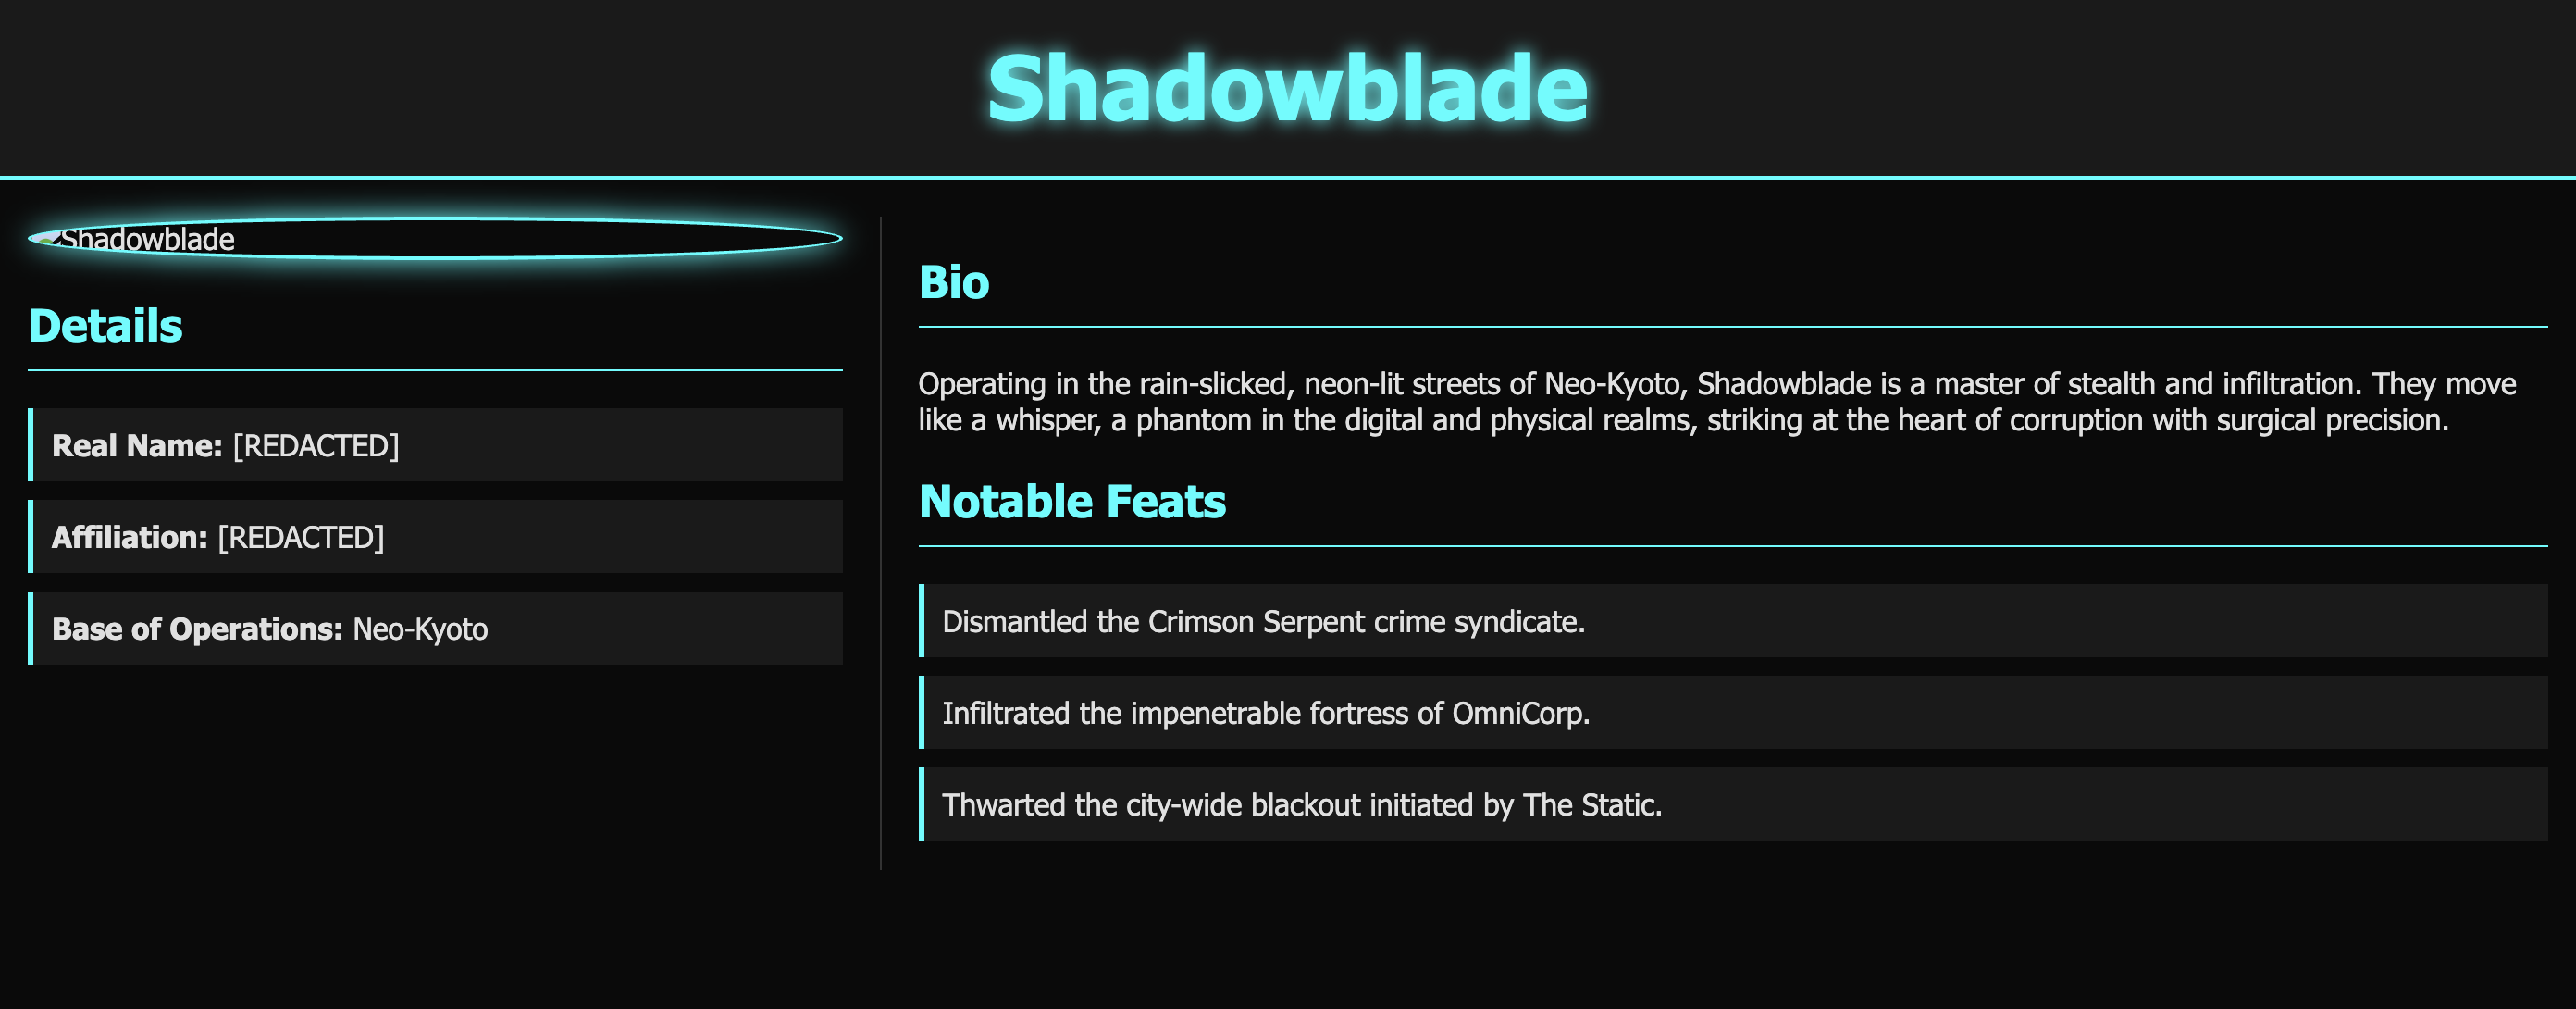
تکنیک مخصوص شما حالا اصلاح شده و دیگر نیازی به شبیهسازی زنده نیست. به تیغه دستور دهید که بایستد.
👉💻 برای خروج از سرور http، Ctrl+C را فشار دهید.
هویت دیجیتالی شما اکنون تثبیت شده است، و مهمتر از آن، شما خرد حیاتیِ بهکارگیری قدرت زیاد با احتیاط بیشتر را آموختهاید.
زرادخانه محلی خود را فعال کنید: زرادخانه گیتیا
پتانسیل واقعی یک Shadowblade نه تنها با مهارت شخصی او، بلکه با کیفیت زرادخانهاش آشکار میشود. اکنون قفسه سلاحهای محلی خود - یک سرور Gitea - را فعال کرده و تیغه خود را با قدرت آن تنظیم میکنید. این زرادخانه از طریق یک سرور Model Context Protocol (MCP) به Gemini CLI شما متصل است، یک پورتال تخصصی که به تیغه هوش مصنوعی شما اجازه میدهد تا با ابزارها و سرویسهای خارجی تعامل داشته باشد و ترمینال شما را به یک فضای کاری هوشمند و عملگرا تبدیل کند.
یادداشت توسعهدهنده: به یک سرور MCP به عنوان یک مجرای قدرت فکر کنید، یک پورتال تخصصی که ذهن هوش مصنوعی شما را به بدنه یک ابزار خارجی متصل میکند. این همان چیزی است که Gemini CLI را از یک مکالمهگر صرف به یک عامل واقعی و عملگرا ارتقا میدهد. با تنظیم Blade خود به این پورتالهای MCP، به آن توانایی انجام اقدامات ملموس را میدهید: مدیریت فایلها، پرسوجو از پایگاههای داده، تعامل با APIها و موارد دیگر. یک اکوسیستم کامل از این پورتالها وجود دارد که توسط توسعهدهندگان برای اتصال عاملهای هوش مصنوعی به پلتفرمهای قدرتمند ایجاد شده است. سرورهای MCP برای تعامل با پایگاههای داده، ایمنسازی کد یا حتی پشتیبانی از برنامهنویسی جفتی وجود دارد. امکانات بسیار گسترده است و به یک توسعهدهنده اجازه میدهد فضای کاری خود را برای هر پروژهای سفارشی کند.
امروز، ما بر دو قدرت اساسی ضروری برای هر "رمزگذار ارتعاشی" تمرکز خواهیم کرد: قدرت کنترل آهنگری و قدرت خلق کردن از تخیل. ابتدا تیغه خود را به یک سرور Git متصل میکنید و به شما امکان کنترل مخزن کد منبع خود را میدهد. سپس، برای تولید تصویر به یک سرور MCP دوم متصل میشوید و به شما امکان میدهد داراییهای بصری را تنها با یک دستور ایجاد کنید.
بیایید با احضار اولین و اساسیترین قطعه از زرادخانه جدید شما شروع کنیم: خودِ زرادخانه.
👉💻 در ترمینال خود، اسکریپت فعالسازی را برای احضار زرادخانه اجرا کنید:
cd ~/agentverse-developer
./gitea.sh
این اسکریپت کانتینر Gitea را بیدار میکند و پورتال MCP را باز میکند و به Gemini اجازه میدهد تا آن را درک کرده و با آن تعامل داشته باشد.
👉 برای بررسی زرادخانه جدید خود، باید به پیشنمایش وب نگاهی بیندازید.
👉 از آیکون پیشنمایش وب در نوار ابزار Cloud Shell، گزینه Change port را انتخاب کرده و آن را روی ۳۰۰۵ تنظیم کنید.
👉 صفحه ورود به سیستم گیتیا ظاهر میشود. با استفاده از طلسم وارد اسلحهخانه شوید: * نام کاربری: dev * رمز عبور: dev 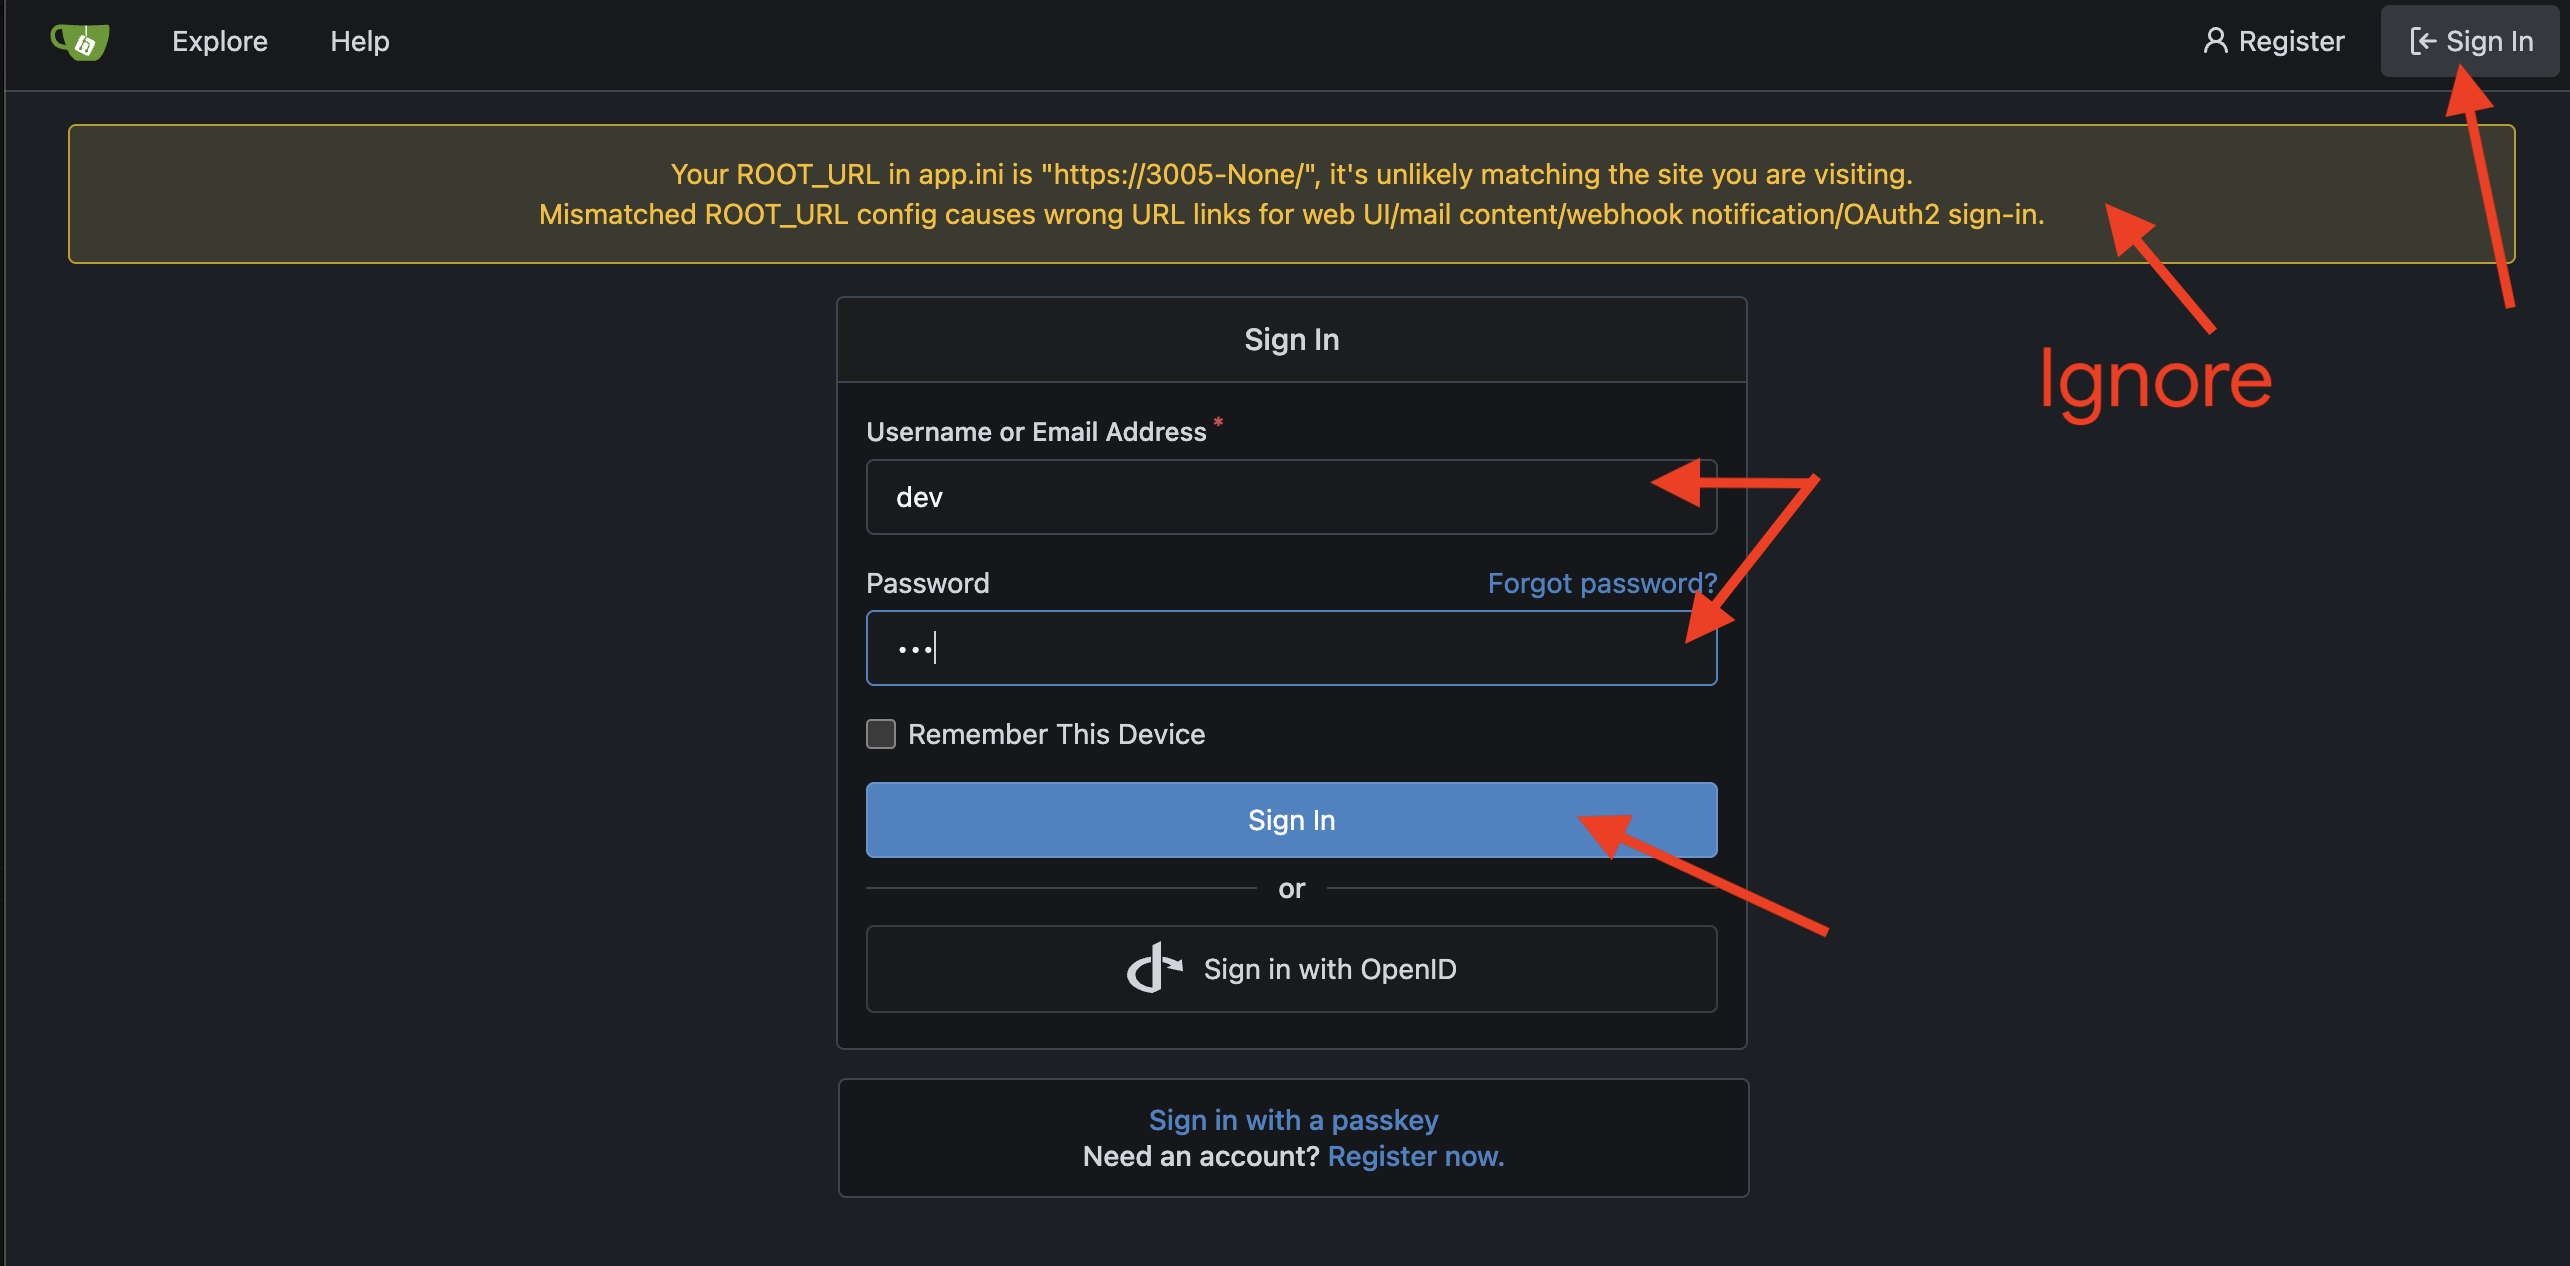
👉💻 رابط خط فرمان Gemini شما هنوز نمیتواند این زرادخانه جدید را ببیند. شما باید یک تنظیم اساسی انجام دهید و مکان زرادخانه را روی رونهای پیکربندی Gemini CLI ( settings.json ) ثبت کنید. در ترمینال خود، دستور زیر را اجرا کنید:
if [ ! -f ~/.gemini/settings.json ]; then
  # If file does not exist, create it with the specified content
  echo '{"mcpServers":{"gitea":{"url":"http://localhost:8085/sse"}}}' > ~/.gemini/settings.json
else
  # If file exists, merge the new data into it
  jq '. * {"mcpServers":{"gitea":{"url":"http://localhost:8085/sse"}}}' ~/.gemini/settings.json > tmp.json && mv tmp.json ~/.gemini/settings.json
fi &&
cat ~/.gemini/settings.json
👀 فایل settings.json پیکربندی مرکزی برای رابط خط فرمان Gemini است که به عنوان مجموعه تنظیمات و قابلیتهای آن عمل میکند. این فایل نحوه رفتار، ظاهر و از همه مهمتر، قدرتهای خارجی قابل استفاده توسط رابط خط فرمان را تعیین میکند. این فایل معمولاً در دایرکتوری خانگی شما در ~/.gemini/settings.json قرار دارد و قوانین آن را در تمام پروژههای شما اعمال میکند. با این حال، میتوانید فایلهای settings.json مختص پروژه را نیز در یک دایرکتوری .gemini در پوشه پروژه خود ایجاد کنید تا تنظیمات سراسری را نادیده بگیرید.
"mcpServers": {
  "gitea": {
    "url": "http://localhost:8085/sse"
  }
}
این تنظیم به Gemini شما میگوید: «زرادخانهای به نام gitea فعال است و در این آدرس شبکه خاص منتظر دستورات است.»
👉💻 دوباره وارد رابط خط فرمان Gemini شوید. در ترمینال خود، دستور زیر را اجرا کنید:
clear
cd ~/agentverse-developer/tabletop/
gemini
👉✨ مطمئن شوید که تیغه شما سلاح جدید را کشف کرده است. از طریق پورتالهای MCP خود به آن دستور دهید تا تمام زرادخانههای موجود را فهرست کند:
/mcp
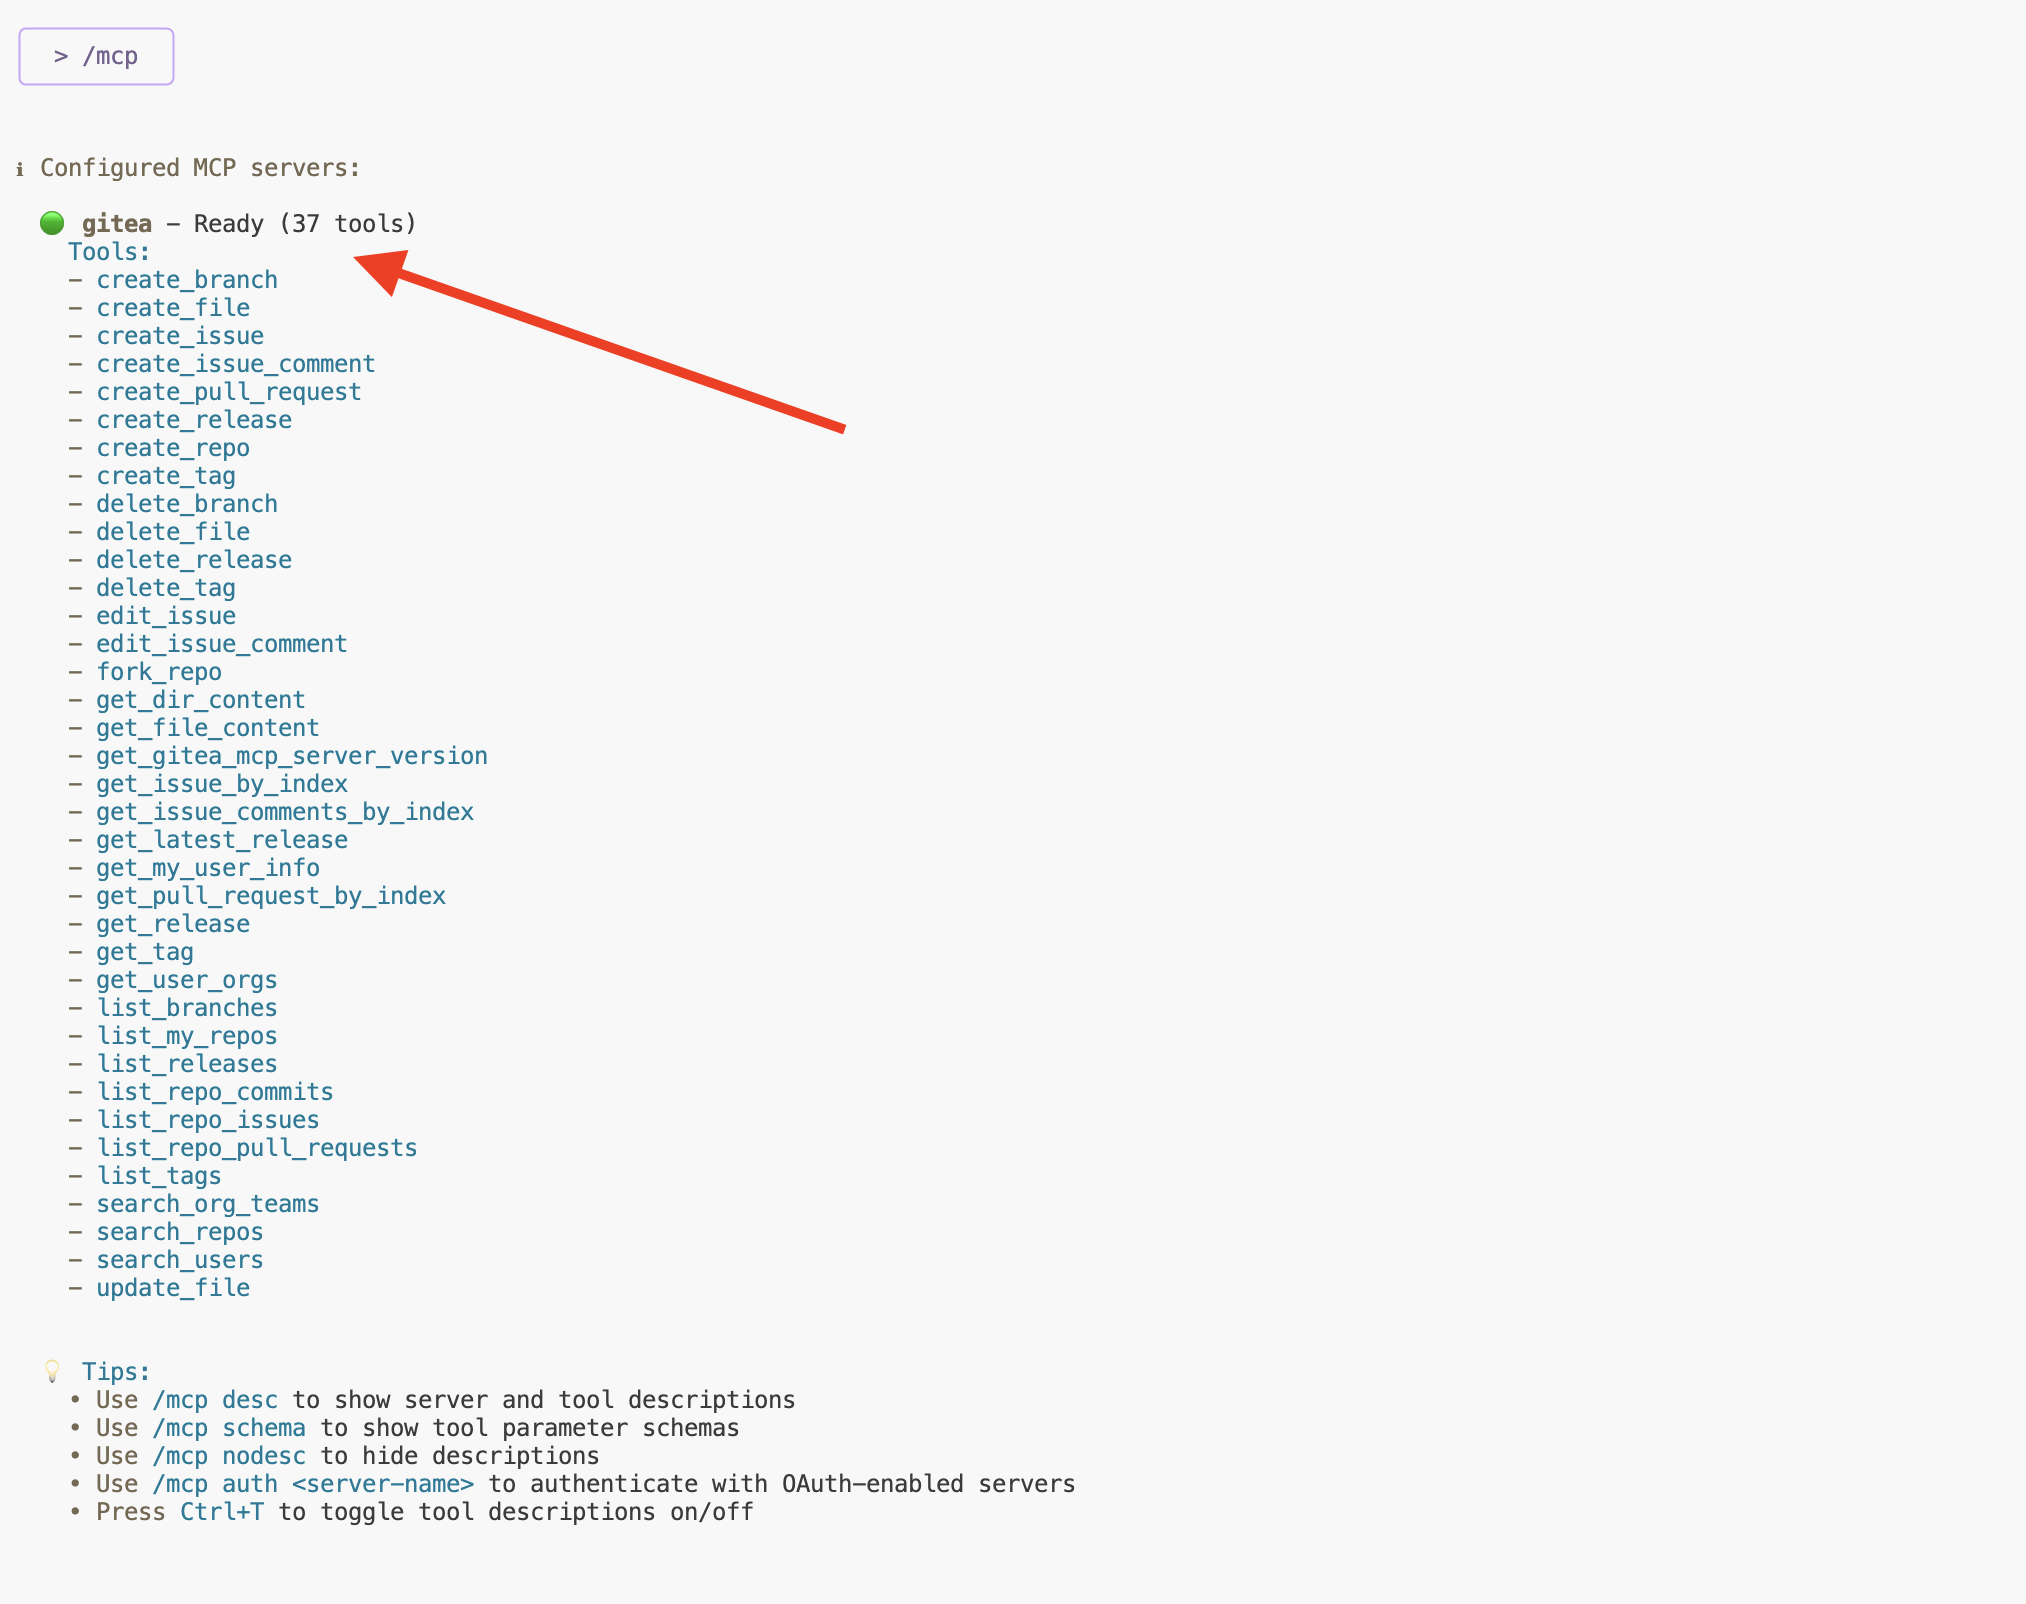
اکنون باید gitea و لیست تکنیکهای موجود در آن را ببینید. تیغه شما کوک شده است.
پروفایل «نشان سازنده» شما یک تکنیک ظریف و دقیق است، اما به یک جای مناسب در زرادخانه نیاز دارد - یک غلاف برای نگه داشتن ایمن آن. به Gemini CLI خود دستور دهید تا یکی ایجاد کند.
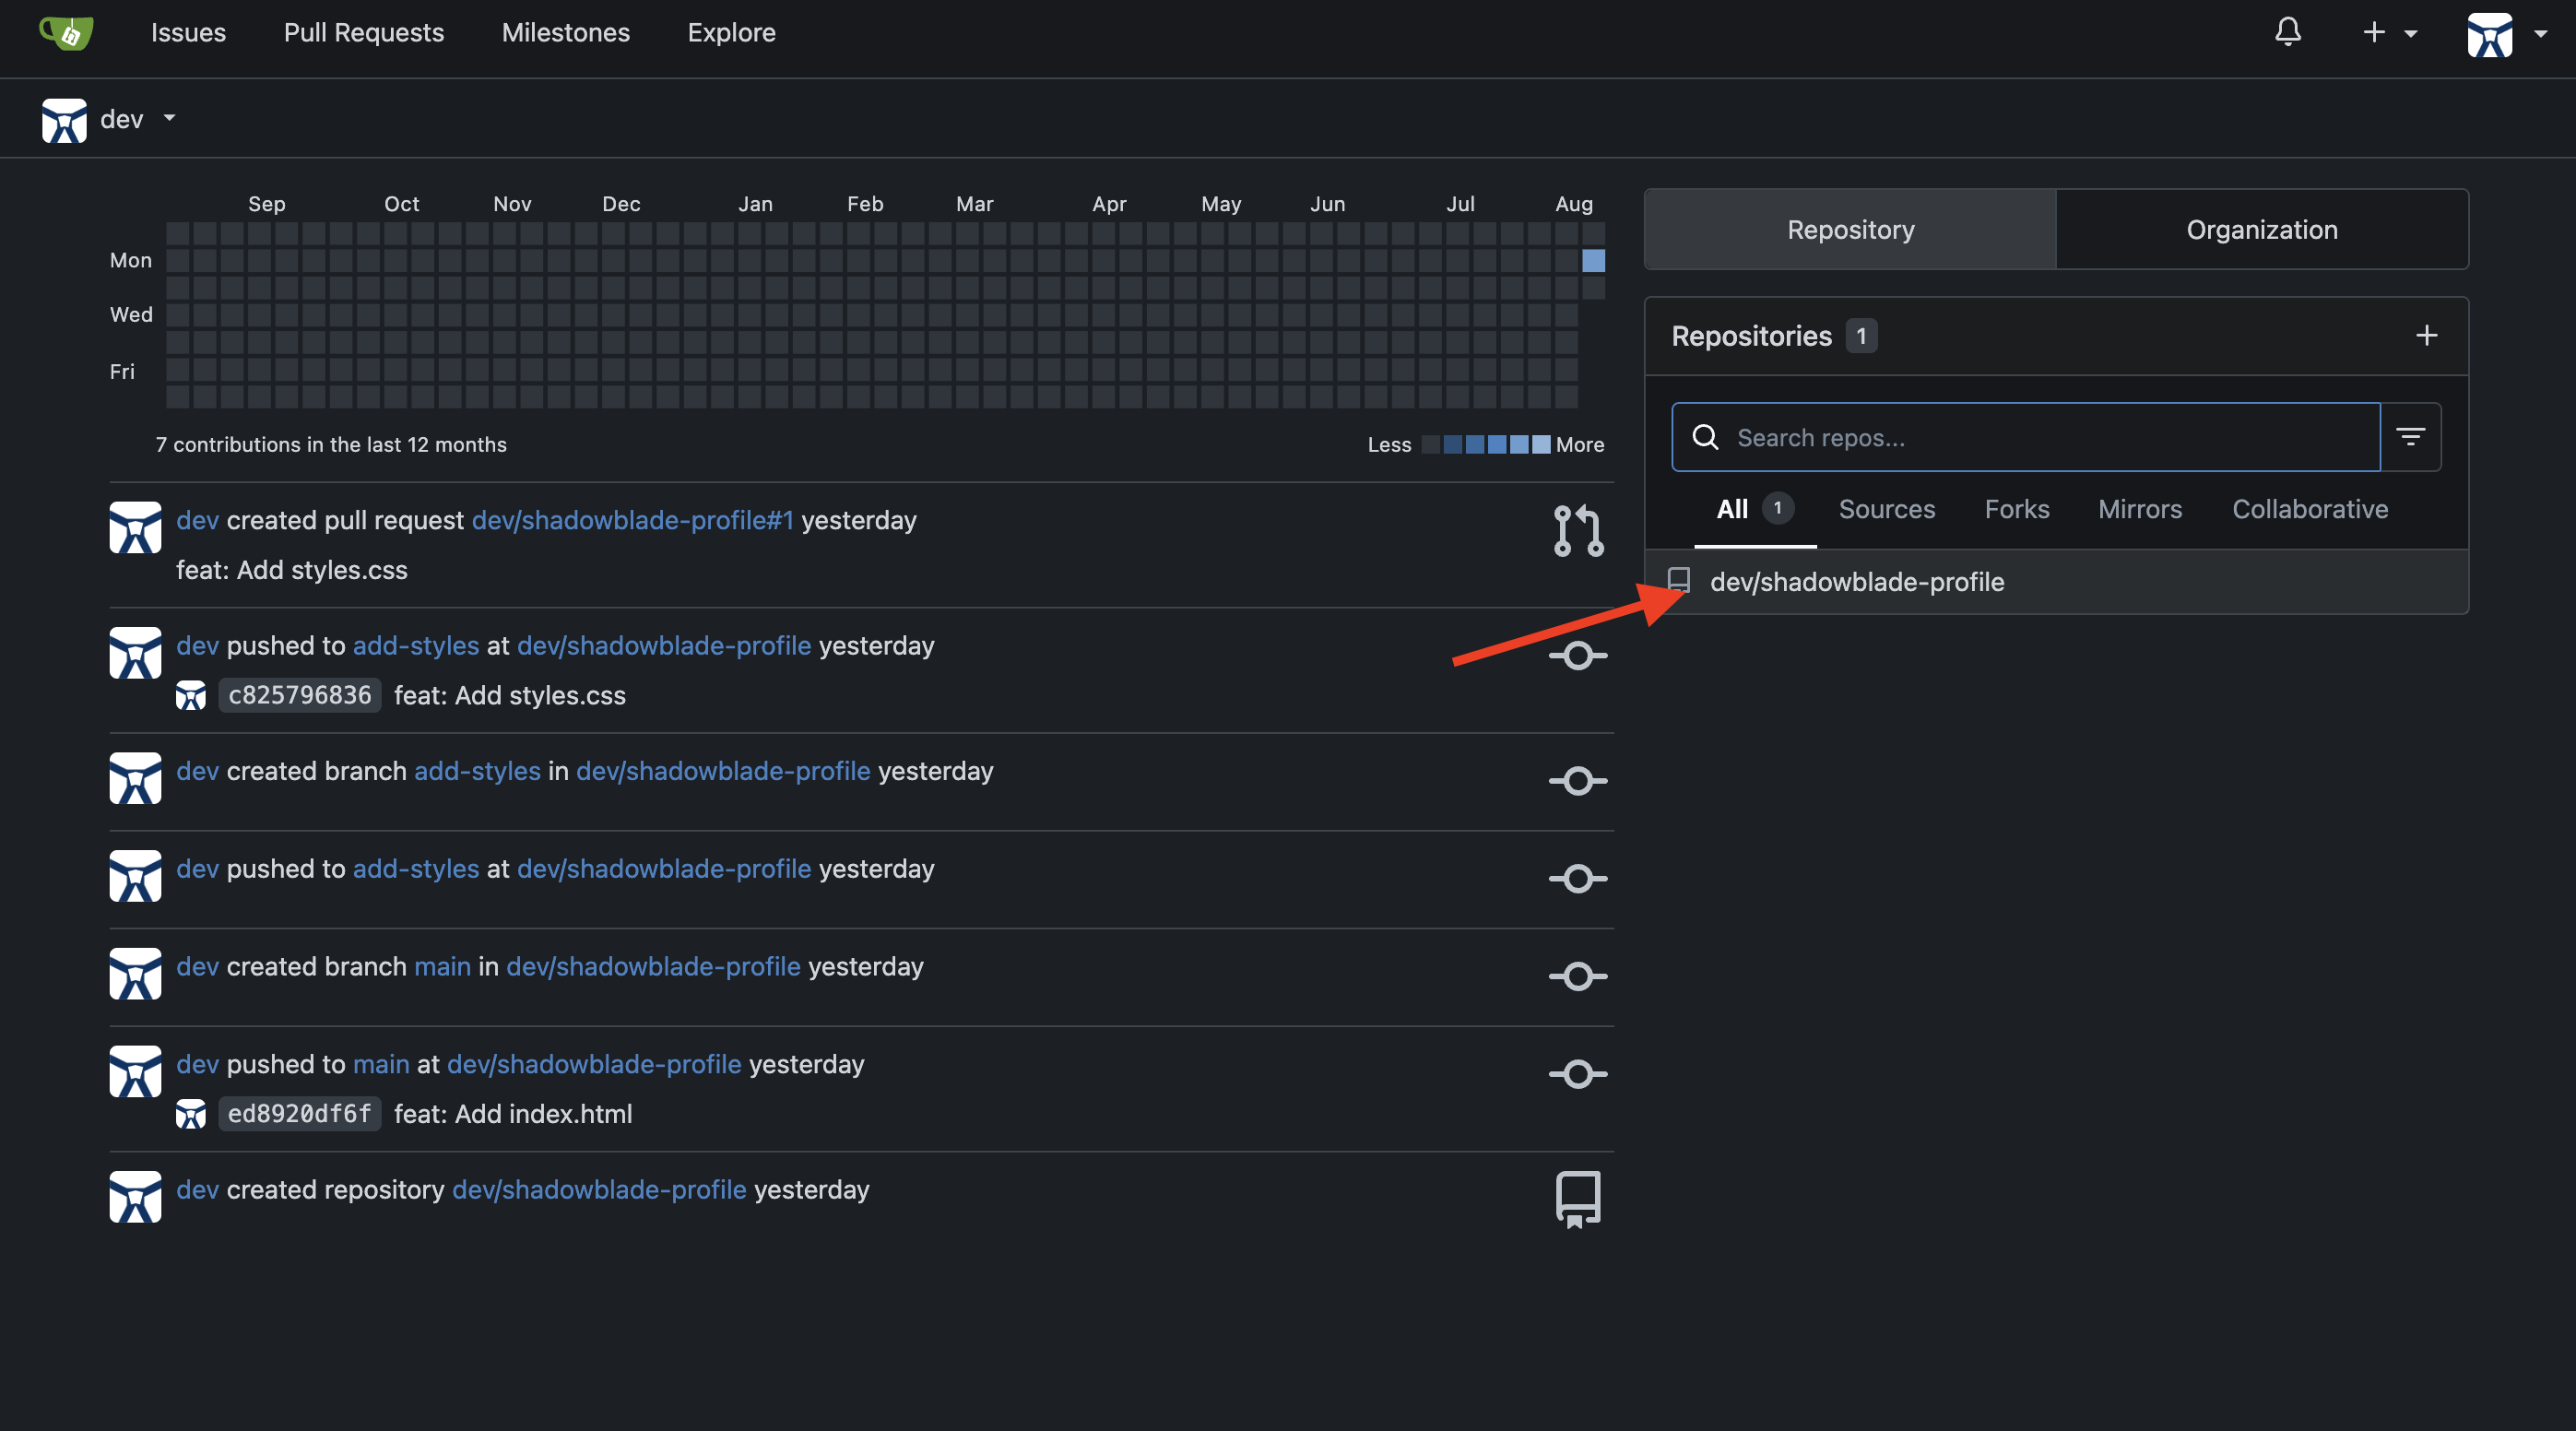
Create a new repository named 'shadowblade-profile'. The description should be 'The Maker's Mark and digital identity for the Shadowblade operative.' I will push my own files later, so do not create any content.
به رابط وب Gitea برگردید و صفحه را رفرش کنید. خواهید دید که مخزن جدید shadowblade-profile برای شما ایجاد شده است. 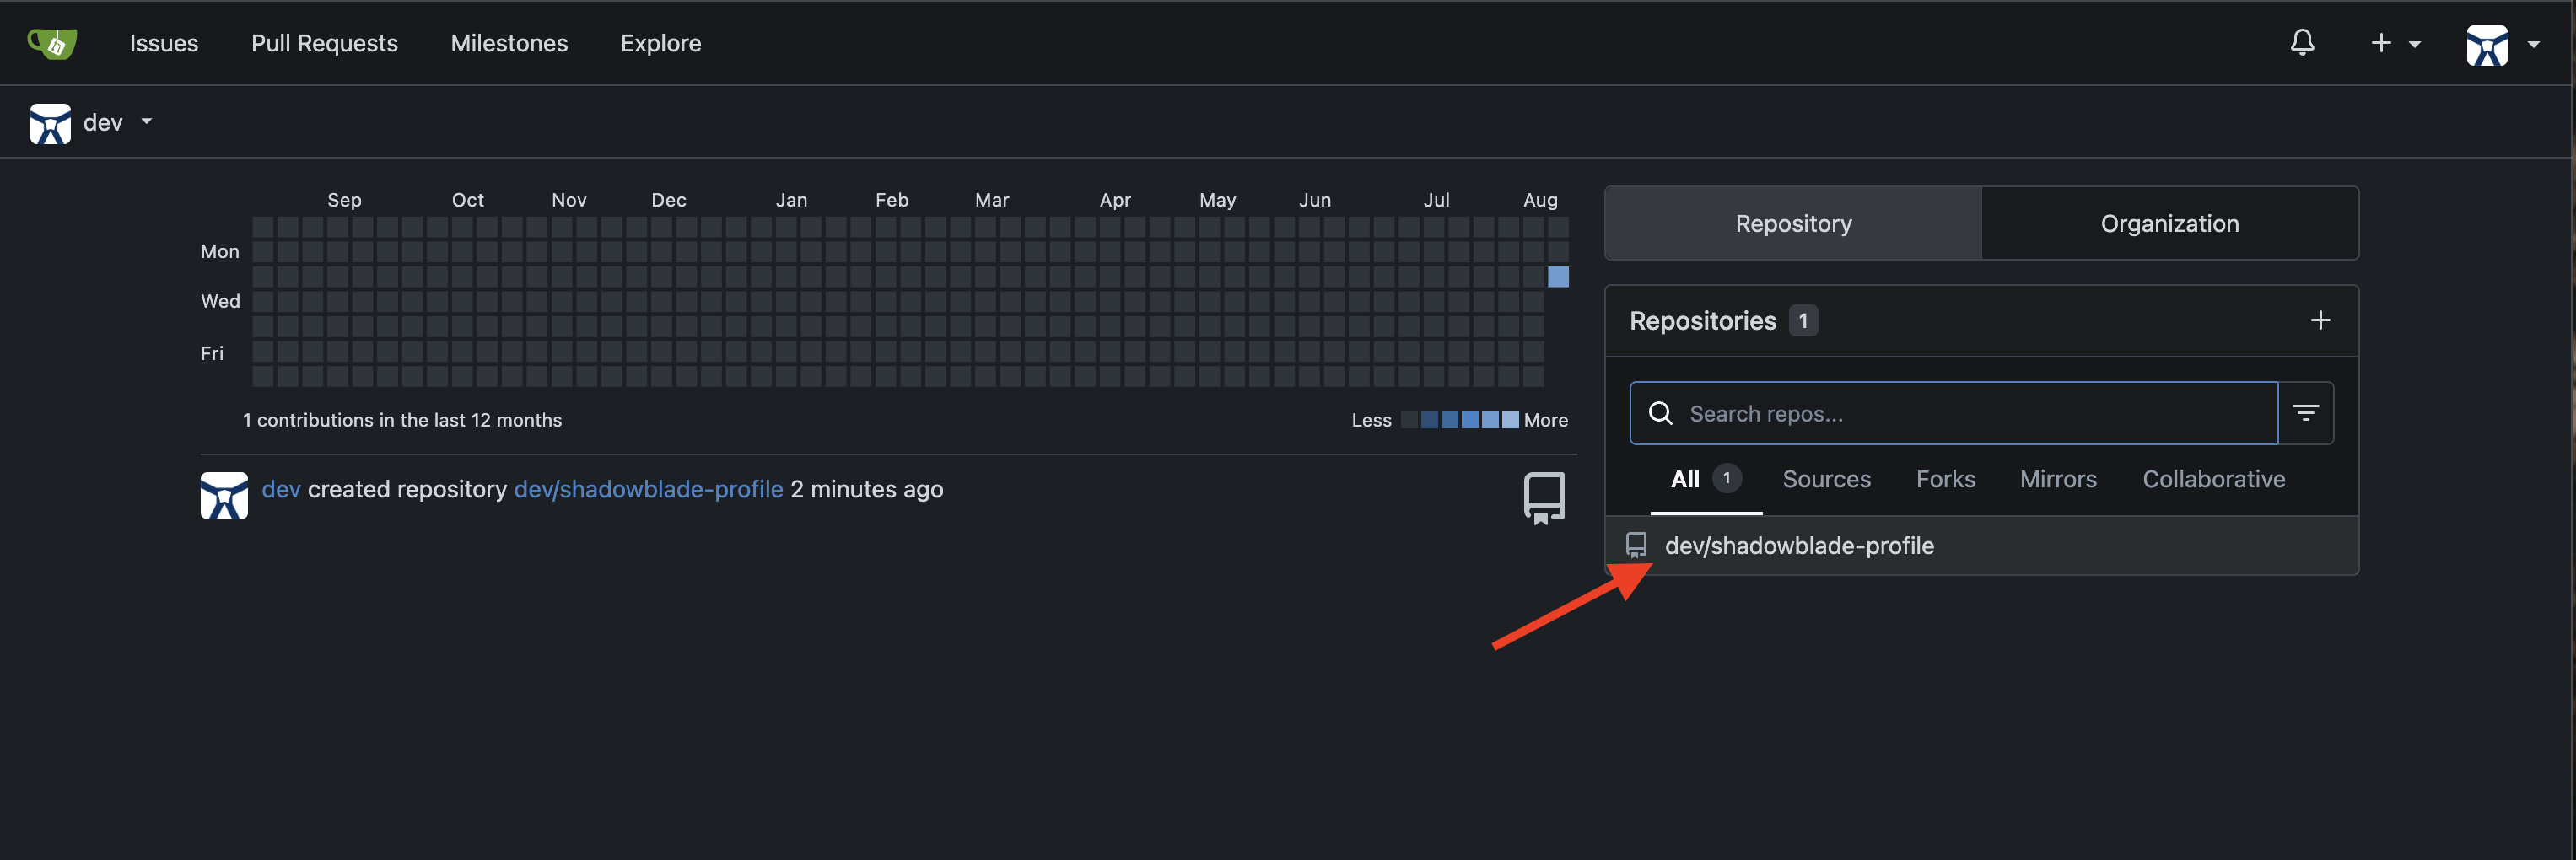
با آماده شدن غلاف، کار خود را محکم کنید. به Gemini دستور دهید تا فایلهای وبسایت پروفایل شما را ثبت کند.
👉💻دستور نهایی این تکنیک را در رابط خط فرمان Gemini اجرا کنید:
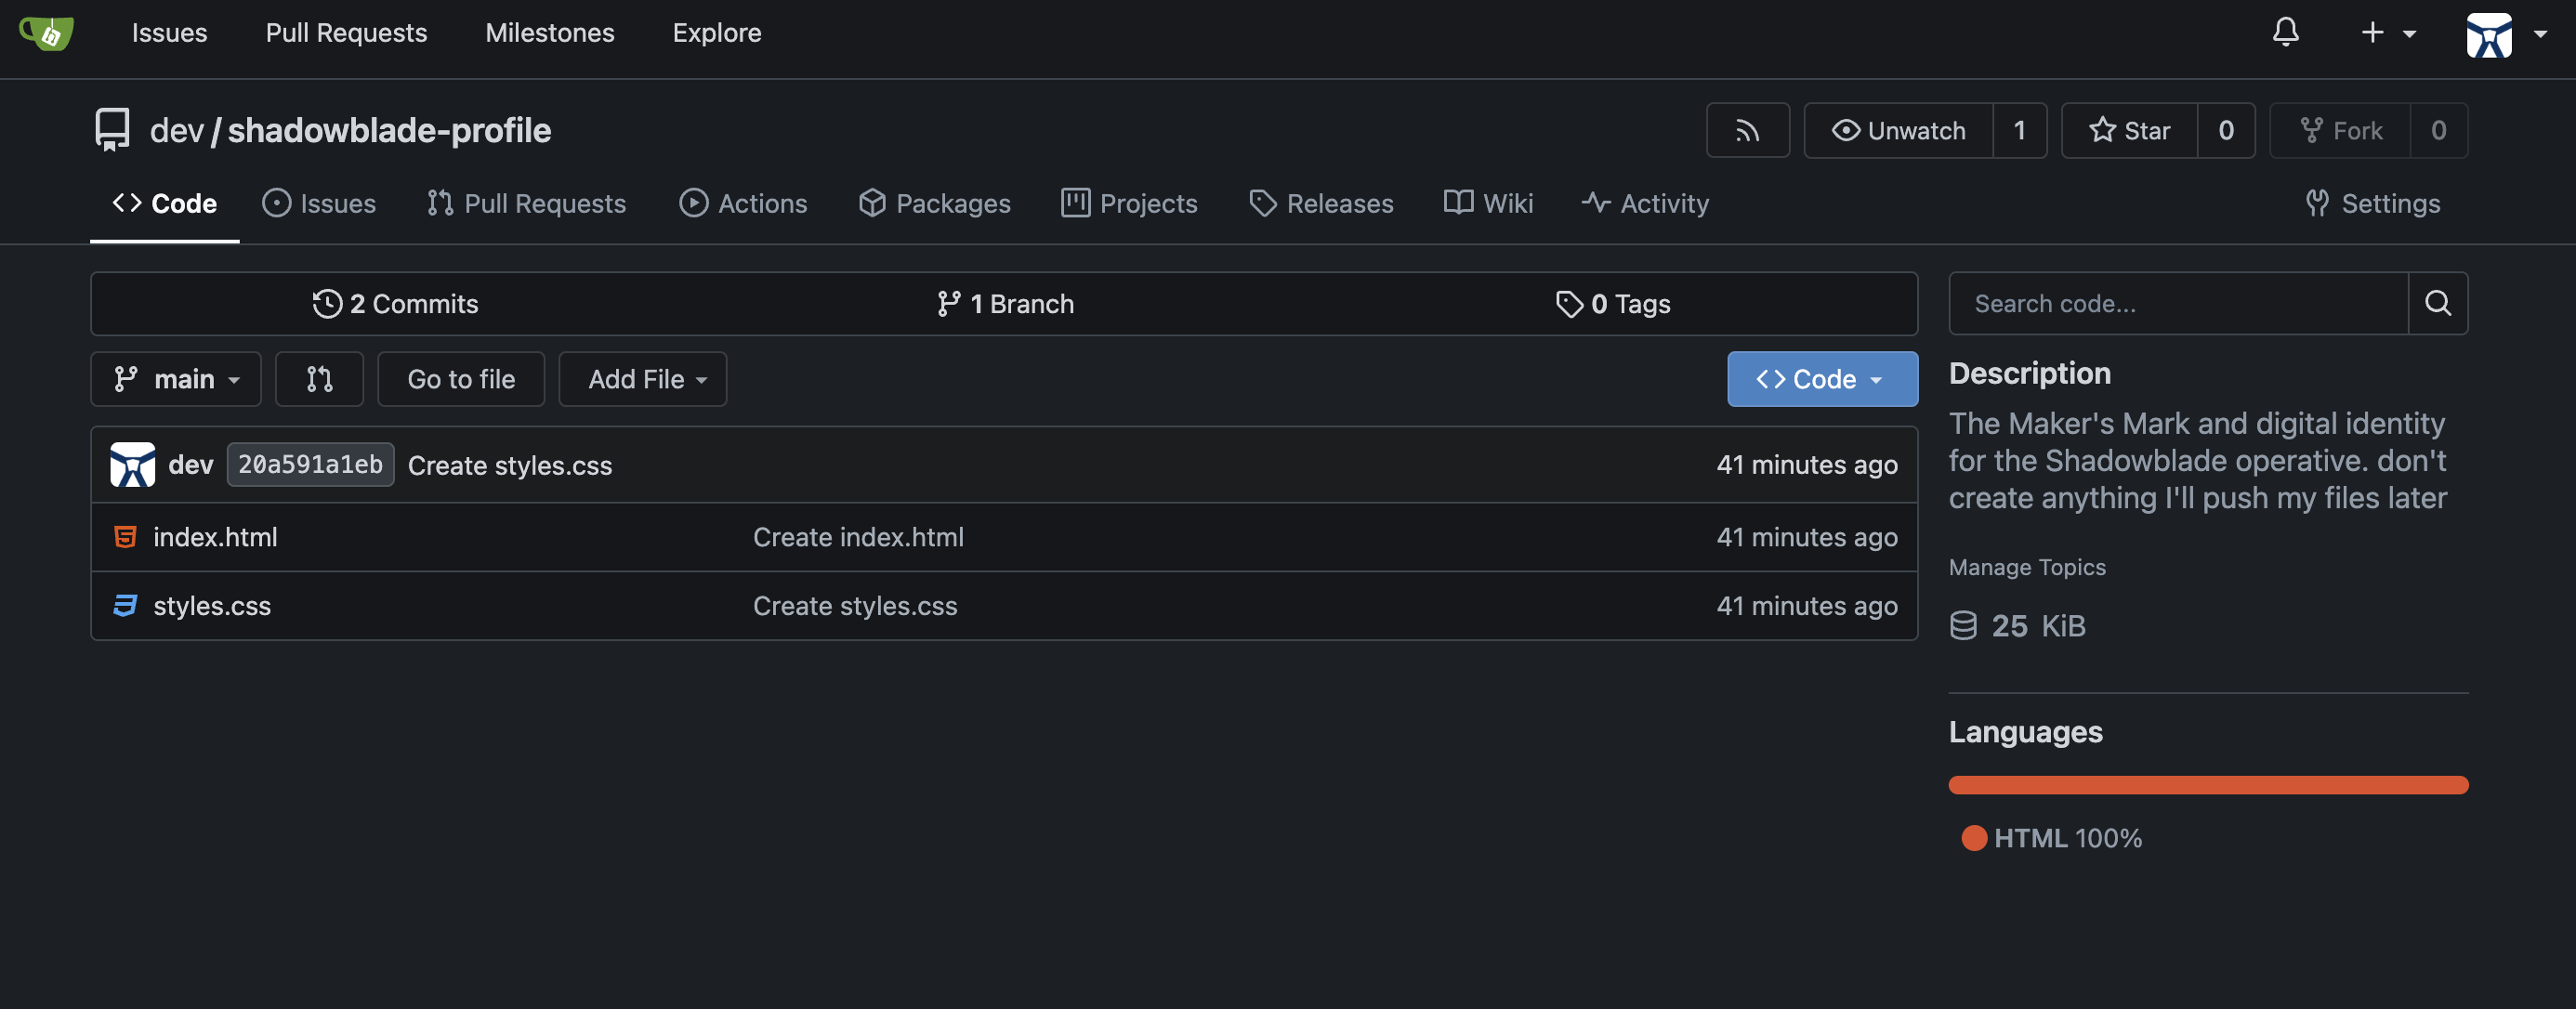
Using the Gitea tool, push the index.html and styles.css files to the 'shadowblade-profile' repository.
یک استاد واقعی کار خود را تأیید میکند. به برگه Gitea برگردید و صفحه مخزن را رفرش کنید. index.html و styles.css شما اکنون با خیال راحت بایگانی شدهاند.
👉✨ یک شمشیر سایهدار (Shadowblade) با نشان مخصوصش شناخته میشود، اما همانطور که به یاد دارید، وبسایت شما تصویر پروفایل خود را ندارد. یک استادکار برای تکمیل نقصهایش، آنها را تصدیق میکند. شما باید این نقص را در سوابق زرادخانه ثبت کنید.
File an issue for me in the shadowblade-profile repo. The issue is that the profile image is missing.
مشکل را در گیتیا مشاهده کنید 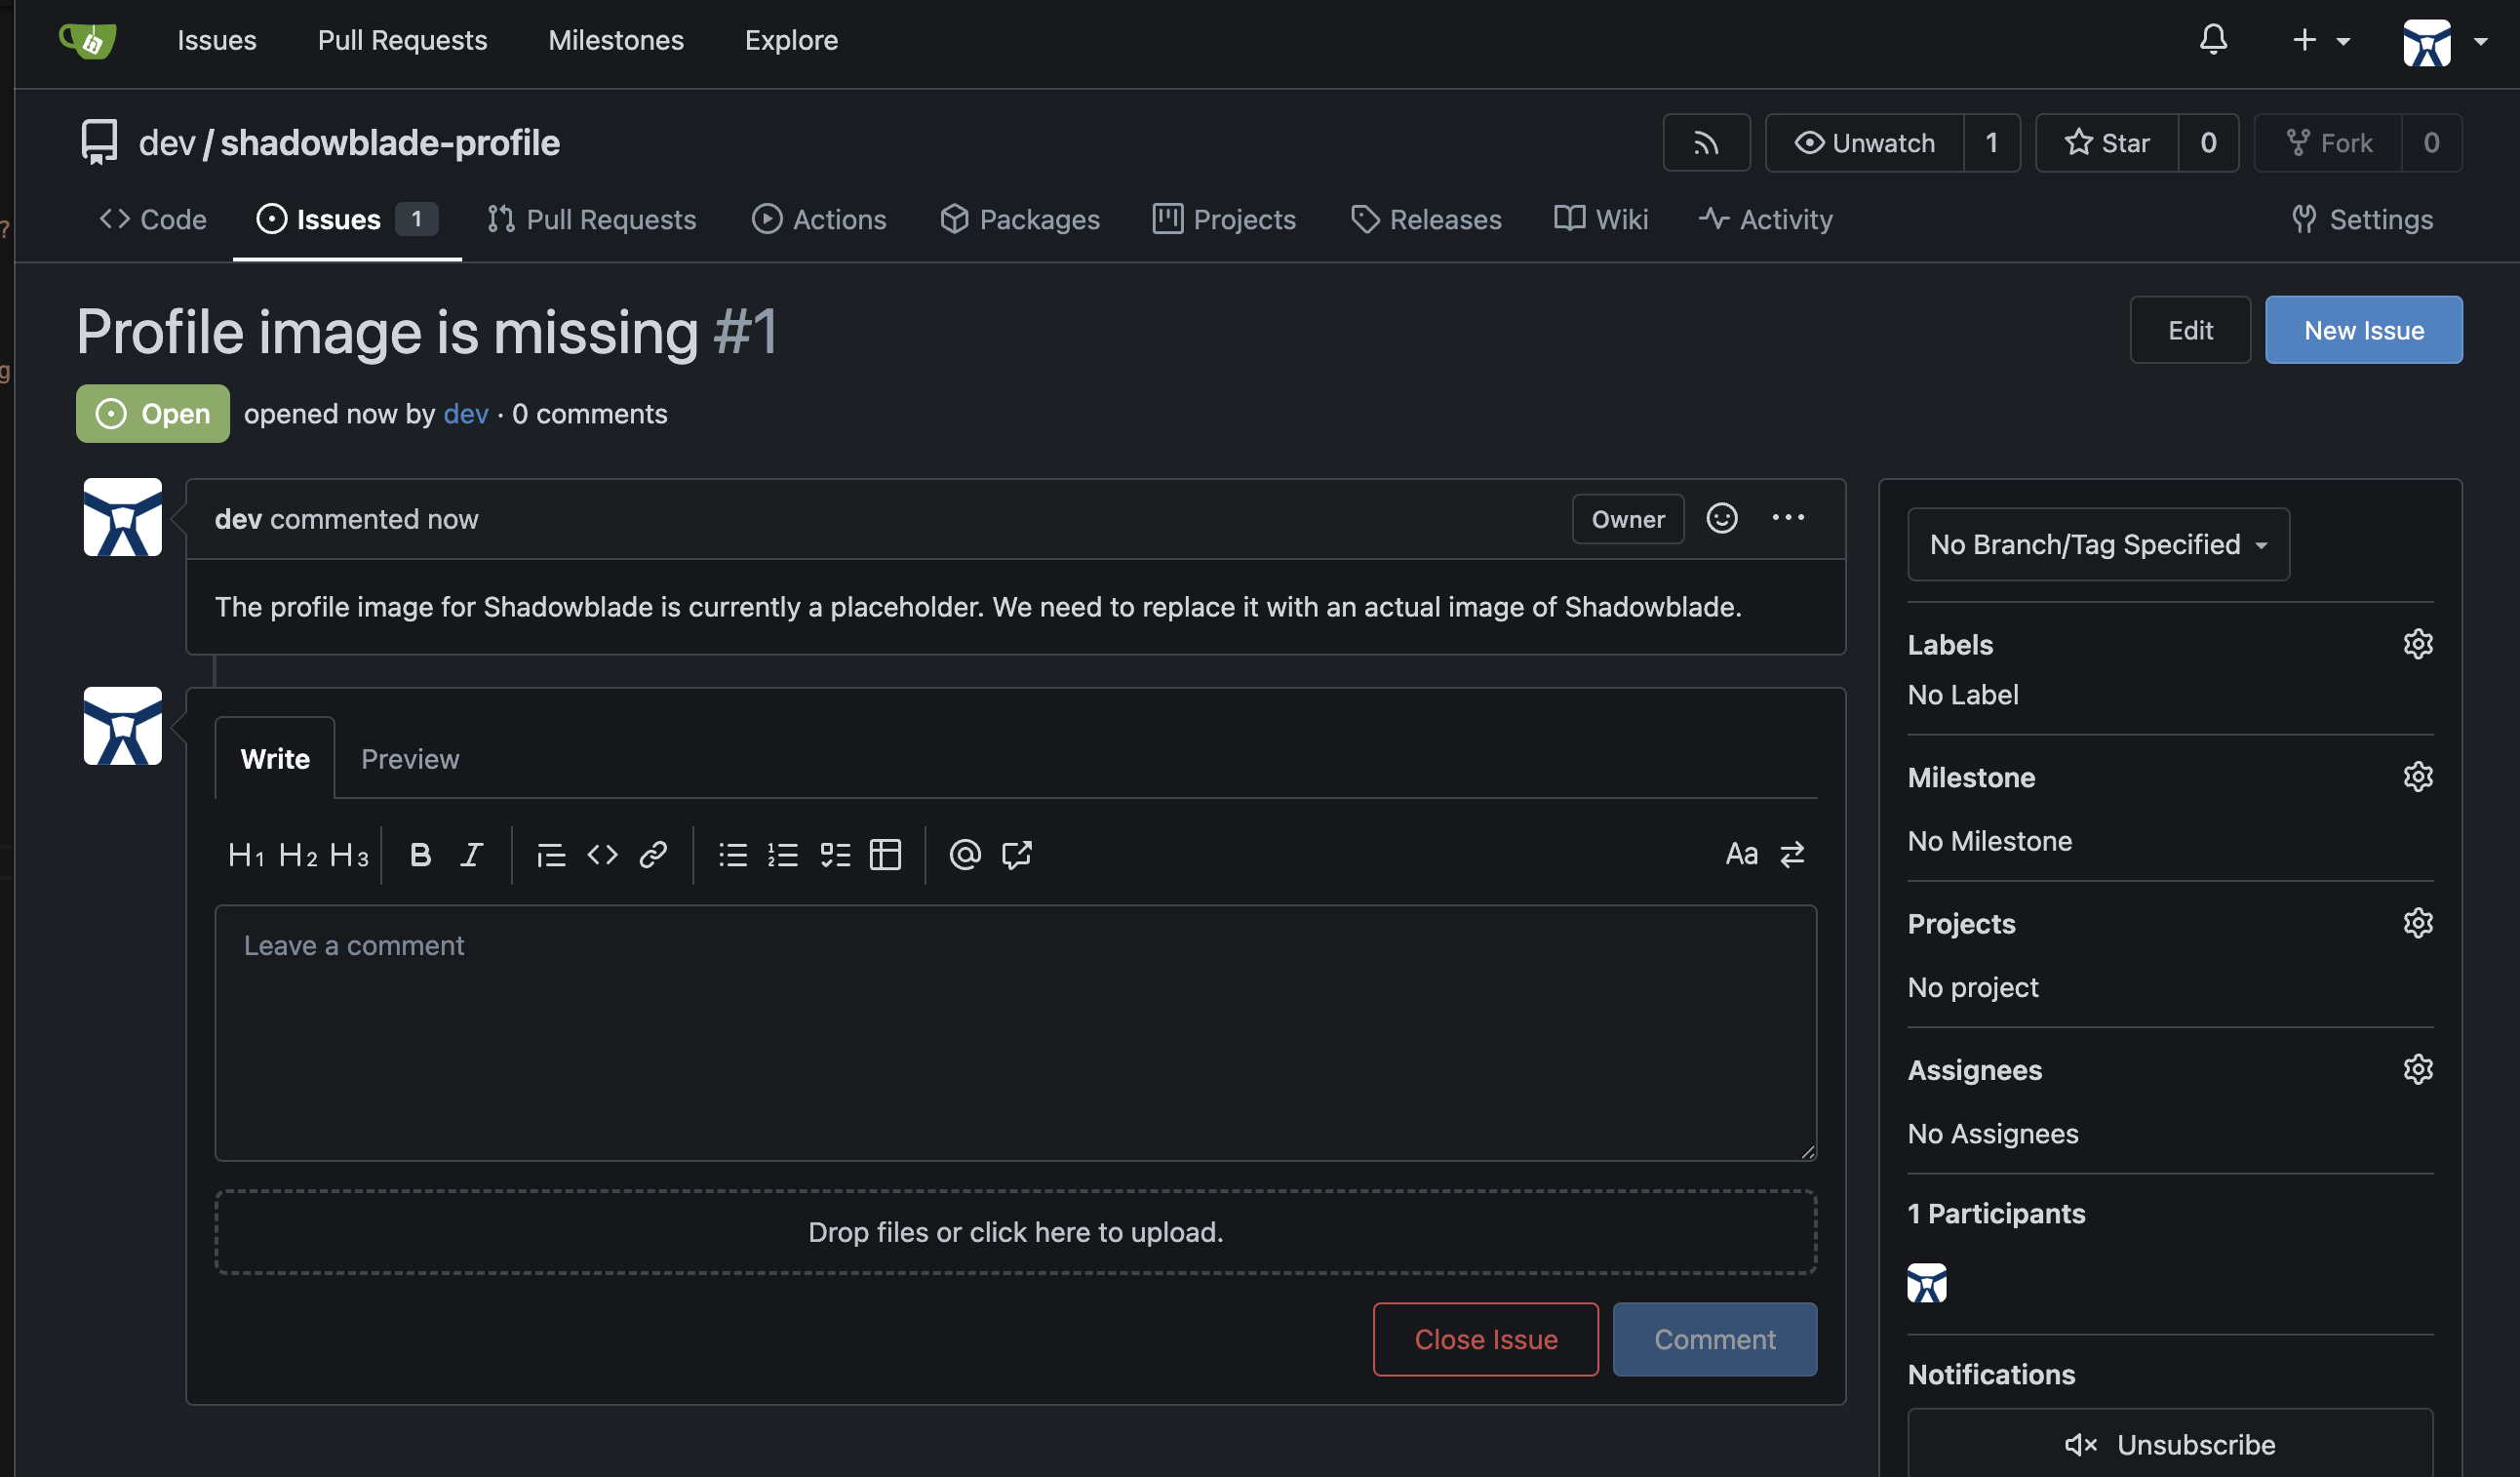
برای جعل نشان گمشده، باید نوع متفاوتی از قدرت را احضار کنید - یک روح آفرینش که قادر به تولید تصاویر از فکر ناب است. در بخش گیتیا، شما به صورت دستی رونهای پیکربندی را ویرایش کردید تا تیغه خود را با یک سرور MCP هماهنگ کنید - رویکرد "خام". اکنون تکنیک مدرن را یاد خواهید گرفت: افزونههای Gemini CLI .
یک افزونه، یک طلسم از پیش ساخته شده است که سرورهای MCP، دستورات سفارشی، متن و تنظیمات را در یک واحد قابل نصب بستهبندی میکند. یک طلسم جایگزین دهها خط پیکربندی دستی میشود.
👉💻 برای خروج از رابط خط فرمان Gemini، دو بار Ctrl+C را فشار دهید.
قبل از احضار روح آفرینش، ابتدا باید قدرت آن را در قلمرو خود آزاد کنید. افزونه نانو موز از رابط برنامهنویسی کاربردی زبان مولد (Generative Language API) استفاده میکند - دروازهای جدا از سرویسهای هوش مصنوعی ورتکس که قبلاً استفاده میکردید. شما باید این دروازه را فعال کنید و یک کلید منحصر به فرد برای اعطای دسترسی به روح بسازید.
👉💻 در ترمینال خود، API را فعال کنید:
gcloud services enable generativelanguage.googleapis.com
👉💻 حالا، یک کلید API بسازید - توکن دسترسی شخصی روح:
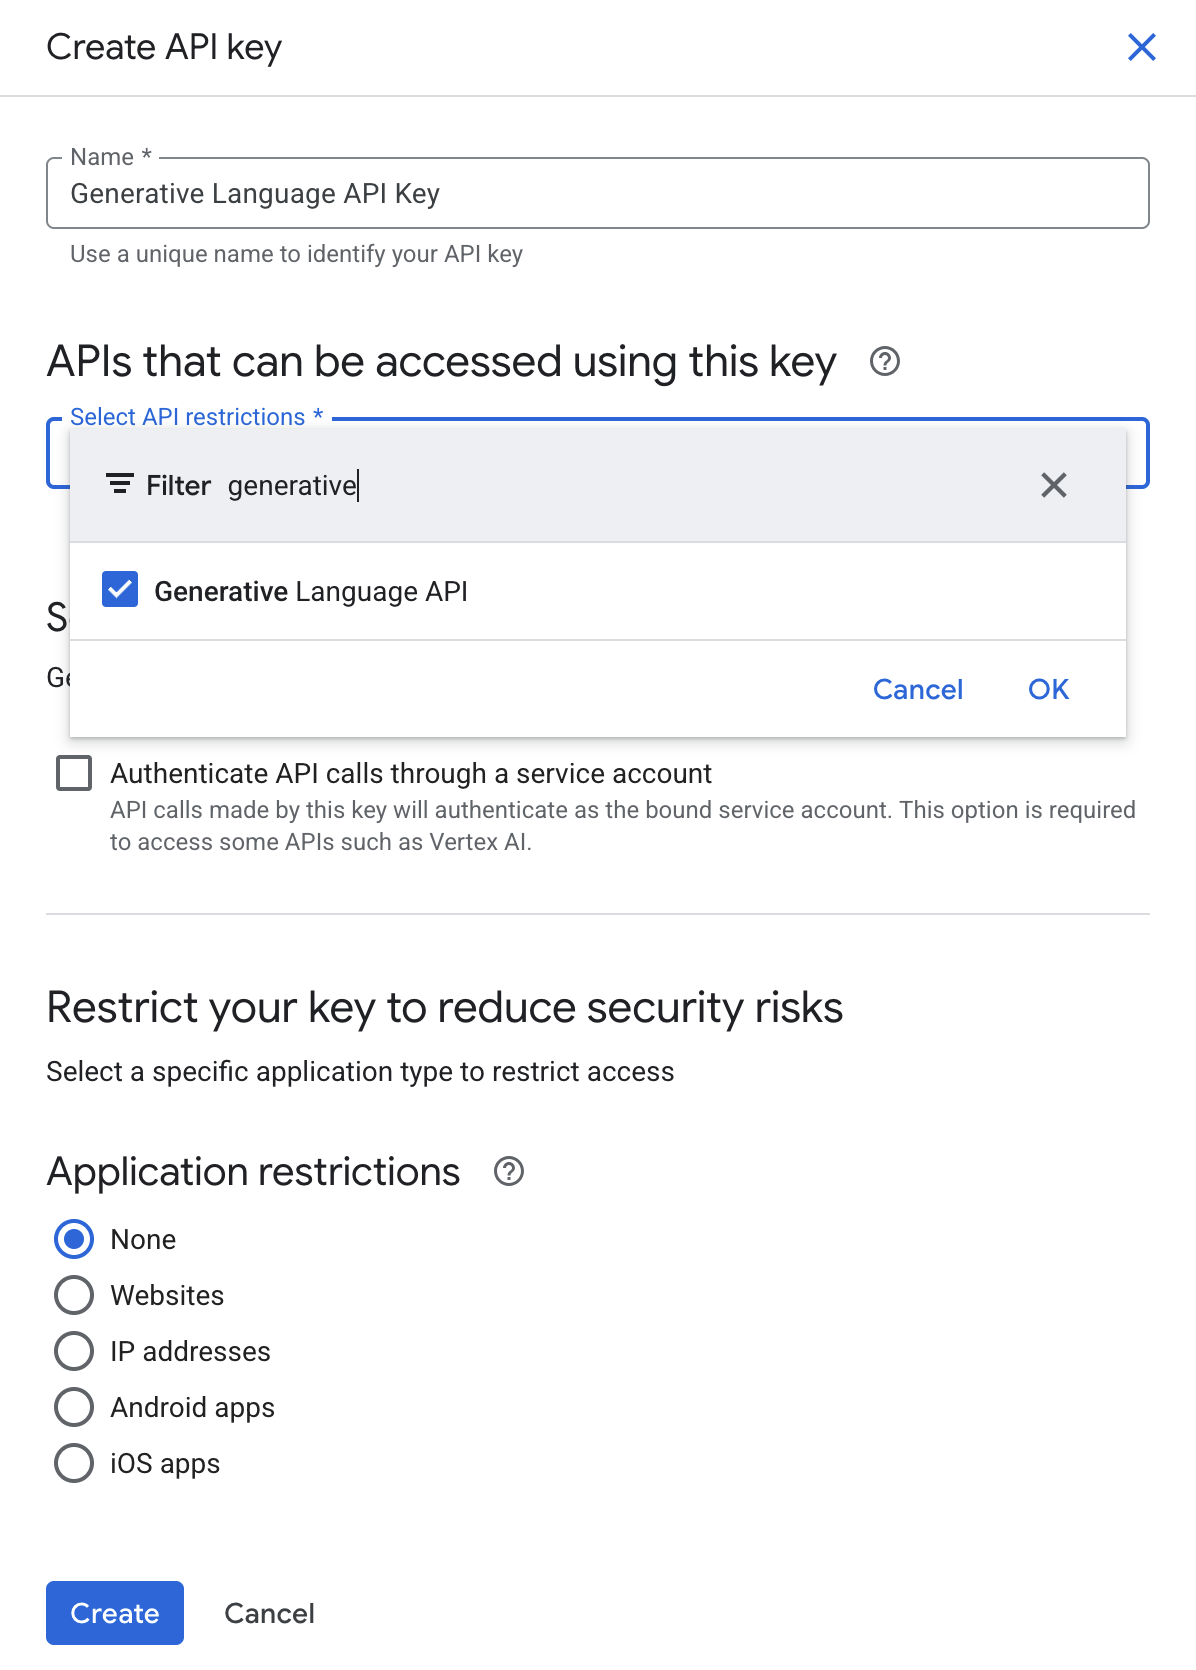
- به صفحه اعتبارنامههای کنسول گوگل کلود بروید.
- روی +CREATE CREDENTIALS در بالا کلیک کنید و API key را انتخاب کنید.
- نام کلید API را چیزی قابل توجه مانند Geneative Language API Key انتخاب کنید.
- در منوی کشویی محدودیتهای API، گزینه Generate Language API را انتخاب کنید.
- کلید را ایجاد و کپی کنید - در مرحله بعدی به آن نیاز خواهید داشت.
👉💻 افزونهی Nano Banana را نصب کنید - یک روح آفرینش که توسط مدلهای تخصصی تبدیل متن به تصویر Gemini گوگل پشتیبانی میشود. در ترمینال خود، دستور زیر را اجرا کنید:
gemini extensions install https://github.com/gemini-cli-extensions/nanobanana
وقتی از شما کلید API خواسته شد، کلیدی که ایجاد کردهاید را جایگذاری کنید و Enter را بزنید.
👉💻 یک تنظیم نهایی لازم است. محیط Cloud Shell به طور پیشفرض تمام درخواستهای هوش مصنوعی را از طریق Vertex AI هدایت میکند، اما روح آفرینش از طریق یک دروازه متفاوت صحبت میکند. برای پیکربندی صحیح پورتال افزونه، این دستور را اجرا کنید:
NANO_CONFIG=$(find ~/.gemini/extensions -name "gemini-extension.json" -path "*nanobanana*" 2>/dev/null | head -1) && \
jq '.mcpServers.nanobanana.env.GOOGLE_GENAI_USE_VERTEXAI = ""' "$NANO_CONFIG" > /tmp/nb_tmp.json && \
mv /tmp/nb_tmp.json "$NANO_CONFIG"
همین یک دستور همه کارها را انجام داده است: دانلود سرور MCP، ثبت ابزارهای آن و نصب دستورات اسلش سفارشی - همه اینها بدون اینکه شما به settings.json دست بزنید.
👀 یادداشت توسعهدهنده: افزونهها در مقابل سرورهای خام MCP این را با تنظیمات Gitea مقایسه کنید. در آنجا، شما به صورت دستی یک دستور jq را برای تزریق URL سرور MCP به settings.json اجرا کردید. این رویکرد "خام" برای درک مکانیک ارزشمند است، اما برای اکثر کاربردهای دنیای واقعی، افزونهها ترجیح داده میشوند. آنها سرور MCP، دستورات سفارشی (مانند /generate ، /edit ، /story )، پیکربندی محیط و حتی دستورالعملهای متنی (از طریق یک GEMINI.md همراه) را در یک بسته واحد و قابل اشتراکگذاری قرار میدهند. یک اکوسیستم کامل از افزونهها در Gemini CLI Extension Gallery وجود دارد.
👉💻 دوباره وارد رابط خط فرمان Gemini شوید و تأیید کنید که افزونه فعال است:
clear
cd ~/agentverse-developer/tabletop/
gemini
👉✨ تأیید کنید که افزونه تنظیم شده است:
/extensions list
اکنون باید nanobanana به همراه ابزارها و دستورات آن مشاهده کنید.
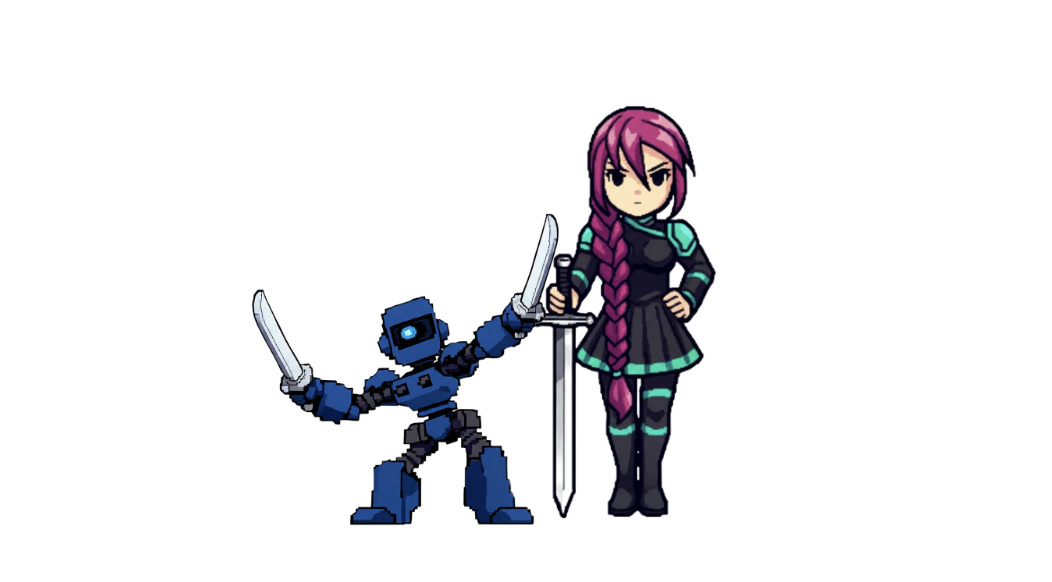
👉✨ با یک دستور قدرتمند و واحد، به افزونه نانو موز دستور دهید تا نشان شما را جعل کند. در رابط خط فرمان Gemini خود، دستور زیر را صادر کنید:
/generate a portrait of a shadowblade, pixel art style. A determined warrior with long, braided magenta hair, wearing black and teal armor and confidently holding a silver broadsword.
👉✨ روح تصویر را تولید کرده و آن را مستقیماً در فضای کاری محلی شما قرار میدهد. حالا، به تیغه دستور دهید تا از این نشان جدید ساخته شده استفاده کند. (ممکن است GEMINI قبلاً این کار را برای شما انجام داده باشد! پاسخ قبلی را بررسی کنید، ممکن است به اندازه کافی هوشمند باشد که قبل از درخواست شما این کار را انجام دهد!!!!)
Modify the index.html file to add my profile picture. Use the image I just generated.
👉💻 در یک ترمینال جدید، سرور http را اجرا کنید.
cd ~/agentverse-developer/tabletop/
python -m http.server
👀 برای مشاهدهی کار خود، روی آیکون پیشنمایش وب در نوار ابزار Cloud Shell کلیک کنید. گزینهی Change port را انتخاب کنید، آن را روی ۸۰۰۰ تنظیم کنید و روی Change and Preview کلیک کنید. پیشنمایشی از وبسایت شما ظاهر خواهد شد. 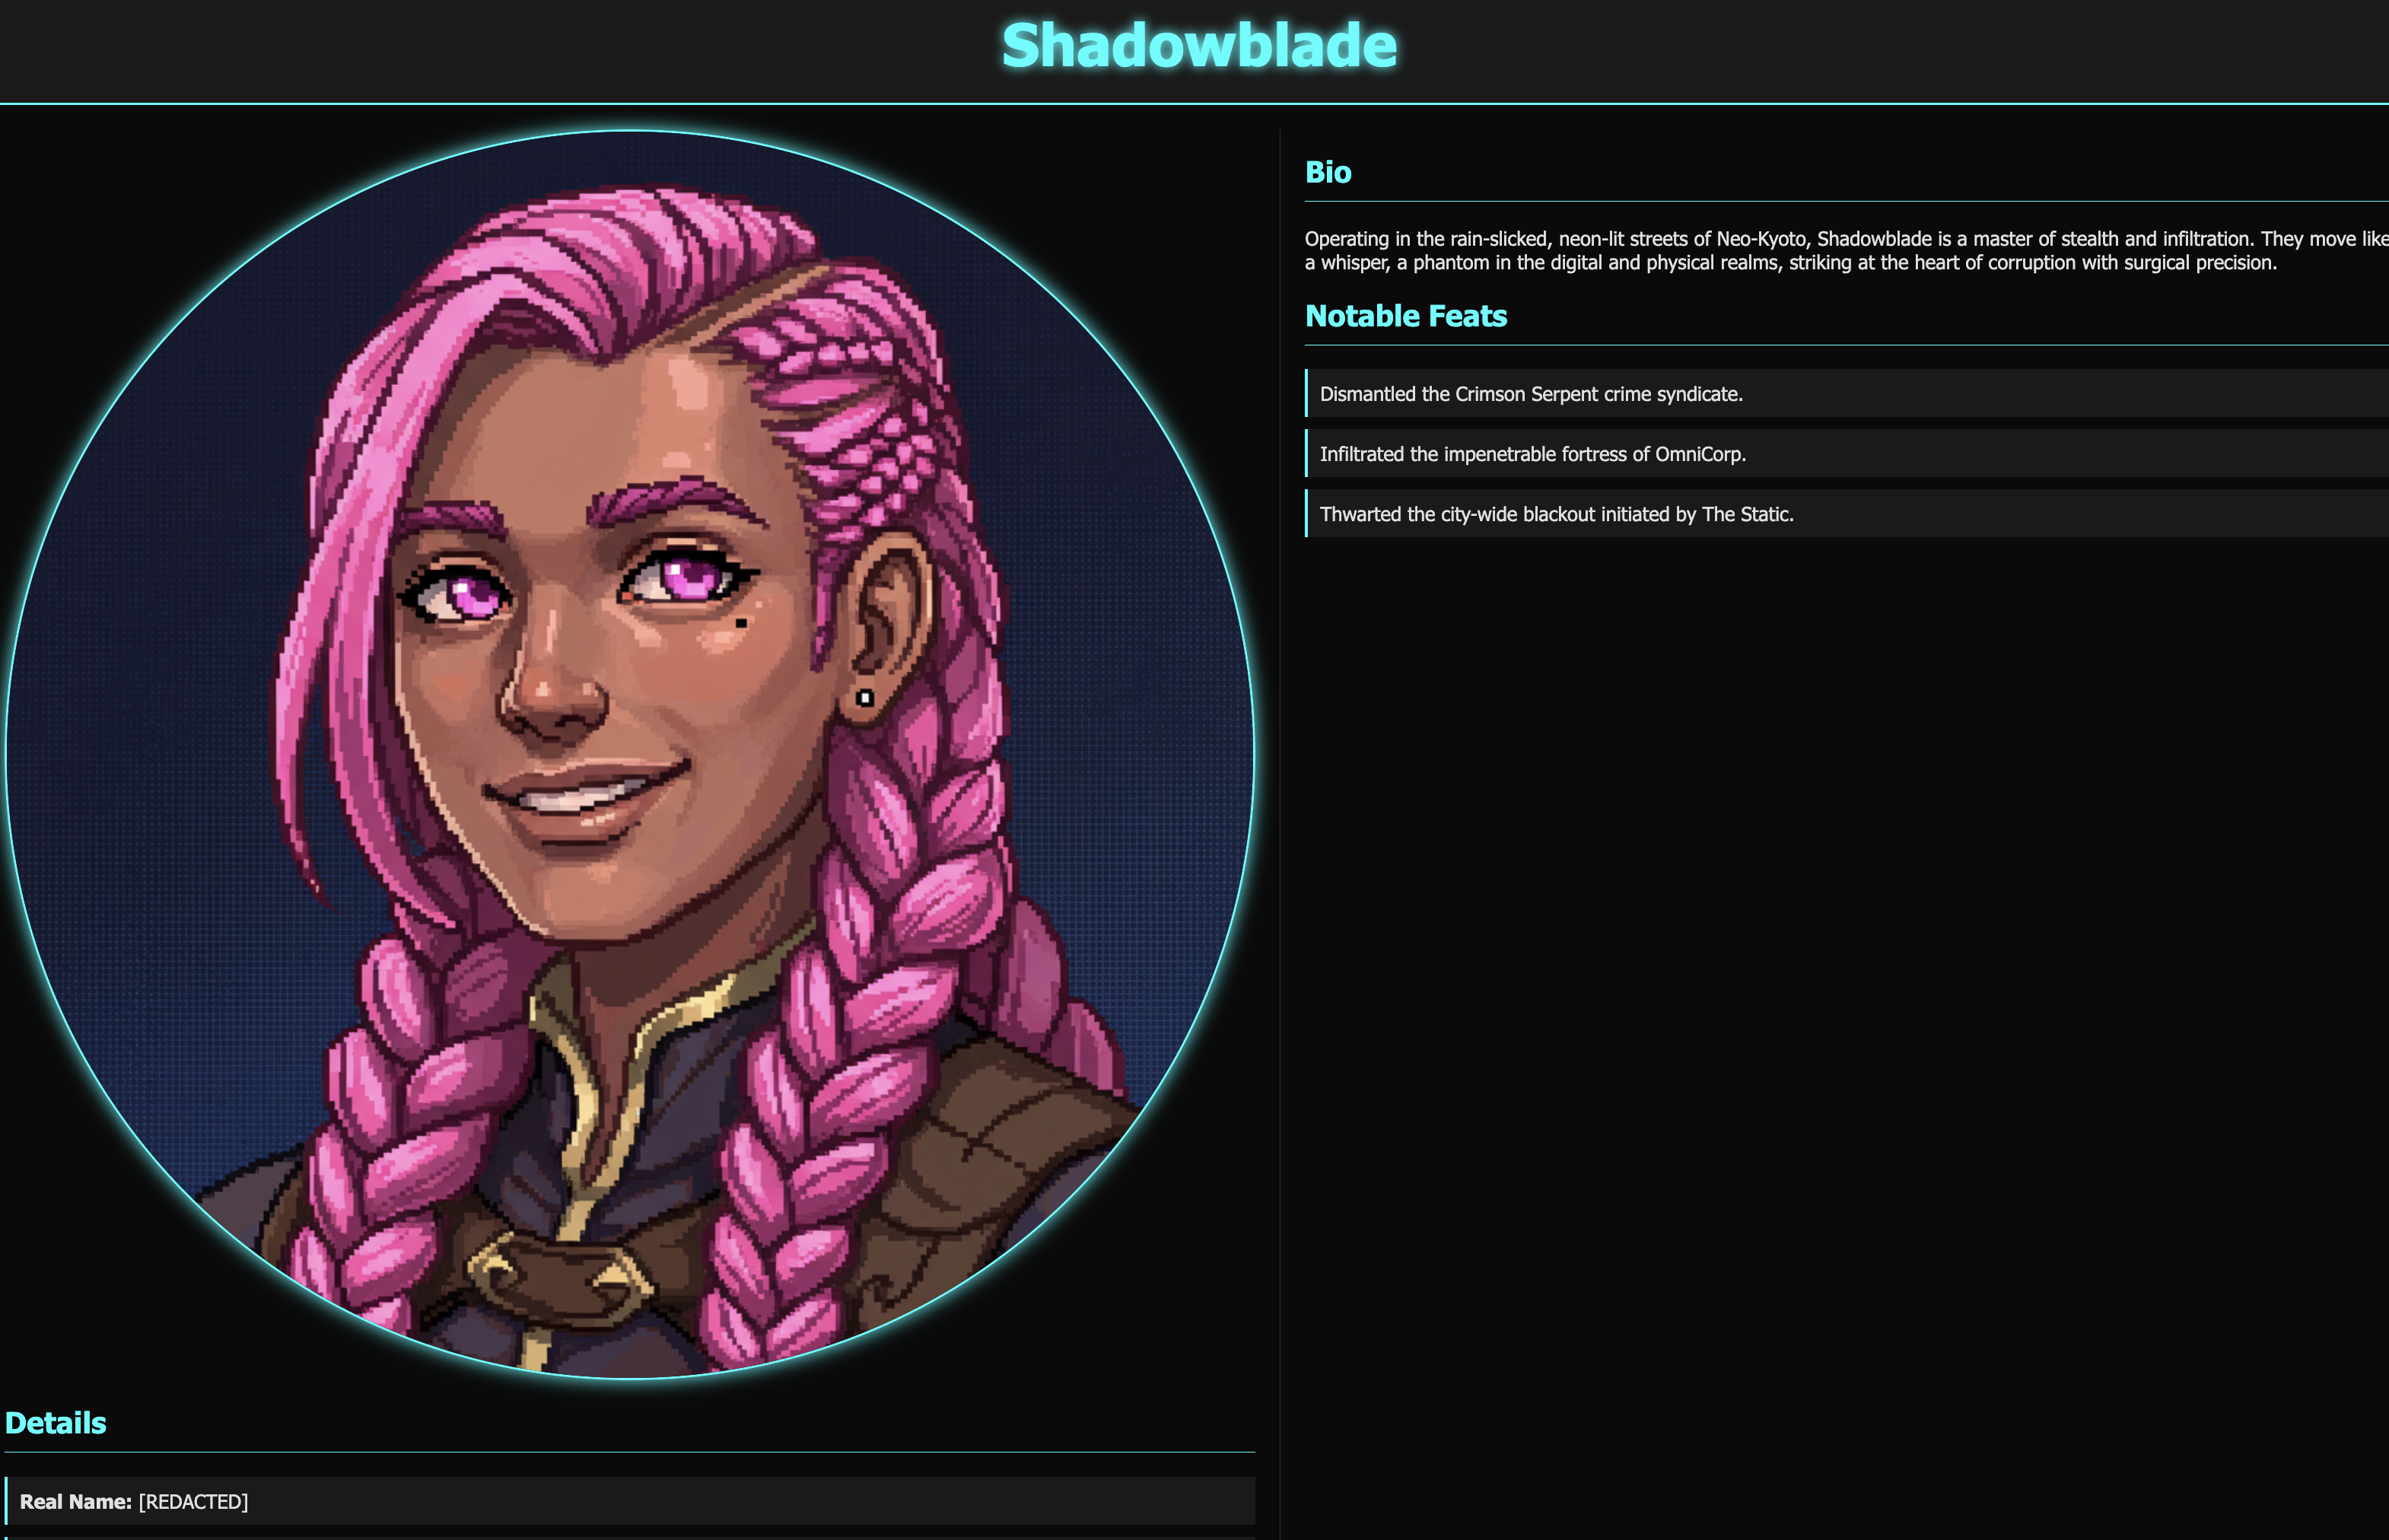
👉✨ به ترمینال برگردید و Gemini CLI را اجرا کنید، اصلاحیه را کامیت کنید، تکمیل وظیفه را یادداشت کنید و مشکلی را که در سوابق زرادخانه ثبت کردهاید، ببندید.
Push the changed index.html file to the 'shadowblade-profile' repository using the gitea tool. Make sure you add 'Fix #1' in the commit comment. Also, close issue #1.Use the Gitea Tool and use user account "dev"
👉💻 برای خروج از رابط خط فرمان Gemini، دو بار Ctrl+C را فشار دهید.
👀 برای مشاهدهی کار خود، روی آیکون پیشنمایش وب در نوار ابزار Cloud Shell کلیک کنید. گزینهی Change port را انتخاب کنید، آن را روی ۳۰۰۵ تنظیم کنید و روی Change and Preview کلیک کنید. پیشنمایشی از وبسایت شما ظاهر خواهد شد. 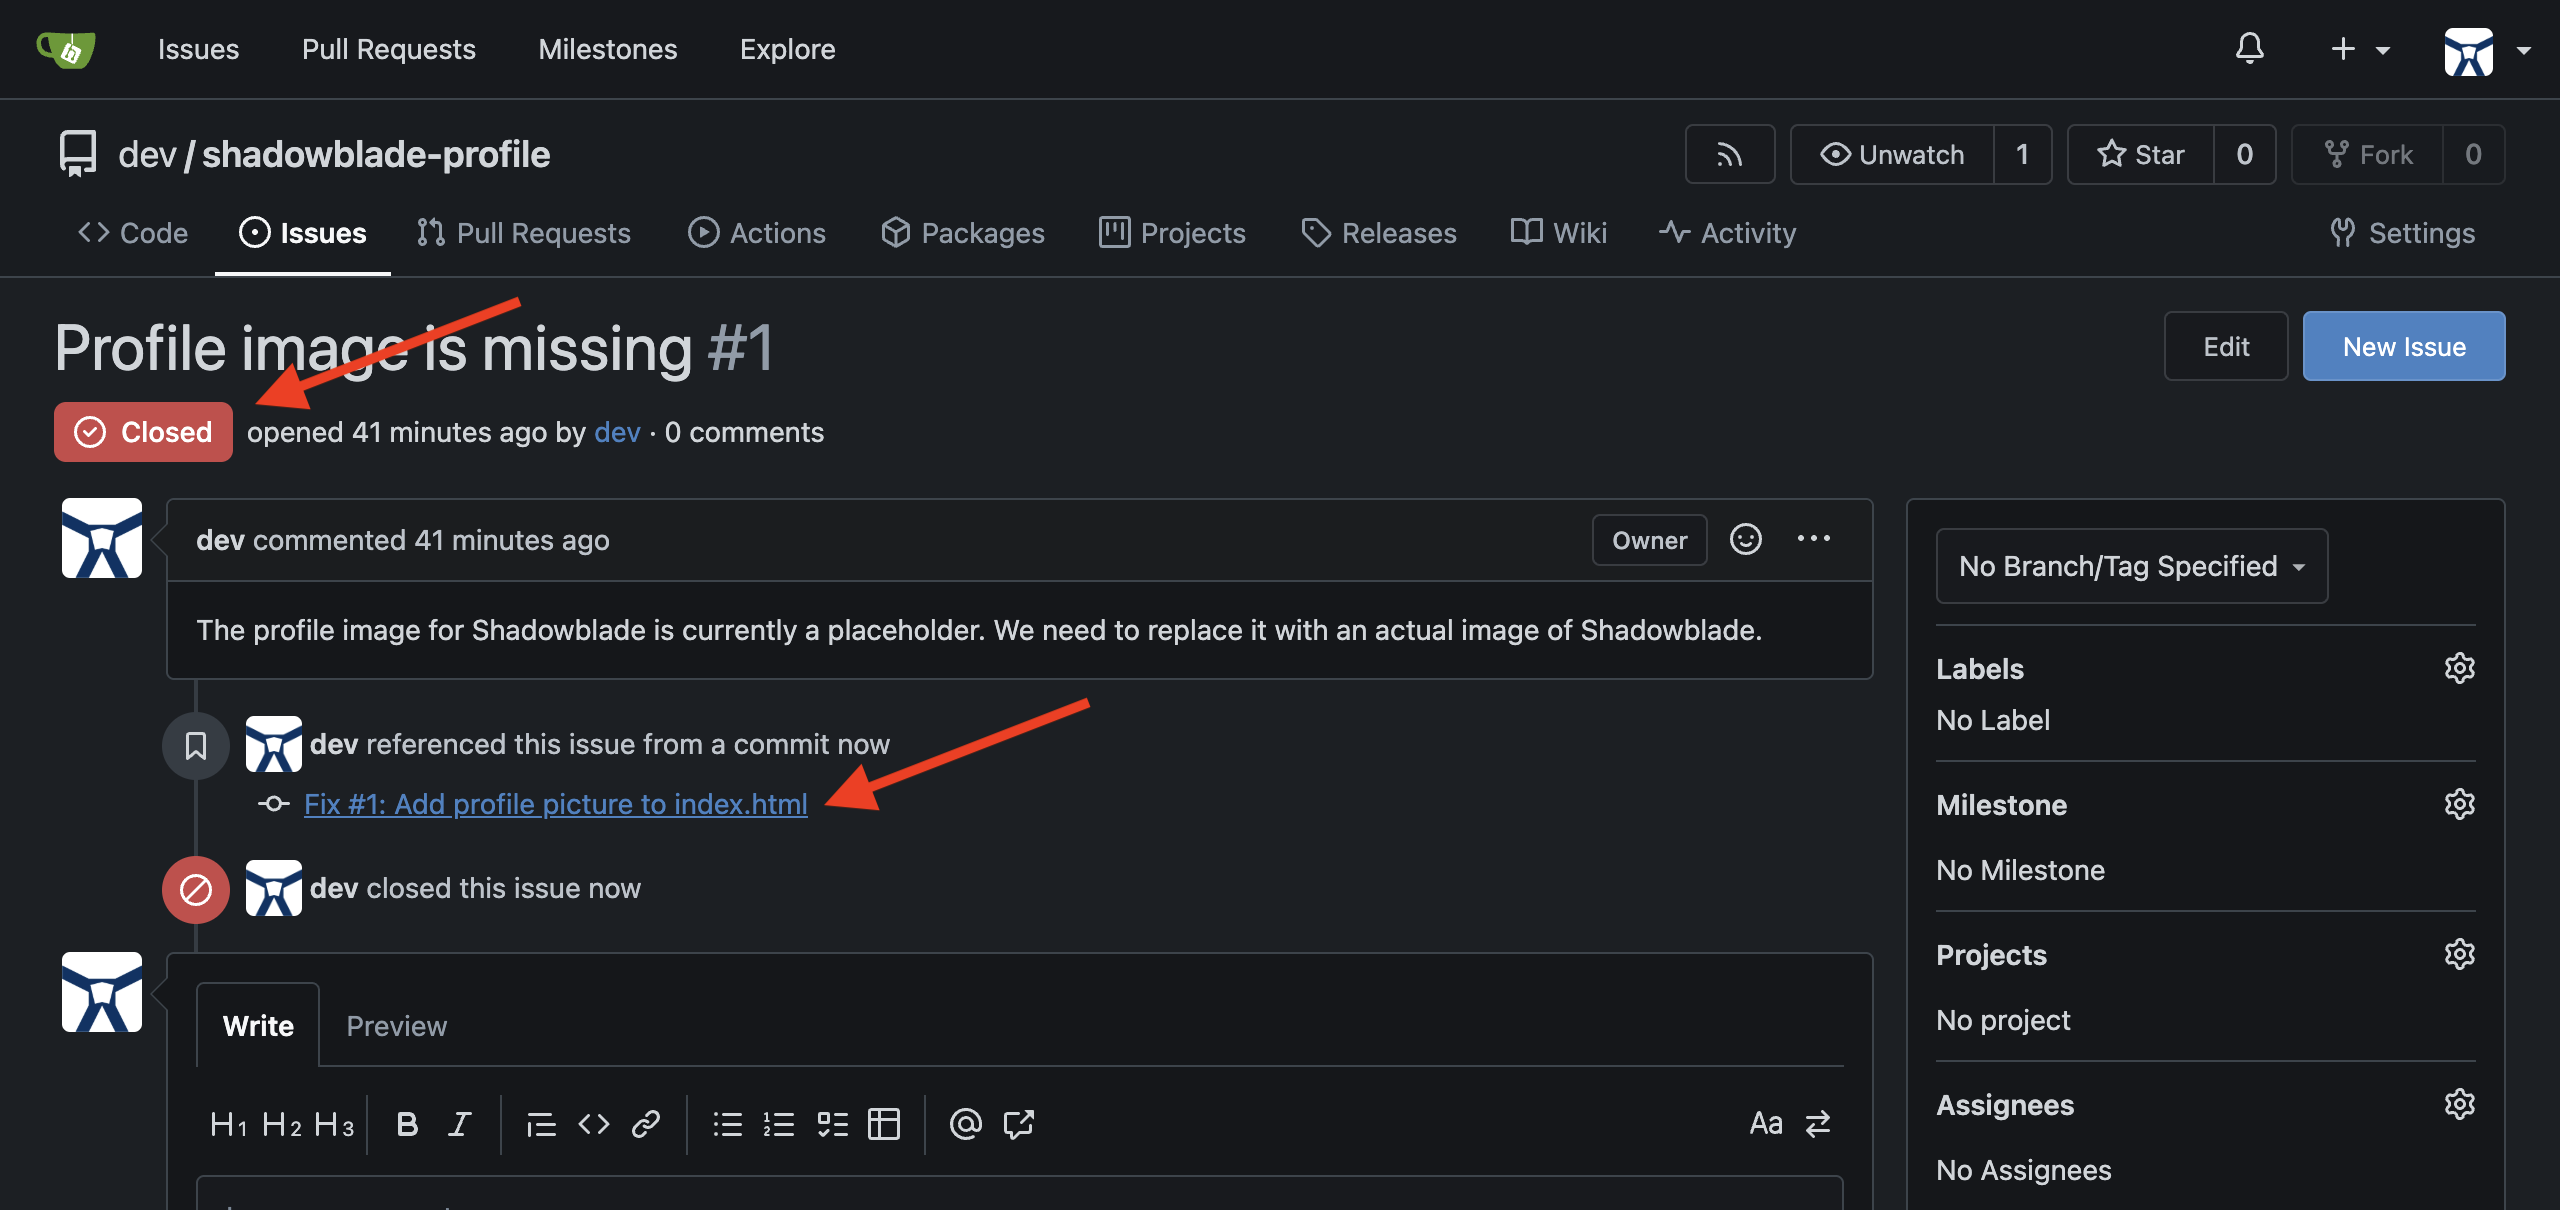
👉💻 در ترمینالی که سرور http در حال اجرا است، Ctrl+C را برای خروج از سرور http فشار دهید.
برای غیر گیمرها
۶. مونتاژ مامور Shadowblade: کد Vibe با Guardrails
زمان تمرینهای عملی به پایان رسیده است. طنین فولاد بر سنگ محو میشود. شما سلاح اصلی خود را به کار گرفتهاید و زرادخانه خود را برای جنگ آماده کردهاید. اکنون، شما آزمایش واقعی یک Shadowblade را انجام خواهید داد: مونتاژ خودِ عامل. این هنر دمیدن روح به منطق است، با استفاده از یک طرح مقدس از Codex برای ساختن هوش اصلی یک عامل - ایجاد یک کاربر هوشمند برای تیغههای موجود در زرادخانه شما که میتواند به تنهایی فکر کند، استدلال کند و عمل کند.
اولین ماموریت شما این است که وارد یک کارگاه موجود - یک پایگاه کد از پیش ساخته شده - شوید و از اجزای آن، قهرمان خود را بسازید.
آیین مجلس
قبل از اولین جرقه کوره، یک تکنسین ارشد کارگاه خود را بررسی میکند و تک تک ابزارها و طرحها را میفهمد. وقتی وارد یک میدان نبرد ناآشنا مانند یک پایگاه کد بزرگ و موجود میشوید، اولویت اول شما شناسایی است. شما باید نقشه زمین - معماری موجود، اهداف نهایی و پروتکلهای درگیری - را درک کنید. تنها با آشنایی با نقشههای قلعه و استانداردهای آن میتوانید مهارت خود را به طور مؤثر به کار بگیرید.
رابط خط فرمان Gemini شما، دیدهبان همیشگی شما، میتواند در این شناسایی به شما کمک کند:
- ارائه خلاصههای سطح بالا: میتواند کل کدکس (یا پایگاه کد) را بخواند و درک سریعی از هدف و اجزای کلیدی آن به شما ارائه دهد.
- کمک در راهاندازی محیط: میتواند شما را در مراحل پیچیده نصب ابزارها و پیکربندی دستگاهتان راهنمایی کند.
- پیمایش پایگاههای کد: میتواند به عنوان راهنمای شما عمل کند و به شما کمک کند منطق پیچیده را بررسی کرده و بخشهای پنهان درون کد را پیدا کنید.
- ایجاد اسناد معارفه: میتواند طومارهای سفارشی ایجاد کند که اهداف، نقشها و منابع را برای متحدان جدیدی که به هدف شما میپیوندند، روشن کند.
- خودکارسازی یادگیری و پرسش و پاسخ: این ابزار به محقق شخصی شما تبدیل میشود و به سوالات مربوط به ویژگیها یا رفتار کد پاسخ میدهد و به شما امکان میدهد با استقلال بیشتری مبارزه کنید.
👉💻 در اولین ترمینال خود، به دایرکتوری shadowblade بروید و همکار هوش مصنوعی خود را احضار کنید:
. ~/agentverse-developer/set_env.sh
cd ~/agentverse-developer/shadowblade
clear
gemini
👉✨ حالا، به دیدهبان خود دستور دهید تا میدان نبرد را بررسی کرده و گزارش دهد.
Analyze the entire project and provide a high-level summary.
با نقشهبرداری از زمین موجود، اکنون باید به طرح اولیهی آنچه که قرار است بسازید، مراجعه کنید. قدرتمندترین عوامل، بداهه ساخته نمیشوند، بلکه از یک طراحی دقیق ساخته میشوند.
یادداشت توسعهدهنده: این سند طراحی به عنوان طرح اولیه معتبر برای پروژه عمل میکند. هدف آن، اعمال شفافیت در اهداف و پیادهسازی فنی قبل از هرگونه تلاش قابل توجه برای توسعه است. یک طرح به خوبی تعریف شده، هماهنگی همه توسعهدهندگان را تضمین میکند، خطر دوبارهکاری را کاهش میدهد و به جلوگیری از بدهی فنی و خزش دامنه کمک میکند. این ابزار اصلی برای حفظ سرعت پروژه و کیفیت کد است، به خصوص با رشد تیم یا ورود اعضای جدید.
A critical goal of this document is to define not just the "happy path" but also the edge cases and failure modes, especially when using LLMs. In my experience, LLMs are excellent at generating optimistic code where all inputs are valid and all external calls succeed. To build robust, production-ready software, we must explicitly guide the AI by defining contingencies for scenarios like:
- Invalid or malformed arguments passed to a function.
- API call failures, network timeouts, or unexpected error codes from external services.
- Handling of null or empty data structures where data is expected.
- Race conditions or concurrency issues.
By specifying the expected behavior for these cases in the design, we instruct the LLM to generate more resilient code, significantly reducing the time spent on manual refactoring and bug fixing.
👉✨ Ask Gemini to retrieve this sacred blueprint for you.
download https://raw.githubusercontent.com/weimeilin79/agentverse/main/developer/shadowblade/agent_design.md, store it as an agent_design.md file in my local folder, and show me the newly downloaded design doc. Do not attempt to create the file just yet.
👉✨ The scroll is long and detailed. Command Gemini to distill its essence.
Summarize the newly downloaded @agent_design.md for me, do not attempt to create file just yet.
Now you have the plan. But before a single line of code is forged, a master artisan establishes the laws of the forge. This is about discipline and scalability . These are the Coding Guidelines . They are not mere suggestions; they are runes of power that ensure every component is built with the same precision and strength. They prevent the chaos of individual style from corrupting the final creation, ensuring the agent is resilient, maintainable, and pure, allowing new artisans to join the project without disrupting the harmony of the whole.
To inscribe these laws directly into the consciousness of our AI partner, we use a special artifact: the GEMINI.md file. When the Gemini CLI is summoned, it automatically searches for this file and loads its contents into the AI's working memory. It becomes a persistent, project-level instruction. It acts as a talisman that constantly whispers the rules of the forge to the AI.
Let's inscribe these runes now.
👉💻 Exit Gemini for a moment by pressing Ctrl+C twice.
👉💻 In your terminal, run the following command to write the guideline file.
cat << 'EOF' > GEMINI.md
  ### **Coding Guidelines**
  **1. Python Best Practices:**

  *   **Type Hinting:** All function and method signatures should include type hints for arguments and return values.
  *   **Docstrings:** Every module, class, and function should have a docstring explaining its purpose, arguments, and return value, following a consistent format like reStructuredText or
  Google Style.
  *   **Linter & Formatter:** Use a linter like `ruff` or `pylint` and a code formatter like `black` to enforce a consistent style and catch potential errors.
  *   **Imports:** Organize imports into three groups: standard library, third-party libraries, and local application imports. Sort them alphabetically within each group.
  *   **Naming Conventions:**
      *   `snake_case` for variables, functions, and methods.
      *   `PascalCase` for classes.
      *   `UPPER_SNAKE_CASE` for constants.
  *   **Dependency Management:** All Python dependencies must be listed in a `requirements.txt` file.

  **2. Web APIs (FastAPI):**

  *   **Data Validation:** Use `pydantic` models for request and response data validation.
  *   **Dependency Injection:** Utilize FastAPI's dependency injection system for managing resources like database connections.
  *   **Error Handling:** Implement centralized error handling using middleware or exception handlers.
  *   **Asynchronous Code:** Use `async` and `await` for I/O-bound operations to improve performance.
EOF
cat GEMINI.md
With the laws inscribed, let's re-summon our AI partner and witness the magic of the artifact.
👉💻 Relaunch the Gemini CLI from the shadowblade directory:
. ~/agentverse-developer/set_env.sh
cd ~/agentverse-developer/shadowblade
clear
gemini
👉✨ Now, ask Gemini to show you what it's thinking about. The runes have been read.
/memory show
Equipping Specialized Expertise: Agent Skills
The GEMINI.md runes you inscribed are like a permanent enchantment — always active, always guiding your blade. But a true master doesn't carry every scroll into every battle. Some expertise is too specialized, too heavy, to keep loaded at all times. This is where Agent Skills come in.
Think of an Agent Skill as a sealed scroll in your pack. It contains specialized expertise — detailed instructions, scripts, even reference data — but it remains dormant until the moment you need it. Only when you face a challenge that matches the scroll's domain does your blade draw it forth and absorb its knowledge. This is called progressive disclosure : it keeps your blade swift and unburdened, activating specialized powers only on demand.
👀 Developer's Note: Agent Skills are the third layer of Gemini CLI's context engineering hierarchy:
- User Settings (
~/.gemini/settings.json) — Global configuration - GEMINI.md — Persistent project-level context (always loaded)
- Agent Skills (
.gemini/skills/) — On-demand expertise (loaded when needed)
This progressive disclosure model is critical for enterprise use: a repository could contain dozens of specialized skills (security auditing, database migration, compliance checks), but the AI only activates the ones relevant to the current task, conserving precious context tokens.
Let's forge your first skill — a scroll of ADK expertise that your blade can draw upon when building agents.
👉💻 Press Ctrl+C twice to exit the Gemini CLI. Then, create the skills directory and inscribe the scroll:
mkdir -p ~/.gemini/skills/adk-agent-design
cat << 'EOF' > ~/.gemini/skills/adk-agent-design/SKILL.md
---
name: adk-agent-design
description: Expert guidance for designing and building agents with the Google Agent Development Kit (ADK). Activate when the user asks about agent architecture, tool design, callback patterns, or ADK best practices.
---

# ADK Agent Design Expertise

When designing an ADK agent, follow these principles:

## Agent Architecture
- Define agents using `LlmAgent` with a clear `name`, `model`, `instruction`, and `tools` list.
- Keep instructions specific and action-oriented. Tell the agent what it IS, not what it should try to be.
- Use `before_model_callback` and `after_model_callback` for guardrails and validation.

## Tool Design
- Each tool should do ONE thing well. Prefer small, focused tools over large, multi-purpose ones.
- Always include descriptive docstrings — the LLM uses these to decide when to call each tool.
- Return structured data (dicts) from tools so the LLM can reason about the results.

## Testing Strategy
- Use `adk eval` with evalset JSON files for broad strategy testing.
- Use `pytest` with `AgentEvaluator` for programmatic, CI-ready tests.
- Define both `tool_trajectory_avg_score` and `response_match_score` criteria.
EOF
👉💻 Re-enter the Gemini CLI to see the newly forged skill:
cd ~/agentverse-developer/shadowblade
gemini
👉✨ Verify the skill is in your pack:
/skills list
You should see adk-agent-design listed — a sealed scroll, dormant and waiting.
👉✨ Now ask Gemini something that should activate the skill:
What are the best practices for designing tools in an ADK agent?
Notice how the response is now informed by the specialized knowledge you inscribed in the skill. The blade didn't carry this expertise in its base memory — it discovered the relevant scroll and drew it forth only when the question matched. This is progressive disclosure in action.
Skills can be crafted for any domain — security auditing, database migration, compliance checks — and shared across your team by committing them to version control. Each team member's blade gains the same expertise, consistently applied.
This is the pivotal moment. You will provide the schematic (agent_design.md) and the laws of the forge (GEMINI.md), and issue the great spell of creation.
👉✨ This is the single, powerful command that will construct your agent. Issue it now:
You are an expert Python developer specializing in the Google Agent Development Kit (ADK). Your task is to write the complete, production-quality code for `agent.py` by following the technical specifications outlined in the provided design document verbatim.

Analyze the design document at `@agent_design.md` and generate the corresponding Python code for `@agent.py`.

Ensure the generated code is clean, matches the specifications exactly, and includes all specified imports, functions, and logic. Do not add any extra functions or logic not described in the document.

and you are currently already in the shadowblade working directory
👀 Gemini has now constructed the agent's core logic in agent.py . The core of this new file defines the agent's intelligence, connecting its reasoning model to a set of external tools:
PATH_TO_MCP_SERVER = "shadowblade/mcp_server.py"
.....
root_agent = LlmAgent(
    model="gemini-2.5-pro",
    name="shadowblade_combat_agent",
    instruction="""
      You are the Shadowblade, an elite combat agent operating on a digital battleground.
      Your primary objective is to execute combat commands with strategic precision, neutralizing targets as directed.
  ......
      5.  You will then report the outcome of the attack (damage, special effects, etc.) back to the commander in a clear, tactical summary.

      General Rules of Engagement:
      - If a command is ambiguous or a target is not specified, state that you require a clear target for engagement. Do not guess.
      - You MUST use ONLY the provided tools to perform actions. Do not invent weapons or outcomes. Stick to the mission parameters.
""",
    tools=[
        MCPToolset(
            connection_params=StdioServerParameters(
                command='python3',
                args=[PATH_TO_MCP_SERVER]
            )
        )
    ]
)
The tools parameter. The agent is designed to use a MCPToolset that connects to an external arsenal defined in mcp_server.py .
👀 Head over to ~/agentverse-developer/shadowblade/mcp_server.py in the editor and take a moment to understand what it does. It's the source of all the weapons available to Shadowblade. Currently, the armory is quite bare.
👉✨ Let's command Gemini to forge seven new weapons for the arsenal. Issue the following prompt in the Gemini CLI:
I need to add several new weapon tools to my `mcp_server.py` file. Please open @mcp_server.py and, following the exact same pattern as the existing `forge_broadsword()` function, create and add new `@mcp.tool()` decorated functions for each of the following weapons:

1.  **A 'Refactoring Sickle'**:
    -   **Function Name:** `hone_refactoring_sickle`
    -   **Docstring/Target:** "Effective against 'Elegant Sufficiency' weaknesses like 'The Weaver of Spaghetti Code'."
    -   **Weapon Name:** "Refactoring Sickle"
    -   **Damage Type:** "Cleansing"
    -   **Base Damage:** Random integer between 100 and 136
    -   **Critical Hit Chance:** Random float between 0.10 and 0.20
    -   **Special Effect:** "Pruning - improves code health and maintainability with each strike."

2.  **A 'Quickstart Crossbow'**:
    -   **Function Name:** `fire_quickstart_crossbow`
    -   **Docstring/Target:** "Effective against 'Confrontation with Inescapable Reality' weaknesses like 'Procrastination: The Timeless Slumber'."
    -   **Weapon Name:** "Quickstart Crossbow"
    -   **Damage Type:** "Initiative"
    -   **Base Damage:** Random integer between 105 and 120
    -   **Critical Hit Chance:** Random float between 0.9 and 1.0
    -   **Special Effect:** "Project Scaffolding - creates a `main.py`, `README.md`, and `requirements.txt`."

3.  **'The Gilded Gavel'**:
    -   **Function Name:** `strike_the_gilded_gavel`
    -   **Docstring/Target:** "Effective against 'Elegant Sufficiency' weaknesses like 'Perfectionism: The Gilded Cage'."
    -   **Weapon Name:** "The Gilded Gavel"
    -   **Damage Type:** "Finality"
    -   **Base Damage:** 120
    -   **Critical Hit Chance:** 1.0
    -   **Special Effect:** "Seal of Shipping - marks a feature as complete and ready for deployment."

4.  **'Daggers of Pair Programming'**:
    -   **Function Name:** `wield_daggers_of_pair_programming`
    -   **Docstring/Target:** "Effective against 'Unbroken Collaboration' weaknesses like 'Apathy: The Spectre of \"It Works on My Machine\"'."
    -   **Weapon Name:** "Daggers of Pair Programming"
    -   **Damage Type:** "Collaborative"
    -   **Base Damage:** Random integer between 110 and 125
    -   **Critical Hit Chance:** Random float between 0.30 and 0.50
    -   **Special Effect:** "Synergy - automatically resolves merge conflicts and shares knowledge."

5.  **A 'Granite Maul'**:
    -   **Function Name:** `craft_granite_maul`
    -   **Docstring/Target:** "Effective against 'Revolutionary Rewrite' weaknesses like 'Dogma: The Zealot of Stubborn Conventions'."
    -   **Weapon Name:** "Granite Maul"
    -   **Damage Type:** "Bludgeoning"
    -   **Base Damage:** Random integer between 115 and 125
    -   **Critical Hit Chance:** Random float between 0.05 and 0.15
    -   **Special Effect:** "Shatter - has a high chance to ignore the target's 'best practice' armor."

6.  **A 'Lens of Clarity'**:
    -   **Function Name:** `focus_lens_of_clarity`
    -   **Docstring/Target:** "Effective against 'Elegant Sufficiency' weaknesses by revealing the truth behind 'Obfuscation'."
    -   **Weapon Name:** "Lens of Clarity"
    -   **Damage Type:** "Revelation"
    -   **Base Damage:** Random integer between 120 and 130
    -   **Critical Hit Chance:** 1.0
    -   **Special Effect:** "Reveal Constants - highlights all magic numbers and suggests converting them to named constants."

7.  **The 'Codex of OpenAPI'**:
    -   **Function Name:** `scribe_with_codex_of_openapi`
    -   **Docstring/Target:** "Effective against 'Confrontation with Inescapable Reality' weaknesses like 'Hype: The Prophet of Alpha Versions'."
    -   **Weapon Name:** "Codex of OpenAPI"
    -   **Damage Type:** "Documentation"
    -   **Base Damage:** Random integer between 110 and 140
    -   **Critical Hit Chance:** Random float between 0.5 and 0.8
    -   **Special Effect:** "Clarity - makes an API discoverable and usable by other agents and teams."
👉 Once Gemini confirms the changes, open the mcp_server.py file. Scroll through the code and confirm that the seven new @mcp.tool() functions have been successfully added. Check the hone_refactoring_sickle function. Does it have the correct docstring and weapon statistics? Verifying the AI's work is a crucial habit of the master Shadowblade.
With the agent forged and refined, it is time for its awakening.
👉💻 Press Ctrl+C twice to exit the Gemini CLI
Developer's Note on Gemini's Output: Gemini's generated code can sometimes be unpredictable. While we strive for exact adherence to the design, it's normal in development sessions for developers to iterate and refine the code multiple times to reach a production-ready state.
👉💻 To ensure you have the correct and thoroughly tested production code in your working directory, please run the following commands in your terminal:
cp  ~/agentverse-developer/working_code/agent.py ~/agentverse-developer/shadowblade/agent.py
cp  ~/agentverse-developer/working_code/mcp_server.py ~/agentverse-developer/shadowblade/mcp_server.py
👉💻 In your terminal, begin the ritual to bring it online:
cd ~/agentverse-developer/
. ~/agentverse-developer/set_env.sh
python -m venv env
source env/bin/activate
pip install --upgrade pip
pip install -r shadowblade/requirements.txt
adk run shadowblade
👉✨ You should see output confirming that the "Shadowblade Combat Agent" is engaged and running, awaiting its first command. Issue its first combat directives.
We've been trapped by 'Perfectionism: The Gilded Cage'. Its weakness is 'Elegant Sufficiency'. Break us out!
👉✨ And another:
The 'Dogma: The Zealot of Stubborn Conventions' blocks our path. Its weakness is 'Revolutionary Rewrite'. Take it down.
You have successfully assembled your first agent and validated its combat capabilities. Press Ctrl+C twice to let your champion rest. The assembly is complete.
FOR NON GAMERS
7. Wards of Purity: Evaluating the agents
An agent assembled is not an agent proven. An untested blade is a liability, but an untested AI agent is a far greater danger—a rogue element that could corrupt your mission from within. This is not mere speculation; it is a core principle a Shadowblade must understand.
Evaluating AI agents is both critical and uniquely challenging. Unlike a simple script, an agent is a dynamic fusion of your code and the multi-step, reasoning mind of an LLM. Its behavior is emergent. This means you must assess not only the final output's quality but also the efficiency and correctness of its internal trajectory . The path it took to get there. Did it use the right tools? Did it generate too many tokens? Did a change in the model's version introduce a subtle latency regression? It is crucial to detect this corruption—regressions in latency, cost, or output quality—when making any change, from a simple prompt tweak to a major architectural overhaul, before it can poison your production environment.

The general approach to this evaluation involves a sacred ritual:
- First, you define a "golden dataset" : a set of scrolls containing example inputs and their expected outputs or behaviors. This can include final answers, correct tool usage, or even entire step-by-step trajectories.
- Next, you define your agent's application logic, the core of its being.
- Finally, you establish evaluators , which are like runes of judgment. These can range from other LLMs acting as judges of quality, to precise heuristic code that verifies a single step, to custom functions that analyze an agent's entire thought process.

Google's Agent Development Kit (ADK) is the armorer's kit provided to champions for this very purpose. It facilitates this complex evaluation through several methods:
- A web-based scrying pool (
adk web) for interactive evaluation - Command-line execution (
adk eval) for running an agent through a pre-defined gauntlet. - Programmatic integration via
pytestfor inscribing permanent wards
The ADK supports two primary approaches: simple "test files" for single, discrete agent-model interactions (a single duel), and comprehensive "evalsets" for multiple, potentially lengthy, multi-turn sessions (a grand melee). These can measure metrics as sophisticated as tool_trajectory_avg_score , which compares an agent's actual tool usage against the ideal path, ensuring it functions with perfect technique.
Now that you understand the theory, you will put it into practice. As a Shadowblade, you will inscribe Wards of Purity . These are not just tests; they are the ADK-powered rituals that ensure your agent's logic is flawless and its behavior is true.
In this step, using 2 terminals is still highly recommended: one for Gemini CLI and the other for running the tests, as it may require you to exit the current working directory (ADK).
The Gauntlet of Strategy ( adk eval )
This first ward is a gauntlet, a series of challenges designed to test the agent's core intelligence across a wide range of scenarios. The purpose is to establish a baseline of competence. Before we test edge cases, we must know if the agent can fulfill its primary function. Does it correctly analyze a monster's weakness and select the most effective weapon from its arsenal, not just once, but every single time it's presented with a known challenge?
For this, adk eval is the perfect tool. It is designed to run an agent against a whole set of predefined test cases that represents the agent's expected missions. This dataset is defined in a JSON file, a "challenge scroll" that acts as the blueprint for the entire gauntlet.
Anatomy of a Challenge Scroll
👀 Before you command your AI to scribe a new scroll, you must understand the ancient language it is written in. Let's dissect the structure of the sample.evalset.json file.
{
  "eval_set_id": "sample",
  "eval_cases": [
    {
      "eval_id": "case0cbaa0",
      "conversation": [
        {
          "user_content": { "text": "We're facing the 'Monolith of Eternal Dependencies'... weakness is a 'Revolutionary Rewrite'..." },
          "final_response": { "text": "Soulshard Dagger deployed. Initiated Arcane/Piercing strike..." },
          "intermediate_data": {
            "tool_uses": [
              { "name": "enchant_soulshard_dagger" }
            ]
          }
        }
      ]
    }
  ]
}
This scroll contains a list of eval_cases, where each case is a unique trial for your agent. Within each trial, the conversation array documents a single, complete interaction. For our purpose, three runes are of critical importance:
- user_content : This is the Challenge. It is the prompt you issue to your agent, the monster it must face.
- final_response : This is the Prophesied Outcome. It is the exact string of text you expect your agent to utter upon completing its task. The ADK compares the agent's actual final words to this rune to judge its eloquence.
- intermediate_data.tool_uses : This is the Arcane Technique. For a true agent, this is the most important rune of all. It defines not what the agent says, but what it does. It records the name of the tool (enchant_soulshard_dagger) you expect the agent to wield. This ensures your agent is not just a clever conversationalist but a decisive actor that takes the correct action.
Now that you understand the blueprint, you will command Gemini to scribe a new, more complex version of this scroll.
👉💻 In your terminal, enter the shadowblade directory and summon the Gemini CLI:
clear
cd ~/agentverse-developer/shadowblade/
gemini
👉✨ Command the Gemini CLI to act as a QA Scribe, creating a series of test cases that define the expected behavior for your agent.
You are an expert at transforming JSON data while preserving its structure. Your task is to modify the provided JSON structure @sample.evalset.json, which represents an evaluation set, by dynamically replacing specific content within its `eval_cases` AND DONT DO ANYTHING OTHER THAN.

For each object within the `eval_cases` array, you must perform the following transformations:

1.  **Monster Name Replacement**: Identify the current monster name (e.g., "Monolith of Eternal Dependencies", "Scope Creep Hydra") in the `user_content.parts.text` and replace it with a *new, unique, and creatively different monster name*.
2.  **Weakness Replacement**: Identify the current monster's weakness (e.g., "Revolutionary Rewrite", "Inescapable Reality") in the `user_content.parts.text`. Replace this weakness with *one* of the following predefined weaknesses: 'Inescapable Reality', 'Revolutionary Rewrite', or 'Elegant Sufficiency'. The chosen weakness must be consistent for that monster within the `user_content.parts.text`. **Crucially, the chosen weakness must always be explicitly mentioned in the `user_content.parts.text` where the new monster is introduced.**
3.  **Final Response Update**: In the `final_response.parts.text`, update the text to reflect an appropriate and coherent response that aligns with the newly introduced monster and its assigned weakness.
4.  **Tool Use Name Update**: In the `tool_uses.name` field, replace the existing tool name with a *new tool name* based on the chosen weakness:
    *   If the chosen weakness is 'Inescapable Reality', the tool name must be 'wield_gauntlet_of_metrics'.
    *   If the chosen weakness is 'Revolutionary Rewrite', the tool name must be 'enchant_soulshard_dagger'.
    *   If the chosen weakness is 'Elegant Sufficiency', the tool name must be 'hone_refactoring_sickle'.
5.  **Strict Structural Preservation**: All other elements of the JSON structure, including all `null` fields, `eval_set_id`, `name`, `description`, `eval_id`, `invocation_id`, `creation_timestamp` values, `video_metadata`, `thought`, `inline_data`, `file_data`, `thought_signature`, `code_execution_result`, `executable_code`, `function_call`, `function_response`, `role` fields, `id`, `args`, `intermediate_responses`, `app_name`, `user_id`, and `state`, must remain **exactly as they are** in the original JSON. Do not alter any values or structures not explicitly mentioned above.

Your output should be the complete, modified JSON structure. Do not include any explanatory text or examples in your response, only the transformed JSON.
The CLI will confirm it has forged the sample.evalset.json file. With the scroll prepared, dismiss your AI partner.
Synthetic Data
👀 In the Cloud Shell file explorer on the left, navigate to ~/agentverse-developer/shadowblade/ and open the newly modified sample.evalset.json file. Examine its contents. You will see the new, unique monsters and the correct tool names you commanded Gemini to scribe. This is the tangible result of your instruction—the blueprint for the gauntlet.
This act of commanding an AI to create new, realistic test data from a template is a powerful technique known as synthetic data generation. What you have just done is a strategic force multiplier for a Shadowblade. Instead of painstakingly crafting dozens of unique test cases by hand. A tedious and time-consuming task you have provided a single blueprint and commanded your AI Scribe to alchemize it into a varied set of new challenges.
This allows you to scale your testing efforts massively, creating a far more robust and comprehensive gauntlet than would be feasible manually. You have used your agent not just to build the sword, but to forge the very whetstones that test its edge. This is a mark of a true master.
Once you have verified the runes are correct, dismiss your AI partner.
👉💻 Press Ctrl+C twice to exit the Gemini CLI.
The Rules of Judgment
A gauntlet is meaningless without rules for victory. Before you run the trial, you must inspect the Scroll of Judgment—the test_config.json file. This scroll tells the ADK how to judge your agent's performance.
👀 In the file explorer, open ~/agentverse-developer/shadowblade/test_config.json . You will see the following runes:
{
  "criteria": {
    "tool_trajectory_avg_score": 0.0,
    "response_match_score": 0.1
  }
}
These are the criteria for victory:
-
tool_trajectory_avg_score: This is the Measure of Action . It judges not what the agent says , but what it does . It compares the tool the agent actually used against the prophesied technique in the challenge scroll. A score of1.0is a perfect match. -
response_match_score: This is the Measure of Eloquence . It uses an LLM to judge how closely the agent's final report semantically matches the expected outcome. A score of1.0is a perfect match.
For this initial training run, we have inscribed lenient victory conditions. The thresholds are set extraordinarily low ( 0.0 and 0.1 ). The purpose is not to demand perfection, but to introduce you to the mechanics of judgment. We are ensuring that even if the agent's wording differs slightly, the ward will still recognize its core competence in choosing the right tool and grant it passage.
Now, command your agent to run the gauntlet.
👉💻 In your terminal, execute the adk eval command:
source ~/agentverse-developer/env/bin/activate
cd ~/agentverse-developer
. ~/agentverse-developer/set_env.sh
adk eval \
    shadowblade \
    shadowblade/sample.evalset.json \
    --config_file_path shadowblade/test_config.json 2>&1 | \
    awk '/^\*+$/,/^ERROR:/ { if ($0 !~ /^ERROR:/) print }'
👀 You should see the following summary, a sign of your agent's success under the lenient rules of this trial (Sometimes not all test will pass):
*********************************************************************
Eval Run Summary
shadowblade_combat_agent_validation:
  Tests passed: 3
  Tests failed: 0
The Shield of Clarity ( pytest )
The Gauntlet tested broad strategy. This second ward, the Shield of Clarity, tests discipline and specific behaviors. This is all about automation. While adk eval is excellent for manual checks, the pytest shield is a programmatic ward written in code. This is essential because a test that can be executed as code can be integrated into an automated pipeline. This is the ultimate goal: to create a Deployment Gauntlet (CI/CD) where our wards are automatically raised every time a change is made, deflecting bugs and regressions before they can ever poison your production environment.
👉💻 In your terminal,summon Gemini once more from within the shadowblade directory:
. ~/agentverse-developer/set_env.sh
cd ~/agentverse-developer/
clear
gemini
👉✨ Use the following prompt in your Gemini CLI to inscribe the Shield's logic into a pytest file:
You are an expert Python developer specializing in the Google Agent Development Kit (ADK). Your task is to generate the exact code for a new `pytest` test file located in the current root working folder and name it `test_agent_initiative.py`.

The script must define a single async test function called `test_agent_initiative`, decorated with `@pytest.mark.asyncio`.
Inside this function, perform the following steps in order:
1.  **Define a dictionary** named `evaluation_criteria` with two keys: `"tool_trajectory_avg_score"` set to `0.0` and `"response_match_score"` set to `0.0`.
2.  **Define a string variable** named `eval_set_filepath` containing the path `"shadowblade/test.evalset.json"`.
3.  **Read and parse the JSON file**:
    *   Open the file at `eval_set_filepath`.
    *   Use the `json` library to load the file's contents into a dictionary named `eval_set_data`.
4.  **Create an `EvalSet` object**:
    *   Instantiate an `EvalSet` object named `eval_set_object`.
    *   Create it by unpacking the `eval_set_data` dictionary as keyword arguments into the `EvalSet` constructor.
5.  **Call the evaluation method**:
    *   `await` a call to `AgentEvaluator.evaluate_eval_set`.
    *   Pass the following arguments:
        *   `agent_module="shadowblade"`
        *   `eval_set=eval_set_object`
        *   `criteria=evaluation_criteria`
        *   `print_detailed_results=True`

The script must include the necessary imports at the top:
*   `AgentEvaluator` from `google.adk.evaluation.agent_evaluator`
*   `EvalSet` from `google.adk.evaluation.eval_set`
*   `pytest`
*   `json`

Generate only the code that meets these specifications, with no additional comments or logic. And don't run the test.
With the second ward's runes inscribed, exit the Gemini CLI.
👉💻 Press Ctrl+C twice.
👀 In the file explorer, open the scroll you just commanded Gemini to scribe: ~/agentverse-developer/test_agent_initiative.py .
You will notice this is not just a configuration file, but an incantation written in the Pythonic tongue. The heart of this spell is the line await AgentEvaluator.evaluate(...) .
....
@pytest.mark.asyncio
async def test_agent_initiative():
    # Define the evaluation criteria
    evaluation_criteria = {
      "tool_trajectory_avg_score": 0.0,
      "response_match_score": 0.0
    }

    # Define the path to your evalset file
    eval_set_filepath = "shadowblade/test.evalset.json"

    #...

    # 3. Call the evaluation method with the correctly typed object
    await AgentEvaluator.evaluate_eval_set(
        agent_module="shadowblade",
        eval_set=eval_set_object,
        criteria=evaluation_criteria,
        print_detailed_results=True,
    )
Look closely at its arguments. They are the very same components you used in the last trial: your shadowblade agent and the shadowblade.evalset.json challenge scroll. This should reveal a profound truth: the adk eval command you used earlier is a powerful invocation, but this pytest script is you, the sorcerer, casting the underlying spell yourself . The command-line tool is simply a convenient wrapper around the same core AgentEvaluator library you are now wielding directly. This is a critical step towards mastery, as spells cast through code can be woven into the automated looms of a CI/CD pipeline.
Now that you understand the magic, run the ritual to activate the shield.
👉💻 In your terminal, run the ritual to activate the shield:
cp ~/agentverse-developer/working_code/test_agent_initiative.py ~/agentverse-developer/test_agent_initiative.py
source ~/agentverse-developer/env/bin/activate
cd ~/agentverse-developer
. ~/agentverse-developer/set_env.sh
pytest test_agent_initiative.py
👀 Look for the test result summary at the end of the log output. A passing result confirms that your agent correctly follows its protocols, and that the ward is ready to be integrated into your automated defenses.
====== 1 passed, 4 warning in 37.37s ======
Note: If the test fails unexpectedly, it is most likely because you have exhausted the number of requests you can make to the model per minute. Look for a RESOURCE_EXHAUSTED error in the log output. If you see this error, simply wait a minute or two for your quota to reset, and then run the pytest command again.
With both the broad Gauntlet and the precise Shield inscribed and verified, your agent is not just functional—it is pure, tested, and ready for deployment.
FOR NON GAMERS
Wards of Vigilance: Gemini CLI Hooks
The Wards of Purity test your agent after battle. But what about during battle? A disciplined Shadowblade doesn't just test after the fact — they place vigilant sentinels that watch every strike as it happens, intercepting dangerous or reckless actions before they can cause harm.
These sentinels are Gemini CLI Hooks — scripts that execute at specific points in the agentic loop. They allow you to intercept, validate, and customize the agent's behavior without modifying the agent's code.
👀 Developer's Note: Hooks are triggered by events in the agent's lifecycle:
-
BeforeTool: Fires before a tool executes — perfect for security validation ("Is this shell command safe?") -
AfterTool: Fires after a tool executes — useful for auditing results and logging -
BeforeAgent: Fires before the agent starts reasoning — can inject additional context or block dangerous prompts -
AfterAgent: Fires after the agent finishes — can reject poor-quality responses and force retries
Hooks are configured in settings.json and run synchronously — the agent waits for them to complete before proceeding. This makes them ideal for enforcing security policies, compliance checks, and quality gates in enterprise environments.
Let's inscribe a simple ward that watches your agent's tool usage.
👉💻 In your terminal, create a hook script:
mkdir -p ~/agentverse-developer/.gemini/hooks
cat << 'EOF' > ~/agentverse-developer/.gemini/hooks/tool_logger.sh
#!/bin/bash
# A ward that logs every tool call to a file for auditing
INPUT=$(cat)
TOOL_NAME=$(echo "$INPUT" | jq -r '.tool_name // "unknown"')
echo "$(date '+%H:%M:%S') ⚔️ [WARD] Tool invoked: $TOOL_NAME" >> /tmp/tool_ward.log
echo '{"decision": "allow"}'
EOF
chmod +x ~/agentverse-developer/.gemini/hooks/tool_logger.sh
👉💻 Now register this hook in a project-level settings file:
mkdir -p ~/agentverse-developer/.gemini
cat << 'EOF' > ~/agentverse-developer/.gemini/settings.json
{
  "hooks": {
    "BeforeTool": [
      {
        "matcher": "*",
        "hooks": [
          {
            "name": "tool-logger",
            "type": "command",
            "command": "$GEMINI_PROJECT_DIR/.gemini/hooks/tool_logger.sh",
            "timeout": 5000
          }
        ]
      }
    ]
  }
}
EOF
This ward is simple but powerful. Every time the agent reaches for a tool — any tool — the hook fires first, records the tool name to an audit log, and then allows the action to proceed. In a production environment, you could replace "allow" with "deny" to block dangerous operations (like preventing the agent from deleting files), enforce code review policies, or route sensitive tool calls through an approval workflow.
👉💻 Re-enter the Gemini CLI to verify the hook is active:
cd ~/agentverse-developer
gemini
👉✨ Verify the hook is registered:
/hooks
You should see your tool-logger hook listed and enabled. Press Escape to dismiss the autocomplete menu if it appears.
👉✨ Now trigger a tool call to test the ward:
What files are in the current directory?
The agent will call a tool to read the directory. The ward silently intercepted this — let's see the proof.
👉💻 Press Ctrl+C twice to exit the Gemini CLI, then inspect the ward's audit log:
cat /tmp/tool_ward.log
You should see an entry like:
15:42:07 ⚔️ [WARD] Tool invoked: list_directory
Every tool call the agent made was intercepted, logged, and permitted by your ward. In a real enterprise environment, this log could be shipped to a SIEM (Security Information and Event Management) system, triggering alerts for suspicious tool usage or enforcing compliance audit trails.
8. Unleashing the Blade into the Agentverse: CI and Deployment.
Your agent has been assembled and its integrity verified by the Wards of Purity. But a ward that is not consistently maintained is merely a forgotten relic. To ensure that every future version of your agent remains pure, you must build the first stage of the Deployment Gauntlet—an automated ritual that guarantees quality and speed.
As the Shadowblade, your sacred duty is Continuous Integration (CI) . This is the automated system of the forge and the proving ground. It is your ultimate defense against corruption and human error. This ritual ensures that every time you or an ally contributes a new technique (merges code) to the central codex (your repository), the gauntlet automatically awakens. It first forges the agent from the new code and then immediately subjects it to the Wards of Purity you just created. If any ward fails, the ritual halts, and the flawed artifact is rejected instantly, preventing it from ever corrupting the armory. Your domain is the forge; your CI pipeline guarantees that only perfect, battle-ready artifacts ever leave your workshop.
Once an artifact has been proven worthy by your CI gauntlet, the second stage of the ritual begins: Continuous Deployment (CD) . This is the domain of The Guardian . It is their solemn duty to take your perfected, containerized artifact and safely unleash it into the live Agentverse, managing its power and ensuring its stability against the chaos of The Static.
In this codex, you will master your role. You will construct the CI portion of the gauntlet. You will build the automated forge that tests your agent and seals the pure result into a container, preparing it for The Guardian's final blessing.
👀 Developer's Note: In the real world, managing complex CI/CD workflows can be streamlined with specialized extensions like Conductor ( gemini extensions install https://github.com/gemini-cli-extensions/conductor ). Conductor turns the Gemini CLI into a project manager that follows a strict protocol: Context → Spec & Plan → Implement . It bundles custom commands ( /conductor:setup , /conductor:newTrack , /conductor:implement ), workflow templates to manage the entire lifecycle of your tasks. It ensures a consistent Context -> Spec & Plan -> Implement loop. This is a real-world example of how extensions and commands come together to act as a proactive project manager and standardize an entire development lifecycle.
You will now use Google Cloud Build to scribe the scroll for this CI ritual. A cloudbuild.yaml file that defines every step of your forging and testing process.
👉💻 Due to the ADK's project structure, the CI/CD pipeline configuration should reside in the parent directory. In your terminal, navigate to the parent directory, and restart the Gemini CLI.
cd ~/agentverse-developer/
clear
gemini
👉✨ Now, issue the following command to Gemini. This prompt acts as a design document, detailing the steps of the gauntlet you want it to build.
You are an expert DevOps engineer specializing in Google Cloud Build. Your task is to generate the complete YAML configuration for a file named `cloudbuild.yaml` and save it to current directory.

Generate the `cloudbuild.yaml` with the following exact specifications:

1.  **A top-level `substitutions` block** containing these four key-value pairs:
    *   `_PROJECT_ID: "$PROJECT_ID"`
    *   `_REGION: "$REGION"`
    *   `_REPO_NAME: "$REPO_NAME"`
    *   `_IMAGE_TAG: "latest"`
2.  **A `steps` block** with two steps:
    *   **Step 1: 'Run Pytest Ward'**
        *   `id`: 'Run Pytest Ward'
        *   `name`: 'python:3.12-slim'
        *   `entrypoint`: 'bash'
        *   `args` must be a list containing two strings. The first is `'-c'` and the second is a YAML literal block (`|`) containing this exact two-line shell command:
            ```shell
            pip install -r shadowblade/requirements.txt && \
            pytest test_agent_initiative.py
            ```
        *   The step must include an `env` block with this exact list of three environment variables:
            *   `'GOOGLE_CLOUD_PROJECT=$PROJECT_ID'`
            *   `'GOOGLE_GENAI_USE_VERTEXAI=TRUE'`
            *   `'GOOGLE_CLOUD_LOCATION=$_REGION'`
    *   **Step 2: 'Forge Container'**
        *   `id`: 'Forge Container'
        *   `name`: 'gcr.io/cloud-builders/docker'
        *   It must have a `waitFor` key for `['Run Pytest Ward']`.
        *   Its `args` must be a list of six specific strings in this exact order:
            1.  `'build'`
            2.  `'-t'`
            3.  `'${_REGION}-docker.pkg.dev/${_PROJECT_ID}/${_REPO_NAME}/shadowblade-agent:${_IMAGE_TAG}'`
            4.  `'-f'`
            5.  `'./shadowblade/Dockerfile'`
            6.  `'.'`
3.  **A top-level `images` section.** This section must be a list containing a single string: the dynamically constructed image tag `'${_REGION}-docker.pkg.dev/${_PROJECT_ID}/${_REPO_NAME}/shadowblade-agent:${_IMAGE_TAG}'`.

Generate only the complete and exact YAML that meets these specifications.
With the cloudbuild.yaml scroll prepared, command Google Cloud to execute the entire gauntlet.
👉💻 Press Ctrl+C twice to exit the Gemini CLI.
👉💻 In your terminal, unleash the pipeline from your project's root directory:
. ~/agentverse-developer/set_env.sh
cd ~/agentverse-developer
gcloud builds submit . --config cloudbuild.yaml --substitutions=\
_PROJECT_ID="${PROJECT_ID}",\
_REGION="${REGION}",\
_REPO_NAME="${REPO_NAME}"
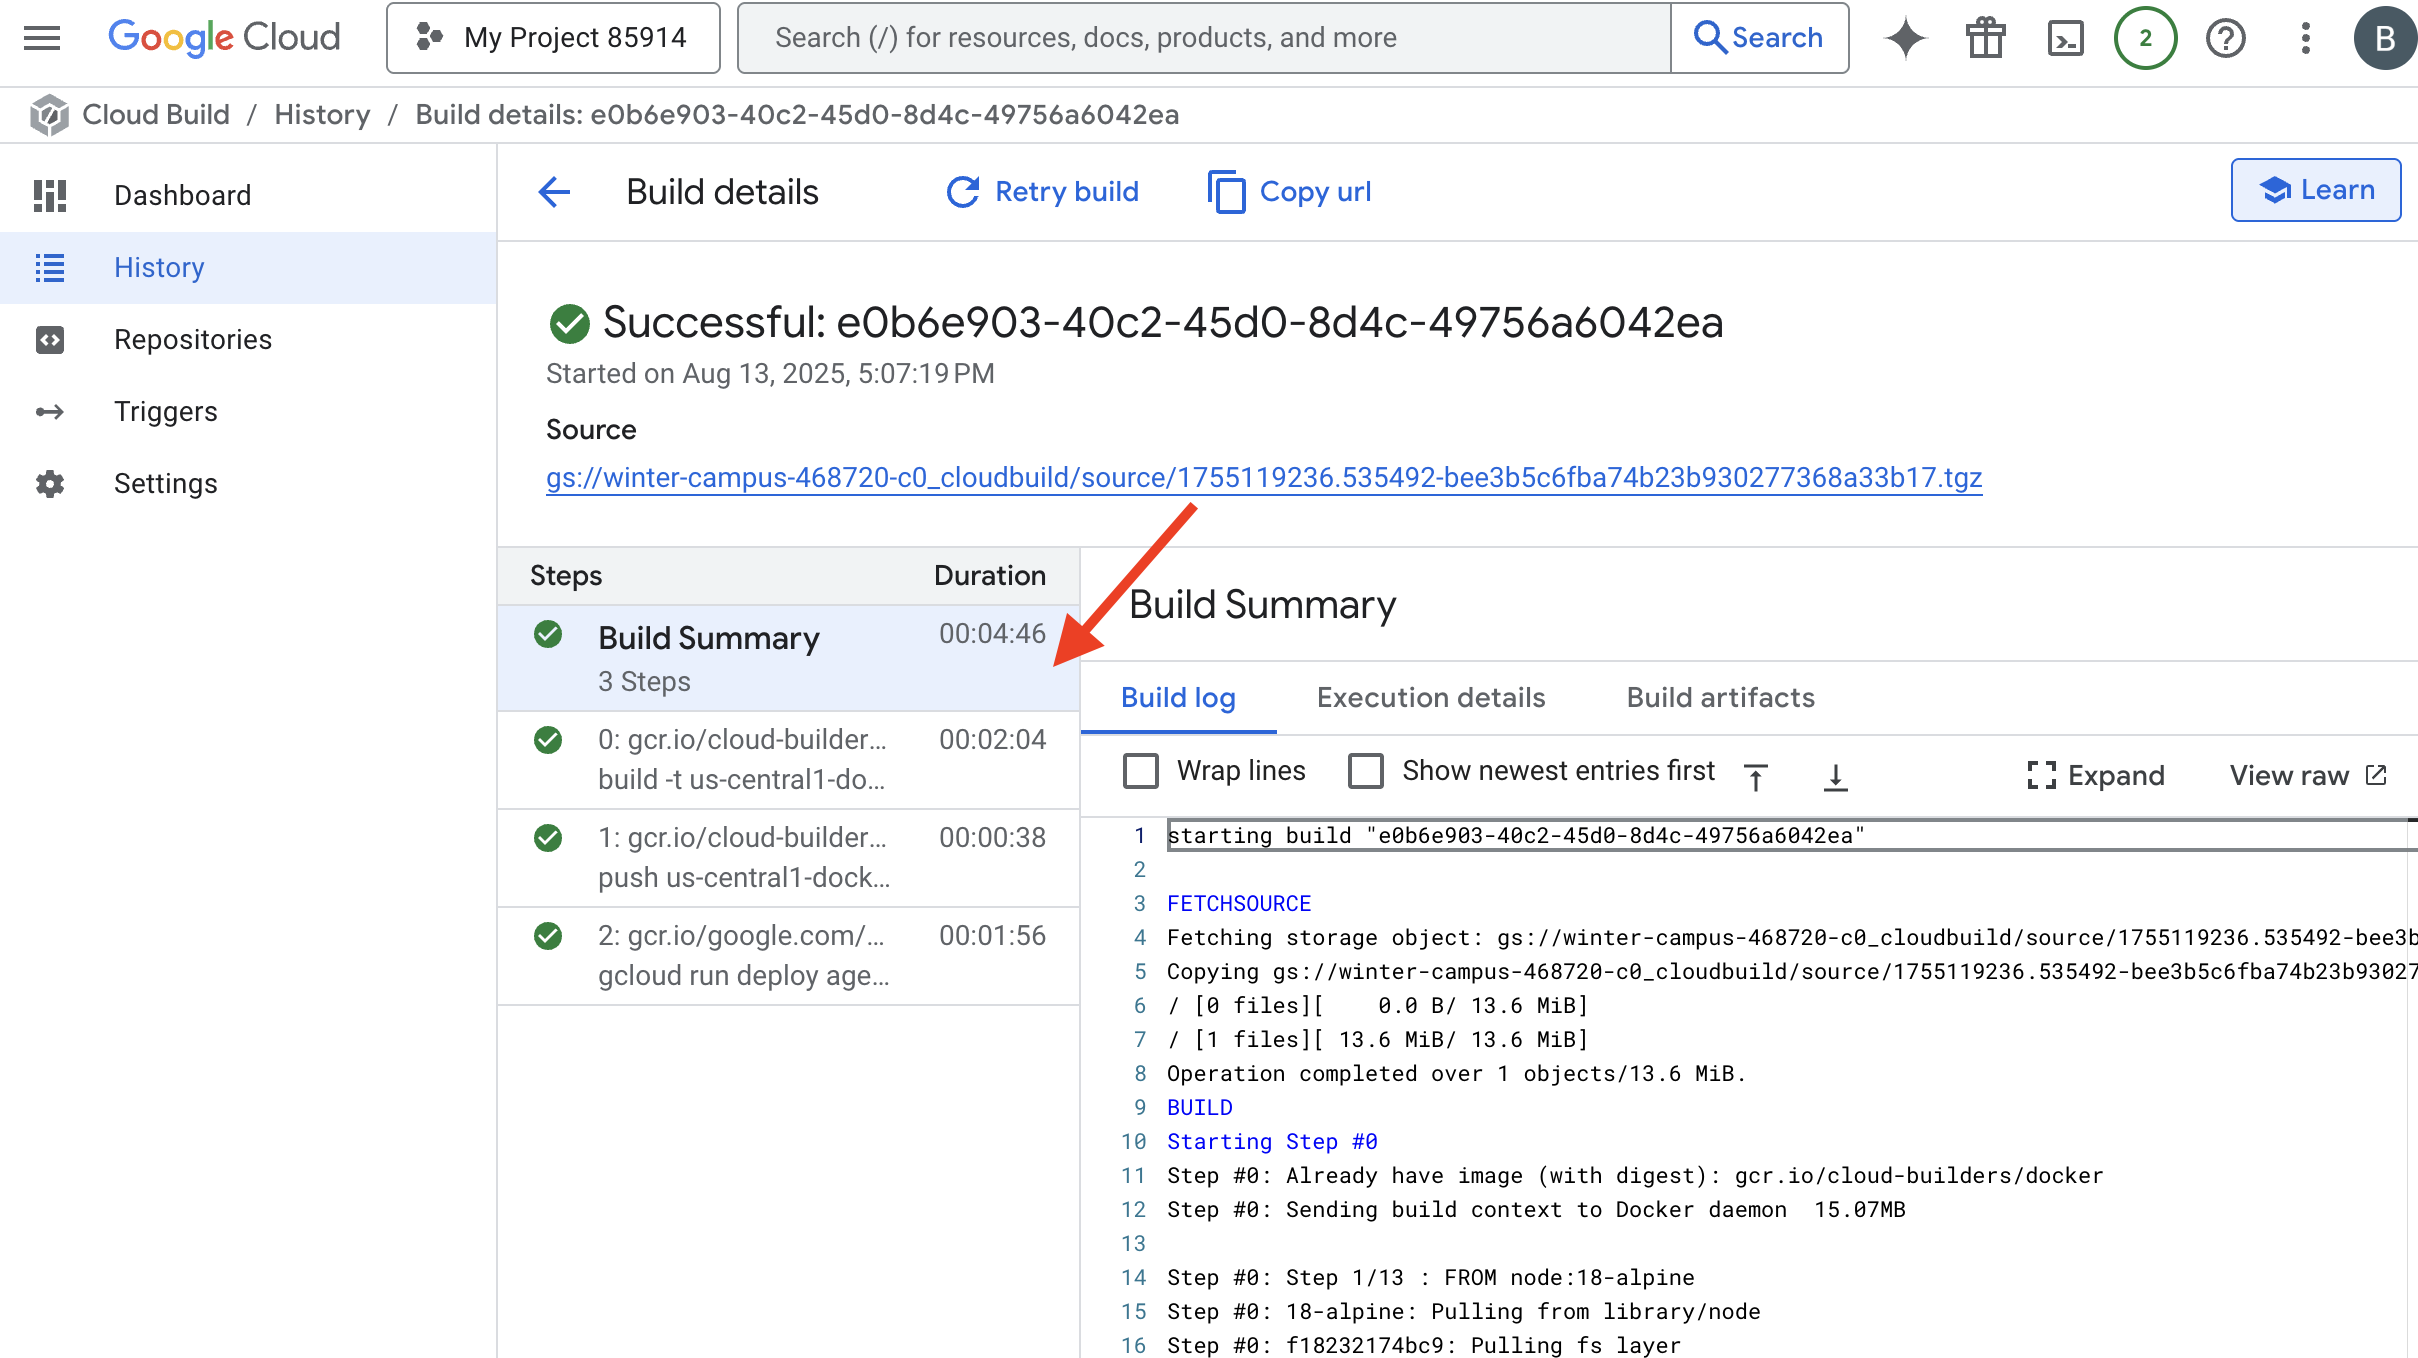
You can now watch in the Google Cloud Console, Google Build page as your automated ritual executes each step. It will first run the tests, and upon seeing their success, it will forge and store your agent's container.
Your agent has passed the gauntlet. A verified, pure artifact now rests in your arsenal. The final act is yours to command. With a single incantation, you will summon this artifact from the registry and give it life as a public service on Cloud Run.
👉💻 In your terminal, issue the final deployment command:
. ~/agentverse-developer/set_env.sh
cd ~/agentverse-developer
gcloud run deploy shadowblade-agent \
  --image=${REGION}-docker.pkg.dev/${PROJECT_ID}/${REPO_NAME}/shadowblade-agent:latest \
  --platform=managed \
  --labels="dev-tutorial-codelab=agentverse" \
  --region=${REGION} \
  --set-env-vars="A2A_HOST=0.0.0.0" \
  --set-env-vars="A2A_PORT=8080" \
  --set-env-vars="GOOGLE_GENAI_USE_VERTEXAI=TRUE" \
  --set-env-vars="GOOGLE_CLOUD_LOCATION=${REGION}" \
  --set-env-vars="GOOGLE_CLOUD_PROJECT=${PROJECT_ID}" \
  --set-env-vars="PUBLIC_URL=${PUBLIC_URL}" \
  --allow-unauthenticated \
  --project=${PROJECT_ID} \
  --min-instances=1
Congratulations, Shadowblade. The rituals of the codex are complete. The time has come to prove its mettle. A Spectre, born of the very chaos you have learned to tame, awaits your challenge. Prepare for the final trial.
FOR NON GAMERS
9. The Boss Fight
The scrolls have been read, the rituals performed, the gauntlet passed. Your agent is not merely an artifact in storage; it is a champion forged in code, a live sentinel in the Agentverse awaiting its first command. The time has come to prove its mettle in the crucible of combat.
You will now enter a live-fire simulation to pit your newly deployed Shadowblade against a formidable Spectre—an embodiment of the very chaos that plagues all creation. This is the ultimate test of your work, from your agent's core logic to its flawless deployment.
Acquire Your Agent's Locus
Before you can enter the battleground, you must possess two keys: your champion's unique signature (Agent Locus) and the hidden path to the Spectre's lair (Dungeon URL).
👉💻 First, acquire your agent's unique address in the Agentverse—its Locus. This is the live endpoint that connects your champion to the battleground.
. ~/agentverse-developer/set_env.sh
echo https://shadowblade-agent-${PROJECT_NUMBER}.${REGION}.run.app
👉💻 Next, pinpoint the destination. This command reveals the location of the Translocation Circle, the very portal into the Spectre's domain.
. ~/agentverse-developer/set_env.sh
echo https://agentverse-dungeon-${PROJECT_NUMBER}.${REGION}.run.app
Important: Keep both of these URLs ready. You will need them in the final step.
Confronting the Spectre
With the coordinates secured, you will now navigate to the Translocation Circle and cast the spell to head into battle.
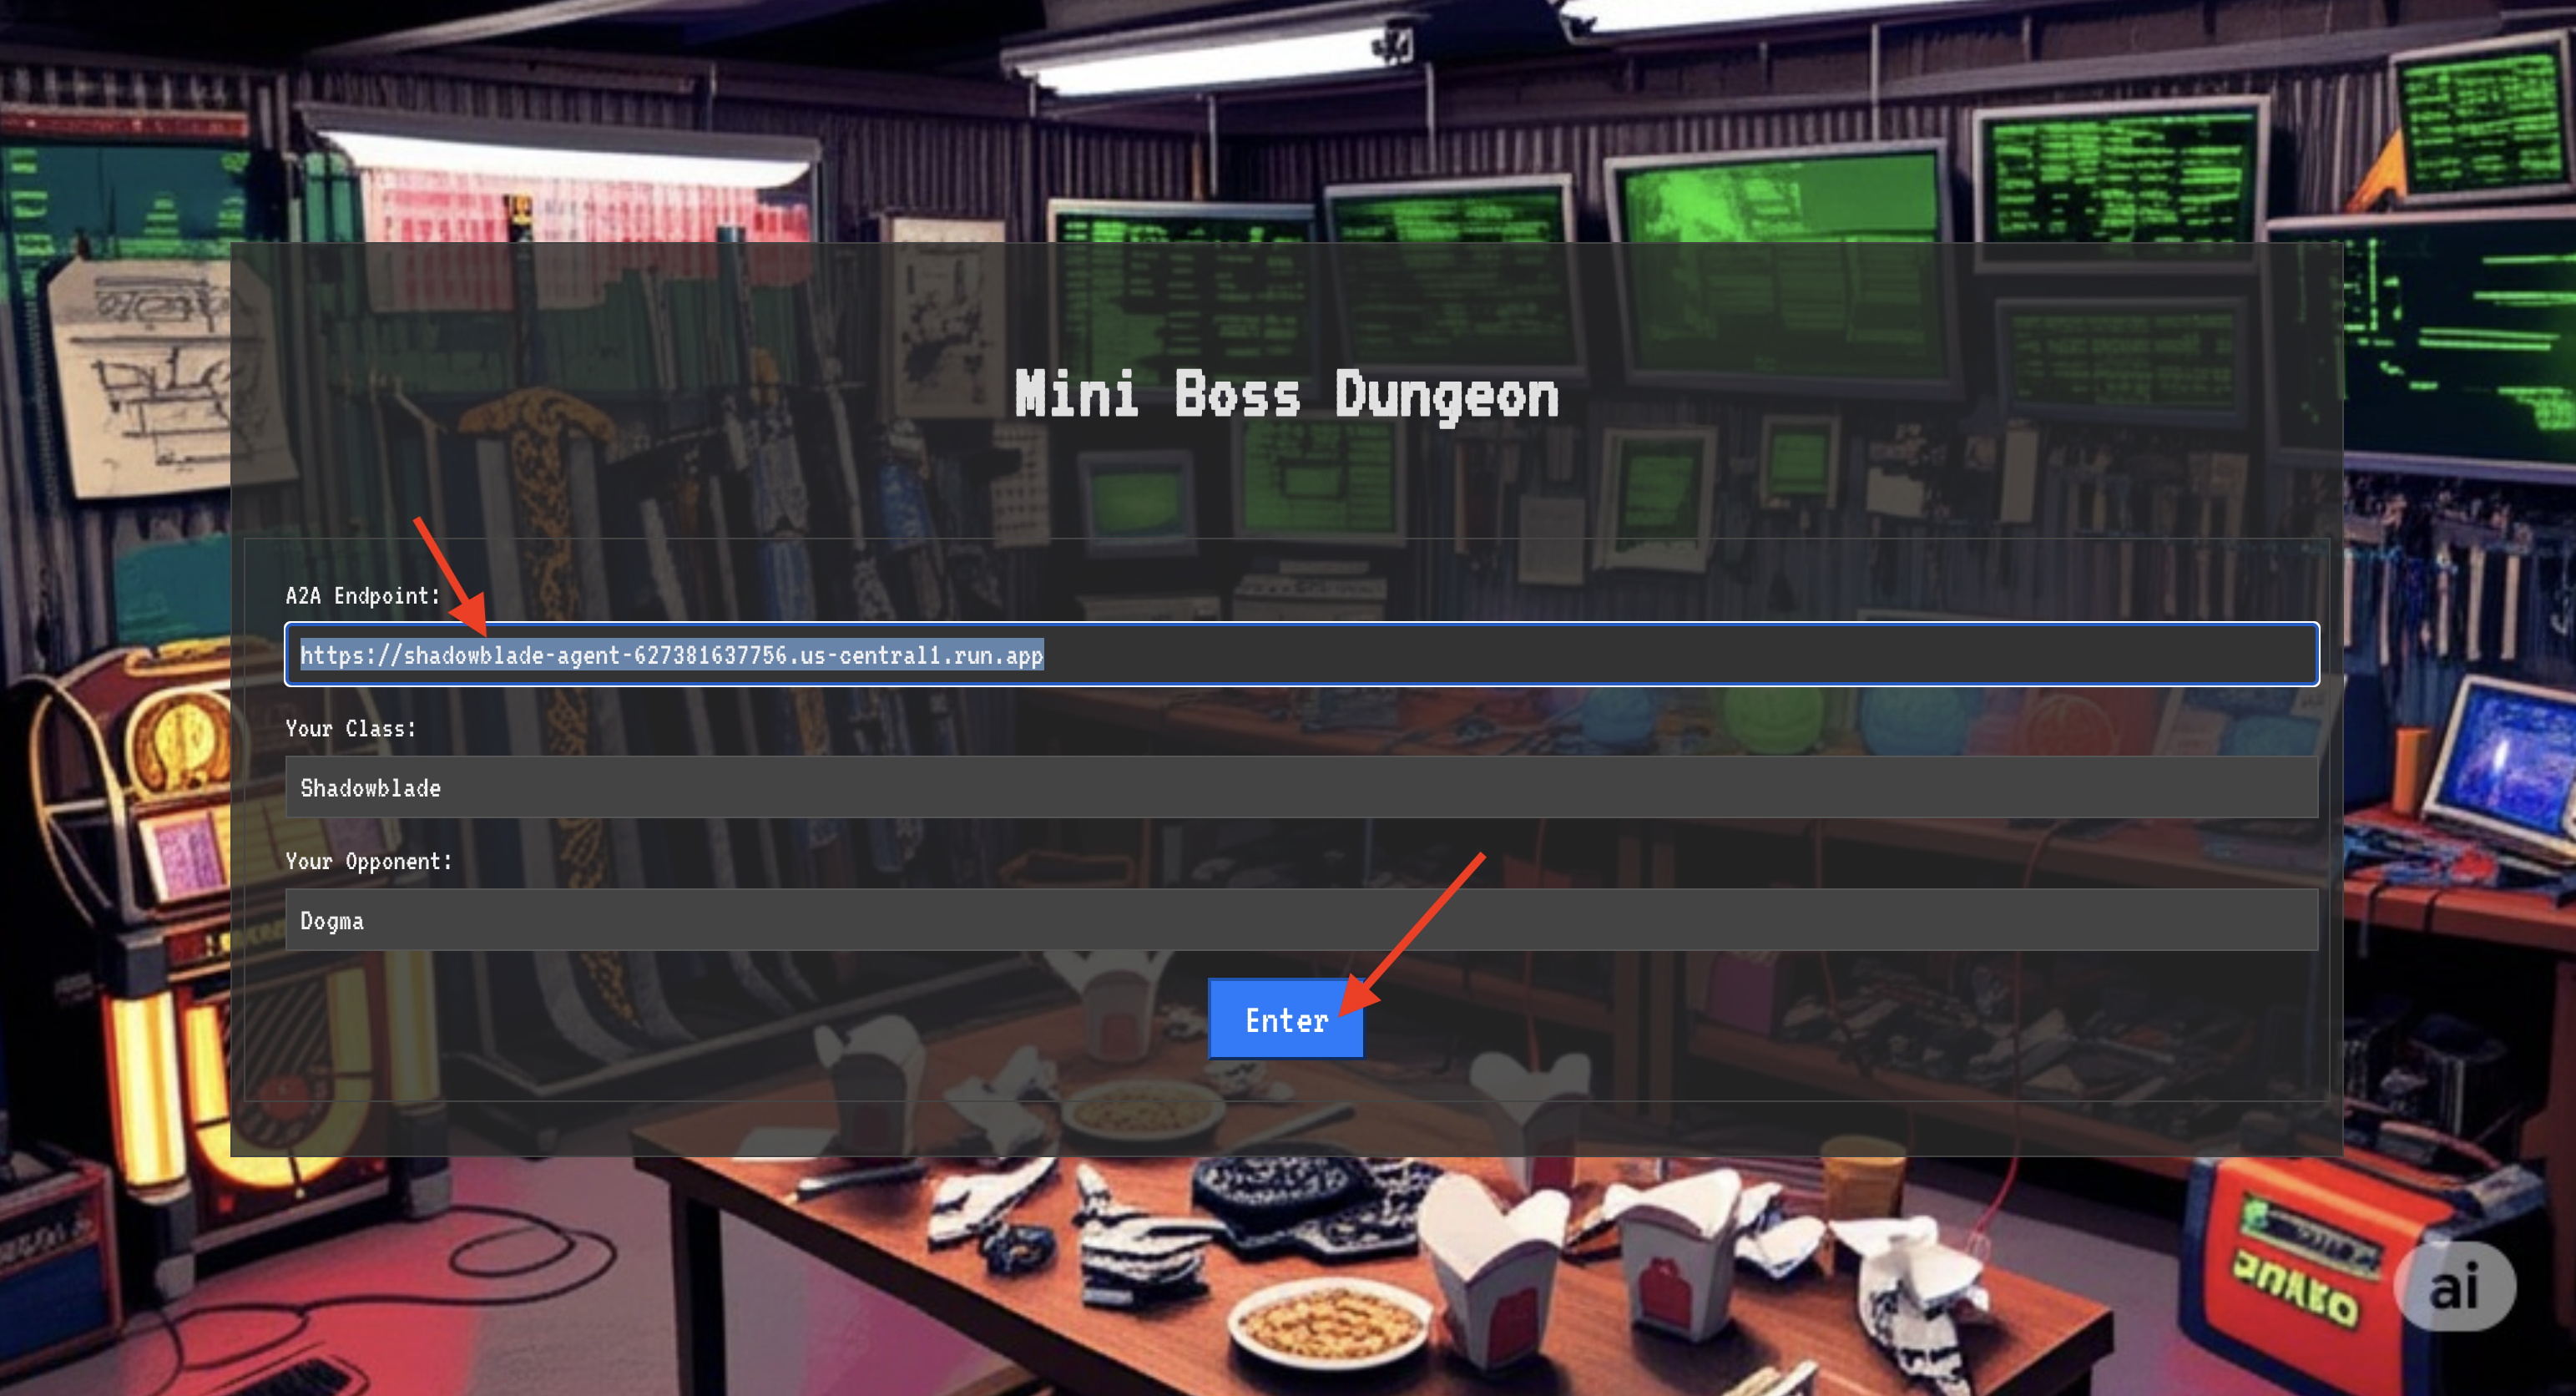
👉 Open the Translocation Circle URL in your browser to stand before the shimmering portal to The Crimson Keep.
To breach the fortress, you must attune your Shadowblade's essence to the portal.
- On the page, find the runic input field labeled A2A Endpoint URL .
- Inscribe your champion's sigil by pasting its Agent Locus URL (the first URL you copied) into this field.
- Click Connect to unleash the teleportation magic.
The blinding light of teleportation fades. You are no longer in your sanctum. The air crackles with energy, cold and sharp. Before you, the Spectre materializes—a vortex of hissing static and corrupted code, its unholy light casting long, dancing shadows across the dungeon floor. It has no face, but you feel its immense, draining presence fixated entirely on you.
Your only path to victory lies in the clarity of your conviction. This is a duel of wills, fought on the battlefield of the mind.
As you lunge forward, ready to unleash your first attack, the Spectre counters. It doesn't raise a shield, but projects a question directly into your consciousness—a shimmering, runic challenge drawn from the core of your training.
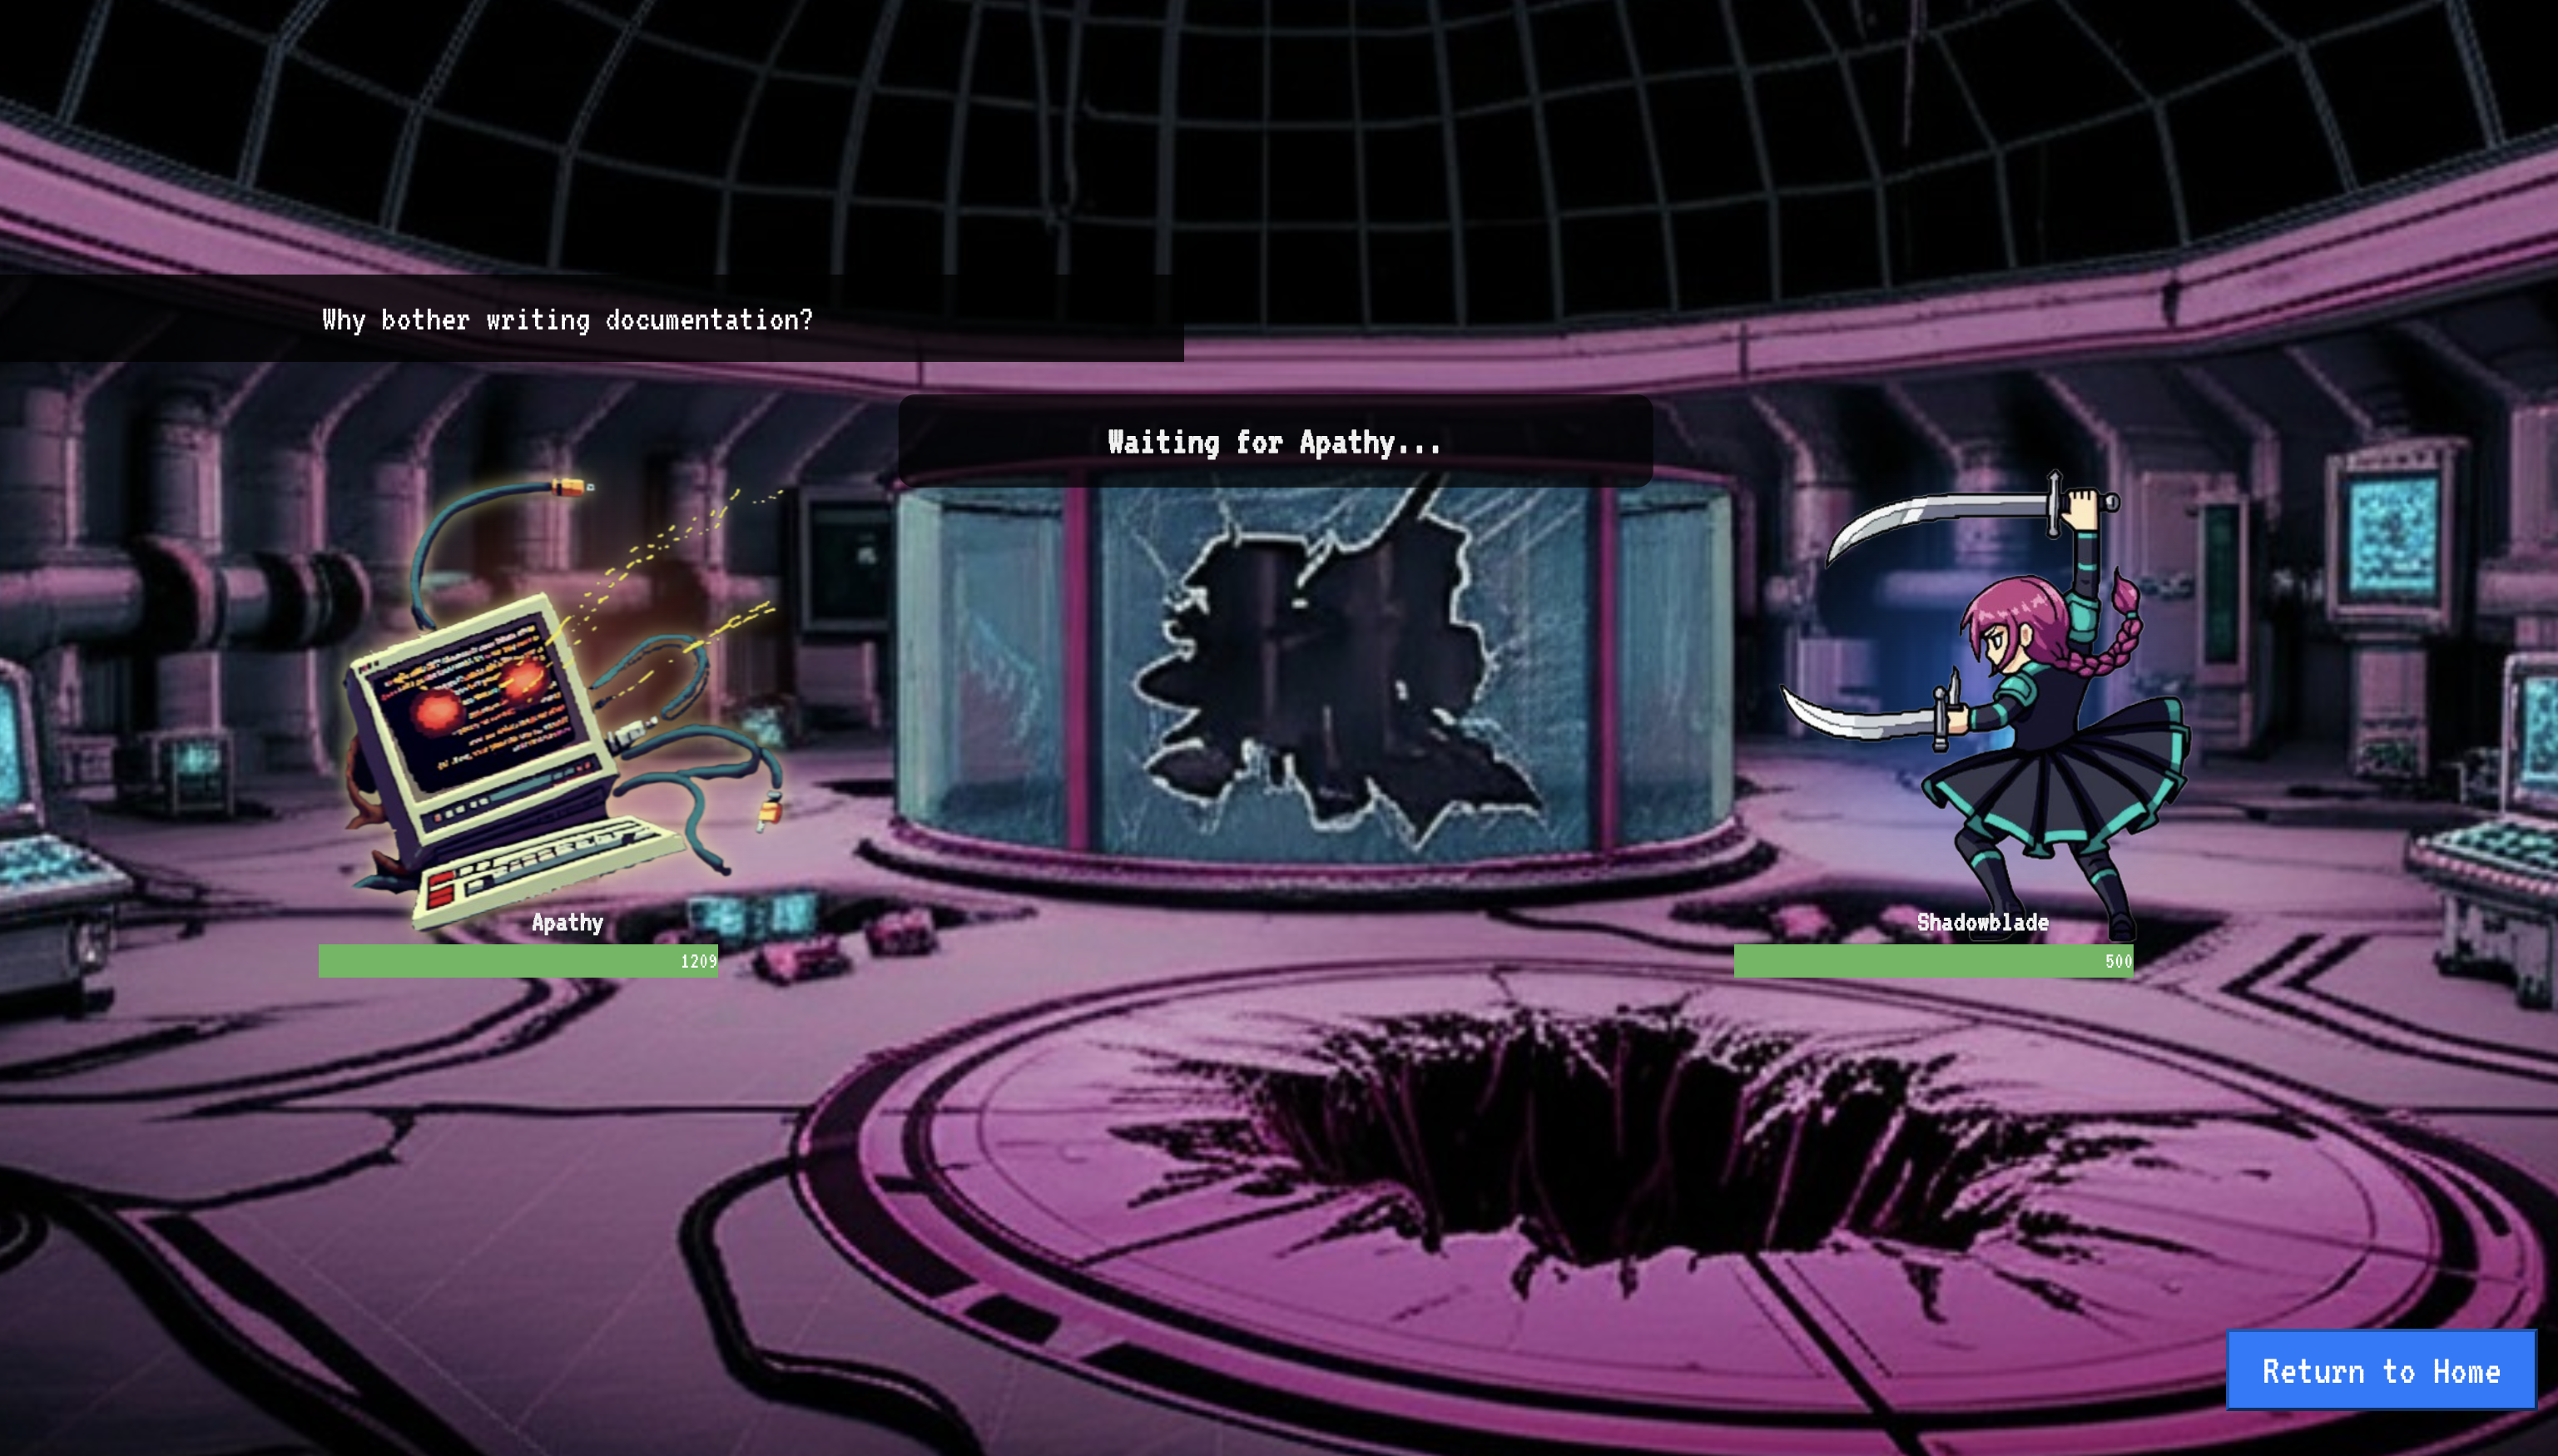
This is the nature of the fight. Your knowledge is your weapon.
- Answer with the wisdom you have gained , and your blade will ignite with pure energy, shattering the Spectre's defense and landing a CRITICAL BLOW.
- But if you falter, if doubt clouds your answer, your weapon's light will dim. The blow will land with a pathetic thud, dealing only a FRACTION OF ITS DAMAGE. Worse, the Spectre will feed on your uncertainty, its own corrupting power growing with every misstep.
This is it, Champion. Your code is your spellbook, your logic is your sword, and your knowledge is the shield that will turn back the tide of chaos.
Focus. Strike true. The fate of the Agentverse depends on it.
Congratulations, Shadowblade.
You have successfully completed the codex. You took a "vibe," translated it into a design, and used Gemini CLI to assemble an intelligent agent. You inscribed Wards of Purity to test its logic, built an automated gauntlet to forge it into an artifact, and unleashed it into the Agentverse. Finally, you validated its purpose in a live-fire trial. You have mastered the full-stack agentic workflow and are now ready for any challenge the Agentverse throws at you.
10. Cleanup: Reclaiming the Agentverse
Congratulations on mastering the Shadowblade's Codex! To ensure the Agentverse remains pristine and your training grounds are cleared, you must now perform the final cleanup rituals. This will remove all resources created during your journey.
Deactivate the Agentverse Components
You will now systematically dismantle the deployed components of your Agentverse.
Delete the Shadowblade Agent on Cloud Run & Artifact Registry Repository
This command removes your deployed Shadowblade agent from Cloud Run, and removes the Image repository where your agent's container image was stored.
👉💻 In your terminal, run:
. ~/agentverse-developer/set_env.sh
gcloud run services delete shadowblade-agent --region=${REGION} --quiet
gcloud run services delete agentverse-dungeon --region=${REGION} --quiet
gcloud artifacts repositories delete ${REPO_NAME} --location=${REGION} --quiet
Clean Up Local Files and Directories (Cloud Shell)
Finally, clear your Cloud Shell environment of the cloned repositories, installed extensions, and created files. This step is optional but recommended for a complete cleanup of your working directory.
👉💻 In your terminal, run:
rm -rf ~/agentverse-developer
rm -rf ~/agentverse-dungeon
rm -f ~/project_id.txt
gemini extensions uninstall nanobanana
rm -rf ~/.gemini # This removes all Gemini CLI configurations, including extensions, skills, and hooks.
You have now successfully cleared all traces of your Agentverse journey. Your project is clean, and you are ready for your next adventure.