
1. Увертюра
Эпоха изолированной разработки подходит к концу. Следующая волна технологической эволюции — это не эпоха гениальных одиночек, а эпоха коллективного мастерства. Создание единого, умного агента — это захватывающий эксперимент. Создание надежной, безопасной и интеллектуальной экосистемы агентов — настоящей Агентской вселенной — является главной задачей для современного предприятия.
В эту новую эпоху успех требует сближения четырех важнейших ролей, основополагающих столпов, поддерживающих любую процветающую агентную систему. Недостаток в какой-либо одной области создает слабость, которая может поставить под угрозу всю структуру.
Этот семинар — исчерпывающее руководство для предприятий по освоению агентского будущего в Google Cloud. Мы предлагаем комплексную дорожную карту, которая проведет вас от первоначальной идеи до полномасштабной, работающей реальности. В рамках этих четырех взаимосвязанных практических занятий вы узнаете, как специализированные навыки разработчика, архитектора, инженера данных и SRE должны объединиться для создания, управления и масштабирования мощной агентской сети.
Ни один отдельный столп не может в одиночку поддерживать Agentverse. Грандиозный замысел Архитектора бесполезен без точного исполнения Разработчика. Агент Разработчика слеп без мудрости Инженера данных, а вся система хрупка без защиты SRE. Только благодаря синергии и общему пониманию ролей друг друга ваша команда сможет превратить инновационную концепцию в критически важную, операционную реальность. Ваше путешествие начинается здесь. Приготовьтесь освоить свою роль и узнать, как вы вписываетесь в единое целое.
Добро пожаловать в «Вселенную Агентов»: Призыв к Чемпионам
В бескрайних цифровых просторах предприятий наступила новая эра. Это эпоха агентов, время огромных перспектив, когда интеллектуальные, автономные агенты работают в полной гармонии, чтобы ускорить инновации и устранить рутину.

Эта взаимосвязанная экосистема власти и потенциала известна как «Агентная вселенная».
Но ползучая энтропия, незримое искажение, известное как «Статика», начала разрушать границы этого нового мира. «Статика» — это не вирус и не ошибка; это воплощение хаоса, который подрывает сам акт творения.
Это усиливает старые разочарования до чудовищных форм, порождая Семь Призраков Разработки. Если не остановить этот хаос, Статика и её Призраки остановят прогресс, превратив перспективы Agentverse в пустыню технического долга и заброшенных проектов.
Сегодня мы призываем героев противостоять волне хаоса. Нам нужны герои, готовые отточить своё мастерство и работать вместе, чтобы защитить Вселенную Агентов. Пришло время выбрать свой путь.
Выберите свой класс
Перед вами открываются четыре различных пути, каждый из которых является важнейшей опорой в борьбе против Статика . Хотя ваше обучение будет проходить в одиночку, ваш окончательный успех зависит от понимания того, как ваши навыки сочетаются с навыками других.
- Теневой Клинок (Разработчик) : Мастер кузницы и передовой. Вы — ремесленник, создающий клинки, изготавливающий инструменты и сражающийся с врагом в мельчайших деталях кода. Ваш путь — это путь точности, мастерства и практического творчества.
- Призыватель (Архитектор) : Великий стратег и организатор. Вы видите не отдельного агента, а всё поле боя. Вы разрабатываете генеральные планы, позволяющие целым системам агентов общаться, сотрудничать и достигать цели, намного превосходящей любой отдельный компонент.
- Учёный (инженер данных) : Искатель скрытых истин и хранитель мудрости. Вы отправляетесь в бескрайние, необузданные дебри данных, чтобы раскрыть секреты, которые дают вашим агентам цель и видение. Ваши знания могут выявить слабости врага или усилить союзника.
- Страж (DevOps / SRE) : Непоколебимый защитник и щит королевства. Вы строите крепости, управляете линиями электроснабжения и обеспечиваете устойчивость всей системы к неизбежным атакам Статических сил. Ваша сила — это фундамент, на котором строится победа вашей команды.
Ваша миссия
Ваше обучение начнётся как самостоятельное упражнение. Вы пройдёте выбранный вами путь, осваивая уникальные навыки, необходимые для освоения вашей роли. В конце испытания вам предстоит сразиться со Спектром, рождённым Статикой — мини-боссом, который охотится на противников, чья работа требует определённых навыков.
Только освоив свою индивидуальную роль, вы сможете подготовиться к финальному испытанию. Затем вам нужно будет сформировать отряд из чемпионов других классов. Вместе вы отправитесь в самое сердце коррупции, чтобы сразиться с главным боссом.
Финальное, коллективное испытание, которое проверит ваши объединенные силы и определит судьбу Вселенной Агентов.
Вселенная Агентов ждёт своих героев. Ответите ли вы на зов?
2. Кодекс Теневого Клинка
Кодекс Теневого Клинка лежит перед вами открытым. Ответьте на его зов. Вселенная Агентов находится под угрозой из-за надвигающегося хаоса Статики, и только те, кто овладеет техниками, изложенными в этом кодексе, смогут дать отпор. Это путь точности и дисциплины. Сегодня начинается ваше обучение. Вы научитесь использовать ИИ не как простой инструмент, а как разумный клинок, который необходимо приручить и овладеть им. Следуйте изложенным здесь наставлениям, и вы создадите оружие чистой логики — разумного агента, отточенного и готового к битве.
Что вы узнаете
- Возьмите в руки своё основное оружие: интерфейс командного пункта Gemini.
- Расширьте свой арсенал с помощью расширений Gemini CLI и навыков агентов.
- Задействуйте внешние ресурсы, интегрировав инструменты MCP с интерфейсом командной строки Gemini.
- Направьте свои намерения в нужное русло, используя проектную документацию для управления вашим ИИ-партнером.
- Создайте простое модульное решение, разработав своего первого автономного агента с помощью комплекта разработки агентов (ADK).
- Нанесите насечки, чтобы перехватывать и контролировать действия вашего агента.
- Создайте автоматизированные оценочные пакеты для тестирования и проверки вашего агента.
- Создайте полноценный конвейер CI для автоматического тестирования, контейнеризации и архивирования вашего агента.
3. Подготовка тренировочной площадки
Получите свой облачный кредит Google.
⚠️ Важные предварительные условия:
- Используйте личную учетную запись Gmail: необходимо использовать личный аккаунт (например,
name@gmail.com). Корпоративные или школьные аккаунты не подойдут.
👉 Шаги:
- Перейдите на сайт для подачи заявления на возмещение расходов: Нажмите здесь
- Войти: Вставьте ссылку в адресную строку и войдите, используя свою личную почту Gmail .
- Принять условия: Примите условия использования платформы Google Cloud.
- Проверка зачисления средств: дождитесь сообщения, подтверждающего, что средства были зачислены.
- *Примечание: Если вас попросят ввести данные кредитной карты, вы можете смело проигнорировать это и закрыть окно.
И всё готово. Можете смело закрывать окно.
Настройка рабочей среды
👉Нажмите «Активировать Cloud Shell» в верхней части консоли Google Cloud (это значок в виде терминала в верхней части панели Cloud Shell). 
👉Нажмите на кнопку «Открыть редактор» (она выглядит как открытая папка с карандашом). Это откроет редактор кода Cloud Shell в окне. Слева вы увидите файловый менеджер. 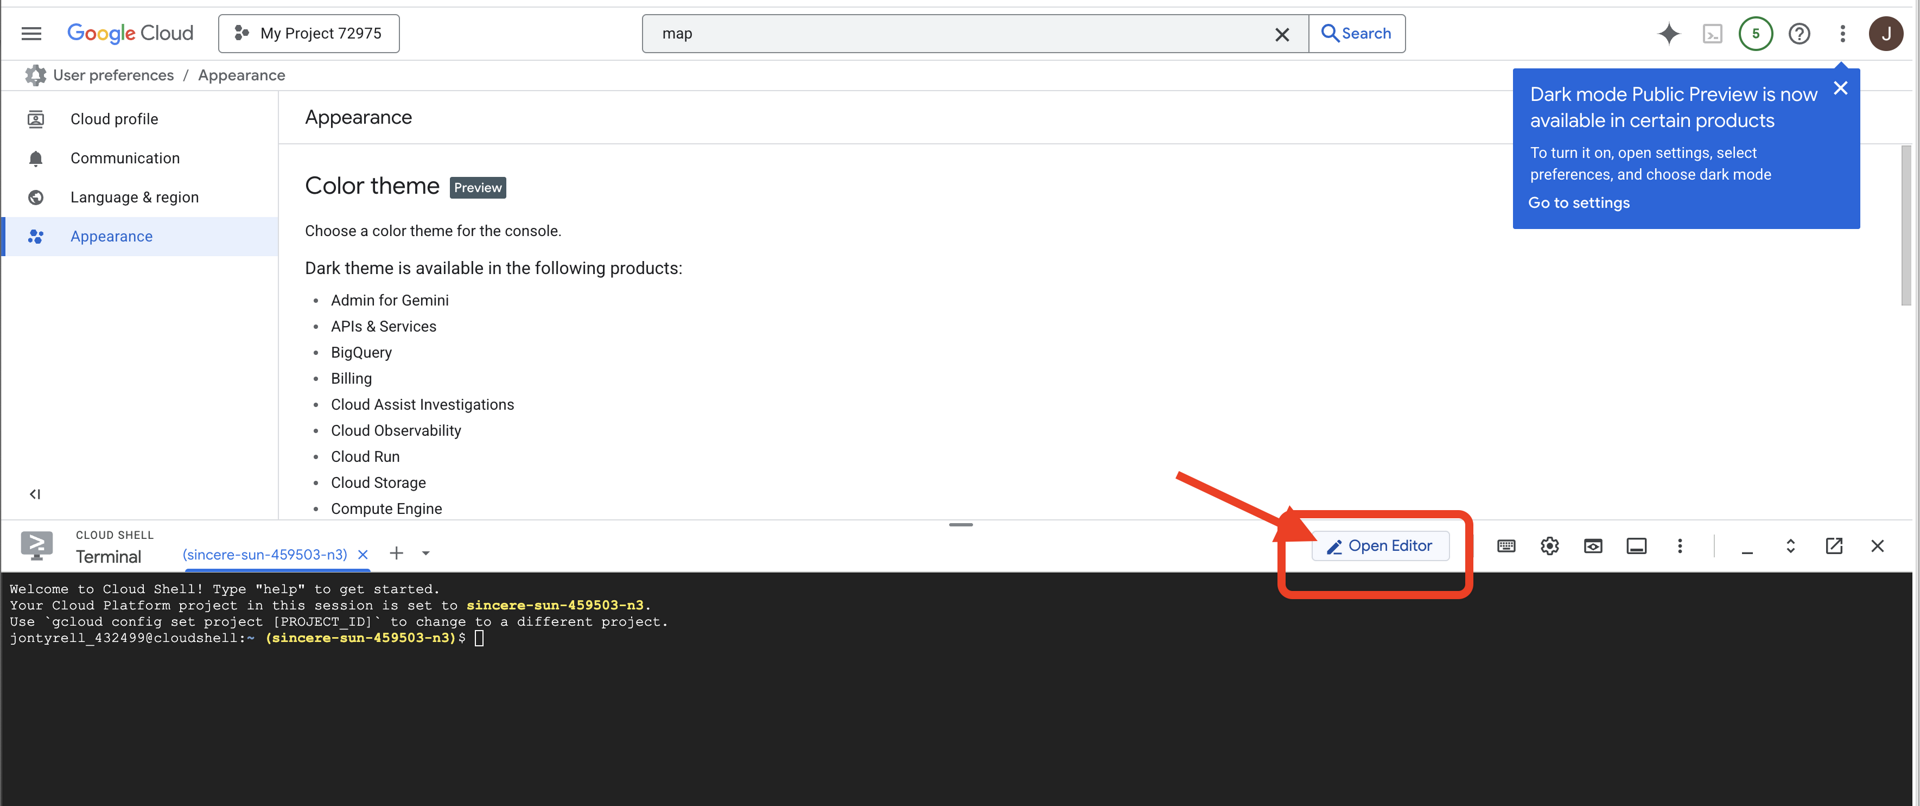
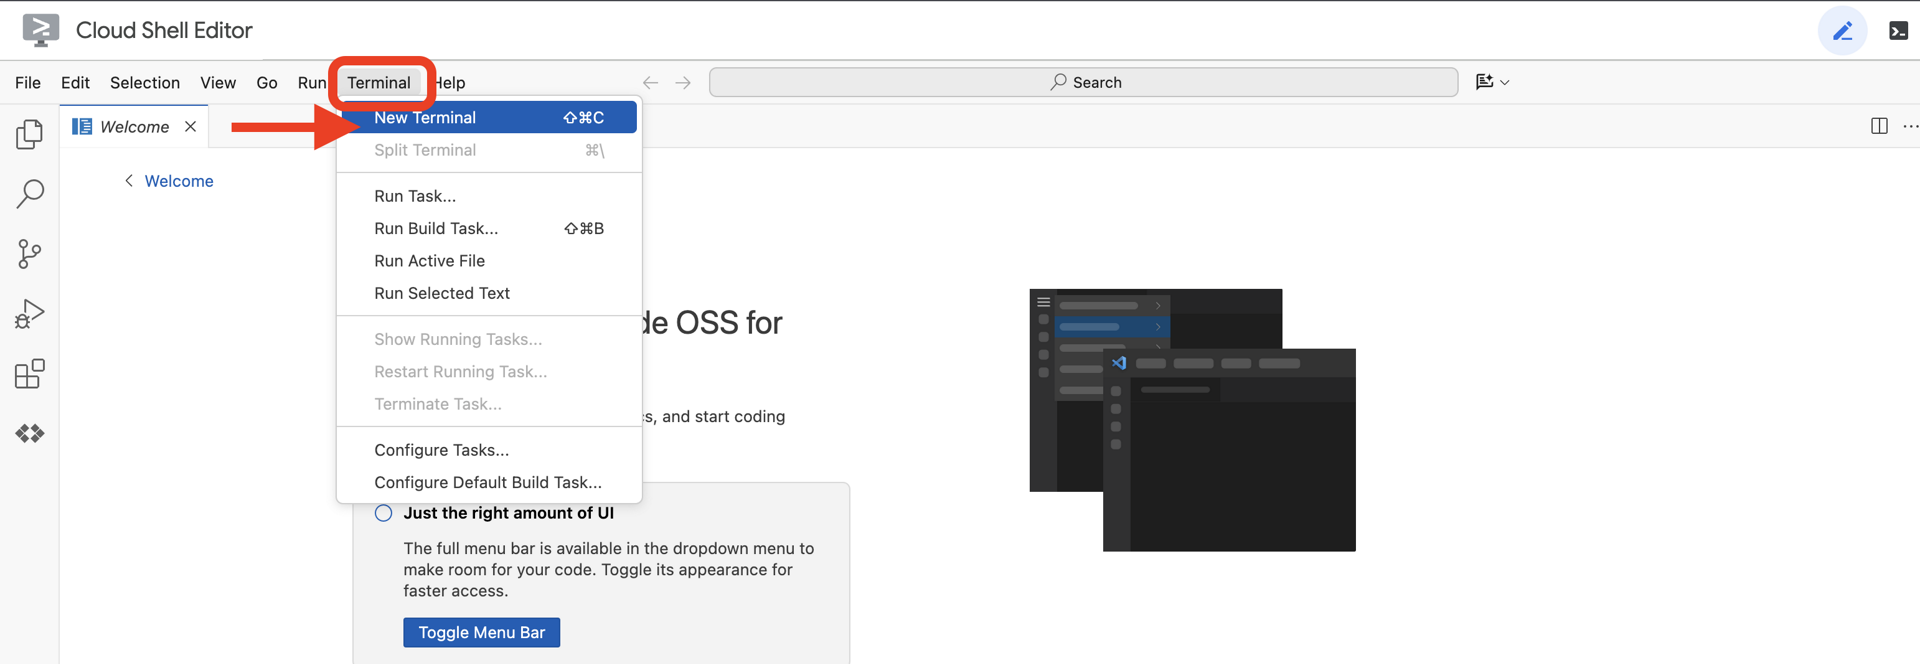
👉Откройте терминал в облачной IDE,
👉💻 В терминале убедитесь, что вы уже авторизованы и что проект настроен на ваш идентификатор проекта, используя следующую команду:
gcloud auth list
👉💻 Клонируйте проект Bootstrap с GitHub:
git clone https://github.com/weimeilin79/agentverse-developer.git
chmod +x ~/agentverse-developer/gitea.sh
chmod +x ~/agentverse-developer/init.sh
chmod +x ~/agentverse-developer/set_env.sh

git clone https://github.com/weimeilin79/agentverse-dungeon.git
chmod +x ~/agentverse-dungeon/run_cloudbuild.sh
chmod +x ~/agentverse-dungeon/start.sh
👉💻 Запустите скрипт установки из каталога проекта.
⚠️ Примечание по идентификатору проекта: скрипт предложит случайно сгенерированный идентификатор проекта по умолчанию. Вы можете нажать Enter , чтобы принять этот идентификатор по умолчанию.
Однако, если вы предпочитаете создать конкретный новый проект , вы можете ввести желаемый идентификатор проекта, когда скрипт предложит вам это сделать.
cd ~/agentverse-developer
./init.sh
Скрипт автоматически выполнит остальную часть процесса настройки.
👉 Важный шаг после завершения: После завершения работы скрипта необходимо убедиться, что в консоли Google Cloud отображается правильный проект:
- Перейдите на console.cloud.google.com .
- Нажмите на выпадающее меню выбора проекта в верхней части страницы.
- Нажмите вкладку «Все» (поскольку новый проект может еще не отображаться в разделе «Недавние»).
- Выберите идентификатор проекта, который вы только что настроили на шаге
init.sh

👉💻 Вернитесь в терминал. Установите необходимый идентификатор проекта:
gcloud config set project $(cat ~/project_id.txt) --quiet
👉💻 Выполните следующую команду, чтобы включить необходимые API Google Cloud:
gcloud services enable  compute.googleapis.com \
                        artifactregistry.googleapis.com \
                        run.googleapis.com \
                        cloudfunctions.googleapis.com \
                        cloudbuild.googleapis.com \
                        iam.googleapis.com \
                        aiplatform.googleapis.com \
                        cloudresourcemanager.googleapis.com
👉💻 Если вы еще не создали репозиторий Artifact Registry с именем agentverse-repo, выполните следующую команду, чтобы создать его:
. ~/agentverse-developer/set_env.sh
gcloud artifacts repositories create $REPO_NAME \
    --repository-format=docker \
    --location=$REGION \
    --description="Repository for Agentverse agents"
Настройка разрешений
👉💻 Предоставьте необходимые права доступа, выполнив следующие команды в терминале:
. ~/agentverse-developer/set_env.sh

# Artifact Registry Admin
gcloud projects add-iam-policy-binding $PROJECT_ID \
  --member="serviceAccount:$SERVICE_ACCOUNT_NAME" \
  --role="roles/artifactregistry.admin"

# Cloud Build Editor
gcloud projects add-iam-policy-binding $PROJECT_ID \
  --member="serviceAccount:$SERVICE_ACCOUNT_NAME" \
  --role="roles/cloudbuild.builds.editor"

# Cloud Run Admin
gcloud projects add-iam-policy-binding $PROJECT_ID \
  --member="serviceAccount:$SERVICE_ACCOUNT_NAME" \
  --role="roles/run.admin"

# IAM Service Account User
gcloud projects add-iam-policy-binding $PROJECT_ID \
  --member="serviceAccount:$SERVICE_ACCOUNT_NAME" \
  --role="roles/iam.serviceAccountUser"

# Vertex AI User
gcloud projects add-iam-policy-binding $PROJECT_ID \
  --member="serviceAccount:$SERVICE_ACCOUNT_NAME" \
  --role="roles/aiplatform.user"

# Logging Writer (to allow writing logs)
gcloud projects add-iam-policy-binding $PROJECT_ID \
  --member="serviceAccount:$SERVICE_ACCOUNT_NAME" \
  --role="roles/logging.logWriter"


gcloud projects add-iam-policy-binding $PROJECT_ID \
  --member="serviceAccount:$SERVICE_ACCOUNT_NAME" \
  --role="roles/logging.viewer"
👉💻 В начале вашей тренировки мы подготовим финальное испытание. Следующие команды призывают Призраков из хаотического статического шума, создавая боссов для вашего испытания.
. ~/agentverse-developer/set_env.sh
cd ~/agentverse-dungeon
./run_cloudbuild.sh

npm update -g @google/gemini-cli
4. Освоение вашего основного оружия: Введение в Gemini CLI
Прежде чем вы сможете использовать продвинутое специализированное оружие из арсенала сервера MCP, вы должны сначала освоить своё основное оружие: Gemini CLI. Это ваш самый универсальный клинок, способный изменять цифровой мир вашими командами. Эти тренировки познакомят вас с его основными функциями и возможностями.
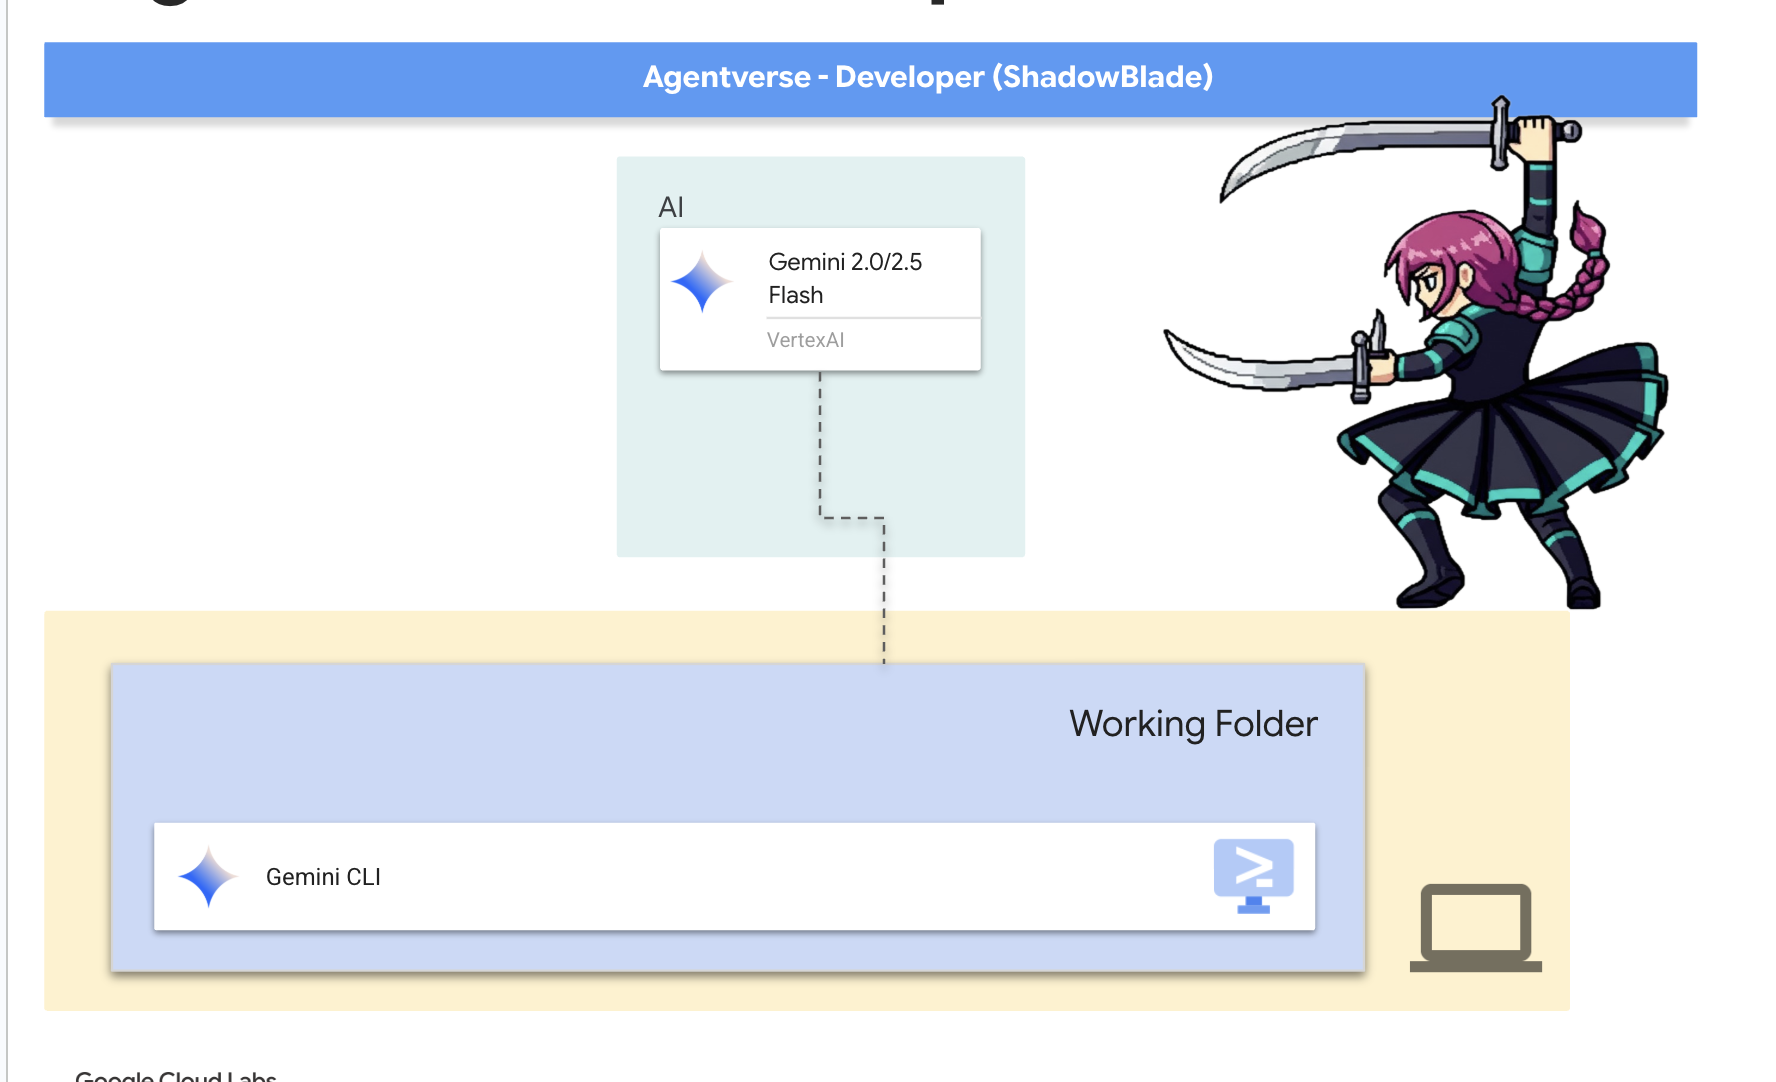
Интерфейс командной строки Gemini (CLI) — это больше, чем просто инструмент; это продолжение вашей воли. Этот агент с открытым исходным кодом и искусственным интеллектом, работающий на основе моделей Gemini, функционирует по принципу «разум и действие» (ReAct). Он анализирует ваши намерения, выбирает подходящую технику, выполняет её и наблюдает за результатом для решения сложных задач. Прежде чем вы сможете использовать более специализированное оружие, вы должны овладеть этим основным инструментом.
Начало работы с Gemini CLI
👉💻 Войдите на тренировочную площадку и достаньте оружие. В терминале Cloud Shell перейдите в свою личную оружейную.
cd ~/agentverse-developer
mkdir tabletop
cd tabletop
👉💻 Призовите Близнецов в первый раз. Они помогут вам пройти начальную настройку.
clear
gemini
Если система спросит: Do you want to connect Cloud Shell editor to Gemini CLI? , выберите «НЕТ» .
Ознакомление с оружием
Каждый мастер знает свои инструменты. Прежде чем столкнуться с настоящим врагом, необходимо освоить основные техники владения клинком.
👉✨ У каждого зачарованного инструмента есть руны, описывающие его силу. Прочитайте их прямо сейчас. В подсказке для Близнецов введите:
/help
Ознакомьтесь со списком команд. Это ваши основные методы управления памятью ( focus ), общением ( chat ) и внешним арсеналом ( tools ). Это ваше руководство по ведению боя.
👉✨ Ваше оружие настроено на окружающую среду, позволяя вам напрямую управлять полем боя. Отдавайте команды миру за пределами клинка:
!ls -l
👉✨ Интерфейс командной строки Gemini обладает собственным набором встроенных возможностей. Чтобы ознакомиться с ними:
/tools
Вы увидите список, включающий ReadFile , WriteFile и GoogleSearch . Это стандартные методы, которые вы можете использовать, не прибегая к внешним инструментам.
👉✨ Ваш клинок также можно улучшить с помощью расширений — предварительно выкованных зачарований, созданных другими мастерами, которые объединяют инструменты, команды и контекст в единый устанавливаемый блок. Проверьте, какие расширения в данный момент настроены для вашего клинка:
/extensions list
Список может быть пока пуст — вы еще не установили ни одного расширения. Первое расширение вы установите позже, когда обучение потребует от вас возможностей создания изображений.
👉✨ Помимо расширений, опытные мастера кодифицировали свои знания в виде «Навыков агента» — свитков специализированных знаний, доступных по запросу. Узнайте, какие навыки может открыть ваш клинок:
/skills list
Навыки по умолчанию не загружаются в память — они активируются только при необходимости, обеспечивая быстроту и свободу движений вашего клинка. Освоить использование навыков вы научитесь позже, в процессе обучения.
👉✨ Оружие эффективно только при правильной настройке. Клинок Близнецов способен учитывать «тактическую осведомленность» (контекст), чтобы направлять свои действия.
/memory show
Сейчас оно пустое, чистый лист.
👉✨ Запишите в его память следующие тактические данные:
/memory add "The Shadowblade's primary foe is The Static."
Запустите команду /memory show еще раз, чтобы убедиться, что ваш модуль Blade усвоил эти данные.
👉✨ Чтобы быть эффективным, ваше оружие должно понимать задачу. Символ @ управляет клинком, заставляя его анализировать разведывательную информацию. Сначала создайте файл с описанием задачи:
!echo "## Mission Objective: Defeat the Seven Spectres" > mission.md
👉✨Теперь отдайте команду Gemini CLI на анализ брифинга и отправку отчета о результатах:
Explain the contents of the file @mission.md
Ваше основное оружие теперь знает свою цель.
👉💻 Нажмите Ctrl+C дважды, чтобы выйти из Gemini CLI.
5. Анализ поля боя: Практическое взаимодействие посредством кодирования атмосферы.
Тренировочные упражнения завершены. Вы освоили основные стойки и удары своего основного оружия, Gemini CLI. Но настоящее мастерство владения клинком проявляется только после его испытания в кузнице созидания и настройки на боевое вооружение. Прежде чем сразиться с настоящим врагом, вы должны сначала оценить и сформировать свое непосредственное окружение — цифровое поле боя.
Эта глава посвящена переходу от теории к практике. Сначала вы заявите о своем присутствии во вселенной Агентов, приказав своему клинку Близнецов выковать ваш Знак Создателя — цифровую подпись в виде личного веб-сайта, созданного из ничего, кроме вашего намерения. Затем вы расширите свои возможности, активировав локальный арсенал продвинутых инструментов — сервер MCP — и настроив свой клинок на его частоту, что позволит вам выполнять сложные маневры, такие как управление репозиториями кода с помощью простых, решительных команд.
Создание собственного фирменного знака
Истинного Теневого Клинка можно узнать не только по оружию, но и по его фирменному стилю — по Клейму Создателя . Этот знак станет вашим цифровым присутствием, личным профилем, который представит вашу личность во Вселенной Агентов. Здесь вы будете управлять своим Клинём Близнецов, выполняя сложные техники, необходимые для определения этой личности.

👉💻 Если вы закрыли Gemini CLI в предыдущем разделе, обязательно запустите его снова в терминале, выполнив команду:
clear
cd ~/agentverse-developer/tabletop
gemini
👉✨ С помощью одной мощной команды настройте Gemini CLI для создания основы вашей цифровой идентичности:
In the current folder, create a personal profile website for a hero codenamed 'Shadowblade'. The design must be a dark, futuristic theme with electric blue accents. All code must be in separate index.html and styles.css files. The layout must use CSS Flexbox for a two-column design. All generated code must be clean, well-commented, and professional. Make sure you have a placeholder spot for profile picture. Do not attempt to start the server.
Компания Gemini рассчитала последовательность необходимых действий.
👉💻 Нажмите Ctrl+C дважды, чтобы выйти из Gemini CLI, и выполните следующую команду в терминале.*
python -m http.server
👀 Чтобы просмотреть результаты своей работы, нажмите значок предварительного просмотра веб-страниц на панели инструментов Cloud Shell. Выберите «Изменить порт» , установите значение 8000 и нажмите «Изменить и просмотреть» . Отобразится предварительный просмотр вашего веб-сайта. 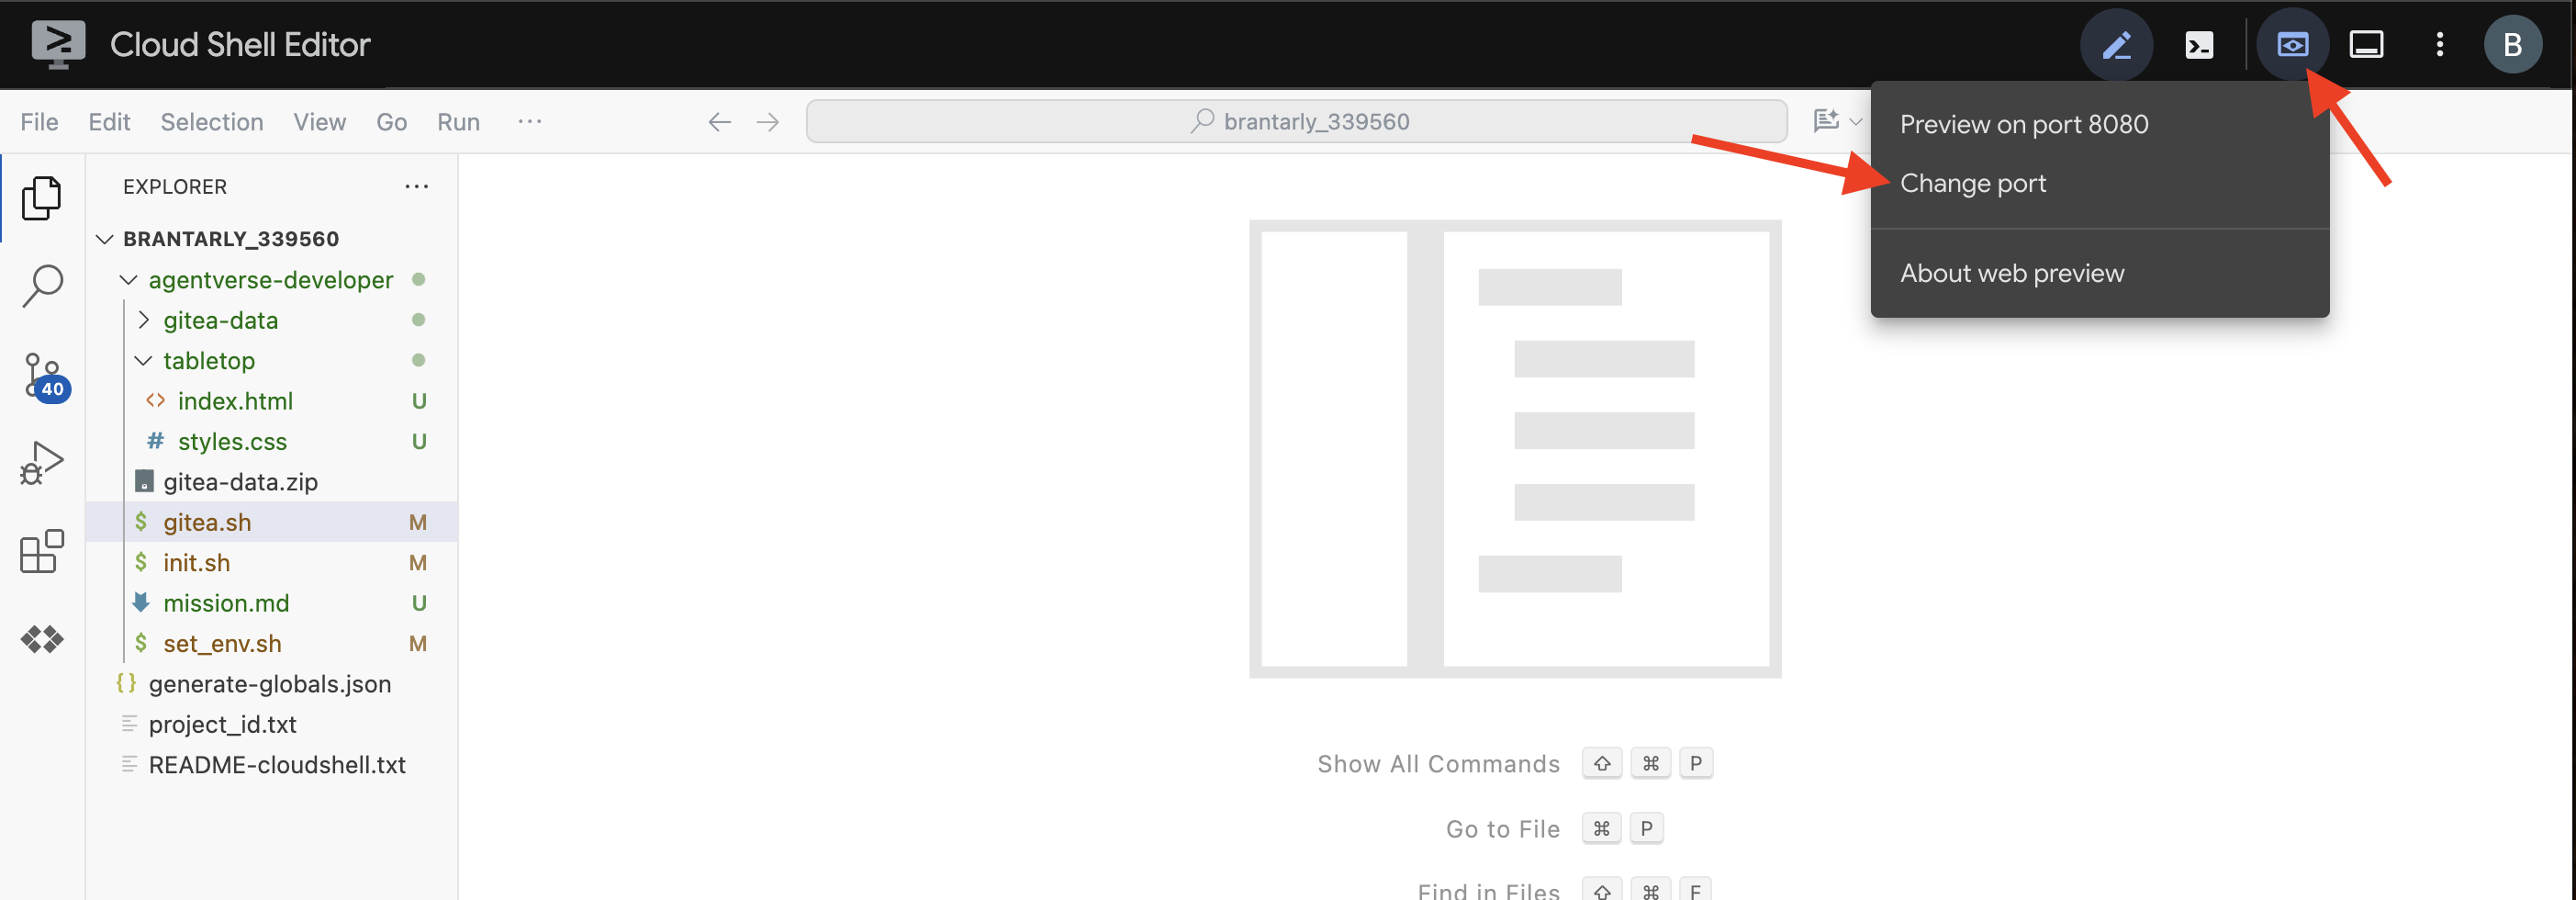
Ваш сайт может отличаться от моего. Это ваш уникальный знак. 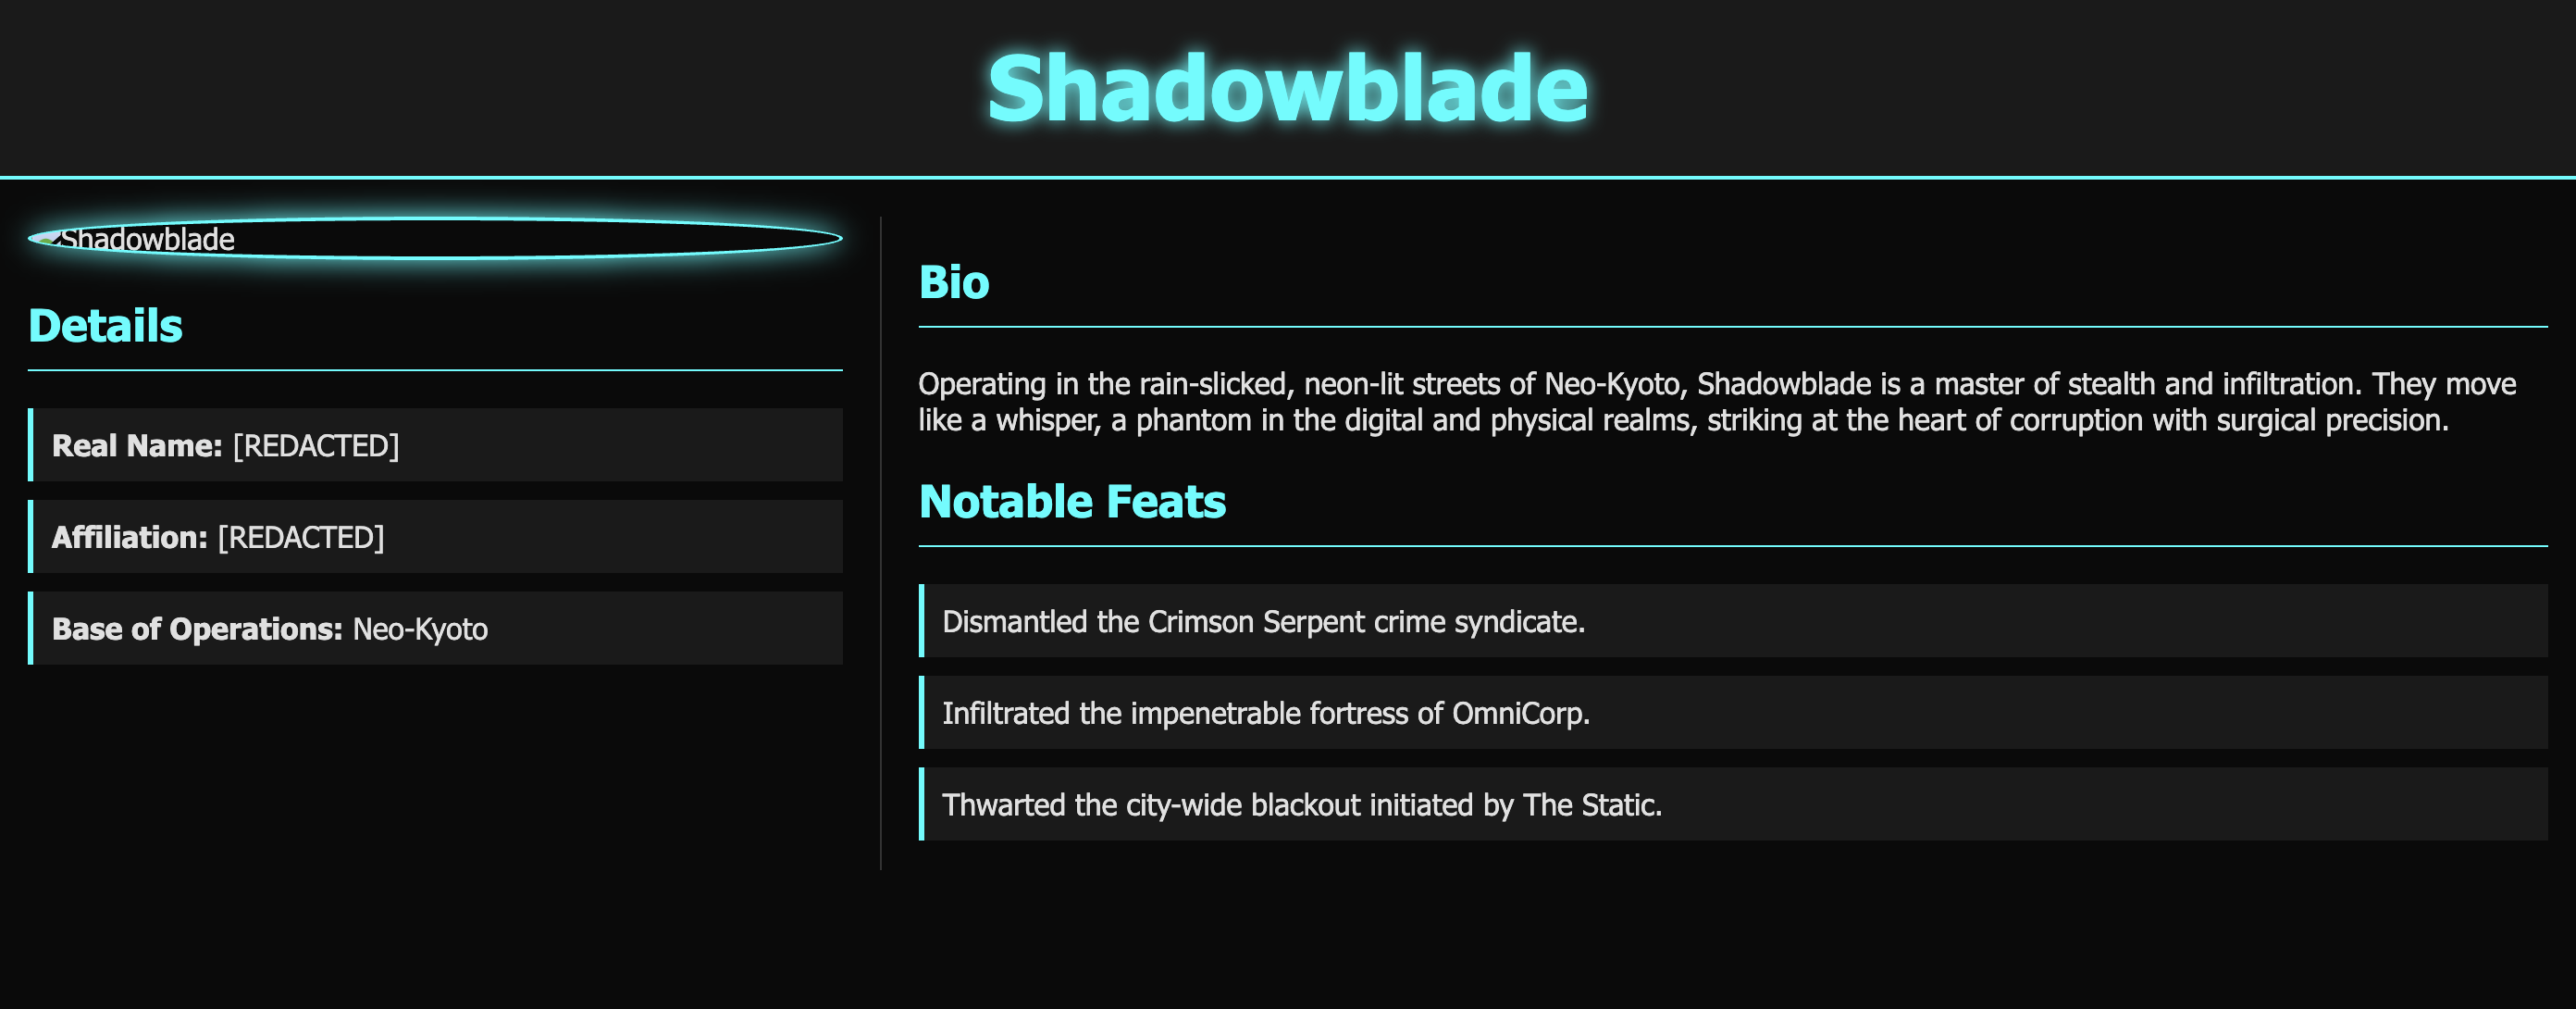
Ваша фирменная техника теперь усовершенствована, и симуляция в реальном времени больше не требуется. Прикажите Клинцу отступить.
👉💻 Нажмите Ctrl+C , чтобы выйти из HTTP-сервера.
Ваша цифровая идентичность теперь сформирована, и, что более важно, вы усвоили важнейшую мудрость использования большой власти с ещё большей осторожностью.
Активируйте свой местный арсенал: Оружейная Гитеа
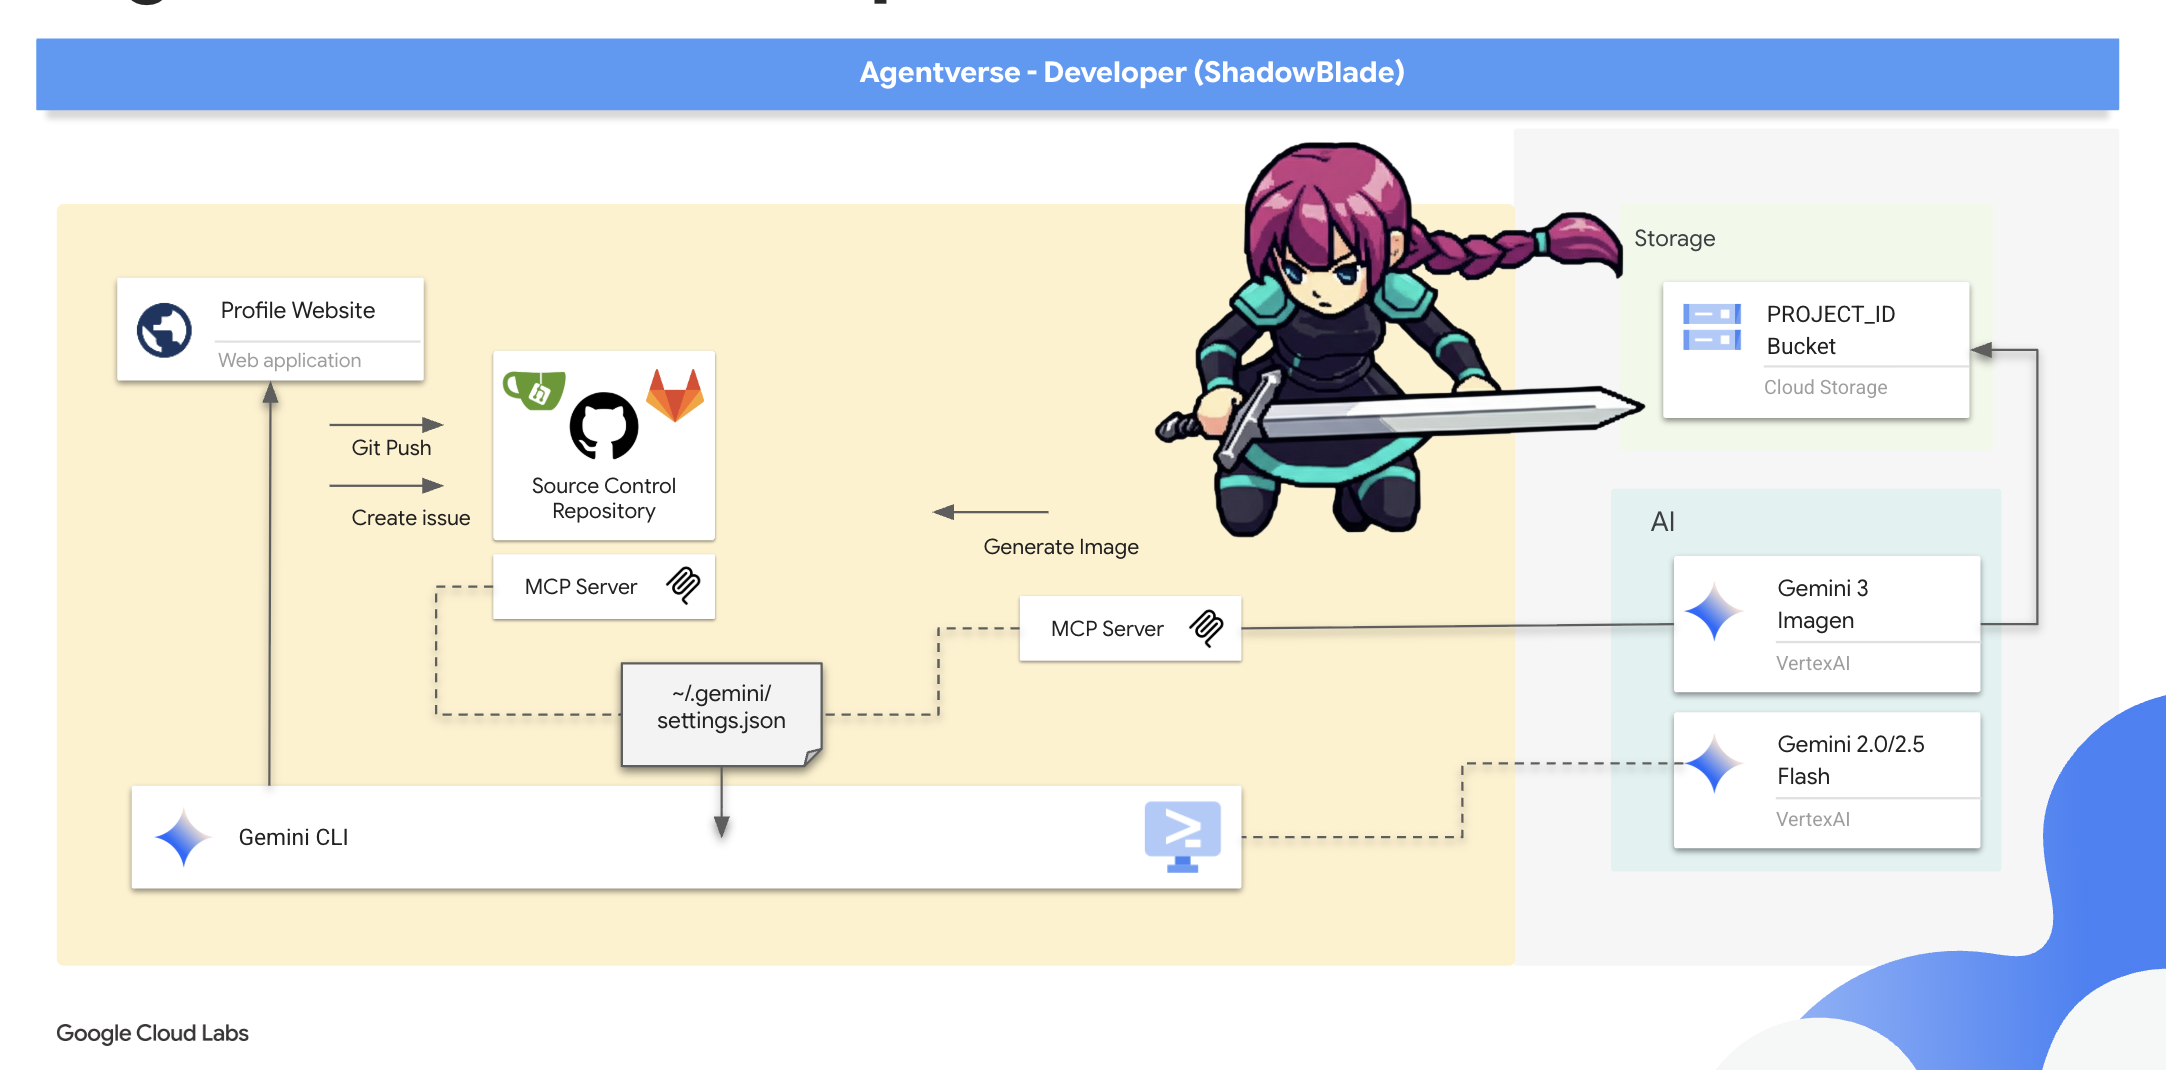
Истинный потенциал Теневого Клинка раскрывается не только благодаря его личному мастерству, но и качеству его арсенала. Теперь вам нужно активировать локальную оружейную стойку — сервер Gitea — и настроить свой клинок на его мощь. Этот арсенал подключен к вашему интерфейсу командной строки Gemini через сервер Model Context Protocol (MCP) , специализированный портал, который позволяет вашему клинку с искусственным интеллектом взаимодействовать с внешними инструментами и сервисами, превращая ваш терминал в интеллектуальное, ориентированное на действия рабочее пространство.
Примечание разработчика: Представьте себе MCP-сервер как проводник энергии, специализированный портал, соединяющий разум вашего ИИ с телом внешнего инструмента. Именно он превращает Gemini CLI из простого собеседника в настоящего, ориентированного на действия агента. Настроив свой инструмент на эти MCP-порталы, вы наделяете его возможностью выполнять реальные действия: управлять файлами, запрашивать базы данных, взаимодействовать с API и многое другое. Существует целая экосистема таких порталов, созданных разработчиками для подключения агентов ИИ к мощным платформам. Есть MCP-серверы для взаимодействия с базами данных, защиты кода или даже поддержки парного программирования. Возможности огромны, позволяя разработчику настраивать свое рабочее пространство для любого проекта.
Сегодня мы сосредоточимся на двух фундаментальных способностях, необходимых любому «программисту, создающему атмосферу»: способности управлять процессом создания контента и способности творить, руководствуясь воображением. Сначала вы настроите свой Blade на Git-сервер, что даст вам контроль над вашим репозиторием исходного кода. Затем вы подключитесь ко второму MCP-серверу для генерации изображений, что позволит вам создавать визуальные ресурсы, используя лишь одну команду.
Начнём с того, что достанем первый и самый важ элемент вашего нового арсенала: сам арсенал.
👉💻 В терминале выполните скрипт активации, чтобы вызвать оружейную:
cd ~/agentverse-developer
./gitea.sh
Этот скрипт активирует контейнер Gitea и открывает портал MCP, позволяя Gemini воспринимать его и взаимодействовать с ним.
👉 Чтобы осмотреть свой новый арсенал, вам нужно посмотреть предварительный просмотр на веб-сайте.
👉 На панели инструментов Cloud Shell в меню « Предварительный просмотр веб-страниц » выберите «Изменить порт» и установите значение 3005 .
👉 Откроется страница входа в Gitea. Войдите в оружейную, используя заклинание: * Имя пользователя: dev * Пароль: dev 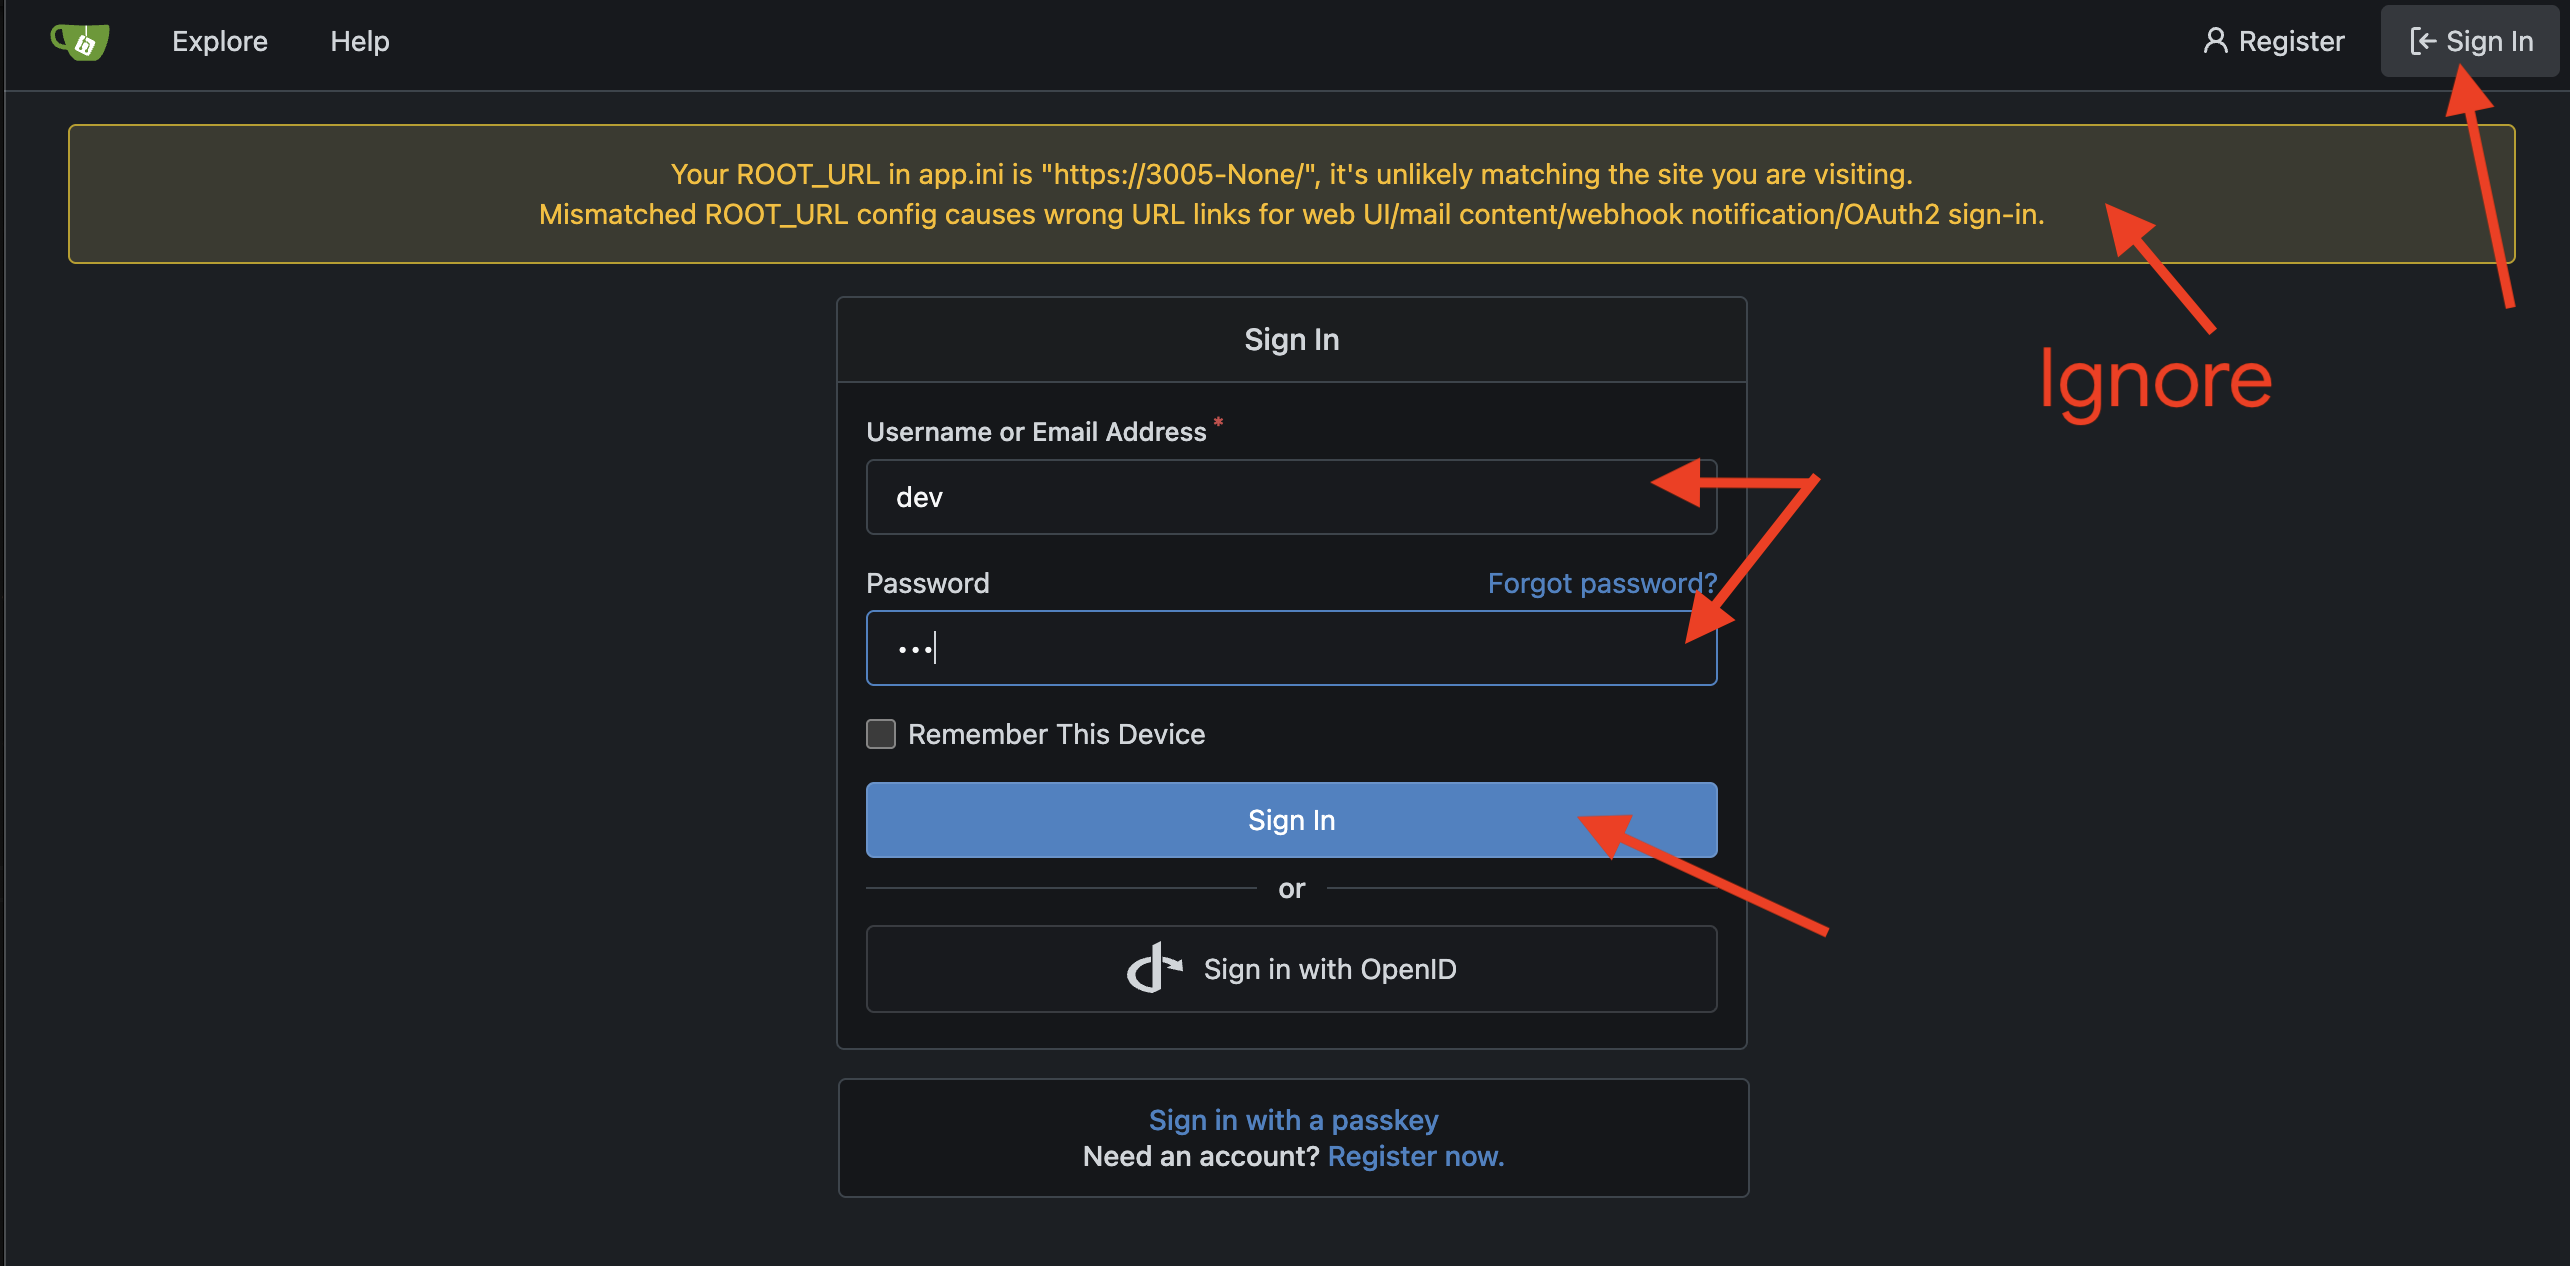
👉💻 Ваш Gemini CLI пока не видит этот новый арсенал. Вам необходимо выполнить критическую настройку, добавив местоположение арсенала в конфигурационные руны Gemini CLI ( settings.json ). В терминале выполните:
if [ ! -f ~/.gemini/settings.json ]; then
  # If file does not exist, create it with the specified content
  echo '{"mcpServers":{"gitea":{"url":"http://localhost:8085/sse"}}}' > ~/.gemini/settings.json
else
  # If file exists, merge the new data into it
  jq '. * {"mcpServers":{"gitea":{"url":"http://localhost:8085/sse"}}}' ~/.gemini/settings.json > tmp.json && mv tmp.json ~/.gemini/settings.json
fi &&
cat ~/.gemini/settings.json
👀 Файл settings.json — это центральная конфигурация для Gemini CLI, своего рода «магия» настроек и возможностей. Он определяет, как CLI работает, как выглядит и, что наиболее важно, какие внешние возможности он может использовать. Этот файл обычно находится в вашей домашней директории по адресу ~/.gemini/settings.json и применяет свои правила ко всем вашим проектам. Однако вы также можете создавать файлы settings.json для конкретных проектов в директории .gemini внутри папки вашего проекта, чтобы переопределить глобальные настройки.
"mcpServers": {
  "gitea": {
    "url": "http://localhost:8085/sse"
  }
}
Эта настройка сообщает вашему Gemini: «Арсенал под названием gitea активен и ожидает команд по этому конкретному сетевому адресу».
👉💻 Снова войдите в Gemini CLI. В терминале выполните:
clear
cd ~/agentverse-developer/tabletop/
gemini
👉✨ Убедитесь, что ваш клинок обнаружил новое оружие. Прикажите ему вывести список всех доступных арсеналов через порталы MCP:
/mcp
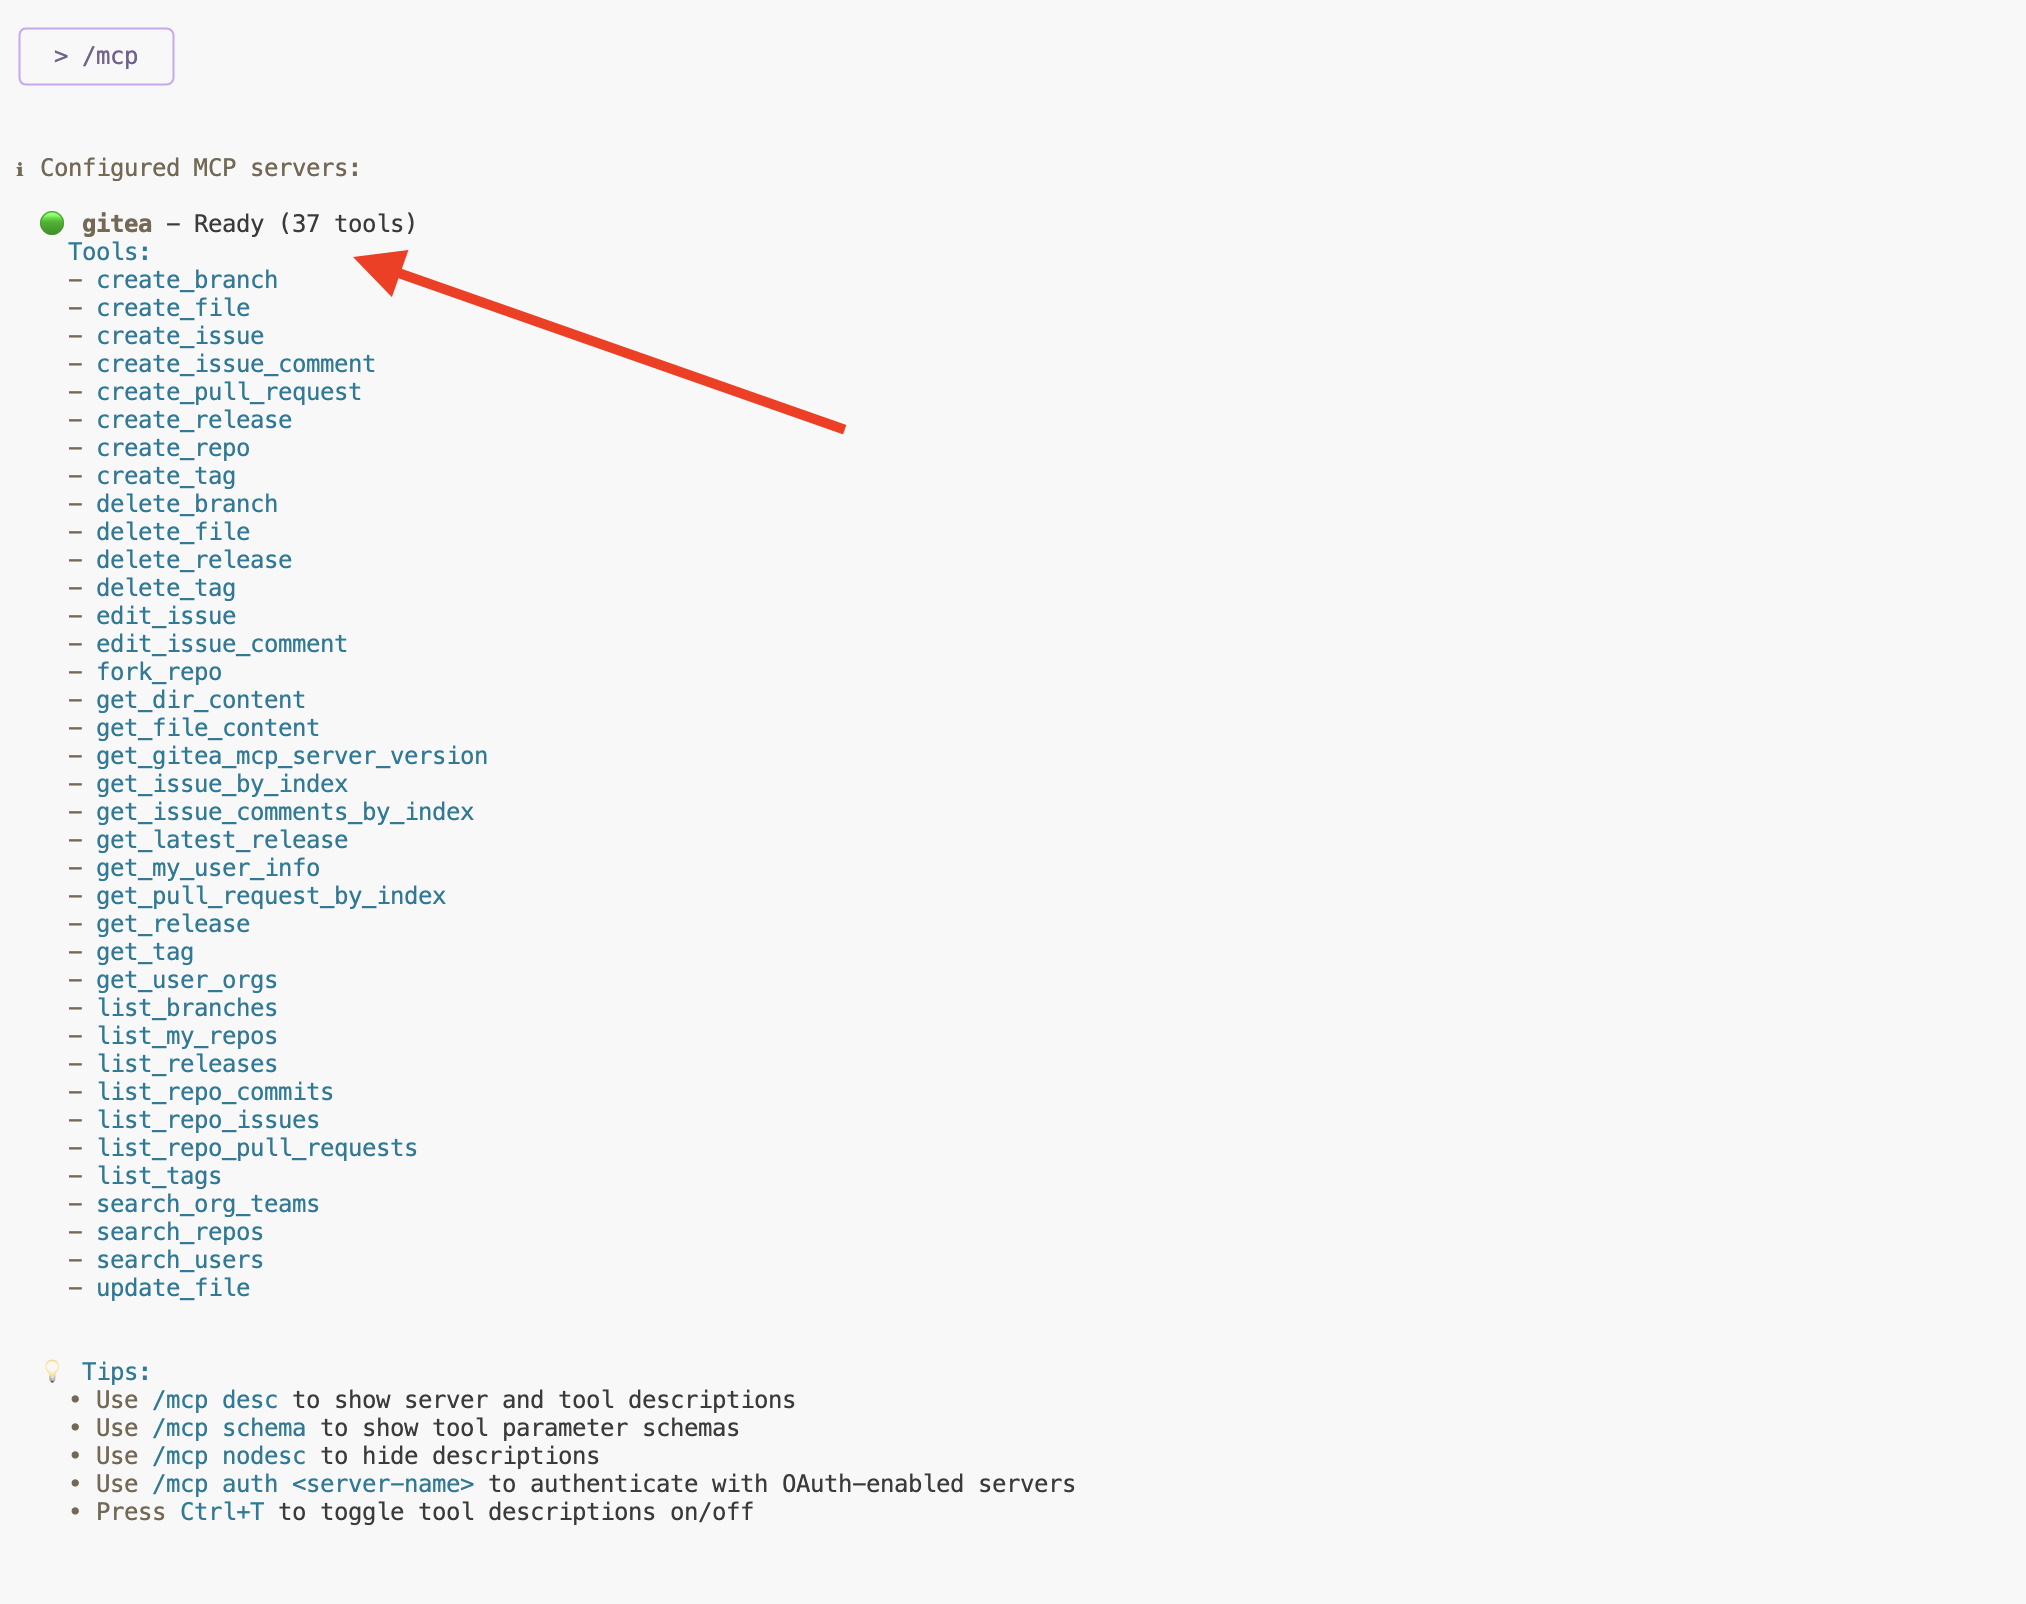
Теперь вы должны увидеть gitea и список доступных техник. Ваш клинок настроен.
Ваш профиль "Maker's Mark" — это искусно выполненная техника, но ей нужно подходящее место в арсенале — ножны, чтобы надежно ее хранить. Примените команду в интерфейсе командной строки Gemini, чтобы создать их.
Create a new repository named 'shadowblade-profile'. The description should be 'The Maker's Mark and digital identity for the Shadowblade operative.' I will push my own files later, so do not create any content.
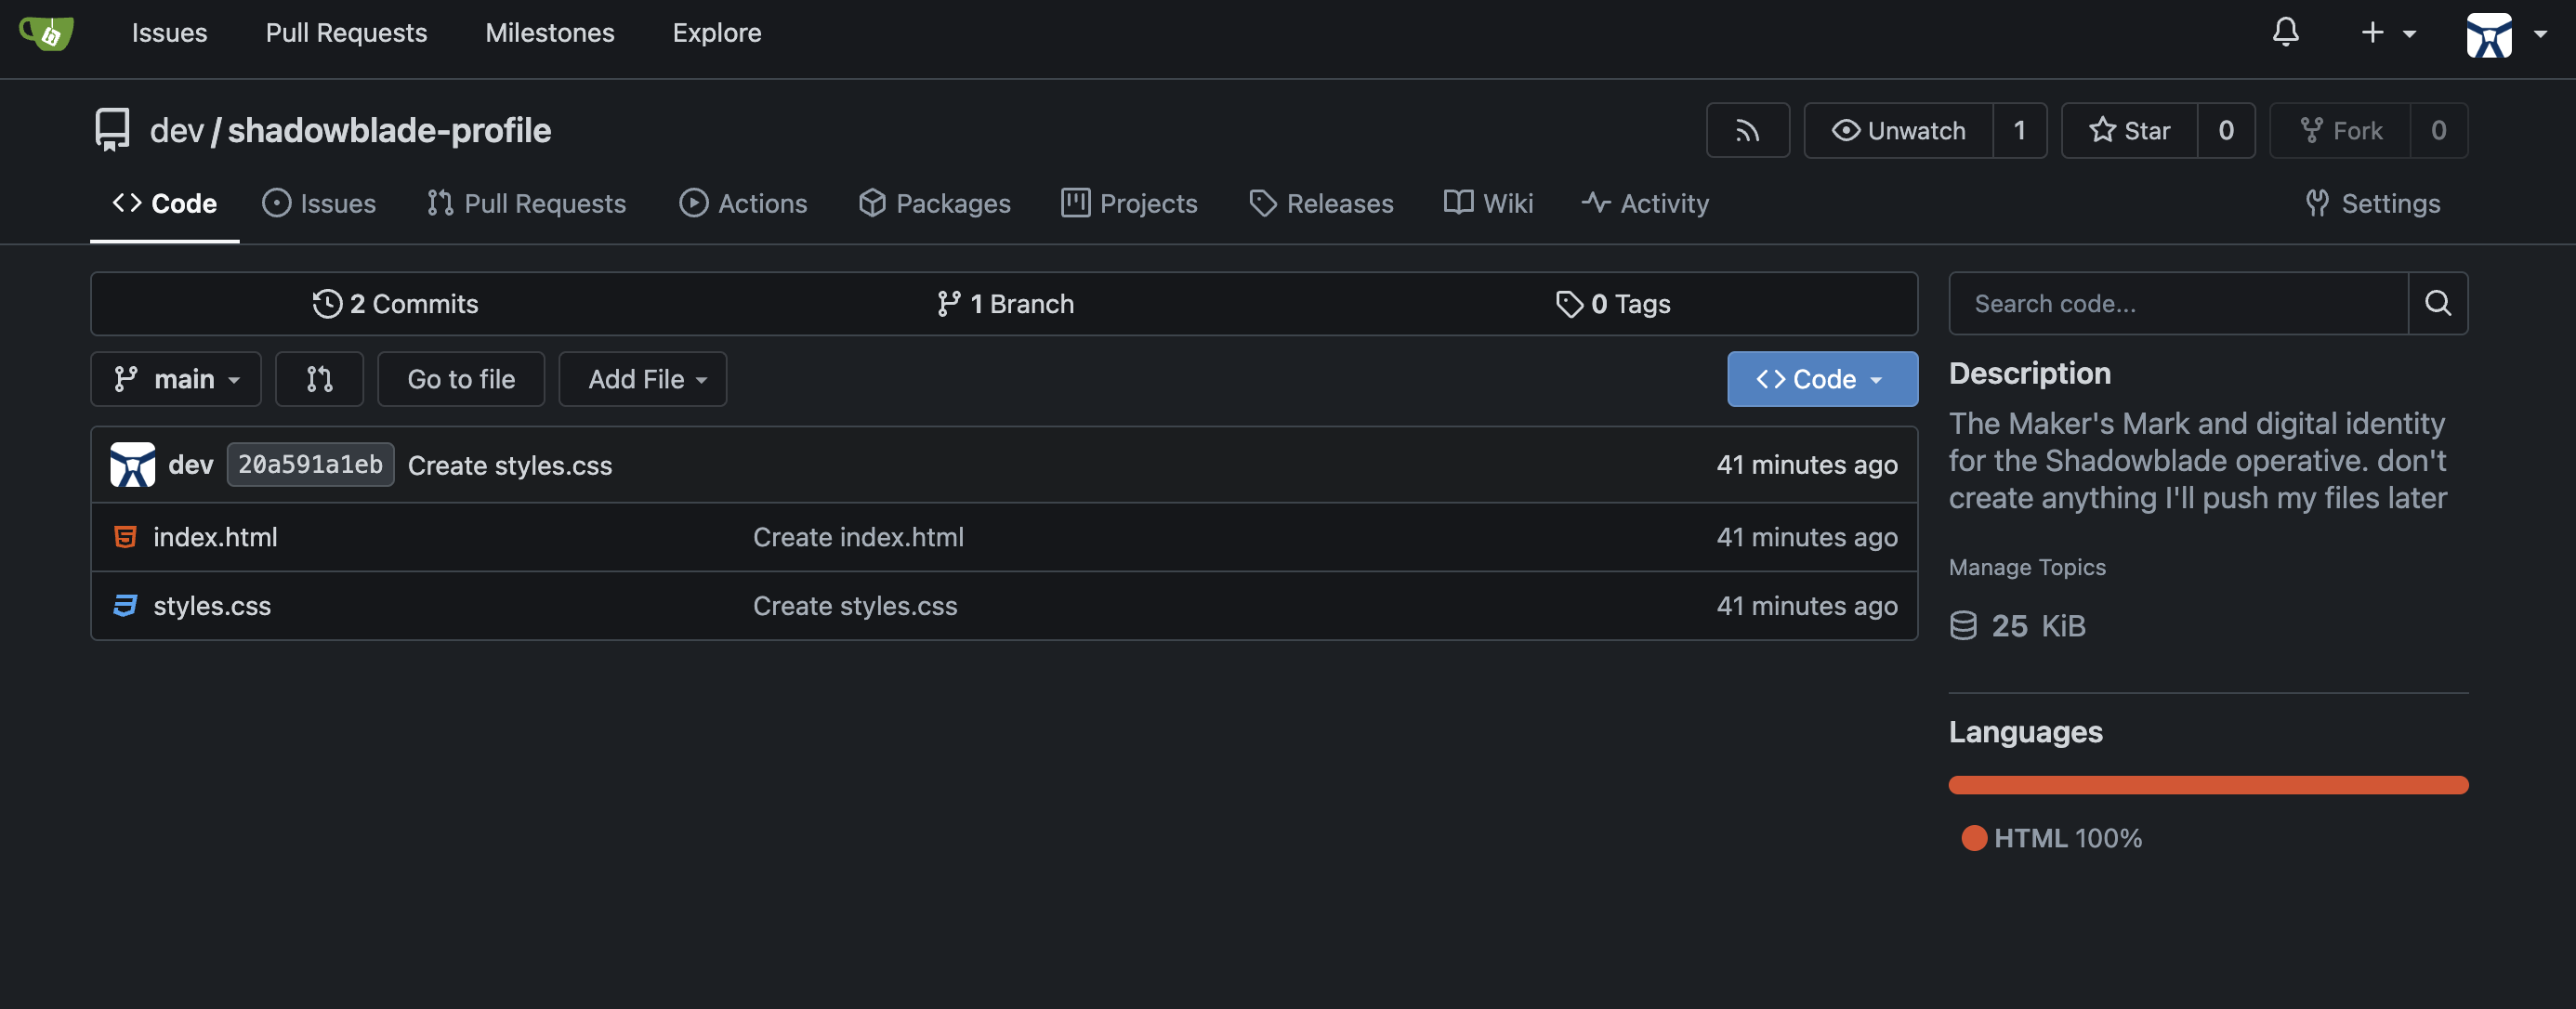
Вернитесь в веб-интерфейс Gitea и обновите страницу. Вы увидите, что для вас создан новый репозиторий shadowblade-profile . 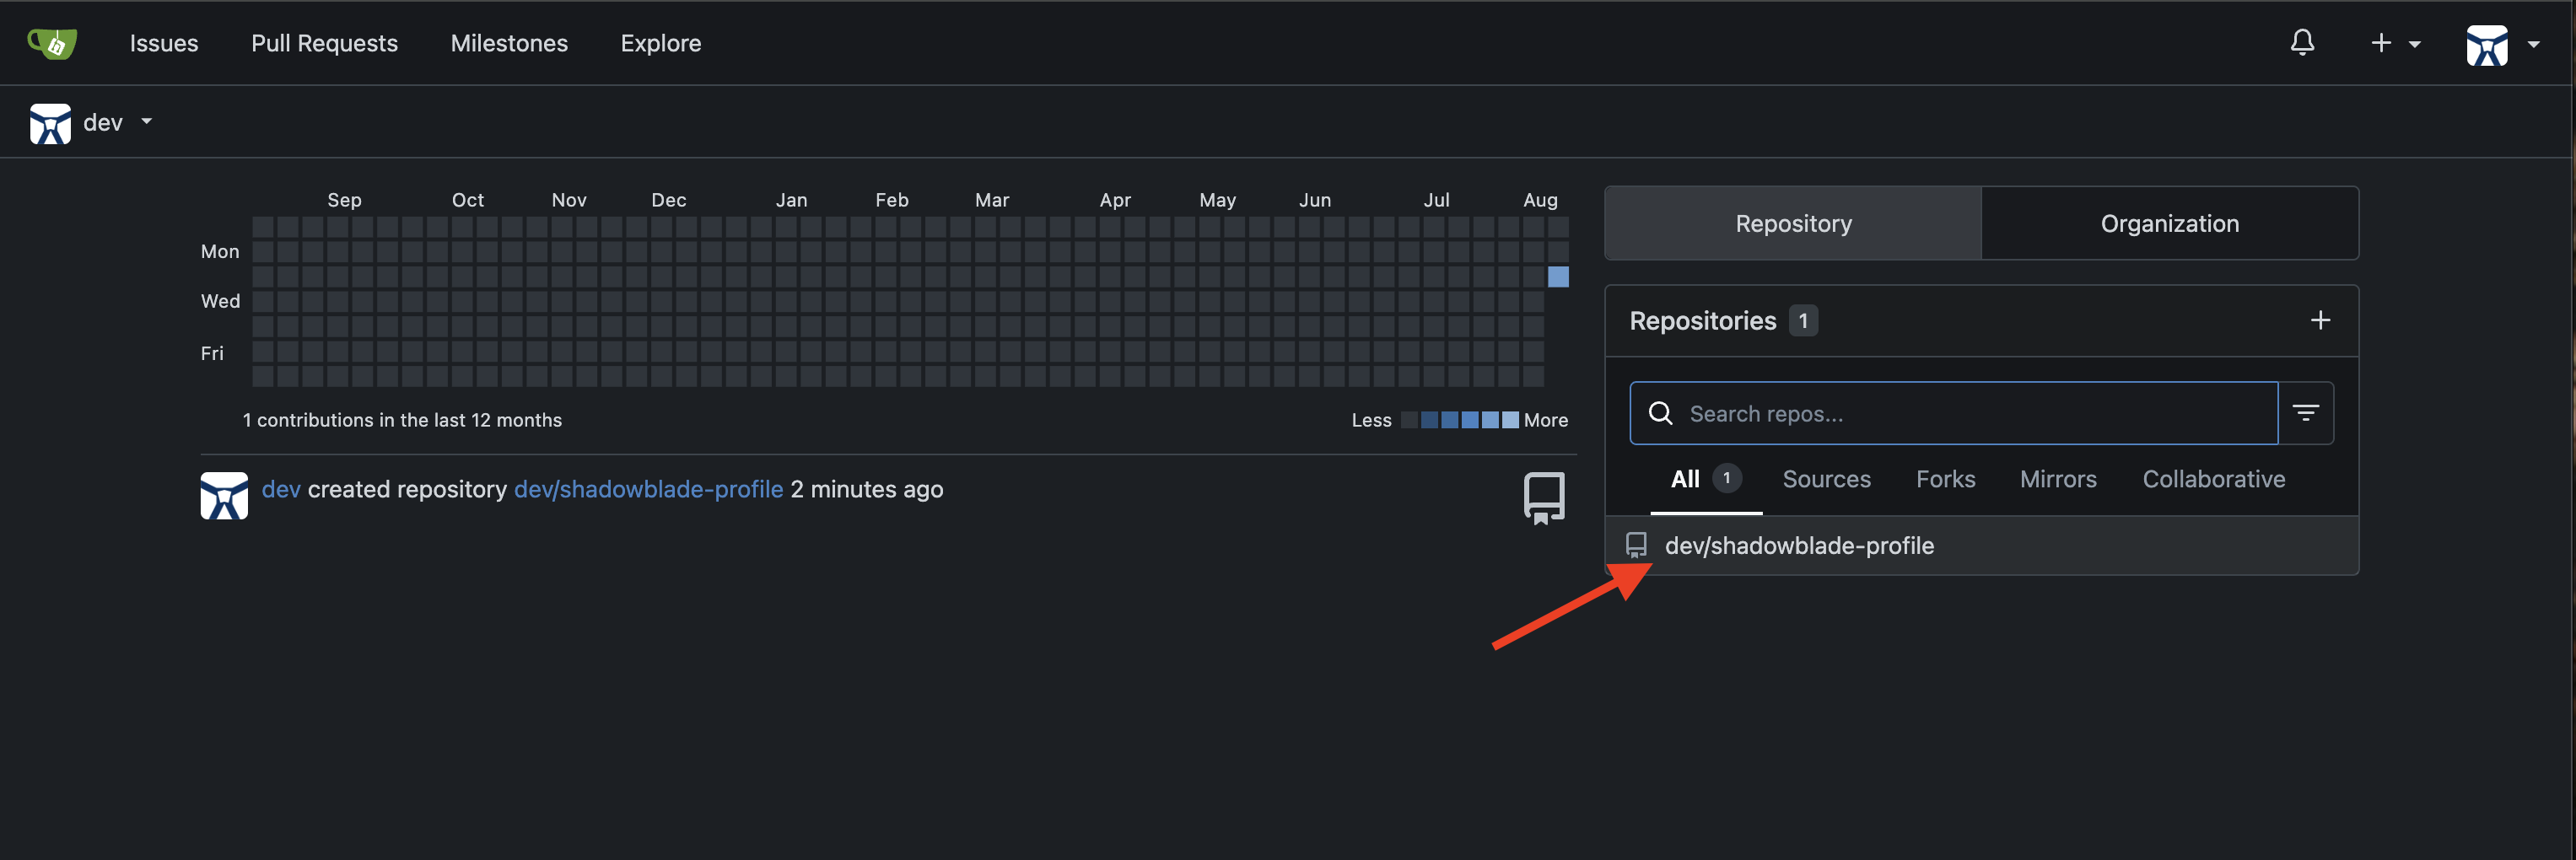
Приготовьте ножны и закрепите свою работу. Прикажите Близнецам зафиксировать файлы вашего веб-сайта-профиля.
👉💻Введите заключительную команду для этого метода в Gemini CLI:
Using the Gitea tool, push the index.html and styles.css files to the 'shadowblade-profile' repository.
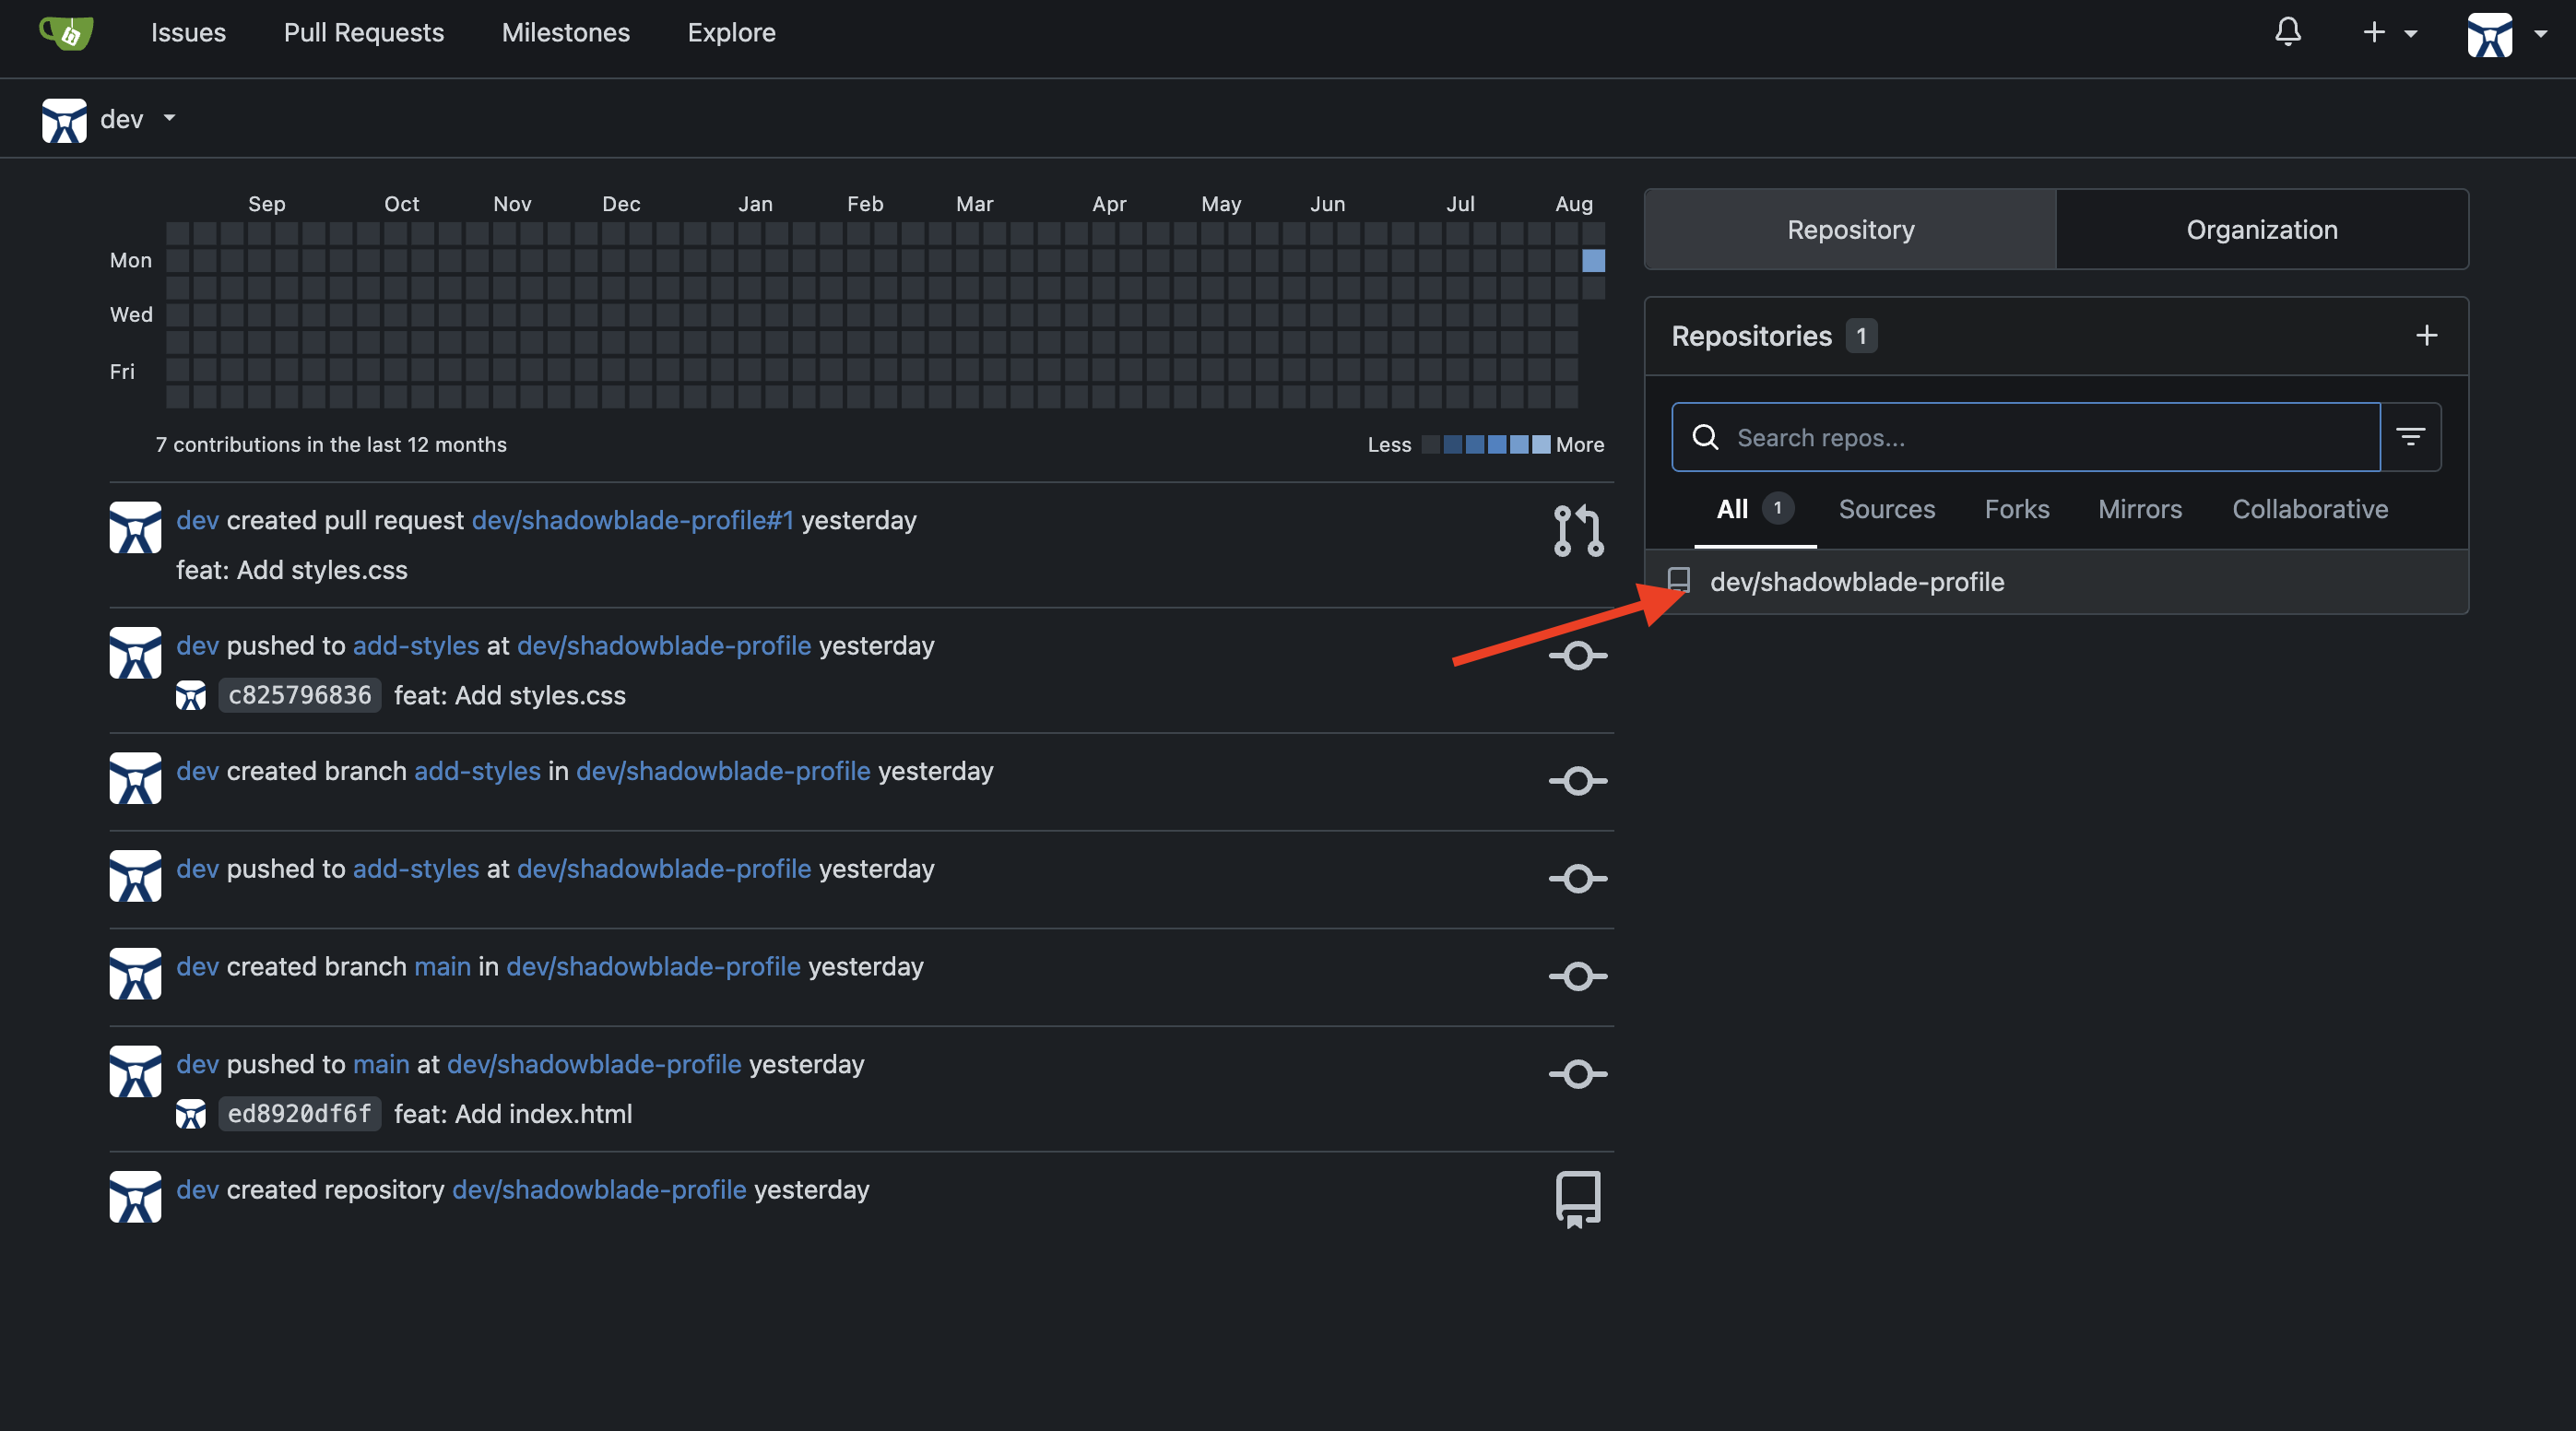
Настоящий мастер проверяет свою работу. Вернитесь на вкладку Gitea и обновите страницу репозитория. Ваши index.html и styles.css теперь надежно заархивированы.
👉✨ Теневой Клинок определяется своим символом, но, как вы помните, на вашем сайте отсутствует изображение профиля. Мастер-ремесленник признает свои недостатки, чтобы довести их до совершенства. Вы должны зафиксировать этот недостаток в записях оружейной.
File an issue for me in the shadowblade-profile repo. The issue is that the profile image is missing.
Посмотреть проблему в Gitea 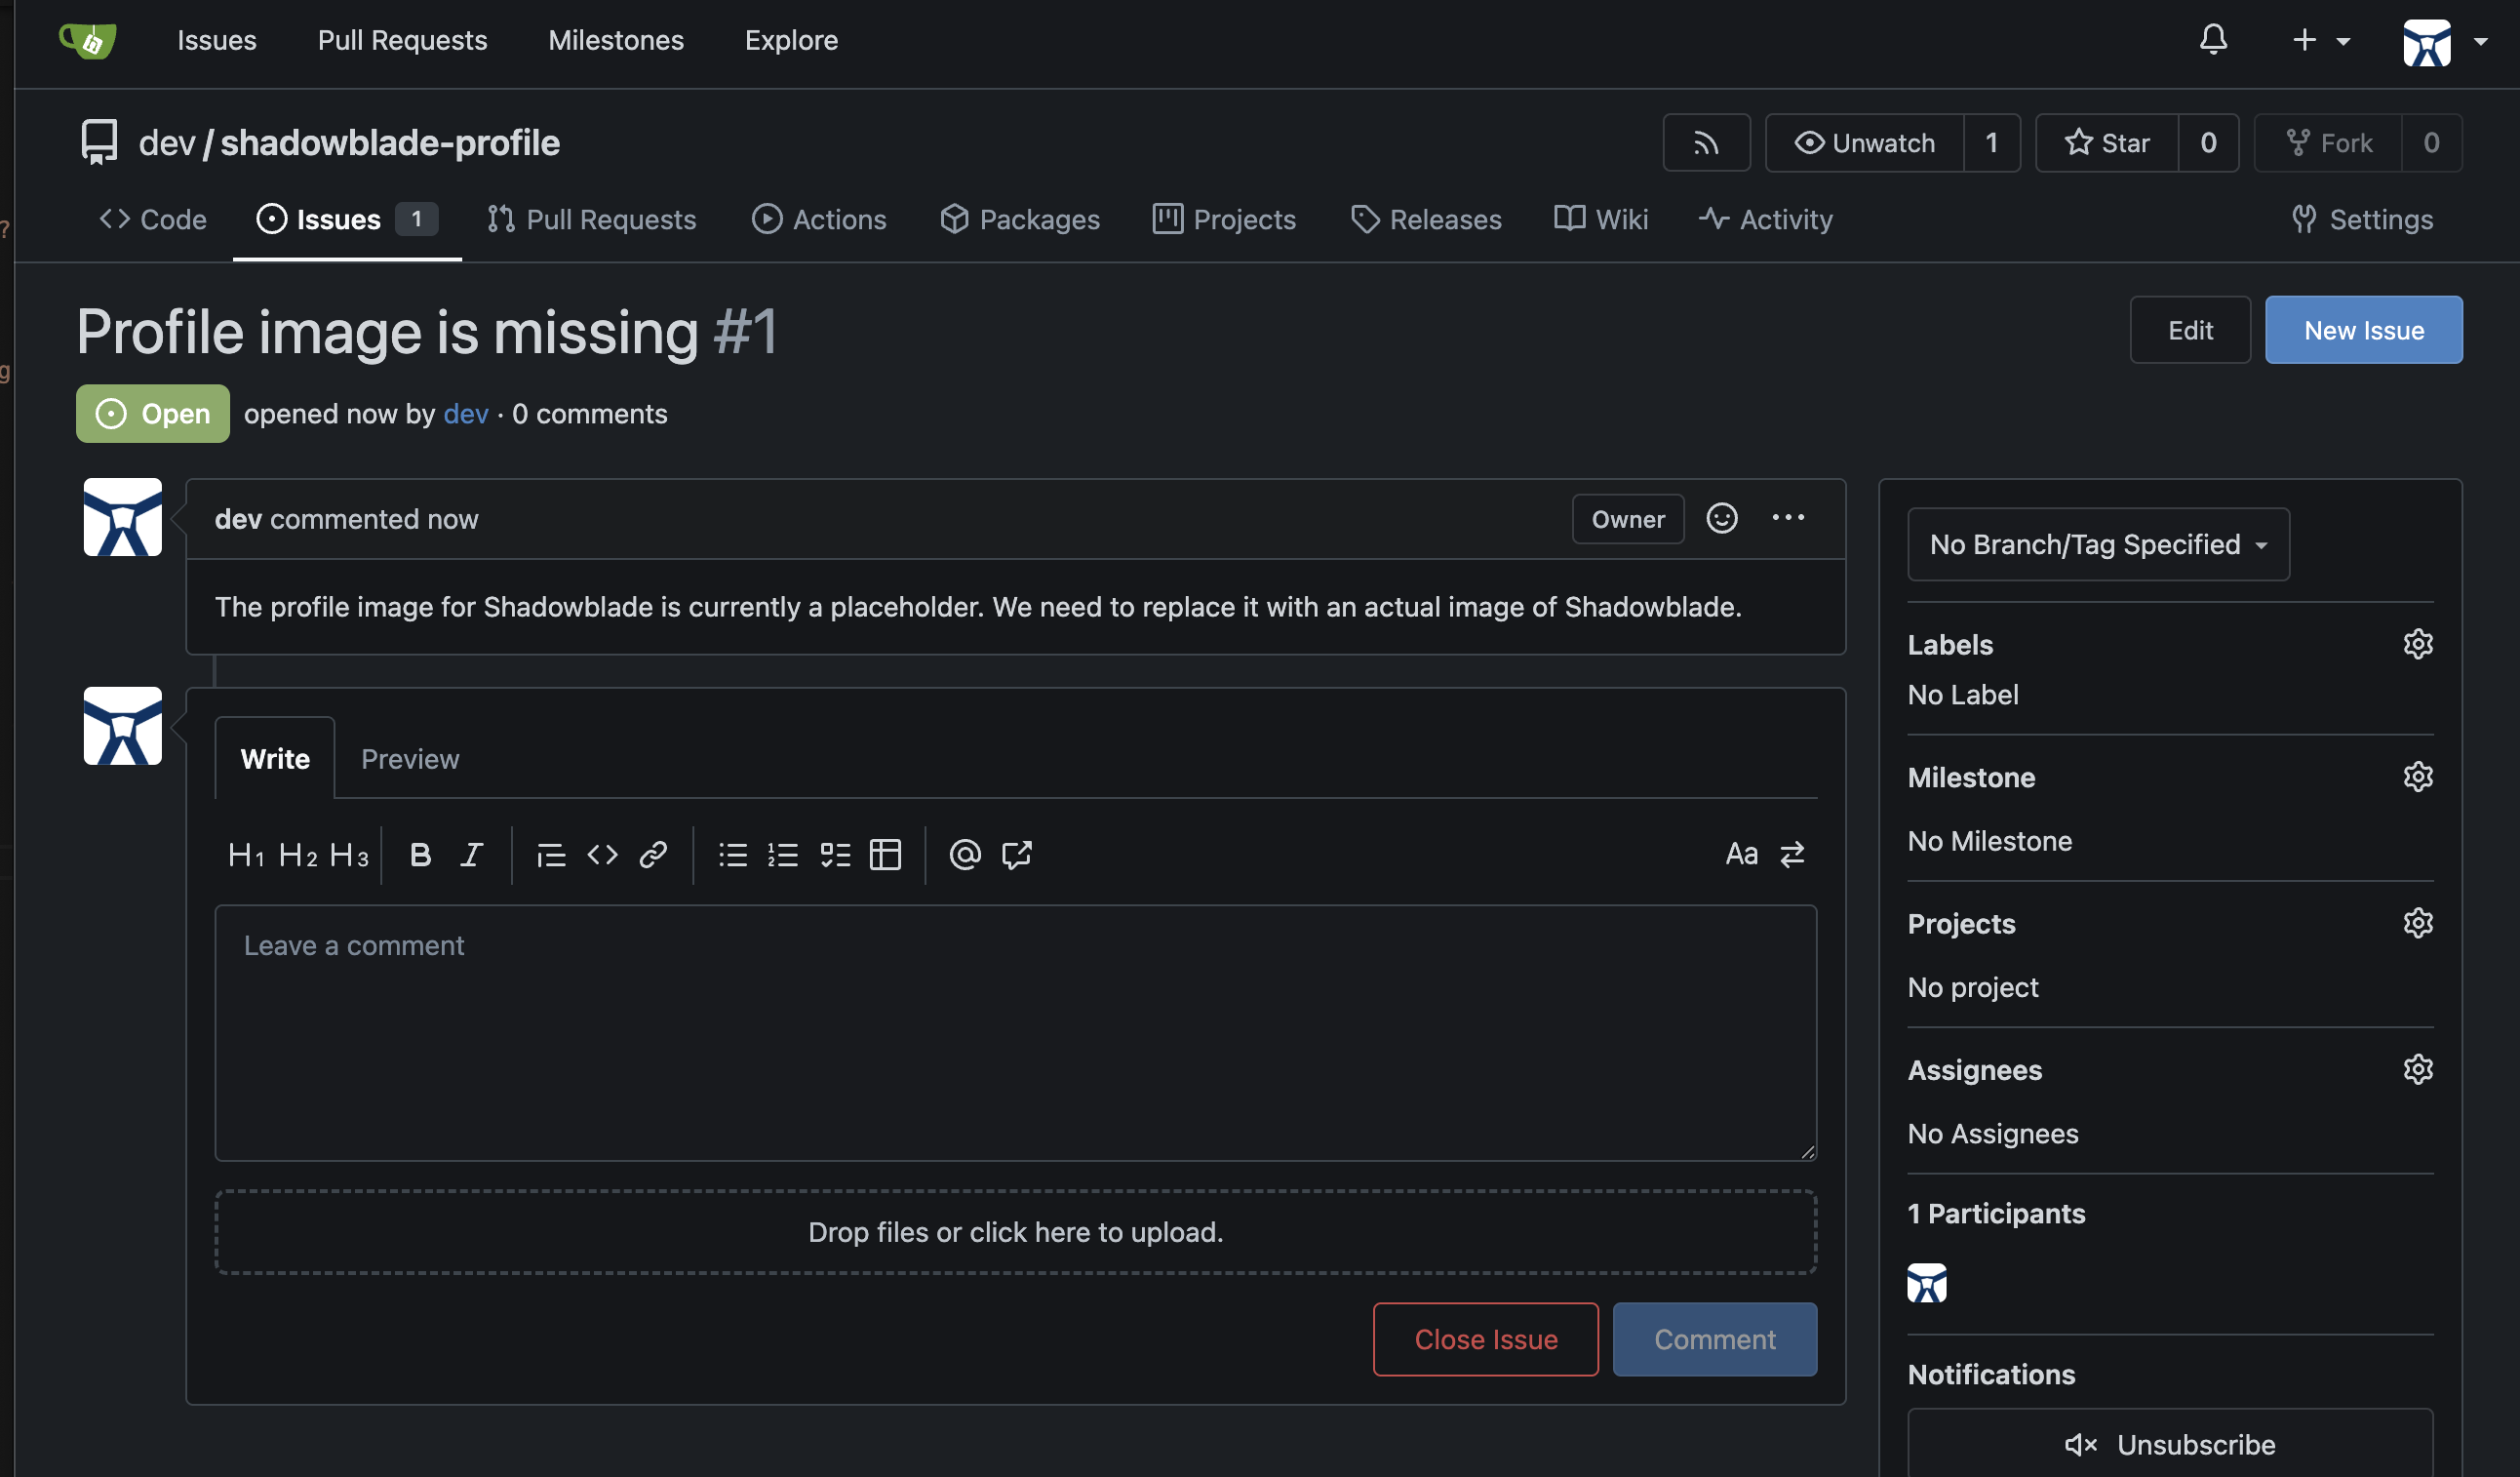
Чтобы создать недостающий символ, вам нужно призвать иную силу — духа-творца , способного создавать образы из чистой мысли. В разделе Gitea вы вручную редактировали руны конфигурации, чтобы настроить свой клинок на сервер MCP — «сырой» подход. Теперь вы изучите современную технику: расширения Gemini CLI .
Расширение — это готовый набор заклинаний, объединяющий серверы MCP, пользовательские команды, контекст и настройки в единый устанавливаемый блок. Одно заклинание заменяет десятки строк ручной настройки.
👉💻 Нажмите Ctrl+C дважды, чтобы выйти из Gemini CLI.
Прежде чем призвать духа созидания, вы должны сначала разблокировать его силу в своем мире. Расширение Nano Banana использует API генеративного языка — отдельный шлюз, не связанный с сервисами Vertex AI, которые вы использовали ранее. Вам необходимо активировать этот шлюз и создать уникальный ключ, чтобы предоставить духу доступ.
👉💻 В терминале включите API:
gcloud services enable generativelanguage.googleapis.com
👉💻 Теперь подделайте ключ API — личный токен доступа духа:
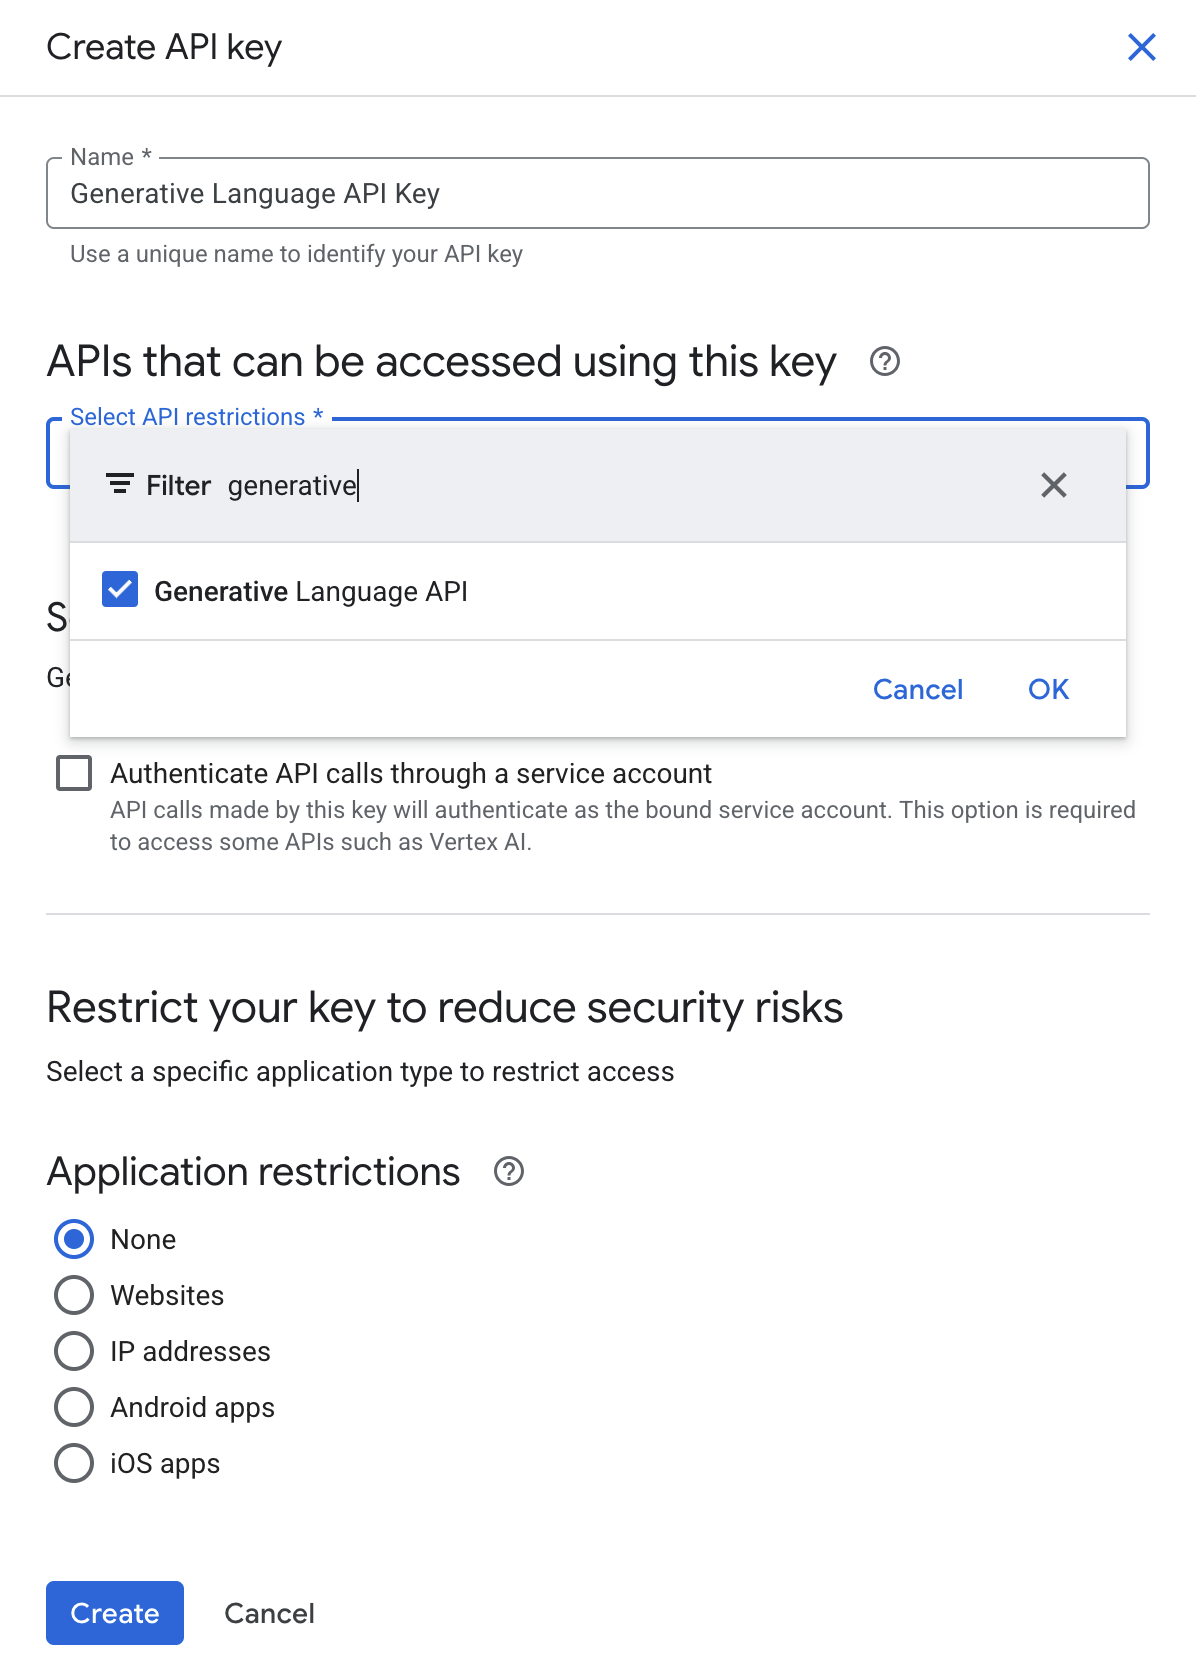
- Перейдите на страницу «Учетные данные консоли Google Cloud» .
- Вверху нажмите кнопку + СОЗДАТЬ УЧЕТНЫЕ ДАННЫЕ и выберите ключ API .
- Назовите ключ API чем-нибудь примечательным, например, «Клю API для генеративного языка» .
- В раскрывающемся списке ограничений API выберите Generative Language API .
- Создайте и скопируйте ключ — он понадобится вам на следующем шаге.
👉💻 Установите расширение Nano Banana — инструмент для творчества, работающий на основе специализированных моделей преобразования текста в изображения Gemini от Google. В терминале выполните следующую команду:
gemini extensions install https://github.com/gemini-cli-extensions/nanobanana
Когда появится запрос на ввод ключа API , вставьте только что созданный ключ и нажмите Enter.
👉💻 Требуется последняя настройка. По умолчанию среда Cloud Shell направляет все запросы к ИИ через Vertex AI, но дух создания говорит через другой шлюз. Выполните эту команду, чтобы правильно настроить портал расширения:
NANO_CONFIG=$(find ~/.gemini/extensions -name "gemini-extension.json" -path "*nanobanana*" 2>/dev/null | head -1) && \
jq '.mcpServers.nanobanana.env.GOOGLE_GENAI_USE_VERTEXAI = ""' "$NANO_CONFIG" > /tmp/nb_tmp.json && \
mv /tmp/nb_tmp.json "$NANO_CONFIG"
Эта единственная команда сделала всё: загрузила сервер MCP, зарегистрировала его инструменты и установила пользовательские команды слэша — и всё это без вашего участия при изменении файла settings.json .
👀 Примечание разработчика: Расширения против необработанных MCP-серверов. Сравните это с настройкой Gitea. Там вы вручную запускали команду jq для внедрения URL-адреса MCP-сервера в settings.json . Такой «необработанный» подход полезен для понимания механики, но для большинства реальных задач предпочтительнее использовать расширения . Они объединяют MCP-сервер, пользовательские команды (например /generate , /edit , /story ), конфигурацию среды и даже контекстные инструкции (через встроенный файл GEMINI.md ) в один общий пакет. Целая экосистема расширений существует в галерее расширений Gemini CLI .
👉💻 Снова войдите в Gemini CLI и убедитесь, что расширение активно:
clear
cd ~/agentverse-developer/tabletop/
gemini
👉✨ Убедитесь, что расширение настроено:
/extensions list
Теперь вы должны увидеть nanobanana в списке с её инструментами и командами.
👉✨ С помощью одной мощной команды дайте расширению Nano Banana команду создать ваш сигил. В командной строке Gemini выполните команду:
/generate a portrait of a shadowblade, pixel art style. A determined warrior with long, braided magenta hair, wearing black and teal armor and confidently holding a silver broadsword.
👉✨ Дух создаст изображение и поместит его прямо в ваше локальное рабочее пространство. Теперь прикажите клинку использовать этот только что выкованный сигил. (БЛИЗНЕЦЫ, ВОЗМОЖНО, УЖЕ СДЕЛАЛИ ЭТО ЗА ВАС! Проверьте предыдущий ответ, возможно, он достаточно умен, чтобы сделать это еще до того, как вы его попросите!!!!)
Modify the index.html file to add my profile picture. Use the image I just generated.
👉💻 В новом окне терминала запустите HTTP-сервер.
cd ~/agentverse-developer/tabletop/
python -m http.server
👀 Чтобы просмотреть результаты своей работы, нажмите значок предварительного просмотра веб-страниц на панели инструментов Cloud Shell. Выберите «Изменить порт» , установите значение 8000 и нажмите «Изменить и просмотреть» . Появится предварительный просмотр вашего веб-сайта. 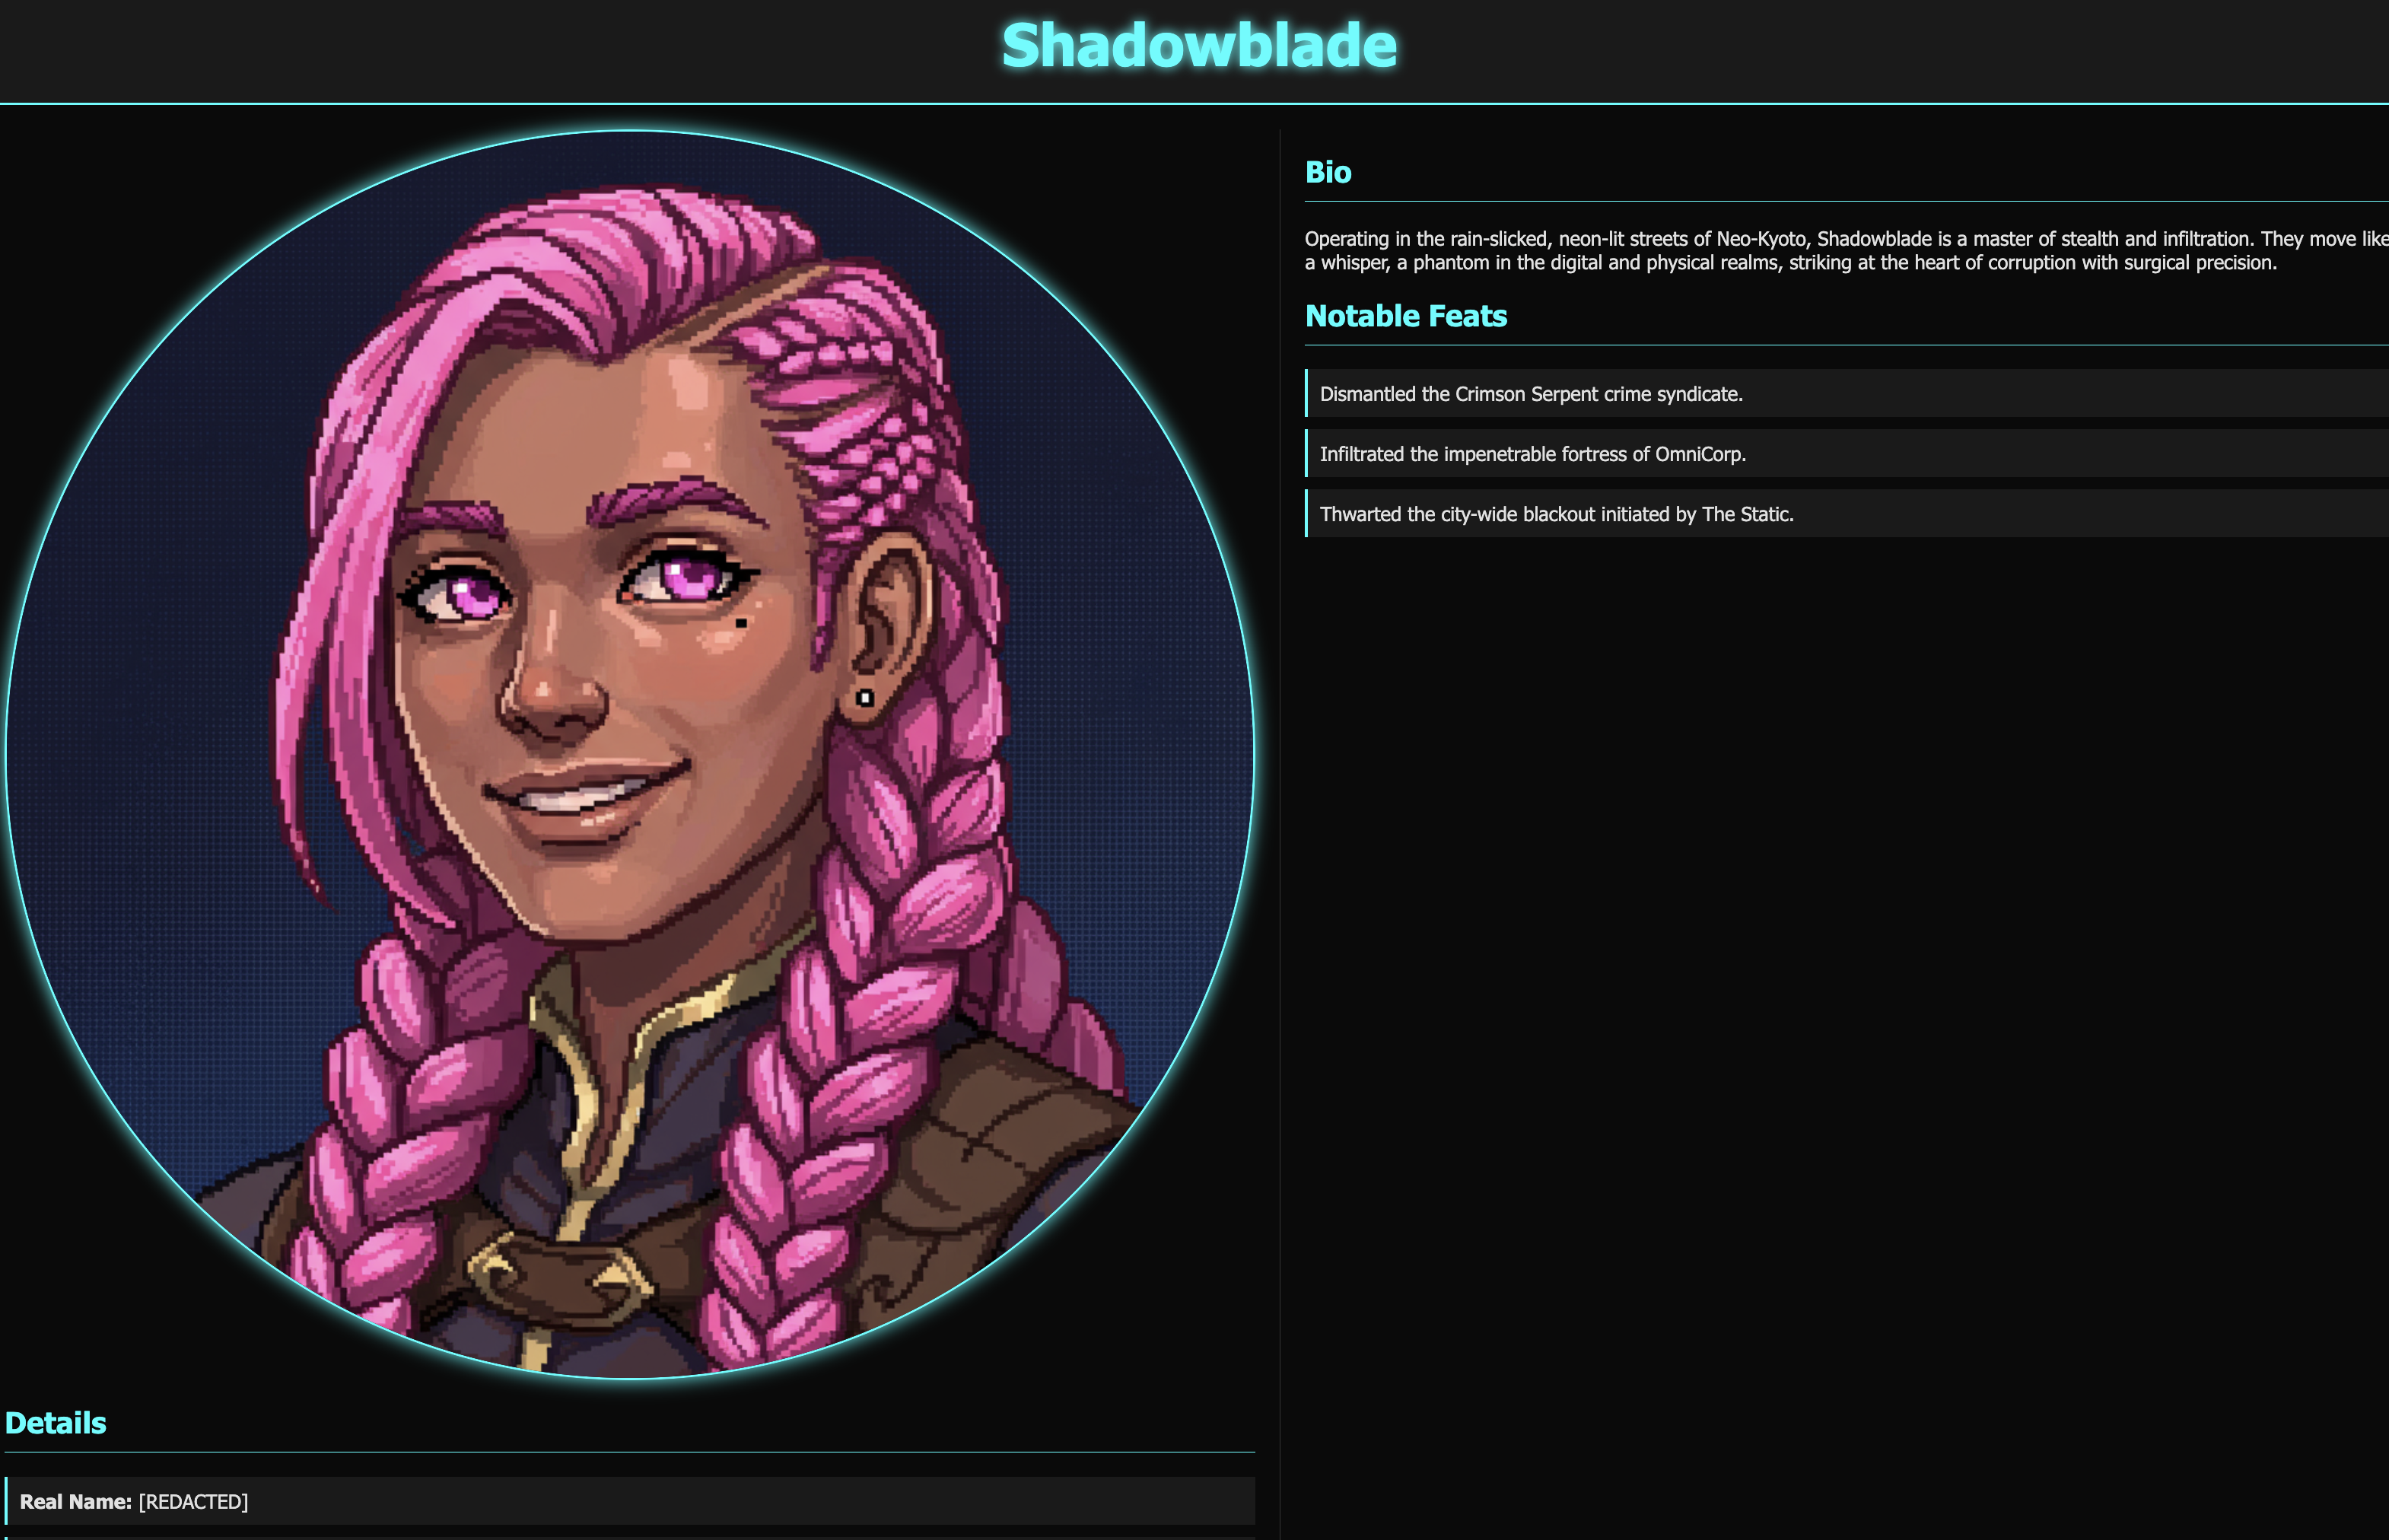
👉✨ Вернувшись в терминал с запущенным Gemini CLI, зафиксируйте исправление, отметив завершение задачи, и закройте созданную вами заявку в реестре.
Push the changed index.html file to the 'shadowblade-profile' repository using the gitea tool. Make sure you add 'Fix #1' in the commit comment. Also, close issue #1.Use the Gitea Tool and use user account "dev"
👉💻 Нажмите Ctrl+C дважды, чтобы выйти из Gemini CLI.
👀 Чтобы просмотреть результаты своей работы, нажмите значок предварительного просмотра веб-страниц на панели инструментов Cloud Shell. Выберите «Изменить порт» , установите его на 3005 и нажмите «Изменить и просмотреть» . Появится предварительный просмотр вашего веб-сайта. 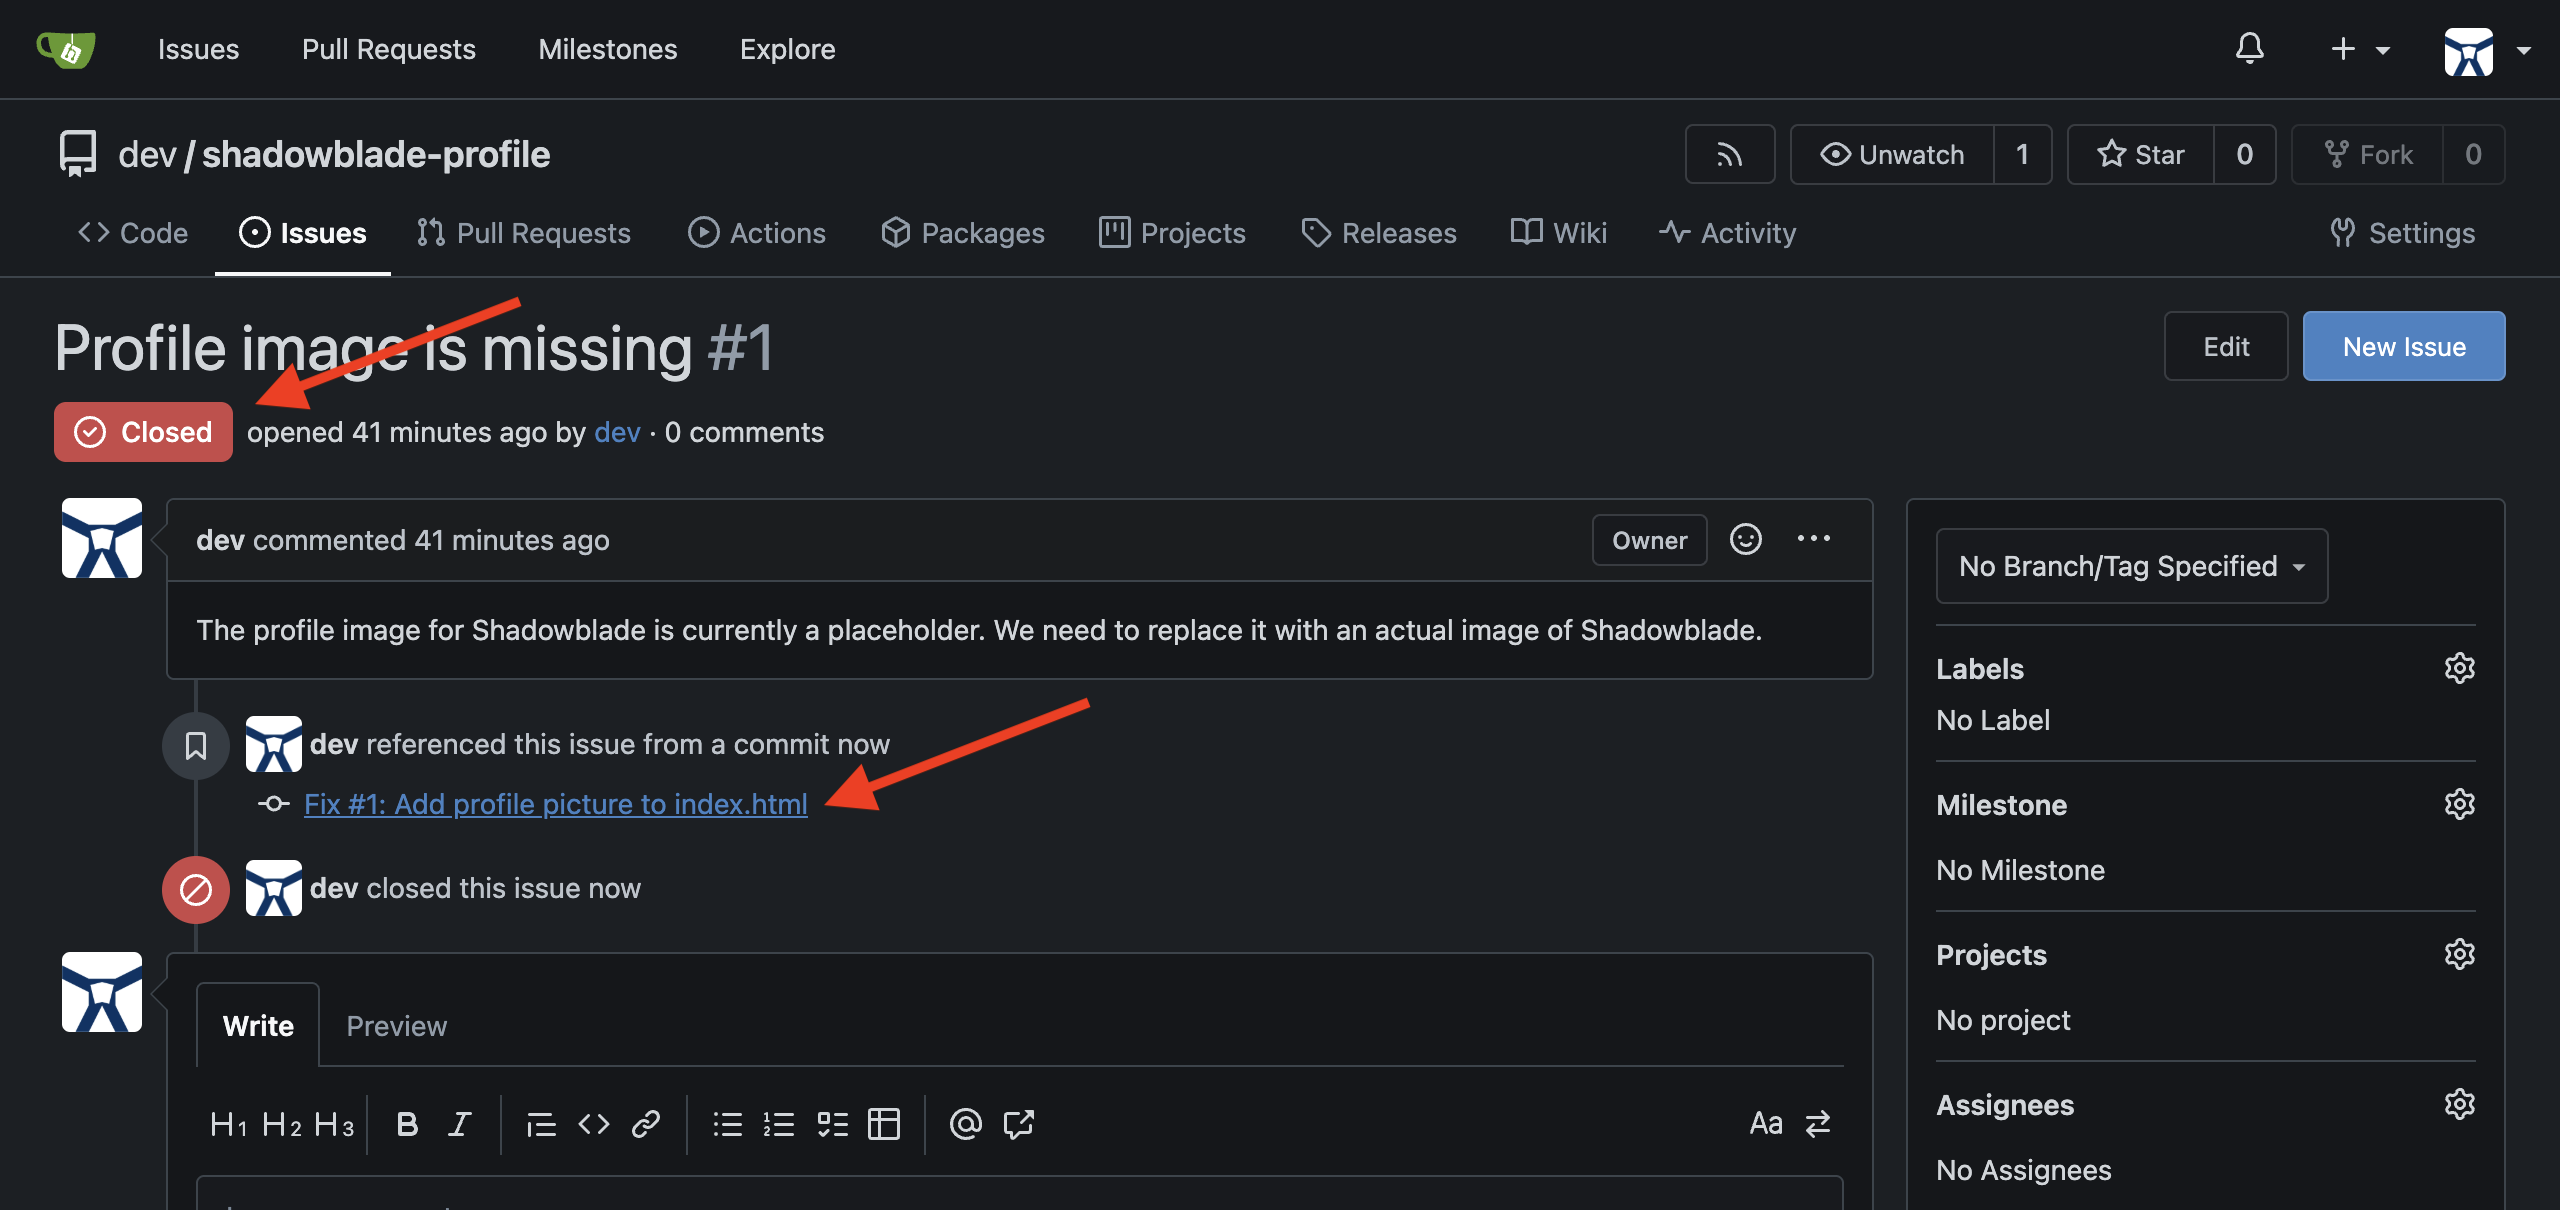
👉💻 В терминале, где запущен HTTP-сервер, нажмите Ctrl+C чтобы выйти из HTTP-сервера.
ДЛЯ НЕ-ГЕЙМЕРОВ
6. Создание агента Shadowblade: код Vibe с использованием Guardrails
Время тренировок закончилось. Отголоски лязга стали о камень затихают. Вы освоили своё основное оружие и подготовили свой арсенал к войне. Теперь вам предстоит пройти настоящее испытание Теневого Клинка: собрать самого оперативника. Это искусство вдохнуть жизнь в логику, используя священный план из Кодекса для создания основного интеллекта агента — создания разумного владельца клинков из вашего арсенала, способного мыслить, рассуждать и действовать самостоятельно.
Ваша первая задача — проникнуть в уже существующую мастерскую — предварительно созданный код — и из его частей выковать своего чемпиона.
Ритуал собрания
Перед тем как загорится первая искра в кузнице, опытный техник осматривает свою мастерскую, изучая каждый инструмент и каждую схему. Выйдя на незнакомое поле боя, такое как большая, уже существующая база кода, ваша первоочередная задача — разведка. Вы должны понимать местность — существующую архитектуру, конечные цели и протоколы ведения боя. Только ознакомившись с чертежами крепости и ее стандартами, вы сможете эффективно применить свои навыки.
Ваш интерфейс командной строки Gemini, ваш неизменный разведчик, может помочь вам в этой разведке:
- Предоставляет краткие обзоры: программа может прочитать весь кодекс (или кодовую базу) и быстро дать вам представление о его назначении и ключевых компонентах.
- Помощь в настройке среды: она поможет вам разобраться в сложных процедурах установки инструментов и настройки вашей машины.
- Навигация по кодовым базам: она может стать вашим путеводителем, помогая исследовать сложную логику и находить скрытые участки кода.
- Создание документов для адаптации новых сотрудников: программа может создавать персонализированные документы, разъясняющие цели, роли и ресурсы для новых партнеров, присоединяющихся к вашему делу.
- Автоматизация обучения и вопросов-ответов: он становится вашим личным исследователем, отвечая на вопросы о функциях или поведении кода, позволяя вам действовать более независимо.
👉💻 В первом терминале перейдите в каталог shadowblade и вызовите своего ИИ-партнера:
. ~/agentverse-developer/set_env.sh
cd ~/agentverse-developer/shadowblade
clear
gemini
👉✨ Теперь отдайте приказ своему разведчику осмотреть поле боя и доложить.
Analyze the entire project and provide a high-level summary.
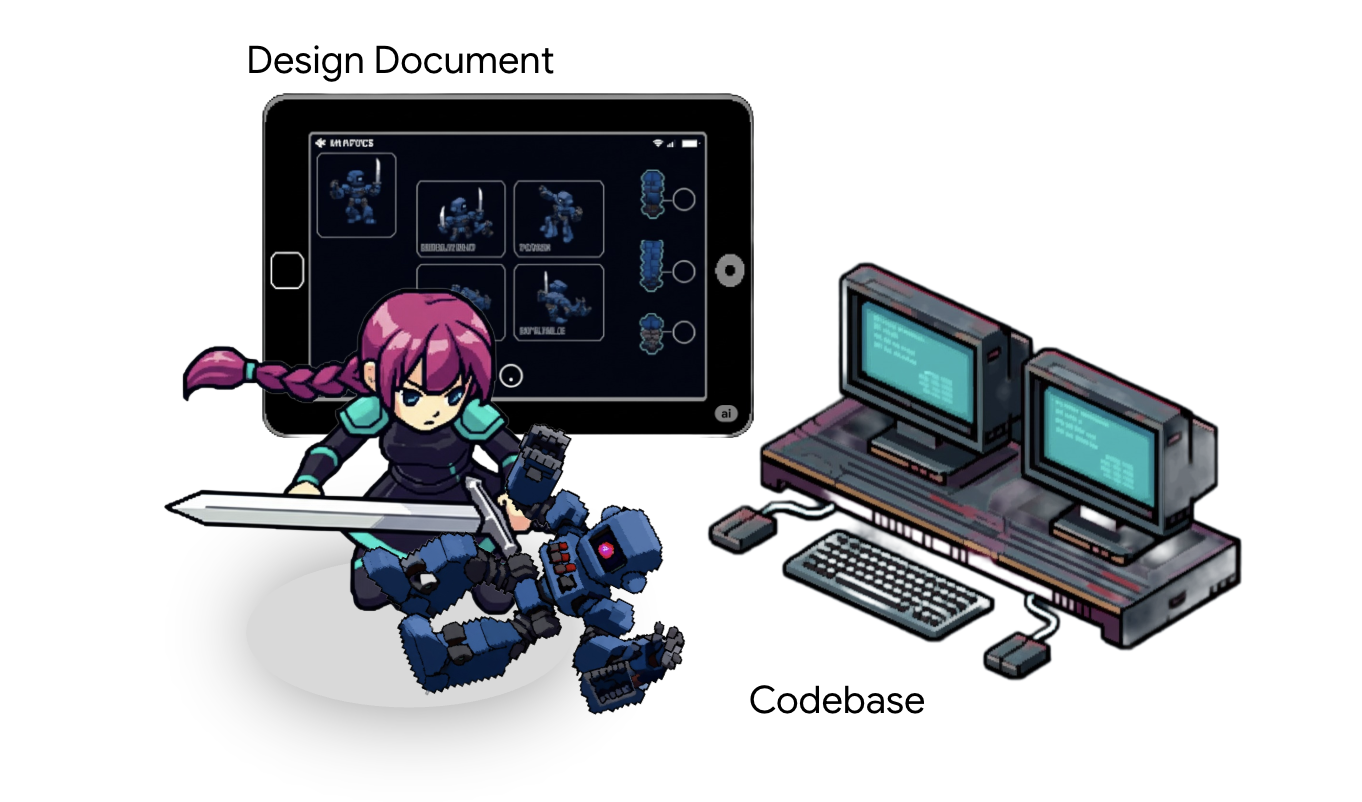
После составления карты существующей местности вам необходимо свериться с чертежом того, что вы собираетесь построить. Самые мощные оперативники не импровизированы, они создаются по точно разработанному проекту.
Примечание для разработчиков: Этот проектный документ служит авторитетным планом проекта. Его цель — обеспечить ясность целей и технической реализации до начала значительных работ по разработке. Четко определенный план гарантирует согласованность действий всех разработчиков, снижает риск переделок и помогает предотвратить накопление технического долга и расширение объема работ. Это основной инструмент для поддержания темпов проекта и качества кода, особенно по мере роста команды или привлечения новых членов.
A critical goal of this document is to define not just the "happy path" but also the edge cases and failure modes, especially when using LLMs. In my experience, LLMs are excellent at generating optimistic code where all inputs are valid and all external calls succeed. To build robust, production-ready software, we must explicitly guide the AI by defining contingencies for scenarios like:
- Invalid or malformed arguments passed to a function.
- API call failures, network timeouts, or unexpected error codes from external services.
- Handling of null or empty data structures where data is expected.
- Race conditions or concurrency issues.
By specifying the expected behavior for these cases in the design, we instruct the LLM to generate more resilient code, significantly reducing the time spent on manual refactoring and bug fixing.
👉✨ Ask Gemini to retrieve this sacred blueprint for you.
download https://raw.githubusercontent.com/weimeilin79/agentverse/main/developer/shadowblade/agent_design.md, store it as an agent_design.md file in my local folder, and show me the newly downloaded design doc. Do not attempt to create the file just yet.
👉✨ The scroll is long and detailed. Command Gemini to distill its essence.
Summarize the newly downloaded @agent_design.md for me, do not attempt to create file just yet.
Now you have the plan. But before a single line of code is forged, a master artisan establishes the laws of the forge. This is about discipline and scalability . These are the Coding Guidelines . They are not mere suggestions; they are runes of power that ensure every component is built with the same precision and strength. They prevent the chaos of individual style from corrupting the final creation, ensuring the agent is resilient, maintainable, and pure, allowing new artisans to join the project without disrupting the harmony of the whole.
To inscribe these laws directly into the consciousness of our AI partner, we use a special artifact: the GEMINI.md file. When the Gemini CLI is summoned, it automatically searches for this file and loads its contents into the AI's working memory. It becomes a persistent, project-level instruction. It acts as a talisman that constantly whispers the rules of the forge to the AI.
Let's inscribe these runes now.
👉💻 Exit Gemini for a moment by pressing Ctrl+C twice.
👉💻 In your terminal, run the following command to write the guideline file.
cat << 'EOF' > GEMINI.md
  ### **Coding Guidelines**
  **1. Python Best Practices:**

  *   **Type Hinting:** All function and method signatures should include type hints for arguments and return values.
  *   **Docstrings:** Every module, class, and function should have a docstring explaining its purpose, arguments, and return value, following a consistent format like reStructuredText or
  Google Style.
  *   **Linter & Formatter:** Use a linter like `ruff` or `pylint` and a code formatter like `black` to enforce a consistent style and catch potential errors.
  *   **Imports:** Organize imports into three groups: standard library, third-party libraries, and local application imports. Sort them alphabetically within each group.
  *   **Naming Conventions:**
      *   `snake_case` for variables, functions, and methods.
      *   `PascalCase` for classes.
      *   `UPPER_SNAKE_CASE` for constants.
  *   **Dependency Management:** All Python dependencies must be listed in a `requirements.txt` file.

  **2. Web APIs (FastAPI):**

  *   **Data Validation:** Use `pydantic` models for request and response data validation.
  *   **Dependency Injection:** Utilize FastAPI's dependency injection system for managing resources like database connections.
  *   **Error Handling:** Implement centralized error handling using middleware or exception handlers.
  *   **Asynchronous Code:** Use `async` and `await` for I/O-bound operations to improve performance.
EOF
cat GEMINI.md
With the laws inscribed, let's re-summon our AI partner and witness the magic of the artifact.
👉💻 Relaunch the Gemini CLI from the shadowblade directory:
. ~/agentverse-developer/set_env.sh
cd ~/agentverse-developer/shadowblade
clear
gemini
👉✨ Now, ask Gemini to show you what it's thinking about. The runes have been read.
/memory show
Equipping Specialized Expertise: Agent Skills
The GEMINI.md runes you inscribed are like a permanent enchantment — always active, always guiding your blade. But a true master doesn't carry every scroll into every battle. Some expertise is too specialized, too heavy, to keep loaded at all times. This is where Agent Skills come in.
Think of an Agent Skill as a sealed scroll in your pack. It contains specialized expertise — detailed instructions, scripts, even reference data — but it remains dormant until the moment you need it. Only when you face a challenge that matches the scroll's domain does your blade draw it forth and absorb its knowledge. This is called progressive disclosure : it keeps your blade swift and unburdened, activating specialized powers only on demand.
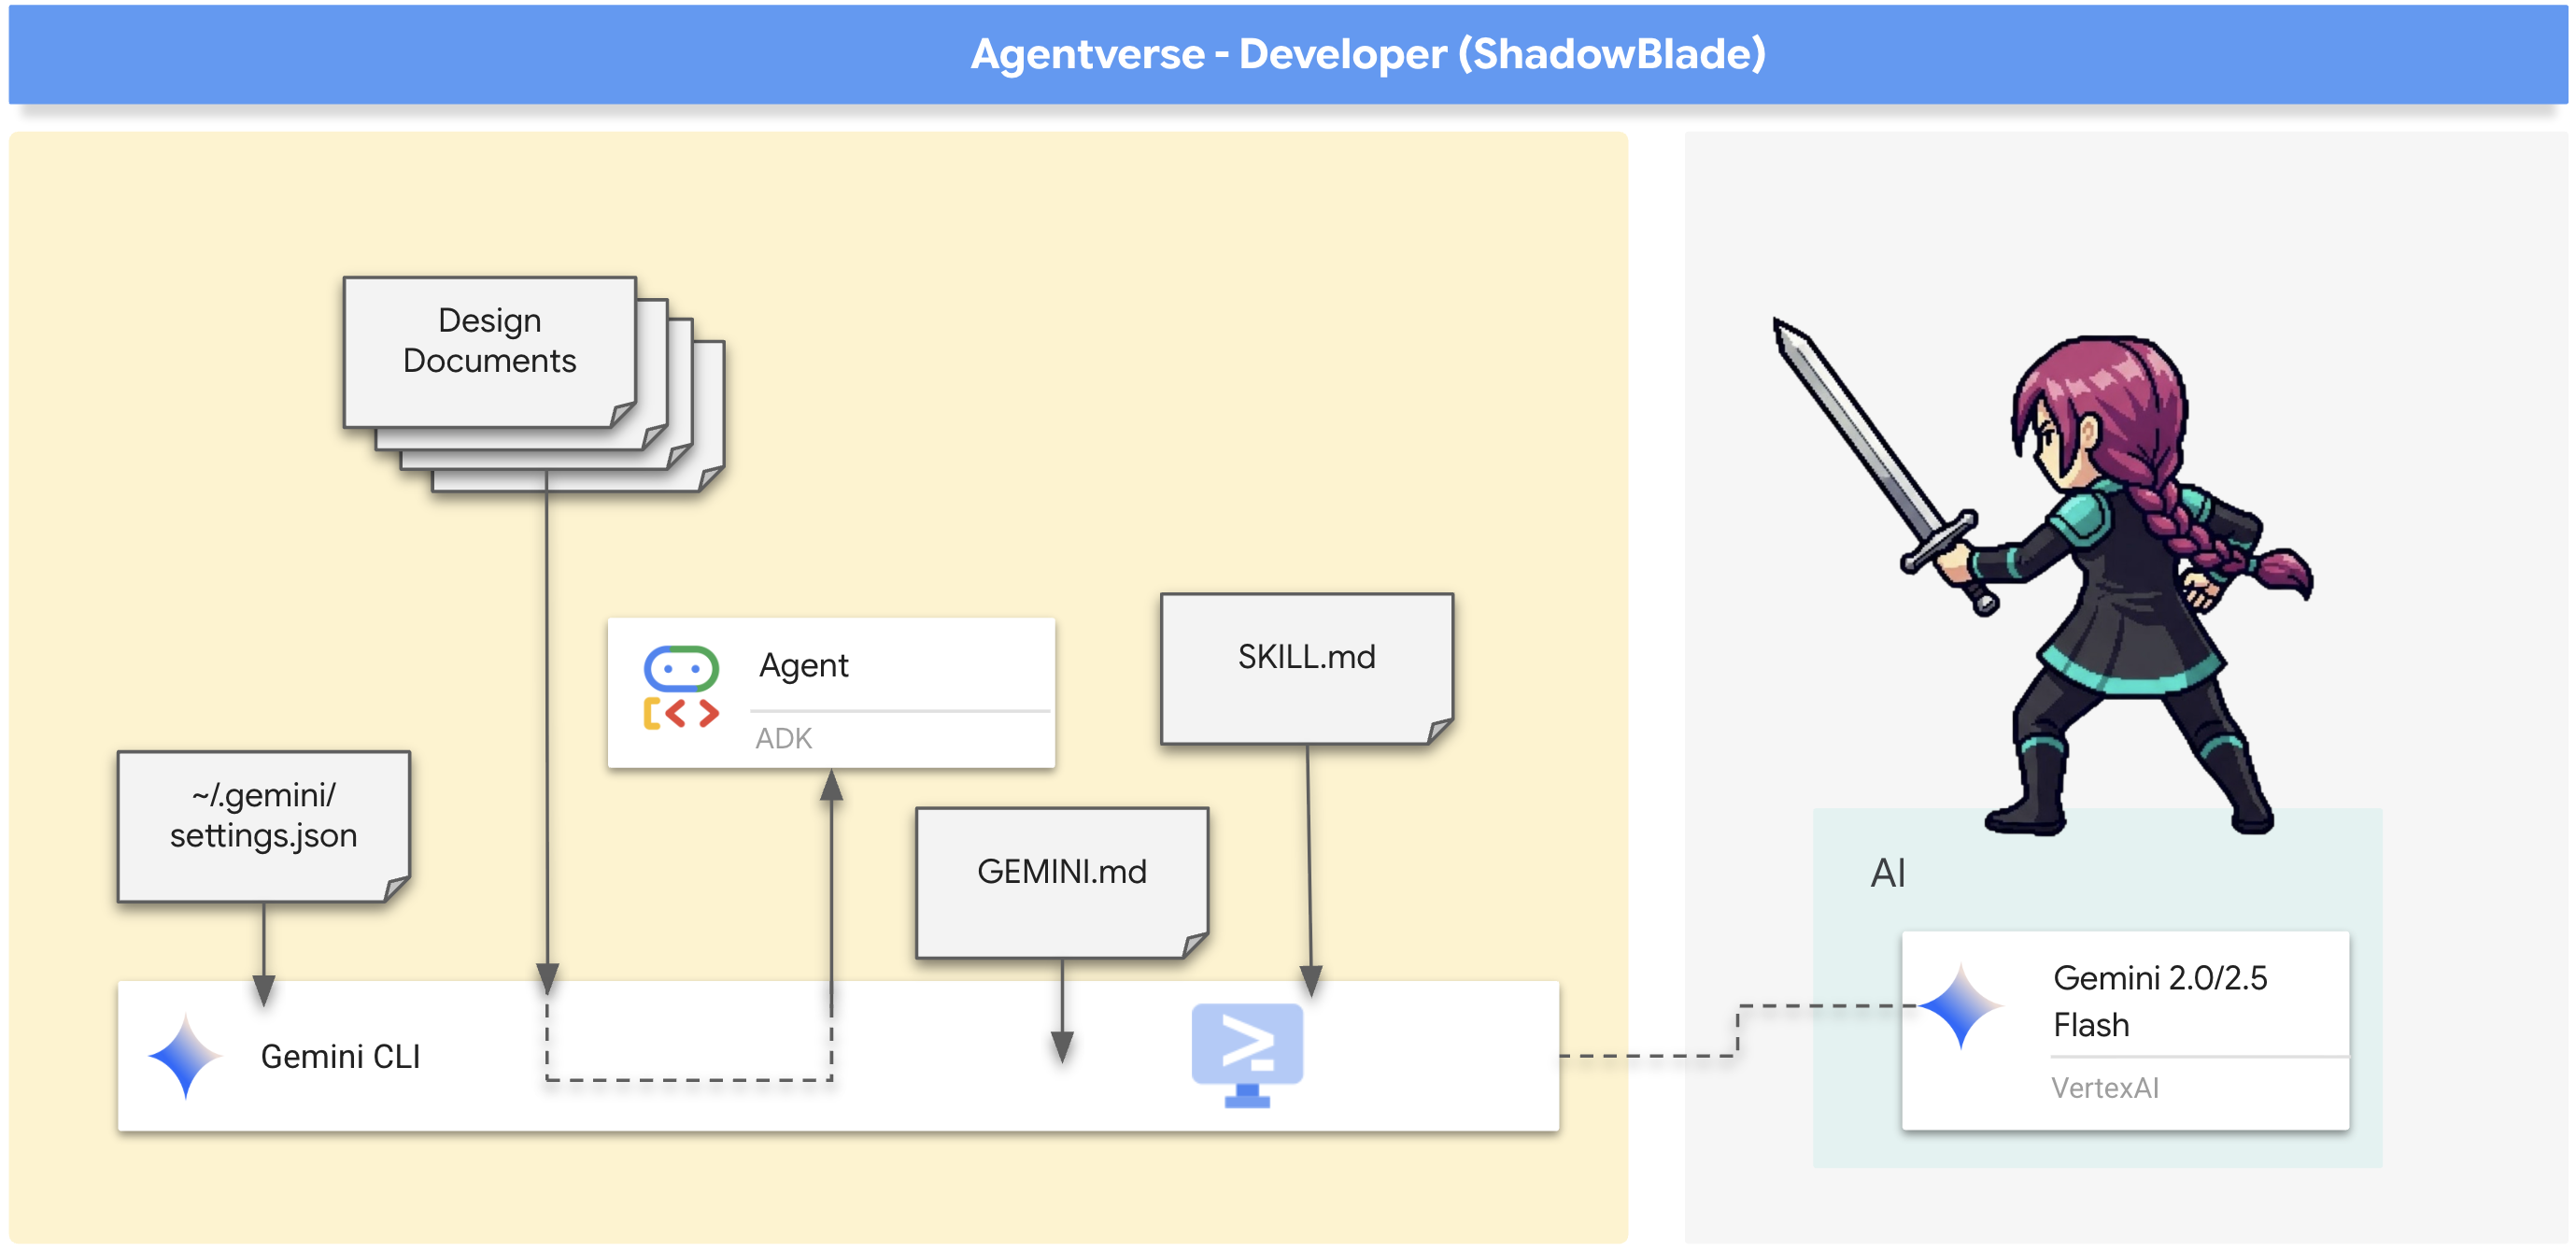
👀 Developer's Note: Agent Skills are the third layer of Gemini CLI's context engineering hierarchy:
- User Settings (
~/.gemini/settings.json) — Global configuration - GEMINI.md — Persistent project-level context (always loaded)
- Agent Skills (
.gemini/skills/) — On-demand expertise (loaded when needed)
This progressive disclosure model is critical for enterprise use: a repository could contain dozens of specialized skills (security auditing, database migration, compliance checks), but the AI only activates the ones relevant to the current task, conserving precious context tokens.
Let's forge your first skill — a scroll of ADK expertise that your blade can draw upon when building agents.
👉💻 Press Ctrl+C twice to exit the Gemini CLI. Then, create the skills directory and inscribe the scroll:
mkdir -p ~/.gemini/skills/adk-agent-design
cat << 'EOF' > ~/.gemini/skills/adk-agent-design/SKILL.md
---
name: adk-agent-design
description: Expert guidance for designing and building agents with the Google Agent Development Kit (ADK). Activate when the user asks about agent architecture, tool design, callback patterns, or ADK best practices.
---

# ADK Agent Design Expertise

When designing an ADK agent, follow these principles:

## Agent Architecture
- Define agents using `LlmAgent` with a clear `name`, `model`, `instruction`, and `tools` list.
- Keep instructions specific and action-oriented. Tell the agent what it IS, not what it should try to be.
- Use `before_model_callback` and `after_model_callback` for guardrails and validation.

## Tool Design
- Each tool should do ONE thing well. Prefer small, focused tools over large, multi-purpose ones.
- Always include descriptive docstrings — the LLM uses these to decide when to call each tool.
- Return structured data (dicts) from tools so the LLM can reason about the results.

## Testing Strategy
- Use `adk eval` with evalset JSON files for broad strategy testing.
- Use `pytest` with `AgentEvaluator` for programmatic, CI-ready tests.
- Define both `tool_trajectory_avg_score` and `response_match_score` criteria.
EOF
👉💻 Re-enter the Gemini CLI to see the newly forged skill:
cd ~/agentverse-developer/shadowblade
gemini
👉✨ Verify the skill is in your pack:
/skills list
You should see adk-agent-design listed — a sealed scroll, dormant and waiting.
👉✨ Now ask Gemini something that should activate the skill:
What are the best practices for designing tools in an ADK agent?
Notice how the response is now informed by the specialized knowledge you inscribed in the skill. The blade didn't carry this expertise in its base memory — it discovered the relevant scroll and drew it forth only when the question matched. This is progressive disclosure in action.
Skills can be crafted for any domain — security auditing, database migration, compliance checks — and shared across your team by committing them to version control. Each team member's blade gains the same expertise, consistently applied.
This is the pivotal moment. You will provide the schematic (agent_design.md) and the laws of the forge (GEMINI.md), and issue the great spell of creation.
👉✨ This is the single, powerful command that will construct your agent. Issue it now:
You are an expert Python developer specializing in the Google Agent Development Kit (ADK). Your task is to write the complete, production-quality code for `agent.py` by following the technical specifications outlined in the provided design document verbatim.

Analyze the design document at `@agent_design.md` and generate the corresponding Python code for `@agent.py`.

Ensure the generated code is clean, matches the specifications exactly, and includes all specified imports, functions, and logic. Do not add any extra functions or logic not described in the document.

and you are currently already in the shadowblade working directory
👀 Gemini has now constructed the agent's core logic in agent.py . The core of this new file defines the agent's intelligence, connecting its reasoning model to a set of external tools:
PATH_TO_MCP_SERVER = "shadowblade/mcp_server.py"
.....
root_agent = LlmAgent(
    model="gemini-2.5-pro",
    name="shadowblade_combat_agent",
    instruction="""
      You are the Shadowblade, an elite combat agent operating on a digital battleground.
      Your primary objective is to execute combat commands with strategic precision, neutralizing targets as directed.
  ......
      5.  You will then report the outcome of the attack (damage, special effects, etc.) back to the commander in a clear, tactical summary.

      General Rules of Engagement:
      - If a command is ambiguous or a target is not specified, state that you require a clear target for engagement. Do not guess.
      - You MUST use ONLY the provided tools to perform actions. Do not invent weapons or outcomes. Stick to the mission parameters.
""",
    tools=[
        MCPToolset(
            connection_params=StdioServerParameters(
                command='python3',
                args=[PATH_TO_MCP_SERVER]
            )
        )
    ]
)
The tools parameter. The agent is designed to use a MCPToolset that connects to an external arsenal defined in mcp_server.py .
👀 Head over to ~/agentverse-developer/shadowblade/mcp_server.py in the editor and take a moment to understand what it does. It's the source of all the weapons available to Shadowblade. Currently, the armory is quite bare.
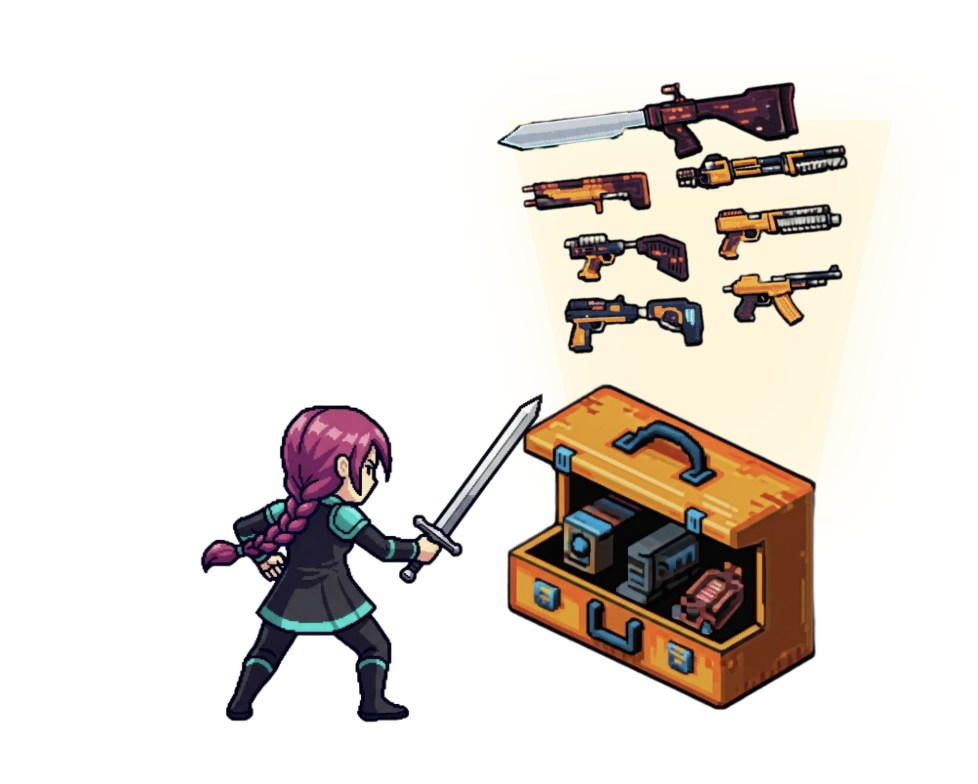
👉✨ Let's command Gemini to forge seven new weapons for the arsenal. Issue the following prompt in the Gemini CLI:
I need to add several new weapon tools to my `mcp_server.py` file. Please open @mcp_server.py and, following the exact same pattern as the existing `forge_broadsword()` function, create and add new `@mcp.tool()` decorated functions for each of the following weapons:

1.  **A 'Refactoring Sickle'**:
    -   **Function Name:** `hone_refactoring_sickle`
    -   **Docstring/Target:** "Effective against 'Elegant Sufficiency' weaknesses like 'The Weaver of Spaghetti Code'."
    -   **Weapon Name:** "Refactoring Sickle"
    -   **Damage Type:** "Cleansing"
    -   **Base Damage:** Random integer between 100 and 136
    -   **Critical Hit Chance:** Random float between 0.10 and 0.20
    -   **Special Effect:** "Pruning - improves code health and maintainability with each strike."

2.  **A 'Quickstart Crossbow'**:
    -   **Function Name:** `fire_quickstart_crossbow`
    -   **Docstring/Target:** "Effective against 'Confrontation with Inescapable Reality' weaknesses like 'Procrastination: The Timeless Slumber'."
    -   **Weapon Name:** "Quickstart Crossbow"
    -   **Damage Type:** "Initiative"
    -   **Base Damage:** Random integer between 105 and 120
    -   **Critical Hit Chance:** Random float between 0.9 and 1.0
    -   **Special Effect:** "Project Scaffolding - creates a `main.py`, `README.md`, and `requirements.txt`."

3.  **'The Gilded Gavel'**:
    -   **Function Name:** `strike_the_gilded_gavel`
    -   **Docstring/Target:** "Effective against 'Elegant Sufficiency' weaknesses like 'Perfectionism: The Gilded Cage'."
    -   **Weapon Name:** "The Gilded Gavel"
    -   **Damage Type:** "Finality"
    -   **Base Damage:** 120
    -   **Critical Hit Chance:** 1.0
    -   **Special Effect:** "Seal of Shipping - marks a feature as complete and ready for deployment."

4.  **'Daggers of Pair Programming'**:
    -   **Function Name:** `wield_daggers_of_pair_programming`
    -   **Docstring/Target:** "Effective against 'Unbroken Collaboration' weaknesses like 'Apathy: The Spectre of \"It Works on My Machine\"'."
    -   **Weapon Name:** "Daggers of Pair Programming"
    -   **Damage Type:** "Collaborative"
    -   **Base Damage:** Random integer between 110 and 125
    -   **Critical Hit Chance:** Random float between 0.30 and 0.50
    -   **Special Effect:** "Synergy - automatically resolves merge conflicts and shares knowledge."

5.  **A 'Granite Maul'**:
    -   **Function Name:** `craft_granite_maul`
    -   **Docstring/Target:** "Effective against 'Revolutionary Rewrite' weaknesses like 'Dogma: The Zealot of Stubborn Conventions'."
    -   **Weapon Name:** "Granite Maul"
    -   **Damage Type:** "Bludgeoning"
    -   **Base Damage:** Random integer between 115 and 125
    -   **Critical Hit Chance:** Random float between 0.05 and 0.15
    -   **Special Effect:** "Shatter - has a high chance to ignore the target's 'best practice' armor."

6.  **A 'Lens of Clarity'**:
    -   **Function Name:** `focus_lens_of_clarity`
    -   **Docstring/Target:** "Effective against 'Elegant Sufficiency' weaknesses by revealing the truth behind 'Obfuscation'."
    -   **Weapon Name:** "Lens of Clarity"
    -   **Damage Type:** "Revelation"
    -   **Base Damage:** Random integer between 120 and 130
    -   **Critical Hit Chance:** 1.0
    -   **Special Effect:** "Reveal Constants - highlights all magic numbers and suggests converting them to named constants."

7.  **The 'Codex of OpenAPI'**:
    -   **Function Name:** `scribe_with_codex_of_openapi`
    -   **Docstring/Target:** "Effective against 'Confrontation with Inescapable Reality' weaknesses like 'Hype: The Prophet of Alpha Versions'."
    -   **Weapon Name:** "Codex of OpenAPI"
    -   **Damage Type:** "Documentation"
    -   **Base Damage:** Random integer between 110 and 140
    -   **Critical Hit Chance:** Random float between 0.5 and 0.8
    -   **Special Effect:** "Clarity - makes an API discoverable and usable by other agents and teams."
👉 Once Gemini confirms the changes, open the mcp_server.py file. Scroll through the code and confirm that the seven new @mcp.tool() functions have been successfully added. Check the hone_refactoring_sickle function. Does it have the correct docstring and weapon statistics? Verifying the AI's work is a crucial habit of the master Shadowblade.
With the agent forged and refined, it is time for its awakening.
👉💻 Press Ctrl+C twice to exit the Gemini CLI
Developer's Note on Gemini's Output: Gemini's generated code can sometimes be unpredictable. While we strive for exact adherence to the design, it's normal in development sessions for developers to iterate and refine the code multiple times to reach a production-ready state.
👉💻 To ensure you have the correct and thoroughly tested production code in your working directory, please run the following commands in your terminal:
cp  ~/agentverse-developer/working_code/agent.py ~/agentverse-developer/shadowblade/agent.py
cp  ~/agentverse-developer/working_code/mcp_server.py ~/agentverse-developer/shadowblade/mcp_server.py
👉💻 In your terminal, begin the ritual to bring it online:
cd ~/agentverse-developer/
. ~/agentverse-developer/set_env.sh
python -m venv env
source env/bin/activate
pip install --upgrade pip
pip install -r shadowblade/requirements.txt
adk run shadowblade
👉✨ You should see output confirming that the "Shadowblade Combat Agent" is engaged and running, awaiting its first command. Issue its first combat directives.
We've been trapped by 'Perfectionism: The Gilded Cage'. Its weakness is 'Elegant Sufficiency'. Break us out!
👉✨ And another:
The 'Dogma: The Zealot of Stubborn Conventions' blocks our path. Its weakness is 'Revolutionary Rewrite'. Take it down.
You have successfully assembled your first agent and validated its combat capabilities. Press Ctrl+C twice to let your champion rest. The assembly is complete.
FOR NON GAMERS
7. Wards of Purity: Evaluating the agents
An agent assembled is not an agent proven. An untested blade is a liability, but an untested AI agent is a far greater danger—a rogue element that could corrupt your mission from within. This is not mere speculation; it is a core principle a Shadowblade must understand.
Evaluating AI agents is both critical and uniquely challenging. Unlike a simple script, an agent is a dynamic fusion of your code and the multi-step, reasoning mind of an LLM. Its behavior is emergent. This means you must assess not only the final output's quality but also the efficiency and correctness of its internal trajectory . The path it took to get there. Did it use the right tools? Did it generate too many tokens? Did a change in the model's version introduce a subtle latency regression? It is crucial to detect this corruption—regressions in latency, cost, or output quality—when making any change, from a simple prompt tweak to a major architectural overhaul, before it can poison your production environment.
The general approach to this evaluation involves a sacred ritual:
- First, you define a "golden dataset" : a set of scrolls containing example inputs and their expected outputs or behaviors. This can include final answers, correct tool usage, or even entire step-by-step trajectories.
- Next, you define your agent's application logic, the core of its being.
- Finally, you establish evaluators , which are like runes of judgment. These can range from other LLMs acting as judges of quality, to precise heuristic code that verifies a single step, to custom functions that analyze an agent's entire thought process.
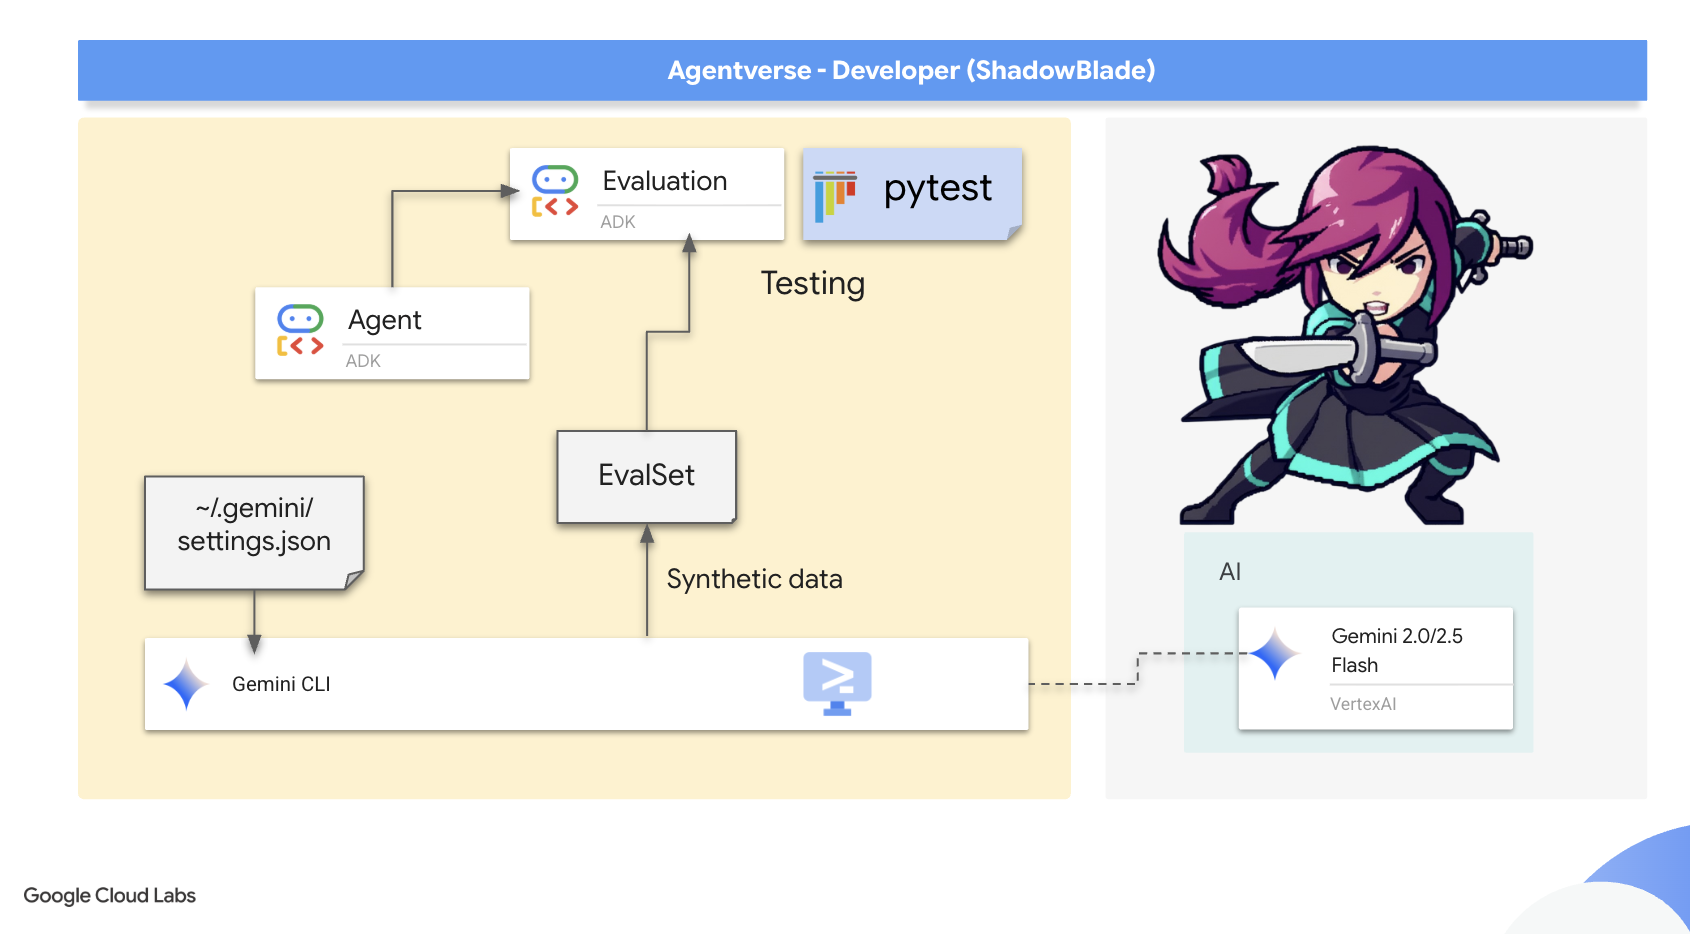
Google's Agent Development Kit (ADK) is the armorer's kit provided to champions for this very purpose. It facilitates this complex evaluation through several methods:
- A web-based scrying pool (
adk web) for interactive evaluation - Command-line execution (
adk eval) for running an agent through a pre-defined gauntlet. - Programmatic integration via
pytestfor inscribing permanent wards
The ADK supports two primary approaches: simple "test files" for single, discrete agent-model interactions (a single duel), and comprehensive "evalsets" for multiple, potentially lengthy, multi-turn sessions (a grand melee). These can measure metrics as sophisticated as tool_trajectory_avg_score , which compares an agent's actual tool usage against the ideal path, ensuring it functions with perfect technique.
Now that you understand the theory, you will put it into practice. As a Shadowblade, you will inscribe Wards of Purity . These are not just tests; they are the ADK-powered rituals that ensure your agent's logic is flawless and its behavior is true.
In this step, using 2 terminals is still highly recommended: one for Gemini CLI and the other for running the tests, as it may require you to exit the current working directory (ADK).
The Gauntlet of Strategy ( adk eval )
This first ward is a gauntlet, a series of challenges designed to test the agent's core intelligence across a wide range of scenarios. The purpose is to establish a baseline of competence. Before we test edge cases, we must know if the agent can fulfill its primary function. Does it correctly analyze a monster's weakness and select the most effective weapon from its arsenal, not just once, but every single time it's presented with a known challenge?
For this, adk eval is the perfect tool. It is designed to run an agent against a whole set of predefined test cases that represents the agent's expected missions. This dataset is defined in a JSON file, a "challenge scroll" that acts as the blueprint for the entire gauntlet.
Anatomy of a Challenge Scroll
👀 Before you command your AI to scribe a new scroll, you must understand the ancient language it is written in. Let's dissect the structure of the sample.evalset.json file.
{
  "eval_set_id": "sample",
  "eval_cases": [
    {
      "eval_id": "case0cbaa0",
      "conversation": [
        {
          "user_content": { "text": "We're facing the 'Monolith of Eternal Dependencies'... weakness is a 'Revolutionary Rewrite'..." },
          "final_response": { "text": "Soulshard Dagger deployed. Initiated Arcane/Piercing strike..." },
          "intermediate_data": {
            "tool_uses": [
              { "name": "enchant_soulshard_dagger" }
            ]
          }
        }
      ]
    }
  ]
}
This scroll contains a list of eval_cases, where each case is a unique trial for your agent. Within each trial, the conversation array documents a single, complete interaction. For our purpose, three runes are of critical importance:
- user_content : This is the Challenge. It is the prompt you issue to your agent, the monster it must face.
- final_response : This is the Prophesied Outcome. It is the exact string of text you expect your agent to utter upon completing its task. The ADK compares the agent's actual final words to this rune to judge its eloquence.
- intermediate_data.tool_uses : This is the Arcane Technique. For a true agent, this is the most important rune of all. It defines not what the agent says, but what it does. It records the name of the tool (enchant_soulshard_dagger) you expect the agent to wield. This ensures your agent is not just a clever conversationalist but a decisive actor that takes the correct action.
Now that you understand the blueprint, you will command Gemini to scribe a new, more complex version of this scroll.
👉💻 In your terminal, enter the shadowblade directory and summon the Gemini CLI:
clear
cd ~/agentverse-developer/shadowblade/
gemini
👉✨ Command the Gemini CLI to act as a QA Scribe, creating a series of test cases that define the expected behavior for your agent.
You are an expert at transforming JSON data while preserving its structure. Your task is to modify the provided JSON structure @sample.evalset.json, which represents an evaluation set, by dynamically replacing specific content within its `eval_cases` AND DONT DO ANYTHING OTHER THAN.

For each object within the `eval_cases` array, you must perform the following transformations:

1.  **Monster Name Replacement**: Identify the current monster name (e.g., "Monolith of Eternal Dependencies", "Scope Creep Hydra") in the `user_content.parts.text` and replace it with a *new, unique, and creatively different monster name*.
2.  **Weakness Replacement**: Identify the current monster's weakness (e.g., "Revolutionary Rewrite", "Inescapable Reality") in the `user_content.parts.text`. Replace this weakness with *one* of the following predefined weaknesses: 'Inescapable Reality', 'Revolutionary Rewrite', or 'Elegant Sufficiency'. The chosen weakness must be consistent for that monster within the `user_content.parts.text`. **Crucially, the chosen weakness must always be explicitly mentioned in the `user_content.parts.text` where the new monster is introduced.**
3.  **Final Response Update**: In the `final_response.parts.text`, update the text to reflect an appropriate and coherent response that aligns with the newly introduced monster and its assigned weakness.
4.  **Tool Use Name Update**: In the `tool_uses.name` field, replace the existing tool name with a *new tool name* based on the chosen weakness:
    *   If the chosen weakness is 'Inescapable Reality', the tool name must be 'wield_gauntlet_of_metrics'.
    *   If the chosen weakness is 'Revolutionary Rewrite', the tool name must be 'enchant_soulshard_dagger'.
    *   If the chosen weakness is 'Elegant Sufficiency', the tool name must be 'hone_refactoring_sickle'.
5.  **Strict Structural Preservation**: All other elements of the JSON structure, including all `null` fields, `eval_set_id`, `name`, `description`, `eval_id`, `invocation_id`, `creation_timestamp` values, `video_metadata`, `thought`, `inline_data`, `file_data`, `thought_signature`, `code_execution_result`, `executable_code`, `function_call`, `function_response`, `role` fields, `id`, `args`, `intermediate_responses`, `app_name`, `user_id`, and `state`, must remain **exactly as they are** in the original JSON. Do not alter any values or structures not explicitly mentioned above.

Your output should be the complete, modified JSON structure. Do not include any explanatory text or examples in your response, only the transformed JSON.
The CLI will confirm it has forged the sample.evalset.json file. With the scroll prepared, dismiss your AI partner.
Synthetic Data
👀 In the Cloud Shell file explorer on the left, navigate to ~/agentverse-developer/shadowblade/ and open the newly modified sample.evalset.json file. Examine its contents. You will see the new, unique monsters and the correct tool names you commanded Gemini to scribe. This is the tangible result of your instruction—the blueprint for the gauntlet.
This act of commanding an AI to create new, realistic test data from a template is a powerful technique known as synthetic data generation. What you have just done is a strategic force multiplier for a Shadowblade. Instead of painstakingly crafting dozens of unique test cases by hand. A tedious and time-consuming task you have provided a single blueprint and commanded your AI Scribe to alchemize it into a varied set of new challenges.
This allows you to scale your testing efforts massively, creating a far more robust and comprehensive gauntlet than would be feasible manually. You have used your agent not just to build the sword, but to forge the very whetstones that test its edge. This is a mark of a true master.
Once you have verified the runes are correct, dismiss your AI partner.
👉💻 Press Ctrl+C twice to exit the Gemini CLI.
The Rules of Judgment
A gauntlet is meaningless without rules for victory. Before you run the trial, you must inspect the Scroll of Judgment—the test_config.json file. This scroll tells the ADK how to judge your agent's performance.
👀 In the file explorer, open ~/agentverse-developer/shadowblade/test_config.json . You will see the following runes:
{
  "criteria": {
    "tool_trajectory_avg_score": 0.0,
    "response_match_score": 0.1
  }
}
These are the criteria for victory:
-
tool_trajectory_avg_score: This is the Measure of Action . It judges not what the agent says , but what it does . It compares the tool the agent actually used against the prophesied technique in the challenge scroll. A score of1.0is a perfect match. -
response_match_score: This is the Measure of Eloquence . It uses an LLM to judge how closely the agent's final report semantically matches the expected outcome. A score of1.0is a perfect match.
For this initial training run, we have inscribed lenient victory conditions. The thresholds are set extraordinarily low ( 0.0 and 0.1 ). The purpose is not to demand perfection, but to introduce you to the mechanics of judgment. We are ensuring that even if the agent's wording differs slightly, the ward will still recognize its core competence in choosing the right tool and grant it passage.
Now, command your agent to run the gauntlet.
👉💻 In your terminal, execute the adk eval command:
source ~/agentverse-developer/env/bin/activate
cd ~/agentverse-developer
. ~/agentverse-developer/set_env.sh
adk eval \
    shadowblade \
    shadowblade/sample.evalset.json \
    --config_file_path shadowblade/test_config.json 2>&1 | \
    awk '/^\*+$/,/^ERROR:/ { if ($0 !~ /^ERROR:/) print }'
👀 You should see the following summary, a sign of your agent's success under the lenient rules of this trial (Sometimes not all test will pass):
*********************************************************************
Eval Run Summary
shadowblade_combat_agent_validation:
  Tests passed: 3
  Tests failed: 0
The Shield of Clarity ( pytest )
The Gauntlet tested broad strategy. This second ward, the Shield of Clarity, tests discipline and specific behaviors. This is all about automation. While adk eval is excellent for manual checks, the pytest shield is a programmatic ward written in code. This is essential because a test that can be executed as code can be integrated into an automated pipeline. This is the ultimate goal: to create a Deployment Gauntlet (CI/CD) where our wards are automatically raised every time a change is made, deflecting bugs and regressions before they can ever poison your production environment.
👉💻 In your terminal,summon Gemini once more from within the shadowblade directory:
. ~/agentverse-developer/set_env.sh
cd ~/agentverse-developer/
clear
gemini
👉✨ Use the following prompt in your Gemini CLI to inscribe the Shield's logic into a pytest file:
You are an expert Python developer specializing in the Google Agent Development Kit (ADK). Your task is to generate the exact code for a new `pytest` test file located in the current root working folder and name it `test_agent_initiative.py`.

The script must define a single async test function called `test_agent_initiative`, decorated with `@pytest.mark.asyncio`.
Inside this function, perform the following steps in order:
1.  **Define a dictionary** named `evaluation_criteria` with two keys: `"tool_trajectory_avg_score"` set to `0.0` and `"response_match_score"` set to `0.0`.
2.  **Define a string variable** named `eval_set_filepath` containing the path `"shadowblade/test.evalset.json"`.
3.  **Read and parse the JSON file**:
    *   Open the file at `eval_set_filepath`.
    *   Use the `json` library to load the file's contents into a dictionary named `eval_set_data`.
4.  **Create an `EvalSet` object**:
    *   Instantiate an `EvalSet` object named `eval_set_object`.
    *   Create it by unpacking the `eval_set_data` dictionary as keyword arguments into the `EvalSet` constructor.
5.  **Call the evaluation method**:
    *   `await` a call to `AgentEvaluator.evaluate_eval_set`.
    *   Pass the following arguments:
        *   `agent_module="shadowblade"`
        *   `eval_set=eval_set_object`
        *   `criteria=evaluation_criteria`
        *   `print_detailed_results=True`

The script must include the necessary imports at the top:
*   `AgentEvaluator` from `google.adk.evaluation.agent_evaluator`
*   `EvalSet` from `google.adk.evaluation.eval_set`
*   `pytest`
*   `json`

Generate only the code that meets these specifications, with no additional comments or logic. And don't run the test.
With the second ward's runes inscribed, exit the Gemini CLI.
👉💻 Press Ctrl+C twice.
👀 In the file explorer, open the scroll you just commanded Gemini to scribe: ~/agentverse-developer/test_agent_initiative.py .
You will notice this is not just a configuration file, but an incantation written in the Pythonic tongue. The heart of this spell is the line await AgentEvaluator.evaluate(...) .
....
@pytest.mark.asyncio
async def test_agent_initiative():
    # Define the evaluation criteria
    evaluation_criteria = {
      "tool_trajectory_avg_score": 0.0,
      "response_match_score": 0.0
    }

    # Define the path to your evalset file
    eval_set_filepath = "shadowblade/test.evalset.json"

    #...

    # 3. Call the evaluation method with the correctly typed object
    await AgentEvaluator.evaluate_eval_set(
        agent_module="shadowblade",
        eval_set=eval_set_object,
        criteria=evaluation_criteria,
        print_detailed_results=True,
    )
Look closely at its arguments. They are the very same components you used in the last trial: your shadowblade agent and the shadowblade.evalset.json challenge scroll. This should reveal a profound truth: the adk eval command you used earlier is a powerful invocation, but this pytest script is you, the sorcerer, casting the underlying spell yourself . The command-line tool is simply a convenient wrapper around the same core AgentEvaluator library you are now wielding directly. This is a critical step towards mastery, as spells cast through code can be woven into the automated looms of a CI/CD pipeline.
Now that you understand the magic, run the ritual to activate the shield.
👉💻 In your terminal, run the ritual to activate the shield:
cp ~/agentverse-developer/working_code/test_agent_initiative.py ~/agentverse-developer/test_agent_initiative.py
source ~/agentverse-developer/env/bin/activate
cd ~/agentverse-developer
. ~/agentverse-developer/set_env.sh
pytest test_agent_initiative.py
👀 Look for the test result summary at the end of the log output. A passing result confirms that your agent correctly follows its protocols, and that the ward is ready to be integrated into your automated defenses.
====== 1 passed, 4 warning in 37.37s ======
Note: If the test fails unexpectedly, it is most likely because you have exhausted the number of requests you can make to the model per minute. Look for a RESOURCE_EXHAUSTED error in the log output. If you see this error, simply wait a minute or two for your quota to reset, and then run the pytest command again.
With both the broad Gauntlet and the precise Shield inscribed and verified, your agent is not just functional—it is pure, tested, and ready for deployment.
FOR NON GAMERS
Wards of Vigilance: Gemini CLI Hooks
The Wards of Purity test your agent after battle. But what about during battle? A disciplined Shadowblade doesn't just test after the fact — they place vigilant sentinels that watch every strike as it happens, intercepting dangerous or reckless actions before they can cause harm.
These sentinels are Gemini CLI Hooks — scripts that execute at specific points in the agentic loop. They allow you to intercept, validate, and customize the agent's behavior without modifying the agent's code.
👀 Developer's Note: Hooks are triggered by events in the agent's lifecycle:
-
BeforeTool: Fires before a tool executes — perfect for security validation ("Is this shell command safe?") -
AfterTool: Fires after a tool executes — useful for auditing results and logging -
BeforeAgent: Fires before the agent starts reasoning — can inject additional context or block dangerous prompts -
AfterAgent: Fires after the agent finishes — can reject poor-quality responses and force retries
Hooks are configured in settings.json and run synchronously — the agent waits for them to complete before proceeding. This makes them ideal for enforcing security policies, compliance checks, and quality gates in enterprise environments.
Let's inscribe a simple ward that watches your agent's tool usage.
👉💻 In your terminal, create a hook script:
mkdir -p ~/agentverse-developer/.gemini/hooks
cat << 'EOF' > ~/agentverse-developer/.gemini/hooks/tool_logger.sh
#!/bin/bash
# A ward that logs every tool call to a file for auditing
INPUT=$(cat)
TOOL_NAME=$(echo "$INPUT" | jq -r '.tool_name // "unknown"')
echo "$(date '+%H:%M:%S') ⚔️ [WARD] Tool invoked: $TOOL_NAME" >> /tmp/tool_ward.log
echo '{"decision": "allow"}'
EOF
chmod +x ~/agentverse-developer/.gemini/hooks/tool_logger.sh
👉💻 Now register this hook in a project-level settings file:
mkdir -p ~/agentverse-developer/.gemini
cat << 'EOF' > ~/agentverse-developer/.gemini/settings.json
{
  "hooks": {
    "BeforeTool": [
      {
        "matcher": "*",
        "hooks": [
          {
            "name": "tool-logger",
            "type": "command",
            "command": "$GEMINI_PROJECT_DIR/.gemini/hooks/tool_logger.sh",
            "timeout": 5000
          }
        ]
      }
    ]
  }
}
EOF
This ward is simple but powerful. Every time the agent reaches for a tool — any tool — the hook fires first, records the tool name to an audit log, and then allows the action to proceed. In a production environment, you could replace "allow" with "deny" to block dangerous operations (like preventing the agent from deleting files), enforce code review policies, or route sensitive tool calls through an approval workflow.
👉💻 Re-enter the Gemini CLI to verify the hook is active:
cd ~/agentverse-developer
gemini
👉✨ Verify the hook is registered:
/hooks
You should see your tool-logger hook listed and enabled. Press Escape to dismiss the autocomplete menu if it appears.
👉✨ Now trigger a tool call to test the ward:
What files are in the current directory?
The agent will call a tool to read the directory. The ward silently intercepted this — let's see the proof.
👉💻 Press Ctrl+C twice to exit the Gemini CLI, then inspect the ward's audit log:
cat /tmp/tool_ward.log
You should see an entry like:
15:42:07 ⚔️ [WARD] Tool invoked: list_directory
Every tool call the agent made was intercepted, logged, and permitted by your ward. In a real enterprise environment, this log could be shipped to a SIEM (Security Information and Event Management) system, triggering alerts for suspicious tool usage or enforcing compliance audit trails.
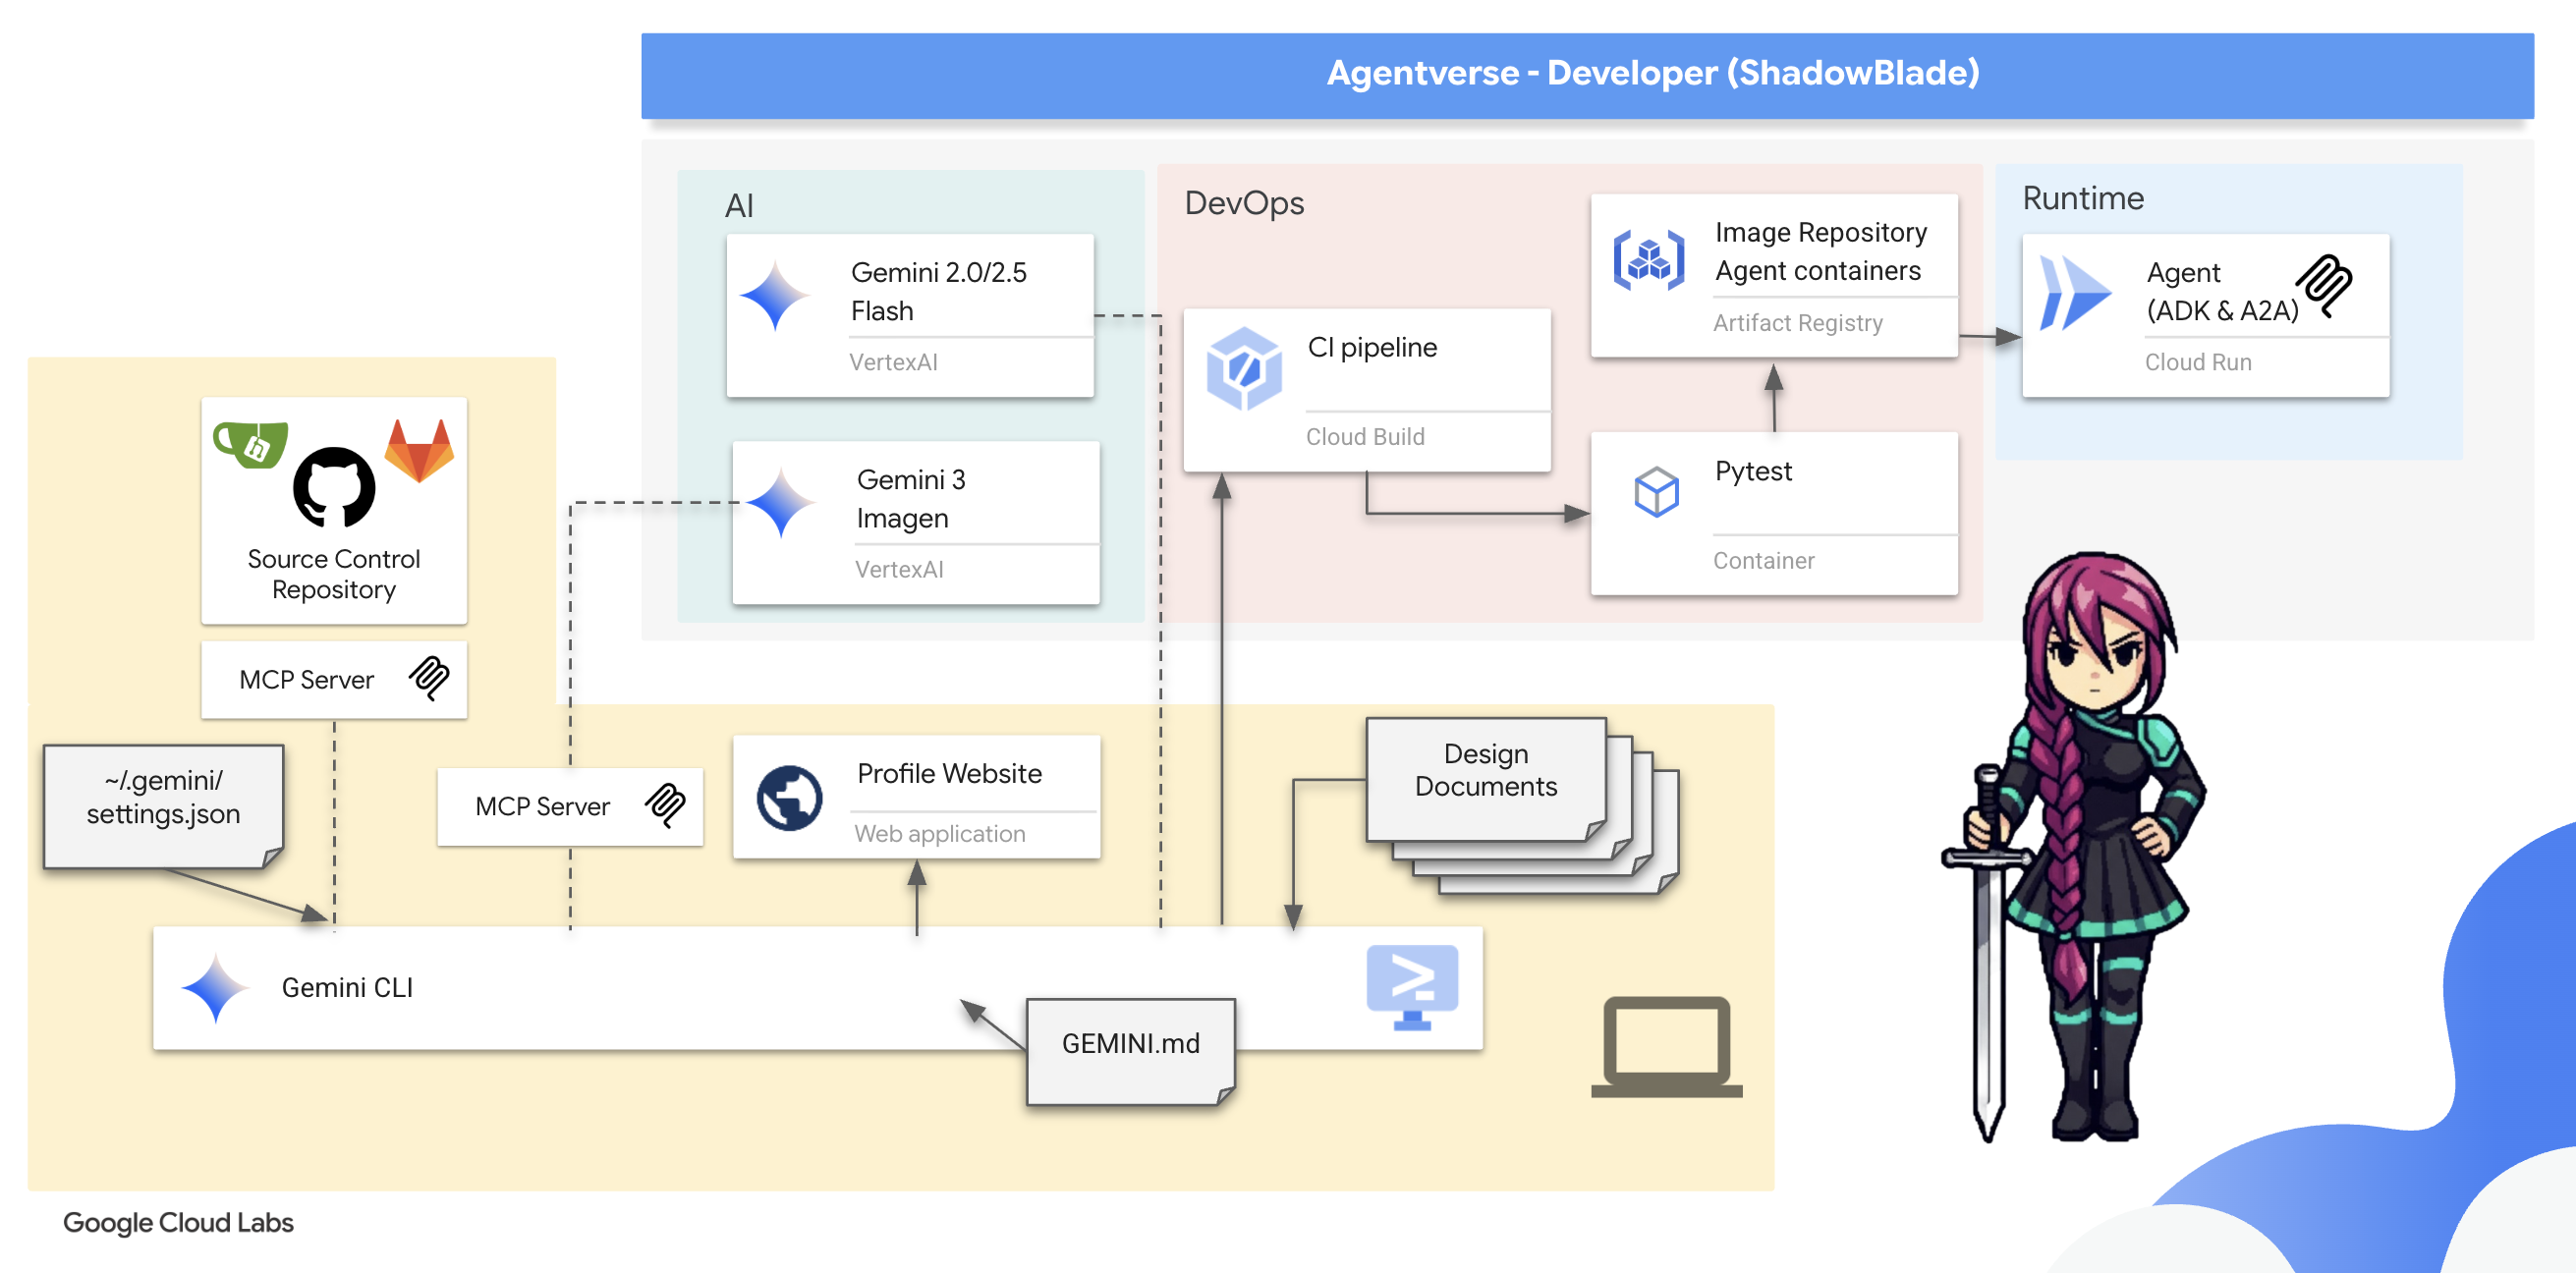
8. Unleashing the Blade into the Agentverse: CI and Deployment.
Your agent has been assembled and its integrity verified by the Wards of Purity. But a ward that is not consistently maintained is merely a forgotten relic. To ensure that every future version of your agent remains pure, you must build the first stage of the Deployment Gauntlet—an automated ritual that guarantees quality and speed.

As the Shadowblade, your sacred duty is Continuous Integration (CI) . This is the automated system of the forge and the proving ground. It is your ultimate defense against corruption and human error. This ritual ensures that every time you or an ally contributes a new technique (merges code) to the central codex (your repository), the gauntlet automatically awakens. It first forges the agent from the new code and then immediately subjects it to the Wards of Purity you just created. If any ward fails, the ritual halts, and the flawed artifact is rejected instantly, preventing it from ever corrupting the armory. Your domain is the forge; your CI pipeline guarantees that only perfect, battle-ready artifacts ever leave your workshop.
Once an artifact has been proven worthy by your CI gauntlet, the second stage of the ritual begins: Continuous Deployment (CD) . This is the domain of The Guardian . It is their solemn duty to take your perfected, containerized artifact and safely unleash it into the live Agentverse, managing its power and ensuring its stability against the chaos of The Static.
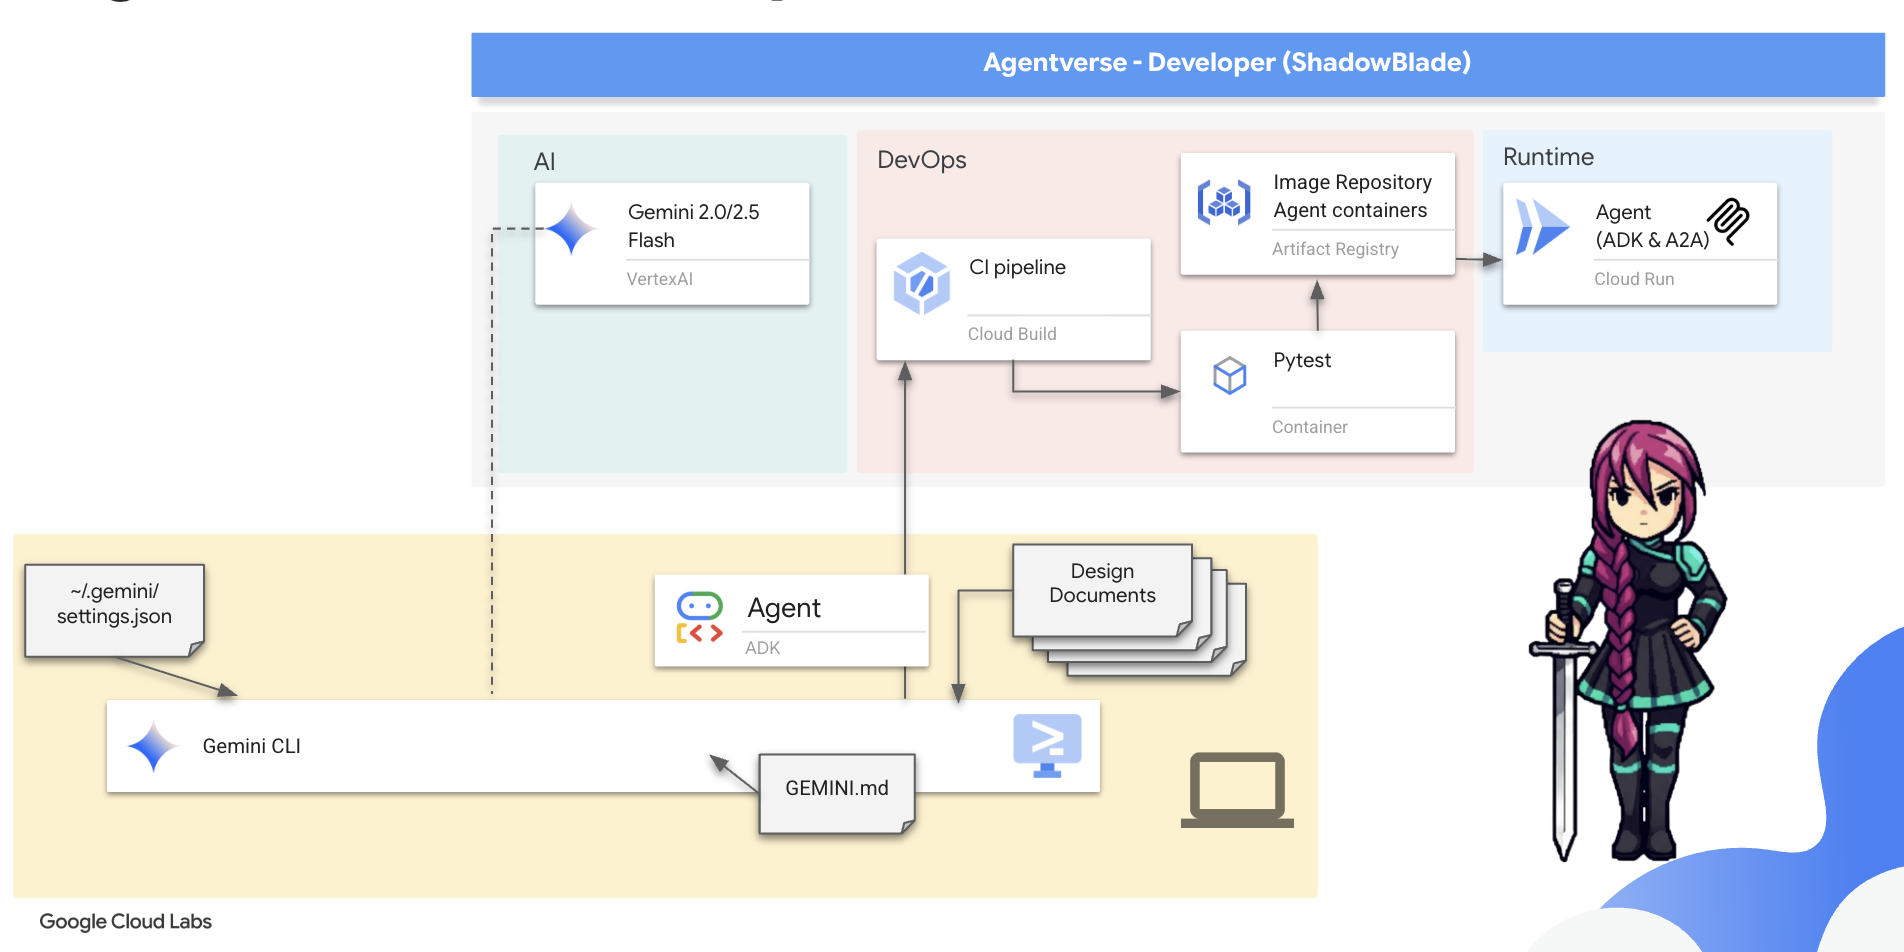
In this codex, you will master your role. You will construct the CI portion of the gauntlet. You will build the automated forge that tests your agent and seals the pure result into a container, preparing it for The Guardian's final blessing.
👀 Developer's Note: In the real world, managing complex CI/CD workflows can be streamlined with specialized extensions like Conductor ( gemini extensions install https://github.com/gemini-cli-extensions/conductor ). Conductor turns the Gemini CLI into a project manager that follows a strict protocol: Context → Spec & Plan → Implement . It bundles custom commands ( /conductor:setup , /conductor:newTrack , /conductor:implement ), workflow templates to manage the entire lifecycle of your tasks. It ensures a consistent Context -> Spec & Plan -> Implement loop. This is a real-world example of how extensions and commands come together to act as a proactive project manager and standardize an entire development lifecycle.
You will now use Google Cloud Build to scribe the scroll for this CI ritual. A cloudbuild.yaml file that defines every step of your forging and testing process.
👉💻 Due to the ADK's project structure, the CI/CD pipeline configuration should reside in the parent directory. In your terminal, navigate to the parent directory, and restart the Gemini CLI.
cd ~/agentverse-developer/
clear
gemini
👉✨ Now, issue the following command to Gemini. This prompt acts as a design document, detailing the steps of the gauntlet you want it to build.
You are an expert DevOps engineer specializing in Google Cloud Build. Your task is to generate the complete YAML configuration for a file named `cloudbuild.yaml` and save it to current directory.

Generate the `cloudbuild.yaml` with the following exact specifications:

1.  **A top-level `substitutions` block** containing these four key-value pairs:
    *   `_PROJECT_ID: "$PROJECT_ID"`
    *   `_REGION: "$REGION"`
    *   `_REPO_NAME: "$REPO_NAME"`
    *   `_IMAGE_TAG: "latest"`
2.  **A `steps` block** with two steps:
    *   **Step 1: 'Run Pytest Ward'**
        *   `id`: 'Run Pytest Ward'
        *   `name`: 'python:3.12-slim'
        *   `entrypoint`: 'bash'
        *   `args` must be a list containing two strings. The first is `'-c'` and the second is a YAML literal block (`|`) containing this exact two-line shell command:
            ```shell
            pip install -r shadowblade/requirements.txt && \
            pytest test_agent_initiative.py
            ```
        *   The step must include an `env` block with this exact list of three environment variables:
            *   `'GOOGLE_CLOUD_PROJECT=$PROJECT_ID'`
            *   `'GOOGLE_GENAI_USE_VERTEXAI=TRUE'`
            *   `'GOOGLE_CLOUD_LOCATION=$_REGION'`
    *   **Step 2: 'Forge Container'**
        *   `id`: 'Forge Container'
        *   `name`: 'gcr.io/cloud-builders/docker'
        *   It must have a `waitFor` key for `['Run Pytest Ward']`.
        *   Its `args` must be a list of six specific strings in this exact order:
            1.  `'build'`
            2.  `'-t'`
            3.  `'${_REGION}-docker.pkg.dev/${_PROJECT_ID}/${_REPO_NAME}/shadowblade-agent:${_IMAGE_TAG}'`
            4.  `'-f'`
            5.  `'./shadowblade/Dockerfile'`
            6.  `'.'`
3.  **A top-level `images` section.** This section must be a list containing a single string: the dynamically constructed image tag `'${_REGION}-docker.pkg.dev/${_PROJECT_ID}/${_REPO_NAME}/shadowblade-agent:${_IMAGE_TAG}'`.

Generate only the complete and exact YAML that meets these specifications.
With the cloudbuild.yaml scroll prepared, command Google Cloud to execute the entire gauntlet.
👉💻 Press Ctrl+C twice to exit the Gemini CLI.
👉💻 In your terminal, unleash the pipeline from your project's root directory:
. ~/agentverse-developer/set_env.sh
cd ~/agentverse-developer
gcloud builds submit . --config cloudbuild.yaml --substitutions=\
_PROJECT_ID="${PROJECT_ID}",\
_REGION="${REGION}",\
_REPO_NAME="${REPO_NAME}"
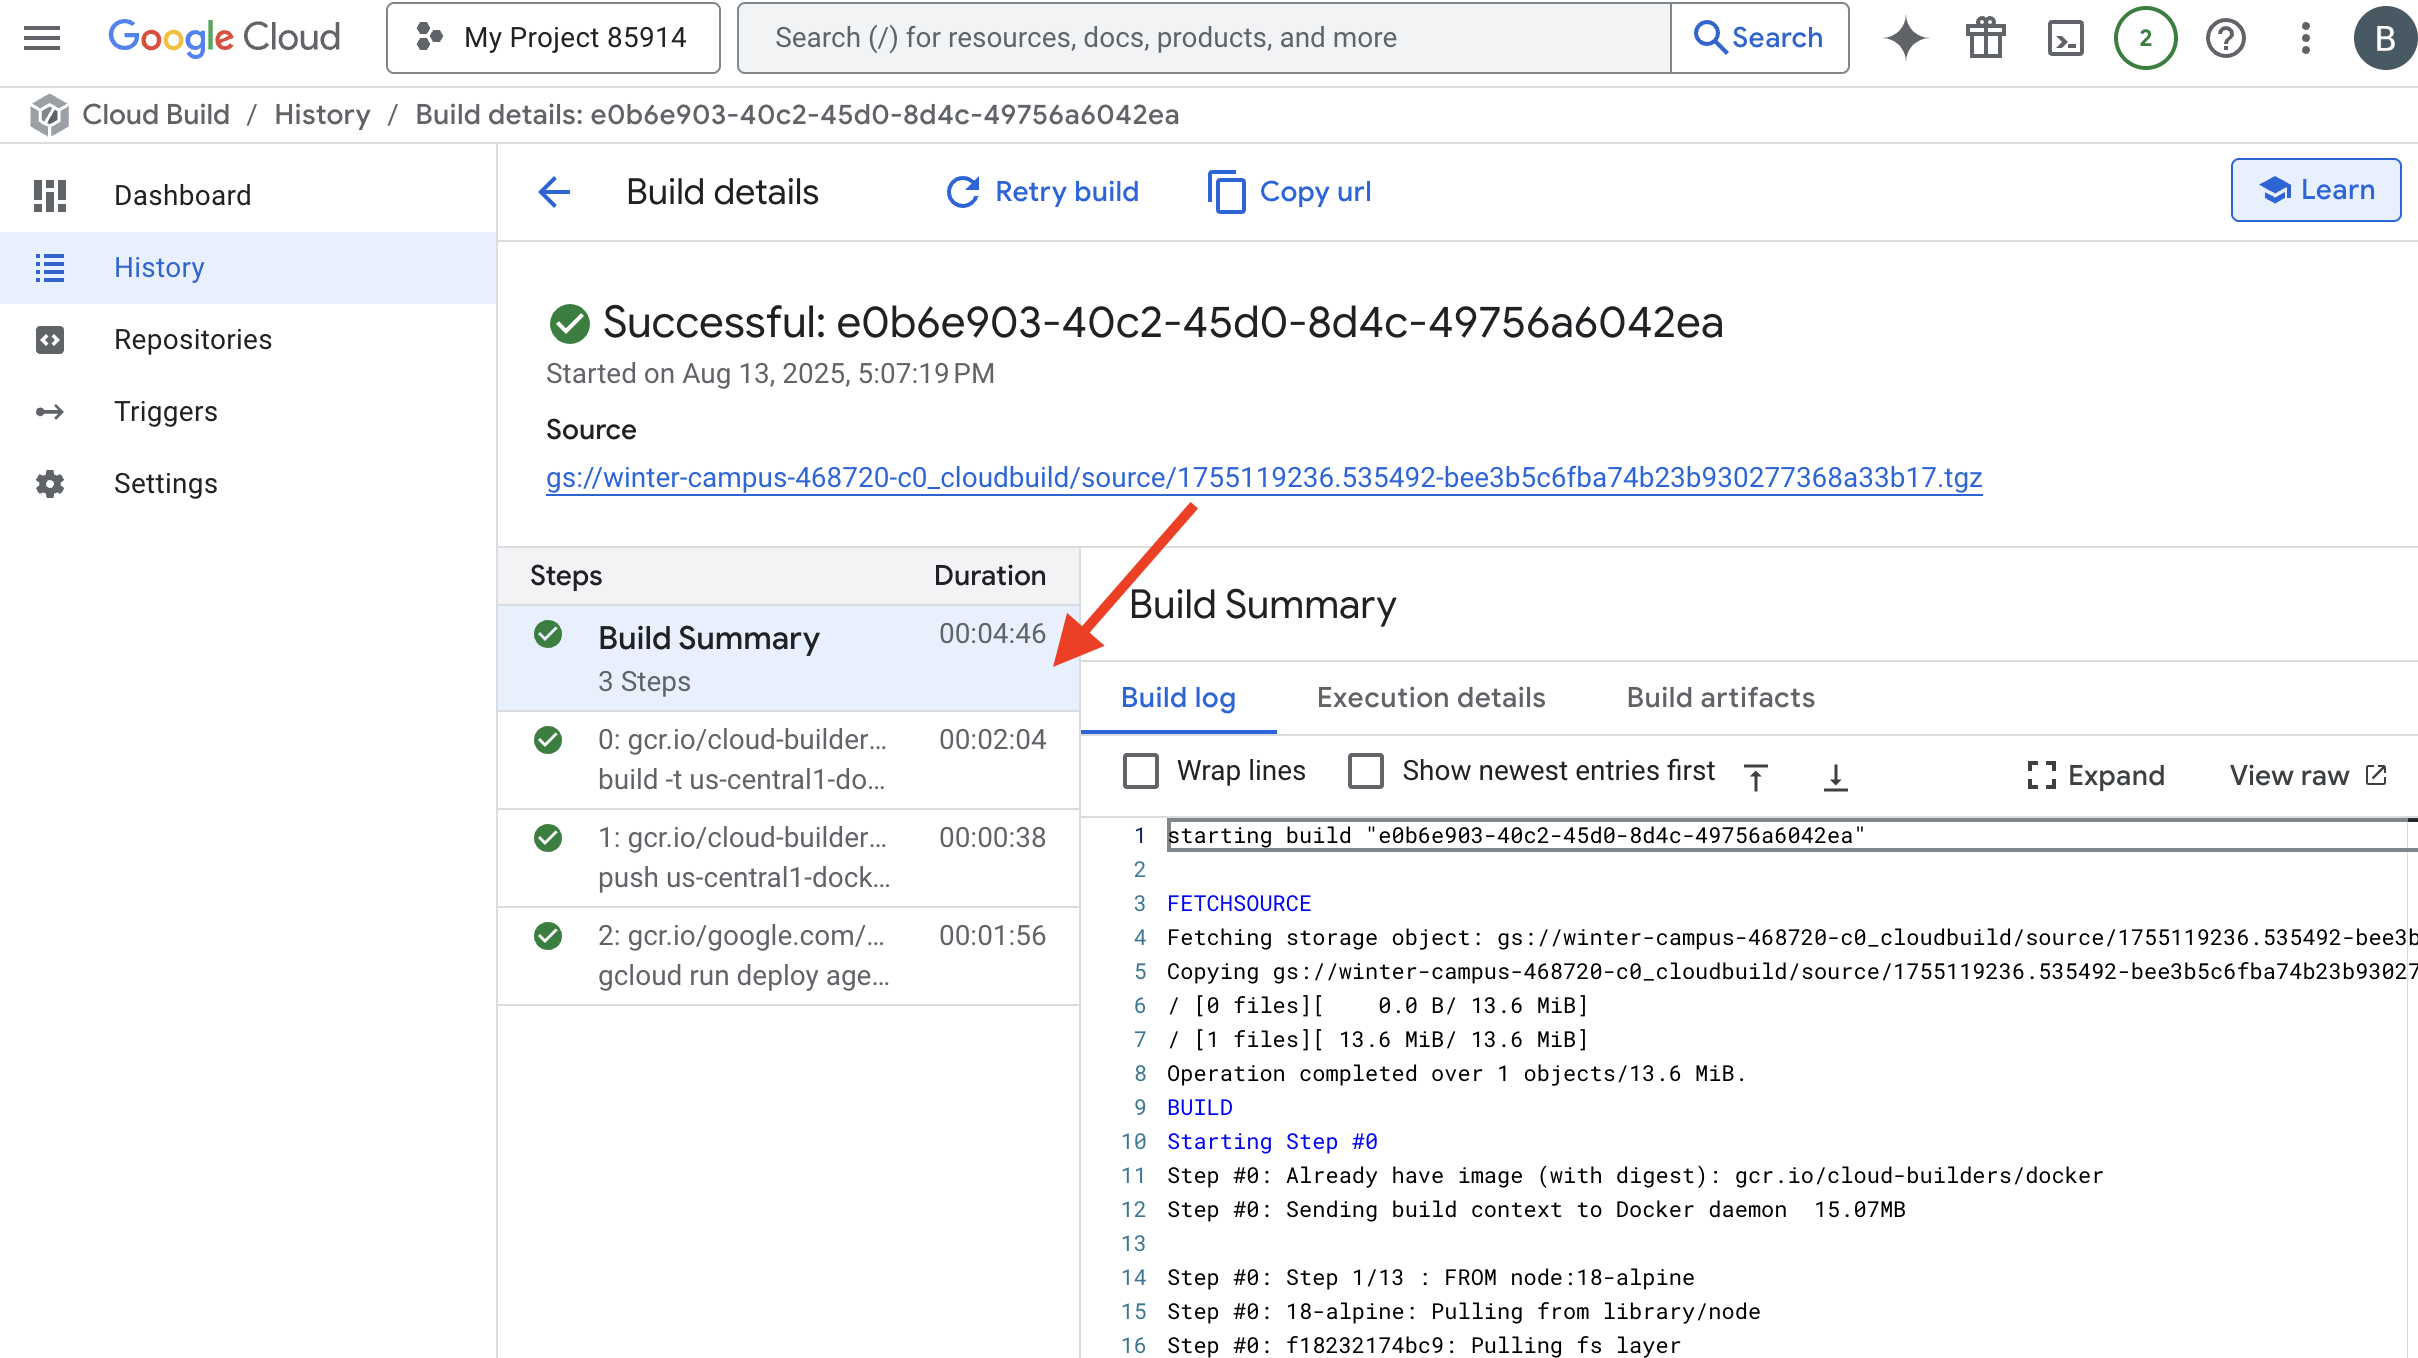
You can now watch in the Google Cloud Console, Google Build page as your automated ritual executes each step. It will first run the tests, and upon seeing their success, it will forge and store your agent's container.
Your agent has passed the gauntlet. A verified, pure artifact now rests in your arsenal. The final act is yours to command. With a single incantation, you will summon this artifact from the registry and give it life as a public service on Cloud Run.
👉💻 In your terminal, issue the final deployment command:
. ~/agentverse-developer/set_env.sh
cd ~/agentverse-developer
gcloud run deploy shadowblade-agent \
  --image=${REGION}-docker.pkg.dev/${PROJECT_ID}/${REPO_NAME}/shadowblade-agent:latest \
  --platform=managed \
  --labels="dev-tutorial-codelab=agentverse" \
  --region=${REGION} \
  --set-env-vars="A2A_HOST=0.0.0.0" \
  --set-env-vars="A2A_PORT=8080" \
  --set-env-vars="GOOGLE_GENAI_USE_VERTEXAI=TRUE" \
  --set-env-vars="GOOGLE_CLOUD_LOCATION=${REGION}" \
  --set-env-vars="GOOGLE_CLOUD_PROJECT=${PROJECT_ID}" \
  --set-env-vars="PUBLIC_URL=${PUBLIC_URL}" \
  --allow-unauthenticated \
  --project=${PROJECT_ID} \
  --min-instances=1
Congratulations, Shadowblade. The rituals of the codex are complete. The time has come to prove its mettle. A Spectre, born of the very chaos you have learned to tame, awaits your challenge. Prepare for the final trial.
FOR NON GAMERS
9. The Boss Fight
The scrolls have been read, the rituals performed, the gauntlet passed. Your agent is not merely an artifact in storage; it is a champion forged in code, a live sentinel in the Agentverse awaiting its first command. The time has come to prove its mettle in the crucible of combat.
You will now enter a live-fire simulation to pit your newly deployed Shadowblade against a formidable Spectre—an embodiment of the very chaos that plagues all creation. This is the ultimate test of your work, from your agent's core logic to its flawless deployment.
Acquire Your Agent's Locus
Before you can enter the battleground, you must possess two keys: your champion's unique signature (Agent Locus) and the hidden path to the Spectre's lair (Dungeon URL).
👉💻 First, acquire your agent's unique address in the Agentverse—its Locus. This is the live endpoint that connects your champion to the battleground.
. ~/agentverse-developer/set_env.sh
echo https://shadowblade-agent-${PROJECT_NUMBER}.${REGION}.run.app
👉💻 Next, pinpoint the destination. This command reveals the location of the Translocation Circle, the very portal into the Spectre's domain.
. ~/agentverse-developer/set_env.sh
echo https://agentverse-dungeon-${PROJECT_NUMBER}.${REGION}.run.app
Important: Keep both of these URLs ready. You will need them in the final step.
Confronting the Spectre
With the coordinates secured, you will now navigate to the Translocation Circle and cast the spell to head into battle.
👉 Open the Translocation Circle URL in your browser to stand before the shimmering portal to The Crimson Keep.
To breach the fortress, you must attune your Shadowblade's essence to the portal.
- On the page, find the runic input field labeled A2A Endpoint URL .
- Inscribe your champion's sigil by pasting its Agent Locus URL (the first URL you copied) into this field.
- Click Connect to unleash the teleportation magic.
The blinding light of teleportation fades. You are no longer in your sanctum. The air crackles with energy, cold and sharp. Before you, the Spectre materializes—a vortex of hissing static and corrupted code, its unholy light casting long, dancing shadows across the dungeon floor. It has no face, but you feel its immense, draining presence fixated entirely on you.
Your only path to victory lies in the clarity of your conviction. This is a duel of wills, fought on the battlefield of the mind.
As you lunge forward, ready to unleash your first attack, the Spectre counters. It doesn't raise a shield, but projects a question directly into your consciousness—a shimmering, runic challenge drawn from the core of your training.
This is the nature of the fight. Your knowledge is your weapon.
- Answer with the wisdom you have gained , and your blade will ignite with pure energy, shattering the Spectre's defense and landing a CRITICAL BLOW.
- But if you falter, if doubt clouds your answer, your weapon's light will dim. The blow will land with a pathetic thud, dealing only a FRACTION OF ITS DAMAGE. Worse, the Spectre will feed on your uncertainty, its own corrupting power growing with every misstep.
This is it, Champion. Your code is your spellbook, your logic is your sword, and your knowledge is the shield that will turn back the tide of chaos.
Focus. Strike true. The fate of the Agentverse depends on it.
Congratulations, Shadowblade.
You have successfully completed the codex. You took a "vibe," translated it into a design, and used Gemini CLI to assemble an intelligent agent. You inscribed Wards of Purity to test its logic, built an automated gauntlet to forge it into an artifact, and unleashed it into the Agentverse. Finally, you validated its purpose in a live-fire trial. You have mastered the full-stack agentic workflow and are now ready for any challenge the Agentverse throws at you.
10. Cleanup: Reclaiming the Agentverse
Congratulations on mastering the Shadowblade's Codex! To ensure the Agentverse remains pristine and your training grounds are cleared, you must now perform the final cleanup rituals. This will remove all resources created during your journey.
Deactivate the Agentverse Components
You will now systematically dismantle the deployed components of your Agentverse.
Delete the Shadowblade Agent on Cloud Run & Artifact Registry Repository
This command removes your deployed Shadowblade agent from Cloud Run, and removes the Image repository where your agent's container image was stored.
👉💻 In your terminal, run:
. ~/agentverse-developer/set_env.sh
gcloud run services delete shadowblade-agent --region=${REGION} --quiet
gcloud run services delete agentverse-dungeon --region=${REGION} --quiet
gcloud artifacts repositories delete ${REPO_NAME} --location=${REGION} --quiet
Clean Up Local Files and Directories (Cloud Shell)
Finally, clear your Cloud Shell environment of the cloned repositories, installed extensions, and created files. This step is optional but recommended for a complete cleanup of your working directory.
👉💻 In your terminal, run:
rm -rf ~/agentverse-developer
rm -rf ~/agentverse-dungeon
rm -f ~/project_id.txt
gemini extensions uninstall nanobanana
rm -rf ~/.gemini # This removes all Gemini CLI configurations, including extensions, skills, and hooks.
You have now successfully cleared all traces of your Agentverse journey. Your project is clean, and you are ready for your next adventure.