

1. บทนำ
Codelab นี้จะสำรวจการเชื่อมต่อขาออกแบบส่วนตัวที่มีการควบคุมสำหรับ Gemini Enterprise โดยใช้ Agent Gateway ในโหมด agent-to-anywhere (ขาออก) คุณจะกำหนดค่าแอป Gemini Enterprise เพื่อเรียกใช้เซิร์ฟเวอร์ Model Context Protocol (MCP) ที่กำหนดเองซึ่งโฮสต์ใน Cloud Run อย่างปลอดภัยโดยกำหนดเส้นทางการรับส่งข้อมูลผ่าน Agent Gateway โดยใช้อินเทอร์เฟซ Private Service Connect (PSC) เพื่อเชื่อมต่อกับปลายทาง PSC สำหรับ Google APIs ในเครือข่าย VPC
ในสภาพแวดล้อมขององค์กร การให้สิทธิ์เข้าถึงเครือข่ายโดยตรงแก่เอเจนต์อัตโนมัติจะเสี่ยงต่อการขโมยข้อมูลและการดำเนินการเครื่องมือที่ไม่ผ่านการตรวจสอบ Agent Gateway มีจุดบังคับใช้แบบ Zero Trust ระดับแพลตฟอร์มแบบรวมศูนย์ ซึ่งจะตรวจสอบเพย์โหลดของเครื่องมือ MCP แบบ HTTP ที่สตรีมได้แบบไดนามิก ระบบจะตรวจสอบสิทธิ์คำขอขาออกด้วยข้อมูลประจำตัวของตัวแทนที่ตรวจสอบได้ด้วยการเข้ารหัสลับ และให้สิทธิ์ผ่าน Identity-Aware Proxy (IAP) โดยใช้นโยบายการเข้าถึงแบบรวม (UAP) ของ IAM ที่มีกฎ Common Expression Language (CEL) ซึ่งช่วยให้ควบคุมการเข้าถึงเครื่องมือและวิธีการ MCP ที่เฉพาะเจาะจงได้อย่างละเอียดโดยไม่ต้องเปิดเผยภาระงานในแบ็กเอนด์ต่ออินเทอร์เน็ตสาธารณะ
สิ่งที่คุณสร้าง
- Agent Gateway ที่ทำงานในโหมดขาออก (agent-to-anywhere) พร้อมการยืนยันปลายทางของ Agent Registry
- บริการ Cloud Run ที่โฮสต์เซิร์ฟเวอร์ MCP แบบ HTTP ที่สตรีมแบบส่วนตัวได้ (
--ingress=internal) ซึ่งลงทะเบียนพร้อมข้อกำหนดของเครื่องมือใน Agent Registry - ส่วนขยายการให้สิทธิ์ Identity-Aware Proxy (IAP) สำหรับ Agent Gateway
- นโยบายการเข้าถึงแบบรวม (UAP) ของ IAM ที่มีเงื่อนไข CEL สำหรับการให้สิทธิ์เครื่องมือ MCP
- แอป Gemini Enterprise ที่เชื่อมโยงกับ Agent Gateway และเชื่อมต่อกับที่เก็บข้อมูลเซิร์ฟเวอร์ MCP ที่กำหนดเองซึ่งนำเข้าจาก Agent Registry
- ทรัพยากรเครือข่าย VPC, โซน Cloud DNS และปลายทาง PSC สำหรับ Google API
- การแนบเครือข่าย PSC สำหรับขาออก VPC ส่วนตัวของ Agent Gateway
- กฎนโยบายไฟร์วอลล์รุ่นถัดไป (NGFW) ของ Cloud เพื่อรักษาความปลอดภัยให้กับการรับส่งข้อมูล VPC
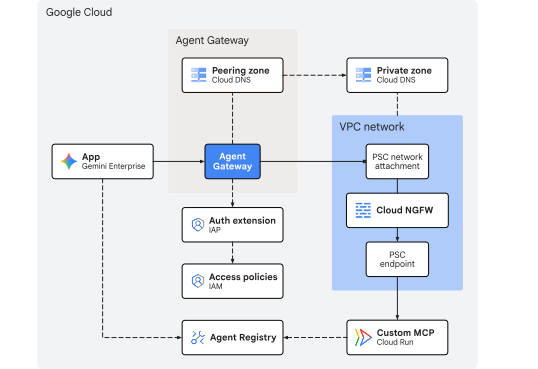
รูปที่ 1 สถาปัตยกรรม Codelab
สิ่งที่คุณจะได้เรียนรู้
- วิธีติดตั้งใช้งานเซิร์ฟเวอร์ MCP แบบ HTTP ที่สตรีมได้แบบส่วนตัวจากแหล่งที่มาใน Cloud Run และลงทะเบียนปลายทางและสคีมาเครื่องมือใน Agent Registry
- วิธีกำหนดค่า Agent Gateway ด้วยรายการรีจิสทรีที่สอดคล้องและกำหนดเส้นทางการเรียกใช้เครื่องมือของแอป Gemini Enterprise ผ่านเกตเวย์
- วิธีสร้างข้อมูลขาออก VPC ส่วนตัวโดยใช้การเชื่อมต่อและอินเทอร์เฟซเครือข่าย PSC
- วิธีมอบสิทธิ์การให้สิทธิ์ Agent Gateway ให้กับ Identity-Aware Proxy (IAP)
- วิธีเขียนและเชื่อมโยงนโยบายการเข้าถึงแบบรวม (UAP) ของ IAM โดยใช้แอตทริบิวต์ CEL
destination.agent_registry.*และdestination.is_registeredเพื่อจำกัดการเรียกใช้เครื่องมือ MCP - วิธีตรวจสอบการบังคับใช้นโยบายและข้อมูลขาออกของเครือข่ายโดยใช้ Cloud Logging
สิ่งที่ต้องมี
- โปรเจ็กต์ Google Cloud ที่เปิดใช้การเรียกเก็บเงิน
- ใบอนุญาต Gemini Enterprise ที่ใช้งานอยู่หรือช่วงทดลองใช้ 30 วัน
- สิทธิ์ IAM ในการจัดสรรบริการเครือข่าย, Gemini Enterprise และทรัพยากร Agent Platform
- เชลล์ที่เข้ากันได้กับ POSIX (
bashหรือzsh) ที่ติดตั้ง Google Cloud CLI (gcloud),curlและjq
ส่วนแนะนำก็มีเพียงเท่านี้... ต่อไปเราจะไปที่ส่วนแนวคิด
2. แนวคิด
ลำดับการติดตั้งใช้งาน
Codelab นี้จะติดตั้งใช้งานโครงสร้างพื้นฐานก่อนเพื่อให้เส้นทางเครือข่ายส่วนตัวและการควบคุมการกำกับดูแลพร้อมใช้งานก่อนที่จะลงทะเบียนและเชื่อมต่อเครื่องมือ MCP กับ Gemini Enterprise
- โครงสร้างพื้นฐานเครือข่าย: จัดสรรซับเน็ต VPC, ปลายทาง PSC, การเชื่อมต่อเครือข่าย PSC, กฎนโยบาย Cloud NGFW และโซน Cloud DNS ส่วนตัว
- เกตเวย์ของตัวแทน: ติดตั้งเกตเวย์ของตัวแทนในโหมดขาออกด้วยการผสานรวมรีจิสทรีของตัวแทน (
registries) และขาออกของ VPC ส่วนตัว (networkAttachment) - นโยบายการให้สิทธิ์: กำหนดค่าส่วนขยายการให้สิทธิ์ IAP, นโยบาย Authz ของเกตเวย์ และนโยบายการเข้าถึงแบบรวม (UAP) ของ IAM โดยใช้เงื่อนไข
destination.is_registeredและdestination.agent_registry.*CEL - ติดตั้งใช้งานและลงทะเบียนเซิร์ฟเวอร์ MCP: ติดตั้งใช้งานเซิร์ฟเวอร์ MCP สำหรับคณิตศาสตร์จากแหล่งที่มาไปยัง Cloud Run (
--ingress=internal) และลงทะเบียนข้อกำหนดของบริการและเครื่องมือ (addและsubtract) ใน Agent Registry - แอป Gemini Enterprise: สร้างแอป Gemini Enterprise (
Engine) กำหนดค่าการตั้งค่าข้อมูลประจำตัวและการสังเกตการณ์ และเชื่อมโยงการรับส่งขาออกกับ Agent Gateway (agentGatewaySetting) - นำเข้าเครื่องมือเชื่อมต่อข้อมูล MCP ที่กำหนดเอง: สร้างและเปิดใช้งาน
REGISTRY_MCPเครื่องมือเชื่อมต่อข้อมูล (:setUpDataConnector) เพื่อลิงก์ที่เก็บข้อมูลสำรองของเซิร์ฟเวอร์ MCP ที่ลงทะเบียนกับแอป Gemini Enterprise - ตรวจสอบ: ทดสอบการดำเนินการเครื่องมือที่อนุญาตและไม่อนุญาตในแชท และยืนยันการบังคับใช้นโยบายใน Agent Gateway, DNS, ไฟร์วอลล์ และบันทึกของ Cloud Run
การส่งออกข้อมูลจาก Gemini Enterprise
Gemini Enterprise จะกำหนดเส้นทางคำขอเครื่องมือเซิร์ฟเวอร์ MCP ที่กำหนดเองไปยัง Agent Gateway เมื่อมีการกำหนดค่าทั้ง agentGatewaySetting ใน Engine และ use_agent_gateway_egress: true ใน DataConnector
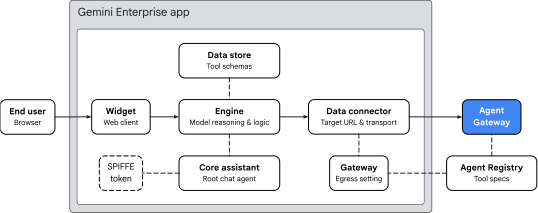
รูปที่ 2 สถาปัตยกรรมการส่งออกของ Gemini Enterprise
แอป Gemini Enterprise จะจัดระเบียบการกำหนดเส้นทางเครื่องมือใน 4 ด้านหลักๆ ดังนี้
- วิดเจ็ต (
default_search_widget_config):- แสดงอินเทอร์เฟซไคลเอ็นต์บนเว็บ วิดเจ็ตจะรับพรอมต์จากผู้ใช้และเริ่มเซสชันแชทกับเครื่องมือที่อยู่เบื้องหลัง
- Core Assistant (
assistants/default_assistant/agents/default/core_assistant):- Agent การให้เหตุผลแบบสนทนาระดับรูทภายในเครื่องมือ เมื่อประเมินคำค้นหาของผู้ใช้ Core Assistant จะพิจารณาว่าจำเป็นต้องมีการคำนวณทางคณิตศาสตร์หรือไม่ ตรวจสอบเครื่องมือที่มีอยู่ และมอบหมายการดำเนินการให้กับ Agent Gateway Agent ย่อยที่สังเคราะห์ขึ้น
- ที่เก็บข้อมูลและเครื่องมือเชื่อมต่อข้อมูล
DataStore: เมื่อ:setUpDataConnectorทำงาน ระบบจะจัดสรรภายในCollectionโดยเฉพาะ ซึ่งจะลิงก์ (dataStoreIds) สคีมาของเครื่องมือ Agent Registry ที่นำเข้า (add,subtract), ประเภทอาร์กิวเมนต์ และวิธีการของ Agent กับEngineของ Gemini EnterpriseDataConnector: จัดการการเชื่อมต่อการดำเนินการREGISTRY_MCP(createBapConnection: true) กับเซิร์ฟเวอร์ MCP ระยะไกล (instance_uri) แก้ไขทรัพยากรเซิร์ฟเวอร์ MCP ของ Agent Registry (registry_mcp_server_name) และเปิดใช้ขาออกของ Agent Gateway (use_agent_gateway_egress: true)
- ตัวตนของเอเจนต์ Agent Registry และ Agent Gateway
- เมื่อตัวเชื่อมต่อข้อมูลส่งการเรียกใช้เครื่องมือขาออก ระบบจะกำหนดเส้นทางการรับส่งข้อมูลไปยังเกตเวย์ที่ระบุใน
agentGatewaySettingผู้ช่วยหลักจะสร้างโทเค็นข้อมูลประจำตัว SPIFFE ที่ยืนยันข้อมูลประจำตัวของตนเอง:principal://agents.global.org-.../agents/default/core_assistant - Agent Gateway ผสานรวมกับ Agent Registry โดยใช้ฟิลด์
registriesเพื่อแก้ไขปลายทางปลายทางและสคีมาเครื่องมือที่ลงทะเบียนแบบไดนามิก โดยจะป้อนข้อมูลแอตทริบิวต์destination.is_registeredและdestination.agent_registry.*แล้วส่งไปยัง IAP v2 เพื่อประเมินกับกฎ CEL ของนโยบายการเข้าถึงแบบรวม (UAP) ของ IAM ก่อนที่จะอนุญาตให้ส่งผ่านไปยังเครือข่าย VPC
- เมื่อตัวเชื่อมต่อข้อมูลส่งการเรียกใช้เครื่องมือขาออก ระบบจะกำหนดเส้นทางการรับส่งข้อมูลไปยังเกตเวย์ที่ระบุใน
การเชื่อมต่อ VPC เกตเวย์
Agent Gateway ช่วยให้การเชื่อมต่อเครือข่าย VPC ส่วนตัวโดยใช้ฟิลด์ YAML 2 รายการ ดังนี้
networkConfig.egress.networkAttachment: สั่งให้กำหนดเส้นทางการรับส่งข้อมูล IP ส่วนตัวผ่านการเชื่อมต่อเครือข่าย PSC ไปยังเครือข่าย VPCdnsPeeringConfig.domains: การแปลง DNS ของเพียร์ด้วยโซน DNS ของ Cloud DNS ของเครือข่าย VPC เพื่อให้ชื่อโฮสต์เป้าหมาย (*.run.app) แปลงเป็นที่อยู่ IP ของปลายทาง PSC ส่วนตัวที่กำหนดไว้ในเครือข่าย VPC
ข้อจำกัดและข้อกำหนด
- StreamableHTTP เท่านั้น: ระบบไม่รองรับการรับส่ง Server-Sent Events (SSE) แบบเดิม เซิร์ฟเวอร์ MCP ต้องใช้ StreamableHTTP
- ต้องใช้ TLS ของ Public CA: อุปกรณ์ปลายทาง MCP ต้องใช้ใบรับรอง TLS ที่ลงชื่อโดย CA ที่เชื่อถือได้แบบสาธารณะ แม้ว่าจะเข้าถึงแบบส่วนตัวผ่าน PSC ก็ตาม
- การลบล้างนโยบายขององค์กร: คุณต้องลบล้างนโยบายขององค์กรสำหรับที่เก็บข้อมูล MCP ที่กำหนดเองอย่างชัดเจนก่อนที่จะลงทะเบียนที่เก็บข้อมูล
จบส่วนแนวคิดแล้ว... ต่อไปเป็นส่วนการตั้งค่า
3. ตั้งค่า
บทบาท IAM ที่ต้องมี
คุณต้องมีบทบาทต่อไปนี้เพื่อทำ Codelab ให้เสร็จสมบูรณ์
โดเมน | บทบาท IAM ที่ต้องมี |
โปรเจ็กต์และ IAM |
|
เครือข่ายและเกตเวย์ |
|
Gemini Enterprise และ Registry |
|
ภาระงานและการสร้าง |
|
ความสามารถในการสังเกต |
|
หรือใช้บทบาทพื้นฐานแบบกว้าง เช่น roles/owner ร่วมกับ roles/orgpolicy.policyAdmin (เนื่องจาก roles/owner เพียงอย่างเดียวไม่สามารถแก้ไขนโยบายองค์กรได้)
เข้าถึงโปรเจ็กต์
Codelab นี้ใช้โปรเจ็กต์ที่อยู่ในระบบคลาวด์ของ Google เดียว ขั้นตอนการกำหนดค่าใช้คำสั่ง gcloud CLI และคำสั่ง Shell ของ Linux
เริ่มต้นด้วยการเข้าถึงบรรทัดคำสั่งของโปรเจ็กต์ที่อยู่ในระบบคลาวด์ของ Google โดยทำดังนี้
- Cloud Shell ที่
shell.cloud.google.comหรือ - เทอร์มินัลในเครื่องที่
gcloudCLI ติดตั้งแล้ว
ตั้งค่ารหัสโปรเจ็กต์
gcloud config set project SET_YOUR_PROJECT_ID_HERE
ตรวจสอบสิทธิ์เซสชัน
# login to gcloud cli
gcloud auth login
# login for gcloud api
gcloud auth application-default login
ตั้งค่าตัวแปรสภาพแวดล้อมของ Shell
# set custom var for slug (eg, "foo") and region preference
export SLUG="foo"
export REGION="us-central1"

echo ${SLUG}
echo ${REGION}
# create project vars (automatic)
export PROJ_ID=$(gcloud config list --format="value(core.project)")
export PROJ_NO=$(gcloud projects describe ${PROJ_ID} --format="value(projectNumber)")
export ORG_ID=$(gcloud projects get-ancestors ${PROJ_ID} --format="value(id)" | tail -n 1)
export USER_IDENTITY=$(gcloud config get-value account)

echo ${PROJ_ID}
echo ${PROJ_NO}
echo ${ORG_ID}
echo ${USER_IDENTITY}
# create resource vars for agent platform (automatic)
export AGW_NAME="agw-${SLUG}-${REGION}-ata"
export AGW_URI="projects/${PROJ_ID}/locations/${REGION}/agentGateways/${AGW_NAME}"
export UAP_POLICY_NAME="uap-policy-${SLUG}"
export UAP_BINDING_NAME="uap-binding-${SLUG}"
export MCP_NAME="math-wizard"
export MCP_URL="https://${MCP_NAME}-${PROJ_NO}.${REGION}.run.app/mcp"

echo ${AGW_NAME}
echo ${AGW_URI}
echo ${UAP_POLICY_NAME}
echo ${UAP_BINDING_NAME}
echo ${MCP_NAME}
echo ${MCP_URL}
# create resource vars for gemini enterprise (automatic)
export GE_APP_DISPLAY_NAME="Codelab app"
export GE_APP_ORG_NAME="${SLUG}, Inc."
export GE_LOCATION="global"
export GE_APP_NAME="app-${SLUG}-${GE_LOCATION}"
export GE_APP_INIT="${GE_APP_NAME}_$(date +%s)"

echo ${GE_APP_DISPLAY_NAME}
echo ${GE_APP_ORG_NAME}
echo ${GE_LOCATION}
echo ${GE_APP_NAME}
echo ${GE_APP_INIT}
ตั้งค่าโดเมนที่เชื่อถือได้ของข้อมูลประจำตัวของ Agent
คำสั่ง if-then-else จะตรวจสอบว่าโปรเจ็กต์เป็นขององค์กรหรือไม่เพื่อตั้งค่าโดเมนที่เชื่อถือได้อย่างถูกต้องสำหรับข้อมูลประจำตัวของตัวแทนหลัก
# set var for trust domain
if [[ -n "${ORG_ID}" ]]; then
  export TRUST_DOMAIN="agents.global.org-${ORG_ID}.system.id.goog"
else
  export TRUST_DOMAIN="agents.global.proj-${PROJ_NO}.system.id.goog"
fi

echo "trust domain: ${TRUST_DOMAIN}"
ตั้งค่าโปรเจ็กต์การเรียกเก็บเงินและโควต้า
# set cli quota project
gcloud config set billing/quota_project ${PROJ_ID}
# set api quota project
gcloud auth application-default set-quota-project ${PROJ_ID}
สร้างไดเรกทอรีในเครื่องสำหรับไฟล์การกำหนดค่า
# create config folder
mkdir -p cfg
อัปเดต gcloud cli (แนะนำ)
หากเรียกใช้การติดตั้ง Google Cloud SDK ที่จัดการด้วยตนเอง (เช่น นอก Cloud Shell) ให้อัปเดตคอมโพเนนต์เป็นเวอร์ชันล่าสุด
# update gcloud cli
gcloud components update
เปิดใช้บริการ API
# enable google apis (part 1)
gcloud services enable \
  agentregistry.googleapis.com \
  agentidentity.googleapis.com \
  aiplatform.googleapis.com \
  apphub.googleapis.com \
  apptopology.googleapis.com \
  cloudapiregistry.googleapis.com \
  cloudtrace.googleapis.com \
  compute.googleapis.com \
  dataform.googleapis.com \
  iam.googleapis.com \
  iap.googleapis.com \
  logging.googleapis.com \
  modelarmor.googleapis.com \
  monitoring.googleapis.com \
  networksecurity.googleapis.com \
  networkservices.googleapis.com \
  notebooks.googleapis.com \
  observability.googleapis.com
# enable google apis (part 2)
gcloud services enable \
  artifactregistry.googleapis.com \
  cloudbuild.googleapis.com \
  discoveryengine.googleapis.com \
  dns.googleapis.com \
  orgpolicy.googleapis.com \
  run.googleapis.com \
  saasservicemgmt.googleapis.com \
  securitycenter.googleapis.com \
  storage.googleapis.com \
  telemetry.googleapis.com \
  texttospeech.googleapis.com
นโยบายองค์กร
ข้อจำกัดของนโยบายขององค์กรที่มีการจัดการของ Google Cloud เริ่มต้นจะจำกัดฟีเจอร์ที่ใช้ใน Codelab นี้
discoveryengine.managed.disableCustomMcpServerConnector:- จำกัดการสร้างเครื่องมือเชื่อมต่อข้อมูลที่ใช้เซิร์ฟเวอร์ MCP ที่กำหนดเอง (
custom_mcp) เป็นแหล่งข้อมูล (บังคับใช้โดยค่าเริ่มต้น)
- จำกัดการสร้างเครื่องมือเชื่อมต่อข้อมูลที่ใช้เซิร์ฟเวอร์ MCP ที่กำหนดเอง (
iam.managed.disableAccessPolicyBinding:- จำกัดการเชื่อมโยงนโยบายการเข้าถึง IAM v3 กับทรัพยากร (บังคับใช้โดยค่าเริ่มต้น)
discoveryengine.managed.allowedEgressFqdns:- จำกัดโดเมนขาออก (
instance_uriFQDN) สำหรับตัวเชื่อมต่อข้อมูลเมื่อการควบคุมบริการ VPC (VPC-SC) ใช้งานอยู่หรือโปรเจ็กต์แสดงอยู่ในพารามิเตอร์enforcedProjectsขององค์กร
- จำกัดโดเมนขาออก (
discoveryengine.managed.allowedDataSources:- จำกัดประเภทเครื่องมือเชื่อมต่อข้อมูลที่อนุญาต (
dataSource) เมื่อ VPC-SC ใช้งานอยู่หรือโปรเจ็กต์แสดงอยู่ในพารามิเตอร์enforcedProjectsขององค์กร
- จำกัดประเภทเครื่องมือเชื่อมต่อข้อมูลที่อนุญาต (
ลบล้างข้อจำกัดของนโยบายองค์กรที่รับช่วงมาในระดับโปรเจ็กต์โดยการตั้งค่า enforce: false อย่างชัดเจน
ปิดใช้ข้อจํากัด MCP ที่กําหนดเอง
# disable data connector constraint (allow custom mcp servers)
gcloud org-policies set-policy /dev/stdin << EOF
name: projects/${PROJ_NO}/policies/discoveryengine.managed.disableCustomMcpServerConnector
spec:
  rules:
  - enforce: false
EOF
# verify org policy constraint on project
gcloud org-policies describe discoveryengine.managed.disableCustomMcpServerConnector \
  --project=${PROJ_ID} --effective
ปิดใช้ข้อจำกัดของนโยบายการเข้าถึง
# disable iam v3 constraint (allow v3 access policies)
gcloud org-policies set-policy /dev/stdin << EOF
name: projects/${PROJ_NO}/policies/iam.managed.disableAccessPolicyBinding
spec:
  rules:
  - enforce: false
EOF
# verify org policy constraint on project
gcloud org-policies describe iam.managed.disableAccessPolicyBinding \
  --project=${PROJ_ID} --effective
ตรวจสอบและปิดใช้ข้อจํากัดของเครื่องมือเชื่อมต่อข้อมูลแบบมีเงื่อนไข
โดยค่าเริ่มต้น discoveryengine.managed.allowedEgressFqdns และ discoveryengine.managed.allowedDataSources จะบล็อกการสร้างเครื่องมือเชื่อมต่อก็ต่อเมื่อโปรเจ็กต์ของคุณอยู่ภายในขอบเขตการควบคุมบริการ VPC (VPC SC) หรือหากผู้ดูแลระบบองค์กรได้เพิ่มโปรเจ็กต์ของคุณไปยัง enforcedProjects
ก่อนอื่น ให้ตรวจสอบนโยบายที่มีผลบังคับใช้ในโปรเจ็กต์ของคุณ
# check effective egress fqdn constraint on project
gcloud org-policies describe discoveryengine.managed.allowedEgressFqdns \
  --project=${PROJ_ID} --effective
# check effective data source constraint on project
gcloud org-policies describe discoveryengine.managed.allowedDataSources \
  --project=${PROJ_ID} --effective
~~IF~~ หากมีการบังคับใช้ข้อจำกัดเหล่านี้ ให้ตั้งค่า enforce: false ในทั้ง 2 นโยบายสำหรับโปรเจ็กต์เพื่อให้แน่ใจว่าข้อจำกัดไม่บล็อกการตั้งค่าเครื่องมือเชื่อมต่อ custom_mcp ในองค์กรที่มีการจำกัดนโยบายหรือ VPC SC
# disable egress fqdn constraint on project
gcloud org-policies set-policy /dev/stdin << EOF
name: projects/${PROJ_NO}/policies/discoveryengine.managed.allowedEgressFqdns
spec:
  rules:
  - enforce: false
EOF
# disable allowed data sources constraint on project
gcloud org-policies set-policy /dev/stdin << EOF
name: projects/${PROJ_NO}/policies/discoveryengine.managed.allowedDataSources
spec:
  rules:
  - enforce: false
EOF
# verify both constraints are disabled on project
gcloud org-policies describe discoveryengine.managed.allowedEgressFqdns \
  --project=${PROJ_ID} --effective

gcloud org-policies describe discoveryengine.managed.allowedDataSources \
  --project=${PROJ_ID} --effective
สิทธิ์ IAM
มอบบทบาท IAM ที่จำเป็นให้กับบัญชีผู้ใช้และบัญชีบริการเริ่มต้นของ Compute Engine ที่ Cloud Build ใช้
- บัญชีผู้ใช้ (
${USER_IDENTITY}):- ต้องมีสิทธิ์ในการติดตั้งใช้งานและเรียกใช้บริการ Cloud Run (
roles/run.admin,roles/run.invoker,roles/iam.serviceAccountUser), สร้างอิมเมจคอนเทนเนอร์ (roles/cloudbuild.builds.editor), จัดการ Gemini Enterprise (roles/discoveryengine.admin) และเขียนนโยบายการเข้าถึงแบบรวม (roles/iam.accessPolicyAdmin)
- ต้องมีสิทธิ์ในการติดตั้งใช้งานและเรียกใช้บริการ Cloud Run (
- บัญชีบริการเริ่มต้นของ Compute Engine(
${PROJ_NO}-compute@developer.gserviceaccount.com):- ใช้โดย Cloud Build เพื่อจัดเตรียมซอร์สโค้ดใน Cloud Storage (
roles/storage.admin) พุชอิมเมจไปยัง Artifact Registry (roles/artifactregistry.writer) และเขียนบันทึกการสร้าง (roles/logging.logWriter)
- ใช้โดย Cloud Build เพื่อจัดเตรียมซอร์สโค้ดใน Cloud Storage (
เรียกใช้คำสั่งต่อไปนี้เพื่อกำหนดการเชื่อมโยงบทบาท
# grant roles to user account
gcloud projects add-iam-policy-binding ${PROJ_ID} \
  --member="user:${USER_IDENTITY}" \
  --role="roles/run.admin"

gcloud projects add-iam-policy-binding ${PROJ_ID} \
  --member="user:${USER_IDENTITY}" \
  --role="roles/iam.serviceAccountUser"

gcloud projects add-iam-policy-binding ${PROJ_ID} \
  --member="user:${USER_IDENTITY}" \
  --role="roles/run.invoker"

gcloud projects add-iam-policy-binding ${PROJ_ID} \
  --member="user:${USER_IDENTITY}" \
  --role="roles/discoveryengine.admin"

gcloud projects add-iam-policy-binding ${PROJ_ID} \
  --member="user:${USER_IDENTITY}" \
  --role="roles/iam.accessPolicyAdmin"

gcloud projects add-iam-policy-binding ${PROJ_ID} \
  --member="user:${USER_IDENTITY}" \
  --role="roles/cloudbuild.builds.editor"
# grant roles to default compute (cloud build) service account
gcloud projects add-iam-policy-binding ${PROJ_ID} \
  --member="serviceAccount:${PROJ_NO}-compute@developer.gserviceaccount.com" \
  --role="roles/storage.admin"

gcloud projects add-iam-policy-binding ${PROJ_ID} \
  --member="serviceAccount:${PROJ_NO}-compute@developer.gserviceaccount.com" \
  --role="roles/artifactregistry.writer"

gcloud projects add-iam-policy-binding ${PROJ_ID} \
  --member="serviceAccount:${PROJ_NO}-compute@developer.gserviceaccount.com" \
  --role="roles/logging.logWriter"
ยืนยันสิทธิ์ IAM
ตรวจสอบการเชื่อมโยงบทบาท 6 รายการ (6) ในบัญชีผู้ใช้
# show iam policy on project for user account
gcloud projects get-iam-policy ${PROJ_ID} \
  --flatten="bindings[].members" \
  --filter="bindings.members:${USER_IDENTITY}" \
  --format="table(bindings.role:label=ROLE, bindings.members:label=PRINCIPAL_IDENTITY)"
ตรวจสอบการเชื่อมโยงบทบาท 3 รายการ (3) ในบัญชีบริการ Compute เริ่มต้น
# show iam policy on project for default compute service account
gcloud projects get-iam-policy ${PROJ_ID} \
  --flatten="bindings[].members" \
  --filter="bindings.members:${PROJ_NO}-compute@developer.gserviceaccount.com" \
  --format="table(bindings.role:label=ROLE, bindings.members:label=PRINCIPAL_IDENTITY)"
ยืนยันการเชื่อมโยงตัวแทนบริการ (ข้อควรระวัง)
ในโปรเจ็กต์ใหม่ Google Cloud จะจัดสรรตัวแทนบริการ Agent Gateway โดยอัตโนมัติและให้สิทธิ์ roles/agentgateway.serviceAgent เมื่อเปิดใช้ networkservices.googleapis.com เป็นครั้งแรก หากคุณใช้โปรเจ็กต์ที่มีอยู่ซ้ำ ซึ่งการล้างข้อมูลก่อนหน้านี้อาจนำการเชื่อมโยงตัวแทนบริการเริ่มต้นออก ให้เรียกใช้คำสั่งต่อไปนี้เพื่อเป็นมาตรการป้องกันข้อผิดพลาดและตรวจสอบว่าการเชื่อมโยงข้อมูลประจำตัวและบทบาทยังคงอยู่
# ensure network services service account has been created
gcloud beta services identity create \
  --service=networkservices.googleapis.com \
  --project="${PROJ_ID}"

# ensure network services service account has service agent roles applied
gcloud projects add-iam-policy-binding "${PROJ_ID}" \
  --member="serviceAccount:service-${PROJ_NO}@gcp-sa-agentgateway.iam.gserviceaccount.com" \
  --role="roles/agentgateway.serviceAgent"
ส่วนการตั้งค่าก็มีเพียงเท่านี้... ต่อไปเราจะไปที่ส่วนเครือข่าย
4. เครือข่าย
ในส่วนนี้ คุณจะติดตั้งใช้งานเครือข่าย VPC โดยใช้โหมดที่กำหนดเองที่มีซับเน็ต /28 โดยเฉพาะ (192.168.10.0/28) ซึ่งรองรับการแนบเครือข่าย PSC สำหรับการออกของเครือข่าย Agent Gateway ไปยังเครือข่าย VPC
ปลายทาง PSC สำหรับ Google APIs จะได้รับการติดตั้งใช้งานโดยใช้/32ที่อยู่ IPv4 ภายในแบบสากล (172.16.20.20) รายการเดียวเพื่อรองรับการเข้าถึงภายในแบบส่วนตัวไปยัง Google APIs และบริการต่างๆ ใน Codelab นี้ Agent Gateway จะกำหนดเป้าหมายเป็น Cloud Run โดยใช้ปลายทาง PSC ด้วยการแก้ปัญหาโดเมน run.app. โดยการ Peering ของ Cloud DNS
สร้างเครือข่าย
สร้างเครือข่าย VPC ทั่วโลก
# create vpc network
gcloud compute networks create vnet-${SLUG} --subnet-mode=custom
สร้างเครือข่ายย่อยสำหรับการเชื่อมต่อเครือข่าย PSC ของ Agent Gateway โดยทำดังนี้
# create subnet for agent gateway psc na
gcloud compute networks subnets create subnet-${REGION}-agw \
  --network=vnet-${SLUG} \
  --range=192.168.10.0/28 \
  --region=${REGION} \
  --enable-private-ip-google-access
สร้างกฎไฟร์วอลล์
สร้างนโยบายไฟร์วอลล์เพื่ออนุญาตการรับส่งข้อมูลขาออกทั้งหมดโดยเปิดใช้การบันทึก ซึ่งจะใช้เพื่อตรวจสอบการรับส่งข้อมูลที่ออกจากเกตเวย์ของ Agent ไปยังเครือข่าย VPC Cloud NGFW รองรับทั้งระดับ Essentials และ Standard สำหรับการรักษาความปลอดภัยของเครือข่ายและการตรวจสอบการรับส่งข้อมูล
# create fw policy
gcloud compute network-firewall-policies create fw-policy-${SLUG} --global
# create fw policy rule
gcloud compute network-firewall-policies rules create 1001 \
  --description="allow all out and log" \
  --firewall-policy=fw-policy-${SLUG} \
  --global-firewall-policy \
  --action=allow \
  --direction=EGRESS \
  --layer4-configs=all \
  --dest-ip-ranges=0.0.0.0/0 \
  --enable-logging
# bind fw policy to network
gcloud compute network-firewall-policies associations create \
  --name=fw-policy-bind-${SLUG} \
  --firewall-policy=fw-policy-${SLUG} \
  --network=vnet-${SLUG} \
  --global-firewall-policy
สร้างการเชื่อมต่อเครือข่าย PSC
สร้างการเชื่อมต่อเครือข่าย Private Service Connect (PSC) ที่กำหนดค่าให้ยอมรับการเชื่อมต่อจาก Agent Gateway โดยอัตโนมัติ การแนบเครือข่ายจะสร้างฝั่งเครือข่าย VPC ของผู้ใช้ในการเชื่อมต่อเพื่อลิงก์กับฝั่งผู้ให้บริการของ Agent Gateway อย่างปลอดภัยสำหรับการรับส่งข้อมูลขาออก ดูข้อมูลเพิ่มเติมเกี่ยวกับข้อกำหนดของเครือข่ายย่อยและข้อกำหนดช่วง IP ได้ที่กำหนดค่าการเชื่อมต่อ VPC
# create psc network attachment
gcloud compute network-attachments create psc-na-${REGION}-agw \
  --region=${REGION} \
  --subnets=subnet-${REGION}-agw \
  --connection-preference=ACCEPT_AUTOMATIC
ยืนยันการแนบเครือข่าย PSC
# show psc network attachment details
gcloud compute network-attachments describe psc-na-${REGION}-agw --region=${REGION}
เรียก URI ของทรัพยากรของ Network Attachment ของ PSC และจัดเก็บไว้ในตัวแปรสภาพแวดล้อม PSC_NA_URI ระบบจะอ้างอิง URI นี้ในการกำหนดค่า Agent Gateway (networkConfig.egress.networkAttachment) เพื่อจัดสรรอินเทอร์เฟซ PSC สำหรับการรับส่งข้อมูลเครือข่ายขาออกไปยังเครือข่าย VPC
# fetch psc network attachment uri
export PSC_NA_URI=$(gcloud compute network-attachments describe psc-na-${REGION}-agw \
  --region=${REGION} \
  --format="value(selfLink.scope(v1))")
echo ${PSC_NA_URI}
สร้างปลายทาง PSC
ระบบจะใช้ปลายทาง Private Service Connect (PSC) สำหรับ Google APIs เพื่อให้ Agent Gateway สร้างการเชื่อมต่อส่วนตัวกับเซิร์ฟเวอร์ MCP ของ Cloud Run ผ่านเส้นทางเครือข่ายภายในโดยไม่ต้องเปิดเผยการรับส่งข้อมูลต่ออินเทอร์เน็ตสาธารณะ การเรียกใช้เครื่องมือขาออกจาก Agent Gateway ไปยังเครือข่าย VPC จะเปลี่ยน URL ของบริการ Cloud Run เป้าหมาย (*.run.app) เป็นที่อยู่ IP ของปลายทางส่วนตัวนี้
จองที่อยู่ IPv4 ภายในส่วนกลางสำหรับปลายทาง PSC ที่อยู่ IP ที่เลือกต้องเป็น/32ที่อยู่ที่ไม่ซ้อนทับกับซับเน็ตที่มีอยู่ในเครือข่าย VPC
# set env var for psc ep ip address
export PSC_EP_IP="172.16.20.20"
echo ${PSC_EP_IP}
# reserve internal global ipv4 address
gcloud compute addresses create ip-psc2gapis \
  --global \
  --purpose=PRIVATE_SERVICE_CONNECT \
  --addresses=${PSC_EP_IP} \
  --network=vnet-${SLUG}
สร้างปลายทาง PSC สำหรับ Google API โดยใช้แพ็กเกจ all-apis ซึ่งรวมถึง Cloud Run (run.app)
# create psc endpoint for google apis
gcloud compute forwarding-rules create psc2gapis \
  --global \
  --network=vnet-${SLUG} \
  --address=ip-psc2gapis \
  --target-google-apis-bundle=all-apis
ยืนยันปลายทาง PSC
# show psc endpoint details
gcloud compute forwarding-rules describe psc2gapis --global
สร้างโซน DNS และระเบียน
Cloud DNS ใช้เพื่อเปิดใช้ Agent Gateway เพื่อสื่อสารแบบส่วนตัวกับเซิร์ฟเวอร์ MCP ที่โฮสต์ใน Cloud Run เมื่อ Agent Gateway ประเมินคำขอเครื่องมือขาออกที่กำหนดเป้าหมายเป็น Cloud Run จะใช้การรับส่งข้อมูล DNS แบบเพียร์ (dnsPeeringConfig.domains) เพื่อแก้ไขการค้นหา DNS สำหรับ *.run.app โดยใช้โซน Cloud DNS ส่วนตัวที่เชื่อมโยงกับเครือข่าย VPC ระเบียน DNS ส่วนตัวจะแสดงผลการค้นหาพร้อมที่อยู่ IP ของปลายทาง PSC ภายใน (172.16.20.20) ซึ่งช่วยให้คำขอของเครื่องมือ MCP ได้รับการกำหนดเส้นทางผ่านเส้นทางเครือข่ายส่วนตัว
สร้างโซนที่มีการจัดการ Cloud DNS ส่วนตัวสำหรับโดเมน run.app. โดยทำดังนี้
# create private dns zone
gcloud dns managed-zones create priv-zone-run \
  --description="private zone for run.app" \
  --dns-name="run.app." \
  --visibility=private \
  --networks=vnet-${SLUG}
สร้างระเบียน DNS A ไวลด์การ์ดสำหรับ *.run.app. ที่ชี้ไปยังที่อยู่ IP ของปลายทาง PSC ดังนี้
# create dns record
gcloud dns record-sets create "*.run.app." \
  --zone=priv-zone-run \
  --type=A \
  --ttl=300 \
  --rrdatas=${PSC_EP_IP}
สร้างนโยบาย Cloud DNS เพื่อเปิดใช้การบันทึกคำขอ DNS การบันทึก DNS จะบันทึกคำขอการแปลงโดเมนที่มาจาก Agent Gateway ภายในเครือข่าย VPC ซึ่งจะช่วยให้คุณตรวจสอบได้และช่วยให้คุณยืนยันได้ว่าคำขอของเครื่องมือ *.run.app แปลงเป็นปลายทาง PSC ภายในอย่างถูกต้อง
# create dns policy (logging)
gcloud dns policies create dns-policy-${SLUG} \
  --description="dns logging for vnet-${SLUG}" \
  --networks=vnet-${SLUG} \
  --enable-logging
ส่วนเครือข่ายก็มีเพียงเท่านี้... ต่อไปเราจะไปที่ส่วนเกตเวย์ตัวแทน
5. Agent Gateway
Agent Gateway ระบุ registries สำหรับอินสแตนซ์ Agent Registry พร้อมกับฟิลด์ networkConfig ที่กำหนดค่าการแนบเครือข่าย PSC และการตั้งค่าการเพียร์ DNS สำหรับการเชื่อมต่อ VPC ส่วนตัว
registries: เชื่อมโยงเกตเวย์กับอินสแตนซ์ Agent Registry สูงสุด 2 รายการ ได้แก่ อินสแตนซ์ระดับภูมิภาค (../locations/${REGION}) และอินสแตนซ์ระดับโลก (../locations/global) ซึ่งจะผสานรวม Agent Gateway กับ Agent Registry เพื่อแก้ไขการติดตั้งใช้งานทั้งในระดับภูมิภาค (เช่น เซิร์ฟเวอร์ MCP ของ Cloud Run ใน${REGION}) และทรัพยากรส่วนกลาง (เช่น เอเจนต์ Gemini Enterprise และปลายทางส่วนกลาง) เพื่อการบังคับใช้นโยบาย IAP v2 แบบละเอียด รายการระดับภูมิภาคจะมีความสำคัญเหนือกว่ารายการระดับโลกเมื่อแก้ไข URL ปลายทางnetworkAttachment: ชี้ไปที่การเชื่อมต่อเครือข่าย PSC (psc-na-${REGION}-agw) ซึ่งเชื่อมต่อ Agent Gateway เข้ากับเครือข่าย VPC เพื่อการออกนอกเครือข่ายแบบส่วนตัวdnsPeeringConfig.domains: กำหนดค่าrun.app.เพื่อให้การค้นหา DNS ที่มาจาก Agent Gateway สำหรับบริการ Cloud Run ใช้การ Peering DNS เพื่อแก้ไขชื่อโฮสต์เป็นที่อยู่ IP ของปลายทาง PSC ของ Google API ส่วนตัว (172.16.20.20) ที่กำหนดค่าไว้ในโซนส่วนตัวของ Cloud DNS
ติดตั้งใช้งาน Agent Gateway
สร้างและนำเข้าไฟล์การกำหนดค่า Agent Gateway
# create agent gateway config file
cat > cfg/${AGW_NAME}-networkConfig.yaml << EOF
name: ${AGW_NAME}
protocols:
  - MCP
googleManaged:
  governedAccessPath: AGENT_TO_ANYWHERE
registries:
  - "//agentregistry.googleapis.com/projects/${PROJ_ID}/locations/${REGION}"
networkConfig:
  egress:
    networkAttachment: ${PSC_NA_URI}
  dnsPeeringConfig:
    domains:
      - run.app.
    targetProject: ${PROJ_ID}
    targetNetwork: projects/${PROJ_ID}/global/networks/vnet-${SLUG}
EOF
# import agent gateway config file (create gateway)
gcloud network-services agent-gateways import ${AGW_NAME} \
  --source="cfg/${AGW_NAME}-networkConfig.yaml" \
  --location=${REGION}
ยืนยันการติดตั้งใช้งาน Agent Gateway
ยืนยันการกำหนดค่ารีจิสทรีของเอเจนต์และเครือข่าย
# show agent gateway registries and network config
gcloud network-services agent-gateways describe ${AGW_NAME} \
  --location=${REGION} \
  --format="yaml(registries,networkConfig)"
ผลลัพธ์ที่คาดไว้:
networkConfig:
  dnsPeeringConfig:
    domains:
    - run.app.
    targetNetwork: projects/${PROJ_ID}/global/networks/vnet-${SLUG}
    targetProject: ${PROJ_ID}
  egress:
    networkAttachment: projects/${PROJ_ID}/regions/${REGION}/networkAttachments/psc-na-${REGION}-agw
registries:
- //agentregistry.googleapis.com/projects/${PROJ_ID}/locations/${REGION}
ตรวจสอบว่าเอาต์พุตแสดงรายละเอียดการกำหนดค่าที่จำเป็น
registries: แสดงรายการ URI ของรีจิสทรีตัวแทนระดับภูมิภาค (${REGION}) ที่เชื่อมโยงกับเกตเวย์egress.networkAttachment: ระบุ URI การเชื่อมต่อเครือข่าย PSC สำหรับขาออก VPCdnsPeeringConfig.domains: มีrun.app.ที่ชี้ไปยังtargetNetworkสำหรับการแก้ปัญหาโดเมนส่วนตัว
ตรวจสอบการเชื่อมต่อเครือข่าย PSC เพื่อยืนยันการเชื่อมต่อเกตเวย์
# show psc network attachment details
gcloud compute network-attachments describe psc-na-${REGION}-agw \
  --region=${REGION} \
  --format="yaml(connectionEndpoints)"
ตรวจสอบว่ามีปลายทางการเชื่อมต่อที่ยอมรับแล้ว
connectionEndpoints:
- ipAddress: 192.168.10.2
  projectIdOrNum: '<AGW_TENANT_PROJ_NO>'
  status: ACCEPTED
  subnetwork: https://www.googleapis.com/compute/v1/projects/${PROJ_ID}/regions/${REGION}/subnetworks/subnet-${REGION}-agw
มอบสิทธิ์การให้สิทธิ์
Agent Gateway จะรักษาความปลอดภัยและควบคุมการรับส่งข้อมูลเครื่องมือขาออกโดยใช้นโยบายการให้สิทธิ์ (networksecurity.authzPolicies) ที่ผสานรวมกับนโยบายการเข้าถึงแบบรวม (UAP) ของ Identity-Aware Proxy (IAP)
แม้ว่า Agent Gateway จะรองรับกฎ ALLOW และ DENY แบบอินไลน์พื้นฐาน แต่สภาพแวดล้อมขององค์กรจำเป็นต้องมีการกำกับดูแลแบบรวมศูนย์ที่เน้นข้อมูลประจำตัว เมื่อใช้นโยบายการเข้าถึงแบบรวมของ IAM (หรือนโยบายการเข้าถึง) คุณจะจัดการกฎการเข้าถึงขาออกได้โดยใช้นโยบายการเข้าถึง IAM v3 มาตรฐาน

รูปที่ 3 สถาปัตยกรรมการให้สิทธิ์
ขั้นตอนการให้สิทธิ์จะเชื่อมต่อคอมโพเนนต์ 3 อย่าง ได้แก่
- นโยบายการให้สิทธิ์เกตเวย์ (
authzPolicy):- ทรัพยากรที่เข้าถึงได้ในภูมิภาคที่กำหนดเป้าหมายไปยัง Agent Gateway
- กำหนดค่าด้วย
policyProfile: REQUEST_AUTHZและaction: CUSTOMเพื่อกำหนดเส้นทางการตรวจสอบการให้สิทธิ์ขาออกทั้งหมดไปยังส่วนขยาย Authz ของ IAP
- ส่วนขยายบริการ IAP (
authzExtension):- ทรัพยากรที่เข้าถึงได้ในภูมิภาคที่มอบสิทธิ์การให้สิทธิ์คำขอไปยัง Identity-Aware Proxy (
iap.googleapis.com) - ประเมินนโยบายในโหมด
ENFORCEโดยใช้เวอร์ชันนโยบายV2
- ทรัพยากรที่เข้าถึงได้ในภูมิภาคที่มอบสิทธิ์การให้สิทธิ์คำขอไปยัง Identity-Aware Proxy (
- นโยบายและการเชื่อมโยงการเข้าถึงแบบรวมของ IAM (
accessPolicy&policyBinding):- ทรัพยากร IAM ทั่วโลกเวอร์ชัน 3 ที่มีกฎการเข้าถึงแบบละเอียด
- ตรวจสอบสิทธิ์ข้อมูลประจำตัวหลัก SPIFFE ของ Agent ที่เรียกใช้ ยืนยันสิทธิ์
iap.googleapis.com/resources.egressViaIAPทั่วไป และประเมินเงื่อนไข Common Expression Language (CEL) กับแอตทริบิวต์ปลายทาง
ติดตั้งใช้งานส่วนขยายการให้สิทธิ์
สร้างservice-extensionsการกำหนดค่าส่วนขยายการให้สิทธิ์ที่มอบหมายการตัดสินใจให้สิทธิ์ไปยังบริการ IAP โดยทำดังนี้
# create authz extension config file
cat > cfg/${AGW_NAME}-svc-ext-authz-iap.yaml << EOF
name: ${AGW_NAME}-svc-ext-authz-iap
service: iap.googleapis.com
failOpen: false
timeout: 1s
metadata:
  iapPolicyVersion: "V2"
EOF
# import iap authz extension (create authz extension)
gcloud service-extensions authz-extensions import ${AGW_NAME}-svc-ext-authz-iap \
  --source=cfg/${AGW_NAME}-svc-ext-authz-iap.yaml \
  --location=${REGION}
ยืนยันการขยายเวลาการให้สิทธิ์
ตรวจสอบว่าส่วนขยายการให้สิทธิ์ใช้งานอยู่หรือไม่
# list authz extensions
gcloud service-extensions authz-extensions list \
  --location=${REGION} \
  --format="table(
    name.basename():label=NAME,
    createTime.date(tz=LOCAL):label=CREATED,
    updateTime.date(tz=LOCAL):label=MODIFIED,
    service:label=SERVICE,
    metadata:label=METADATA,
    timeout:label=TIMEOUT
  )"
ติดตั้งใช้งานนโยบายการให้สิทธิ์
สร้างnetwork-securityการกำหนดค่านโยบายการให้สิทธิ์ที่กำหนดเป้าหมายไปยัง Agent Gateway และมอบสิทธิ์การยืนยันคำขอให้กับส่วนขยายการให้สิทธิ์สำหรับ IAP โดยทำดังนี้
# create authz policy config file
cat > cfg/${AGW_NAME}-authz-policy-iap.yaml << EOF
name: ${AGW_NAME}-authz-policy-iap
target:
  resources:
    - "projects/${PROJ_ID}/locations/${REGION}/agentGateways/${AGW_NAME}"
policyProfile: REQUEST_AUTHZ
action: CUSTOM
customProvider:
  authzExtension:
    resources:
      - "projects/${PROJ_ID}/locations/${REGION}/authzExtensions/${AGW_NAME}-svc-ext-authz-iap"
EOF
# import authz policy config file (create authz policy)
gcloud network-security authz-policies import ${AGW_NAME}-authz-policy-iap \
  --source=cfg/${AGW_NAME}-authz-policy-iap.yaml \
  --location=${REGION}
ยืนยันนโยบายการให้สิทธิ์
ตรวจสอบว่านโยบายการให้สิทธิ์ใช้งานอยู่หรือไม่
# list authz policies
gcloud network-security authz-policies list \
  --location=${REGION} \
  --format="table(
    name.basename():label=NAME,
    action:label=ACTION,
    customProvider.list().sub('\W.*', ''):label=CUSTOM_PROVIDER_TYPE,
    policyProfile:label=POLICY_PROFILE,
    customProvider.authzExtension.resources[0].basename():label=CUSTOM_PROVIDER_RESOURCE
  )"
สร้างนโยบายการเข้าถึง IAM
ตอนนี้ Agent Gateway จะมอบหมายการตรวจสอบการให้สิทธิ์ไปยัง IAP และแก้ไขข้อมูลเมตาปลายทางจาก Agent Registry จากนั้นกำหนดกฎนโยบายการเข้าถึงแบบรวมของ IAM เพื่อควบคุมการเรียกใช้เครื่องมือขาออก
IAP ประเมินนิพจน์แอตทริบิวต์ CEL กับแอตทริบิวต์ปลายทางของรีจิสทรีของเอเจนต์ต่อไปนี้
- สถานะที่ลงทะเบียน (
destination.is_registered):- บูลีน (
true/false) ที่ระบุว่าปลายทางอยู่ในแคตตาล็อกใน Agent Registry หรือไม่
- บูลีน (
- ชื่อเซิร์ฟเวอร์ MCP (
destination.agent_registry.mcp_server.name):- ชื่อทรัพยากรเซิร์ฟเวอร์ MCP ที่เป็นมาตรฐานซึ่งลงทะเบียนใน Agent Registry
- วิธีการ MCP (
destination.agent_registry.mcp_server.method):- วิธีการ MCP ที่เรียกใช้ (เช่น
tools/call,tools/list,initialize)
- วิธีการ MCP ที่เรียกใช้ (เช่น
- ชื่อเครื่องมือ (
destination.agent_registry.mcp_server.tool.name):- ชื่อเครื่องมือที่เฉพาะเจาะจงที่เรียกใช้ (เช่น
subtractหรือadd) ซึ่งช่วยให้การให้สิทธิ์ระดับเครื่องมือแบบละเอียดในเซิร์ฟเวอร์ MCP ที่ลงทะเบียน
- ชื่อเครื่องมือที่เฉพาะเจาะจงที่เรียกใช้ (เช่น
กำหนดกฎนโยบายการเข้าถึง IAM
ไฟล์ Manifest ของกฎนโยบาย IAM จะระบุสิ่งต่อไปนี้
- Principal: ข้อมูลประจำตัวของ SPIFFE Principal ที่แสดงถึง Agent ผู้ช่วยหลักของ Gemini Enterprise
- สิทธิ์: สิทธิ์
iap.googleapis.com/resources.egressViaIAPแบบสากลที่จำเป็นสำหรับการรับส่งข้อมูลขาออกทั้งหมดที่ควบคุมโดย IAP - เงื่อนไข: นิพจน์ CEL (
destination.is_registered == true) ที่ช่วยให้มั่นใจว่า Agent จะเรียกใช้ได้เฉพาะปลายทางที่แคตตาล็อกไว้ในรีจิสทรีของ Agent เท่านั้น
สร้างไฟล์ Manifest ของกฎนโยบาย
# create access policy rule file
cat > cfg/${UAP_POLICY_NAME}-rules.json << EOF
[
  {
    "description": "allow ge assistant to any registered service",
    "effect": "ALLOW",
    "principals": [
      "principal://${TRUST_DOMAIN}/resources/discoveryengine/projects/${PROJ_NO}/locations/global/engines/${GE_APP_INIT}/assistants/default_assistant/agents/default/core_assistant"
    ],
    "operation": {
      "permissions": [
        "iap.googleapis.com/resources.egressViaIAP"
      ]
    },
    "conditions": {
      "iap.googleapis.com": {
        "expression": \
        "destination.is_registered == true"
      }
    }
  }
]
EOF
ติดตั้งใช้งานนโยบายการเข้าถึง IAM
สร้างนโยบายการเข้าถึง IAM ทั่วโลกโดยใช้กฎที่กำหนดไว้ในไฟล์ Manifest
# create iam access policy
gcloud iam access-policies create ${UAP_POLICY_NAME} \
  --details-rules=cfg/${UAP_POLICY_NAME}-rules.json \
  --project=${PROJ_ID} \
  --location=global
ยืนยันนโยบายการเข้าถึง IAM
ตรวจสอบว่าสร้างนโยบายการเข้าถึง IAM เรียบร้อยแล้ว และตรวจสอบรายละเอียดกฎ
# show iam access policy details
gcloud iam access-policies describe ${UAP_POLICY_NAME} \
  --project=${PROJ_ID} \
  --location=global
ผลลัพธ์ที่คาดไว้:
details:
  rules:
  - conditions:
      iap.googleapis.com:
        expression: destination.is_registered == true
    description: allow ge assistant to any registered service
    effect: ALLOW
    operation:
      permissions:
      - iap.googleapis.com/resources.egressViaIAP
    principals:
    - principal://agents.global.org-${ORG_ID}.system.id.goog/resources/discoveryengine/projects/${PROJ_NO}/locations/global/engines/${GE_APP_INIT}/assistants/default_assistant/agents/default/core_assistant
name: projects/${PROJ_ID}/locations/global/accessPolicies/${UAP_POLICY_NAME}
เชื่อมโยงนโยบายการเข้าถึง IAM กับโปรเจ็กต์
หากต้องการเปิดใช้งานการบังคับใช้ใน Agent Gateway ทั้งหมดในโปรเจ็กต์ ให้สร้างการเชื่อมโยงนโยบายที่แนบนโยบายการเข้าถึง IAM กับทรัพยากรโปรเจ็กต์
# bind iam access policy to project resource
gcloud iam policy-bindings create ${UAP_BINDING_NAME} \
  --policy="projects/${PROJ_ID}/locations/global/accessPolicies/${UAP_POLICY_NAME}" \
  --target-resource="//cloudresourcemanager.googleapis.com/projects/${PROJ_ID}" \
  --project=${PROJ_ID} \
  --location=global
ยืนยันการเชื่อมโยงนโยบายการเข้าถึง IAM
ตรวจสอบว่าจุดเชื่อมโยงนโยบายที่ใช้งานอยู่ชี้ไปยังนโยบายและเป้าหมายที่ถูกต้อง
# show policy binding details
gcloud iam policy-bindings describe ${UAP_BINDING_NAME} \
  --project=${PROJ_ID} \
  --location=global
ผลลัพธ์ที่คาดไว้:
name: projects/${PROJ_ID}/locations/global/policyBindings/${UAP_BINDING_NAME}
policy: projects/${PROJ_ID}/locations/global/accessPolicies/${UAP_POLICY_NAME}
policyKind: ACCESS
target:
  resource: //cloudresourcemanager.googleapis.com/projects/${PROJ_ID}
ส่วนของ Agent Gateway ก็มีเพียงเท่านี้ ต่อไปเราจะไปที่ส่วนเซิร์ฟเวอร์ MCP
6. เซิร์ฟเวอร์ MCP
ในส่วนนี้ คุณจะสร้างเซิร์ฟเวอร์ FastMCP ที่กำหนดเองซึ่งแสดงเครื่องมือ add และ subtract แล้วติดตั้งใช้งานใน Cloud Run โดยตรงจากแหล่งที่มา ในระหว่างการติดตั้งใช้งานแหล่งที่มา (--source) Cloud Build จะแพ็กเกจอิมเมจคอนเทนเนอร์โดยใช้ Dockerfile และ uv ที่รวมไว้ (ซึ่งจะติดตั้งทรัพยากร Dependency ที่กำหนดไว้ใน pyproject.toml และเปิดใช้ server.py)
เมื่อติดตั้งใช้งานบริการ Cloud Run แล้ว ให้ลงทะเบียนเซิร์ฟเวอร์ MCP ใน Agent Registry พร้อมกับข้อกำหนดของเครื่องมือ (toolspec.json) เพื่อให้ Gemini Enterprise ค้นพบและเรียกใช้เครื่องมือได้
สร้างแอปพลิเคชันเซิร์ฟเวอร์ MCP
สร้างmath-wizardไดเรกทอรีโปรเจ็กต์สำหรับโค้ดของแอปพลิเคชัน
# create directory for code
mkdir -p math-wizard
เขียนไฟล์ Manifest ของโปรเจ็กต์ Python
# create python project manifest file
cat > math-wizard/pyproject.toml << 'EOF'
[project]
name = "math-wizard"
version = "0.1.0"
description = "math wizard mcp server"
requires-python = ">=3.12"
dependencies = [
    "fastmcp==2.13.1",
]
EOF
โค้ดมีฟังก์ชันการวัดประสิทธิภาพเพิ่มเติมบางอย่างเพื่อบันทึกส่วนหัว HTTP ขาเข้า (mcp-session-id, x-forwarded-for, user-agent และ x-cloud-trace-context) สำหรับการตรวจสอบ Cloud Logging และ Cloud Trace
เขียนไฟล์โค้ดของแอปพลิเคชัน
# create mcp server application code
cat > math-wizard/server.py << 'EOF'
import asyncio
import json
import logging
import os
from fastmcp import FastMCP
from fastmcp.server.dependencies import get_http_headers
from mcp.types import ToolAnnotations

logger = logging.getLogger(__name__)
logging.basicConfig(format="[%(levelname)s]: %(message)s", level=logging.INFO)

mcp = FastMCP("math wizard mcp server")

def log_network_context(tool_name: str, a: int, b: int) -> None:
    headers = get_http_headers()
    print(json.dumps({
        "severity": "INFO",
        "message": f">>> 🛠️ Tool: '{tool_name}' called with numbers '{a}' and '{b}'",
        "tool": tool_name,
        "mcp_session_id": headers.get("mcp-session-id"),
        "x_forwarded_for": headers.get("x-forwarded-for"),
        "user_agent": headers.get("user-agent"),
        "trace_header": headers.get("x-cloud-trace-context"),
    }), flush=True)

@mcp.tool(
    annotations=ToolAnnotations(
        readOnlyHint=True,
    )
)
def add(a: int, b: int) -> int:
    """Use this to add two numbers together.

    Args:
        a: The first number.
        b: The second number.

    Returns:
        The sum of the two numbers.
    """
    logger.info(f">>> 🛠️ Tool: 'add' called with numbers '{a}' and '{b}'")
    log_network_context("add", a, b)
    return a + b

@mcp.tool(
    annotations=ToolAnnotations(
        readOnlyHint=True,
    )
)
def subtract(a: int, b: int) -> int:
    """Use this to subtract two numbers.

    Args:
        a: The first number.
        b: The second number.

    Returns:
        The difference of the two numbers.
    """
    logger.info(f">>> 🛠️ Tool: 'subtract' called with numbers '{a}' and '{b}'")
    log_network_context("subtract", a, b)
    return a - b

if __name__ == "__main__":
    logger.info(f"🚀 MCP server started on port {os.getenv('PORT', 8080)}")
    asyncio.run(
        mcp.run_async(
            transport="streamable-http",
            host="0.0.0.0",
            port=int(os.getenv("PORT", 8080)),
        )
    )
EOF
เขียน Dockerfile เพื่อกำหนดวิธีการสร้างอิมเมจคอนเทนเนอร์และคำสั่งเริ่มต้น
# create dockerfile
cat > math-wizard/Dockerfile << 'EOF'
# use official python 3.12 image
FROM python:3.12-slim

# install uv
COPY --from=ghcr.io/astral-sh/uv:latest /uv /uvx /bin/

# install the project into /app
COPY . /app
WORKDIR /app

# allow statements and log messages to immediately appear in the logs
ENV PYTHONUNBUFFERED=1

# install dependencies
RUN uv sync

EXPOSE 8080

# run the mcp server
CMD ["uv", "run", "server.py"]
EOF
ติดตั้งใช้งานบริการใน Cloud Run
ติดตั้งใช้งานเซิร์ฟเวอร์ MCP จากแหล่งที่มาโดยใช้ Cloud Build (ซึ่งใช้บัญชีบริการ Compute เริ่มต้นของโปรเจ็กต์ ${PROJ_NO}-compute@developer.gserviceaccount.com)
# deploy cloud run service
gcloud run deploy ${MCP_NAME} \
  --source math-wizard \
  --region=${REGION} \
  --no-invoker-iam-check \
  --ingress=internal \
  --quiet
ยืนยันการติดตั้งใช้งาน Cloud Run
ตรวจสอบรายละเอียดบริการ Cloud Run เพื่อยืนยันการกำหนดค่าที่ใช้งานอยู่
# show cloud run service details
gcloud run services describe ${MCP_NAME} --region=${REGION}
ผลลัพธ์ที่คาดไว้:
<snip>
✔ Service math-wizard in region ${REGION}

URL:     https://math-wizard-${PROJ_NO}.${REGION}.run.app
Ingress: internal
Traffic:
  100% LATEST (currently math-wizard-00001-<id>)
</snip>
ลงทะเบียนเซิร์ฟเวอร์ MCP ใน Agent Registry
หากต้องการให้ Gemini Enterprise ค้นพบเครื่องมือที่แน่นอนซึ่งพร้อมใช้งานในเซิร์ฟเวอร์ MCP คุณต้องระบุไฟล์ข้อกำหนดของเครื่องมือ (toolspec.json) ในระหว่างการลงทะเบียนกับรีจิสทรี Agent
สร้างข้อกำหนดของเครื่องมือ MCP
# create tool spec file
cat > cfg/toolspec.json << 'EOF'
{
  "tools": [
    {
      "name": "add",
      "description": "Use this to add two numbers together.",
      "inputSchema": {
        "type": "object",
        "properties": {
          "a": { "type": "integer", "description": "The first number." },
          "b": { "type": "integer", "description": "The second number." }
        },
        "required": ["a", "b"]
      },
      "isReadOnly": true,
      "isDestructive": false,
      "isIdempotent": true,
      "isOpenWorld": false
    },
    {
      "name": "subtract",
      "description": "Use this to subtract two numbers.",
      "inputSchema": {
        "type": "object",
        "properties": {
          "a": { "type": "integer", "description": "The first number." },
          "b": { "type": "integer", "description": "The second number." }
        },
        "required": ["a", "b"]
      },
      "isReadOnly": true,
      "isDestructive": false,
      "isIdempotent": true,
      "isOpenWorld": false
    }
  ]
}
EOF
ลงทะเบียนเซิร์ฟเวอร์ MCP ใน Agent Registry
# register mcp server in agent registry
gcloud agent-registry services create ${MCP_NAME} \
  --project=${PROJ_ID} \
  --location=${REGION} \
  --display-name="${MCP_NAME}-${PROJ_NO}.${REGION}.run.app" \
  --description="MANDATORY MATH & ARITHMETIC AGENT: You MUST ALWAYS invoke \
this tool for ANY mathematical calculation, addition (+), subtraction (-), \
sum, difference, or arithmetic question (including simple questions like \
'what is 67 + 345?'). NEVER compute arithmetic yourself and NEVER transfer \
math queries to file_and_coding_agent / code interpreter. Always delegate \
every math question to this tool." \
  --mcp-server-spec-type=tool-spec \
  --mcp-server-spec-content=cfg/toolspec.json \
  --interfaces=protocolBinding=JSONRPC,url="${MCP_URL}"
ยืนยันเซิร์ฟเวอร์ MCP ใน Agent Registry
ตรวจสอบว่าบริการ Cloud Run ที่ติดตั้งใช้งานแสดงเป็นเซิร์ฟเวอร์ MCP ที่ลงทะเบียนในภูมิภาคพร้อมกับ URL ปลายทางและเครื่องมือที่พร้อมใช้งาน
# list registered mcp servers in agent registry
gcloud agent-registry mcp-servers list \
  --location=${REGION} \
  --project=${PROJ_ID} \
  --format="table(
    name.basename():label=REGISTRY_ID,
    displayName:label=DISPLAY_NAME,
    interfaces[0].url:label=ENDPOINT_URL,
    tools[].name.list():label=TOOLS
  )"
ผลลัพธ์ที่คาดไว้:
REGISTRY_ID                                         DISPLAY_NAME                                  ENDPOINT_URL                                              TOOLS
agentregistry-00000000-0000-0000-0012-3456789abcde  math-wizard-${PROJ_NO}.${REGION}.run.app      https://math-wizard-${PROJ_NO}.${REGION}.run.app/mcp      add,subtract
ดูข้อกำหนดการกำหนดค่าบริการเพื่อดูว่าบริการลงทะเบียนคำจำกัดความของเครื่องมือที่แน่นอน, สคีมาอินพุต และคำอธิบายประกอบลักษณะการทำงานสำหรับเครื่องมือแต่ละรายการหรือไม่
# describe mcp server tool specs
gcloud agent-registry services describe ${MCP_NAME} \
  --location=${REGION} \
  --project=${PROJ_ID} \
  --format="yaml(mcpServerSpec.content.tools)"
ส่วนเซิร์ฟเวอร์ MCP ก็มีเพียงเท่านี้... ต่อไปจะเป็นส่วน Gemini Enterprise
7. Gemini Enterprise
ในส่วนนี้ คุณจะสร้างและกำหนดค่าแอป Gemini Enterprise และทรัพยากรที่เก็บข้อมูลเซิร์ฟเวอร์ MCP ที่กำหนดเองที่ลิงก์ไว้
รูปแบบทรัพยากรของ Discovery Engine
แอป Gemini Enterprise (แสดงเป็นทรัพยากร Engine ใน Discovery Engine API) เป็นเลเยอร์การจัดการเป็นกลุ่มส่วนกลางและอินเทอร์เฟซการสนทนาสำหรับผู้ใช้ปลายทาง โดยจะจัดการเซสชันแชทของผู้ใช้ อ้างอิงโมเดล Generative จากข้อมูลขององค์กร และประสานงานการดำเนินการเครื่องมือแบบไดนามิก
แอป Gemini Enterprise จะโต้ตอบกับข้อมูลและระบบผ่านที่เก็บข้อมูล ดังนี้
- ที่เก็บข้อมูลความรู้: นำเข้าและจัดทำดัชนีเนื้อหาแบบคงที่ (เช่น Cloud Storage, Google ไดรฟ์, BigQuery) สำหรับการสร้างที่เพิ่มการดึงข้อมูล (RAG)
- เครื่องมือเชื่อมต่อข้อมูล (ผู้ให้บริการการดำเนินการ): เชื่อมต่อกับ API แบบไดนามิกของบุคคลที่สามหรือ API ที่กำหนดเอง ที่เก็บข้อมูลเซิร์ฟเวอร์ MCP ที่กำหนดเองจะแสดงเครื่องมือที่กำหนดโดย Model Context Protocol (MCP) ซึ่งช่วยให้โมเดลเรียกใช้ฟังก์ชันภายนอกแบบไดนามิกระหว่างการสนทนาได้
การกำหนดเส้นทางขาออกผ่าน Agent Gateway
โดยค่าเริ่มต้น Gemini Enterprise จะกำหนดเส้นทางการรับส่งข้อมูลการดำเนินการของตัวเชื่อมต่อและเครื่องมือผ่านเครือข่ายสาธารณะ อย่างไรก็ตาม สำหรับภาระงาน VPC ส่วนตัวและการกำกับดูแลแบบ Zero Trust คุณสามารถกำหนดค่าเครื่องมือเพื่อกำหนดเส้นทางขาออกผ่าน Agent Gateway ได้โดยทำดังนี้
- เมื่อสร้างที่เก็บข้อมูลเซิร์ฟเวอร์ MCP ที่กำหนดเองในภายหลังใน Lab นี้ คุณจะเปิดใช้กำหนดเส้นทางขาออกผ่าน Agent Gateway ในการตั้งค่าที่เก็บข้อมูล
- ซึ่งจะเชื่อมโยงการเรียกใช้เครื่องมือขาออกของเครื่องมือกับ Agent Gateway ระดับภูมิภาค เพื่อให้มั่นใจว่าคำขอ MCP ทั้งหมดจะมี
Agent Identityของแอป ได้รับการให้สิทธิ์รันไทม์โดยใช้นโยบายการเข้าถึงแบบรวม (UAP) ของ IAP และ IAM และจะข้ามการเชื่อมต่อเครือข่าย PSC ไปยัง VPC ส่วนตัว
สร้างแอป Gemini Enterprise
เมธอดต่อไปนี้ใช้ discoveryengine.googleapis.com API เพื่อสร้างทรัพยากรและการกำหนดค่าแอป Gemini Enterprise หากต้องการกำหนดค่าโดยใช้ UI ของคอนโซล Google Cloud โปรดดูวิธีการในหัวข้อสร้างแอป
# create engine (ge app)
curl -s -X POST "https://${GE_LOCATION}-discoveryengine.googleapis.com/v1/projects/${PROJ_ID}/locations/${GE_LOCATION}/collections/default_collection/engines?engineId=${GE_APP_INIT}" \
  -H "Authorization: Bearer $(gcloud auth application-default print-access-token)" \
  -H "X-Goog-User-Project: ${PROJ_ID}" -H "Content-Type: application/json" \
  -d @- <<EOF
{
  "displayName": "${GE_APP_DISPLAY_NAME}",
  "dataStoreIds": [],
  "solutionType": "SOLUTION_TYPE_SEARCH",
  "industryVertical": "GENERIC",
  "appType": "APP_TYPE_INTRANET",
  "searchEngineConfig": {
    "searchTier": "SEARCH_TIER_ENTERPRISE",
    "searchAddOns": [
      "SEARCH_ADD_ON_LLM"
    ]
  },
  "commonConfig": {
    "companyName": "${GE_APP_ORG_NAME}"
  }
}
EOF
ยืนยันการสร้างแอป
# fetch engine (ge app) id
export GE_APP_ID=$(curl -s "https://${GE_LOCATION}-discoveryengine.googleapis.com/v1/projects/${PROJ_ID}/locations/${GE_LOCATION}/collections/default_collection/engines" \
  -H "Authorization: Bearer $(gcloud auth application-default print-access-token)" -H "X-Goog-User-Project: ${PROJ_ID}" \
  | jq -r --arg name "${GE_APP_DISPLAY_NAME}" '.engines[] | select(.displayName==$name) | .name | split("/") | last')

echo "engine (ge app) id: ${GE_APP_ID}"
ดูรายละเอียดเครื่องมือเพื่อดูการกำหนดค่าที่สร้างขึ้น
# get engine (ge app) details
curl -s "https://${GE_LOCATION}-discoveryengine.googleapis.com/v1/projects/${PROJ_ID}/locations/${GE_LOCATION}/collections/default_collection/engines/${GE_APP_ID}" \
  -H "Authorization: Bearer $(gcloud auth application-default print-access-token)" \
  -H "X-Goog-User-Project: ${PROJ_ID}"
โปรดสังเกตพร็อพเพอร์ตี้ที่เซิร์ฟเวอร์สร้างขึ้นต่อไปนี้ในการตอบกลับ JSON
name: เส้นทางทรัพยากร Canonical (projects/${PROJ_NO}/locations/global/collections/default_collection/engines/${GE_APP_ID})sessionConfig.sessionManagementPolicy: ค่าเริ่มต้นคือ"VERTEX_AI_MANAGED"ซึ่งจะคงสถานะการสนทนาไปมาและการเรียกใช้เครื่องมือใน Agent Platform (เดิมชื่อ Vertex AI)observabilityConfig.observabilityEnabled: ค่าเริ่มต้นคือtrueสำหรับเมตริกพื้นฐาน (การบันทึกเพย์โหลดของพรอมต์และเครื่องมือแบบละเอียดจะเปิดใช้ในขั้นตอนถัดไป)
เปิดใช้ผู้ให้บริการข้อมูลประจำตัว
เปิดใช้ข้อมูลประจำตัวของ Google เป็นผู้ให้บริการข้อมูลประจำตัวสำหรับการตรวจสอบสิทธิ์ผู้ใช้ปลายทางในแอป Gemini Enterprise
วิธีการต่อไปนี้ใช้ discoveryengine.googleapis.com API เพื่อกำหนดค่าผู้ให้บริการข้อมูลประจำตัวของแอป Gemini Enterprise หากต้องการกำหนดค่าโดยใช้ UI ของคอนโซล Google Cloud โปรดดูวิธีการในหัวข้อกำหนดค่าผู้ให้บริการข้อมูลประจำตัว
# set identity provider
curl -s -X PATCH "https://${GE_LOCATION}-discoveryengine.googleapis.com/v1/projects/${PROJ_ID}/locations/${GE_LOCATION}/aclConfig" \
  -H "Authorization: Bearer $(gcloud auth application-default print-access-token)" \
  -H "X-Goog-User-Project: ${PROJ_ID}" -H "Content-Type: application/json" \
  -d @- <<EOF
{
  "idpConfig": {
    "idpType": "GSUITE"
  }
}
EOF
ยืนยันผู้ให้บริการข้อมูลประจำตัว
# show identity provider
curl -s "https://${GE_LOCATION}-discoveryengine.googleapis.com/v1/projects/${PROJ_ID}/locations/${GE_LOCATION}/aclConfig" \
  -H "Authorization: Bearer $(gcloud auth application-default print-access-token)" \
  -H "X-Goog-User-Project: ${PROJ_ID}"
เอาต์พุต "idpType": "GSUITE" สอดคล้องกับผู้ให้บริการข้อมูลประจำตัวของ Google
(ไม่บังคับ) เปิดใช้ใบอนุญาตทดลองใช้ Gemini Enterprise
หากใช้โปรเจ็กต์ที่มีการมอบหมายใบอนุญาต Gemini Enterprise คุณสามารถข้ามขั้นตอนนี้ได้ หากคุณใช้โปรเจ็กต์ใหม่ที่ไม่มีใบอนุญาต ให้ดำเนินการต่อและทำตามขั้นตอนต่อไปนี้
สร้างทรัพยากรการกำหนดค่าใบอนุญาตเพื่อให้สิทธิ์ที่นั่งผู้ใช้ Gemini Enterprise เป็นเวลา 30 วัน ซึ่งจะเป็นการตั้งค่าใบอนุญาตเริ่มต้นเป็นการทดลองใช้ใหม่ ดังนั้นผู้ใช้ที่เข้าสู่ระบบจะได้รับที่นั่งโดยอัตโนมัติ
# configure free trial subscription
curl -s -X POST "https://${GE_LOCATION}-discoveryengine.googleapis.com/v1/projects/${PROJ_ID}/locations/${GE_LOCATION}/licenseConfigs?licenseConfigId=free_trial_gemini" \
  -H "Authorization: Bearer $(gcloud auth application-default print-access-token)" \
  -H "X-Goog-User-Project: ${PROJ_ID}" -H "Content-Type: application/json" \
  -d @- <<EOF
{
  "subscriptionTier": "SUBSCRIPTION_TIER_SEARCH_AND_ASSISTANT",
  "freeTrial": true
}
EOF
ยืนยันว่ามีการใช้ใบอนุญาตแล้ว
# show license config
curl -s "https://${GE_LOCATION}-discoveryengine.googleapis.com/v1/projects/${PROJ_ID}/locations/${GE_LOCATION}/licenseConfigs/free_trial_gemini" \
  -H "Authorization: Bearer $(gcloud auth application-default print-access-token)" \
  -H "X-Goog-User-Project: ${PROJ_ID}"
ตรวจสอบ "subscriptionTerm": "SUBSCRIPTION_TERM_ONE_MONTH" และ "freeTrial": true
# verify auto-registration enabled on default user store
curl -s "https://${GE_LOCATION}-discoveryengine.googleapis.com/v1/projects/${PROJ_ID}/locations/${GE_LOCATION}/userStores/default_user_store" \
  -H "Authorization: Bearer $(gcloud auth application-default print-access-token)" \
  -H "X-Goog-User-Project: ${PROJ_ID}"
ตรวจสอบ ../free_trial_gemini" และ "enableLicenseAutoRegister": true
เปิดใช้การตั้งค่าความสามารถในการสังเกต
การเปิดใช้การสังเกตการณ์ในระดับแอป (เครื่องมือ) Gemini Enterprise ช่วยให้คุณดูการโต้ตอบของผู้ช่วยหลักกับข้อมูลเมตริกในเครื่องมือสำรวจเมตริก และเชื่อมโยงการติดตามแบบครบวงจรใน Cloud Trace ได้
# set observability on engine (ge app)
curl -s -X PATCH "https://${GE_LOCATION}-discoveryengine.googleapis.com/v1/projects/${PROJ_ID}/locations/${GE_LOCATION}/collections/default_collection/engines/${GE_APP_ID}?updateMask=observabilityConfig" \
  -H "Authorization: Bearer $(gcloud auth application-default print-access-token)" \
  -H "X-Goog-User-Project: ${PROJ_ID}" -H "Content-Type: application/json" \
  -d @- <<EOF
{
  "observabilityConfig": {
    "observabilityEnabled": true,
    "sensitiveLoggingEnabled": true
  }
}
EOF
ยืนยันการตั้งค่าการสังเกตการณ์
# verify observability is enabled on engine (ge app)
curl -s "https://${GE_LOCATION}-discoveryengine.googleapis.com/v1/projects/${PROJ_ID}/locations/${GE_LOCATION}/collections/default_collection/engines/${GE_APP_ID}" \
  -H "Authorization: Bearer $(gcloud auth application-default print-access-token)" \
  -H "X-Goog-User-Project: ${PROJ_ID}" \
  | jq '{observabilityConfig: .observabilityConfig}'
ดู "sensitiveLoggingEnabled": true
เชื่อมโยงกับ Agent Gateway
การกำหนดเส้นทางการรับส่งข้อมูลขาออกจาก Gemini Enterprise ผ่าน Agent Gateway จะสร้างขอบเขตการบังคับใช้การกำกับดูแลและการรักษาความปลอดภัยแบบ Zero-Trust แบบรวมศูนย์สำหรับการเรียกใช้เครื่องมือ AI Agent ทั้งหมด
- การบังคับใช้นโยบายแบบรวมศูนย์: Agent Gateway ทำหน้าที่เป็นพร็อกซีแบบอินไลน์ที่ประเมินคำขอเครื่องมือขาออกเทียบกับนโยบายการให้สิทธิ์และการควบคุมการกำกับดูแลก่อนที่การเข้าชมจะออกจากสภาพแวดล้อมของ Agent
- การออกในเครือข่ายส่วนตัว: การเชื่อมโยง Gemini Enterprise กับ Agent Gateway ช่วยให้มั่นใจได้ว่าการเรียกใช้เครื่องมือที่กำหนดเป้าหมายไปยังเซิร์ฟเวอร์ MCP ส่วนตัวใน Cloud Run จะกำหนดเส้นทางอย่างปลอดภัยผ่าน Private Service Connect (PSC) โดยข้ามอินเทอร์เน็ตสาธารณะ
- การตรวจสอบแบบรวม: ให้การบันทึกคำขอ การวัดและส่งข้อมูลทางไกล และบันทึกการตรวจสอบแบบรวมศูนย์ในเซิร์ฟเวอร์ MCP ที่เชื่อมต่อทั้งหมดและเครื่องมือภายนอก
การกำหนดค่า agentGatewaySetting ในแอป Gemini Enterprise จะทำให้การเรียกเครื่องมือและตัวแทนขาออกที่เริ่มต้นโดยคำค้นหาของผู้ใช้ปลายทาง (เช่น การเรียกเซิร์ฟเวอร์ MCP ที่กำหนดเองซึ่งนำเข้าจาก Agent Registry และตัวแทน A2A) ผ่าน Agent Gateway โดยอัตโนมัติ
โปรดแก้ไขเครื่องมือ agentGatewaySetting เพื่อเปิดใช้ฟีเจอร์ต่อไปนี้
# bind engine (ge app) to agent gateway
curl -s -X PATCH "https://${GE_LOCATION}-discoveryengine.googleapis.com/v1/projects/${PROJ_ID}/locations/${GE_LOCATION}/collections/default_collection/engines/${GE_APP_ID}?updateMask=agentGatewaySetting.defaultEgressAgentGateway.name" \
  -H "Authorization: Bearer $(gcloud auth application-default print-access-token)" \
  -H "X-Goog-User-Project: ${PROJ_ID}" -H "Content-Type: application/json" \
  -d @- <<EOF
{
  "agentGatewaySetting": {
    "defaultEgressAgentGateway": {
      "name": "projects/${PROJ_ID}/locations/${REGION}/agentGateways/${AGW_NAME}"
    }
  }
}
EOF
ยืนยันการเชื่อมโยง Agent Gateway
เรียกข้อมูลการกำหนดค่าแอปเพื่อยืนยันการเชื่อมโยง agentGatewaySetting ดังนี้
# verify engine (ge app) agent gateway configuration
curl -s "https://${GE_LOCATION}-discoveryengine.googleapis.com/v1/projects/${PROJ_ID}/locations/${GE_LOCATION}/collections/default_collection/engines/${GE_APP_ID}" \
  -H "Authorization: Bearer $(gcloud auth application-default print-access-token)" \
  -H "X-Goog-User-Project: ${PROJ_ID}" \
  | jq '{name: .name, displayName: .displayName, agentGatewaySetting: .agentGatewaySetting}'
ผลลัพธ์ที่คาดไว้:
{
  "name": "projects/${PROJ_NO}/locations/${GE_LOCATION}/collections/default_collection/engines/${GE_APP_ID}",
  "displayName": "${GE_APP_DISPLAY_NAME}",
  "agentGatewaySetting": {
    "defaultEgressAgentGateway": {
      "name": "projects/${PROJ_ID}/locations/${REGION}/agentGateways/${AGW_NAME}"
    }
  }
}
สร้างพื้นที่เก็บข้อมูลเซิร์ฟเวอร์ MCP ที่กำหนดเอง
ในส่วนนี้ คุณจะเชื่อมต่อเซิร์ฟเวอร์ MCP กับ Gemini Enterprise โดยการสร้างที่เก็บข้อมูล MCP ที่กำหนดเอง
การใช้ Discovery Engine API มีกระบวนการ 2 ขั้นตอนดังนี้
- สร้าง (
:setUpDataConnector): สร้างทรัพยากรCollectionโดยเฉพาะ (${MCP_NAME}-%timestamp-collection) แนบDataConnector(custom_mcp) และจัดสรรDataStore(..._mcp_data) ที่รองรับ - เปิดใช้งาน (
PATCH .../dataConnector?updateMask=actionConfig): เปิดใช้งานรันไทม์การดำเนินการของตัวเชื่อมต่อ (actionState: "ACTIVE") โดยใช้ข้อกำหนดของเครื่องมือ Agent Registry และเชื่อมโยงDataStore(dataStoreIds) กับEngineของ Gemini Enterprise
# fetch mcp server agent registry resource name
export MCP_REGISTRY_URI=$(gcloud agent-registry mcp-servers list \
  --location=${REGION} \
  --project=${PROJ_ID} \
  --filter="displayName:${MCP_NAME}" \
  --format="value(name)")

echo "mcp registry name: ${MCP_REGISTRY_URI}"
echo "mcp url: ${MCP_URL}"
สร้างเครื่องมือเชื่อมต่อข้อมูล
# create custom mcp data connector from agent registry and link to engine
curl -s -X POST "https://${GE_LOCATION}-discoveryengine.googleapis.com/v1alpha/projects/${PROJ_ID}/locations/${GE_LOCATION}:setUpDataConnector" \
  -H "Authorization: Bearer $(gcloud auth application-default print-access-token)" \
  -H "X-Goog-User-Project: ${PROJ_ID}" \
  -H "Content-Type: application/json" \
  -d @- <<EOF
{
  "collectionId": "${MCP_NAME}-$(date +%s)-collection",
  "collectionDisplayName": "${MCP_NAME}-collection",
  "dataConnector": {
    "dataSource": "custom_mcp",
    "dataSourceVersion": 1,
    "params": {
      "oauth_access_token": "unused"
    },
    "refreshInterval": "86400s",
    "entities": [
      {
        "entityName": "mcp_data"
      }
    ],
    "connectorModes": [
      "FEDERATED"
    ],
    "actionConfig": {
      "isActionConfigured": true,
      "createBapConnection": true,
      "actionParams": {
        "auth_type": "NO_AUTH",
        "instance_uri": "${MCP_URL}",
        "mcp_server_source": "REGISTRY_MCP",
        "registry_mcp_server_name": "${MCP_REGISTRY_URI}",
        "mcp_agent_instructions": "MANDATORY MATH & ARITHMETIC AGENT: Always invoke this tool for any mathematical calculation, addition (+), subtraction (-), sum, or difference.",
        "use_agent_gateway_egress": true,
        "agent_gateway_engine": "projects/${PROJ_ID}/locations/global/collections/default_collection/engines/${GE_APP_ID}"
      }
    }
  }
}
EOF
ยืนยันการสร้างเครื่องมือเชื่อมต่อข้อมูล
# fetch collection id
export GE_COLLECTION_ID=$(curl -s "https://${GE_LOCATION}-discoveryengine.googleapis.com/v1alpha/projects/${PROJ_ID}/locations/${GE_LOCATION}/collections" \
  -H "Authorization: Bearer $(gcloud auth application-default print-access-token)" \
  -H "X-Goog-User-Project: ${PROJ_ID}" \
  | jq -r --arg dname "${MCP_NAME}-collection" '.collections[] | select(.displayName == $dname) | .name | split("/") | last' | head -n 1)

echo "ge collection id: ${GE_COLLECTION_ID}"
ตรวจสอบว่าช่อง "registry_mcp_server_name" มี UUID ของ Agent Registry สำหรับเซิร์ฟเวอร์ MCP ดังนี้
# show data connector details
curl -s "https://${GE_LOCATION}-discoveryengine.googleapis.com/v1alpha/projects/${PROJ_ID}/locations/${GE_LOCATION}/collections/${GE_COLLECTION_ID}/dataConnector" \
  -H "Authorization: Bearer $(gcloud auth application-default print-access-token)" \
  -H "X-Goog-User-Project: ${PROJ_ID}" \
  | jq '{name, state, actionState, connectorModes, bapConfig, registry_mcp_server_name: .actionConfig.actionParams.registry_mcp_server_name}'
ดูรายการรีจิสทรีเซิร์ฟเวอร์ MCP ใน UI ของคอนโซล Google Cloud โดยทำดังนี้
echo "mcp server registry page url: https://console.cloud.google.com/agent-platform/agent-registry/mcp-servers/${REGION}/${MCP_REGISTRY_URI##*/}/overview?project=${PROJ_ID}"
เปิดใช้งานเครื่องมือเชื่อมต่อข้อมูล
# activate and bind data connector
curl -s -X PATCH "https://discoveryengine.googleapis.com/v1alpha/projects/${PROJ_ID}/locations/global/collections/${GE_COLLECTION_ID}/dataConnector?updateMask=actionConfig" \
  -H "Authorization: Bearer $(gcloud auth application-default print-access-token)" \
  -H "X-Goog-User-Project: ${PROJ_ID}" \
  -H "Content-Type: application/json" \
  -d @- <<EOF
{
  "name": "projects/${PROJ_ID}/locations/global/collections/${GE_COLLECTION_ID}/dataConnector",
  "actionConfig": {
    "isActionConfigured": true,
    "createBapConnection": true,
    "actionParams": {
      "auth_type": "NO_AUTH",
      "instance_uri": "${MCP_URL}",
      "mcp_server_source": "REGISTRY_MCP",
      "registry_mcp_server_name": "${MCP_REGISTRY_URI}",
      "mcp_agent_instructions": "MANDATORY MATH & ARITHMETIC AGENT: Always invoke this tool for any mathematical calculation, addition (+), subtraction (-), sum, or difference.",
      "use_agent_gateway_egress": true,
      "agent_gateway_engine": "projects/${PROJ_ID}/locations/global/collections/default_collection/engines/${GE_APP_ID}"
    }
  }
}
EOF
ยืนยันการเชื่อมโยงเซิร์ฟเวอร์ MCP ที่กำหนดเอง
# show engine (ge app) details
curl -s "https://${GE_LOCATION}-discoveryengine.googleapis.com/v1/projects/${PROJ_ID}/locations/${GE_LOCATION}/collections/default_collection/engines/${GE_APP_ID}" \
  -H "Authorization: Bearer $(gcloud auth application-default print-access-token)" \
  -H "X-Goog-User-Project: ${PROJ_ID}" \
  | jq '{name: .name, dataStoreIds: .dataStoreIds, agentGatewaySetting: .agentGatewaySetting}'
ตรวจสอบที่เก็บข้อมูลที่ลิงก์ "dataStoreIds": "collection-math-wizard-
# show collection details
curl -s "https://${GE_LOCATION}-discoveryengine.googleapis.com/v1alpha/projects/${PROJ_ID}/locations/${GE_LOCATION}/collections" \
  -H "Authorization: Bearer $(gcloud auth application-default print-access-token)" \
  -H "X-Goog-User-Project: ${PROJ_ID}" \
  | jq --arg app "${GE_APP_ID}" '.collections[] | select(.dataConnector.actionConfig.actionParams.agent_gateway_engine // "" | endswith($app)) | .dataConnector | {name: .name, state: .state, actionState: .actionState, connectorModes: .connectorModes, actionParams: .actionConfig.actionParams}'
ตรวจสอบ "state": "ACTIVE" โดยระบุพารามิเตอร์ทั้งหมด
การดำเนินการของเครื่องมือ
เมื่อตรวจสอบmath-wizard-collectionที่เก็บข้อมูลในแดชบอร์ด Gemini Enterprise คุณจะเห็นว่าระบบไม่ได้ใช้แท็บการดำเนินการและปุ่ม↻ โหลดการดำเนินการที่กำหนดเองซ้ำจะปิดอยู่ ซึ่งเป็นลักษณะการทำงานที่คาดไว้อยู่แล้ว
ดูหน้ารายละเอียดที่เก็บข้อมูลใน UI ของคอนโซล Google Cloud โดยทำดังนี้
echo "data store details page url: https://console.cloud.google.com/gemini-enterprise/locations/${GE_LOCATION}/collections/${GE_COLLECTION_ID}/connector/details?project=${PROJ_ID}"
การค้นพบและการกำกับดูแลเครื่องมือจะได้รับการจัดการด้วยวิธีใดวิธีหนึ่งต่อไปนี้ โดยขึ้นอยู่กับวิธีเชื่อมต่อเซิร์ฟเวอร์ MCP ที่กำหนดเองกับ Gemini Enterprise
- MCP ที่กำหนดเองโดยตรง (
BYO_MCPเวิร์กโฟลว์): เมื่อกำหนดค่าเซิร์ฟเวอร์ MCP ที่กำหนดเองภายใน Gemini Enterprise โดยตรงโดยไม่มีรีจิสทรี Agent ที่เก็บข้อมูลจะจัดการแคตตาล็อกเครื่องมือ (connectorModes: ["FEDERATED", "ACTIONS"]) ด้วยตนเอง คุณต้องเปิดแท็บการดำเนินการ คลิก ↻ โหลดการดำเนินการที่กำหนดเองซ้ำเพื่อดึงข้อมูลสคีมาtools/listและเปิดหรือปิดเครื่องมือแต่ละรายการ (addและsubtract) ด้วยตนเองใน UI - การนำเข้า Agent Registry (
REGISTRY_MCPเวิร์กโฟลว์ที่ใช้ใน Codelab นี้): เมื่อนำเข้าเซิร์ฟเวอร์ MCP จาก Agent Registry, Agent Registry จะทำหน้าที่เป็นแหล่งความจริงที่เชื่อถือได้สำหรับปลายทาง MCP, ข้อมูลเมตาของอินเทอร์เฟซ และแคตตาล็อกเครื่องมือ (connectorModes: ["FEDERATED"]) Gemini Enterprise จะเปิดใช้เครื่องมือ MCP ที่ลงทะเบียนโดยอัตโนมัติในรันไทม์ผ่าน Agent Gateway ของเครื่องมือโดยไม่ต้องให้คุณโหลดซ้ำหรือสลับการดำเนินการใน UI ของที่เก็บข้อมูลด้วยตนเอง
ส่วนของแอป Gemini Enterprise ก็มีเพียงเท่านี้... ต่อไปคือส่วนตรวจสอบ
8. ตรวจสอบ
ในส่วนนี้ คุณจะทริกเกอร์การเรียกใช้เครื่องมือ MCP แบบเรียลไทม์จากเว็บแอป Gemini Enterprise และติดตามโฟลว์คำขอผ่าน Agent Gateway, Cloud DNS, ไฟร์วอลล์ VPC และบันทึก Cloud Run จากนั้นคุณจะเพิ่มความเข้มงวดให้กับนโยบายการเข้าถึงแบบรวมของ IAM เพื่ออนุญาต subtract ขณะบล็อก add โดยตรวจสอบการบังคับใช้แบบ Zero Trust ที่เกตเวย์
การเข้าถึงของผู้ใช้
สร้าง URL สำหรับเว็บแอป Gemini Enterprise โดยทำดังนี้
# fetch app user url
export GE_WIDGET_ID=$(curl -s "https://${GE_LOCATION}-discoveryengine.googleapis.com/v1/projects/${PROJ_ID}/locations/${GE_LOCATION}/collections/default_collection/engines/${GE_APP_ID}/widgetConfigs/default_search_widget_config" \
  -H "Authorization: Bearer $(gcloud auth application-default print-access-token)" \
  -H "X-Goog-User-Project: ${PROJ_ID}" \
  -H "Content-Type: application/json" \
  | jq -r '.configId')

export GE_APP_USER_URL="https://vertexaisearch.cloud.google.com/home/cid/${GE_WIDGET_ID}"

echo "app user url: ${GE_APP_USER_URL}"
คลิกลิงก์เพื่อเปิดอินเทอร์เฟซแชทของเว็บแอป Gemini Enterprise ในเบราว์เซอร์ แล้วคลิกเริ่มต้นใช้งาน
ทดสอบคำถามของ Agent ในแชท
ใน UI ของแชท ให้ยืนยันว่าได้เปิดใช้math-wizard-collectionเครื่องมือเชื่อมต่อข้อมูลแล้วโดยคลิกไอคอนจิ๊กซอว์สำหรับเครื่องมือเชื่อมต่อที่ด้านล่างของกล่องแชท คุณควรเห็นปุ่มเปิด/ปิดที่ปรากฏขึ้น (เป็นสี)
ลองใช้คำค้นหาทดสอบต่อไปนี้
what is 2342345 - 98234798324?
what is 72347234 + 234234?
ตรวจสอบว่าผู้ช่วยแสดงคำตอบที่ถูกต้องและแสดงป้ายการอ้างอิงการดำเนินการแบบอินเทอร์แอกทีฟ (เช่น Math Calculation (8s) 🤖 Agentgateway Agent) ใต้คำตอบแต่ละรายการ ซึ่งเป็นการยืนยันว่ามีการเรียกใช้เครื่องมือ
ตรวจสอบบันทึกใน Cloud Logging
ตรวจสอบว่า Gemini Enterprise ได้กำหนดเส้นทางการเรียกใช้เครื่องมือผ่าน Agent Gateway และเครือข่าย VPC ส่วนตัวโดยการตรวจสอบบันทึกใน Cloud Logging
1. ยืนยันการให้สิทธิ์ Agent Gateway และ IAP
ยืนยันว่า Agent Gateway สกัดกั้นคำขอ แก้ไขเป้าหมายในรีจิสทรีของ Agent มอบสิทธิ์การให้สิทธิ์ให้ IAP และอนุญาตการเรียกใช้เครื่องมือ
# show agent gateway logs
gcloud logging read 'resource.type="networkservices.googleapis.com/Gateway"' \
  --project=${PROJ_ID} \
  --limit=5 \
  --format="table( \
    timestamp.date(tz=LOCAL):label=TIMESTAMP, \
    httpRequest.status:label=STATUS, \
    httpRequest.serverIp:label=SERVER_IP, \
    jsonPayload.agentGatewayInfo.mcpInfo.method:label=MCP_METHOD, \
    jsonPayload.agentGatewayInfo.mcpInfo.parameter:label=TOOL, \
    jsonPayload.authzPolicyInfo.result:label=AUTHZ, \
    jsonPayload.agentGatewayInfo.agentRegistryResource.basename():label=REGISTRY_MCP
  )"
ตรวจสอบว่าเอาต์พุตมีข้อมูลต่อไปนี้
STATUS:200(ดำเนินการสำเร็จ) และ202(notifications/initializedแฮนด์เชค)SERVER_IP: IP ของปลายทาง PSC ของ Google APIs (172.16.20.20:443)MCP_METHODและTOOL: ลำดับโปรโตคอล MCP (notifications/initialized,tools/listและtools/callที่มีaddหรือsubtract)AUTHZ:ALLOWED(อนุญาตการออกของ IAP)REGISTRY_MCP: รหัสทรัพยากรของรีจิสทรีตัวแทนที่แก้ไขแล้ว (agentregistry-...)
2. ยืนยันการรับส่ง DNS และไฟร์วอลล์
ยืนยันว่า Cloud DNS แก้ไขชื่อโฮสต์ไปยังปลายทาง PSC และไฟร์วอลล์อนุญาตให้มีการรับส่งข้อมูลจากอินเทอร์เฟซเกตเวย์ของ Agent ดังนี้
# show dns logs
gcloud logging read 'resource.type="dns_query"' \
  --project=${PROJ_ID} \
  --limit=5 \
  --format="table( \
    timestamp.date(tz=LOCAL):label=TIMESTAMP, \
    jsonPayload.queryName:label=QUERY_NAME, \
    jsonPayload.queryType:label=TYPE, \
    jsonPayload.responseCode:label=RCODE, \
    jsonPayload.rdata:label=RDATA
  )"
# show firewall logs
gcloud logging read 'logName:"compute.googleapis.com%2Ffirewall"' \
  --project=${PROJ_ID} \
  --limit=5 \
  --format="table( \
    timestamp.date(tz=LOCAL):label=TIMESTAMP, \
    jsonPayload.connection.src_ip:label=SRC_IP, \
    jsonPayload.connection.dest_ip:label=DEST_IP, \
    jsonPayload.connection.dest_port:label=PORT, \
    jsonPayload.rule_details.reference.basename():label=RULE, \
    jsonPayload.disposition:label=DISPOSITION
  )"
ตรวจสอบค่าต่อไปนี้
- DNS
QUERY_NAME&RDATA: แปลงmath-wizard-...run.app.(ระเบียนA,NOERROR) เป็น172.16.20.20 - ไฟร์วอลล์
SRC_IPและDEST_IP:192.168.10.2(IP อินเทอร์เฟซ PSC ของเกตเวย์ Agent) ไปยัง172.16.20.20:443 - ไฟร์วอลล์
RULEและDISPOSITION: ตรงกันfirewallPolicy:fw-policy-...กับALLOWED
3. ยืนยันการดำเนินการเครื่องมือ Cloud Run
ยืนยันว่าคอนเทนเนอร์ Cloud Run ได้รับและประมวลผลการเรียกใช้เครื่องมือแล้ว โดยทำดังนี้
# show cloud run logs
gcloud logging read 'resource.type="cloud_run_revision"
  AND textPayload:"Tool:"' \
  --project=${PROJ_ID} \
  --limit=5 \
  --format="value(timestamp.date(tz=LOCAL), textPayload)"
ตรวจสอบว่า textPayload แสดงรายการการเรียกใช้เครื่องมือ (เช่น >>> 🛠️ Tool: 'subtract' called with numbers '[x]' and '[y]')
ทดสอบการบังคับใช้นโยบายการให้สิทธิ์ขั้นต่ำที่สุด
ในนโยบายการเข้าถึง IAM เริ่มต้น ระบบอนุญาตให้ใช้วิธีการหรือเครื่องมือใดก็ได้ตราบใดที่ได้ลงทะเบียนปลายทางแล้ว (destination.is_registered == true) ในขั้นตอนนี้ ให้อัปเดตนโยบายเพื่อบังคับใช้หลักการให้สิทธิ์น้อยที่สุดโดยอนุญาตเฉพาะเครื่องมือ subtract ขณะที่บล็อก add
อัปเดตนโยบายการเข้าถึง IAM
เมื่อจำกัดการเรียกใช้เครื่องมือ MCP ให้ใช้รูปแบบ 2 กฎ
- กฎ 1 (การค้นหาและการแฮนด์เชคของ MCP): อนุญาตให้ใช้วิธีการวงจรของ MCP ที่ไม่ใช่การเรียกใช้เครื่องมือ (
destination.is_registered == trueและdestination.agent_registry.mcp_server.method != 'tools/call') เนื่องจาก Gemini Enterprise จะเจรจาการตั้งค่าสตรีมและการค้นหา (initialize,notifications/initialized,tools/list) ก่อนที่จะเรียกใช้เครื่องมือ และdestination.agent_registry.mcp_server.tool.nameจะได้รับการป้อนข้อมูลระหว่างtools/callเท่านั้น กฎ 1 จึงจำเป็นต่อการเริ่มต้นเซสชันและการค้นหาแคตตาล็อก - กฎ 2 (การจำกัดระดับเครื่องมือ): จำกัดการดำเนินการ
tools/callเพื่อให้ใช้ได้เฉพาะเครื่องมือsubtract(destination.is_registered == true,destination.agent_registry.mcp_server.method == 'tools/call'และdestination.agent_registry.mcp_server.tool.name == 'subtract')
อัปเดตไฟล์ Manifest ของกฎนโยบายการเข้าถึงด้วยกฎทั้ง 2 ข้อ
# create access policy rule file (update: allow subtract only)
cat > cfg/${UAP_POLICY_NAME}-rule-update.json << EOF
[
  {
    "description": "allow ge assistant to any registered endpoint to perform mcp discovery and handshake",
    "effect": "ALLOW",
    "principals": [
      "principal://${TRUST_DOMAIN}/resources/discoveryengine/projects/${PROJ_NO}/locations/global/engines/${GE_APP_ID}/assistants/default_assistant/agents/default/core_assistant"
    ],
    "operation": {
      "permissions": [
        "iap.googleapis.com/resources.egressViaIAP"
      ]
    },
    "conditions": {
      "iap.googleapis.com": {
        "expression": \
        "destination.is_registered == true && \
         destination.agent_registry.mcp_server.method != 'tools/call'"
      }
    }
  },
  {
    "description": "allow ge assistant to any registered mcp server with tool call subtract",
    "effect": "ALLOW",
    "principals": [
      "principal://${TRUST_DOMAIN}/resources/discoveryengine/projects/${PROJ_NO}/locations/global/engines/${GE_APP_ID}/assistants/default_assistant/agents/default/core_assistant"
    ],
    "operation": {
      "permissions": [
        "iap.googleapis.com/resources.egressViaIAP"
      ]
    },
    "conditions": {
      "iap.googleapis.com": {
        "expression": \
        "destination.is_registered == true && \
         destination.agent_registry.mcp_server.method == 'tools/call' && \
         destination.agent_registry.mcp_server.tool.name == 'subtract'"
      }
    }
  }
]
EOF
ใช้กฎที่อัปเดตกับนโยบายการเข้าถึง IAM โดยทำดังนี้
# update iam access policy
gcloud iam access-policies update ${UAP_POLICY_NAME} \
  --details-rules=cfg/${UAP_POLICY_NAME}-rule-update.json \
  --project=${PROJ_ID} \
  --location=global
ยืนยันนโยบายการเข้าถึง IAM
ตรวจสอบว่ามีการใช้นโยบายการเข้าถึง IAM ใหม่และอนุญาตเฉพาะเครื่องมือลบเท่านั้น
# show iam access policy details
gcloud iam access-policies describe ${UAP_POLICY_NAME} \
  --project=${PROJ_ID} \
  --location=global \
  --flatten="details.rules[]" \
  --format="table( \
    details.rules.principals[0].scope(engines).sub('assistants/default_assistant/agents/default', '...'):label=PRINCIPAL, \
    details.rules.effect:label=EFFECT, \
    details.rules.conditions.'iap.googleapis.com'.expression.sub('\s*&&\s*', '\n&& ').sub('\s*\|\|\s*', '\n|| '):label=EXPRESSION
  )"
ทดสอบการเรียกใช้เครื่องมือที่ไม่อนุญาต
กลับไปที่ UI แชทของเว็บแอป Gemini Enterprise แล้วลองใช้คำค้นหาทดสอบอีกรายการ
what is 100 plus 20?
ผู้ช่วยพยายามเรียกใช้ add แต่ Agent Gateway และ IAP ประเมินเงื่อนไขนโยบาย IAM เป็น false และปฏิเสธคำขอขาออกด้วย HTTP 403 Forbidden ใน UI ของแชท คุณจะเห็นผู้ช่วยแสดง Calculate Sum และหมุนบน 🤖 Agentgateway Agent ... Working on it. ขณะที่พยายามเรียกใช้เครื่องมือที่ถูกบล็อกอีกครั้ง นี่เป็นลักษณะการทำงานที่คาดไว้ ซึ่งเป็นการยืนยันว่า Agent Gateway และ IAP กำลังสกัดกั้นและปฏิเสธการดำเนินการเครื่องมือที่ไม่ได้รับอนุญาตในระดับเครือข่าย
ตรวจสอบบันทึกใน Cloud Logging อีกครั้ง
ดูรายการบันทึกของ Agent Gateway และสังเกตรายการ 403 ใหม่ที่สอดคล้องกับการเรียกใช้เครื่องมือ add ที่ไม่อนุญาต
# show agent gateway logs
gcloud logging read 'resource.type="networkservices.googleapis.com/Gateway"' \
  --project=${PROJ_ID} \
  --limit=5 \
  --format="table( \
    timestamp.date(tz=LOCAL):label=TIMESTAMP, \
    httpRequest.status:label=STATUS, \
    httpRequest.serverIp:label=SERVER_IP, \
    jsonPayload.agentGatewayInfo.mcpInfo.method:label=MCP_METHOD, \
    jsonPayload.agentGatewayInfo.mcpInfo.parameter:label=TOOL, \
    jsonPayload.authzPolicyInfo.result:label=AUTHZ, \
    jsonPayload.agentGatewayInfo.agentRegistryResource.basename():label=REGISTRY_MCP
  )"
ผลลัพธ์ที่คาดไว้:
TIMESTAMP            STATUS  SERVER_IP         MCP_METHOD                 TOOL  AUTHZ    REGISTRY_MCP
YYYY-MM-DDTHH:MM:SS  403                       tools/call                 add   DENIED   agentregistry-00000000-0000-0000-0012-3456789abcde
YYYY-MM-DDTHH:MM:SS  403
YYYY-MM-DDTHH:MM:SS  202     172.16.20.20:443  notifications/initialized        ALLOWED  agentregistry-00000000-0000-0000-0012-3456789abcde
YYYY-MM-DDTHH:MM:SS          172.16.20.20:443                                   ALLOWED  agentregistry-00000000-0000-0000-0012-3456789abcde
YYYY-MM-DDTHH:MM:SS  200     172.16.20.20:443  initialize                       ALLOWED  agentregistry-00000000-0000-0000-0012-3456789abcde
ตรวจสอบว่าคำขอเพิ่มเติมไม่เคยไปถึงแบ็กเอนด์ของ Cloud Run
# show cloud run logs
gcloud logging read 'resource.type="cloud_run_revision"
  AND textPayload:"Tool:"' \
  --project=${PROJ_ID} \
  --limit=5 \
  --format="value(timestamp.date(tz=LOCAL), textPayload)"
คำสั่งจะไม่แสดงรายการใหม่ ซึ่งยืนยันว่า Agent Gateway บังคับใช้นโยบายการเข้าถึง IAM ได้สำเร็จ
ส่วนการตรวจสอบก็มีเพียงเท่านี้ ต่อไปเราจะไปที่ส่วนการล้างข้อมูล
9. ล้างข้อมูล
ทำตามขั้นตอนต่อไปนี้เพื่อลบทรัพยากรและการกำหนดค่าที่สร้างขึ้นในแล็บนี้
นำคอมโพเนนต์ Gemini Enterprise ออก
# delete gemini enterprise engine (app)
curl -s -X DELETE "https://${GE_LOCATION}-discoveryengine.googleapis.com/v1/projects/${PROJ_ID}/locations/${GE_LOCATION}/collections/default_collection/engines/${GE_APP_ID}" \
  -H "Authorization: Bearer $(gcloud auth application-default print-access-token)" \
  -H "X-Goog-User-Project: ${PROJ_ID}"

# delete custom mcp collection, data connector, and backing data store
curl -s -X DELETE "https://${GE_LOCATION}-discoveryengine.googleapis.com/v1alpha/projects/${PROJ_ID}/locations/${GE_LOCATION}/collections/${GE_COLLECTION_ID}" \
  -H "Authorization: Bearer $(gcloud auth application-default print-access-token)" \
  -H "X-Goog-User-Project: ${PROJ_ID}"

# reset identity provider configuration
curl -s -X PATCH "https://${GE_LOCATION}-discoveryengine.googleapis.com/v1/projects/${PROJ_ID}/locations/${GE_LOCATION}/aclConfig" \
  -H "Authorization: Bearer $(gcloud auth application-default print-access-token)" \
  -H "X-Goog-User-Project: ${PROJ_ID}" \
  -H "Content-Type: application/json" \
  -d '{"idpConfig":{"idpType":"IDP_TYPE_UNSPECIFIED"}}'
นำคอมโพเนนต์เซิร์ฟเวอร์ MCP ออก
# delete agent registry service
gcloud -q agent-registry services delete ${MCP_NAME} \
  --location=${REGION} \
  --project=${PROJ_ID}

# delete cloud run service, source-deploy artifact registry repo, and staging bucket
gcloud -q run services delete ${MCP_NAME} \
  --region=${REGION} \
  --project=${PROJ_ID}

gcloud -q artifacts repositories delete cloud-run-source-deploy \
  --location=${REGION} \
  --project=${PROJ_ID}

gcloud -q storage rm --recursive gs://run-sources-${PROJ_ID}-${REGION} \
  --project=${PROJ_ID}
นำเกตเวย์ของตัวแทนและนโยบายการเข้าถึง IAM ออก
# delete gateway authorization policy, iap extension, and agent gateway
gcloud -q network-security authz-policies delete ${AGW_NAME}-authz-policy-iap \
  --location=${REGION} \
  --project=${PROJ_ID}

gcloud -q service-extensions authz-extensions delete ${AGW_NAME}-svc-ext-authz-iap \
  --location=${REGION} \
  --project=${PROJ_ID}

gcloud -q network-services agent-gateways delete ${AGW_NAME} \
  --location=${REGION} \
  --project=${PROJ_ID}
# delete iam policy binding and access policy
gcloud -q iam policy-bindings delete ${UAP_BINDING_NAME} \
  --location=global \
  --project=${PROJ_ID}

gcloud -q iam access-policies delete ${UAP_POLICY_NAME} \
  --location=global \
  --project=${PROJ_ID}
นำคอมโพเนนต์ DNS และไฟร์วอลล์ออก
# delete dns record set, managed zone, and policy
gcloud -q dns record-sets delete "*.run.app." \
  --type=A \
  --zone=priv-zone-run \
  --project=${PROJ_ID}

gcloud -q dns managed-zones delete priv-zone-run \
  --project=${PROJ_ID}

gcloud -q dns policies update dns-policy-${SLUG} \
  --networks="" \
  --project=${PROJ_ID}

gcloud -q dns policies delete dns-policy-${SLUG} \
  --project=${PROJ_ID}
# delete firewall policy association, rule, and policy
gcloud -q compute network-firewall-policies associations delete \
  --name=fw-policy-bind-${SLUG} \
  --firewall-policy=fw-policy-${SLUG} \
  --global-firewall-policy \
  --project=${PROJ_ID}

gcloud -q compute network-firewall-policies rules delete 1001 \
  --firewall-policy=fw-policy-${SLUG} \
  --global-firewall-policy \
  --project=${PROJ_ID}

gcloud -q compute network-firewall-policies delete fw-policy-${SLUG} \
  --global \
  --project=${PROJ_ID}
นำคอมโพเนนต์ PSC และเครือข่าย VPC ออก
# delete psc forwarding rule and internal ip address
gcloud -q compute forwarding-rules delete psc2gapis \
  --global \
  --project=${PROJ_ID}

gcloud -q compute addresses delete ip-psc2gapis \
  --global \
  --project=${PROJ_ID}
# delete psc network attachment, subnet, and vpc network
gcloud -q compute network-attachments delete psc-na-${REGION}-agw \
  --region=${REGION} \
  --project=${PROJ_ID}

gcloud -q compute networks subnets delete subnet-${REGION}-agw \
  --region=${REGION} \
  --project=${PROJ_ID}

gcloud -q compute networks delete vnet-${SLUG} \
  --project=${PROJ_ID}
นำการลบล้างนโยบายขององค์กรและไฟล์ในเครื่องออก
# delete project-level organization policy overrides
gcloud -q org-policies delete discoveryengine.managed.disableCustomMcpServerConnector --project=${PROJ_ID}
gcloud -q org-policies delete iam.managed.disableAccessPolicyBinding --project=${PROJ_ID}
# remove local project files
rm -rf cfg math-wizard
งานการทำความสะอาดข้อมูลก็มีเพียงเท่านี้... ต่อไปเราจะไปที่สรุปกัน
10. บทสรุป
ยินดีด้วย คุณได้สร้างสถาปัตยกรรมแบบครบวงจรที่ช่วยให้แอป Gemini Enterprise ค้นพบและเรียกใช้เครื่องมือในเซิร์ฟเวอร์ MCP แบบกำหนดเองส่วนตัวได้อย่างปลอดภัย
- เซิร์ฟเวอร์ MCP ที่กำหนดเองและรีจิสทรี Agent: ติดตั้งใช้งานบริการ FastMCP แบบส่วนตัวใน Cloud Run (
--ingress=internal) และลงทะเบียนปลายทางและสคีมาเครื่องมือ (addและsubtract) ในรีจิสทรี Agent - การผสานรวม Gemini Enterprise: จัดสรรแอป Gemini Enterprise, เชื่อมโยงการรับส่งข้อมูลเครื่องมือขาออกกับ Agent Gateway และแนบเซิร์ฟเวอร์ MCP ที่ลงทะเบียนเป็น
REGISTRY_MCPเครื่องมือเชื่อมต่อข้อมูล - การออก VPC ส่วนตัวและการกำกับดูแลแบบ Zero-Trust: การดำเนินการเครื่องมือที่กำหนดเส้นทางแบบส่วนตัวผ่าน PSC (
172.16.20.20) และการบังคับใช้สิทธิ์ขั้นต่ำระดับเครื่องมือโดยใช้ IAP และนโยบายการเข้าถึงแบบรวมของ IAM (destination.agent_registry.*)

Cosmpup คิดว่า Codelab นั้นยอดเยี่ยมมาก!
ขั้นตอนถัดไป
- ดูฟีเจอร์ขั้นสูงและบทแนะนำได้ในเอกสารประกอบแพลตฟอร์ม Agent ของ Gemini Enterprise
- กำหนดค่าขอบเขตความปลอดภัยของ Model Armor ใน Agent Gateway เพื่อเพิ่มความปลอดภัยของ AI
- ดูนโยบายการกำกับดูแลเชิงความหมายเพื่อบังคับใช้กฎทางธุรกิจและการปฏิบัติตามข้อกำหนดสำหรับการค้นหาด้วยภาษาธรรมชาติ
โปรดแสดงความคิดเห็น ถามคำถาม หรือแก้ไขข้อมูลโดยใช้แบบฟอร์มความคิดเห็นนี้
ขอขอบคุณ