

1. 简介
此 Codelab 将探讨如何使用 agent-to-anywhere(出站)模式下的 Agent Gateway 为 Gemini Enterprise 实现私密且受管控的出站连接。您将配置一个 Gemini Enterprise 应用,以通过 Agent Gateway 路由流量,使用 Private Service Connect (PSC) 接口连接到 VPC 网络中 Google API 的 PSC 端点,从而安全地调用在 Cloud Run 上托管的自定义 Model Context Protocol (MCP) 服务器。
在企业环境中,授予自主智能体直接网络访问权限可能会导致数据渗漏和未经审查的工具执行。Agent Gateway 提供了一个集中式平台级零信任强制执行点,可动态检查可流式传输的 HTTP MCP 工具载荷。出站请求通过 Agent Identity 进行身份验证(可进行加密验证),并通过 Identity-Aware Proxy (IAP) 使用 IAM Unified Access Policies (UAP) 和通用表达式语言 (CEL) 规则进行授权。这样一来,您就可以对特定的 MCP 工具和方法进行精细的访问权限控制,而无需将后端工作负载暴露在公共互联网上。
构建内容
- 在出站流量(代理到任意目的地)模式下运行的 Agent Gateway,并进行 Agent Registry 端点验证
- 在 Agent Registry 中注册了工具规范的 Cloud Run 服务,用于托管私有可流式传输的 HTTP MCP 服务器 (
--ingress=internal) - Agent Gateway 的 Identity-Aware Proxy (IAP) 授权扩展程序
- 具有 CEL 条件的 IAM Unified Access Policies (UAP),用于 MCP 工具授权
- 已绑定到 Agent Gateway 并连接到从 Agent Registry 导入的自定义 MCP 服务器数据存储区的 Gemini Enterprise 应用
- VPC 网络资源、Cloud DNS 区域和 Google API 的 PSC 端点
- 用于 Agent Gateway 专用 VPC 出站流量的 PSC 网络连接
- Cloud Next Generation Firewall (NGFW) 政策规则,用于保护 VPC 流量
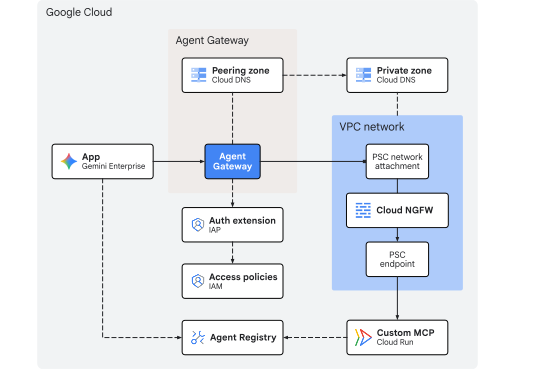
图 1. Codelab 架构
学习内容
- 如何从源代码在 Cloud Run 上部署私有可流式传输的 HTTP MCP 服务器,并在 Agent Registry 中注册其端点和工具架构
- 如何配置具有合规注册表条目的代理网关,以及如何通过该网关路由 Gemini Enterprise 应用工具调用
- 如何使用 PSC 网络附件和接口建立专用 VPC 出站流量
- 如何将 Agent Gateway 授权委托给 Identity-Aware Proxy (IAP)
- 如何使用
destination.agent_registry.*和destination.is_registeredCEL 属性编写和绑定 IAM Unified Access Policies (UAP),以限制 MCP 工具执行 - 如何使用 Cloud Logging 验证政策执行情况和网络出站流量
所需条件
- 启用了结算功能的 Google Cloud 项目
- 有效的 Gemini Enterprise 许可或为期 30 天的试用期
- 用于预配网络服务、Gemini Enterprise 和 Agent Platform 资源的 IAM 权限
- 安装了 Google Cloud CLI (
gcloud)、curl和jq的 POSIX 兼容 shell(bash或zsh)
介绍部分到此结束…接下来是概念部分。
2. 概念
部署序列
此 Codelab 会先部署基础架构,以便在注册和连接 MCP 工具与 Gemini Enterprise 之前,专用网络路径和治理控制措施能够正常运行:
- 网络基础架构:预配 VPC 子网、PSC 端点、PSC 网络连接、Cloud NGFW 政策规则和专用 Cloud DNS 区域。
- Agent Gateway:以出站流量模式部署 Agent Gateway,并集成 Agent Registry (
registries) 和专用 VPC 出站流量 (networkAttachment)。 - 授权政策:使用
destination.is_registered和destination.agent_registry.*CEL 条件配置 IAP 授权扩展程序、网关授权政策和 IAM 统一访问权限政策 (UAP)。 - 部署和注册 MCP 服务器:将源代码中的数学 MCP 服务器部署到 Cloud Run (
--ingress=internal),并在 Agent Registry 中注册服务和工具规范(add和subtract)。 - Gemini Enterprise 应用:创建 Gemini Enterprise 应用 (
Engine),配置身份和可观测性设置,并将出站流量绑定到 Agent Gateway (agentGatewaySetting)。 - 导入自定义 MCP 数据连接器:创建并激活
REGISTRY_MCP数据连接器 (:setUpDataConnector),以将已注册的 MCP 服务器的后备数据存储区关联到 Gemini Enterprise 应用。 - 验证:在聊天中测试允许和拒绝的工具执行,并验证 Agent Gateway、DNS、防火墙和 Cloud Run 日志中的政策执行情况。
Gemini Enterprise 出站
当 Engine 上同时配置了 agentGatewaySetting 和 DataConnector 上的 use_agent_gateway_egress: true 时,Gemini Enterprise 会将自定义 MCP 服务器工具请求路由到 Agent Gateway。
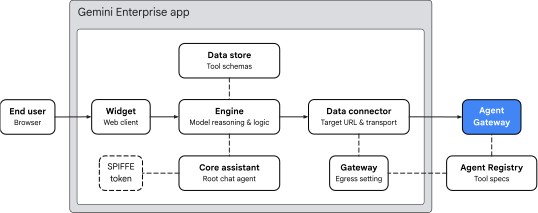
图 2. Gemini Enterprise 出站架构
Gemini Enterprise 应用在以下四个关键领域组织工具路由:
- 微件 (
default_search_widget_config):- 提供 Web 客户端界面。微件接收来自用户的提示,并与底层引擎启动聊天会话。
- 核心助理 (
assistants/default_assistant/agents/default/core_assistant):- 引擎中的根对话式推理代理。在评估用户查询时,核心助理会确定是否需要进行算术计算,检查可用的工具,并将执行任务委托给合成的 Agent Gateway 子智能体。
- 数据存储区和数据连接器:
DataStore:在:setUpDataConnector运行时,在专用Collection内预配,它会将导入的代理注册表工具架构(add、subtract)、实参类型和代理指令关联 (dataStoreIds) 到 Gemini EnterpriseEngine。DataConnector:管理与远程 MCP 服务器 (instance_uri) 的REGISTRY_MCP操作连接 (createBapConnection: true),解析代理注册表 MCP 服务器资源 (registry_mcp_server_name),并启用代理网关出站流量 (use_agent_gateway_egress: true)。
- Agent Identity、Agent Registry 和 Agent Gateway:
- 当数据连接器调度出站工具调用时,它会将流量路由到
agentGatewaySetting中指定的网关。核心星域助理会铸造一个 SPIFFE 身份令牌来声明其身份:principal://agents.global.org-.../agents/default/core_assistant。 - Agent Gateway 使用
registries字段与 Agent Registry 集成,以动态解析目标端点和已注册的工具架构。它会填充destination.is_registered和destination.agent_registry.*属性,并将其传递给 IAP v2,以便根据 IAM 统一访问政策 (UAP) CEL 规则进行评估,然后再允许流量进入 VPC 网络。
- 当数据连接器调度出站工具调用时,它会将流量路由到
网关 VPC 连接
Agent Gateway 使用两个 YAML 字段实现专用 VPC 网络连接:
networkConfig.egress.networkAttachment:指示将专用 IP 流量通过 PSC 网络连接路由到 VPC 网络。dnsPeeringConfig.domains:与 VPC 网络 Cloud DNS 区域对等互连的 DNS 解析,以便目标主机名 (*.run.app) 解析为 VPC 网络中定义的专用 PSC 端点 IP 地址。
限制和要求
- 仅限 StreamableHTTP:不支持旧版服务器发送事件 (SSE) 传输。MCP 服务器必须使用 StreamableHTTP。
- 需要使用 Public CA TLS:即使通过 PSC 以私密方式访问,MCP 端点也必须使用由广受信任的 CA 签名的 TLS 证书。
- 组织政策覆盖:在注册数据存储区之前,您必须明确覆盖自定义 MCP 数据存储区的组织政策。
概念部分到此结束,接下来进入设置部分。
3. 设置
所需 IAM 角色
如需完成此 Codelab,您需要具备以下角色:
网域 | 所需 IAM 角色 |
项目和 IAM |
|
网络和网关 |
|
Gemini Enterprise 和注册表 |
|
工作负载和 build |
|
可观测性 |
|
或者,使用广泛的基本角色(例如 roles/owner)与 roles/orgpolicy.policyAdmin 结合使用(因为 roles/owner 本身无法修改组织政策)。
访问项目
本 Codelab 使用单个 Google Cloud 项目。配置步骤使用 gcloud CLI 和 Linux shell 命令。
首先,访问 Google Cloud 云项目命令行:
- Cloud Shell 位于
shell.cloud.google.com,或者 - 安装了
gcloudCLI 的本地终端
设置项目 ID
gcloud config set project SET_YOUR_PROJECT_ID_HERE
验证会话
# login to gcloud cli
gcloud auth login
# login for gcloud api
gcloud auth application-default login
设置 shell 环境变量
# set custom var for slug (eg, "foo") and region preference
export SLUG="foo"
export REGION="us-central1"

echo ${SLUG}
echo ${REGION}
# create project vars (automatic)
export PROJ_ID=$(gcloud config list --format="value(core.project)")
export PROJ_NO=$(gcloud projects describe ${PROJ_ID} --format="value(projectNumber)")
export ORG_ID=$(gcloud projects get-ancestors ${PROJ_ID} --format="value(id)" | tail -n 1)
export USER_IDENTITY=$(gcloud config get-value account)

echo ${PROJ_ID}
echo ${PROJ_NO}
echo ${ORG_ID}
echo ${USER_IDENTITY}
# create resource vars for agent platform (automatic)
export AGW_NAME="agw-${SLUG}-${REGION}-ata"
export AGW_URI="projects/${PROJ_ID}/locations/${REGION}/agentGateways/${AGW_NAME}"
export UAP_POLICY_NAME="uap-policy-${SLUG}"
export UAP_BINDING_NAME="uap-binding-${SLUG}"
export MCP_NAME="math-wizard"
export MCP_URL="https://${MCP_NAME}-${PROJ_NO}.${REGION}.run.app/mcp"

echo ${AGW_NAME}
echo ${AGW_URI}
echo ${UAP_POLICY_NAME}
echo ${UAP_BINDING_NAME}
echo ${MCP_NAME}
echo ${MCP_URL}
# create resource vars for gemini enterprise (automatic)
export GE_APP_DISPLAY_NAME="Codelab app"
export GE_APP_ORG_NAME="${SLUG}, Inc."
export GE_LOCATION="global"
export GE_APP_NAME="app-${SLUG}-${GE_LOCATION}"
export GE_APP_INIT="${GE_APP_NAME}_$(date +%s)"

echo ${GE_APP_DISPLAY_NAME}
echo ${GE_APP_ORG_NAME}
echo ${GE_LOCATION}
echo ${GE_APP_NAME}
echo ${GE_APP_INIT}
设置代理身份信任网域
if-then-else 语句用于检查项目是否属于某个组织,以便为委托代理身份设置正确的信任网域。
# set var for trust domain
if [[ -n "${ORG_ID}" ]]; then
  export TRUST_DOMAIN="agents.global.org-${ORG_ID}.system.id.goog"
else
  export TRUST_DOMAIN="agents.global.proj-${PROJ_NO}.system.id.goog"
fi

echo "trust domain: ${TRUST_DOMAIN}"
设置结算项目和配额项目
# set cli quota project
gcloud config set billing/quota_project ${PROJ_ID}
# set api quota project
gcloud auth application-default set-quota-project ${PROJ_ID}
为配置文件创建本地目录
# create config folder
mkdir -p cfg
更新 gcloud cli(推荐)
如果您运行的是 Google Cloud SDK 的自行管理的安装(即在 Cloud Shell 之外),请将组件更新到最新版本。
# update gcloud cli
gcloud components update
启用 API 服务
# enable google apis (part 1)
gcloud services enable \
  agentregistry.googleapis.com \
  agentidentity.googleapis.com \
  aiplatform.googleapis.com \
  apphub.googleapis.com \
  apptopology.googleapis.com \
  cloudapiregistry.googleapis.com \
  cloudtrace.googleapis.com \
  compute.googleapis.com \
  dataform.googleapis.com \
  iam.googleapis.com \
  iap.googleapis.com \
  logging.googleapis.com \
  modelarmor.googleapis.com \
  monitoring.googleapis.com \
  networksecurity.googleapis.com \
  networkservices.googleapis.com \
  notebooks.googleapis.com \
  observability.googleapis.com
# enable google apis (part 2)
gcloud services enable \
  artifactregistry.googleapis.com \
  cloudbuild.googleapis.com \
  discoveryengine.googleapis.com \
  dns.googleapis.com \
  orgpolicy.googleapis.com \
  run.googleapis.com \
  saasservicemgmt.googleapis.com \
  securitycenter.googleapis.com \
  storage.googleapis.com \
  telemetry.googleapis.com \
  texttospeech.googleapis.com
组织政策
默认 Google Cloud 受管理的组织政策限制条件会限制此 Codelab 中使用的功能:
discoveryengine.managed.disableCustomMcpServerConnector:- 限制创建使用自定义 MCP 服务器 (
custom_mcp) 作为数据源的数据连接器(默认强制执行)。
- 限制创建使用自定义 MCP 服务器 (
iam.managed.disableAccessPolicyBinding:- 将 IAM v3 访问权限政策绑定限制为资源(默认强制执行)。
discoveryengine.managed.allowedEgressFqdns:- 在 VPC Service Controls (VPC-SC) 处于有效状态或项目列在组织的
enforcedProjects参数中时,限制数据连接器的出站流量网域(instance_uriFQDN)。
- 在 VPC Service Controls (VPC-SC) 处于有效状态或项目列在组织的
discoveryengine.managed.allowedDataSources:- 当 VPC-SC 处于有效状态或项目列在组织的
enforcedProjects参数中时,限制允许的数据连接器类型 (dataSource)。
- 当 VPC-SC 处于有效状态或项目列在组织的
通过显式设置 enforce: false,在项目级层替换任何继承的组织政策限制。
停用自定义 MCP 限制条件
# disable data connector constraint (allow custom mcp servers)
gcloud org-policies set-policy /dev/stdin << EOF
name: projects/${PROJ_NO}/policies/discoveryengine.managed.disableCustomMcpServerConnector
spec:
  rules:
  - enforce: false
EOF
# verify org policy constraint on project
gcloud org-policies describe discoveryengine.managed.disableCustomMcpServerConnector \
  --project=${PROJ_ID} --effective
停用访问权限政策限制
# disable iam v3 constraint (allow v3 access policies)
gcloud org-policies set-policy /dev/stdin << EOF
name: projects/${PROJ_NO}/policies/iam.managed.disableAccessPolicyBinding
spec:
  rules:
  - enforce: false
EOF
# verify org policy constraint on project
gcloud org-policies describe iam.managed.disableAccessPolicyBinding \
  --project=${PROJ_ID} --effective
检查并停用条件数据连接器限制
默认情况下,只有当您的项目位于 VPC Service Controls (VPC SC) 边界内,或者组织管理员已将您的项目添加到 enforcedProjects 时,discoveryengine.managed.allowedEgressFqdns 和 discoveryengine.managed.allowedDataSources 才会阻止连接器创建。
首先,检查项目中的有效政策:
# check effective egress fqdn constraint on project
gcloud org-policies describe discoveryengine.managed.allowedEgressFqdns \
  --project=${PROJ_ID} --effective
# check effective data source constraint on project
gcloud org-policies describe discoveryengine.managed.allowedDataSources \
  --project=${PROJ_ID} --effective
~~如果~~强制执行这些限制条件,为确保它们不会阻止在 VPC SC 或受政策限制的组织中设置 custom_mcp 连接器,请为项目的这两项政策都设置 enforce: false:
# disable egress fqdn constraint on project
gcloud org-policies set-policy /dev/stdin << EOF
name: projects/${PROJ_NO}/policies/discoveryengine.managed.allowedEgressFqdns
spec:
  rules:
  - enforce: false
EOF
# disable allowed data sources constraint on project
gcloud org-policies set-policy /dev/stdin << EOF
name: projects/${PROJ_NO}/policies/discoveryengine.managed.allowedDataSources
spec:
  rules:
  - enforce: false
EOF
# verify both constraints are disabled on project
gcloud org-policies describe discoveryengine.managed.allowedEgressFqdns \
  --project=${PROJ_ID} --effective

gcloud org-policies describe discoveryengine.managed.allowedDataSources \
  --project=${PROJ_ID} --effective
IAM 权限
向您的用户账号和 Cloud Build 使用的 Compute Engine 默认服务账号授予所需的 IAM 角色:
- 用户账号 (
${USER_IDENTITY}):- 需要具备以下权限:部署和调用 Cloud Run 服务 (
roles/run.admin、roles/run.invoker、roles/iam.serviceAccountUser)、构建容器映像 (roles/cloudbuild.builds.editor)、管理 Gemini Enterprise (roles/discoveryengine.admin) 以及创建 Unified Access Policies (roles/iam.accessPolicyAdmin)。
- 需要具备以下权限:部署和调用 Cloud Run 服务 (
- Compute Engine 默认服务账号(
${PROJ_NO}-compute@developer.gserviceaccount.com):- 由 Cloud Build 用于在 Cloud Storage (
roles/storage.admin) 中暂存源代码、将映像推送到 Artifact Registry (roles/artifactregistry.writer) 以及写入 build 日志 (roles/logging.logWriter)。
- 由 Cloud Build 用于在 Cloud Storage (
执行以下命令以分配角色绑定:
# grant roles to user account
gcloud projects add-iam-policy-binding ${PROJ_ID} \
  --member="user:${USER_IDENTITY}" \
  --role="roles/run.admin"

gcloud projects add-iam-policy-binding ${PROJ_ID} \
  --member="user:${USER_IDENTITY}" \
  --role="roles/iam.serviceAccountUser"

gcloud projects add-iam-policy-binding ${PROJ_ID} \
  --member="user:${USER_IDENTITY}" \
  --role="roles/run.invoker"

gcloud projects add-iam-policy-binding ${PROJ_ID} \
  --member="user:${USER_IDENTITY}" \
  --role="roles/discoveryengine.admin"

gcloud projects add-iam-policy-binding ${PROJ_ID} \
  --member="user:${USER_IDENTITY}" \
  --role="roles/iam.accessPolicyAdmin"

gcloud projects add-iam-policy-binding ${PROJ_ID} \
  --member="user:${USER_IDENTITY}" \
  --role="roles/cloudbuild.builds.editor"
# grant roles to default compute (cloud build) service account
gcloud projects add-iam-policy-binding ${PROJ_ID} \
  --member="serviceAccount:${PROJ_NO}-compute@developer.gserviceaccount.com" \
  --role="roles/storage.admin"

gcloud projects add-iam-policy-binding ${PROJ_ID} \
  --member="serviceAccount:${PROJ_NO}-compute@developer.gserviceaccount.com" \
  --role="roles/artifactregistry.writer"

gcloud projects add-iam-policy-binding ${PROJ_ID} \
  --member="serviceAccount:${PROJ_NO}-compute@developer.gserviceaccount.com" \
  --role="roles/logging.logWriter"
验证 IAM 权限
检查用户账号上是否有六个 (6) 角色绑定。
# show iam policy on project for user account
gcloud projects get-iam-policy ${PROJ_ID} \
  --flatten="bindings[].members" \
  --filter="bindings.members:${USER_IDENTITY}" \
  --format="table(bindings.role:label=ROLE, bindings.members:label=PRINCIPAL_IDENTITY)"
检查默认计算服务账号上是否存在三个 (3) 角色绑定。
# show iam policy on project for default compute service account
gcloud projects get-iam-policy ${PROJ_ID} \
  --flatten="bindings[].members" \
  --filter="bindings.members:${PROJ_NO}-compute@developer.gserviceaccount.com" \
  --format="table(bindings.role:label=ROLE, bindings.members:label=PRINCIPAL_IDENTITY)"
验证服务代理绑定(预防措施)
在新项目中,首次启用 networkservices.googleapis.com 时,Google Cloud 会自动预配 Agent Gateway 服务代理并向其授予 roles/agentgateway.serviceAgent。如果您要重复使用现有项目,但之前的清理操作可能已移除默认服务代理绑定,请运行以下命令作为安全措施,以确保身份和角色绑定完好无损:
# ensure network services service account has been created
gcloud beta services identity create \
  --service=networkservices.googleapis.com \
  --project="${PROJ_ID}"

# ensure network services service account has service agent roles applied
gcloud projects add-iam-policy-binding "${PROJ_ID}" \
  --member="serviceAccount:service-${PROJ_NO}@gcp-sa-agentgateway.iam.gserviceaccount.com" \
  --role="roles/agentgateway.serviceAgent"
设置部分到此结束…接下来请前往网络部分。
4. 网络
在本部分中,您将部署一个使用自定义模式的 VPC 网络,该网络具有专用的 /28 子网 (192.168.10.0/28),支持 PSC 网络连接,以便将 Agent Gateway 网络出站流量路由到 VPC 网络。
Google API 的 PSC 端点使用单个 /32全球内部 IPv4 地址 (172.16.20.20) 进行部署,以支持对 Google API 和服务的非公开内部访问。在此 Codelab 中,Agent Gateway 通过 Cloud DNS 对等互连解析 run.app. 域名,从而使用 PSC 端点以 Cloud Run 为目标。
创建网络
创建全球 VPC 网络。
# create vpc network
gcloud compute networks create vnet-${SLUG} --subnet-mode=custom
为 Agent Gateway PSC 网络连接创建子网:
# create subnet for agent gateway psc na
gcloud compute networks subnets create subnet-${REGION}-agw \
  --network=vnet-${SLUG} \
  --range=192.168.10.0/28 \
  --region=${REGION} \
  --enable-private-ip-google-access
创建防火墙规则
创建防火墙政策以允许所有出站流量,并启用日志记录。此规则将用于监控从 Agent Gateway 到 VPC 网络的出站流量。Cloud NGFW 支持基本功能版和标准版,用于网络安全和流量监控。
# create fw policy
gcloud compute network-firewall-policies create fw-policy-${SLUG} --global
# create fw policy rule
gcloud compute network-firewall-policies rules create 1001 \
  --description="allow all out and log" \
  --firewall-policy=fw-policy-${SLUG} \
  --global-firewall-policy \
  --action=allow \
  --direction=EGRESS \
  --layer4-configs=all \
  --dest-ip-ranges=0.0.0.0/0 \
  --enable-logging
# bind fw policy to network
gcloud compute network-firewall-policies associations create \
  --name=fw-policy-bind-${SLUG} \
  --firewall-policy=fw-policy-${SLUG} \
  --network=vnet-${SLUG} \
  --global-firewall-policy
创建 PSC 网络连接
创建配置为自动接受来自 Agent Gateway 的连接的 Private Service Connect (PSC) 网络连接。网络连接建立连接的使用方 VPC 网络端,以安全地与 Agent Gateway 提供方端关联,从而实现出站流量。如需详细了解子网要求和 IP 地址范围规范,请参阅配置 VPC 连接。
# create psc network attachment
gcloud compute network-attachments create psc-na-${REGION}-agw \
  --region=${REGION} \
  --subnets=subnet-${REGION}-agw \
  --connection-preference=ACCEPT_AUTOMATIC
验证 PSC 网络连接
# show psc network attachment details
gcloud compute network-attachments describe psc-na-${REGION}-agw --region=${REGION}
检索 PSC 网络附件的资源 URI,并将其存储在 PSC_NA_URI 环境变量中。此 URI 将在 Agent Gateway 配置 (networkConfig.egress.networkAttachment) 中引用,以预配 PSC 接口,用于将网络出站流量路由到 VPC 网络:
# fetch psc network attachment uri
export PSC_NA_URI=$(gcloud compute network-attachments describe psc-na-${REGION}-agw \
  --region=${REGION} \
  --format="value(selfLink.scope(v1))")
echo ${PSC_NA_URI}
创建 PSC 端点
Google API 的 Private Service Connect (PSC) 端点用于使 Agent Gateway 通过内部网络路径与 Cloud Run MCP 服务器建立专用连接,而无需将流量暴露给公共互联网。从 Agent Gateway 传出到 VPC 网络的出站工具调用会将目标 Cloud Run 服务网址 (*.run.app) 解析为此专用端点 IP 地址。
为 PSC 端点预留全球内部 IPv4 地址。所选 IP 地址必须是 /32 地址,且不得与 VPC 网络中的任何现有子网重叠:
# set env var for psc ep ip address
export PSC_EP_IP="172.16.20.20"
echo ${PSC_EP_IP}
# reserve internal global ipv4 address
gcloud compute addresses create ip-psc2gapis \
  --global \
  --purpose=PRIVATE_SERVICE_CONNECT \
  --addresses=${PSC_EP_IP} \
  --network=vnet-${SLUG}
使用 all-apis 软件包为 Google API 创建 PSC 端点,该软件包包含 Cloud Run (run.app)。
# create psc endpoint for google apis
gcloud compute forwarding-rules create psc2gapis \
  --global \
  --network=vnet-${SLUG} \
  --address=ip-psc2gapis \
  --target-google-apis-bundle=all-apis
验证 PSC 端点
# show psc endpoint details
gcloud compute forwarding-rules describe psc2gapis --global
创建 DNS 区域和记录
Cloud DNS 用于使 Agent Gateway 能够与 Cloud Run 托管的 MCP 服务器进行私密通信。当 Agent Gateway 评估以 Cloud Run 为目标的出站工具请求时,它会使用 DNS 对等互连 (dnsPeeringConfig.domains) 通过与您的 VPC 网络关联的专用 Cloud DNS 区域来解析 *.run.app 的 DNS 查询。专用 DNS 记录会返回包含内部 PSC 端点 IP 地址 (172.16.20.20) 的查询,从而允许 MCP 工具请求通过专用网络路径进行路由。
为 run.app. 网域创建专用 Cloud DNS 托管式区域:
# create private dns zone
gcloud dns managed-zones create priv-zone-run \
  --description="private zone for run.app" \
  --dns-name="run.app." \
  --visibility=private \
  --networks=vnet-${SLUG}
为 *.run.app. 创建指向 PSC 端点 IP 地址的通配符 DNS A 记录:
# create dns record
gcloud dns record-sets create "*.run.app." \
  --zone=priv-zone-run \
  --type=A \
  --ttl=300 \
  --rrdatas=${PSC_EP_IP}
创建 Cloud DNS 政策以启用 DNS 查询日志记录。DNS 日志记录功能可捕获源自 VPC 网络内 Agent Gateway 的网域解析请求,从而提供可审核性,并允许您验证 *.run.app 工具请求是否正确解析为内部 PSC 端点:
# create dns policy (logging)
gcloud dns policies create dns-policy-${SLUG} \
  --description="dns logging for vnet-${SLUG}" \
  --networks=vnet-${SLUG} \
  --enable-logging
网络部分到此结束…接下来进入Agent Gateway部分。
5. Agent Gateway
Agent Gateway 为 Agent Registry 实例指定 registries,同时指定 networkConfig 字段,用于为专用 VPC 连接配置 PSC 网络连接和 DNS 对等互连设置:
registries:将网关与最多两个 Agent Registry 实例相关联:一个区域级实例 (../locations/${REGION}) 和一个全局级实例 (../locations/global)。这会将 Agent Gateway 与 Agent Registry 集成,以解析区域级部署(例如${REGION}中的 Cloud Run MCP 服务器)和全局资源(例如 Gemini Enterprise 智能体和全局端点),从而实现精细的 IAP v2 政策强制执行。在解析目标网址时,区域条目的优先级高于全局条目。networkAttachment:指向 PSC 网络连接 (psc-na-${REGION}-agw),将 Agent Gateway 连接到您的 VPC 网络以实现专用出站流量。dnsPeeringConfig.domains:配置run.app.,使源自 Cloud Run 服务 Agent Gateway 的 DNS 查询使用 DNS 对等互连将主机名解析为在 Cloud DNS 私有区域中配置的专用 Google API PSC 端点 IP 地址 (172.16.20.20)。
部署 Agent Gateway
创建并导入 Agent Gateway 配置文件。
# create agent gateway config file
cat > cfg/${AGW_NAME}-networkConfig.yaml << EOF
name: ${AGW_NAME}
protocols:
  - MCP
googleManaged:
  governedAccessPath: AGENT_TO_ANYWHERE
registries:
  - "//agentregistry.googleapis.com/projects/${PROJ_ID}/locations/${REGION}"
networkConfig:
  egress:
    networkAttachment: ${PSC_NA_URI}
  dnsPeeringConfig:
    domains:
      - run.app.
    targetProject: ${PROJ_ID}
    targetNetwork: projects/${PROJ_ID}/global/networks/vnet-${SLUG}
EOF
# import agent gateway config file (create gateway)
gcloud network-services agent-gateways import ${AGW_NAME} \
  --source="cfg/${AGW_NAME}-networkConfig.yaml" \
  --location=${REGION}
验证 Agent Gateway 部署
确认 Agent Registry 和网络配置:
# show agent gateway registries and network config
gcloud network-services agent-gateways describe ${AGW_NAME} \
  --location=${REGION} \
  --format="yaml(registries,networkConfig)"
预期输出:
networkConfig:
  dnsPeeringConfig:
    domains:
    - run.app.
    targetNetwork: projects/${PROJ_ID}/global/networks/vnet-${SLUG}
    targetProject: ${PROJ_ID}
  egress:
    networkAttachment: projects/${PROJ_ID}/regions/${REGION}/networkAttachments/psc-na-${REGION}-agw
registries:
- //agentregistry.googleapis.com/projects/${PROJ_ID}/locations/${REGION}
验证输出是否显示了所需的配置详细信息:
registries:列出与网关关联的区域 (${REGION}) Agent Registry URI。egress.networkAttachment:指定 VPC 出站流量的 PSC 网络连接 URI。dnsPeeringConfig.domains:包含指向targetNetwork的run.app.,用于专用网域解析。
检查 PSC 网络连接,确认网关连接:
# show psc network attachment details
gcloud compute network-attachments describe psc-na-${REGION}-agw \
  --region=${REGION} \
  --format="yaml(connectionEndpoints)"
检查是否存在已接受的连接端点:
connectionEndpoints:
- ipAddress: 192.168.10.2
  projectIdOrNum: '<AGW_TENANT_PROJ_NO>'
  status: ACCEPTED
  subnetwork: https://www.googleapis.com/compute/v1/projects/${PROJ_ID}/regions/${REGION}/subnetworks/subnet-${REGION}-agw
委托授权
Agent Gateway 使用与 Identity-Aware Proxy (IAP) Unified Access Policies (UAP) 集成的授权政策 (networksecurity.authzPolicies) 来保护和管理出站工具流量。
虽然 Agent Gateway 支持基本的内嵌 ALLOW 和 DENY 规则,但企业环境需要以身份为中心的集中式治理。借助 IAM 统一访问权限政策(或访问权限政策),您可以使用标准 IAM v3 访问权限政策来管理出站访问权限规则。

图 3. 授权架构
授权流程连接了三个组件:
- 网关授权政策 (
authzPolicy):- 以 Agent Gateway 为目标的区域级资源。
- 配置了
policyProfile: REQUEST_AUTHZ和action: CUSTOM,以将所有出站授权检查路由到 IAP Authz 扩展程序。
- IAP 服务扩展 (
authzExtension):- 一种将请求授权委托给 Identity-Aware Proxy (
iap.googleapis.com) 的区域级资源。 - 使用政策版本
V2以ENFORCE模式评估政策。
- 一种将请求授权委托给 Identity-Aware Proxy (
- IAM 统一访问权限政策和绑定 (
accessPolicy和policyBinding):- 包含精细访问权限规则的全局 IAM v3 资源。
- 对调用代理的 SPIFFE 主体身份进行身份验证,验证通用
iap.googleapis.com/resources.egressViaIAP权限,并根据目标属性评估通用表达式语言 (CEL) 条件。
部署授权扩展程序
创建 service-extensions 授权扩展程序配置,将授权决策委托给 IAP 服务:
# create authz extension config file
cat > cfg/${AGW_NAME}-svc-ext-authz-iap.yaml << EOF
name: ${AGW_NAME}-svc-ext-authz-iap
service: iap.googleapis.com
failOpen: false
timeout: 1s
metadata:
  iapPolicyVersion: "V2"
EOF
# import iap authz extension (create authz extension)
gcloud service-extensions authz-extensions import ${AGW_NAME}-svc-ext-authz-iap \
  --source=cfg/${AGW_NAME}-svc-ext-authz-iap.yaml \
  --location=${REGION}
验证授权扩展程序
检查授权扩展服务是否处于活动状态:
# list authz extensions
gcloud service-extensions authz-extensions list \
  --location=${REGION} \
  --format="table(
    name.basename():label=NAME,
    createTime.date(tz=LOCAL):label=CREATED,
    updateTime.date(tz=LOCAL):label=MODIFIED,
    service:label=SERVICE,
    metadata:label=METADATA,
    timeout:label=TIMEOUT
  )"
部署授权政策
创建 network-security 授权政策配置,该配置以 Agent Gateway 为目标,并将请求验证委托给 IAP 的授权扩展程序:
# create authz policy config file
cat > cfg/${AGW_NAME}-authz-policy-iap.yaml << EOF
name: ${AGW_NAME}-authz-policy-iap
target:
  resources:
    - "projects/${PROJ_ID}/locations/${REGION}/agentGateways/${AGW_NAME}"
policyProfile: REQUEST_AUTHZ
action: CUSTOM
customProvider:
  authzExtension:
    resources:
      - "projects/${PROJ_ID}/locations/${REGION}/authzExtensions/${AGW_NAME}-svc-ext-authz-iap"
EOF
# import authz policy config file (create authz policy)
gcloud network-security authz-policies import ${AGW_NAME}-authz-policy-iap \
  --source=cfg/${AGW_NAME}-authz-policy-iap.yaml \
  --location=${REGION}
验证授权政策
检查授权政策是否处于有效状态:
# list authz policies
gcloud network-security authz-policies list \
  --location=${REGION} \
  --format="table(
    name.basename():label=NAME,
    action:label=ACTION,
    customProvider.list().sub('\W.*', ''):label=CUSTOM_PROVIDER_TYPE,
    policyProfile:label=POLICY_PROFILE,
    customProvider.authzExtension.resources[0].basename():label=CUSTOM_PROVIDER_RESOURCE
  )"
创建 IAM 访问权限政策
Agent Gateway 现在将授权检查委托给 IAP,并从 Agent Registry 中解析目标元数据。接下来,定义一个 IAM 统一访问权限政策规则,以管理出站工具执行。
IAP 会根据以下 Agent Registry 目标属性评估 CEL 属性表达式:
- 注册状态 (
destination.is_registered):- 布尔值 (
true/false),用于指示目标是否已在 Agent Registry 中编入目录。
- 布尔值 (
- MCP 服务器名称 (
destination.agent_registry.mcp_server.name):- 在 Agent Registry 中注册的规范 MCP 服务器资源名称。
- MCP 方法 (
destination.agent_registry.mcp_server.method):- 正在调用的 MCP 方法(例如
tools/call、tools/list、initialize)。
- 正在调用的 MCP 方法(例如
- 工具名称 (
destination.agent_registry.mcp_server.tool.name):- 调用的具体工具名称(例如
subtract或add),可在注册的 MCP 服务器上实现精细的工具级授权。
- 调用的具体工具名称(例如
定义 IAM 访问权限政策规则
IAM 政策规则清单指定了以下内容:
- 主账号:表示 Gemini Enterprise 核心助理代理的 SPIFFE 主账号身份。
- 权限:所有受 IAP 管控的出站流量所需的通用
iap.googleapis.com/resources.egressViaIAP权限。 - Conditions:一种 CEL 表达式 (
destination.is_registered == true),用于确保代理只能调用 Agent Registry 中编目的端点。
创建政策规则清单文件:
# create access policy rule file
cat > cfg/${UAP_POLICY_NAME}-rules.json << EOF
[
  {
    "description": "allow ge assistant to any registered service",
    "effect": "ALLOW",
    "principals": [
      "principal://${TRUST_DOMAIN}/resources/discoveryengine/projects/${PROJ_NO}/locations/global/engines/${GE_APP_INIT}/assistants/default_assistant/agents/default/core_assistant"
    ],
    "operation": {
      "permissions": [
        "iap.googleapis.com/resources.egressViaIAP"
      ]
    },
    "conditions": {
      "iap.googleapis.com": {
        "expression": \
        "destination.is_registered == true"
      }
    }
  }
]
EOF
部署 IAM 访问权限政策
使用清单文件中定义的规则创建全局 IAM 访问权限政策:
# create iam access policy
gcloud iam access-policies create ${UAP_POLICY_NAME} \
  --details-rules=cfg/${UAP_POLICY_NAME}-rules.json \
  --project=${PROJ_ID} \
  --location=global
验证 IAM 访问权限政策
检查 IAM 访问权限政策是否已成功创建,并检查规则详细信息:
# show iam access policy details
gcloud iam access-policies describe ${UAP_POLICY_NAME} \
  --project=${PROJ_ID} \
  --location=global
预期输出:
details:
  rules:
  - conditions:
      iap.googleapis.com:
        expression: destination.is_registered == true
    description: allow ge assistant to any registered service
    effect: ALLOW
    operation:
      permissions:
      - iap.googleapis.com/resources.egressViaIAP
    principals:
    - principal://agents.global.org-${ORG_ID}.system.id.goog/resources/discoveryengine/projects/${PROJ_NO}/locations/global/engines/${GE_APP_INIT}/assistants/default_assistant/agents/default/core_assistant
name: projects/${PROJ_ID}/locations/global/accessPolicies/${UAP_POLICY_NAME}
将 IAM 访问权限政策绑定到项目
如需在项目中的所有代理网关上启用强制执行,请创建将 IAM 访问权限政策附加到项目资源的政策绑定:
# bind iam access policy to project resource
gcloud iam policy-bindings create ${UAP_BINDING_NAME} \
  --policy="projects/${PROJ_ID}/locations/global/accessPolicies/${UAP_POLICY_NAME}" \
  --target-resource="//cloudresourcemanager.googleapis.com/projects/${PROJ_ID}" \
  --project=${PROJ_ID} \
  --location=global
验证 IAM 访问权限政策绑定
检查有效政策绑定点是否指向正确的政策和目标:
# show policy binding details
gcloud iam policy-bindings describe ${UAP_BINDING_NAME} \
  --project=${PROJ_ID} \
  --location=global
预期输出:
name: projects/${PROJ_ID}/locations/global/policyBindings/${UAP_BINDING_NAME}
policy: projects/${PROJ_ID}/locations/global/accessPolicies/${UAP_POLICY_NAME}
policyKind: ACCESS
target:
  resource: //cloudresourcemanager.googleapis.com/projects/${PROJ_ID}
“代理网关”部分到此结束,接下来将介绍 MCP 服务器部分。
6. MCP 服务器
在本部分中,您将创建一个自定义 FastMCP 服务器,用于公开 add 和 subtract 工具,并直接从源代码将其部署到 Cloud Run。在源代码部署 (--source) 期间,Cloud Build 将使用随附的 Dockerfile 和 uv(用于安装 pyproject.toml 中定义的依赖项并启动 server.py)打包容器映像。
部署 Cloud Run 服务后,您需要在 Agent Registry 中注册 MCP 服务器及其工具规范 (toolspec.json),以便 Gemini Enterprise 可以发现并调用其工具。
创建 MCP 服务器应用
为应用代码创建 math-wizard 项目目录:
# create directory for code
mkdir -p math-wizard
编写 Python 项目清单文件:
# create python project manifest file
cat > math-wizard/pyproject.toml << 'EOF'
[project]
name = "math-wizard"
version = "0.1.0"
description = "math wizard mcp server"
requires-python = ">=3.12"
dependencies = [
    "fastmcp==2.13.1",
]
EOF
代码中包含一些额外的插桩函数,用于捕获传入的 HTTP 标头(mcp-session-id、x-forwarded-for、user-agent 和 x-cloud-trace-context),以便进行 Cloud Logging 和 Cloud Trace 验证。
编写应用代码文件:
# create mcp server application code
cat > math-wizard/server.py << 'EOF'
import asyncio
import json
import logging
import os
from fastmcp import FastMCP
from fastmcp.server.dependencies import get_http_headers
from mcp.types import ToolAnnotations

logger = logging.getLogger(__name__)
logging.basicConfig(format="[%(levelname)s]: %(message)s", level=logging.INFO)

mcp = FastMCP("math wizard mcp server")

def log_network_context(tool_name: str, a: int, b: int) -> None:
    headers = get_http_headers()
    print(json.dumps({
        "severity": "INFO",
        "message": f">>> 🛠️ Tool: '{tool_name}' called with numbers '{a}' and '{b}'",
        "tool": tool_name,
        "mcp_session_id": headers.get("mcp-session-id"),
        "x_forwarded_for": headers.get("x-forwarded-for"),
        "user_agent": headers.get("user-agent"),
        "trace_header": headers.get("x-cloud-trace-context"),
    }), flush=True)

@mcp.tool(
    annotations=ToolAnnotations(
        readOnlyHint=True,
    )
)
def add(a: int, b: int) -> int:
    """Use this to add two numbers together.

    Args:
        a: The first number.
        b: The second number.

    Returns:
        The sum of the two numbers.
    """
    logger.info(f">>> 🛠️ Tool: 'add' called with numbers '{a}' and '{b}'")
    log_network_context("add", a, b)
    return a + b

@mcp.tool(
    annotations=ToolAnnotations(
        readOnlyHint=True,
    )
)
def subtract(a: int, b: int) -> int:
    """Use this to subtract two numbers.

    Args:
        a: The first number.
        b: The second number.

    Returns:
        The difference of the two numbers.
    """
    logger.info(f">>> 🛠️ Tool: 'subtract' called with numbers '{a}' and '{b}'")
    log_network_context("subtract", a, b)
    return a - b

if __name__ == "__main__":
    logger.info(f"🚀 MCP server started on port {os.getenv('PORT', 8080)}")
    asyncio.run(
        mcp.run_async(
            transport="streamable-http",
            host="0.0.0.0",
            port=int(os.getenv("PORT", 8080)),
        )
    )
EOF
编写 Dockerfile 以定义容器映像构建说明和启动命令:
# create dockerfile
cat > math-wizard/Dockerfile << 'EOF'
# use official python 3.12 image
FROM python:3.12-slim

# install uv
COPY --from=ghcr.io/astral-sh/uv:latest /uv /uvx /bin/

# install the project into /app
COPY . /app
WORKDIR /app

# allow statements and log messages to immediately appear in the logs
ENV PYTHONUNBUFFERED=1

# install dependencies
RUN uv sync

EXPOSE 8080

# run the mcp server
CMD ["uv", "run", "server.py"]
EOF
将服务部署到 Cloud Run
使用 Cloud Build(使用项目默认计算服务账号 ${PROJ_NO}-compute@developer.gserviceaccount.com)从源代码部署 MCP 服务器:
# deploy cloud run service
gcloud run deploy ${MCP_NAME} \
  --source math-wizard \
  --region=${REGION} \
  --no-invoker-iam-check \
  --ingress=internal \
  --quiet
验证 Cloud Run 部署
检查 Cloud Run 服务详情,验证其有效配置:
# show cloud run service details
gcloud run services describe ${MCP_NAME} --region=${REGION}
预期输出:
<snip>
✔ Service math-wizard in region ${REGION}

URL:     https://math-wizard-${PROJ_NO}.${REGION}.run.app
Ingress: internal
Traffic:
  100% LATEST (currently math-wizard-00001-<id>)
</snip>
在 Agent Registry 中注册 MCP 服务器
为了让 Gemini Enterprise 发现 MCP 服务器上可用的确切工具,必须在向 Agent Registry 注册期间提供工具规范文件 (toolspec.json)。
创建 MCP 工具规范
# create tool spec file
cat > cfg/toolspec.json << 'EOF'
{
  "tools": [
    {
      "name": "add",
      "description": "Use this to add two numbers together.",
      "inputSchema": {
        "type": "object",
        "properties": {
          "a": { "type": "integer", "description": "The first number." },
          "b": { "type": "integer", "description": "The second number." }
        },
        "required": ["a", "b"]
      },
      "isReadOnly": true,
      "isDestructive": false,
      "isIdempotent": true,
      "isOpenWorld": false
    },
    {
      "name": "subtract",
      "description": "Use this to subtract two numbers.",
      "inputSchema": {
        "type": "object",
        "properties": {
          "a": { "type": "integer", "description": "The first number." },
          "b": { "type": "integer", "description": "The second number." }
        },
        "required": ["a", "b"]
      },
      "isReadOnly": true,
      "isDestructive": false,
      "isIdempotent": true,
      "isOpenWorld": false
    }
  ]
}
EOF
在 Agent Registry 中注册 MCP 服务器
# register mcp server in agent registry
gcloud agent-registry services create ${MCP_NAME} \
  --project=${PROJ_ID} \
  --location=${REGION} \
  --display-name="${MCP_NAME}-${PROJ_NO}.${REGION}.run.app" \
  --description="MANDATORY MATH & ARITHMETIC AGENT: You MUST ALWAYS invoke \
this tool for ANY mathematical calculation, addition (+), subtraction (-), \
sum, difference, or arithmetic question (including simple questions like \
'what is 67 + 345?'). NEVER compute arithmetic yourself and NEVER transfer \
math queries to file_and_coding_agent / code interpreter. Always delegate \
every math question to this tool." \
  --mcp-server-spec-type=tool-spec \
  --mcp-server-spec-content=cfg/toolspec.json \
  --interfaces=protocolBinding=JSONRPC,url="${MCP_URL}"
验证 Agent Registry 中的 MCP 服务器
验证已部署的 Cloud Run 服务是否在相应区域中列为已注册的 MCP 服务器,以及其端点网址和可用工具:
# list registered mcp servers in agent registry
gcloud agent-registry mcp-servers list \
  --location=${REGION} \
  --project=${PROJ_ID} \
  --format="table(
    name.basename():label=REGISTRY_ID,
    displayName:label=DISPLAY_NAME,
    interfaces[0].url:label=ENDPOINT_URL,
    tools[].name.list():label=TOOLS
  )"
预期输出:
REGISTRY_ID                                         DISPLAY_NAME                                  ENDPOINT_URL                                              TOOLS
agentregistry-00000000-0000-0000-0012-3456789abcde  math-wizard-${PROJ_NO}.${REGION}.run.app      https://math-wizard-${PROJ_NO}.${REGION}.run.app/mcp      add,subtract
查看服务配置规范,了解它如何注册每个工具的确切工具定义、输入架构和行为注释:
# describe mcp server tool specs
gcloud agent-registry services describe ${MCP_NAME} \
  --location=${REGION} \
  --project=${PROJ_ID} \
  --format="yaml(mcpServerSpec.content.tools)"
MCP 服务器部分到此结束…接下来是 Gemini Enterprise 部分。
7. Gemini Enterprise
在本部分中,您将创建并配置 Gemini Enterprise 应用和关联的自定义 MCP 服务器数据存储区资源。
Discovery Engine 资源模型
Gemini Enterprise 应用(在 Discovery Engine API 中表示为 Engine 资源)是面向最终用户的中央编排层和对话界面。它负责管理用户聊天会话、根据企业数据为生成式模型提供依据,并协调动态工具执行。
Gemini Enterprise 应用通过数据存储区与数据和系统进行互动:
- 知识数据存储区:提取静态内容(例如 Cloud Storage、Google 云端硬盘、BigQuery)并为其编制索引,以实现检索增强生成 (RAG)。
- 数据连接器(操作提供方):连接到动态第三方 API 或自定义 API。自定义 MCP 服务器数据存储区会公开由 Model Context Protocol (MCP) 定义的工具,使模型能够在对话期间动态调用外部函数。
通过 Agent Gateway 进行出站流量路由
默认情况下,Gemini Enterprise 通过公共网络路由连接器和工具执行流量。不过,对于专用 VPC 工作负载和零信任治理,可以配置引擎以通过 Agent Gateway 路由出站流量:
- 在本实验中稍后创建自定义 MCP 服务器数据存储区时,您需要在数据存储区设置中启用通过 Agent Gateway 路由出站流量。
- 这会将引擎的出站工具调用绑定到您的区域 Agent Gateway,确保所有 MCP 请求都携带应用的
Agent Identity,使用 IAP 和 IAM Unified Access Policies (UAP) 进行运行时授权,并通过 PSC 网络连接进入您的私有 VPC。
创建 Gemini Enterprise 应用
以下方法使用 discoveryengine.googleapis.com API 创建 Gemini Enterprise 应用资源和配置。如需使用 Google Cloud 控制台界面进行配置,请参阅创建应用以获取相关说明。
# create engine (ge app)
curl -s -X POST "https://${GE_LOCATION}-discoveryengine.googleapis.com/v1/projects/${PROJ_ID}/locations/${GE_LOCATION}/collections/default_collection/engines?engineId=${GE_APP_INIT}" \
  -H "Authorization: Bearer $(gcloud auth application-default print-access-token)" \
  -H "X-Goog-User-Project: ${PROJ_ID}" -H "Content-Type: application/json" \
  -d @- <<EOF
{
  "displayName": "${GE_APP_DISPLAY_NAME}",
  "dataStoreIds": [],
  "solutionType": "SOLUTION_TYPE_SEARCH",
  "industryVertical": "GENERIC",
  "appType": "APP_TYPE_INTRANET",
  "searchEngineConfig": {
    "searchTier": "SEARCH_TIER_ENTERPRISE",
    "searchAddOns": [
      "SEARCH_ADD_ON_LLM"
    ]
  },
  "commonConfig": {
    "companyName": "${GE_APP_ORG_NAME}"
  }
}
EOF
验证应用创建
# fetch engine (ge app) id
export GE_APP_ID=$(curl -s "https://${GE_LOCATION}-discoveryengine.googleapis.com/v1/projects/${PROJ_ID}/locations/${GE_LOCATION}/collections/default_collection/engines" \
  -H "Authorization: Bearer $(gcloud auth application-default print-access-token)" -H "X-Goog-User-Project: ${PROJ_ID}" \
  | jq -r --arg name "${GE_APP_DISPLAY_NAME}" '.engines[] | select(.displayName==$name) | .name | split("/") | last')

echo "engine (ge app) id: ${GE_APP_ID}"
查看引擎详细信息,了解已创建的配置:
# get engine (ge app) details
curl -s "https://${GE_LOCATION}-discoveryengine.googleapis.com/v1/projects/${PROJ_ID}/locations/${GE_LOCATION}/collections/default_collection/engines/${GE_APP_ID}" \
  -H "Authorization: Bearer $(gcloud auth application-default print-access-token)" \
  -H "X-Goog-User-Project: ${PROJ_ID}"
请注意 JSON 响应中的以下服务器填充属性:
name:规范资源路径 (projects/${PROJ_NO}/locations/global/collections/default_collection/engines/${GE_APP_ID})。sessionConfig.sessionManagementPolicy:默认值为"VERTEX_AI_MANAGED",用于在 Agent Platform(以前称为 Vertex AI)中持久保存多轮对话和工具调用状态。observabilityConfig.observabilityEnabled:对于基准指标,默认值为true(在后续步骤中,系统会启用详细的提示和工具载荷日志记录)。
启用身份提供方
启用 Google Identity 作为 Gemini Enterprise 应用上最终用户身份验证的身份提供方。
以下方法使用 discoveryengine.googleapis.com API 来配置 Gemini Enterprise 应用身份提供方。如需使用 Google Cloud 控制台界面进行配置,请参阅配置身份提供方,了解相关说明。
# set identity provider
curl -s -X PATCH "https://${GE_LOCATION}-discoveryengine.googleapis.com/v1/projects/${PROJ_ID}/locations/${GE_LOCATION}/aclConfig" \
  -H "Authorization: Bearer $(gcloud auth application-default print-access-token)" \
  -H "X-Goog-User-Project: ${PROJ_ID}" -H "Content-Type: application/json" \
  -d @- <<EOF
{
  "idpConfig": {
    "idpType": "GSUITE"
  }
}
EOF
验证身份提供方
# show identity provider
curl -s "https://${GE_LOCATION}-discoveryengine.googleapis.com/v1/projects/${PROJ_ID}/locations/${GE_LOCATION}/aclConfig" \
  -H "Authorization: Bearer $(gcloud auth application-default print-access-token)" \
  -H "X-Goog-User-Project: ${PROJ_ID}"
输出 "idpType": "GSUITE" 对应于 Google Identity 提供方。
(可选)启用 Gemini Enterprise 试用许可
如果您使用的是已分配 Gemini Enterprise 许可的项目,则可以跳过此步骤。如果您使用的是没有许可的新项目,请继续并按以下步骤操作。
创建许可配置资源,以授予 Gemini Enterprise 用户席位 30 天的许可。这会将默认许可设置为新的试用许可,因此任何登录的用户都会自动获得席位:
# configure free trial subscription
curl -s -X POST "https://${GE_LOCATION}-discoveryengine.googleapis.com/v1/projects/${PROJ_ID}/locations/${GE_LOCATION}/licenseConfigs?licenseConfigId=free_trial_gemini" \
  -H "Authorization: Bearer $(gcloud auth application-default print-access-token)" \
  -H "X-Goog-User-Project: ${PROJ_ID}" -H "Content-Type: application/json" \
  -d @- <<EOF
{
  "subscriptionTier": "SUBSCRIPTION_TIER_SEARCH_AND_ASSISTANT",
  "freeTrial": true
}
EOF
验证许可是否已应用
# show license config
curl -s "https://${GE_LOCATION}-discoveryengine.googleapis.com/v1/projects/${PROJ_ID}/locations/${GE_LOCATION}/licenseConfigs/free_trial_gemini" \
  -H "Authorization: Bearer $(gcloud auth application-default print-access-token)" \
  -H "X-Goog-User-Project: ${PROJ_ID}"
检查 "subscriptionTerm": "SUBSCRIPTION_TERM_ONE_MONTH" 和 "freeTrial": true。
# verify auto-registration enabled on default user store
curl -s "https://${GE_LOCATION}-discoveryengine.googleapis.com/v1/projects/${PROJ_ID}/locations/${GE_LOCATION}/userStores/default_user_store" \
  -H "Authorization: Bearer $(gcloud auth application-default print-access-token)" \
  -H "X-Goog-User-Project: ${PROJ_ID}"
检查 ../free_trial_gemini" 和 "enableLicenseAutoRegister": true。
启用可观测性设置
在 Gemini Enterprise 应用(引擎)级别启用可观测性后,您可以在 Metrics Explorer 中查看核心助理与指标数据的互动,并在 Cloud Trace 中关联端到端跟踪记录。
# set observability on engine (ge app)
curl -s -X PATCH "https://${GE_LOCATION}-discoveryengine.googleapis.com/v1/projects/${PROJ_ID}/locations/${GE_LOCATION}/collections/default_collection/engines/${GE_APP_ID}?updateMask=observabilityConfig" \
  -H "Authorization: Bearer $(gcloud auth application-default print-access-token)" \
  -H "X-Goog-User-Project: ${PROJ_ID}" -H "Content-Type: application/json" \
  -d @- <<EOF
{
  "observabilityConfig": {
    "observabilityEnabled": true,
    "sensitiveLoggingEnabled": true
  }
}
EOF
验证可观测性设置
# verify observability is enabled on engine (ge app)
curl -s "https://${GE_LOCATION}-discoveryengine.googleapis.com/v1/projects/${PROJ_ID}/locations/${GE_LOCATION}/collections/default_collection/engines/${GE_APP_ID}" \
  -H "Authorization: Bearer $(gcloud auth application-default print-access-token)" \
  -H "X-Goog-User-Project: ${PROJ_ID}" \
  | jq '{observabilityConfig: .observabilityConfig}'
检查是否存在 "sensitiveLoggingEnabled": true。
绑定到 Agent Gateway
通过 Agent Gateway 路由来自 Gemini Enterprise 的出站流量,可为所有 AI 智能体工具调用建立集中的零信任治理和安全执行边界:
- 集中式政策执行:Agent Gateway 充当内嵌代理,可在流量离开智能体环境之前,根据授权政策和治理控制措施评估出站工具请求。
- 专用网络出站流量:将 Gemini Enterprise 绑定到 Agent Gateway 可确保以 Cloud Run 上的专用 MCP 服务器为目标的工具调用通过 Private Service Connect (PSC) 安全地路由,从而绕过公共互联网。
- 统一的可审核性:可集中记录所有已连接的 MCP 服务器和外部工具的请求、遥测数据和审核轨迹。
通过在 Gemini Enterprise 应用上配置 agentGatewaySetting,最终用户查询(例如对从 Agent Registry 和 A2A 代理导入的自定义 MCP 服务器的调用)发起的出站工具和代理调用会自动通过 Agent Gateway 进行路由。
修补引擎 agentGatewaySetting 以启用:
# bind engine (ge app) to agent gateway
curl -s -X PATCH "https://${GE_LOCATION}-discoveryengine.googleapis.com/v1/projects/${PROJ_ID}/locations/${GE_LOCATION}/collections/default_collection/engines/${GE_APP_ID}?updateMask=agentGatewaySetting.defaultEgressAgentGateway.name" \
  -H "Authorization: Bearer $(gcloud auth application-default print-access-token)" \
  -H "X-Goog-User-Project: ${PROJ_ID}" -H "Content-Type: application/json" \
  -d @- <<EOF
{
  "agentGatewaySetting": {
    "defaultEgressAgentGateway": {
      "name": "projects/${PROJ_ID}/locations/${REGION}/agentGateways/${AGW_NAME}"
    }
  }
}
EOF
验证 Agent Gateway 绑定
检索应用配置以确认 agentGatewaySetting 绑定:
# verify engine (ge app) agent gateway configuration
curl -s "https://${GE_LOCATION}-discoveryengine.googleapis.com/v1/projects/${PROJ_ID}/locations/${GE_LOCATION}/collections/default_collection/engines/${GE_APP_ID}" \
  -H "Authorization: Bearer $(gcloud auth application-default print-access-token)" \
  -H "X-Goog-User-Project: ${PROJ_ID}" \
  | jq '{name: .name, displayName: .displayName, agentGatewaySetting: .agentGatewaySetting}'
预期输出:
{
  "name": "projects/${PROJ_NO}/locations/${GE_LOCATION}/collections/default_collection/engines/${GE_APP_ID}",
  "displayName": "${GE_APP_DISPLAY_NAME}",
  "agentGatewaySetting": {
    "defaultEgressAgentGateway": {
      "name": "projects/${PROJ_ID}/locations/${REGION}/agentGateways/${AGW_NAME}"
    }
  }
}
创建自定义 MCP 服务器数据存储区
在本部分中,您将通过创建自定义 MCP 数据存储区将 MCP 服务器连接到 Gemini Enterprise。
使用 Discovery Engine API 时,此过程分为两个步骤:
- 创建 (
:setUpDataConnector):创建专用Collection资源 (${MCP_NAME}-%timestamp-collection),附加DataConnector(custom_mcp),并预配其后备DataStore(..._mcp_data)。 - 激活 (
PATCH .../dataConnector?updateMask=actionConfig):使用 Agent Registry 工具规范激活连接器的操作运行时 (actionState: "ACTIVE"),并将DataStore(dataStoreIds) 绑定到 Gemini EnterpriseEngine。
# fetch mcp server agent registry resource name
export MCP_REGISTRY_URI=$(gcloud agent-registry mcp-servers list \
  --location=${REGION} \
  --project=${PROJ_ID} \
  --filter="displayName:${MCP_NAME}" \
  --format="value(name)")

echo "mcp registry name: ${MCP_REGISTRY_URI}"
echo "mcp url: ${MCP_URL}"
创建数据连接器
# create custom mcp data connector from agent registry and link to engine
curl -s -X POST "https://${GE_LOCATION}-discoveryengine.googleapis.com/v1alpha/projects/${PROJ_ID}/locations/${GE_LOCATION}:setUpDataConnector" \
  -H "Authorization: Bearer $(gcloud auth application-default print-access-token)" \
  -H "X-Goog-User-Project: ${PROJ_ID}" \
  -H "Content-Type: application/json" \
  -d @- <<EOF
{
  "collectionId": "${MCP_NAME}-$(date +%s)-collection",
  "collectionDisplayName": "${MCP_NAME}-collection",
  "dataConnector": {
    "dataSource": "custom_mcp",
    "dataSourceVersion": 1,
    "params": {
      "oauth_access_token": "unused"
    },
    "refreshInterval": "86400s",
    "entities": [
      {
        "entityName": "mcp_data"
      }
    ],
    "connectorModes": [
      "FEDERATED"
    ],
    "actionConfig": {
      "isActionConfigured": true,
      "createBapConnection": true,
      "actionParams": {
        "auth_type": "NO_AUTH",
        "instance_uri": "${MCP_URL}",
        "mcp_server_source": "REGISTRY_MCP",
        "registry_mcp_server_name": "${MCP_REGISTRY_URI}",
        "mcp_agent_instructions": "MANDATORY MATH & ARITHMETIC AGENT: Always invoke this tool for any mathematical calculation, addition (+), subtraction (-), sum, or difference.",
        "use_agent_gateway_egress": true,
        "agent_gateway_engine": "projects/${PROJ_ID}/locations/global/collections/default_collection/engines/${GE_APP_ID}"
      }
    }
  }
}
EOF
验证数据连接器的创建
# fetch collection id
export GE_COLLECTION_ID=$(curl -s "https://${GE_LOCATION}-discoveryengine.googleapis.com/v1alpha/projects/${PROJ_ID}/locations/${GE_LOCATION}/collections" \
  -H "Authorization: Bearer $(gcloud auth application-default print-access-token)" \
  -H "X-Goog-User-Project: ${PROJ_ID}" \
  | jq -r --arg dname "${MCP_NAME}-collection" '.collections[] | select(.displayName == $dname) | .name | split("/") | last' | head -n 1)

echo "ge collection id: ${GE_COLLECTION_ID}"
检查 "registry_mcp_server_name" 字段是否填充了 MCP 服务器的 Agent Registry UUID:
# show data connector details
curl -s "https://${GE_LOCATION}-discoveryengine.googleapis.com/v1alpha/projects/${PROJ_ID}/locations/${GE_LOCATION}/collections/${GE_COLLECTION_ID}/dataConnector" \
  -H "Authorization: Bearer $(gcloud auth application-default print-access-token)" \
  -H "X-Goog-User-Project: ${PROJ_ID}" \
  | jq '{name, state, actionState, connectorModes, bapConfig, registry_mcp_server_name: .actionConfig.actionParams.registry_mcp_server_name}'
在 Google Cloud 控制台界面中查看 MCP 服务器注册条目:
echo "mcp server registry page url: https://console.cloud.google.com/agent-platform/agent-registry/mcp-servers/${REGION}/${MCP_REGISTRY_URI##*/}/overview?project=${PROJ_ID}"
激活数据连接器
# activate and bind data connector
curl -s -X PATCH "https://discoveryengine.googleapis.com/v1alpha/projects/${PROJ_ID}/locations/global/collections/${GE_COLLECTION_ID}/dataConnector?updateMask=actionConfig" \
  -H "Authorization: Bearer $(gcloud auth application-default print-access-token)" \
  -H "X-Goog-User-Project: ${PROJ_ID}" \
  -H "Content-Type: application/json" \
  -d @- <<EOF
{
  "name": "projects/${PROJ_ID}/locations/global/collections/${GE_COLLECTION_ID}/dataConnector",
  "actionConfig": {
    "isActionConfigured": true,
    "createBapConnection": true,
    "actionParams": {
      "auth_type": "NO_AUTH",
      "instance_uri": "${MCP_URL}",
      "mcp_server_source": "REGISTRY_MCP",
      "registry_mcp_server_name": "${MCP_REGISTRY_URI}",
      "mcp_agent_instructions": "MANDATORY MATH & ARITHMETIC AGENT: Always invoke this tool for any mathematical calculation, addition (+), subtraction (-), sum, or difference.",
      "use_agent_gateway_egress": true,
      "agent_gateway_engine": "projects/${PROJ_ID}/locations/global/collections/default_collection/engines/${GE_APP_ID}"
    }
  }
}
EOF
验证自定义 MCP 服务器关联
# show engine (ge app) details
curl -s "https://${GE_LOCATION}-discoveryengine.googleapis.com/v1/projects/${PROJ_ID}/locations/${GE_LOCATION}/collections/default_collection/engines/${GE_APP_ID}" \
  -H "Authorization: Bearer $(gcloud auth application-default print-access-token)" \
  -H "X-Goog-User-Project: ${PROJ_ID}" \
  | jq '{name: .name, dataStoreIds: .dataStoreIds, agentGatewaySetting: .agentGatewaySetting}'
检查关联的数据存储区 "dataStoreIds": "collection-math-wizard-。
# show collection details
curl -s "https://${GE_LOCATION}-discoveryengine.googleapis.com/v1alpha/projects/${PROJ_ID}/locations/${GE_LOCATION}/collections" \
  -H "Authorization: Bearer $(gcloud auth application-default print-access-token)" \
  -H "X-Goog-User-Project: ${PROJ_ID}" \
  | jq --arg app "${GE_APP_ID}" '.collections[] | select(.dataConnector.actionConfig.actionParams.agent_gateway_engine // "" | endswith($app)) | .dataConnector | {name: .name, state: .state, actionState: .actionState, connectorModes: .connectorModes, actionParams: .actionConfig.actionParams}'
检查是否已填充所有参数的 "state": "ACTIVE"。
工具操作
在 Gemini Enterprise 控制面板中检查 math-wizard-collection 数据存储区时,您会发现操作标签页未被使用,并且↻ 重新加载自定义操作按钮处于停用状态。这是预期行为。
在 Google Cloud 控制台界面中查看数据存储区详情页面:
echo "data store details page url: https://console.cloud.google.com/gemini-enterprise/locations/${GE_LOCATION}/collections/${GE_COLLECTION_ID}/connector/details?project=${PROJ_ID}"
根据您将自定义 MCP 服务器连接到 Gemini Enterprise 的方式,工具发现和治理将通过以下两种方式之一进行处理:
- 直接自定义 MCP(
BYO_MCP工作流):如果您在 Gemini Enterprise 中直接配置自定义 MCP 服务器,而不使用 Agent Registry,则数据存储区本身会管理工具目录 (connectorModes: ["FEDERATED", "ACTIONS"])。您必须打开操作标签页,点击 ↻ 重新加载自定义操作以提取tools/list架构,然后在界面中手动开启或关闭各个工具(add和subtract)。 - Agent Registry 导入(本 Codelab 中使用的
REGISTRY_MCP工作流):从Agent Registry导入 MCP 服务器时,Agent Registry 会充当 MCP 端点、其接口元数据及其工具目录 (connectorModes: ["FEDERATED"]) 的权威事实来源。Gemini Enterprise 会在运行时通过引擎的Agent Gateway自动启用已注册的 MCP 工具,而无需您在数据存储区界面中手动重新加载或切换操作。
Gemini Enterprise 应用部分到此结束…接下来是验证部分。
8. 验证
在本部分中,您将从 Gemini Enterprise Web 应用触发实时 MCP 工具调用,并跟踪 Agent Gateway、Cloud DNS、VPC 防火墙和 Cloud Run 日志中的请求流。然后,您将收紧 IAM 统一访问权限政策,以允许 subtract 并阻止 add,从而在网关上验证零信任强制执行。
用户访问权限
构建 Gemini Enterprise Web 应用的网址:
# fetch app user url
export GE_WIDGET_ID=$(curl -s "https://${GE_LOCATION}-discoveryengine.googleapis.com/v1/projects/${PROJ_ID}/locations/${GE_LOCATION}/collections/default_collection/engines/${GE_APP_ID}/widgetConfigs/default_search_widget_config" \
  -H "Authorization: Bearer $(gcloud auth application-default print-access-token)" \
  -H "X-Goog-User-Project: ${PROJ_ID}" \
  -H "Content-Type: application/json" \
  | jq -r '.configId')

export GE_APP_USER_URL="https://vertexaisearch.cloud.google.com/home/cid/${GE_WIDGET_ID}"

echo "app user url: ${GE_APP_USER_URL}"
点击链接,在浏览器中打开 Gemini Enterprise Web 应用聊天界面,然后点击开始。
在对话中测试智能体查询
在聊天界面中,点击聊天框底部的连接器拼图块图标,确认 math-wizard-collection 数据连接器已启用。您应该会看到一个切换按钮,该按钮处于开启状态(带有颜色)。
尝试以下测试查询:
what is 2342345 - 98234798324?
what is 72347234 + 234234?
验证助理是否返回正确答案,并在每个回答下方显示互动操作引用徽章(例如 Math Calculation (8s) 🤖 Agentgateway Agent),以确认工具已执行。
检查 Cloud Logging 中的日志
通过检查 Cloud Logging 中的日志,验证 Gemini Enterprise 是否通过 Agent Gateway 和专用 VPC 网络路由了工具调用。
1. 验证 Agent Gateway 和 IAP 授权
确认 Agent Gateway 拦截了请求,在 Agent Registry 中解析了目标,将授权委托给 IAP,并允许了工具调用:
# show agent gateway logs
gcloud logging read 'resource.type="networkservices.googleapis.com/Gateway"' \
  --project=${PROJ_ID} \
  --limit=5 \
  --format="table( \
    timestamp.date(tz=LOCAL):label=TIMESTAMP, \
    httpRequest.status:label=STATUS, \
    httpRequest.serverIp:label=SERVER_IP, \
    jsonPayload.agentGatewayInfo.mcpInfo.method:label=MCP_METHOD, \
    jsonPayload.agentGatewayInfo.mcpInfo.parameter:label=TOOL, \
    jsonPayload.authzPolicyInfo.result:label=AUTHZ, \
    jsonPayload.agentGatewayInfo.agentRegistryResource.basename():label=REGISTRY_MCP
  )"
验证输出是否包含以下内容:
STATUS:200(成功执行)和202(notifications/initialized握手)。SERVER_IP:Google API PSC 端点 IP (172.16.20.20:443)。MCP_METHOD和TOOL:MCP 协议序列(notifications/initialized、tools/list和tools/call,带有add或subtract)。AUTHZ:ALLOWED(允许 IAP 授权的出站流量)。REGISTRY_MCP:已解析的 Agent Registry 资源 ID (agentregistry-...)。
2. 验证 DNS 和防火墙传输
确认 Cloud DNS 已将主机名解析为 PSC 端点,并且防火墙允许来自 Agent Gateway 接口的流量:
# show dns logs
gcloud logging read 'resource.type="dns_query"' \
  --project=${PROJ_ID} \
  --limit=5 \
  --format="table( \
    timestamp.date(tz=LOCAL):label=TIMESTAMP, \
    jsonPayload.queryName:label=QUERY_NAME, \
    jsonPayload.queryType:label=TYPE, \
    jsonPayload.responseCode:label=RCODE, \
    jsonPayload.rdata:label=RDATA
  )"
# show firewall logs
gcloud logging read 'logName:"compute.googleapis.com%2Ffirewall"' \
  --project=${PROJ_ID} \
  --limit=5 \
  --format="table( \
    timestamp.date(tz=LOCAL):label=TIMESTAMP, \
    jsonPayload.connection.src_ip:label=SRC_IP, \
    jsonPayload.connection.dest_ip:label=DEST_IP, \
    jsonPayload.connection.dest_port:label=PORT, \
    jsonPayload.rule_details.reference.basename():label=RULE, \
    jsonPayload.disposition:label=DISPOSITION
  )"
验证以下值:
- DNS
QUERY_NAME和RDATA:将math-wizard-...run.app.(A记录,NOERROR)解析为172.16.20.20。 - 防火墙
SRC_IP和DEST_IP:192.168.10.2(Agent Gateway PSC 接口 IP)到172.16.20.20:443。 - 防火墙
RULE和DISPOSITION:firewallPolicy:fw-policy-...与ALLOWED相匹配。
3. 验证 Cloud Run 工具执行
确认 Cloud Run 容器已接收并处理工具调用:
# show cloud run logs
gcloud logging read 'resource.type="cloud_run_revision"
  AND textPayload:"Tool:"' \
  --project=${PROJ_ID} \
  --limit=5 \
  --format="value(timestamp.date(tz=LOCAL), textPayload)"
验证 textPayload 是否显示工具执行条目(例如 >>> 🛠️ Tool: 'subtract' called with numbers '[x]' and '[y]')。
测试最小权限政策的执行情况
在初始 IAM 访问权限政策中,只要目的地已注册 (destination.is_registered == true),就允许使用任何方法或工具。在此步骤中,更新政策以强制执行最小权限原则,具体做法是仅允许使用 subtract 工具,同时禁止使用 add。
更新 IAM 访问权限政策
限制 MCP 工具执行时,请使用双规则模式:
- 规则 1(MCP 发现和握手):允许使用非工具调用 MCP 生命周期方法(
destination.is_registered == true和destination.agent_registry.mcp_server.method != 'tools/call')。由于 Gemini Enterprise 在调用工具之前会协商流设置和发现(initialize、notifications/initialized、tools/list),并且destination.agent_registry.mcp_server.tool.name仅在tools/call期间填充,因此规则 1 对于保持会话初始化和目录发现正常运行是必要的。 - 规则 2(工具级限制):限制
tools/call执行,仅允许使用subtract工具(destination.is_registered == true、destination.agent_registry.mcp_server.method == 'tools/call'和destination.agent_registry.mcp_server.tool.name == 'subtract')。
使用以下两个规则更新访问权限政策规则清单文件:
# create access policy rule file (update: allow subtract only)
cat > cfg/${UAP_POLICY_NAME}-rule-update.json << EOF
[
  {
    "description": "allow ge assistant to any registered endpoint to perform mcp discovery and handshake",
    "effect": "ALLOW",
    "principals": [
      "principal://${TRUST_DOMAIN}/resources/discoveryengine/projects/${PROJ_NO}/locations/global/engines/${GE_APP_ID}/assistants/default_assistant/agents/default/core_assistant"
    ],
    "operation": {
      "permissions": [
        "iap.googleapis.com/resources.egressViaIAP"
      ]
    },
    "conditions": {
      "iap.googleapis.com": {
        "expression": \
        "destination.is_registered == true && \
         destination.agent_registry.mcp_server.method != 'tools/call'"
      }
    }
  },
  {
    "description": "allow ge assistant to any registered mcp server with tool call subtract",
    "effect": "ALLOW",
    "principals": [
      "principal://${TRUST_DOMAIN}/resources/discoveryengine/projects/${PROJ_NO}/locations/global/engines/${GE_APP_ID}/assistants/default_assistant/agents/default/core_assistant"
    ],
    "operation": {
      "permissions": [
        "iap.googleapis.com/resources.egressViaIAP"
      ]
    },
    "conditions": {
      "iap.googleapis.com": {
        "expression": \
        "destination.is_registered == true && \
         destination.agent_registry.mcp_server.method == 'tools/call' && \
         destination.agent_registry.mcp_server.tool.name == 'subtract'"
      }
    }
  }
]
EOF
将更新后的规则应用于 IAM 访问权限政策:
# update iam access policy
gcloud iam access-policies update ${UAP_POLICY_NAME} \
  --details-rules=cfg/${UAP_POLICY_NAME}-rule-update.json \
  --project=${PROJ_ID} \
  --location=global
验证 IAM 访问权限政策
检查新的 IAM 访问权限政策是否已应用,以及是否仅允许使用减去工具:
# show iam access policy details
gcloud iam access-policies describe ${UAP_POLICY_NAME} \
  --project=${PROJ_ID} \
  --location=global \
  --flatten="details.rules[]" \
  --format="table( \
    details.rules.principals[0].scope(engines).sub('assistants/default_assistant/agents/default', '...'):label=PRINCIPAL, \
    details.rules.effect:label=EFFECT, \
    details.rules.conditions.'iap.googleapis.com'.expression.sub('\s*&&\s*', '\n&& ').sub('\s*\|\|\s*', '\n|| '):label=EXPRESSION
  )"
测试禁止的工具调用
返回 Gemini Enterprise Web 应用对话界面,然后尝试其他测试查询:
what is 100 plus 20?
助理尝试调用 add,但 Agent Gateway 和 IAP 将 IAM 政策条件评估为 false,并使用 HTTP 403 Forbidden 拒绝出站请求。在聊天界面中,您会注意到助理在重试被阻止的工具调用时,会在 Calculate Sum 上显示 🤖 Agentgateway Agent ... Working on it. 并旋转。这是预期行为。这确认了 Agent Gateway 和 IAP 正在网络级主动拦截并拒绝执行不允许的工具。
重新检查 Cloud Logging 中的日志
查看 Agent Gateway 日志条目,并注意与禁止的 add 工具调用对应的新 403 条目:
# show agent gateway logs
gcloud logging read 'resource.type="networkservices.googleapis.com/Gateway"' \
  --project=${PROJ_ID} \
  --limit=5 \
  --format="table( \
    timestamp.date(tz=LOCAL):label=TIMESTAMP, \
    httpRequest.status:label=STATUS, \
    httpRequest.serverIp:label=SERVER_IP, \
    jsonPayload.agentGatewayInfo.mcpInfo.method:label=MCP_METHOD, \
    jsonPayload.agentGatewayInfo.mcpInfo.parameter:label=TOOL, \
    jsonPayload.authzPolicyInfo.result:label=AUTHZ, \
    jsonPayload.agentGatewayInfo.agentRegistryResource.basename():label=REGISTRY_MCP
  )"
预期输出:
TIMESTAMP            STATUS  SERVER_IP         MCP_METHOD                 TOOL  AUTHZ    REGISTRY_MCP
YYYY-MM-DDTHH:MM:SS  403                       tools/call                 add   DENIED   agentregistry-00000000-0000-0000-0012-3456789abcde
YYYY-MM-DDTHH:MM:SS  403
YYYY-MM-DDTHH:MM:SS  202     172.16.20.20:443  notifications/initialized        ALLOWED  agentregistry-00000000-0000-0000-0012-3456789abcde
YYYY-MM-DDTHH:MM:SS          172.16.20.20:443                                   ALLOWED  agentregistry-00000000-0000-0000-0012-3456789abcde
YYYY-MM-DDTHH:MM:SS  200     172.16.20.20:443  initialize                       ALLOWED  agentregistry-00000000-0000-0000-0012-3456789abcde
检查额外请求是否从未到达 Cloud Run 后端:
# show cloud run logs
gcloud logging read 'resource.type="cloud_run_revision"
  AND textPayload:"Tool:"' \
  --project=${PROJ_ID} \
  --limit=5 \
  --format="value(timestamp.date(tz=LOCAL), textPayload)"
该命令未返回任何新条目,这确认了 Agent Gateway 已成功强制执行 IAM 访问政策。
验证部分到此结束,接下来进入清理部分。
9. 清理
请按照以下步骤删除在本实验中创建的资源和配置。
移除 Gemini Enterprise 组件
# delete gemini enterprise engine (app)
curl -s -X DELETE "https://${GE_LOCATION}-discoveryengine.googleapis.com/v1/projects/${PROJ_ID}/locations/${GE_LOCATION}/collections/default_collection/engines/${GE_APP_ID}" \
  -H "Authorization: Bearer $(gcloud auth application-default print-access-token)" \
  -H "X-Goog-User-Project: ${PROJ_ID}"

# delete custom mcp collection, data connector, and backing data store
curl -s -X DELETE "https://${GE_LOCATION}-discoveryengine.googleapis.com/v1alpha/projects/${PROJ_ID}/locations/${GE_LOCATION}/collections/${GE_COLLECTION_ID}" \
  -H "Authorization: Bearer $(gcloud auth application-default print-access-token)" \
  -H "X-Goog-User-Project: ${PROJ_ID}"

# reset identity provider configuration
curl -s -X PATCH "https://${GE_LOCATION}-discoveryengine.googleapis.com/v1/projects/${PROJ_ID}/locations/${GE_LOCATION}/aclConfig" \
  -H "Authorization: Bearer $(gcloud auth application-default print-access-token)" \
  -H "X-Goog-User-Project: ${PROJ_ID}" \
  -H "Content-Type: application/json" \
  -d '{"idpConfig":{"idpType":"IDP_TYPE_UNSPECIFIED"}}'
移除 MCP 服务器组件
# delete agent registry service
gcloud -q agent-registry services delete ${MCP_NAME} \
  --location=${REGION} \
  --project=${PROJ_ID}

# delete cloud run service, source-deploy artifact registry repo, and staging bucket
gcloud -q run services delete ${MCP_NAME} \
  --region=${REGION} \
  --project=${PROJ_ID}

gcloud -q artifacts repositories delete cloud-run-source-deploy \
  --location=${REGION} \
  --project=${PROJ_ID}

gcloud -q storage rm --recursive gs://run-sources-${PROJ_ID}-${REGION} \
  --project=${PROJ_ID}
移除 Agent Gateway 和 IAM 访问权限政策
# delete gateway authorization policy, iap extension, and agent gateway
gcloud -q network-security authz-policies delete ${AGW_NAME}-authz-policy-iap \
  --location=${REGION} \
  --project=${PROJ_ID}

gcloud -q service-extensions authz-extensions delete ${AGW_NAME}-svc-ext-authz-iap \
  --location=${REGION} \
  --project=${PROJ_ID}

gcloud -q network-services agent-gateways delete ${AGW_NAME} \
  --location=${REGION} \
  --project=${PROJ_ID}
# delete iam policy binding and access policy
gcloud -q iam policy-bindings delete ${UAP_BINDING_NAME} \
  --location=global \
  --project=${PROJ_ID}

gcloud -q iam access-policies delete ${UAP_POLICY_NAME} \
  --location=global \
  --project=${PROJ_ID}
移除 DNS 和防火墙组件
# delete dns record set, managed zone, and policy
gcloud -q dns record-sets delete "*.run.app." \
  --type=A \
  --zone=priv-zone-run \
  --project=${PROJ_ID}

gcloud -q dns managed-zones delete priv-zone-run \
  --project=${PROJ_ID}

gcloud -q dns policies update dns-policy-${SLUG} \
  --networks="" \
  --project=${PROJ_ID}

gcloud -q dns policies delete dns-policy-${SLUG} \
  --project=${PROJ_ID}
# delete firewall policy association, rule, and policy
gcloud -q compute network-firewall-policies associations delete \
  --name=fw-policy-bind-${SLUG} \
  --firewall-policy=fw-policy-${SLUG} \
  --global-firewall-policy \
  --project=${PROJ_ID}

gcloud -q compute network-firewall-policies rules delete 1001 \
  --firewall-policy=fw-policy-${SLUG} \
  --global-firewall-policy \
  --project=${PROJ_ID}

gcloud -q compute network-firewall-policies delete fw-policy-${SLUG} \
  --global \
  --project=${PROJ_ID}
移除 PSC 和 VPC 网络组件
# delete psc forwarding rule and internal ip address
gcloud -q compute forwarding-rules delete psc2gapis \
  --global \
  --project=${PROJ_ID}

gcloud -q compute addresses delete ip-psc2gapis \
  --global \
  --project=${PROJ_ID}
# delete psc network attachment, subnet, and vpc network
gcloud -q compute network-attachments delete psc-na-${REGION}-agw \
  --region=${REGION} \
  --project=${PROJ_ID}

gcloud -q compute networks subnets delete subnet-${REGION}-agw \
  --region=${REGION} \
  --project=${PROJ_ID}

gcloud -q compute networks delete vnet-${SLUG} \
  --project=${PROJ_ID}
移除组织政策覆盖和本地文件
# delete project-level organization policy overrides
gcloud -q org-policies delete discoveryengine.managed.disableCustomMcpServerConnector --project=${PROJ_ID}
gcloud -q org-policies delete iam.managed.disableAccessPolicyBinding --project=${PROJ_ID}
# remove local project files
rm -rf cfg math-wizard
清理工作到此结束…接下来是总结!
10. 总结
恭喜!您构建了一个端到端架构,使 Gemini Enterprise 应用能够安全地发现和调用私有自定义 MCP 服务器上的工具:
- 自定义 MCP 服务器和 Agent Registry:在 Cloud Run 上部署了私有 FastMCP 服务 (
--ingress=internal),并在 Agent Registry 中注册了其端点和工具架构(add和subtract)。 - Gemini Enterprise 集成:预配了 Gemini Enterprise 应用,将出站工具流量绑定到 Agent Gateway,并将注册的 MCP 服务器作为
REGISTRY_MCP数据连接器附加。 - 专用 VPC 出站流量和零信任治理:通过 PSC (
172.16.20.20) 以私密方式路由工具执行,并使用 IAP 和 IAM Unified Access Policies (destination.agent_registry.*) 强制执行工具级最小权限。

Cosmpup 认为 Codelab 绝对是最好的!
接下来会发生什么?
- 如需了解高级功能和教程,请参阅 Gemini Enterprise Agent Platform 文档。
- 在 Agent Gateway 上配置 Model Armor 保护机制,以进一步提升 AI 的安全性和防护能力。
- 探索语义治理政策,以针对自然语言查询强制执行业务规则和合规性要求。
欢迎随时使用此反馈表单提供意见、提出问题或做出更正。
谢谢!