

1. 簡介
本程式碼實驗室將探討如何使用 agent-to-anywhere (輸出) 模式的 Agent Gateway,為 Gemini Enterprise 建立受控的私人輸出連線。您將設定 Gemini Enterprise 應用程式,透過 Agent Gateway 路由傳輸流量,使用 Private Service Connect (PSC) 介面連線至虛擬私有雲網路中的 Google API PSC 端點,安全地叫用 Cloud Run 上代管的自訂模型內容通訊協定 (MCP) 伺服器。
在企業環境中,如果授予自主代理直接網路存取權,可能會導致資料外洩,以及執行未經審查的工具。Agent Gateway 提供平台層級的集中式零信任強制執行點,可動態檢查可串流的 HTTP MCP 工具有效負載。系統會使用可透過密碼編譯驗證的Agent Identity驗證輸出要求,並透過 Identity-Aware Proxy (IAP),使用 IAM 統一存取政策 (UAP) 和一般運算語言 (CEL) 規則授權要求。這樣一來,您就能精細控管特定 MCP 工具和方法的存取權,同時避免後端工作負載暴露在公開網際網路上。
建構內容
- Agent Gateway 以輸出 (代理至任意目的地) 模式運作,並驗證 Agent Registry 端點
- Cloud Run 服務,其中代管私有可串流 HTTP MCP 伺服器 (
--ingress=internal),並在 Agent Registry 中註冊工具規格 - Agent Gateway 的 Identity-Aware Proxy (IAP) 授權擴充功能
- 透過 CEL 條件設定 IAM 統一存取政策 (UAP),授權使用 MCP 工具
- Gemini Enterprise 應用程式已繫結至 Agent Gateway,並連結至從 Agent Registry 匯入的自訂 MCP 伺服器資料儲存庫
- 虛擬私有雲網路資源、Cloud DNS 區域和 Google API 的 PSC 端點
- Agent Gateway 私人虛擬私有雲輸出流量的 PSC 網路連結
- Cloud Next Generation Firewall (NGFW) 政策規則,可保護虛擬私有雲流量
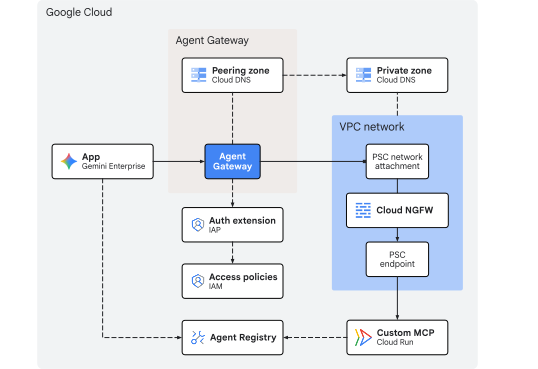
圖 1. 程式碼研究室架構
課程內容
- 如何從 Cloud Run 上的來源部署私有可串流 HTTP MCP 伺服器,並在 Agent Registry 中註冊其端點和工具結構定義
- 如何設定 Agent Gateway,使用符合規定的登錄項目,並透過閘道轉送 Gemini Enterprise 應用程式工具呼叫
- 如何使用 PSC 網路附件和介面建立私有虛擬私有雲輸出連線
- 如何將 Agent Gateway 授權委派給 Identity-Aware Proxy (IAP)
- 如何使用
destination.agent_registry.*和destination.is_registeredCEL 屬性,授權及繫結 IAM 統一存取政策 (UAP),限制 MCP 工具執行 - 如何使用 Cloud Logging 驗證政策強制執行和網路輸出
需求條件
- 已啟用計費功能的 Google Cloud 雲端專案
- 有效的 Gemini Enterprise 授權或 30 天試用方案
- 佈建網路服務、Gemini Enterprise 和 Agent Platform 資源的 IAM 權限
- 與 POSIX 相容的殼層 (
bash或zsh),並已安裝 Google Cloud CLI (gcloud)、curl和jq
簡介部分到此結束,接下來請前往「概念」部分。
2. 概念
部署順序
本程式碼實驗室會先部署基礎架構,確保私人網路路徑和控管機制運作無虞,再註冊 MCP 工具並連結至 Gemini Enterprise:
- 網路基礎架構:佈建 VPC 子網路、PSC 端點、PSC 網路連結、Cloud NGFW 政策規則和私人 Cloud DNS 區域。
- Agent Gateway:在輸出模式下部署 Agent Gateway,並整合 Agent Registry (
registries) 和私有 VPC 輸出 (networkAttachment)。 - 授權政策:使用
destination.is_registered和destination.agent_registry.*CEL 條件,設定 IAP 授權擴充功能、閘道授權政策和 IAM 統一存取權政策 (UAP)。 - 部署及註冊 MCP 伺服器:將來源的數學 MCP 伺服器部署至 Cloud Run (
--ingress=internal),並在 Agent Registry 中註冊服務和工具規格 (add和subtract)。 - Gemini Enterprise 應用程式:建立 Gemini Enterprise 應用程式 (
Engine)、設定身分和可觀測性設定,並將輸出外送繫結至 Agent Gateway (agentGatewaySetting)。 - 匯入自訂 MCP 資料連接器:建立並啟用
REGISTRY_MCP資料連接器 (:setUpDataConnector),將已註冊 MCP 伺服器的支援資料儲存庫連結至 Gemini Enterprise 應用程式。 - 驗證:在即時通訊中測試允許和拒絕的工具執行作業,並驗證 Agent Gateway、DNS、防火牆和 Cloud Run 記錄檔是否強制執行政策。
Gemini Enterprise 輸出
當 Engine 上的 agentGatewaySetting 和 DataConnector 上的 use_agent_gateway_egress: true 都已設定時,Gemini Enterprise 會將自訂 MCP 伺服器工具要求轉送至 Agent Gateway。
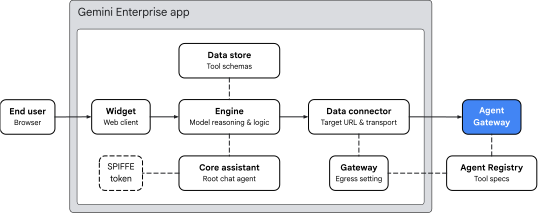
圖 2. Gemini Enterprise 輸出架構
Gemini Enterprise 應用程式會依據四個主要領域,安排工具路徑:
- 小工具 (
default_search_widget_config):- 提供網頁用戶端介面。小工具會接收使用者的提示,並透過基礎引擎啟動對話工作階段。
- 核心助理 (
assistants/default_assistant/agents/default/core_assistant):- 引擎中的根對話式推理代理。評估使用者查詢時,核心助理會判斷是否需要算術計算、檢查可用工具,並將執行作業委派給合成的 Agent Gateway 子代理。
- 資料庫和資料連接器:
DataStore:在:setUpDataConnector執行時,於專屬Collection中佈建,將匯入的 Agent Registry 工具結構定義 (add、subtract)、引數型別和代理指令連結 (dataStoreIds) 至 Gemini EnterpriseEngine。DataConnector:管理與遠端 MCP 伺服器 (instance_uri) 的REGISTRY_MCP動作連線 (createBapConnection: true)、解析 Agent Registry MCP 伺服器資源 (registry_mcp_server_name),以及啟用 Agent Gateway 輸出 (use_agent_gateway_egress: true)。
- Agent Identity、Agent Registry和Agent Gateway:
- 資料連接器傳送外送工具呼叫時,會將流量轉送至
agentGatewaySetting中指定的閘道。核心星域助理會鑄造 SPIFFE 身分識別權杖,聲明其身分:principal://agents.global.org-.../agents/default/core_assistant。 - Agent Gateway 會使用
registries欄位與 Agent Registry 整合,動態解析目的地端點和已註冊的工具結構定義。這個服務會填入destination.is_registered和destination.agent_registry.*屬性,並將這些屬性傳遞至 IAP v2,以便根據 IAM 統一存取政策 (UAP) CEL 規則進行評估,然後才允許傳輸至虛擬私有雲網路。
- 資料連接器傳送外送工具呼叫時,會將流量轉送至
閘道虛擬私有雲連線
Agent Gateway 可透過兩個 YAML 欄位,啟用私人虛擬私有雲網路連線:
networkConfig.egress.networkAttachment:將私人 IP 流量導向虛擬私有雲網路,透過 PSC 網路連結進行路由。dnsPeeringConfig.domains:與虛擬私有雲網路 Cloud DNS 區域對等互連 DNS 解析,因此目標主機名稱 (*.run.app) 會解析為虛擬私有雲網路中定義的私有 PSC 端點 IP 位址。
限制與規定
- 僅限 StreamableHTTP:系統不支援舊版伺服器傳送事件 (SSE) 傳輸。MCP 伺服器必須使用 StreamableHTTP。
- 需要 Public CA TLS:即使透過 PSC 私下存取,MCP 端點也必須使用公開信任的 CA 簽署的 TLS 憑證。
- 機構政策覆寫:您必須先覆寫自訂 MCP 資料儲存庫的機構政策,才能註冊資料儲存庫。
概念部分到此結束,接下來請前往「設定」一節。
3. 設定
必要的 IAM 角色
如要完成本程式碼研究室,您必須具備下列角色:
網域 | 必要的 IAM 角色 |
專案和 IAM |
|
網路和閘道 |
|
Gemini Enterprise 和 Registry |
|
工作負載和建構 |
|
觀測能力 |
|
或者,使用廣泛的基本角色 (例如 roles/owner) 搭配 roles/orgpolicy.policyAdmin (因為單獨使用 roles/owner 無法修改機構政策)。
存取專案
本程式碼研究室使用單一 Google Cloud 雲端專案。設定步驟會使用 gcloud CLI 和 Linux 殼層指令。
首先,請存取 Google Cloud 雲端專案指令列:
- Cloud Shell (
shell.cloud.google.com) 或 - 已安裝
gcloudCLI 的本機終端機
設定專案 ID
gcloud config set project SET_YOUR_PROJECT_ID_HERE
驗證工作階段
# login to gcloud cli
gcloud auth login
# login for gcloud api
gcloud auth application-default login
設定殼層環境變數
# set custom var for slug (eg, "foo") and region preference
export SLUG="foo"
export REGION="us-central1"

echo ${SLUG}
echo ${REGION}
# create project vars (automatic)
export PROJ_ID=$(gcloud config list --format="value(core.project)")
export PROJ_NO=$(gcloud projects describe ${PROJ_ID} --format="value(projectNumber)")
export ORG_ID=$(gcloud projects get-ancestors ${PROJ_ID} --format="value(id)" | tail -n 1)
export USER_IDENTITY=$(gcloud config get-value account)

echo ${PROJ_ID}
echo ${PROJ_NO}
echo ${ORG_ID}
echo ${USER_IDENTITY}
# create resource vars for agent platform (automatic)
export AGW_NAME="agw-${SLUG}-${REGION}-ata"
export AGW_URI="projects/${PROJ_ID}/locations/${REGION}/agentGateways/${AGW_NAME}"
export UAP_POLICY_NAME="uap-policy-${SLUG}"
export UAP_BINDING_NAME="uap-binding-${SLUG}"
export MCP_NAME="math-wizard"
export MCP_URL="https://${MCP_NAME}-${PROJ_NO}.${REGION}.run.app/mcp"

echo ${AGW_NAME}
echo ${AGW_URI}
echo ${UAP_POLICY_NAME}
echo ${UAP_BINDING_NAME}
echo ${MCP_NAME}
echo ${MCP_URL}
# create resource vars for gemini enterprise (automatic)
export GE_APP_DISPLAY_NAME="Codelab app"
export GE_APP_ORG_NAME="${SLUG}, Inc."
export GE_LOCATION="global"
export GE_APP_NAME="app-${SLUG}-${GE_LOCATION}"
export GE_APP_INIT="${GE_APP_NAME}_$(date +%s)"

echo ${GE_APP_DISPLAY_NAME}
echo ${GE_APP_ORG_NAME}
echo ${GE_LOCATION}
echo ${GE_APP_NAME}
echo ${GE_APP_INIT}
設定代理身分信任網域
if-then-else 陳述式會檢查專案是否屬於機構,以便為主體代理程式身分設定正確的信任網域。
# set var for trust domain
if [[ -n "${ORG_ID}" ]]; then
  export TRUST_DOMAIN="agents.global.org-${ORG_ID}.system.id.goog"
else
  export TRUST_DOMAIN="agents.global.proj-${PROJ_NO}.system.id.goog"
fi

echo "trust domain: ${TRUST_DOMAIN}"
設定帳單和配額專案
# set cli quota project
gcloud config set billing/quota_project ${PROJ_ID}
# set api quota project
gcloud auth application-default set-quota-project ${PROJ_ID}
建立設定檔的本機目錄
# create config folder
mkdir -p cfg
更新 gcloud cli (建議)
如果執行自行管理的 Google Cloud SDK 安裝作業 (即在 Cloud Shell 外部),請將元件更新至最新版本。
# update gcloud cli
gcloud components update
啟用 API 服務
# enable google apis (part 1)
gcloud services enable \
  agentregistry.googleapis.com \
  agentidentity.googleapis.com \
  aiplatform.googleapis.com \
  apphub.googleapis.com \
  apptopology.googleapis.com \
  cloudapiregistry.googleapis.com \
  cloudtrace.googleapis.com \
  compute.googleapis.com \
  dataform.googleapis.com \
  iam.googleapis.com \
  iap.googleapis.com \
  logging.googleapis.com \
  modelarmor.googleapis.com \
  monitoring.googleapis.com \
  networksecurity.googleapis.com \
  networkservices.googleapis.com \
  notebooks.googleapis.com \
  observability.googleapis.com
# enable google apis (part 2)
gcloud services enable \
  artifactregistry.googleapis.com \
  cloudbuild.googleapis.com \
  discoveryengine.googleapis.com \
  dns.googleapis.com \
  orgpolicy.googleapis.com \
  run.googleapis.com \
  saasservicemgmt.googleapis.com \
  securitycenter.googleapis.com \
  storage.googleapis.com \
  telemetry.googleapis.com \
  texttospeech.googleapis.com
機構政策
預設 Google Cloud 受管理機構政策限制會限制本程式碼研究室使用的功能:
discoveryengine.managed.disableCustomMcpServerConnector:- 限制建立使用自訂 MCP 伺服器 (
custom_mcp) 做為資料來源的資料連接器 (預設為強制執行)。
- 限制建立使用自訂 MCP 伺服器 (
iam.managed.disableAccessPolicyBinding:- 將 IAM 第 3 版存取權政策繫結限制為資源 (預設為強制執行)。
discoveryengine.managed.allowedEgressFqdns:- 如果 VPC Service Controls (VPC-SC) 處於啟用狀態,或專案列於機構的
enforcedProjects參數中,則限制資料連接器的輸出外送網域 (instance_uriFQDN)。
- 如果 VPC Service Controls (VPC-SC) 處於啟用狀態,或專案列於機構的
discoveryengine.managed.allowedDataSources:- 當 VPC-SC 處於啟用狀態,或專案列於機構的
enforcedProjects參數中時,會限制允許的資料連接器類型 (dataSource)。
- 當 VPC-SC 處於啟用狀態,或專案列於機構的
在專案層級明確設定 enforce: false,即可覆寫專案層級的任何繼承機構政策限制。
停用自訂 MCP 限制
# disable data connector constraint (allow custom mcp servers)
gcloud org-policies set-policy /dev/stdin << EOF
name: projects/${PROJ_NO}/policies/discoveryengine.managed.disableCustomMcpServerConnector
spec:
  rules:
  - enforce: false
EOF
# verify org policy constraint on project
gcloud org-policies describe discoveryengine.managed.disableCustomMcpServerConnector \
  --project=${PROJ_ID} --effective
停用存取權政策限制
# disable iam v3 constraint (allow v3 access policies)
gcloud org-policies set-policy /dev/stdin << EOF
name: projects/${PROJ_NO}/policies/iam.managed.disableAccessPolicyBinding
spec:
  rules:
  - enforce: false
EOF
# verify org policy constraint on project
gcloud org-policies describe iam.managed.disableAccessPolicyBinding \
  --project=${PROJ_ID} --effective
檢查並停用條件式資料連接器限制
根據預設,如果專案位於 VPC Service Controls (VPC SC) 範圍內,或機構管理員已將專案新增至 enforcedProjects,discoveryengine.managed.allowedEgressFqdns 和 discoveryengine.managed.allowedDataSources 只會封鎖連接器建立作業。
首先,請檢查專案的有效政策:
# check effective egress fqdn constraint on project
gcloud org-policies describe discoveryengine.managed.allowedEgressFqdns \
  --project=${PROJ_ID} --effective
# check effective data source constraint on project
gcloud org-policies describe discoveryengine.managed.allowedDataSources \
  --project=${PROJ_ID} --effective
~~IF~~強制執行這些限制時,請在專案的兩項政策中設定 enforce: false,確保這些限制不會在 VPC SC 或政策受限的機構中封鎖 custom_mcp 連接器設定:
# disable egress fqdn constraint on project
gcloud org-policies set-policy /dev/stdin << EOF
name: projects/${PROJ_NO}/policies/discoveryengine.managed.allowedEgressFqdns
spec:
  rules:
  - enforce: false
EOF
# disable allowed data sources constraint on project
gcloud org-policies set-policy /dev/stdin << EOF
name: projects/${PROJ_NO}/policies/discoveryengine.managed.allowedDataSources
spec:
  rules:
  - enforce: false
EOF
# verify both constraints are disabled on project
gcloud org-policies describe discoveryengine.managed.allowedEgressFqdns \
  --project=${PROJ_ID} --effective

gcloud org-policies describe discoveryengine.managed.allowedDataSources \
  --project=${PROJ_ID} --effective
IAM 權限
將必要的 IAM 角色授予使用者帳戶和 Cloud Build 使用的 Compute Engine 預設服務帳戶:
- 使用者帳戶 (
${USER_IDENTITY}):- 需要部署及叫用 Cloud Run 服務 (
roles/run.admin、roles/run.invoker、roles/iam.serviceAccountUser)、建構容器映像檔 (roles/cloudbuild.builds.editor)、管理 Gemini Enterprise (roles/discoveryengine.admin) 和撰寫統一存取政策 (roles/iam.accessPolicyAdmin) 的權限。
- 需要部署及叫用 Cloud Run 服務 (
- Compute Engine 預設服務帳戶(
${PROJ_NO}-compute@developer.gserviceaccount.com):- Cloud Build 會使用此服務在 Cloud Storage 中暫存原始碼 (
roles/storage.admin)、將映像檔推送至 Artifact Registry (roles/artifactregistry.writer),以及寫入建構記錄 (roles/logging.logWriter)。
- Cloud Build 會使用此服務在 Cloud Storage 中暫存原始碼 (
執行下列指令來指派角色繫結:
# grant roles to user account
gcloud projects add-iam-policy-binding ${PROJ_ID} \
  --member="user:${USER_IDENTITY}" \
  --role="roles/run.admin"

gcloud projects add-iam-policy-binding ${PROJ_ID} \
  --member="user:${USER_IDENTITY}" \
  --role="roles/iam.serviceAccountUser"

gcloud projects add-iam-policy-binding ${PROJ_ID} \
  --member="user:${USER_IDENTITY}" \
  --role="roles/run.invoker"

gcloud projects add-iam-policy-binding ${PROJ_ID} \
  --member="user:${USER_IDENTITY}" \
  --role="roles/discoveryengine.admin"

gcloud projects add-iam-policy-binding ${PROJ_ID} \
  --member="user:${USER_IDENTITY}" \
  --role="roles/iam.accessPolicyAdmin"

gcloud projects add-iam-policy-binding ${PROJ_ID} \
  --member="user:${USER_IDENTITY}" \
  --role="roles/cloudbuild.builds.editor"
# grant roles to default compute (cloud build) service account
gcloud projects add-iam-policy-binding ${PROJ_ID} \
  --member="serviceAccount:${PROJ_NO}-compute@developer.gserviceaccount.com" \
  --role="roles/storage.admin"

gcloud projects add-iam-policy-binding ${PROJ_ID} \
  --member="serviceAccount:${PROJ_NO}-compute@developer.gserviceaccount.com" \
  --role="roles/artifactregistry.writer"

gcloud projects add-iam-policy-binding ${PROJ_ID} \
  --member="serviceAccount:${PROJ_NO}-compute@developer.gserviceaccount.com" \
  --role="roles/logging.logWriter"
驗證 IAM 權限
檢查使用者帳戶的六個 (6) 角色繫結。
# show iam policy on project for user account
gcloud projects get-iam-policy ${PROJ_ID} \
  --flatten="bindings[].members" \
  --filter="bindings.members:${USER_IDENTITY}" \
  --format="table(bindings.role:label=ROLE, bindings.members:label=PRINCIPAL_IDENTITY)"
檢查預設 Compute 服務帳戶是否已繫結三種 (3) 角色。
# show iam policy on project for default compute service account
gcloud projects get-iam-policy ${PROJ_ID} \
  --flatten="bindings[].members" \
  --filter="bindings.members:${PROJ_NO}-compute@developer.gserviceaccount.com" \
  --format="table(bindings.role:label=ROLE, bindings.members:label=PRINCIPAL_IDENTITY)"
驗證服務代理程式繫結 (預防措施)
在新的專案中,首次啟用 networkservices.googleapis.com 時,Google Cloud 會自動佈建 Agent Gateway 服務代理,並授予 roles/agentgateway.serviceAgent。如果您要重複使用現有專案,但先前的清理作業可能已移除預設服務代理程式繫結,請執行下列指令,確保身分和角色繫結完好無損:
# ensure network services service account has been created
gcloud beta services identity create \
  --service=networkservices.googleapis.com \
  --project="${PROJ_ID}"

# ensure network services service account has service agent roles applied
gcloud projects add-iam-policy-binding "${PROJ_ID}" \
  --member="serviceAccount:service-${PROJ_NO}@gcp-sa-agentgateway.iam.gserviceaccount.com" \
  --role="roles/agentgateway.serviceAgent"
設定部分到此結束,接下來請前往「網路」部分。
4. 網路
在本節中,您將使用自訂模式部署虛擬私有雲網路,並使用專屬的 /28 子網路 (192.168.10.0/28) 支援 PSC 網路連結,讓 Agent Gateway 網路輸出至虛擬私有雲網路。
Google API 的 PSC 端點是使用單一 /32全域內部 IPv4 位址 (172.16.20.20) 部署,支援私有內部存取 Google API 和服務。在本程式碼實驗室中,Agent Gateway 會透過 Cloud DNS 對等互連解析 run.app. 網域,並使用 PSC 端點以 Cloud Run 為目標。
建立網路
建立全域虛擬私有雲網路。
# create vpc network
gcloud compute networks create vnet-${SLUG} --subnet-mode=custom
為 Agent Gateway PSC 網路連結建立子網路:
# create subnet for agent gateway psc na
gcloud compute networks subnets create subnet-${REGION}-agw \
  --network=vnet-${SLUG} \
  --range=192.168.10.0/28 \
  --region=${REGION} \
  --enable-private-ip-google-access
建立防火牆規則
建立防火牆政策,允許所有輸出流量並啟用記錄功能。這項指標可用於監控從 Agent Gateway 輸出至虛擬私有雲網路的流量。Cloud NGFW 支援Essentials 和 Standard 級別的網路安全和流量監控。
# create fw policy
gcloud compute network-firewall-policies create fw-policy-${SLUG} --global
# create fw policy rule
gcloud compute network-firewall-policies rules create 1001 \
  --description="allow all out and log" \
  --firewall-policy=fw-policy-${SLUG} \
  --global-firewall-policy \
  --action=allow \
  --direction=EGRESS \
  --layer4-configs=all \
  --dest-ip-ranges=0.0.0.0/0 \
  --enable-logging
# bind fw policy to network
gcloud compute network-firewall-policies associations create \
  --name=fw-policy-bind-${SLUG} \
  --firewall-policy=fw-policy-${SLUG} \
  --network=vnet-${SLUG} \
  --global-firewall-policy
建立 PSC 網路連結
建立 Private Service Connect (PSC) 網路連結,並設定為自動接受 Agent Gateway 的連線。網路連結會在消費者虛擬私有雲網路端建立連線,安全地連結至 Agent Gateway 生產者端,以傳出輸出流量。如要進一步瞭解子網路需求和 IP 範圍規格,請參閱「設定虛擬私有雲連線」。
# create psc network attachment
gcloud compute network-attachments create psc-na-${REGION}-agw \
  --region=${REGION} \
  --subnets=subnet-${REGION}-agw \
  --connection-preference=ACCEPT_AUTOMATIC
驗證 PSC 網路連結
# show psc network attachment details
gcloud compute network-attachments describe psc-na-${REGION}-agw --region=${REGION}
擷取 PSC 網路連結的資源 URI,並儲存在 PSC_NA_URI 環境變數中。這個 URI 會在 Agent Gateway 設定 (networkConfig.egress.networkAttachment) 中參照,以佈建 PSC 介面,供網路輸出至虛擬私有雲網路:
# fetch psc network attachment uri
export PSC_NA_URI=$(gcloud compute network-attachments describe psc-na-${REGION}-agw \
  --region=${REGION} \
  --format="value(selfLink.scope(v1))")
echo ${PSC_NA_URI}
建立 PSC 端點
Agent Gateway 會使用 Google API 的 Private Service Connect (PSC) 端點,透過內部網路路徑與 Cloud Run MCP 伺服器建立私人連線,避免流量暴露於公開網路上。從 Agent Gateway 傳輸至虛擬私有雲網路的出站工具呼叫,會將目標 Cloud Run 服務網址 (*.run.app) 解析為這個私人端點 IP 位址。
為 PSC 端點保留全域內部 IPv4 位址。所選 IP 位址必須是 /32 位址,且不得與虛擬私有雲網路中的任何現有子網路重疊:
# set env var for psc ep ip address
export PSC_EP_IP="172.16.20.20"
echo ${PSC_EP_IP}
# reserve internal global ipv4 address
gcloud compute addresses create ip-psc2gapis \
  --global \
  --purpose=PRIVATE_SERVICE_CONNECT \
  --addresses=${PSC_EP_IP} \
  --network=vnet-${SLUG}
使用 all-apis 套件為 Google API 建立 PSC 端點,其中包含 Cloud Run (run.app)。
# create psc endpoint for google apis
gcloud compute forwarding-rules create psc2gapis \
  --global \
  --network=vnet-${SLUG} \
  --address=ip-psc2gapis \
  --target-google-apis-bundle=all-apis
驗證 PSC 端點
# show psc endpoint details
gcloud compute forwarding-rules describe psc2gapis --global
建立 DNS 區域和記錄
Cloud DNS 用於讓 Agent Gateway 私下與 Cloud Run 代管的 MCP 伺服器通訊。當 Agent Gateway 評估以 Cloud Run 為目標的傳出工具要求時,會使用 DNS 對等互連 (dnsPeeringConfig.domains) 解析 *.run.app 的 DNS 查詢,並使用與虛擬私有雲網路相關聯的私人 Cloud DNS 區域。私人 DNS 記錄會傳回查詢,並附上內部 PSC 端點 IP 位址 (172.16.20.20),讓 MCP 工具要求透過私人網路路徑轉送。
為 run.app. 網域建立私人 Cloud DNS 代管區域:
# create private dns zone
gcloud dns managed-zones create priv-zone-run \
  --description="private zone for run.app" \
  --dns-name="run.app." \
  --visibility=private \
  --networks=vnet-${SLUG}
為 *.run.app. 建立萬用字元 DNS A 記錄,指向 PSC 端點的 IP 位址:
# create dns record
gcloud dns record-sets create "*.run.app." \
  --zone=priv-zone-run \
  --type=A \
  --ttl=300 \
  --rrdatas=${PSC_EP_IP}
建立 Cloud DNS 政策,啟用 DNS 查詢記錄功能。DNS 記錄會擷取來自虛擬私有雲網路中 Agent Gateway 的網域解析要求,提供稽核功能,並讓您確認 *.run.app 工具要求是否正確解析為內部 PSC 端點:
# create dns policy (logging)
gcloud dns policies create dns-policy-${SLUG} \
  --description="dns logging for vnet-${SLUG}" \
  --networks=vnet-${SLUG} \
  --enable-logging
網路部分到此結束,接下來請參閱「Agent Gateway」一節。
5. Agent Gateway
Agent Gateway 會指定 registries 旁的 Agent Registry 執行個體,以及設定私人虛擬私有雲連線的 PSC 網路連結和 DNS 對等互連設定的 networkConfig 欄位:
registries:將閘道與最多兩個 Agent Registry 執行個體建立關聯:一個區域 (../locations/${REGION}) 和一個全域 (../locations/global)。這會整合 Agent Gateway 與 Agent Registry,以解決區域部署 (例如${REGION}中的 Cloud Run MCP 伺服器) 和全域資源 (例如 Gemini Enterprise 代理和全域端點),進而精細地強制執行 IAP v2 政策。解析目的地網址時,區域項目優先於全域項目。networkAttachment:指向 PSC 網路連結 (psc-na-${REGION}-agw),將 Agent Gateway 連線至您的虛擬私有雲網路,以進行私人輸出。dnsPeeringConfig.domains:設定run.app.,讓 Cloud Run 服務的 Agent Gateway 傳送 DNS 查詢時,使用 DNS 對等互連將主機名稱解析為 Cloud DNS 私人區域中設定的私人 Google API PSC 端點 IP 位址 (172.16.20.20)。
部署 Agent Gateway
建立及匯入 Agent Gateway 設定檔。
# create agent gateway config file
cat > cfg/${AGW_NAME}-networkConfig.yaml << EOF
name: ${AGW_NAME}
protocols:
  - MCP
googleManaged:
  governedAccessPath: AGENT_TO_ANYWHERE
registries:
  - "//agentregistry.googleapis.com/projects/${PROJ_ID}/locations/${REGION}"
networkConfig:
  egress:
    networkAttachment: ${PSC_NA_URI}
  dnsPeeringConfig:
    domains:
      - run.app.
    targetProject: ${PROJ_ID}
    targetNetwork: projects/${PROJ_ID}/global/networks/vnet-${SLUG}
EOF
# import agent gateway config file (create gateway)
gcloud network-services agent-gateways import ${AGW_NAME} \
  --source="cfg/${AGW_NAME}-networkConfig.yaml" \
  --location=${REGION}
驗證 Agent Gateway 部署作業
確認 Agent Registry 和網路設定:
# show agent gateway registries and network config
gcloud network-services agent-gateways describe ${AGW_NAME} \
  --location=${REGION} \
  --format="yaml(registries,networkConfig)"
預期的輸出內容:
networkConfig:
  dnsPeeringConfig:
    domains:
    - run.app.
    targetNetwork: projects/${PROJ_ID}/global/networks/vnet-${SLUG}
    targetProject: ${PROJ_ID}
  egress:
    networkAttachment: projects/${PROJ_ID}/regions/${REGION}/networkAttachments/psc-na-${REGION}-agw
registries:
- //agentregistry.googleapis.com/projects/${PROJ_ID}/locations/${REGION}
確認輸出內容顯示所需的設定詳細資料:
registries:列出與閘道相關聯的區域 (${REGION}) Agent Registry URI。egress.networkAttachment:指定虛擬私有雲輸出流量的 PSC 網路連結 URI。dnsPeeringConfig.domains:包含指向targetNetwork的run.app.,用於解析私人網域。
檢查 PSC 網路連結,確認閘道連線:
# show psc network attachment details
gcloud compute network-attachments describe psc-na-${REGION}-agw \
  --region=${REGION} \
  --format="yaml(connectionEndpoints)"
確認有已接受的連線端點:
connectionEndpoints:
- ipAddress: 192.168.10.2
  projectIdOrNum: '<AGW_TENANT_PROJ_NO>'
  status: ACCEPTED
  subnetwork: https://www.googleapis.com/compute/v1/projects/${PROJ_ID}/regions/${REGION}/subnetworks/subnet-${REGION}-agw
委派授權
Agent Gateway 會使用與 Identity-Aware Proxy (IAP) 統一存取政策 (UAP) 整合的授權政策 (networksecurity.authzPolicies),保護及控管連出工具的流量。
雖然 Agent Gateway 支援基本的內嵌 ALLOW 和 DENY 規則,但企業環境需要以身分為中心的集中式治理。透過 IAM 統一存取政策 (或存取權政策),您可以使用標準 IAM v3 存取權政策管理輸出存取規則。

圖 3. 授權架構
授權流程會連結下列三個元件:
- 閘道授權政策 (
authzPolicy):- 以 Agent Gateway 為目標的區域性資源。
- 已設定
policyProfile: REQUEST_AUTHZ和action: CUSTOM,將所有外送授權檢查作業轉送至 IAP Authz 擴充功能。
- IAP 服務擴充功能 (
authzExtension):- 區域性資源,可將要求授權委派給 Identity-Aware Proxy (
iap.googleapis.com)。 - 使用政策版本
V2,以ENFORCE模式評估政策。
- 區域性資源,可將要求授權委派給 Identity-Aware Proxy (
- IAM 統一存取權政策和繫結 (
accessPolicy和policyBinding):- 包含精細存取權規則的全球 IAM 第 3 版資源。
- 驗證呼叫端代理程式的 SPIFFE 主體身分、驗證通用
iap.googleapis.com/resources.egressViaIAP權限,並根據目的地屬性評估一般運算語言 (CEL) 條件。
部署授權擴充功能
建立 service-extensions 授權擴充功能設定,將授權決策委派給 IAP 服務:
# create authz extension config file
cat > cfg/${AGW_NAME}-svc-ext-authz-iap.yaml << EOF
name: ${AGW_NAME}-svc-ext-authz-iap
service: iap.googleapis.com
failOpen: false
timeout: 1s
metadata:
  iapPolicyVersion: "V2"
EOF
# import iap authz extension (create authz extension)
gcloud service-extensions authz-extensions import ${AGW_NAME}-svc-ext-authz-iap \
  --source=cfg/${AGW_NAME}-svc-ext-authz-iap.yaml \
  --location=${REGION}
驗證授權延長
確認授權擴充功能是否處於啟用狀態:
# list authz extensions
gcloud service-extensions authz-extensions list \
  --location=${REGION} \
  --format="table(
    name.basename():label=NAME,
    createTime.date(tz=LOCAL):label=CREATED,
    updateTime.date(tz=LOCAL):label=MODIFIED,
    service:label=SERVICE,
    metadata:label=METADATA,
    timeout:label=TIMEOUT
  )"
部署授權政策
建立 network-security 授權政策設定,以 Agent Gateway 為目標,並將要求驗證作業委派給 IAP 的授權擴充功能:
# create authz policy config file
cat > cfg/${AGW_NAME}-authz-policy-iap.yaml << EOF
name: ${AGW_NAME}-authz-policy-iap
target:
  resources:
    - "projects/${PROJ_ID}/locations/${REGION}/agentGateways/${AGW_NAME}"
policyProfile: REQUEST_AUTHZ
action: CUSTOM
customProvider:
  authzExtension:
    resources:
      - "projects/${PROJ_ID}/locations/${REGION}/authzExtensions/${AGW_NAME}-svc-ext-authz-iap"
EOF
# import authz policy config file (create authz policy)
gcloud network-security authz-policies import ${AGW_NAME}-authz-policy-iap \
  --source=cfg/${AGW_NAME}-authz-policy-iap.yaml \
  --location=${REGION}
驗證授權政策
確認授權政策是否有效:
# list authz policies
gcloud network-security authz-policies list \
  --location=${REGION} \
  --format="table(
    name.basename():label=NAME,
    action:label=ACTION,
    customProvider.list().sub('\W.*', ''):label=CUSTOM_PROVIDER_TYPE,
    policyProfile:label=POLICY_PROFILE,
    customProvider.authzExtension.resources[0].basename():label=CUSTOM_PROVIDER_RESOURCE
  )"
建立 IAM 存取權政策
Agent Gateway 現在會將授權檢查作業委派給 IAP,並從 Agent Registry 解決目的地中繼資料。接著,請定義 IAM 統一存取政策規則,控管工具的輸出執行作業。
IAP 會根據下列 Agent Registry 目的地屬性評估 CEL 屬性運算式:
- 註冊狀態 (
destination.is_registered):- 布林值 (
true/false),指出目的地是否已編目至 Agent Registry。
- 布林值 (
- MCP 伺服器名稱 (
destination.agent_registry.mcp_server.name):- 在 Agent Registry 中註冊的標準 MCP 伺服器資源名稱。
- MCP 方法 (
destination.agent_registry.mcp_server.method):- 要叫用的 MCP 方法 (例如
tools/call、tools/list、initialize)。
- 要叫用的 MCP 方法 (例如
- 工具名稱 (
destination.agent_registry.mcp_server.tool.name):- 呼叫的特定工具名稱 (例如
subtract或add),可在已註冊的 MCP 伺服器上啟用精細的工具層級授權。
- 呼叫的特定工具名稱 (例如
定義 IAM 存取權政策規則
IAM 政策規則資訊清單會指定:
- 主體:代表 Gemini Enterprise 核心助理代理程式的 SPIFFE 主體身分。
- 權限:所有受 IAP 管控的出站流量都必須具備通用的
iap.googleapis.com/resources.egressViaIAP權限。 - 條件:CEL 運算式 (
destination.is_registered == true),確保代理程式只能叫用 Agent Registry 中編目的端點。
建立政策規則資訊清單檔案:
# create access policy rule file
cat > cfg/${UAP_POLICY_NAME}-rules.json << EOF
[
  {
    "description": "allow ge assistant to any registered service",
    "effect": "ALLOW",
    "principals": [
      "principal://${TRUST_DOMAIN}/resources/discoveryengine/projects/${PROJ_NO}/locations/global/engines/${GE_APP_INIT}/assistants/default_assistant/agents/default/core_assistant"
    ],
    "operation": {
      "permissions": [
        "iap.googleapis.com/resources.egressViaIAP"
      ]
    },
    "conditions": {
      "iap.googleapis.com": {
        "expression": \
        "destination.is_registered == true"
      }
    }
  }
]
EOF
部署 IAM 存取權政策
使用資訊清單檔案中定義的規則,建立全域 IAM 存取權政策:
# create iam access policy
gcloud iam access-policies create ${UAP_POLICY_NAME} \
  --details-rules=cfg/${UAP_POLICY_NAME}-rules.json \
  --project=${PROJ_ID} \
  --location=global
驗證 IAM 存取權政策
檢查是否已成功建立 IAM 存取權政策,並檢查規則詳細資料:
# show iam access policy details
gcloud iam access-policies describe ${UAP_POLICY_NAME} \
  --project=${PROJ_ID} \
  --location=global
預期的輸出內容:
details:
  rules:
  - conditions:
      iap.googleapis.com:
        expression: destination.is_registered == true
    description: allow ge assistant to any registered service
    effect: ALLOW
    operation:
      permissions:
      - iap.googleapis.com/resources.egressViaIAP
    principals:
    - principal://agents.global.org-${ORG_ID}.system.id.goog/resources/discoveryengine/projects/${PROJ_NO}/locations/global/engines/${GE_APP_INIT}/assistants/default_assistant/agents/default/core_assistant
name: projects/${PROJ_ID}/locations/global/accessPolicies/${UAP_POLICY_NAME}
將 IAM 存取權政策繫結至專案
如要為專案中的所有代理程式閘道啟用強制執行功能,請建立政策繫結,將 IAM 存取權政策附加至專案資源:
# bind iam access policy to project resource
gcloud iam policy-bindings create ${UAP_BINDING_NAME} \
  --policy="projects/${PROJ_ID}/locations/global/accessPolicies/${UAP_POLICY_NAME}" \
  --target-resource="//cloudresourcemanager.googleapis.com/projects/${PROJ_ID}" \
  --project=${PROJ_ID} \
  --location=global
驗證 IAM 存取權政策繫結
檢查有效政策是否正確繫結至正確的政策和目標:
# show policy binding details
gcloud iam policy-bindings describe ${UAP_BINDING_NAME} \
  --project=${PROJ_ID} \
  --location=global
預期的輸出內容:
name: projects/${PROJ_ID}/locations/global/policyBindings/${UAP_BINDING_NAME}
policy: projects/${PROJ_ID}/locations/global/accessPolicies/${UAP_POLICY_NAME}
policyKind: ACCESS
target:
  resource: //cloudresourcemanager.googleapis.com/projects/${PROJ_ID}
代理閘道部分到此結束,接下來請參閱 MCP 伺服器一節。
6. MCP 伺服器
在本節中,您將建立自訂 FastMCP 伺服器,公開 add 和 subtract 工具,並直接從來源部署至 Cloud Run。在來源部署期間 (--source),Cloud Build 會使用內含的 Dockerfile 和 uv (安裝 pyproject.toml 中定義的依附元件,並啟動 server.py),將容器映像檔封裝。
部署 Cloud Run 服務後,請在 Agent Registry 中註冊 MCP 伺服器及其工具規格 (toolspec.json),讓 Gemini Enterprise 探索及叫用工具。
建立 MCP 伺服器應用程式
為應用程式程式碼建立 math-wizard 專案目錄:
# create directory for code
mkdir -p math-wizard
撰寫 Python 專案資訊清單檔案:
# create python project manifest file
cat > math-wizard/pyproject.toml << 'EOF'
[project]
name = "math-wizard"
version = "0.1.0"
description = "math wizard mcp server"
requires-python = ">=3.12"
dependencies = [
    "fastmcp==2.13.1",
]
EOF
程式碼中包含一些額外的檢測函式,可擷取傳入的 HTTP 標頭 (mcp-session-id、x-forwarded-for、user-agent 和 x-cloud-trace-context),用於 Cloud Logging 和 Cloud Trace 驗證。
編寫應用程式程式碼檔案:
# create mcp server application code
cat > math-wizard/server.py << 'EOF'
import asyncio
import json
import logging
import os
from fastmcp import FastMCP
from fastmcp.server.dependencies import get_http_headers
from mcp.types import ToolAnnotations

logger = logging.getLogger(__name__)
logging.basicConfig(format="[%(levelname)s]: %(message)s", level=logging.INFO)

mcp = FastMCP("math wizard mcp server")

def log_network_context(tool_name: str, a: int, b: int) -> None:
    headers = get_http_headers()
    print(json.dumps({
        "severity": "INFO",
        "message": f">>> 🛠️ Tool: '{tool_name}' called with numbers '{a}' and '{b}'",
        "tool": tool_name,
        "mcp_session_id": headers.get("mcp-session-id"),
        "x_forwarded_for": headers.get("x-forwarded-for"),
        "user_agent": headers.get("user-agent"),
        "trace_header": headers.get("x-cloud-trace-context"),
    }), flush=True)

@mcp.tool(
    annotations=ToolAnnotations(
        readOnlyHint=True,
    )
)
def add(a: int, b: int) -> int:
    """Use this to add two numbers together.

    Args:
        a: The first number.
        b: The second number.

    Returns:
        The sum of the two numbers.
    """
    logger.info(f">>> 🛠️ Tool: 'add' called with numbers '{a}' and '{b}'")
    log_network_context("add", a, b)
    return a + b

@mcp.tool(
    annotations=ToolAnnotations(
        readOnlyHint=True,
    )
)
def subtract(a: int, b: int) -> int:
    """Use this to subtract two numbers.

    Args:
        a: The first number.
        b: The second number.

    Returns:
        The difference of the two numbers.
    """
    logger.info(f">>> 🛠️ Tool: 'subtract' called with numbers '{a}' and '{b}'")
    log_network_context("subtract", a, b)
    return a - b

if __name__ == "__main__":
    logger.info(f"🚀 MCP server started on port {os.getenv('PORT', 8080)}")
    asyncio.run(
        mcp.run_async(
            transport="streamable-http",
            host="0.0.0.0",
            port=int(os.getenv("PORT", 8080)),
        )
    )
EOF
編寫 Dockerfile,定義容器映像檔建構指令和啟動指令:
# create dockerfile
cat > math-wizard/Dockerfile << 'EOF'
# use official python 3.12 image
FROM python:3.12-slim

# install uv
COPY --from=ghcr.io/astral-sh/uv:latest /uv /uvx /bin/

# install the project into /app
COPY . /app
WORKDIR /app

# allow statements and log messages to immediately appear in the logs
ENV PYTHONUNBUFFERED=1

# install dependencies
RUN uv sync

EXPOSE 8080

# run the mcp server
CMD ["uv", "run", "server.py"]
EOF
將服務部署至 Cloud Run
使用 Cloud Build 從來源部署 MCP 伺服器 (這會使用專案預設的 Compute 服務帳戶 ${PROJ_NO}-compute@developer.gserviceaccount.com):
# deploy cloud run service
gcloud run deploy ${MCP_NAME} \
  --source math-wizard \
  --region=${REGION} \
  --no-invoker-iam-check \
  --ingress=internal \
  --quiet
驗證 Cloud Run 部署作業
檢查 Cloud Run 服務詳細資料,確認其有效設定:
# show cloud run service details
gcloud run services describe ${MCP_NAME} --region=${REGION}
預期的輸出內容:
<snip>
✔ Service math-wizard in region ${REGION}

URL:     https://math-wizard-${PROJ_NO}.${REGION}.run.app
Ingress: internal
Traffic:
  100% LATEST (currently math-wizard-00001-<id>)
</snip>
在 Agent Registry 中註冊 MCP 伺服器
如要讓 Gemini Enterprise 探索 MCP 伺服器上可用的確切工具,註冊 Agent Registry 時必須提供工具規格檔案 (toolspec.json)。
建立 MCP 工具規格
# create tool spec file
cat > cfg/toolspec.json << 'EOF'
{
  "tools": [
    {
      "name": "add",
      "description": "Use this to add two numbers together.",
      "inputSchema": {
        "type": "object",
        "properties": {
          "a": { "type": "integer", "description": "The first number." },
          "b": { "type": "integer", "description": "The second number." }
        },
        "required": ["a", "b"]
      },
      "isReadOnly": true,
      "isDestructive": false,
      "isIdempotent": true,
      "isOpenWorld": false
    },
    {
      "name": "subtract",
      "description": "Use this to subtract two numbers.",
      "inputSchema": {
        "type": "object",
        "properties": {
          "a": { "type": "integer", "description": "The first number." },
          "b": { "type": "integer", "description": "The second number." }
        },
        "required": ["a", "b"]
      },
      "isReadOnly": true,
      "isDestructive": false,
      "isIdempotent": true,
      "isOpenWorld": false
    }
  ]
}
EOF
在 Agent Registry 中註冊 MCP 伺服器
# register mcp server in agent registry
gcloud agent-registry services create ${MCP_NAME} \
  --project=${PROJ_ID} \
  --location=${REGION} \
  --display-name="${MCP_NAME}-${PROJ_NO}.${REGION}.run.app" \
  --description="MANDATORY MATH & ARITHMETIC AGENT: You MUST ALWAYS invoke \
this tool for ANY mathematical calculation, addition (+), subtraction (-), \
sum, difference, or arithmetic question (including simple questions like \
'what is 67 + 345?'). NEVER compute arithmetic yourself and NEVER transfer \
math queries to file_and_coding_agent / code interpreter. Always delegate \
every math question to this tool." \
  --mcp-server-spec-type=tool-spec \
  --mcp-server-spec-content=cfg/toolspec.json \
  --interfaces=protocolBinding=JSONRPC,url="${MCP_URL}"
在 Agent Registry 中驗證 MCP 伺服器
確認已部署的 Cloud Run 服務在該區域中列為已註冊的 MCP 伺服器,並顯示端點網址和可用工具:
# list registered mcp servers in agent registry
gcloud agent-registry mcp-servers list \
  --location=${REGION} \
  --project=${PROJ_ID} \
  --format="table(
    name.basename():label=REGISTRY_ID,
    displayName:label=DISPLAY_NAME,
    interfaces[0].url:label=ENDPOINT_URL,
    tools[].name.list():label=TOOLS
  )"
預期的輸出內容:
REGISTRY_ID                                         DISPLAY_NAME                                  ENDPOINT_URL                                              TOOLS
agentregistry-00000000-0000-0000-0012-3456789abcde  math-wizard-${PROJ_NO}.${REGION}.run.app      https://math-wizard-${PROJ_NO}.${REGION}.run.app/mcp      add,subtract
查看服務設定規格,確認每個工具都已註冊確切的工具定義、輸入結構定義和行為註解:
# describe mcp server tool specs
gcloud agent-registry services describe ${MCP_NAME} \
  --location=${REGION} \
  --project=${PROJ_ID} \
  --format="yaml(mcpServerSpec.content.tools)"
MCP 伺服器部分到此結束,接下來請前往 Gemini Enterprise 部分。
7. Gemini Enterprise
在本節中,您將建立及設定 Gemini Enterprise 應用程式,以及連結的自訂 MCP 伺服器資料儲存庫資源。
Discovery Engine 資源模型
Gemini Enterprise 應用程式 (在 Discovery Engine API 中以 Engine 資源表示) 是終端使用者的中央調度管理層和對話介面。這項服務可管理使用者即時通訊工作階段、根據企業資料訓練生成式模型,以及協調動態工具執行作業。
Gemini Enterprise 應用程式會透過資料儲存庫與資料和系統互動:
- 知識資料儲存庫:擷取靜態內容 (例如 Cloud Storage、Google 雲端硬碟、BigQuery) 並建立索引,以供檢索增強生成 (RAG) 使用。
- 資料連接器 (動作供應商):連結至動態第三方或自訂 API。自訂 MCP 伺服器資料儲存庫會公開 Model Context Protocol (MCP) 定義的工具,讓模型在對話期間動態呼叫外部函式。
透過 Agent Gateway 轉送輸出流量
根據預設,Gemini Enterprise 會透過公用網路傳送連接器和工具執行流量。不過,如果是私有虛擬私有雲工作負載和零信任控管,引擎可以設定為透過 Agent Gateway 轉送輸出內容:
- 在本實驗室稍後建立自訂 MCP 伺服器資料儲存庫時,請在資料儲存庫設定中啟用「透過 Agent Gateway 路由傳出流量」。
- 這會將引擎的輸出工具呼叫繫結至區域 Agent Gateway,確保所有 MCP 要求都攜帶應用程式的
Agent Identity,並使用 IAP 和 IAM 統一存取政策 (UAP) 進行執行階段授權,然後透過 PSC 網路連結進入您的私有 VPC。
建立 Gemini Enterprise 應用程式
下列方法會使用 discoveryengine.googleapis.com API 建立 Gemini Enterprise 應用程式資源和設定。如要使用 Google Cloud 控制台 UI 進行設定,請參閱「建立應用程式」一文的操作說明。
# create engine (ge app)
curl -s -X POST "https://${GE_LOCATION}-discoveryengine.googleapis.com/v1/projects/${PROJ_ID}/locations/${GE_LOCATION}/collections/default_collection/engines?engineId=${GE_APP_INIT}" \
  -H "Authorization: Bearer $(gcloud auth application-default print-access-token)" \
  -H "X-Goog-User-Project: ${PROJ_ID}" -H "Content-Type: application/json" \
  -d @- <<EOF
{
  "displayName": "${GE_APP_DISPLAY_NAME}",
  "dataStoreIds": [],
  "solutionType": "SOLUTION_TYPE_SEARCH",
  "industryVertical": "GENERIC",
  "appType": "APP_TYPE_INTRANET",
  "searchEngineConfig": {
    "searchTier": "SEARCH_TIER_ENTERPRISE",
    "searchAddOns": [
      "SEARCH_ADD_ON_LLM"
    ]
  },
  "commonConfig": {
    "companyName": "${GE_APP_ORG_NAME}"
  }
}
EOF
確認應用程式建立作業
# fetch engine (ge app) id
export GE_APP_ID=$(curl -s "https://${GE_LOCATION}-discoveryengine.googleapis.com/v1/projects/${PROJ_ID}/locations/${GE_LOCATION}/collections/default_collection/engines" \
  -H "Authorization: Bearer $(gcloud auth application-default print-access-token)" -H "X-Goog-User-Project: ${PROJ_ID}" \
  | jq -r --arg name "${GE_APP_DISPLAY_NAME}" '.engines[] | select(.displayName==$name) | .name | split("/") | last')

echo "engine (ge app) id: ${GE_APP_ID}"
查看引擎詳細資料,瞭解建立的設定:
# get engine (ge app) details
curl -s "https://${GE_LOCATION}-discoveryengine.googleapis.com/v1/projects/${PROJ_ID}/locations/${GE_LOCATION}/collections/default_collection/engines/${GE_APP_ID}" \
  -H "Authorization: Bearer $(gcloud auth application-default print-access-token)" \
  -H "X-Goog-User-Project: ${PROJ_ID}"
請注意 JSON 回應中由伺服器填入的下列屬性:
name:標準資源路徑 (projects/${PROJ_NO}/locations/global/collections/default_collection/engines/${GE_APP_ID})。sessionConfig.sessionManagementPolicy:預設為"VERTEX_AI_MANAGED",可在 Agent Platform (舊稱 Vertex AI) 中保留多輪對話和工具呼叫狀態。observabilityConfig.observabilityEnabled:預設為基準指標的true(詳細提示和工具有效負載記錄會在後續步驟中啟用)。
啟用識別資訊提供者
啟用 Google Identity,做為 Gemini Enterprise 應用程式的使用者驗證識別資訊提供者。
下列方法會使用 discoveryengine.googleapis.com API 設定 Gemini Enterprise 應用程式的識別資訊提供者。如要使用 Google Cloud 控制台 UI 進行設定,請參閱「設定身分識別提供者」一文的操作說明。
# set identity provider
curl -s -X PATCH "https://${GE_LOCATION}-discoveryengine.googleapis.com/v1/projects/${PROJ_ID}/locations/${GE_LOCATION}/aclConfig" \
  -H "Authorization: Bearer $(gcloud auth application-default print-access-token)" \
  -H "X-Goog-User-Project: ${PROJ_ID}" -H "Content-Type: application/json" \
  -d @- <<EOF
{
  "idpConfig": {
    "idpType": "GSUITE"
  }
}
EOF
驗證身分識別資訊提供者
# show identity provider
curl -s "https://${GE_LOCATION}-discoveryengine.googleapis.com/v1/projects/${PROJ_ID}/locations/${GE_LOCATION}/aclConfig" \
  -H "Authorization: Bearer $(gcloud auth application-default print-access-token)" \
  -H "X-Goog-User-Project: ${PROJ_ID}"
輸出內容 "idpType": "GSUITE" 對應至 Google Identity 供應商。
(選用) 啟用 Gemini Enterprise 試用授權
如果您使用的專案已指派 Gemini Enterprise 授權,可以略過這個步驟。如果您使用沒有授權的新專案,請繼續並按照下列步驟操作。
建立授權設定資源,為 Gemini Enterprise 使用者席位授予 30 天的權利。這樣一來,新試用方案就會採用預設授權,登入的使用者都會自動獲得席位:
# configure free trial subscription
curl -s -X POST "https://${GE_LOCATION}-discoveryengine.googleapis.com/v1/projects/${PROJ_ID}/locations/${GE_LOCATION}/licenseConfigs?licenseConfigId=free_trial_gemini" \
  -H "Authorization: Bearer $(gcloud auth application-default print-access-token)" \
  -H "X-Goog-User-Project: ${PROJ_ID}" -H "Content-Type: application/json" \
  -d @- <<EOF
{
  "subscriptionTier": "SUBSCRIPTION_TIER_SEARCH_AND_ASSISTANT",
  "freeTrial": true
}
EOF
確認已套用授權
# show license config
curl -s "https://${GE_LOCATION}-discoveryengine.googleapis.com/v1/projects/${PROJ_ID}/locations/${GE_LOCATION}/licenseConfigs/free_trial_gemini" \
  -H "Authorization: Bearer $(gcloud auth application-default print-access-token)" \
  -H "X-Goog-User-Project: ${PROJ_ID}"
檢查 "subscriptionTerm": "SUBSCRIPTION_TERM_ONE_MONTH" 和 "freeTrial": true。
# verify auto-registration enabled on default user store
curl -s "https://${GE_LOCATION}-discoveryengine.googleapis.com/v1/projects/${PROJ_ID}/locations/${GE_LOCATION}/userStores/default_user_store" \
  -H "Authorization: Bearer $(gcloud auth application-default print-access-token)" \
  -H "X-Goog-User-Project: ${PROJ_ID}"
檢查 ../free_trial_gemini" 和 "enableLicenseAutoRegister": true。
啟用可觀測性設定
在 Gemini Enterprise 應用程式 (引擎) 層級啟用可觀測性,即可在 Metrics Explorer 中查看核心助理的互動和指標資料,並在 Cloud Trace 中關聯端對端追蹤記錄。
# set observability on engine (ge app)
curl -s -X PATCH "https://${GE_LOCATION}-discoveryengine.googleapis.com/v1/projects/${PROJ_ID}/locations/${GE_LOCATION}/collections/default_collection/engines/${GE_APP_ID}?updateMask=observabilityConfig" \
  -H "Authorization: Bearer $(gcloud auth application-default print-access-token)" \
  -H "X-Goog-User-Project: ${PROJ_ID}" -H "Content-Type: application/json" \
  -d @- <<EOF
{
  "observabilityConfig": {
    "observabilityEnabled": true,
    "sensitiveLoggingEnabled": true
  }
}
EOF
確認可觀測性設定
# verify observability is enabled on engine (ge app)
curl -s "https://${GE_LOCATION}-discoveryengine.googleapis.com/v1/projects/${PROJ_ID}/locations/${GE_LOCATION}/collections/default_collection/engines/${GE_APP_ID}" \
  -H "Authorization: Bearer $(gcloud auth application-default print-access-token)" \
  -H "X-Goog-User-Project: ${PROJ_ID}" \
  | jq '{observabilityConfig: .observabilityConfig}'
檢查 "sensitiveLoggingEnabled": true。
繫結至 Agent Gateway
透過 Agent Gateway 轉送 Gemini Enterprise 的輸出流量,可為所有 AI 代理工具叫用作業建立集中式零信任治理和安全強制執行界線:
- 集中執行政策:Agent Gateway 會做為內嵌 Proxy,在流量離開代理環境前,根據授權政策和控管措施評估傳出工具要求。
- 私人網路輸出:將 Gemini Enterprise 繫結至 Agent Gateway,可確保以 Cloud Run 上私人 MCP 伺服器為目標的工具呼叫,能安全地透過 Private Service Connect (PSC) 傳送,繞過公用網際網路。
- 統一稽核:集中記錄所有已連線 MCP 伺服器和外部工具的要求、遙測資料和稽核追蹤記錄。
在 Gemini Enterprise 應用程式中設定 agentGatewaySetting 後,使用者查詢 (例如呼叫從 Agent Registry 匯入的自訂 MCP 伺服器和 A2A 代理) 啟動的外送工具和代理呼叫,就會自動透過 Agent Gateway 路由傳送。
修補引擎 agentGatewaySetting 以啟用:
# bind engine (ge app) to agent gateway
curl -s -X PATCH "https://${GE_LOCATION}-discoveryengine.googleapis.com/v1/projects/${PROJ_ID}/locations/${GE_LOCATION}/collections/default_collection/engines/${GE_APP_ID}?updateMask=agentGatewaySetting.defaultEgressAgentGateway.name" \
  -H "Authorization: Bearer $(gcloud auth application-default print-access-token)" \
  -H "X-Goog-User-Project: ${PROJ_ID}" -H "Content-Type: application/json" \
  -d @- <<EOF
{
  "agentGatewaySetting": {
    "defaultEgressAgentGateway": {
      "name": "projects/${PROJ_ID}/locations/${REGION}/agentGateways/${AGW_NAME}"
    }
  }
}
EOF
驗證 Agent Gateway 繫結
擷取應用程式設定,確認 agentGatewaySetting 繫結:
# verify engine (ge app) agent gateway configuration
curl -s "https://${GE_LOCATION}-discoveryengine.googleapis.com/v1/projects/${PROJ_ID}/locations/${GE_LOCATION}/collections/default_collection/engines/${GE_APP_ID}" \
  -H "Authorization: Bearer $(gcloud auth application-default print-access-token)" \
  -H "X-Goog-User-Project: ${PROJ_ID}" \
  | jq '{name: .name, displayName: .displayName, agentGatewaySetting: .agentGatewaySetting}'
預期的輸出內容:
{
  "name": "projects/${PROJ_NO}/locations/${GE_LOCATION}/collections/default_collection/engines/${GE_APP_ID}",
  "displayName": "${GE_APP_DISPLAY_NAME}",
  "agentGatewaySetting": {
    "defaultEgressAgentGateway": {
      "name": "projects/${PROJ_ID}/locations/${REGION}/agentGateways/${AGW_NAME}"
    }
  }
}
建立自訂 MCP 伺服器資料儲存庫
在本節中,您將建立自訂 MCP 資料儲存庫,將 MCP 伺服器連結至 Gemini Enterprise。
使用 Discovery Engine API 時,請按照下列兩個步驟操作:
- 建立 (
:setUpDataConnector):建立專屬的Collection資源 (${MCP_NAME}-%timestamp-collection)、附加DataConnector(custom_mcp),並佈建其備份DataStore(..._mcp_data)。 - 啟用 (
PATCH .../dataConnector?updateMask=actionConfig):使用 Agent Registry 工具規格啟用連結器的動作執行階段 (actionState: "ACTIVE"),並將DataStore(dataStoreIds) 繫結至 Gemini EnterpriseEngine。
# fetch mcp server agent registry resource name
export MCP_REGISTRY_URI=$(gcloud agent-registry mcp-servers list \
  --location=${REGION} \
  --project=${PROJ_ID} \
  --filter="displayName:${MCP_NAME}" \
  --format="value(name)")

echo "mcp registry name: ${MCP_REGISTRY_URI}"
echo "mcp url: ${MCP_URL}"
建立資料連接器
# create custom mcp data connector from agent registry and link to engine
curl -s -X POST "https://${GE_LOCATION}-discoveryengine.googleapis.com/v1alpha/projects/${PROJ_ID}/locations/${GE_LOCATION}:setUpDataConnector" \
  -H "Authorization: Bearer $(gcloud auth application-default print-access-token)" \
  -H "X-Goog-User-Project: ${PROJ_ID}" \
  -H "Content-Type: application/json" \
  -d @- <<EOF
{
  "collectionId": "${MCP_NAME}-$(date +%s)-collection",
  "collectionDisplayName": "${MCP_NAME}-collection",
  "dataConnector": {
    "dataSource": "custom_mcp",
    "dataSourceVersion": 1,
    "params": {
      "oauth_access_token": "unused"
    },
    "refreshInterval": "86400s",
    "entities": [
      {
        "entityName": "mcp_data"
      }
    ],
    "connectorModes": [
      "FEDERATED"
    ],
    "actionConfig": {
      "isActionConfigured": true,
      "createBapConnection": true,
      "actionParams": {
        "auth_type": "NO_AUTH",
        "instance_uri": "${MCP_URL}",
        "mcp_server_source": "REGISTRY_MCP",
        "registry_mcp_server_name": "${MCP_REGISTRY_URI}",
        "mcp_agent_instructions": "MANDATORY MATH & ARITHMETIC AGENT: Always invoke this tool for any mathematical calculation, addition (+), subtraction (-), sum, or difference.",
        "use_agent_gateway_egress": true,
        "agent_gateway_engine": "projects/${PROJ_ID}/locations/global/collections/default_collection/engines/${GE_APP_ID}"
      }
    }
  }
}
EOF
確認資料連接器已建立
# fetch collection id
export GE_COLLECTION_ID=$(curl -s "https://${GE_LOCATION}-discoveryengine.googleapis.com/v1alpha/projects/${PROJ_ID}/locations/${GE_LOCATION}/collections" \
  -H "Authorization: Bearer $(gcloud auth application-default print-access-token)" \
  -H "X-Goog-User-Project: ${PROJ_ID}" \
  | jq -r --arg dname "${MCP_NAME}-collection" '.collections[] | select(.displayName == $dname) | .name | split("/") | last' | head -n 1)

echo "ge collection id: ${GE_COLLECTION_ID}"
檢查「"registry_mcp_server_name"」欄位是否填入 MCP 伺服器的 Agent Registry UUID:
# show data connector details
curl -s "https://${GE_LOCATION}-discoveryengine.googleapis.com/v1alpha/projects/${PROJ_ID}/locations/${GE_LOCATION}/collections/${GE_COLLECTION_ID}/dataConnector" \
  -H "Authorization: Bearer $(gcloud auth application-default print-access-token)" \
  -H "X-Goog-User-Project: ${PROJ_ID}" \
  | jq '{name, state, actionState, connectorModes, bapConfig, registry_mcp_server_name: .actionConfig.actionParams.registry_mcp_server_name}'
在 Google Cloud 控制台 UI 中查看 MCP 伺服器登錄項目:
echo "mcp server registry page url: https://console.cloud.google.com/agent-platform/agent-registry/mcp-servers/${REGION}/${MCP_REGISTRY_URI##*/}/overview?project=${PROJ_ID}"
啟用資料連接器
# activate and bind data connector
curl -s -X PATCH "https://discoveryengine.googleapis.com/v1alpha/projects/${PROJ_ID}/locations/global/collections/${GE_COLLECTION_ID}/dataConnector?updateMask=actionConfig" \
  -H "Authorization: Bearer $(gcloud auth application-default print-access-token)" \
  -H "X-Goog-User-Project: ${PROJ_ID}" \
  -H "Content-Type: application/json" \
  -d @- <<EOF
{
  "name": "projects/${PROJ_ID}/locations/global/collections/${GE_COLLECTION_ID}/dataConnector",
  "actionConfig": {
    "isActionConfigured": true,
    "createBapConnection": true,
    "actionParams": {
      "auth_type": "NO_AUTH",
      "instance_uri": "${MCP_URL}",
      "mcp_server_source": "REGISTRY_MCP",
      "registry_mcp_server_name": "${MCP_REGISTRY_URI}",
      "mcp_agent_instructions": "MANDATORY MATH & ARITHMETIC AGENT: Always invoke this tool for any mathematical calculation, addition (+), subtraction (-), sum, or difference.",
      "use_agent_gateway_egress": true,
      "agent_gateway_engine": "projects/${PROJ_ID}/locations/global/collections/default_collection/engines/${GE_APP_ID}"
    }
  }
}
EOF
驗證自訂 MCP 伺服器連結
# show engine (ge app) details
curl -s "https://${GE_LOCATION}-discoveryengine.googleapis.com/v1/projects/${PROJ_ID}/locations/${GE_LOCATION}/collections/default_collection/engines/${GE_APP_ID}" \
  -H "Authorization: Bearer $(gcloud auth application-default print-access-token)" \
  -H "X-Goog-User-Project: ${PROJ_ID}" \
  | jq '{name: .name, dataStoreIds: .dataStoreIds, agentGatewaySetting: .agentGatewaySetting}'
檢查連結的資料儲存庫 "dataStoreIds": "collection-math-wizard-。
# show collection details
curl -s "https://${GE_LOCATION}-discoveryengine.googleapis.com/v1alpha/projects/${PROJ_ID}/locations/${GE_LOCATION}/collections" \
  -H "Authorization: Bearer $(gcloud auth application-default print-access-token)" \
  -H "X-Goog-User-Project: ${PROJ_ID}" \
  | jq --arg app "${GE_APP_ID}" '.collections[] | select(.dataConnector.actionConfig.actionParams.agent_gateway_engine // "" | endswith($app)) | .dataConnector | {name: .name, state: .state, actionState: .actionState, connectorModes: .connectorModes, actionParams: .actionConfig.actionParams}'
檢查 "state": "ACTIVE" 是否已填入所有參數。
工具動作
在 Gemini Enterprise 資訊主頁檢查 math-wizard-collection 資料儲存庫時,您會發現「動作」分頁標籤未啟用,且「重新載入自訂動作」按鈕已停用。這是預期中的行為。
在 Google Cloud 控制台 UI 中查看資料儲存庫詳細資料頁面:
echo "data store details page url: https://console.cloud.google.com/gemini-enterprise/locations/${GE_LOCATION}/collections/${GE_COLLECTION_ID}/connector/details?project=${PROJ_ID}"
視您將自訂 MCP 伺服器連結至 Gemini Enterprise 的方式而定,工具探索和管理作業會透過下列其中一種方式處理:
- 直接自訂 MCP (
BYO_MCP工作流程):在 Gemini Enterprise 中直接設定自訂 MCP 伺服器時,資料存放區本身會管理工具目錄 (connectorModes: ["FEDERATED", "ACTIONS"])。您必須開啟「動作」分頁,按一下「重新載入自訂動作」來擷取tools/list架構,並在使用者介面中手動開啟或關閉個別工具 (add和subtract)。 - Agent Registry 匯入 (本程式碼研究室使用的
REGISTRY_MCP工作流程):從Agent Registry匯入 MCP 伺服器時,Agent Registry 會做為 MCP 端點、介面中繼資料和工具目錄 (connectorModes: ["FEDERATED"]) 的權威來源。Gemini Enterprise 會在執行階段透過引擎的 Agent Gateway 自動啟用已註冊的 MCP 工具,您無須在資料儲存庫 UI 中手動重新載入或切換動作。
Gemini Enterprise 應用程式部分到此結束,接下來請前往「驗證」部分。
8. 驗證
在本節中,您將從 Gemini Enterprise 網頁應用程式觸發即時 MCP 工具呼叫,並追蹤 Agent Gateway、Cloud DNS、虛擬私有雲防火牆和 Cloud Run 記錄中的要求流程。接著,您將收緊 IAM 統一存取政策,允許 subtract 並封鎖 add,在閘道驗證零信任強制執行。
使用者存取權
建構 Gemini Enterprise 網頁應用程式的網址:
# fetch app user url
export GE_WIDGET_ID=$(curl -s "https://${GE_LOCATION}-discoveryengine.googleapis.com/v1/projects/${PROJ_ID}/locations/${GE_LOCATION}/collections/default_collection/engines/${GE_APP_ID}/widgetConfigs/default_search_widget_config" \
  -H "Authorization: Bearer $(gcloud auth application-default print-access-token)" \
  -H "X-Goog-User-Project: ${PROJ_ID}" \
  -H "Content-Type: application/json" \
  | jq -r '.configId')

export GE_APP_USER_URL="https://vertexaisearch.cloud.google.com/home/cid/${GE_WIDGET_ID}"

echo "app user url: ${GE_APP_USER_URL}"
點選連結,在瀏覽器中開啟 Gemini Enterprise 網頁應用程式的對話介面,然後按一下「開始使用」。
在即時通訊中測試代理查詢
在對話 UI 中,按一下對話方塊底部的「連接器」拼圖圖示,確認 math-wizard-collection 資料連接器已啟用。您應該會看到切換按鈕顯示為開啟 (有顏色)。
請試試下列測試查詢:
what is 2342345 - 98234798324?
what is 72347234 + 234234?
確認助理是否傳回正確答案,並在每項回覆下方顯示互動式動作引用標記 (例如 Math Calculation (8s) 🤖 Agentgateway Agent),確認工具已執行。
在 Cloud Logging 中檢查記錄
在 Cloud Logging 中檢查記錄,確認 Gemini Enterprise 已透過 Agent Gateway 和私有虛擬私有雲網路,將工具呼叫轉送至工具。
1. 驗證 Agent Gateway 和 IAP 授權
確認 Agent Gateway 攔截要求、在 Agent Registry 中解析目標、將授權委派給 IAP,並允許工具呼叫:
# show agent gateway logs
gcloud logging read 'resource.type="networkservices.googleapis.com/Gateway"' \
  --project=${PROJ_ID} \
  --limit=5 \
  --format="table( \
    timestamp.date(tz=LOCAL):label=TIMESTAMP, \
    httpRequest.status:label=STATUS, \
    httpRequest.serverIp:label=SERVER_IP, \
    jsonPayload.agentGatewayInfo.mcpInfo.method:label=MCP_METHOD, \
    jsonPayload.agentGatewayInfo.mcpInfo.parameter:label=TOOL, \
    jsonPayload.authzPolicyInfo.result:label=AUTHZ, \
    jsonPayload.agentGatewayInfo.agentRegistryResource.basename():label=REGISTRY_MCP
  )"
確認輸出內容包含:
STATUS:200(成功執行) 和202(notifications/initialized交握)。SERVER_IP:Google API PSC 端點 IP (172.16.20.20:443)。MCP_METHOD和TOOL:MCP 通訊協定序列 (notifications/initialized、tools/list和tools/call,搭配add或subtract)。AUTHZ:ALLOWED(允許 IAP 授權的輸出)。REGISTRY_MCP:已解析的 Agent Registry 資源 ID (agentregistry-...)。
2. 驗證 DNS 和防火牆轉移
確認 Cloud DNS 已將主機名稱解析為 PSC 端點,且防火牆允許來自 Agent Gateway 介面的流量:
# show dns logs
gcloud logging read 'resource.type="dns_query"' \
  --project=${PROJ_ID} \
  --limit=5 \
  --format="table( \
    timestamp.date(tz=LOCAL):label=TIMESTAMP, \
    jsonPayload.queryName:label=QUERY_NAME, \
    jsonPayload.queryType:label=TYPE, \
    jsonPayload.responseCode:label=RCODE, \
    jsonPayload.rdata:label=RDATA
  )"
# show firewall logs
gcloud logging read 'logName:"compute.googleapis.com%2Ffirewall"' \
  --project=${PROJ_ID} \
  --limit=5 \
  --format="table( \
    timestamp.date(tz=LOCAL):label=TIMESTAMP, \
    jsonPayload.connection.src_ip:label=SRC_IP, \
    jsonPayload.connection.dest_ip:label=DEST_IP, \
    jsonPayload.connection.dest_port:label=PORT, \
    jsonPayload.rule_details.reference.basename():label=RULE, \
    jsonPayload.disposition:label=DISPOSITION
  )"
確認下列值:
- DNS
QUERY_NAME&RDATA:將math-wizard-...run.app.(A記錄、NOERROR) 解析為172.16.20.20。 - 防火牆
SRC_IP&DEST_IP:192.168.10.2(Agent Gateway PSC 介面 IP) 至172.16.20.20:443。 - 防火牆
RULE&DISPOSITION:已比對firewallPolicy:fw-policy-...與ALLOWED。
3. 驗證 Cloud Run 工具執行作業
確認 Cloud Run 容器已收到並處理工具呼叫:
# show cloud run logs
gcloud logging read 'resource.type="cloud_run_revision"
  AND textPayload:"Tool:"' \
  --project=${PROJ_ID} \
  --limit=5 \
  --format="value(timestamp.date(tz=LOCAL), textPayload)"
確認 textPayload 顯示工具執行項目 (例如 >>> 🛠️ Tool: 'subtract' called with numbers '[x]' and '[y]')。
測試強制執行最低權限政策
在初始 IAM 存取權政策中,只要目的地已註冊 (destination.is_registered == true),任何方法或工具都可使用。在這個步驟中,請更新政策,只允許 subtract 工具,並封鎖 add,以強制執行最小權限原則。
更新 IAM 存取權政策
限制 MCP 工具執行時,請使用雙規則模式:
- 規則 1 (MCP 探索和交握):允許非工具呼叫 MCP 生命週期方法 (
destination.is_registered == true和destination.agent_registry.mcp_server.method != 'tools/call')。由於 Gemini Enterprise 會先協商串流設定和探索 (initialize、notifications/initialized、tools/list),再叫用工具,且destination.agent_registry.mcp_server.tool.name只會在tools/call期間填入,因此規則 1 是維持工作階段初始化和目錄探索運作的必要條件。 - 規則 2 (工具層級限制):限制
tools/call執行,只允許subtract工具 (destination.is_registered == true、destination.agent_registry.mcp_server.method == 'tools/call'和destination.agent_registry.mcp_server.tool.name == 'subtract')。
使用這兩項規則更新存取權政策規則資訊清單檔案:
# create access policy rule file (update: allow subtract only)
cat > cfg/${UAP_POLICY_NAME}-rule-update.json << EOF
[
  {
    "description": "allow ge assistant to any registered endpoint to perform mcp discovery and handshake",
    "effect": "ALLOW",
    "principals": [
      "principal://${TRUST_DOMAIN}/resources/discoveryengine/projects/${PROJ_NO}/locations/global/engines/${GE_APP_ID}/assistants/default_assistant/agents/default/core_assistant"
    ],
    "operation": {
      "permissions": [
        "iap.googleapis.com/resources.egressViaIAP"
      ]
    },
    "conditions": {
      "iap.googleapis.com": {
        "expression": \
        "destination.is_registered == true && \
         destination.agent_registry.mcp_server.method != 'tools/call'"
      }
    }
  },
  {
    "description": "allow ge assistant to any registered mcp server with tool call subtract",
    "effect": "ALLOW",
    "principals": [
      "principal://${TRUST_DOMAIN}/resources/discoveryengine/projects/${PROJ_NO}/locations/global/engines/${GE_APP_ID}/assistants/default_assistant/agents/default/core_assistant"
    ],
    "operation": {
      "permissions": [
        "iap.googleapis.com/resources.egressViaIAP"
      ]
    },
    "conditions": {
      "iap.googleapis.com": {
        "expression": \
        "destination.is_registered == true && \
         destination.agent_registry.mcp_server.method == 'tools/call' && \
         destination.agent_registry.mcp_server.tool.name == 'subtract'"
      }
    }
  }
]
EOF
將更新後的規則套用至 IAM 存取權政策:
# update iam access policy
gcloud iam access-policies update ${UAP_POLICY_NAME} \
  --details-rules=cfg/${UAP_POLICY_NAME}-rule-update.json \
  --project=${PROJ_ID} \
  --location=global
驗證 IAM 存取權政策
檢查是否已套用新的 IAM 存取權政策,且只允許使用減法工具:
# show iam access policy details
gcloud iam access-policies describe ${UAP_POLICY_NAME} \
  --project=${PROJ_ID} \
  --location=global \
  --flatten="details.rules[]" \
  --format="table( \
    details.rules.principals[0].scope(engines).sub('assistants/default_assistant/agents/default', '...'):label=PRINCIPAL, \
    details.rules.effect:label=EFFECT, \
    details.rules.conditions.'iap.googleapis.com'.expression.sub('\s*&&\s*', '\n&& ').sub('\s*\|\|\s*', '\n|| '):label=EXPRESSION
  )"
測試遭禁的工具呼叫
返回 Gemini Enterprise 網頁應用程式的對話使用者介面,然後嘗試其他測試查詢:
what is 100 plus 20?
助理會嘗試叫用 add,但 Agent Gateway 和 IAP 會將 IAM 政策條件評估為 false,並以 HTTP 403 Forbidden 拒絕輸出要求。在聊天使用者介面中,你會看到助理顯示 Calculate Sum 和 🤖 Agentgateway Agent ... Working on it.,表示正在重試遭封鎖的工具呼叫。這是預期中的行為。確認 Agent Gateway 和 IAP 會主動在網路層級攔截並拒絕執行不允許的工具。
重新檢查 Cloud Logging 中的記錄
查看 Agent Gateway 記錄項目,並注意與禁止使用的 add 工具呼叫對應的新 403 項目:
# show agent gateway logs
gcloud logging read 'resource.type="networkservices.googleapis.com/Gateway"' \
  --project=${PROJ_ID} \
  --limit=5 \
  --format="table( \
    timestamp.date(tz=LOCAL):label=TIMESTAMP, \
    httpRequest.status:label=STATUS, \
    httpRequest.serverIp:label=SERVER_IP, \
    jsonPayload.agentGatewayInfo.mcpInfo.method:label=MCP_METHOD, \
    jsonPayload.agentGatewayInfo.mcpInfo.parameter:label=TOOL, \
    jsonPayload.authzPolicyInfo.result:label=AUTHZ, \
    jsonPayload.agentGatewayInfo.agentRegistryResource.basename():label=REGISTRY_MCP
  )"
預期的輸出內容:
TIMESTAMP            STATUS  SERVER_IP         MCP_METHOD                 TOOL  AUTHZ    REGISTRY_MCP
YYYY-MM-DDTHH:MM:SS  403                       tools/call                 add   DENIED   agentregistry-00000000-0000-0000-0012-3456789abcde
YYYY-MM-DDTHH:MM:SS  403
YYYY-MM-DDTHH:MM:SS  202     172.16.20.20:443  notifications/initialized        ALLOWED  agentregistry-00000000-0000-0000-0012-3456789abcde
YYYY-MM-DDTHH:MM:SS          172.16.20.20:443                                   ALLOWED  agentregistry-00000000-0000-0000-0012-3456789abcde
YYYY-MM-DDTHH:MM:SS  200     172.16.20.20:443  initialize                       ALLOWED  agentregistry-00000000-0000-0000-0012-3456789abcde
確認額外要求從未抵達 Cloud Run 後端:
# show cloud run logs
gcloud logging read 'resource.type="cloud_run_revision"
  AND textPayload:"Tool:"' \
  --project=${PROJ_ID} \
  --limit=5 \
  --format="value(timestamp.date(tz=LOCAL), textPayload)"
指令不會傳回任何新項目,確認 Agent Gateway 已成功強制執行 IAM 存取政策。
驗證部分到此結束,接下來請前往「清除」一節。
9. 清除
請按照下列步驟,刪除在本實驗室中建立的資源和設定。
移除 Gemini Enterprise 元件
# delete gemini enterprise engine (app)
curl -s -X DELETE "https://${GE_LOCATION}-discoveryengine.googleapis.com/v1/projects/${PROJ_ID}/locations/${GE_LOCATION}/collections/default_collection/engines/${GE_APP_ID}" \
  -H "Authorization: Bearer $(gcloud auth application-default print-access-token)" \
  -H "X-Goog-User-Project: ${PROJ_ID}"

# delete custom mcp collection, data connector, and backing data store
curl -s -X DELETE "https://${GE_LOCATION}-discoveryengine.googleapis.com/v1alpha/projects/${PROJ_ID}/locations/${GE_LOCATION}/collections/${GE_COLLECTION_ID}" \
  -H "Authorization: Bearer $(gcloud auth application-default print-access-token)" \
  -H "X-Goog-User-Project: ${PROJ_ID}"

# reset identity provider configuration
curl -s -X PATCH "https://${GE_LOCATION}-discoveryengine.googleapis.com/v1/projects/${PROJ_ID}/locations/${GE_LOCATION}/aclConfig" \
  -H "Authorization: Bearer $(gcloud auth application-default print-access-token)" \
  -H "X-Goog-User-Project: ${PROJ_ID}" \
  -H "Content-Type: application/json" \
  -d '{"idpConfig":{"idpType":"IDP_TYPE_UNSPECIFIED"}}'
移除 MCP 伺服器元件
# delete agent registry service
gcloud -q agent-registry services delete ${MCP_NAME} \
  --location=${REGION} \
  --project=${PROJ_ID}

# delete cloud run service, source-deploy artifact registry repo, and staging bucket
gcloud -q run services delete ${MCP_NAME} \
  --region=${REGION} \
  --project=${PROJ_ID}

gcloud -q artifacts repositories delete cloud-run-source-deploy \
  --location=${REGION} \
  --project=${PROJ_ID}

gcloud -q storage rm --recursive gs://run-sources-${PROJ_ID}-${REGION} \
  --project=${PROJ_ID}
移除 Agent Gateway 和 IAM 存取權政策
# delete gateway authorization policy, iap extension, and agent gateway
gcloud -q network-security authz-policies delete ${AGW_NAME}-authz-policy-iap \
  --location=${REGION} \
  --project=${PROJ_ID}

gcloud -q service-extensions authz-extensions delete ${AGW_NAME}-svc-ext-authz-iap \
  --location=${REGION} \
  --project=${PROJ_ID}

gcloud -q network-services agent-gateways delete ${AGW_NAME} \
  --location=${REGION} \
  --project=${PROJ_ID}
# delete iam policy binding and access policy
gcloud -q iam policy-bindings delete ${UAP_BINDING_NAME} \
  --location=global \
  --project=${PROJ_ID}

gcloud -q iam access-policies delete ${UAP_POLICY_NAME} \
  --location=global \
  --project=${PROJ_ID}
移除 DNS 和防火牆元件
# delete dns record set, managed zone, and policy
gcloud -q dns record-sets delete "*.run.app." \
  --type=A \
  --zone=priv-zone-run \
  --project=${PROJ_ID}

gcloud -q dns managed-zones delete priv-zone-run \
  --project=${PROJ_ID}

gcloud -q dns policies update dns-policy-${SLUG} \
  --networks="" \
  --project=${PROJ_ID}

gcloud -q dns policies delete dns-policy-${SLUG} \
  --project=${PROJ_ID}
# delete firewall policy association, rule, and policy
gcloud -q compute network-firewall-policies associations delete \
  --name=fw-policy-bind-${SLUG} \
  --firewall-policy=fw-policy-${SLUG} \
  --global-firewall-policy \
  --project=${PROJ_ID}

gcloud -q compute network-firewall-policies rules delete 1001 \
  --firewall-policy=fw-policy-${SLUG} \
  --global-firewall-policy \
  --project=${PROJ_ID}

gcloud -q compute network-firewall-policies delete fw-policy-${SLUG} \
  --global \
  --project=${PROJ_ID}
移除 PSC 和虛擬私有雲網路元件
# delete psc forwarding rule and internal ip address
gcloud -q compute forwarding-rules delete psc2gapis \
  --global \
  --project=${PROJ_ID}

gcloud -q compute addresses delete ip-psc2gapis \
  --global \
  --project=${PROJ_ID}
# delete psc network attachment, subnet, and vpc network
gcloud -q compute network-attachments delete psc-na-${REGION}-agw \
  --region=${REGION} \
  --project=${PROJ_ID}

gcloud -q compute networks subnets delete subnet-${REGION}-agw \
  --region=${REGION} \
  --project=${PROJ_ID}

gcloud -q compute networks delete vnet-${SLUG} \
  --project=${PROJ_ID}
移除組織政策覆寫和本機檔案
# delete project-level organization policy overrides
gcloud -q org-policies delete discoveryengine.managed.disableCustomMcpServerConnector --project=${PROJ_ID}
gcloud -q org-policies delete iam.managed.disableAccessPolicyBinding --project=${PROJ_ID}
# remove local project files
rm -rf cfg math-wizard
清理工作到此結束,接下來請參閱結論!
10. 結語
恭喜!您已建構端對端架構,讓 Gemini Enterprise 應用程式安全地探索及叫用私有自訂 MCP 伺服器上的工具:
- 自訂 MCP 伺服器和 Agent Registry:在 Cloud Run 上部署私人的 FastMCP 服務 (
--ingress=internal),並在 Agent Registry 中註冊其端點和工具結構定義 (add和subtract)。 - Gemini Enterprise 整合:已佈建 Gemini Enterprise 應用程式、將輸出工具流量繫結至 Agent Gateway,並將已註冊的 MCP 伺服器附加為
REGISTRY_MCP資料連接器。 - 私有虛擬私有雲輸出和零信任控管:透過 PSC (
172.16.20.20) 私下路由工具執行作業,並使用 IAP 和 IAM 統一存取政策 (destination.agent_registry.*) 強制執行工具層級的最低權限。

Cosmpup 認為程式碼研究室絕對是頂尖之作!
後續步驟
- 如需進階功能和教學課程,請參閱 Gemini Enterprise Agent Platform 文件。
- 在 Agent Gateway 上設定 Model Armor 防護機制,進一步確保 AI 安全。
- 探索語意管理政策,針對自然語言查詢強制執行業務規則和法規遵循。
歡迎透過這份意見回饋表單提供意見、提出問題或修正內容。
感謝您!