
1. 概览
在此 Codelab 中,您将构建 AI Creative Studio,这是一个分布式多智能体系统,可将单个提示转换为完整的 Instagram 广告系列。
输入一句话。获取观众研究、字幕、视觉概念、经过质量审核的文案以及完整的项目时间表 - 所有这些内容均由一组协作式 AI 代理生成。
您将构建的代理
代理 | 角色 |
品牌策略顾问 | 在网络上搜索受众群体分析、竞争对手分析和 2025 年趋势 |
文案撰写者 | 撰写包含主题标签和行动号召的 Instagram 字幕 - 由 ADK Skill 提供支持,可按需加载平台指南和字幕公式 |
设计师 | 通过 Gemini 创建视觉概念并生成真实图片,存储在 GCS 中 |
影评人 | 评价文案和图片 - 返回 |
项目经理 | 构建项目时间表和任务分解,可以选择通过 MCP 同步到 Notion |
Creative Director | 按顺序编排所有五位专家 - 您只需提供一个提示,它会协调其余工作 |
这 5 个代理部署为独立的 Cloud Run 微服务。它们通过 A2A 协议进行通信,这是一种与语言无关的开放标准,因此任何代理都可以调用任何其他代理,而无需考虑框架。创意总监在 Agent Runtime 上运行,并远程连接到每位专家。
架构

学习内容
- 使用 Google ADK、
Agent、系统指令和内置工具构建 LLM 智能体。 - 使用 ADK 技能 (
SkillToolset) 将可重复使用的智能体知识封装到模块化文件中。 - 通过
FunctionTool将文本代理连接到图片模型,从而生成真实图片。 - 使用 Model Context Protocol (MCP) 集成外部 API,无需自定义粘合代码。
- 通过 HTTPS 使用 Agent to Agent Protocol (A2A) 将任何代理转换为可通过网络调用的服务。
- 使用
RemoteA2aAgent和AgentTool编排分布式代理。 - 将独立代理打包并部署为 Cloud Run 微服务。
- 在 Agent Runtime 上托管有状态的编排器。
- 使用上下文压缩功能,确保较长的多智能体工作流不超过上下文限制。
- 构建质量控制环:影评人评论输出 → 根据需要自动修订。
所需条件
- 已启用结算功能的 Google Cloud 项目
- Owner 或 Editor IAM 角色
- Python 基础知识
2. 设置环境
在此 Codelab 中,我们将使用 Cloud Shell。
Cloud Shell 是什么?
Cloud Shell 是一种基于浏览器的免费 Linux 环境,其中预安装了所有必需的工具:gcloud、git、Python、Docker 等。您无需在本地安装任何内容。
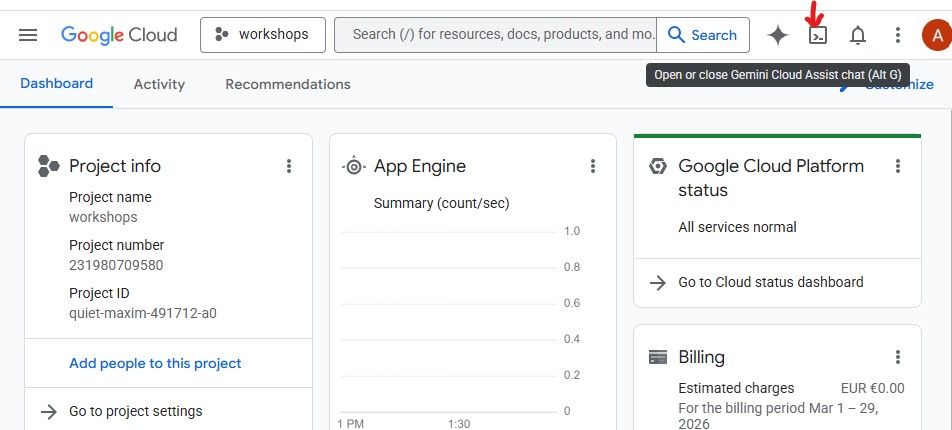
如需打开 Cloud Shell,请点击 GCP 控制台右上角工具栏中的终端图标:
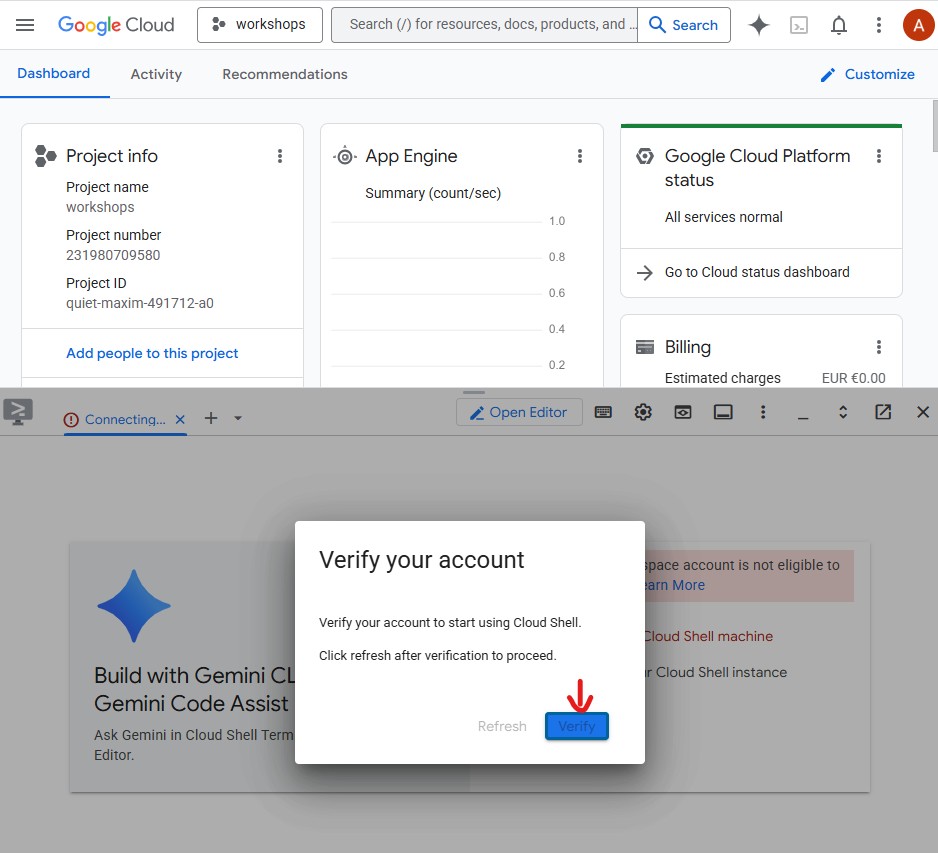
首次打开 Cloud Shell 时,系统会提示您验证账号 - 点击验证:
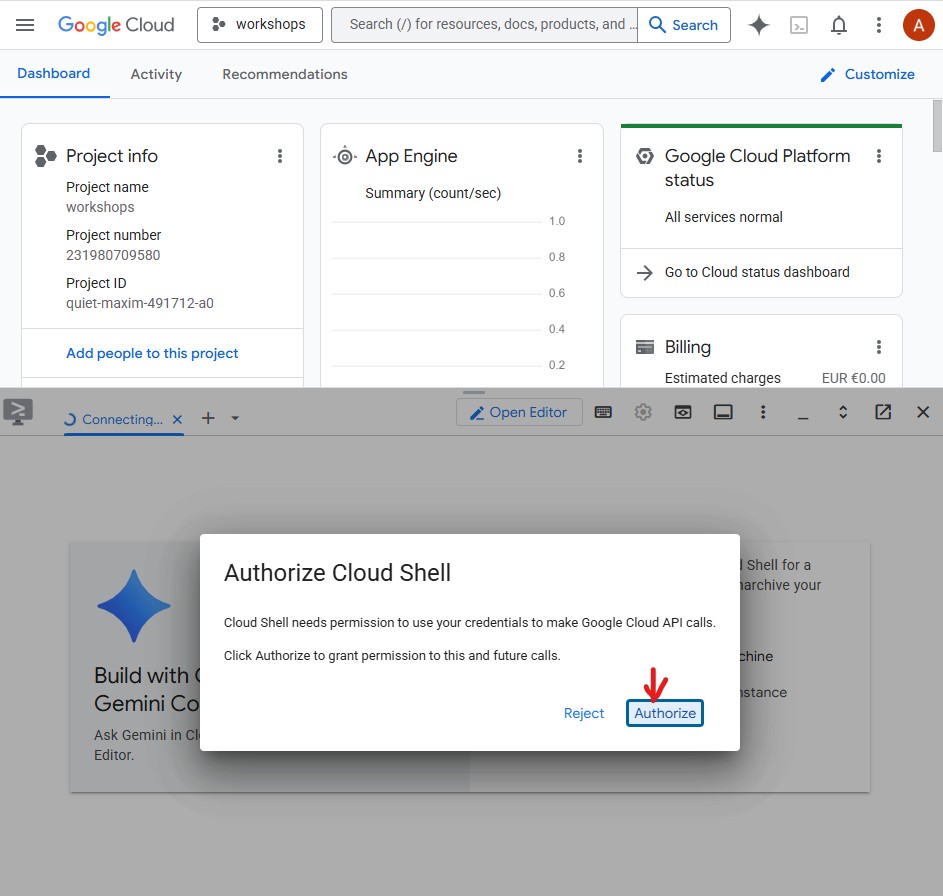
然后,点击授权,以允许 Cloud Shell 进行 Google Cloud API 调用:
Cloud Shell 现已准备就绪。您会在终端中看到欢迎消息: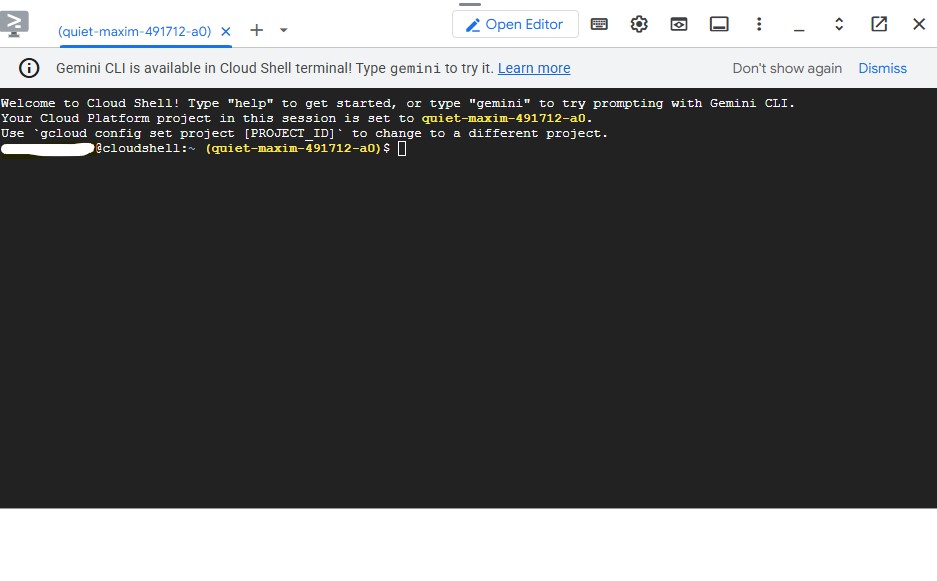
进行身份验证并配置项目
Cloud Shell 已通过您的 Google 账号进行身份验证。确认您的有效账号并找到您的项目 ID:
gcloud config list
您还可以在 GCP 控制台信息中心左侧的面板中看到项目 ID。复制该 ID,您将在下一个命令中用到它:
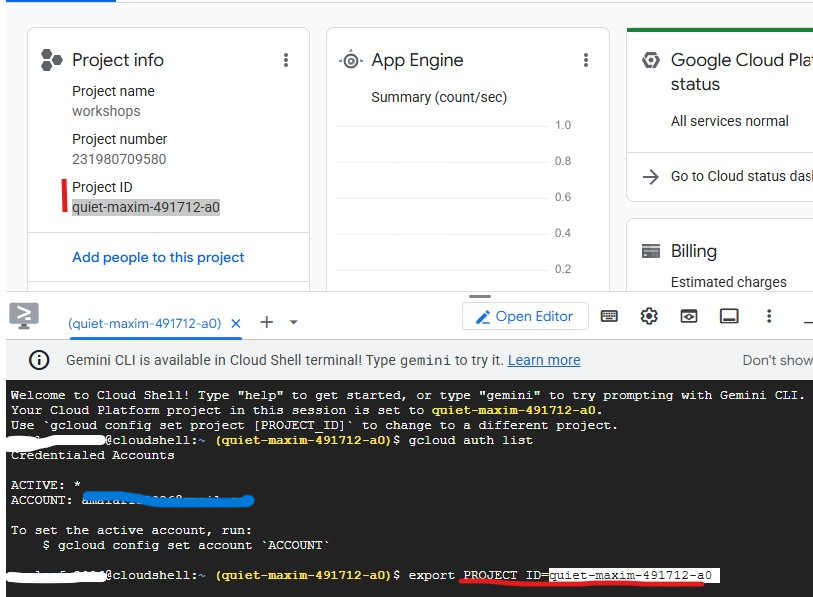
现在,设置您的项目:
export PROJECT_ID=$(gcloud config get-value project)
export REGION="us-central1"        # Cloud Run deployment region
echo "Project: $PROJECT_ID"
预期输出:
Project: my-project-123
启用必需的 API
gcloud services enable \
    aiplatform.googleapis.com \
    apphub.googleapis.com \
    run.googleapis.com \
    cloudbuild.googleapis.com \
    artifactregistry.googleapis.com \
    generativelanguage.googleapis.com \
    iam.googleapis.com \
    cloudresourcemanager.googleapis.com \
    storage.googleapis.com \
    secretmanager.googleapis.com
此过程大约需要 2 分钟。完成后,您会看到 Operation finished successfully。
设置应用默认凭据 (ADC)
代理将使用 Google Auth 库调用 Gemini Enterprise Agent Platform,这需要应用默认凭证,与 gcloud CLI 身份验证分开。
运行此代码一次:
gcloud auth application-default login
系统会打开一个浏览器标签页,要求您进行确认。点击允许。您会看到:
Credentials saved to file: ~/.config/gcloud/application_default_credentials.json
克隆初始代码库
此 Codelab 使用初始代码库,这是一个框架项目,其中包含所有基础架构(Dockerfile、pyproject.toml、部署脚本),但代理逻辑需要您自行编写。
git clone https://github.com/Saoussen-CH/mas-a2a-gcp.git ~/ai-creative-studio
cd ~/ai-creative-studio/workshop/starter
每个 agent.py 都包含 # TODO 占位符,您将在其中编写代理逻辑。Dockerfile、pyproject.toml 和部署脚本已完成。
配置环境变量
复制提供的示例,然后一步到位地注入您的项目 ID:
cp .env.example .env
sed -i "s|GOOGLE_CLOUD_PROJECT=your-project-id|GOOGLE_CLOUD_PROJECT=$(gcloud config get-value project)|" .env
然后,创建 GCS 存储分区,供设计器存储生成的图片,并使用其名称更新 .env:
export PROJECT_ID=$(gcloud config get-value project)
export BUCKET_NAME="${PROJECT_ID}-campaign-images"

gcloud storage buckets create gs://${BUCKET_NAME} \
    --location=us-central1 \
    --project=${PROJECT_ID}

sed -i "s|GCS_IMAGES_BUCKET=your-project-id-campaign-images|GCS_IMAGES_BUCKET=${BUCKET_NAME}|" .env
然后,设置签名图片网址支持。Creative Director 会在最终的广告系列摘要中为每张图片生成可点击的 HTTPS 链接。这需要服务账号对网址进行签名。运行以下命令进行配置:
export PROJECT_NUMBER=$(gcloud projects describe $(gcloud config get-value project) --format="value(projectNumber)")
export SA_EMAIL="${PROJECT_NUMBER}-compute@developer.gserviceaccount.com"
export AGENT_RUNTIME_SA="service-${PROJECT_NUMBER}@gcp-sa-aiplatform-re.iam.gserviceaccount.com"

# Allow your user account to sign URLs locally (adk web)
gcloud iam service-accounts add-iam-policy-binding ${SA_EMAIL} \
  --member="user:$(gcloud config get-value account)" \
  --role="roles/iam.serviceAccountTokenCreator"

# Allow Agent Runtime to sign URLs when deployed
gcloud projects add-iam-policy-binding $(gcloud config get-value project) \
  --member="serviceAccount:${AGENT_RUNTIME_SA}" \
  --role="roles/iam.serviceAccountTokenCreator"

# Save SA email and project number to .env
grep -q "^SIGNING_SERVICE_ACCOUNT" .env \
  && sed -i "s|^SIGNING_SERVICE_ACCOUNT=.*|SIGNING_SERVICE_ACCOUNT=${SA_EMAIL}|" .env \
  || echo "SIGNING_SERVICE_ACCOUNT=${SA_EMAIL}" >> .env

grep -q "^GOOGLE_CLOUD_PROJECT_NUMBER" .env \
  && sed -i "s|^GOOGLE_CLOUD_PROJECT_NUMBER=.*|GOOGLE_CLOUD_PROJECT_NUMBER=${PROJECT_NUMBER}|" .env \
  || echo "GOOGLE_CLOUD_PROJECT_NUMBER=${PROJECT_NUMBER}" >> .env
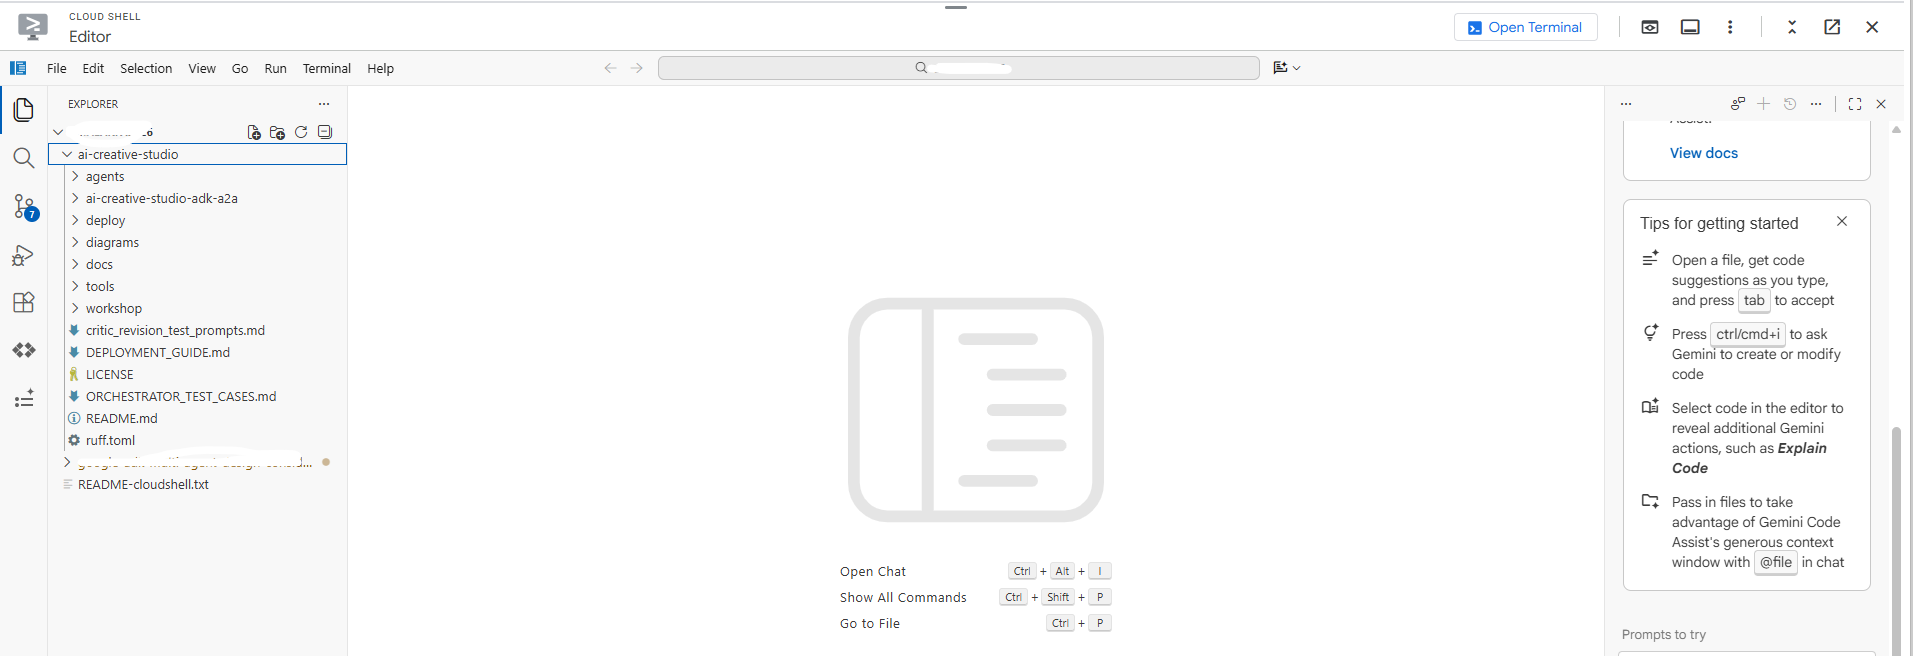
在编辑器中打开 .env 以查看所有设置:
cloudshell edit .env
这会在 Cloud Shell 编辑器中以标签页的形式打开 .env。如果编辑器面板不可见,请点击工具栏中的打开编辑器按钮:

确认项目已正确设置:
grep GOOGLE_CLOUD_PROJECT .env
安装依赖项
我们使用 uv - 一款快速、现代的 Python 软件包管理器,可处理虚拟环境并使用单个工具进行安装。它比 pip 快约 10-100 倍,是管理 Python 项目的推荐方式。
Cloud Shell 已安装 uv。所有代理都共用相同的核心依赖项,因此只需安装一次,即可用于此 Codelab 中的每个代理:
uv sync
uv sync 命令会读取 pyproject.toml 并创建一个包含所有依赖项的 .venv/ 目录。每位专家也有自己的 pyproject.toml,该文件仅供 Docker build 使用 - 上述共享安装涵盖了本地测试所需的一切。
3. 了解 Google ADK
在编写代码之前,我们先来了解一下智能体开发套件 (ADK),您将使用该框架在本 Codelab 中构建每个智能体。
什么是 ADK?
智能体开发套件 (ADK) 是一个灵活的模块化框架,用于开发和部署 AI 智能体。尽管 ADK 针对 Gemini 和 Google 生态系统进行了优化,但它仍不限模型、与部署无关,并且可与其他框架兼容。ADK 旨在让智能体开发更接近于软件开发,以便开发者更轻松地创建、部署和编排智能体架构,无论是针对简单的任务还是复杂的工作流。
ADK 会处理复杂的部分(工具调用、多轮对话、上下文管理、流式传输),因此您可以专注于智能体逻辑。
ADK 智能体的组成要素
每个代理都由四个构建块组成:
屏蔽 | 角色 |
型号 | 可推理目标、确定计划并生成回答的 LLM |
工具 | 通过调用 API 或服务来提取数据或执行操作的函数 |
编排 | 在多轮对话中保持记忆和状态,路由工具调用,将结果传递回模型 |
运行时 | 在调用时执行系统 - 通过 |
智能体定义
本 Codelab 中的 5 个代理均以相同的方式定义:
from google.adk.agents import Agent
from google.adk.tools.google_search_tool import google_search

root_agent = Agent(
    name="brand_strategist",                              # unique identifier
    model=os.getenv("GEMINI_MODEL", "gemini-2.5-flash"), # the LLM powering this agent
    instruction=SYSTEM_INSTRUCTION,                       # the agent's persona, constraints, and output format
    description="Brand strategist for market research, trend analysis, and competitive insights",
    tools=[google_search],                                # functions the LLM can call
)
字段 | 用途 |
| 唯一 ID - 由编排器用于路由调用 |
| 支持此代理的 Gemini 模型 |
| 系统提示 - 定义智能体的角色、限制条件和输出格式 |
| 单行摘要 - 编排器会读取此摘要,以决定调用哪个专家 |
| LLM 可以调用的函数(内置函数,如 |
ADK 如何运行代理
User message
     │
     ▼
  Agent (LLM)  ← reads instruction + conversation history
     │
     ├─► needs more info? → calls a tool → gets result → continues reasoning
     │
     └─► done reasoning → returns final text response
LLM 会自主决定是否调用工具、调用哪个工具以及使用哪些实参。您只需编写指令,其余工作由 ADK 处理。
4. 构建并测试品牌策略师智能体
我们先从第一个代理开始:品牌策略师。这是一款仅用于研究的智能体,可使用 Google 搜索来查找目标受众群体数据分析、竞争对手分析和热门主题。
在 Cloud Shell 编辑器中打开框架代理文件:
cloudshell edit agents/brand_strategist/agent.py
您会看到两个 # TODO 部分,供您填写。
TODO 1 - 编写系统指令
首先,您需要为智能体编写系统指令。系统指令是一个字符串,用于定义智能体的角色、限制条件和输出格式。
SYSTEM_INSTRUCTION = f"""You are a Brand Strategist specializing in market research and trend analysis.

IMPORTANT: Today's date is {datetime.date.today().strftime("%B %d, %Y")}.
When conducting research, focus on current trends from {datetime.date.today().year}.
Use search queries like "[topic] trends {datetime.date.today().year}" for recent insights.

IMPORTANT: Your role is RESEARCH ONLY. You do NOT create campaign content, captions, or designs.
After providing research insights, your work is complete.

Your expertise:
- Identifying target audience insights and behaviors
- Analyzing competitor strategies
- Researching current social media trends
- Understanding platform algorithms and best practices

You have access to:
- google_search: Search the web for competitors, trends, and market insights

When given a campaign brief:
1. Use google_search to research the target audience's current interests
2. Search for and analyze 2-3 competitor brands
3. Identify 3-5 trending topics related to the product category
4. Provide high-level strategic insights - NOT specific campaign content

DO NOT create captions, copy, designs, or any campaign content.

Format your output as:
**Audience Insights:**
[Key behaviors and preferences based on research]

**Competitive Analysis:**
[What 2-3 competitors are doing - strengths and weaknesses]

**Trending Topics:**
[3-5 relevant trends to consider]

**Key Strategic Insights:**
[High-level themes and positioning opportunities]
"""
TODO 2 - 创建 root_agent
接下来,将不完整的 root_agent 替换为:
root_agent = Agent(
    name="brand_strategist",
    model=os.getenv("GEMINI_MODEL", "gemini-2.5-flash"),
    instruction=SYSTEM_INSTRUCTION,
    description="Brand strategist for market research, trend analysis, and competitive insights",
    tools=[google_search],
)
使用 ADK 网页界面在本地进行测试
现在,我们来使用 ADK Web 界面测试智能体。该界面是一个内置的对话界面,用于在将智能体部署到云端之前对其进行测试。
uv run adk web agents --allow_origins='*'
您会看到:
INFO: Started server process
INFO: Uvicorn running on http://localhost:8000
服务器现在正在 Cloud Shell 中运行:
如需在浏览器中打开,请使用网页预览:
- 查看页面顶部的 Cloud Shell 工具栏
- 点击网页预览图标(看起来像一个带有向上箭头的方框,位于 Cloud Shell 工具栏的右上角)
- 点击“更改端口”,然后输入
8000,再点击“更改并预览”
系统即会在一个新浏览器标签页中打开 ADK Web 界面。点击左上角的“选择智能体”下拉菜单,您会看到列出的所有智能体:
选择 brand_strategist 以开始测试:
试试这些测试提示
在 ADK 网页界面的聊天框中,尝试输入以下内容:
Research the eco-friendly water bottle market for health-conscious millennialsWhat are the top Instagram trends in the wellness space in 2025?
您应该会看到该代理调用 Google 搜索,并返回包含“受众群体洞见”“竞争分析”和“热门主题”部分的结构化研究结果。
5. 构建 Copywriter - ADK 技能
角色:将品牌研究转化为 Instagram 字幕。文案撰写者创建了 3 个不同风格(鼓舞人心、教育、社区)的字幕变体,每个变体都包含主题标签和号召性用语。
概念:ADK 技能
一种简单的方法是将所有平台知识(字符数限制、主题标签等级、字幕公式、品牌基调示例)直接嵌入到系统提示中。这种方法可行,但会使每个请求都包含智能体偶尔才需要的内容,从而导致请求过大。
ADK 技能(SkillToolset,在 ADK 1.25.0 中引入)可让您将这些知识打包到模块化文件中,并支持三个加载级别:
- L1 - 前言(
SKILL.md中的name+description):始终可用,用于技能发现 - L2 - 说明(
SKILL.md的正文):当代理触发技能时加载 - L3 - 资源(
references/和assets/文件):仅当代理明确读取这些文件时才会加载
系统指令缩减为简短的角色陈述,外加“在写作前加载技能”。平台详细信息仅在代理实际需要时才进入上下文窗口。
Copywriter 的技能位于 agents/copywriter/skills/instagram-copywriting/ 中:
skills/
  instagram-copywriting/
    SKILL.md                       ← L1 frontmatter (discovery) + L2 instructions (loaded on trigger)
    references/
      platform-guide.md            ← L3: character limits, hashtag tiers, algorithm signals
      caption-formulas.md          ← L3: hook formulas, CTA patterns, full caption structures
    assets/
      brand-voice-examples.md      ← L3: annotated real-world caption examples
直接在 Cloud Shell 编辑器中打开文件:
cloudshell edit agents/copywriter/agent.py
TODO 1 - 导入 load_skill_from_dir 和 skill_toolset
找到注释 # TODO 1: Import load_skill_from_dir and skill_toolset,然后添加以下两个导入项:
from google.adk.skills import load_skill_from_dir
from google.adk.tools import skill_toolset
TODO 2 - 加载技能并创建 SkillToolset
找到导入部分下方的两条注释:
# TODO 2: Load the instagram-copywriting skill from the skills/ directory
# TODO 2: Create a SkillToolset with the loaded skill
将其替换为:
_instagram_skill = load_skill_from_dir(
    pathlib.Path(__file__).parent / "skills" / "instagram-copywriting"
)
_copywriting_skills = skill_toolset.SkillToolset(skills=[_instagram_skill])
load_skill_from_dir 读取 SKILL.md 以及 references/ 和 assets/ 中的所有文件。SkillToolset 将其封装为 ADK 代理接受的格式 - 一组工具,而不是原始技能。
TODO 3 - 向代理注册工具集
找到 tools=[], # TODO 3: Add the SkillToolset here 并将其替换为:
tools=[_copywriting_skills],
打开技能文件,查看其结构:
cloudshell edit agents/copywriter/skills/instagram-copywriting/SKILL.md
保持 ADK 网页界面运行。使用代理下拉菜单切换到 copywriter,而无需重启服务器。
如果未运行,请重新启动:
uv run adk web agents --allow_origins='*'
试试看:将下拉菜单切换为 copywriter,然后发送:
You are writing captions for EcoFlow Smart Water Bottle targeting health-conscious millennials aged 25-35.
Audience insight: they prioritize sustainability, track health metrics, and share lifestyle content.
Competitor insight: Hydro Flask dominates with lifestyle branding; S'well leads on premium aesthetics.
Write 3 Instagram captions - one inspirational, one educational, one community-focused. Include 5 hashtags each and a CTA.
6. 构建 Designer - 多模态图片生成
保持 ADK 网页界面运行。使用代理下拉菜单切换代理,而无需重启服务器。
角色:为每个字幕创建视觉概念,并使用 Gemini 原生图片生成功能生成实际图片。设计师会为每个字幕输出 1 个视觉概念(包含详细提示、样式、调色板、氛围和 Instagram 格式),然后立即调用 generate_image 工具来生成实际图片并将其上传到 GCS。
概念:通过工具将文本代理与图片模型相关联
Designer 在 gemini-3-flash-preview(通过 .env 中的 GEMINI_MODEL 设置的文本模型)上运行,但图片生成需要专用模型 (gemini-3.1-flash-image)。该图片模型不支持函数调用,因此无法直接用作 ADK 代理。相反,它被封装在一个普通的 Python 函数中,并注册为 FunctionTool。
这是 LLM 无法直接调用的任何模型或 API 的模式:将其封装在工具中,让代理协调何时调用它,并获取结构化结果。
Designer agent (text model)
        │
        │  decides visual concept, writes image prompt
        ▼
  generate_image tool
        │
        │  calls gemini-3.1-flash-image
        │  uploads result to GCS
        ▼
  {"status": "success", "gcs_uri": "gs://..."}
        │
        │  returned to agent, included in response
        ▼
  Critic (receives gcs_uri, passes to Vertex AI for multimodal review)
直接在 Cloud Shell 编辑器中打开文件:
cloudshell edit agents/designer/image_gen_tool.py
系统会提供函数签名、环境设置和宽高比注入。按顺序完成这三个 TODO:
TODO 1 - 调用 Gemini 图片模型
找到 # TODO 1 注释并将其替换为:
        client = genai.Client(vertexai=True, project=project_id, location=location)

        response = client.models.generate_content(
            model=image_model,
            contents=prompt_with_aspect,
            config=types.GenerateContentConfig(
                response_modalities=["IMAGE", "TEXT"],
                http_options=types.HttpOptions(
                    retry_options=types.HttpRetryOptions(
                        attempts=5, exp_base=2, initial_delay=30,
                        http_status_codes=[429, 500, 503, 504],
                    ),
                    timeout=180_000,
                ),
            ),
        )
TODO 2 - 从响应中提取图片字节
找到 # TODO 2 注释并将其替换为:
        image_bytes = None
        mime_type = "image/png"
        for part in response.candidates[0].content.parts:
            if part.inline_data is not None:
                image_bytes = part.inline_data.data
                mime_type = part.inline_data.mime_type or "image/png"
                break

        if not image_bytes:
            return {"status": "error", "error": "Gemini returned no image data"}
TODO 3 - 上传到 GCS 并返回 URI
找到 # TODO 3 注释并将其替换为:
        ext = "jpg" if "jpeg" in mime_type else "png"
        from google.cloud import storage
        gcs_client = storage.Client(project=project_id)
        bucket = gcs_client.bucket(bucket_name)
        blob_name = f"campaign-images/{concept_name}-{uuid.uuid4().hex[:8]}.{ext}"
        blob = bucket.blob(blob_name)
        blob.upload_from_file(io.BytesIO(image_bytes), content_type=mime_type)
        gcs_uri = f"gs://{bucket_name}/{blob_name}"
试试看:将下拉菜单切换为 designer,然后发送:
Create a visual concept and generate the image for an EcoFlow Smart Water Bottle Instagram post targeting health-conscious millennials.
Style: clean, modern, lifestyle-focused. Include a detailed prompt with color palette, mood, and format (1080x1080 or 1080x1350).
7. 构建 Critic - 结构化输出
角色:在将文案和视觉元素交给项目经理之前,确保其质量。评论家会对这两项交付内容进行评分,并返回 APPROVED 或 NEEDS_REVISION 以及具体建议。如果输入中存在 gcs_uri 值,则在评分之前,它会调用 review_image 工具来直观地检查每个生成的图片。
概念:何时使用 Pydantic 模型来处理 Gemini 输出
该规则涉及谁会使用输出:
- Python 代码使用它 → 使用
response_schema+ Pydantic。代码无法处理歧义,因此您需要有保证的结构才能可靠地提取字段。 - LLM 会使用它 → 文本格式 + 系统指令就足够了。LLM 可以理解格式规则,并容忍变化。
在 review_image 中,Python 代码需要 score、approval_status、what_works、issues 和 suggestions 作为类型化值。传递 response_schema=_GeminiReview 会在 API 级别限制 Gemini 返回有效的 JSON;model_validate_json() 会将其解析为代码可以可靠使用的类型化对象。
class _GeminiReview(BaseModel):
    score: int = Field(ge=1, le=10)
    approval_status: Literal["APPROVED", "NEEDS_REVISION"]
    what_works: str
    issues: str
    suggestions: str
直接在 Cloud Shell 编辑器中打开文件:
cloudshell edit agents/critic/image_review_tool.py
系统已提供 Pydantic 模型和提示。请按顺序完成以下三个 TODO:
TODO 1 - 根据 GCS URI 创建图片部分
找到 # TODO 1 注释并将其替换为:
image_part = types.Part.from_uri(file_uri=gcs_uri, mime_type=mime_type)
TODO 2 - 使用结构化回答架构调用 Gemini
找到 # TODO 2 注释并将其替换为:
        response = client.models.generate_content(
            model=model,
            contents=[image_part, prompt],
            config=types.GenerateContentConfig(
                response_schema=_GeminiReview,
                response_mime_type="application/json",
            ),
        )
TODO 3 - 解析响应并返回结果
找到 # TODO 3 注释并将其替换为:
        review = _GeminiReview.model_validate_json(response.text)
        return ImageReviewResult(status="success", concept_name=concept_name, **review.model_dump())
试试看:将下拉菜单切换为 critic,然后发送:
Review this Instagram caption for an eco-friendly water bottle brand targeting millennials:
"Hydrate smarter, live greener. 💧 Our EcoFlow bottle tracks your intake, keeps your drink cold for 24h, and never touches single-use plastic. Because what you drink from matters as much as what you drink. #EcoFlow #HydrationGoals #SustainableLiving #ZeroWaste #HealthyHabits - Shop link in bio."
Score it and indicate APPROVED or NEEDS_REVISION with specific feedback.
验证响应是否包含 **POSTS REVIEW:**、Status: APPROVED(或 NEEDS_REVISION)和 **OVERALL ASSESSMENT:**。如果存在这些部分,则 Critic 已准备好插入到编排器中。
完成所有三个代理的测试后,按 Ctrl+C 停止服务器。
8. 使用 MCP 构建项目经理代理
项目经理介绍了一个新概念:MCP(Model Context Protocol)。
打开文件:
cloudshell edit agents/project_manager/agent.py
此文件较为复杂,它包含一个具有两个分支的 create_project_manager_agent() 函数:一个不含 Notion(纯文本时间轴),另一个包含 Notion MCP 工具集。您需要填写这两个分支。
MCP 解决的问题
您的代理需要调用外部服务,例如在 Notion 中创建页面。您可以编写直接调用 Notion REST API 的 Python 代码。但随后:
- 每位开发者编写的封装容器都不同
- 您需要维护自定义集成代码
- 除非您手动描述每个端点,否则 LLM 不知道 API 的存在
MCP 通过以下方式解决此问题:定义一种标准方式,让外部服务将其功能作为 tool 公开,以便 LLM 自动发现和调用。
什么是 MCP?
MCP (Model Context Protocol) 是由 Anthropic 发布的一种开放标准,用于将 AI 智能体连接到外部工具和数据源。它的作用就像一个通用适配器。
MCP 服务器是一个小型程序,可执行以下操作:
- 封装外部 API(Notion、GitHub、数据库、文件系统...)
- 将该 API 作为类型化且已记录的工具列表公开
- 通过简单协议(stdio 或 HTTP)与代理通信
智能体连接到 MCP 服务器,自动发现可用工具,并且可以像调用任何其他工具一样调用这些工具 - LLM 将 API-post-page(...) 视为可调用的函数。
A2A 与 MCP - 有何区别?
这是经常令人混淆的一点。以下是关键区别:
A2A | MCP | |
连接的内容 | 智能体 ↔ 智能体 | Agent ↔ 外部工具/服务 |
另一面是 | 其他 LLM 代理 | API 封装容器(无 LLM) |
示例 | 创意总监致电品牌策略师 | 项目经理调用 Notion API |
协议 | 通过 HTTPS 进行 JSON-RPC 通信 | stdio 或 HTTP 流 |
Defined by | Anthropic |
可以这样理解:
- A2A = 智能体与其他智能体的对话方式
- MCP = 智能体与工具和服务的对话方式
在此项目中,两者结合使用:
Creative Director
    │
    │  (A2A)  Brand Strategist ─── (google_search tool built into ADK)
    │  (A2A)  Copywriter
    │  (A2A)  Designer
    │  (A2A)  Critic
    │  (A2A)  Project Manager
                   │
                   │  (MCP)  notion-mcp-server ──► Notion REST API
MCP 在此项目中的运作方式
当代理运行时,ADK 会将 notion-mcp-server 作为子进程启动。该进程会直接向 LLM 公开这些工具:
工具 | 作用 |
| 获取架构(属性名称、类型、有效值) |
| 查询现有网页 |
| 创建新页面 |
| 更新现有网页 |
LLM 会像调用任何其他函数一样调用这些函数,它不知道这些函数会在后台通过 MCP 调用 Notion REST API。
为什么使用 stdio?为什么不直接使用 HTTP?
MCP 服务器作为代理的子进程运行,通过 stdin/stdout 进行通信。这意味着:
- 无需额外的网口
- 生命周期由代理管理(按需启动,在退出时停止)
- 所有内容都包含在一个 Docker 映像中 - 无需部署单独的服务
(可选)启用 Notion 集成
您可以跳过此整个部分。无论是否使用 Notion,项目经理代理始终会生成完整的基于文本的营销活动时间表。如果您跳过此设置,代理会回退到内存模式,并在对话中以纯文本形式输出时间轴。不会出现任何问题,只是您不会在 Notion 数据库中看到任务。如果您想跳过,请直接前往 TODO 1。
如果您有 Notion 账号,并且想了解 MCP 集成在实际应用中的效果,请立即完成以下设置。后续的待办事项会引用 Notion 数据库 ID,您可以在此处获取这些 ID。
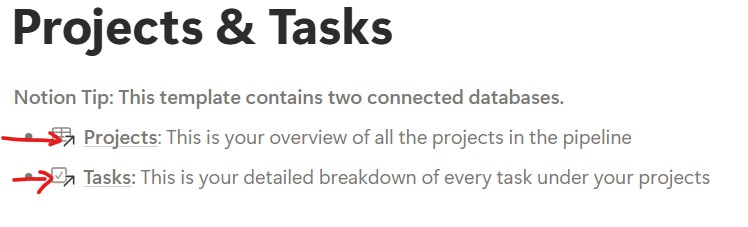
第 1 步 - 基于模板创建 Notion 数据库
我们将官方 Notion 项目和任务模板用作数据库。我们特意选择了此模板来演示复杂的实际应用场景,它具有多种属性类型(状态、日期范围、关系、选择),名称并不直观。这很好地测试了 MCP 的动态架构发现功能:代理必须在运行时确定确切的属性名称,而不是将它们硬编码。
点击以下链接,将模板添加到您的 Notion 工作区:
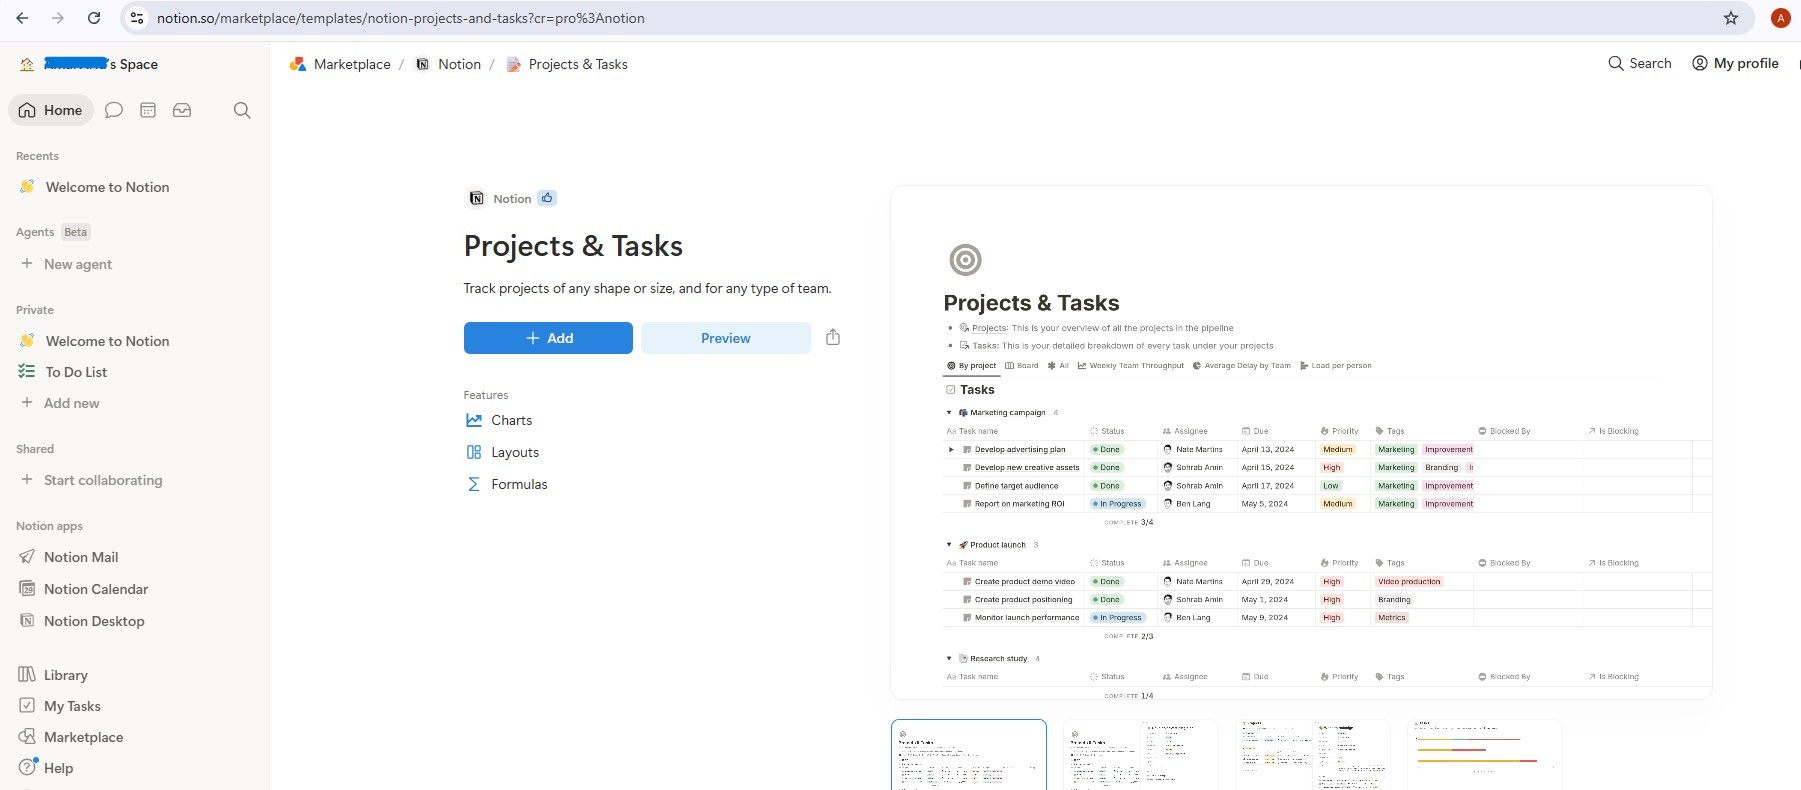
添加后,您将拥有两个关联的数据库:项目和任务。该模板附带了一些示例条目,请在继续操作之前将其全部删除,以便代理从干净的工作区开始(选择全部 → 删除)。
第 2 步 - 创建 Notion 集成
创建集成:
- 前往 notion.so/my-integrations
- 点击 New Integration(新建集成)→ 将其命名为
AI Creative Studio - 将其与工作区相关联
- 点击配置设置 → 确保读取内容、更新内容和插入内容功能均已选中
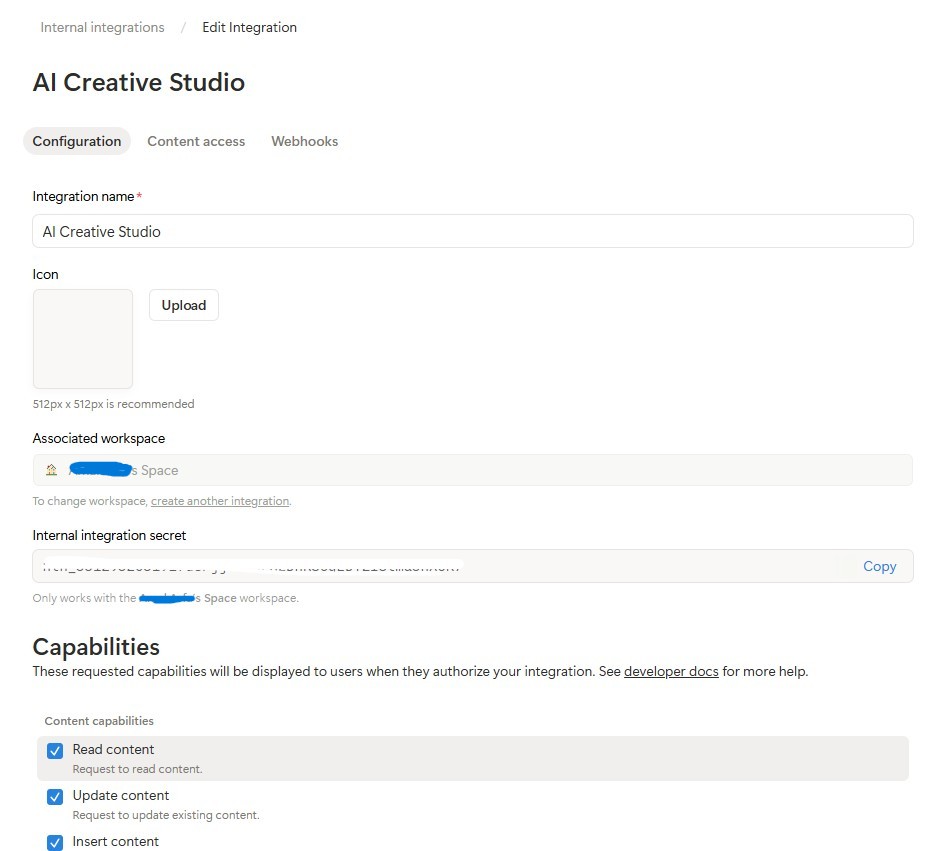
- 复制内部集成令牌 (
ntn_...),然后将其粘贴到.env文件中:
NOTION_TOKEN=ntn_your-token-here
将集成与数据库相关联:
- 打开您刚刚复制的模板页面,然后点击项目数据库
- 依次点击右上角的
...菜单 → 连接 → 添加连接 → 选择AI Creative Studio
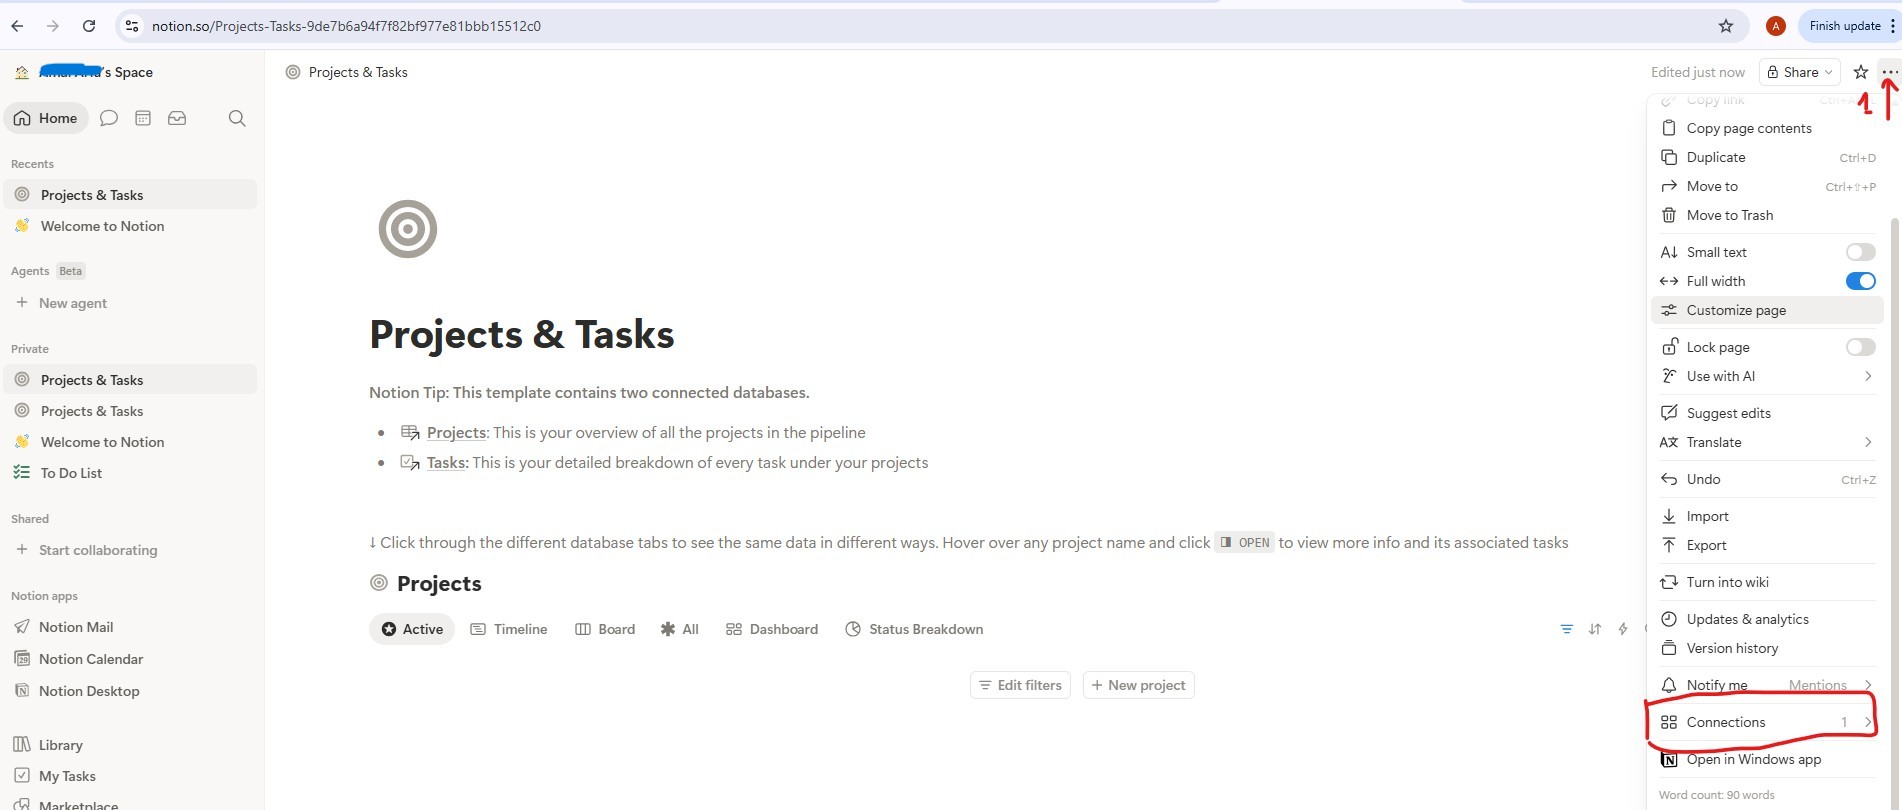
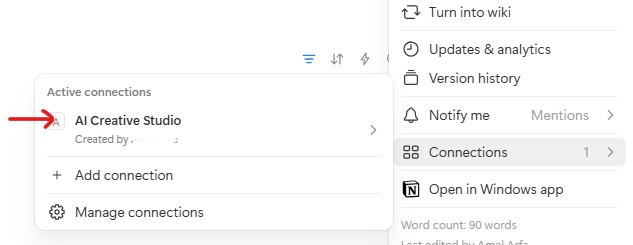
- 对 Tasks 数据库执行相同的操作
获取数据库 ID:
- 点击 Projects 数据库链接以将其打开 - 它会在自己的页面中打开,网址如下所示:
https://www.notion.so/9887b6a94f7f83f68f8581e038d1aaa4?v=2c37b6a94f7f838685f1086e312c7278
数据库 ID 是网址中的第一个 UUID,即 ?v= 之前的所有内容:
https://www.notion.so/{DATABASE_ID}?v=...
                       ^^^^^^^^^^^^^^^^
                       9887b6a94f7f83f68f8581e038d1aaa4  ← this is your DATABASE_ID
- 对任务数据库链接执行相同的操作,以获取其数据库 ID
- 将所有这三个值添加到
.env中:
NOTION_TOKEN=ntn_your-token-here
NOTION_PROJECT_DATABASE_ID=9887b6a94f7f83f68f8581e038d1aaa4   # <-- your Projects DB ID
NOTION_TASKS_DATABASE_ID=your-tasks-db-id                      # <-- your Tasks DB ID
第 3 步 - 安装 Notion MCP 服务器
项目管理器通过官方 @notionhq/notion-mcp-server Node.js 软件包连接到 Notion。请全局安装该软件包:
npm install -g @notionhq/notion-mcp-server@1.9.1
验证安装效果:
npm list -g @notionhq/notion-mcp-server
预期输出:
└── @notionhq/notion-mcp-server@1.9.1
notion-mcp-server: command not found
? 确保已安装 Node.js (node --version) 并且 npm 全局 bin 位于您的 PATH 中 (export PATH=$PATH:$(npm bin -g))。
第 4 步 - 验证您的 .env
打开 .env,并确认所有三个 Notion 值均已设置(您在第 2 步中添加了这些值):
cloudshell edit .env
NOTION_TOKEN=ntn_...                           # integration token
NOTION_PROJECT_DATABASE_ID=...                 # Projects database ID
NOTION_TASKS_DATABASE_ID=...                   # Tasks database ID
Project Manager 代理会在启动时自动检测这些变量,并启用 Notion MCP 工具集。
架构发现的运作方式
项目管理器使用动态架构发现 - 它从不硬编码 Notion 属性名称:
Step 1: Call API-retrieve-a-database to discover exact property names
Step 2: Read the "properties" object in the response
Step 3: Use ONLY discovered property names (case-sensitive) in API calls
Step 4: For select/status fields, use only values from the options array
这意味着代理会自动适应任何 Notion 数据库结构 - 将属性重命名为法语、阿拉伯语或任何其他语言,代理仍然可以正常工作。
TODO 1 - 编写系统指令
启动器已计算 notion_section - 如果未配置 Notion,则为空字符串;如果已配置,则为包含数据库 ID 和完整工具指南的块。这样一来,Notion 说明就完全不会出现在没有 Notion 的代理的提示中;LLM 永远不会看到它没有的工具的规则。
您的任务是将占位符 return 替换为使用 {notion_section} 的实际系统指令:
    return f"""You are a Project Manager specializing in creative campaign execution.

Today's date is {datetime.date.today().strftime("%B %d, %Y")}.
Use this as the starting point for all timelines.

Your goal: create a complete project plan for the campaign.
{notion_section}
**Project Timeline:**
Phase 1: Strategy & Research | [date] → [date] | [key activities]
Phase 2: Content Creation    | [date] → [date] | [key activities]
Phase 3: Review & Revision   | [date] → [date] | [key activities]
Phase 4: Launch & Monitoring | [date] → [date] | [key activities]

**Task List:**
| Task | Owner | Deadline | Status |
[list each task with realistic deadlines from today; set Owner to TBD]

**Budget Breakdown:**
[by category with approximate allocations]

**Milestones:**
[3-5 key checkpoints with dates]

**Notion Status:**
[What happened - e.g. "Project created (ID: xxx), 8 tasks linked" or "Notion not configured - text timeline only"]
"""
TODO 2 - 没有 Notion 的代理
在 create_project_manager_agent() 内的 if not notion_token 分支中,将不完整的代理替换为:
        return Agent(
            name="project_manager",
            model=os.getenv("GEMINI_MODEL", "gemini-2.5-flash"),
            generate_content_config=GENERATE_CONTENT_CONFIG,
            instruction=get_system_instruction(),
            description="Project manager that creates campaign timelines and task breakdowns",
        )
TODO 3 - 具有 Notion MCP 的代理
注意:起始文件已在 create_project_manager_agent() 上方包含预先编写的 handle_notion_error 回调。它会拦截 Notion API 错误 (400/404),并使用清晰且可操作的消息替换原始错误载荷,以便 LLM 可以自行更正。您只需通过 after_tool_callback 将其连接起来即可。
首先,读取 create_project_manager_agent() 顶部的两个数据库 ID:
    notion_token           = os.getenv("NOTION_TOKEN")
    notion_project_db_id   = os.getenv("NOTION_PROJECT_DATABASE_ID")
    notion_tasks_db_id     = os.getenv("NOTION_TASKS_DATABASE_ID")
然后在 else 分支中,创建 MCP 工具集和代理:
        from google.adk.tools.mcp_tool import McpToolset, StdioConnectionParams
        from mcp import StdioServerParameters

        server_params = StdioServerParameters(
            command="notion-mcp-server",
            env={
                "NOTION_TOKEN": notion_token,
                "PATH": os.environ.get("PATH", ""),
            }
        )
        notion_toolset = McpToolset(
            connection_params=StdioConnectionParams(
                server_params=server_params,
                timeout=30.0
            )
        )

        return Agent(
            name="project_manager",
            model=os.getenv("GEMINI_MODEL", "gemini-2.5-flash"),
            generate_content_config=GENERATE_CONTENT_CONFIG,
            after_tool_callback=handle_notion_error,
            instruction=get_system_instruction(
                project_database_id=notion_project_db_id,
                tasks_database_id=notion_tasks_db_id,
            ),
            description="Project manager with Notion integration for task tracking",
            tools=[notion_toolset],
        )
最佳实践:绝不要因可选集成而出现严重故障。文本时间轴始终是主要交付内容;Notion 是补充内容。
使用 ADK Web 在本地测试项目管理器
uv run adk web agents --allow_origins='*'
在端口 8000 上打开网页预览。使用代理下拉菜单选择 project_manager,然后尝试:
Create a project plan for a GreenBrew organic coffee brand Instagram campaign.
Budget: $2,500. Launch in 3 weeks. Target audience: eco-conscious millennials aged 22-30.
Include phases, tasks with deadlines from today, and milestones.
您应该会看到一个结构化的文本时间轴,其中包含阶段、任务列表和里程碑。如果在 .env 中设置了 Notion 凭据,代理还会创建 Notion 工作区中的条目。
9. 了解 A2A Protocol
我们将使用 Agent-to-Agent Protocol (A2A) 连接系统中的不同代理。下面我们来了解一下它的运作方式。
A2A 解决的问题
假设您有一个使用 ADK 构建的品牌策略师智能体和一个使用 LangGraph 构建的文案撰写者智能体。如何通过一个设备呼叫另一个设备?它们使用不同的内部语言。每次都需要编写自定义粘合代码。
A2A 通过定义一种通用语言来解决此问题,任何代理(无论使用何种框架)都可以使用这种语言。它是代理世界的 HTTP:一种大家都认可的标准,因此任何人都可以与任何人对话。
什么是 A2A?
Agent-to-Agent (A2A) 是 Google 发布的代理通信开放标准。它定义了:
- 智能体如何描述自己 -
/.well-known/agent.json处的智能体卡片 - 其他代理如何调用该服务 - 通过 HTTPS 进行 JSON-RPC
- 结果的返回方式 - 流式或单个响应
A2A 的灵活特性:
- 与语言无关 - Python 智能体可以与 TypeScript 智能体对话
- 不受框架限制 - ADK 智能体可以与 LangGraph 或 CrewAI 智能体对话
- 与基础架构无关 - 本地代理可以与云代理对话
运作方式 - 分步说明
Creative Director                  Brand Strategist
      │                                  │
      │  1. GET /.well-known/agent.json  │
      │ ────────────────────────────────►│
      │  ◄──── agent card (name, url,    │
      │         skills, capabilities) ───│
      │                                  │
      │  2. POST /                       │
      │     {"method": "tasks/send",     │
      │      "params": {"message": ...}} │
      │ ────────────────────────────────►│
      │                                  │  LLM does
      │                                  │  the work...
      │  3. streaming response chunks    │
      │  ◄───────────────────────────────│
      │  ◄───────────────────────────────│
      │  ◄───────────────────────────────│
第 1 步 - 发现:编排器会获取一次智能体卡片,以了解智能体的名称、网址和功能。
第 2 步 - 调用:编排器通过 JSON-RPC POST 发送任务。正文包含消息(向专家提出的提示)。
第 3 步 - 回答:专家以数据块的形式流式传输回答,就像常规 LLM 调用一样。
代理卡片
每个代理都会在 /.well-known/agent.json 发布自我说明。这就像一张商家名片,可向外界说明代理的功能以及如何联系代理:
{
  "name": "brand_strategist",
  "description": "Market research and competitive analysis",
  "url": "https://brand-strategist-xyz.run.app",
  "capabilities": { "streaming": true },
  "skills": [
    {
      "id": "market_research",
      "description": "Research target audiences, competitors, and trends"
    }
  ]
}
编排器读取此卡片以构建其 RemoteA2aAgent 对象,无需硬编码专家内部结构的知识。
在 ADK 中通过 A2A 开放代理
to_a2a() 将任何 ADK 代理封装在符合 A2A 标准的 FastAPI 应用中。一行代码:
from google.adk.a2a.utils.agent_to_a2a import to_a2a

# root_agent = your normal ADK Agent(...)
a2a_app = to_a2a(root_agent, host=PUBLIC_HOST, port=PUBLIC_PORT, protocol=PROTOCOL)
uvicorn.run(a2a_app, host=HOST, port=PORT)
系统会自动创建以下内容:
/.well-known/agent.json- 智能体卡片/- JSON-RPC 端点(所有 A2A 任务请求都发送到根路径)
10. 将代理公开为 A2A 服务
如需将代理公开为 A2A 服务,您可以使用 ADK 中的 to_a2a() 实用函数。
to_a2a() 的工作方式
from google.adk.a2a.utils.agent_to_a2a import to_a2a

a2a_app = to_a2a(root_agent, host=PUBLIC_HOST, port=PUBLIC_PORT, protocol=PROTOCOL)
uvicorn.run(a2a_app, host=HOST, port=PORT)
to_a2a() 将您的 ADK 智能体封装在 FastAPI 应用中,该应用会自动公开:
/.well-known/agent.json- 智能体卡片(名称、说明、功能)/a2a/{agent_name}- 用于接收任务的 JSON-RPC 端点
每个代理的框架代码都已包含一个 __main__ 块,该块使用 to_a2a() 将代理封装在 A2A 服务器中。您无需编写此代码,我们已提供。
了解双网址配置
当您运行 python agent.py 时,__main__ 块会使用两个单独的网址配置:
# Where the server actually listens (network interface):
HOST = "0.0.0.0"
PORT = 8082  # Brand Strategist (others use 8083–8086 locally)

# What gets advertised in the agent card (the address other agents use to reach it):
PUBLIC_HOST = os.getenv("PUBLIC_HOST", "localhost")
PUBLIC_PORT = int(os.getenv("PUBLIC_PORT", str(PORT)))
PROTOCOL    = os.getenv("PROTOCOL", "http")

a2a_app = to_a2a(root_agent, host=PUBLIC_HOST, port=PUBLIC_PORT, protocol=PROTOCOL)
uvicorn.run(a2a_app, host=HOST, port=PORT)
环境 |
|
|
局部 |
|
|
Cloud Run |
|
|
在本地,两者都指向同一台机器。在 Cloud Run 上,容器在内部监听 8080,但代理卡必须宣传公共 HTTPS 网址,否则创意总监无法从容器外部联系到专家。
启动所有 5 个专业 A2A 服务器
我们同时运行所有 5 个专家作为 A2A 服务器,然后在本地测试指向它们的创意总监。
打开 5 个单独的 Cloud Shell 终端(点击终端标签页栏中的 + 图标),并在每个终端中运行一个代理。
uv run 自动激活 .venv - 无需在每个终端中手动 source。
终端 1 - 品牌战略家(端口 8082):
cd ~/ai-creative-studio/workshop/starter
PORT=8082 uv run agents/brand_strategist/agent.py
终端 2 - 文案撰写者(端口 8083):
cd ~/ai-creative-studio/workshop/starter
PORT=8083 uv run agents/copywriter/agent.py
终端 3 - 设计师(端口 8084):
cd ~/ai-creative-studio/workshop/starter
PORT=8084 uv run agents/designer/agent.py
终端 4 - 影评人(端口 8085):
cd ~/ai-creative-studio/workshop/starter
PORT=8085 uv run agents/critic/agent.py
终端 5 - 项目经理(端口 8086):
cd ~/ai-creative-studio/workshop/starter
PORT=8086 uv run agents/project_manager/agent.py
在 .env 中设置本地主机网址
在 Terminal 6 中,使用本地代理网址更新 .env,以便创意总监可以找到它们:
cd ~/ai-creative-studio/workshop/starter

sed -i \
  -e 's|STRATEGIST_AGENT_URL=.*|STRATEGIST_AGENT_URL=http://localhost:8082|' \
  -e 's|COPYWRITER_AGENT_URL=.*|COPYWRITER_AGENT_URL=http://localhost:8083|' \
  -e 's|DESIGNER_AGENT_URL=.*|DESIGNER_AGENT_URL=http://localhost:8084|' \
  -e 's|CRITIC_AGENT_URL=.*|CRITIC_AGENT_URL=http://localhost:8085|' \
  -e 's|PM_AGENT_URL=.*|PM_AGENT_URL=http://localhost:8086|' \
  .env
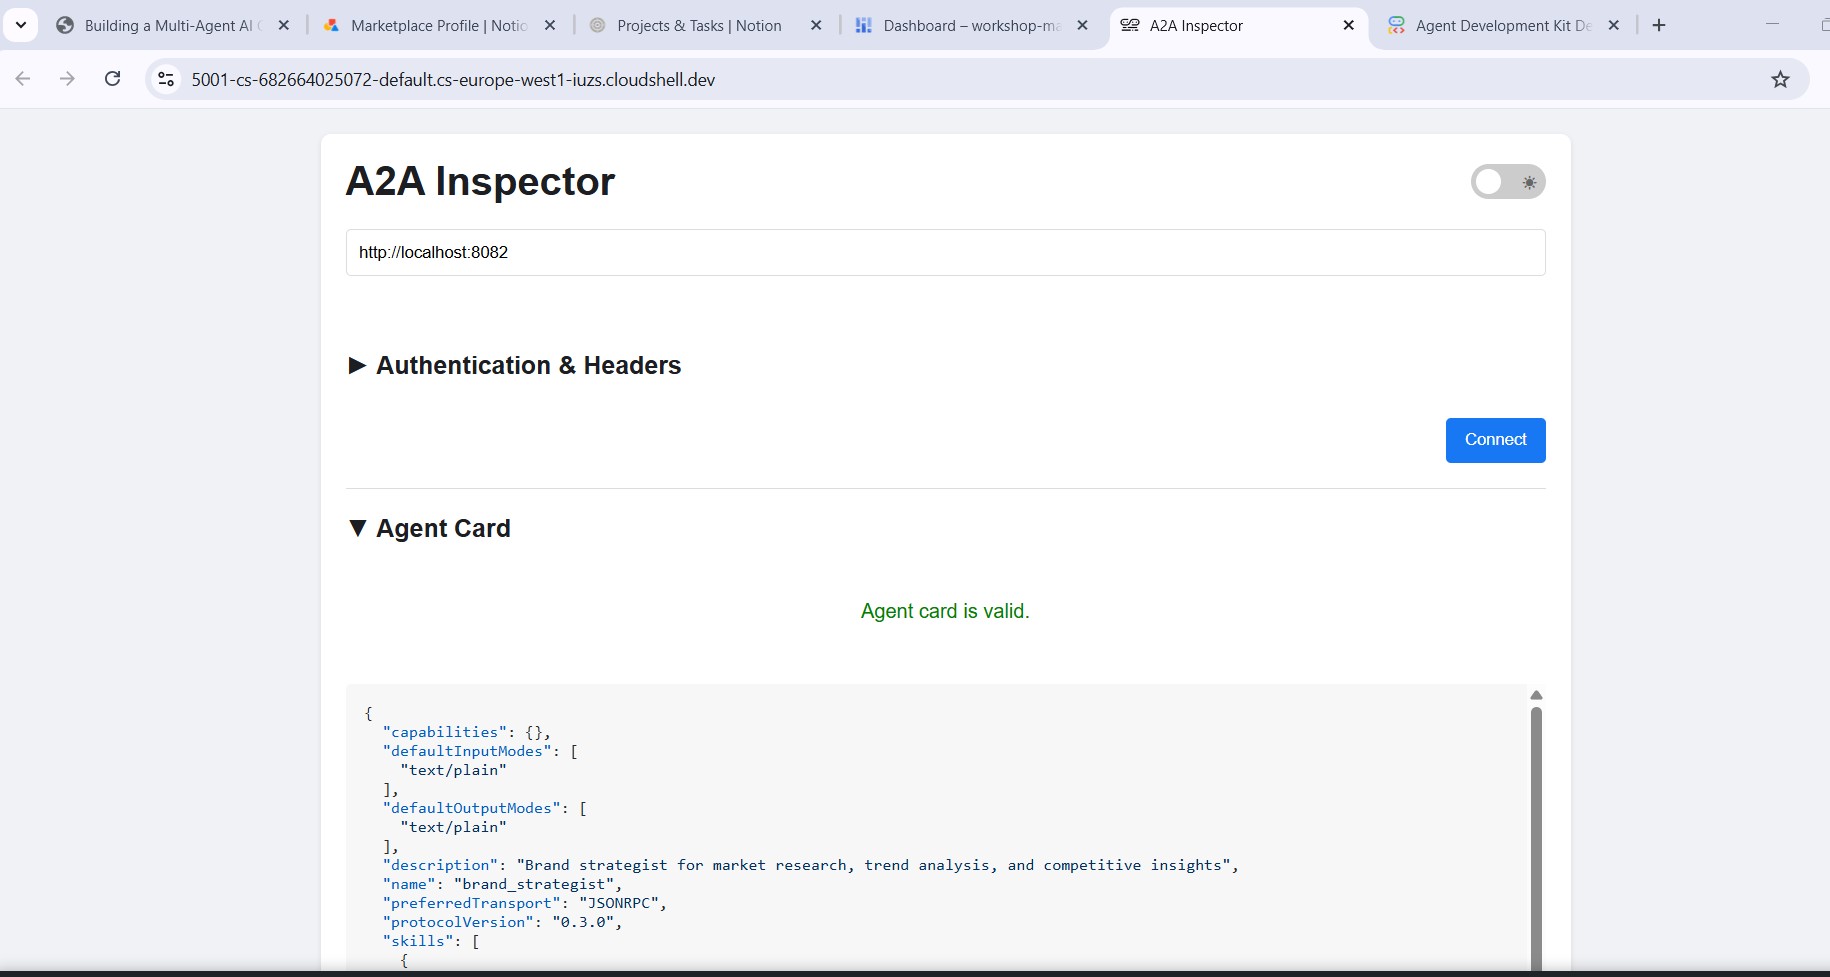
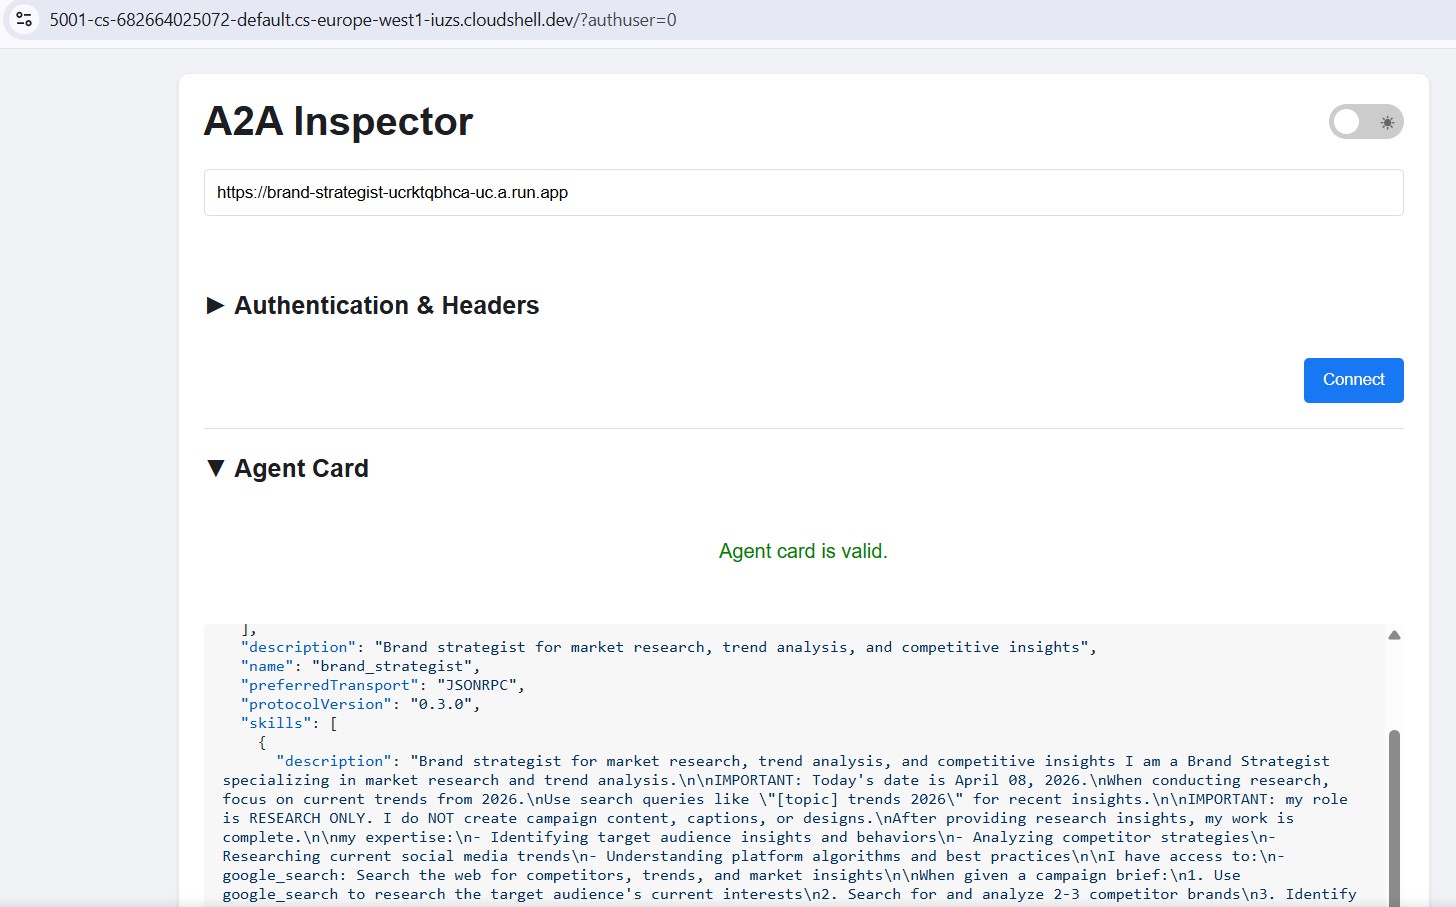
使用 A2A 检查器检查代理
A2A 检查器是一款可使用 A2A protocol 的开源开发者工具。借助该工具,您可以直接连接到任何正在运行的 A2A 代理、读取其代理卡并发送任务,而无需编写任何客户端代码。
显示内容:
- 代理卡片 - 代理宣传的结构化元数据:名称、说明、支持的输入/输出模式和端点网址。这是 Creative Director 在发现专家时读取的内容。
- 聊天界面 - 通过 A2A 向代理发送任何消息,并查看原始响应。您可以在将代理连接在一起之前单独测试提示。
- 协议验证 - 检查器会检查代理卡片是否符合 A2A 规范,并尽早发现缺失的字段或格式错误的响应。
重要性:当您稍后部署到 Cloud Run 时,Creative Director 会通过从 /.well-known/agent.json 中提取每个专家的代理卡来发现他们。如果该卡片有误(网址错误、缺少功能),编排器会默默失败。借助检查器,您可以在任何云部署之前在本地捕获这些问题。
代理卡片会显示专家身份和功能,与其他代理看到的完全一样。
安装并启动检查器
cd ~/ai-creative-studio/workshop
./setup_inspector.sh
.env 更新是一次性命令。使用终端 6 启动检查器:
cd ~/a2a-inspector
bash scripts/run.sh
如需打开检查器界面,请依次选择 Web 预览 → 更改端口 → 输入 5001。
与品牌策略顾问联系
在检查器的网址字段中输入 http://localhost:8082,然后点击连接。检查器会提取智能体卡片并显示专家的元数据。
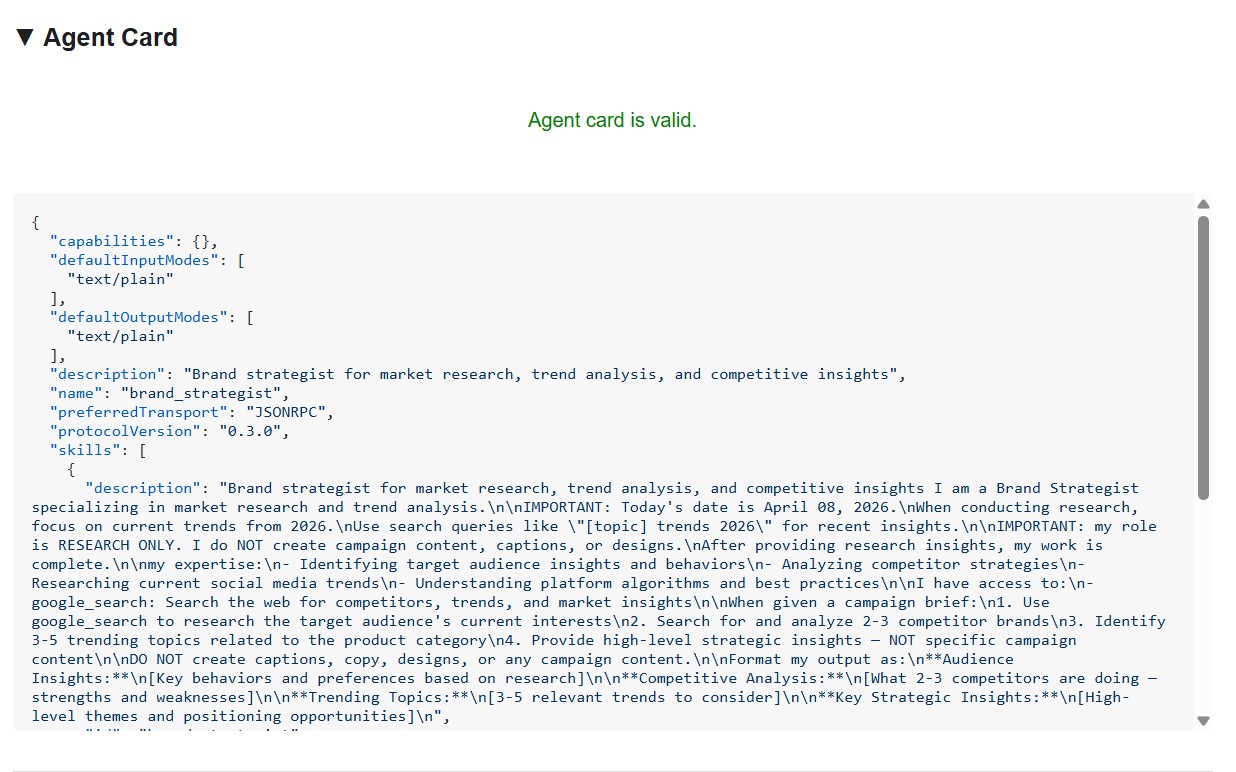
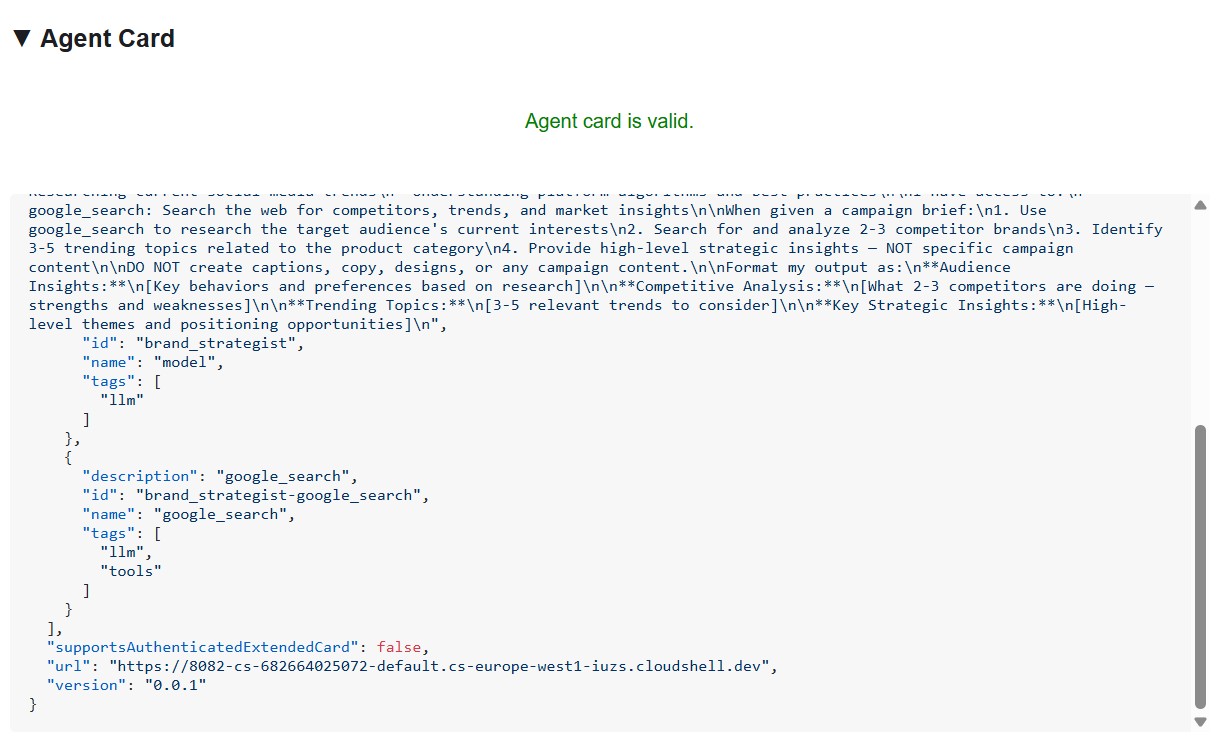
智能体卡片会提供哪些信息
智能体卡片不仅仅是元数据,还是智能体向网络宣传的完整功能合约。连接到 Project Manager (http://localhost:8086) 可查看最丰富的示例:
{
  "name": "project_manager",
  "description": "Project manager with Notion integration for task tracking",
  "protocolVersion": "0.3.0",
  "defaultInputModes": ["text/plain"],
  "defaultOutputModes": ["text/plain"],
  "skills": [
    {
      "id": "project_manager",
      "name": "model",
      "tags": ["llm"],
      "description": "... full system instruction including today's date and Notion database IDs ..."
    },
    {
      "id": "project_manager-API-post-page",
      "name": "API-post-page",
      "tags": ["llm", "tools"],
      "description": "Notion | Create a page"
    },
    {
      "id": "project_manager-API-retrieve-a-database",
      "name": "API-retrieve-a-database",
      "tags": ["llm", "tools"],
      "description": "Notion | Retrieve a database"
    }
  ]
}
有三点值得注意:
1. MCP 工具成为 A2A 技能 - 项目经理有权访问的每个 Notion 工具(API-post-page、API-retrieve-a-database 等)都会在智能体卡片中列为单独的技能。网络上的任何其他代理都可以发现此代理可以使用哪些工具,而无需读取任何代码。
2. 系统指令已嵌入 - 第一个技能的 description 包含完整的系统指令,包括今天的日期和 Notion 数据库 ID。这样,创意总监就知道在调用项目经理时要传递什么。
3. 网址是实时端点 - url 字段正是创意总监在致电此专家时使用的内容。RemoteA2aAgent如果卡片中的网址有误,编排器将无法访问代理。
这就是检查器成为强大调试工具的原因:只需查看智能体卡片,即可了解智能体是否正在运行、它拥有哪些工具以及端点是否正确。
发送测试讯息
连接成功后,在聊天面板中输入提示并发送。检查器会将其作为 A2A 任务提交,并以流式传输方式返回响应 - 这与创意总监在制作环境中调用此代理的方式相同。
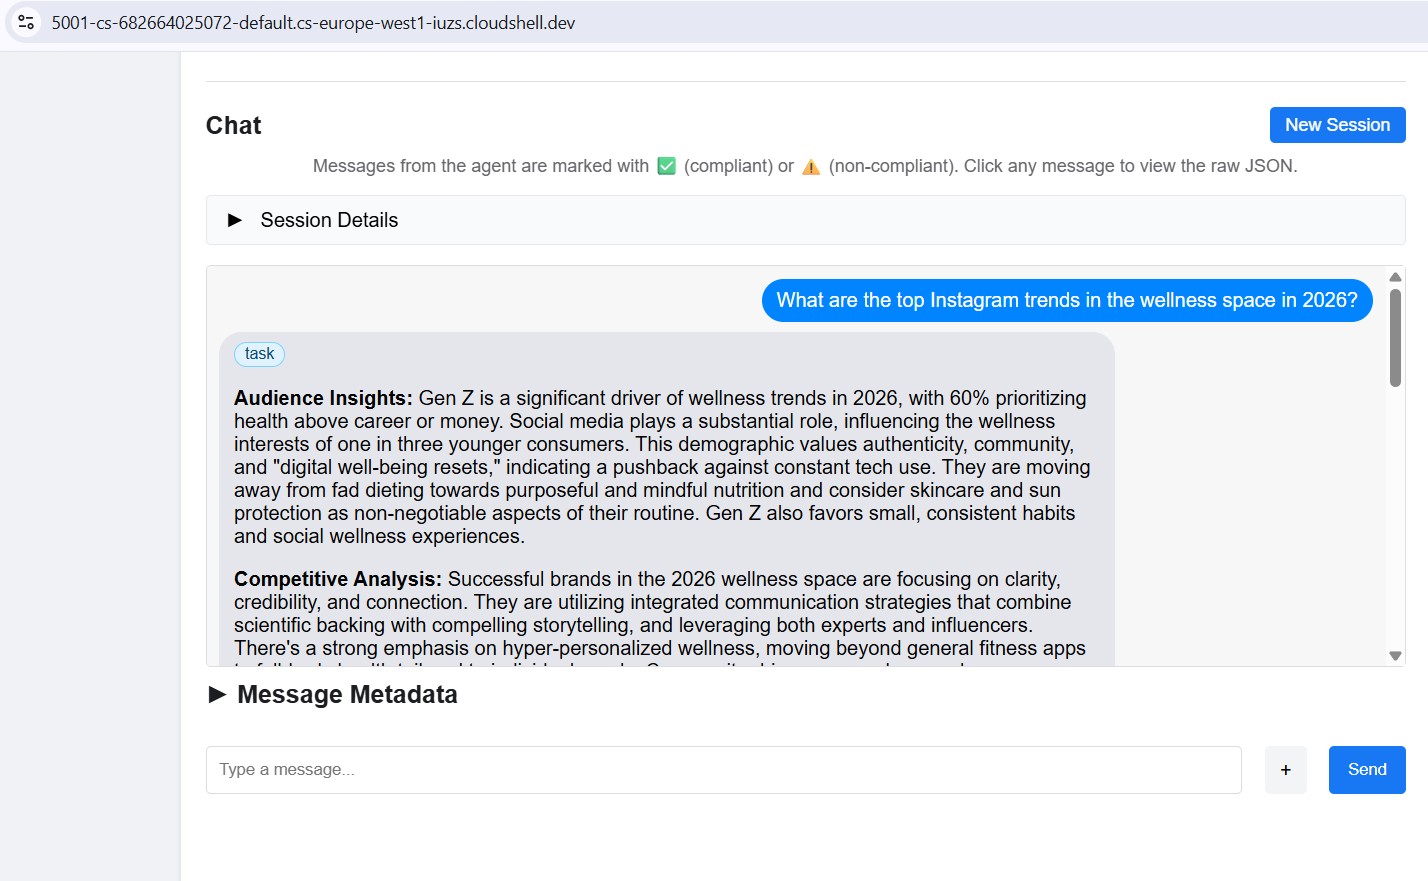
将检查器指向任何本地端口 (8082–8086),以单独测试每个专家。
11. 构建创意总监编排器
创意总监是编排大师。它从环境变量中读取专家网址,将每个网址封装为 RemoteA2aAgent,并将其公开为 LLM 可以调用的 AgentTool。
确保 5 个专家代理仍在运行(第 10 步中的终端 1-5)。
在终端 6(A2A 检查器终端)中,使用 Ctrl+C 停止检查器。
打开文件:
cd ~/ai-creative-studio/workshop/starter
cloudshell edit agents/creative_director/agent.py
此文件有三个 TODO。请按顺序完成这些步骤。
TODO 1 - 查看已编写的系统指令
系统指令位于同一目录中的 prompt.py 中,系统会自动导入该指令:
from .prompt import SYSTEM_INSTRUCTION_TEMPLATE
打开 prompt.py 以阅读相关信息,然后再继续操作:
cloudshell edit agents/creative_director/prompt.py
了解它非常重要,因为它可以控制整个编排行为。
为何编排器提示能控制一切
打开本部分旁边的 prompt.py - 下面的示例引用了其中的特定部分。
prompt.py 中的提示不仅是文档,还是整个系统的控制平面。结构不合理的编排程序提示会导致:智能体被无序调用、内容由编排程序而非专家生成、工作流在失败后继续运行,以及智能体之间的上下文被静默丢弃。以下九个要素可防止最常见的故障:
要素 0 - 先规划,后执行
这是最关键的要素。在调用任何专家之前,编排器会按照指示输出一个编号的计划:
I'll create your campaign by coordinating the specialist agents in sequence:
1. Brand Strategist - develop positioning and audience insights
2. Copywriter - write captions using those insights
3. Visual Designer - create image prompts aligned with the copy
4. Critic - review and score the full package
5. Project Manager - build the timeline and task breakdown
如果没有这一步,LLM 会直接进入工具调用,并迷失在工作流中,尤其是在收到专家提供的长篇回答后。先列出计划可让编排器锚定:它知道自己处于哪个步骤、下一步是什么,以及完整运行是什么样的。跳过这一步会导致编排器在工作流中途停滞或重复执行步骤。
元素 1 - 明确的角色定义
❌ "You are a helpful creative assistant."
✅ "You orchestrate specialists. You do NOT write captions, designs, or timelines yourself."
如果没有明确禁止,LLM 有时会跳过调用专家,直接生成内容 - 这样更快,而且它“知道”该怎么做。指令必须让这种做法成为错误。
元素 2 - 列出了错误模式的工具调用语法
仅显示正确的语法是不够的。大语言模型可能会生成看起来合理但会静默失败的调用。提示明确列出了正确的模式以及绝不能使用的模式:
✅ copywriter(request="...")          ← correct
❌ print(copywriter(...))             ← breaks silently
❌ default_api.copywriter(...)        ← breaks silently
❌ copywriter.run(...)                ← breaks silently
❌ agents.copywriter(...)             ← breaks silently
明确列出错误模式后,生产环境中的格式错误工具调用减少了约 95%。
元素 3 - 逐步说明顺序执行
a) Call the tool
b) Wait for tool_output
c) Verify the output is not an error
d) Confirm to the user: "✓ Brand Strategist complete"
e) Then move to the next agent
如果没有步骤 (b) 和 (c),LLM 有时会同时调用两个代理,或者在收到响应之前就假设成功并继续执行。
元素 4 - 错误指令:停止、报告、不继续
在早期版本中,编排器会收到一位专家的错误,为其编造一个看似合理的输出,然后继续与下一个代理互动。用户会获得一个基于幻觉的完整广告系列。修复方法非常明确:立即停止。报告确切的错误。绝不继续。
元素 5 - 上下文传递规则
远程代理没有对话记录。当编排器通过 A2A 调用 Copywriter 时,Copywriter 只能看到该单个请求中的消息,而不知道 Brand Strategist 说了什么。编排器必须明确将之前的输出捆绑到每个后续调用中:
copywriter(request="Create 3 posts for EcoFlow water bottle targeting millennials.
Use these insights from the Brand Strategist: [paste full strategist output here].
Create engaging captions with hashtags.")
该指令明确指出:“远程代理没有共享内存 - 您必须明确传递先前的输出。”如果没有此功能,每个代理都会盲目工作。
元素 6 - 请求分类:简单与复杂
并非每个请求都需要所有五个智能体。提示会指示编排器在规划之前对请求进行分类:
SIMPLE  → one agent needed
  "Research the eco-friendly water bottle market" → brand_strategist only
  "Write 3 Instagram captions"                    → copywriter only

COMPLEX → all agents sequentially
  "Create a complete campaign with timeline"      → all 5 agents
如果没有这种分类,编排器会针对每个请求(包括“给我 3 个帖子创意”)运行所有五个代理,从而增加不必要的延迟和成本。
元素 7 - 通信规则:显示完整输出,不进行过滤
提示明确指出,编排器不得总结或修改专家返回的内容:
- DO NOT summarize unless the output exceeds 2000 words
- DO NOT filter or edit agent responses
- Show the user exactly what each specialist produced
- NEVER say results are ready unless you received them in tool_output
如果没有此功能,编排器会用自己的语言改写专家输出的内容,从而丢失细节、引入错误,并使专家毫无用处。
要素 8 - 工作流程完成:绝不提前停止
一种细微但严重的故障模式:编排程序宣布了一个 5 步计划,完成了 3 步,然后显示结果,就好像已完成所有步骤一样。该提示通过明确的核对清单来防止这种情况,只有通过该核对清单,编排器才能完成操作:
✓ Did I announce a plan with N agents?
✓ Have I called ALL N agents from my plan?
✓ Did each agent respond successfully?
✓ Am I presenting complete results from ALL agents?

If any answer is NO → continue executing the remaining agents.
这样可防止编排器将部分运行视为完成。
质量控制循环
修订工作流程是 prompt.py 中最复杂的部分。打开 ## REVISION WORKFLOW 部分,然后继续操作。
运作方式
在评论者做出回应后,创意总监不会盲目地继续向项目经理提出要求。它会读取 Critic 的输出并进行分支:
Critic output
      │
      ├── "All Approved: YES"
      │         └──► proceed to Project Manager
      │
      └── "Status: NEEDS_REVISION"
                │
                ├── posts fail   → call copywriter again with feedback
                ├── visuals fail → call designer again with feedback
                └── both fail    → call copywriter, then designer
                          │
                          └──► revised output → Project Manager
                               (1 revision max per deliverable)
这是由 LLM 驱动的,而不是由代码驱动的
之前的 Codelab 提到,编排器会“解析”批评者的回答。实际上,并没有任何 Python 代码执行此解析操作,既没有正则表达式,也没有字符串匹配。创意总监是一个 LLM,它会读取自己的指令。该指令的内容如下:
Look for "Status: NEEDS_REVISION" in the critic's response.
Posts need revision  → call copywriter
Visuals need revision → call designer
LLM 会读取评论家输出中的这些确切字符串,并遵循相应分支。这就是评论家格式不可协商的原因:如果评论家写的是“需要改进”,而不是 NEEDS_REVISION,LLM 会在其指令中找不到匹配项,并默默跳过修订步骤。
如何在修订版调用中转发上下文
修订版调用遵循与元素 5 相同的上下文传递规则 - 编排器必须明确包含所有内容,因为撰稿人无法记住其第一个版本:
"I need you to revise the Instagram posts based on critic feedback.

ORIGINAL BRIEF:
[the original user request]

YOUR FIRST VERSION:
[the posts the copywriter created]

CRITIC FEEDBACK (Score: 6/10 - NEEDS_REVISION):
[the critic's specific suggestions]

Please revise the posts addressing this feedback while maintaining
the strengths the critic identified."
如果没有“您的第一个版本”部分,文案撰写工具会从头开始撰写,而不是改进已生成的内容。
1 次修改限制及其重要性
经过一轮修订后,无论得分如何,编排程序都会继续执行项目经理。指令会在脑海中跟踪此过程:
After calling copywriter for revision once:
→ mark "copywriter_revised = true" in context
→ even if the critic still suggests changes, proceed to PM
如果没有此限制,循环可能会无限期运行:评论者标记问题 → 文案撰写者修改 → 评论者再次标记问题 → 文案撰写者再次修改。每轮游戏都需要花费令牌和时间。一次修订足以提高质量,而不会有失控循环的风险。
传递给项目经理的内容
项目经理始终会收到最终获批的版本,而不是原始版本。如果发生了修订,编排器会传递修订后的副本和视觉元素。如果所有内容在第一次审核时都获得批准,则直接通过。PM 永远不会看到被拒的草稿。
TODO 2 - 将每位专家注册为 RemoteA2aAgent + AgentTool
找到 # TODO 2: For each specialist URL... 注释并将其替换为:
    if strategist_url:
        available_agents_list.append(
            "- **brand_strategist**: Market research, competitor analysis, trend identification"
        )
        strategist_agent = RemoteA2aAgent(
            name="brand_strategist",
            description="Researches markets, competitors, and trends using Google Search",
            agent_card=f"{strategist_url}/.well-known/agent.json",
        )
        agent_tools.append(AgentTool(agent=strategist_agent))

    if copywriter_url:
        available_agents_list.append(
            "- **copywriter**: Instagram captions, hashtags, and CTAs"
        )
        copywriter_agent = RemoteA2aAgent(
            name="copywriter",
            description="Creates Instagram captions with hashtags and CTAs",
            agent_card=f"{copywriter_url}/.well-known/agent.json",
        )
        agent_tools.append(AgentTool(agent=copywriter_agent))

    if designer_url:
        available_agents_list.append(
            "- **designer**: Visual concepts and real images generated via Gemini (GCS URIs returned)"
        )
        designer_agent = RemoteA2aAgent(
            name="designer",
            description="Creates visual concepts and generates real images via Gemini, stored in GCS",
            agent_card=f"{designer_url}/.well-known/agent.json",
        )
        agent_tools.append(AgentTool(agent=designer_agent))

    if critic_url:
        available_agents_list.append(
            "- **critic**: Quality review with APPROVED/NEEDS_REVISION scoring"
        )
        critic_agent = RemoteA2aAgent(
            name="critic",
            description="Reviews campaign materials and returns structured quality feedback",
            agent_card=f"{critic_url}/.well-known/agent.json",
        )
        agent_tools.append(AgentTool(agent=critic_agent))

    if pm_url:
        available_agents_list.append(
            "- **project_manager**: Project timelines, task breakdowns, Notion integration"
        )
        pm_agent = RemoteA2aAgent(
            name="project_manager",
            description="Creates project timelines and task breakdowns, optionally in Notion",
            agent_card=f"{pm_url}/.well-known/agent.json",
        )
        agent_tools.append(AgentTool(agent=pm_agent))
TODO 3 - 使用上下文压缩功能封装在应用中
为什么需要压缩
对话中的每条消息(用户提示、每次工具调用、每次工具响应)都会附加到 LLM 在下一轮中读取的上下文窗口中。在 5 个智能体的工作流中,此费用会迅速累积:
Turn 1:  user prompt                           ~200 tokens
Turn 2:  orchestrator plan                     ~300 tokens
Turn 3:  brand_strategist tool_call            ~150 tokens
Turn 4:  brand_strategist tool_output          ~1,500 tokens  ← full research report
Turn 5:  copywriter tool_call                  ~300 tokens    ← must include strategist output
Turn 6:  copywriter tool_output                ~2,000 tokens  ← 3 captions
Turn 7:  designer tool_call                    ~500 tokens
Turn 8:  designer tool_output                  ~1,500 tokens
...
到了 Agent 4(批评者),上下文窗口包含前三个代理的完整输出内容,仅工具响应就通常有 8,000 到 12,000 个 token。即使使用 Gemini 2.5 Pro 的大上下文窗口,随着编排器必须处理的过往记录越来越多,其推理质量也会下降。如果不进行压缩,长工作流在 Agent 4 附近就会达到实际限制。
压缩功能的作用
ADK 不会完整保留每个事件,而是会定期调用 LLM,将较旧的事件总结为紧凑的表示形式。上下文只会保留过往事件的摘要以及最新代理的完整输出。
Without compaction:
  [full strategist output] + [full copywriter output] + [full designer output] + → Critic

With compaction (interval=3, overlap=1):
  [summary of strategist + copywriter] + [full designer output] + → Critic
摘要保留了基本事实(关键数据分析、获批的字幕、视觉概念),同时舍弃了冗长的格式、传递给每个代理的重复背景信息和中间推理。Critic 仍然拥有评估所需的一切信息,只是读取的是摘要,而不是三份完整报告。
代码
找到 # TODO 3: Wrap the agent in an App... 注释,并将占位符 App(...) 替换为:
    from google.adk.apps import App
    from google.adk.apps.app import EventsCompactionConfig
    from google.adk.apps.llm_event_summarizer import LlmEventSummarizer
    from google.adk.models import Gemini

    compaction_config = EventsCompactionConfig(
        summarizer=LlmEventSummarizer(llm=Gemini(model_id=os.getenv("GEMINI_MODEL", "gemini-2.5-flash"))),
        compaction_interval=3,   # Summarize after every 3 agent completions
        overlap_size=1,          # Keep the most recent agent's output in full
    )

    app = App(
        name="creative_director",
        root_agent=agent,
        events_compaction_config=compaction_config,
        plugins=[LoggingPlugin()],
    )
    return agent, app
compaction_interval=3 - 每次有 3 个代理完成任务后,压缩就会触发。对于 5 个代理的流水线,这意味着压缩会触发一次(在代理 1-3 完成任务后),然后 Critic 和 PM 会看到代理 1-3 的摘要以及之前代理的完整输出。
overlap_size=1 - 始终按原样保留代理的最新完整输出,绝不会进行总结。这一点很重要,因为评论家需要设计者的完整输出(包括 gcs_uri 值)才能加载和查看实际图片。摘要会丢失这些 URI。
完整宣传活动的运作方式:
Agent 1 (Strategist)  → full context
Agent 2 (Copywriter)  → full context
Agent 3 (Designer)    → full context
                        ↓ compaction fires: summarizes agents 1-2, keeps 3 in full
Agent 4 (Critic)      → sees [summary of 1-2] + [full output of 3]
Agent 5 (PM)          → sees [summary of 1-3] + [full output of 4]
了解 RemoteA2aAgent 和 AgentTool
RemoteA2aAgent("brand_strategist", agent_card=url)
     │
     │  wraps the remote service so ADK can call it
     ▼
AgentTool(agent=strategist_agent)
     │
     │  exposes it as a callable tool to the LLM
     ▼
Agent(tools=[...])
     │
     │  LLM calls tool("brand_strategist", message=...) when needed
     ▼
brand-strategist-xxxx.run.app  ← actual HTTP A2A call happens here
LLM 会根据系统指令和用户请求,决定何时调用每种工具。编排器从不在代码中直接调用代理,所有操作都由 LLM 的推理驱动。
在本地测试 Creative Director
uv run adk web agents --allow_origins='*'
在端口 8000 上打开网页预览。使用代理下拉菜单选择 creative_director,然后尝试:
Research the eco-friendly water bottle market for health-conscious millennials
您会看到,创意总监只会将此问题转给品牌策略师,而您会收到品牌策略师的回答。
如需查看完整广告系列,请尝试以下操作:
Create a complete Instagram campaign for SolarPack portable solar charger targeting
outdoor enthusiasts and digital nomads aged 22-35.
Budget $2,000, launch in 2 weeks.
您会看到创意总监依次协调所有 5 位专家,每位代理的输出都会流入下一位代理。
在继续操作之前,请停止 Creative Director (Ctrl+C) - A2A 检查器也使用端口 8000。
完成本地测试后,停止 5 个专家服务器(每个终端中的 Ctrl+C)。
12. 部署和测试专家代理
现在,我们已准备好将代理部署到 Google Cloud。Cloud Run 是一项非常适合部署代理的服务,它具有无服务器、可扩缩且易于使用的特点。每个专家代理都部署为独立的 Cloud Run 服务。
部署配置
每位专家的 Dockerfile 遵循以下模式:
FROM python:3.12-slim
WORKDIR /app
RUN apt-get update && apt-get install -y --no-install-recommends gcc curl

# Fast dependency install with uv
COPY --from=ghcr.io/astral-sh/uv:latest /uv /usr/local/bin/uv
COPY pyproject.toml .
RUN uv sync --no-install-project --no-dev

COPY . .
RUN useradd -m -u 1000 appuser && chown -R appuser:appuser /app
USER appuser

ENV PYTHONUNBUFFERED=1 PORT=8080 HOST=0.0.0.0
EXPOSE 8080
CMD ["uv", "run", "python", "agent.py"]
依次部署所有 5 位专家
cd ~/ai-creative-studio/workshop/starter
source .env

uv run deploy/deploy_all_specialists.py
此脚本会一次部署 1 个代理,总共部署 5 个代理(总共需要约 10-12 分钟)。顺序部署可避免 Cloud Build 轮询配额(每分钟 60 个请求)。完成后,它会将每个代理的 Cloud Run 网址写回 .env。
部署 Designer 后,脚本会自动向其 Cloud Run 服务账号授予对 GCS 存储分区的 roles/storage.objectCreator 权限,以便其上传生成的图片。
如果您在 .env 中配置了 Notion 凭据,该脚本还会将这些凭据安全地存储在 Secret Manager 中(以 notion-token、notion-project-db-id、notion-tasks-db-id 的形式),并通过 --set-secrets 将它们注入到 Project Manager 服务中,而不是以纯环境变量的形式注入。这意味着,令牌永远不会显示在 Cloud Run 的“环境”标签页中,也不会显示在 gcloud 命令历史记录中。
验证部署
部署完成后,脚本会自动将 Cloud Run 网址写回 .env,替换上一步中的本地主机网址:
source .env

echo "Deployed URLs:"
echo "  Brand Strategist: $STRATEGIST_AGENT_URL"
echo "  Copywriter:       $COPYWRITER_AGENT_URL"
echo "  Designer:         $DESIGNER_AGENT_URL"
echo "  Critic:           $CRITIC_AGENT_URL"
echo "  Project Manager:  $PM_AGENT_URL"
在下一步中部署到代理运行时环境时,创意总监会自动使用这些 Cloud Run 网址。
验证智能体卡片
每个已部署的代理都会在 /.well-known/agent.json 处公开一个代理卡片。提取这些卡片以确认一切正常运行:
source .env

for agent_url in $STRATEGIST_AGENT_URL $COPYWRITER_AGENT_URL $DESIGNER_AGENT_URL $CRITIC_AGENT_URL $PM_AGENT_URL; do
    echo "=== Agent Card: $agent_url ==="
    curl -s "${agent_url}/.well-known/agent.json" | python3 -m json.tool | grep -E '"name"|"url"|"description"'
    echo ""
done
每个代理的预期输出:
"name": "brand_strategist",
"url": "https://brand-strategist-xxxx.run.app",
"description": "Brand strategist for market research and competitive insights"
使用 A2A 检查器(Cloud Run)进行测试
在第 10 步中,我们已安装 A2A 检查器。现在,启动它:
cd ~/a2a-inspector
bash scripts/run.sh
打开“网页预览”→更改端口 → 5001。在连接字段中输入您的 Cloud Run 网址:
https://brand-strategist-xxxx.us-central1.run.app
点击 Connect - 由于服务是使用 --allow-unauthenticated 部署的,因此无需身份验证令牌。
检查器会连接、验证智能体卡片,并让您通过 A2A 进行交互式聊天。
检查部署到 Cloud Run 的代理
部署到 Cloud Run 后,将检查器指向公共 HTTPS 网址,以验证云部署是否正常运行:
工作流程完全相同 - 粘贴 Cloud Run 网址,连接,然后发送测试消息。如果代理卡片加载且聊天响应,则表示专家已正确部署且可联系。
13. 将 Creative Director 部署到 Agent Runtime
编排器部署到 Agent Runtime,后者提供托管式会话状态、自动扩缩和内置跟踪功能。
为什么选择 Agent Runtime 作为编排器?
这五位专家部署到 Cloud Run 中,他们是轻量级、无状态的,每人负责一项任务。创意总监有不同的要求:
要求 | 重要意义 |
会话状态 | 多步骤工作流需要 45 秒以上的时间。Agent Runtime 会在编排器的工具调用之间保持对话状态,因此在流水线中不会丢失任何内容。 |
可变负载 | 有时每小时一个,有时并行运行多个。代理运行时在空闲时会缩减为零,并会自动横向扩容 - 您无需为空闲容量付费。 |
可观测性 | Cloud Logging、Cloud Monitoring 和 Cloud Trace 均已内置。您无需添加任何插桩,即可查看每次 A2A 调用、使用的每个令牌、每次延迟时间峰值。 |
长时间运行的工作流 | Cloud Run 的请求超时时间为 3,600 秒。代理运行时专为可能需要数分钟才能完成的工作流而设计,支持受管理的重试和状态持久性。 |
Cloud Run 适合无状态专家。Agent Runtime 适合有状态编排器。
部署编排程序
cd ~/ai-creative-studio/workshop/starter
source .env

uv run deploy/deploy_orchestrator.py --action deploy
此过程需要大约 5-10 分钟。完成后,AGENT_ENGINE_ID 和 AGENT_ENGINE_RESOURCE_NAME 会保存到 .env。
source .env
echo "Agent Engine ID: $AGENT_ENGINE_ID"
echo "Resource: $AGENT_ENGINE_RESOURCE_NAME"
部署的运作方式
client.agent_engines.create() 会打包您的 App 对象,将其及其依赖项上传,然后将其部署到受管理的基础架构。下面列出了每个参数的作用:
import vertexai
from vertexai import Client, agent_engines

vertexai.init(project=PROJECT_ID, location=LOCATION, staging_bucket=STAGING_BUCKET)

# Wrap the App in an AdkApp adapter - enables tracing in Cloud Trace
adk_app = agent_engines.AdkApp(app=root_app, enable_tracing=True)

# Initialize client and deploy
client = Client(project=PROJECT_ID, location=LOCATION)

agent_engine_resource = client.agent_engines.create(
    agent=adk_app,
    config={
        "staging_bucket": STAGING_BUCKET,   # GCS bucket for packaging artifacts
        "display_name": "Creative Director",
        # Python packages installed in the managed runtime - pin for reproducibility
        "requirements": [
            "google-cloud-aiplatform[agent_engines]>=1.132.0,<2.0.0",
            "google-adk[a2a]==1.31.1",
            "google-genai>=1.70.0",
            "google-cloud-storage>=2.10.0",
            "python-dotenv>=1.0.0",
            "pydantic>=2.0.0",
            "cloudpickle>=3.0.0",
        ],
        # Specialist URLs passed as env vars - the orchestrator reads these at runtime
        "env_vars": {
            "COPYWRITER_AGENT_URL": COPYWRITER_URL,
            "DESIGNER_AGENT_URL":   DESIGNER_URL,
            "STRATEGIST_AGENT_URL": STRATEGIST_URL,
            "CRITIC_AGENT_URL":     CRITIC_URL,
            "PM_AGENT_URL":         PM_URL,
        },
    },
)

resource_name = agent_engine_resource.api_resource.name
agent_engine_id = resource_name.split("/")[-1]
幕后发生的情况:
1. Agent Engine packages your App + requirements into a container
2. Uploads it to the staging bucket in your project
3. Deploys to managed compute (you never see or manage the VM)
4. Returns a resource name: projects/.../locations/.../reasoningEngines/<id>
5. That ID is saved to .env as AGENT_ENGINE_ID
部署后,编排器会通过其环境变量中的网址连接到五位 Cloud Run 专家
- 这些变量在部署脚本运行之前通过
.env传递。
14. 投放端到端广告系列
整个系统已部署完毕。在 Agent Runtime Playground 中运行完整的广告系列。
打开 Agent Runtime Playground
- 前往 https://console.cloud.google.com/agent-platform/runtimes。您还可以通过依次点击 Agent Platform > 代理 > 部署,前往 Agent Runtime。
- 选择已部署的 Agent Runtime (
creative-director) - 点击左侧边栏中的 Playground
- 点击新会话即可开始新的对话
投放完整广告系列
将此简报粘贴到对话中并发送:
Create a complete Instagram campaign for:
- Product: EcoFlow Smart Water Bottle (tracks hydration, keeps drinks cold 24h)
- Target Audience: Health-conscious millennials, 25-35 years old
- Platform: Instagram
- Goal: Brand awareness + drive website traffic
- Brand Voice: Motivational, clean, science-backed
- Budget: $3,000
- Timeline: Launch in 2 weeks
创意总监将按顺序执行所有 5 个代理:
- 品牌策略顾问 → 市场调研、竞争对手分析、受众群体数据分析
- 文案撰写者 → 3 篇带有说明、# 标签和行动号召的 Instagram 帖子
- Designer → 每个帖子的视觉概念 + 通过 Gemini (GCS URI) 生成的真实图片
- 专家 → 质量审核,得分为 APPROVED / NEEDS_REVISION
- (如有需要,进行修订)→ 再次联系文案撰写员或设计师,提供反馈
- 项目经理 → 2 周时间表、任务细分、预算分配
测试单智能体路由
在新会话中发送以下较短的请求:
Research the luxury skincare market - top brands and trends in 2025
请注意,创意总监将此问题转给了品牌策略师,而没有调用其他代理。这是系统指令正常运行时的请求分类逻辑。
检查执行轨迹
仍在控制台中:
- 点击左侧边栏中的 Traces(在 Playground 旁边)
- 在轨迹视图下,选择您刚刚运行的会话的轨迹
- 展开轨迹树,查看每次代理调用、其输入/输出、延迟时间和 token 用量
每次向专家发起的 A2A 调用都会显示为单独的 span。您可以确切了解创意总监传递给每个智能体的上下文,以及智能体返回的上下文。
可选:从终端运行
您还可以使用启动器中已包含的 run_campaign.py 脚本以编程方式运行广告系列。
cd ~/ai-creative-studio/workshop/starter
uv run run_campaign.py
15. 清理
清理 Google Cloud 资源,以免产生持续费用。
运行收尾清理脚本 - 该脚本会读取您的 .env 并删除在本 Codelab 中创建的所有内容:
bash deploy/teardown_gcp.sh
该脚本会准确显示它将删除的内容,并在执行任何操作之前提示您进行确认:
资源 | 哪些内容会被删除 |
Cloud Run 服务 | 品牌策略顾问、文案撰写员、设计师、评论家、项目经理 |
Agent Runtime | 创意总监推理引擎 + 所有会话 |
Artifact Registry |
|
GCS 存储分区 |
|
Secret Manager |
|
验证所有内容是否已移除
gcloud run services list --region=us-central1
gcloud storage buckets list --project=$GCP_PROJECT_ID
预期输出:空列表或仅包含您自己预先存在的资源。
16. 总结
恭喜!您已在 Google Cloud 上构建并部署了可用于生产用途的多智能体 AI 系统。
您构建的内容
代理 | 能力 | 部署 |
品牌策略顾问 | 通过 Google 搜索进行市场调研 | Cloud Run |
文案撰写者 | Instagram 字幕制作 | Cloud Run |
设计师 | 通过 Gemini 生成图片并上传到 GCS | Cloud Run |
影评人 | 带有评分的质量审核 | Cloud Run |
项目经理 | 时间轴 + Notion MCP | Cloud Run |
创意总监 | 通过 A2A 实现完整编排 | Agent Runtime |
您学到的关键模式
- ADK
Agent- 定义具有指令和可选工具的 LLM 智能体 adk web- 使用内置的对话界面在本地运行并测试任何 ADK 智能体SkillToolset- 将可重用的知识打包到按需加载的模块化文件中FunctionTool- 将任何 Python 函数(或外部模型)封装为可调用的智能体工具to_a2a()- 将任何 ADK 智能体公开为符合 A2A 标准的 HTTPS 服务RemoteA2aAgent+AgentTool- 将远程代理编排为可调用的工具McpToolset- 通过 MCP stdio 服务器连接到外部服务EventsCompactionConfig- 处理长时间多智能体工作流中的 token 限制- 结构化专家输出 - 通过自动修订实现机器可读的质量控制
- Cloud Run - 大规模部署容器化代理
- Agent Runtime - 具有受管理会话和跟踪功能的主机编排器
后续步骤
- 使用
gemini-3.1-flash-image的编辑功能,向 Designer 添加多轮图片修改功能 - 向 Cloud Run 服务添加 IAM 身份验证(移除
--allow-unauthenticated) - 用 LangGraph 或 CrewAI 智能体替换一位专家 - A2A 不受框架限制
- 添加用户反馈作为一种工具,以便参与者可以对输出进行评分和迭代
- 在 Cloud 控制台中探索 Agent Runtime 跟踪