
1. 소개
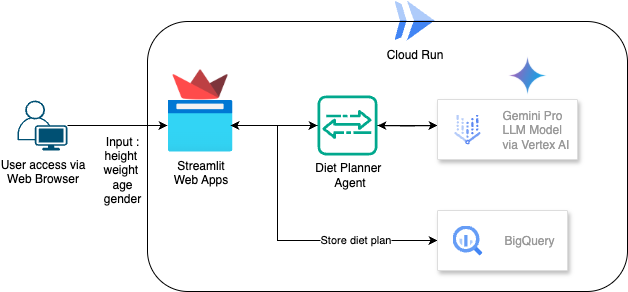
이 Codelab에서는 AI 기반 에이전트 식단 플래너를 빌드하고 배포하는 방법을 알아봅니다. Streamlit을 사용하는 UI, Gemini Pro 2.5를 사용하는 LLM 모델, Vertex AI를 사용하여 개발된 에이전트 AI용 Agentic AI Engine Orchestrator, 데이터를 저장하는 BigQuery, 배포용 Cloud Run을 사용합니다.
Codelab을 통해 다음과 같이 단계별 접근 방식을 사용합니다.
- Google Cloud 프로젝트를 준비하고 필요한 API를 모두 사용 설정합니다.
- Streamlit, Vertex AI, BigQuery를 사용하여 에이전트형 AI 식단 플래너 빌드
- Cloud Run에 애플리케이션 배포
아키텍처 개요
선행 조건
- 결제가 사용 설정된 Google Cloud Platform (GCP) 프로젝트
- Python에 관한 기본 지식
학습할 내용
- streamlit, Vertex AI를 사용하여 에이전트형 AI 식단 플래너를 빌드하고 BigQuery에 데이터를 저장하는 방법
- Cloud Run에 애플리케이션을 배포하는 방법
필요한 항목
- Chrome 웹브라우저
- Gmail 계정
- 결제가 사용 설정된 Cloud 프로젝트
2. 기본 설정 및 요구사항
자습형 환경 설정
- Google Cloud Console에 로그인하여 새 프로젝트를 만들거나 기존 프로젝트를 재사용합니다. 아직 Gmail이나 Google Workspace 계정이 없는 경우 계정을 만들어야 합니다.

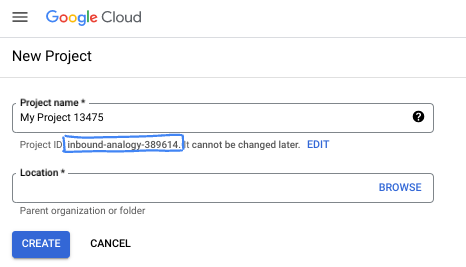
- 프로젝트 이름은 이 프로젝트 참가자의 표시 이름입니다. 이는 Google API에서 사용하지 않는 문자열이며 언제든지 업데이트할 수 있습니다.
- 프로젝트 ID는 모든 Google Cloud 프로젝트에서 고유하며, 변경할 수 없습니다 (설정된 후에는 변경할 수 없음). Cloud 콘솔은 고유한 문자열을 자동으로 생성합니다. 일반적으로는 신경 쓰지 않아도 됩니다. 대부분의 Codelab에서는 프로젝트 ID (일반적으로
PROJECT_ID로 식별됨)를 참조해야 합니다. 생성된 ID가 마음에 들지 않으면 다른 임의 ID를 생성할 수 있습니다. 또는 직접 시도해 보고 사용 가능한지 확인할 수도 있습니다. 이 단계 이후에는 변경할 수 없으며 프로젝트 기간 동안 유지됩니다. - 참고로 세 번째 값은 일부 API에서 사용하는 프로젝트 번호입니다. 이 세 가지 값에 대한 자세한 내용은 문서를 참고하세요.
- 다음으로 Cloud 리소스/API를 사용하려면 Cloud 콘솔에서 결제를 사용 설정해야 합니다. 이 Codelab 실행에는 많은 비용이 들지 않습니다. 이 튜토리얼이 끝난 후에 요금이 청구되지 않도록 리소스를 종료하려면 만든 리소스 또는 프로젝트를 삭제하면 됩니다. Google Cloud 신규 사용자는 300달러(USD) 상당의 무료 체험판 프로그램에 참여할 수 있습니다.
3. 시작하기 전에
Cloud Shell 편집기에서 클라우드 프로젝트 설정하기
이 Codelab에서는 결제가 사용 설정된 Google Cloud 프로젝트가 이미 있다고 가정합니다. 아직 설치하지 않았다면 아래 안내에 따라 시작하세요.
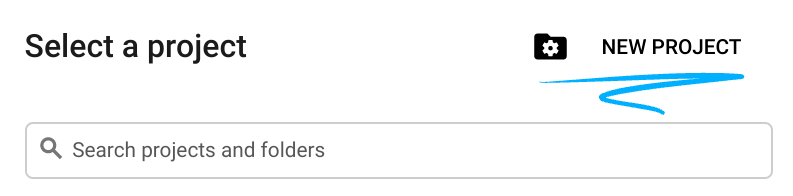
- Google Cloud 콘솔의 프로젝트 선택기 페이지에서 Google Cloud 프로젝트를 선택하거나 만듭니다.
- Cloud 프로젝트에 결제가 사용 설정되어 있는지 확인합니다. 프로젝트에 결제가 사용 설정되어 있는지 확인하는 방법을 알아보세요 .
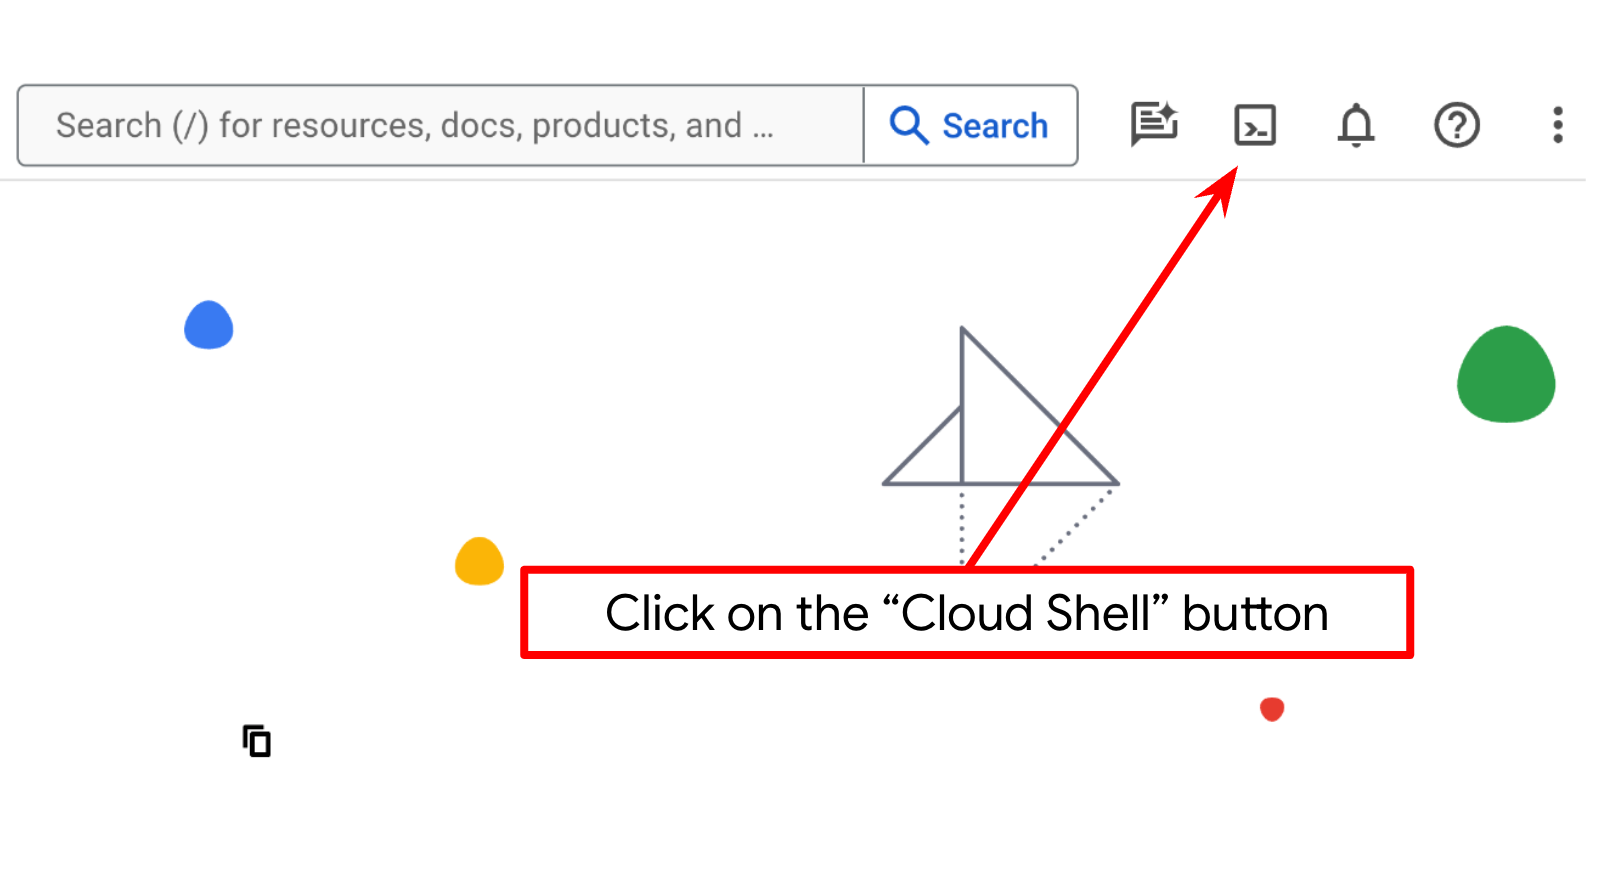
- bq가 미리 로드되어 제공되는 Google Cloud에서 실행되는 명령줄 환경인 Cloud Shell을 사용합니다. Google Cloud 콘솔 상단에서 Cloud Shell 활성화를 클릭합니다.
- Cloud Shell에 연결되면 다음 명령어를 사용하여 이미 인증되었는지, 프로젝트가 프로젝트 ID로 설정되었는지 확인합니다.
gcloud auth list
- Cloud Shell에서 다음 명령어를 실행하여 gcloud 명령어가 프로젝트를 알고 있는지 확인합니다.
gcloud config list project
- 프로젝트가 설정되지 않은 경우 다음 명령어를 사용하여 설정합니다.
gcloud config set project <YOUR_PROJECT_ID>
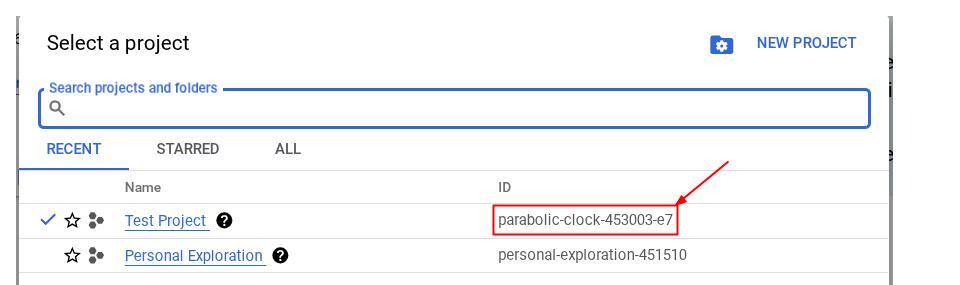
또는 콘솔에서 PROJECT_ID ID를 확인할 수도 있습니다.

클릭하면 오른쪽에 모든 프로젝트와 프로젝트 ID가 표시됩니다.
- 아래에 표시된 명령어를 통해 필수 API를 사용 설정합니다. 몇 분 정도 걸릴 수 있으니 잠시 기다려 주세요.
gcloud services enable aiplatform.googleapis.com \
                           run.googleapis.com \
                           cloudbuild.googleapis.com \
                           cloudresourcemanager.googleapis.com \
                    bigquery.googleapis.com
명령어가 성공적으로 실행되면 아래와 유사한 메시지가 표시됩니다.
Operation "operations/..." finished successfully.
gcloud 명령의 대안은 콘솔을 통해 각 제품을 검색하거나 이 링크를 사용하는 것입니다.
API가 누락된 경우 구현 과정에서 언제든지 사용 설정할 수 있습니다.
gcloud 명령어 및 사용법은 문서를 참조하세요.
애플리케이션 작업 디렉터리 설정
- 편집기 열기 버튼을 클릭하면 Cloud Shell 편집기가 열립니다. 여기에 코드를 작성할 수 있습니다.

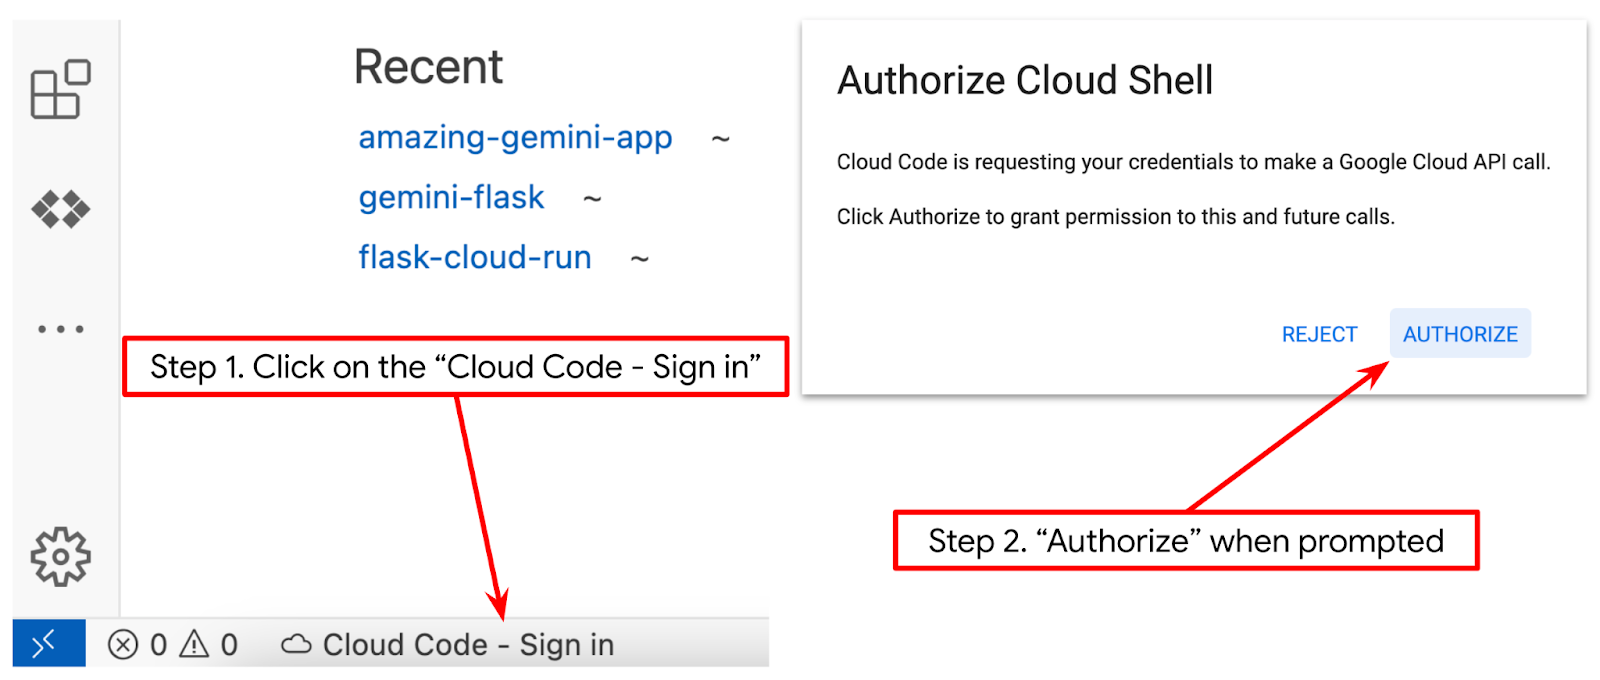
- 아래 이미지에 강조 표시된 것처럼 Cloud Shell 편집기의 왼쪽 하단 (상태 표시줄)에 Cloud Code 프로젝트가 설정되어 있고 결제가 사용 설정된 활성 Google Cloud 프로젝트로 설정되어 있는지 확인합니다. 메시지가 표시되면 승인을 클릭합니다. Cloud Shell 편집기를 초기화한 후 Cloud Code - 로그인 버튼이 표시되기까지 시간이 걸릴 수 있으니 잠시 기다려 주세요.
다음으로 Python 환경을 준비합니다.
환경 설정
Python 가상 환경 준비
다음 단계는 개발 환경을 준비하는 것입니다. 이 Codelab에서는 Python 3.12를 사용하고 Python 가상 환경을 사용하여 Python 버전과 가상 환경을 만들고 관리할 필요성을 간소화합니다.
- 터미널을 아직 열지 않은 경우 터미널 -> 새 터미널을 클릭하여 열거나 Ctrl + Shift + C를 사용합니다.

- 다음 명령어를 실행하여 새 폴더를 만들고 위치를 이 폴더로 변경합니다.
mkdir agent_diet_planner
cd agent_diet_planner
- 다음 명령어를 실행하여 새 virtualenv를 만듭니다.
python -m venv .env
- 다음 명령어를 사용하여 virtualenv를 활성화합니다.
source .env/bin/activate
requirements.txt를 만듭니다. 파일 → 새 텍스트 파일을 클릭하고 아래 콘텐츠로 채웁니다. 그런 다음requirements.txt로 저장합니다.
streamlit==1.33.0
google-cloud-aiplatform
google-cloud-bigquery
pandas==2.2.2
db-dtypes==1.2.0
pyarrow==16.1.0
- 그런 다음 다음 명령어를 실행하여 requirements.txt에서 모든 종속 항목을 설치합니다.
pip install -r requirements.txt
- 아래에 다음 명령어를 입력하여 모든 Python 라이브러리 종속 항목이 설치되었는지 확인합니다.
pip list
설정 구성 파일
이제 이 프로젝트의 구성 파일을 설정해야 합니다. 구성 파일은 변수와 서비스 계정 사용자 인증 정보를 저장하는 데 사용됩니다.
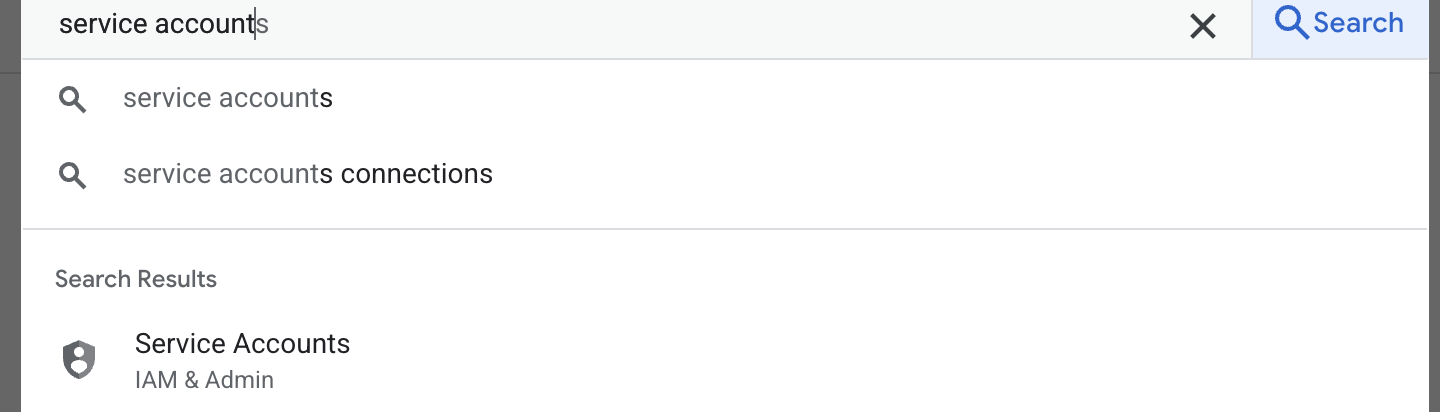
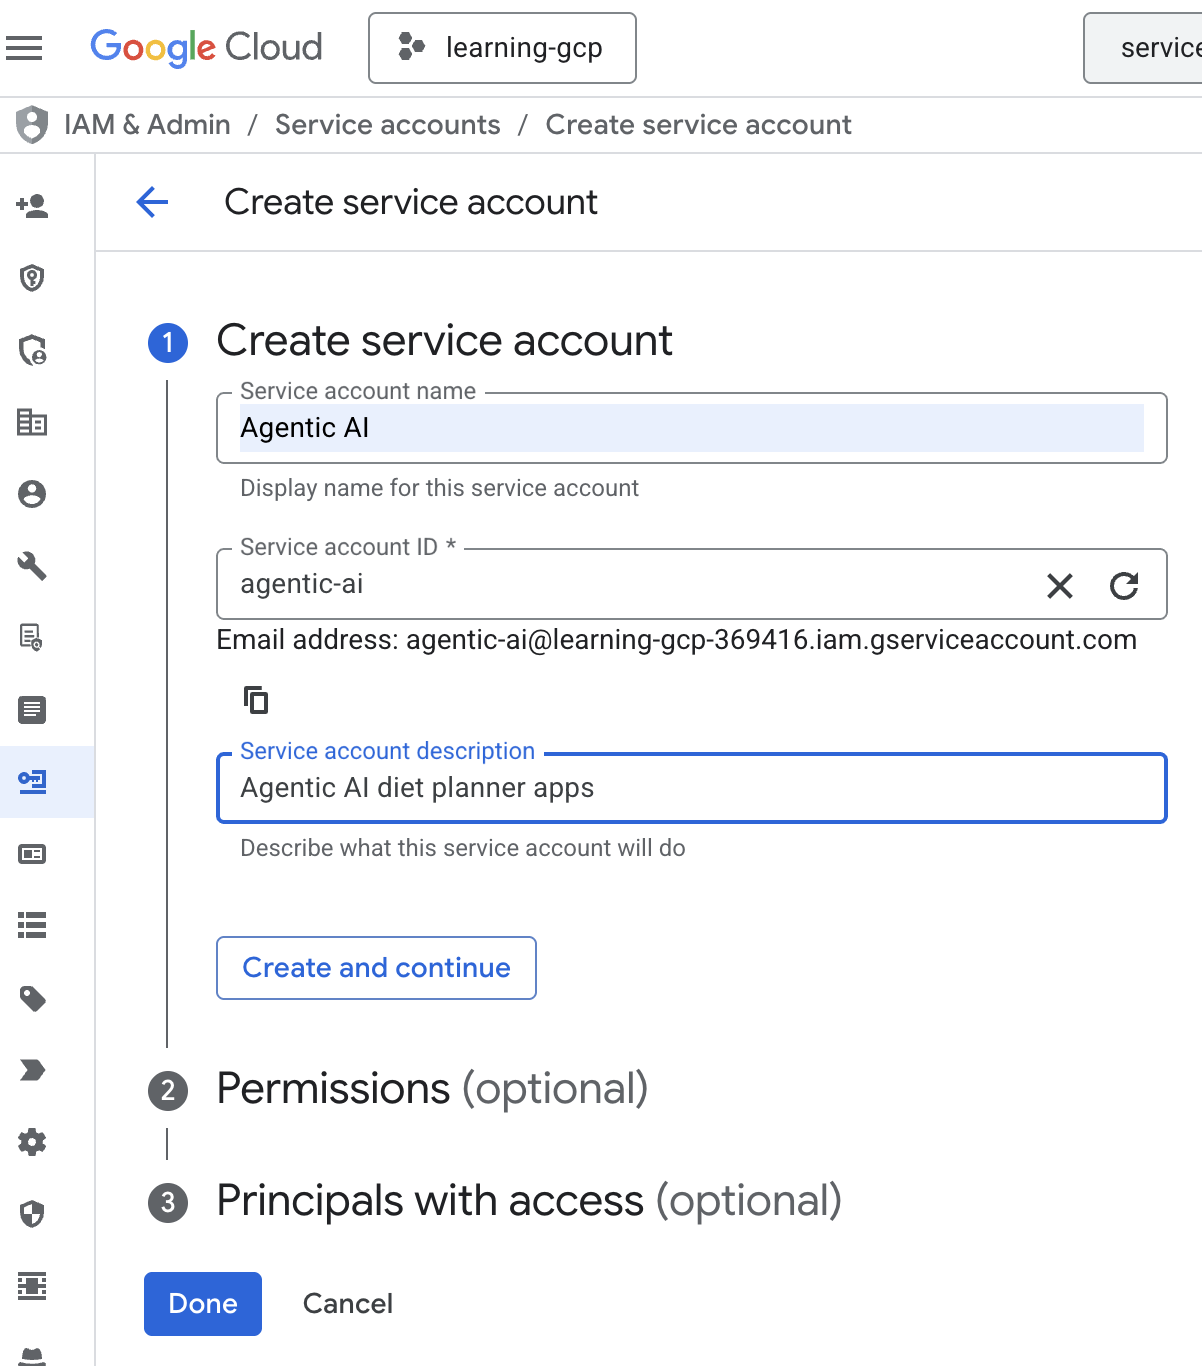
- 첫 번째 단계는 서비스 계정을 만드는 것입니다. 검색창에 서비스 계정을 입력한 다음 서비스 계정을 클릭합니다.
- + 서비스 계정 만들기를 클릭합니다. 서비스 계정 이름을 입력한 다음 만들고 계속하기를 클릭합니다.
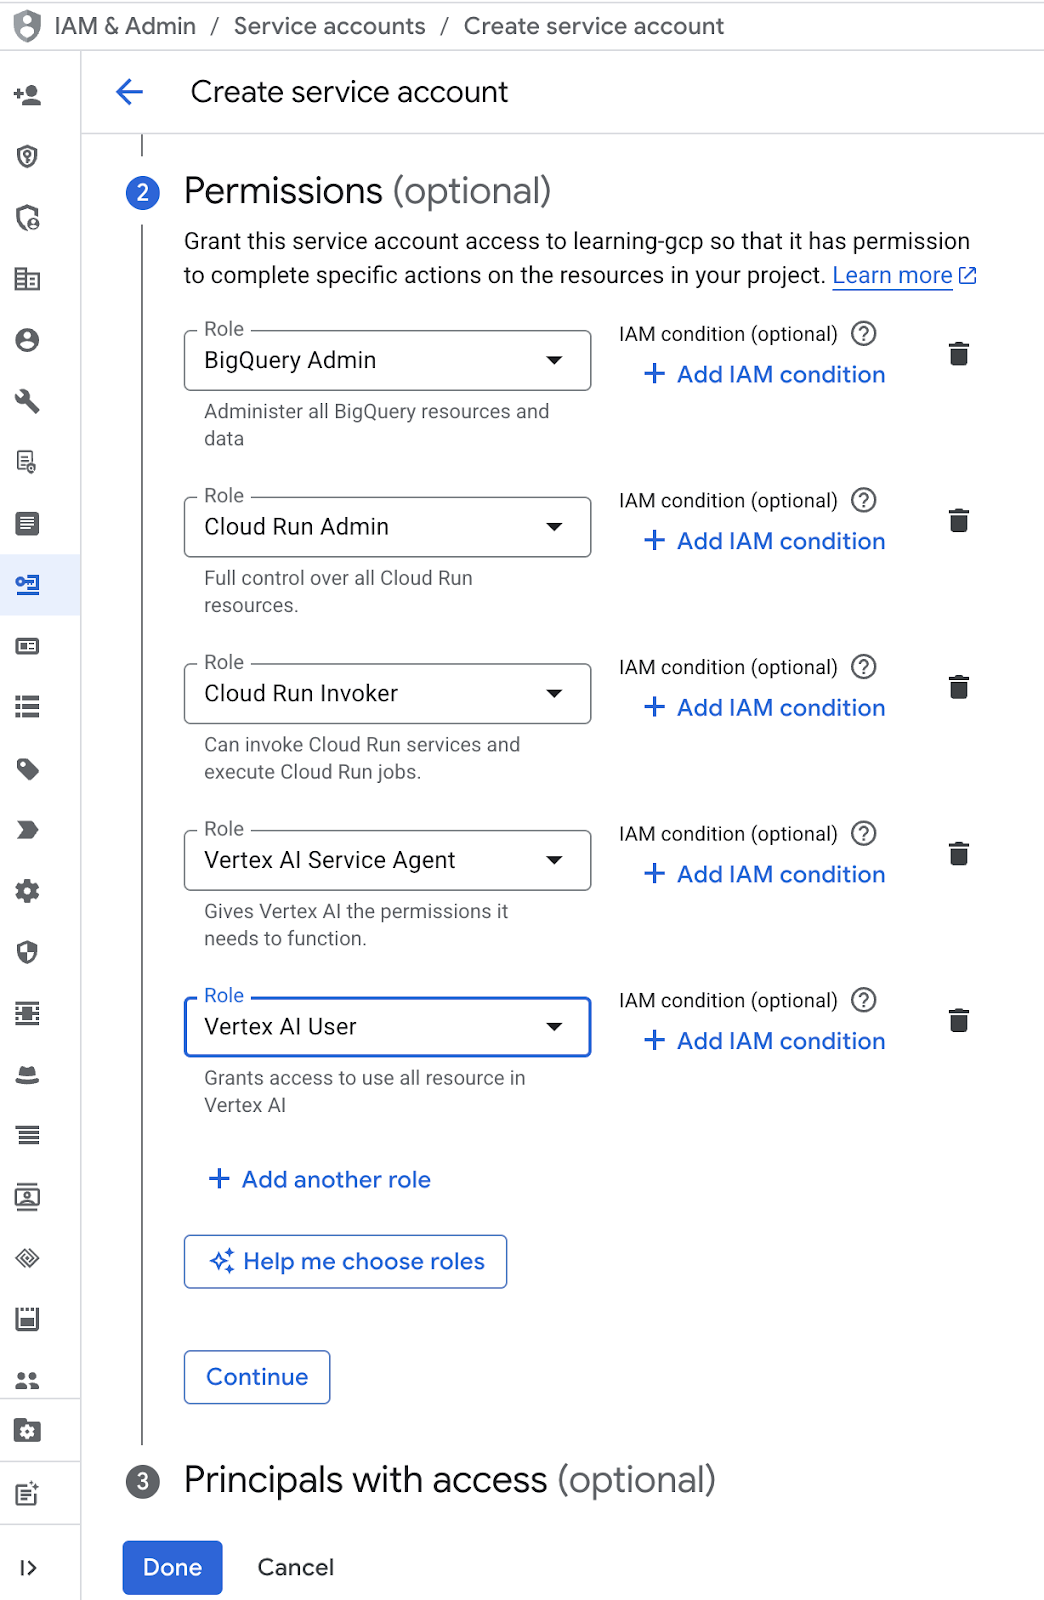
- 권한에서 역할 서비스 계정 사용자를 선택합니다. '+ 다른 역할 추가'를 클릭하고 IAM 역할 : BigQuery 관리자, Cloud Run 관리자, Cloud Run 호출자, Vertex AI 서비스 에이전트, Vertex AI 사용자를 선택한 다음 '완료'를 클릭합니다.
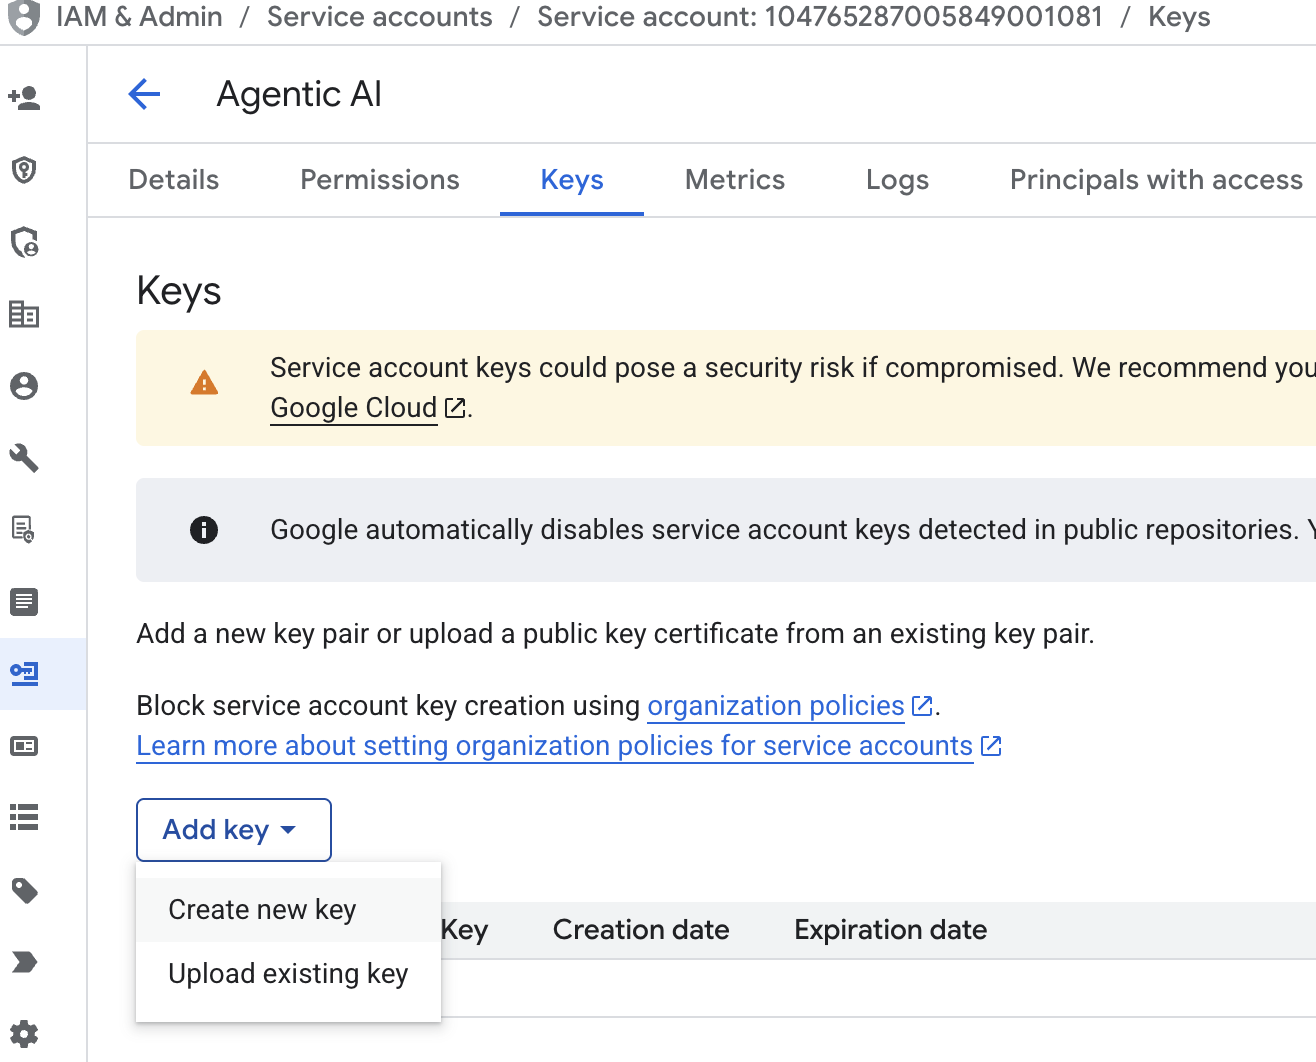
- 서비스 계정 이메일을 클릭하고 탭 키를 클릭하고 키 추가 → 새 키 만들기를 클릭합니다.
- json을 선택한 다음 만들기를 클릭합니다. 다음 단계
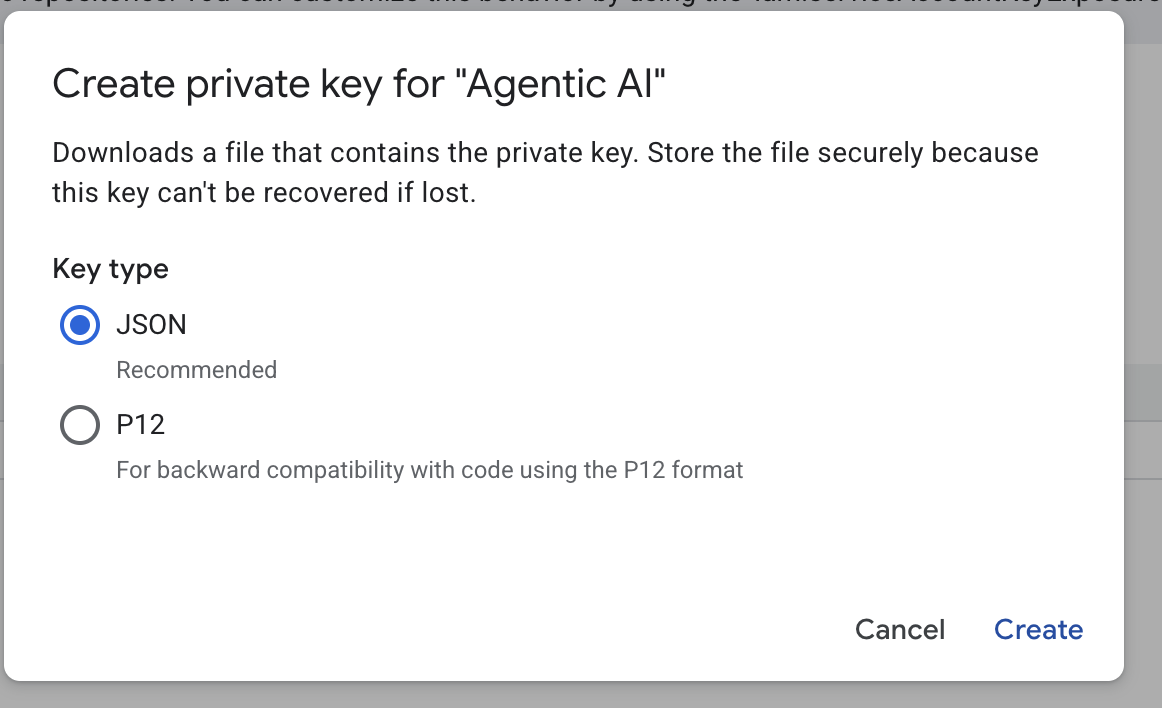 를 위해 이 서비스 계정 파일을 로컬에 저장합니다.
 - 다음 구성으로 .streamlit이라는 폴더를 만듭니다. 마우스를 오른쪽 버튼으로 클릭하고 새 폴더를 클릭한 다음 폴더 이름
.streamlit을 입력합니다. .streamlit폴더를 마우스 오른쪽 버튼으로 클릭한 다음 새 파일을 클릭하고 아래 값을 입력합니다. 그런 다음secrets.toml로 저장합니다.
# secrets.toml (for Streamlit sharing)
# Store in .streamlit/secrets.toml

[gcp]
project_id = "your_gcp_project"
location = "us-central1"

[gcp_service_account]
type = "service_account"
project_id = "your-project-id"
private_key_id = "your-private-key-id"
private_key = '''-----BEGIN PRIVATE KEY-----
YOUR_PRIVATE_KEY_HERE
-----END PRIVATE KEY-----'''
client_email = "your-sa@project-id.iam.gserviceaccount.com"
client_id = "your-client-id"
auth_uri = "https://accounts.google.com/o/oauth2/auth"
token_uri = "https://oauth2.googleapis.com/token"
auth_provider_x509_cert_url = "https://www.googleapis.com/oauth2/v1/certs"
client_x509_cert_url = "https://www.googleapis.com/robot/v1/metadata/x509/your-sa%40project-id.iam.gserviceaccount.com"
- 이전 단계에서 만든 서비스 계정을 기반으로
project_id,private_key_id,private_key,client_email,client_id , and auth_provider_x509_cert_url값을 업데이트합니다.
BigQuery 데이터 세트 준비
다음 단계는 생성 결과를 BigQuery에 저장하기 위한 BigQuery 데이터 세트를 만드는 것입니다.
- 검색창에 BigQuery를 입력한 다음 BigQuery를 클릭합니다.
- 을 클릭한 다음 데이터 세트 만들기를 클릭합니다.

- 데이터 세트 ID
diet_planner_data를 입력한 다음 데이터 세트 만들기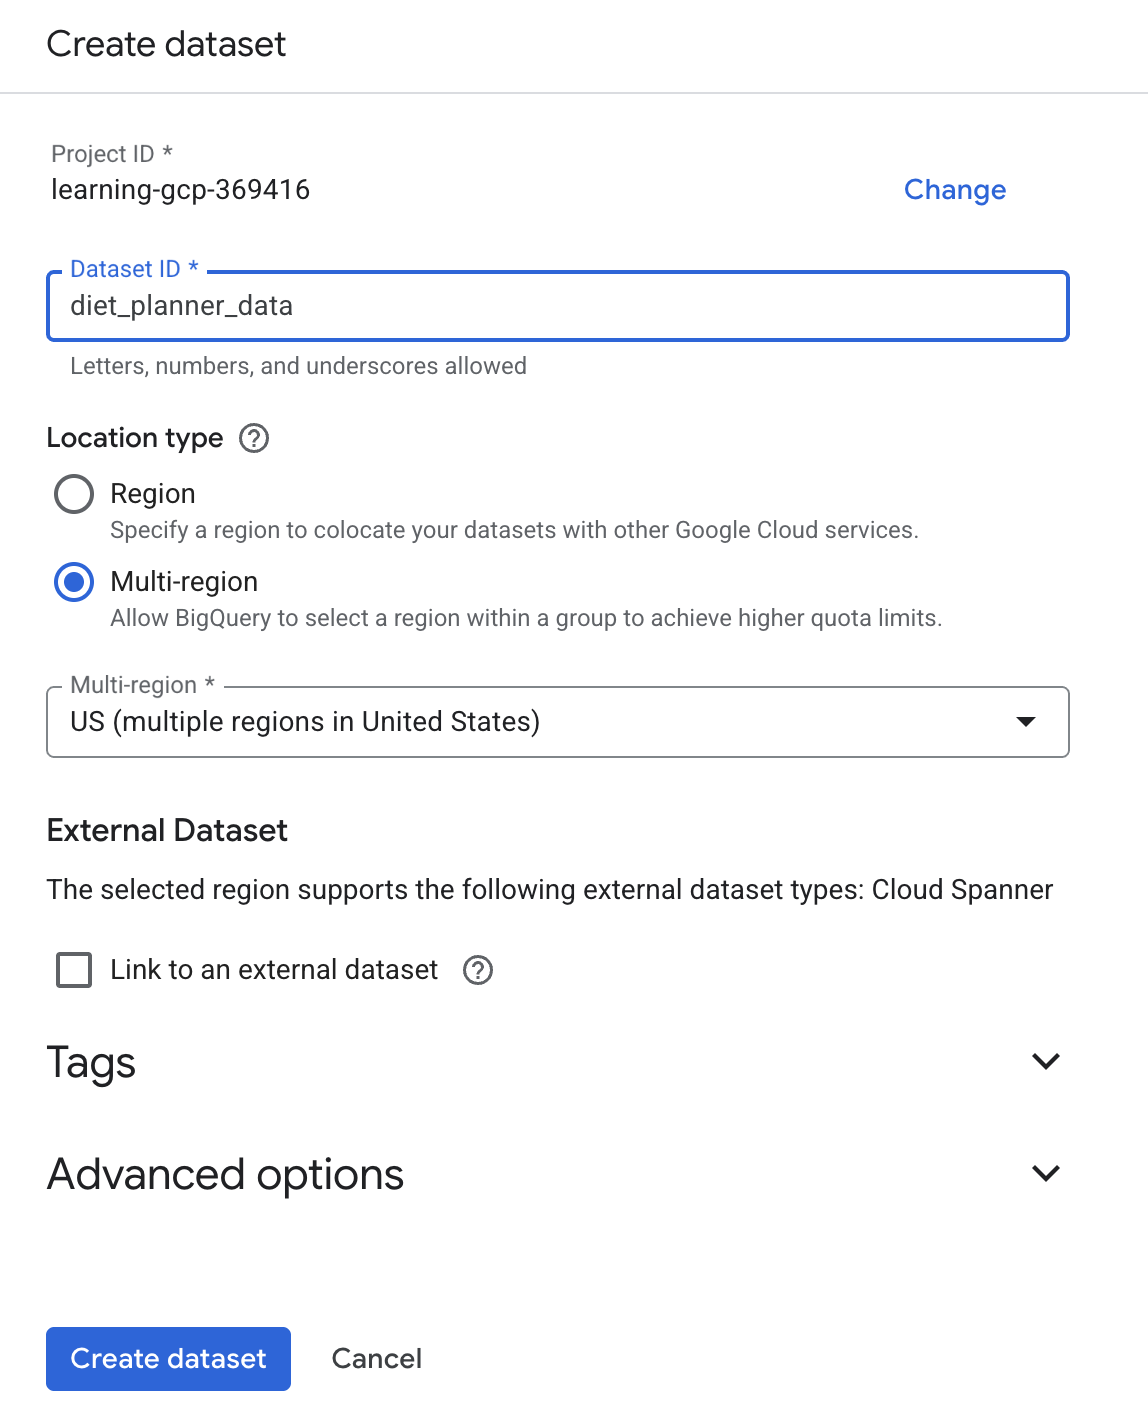 를 클릭합니다.
4. 에이전트 다이어트 플래너 앱 빌드
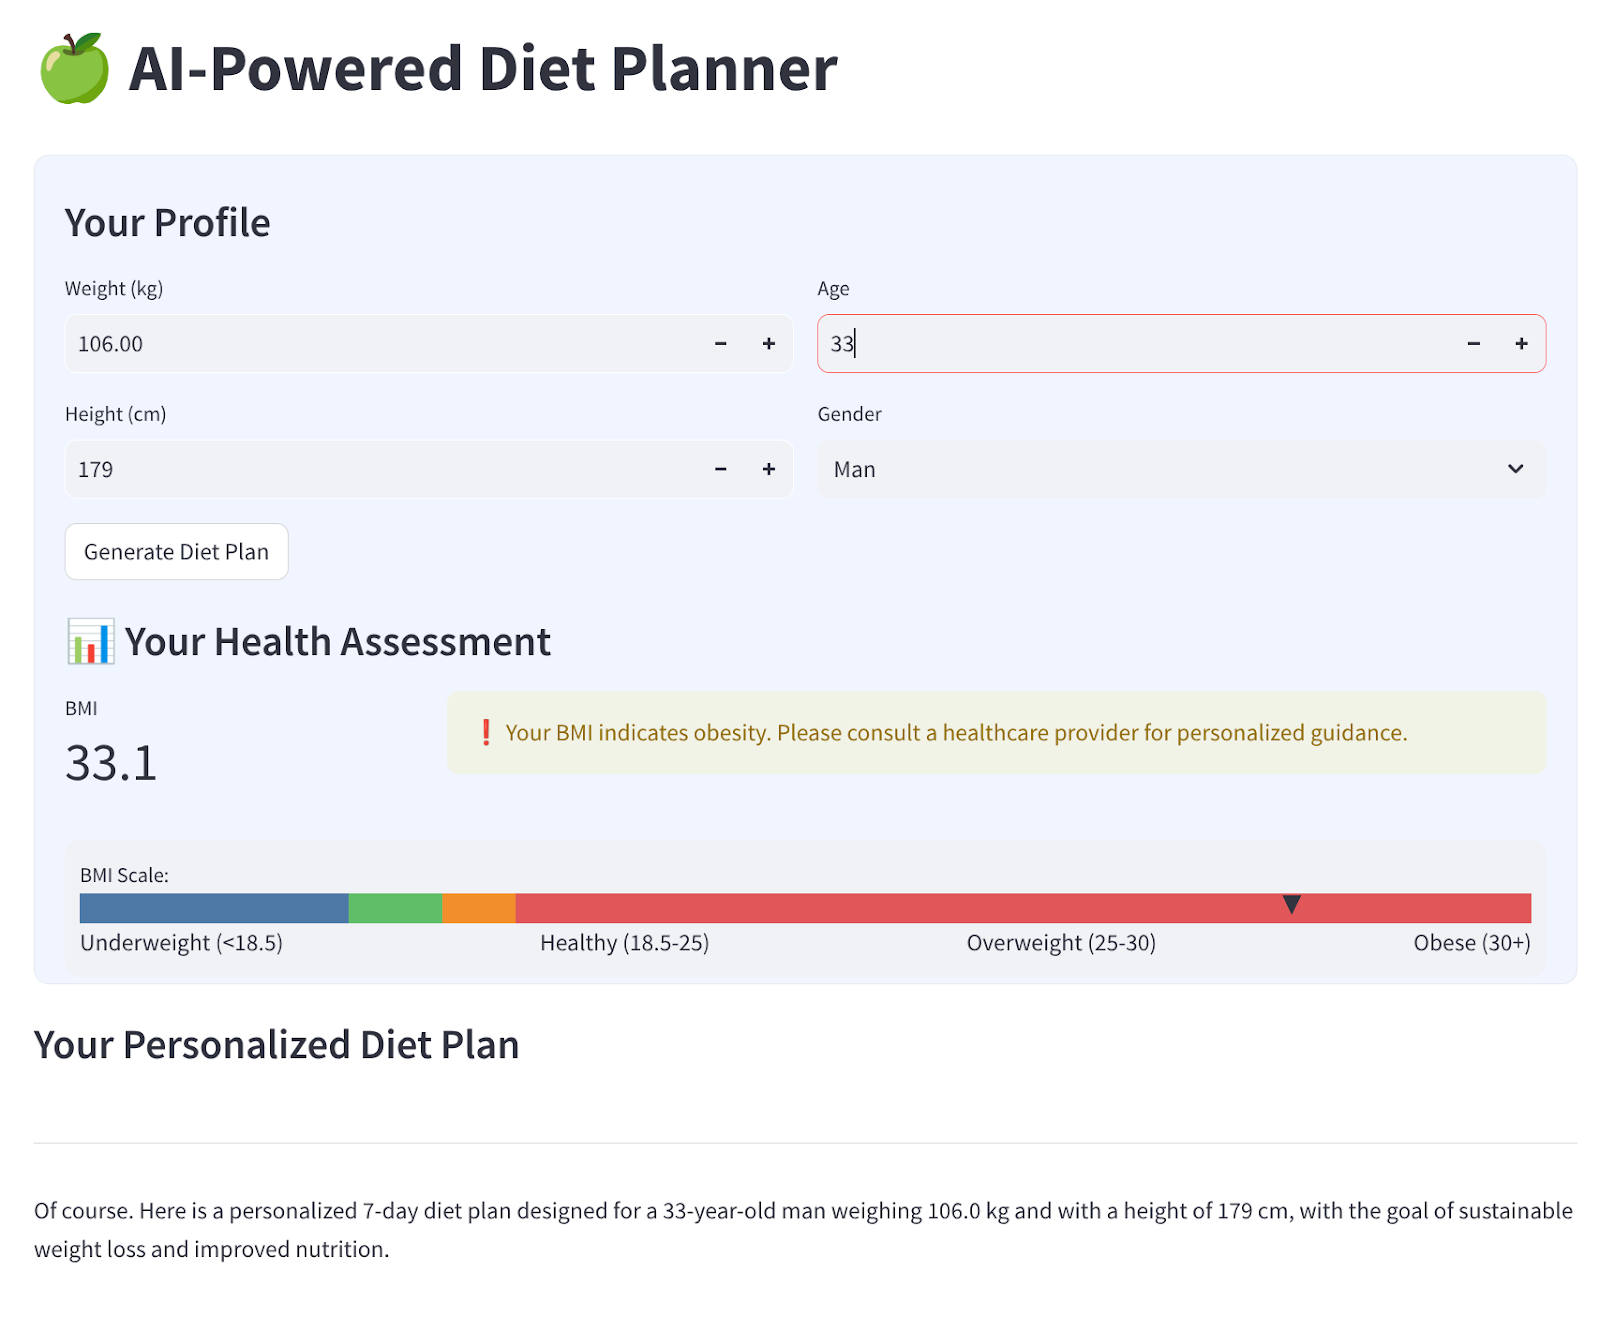
다음과 같은 4개의 입력이 있는 간단한 웹 인터페이스를 빌드합니다.
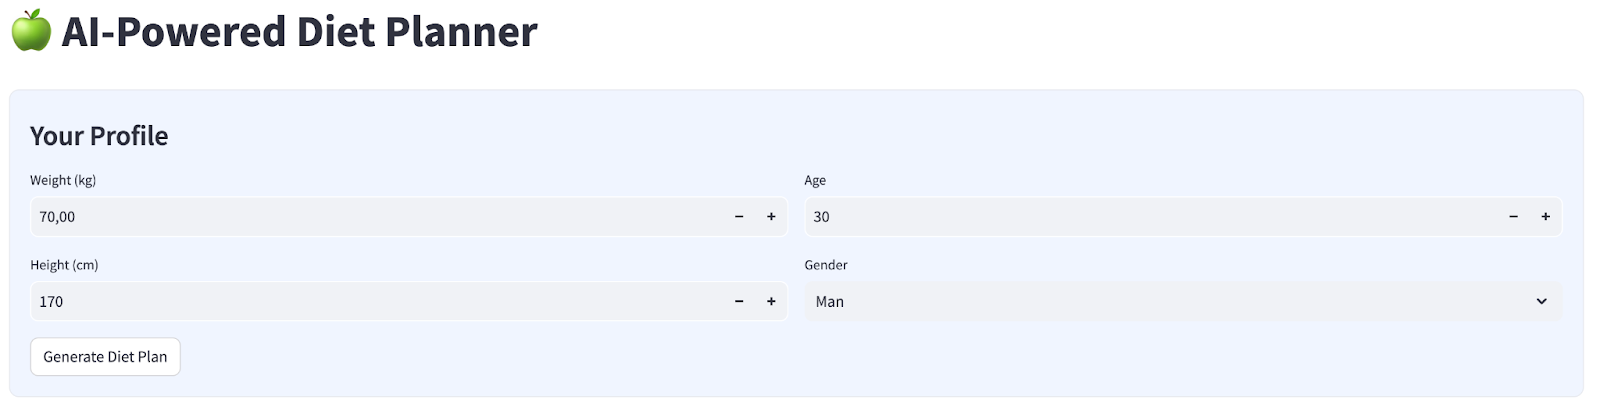
프로필에 따라 체중, 키, 나이, 성별을 변경한 다음 '생성'을 클릭합니다. Vertex AI 라이브러리에서 LLM 모델 Gemini Pro 2.5를 호출하고 생성된 결과를 BigQuery에 저장합니다.
코드가 너무 길어지지 않도록 6부분으로 구분됩니다.
함수 만들기: BMI 상태 계산
agent_diet_planner폴더를 마우스 오른쪽 버튼으로 클릭 → 새 파일 → 파일 이름bmi_calc.py입력 후 Enter 키 누르기- 다음으로 코드를 채웁니다.
# Add this function to calculate BMI and health status
def calculate_bmi_status(weight, height):
   """
   Calculate BMI and return status message
   """
   height_m = height / 100  # Convert cm to meters
   bmi = weight / (height_m ** 2)

   if bmi < 18.5:
       status = "underweight"
       message = "⚠️ Your BMI suggests you're underweight. Consider increasing calorie intake with nutrient-dense foods."
   elif 18.5 <= bmi < 25:
       status = "normal"
       message = "✅ Your BMI is in the healthy range. Let's maintain this balance!"
   elif 25 <= bmi < 30:
       status = "overweight"
       message = "⚠️ Your BMI suggests you're overweight. Focus on gradual weight loss through balanced nutrition."
   else:
       status = "obese"
       message = "❗ Your BMI indicates obesity. Please consult a healthcare provider for personalized guidance."

   return {
       "value": round(bmi, 1),
       "status": status,
       "message": message
   }
에이전트 다이어트 플래너 기본 앱 만들기
agent_diet_planner폴더를 마우스 오른쪽 버튼으로 클릭 → 새 파일 → 파일 이름app.py입력 후 Enter 키를 누릅니다.- 다음으로 코드를 채웁니다.
import os
from google.oauth2 import service_account
import streamlit as st
from google.cloud import bigquery
from vertexai.preview.generative_models import GenerativeModel
import vertexai
import datetime
import time
import pandas as pd
from bmi_calc import calculate_bmi_status

# Get configuration from environment
PROJECT_ID = os.environ.get("GCP_PROJECT_ID", "your_gcp_project_id")
LOCATION = os.environ.get("GCP_LOCATION", "us-central1")

#CONSTANTS Dataset and table in BigQuery
DATASET = "diet_planner_data"
TABLE = "user_plans"

# Initialize Vertex AI
vertexai.init(project=PROJECT_ID, location=LOCATION)

# Initialize BigQuery client
try:
   # For Cloud Run, use default credentials
   bq_client = bigquery.Client()
except:
   # For local development, use service account from secrets
   if "gcp_service_account" in st.secrets:
       service_account_info = dict(st.secrets["gcp_service_account"])
       credentials = service_account.Credentials.from_service_account_info(service_account_info)
       bq_client = bigquery.Client(credentials=credentials, project=PROJECT_ID)
   else:
       st.error("BigQuery client initialization failed")
       st.stop()
your_gcp_project_id 값을 프로젝트 ID로 변경합니다.
에이전트 다이어트 플래너 기본 앱 만들기 - setup_bq_tables
이 섹션에서는 입력 매개변수 bq_client가 하나 있는 setup_bq_table라는 함수를 만듭니다. 이 함수는 BigQuery 테이블에 스키마를 정의하고 테이블이 없는 경우 테이블을 만듭니다.
app.py의 이전 코드 아래에 다음 코드를 입력합니다.
# Create BigQuery table if not exists
def setup_bq_table(bq_client):
   dataset_id = f"{st.secrets['gcp']['project_id']}.{DATASET}"
   table_id = f"{dataset_id}.{TABLE}"

   schema = [
       bigquery.SchemaField("user_id", "STRING", mode="REQUIRED"),
       bigquery.SchemaField("timestamp", "TIMESTAMP", mode="REQUIRED"),
       bigquery.SchemaField("weight", "FLOAT", mode="REQUIRED"),
       bigquery.SchemaField("height", "INTEGER", mode="REQUIRED"),
       bigquery.SchemaField("age", "INTEGER", mode="REQUIRED"),
       bigquery.SchemaField("gender", "STRING", mode="REQUIRED"),
       bigquery.SchemaField("diet_plan", "STRING", mode="REQUIRED")
   ]

   try:
       bq_client.get_table(table_id)
   except:
       table = bigquery.Table(table_id, schema=schema)
       bq_client.create_table(table)
       st.toast("BigQuery table created successfully")
에이전트 다이어트 계획 도우미 기본 앱 만들기 - generate_diet_plan
이 섹션에서는 입력 매개변수가 하나인 generate_diet_plan라는 함수를 만듭니다. 이 함수는 정의 프롬프트로 LLM 모델 Gemini Pro 2.5를 호출하고 결과를 생성합니다.
app.py의 이전 코드 아래에 다음 코드를 입력합니다.
# Generate diet plan using Gemini Pro
def generate_diet_plan(params):
   try:
       model = GenerativeModel("gemini-2.5-pro")
       prompt = f"""
       Create a personalized 7-day diet plan for:
       - {params['gender']}, {params['age']} years old
       - Weight: {params['weight']} kg
       - Height: {params['height']} cm

       Include:
       1. Daily calorie target
       2. Macronutrient breakdown (carbs, protein, fat)
       3. Meal timing and frequency
       4. Food recommendations
       5. Hydration guidance

       Make the plan:
       - Nutritionally balanced
       - Practical for daily use
       - Culturally adaptable
       - With portion size guidance
       """

       response = model.generate_content(prompt)
       return response.text
   except Exception as e:
       st.error(f"AI generation error: {str(e)}")
       return None
에이전트 식단 플래너 기본 앱 만들기 - save_to_bq
이 섹션에서는 bq_client, user_id, plan의 세 가지 입력 매개변수가 있는 save_to_bq라는 함수를 만듭니다. 이 함수는 생성 결과를 BigQuery 테이블에 저장합니다.
app.py의 이전 코드 아래에 다음 코드를 입력합니다.
# Save user data to BigQuery
def save_to_bq(bq_client, user_id, plan):
   try:
       dataset_id = f"{st.secrets['gcp']['project_id']}.{DATASET}"
       table_id = f"{dataset_id}.{TABLE}"

       row = {
           "user_id": user_id,
           "timestamp": datetime.datetime.utcnow().isoformat(),
           "weight": st.session_state.user_data["weight"],
           "height": st.session_state.user_data["height"],
           "age": st.session_state.user_data["age"],
           "gender": st.session_state.user_data["gender"],
           "diet_plan": plan
       }

       errors = bq_client.insert_rows_json(table_id, [row])
       if errors:
           st.error(f"BigQuery error: {errors}")
       else:
           return True
   except Exception as e:
       st.error(f"Data saving error: {str(e)}")
       return False
에이전트 다이어트 플래너 기본 앱 만들기 - main
이 섹션에서는 입력 매개변수가 없는 main이라는 함수를 만듭니다. 이 함수는 주로 Streamlit UI 스크립트를 처리하고, 생성된 결과를 표시하고, BigQuery 테이블에서 생성된 이전 결과를 표시하고, 데이터를 마크다운 파일로 다운로드합니다.
app.py의 이전 코드 아래에 다음 코드를 입력합니다.
# Streamlit UI
def main():
   st.set_page_config(page_title="AI Diet Planner", page_icon="🍏", layout="wide")

   # Initialize session state
   if "user_data" not in st.session_state:
       st.session_state.user_data = None
   if "diet_plan" not in st.session_state:
       st.session_state.diet_plan = None

   # Initialize clients
   #bq_client = init_clients()
   setup_bq_table(bq_client)

   st.title("🍏 AI-Powered Diet Planner")
   st.markdown("""
   <style>
   .stProgress > div > div > div > div {
       background-color: #4CAF50;
   }
   [data-testid="stForm"] {
       background: #f0f5ff;
       padding: 20px;
       border-radius: 10px;
       border: 1px solid #e6e9ef;
   }
   </style>
   """, unsafe_allow_html=True)

   # User input form
   with st.form("user_profile", clear_on_submit=False):
       st.subheader("Your Profile")
       col1, col2 = st.columns(2)

       with col1:
           weight = st.number_input("Weight (kg)", min_value=30.0, max_value=200.0, value=70.0)
           height = st.number_input("Height (cm)", min_value=100, max_value=250, value=170)

       with col2:
           age = st.number_input("Age", min_value=18, max_value=100, value=30)
           gender = st.selectbox("Gender", ["Man", "Woman"])

       submitted = st.form_submit_button("Generate Diet Plan")

       if submitted:
           user_data = {
               "weight": weight,
               "height": height,
               "age": age,
               "gender": gender
           }

           st.session_state.user_data = user_data
           # Calculate BMI
           bmi_result = calculate_bmi_status(weight, height)

           # Display BMI results in a visually distinct box
           with st.container():
               st.subheader("📊 Your Health Assessment")
               col1, col2 = st.columns([1, 3])

               with col1:
                   st.metric("BMI", bmi_result["value"])

               with col2:
                   if bmi_result["status"] != "normal":
                       st.warning(bmi_result["message"])
                   else:
                       st.success(bmi_result["message"])

           # Add BMI scale visualization
           st.markdown(f"""
           <div style="background:#f0f2f6;padding:10px;border-radius:10px;margin-top:10px">
           <small>BMI Scale:</small><br>
           <div style="display:flex;height:20px;background:linear-gradient(90deg,
           #4e79a7 0%,
           #4e79a7 18.5%,
           #60bd68 18.5%,
           #60bd68 25%,
           #f28e2b 25%,
           #f28e2b 30%,
           #e15759 30%,
           #e15759 100%);position:relative">
           <div style="position:absolute;left:{min(100, max(0, (bmi_result["value"]/40)*100))}%;top:-5px">
               ▼
           </div>
           </div>
           <div style="display:flex;justify-content:space-between">
           <span>Underweight (<18.5)</span>
           <span>Healthy (18.5-25)</span>
           <span>Overweight (25-30)</span>
           <span>Obese (30+)</span>
           </div>
           </div>
           """, unsafe_allow_html=True)

           # Store BMI in session state
           st.session_state.bmi = bmi_result

   # Plan generation and display
   if submitted and st.session_state.user_data:
       with st.spinner("🧠 Generating your personalized diet plan using Gemini AI..."):
           #diet_plan = generate_diet_plan(st.session_state.user_data)
           diet_plan = generate_diet_plan({**st.session_state.user_data,"bmi": bmi_result["value"],
                                           "bmi_status": bmi_result["status"]
           })

           if diet_plan:
               st.session_state.diet_plan = diet_plan

               # Generate unique user ID
               user_id = f"user_{int(time.time())}"

               # Save to BigQuery
               if save_to_bq(bq_client, user_id, diet_plan):
                   st.toast("✅ Plan saved to database!")

   # Display generated plan
   if st.session_state.diet_plan:
       st.subheader("Your Personalized Diet Plan")
       st.markdown("---")
       st.markdown(st.session_state.diet_plan)

       # Download button
       st.download_button(
           label="Download Plan",
           data=st.session_state.diet_plan,
           file_name="my_diet_plan.md",
           mime="text/markdown"
       )

       # Show history
       st.subheader("Your Plan History")
       try:
           query = f"""
               SELECT timestamp, weight, height, age, gender
               FROM `{st.secrets['gcp']['project_id']}.{DATASET}.{TABLE}`
               WHERE user_id LIKE 'user_%'
               ORDER BY timestamp DESC
               LIMIT 5
           """
           history = bq_client.query(query).to_dataframe()
           if not history.empty:
               history["timestamp"] = pd.to_datetime(history["timestamp"])
               st.dataframe(history.style.format({
                   "weight": "{:.1f} kg",
                   "height": "{:.0f} cm"
               }))
           else:
               st.info("No previous plans found")
       except Exception as e:
           st.error(f"History load error: {str(e)}")

if __name__ == "__main__":
   main()
코드를 app.py라는 이름으로 저장합니다.
5. Cloud Build를 사용하여 Cloud Run에 앱 배포
이제 이 멋진 앱을 다른 사람들에게도 보여주고 싶습니다. 이렇게 하려면 이 애플리케이션을 패키징하고 다른 사용자가 액세스할 수 있는 공개 서비스로 Cloud Run에 배포하면 됩니다. 이를 위해 아키텍처를 다시 살펴보겠습니다.
먼저 Dockerfile이 필요합니다. File->New Text File을 클릭하고 다음 코드를 복사하여 붙여넣은 다음 Dockerfile로 저장합니다.
# Use official Python image
FROM python:3.12-slim

# Set environment variables
ENV PYTHONDONTWRITEBYTECODE 1
ENV PYTHONUNBUFFERED 1
ENV PORT 8080

# Install system dependencies
RUN apt-get update && \
   apt-get install -y --no-install-recommends \
   build-essential \
   libpq-dev \
   && rm -rf /var/lib/apt/lists/*

# Set working directory
WORKDIR /app

# Copy requirements
COPY requirements.txt .

# Install Python dependencies
RUN pip install --no-cache-dir -r requirements.txt

# Copy application files
COPY . .

# Expose port
EXPOSE $PORT

# Run the application
CMD ["streamlit", "run", "app.py", "--server.port", "8080", "--server.address", "0.0.0.0"]
다음으로 앱을 빌드하여 Docker 이미지가 되고, Artifact Registry에 푸시되고, Cloud Run에 배포되도록 cloudbuild.yaml을 만듭니다.
파일->새 텍스트 파일을 클릭하고 다음 코드를 복사하여 붙여넣은 후 cloudbuild.yaml로 저장합니다.
steps:
 # Build Docker image
 - name: 'gcr.io/cloud-builders/docker'
   args: ['build', '-t', 'gcr.io/$PROJECT_ID/diet-planner:$BUILD_ID', '--no-cache',
        '--progress=plain',
        '.']
   id: 'Build'
   timeout: 1200s
   waitFor: ['-']
   dir: '.'
  # Push to Container Registry
 - name: 'gcr.io/cloud-builders/docker'
   args: ['push', 'gcr.io/$PROJECT_ID/diet-planner:$BUILD_ID']
   id: 'Push'
   waitFor: ['Build']
  # Deploy to Cloud Run
 - name: 'gcr.io/google.com/cloudsdktool/cloud-sdk'
   entrypoint: gcloud
   args:
     - 'run'
     - 'deploy'
     - 'diet-planner-service'
     - '--image=gcr.io/$PROJECT_ID/diet-planner:$BUILD_ID'
     - '--port=8080'
     - '--region=us-central1'
     - '--platform=managed'
     - '--allow-unauthenticated'
     - '--set-env-vars=GCP_PROJECT_ID=$PROJECT_ID,GCP_LOCATION=us-central1'
     - '--cpu=1'
     - '--memory=1Gi'
     - '--timeout=300'
   waitFor: ['Push']

options:
 logging: CLOUD_LOGGING_ONLY
 machineType: 'E2_HIGHCPU_8'
 diskSizeGb: 100

images:
 - 'gcr.io/$PROJECT_ID/diet-planner:$BUILD_ID'
이제 앱을 빌드하여 Docker 이미지가 되고, Artifact Registry에 푸시되고, Cloud Run에 배포되는 데 필요한 모든 파일이 있습니다. 배포해 보겠습니다. Cloud Shell 터미널로 이동하여 현재 프로젝트가 활성 프로젝트로 구성되어 있는지 확인합니다. 그렇지 않은 경우 gcloud configure 명령어를 사용하여 프로젝트 ID를 설정해야 합니다.
gcloud config set project [PROJECT_ID]
그런 다음 다음 명령어를 실행하여 앱을 Docker 이미지로 빌드하고, Artifact Registry에 푸시하고, Cloud Run에 배포합니다.
gcloud builds submit --config cloudbuild.yaml
이전 단계에서 제공한 Dockerfile을 기반으로 Docker 컨테이너를 빌드하고 Artifact Registry에 푸시합니다. 그런 다음 구성된 이미지를 Cloud Run에 배포합니다. 이 모든 프로세스는 cloudbuild.yaml 단계에 정의되어 있습니다.
데모 애플리케이션이므로 여기서는 인증되지 않은 액세스를 허용합니다. 엔터프라이즈 및 프로덕션 애플리케이션에 적절한 인증을 사용하는 것이 좋습니다.
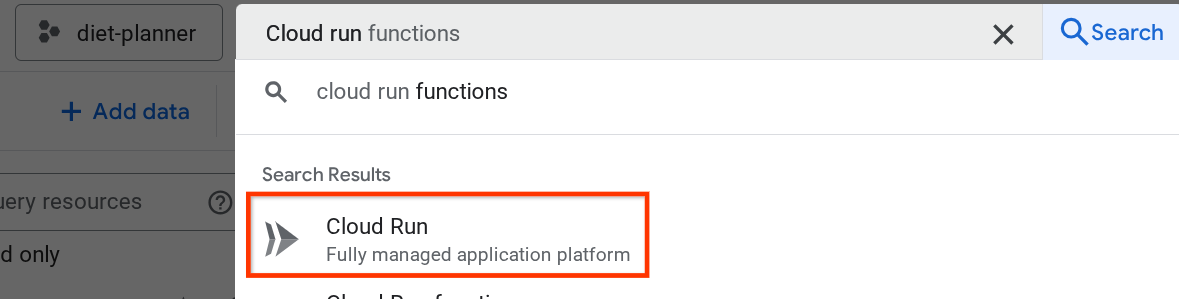
배포가 완료되면 Cloud Run 페이지에서 확인할 수 있습니다. 상단의 Cloud 콘솔 검색창에서 Cloud Run을 검색하고 Cloud Run 제품을 클릭합니다.
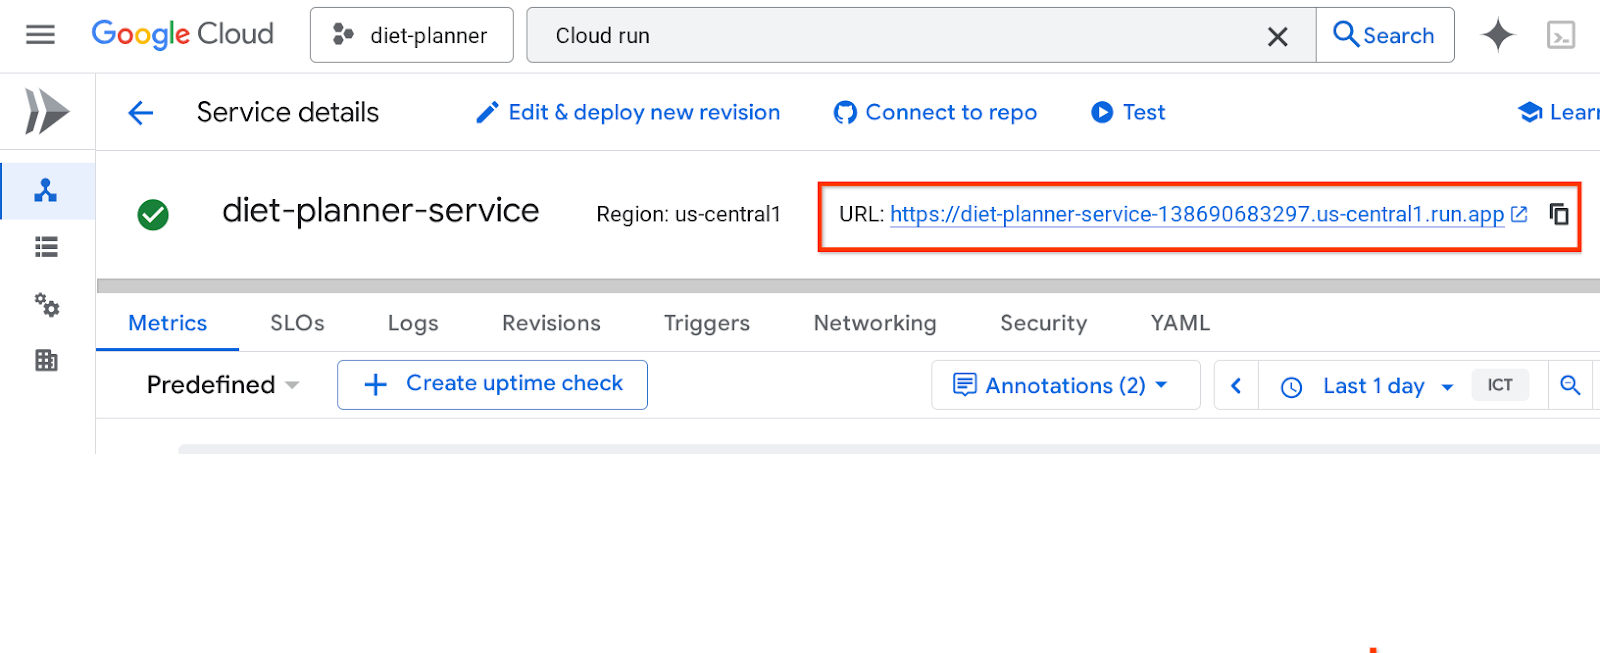
그런 다음 Cloud Run 서비스 페이지에 나열된 배포된 서비스를 검사하고 서비스를 클릭하여 서비스 URL을 가져올 수 있습니다.

서비스 URL은 상단 표시줄에 표시됩니다.
 시크릿 모드 창이나 휴대기기에서 애플리케이션을 사용합니다. 이미 게시되었을 것입니다.
6. 삭제
이 Codelab에서 사용한 리소스의 비용이 Google Cloud 계정에 청구되지 않도록 하려면 다음 단계를 따르세요.