
1. 簡介
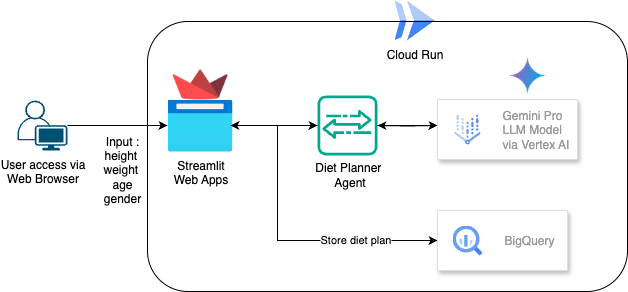
在本程式碼研究室中,您將瞭解如何建構及部署飲食規劃師 AI 代理。使用者介面採用 Streamlit,LLM 模型採用 Gemini Pro 2.5,代理式 AI 引擎調度管理工具採用 Vertex AI 開發代理式 AI,BigQuery 用於儲存資料,Cloud Run 則用於部署。
在本程式碼研究室中,您將逐步完成下列步驟:
- 準備 Google Cloud 專案,並啟用所有必要 API
- 使用 Streamlit、Vertex AI 和 BigQuery 建構代理式 AI 飲食計畫工具
- 將應用程式部署至 Cloud Run
架構總覽
必要條件
- 已啟用計費功能的 Google Cloud Platform (GCP) 專案。
- Python 的基本知識
課程內容
- 如何使用 Streamlit 和 Vertex AI 建構代理式 AI 飲食計畫工具,並將資料儲存至 BigQuery
- 如何將應用程式部署至 Cloud Run
軟硬體需求
- Chrome 網路瀏覽器
- Gmail 帳戶
- 已啟用計費功能的 Cloud 專案
2. 基本設定和需求
自修實驗室環境設定
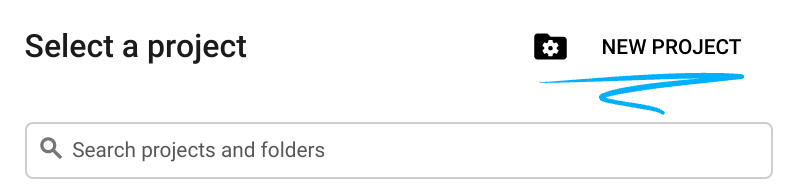
- 登入 Google Cloud 控制台,然後建立新專案或重複使用現有專案。如果沒有 Gmail 或 Google Workspace 帳戶,請先建立帳戶。

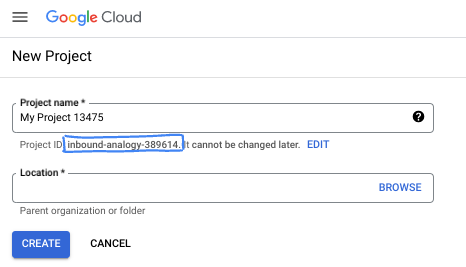
- 專案名稱是專案參與者的顯示名稱。這是 Google API 未使用的字元字串。你隨時可以更新。
- 專案 ID 在所有 Google Cloud 專案中不得重複,且設定後即無法變更。Cloud 控制台會自動產生專屬字串,通常您不需要在意該字串為何。在大多數程式碼研究室中,您需要參照專案 ID (通常標示為
PROJECT_ID)。如果您不喜歡產生的 ID,可以產生另一個隨機 ID。你也可以嘗試使用自己的名稱,看看是否可用。完成這個步驟後就無法變更,且專案期間會維持不變。 - 請注意,部分 API 會使用第三個值,也就是專案編號。如要進一步瞭解這三種值,請參閱說明文件。
- 接著,您需要在 Cloud 控制台中啟用帳單,才能使用 Cloud 資源/API。完成這個程式碼研究室的費用不高,甚至可能完全免費。如要關閉資源,避免在本教學課程結束後繼續產生費用,請刪除您建立的資源或專案。Google Cloud 新使用者可參加價值$300 美元的免費試用計畫。
3. 事前準備
在 Cloud Shell 編輯器中設定 Cloud 專案
本程式碼研究室假設您已擁有啟用計費功能的 Google Cloud 專案。如果尚未取得,請按照下列指示操作。
- 在 Google Cloud 控制台的專案選取器頁面中,選取或建立 Google Cloud 專案。
- 確認 Cloud 專案已啟用計費功能。瞭解如何檢查專案是否已啟用計費功能。
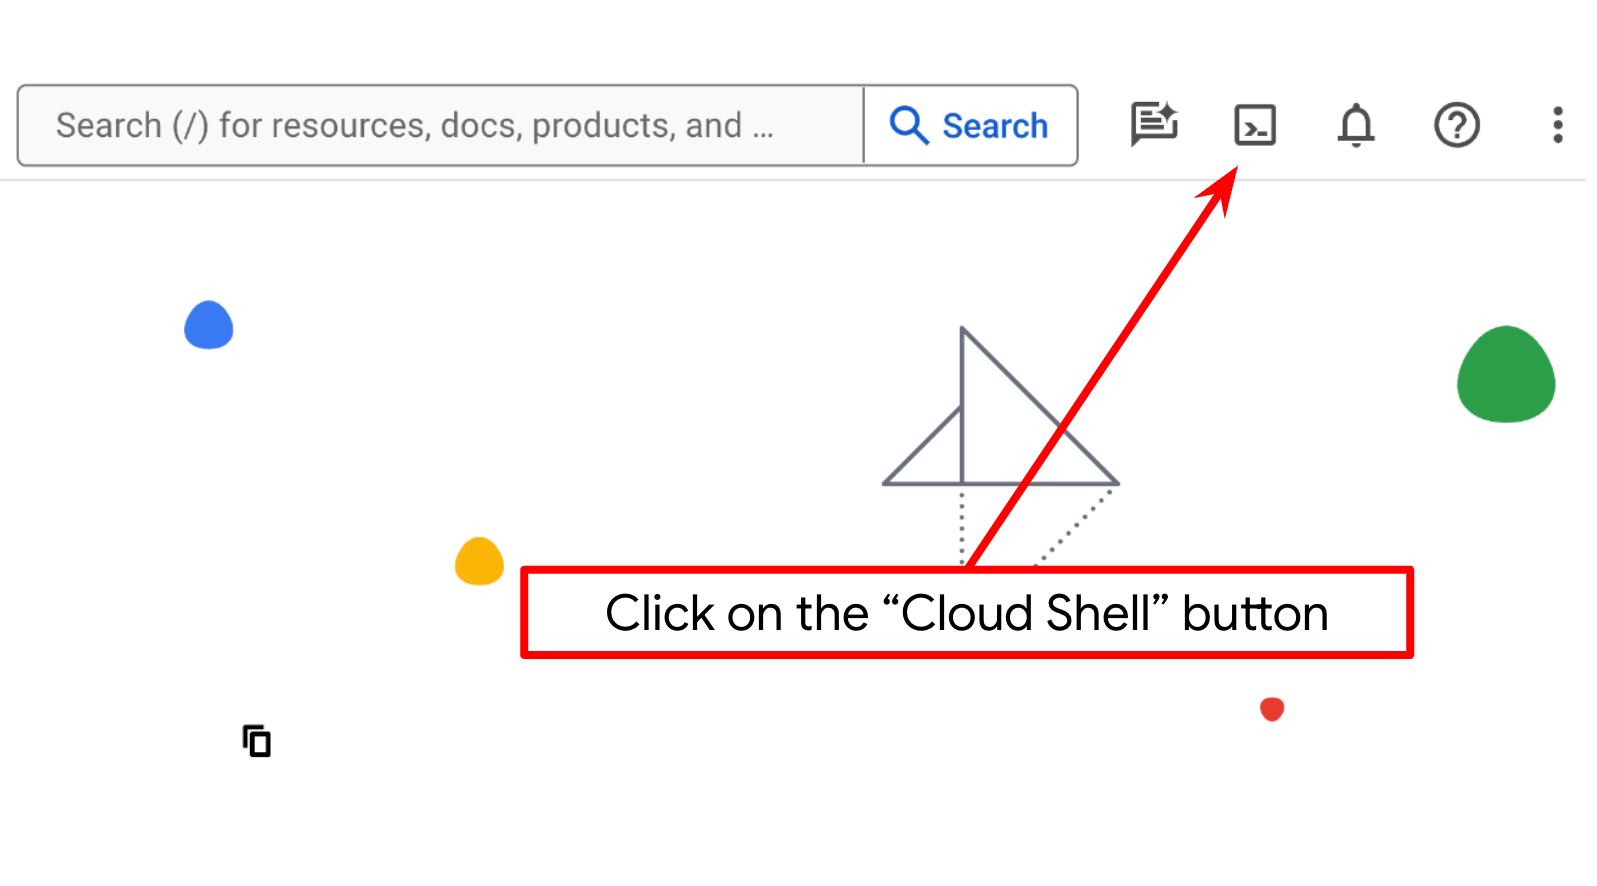
- 您將使用 Cloud Shell,這是 Google Cloud 中執行的指令列環境,預先載入了 bq。點選 Google Cloud 控制台頂端的「啟用 Cloud Shell」。
- 連至 Cloud Shell 後,請使用下列指令確認驗證已完成,專案也已設為獲派的專案 ID:
gcloud auth list
- 在 Cloud Shell 中執行下列指令,確認 gcloud 指令已瞭解您的專案。
gcloud config list project
- 如果未設定專案,請使用下列指令來設定:
gcloud config set project <YOUR_PROJECT_ID>
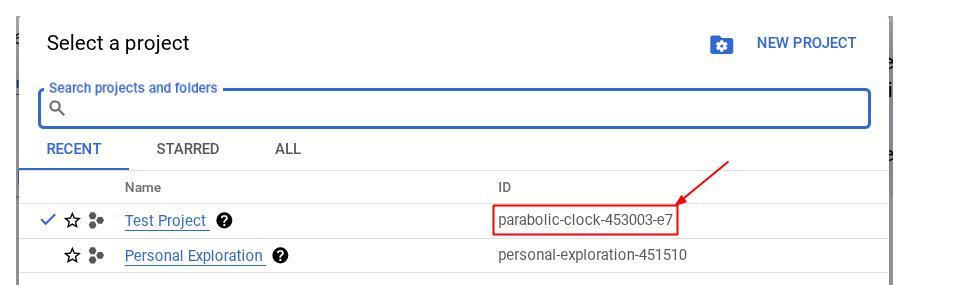
或者,您也可以在控制台中查看 PROJECT_ID id

按一下該專案,右側就會顯示所有專案和專案 ID
- 透過下列指令啟用必要的 API。這可能需要幾分鐘的時間,請耐心等候。
gcloud services enable aiplatform.googleapis.com \
                           run.googleapis.com \
                           cloudbuild.googleapis.com \
                           cloudresourcemanager.googleapis.com \
                    bigquery.googleapis.com
成功執行指令後,您應該會看到類似下方的訊息:
Operation "operations/..." finished successfully.
除了使用 gcloud 指令,您也可以透過控制台搜尋各項產品,或使用這個連結。
如果遺漏任何 API,您隨時可以在導入過程中啟用。
如要瞭解 gcloud 指令和用法,請參閱說明文件。
設定應用程式工作目錄
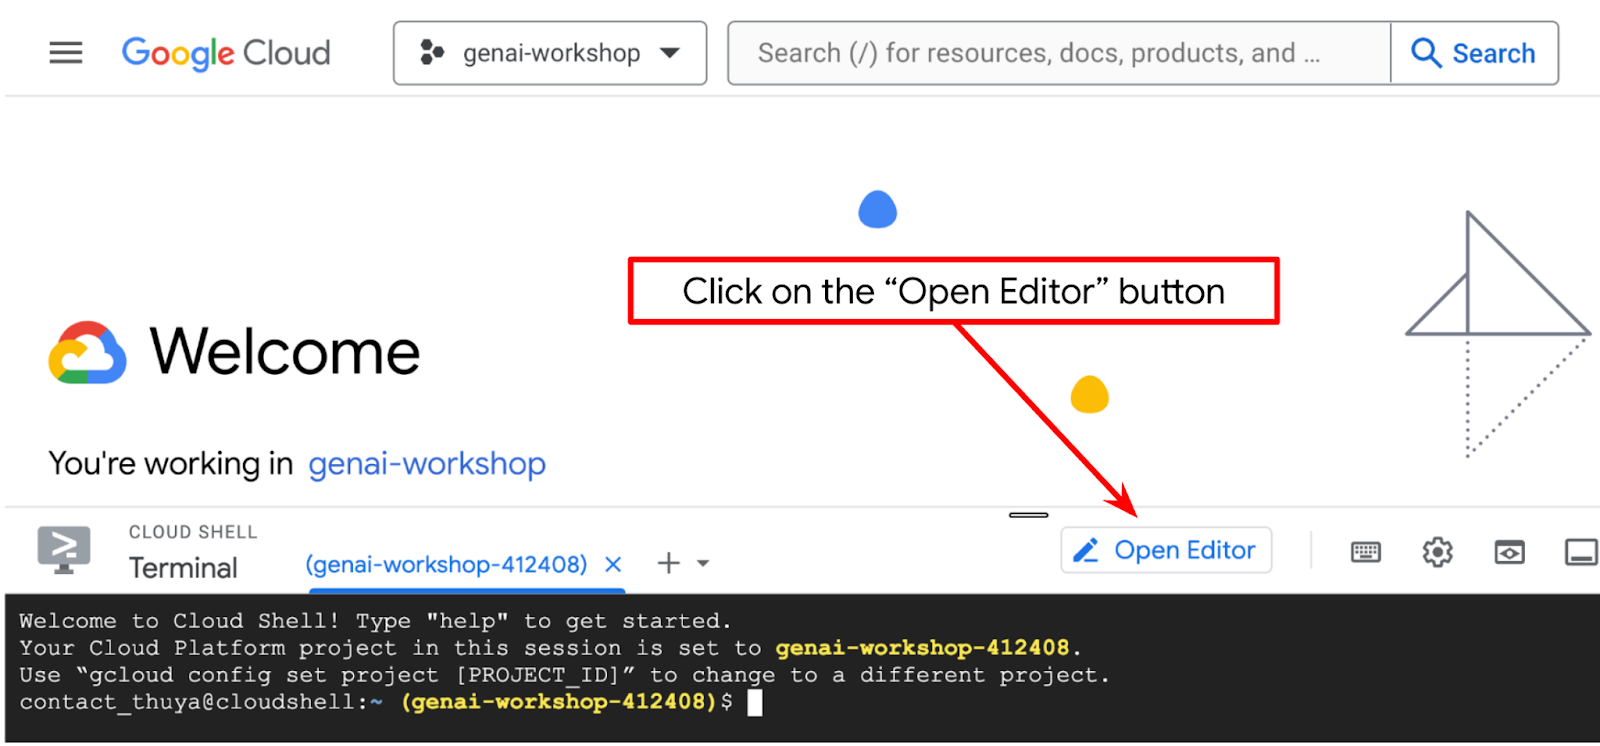
- 按一下「Open Editor」(開啟編輯器) 按鈕,開啟 Cloud Shell 編輯器,即可在此編寫程式碼
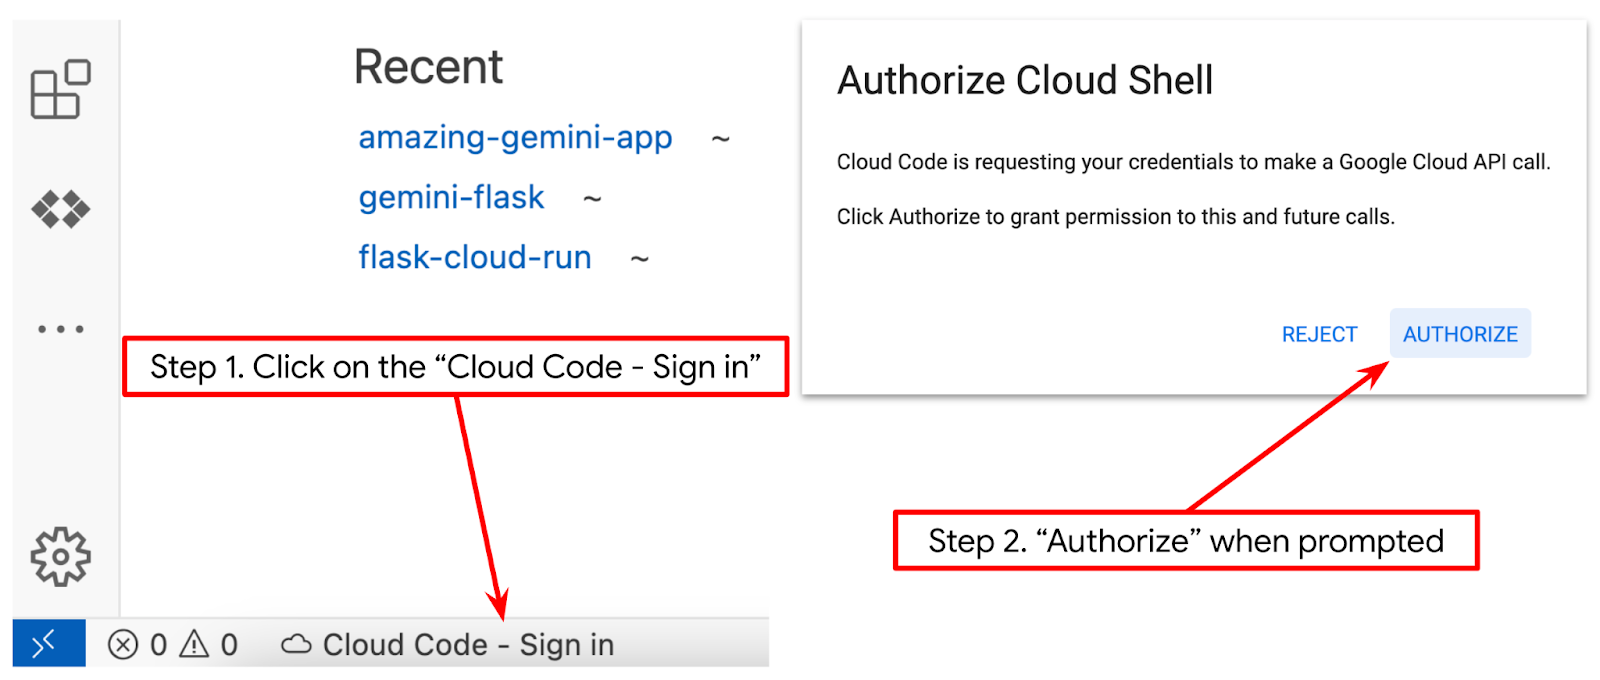
- 請確認 Cloud Shell 編輯器的左下角 (狀態列) 已設定 Cloud Code 專案,如下圖所示,且已設為啟用計費功能的有效 Google Cloud 專案。如果出現提示訊息,請點選「授權」。初始化 Cloud Shell 編輯器後,可能要過一段時間才會顯示「Cloud Code - Sign In」(Cloud Code - 登入) 按鈕,請耐心等候。
接著準備 Python 環境
環境設定
準備 Python 虛擬環境
下一步是準備開發環境。在本程式碼實驗室中,我們將使用 Python 3.12,並使用 Python virtualenv 簡化建立及管理 Python 版本和虛擬環境的需求
- 如果尚未開啟終端機,請依序點選「Terminal」(終端機) ->「New Terminal」(新增終端機),或使用 Ctrl + Shift + C 開啟終端機

- 建立新資料夾,然後執行下列指令,將位置變更為這個資料夾
mkdir agent_diet_planner
cd agent_diet_planner
- 執行下列指令,建立新的 virtualenv
python -m venv .env
- 使用下列指令啟動 virtualenv
source .env/bin/activate
- 建立
requirements.txt。按一下「檔案」→「新增文字檔」,然後填入下列內容。然後儲存為requirements.txt
streamlit==1.33.0
google-cloud-aiplatform
google-cloud-bigquery
pandas==2.2.2
db-dtypes==1.2.0
pyarrow==16.1.0
- 然後執行下列指令,從 requirements.txt 安裝所有依附元件
pip install -r requirements.txt
- 輸入下列指令,檢查是否已安裝所有 Python 程式庫依附元件
pip list
設定檔
現在我們需要為這個專案設定設定檔。設定檔用於儲存變數和服務帳戶憑證。
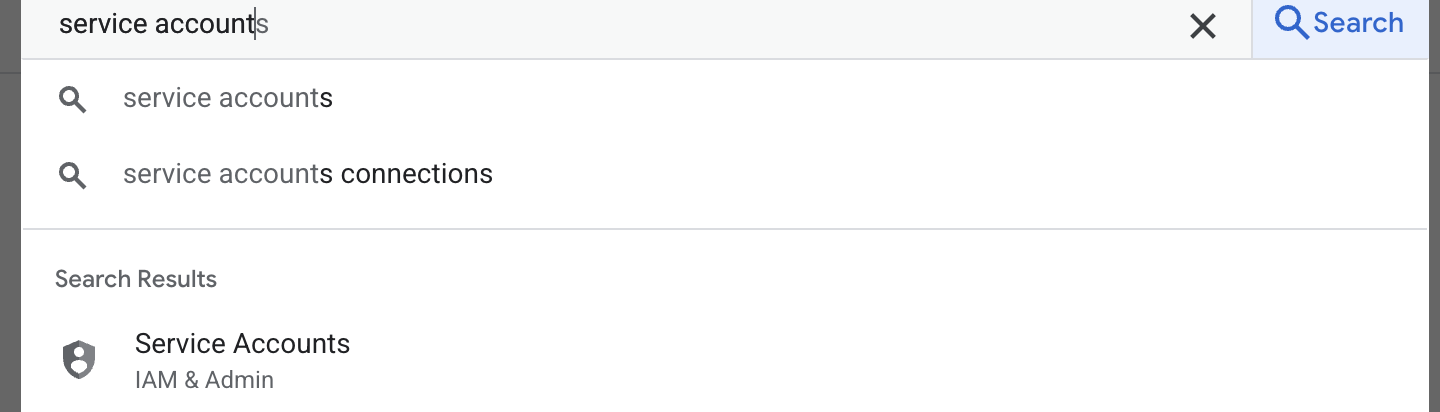
- 第一步是建立服務帳戶。在搜尋欄位中輸入服務帳戶,然後按一下服務帳戶。
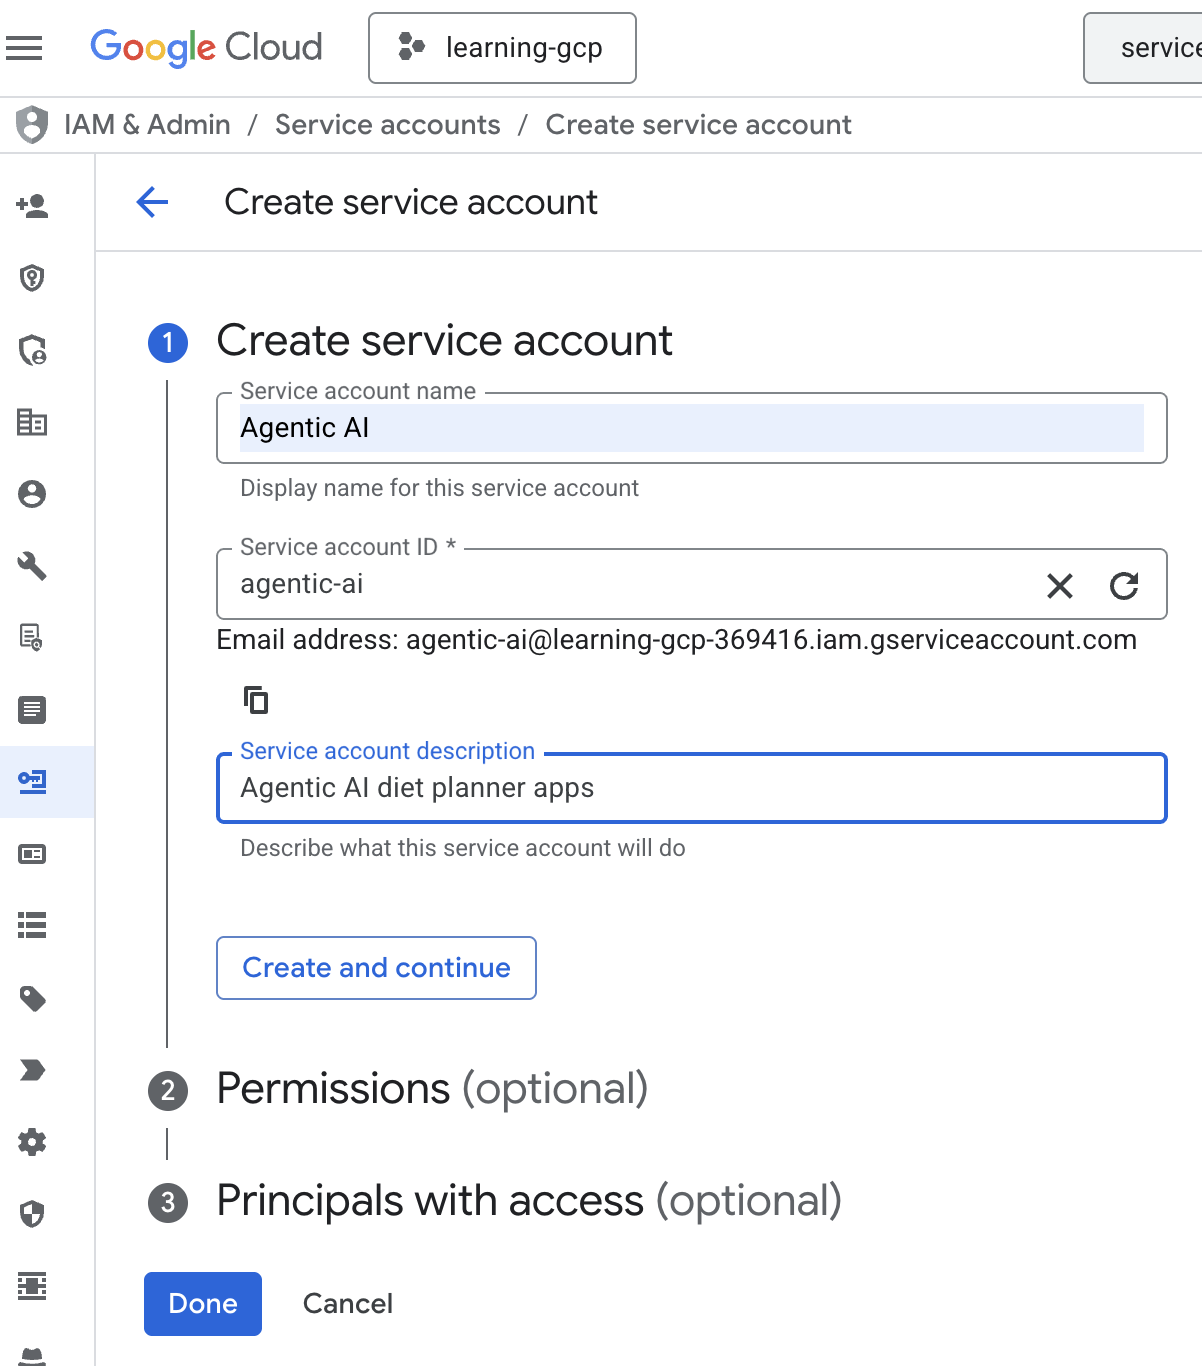
- 按一下「+ 建立服務帳戶」。輸入服務帳戶名稱,然後按一下「建立並繼續」。
- 在權限中,選擇「服務帳戶使用者」角色。按一下「+ 新增其他角色」,然後選擇 IAM 角色:「BigQuery 管理員」、「Cloud Run 管理員」、「Cloud Run Invoker」、「Vertex AI 服務代理程式」和「Vertex AI 使用者」,然後按一下「完成」圖示
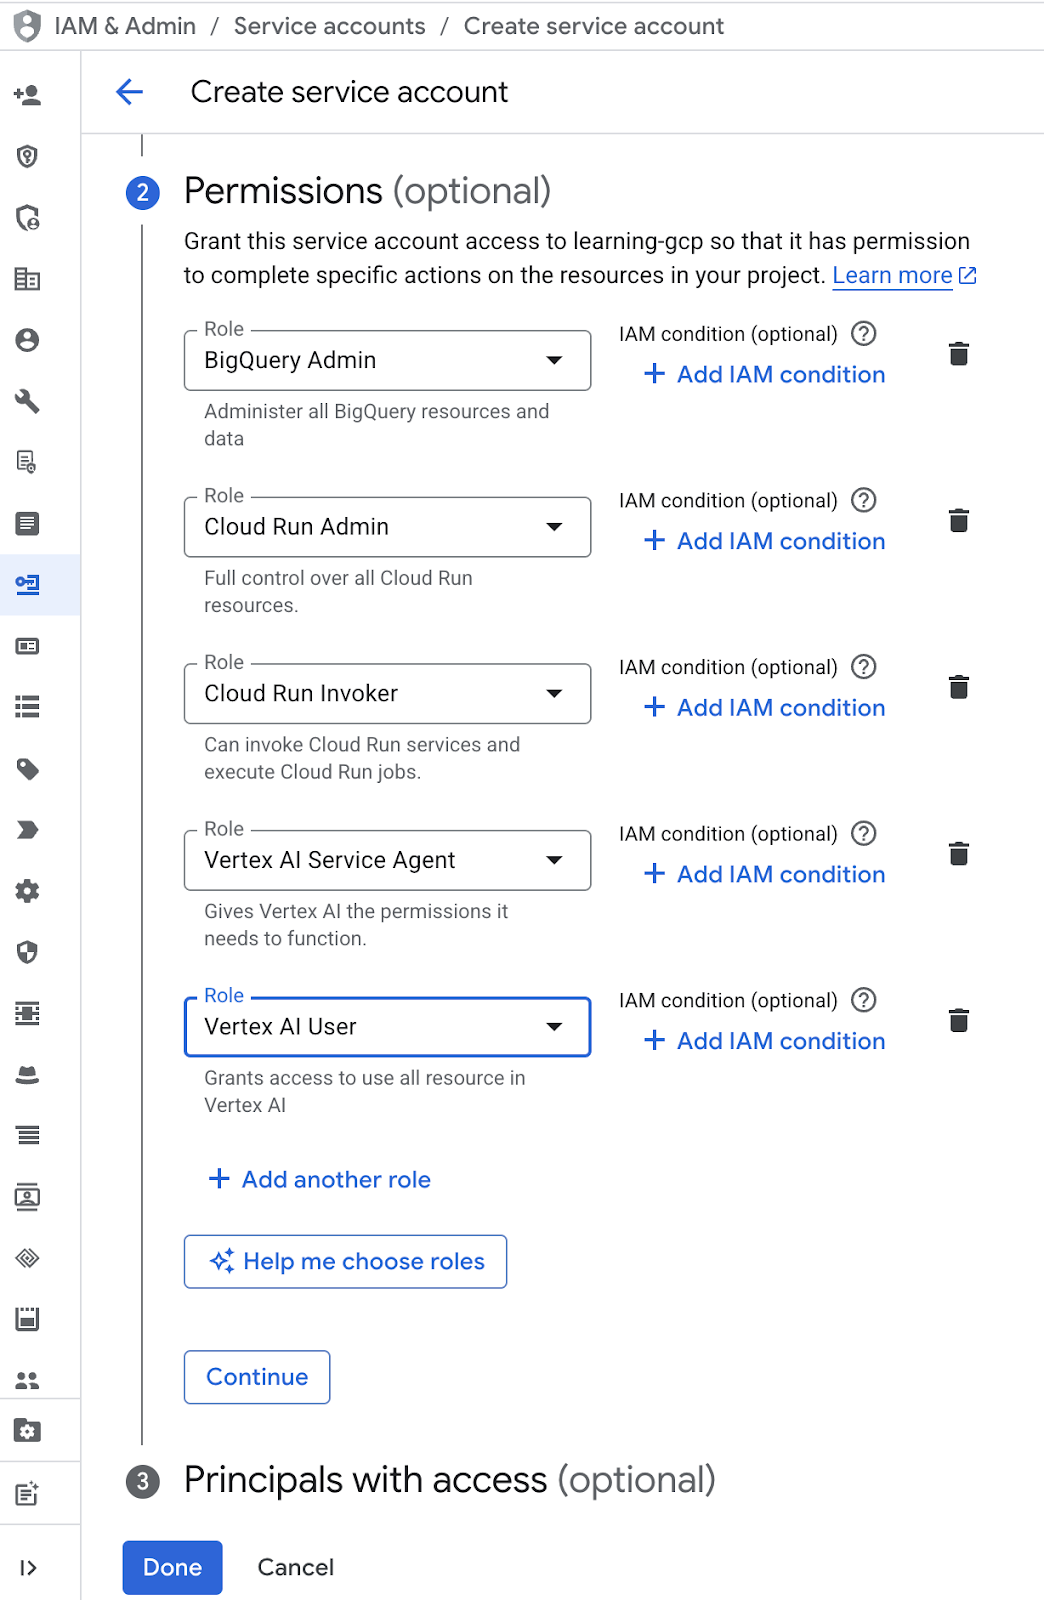 。
。 - 依序點選服務帳戶電子郵件、Tab 鍵、新增金鑰 → 建立新的金鑰。
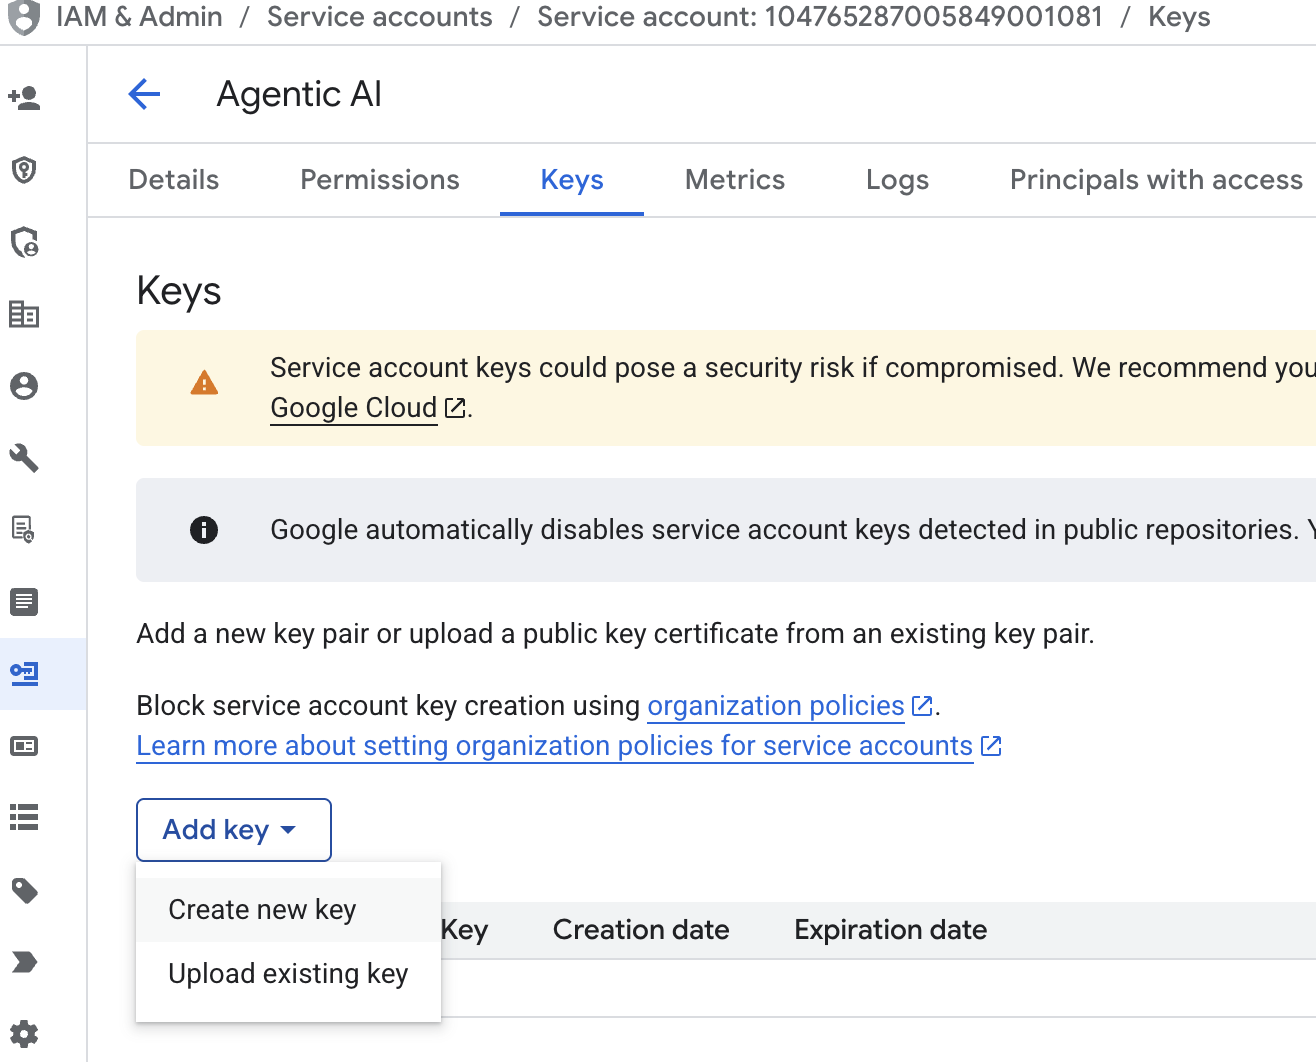
- 選擇「json」,然後按一下「建立」。將這個服務帳戶檔案儲存到本機,以供下一個步驟
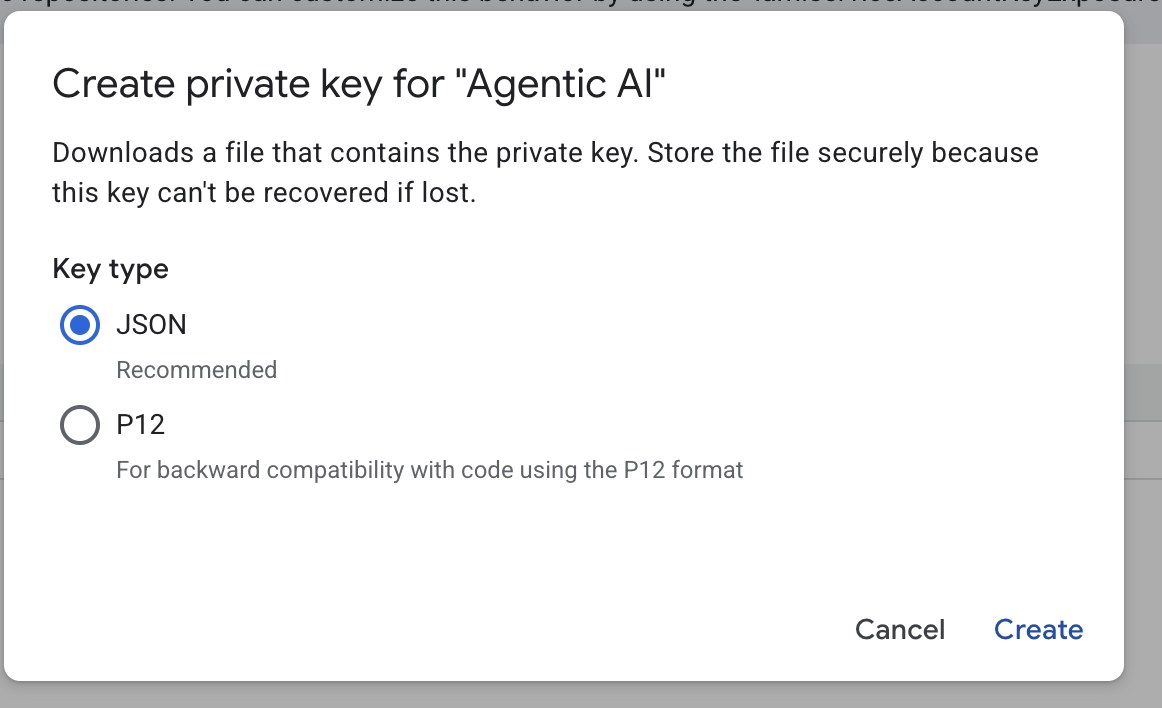 使用
使用 - 建立名為 .streamlit 的資料夾,並加入下列設定。按一下滑鼠右鍵,然後依序點選「新增資料夾」並輸入資料夾名稱
.streamlit - 在
.streamlit資料夾中按一下滑鼠右鍵,然後按一下「New File」,並填入下列值。然後儲存為secrets.toml
# secrets.toml (for Streamlit sharing)
# Store in .streamlit/secrets.toml

[gcp]
project_id = "your_gcp_project"
location = "us-central1"

[gcp_service_account]
type = "service_account"
project_id = "your-project-id"
private_key_id = "your-private-key-id"
private_key = '''-----BEGIN PRIVATE KEY-----
YOUR_PRIVATE_KEY_HERE
-----END PRIVATE KEY-----'''
client_email = "your-sa@project-id.iam.gserviceaccount.com"
client_id = "your-client-id"
auth_uri = "https://accounts.google.com/o/oauth2/auth"
token_uri = "https://oauth2.googleapis.com/token"
auth_provider_x509_cert_url = "https://www.googleapis.com/oauth2/v1/certs"
client_x509_cert_url = "https://www.googleapis.com/robot/v1/metadata/x509/your-sa%40project-id.iam.gserviceaccount.com"
- 根據上一個步驟中建立的服務帳戶,更新
project_id、private_key_id、private_key、client_email和client_id , and auth_provider_x509_cert_url的值
準備 BigQuery 資料集
下一步是建立 BigQuery 資料集,將生成結果儲存至 BigQuery。
- 在搜尋框中輸入「BigQuery」,然後按一下「BigQuery」。
- 按一下
 ,然後按一下「建立資料集」。
 - 輸入資料集 ID
diet_planner_data,然後按一下「建立資料集」圖示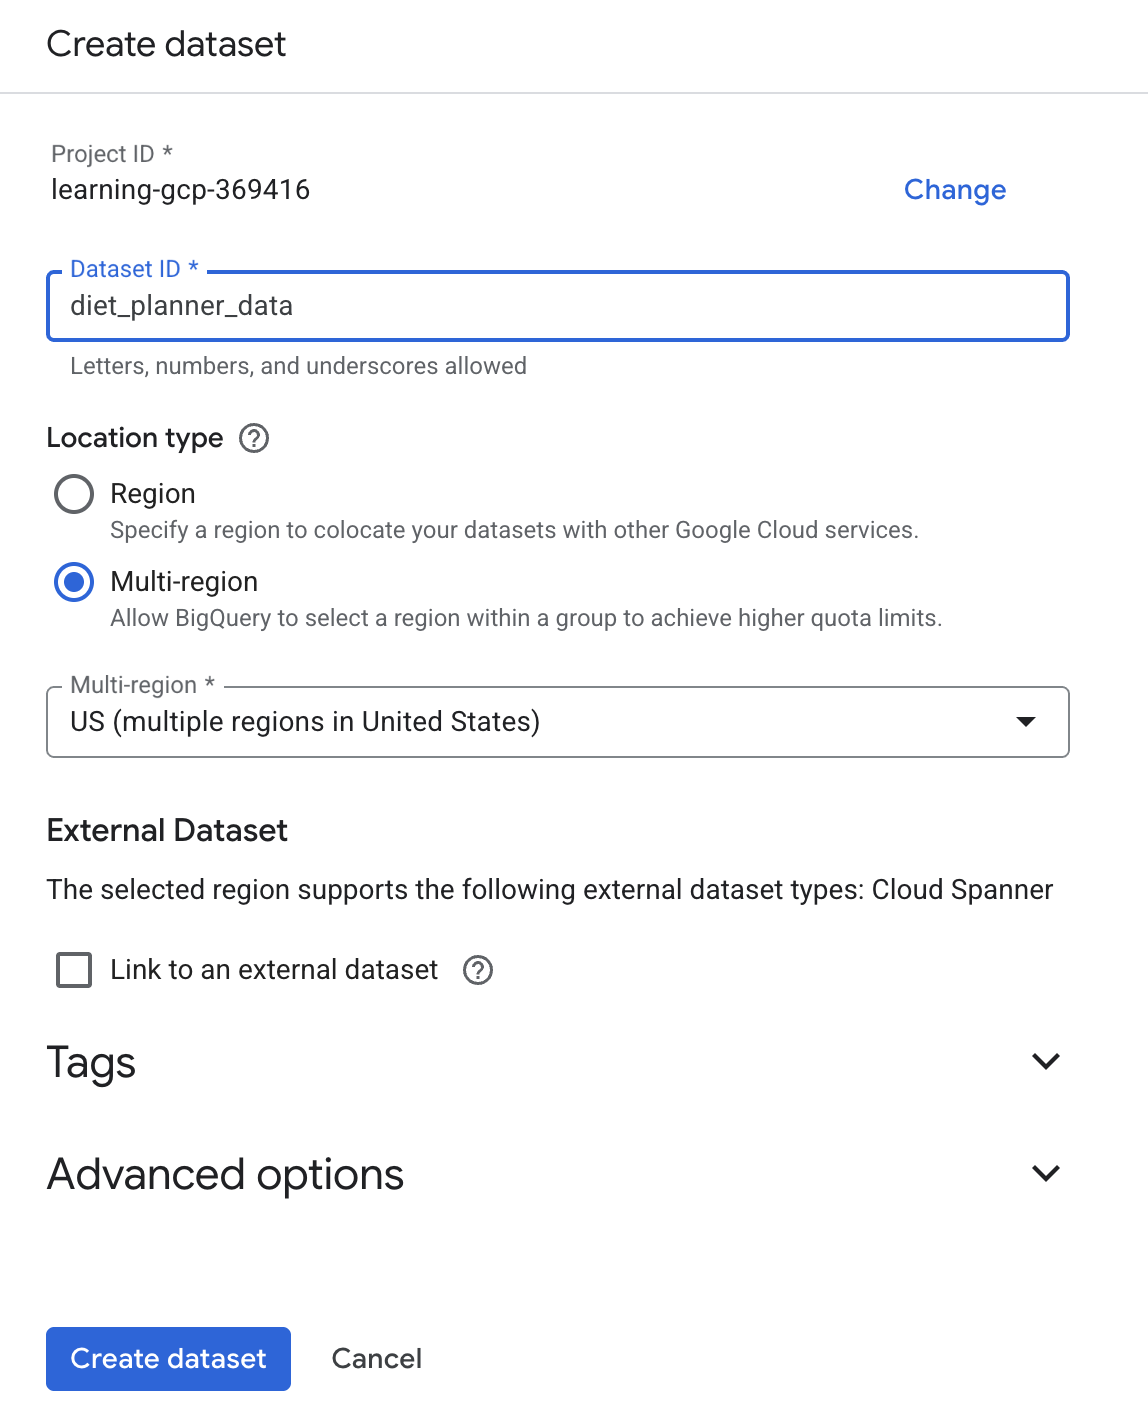
4. 建構 Agent Diet Planner 應用程式
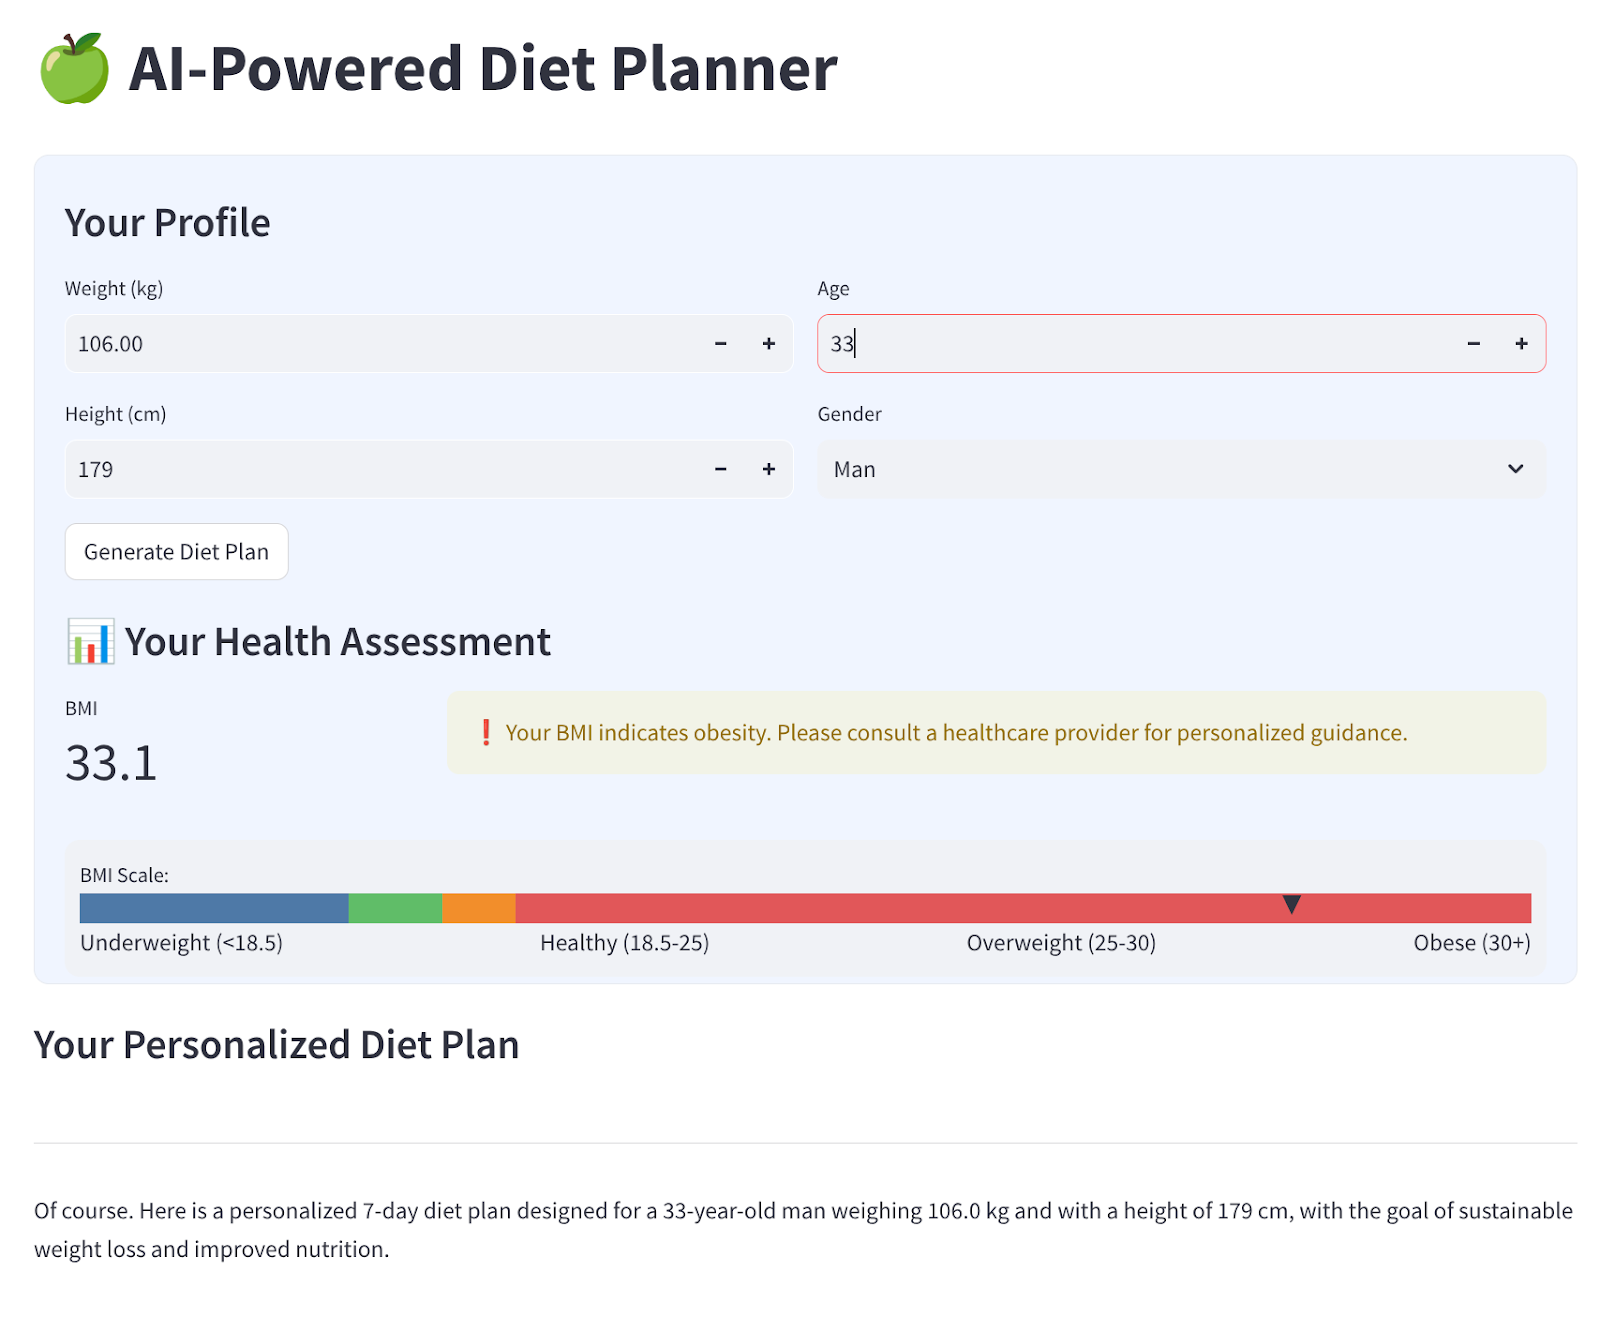
我們將建構簡單的網頁介面,其中包含 4 個輸入內容,如下所示
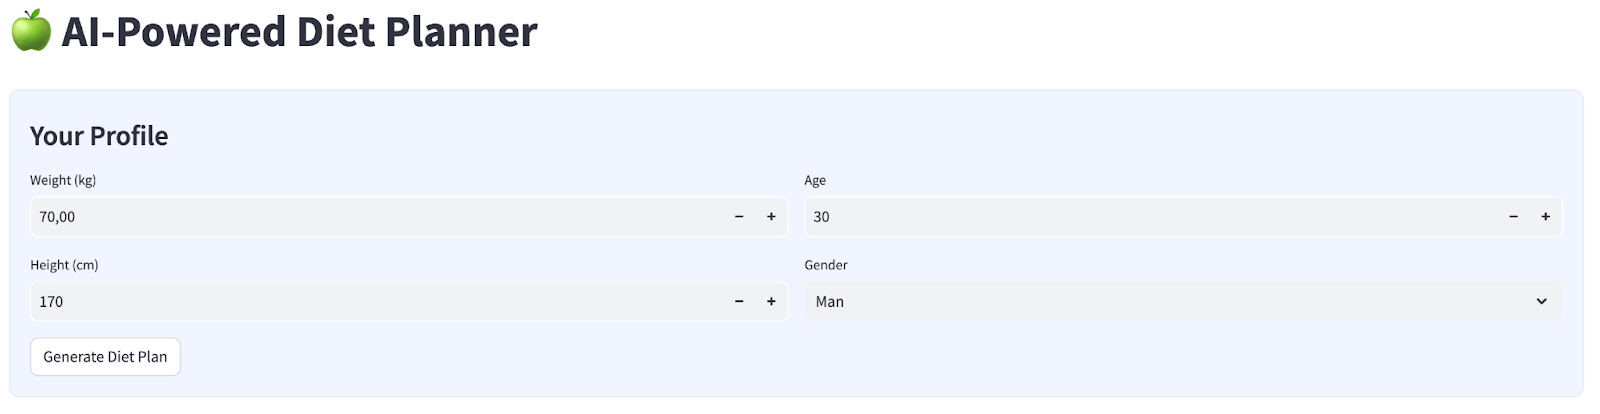
根據個人資料變更體重、身高、年齡和性別,然後按一下「產生」。這項作業會呼叫 Vertex AI 程式庫中的 LLM 模型 Gemini Pro 2.5,並將生成的結果儲存至 BigQuery。
為避免驗證碼過長,系統會將驗證碼分成 6 個部分。
建立函式 calculate bmi status
- 在
agent_diet_planner資料夾上按一下滑鼠右鍵 →「New File ..」(新增檔案) → 輸入檔案名稱bmi_calc.py,然後按下 Enter 鍵 - 填入下列程式碼
# Add this function to calculate BMI and health status
def calculate_bmi_status(weight, height):
   """
   Calculate BMI and return status message
   """
   height_m = height / 100  # Convert cm to meters
   bmi = weight / (height_m ** 2)

   if bmi < 18.5:
       status = "underweight"
       message = "⚠️ Your BMI suggests you're underweight. Consider increasing calorie intake with nutrient-dense foods."
   elif 18.5 <= bmi < 25:
       status = "normal"
       message = "✅ Your BMI is in the healthy range. Let's maintain this balance!"
   elif 25 <= bmi < 30:
       status = "overweight"
       message = "⚠️ Your BMI suggests you're overweight. Focus on gradual weight loss through balanced nutrition."
   else:
       status = "obese"
       message = "❗ Your BMI indicates obesity. Please consult a healthcare provider for personalized guidance."

   return {
       "value": round(bmi, 1),
       "status": status,
       "message": message
   }
建立虛擬服務專員飲食規劃工具主要應用程式
- 在
agent_diet_planner資料夾上按一下滑鼠右鍵 →「New File ..」→ 輸入檔案名稱app.py,然後按下 Enter 鍵。 - 填入下列程式碼
import os
from google.oauth2 import service_account
import streamlit as st
from google.cloud import bigquery
from vertexai.preview.generative_models import GenerativeModel
import vertexai
import datetime
import time
import pandas as pd
from bmi_calc import calculate_bmi_status

# Get configuration from environment
PROJECT_ID = os.environ.get("GCP_PROJECT_ID", "your_gcp_project_id")
LOCATION = os.environ.get("GCP_LOCATION", "us-central1")

#CONSTANTS Dataset and table in BigQuery
DATASET = "diet_planner_data"
TABLE = "user_plans"

# Initialize Vertex AI
vertexai.init(project=PROJECT_ID, location=LOCATION)

# Initialize BigQuery client
try:
   # For Cloud Run, use default credentials
   bq_client = bigquery.Client()
except:
   # For local development, use service account from secrets
   if "gcp_service_account" in st.secrets:
       service_account_info = dict(st.secrets["gcp_service_account"])
       credentials = service_account.Credentials.from_service_account_info(service_account_info)
       bq_client = bigquery.Client(credentials=credentials, project=PROJECT_ID)
   else:
       st.error("BigQuery client initialization failed")
       st.stop()
將 your_gcp_project_id 值改為專案 ID。
建立代理飲食計畫主要應用程式 - setup_bq_tables
在本節中,我們將建立名為 setup_bq_table 的函式,並使用 1 個輸入參數 bq_client。這個函式會在 BigQuery 資料表中定義結構定義,並在資料表不存在時建立資料表。
在 app.py 中,於前一段程式碼下方填入下列程式碼
# Create BigQuery table if not exists
def setup_bq_table(bq_client):
   dataset_id = f"{st.secrets['gcp']['project_id']}.{DATASET}"
   table_id = f"{dataset_id}.{TABLE}"

   schema = [
       bigquery.SchemaField("user_id", "STRING", mode="REQUIRED"),
       bigquery.SchemaField("timestamp", "TIMESTAMP", mode="REQUIRED"),
       bigquery.SchemaField("weight", "FLOAT", mode="REQUIRED"),
       bigquery.SchemaField("height", "INTEGER", mode="REQUIRED"),
       bigquery.SchemaField("age", "INTEGER", mode="REQUIRED"),
       bigquery.SchemaField("gender", "STRING", mode="REQUIRED"),
       bigquery.SchemaField("diet_plan", "STRING", mode="REQUIRED")
   ]

   try:
       bq_client.get_table(table_id)
   except:
       table = bigquery.Table(table_id, schema=schema)
       bq_client.create_table(table)
       st.toast("BigQuery table created successfully")
建立代理飲食計畫主應用程式 - generate_diet_plan
在本節中,我們將建立名為 generate_diet_plan 的函式,並使用 1 個輸入參數。這個函式會使用定義的提示呼叫 LLM 模型 Gemini Pro 2.5,並生成結果。
在 app.py 中,於前一段程式碼下方填入下列程式碼
# Generate diet plan using Gemini Pro
def generate_diet_plan(params):
   try:
       model = GenerativeModel("gemini-2.5-pro")
       prompt = f"""
       Create a personalized 7-day diet plan for:
       - {params['gender']}, {params['age']} years old
       - Weight: {params['weight']} kg
       - Height: {params['height']} cm

       Include:
       1. Daily calorie target
       2. Macronutrient breakdown (carbs, protein, fat)
       3. Meal timing and frequency
       4. Food recommendations
       5. Hydration guidance

       Make the plan:
       - Nutritionally balanced
       - Practical for daily use
       - Culturally adaptable
       - With portion size guidance
       """

       response = model.generate_content(prompt)
       return response.text
   except Exception as e:
       st.error(f"AI generation error: {str(e)}")
       return None
建立代理飲食計畫主應用程式 - save_to_bq
在本節中,我們將建立名為 save_to_bq 的函式,並使用 3 個輸入參數:bq_client、user_id 和 plan。這個函式會將生成結果儲存至 BigQuery 資料表
在 app.py 中,於前一段程式碼下方填入下列程式碼
# Save user data to BigQuery
def save_to_bq(bq_client, user_id, plan):
   try:
       dataset_id = f"{st.secrets['gcp']['project_id']}.{DATASET}"
       table_id = f"{dataset_id}.{TABLE}"

       row = {
           "user_id": user_id,
           "timestamp": datetime.datetime.utcnow().isoformat(),
           "weight": st.session_state.user_data["weight"],
           "height": st.session_state.user_data["height"],
           "age": st.session_state.user_data["age"],
           "gender": st.session_state.user_data["gender"],
           "diet_plan": plan
       }

       errors = bq_client.insert_rows_json(table_id, [row])
       if errors:
           st.error(f"BigQuery error: {errors}")
       else:
           return True
   except Exception as e:
       st.error(f"Data saving error: {str(e)}")
       return False
建立代理飲食規劃工具的主要應用程式 - main
在本節中,我們將建立名為 main 的函式,該函式沒有輸入參數。這個函式主要處理 Streamlit UI 指令碼、顯示產生的結果、顯示 BigQuery 資料表中的歷來生成結果,以及將資料下載至 Markdown 檔案。
在 app.py 中,於前一段程式碼下方填入下列程式碼
# Streamlit UI
def main():
   st.set_page_config(page_title="AI Diet Planner", page_icon="🍏", layout="wide")

   # Initialize session state
   if "user_data" not in st.session_state:
       st.session_state.user_data = None
   if "diet_plan" not in st.session_state:
       st.session_state.diet_plan = None

   # Initialize clients
   #bq_client = init_clients()
   setup_bq_table(bq_client)

   st.title("🍏 AI-Powered Diet Planner")
   st.markdown("""
   <style>
   .stProgress > div > div > div > div {
       background-color: #4CAF50;
   }
   [data-testid="stForm"] {
       background: #f0f5ff;
       padding: 20px;
       border-radius: 10px;
       border: 1px solid #e6e9ef;
   }
   </style>
   """, unsafe_allow_html=True)

   # User input form
   with st.form("user_profile", clear_on_submit=False):
       st.subheader("Your Profile")
       col1, col2 = st.columns(2)

       with col1:
           weight = st.number_input("Weight (kg)", min_value=30.0, max_value=200.0, value=70.0)
           height = st.number_input("Height (cm)", min_value=100, max_value=250, value=170)

       with col2:
           age = st.number_input("Age", min_value=18, max_value=100, value=30)
           gender = st.selectbox("Gender", ["Man", "Woman"])

       submitted = st.form_submit_button("Generate Diet Plan")

       if submitted:
           user_data = {
               "weight": weight,
               "height": height,
               "age": age,
               "gender": gender
           }

           st.session_state.user_data = user_data
           # Calculate BMI
           bmi_result = calculate_bmi_status(weight, height)

           # Display BMI results in a visually distinct box
           with st.container():
               st.subheader("📊 Your Health Assessment")
               col1, col2 = st.columns([1, 3])

               with col1:
                   st.metric("BMI", bmi_result["value"])

               with col2:
                   if bmi_result["status"] != "normal":
                       st.warning(bmi_result["message"])
                   else:
                       st.success(bmi_result["message"])

           # Add BMI scale visualization
           st.markdown(f"""
           <div style="background:#f0f2f6;padding:10px;border-radius:10px;margin-top:10px">
           <small>BMI Scale:</small><br>
           <div style="display:flex;height:20px;background:linear-gradient(90deg,
           #4e79a7 0%,
           #4e79a7 18.5%,
           #60bd68 18.5%,
           #60bd68 25%,
           #f28e2b 25%,
           #f28e2b 30%,
           #e15759 30%,
           #e15759 100%);position:relative">
           <div style="position:absolute;left:{min(100, max(0, (bmi_result["value"]/40)*100))}%;top:-5px">
               ▼
           </div>
           </div>
           <div style="display:flex;justify-content:space-between">
           <span>Underweight (<18.5)</span>
           <span>Healthy (18.5-25)</span>
           <span>Overweight (25-30)</span>
           <span>Obese (30+)</span>
           </div>
           </div>
           """, unsafe_allow_html=True)

           # Store BMI in session state
           st.session_state.bmi = bmi_result

   # Plan generation and display
   if submitted and st.session_state.user_data:
       with st.spinner("🧠 Generating your personalized diet plan using Gemini AI..."):
           #diet_plan = generate_diet_plan(st.session_state.user_data)
           diet_plan = generate_diet_plan({**st.session_state.user_data,"bmi": bmi_result["value"],
                                           "bmi_status": bmi_result["status"]
           })

           if diet_plan:
               st.session_state.diet_plan = diet_plan

               # Generate unique user ID
               user_id = f"user_{int(time.time())}"

               # Save to BigQuery
               if save_to_bq(bq_client, user_id, diet_plan):
                   st.toast("✅ Plan saved to database!")

   # Display generated plan
   if st.session_state.diet_plan:
       st.subheader("Your Personalized Diet Plan")
       st.markdown("---")
       st.markdown(st.session_state.diet_plan)

       # Download button
       st.download_button(
           label="Download Plan",
           data=st.session_state.diet_plan,
           file_name="my_diet_plan.md",
           mime="text/markdown"
       )

       # Show history
       st.subheader("Your Plan History")
       try:
           query = f"""
               SELECT timestamp, weight, height, age, gender
               FROM `{st.secrets['gcp']['project_id']}.{DATASET}.{TABLE}`
               WHERE user_id LIKE 'user_%'
               ORDER BY timestamp DESC
               LIMIT 5
           """
           history = bq_client.query(query).to_dataframe()
           if not history.empty:
               history["timestamp"] = pd.to_datetime(history["timestamp"])
               st.dataframe(history.style.format({
                   "weight": "{:.1f} kg",
                   "height": "{:.0f} cm"
               }))
           else:
               st.info("No previous plans found")
       except Exception as e:
           st.error(f"History load error: {str(e)}")

if __name__ == "__main__":
   main()
將程式碼儲存為 app.py。
5. 使用 Cloud Build 將應用程式部署至 Cloud Run
現在,我們當然要向其他人展示這個出色的應用程式。為此,我們可以將這個應用程式封裝並部署至 Cloud Run,做為可供他人存取的公開服務。為此,我們來回顧一下架構
首先,我們需要 Dockerfile。依序點選「File」>「New Text File」,然後複製並貼上下列程式碼,並儲存為 Dockerfile。
# Use official Python image
FROM python:3.12-slim

# Set environment variables
ENV PYTHONDONTWRITEBYTECODE 1
ENV PYTHONUNBUFFERED 1
ENV PORT 8080

# Install system dependencies
RUN apt-get update && \
   apt-get install -y --no-install-recommends \
   build-essential \
   libpq-dev \
   && rm -rf /var/lib/apt/lists/*

# Set working directory
WORKDIR /app

# Copy requirements
COPY requirements.txt .

# Install Python dependencies
RUN pip install --no-cache-dir -r requirements.txt

# Copy application files
COPY . .

# Expose port
EXPOSE $PORT

# Run the application
CMD ["streamlit", "run", "app.py", "--server.port", "8080", "--server.address", "0.0.0.0"]
接下來,我們要建立 cloudbuild.yaml,將應用程式建構為 Docker 映像檔、推送至 Artifact Registry,並部署至 Cloud Run。
依序點選「File」->「New Text File」,然後複製並貼上下列程式碼,並儲存為 cloudbuild.yaml
steps:
 # Build Docker image
 - name: 'gcr.io/cloud-builders/docker'
   args: ['build', '-t', 'gcr.io/$PROJECT_ID/diet-planner:$BUILD_ID', '--no-cache',
        '--progress=plain',
        '.']
   id: 'Build'
   timeout: 1200s
   waitFor: ['-']
   dir: '.'
  # Push to Container Registry
 - name: 'gcr.io/cloud-builders/docker'
   args: ['push', 'gcr.io/$PROJECT_ID/diet-planner:$BUILD_ID']
   id: 'Push'
   waitFor: ['Build']
  # Deploy to Cloud Run
 - name: 'gcr.io/google.com/cloudsdktool/cloud-sdk'
   entrypoint: gcloud
   args:
     - 'run'
     - 'deploy'
     - 'diet-planner-service'
     - '--image=gcr.io/$PROJECT_ID/diet-planner:$BUILD_ID'
     - '--port=8080'
     - '--region=us-central1'
     - '--platform=managed'
     - '--allow-unauthenticated'
     - '--set-env-vars=GCP_PROJECT_ID=$PROJECT_ID,GCP_LOCATION=us-central1'
     - '--cpu=1'
     - '--memory=1Gi'
     - '--timeout=300'
   waitFor: ['Push']

options:
 logging: CLOUD_LOGGING_ONLY
 machineType: 'E2_HIGHCPU_8'
 diskSizeGb: 100

images:
 - 'gcr.io/$PROJECT_ID/diet-planner:$BUILD_ID'
此時,我們已備妥所有檔案,可建構應用程式成為 Docker 映像檔、推送至 Artifact Registry,並部署至 Cloud Run。現在就來部署吧!前往 Cloud Shell 終端機,確認目前專案已設為有效專案。如果不是,請使用 gcloud 設定指令設定專案 ID:
gcloud config set project [PROJECT_ID]
接著執行下列指令,將應用程式建構為 Docker 映像檔、推送至 Artifact Registry,並部署至 Cloud Run:
gcloud builds submit --config cloudbuild.yaml
這項作業會根據先前提供的 Dockerfile 建構 Docker 容器,並推送至 Artifact Registry。接著,我們會將建構的映像檔部署至 Cloud Run。所有程序都定義在 cloudbuild.yaml 步驟中。
請注意,我們允許未經驗證的存取要求,因為這是示範應用程式。建議您為企業和正式版應用程式使用適當的驗證方式。
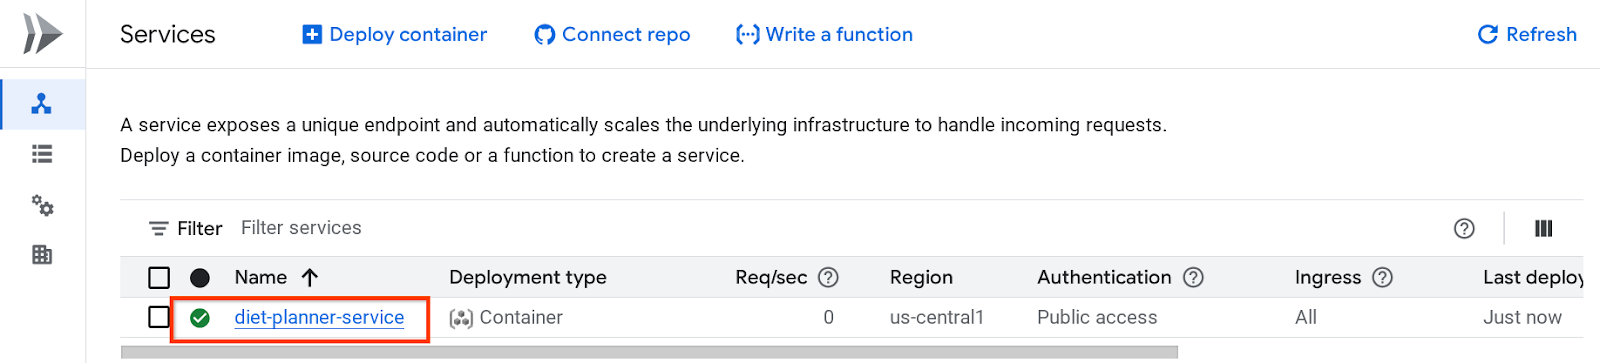
部署完成後,我們可以在 Cloud Run 頁面中檢查,在頂端的 Cloud 控制台搜尋列中搜尋 Cloud Run,然後點選 Cloud Run 產品
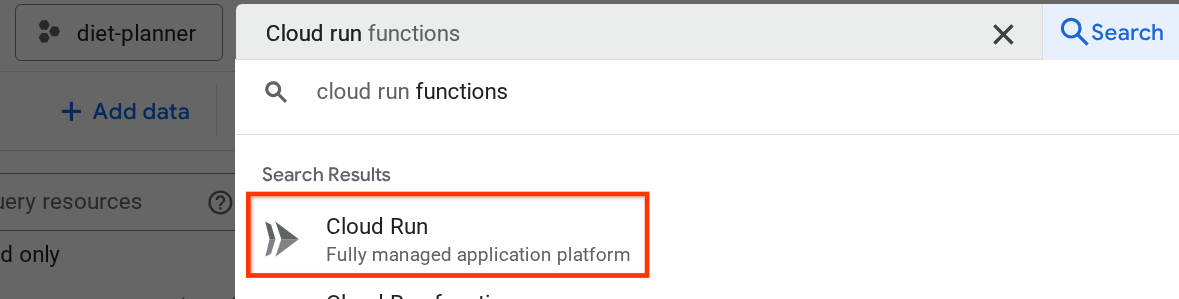
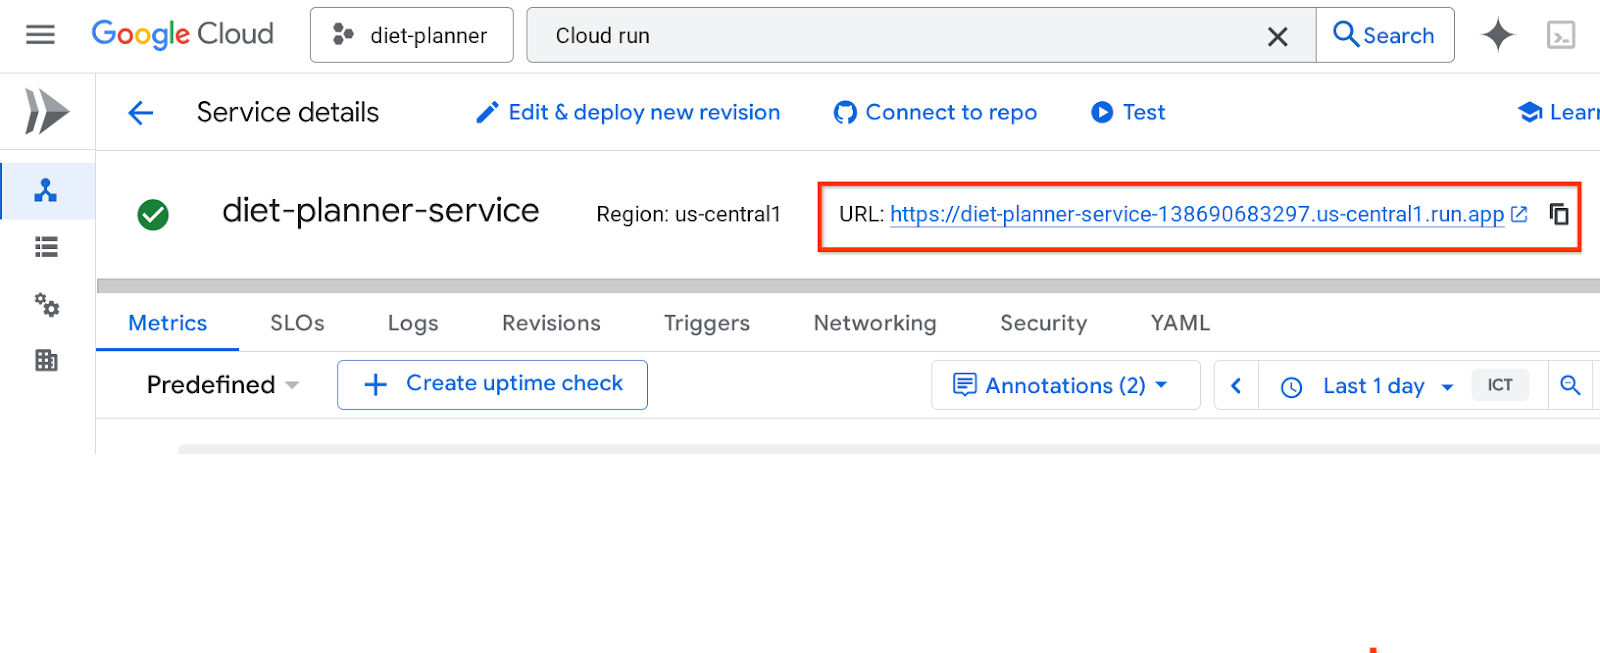
接著,您可以檢查 Cloud Run 服務頁面中列出的已部署服務,然後按一下該服務,取得服務網址。
服務網址會顯示在頂端列
 請繼續在無痕視窗或行動裝置上使用應用程式。這項功能應該已經上線。
6. 清理
如要避免系統向您的 Google Cloud 帳戶收取本程式碼研究室所用資源的費用,請按照下列步驟操作: