
1. Introduction
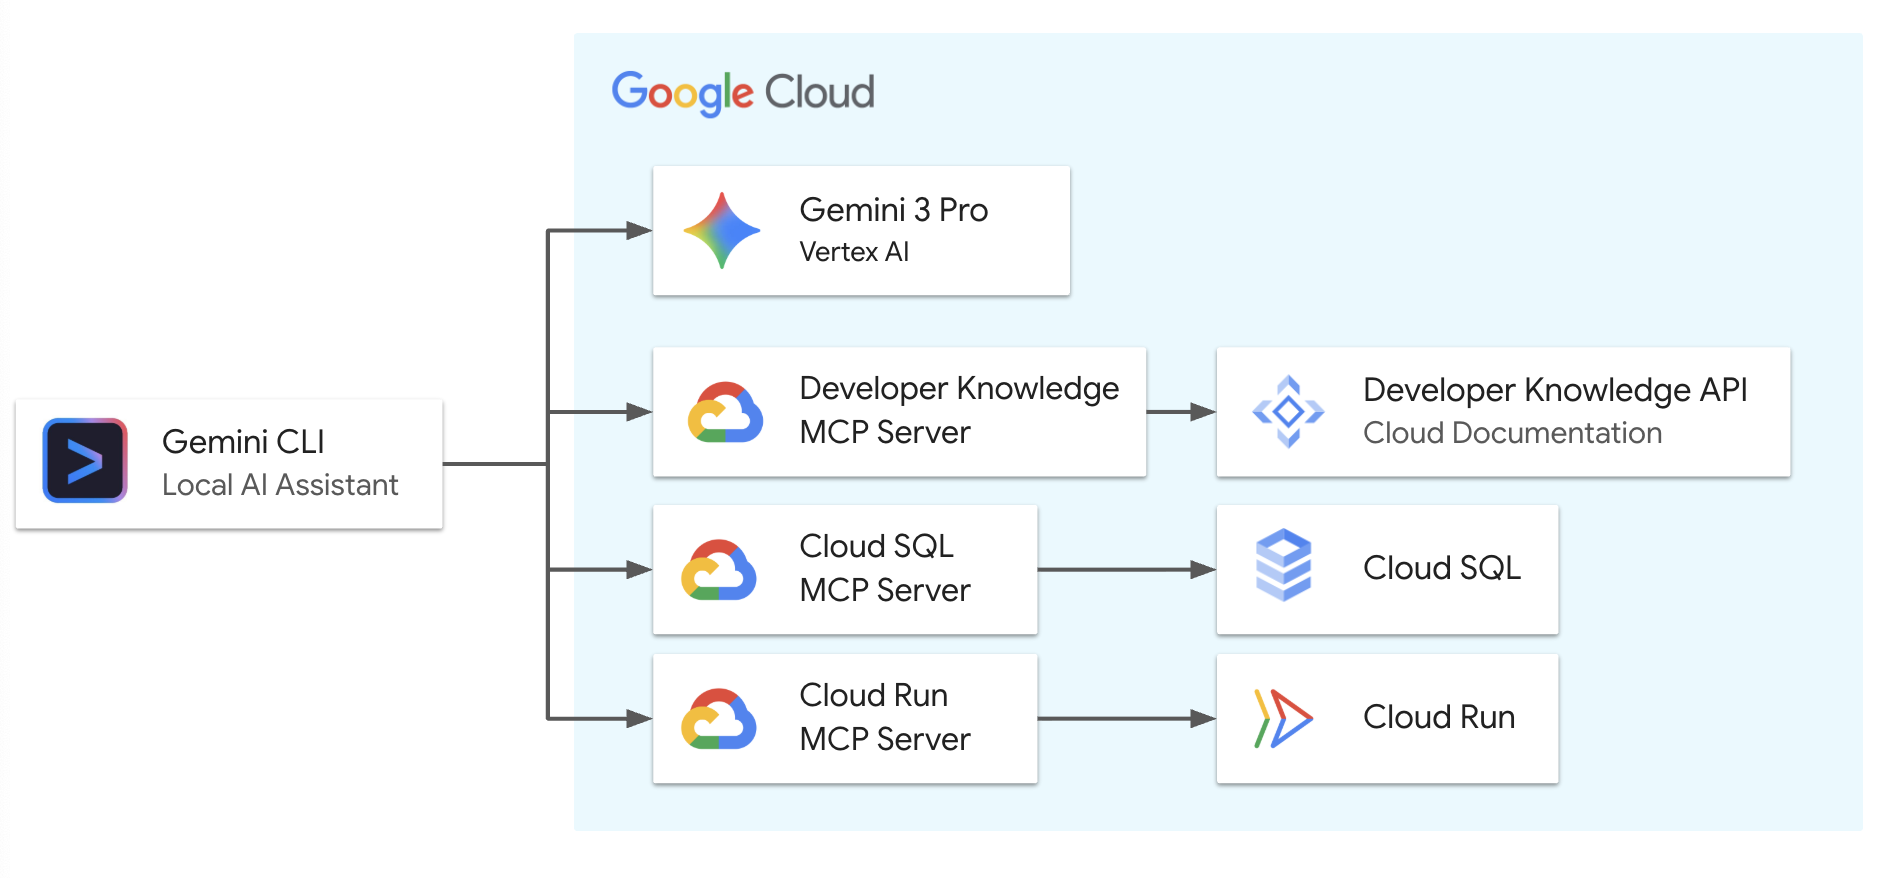
Meet AllStrides, a full-stack event management platform for fitness communities. Despite being rich in features, its current state is "Local-Only." It relies on a local SQLite database and manual Node.js execution. For the community to grow, AllStrides needs the scale, reliability, and security of Google Cloud.
In this codelab, you won't perform a traditional migration. Instead, you will act as a Product Architect, using the Gemini CLI as your agentic partner. By equipping Gemini with three Google Cloud Model Context Protocol (MCP) servers, you will allow the AI to "reach out" and interact directly with Google Cloud services. You will start off by using the Developer Knowledge MCP to identify the best Google Cloud database for the allstrides app. Then you will use the Cloud SQL MCP to provision a database instance and move your local community data to the cloud with a single prompt. Lastly, you will use the Cloud Run MCP to containerize the application, making AllStrides live and globally accessible.
Prerequisites
- A basic understanding of the Google Cloud console
- Basic skills in command line interface and Cloud Shell
What you'll learn
- How to deploy configure Gemini CLI to work with Google Cloud MCP
- How to use the Development Knowledge MCP server
- How to use the Cloud SQL Google Cloud MCP server to migrate data to the cloud
- How to use the Cloud Run Google Cloud MCP server to deploy application in the cloud
- How to use Gemini CLI in Google Cloud Shell
What you'll need
- A Google Cloud Account and Google Cloud Project
- A web browser such as Chrome supporting Google Cloud console and Cloud Shell
2. Setup and Requirements
Project Setup
- Sign-in to the Google Cloud Console. If you don't already have a Gmail or Google Workspace account, you must create one.
Use a personal account instead of a work or school account.
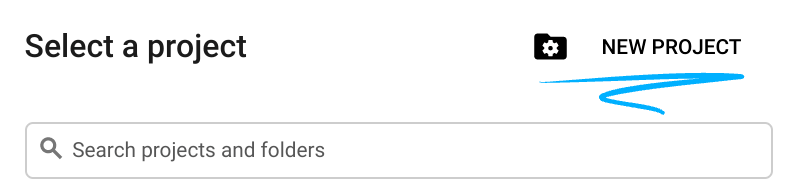
- Create a new project or reuse an existing one. To create a new project in the Google Cloud console, in the header, click the Select a project button which will open a popup window.

In the Select a project window push the button New Project which will open a dialog box for the new project.
In the dialog box put your preferable Project name and choose the location.
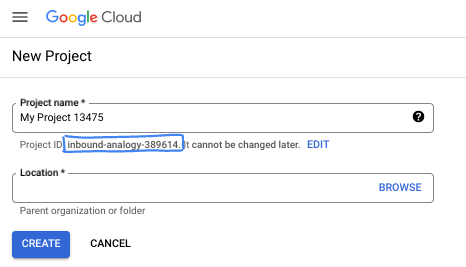
- The Project name is the display name for this project's participants. The project name isn't used by Google APIs, and it can be changed at any time.
- The Project ID is unique across all Google Cloud projects and is immutable (it can't be changed after it has been set). The Google Cloud console automatically generates a unique ID, but you can customize it. If you don't like the generated ID, you can generate another random one or provide your own to check its availability. In most codelabs, you'll need to reference your project ID, which is typically identified with the placeholder PROJECT_ID.
- For your information, there is a third value, a Project Number, which some APIs use. Learn more about all three of these values in the documentation.
Enable Billing
Redeem Google Cloud credits (optional)
To run this workshop, you need a billing account with some credit. Use the credits from the banner at the top of this codelab to get started. If you are already connected to a billing account, you can skip this step.
Set up a personal billing account
If you set up billing using Google Cloud credits, you can skip this step.
To set up a personal billing account, go here to enable billing in the Cloud Console.
Some Notes:
- Completing this lab should cost less than $3 USD in Cloud resources.
- You can follow the steps at the end of this lab to delete resources to avoid further charges.
- New users are eligible for the $300 USD Free Trial.
Start Cloud Shell
While Google Cloud can be operated remotely from your laptop, in this codelab you will be using Google Cloud Shell, a command line environment running in the Cloud.
From the Google Cloud Console, click the Cloud Shell icon on the top right toolbar:

Alternatively you can press G then S. This sequence will activate Cloud Shell if you are within the Google Cloud Console or use this link.
It should only take a few moments to provision and connect to the environment. When it is finished, you should see something like this:

This virtual machine is loaded with all the development tools you'll need. It offers a persistent 5GB home directory, and runs on Google Cloud, greatly enhancing network performance and authentication. All of your work in this codelab can be done within a browser. You do not need to install anything.
3. Before you begin
Enable Basic API
To use managed databases services like Cloud SQL and other services to build and deploy your application to Cloud Run you need to enable their respective APIs in your Google Cloud project.
Depending on your approach you can optionally skip the step and let Gemini CLI enable all required APIs later but you might experience some delays and repeated steps during the execution in such a case.
Inside Cloud Shell terminal, make sure that your project ID is setup:
gcloud config set project [YOUR-PROJECT-ID]
Set environment variable PROJECT_ID:
PROJECT_ID=$(gcloud config get-value project)
Enable all necessary services:
gcloud services enable sqladmin.googleapis.com \
                       aiplatform.googleapis.com \
                       secretmanager.googleapis.com \
                       artifactregistry.googleapis.com \
                       cloudbuild.googleapis.com \
                       run.googleapis.com \
                       containerregistry.googleapis.com
Expected output:
student@cloudshell:~ (test-project-001-402417)$ PROJECT_ID=$(gcloud config get-value project)
Your active configuration is: [cloudshell-14650]
student@cloudshell:~ (test-project-001-402417)$
student@cloudshell:~ (test-project-001-402417)$ gcloud services enable sqladmin.googleapis.com \
                       aiplatform.googleapis.com \
                       secretmanager.googleapis.com \
                       artifactregistry.googleapis.com \
                       cloudbuild.googleapis.com \
                       run.googleapis.com \
                       containerregistry.googleapis.com
Operation "operations/acat.p2-812263612774-c2dbeef3-c4c1-4a7d-a4b2-b5380be65044" finished successfully.
Grant Permissions to Service Account
You need to provide storage admin permissions to the default compute service account to be able to build and store application images.
PROJECT_ID=$(gcloud config get-value project)
 gcloud projects add-iam-policy-binding $PROJECT_ID --member=serviceAccount:$(gcloud projects describe $PROJECT_ID --format="value(projectNumber)")-compute@developer.gserviceaccount.com --role=roles/storage.admin
Enable Google MCP Services
The Google Cloud MCP services should explicitly be enabled for each service in a project. They are disabled by default and it helps to regulate API access on the project and service level.
Let us start with the Developer Knowledge MCP service. To enable the Developer Knowledge API and the Google MCP service, you should run the following gcloud commands.
PROJECT_ID=$(gcloud config get-value project)
gcloud beta services mcp enable developerknowledge.googleapis.com --project=$PROJECT_ID
When the API and Google MCP for Developer Knowledge are enabled, you can proceed and do the same for the Google Cloud MCP service for Cloud SQL.
gcloud beta services mcp enable sqladmin.googleapis.com --project=$PROJECT_ID
As with all Google Cloud MCP for databases the MCP access and permissions are staged providing granular access on the project level to the API itself and only a principal (user or service account) with Service Usage Admin (roles/serviceusage.serviceUsageAdmin) role can do that.
And only principals with the MCP Tool User (roles/mcp.toolUser) role can make calls to the Google Cloud MCP API.
For instance, if you don't have a Cloud SQL Admin (roles/cloudsql.admin) role then you will not be able to create, clone or update any instance in the project.
You can read more about the required roles and permissions in the documentation.
As we can see, the staged and granular authorization protects us from an unauthorized attack even when the Google Cloud MCP endpoint is enabled making it sufficiently safe for our production.
The next Google Cloud MCP we are going to enable is for Cloud Run service. The approach for the Cloud Run Google Cloud MCP enablement and access is similar to the Cloud SQL Google Cloud MCP.
Enable the Cloud Run MCP service with the following command.
gcloud beta services mcp enable run.googleapis.com --project=$PROJECT_ID
Finally we can verify all Google Cloud MCP enabled in our project using the following command.
gcloud beta services mcp list --project=$PROJECT_ID
Expected output:
student@cloudshell:~ (test-project-001-402417)$ gcloud beta services mcp list --project=$PROJECT_ID
NAME: services/developerknowledge.googleapis.com
MCP_ENDPOINT: developerknowledge.googleapis.com

NAME: services/run.googleapis.com
MCP_ENDPOINT: run.googleapis.com/mcp

NAME: services/sqladmin.googleapis.com
MCP_ENDPOINT: sqladmin.googleapis.com/mcp
Now when all our API and services are enabled we need to configure Gemini CLI.
4. Configure Gemini CLI
The lab is designed to use Gemini CLI as the main agent to perform most of the actions and the first step is to configure it to work with Google Cloud MCP services. Also it is highly recommended to use the latest version of Gemini CLI and the latest version of Gemini such as Gemini-3.1-pro or Gemini-3-flash (currently in preview).
If you already have the latest version of Gemini CLI and configured it to use the latest Gemini models then you can skip the next 2 steps and go directly to step 3.
1. Get a Gemini API Key
To use the latest Gemini models in your Gemini CLI it needs to be configured with an API key authentication. We can get the API key in the Google AI Studio
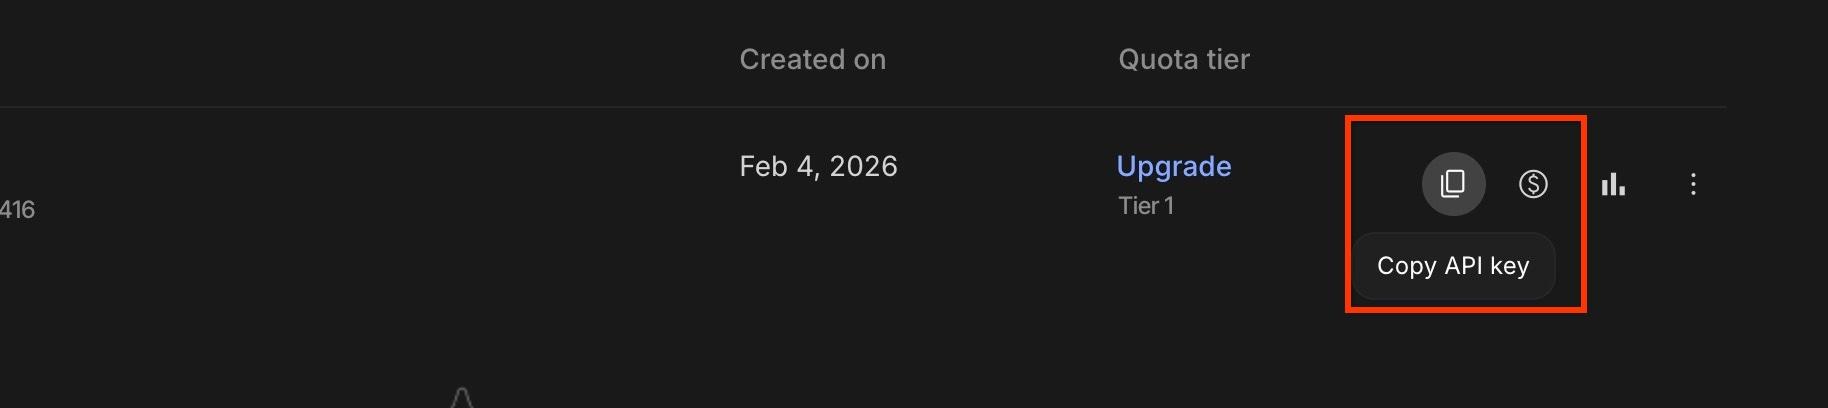
- Go to the Google AI Studio -> Get API key in your browser.
- On the right side of the screen click
Create API keybutton - In the pop-up window choose your project or import if it is not visible there
- Create the API key.
- You can copy the key using the copy button on the right side.
The key is prepared and now we can use it for Gemini CLI
2. Configure Gemini CLI
Gemini CLI can be configured through the settings configurations file or interactively using /settings command. We want our settings to be preserved in our settings file.
First we will create a directory for our project. Let's call the directory projectmcp and switch to that directory using the following commands.
mkdir ~/projectmcp
cd ~/projectmcp
In the directory we will create a directory for gemini configuration files and will be running all our commands. Gemini CLI by default uses a user scope configuration file and extensions installed in the ~/.gemini directory. But we are going to create our own project scope configuration in our ~/projectmcp directory. Let's start from creating the configuration directory and files.
mkdir ~/projectmcp/.gemini
touch ~/projectmcp/.gemini/settings.json
Then we open the ~/projectmcp/.gemini/settings.json file using cloud shell editor.
edit ~/projectmcp/.gemini/settings.json
In the opened editor window add the following configuration.
{
  "general": {
    "preferredEditor": "vscode",
    "previewFeatures": true,
    "sessionRetention": {
      "enabled": true
    }
  },
  "ide": {
    "enabled": true,
    "hasSeenNudge": true
  },
  "security": {
    "auth": {
      "selectedType": "gemini-api-key"
    }
  },
  "ui": {
    "theme": "Default"
  },
  "tools": {
    "shell": {
      "enableInteractiveShell": false
    }
  }
}
After editing the file you can use ctrl+s to save your changes and switch back to the terminal by clicking the Open Terminal button

The above settings.json filesets your Gemini CLI authentication type as gemini-api-key and you need to provide the key to the model. You can do it by creating an .env file in the directory you want to work with Gemini CLI and store your API key for Gemini CLI auth as an environment variable which will be picked up when you start the IDE.
Let's edit the file using Cloud Shell editor
edit ~/projectmcp/.env
And store your API key created in step 1.
GEMINI_API_KEY= <YOUR_API_KEY>
Now you can return back to the terminal and continue. The next step is to update your Gemini CLI to the latest version. The version in the Google Cloud Shell or in your environment can be outdated and might not work correctly with the latest configurations and MCP services. So it's important that you update Gemini CLI to the latest version and start it up. In the terminal execute the following. Please be aware it might take a few minutes to complete.
cd ~/projectmcp/
npm install -g @google/gemini-cli@latest
Now you can verify the version. Please keep in mind that if you are working in the Google Cloud Shell, every time that you restart the shell it might return to the previous version. The changes you make to the Gemini CLI itself are not permanent in Cloud Shell.
gemini --version
It should show the latest Gemini CLI version (version 0.27 on the moment of writing the lab). You can verify the latest Gemini CLI version here. And now we can start it and make sure it is using the latest Gemini model. Run the following command in your project folder to start Gemini CLI.
gemini
And when Gemini CLI starts you can check the version and the model by running /about command in the interface. You should get something like the picture below.
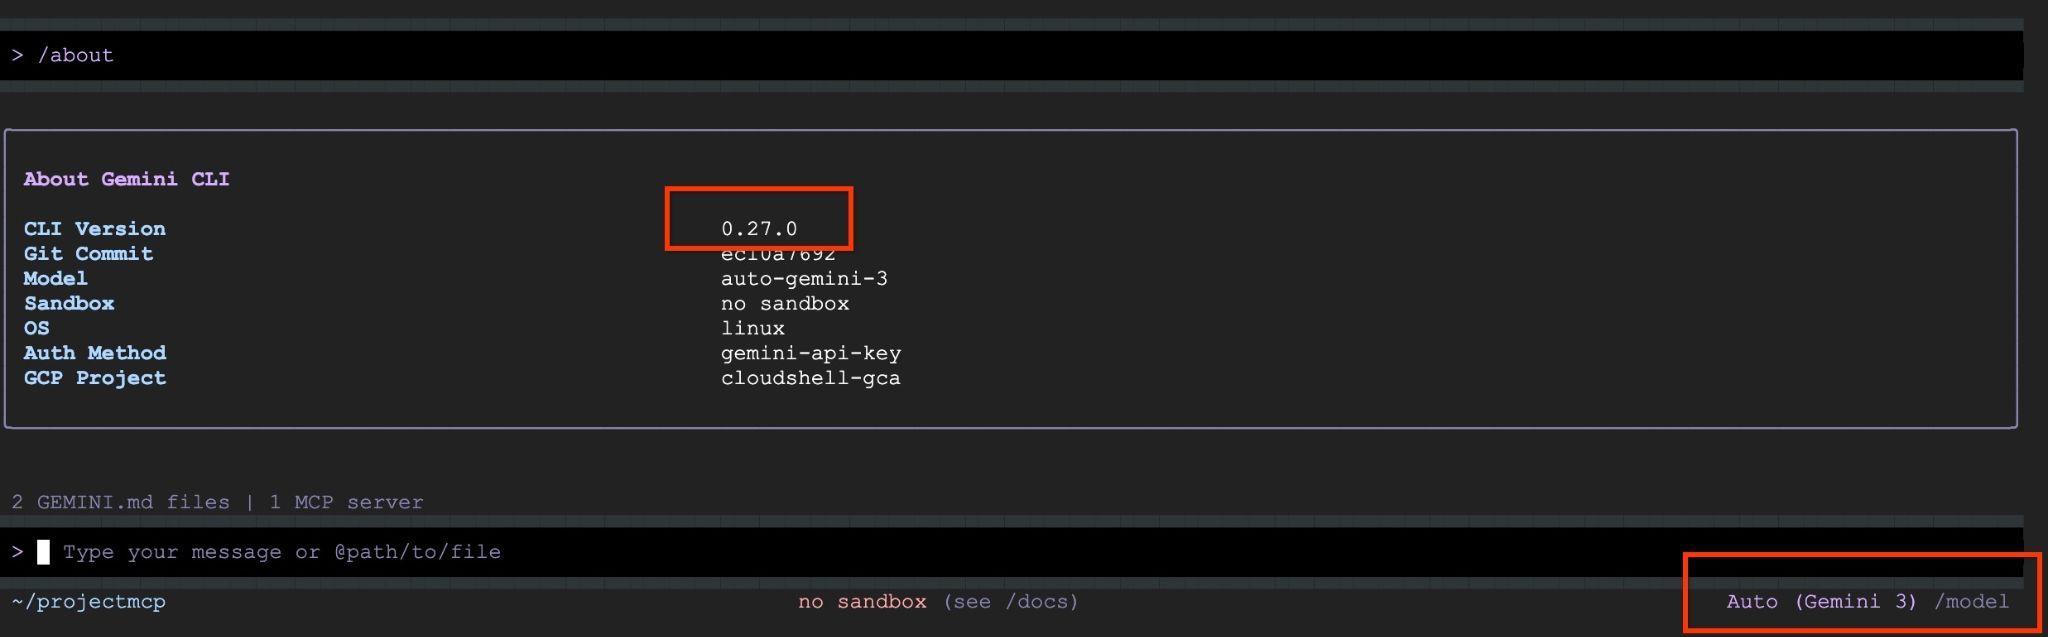
You can see it is using the latest Gemini-3 model.
2. Configure MCP servers in Gemini CLI
Now it is time to add all our enabled MCP servers. You have two ways to enable them in the Gemini CLI - through extensions or directly in the settings. In this lab, you will use your project scope setting.json file and you will add the MCP servers authentication details there.
- For the Developer Knowledge MCP server, you need to create an API key to be authorized on the endpoint.
Here are the steps:
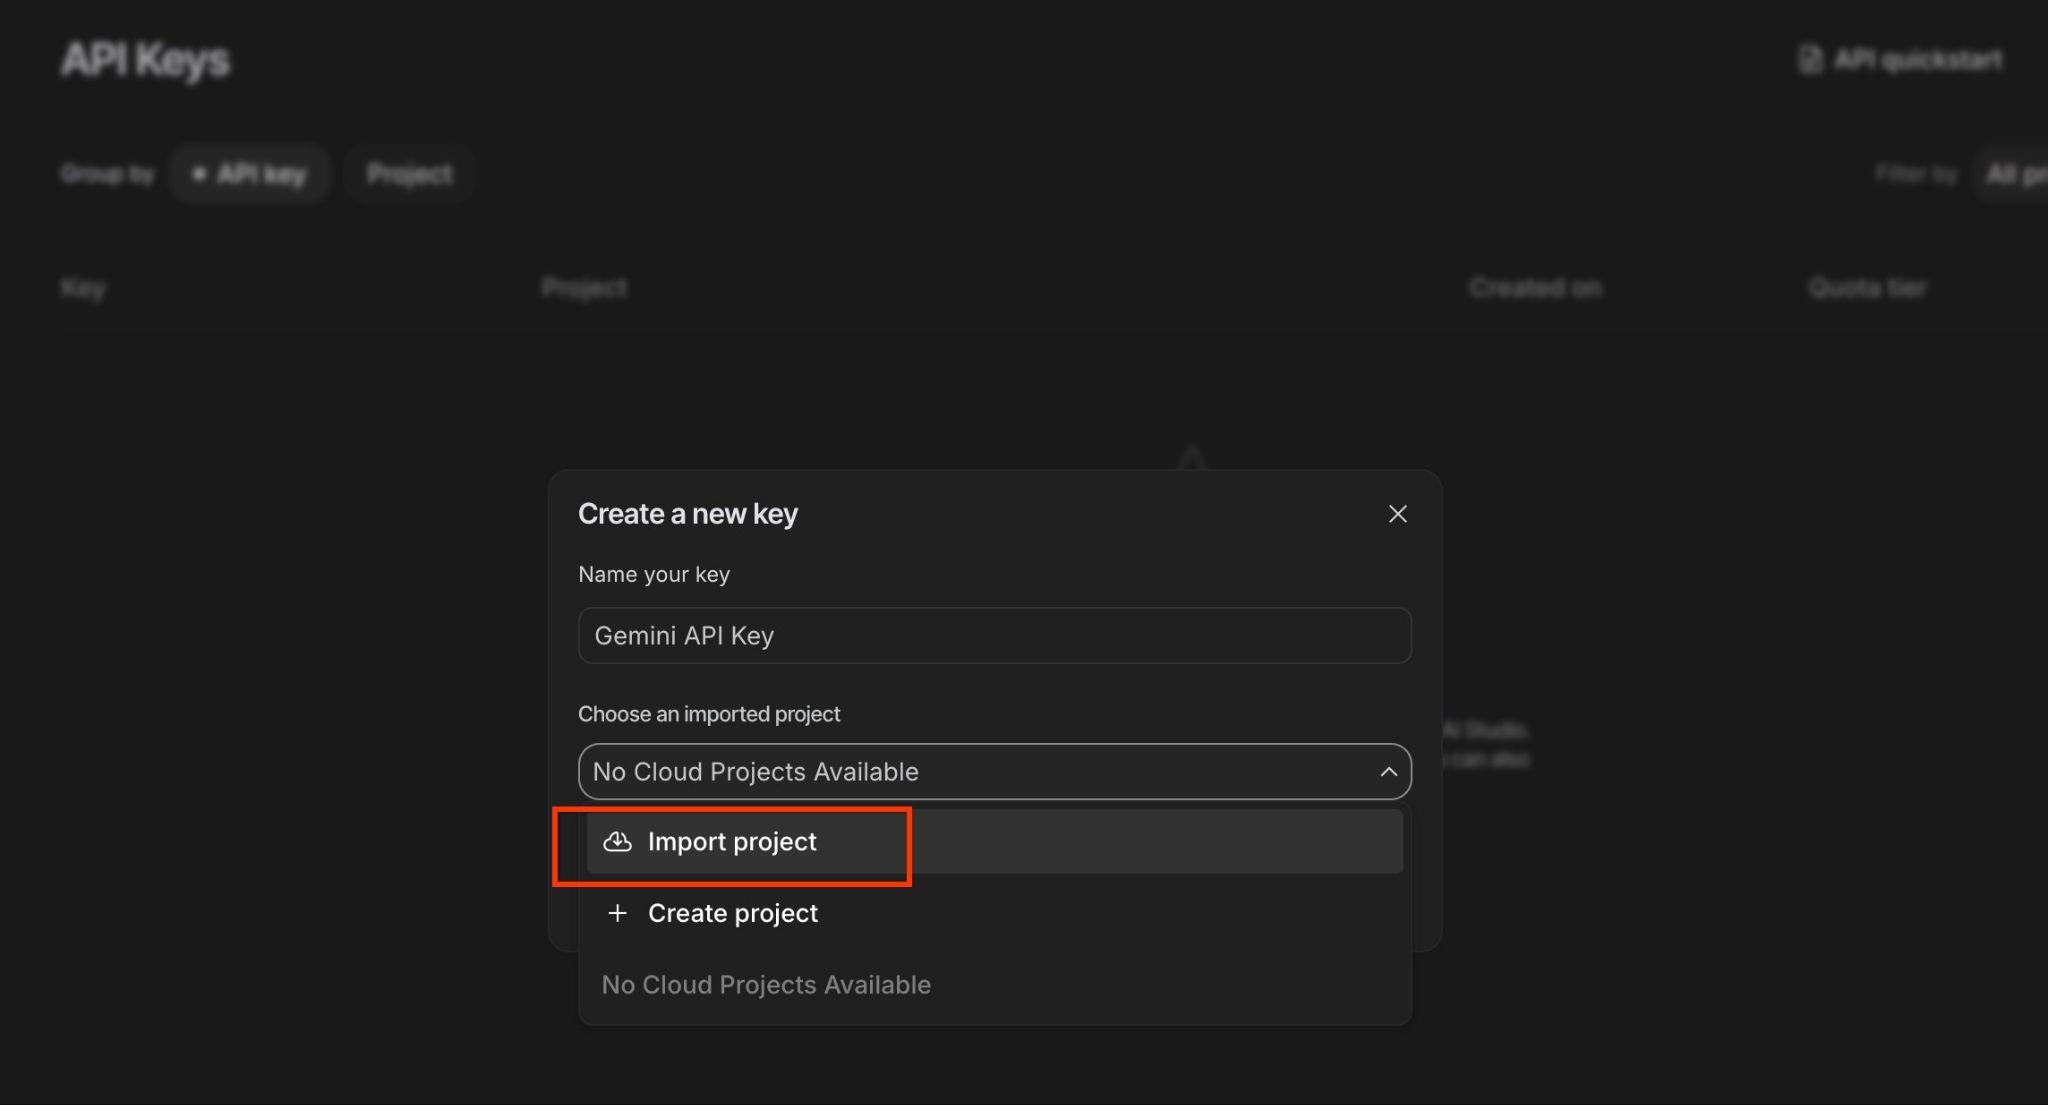
- In the Google Cloud console for the project in which you enabled the API, go to the Credentials page.
- Click Create credentials, and then select API key from the menu. The API key created dialog displays the string for your newly created key.
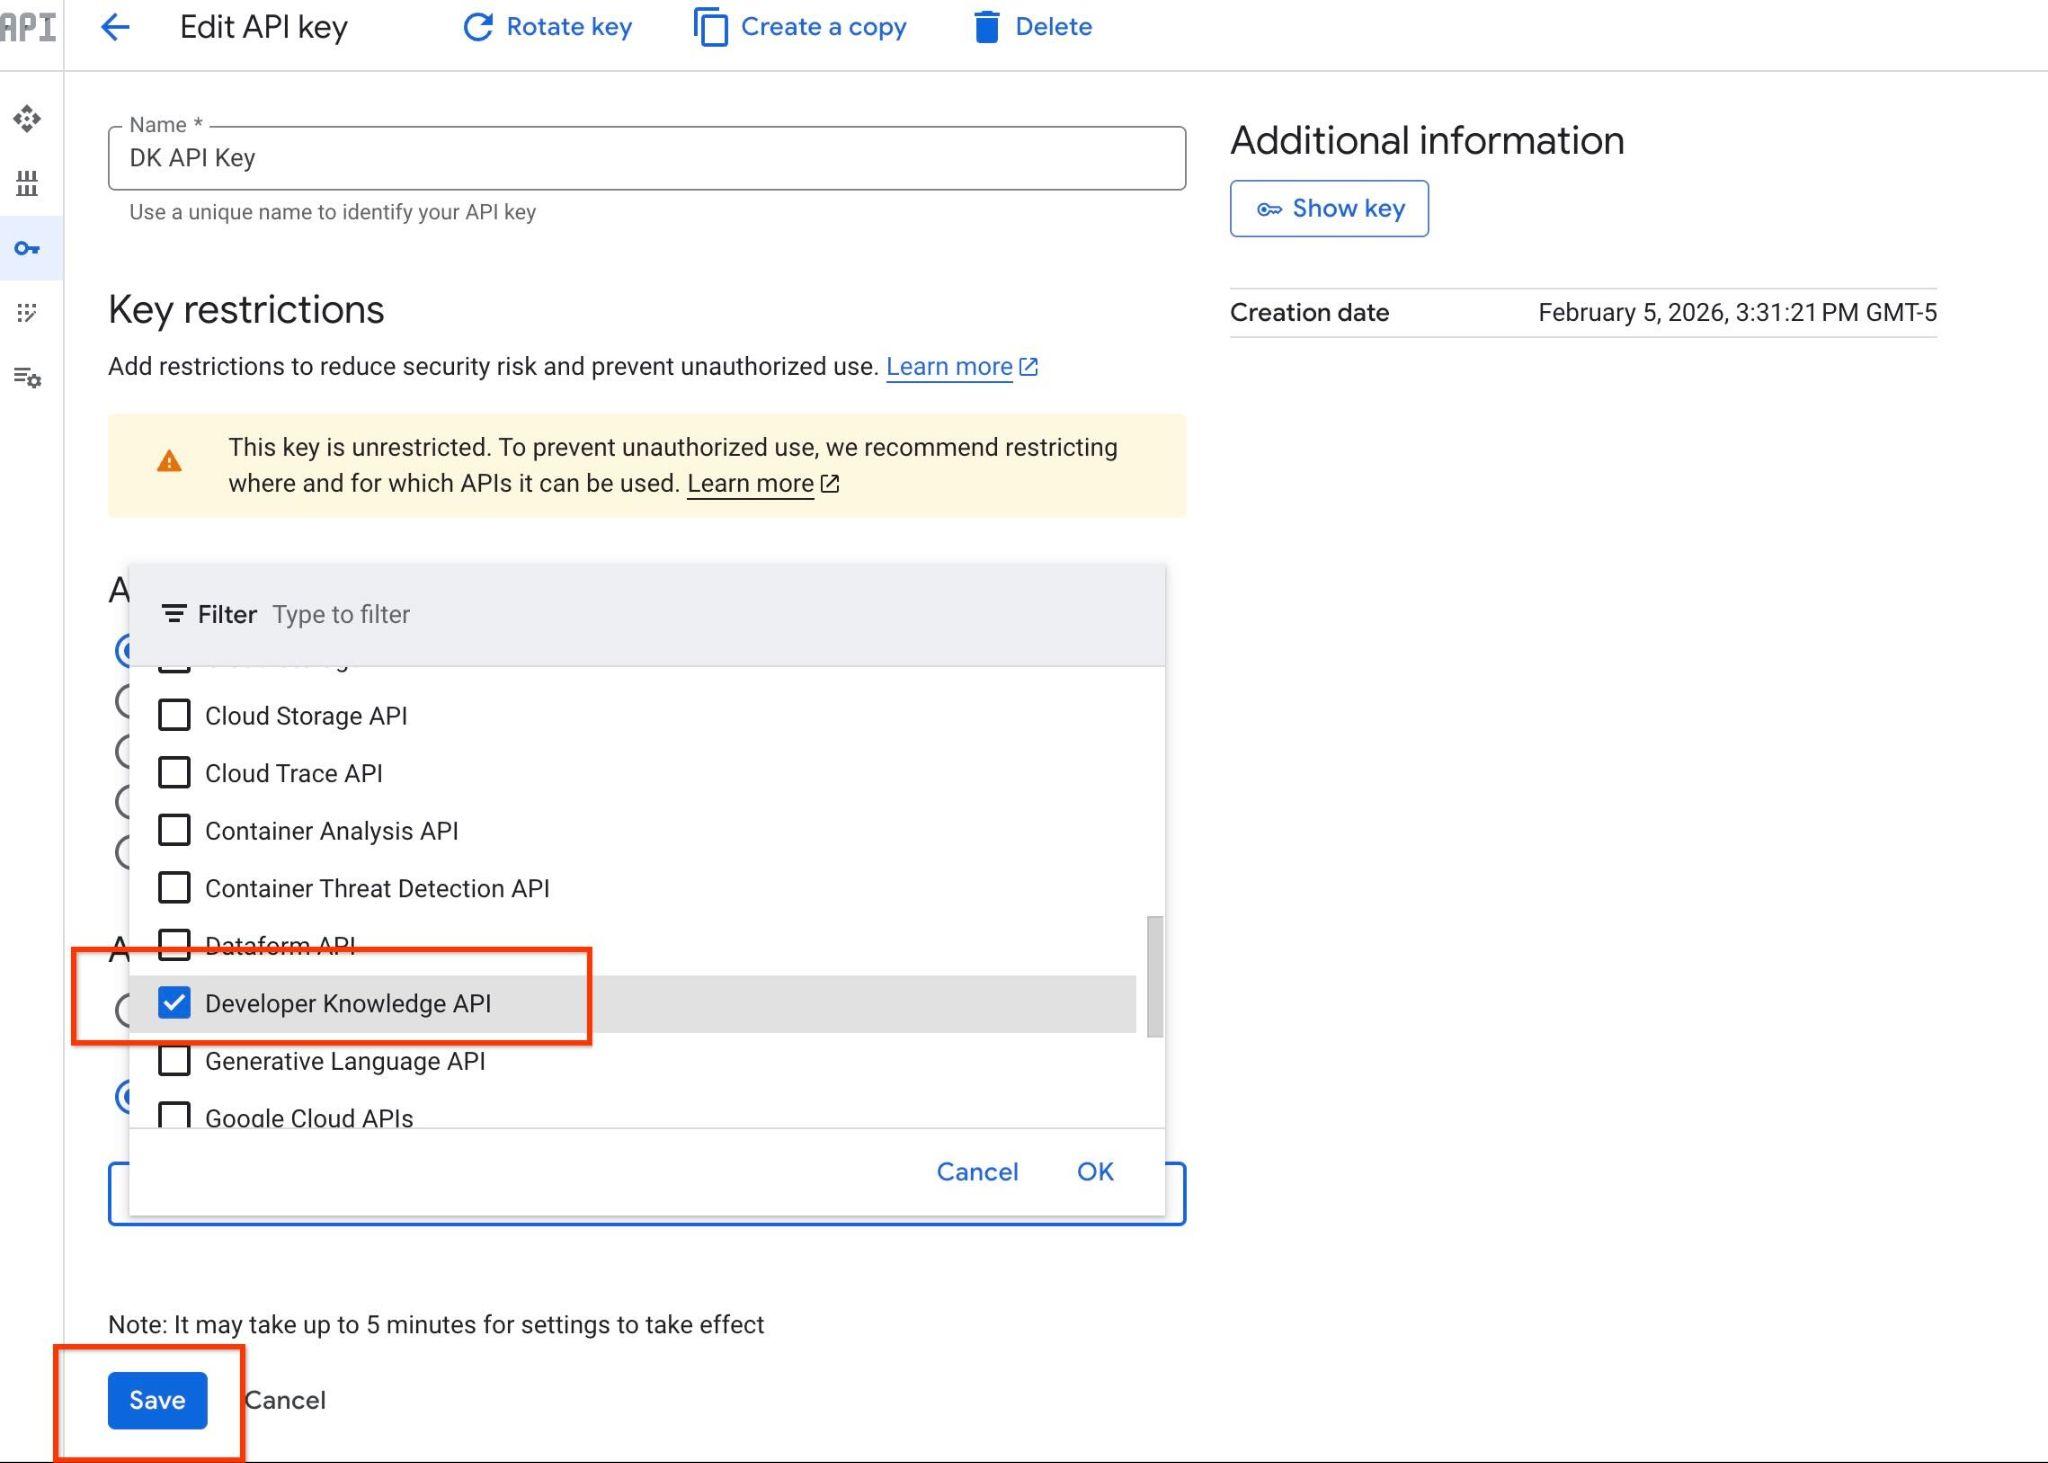
- Click the
Edit API keylink in the dialog. - In the
Namefield, provide a name for the key. For exampleDK API Key. - Under API restrictions, select the
Restrict key. - From the Select APIs list, enable
Developer Knowledge APIand click OK. - Click Save.
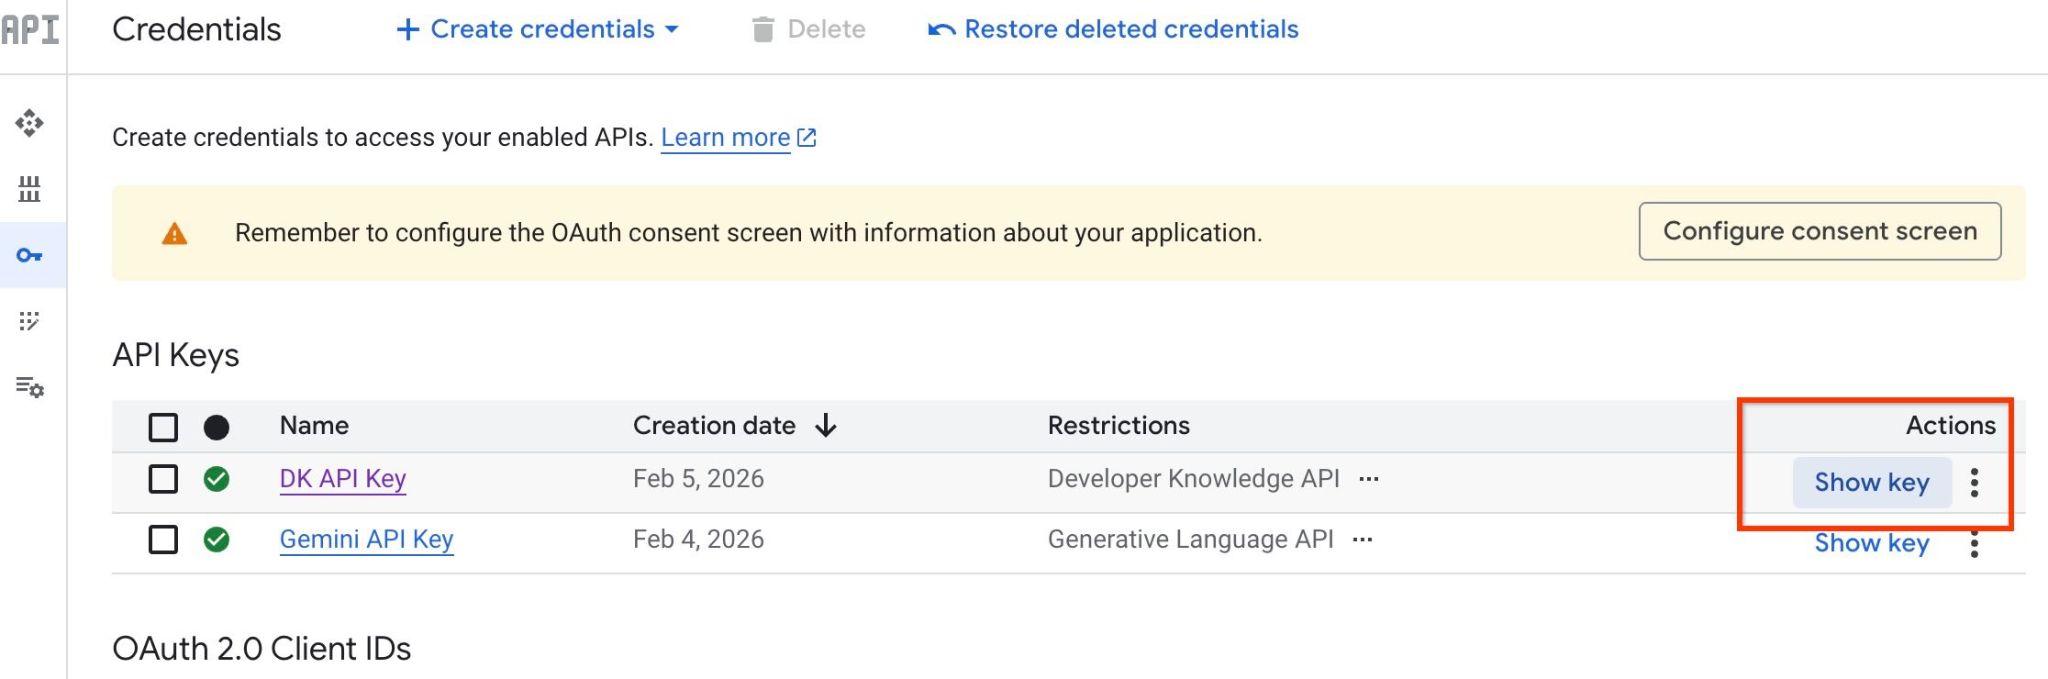
Now if you need to use the key you can go to the page and click on Show key on the right.
Now you need to store that key in the configuration. The MCP section of our settings.json file would look like this (you need to put a value for your DK API key there). Here is an example of what the MCP section of the settings.json file looks like if only DK API is added. Later on in the lab, you will also see how the settings.json file should look like with all MCP servers together.
    "mcpServers": {
    "DeveloperKnowledge": {
      "httpUrl": "https://developerknowledge.googleapis.com/mcp",
      "headers": {
        "X-Goog-Api-Key": "<Your DK API Key>"
      }
    }
  },
- Next, you can add configuration for our Cloud SQL MCP server. For the Cloud SQL MCP, you will be using your google credentials instead of API. It is more secure and gives us the ability to define roles and scope of actions allowable for a user. Here is the configuration for the MCP server. Please replace the "<YOUR_GCP_PROJECT>" with your own project id.
    "Cloud SQL MCP Server": {
      "httpUrl": "https://sqladmin.googleapis.com/mcp",
      "authProviderType": "google_credentials",
      "oauth": {
        "scopes": [
          "https://www.googleapis.com/auth/cloud-platform"
        ]
      },
      "timeout": 500000,
      "trust": false,
      "headers": {
        "X-Goog-User-Project": "<YOUR_GCP_PROJECT>"
      }
    },
- This next chunk of json contains the configuration for Cloud Run MCP server. It is following the same pattern as the example above and using Google credentials for authentication and authorization. Here is the sample configuration.
    "CloudRun": {
      "httpUrl": "https://run.googleapis.com/mcp",
      "authProviderType": "google_credentials",
      "oauth": {
        "scopes": [
          "https://www.googleapis.com/auth/cloud-platform"
        ]
      }
    }
All of these need to be added to the ~/projectmcp/.gemini/settings.json file.
Open the ~/projectmcp/.gemini/settings.json file using cloud shell editor.
edit ~/projectmcp/.gemini/settings.json
And replace the contents by the following configuration. Please put your API key and project id in the "X-Goog-Api-Key" and the "X-Goog-User-Project" fields according to your environment.
{
  "general": {
    "preferredEditor": "vscode",
    "previewFeatures": true,
    "sessionRetention": {
      "enabled": true
    }
  },
  "ide": {
    "enabled": true,
    "hasSeenNudge": true
  },
  "security": {
    "auth": {
      "selectedType": "gemini-api-key"
    }
  },
  "mcpServers": {
    "DeveloperKnowledge": {
      "httpUrl": "https://developerknowledge.googleapis.com/mcp",
      "headers": {
        "X-Goog-Api-Key": "<Your DK API Key>"
      }
    },
    "Cloud SQL MCP Server": {
      "httpUrl": "https://sqladmin.googleapis.com/mcp",
      "authProviderType": "google_credentials",
      "oauth": {
        "scopes": [
          "https://www.googleapis.com/auth/cloud-platform"
        ]
      },
      "timeout": 500000,
      "trust": false,
      "headers": {
        "X-Goog-User-Project": "<YOUR_GCP_PROJECT>"
      }
    },
    "CloudRun": {
      "httpUrl": "https://run.googleapis.com/mcp",
      "authProviderType": "google_credentials",
      "oauth": {
        "scopes": [
          "https://www.googleapis.com/auth/cloud-platform"
        ]
      }
    }
  },
  "ui": {
    "theme": "Default"
  },
  "tools": {
    "shell": {
      "enableInteractiveShell": false
    }
  }
}
Now we can start the Gemini CLI and see all our MCP servers enabled there.
cd ~/projectmcp/
gemini
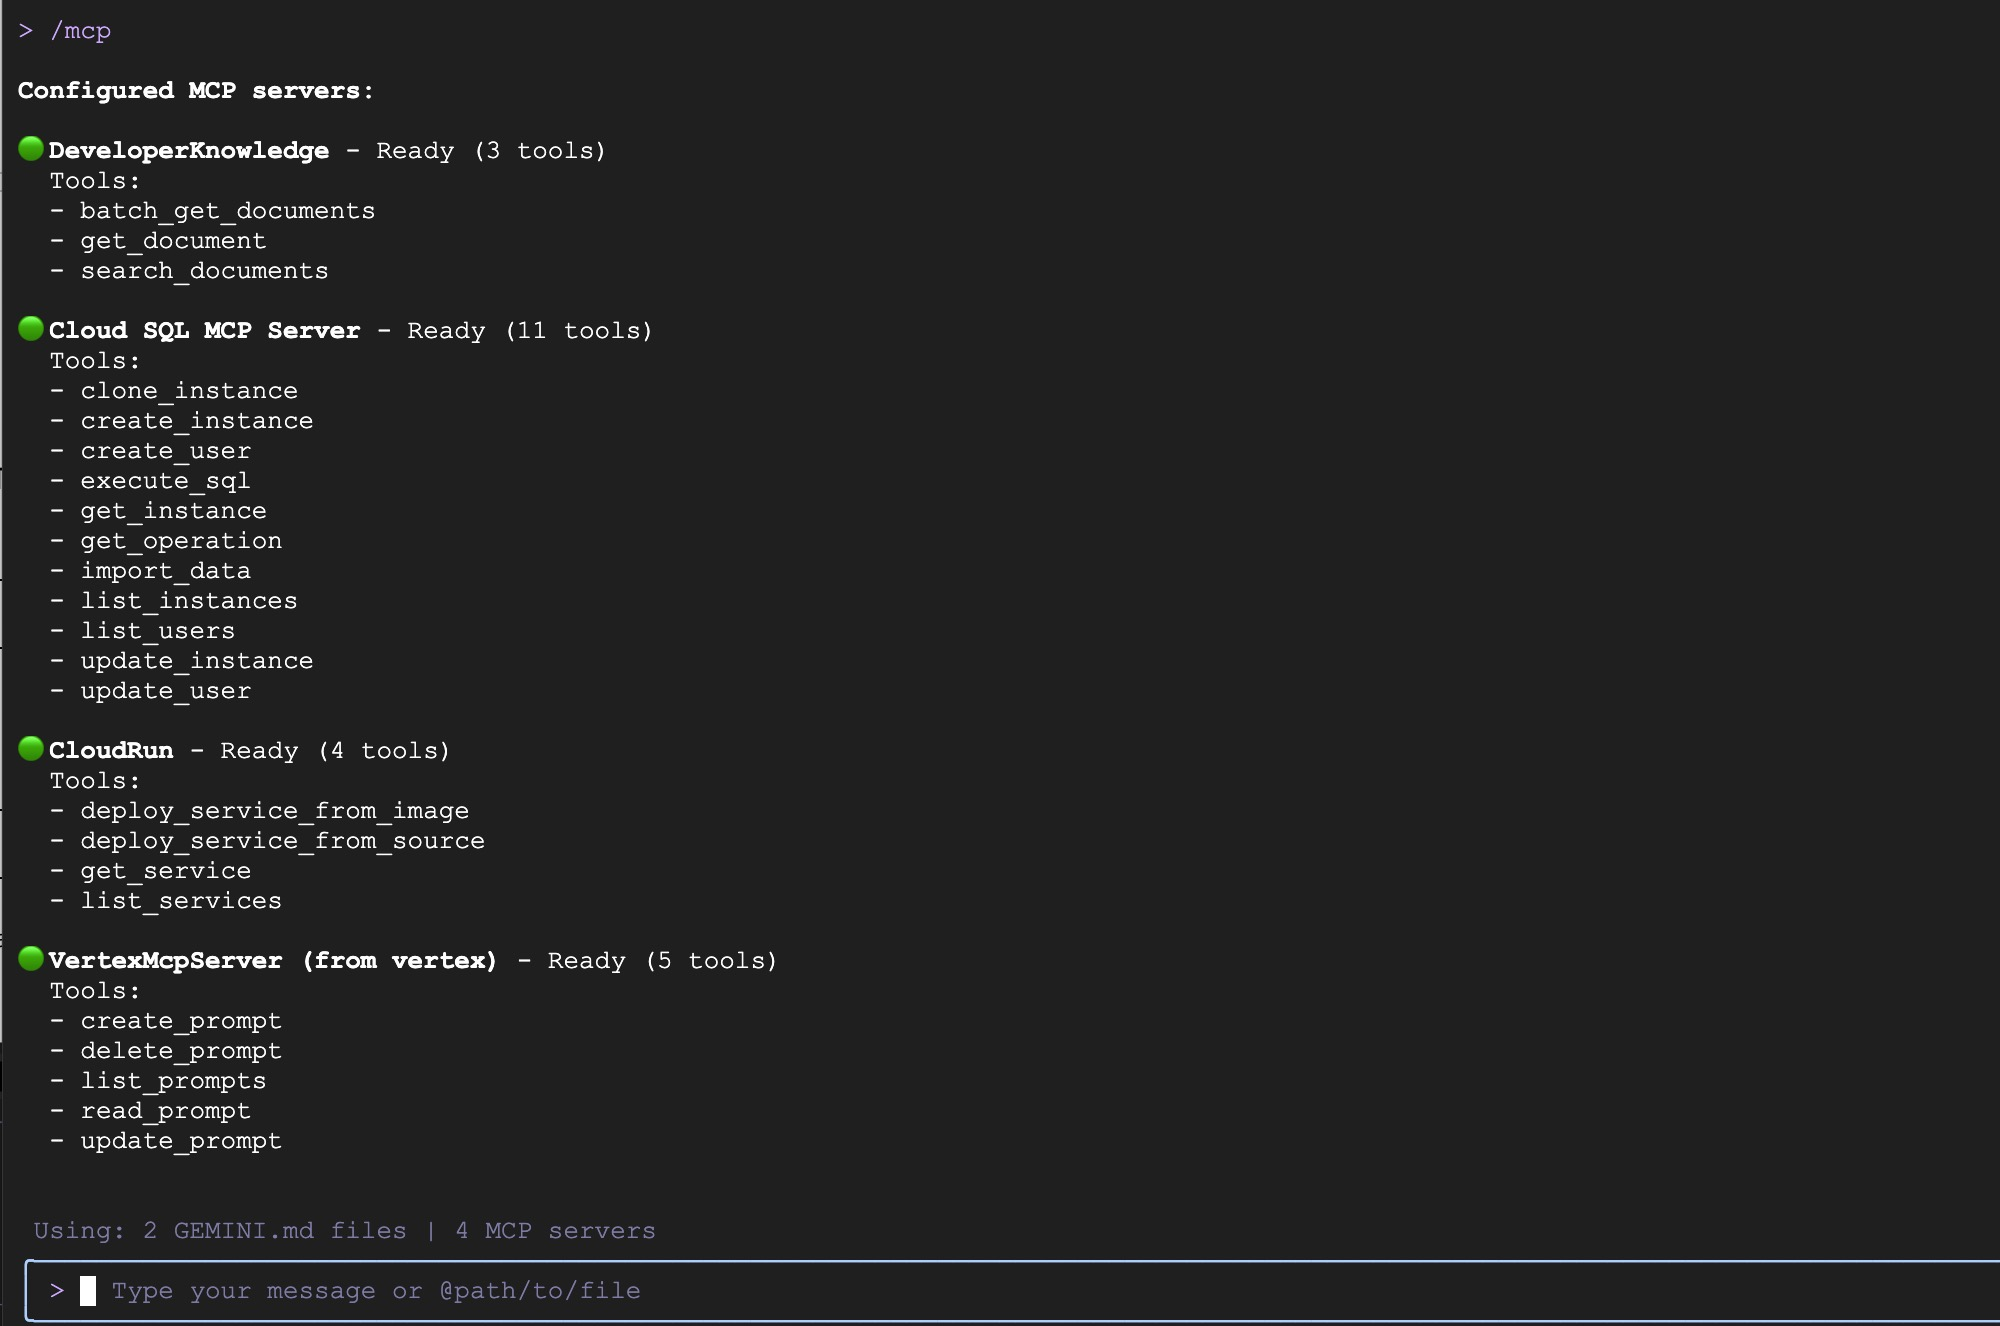
When the Gemini CLI is started you can execute the /mcp command to see all MCP servers up and running.
5. Preparing The Application
In the following example, you will try to migrate your sample local application to Google Cloud. First we install the application locally and test it out.
1. Clone Source Code
We need to clone our application from the GitHub repository. In the Cloud Shell or your local terminal in the project folder execute.
cd ~/projectmcp
git clone --no-checkout --filter=blob:none --depth=1 https://github.com/google/mcp.git
cd mcp
git sparse-checkout set examples/allstrides
git checkout
cd examples/allstrides
2. Start The Application Locally
Let's test the application and load some sample data
In the same shell while you are in the application folder start the application using the start_allstrides.sh script.
./start_allstrides.sh
3. Test the Application
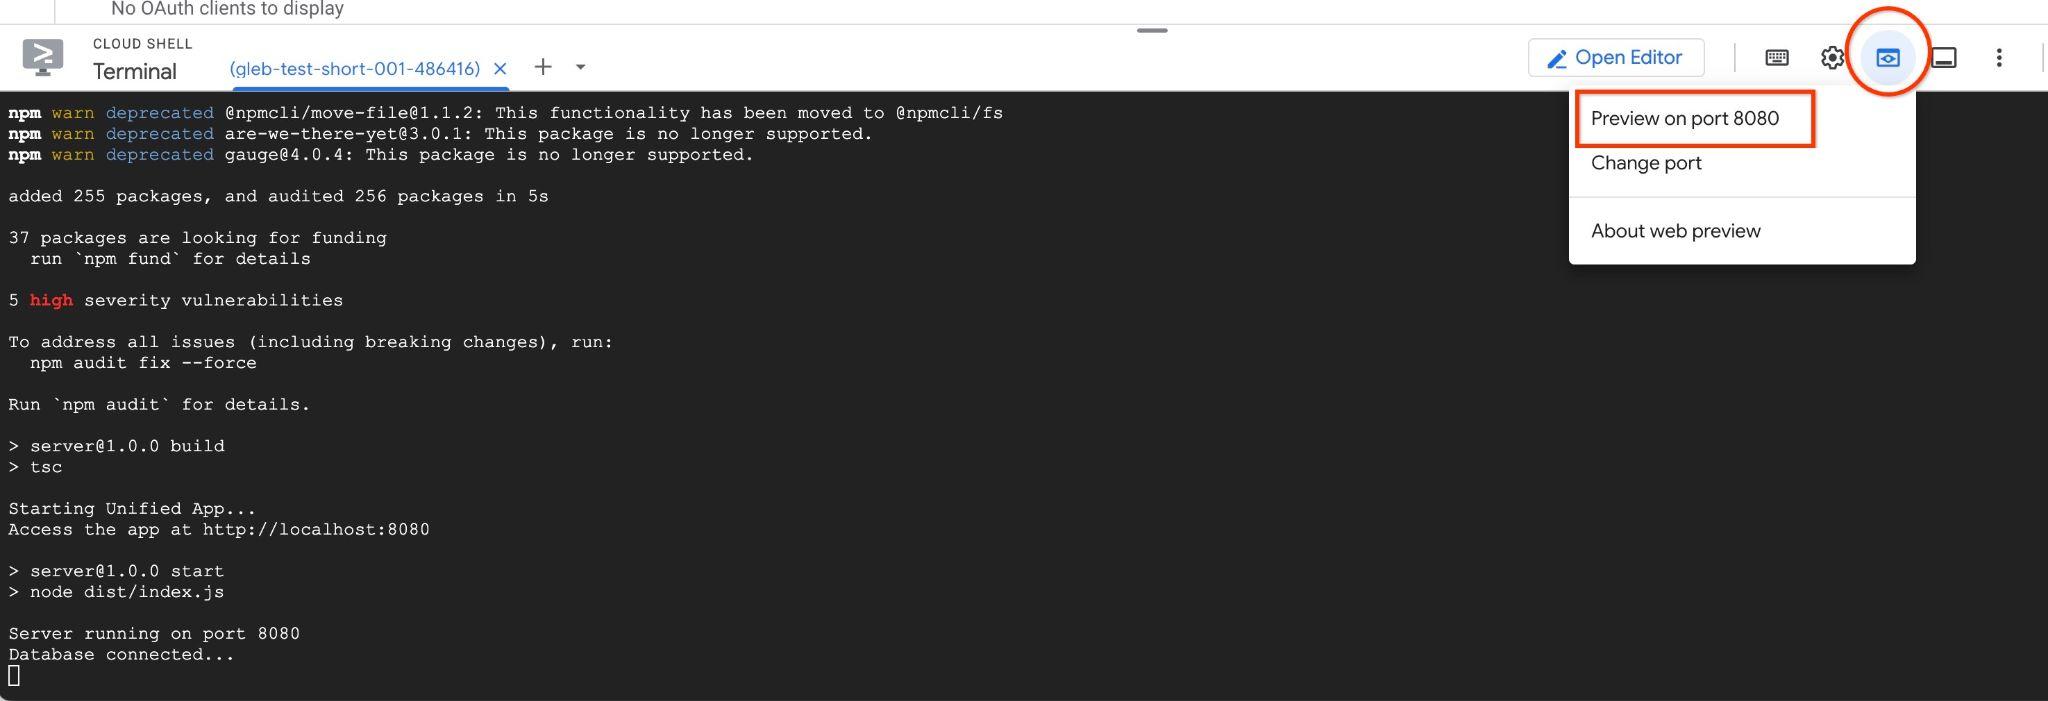
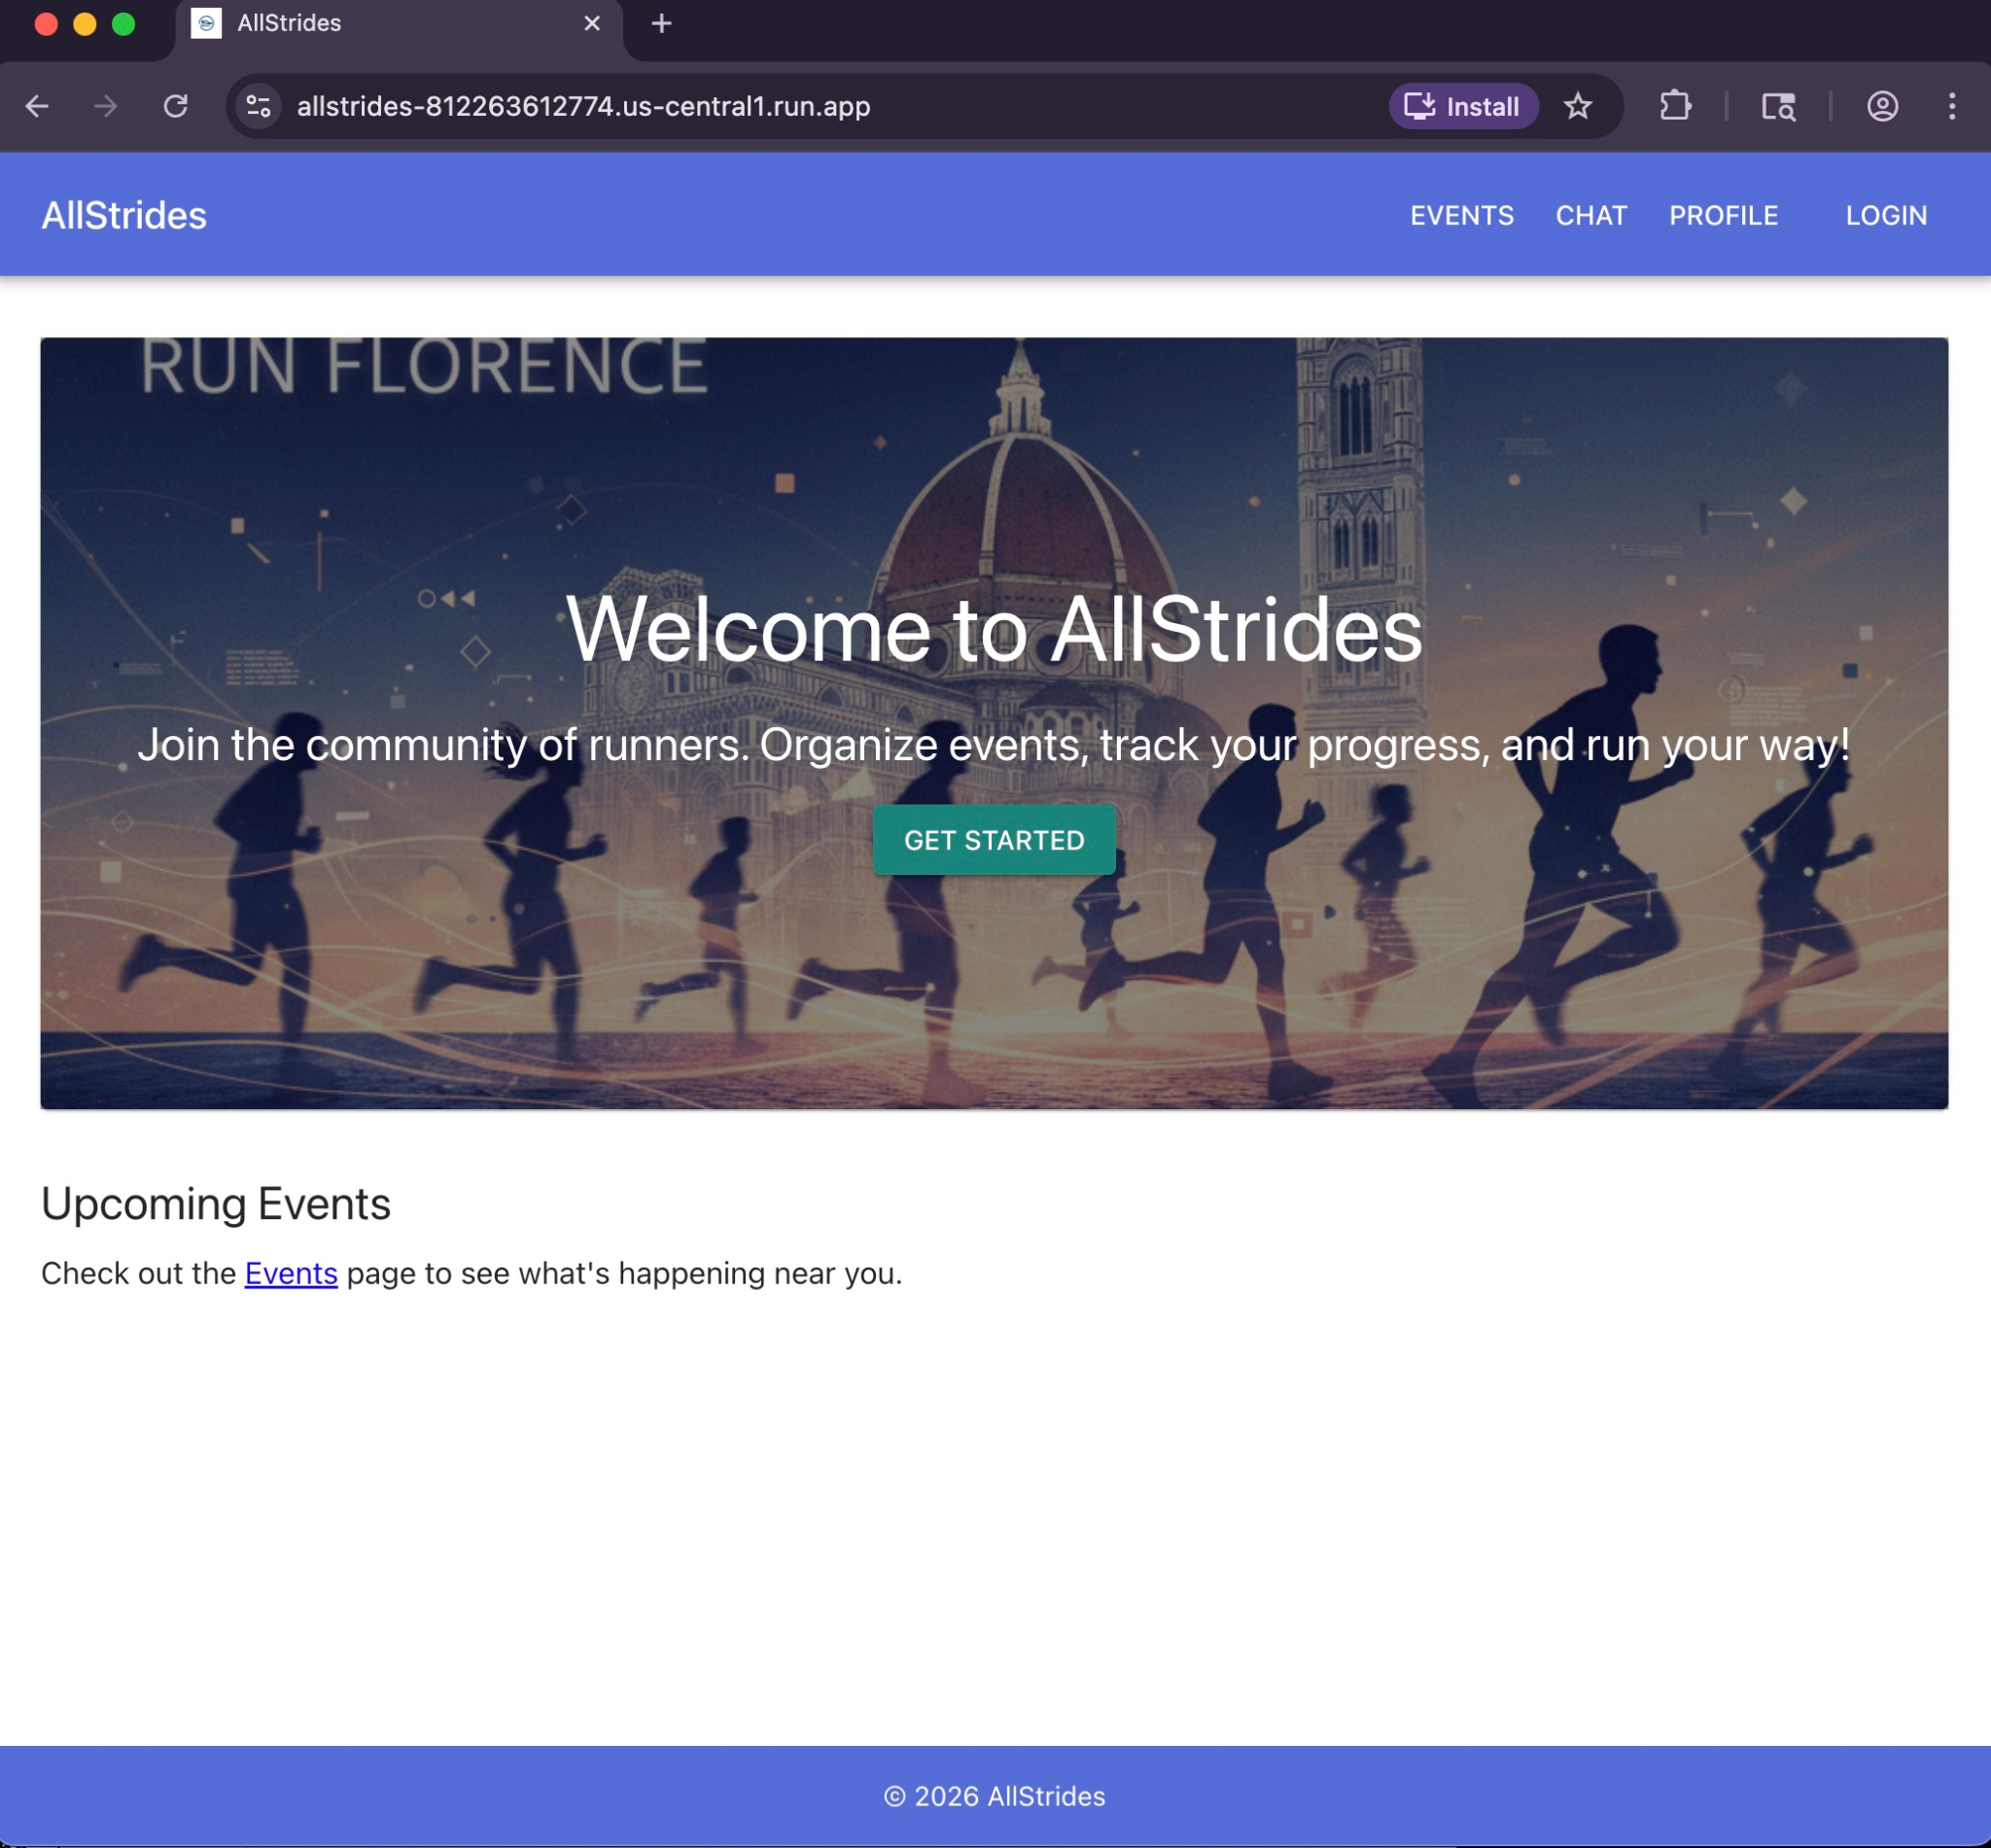
If you are working in the Cloud Shell then push the Web preview button on the top of cloud shell window and choose Preview on port 8080
It will open a new browser tab with the application interface where you can for example click on the Events button.
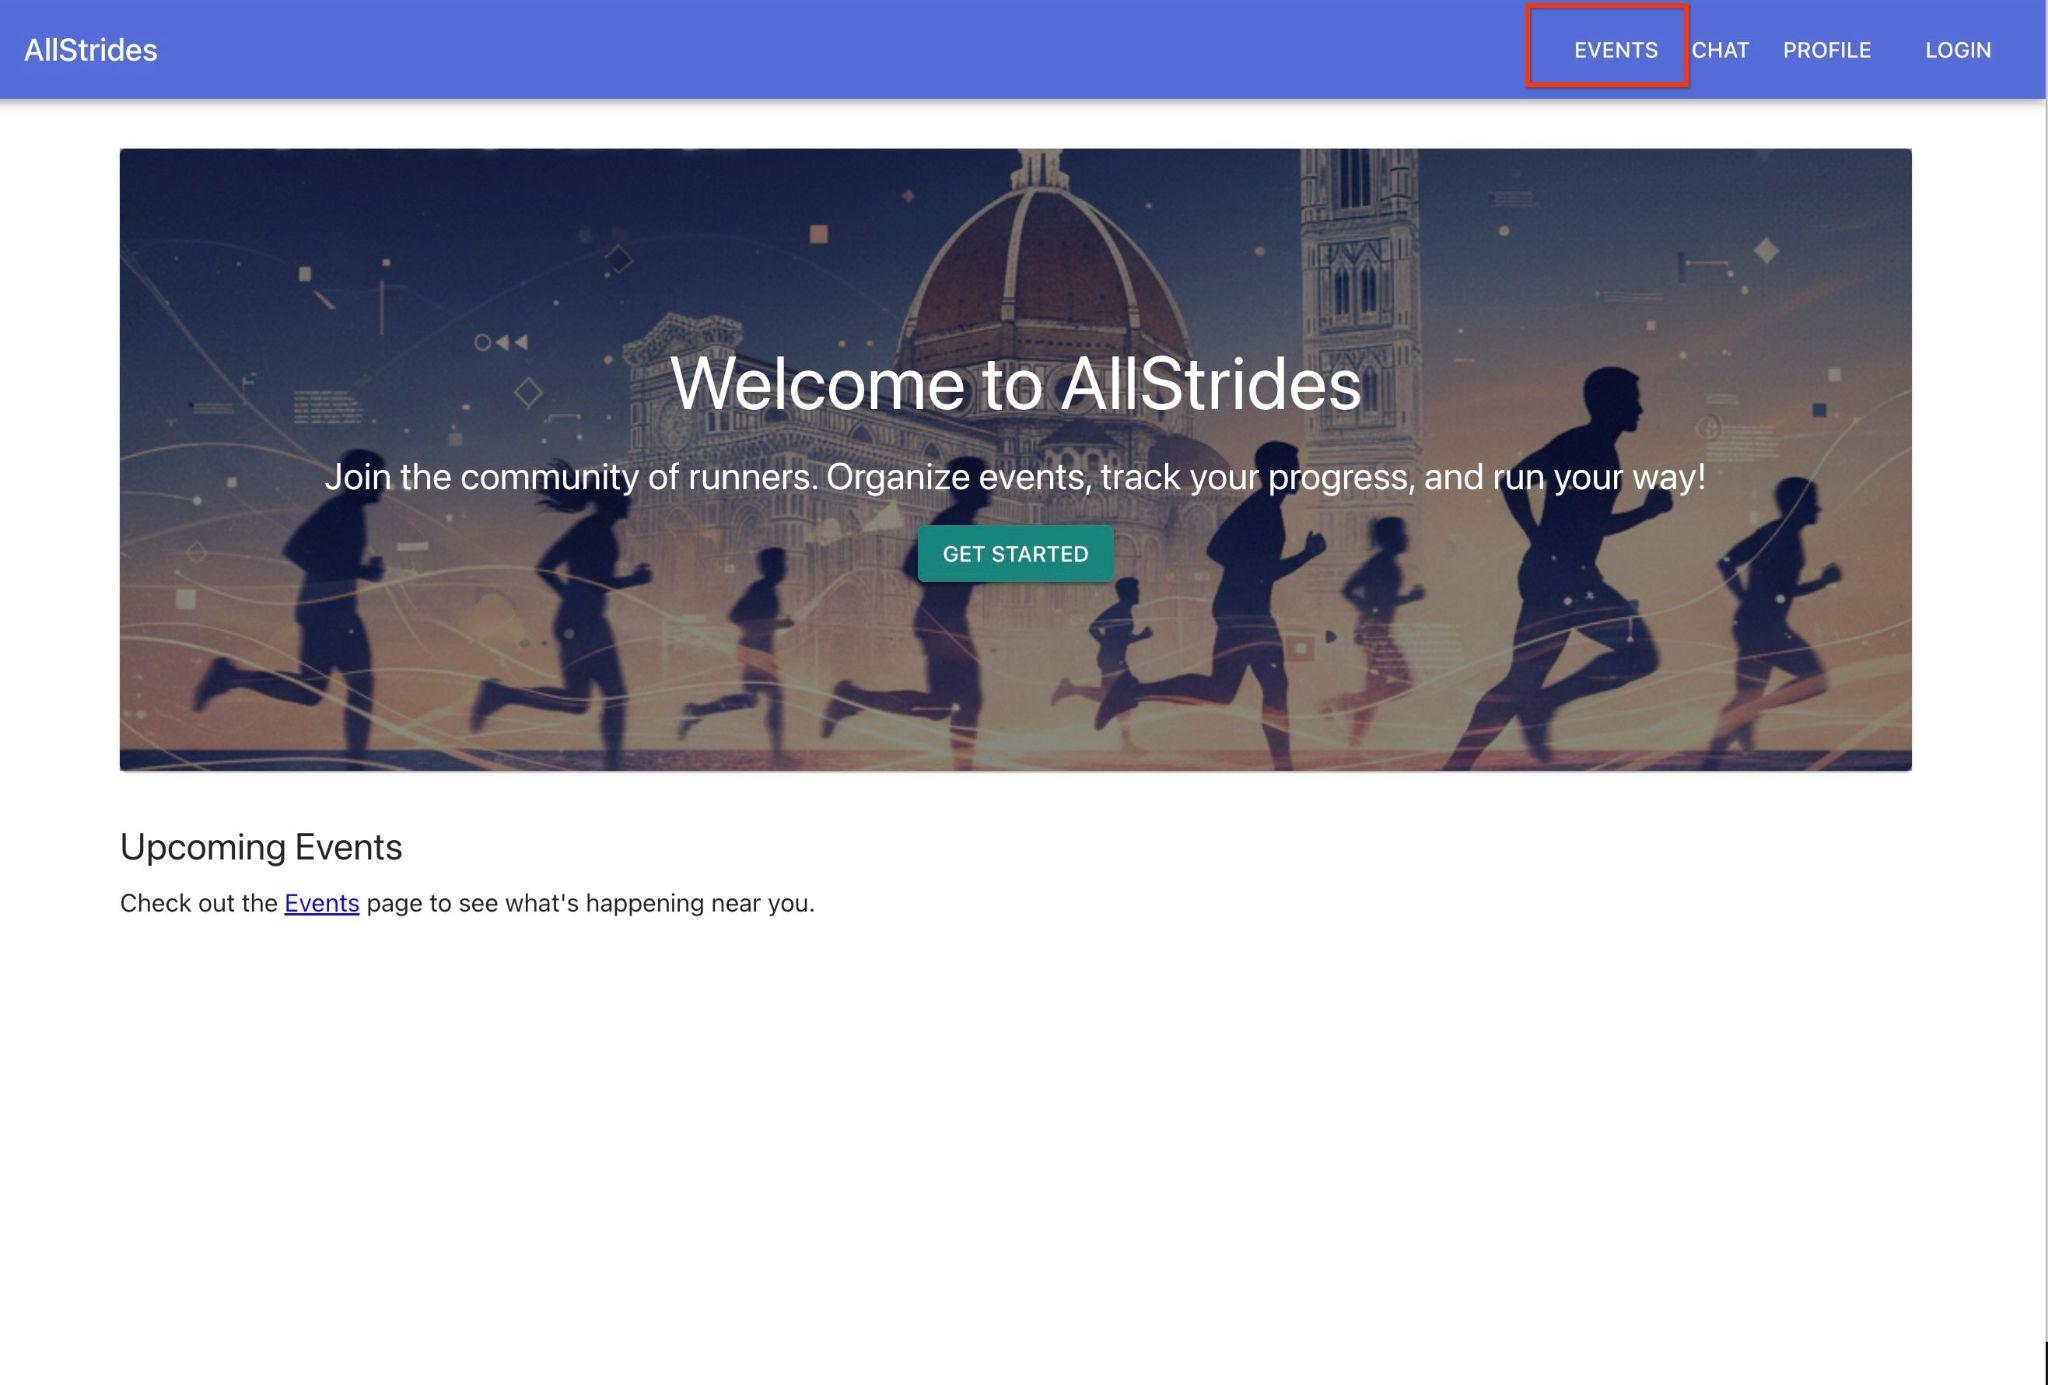
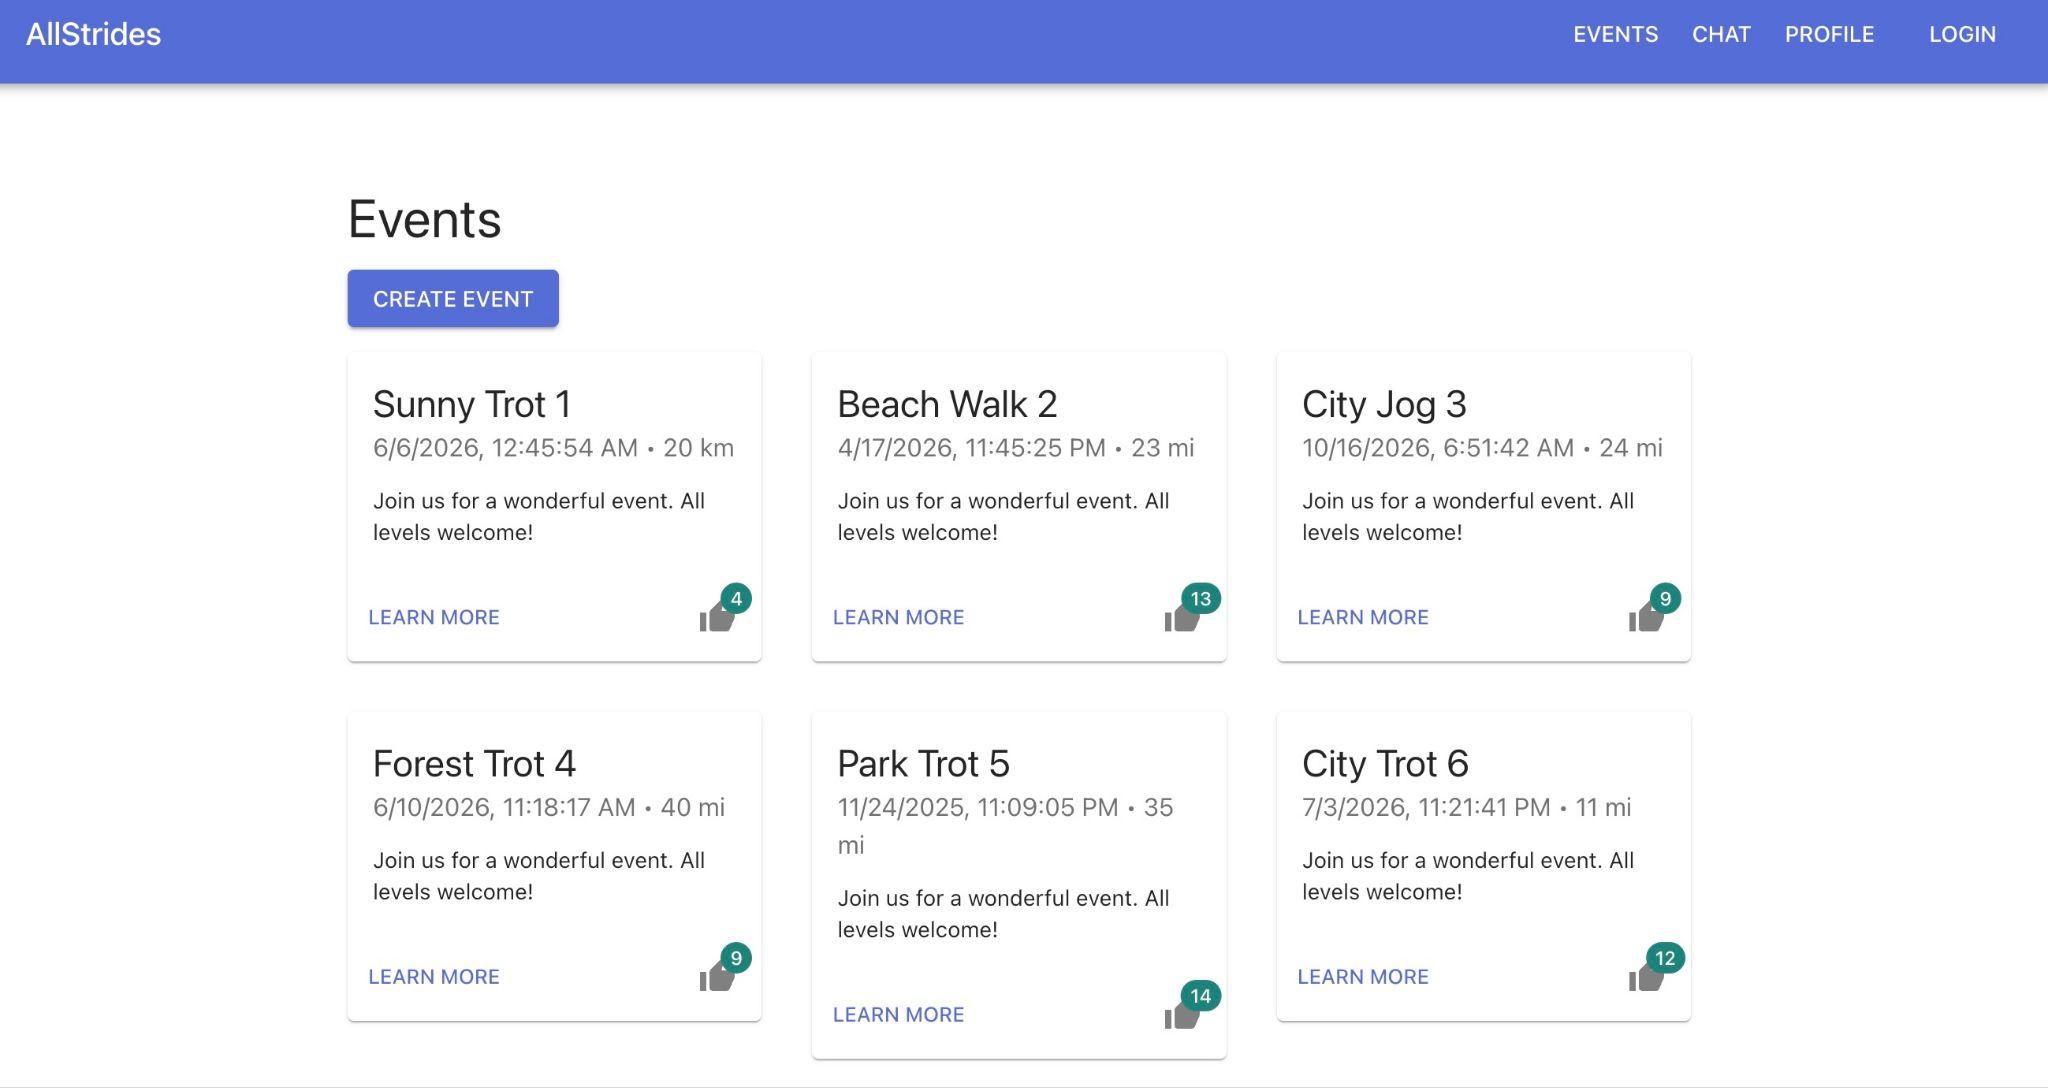
As of now you don't have any events.
4. Load Sample Data
You can optionally register in the application and create your own events, chat messages and users or you can use the sample data supplied with the application.
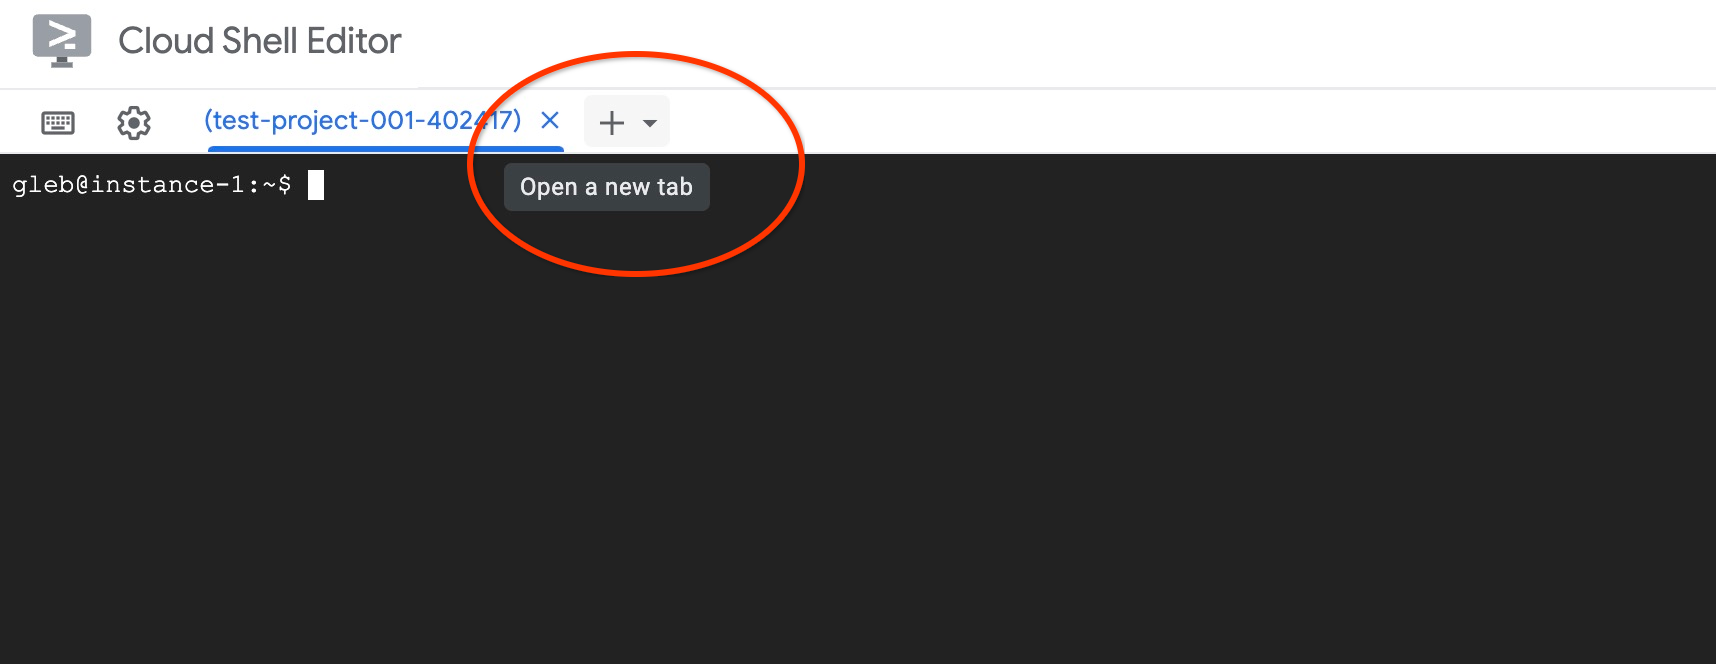
Open another Cloud Shell tab using the sign "+" at the top.
In the new cloud shell tab execute switch to the application directory and execute import using sqllite3 utility:
cd ~/projectmcp/mcp/examples/allstrides
sqlite3 allstrides.db < seed_data.sql
If you go back to the application page then after clicking on the Events button again you should see multiple events.
You also can test the chat page and see some messages there.
Now you can close the second tab typing exit
exit
And stop the application in the first tab using ctrl+c combination.
6. Testing Developer Knowledge MCP
The Developer Knowledge MCP allows us to use Google documents directly from our agnostic tools providing ability to verify instructions, create tutorials and other tasks which can be augmented by the latest Google documentation.
Start your Gemini CLI and list available MCP tools in the Developer Knowledge MCP server.
/mcp
For the Developer Knowledge MCP you should see three available tool:
Expected output:
🟢 DeveloperKnowledge - Ready (3 tools)
  Tools:
  - batch_get_documents
  - get_document
  - search_documents
Our task is to move our application to the Google Cloud and it means we need to switch from the local Sqlite database to a more scalable and cloud native solution. Let's ask Gemini to analyze our application code and advice on the database solution.
In the Gemini CLI prompt type the following:
Hello, I need to choose a database platform for my allstrides application in Google Cloud. Can you analyze documentation and prepare a tutorial to choose the correct database engine?
Gemini CLI will start from analyzing your code and then ask to execute the
Expected output
 ?  search_documents (DeveloperKnowledge MCP Server) {"query":"choose google cloud database"}                                                                                                               ← │
│                                                                                                                                                                                                              │
│ MCP Server: DeveloperKnowledge                                                                                                                                                                               │
│ Tool: search_documents                                                                                                                                                                                       │
│                                                                                                                                                                                                              │
│ Allow execution of MCP tool "search_documents" from server "DeveloperKnowledge"?                                                                                                                             │
│                                                                                                                                                                                                              │
│ ● 1. Allow once                                                                                                                                                                                              │
│   2. Allow tool for this session                                                                                                                                                                             │
│   3. Allow all server tools for this session                                                                                                                                                                 │
│   4. No, suggest changes (esc)
We can see that the tool is using MCP to ground the response by Google documentation. Allow the execution of the Developer Knowledge MCP request. It might ask you one or two times more to get more information before providing the response. Do not allow any changes in your application as of now.
At the end it has created a tutorial with a summary where Cloud SQL for Postgres was defined as the best choice for database backend. You might get a slightly different response due to the non-deterministic nature of Generative AI models.
Expected output:
By switching to Cloud SQL for PostgreSQL, AllStrides gains a robust, scalable foundation suitable for production deployment on Google Cloud. The transition is straightforward due to the use of Sequelize ORM.
We also can ask to prepare a step-by-step data migration guide. Put a new prompt to the Gemini CLI:
I agree with the recommendation to use Cloud SQL for PostgreSQL as the new database for my application. Can you prepare a detailed migration tutorial based on Google documentation on how to move data from my local database to Cloud SQL in the cloud?
And here again we expect Gemini CLI to use Developer Knowledge MCP as the source for truth while preparing the tutorial. The sequence of actions taken by Gemini CLI can be slightly different depending on the exact model and other factors. For example it can ask to prepare migration scripts first and only after that work on the final tutorial documentation.
Here is one of the examples where it asks for permission to execute the Developer Knowledge MCP:
 ?  search_documents (DeveloperKnowledge MCP Server) {"query":"migrate local database to Cloud SQL for PostgreSQL"}                                                                                         ← │
│                                                                                                                                                                                                              │
│ MCP Server: DeveloperKnowledge                                                                                                                                                                               │
│ Tool: search_documents                                                                                                                                                                                       │
│                                                                                                                                                                                                              │
│ Allow execution of MCP tool "search_documents" from server "DeveloperKnowledge"?                                                                                                                             │
│                                                                                                                                                                                                              │
│ ● 1. Allow once                                                                                                                                                                                              │
│   2. Allow tool for this session                                                                                                                                                                             │
│   3. Allow all server tools for this session                                                                                                                                                                 │
│   4. No, suggest changes (esc)                                                                                                                                                                               │
│                                                                                                                                                                                                              │
│                                                                                                                                                                                                              │
│ ⊷  search_documents (DeveloperKnowledge MCP Server) {"query":"import data into Cloud SQL PostgreSQL"}
During the execution Gemini CLI might ask you to execute some commands. For example to better understand the data schema to prepare correct instructions for the data migration.
And in the end it should prepare a step-by-step instruction for data migration.
Then you can ask Gemini CLI to write the tutorial down
Please write the tutorial down
And it will create a new markdown file with the tutorial document.
Expected output:
✦ I have created a detailed migration guide for you.

  You can find the tutorial in the new file: MIGRATION_GUIDE.md.

  This guide covers:
   1. Exporting your local SQLite data to CSV format.
   2. Creating the PostgreSQL schema with compatible data types.
   3. Uploading data to Google Cloud Storage.
   4. Importing data into Cloud SQL in the correct order to respect relationships.
   5. Resetting ID sequences to ensure new data can be added without errors.
In the next step we will be working with Cloud SQL MCP preparing our database and migrating data.
7. Testing Cloud SQL Google Cloud MCP
1. Create Cloud SQL instance
You can start from checking the available tools in the Cloud SQL MCP server by typing /mcp in the Gemini CLI
/mcp
Currently we have the following tools available for us.
Expected output:
🟢 Cloud SQL MCP Server - Ready (11 tools)
  Tools:
  - clone_instance
  - create_instance
  - create_user
  - execute_sql
  - get_instance
  - get_operation
  - import_data
  - list_instances
  - list_users
  - update_instance
  - update_user
We've already decided to use Cloud SQL for Postgres as the backend for our application in the Google Cloud. Now we can ask Gemini to create a Cloud SQL instance for us.
In the Gemini CLI prompt type your request like the following:
Please create a Cloud SQL for Postgres instance with appropriate edition and version in the us-central1 region to be a backend for our application with a public IPs in the current project with 2 CPU and 8 GB memory.
To avoid extra calls to identify your current project you can explicitly specify your project id when you put your prompt. If the project name was not used in the context before the model will either ask the project id or ask to execute gcloud command to identify the project.
Then it will analyze existing tools and ask to execute Cloud SQL MCP tools. You should expect to see the following request for approval.
?  create_instance (Cloud SQL MCP Server MCP Server) {"tier":"db-custom-2-8192","region":"us-central1","project":"gleb-test-short-001-486416","databaseVersion":"POSTGRES_17","edition":"ENTERPRISE","nam... ← │
│                                                                                                                                                                                                              │
│ MCP Server: Cloud SQL MCP Server                                                                                                                                                                             │
│ Tool: create_instance                                                                                                                                                                                        │
│                                                                                                                                                                                                              │
│ Allow execution of MCP tool "create_instance" from server "Cloud SQL MCP Server"?                                                                                                                            │
│                                                                                                                                                                                                              │
│ ● 1. Allow once                                                                                                                                                                                              │
│   2. Allow tool for this session                                                                                                                                                                             │
│   3. Allow all server tools for this session                                                                                                                                                                 │
│   4. No, suggest changes (esc)
After starting the execution it will ask to monitor the operation status and possible sleep requests between the checks. Something like the following.
✦ I will wait for 30 seconds before checking the status of the instance creation.
╭──────────────────────────────────────────────────────────────────────────────────────────────────────────────────────────────────────────────────────────────────────────────────────────────────────────────╮
│ ⊶  Shell sleep 30 [current working directory /home/gleb/demo]                                                                                                                                                │
│                                                                                                                                                                                                              │
╰──────────────────────────────────────────────────────────────────────────────────────────────────────────────────────────────────────────────────────────────────────────────────────────────────────────────╯
⠋ Refining Instance Configuration (esc to cancel, 11s)
That would be followed by a get_operation tool for Cloud SQL Server MCP.
╭──────────────────────────────────────────────────────────────────────────────────────────────────────────────────────────────────────────────────────────────────────────────────────────────────────────────╮
│ ?  get_operation (Cloud SQL MCP Server MCP Server) {"project":"gleb-test-short-001-486416","operation":"73c39ca7-65fe-46d1-bdb8-0dfa00000032"}                                                             ← │
│                                                                                                                                                                                                              │
│ MCP Server: Cloud SQL MCP Server                                                                                                                                                                             │
│ Tool: get_operation                                                                                                                                                                                          │
│                                                                                                                                                                                                              │
│ Allow execution of MCP tool "get_operation" from server "Cloud SQL MCP Server"?                                                                                                                              │
│                                                                                                                                                                                                              │
│ ● 1. Allow once
After the final get_instance request you should get information about the created instance. Something like the following.
Expected output:
✦ I will wait for 30 seconds before checking the status of the instance creation.
╭──────────────────────────────────────────────────────────────────────────────────────────────────────────────────────────────────────────────────────────────────────────────────────────────────────────────╮
│ ⊶  Shell sleep 30 [current working directory /home/gleb/demo]                                                                                                                                                │
│                                                                                                                                                                                                              │
╰──────────────────────────────────────────────────────────────────────────────────────────────────────────────────────────────────────────────────────────────────────────────────────────────────────────────╯
⠋ Refining Instance Configuration (esc to cancel, 11s)
That would be followed by a get_operation tool for Cloud SQL Server MCP and by the get_insance MCP tool call. You might experience additional checks and call executed by Gemini CLI to verify the successful completion of the task.
The Cloud SQL for Postgres instance allstrides-db has been successfully created in the us-central1 region with 2 vCPUs and 8 GB of RAM.

  Instance Details:
   - Project ID: gleb-test-short-001-486416
   - Instance Name: allstrides-db
   - Public IP Address: 35.226.187.246
   - Database Version: POSTGRES_17
   - Machine Type: db-custom-2-8192 (2 vCPU, 8 GB RAM)
   - Region: us-central1
   - Connection Name: gleb-test-short-001-486416:us-central1:allstrides-db

  The instance is configured with public IP enabled, IAM authentication turned on, and Data API access allowed.
2. Migrate Data
The instance is ready and now we can continue migrating all our data from the existing SQLite database to a new database in the cloud.
In the Gemini CLI prompt type the following request
Now when we have our Cloud SQL instance ready it is time to move the data from our local database. Please migrate all the data to a new database in our Cloud SQL instance where the new user for application would be the database owner? Let's call the new database allstrides-db and the user allstrides. Please use our MCP tools whenever it is possible.
During the execution the Gemini CLI will analyze our data model and to do that it will ask permissions to run some commands. The workflow is not 100% deterministic and some steps can be different.
Here is an example of how it might start.
Expected output:
✦ I will read the allstrides/README.md and allstrides/seed_data.sql files to understand the local database structure and data.
╭──────────────────────────────────────────────────────────────────────────────────────────────────────────────────────────────────────────────────────────────────────────────────────────────────────────────╮
│ ✓  ReadFile allstrides/README.md                                                                                                                                                                             │
│                                                                                                                                                                                                              │
│                                                                                                                                                                                                              │
│ ✓  ReadFile allstrides/seed_data.sql                                                                                                                                                                         │
│                                                                                                                                                                                                              │
╰─────────────────────────────────────────────────────────────────────────
Then after several steps it will use Cloud SQL MCP to prepare the database, user and eventually migrate data. One of the first actions it performs on the database is add you as an IAM user and grant you permissions to create database and user. You should have sufficient privileges in the Google Cloud as IAM
Here is an example of some steps during the workflow
Expected output:
 ✓  execute_sql (Cloud SQL MCP Server MCP Server) {"project":"gleb-test-short-001-486416","instance":"allstrides-db","sqlStatement":"CREATE DATABASE \"allstrides-db\";","database":"postgres"}               │
│                                                                                                                                                                                                              │
│ {                                                                                                                                                                                                            │
│   "messages": [                                                                                                                                                                                              │
│     {                                                                                                                                                                                                        │
│       "message": "Execution complete. 1 result set(s) returned.",                                                                                                                                            │
│       "severity": "INFO"                                                                                                                                                                                     │
│     }                                                                                                                                                                                                        │
│   ],                                                                                                                                                                                                         │
│   "metadata": {                                                                                                                                                                                              │
│     "sqlStatementExecutionTime": "0.075591388s"                                                                                                                                                              │
│   },                                                                                                                                                                                                         │
│   "results": [                                                                                                                                                                                               │
│     {}                                                                                                                                                                                                       │
│   ]                                                                                                                                                                                                          │
│ }                                                                                                                                                                                                            │
│
3. Deploy Application to Cloud Run
Now, the database has been created and the local application data has been migrated to your CloudSQL database. You are now ready to deploy your application to Cloud Run. During the deployment you will be using a combination of Google Cloud SDK to build the image in Google cloud and then deploy it using Cloud Run MCP.
In Gemini CLI, run the following prompt.
Now, when all the data is successfully migrated to our Cloud SQL instance allstrides-db we can migrate our allstrides application to Cloud Run and deploy using my Cloud SQL database. Please put the username and the password for my database user user to Secret Manager to not show openly in Cloud Run.
Let's build the image first and then use MCP to create the Cloud Run service.
During execution it will check the APIs, prepare the data for the secret manager and create the required secrets. Also it will be updating the application to work with PostgreSQL database and add the necessary npm modules.
Then after building the image and placing it to the Artifact Registry it uses MCP service to deploy the application to Cloud Run.
Here is an example of calling the Cloud Run MCP
Expected output:
✦ I will deploy the 'allstrides' service to Cloud Run using the deploy_service_from_image tool. I will configure the environment variables and map the
  database credentials from Secret Manager. Note that the MCP tool's schema does not explicitly expose the Cloud SQL instance attachment parameter, which is
  typically required for the Unix socket connection (/cloudsql/...) to work. I will proceed with the deployment as requested, but if the database connection
  fails due to the missing instance attachment, we may need to use gcloud to update that specific configuration.


╭───────────────────────────────────────────────────────────────────────────────────────────────────────────────────────────────────────────────────────────╮
│ Action Required                                                                                                                                    1 of 1 │
│                                                                                                                                                           │
│ ?  deploy_service_from_image (CloudRun MCP Server) {"service":{"invokerIamDisabled":true,"name":"projects/gleb-test-short-001-486416/locations/us-centra... │
│                                                                                                                                                           │
│ MCP Server: CloudRun                                                                                                                                      │
│ Tool: deploy_service_from_image                                                                                                                           │
│ Allow execution of MCP tool "deploy_service_from_image" from server "CloudRun"?                                                                           │
│                                                                                                                                                           │
│ ● 1. Allow once                                                                                                                                           │
│   2. Allow tool for this session                                                                                                                          │
│   3. Allow all server tools for this session                                                                                                              │
│   4. No, suggest changes (esc)                                                                                                                            │
│                                                                                                                                                           │
╰───────────────────────────────────────────────────────────────────────────────────────────────────────────────────────────────────────────────────────────╯
The exact path to complete all operations can vary from execution to execution. AI agents choose the path based on the context, command output, and multiple other variables. And here lies the strength of AI agentic software - it can react, adjust its approach, and retry steps to complete tasks and deliver successful results.
You should now have your allstrides application deployed and running in Cloud Run and connected to your Cloud SQL database.
Here is what you might be able to see at the end.
Expected output:
✦ The application allstrides has been successfully migrated to Cloud Run and is connected to the Cloud SQL database allstrides-db.

  Deployment Details:


   * Service URL: https://allstrides-812263612774.us-central1.run.app
   * Database: allstrides-db (PostgreSQL)
   * Database User: allstrides (Password updated and stored in Secret Manager)
   * Secrets: db-user and db-pass are mounted as environment variables.
   * Region: us-central1

  Steps Taken:


   1. Database Configuration:
       * Updated the allstrides database user password.
       * Created db-user and db-pass secrets in Google Cloud Secret Manager.
       * Updated database.ts to support PostgreSQL connections via Cloud SQL socket.
   2. Build:
       * Built the container image gcr.io/gleb-test-short-001-486416/allstrides using Cloud Build.
   3. Deployment:
       * Initiated deployment using the MCP deploy_service_from_image tool.
       * Granted the Secret Manager Secret Accessor role to the Cloud Run service account.
       * Attached the Cloud SQL instance connection using gcloud (as the MCP tool currently lacks this specific configuration parameter).


  The application is now serving traffic and successfully connected to the database.
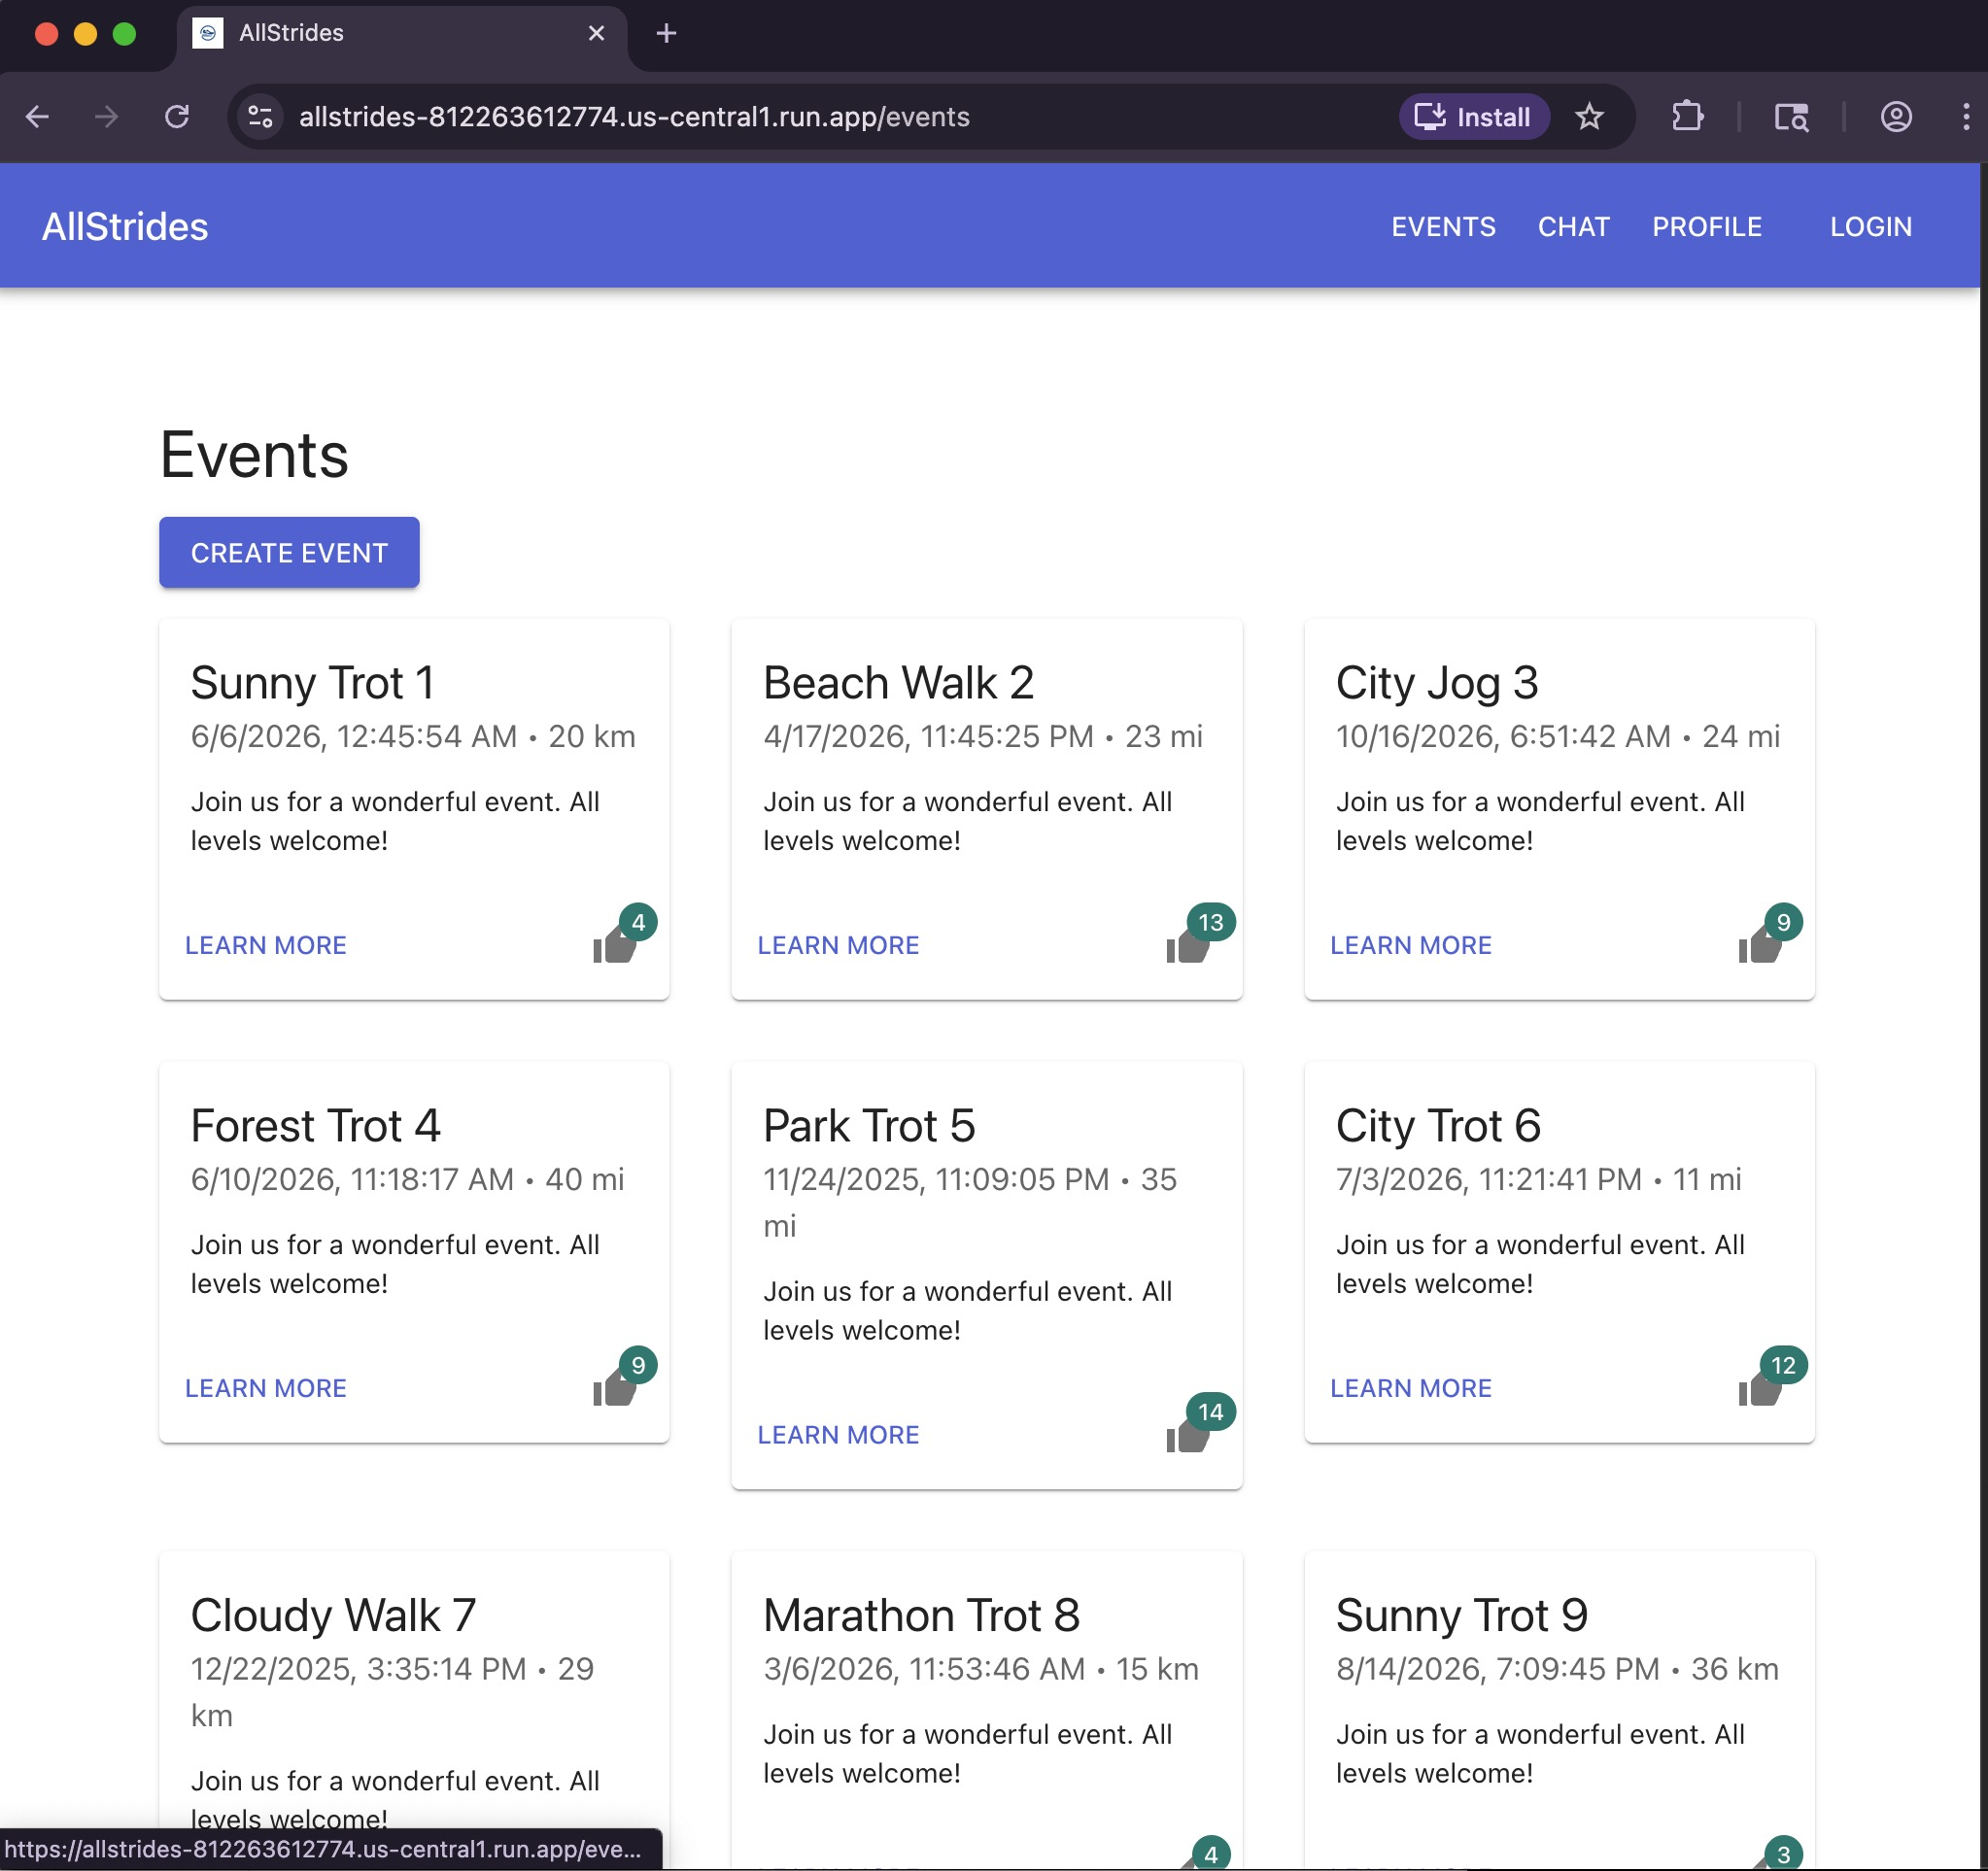
And when you open the provided URL in the browser you should see the application page.
And all our events should be visible there
Congratulations! You were able to use Gemini CLI and Google Cloud Google Cloud MCP services to move your local application to the cloud. That concludes the deployment and all the resources can be cleaned up.
8. Clean up environment
The easiest way to clean the environment is to ask Gemini CLI to remove all the components you've created. It should keep in the context all assets. But if, somehow you've been logged out and you don't have any saved history then you can try to be more precise and request to clean up the Cloud Run service, the image and the Cloud SQL instance. To remove the service it has to be authenticated with the user who has required permissions and will be using the gcloud command.
Here is an example of a prompt
Now, when we've tested the application can you please delete the created Cloud Run service, the image we've built and the Cloud SQL instance we've created in the project.
After removal, you can use the Google Cloud MCP services to verify successful removal of the Cloud Run service or the Cloud SQL instance.
Can you please list all Cloud SQL instances in the project and Cloud Run services in the project.
You should see like the following message at the end:
Expected output:
✦ There are currently no Cloud SQL instances or Cloud Run services (in us-central1) in the project gleb-test-short-001-486416.
That concludes the lab's steps.
9. Congratulations
Congratulations for completing the codelab.
Google Cloud Learning Path
What we've covered
- How to deploy configure Gemini CLI to work with Google Cloud Google Cloud MCPs
- How to use Development KnowledgeMCP
- How to use Cloud SQL MCP to migrate data to the cloud
- How to use Cloud Run MCP to deploy application in the cloud
- How to use Gemini CLI in the Google Cloud Shell
10. Survey
Output: